


allanyed
-
Posts
8,144 -
Joined
-
Last visited
Content Type
Profiles
Forums
Gallery
Events
Everything posted by allanyed
-
 Tony The following are the scantlings for a 16 foot cutter found in W.E. May''s book which were taken from Steel, so we are talking about 1800 +/- Floors Sided 1 1/4" Moulded at the head 1 1/8" Moulded at the throat 2" Futtocks Sided at the heels 1 1/8" Sided at the heads 7/8" Moulded at the heads 7/8" Scarph of the timbers: 1'7" Hope this helps you Allan
 -
Clay, Further to your note on having a copy of the original drafts there are often quite a few notes and sketches with references, dates, etc. as you have no doubt found. Wayne incorporated them as much as possible on the Euryalus drawings. One of the copies of the orginal drawings that we had, a cross section, shows changes made to some of the later vessels in the class and signed by Seppings. With NMM now electronically sending, the colors do indeed give further information and make it easier to interpret some of the lines. Wish they did not charge an arm and a leg for such a scan and send. I would have thought it would be less expensive than the paper copies but I guess not. Your build is looking really great and a joy to follow. Allan
-
Gary, Long before Model Ship World was started, I have been following your built for a long long time and it has been a treat. Thanks for sharing during so many of the steps along the way. Allan
-
HMS Euryalus by egen -
allanyed replied to egen's topic in - Build logs for subjects built 1801 - 1850
Egen I had my doubts that your idea would work, but am now a believer that there is always something new to consider or actually try. Allan -
sport29652 The appearance of the woodwork looks very nice. Regarding your request for feedack on the cannon rigging, couple suggestions, so hope you don't mind. It looks like you ran the running rigging through the eyes where there would be another block. The blocks that you do have there appear to be oversized, which may be the reason it did not look right in your earlier tries. For the blocks that you did use, the hole in the blocks through which the line passes should be towards the bulkhead. The missing blocks would have the holes opposite. The ends of the lines were more likely frapped rather than coiled on the deck. Again hope you don't mind the comments. Allan
-
I suggest getting a copy of McCaffery's Ships in Miniature for "how to" information and Donald McNarry's Ship Models in Miniature for photos of many small scale models. Allan
-
Looking for tips on creating sail seams by pencil
allanyed replied to bhermann's topic in Masting, rigging and sails
Bob, For sure try the sewing. For me I find the stitches to be out of scale so went to pencil. Jay, NICE cross stiching on the bolt rope. Re: what material? I use 800 or 1200 TC linen in off-white color. The fine weave is about as close as I can get to scale with linen. Allan -
Belaying Pins
allanyed replied to allanyed's topic in Discussion for a Ship's Deck Furniture, Guns, boats and other Fittings
Guillermo Yes I did try to preweld and then file the handle shape. The heat needed for silver soldering softens the brass so it is too weak when chucked in the drill and bends as soon any pressure is applied. Allan -
Ron There is a note on making pins that would have 0.020mm smallest diameter pins in the deck furniture forum posted February 24th that may help you. I suspect I should have posted it in the rigging forum. Allan
-
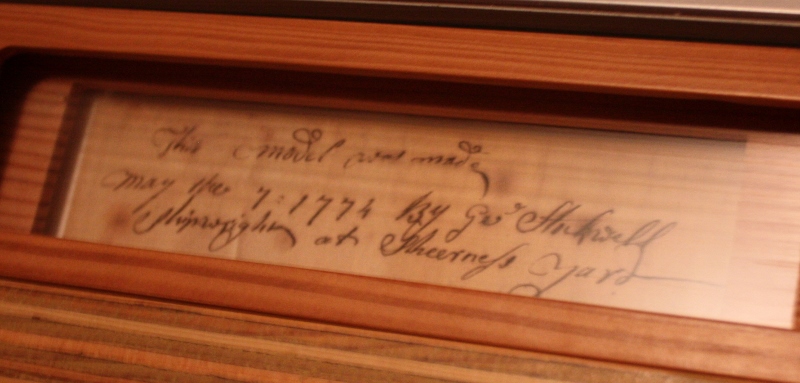
The photo is of the paper written by George Stockwell who built the model of the HMS Bristol and found in the model as pointed out by Greg in an earlier post on this thread. I am not sure, but it may still be on loan to the Art Gallery of Toronto. The note says This model was made May the 7, 1774 By Geo Stockwell Shipwright at Sheerness Yard This is actually a copy of the original and put on display with the model. Allan
-
Looking for tips on creating sail seams by pencil
allanyed replied to bhermann's topic in Masting, rigging and sails
I too use a pencil to make the seams, but continually sharpen the pencil. I like to use a clutch pencil and renew the point each seam. A mechanical pencil that holds the smallest available lead (0.2mm I believe) is also good as it maintains the same width for the entire seam. Allan -
Grant and Edward Thank you very much Allan
-
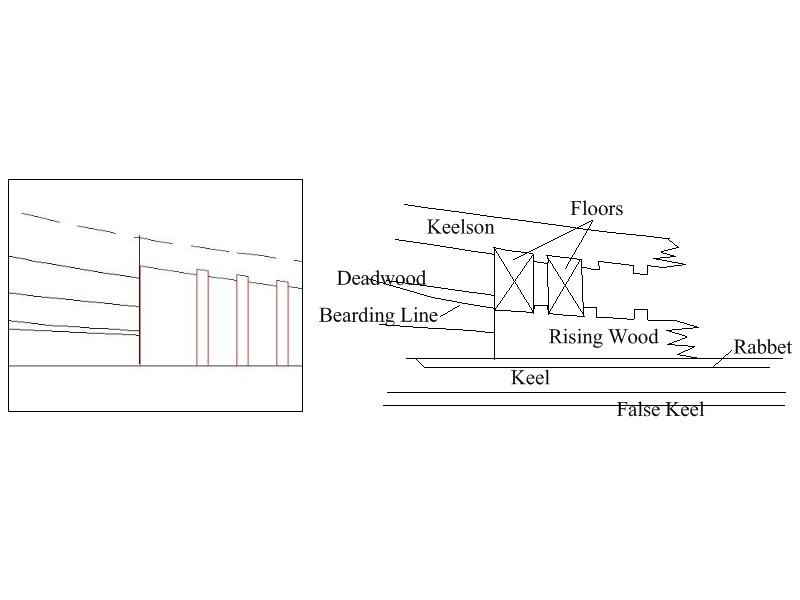
Joss, There seems to be a line missing. I have attached a sketch identifying the timbers. If my sketch is incorrect, Wayne or someone please step in as I do not want to lead Joss down the wrong path. Allan
-
Alfons, Impressive work, especially the deck planking, well done! Are the techniques you are showing all given in the kit, or are you inventing some of your ideas? I look forward to your next posts. Allan
-
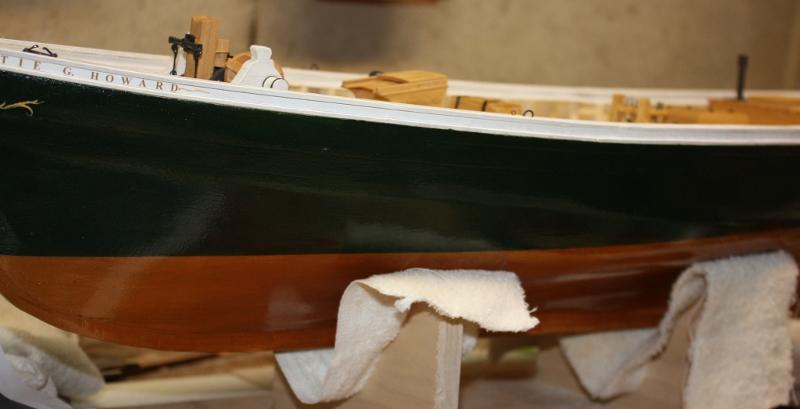
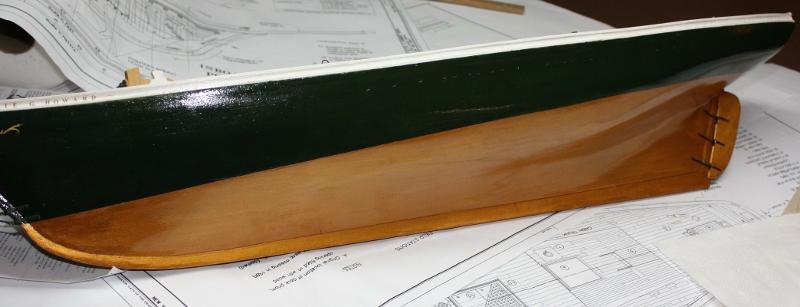
I had the good fortune to visit the New York Yacht Club a few months back. The models there are spectacular and nary a one has a copper bottom using plate. Those that are coppered are painted and looked great. For warships copper bottoms do look more realistic, but for the dozens of racing yachts, mostly America's Cup winners and challengers, I like the look of the simulated bottom cover. I tried this recently and am pleased with the look on a the yacht Thistle and now on the Fredonia fishing schooner Lettie G. Howard,( pics attached on the Lettie.) Allan
-
For clear descriptions on these kinds of rigging details found on a British ship and then actually doing it on a model, seriously consider, Lees' Masting and Rigging and David Antscherl's The Fully Framed Model Volume IV. Allan
-
As was said before, depends on the type of ship and era in which you are interested as well as your budget. You can spend a couple thousand dollars very easily on a small library. For schooners you cannot leave out Chappelle's book on American schooners. For 1800 plus/minus British war ships, David Steel's Elements of Naval Architecture is a really important, albeit, expensive book to be included. For mid 18th century the Shipbuilder's Repository is a great reference to include, but again an expensive addition. For British warships Lee's Masting and Rigging English Ships of War and Lavery's Arming and Fitting 1600-1815 are gold mines of information if you want accuracy and detail. Sorry but have to throw in a little plug as I don't know any other any other ship modeler's site that has several members who have had books and plans published. Chuck's work has been mentioned above and I know that Gerard Delacroix checks in now and then and is well known for his monographs. There are also several books that give a ton of "how to" information on 18th/19th century British warships, The Fully Framed Model series as mentioned above, Naiad, and Euryalus. For ship's boats, hard to beat W.E. May's book The Boats of Men of War. Lots of birthday ideas! Allan
-
Erik I normally cut one piece then lay it on the second piece and with a sharp point, mark the matching line. Cut short of the marked line, test fit, then trim with a chisel or other sharp blade and test fit again and trim and test until it is a perfect fit. It is easy, albeit takes a little time and patience. Allan
-
Thanks Rob and Dave. 'Twas a labor of love for a couple amateurs so the cudos mean a lot. Allan
-
HMS Euryalus by egen -
allanyed replied to egen's topic in - Build logs for subjects built 1801 - 1850
Don't know if I missed something somewhere, but I don't recall ever seeing such a prefabricated assembly done off the ship. It must be much easier doing this out in the open. I hope it all fits in place without too much difficulty. I would never have had the nerve to try it, so I am very anxious to see how it all goes in place. It sure does look great. Allan -
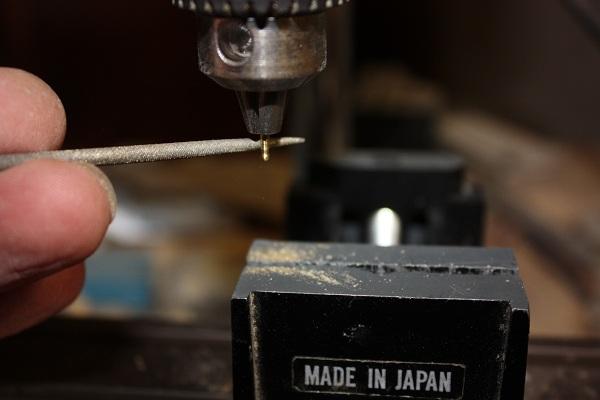
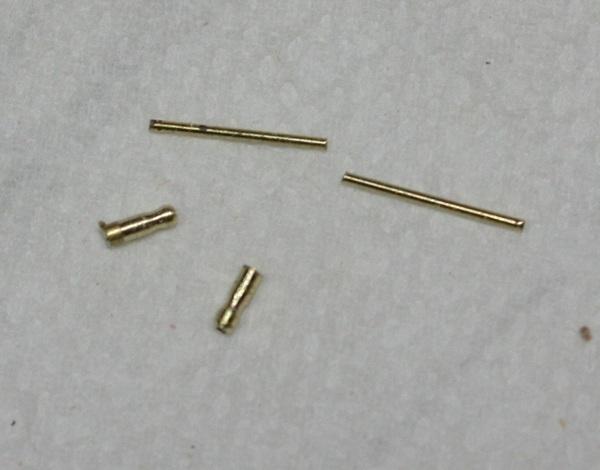
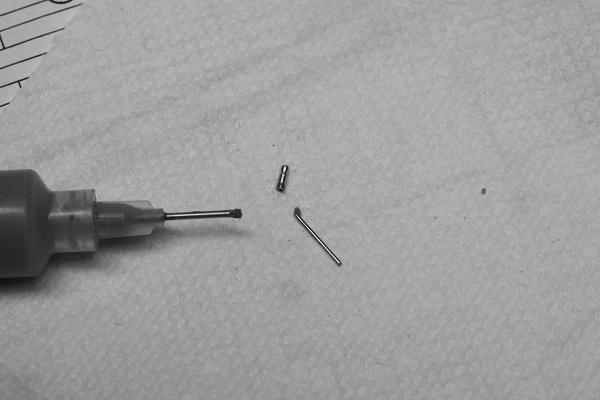
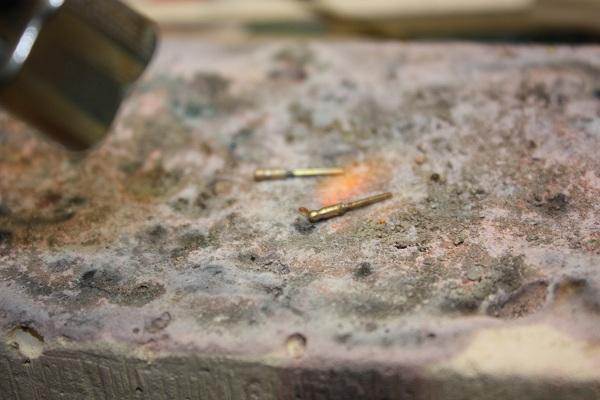
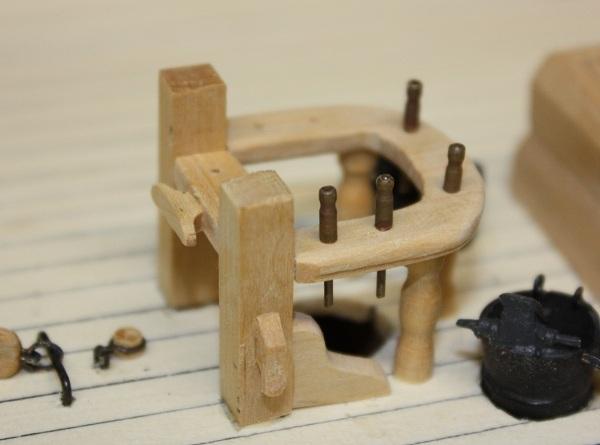
Some folks find making trennals or blocks tedious. I don't like belaying pins. If made of wood and to scale they are hard to make and weak, even using a good strong wood such as boxwood. Turning them from metal is difficult, even with a mini lather. Store bought are invariably not to scale, or if made of metal and to scale, pretty expensive. I came up with an idea some of you may like to try. This has probably been done before, but I had not seen it and so far I am not unhappy with the results for making these for my current schooner project. You will need the following: Small drill press or Dremel that can be held in a clamping device Brass tubing Brass rod that is the same diameter as the tube inside diameter Jeweler files Silver solder Pickling solution Oxidizing agent Chuck a short piece of tubing in the press or in the Dremel type drill. Shape the handle with the jeweler files Cut off the handle for the tube and make another and another....... Cut the rod so it goes the entire length into the tube and extends out the proper length Place a tiny tab of silver solder paste into the tube Insert the rod into the tube Heat the piece until the solder melts Clean in a pickling solution for 5 or 10 minutes until it is clean Oxidize with Blacken It or other agent. I use a diluted solution (about 6 or 8 to 1) Keep it in until it turns a brownish color to simulate wood, or if your vessel has iron pins, keep it in until black. Hope this helps others that are not happy with other methods. Sorry the pics are not in the proper order
-
I also use PVC pipe, 1 inch diameter or so. I have different lengths, but nothing over 18 inches as the planks are normally never more than 30-35 feet long or about 8 inches at 1/4" scale. Yeah, I do go with longer pieces at times, and fake a butt seam, thus the longer piece of pipe for those occasions. Some species will indeed sink, so the shorter pipes make retrieval easier. Allan
-
Thanks guys,it is appreciated.
-
Gary Thank you for taking the time and effort to get the log back up on the site. It has been a treat following it and would have been sad to miss out on upcoming progress. Allan
-
Mayohoo, What size cannon and what nationality? MOST British cannon used two singles. 32 pounders used a single and double, but I am pretty sure anything smaller would use singles. If anyone has a copy of Adrian Caruana' books on British Armament they can confirm or correct this statement. Allan
