allanyed
-
Posts
8,079 -
Joined
-
Last visited
Content Type
Profiles
Forums
Gallery
Events
Everything posted by allanyed
-
 Thanks again Druxey. I was picturing counters, but thinking fashion pieces and the fact that they are so far above the water line, no need to hood the ends of the planks. Allan
 -
That's a first for me Druxey. It makes complete sense though. What about on later ships where the lower planking wrapped around the fashion piece and ended at the tuck molding? Would the planking at the stern above the tuck molding have been hooded into the fashion piece? Thanks for this interesting new (for me) tidbit. Allan
-
I have and I use American Fishing Schooners: 1825-1935 By Howard Chapelle regularly. I love this book. If there is one negative for me for this book it is the fact that there is no index that makes sense. There is so much good information in the second half of the book, but none of the key items or words are in the index. Worse still, each item in the main text is presented alphabetically, and not necessarily categorically. Still, I believe this book would enable any builder of an American schooner to do a construct a very accurate and detailed model. Allan
-
Hornet, I am having a really hard time picturing this. The cotter pin has me baffled. Can you post a photo or two? Thanks Allan
-
HMS Euryalus by egen -
allanyed replied to egen's topic in - Build logs for subjects built 1801 - 1850
Use the lower deck beam, even if temporarily fit in place, to be the fit is correct. You can also use the upper deck beam temporarily to be sure the scores in the bitts are OK. The drawings are correct, but sometimes it takes a little bit field fitting to be sure the actual fit is correct. Allan -
Maine Maritime Museum as well. Allan www.mainemaritimemuseum.org
-
HMS Euryalus by egen -
allanyed replied to egen's topic in - Build logs for subjects built 1801 - 1850
Egen, I do not have a printed copy of Volume I so I am not sure what page, but the sleepers are shown pretty clearly in chapter 6 on a drawing by Wayne with an explanation of how I did them. Whatever way works best for you is the way to make and set them in place. In short I made templates of each sleeper using Sculpey clay and test fit the surrounding beams. once they clay sleepers were temporarily in place. Once I was satisfied with the clay beams I baked them hard and used them as a model for making the wooden sleepers. Hope this is of some help. Allan -
I finally noticed your log and spent well over an hour reading it last night and this morning. I am speechless. The only interest I ever had in bone was eating the marrow from a serving of Osso Buco. You have changed that with your beautiful work. I look forward to more posts and photos. Allan
-
Planking Bulkheads
allanyed replied to robert203's topic in Building, Framing, Planking and plating a ships hull and deck
Robert, Good advice from Russ, ask the shipwrights at the Constellation. There are usually one or two around during visiting hours. It may also depend on the use of the bulkheads and if they are permanent or removable. I have seen bulkheads with vertical planking and some with horizontal planking. With vertical posts spaced every two feet or so, the planks are easily set in place across the posts and not meant for being removed on a regular basis. Panels that can be removed more often had the planks in vertical positions with horizontal or diagonal cross pieces much like a door. Lavery's Arming and Fitting gives a lot of information on bulkheads, but these may not be appropriate for an American frigate,. Allan -
Fairing a Hahn POF hull
allanyed replied to butch's topic in Building, Framing, Planking and plating a ships hull and deck
Mark is correct, there are as many ways as there are builders, and if the method works it is the right way to go. I usually build the cant frames first, thus fair them first. I usually do some pretty aggressive fairing before setting them in place, then after every two or three frames are set, more fairing and finally finisht the fairing after all the cants are in place. The inboard surface for the square frames are easy by comparison, I use a Dremel rough sanding in tight spots and a mouse sander where there is room. Sanding sticks with various shapes and grits work well for the final fairing. Allan -
HMS Euryalus by egen -
allanyed replied to egen's topic in - Build logs for subjects built 1801 - 1850
Egen It really does look great. I need to go back to the contract and drawings to respond on the sleepers questions. I do remember conversations between Wayne and me before coming to a conclusion but I do not remember if the results were gleened from information in the contract, Steel or some other source. Sorry for the delay in this response. Allan -
Hi Jay. Thank you very much for the information and the search you did. My description of my book wish list was poorly worded, sorry for that. I do have Lavery's Arming and Fitting but cannot find Adrian Caruana's volume II for a reasonable price. Volume I is out there for under $400, but only goes to 1715. That is about where I start in my modeling so I am on the hunt for volume II. Thanks again Allan
-
Brian Lavery's Arming and Fitting English Ships of War gives a lot of information on British armament. Adrian Caruana's History of English Sea Ordinance is probably the best source of detailed information. Wish I had a copy of this two volume set! Allan
-
Dan, Many years ago a friend and I made a set of glass and gel coat molds used to make a couple fiberglass models of Islander 30 sail boats. To get scale non-skid surface areas I masked of the area that was not to be textured. The uncovered area then received a thin coat of resin. Last I used an old fashioned dust sprayer (remember the scene in the Godfather One where Don Corleone is spraying tomato plants with his grand son) and sprayed glass micro beads which actually looked and flowed like a powder. The texture was perfect and of course glass lasts and can take a paint over it as well. Allan
-
Dan Sweet!!! Metal work can make or break the appearance of any model in my opinion. Your metal work is looking oh so nice! Any detailed photos on the how you are doing everything and anything will be most welcome. Allan
-
HMS Euryalus by egen -
allanyed replied to egen's topic in - Build logs for subjects built 1801 - 1850
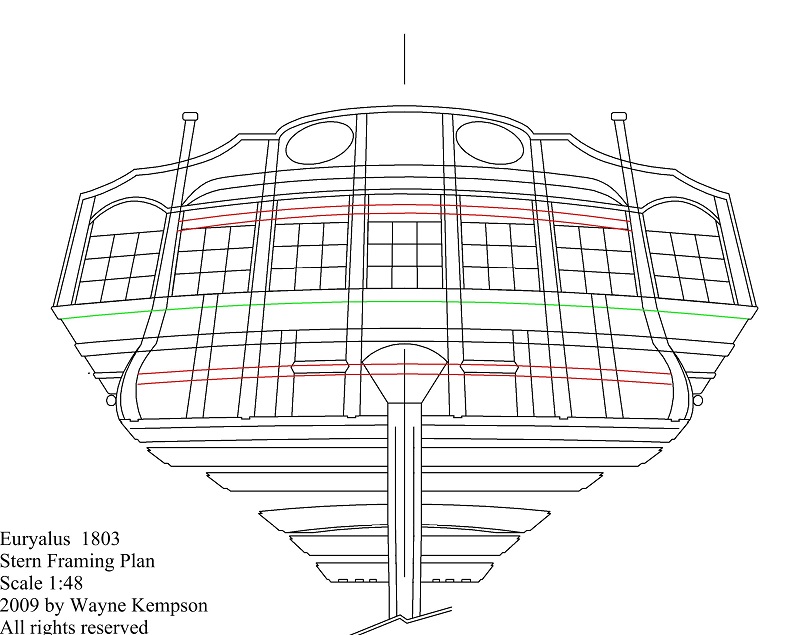
Egen, Number 1 is the correct location The drawing attached shows the line in red. You can also see this in the plans in the inboard profile. Allan
-
HMS Euryalus by egen -
allanyed replied to egen's topic in - Build logs for subjects built 1801 - 1850
Rob and Egen, In almost all cases where there was inconsistency between Steel, the Astrea/Curacoa contract and the drawings, the drawings were the default that I used. There were dozens, perhaps hundreds, of items where there were inconsistencies. It was a happy day when two out of three of the sources matched. I will look at the model and drawings to see if I can remember how I came to the conclusion I did reach on making the part itself. Allan -
Rob, I cannot tell you how much fun it is to watch your build, along with Egen and anyone doing Euryalus or other ships in the class. Careful with the stern timbers. I waited until much later to set them in place as I was worried about knocking them off before before they were fully framed and the counter planking completed. Great job, and thanks again for sharing Allan
-
Hi Dan Very happy to see your log. Thanks for sharing details on how you are doing the various steps and please do keep them coming. She looks terrific. Allan
-
Don http://www.seawatchbooks.com/ $75 plus S&H. I have volume I and have learned quite a few tips from Ed's book. There are many things that would be useful to any model and any level builder. Allan
-
Dan, I agree with your use of wood as a substitute for metal for the bearings. I have used English boxwood for such small parts and painted it a grimy black. So far no one seems to have noticed they are not metal. Allan
-
Beautiful detailing. Allan
-
Greg, I never tire of looking at your posts. SUPER! Allan
-
Tony The following are the scantlings for a 16 foot cutter found in W.E. May''s book which were taken from Steel, so we are talking about 1800 +/- Floors Sided 1 1/4" Moulded at the head 1 1/8" Moulded at the throat 2" Futtocks Sided at the heels 1 1/8" Sided at the heads 7/8" Moulded at the heads 7/8" Scarph of the timbers: 1'7" Hope this helps you Allan
-
Clay, Further to your note on having a copy of the original drafts there are often quite a few notes and sketches with references, dates, etc. as you have no doubt found. Wayne incorporated them as much as possible on the Euryalus drawings. One of the copies of the orginal drawings that we had, a cross section, shows changes made to some of the later vessels in the class and signed by Seppings. With NMM now electronically sending, the colors do indeed give further information and make it easier to interpret some of the lines. Wish they did not charge an arm and a leg for such a scan and send. I would have thought it would be less expensive than the paper copies but I guess not. Your build is looking really great and a joy to follow. Allan