


DocRob
-
Posts
1,188 -
Joined
-
Last visited
Content Type
Profiles
Forums
Gallery
Events
Posts posted by DocRob
-
-
Today, I finished building the Schneider minus the tracks. Almost everything worked like a breeze and the fit of the body parts was very good. The manual suggests to add the side MG´s with their gun carriage glued to the base of the tub and then add the sidewalls with the fitting hole on. That was somehow impossible to achieve and I suggest to cut away the lower part of the gun carriage and glue the ball mount direct to the side wall hole.


Cheers Rob -
One little tip, as I finished the build right now. I followed the manual for the installation of the machine guns and it proved very difficult to get the ball mounts in the center of the holes of the hull plates. It is easier to cut the gun mount away and glue the ball mount directly into the hulls hole. I didn´t one on side and the gun sagged after everything was sitting right and now I have a small gap.
Cheers Rob -
-
9 hours ago, RGL said:
Sweet, this is my next built OOB! I got it dirt cheap and look forward to following you!
You can´t go wrong with the kit Greg, it´s far from perfect, but there are no serious issues. The supplied tracks are fiddly to build, as there is no guiding aid for assembling the single track links and clean up is tedious. I opted for Friul tracks for a Renault FT-17, which have the same links.
Cheers Rob- GrandpaPhil, Canute, Jack12477 and 1 other
-
 4
4
-
10 hours ago, gsdpic said:
I'm not a tank person, but I'll follow along. And yes the phrase "steam punk bat mobile" caused me to google "Romfell armored car"
")
When I see my Romfell kit, I always think about a steam punk modified version, made from patinaed copper and bronze, but without the Batman twist.
Cheers Rob- Jack12477, Canute and Old Collingwood
-
3
-
12 hours ago, king derelict said:
This looks really interesting. I’m looking forward to following developments. I’m feeling I should get my Flyhawk Renault FT-17 off the pile and join in.
Thank you Alan, good to have you on this (short?) ride. Isn´t your FT-17 in 1/72? This tiny tank in that scale, urgh, I feel my eyes watering") .
.
Cheers Rob- Old Collingwood, Canute and Jack12477
-
1
-
 2
2
-
-
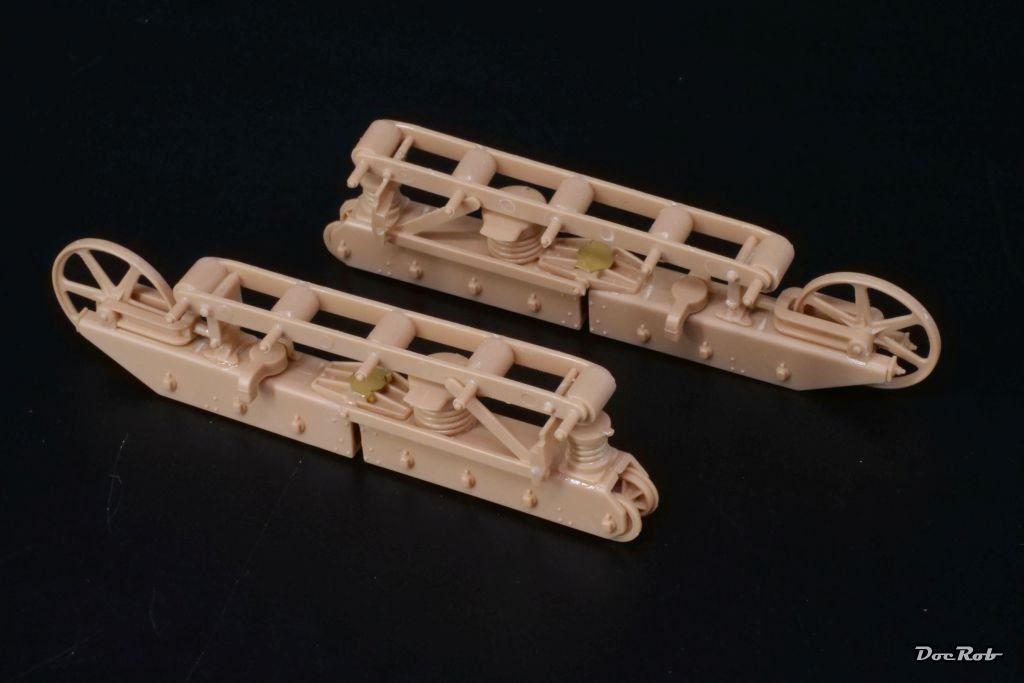
I have the feeling, this will be a short build log, I´m not used to put something together in only a few hours. I started with the under carriage, which consists on maybe half the parts count. It´s a bit fragile during construction, but in the end, it´s robust enough. Some parts like the coil springs look a bit toyish, but there will be dust and mud, so I didn´t bother. Fit was good, engineering was - hmmh - hobbybossish.
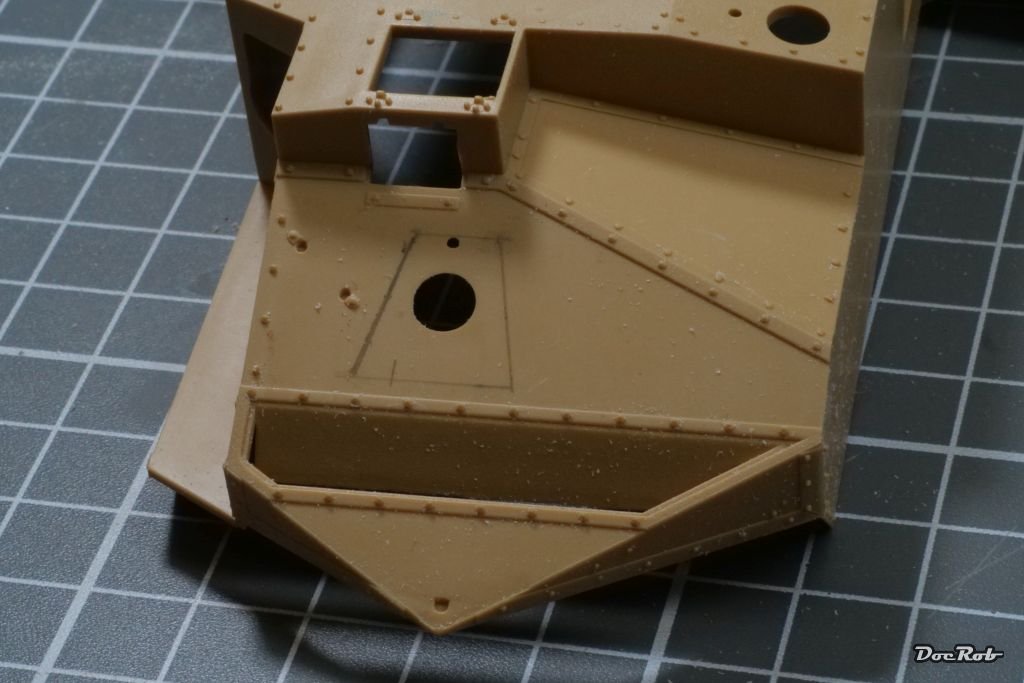
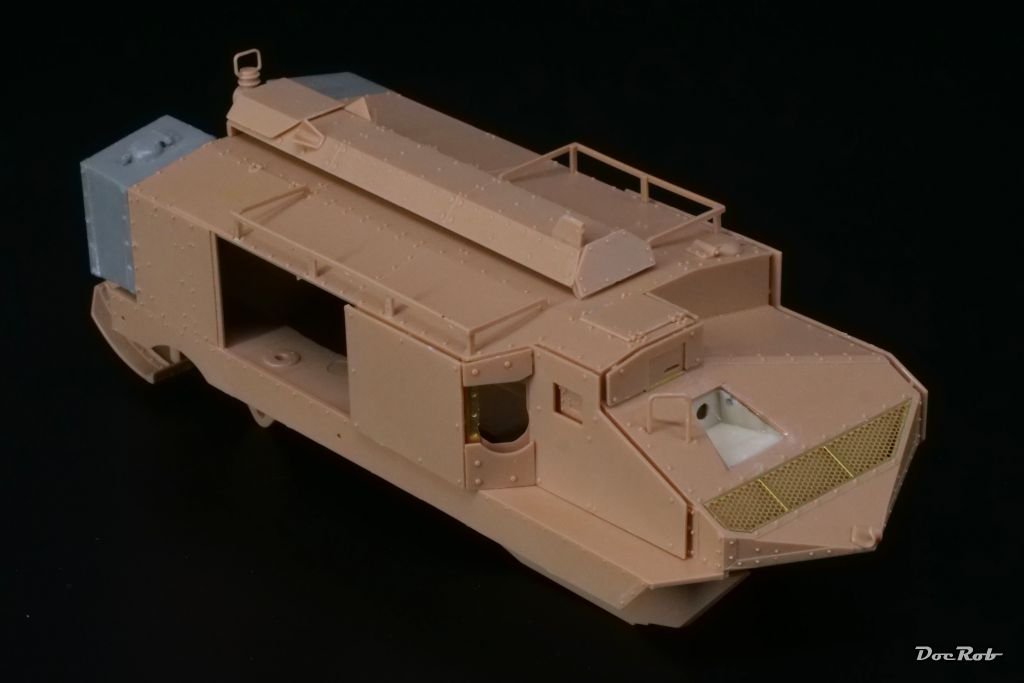
Next was the boxy body, which luckily is build up from a one piece tub. I needed to make some surgery, to add the front gun port, which only had some of the Spanish vehicles. Here the position is shown, clearly measured in the manual.
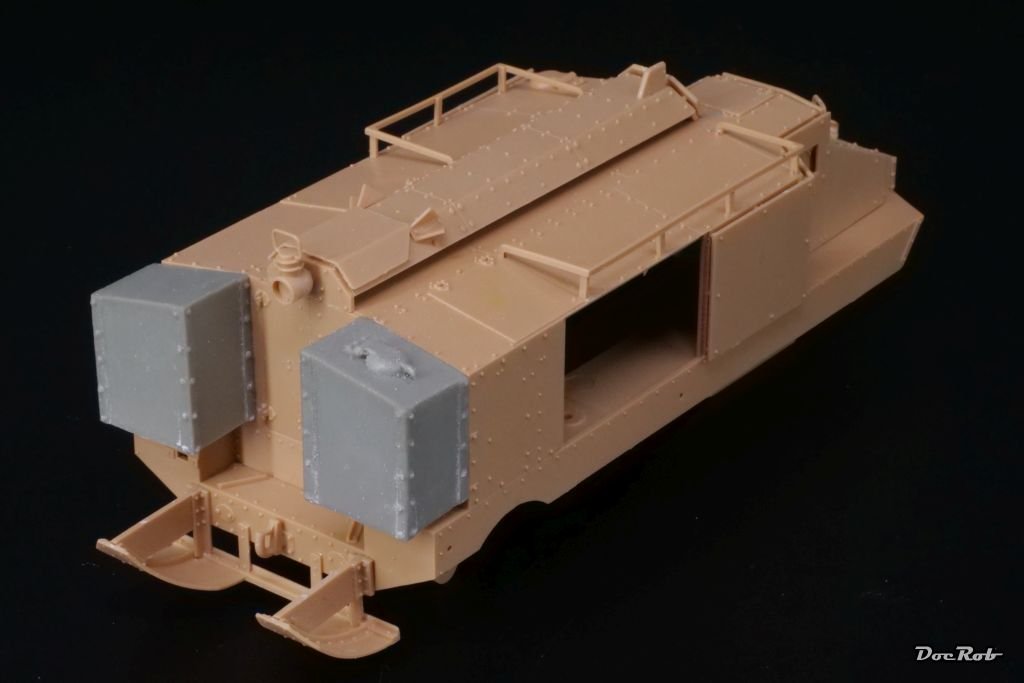
I added the gun port in front and the huge external tanks at the back. The cabin built up straight forward without issues. In contrast to the early version of the tank, this one was up-armored with additional steel plates, riveted on top of the body.
Cheers Rob -
14 minutes ago, ccoyle said:
My goodness, we are having a rash of homely WW1 tanks around here! Interesting models, nonetheless, but definitely not winning any beauty contests -- if there were such a thing for tanks. 😉
Two times right, Chris, there are some other interesting builds and yup, these beasts are ugly, but I like the crude unrefined looks of these behemoths. There is one exception which I nearly chose to build, the Romfell armored car, which somehow looks like a steam punk Bat Mobile.
Cheers Rob- gsdpic, Old Collingwood, Canute and 2 others
-
5
-
I´m in a midsummer modelling funk right now, I opened many boxes, but got no motivation to build the kits. My latest projects had been demanding long term builds and I felt bored by the idea of simply snipping plastic from a sprue.
The Schneider CA was sleeping in my stash since some years and now I pulled it out, as a simple in between travel, swimming, surfing, biking, barbecuing and whatever else comes to mind build.
The Schneider CA was the first operational French tank, first used in 1916. The off road capabilities were limited and it had another serious design flaw. The petrol tanks were positioned on the roof and could be hit easily, which gave the tank the nickname "Rolling Crematory".
400 of these were built and 6 were sold to Spain, where they were used in Maroc in 1922 and lastly by Spanish Republican forces in the Spanish Civil War in 1936, which lead to my title, because by then, it was an obsolete design.
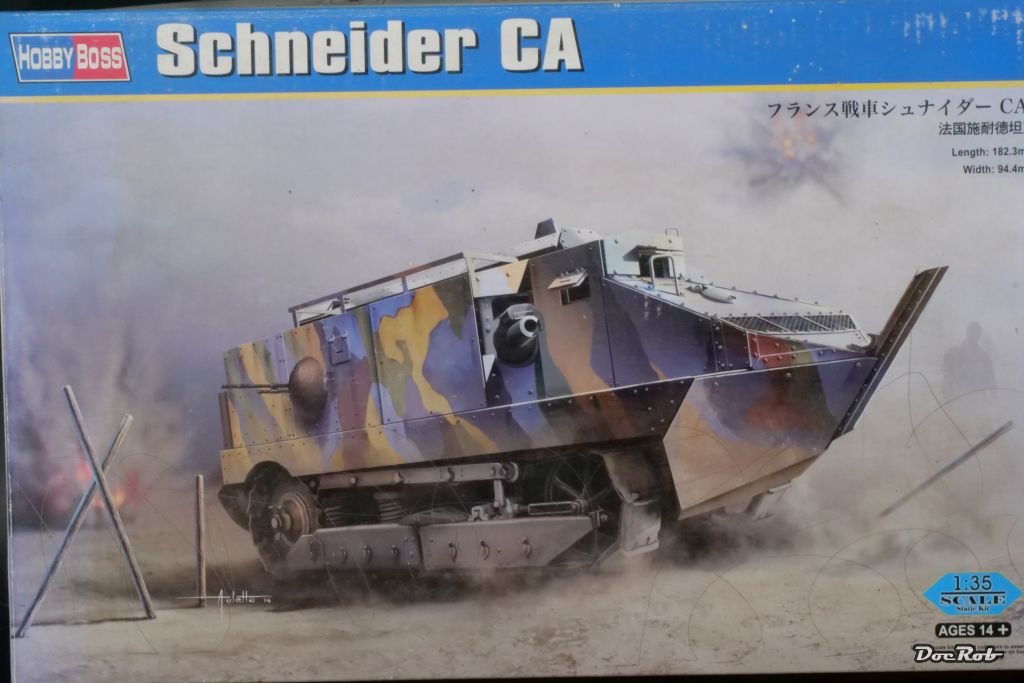
The kit is from Hobby Boss and represents the up armored late model, needed for the FC Model Tips conversion. The kit is of relatively high quality, but some parts could be more refined. Sprue attachment points seem to be placed at random and some parts have prominent parting lines. There are also some errors in the manual and some placements are only shown vaguely. In all, it´s an easy build with a fiddly three piece per link track, which I will substitute with a set of Friul white metal tracks.
The FC Model Tips conversion set contains some resin parts, which address the changes made from the late model, mainly the new rear tanks, a gunport in the front hull section, a manhole cover as extra armor and a few bits and pieces. A decal sheet for all the Spanish tanks is supplied, be it the 1922 Maroc version or the later 1936 Madrid version.
The resin is of relatively bad quality, with imperfections and bubbles and huge cast blocks, but nothing, that couldn´t be overcome.
Cheers Rob -
8 hours ago, RGL said:
Thoughts?
I like it a lot, it somehow looks steelish, which is always great, when plastic or in your case resin looks like the real thing. The weathering is spot on, specially with the fibers inserted. The front left upper coil spring seems to be a little off, but maybe that´s the reason, why the crew removed the cover") .
.
Cheers Rob- Jack12477, Old Collingwood, Canute and 1 other
-
4
-
On 8/7/2025 at 2:32 PM, CDW said:
A truly gorgeous model, Rob. Superb in every way.
On 8/7/2025 at 4:57 PM, GrandpaPhil said:Very well done!
A belated thank you Craig and Phil, I was traveling a bit and didn´t access the forum.
Cheers Rob- GrandpaPhil, Jack12477, Canute and 1 other
-
4
-
What an amazing result Alan and it´s 1/700
 , I can imagine how it is to work at it with tweezers and shaking fingers. I like the weathering and paintjob full of contrast.
I also use a lot of CA, not only for metal parts like PE or white metal, but also for pre painted parts, where plastic glue can ruin the finish. My go to is Colle 21 which is odorless and I didn´t feel more airheaded then normal, even after using it for hours.
I use water thinned PVA or Future only for tiny parts, which need to be glued flat onto larger parts, like an 1/12 dial, or for transparent parts, where the CA fumes can fog the clear.
Cheers Rob- Jack12477, AJohnson, Old Collingwood and 1 other
-
4
-
The chebec is such a beautiful ship Yves, with it´s shape looking like made for speed. Your log is mouthwatering and I have to withstand myself from bringing frustration over me by trying to build one too.
You can anneal PE parts for easier bending. It´s very easy, just heat the part with the tip of a lighter flame until it turns bluish. This lessens the crystalline tension of the brass and it is easier to bend afterwards, being softer and less springy. But don´t overheat and melt the PE parts.
Cheers Rob- MAGIC's Craig, Paul Le Wol, cotrecerf and 2 others
-
4
-
 1
1
-
Great work Chris, I always loved the combination of bright colored fuselages and lozenge camouflaged wings. Makes no sense but stunning looks. I have two Wingnut Wings D.VII in my stash and feel the urge to start one, when I see yours. No card, but high quality stuff as well.
Cheers Rob- Canute, eatcrow2, Old Collingwood and 6 others
-
9
-
8 hours ago, king derelict said:
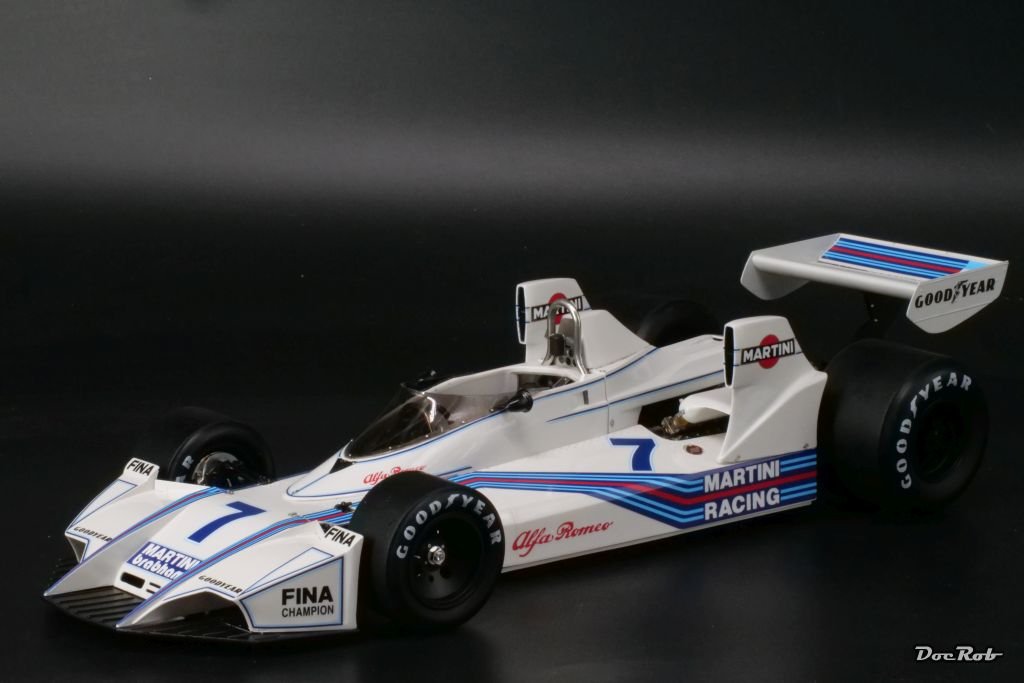
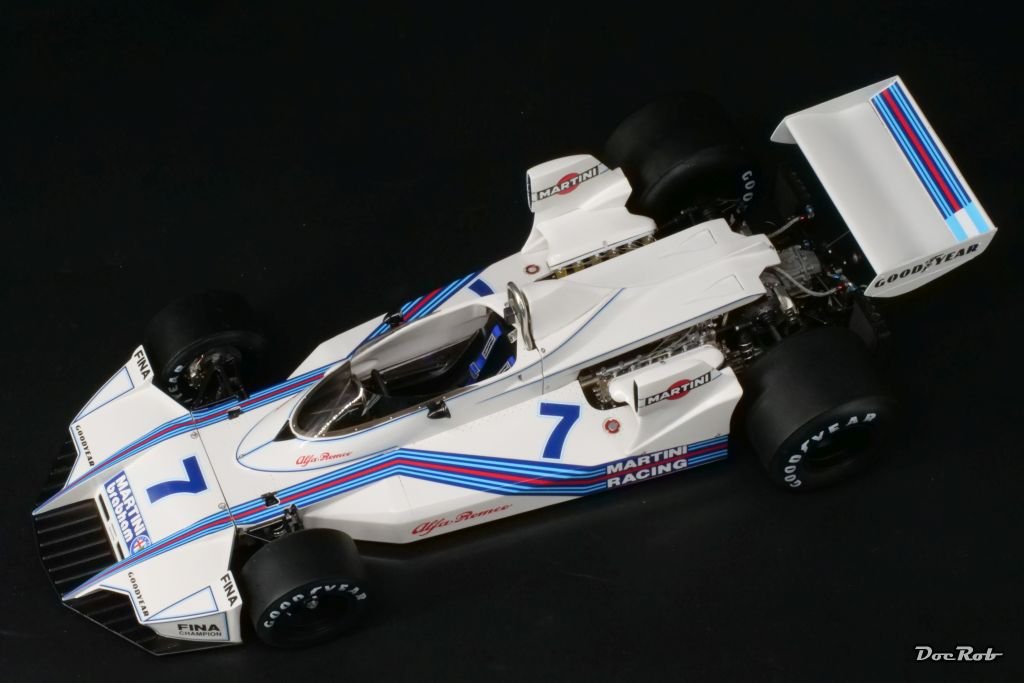
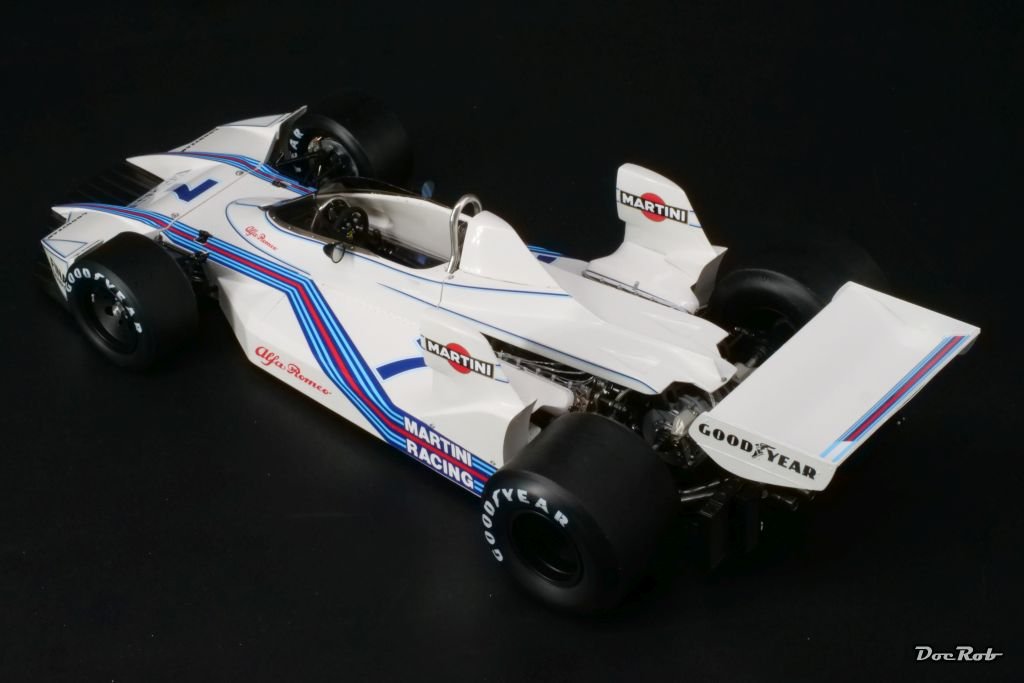
We need a “super wow” emoji for builds like this one. Congratulations Rob, it’s beautiful and great photos as always. Very neat work and the kit details are staggeringly good. You deserve several martinis.
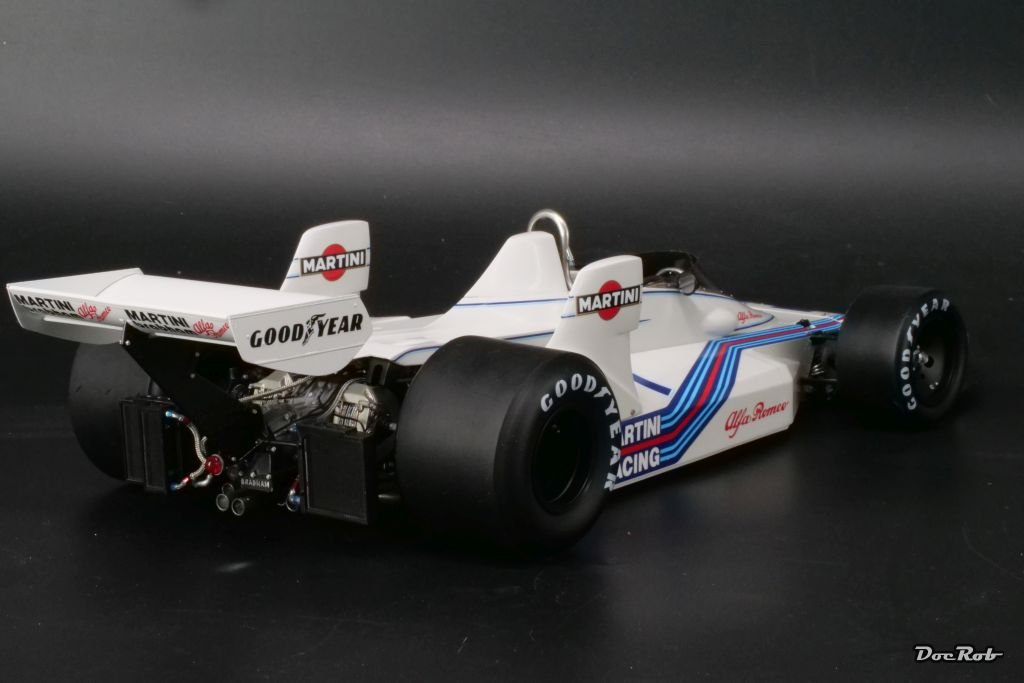
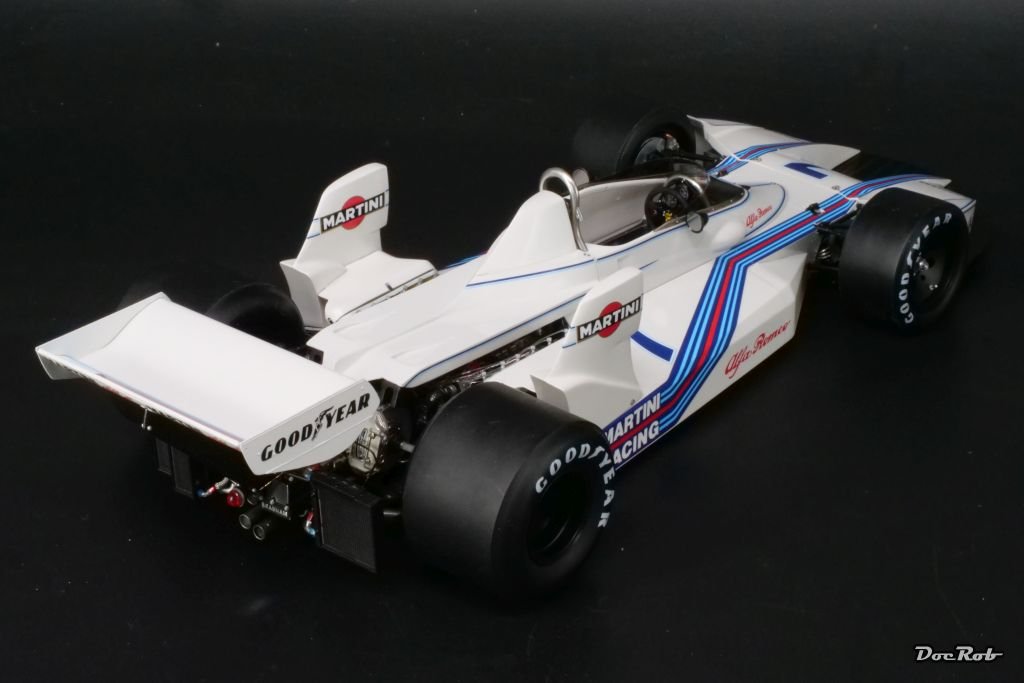
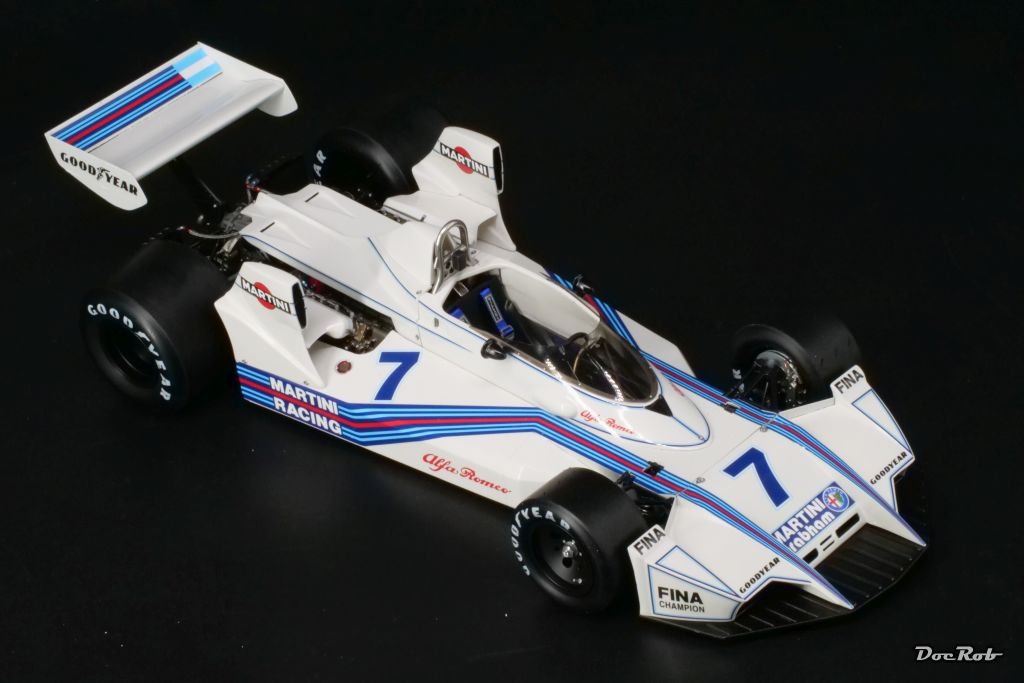
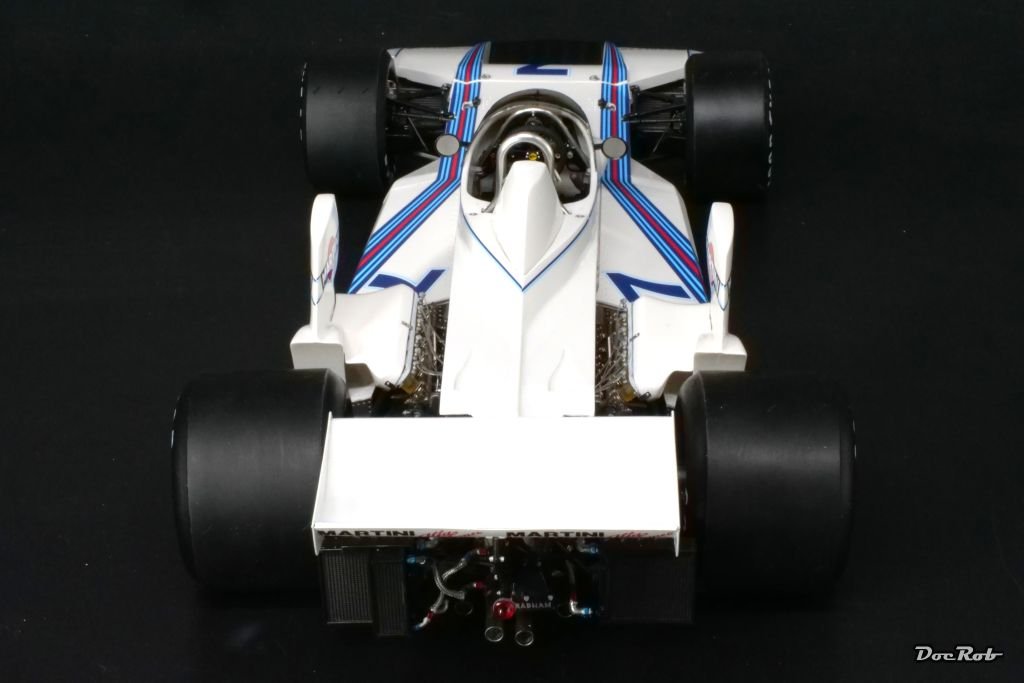
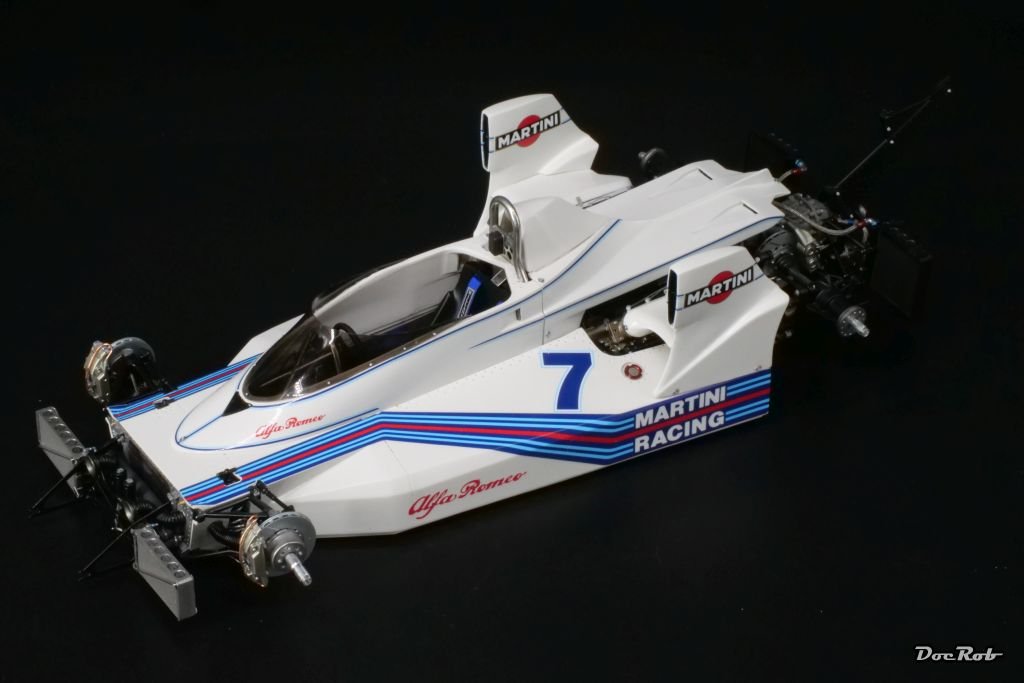
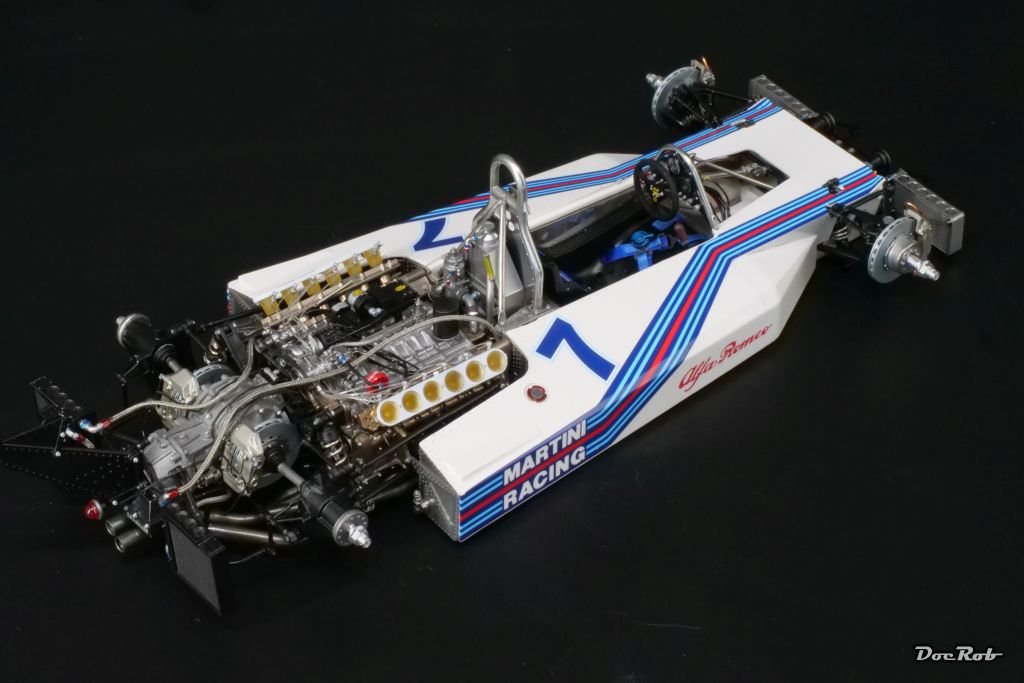
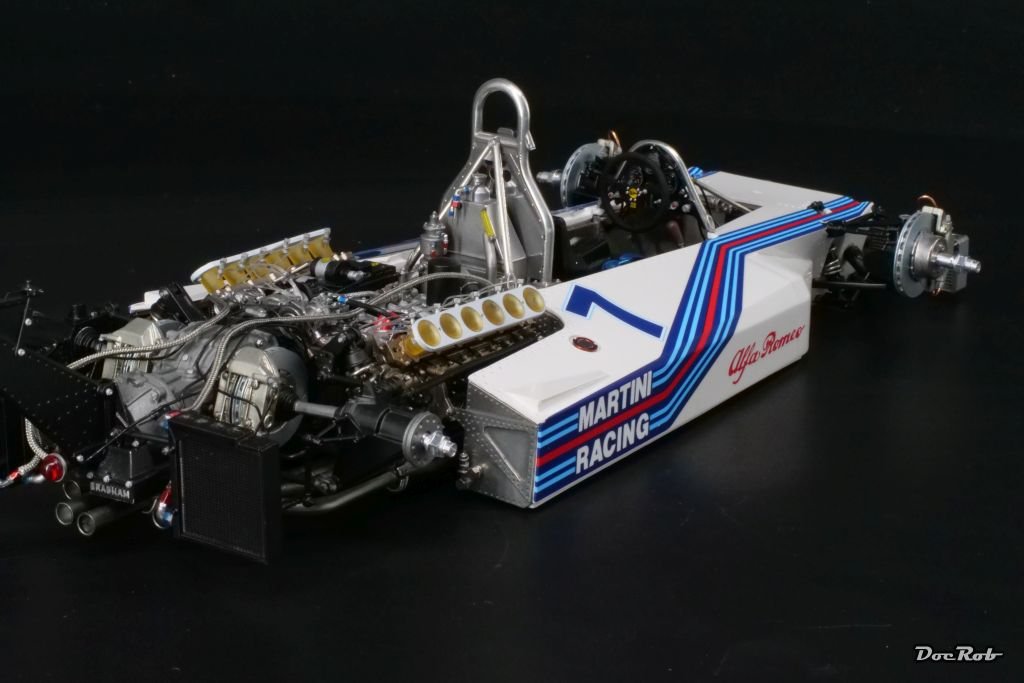
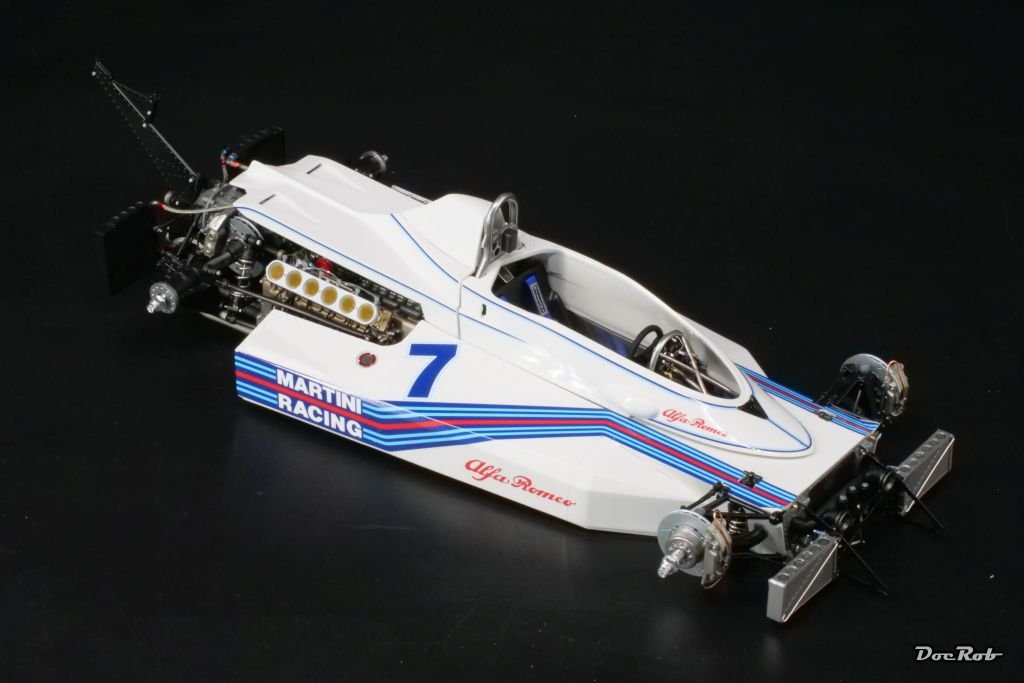
Thank you Alan, the Martini´s are in the books, or better said, I prepared Tuxedo´s yesterday. I liked the looks of the car from the beginning, but even more in the white livery than in the red one, which actually raced. I will add some outdoor pics later, when the weather is fine and I can tame the cats.
Cheers Rob -
13 hours ago, gsdpic said:
Wow, beautiful build, take a bow. And pretty quickly done for such a complex kit. Glad it went together so well for you, and looking forward to what's next.
Thank you Gary, I was a bit surprised myself, how fast the BT45 went together in the end. It was not that I spent the whole day in the cave. I will be traveling a bit, so maybe a short summer project, until I start something serious again.
Cheers Rob -
14 minutes ago, yvesvidal said:
Beautifully executed Rob. Maybe you should have a group picture of all your Model Hiro Factory models.....
What is the next candidate?
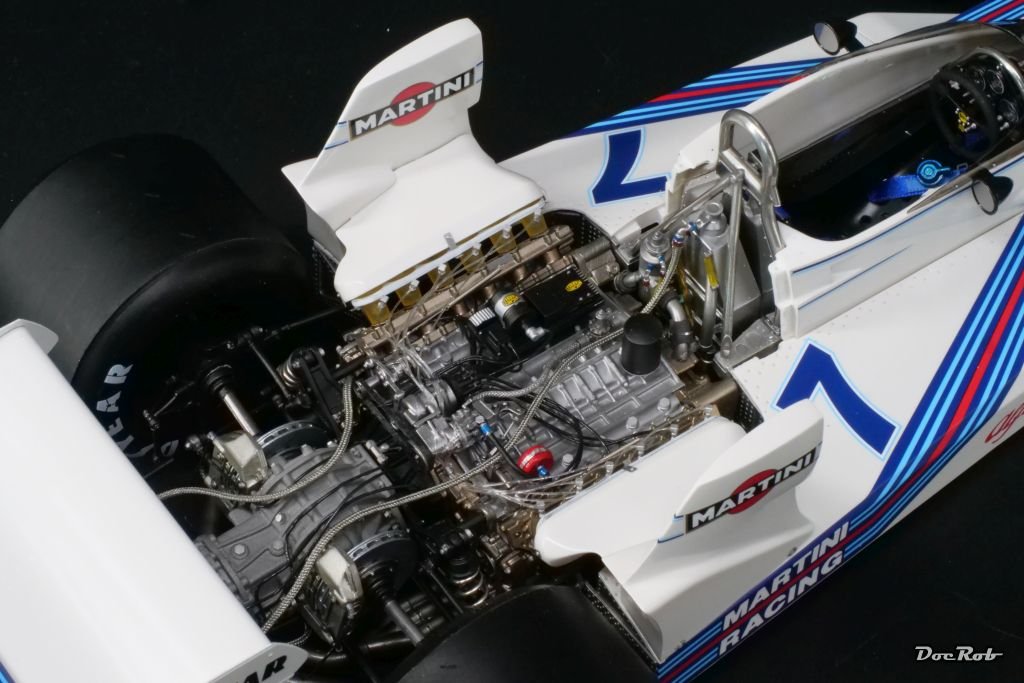
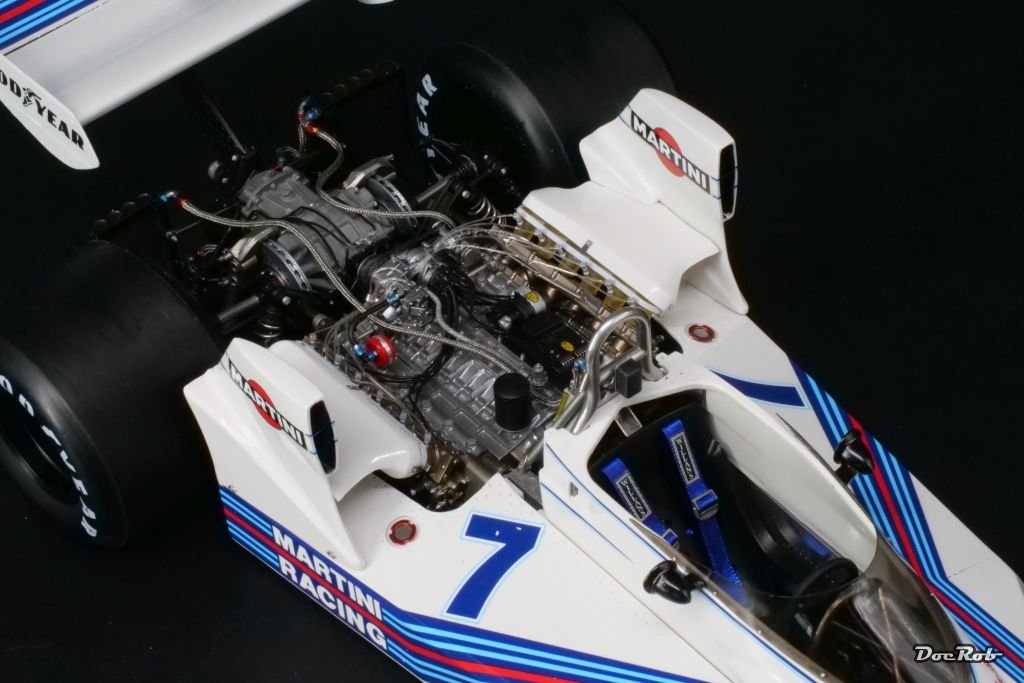
Thank you Yves, there are not so many finished MFH kits. I built three, the Crocker motorcycle, the Cobra Coupe and now the BT45. As I guessed before, building a MFH Formula 1 kit was much easier than a full bodied race car like the Cobra Coupe with all it´s doors, bonnet, many clear parts, etc.
Basically there were no real problematic areas through the build and I enjoyed it massively. The build took less than three months.
What´s next, good question, cleaning the bench is a must, which is cluttered with parts and tools, jars and reference and then...
I will be traveling a bit over the next weeks, so maybe a short project, probably not a MFH kit.
Cheers Rob
-
52 minutes ago, Canute said:
That's one beautiful build, Rob. The F1 racers are so aerodynamic. Well done. 👍
Thank you Ken, I especially like the looks of the BT45, it looks faster than it actually was with it´s sleek low profile shape, which was possible due to the use of the flat 12 cylinder engine.
Cheers Rob- Canute and Old Collingwood
-
2
-
Here is the song. If the Reverend says so it must be true

Cheers (I mean it) Rob- Ryland Craze, Jack12477, Canute and 1 other
-
4
-
There is a song from The Reverend Horton Heat, which is called "It´s Martini Time". The song is like a anthem to me as I love cocktails and specially Martini cocktails, albeit, I never prepare them with Martini. Anyway, the BT45 would fit into the bar, but no chance, no models in the living area
 .
.
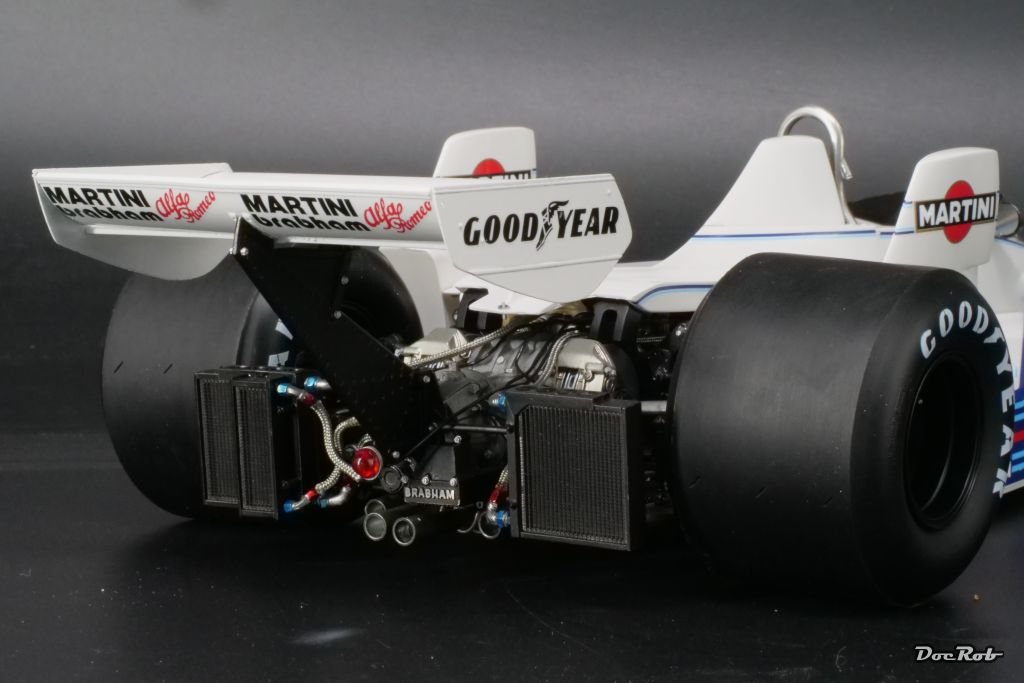
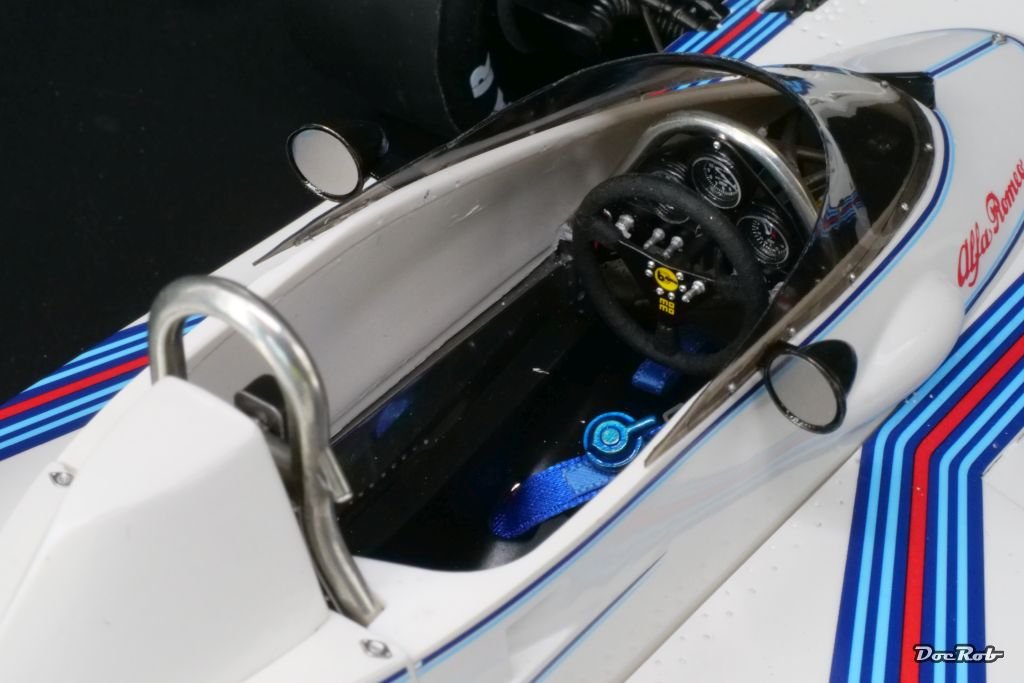
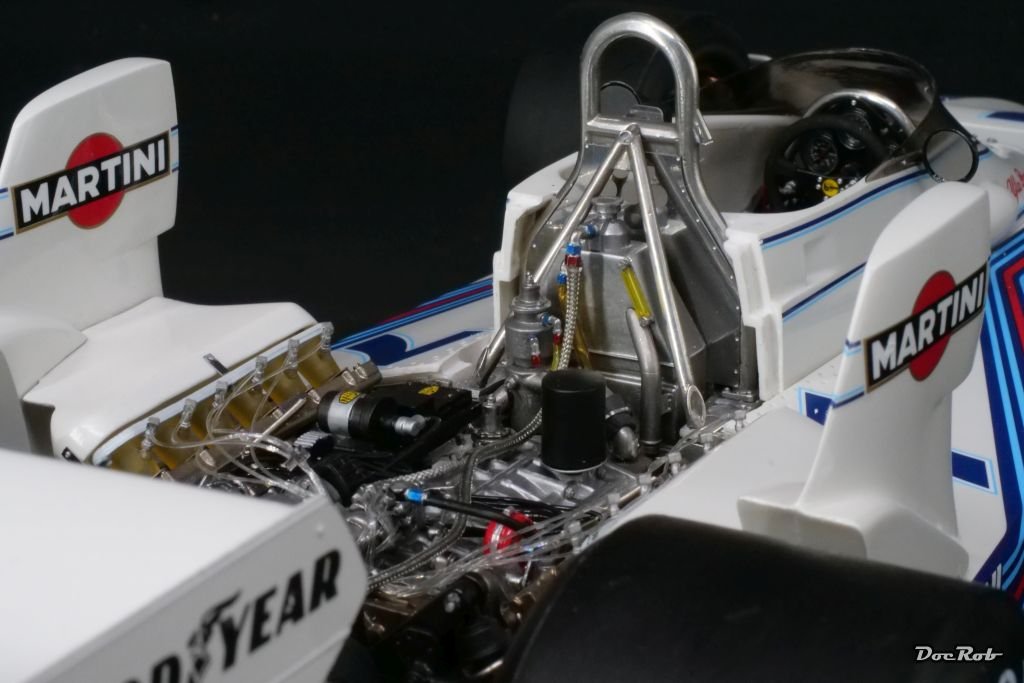
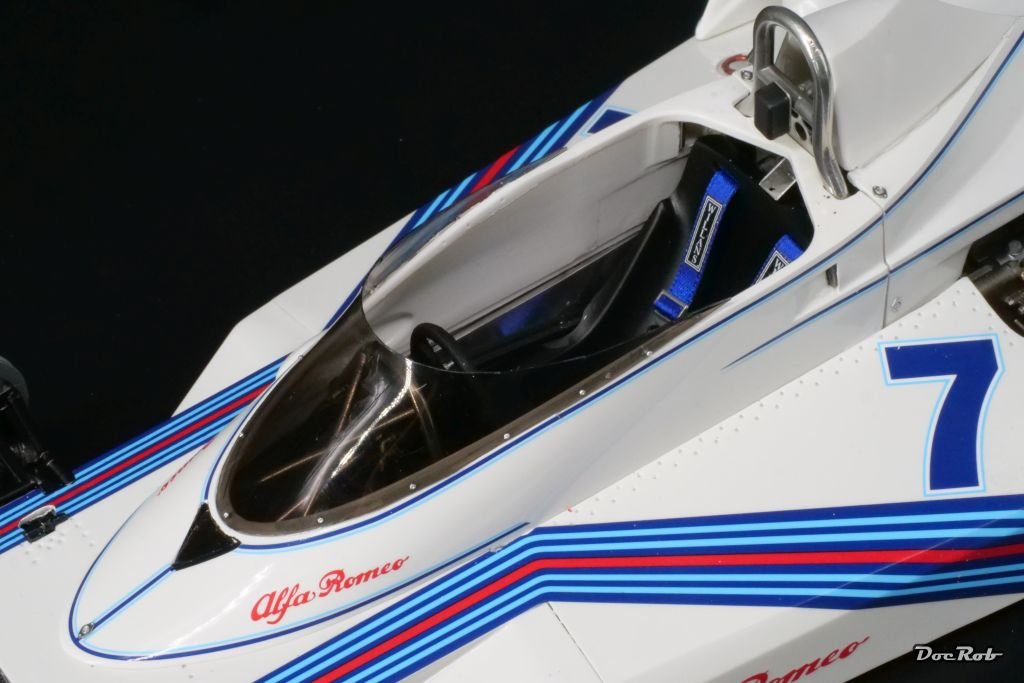
After two more sessions, the BT45 was done surprisingly rapid in the end. The innards of the nose section fit perfectly and on went the nose. It is removable as are the cockpit and engine fairing.
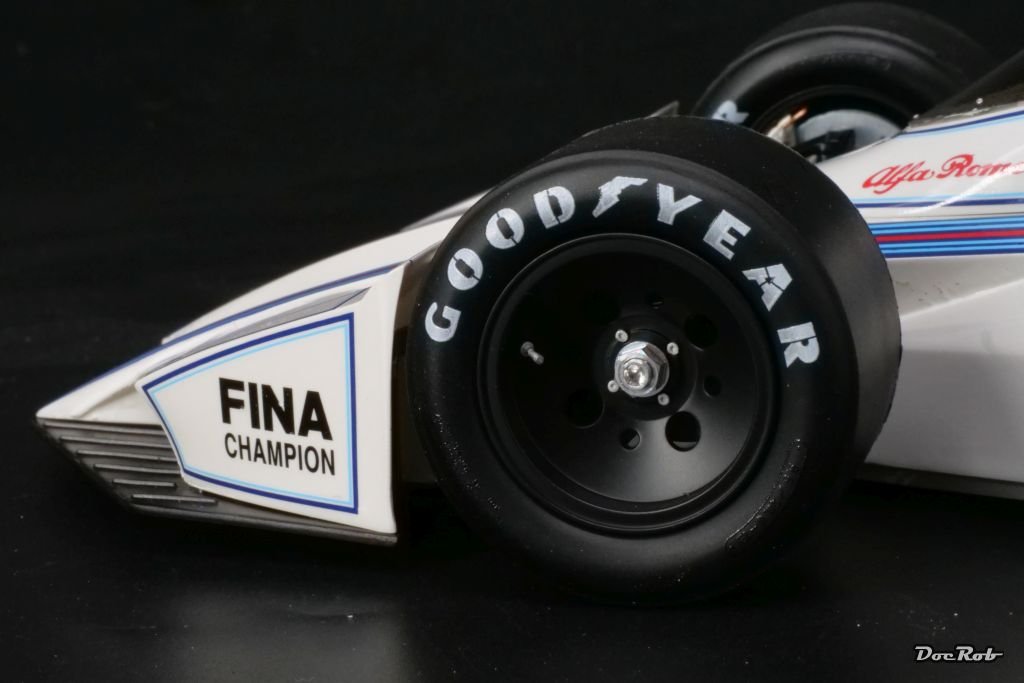
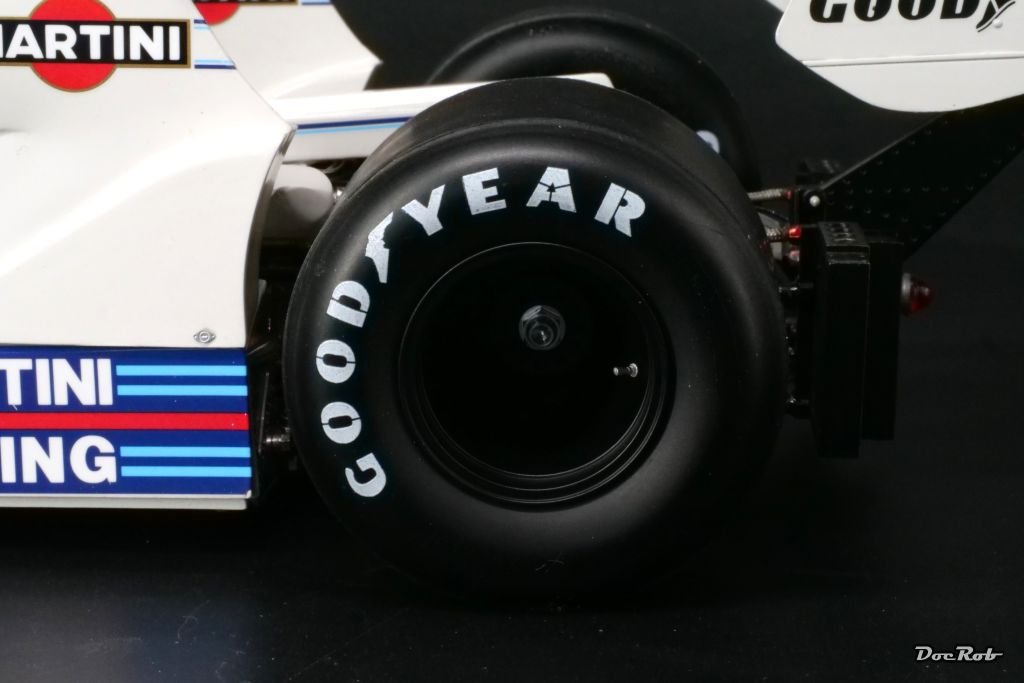
It felt nearly indecent, to paint the beautiful turned aluminum rims, but my car had them in black. After drilling all the needed holes very carefully, not to scratch the precious parts, I primed them with Mr. Surfacer 1500 black and found the matte black looked so good, why spoiling it with a color coat. Finally the tyres were mounted onto the rims and then I added the air vents, which proved fiddly. The tyres are absolutely perfect, with pre printed branding and much heavier and durable then e.g. Tamiya tyres. They need to be with the weight of the car, which is also supported by two spacers under the chassis.
Well, let the pics speak:


Cheers Rob
- king derelict, hof00, MAGIC's Craig and 10 others
-
4
-
 9
9
-
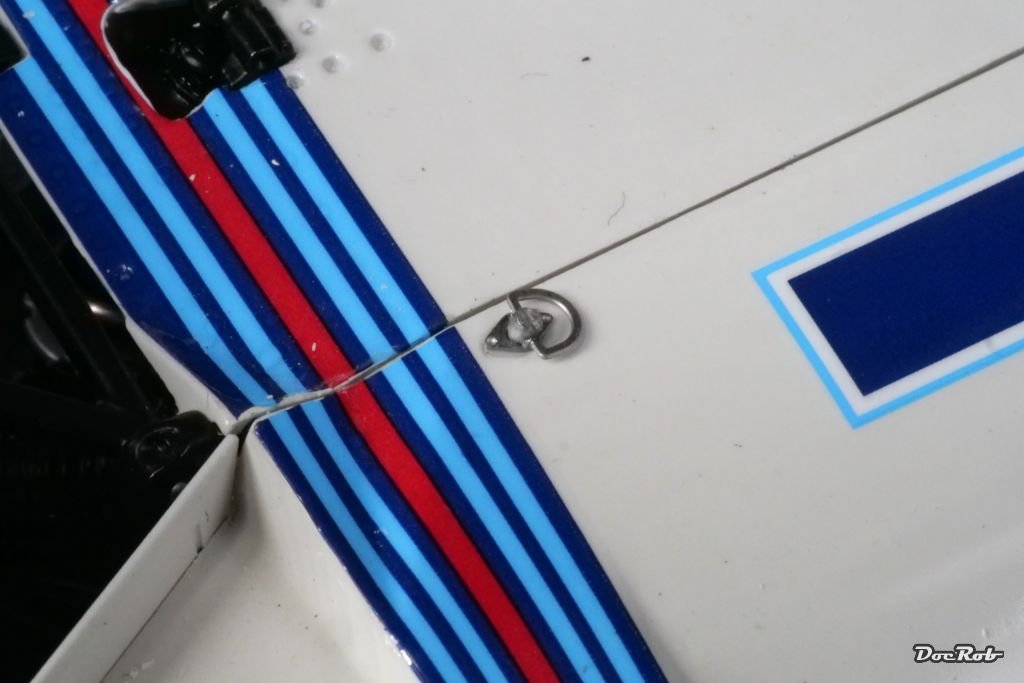
Slowly, I´m nearing the finish line. I added many details to the body, like fasteners, bolts and rivets and worked on the final fitting of the body parts. I am always a little scared when it comes to vacuum formed parts like the smoke clear windshield. It´s always best to cut it with a pair of scissors, than sanding, because the burr is very hard to remove. Finally I got it done, using Tamiya flexible masking tape as a guideline.
The clear part was glued to the body with 1mm wide double sided clear adhesive tape and then received the tiny rivets. The side air intakes are not finally glued to the body, I may let them removable for better sight on the engine, but then, I add some guiding bolts.
Now I´m preparing the rims and the nose section and then wroarrrrrrrrrrr 🏁.
Cheers Rob
-
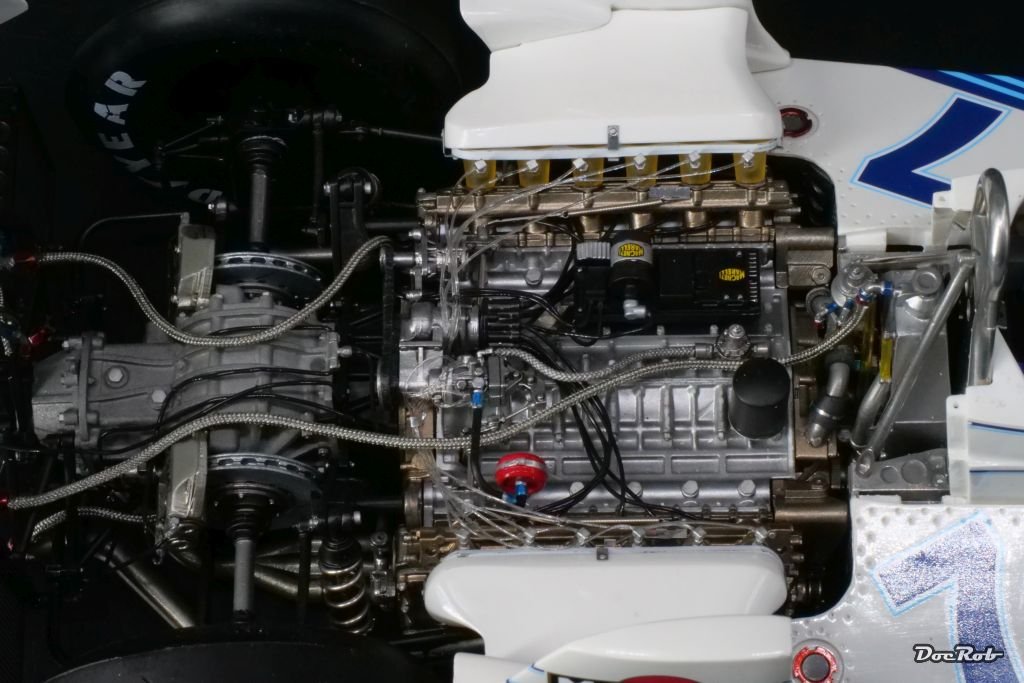
Today, I joined the engine with the monocoque. Test fitting was done before, but a last aggregate with three tubes attached needed to be fittet in between. That proved very difficult, but after some attempts, I got it done. If you ever build the kit, don´t glue the metal end plates (M142, M143) to the monocoque, like shown in step 13. Luckily I didn´t, because other ways I would have had to remove them to fit the engine in step 17.
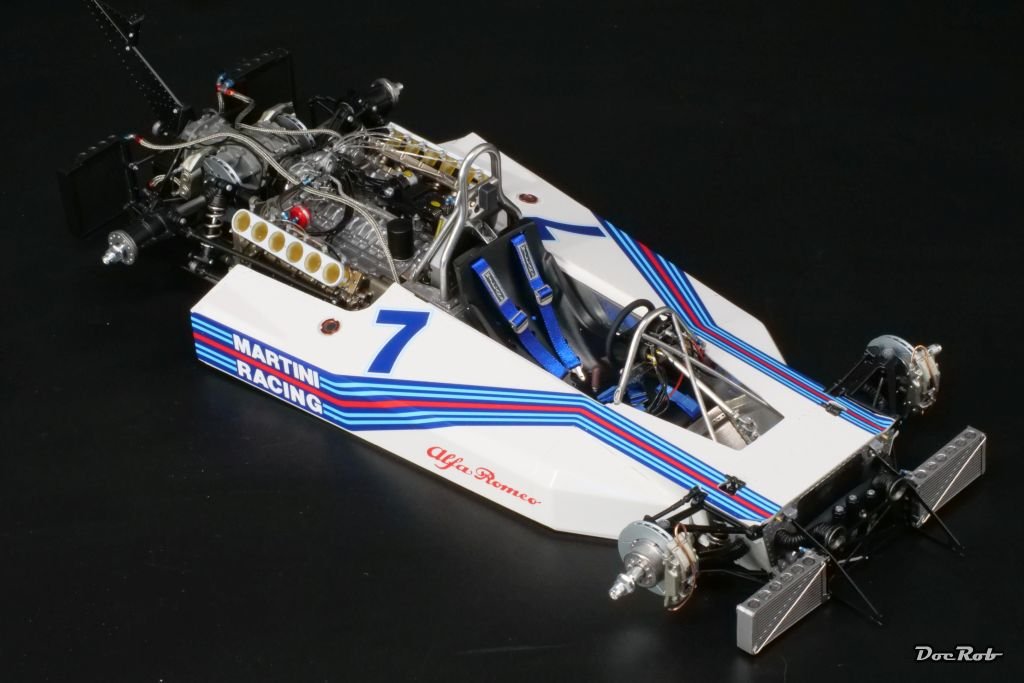

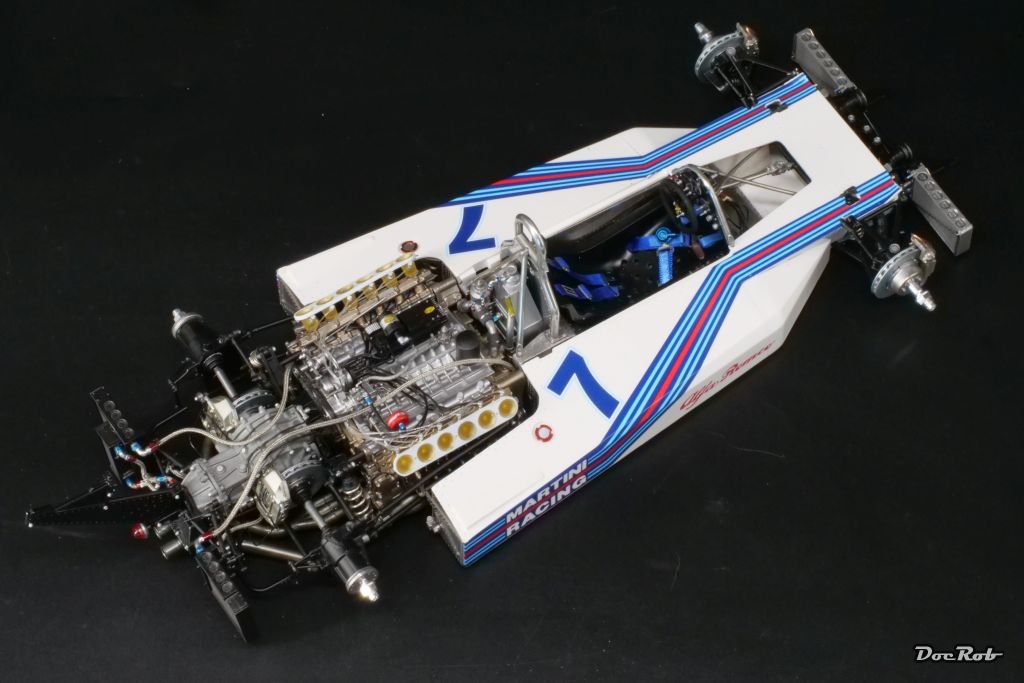
And finally, I tried the fit of the center body parts.
Cheers Rob -
20 hours ago, MAGIC's Craig said:
My quaking hand starts to shake just looking at the exquisite details of your project and trying to imagine the necessary precision which would be required. What a treat that you also take such excellent and revealing photos!
Many thanks for sharing your progress to us all.
Thank you for your nice comment and for dropping into my log, Craig. I believe a forum like MSW is always a two way exchange platform, I give and I receive. I´m glad to share my experiences with my niche of modeling with you and benefited a lot through the input of fellow members in my threads or browsing through MSW, searching for help, information or just a friendly pat on the shoulder (literally).
Cheers Rob
Shapur the Great by king derelict - FINISHED - Art Girona - 54 mm
in Non-ship/categorised builds
Posted
Nice one, Alan. I like the slightly arrogant look of him best.
Cheers Rob