


DocRob
-
Posts
708 -
Joined
-
Last visited
Content Type
Profiles
Forums
Gallery
Events
Posts posted by DocRob
-
-
I have these mask sets for my Tamiya P-51, makes life easier, hopefully.
P-51D MUSTANG - SURFACE PANELS MASK - 1/32, Miryoku MIR/32008 (scalemates.com)
P-51D MUSTANG - PAINT MASKS FOR WHEEL BAY - 1/32, Miryoku MIR/32009 (scalemates.com)Cheers Rob
-
Good kit, bad kit, doesn´t matter, it looks like a Mustang and it´s going to be a nice one Craig.
I like Pledge as a varnish like you, but prefer using it in the airbrush. What I don´t like about Pledge, it´s not the most durable finish and can be easily damaged with decal solutions. I once had frosty irritations around decals, using the relatively mild Micro Sol onto pledged decals.
It´s good to see, the Pledge took away only a tiny bit of the shine, an effect, I always fear, when it comes to sealing NMF.Cheers Rob
-
3 hours ago, Canute said:
Coming along nicely, Rob. Your "distressing" of the engine panels came out great.👍
Thank you Ken, this part of the build, is right down my alley, playing mad scientist, with the whole bench cluttered with colors, pigments, metal waxes, tools to wear and tear, a bunch of different brushes and a picture in my had, how everything should look.
I especially like the hairspray method for weathering, which was used for the cowlings and engine cages here. I prefer working into the layers for weathering instead of onto, like paint chipping with a brush. When you work ´into´ the layers and later add more weathering with oils and washes, you achieve a much deeper result.Cheers Rob
- king derelict, CDW, Old Collingwood and 4 others
-
 7
7
-
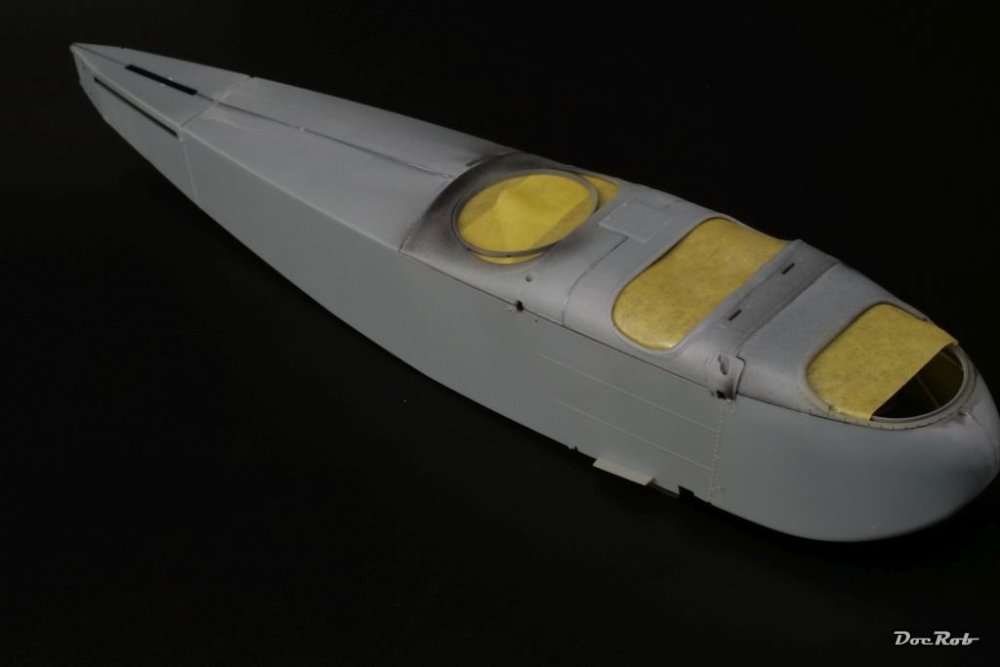
This may not mean a lot to most of you, but I got the decaled fuselage sealed in. I feared bad reactions with `hot´ varnishes, but because of my planned weathering schedule, I wanted a durable sealing coat, a contradiction.
First, I wiped down the whole airframe with a cotton towel and purified water, to get rid of decal solution residues.
I took out god old Tamiya X-22 clear and mixed it with Tamiya acrylic thinner and sprayed it on some test parts, so far so good. When I sprayed on my decaled test elevator, the finish looked like marbled and scratched, bummer.
With shaking hands, I mixed the ´hot´ Tamiya lacquer LP-32 flat clear with equally ´hot´ levelling thinner at a ratio of about 55% thinner, less than normal and cautiously sprayed the tail underside and immediately blew the varnish dry with the airbrush, to minimize reaction time.
Hooray, it worked, no smelt decals and a nice and even near flat coat. Even the resprayed elevator was rescued, with over spraying and looks good now.
Cheers Rob
-
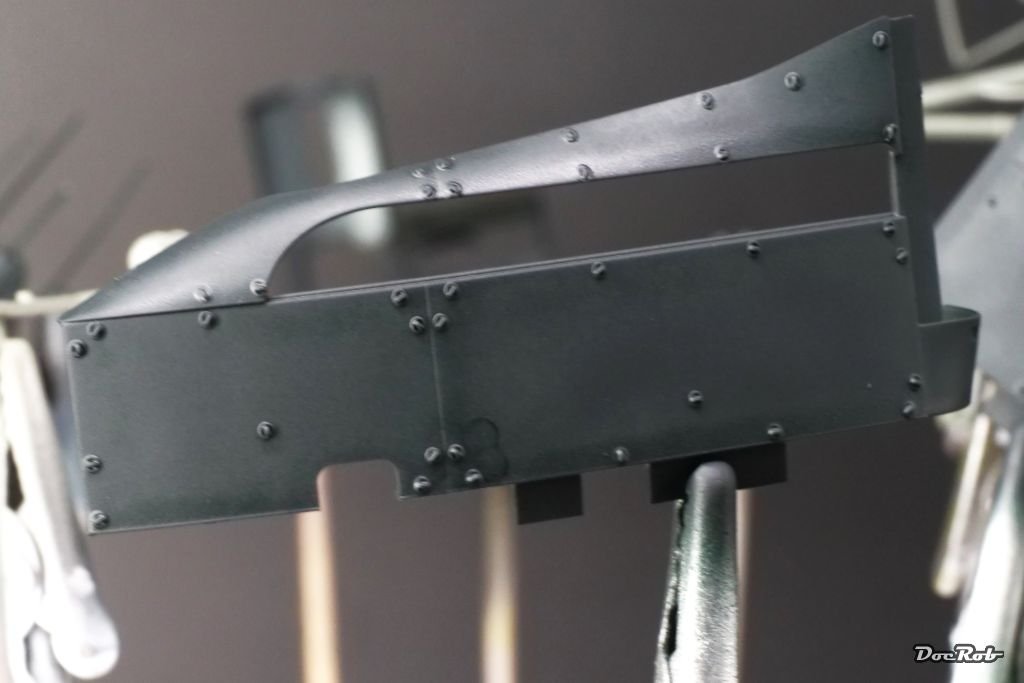
Phew, I got some work done over the last days. The engine nacelles were not the easiest part of the build. Many fragile parts were to paint weather and mount, and I´m really lucky, it is a WNW kit with great engineering and fit. Look alone for the filigrane tubing around the exposed engine, unbelievable.
I applied Tamiya XF-17 onto the outside of the cowlings and struts onto the hairspray. When dried, I dampened the parts, activating the hairspray and abused the surfaces with toothpicks, fiber pencil and other scratching tools with an emphasize on the sheet borders and fasteners.
Again, all the painted parts were glued together using CA, which I prefer to runny plastic cement with near ready parts.Unfortunately, I broke an engine strut, where it connects to the lug, which will be inserted into the wing later, damn, a very important connection. Out with the 0,5 mm drill bit, drilled both ends and inserted a brass rod along CA.
Left nacelle
Right nacelle

Later, I will apply some brown Flory clay wash, but this has to wait, until I have the fuselage weathered, to achieve a similar finish.
I mocked some picture, carefully mounting the nacelles to the beast.
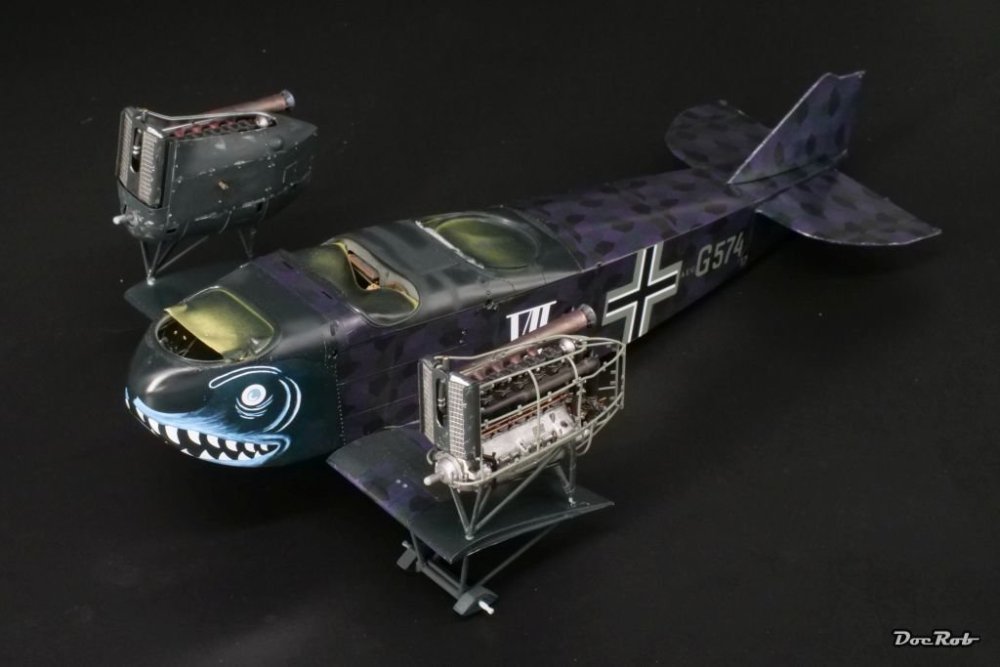
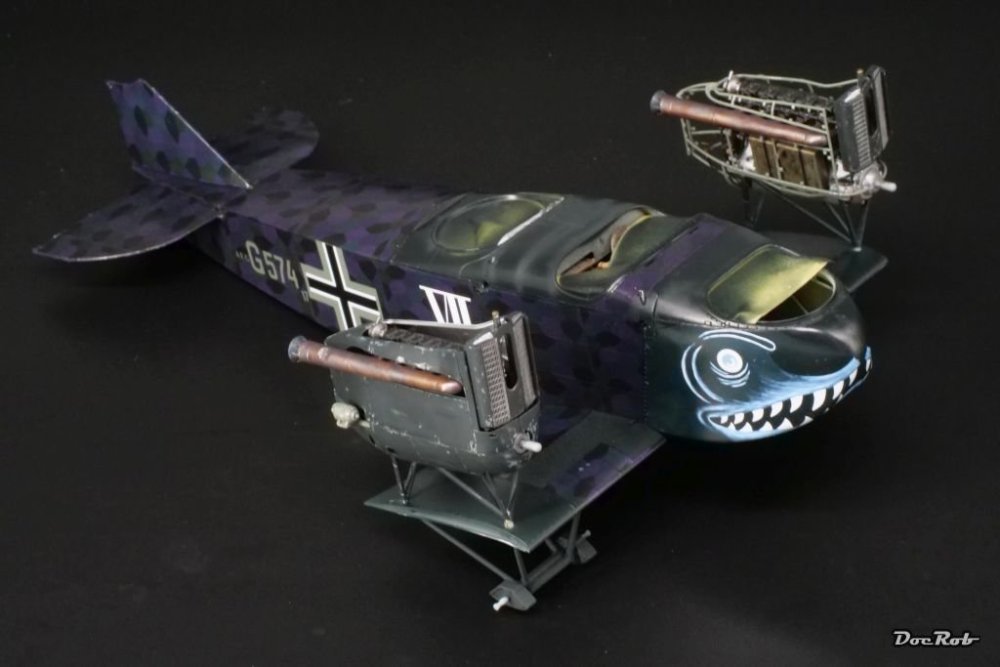
@Egilman, there is no need to worry about the Rexx exhausts, I removed them as carefully as I could from their packing, but felt the weight and was immediately relived. They are sturdy and don´t feel fragile at all.Cheers Rob
-
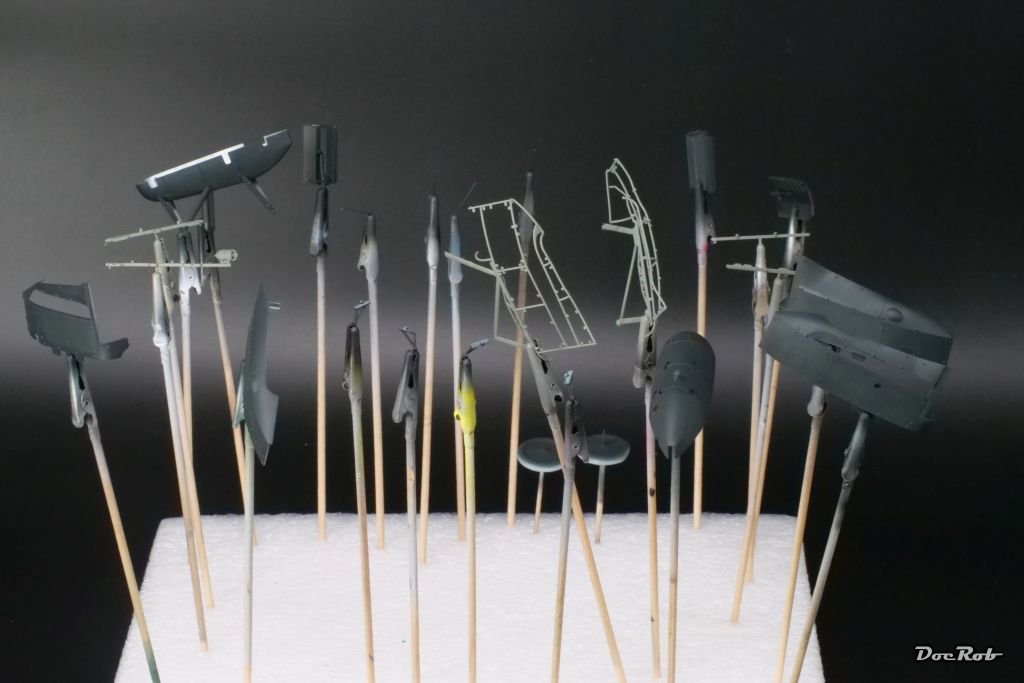
After I figured out, which parts were needed for the nacelles and radiators, I started to paint them. The left engine will be displayed un-cowled, the right one with cowlings.
All parts were sprayed with AK matte aluminum, which is not that matte, but covers great and has a nice metallic sheen. It will be only the base layer for weathering and was followed by two coats of horrible smelly hairspray for later chipping.

Then the parts were sprayed with Tamiya XF-22 (RLM 22) for the engine bearers and XF-17 sea blue for the outside of the cowlings and radiators.
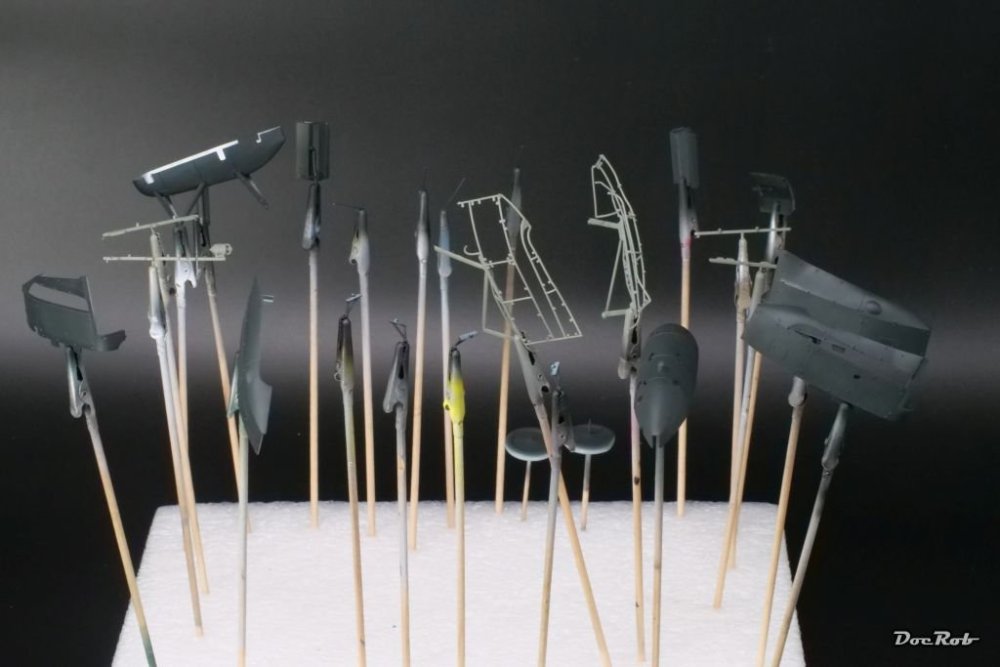
The sea blue was highlighted then, with some drops of sand color added, highlighting the upper sides and the panel borders. The effect is hard to see on the pic, but it´s there. Later, the cowling outsides will be dampened to activate the hairspray and scratched with a variety of tools for chipping.

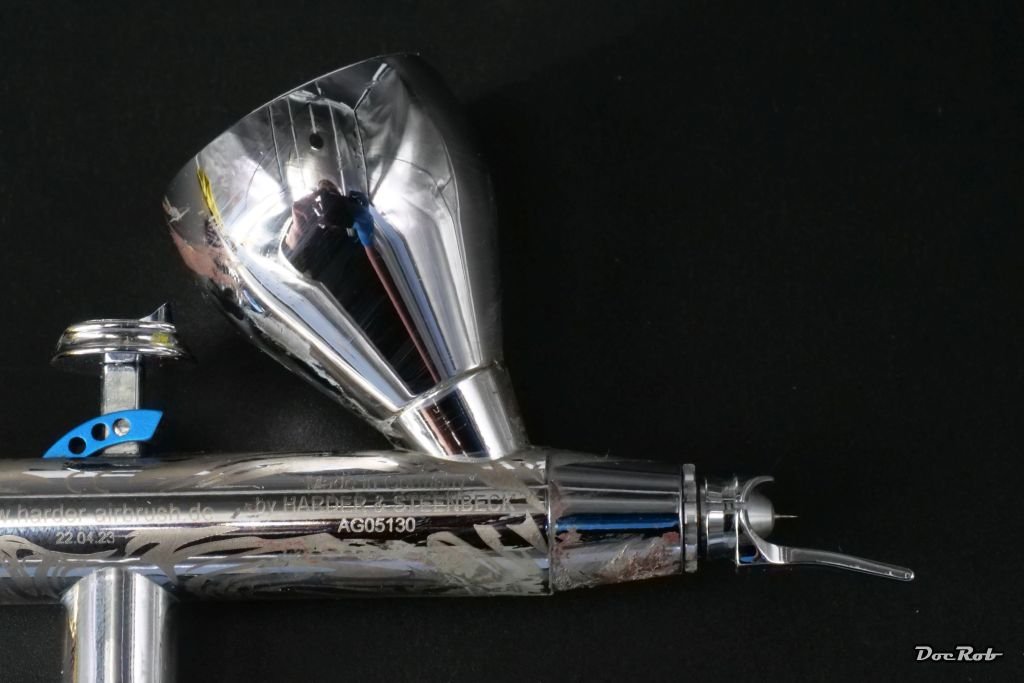
Airbrushing slightly lighted sea blue onto the dark surfaces proved difficult, but I remembered that with my H&S Infinity Giraldez edition airbrush came three different nozzle guide horns (the mounted one is the longest), which were very helpful, placing the slightly lighter dots and will come handy with free hand squiggle camo, as you keep the same distance to the kit and it makes aiming easier.

Cheers Rob
- Canute, Jack12477, Old Collingwood and 9 others
-
12
-
Just stumbled into your log Greg. With a bit of time, I will read the entire thread about how your masterpiece was made. I´m sure, there´s a lot to learn in it. Your Dreadnought looks fantastic overall and I couldn´t imagine, how difficult the antenna rigging was.
Cheers Rob
-
5 hours ago, wefalck said:
I am not into aircraft, but seeing those engine kits, I have been tempted for a long time to put one into a model of those speedboats that were popular in the 1920 and that used marinised surplus aircraft engines.
Building a model of the smallest Dornier flying boats, a LIBELLE, has also been on my temptation list. They used inter alia Siemens Halske sh4 and sh5 engines as well as British radial engines.
That sounds like a great idea, wefalck. I guess, there were some interesting speedboats built with airplane engines and there are some great engine kits around in 1/32, 1/48 and 1/72. Lukgraph for example has some in their portfolio as has Copper State.
I once built the ´predecessor´ of the SH4 (I know, it´s not the same amount of cylinders, ...) the SH3 twice for my 1/48 Siemens Schuckert D.III twin build.
Left, the Eduard Brassin engine and right the kit part.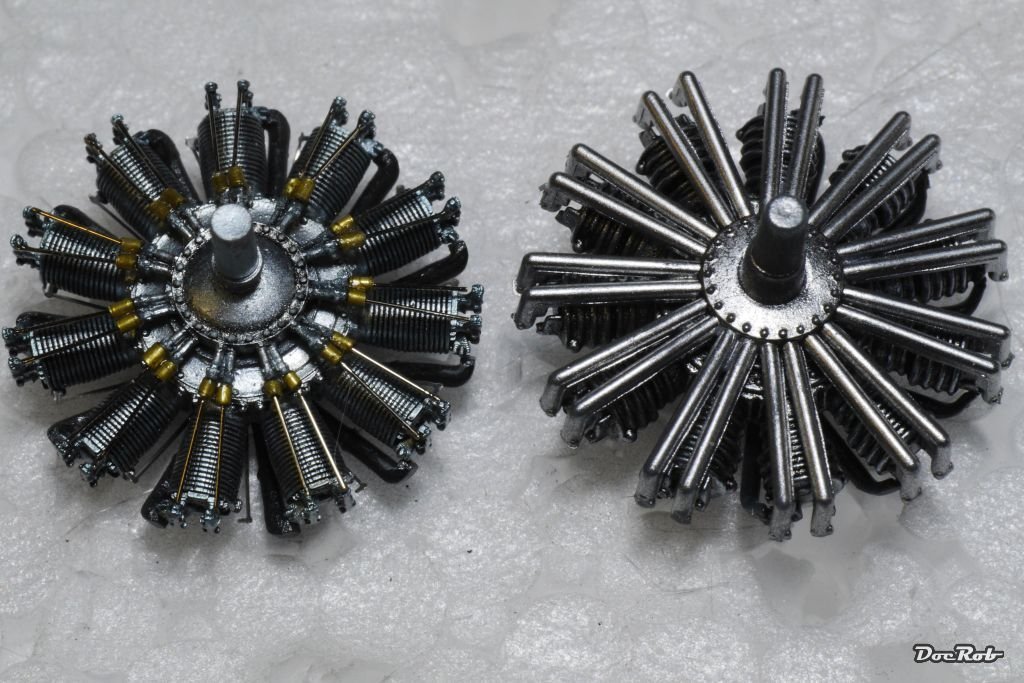
There are the evil twins.
Cheers Rob
-
6 hours ago, Egilman said:
Yep, and subjects no one else has... I added some pics of the albatross to the previous posting, sorry for the de-rail Rob.... (probably should have done it in a PN)
No worries Egilman, nothing against some detours once in a while, which widens the horizon. Nice kits by the way, love the Albatros.Cheers Rob
-
6 hours ago, CDW said:
Beautiful work, Rob.
Have you or any others who may read this have any experience with Lukgraph resin kits? They offer a range of various 1:32 WW1 multimedia kits that are priced in the range of current WnW kit prices...average price point seems to be in the $200 - $225 range. The only place I've seen the kits offered for sale are on Ebay. No place local to me nor my regular online suppliers carry them.
I haven´t build any Lukgraph kits, but thought about buying one or two. The Friedrichshafen caught my eye, when it came out. You can buy them from Hanants in the UK, they are well stocked with Lukgraph kits.
Their kits are a mix of resin cast for fuselage and wings, 3D print for engines, weapons, etc. and PE and they cover a great range of not often seen subjects.
The only Lukgraph bit, I ever built was the Oberursel engine for my Fokker D.VIII. It was a 3D printed gem, relatively easy to build and fitted without modifications under the Aviattic cowling and would have fitted even into the MikroMir cowling.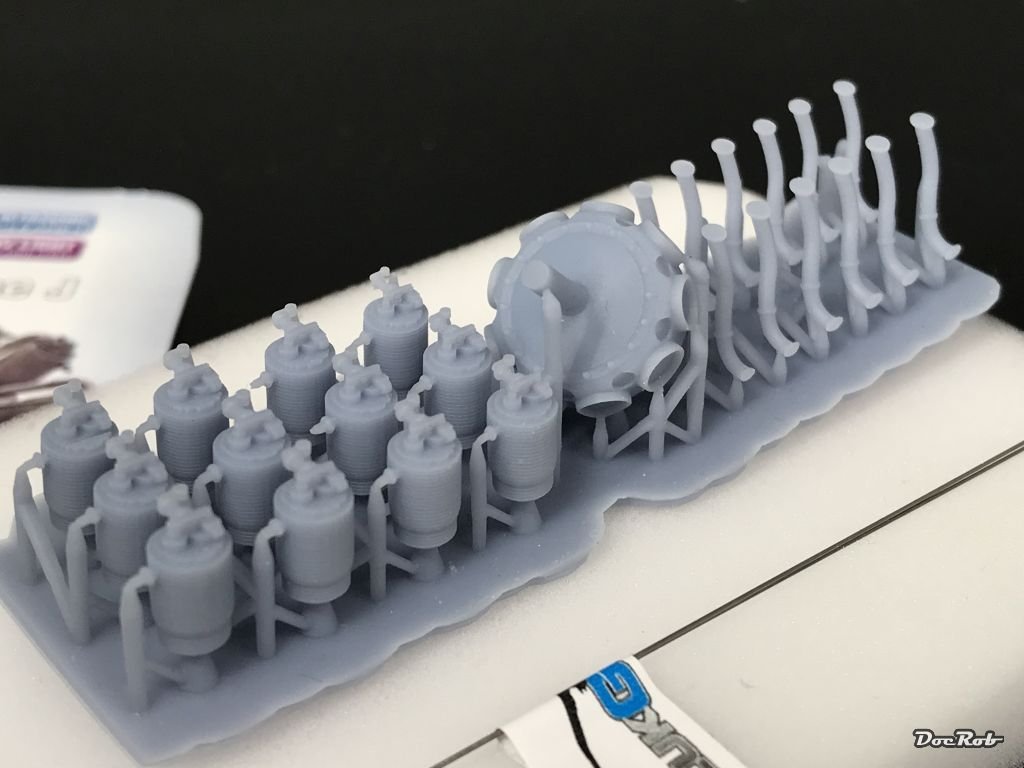
If you want to see, how they build up, Mike `Sandbagger´Norris is actually building a Lukgraph Halberstadt over on LargeScaleModeler. He is a very gifted WWI builder and you can learn a lot from his well documented builds, which he also offers as PDF download, when finished.
1:32nd scale Halberstadt D.II - LSM 1/35 and Larger Work In Progress - Large Scale Modeller
Cheers Rob
-
2 hours ago, Old Collingwood said:
Look at that engine - (now where did you put the model one you was working on)
Thank you OC, building those WNW engines is a lot of fun. There are so many different materials involved, some under varying thermal conditions, it´s like a party for modeling material fetishists. With the AEG´s engine, there are no pushrods to substitute for a change.
I thought long about getting the Taurus sets for the timing gear, but with the two engine design, it´s not that visible, hidden under the top wing. Engraving the coil springs with a needle and rubbing them with steel pigments was sufficient for these engines.
I will add some staining in the end and maybe some more pigments.Cheers Rob
- davec, Old Collingwood, Canute and 4 others
-
7
-
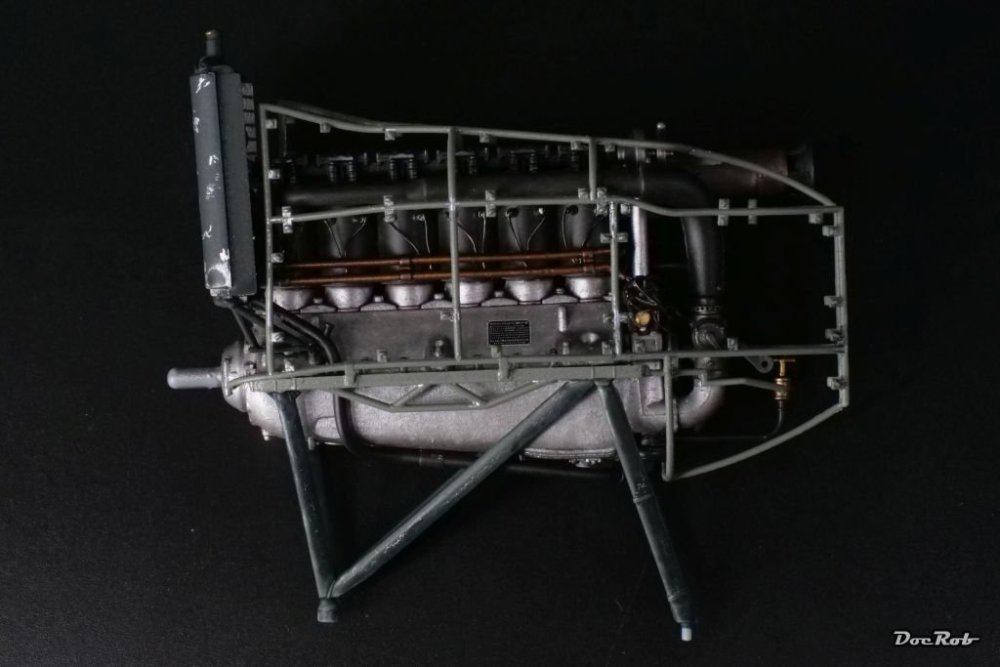
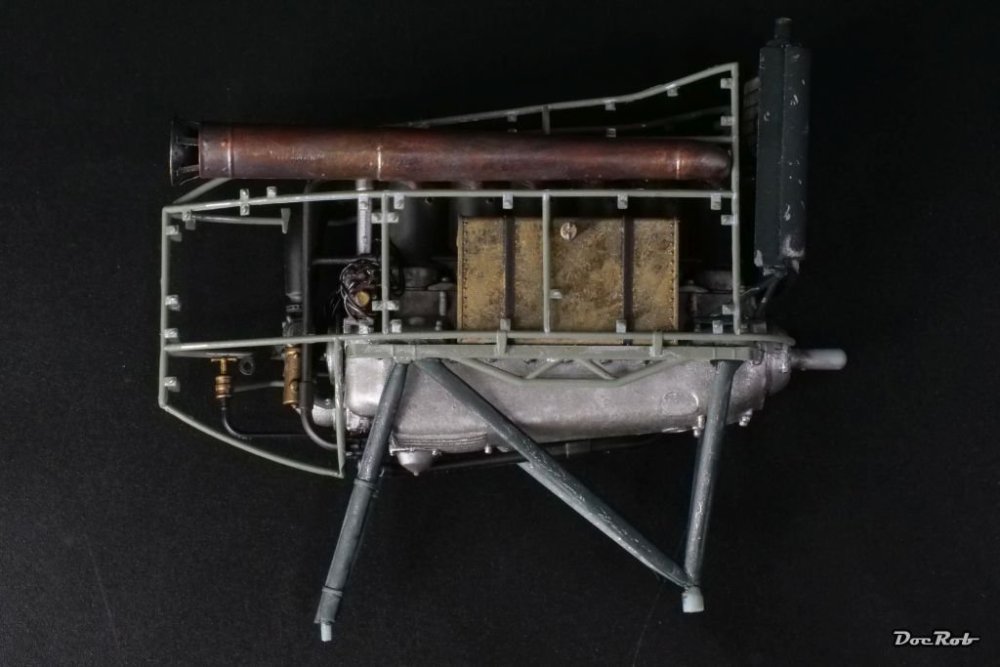
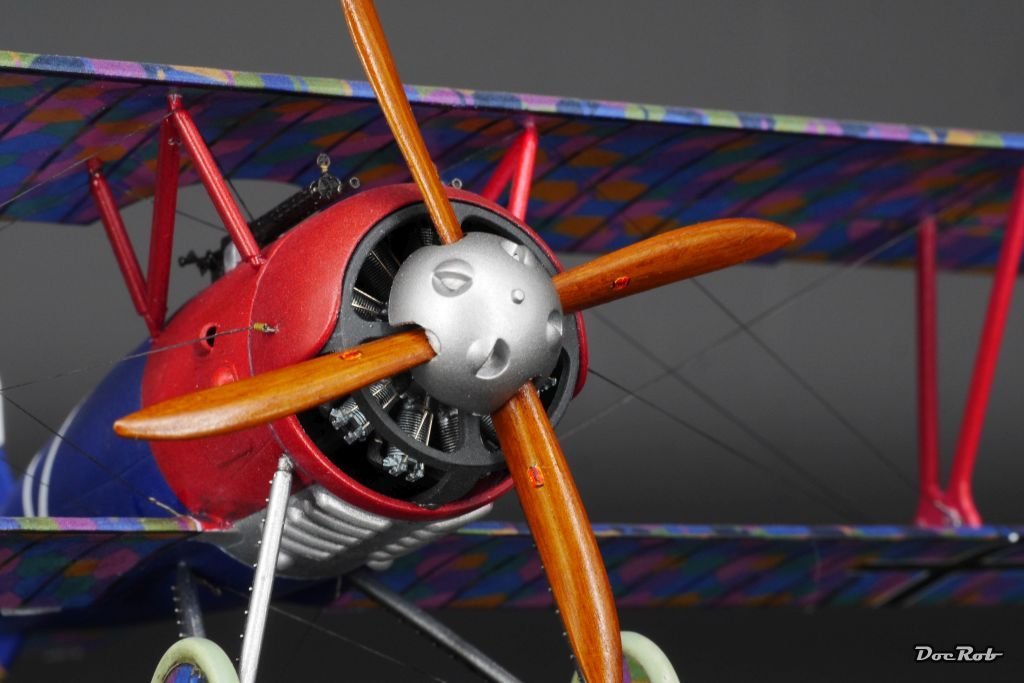
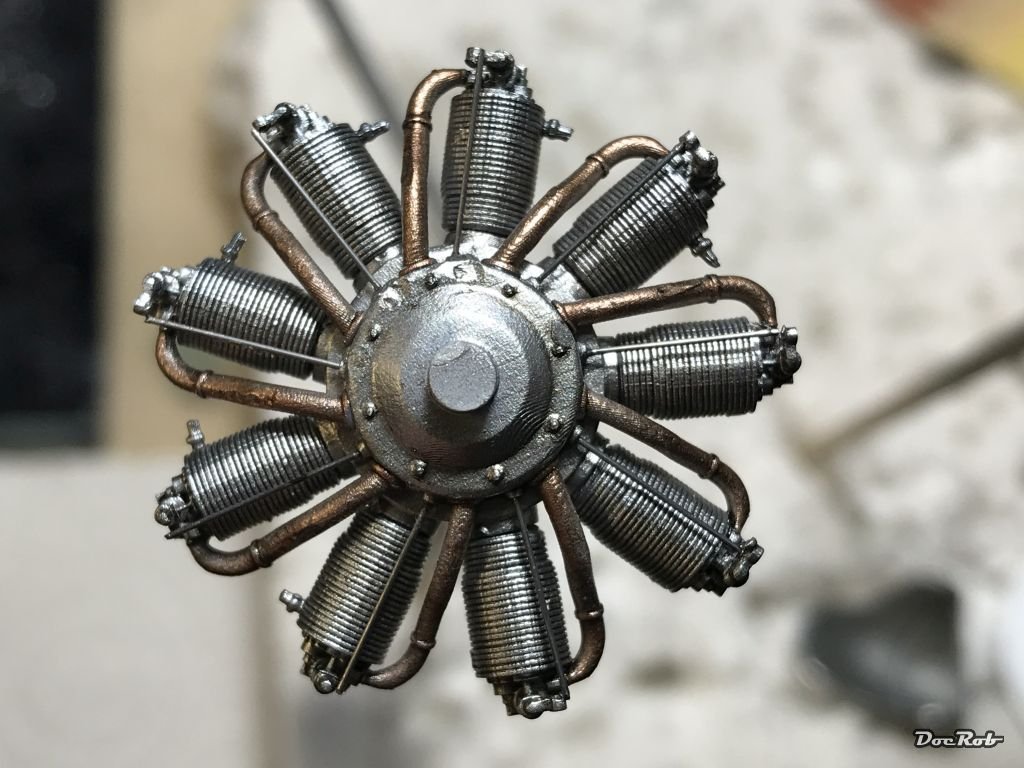
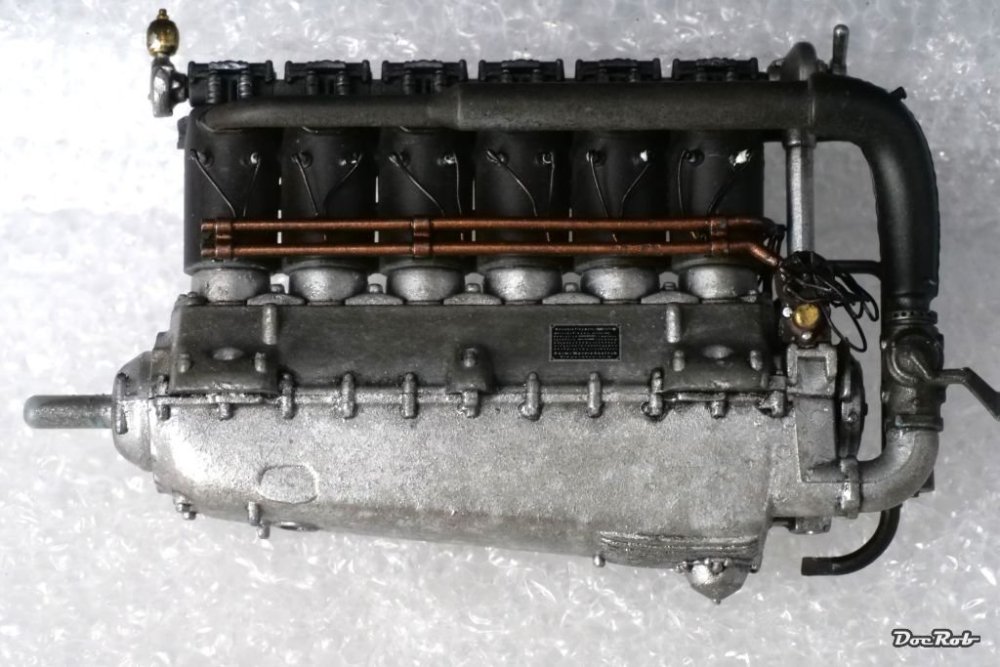
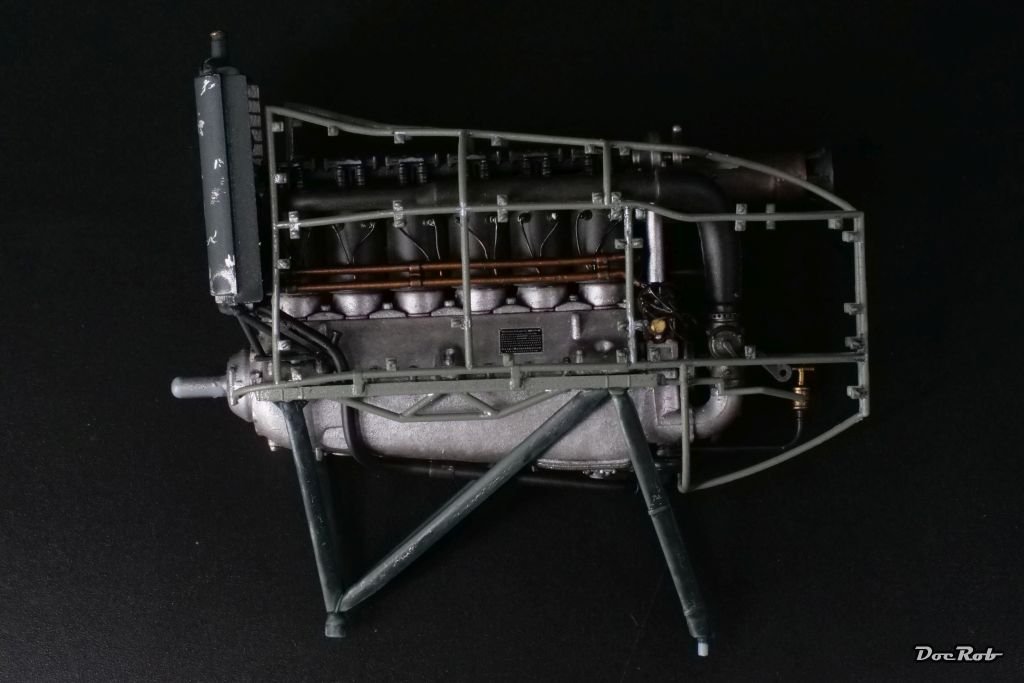
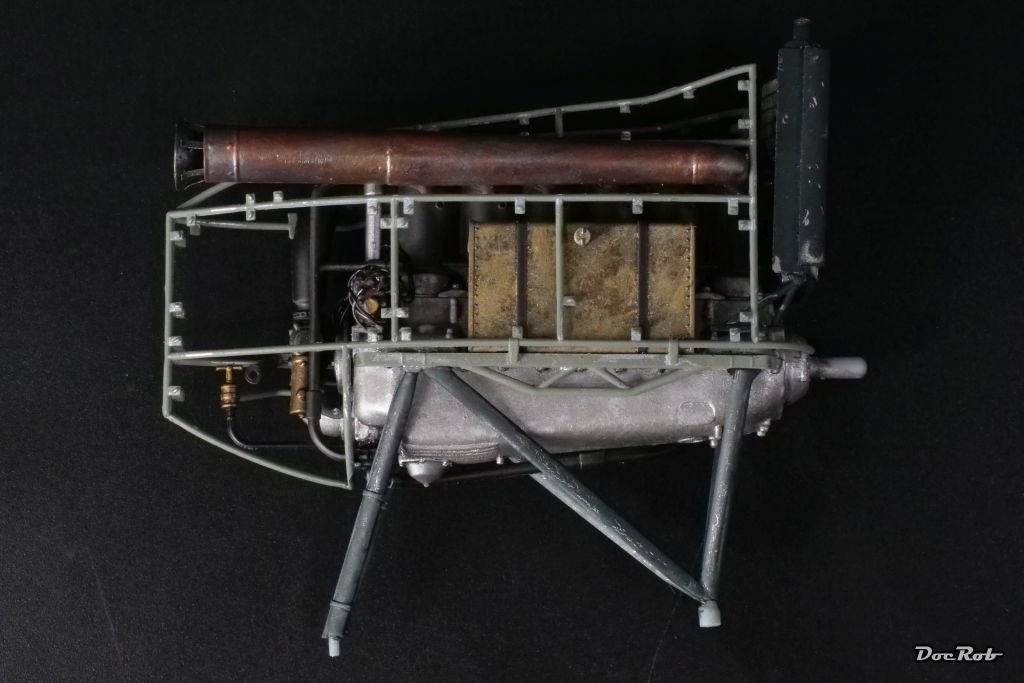
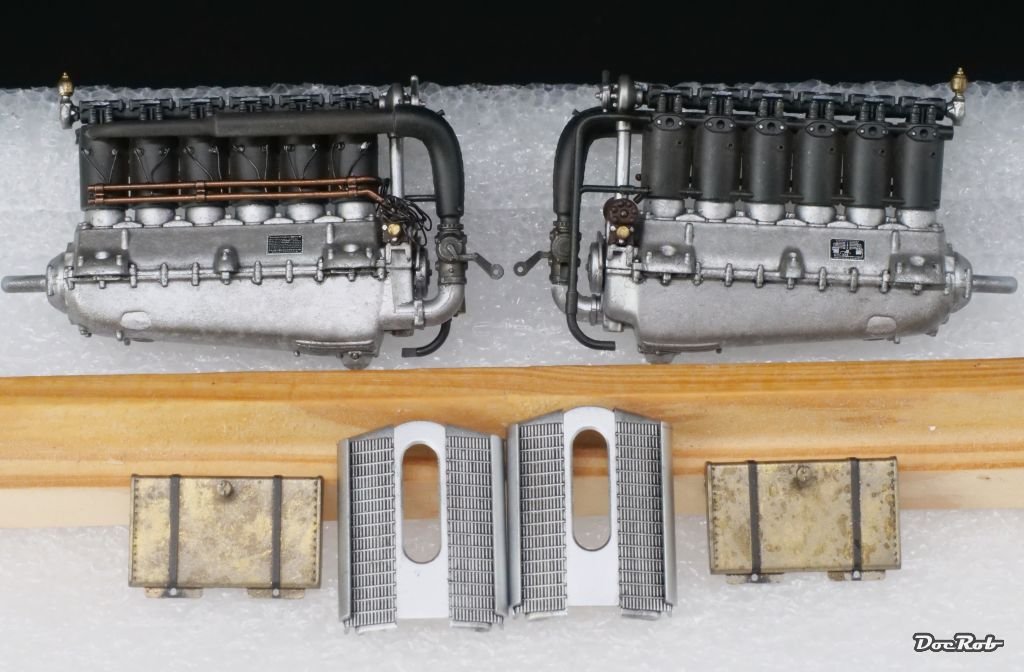
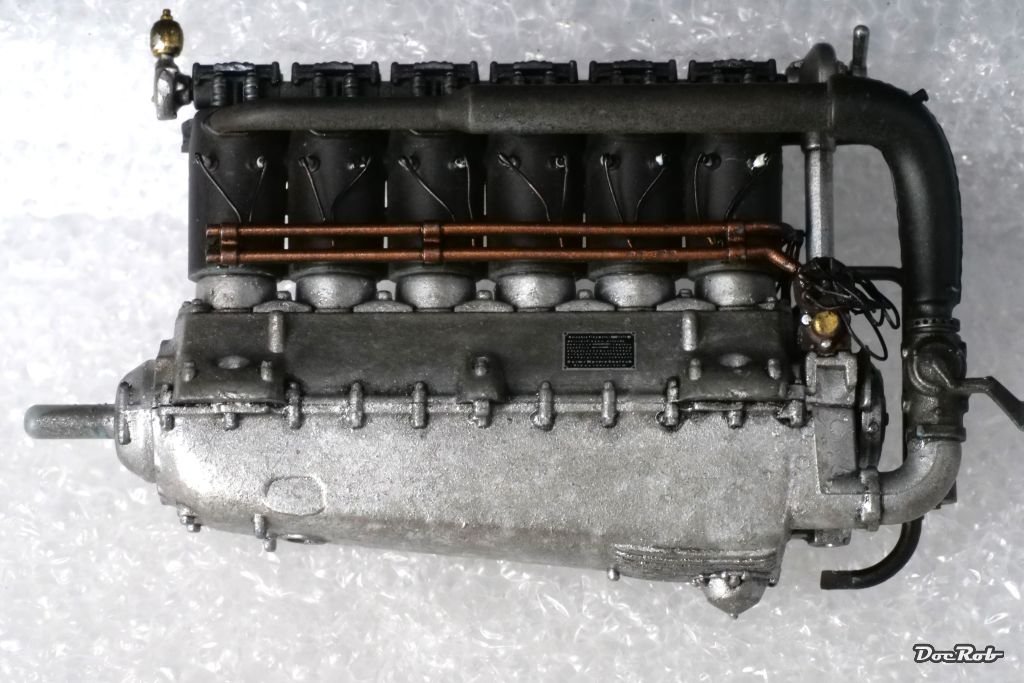
I finished the engines today, which were fun to build, but a ton of work. I wired only the left engine, as the right one will be hidden under cowlings.
After priming all the parts with Tamiya LP-5 semi gloss black, the aluminum parts were sprayed with AK´s Extreme metals matte aluminum, the ignition harness in copper and the tiny ´golden´ parts in brass, all from AK.
I wanted a blotchy look for the lower aluminum parts and used the salt technique again, spraying dark aluminum on top. After that, I used AK´s true metal wax aluminum, dark aluminum and steel, dabbed on with a stiff old brush and then worked into the surface with a flat brush. The result looks more dotted to the real eye.
The tubing received my usual treatment of steel pigment rubbed in only slightly for a tiny bit of sheen, followed by some dark brown pigments on the intake manifold and cylinders.
The oil tanks were sprayed brass, salted and followed by pale brass, later waxes of brass and bronze for a worn, but shiny metal look.
I applied a self mixed black oil wash, thinned with matte thinner, to enhance the details.

Wiring was next, I but glued the ignition cables to the spark plugs with CA and cut the overlap with a fresh blade, easy with 0,2 mm lead wire.
The ´bushes´ of 6 cables for each magneto were sorted out and glued into place. Finally, I dabbed some semi matte black onto CA residues.
Per my usual practice, I used CA for mounting painted parts, which is more comfortable to me. I use a toothpick to add the CA, a less potential messy affair than using Extra thin, eating through the paint and running into unwanted places.
Cheers Rob
-
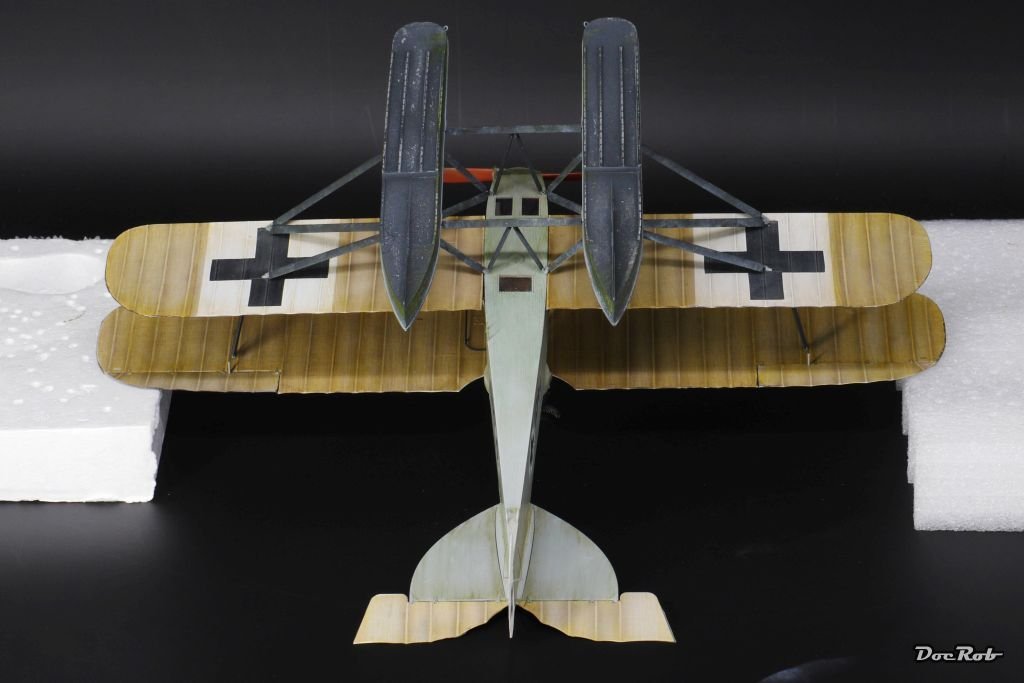
The creature got it´s tail, but without the rudder and elevator for now. The joints are fragile and therefore they will be added later. The intersecting tail parts are pure genius, they hold all three parts exactly in place with perfect fit, I only glued for security.

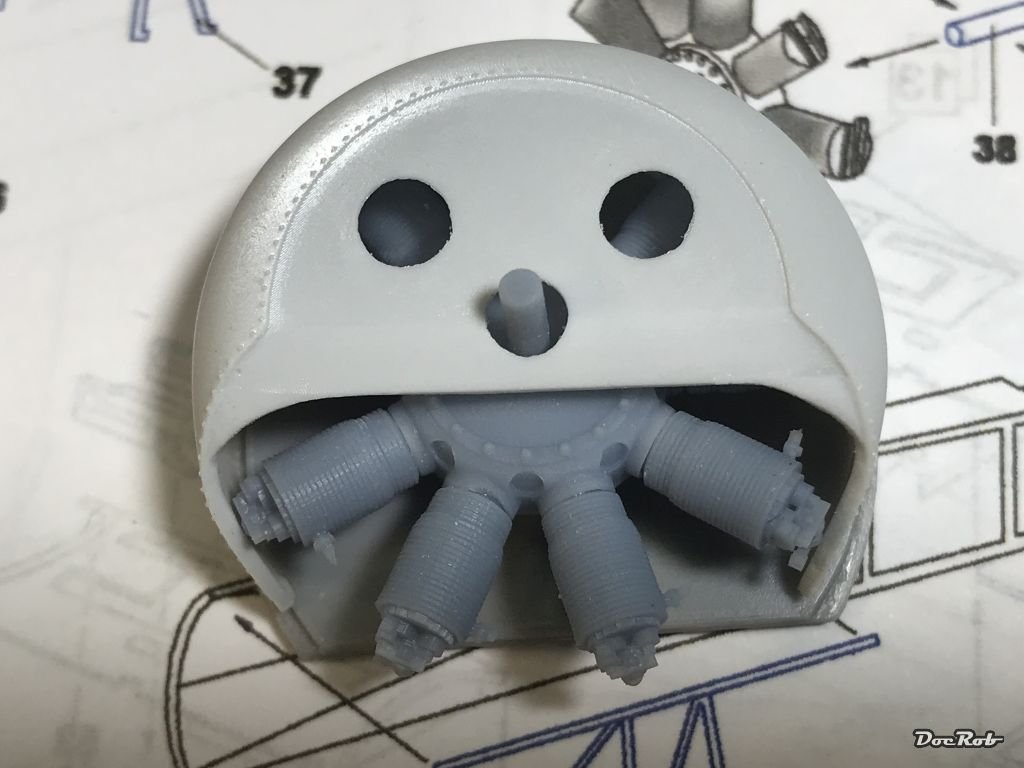
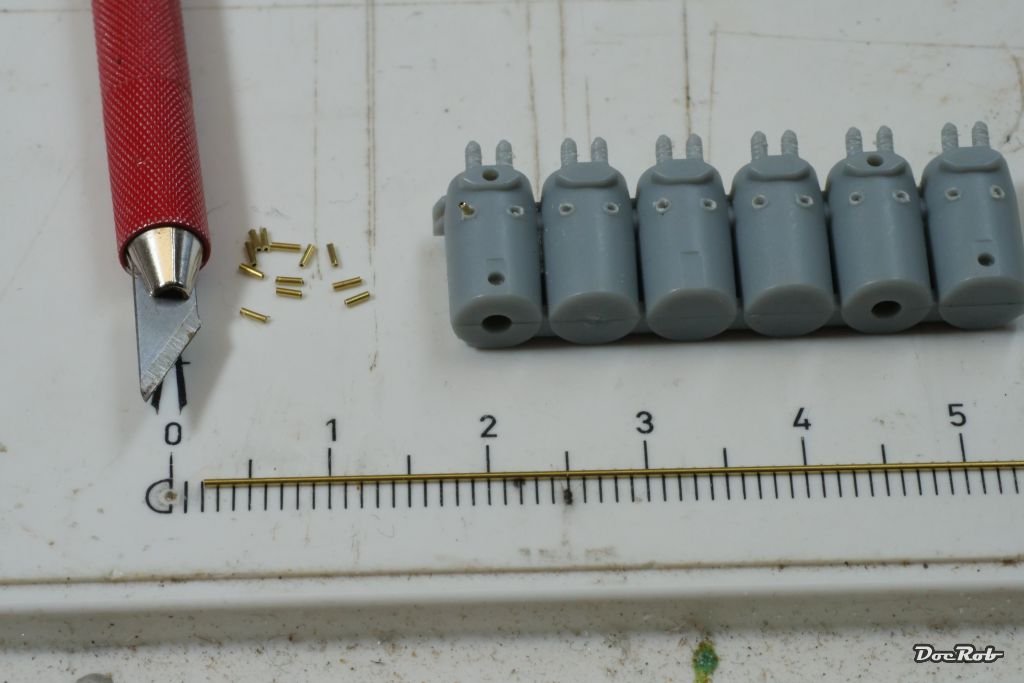
As a break from decaling, I decided to start the engines. One will be covered with cowls and less detailed, the other will be without cowls and receive some updates, to enhance detail level.
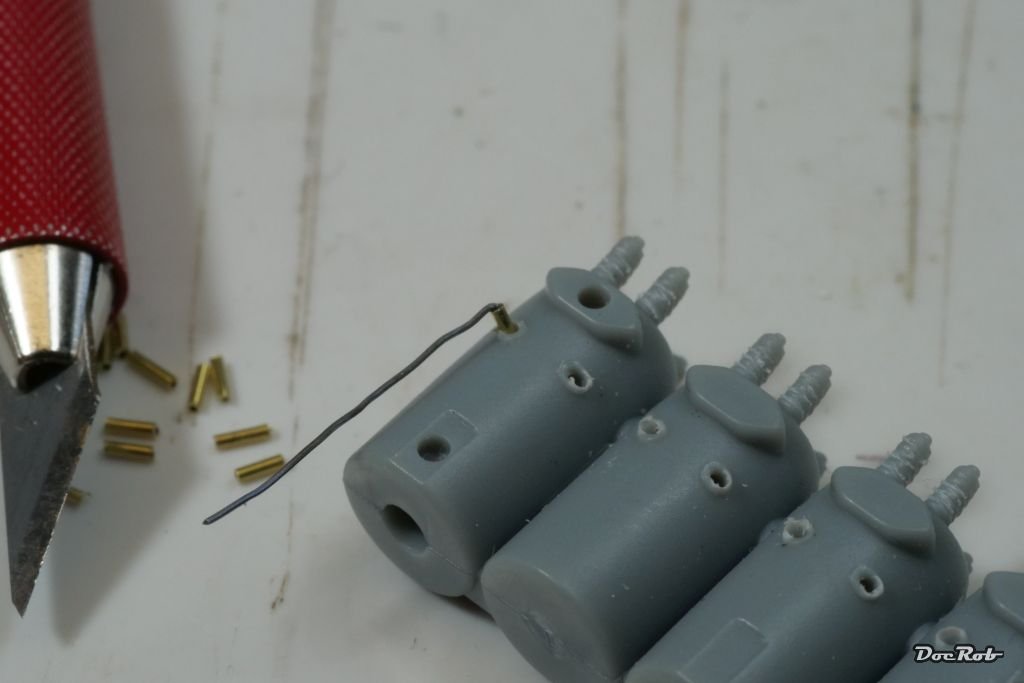
First, I scratched the top rocker springs for a more coiled look with a sharp scribing needle. Next, I drilled out the holes for the spark plugs with a 0,5 mm drill bit, to accept 1,5 mm long pieces of brass tube with an outer diameter of 0,5 mm and an inner diameter of 0,3 mm.
Said tube pieces were cut with a sharp blade, only rolling them on a flat surface with only slight pressure. This way, you cut easily without leaving burr in the hole.
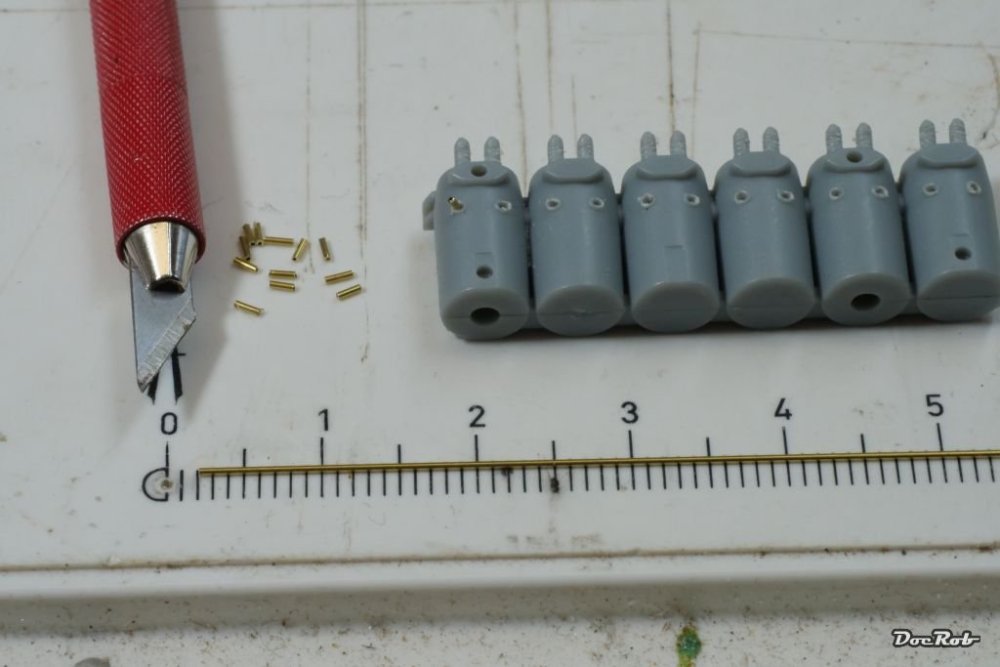
These spark plugs will be CA-ed into the holes and will become 0,2 mm lead wire inserted for the ignition cables.

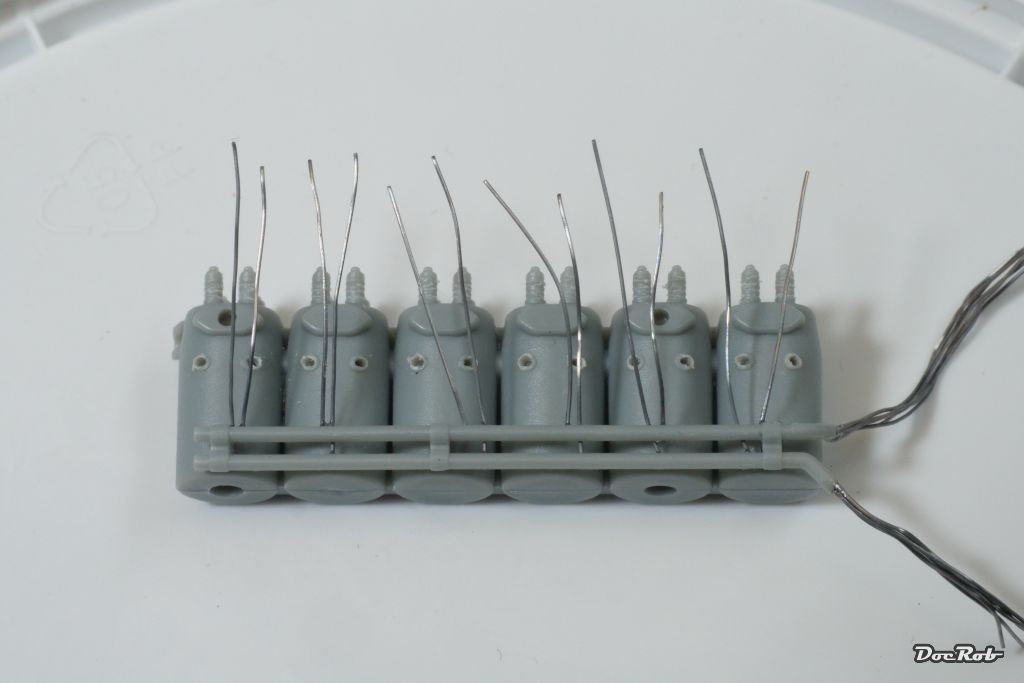
Then I prepared the ignition harness, using the kit part and gluing a six pack of 0,2 mm lead wires to the end of the tubes, which will later be connected with the magnetos and glued a pair of lead wires for every cylinder to the plastic part, which will later be inserted into the spark plugs.
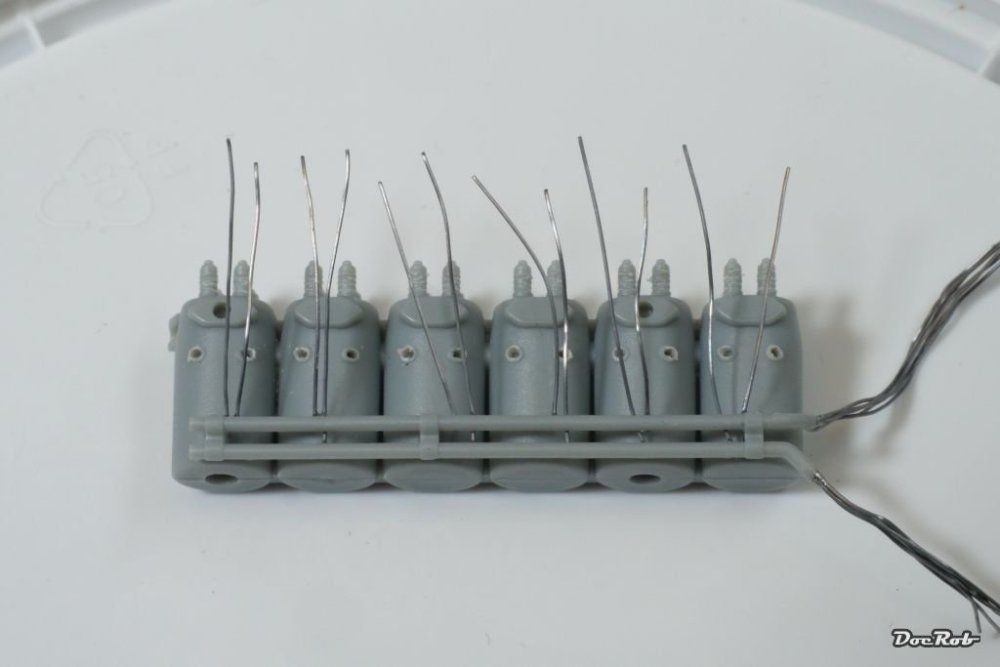
Cheers Rob
- king derelict, CDW, Paul Le Wol and 12 others
-
15
-
13 hours ago, CDW said:
Those exhaust look fantastic. There once was another company that produced very thin, realistic exhaust similar to these for a large variety of different kits. Was the name of that company, Moskit, or something similar? I have not seen their products on the shelves in a number of years and I have wondered what happened to them.
I don´t know about Moskit exhausts, but remember at least, that there was another company producing exhausts with a similar process. This is my first purchase of Rexx products, but they are hard to get and were even before the war in Ukraine.
11 hours ago, Canute said:I too remember Moskit, but they disappeared into the fog of yesterdays. Are those 3D prints? Nice and delicate.
No, Ken, it´s not printed, but galvanic grown. The exhaust are made from metal (some kind of copper?), like @wefalck or @Egilman described the process in post #66 and #67.
11 hours ago, Egilman said:Yep Moskit, They were just as difficult to find as REXx sets today are...
I guess you could call them 3D printed in a sense, but what they are is electroplated over a master form, then the form is melted away leaving a very fine metal shell... This is why they state they are "grown" rather than printed...
They (Reskit) were the thickness of tinfoil... (it's why they looked so realistic) I've been told that the REXx sets are a bit thicker but not by much....
Reskit died a quick death when it was discovered that their parts were so fragile, you had to be careful even looking at it... REXx has the same reputation.... Also, when they say they are designed for a specific model they mean it... You will have a very, very difficult time adapting/modifying them to any other kit...
Most modelers I've inquired about them would not recommend them...
Museum quality looks? yes,
Very difficult to actually use without destroying them? yes,
Worth it in the long run? opinions vary...
Don't dispose of your kit exhausts until your completely done with the kit, there are any number of reports on REXx sets getting completely destroyed beyond repair by just picking up the model in the wrong spot...
Personally, not worth it in my opinion....
Thank you for the warning Egilman, the exhaust are indeed very delicate with their very thin material. I had only the AEG´s exhausts in my hands for the photo and they didn´t feel too fragile then. Adding them to the model will be another subject, but I hope for the best. I haven´t been reading a lot about the Rexx products in advance, but since I started my first WNW kit some years ago, they spooked around in my head. The sets are very hard to find and I was lucky, when I saw the three sets for sale, fitting for some of my WNW kits. I will of course keep the kit ones and to be honest, as good as the Rexx exhausts look, they are not a must buy. The plastic supplied by WNW isn´t too shabby and with a bit of talented painting and ageing, they will look good.
The purchase was more about, what, there are three sets available for my projects, I couldn´t let pass.
I will try to get a better feeling for how fragile the exhaust are, when I very soon (maybe today) start with the engines of the AEG. I may have liked some tiny deformations in the exhaust, but not unwanted .
.
1 hour ago, wefalck said:There was/is a Russian/Ukrainian (I don't remember which ...) colleague on this forum, who made galvanoplastic ventilators and similar hollow parts. I also know of railway modellers, who 'grow' rivets on metal with this technique. In galvanoplastic, you make a wax core, cover it in a silver paint to make it electrically conducting and then galvanically deposit copper on it. The way then is melted out. It was once a very common method to reproduce medals, small objects and even architectural decorative items (in the latter case using zinc).
Basically, if you are set up to do your own photoetched parts, you could also do galvanoplastics.
Thank you, for describing the process, wefalck. When I was young, I had an internship in a galvanic shop for two weeks and applied different kinds of metals onto primary coppered parts of different metal origin, but never knew about using it to create 3D objects.Cheers Rob
- Old Collingwood, mtaylor, Egilman and 4 others
-
7
-
15 hours ago, chadwijm6 said:
Rob this is a brilliant build log for a newbie like me to follow, I'm learning a lot and your detailed process descriptions and photos are fantastic and very informative. I'll follow along if you don't mind
Thank you James and you are very welcome to peek into my build. I´m also a newbie here on MSW and with wooden ship modelling, finishing my Duchess of Kingston sans rigging with a lot of input and help from fellow members here.Cheers Rob
-
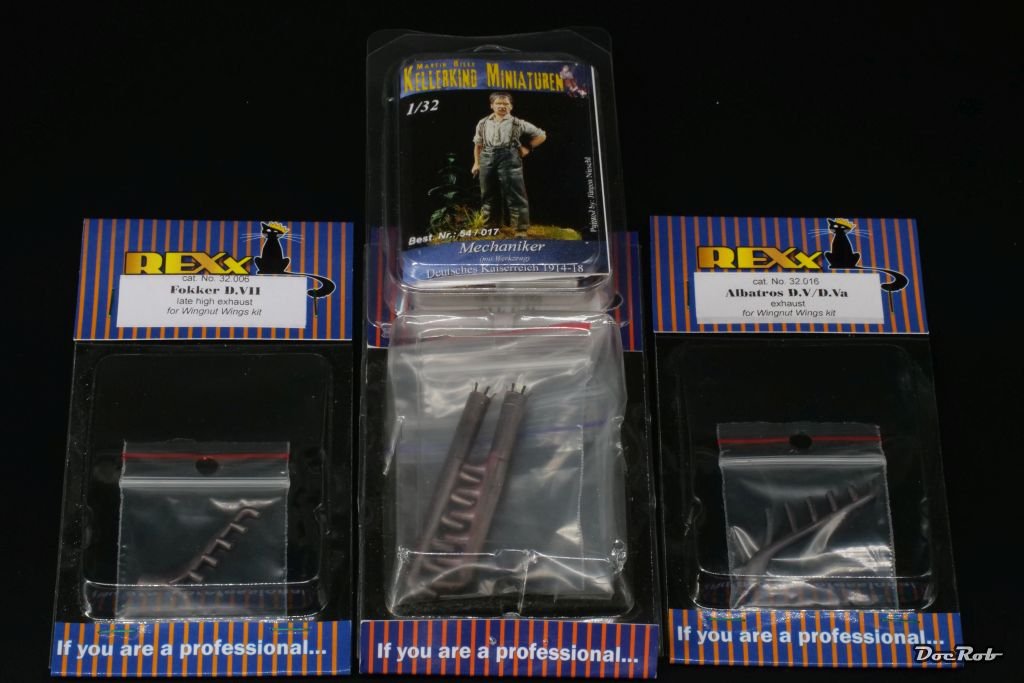
Today, I received some goodies from Aviattic.com the three days after my purchase (temporarily) defunct European distributor for Aviattic.co.uk. I spare you the details, but I was lucky enough to hold these items in my hand.
Three sets from the Ukrainian company Rexx, which produces galvanic grown metal exhausts for my AEG, Albatros and Fokker D.VII. The mechanic figure is casted by Martin Hille from Kellerkind miniatures, a company from my old hometown Berlin.
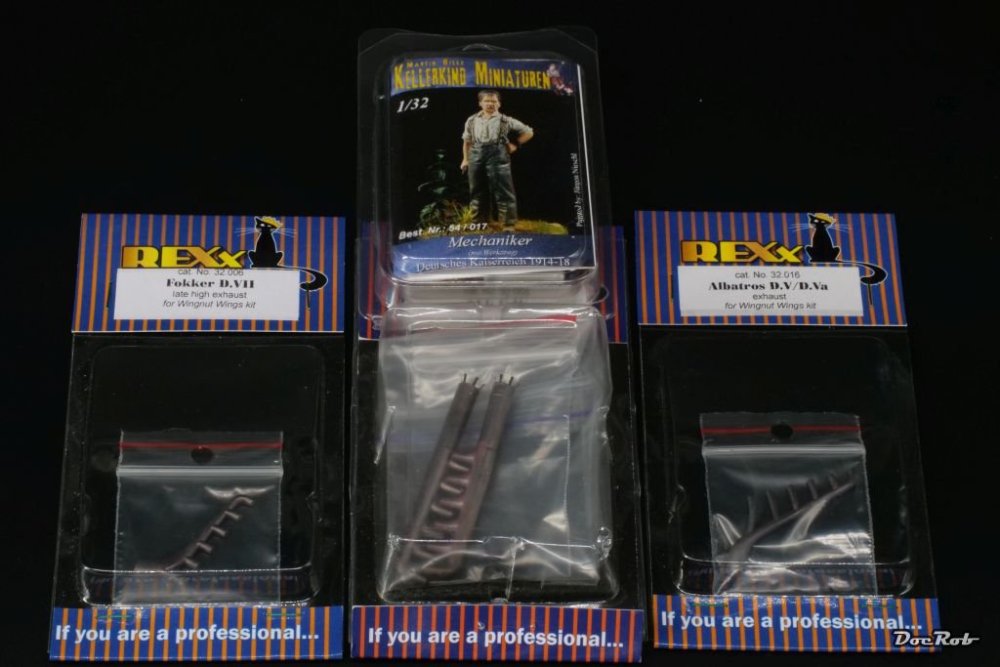
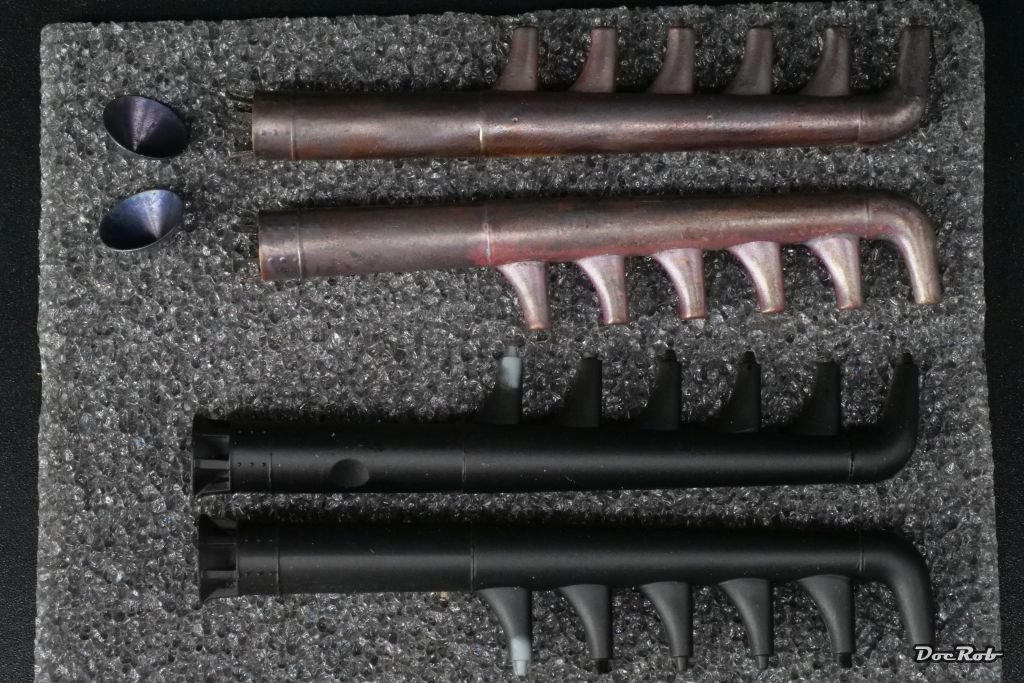
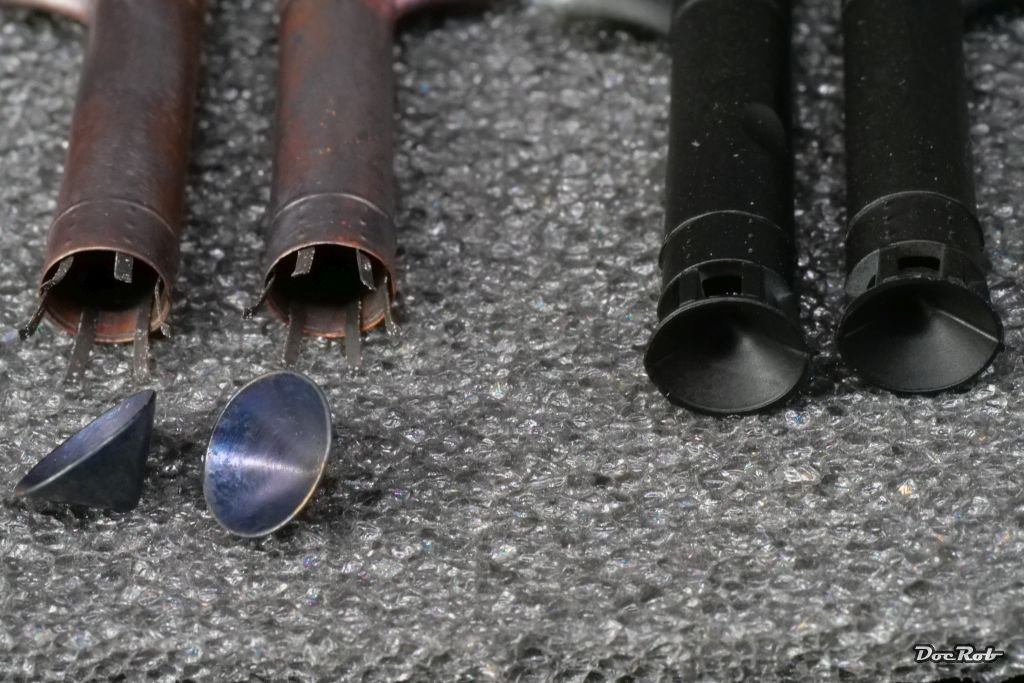
Some detail shots from the exhausts, definitely an improvement over the kit parts and fascinating product due to the thinness of the material.


Cheers Rob
-
3 hours ago, Old Collingwood said:
Looking good, I hear your woes over decal placing, I went through it with my old mossie build where some decs just wouldn't settle.
2 hours ago, CDW said:Does anyone know who made the WnW's decal sheets?
Decals almost always are a gamble unless you are dealing with a specific brand every time. What works with one brand can vary wildly with what works with another. That's a lesson learned the hard way many times for me.
2 hours ago, davec said:I'm pretty sure their decals are from cartograph
2 hours ago, Danstream said:Yes, they were from Cartograf.
Yes Gentlemen, the decals are made by Cartograph and they are very good. Even the tiniest cutout is in the right place, what makes my head scratch is, different decal sheets from the five supplied ones behave different, some soak in seconds others take more than five minutes.
Generally spoken, I have had very good experiences with Cartograph decals, but found, they do not behave all the same. I´m pretty sure, there are different qualities, thicknesses and opacities to be had.
Please remember, that´s not some insignia to decal here, it´s nearly the whole airframe, plastered with the camo decals and some are huge, which makes it a bit more daunting.
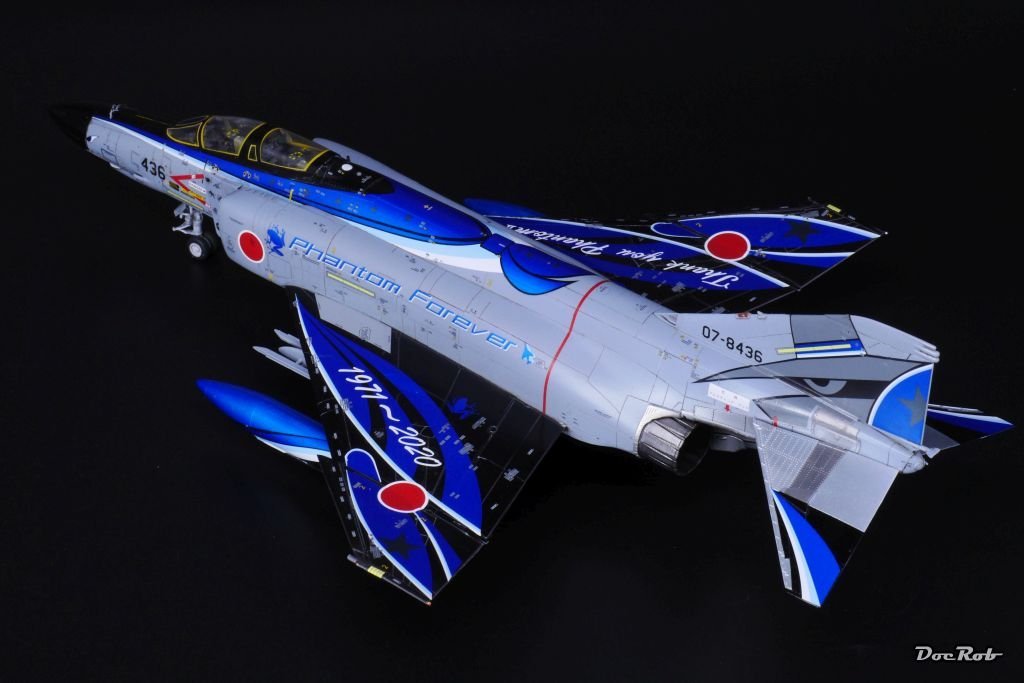
I had another very pleasant decaling session with Cartograph products, when I built the fantastic Zoukei Moura Kai Phantom, but these decals were more robust and a tad thicker.
Like Craig said, decals are always a gamble and that counts especially for these plastered WWI birds. i dread decaling, as it´s a stage late in the build usually, where you can ruin your precious work in an instant.
I used Aviattic´s decals for some builds and liked them a lot, robust, well settling, with a nice woven texture and the right tiny bit of stretch to work them around the wings edges. Another plus is the semi transparency, which allows pre shading, which I prefer to post shading. For the AEG, the use of Aviattic decals would have been too much for me, not only to cut out every single decal, but also match the lozenge pattern.
This Fokker D.VIII, a really tough build, but a kind of a pet project, was decaled using Aviattic lozenge decals. You can clearly see the woven structure which I find very convincing for WWI planes.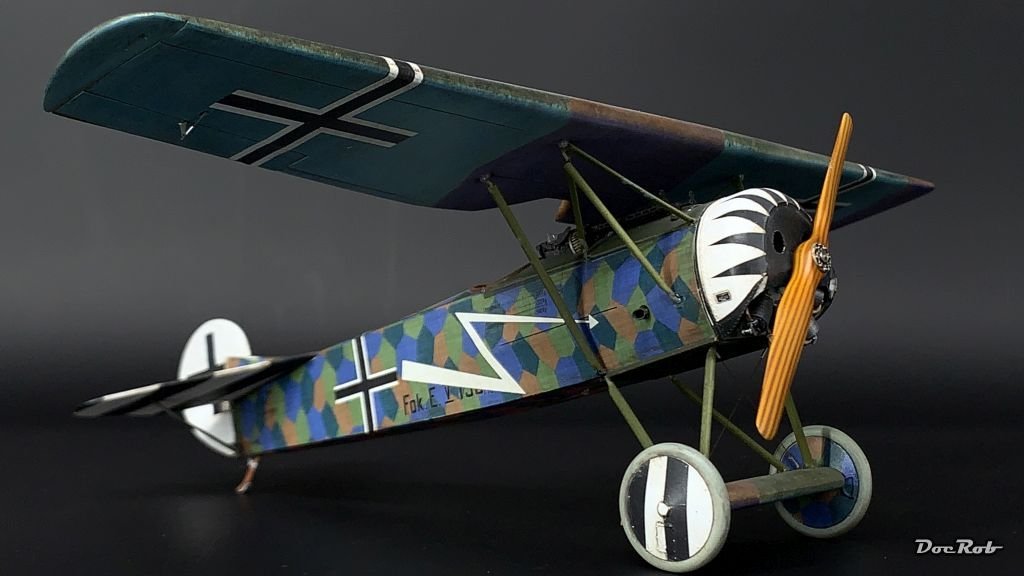
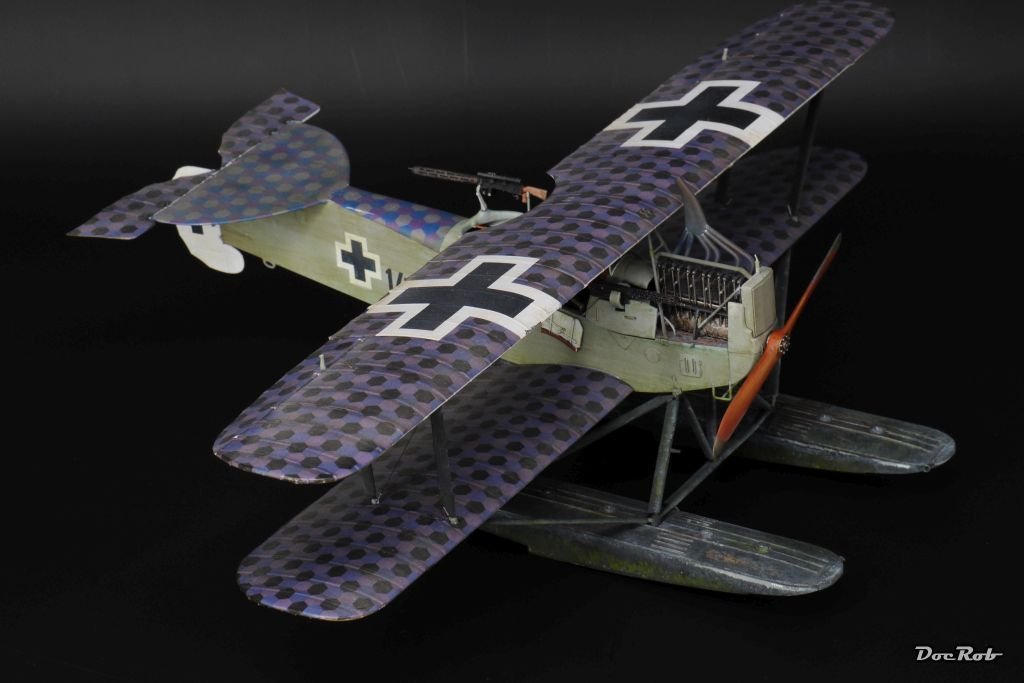
My Hansa Brandenburg was also decaled using Aviattic decals for the naval lozenge camo. Here you can clearly see the pre shading effect, which I miss with the Cartograph decals for the AEG.
Cheers Rob
-
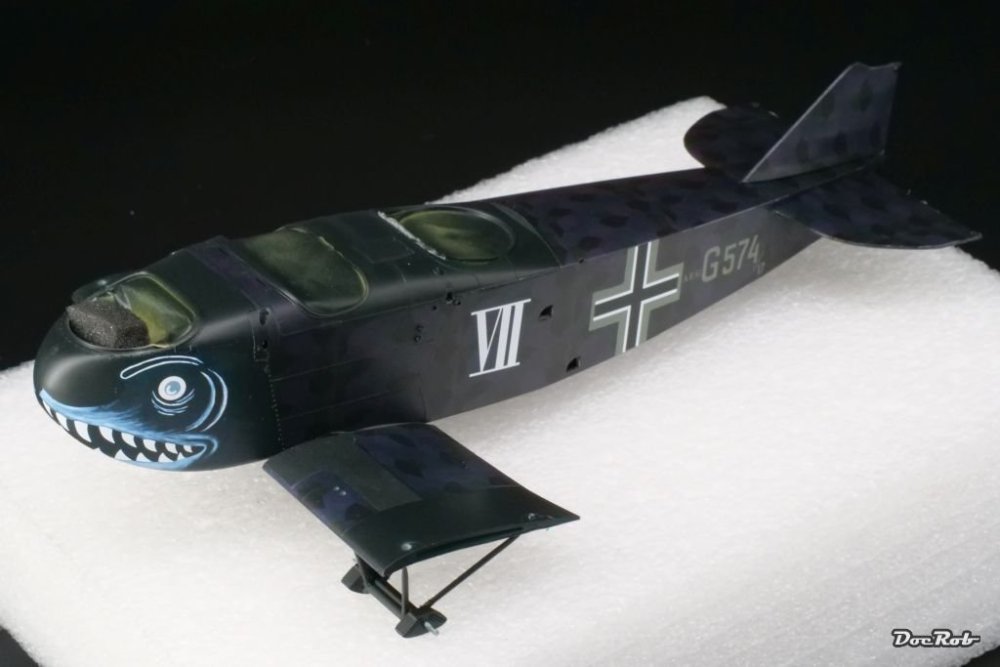
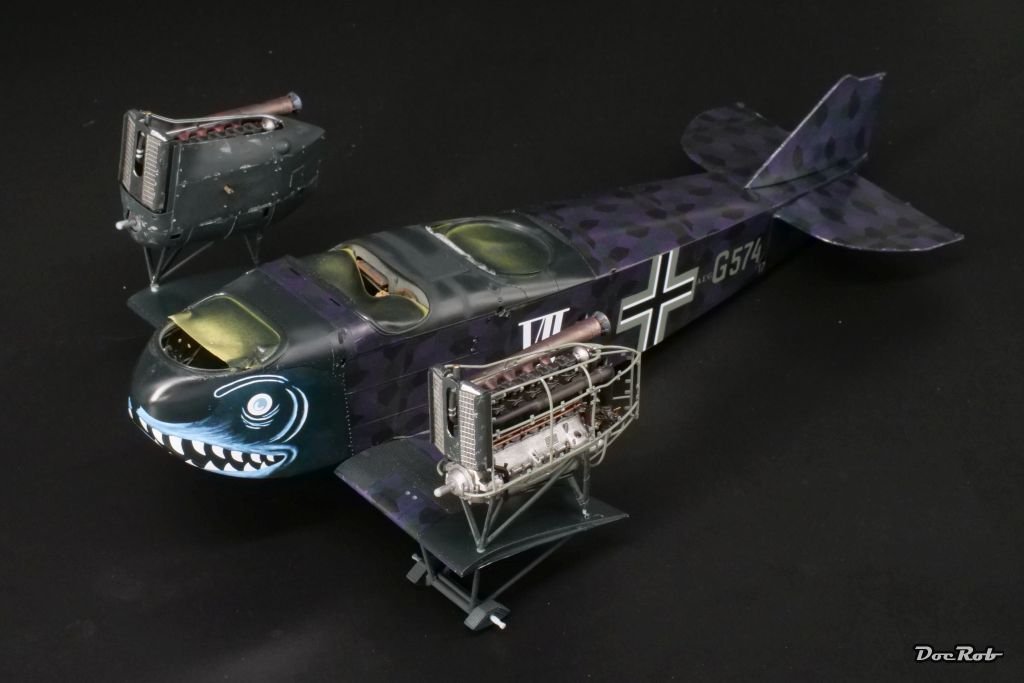
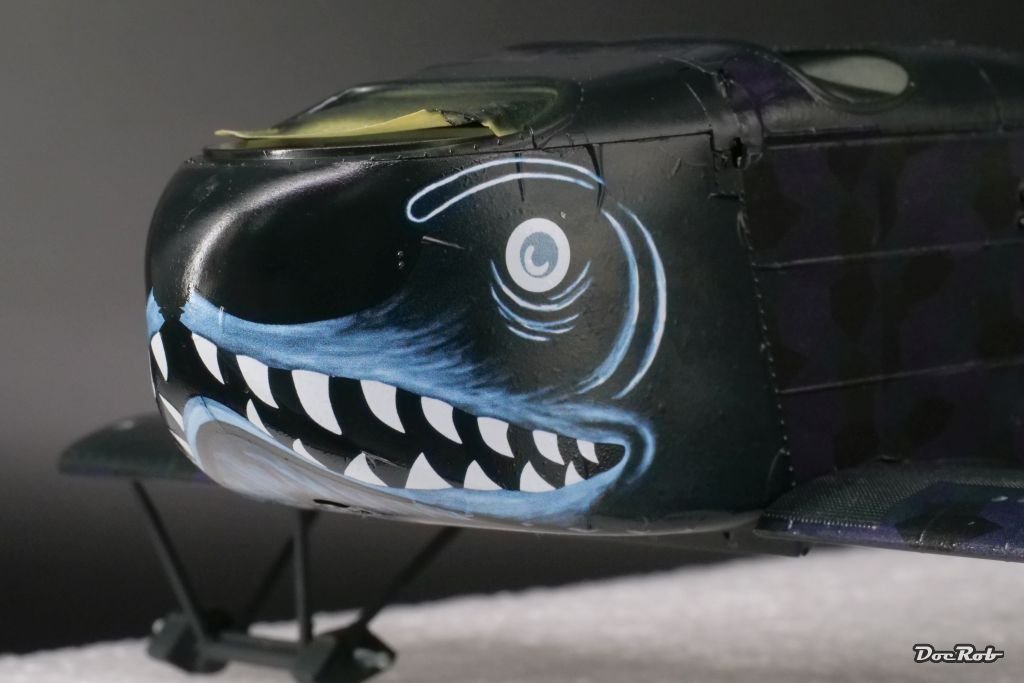
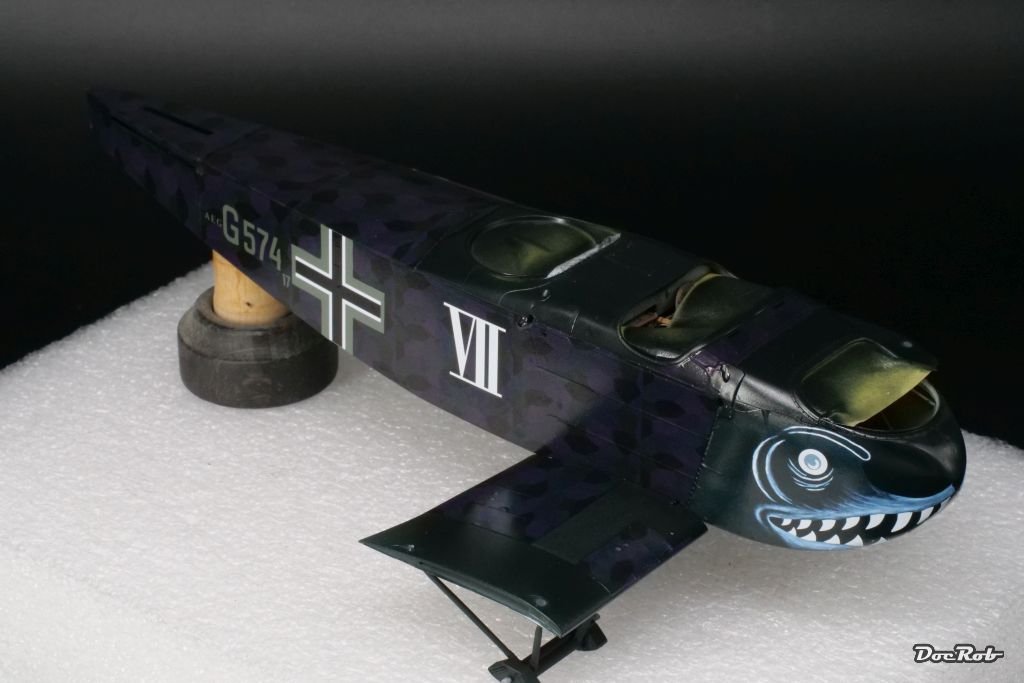
The creature got it´s creature jaws. After finishing the fuselage lozenge camo, I added the shark? mouth and the fuselage markings. The serial number of my plane is not known, but the command is and so I used a fictional number for the correct unit.
With the lozenge decals, I had some unexpected troubles, when I used the hairdryer carefully onto one fuselage side, it wrinkled terribly and I was next to bin the kit, but leaned back and continued with Micro Sol and trying to push the wrinkles away, with every tool come to mind. Finally it was ok-ish but not perfect.
I hope for the matte finish and tinted overlayer, to look good in the end.
I also started with the tail, applying lozenge camo decals. It proved to be hard to fit them around the corners, which needed several applications of Micro Sol and hairdryer treatment. I could have used a stronger decal solvent, but decided against it, after I´ve seen, how sensible the decals are with thinner. Patience is the key here, a virtue I´m a bit short of possession, unfortunately.
Then it was decision time about the shark mouth or maybe better whale mouth. WNW supplies two different options, one only in white and one with bluish brushstrokes around. Further, you can decide if the inner mouth should be dark or red.
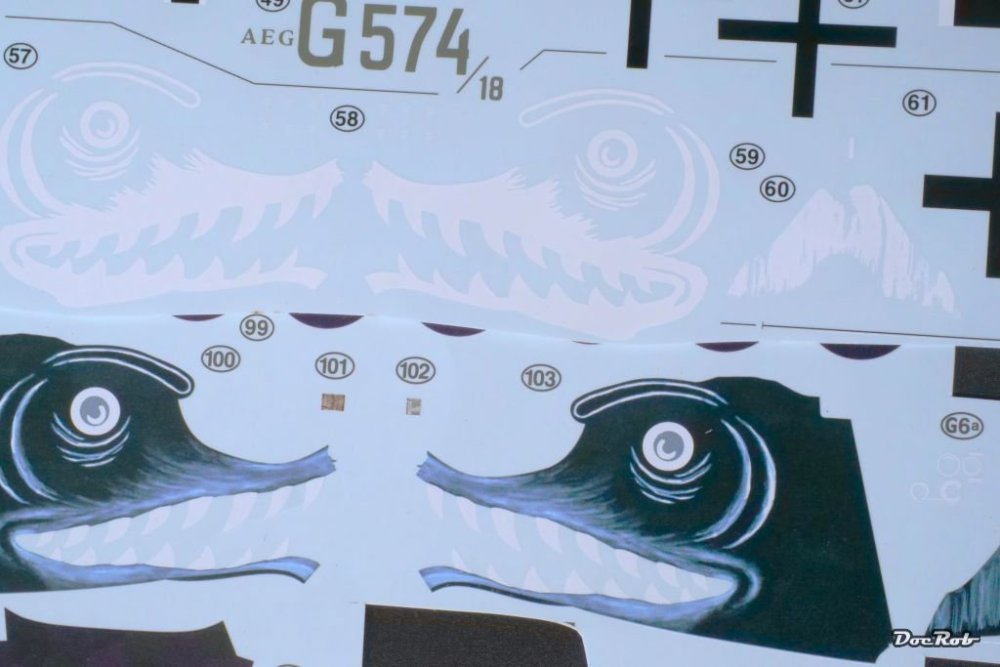
The red was omitted initially and after inspecting the very good existing front section photo, I decided for the one with the blue brushstrokes around. No worries, the last wrinkles will be gone after some more Sol applications.

This all looks a bit stark now, but will tuned down a bit due to the use of tinted varnish, matte coat and weathering.

Cheers Rob
-
On 3/2/2024 at 8:13 PM, Danstream said:
I built a wingnut kit in the past and I also found its decals of extremely good quality and fit.
At that time, strangely, I found that the blue Micro set was slow, but more effective than the red in setting down the large decal foils when left acting overnight.
Great build Rob,
Thank you Dan, after working with the decals, I had some really bad experiences, after working with a hairdryer onto one fuselage side, the huge decals wrinkled terribly, where the others worked fine with the same treatment. With a lot of patience, I got it sorted out finally.
I always use Micro Set for the application and later, if there are wrinkles or details, over which the decal didn´t conform too well, I use Micro Sol, in this case multiple times, with a hairdryer in between. I wouldn´t use Sol for the first application, because it softens the decal and makes it more sensible for destruction and unwanted stretch, which can cause fit issues.Cheers Rob
-
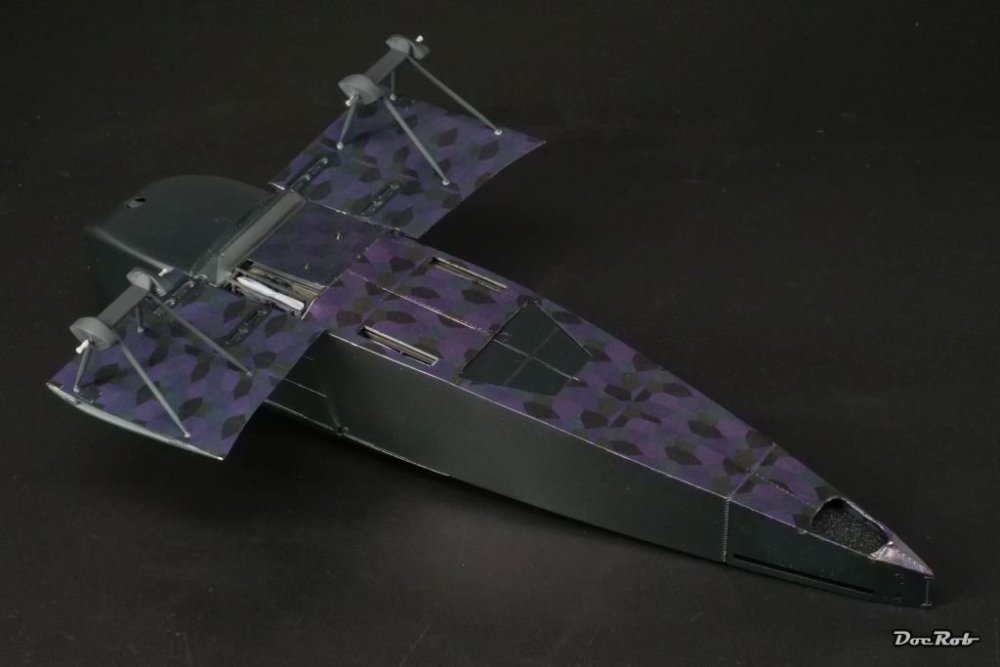
Today I decaled the lower fuselage and wing stubs with lozenge camo. The provided decals are ABSOLUTELY fantastic, maybe the best I ever worked with. The fit, even for the cut outs and strut holes are perfect, which is a great relieve. I decided to work my way up, in case there are overlaps, which indeed are minimal.
I used Micro Set and Sol and a hairdryer for the application along a flat brush, to push the bubbles away.
One strange thing, on two of the five decal sheets, the decals need to soak for more than five minutes, where the others need only a minute.
Then I changed plans for the umpteenth time in this build and build the undercarriage, which luckily is a very sturdy construction. Not visible on the pic are the eyelets, which I glued in, before painting as a preparation for rigging. Now the fuselage can rest on the undercarriage and the underside decals remain unharmed.
Cheers Rob
-
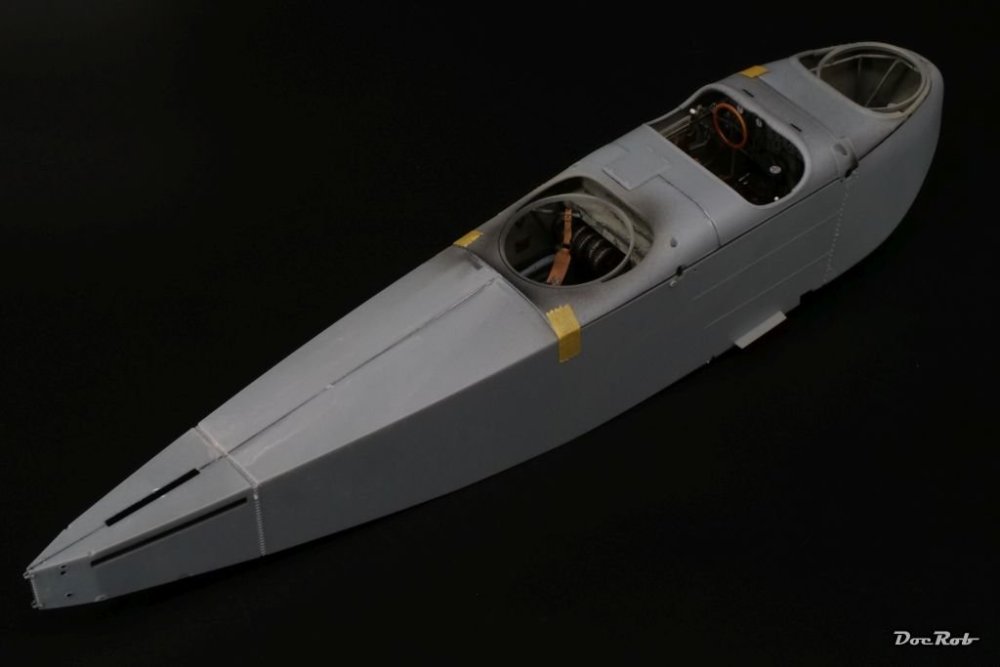
I started to clean up the engine parts and parts of the nacelles, because I wanted to get a grip for the fit and for the painting process. By the way, I decided to wire the engines and pre drilled the magnetos with 0,3 mm holes for the wiring and the cylinder heads with 0,5 mm holes for my brass tube spark plugs.
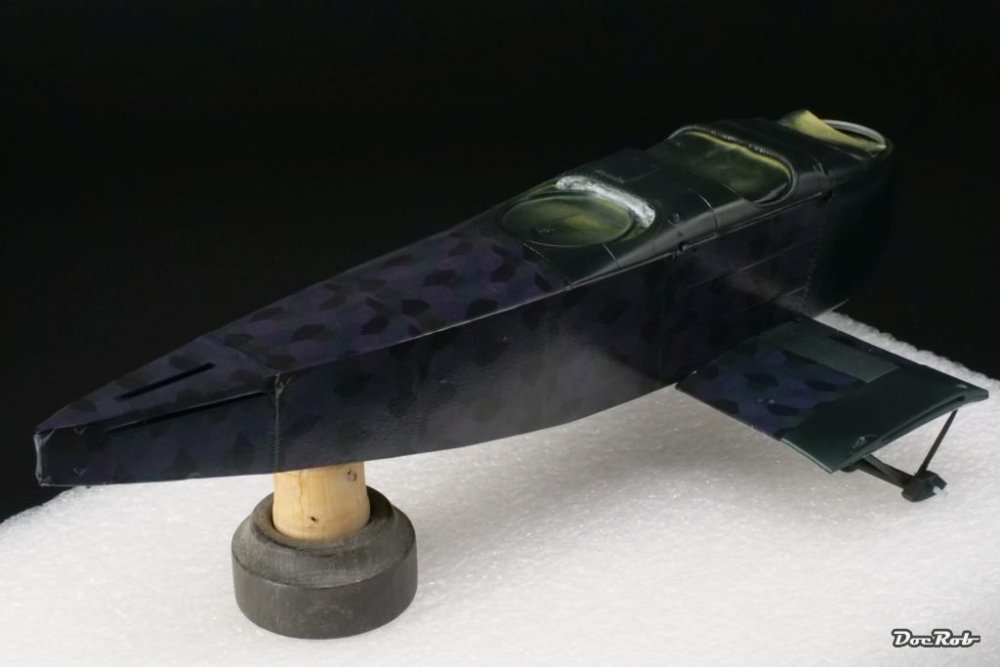
Meanwhile the fuselage was airbrushed with Tamiya XF-17 sea blue. In case you wonder, why the AEG looks like a porcupine, I put in wood plugs into the holes for the struts, adhered with a drop of thinned PVA. If you know about WNW tolerances, you got the idea, I don´t want to clean out every hole, before assembly. For the same reason, the engine support struts were loosely mounted.

As much as I like the matte look, I need a glossy surface for the lozenge decals and sprayed on Mr Hobby GX-100 clear gloss, with two thirds of leveling thinner in the mix and ruined the perfect mattedness.
Cheers Rob
-
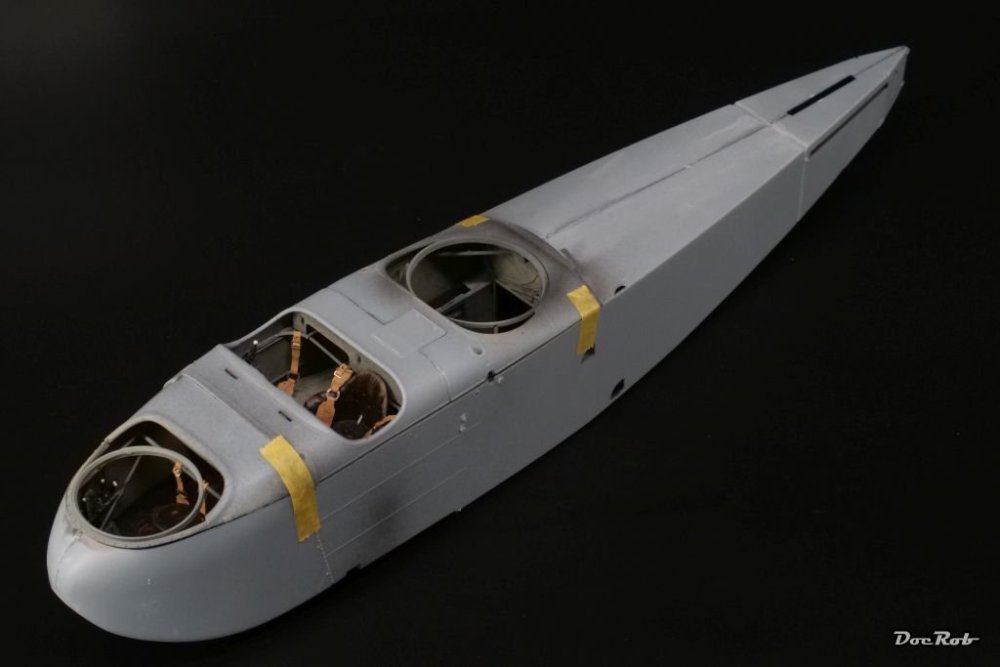
I haven´t done as much as I wanted lately, but checked the gaps in the fuselage and sanded a bit. A tiny bit more filling and sanding is needed, before I can continue with airbrushing the base layer for the lozenge decals.
What I did, was pondering about the painting and decaling sequence, identifying where the fuselage decals go. Nose, decks and parts of the wing stubs are only painted, the rest will receive decals.
The next decision was about the base layer, therefore I decaled a gloss white plastic strip, which I painted with areas of gloss black and added a spare decal, to see, how much transparency the decals have. It´s almost non visible, which means, I will airbrush Tamiya XF-17 sea blue as a base, followed by a gloss coat for the decals. If I would have base coated with gloss white, I would have had the possibility of pre shading, like with Aviatic decals, but this makes no sense here. It has to be post shading then.
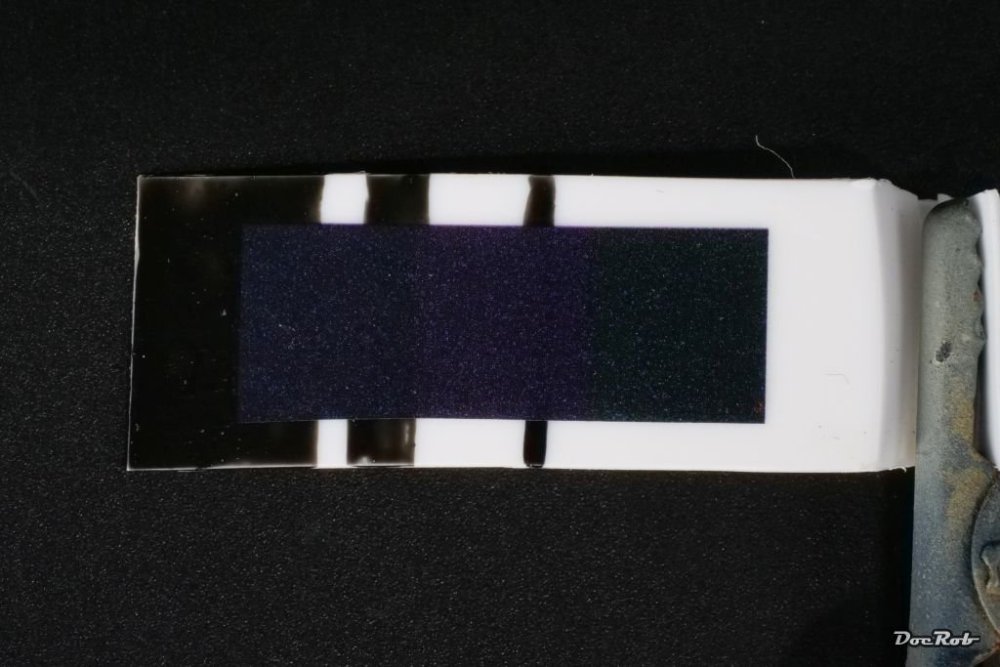
Cheers Rob
-
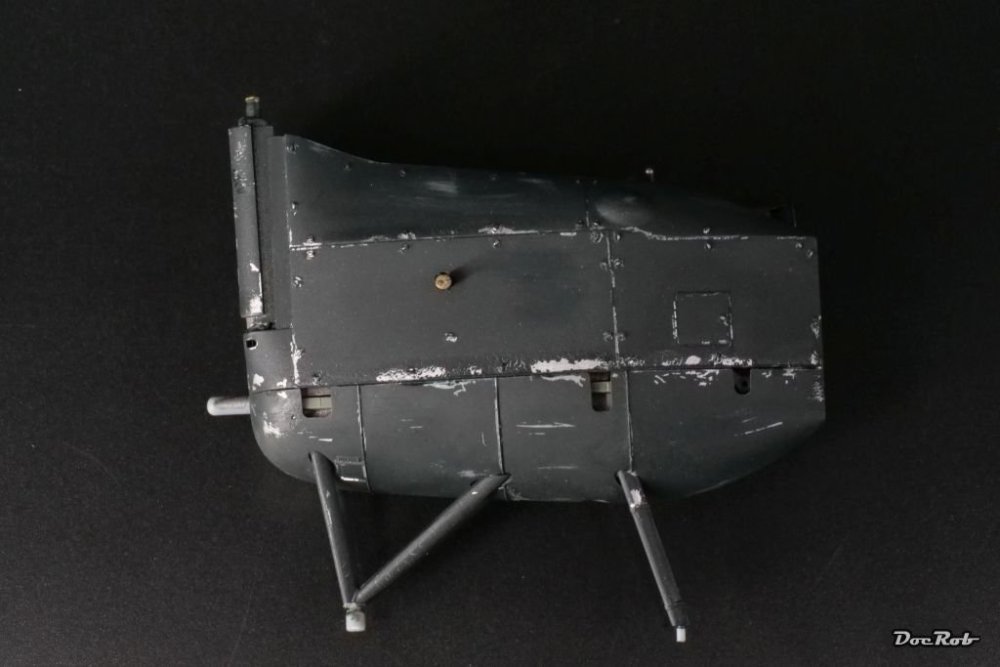
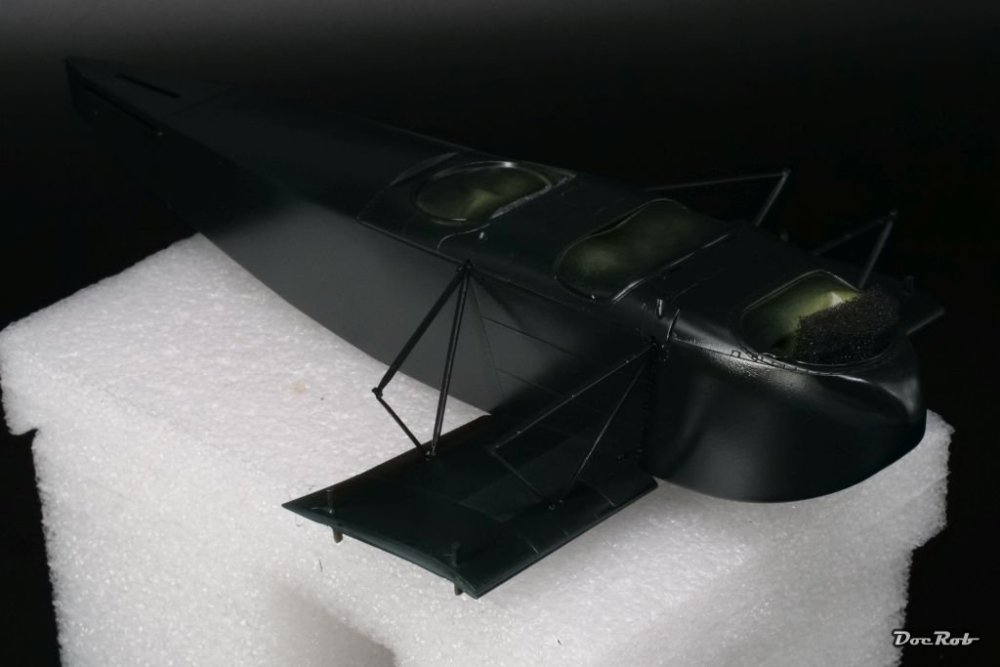
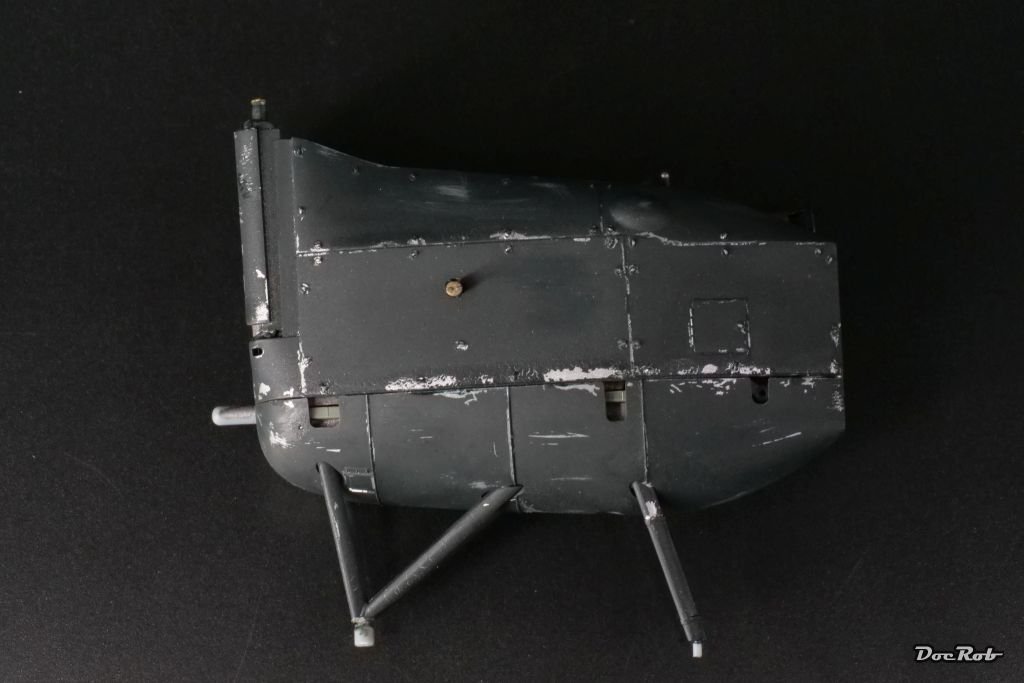
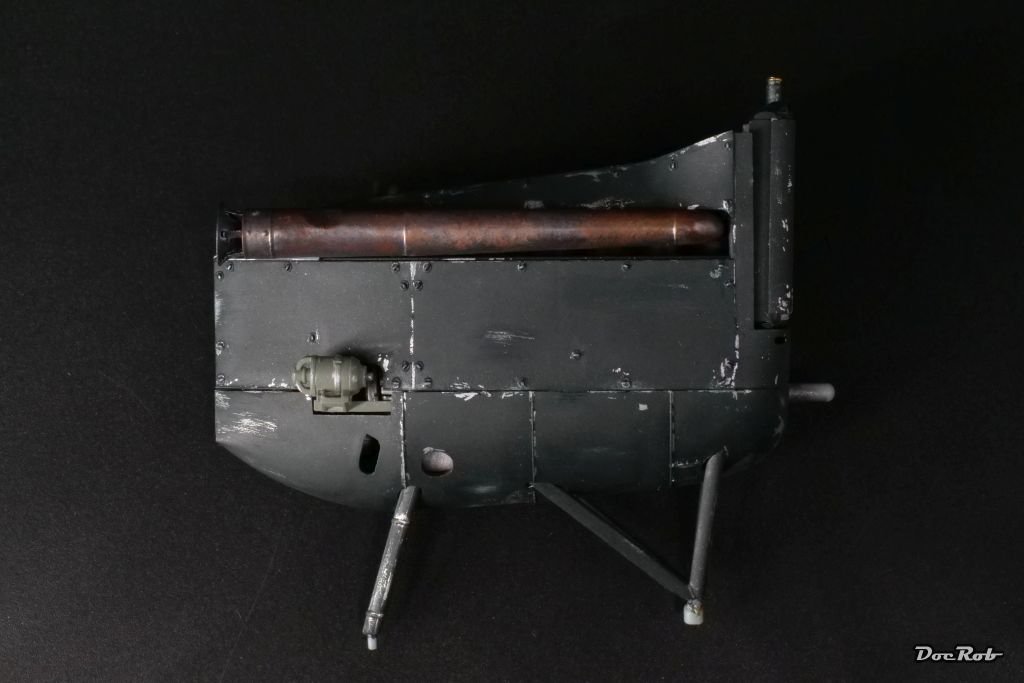
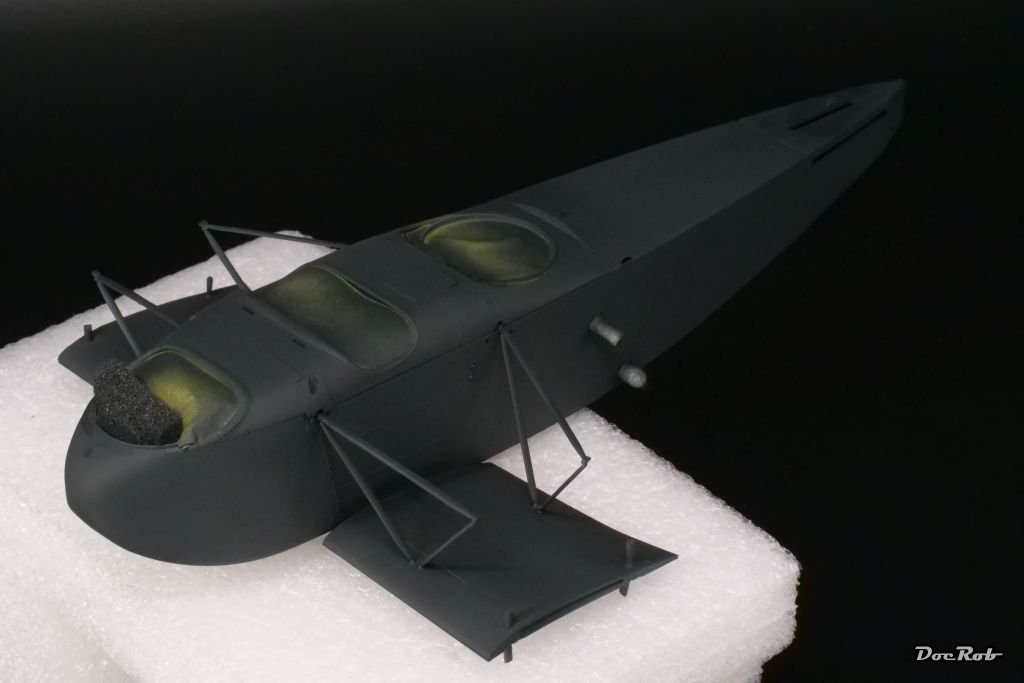
Preliminary to closing the fuselage permanently, I made a last test fit of the decks and had a last peek at the interior, where the final details were added, like the folding seat for the commander. I displayed it folded and stored, which leaves a narrow tunnel for the crew to slide through to the back of the cockpit, not too easy I guess with the thick leather outfit and maybe a life jacket.
Then I closed the fuselage, did a first bit of sanding on the seams. Fit was good, but not perfect, due to the very thin plastic and multiple parts intersecting.
On the lower side, you can see the dark patch of the tiltable window for the fuselage gun. WNW chose to produce the stitching on the lower side as separate parts, which seal the lower fuselage side seamless, genial.
There is one rectangular part fitting between the two bomb slots in front of said window, where the WNW manual calls falsely for part A45, where A44 is the correct one.
I shimmed the lower nose section with a strip of evergreen, because this area is very flexible, due to the thinness of the plastic.
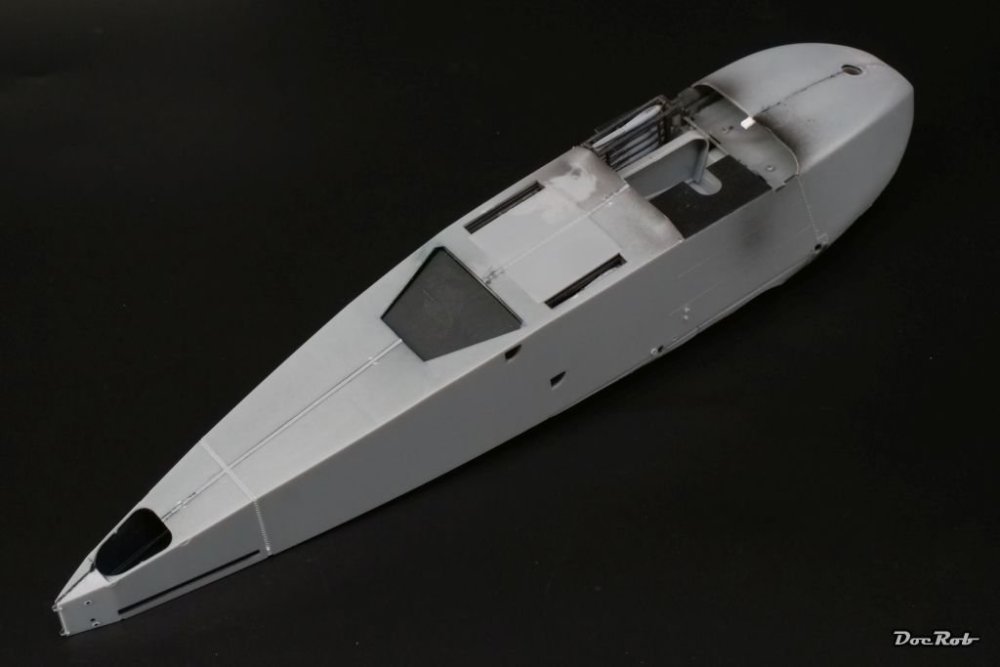
Cheers Rob
-
14 hours ago, wefalck said:
Excellent painting and ageing/wearing job on the leather and floor-boards 👍🏻👍🏻
One thing though bugged me: did these machines really become old enough to experience such wear and tear?
Thank you wefalck, you possibly got me there. I´m mostly sure, these planes had a relatively short service time, due to technical failures, enemy fire, accidents and further technological development. On the other hand, they were used under less than comfortable conditions, at night time in cold, windy and humid weather conditions, with a crew, trying to stay warm, crawling around in the crammed space with their thick leather outfits on.
The envisioned picture, I painted in the second part, led to my rendered image, I developed before I even started the build. When I start a project, I always try to get a feel for the subject, the conditions and circumstances and this along with other sources forms that said picture in my head and that´s what I follow through the build.
I like to build realistic models, but not to the last possible aspect. With my picture in mind, I keep the liberty of freestyling a bit. With the AEG, I was sure, the question will arise sooner or later, but rendering this picture I have pre-envisioned into scaled reality is what drives me in modeling.On a side note, with wooden ship modeling, there seems to be a great hesitation with weathering and ageing in general, which is a pity. The majority of builds look brand new, my feeble attempt with the Duchess of Kingston included.
I think, weathering and ageing is an art and will use it on wooden ships as well, when I have some more experience with the subject. A first try might be a fishing vessel or similar.Cheers Rob


AEG G.IV - Creature of the Night by DocRob - FINISHED - Wingnut Wings - 1/32
in Non-ship/categorised builds
Posted
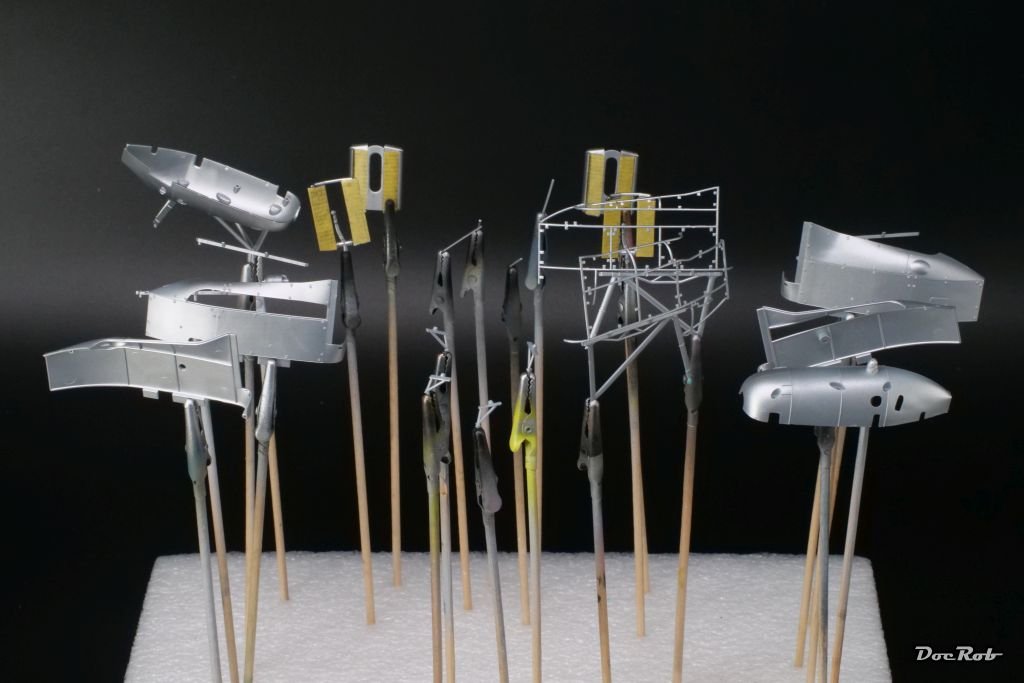
Progress is a bit slow at the moment, but I managed to prepare the wings for decaling and painted struts and other wing connected parts.
It´s a Wingnut kit and I spoke about tolerances before and that´s why used liquid mask and numbered tape strips for identification of the struts, to seal the connection points and wooden or plastic rods for the strut´s holes in the wing, glued in with heavily water thinned white glue.
I then applied some white pastel onto the seams of the wings, with a flat piece. This was the fastest and easiest way to pre shade the spars. I didn´t want to put much effort into this step, because I guess, it may remained unseen with the opacity of the lozenge decals on top.
Then the wings were coated with Mr Color GX-100 gloss varnish. I always have mixed results with that stuff. If everything works fine, it produces an absolutely fantastic gloss layer mixed with leveling thinner, but when not....
I learned the hard way, not to pre mix GX-100 in a plastic jar, as it produces very ugly ´frosted´ spray, maybe because color and/or thinner reacts with the plastic jar.
In this case, I mixed everything in a glass jar, but still, I had the frosting effect three times while spraying. After cleaning the airbrush, I used the same mix without issues, very strange.
Cheers Rob