


Jaager
-
Posts
3,084 -
Joined
-
Last visited
Content Type
Profiles
Forums
Gallery
Events
Everything posted by Jaager
-
Plastic is a polymer that is formed by catalytic reaction and continues after production - at a slower rate. Oxygen, UV light, heat can increase the polymerization reaction -making it brittle and stiff and prone to turn to powder. Wood is a polymer make by specialized cells. They are no longer active while the wood is still a tree. There are trees that are hundreds if not thousands of years old, What does wood in is fungus and insects, not UV or oxygen. Swelling and shrinking in response to changes in humidity can produce splits. If brittle wood is a problem, the cause is probably a result of the wood species - not time. The appropriate wood species to use are usually more expensive and do not come in truck load quantities. Some boutique kit makers use the preferred wood species. Mass market kit assemblers often use wood species that a scratch modeler would never choose. You asking the question, this probably means that you may be happier if you second source a wood supply - after some research here as to which species would work better for you.
-
 To help with your search, the lines and spar and sail plans for Young America are a part of the folio of plans done by William H. Webb. If a library close to where your ancestor lived had the folio or he lived close enough to the Webb Institute, that could explain where he got the plans. The deck details would have to come from another source. The ship is 235 feet deck length or 4.9 feet long @ 1:48 just for the hull before the spars were added. I doubt that any kit manufacturer would have been mad enough to produce a product of this size. Most seem to have some idealized mantel piece length and adjust their model's scale to fit that length. A serious amount of lumber would have been needed to produce the hull. You have both a gem and something of a white elephant. It also represents and serious expenditure of both time and skill on the part of your forebearer.
 -
Sounds like it is museum scale -1/4":1'. You sorta haveta live in a mansion to display a model of a ship that was that large at that scale. Furring strips will not be overkill. If you use plywood instead of 1/8" hardboard or pegboard, it gets heavy . As it is, adding some sort of wheels to the base would make things easier for you. With pegboard, it can double as a rolling tool holder.
-
Admiralty model query
Jaager replied to iMack's topic in Building, Framing, Planking and plating a ships hull and deck
Your window of opportunity may be a short one, as they may be going dark again, but The Smithsonian has made a big deal of the gunboat Philadelphia. They have 18 sheets of plans. One that is Chapelle's and 17 that are based on the archeological work done on the actual hull. The whole K&K is expensive = $170 but you would have the equivalent of the best ANCRE monograph to work from. -
You should certainly keep the model. A plywood base and a frame made from furring strips. Use steel corner braces and drill for 1/4" flat head bolts. No glue. Cover the frame with 4/6 mil vapor barrier. Have some vent holes. The frame can then be covered with hardboard or peg board. Use screws and when your domestic situation changes and you are able to display the ship, the container can be easily disassembled and the the components repurposed..
-
If waxed paper does not work - I have found soy sauce flat-ish micro dipping bowels in an Asian food market in various sizes that may work. Not expensive. Works if your community has an East Asian population that is large enough to support a market.
-
Unless you nick the edge, it should be enough to strop. A piece of scrap leather and rub it with a bar of compound like FlexCut Gold or someone else's finest grit stropping medium. The angle does not need to be exact. Too flat and you polish the bevel and not the edge. But too vertical and it may not get you the edge that you are after.
-
Byrnes Table Saw Tips (requested)
Jaager replied to Matrim's topic in Modeling tools and Workshop Equipment
Bob, when I can, I mount a bench top machine on an end cutting of a 2x12. For Allen wrenches, I drill a hole in the base that is a push fit for the short arm of the wrench - always there. For the Byrnes thickness sander I used some Gorilla double sided tape to stick a piece of scrap planking and put a hole in that and stuck a small plastic container with a lid to hold the screws. The 9" bandsaw has open end wrenches, and I screwed a spring loaded towel rod brace to the base and it holds the wrenches. The Allens are in their holes next to it. For the tablesaw, a thick piece of scrap taped to the side, with the holes in the top. -
Oliver, you provide no location information, so you may not be used to Imperial unit materials, but for me a Rogers Drill Bit Stand #61-80 has continued to be a very useful way to access bits when trying several sizes. About the most expensive choice, but refills you buy in bulk - when you discover which sizes get the most use. I usually remove and replace using a Kelly clamp.
-
I have one and I like it. I agree with John about it not "remembering" the set speed. Mine was one of the lot numbers in the recall. It was done efficiently and there has been no heat problem. Gonna get the keyless chuck with my next Amazon order.
-
Best glue for paper templates?
Jaager replied to andante's topic in Modeling tools and Workshop Equipment
I forget what is in rubbing alcohol - ethyl - to get it past the federal tax, iso is poison all by itself -- anyway, I was trying to unbond wood that was joined using Franklin Hide Glue. A heat gun and 70% ethyl rubbing alcohol did the job - I was too OCD in my glue coverage and the wood was sort of thick - and it took too much heat to get deep into the bonded layer and the Maple was almost charring on the surface, so I had to find another way to do what I was after. But - a surface bond with a paper pattern has no problem with access - and the heat and 70% ethyl not only broke the bond, the glue formed into little beads that easily rubbed off and the wood grain should not swell as much as using just water. I did not take notes, but I seem to remember that 91% Iso was not as reactive with the glue protein. It might do and that would solve any swelling problem. The paint thinner ethyl alcohol is 95% with a touch of methanol, etc. Ethanol has an attraction to water that makes it impossible to have 100% if it is exposed to water vapor in the air it is in. I think the pharmacy alcohol is less expensive than the paint store stuff. -
Byrnes Table Saw Tips (requested)
Jaager replied to Matrim's topic in Modeling tools and Workshop Equipment
I have proposed that he consider a sleeveless drum sanding table,that has reversible rotation. If a chuck with his usual precision and quality is also supplied, all manor of cutting burrs and wood eating attachments could be mounted. Was there ever a digital read micrometer for the table saw? One of those would be super peachy keen. -
Best glue for paper templates?
Jaager replied to andante's topic in Modeling tools and Workshop Equipment
Bob, for removing hide glue, try ethyl alcohol - the rubbing alcohol in pharmacies - not the isopropyl. Heat and ethanol denatures the protein - changes its shape and no longer bonds. -
Need help finding schooner plans of about 1860
Jaager replied to wemerson's topic in New member Introductions
This may not be a timely solution - The Smithsonian will be closed for =? -
Need help finding schooner plans of about 1860
Jaager replied to wemerson's topic in New member Introductions
You could adapt Burrows brig 1845 Smithsonian Warship plan #2 figure 139 HASN It was never built and is a "clipper" so the lines are sharp. It was 126 x 30 x 14 reduce the scale of the width and depth to 94% and it is 119 x 28.25 x 13 the extra depth should not be a problem. For the length = I count 60 bends. Burrows R&S 25" timbers sided 8.5" so 17" of wood and 8" of space - reduce the space to 2" and you got it to 104" this version of Williams R&S 19" Make the timbers side 9.5" and you have a solid wall, which means that for a model, the Davis/Hahn convention can b used = drop every other bend. Half the work, half the wood - looks like a lot of models. -
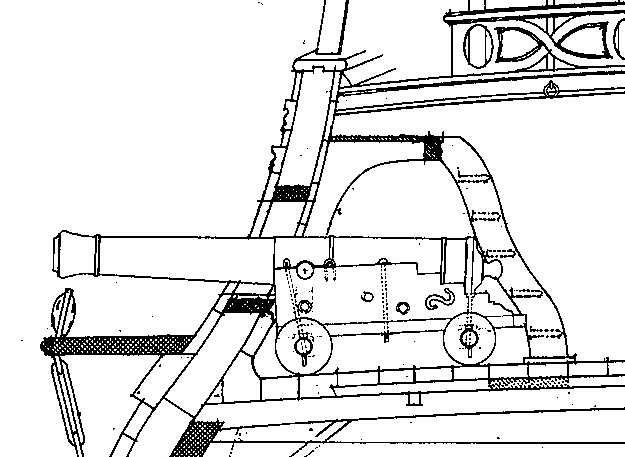
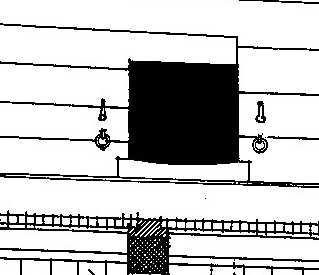
From the ANCRE monograph for the actual Renommee 1744 I do not see lids either. note, the port sill inside overlaps the inner planking a bit and remember - the sill and lentil are parallel to the deck at its location, not horizontal
-
The electrician who wired my garage for 220V suggested that I replace my 4' fluorescent drop lights with 4' LED units. I did. Twice as bright and lower electricity use. I think I will place one over my inside bench, too. They do not weigh very much, so the ceiling hooks need not be all that robust.
-
The plans in HIC books are available from The Smithsonian for $10 a sheet plus $5/12 postage. The line scan is crisper.
- 355 replies
-
- 3
-

-
- prince de neufchatel
- schooner
- (and 3 more)
-
I have been getting emails from SolidWorks offering savings of upto $4000 - I tried to see what cost $4000, but there were too many questions. What are they offering that is worth $4000?
-
For clean up, I use the polygonal selector tool to outline what I want, invert the selection and CUT. The close in junk still needs attention, but everything else is gone.
-
What rigging goes where? Was it standardized?
Jaager replied to Kevin's topic in Nautical/Naval History
Almost half the time, the rigging was handled in the dark. Crew was open to change at every port. Their nationality was varied. Navy crew altered. In severe weather the lines were handled under real stress. There was every reason for having which line was where be as standardized as possible. -
Barrels, check the site database or the online journal for ways to make them. You can get a dowel that is close to the diameter and use a drill to turn it to the arc cross section shape. If nothing is closer, there is a Wood Craft in Norwalk that has veneer to cover the dowel plug. Trying to think of a way to reuse the same plug and assemble the staves. Best I can come up with is a second dowel that is the diameter of the ends, that the staves can be glued to at either end. Maybe a band of paper or cardboard as support for the middle. Cover the ends with veneer. Come to think of it, just use cardboard instead of veneer, if you are good at painting faux wood. Or if you have a good graphics program, down load a wood texture from a graphics site and print it on paper.
-
Best finish for wood ships
Jaager replied to Dave3092's topic in Painting, finishing and weathering products and techniques
My bias 1st - prime with 50% diluted super blonde shellac. Most anything is compatible over it. Pre 20th C sail, - matte For your glue 1st or finish first - consider protecting the bond area foot print with high quality painters tape, cut JUSST shy of its full outline, and finish, remove tape, glue. I am giving Sutherland Welles polymerized Tung oil a close look. Otherwise, several 100% shellac - rag app or pure Tung oil - rag app. Renaissance Wax as a final. About the only way to protect against dust - a case. Pay attention to ventilation of the case, having it be an oven would not be good. -
LETTERING
Jaager replied to timjina's topic in Painting, finishing and weathering products and techniques
Fabric shops here have letter size sheets of Mylar, used for patterns. A computer drawing program = font sizing and rotation Web has sites with free fonts. An exact pattern of the location can be made from the model and that scanned into the drawing program You can practice the scroll in the drawing program. Print the result on the Mylar - cut it out and you have a stencil double stick tape to reduce seeping -
My top 4 most useful tools
Jaager replied to Tim Moore's topic in Modeling tools and Workshop Equipment
FastCap Babe-Bot, 4 Ounce Glue Bottle Amazon $7 Highland $5 Wood Craft $8 --plus shipping - which can be a lot.