Rustyj
-
Posts
2,535 -
Joined
-
Last visited
Content Type
Profiles
Forums
Gallery
Events
Everything posted by Rustyj
-
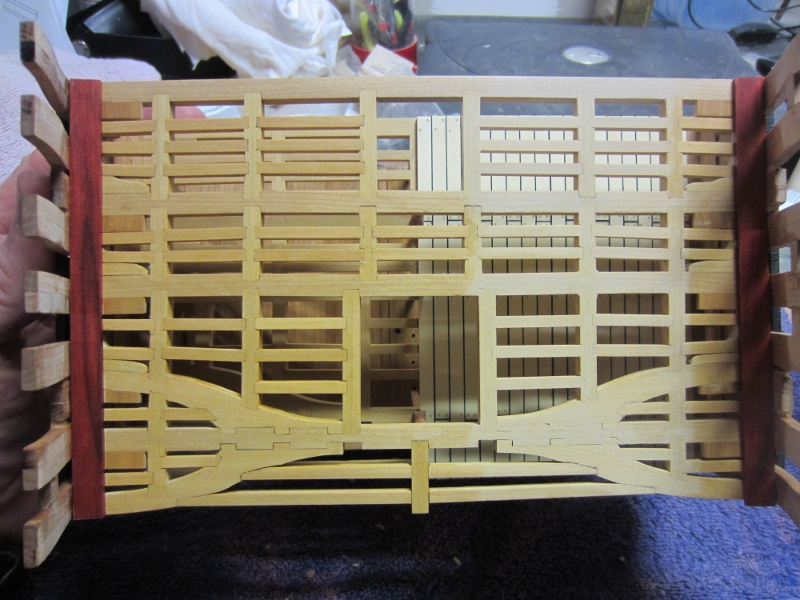
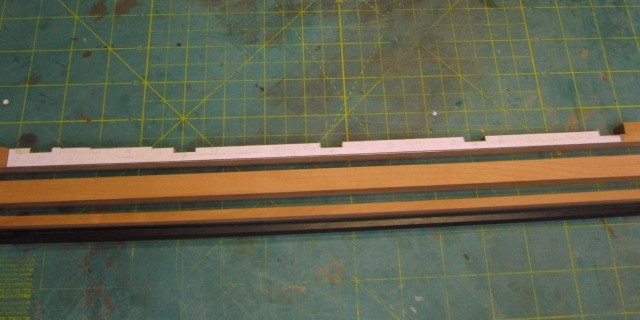
 Thanks Pete, Mark, Paddy, Martin, Bob, Ben and Grant. Thanks Russ, I was hoping the colors would look good and was pleased with the results. Thanks Chris. Sounds like a good way to do them and I’ll try it next time. Here they are the hatches just set in place. And here I have glued them in place and started the deck planking. I'm continuing to use Holly planks with black paper for the caulking I'm off to continue the planking and will use boxwood for the tree nails like on the lower deck.
- 332 replies
-
- 3
-

-
- Triton
- cross-section
- (and 1 more)
-
Great job Bob. It sure is a lot more fun planking these!
-
Hi Marius, Everything is looking very good. You may not have xacto blades but your wood is great. One thing with doing the fake treenails, I’ve done the same. I’ve been told that you should use a filler that dries hard. Some filler is firm to start and is wax like but never hardens. Keep up the great work!
-
Ow Martin. I've sliced and diced a few fingers over the years but never got a tendon. I hope all goes well and you make a full recovery. My best to you and good luck.
-
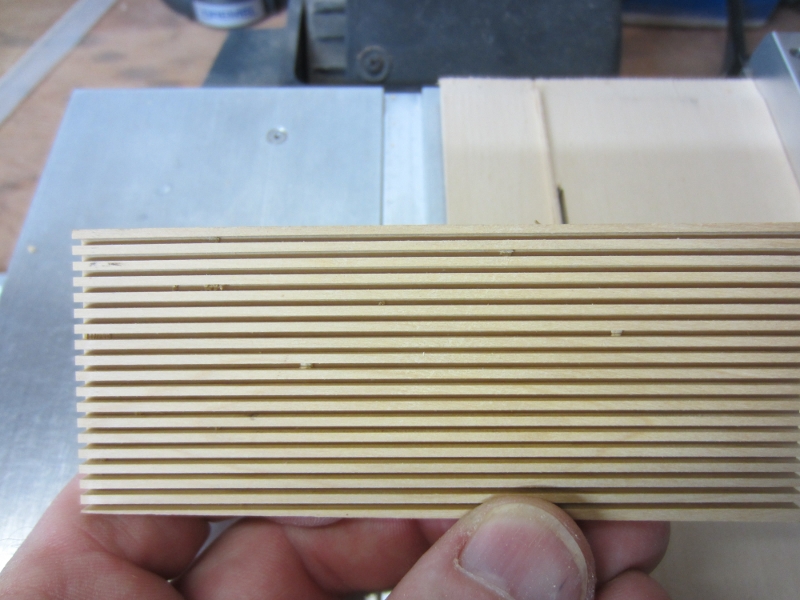
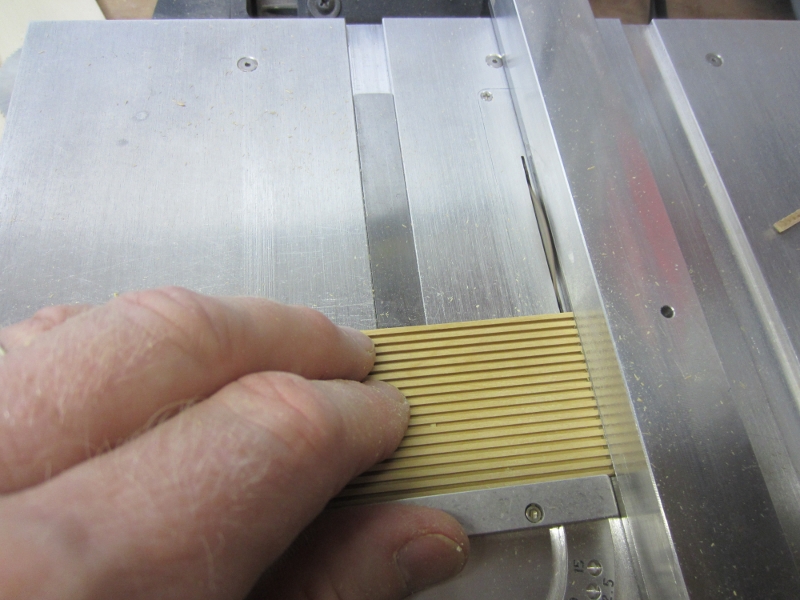
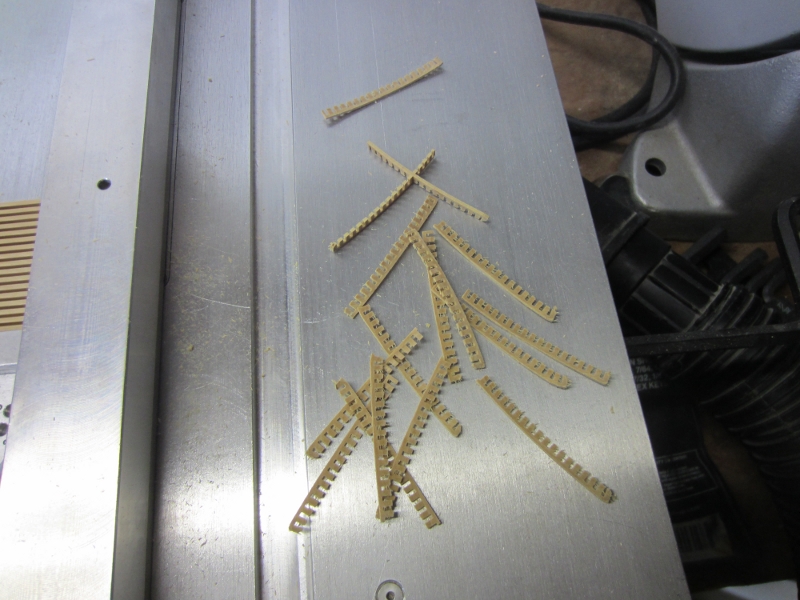
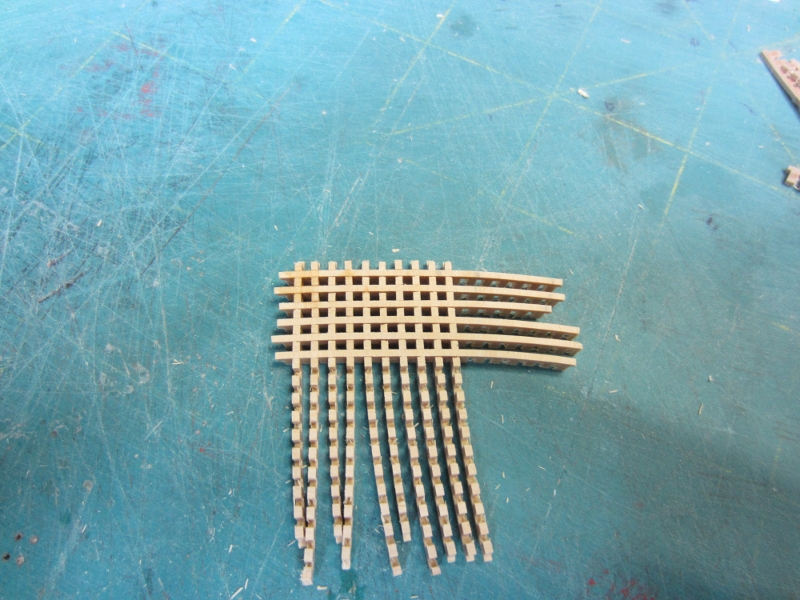
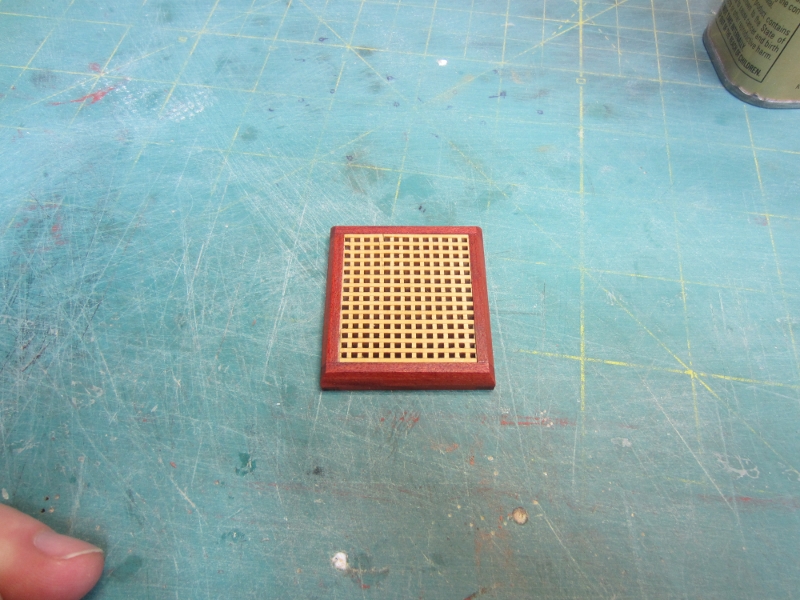
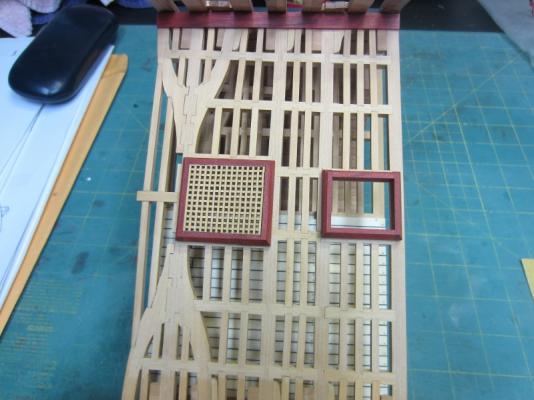
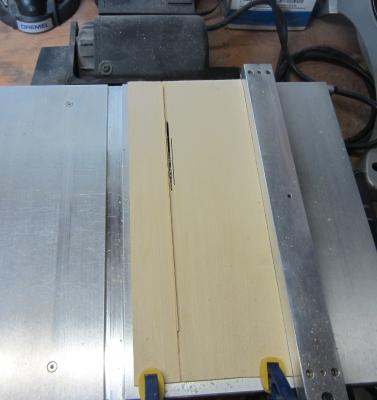
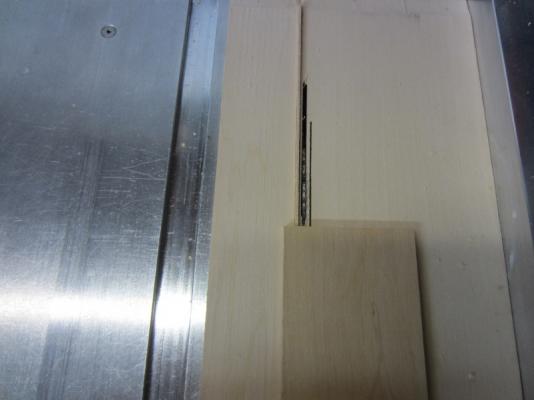
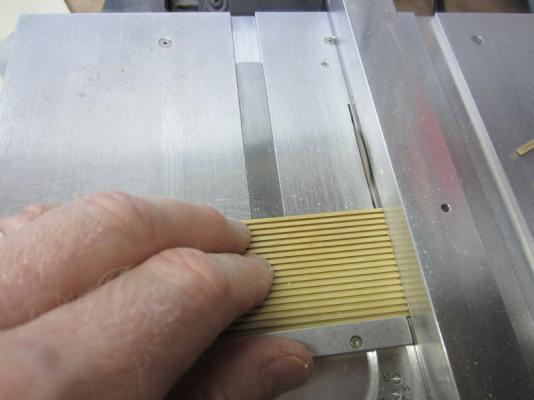
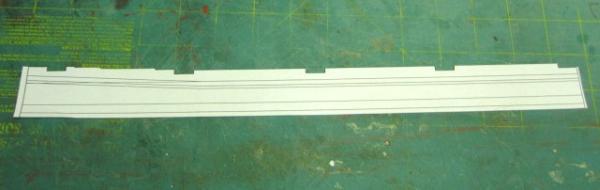
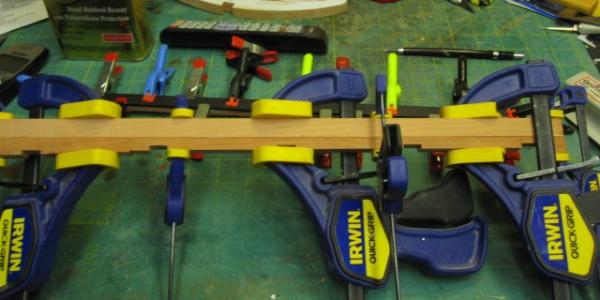
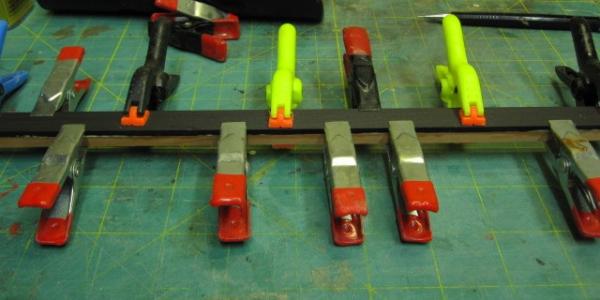
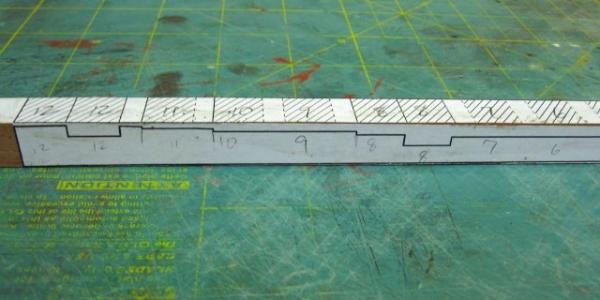
Well I’ve had to spend the weekend before building a deck for one daughter and t hen went on a little 4 day vacation and just got back. Here is an update on what I had done but didn’t have time to post. Also there is a whole lot posts I have to catch up on. Wow you all have been busy. Thank you Shannon, the Byrnes saw makes all the difference. Hi Bob, I do like the color. Of course I got it from Hobby Mill. Hi Joe, It has been quite a while now hasn’t it? Great to hear from you. Hi Ben, Yes it is hard. Might even be harder then Boxwood. As I said it’s the saw. Now that you have one I expect you to practice and be able to do it too. Thanks Wayne. I’ve made the hatch grate using a technique I copied here. I’ll try to explain it in case others haven’t seen it. I used 1/8” boxwood and a saw blade that is .040” thick. First I used a piece of scrap basswood to make the jig, I cut a channel in the basswood the width of the saw blade. I then cut a strip of wood the same thickness as the blade and inserted it into the channel so that 1/16” showed. I then clamped it to the top of the Byrnes table saw making sure that the blade was the 0.40” away from the channel. Next using the jig I cut a series of slots in the underside of the boxwood board, and then sliced the board into strips on the table saw using a fine tooth blade. The strips were cut the same thickness as the blade. (0.40”). I then assembled the gratings like we do when we buy them precut. I hope that makes sense


- 332 replies
-
- 6
-
-
- Triton
- cross-section
- (and 1 more)
-
US Brig Syren by roger
Rustyj replied to roger's topic in - Build logs for subjects built 1801 - 1850
Hi Roger, Frontwards, backwards who cares. It's just great to be able to see your build pictures again. -
Hi Chris, Great to see you back. I’ve been wondering how you and your family were doing. I’m glad to hear all is well and you will start back on the Confederacy. I know grabbing time will be tough but we know you can do it!
-
Thanks Russ, Joss, Grant and Pete. Grant. You can see the difference between the earlier picture and the close up of the completed one. The completed one is the color with a coat of wipe on poly applied. No touch up. It’s that red. Paddy. One thing they say is the Red Heart can fade some over time especially if exposed to sunlight. This is some I have had on hand for a couple of years and it hasn’t faded. Also I plan on keeping it out of direct sunlight once completed. Daniel. Nope not Blood wood but Red Heart. Blood wood is a deeper darker red. I have used it in the past but I didn’t have enough for this so I couldn’t use it now. Again thank you all!
-
Just to confuse you more I went half way between the two.
-
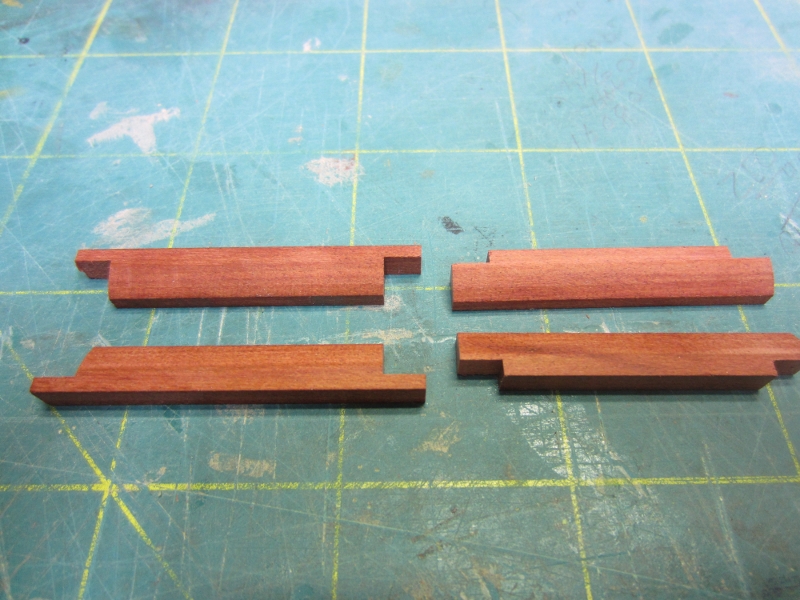
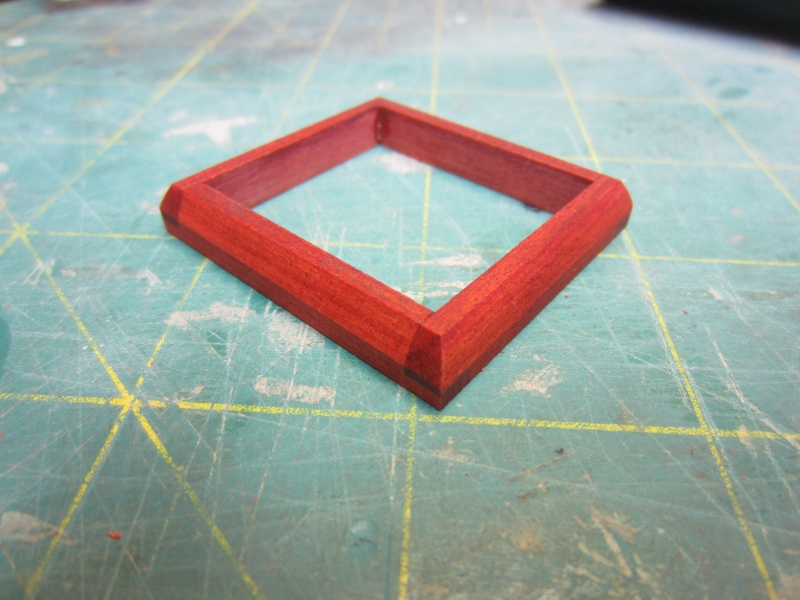
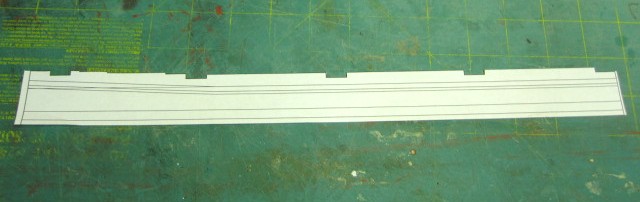
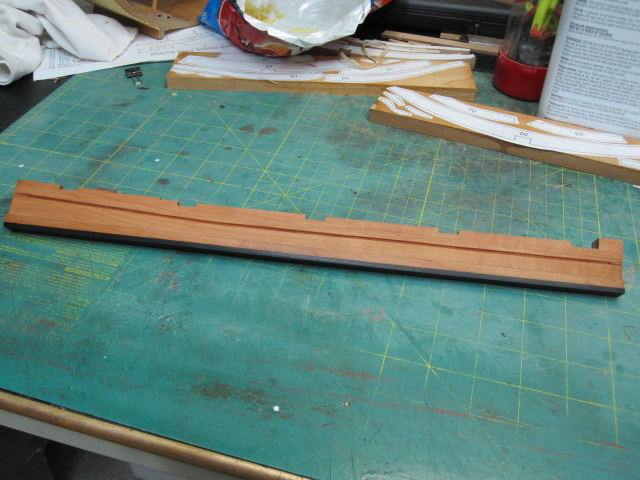
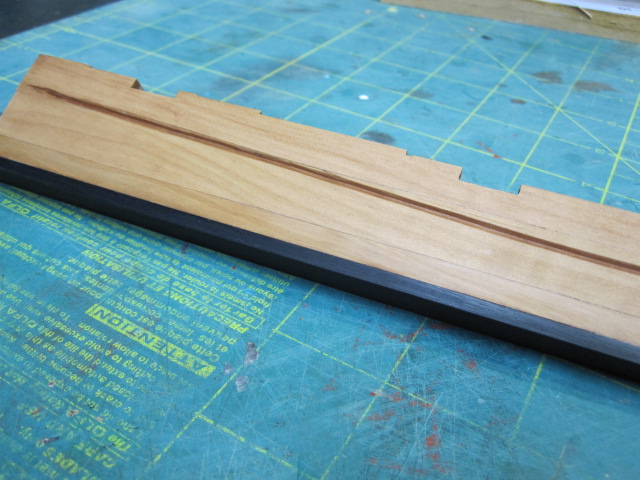
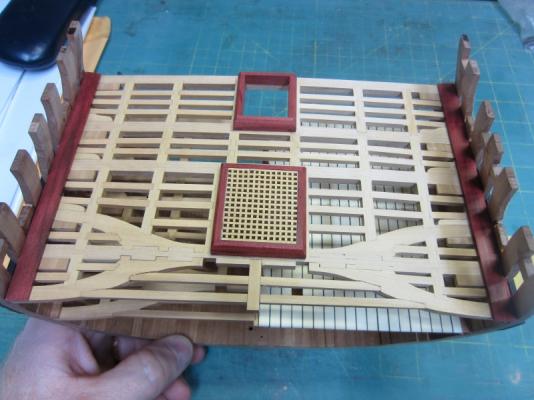
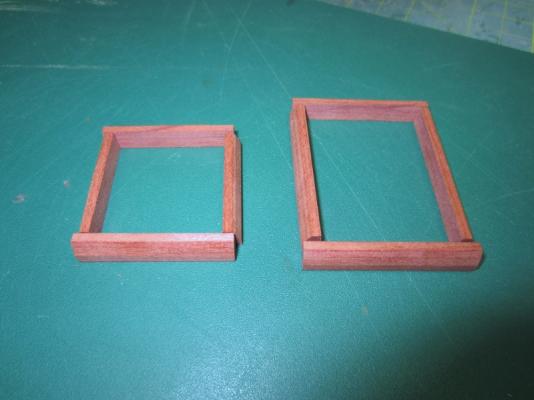
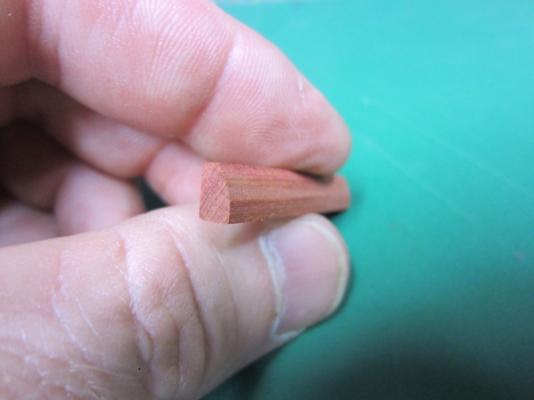
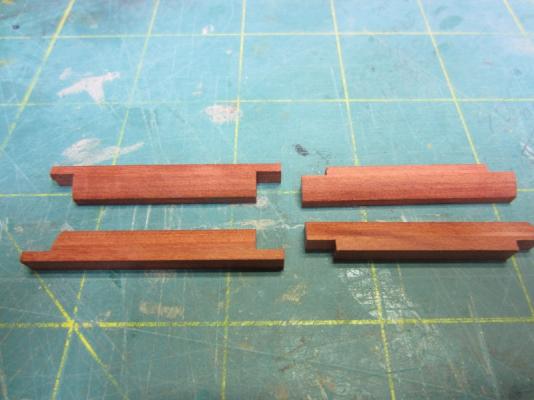
Hi all. Thanks for the kind words. I hope it works for you as well as it did for me. Here I’ve added the waterway and have started on the hatches. Both are being cut from red heart. Here the sides are cut to length with the bevel cut into them. Here they are notched for assembly. And here it is assembled. Are here they are set in place but not yet glued down. Next I'm going to make my first attempt at making my own hatch gratings.


- 332 replies
-
- 5
-
-
- Triton
- cross-section
- (and 1 more)
-
Hi Ben, That’s great you’ll love it! The wood is swiss pear and the false keel is ebony. I have a little left and figured it was a good place to use it. After gluing the two sections together I cut out the pattern that shows the rabbet location, transferred it to the keel and then cut it out using a V grove chisel.


- 421 replies
-
- 3
-
-
- granado
- bomb ketch
- (and 2 more)
-
Belated Happy Birthday and well done on the frames. Ummmm that cake sure looks good too!
-
Hi Bob, Boy they sure look nice to me! Well done.
-
Hi olphart, nice to see your progressing along nicely. Good luck on redoing the limber boards.
-
Very nice Pete. Travel safely.
-
Ok seeing that the pieces for the keel had all been cut to size I figured it wouldn't to start assembling it. Here is the hog, keel, false keel (upper) and false keel (lower). Hog and keel clamped together and drying, False keel drying too.

- 421 replies
-
- 1
-
-
- granado
- bomb ketch
- (and 2 more)
-
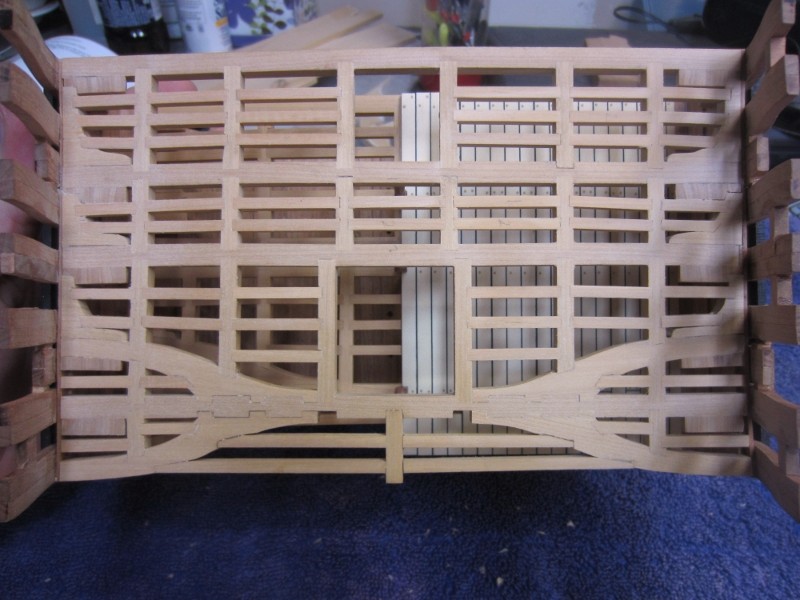
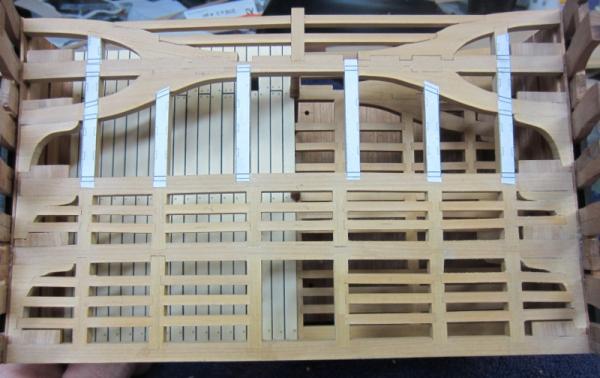
Hi all and thank you for your kind words. Hi Daniel I used the following sizes. Ledges 1/8” x 1/8” and carlings 3/16” x 3/16”. Not sure if they are 100% accurate but they worked for me. The way I used for cutting the mortises is what worked for me. Experiment and see what works best for you. We all add our unique touch to how we do things. Well here it is with all of the carlings and ledges in place. Now to sand it all smooth then next up will be adding the waterways and decking.

- 332 replies
-
- 1
-
-
- Triton
- cross-section
- (and 1 more)
-
Well done Paddy. It sure does feel nice when you raise that first one!
-
Yes do tell!
-
Hi Pete. There were several different heights and a lot of blade adjustments! Also a little fine tuning was done with a file.
-
Well the now infamous “set up” has continued. While I was doing some cutting with the table saw I could hear the keel calling me and it was just excited to hear the saw running. Well I just couldn’t disappoint it sooooo…… I figured a little "advanced" set up was in order. I cut out the side and top profile plans and glued them to the pear and started working on the hog. All pieces were left a little long and will be trimmed to the correct length later. I set the saw blade height to remove just enough wood to get to the plans line. I then just started working my way down the hog adjusting as I went. And here is the hog with all of the cuts made. Time will tell if the "advanced" set will continue!

- 421 replies
-
- 4
-
-
- granado
- bomb ketch
- (and 2 more)
-
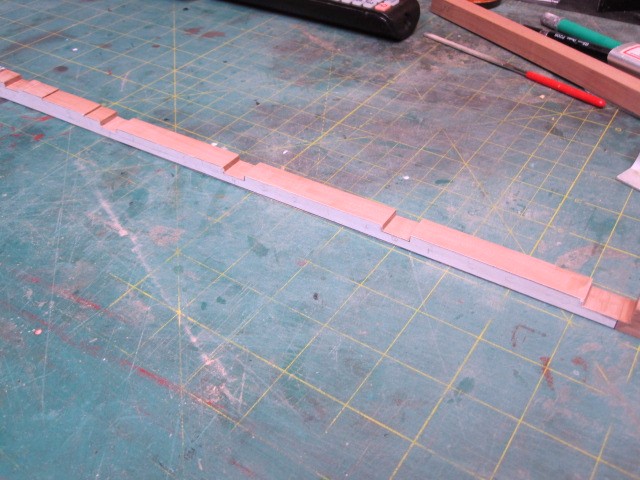
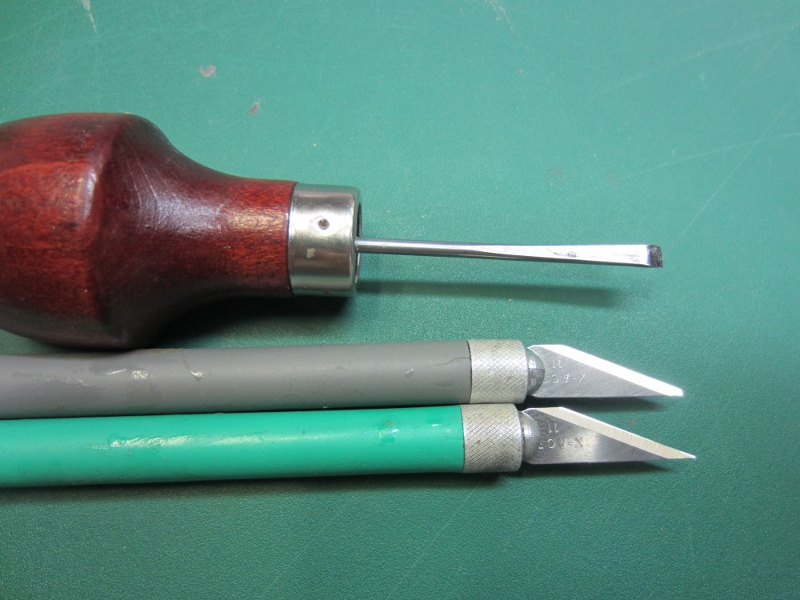
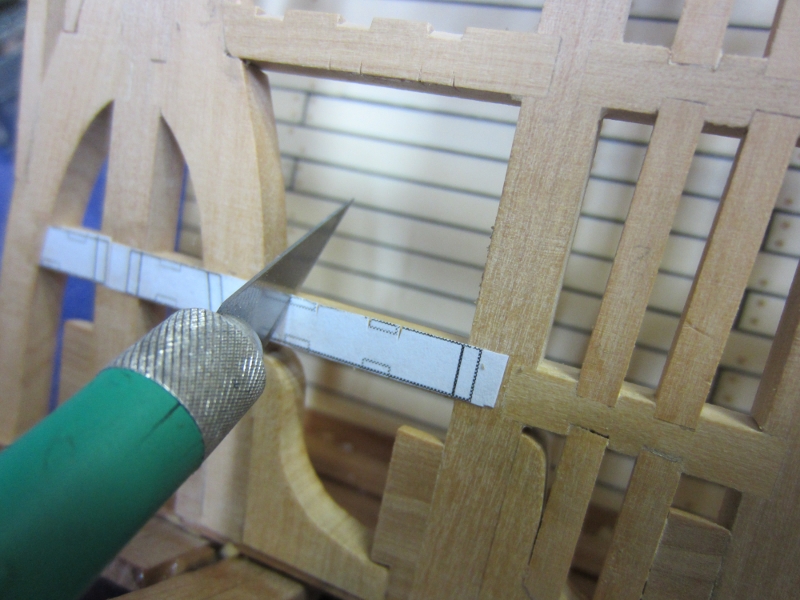
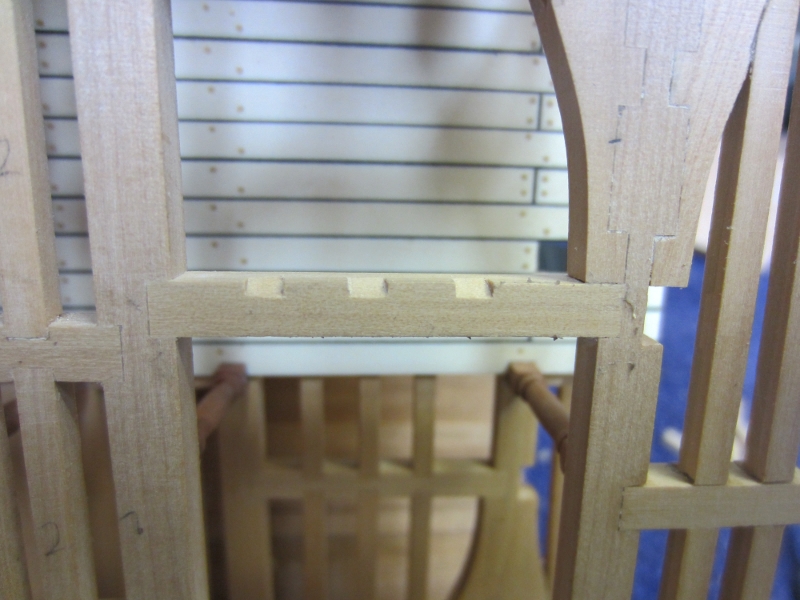
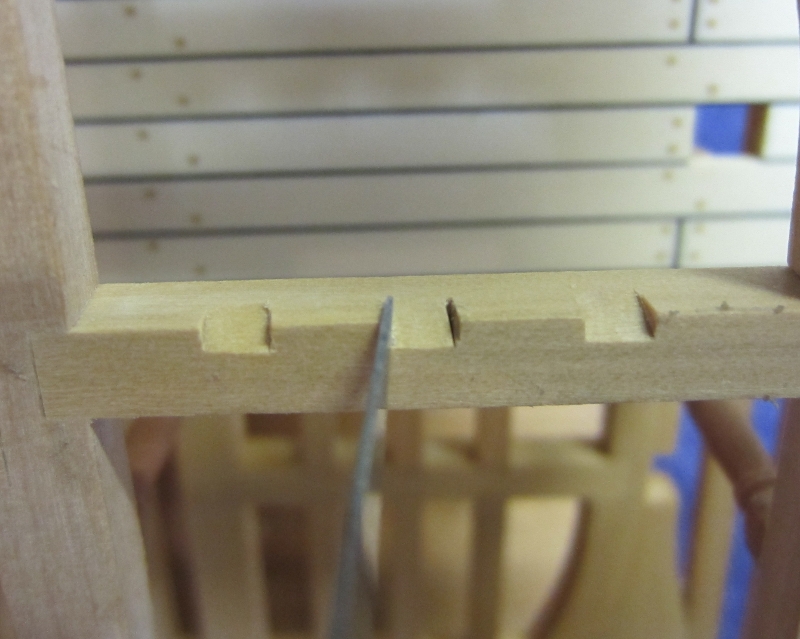
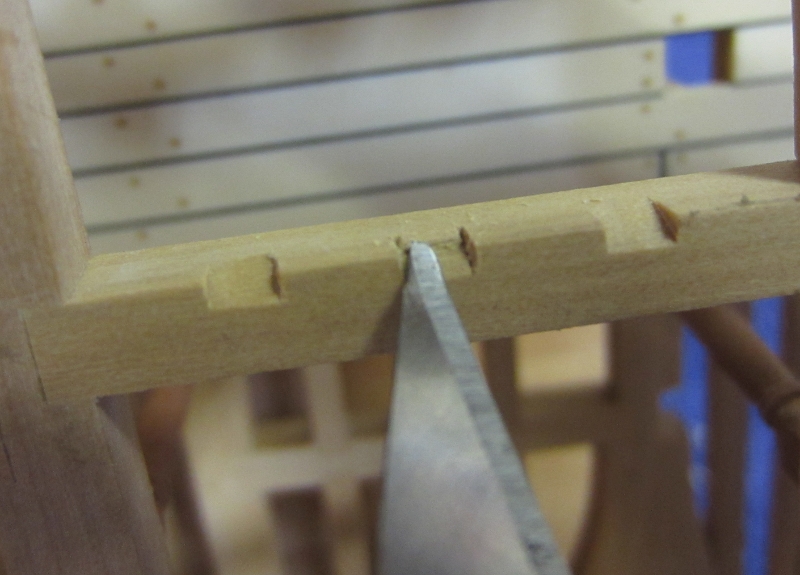
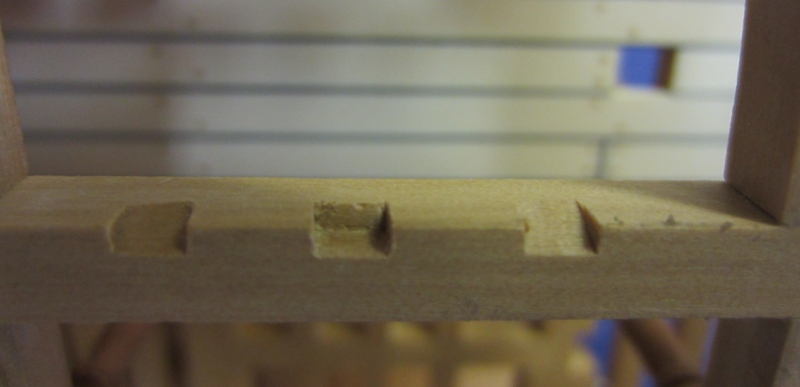
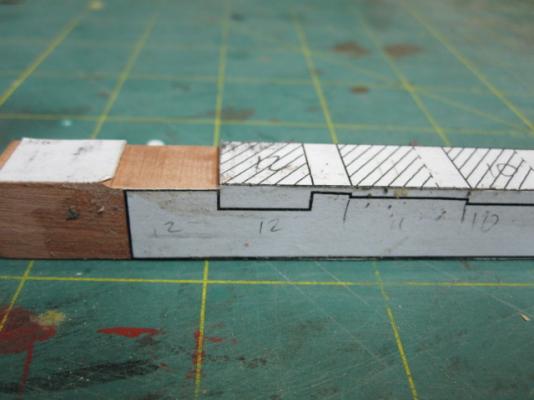
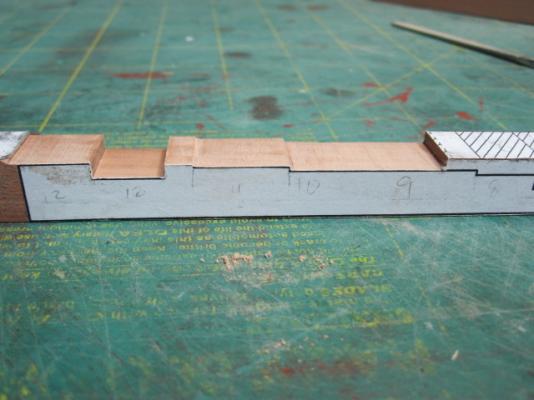
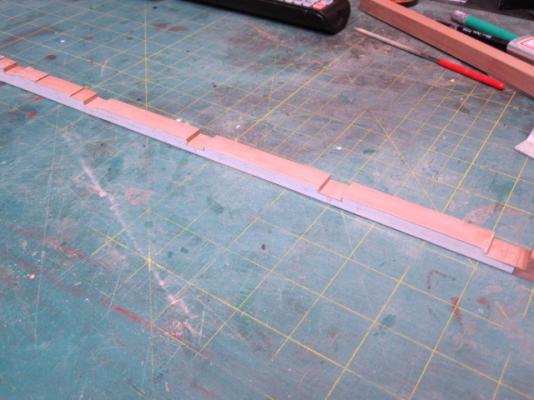
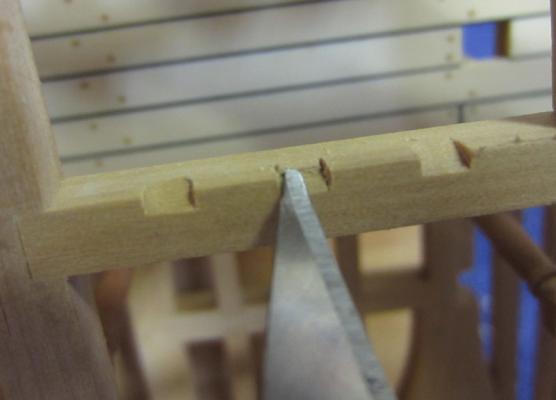
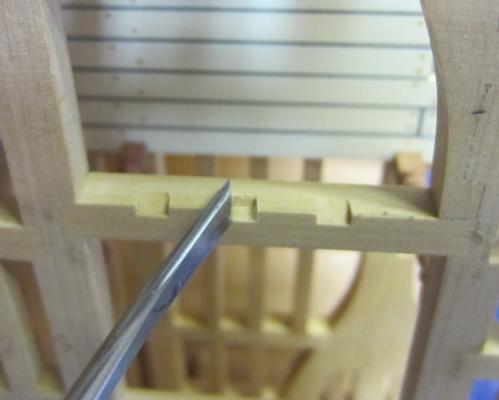
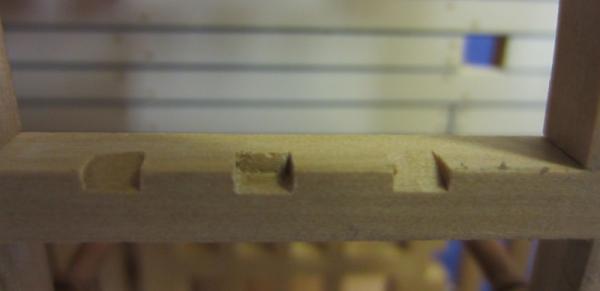
Thanks Pete, Paddy and Grant. Hi Ben, OK here is how I do it and is by no means a tutorial on how to do it. Just a way that works for me. Here are the tools. The top is a U.J. Ramelson chisel. Next is the x-acto blade with the tip broken off (usually I get this from the sharp blade as I break the tip while using it ) and the bottom is a regular x-acto blade. First I score the beam at the correct location and then widen it to the proper width using the pointed x-acto. Next I cut down each side And then horizontally with the broken tipped x-acto down to the desired depth. Then I use the chisel to clean it up. And here is one roughly done. I fine tune them as I cut and fit each piece to them. I hope this helps.


- 332 replies
-
- 9
-
-
- Triton
- cross-section
- (and 1 more)
-
US Brig Syren by Rustyj - FINISHED - 1:64
Rustyj replied to Rustyj's topic in - Build logs for subjects built 1801 - 1850
Thanks Grant, Much appreciated. Hi Dave, It was part of the group build here using the plans and practicum by Chuck that was later submitted to Model Shipways for production. B.E. The Syren is really an enjoyable build and I’m sure you would enjoy it too. -
Hi Ben, I use two x-acto knives. One with the tip broken off to get into the corners, one sharp and one very small chisel. Thanks Joe, Bob and Ron. Mark, No sins? Obviously you haven’t spoken with the Admiral! Thanks Sinan. Just wait you’ll see what I mean when you get there! Well 32 down, 22 to go. That means there are 44 mortices to cut. It's getting sad that I'm counting how many are left! Last night I was finishing the last one, had a good tight fit, and pushed it out and away it went high in the air, bounced on the end of the desk and landed right in the trash bin. Of course it was almost full with bits and pieces and lots of saw dust. I sat there for a good five minutes trying to decide if I wanted to go dumpster diving or not. I finally decided discretion is the best course and made a new one.
- 332 replies
-
- 3
-
-
- Triton
- cross-section
- (and 1 more)
-
She's looking very nice. Thanks for posting them!