HOLIDAY DONATION DRIVE - SUPPORT MSW - DO YOUR PART TO KEEP THIS GREAT FORUM GOING!
×


VitusBering
-
Posts
297 -
Joined
-
Last visited
Content Type
Profiles
Forums
Gallery
Events
Everything posted by VitusBering
-
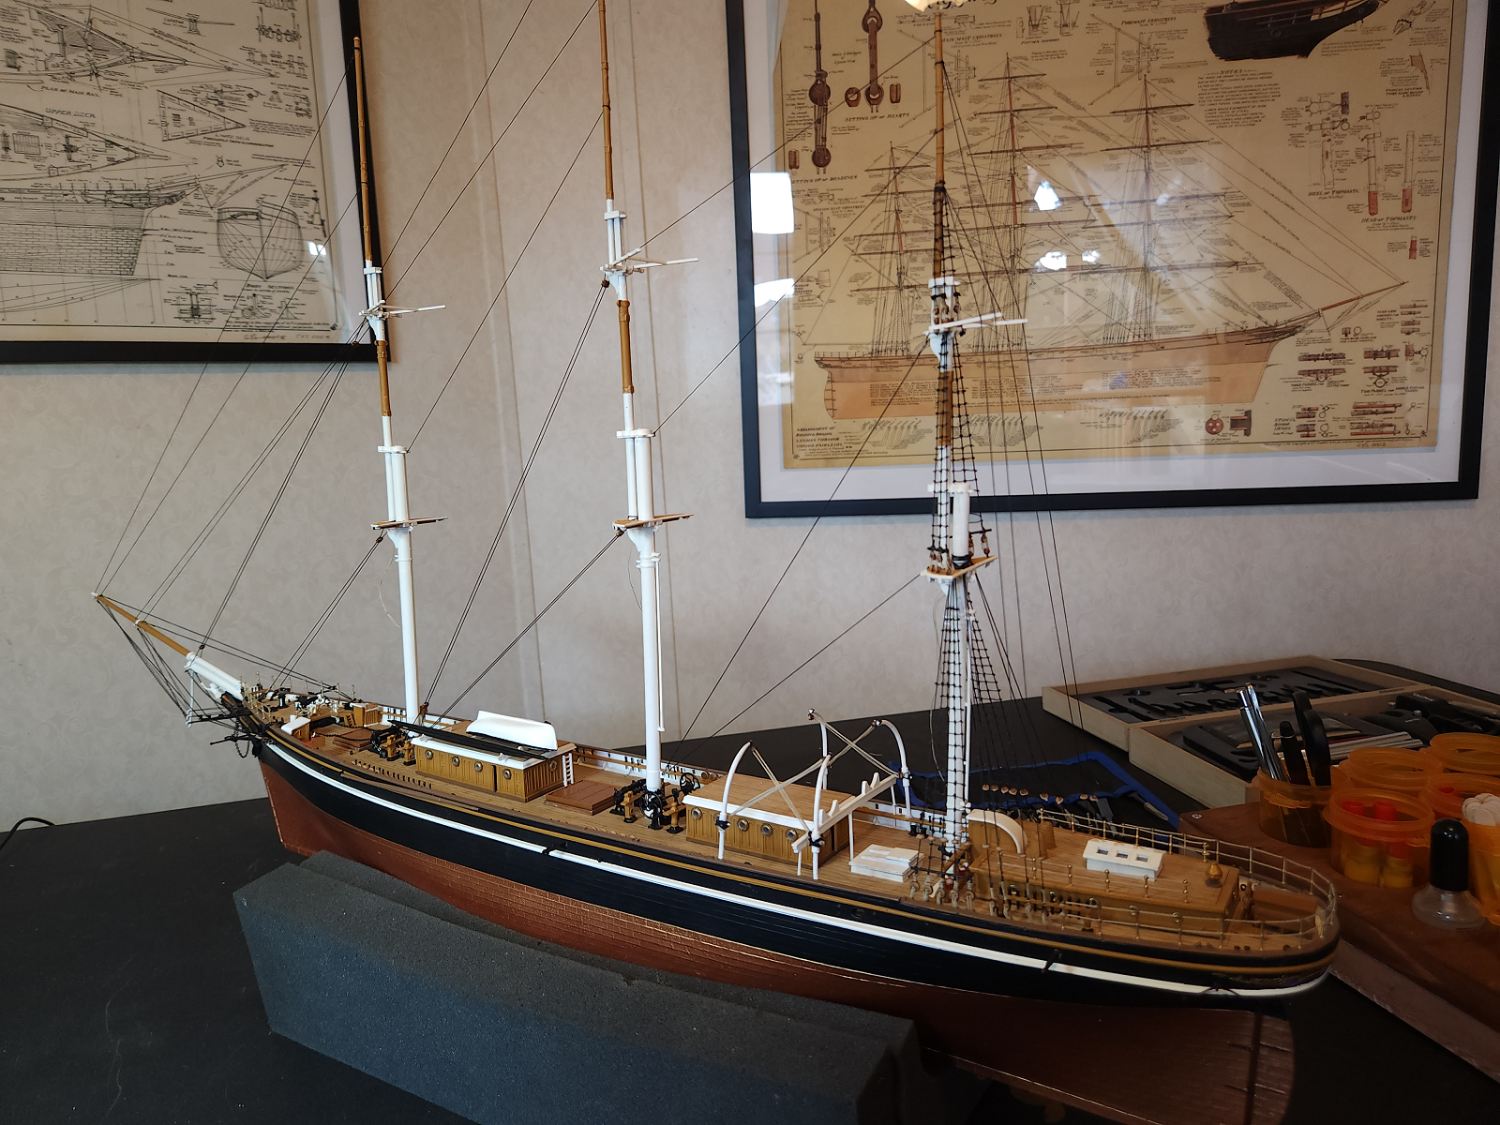
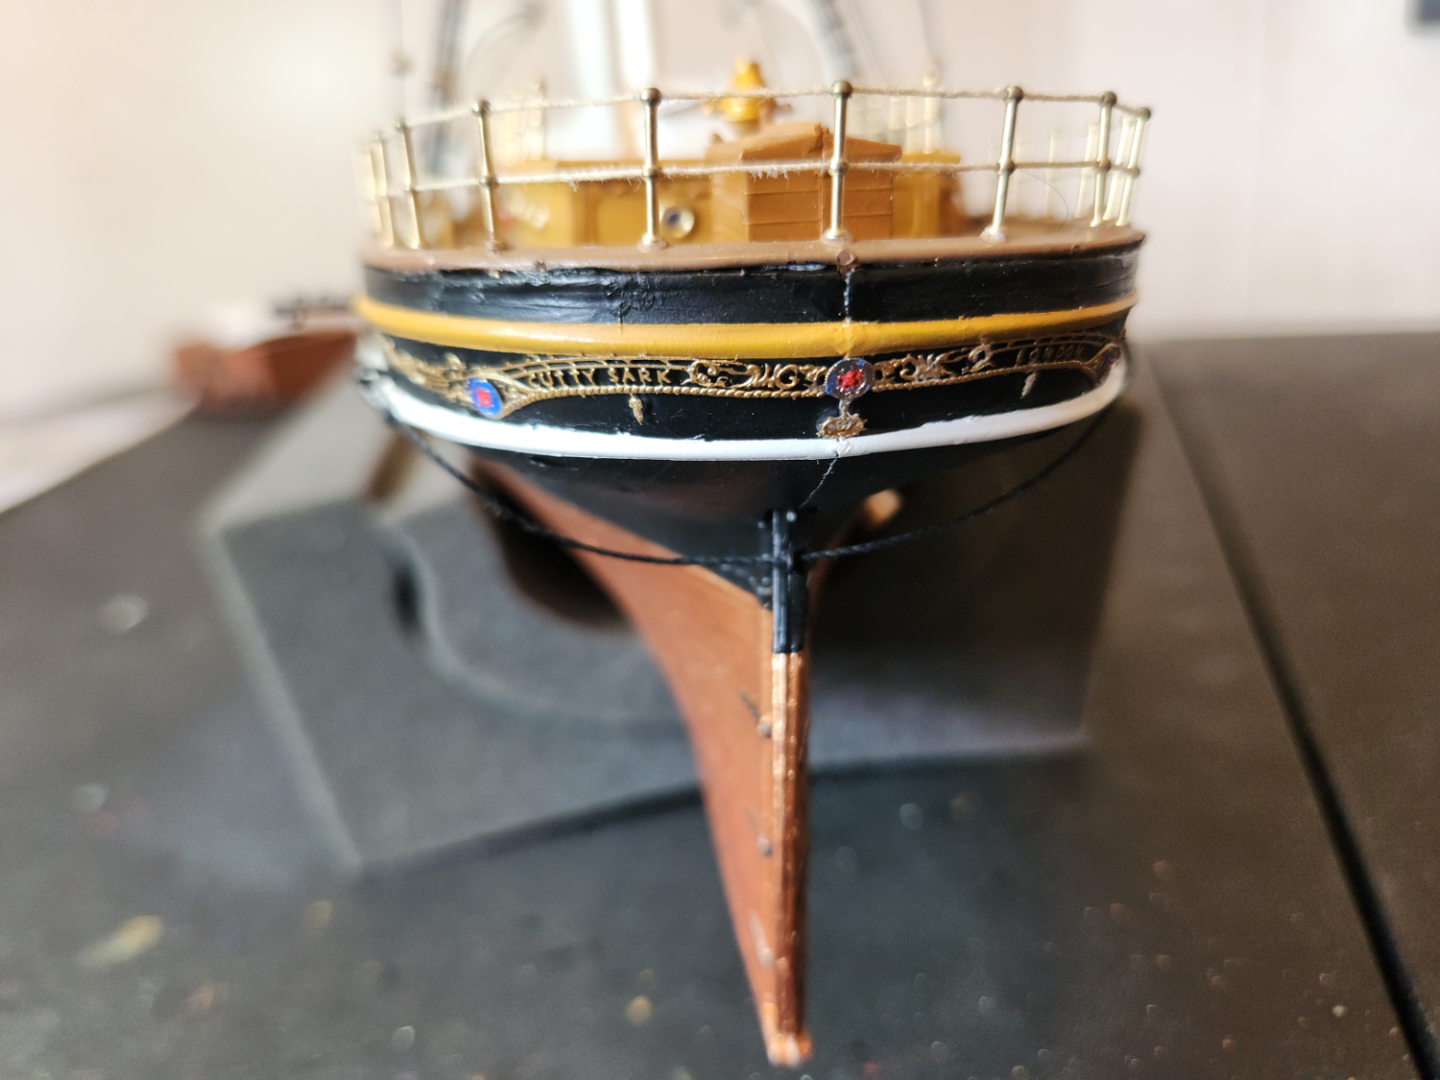
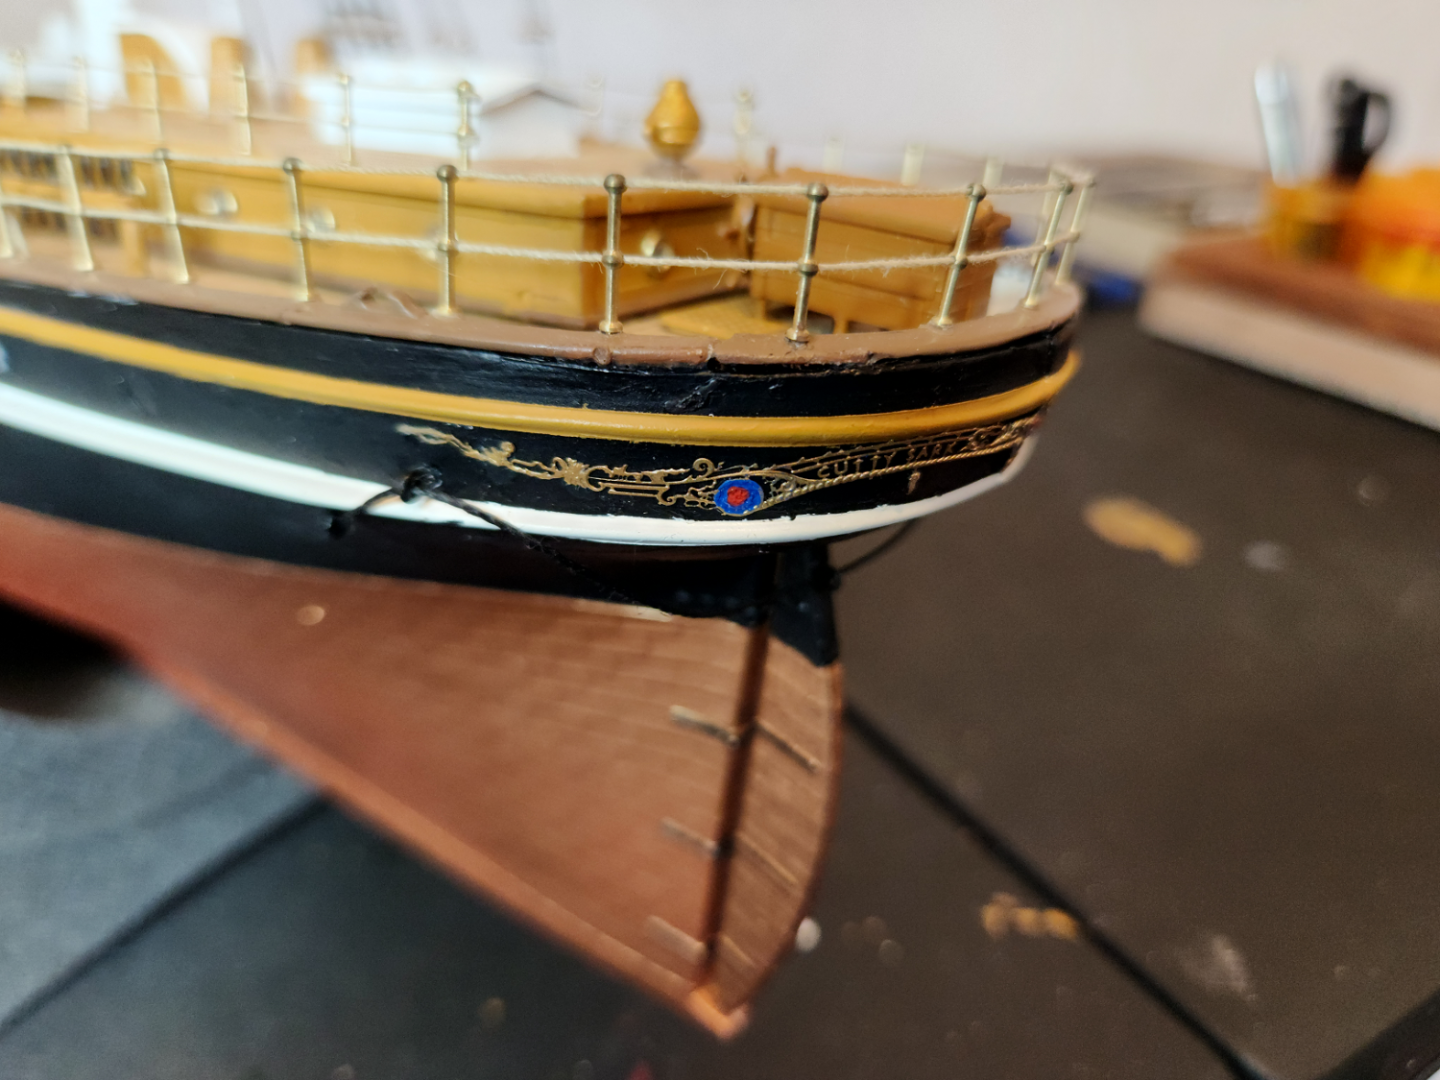
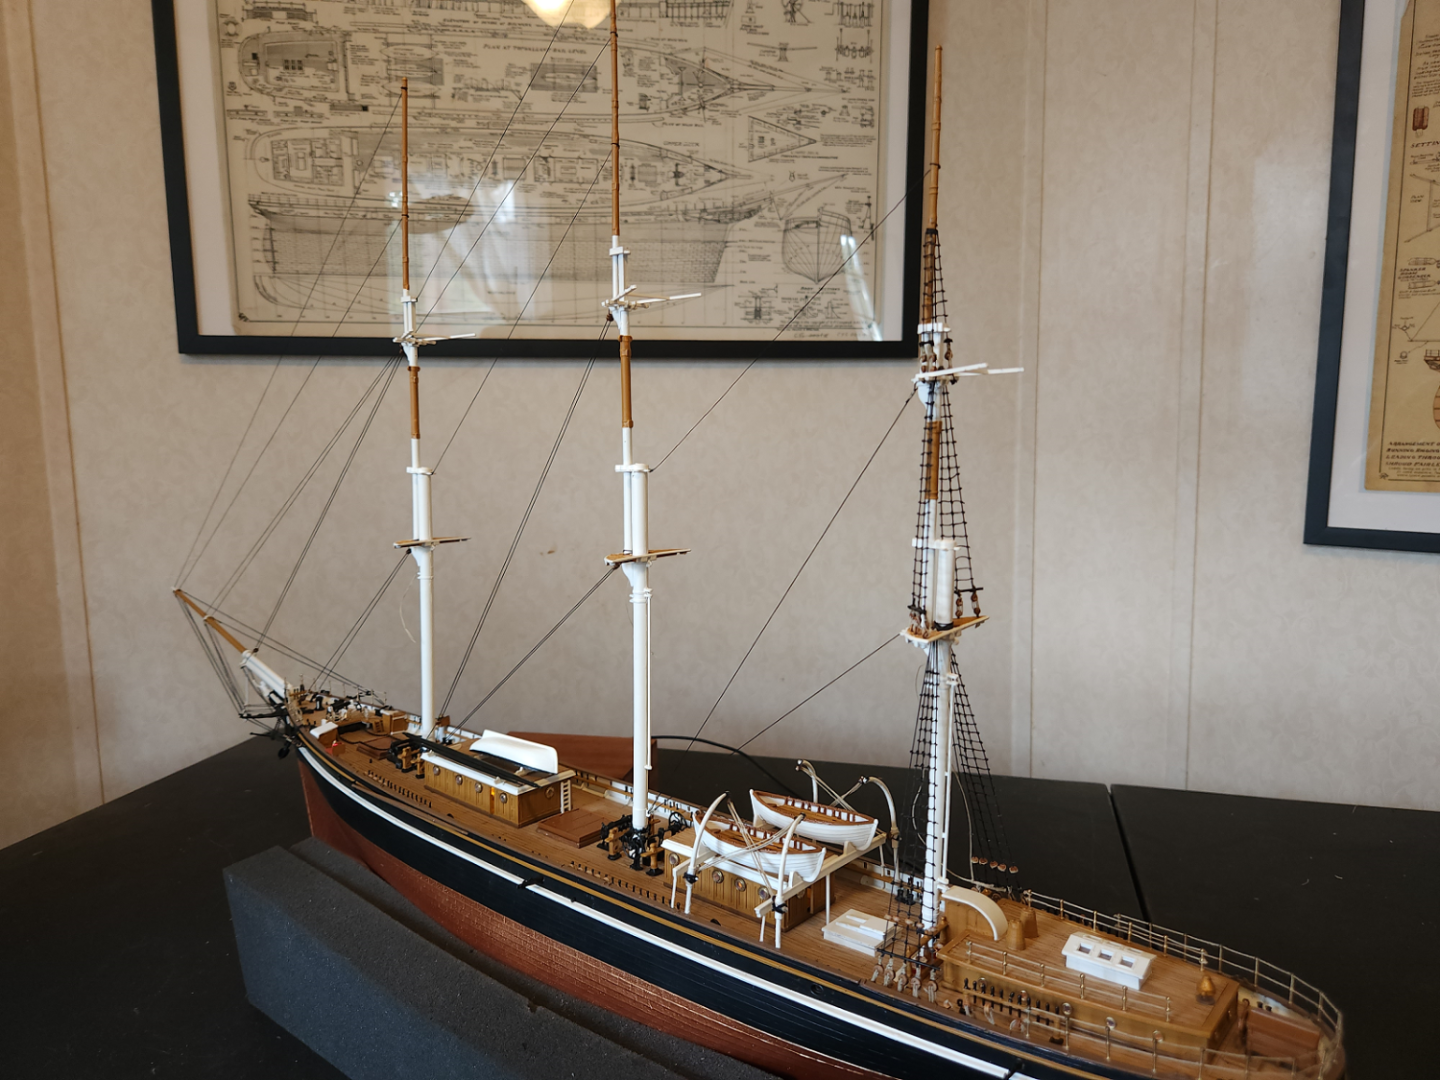
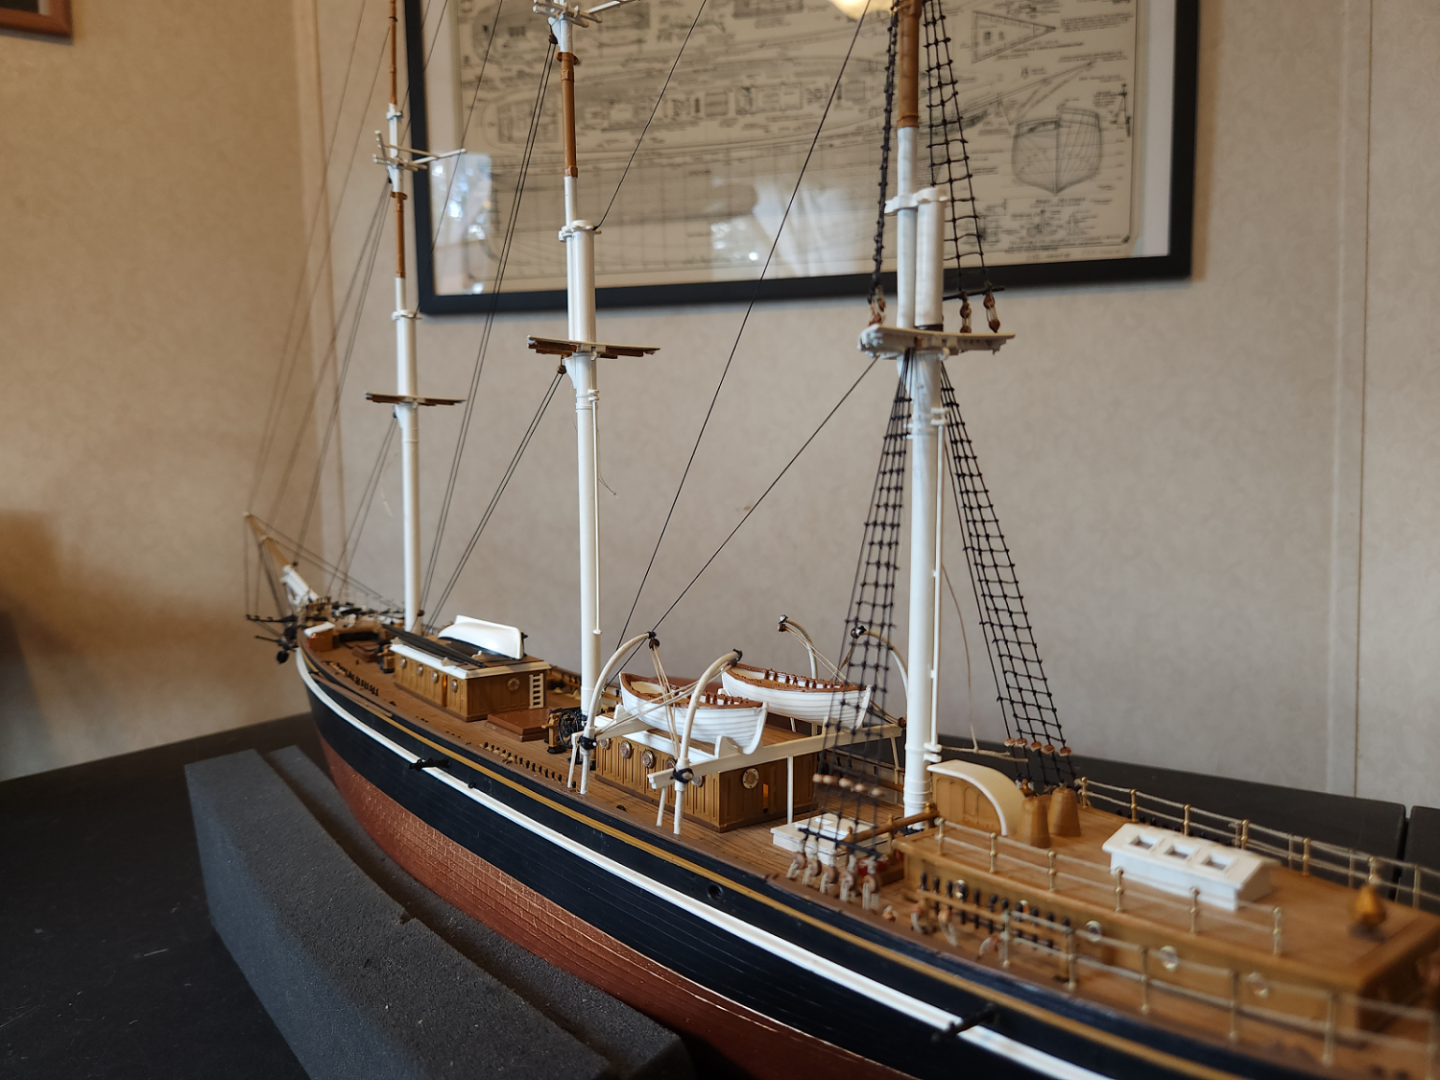
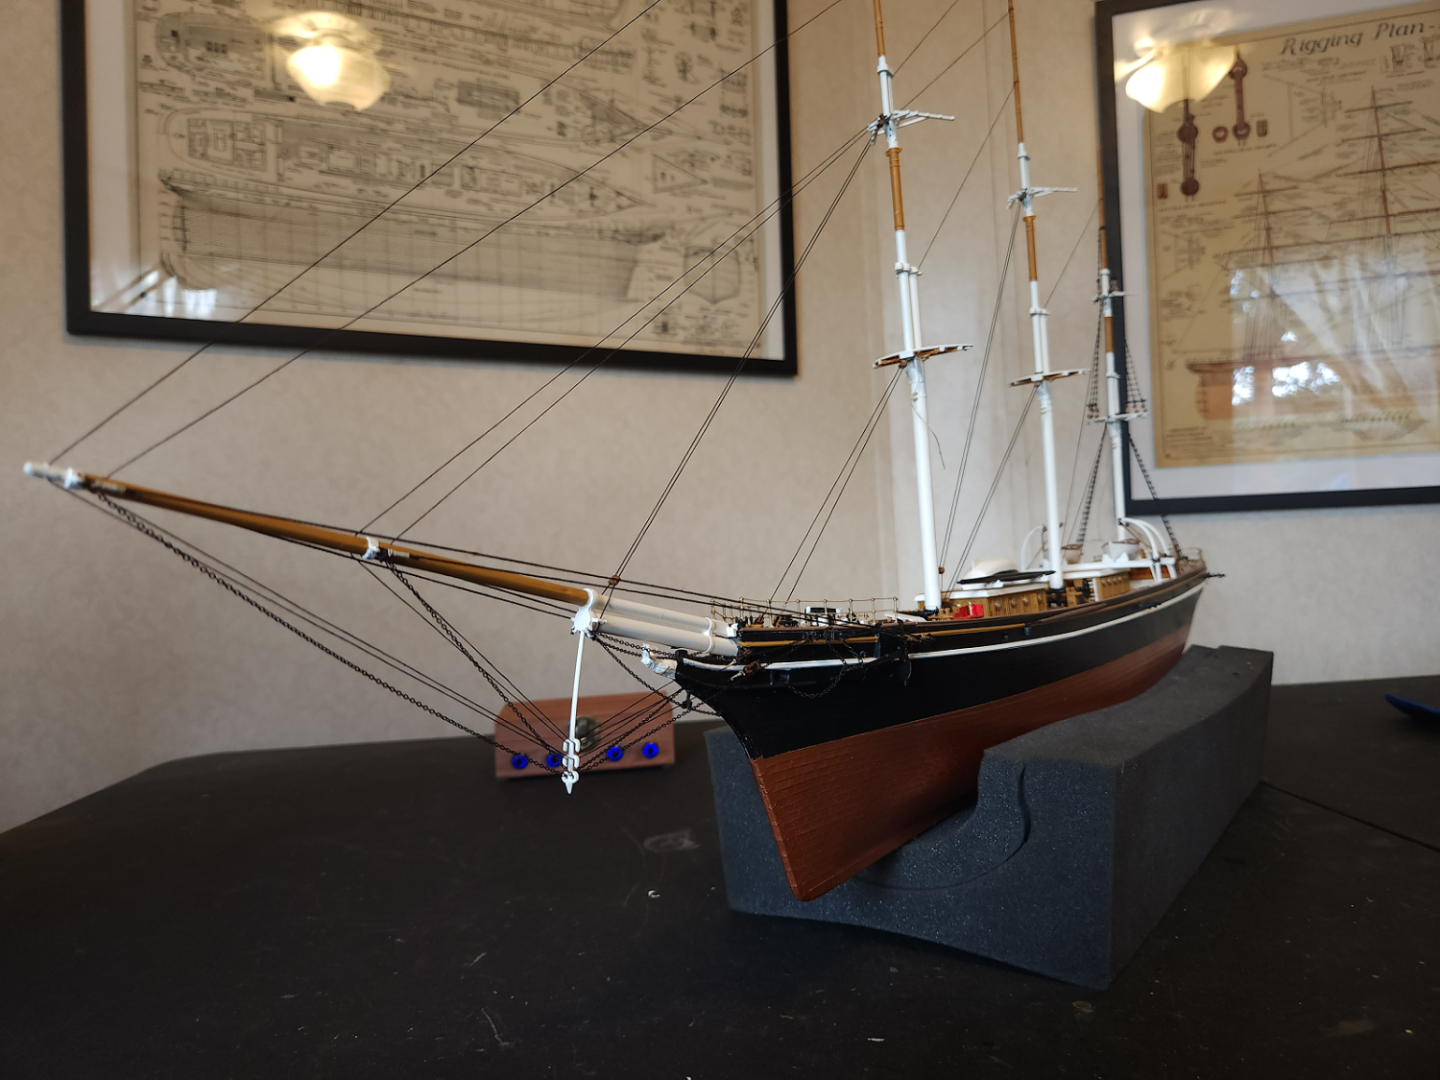
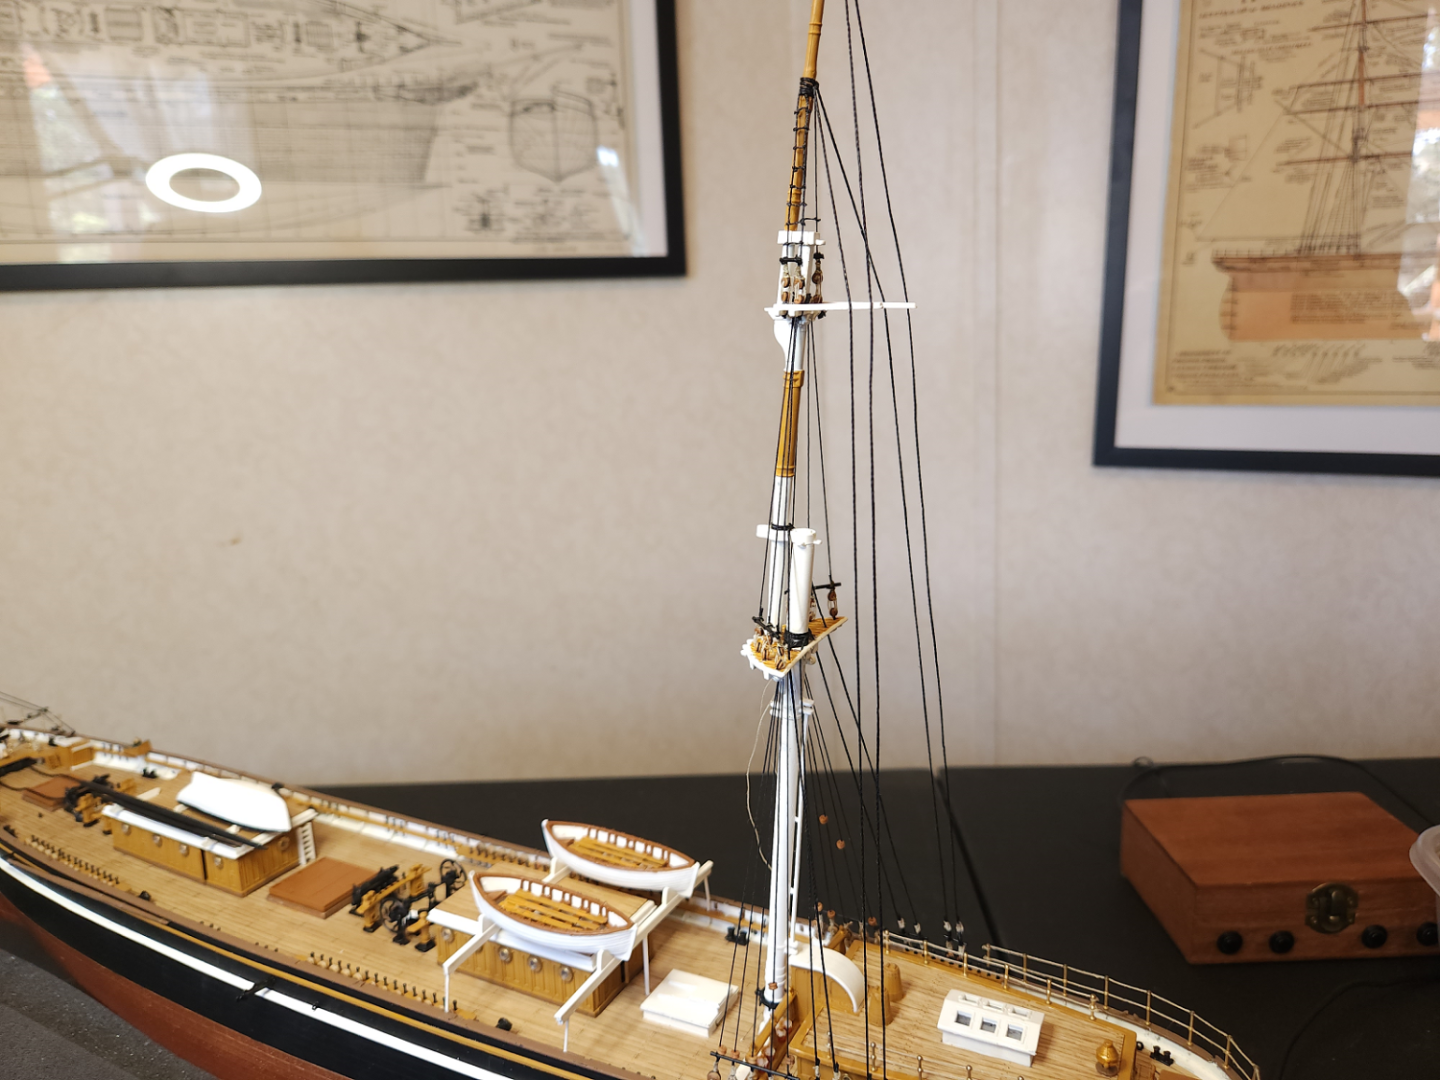
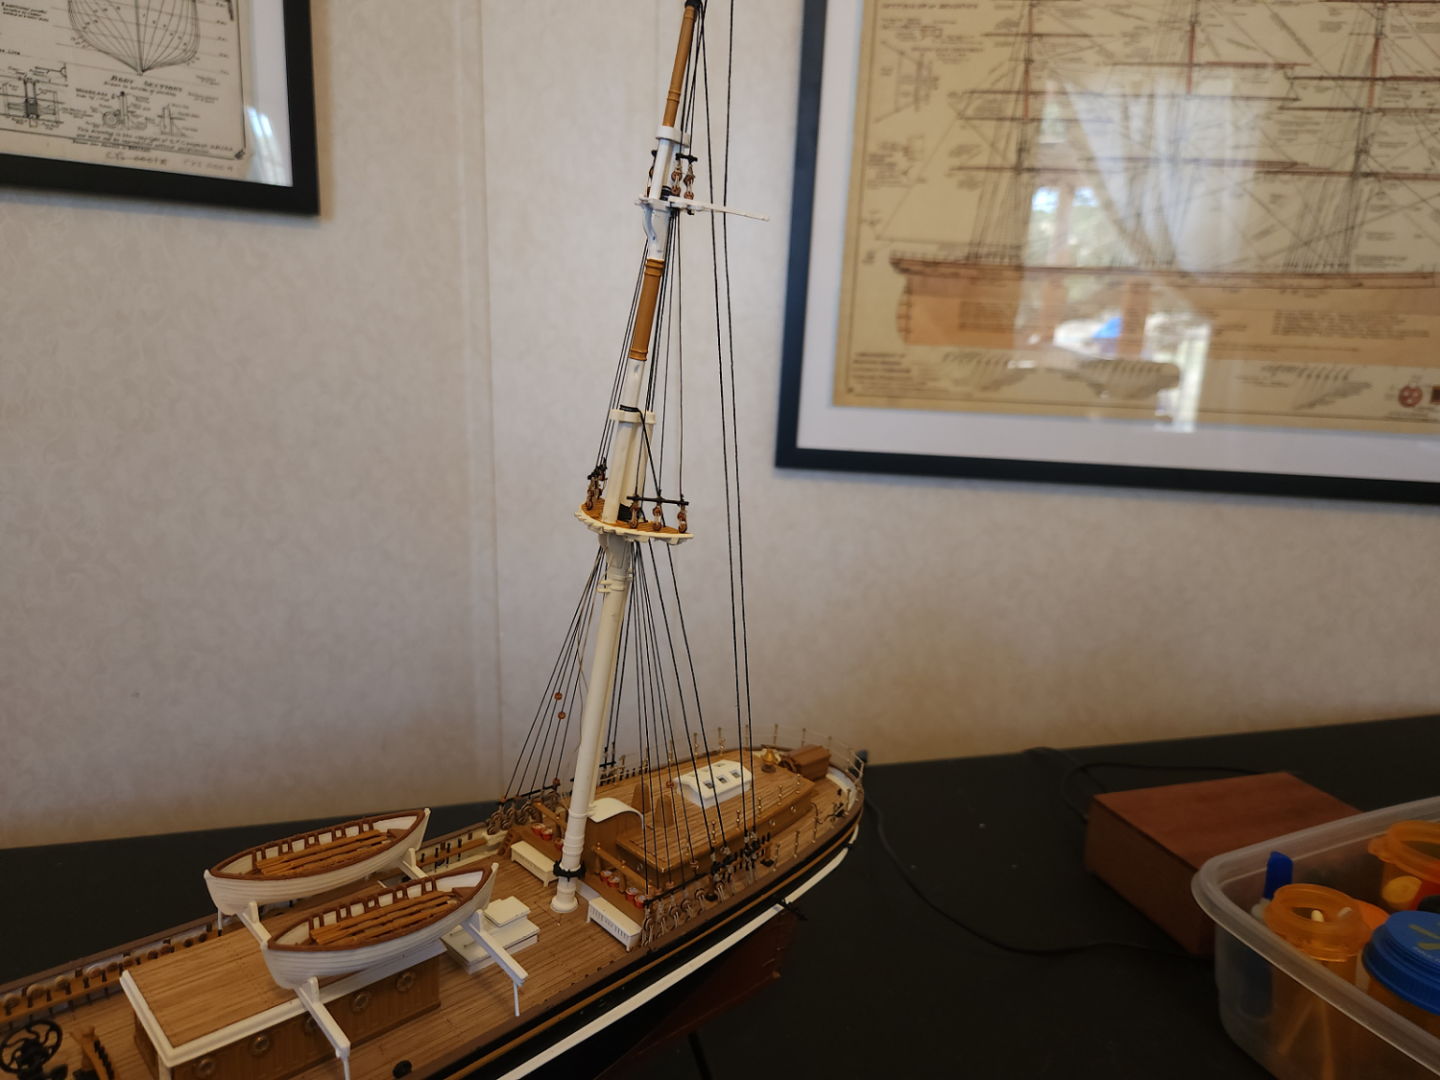
 Trail boards and gingerbread installed. I haven't tackled the nameplate on the steering box yet - that PE is so fiddly it makes me nervous. I'll get to it when I'm in more of a Zen state of mind. [edit] what looks like gold or copper on those chains is just reflection. I did a double-take and had to check. The camera can be deceptive. Also reinstalled the mizzen backstays to much better effect this time around and didn't neglect their fairleads this time. Sharp eyes may notice I've removed the foremost boat mount (it was not glued in and may never be), and removed the mid section's belaying pins (like their full scale counterparts, they are not permanently set, either). That is all so I can get me some fightin' room to begin work on the main's shrouds and stays.
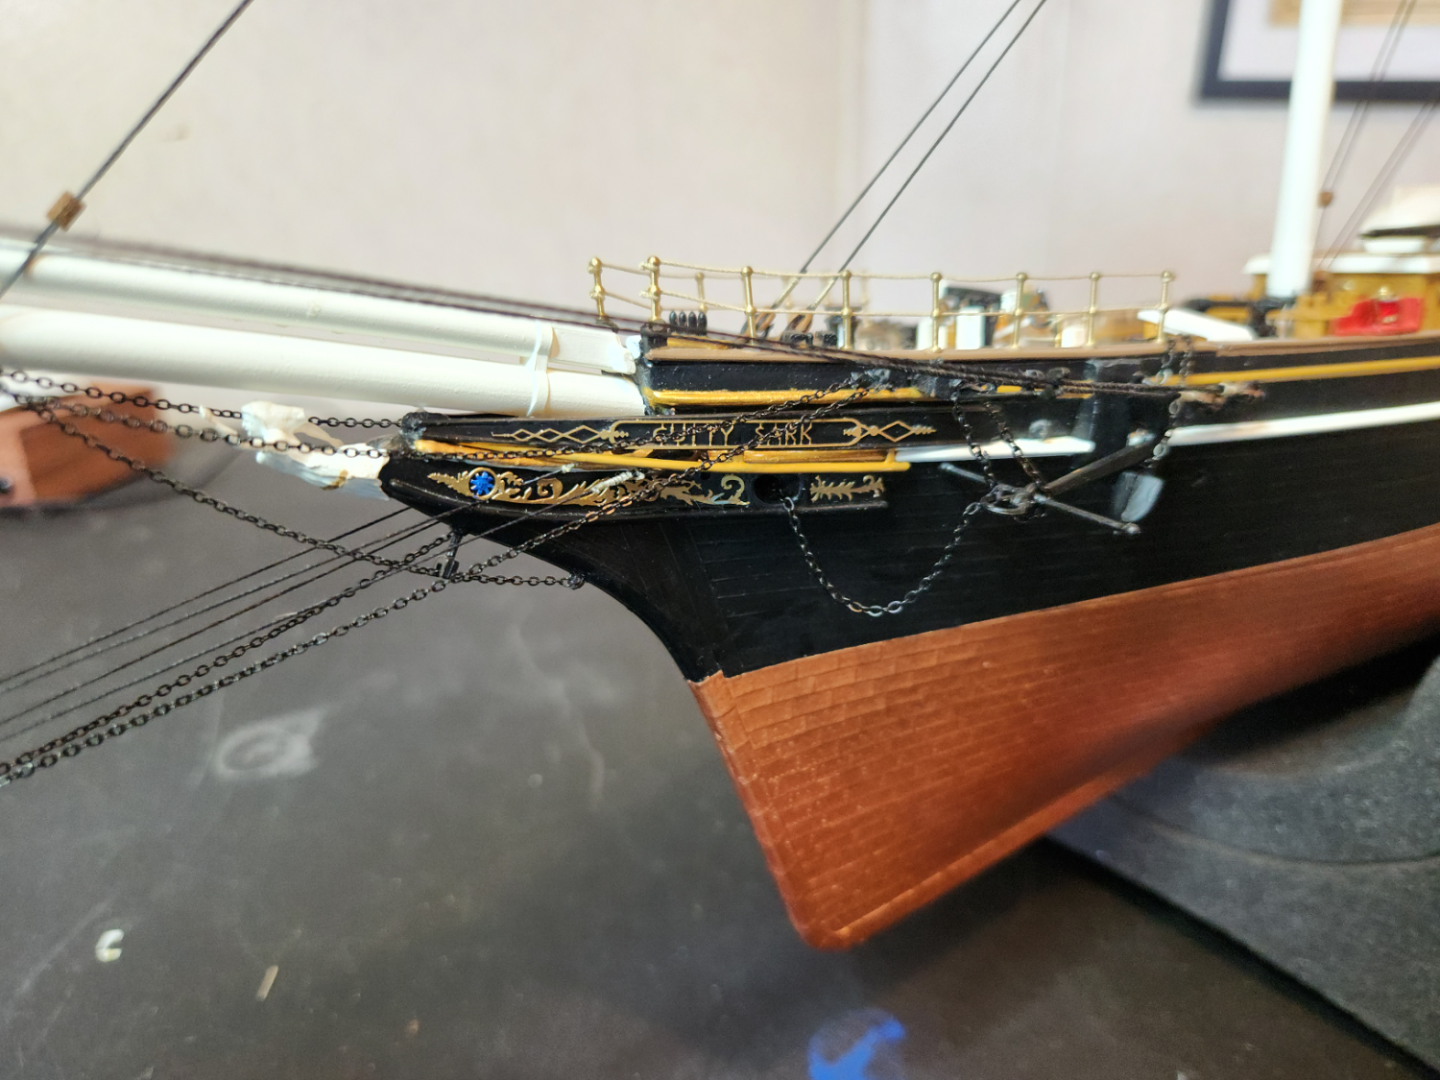

- 89 replies
-
- 7
-

-

-
- Cutty Sark
- Revell
- (and 2 more)
-
As painful as the removal of the backstays was, it was ultimately the right call. The forestays are now installed. I've taken considerably liberty with tie points and methods, mostly because the instructions (both old and new) are ambiguous or missing critical detail. In some cases I was able to glean some useful info from books and Kevin-the-lubber's amazing collection of images of the restored ship. As for the rest, I just chose to do what felt good to me and would look pleasing on the model. On a side note, the two forward deck houses have some open doors. My better half noticed and wondered where the furniture was. I think it is a good question. The forward deck house's roof is removeable and I may search around a bit for a 1/96 scale (or similar) table and chair set.
- 89 replies
-
- 4
-
-
- Cutty Sark
- Revell
- (and 2 more)
-
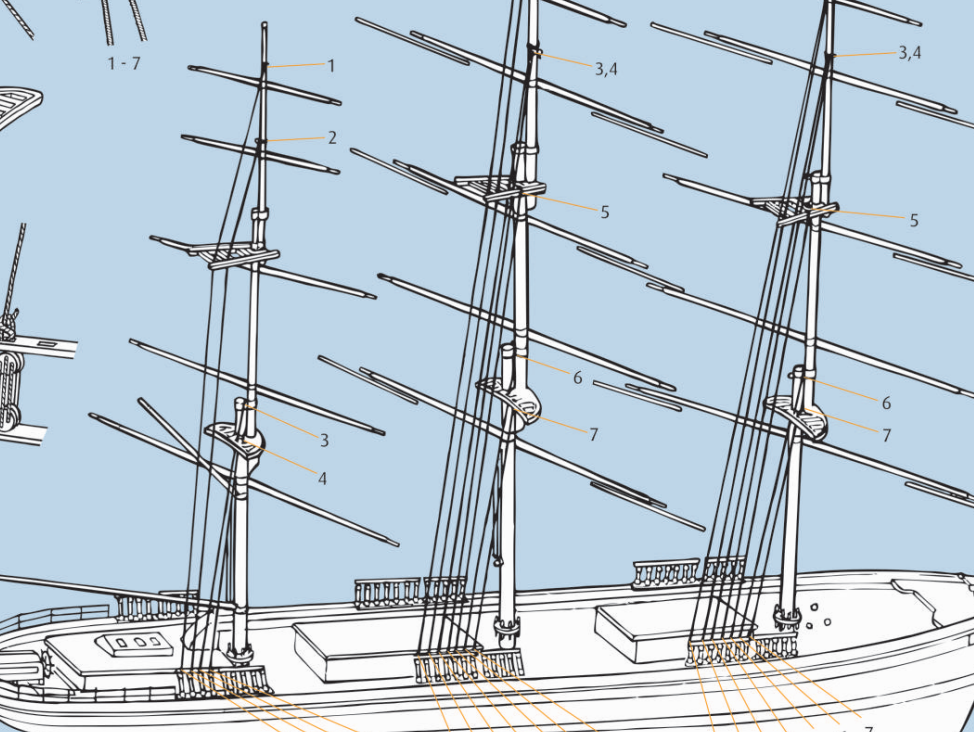
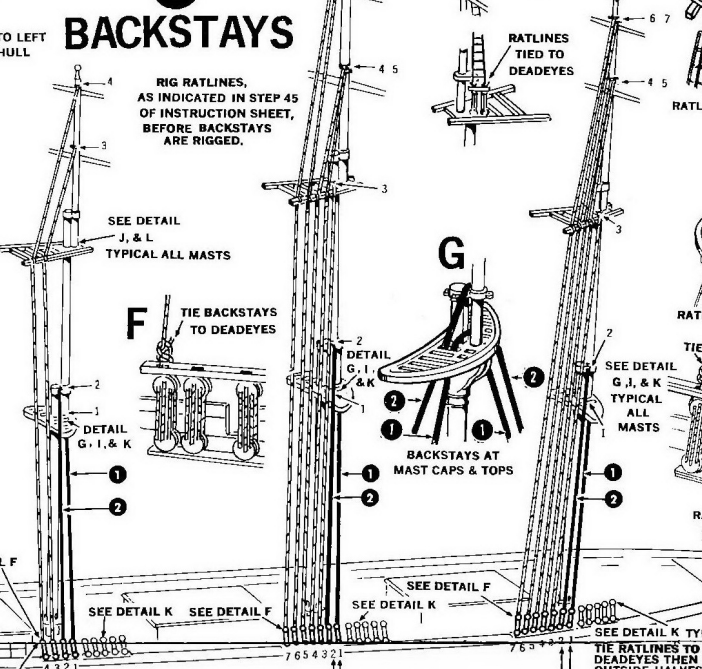
Thanks Ian. After studying the stays both fore and back the 1974 instructions seem to make sense to me, rigging the forestays bow first. The backstays may be a different story by the time the forestays are in place, I may rig them stern to fore. [edit] I rigged the backstays first because the 2017 instructions are ambiguous at best and suggest, without specifics, that's the way it should be done. The 1974 instructions are much more clear with numbered steps and detailed imagery. I will, from this stage forward, use those instructions as my main reference. The more I read the later ones, the less they make sense. I like your idea of a temporary stay to help with tensioning - I applied that technique when rigging the backstays but it was less than successful. That's my own fault, though, and the re-do (while a bit painful) will result in a much more workable scenario.
- 89 replies
-
- 2
-
-
- Cutty Sark
- Revell
- (and 2 more)
-
After long consideration I've made the painful decision to un-rig the backstays entirely. The aft bend in the royal sections of the masts can be mostly corrected by subsequent installation of the forestays - but the key word here is mostly. It caused me much anguish to clip all of those deadeye lanyards, knowing each will need to be re-wired (my least favorite part of rigging) but it simply is necessary. I'll run the forestays first, from the deck upwards and fore to aft, as indicated in the older 1974 instructions. It will also give me an opportunity to more closely examine the attachments for all of the standing rigging in books and images.
- 89 replies
-
- 2
-
-
- Cutty Sark
- Revell
- (and 2 more)
-
I finished the ratlines on the mizzen and the backstays on the main. As bad as the instruction page for the mizzen is, the main is worse. The tie points for the backstays make no sense at all. I did follow the instructions though because the scale-appropriate rigging for the backstays is not really feasible with this model. And as you might imagine the royal section of the main mast is very thin and excessively flexible. Despite having yet again virtually no tension on the stays, the upper section of the mast bends unacceptably. I ran a test and the forestays will correct the problem. So, no pics until more of the standing rigging is in place. Right now I'm working on those alternative boat davits and they're working out very well.
- 89 replies
-
- 3
-
-
- Cutty Sark
- Revell
- (and 2 more)
-
Kudos for taking on this task, it appears daunting to me.
-
Bruma, here is a link to a full archive of Kevin-the-lubber's images. It is a large archive - 470 910 mages for a total size of 5.6 Gb. However, you can browse the archive and pick what you wish to see, if you wish. https://mega.nz/folder/iElDBRLT#RMcfNKHp3iyaBHvoiBS3hw These images have been very informative and useful for me.
- 399 replies
-
- 4
-
-

-
- cutty sark
- revell
- (and 2 more)
-
The Royal Museums Greenwich has this to say... The T-shirt looking thing is a masthead vane. It has quite a story of its own. Attributions: https://www.rmg.co.uk/stories/blog/curatorial/object-focus-cutty-sarks-flags https://www.rmg.co.uk/stories/blog/ships-blog-mast-head-vane
- 399 replies
-
- 2
-
-
- cutty sark
- revell
- (and 2 more)
-
There is really no tension at all on the stays, only enough to keep them from looking saggy. Each of them are single lines, running from the main deck deadeye to a knot on the mast tie point then down to the corresponding deadeye on the opposite side. As I mentioned to Johnny I'm fairly certain it will be a self-correcting problem as the rigging progresses. If not, I can re-run the stays but will probably need to reinforce the royal section of the mast. I'm hoping to avoid that, but it is an option. [edit] I use this knot at the tie points for most of the stays, I really like the way it looks and behaves.

- 89 replies
-
- 2
-
-
- Cutty Sark
- Revell
- (and 2 more)
-
It is, as gak1965 noted, partly an artifact of camera angle and juxtaposition with the other two masts - but only partly. Even though there is virtually no tension on the stays, the fragile nature of the thinnest parts of the masts means they will bend. Most of this will be corrected and offset by other elements of the standing rigging (I don't know what the lines are called but there are several that originate on the main mast and terminate on upper parts of the mizzen) and quite probably the running rigging as well. The royal section of the main mast is even more flexible and will require extra care to prevent over-raking.
- 89 replies
-
- 2
-
-
- Cutty Sark
- Revell
- (and 2 more)
-
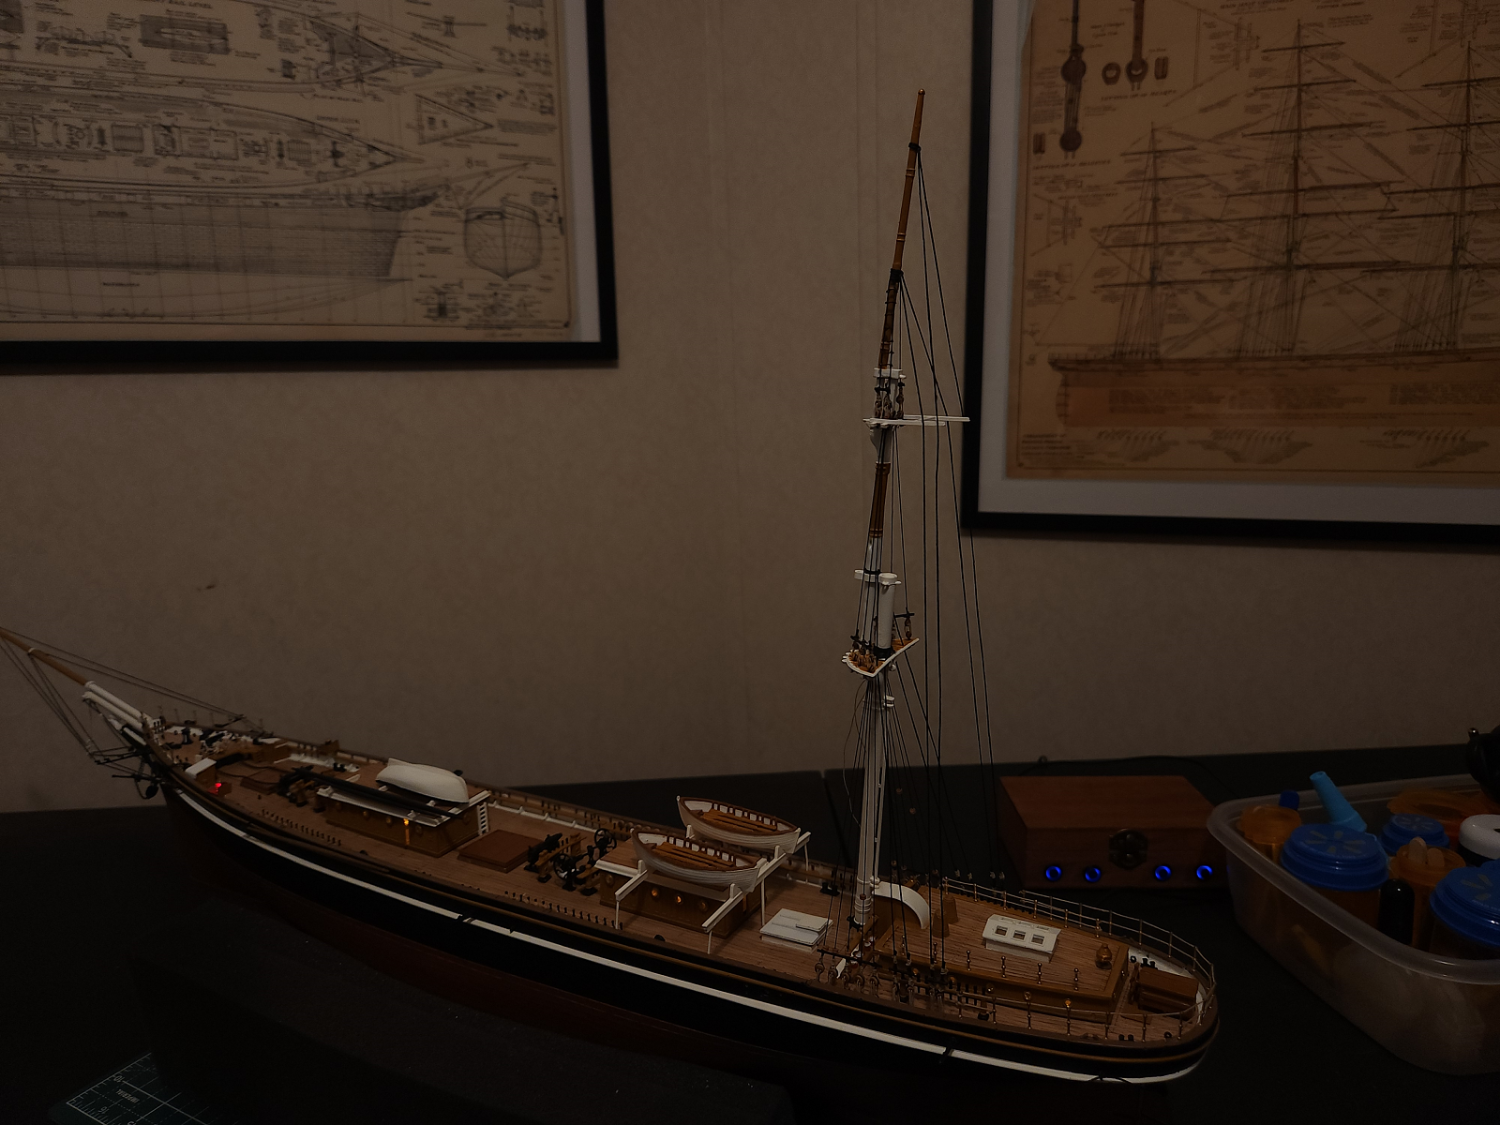
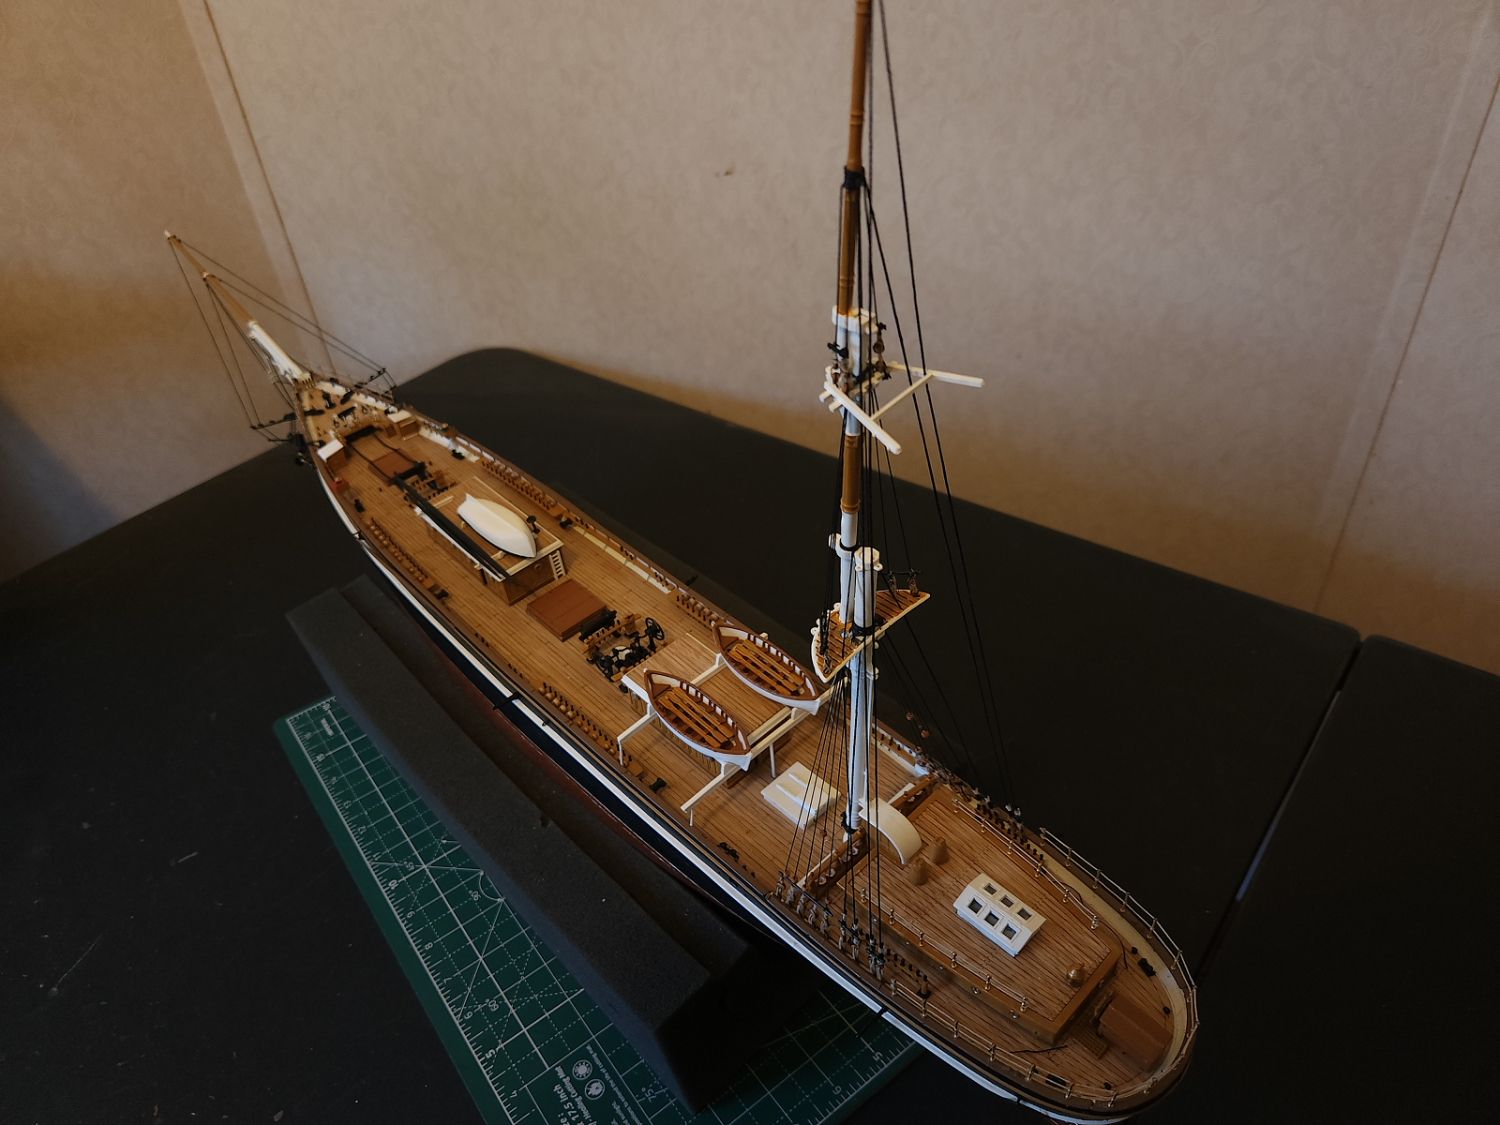
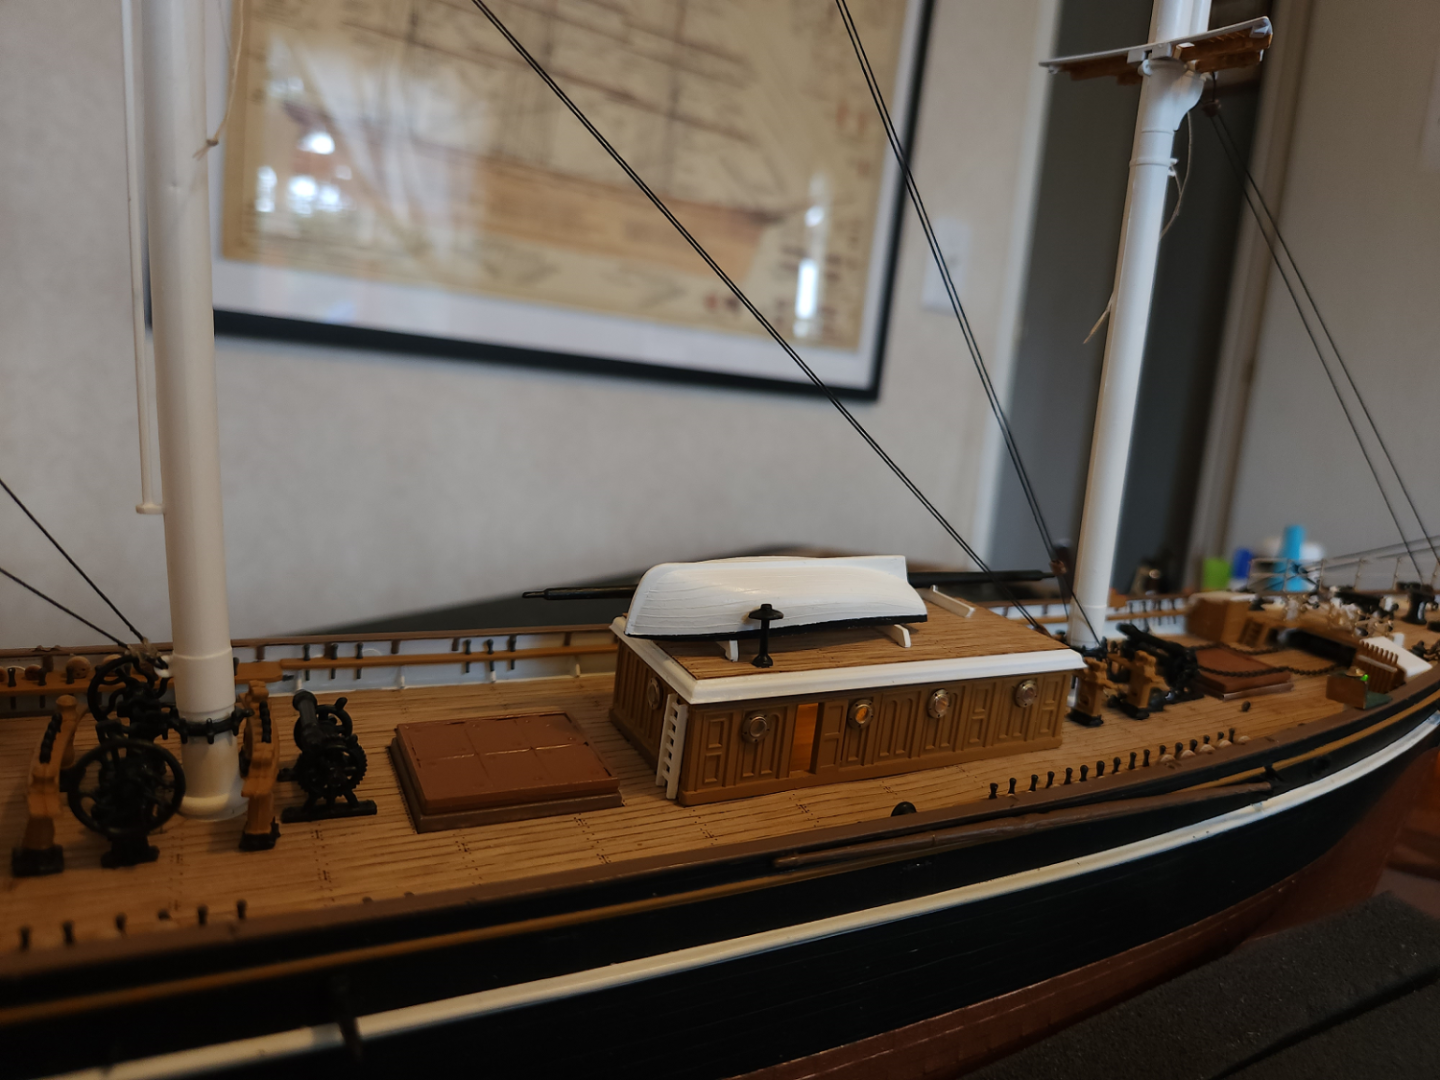
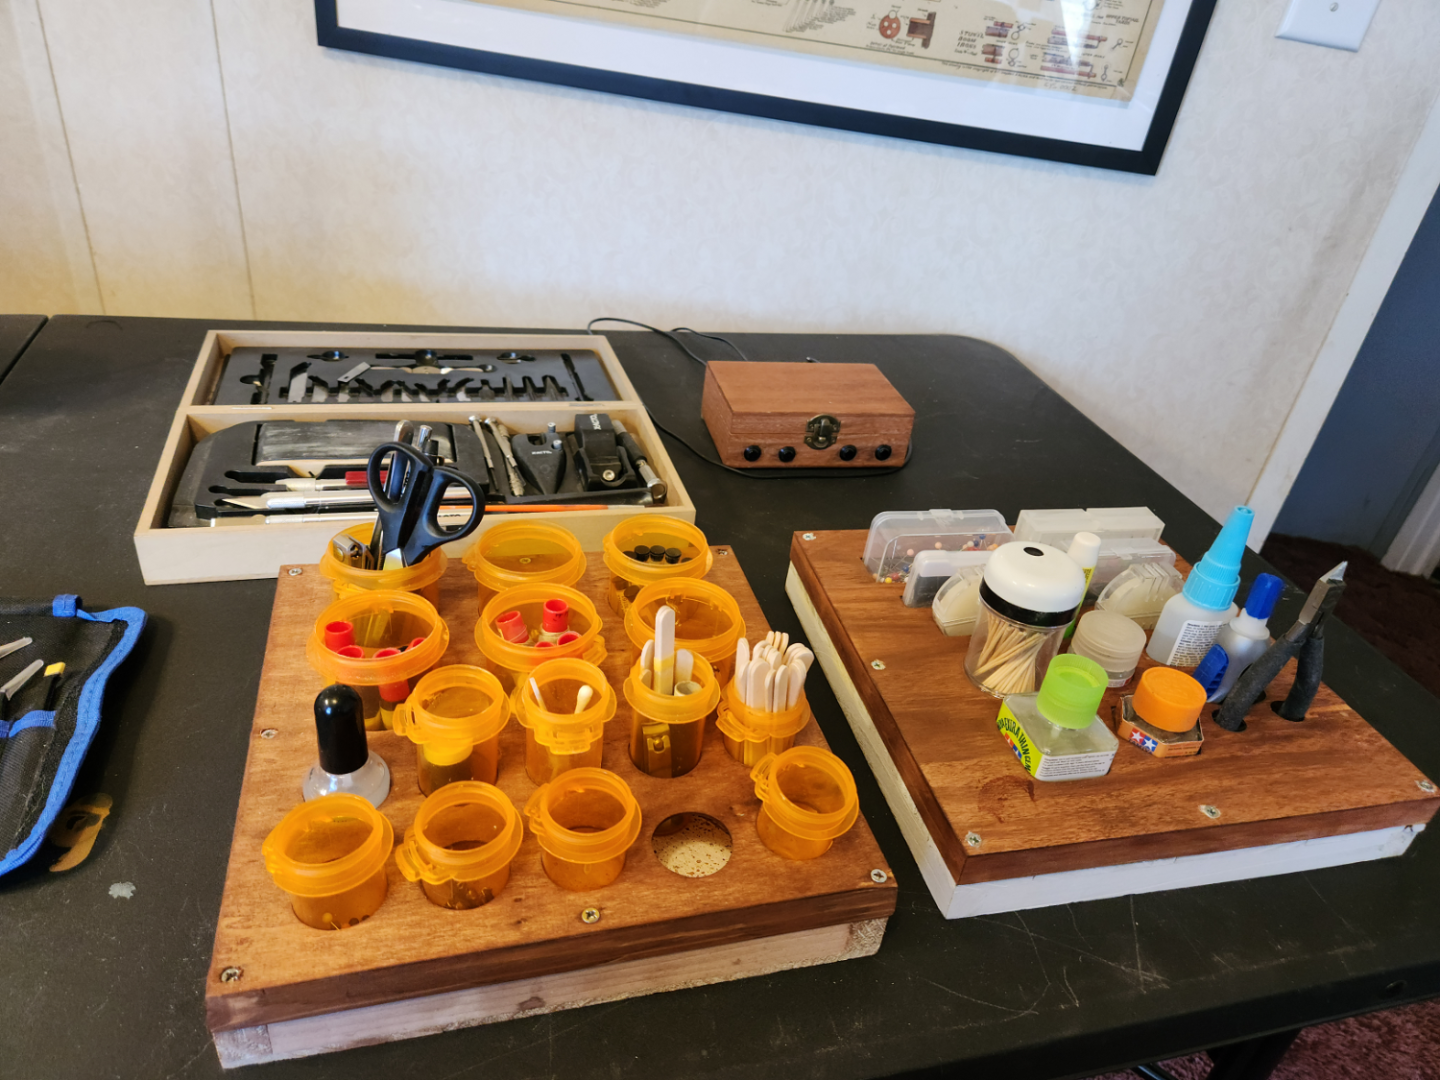
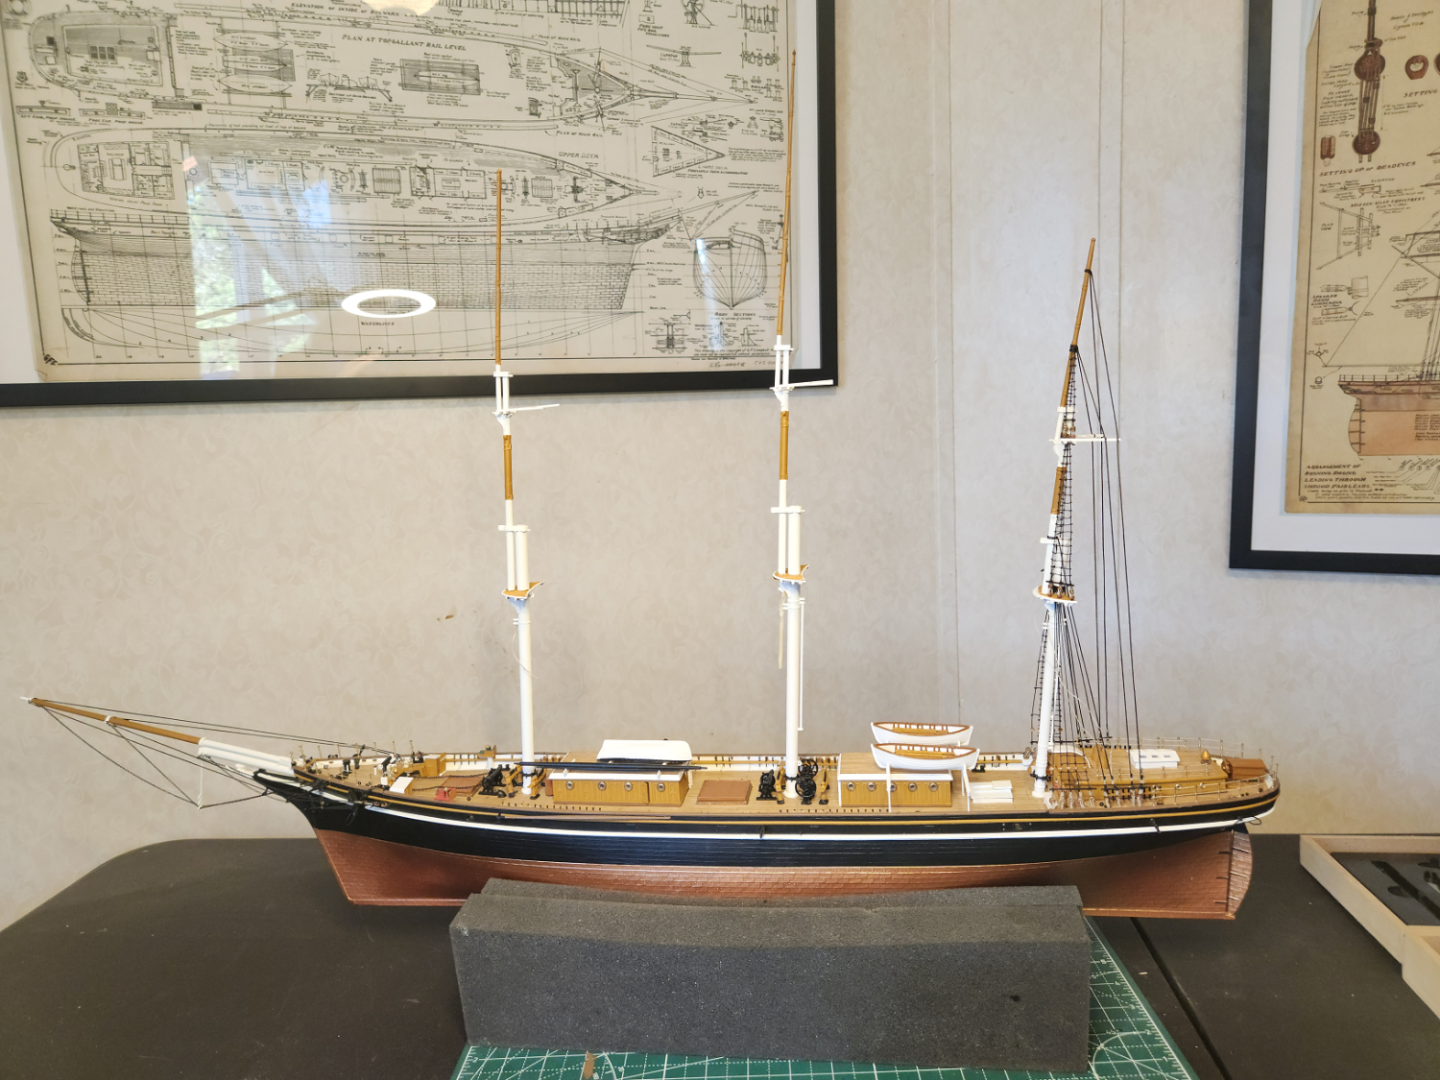
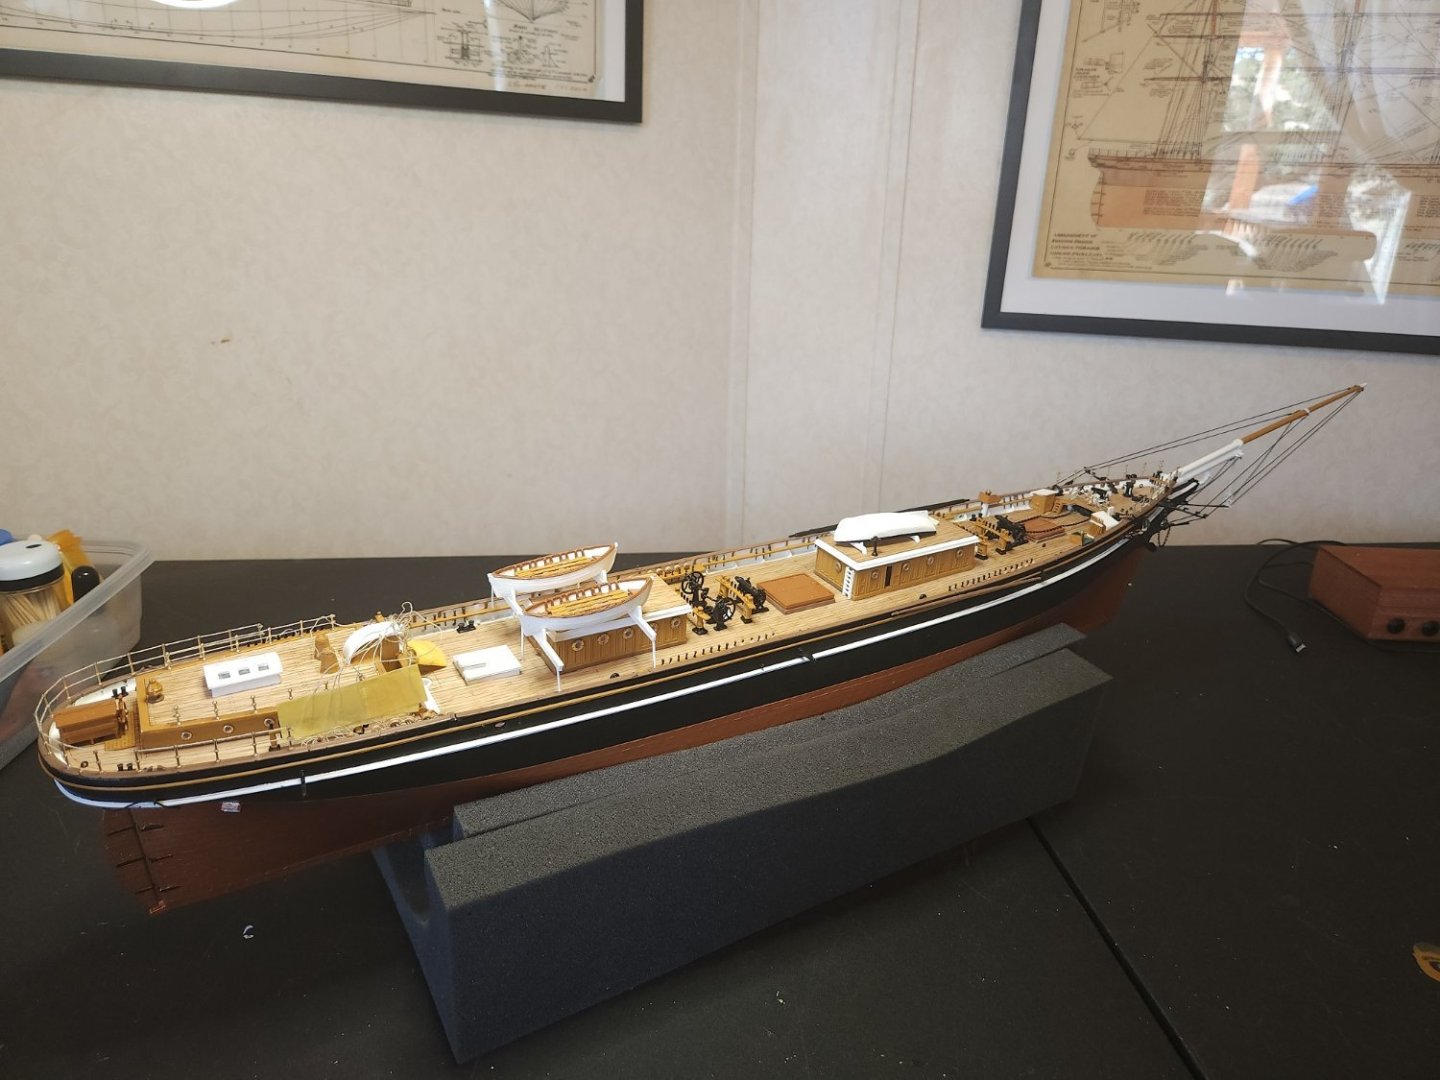
I do like having many of my modeling tools and materials organized in medicine bottles but having them rattling about in a Tupperware container was less than ideal. They'd fall over frequently and were rarely in the same spot I left them last. I have a pile of these easel boxes so I repurposed a few of them to organize the stuff. I think they came out OK. At least things are a bit more organized now. The Cutty Sark has not been sitting entirely idle. The fore and main masts are painted and dry fit and sitting loose in the sockets - that's why the rake looks kind of goofy. Of course a handful of other deck elements are also dry fit as I've mentioned before (boats and fife rails for example). The ratlines for the mizzen are almost done, and I disguised some deadeyes to serve as fairleads. I didn't notice until I took this pic that at least one of the ratline rungs on the starboard side of the mizzen needs to be re-done. The bend in the shroud isn't really noticeable until it shows up in the photo, especially with the mast in contrast. It is rather easily done though because I've used nail polish as an adhesive (thanks again hof00) so they'll come loose more easily than if they were secured with CA. [edit] Fixed already.
- 89 replies
-
- 3
-
-
- Cutty Sark
- Revell
- (and 2 more)
-
Very glad to hear you are on the mend and hope it continues. The boat is looking really good.
-
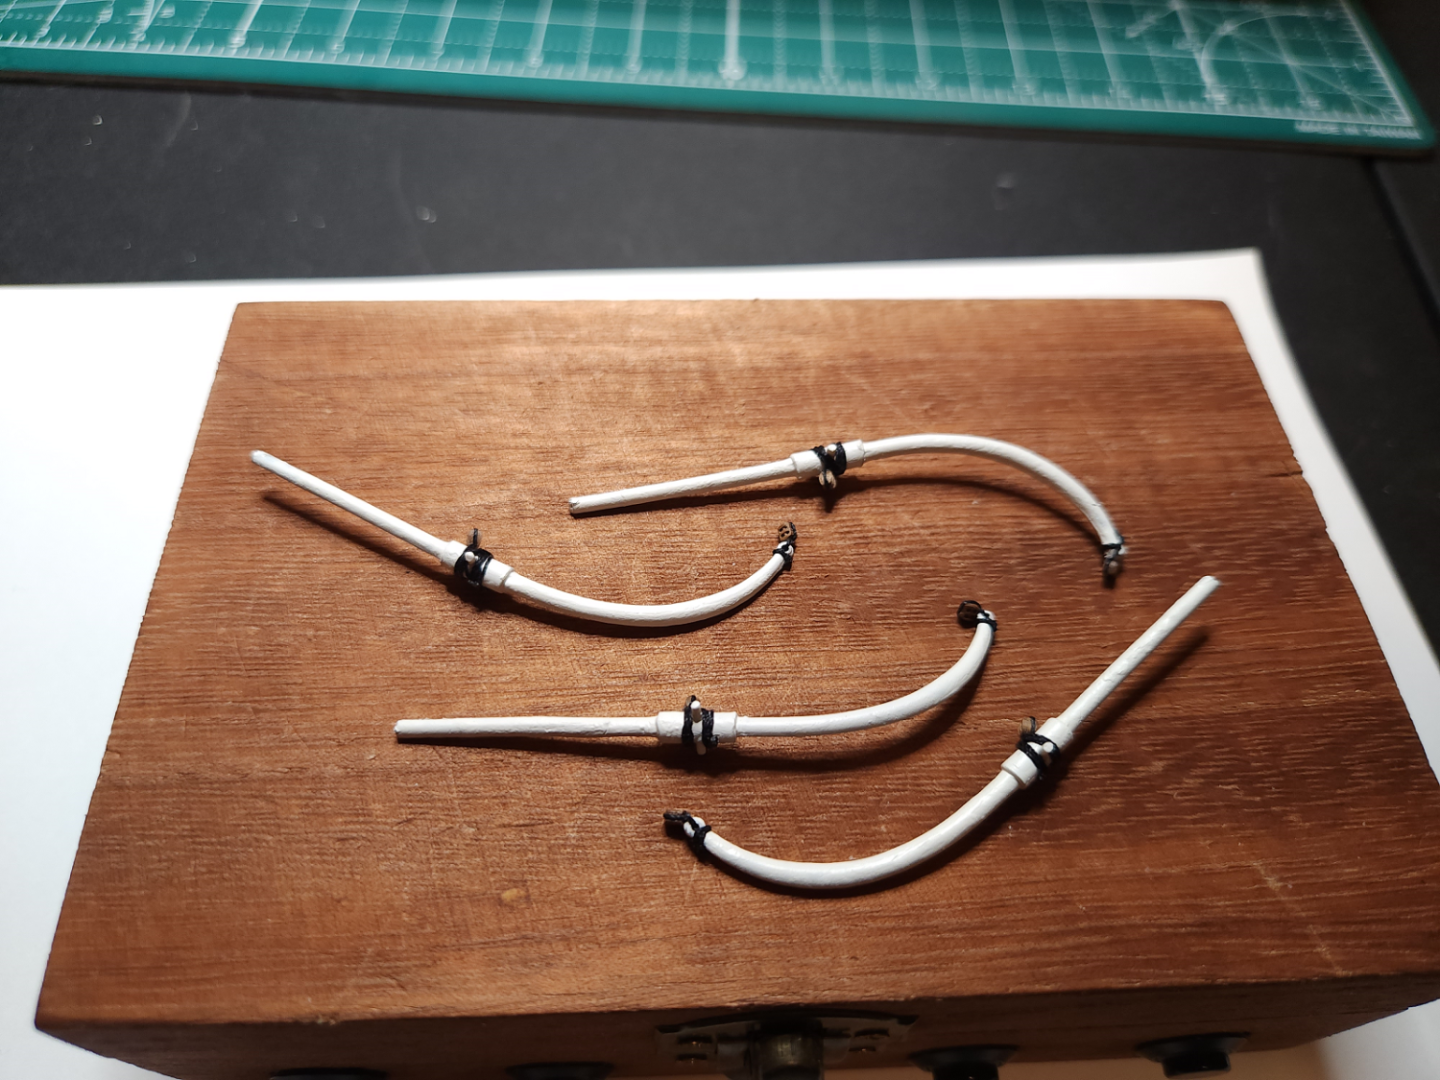
My ratline tying was briefly interrupted by the arrival of custom boat davits from Bluejacket Shipcrafters. The metal they're made from is very soft, but they aren't as flimsy as the soft plastic kit davits. They were not pre-drilled. Holes in the ends posed no problem, holes in the center for cleat attachment created a weak point that worried me so I made a predrilled, snug-fitting styrene sleeve and slid it over the area, and installed a facsimile cleat in the aligned holes. I painted the whole shebang and wired up some blocks. The davits are ready to install but on Bruma's wise suggestion I'll wait until the main mast is rigged before tackling these. I'm confident they won't suffer the wobbly distortion with which the kit davits are afflicted.
- 89 replies
-
- 6
-
-
- Cutty Sark
- Revell
- (and 2 more)
-
I've seen that in numerous pictures but with the location of the deadeyes there is no straight shot to the tie points. I've installed the deadeyes as closely as possible to the location of the kit's faux deadeyes. As for the rest, I think you're spot on when you say it is/was a lazy method and the same should be said for all the stays. I know it rankles, but I will probably follow the kit's instructions for the main and fore mast stays as well, largely to maintain some semblance of consistency. I haven't started those, of course, and my thoughts may change as the build progresses. Right now, I have hundreds of clove hitches to tie.
- 89 replies
-
- 2
-
-
- Cutty Sark
- Revell
- (and 2 more)
-
I totally agree with you that the instructions are grossly wrong. I suspect that the kit makers were not well versed at all in the way that a clipper is rigged and also completely ignored all of the available documentation on clippers and this vessel in particular. I think that the instructions show locations that are convenient for the kit maker and instruction writers - those locations have visual effect as the primary consideration with little or no regard for practical applicability. So... what am I to do? I'm not at all sure. For the standing rigging, I'm inclined to follow the instructions in so far as they don't egregiously violate my sensibilities. I am quite positive that the standing rigging instructions are going to be less offensive than the running rigging. A quick glance at that shows a rudimentary approach that will take many hours of study of the Underhill and Longridge books to correct. I've often said that I don't intend for this to be a museum quality model. I may build one of those one day but you can bet it won't be a Revell kit. Thank you again for your invaluable help, support, and advice, and I hope you are prepared for a barrage of questions as this build progresses.
- 89 replies
-
- 1
-
-
- Cutty Sark
- Revell
- (and 2 more)
-
Hey George I want to thank you for all of your help, support, and advice.
- 89 replies
-
- 1
-
-
- Cutty Sark
- Revell
- (and 2 more)
-
Here's a better pic. My stays are not tied to the connecting iron though they are tied to the mast above the connector and cap. I've started work on the ratlines, and I'd like to give a shout out to hof00 for giving me the tip of using clear nail polish as a thread/rope adhesive. It is great for light duty without the obnoxiousness of CA. Thanks!.
- 89 replies
-
- 4
-
-
- Cutty Sark
- Revell
- (and 2 more)
-
Better... I haven't lashed them to the spreader arms yet, that will wait until the main mast is done as tensioning will likely change a bit. @gak1965 I'll look at other sources too to find better info than the instructions give - they are notoriously incorrect on a lot of topics.

- 89 replies
-
- 2
-
-
- Cutty Sark
- Revell
- (and 2 more)
-
Thank you very much Bruma, I will likely re-route those. The 2017 instructions show them running inside the arms, the 1974 instructions are ambiguous. The stays appear to be tied to the arms but it is not clear whether inside or out (it looks inside to me). Your expertise is well noted, however, and your words make total sense to me. I thank you for your advice and observation.
- 89 replies
-
- 1
-
-
- Cutty Sark
- Revell
- (and 2 more)
-
Mizzen stays, ratline shrouds, sheer poles, and fairleads done. Ratline rungs are next. Fairleads are "floating" right now, they slide up and down the shrouds. They'll be secured as the ratline rungs are installed. How far up the shroud should the fairleads live? I get various answers in both text and images. Boats and fife rails are still dry-fit and resting in their assigned places for decoration. I'm waiting on davits from Bluejacket - they're taking what I consider to be a long time filling the order. I haven't reached out to them yet, I'm not in a hurry for those things, they won't get installed until after standing rigging is done or perhaps even later. The line hanging from the cheeks is a pre-threaded loop for securing a sling chain to the mast when the spar is eventually installed. There is an eye on the mast but it is obscured by the cheek block and impossible to get to after the block is attached to the mast.

- 89 replies
-
- 4
-
-
-
- Cutty Sark
- Revell
- (and 2 more)
-
I swear on my Dad's memory every word of this is true. The Great Gold Mine Adventure.txt
-
Hackney's book makes no mention that I've found. Both Longridge (vol. II, p. 126) and Underhill (p. 23) mention signal and ensign flags on the vangs of the spanker gaff. They're not specific about which flags are there, Old White Hat's flag would quite reasonably be displayed on the main mast.
- 399 replies
-
- 2
-
-
- cutty sark
- revell
- (and 2 more)
-
@gak1965 - thank you for the tip on Bluejacket. I've ordered a couple sets of davits from them, they look like they will work out better than the plastic ones. I'll need to fit cleats on them but I can do that fairly easily. Thanks again for the info and fingers crossed... In the mean time, it is time to start working on the mizzen mast. Some of the deck elements in this pic are dry fit and not glued in such as the boats and fife rails. I'll start with the mizzen because I already have the main deck deadeyes wired up for the ratline and stay shrouds.
- 89 replies
-
- 4
-
-
-
- Cutty Sark
- Revell
- (and 2 more)