JacquesCousteau
-
Posts
1,374 -
Joined
-
Last visited
Content Type
Profiles
Forums
Gallery
Events
Everything posted by JacquesCousteau
-
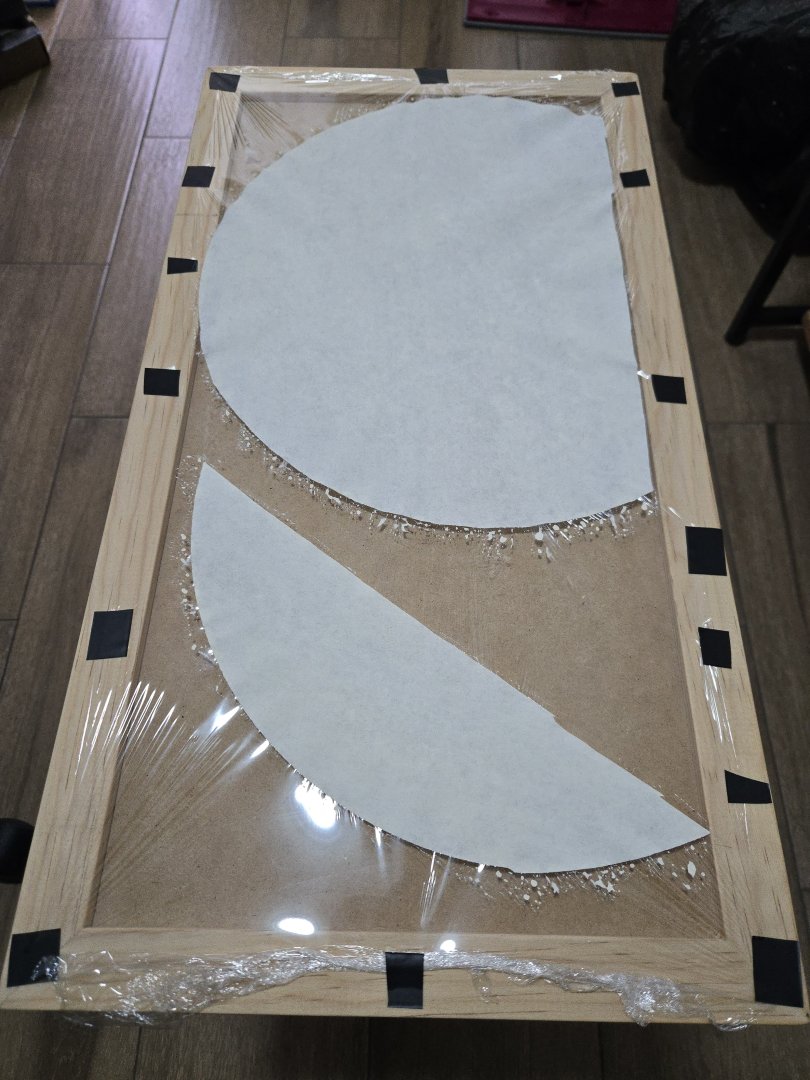
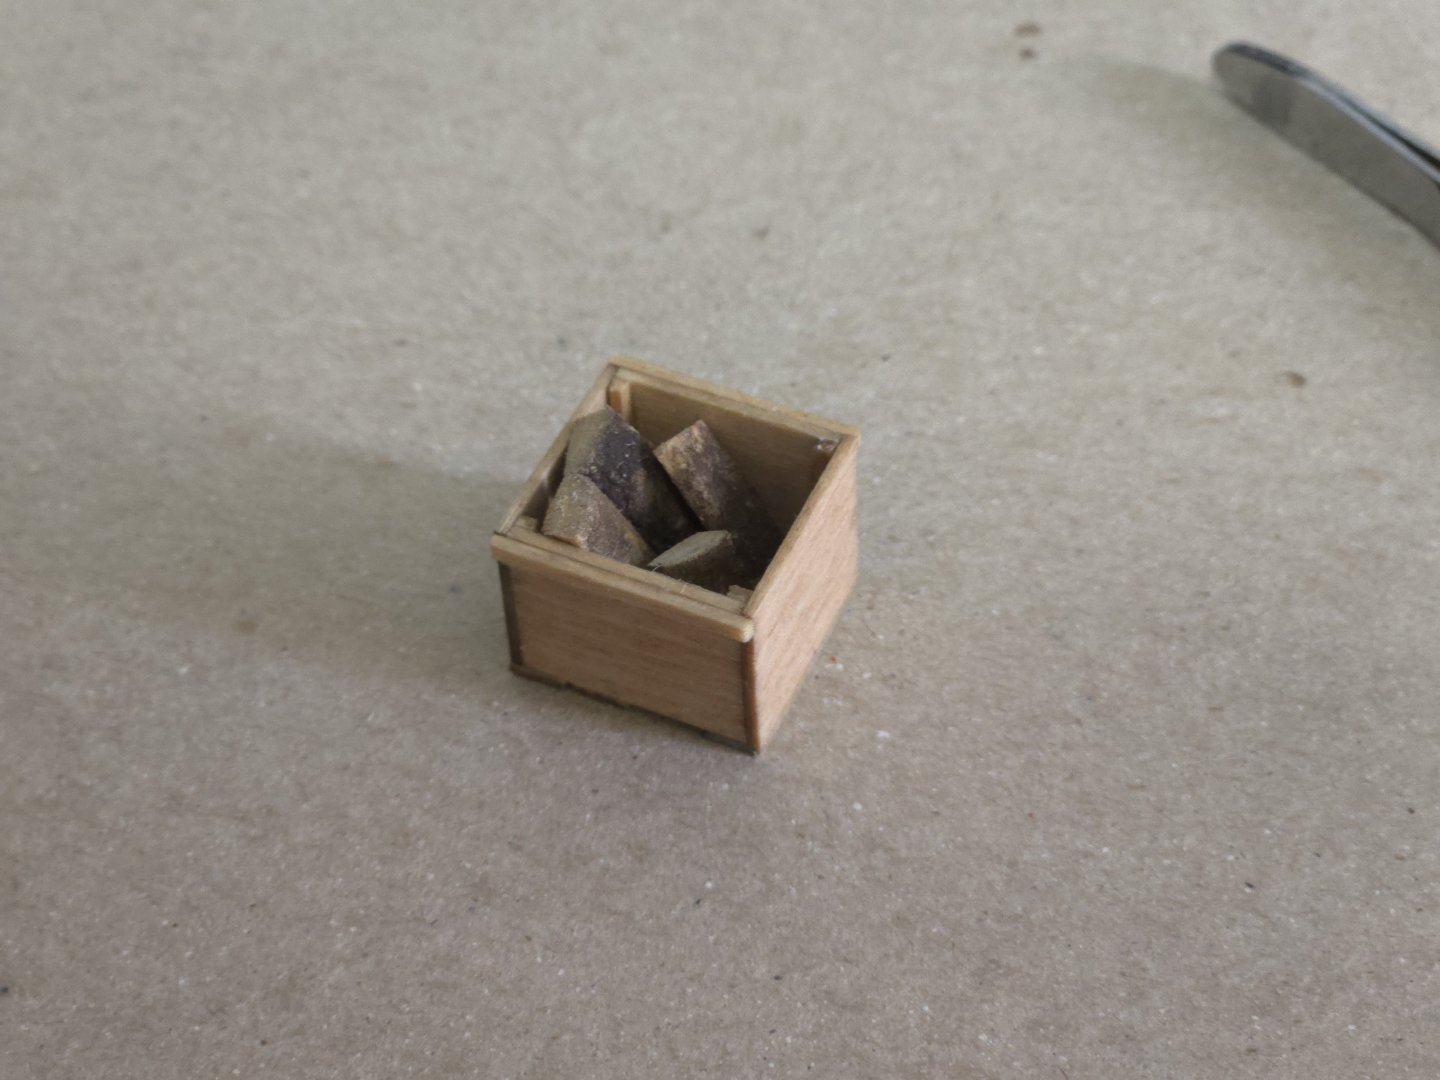
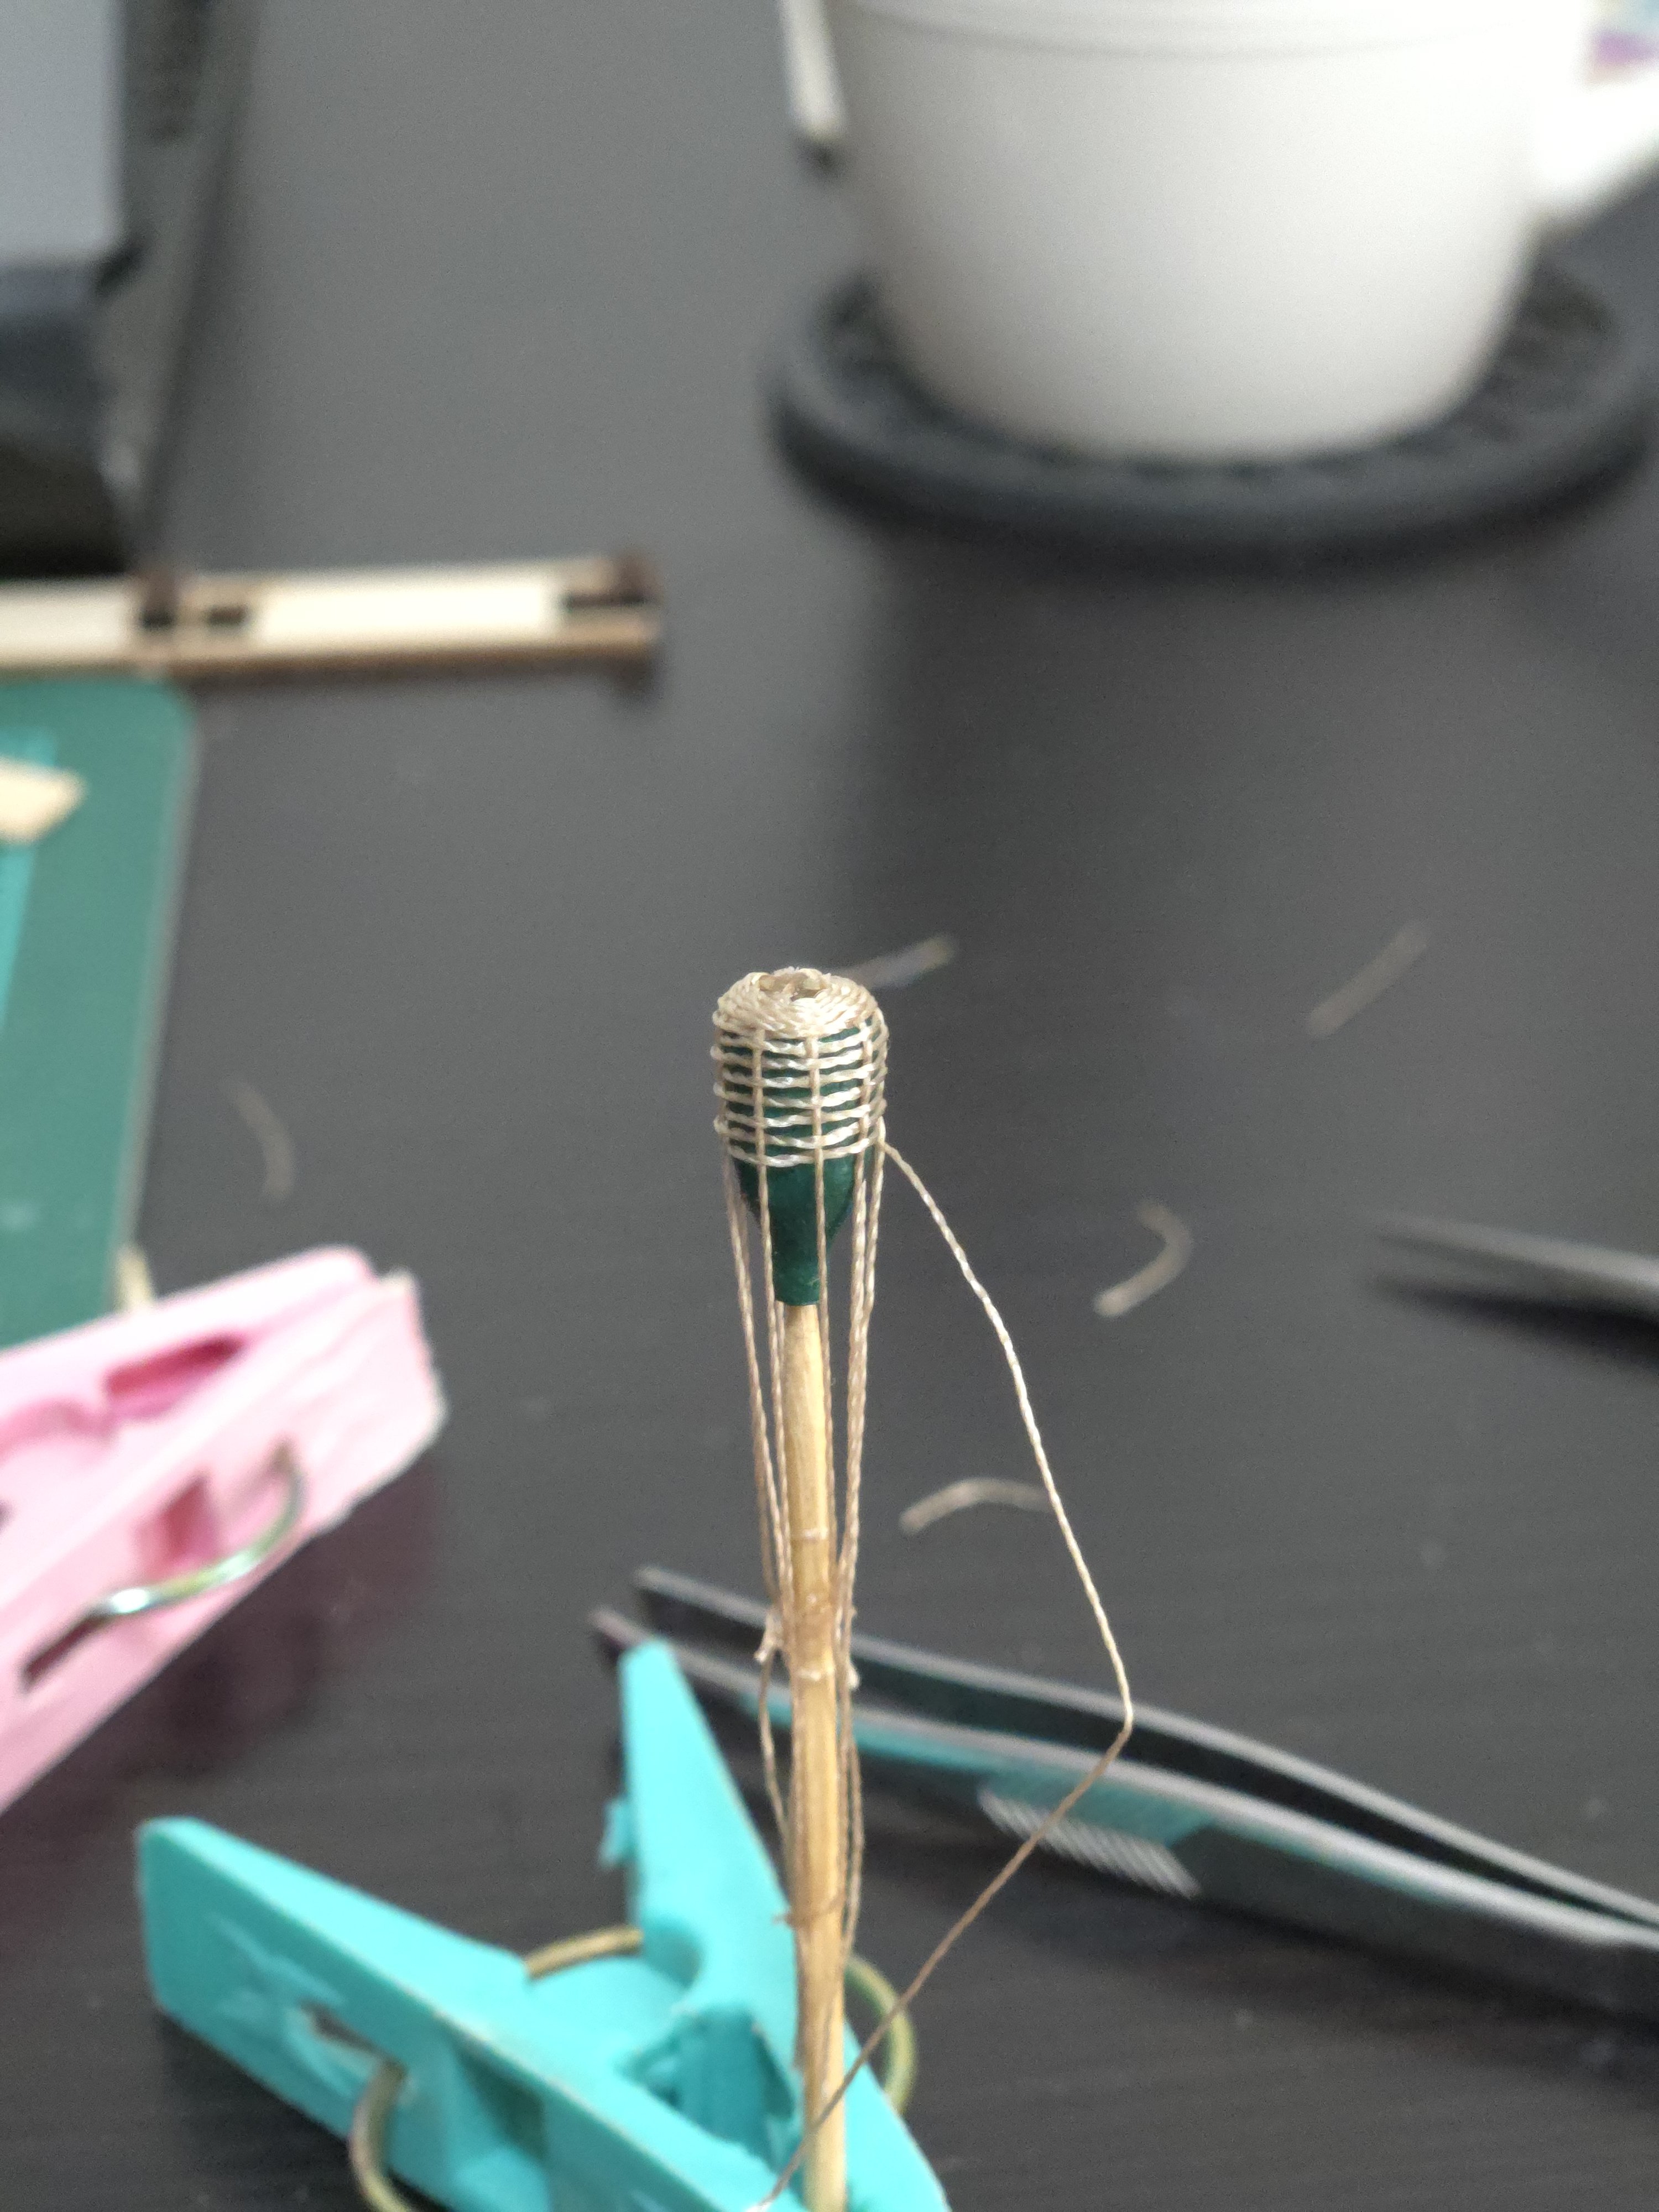
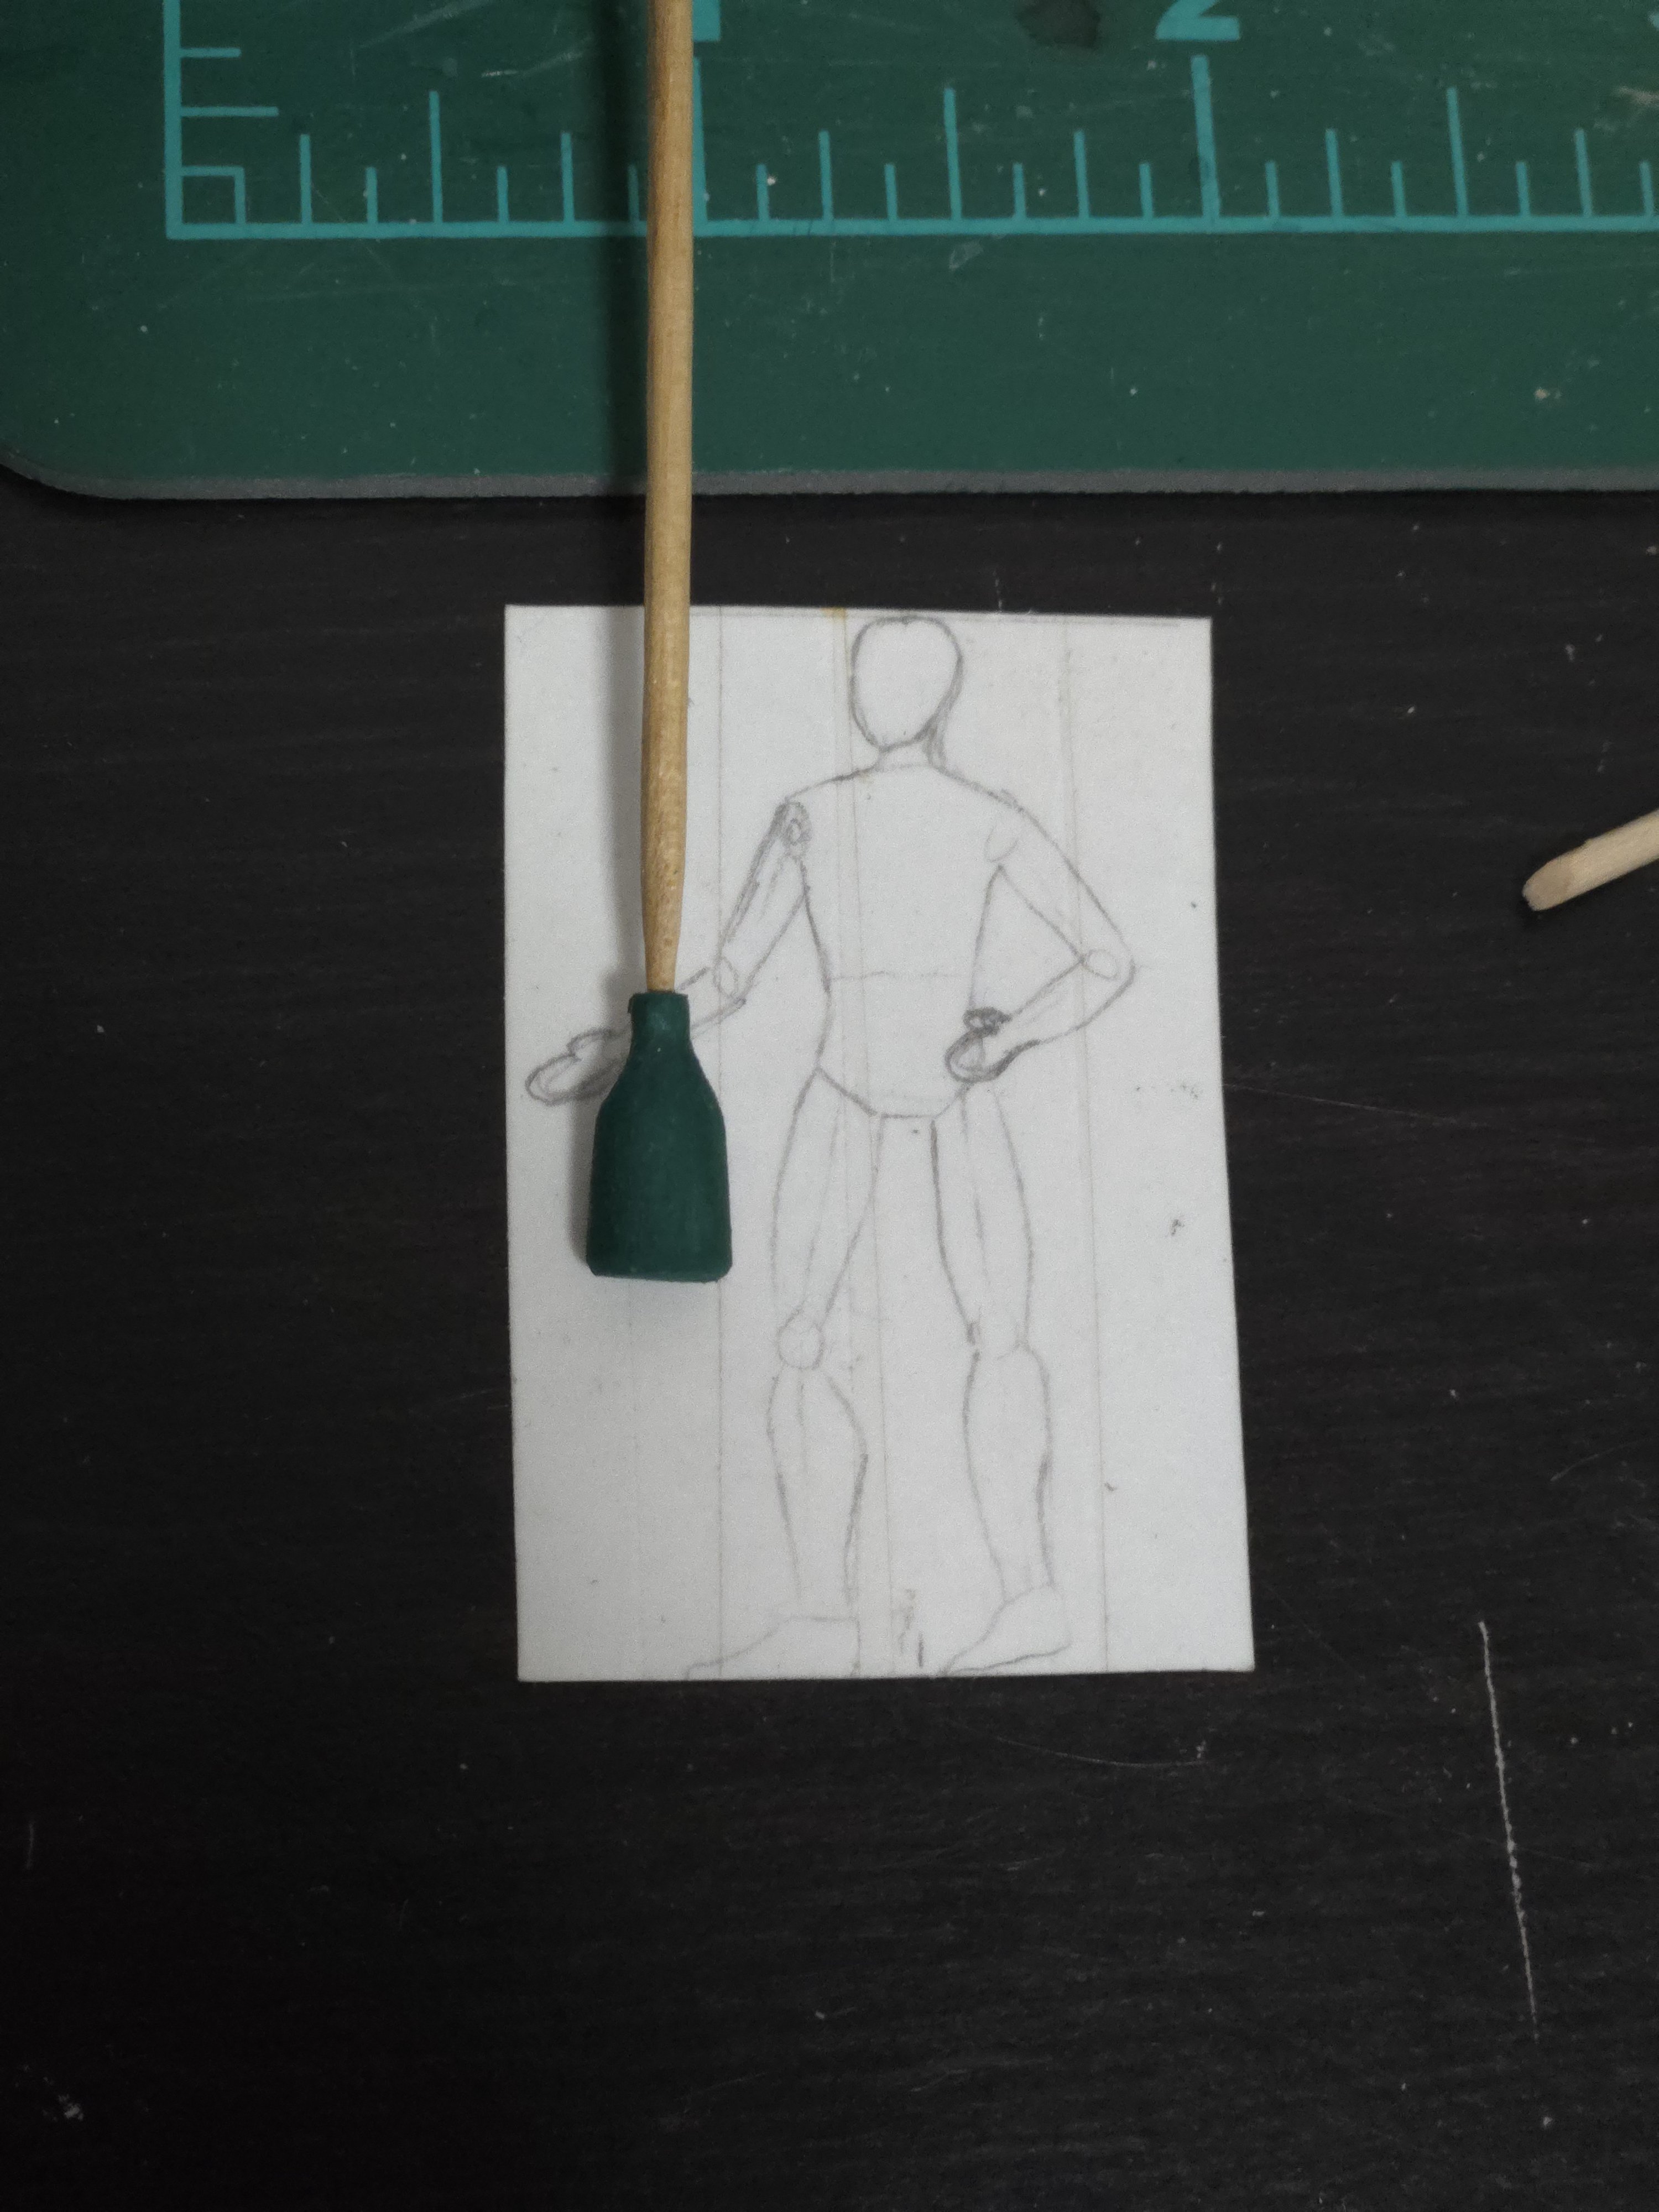
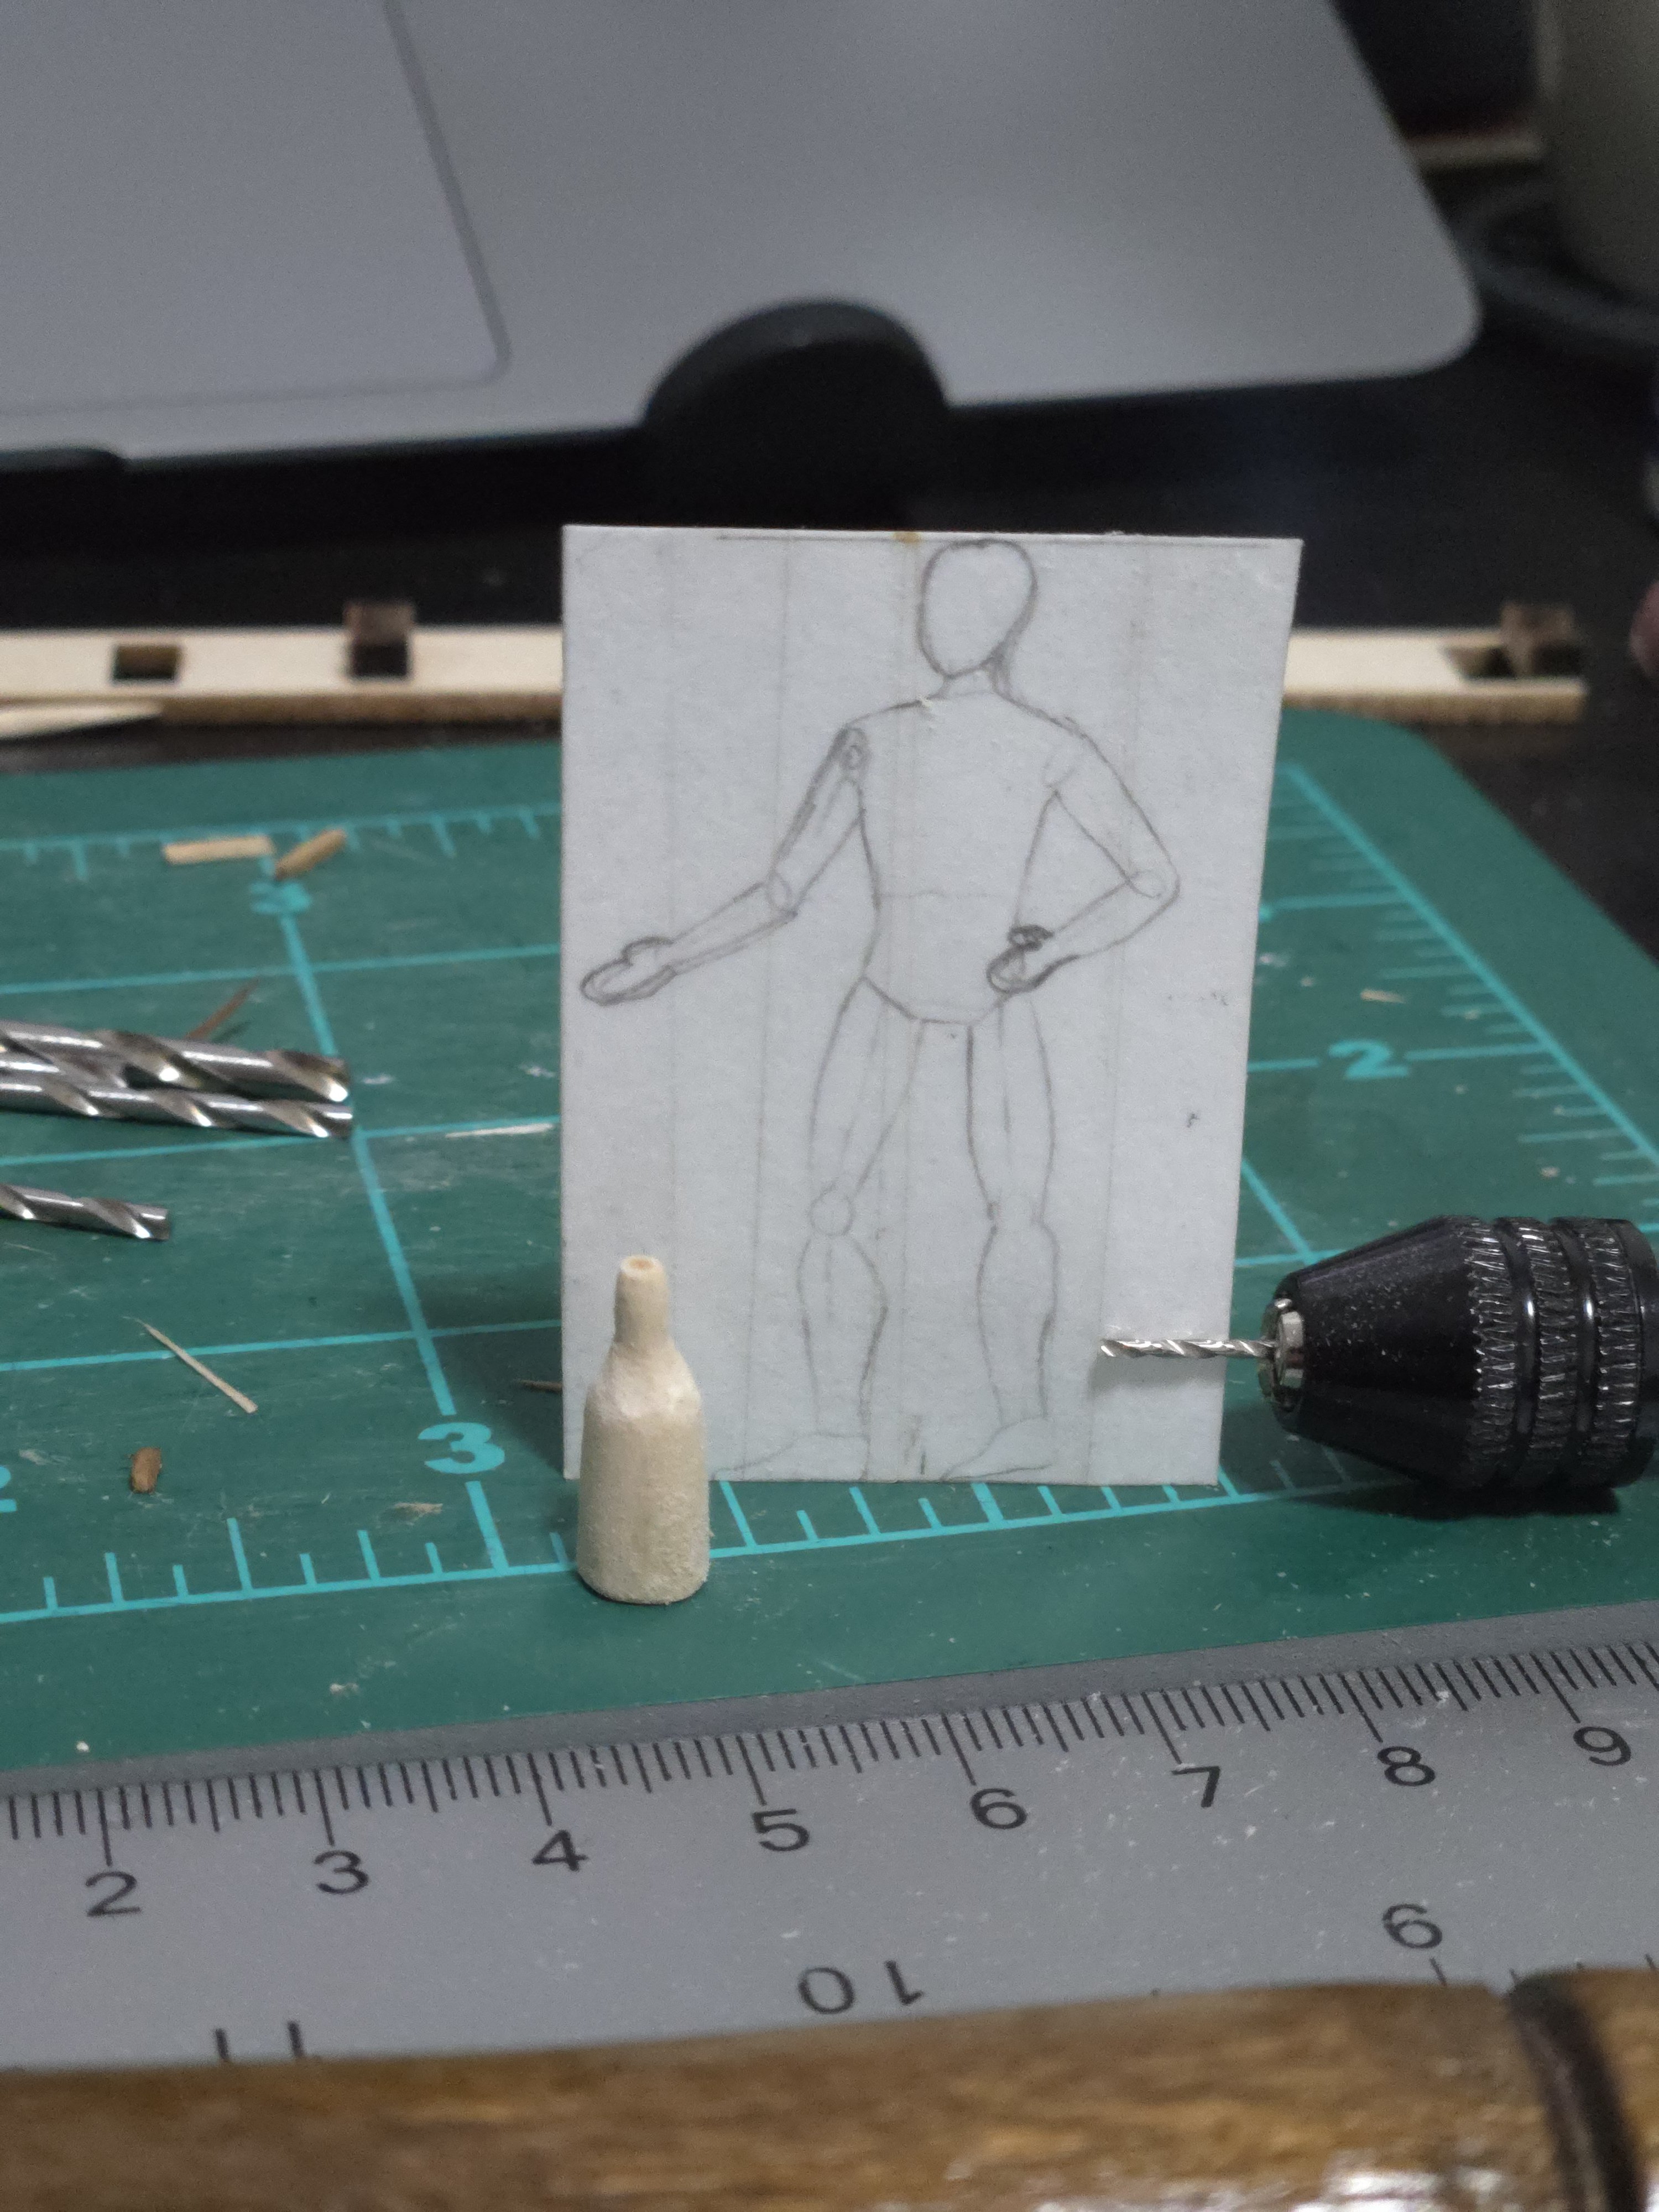
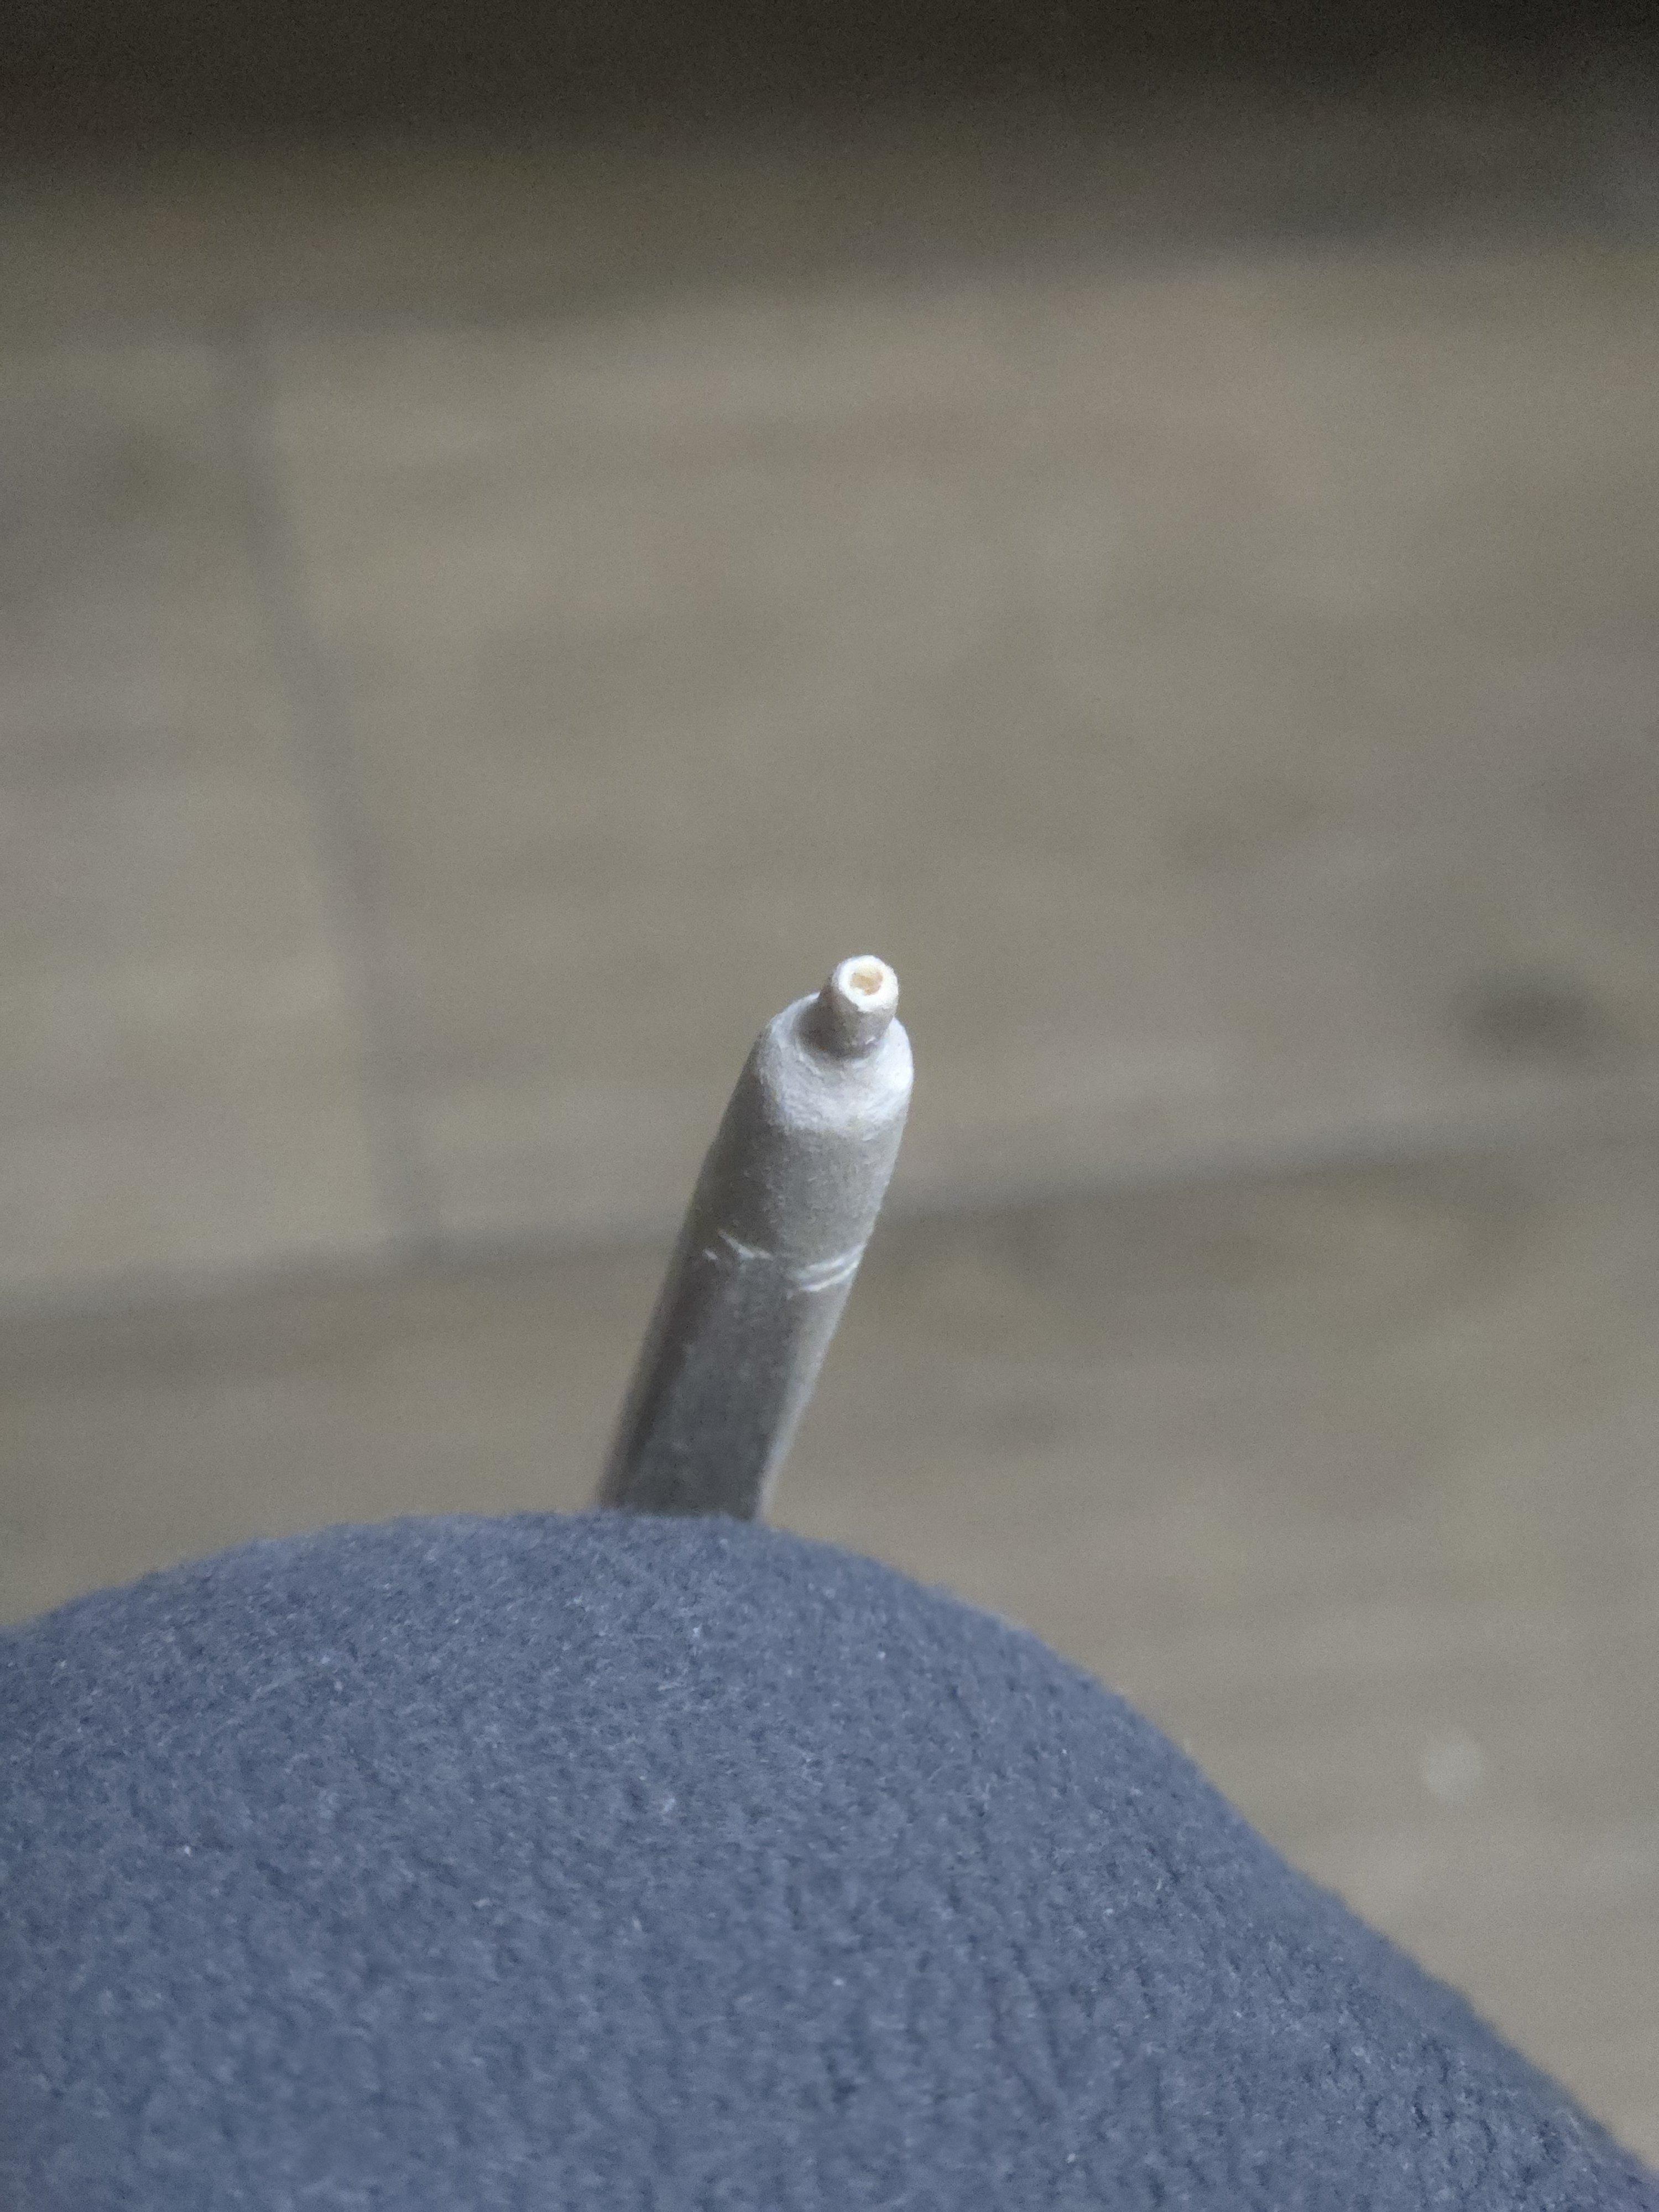
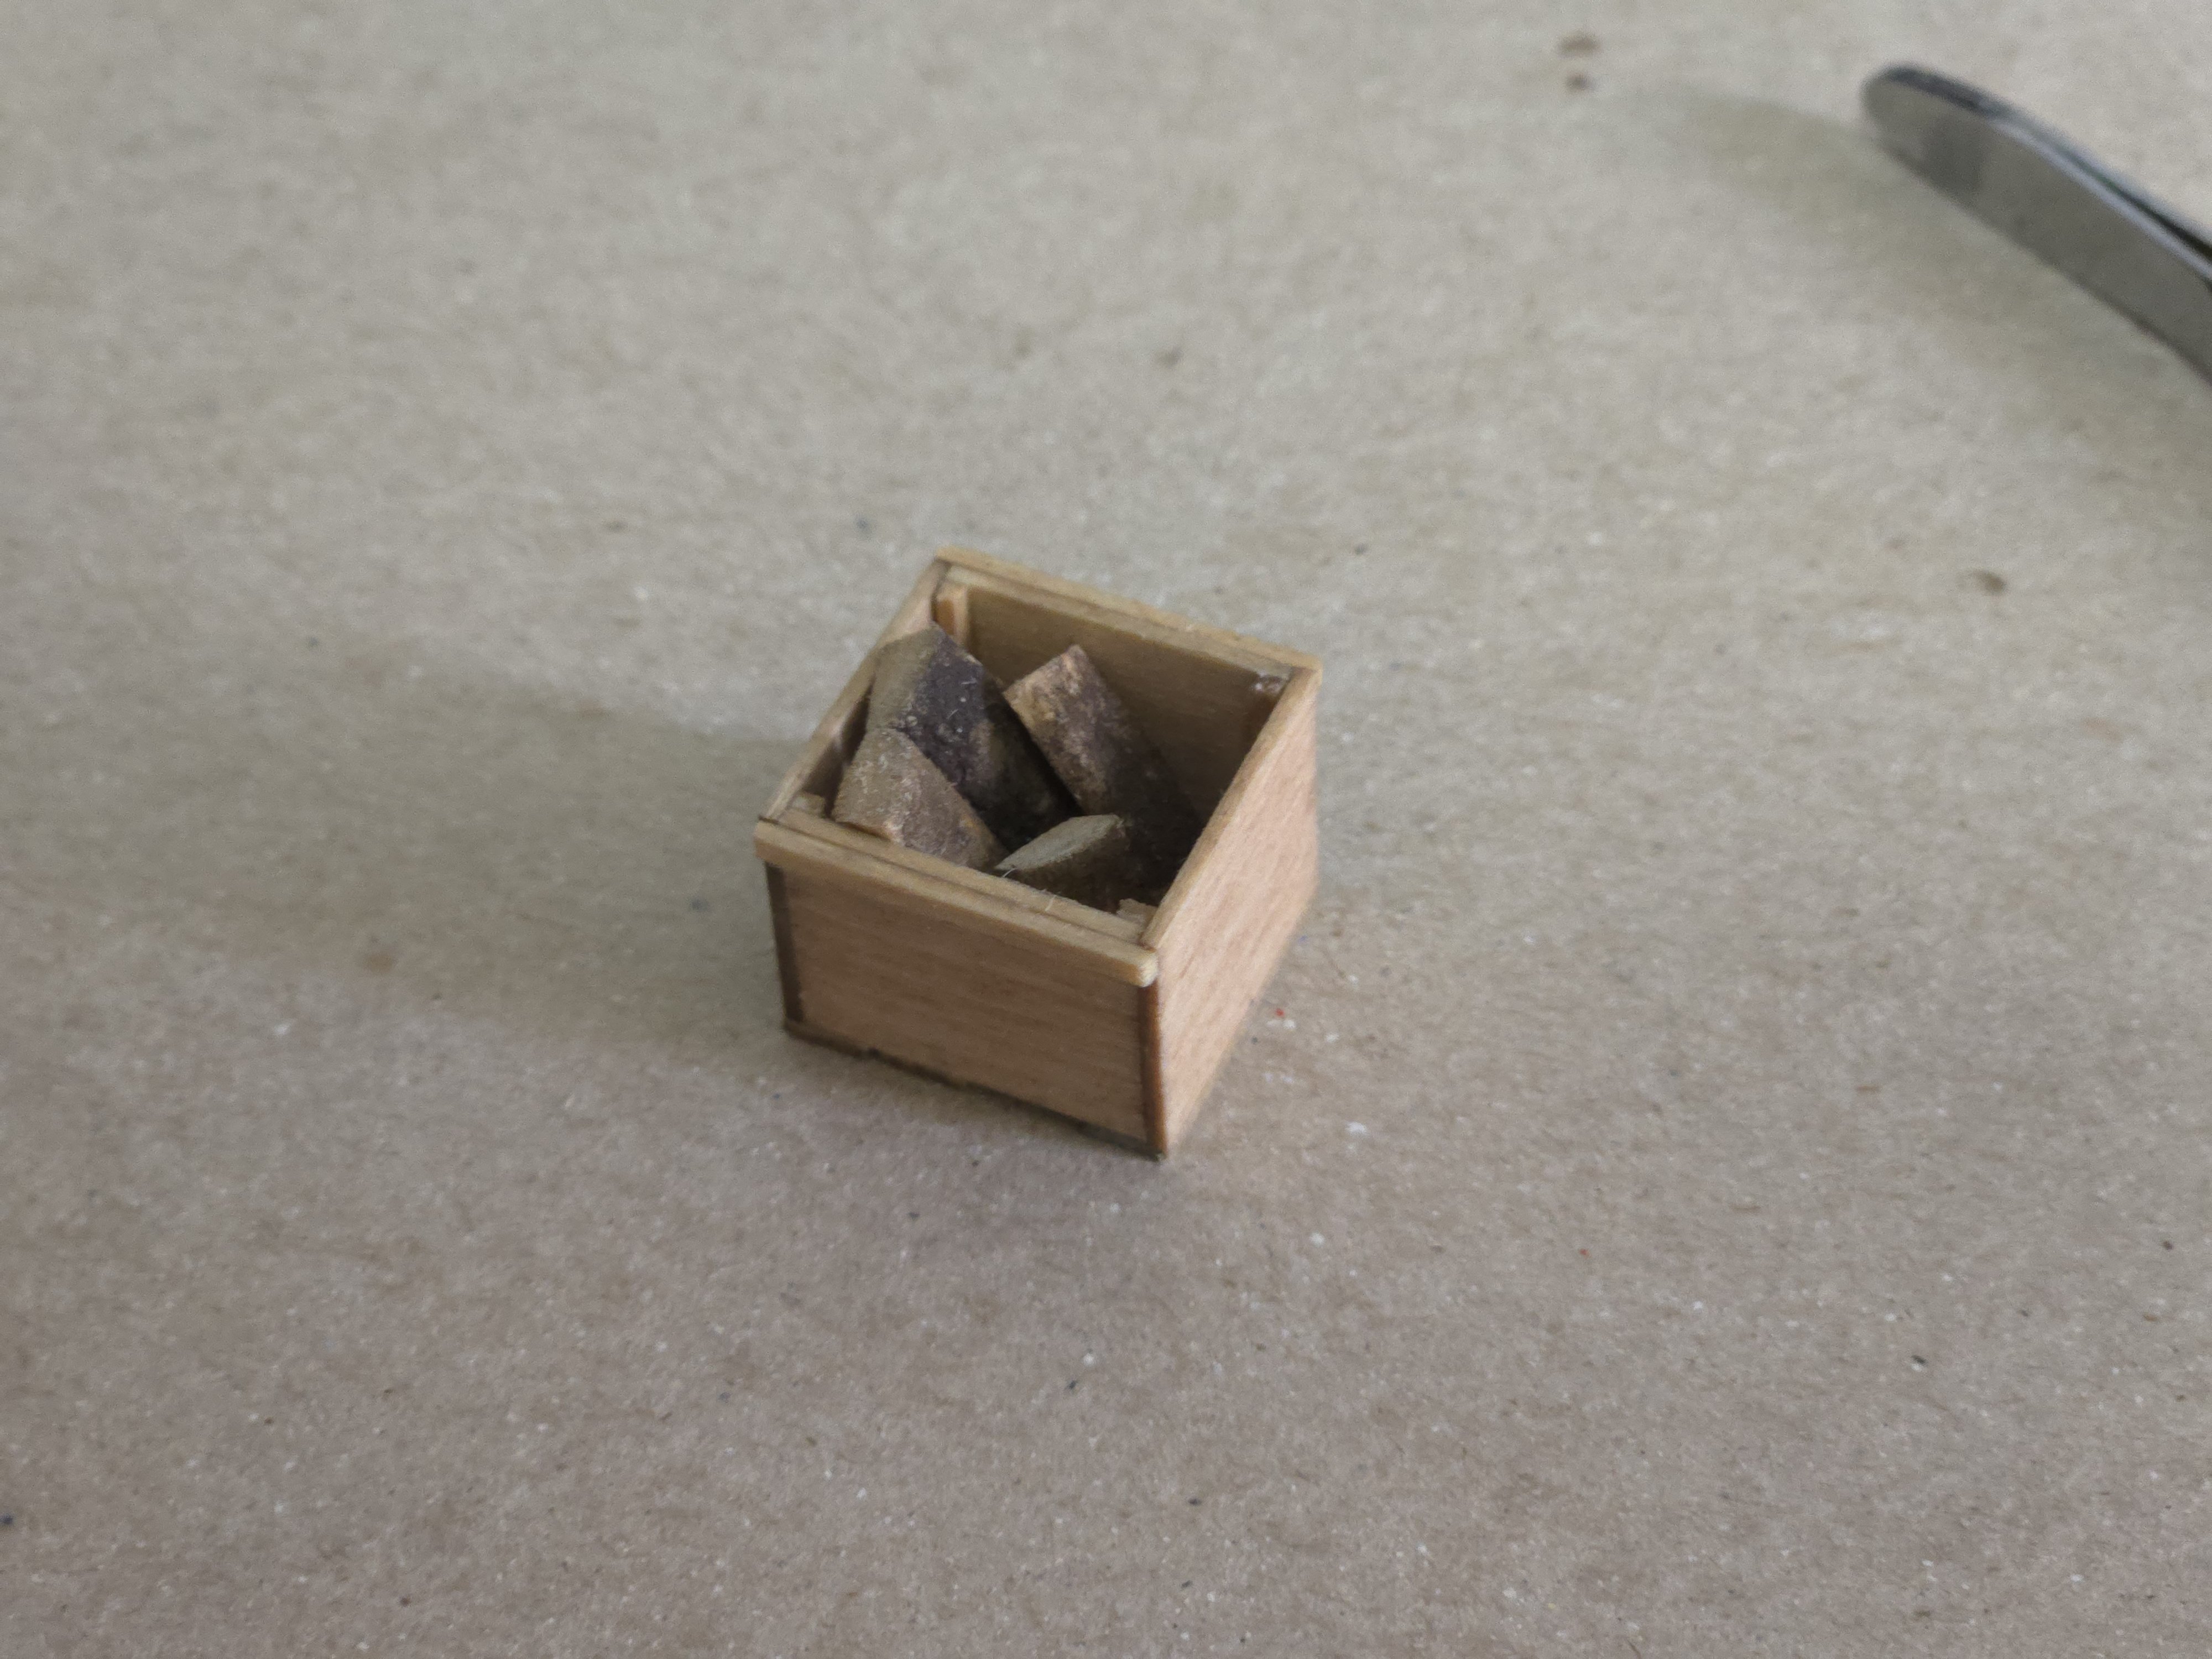
 Thanks, Keith! The box won't be used for this model (photos show that non-firewood cargo was more often carried in sacks), but one benefit of trying to make most of my models in 1:32 scale is that a lot of accoutrements are interchangeable, so it will probably be used for some other build. Remaking the box was straightforward. It's just a little smaller in each dimension, but it looks like a much better fit. I also started work on the sails, which I'll be making by joining together panels cut from a big coffee filter. I first tried stretching plastic wrap over a flat surface (a side table), but the wrap bunched up a lot and was impossible to keep flat, which I realized would lead to a wrinkled, unevenly-colored sail. So, I instead stretched some plastic wrap over the back of my NRG Half-Hull frame. The ability to stretch the plastic over an empty space made it much easier to get a flat surface. Unfortunately the sudden change meant I had to haphazardly cut the still-wet coffee filter to size, leaving a jagged edge. While I advance on the sail, I also made another deck accoutrement. Photos like the one in my last post often show a glass bottle wrapped in wicker. According to Clinton R. Edwards's article "Commercial Sail and Small Fishing Craft of Western South America" (The Mariner's Mirror Vol. 53, No. 4, Nov. 1967: 357-369)*, it was common in Colombia and Peru for fishermen to carry their drinking water in glass or ceramic bottles protected from breakage by a wicker or net wrap, and based on photos it seems Chilote sailors did the same. I began by carving a bottle from the end of a 1/4‐inch square basswood strip. After rounding it and somewhat tapering with a mini block plane, I used a sanding drum on a rotary tool to get more of a bottle shape, holding the tool steady and spinning the strip in my hand. I nearly took off too much material right at the start, but it worked out in the end. I then drilled out the top and used a razor saw to cut the bottle from the strip. It didn't look too oversize, considering that it's a pretty big bottle (about 8 inches diameter), but I was wary of scale issues after having had to redo the box, so I trimmed the bottom and neck a bit. I then placed a toothpick in the opening to better handle the bottle and to serve as a cork once cut off later, and painted the bottle a dark green, which seemed like a reasonable glass color. I then began to weave around the bottle using .2mm nylon thread, as I did for one of the baskets on the Canoa build. Around the sides, I went with a much looser weave than I had used on the basket, to better show that this was a bottle wrapped in a protective coating. The neck was a bit of a challenge, as pulling the thread tight tended to make it slide down off the bottle neck. I finished it off by wrapping the excess a few times around the neck and tying off a simple handle, cutting off the excess toothpick to create a cork stopper, and giving the whole thing a coat of matte varnish to hold everything in place. Overall I'm happy with how it turned out, although maybe it would have looked better with a thinner material and more stakes (although adding more stakes would have produced a bulkier bottom). *I should note that the Edwards article is invaluable for understanding "traditional" workboats on the Pacific coast of South America, although it would be significantly more useful for modeling if it had included any hull lines or at least more photos. A few particularly interesting tidbits: - Pre-hispanic vessel types (although often modified with European influence) seem to have predominated through the colonial period, with generally limited impact from European-style designs until the early 1800s or so. This comports well with Maino Prado's observations about Chile discussed in an earlier post. - Sloops and schooners remained in frequent use for coastal trade in Colombia and Ecuador by the mid-20th century, focusing on small towns and trade routes that were ignored by more expensive motor vessels. - There were a number of distinct vessel types, including double-ended rowing vessels clearly influenced by whaleboats, and the Peruvian "bote de pescador"‐‐a beamy, partially-decked, single-masted lugger. As happened in San Francisco, immigration by Italian fishermen led to the introduction of Mediterranean-style lateeners, called "faluchos" in Peru (but quite different from the Chilean "falucho maulino" mentioned in an early post in this topic). - In arid parts of the Peruvian coast, the preferred boatbuilding lumber by the mid-20th century was pine imported from the Pacific Northwest of the United States, which local boatbuilders considered superior to Chilean lumber.
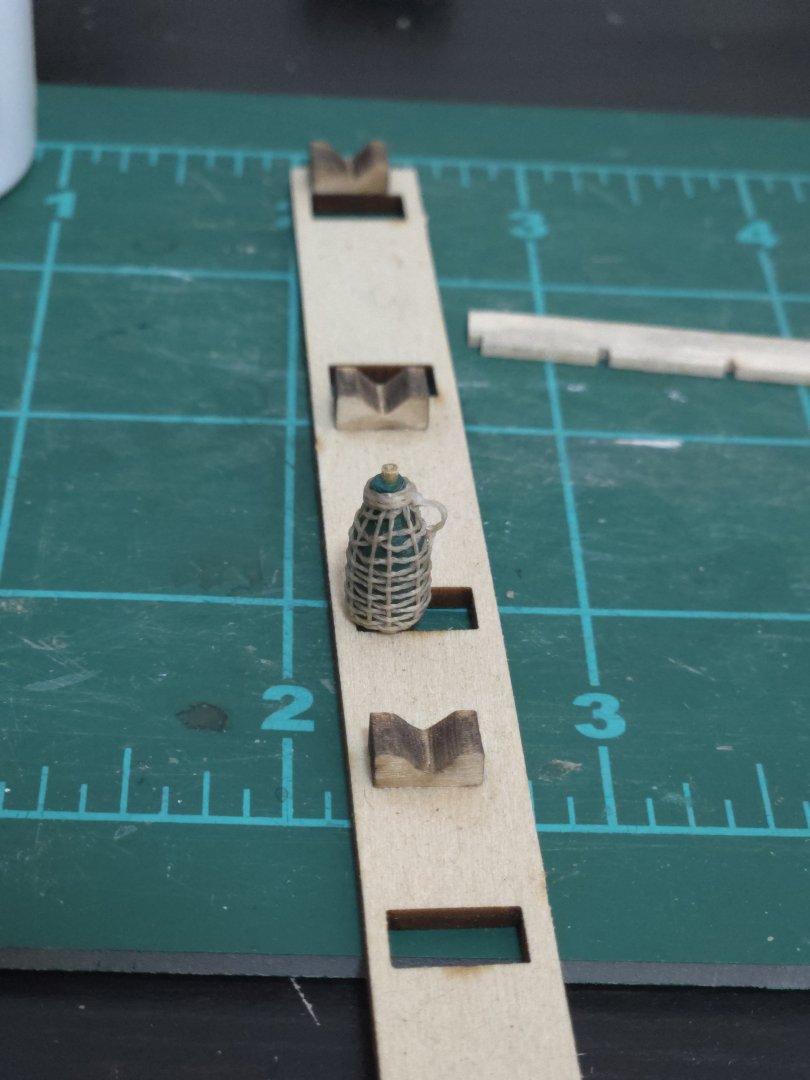


- 312 replies
-
- 11
-

-
- Chile
- Latin America
- (and 6 more)
-
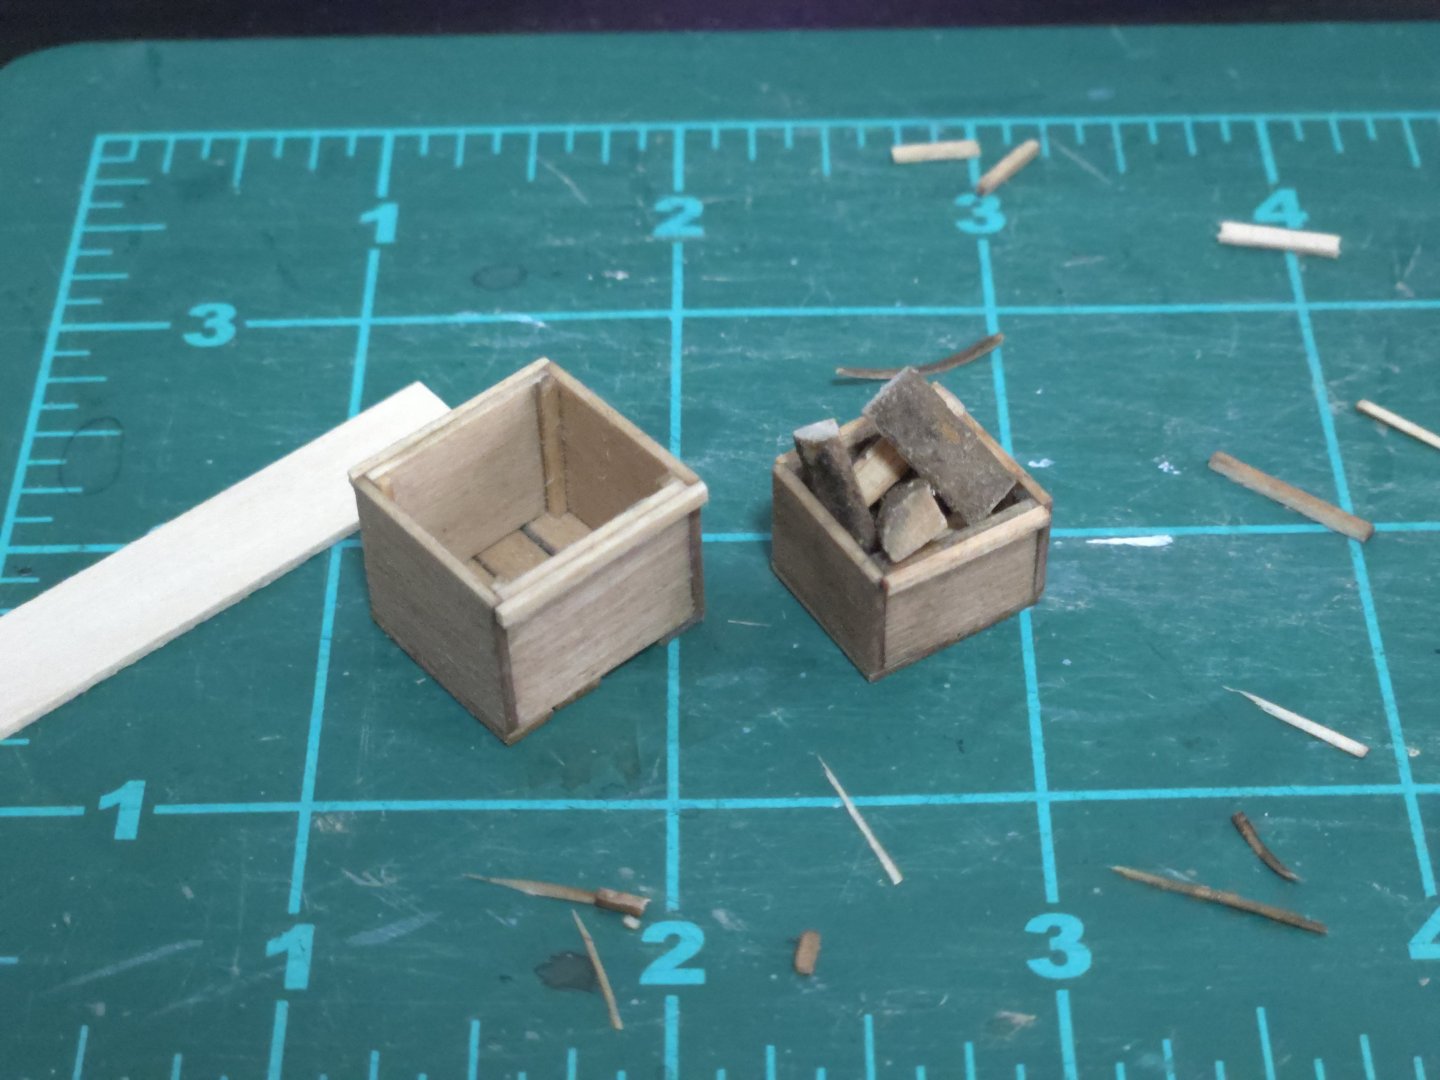
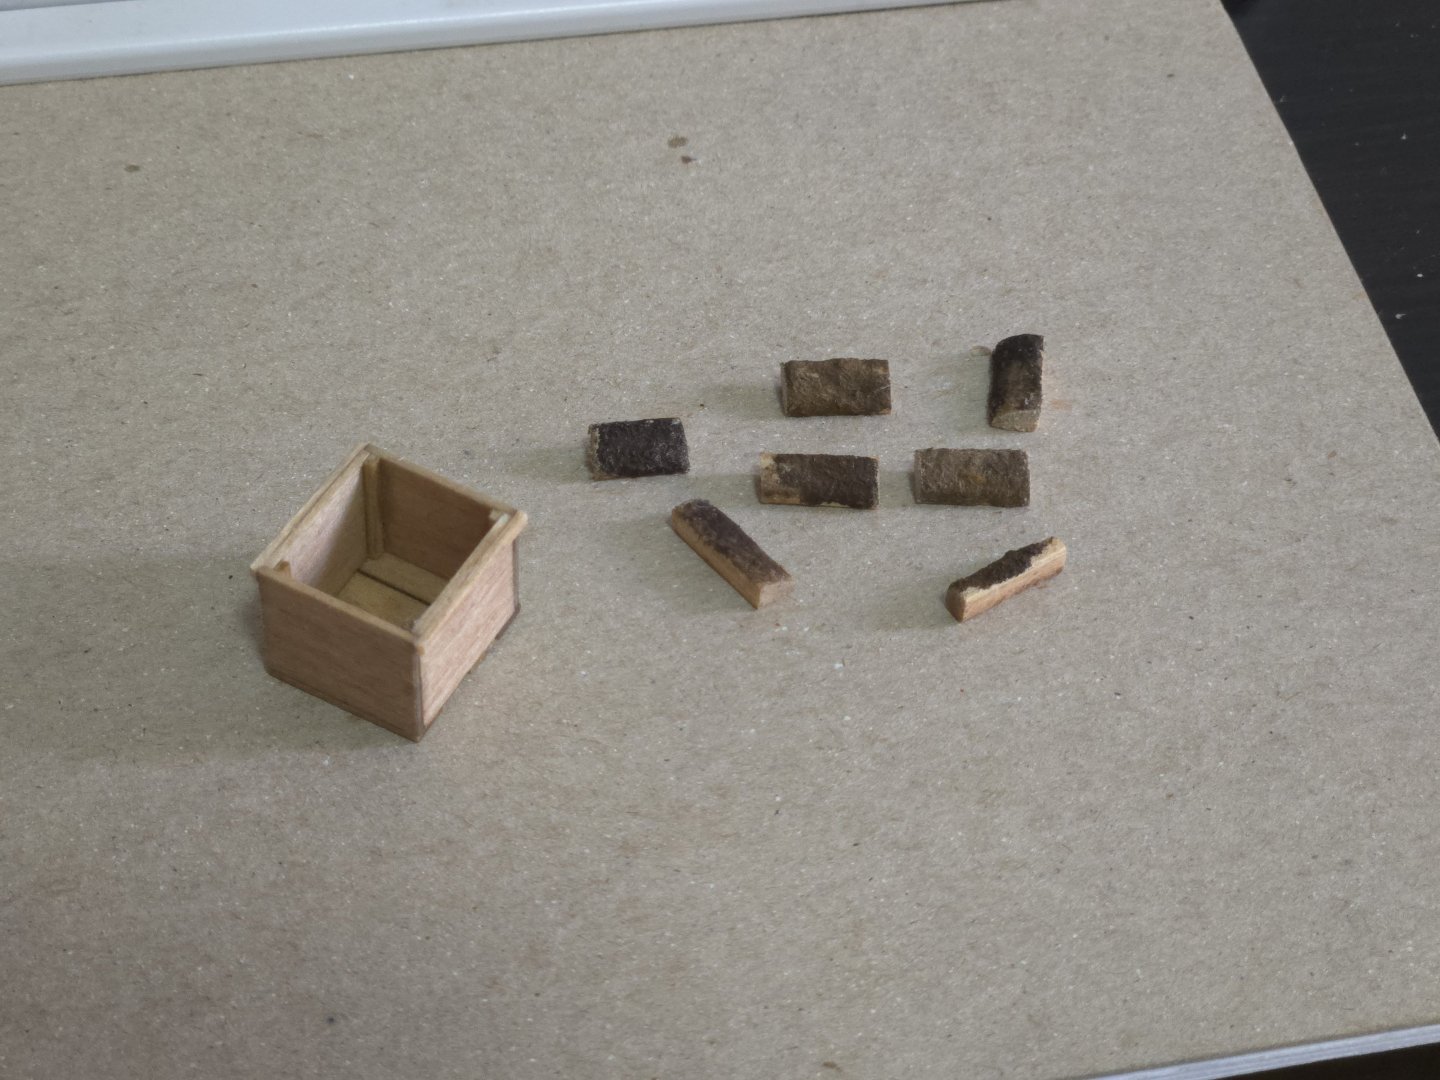
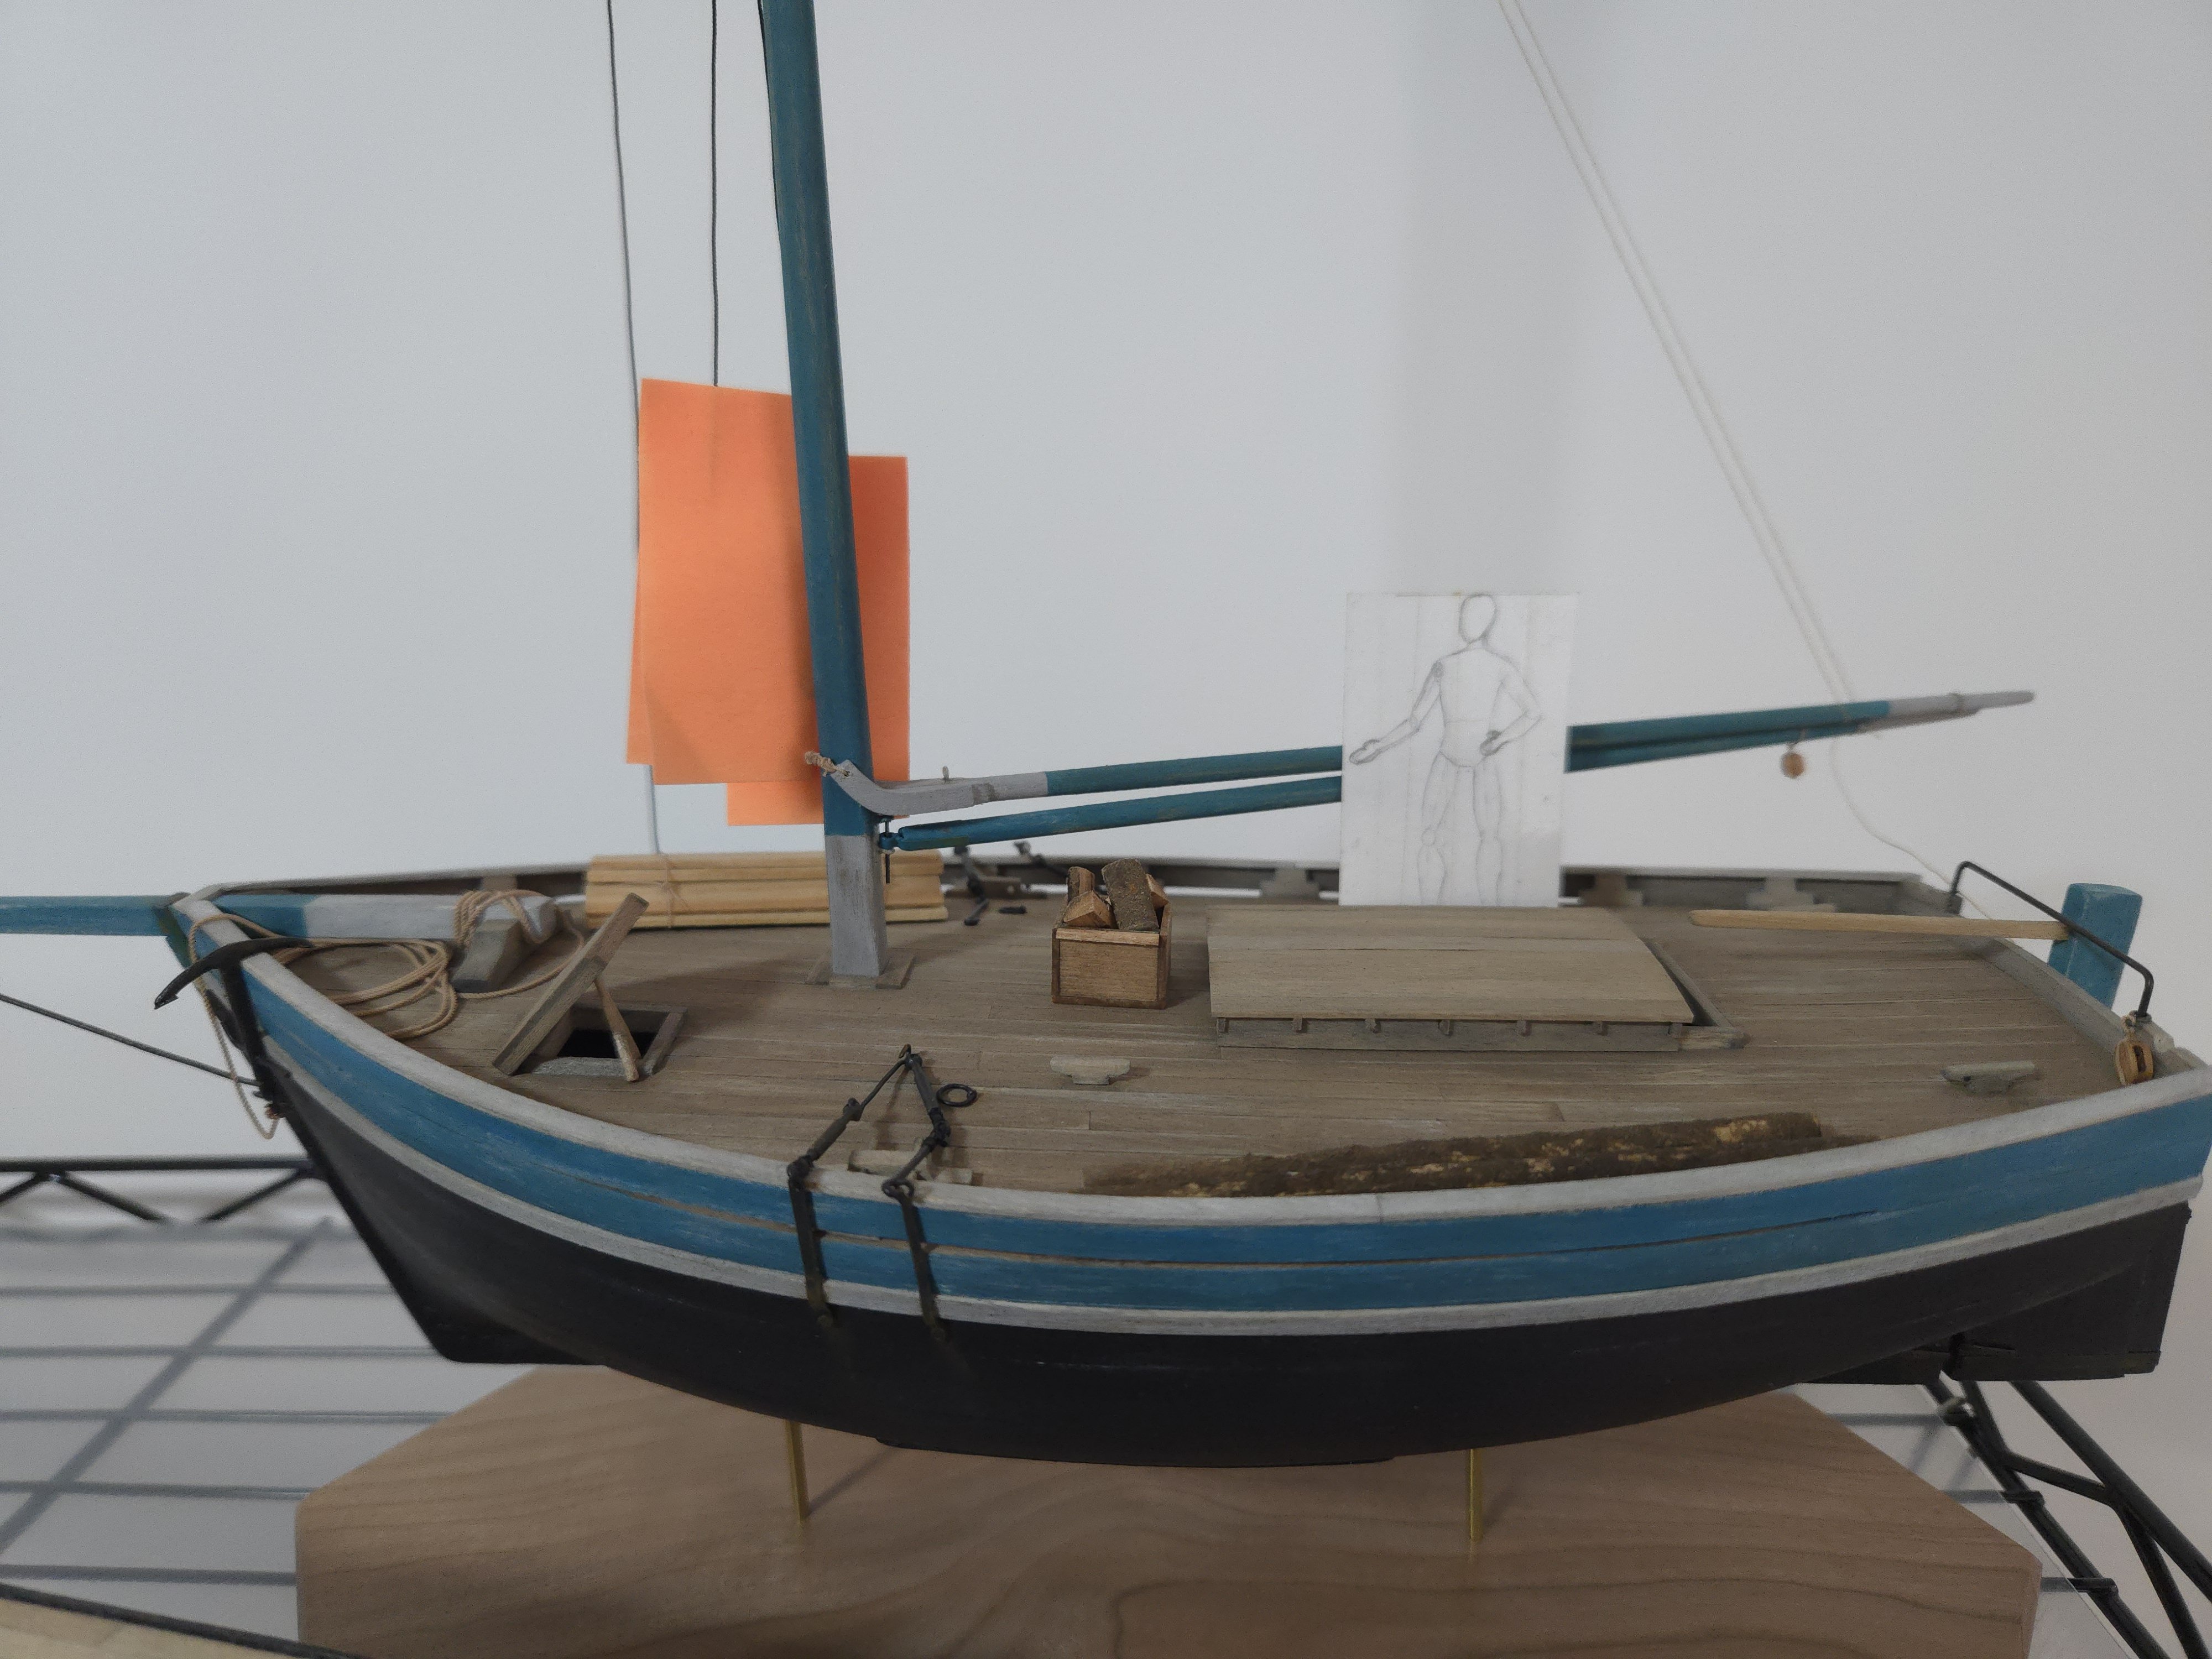
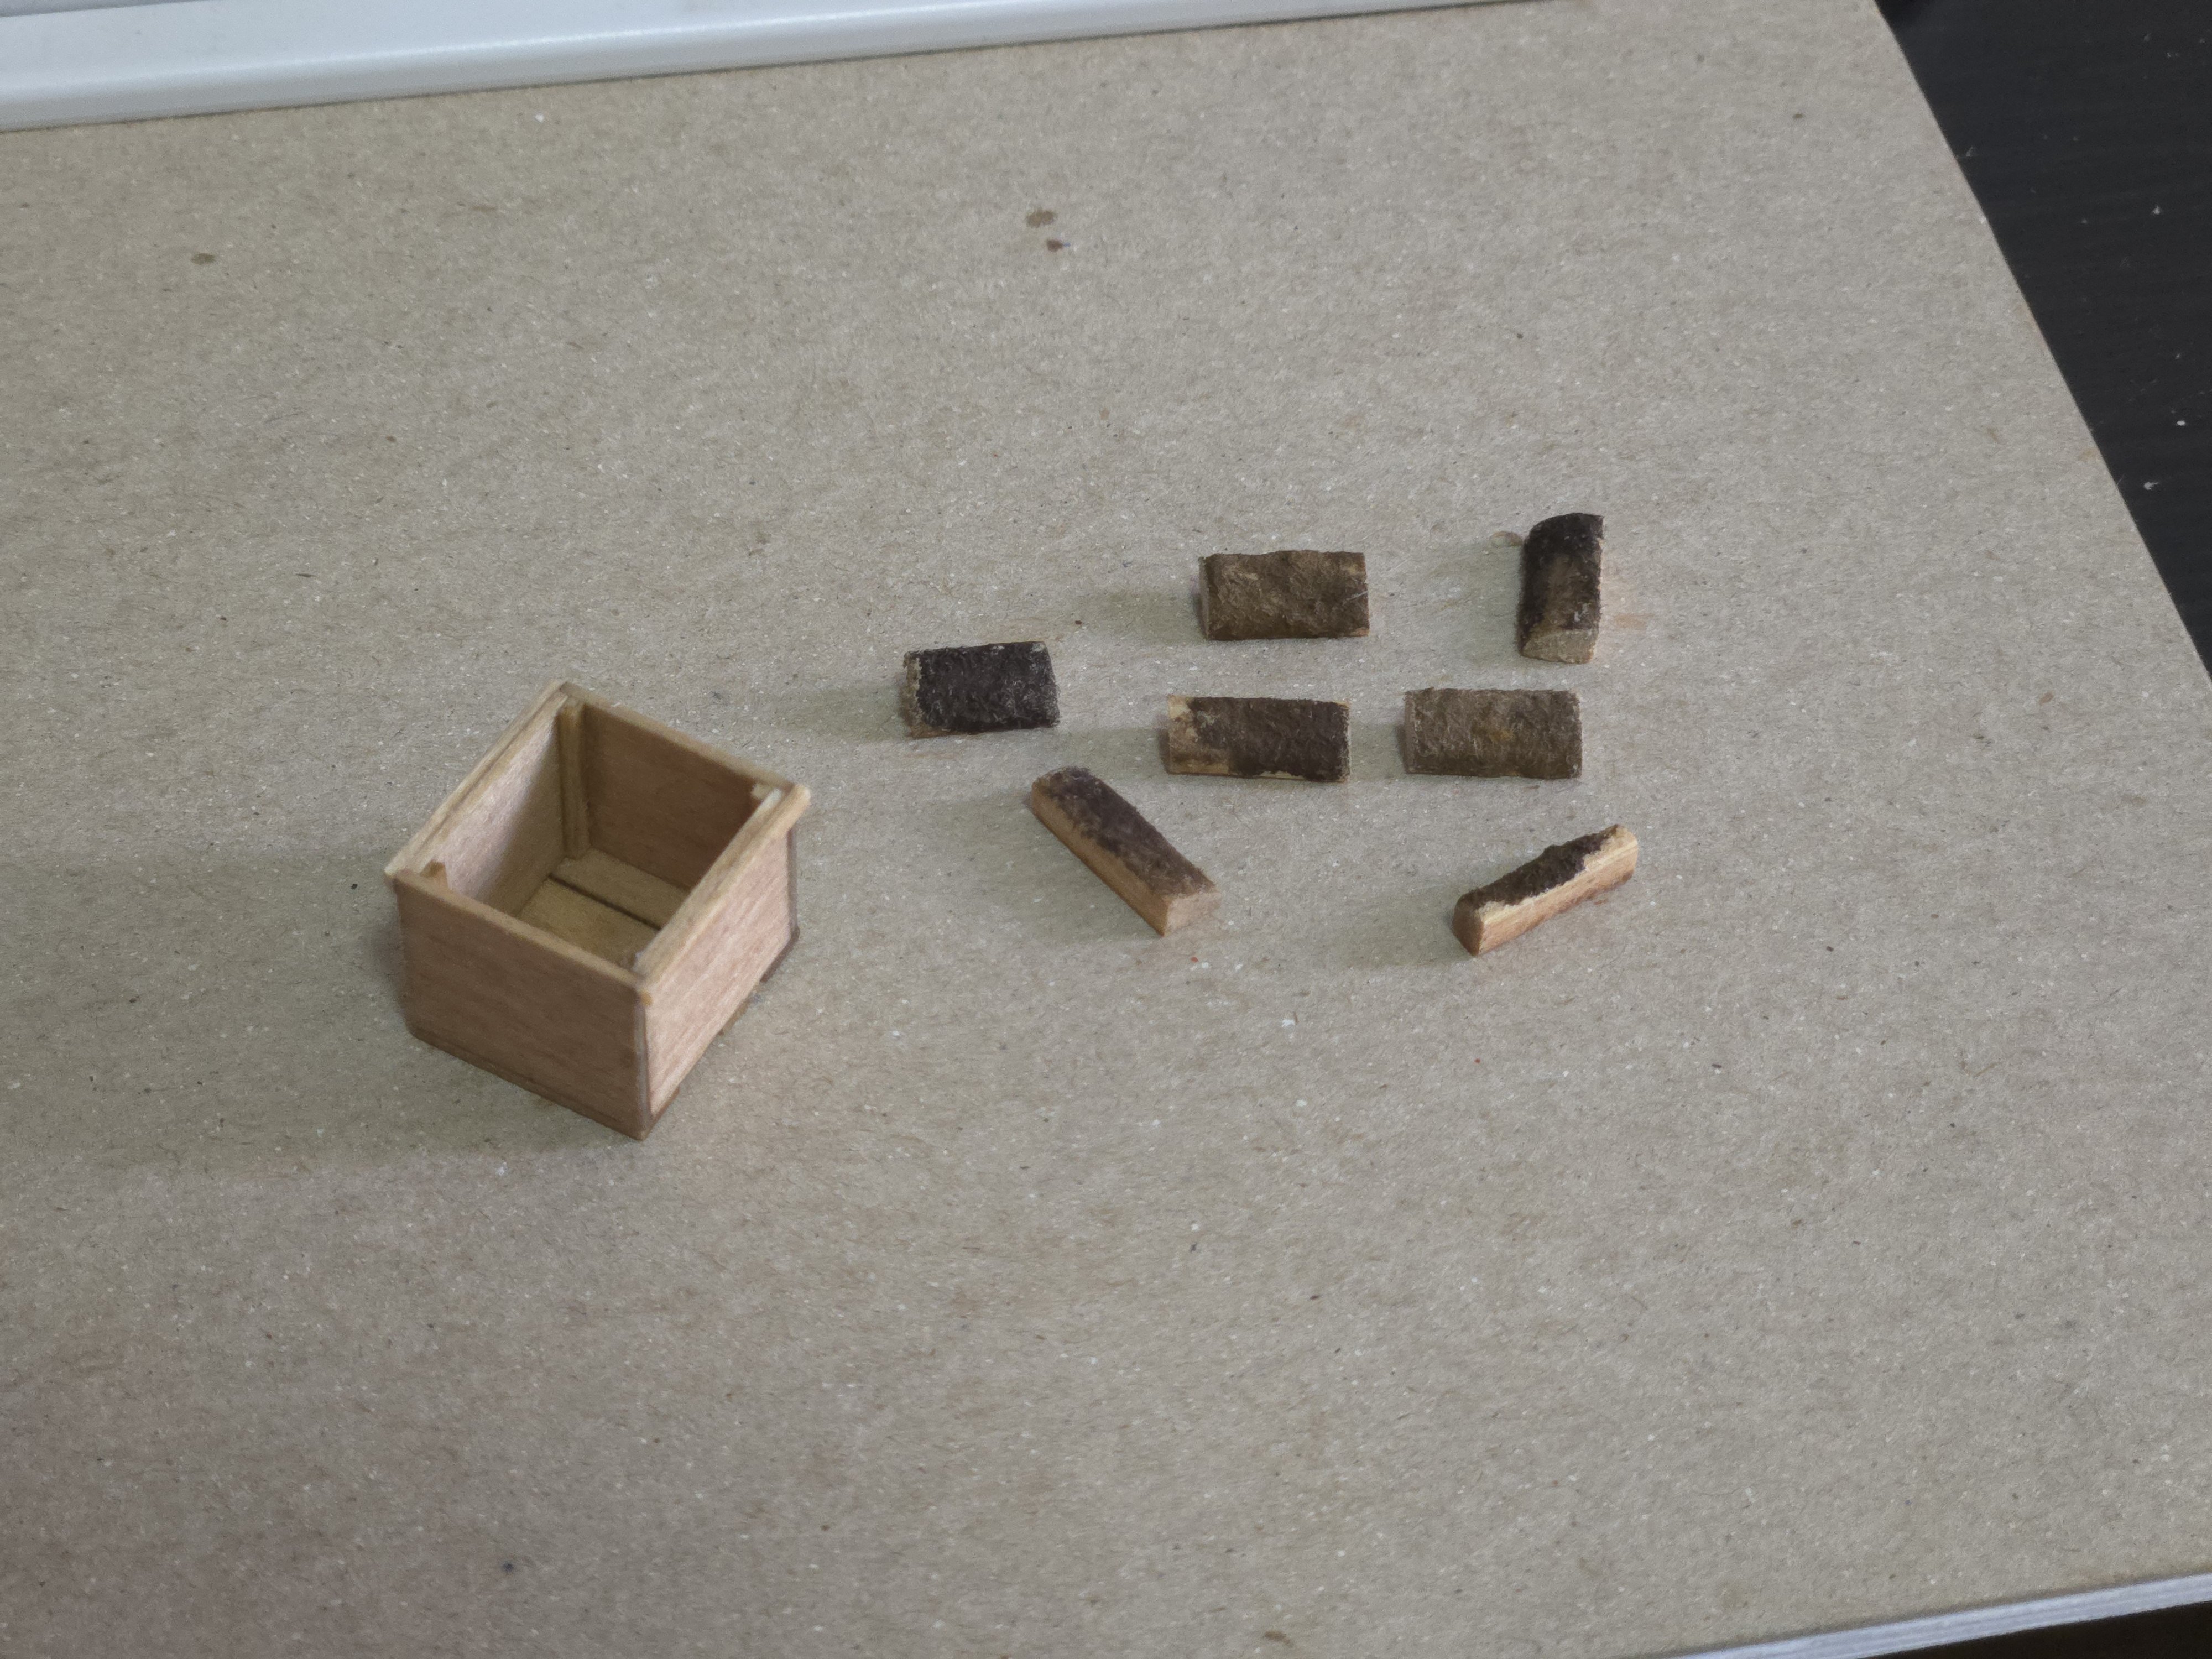
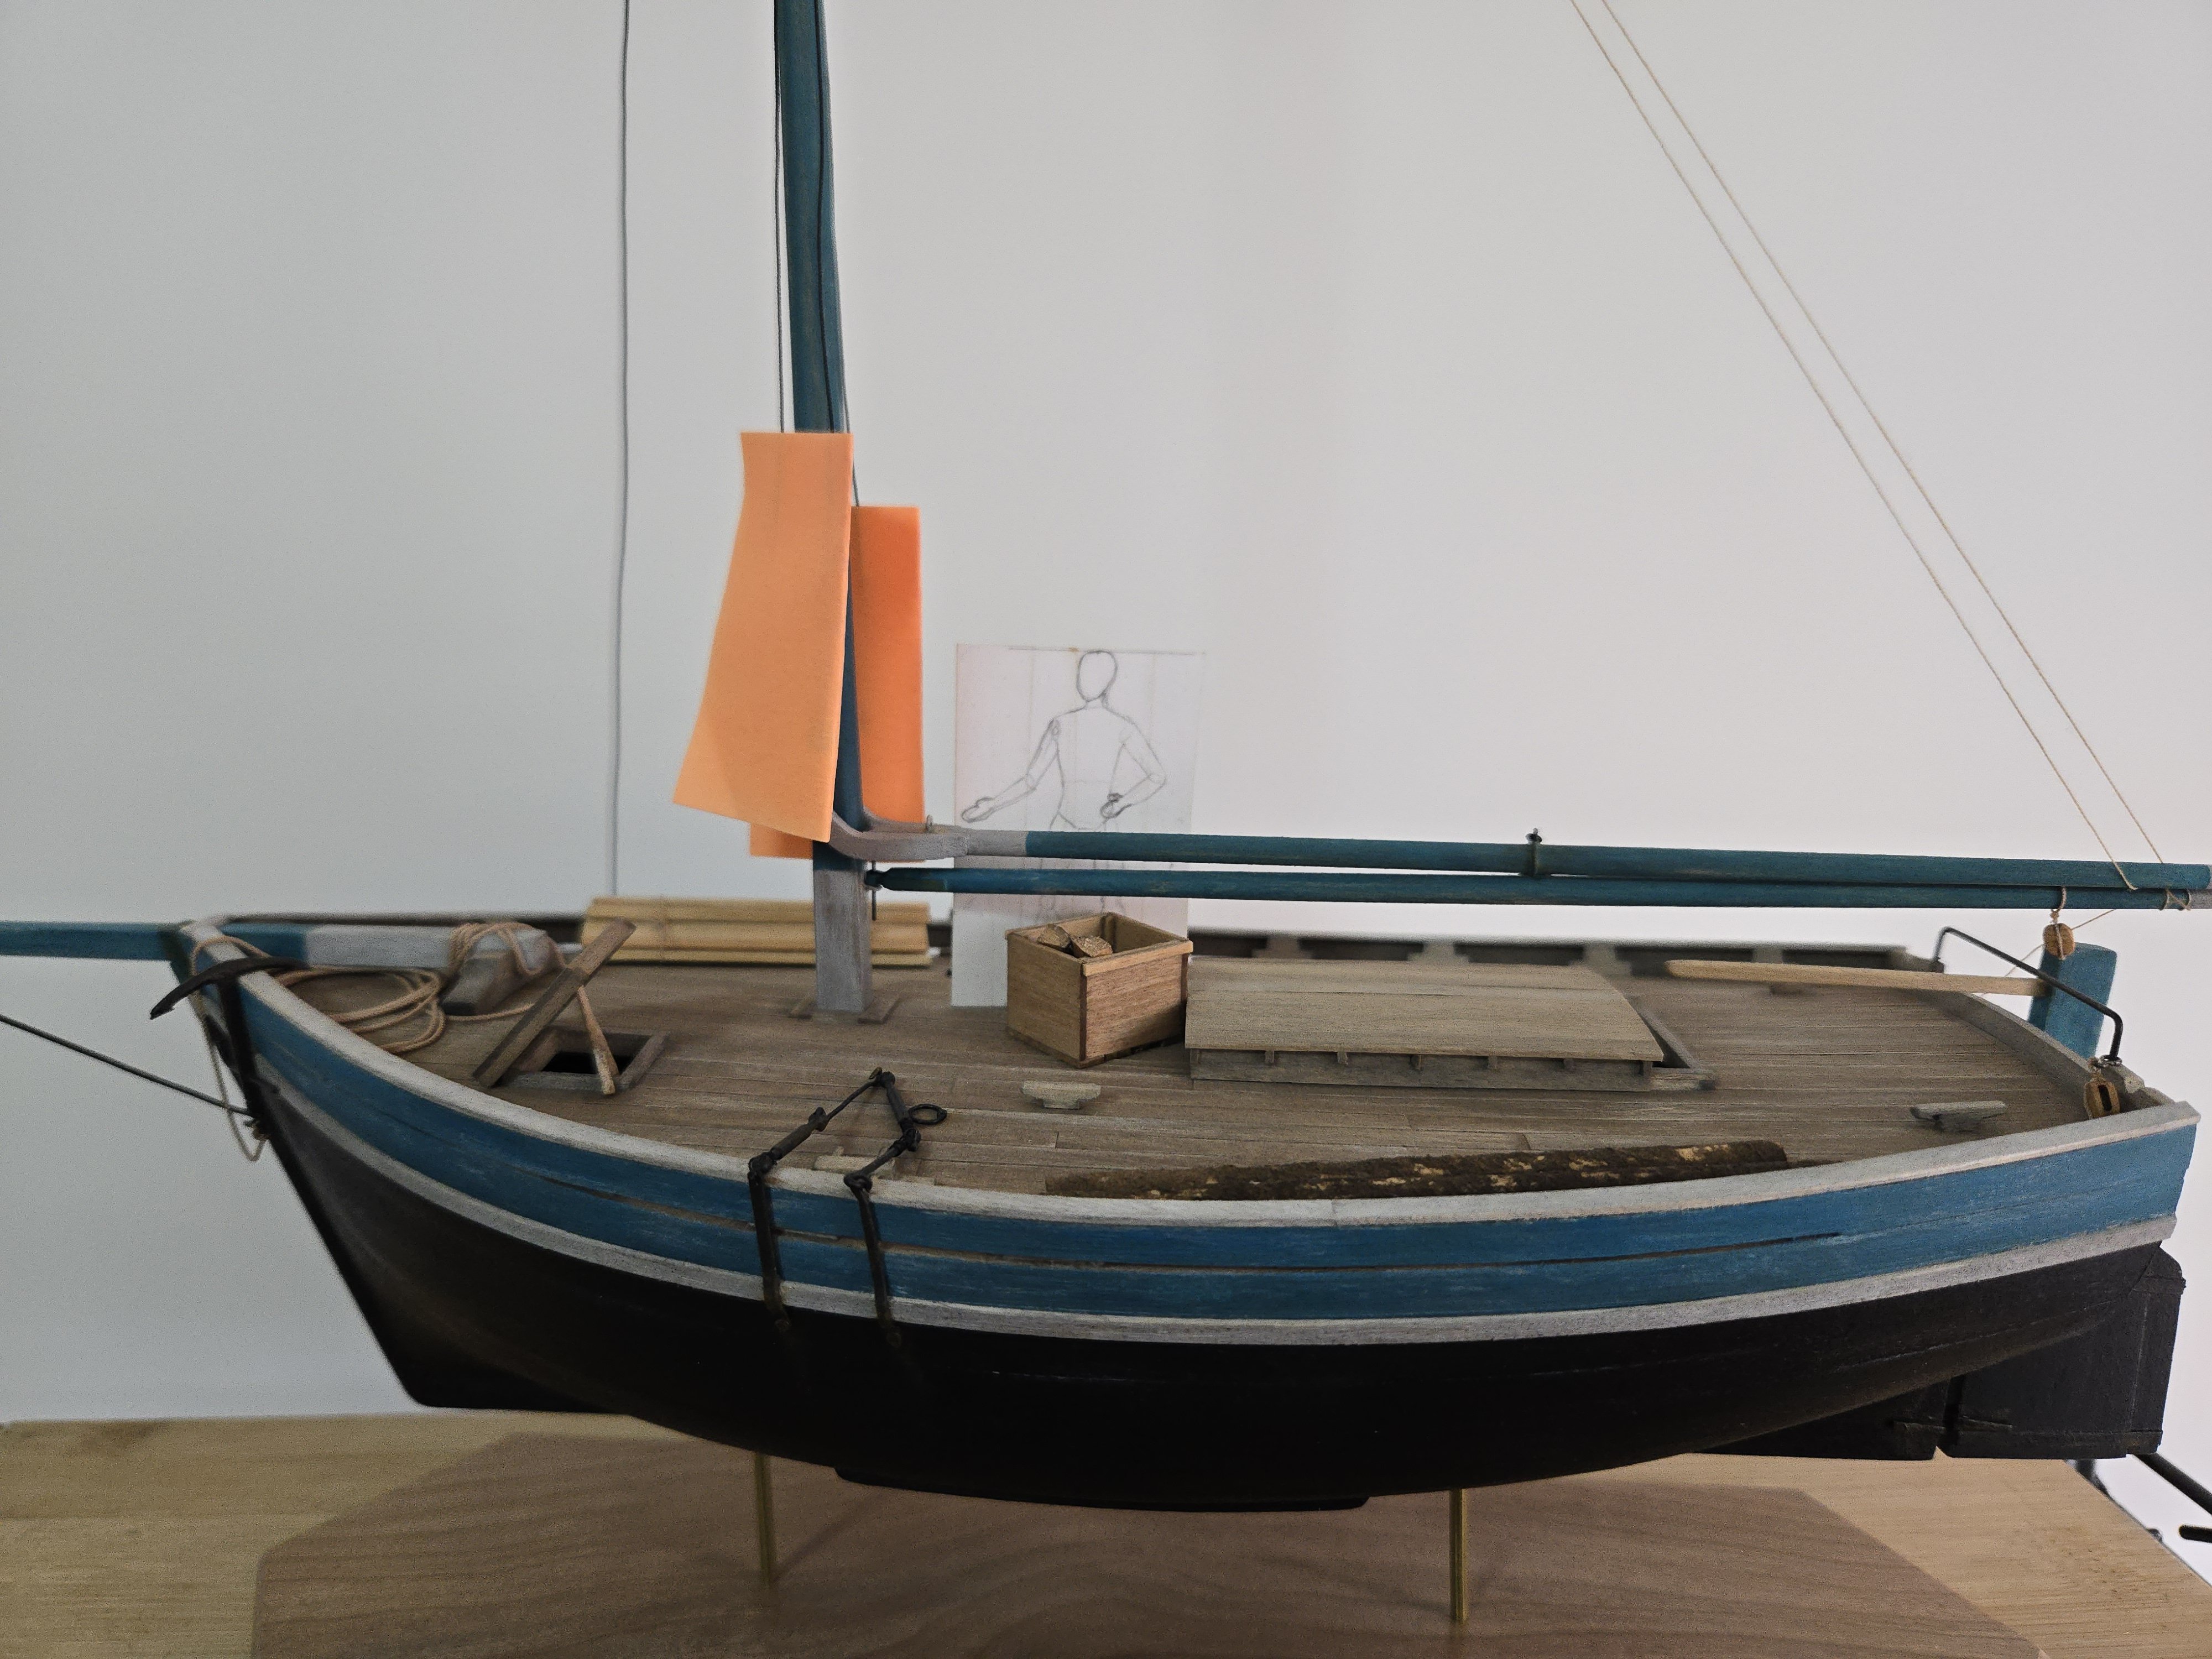
A slight setback. In the photo below, you can see what looks like a small box of firewood on the deck of the lancha. I thought this could be a fun detail to add, to have some small split pieces of firewood alongside the longer pieces I already made. Source: https://www.bibliotecanacionaldigital.gob.cl/bnd/629/w3-article-644834.html The box was pretty straightforward to make, and the firewood was made by the same process as earlier. Unfortunately, when I put it on the hull, I found that the box looked disproportionately large. I had tried to judge the size from the photo, but I guess I had said "just a hair larger will be fine" a few times too many. It's still not a particularly large box, but a big bigger than I would like. The firewood, at least, can still be used, and it won't be too hard to make a smaller box. It's a good reminder to stick to scale dimensions rather than to change things up on the fly. I've also been working on the sails. I've got basic paper templates made, and hope to start on the actual sail soon. I plan on making the sails from strips of coffee filter paper glued together, and as I've had trouble in the past getting things to stick with watered-down white glue (which also has a tendency to swell and distort the material), I decided to test another glue. I used Aleene's Fabric Fusion glue to good effect for some touch-ups on the Canoa sail, so I gave it a try for the seams on some scrap. Unfortunately, I found that any excess left a shiny residue. I then tried a matte varnish to cover it, but the varnish I have left its own residue. Finally, I tried some leftover transparent matte acrylic spray that I've been using in my carpentry workshop. It seems to have worked pretty well. The one issue is that my scrap material was a bit wrinkled to begin with, and didn't exactly improve with all these tests, so I'll be testing to see if I can flatten it out with an iron (carefully and with some material covering the paper to avoid burning) or if it will work if I spray it at an earlier stage.


- 312 replies
-
- 10
-
-
- Chile
- Latin America
- (and 6 more)
-
Excellent work on the seats, they look great!
-
Very precise work, the deckhouse looks incredible!
-
Very interesting! So, while coppering was certainly expensive, it significantly cut down on the need for expensive full refits every few years of ships sent into warmer waters. So some portion of the funding for coppering could have just come out of the maintenance budget (in theory, although in practice I have no idea if the Royal Navy handled its finances in that way).
-
Nice job! Adding all those tiny supports looks incredibly tedious but it really elevates the build.
-
Excellent work and great catch on the errant bulkhead! The model’s really coming along well. Very interesting statistic about how quickly the royal navy coppered its ships. That's a lot of copper, and as I was under the impression (possibly incorrectly) that coppering was expensive, I wonder how they financed it.
-
Nice work! Will the model be fully decked, or will there be a way to see into the cabins?
-
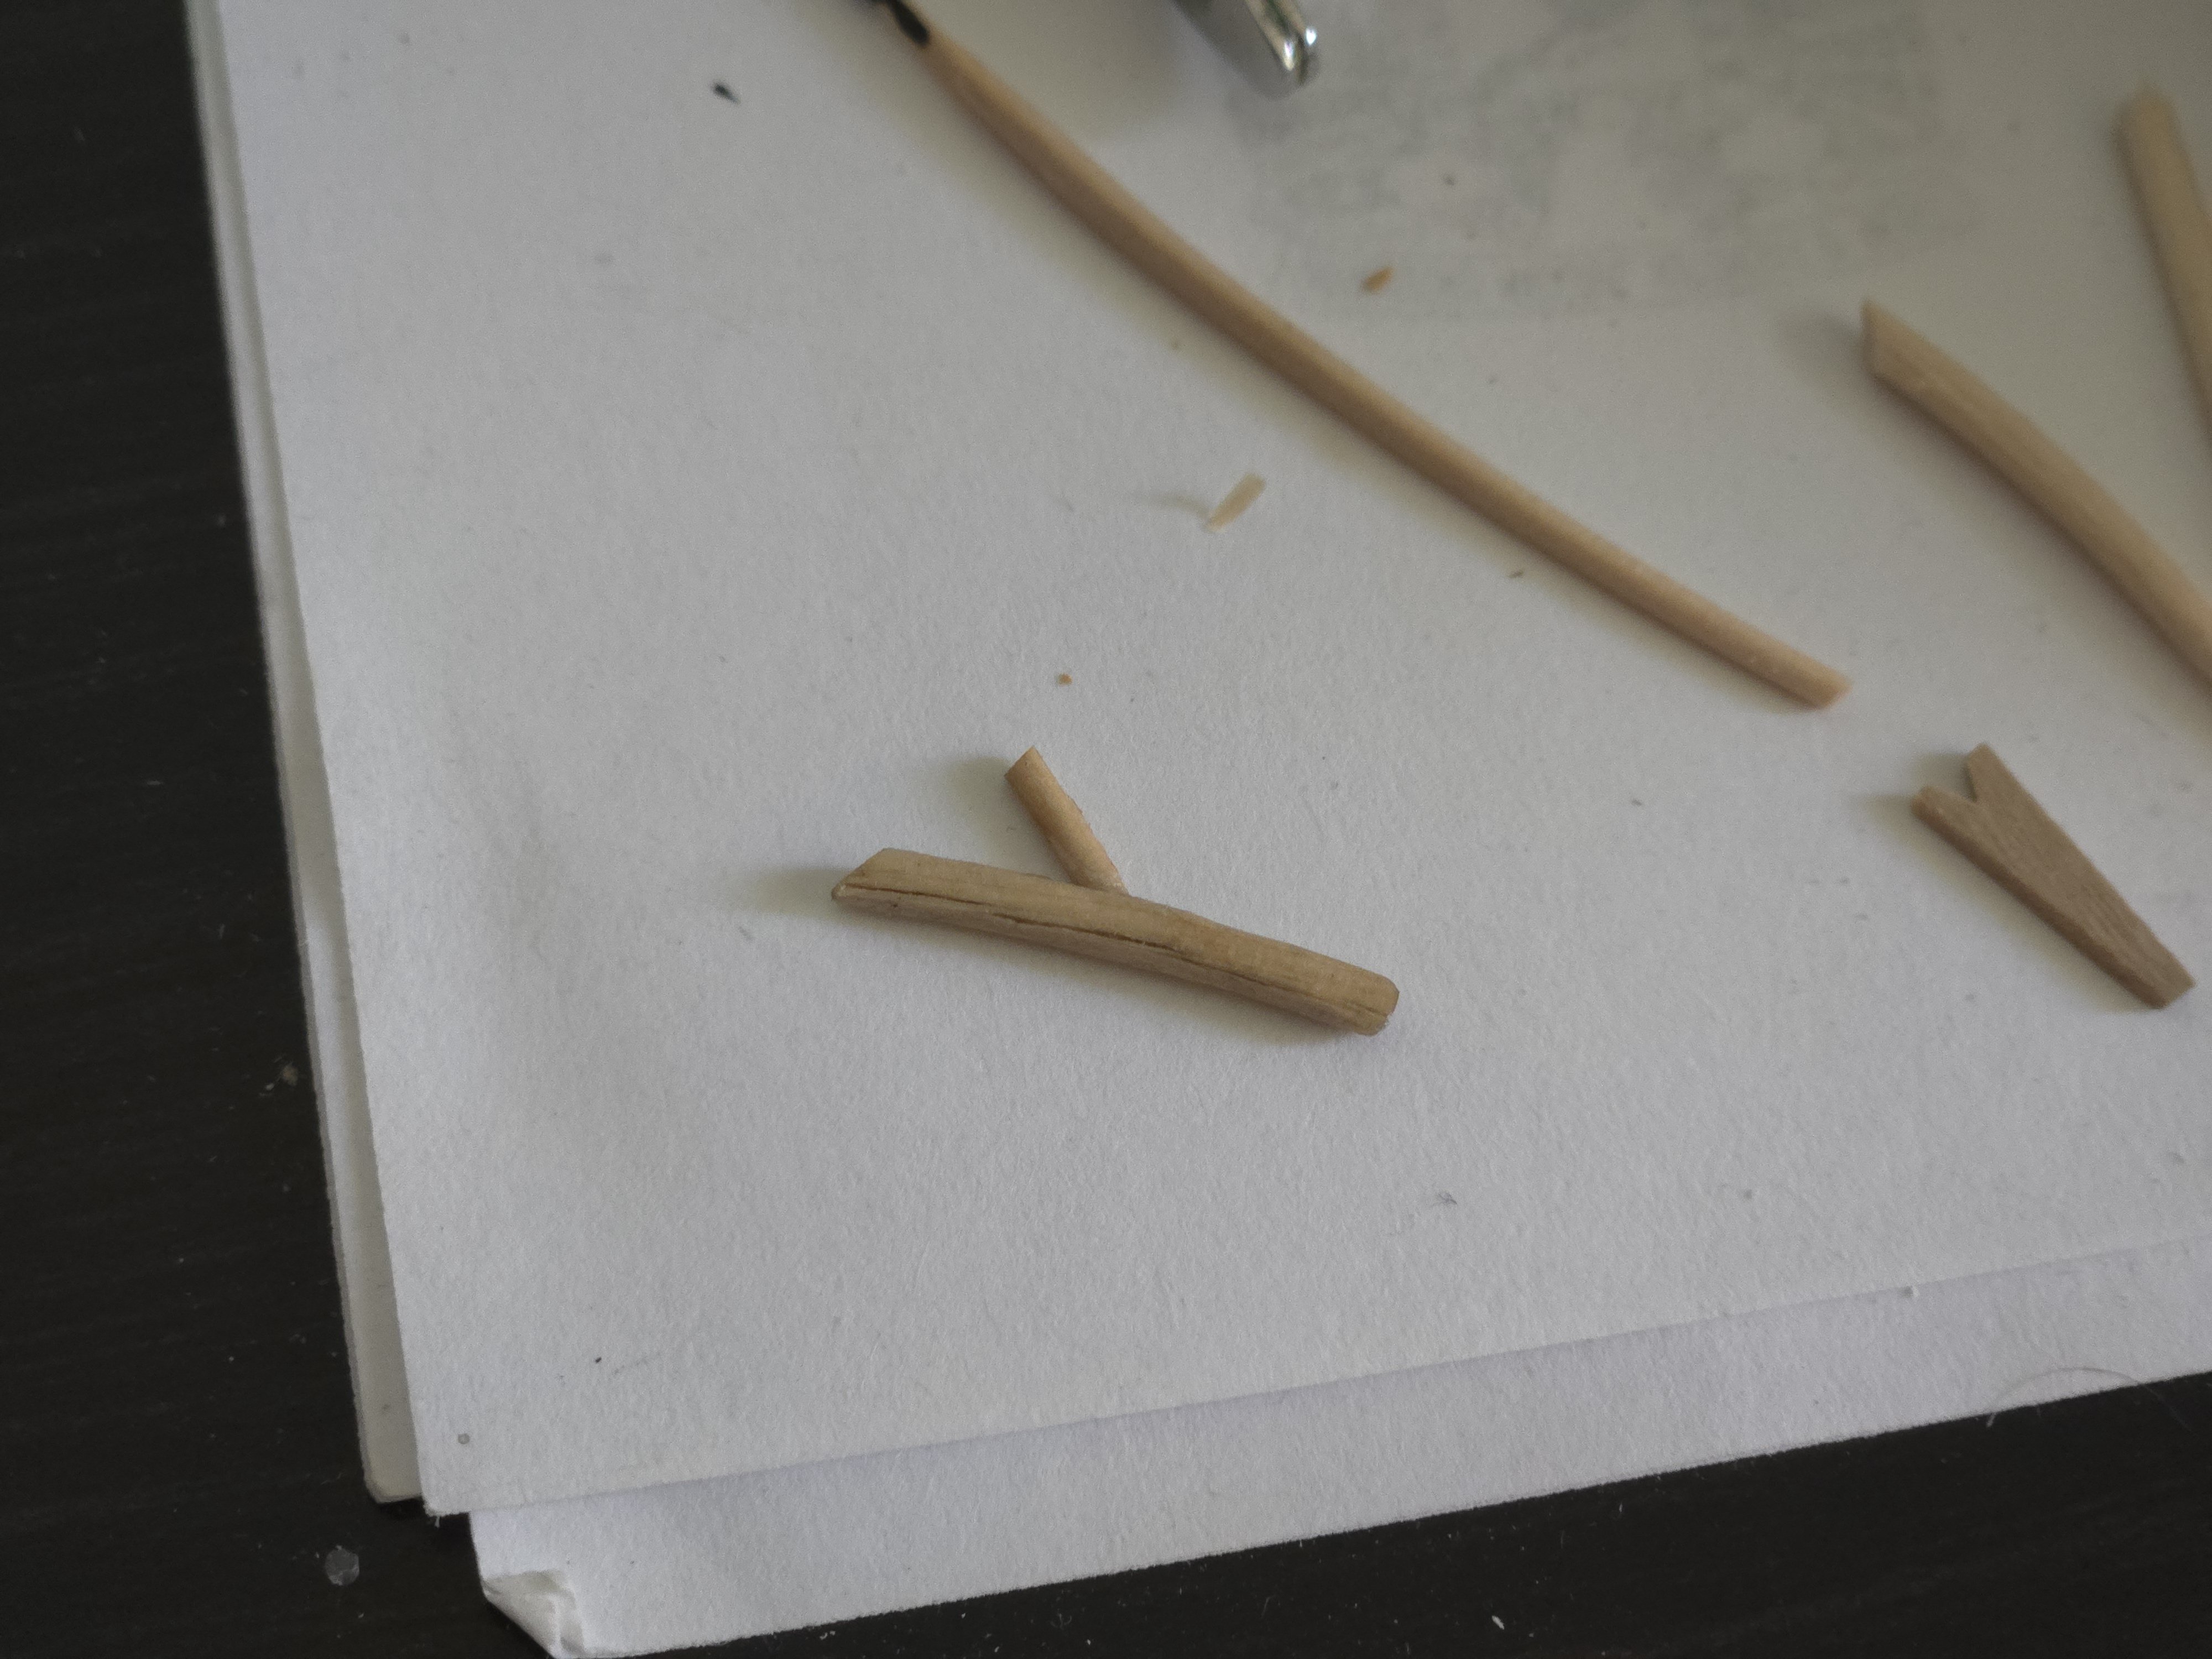
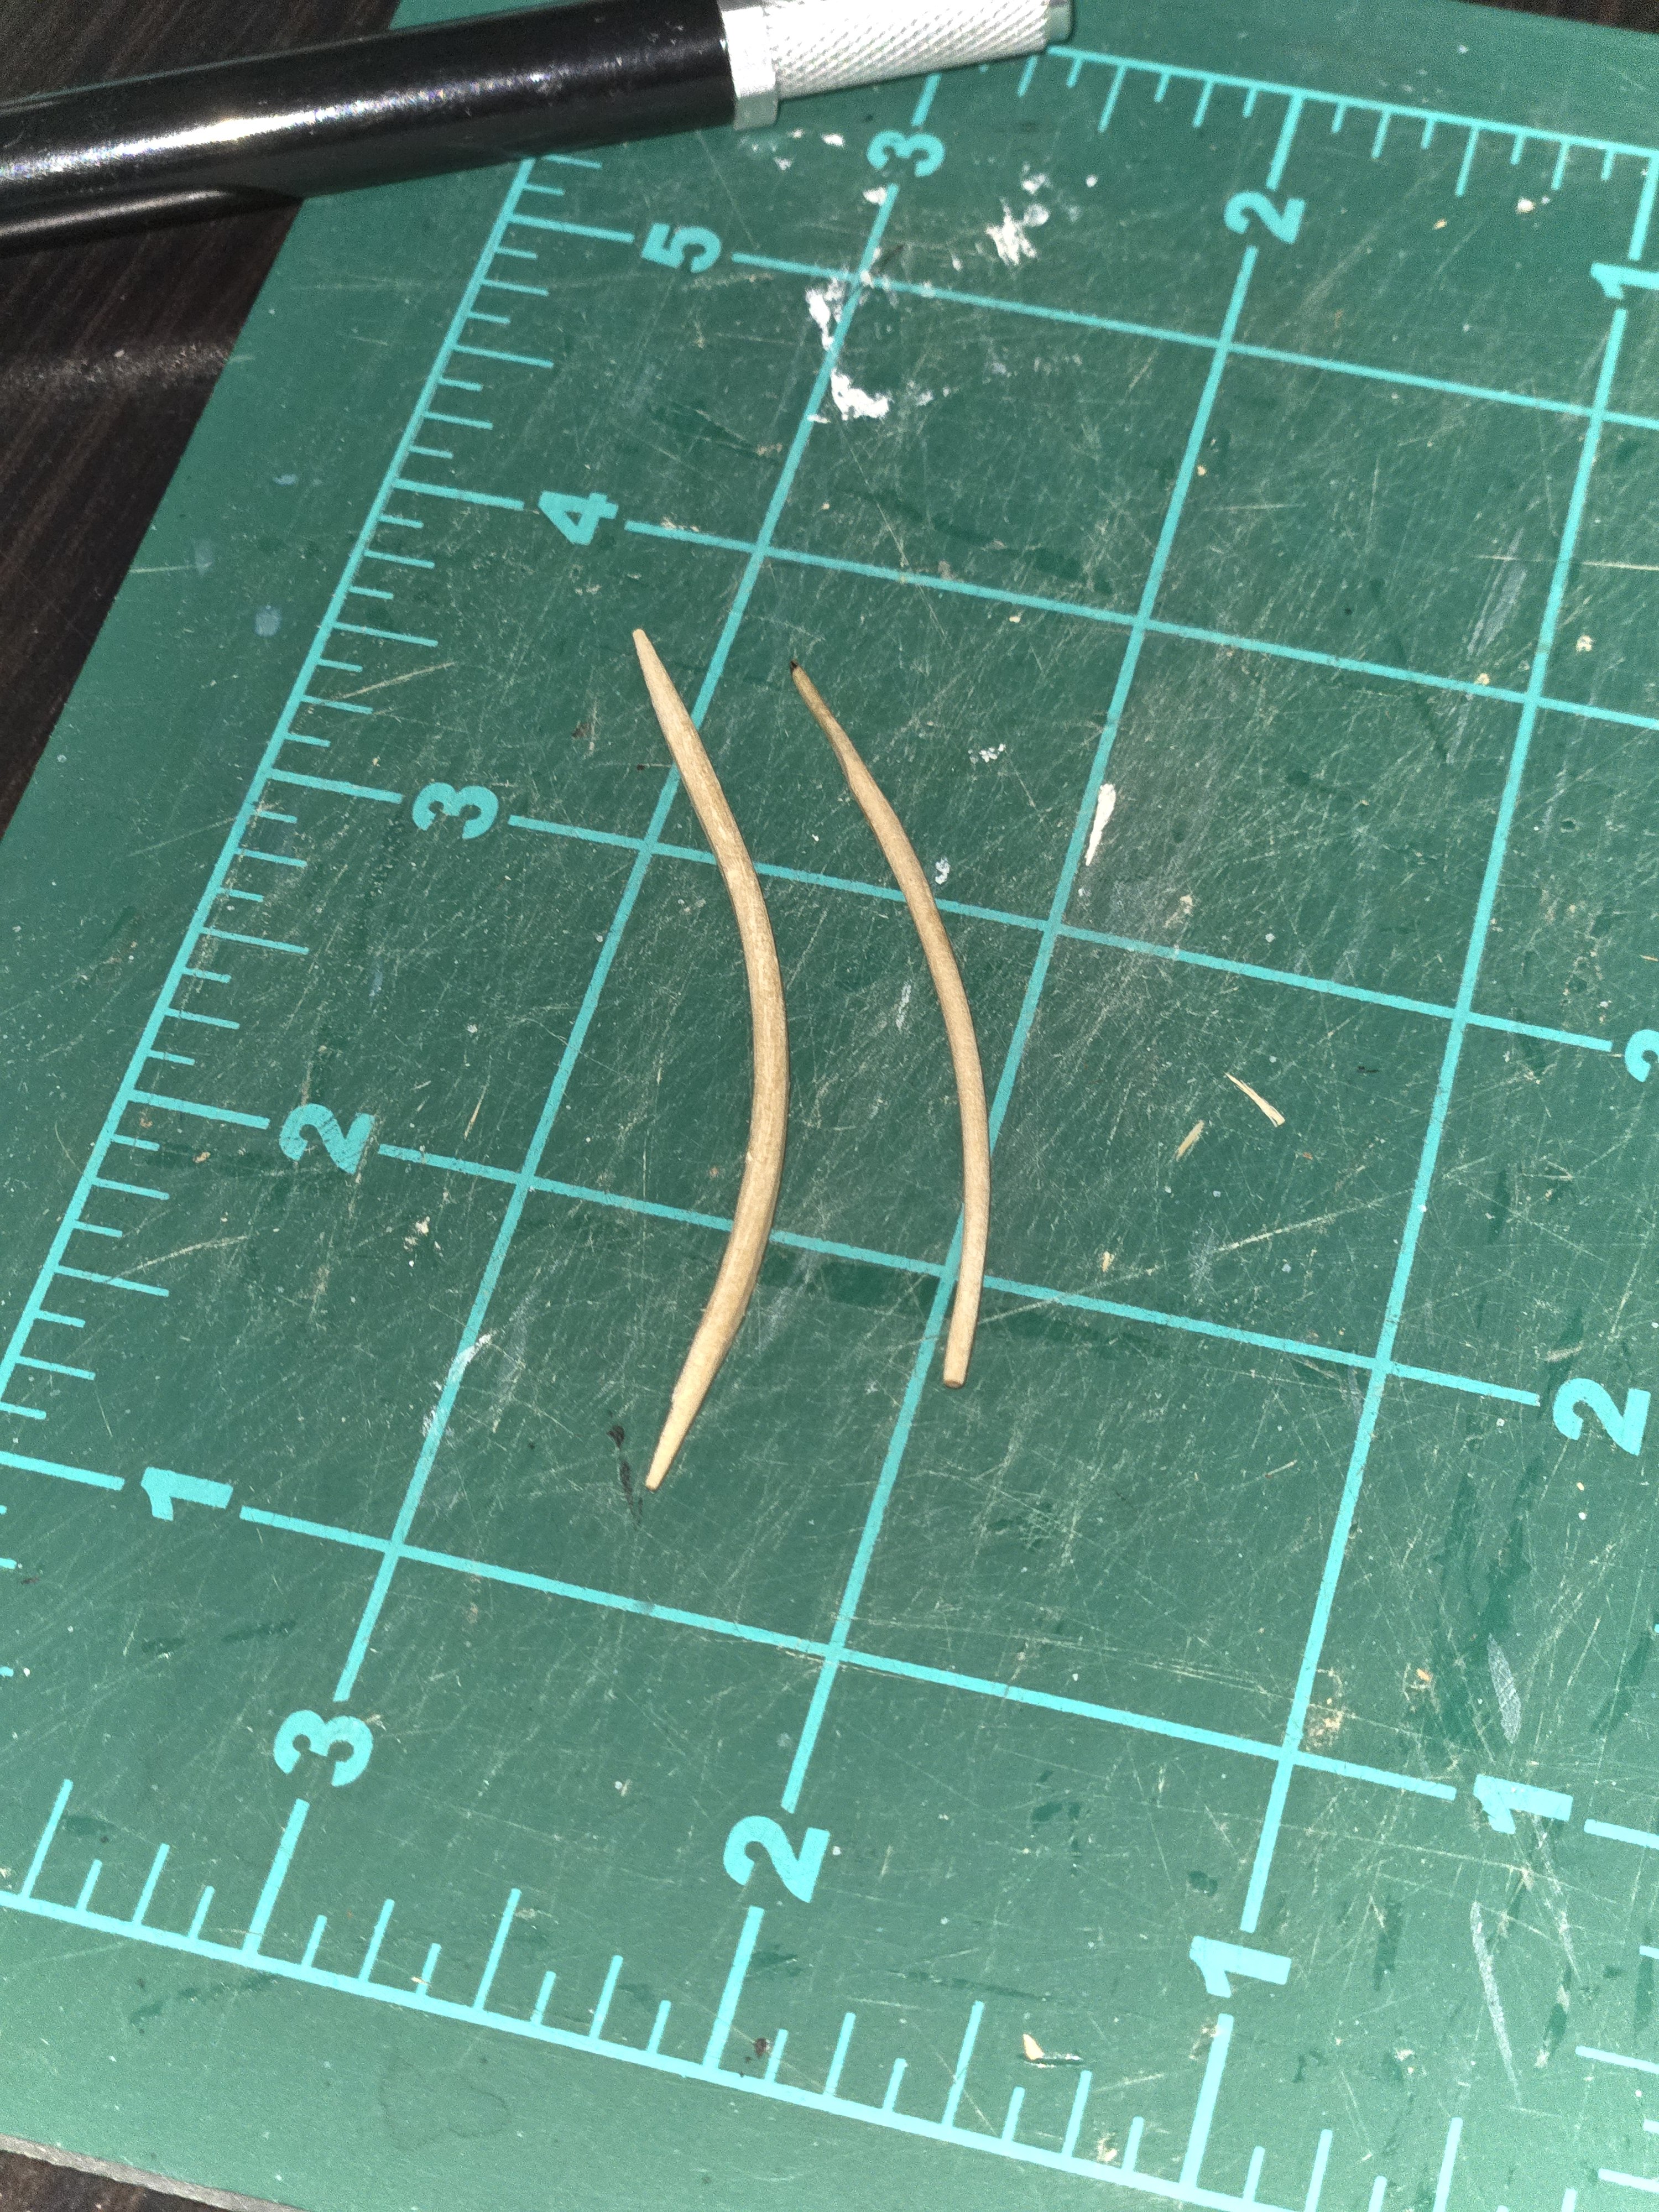
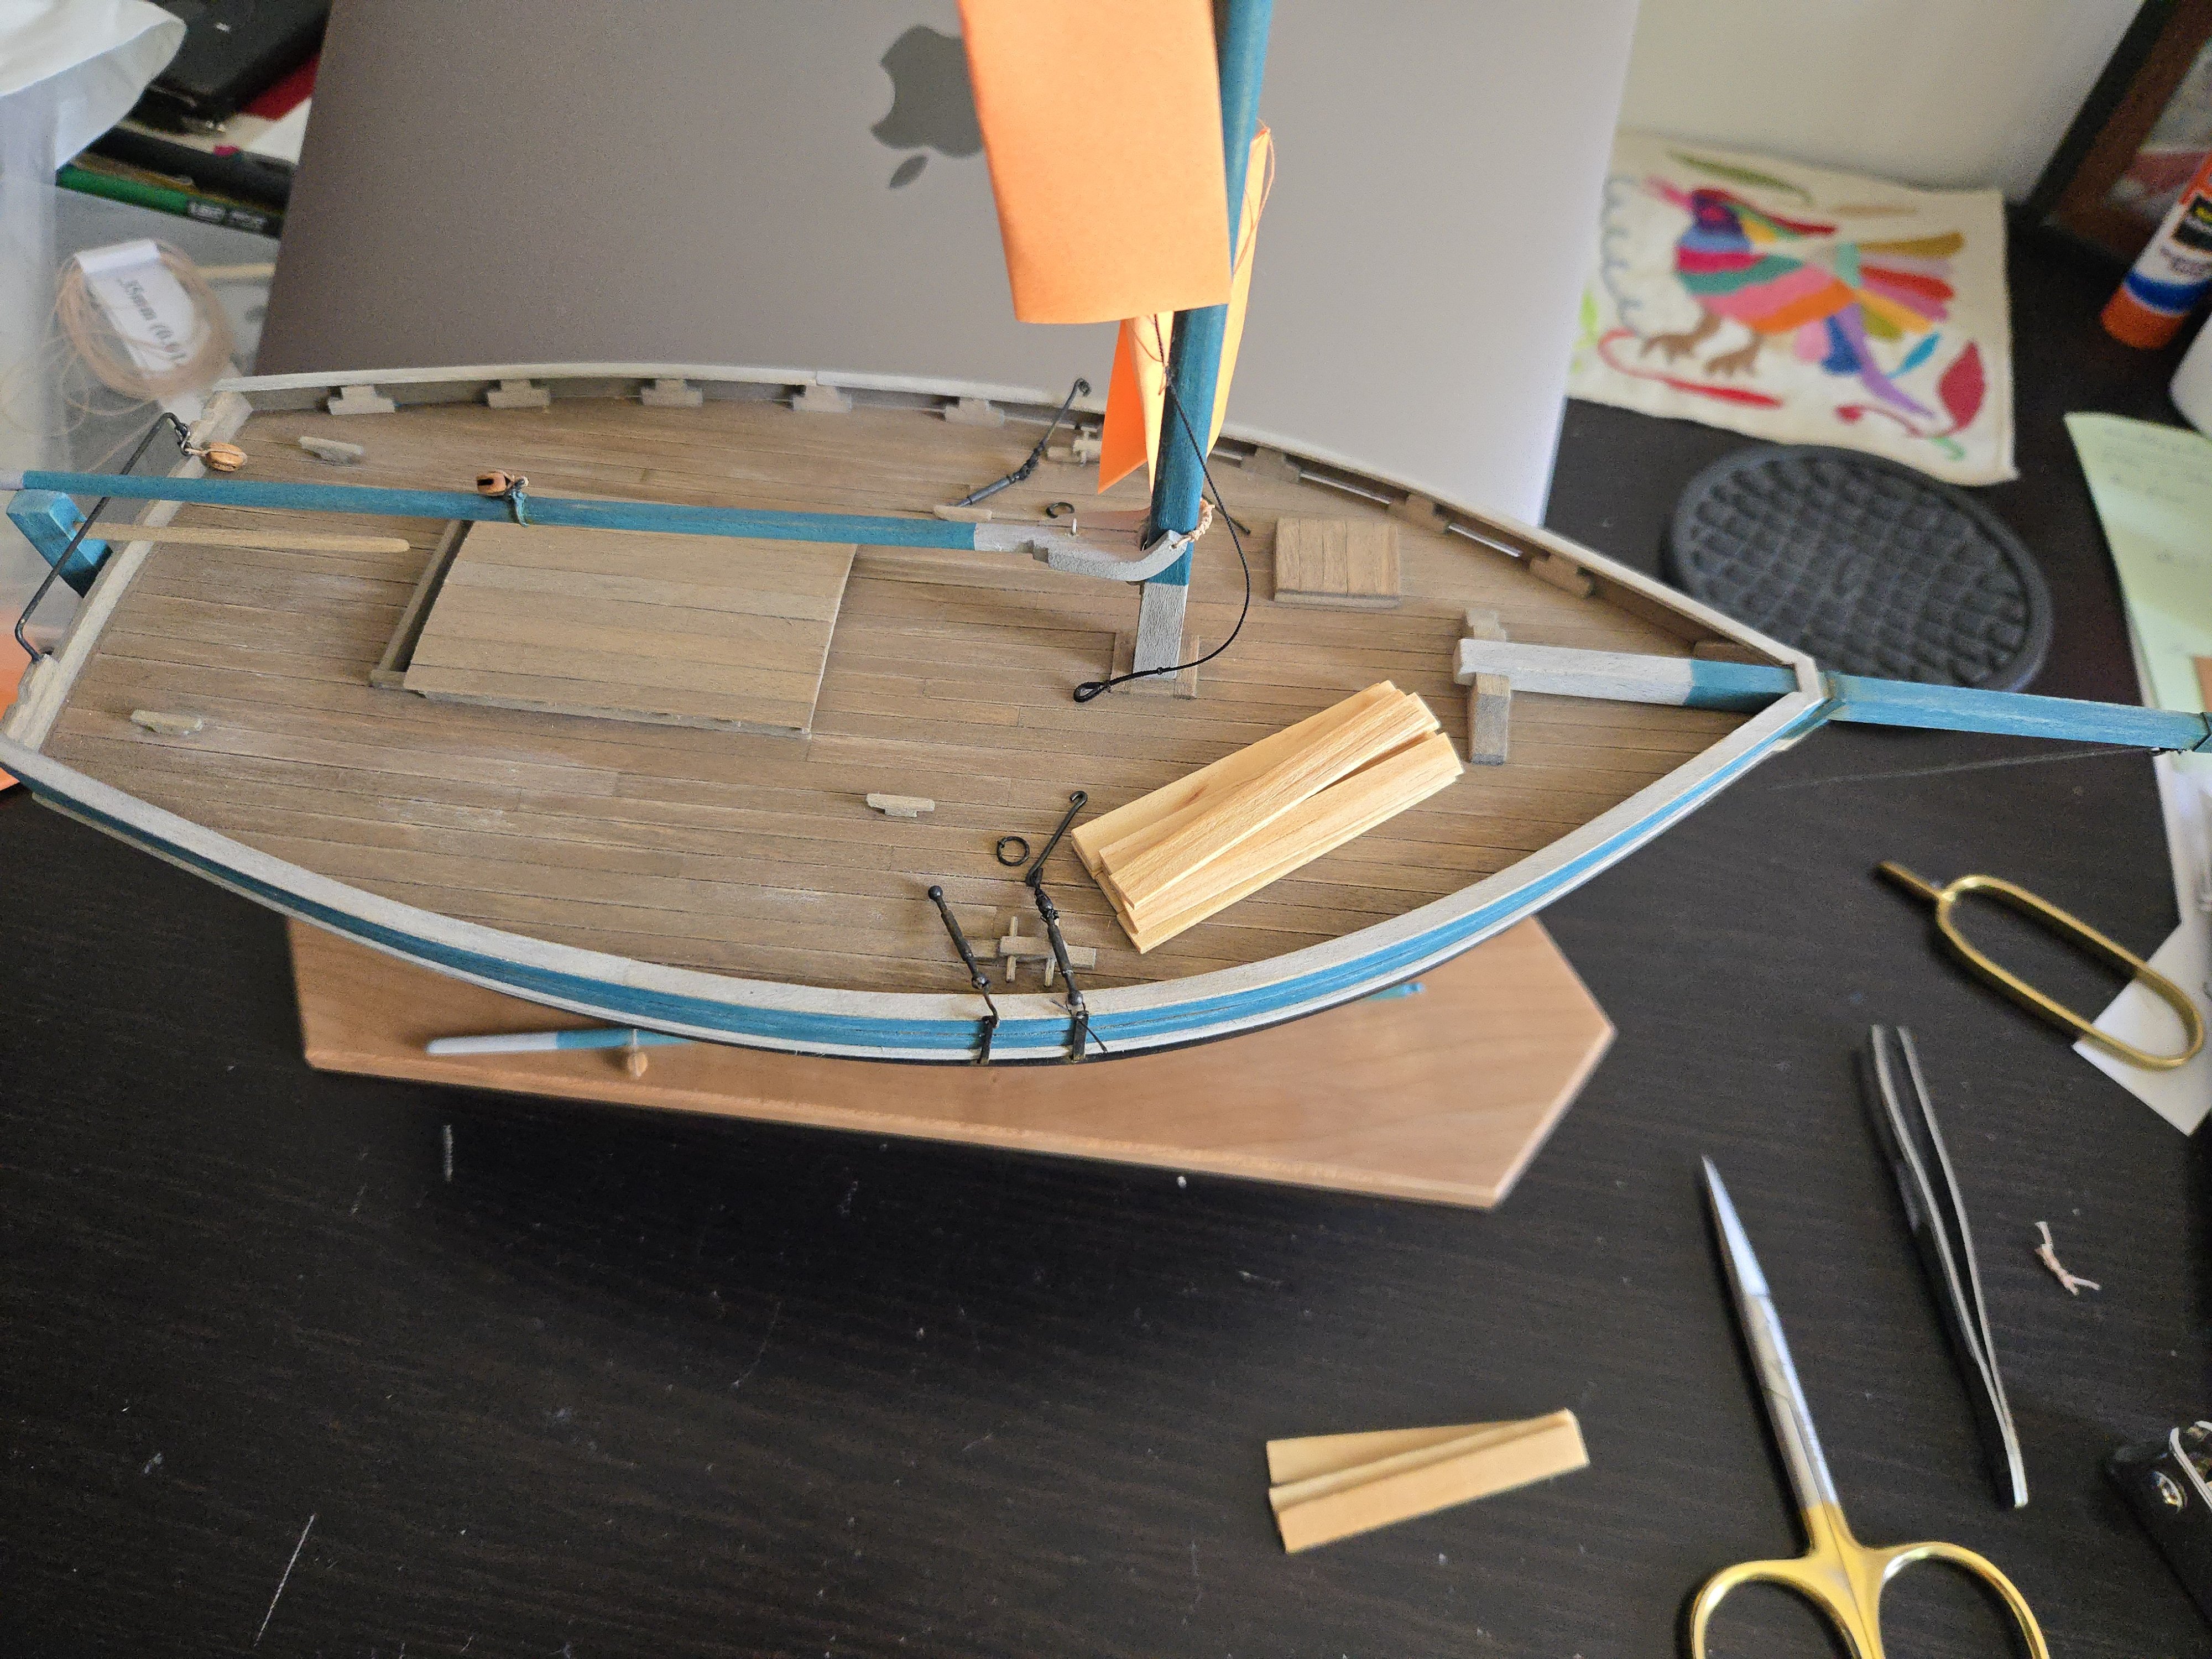
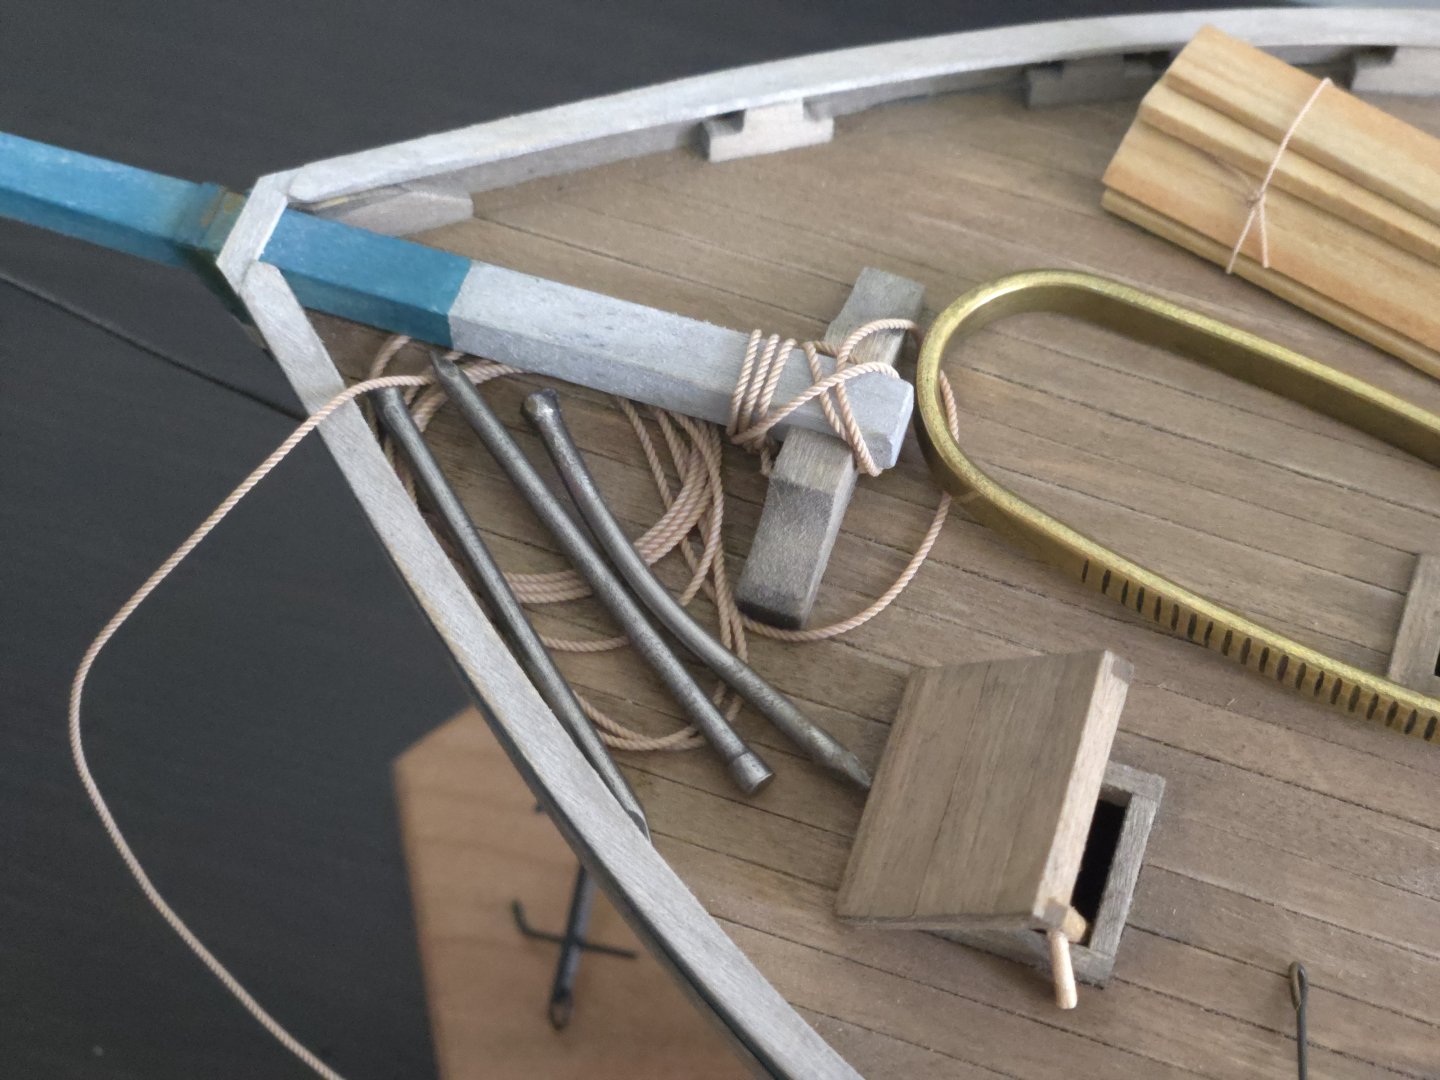
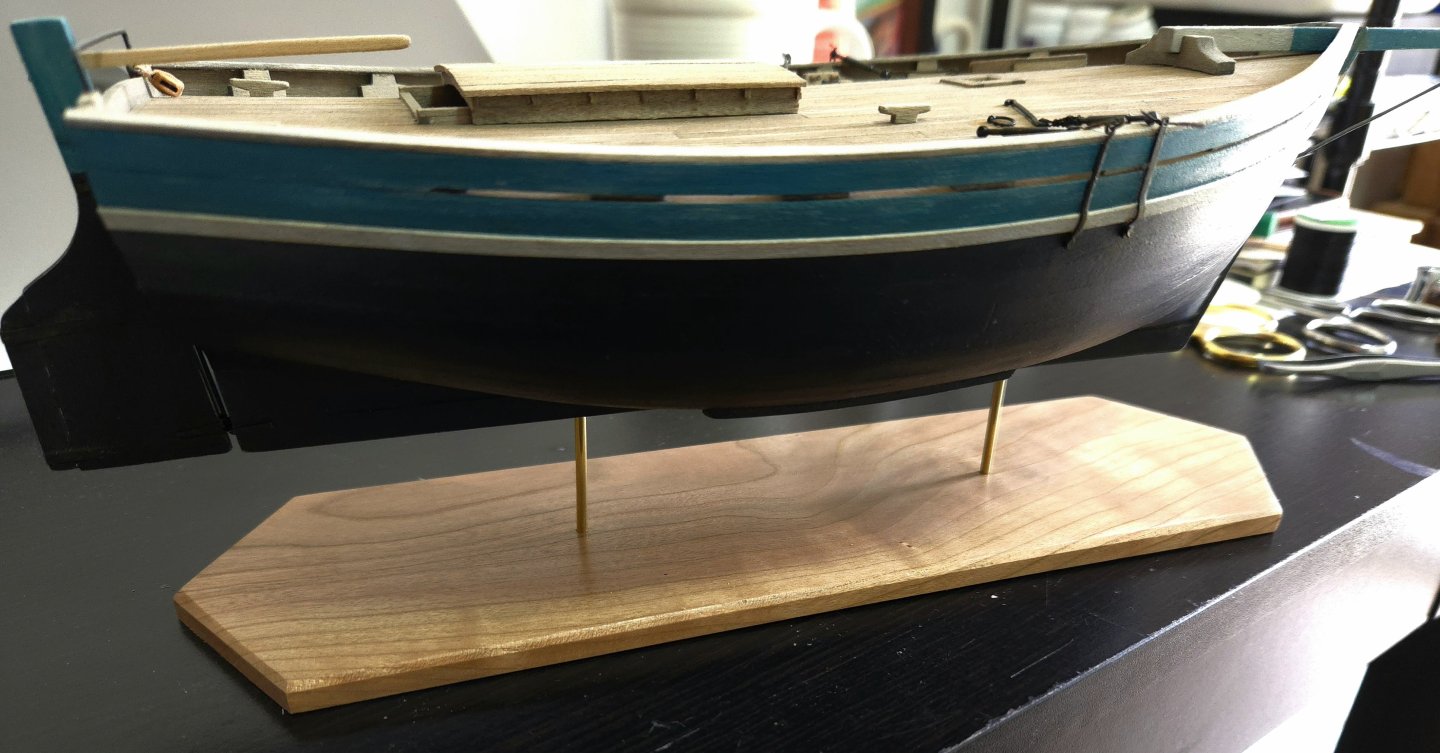
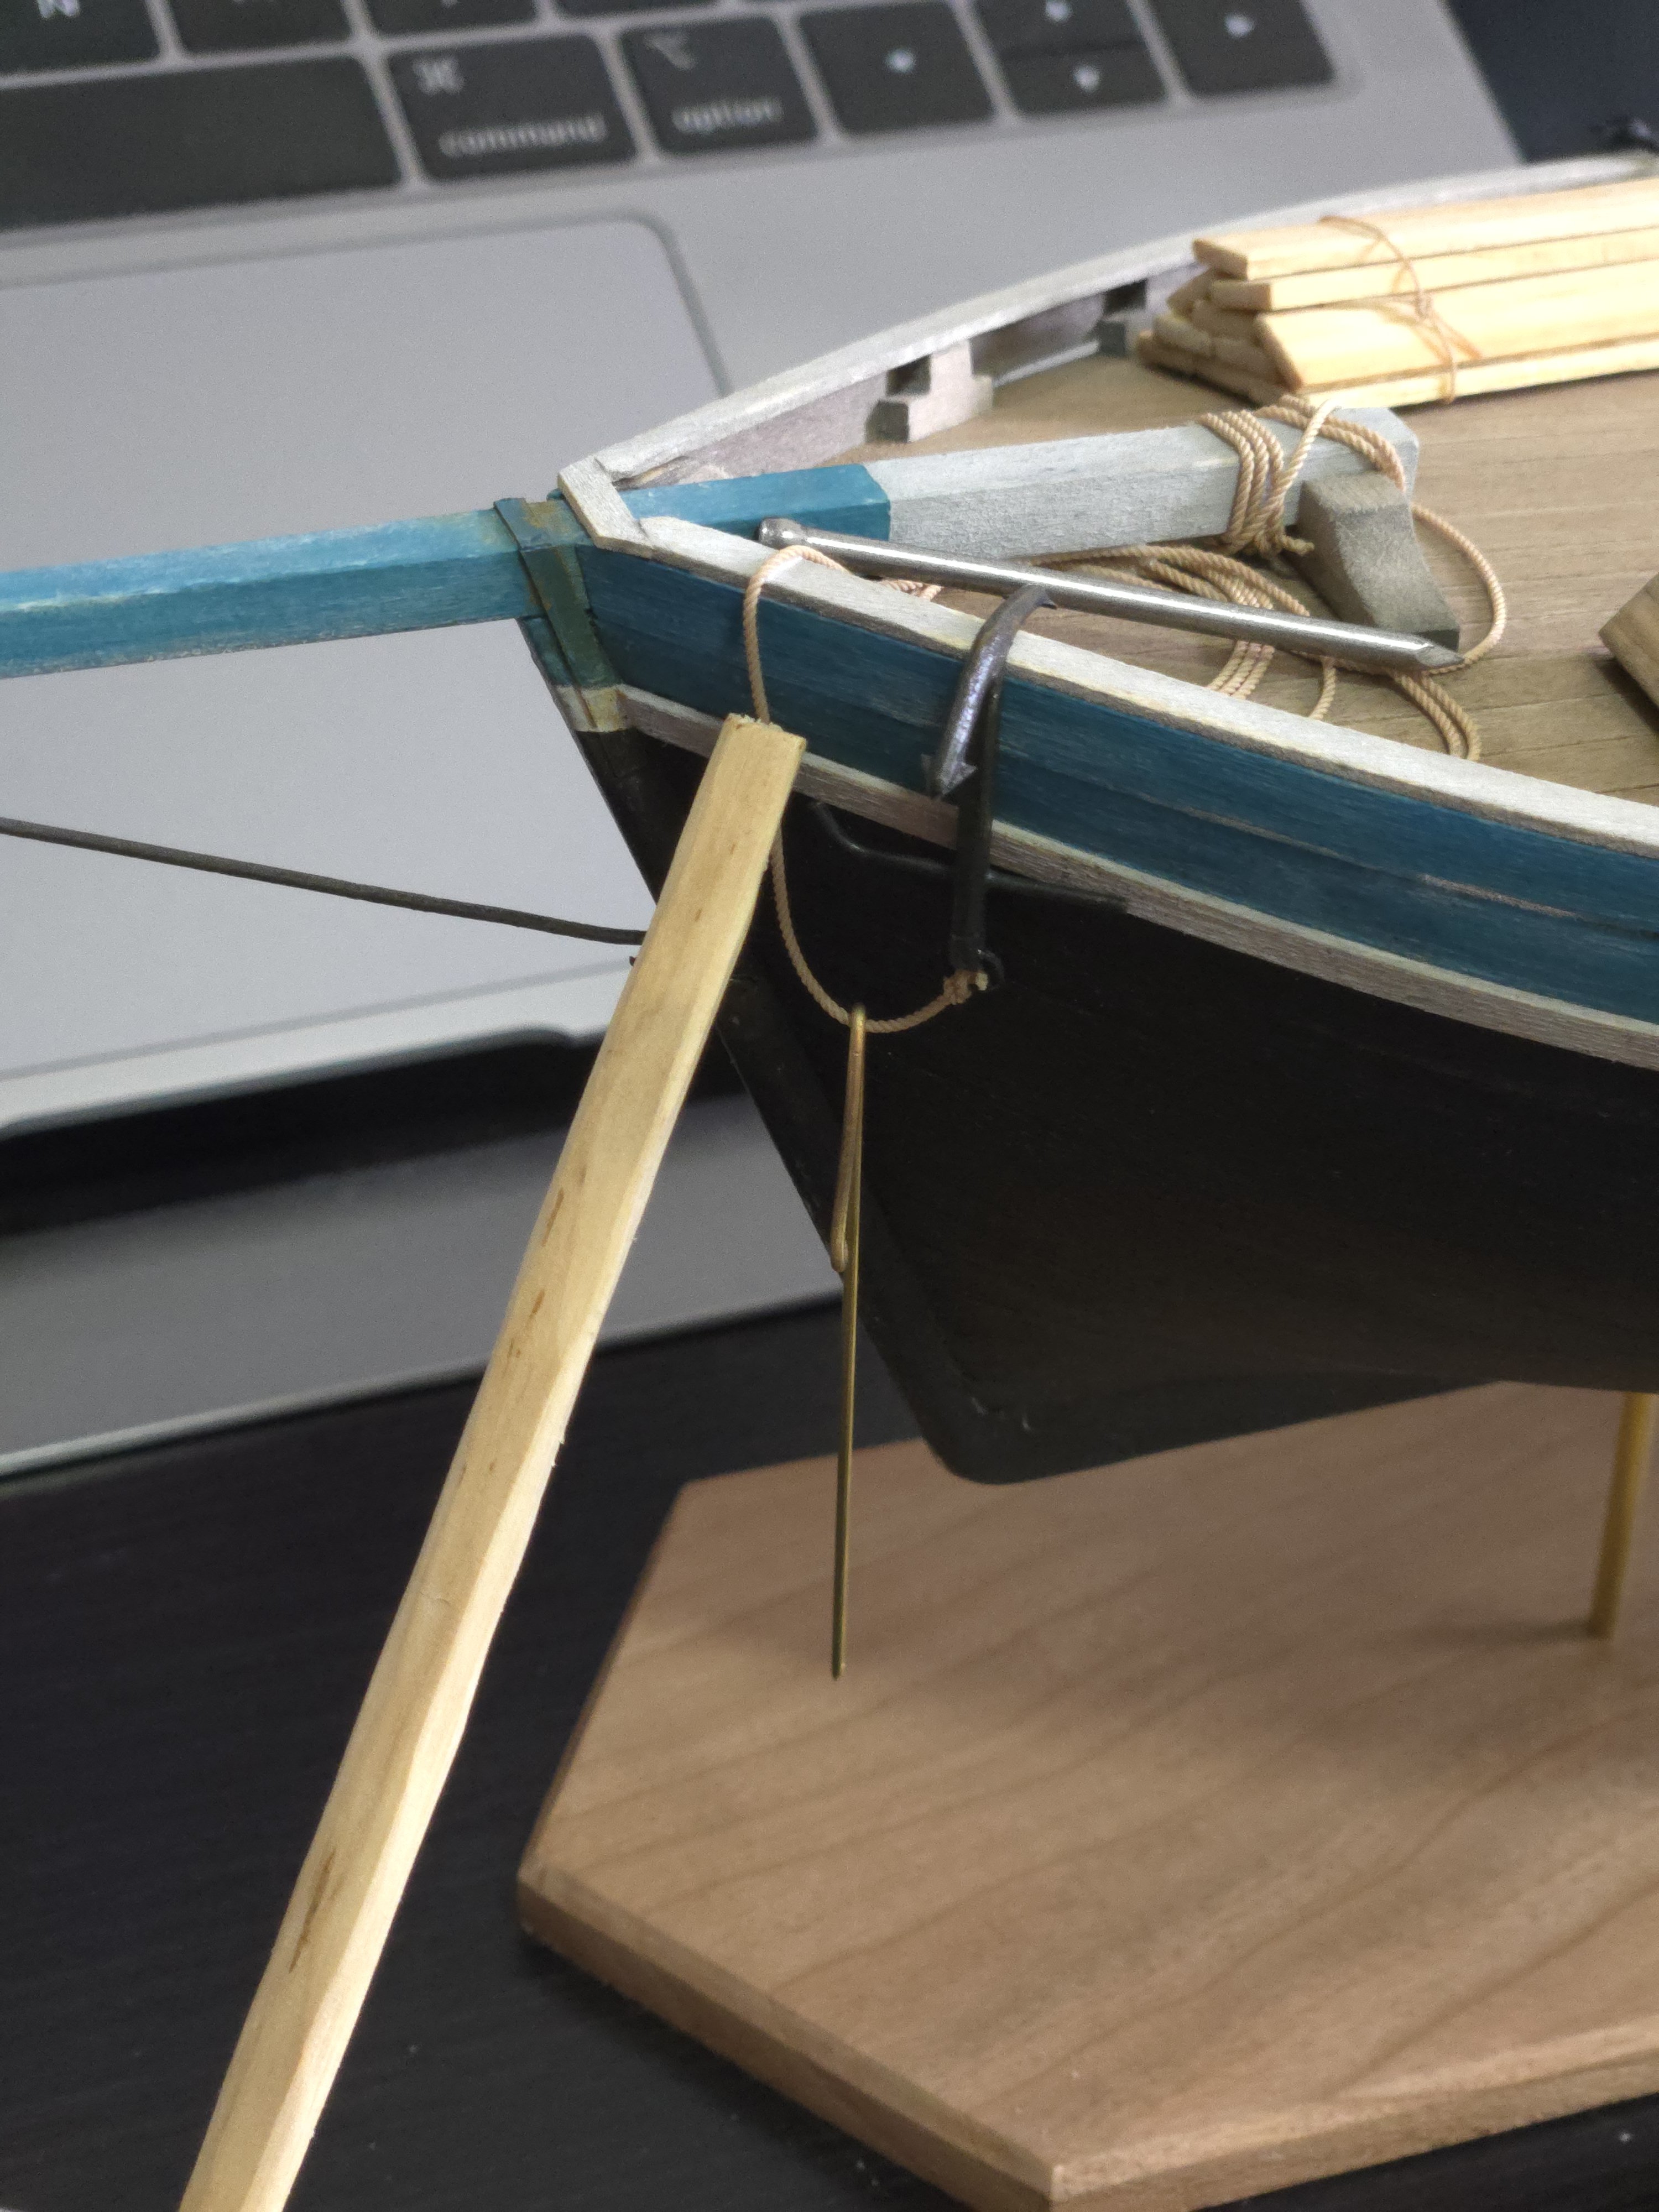
I'm making good progress with the furnishings and equipment, although I still have a few things to do. First up, I finally got around to making a fore hatch prop in the form of a forked stick. I did this by first bending two toothpicks (one of which had been sanded down to a slimmer thickness). I then drilled a small divot into the thicker one, glued in the thinner one, and then cut to size. I also slightly whittled the edges to give it less of a uniform look, and added a bit of stain and a dark acrylic wash. I then glued it in place, propping open the forward hatch. I wasn't quite pleased with it, though. I decided that it looked a bit thick. So, I carefully removed it, whittled the stick down a bit, and re-stained and colored it before reattaching it. It's a subtle difference, but worth it. While working on that, I also got started on attaching the anchor. Although some photos show chains, others show cables instead, so I went with that to save myself the hassle of blackening a chain. I would have expected the anchor cable to be the thickest rope on the lancha, but looking at photos, in most cases it looked to be about the thickness of the rigging ropes. I'll be using 0.6mm rope for the mainsheet, so I decided to use that rope for the cable, as well. Photos show it was knotted and looped around the bowsprit, so I went with something fairly simple and then loosely rolled the rope on deck. Getting it to sit right took a lot of watered-down glue and some very small but dense weights. I found that nails worked well. I then tied it off to the anchor, which I rested upside down hanging off the rail (one of many ways the anchor was placed, according to photos--I thought this looked better than simply resting on deck). Getting the rope into a nice curve took some creative, light "clamping." With that dry, here's the current state of the deck, with the boards and firewood not jet glued as I may fiddle with placement. I ultimately decided against adding a "split log" to the firewood, as I don't want the deck to be excessively busy, and there are still a few more things to add.

.thumb.jpg.02c5a403c919d5e2bafb35421e61f0ab.jpg)

.thumb.jpg.4e87000fe82b354e3821e5def5823d16.jpg)


- 312 replies
-
- 12
-
-
- Chile
- Latin America
- (and 6 more)
-
While I like the zen garden base idea, I agree that it competes with the ship for attention. The stone base looks quite nice, and I agree with @Thukydides about the moss idea.
- 106 replies
-
- 4
-

-
-
- Kentoshi-Sen
- bottle
- (and 1 more)
-
Thanks, all! Yes, a lot of the metalwork was probably made by non-specialists. Lancha owners and crew were not full-time sailors, but most often farmers who needed to get around the archipelago and bring their goods to market. While sources are clear that overall vessel construction was done by more specialized boat builders, most of the metalwork would have probably been done by local blacksmiths and the like who had to be "good enough" at making and repairing a wide range of items. Actually, the 1949 image in my recent post shows a different stock design which is straight (more or less), surprisingly thick, and not quite perpendicular to the arms. I had a range of options when it came to designing my model's anchor, and decided on the bent-stock design for the added visual interest it offers.
- 312 replies
-
- 6
-
-
- Chile
- Latin America
- (and 6 more)
-
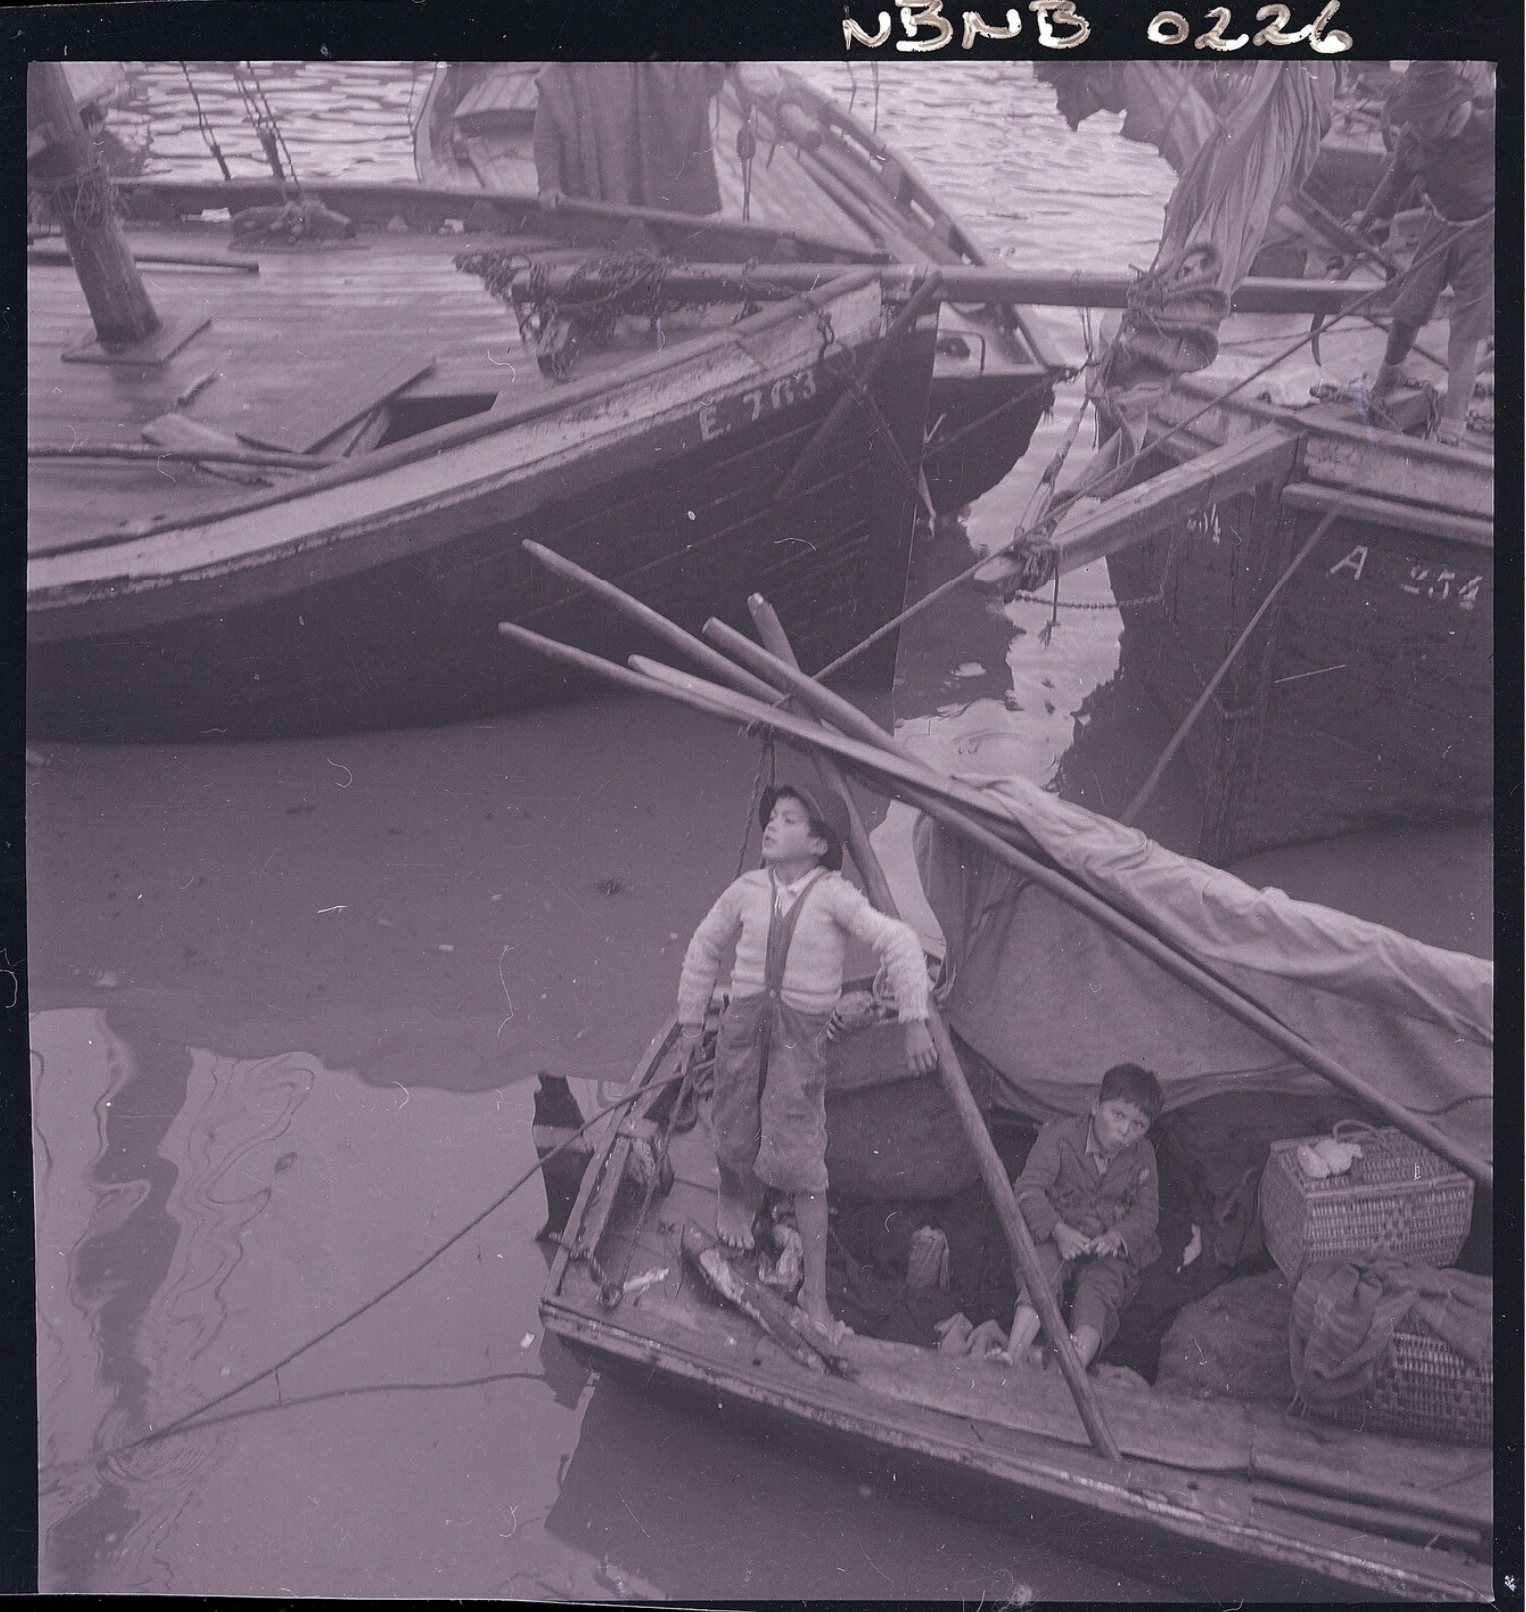
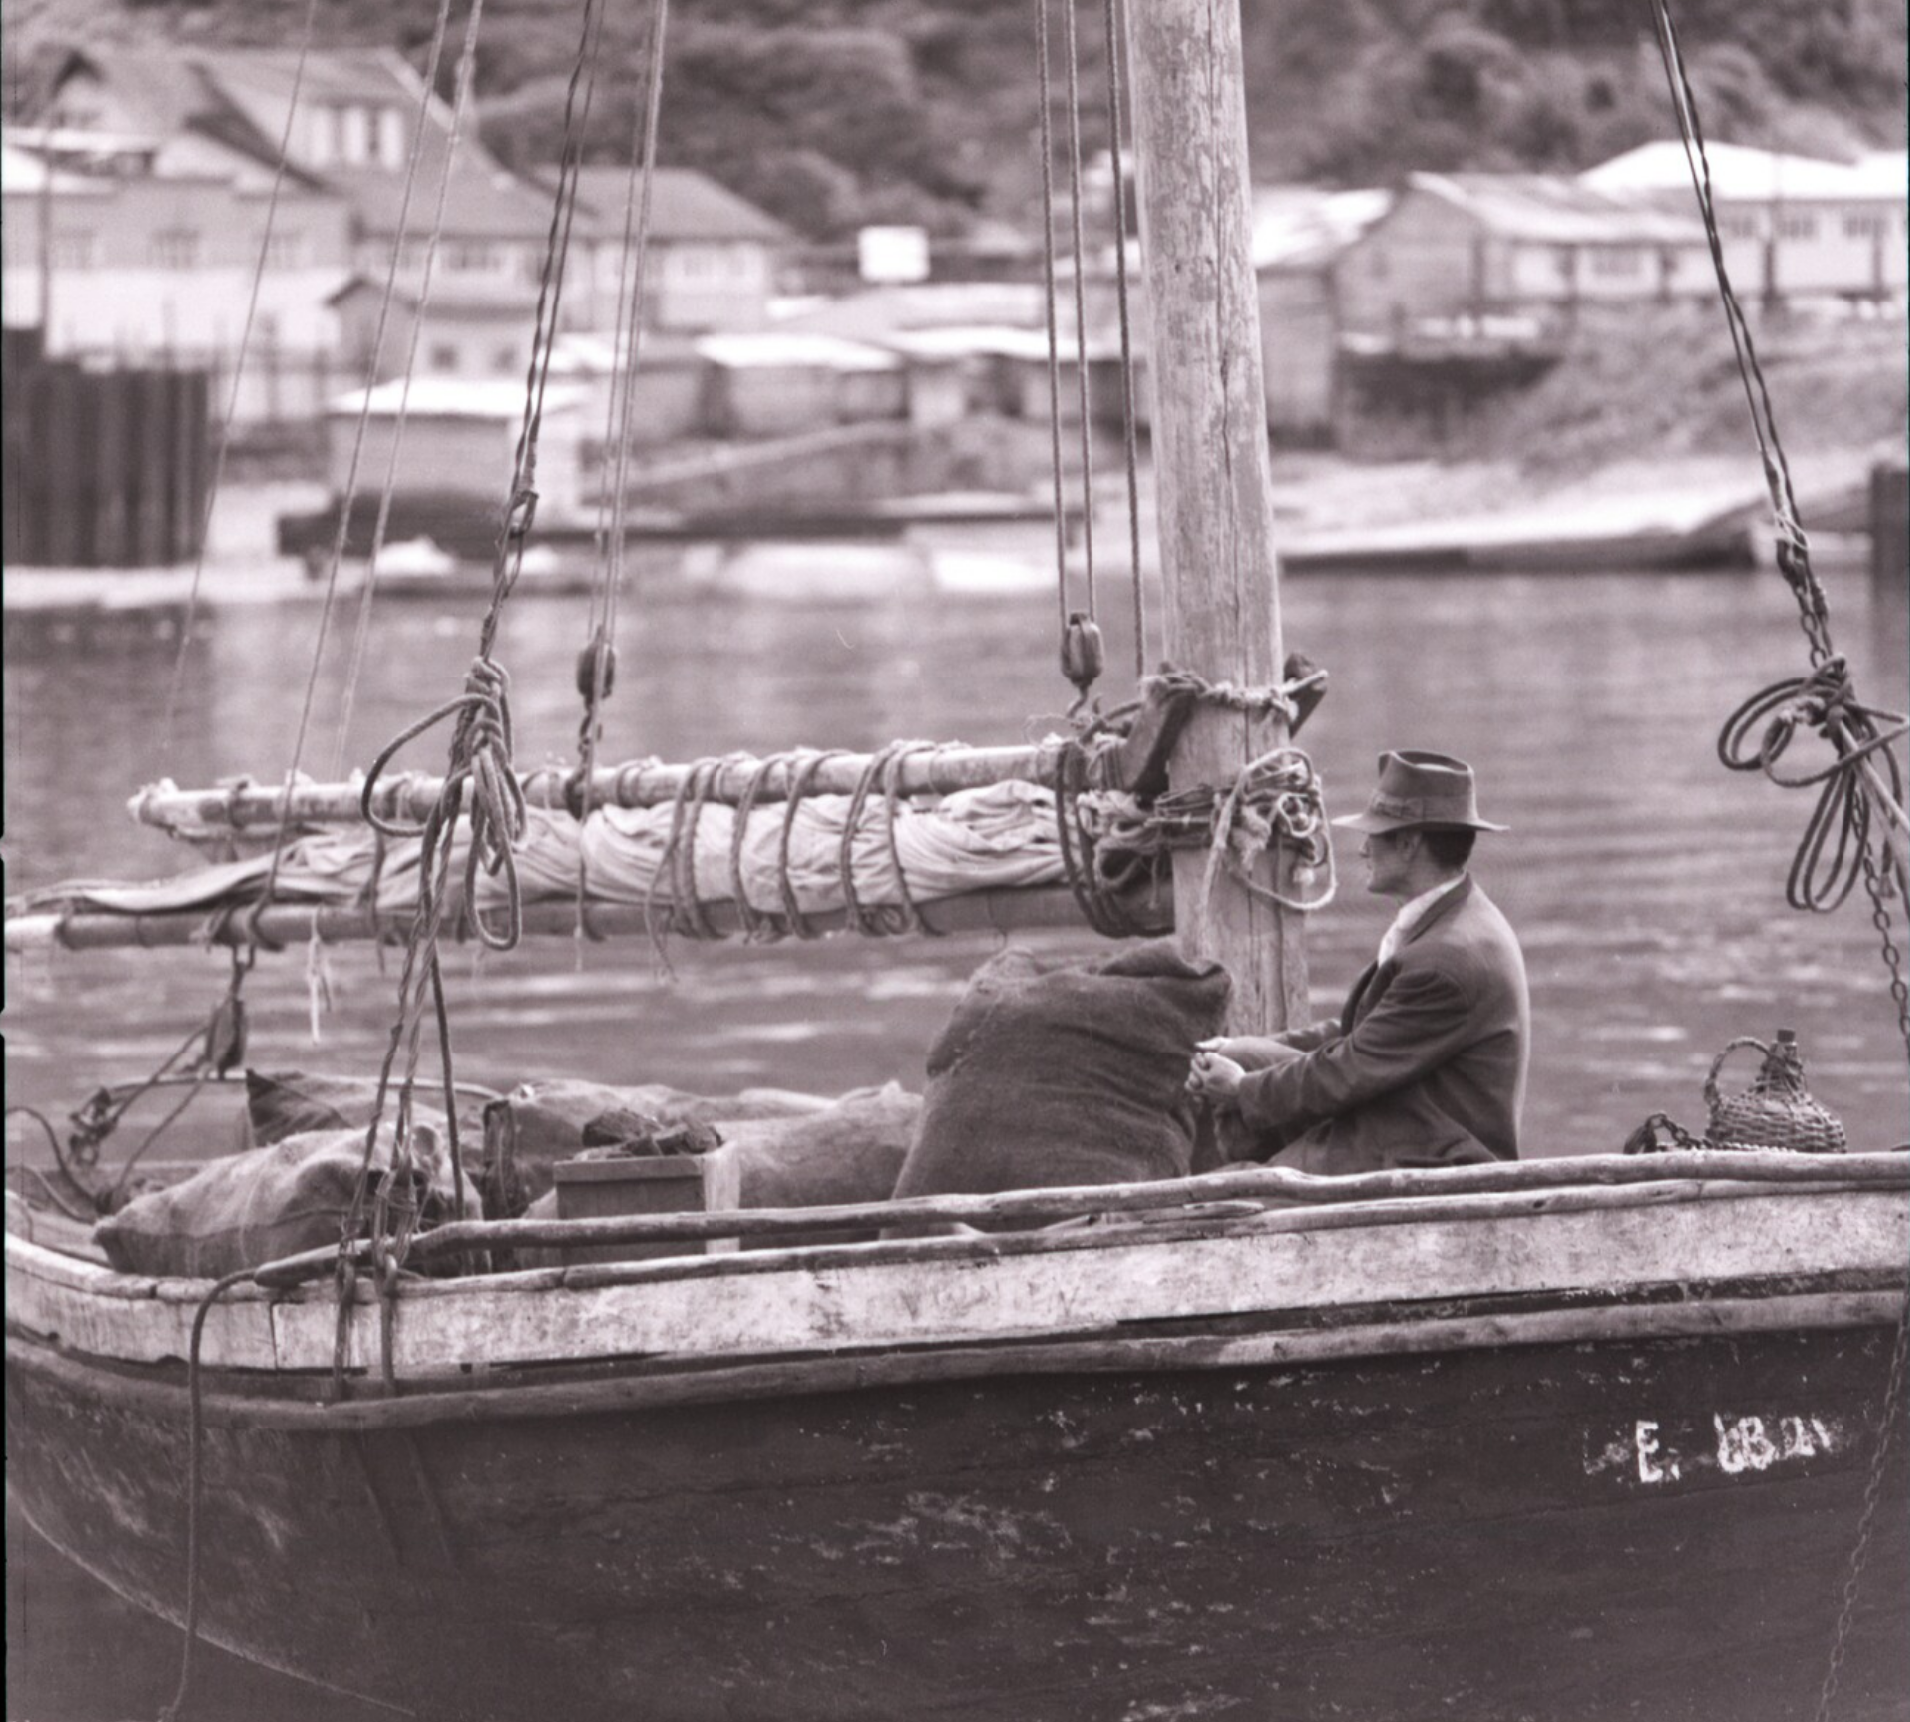
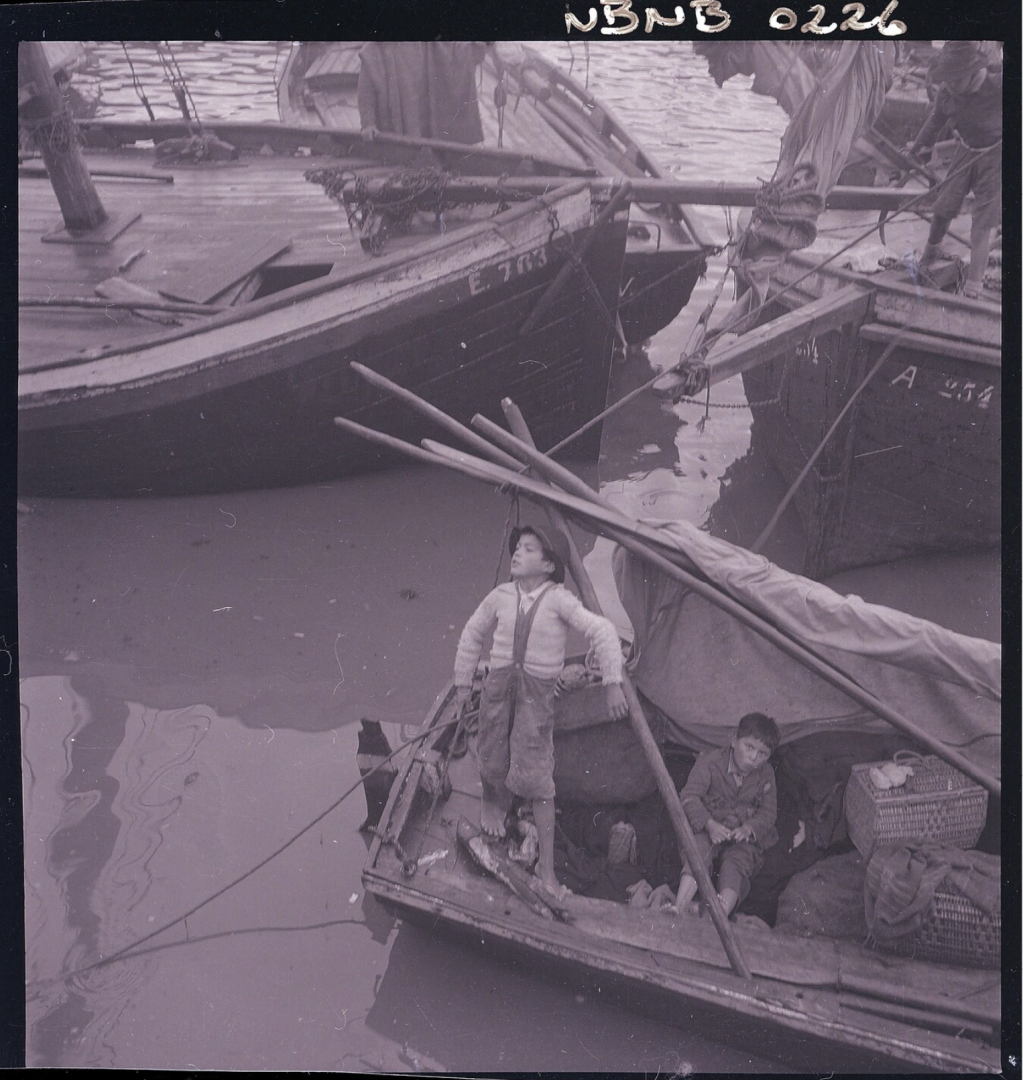
Also, a brief note. While images from about the 1960s onward (including the photos by Carlos Vairo from the 1980s that I've repeatedly linked to) are very clear that lanchas were using internally-stropped blocks by then, I had gone with rope-stropped blocks on my build. This wasn't just because they are easier to make and stropping is a skill I wanted to learn (although those both did shape my decision), but also because I had seen rope-stropped blocks in earlier photos. However, I've been a bit nervous lately as I couldn't find the photos showing that, leaving me wondering if I had misremembered things and would have to redo all the blocks. Fortunately, I re-found it, and now can confirm that my rope-stropped blocks are accurate. While I've been bookmarking all of the useful images I came across with keywords, I hadn't thought to include "blocks" as a keyword, which has now been remedied. The photo below, by Ignacio Hochhäusler, is from between 1949 and 1960 (the date is variously given as that range or 1949). It shows a few lanchas in port and, closer to the camera, a couple children in a smaller open vessel (not a chalupa, as it has a transom stern). There's a lot of good detail in the photo showing bowsprit rigging on the lanchas and quite a few large woven baskets in the smaller vessel. If you're interested in seeing more, you can follow the link and click the blue "Visualizar" link (with the eye image) to the top left of the image to see a much higher-quality scan. Source: https://www.bibliotecanacionaldigital.gob.cl/bnd/629/w3-article-164722.html If we zoom in at the top of the image, on the furthest lancha we can see what is unmistakably a rope-stropped block dangling from the boom. So, I'm on firm ground with my decision to include rope-stropped blocks, and don't have to redo them. My goal with this build is to represent a midcentury lancha. It has some features that would have been relatively recent innovations at the time, such as the longer and higher-peaked gaff, but also is still using rope-stropped blocks, and uses ordinary rope instead of the brightly-colored synthetics that we can see in the 1980s Vairo photos I've linked to before.

- 312 replies
-
- 6
-
-
- Chile
- Latin America
- (and 6 more)
-
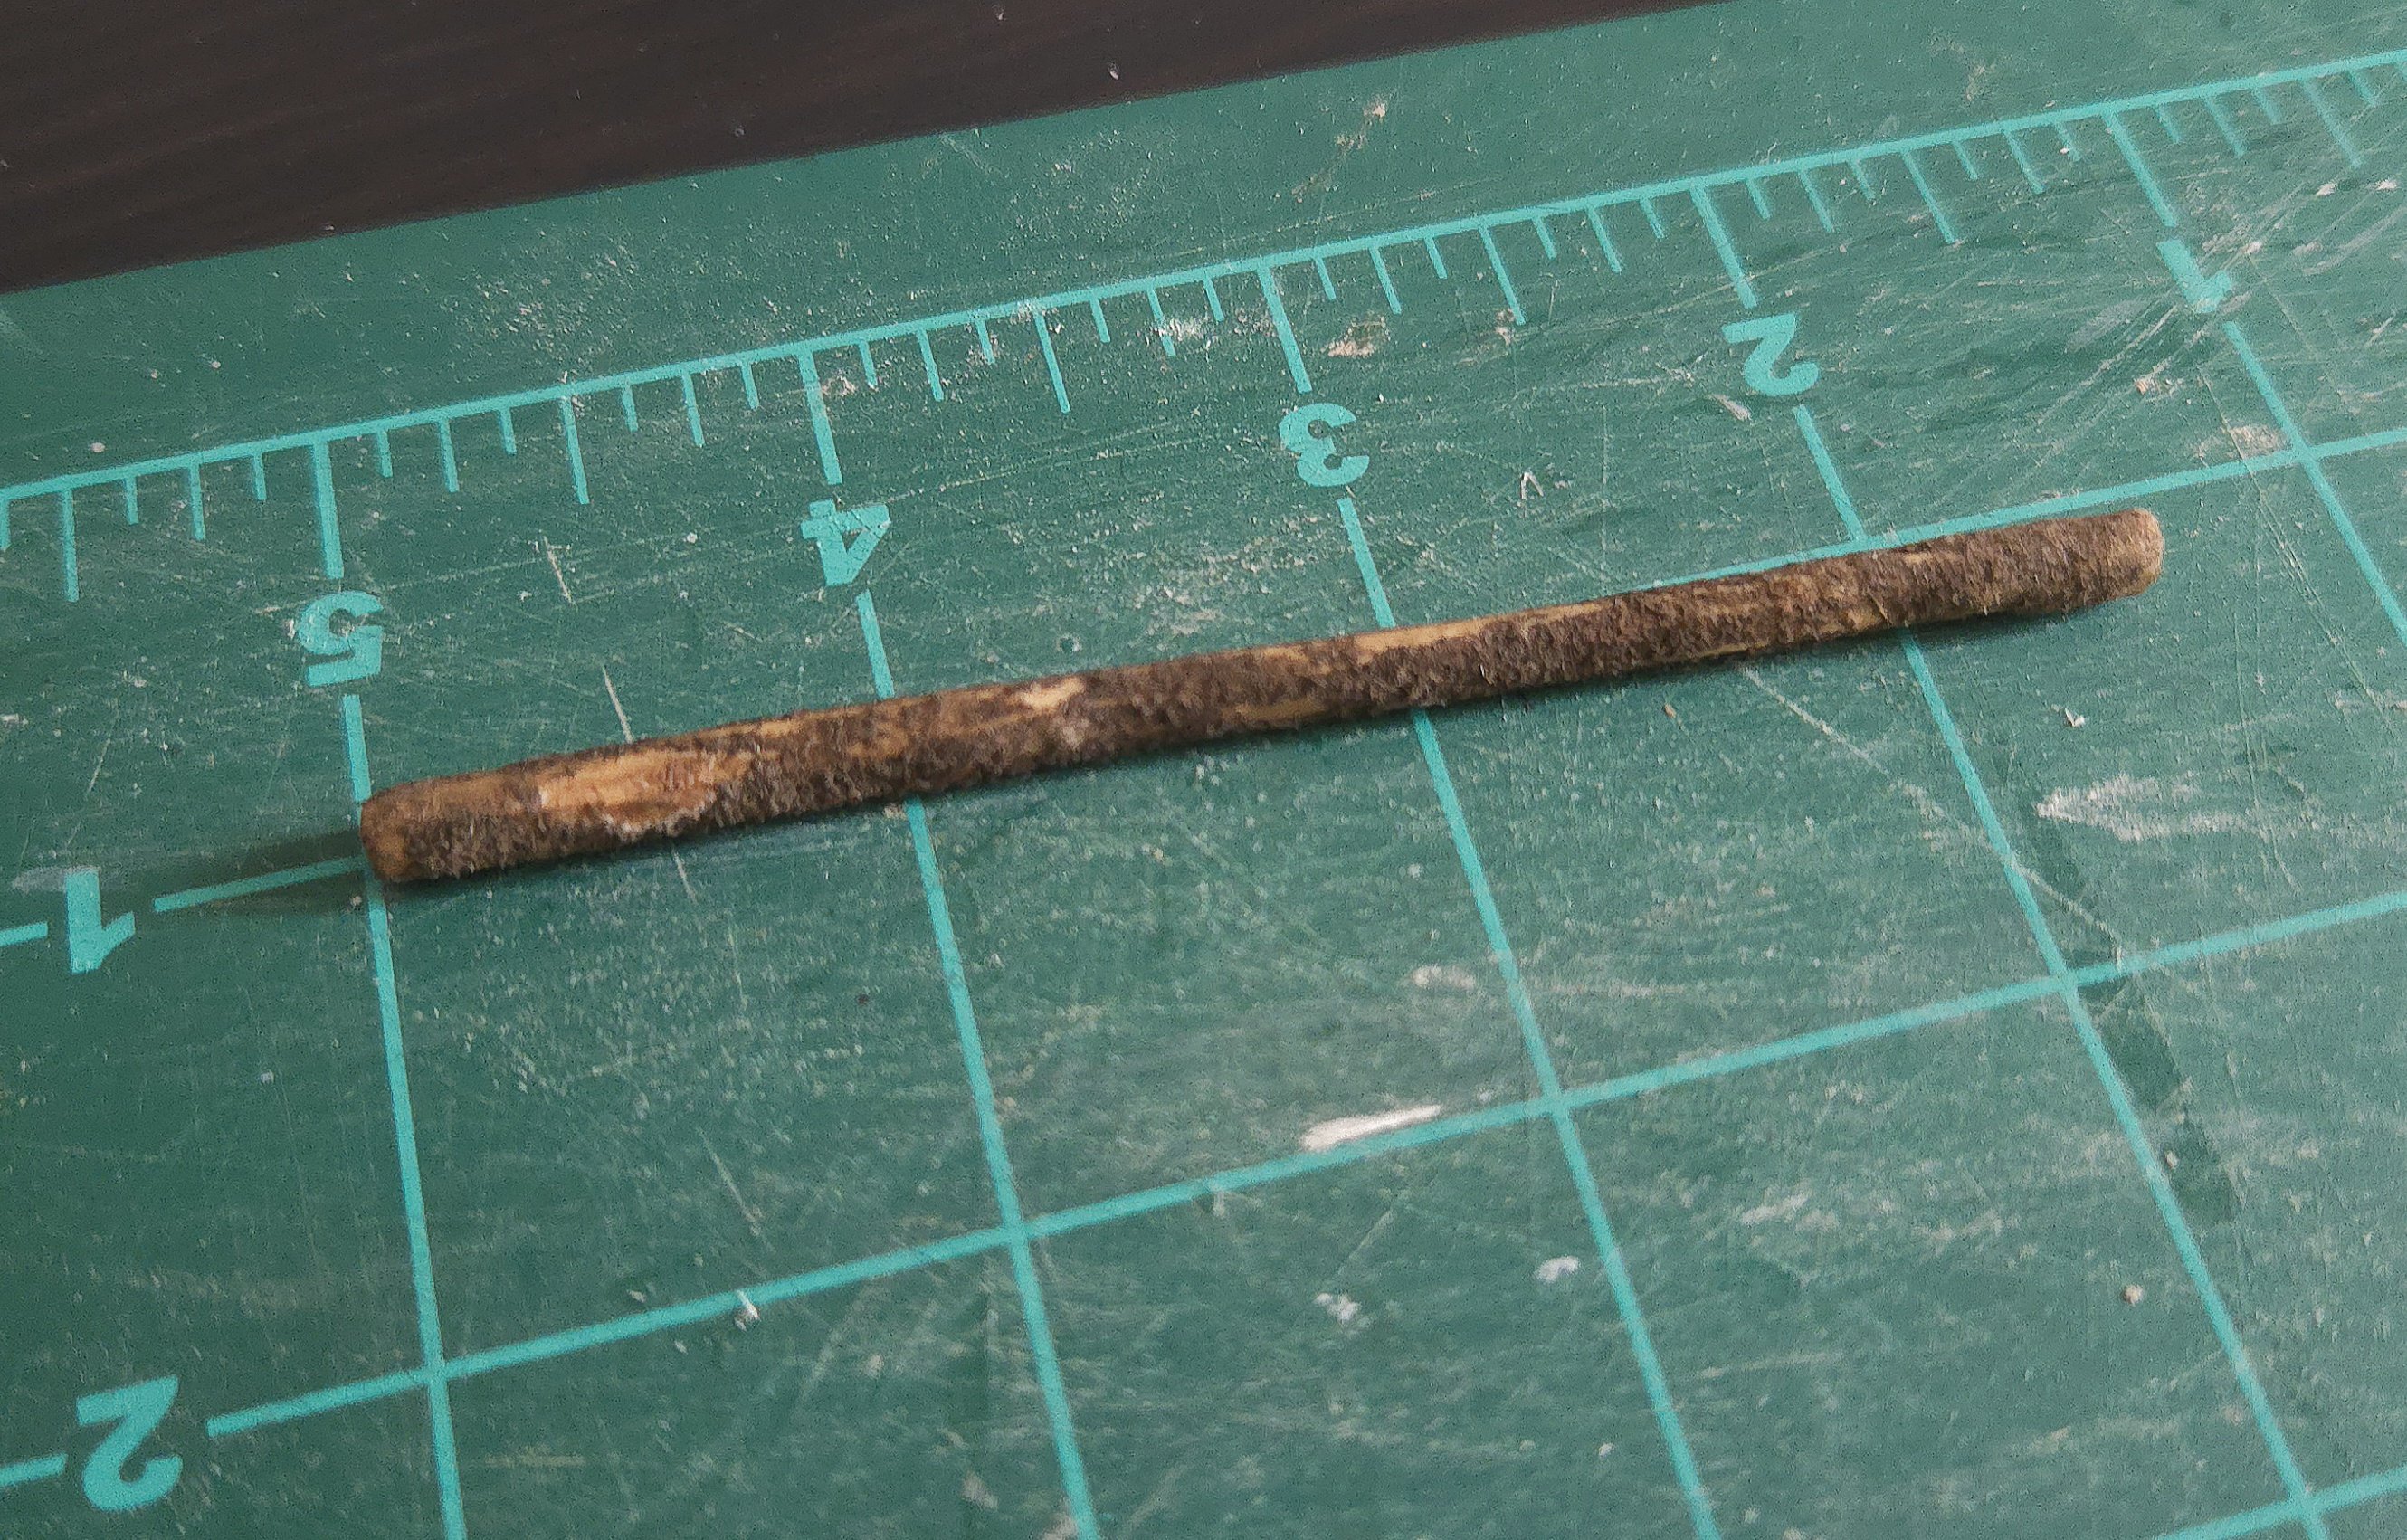
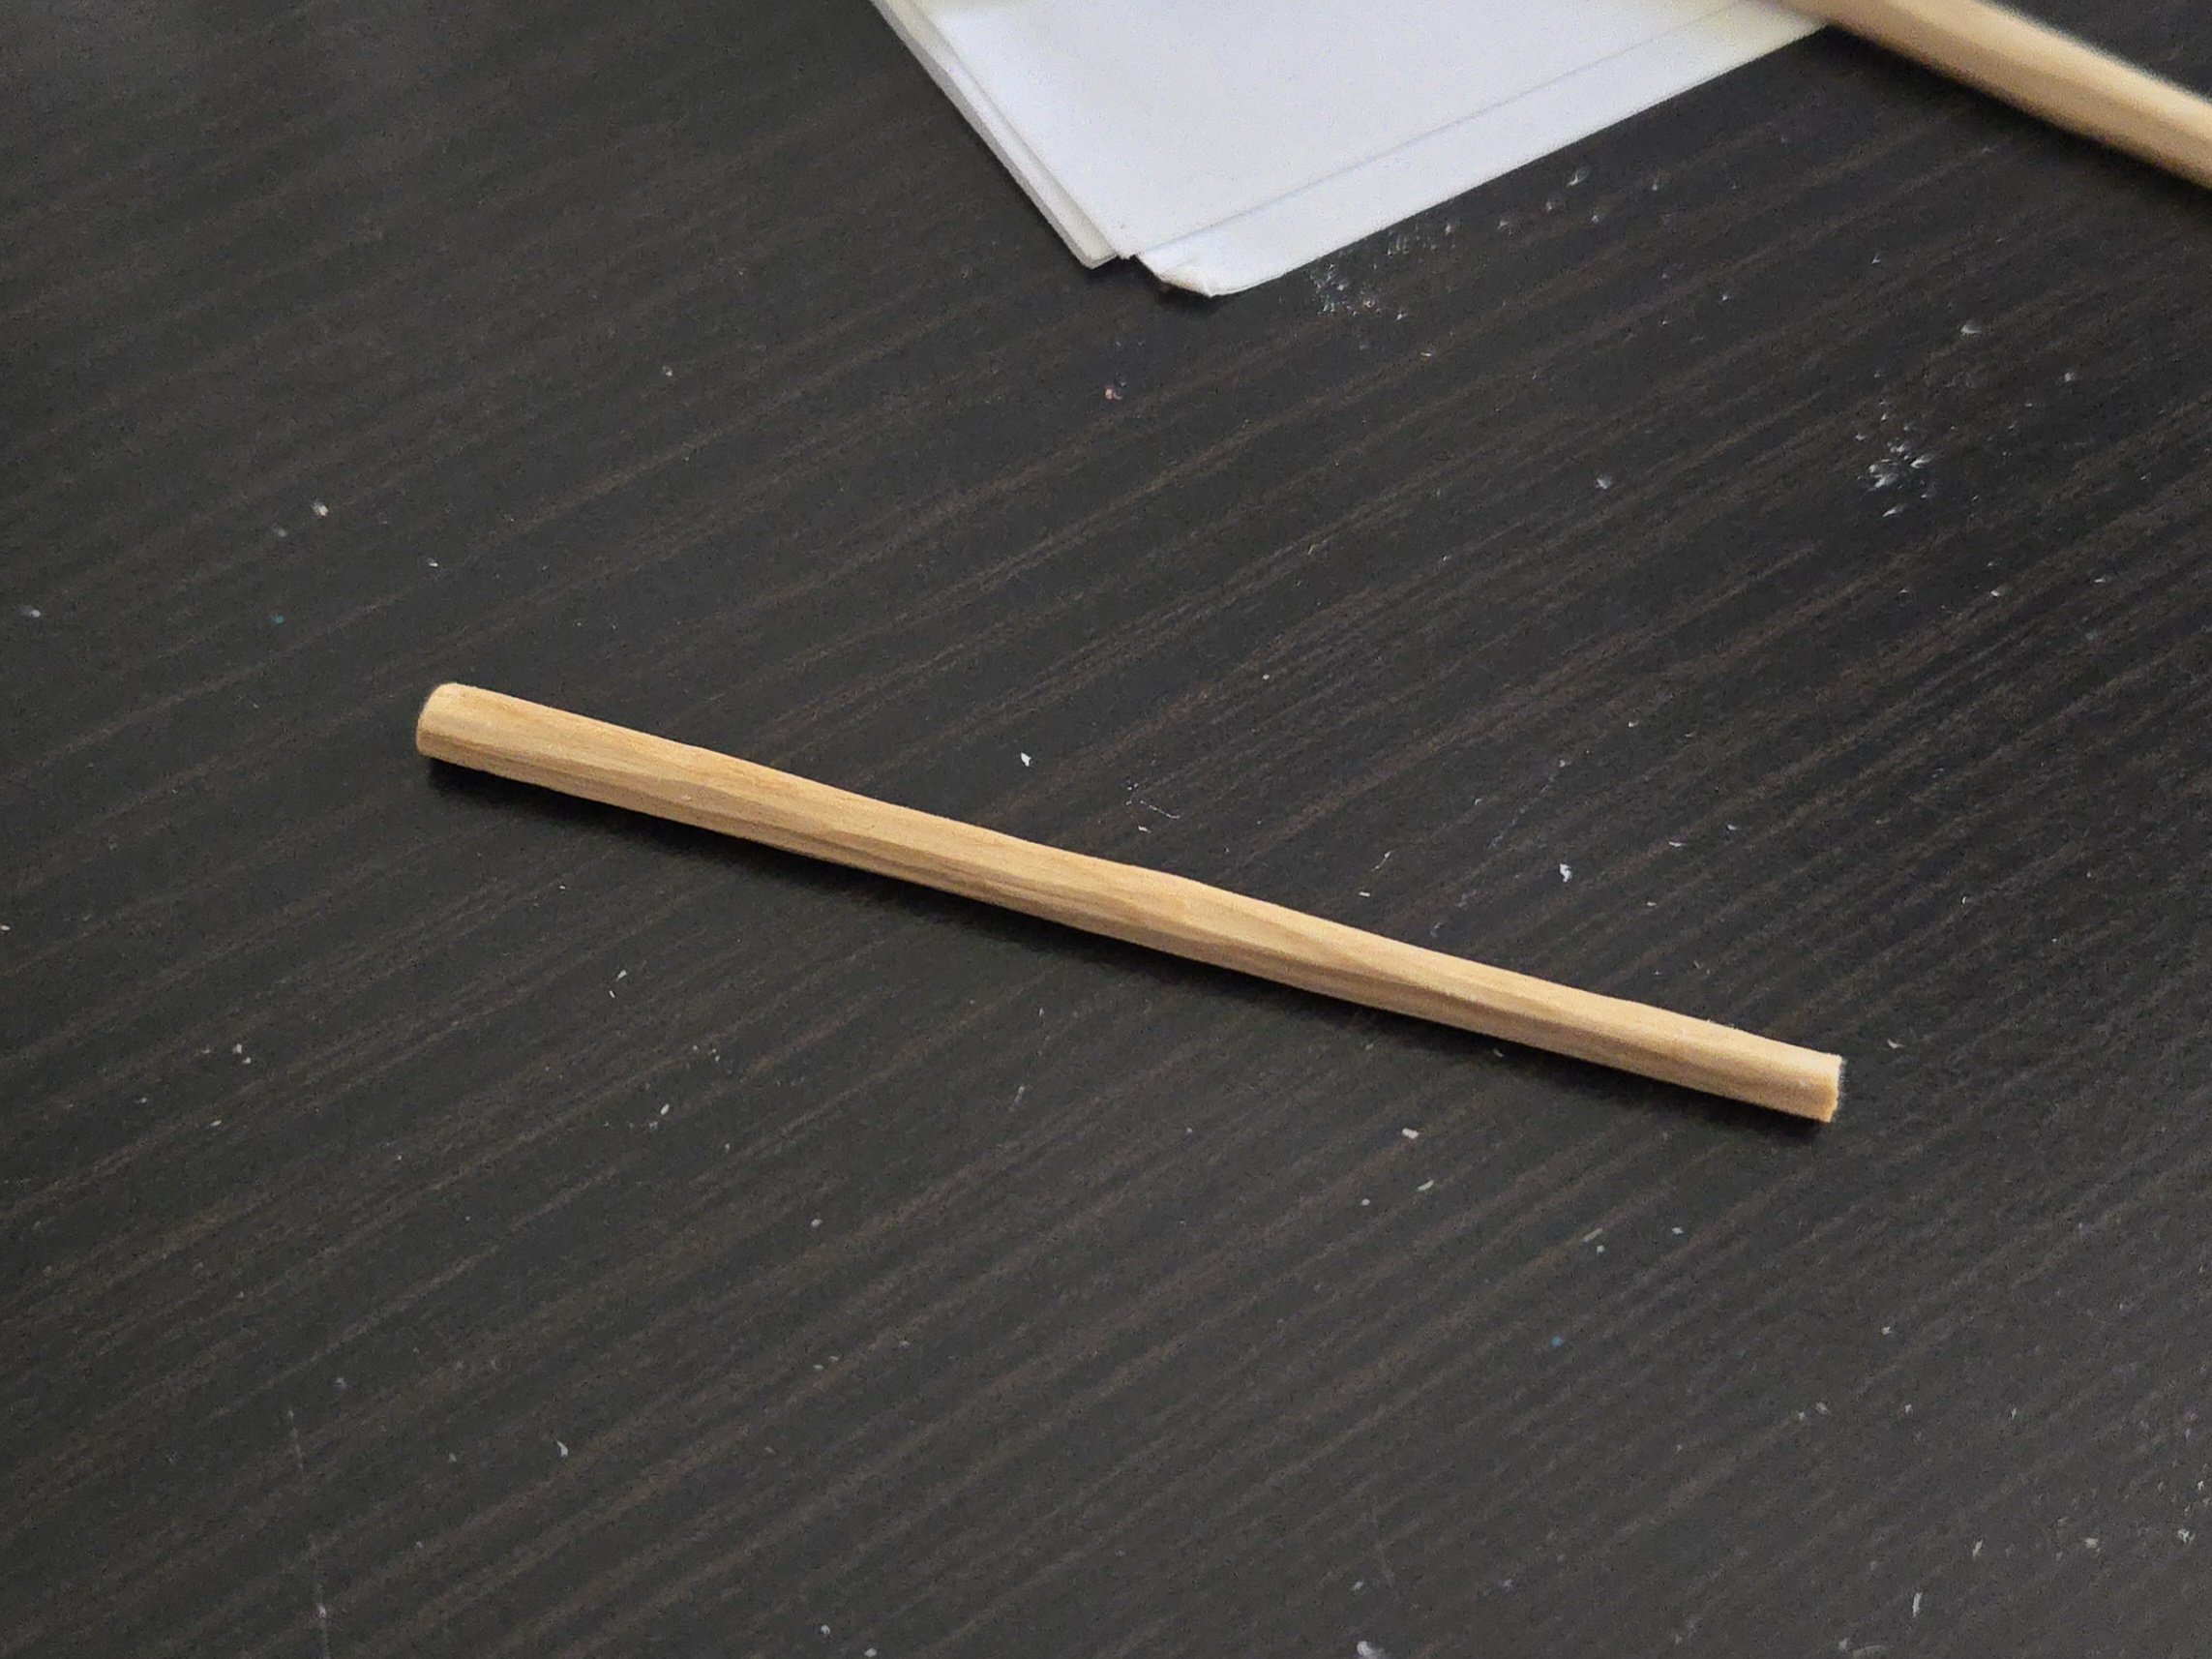
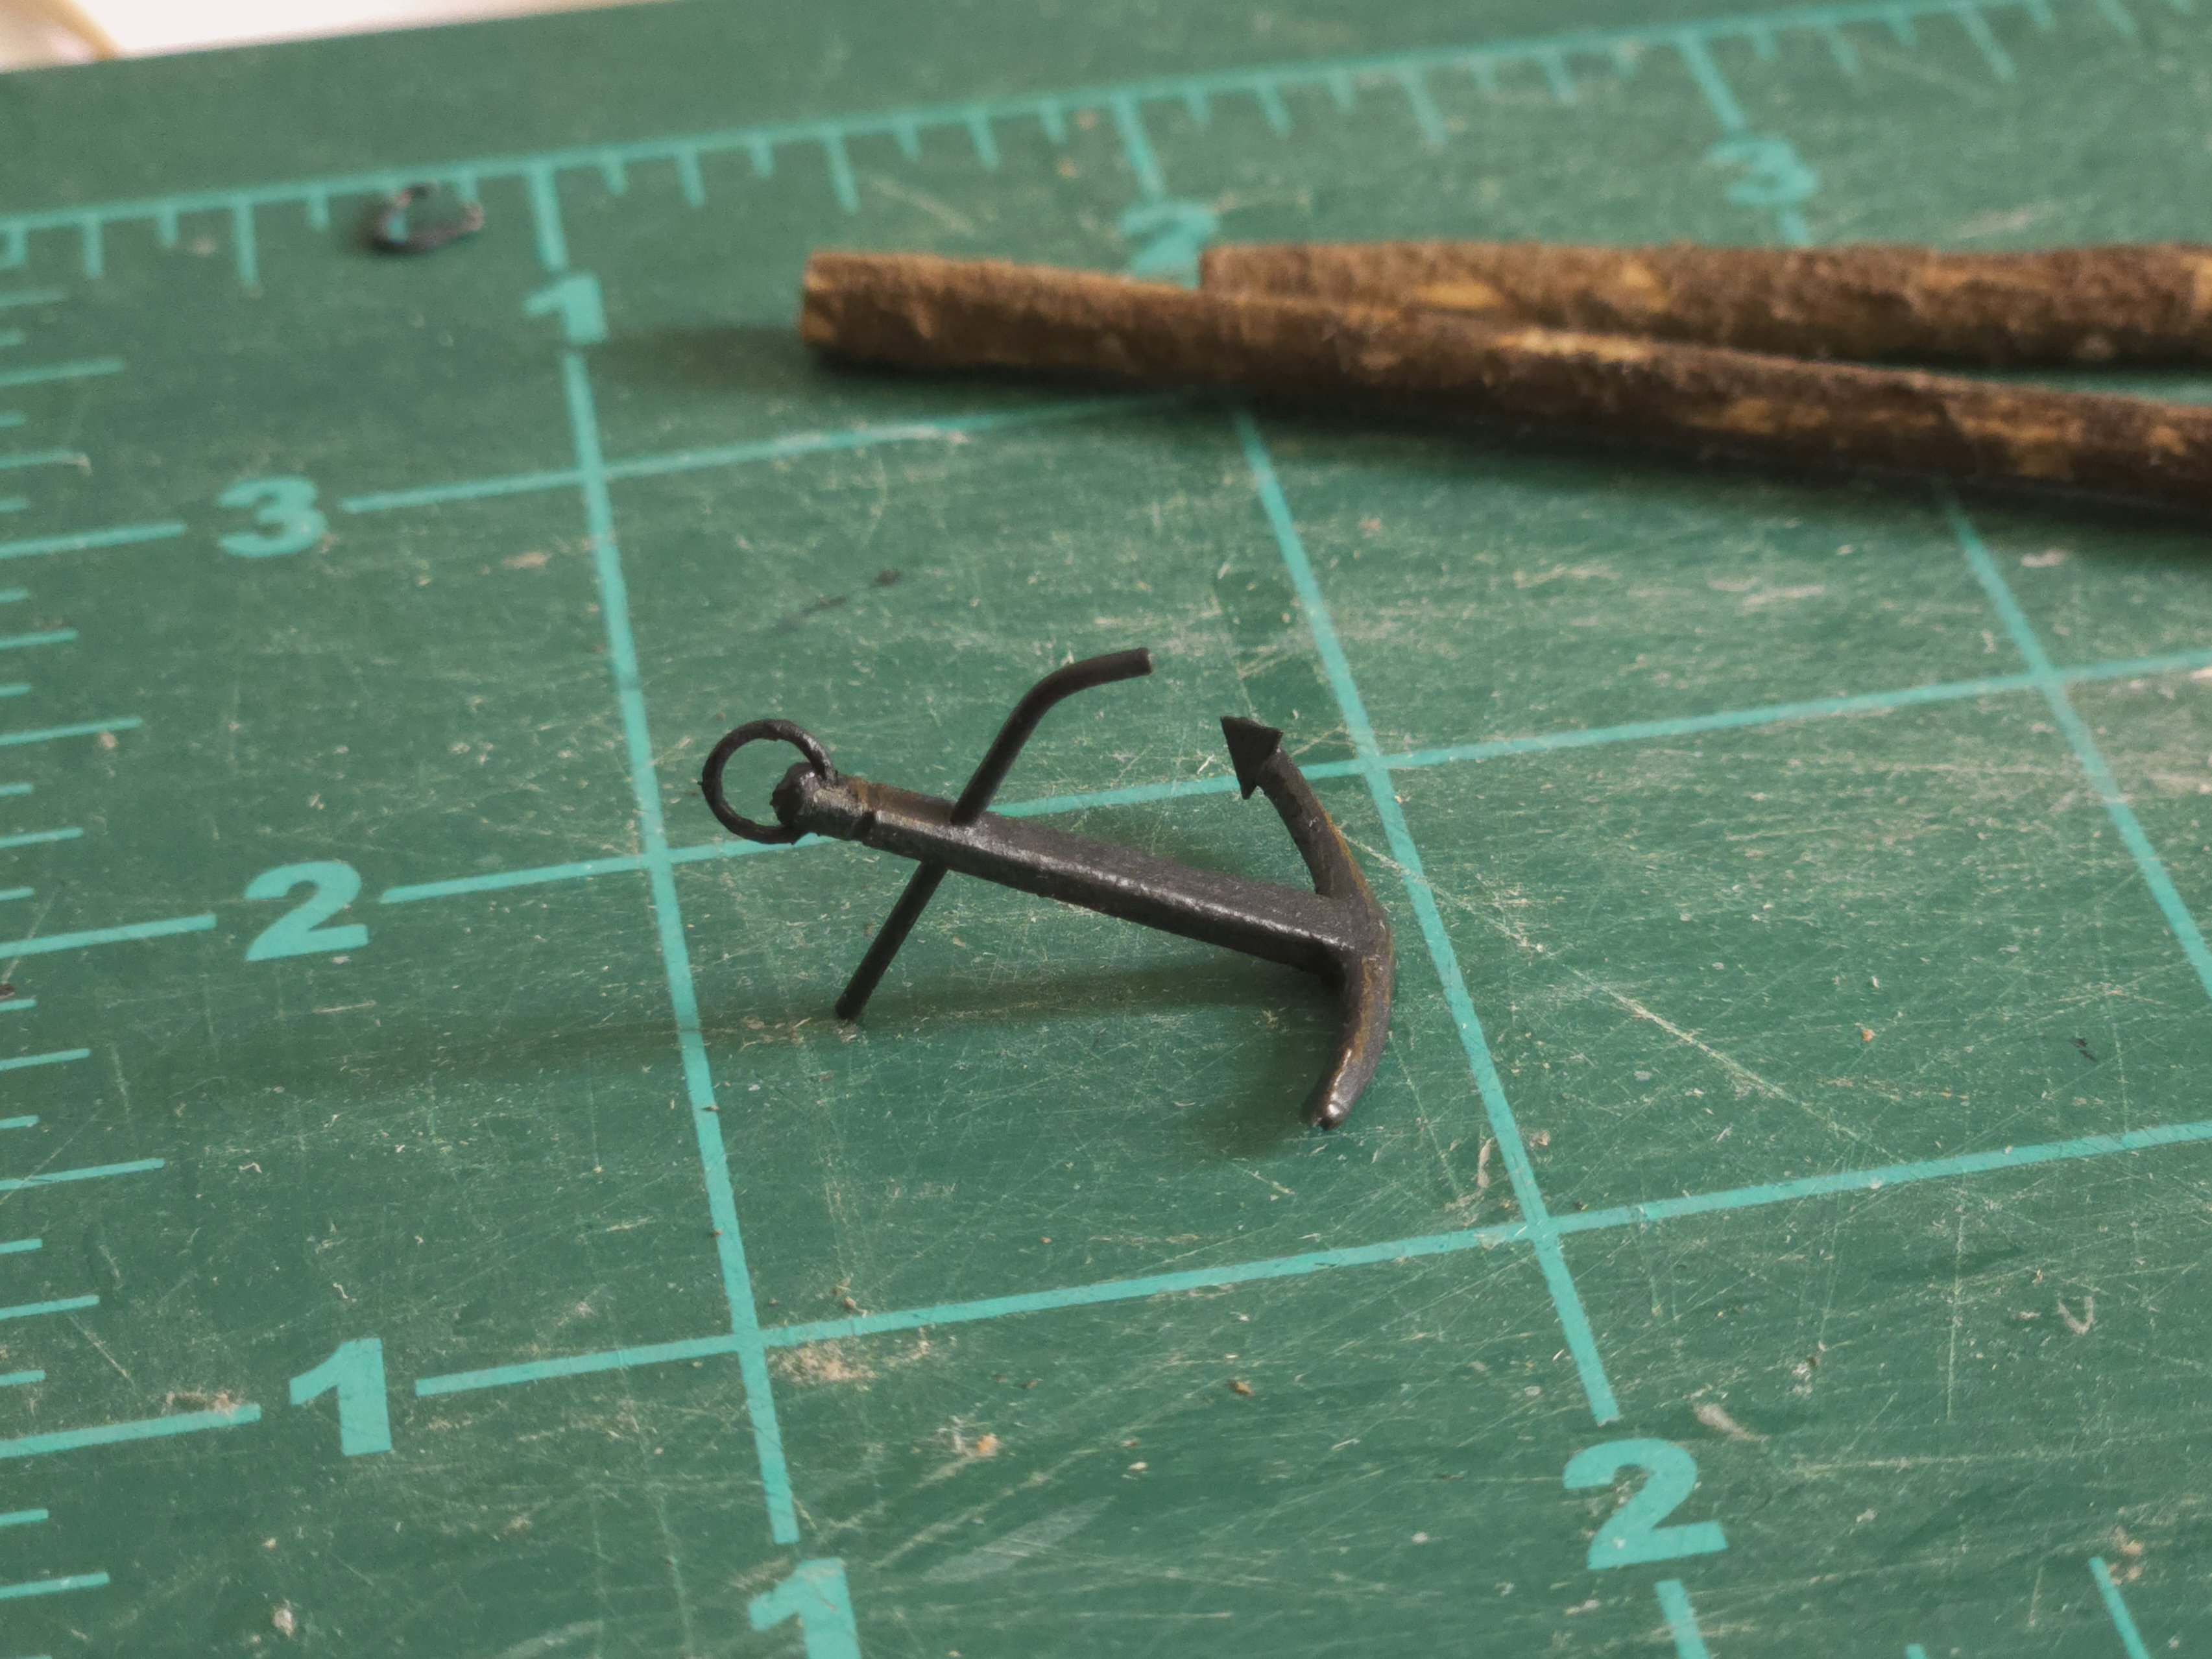
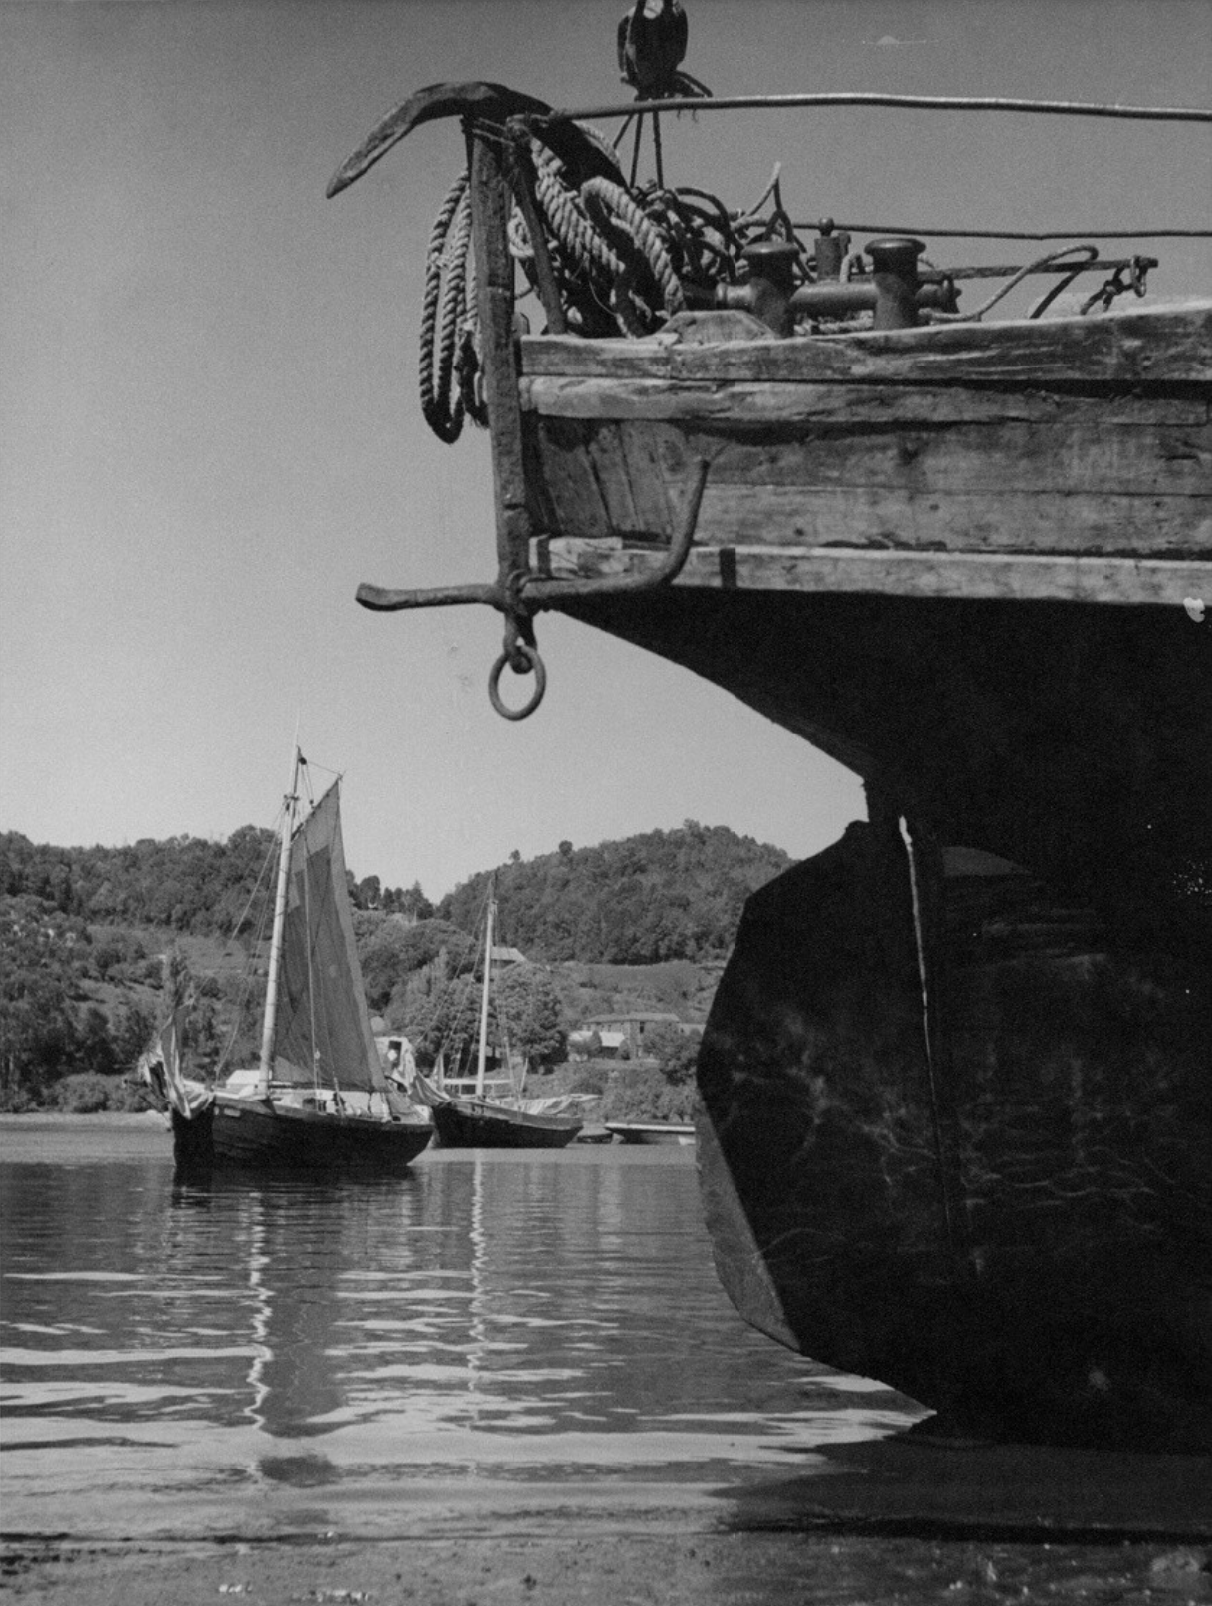
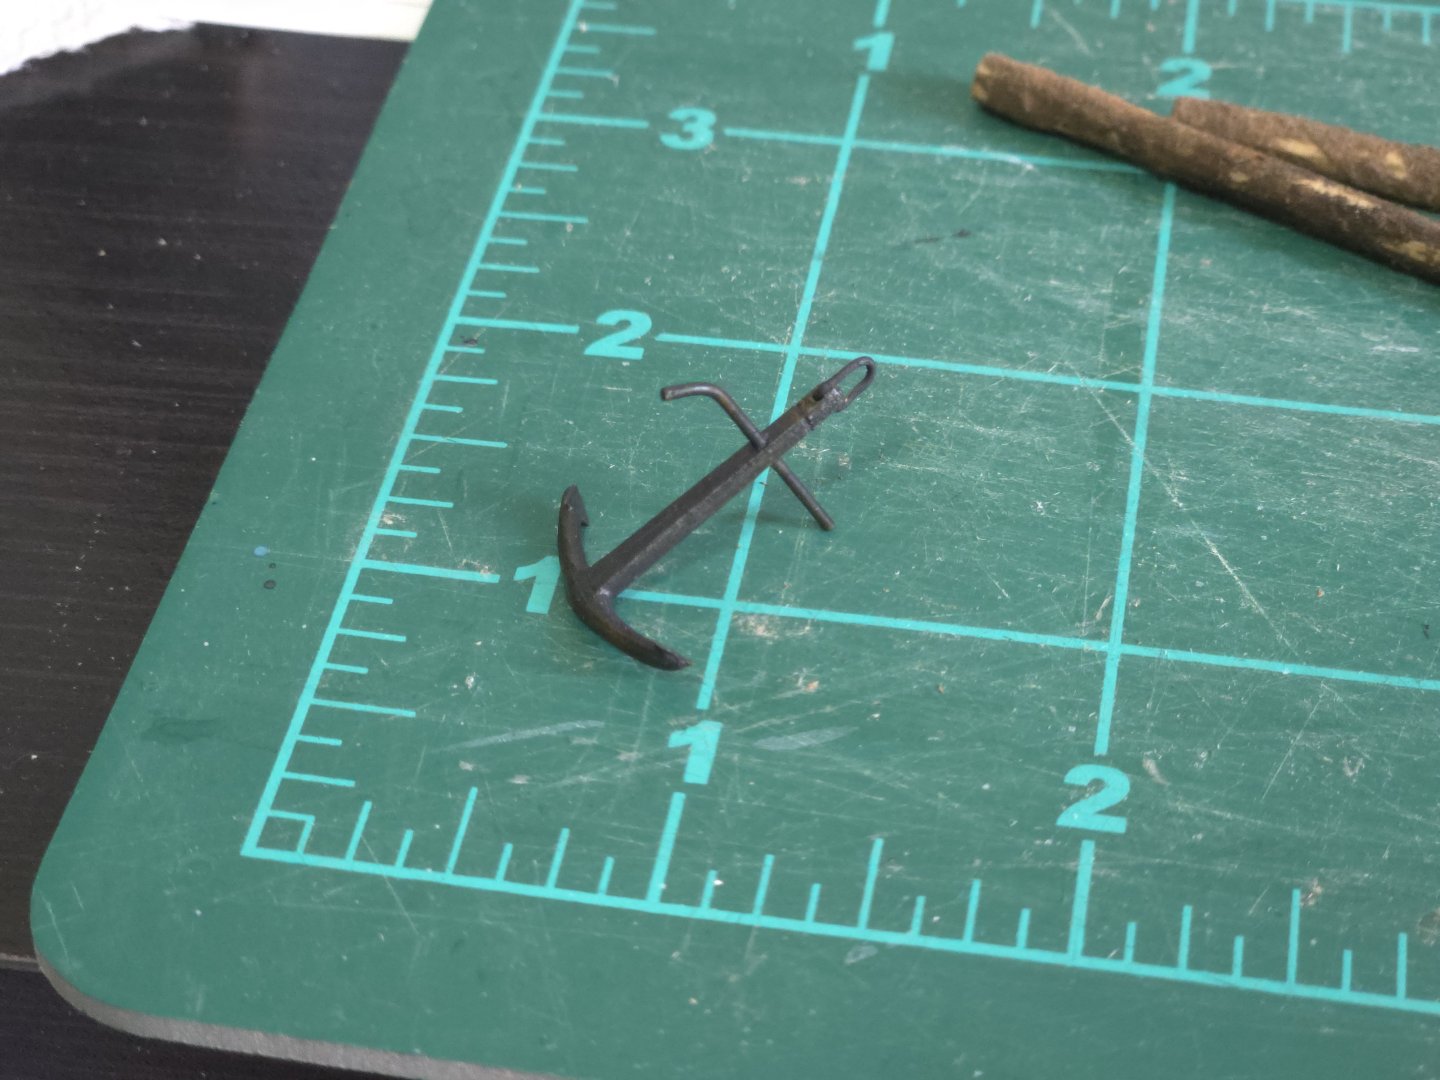
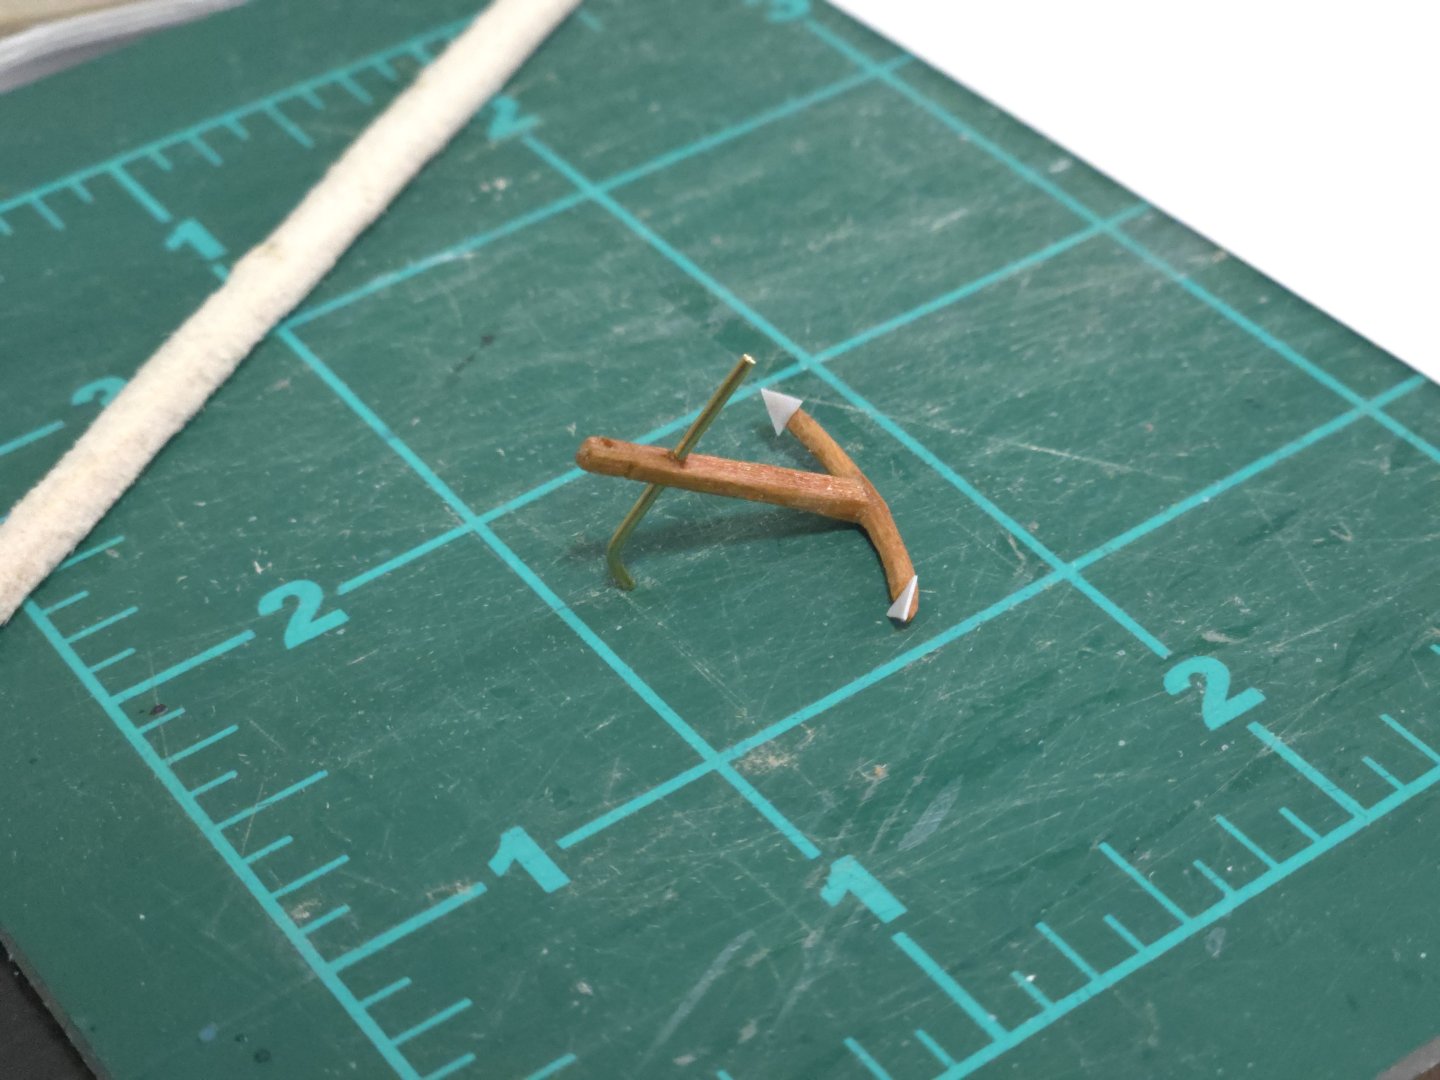
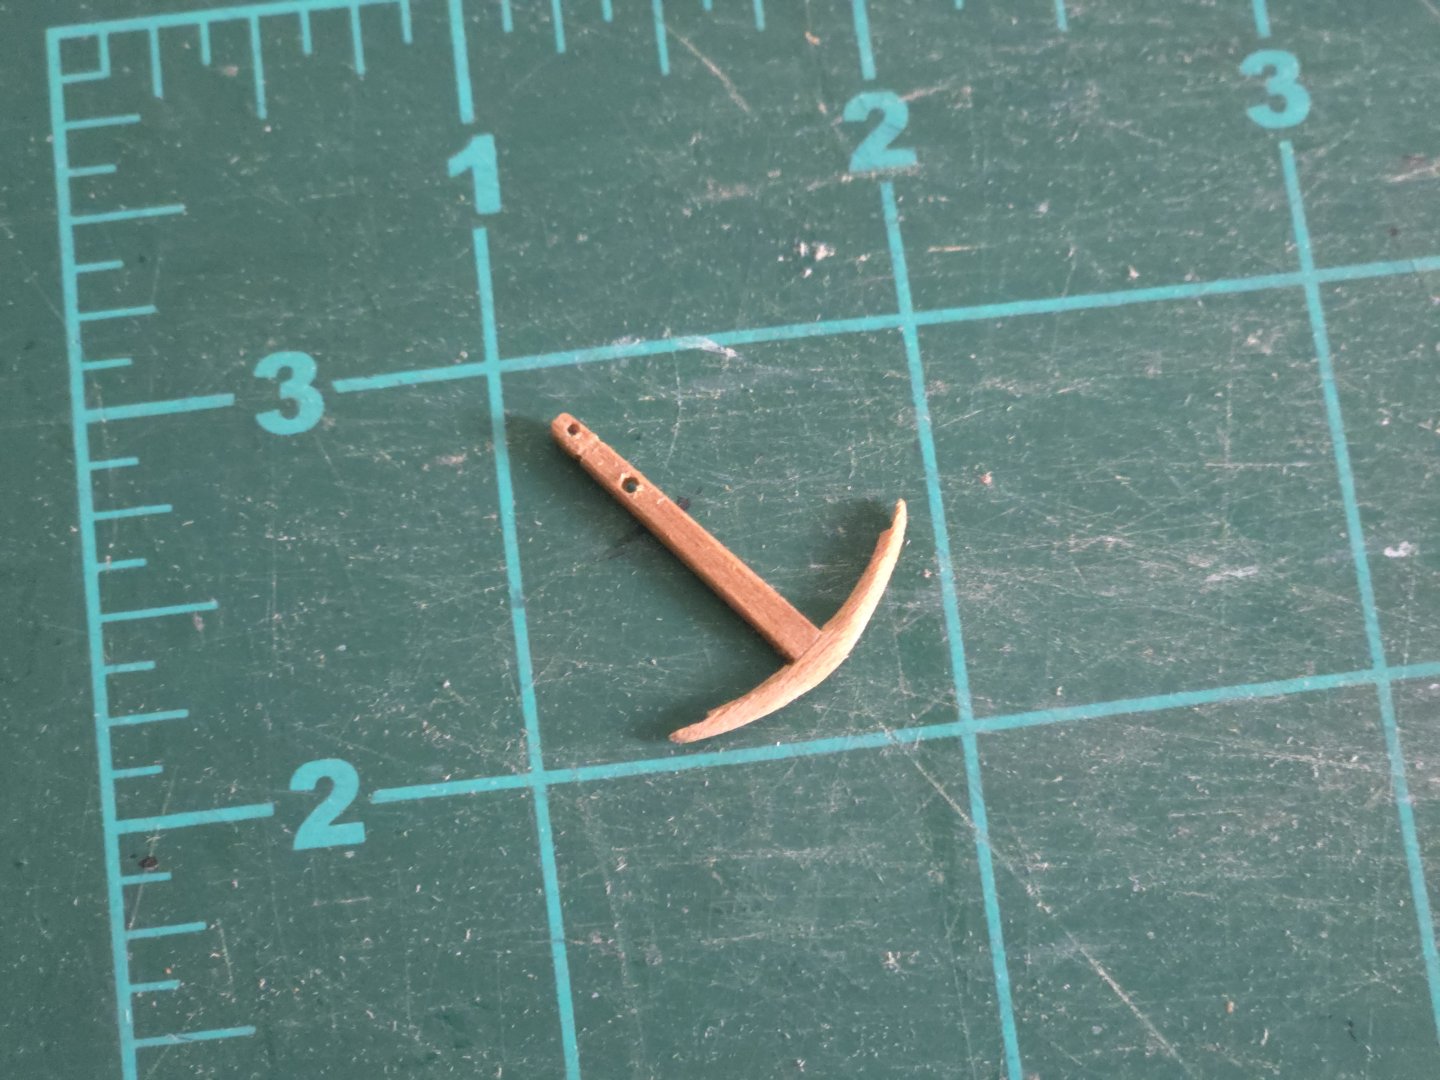
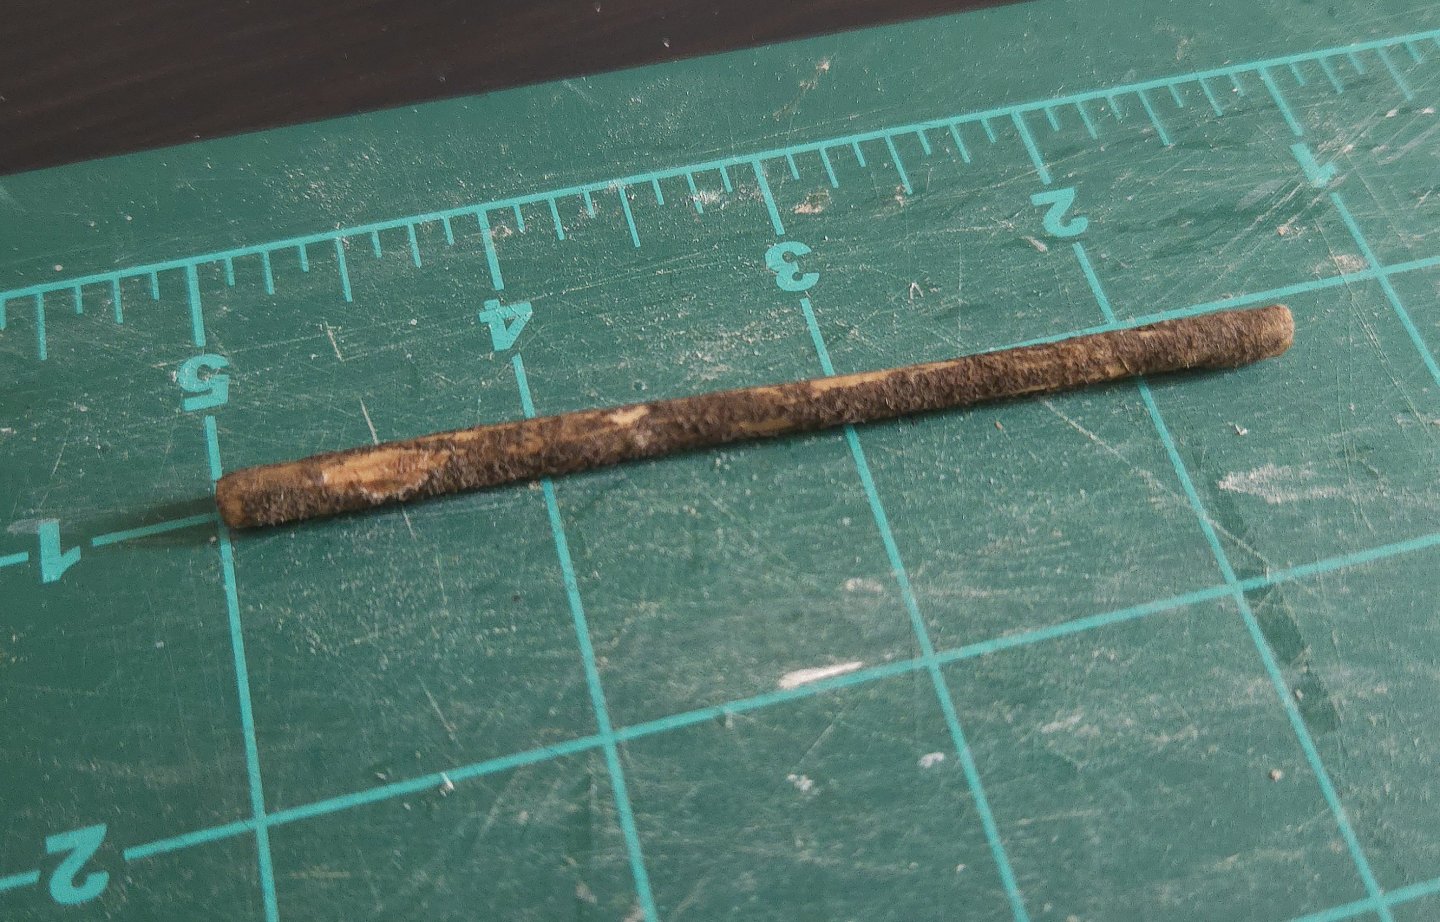
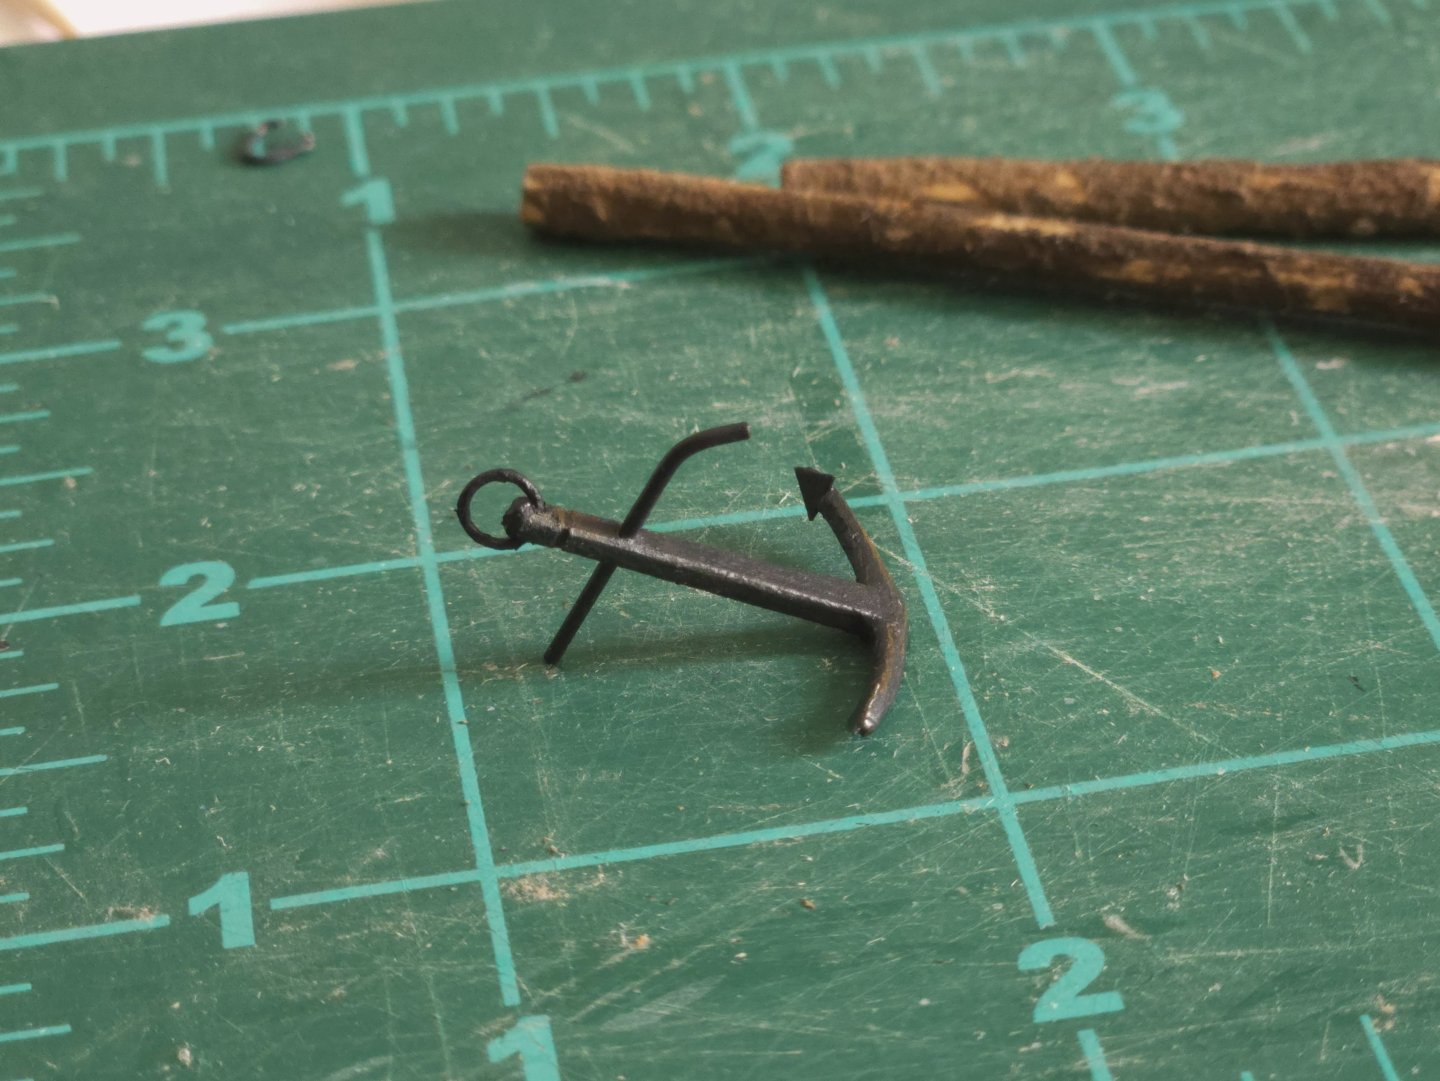
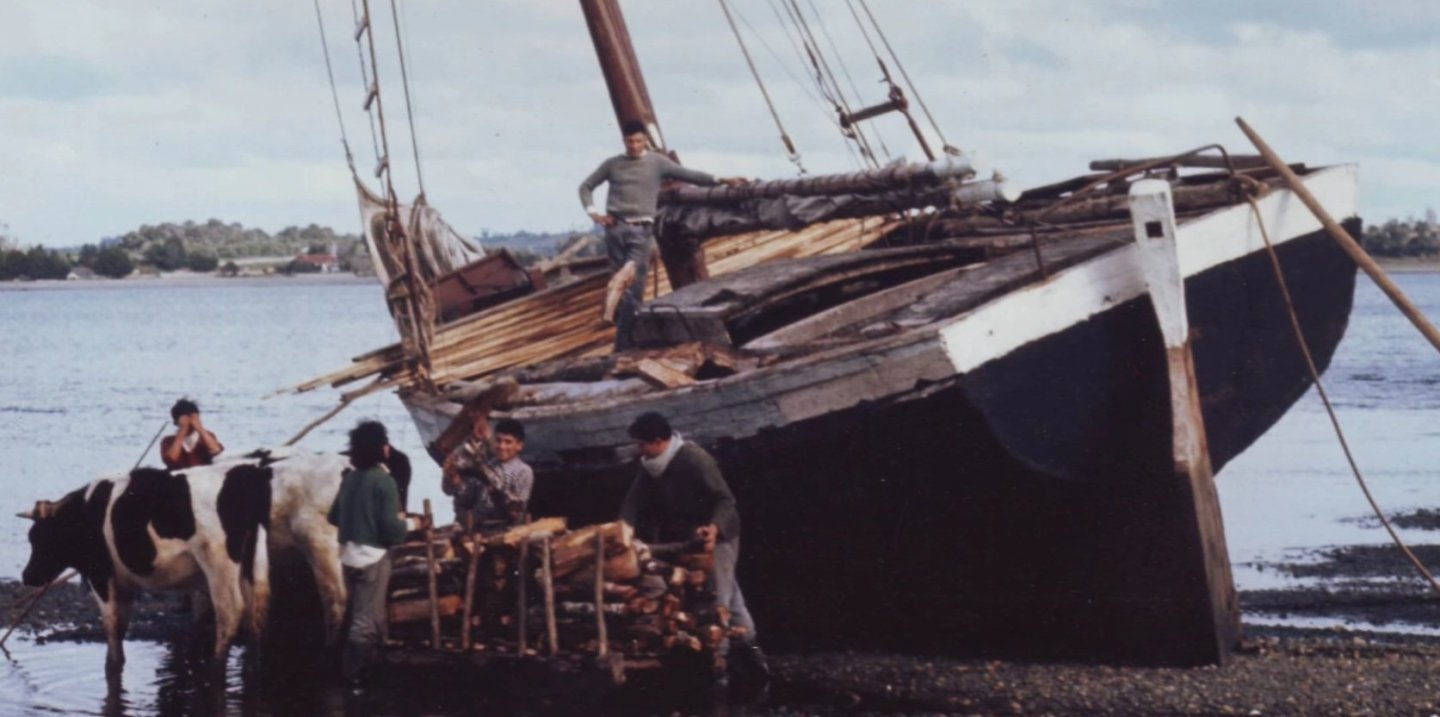
@wefalck, thanks for the suggestion! I cut some lengths of more-or-less round pieces of mango wood, and applied a bit of minwax cherry stain from a stain pen to try to give it a redder color like in the photos. For whatever reason, the stain didn't really take, forming a slightly darker, slightly gummy outer layer rather than really tinting the wood. I then applied some glue and rolled the stick through sawdust. At first, as seen below, the result looks very fuzzy. After leaving the glue to fully dry, and then shaking off excess sawdust, I then applied somewhat watered-down acrylic paint. The painting process and water led to some clumps of sawdust coming off. It looked odd at first, but once dry, I think the result looked pretty convincing as a roughly cut thin log with the bark still on intended as firewood. I'm considering trying another with the "bark" only on one side meant to look like a split log. I also made an anchor. While earlier chilote vessels used a distinctive type of anchor made by lashing lumber around a heavy stone, metal anchors were common on lanchas, as shown below. Actually, given the overhanging stern, the vessel below is not a lancha but a somewhat larger vessel--perhaps one of the small coasting schooners or sloops that have appeared in the background of other photos I've shared--but it provides an exceptionally clear view of the anchor, and other photos show similar anchors on lanchas proper. Source: https://www.bibliotecanacionaldigital.gob.cl/bnd/629/w3-article-320807.html In the past, I used wire and thread to make the anchor for the Cargo Canoa, while I went with an aftermarket part for the Canoa de Rancho's anchor. This time, I wanted to try making one out of wood, specifically cherry as I needed a fairly hard wood to properly shape the small pieces. I cut the parts from 1/16‐inch thick cherry strip and shaped them with mini-files, glued them together, and drilled the holes for the anchor ring and stock. The wood split when I started drilling the anchor ring hole, but I was able to glue and clamp it back into place and then successfully drill. I then added flukes, made of card soaked in superglue, and a stock of brass rod. Finally, I painted the anchor, dry-brushed on some rust, and added a protective clear coat and an anchor ring. That said, I then double-checked photos and realized that the anchor ring should really be round. Thankfully it was an easy fix. Overall I'm happy with how the anchor turned out. The arms aren't quite even, but I think it's acceptable. I now feel confident making my own anchors from wood rather than having to buy aftermarket ones.


- 312 replies
-
- 7
-
-
- Chile
- Latin America
- (and 6 more)
-
Nice job, the paint work looks great! As does the base. Your photos really highlight that, despite being a relatively small boat, this is quite a big model.
- 90 replies
-
- 1
-
-
- Friendship Sloop
- bluejacket shipcrafters
- (and 1 more)
-
Excellent miniature work, as always. That painting is a great find! Very vibrant and with some interesting details, despite the perspective issue. Out of curiosity, how did you come across it?
-
Thanks, @wefalck, for the glasses suggestion. Light ones would certainly be nice, and I may look into them as an upgrade, for now I'm using the big bulky pair we already have. It's been a while since my last post. Unfortunately, there's not much to report on this build. I would quite like to get back to it, but work has been very hectic and I've focused my limited modeling time on the Lancha Chilota, so I haven't been able to cut out any more frames. In any case, I need longer bolts to properly set up the building cradle, which has proven substantially more difficult than I anticipated. Somehow, none of the many hardware shops I've visited have bolts that are long enough, and they don't seem to be available here online, either. At this point, my best bet looks to be to buy a long length of threaded rod, have it cut to size, and use that plus extra nuts and washers in place of the bolt (which will also require drilling bigger holes in the building cradle, which in turn requires buying a bigger bit and bringing the cradle to the carpentry workshop so I can use their drill press). Hopefully the cutting process doesn't damage the threads at the end and make it impossible to add nuts. Alternately, I suppose I could try to make wooden supports to replace the bolts, although I worry about my ability to get them vertical enough. These sorts of tedious issues have been enough of a headache to block things the few times I've had the time and inclination to try to resume work on the Bateau. All of which is to say, this build will pick back up again at some point, hopefully sooner rather than later.
- 139 replies
-
- 4
-
-
- ancre
- Bateau de Lanveoc
- (and 2 more)
-
Congratulations on finishing! Great job on the rigging, I'm sure the original builder would be happy to see his work completed so well.
- 301 replies
-
- 4
-
-
-
- Constitution
- Bluejacket Shipcrafters
- (and 1 more)
-
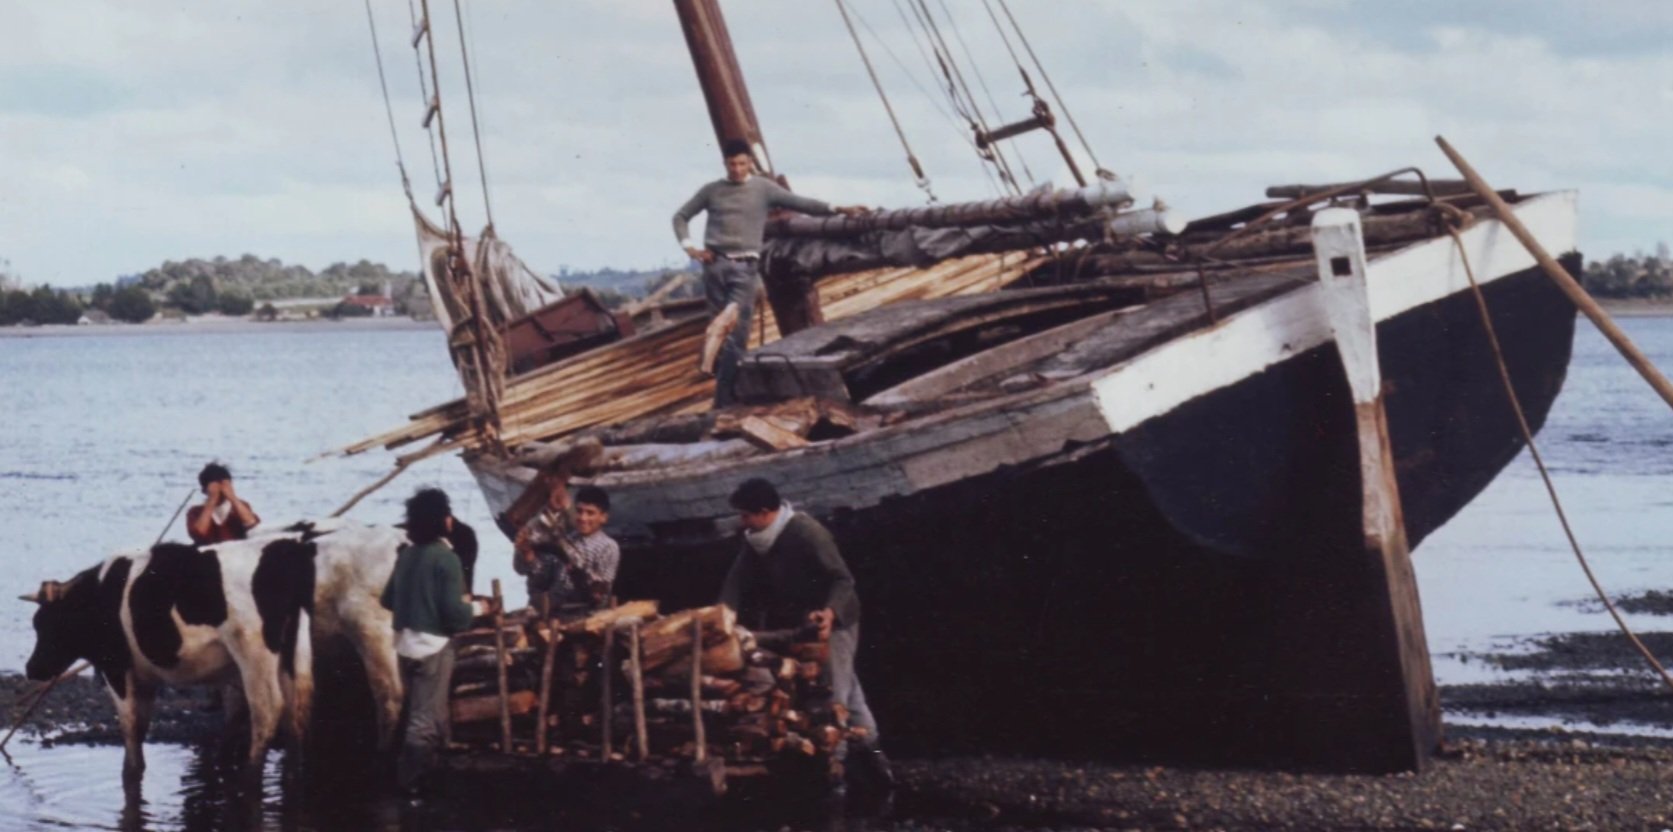
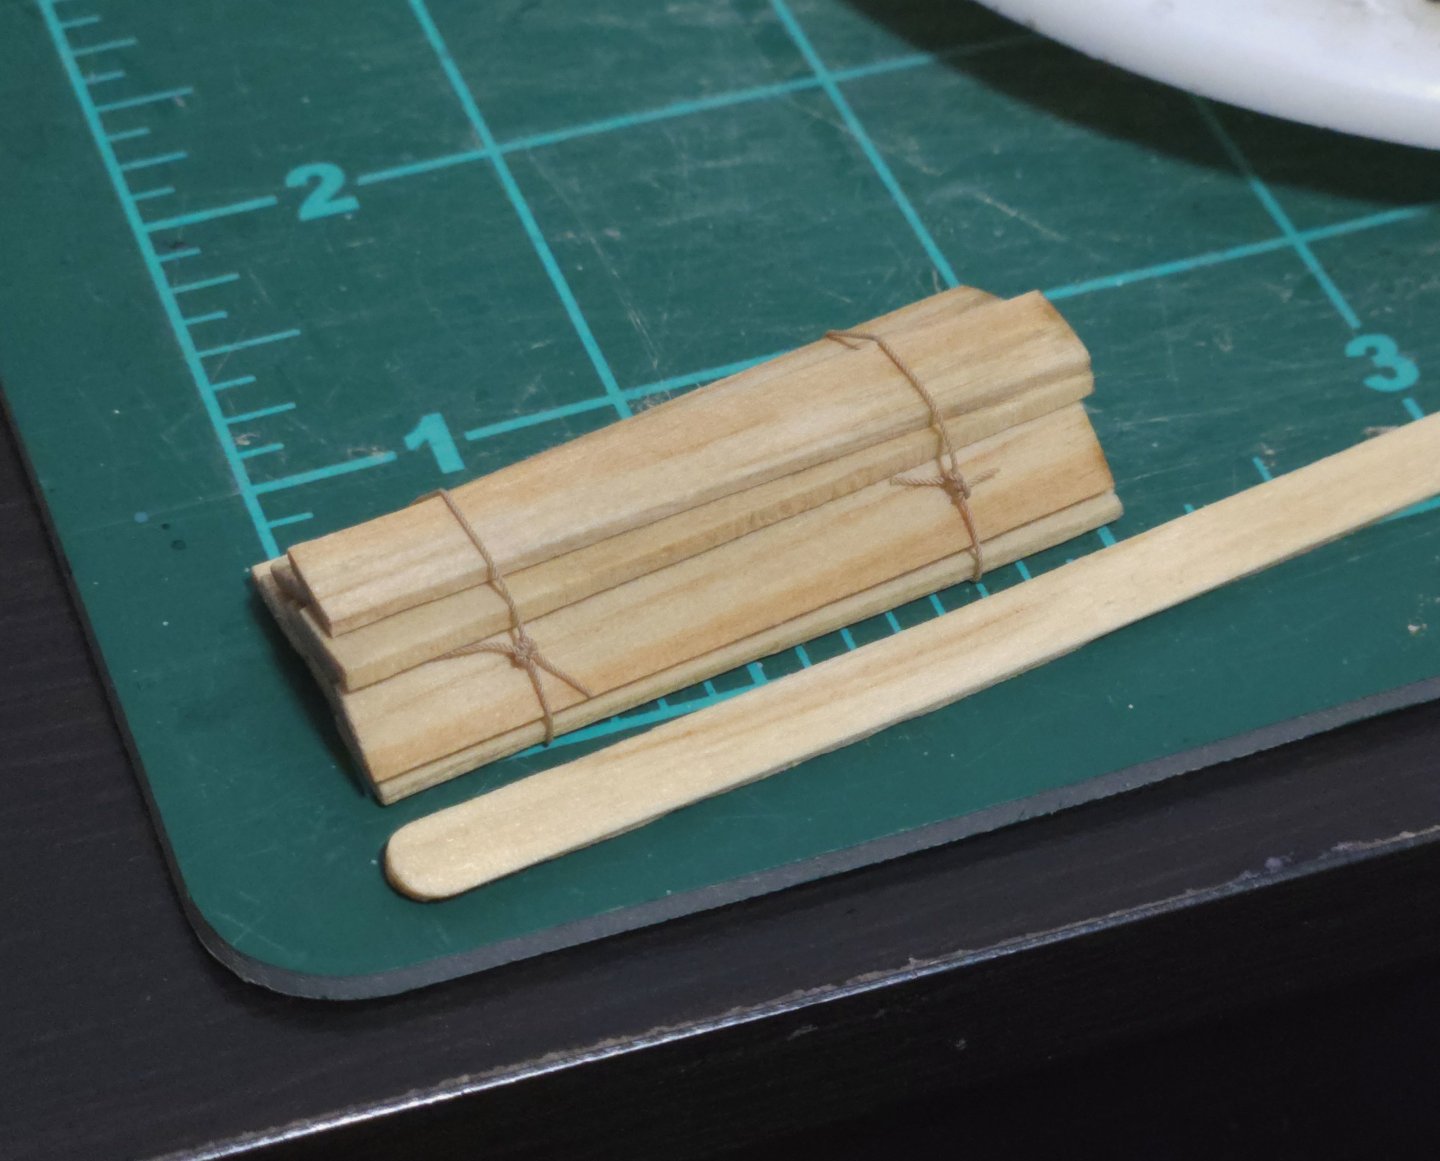
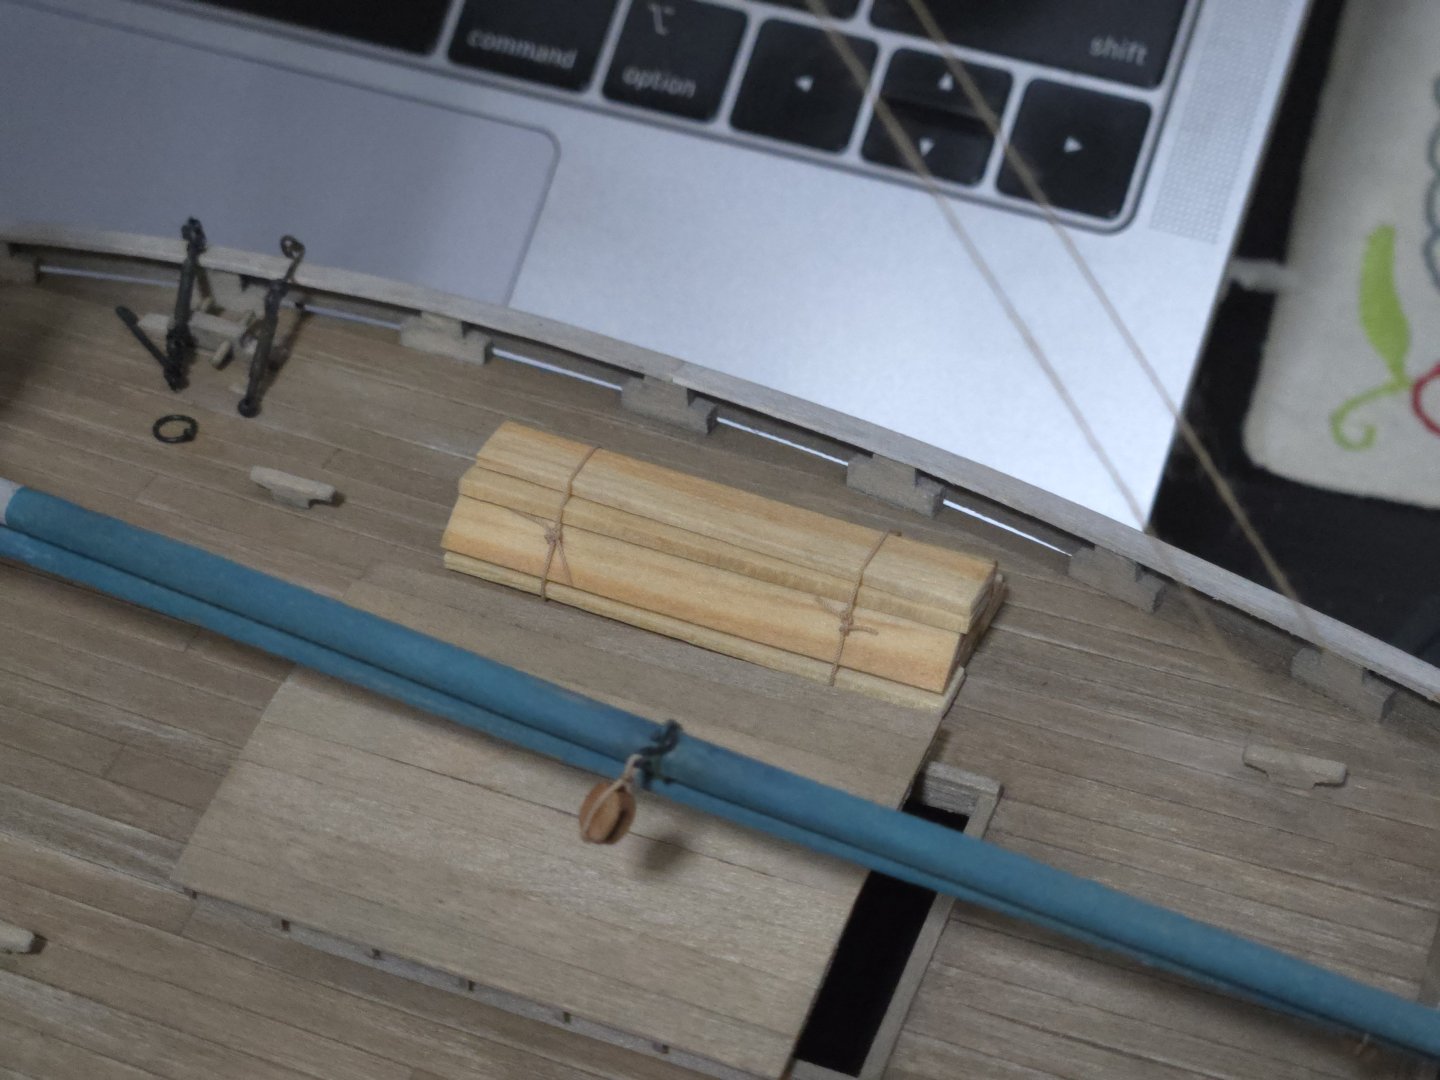
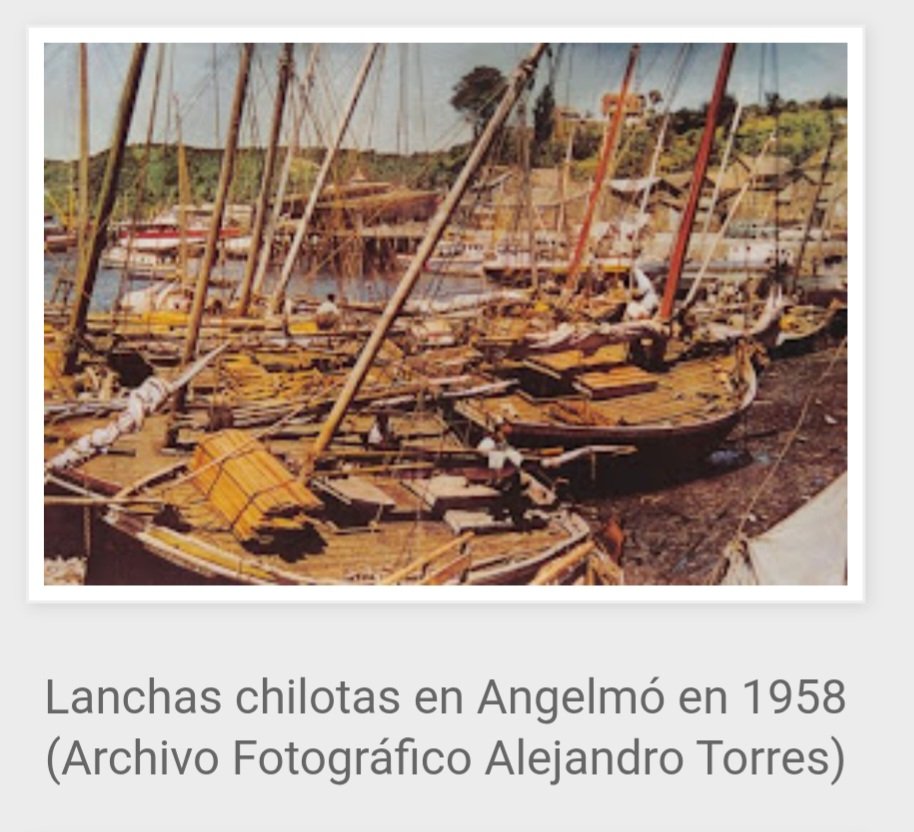
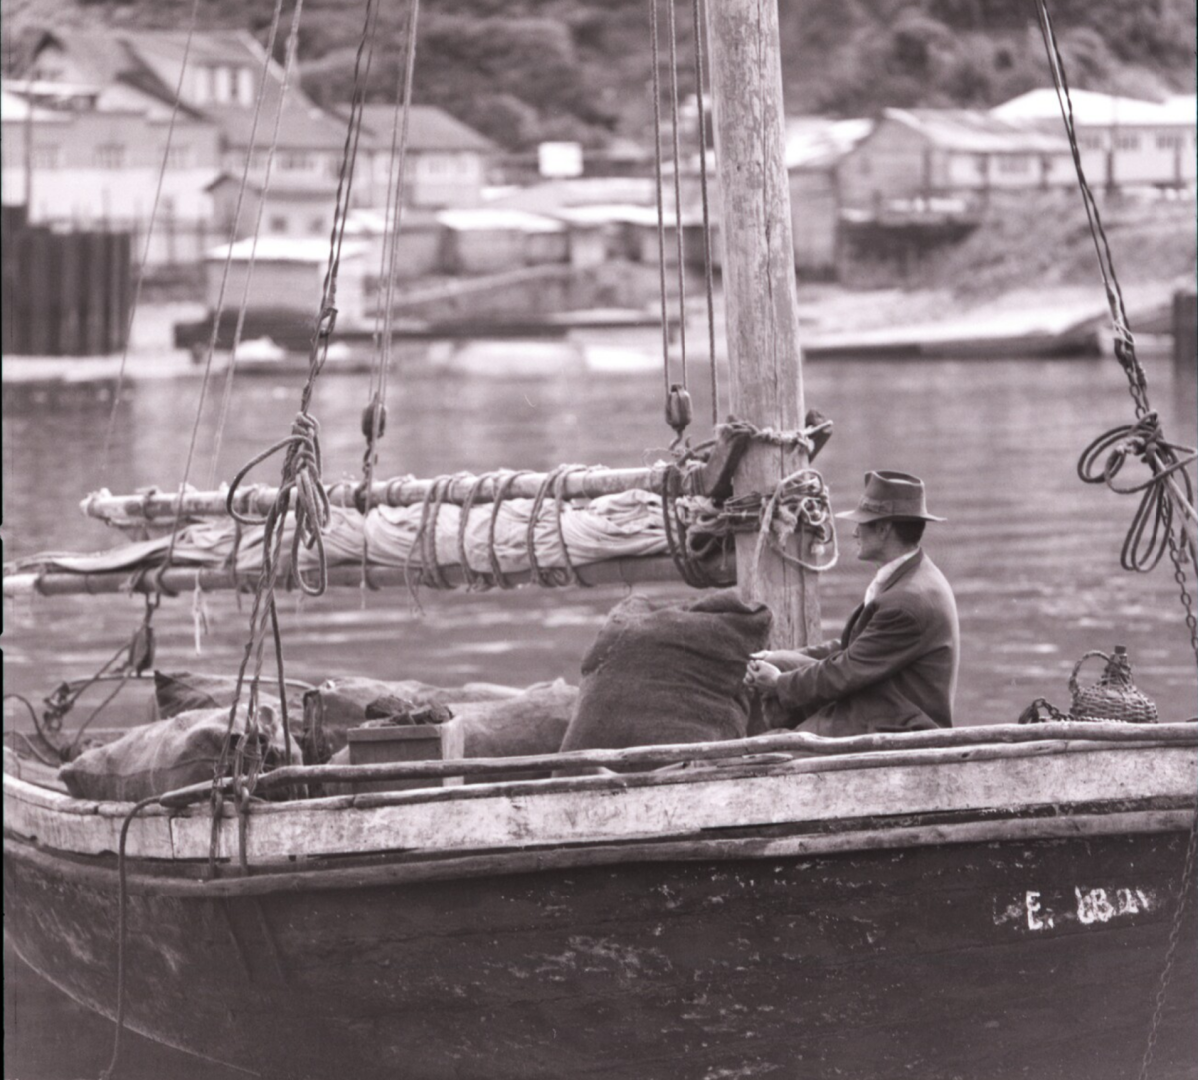
Thanks, @Paul Le Wol! I mentioned in my previous post that I was trying to add a bit of lumber to the deck as part of a cargo, but that I wasn't totally convinced by the chopped-up coffee stir sticks I was using. I decided that they were a bit too bright in comparison with the rest of the build, which is rather weathered. Figuring out how to handle this was tricky--after all, recently-cut lumber should of course look much cleaner than a weathered old hull! But it also just looked off. Ultimately, I added a very thin dark wash, just to slightly tone it down a bit. I also made the lumber "stack" a bit uneven and irregular, after my wife (who has a very good eye) suggested that an earlier attempt looked too regularly-structured in comparison with photos of actual lanchas. Finally, I added some rope ties made from scrap rope. As you can see below, it looks a bit less bright than the unfinished original coffee stir sticks. I think the result looks much better on the model, fitting with its visual "language" instead of looking out-of-place while still, I hope, looking like a shipment of lumber. I think it especially looks better in contrast with the unfinished coffee stir stick color (I should briefly note at some point that these are much thicker and more irregular stir sticks than the ones I used for the deck). As can be seen below, I'm definitely erring on the side of caution with deck cargo. I could totally cover the deck and technically be accurate, but I'd prefer to use these details and accoutrements to hint at real practices and purposes without overwhelming the rest of the model. Source: https://losbarcosdejuanvasquez.wordpress.com/2011/06/14/la-lancha-velera-que-transportaba-lena-y-maderas/ While I'm happy with the bundle of milled lumber cargo, the photos above and below show that it was also common to transport rough-cut firewood. Source: https://www.carlosvairo.com/galeria-puerto-montt-lanchas-chilotas This strikes me as a good deal harder to represent. Just grabbing a few sticks seems like it would look out-of-scale. I could use some of the rough-cut mango branch wood that I have on hand, and could stain it a redder color to better match the photo above, but I don't really know how to represent the bark that was clearly still left on the firewood. I considered paint, but I feel like thick blotches of acrylic won't look right. If anyone has any suggestions, I'm all ears!


- 312 replies
-
- 8
-
-
- Chile
- Latin America
- (and 6 more)
-
Nice progress! It certainly sounds like it was a frustrating experience! Getting bulkheads properly positioned can be a real pain in the neck, I remember that it took me quite a long time to do it on my Lancha Chilota build. Your time and care in getting everything squared at this point, though, should pay off later.
-
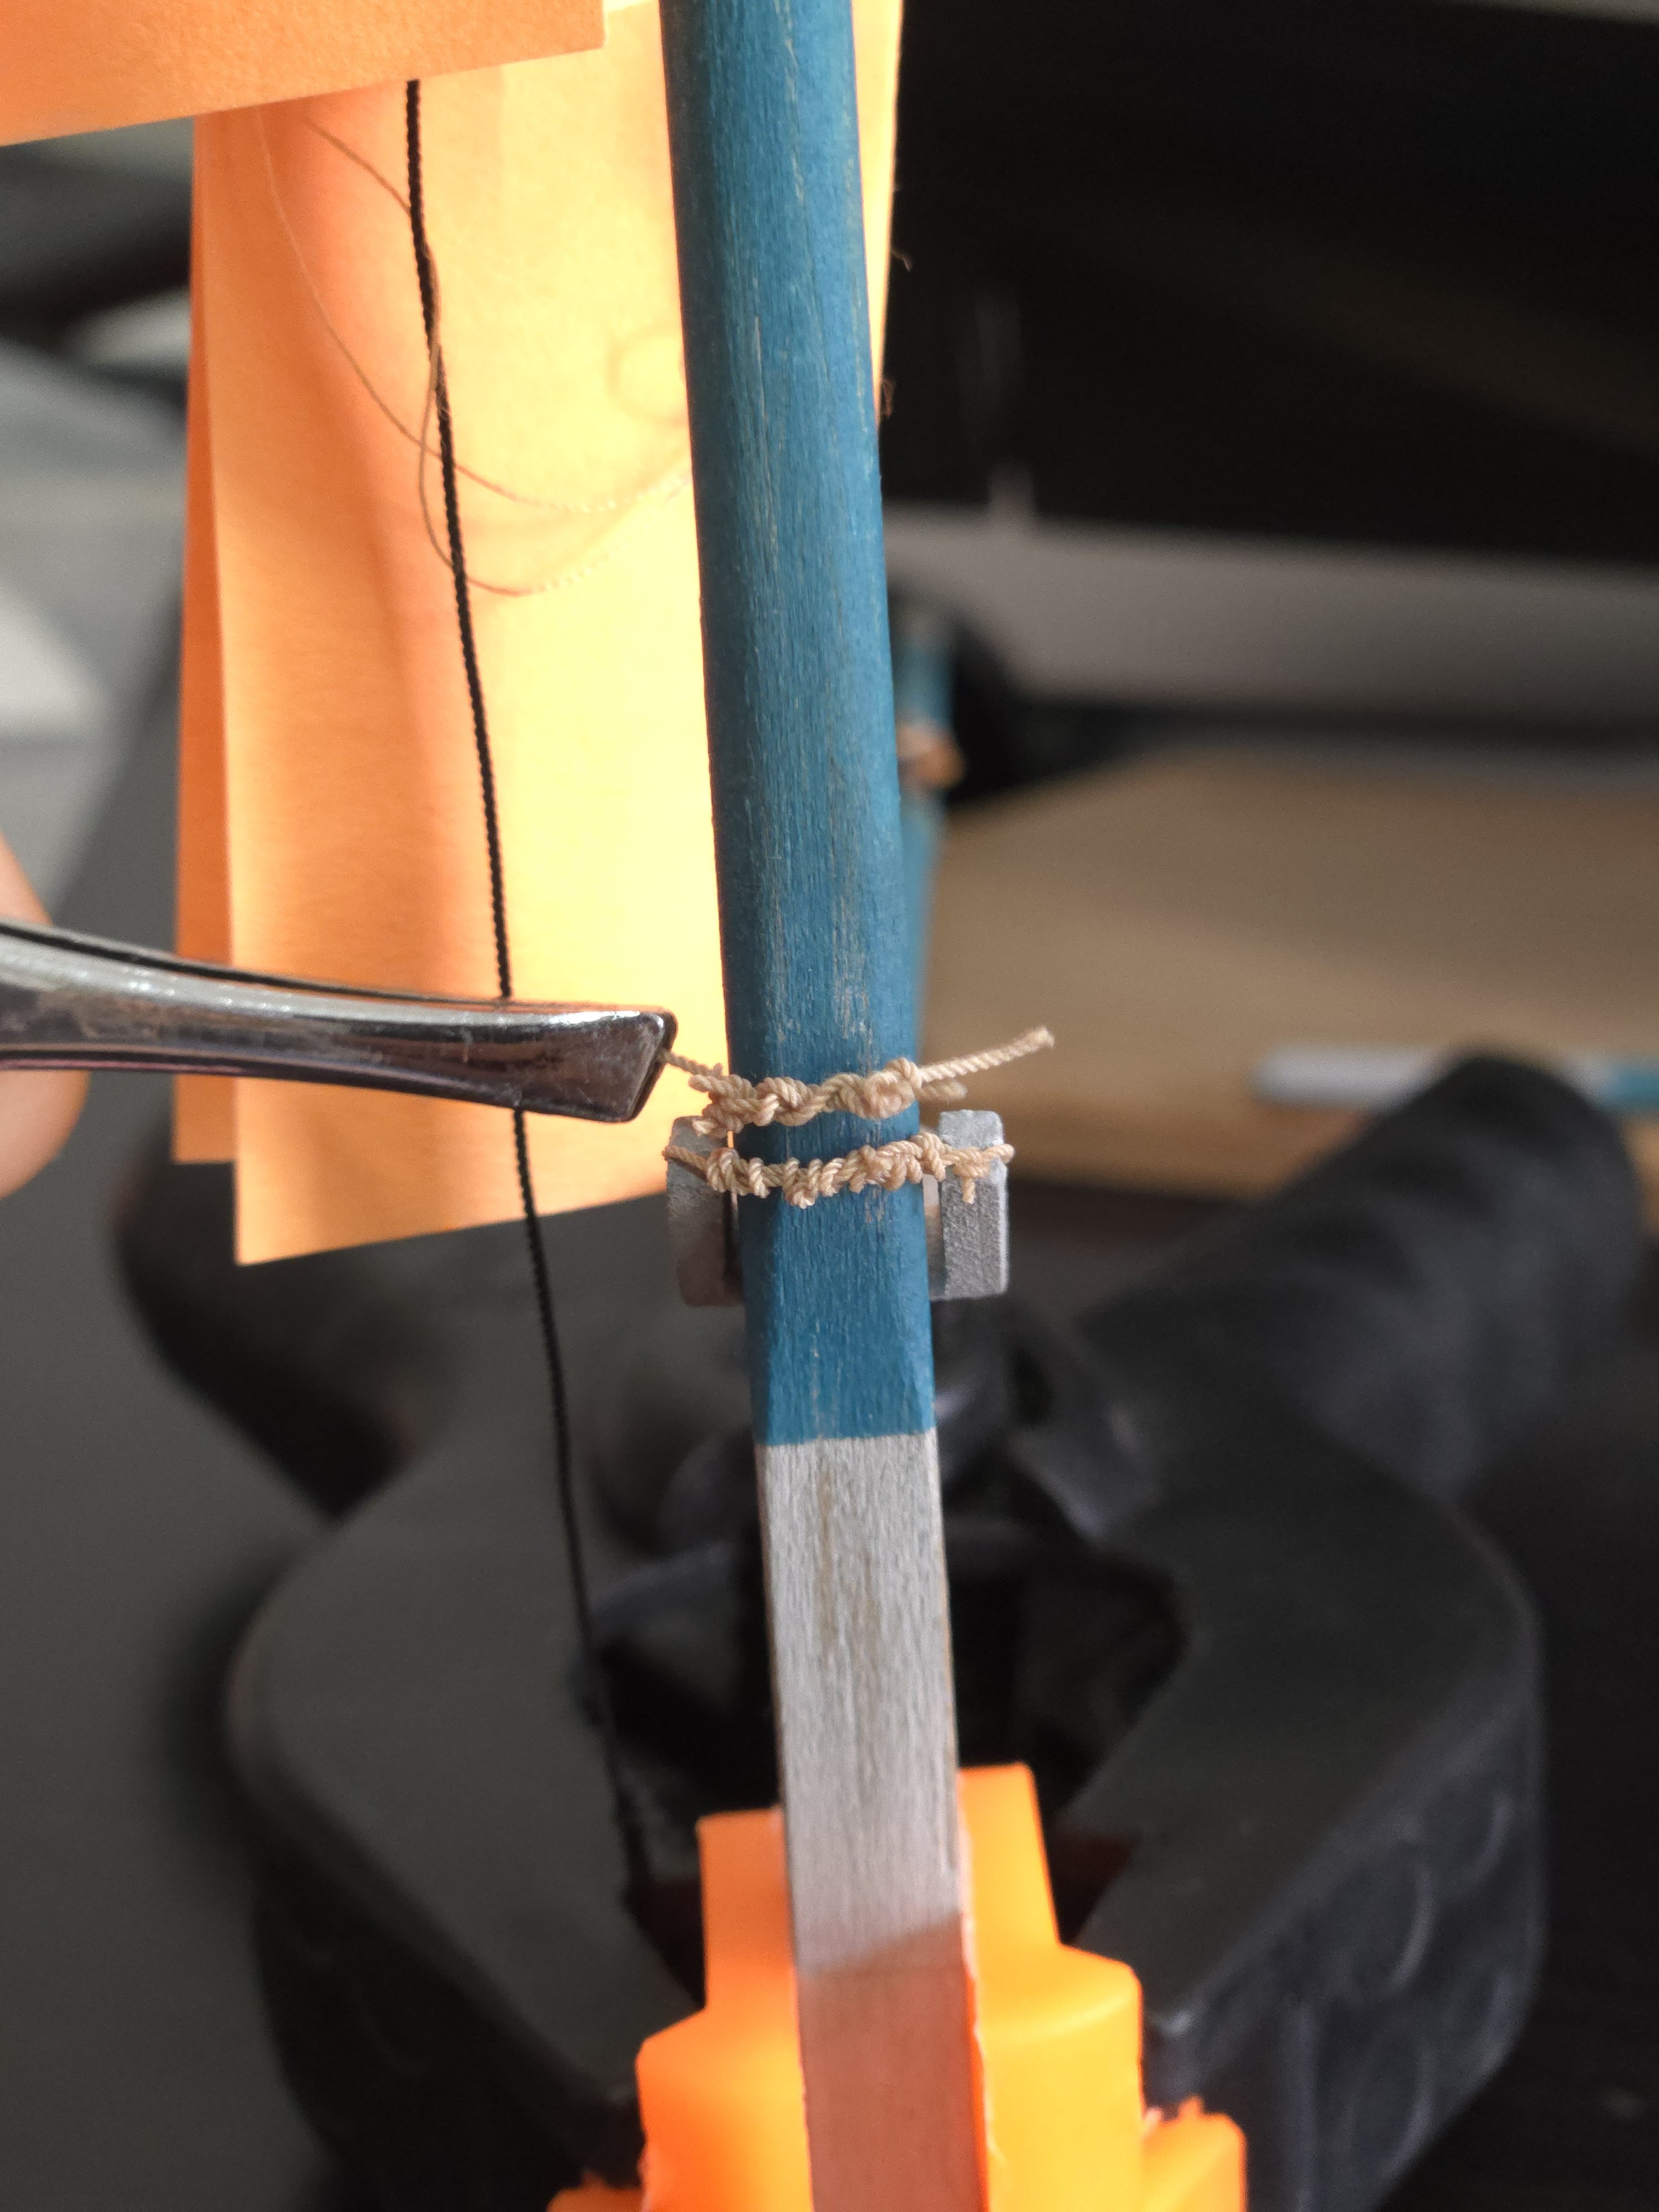
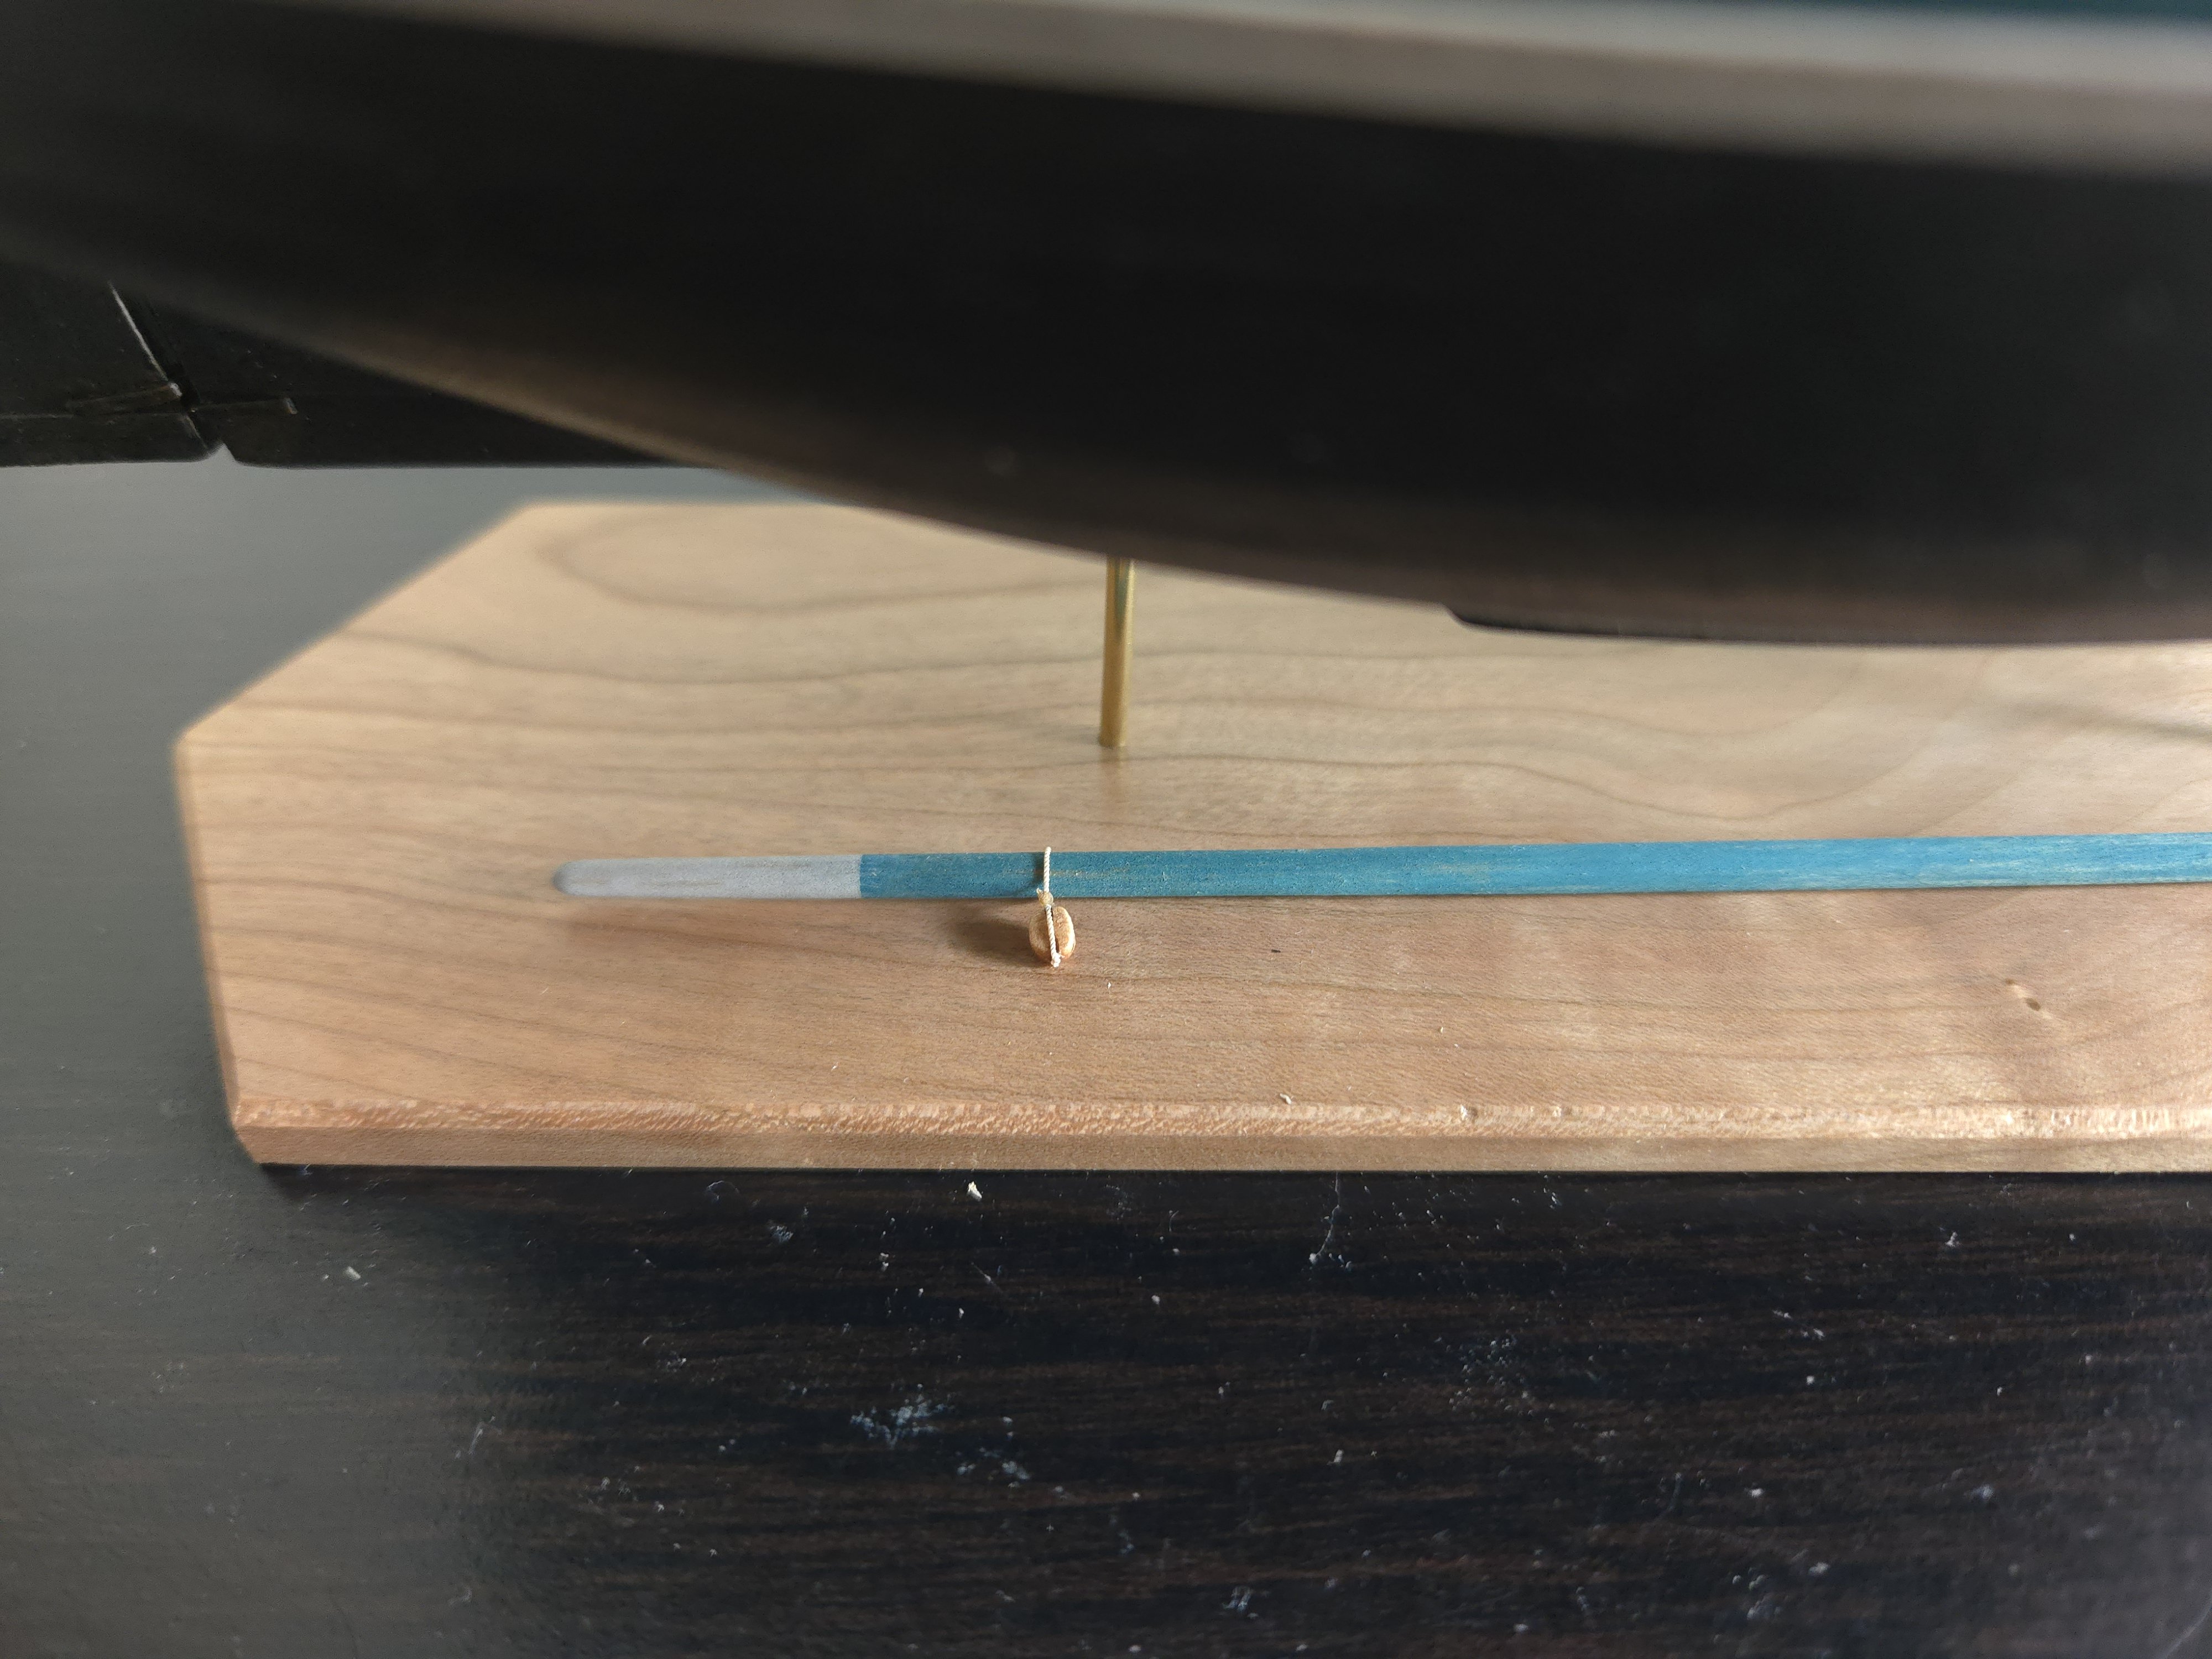
More slight progress as I cross items off the build's to-do list. First up, I needed to add the parrel rope that holds the gaff to the mast. The clearest photo I could find is below. As can be seen, instead of using parrel beads, the rope itself is doubled up and twisted around itself. Source: https://www.bibliotecanacionaldigital.gob.cl/bnd/629/w3-article-644834.html So, I tried to replicate this with .45mm rope. Unfortunately, after adding it, I realized that I hadn’t quite left enough space in the parrel to let the gaff rest horizontally when lowered--due to the angled jaws and the taper of the mast, when fully lowered it wanted to point up a bit. So, with the gaff still attached to the mast, I carefully filed and cut the inside of the gaff jaws (and repainted it) until it lay better. After doing that, though, I took another look at the photo of a real lancha, and decided that my parrel rope was a lot lumpier than it should be. So, I redid it in .35mm rope. This time, instead of just looping the rope around, I tied a series of simple knots to better hold things. Below, the new parrel, with the original held above it. I'm not sure if it really looks all that much better, but I think I can accept the result. Besides the parrel, I also stropped the sheet block to the boom (the final block on this model). And I added sealer/varnish to the base, sanded with 600-grit sandpaper, added a second layer, sanded again, and rubbed it down with a cloth (I'm not sure if that last step really did much). I'm happy with how the base turned out, it's very smooth to the touch and the very slight darkening effect of the sealer/varnish is exactly what I was looking for. Finally, I've begun experimenting with adding a small load of lumber to the deck. Although there are a few photos of lanchas under sail with decks crowded with lumber, it seems to have been more common to keep things in the hold and only bring them out for display upon arriving in the port to sell the wood. See below, for instance. Source: https://ceph-puerto-montt.blogspot.com/2009/02/album-del-recuerdo-imagenes-de-nuestra_22.html?m=1 For now I've chopped up a few coffee stir sticks to try to represent fresh-cut lumber, although I'm not sure how well they represent what I'm going for.


- 312 replies
-
- 9
-
-
- Chile
- Latin America
- (and 6 more)
-
Excellent job, thanks for sharing photos of the completed build! Very well done, especially for a small open boat at a relatively small scale. I'll definitely be checking back on this build log for ideas for my own future builds of open vessels.


.jpg.cedba4275bf03d20fcc93849d47bbde6.jpg)

.jpg.b30039289f0703473ac427176537038d.jpg)