HOLIDAY DONATION DRIVE - SUPPORT MSW - DO YOUR PART TO KEEP THIS GREAT FORUM GOING! (Only 20 donations so far - C'mon guys!)
×


JacquesCousteau
-
Posts
1,311 -
Joined
-
Last visited
Content Type
Profiles
Forums
Gallery
Events
Everything posted by JacquesCousteau
-
 Thanks, @Waldemar, for the catch on the title! The monograph mostly calls it the Album de 1679 and says it was likely made for Colbert, so I got the names mixed up when it came time to write. Indeed! I find that's usually how research goes. In trying to answer one question, you inevitably find more questions. Thanks, @François de Saint Nazaire! That image is quite useful for thinking about the shift from square to lug sail. It's interesting that it includes the lateen sail, which makes perfect sense for a Mediterranean vessel like the trabaccolo. A similar sail "family tree" for Brest workboats probably wouldn't have the lateen sail, which there was limited to the mizzens of larger ships, but would have a gaff come it al some point alongside but not replacing the lug.
- 136 replies
-
- 2
-

-
- ancre
- Bateau de Lanveoc
- (and 2 more)
-
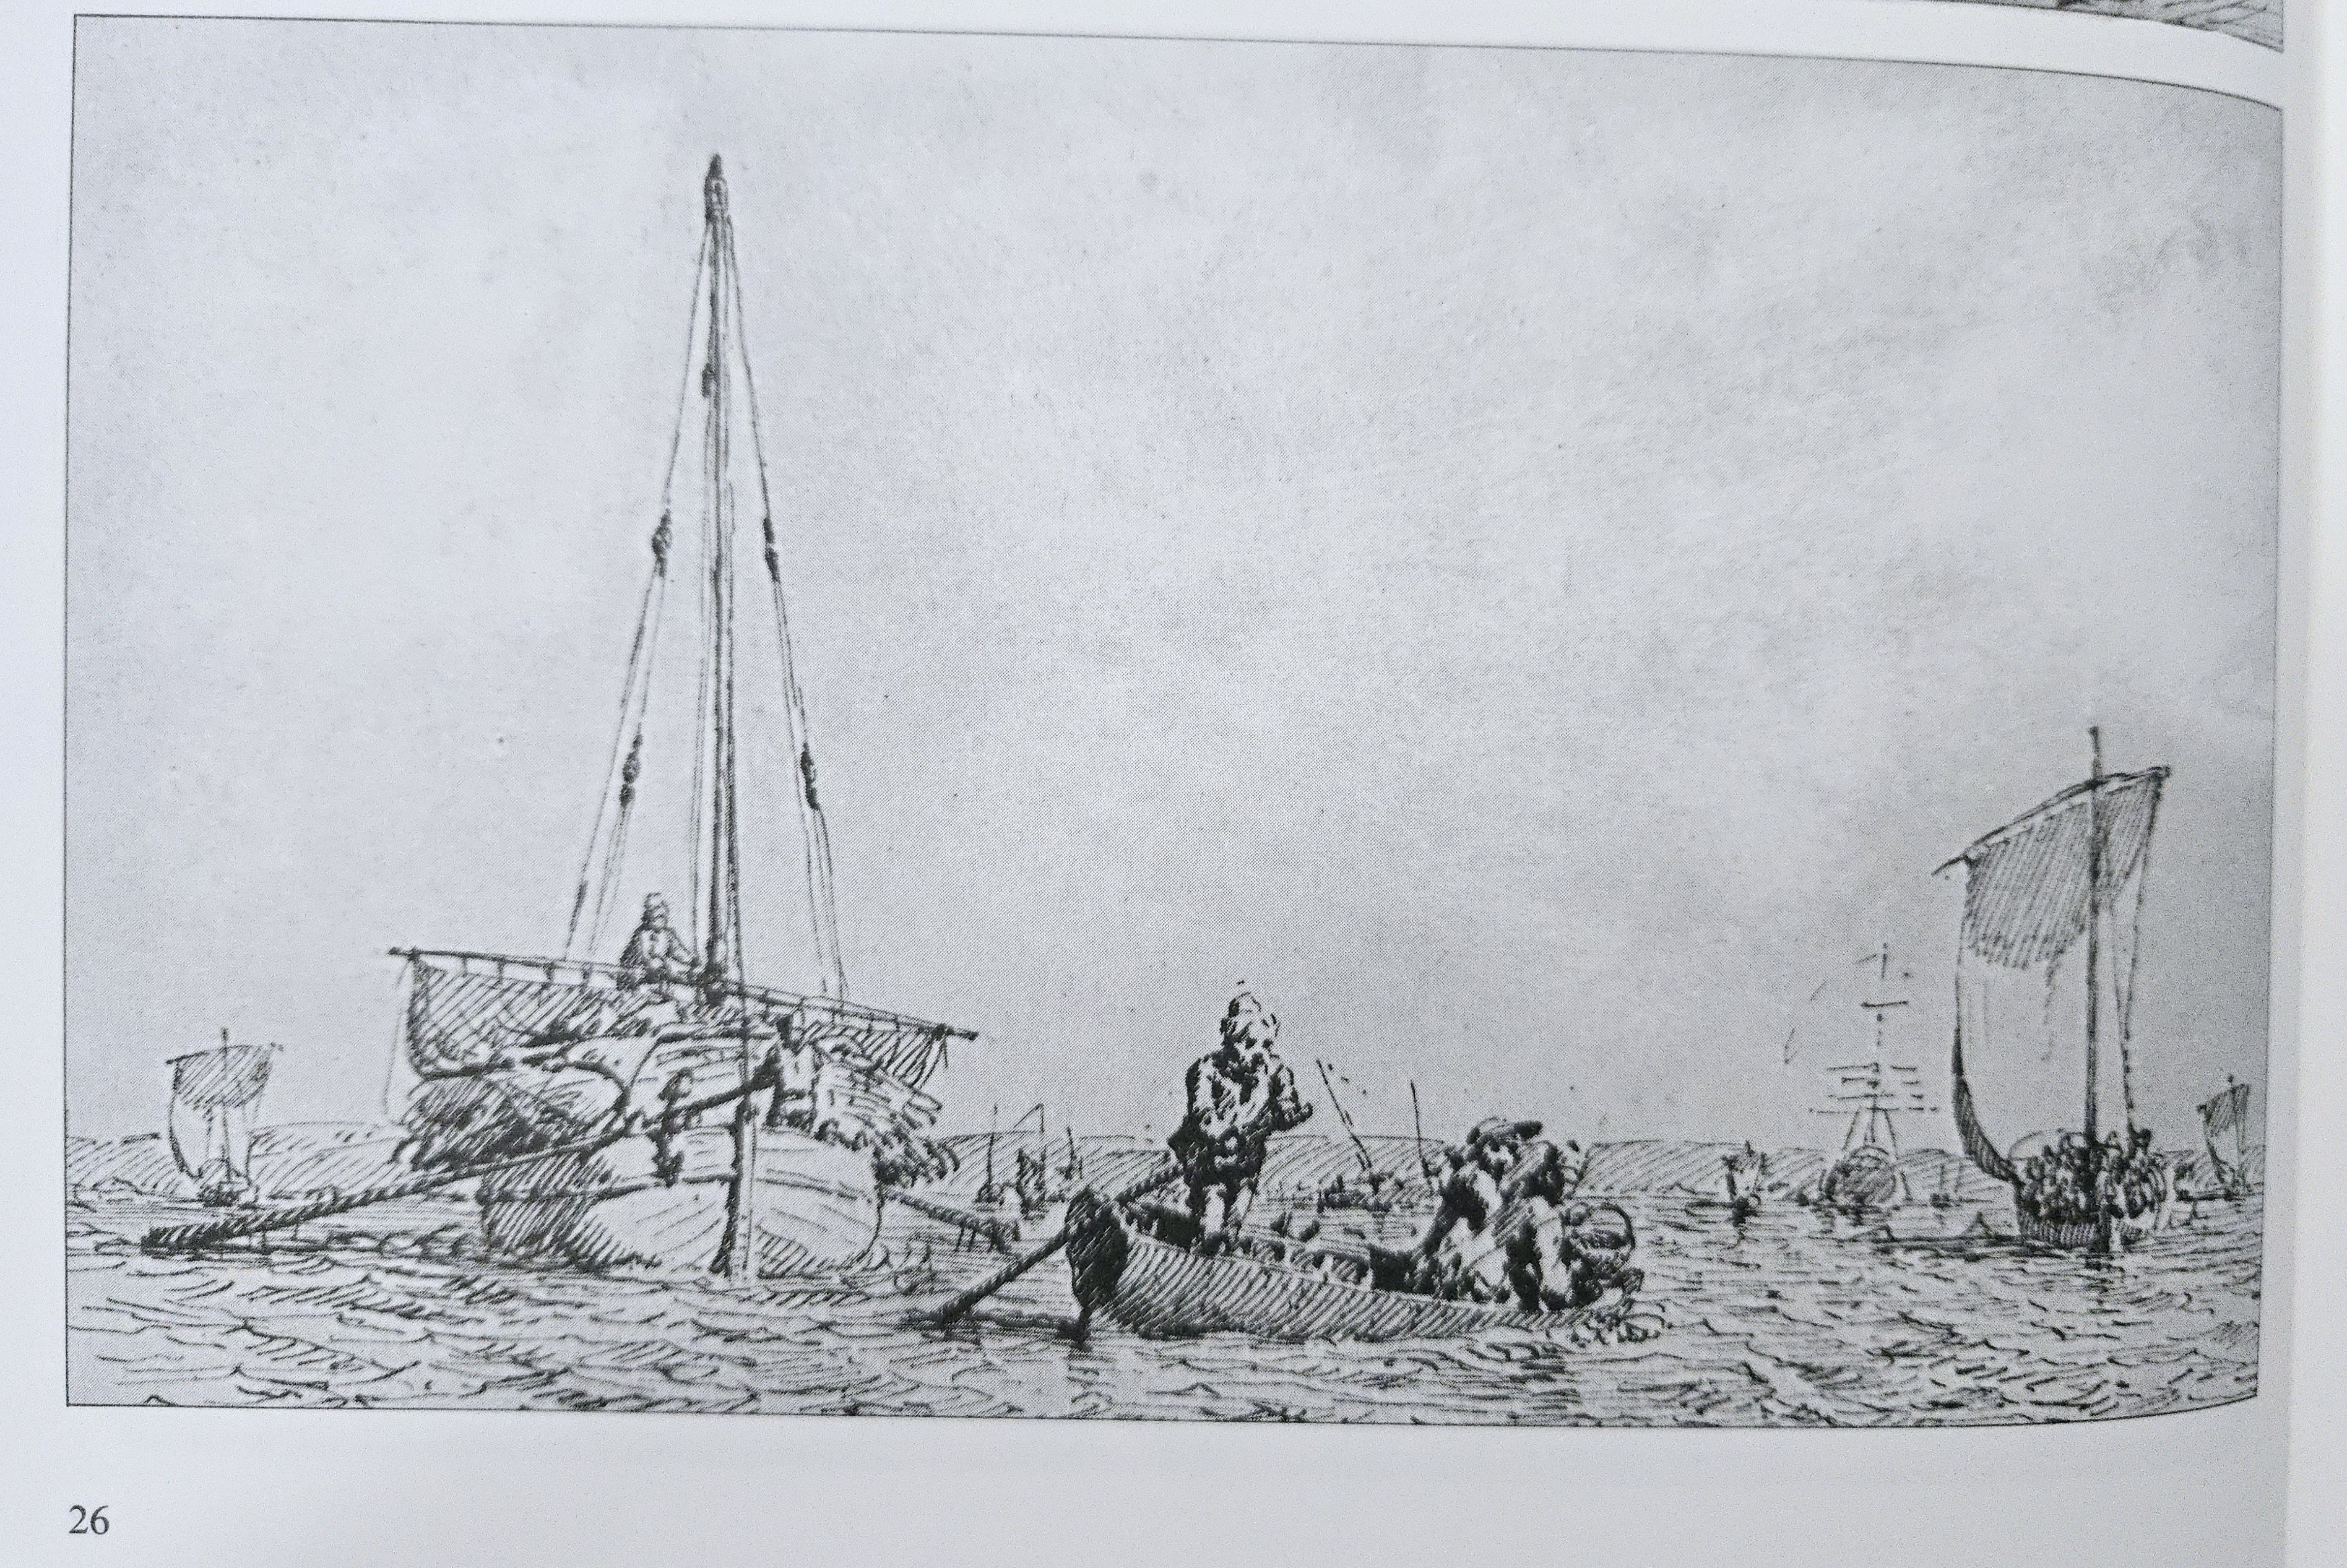
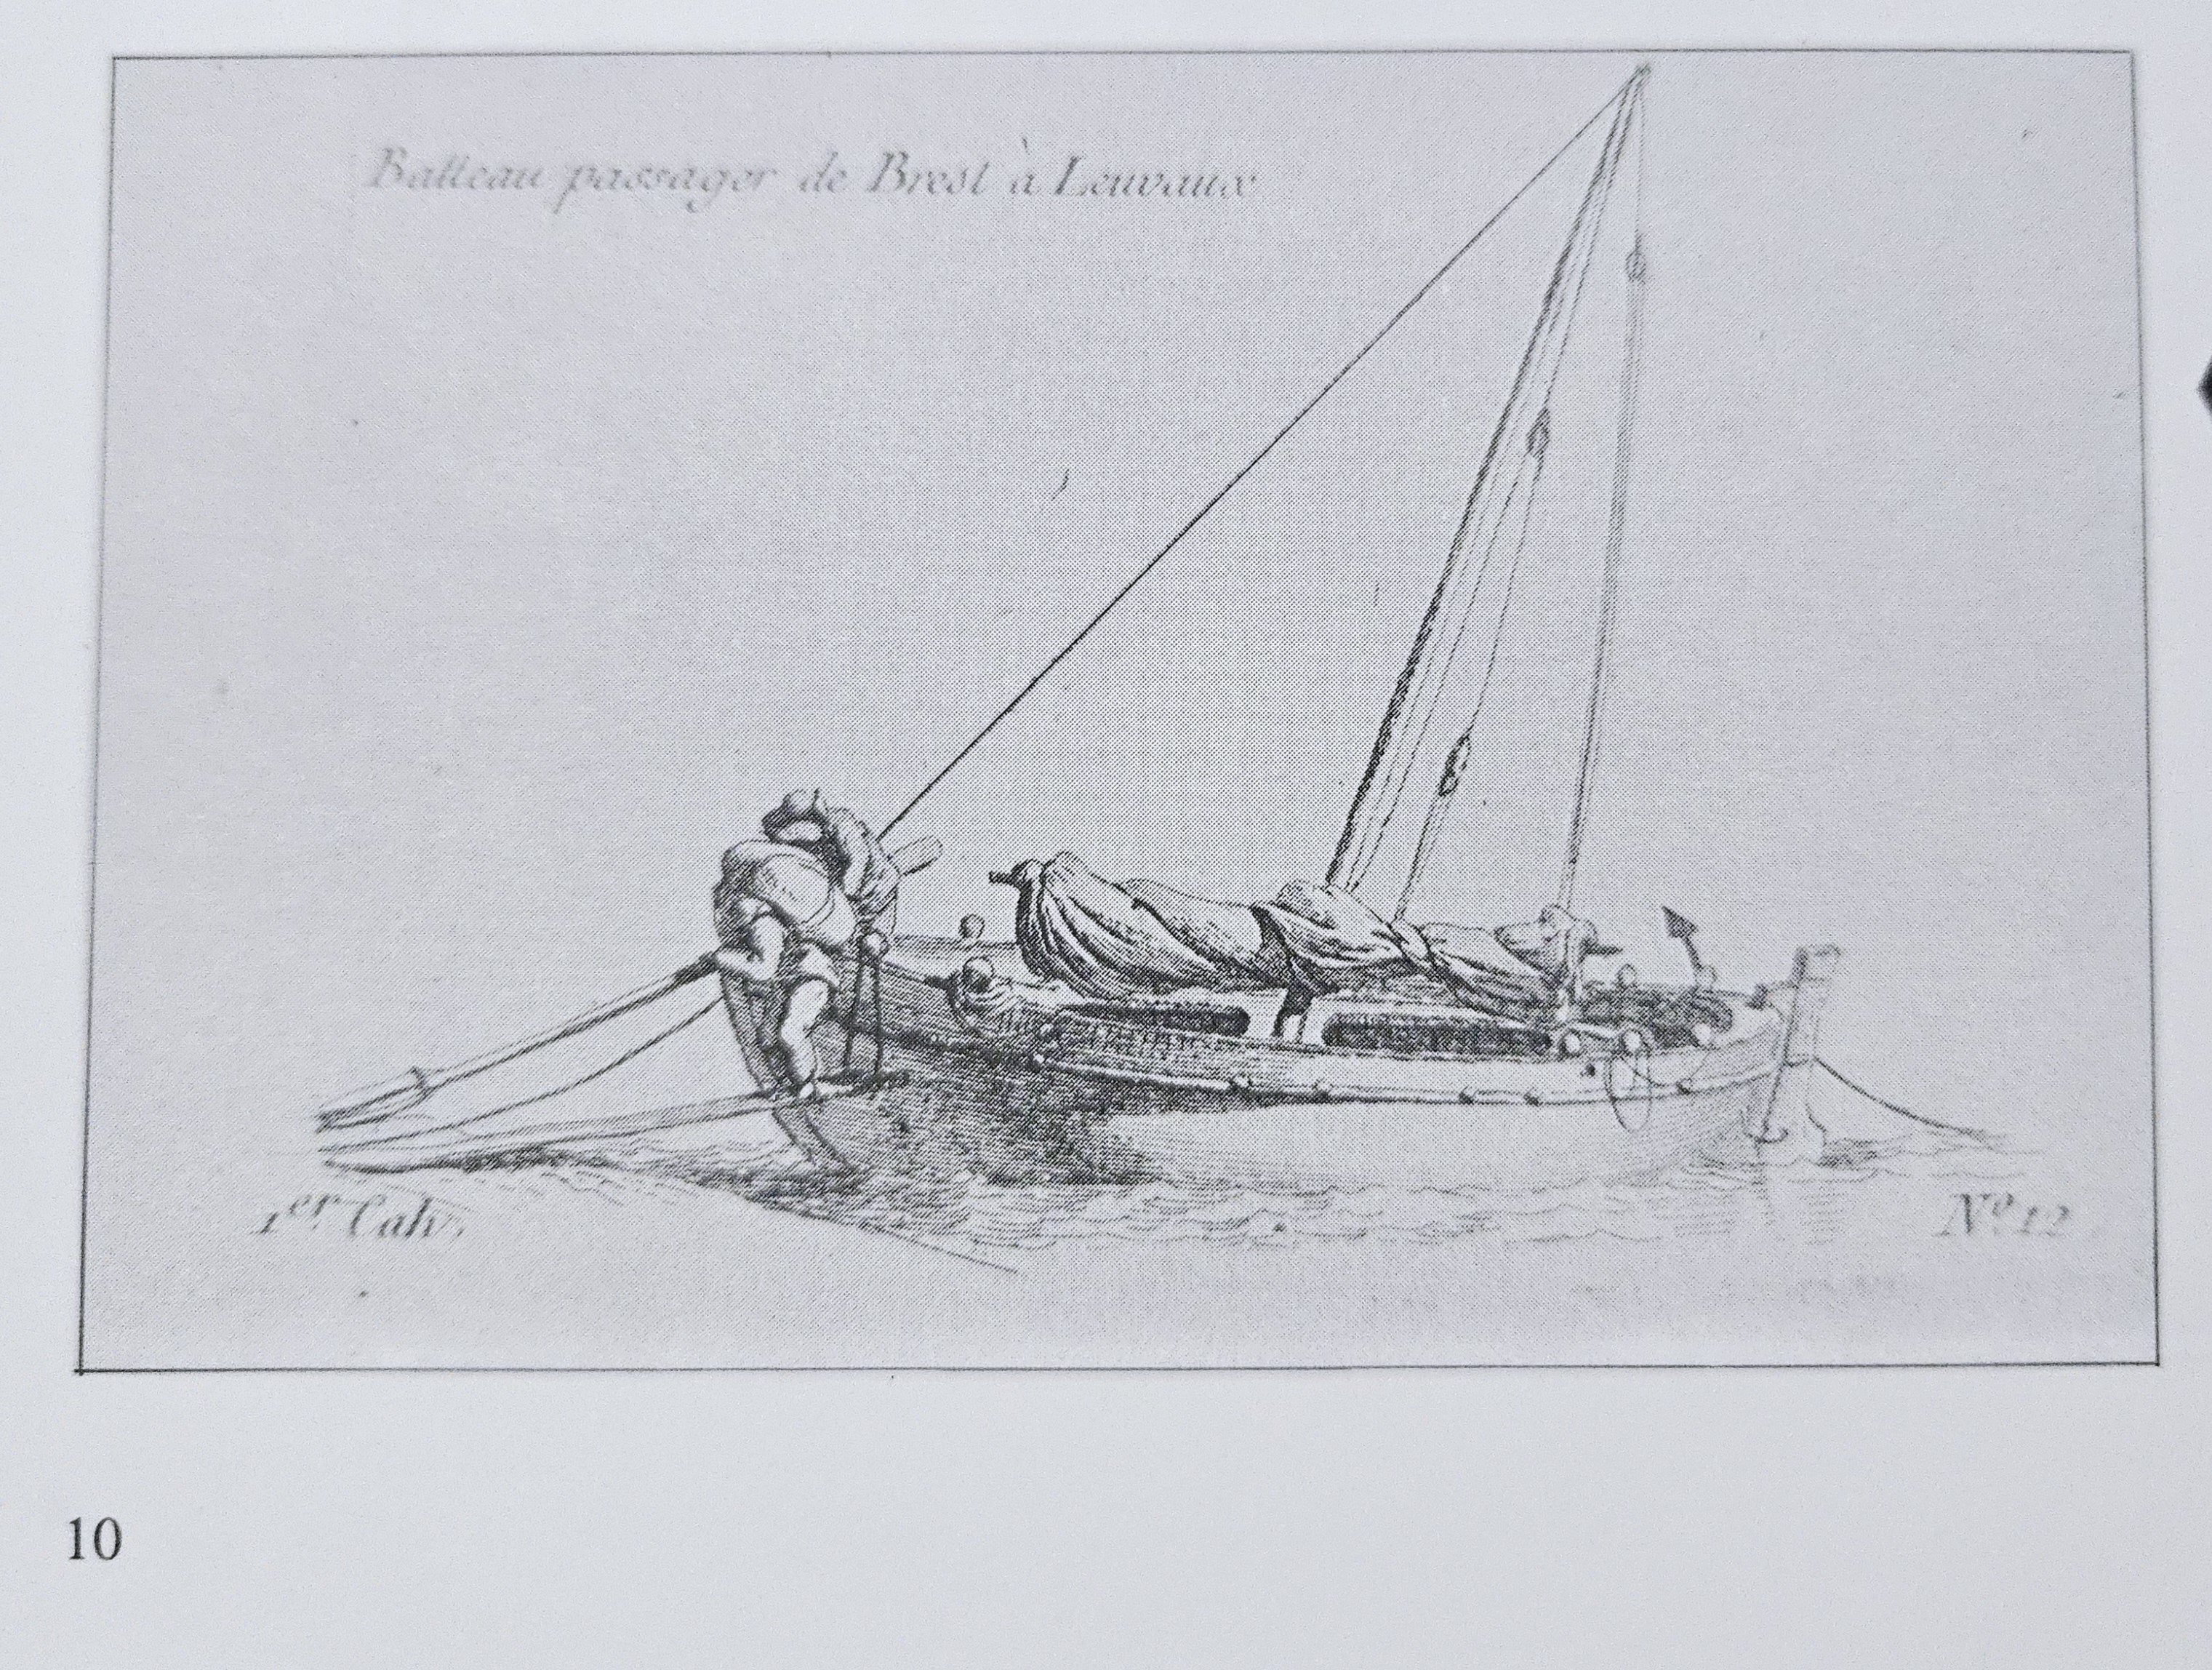
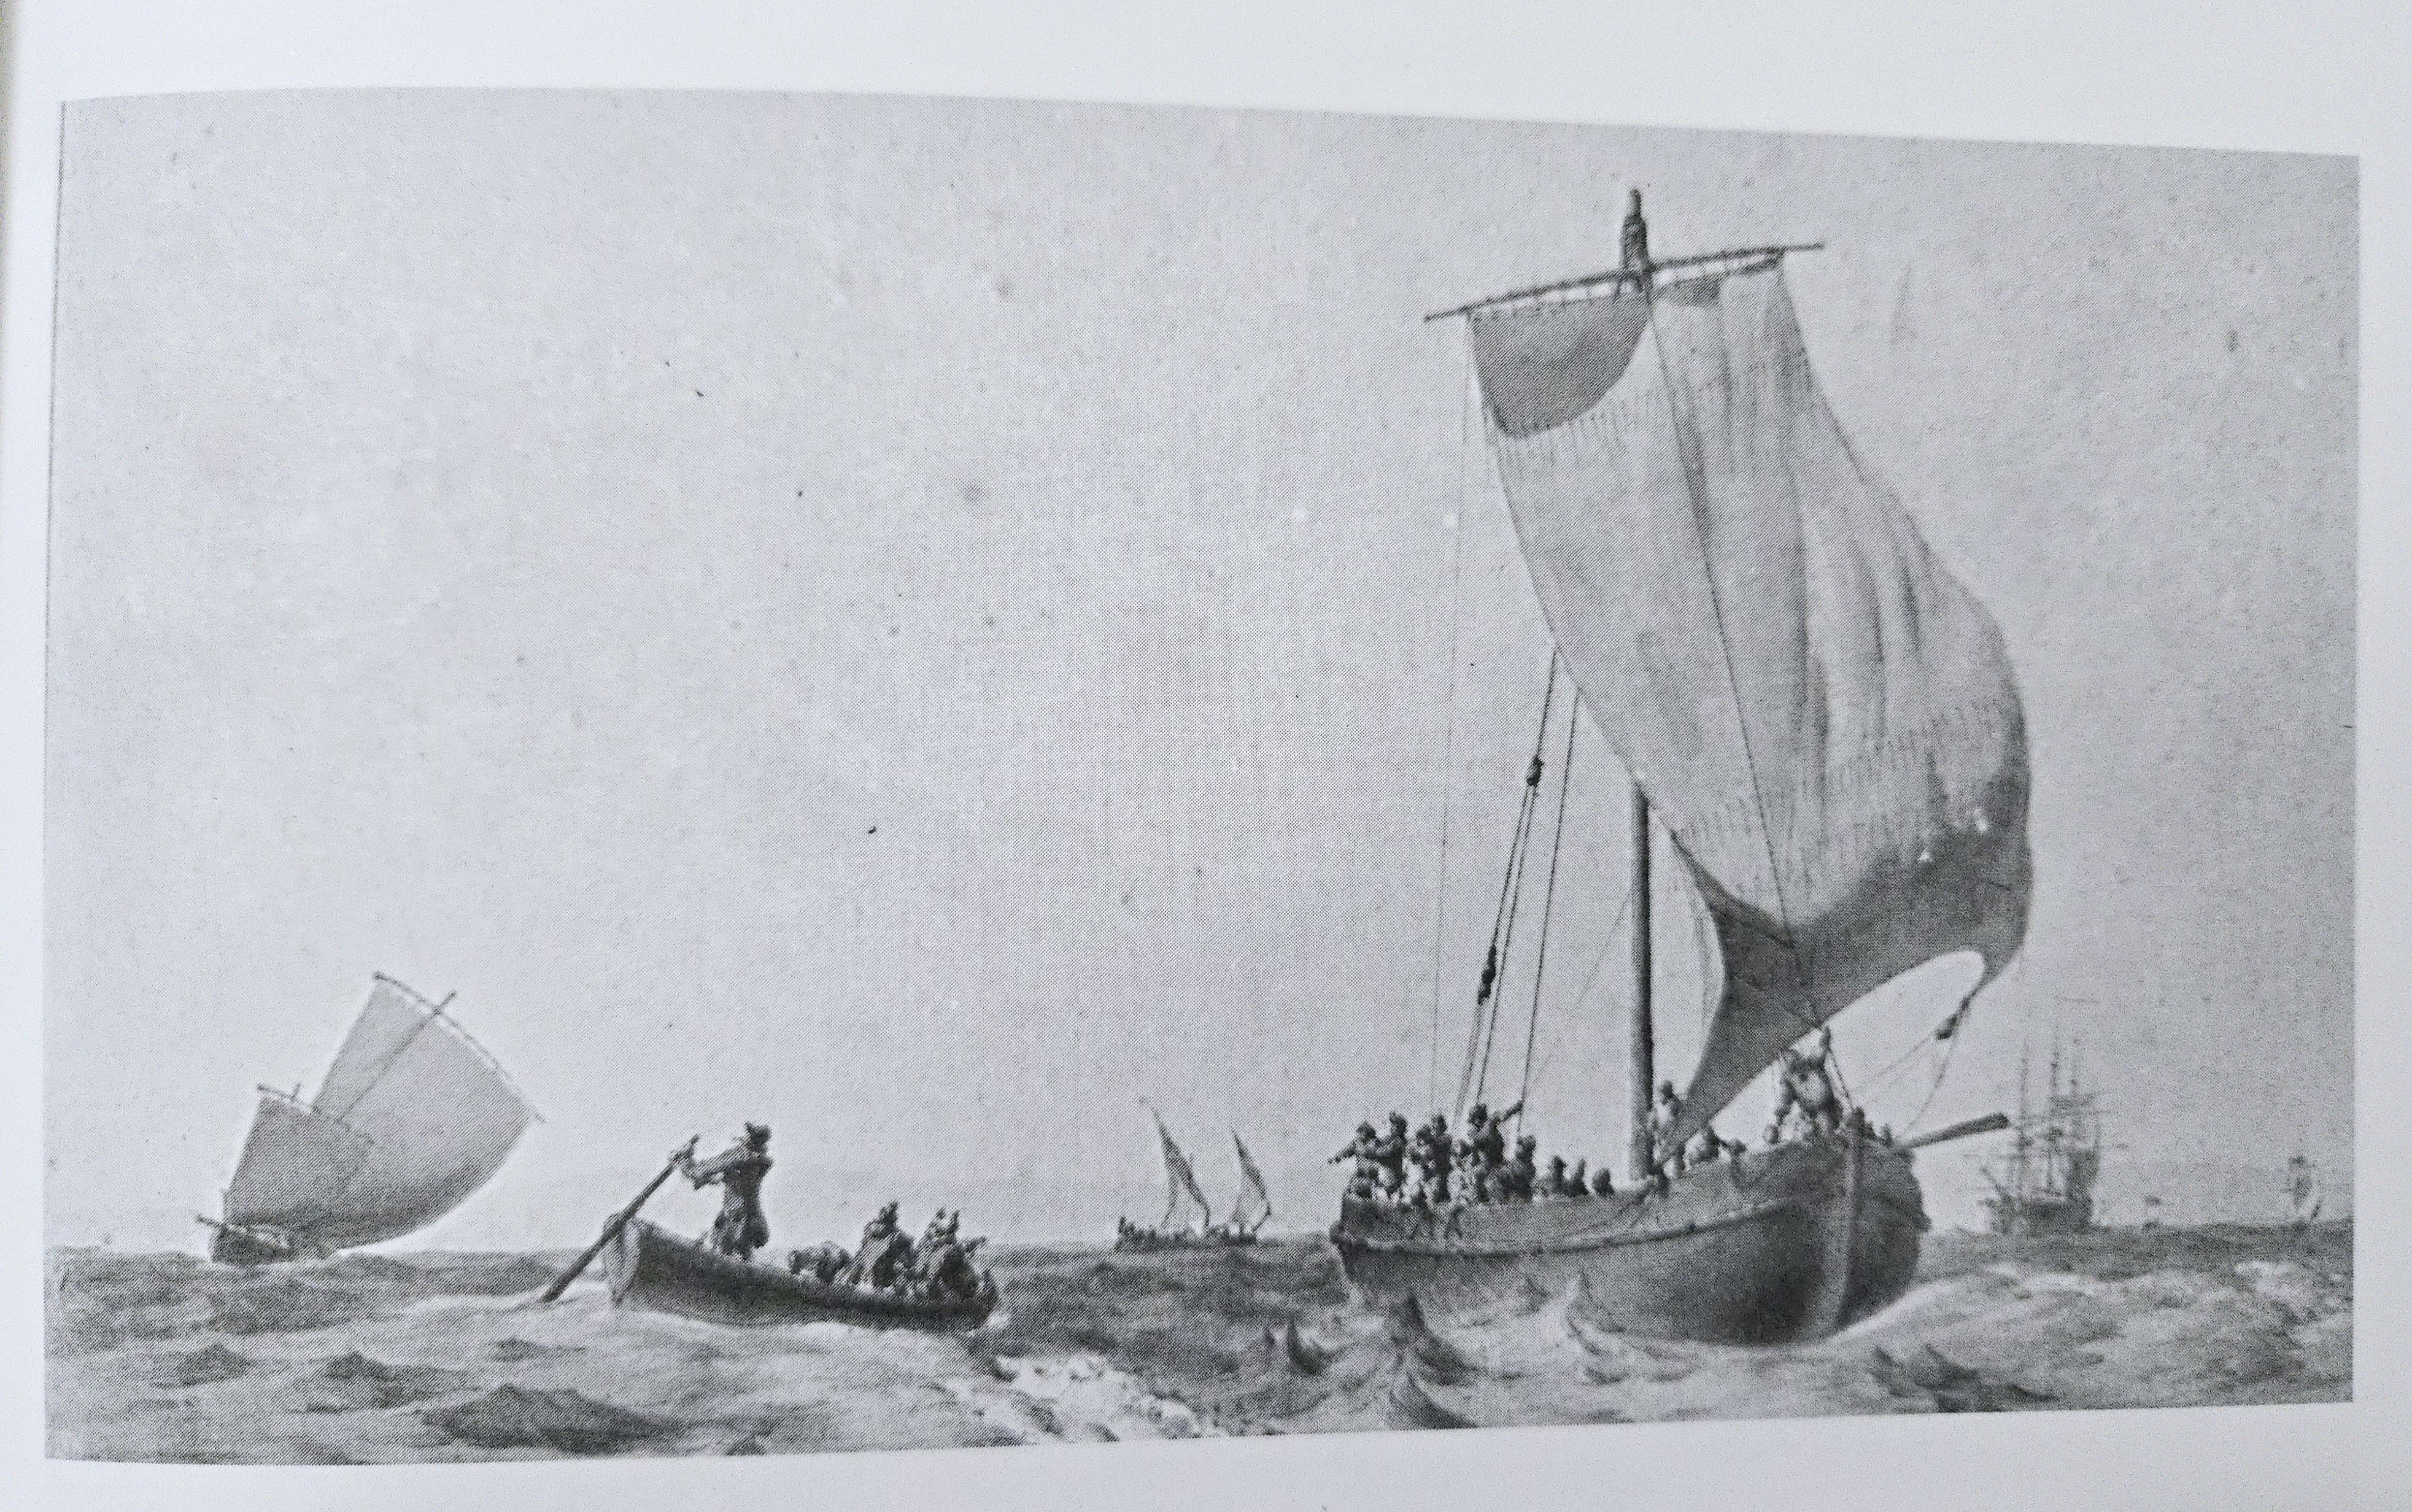
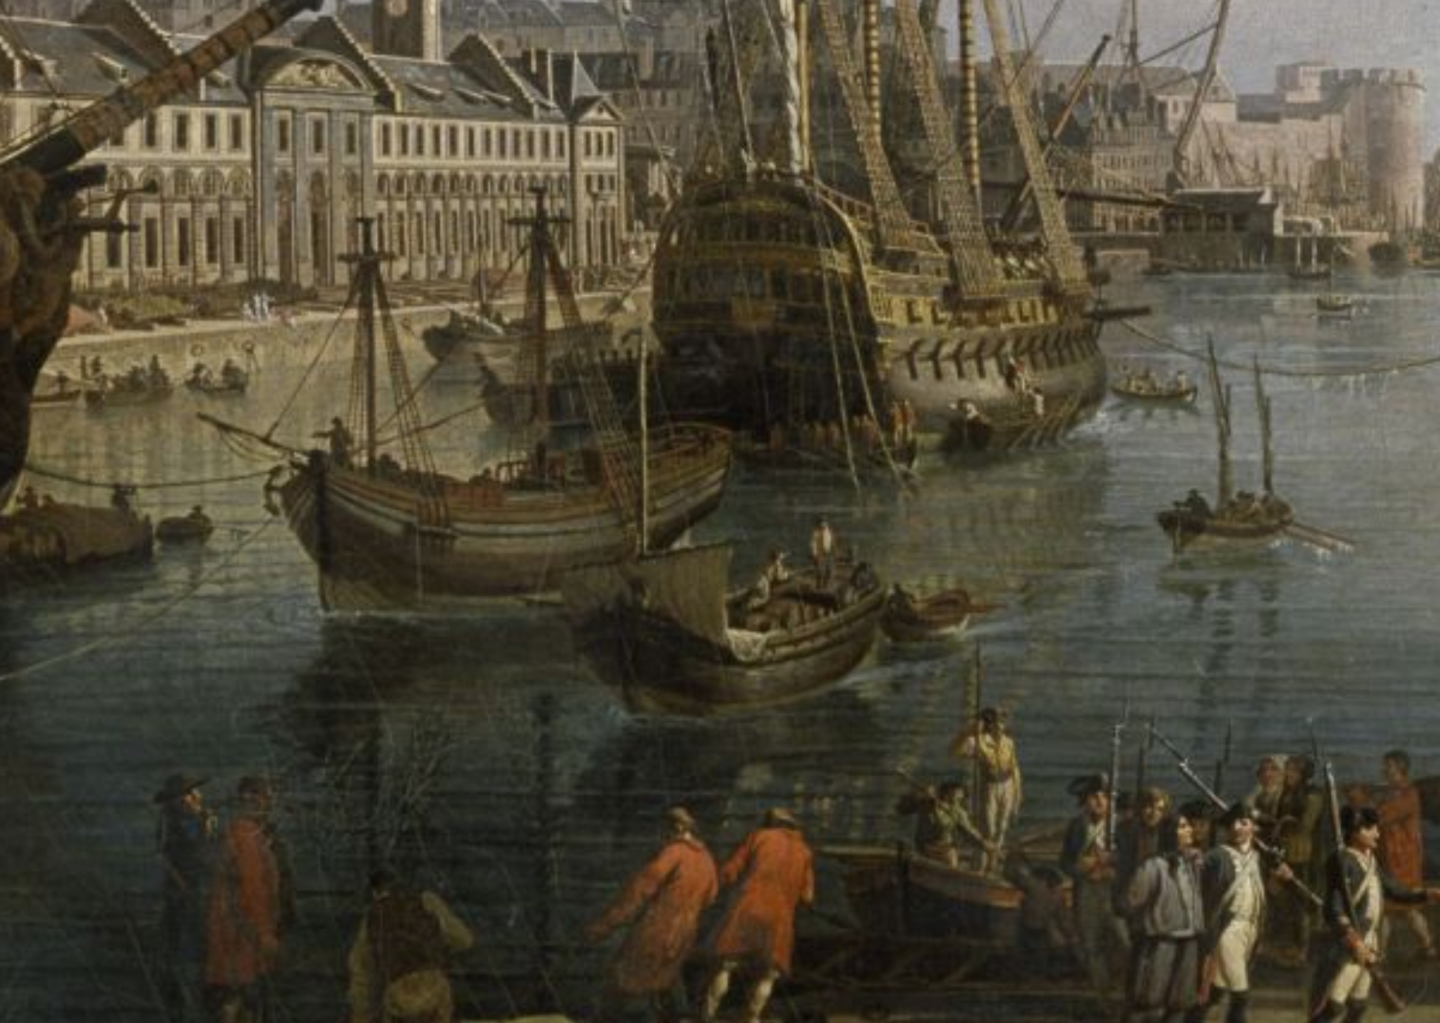
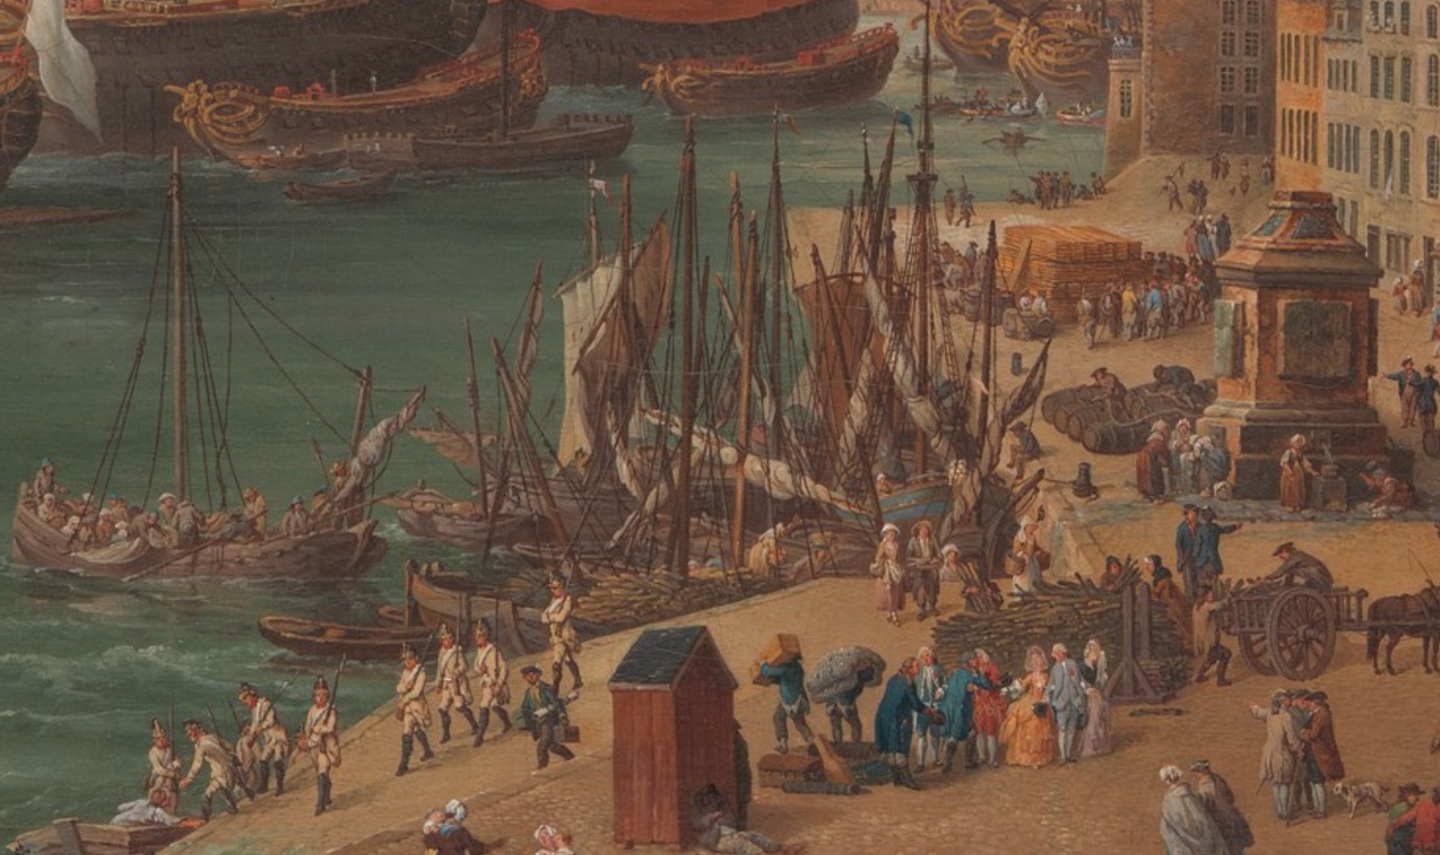
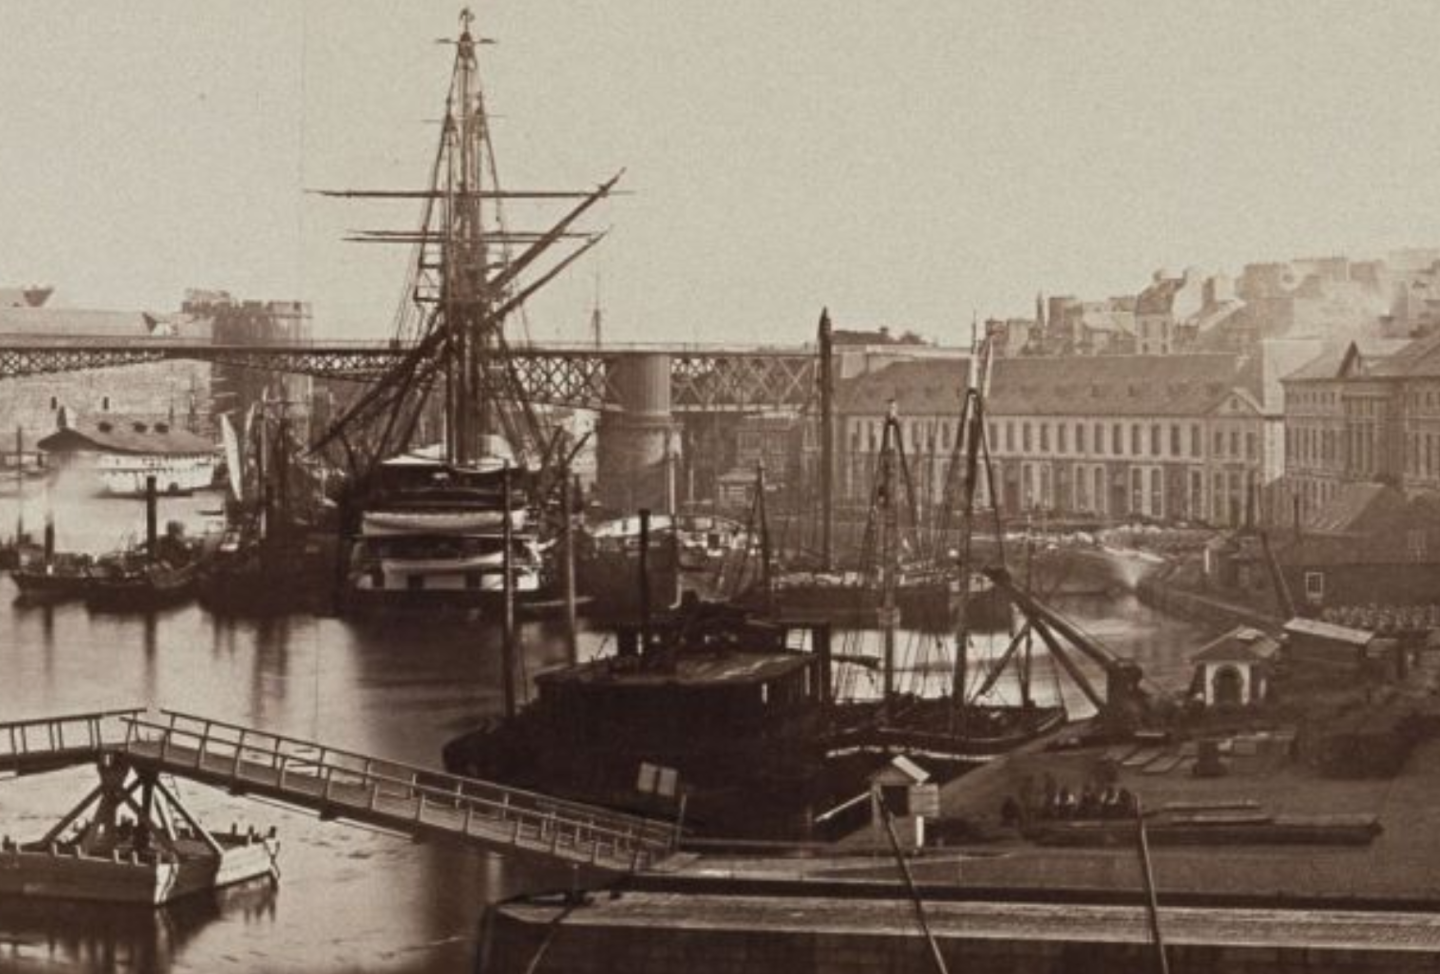
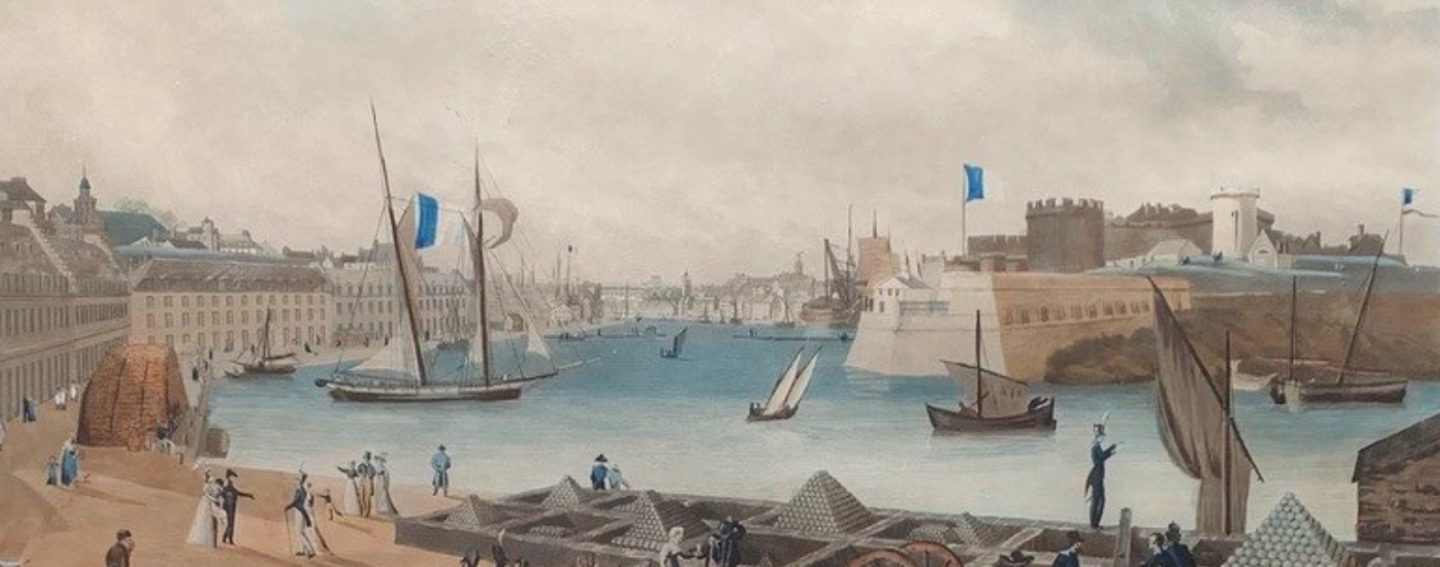
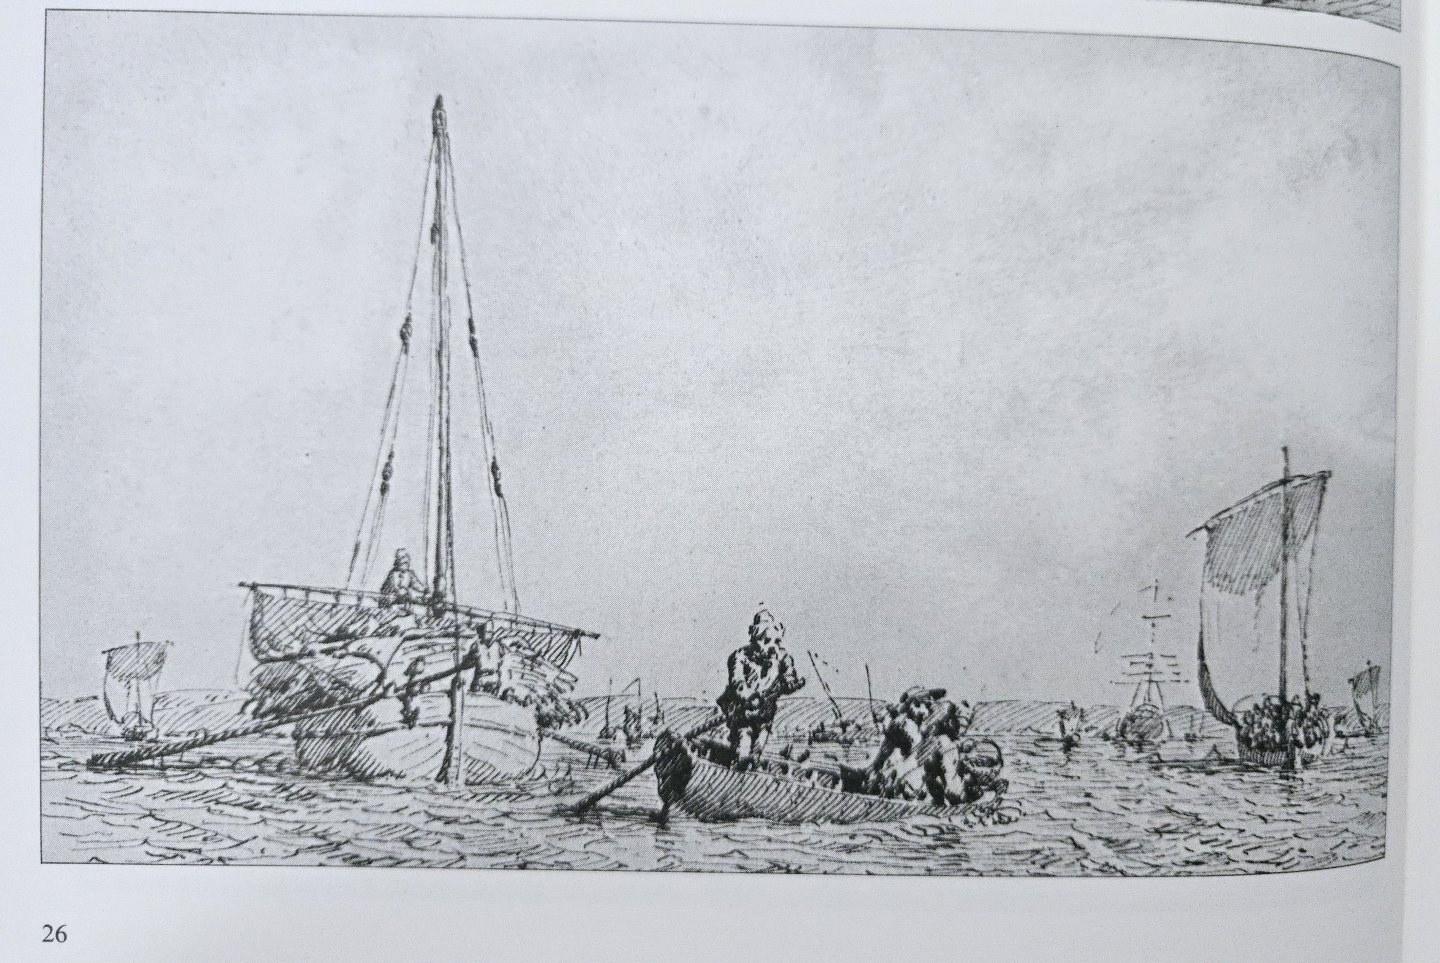
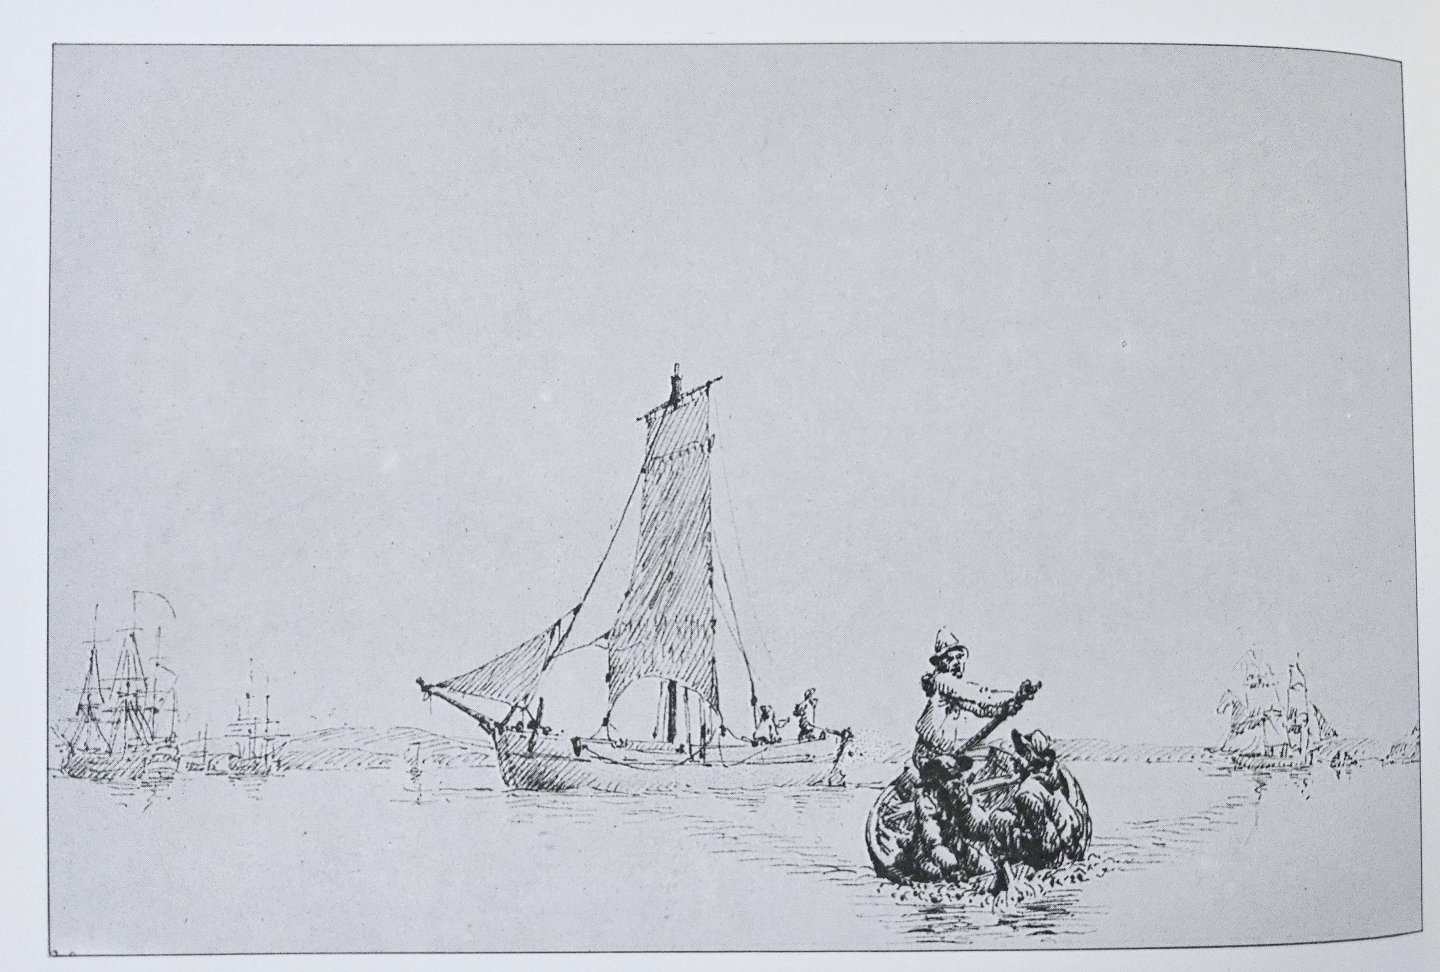
Bateau de Lanvéoc: History and Design, Pt. 2 of 2 Uses and Activities Getting into what Bateaus were used for requires going a bit beyond the monograph, especially into visual sources. As discussed, while differences between fishing vessels and cargo Bateaus are somewhat visible in images, Bateaus were also quite similar to many harbor lighters and barges, and it can be difficult to distinguish them in images, in part because they may have been the same vessels (although there were also clearly plenty of simple, slab-sided barges, as well). In any case, such vessels show up frequently in paintings of the port of Brest. See, for instance, the double-ended vessel in a detail from Jean-François Hue's 1795 painting "View of the Inner Harbor of Brest," below, which has a single mast at the bow (I'm not sure if it normally would have a mast in the center that has perhaps been unshipped). Source: https://mnm.webmuseo.com:8443/ws/musee-national-marine/app/collection/record/9937 While paintings like these show that vessels like the Bateau played a major part in work and daily life in Brest, they don’t give a great sense of what they were actually doing. In contrast, this detail from Henri Joseph van Blarenberghe's 1773 work, "The Outer Harbor of Brest," is much more useful. The two-masted vessel at left, its decks crowded with passengers, seems to be a ferry of some sort. In contrast, at least some of the vessels docked at center are clearly dedicated to carrying freight—a couple have firewood stacked high. The docks near these small vessels also give some indication of types of cargo. From the foreground back, there are apparently passengers and their luggage (perhaps getting ready to board the ferry), stacks of firewood, a large number of barrels (containing what, it’s hard to say), and milled lumber, possibly for the arsenal and shipyard. https://www.metmuseum.org/art/collection/search/435673 Similarly, the Ozanne drawing below (shown in the monograph) shows a Bateau loaded with firewood and hay. Firewood, besides being useful for homes, was also undoubtedly necessary for the Arsenal’s production. The drawing also shows two other Bateaus, at left and right, the rightmost one apparently loaded with passengers—a common theme in many of Ozanne’s drawings, which regularly show extremely crowded Bateaus. Notably, the vessel on the right seems to have placed the halyard 1/3 of the way along the yard rather than in the center, perhaps—although this is far from certain—hinting at a use of the square sail as lugsail, as mentioned earlier. The Decline of the Bateau As mentioned earlier, the brief description in Paris’s Souvenirs de Marine, written in the late 1800s, mentions that the Bateau de Lanvéoc had by then fallen out of use, but neither Paris nor Boudriot/Berti discuss how or why the vessel disappeared. Brest remained an important naval base in the 1800s and continued to grow, and it seems unlikely to me that demand for such small ferries, cargo haulers, and lighters around the port declined, although I’m not sure if any railroad construction or improvements in terrestrial roads took place or would have had an impact. However, after the Bateau and similar square-sailed vessels had been used for over a century, there does seem to have been a technological change away from the square sail in the 1800s. Paris’s Souvenirs de Marine includes plans for a gabare—roughly translatable as a barge or a lighter—from “the west coast of France,” shown below. While the capacious hull form doesn’t look all that different from the Bateau de Lanvéoc, especially in cross-section, the vessel is decked and equipped with a gaff-rigged mainsail and a lug mizzen, and the written description states that such vessels were often brig- or schooner-rigged in Brest. As is well-known, the gaff sail became common on the mizzen of large ships beginning in the late 1700s. On smaller vessels, it does not seem to have been very common around the Brest roadstead, where, as has been seen, the square and lug sail dominated, although Paris’s Souvenirs de Marine includes a small gaff-rigged sloop said to be from the Island of Ouessant, off the coast of Brest, from the very end of the 1700s. It seems that, in areas where the gaff sail was not common previously, the gaff diffused downward from larger ships into the rigs of smaller vessels, likely due to its ease of handling and weatherliness. This change only lightly impacted fishing vessels, many of which were already fore-and-aft rigged with lug sails, to a limited extent, although gaff-rigged fishing sloops did emerge in Brittany by the late 1800s or so. But, if the Paris plans are anything to go off, the lighters used in Brest’s naval base do seem to have shifted over to the new rig, abandoning the previous square sail. Given the close connections between the Bateau de Lanvéoc and Brest’s harbor lighters, it seems that the type would have thus been replaced by different rigs. This may seem contradictory—didn’t I just suggest earlier that the square sail survived on the Bateau, despite the presence of more weatherly lug sails, because it was well-suited for the limited sailing qualities demanded of an in-harbor ferry and lighter? It’s not entirely clear to me why this shift away from the square sail happened when it did. Perhaps the gaff sail offered advantages in ease of handling over the lug sail, or perhaps military influence—where the gaff sail was becoming increasingly common—simply was decisive. In any case, images from the early 1800s are suggestive of a slow change. The detail shown below from a painting of Brest by Louise-Ambrose Garneray, likely painted between the 1820s and the 1840s, is interesting in showing a rather wider range of rigs on small workboats than earlier artwork. At right, there’s a two-masted vessel, possibly lug-rigged like the single mast that appears at right foreground, and there’s a small single-masted vessel of the Bateau type (although possibly lug-rigged) at right-center. Yet there’s also a gaff-rigged vessel docked to the left of the schooner, not to mention possible gaff rigs on at least some of the small vessels under sail at center/center-left. Comparing images like this to the Ozanne drawings and earlier depictions, the slowly-growing presence of the gaff rig is evident. Source: https://www.proantic.com/en/1159293-louis-ambroise-garneray-port-of-brest.html# In any case, the Souvenirs de Marine description of the sailing gabare notes that it, too, was replaced by the advent of steam over the 1800s, the advantages of which for maneuvering around a crowded harbor or for maintaining a regularly-scheduled ferry service can be imagined. I believe that you can see both types in the detail, below, from a photo of the Brest arsenal in around 1861. There are a number of small steam vessels at the left, while the vessel with white trim at center-right looks to my eyes to have a gaff-rigged main mast and a lug on the mizzen (while the foremast’s rigging is not entirely clear), perhaps being a larger version of the type of gabare shown by Paris. There do not seem to be any square-rigged small vessels by this time, although there are a handful of possible luggers. Source: https://mnm.webmuseo.com:8443/ws/musee-national-marine/app/collection/record/10019?expoCtxt=ePkH4LF7A0ZfTk5qcklmfp5zSUWJa0VBvkJxRn55cmJxKsgeYG2lbwcACuENAQ$$ Conclusions and Further Questions The notes above, while far from conclusive, still help to establish what makes the Bateau de Lanvéoc an interesting subject to model. In particular, I think that it’s very interesting to see that, even for such a simple vessel, detailed written descriptions exist of their design process, scantlings, and mast proportions, allowing a very thorough reconstruction of not just the vessel type, but of the way boatbuilders arrived at the final vessel. This sort of information would be incredibly helpful to have for Latin American workboats, but is unfortunately often lacking in their cases (not entirely, though: I do wonder whether José A. Garnham documented this among Chilean Lancha builders, and this sort of information has survived for the Saveiro builders of Bahia, Brazil). The images are also helpful to envision how this vessel was used, in ways that possibly will shape the model. As mentioned in an earlier post, my build’s final presentation will most likely be focused on the vessel’s construction, but I have toyed with the idea of depicting it as a working boat. Initially, when I read that the Bateau could be used as a fishing boat, I thought that it could be interesting to depict it as such, but I discarded that idea after finding substantially more information about Bateaus as ferries or cargo vessels. I won’t be displaying it as a crowded ferry boat, but possibly a small load of firewood and barrels could be an interesting and historically-accurate depiction. That said, there are still a number of questions I have about the Bateau, although I’m not sure how I would go about answering them. I’d be interested to know more about the connections between the square and lug sail in and around Brest, especially to get more evidence as to whether the Bateau’s square sail was ever raised in a fore-and-aft position inside the shrouds for use as a lugsail. This could be useful to help understand the square rig’s seemingly anachronistic survival. Second, I’d be interested to know more about design differentiation between the Bateau and other small workboats in the surrounding area. By the 1790s or so, were there actually marked differences in hull form and rig between the Bateau and local fishing boats, as the Paris Souvenirs de Marine plans and images seem to suggest, or was the Bateau truly used not just as a ferry and cargo vessel but also for fishing, as some of the shipbuilding manuscripts suggest? Am I correct that there was a growing specialization in vessel design over time? Were the differences visible in the Paris plans just a reflection of differences in building location, such that Lanvéoc had a different building style than, say, Plougastel or Douarnenez, or did these differences also reflect different intended uses, say, fishing vs. cargo-hauling? Third, relatedly, I wish I knew more about the actual work done by the Bateau, and especially about the routes it traveled. Was the Bateau generally just used within the Brest roadstead itself, or was it also used for longer voyages further along the coast, and if so, where to? This would impact the utility of the rig and hull design in different conditions. Fourth, who owned these vessels, and how was the labor of sailing them and building them organized? Were they operated directly by their owners, or did traders more often own multiple vessels? Were ferry routes monopolized, or did each vessel compete for passengers? Information on this could help us to understand how much capital Bateau owners had, and what sorts of pressures they were under to adapt new technologies in order to compete for market share (which could help explain the eventual demise of the square sail). Who crewed these vessels? Did they tend to be family affairs, as was often the case of lanchas chilotas, or were hands usually hired? How much overlap was there between sailors on Bateaus, sailors on other small coastal vessels, and deepwater sailors? This would help us to better understand life on and around Bateaus and how their sailors understood themselves. What about the Bateaus used as lighters employed around the arsenal? Were they owned and operated directly by the navy, or hired out? This also might shape changes over time in the rig and hull design, based on the navy’s preferences and the influence they had over procurement. Finally, who built and designed Bateaus? Were there specialized Bateau builders, or did small boatyards make a wide variety of workboats such that a Bateau might be built alongside a fishing lugger? Did their builders ever build larger vessels? This could also influence changes in the Bateau over time. I don’t know if I’ll be able to answer any of these questions over the course of the build, but I’ll keep an eye out.

- 136 replies
-
- 6
-
-

-
- ancre
- Bateau de Lanveoc
- (and 2 more)
-
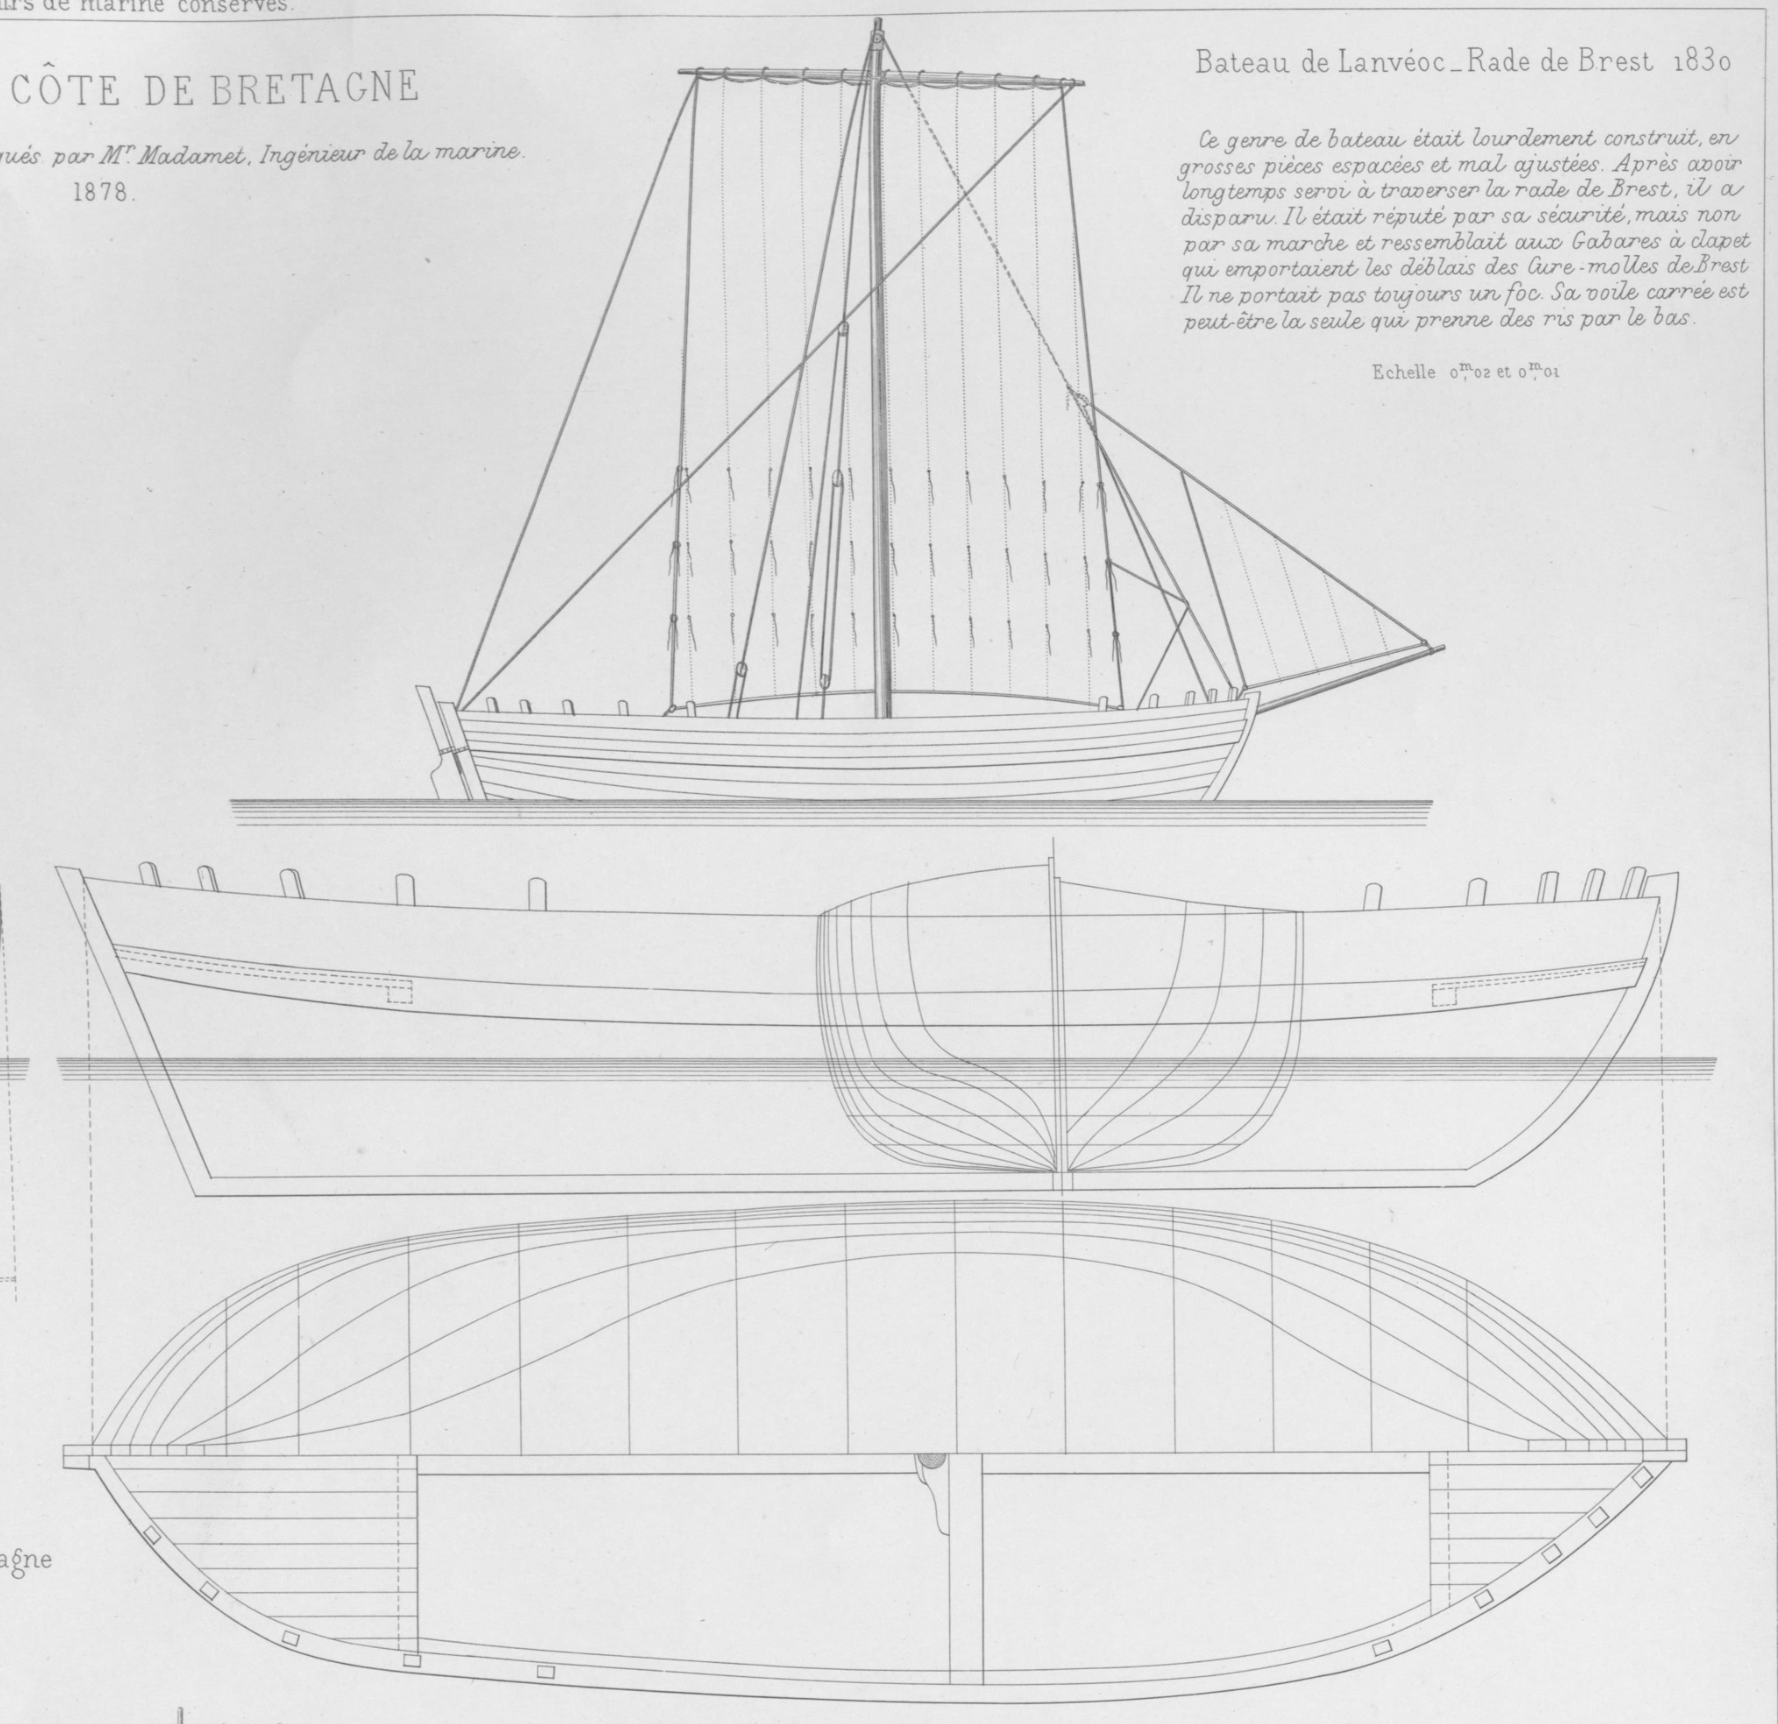
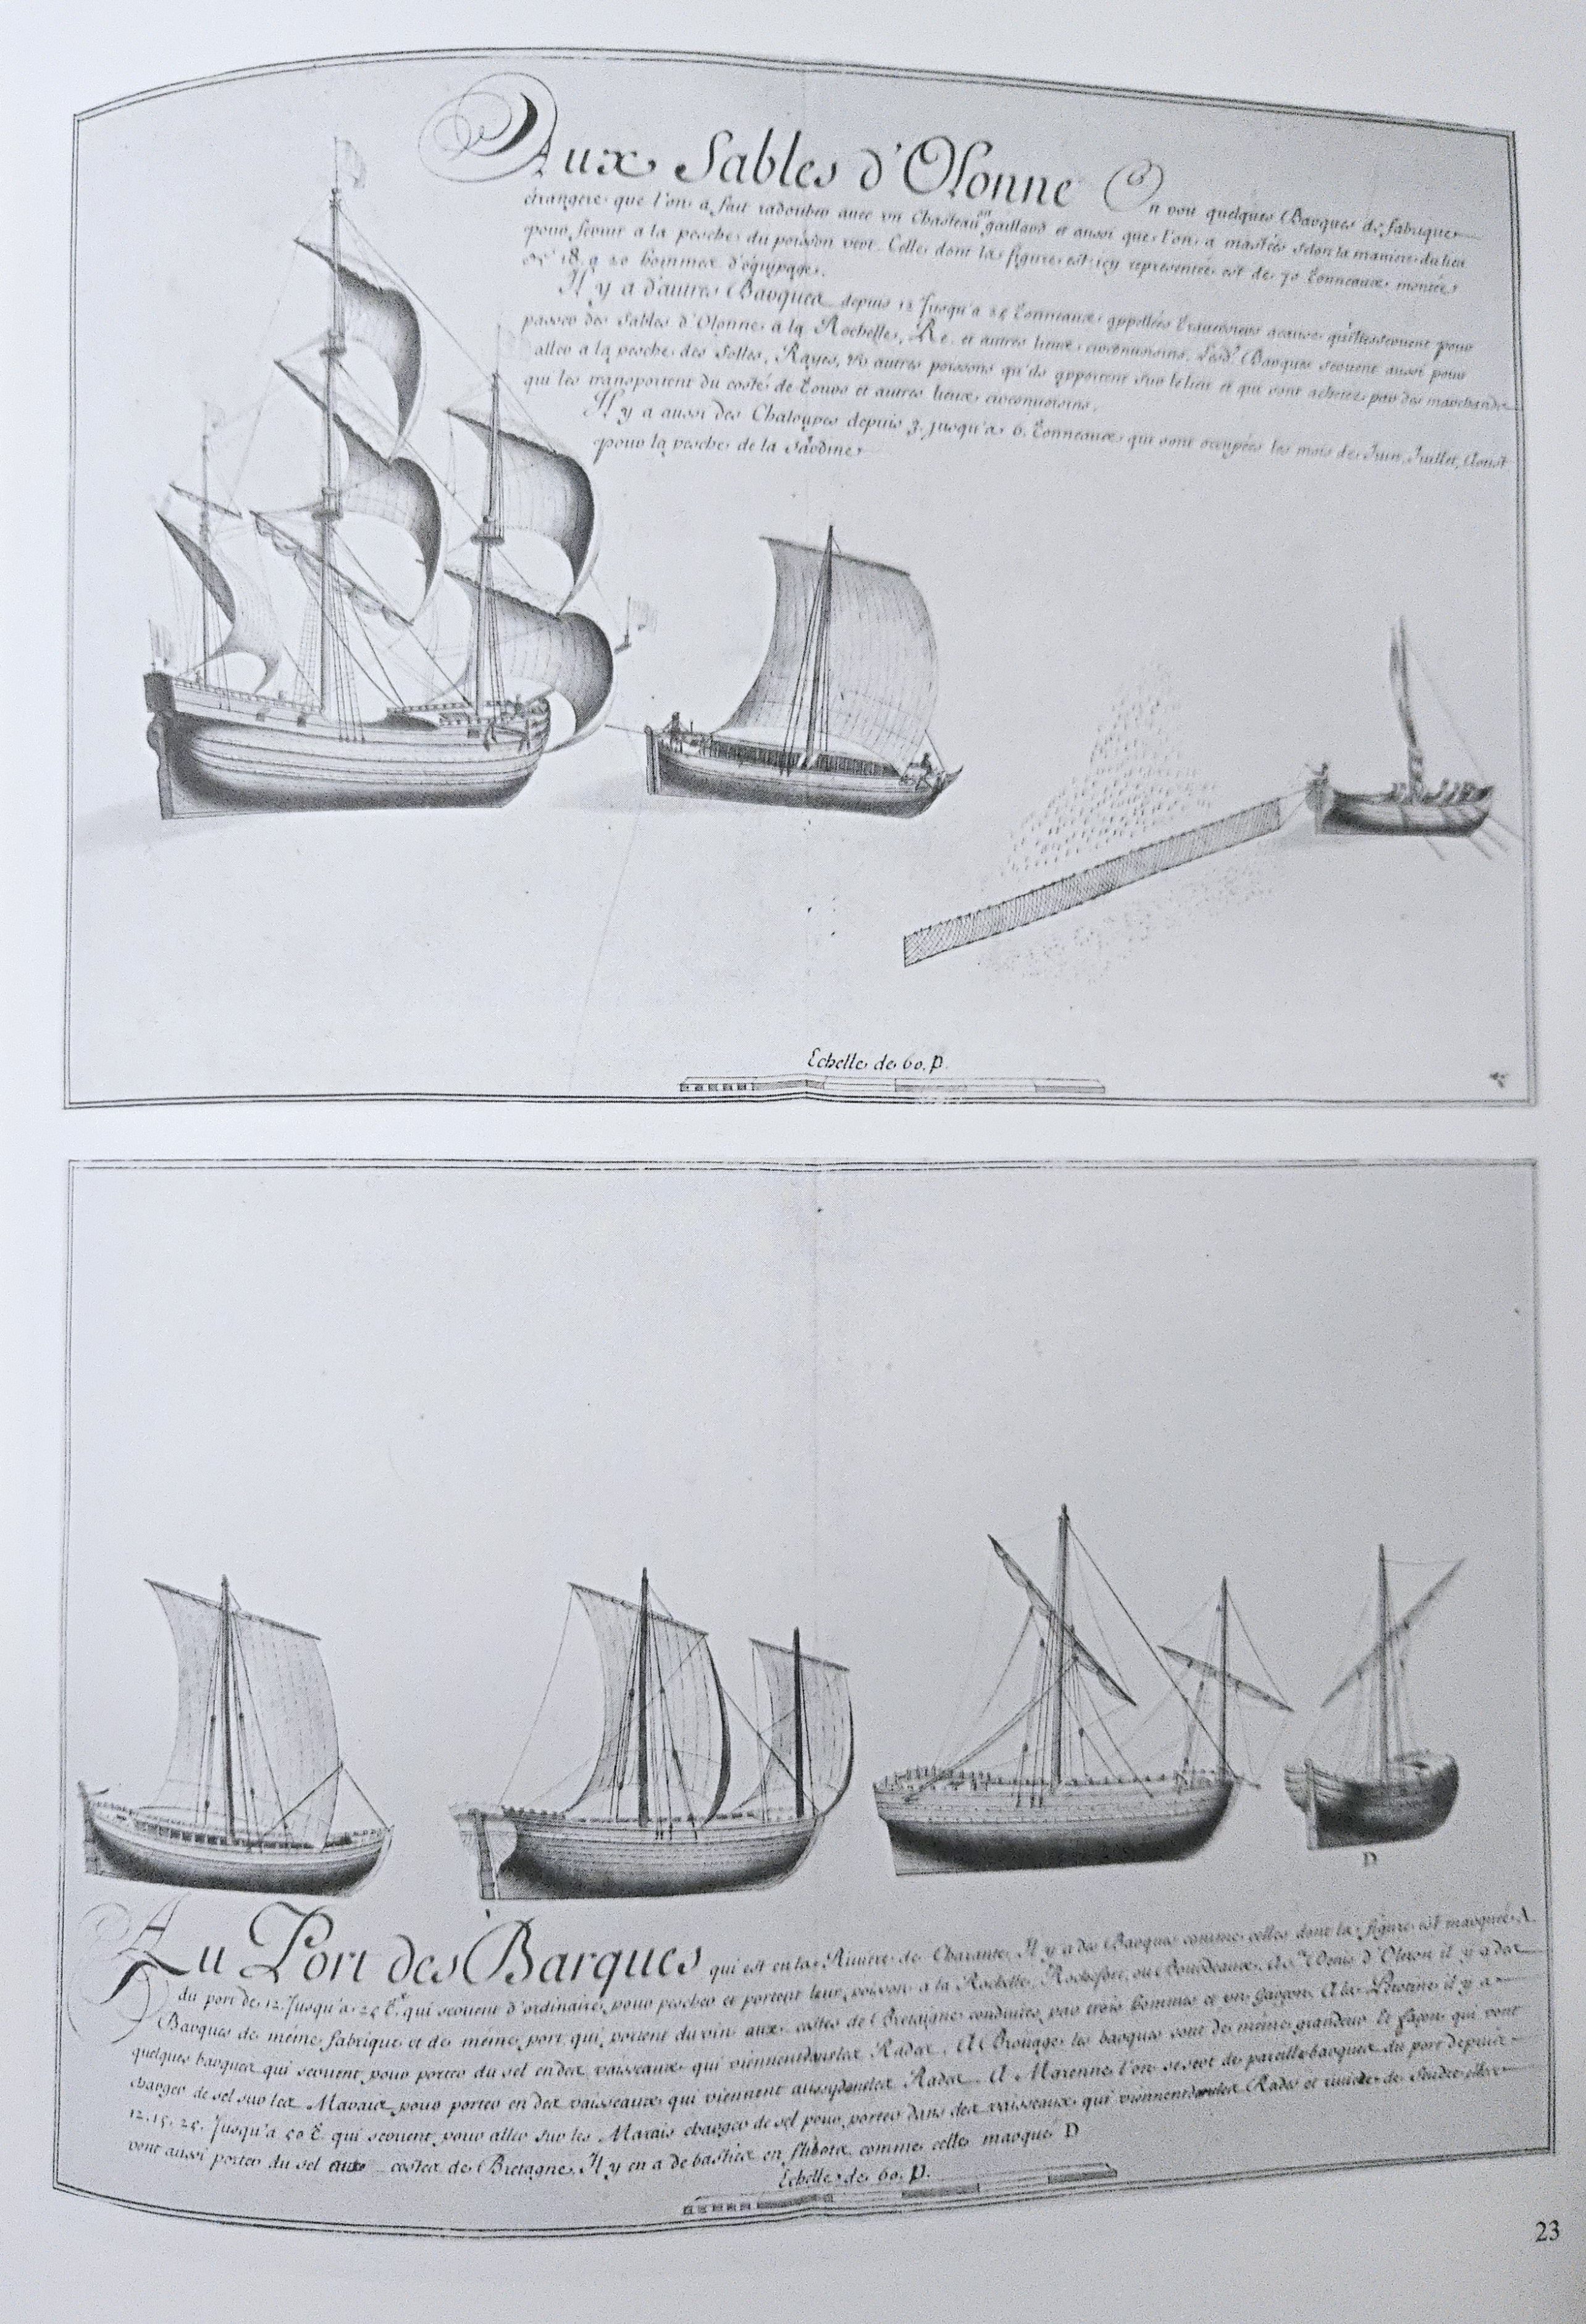
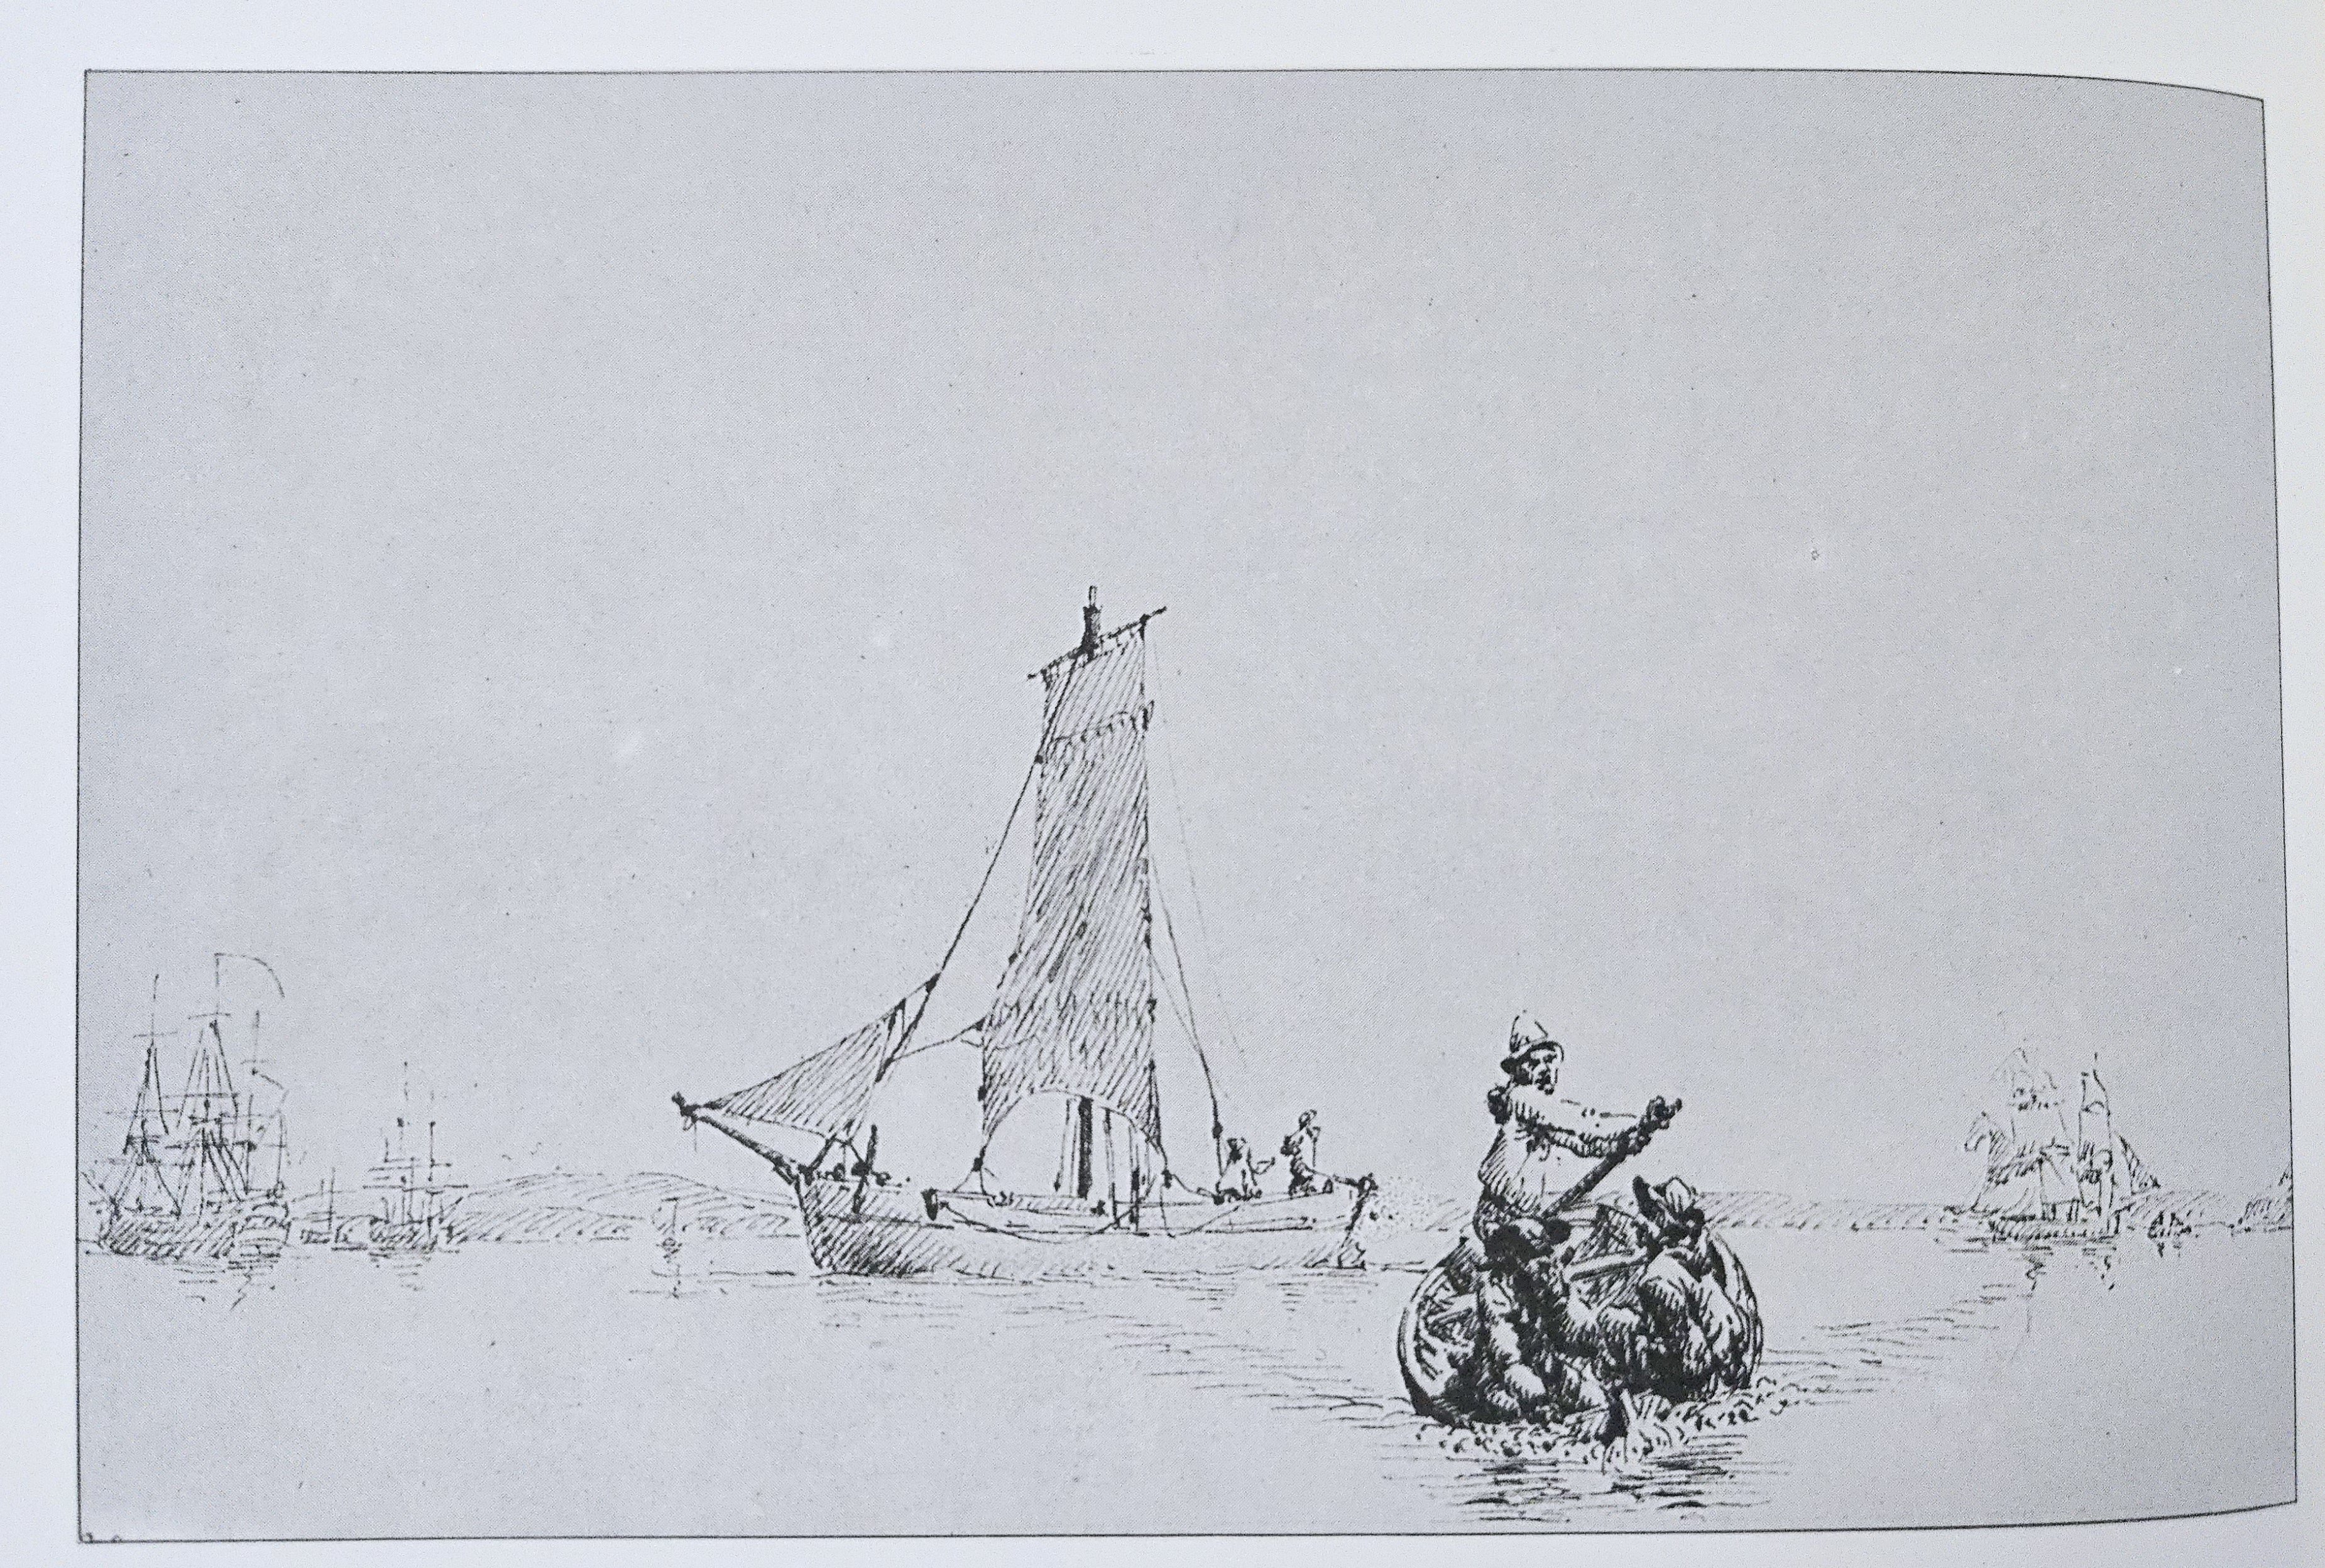
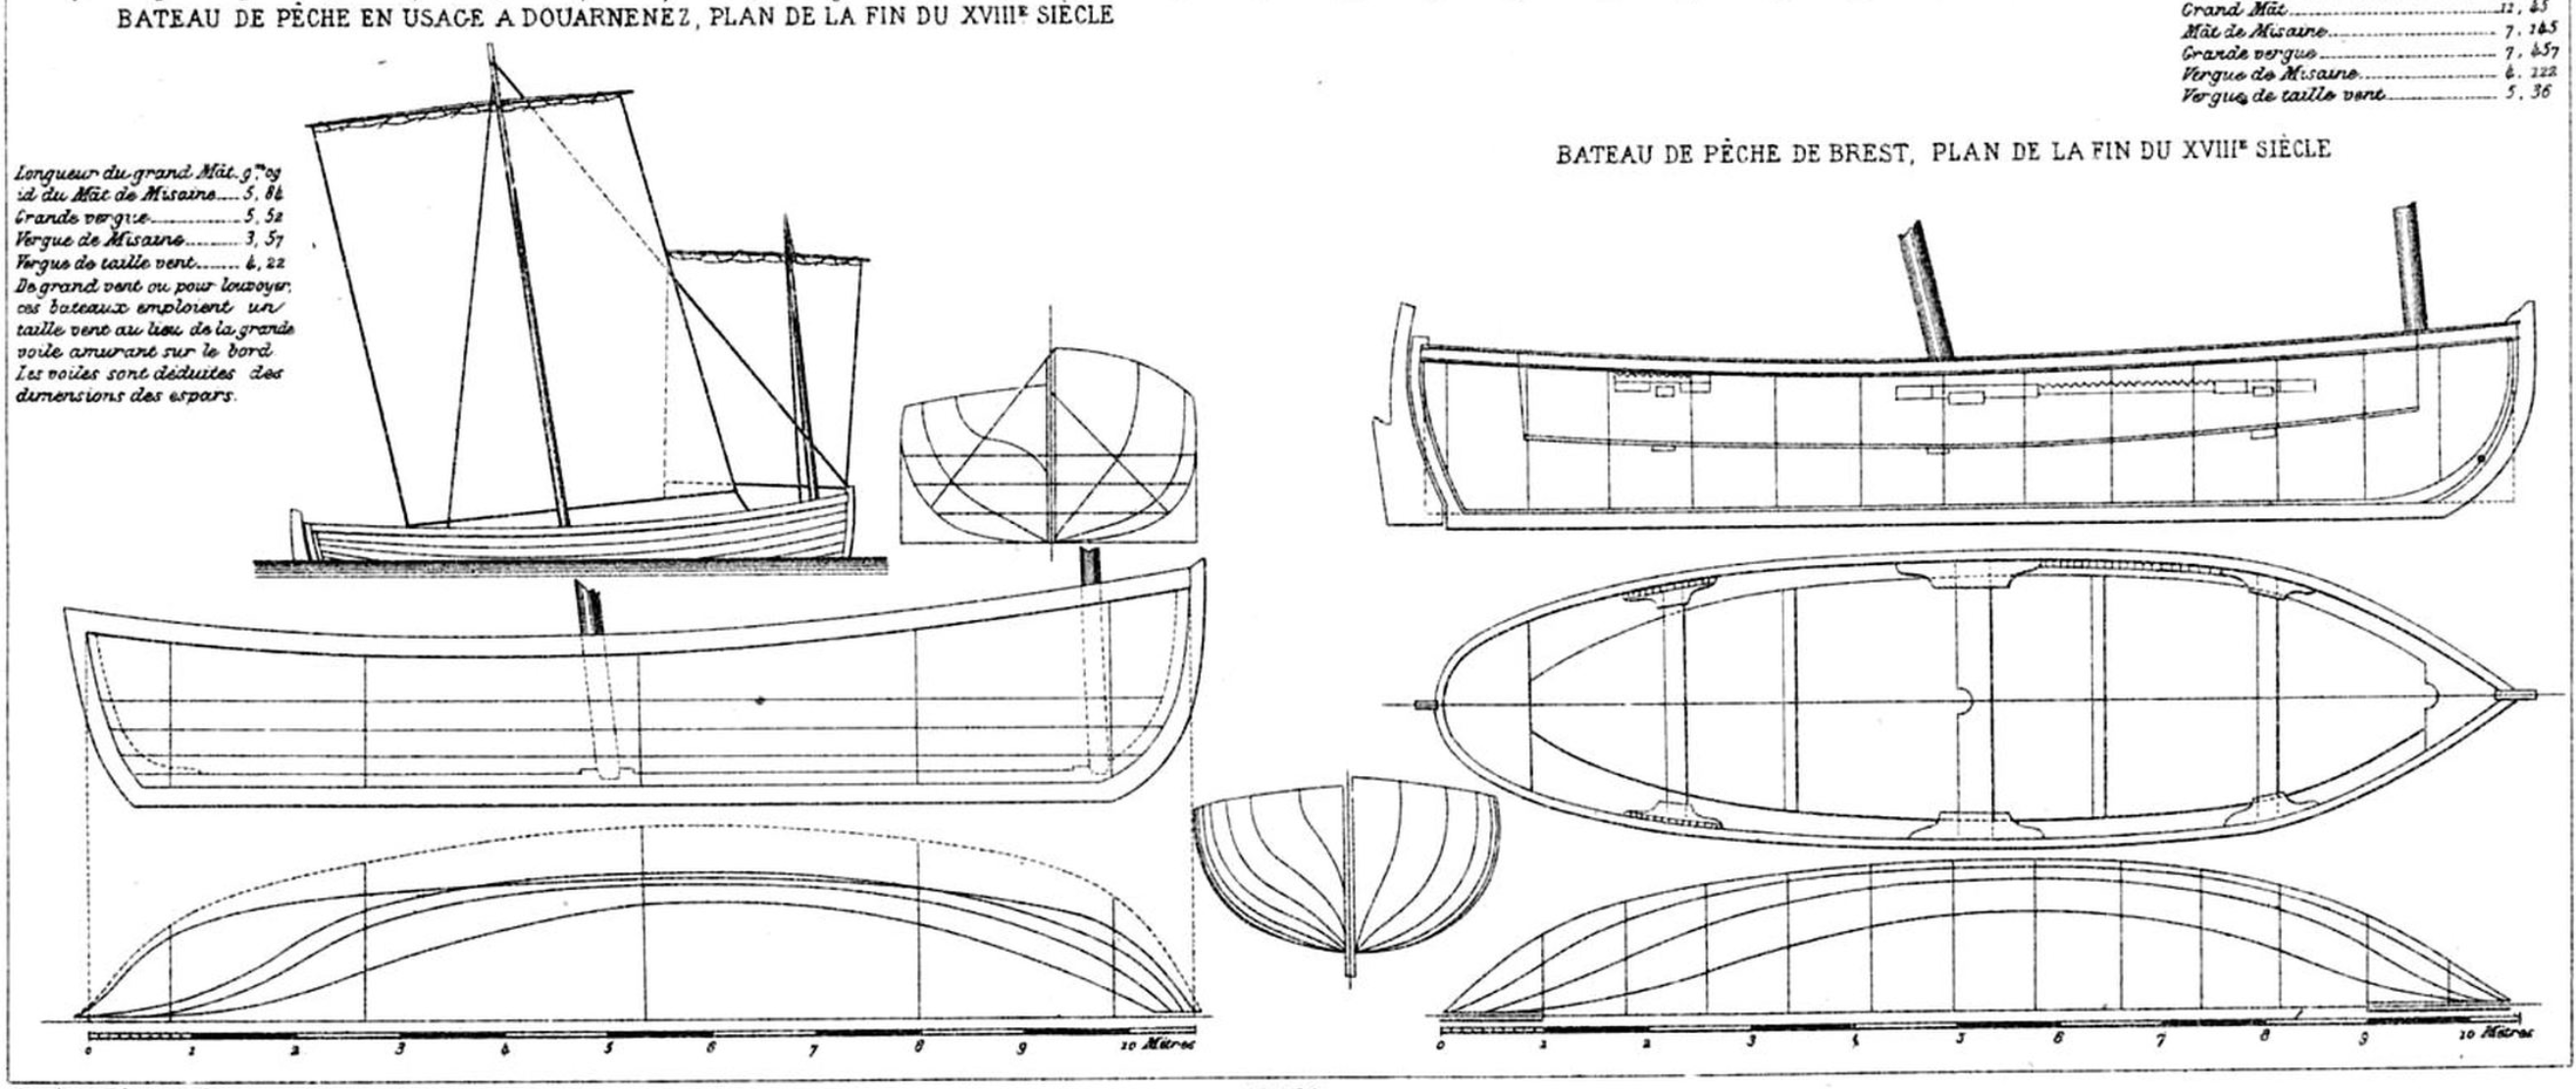
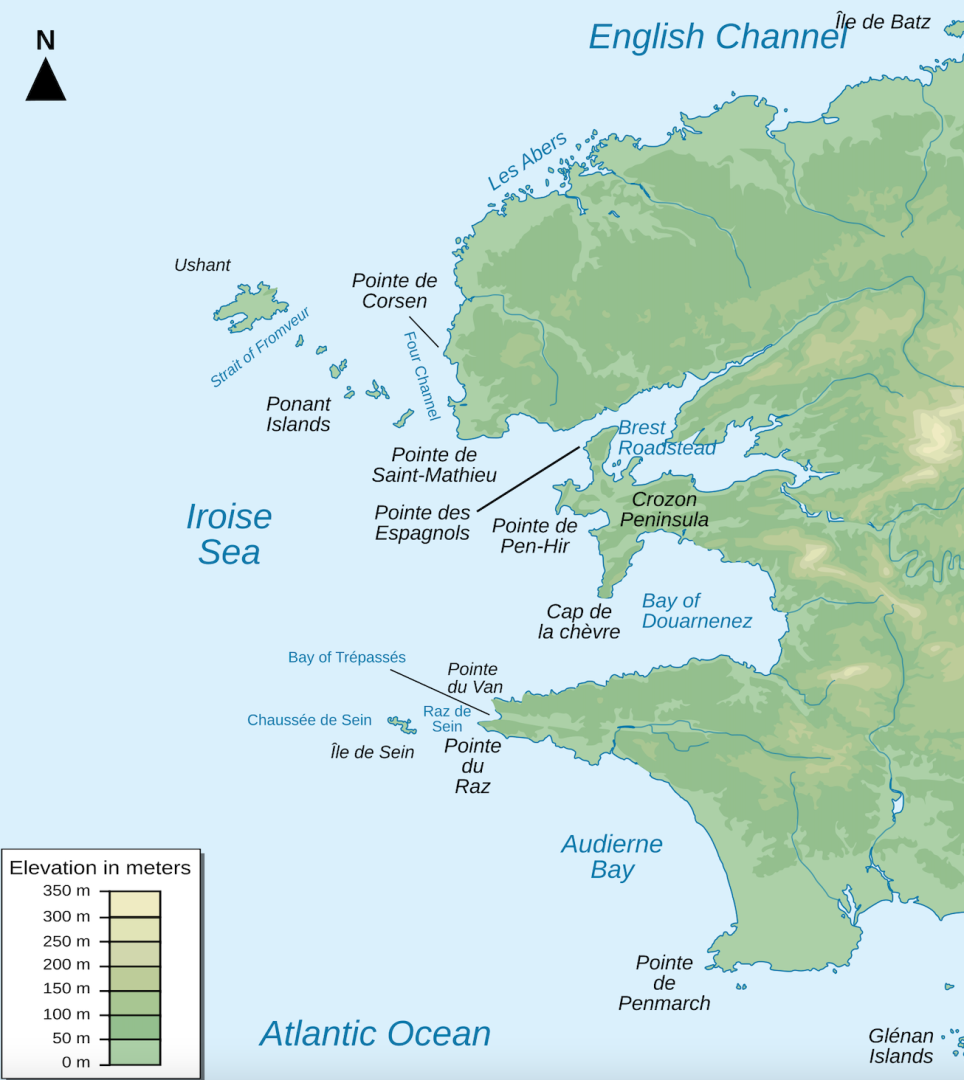
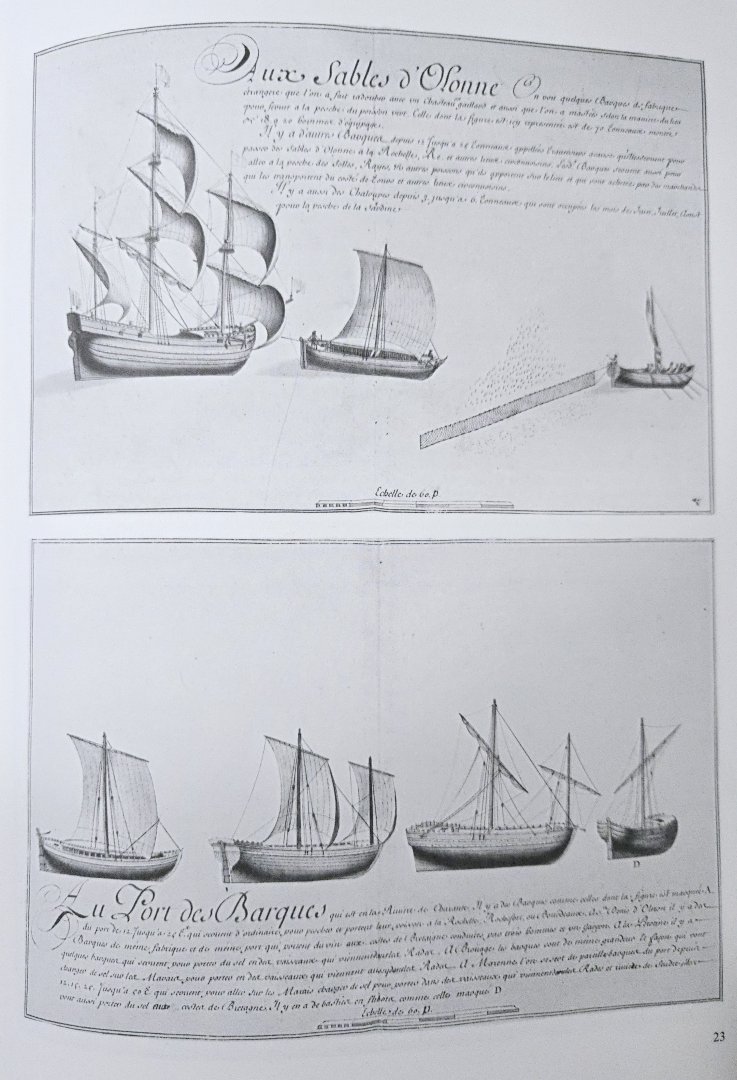
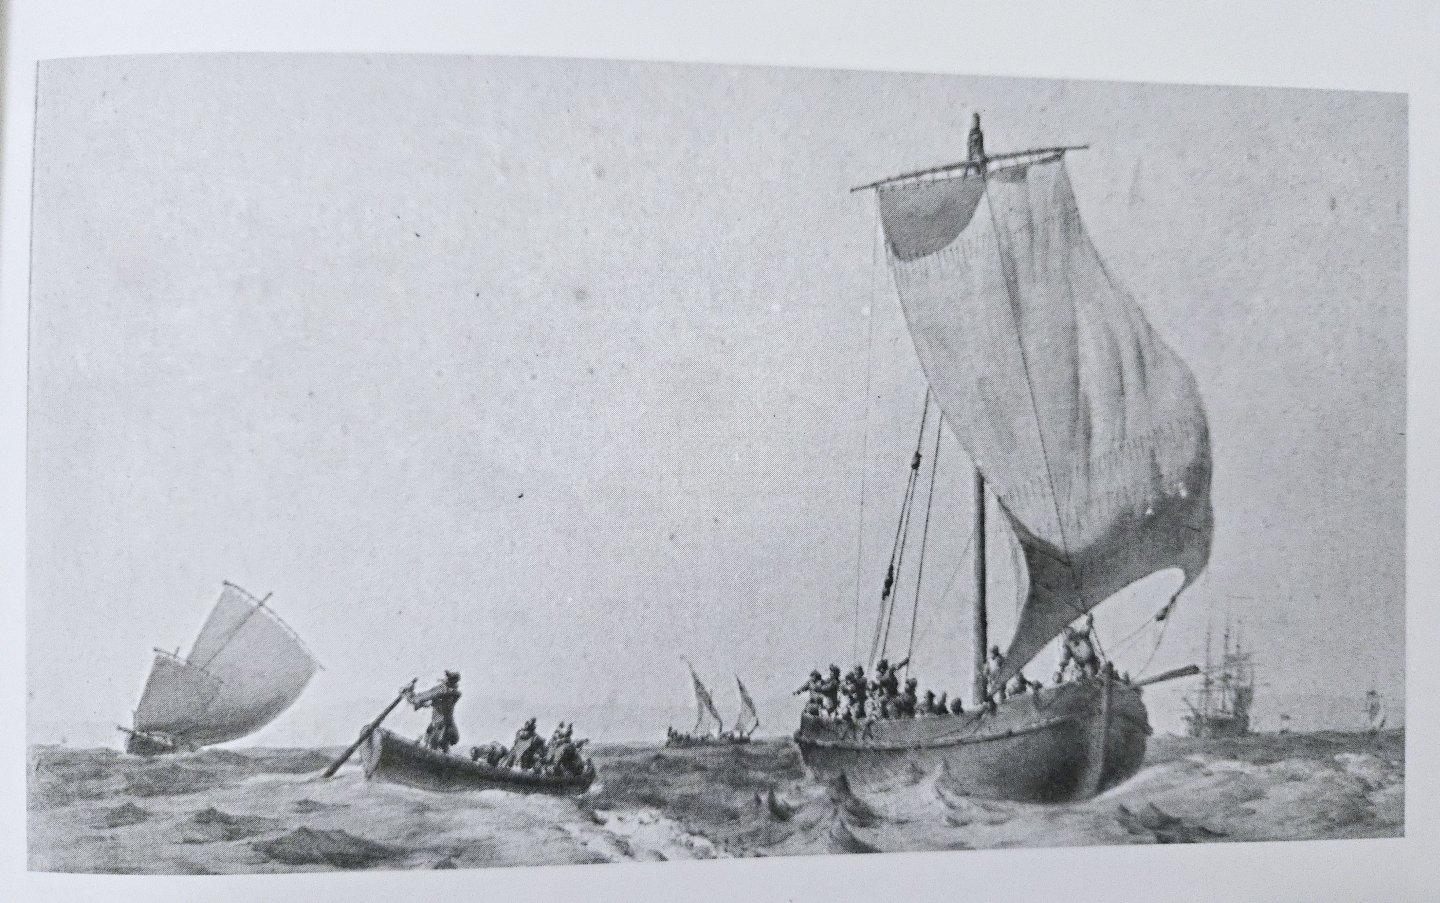
Bateau de Lanvéoc: History and Design, Pt. 1 of 2 I've been reading more of the monograph. It's been rather slow going. While it's amazing that my phone camera can scan and copy text from photos, the translation it gives is frequently quite bad, especially where maritime terminology is involved. It's fine with sentences like "Let's move on to the description of the hull of the boat with various drawings," but in other cases you get: "The rectilinear stunt is assembled by a tenon in a squirrel on the back of the upper face of the keel, a small curve angular bonding. The bow and stunt wear a scribble. The embers consist of varangues on which apply to partial recovery (empat) of the allones thus prolonging the varangues and some nails hand-hold the covering." After some confusion, I realized that by "stunt" it means sternpost, "scribble" is rabbet, "embers" are frames, etc. No clue how it got "squirrel," but it's at least clear it's talking about a mortise and tenon joint there. Google Translate and Deepl are better, though not without their own headscratchers. Anyway, the monograph has a lot of interesting information and large-format images. Taken together with some other sources, there's quite a bit that we can know about this vessel type. To summarize, the Bateau de Lanvéoc was a fairly well-defined vessel type and part of a family of broadly similar square-rigged, one- and two-masted, decked and undecked, double-ended or transom-sterned workboats that were common in the area around the port of Brest from the mid-1600s (if not earlier) up into the first decades of the 1800s. Before proceeding, I should note that the following is not in any way conclusive. There is plenty out there published about French workboats that I have not read due to lack of access and the language barrier, and it is entirely possible that some or all of my suppositions below are proven wrong in these other sources. There’s a reason why it’s important to speak the local language when researching something. Nonetheless, I think it can be useful to lay out some of my thinking on this even at an early stage—after all, this is a forum, not a peer-reviewed publication. Brest and its Environs The port of Brest is located in Brittany at the northwestern tip of continental France, where the English Channel meets the Bay of Biscay. The Iroise Sea--as the waters offshore are called--is frequently harsh, subject to severe storms and strong tides. The meeting of different currents also produces an ecological hotspot offshore marked by rich marine life. The shoreline, which is pierced by numerous inlets and dotted with small islands, is in places quite rocky and cliff-lined, although other areas are marked by beaches and mudflats. There are two large bays in the area, separated by the jagged Crozon Peninsula: the Brest Roadstead to the north, a large and well-protected bay with Brest on its north shore, and the Bay of Douarnenez, with a fishing port of the same name, to the south. Lanveóc is a small town on the north shore of the Crozon Peninsula, about 11 miles across the roadstead from Brest. Source: https://commons.wikimedia.org/wiki/File:Iroise_sea_map-en.svg Although the area had long been recognized for its fantastic natural harbor, it became increasingly strategically important after the establishment of a naval base at Brest in 1631, and especially the creation of a major naval arsenal in 1669. Brest never became a major commercial hub on the level of ports like Nantes and Bordeaux, which had much larger populations and merchants with substantial trade connections with the rest of the world. Nevertheless, the military base and its needs for supplies and people spurred a great deal of commercial and transport activity in the area. As a result, the Brest region developed a number of types of small workboats, of which the Bateau de Lanvéoc was one. Such vessels needed to be rather strongly-constructed and seaworthy, to deal with the harsh conditions offshore, but also capacious and capable of operating in the shallow waters close to shore. I should note here that, while “Bateau” is the generic French word for “boat,” in what follows I’ll be using it to refer specifically to the Bateau de Lanvéoc type. Design and Appearance of the Bateau de Lanvéoc There are several sources allowing for the detailed technical reconstruction of the Bateau that Boudriot and Berti undertake in the monograph. The lines of a roughly 38-foot-long Bateau were taken off in 1830 and included in Admiral François Edmond Paris's Souvenirs de Marine, as shown below. The description states (to roughly translate): “This type of boat was heavily constructed, of large, widely spaced, and poorly fitted pieces. After having been used for a long time to cross the harbor of Brest, it disappeared. It was renowned for its safety, but not for its sailing qualities, and resembled the barges that carried away the residue of the Brest dredges. It did not always include a jib. Its square sail is perhaps the only one that is reefed from below.” More importantly, there are several detailed technical descriptions of these vessels' design. Blaise Ollivier's 1740s dictionary manuscript discussed in some detail the hull proportions and scantlings of small fishing and ferry boats (traversiers) in Brittany as a whole, including vessels very similar to the 1830 plans. In the 1750s or 1760s, a shipwright named Morineau at Rochefort further down the coast wrote a manuscript in which he included numerous details establishing the proportions used for working out the hull form and structure of a vessel very similar to that shown in Souvenirs de Marine, though rather larger (nearly 60 feet long). Morineau's proportions are confirmed by nearly identical details given by the engineer Pierre-Alexandre-Laurent Forfait, whose 1788 work Traité élémentaire de la mâture des vaisseaux establishes the mast and sail proportions for the same type of vessel, as well. These sources also show how Bateaus were single-masted up to a length of about 60 feet, beyond which they gained a small foremast. Taking especially Morineau and Forfait’s information, the monograph proposes a vessel type defined by a set of proportions between length, width, and mast/sail size. Other sources discussed in the monograph highlight similarities in design and construction between passenger and cargo Bateaus, fishing boats, and lighters used in Brest. Taken together, it seems clear that boatbuilders from the mid-1700s onward, if not earlier, until the decline of the Bateau, were working with well-established proportions, creating vessels both double-ended or with transom sterns (but otherwise quite similar). Indeed, the monograph also includes a number of plates from the Album de Jouve (edit: and not de Colbert as I initilally wrote) of 1679, such as those shown below, showing small one-and-two masted vessels used for transport and fishing, some of which are very similar to later vessel. The main change over the years appears to have been the addition of a bowsprit and jib to some (though not all) such vessels by the mid-1700s, to improve steering qualities and to help better set the bowlines on the square sail. (It bears mentioning that Boudriot and Berti suggest that the basic proportions of mast/sail to hull dimensions established for the Bateau de Lanvéoc were likely used for medieval square-riggers, as well. I don’t really know enough about medieval vessels to comment on this, beyond mentioning that A: I’d be curious to know if more recent archeological finds show anything about this, and B: I wouldn’t be surprised if there were regional variations in medieval square-rigger proportions.) The other main source presented in the monograph is the numerous drawings of bateaus made by French naval officer and marine artist Pierre Ozanne in the late 1700s. Ozanne's works show a wide variety of Bateaus, but confirm details of the hull and rigging given in the written sources. Some Bateau depicted are quite small, such as the 20-footer below, while others are much larger: Ozanne depicted Bateaus at sail in all kinds of weather, including in squalls and becalmed, as below: A note must be added about the sail itself. As is clear, the Bateau de Lanvéoc was defined in part by being rigged with a single large square sail (besides the jib, which not all Bateaus used). The use of such an apparently clumsy and unweatherly sail on a relatively small working vessel can seem anachronistic, and perhaps it was by the time lines were taken off in 1830. But two points should be made. First, the square sail was not necessarily as unweatherly as it appears, especially because in the 1600s into the 1700s, there was often less of a clear distinction between a square sail and a fore-and-aft lugsail (which was also commonly in use around Brest) than present-day categories suggest. As Ian McLaughlan states in The Sloop of War, on at least some small vessels (especially those used in the Bay of Biscay) it was possible to raise a square sail placed fore-and-aft inside the shrouds with the halyard placed not in the center of the yard but 1/3 of the way from the end, effectively turning it into a sort of lugsail. It’s unclear whether this was ever done on the Bateau de Lanvéoc. I do not see any clear examples in the Ozanne drawings, although one Bateau in the background of one image (which will be posted in part 2) seems to have the halyard placed at the yard’s 1/3 point rather than in the center. Sail types also became increasingly differentiated over time. But using the vessel’s square sail as a fore-and-aft lug would not have been without precedent in the region. (I should note that it’s possible that the monograph answers this question, but the rather chaotic automatic translation of the rigging details is a bit hard to parse, especially as my own knowledge of rigging terminology is lacking). Second, it seems likely that there was some degree of specialization that differentiated the Bateau (at least in its larger forms) from other vessels and hence its use could help explain the rigging and design, although information here is contradictory. On one hand, Morineau’s proportions from the mid-1700s are stated to apply to both a ferry (traversier) and a fishing boat, some of the small Bateaus shown by Ozanne are stated to be used as fishing vessels, and Ollivier described the Bateau as both a fishing and a ferry boat. On the other hand, other sources suggest a greater degree of specialization by the end of the 1700s, especially between fishing and cargo/ferry vessels. The drawing below by Ozanne (included in the monograph) particularly highlights the differences in rig between the large Bateau at right, and the lugger at left of the type that came to be known as a Plougastel Boat. More clearly, Paris’s Souvenirs de Marine also includes plans of fishing vessels from Brest and Douarnenez from the end of the 1700s, as can be seen below. Besides the distinct lugsail rigs (which look to be practically identical to the Plougastel Boat), they show quite different hull lines from the Bateau de Lanvéoc, being much sharper and with a less boxy hull form. I mention this to suggest that the Bateau’s seeming anachronism in a period of apparently growing specialization may suggest that it was simply well-suited for the type of work it performed. In thinking this, I’m drawing on Eric McKee’s writing in Working Boats of Britain: Their Shape and Form (which, while based on the UK, offers much more generalizable thoughts about factors shaping boat design and change). As McKee notes, quite simple and seemingly anachronistic work designs and rigs often continued in use for quite some time, despite broader changes in boat technology, when they were appropriate for local conditions and uses. While fishing vessels, depending on their target species, may have needed to operate some distance offshore and had to haul their catch to market quickly, the Bateau may have fallen out of favor for such purposes and come to specialize in other uses. At least by around 1800 or so (if not earlier), based on images (as will be discussed below), it more often seems to have been used for hauling passengers and cargo, and serving as a lighter, around the Brest roadstead and perhaps to nearby harbors. Speed and weatherliness were presumably less important in this role than cargo capacity, stability, and maybe ease of handling. To be continued…


- 136 replies
-
- 4
-
-
-
- ancre
- Bateau de Lanveoc
- (and 2 more)
-
Looks like an interesting build, and a good home for the Peerless!
-
Thanks, all, for the advice, it's very helpful! There are some metal parts that I can get away with making from paper, like the band that holds the bowsprit to the stem. Many parts of the rigging parts will have to be metal, though, as will the rudder hinges, due to the pressure they'll be under. I'm going to take a look and see if any etching or solvent-based primers are readily available, but if not, it looks like I can get blackening solution here for only a little more than it costs in the US.
- 312 replies
-
- 3
-
-
- Chile
- Latin America
- (and 6 more)
-
Sorry to hear about the interview results, but the Polar Research Institute sounds like it was a fantastic trip! Very cool that you were able to see the original photos.
-
Nice work! It's very interesting to hear about ownership patterns, it helps to explain a lot about what life onboard must have been like.
-
It may be helpful to post screenshots or links showing what you mean by AL's instructions and the other build log's methods. In general, many kits provide poor instructions on planking that produce frequently inaccurate results. It's up to you how much that matters to you. In general, the planks will need to be narrowed quite a bit near the bow. Lining off your hull can be very useful for figuring out the required taper.
-
Fascinating, I hadn't realized. I grew up in Montana and may well have driven past where the photo was taken.
- 732 replies
-
- 6
-
-
- Lula
- sternwheeler
- (and 1 more)
-
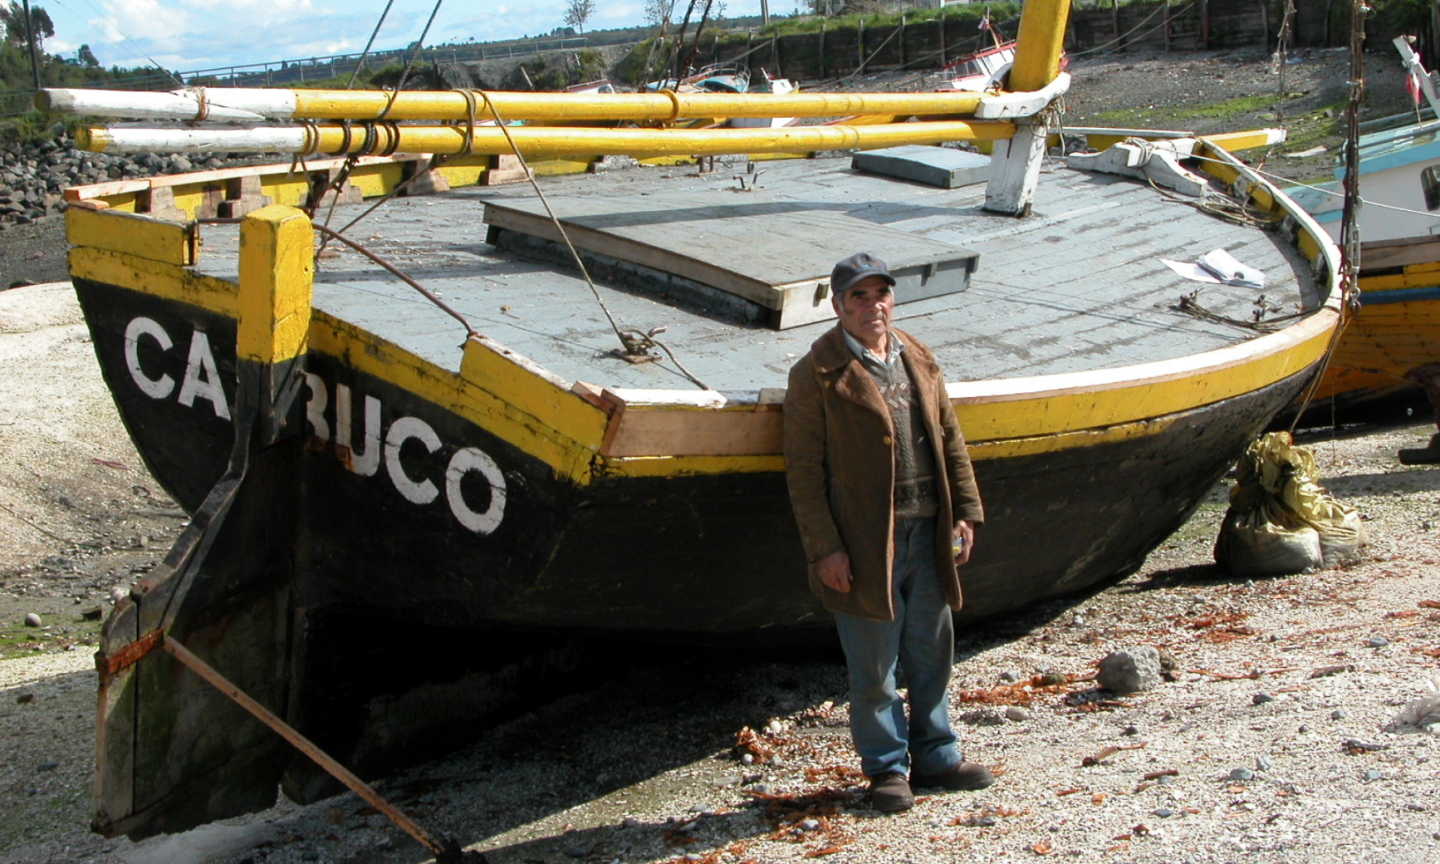
Very nice work! It's so hard to tell color from black and white photos. I assume that the car and the vest on the guy next to the car are black. In which case, the trim looks to be a slightly less dark color? (Although it might also just be differences in reflectivity or something). I'd say that, if you like red, it's your vessel and you should go for it, as long as it's a dark red I think it could be a reasonable interpretation. Plus who's to say they didn't change the trim color at some point? Maybe one day there was a sale on dark red. Also, looking closely at the photo, I noticed for the first time that Lula has its home port written on the stern. Does it say "Great Falls"?
- 732 replies
-
- 6
-
-
-
- Lula
- sternwheeler
- (and 1 more)
-
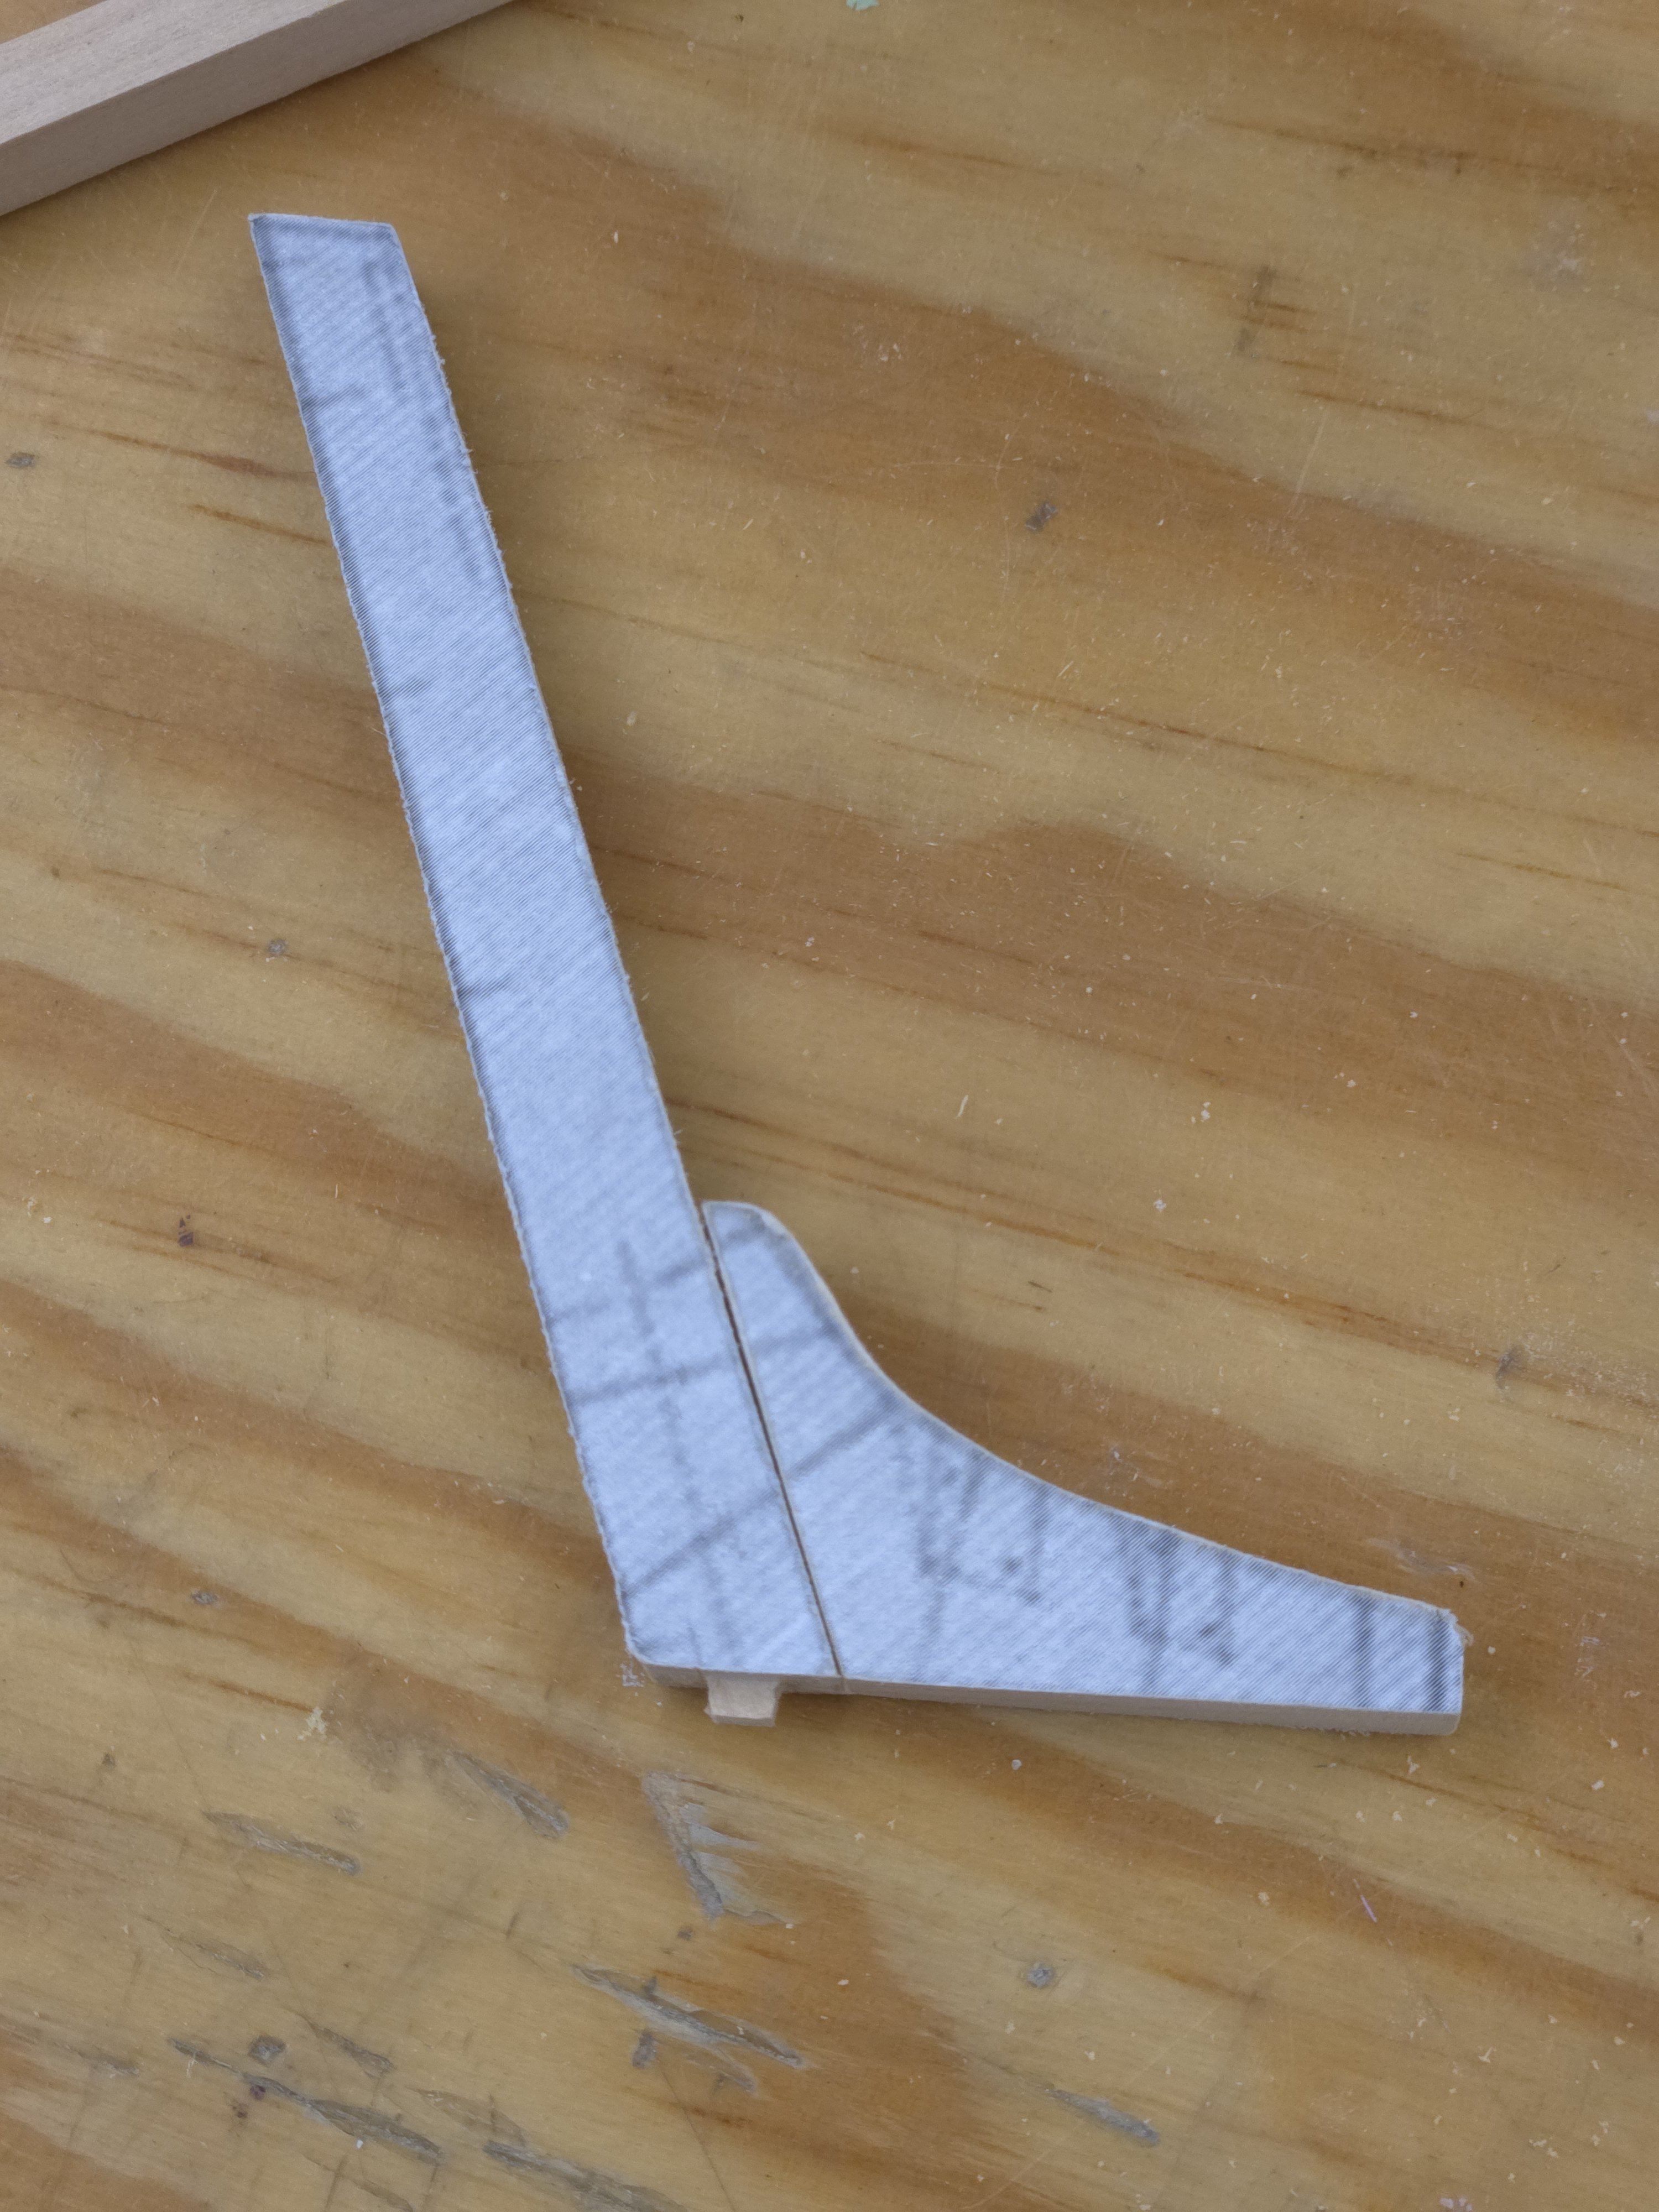
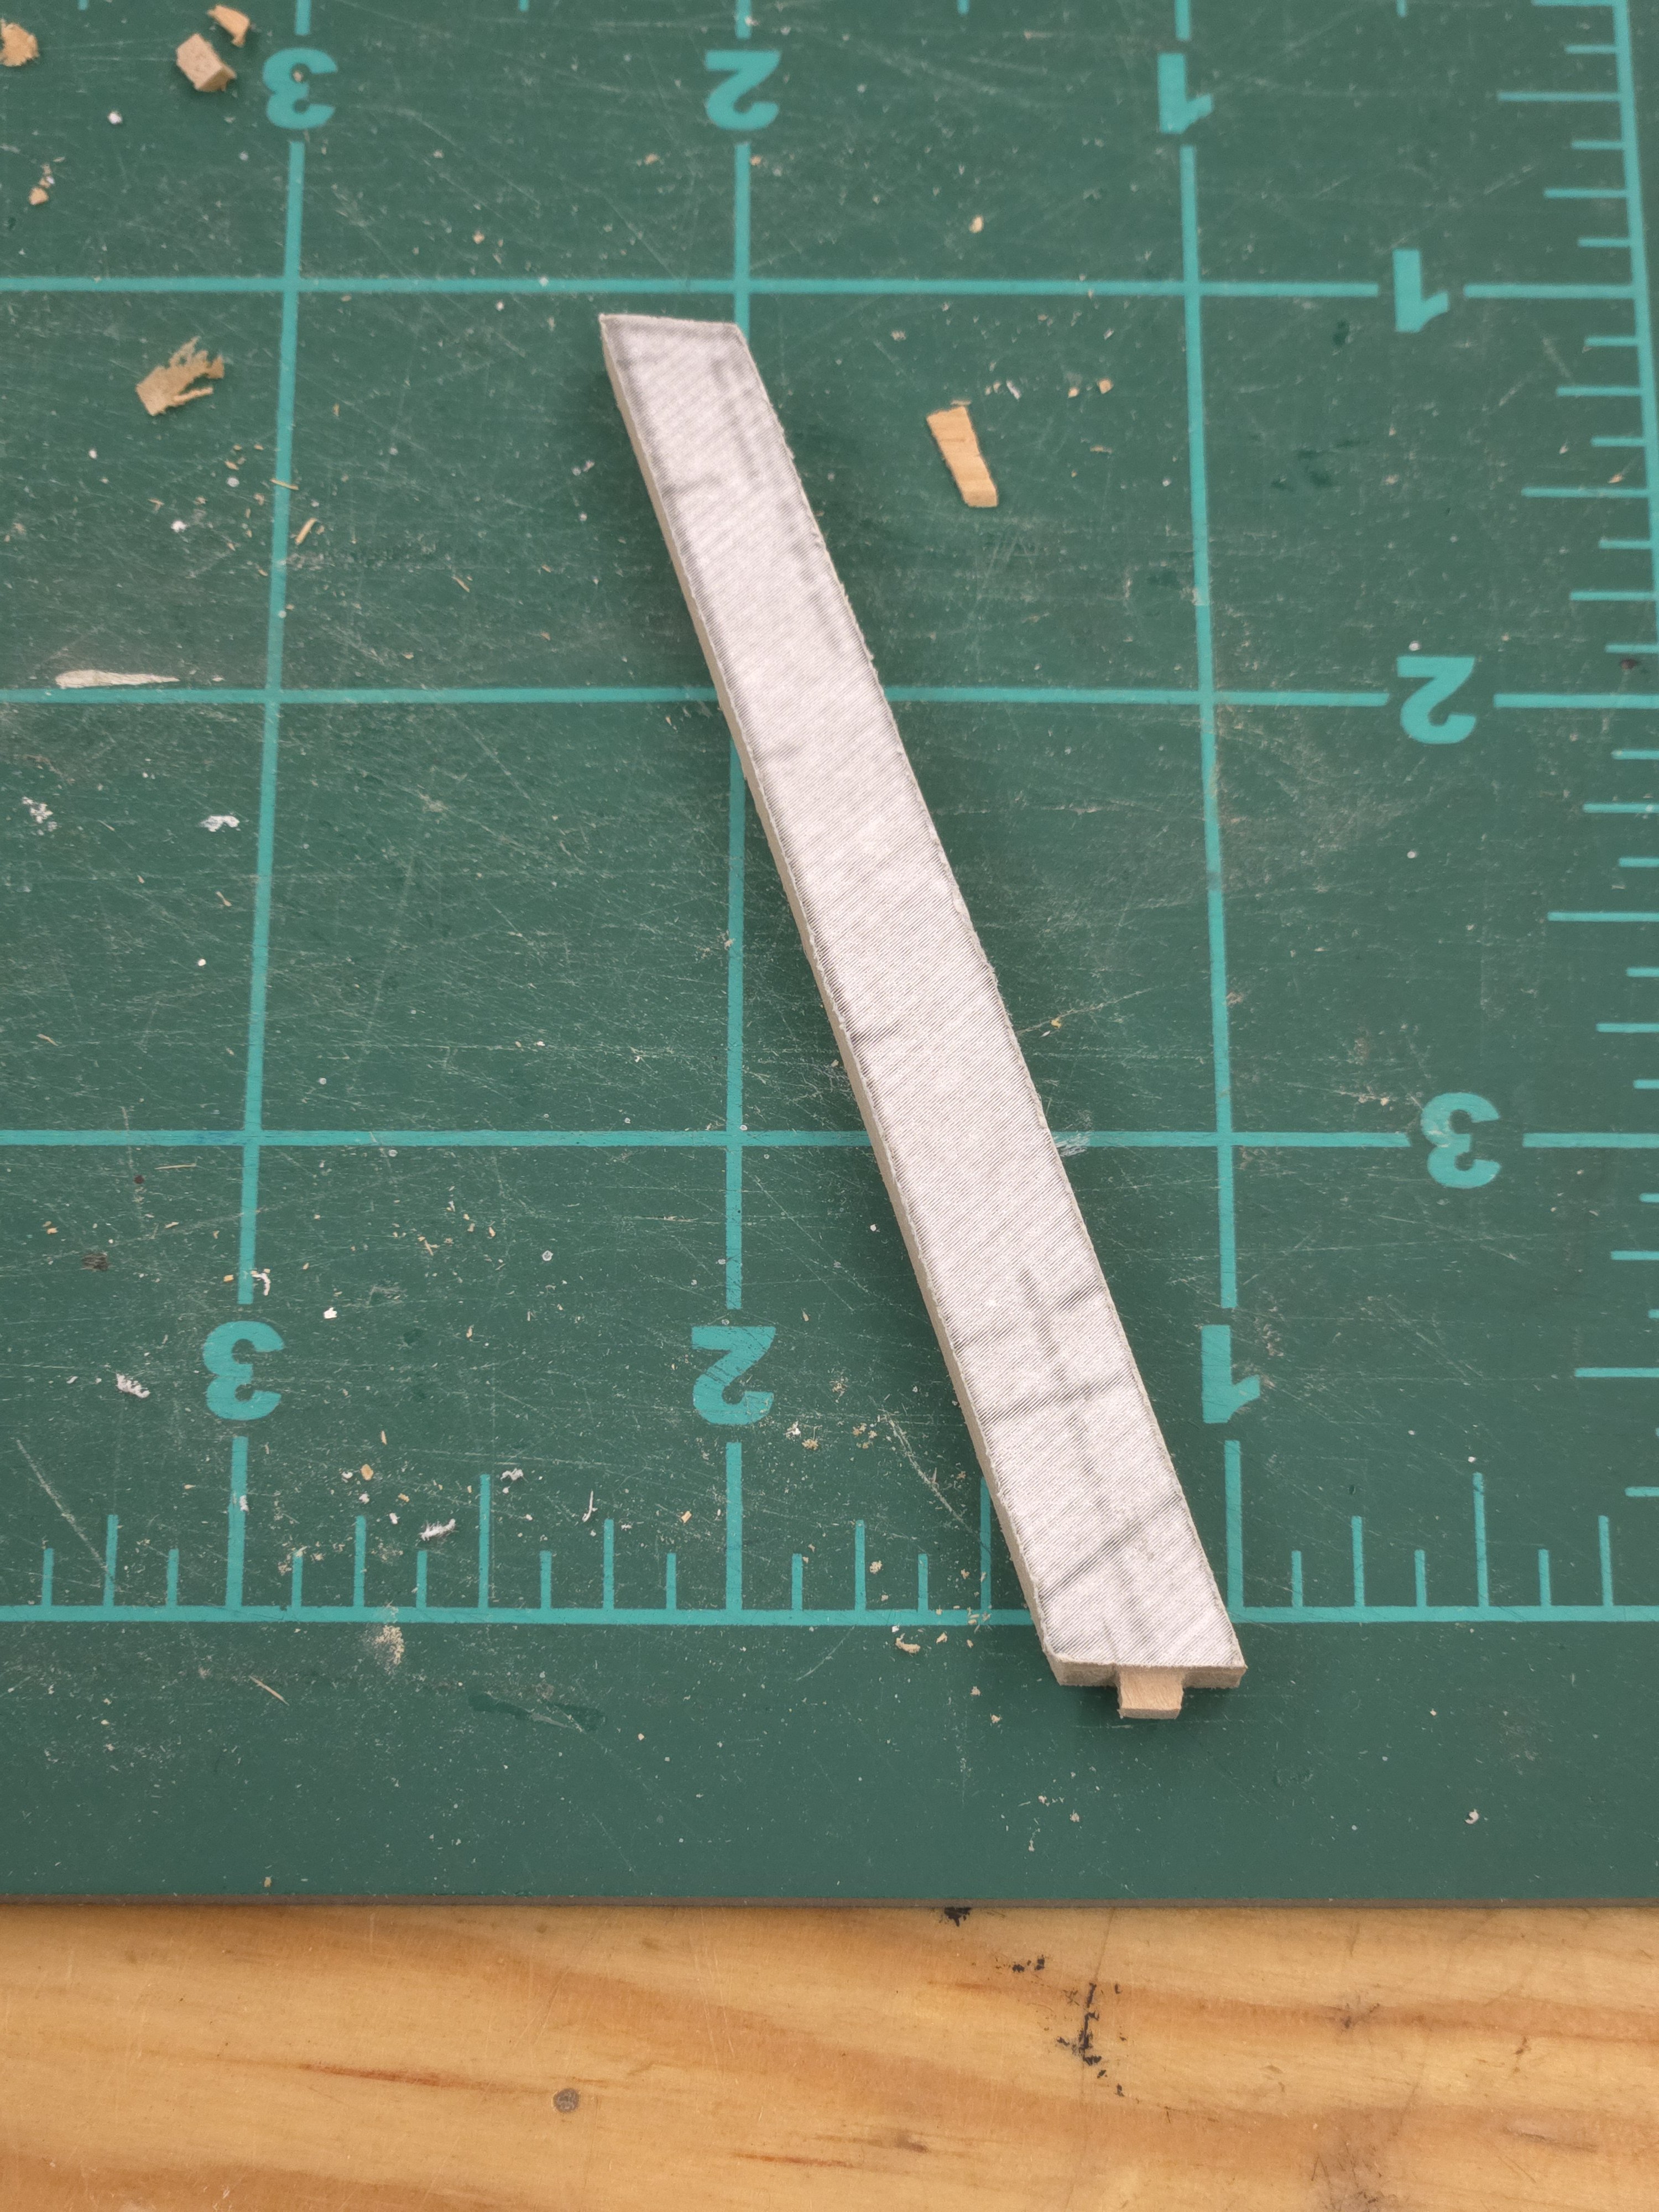
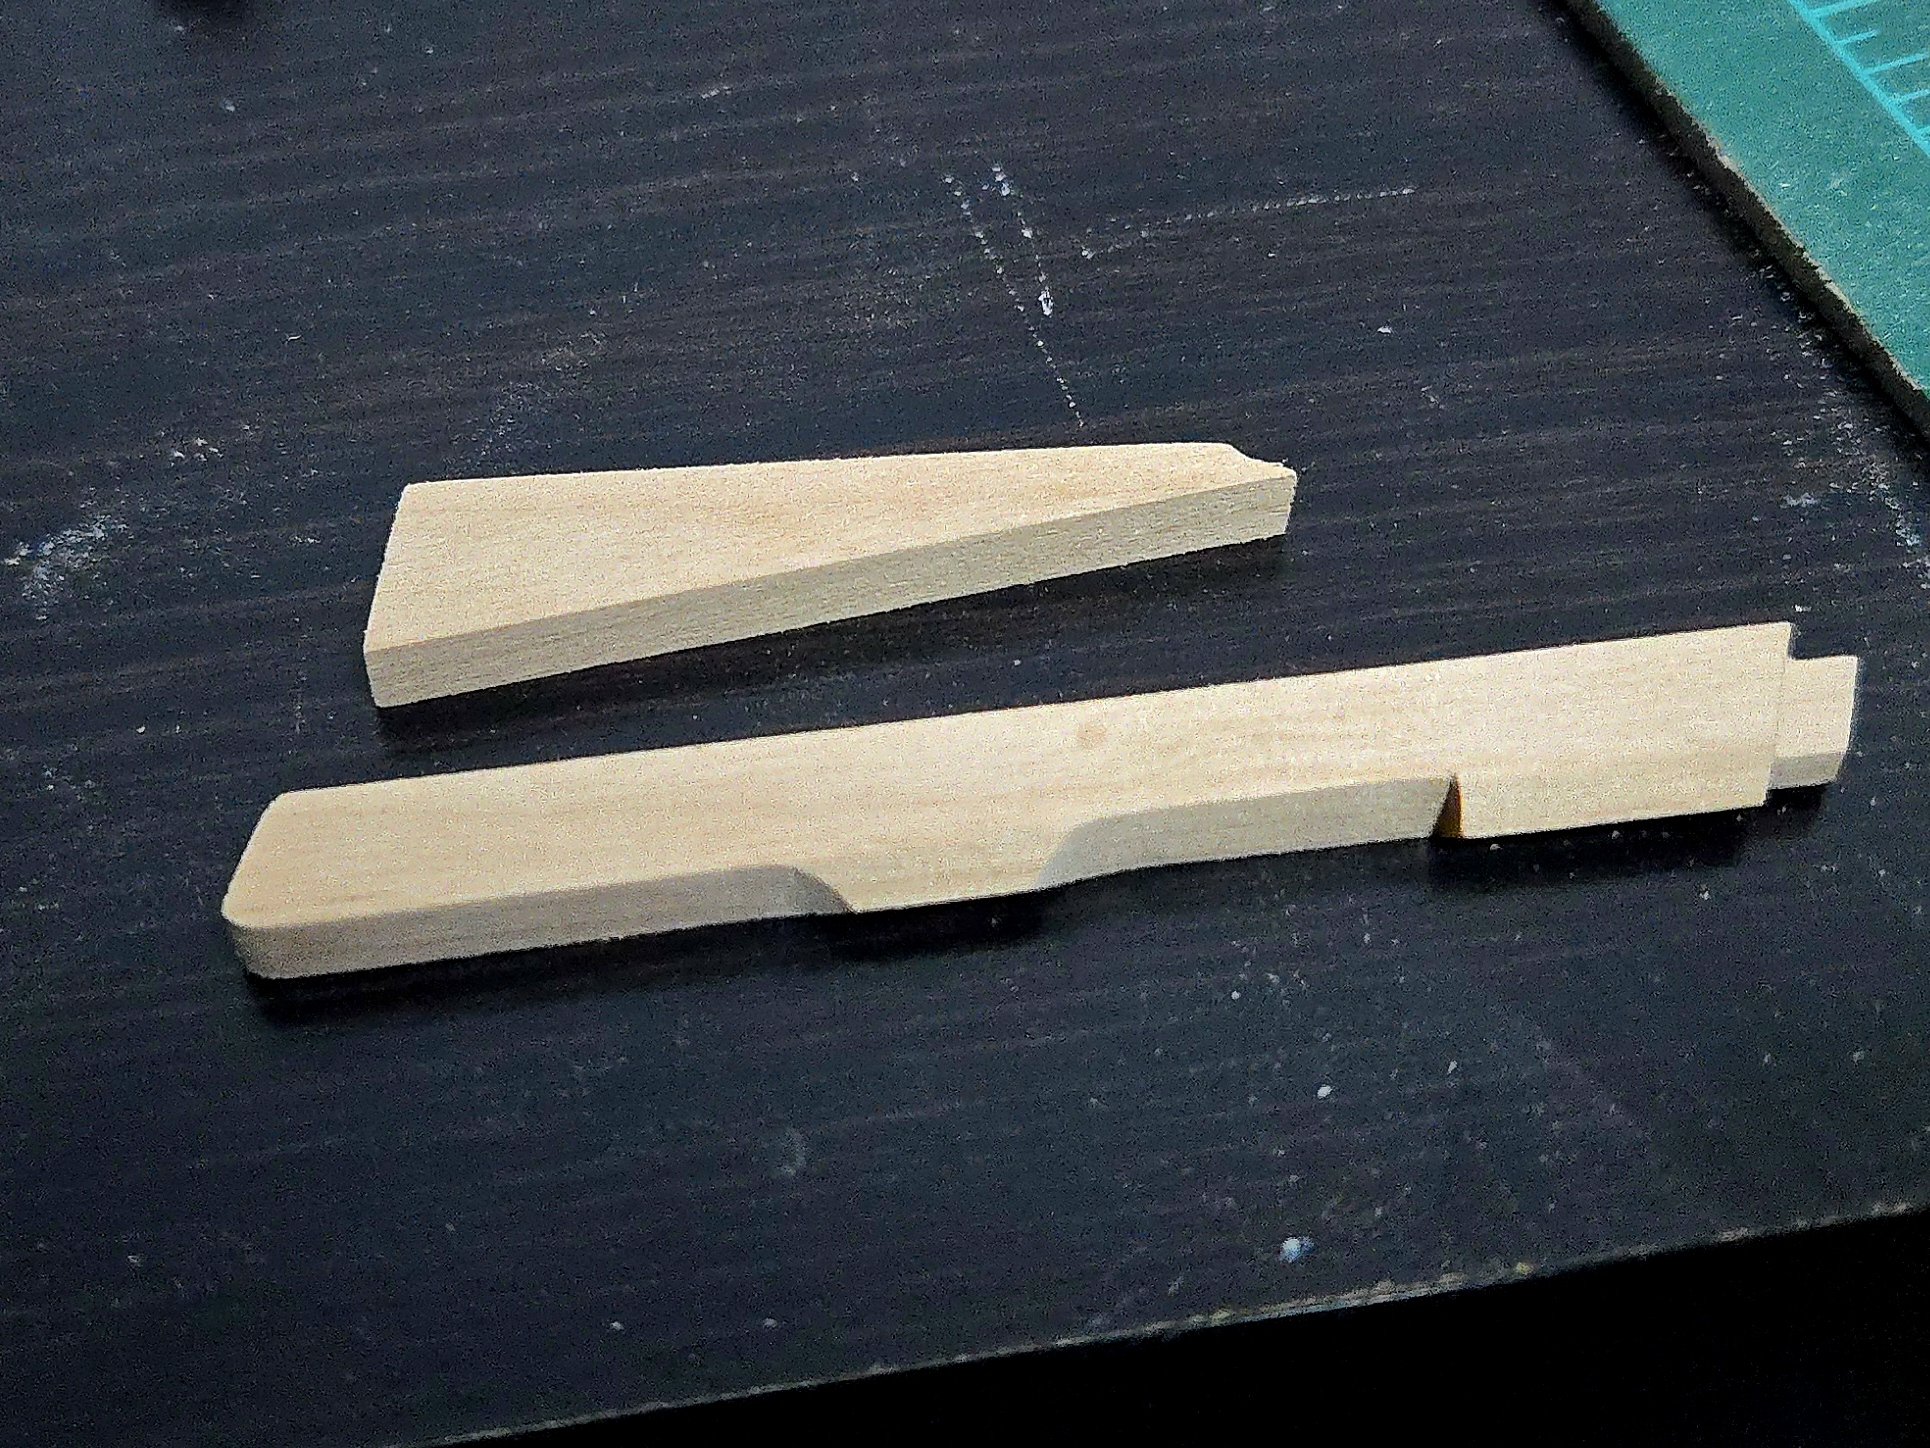
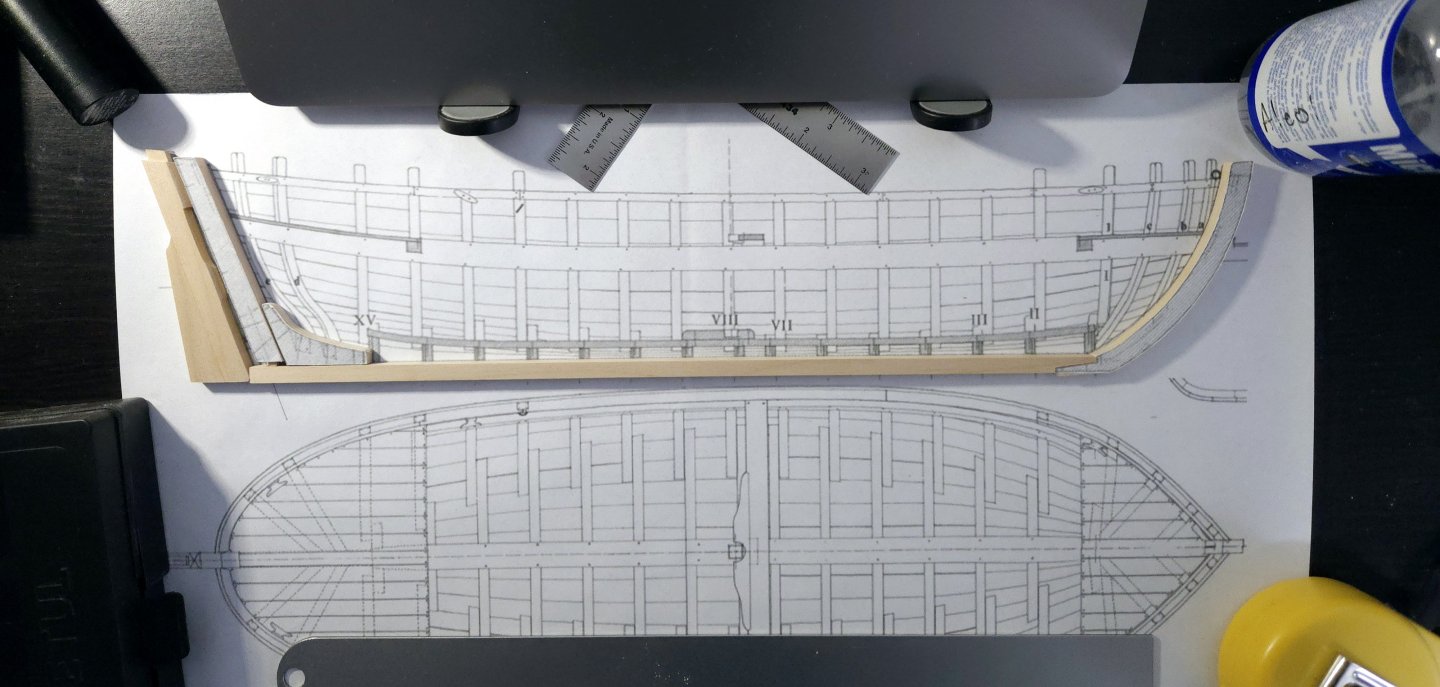
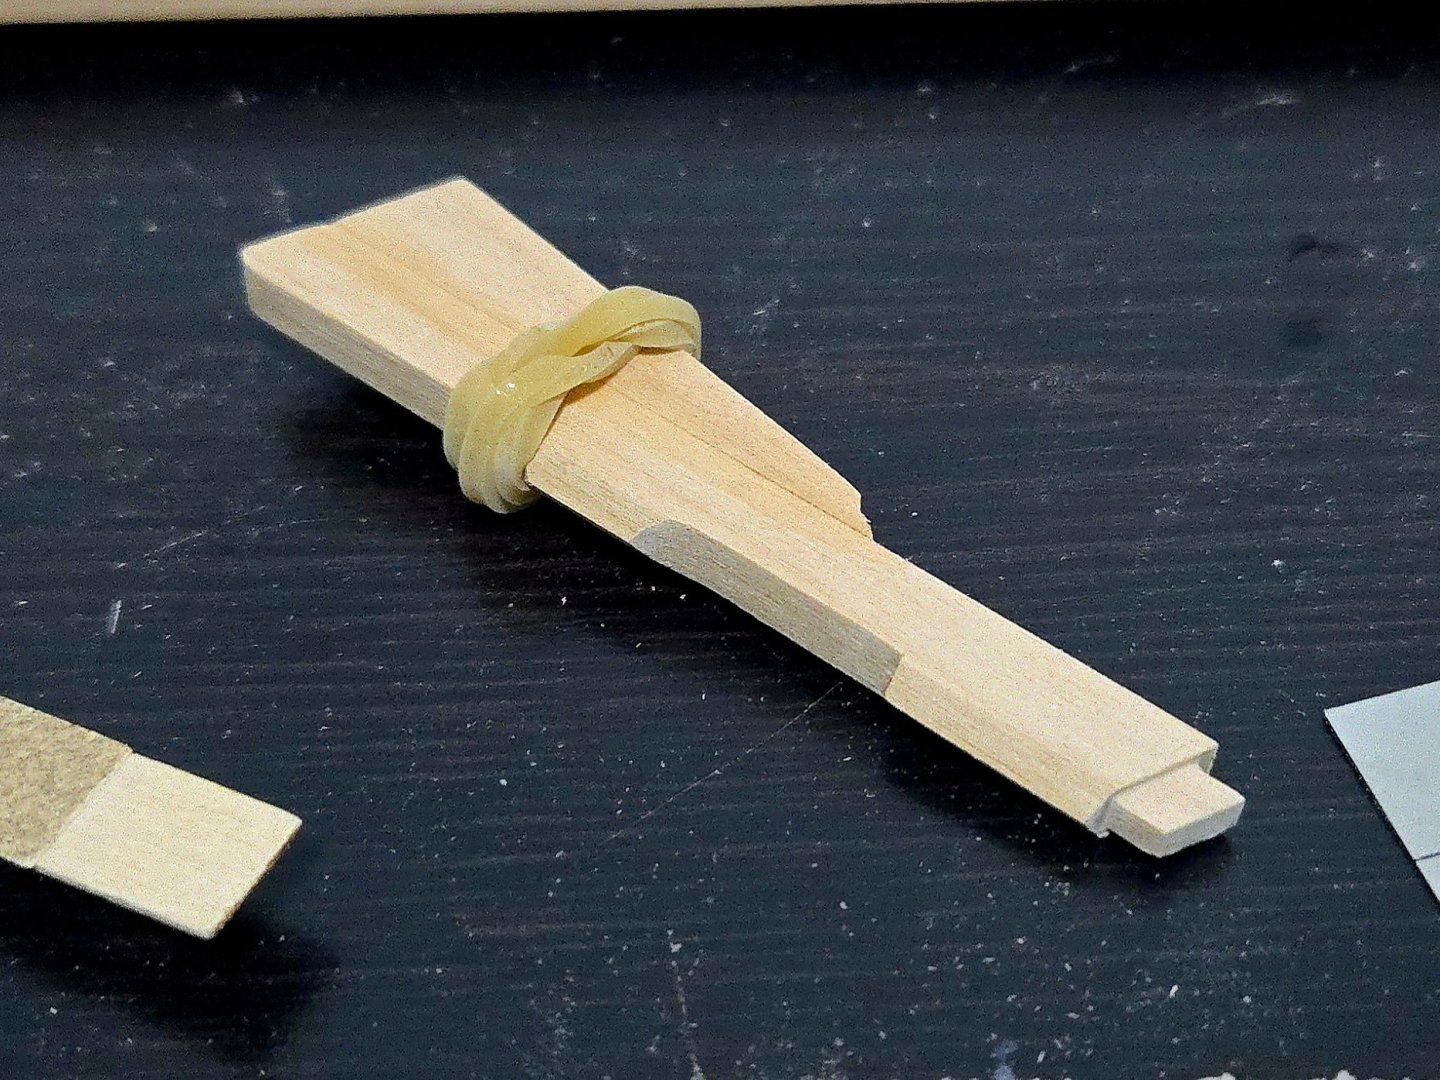
Apparently it's a classic for a reason! Thanks! I'm definitely going to be borrowing some techniques from your Santa Caterina build, although the Bateau is a bit simpler. I've made progress on the keel assembly, first rough-cutting the stem, deadwood, and sternpost and then finalizing the shape with an x-acto knife, sandpaper, a mini-plane, and files. The sternpost was the easiest part to shape. I decided to include the tenon shown on the plans to practice my carving, although I'm not sure if I'll actually carve a mortise into the keel--getting the right angle and locations will be a little tricky, and the joint will be entirely invisible once I glue the sternpost to the keel. I decided to leave the front edge of the deadwood a little wide for now. A frame will be butted up against it, and I want to make sure everything will line up on the build board rather than risk trimming it too short now. I also will need to thin it (well, part of it at least--actually, I should double-check how much of it is thinned) for the rabbet. The stem was a little tricky to sand on the interior edge and still needs some shaping on both sides in the photo below. Lacking a spindle sander, I wrapped a bit of sandpaper around a gluestick and found that to work pretty well. I tried to position the stem lengthwise along the grain, but the joint at the bottom is still a little fragile, so I'm leaving some excess that I'll trim once it's glued to the keel. Getting the joint right between the keel and stem was tricky. For keel no. 2, I cut a strip of the right dimensions but overlength, and worked on the joint first. That way, I could trim off a bit of the foreward end of the joint if I thinned it too much, without making the keel too short. The aft end will be trimmed once the whole keel structure is assembled. It took a lot of fine filing and checking, but I finally got a joint I'm happy with. While there's a slight gap in the photo, keep in mind that the parts aren't being pressed together in the photo. One odd issue I've encountered is that, although all the parts thus far have been cut from the same sheet, the bottom of the stem is slightly thinner (by maybe 1/64-inch or less) than the rest of the parts. I'm not really sure how it happened, I guess there's a low part on the sheet. It's not really a problem as the keel assembly as a whole needs to be thinned very slightly to match the dimensions, but it was definitely a surprise. In any case, nothing is glued yet except for the two parts of the rudder, but if the parts are assembled, it starts to look a little like a boat (especially if they're placed together over the plans). Next up, I need to shape the rabbet and get the build cradle ready.


- 136 replies
-
- 9
-
-
- ancre
- Bateau de Lanveoc
- (and 2 more)
-
@KeithAug I have only painted a few very small metal parts, but mostly just touch-up work or parts that were barely handled. I thought I remembered that Thukydides's Alert build made extensive use of painted brass, but upon double-checking, I see that he did a mix of painting and blackening because he wasn't wholly satisfied with the paint. Blackening may be the way to go, especially for parts like the anchor chain.
- 312 replies
-
- 4
-
-
- Chile
- Latin America
- (and 6 more)
-
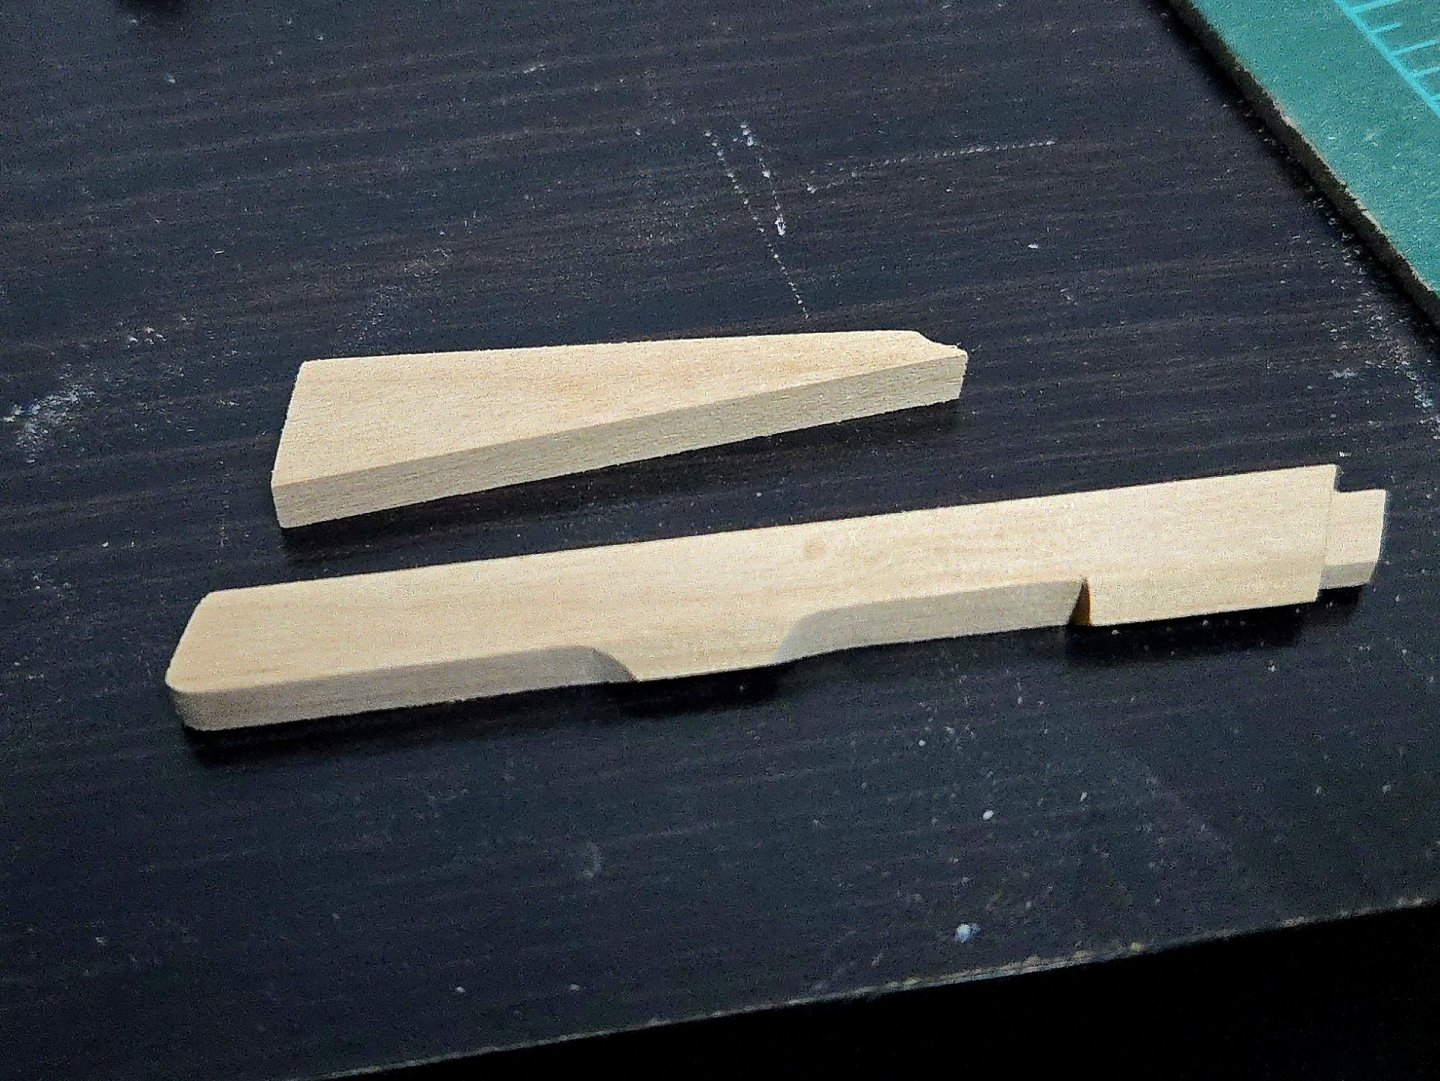
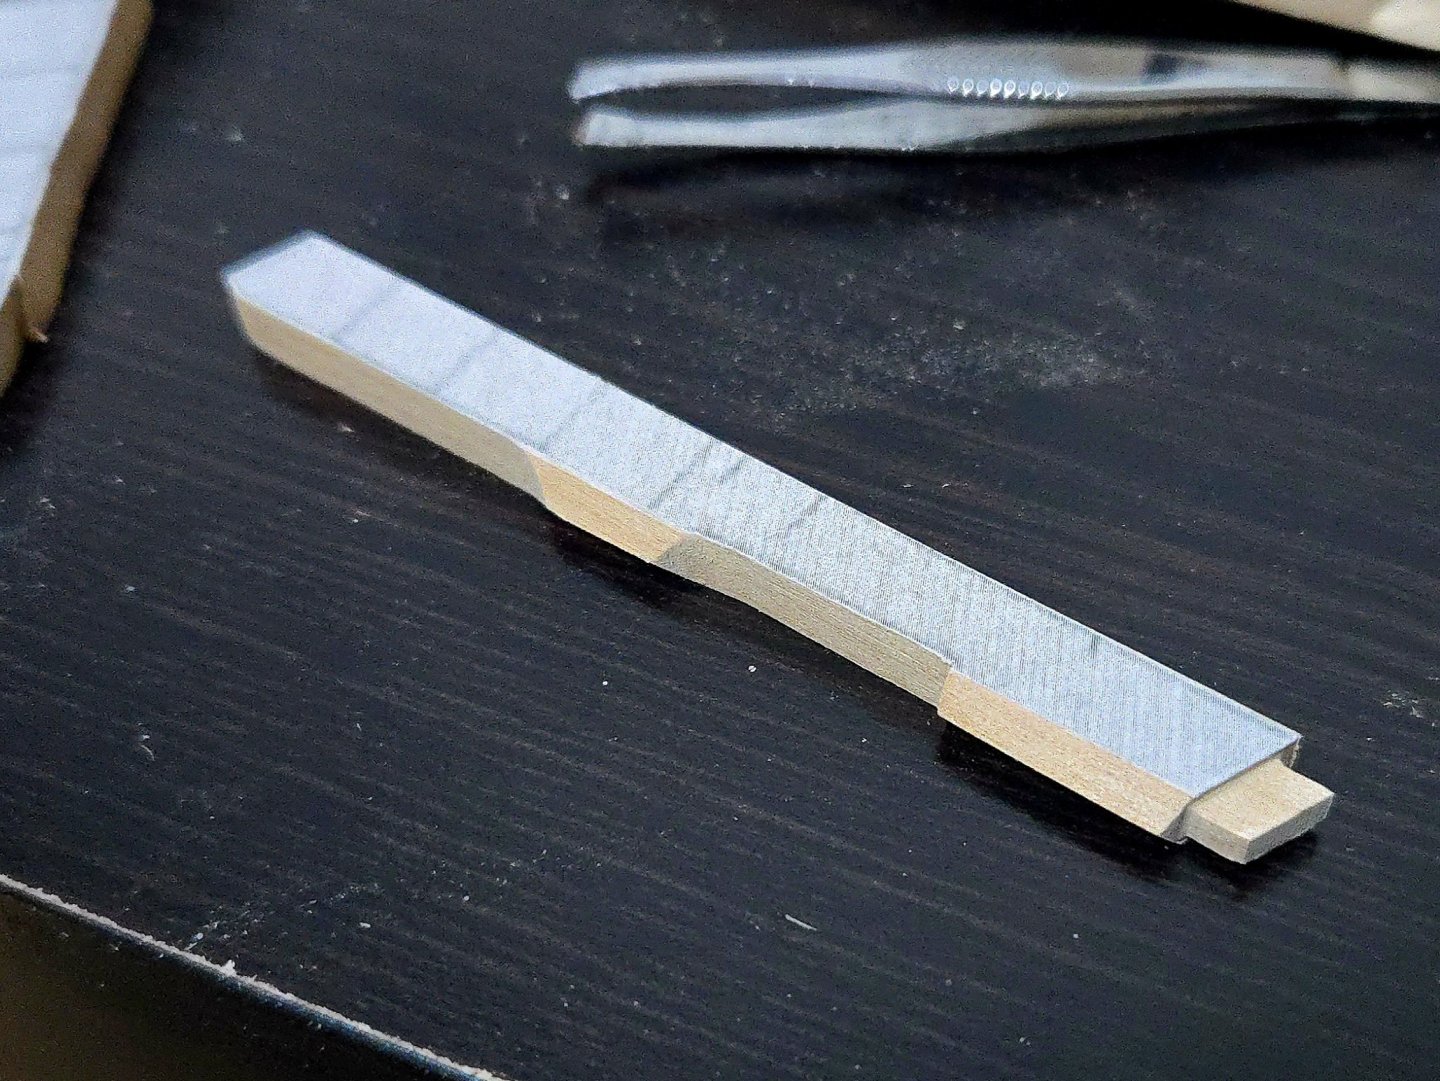
Excellent point! Thankfully it will be a while until I get to the floorboards, so I can ponder my choice. On the build, it's been one step forward, one step back, with a good learning experience. I started work on the keel assembly. Rather than try to do a perfectly straight cut with the fretsaw to remove the keel from the alder sheet, I preferred to use a sharp blade and a straightedge, cutting from both sides of the board. Innumerable cuts later, I had a rough keel. I flattened the rough edge through planing and some sanding, and then worked at cutting out the joints at the fore and aft ends. As on the rudder, I'm finding the alder to be a real joy to work with. Before too long, I had myself a keel! But, there was a problem, as shown below. I shaped the keel following the top plan sheet, which showed a notched joint with the sternpost. After cutting out the joint, I noticed that the bottom plan sheet doesn't show the joint. Apparently the joint is entirely internal. I would have thought that the top plan sheet would have shown this with a dashed line in this case, as it does for some other parts, but this was an incorrect assumption on my part. In any case, the lesson is to always double-check the parts against multiple plans before cutting. Maybe an obvious point, but clearly something I needed to learn the hard way first. At least I still have plenty of alder left in this thickness to try again!


- 136 replies
-
- 7
-
-
- ancre
- Bateau de Lanveoc
- (and 2 more)
-
Thanks, @Keith Black and @Glen McGuire! Yes, I would definitely include the metal straps. Speaking of metal, I'm rapidly approaching the point where I'll need to start adding some metal parts for the rudder hinges and rigging. I'm trying to decide how to proceed with them. On one hand, I already blackened the turnbuckles back during my canoa build, and the blackening process itself is not difficult and seems to give good, even results (assuming I can buy any blackening fluid here). On the other hand, the blackening process entails working with some rather toxic chemicals that are hard to get rid of, which I don't love working with. So, I was considering just painting the metal, but to do that properly I'll need to pick up some metal primer and a better gunmetal paint than I can make by mixing the craft paints I have, and I'm not sure how well it will turn out compared to blackening (especially for the anchor chain--painting a chain seems difficult). Besides this, I'm pretty slow at metalworking and suspect I'll need to learn how to solder, so visible progress on this build may slow down a bit.
- 312 replies
-
- 4
-
-
- Chile
- Latin America
- (and 6 more)
-
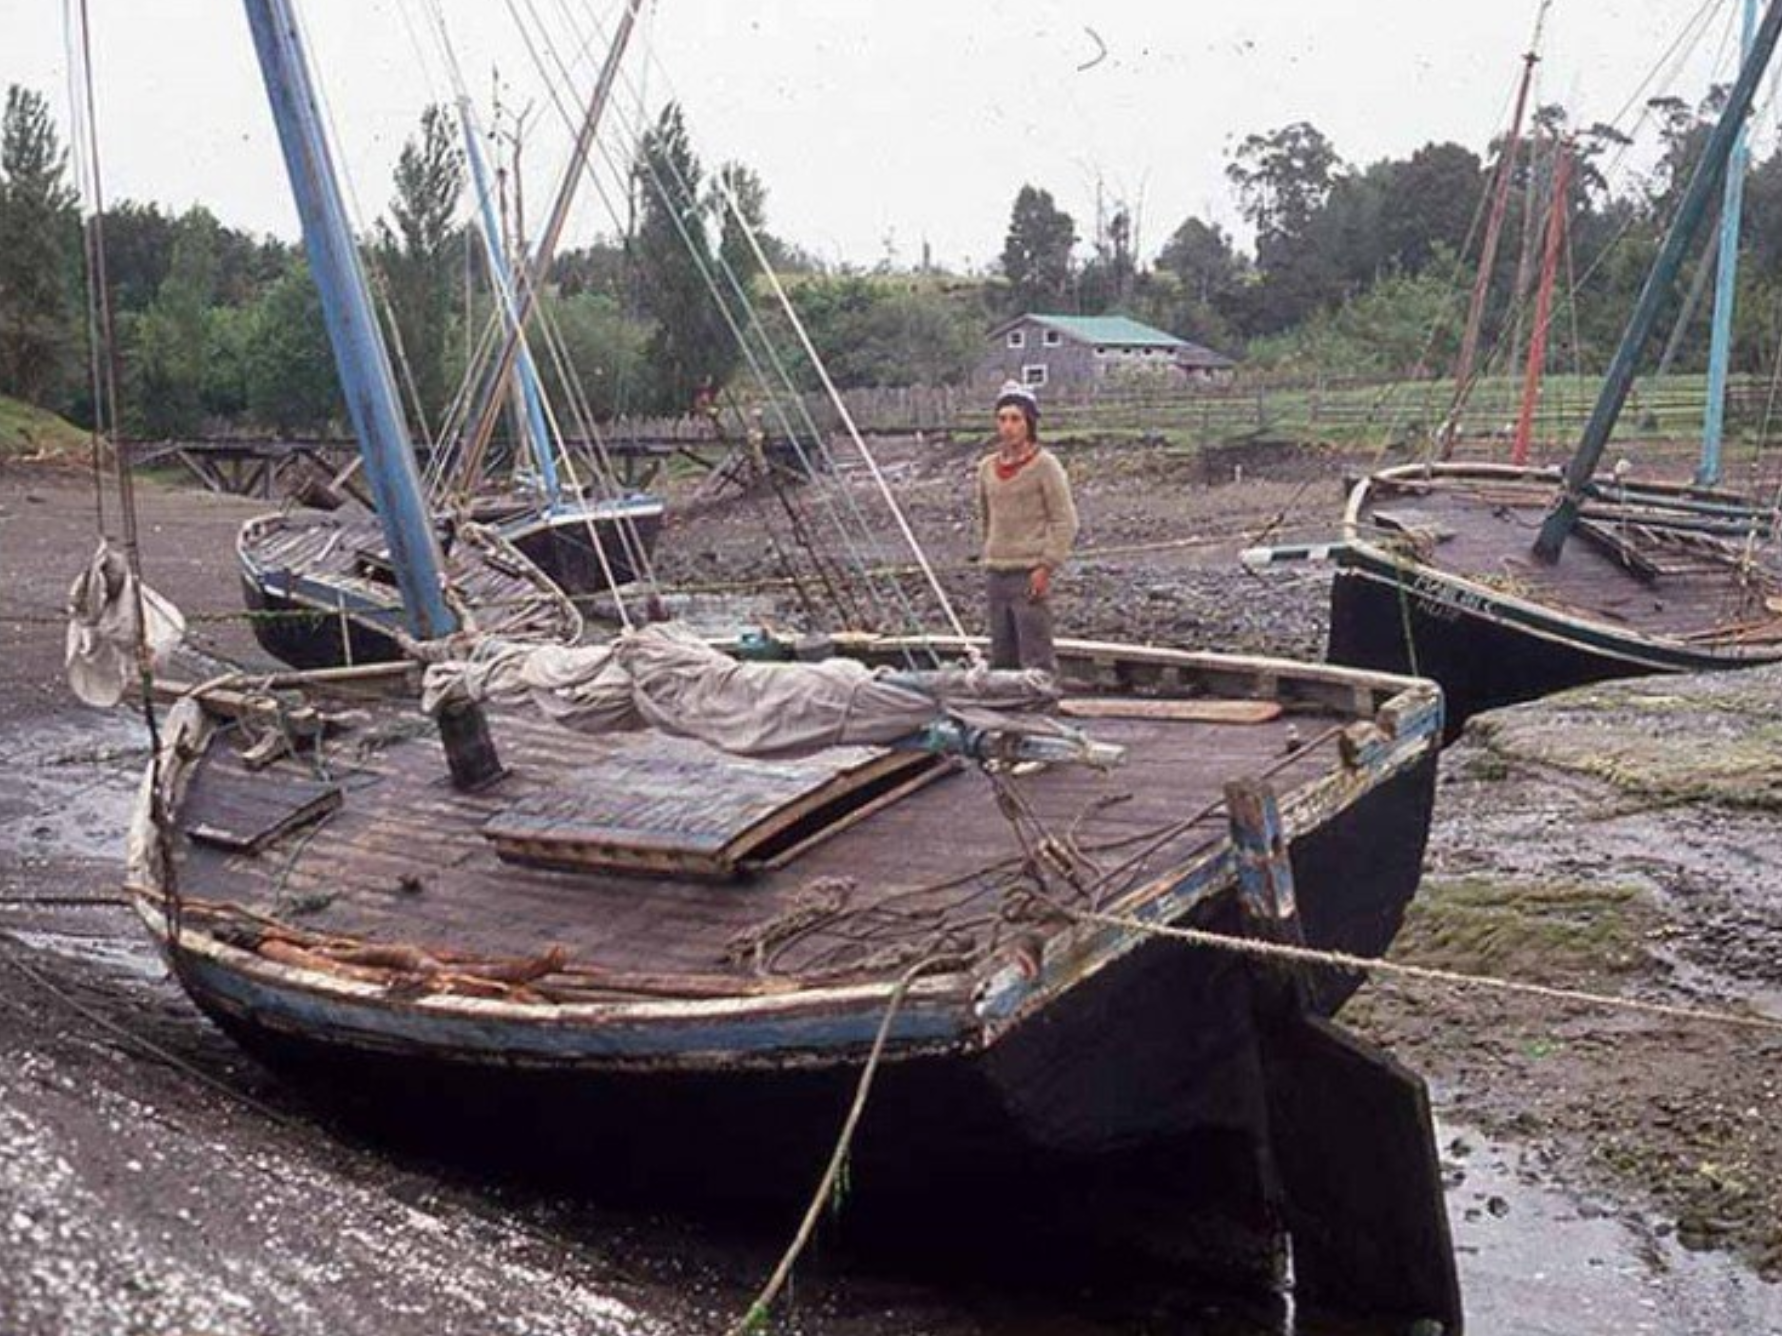
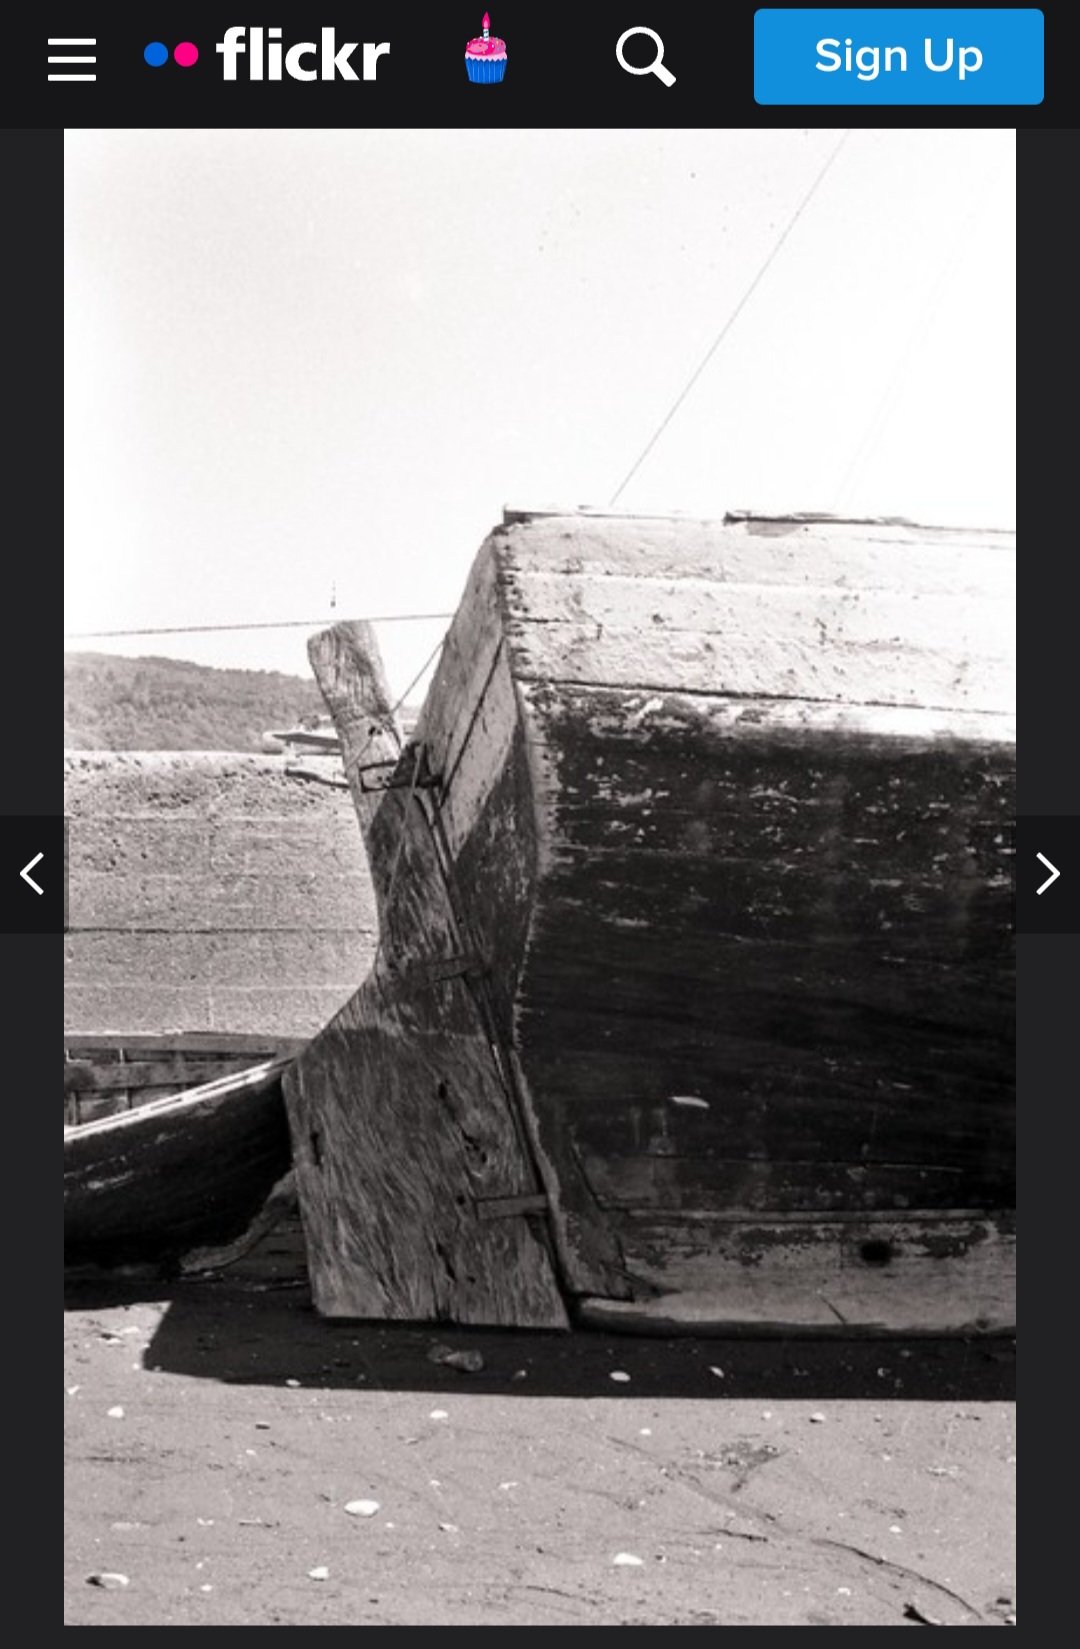
I’ve made some progress on the rudder. The plans show a multi-part, rather complex rudder, below, in which the rudder shaft is particularly thick at the top where the tiller is inserted. However, not all lanchas had rudders constructed in such a way. The rudder below, for instance, shares the thicker top of the rudder shaft, but seems to be constructed entirely from a single piece of (very heavily worn) wood. Source: https://www.flickr.com/photos/luchinmardones/5312311416/ I decided to go for a single-piece rudder, created from basswood of the same thickness as the keel, but left thick at the top and narrowed slightly below. After drawing up a rudder shape and leaving it a little wide to allow for shaping, I used a fretsaw to cut it out of a basswood sheet. So far, so good. The same day, I also made the rudder for my new Bateau de Lanvéoc build, which has a much narrower, more vertical profile. Perhaps influenced by this, I thought that the rudder I made for the lancha looked too long. So, while shaping it, I trimmed a bit off the end. Although I think it looks good, there’s one problem: if you look at the photo above, or the one below, it’s very noticeable that many (although not all) lanchas tend to have rather large rudders, probably to help deal with the poor turning abilities that Vairo noted in his article. The rudder I made may now be a bit on the short side. Source: https://www.carlosvairo.com/galeria-puerto-montt-lanchas-chilotas I can leave it as it is, but there may be a work-around. One detail that stood out to me about the Quenita (the lancha that my plans are, in theory, based on) is that, as seen below, its rudder had an extension attached to the end. Possibly the rudder was damaged and repaired, or perhaps the owner decided that its turning abilities were lacking and so tacked on an extra strip of wood to try to correct it. Source: http://lanchaschilotas.com/dscn7150-2/ This, then, might be another option. I’m a bit torn between liking the looks of the slimmer rudder, and liking the aspects of telling a story with the model by having an extended rudder.


- 312 replies
-
- 10
-
-
- Chile
- Latin America
- (and 6 more)
-
Thanks, that is very unambiguous indeed! It still seems very odd to me that they wouldn't add anything to protect the frames and hull planking, but unless I find other sources showing otherwise, the interior will be left unplanked then.
- 136 replies
-
- 2
-
-
- ancre
- Bateau de Lanveoc
- (and 2 more)
-
I did the "garden hose"‐ type loops on my dory, which I modified to include a sail. To make them, I wrapped the string around a plastic brush bristle protector tube, as the white glue didn't really stick to it. As for whether to go with simpler loops or complex coils, I suppose it depends on the effect you're going for--a yacht or a workboat? A useful source may be the many photographs at the following link of Friendship sloops (which are quite similar to the Muscongus Bay smack), both working sloops and yachts: https://penobscotmarinemuseum.historyit.com/search-interfaces/search/digital-collection/0/1/1/1?rq[0]=8639&ip=1 (You can also search at that site for sloops in general or for Muscongus Bay, but my impression was that most of the clearest photos were of Friendship Sloops.)
- 59 replies
-
- 3
-
-
- muscongus bay lobster smack
- Model Shipways
- (and 2 more)
-
Thanks, @Bryan Woods! Thank you, @Waldemar, for the information. It's good to know that this is in fact just another method of making a keel. Limber holes are an interesting idea. I'd have to double check once I have the plans in front of me again, but I don't think they're shown. They seem to me like they would be a good idea to include, unless there was some reason why they would have preferred to bail out each section between frames individually (I can't imagine why, though). This also raises a couple other minor issues with the plan set. First, unless it's written about in some section of the monograph I haven't gotten to translating yet (which is entirely possible), there doesn't seem to be any sort of pump. Maybe this vessel is still small enough that they would have just bailed it by hand, or maybe they were using some sort of separate small pump that wasn't an integral part of the boat, but it's something to look at. Second, the monograph follows the Paris Souvenirs de Marine drawing, and the Musee de Marine model, in not including any sort of floor planking, just a two-part keelson. Perhaps this was accurate, but it seems unlikely to me. Without floor planking, passengers and cargo would be directly on the frames or pressing the hull planking from the inside, causing a lot of wear and tear that could be very easily avoided. So, I may add some floor planking. Even with a monograph, apparently there's always more to research!
- 136 replies
-
- 4
-
-
- ancre
- Bateau de Lanveoc
- (and 2 more)
-
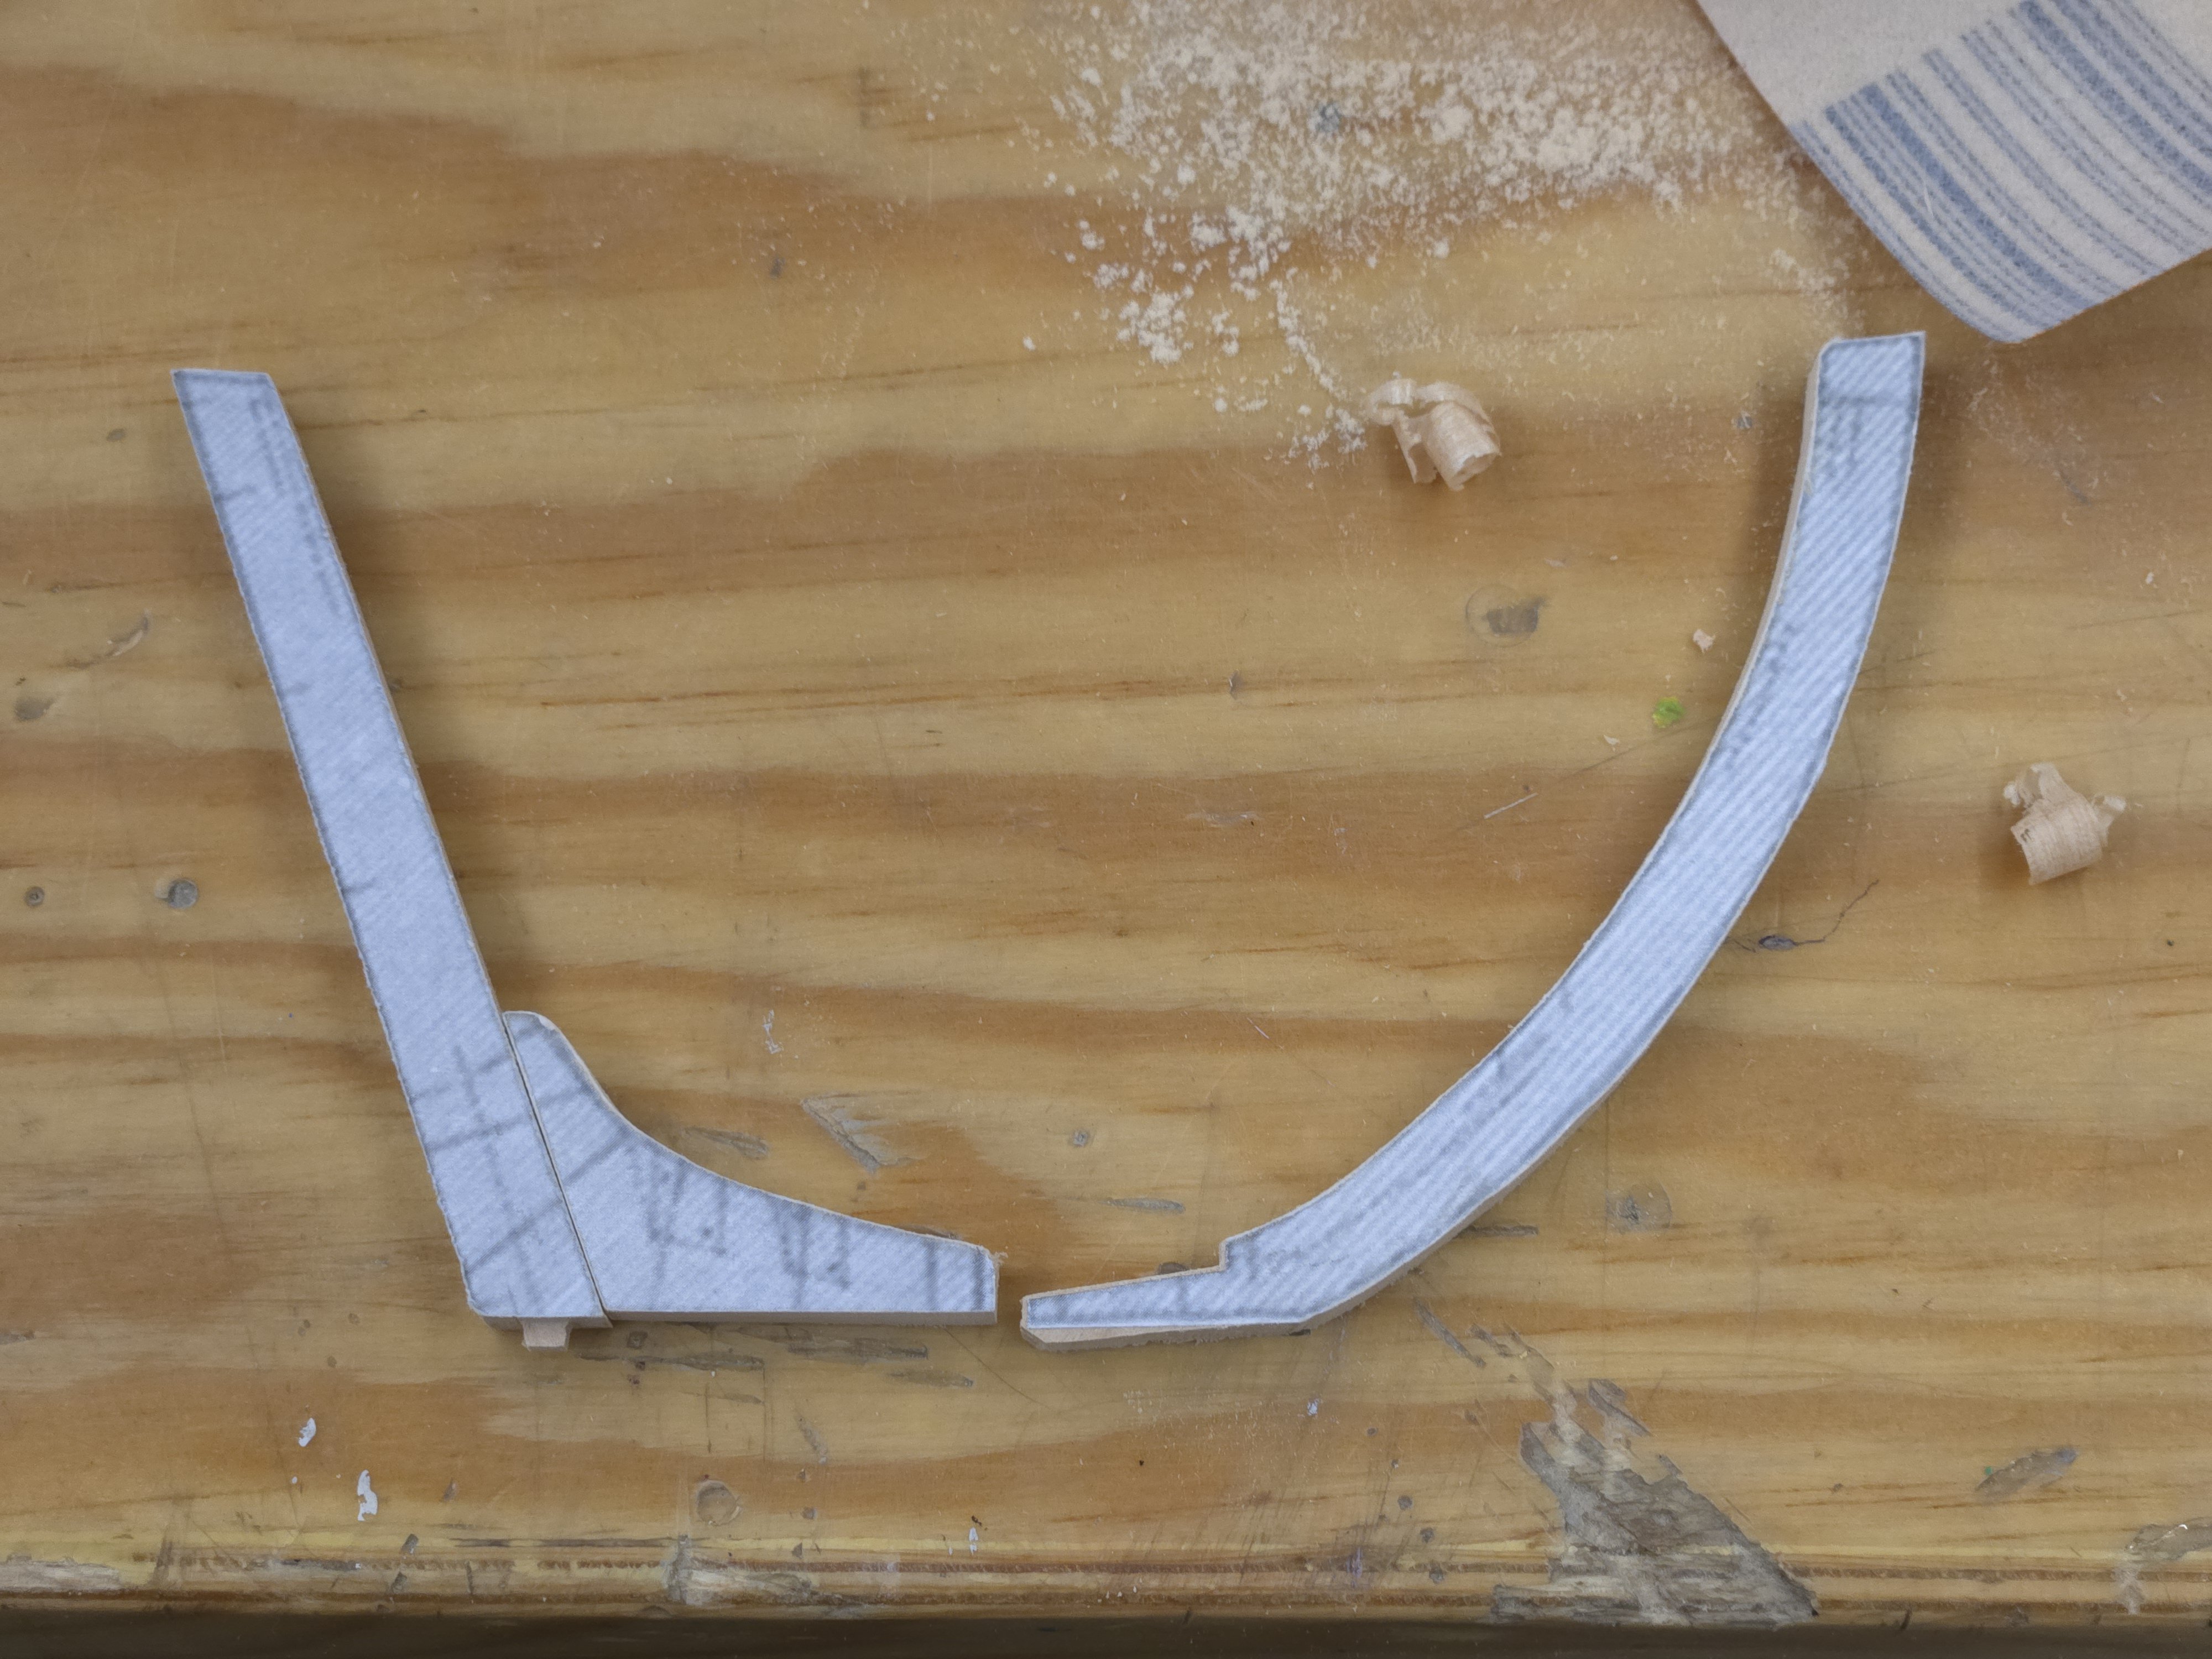
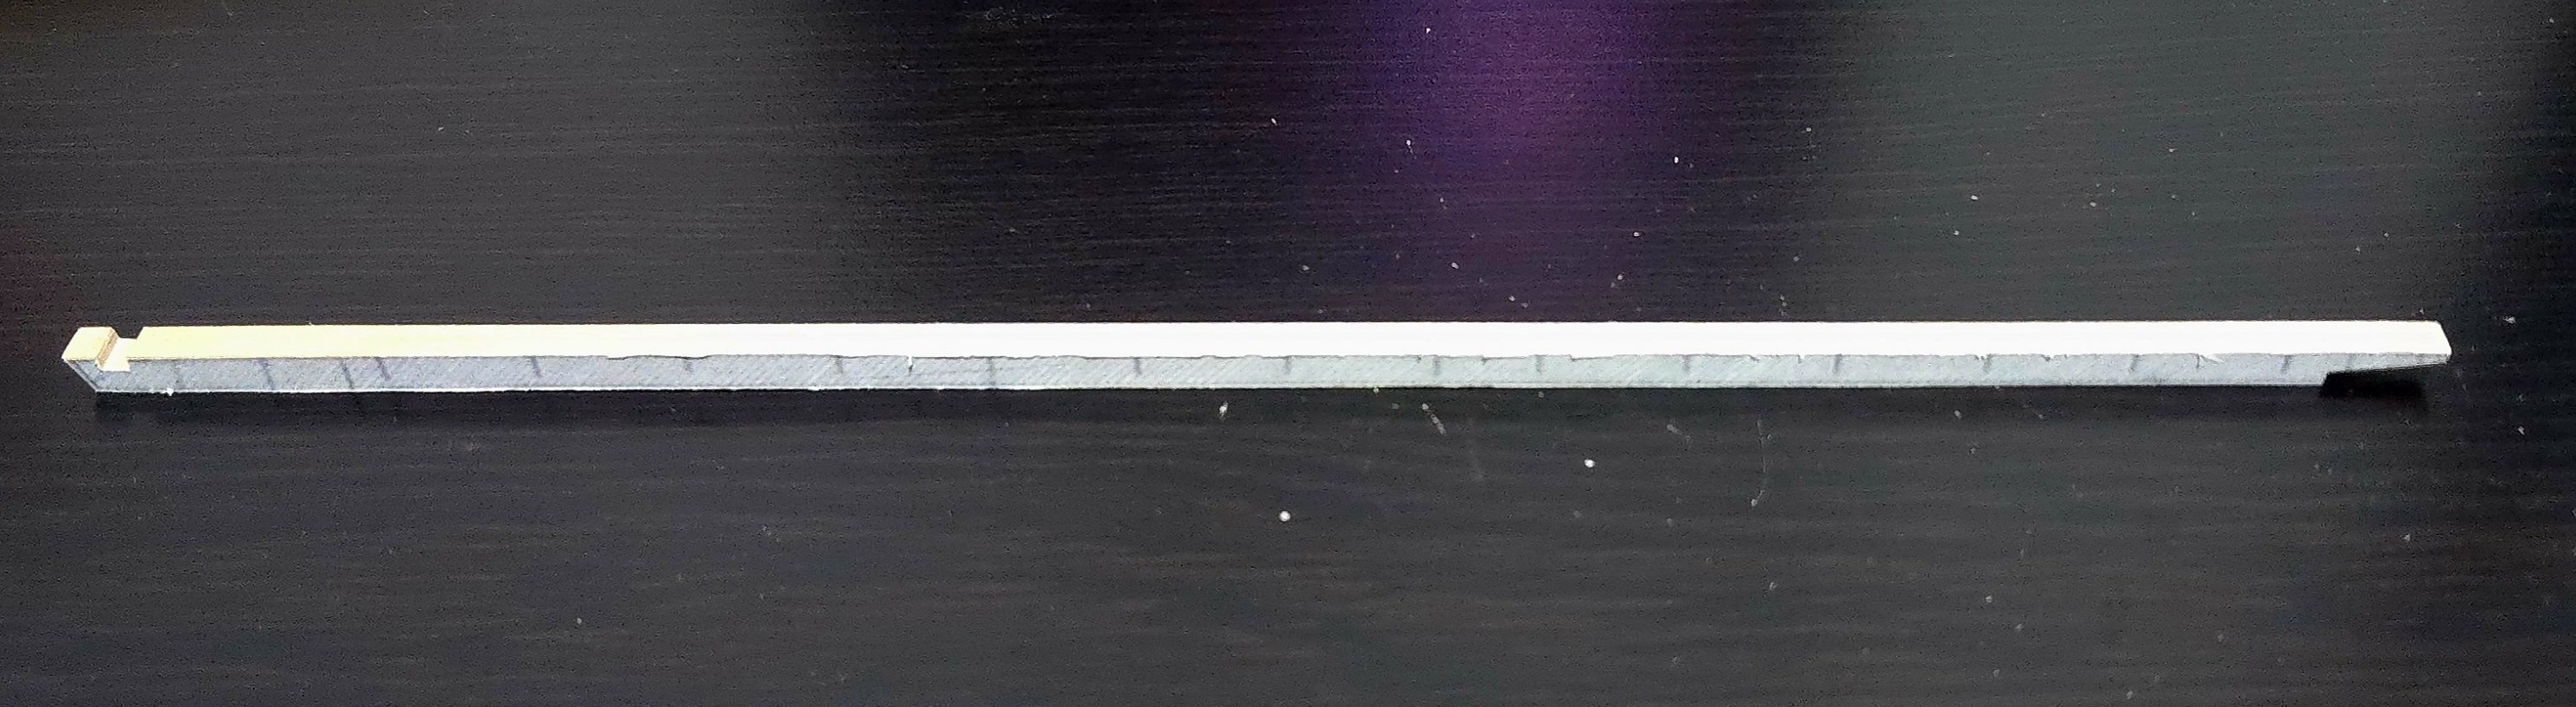
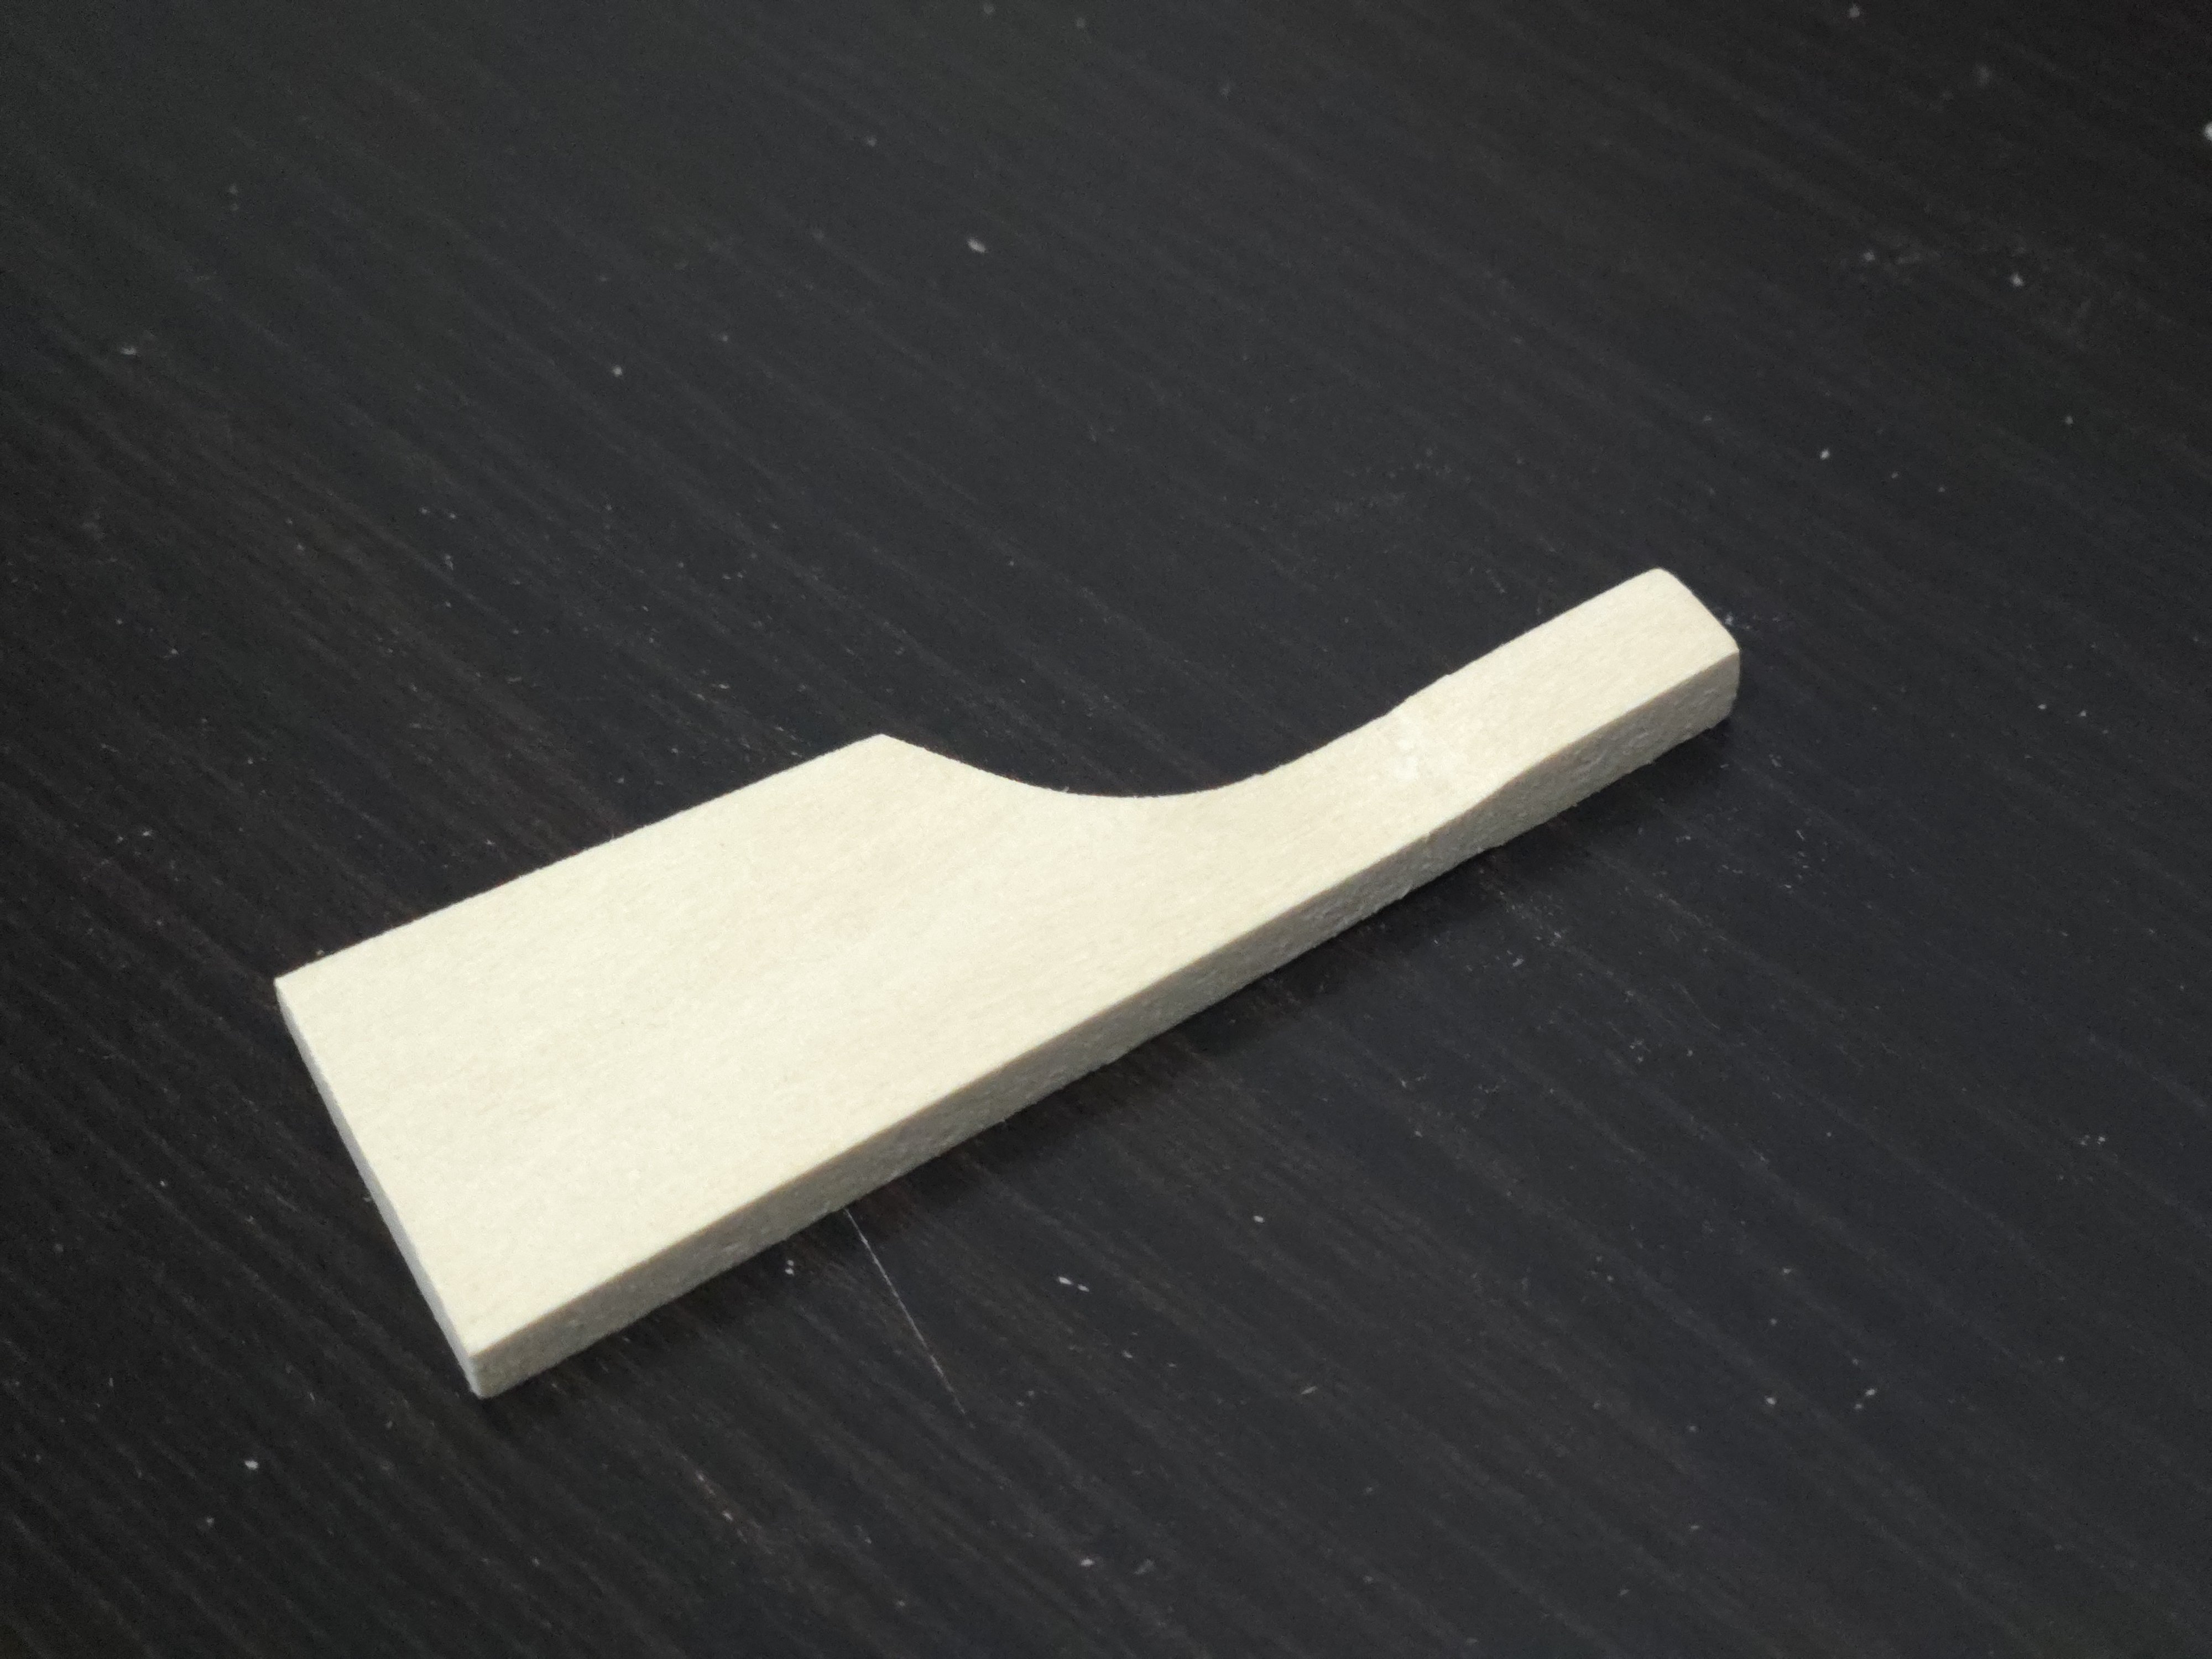
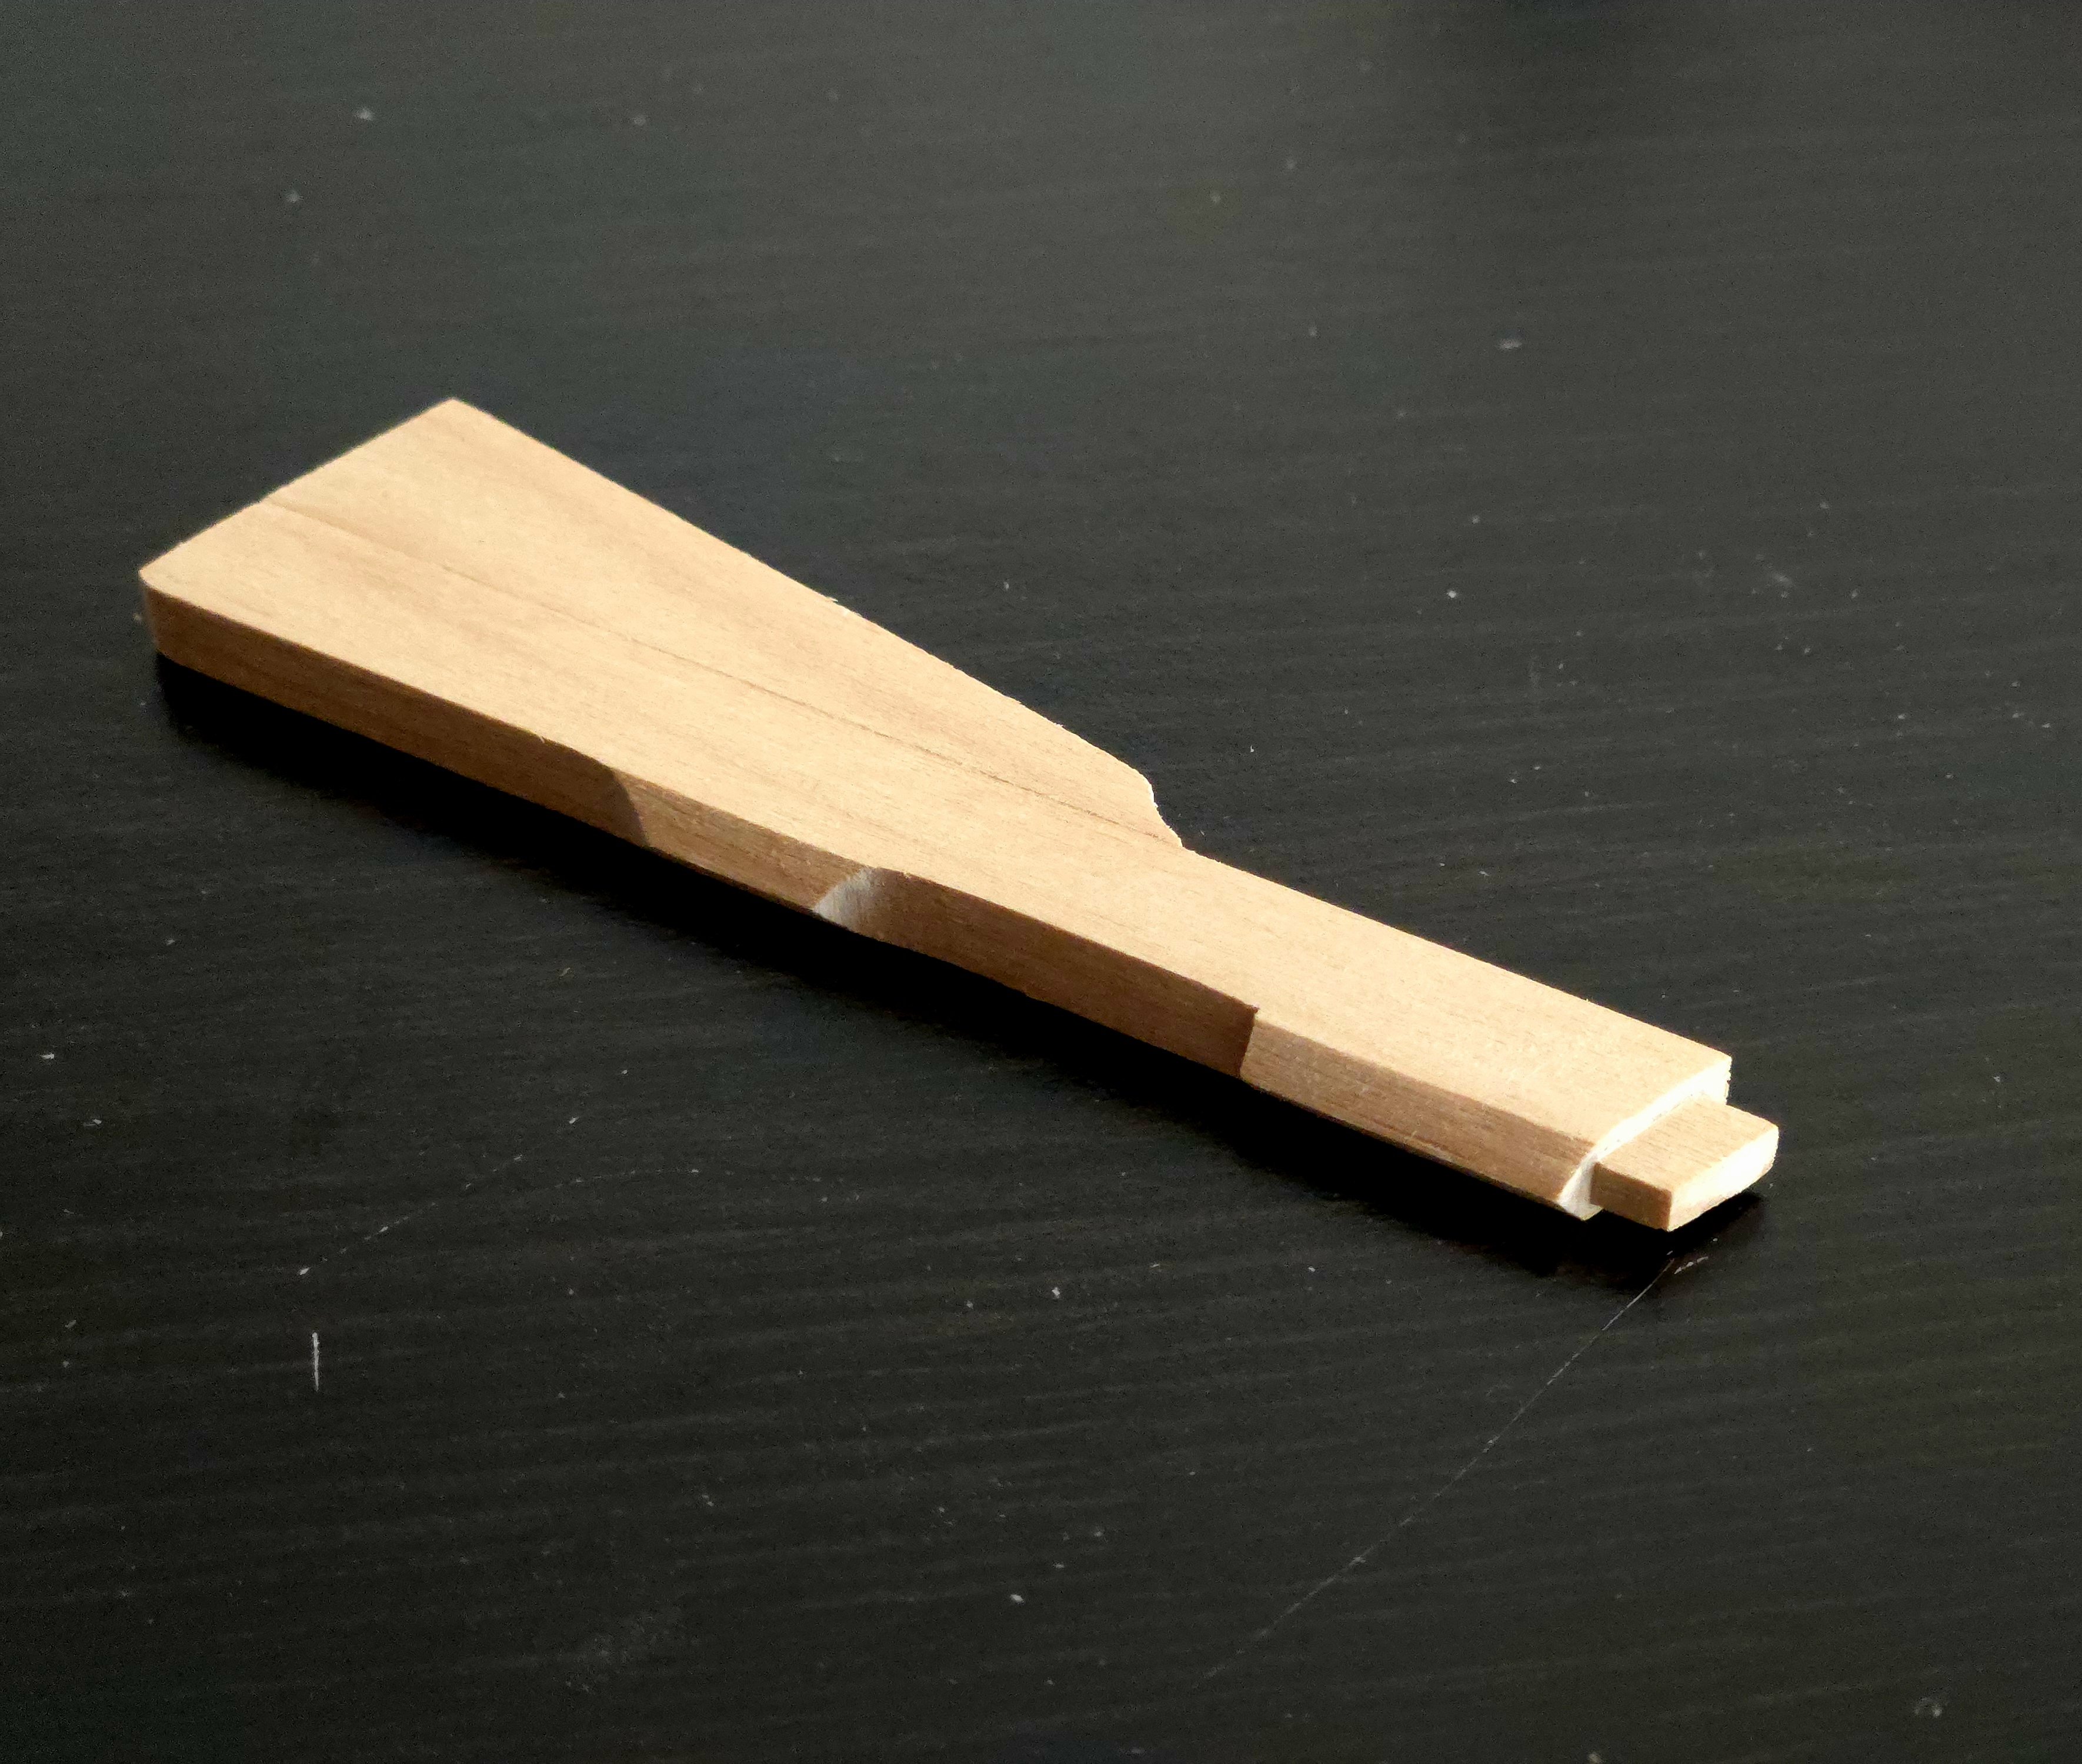
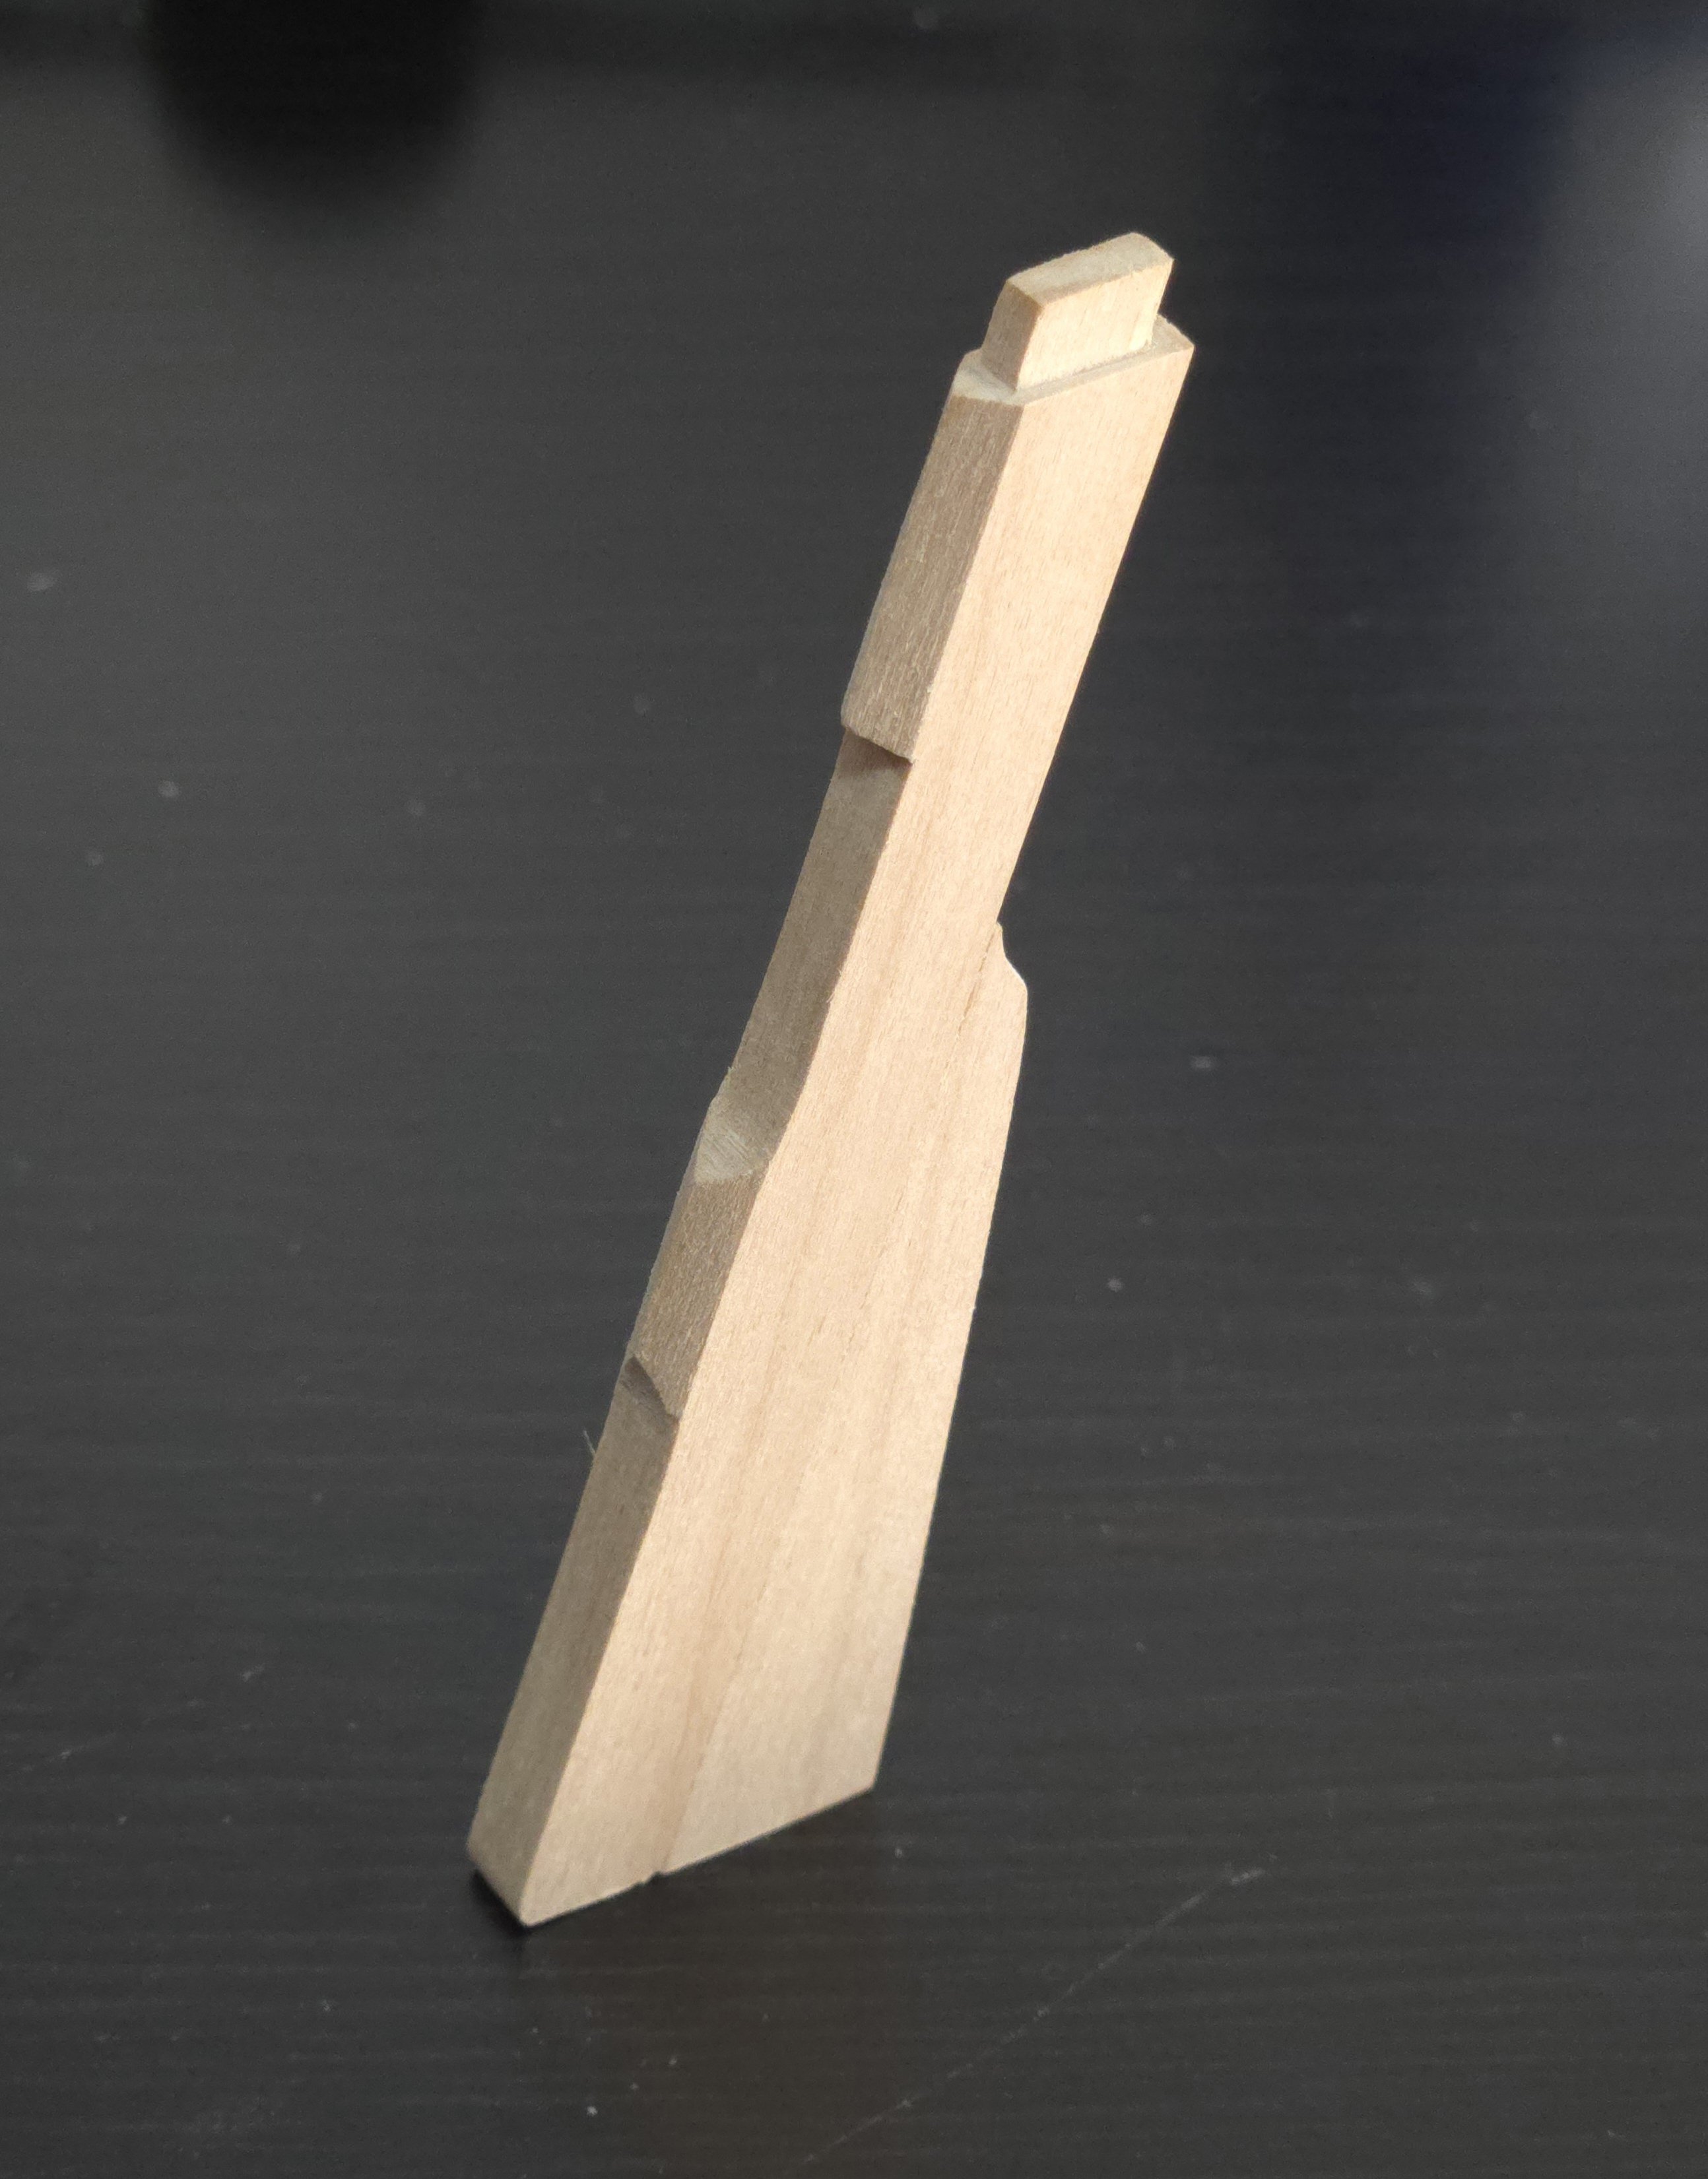
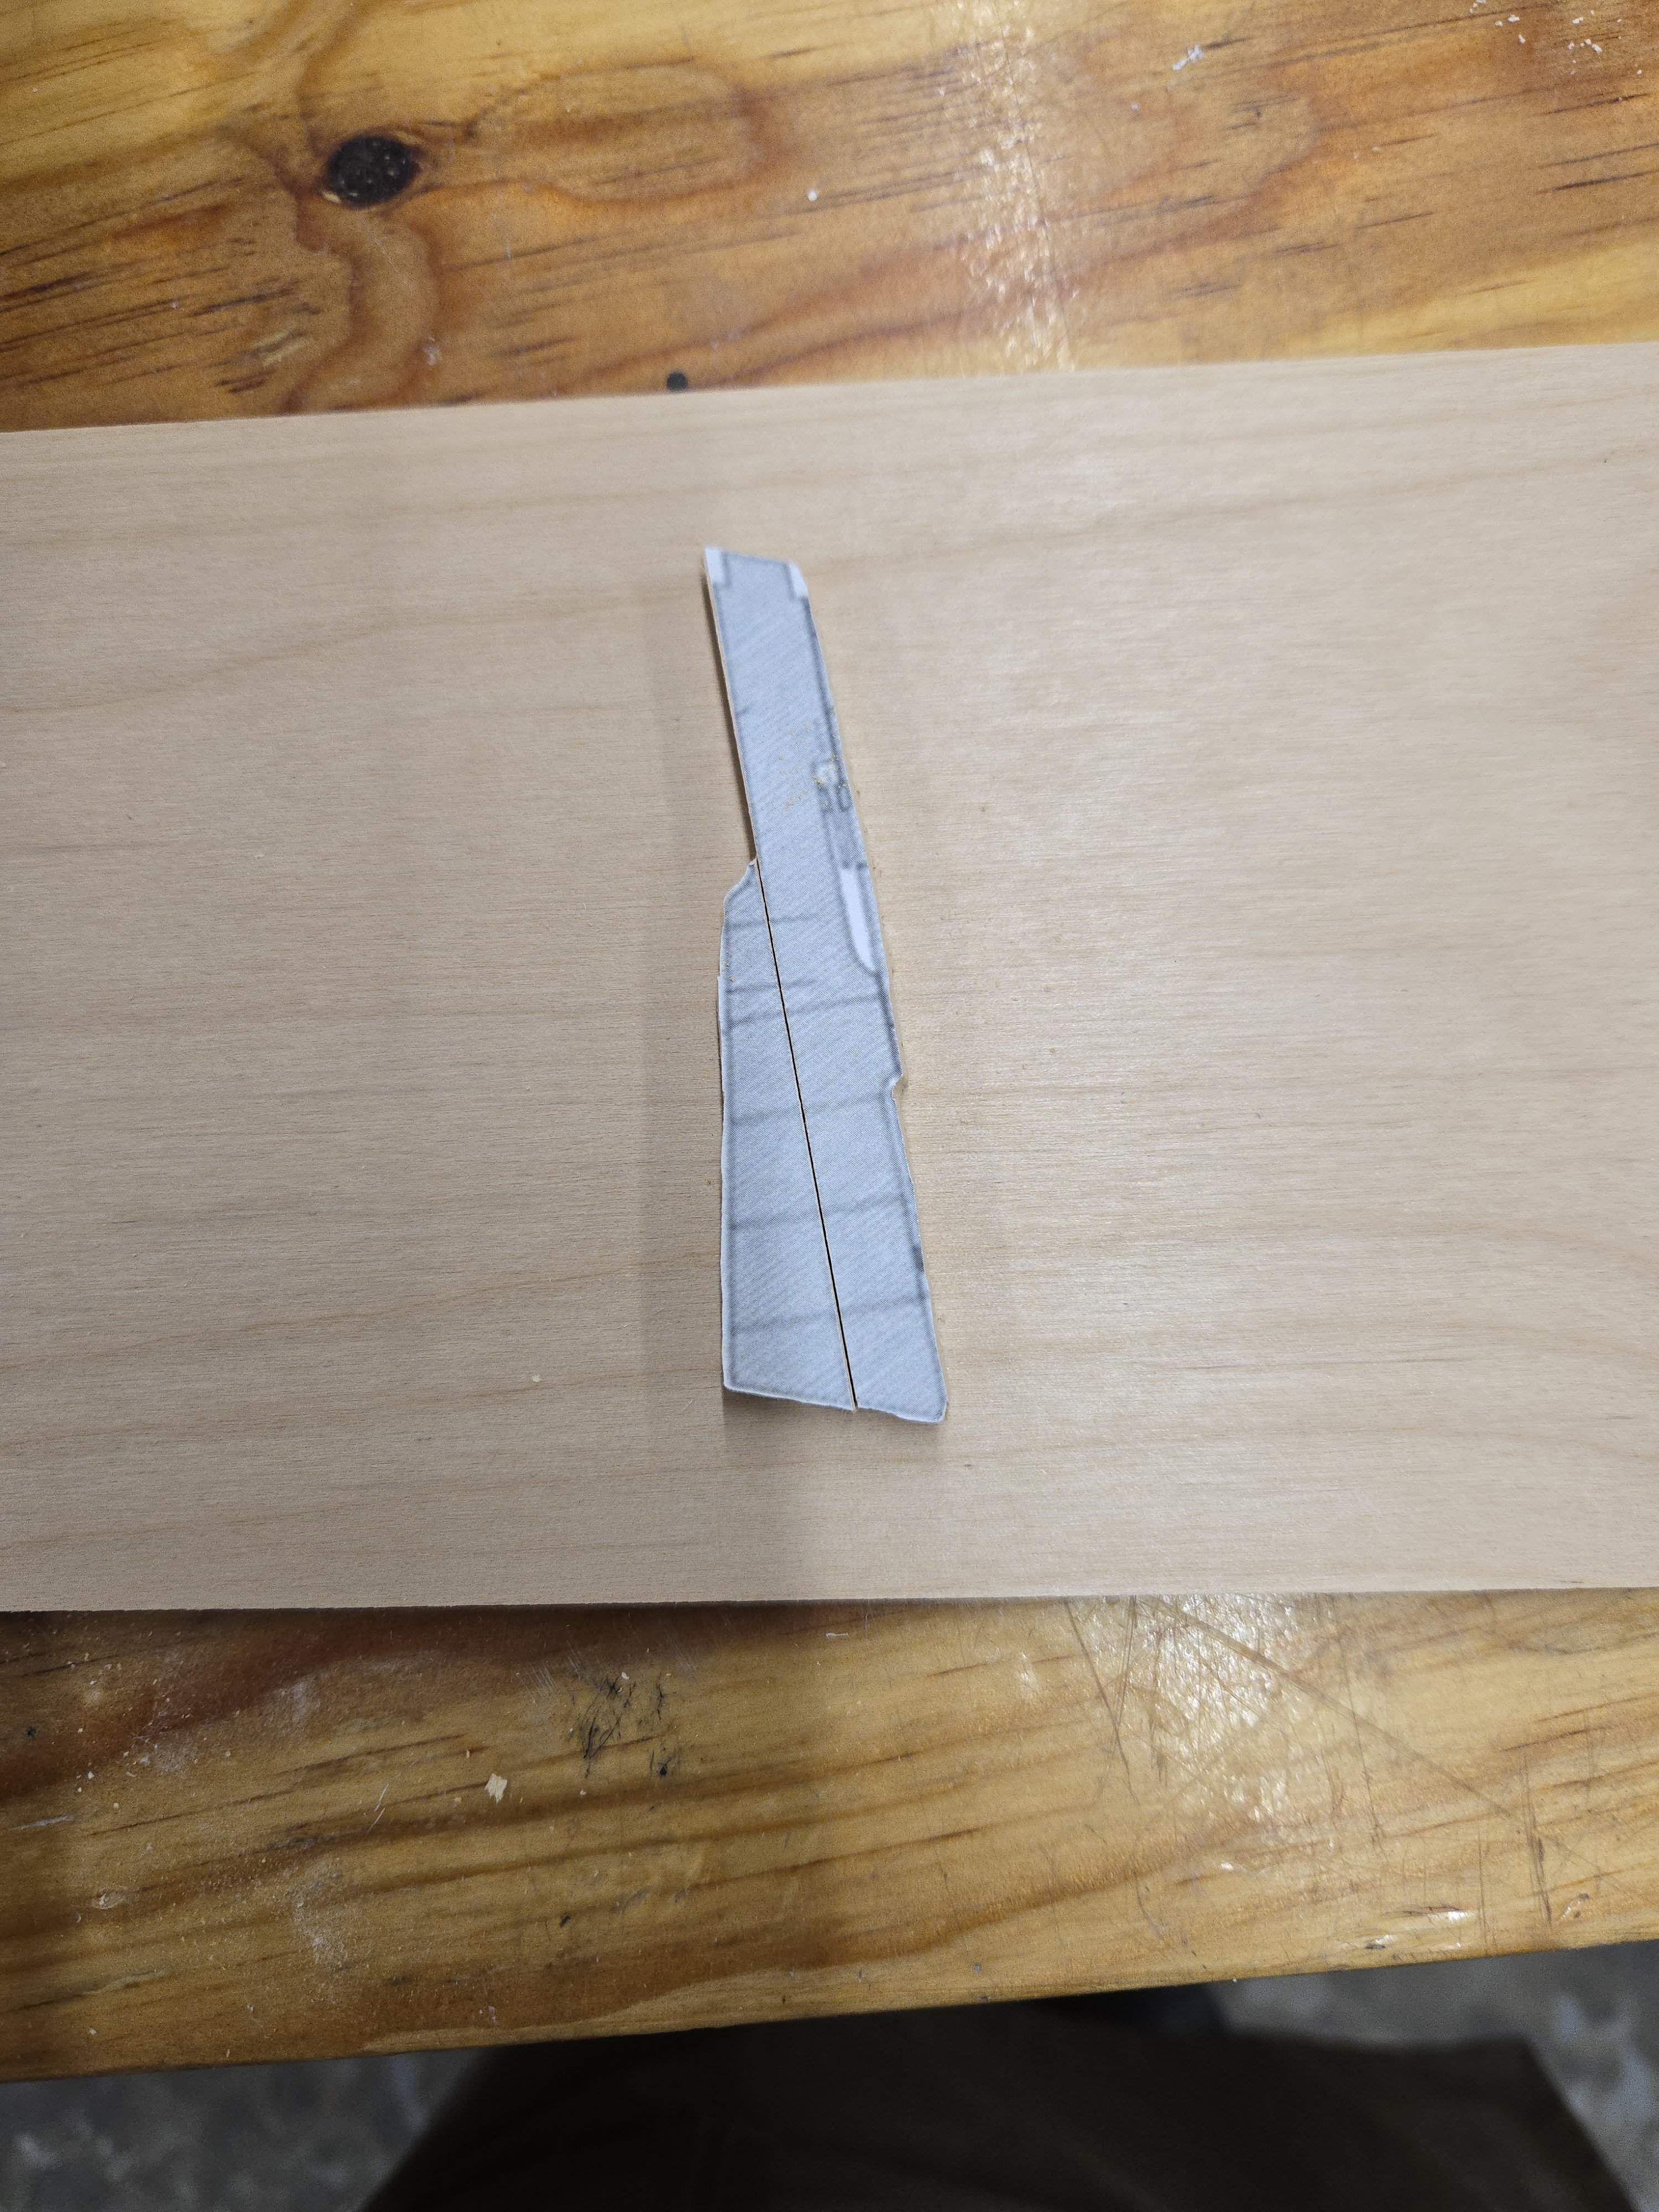
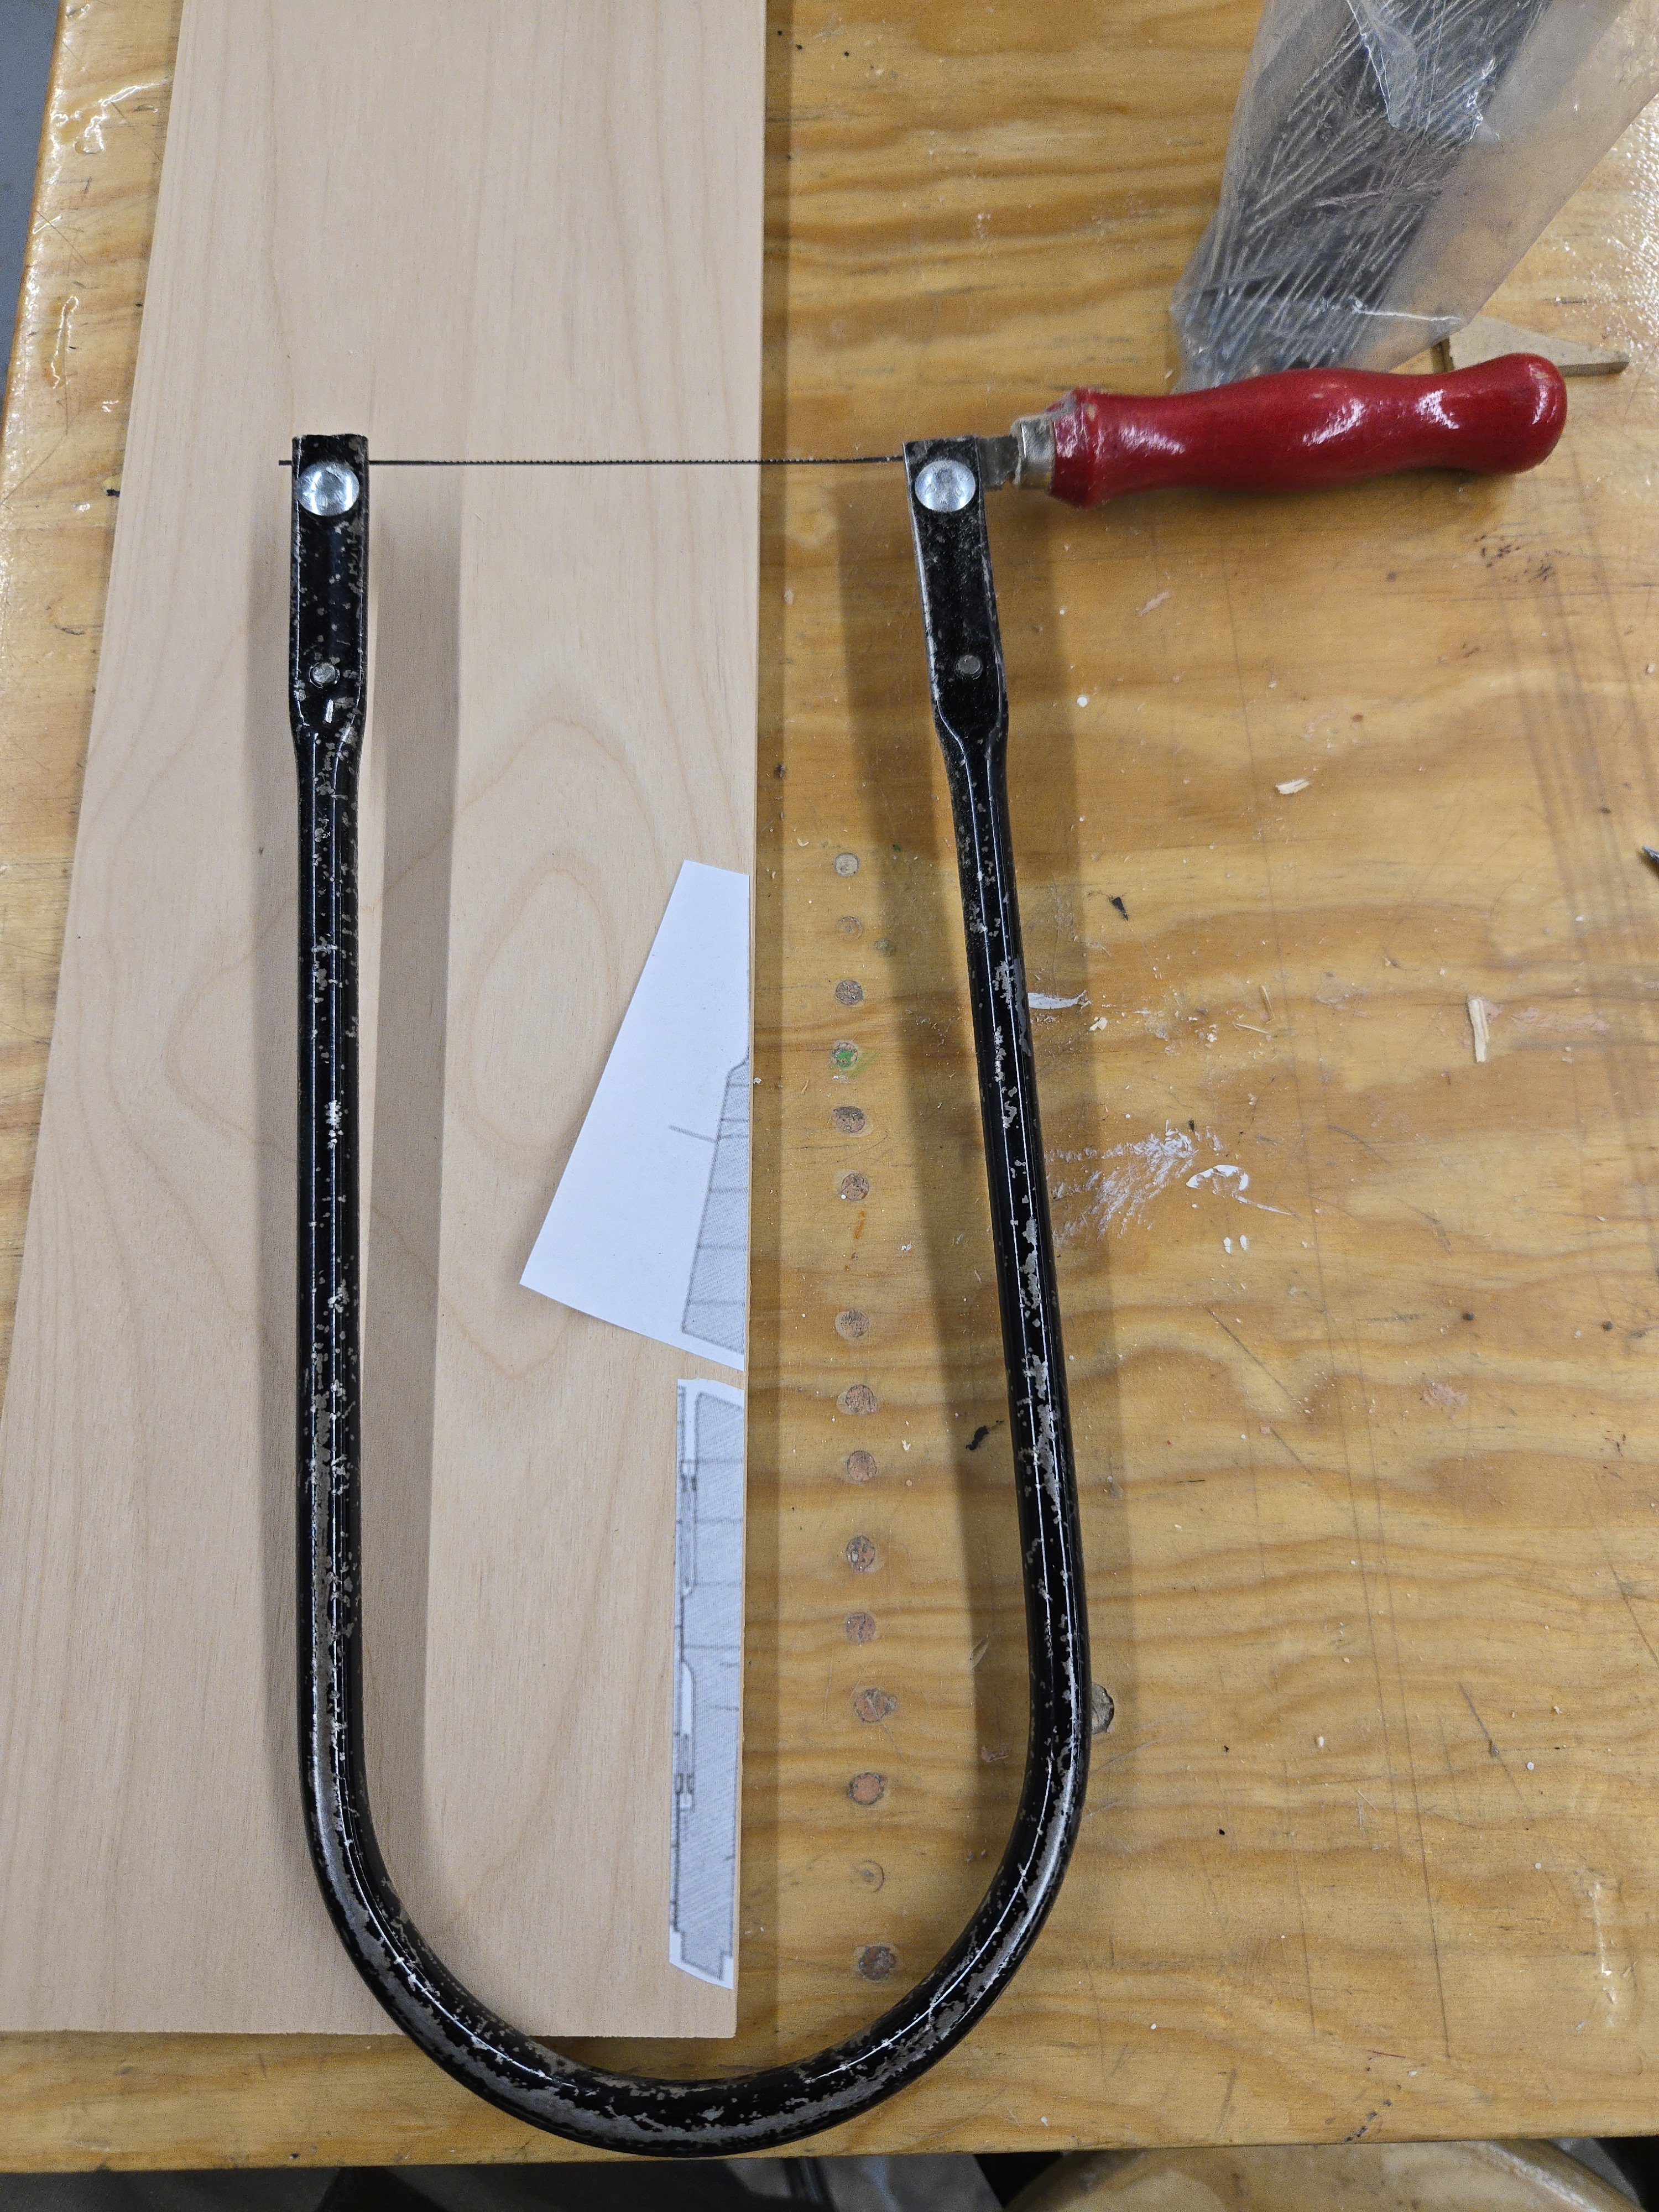
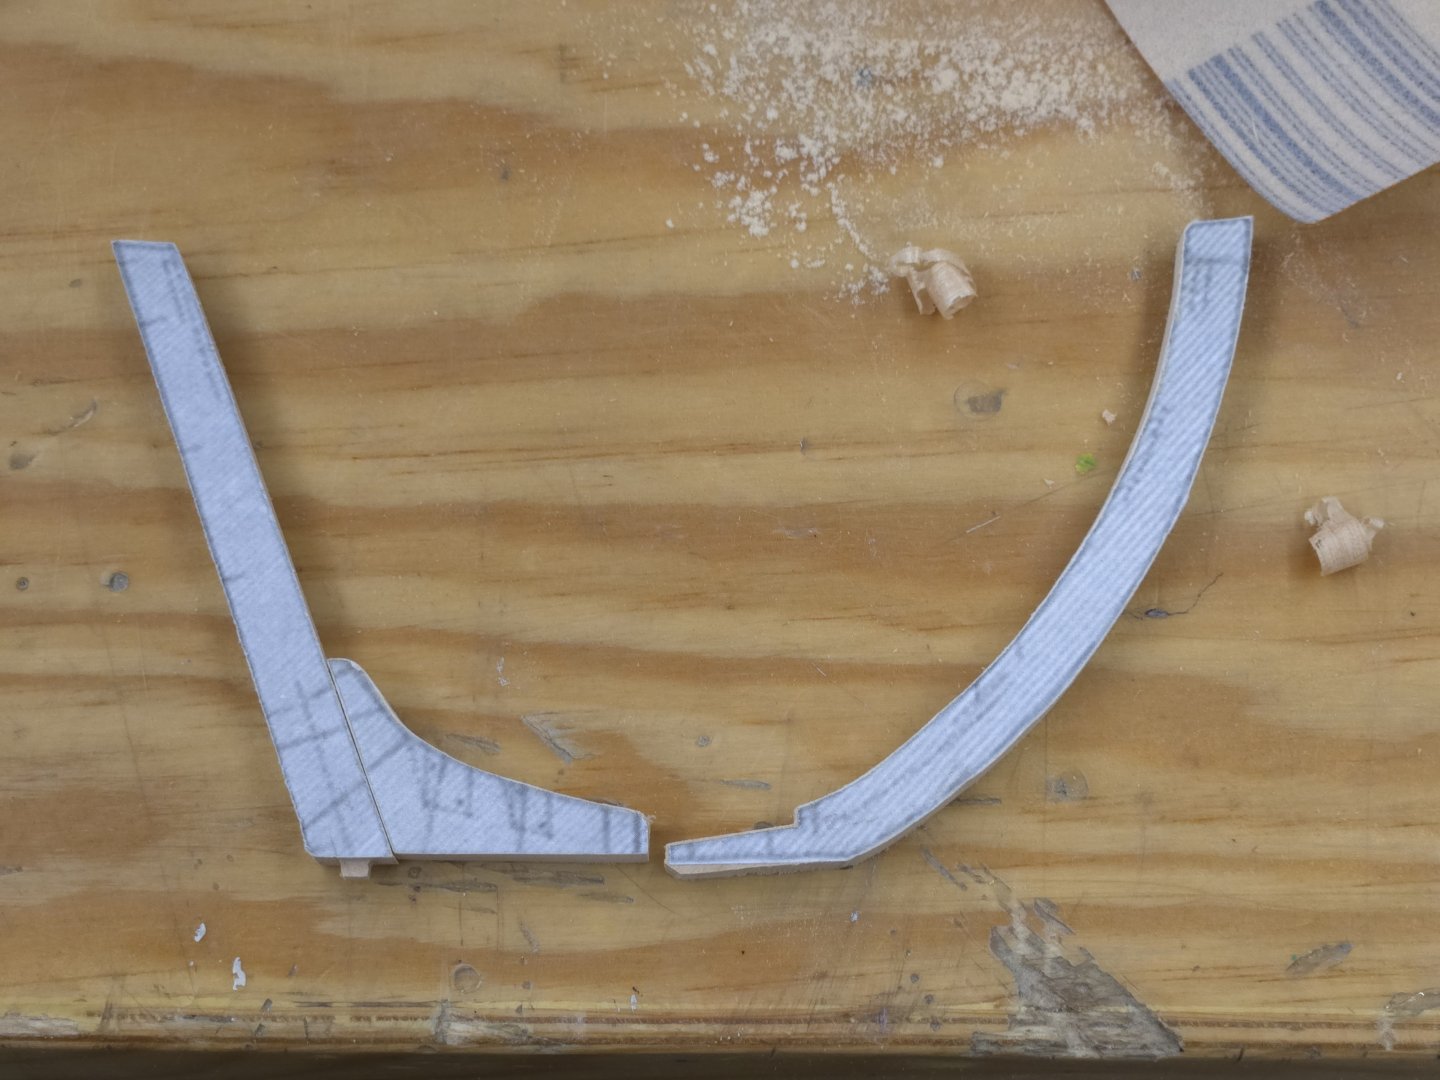
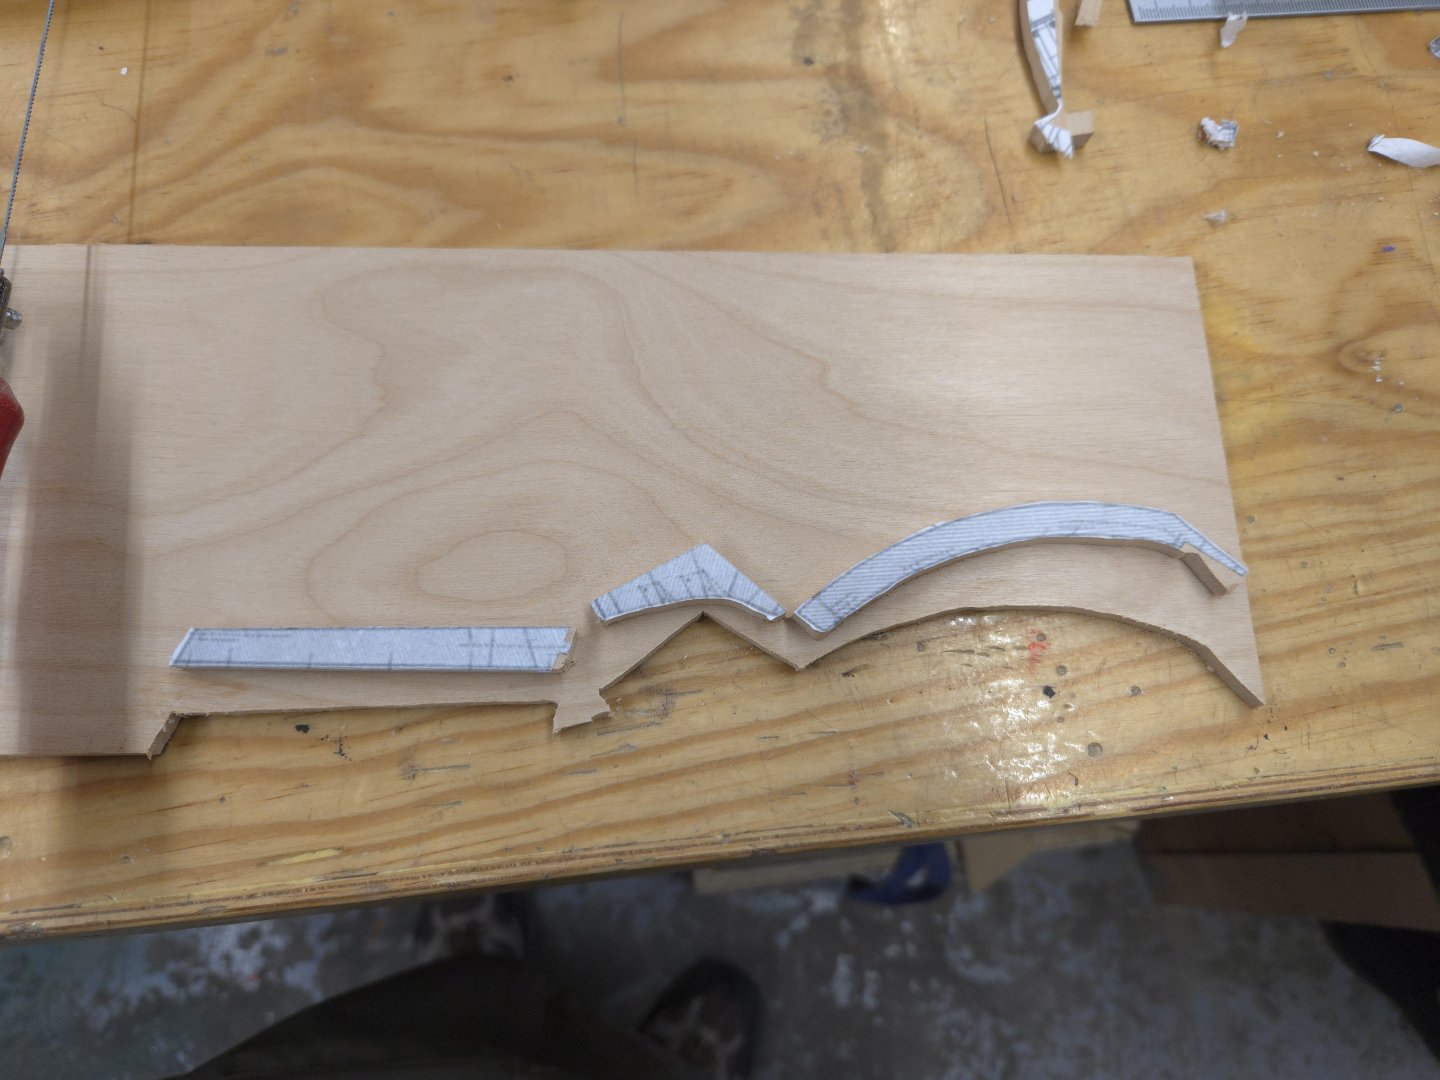
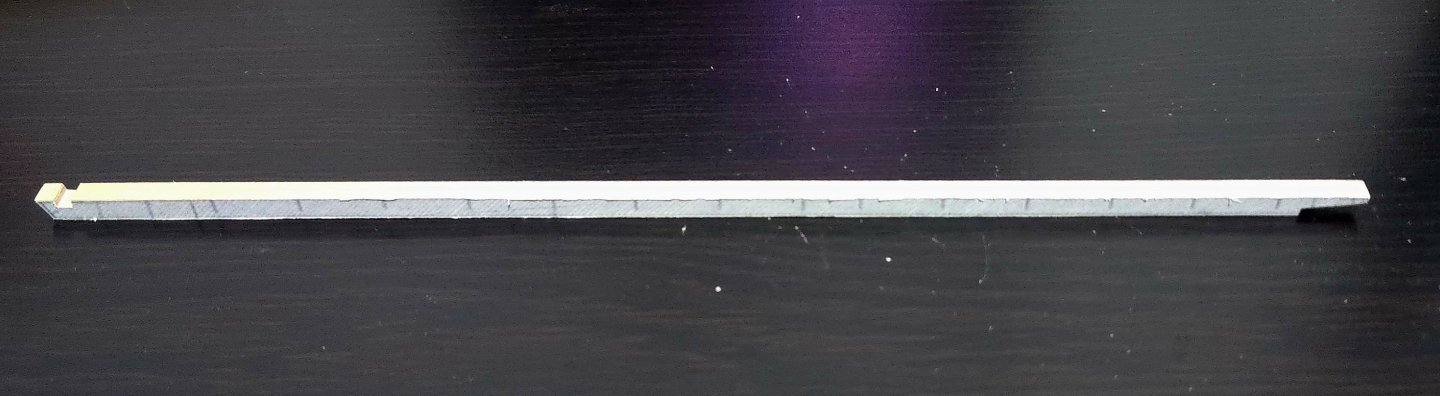
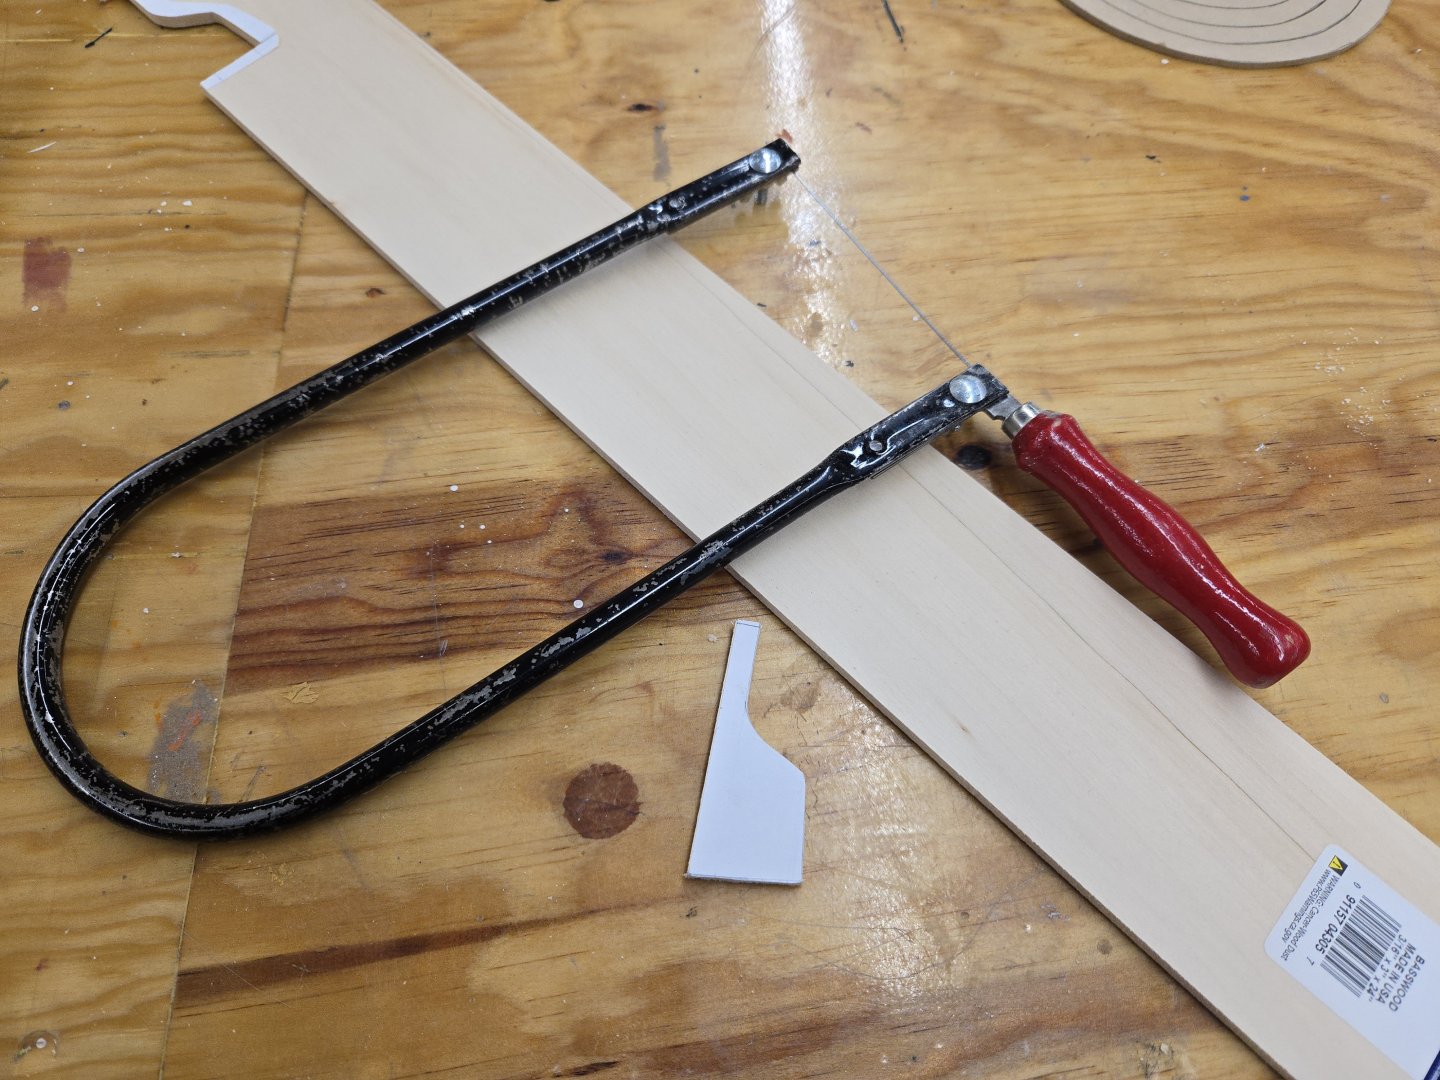
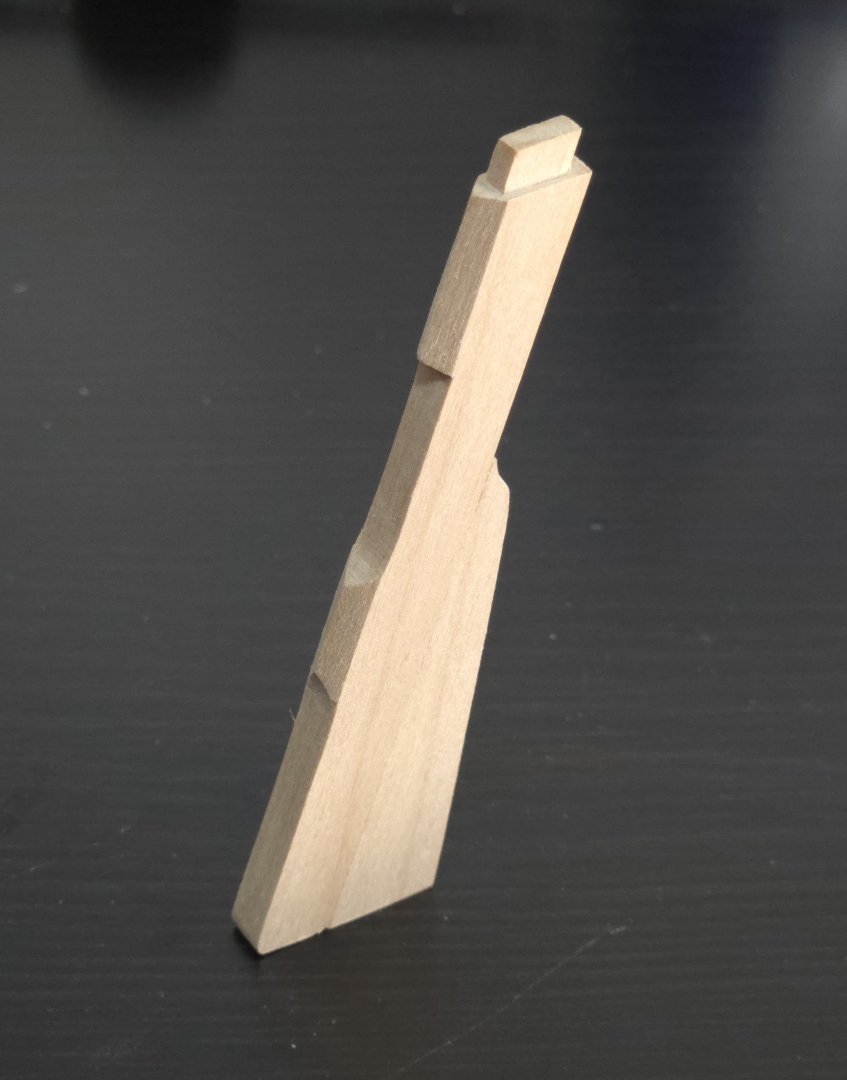
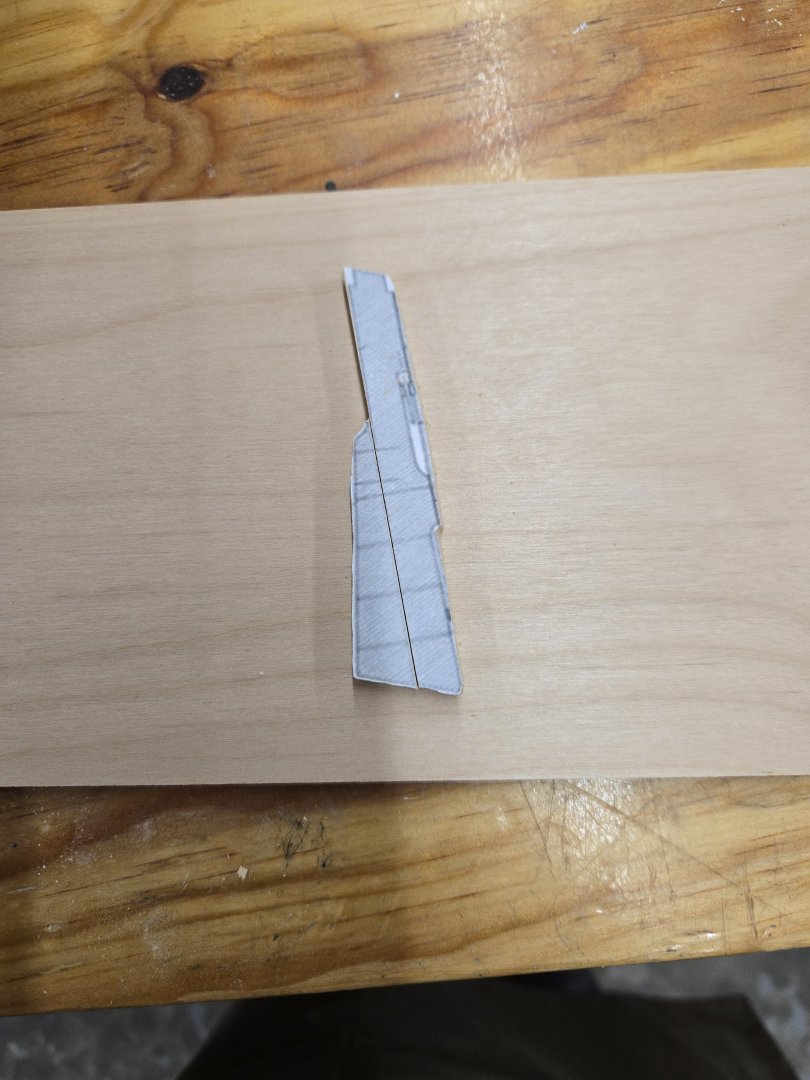
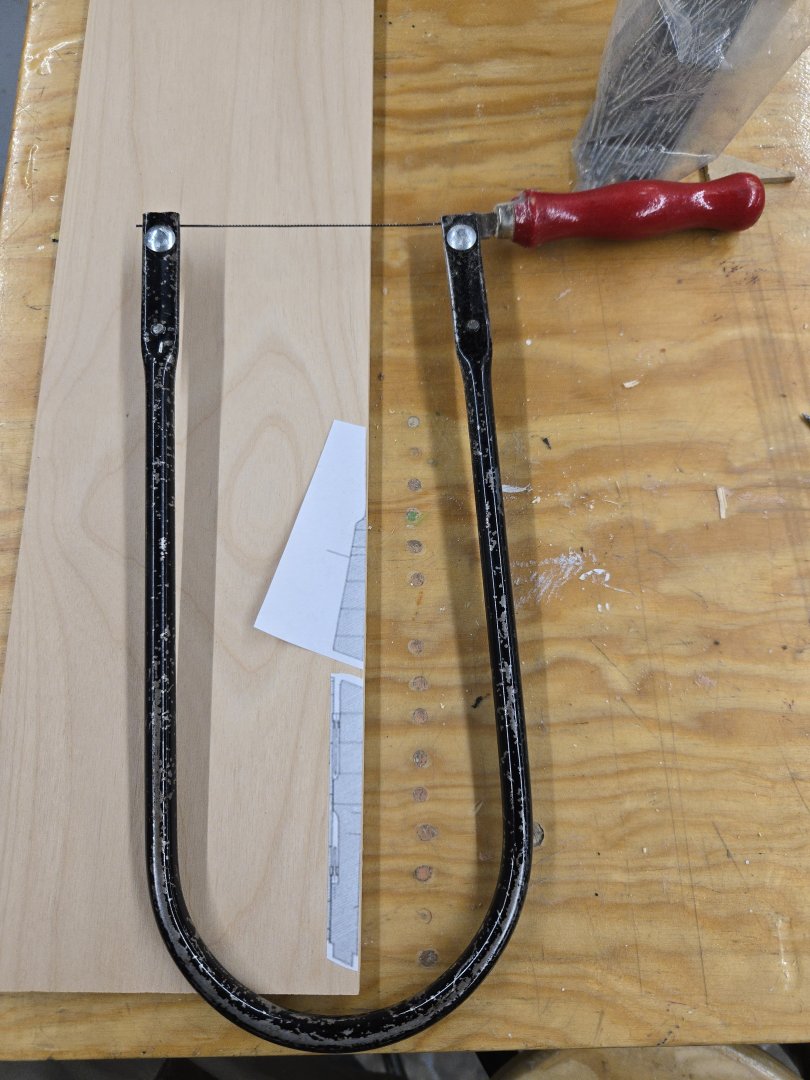
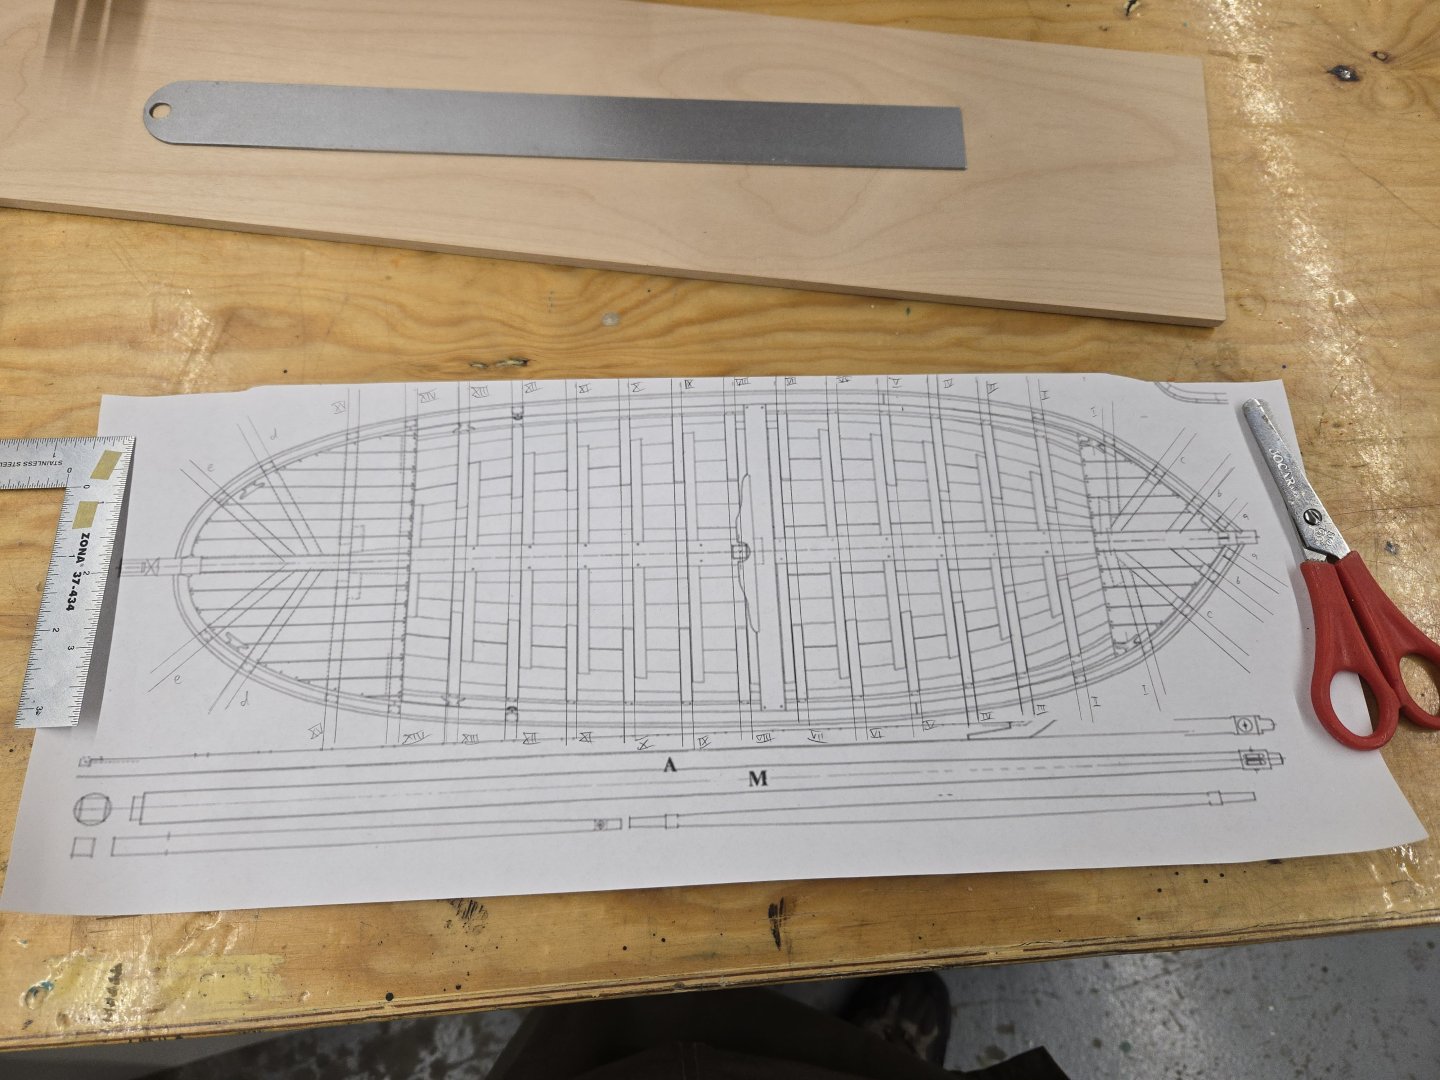
Thanks, @Paul Le Wol! There will still be plenty of research to come for the Lancha Chilota and enough other Latin American workboats to keep me busy for a long while. Not to mention that I'll definitely be on the lookout for more details about the Bateau than are in the monograph, although any research will be tricky without speaking French. I definitely enjoy research and sharing what I find. But sometimes it can be a lot to keep up with, and its nice to have something where I can focus more on the woodworking and construction aspects. Thank you @François de Saint Nazaire! Or should I say "merci." I'll have to add "tonnerre de Brest!" to my French phrasebook, which otherwise is just words like "quille," "modèle," "proue," and others that are close enough to english or spanish that I recognize them. Although I didn't end up having as much time for the Bateau in my carpentry class as I had thought I would, I did make some progress--and sawdust! First, I began preparing the build cradle. Although some people seem to be able to build POF just fine without one, I thought it seemed like it could only help to have one. To start, I extended the lines of the frames outwards on the plan view and marked the frame numbers. I then glued the plan sheet to an mdf board. Next I will cut the mdf top part of the cradle to size (it will extend equally on both sides of the hull) and cut out the shape of the hull, creating a form for the frames to follow. I also need to get a thicker base, which will have the same plan view of the hull. For the model itself, I decided to start with the rudder. This is made of the same 7/32-inch thick alder that I'll be using for the keel, stem, and sternpost (and possibly a base, as well). Although the rudder on the Musee de Marine's model Bateau seems to be one piece, the monograph plans show it in two pieces. I began by gluing the plan drawings to the alder, to cut out with a fretsaw. I'll be doing the same process for the frames, so this was good practice for them. There were two things that I learned. First, it's vitally important to hold the fretsaw vertically, especially when cutting thick pieces of wood like these, and its very important to cut a bit outside the line so that any inward angle to the saw doesn't cut into the body of the piece. Second, I'll need to think more about where I place the pieces on the sheet before sawing, which wasn't such an issue when I learned how to use the fretsaw on small pieces but is much more important when I'm cutting from a big, unwieldy sheet. I'm right-handed, so placing the pieces to be cut on the bottom right of the sheet seemed like a good way to leave room for me to hold the wood in my left hand while sawing. While this is true, the clamps that I was using to hold the notched cutting platform to the workbench kept me from holding the wood sheet properly lengthwise to the platform. Instead I was forced to hold it awkwardly perpendicular to the platform, in such a way that I was squished up against the workbench and some cuts weren't quite as straight or as smooth as I would have liked. In the future I may try placing the templates in better locations, or try placing enough parts to be cut together that I can first trim off a chunk of the wood sheet and be left with a much smaller piece to manuever. Other than the issues noted above, the parts cut out pretty easily, although there was a good bit left for final shaping. The alder saws quite well. Back at home, I began final shaping with x-acto knives, files, and sanding blocks. In most ways, the alder is a joy to work with. It's soft enough to be readily carveable with a knife, but it holds edges very well and sands beautifully. It's noticeably harder than basswood, which makes it more difficult to over-sand. The only thing I don't love is that it produces a much finer sawdust than basswood, which makes clean-up a bit trickier when working from the home office. I may have to look into getting a small shopvac or something, although it would be tricky to operate while my wife is working (we share the home office). After shaping, I sprayed a bit of alcohol and easily removed the paper templates. The gluestick residue is quite easy to remove, at least as long as you don't leave it for several months. Once that dried, I glued the rudder parts together, leaving the line of the bottom for final shaping after everything was attached. Although the close-up photography reveals a few areas to touch up, overall I'm very very happy with how the rudder turned out. I'm looking forward to further progress and am enjoying the alder. Next up: the keel, stem, and sternpost.


- 136 replies
-
- 11
-
-

-
- ancre
- Bateau de Lanveoc
- (and 2 more)
-
Excellent job on the boat, it really turned out great! The exposed plywood issue sounds annoying, but for what it's worth, I don't notice it in the photos. The crew is a fantastic touch, too, I'm sure the new owner will love it.
- 55 replies
-
- 6
-
-
-
- Le Martegaou
- billing boats
- (and 1 more)
-
Welcome!
-
Very nicely done!
-
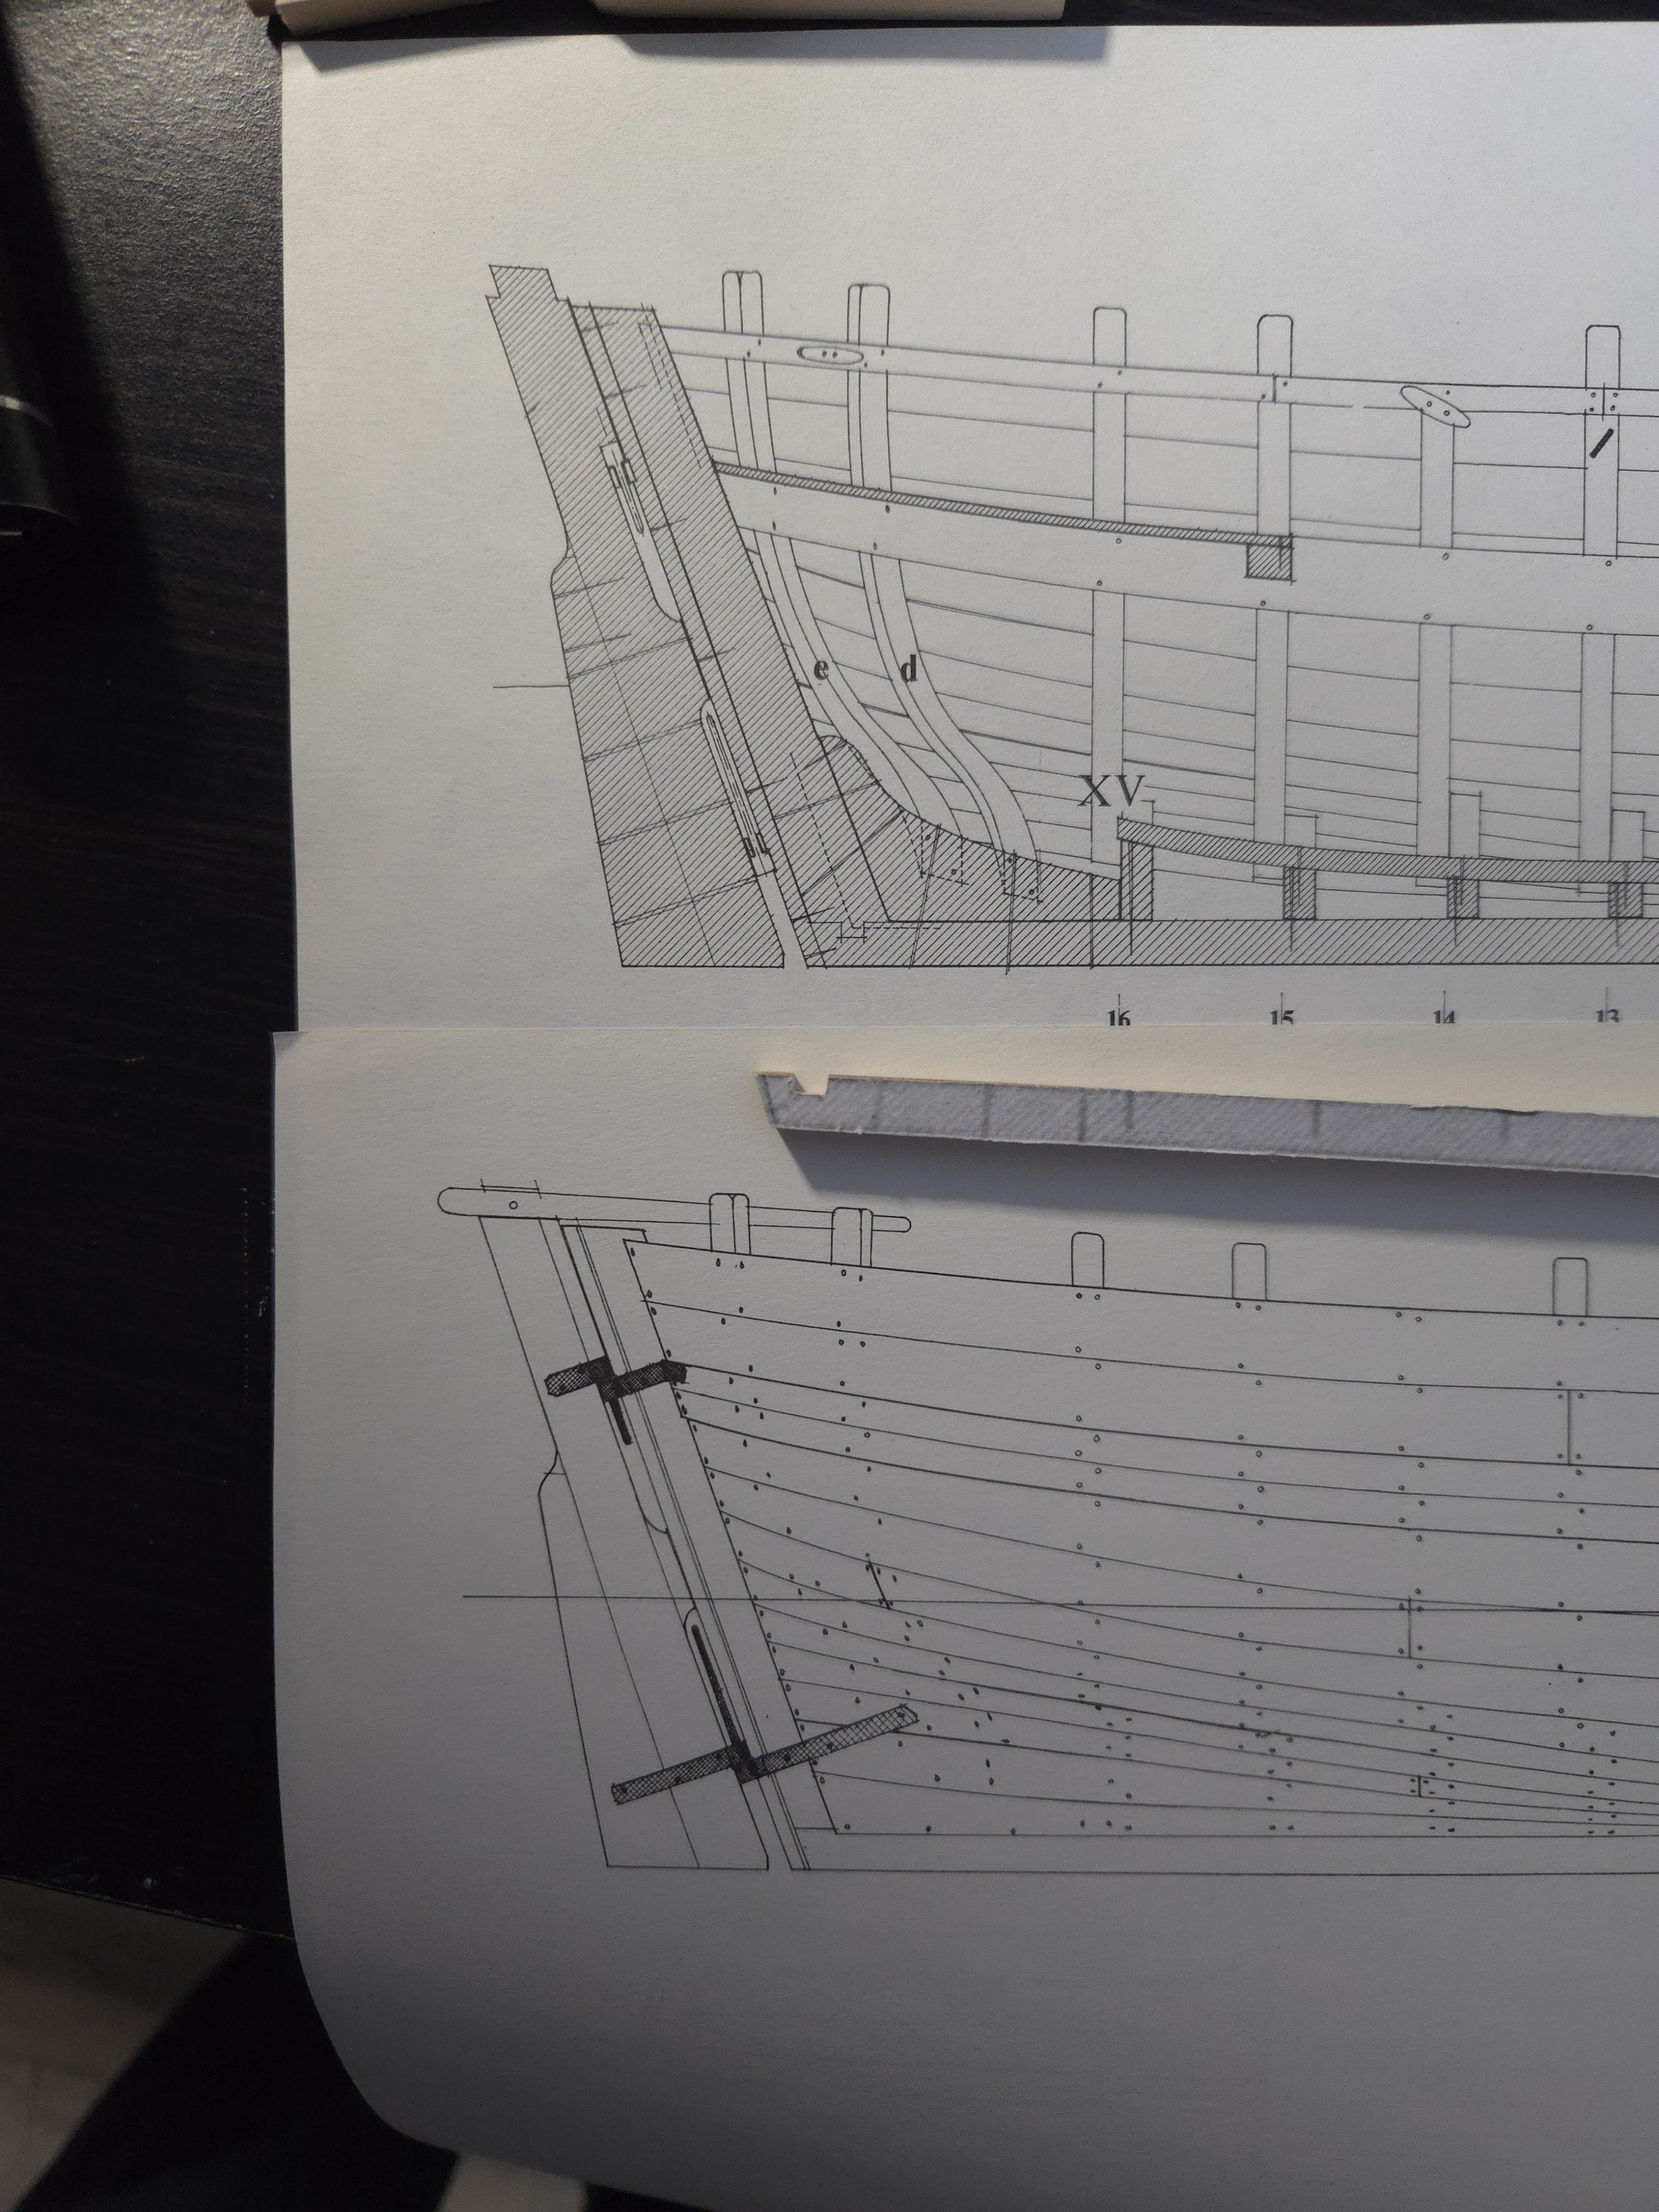
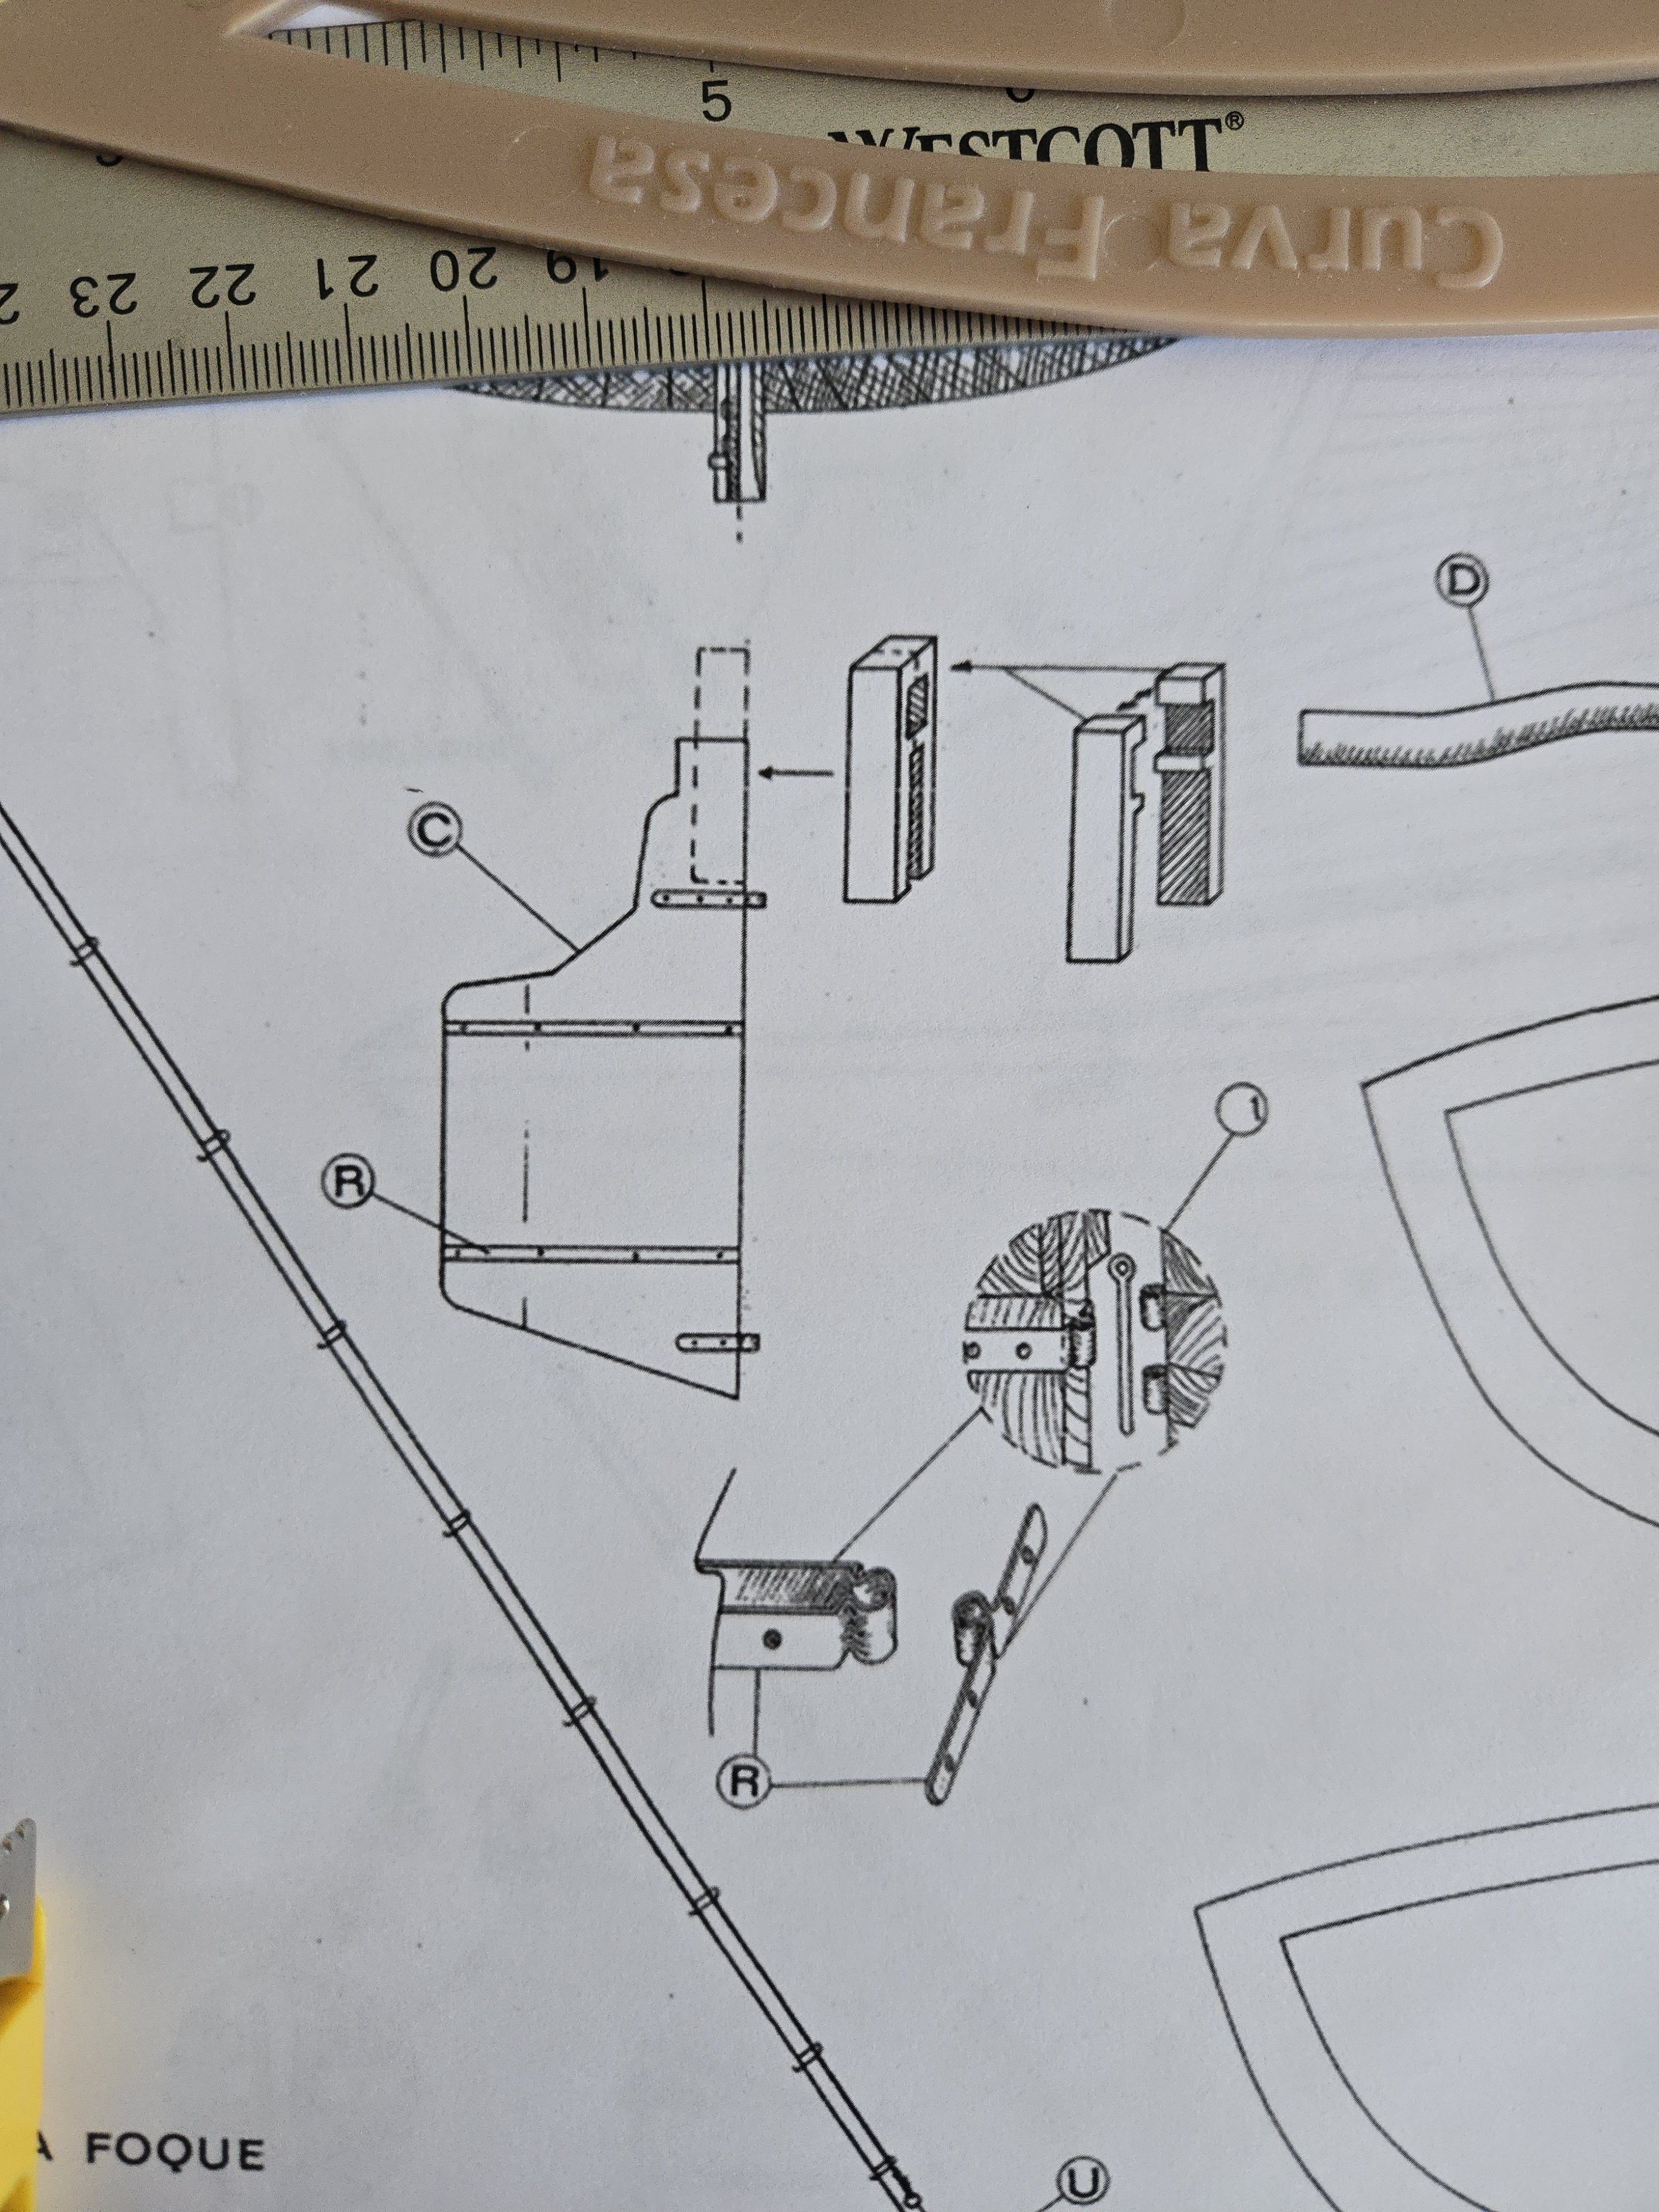
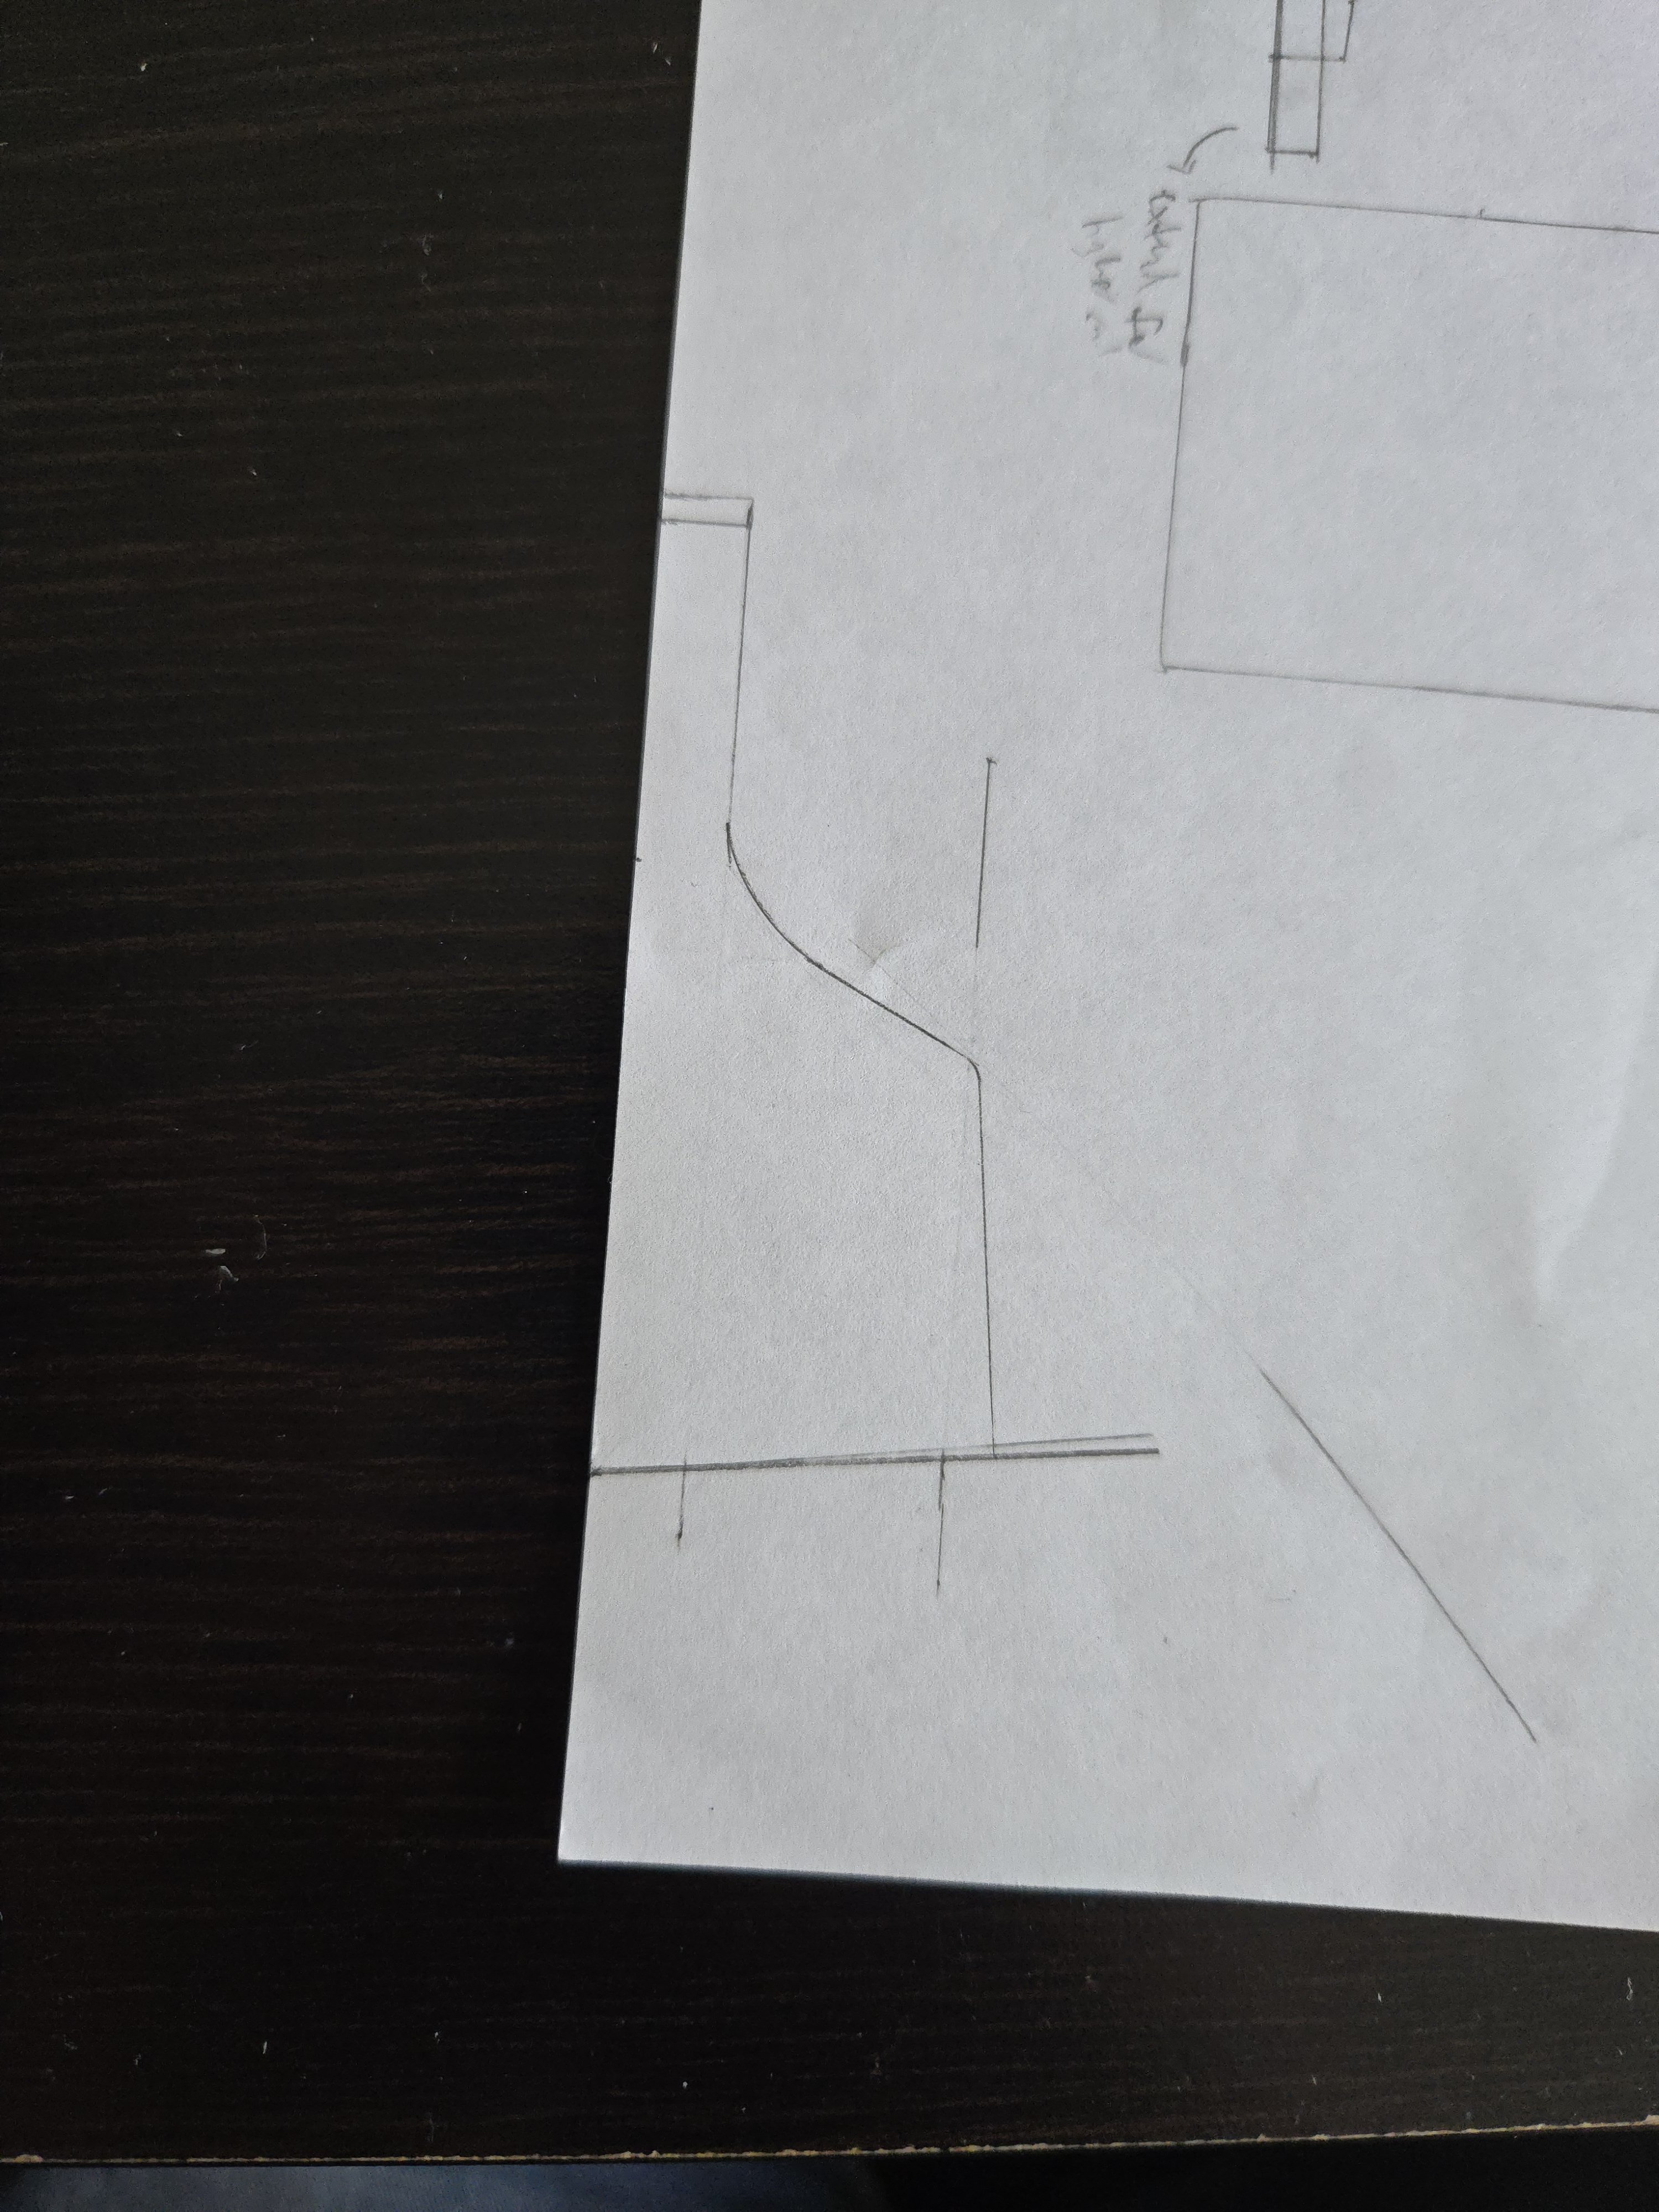
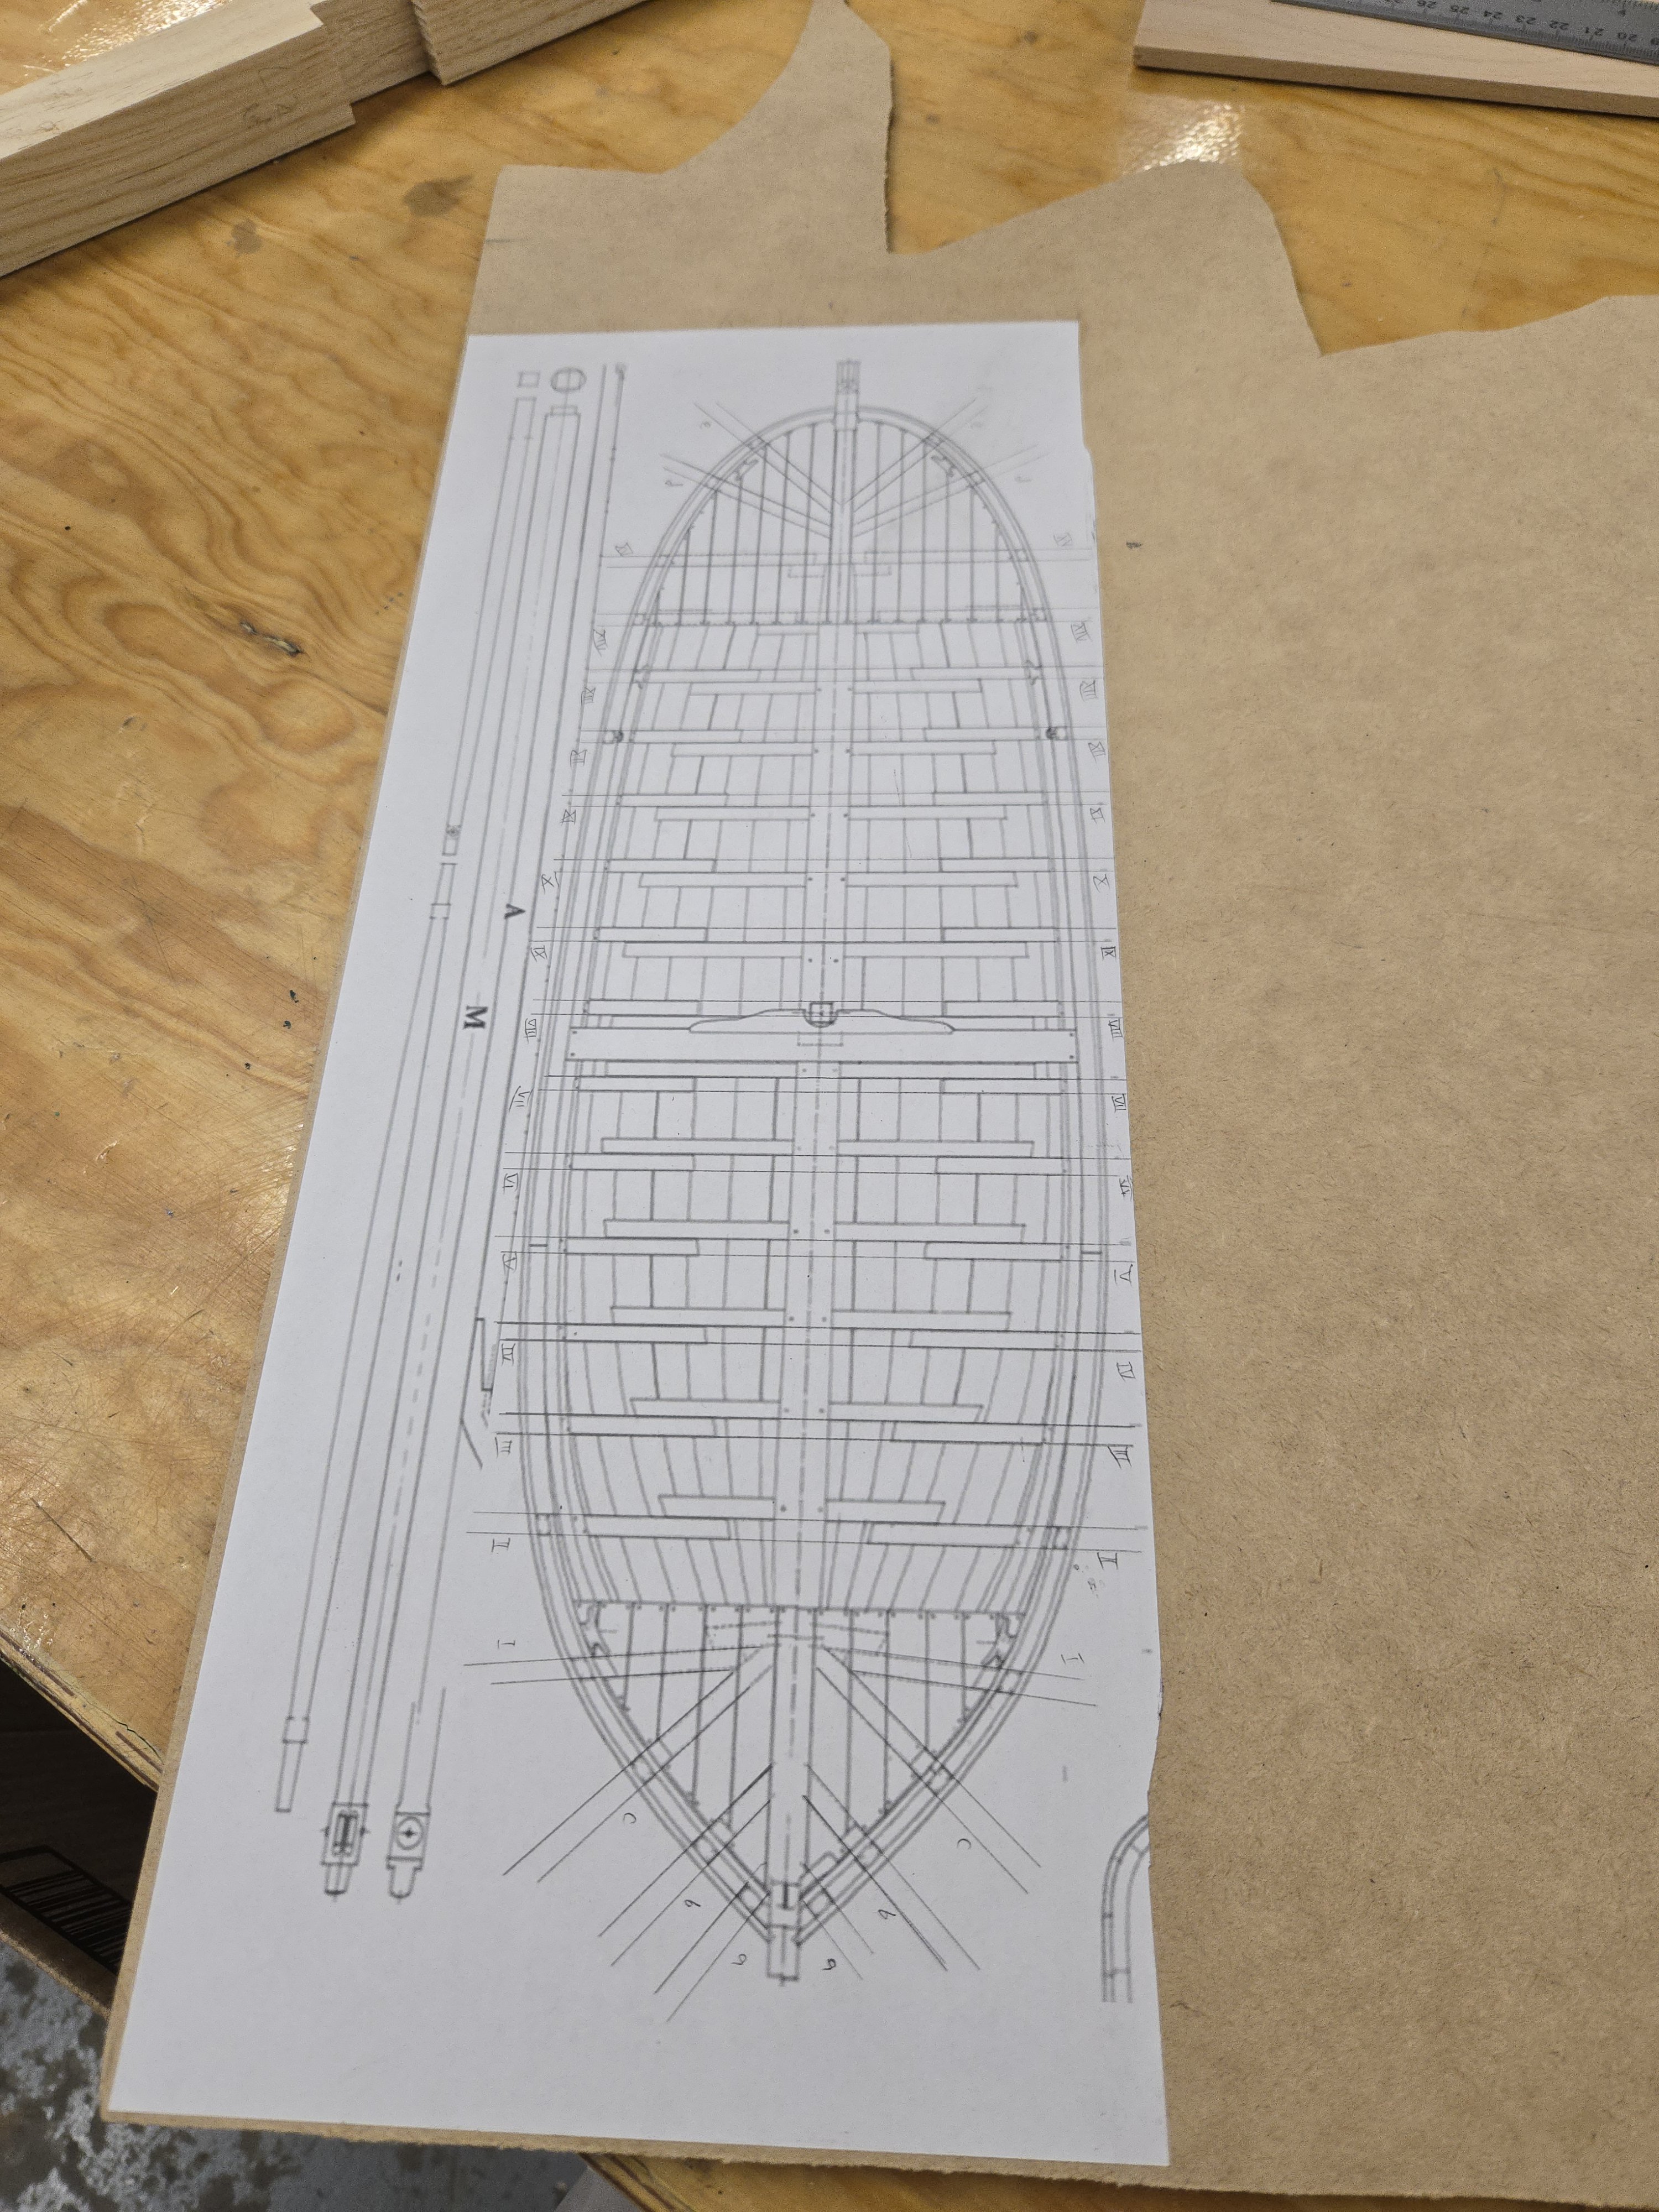
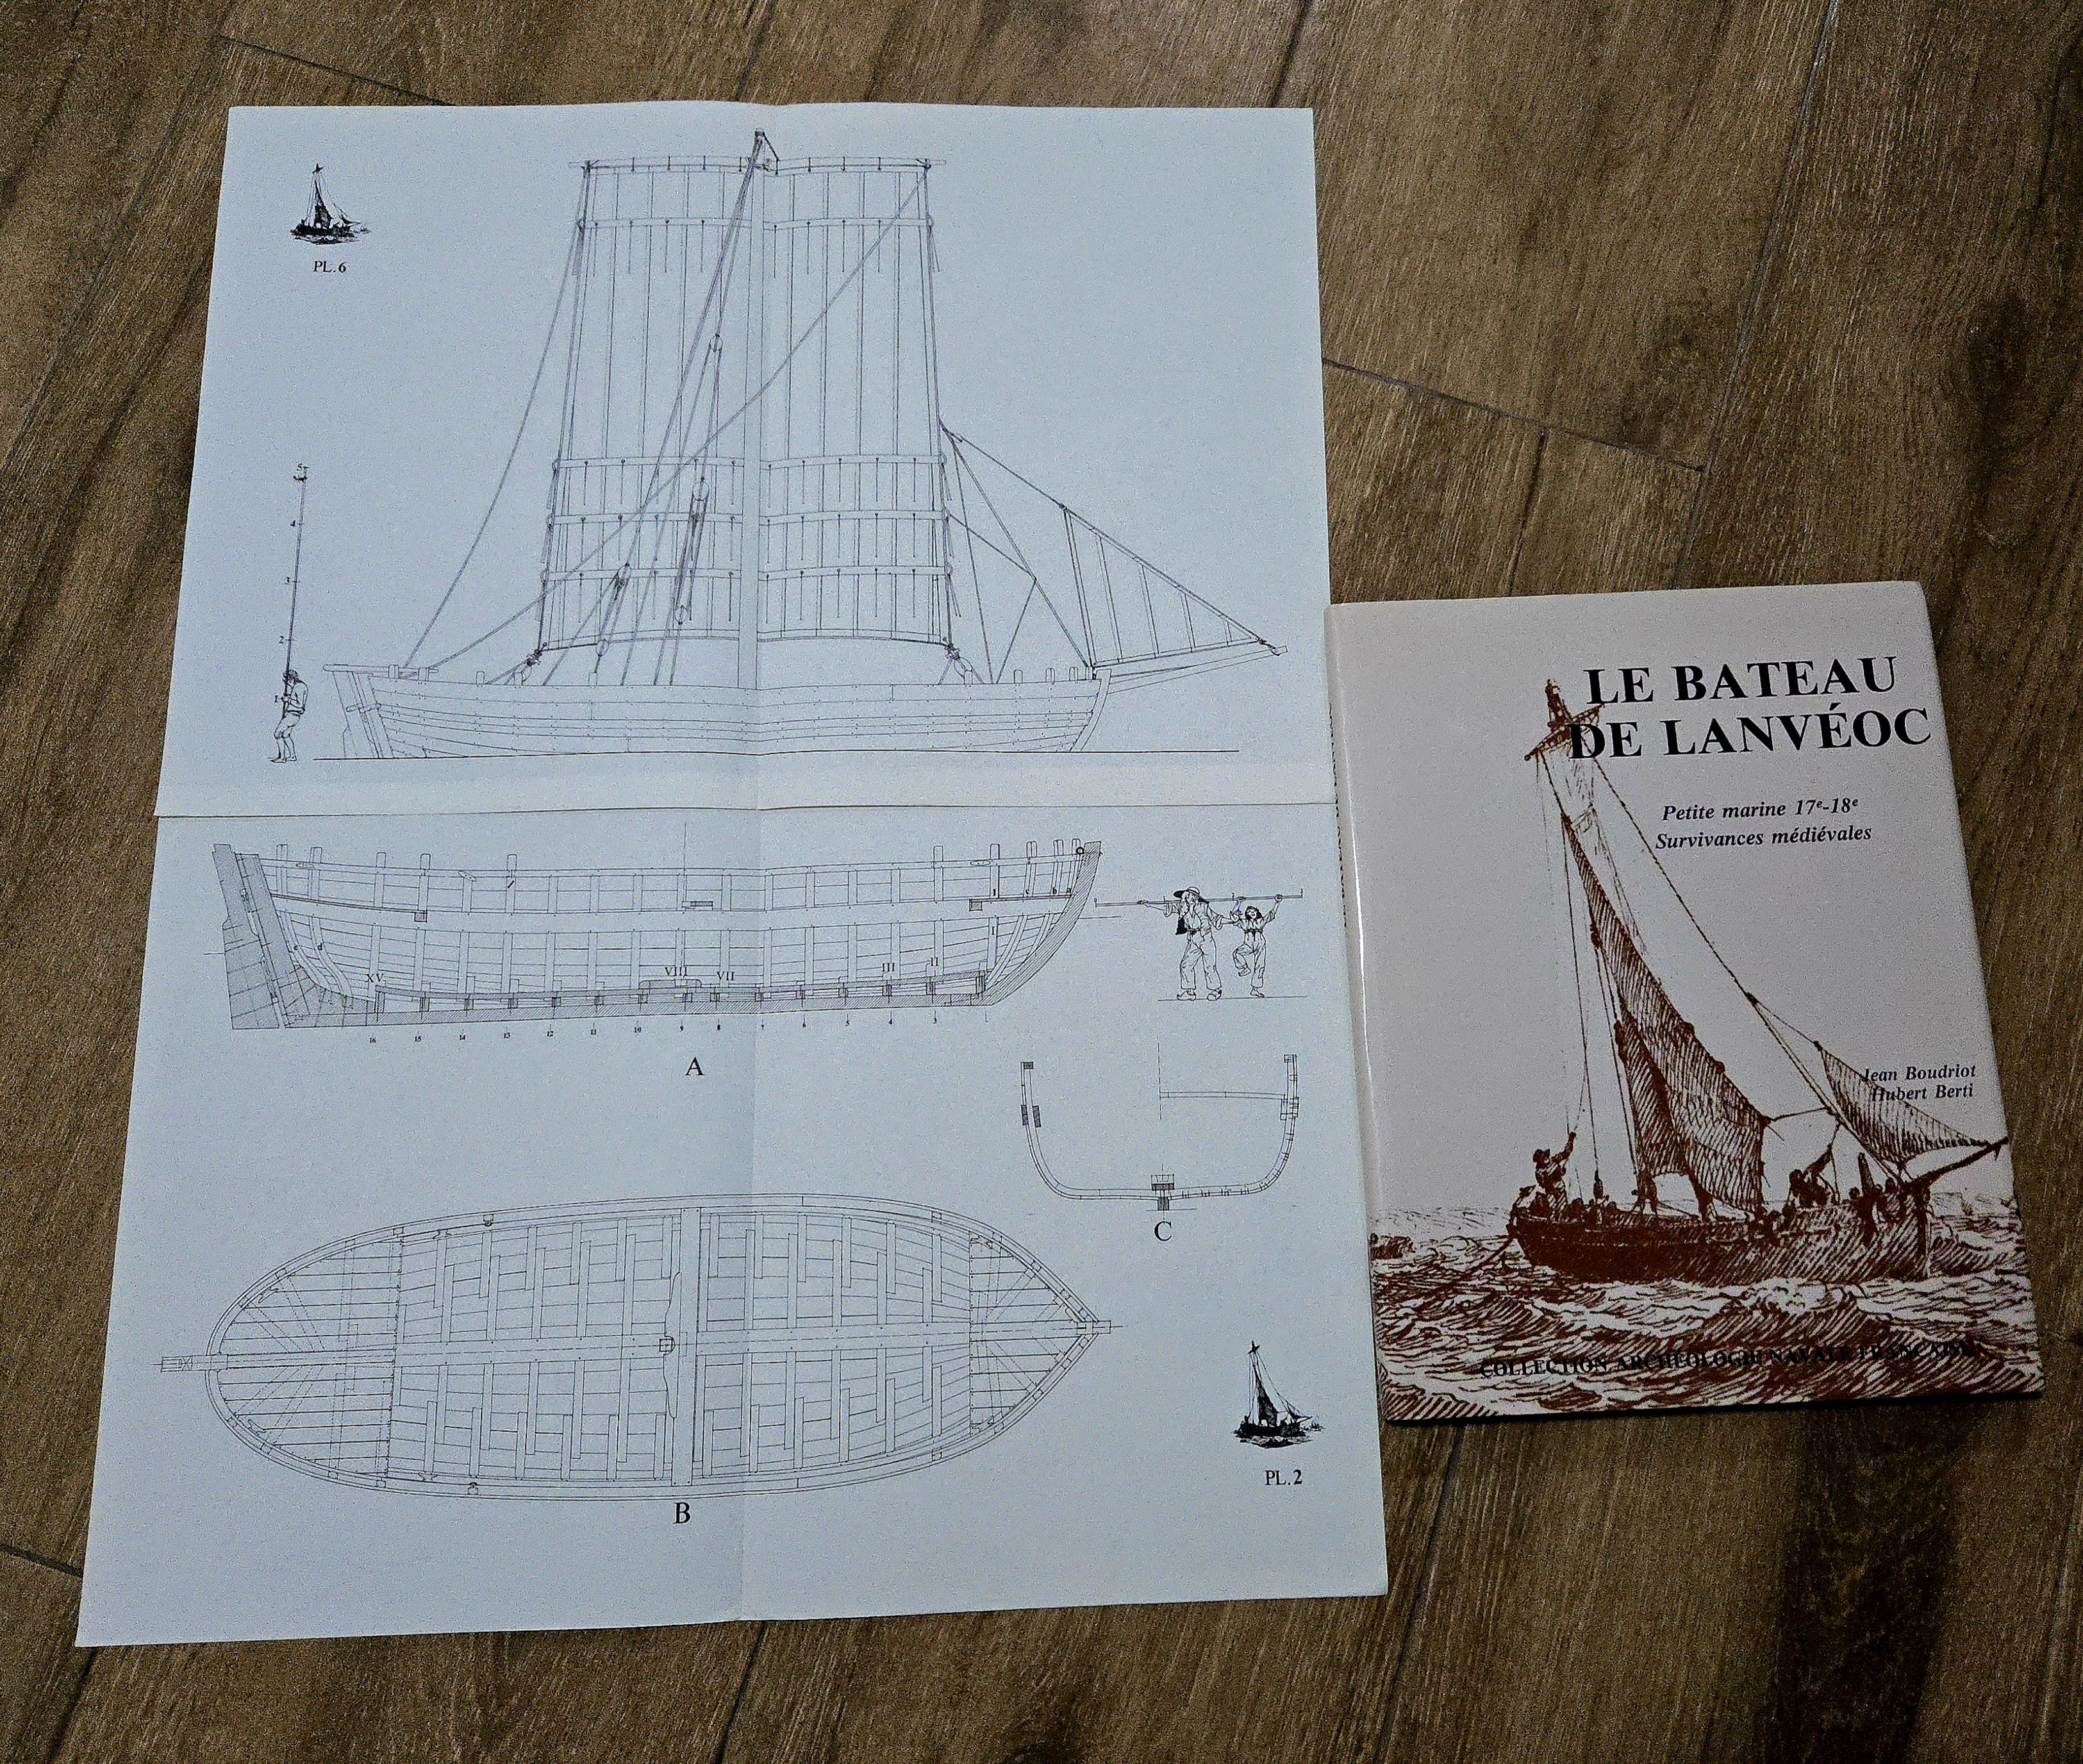
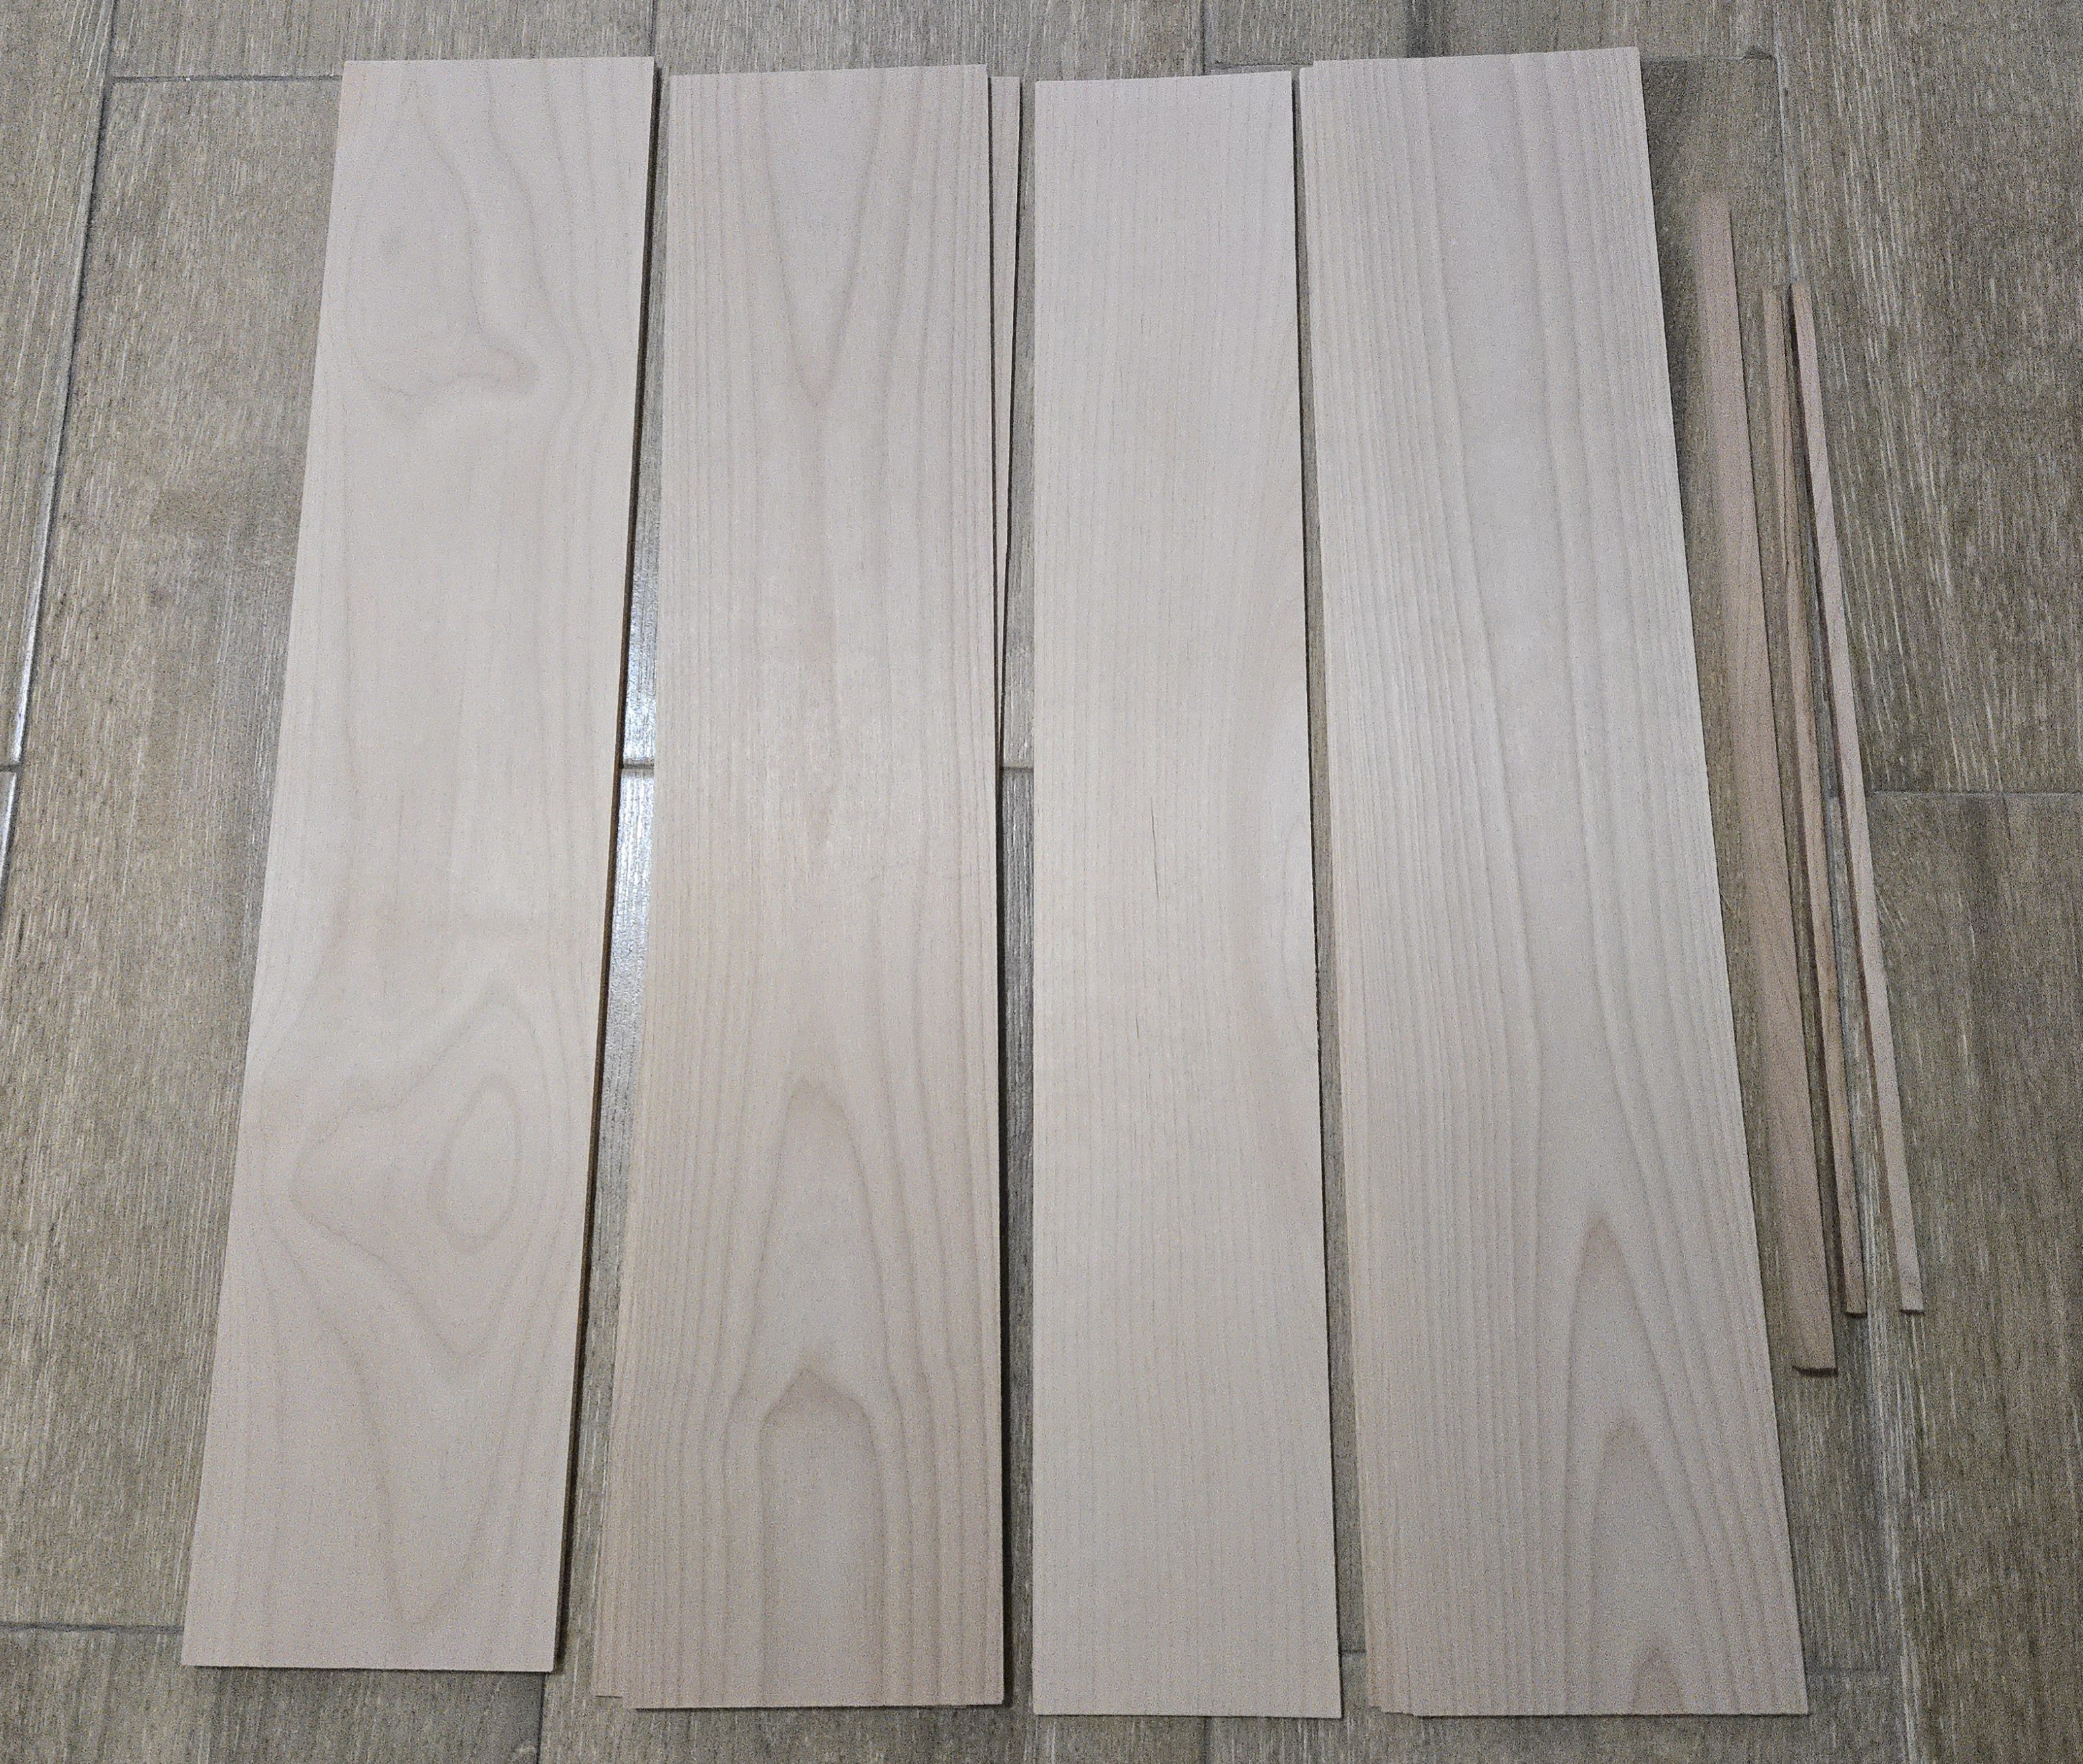
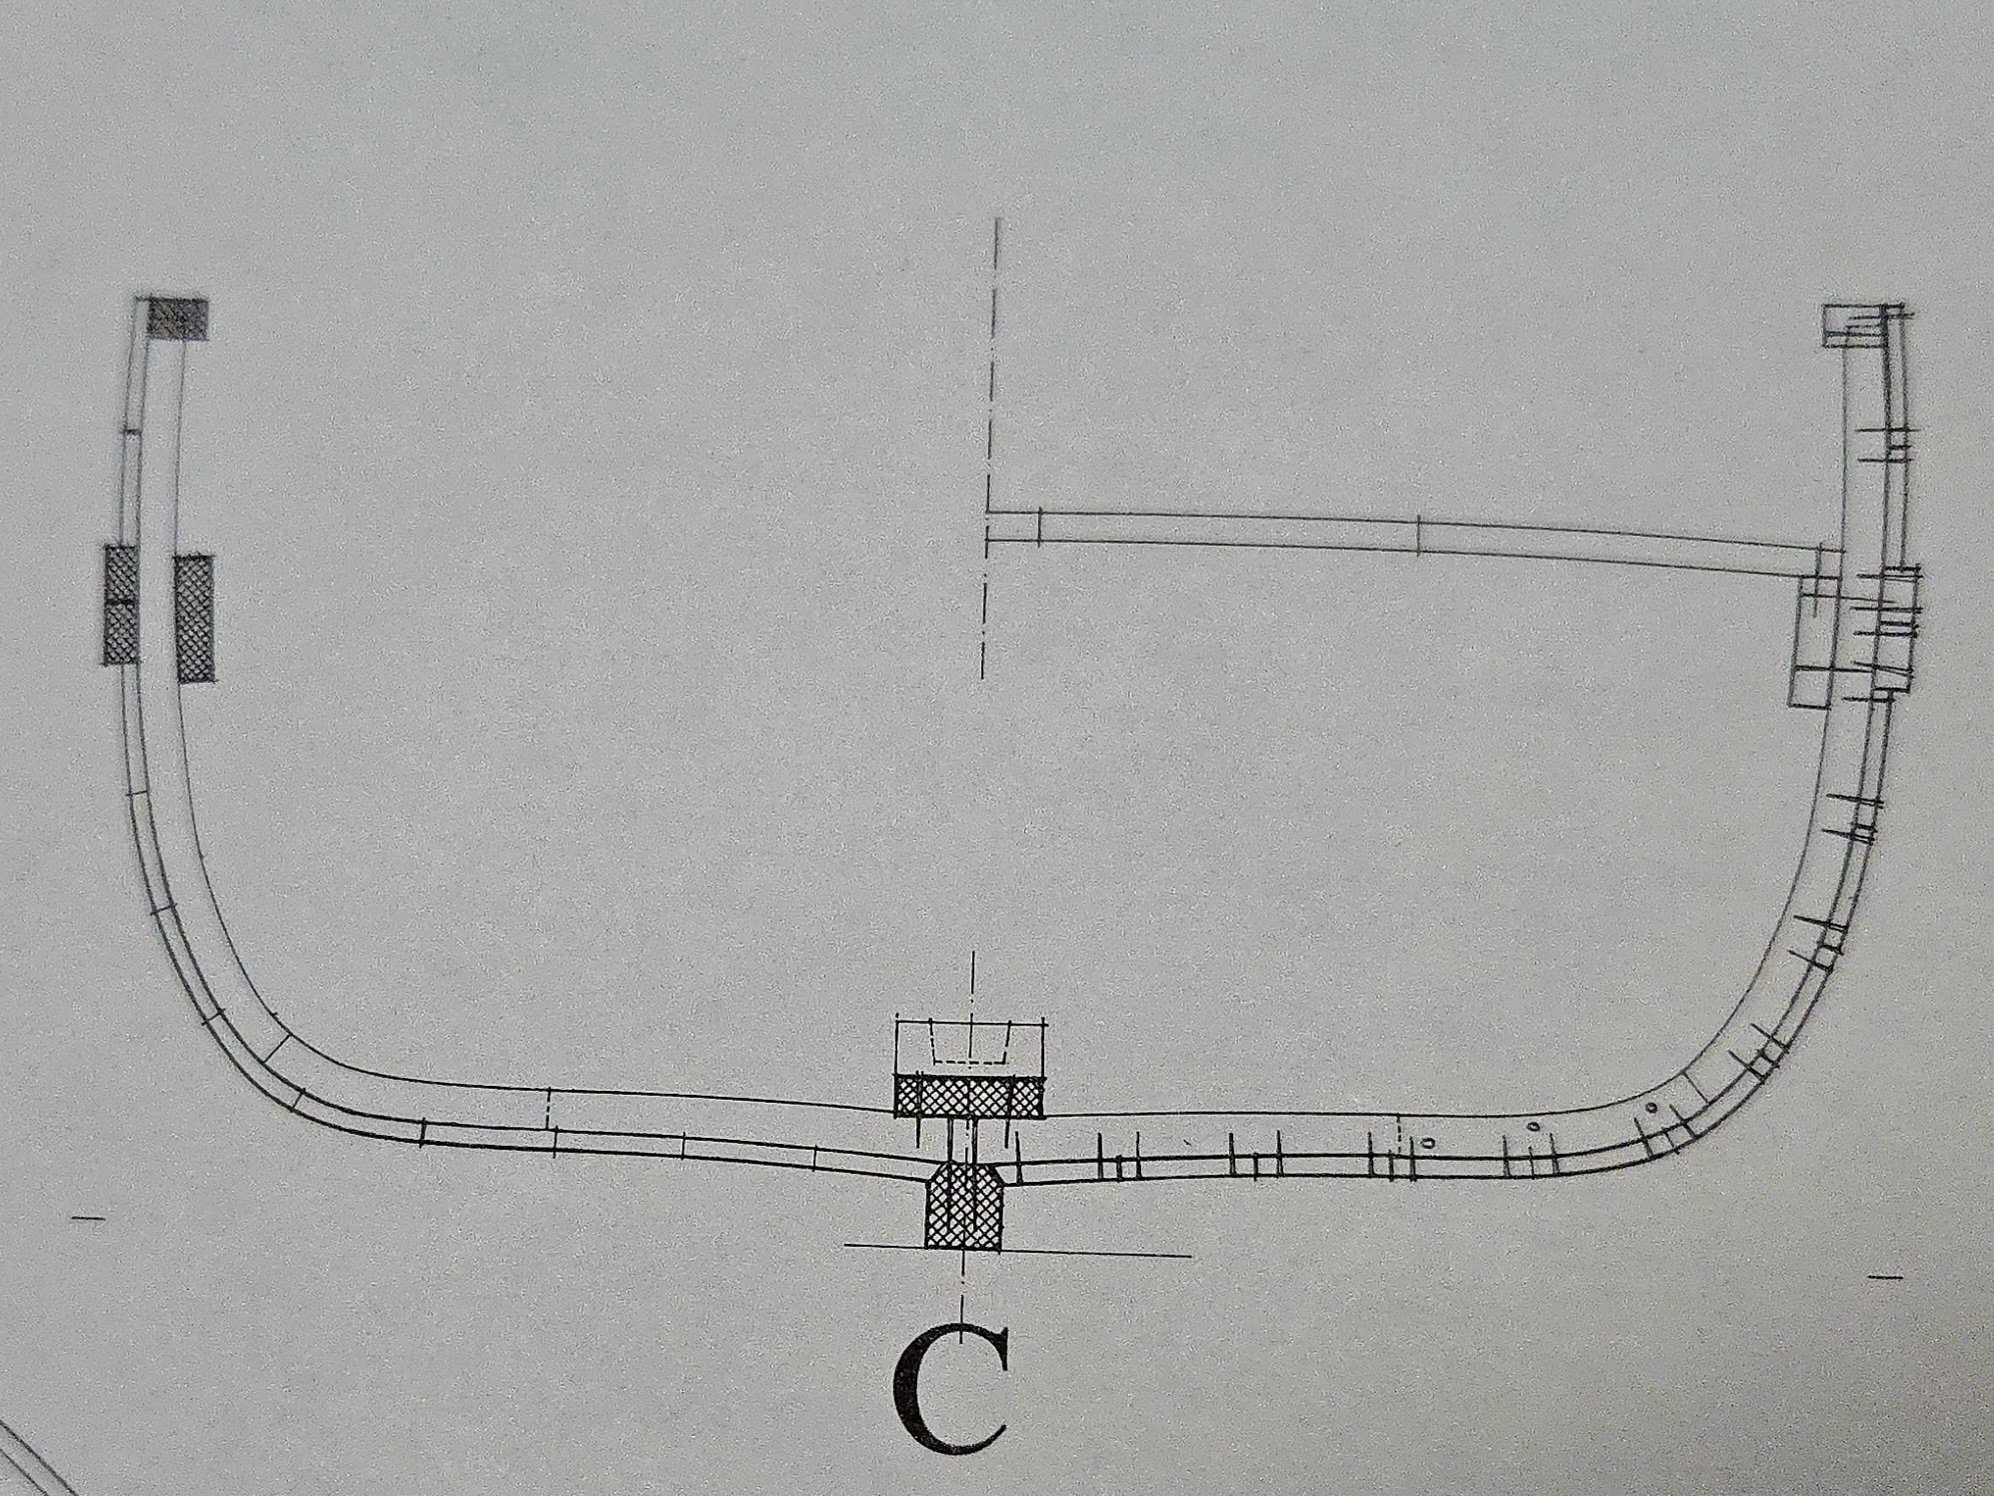
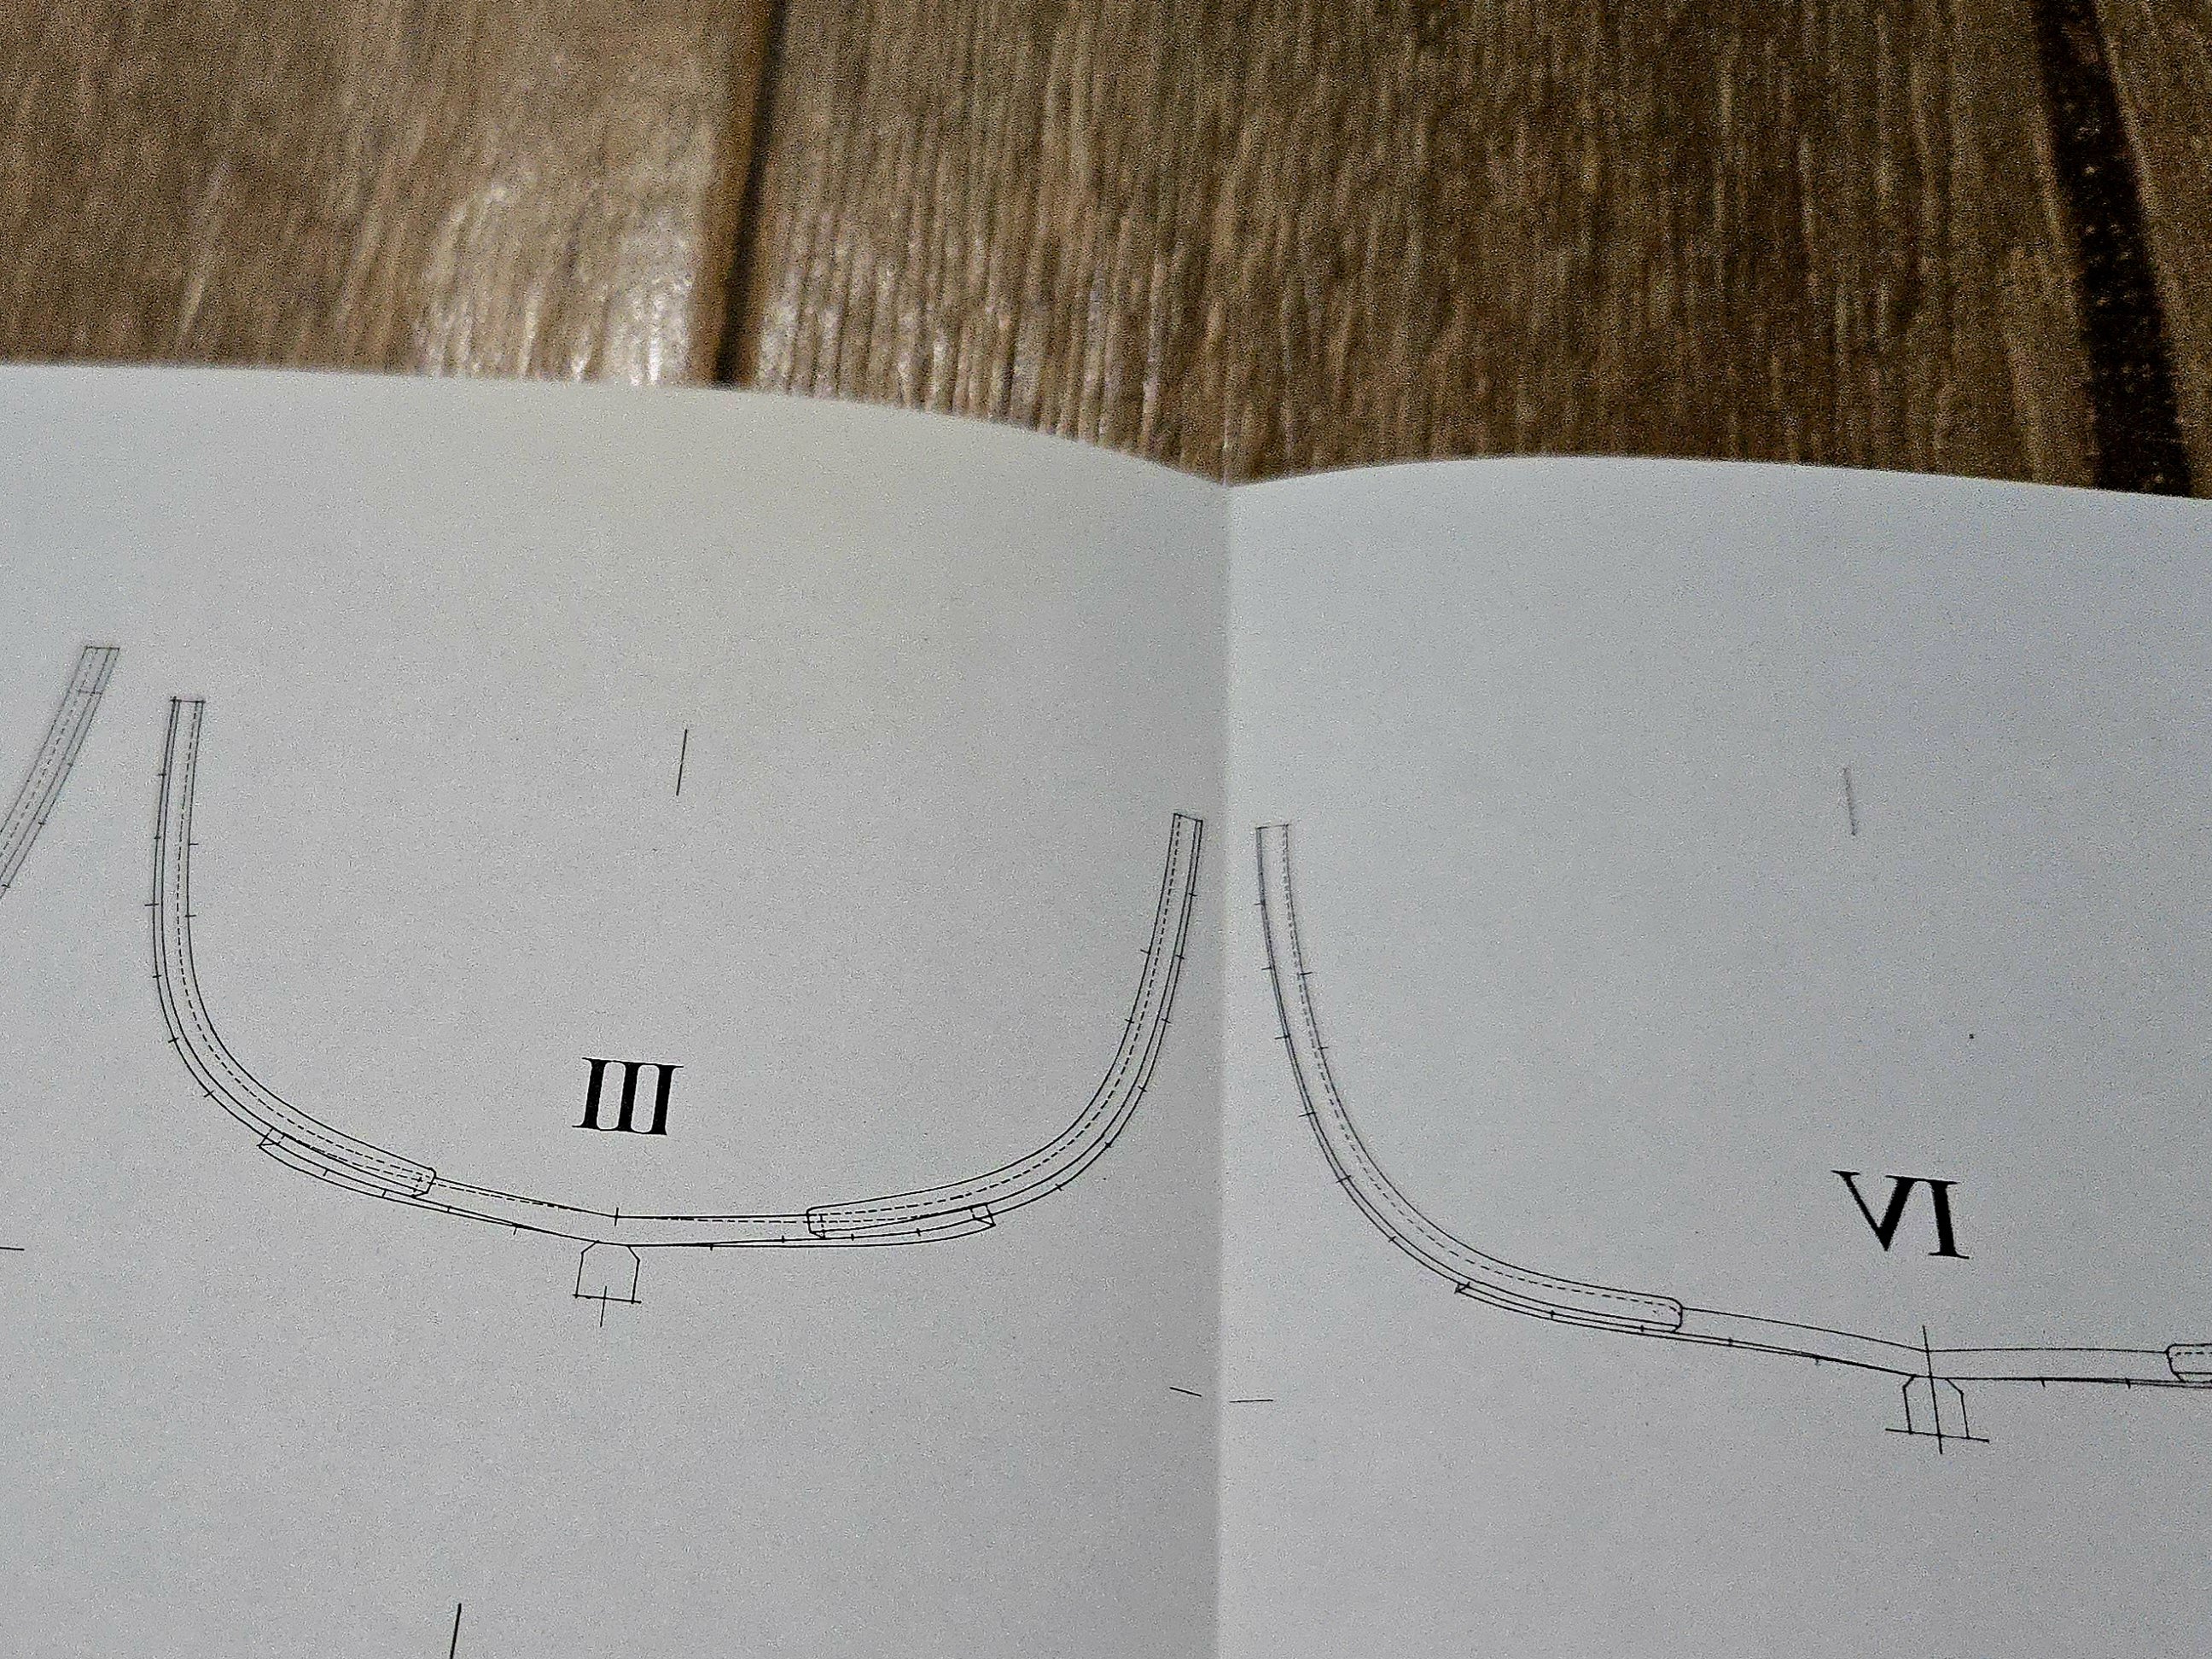
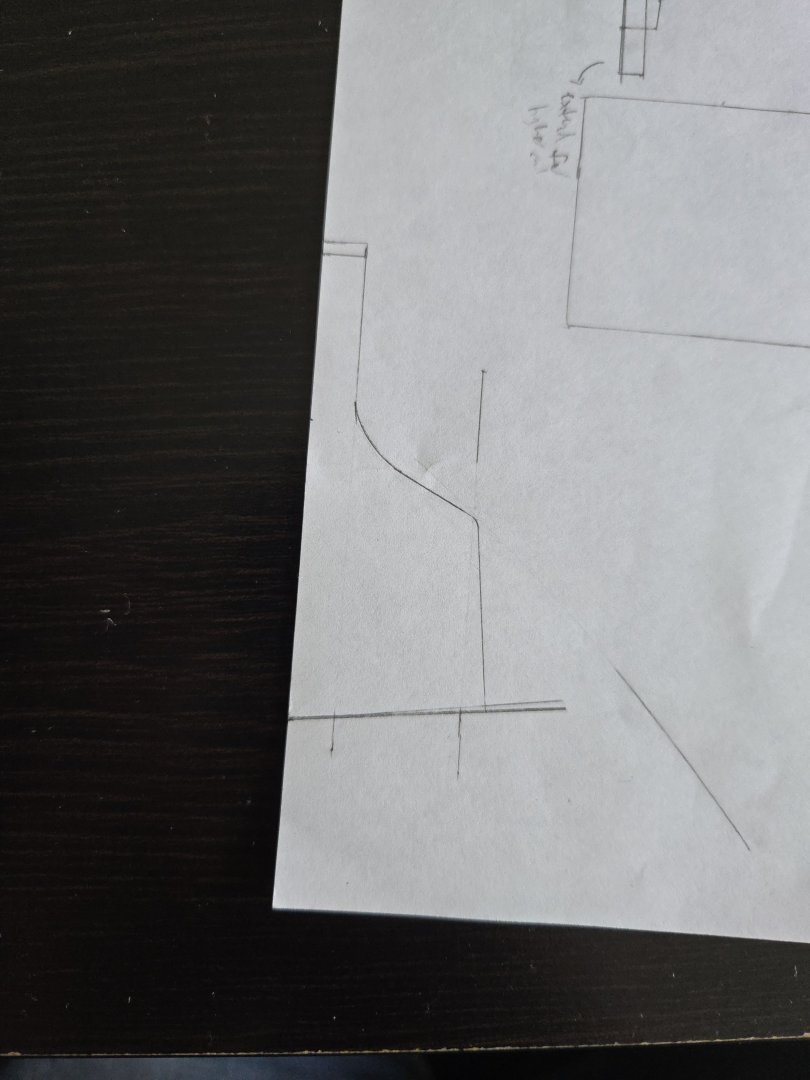
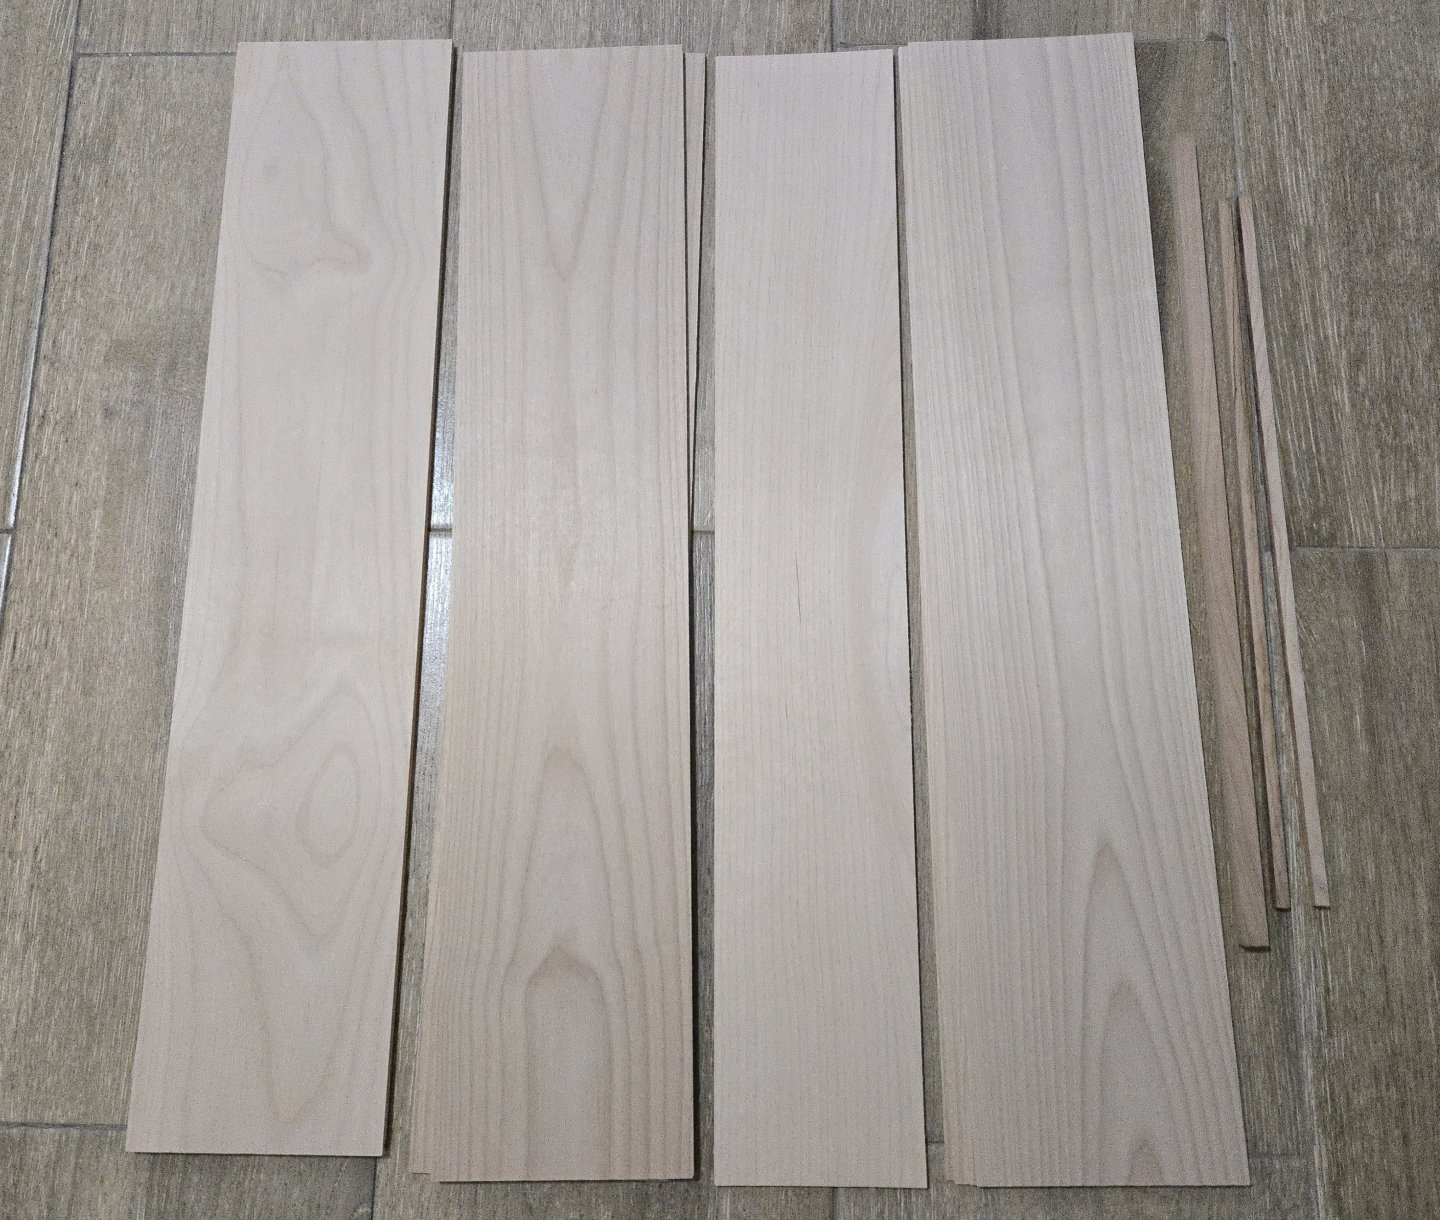
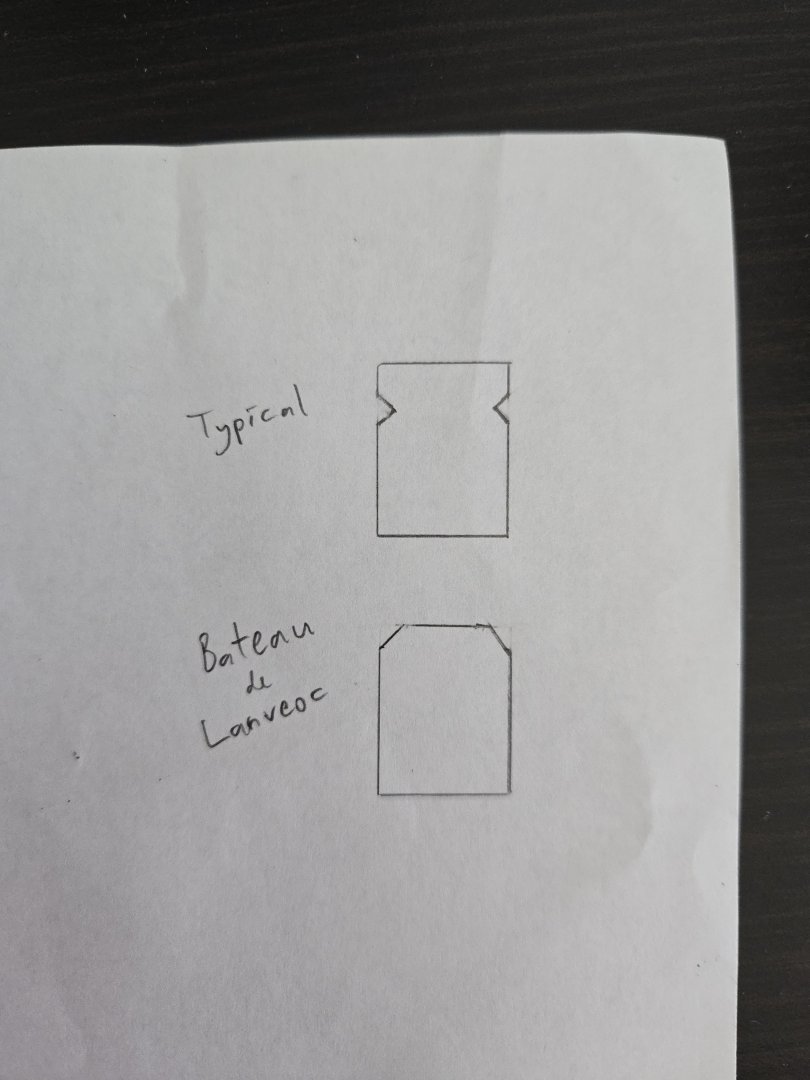
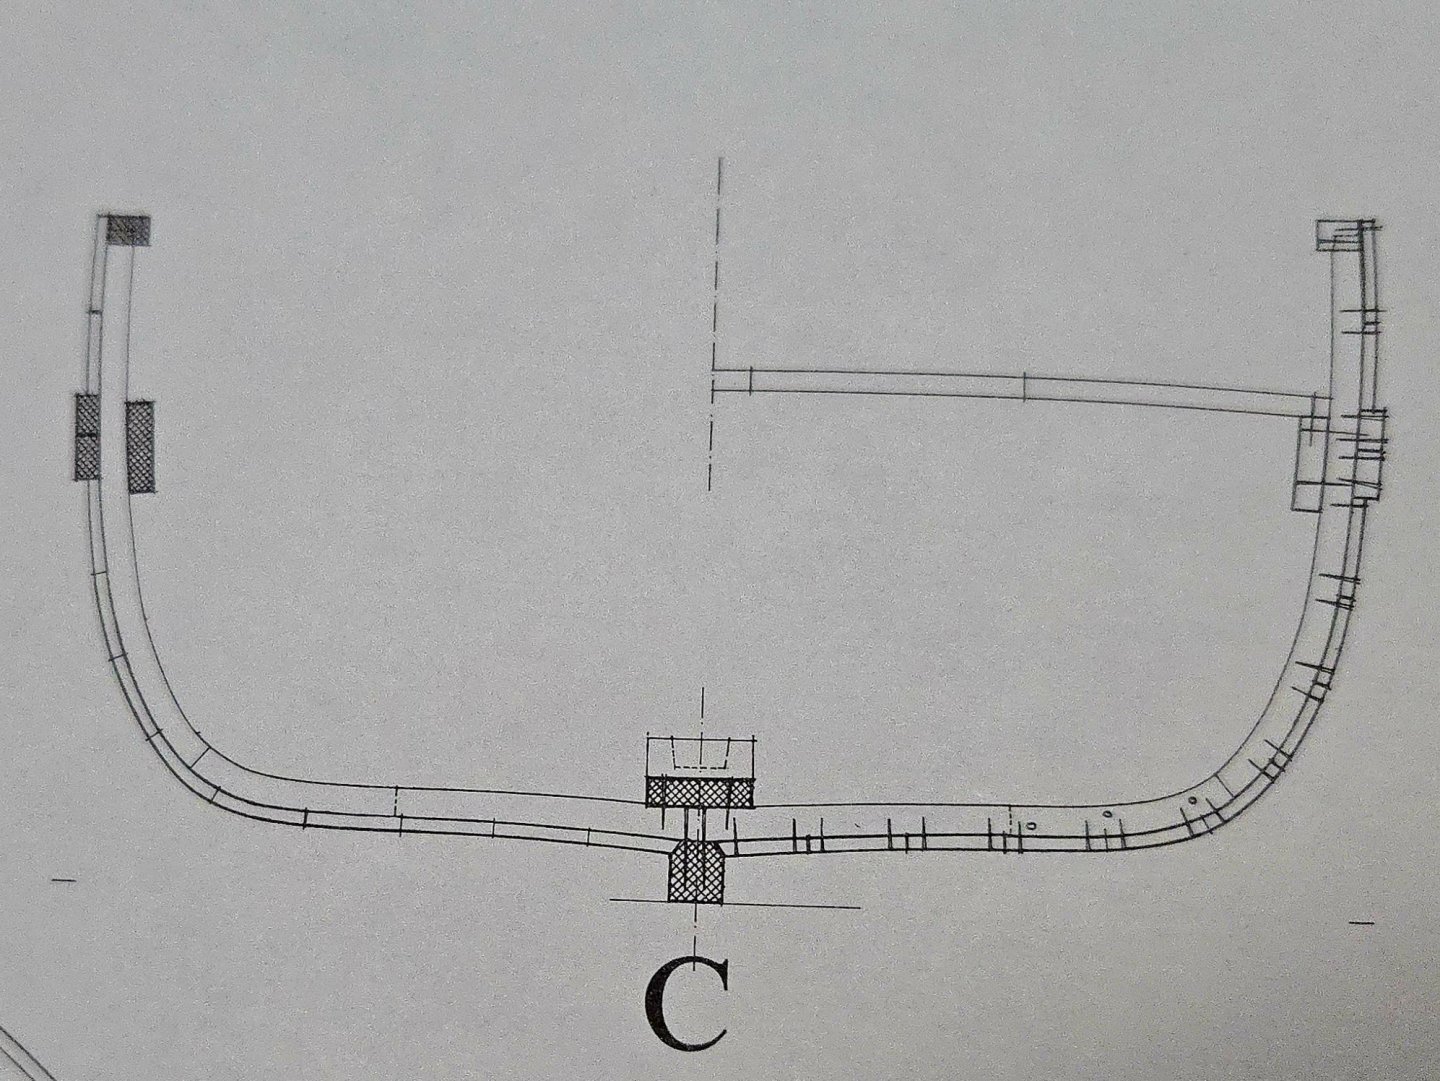
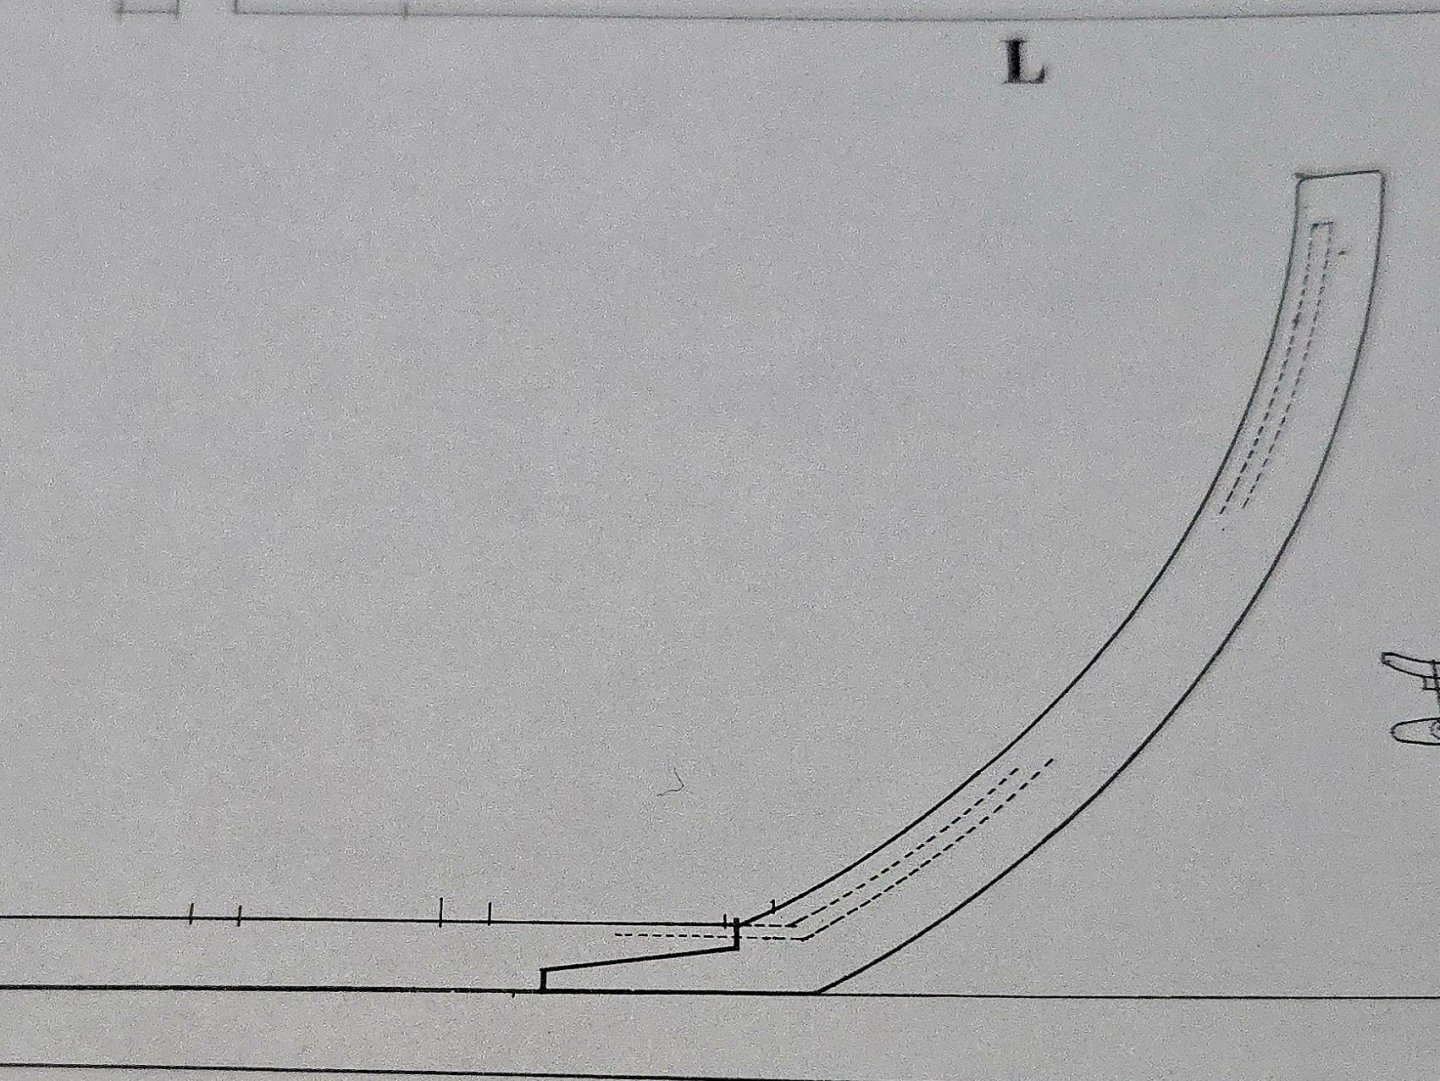
With my Lancha Chilota build about to shift from wood-working to rigging, I decided that it’s a good time to start another build. Once again, I’ve selected a relatively small, “traditional” workboat. This time, though, I have a complete plan set, which in theory should cut down on the second-guessing I’ve experienced in many other builds. There’s also a fair bit already written about this vessel, so I will not be doing as much research as on my Latin American builds. This will be a major step up in complexity from what I've built before, but I'm looking forward to the challenge. Since I started modeling, I’ve wanted to do a Plank-on-Frame build, and I’ve been fascinated by Ancre’s monographs. I was lucky enough to be able to access a few, mostly for warships, via the library, and I was amazed by the level of detail they show. But the ones I was really interested in were for the small and mid-sized working boats. I initially thought I might build the Gozzo Santa Caterina, but the model would be quite tiny in my preferred 1:32 scale, plus a few existing build logs pointed out a few issues with the monograph’s plans. Instead, I decided to go with the Bateau de Lanveoc. The monograph has a lot more detail on the type’s history than is given for the Gozzo, although unfortunately I could only get it in French—my phone’s translate function will be getting quite the workout. The Bateau’s hull is very simple, with fewer parts than even the Gozzo, which makes it ideal for a first full POF build. More importantly, I think it’s a very interesting vessel. The single square sail looks almost anachronistic on a boat from the 1800s, and the hull, while far from sleek, looks quite charming to me. To my eye, the keel/stem/sternpost assembly look reminiscent of what I’ve seen for earlier, much larger Atlantic vessels, while the framing looks more like what I’ve seen for Mediterranean vessels. I’ve rescaled the plans from 1:36 to 1:32, bringing the model in line with my Canoa and Lancha builds. After considering several wood options, I decided to build primarily out of alder, with cherry for the mast, yard, and bowsprit. From what I’ve read, alder is harder than basswood and not as hard as cherry, and it sands and holds an edge well without fuzzing like basswood. Its Janka Hardness is comparable with Alaskan yellow cedar. While I know that some recommend against using Alaskan yellow cedar for framing, saying that it’s too soft, this model has fairly bulky frames that should mitigate against this. It seems like it should be very workable with hand tools. I’ve actually had the alder for quite some time, as I placed an order for the wood from Ocooch Hardwoods last year in Chicago to celebrate finishing my most intensive quarter of teaching yet. Ocooch was able to mill the wood to custom sizes down to a minimum of 3/64-inch thick for the planking, and I found their customer service and shipping to be excellent. The cherry for the mast (plus some sheets) I got from Modeler’s Woodshed, where Joe also did an excellent job with the order. Unlike Ocooch, Modeler’s Woodshed and mill down to 1/32-inch-thick (or apparently even thinner). In my experience, both businesses are good options, and you can’t go wrong with either (at least if you’re in the US, I have no idea how international shipping would go). I foresee this being a pretty slow build. Things are going to ramp up at work soon, so I’ll be pretty busy. Plus, much of the work of cutting out frames and other parts will have to be done at the carpentry workshop I’ve been participating in—where I can access a fretsaw and other tools that I don’t really have the space for at home—which I’ll probably only be able to attend once a week for the foreseeable future. I should also note that I’m considering a few different ways of building this. One option is to do a complete build, painting the exterior black (as the actual vessels were tarred on the outside) and leaving the interior natural. Another possibility is to do something like an Admiralty-style model, leaving it unplanked below the wales to show off the frames and construction methods, and leaving the wood all natural. In this case, I could either build it with the mast and rigging (which would be interesting but takes up quite a bit more space) or do it as strictly a hull model. I’ll have to decide eventually, but there are a lot of frames to cut before I get to that point. For this first post, I want to leave things on a question that I have before I make any sawdust. Looking at the drawings, it seems like the rabbet in the keel is quite different from what I’m used to seeing. Generally, the keel rabbet is a v-shaped notch (with the angle of course changing over the length of the keel). But from the plans, it seems like the rabbet over most of the keel is simply a 45-degree angle cut along the top of the keel (see simplified drawing below). The rabbet runs directly into the frames. Moreover, there do not seem to be any notches in the keel for the frames, or in the frames for the keel, which would bring the bottom of the frames a bit lower on the keel. Finally, the keelson is also not notched and seems to just sit on top of the frames, leaving space between each. This means that there’s nothing (except the spaced frames) to seat the end of the rabbet. To me, this seems like a very strange design that, on an actual vessel, would very easily leak along the seam of the keel and the planking. Yet this seems to be what the plans show (see below) and what was done on this build: https://www.alexshipmodels.com/2016/12/10/le-bateau-de-lanveoc/ Below: Cross-section of hull showing keel and frames. The lack of frame notches is apparent. Below: Side view of the construction showing the lack of keel notches and the space between the keel and the keelson. Below: Side view of stem and fore part of keel with rabbet marked in dashed line. You can see how the rabbet is a notch along the stem, but then runs straight into the top of the keel. Below: Frames, once again the lack of a keel notch in the floors is evident. (Sorry for the blurry photos, I’m not very good at close-up photography on my phone). So, am I reading the plans wrong, or is this how I should actually build it?


- 136 replies
-
- 9
-
-
- ancre
- Bateau de Lanveoc
- (and 2 more)