JacquesCousteau
-
Posts
1,374 -
Joined
-
Last visited
Content Type
Profiles
Forums
Gallery
Events
Everything posted by JacquesCousteau
-
 Checking it in the light of day: yes I think there's a bit of chatter. I'll see if I can sand it out.
- 312 replies
-
- 4
-

-
- Chile
- Latin America
- (and 6 more)
-
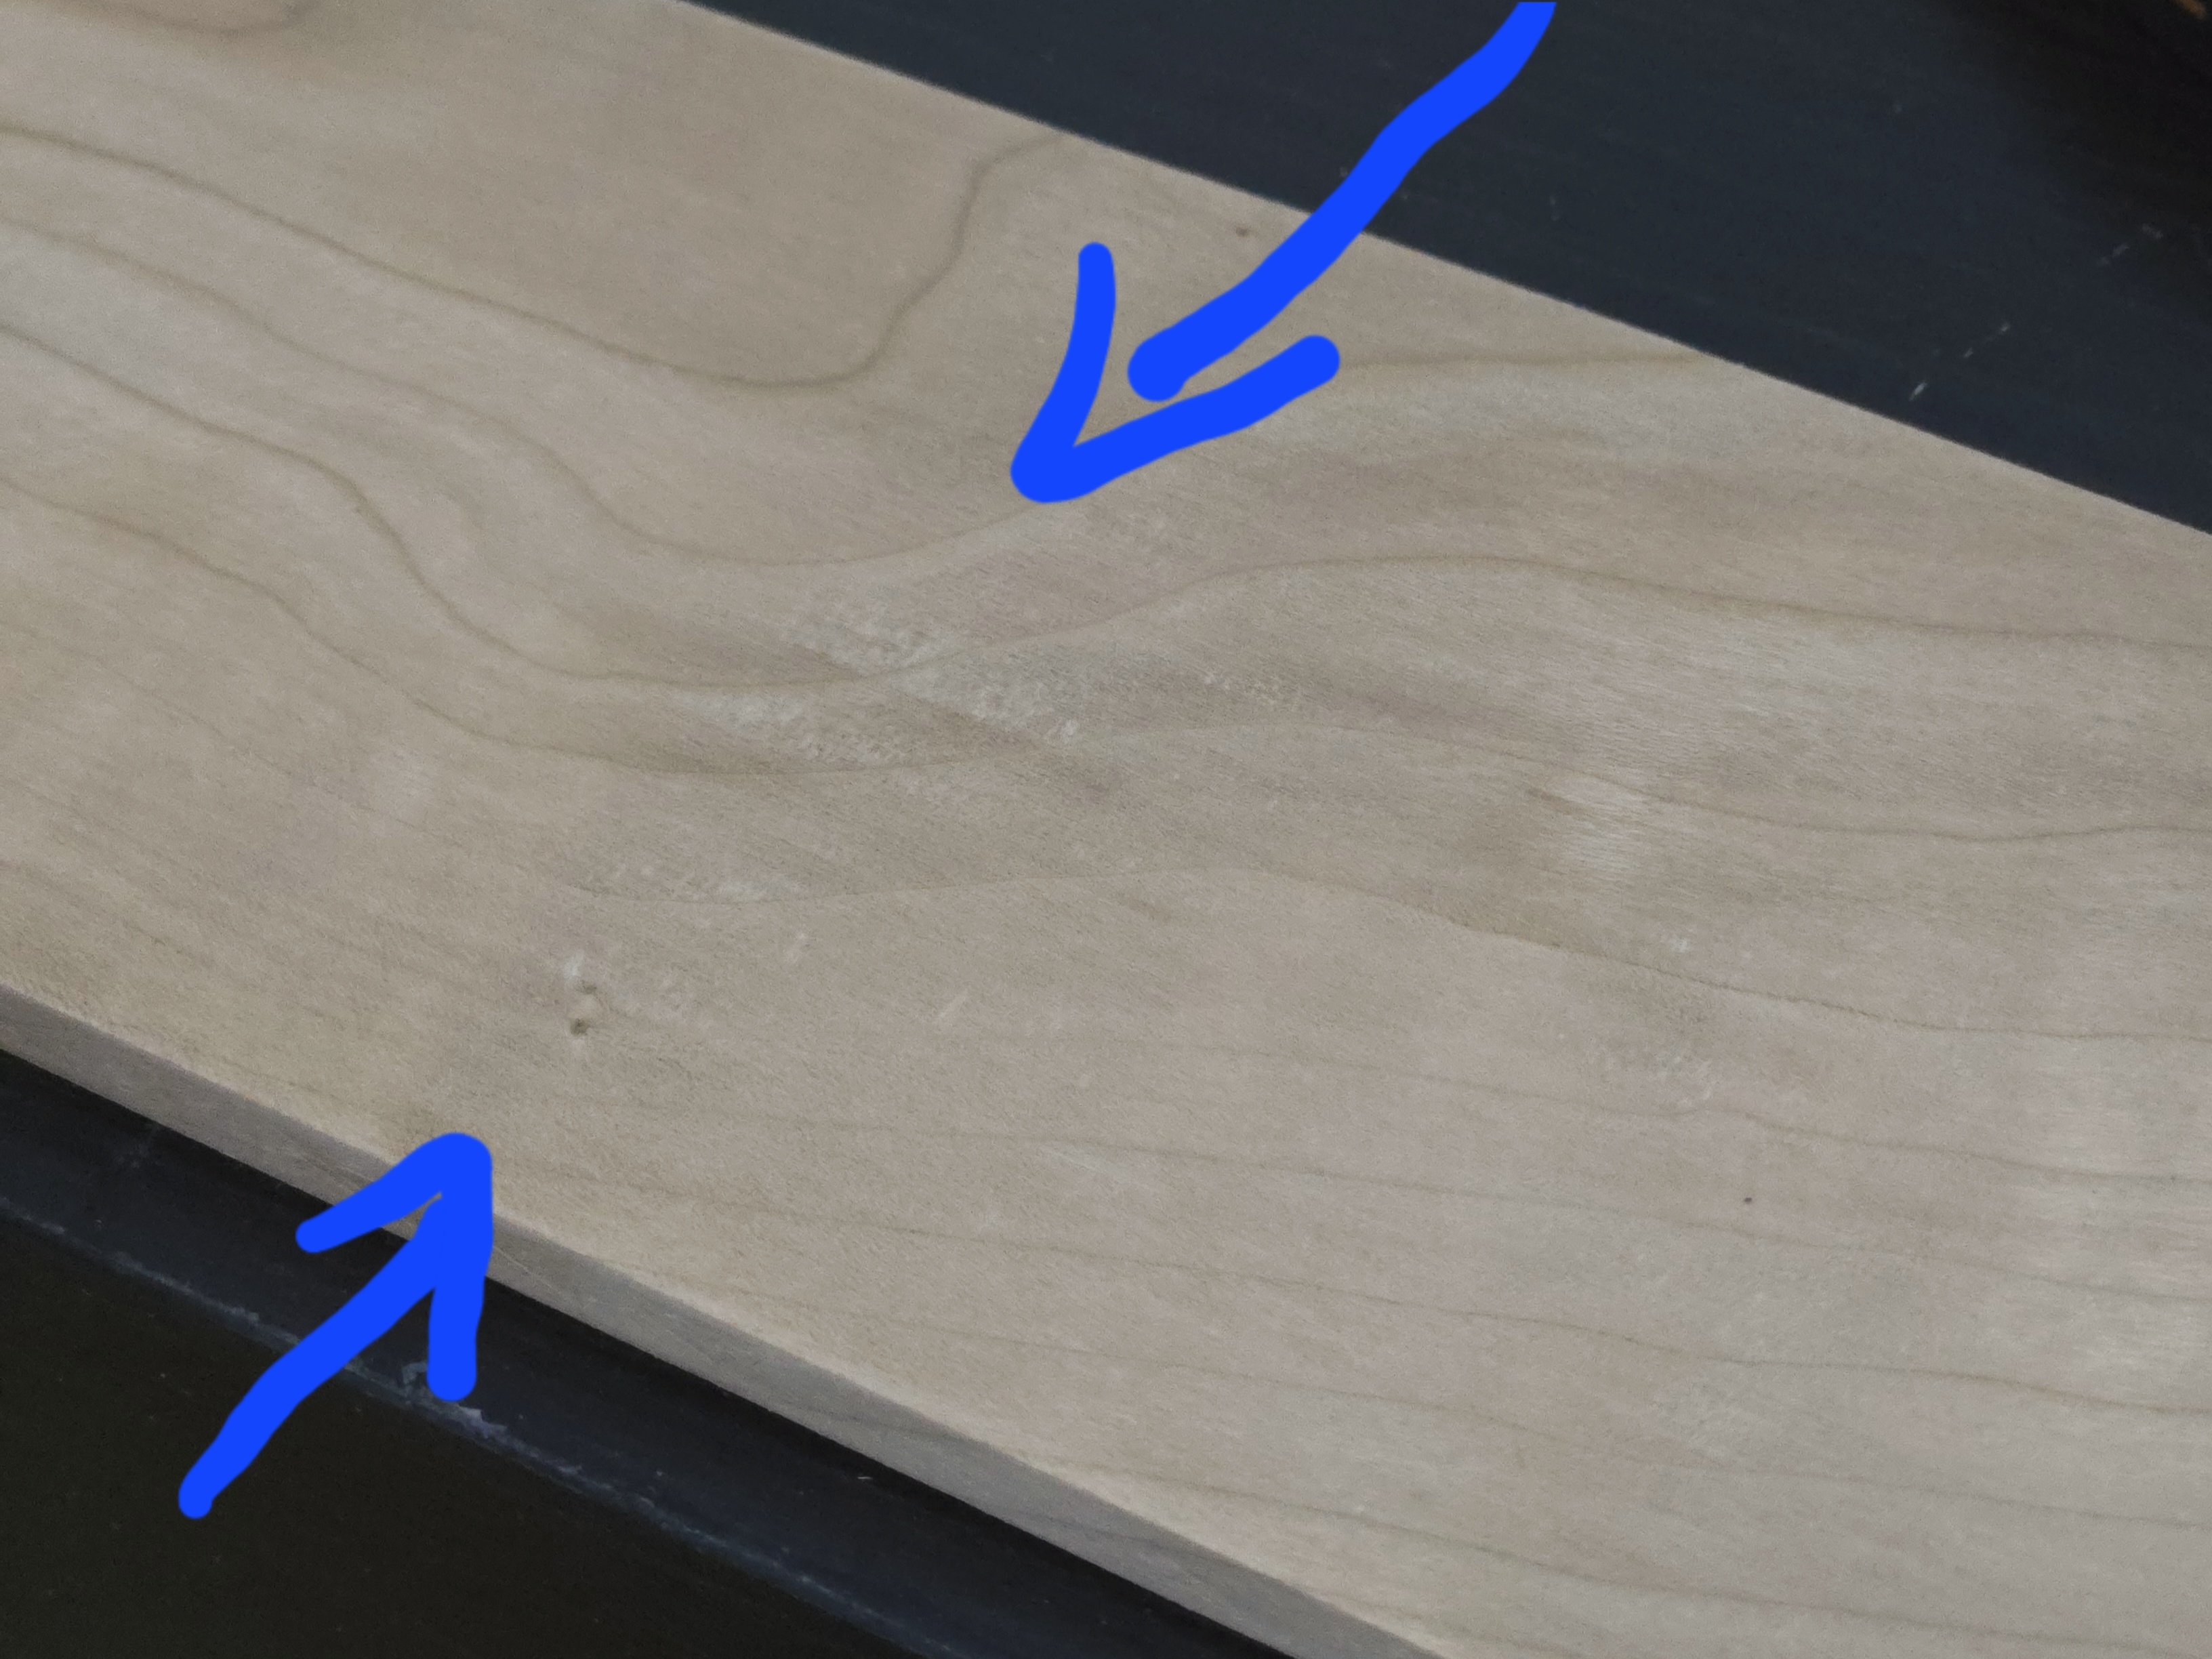
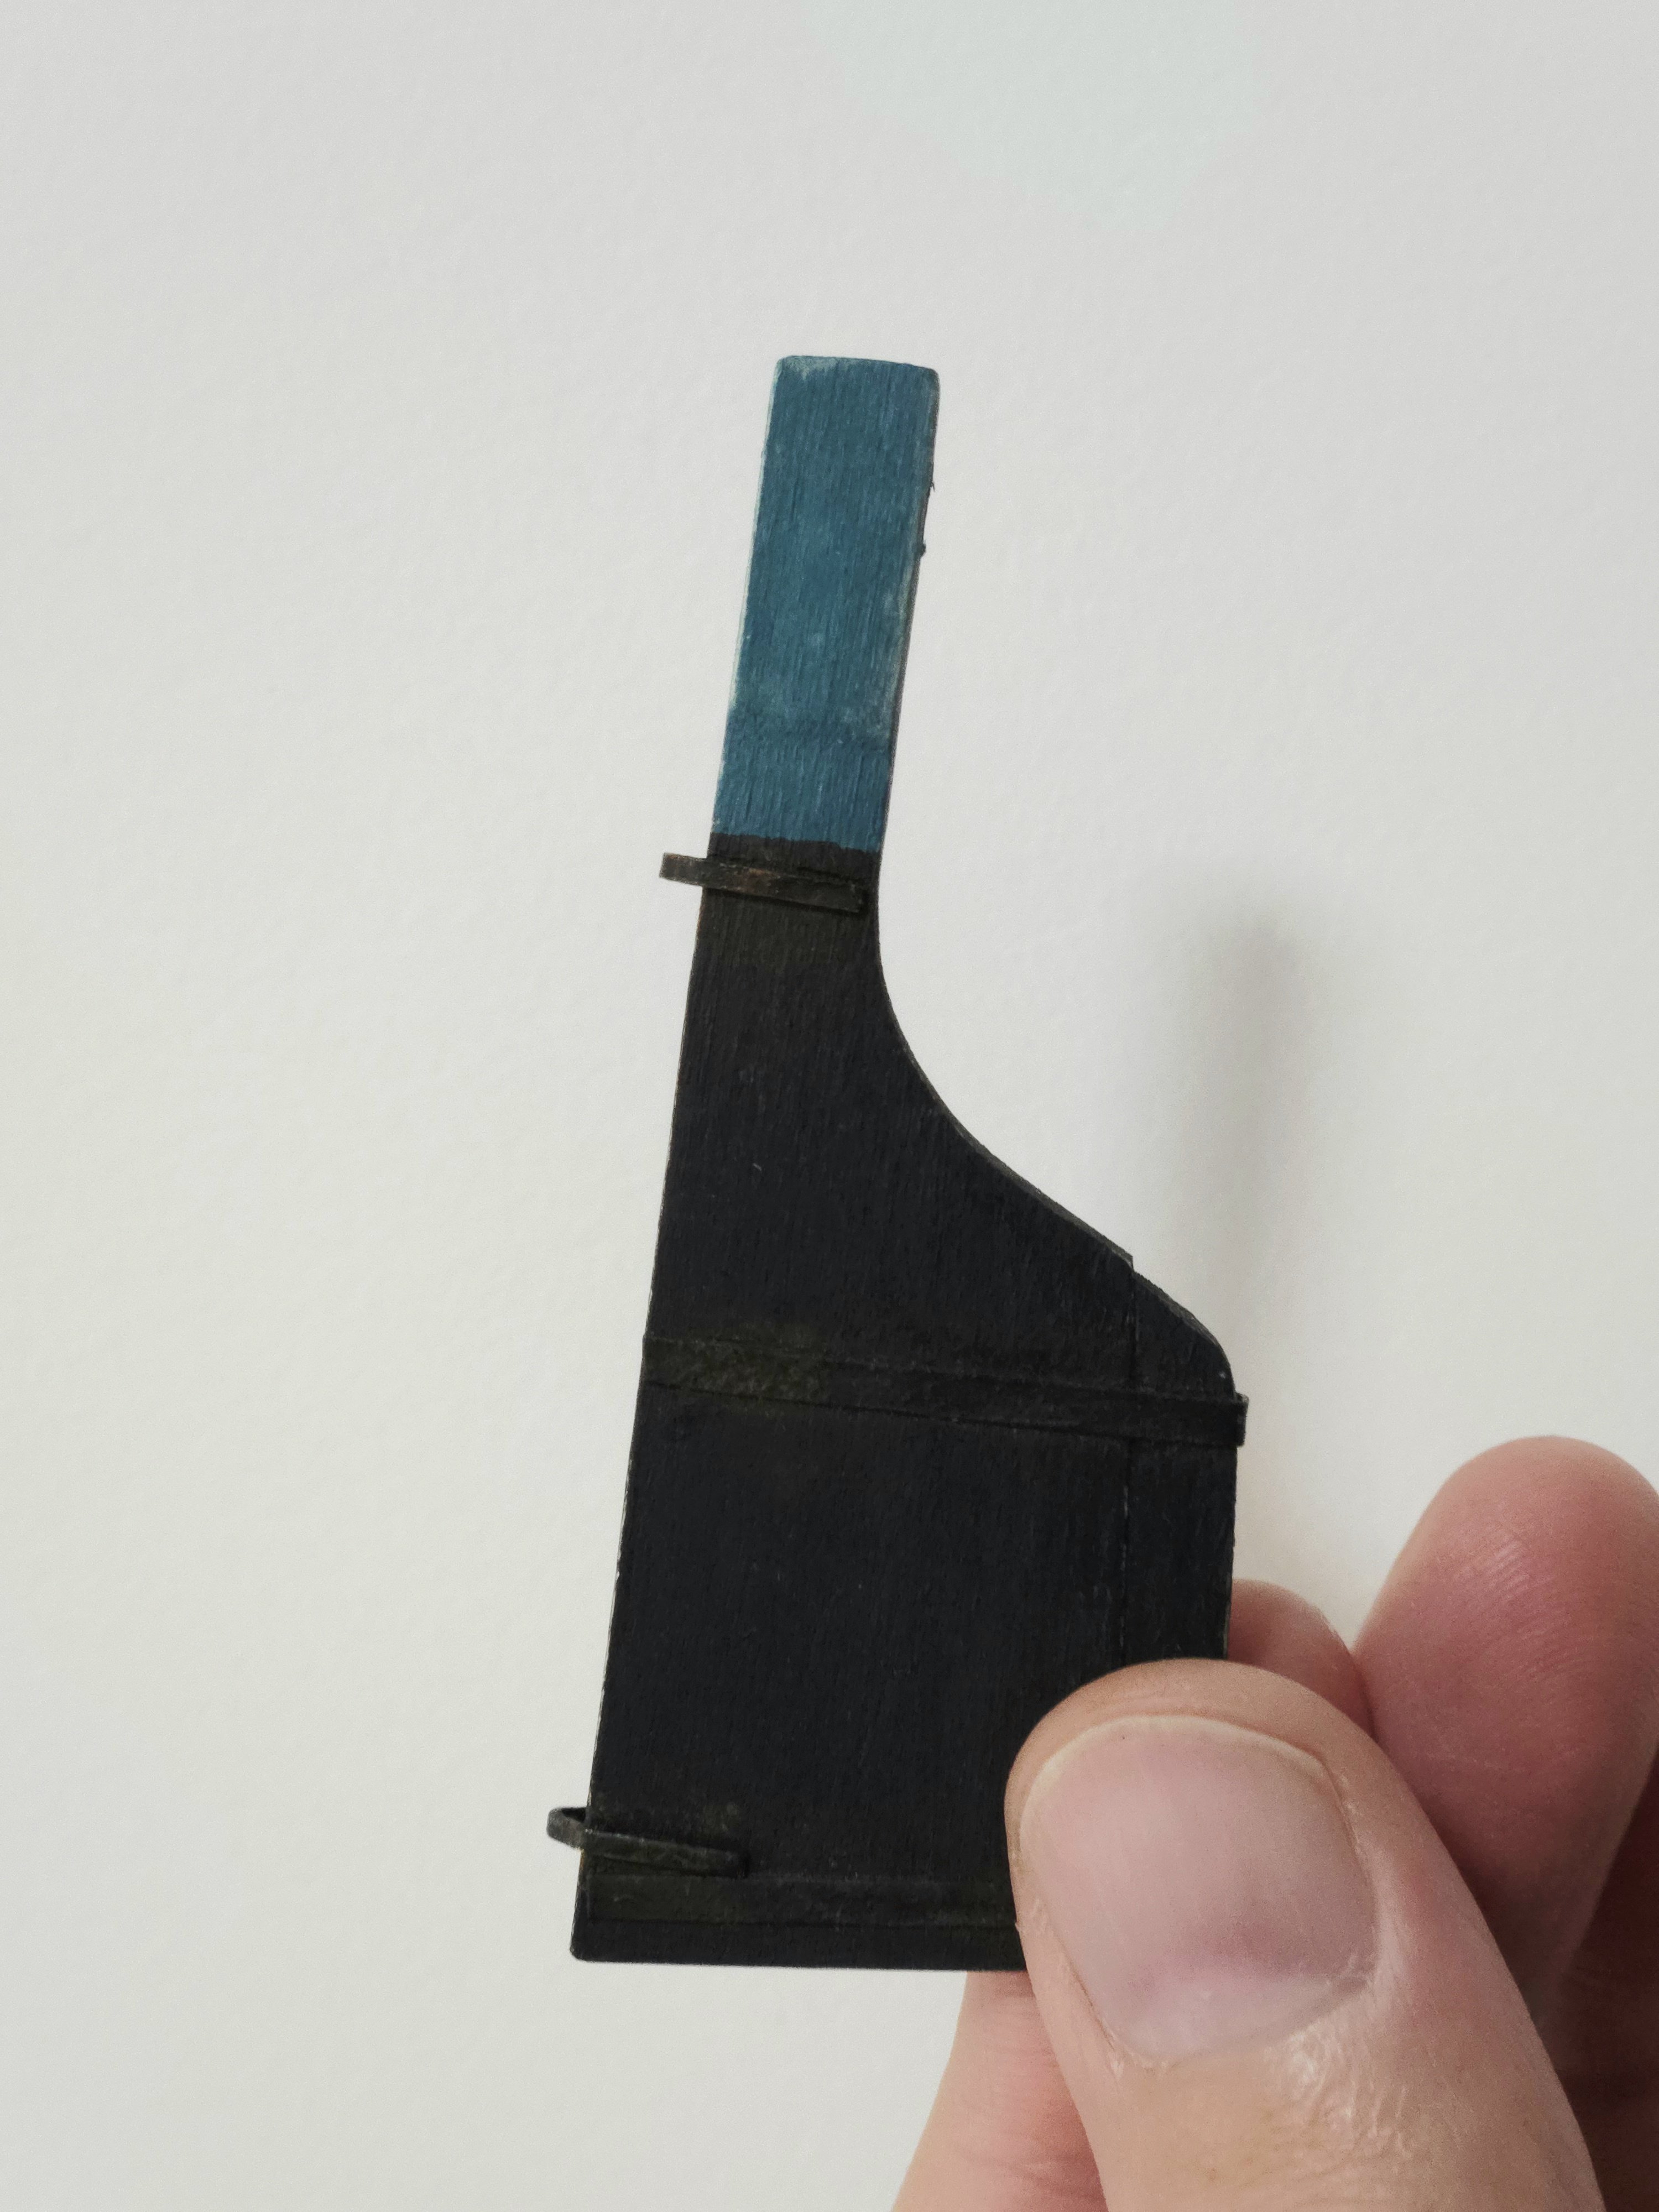
Thanks, all! We'll see how well it turns out on the spectrum between looking like a good representation of improvised parts, and looking like I have no clue what I'm doing. @Glen McGuire, I think it is a bit of chatter. I don't really understand how it can be smooth to the touch and still appear rough, but when I used a slightly damp cloth to wipe dust off, I noticed that that area seemed to absorb more water and retain it for much longer. The other side has a bit of lengthwise chatter marks, and had the price and bar code stickers. Despite spraying alcohol, scraping, and sanding, there still seems to be a bit of sticker residue that I can't seem to get off, so I think this side it will be.
- 312 replies
-
- 5
-
-
- Chile
- Latin America
- (and 6 more)
-
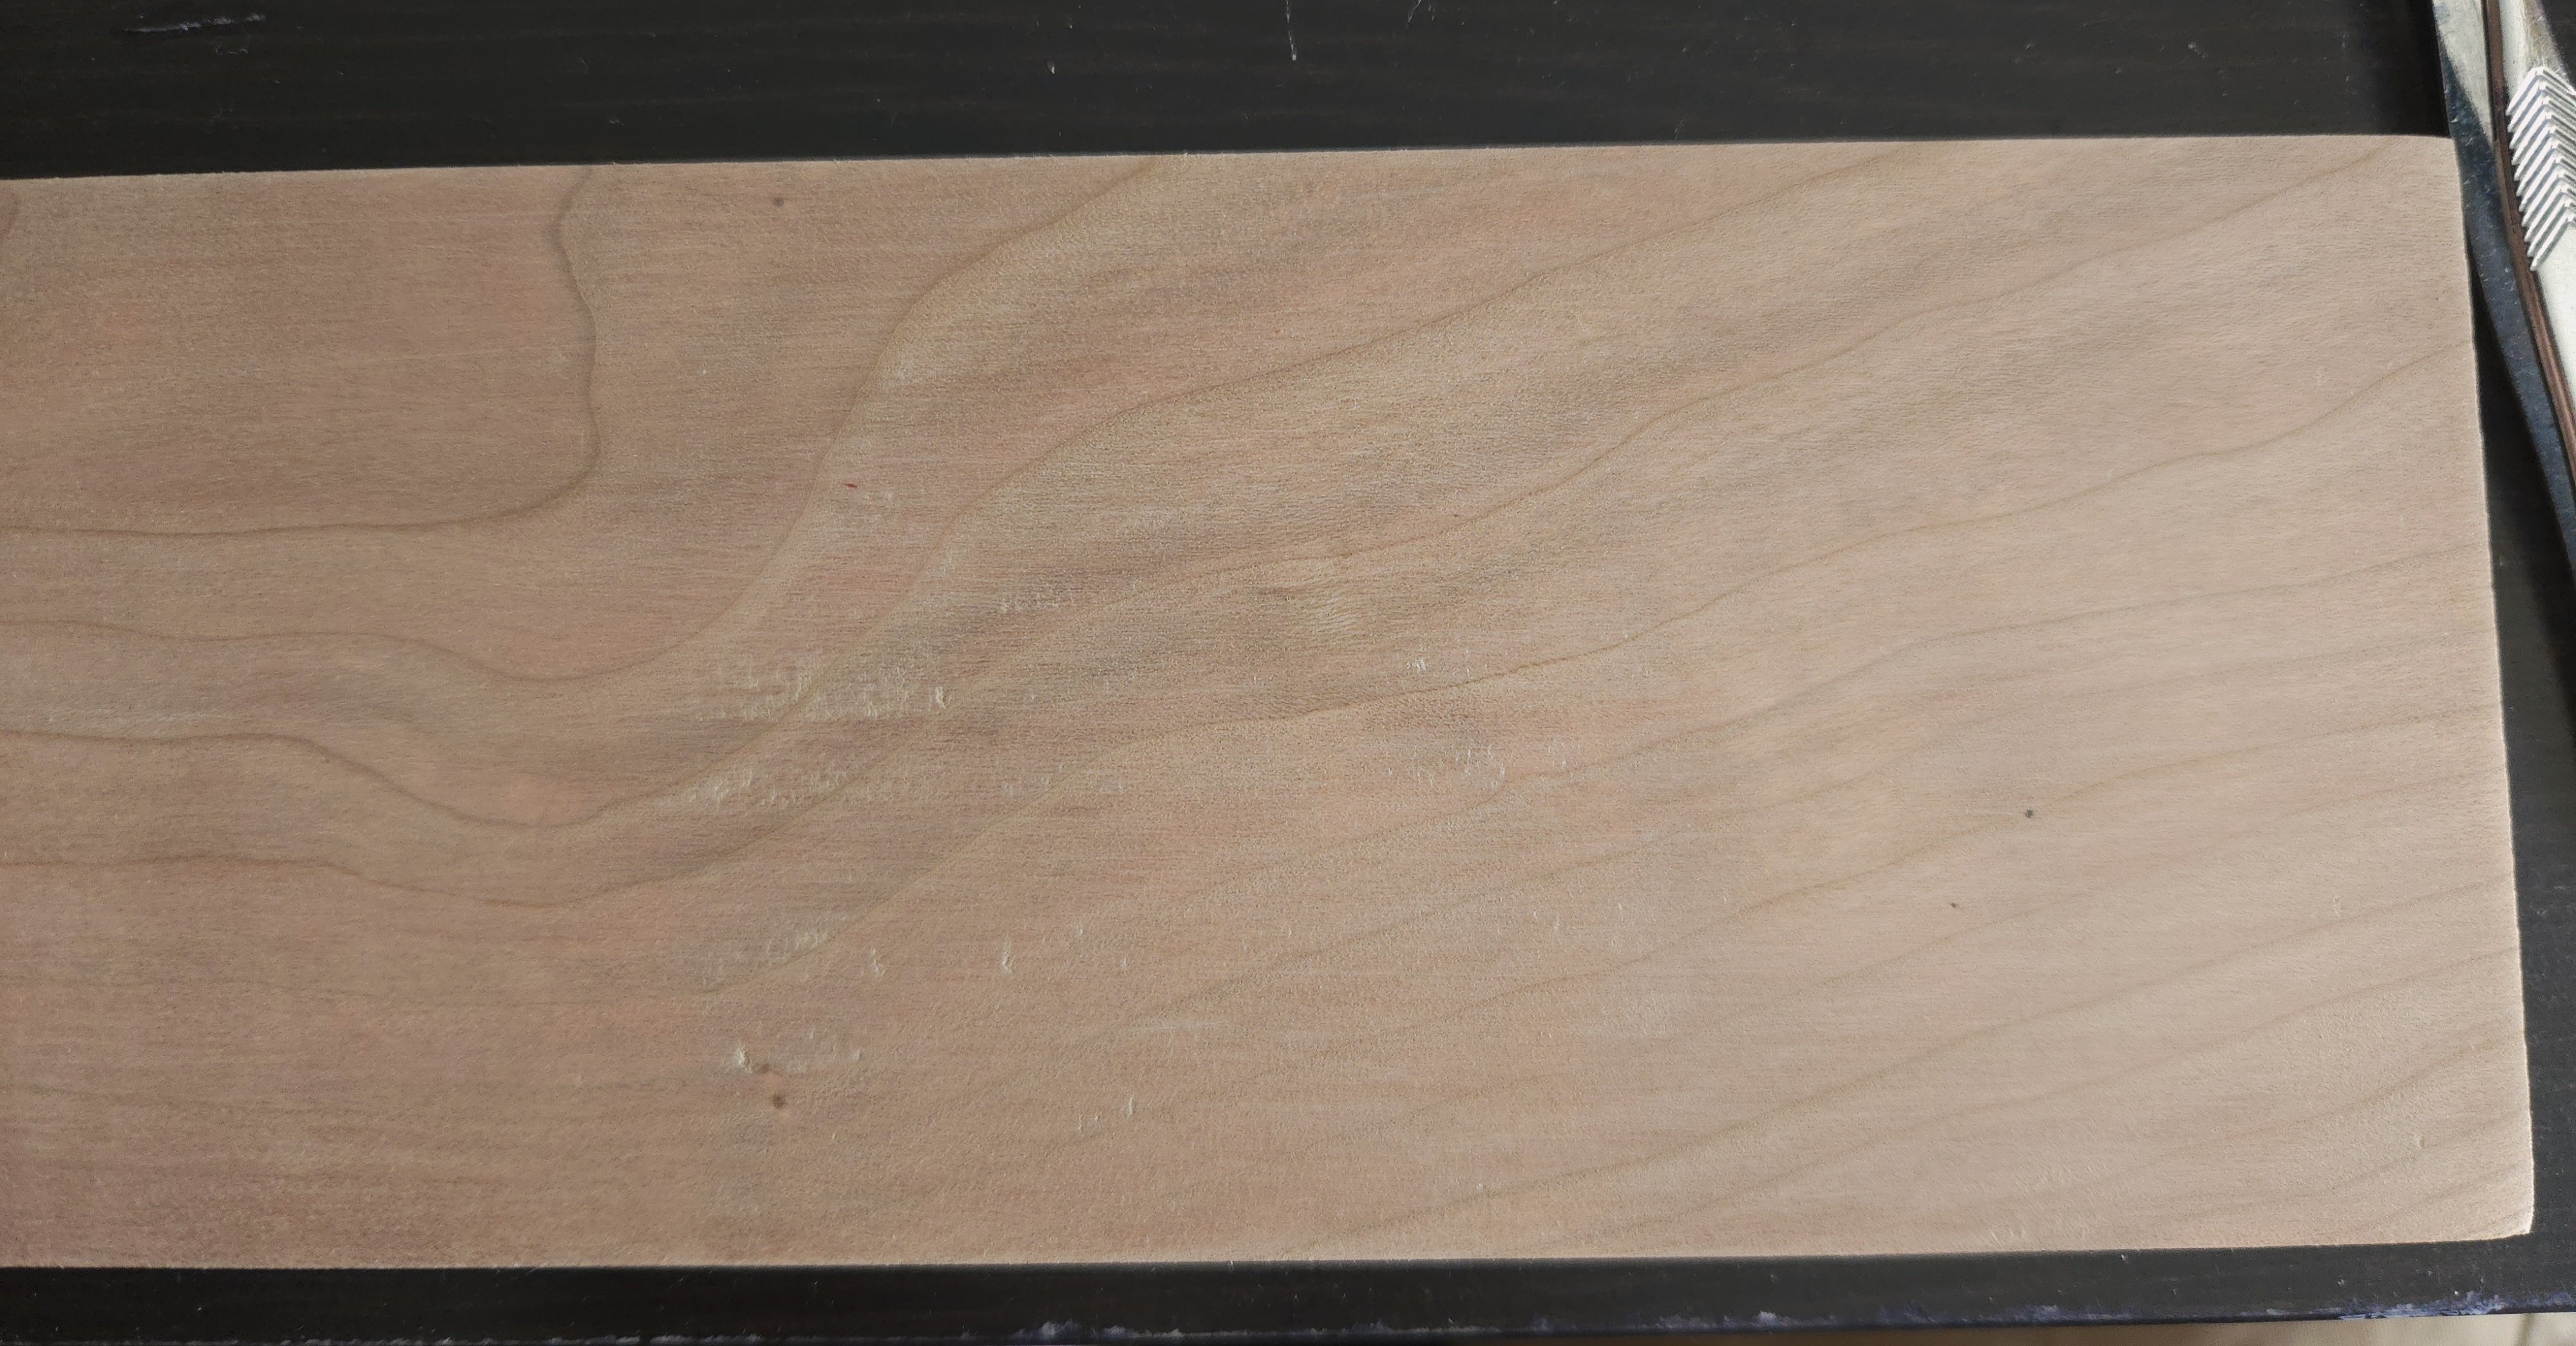
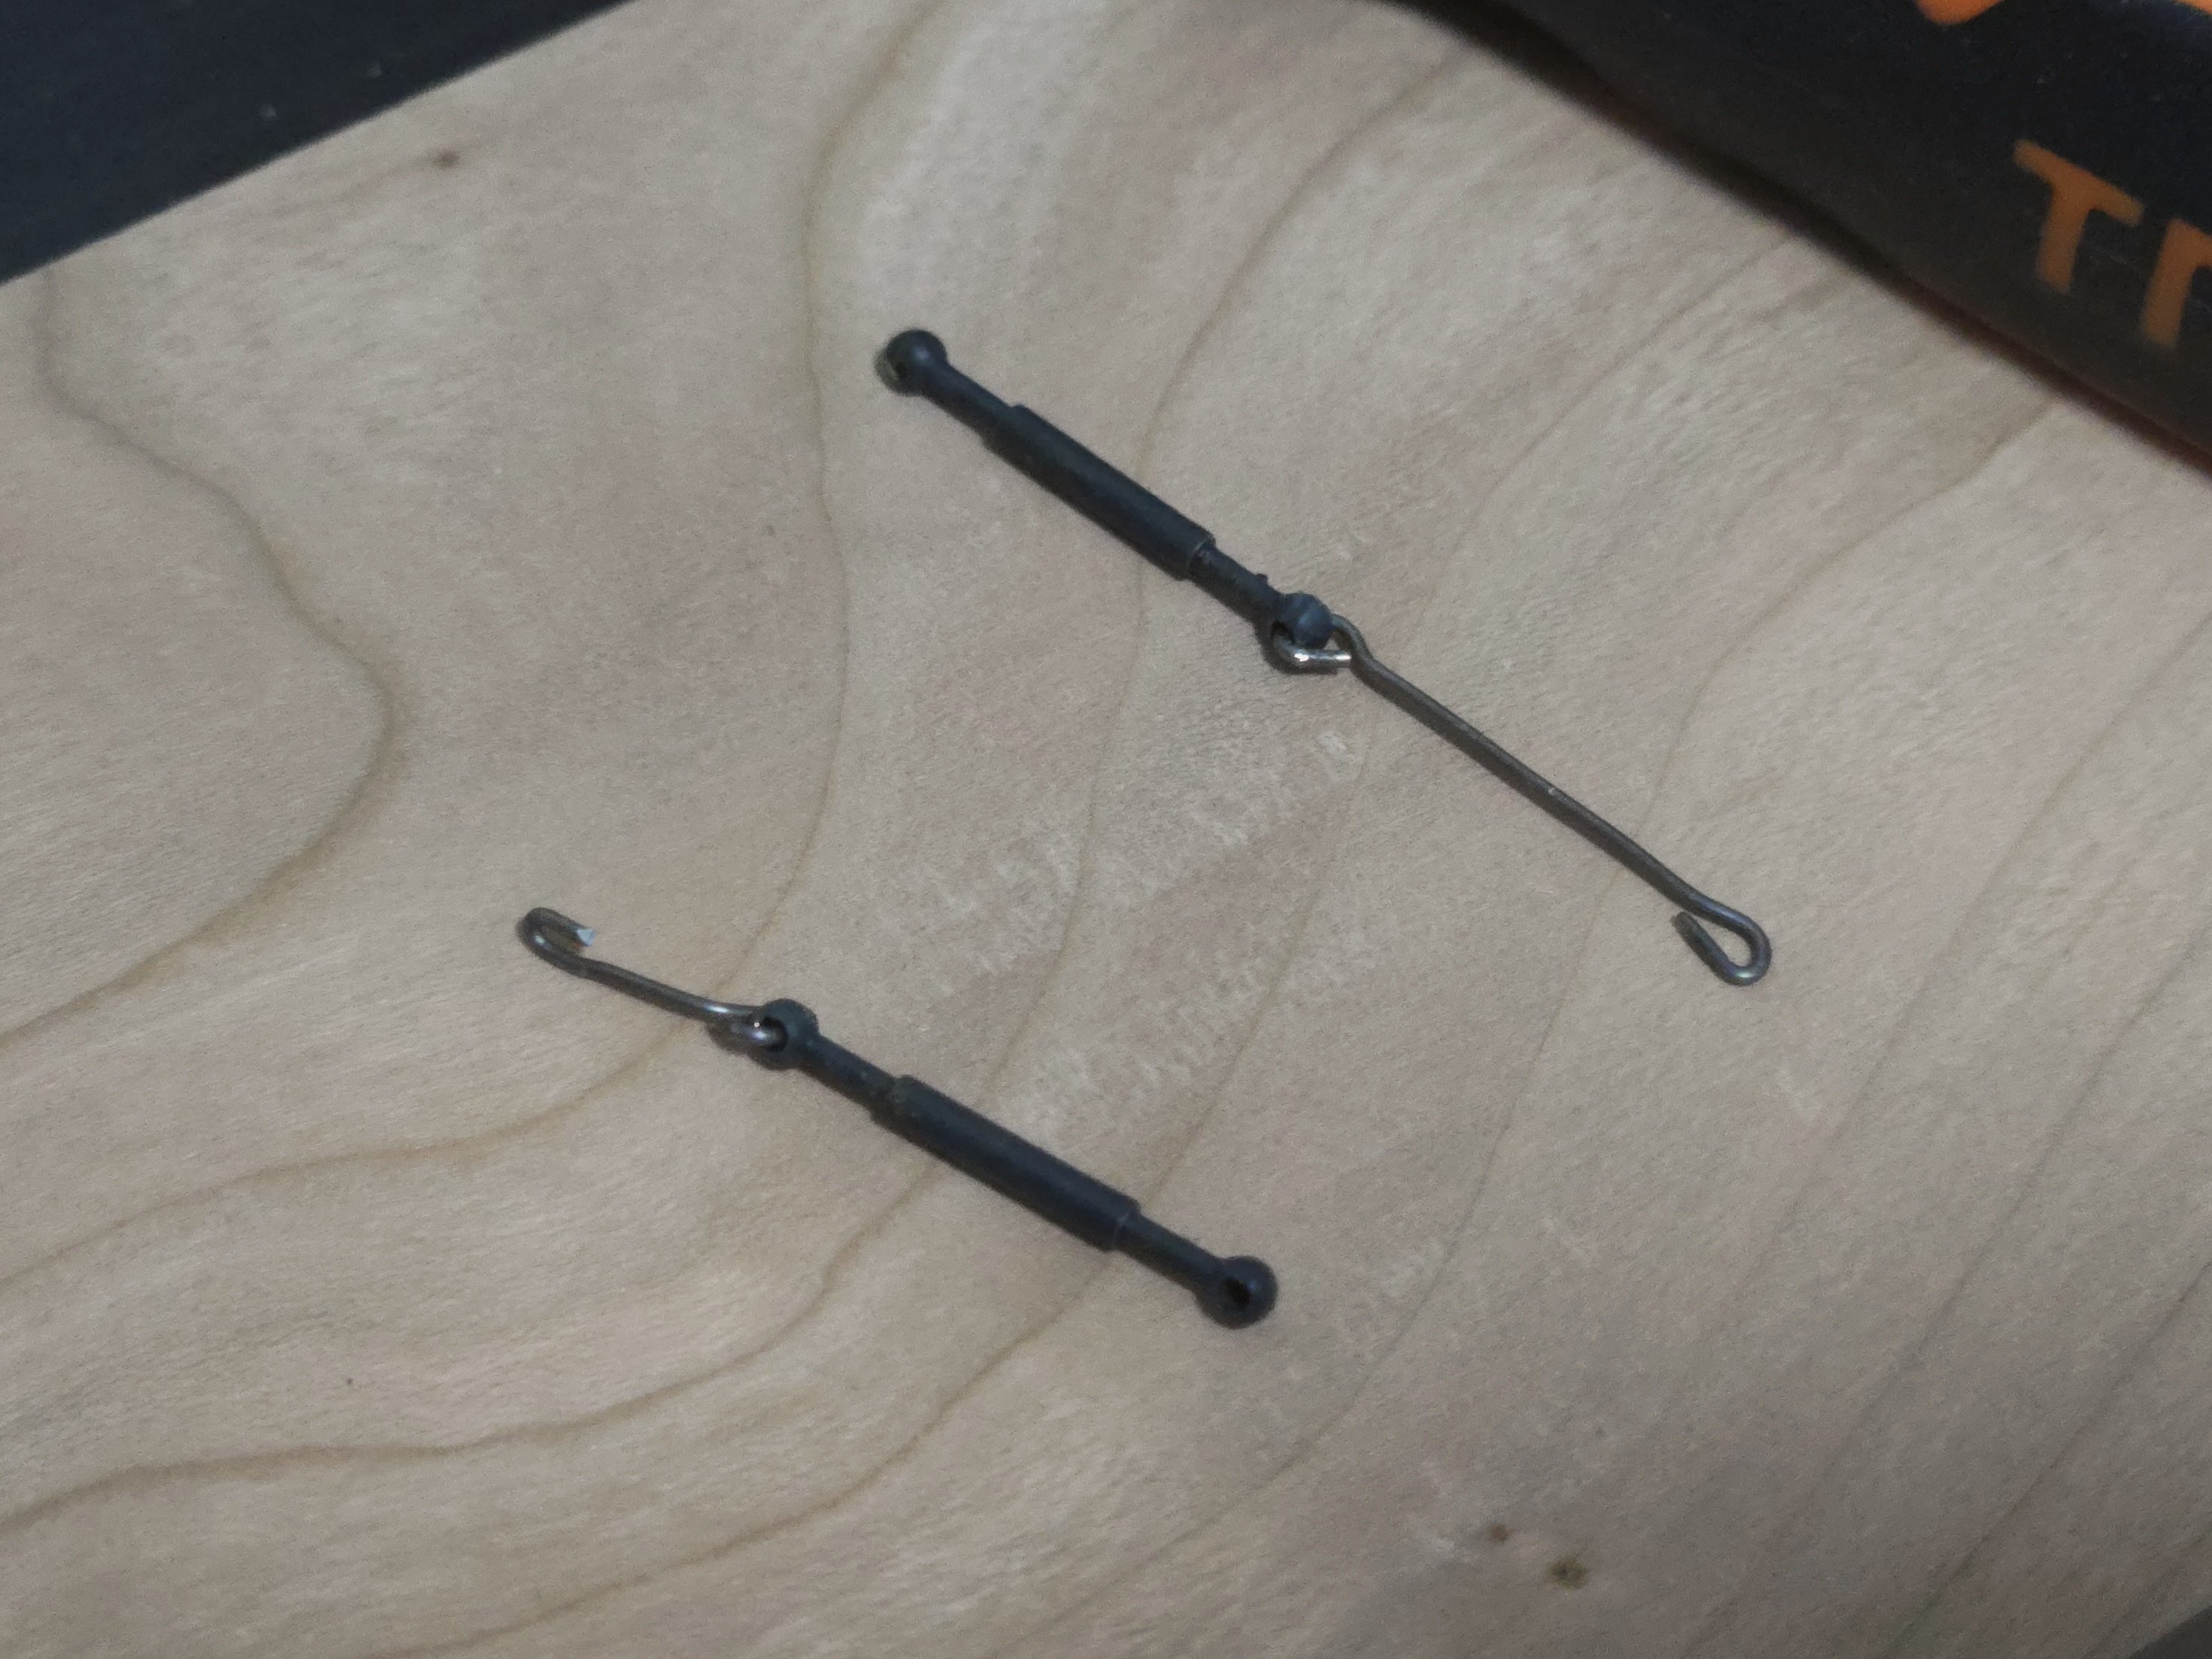
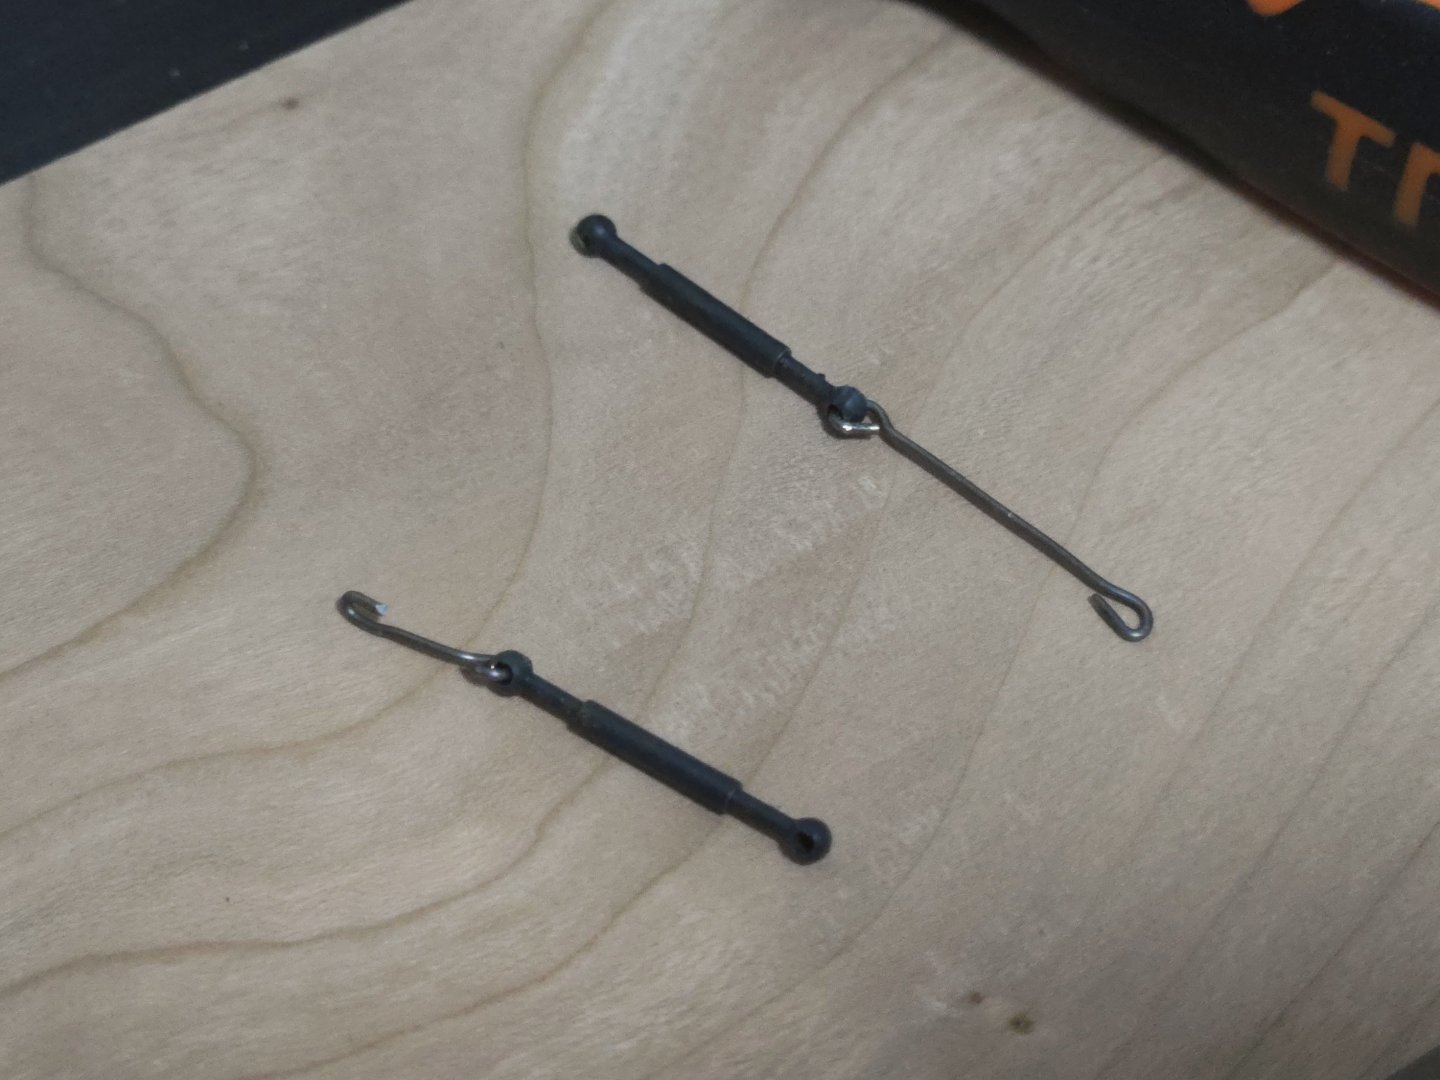
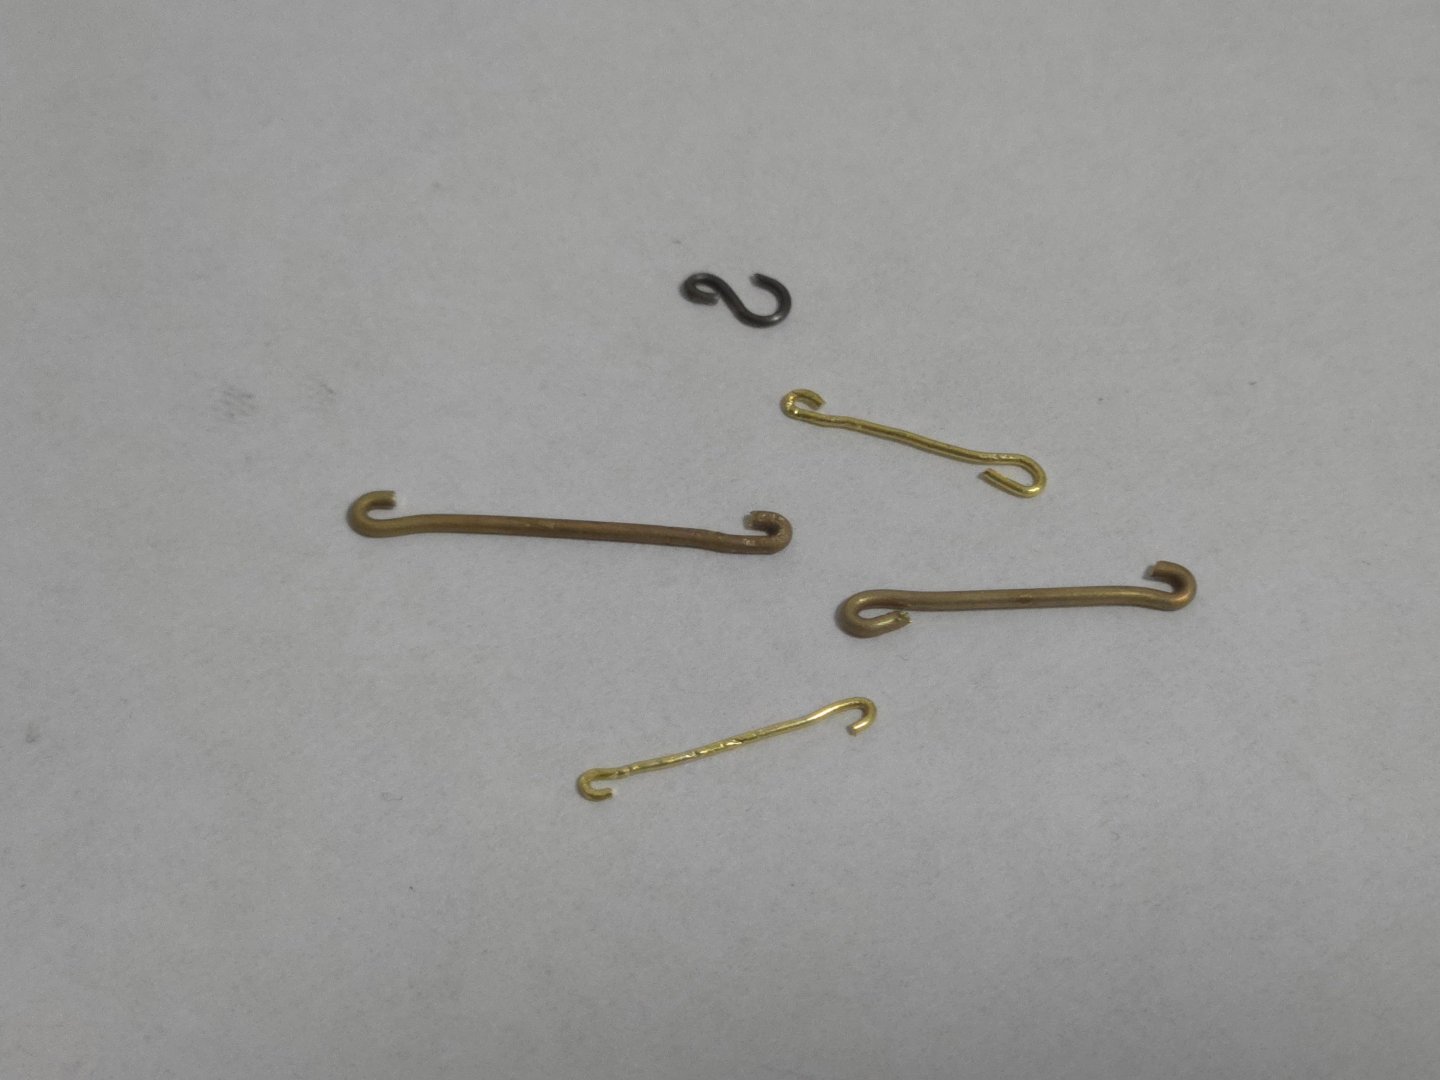
Next on my list are the metal hooks that, with the turnbuckles, join the shrouds to the chainplates. As has been seen in a lot of photos I've posted earlier, the exact arrangement of these could be a bit haphazard, so I decided to make the metal hooks in different lengths and thicknesses of material. Initially, I made two out of some brass eyebolts, and two from a thicker brass rod. The four hooks are seen below, along with a smaller hook to serve as a traveler. This latter piece is made of annealed wire, which has the advantage of naturally being a nice gunmetal color, but I don't want to use it too much in order to better match my existing metalwork, which is painted. However, I made an exception for the traveler, as after the block is stropped, I'll need to squeeze it tight into a loop around the horse--something that would be impossible to do to a painted piece without requiring a lot of touch-up. However, when I went to prime the pieces, one of the smaller brass hooks flipped away, off the wire it was suspdnded from and off my balcony. I decided to redo the smaller hooks in annealed wire, but to paint them, and to attach the ends directly to the turnbuckles (unlike the larger hooks, which will be tied). This will hopefully add to the rather improvised look I'm going for (as will the size difference in hooks). While the paint is drying, I've also begun prepping the display base, which will be a 1/4x3x10-inch cherry sheet. However, after a lot of sanding, there's a section that feels as smooth as the rest of the board, but looks white-ish, almost like a rough patch (but, again, it feels perfectly smooth). I take it the board just needs more sanding?

- 312 replies
-
- 7
-
-
- Chile
- Latin America
- (and 6 more)
-
I'm not familiar with Dressel's book, but have marked out planking bands before in some of my own builds. How are you measuring the distances and how are you marking out the band locations? Before doing anything else, I'd triple-check that your measurements are being taken from consistent points on the same bulkhead/frame (something that I've certainly gotten mixed up on before), and using a material that won't stretch. For instance, string might stretch when you pull it tight around the bulkhead shape or to measure it, but a strip of paper or cardstock won't stretch.
-
Very nice work! That stern looks a bit tricky to plank but it turned out well.
-
Nice job! You definitely won't regret taking the time to properly fair the hull.
-
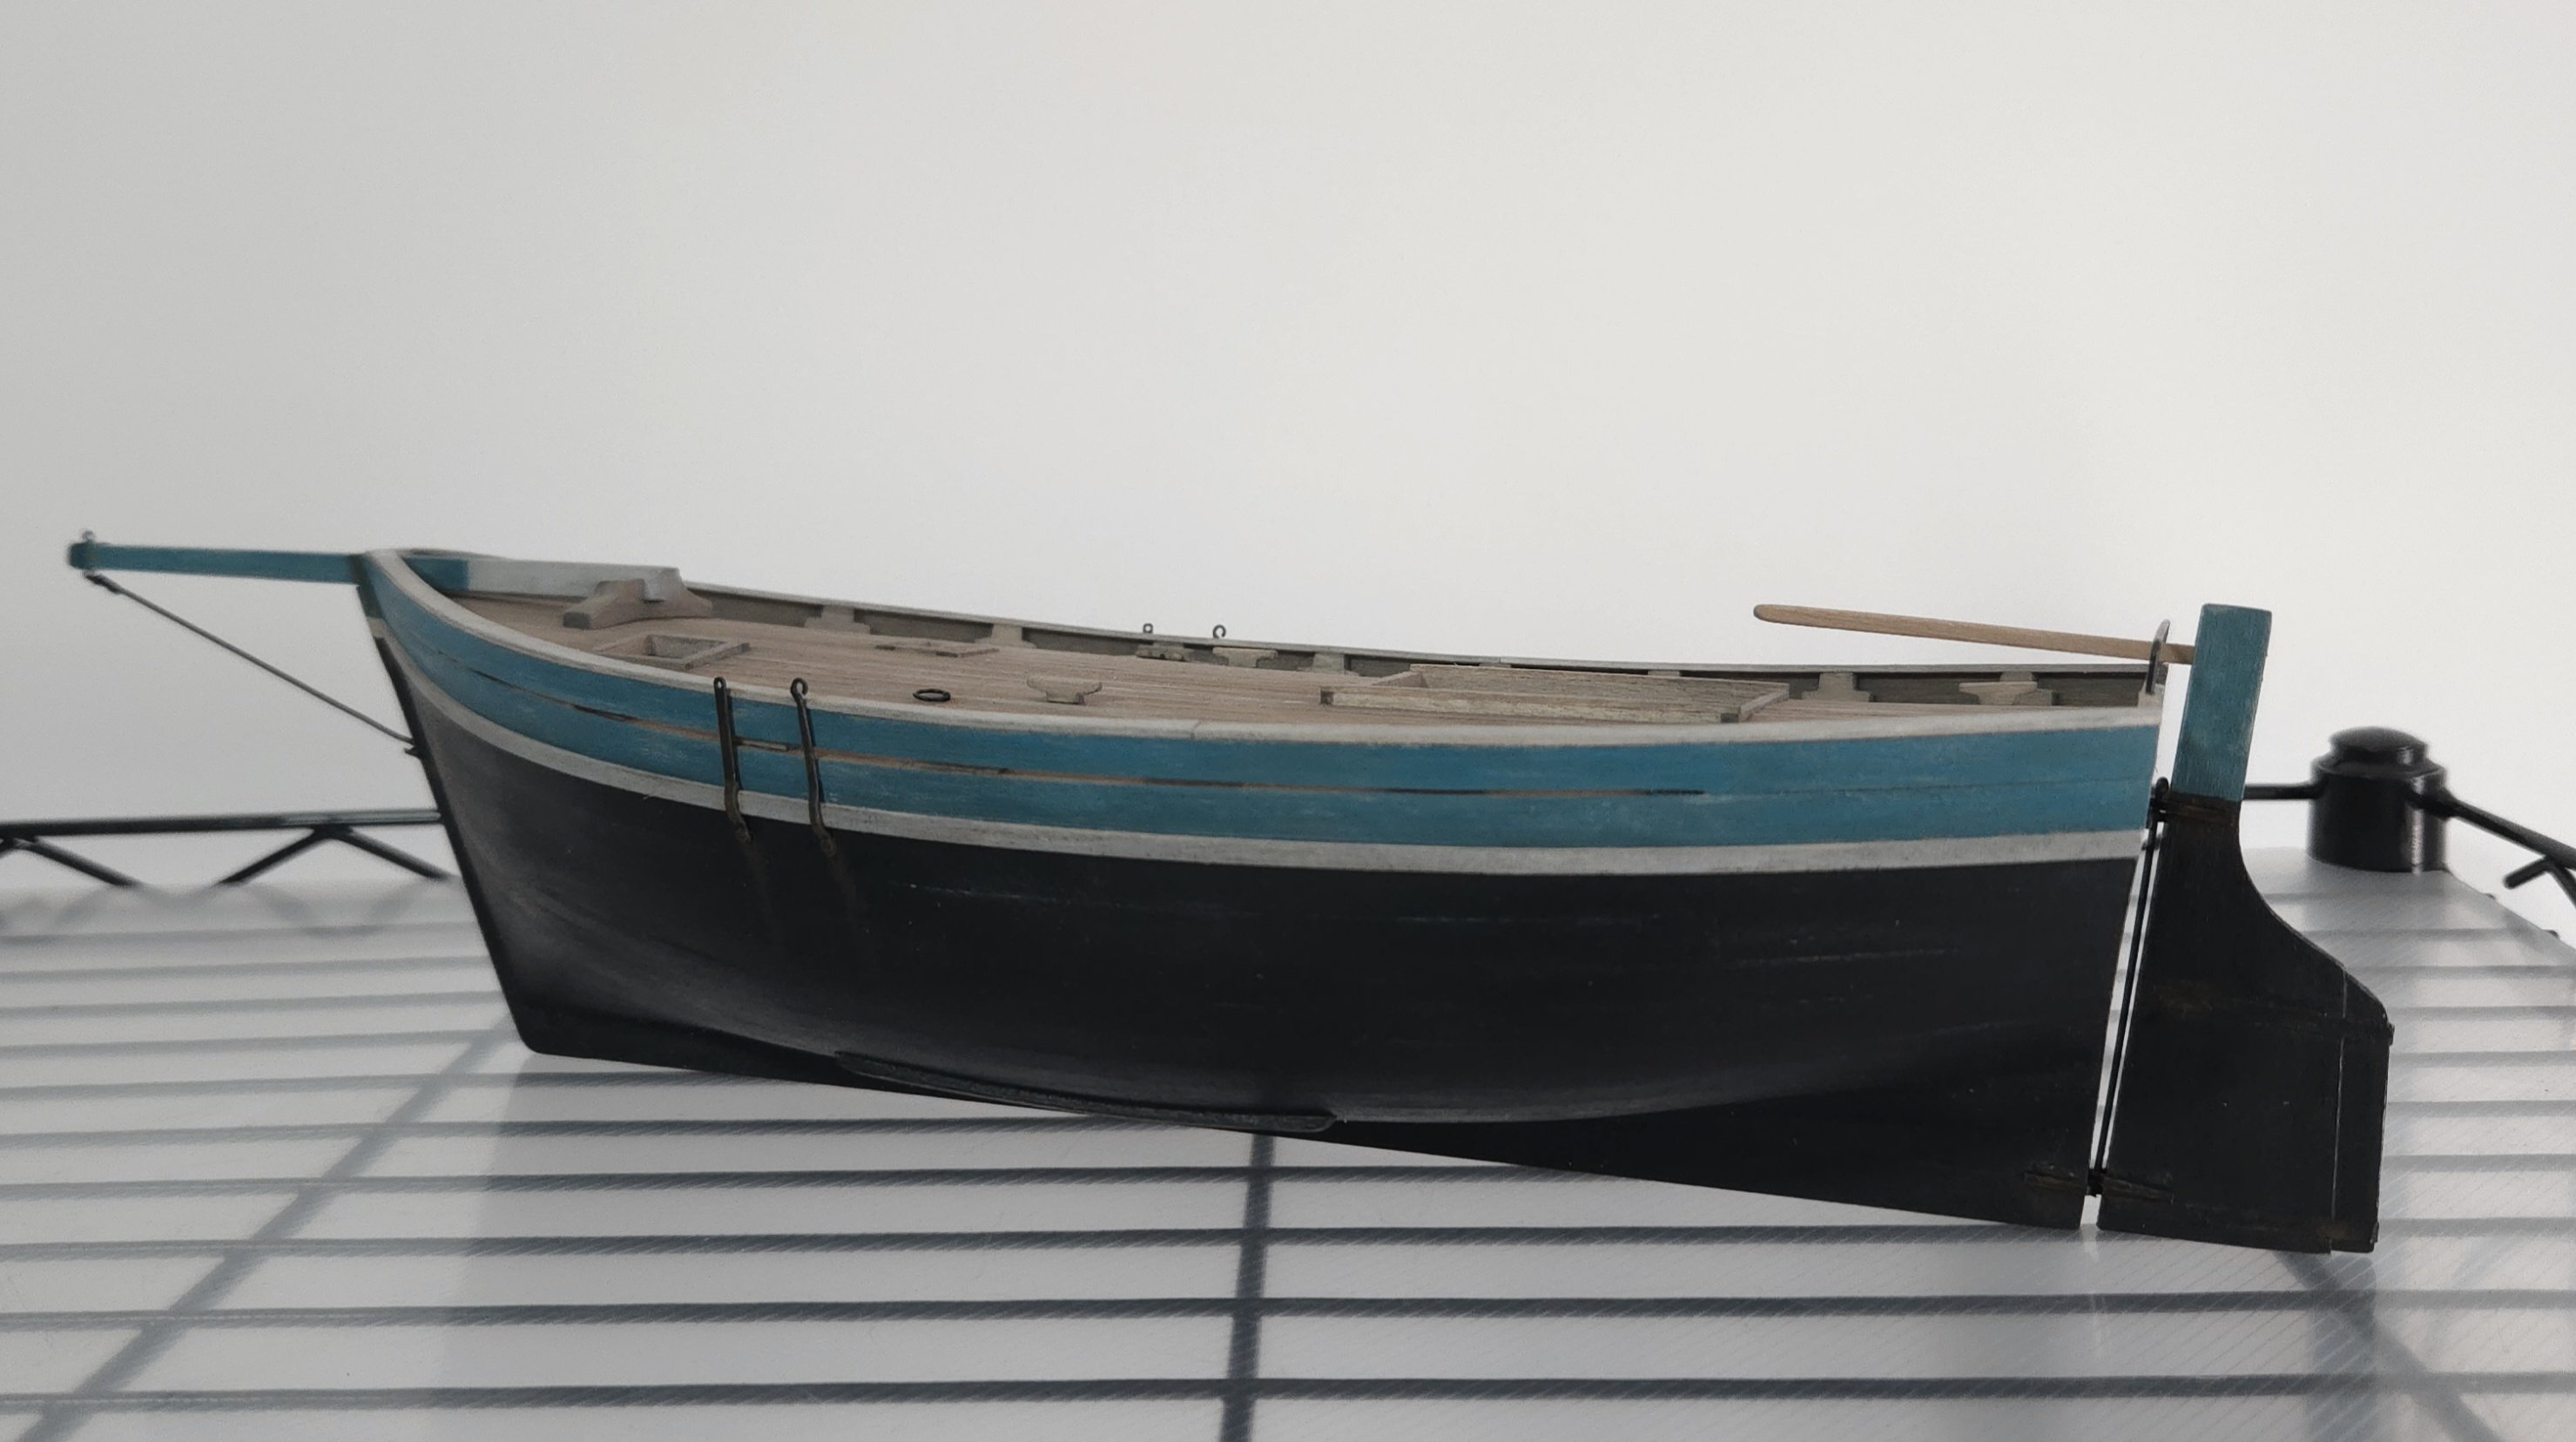
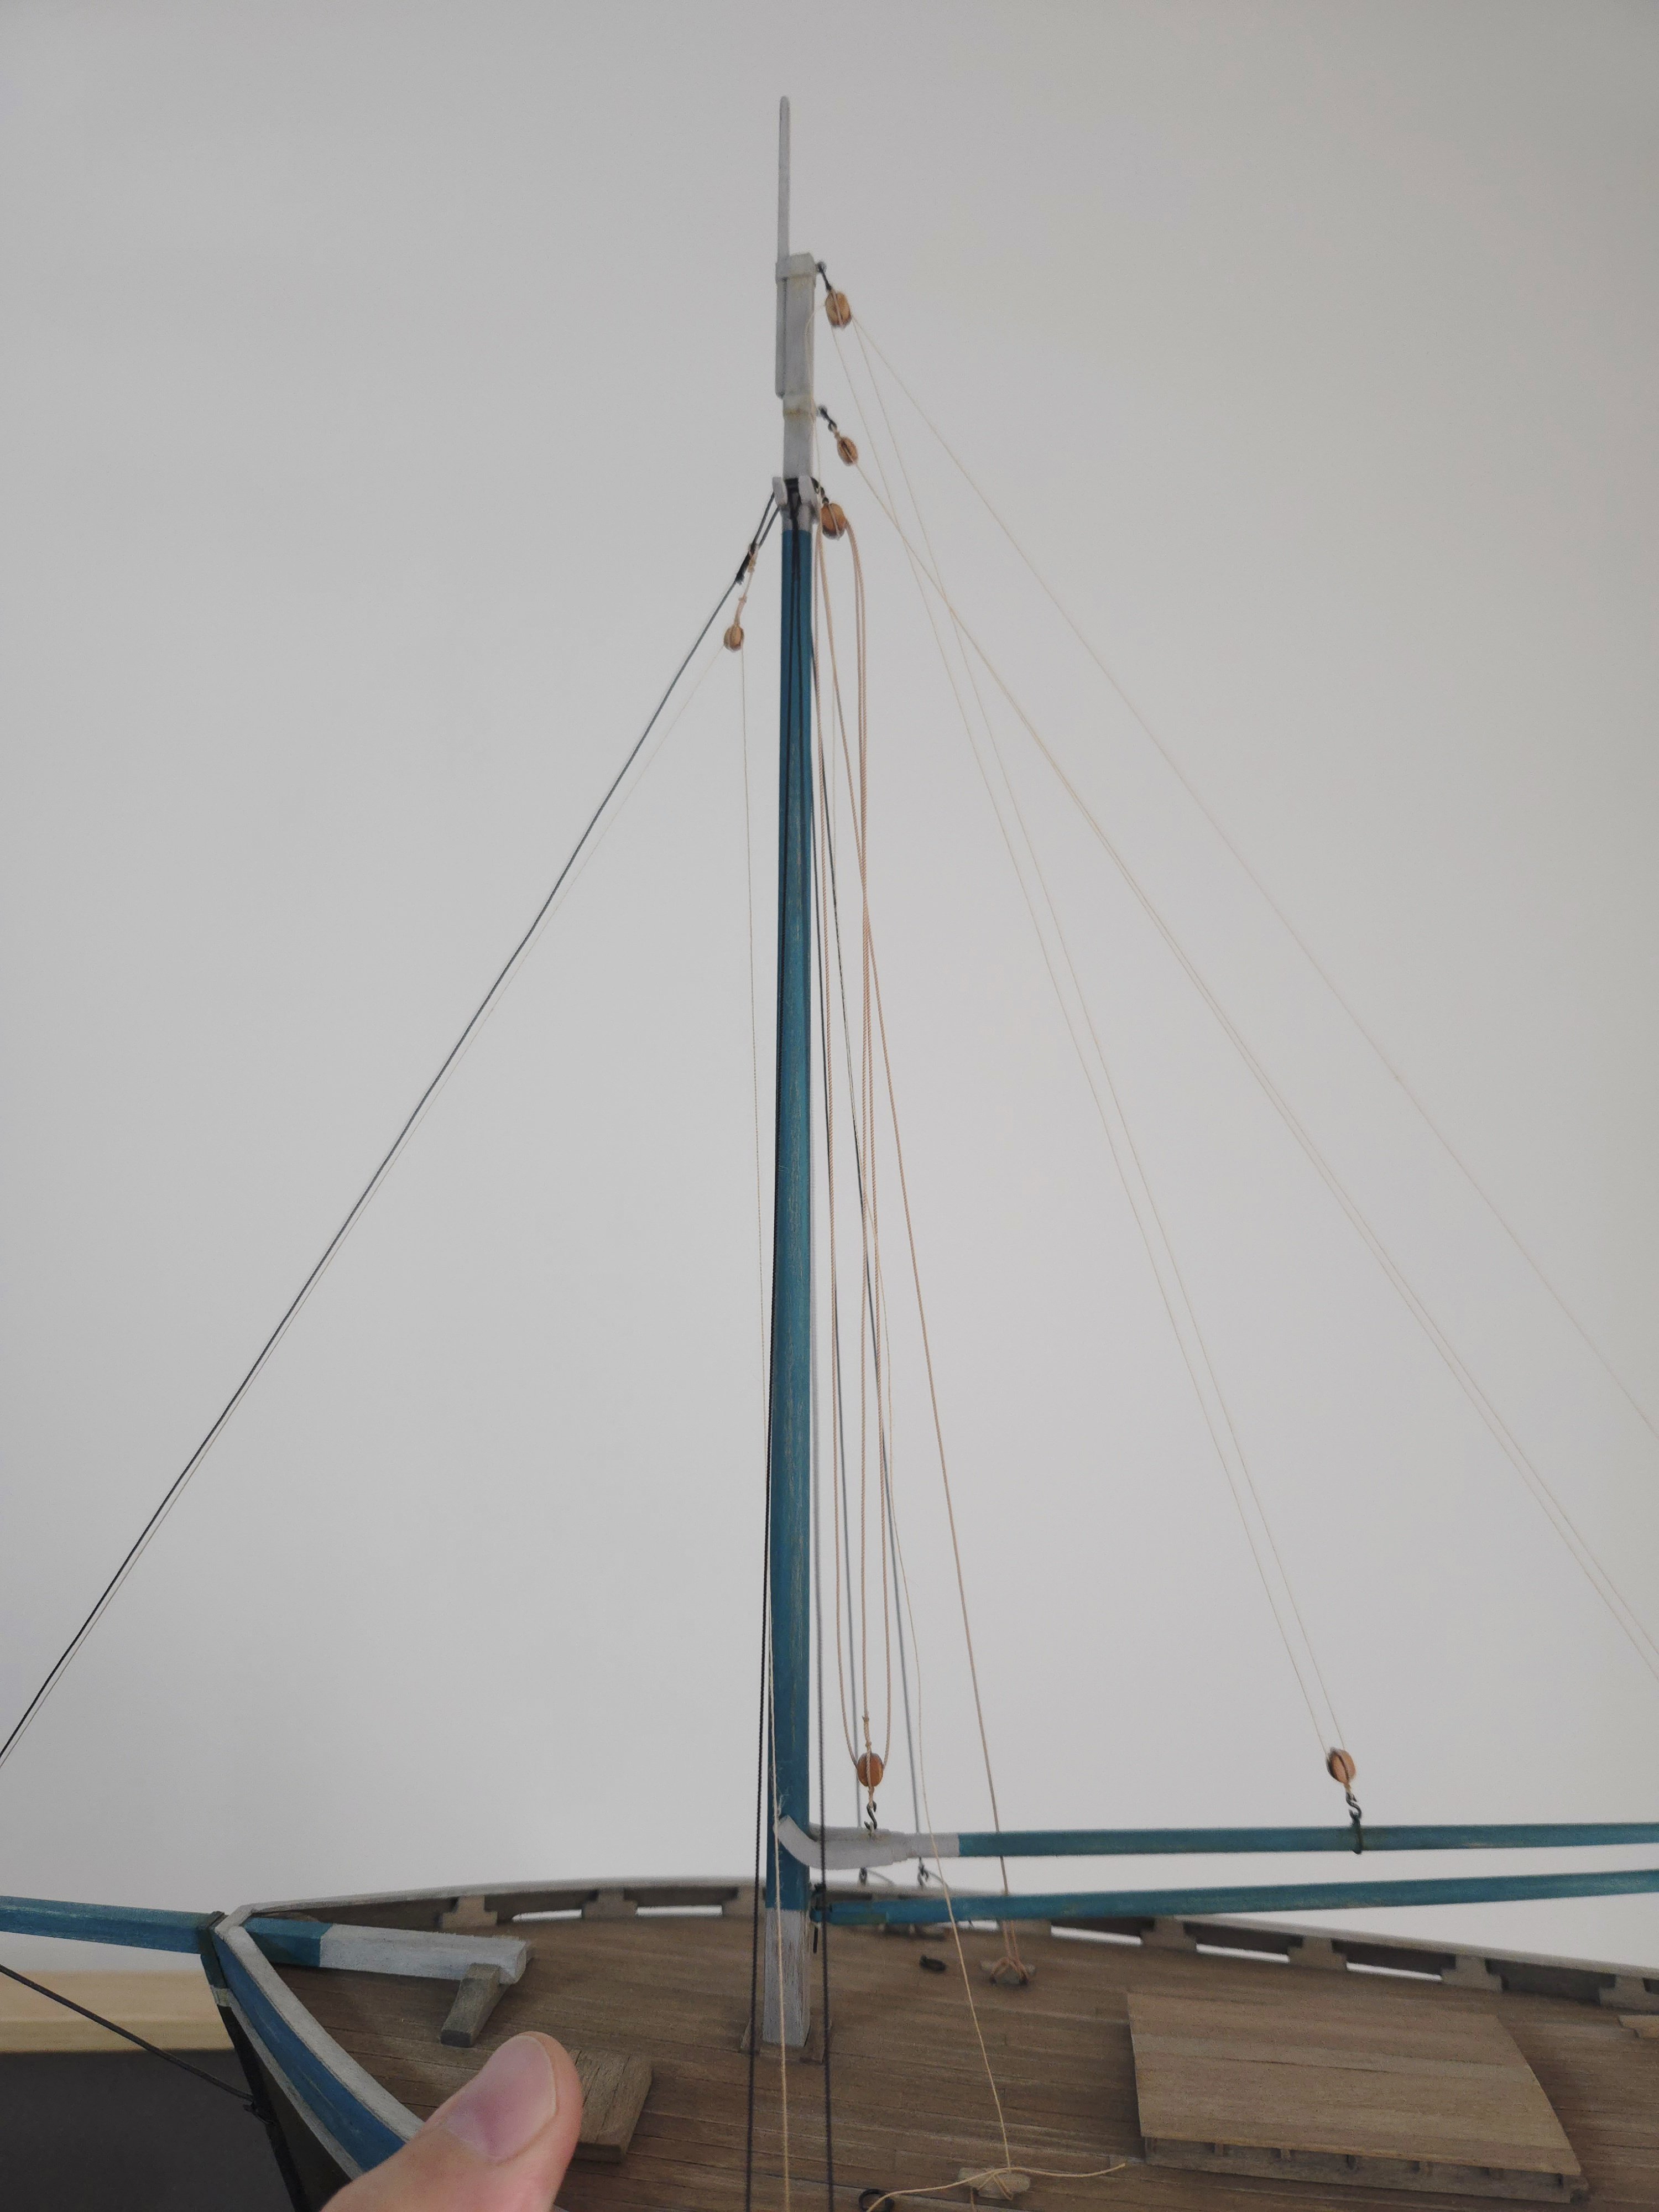
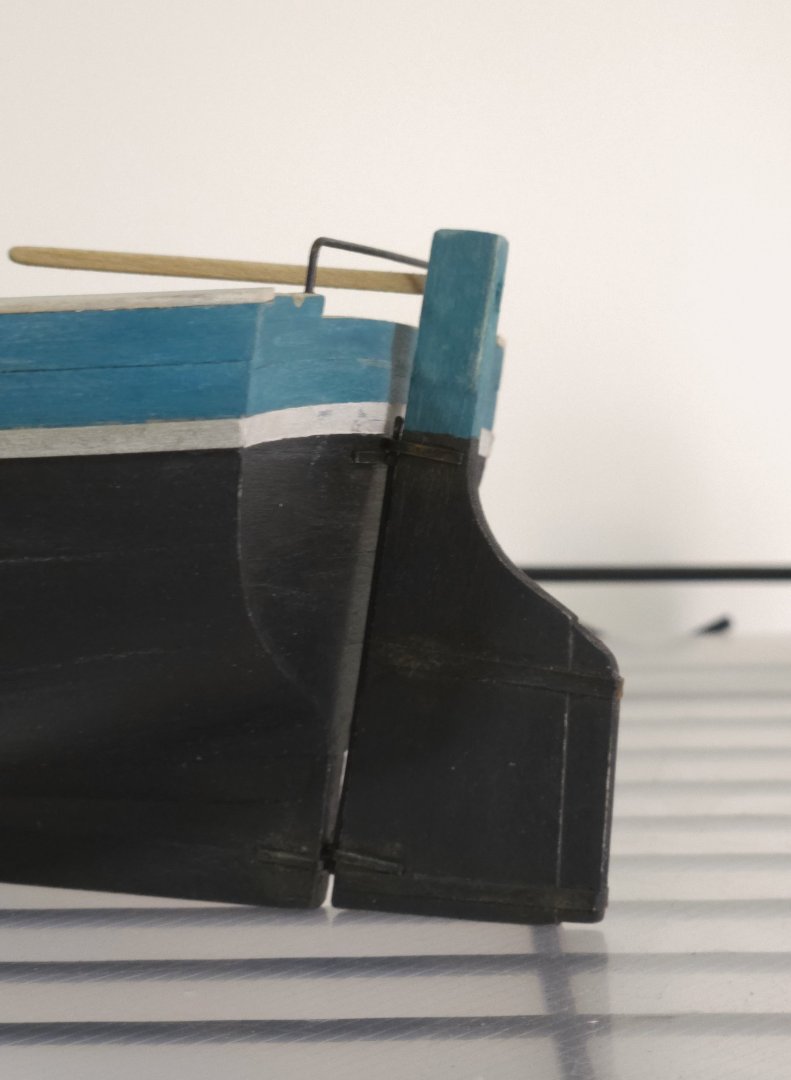
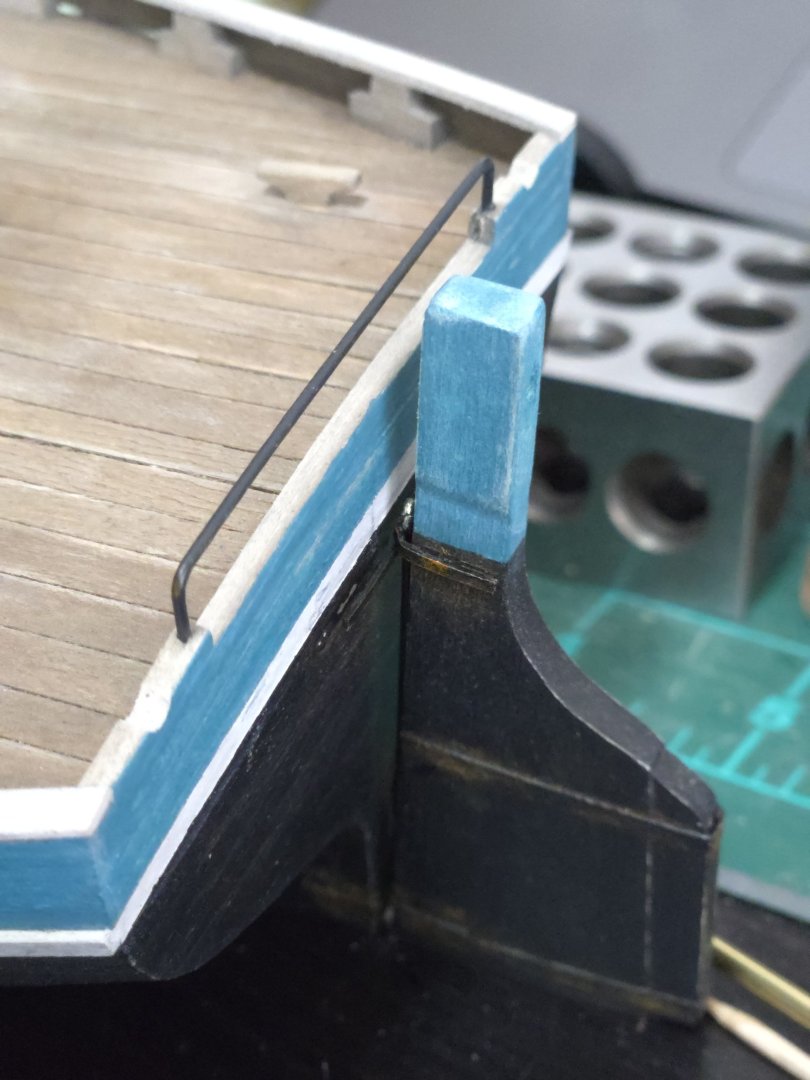
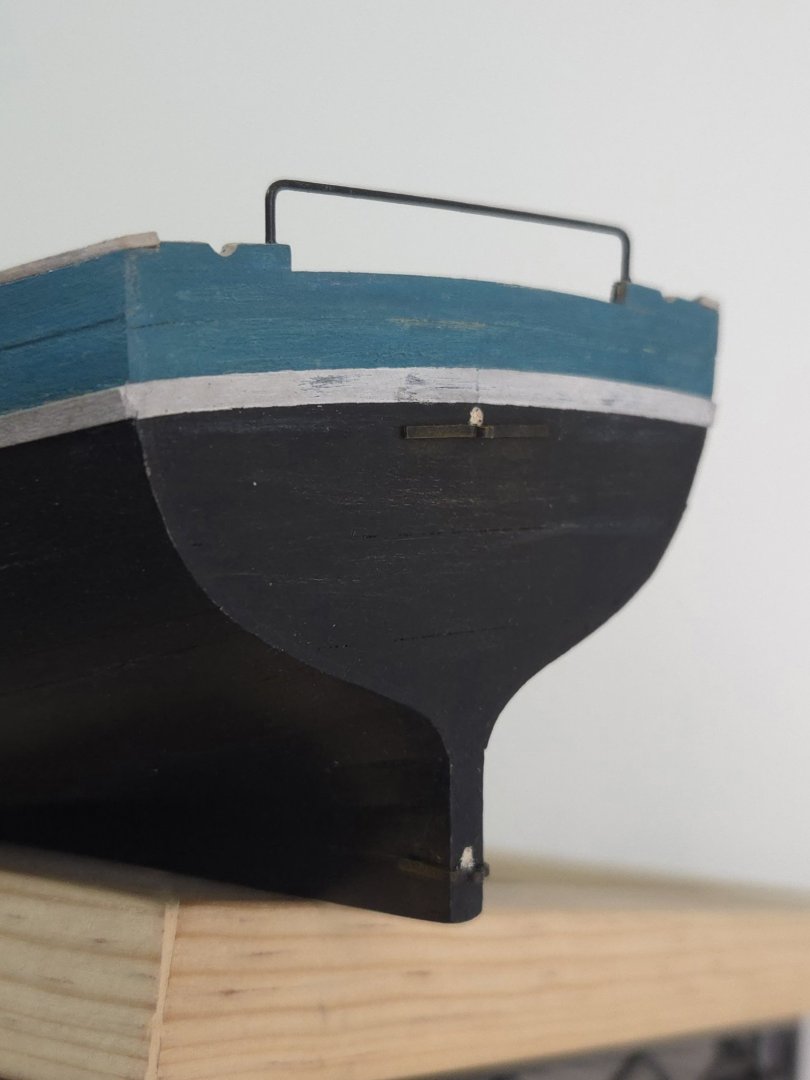
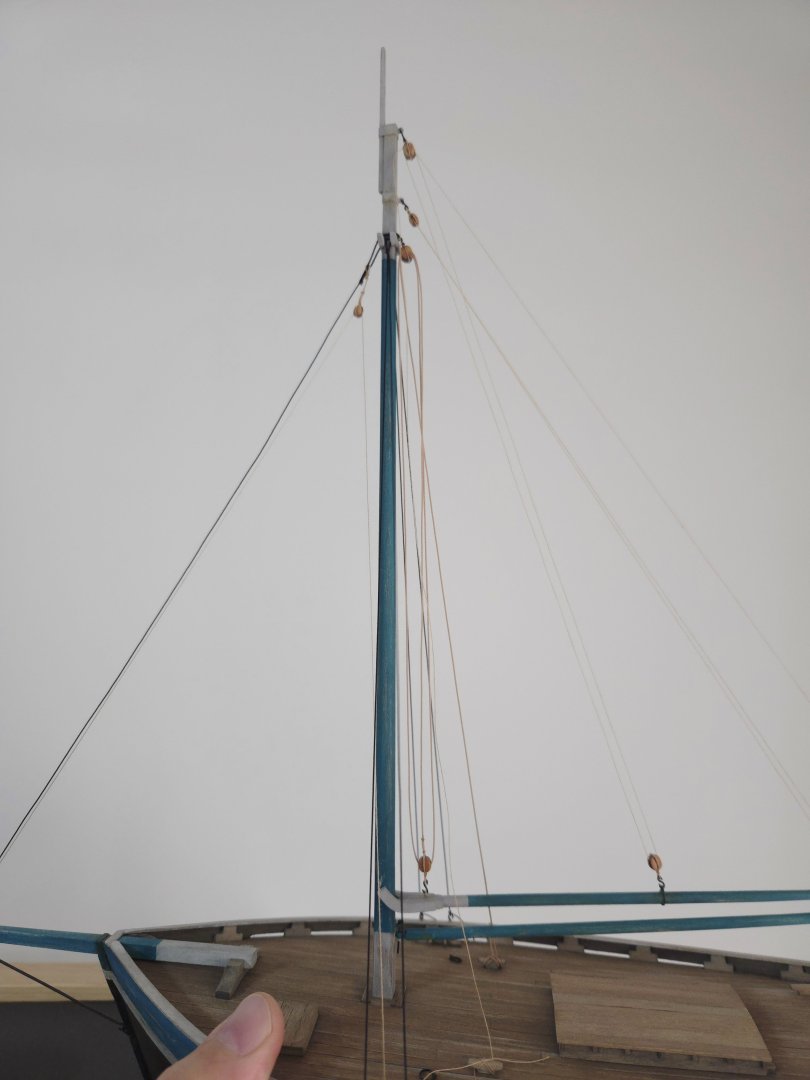
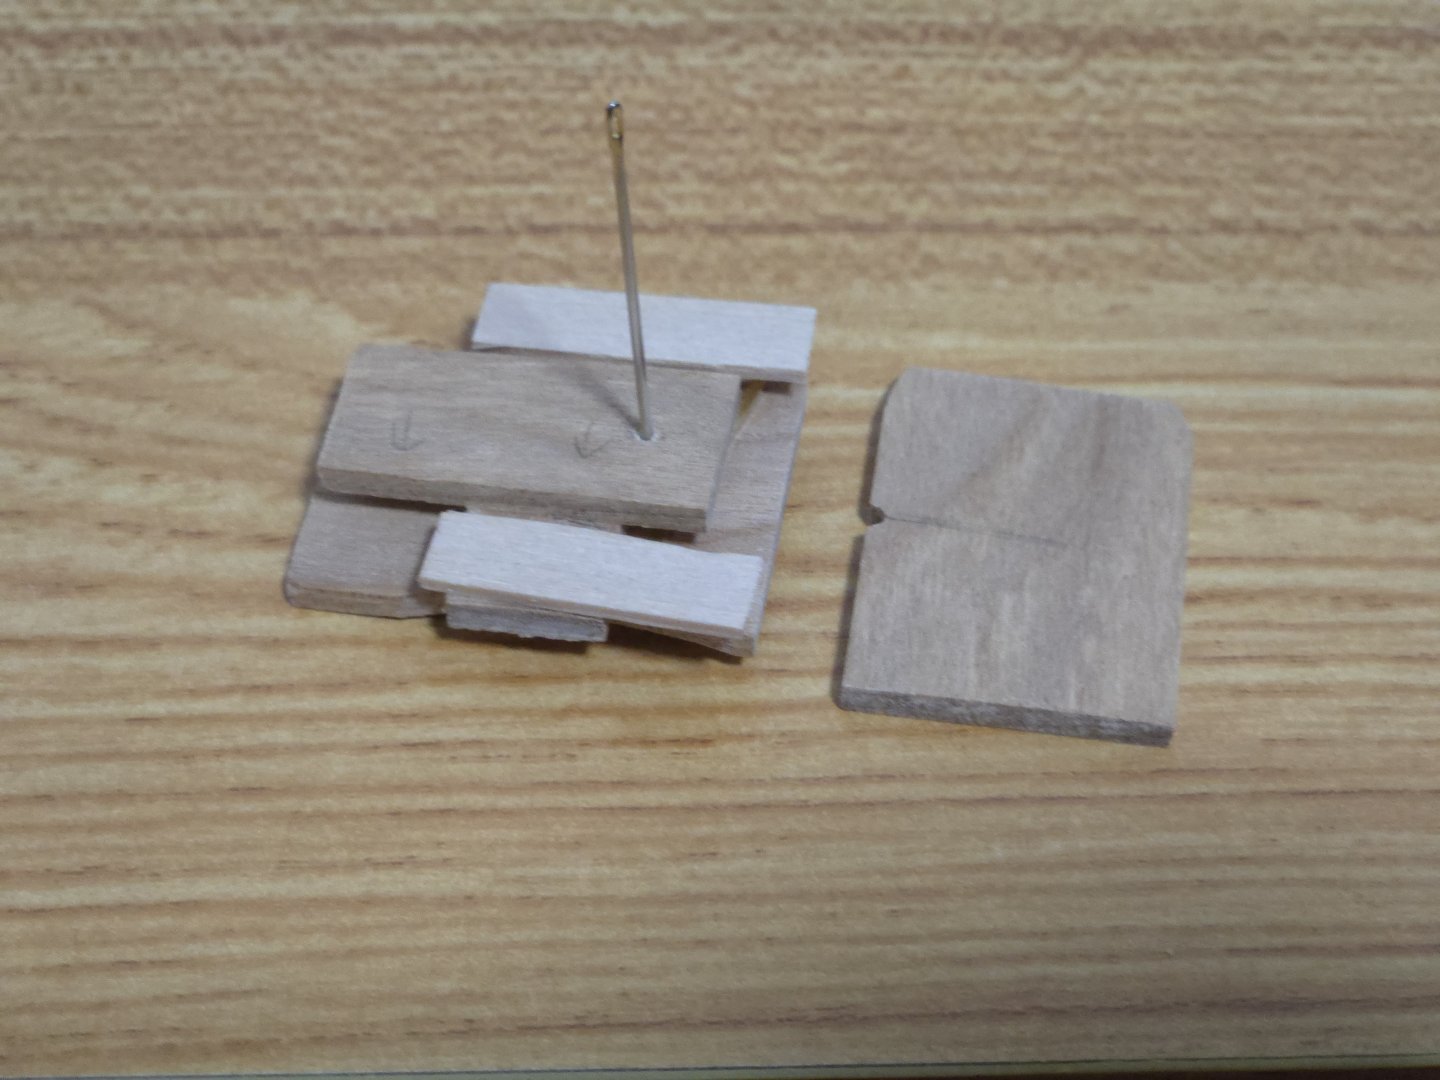
Between travel, work, and some other projects, I haven't had much time for the build. I was able to get a bit of work done in the last few days, though. First, I added the throat halyard. While the mast-side double block for the halyard is already in place, I still needed to add the gaff-side single block. In hindsight, it may have been more accurate to use single blocks for both, as that arrangement shows up in most photos, while I followed the plan which has a double block. Fortunately, I did find a photo of a working lancha rigged with a double block on the throat halyard, so doing it this way is plausible. But it's still a good reminder to double-check everything, including the number of lines passing through each block, rather than just trusting plans. Then it was time to remove the mast and rigging, leaving everything still attached to the mast, to work on the rudder hinges. I tried to make a jig to get a tighter, more consistent bend on the rudder hinges, which are made of brass strip. I used some paint stir sticks that were made of a surprisingly hard wood, as well as some scrap and a thick steel sewing needle as a pin (held in holes in the top and bottom of the jig). The basic idea of the jig was to place the brass strip centered at the pin and to press the notched wood against it, shaping it around the pin. Unfortunately, the jig didn't work very well. The brass strip--even after heating it red-hot, and using the very thin strip that I used to make the chainplates--just didn't take very tight bends with the jig. Instead, I ended up just bending the hinges by hand. With a lot of care, I got them a good bit smaller than those on the Canoa de Rancho. (Unfortunately I forgot to take photos). Photos like the one below show that Lanchas used a single long pin threaded through all the hinges, although my build follows other examples in having two rather than three hinge pairs and in using hinges rather than eyebolts on the hull side. Source: https://www.flickr.com/photos/luchinmardones/5312311416/ After cleaning and priming the hinges, it was time to attach them and hang the rudder. I began by gluing the hull-side hinges in place, using a brass rod to ensure they were lined up properly. I then looped the rudder-side hinges around the rod, slid them into place, and dry fit the rudder. I found that my efforts to make small hinges seemed to have paid off--if anything they were too small, and there wasn't enough space between the rod and the transom/sternpost to fit the rudder hinges. I decided that the best way to deal with this was to carefully cut a little divot where the hinges will go so they have space, as seen below. The divots were then painted to match the hull, becoming nearly imperceptible. It was then time to glue the rudder-side hinges in place. In order to make sure they were properly positioned, I glued the bottom hinge in the correct location off the hull, then hung the rudder, threading it on the rod, to get the top hinge in place. This was quite difficult, as there was very little space even with the divots. In order to add superglue to the inside of the top hinge, I had to tilt the rudder back, but after gluing the top hinge I found that this had popped the lower hinge loose from the rudder, so I had to carefully re-glue it. After some frustrating minutes, though, it worked out. I then removed the rod and painted and weathered the rudder-side hinges, below. I also made the long rudder pin with a length of brass rod that I put a small loop into one end of, and then primed and painted that. At this point, I was ready to finally hang the rudder. I lined it up and began to pass the pin through the hinges. Of course, the added paint made the pin thicker than it was before, and it got stuck. When I pushed it down a little harder, the top hinge popped off the hull, as can be seen (kinda) below. At this point I remembered that I should have scraped the paint off the gluing surface for a better hold... Finally, I was able to re-glue the hinge and to touch up the paint. The rudder is now in place! It does rotate about 45 degrees to each side, although it's pretty stiff. Overall I'm much happier with how these hinges turned out than I was with the Canoa de Rancho's hinges, but I clearly still have a lot to learn. Hats off to those of you who can make nice hinges and otherwise do great metalwork! While I had been hoping to have this finished for the NRG photo competition, I've taken on some other projects and don't think it will be ready in time (at least not with sails...). That said, I've been really enjoying getting into other sorts of woodworking. I'm nearly done making a ring box, below, from cherry, walnut, and maple. It's interesting how even a small box like this changes your perspective. While I previously considered anything over 1/8‐inch to be thick wood, that's really quite thin for this sort of work. Getting things perfectly square is also much harder than I thought (especially with limited tools). These sorts of projects are really challenging me, but I'm learning an entirely different style of woodworking from what I do with models. It's very fun, even if every project takes a lot longer than I think it will.


- 312 replies
-
- 12
-
-
- Chile
- Latin America
- (and 6 more)
-
I'm looking forward to following along on this build!
-
Very interesting model!
-
Excellent work on the whaleboats! I have to ask, how were they made? Are they plank on mold, hollow lifts, or some other method? They look very convincing.
-
Sorry to hear about the build. I definitely found some aspects of this model to be a little frustrating, especially that fairing the hull took so much sanding. For whatever it's worth, if you decide to pick it up again in the future, I found it helpful to use the markings on the tape more as a rough guide to cut out an oversized plank beyond the lines, and then to sand the plank, with numerous test fittings, until it fit well against the previous plank.
-
Will there be anything inside the cabin that will be visible through the windows? If they just show the internal framework of the model, something opaque or maybe even black cardstock might work well to give the appearance of windows.
-
Excellent information, @Dee_Dee, and your build log on this subject is very interesting--great model! There are a number of differences between the Model Shipways kit and the Chapelle plans. The shrouds are one--I assume they were added to make the kit more of a learning experience for new builders, but they're really more appropriate for a Friendship Sloop. I was also intrigued by Chapelle's statement that most of the centerboard Muscongus Bay sloops were lapstrake planked (although his plan is based in part on a hulk that was carvel-planked), something I haven't seen represented by any model.
-
Welcome!
-
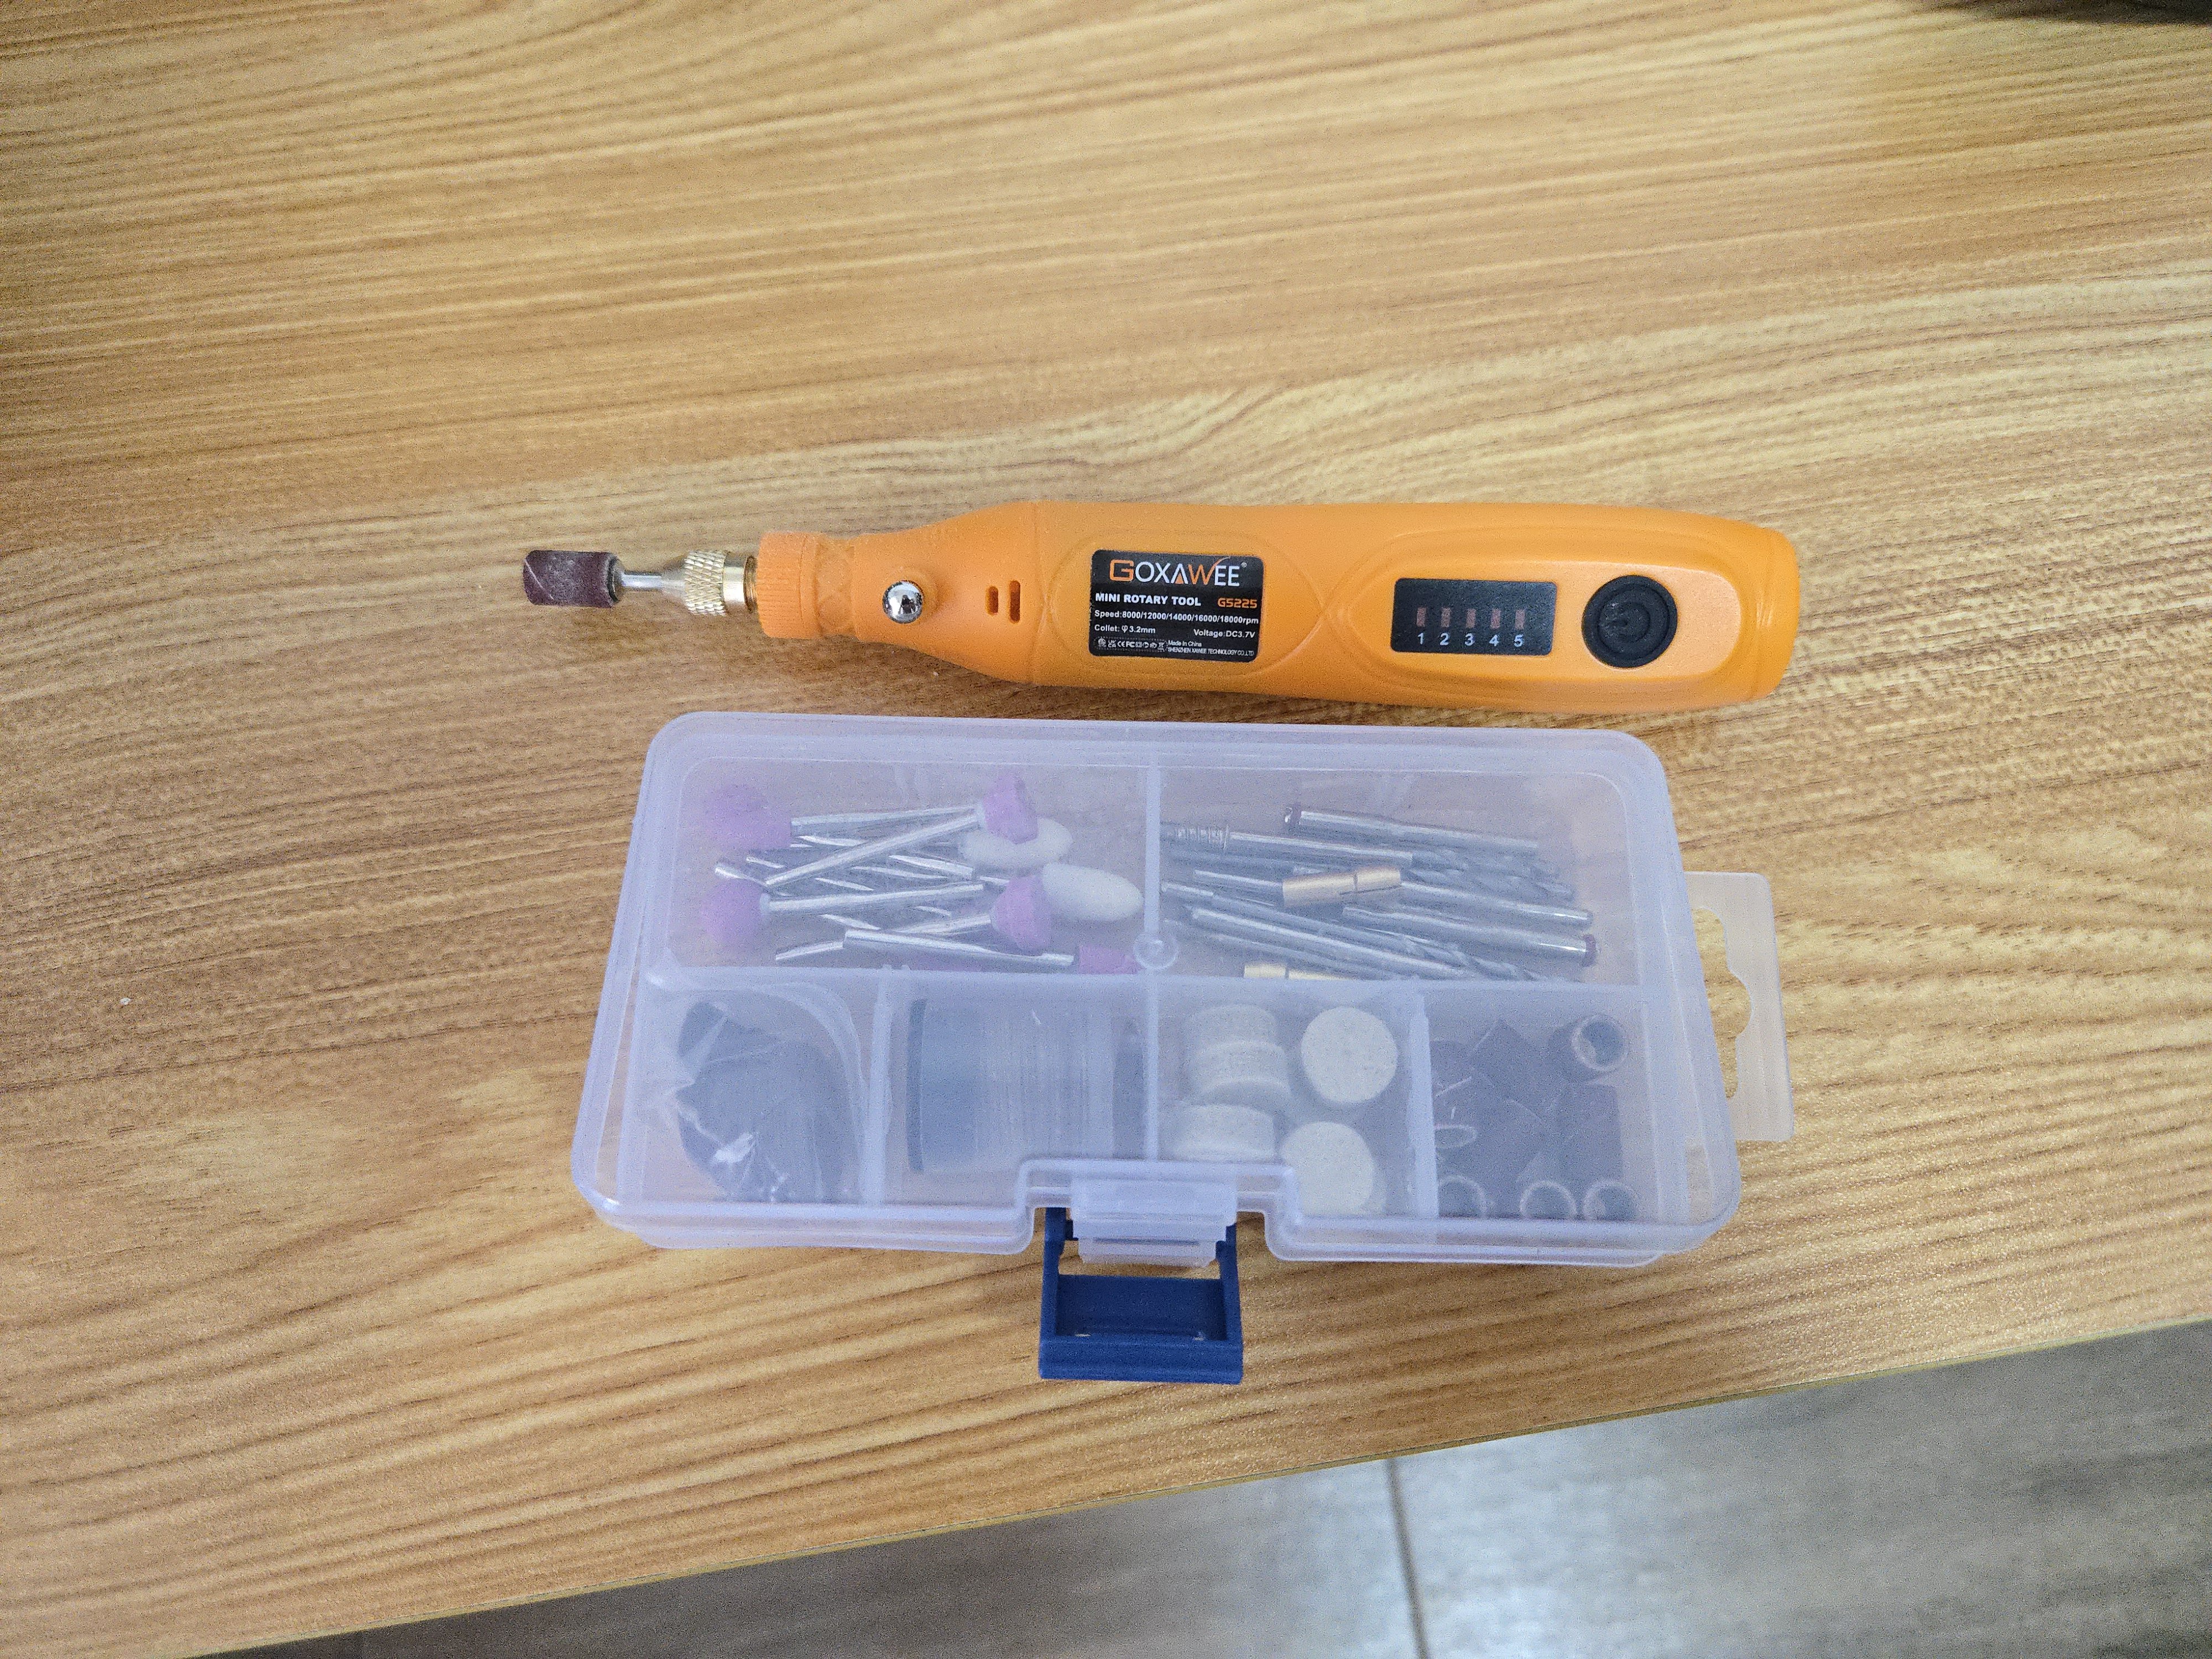
I haven't yet figured out the cant frames, and still need to find longer bolts for the jig, but I've made progress in another area. After some consideration, I decided to buy a small, rechargeable rototool similar to the one @Glen McGuirementioned. I was able to get it going today and found it to be extremely useful. While I previously could sand one part in about 30 minutes, I can now sand ten or more in that time. The parts will still need a final sanding by hand for smoothness, but this still significantly sped up what has to be one of the most tedious parts of modeling. For that, I'm very happy. The tool itself is very simple--you press the power button to cycle through 5 speeds or hold it down to turn it off--and I can see some ways it could be better. It gets a little warm after extended use, which is a good sign to take a break, and the button placement at the back end makes it slightly awkward to turn it off while using. It's definitely not very powerful, although that's not really a problem for what I've been doing--I would hate to accidentally over-sand and ruin a piece. So far I've only used the sanding drum, but it comes with a number of other parts as well. I'm curious to see how the mini saw blade works, although I doubt it will work very well on anything but the thinnest wood. I'm also thinking about making some sort of stand from mdf or something to better hold it steady for a consistent sanding angle. All told, there are certainly much better tools out there, and for all I know this one's going to break tomorrow, but for about 14 dollars, I'm quite happy with what I got and it's already helping quite a bit with this project.

- 139 replies
-
- 5
-
-
- ancre
- Bateau de Lanveoc
- (and 2 more)
-
I think the Internet Archive's borrowing period is just for an hour, so it might be available again soon. Beyond the plan, the written description on the accompanying pages can be useful as well. While you can certainly go for it, this may be a bit of a tricky hull to plank given the overhanging stern. I suspect that the kit planks are not quite to scale in terms of width--you may be able to count planks from a photo to figure out the proper width. If you're going the tapered strip route, instead of cutting spiled planks directly from a wider sheet, you'd probably need thinner strips than the kit includes anyway in order to better edge bend them. Looking forward to seeing how you decide to go about it!
-
It's also available for short-term loan online through the Internet Archive (a fantastic source for books, btw).
-
Looking forward to following along! If you're looking for inspiration, I'd second the recommendation to have a look at the relevant section of Chapelle. Another potential source would be to look for old photos. While I haven't found many of the Muscongus Bay centerboard sloop, there are quite a few photos of Friendship Sloops, which were deeper-hulled but otherwise quite similar vessels. There are a lot of photos of these--mostly as yachts, but a few as fishing vessels--here, for example: https://penobscotmarinemuseum.historyit.com/search-interfaces/search/digital-collection/0/1/1/1?rq[0]=8639&ip=1
-
Excellent job, it turned out really well! I've been very happy with the rope I've bought from Ropes of Scale, they have a wide range of colors and sizes. I've used it for my Canoa de Rancho and Lancha Chilota builds (although I haven't yet rigged the latter). I've also bought rope from Syren Ship Model Co., which looks to be excellent as well, although I haven't had a chance to use it yet.
- 55 replies
-
- 3
-

-
-
- Norwegian Sailing Pram
- Model Shipways
- (and 2 more)