JacquesCousteau
-
Posts
1,374 -
Joined
-
Last visited
Content Type
Profiles
Forums
Gallery
Events
Everything posted by JacquesCousteau
-
 There are a lot of different ways to go about this. A lot of people use legos to hold the bulkheads square, or other things like machinists' 3-2-1 blocks. A small carpenter's square is also very useful. I've also tried using large binder clips along the backbone to try to square up the bulkheads, although it's not wholly ideal. Above all, I think you just have to go slow and repeatedly check each bulkhead as you go. Good luck!
- 5 replies
-
- 1
-

-
- Bluenose
- Billing Boats
- (and 1 more)
-
Welcome! Those are some very impressive builds!
-
Nice research work!
-
Very nice, subtle effect!
-
Very nice work, the details really bring the yards to life!
-
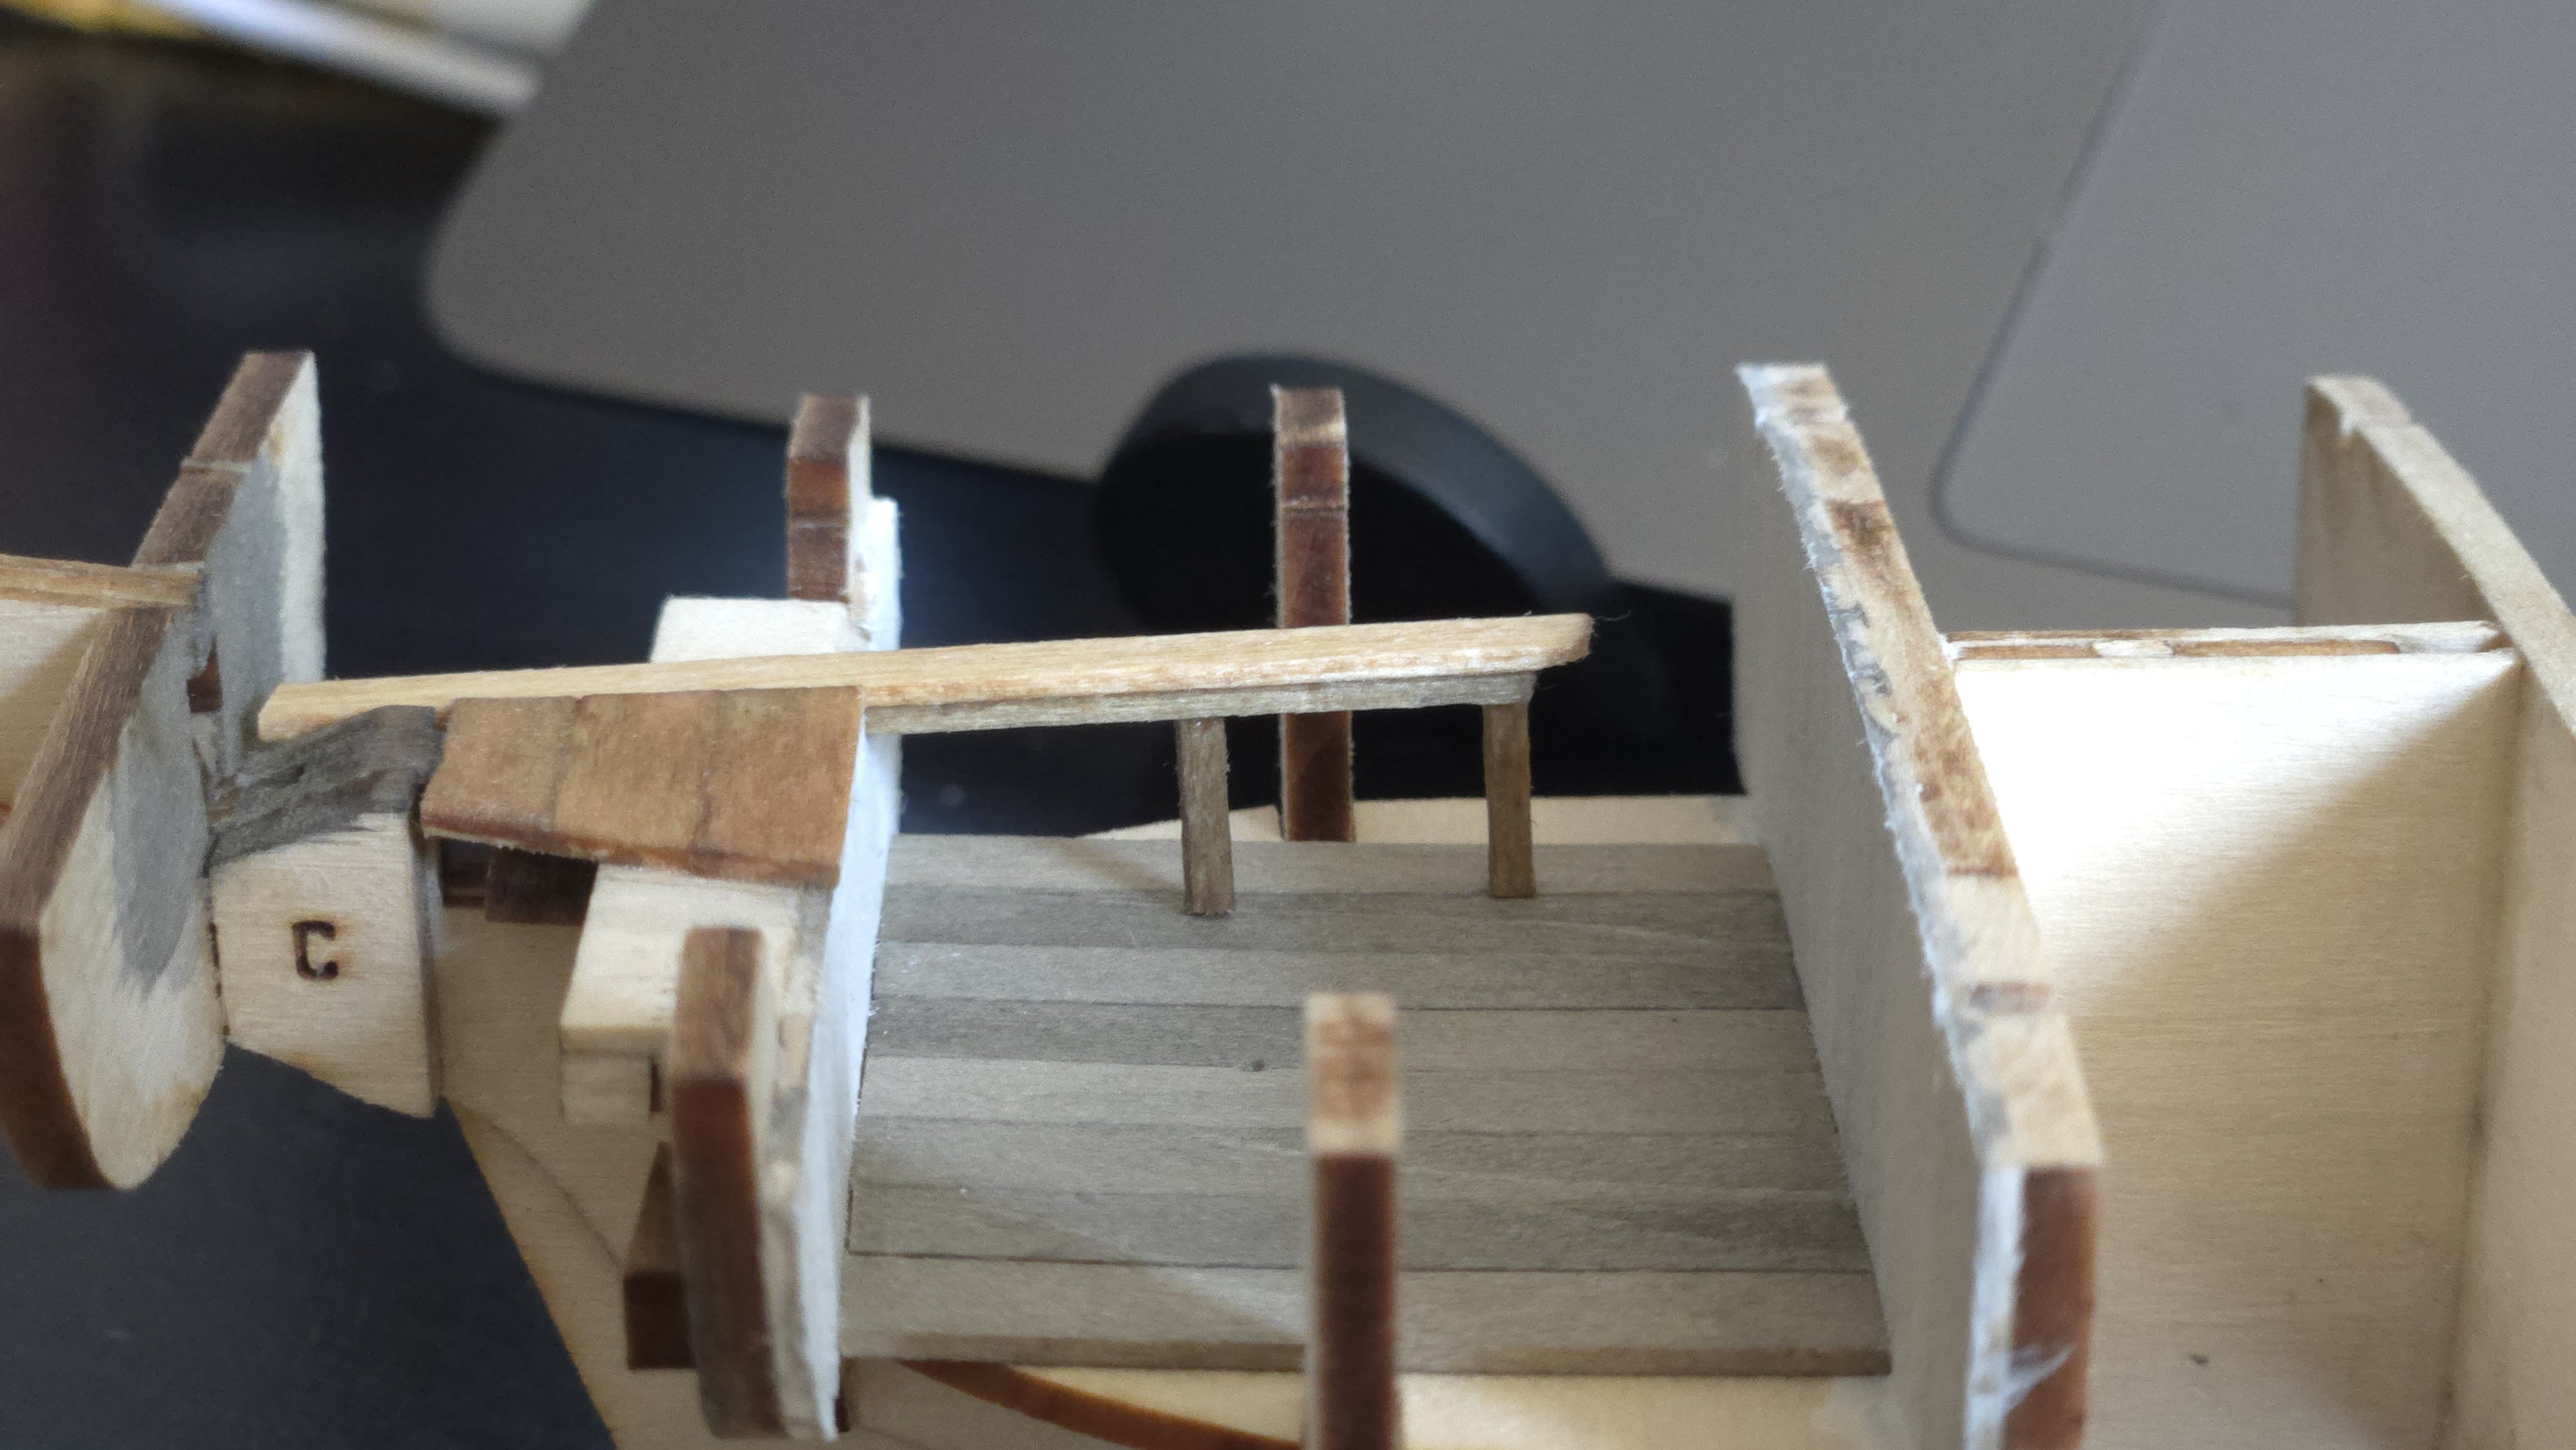
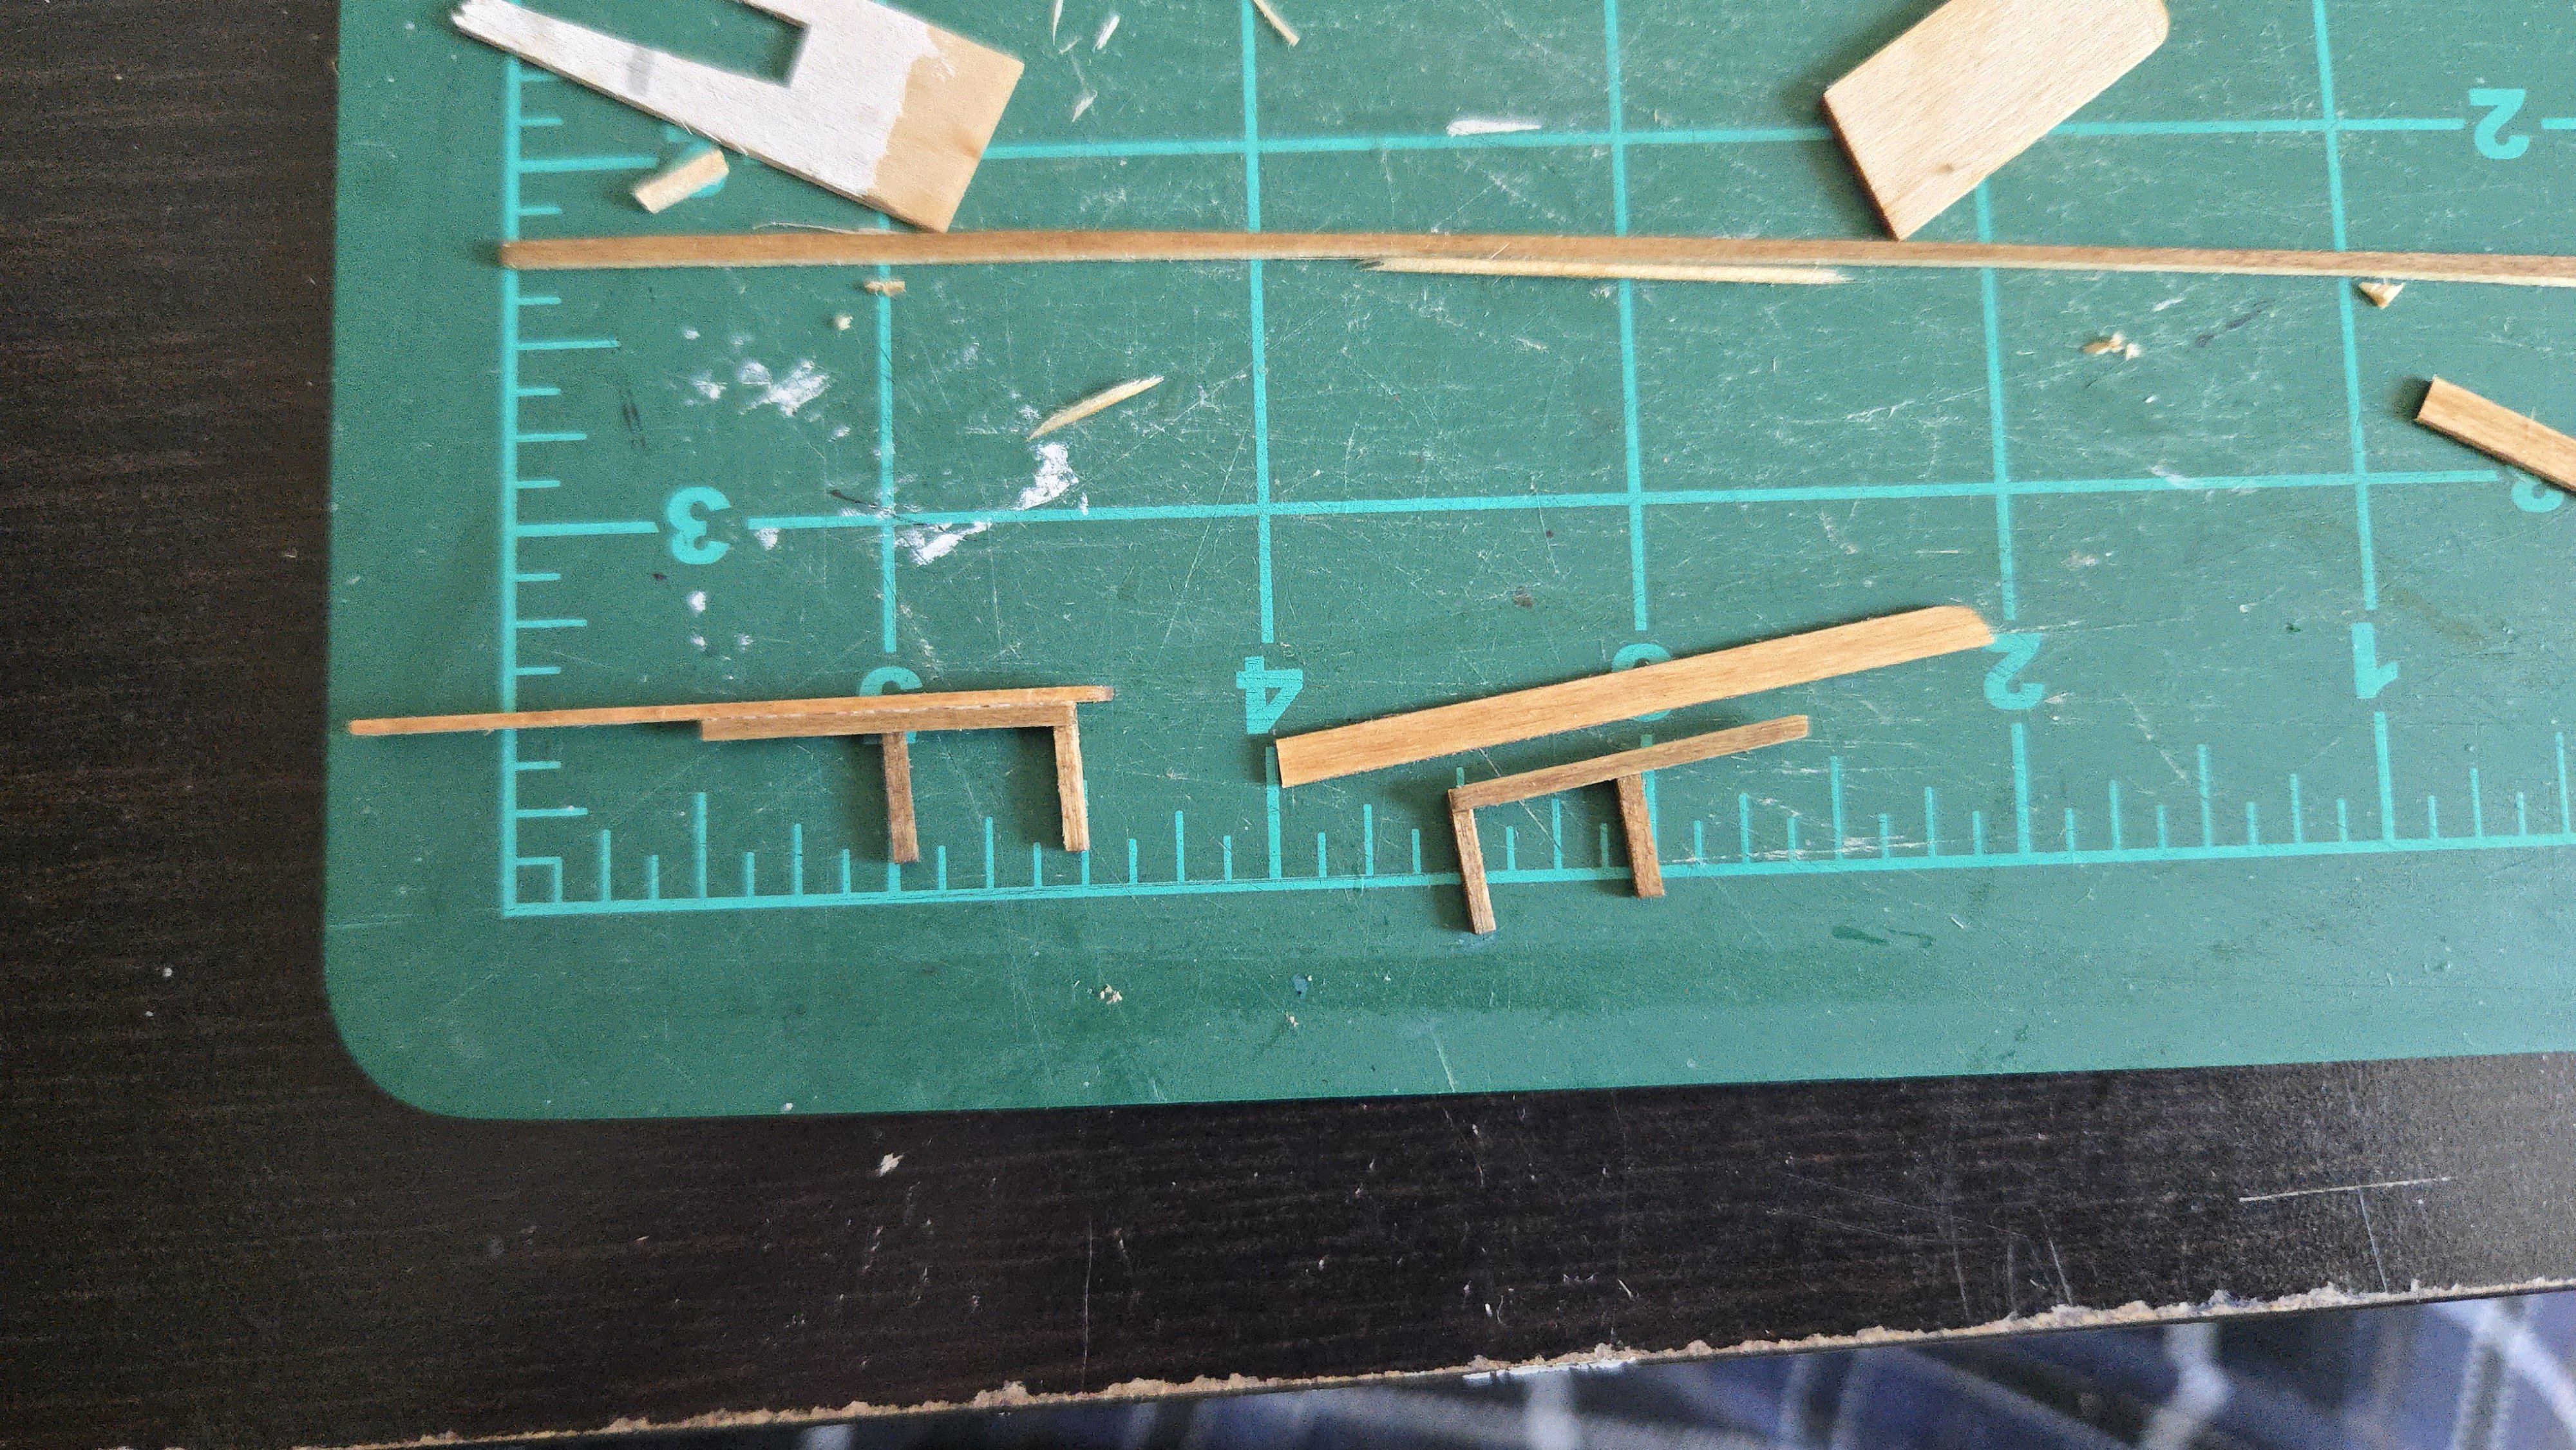
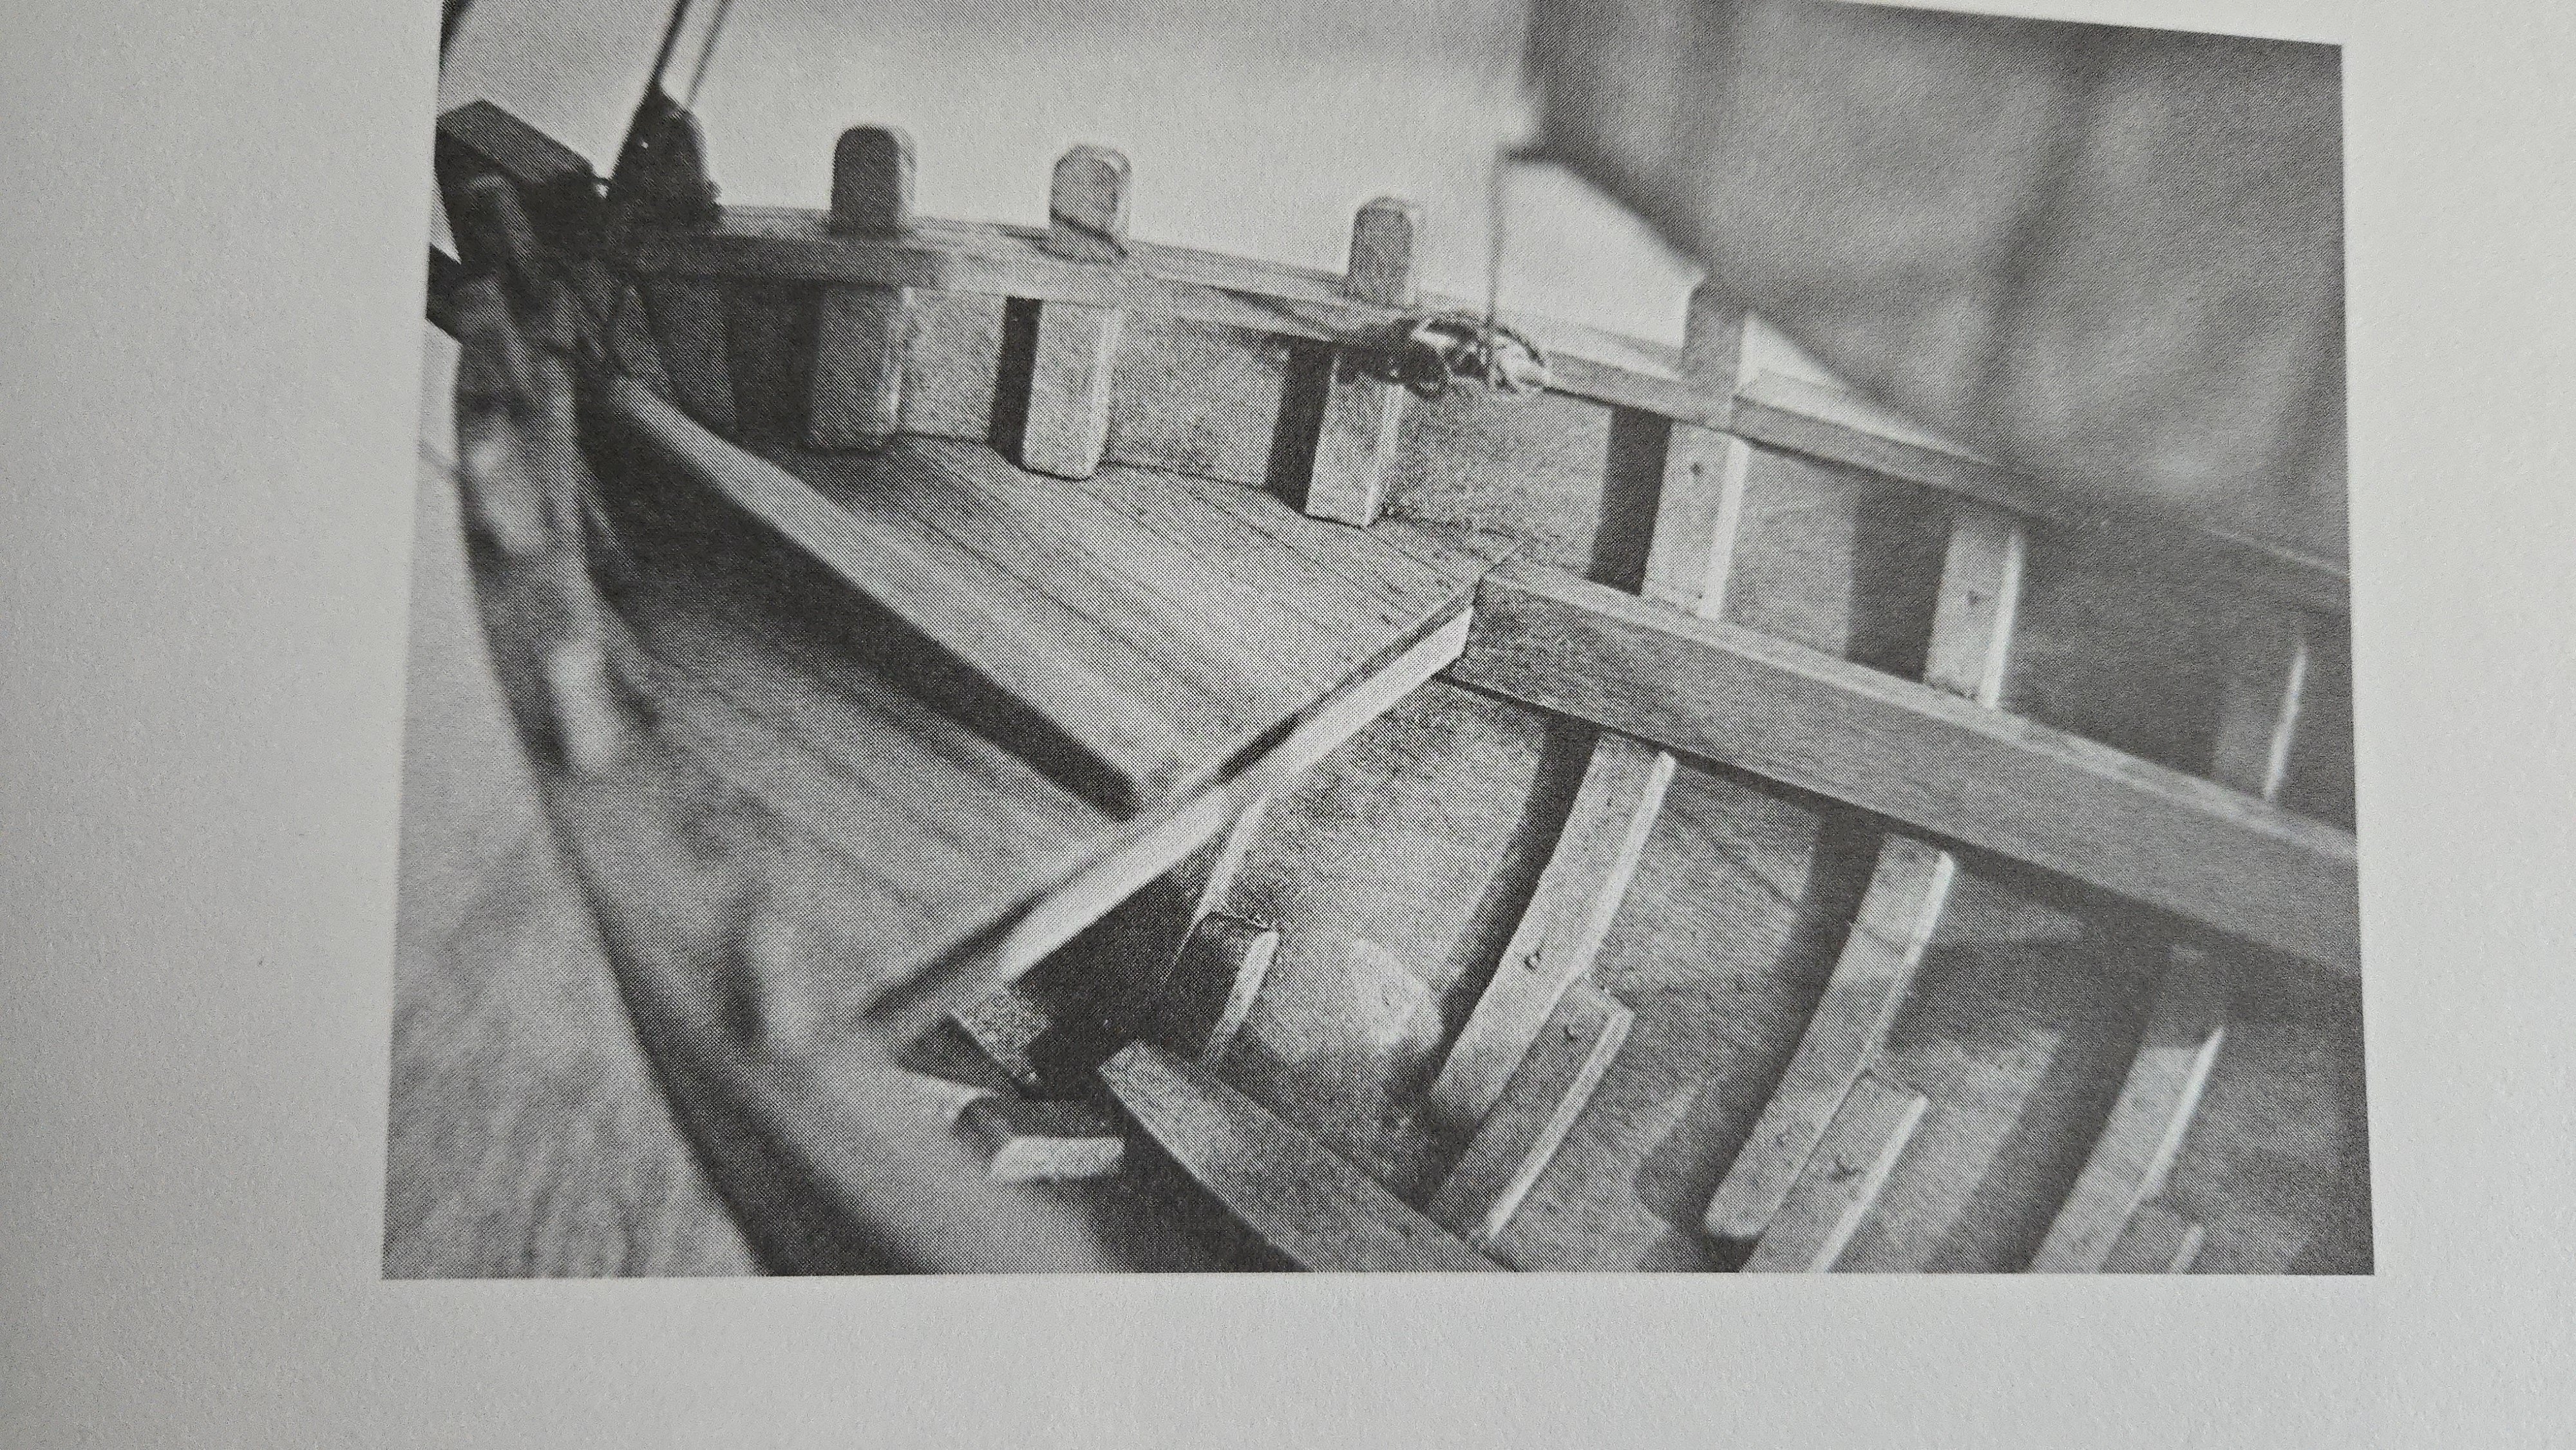
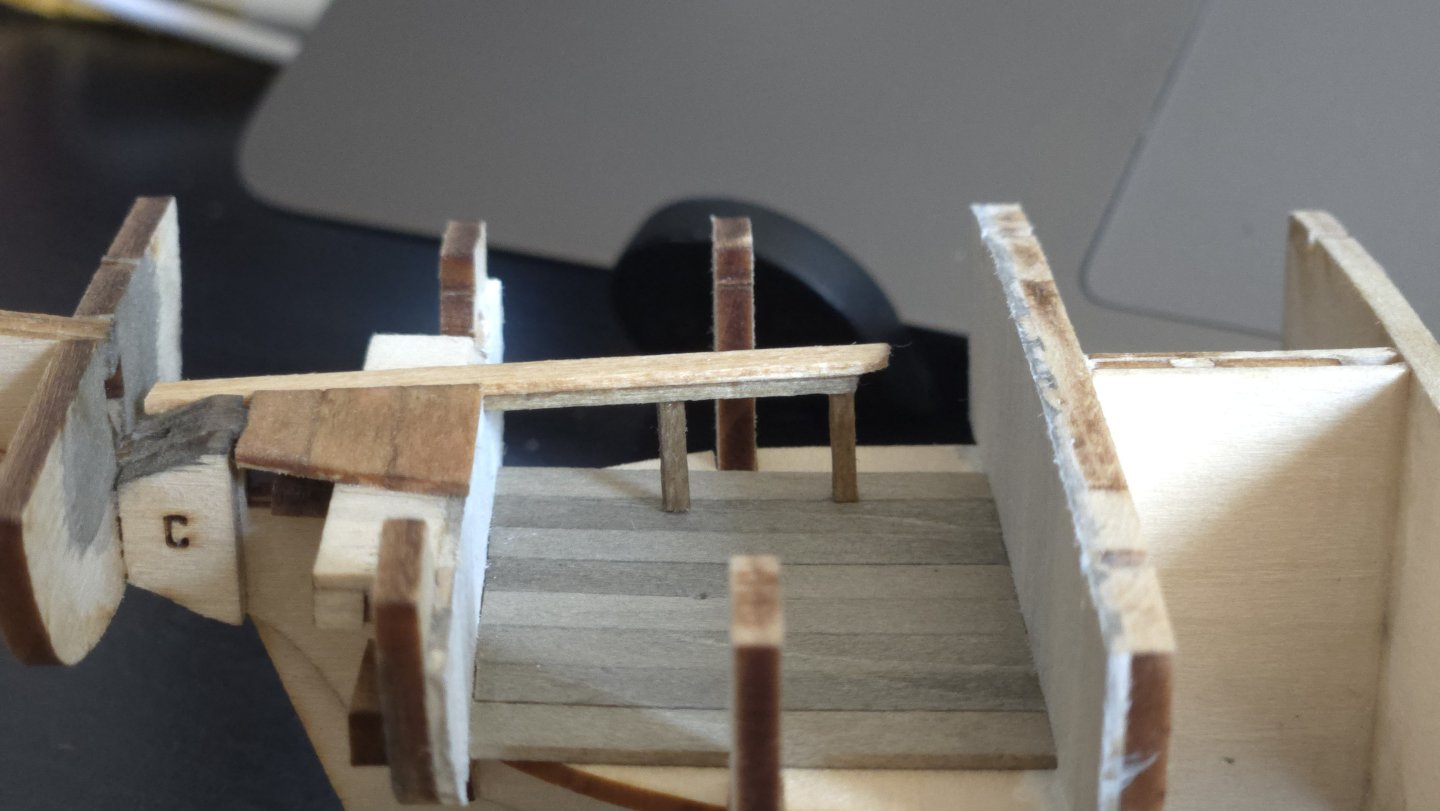
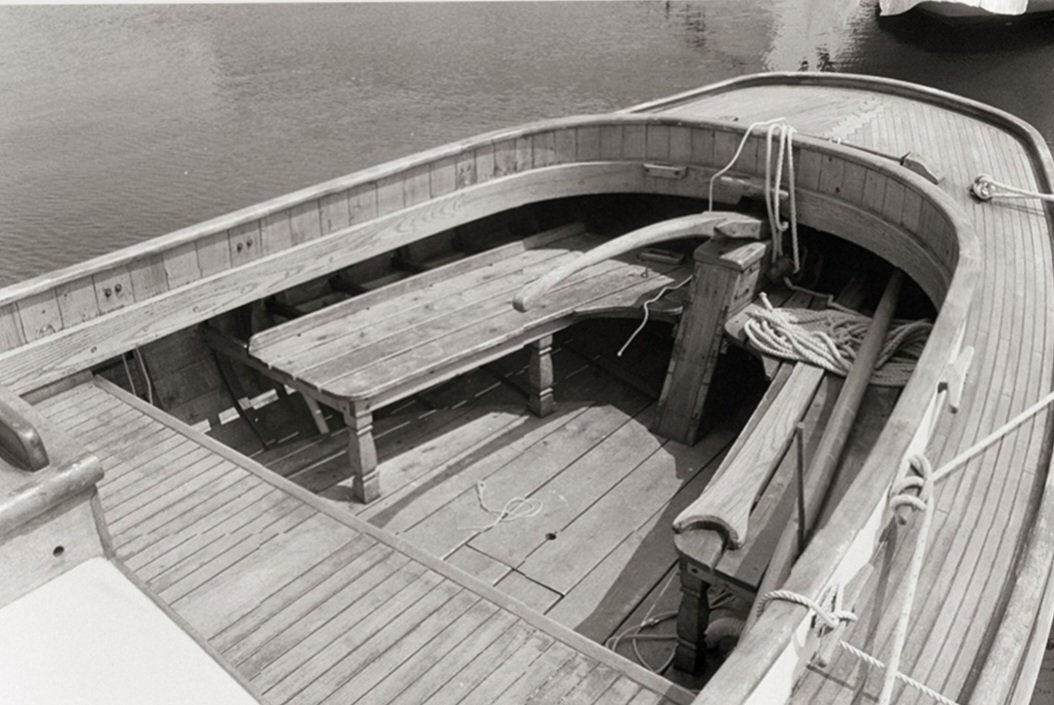
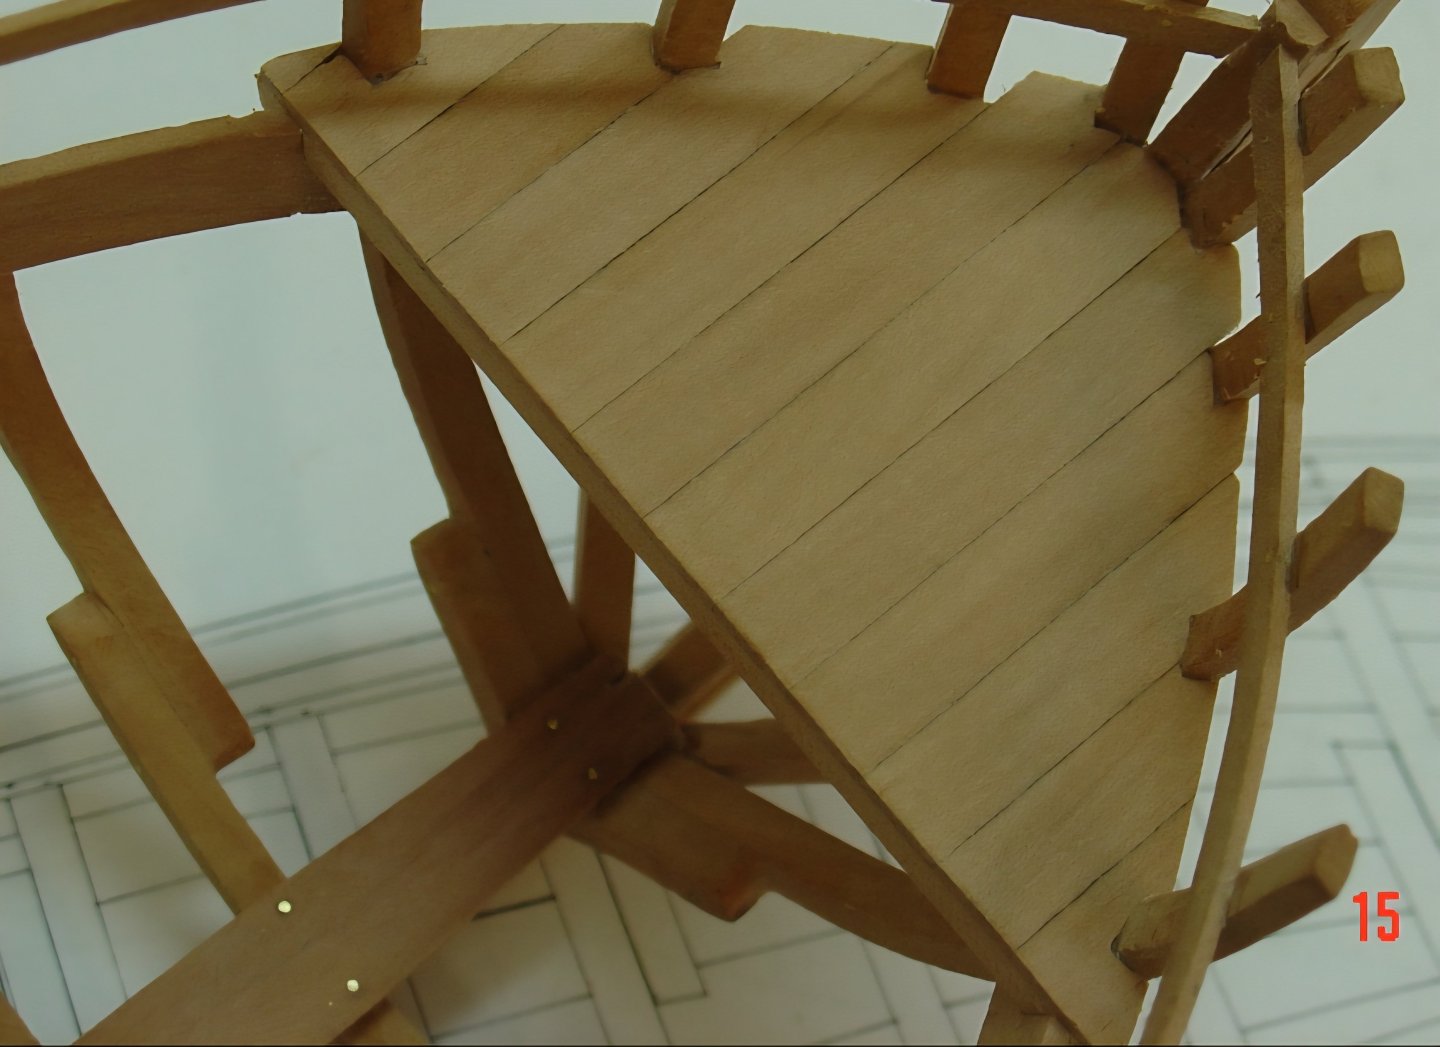
Thanks, Keith! I decided to work a bit on the side seats before planking the hull and blocking a lot of access, although I'll be gluing them in later. I took the photo below as my guide, although I'm modifying it to fit with the bulkhead aft. As you can see, the seats are supported by a framework that rests on columns at the front end and, at the back, is held up by supports that run back to the hull and are attached to a stringer and the frames. Source: https://penobscotmarinemuseum.historyit.com/items/view/digital-collection/298307/search?resultsMode=search&searchInterfaceId=1&search=eyJxIjp7InNmMTI3IjoiRnJpZW5kc2hpcCBjb2NrcGl0In0sIm9iIjoic2NvcmUiLCJvIjoiZGVzYyIsInBzIjoyNCwidiI6ImdyaWQiLCJyY2kiOjAsInNzZiI6MCwicHJlIjp0cnVlLCJpcCI6MSwicmEiOltdLCJwZyI6MCwidmlld01vZGUiOiJncmlkIiwiZmFjZXRTdGF0ZSI6ImVKeE5UanNPd2pBTXZRcnkzSUd5SURJeUZIVURNU0tHa0xqRkltMUNuQ0JWVmUrT29VVmlzWi9mVHg2aE82TkRrOGozdkI4cWJUQlZoTTZDR3FjQ3VvVndDV1BkaDV6KzZVUDBPZkFjUndsY3JqL2xxRnZreFZyM2xFaTd1UVB0S1dNY1JJTG5aM0JUYnJhZ29JcUV2ZVU3aFpYeDVoRW9nV1Q5VFNRMlBpTElJZGdpRzRGQnVuY0Z2SVJwSTFsaG9pRlE2d0tZbSs4T0VsRXBaaXlBQXFoU0hIcCtNTFJpbUtZM0ROWlJudz09In0= I won't be able to attach the stringer or supports running out to the hull until the hull is planked, but I can fabricate the front of the seats, with the columns, now so that I can make sure they're even. Everything was made from basswood. I stained the framework a darker color than the seat planks. Unfortunately, due to the fragility of the 1/16‐inch square basswood columns, I did not include the decorative elements visible in the photo above. I left the planks long at the aft end, as they will be covered by the seat back, and left the columns a hair oversized so I could carefully trim them to fit properly. And here both seat fronts are dry-fit. The seat planks need a bit more staining. For now, these will be removed so as to not interfere with finishing the floor planking after covering the hull.


-
Very nice work! The diagonal planking is interesting, did it somehow help strengthen the hull against ice?
-
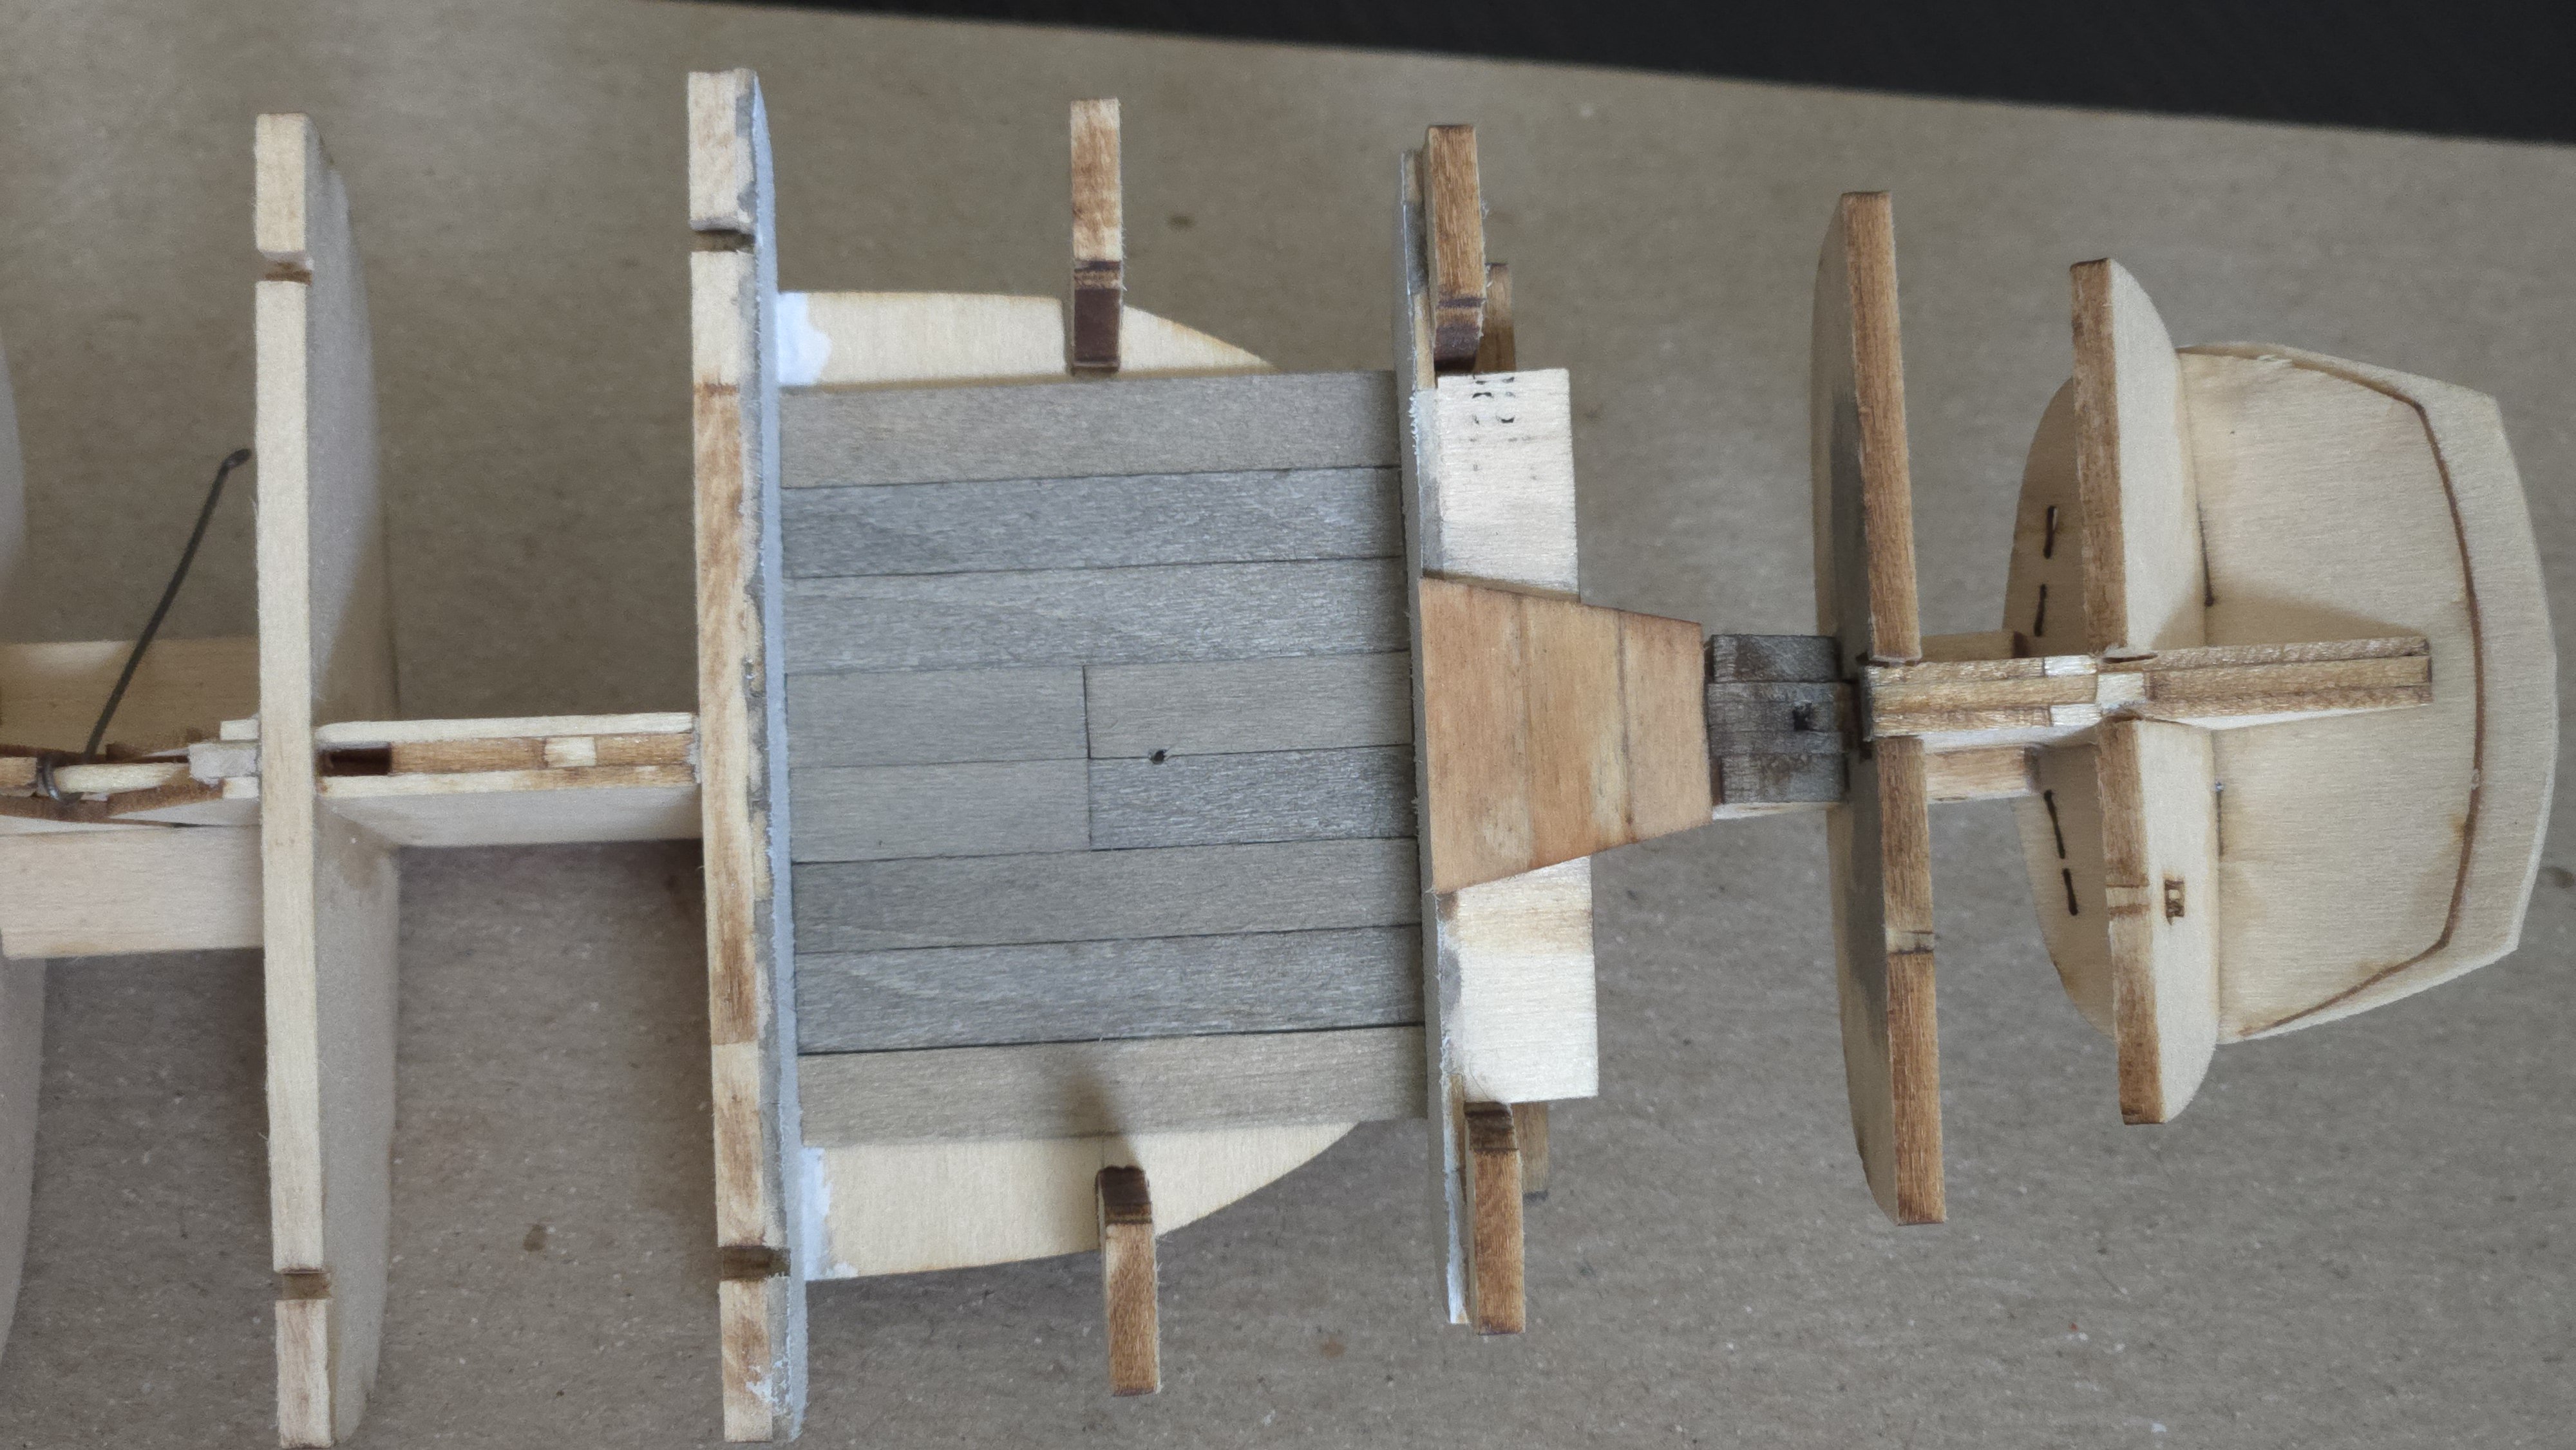
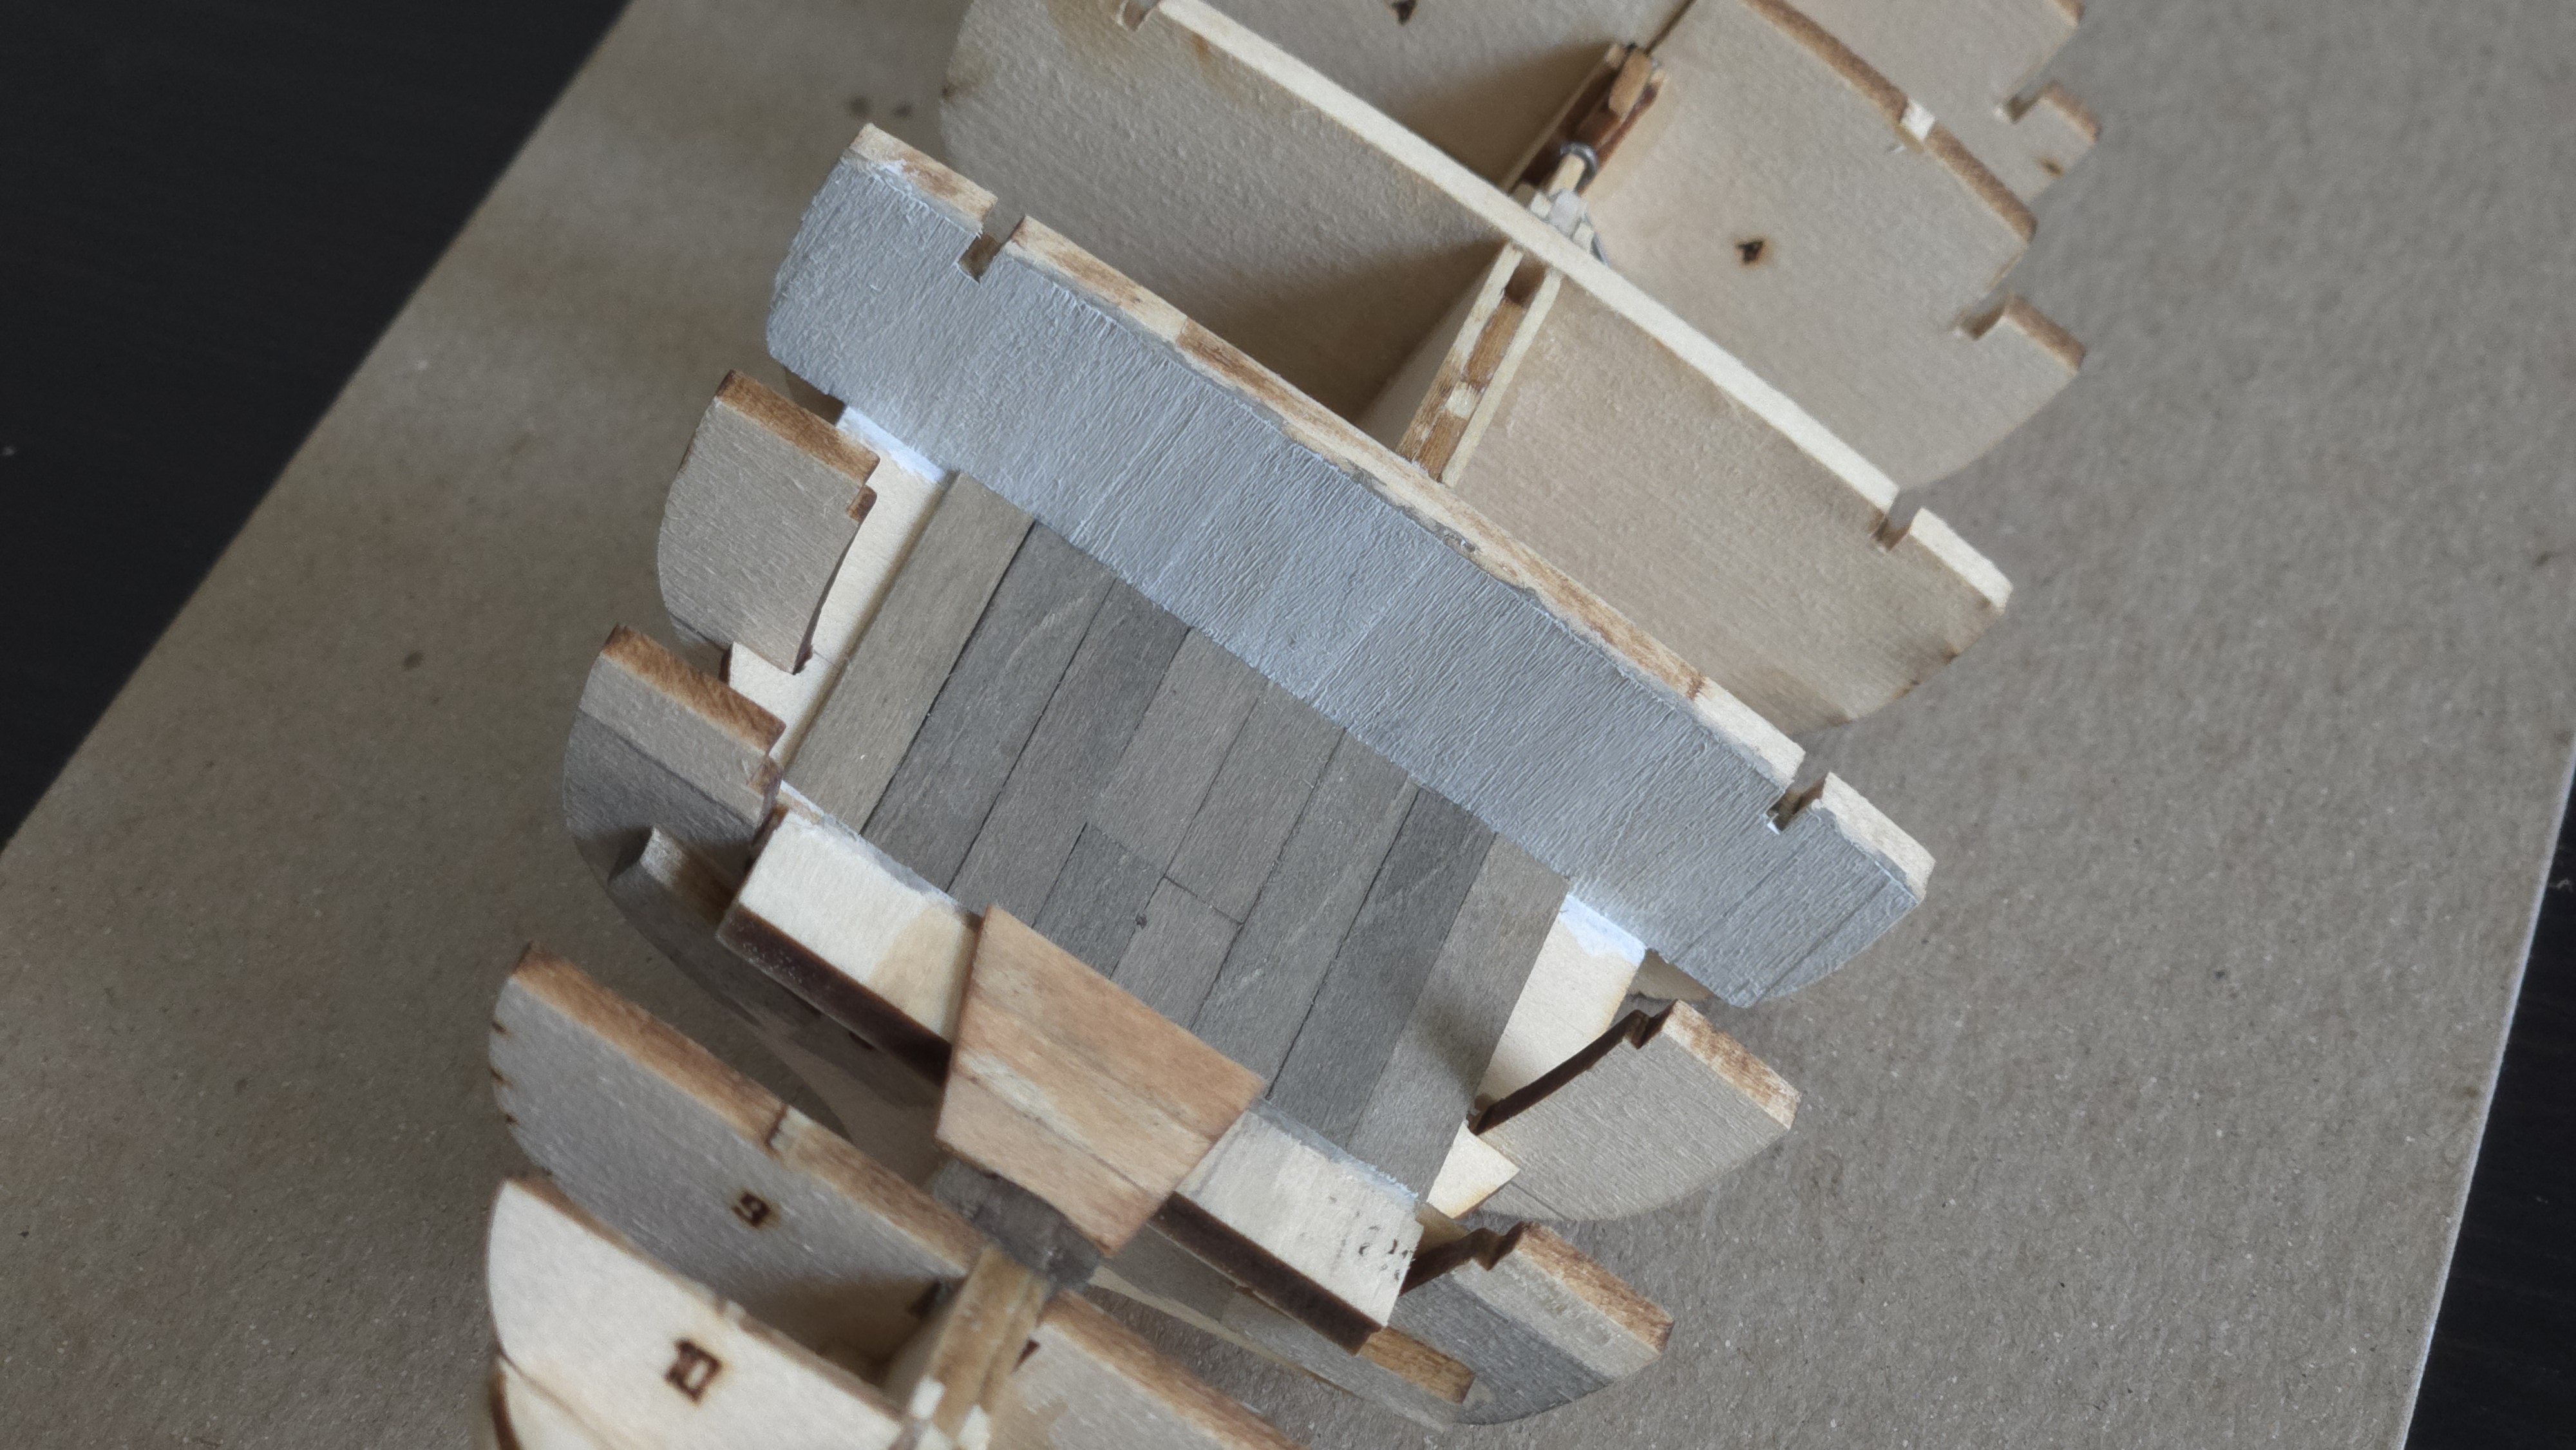
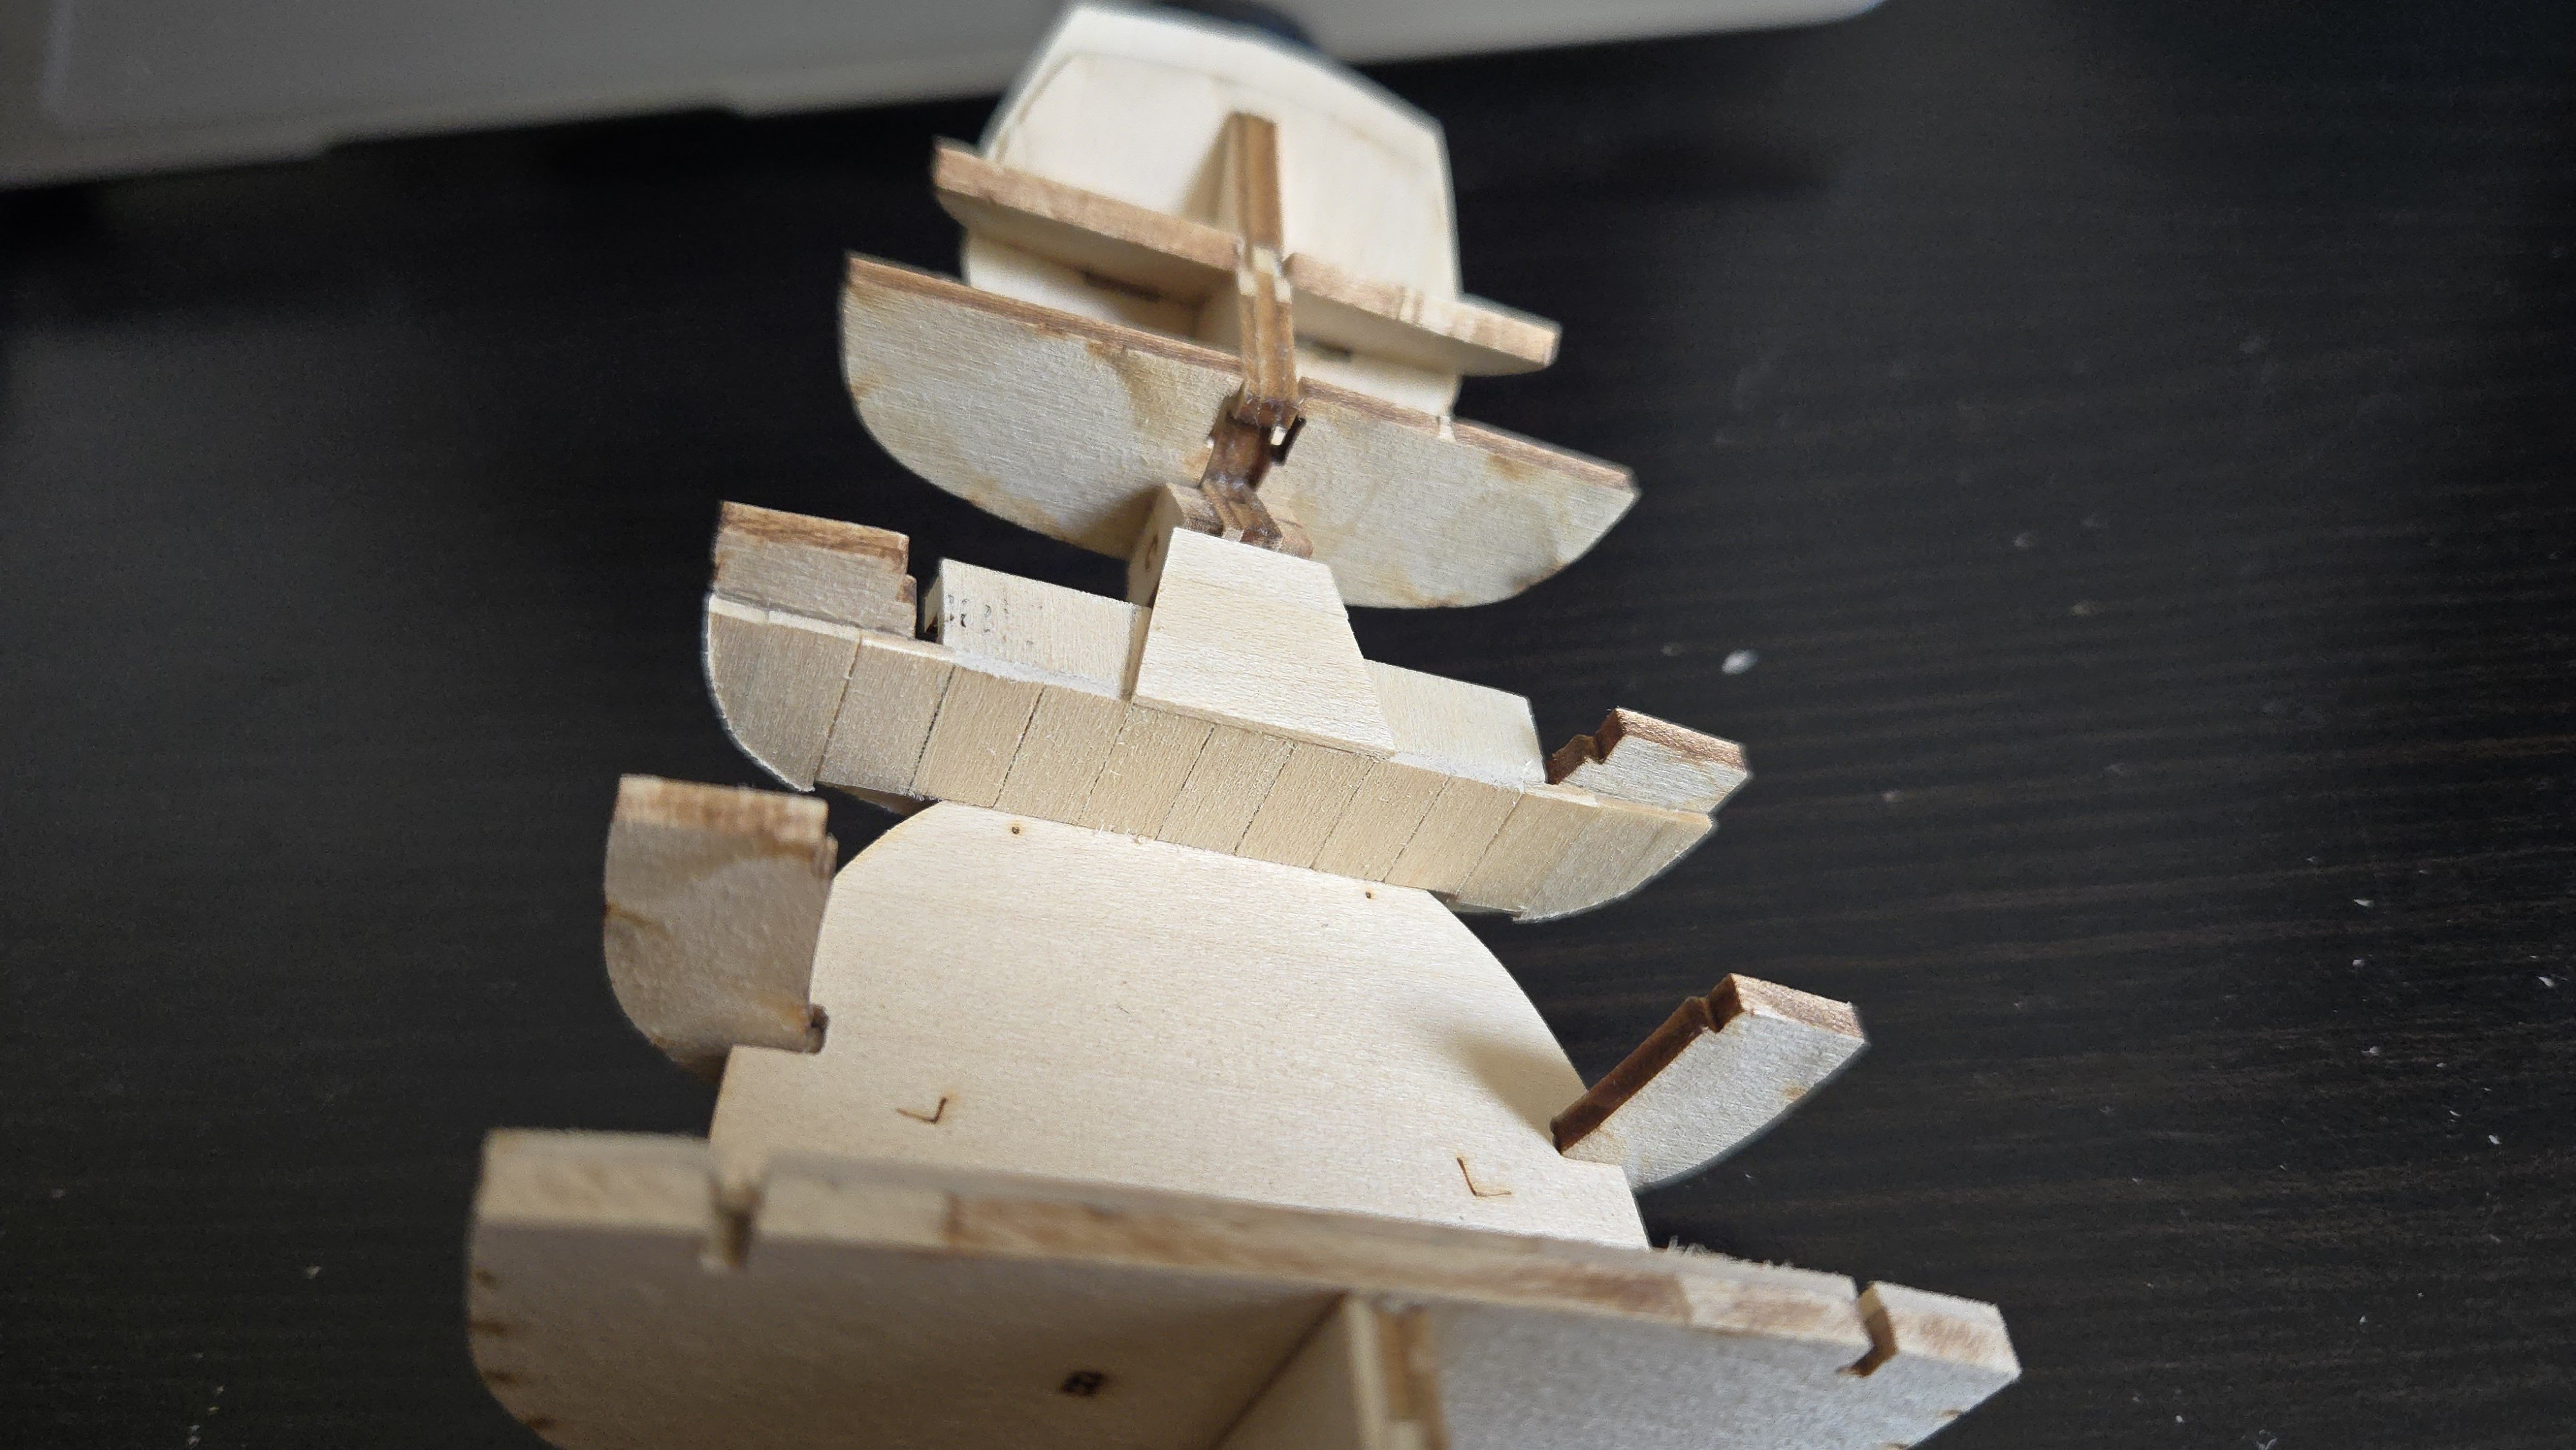
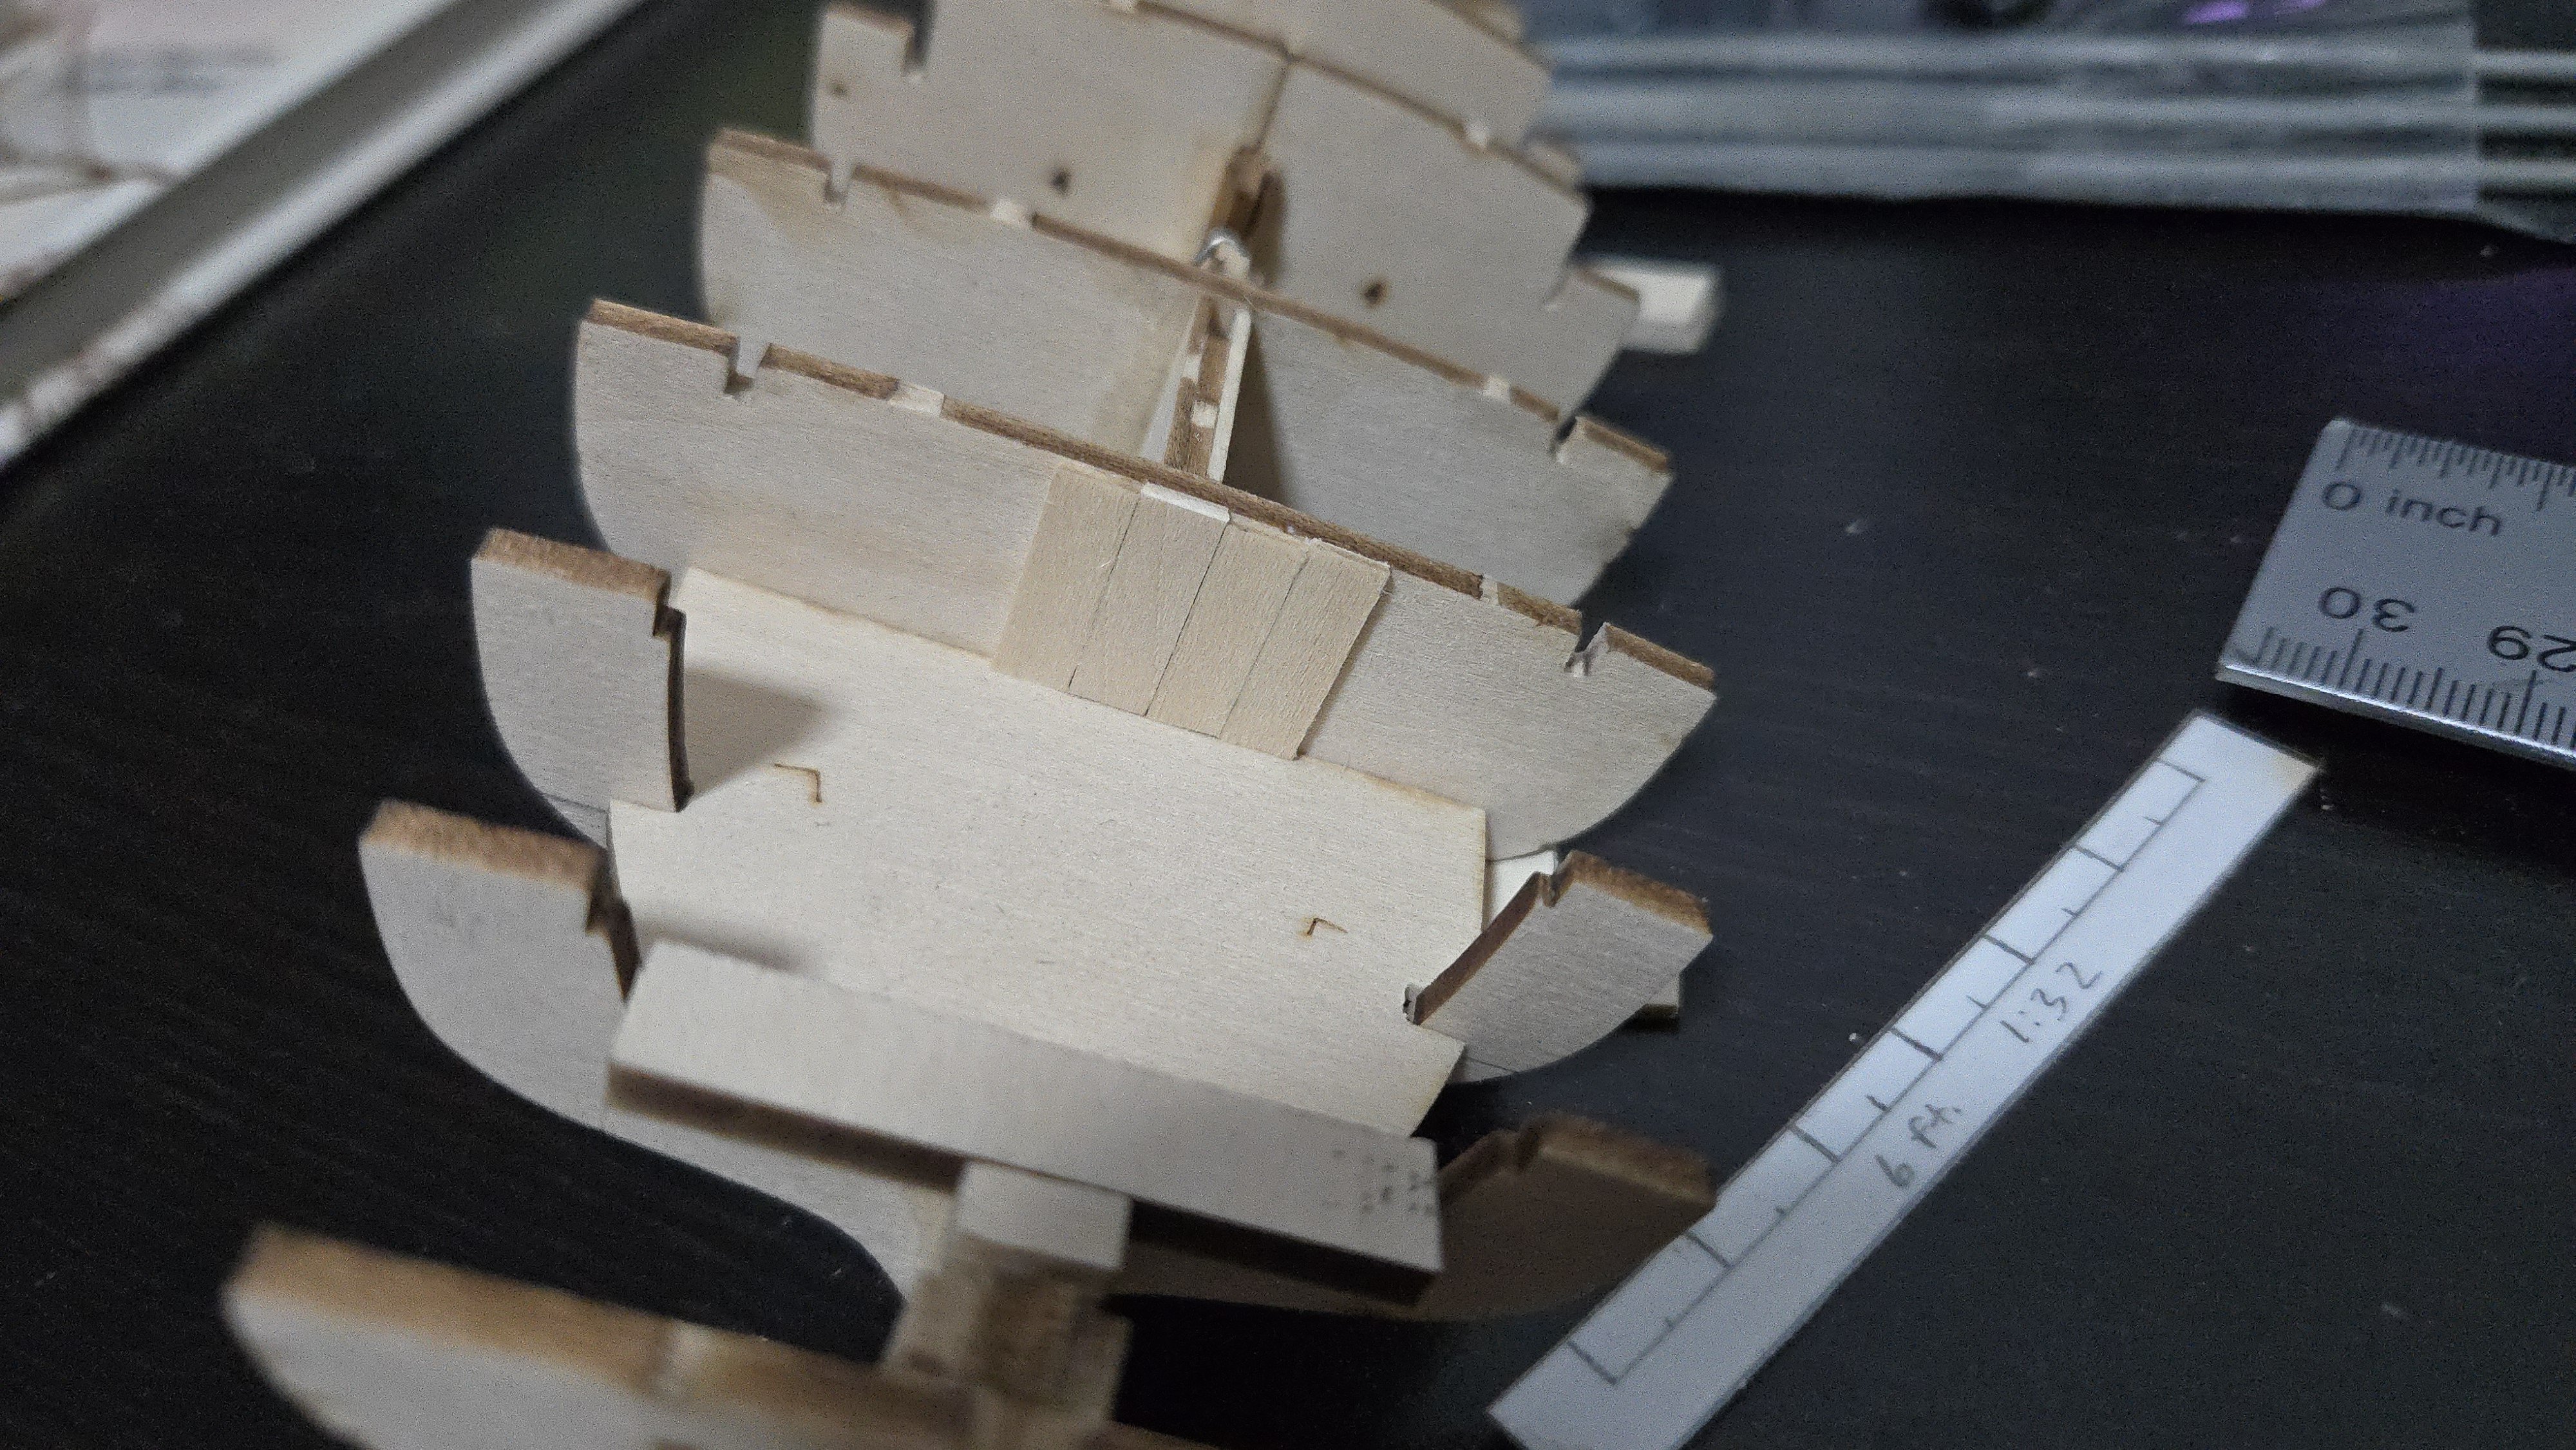
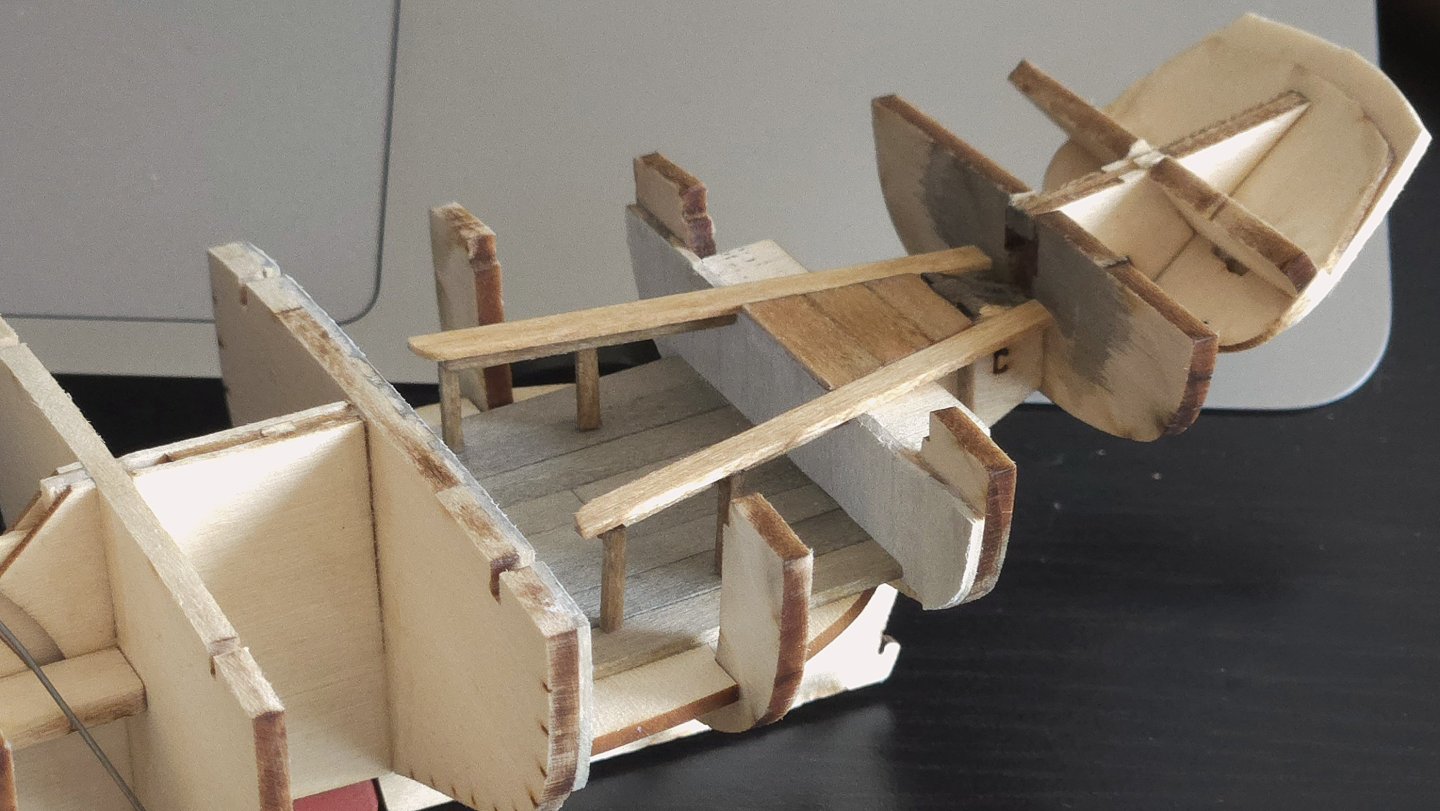
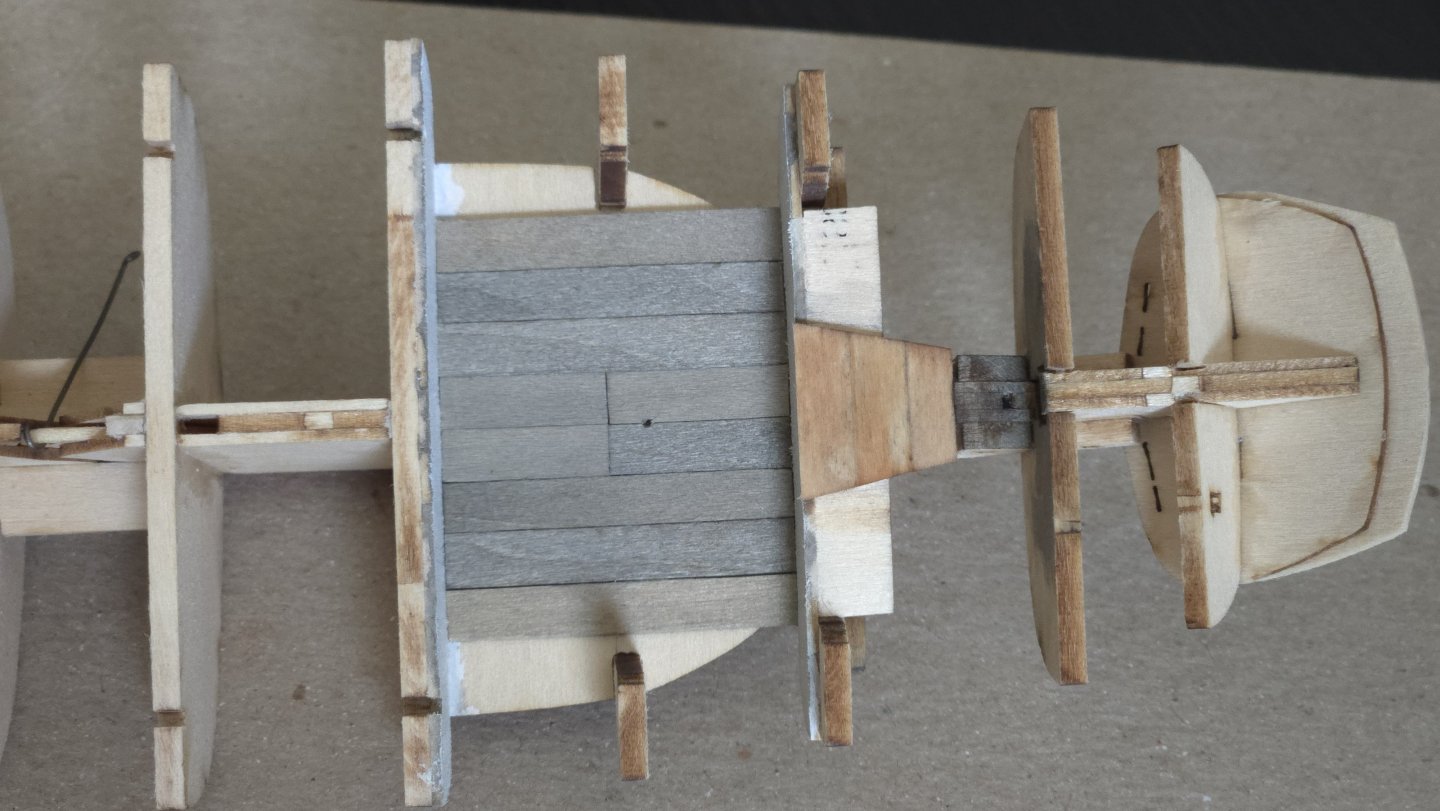
A bit more progress with the cockpit. Originally I was planning on cutting away the sides of the frame under the aft cockpit seat, hence why I only planked partway to the sides. But then I noticed that Ansel describes the Ranger as having a full bulkhead running across the hull under its aft seat. That made sense to me, so I redid the planking. I also added the central portion of the seats. The planking for the side benches, not yet added, will run back over the bulkhead all the way to the back of the seat. As can be seen, I needed to glue supports over the portions I had already scored on the bulkheads, and re-scored a new line to remove to upper portion of the bulkhead after planking the hull. Next, I wanted to get a sort of dirty, weathered whitewash on the bulkheads--like they were in need of a new coat of paint after a hard season. I began by applying a dark wash as an undercoat, followed by a white wash on top. I tried using tape to selectively strip off random portions of the white wash, but it didn't quite work as planned. I then decided to try to add at least the central portion of the cockpit floor planking, figuring it would be slightly easier before planking the hull. I drew inspiration from the photo shown in an earlier post of a Friendship Sloop cockpit, which had short central planks with a finger hole in the middle, presumably to allow the central planks to be removed for bailing. I colored the planks with a dark wash before gluing them in place. This is as far as I can plank the floor without removing a portion of the bulkhead, so the rest will have to wait until the hull is planked. I already cut planks to the right width and gave them a dark wash, though, so it won't be too difficult then. Unfortunately, my attempt to color the seat by staining and then adding a dark wash revealed some glue stains. I think I may remove the central seat and redo it.

-
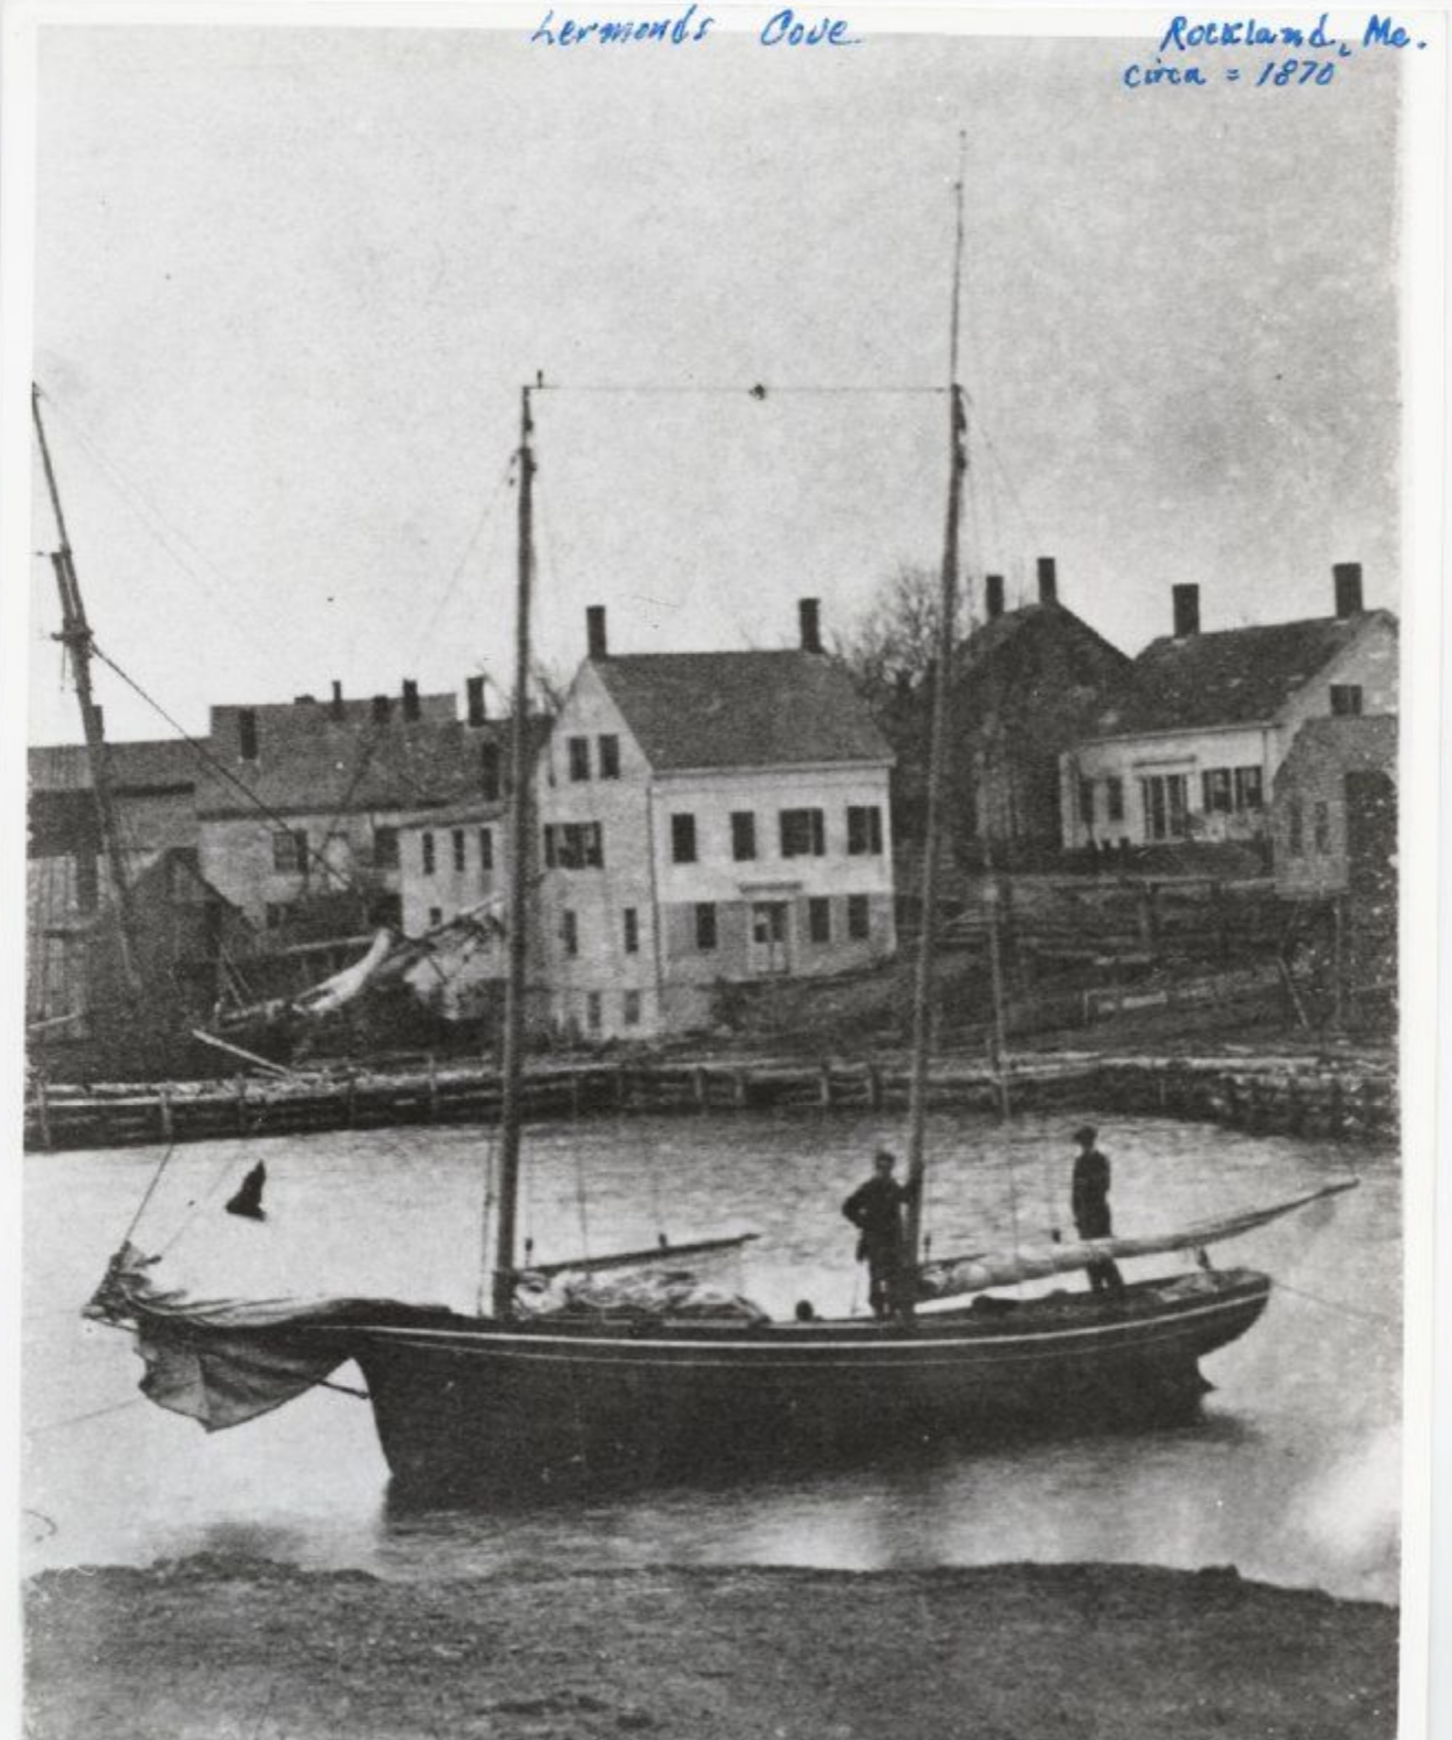
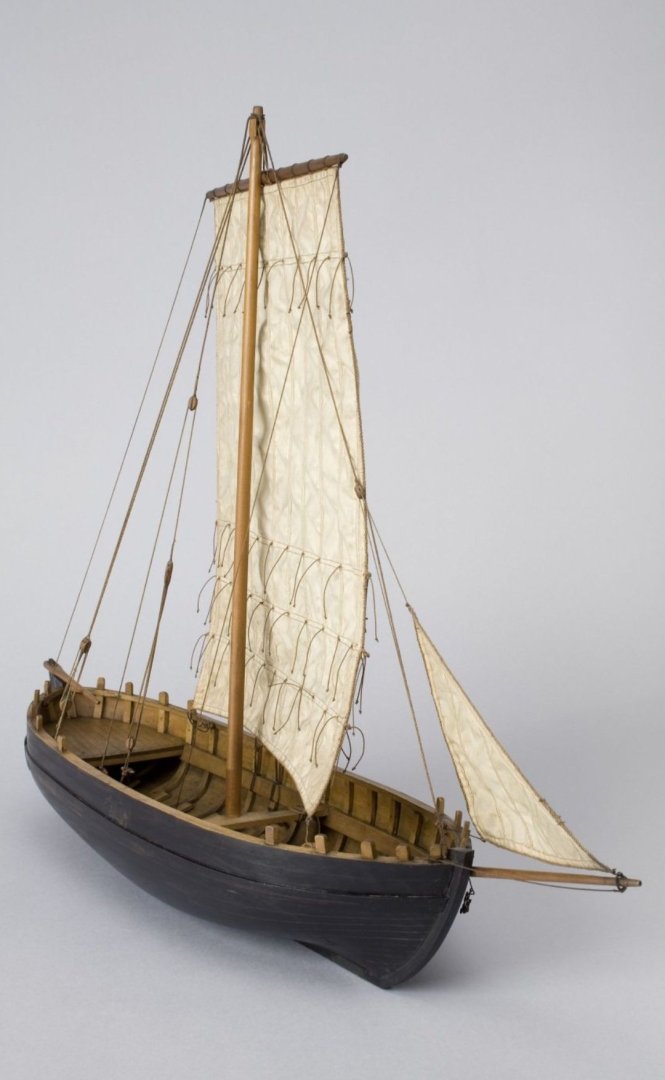
Thanks, @Kenchington, lacking much nautical experience myself there's a lot that I'm still learning, and it's wonderful to be able to benefit from the knowledge of others. I hadn't considered that about the plumb vs raked bow's suitability for different conditions, but what you say makes a lot of sense. I had been considering trying to pare back the top of the stem a bit and doing away with the gammon to get more of a plumb bow, but I think that doing so will throw off the lines of the hull a bit too much. Besides, much like those fishermen, I have to admit that the clipper bow looks quite nice, and I don't think I'll be modeling anything with one anytime soon, so I think I'll keep the kit design for the bow after all. This also makes a lot of sense. Incidentally, Chapelle also mentions that there were some of the larger lapstrake-planked centerboarders with this type of hull design were rigged as schooners. I found a photo of one such vessel from the 1870s in Rockland, Maine, below, which I estimate around 30-32 feet in length. Incidentally, it looks to have a gammon at the bow. I think I'm on fairly firm ground, then, to try and build my model with lapstrake planking and the clipper bow. Source: https://penobscotmarinemuseum.historyit.com/items/view/digital-collection/193711/search?resultsMode=search&searchInterfaceId=1&search=eyJxIjp7InNmMTI3IjoibGFwc3RyYWtlIn0sIm9iIjoic2NvcmUiLCJvIjoiZGVzYyIsInBzIjoyNCwidiI6ImdyaWQiLCJyY2kiOjAsInNzZiI6MCwicHJlIjoxLCJpcCI6MSwicmEiOltdLCJ2aWV3TW9kZSI6ImdyaWQiLCJwZyI6MX0= Your point about fishermen's pride in their boat and interest in decorating them is also very well taken. It reminds me of what I saw while researching and building my Canoa de Rancho model. These were extremely utilitarian boats. But it was still possible to see some decorative elements or other aspects showing their owners' pride in the vessels. This was most obvious in the names given to them--I'm particularly thinking of one small, open vessel, a little rowboat no more than 15 feet long, with the name "The Whale" (La Bayena [sic]) grandly written in large letters across the bow. But some (though a minority) also had aesthetically pleasing shapes carved into the supports running under the aft portion of the wide rail/poling platform along the sides of the boat, with no apparent functional purpose. Or one photograph where they raised up the peaked roof on top of some very elegant balustrades, presumably originally intended for use on a building but repurposed, probably both because they were available and because the owner liked the way it looked (if he didn't, he could have easily just used ordinary lumber for the same end). What an experience! I have to ask, can you still eat salmon today? I had a friend who, in high school, worked one summer in an Alaska salmon cannery. He wanted nothing to do with salmon for a long time afterward. Very minor progress on the model, I've planked the fore end of the aft cockpit seat. Once the glue fully cures, I'll be able to sand the top smooth and plank the seat itself.

-
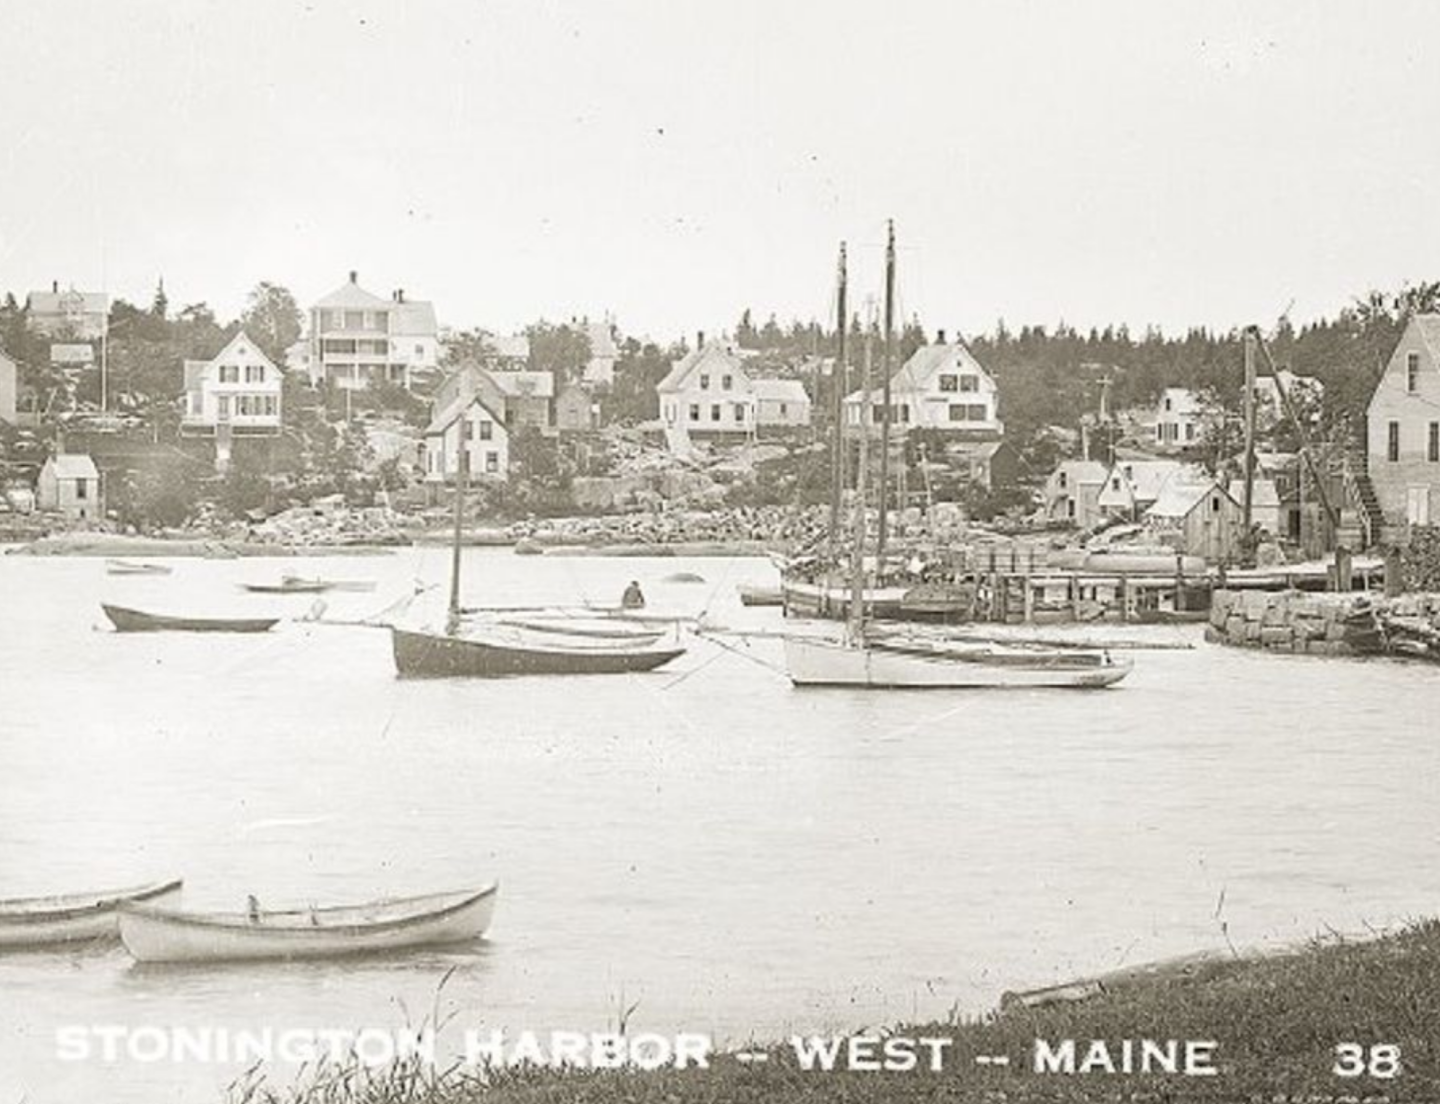
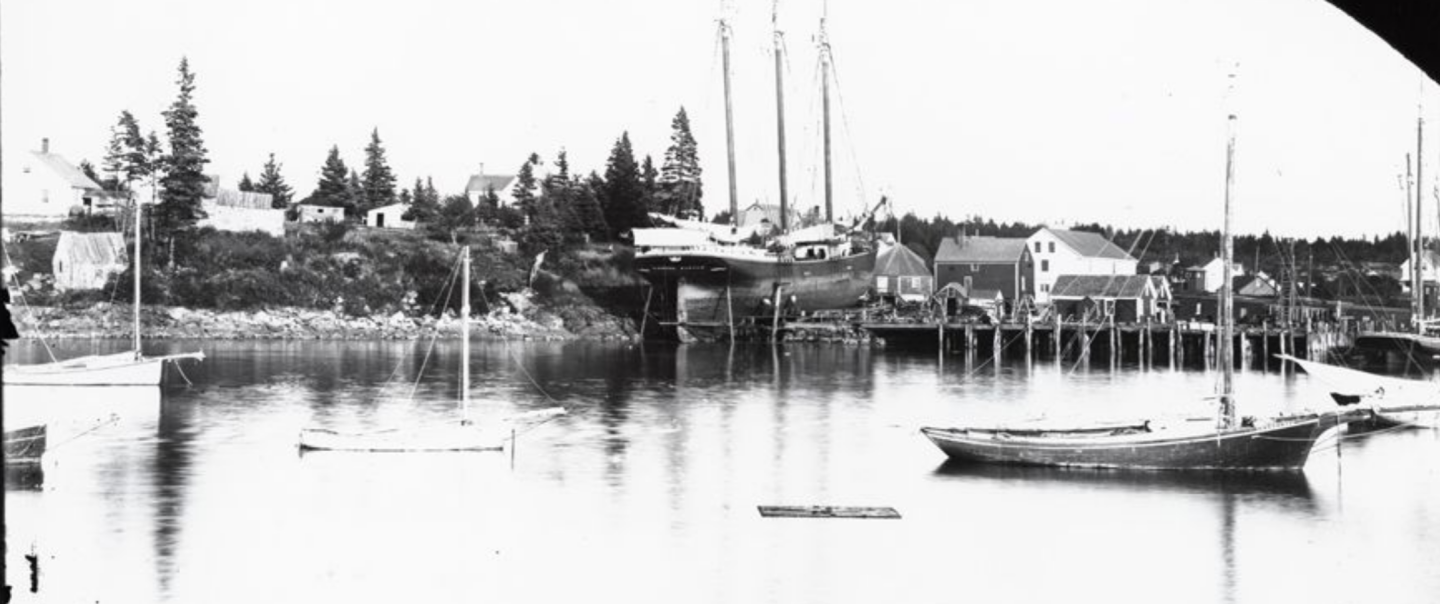
Good catch, I had forgotten about that! Looks like it's in Goode's fisheries report, on page 670 here: https://archive.org/details/fisheriesfishery52goodrich/fisheriesfishery52goodrich/page/670/mode/2up That certainly sounds profoundly uncomfortable, being stuck in a cuddy with a bunch of lobster. On the theme of variations among Muscongus Bay vessels, it seems like the Penobscot Marine Museum has digitized some more photos since I last checked, including several of smaller craft. The one below is interesting in that it seems to be lapstrake planked, at least judging by the fairly prominent strake lines. Source: https://penobscotmarinemuseum.historyit.com/items/view/digital-collection/203749/search?resultsMode=search&searchInterfaceId=1&search=eyJxIjp7InNmMTI3IjoibXVzY29uZ3VzIn0sIm9iIjoic2NvcmUiLCJvIjoiZGVzYyIsInBzIjoyNCwidiI6ImdyaWQiLCJyY2kiOjAsInNzZiI6MCwicHJlIjp0cnVlLCJpcCI6MSwicmEiOltdLCJwZyI6MCwidmlld01vZGUiOiJncmlkIiwiZmFjZXRTdGF0ZSI6ImVKeE5qcjBPd2pBTWhOL0Zjd2JLZ3NqSVVOUU54Rmd4aE1TTklxVkppQk9rcXVxN1kyaVJXUHp6K2U3a0djWWJldFRGeFVDbnFWVWFTK3ZRRzVEekltRGNnQytZdTVCcStjZm5IR3VpMVk1czZPKy95MFZacEUzYUJWZWM4bXNHbW12RlBQRUpucDlDUTdNL2dJU3hrbzdCVmdLMnhBY1Qzak1DTHp3YkpNMWo0c2lqZ0JjVG01MWhrclVEdVJOQU5IeDdZb3NzdWFJQWwwQTJyRkRyWDhteVlGbmUvenhPYWc9PSJ9 The vessels below, meanwhile, are larger, but also lack the clipper bow. It's hard to tell whether they are centerboarders or not. Source: https://penobscotmarinemuseum.historyit.com/items/view/digital-collection/372136/search?resultsMode=search&searchInterfaceId=1&search=eyJycSI6WyI4NjM5Il0sImlwIjoxLCJvYiI6InNjb3JlIiwibyI6ImRlc2MiLCJwcyI6MjQsInYiOiJncmlkIiwicmNpIjoxLCJzc2YiOjEsInByZSI6dHJ1ZSwicmEiOltdLCJwZyI6OCwidmlld01vZGUiOiJncmlkIiwiZmFjZXRTdGF0ZSI6ImVKeE5qa0VMd2pBTWhmOUx6cnVJSUxOSEQ1UGRGSS9pb2JaeEJMcTFKcTB3eHY2N1ladmdLUy92NVh0a2d2NkdBVjJtT01ocGJLekQzQkFHRDJhYUsrZzNJMlRrZGtnbC85dG5qaVhKaXFNQzk4Y3Z1ZGdPWlR0dEI4cGt3OXFCL2xxUVI0MkEzMHBBZmRnZlFUbEtZSFlWeENjWUVCY1pRUmZWSHNXcFROcDJyT0NqVHNmazFXRkhDeUh5V21aU3hHUXVxSkZkZjBrZG1IcWV2OVRzU2FzPSJ9 Finally, the photo below shows a a contrast between the larger, clipper-bowed Friendship sloop at right, and the smaller, plumb-bowed vessels at left. Source: https://penobscotmarinemuseum.historyit.com/items/view/digital-collection/192568/search?resultsMode=search&searchInterfaceId=1&search=eyJxIjp7InNmMTI3Ijoic2xvb3AiLCJkYXRlIjp7InN0YXJ0IjoiMTkwNS0wMS0wMVQwMDowMDowMFoiLCJlbmQiOiIxOTA1LTEyLTMxVDExOjU5OjU5WiIsIm9wZXJhdG9yIjoiaW50ZXJzZWN0aW5nIn19LCJwZyI6MCwib2IiOiJzY29yZSIsIm8iOiJkZXNjIiwicHMiOjI0LCJ2IjoiZ3JpZCIsInJjaSI6MCwic3NmIjowLCJwcmUiOjEsImlwIjoxLCJyYSI6W10sImV4Ijp7ImRhdGUiOjF9LCJ2aWV3TW9kZSI6ImdyaWQifQ==

-
All excellent points! Some degree of abstraction is necessary for understanding, but some categories contain more variation than others. For the various vessels classified as "Muscongus Bay Sloops," it would be great to have more information about the rationale behind different design choices. Why lapstrake vs caravel planking, why a plumb bow vs a clipper bow, etc. Some of these we can guess at: obviously, the size depends on the resources and purpose of the person who ordered the boat, smaller vessels are better suited for closer inshore work, and smaller means less space for a cuddy or fish well. Others are less clear to me: why lapstrake vs caravel planking, for instance--a matter of cost? builders' tradition? would one style be better suited for some sizes?--or why a plumb bow vs a clipper bow (I suppose a clipper bow might look a bit silly on a very small vessel, but I don't know what the minimum size would be).
-
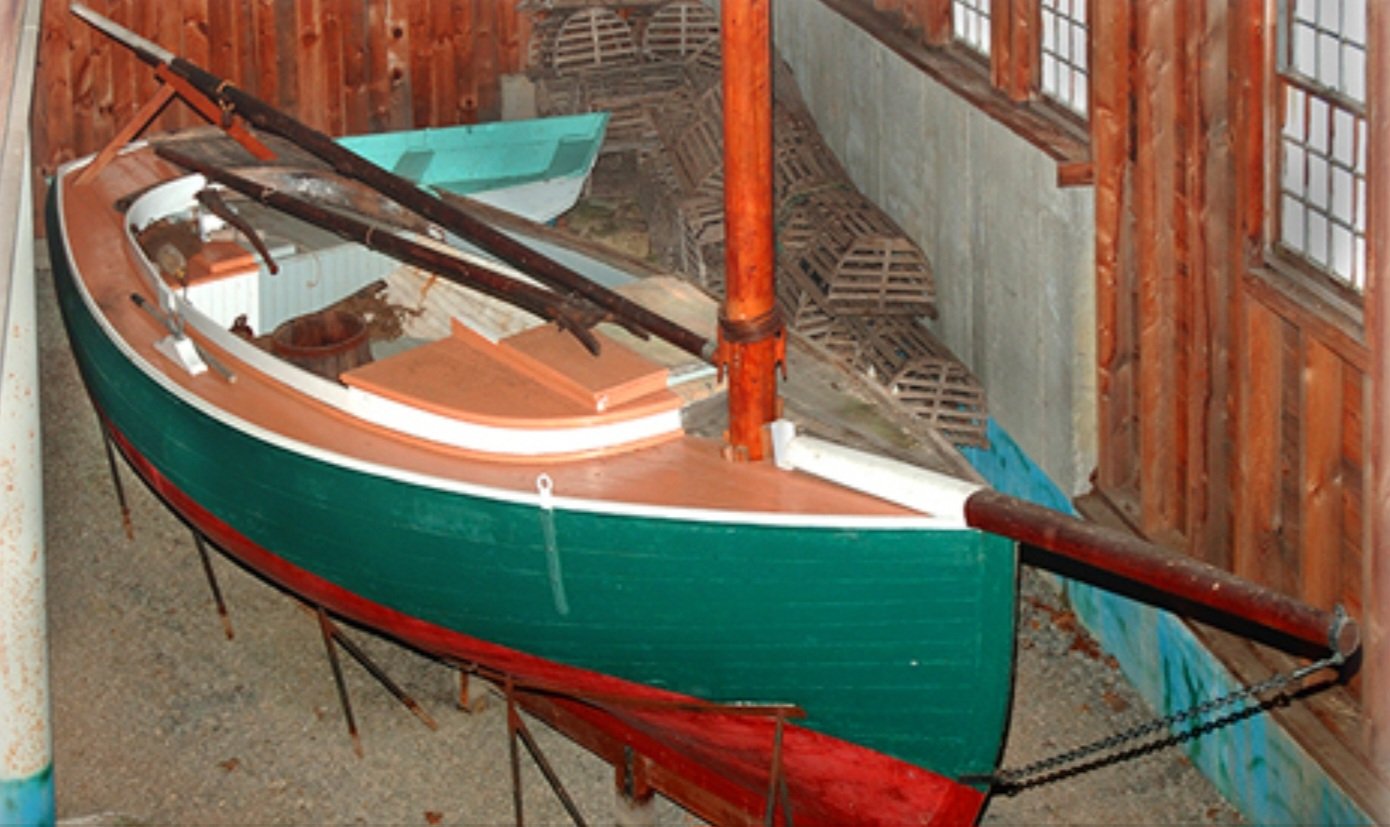
Thanks for the help on the terminology! I learn something new every day. As for the ceilings, it seems that there was a lot of variation. Chapelle's plan is derived in large part from a caravel-planked vessel that he says was very similar to the larger Friendship Sloop except for the centerboard, and he states that deck arrangements on the centerboard vessels ranged widely: some had a very large open cockpit, some added a small cuddy, and some (as in his plans) had a deck arrangement similar to the Friendship Sloop. He doesn't say anything about ceilings for the centerboard vessels, but when discussing the Friendship Sloop, says that most had very extensive ceiling planking covering the entirety of the hull interior, and "Thus, the boat had almost a double skin" (pg. 274). Of course, the Friendship Sloop cockpit in the photo in my previous post has visible frames and so no ceiling (at least along the sides of the cockpit). The replica Muscongus Bay sloop built in the 1970s, also shown in the previous post, clearly has extensive ceiling planking. I'm still deciding whether or not I'll plank my ceilings. Part of it will depend on whether or not I go with lapstrake or caravel planking for the hull, and relatedly, the style of frames that would go with each. If caravel, the frames were thin and bent, which would be easy to represent. If lapstrake, the frames perhaps would be sawn and notched, which would be a lot more work (although I have to do more research on lapstrake construction to check that). In this case, adding a ceiling would allow me to cover up an easier-to-make, inaccurate bent frame. All something to consider! It would be very interesting for someone to model one of the earlier, smaller, more open Muscongus Bay sloops, but at that point you'd be modifying the kit design enough that it would really have to be a complete scratch build.
-
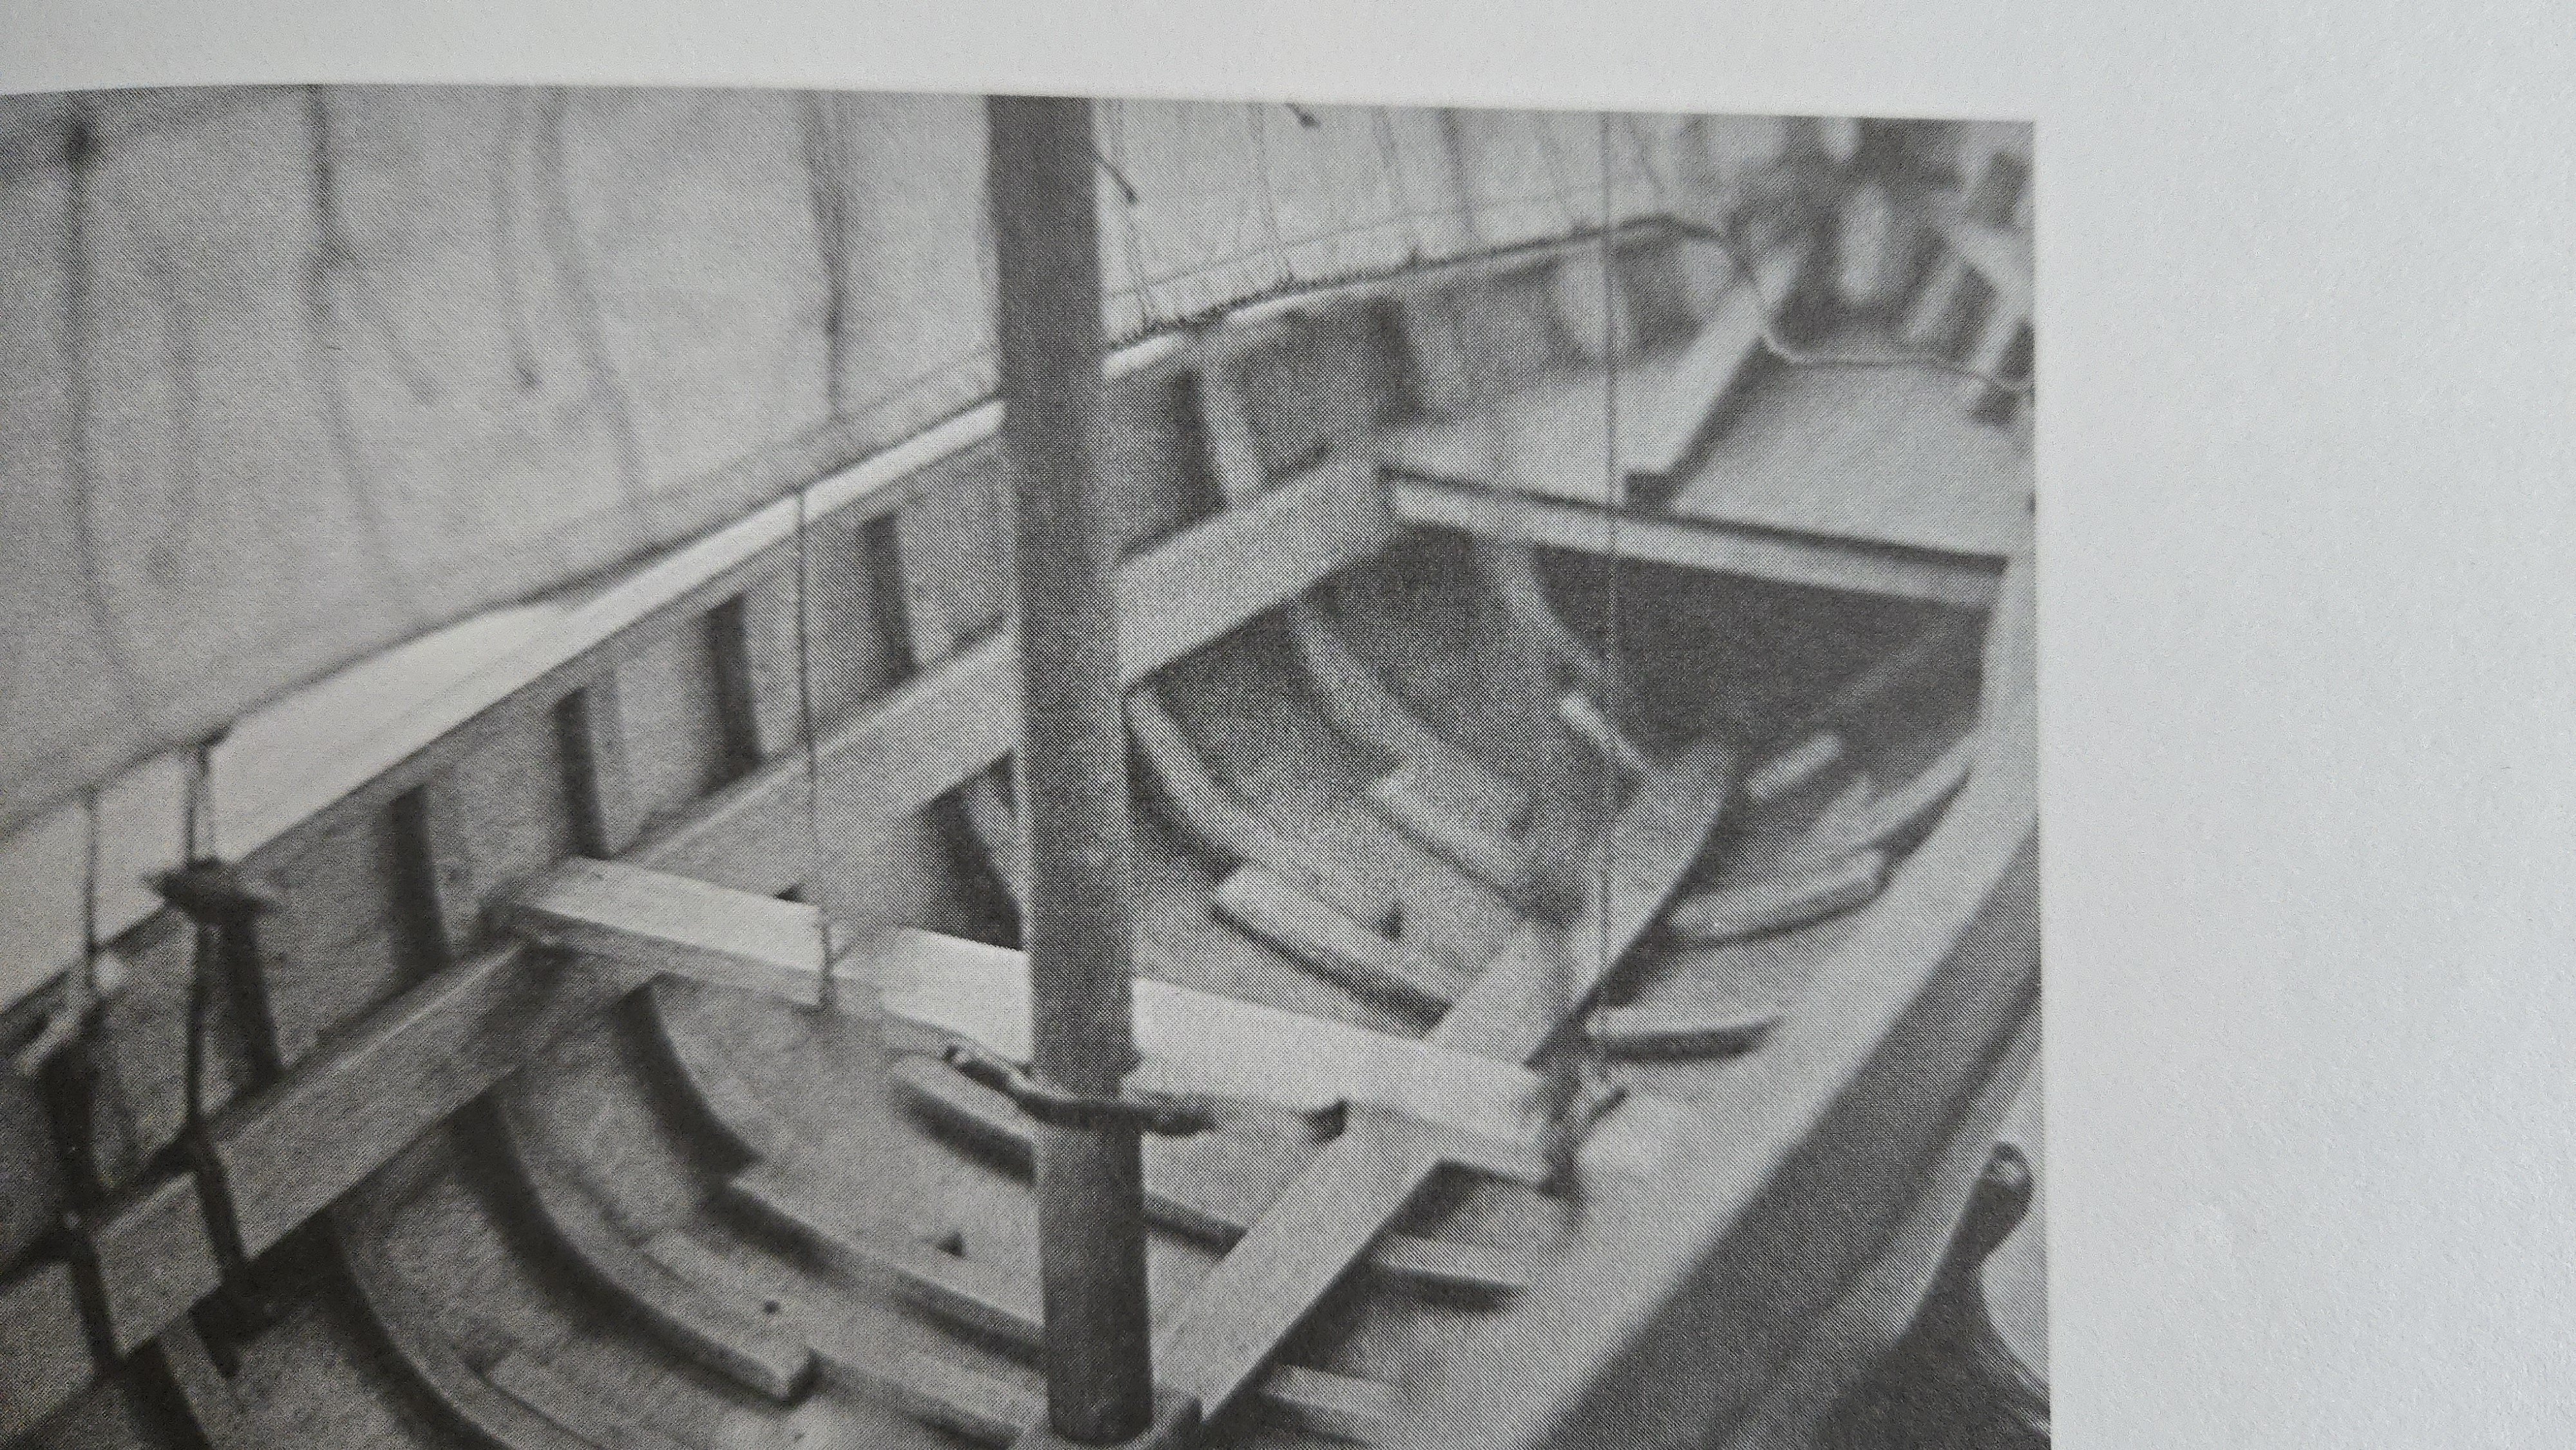
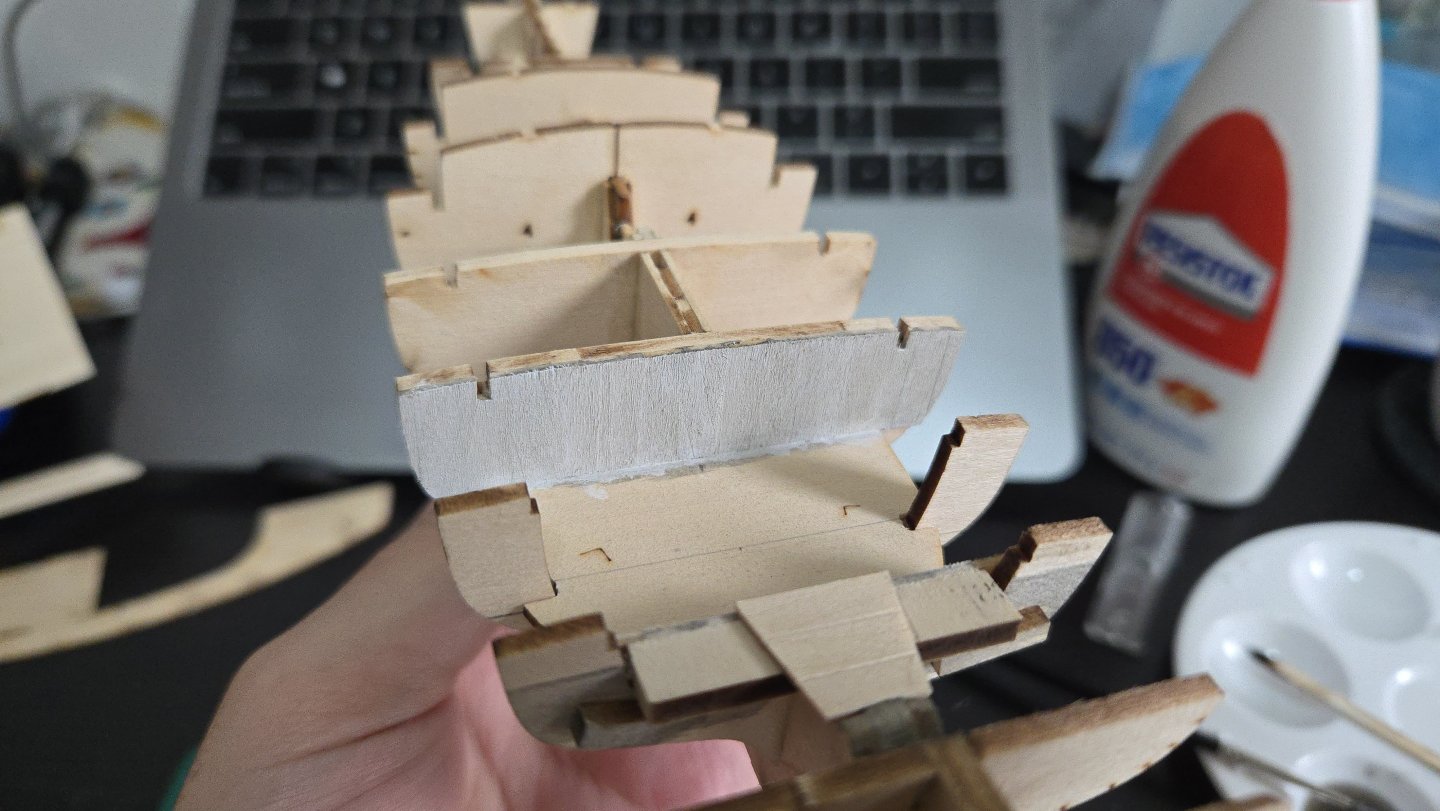
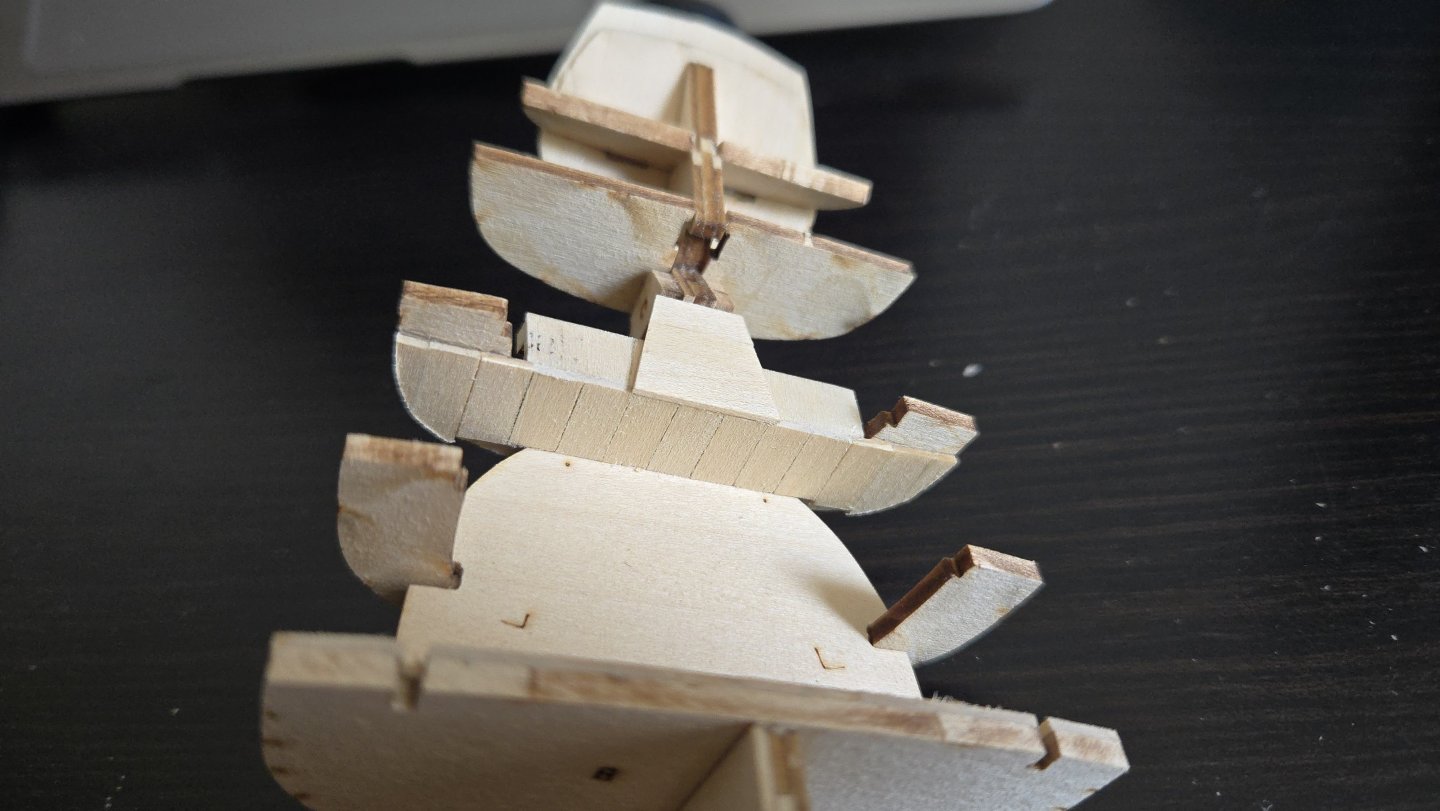
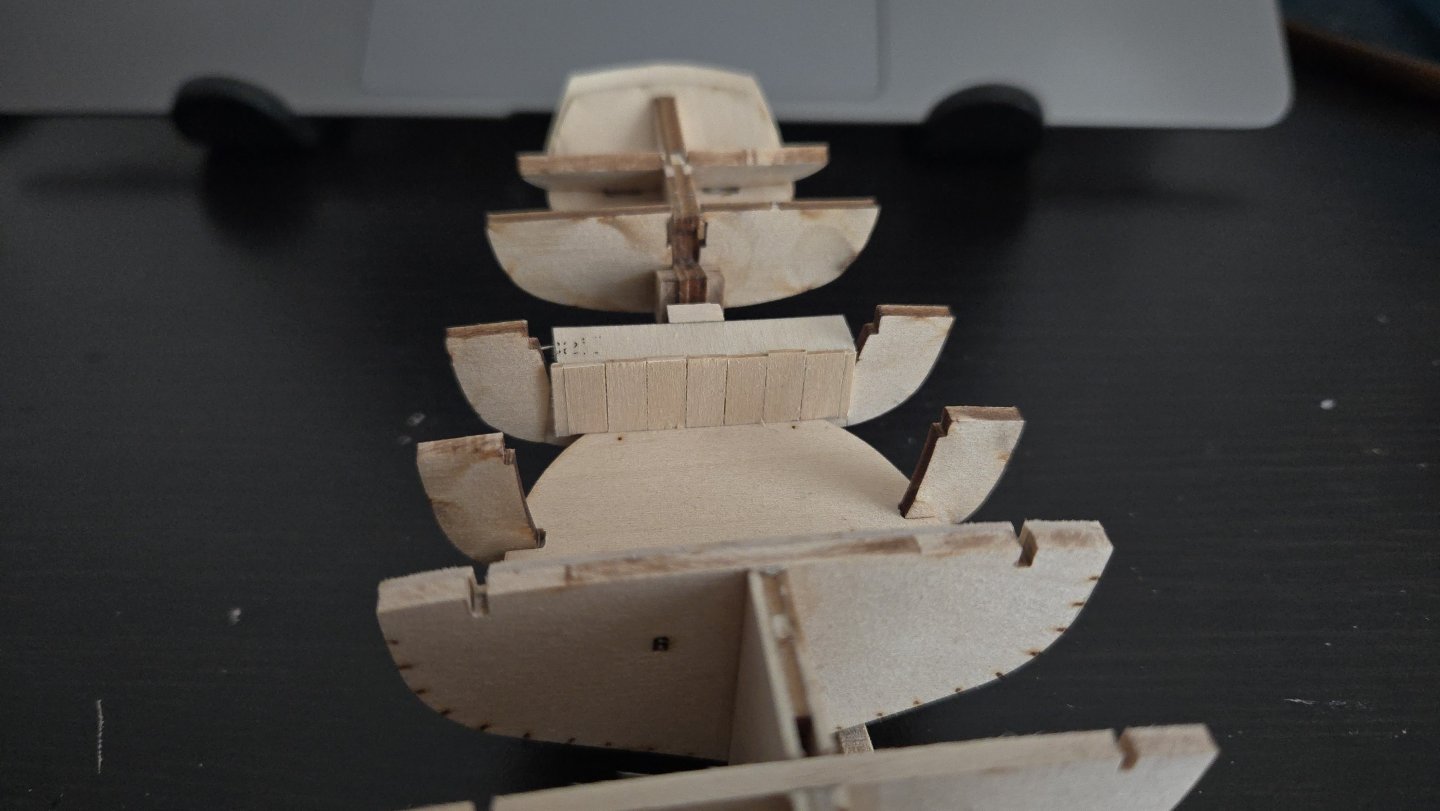
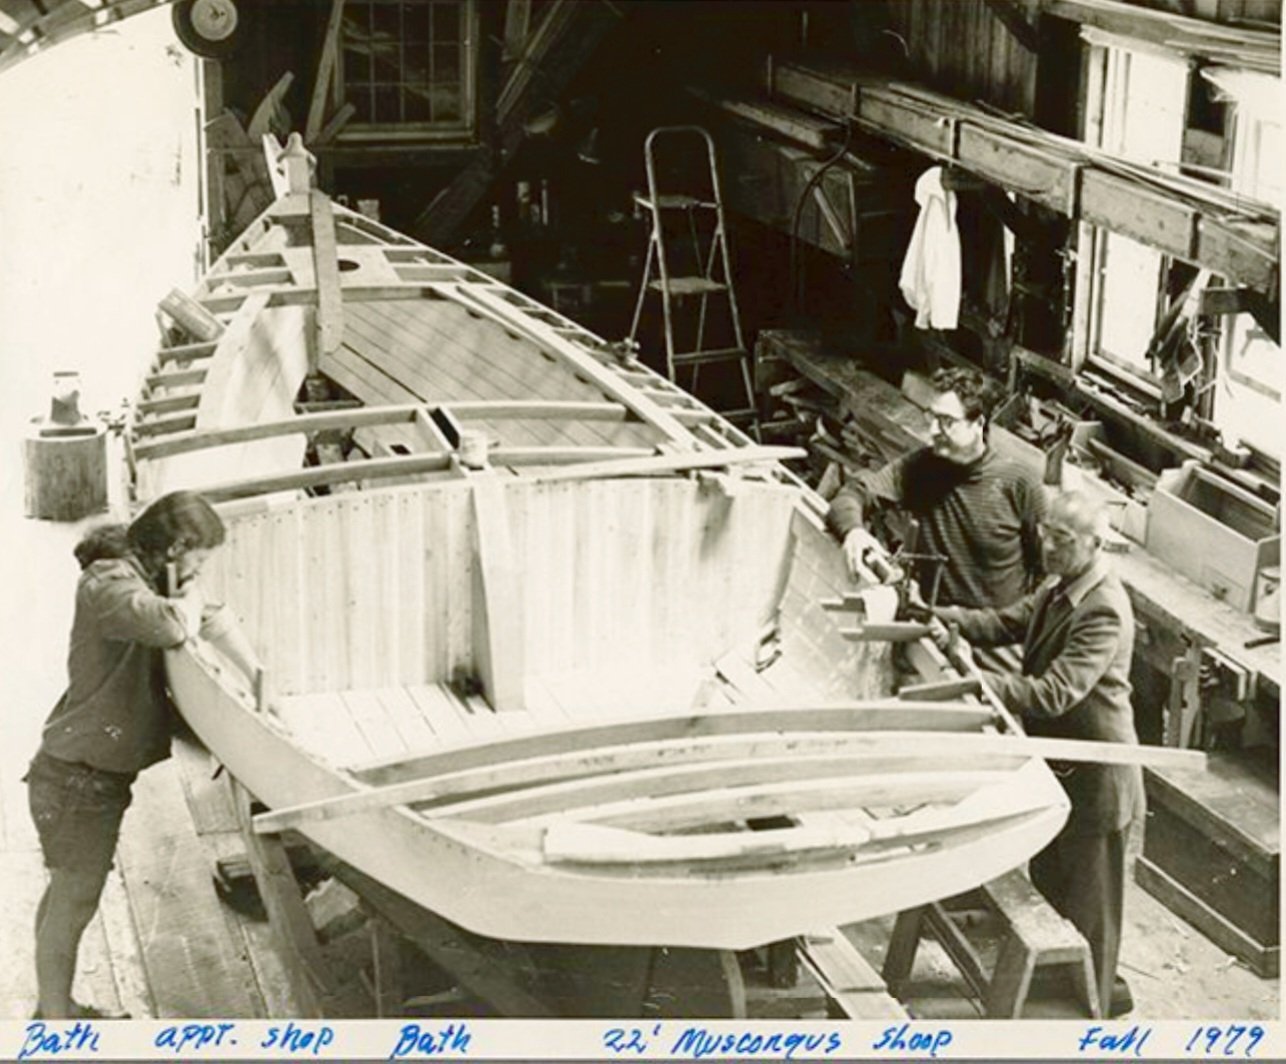
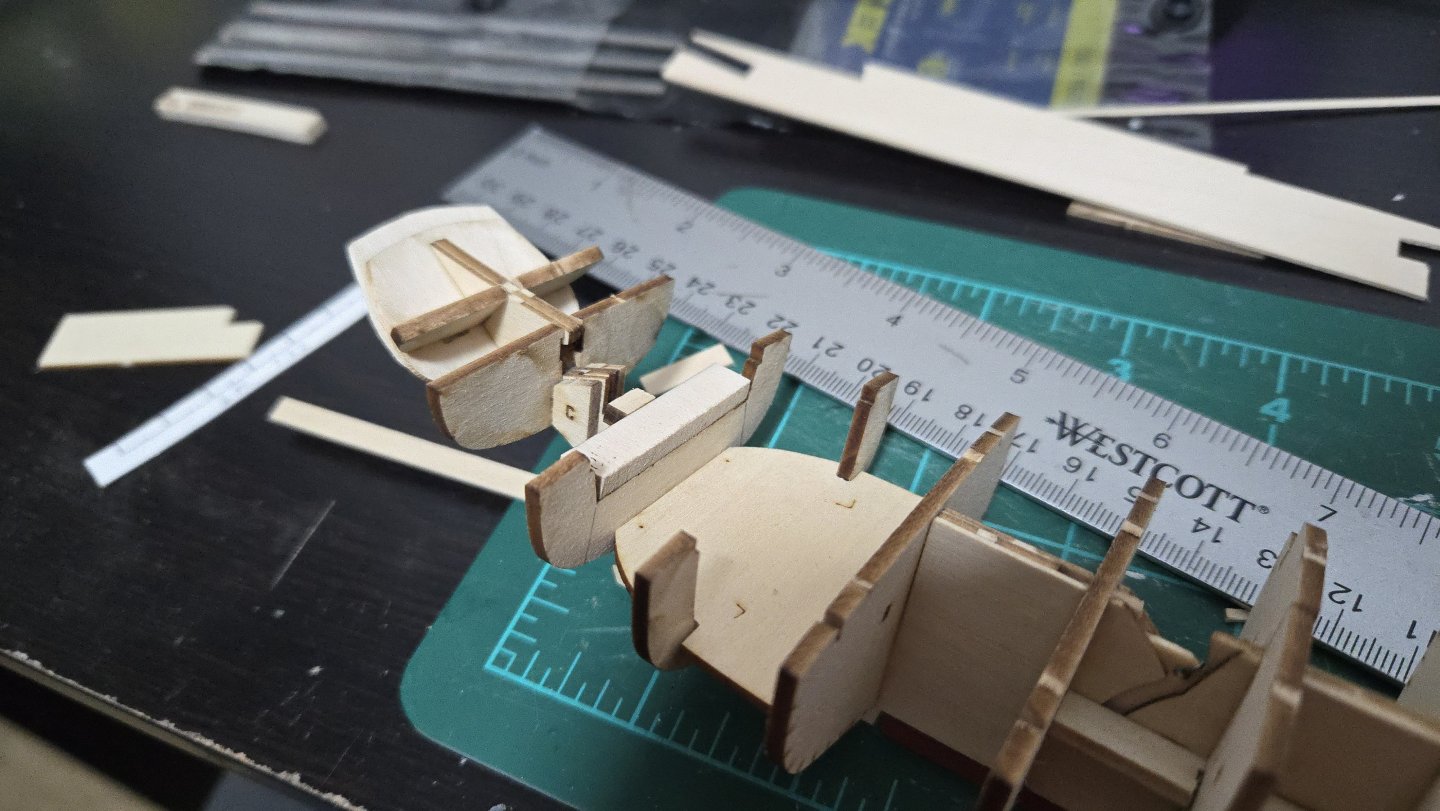
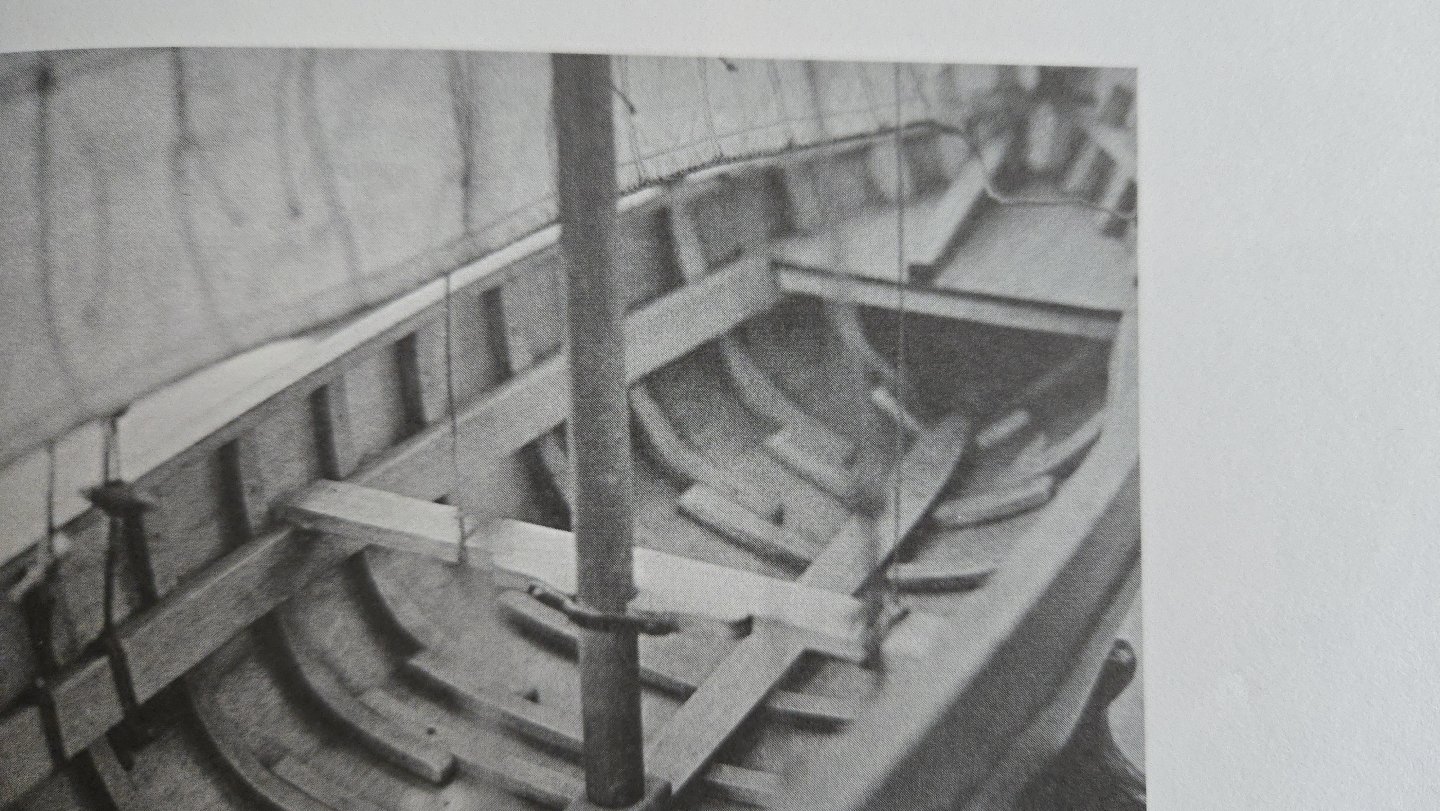
Thanks, Rick! I've been mostly focused on my Bateau de Lanvéoc build, but needed a bit of a break from some tedious sanding and headaches with the cant frames. On the Lobster Smack, the next step is to work on the cockpit. Having deepened it a bit, I added the kit version of the floor, which will serve as a surface to plank over later. I then used some scrap to raise the benches to a more comfortable height, taking Ranger as a guide. This will be a support only, with the bench itself made of multiple planks added on top. I then turned my attention to the forward cabin bulkhead. In the photo below, of a replica Muscongus Bay Centerboard Sloop under construction in 1979, you can see that the bulkhead was vertically planked. (You can also see that, unlike on this model, the tip of the centerboard case protrudes a bit into the cockpit). Source: https://penobscotmarinemuseum.historyit.com/items/view/digital-collection/193047/search?resultsMode=search&searchInterfaceId=1&search=eyJxIjp7InNmMTI3IjoiTXVzY29uZ3VzIn0sInJlc3VsdHNNb2RlIjoic2VhcmNoIiwib2IiOiJzY29yZSIsIm8iOiJkZXNjIiwicHMiOjI0LCJ2IjoiZ3JpZCIsInJjaSI6MCwic3NmIjowLCJwcmUiOnRydWUsImlwIjoxLCJwZyI6Mywidmlld01vZGUiOiJncmlkIiwiZmFjZXRTdGF0ZSI6ImVKeE5qN3NPd2pBTVJmL0Zjd1llQXlJakE2aERKUkFqWWdpSld5S2xUYkFURUVMOWQxd29Fa3RpbjV0akt5L29qaGpRWmg5NzNqeTN4bUxlZWd3TzlHdFEwRTBnWktTcVR5WC80eDNGa3Zpcm93aW44eS9abXhaNWVscjFQbnNUdmpQUUhRclNVeUs0alFjMzg4VUtOTlNGYmV6YndpQUtJWmVRdVk0T0pXSTBaSytnSUY3R3prYkNzWkhhSVZzcGsyeGFLN2dMYWNrN0lXUTk2SmtDNXVaekoxRjBwb0lLZkFJOUY5S0NYb3JqOFRHdCthbG0vTWN3dkFFd3VWd2MiLCJyYSI6W119 Planking it was straightforward. I think that planking the cockpit floor will have to wait until the hull is planked, as the floor needs to extend to either the frames or the ceiling planks. But, there's still some work to do on the cockpit before I go on, specifically, the aft bench. Photos show a variety of types of benches. The photo below shows the cockpit of a Friendship Sloop (so, similar but a bit larger than this model), apparently a yacht. It's notable that the frames are visible, and that the benches are lightly built over a framework around the rudder post. Source: https://penobscotmarinemuseum.historyit.com/items/view/digital-collection/298307/search?resultsMode=search&searchInterfaceId=1&search=eyJxIjp7InNmMTI3IjoiRnJpZW5kc2hpcCBjb2NrcGl0In0sIm9iIjoic2NvcmUiLCJvIjoiZGVzYyIsInBzIjoyNCwidiI6ImdyaWQiLCJyY2kiOjAsInNzZiI6MCwicHJlIjp0cnVlLCJpcCI6MSwicmEiOltdLCJwZyI6MCwidmlld01vZGUiOiJncmlkIiwiZmFjZXRTdGF0ZSI6ImVKeE5UanNPd2pBTXZRcnkzSUd5SURJeUZIVURNU0tHa0xqRkltMUNuQ0JWVmUrT29VVmlzWi9mVHg2aE82TkRrOGozdkI4cWJUQlZoTTZDR3FjQ3VvVndDV1BkaDV6KzZVUDBPZkFjUndsY3JqL2xxRnZreFZyM2xFaTd1UVB0S1dNY1JJTG5aM0JUYnJhZ29JcUV2ZVU3aFpYeDVoRW9nV1Q5VFNRMlBpTElJZGdpRzRGQnVuY0Z2SVJwSTFsaG9pRlE2d0tZbSs4T0VsRXBaaXlBQXFoU0hIcCtNTFJpbUtZM0ROWlJudz09In0= Meanwhile, this photo--apparently of Ranger, and taken from DeeDee's build log, as the image link there no longer works--shows a simple, single bench with a vertically-planked front at the aft end of the cockpit. Source: I think I'll combine aspects of both designs. The aft bench (which apparently is technically called the stern sheets? There are some aspects of nautical jargon I will never understand) will be a sort of box, like on Ranger. I'm wondering whether it would at all make sense to include a cabinet or two in there, as it seems like it could be a useful storage space on each side of the rudderpost. I think it makes sense to include side benches, as well, for more flexibility when sailing, but these will be built on a framework like in the Friendship Sloop cockpit I shared above.

-
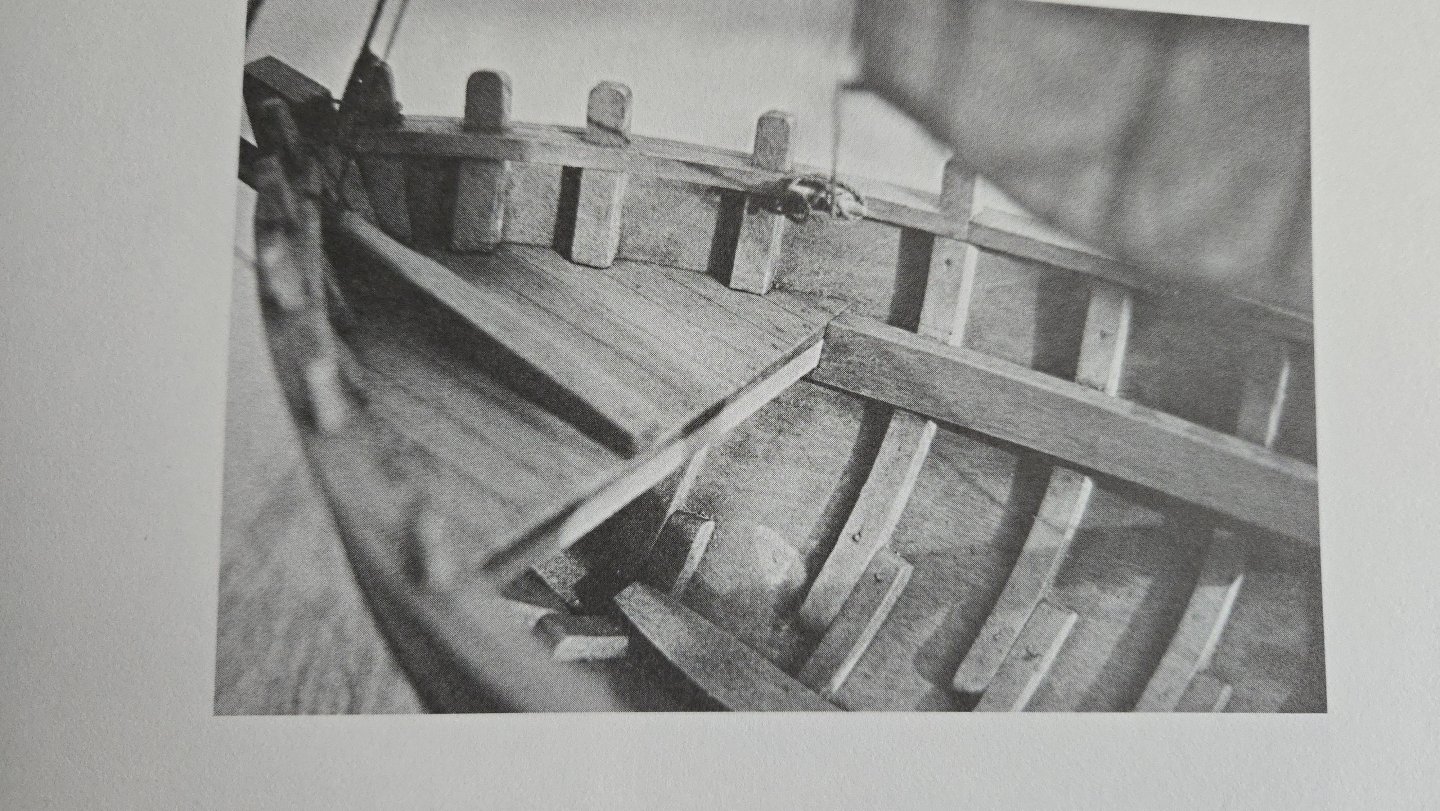
The empty thwart notches are definitely a bit odd. You may be able to find more about the possible cap rail or partial decking in Howard Chapelle's American Small Sailing Craft (which can be checked out from the internet archive, last I checked). There's a lot of info on small Chesapeake workboats there.
- 38 replies
-
- 2
-
-
- crabbing skiff
- Chesapeake Bay crabbing skiff
- (and 2 more)
-
Very nice job! Looks like you had a good time building it, and will be ready to tackle your next model.
- 3 replies
-
- 1
-
-
- first build
- grand banks dory
- (and 1 more)
-
Thanks, all, I appreciate the likes and comments! @druxey, I'll definitely give that a try to sharpen the scraper. I have a curved scraper that should be useful inside the bow and stern. I’ve also started making some curved sanding blocks from scrap pine. Still considering whether to fair the exterior or interior first, but I'll be ready either way.

- 139 replies
-
- 7
-
-
- ancre
- Bateau de Lanveoc
- (and 2 more)
-
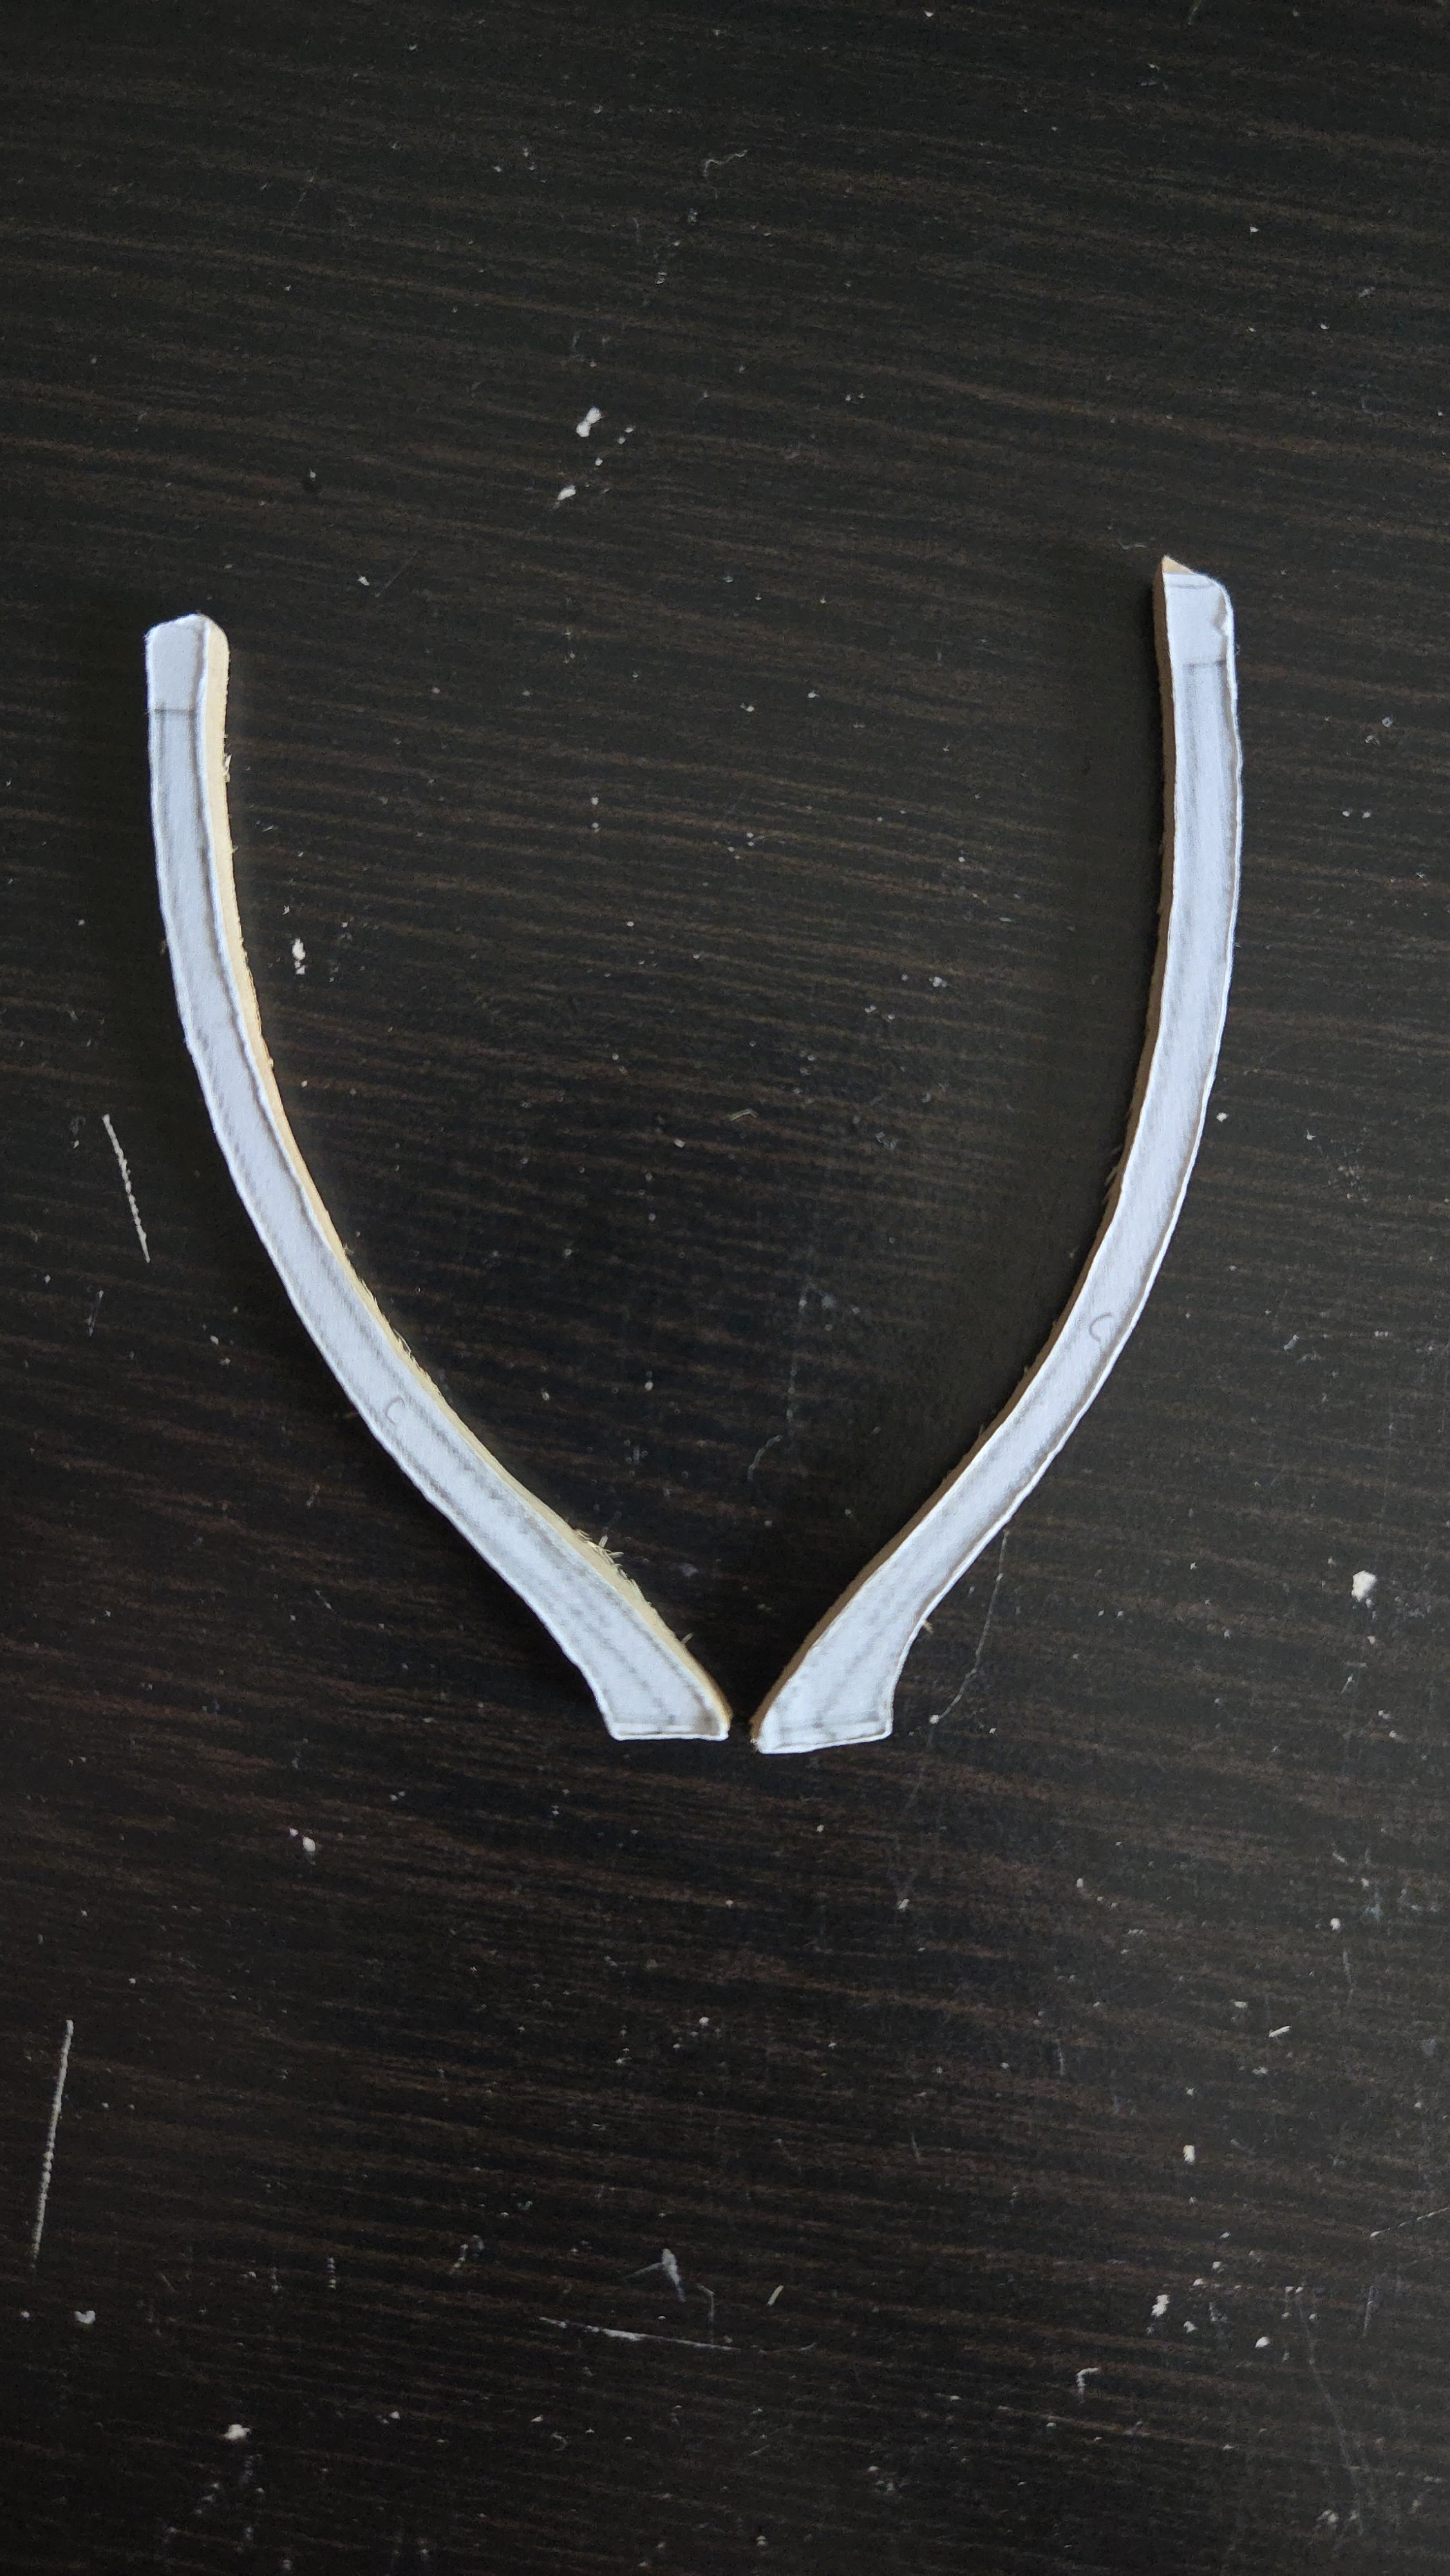
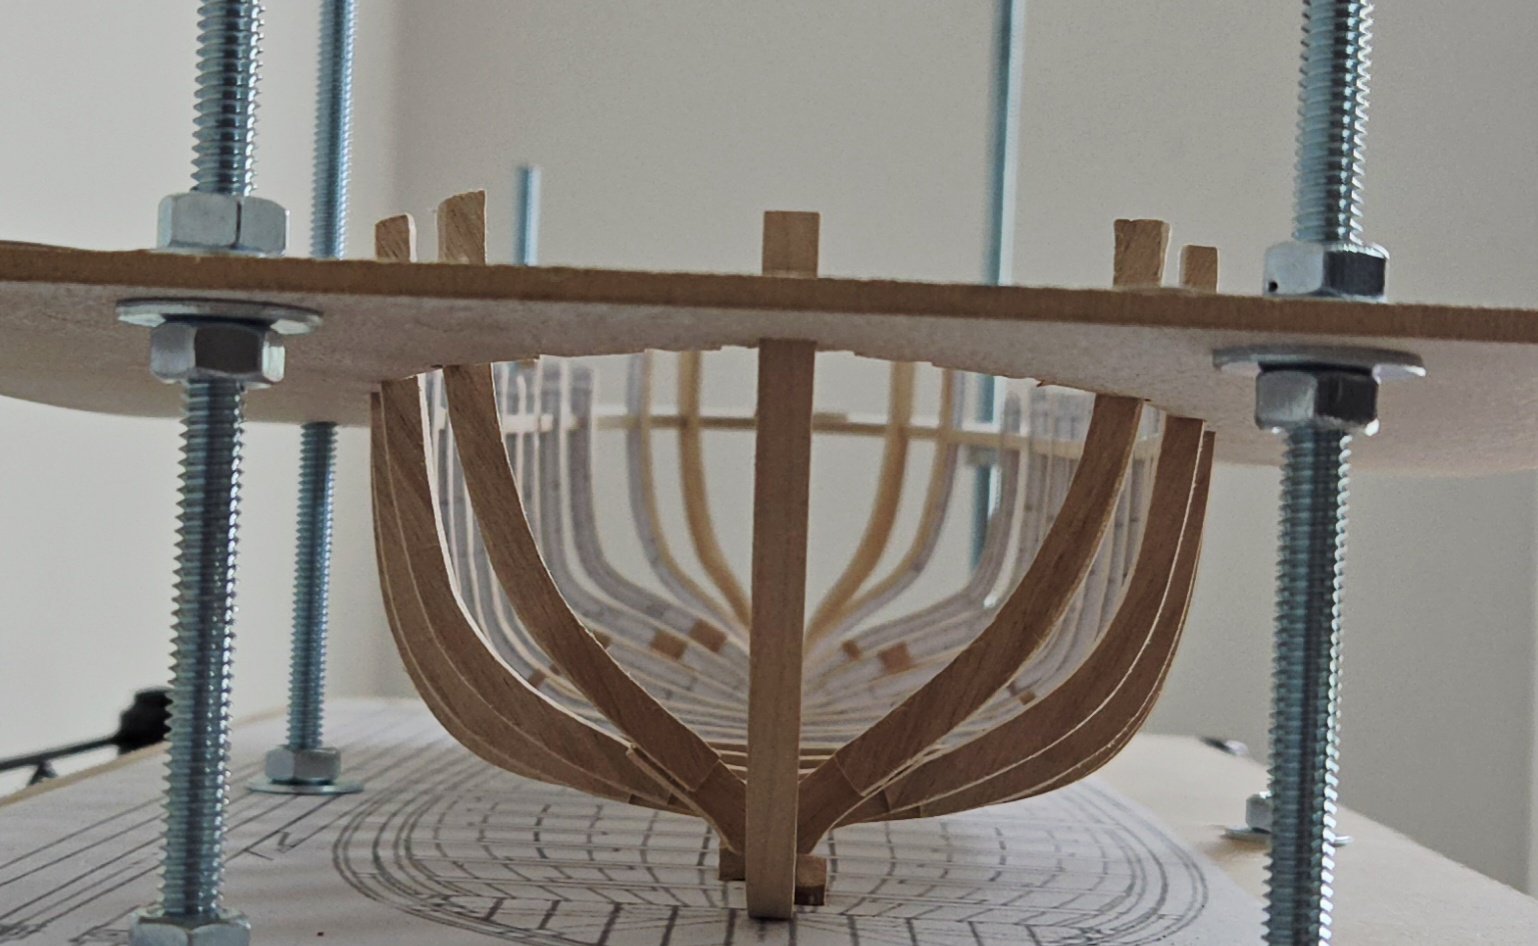
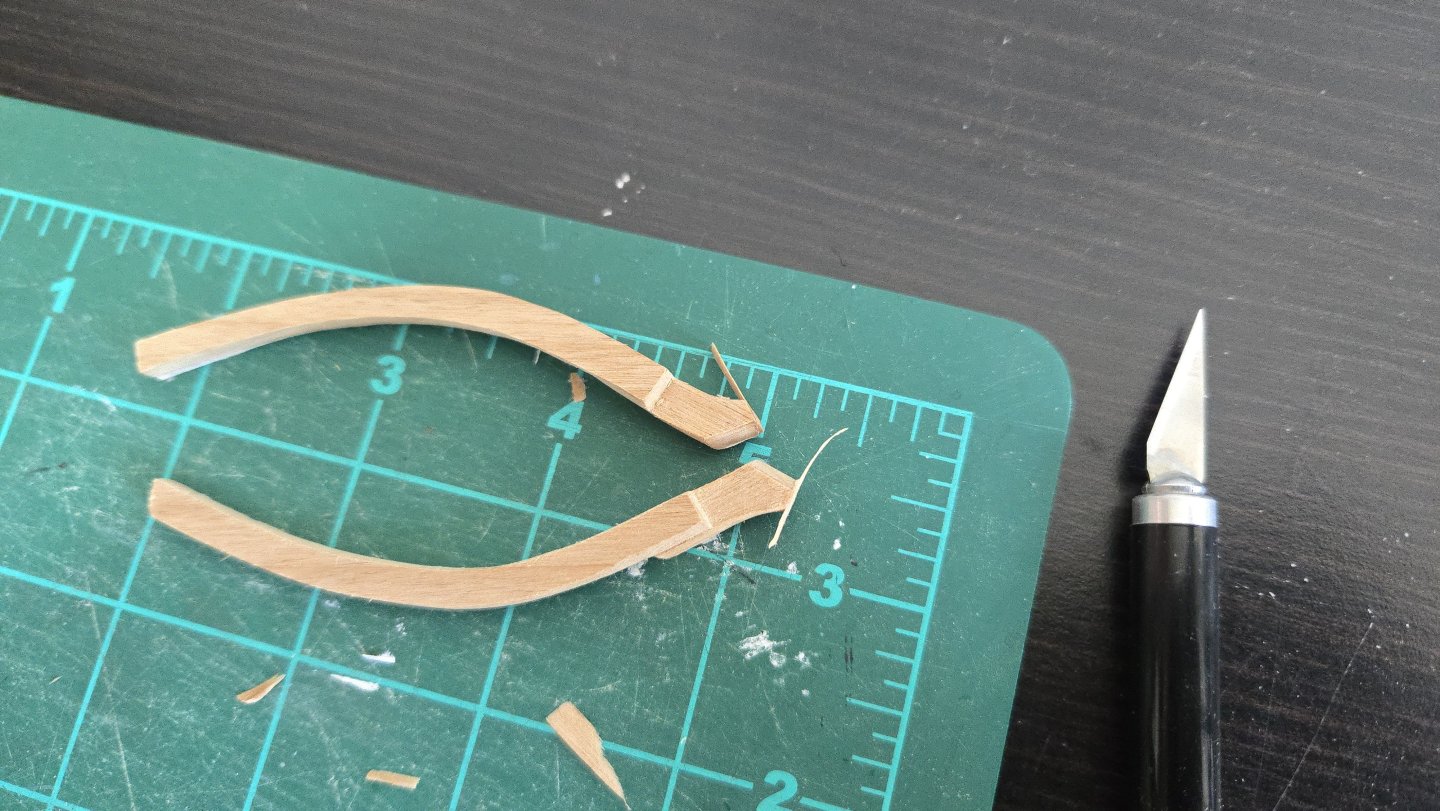
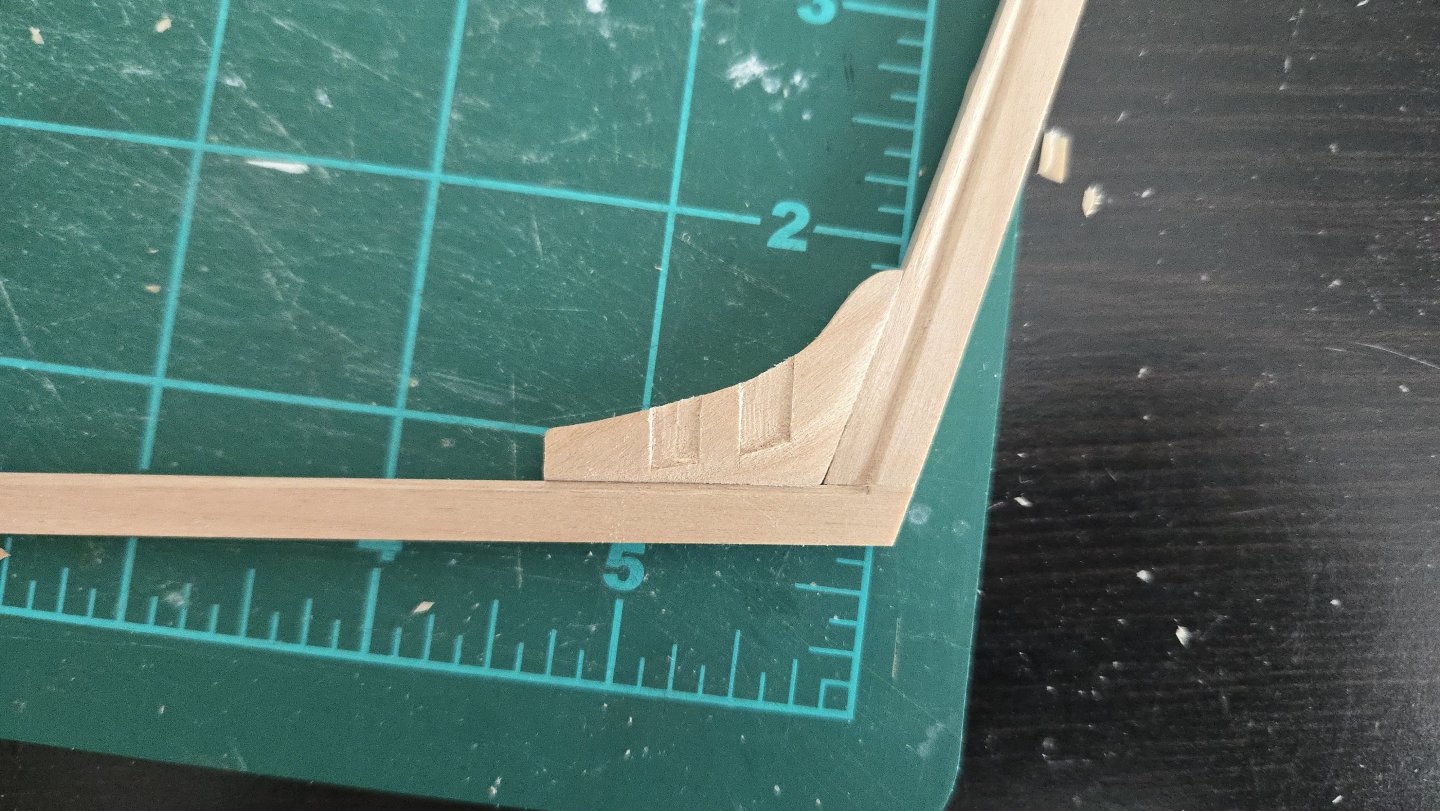
Thanks, all, I appreciate the comments! Cant frame 1 needed some shaping at the juncture with the keel, both to get the proper angle between the two half-floors and to set up the proper shape against the keel and running up the curved stem a bit. This was tricky to get right. I didn't quite cut the right angle between the two half-floors, although that side of the joint will ve totally covered by cant frame C, the keelson, and the garboard and broad strake, so I'm ok with leaving it as is and doing better next time. I then beveled the bottom, to match the frame's rise onto the stem, in the wrong direction. Thankfully I was able to glue back on the shavings I had removed, and some extra as necessary, to build it back up to the proper size, then did it right the next time. As with the other cant frames, I found frame 1 quite challenging to properly fit. As can be seen here, with the port half left off and the starboard half dry-fit, it's an awkward fit over the juncture of the keel and stem. More challenging will be Cant Frame C, which need to butt up against the fore side of frame 1. Confusingly, while the frame drawings show these as having a flat bottom, while they actually will intersect the curved stem a distance above the line of the keel. Not to be a broken record, but it would be nice if the plan sheets properly depicted the joint between the cant frames and the keel/stem/deadwood, as a difference of a millimeter or two can really throw off the shape of the hull. At this point, I'm nearly to ready to start gluing frames to the keel. I wanted to ask if anyone has any advice about placing and fairing the frames. First, whether it's best to start with the cant frames, shaping them as you go, before adding the middle frames, or to start with the midfle frames and work out to the cant frames at the ends. Second, whether it's recommended to fair the interior first while still in the jig, then to add the interior supports and fair the exterior, or to add temporary supports across the tops of the frames, fair the exterior first, and then do the interior. I've seen all of these processes on POF builds, but I'm not sure what the pros and cons of each are. On frame order: it seems like starting with the cant frames and working inward is often recommended because it gives you more space to fair the cant frames without the middle frames in the way. But, given my difficulties with figuring out how the cant frames are supposed to be placed, I feel like it might be useful to run battens to figure out their placement, which would require that the middle frames be added first. Plus, I'd hate to start with the cant frames, fairing as I go, and later find that getting a fair hull requires removing them and adding them in a slightly different position, destroying the fairing and necessitating the redoing of the whole frame. On interior vs exterior fairing first: fairing the exterior first seems like the simplest option, and would show me pretty quickly whether the cant frames need repositioning, but adding all the necessary supports will take a good bit of scrap wood. Fairing the interior first seems more elegant--it would use less scrap wood and would make more use of the framing jig--but I don't know if there's any other reason it might be recommended. In the meantime, I've removed the paper templates from the frames, using a little rubbing alcohol to remove the glue residue. Oddly, one of my old exacto blades works really well as a scraper, while I can't for the life of me get the card scraper I bought properly sharpened (maybe I'm burnishing too hard?). I've also pre-faired the interior of the frames. Looking forward to hearing any suggestions about the frame placement order and fairing!
- 139 replies
-
- 10
-
-
- ancre
- Bateau de Lanveoc
- (and 2 more)
-
Great start, I'm looking forward to following along with your build!
- 21 replies
-
- 1
-
-
- Cala Esmeralda
- Santa Eulalia
- (and 1 more)
-
Nice job. I hadn't realized just how long the bowsprit is, once rigged this will take up quite some space!
-
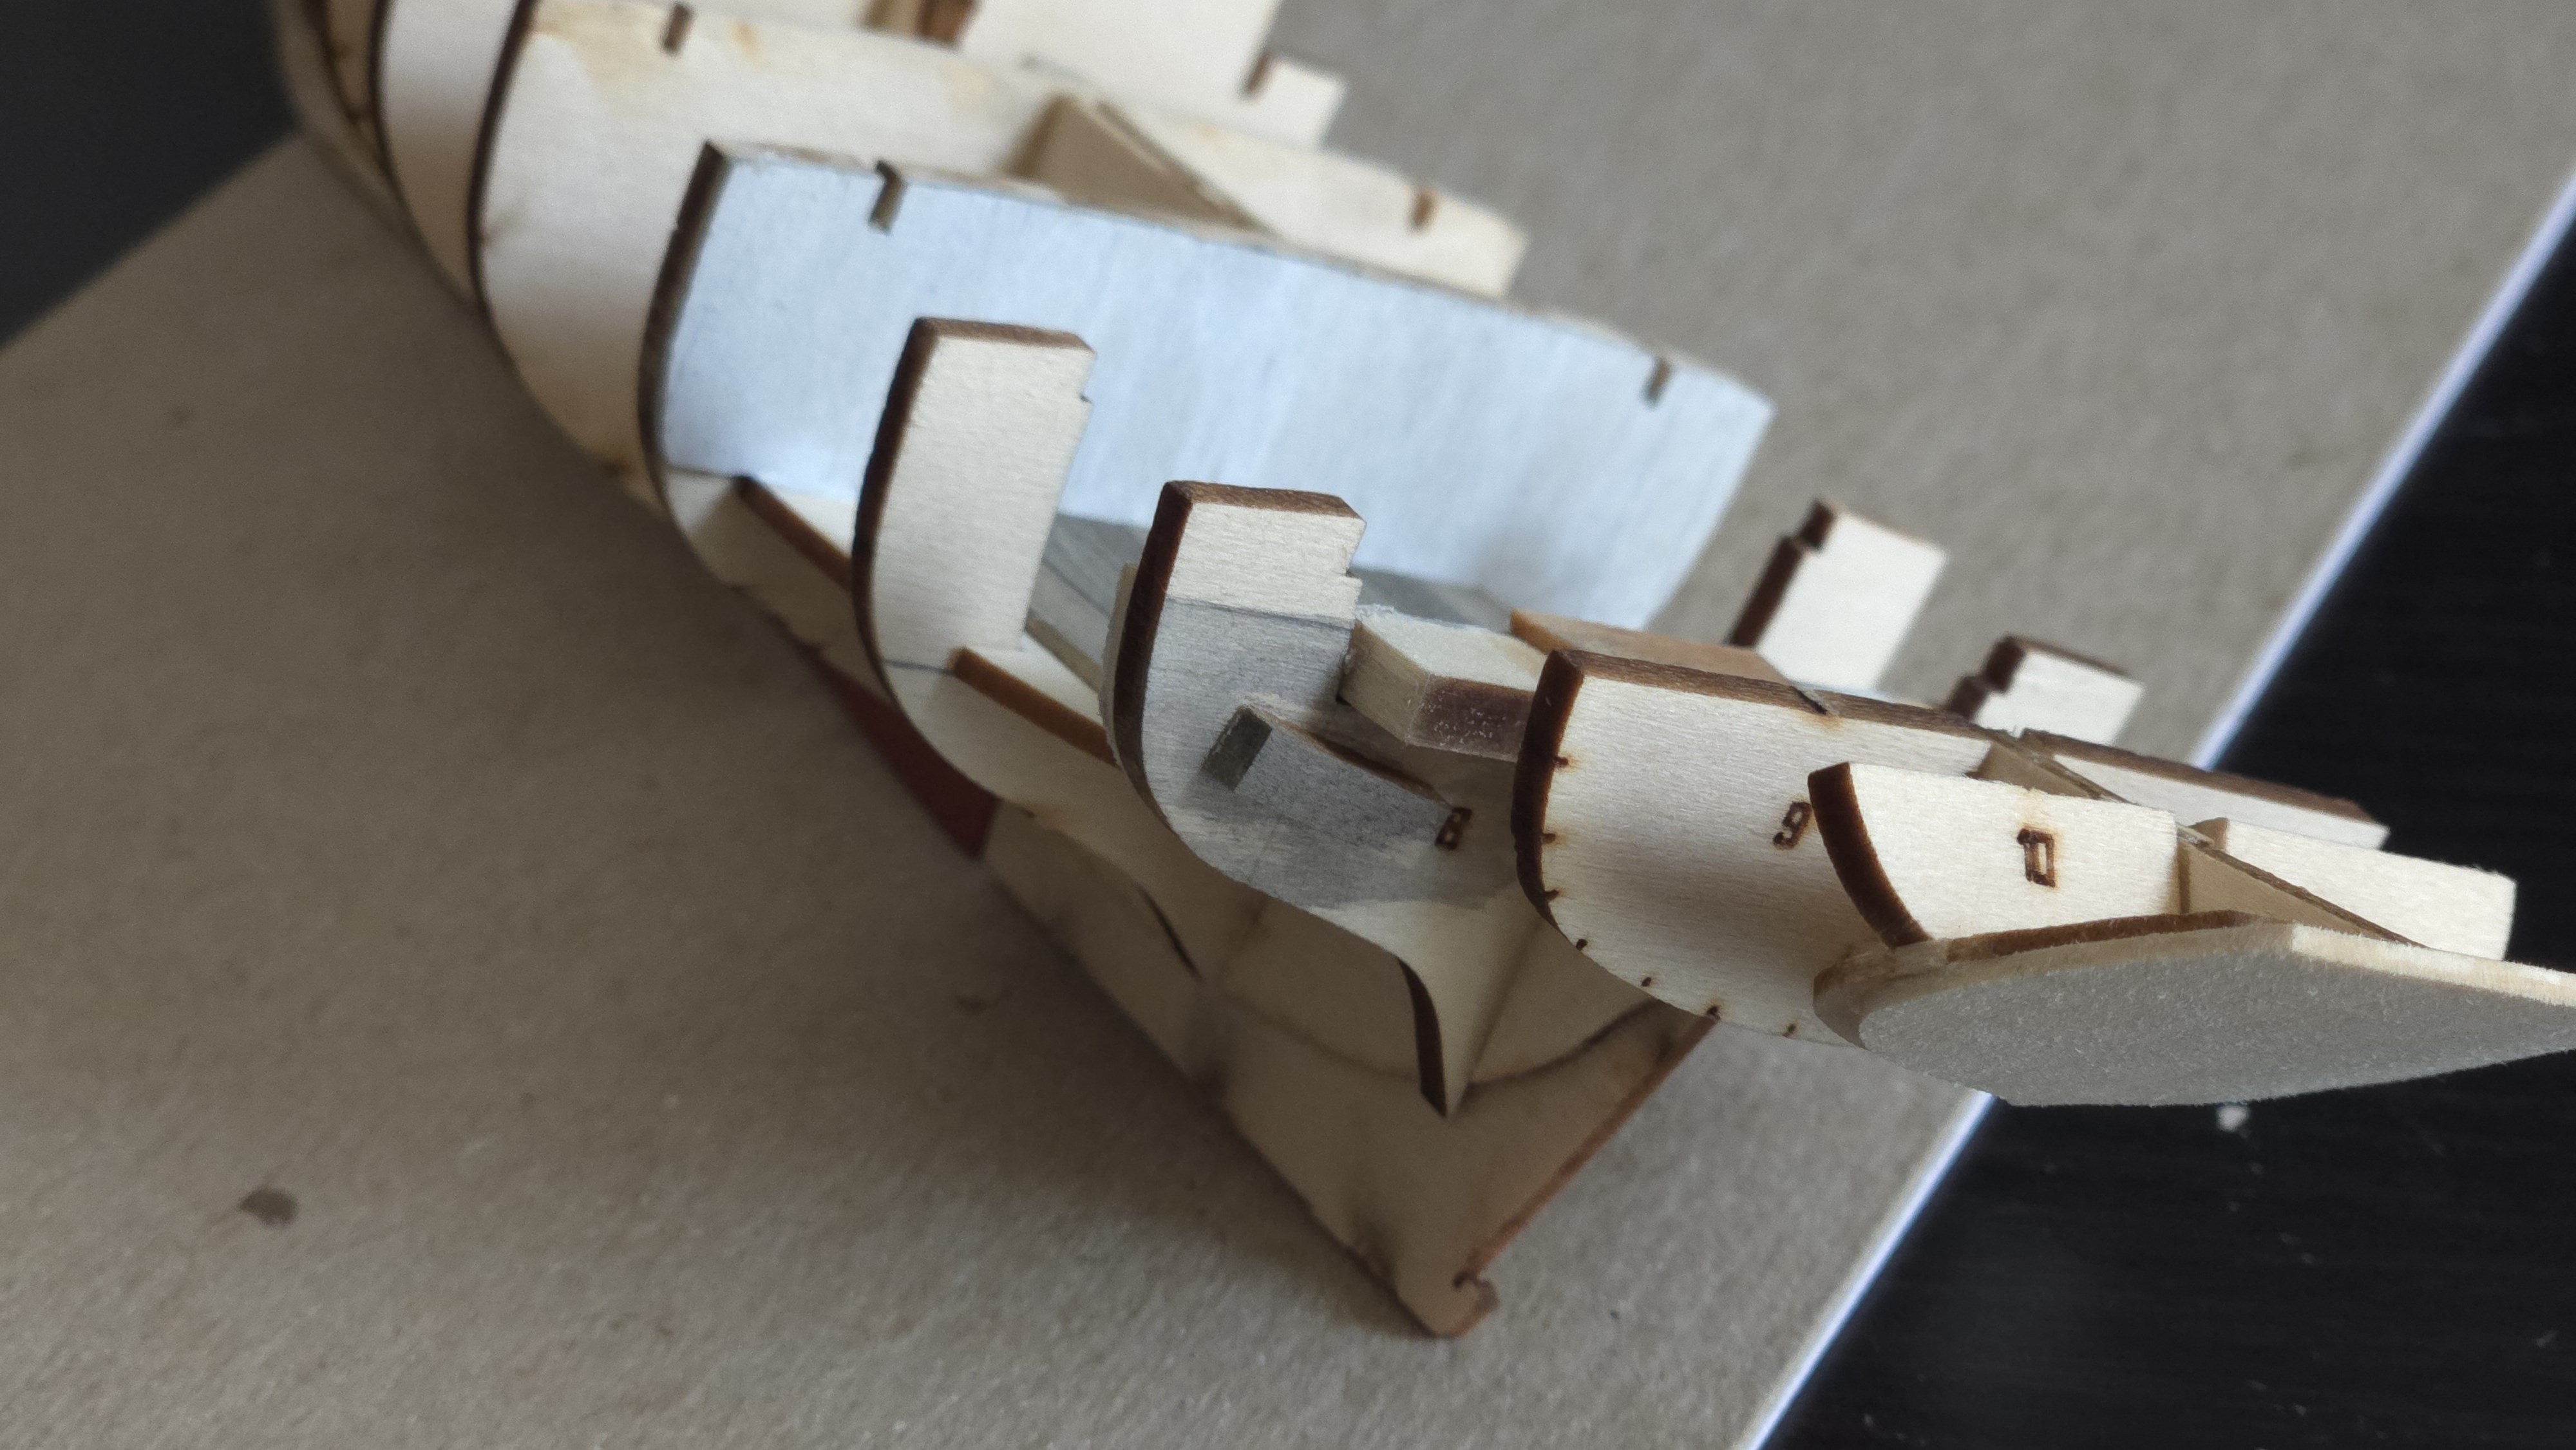
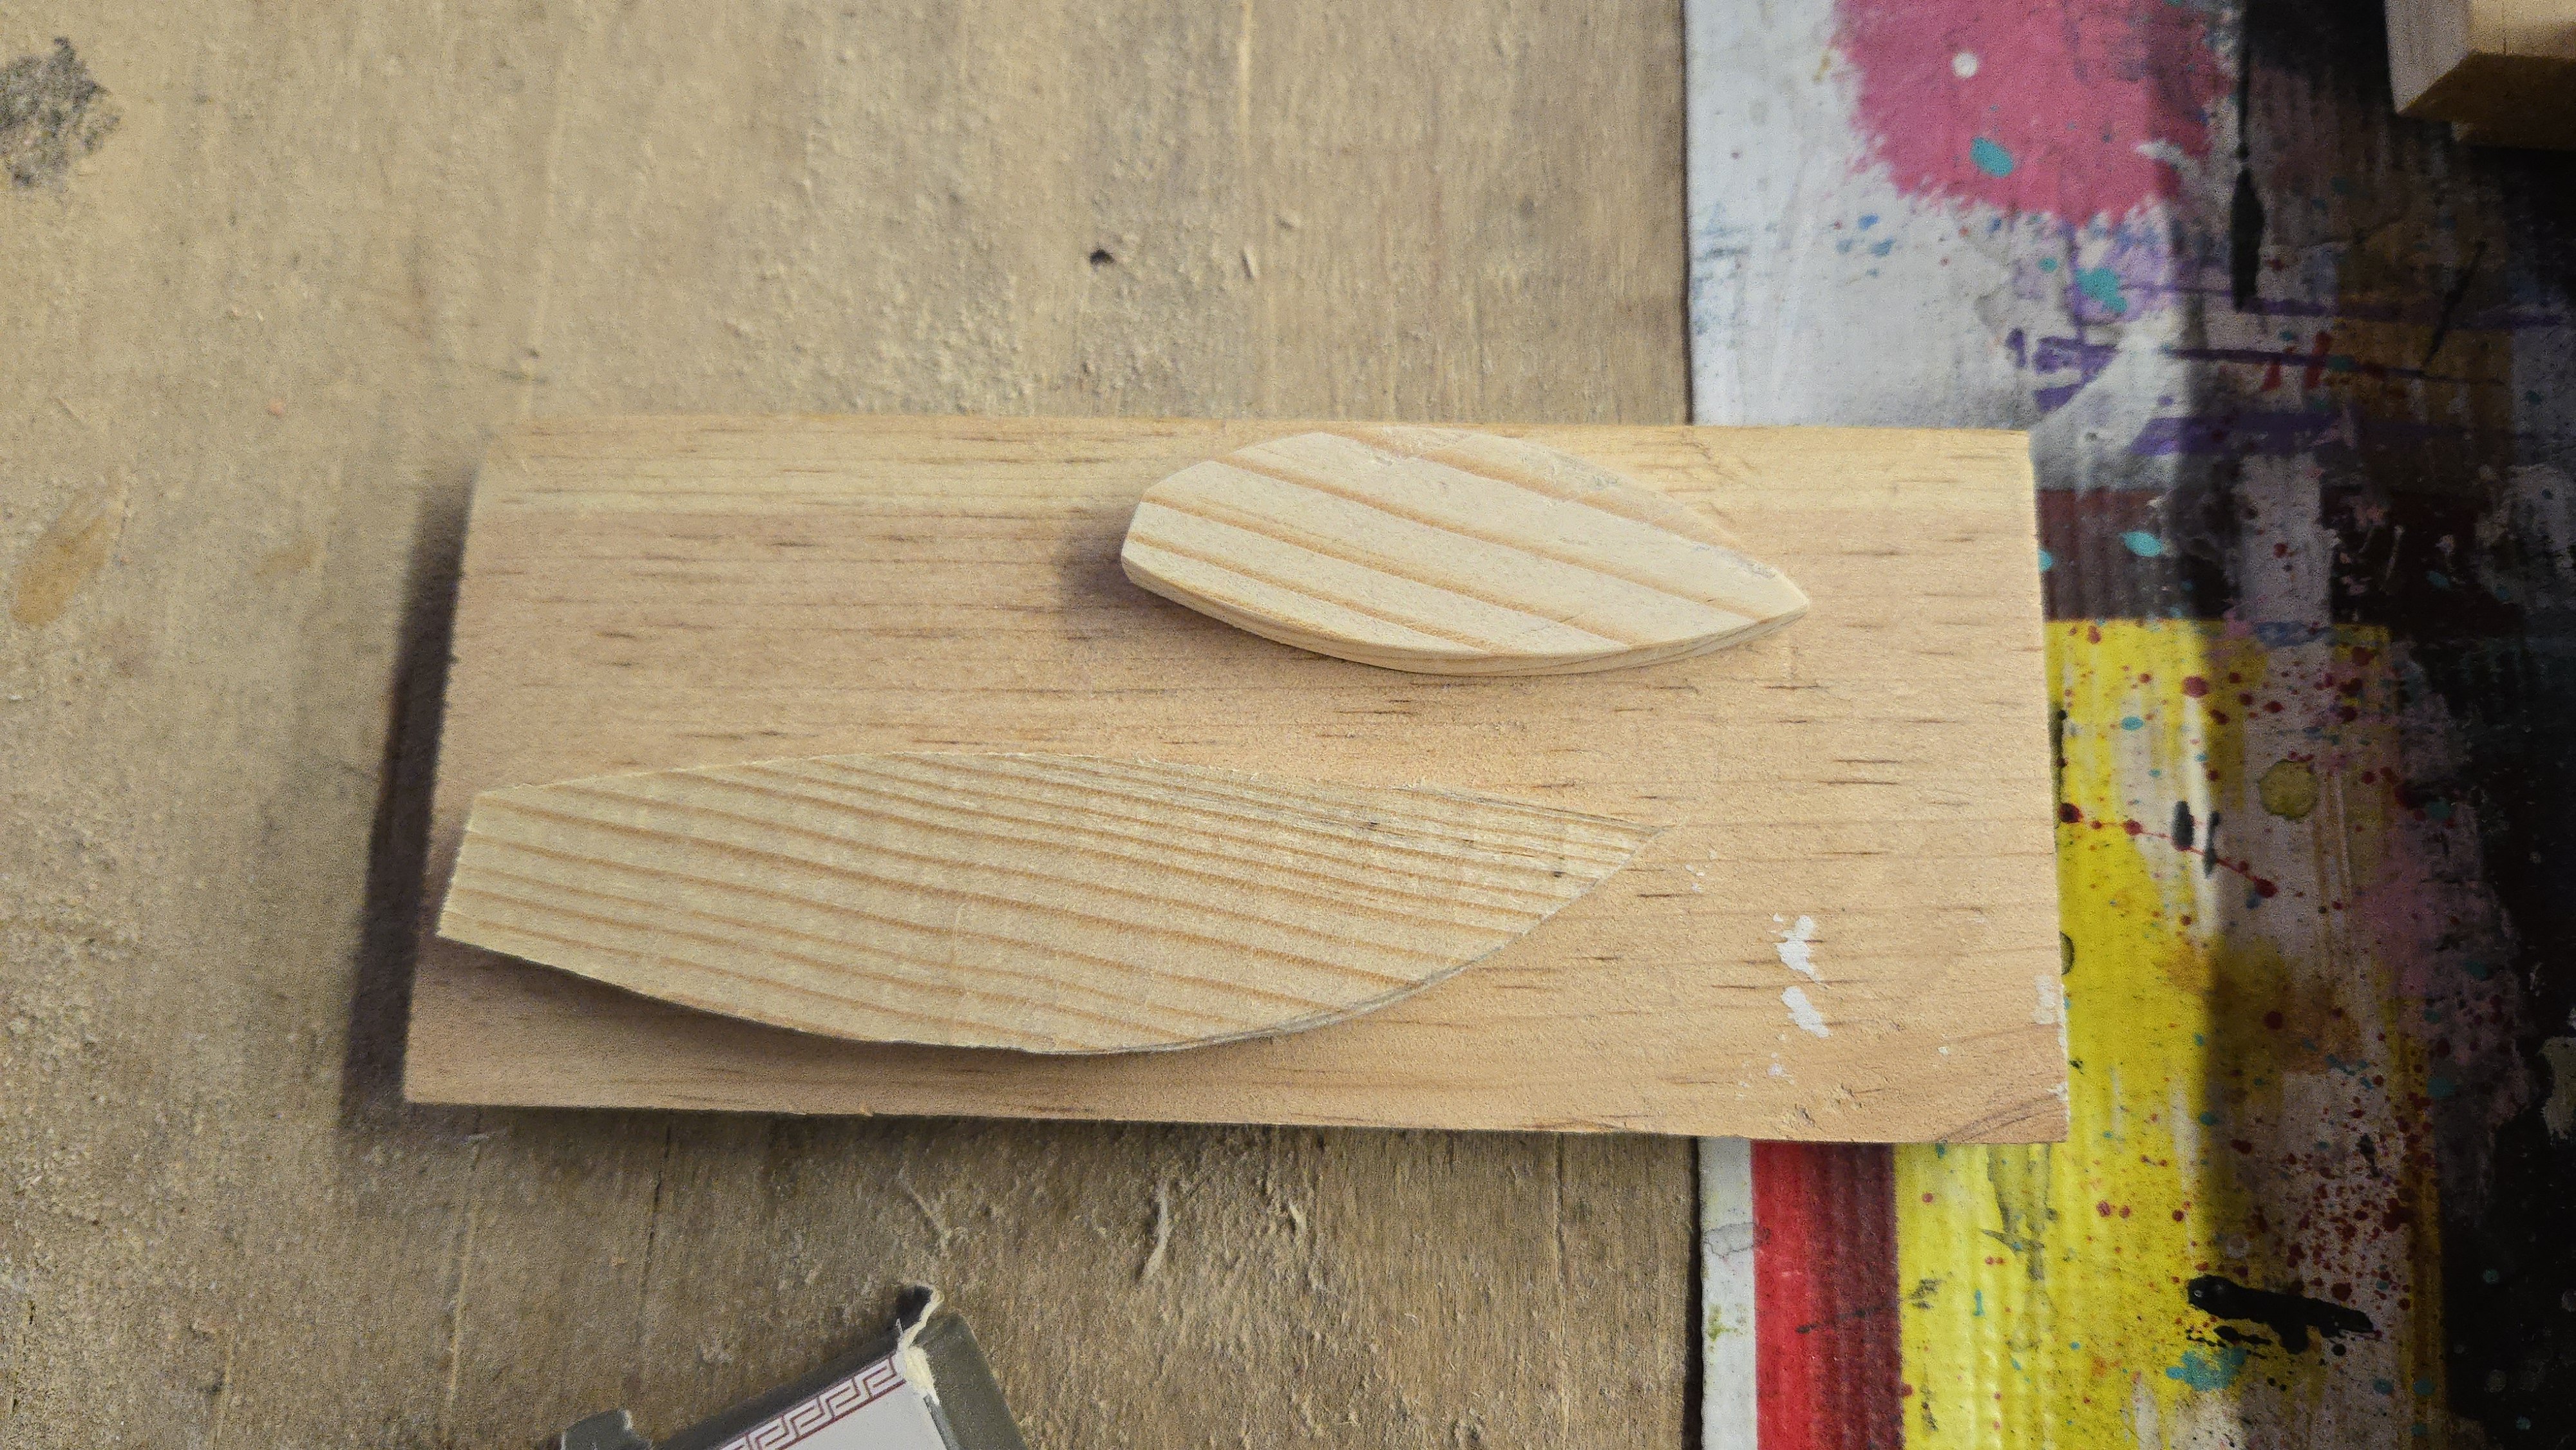
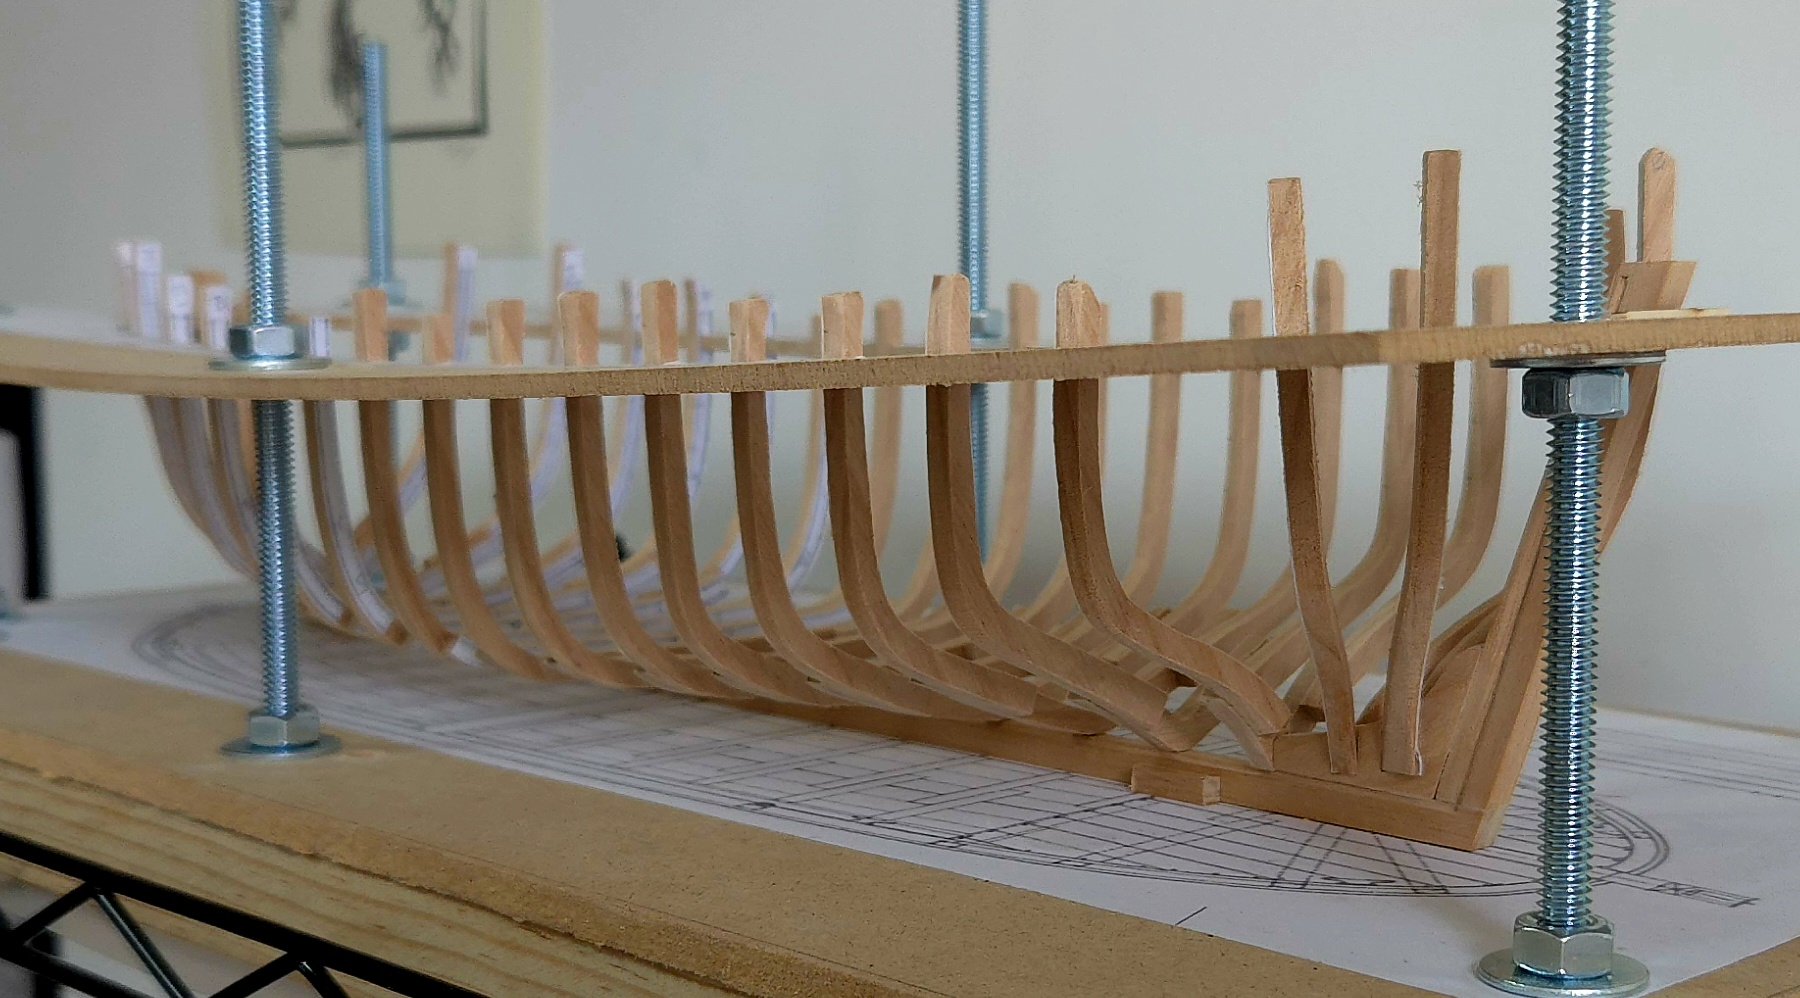
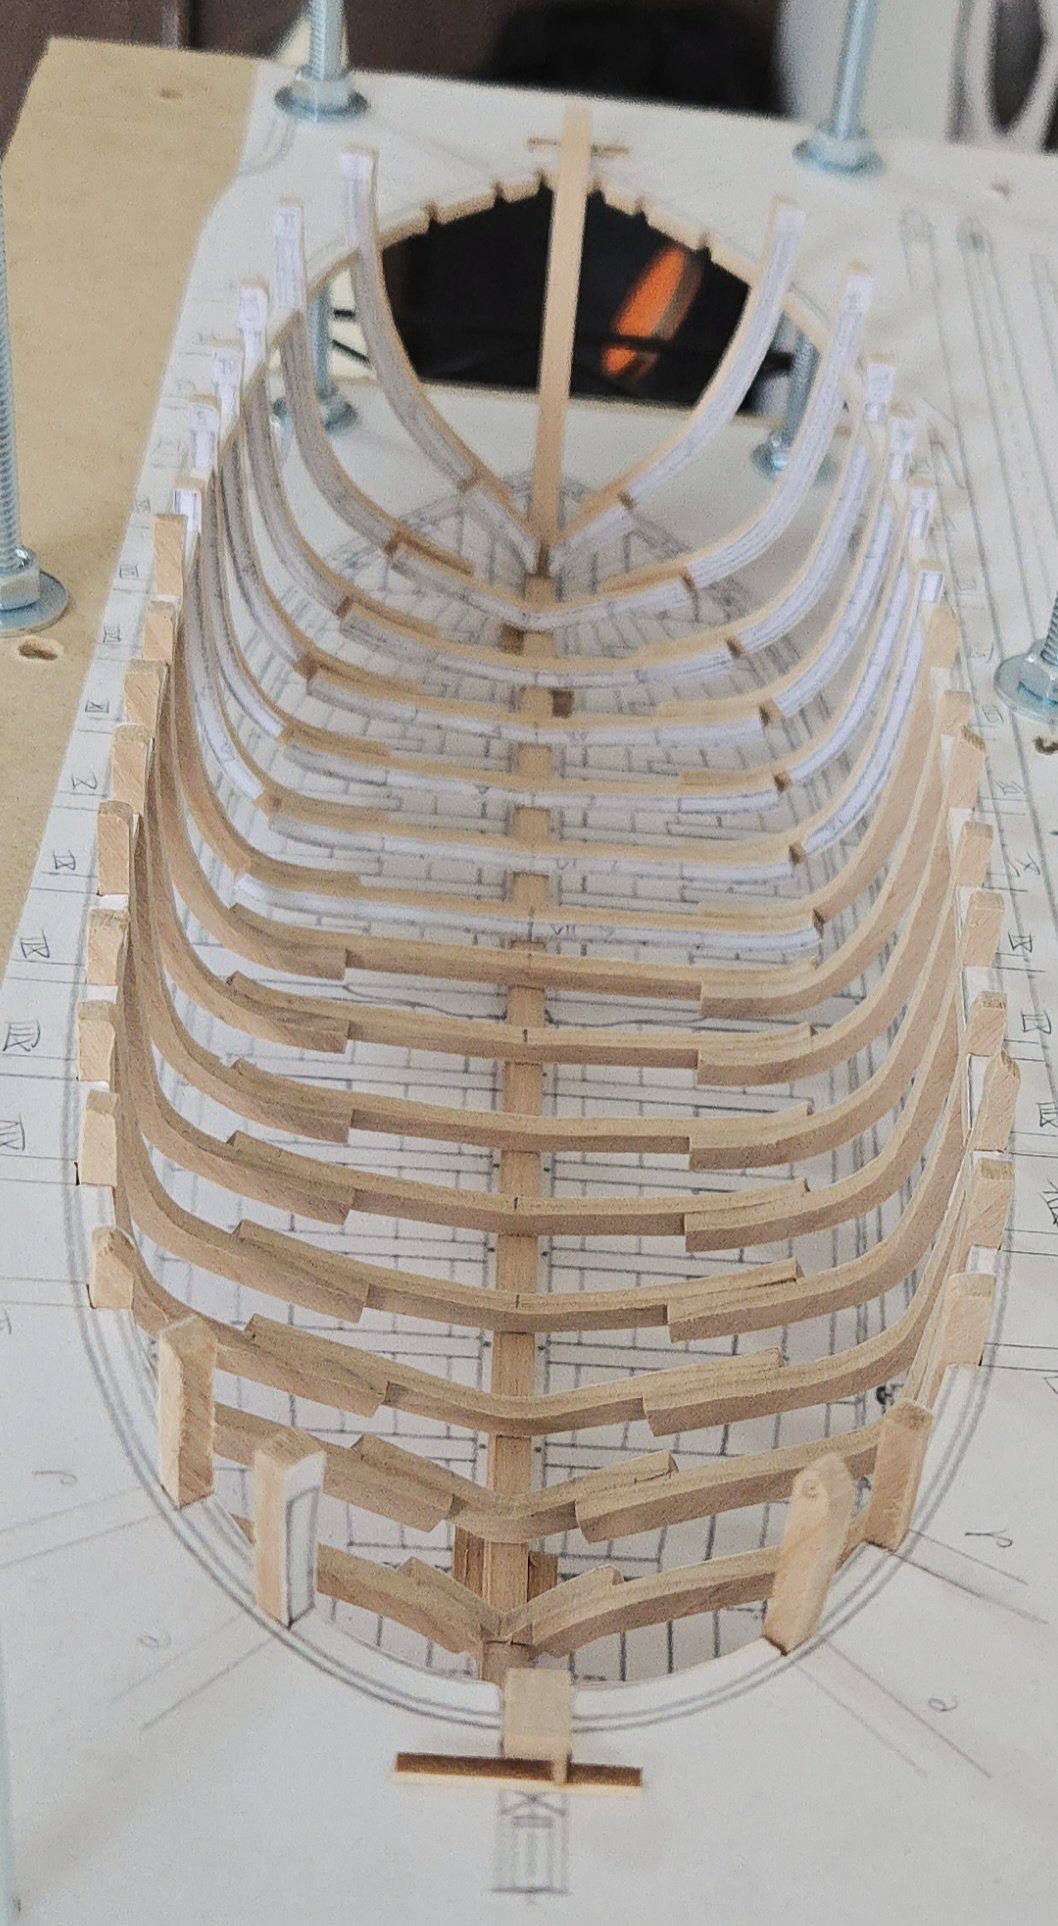
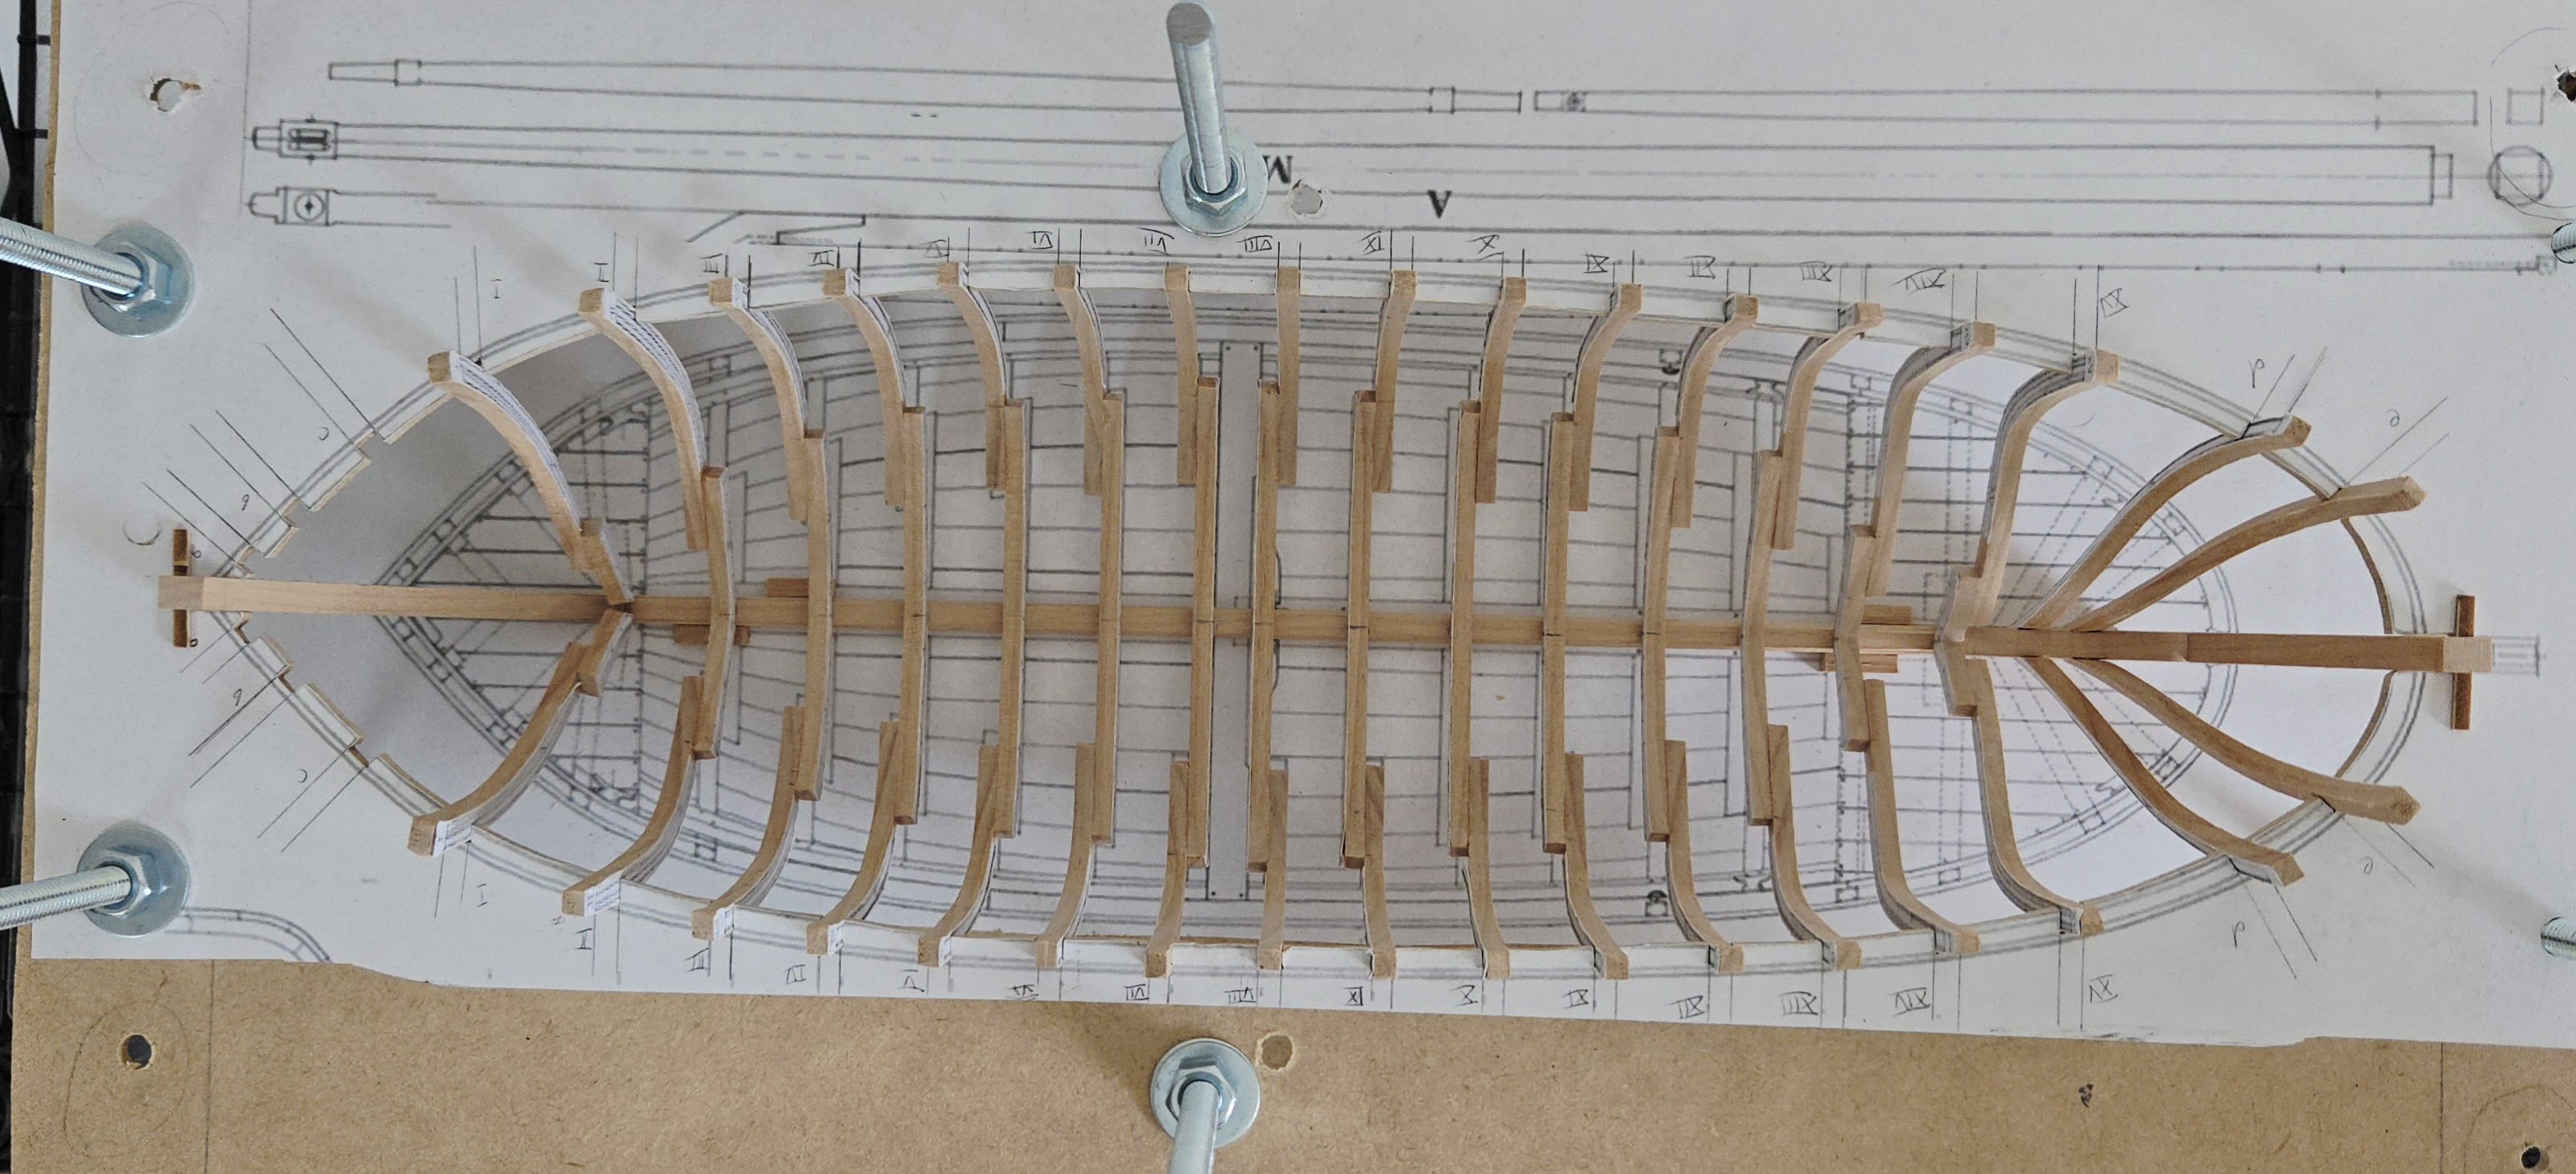
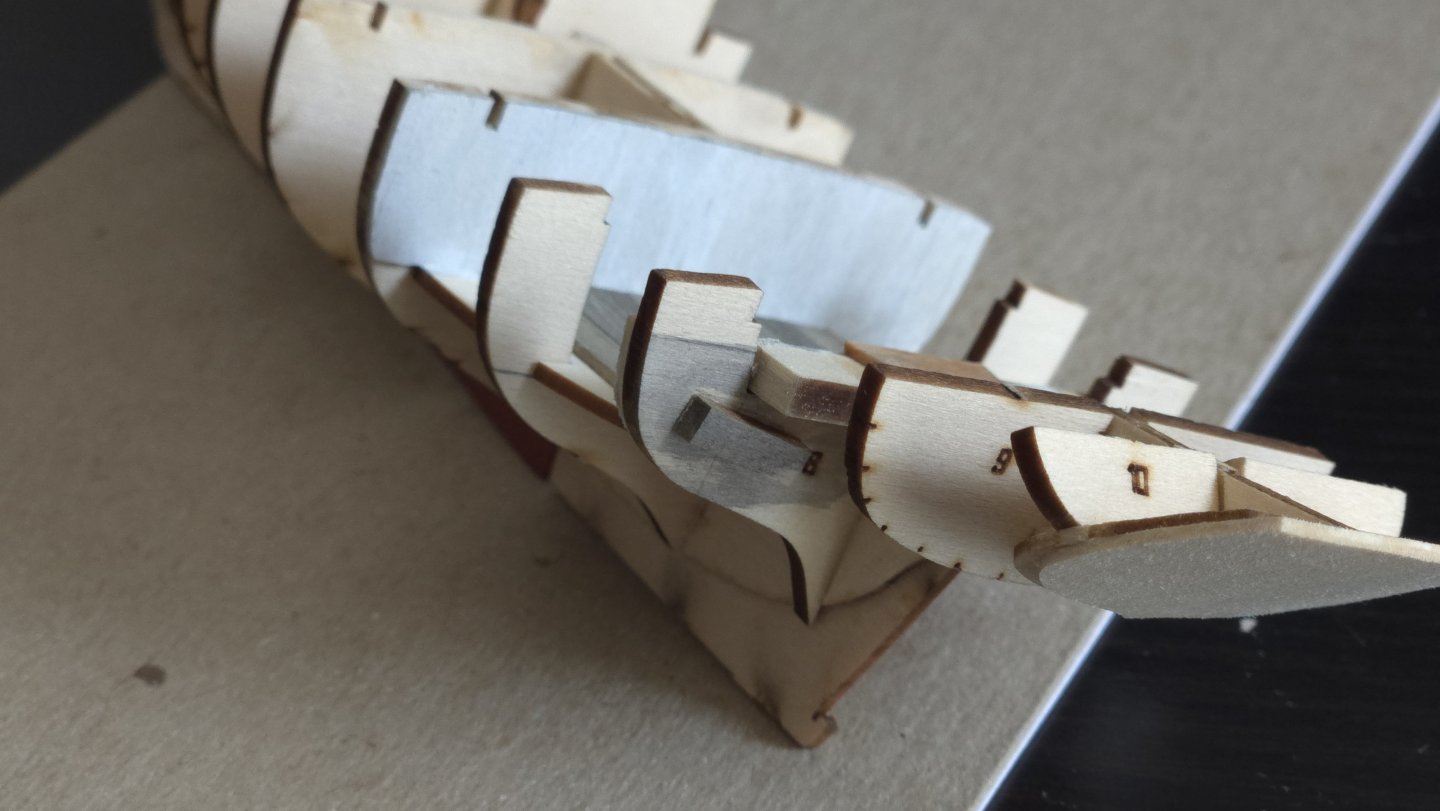
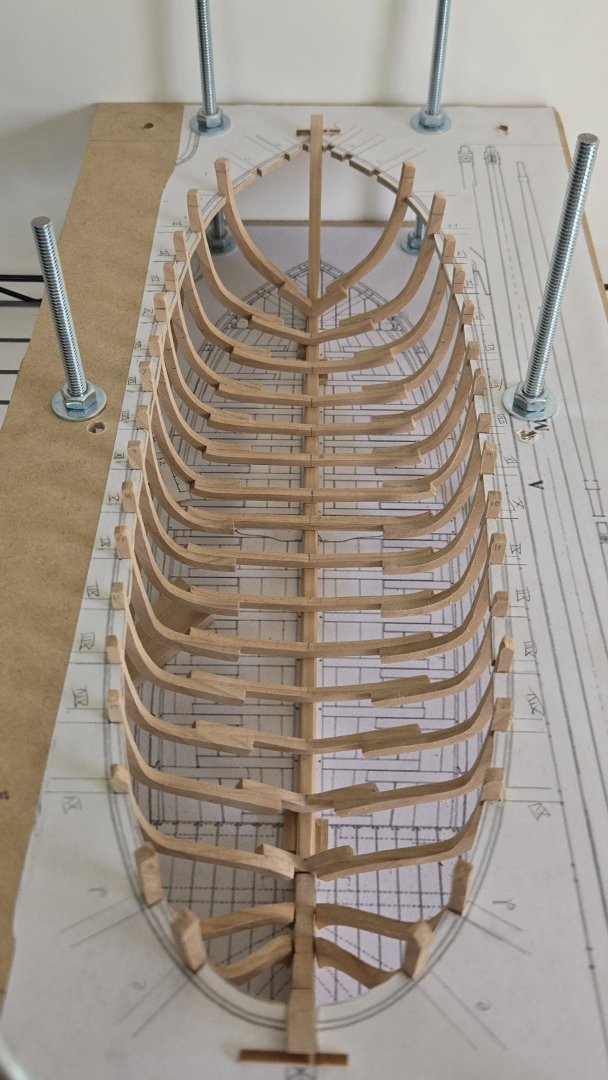
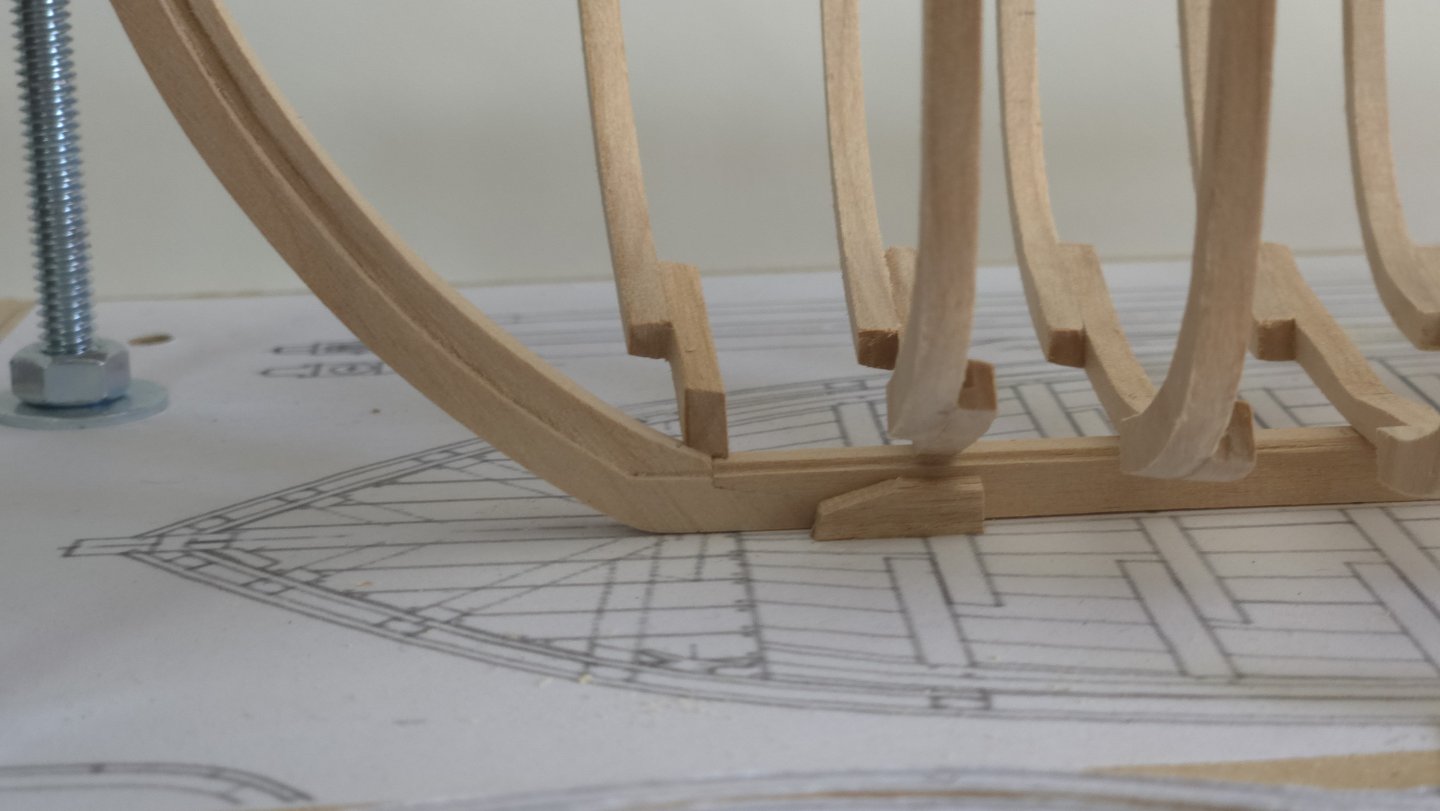
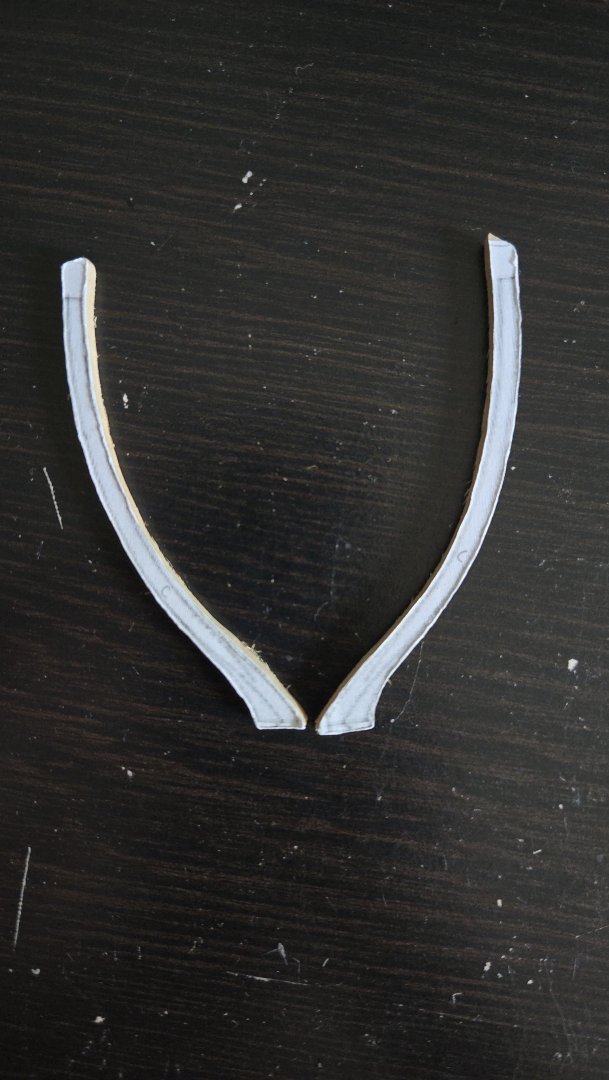
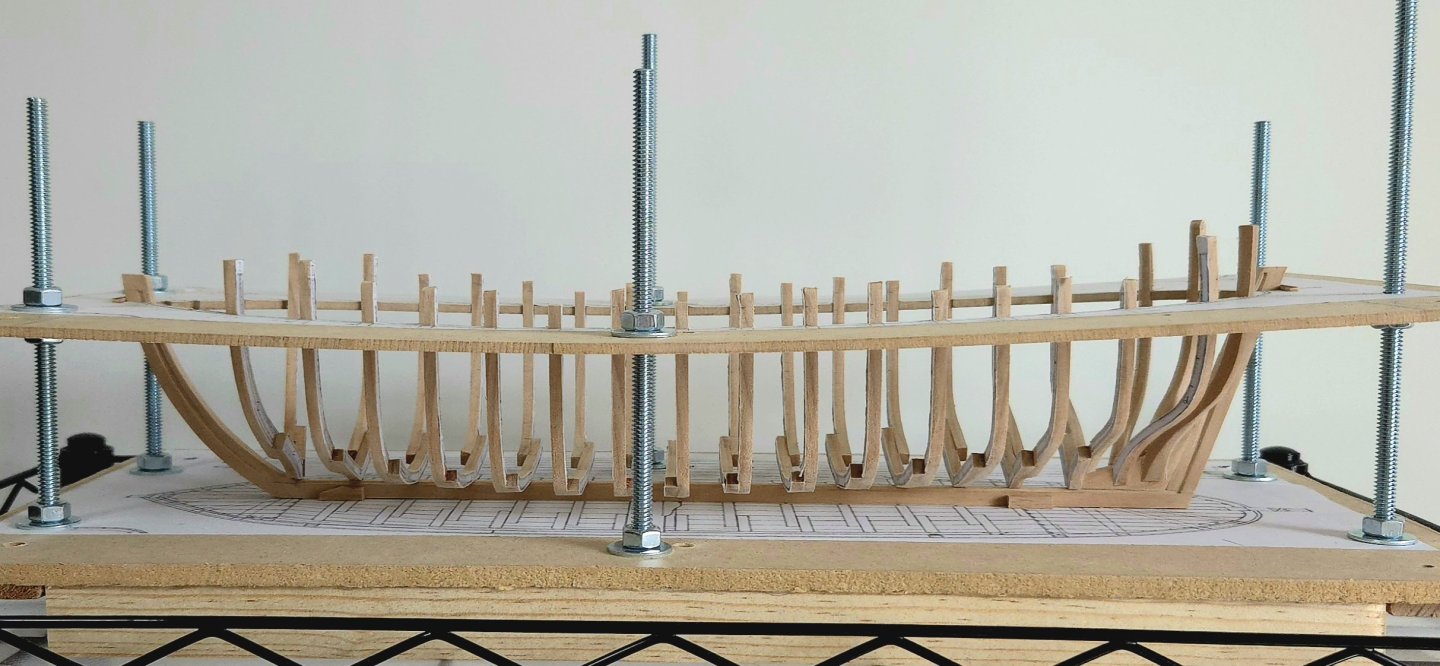
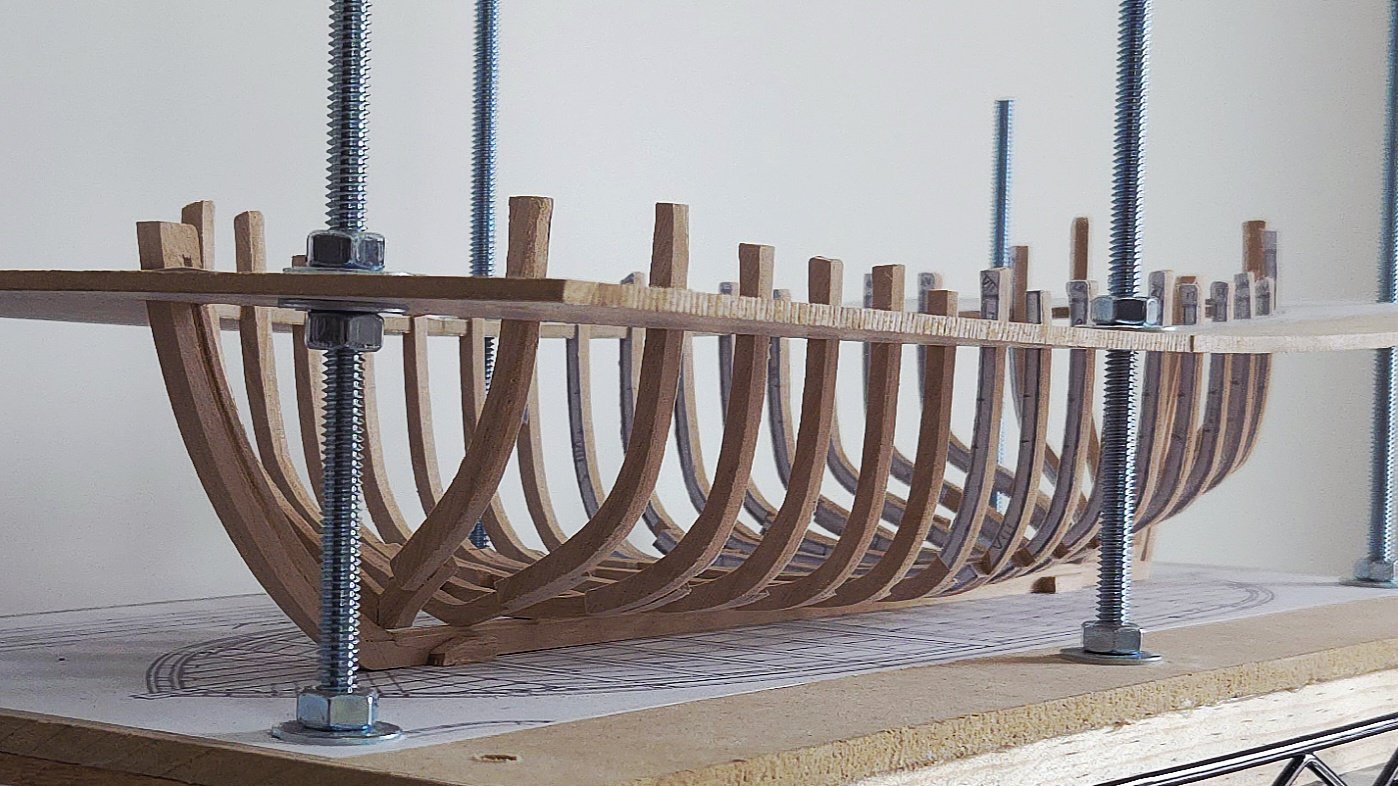
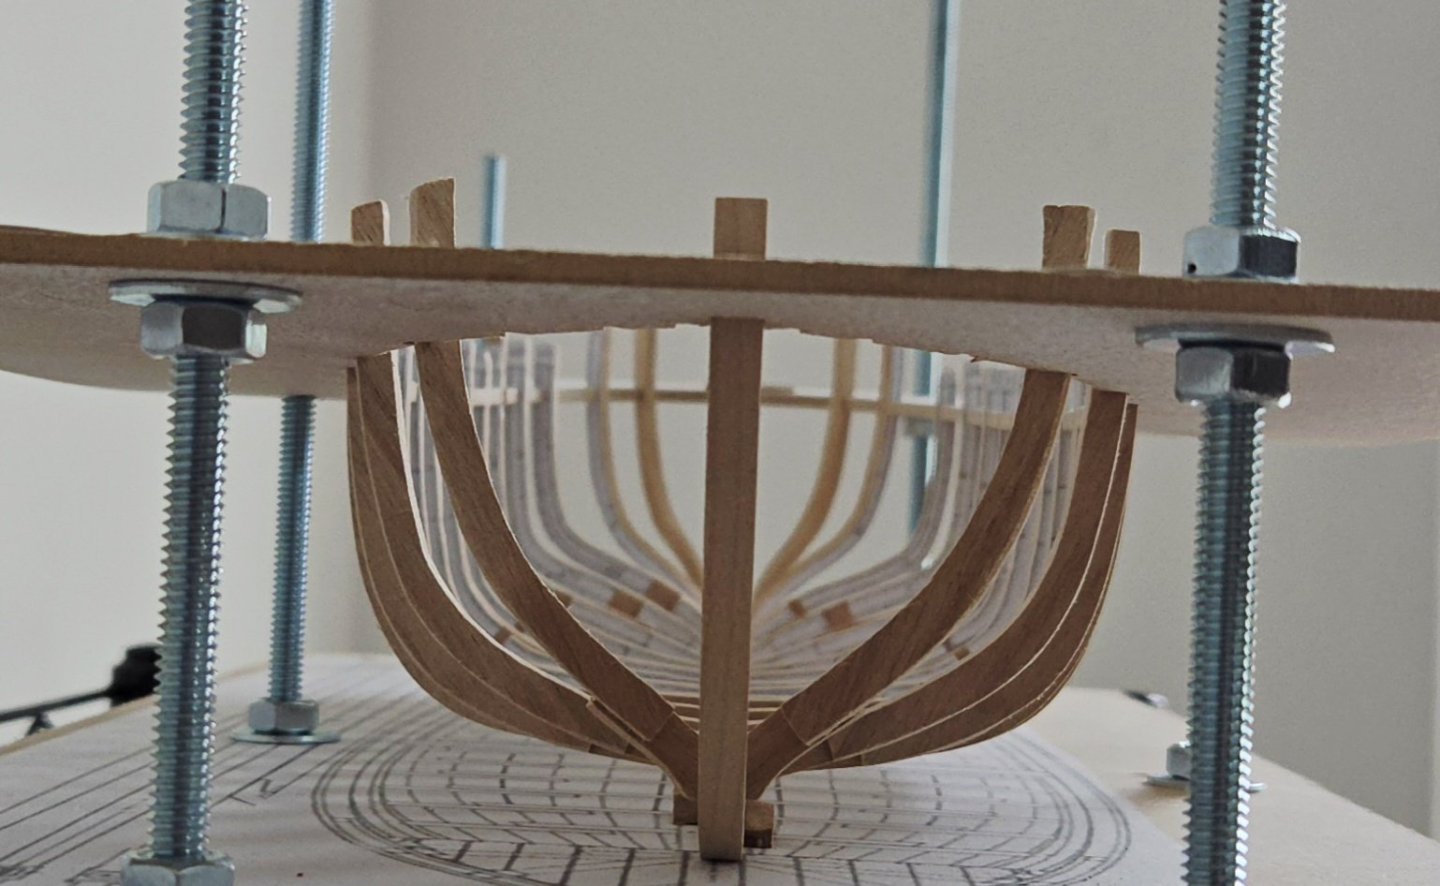
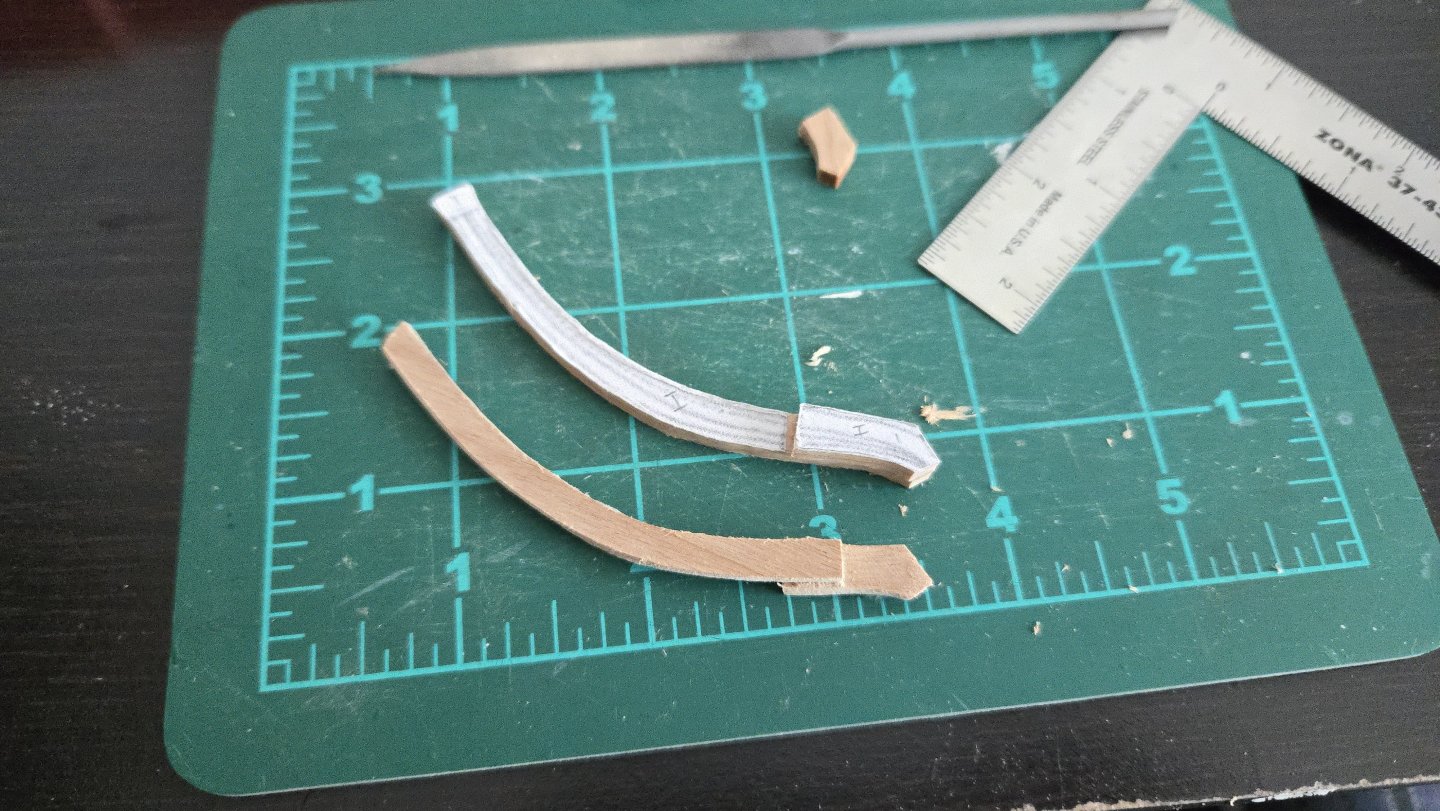
I had already glued the floors to the full-length futtocks for frame 1, as given in the frame view plans and shown in the other photo-only build log I mentioned above. However, after some thought, I decided to trim back the bottom ends of the futtocks, as shown in the top-down plans. Frame 1 reaches the keel right where the keel joins the stem, meaning that there's a lot of extra shaping to fit the curved stem if you leave the futtocks full-length. This was pretty easy to do, using a razor saw to carefully cut the futtock, then applying alcohol to the part to be removed and using an xcel blade to cut it off before sanding and filing smooth. In the photo below, the bottom frame has been trimmed, while the top is next. I also decided, in the spirit of the monograph being a reconstruction and not an exact replica that must be absolutely followed, to deviate slightly from the plans regarding the aft cant frames' joints with the deadwood. The plans show this as a simple butt joint. However, as the deadwood is smooth and the cant frames have a complex curve to them, I found it extremely difficult to place them against the deadwood at the correct location. I had marked it in pencil, but it was hard to see with the jig and my fingers in the way, and the cant frames want to slide all over the surface with any pressure, especially as pressure must me exerted on the highly curved and angled exterior side. So, I decided to cut slightly into the deadwood, giving the frames just enough of a slot that they can be held in place much easier. This was done carefully with an xacto knife and a file. As can be seen, it's a very small amount that was removed, but it makes a world of difference in positioning the cant frames. I've also finished pre-fairing the exterior of the frames (except for the cant frames). With everything dry fit, the shape of the hull shines through. After six months of work, admittedly with a lot of interruptions, the model is looking more like a ship than ever. The interior of the frames still need pre-fairing before I actually glue anything. I have to say, I quite like the skeletal look, and I'm strongly considering leaving the model unplanked between the broad strake and the wales.


- 139 replies
-
- 14
-
-

-
- ancre
- Bateau de Lanveoc
- (and 2 more)
-
Thanks, all! Keith, I'll definitely use a batten to check fit, but I think it will have to wait until the other frames are a bit better secured. Waldemar, I greatly appreciate the reminder that the plans are merely a reconstruction, and not necessarily 100% accurate. There are many ways to skin a cat, and it's worth considering alternatives. Incidentally, this is making me realize that I was under the impression that French ships usually didn't use cant frames, although maybe that doesn't apply by 1830 or to small vessels like this one. As I've already cut the floor pieces as given in the plans, I'll try to make that work first, but may have to redo the floor and try something else. Incidentally, I realized that I was forgetting another source: the model in the Musée National de Marine, photos of which are in the monograph itself! (This is what I get for building so slowly and for doing multiple builds at once). The photos are a bit blurry. In the first, the futtocks look like they cut off just before the keel. In the second, it looks like they go nearly to the keel if not quite to it. Interestingly, cant frame C, which by the plans is supposed to butt up against frame 1, isn't visible at all, and from the angle looks like it would go to the keel further forward. Of course, on this model, the frames aren't really structural: the hull is actually a hollowed shell with planking scribed on the exterior and frames added later. The Musée National de Marine site has some nice photos of the model, although none of this detail under the foredeck. Source: https://mnm.webmuseo.com:8443/ws/musee-national-marine/app/collection/record/9718 In the meantime, the exterior of the frames have been sanded a bit. Still a long way to go, though!
- 139 replies
-
- 8
-
-
- ancre
- Bateau de Lanveoc
- (and 2 more)
-
Very nice work!
-
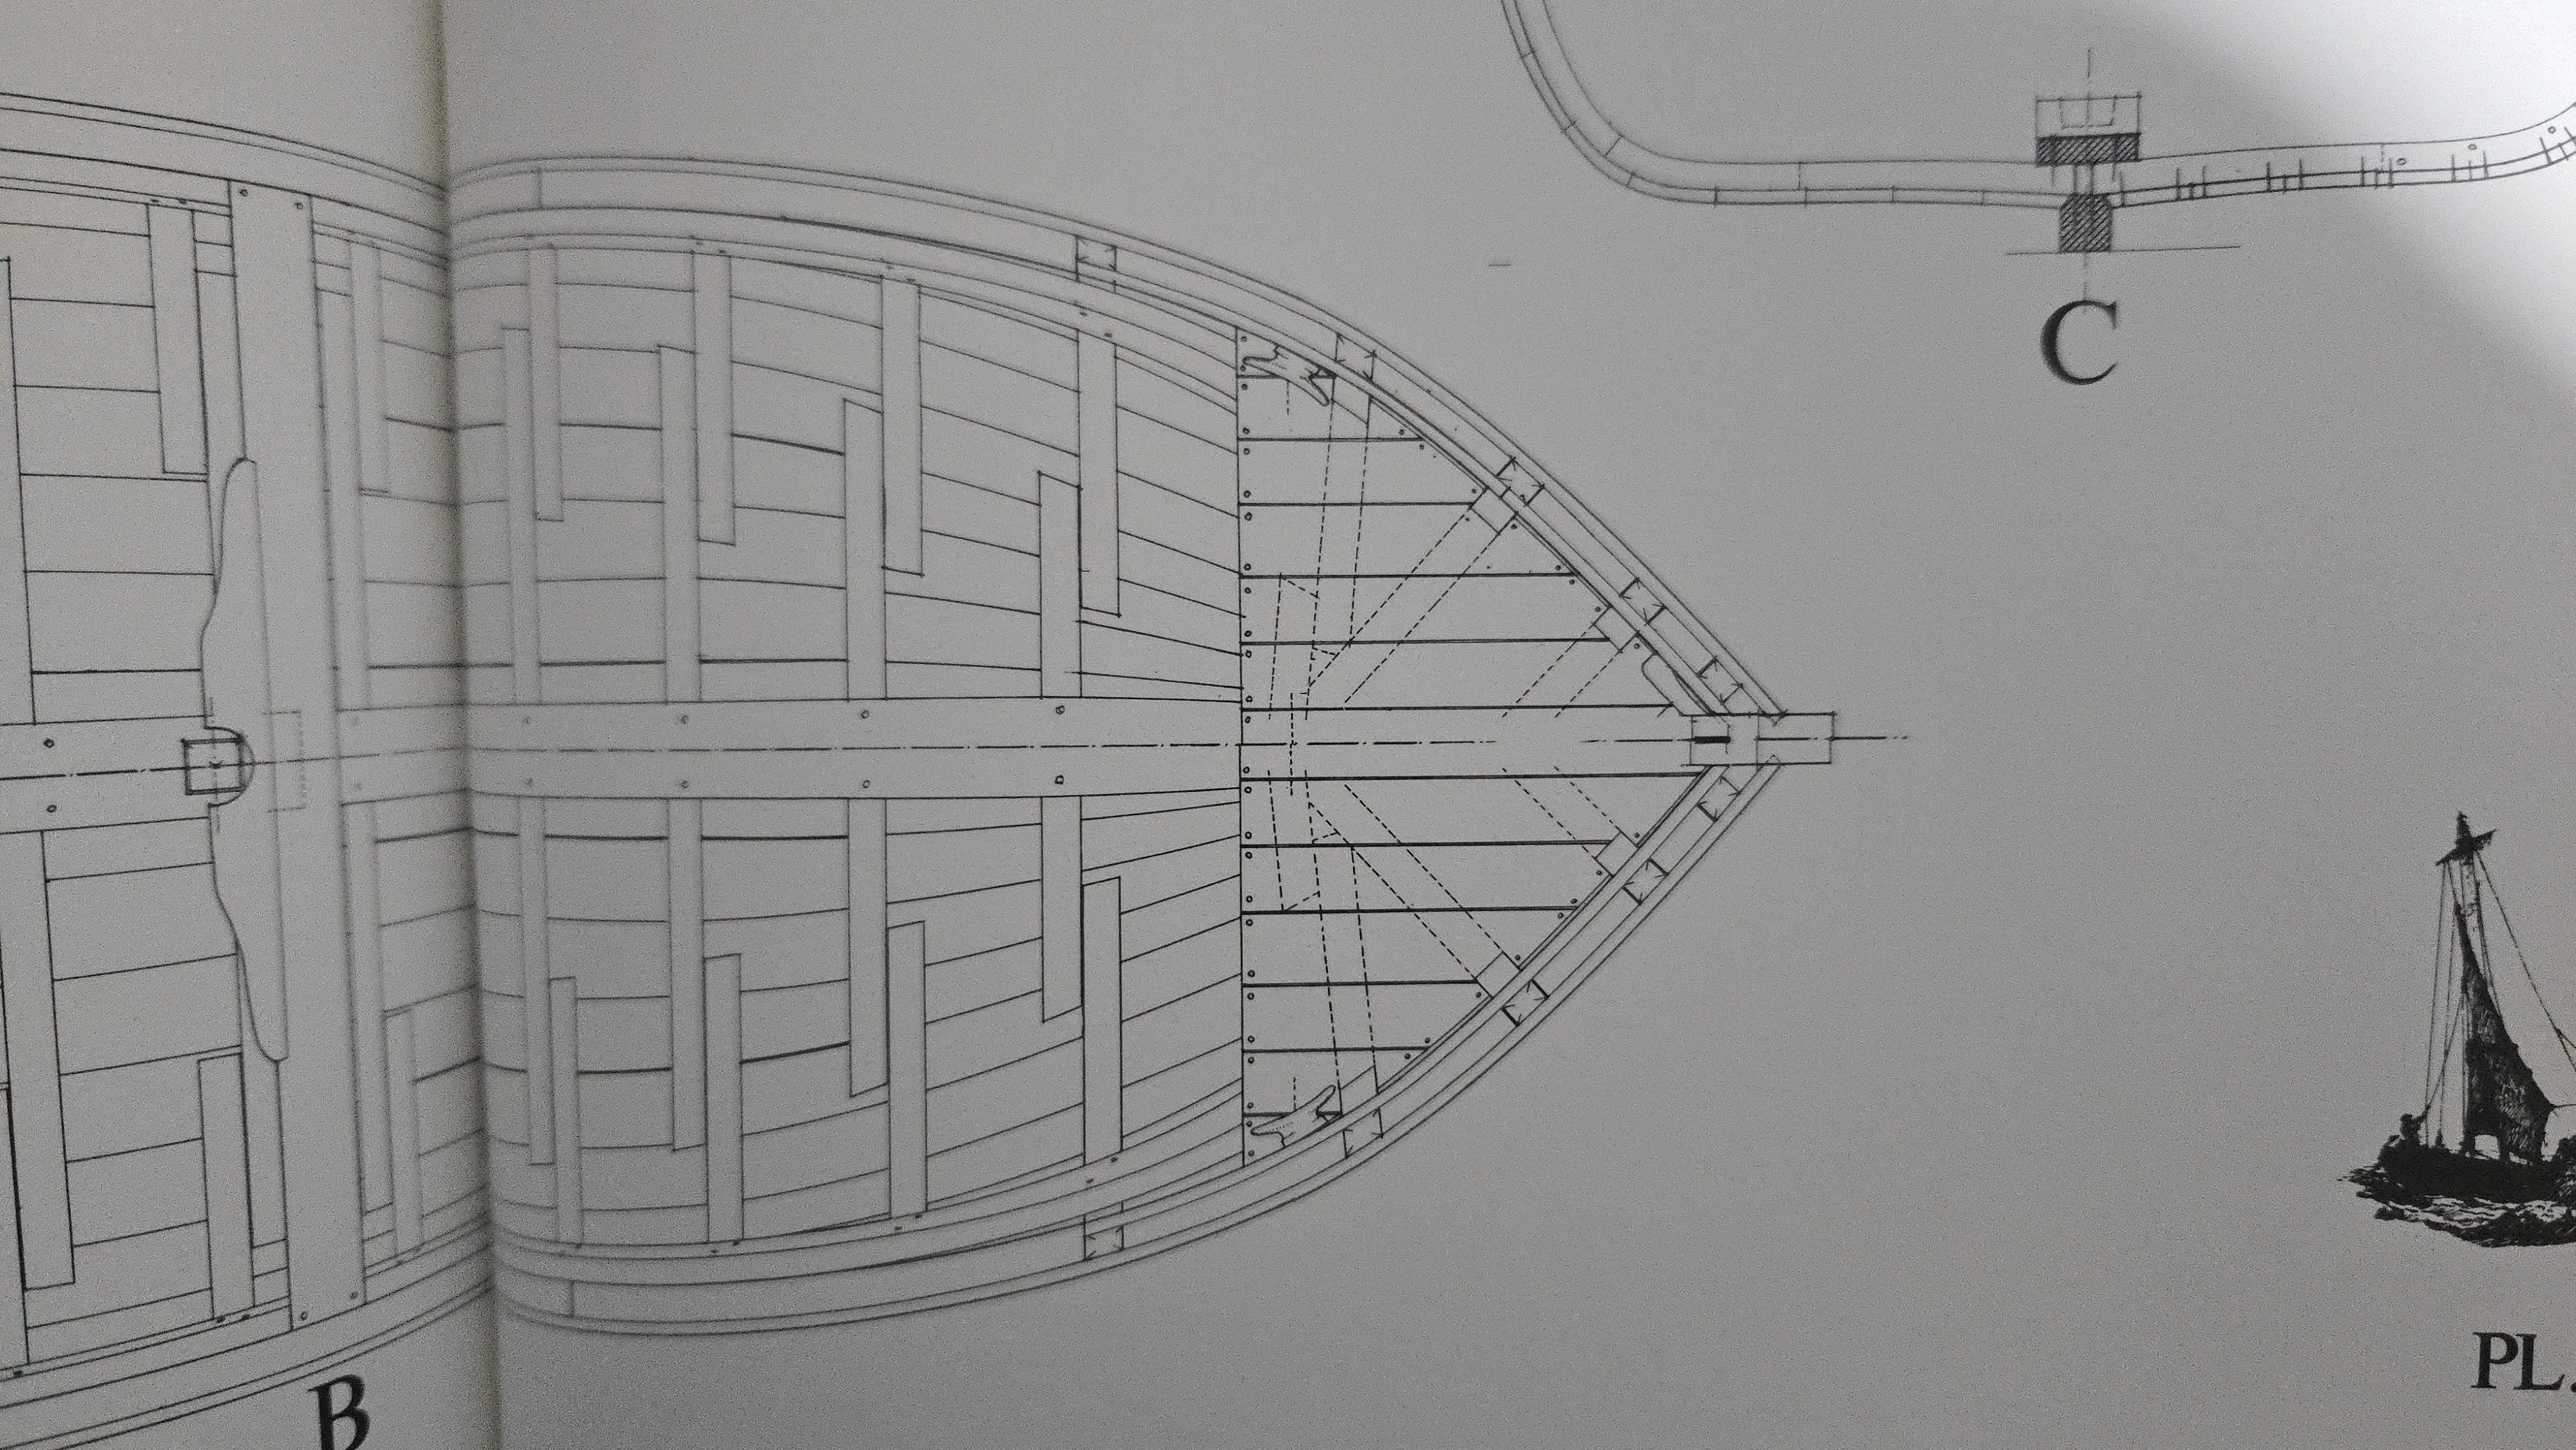
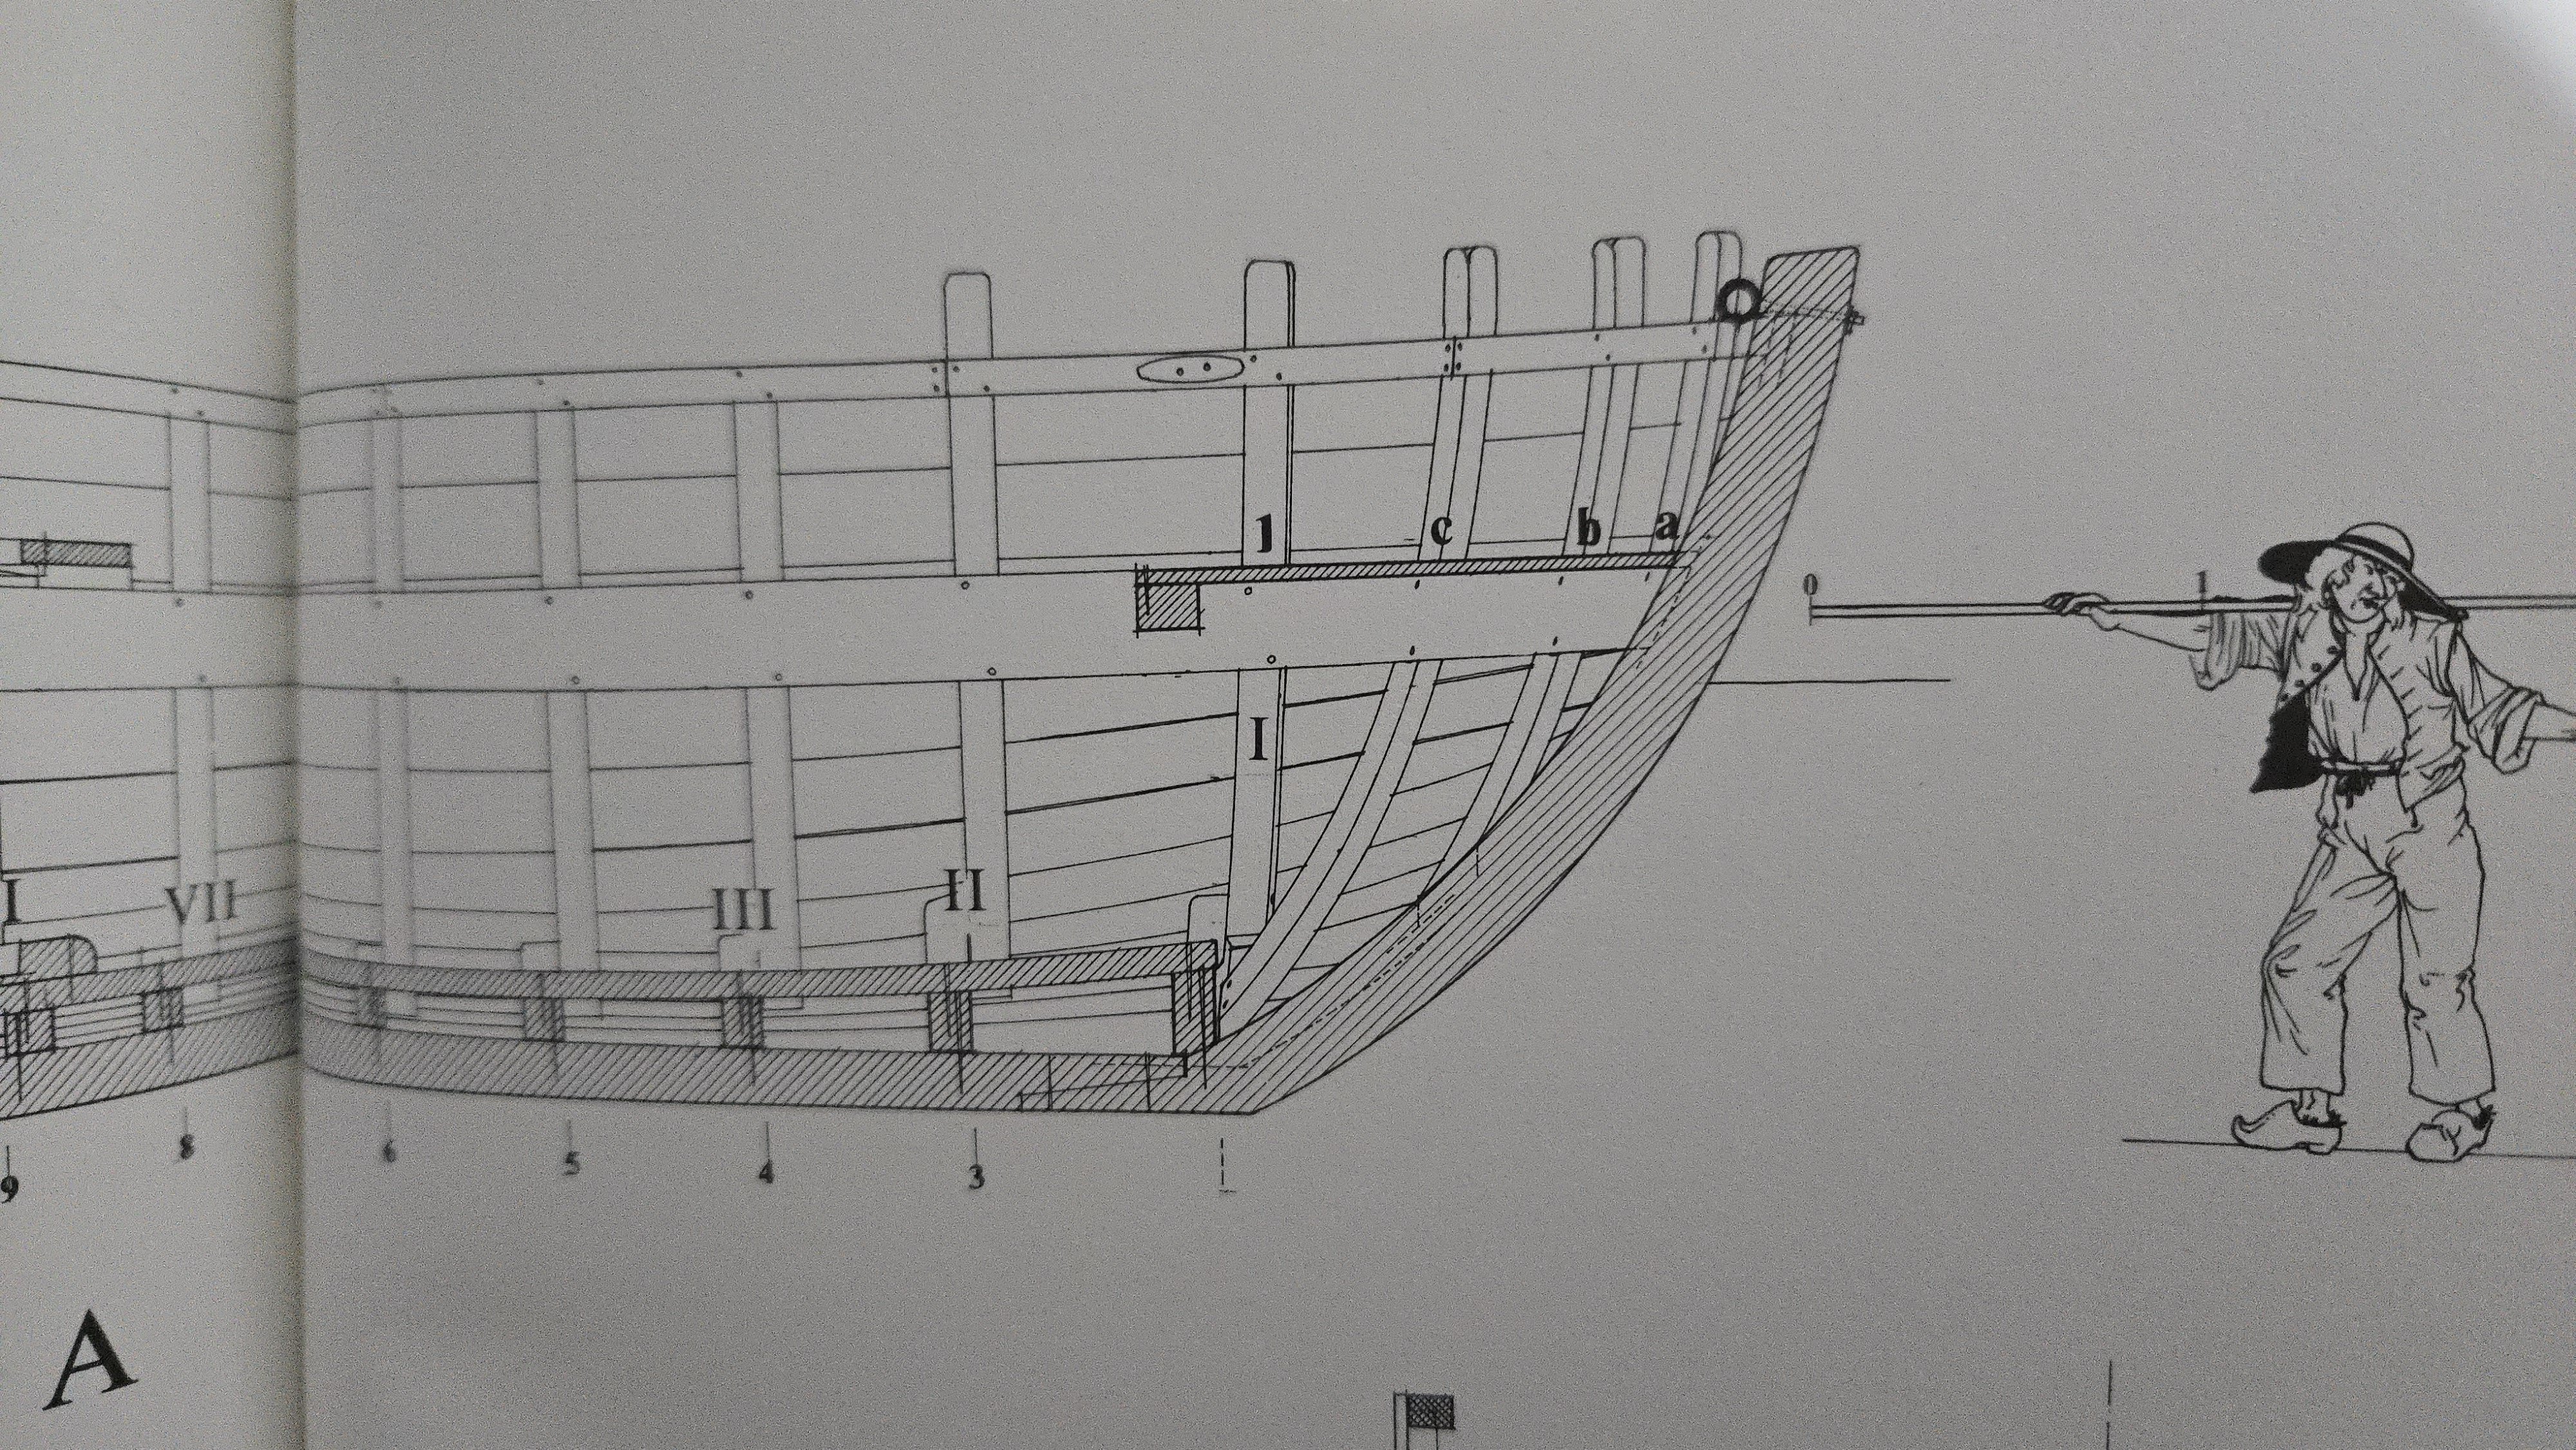
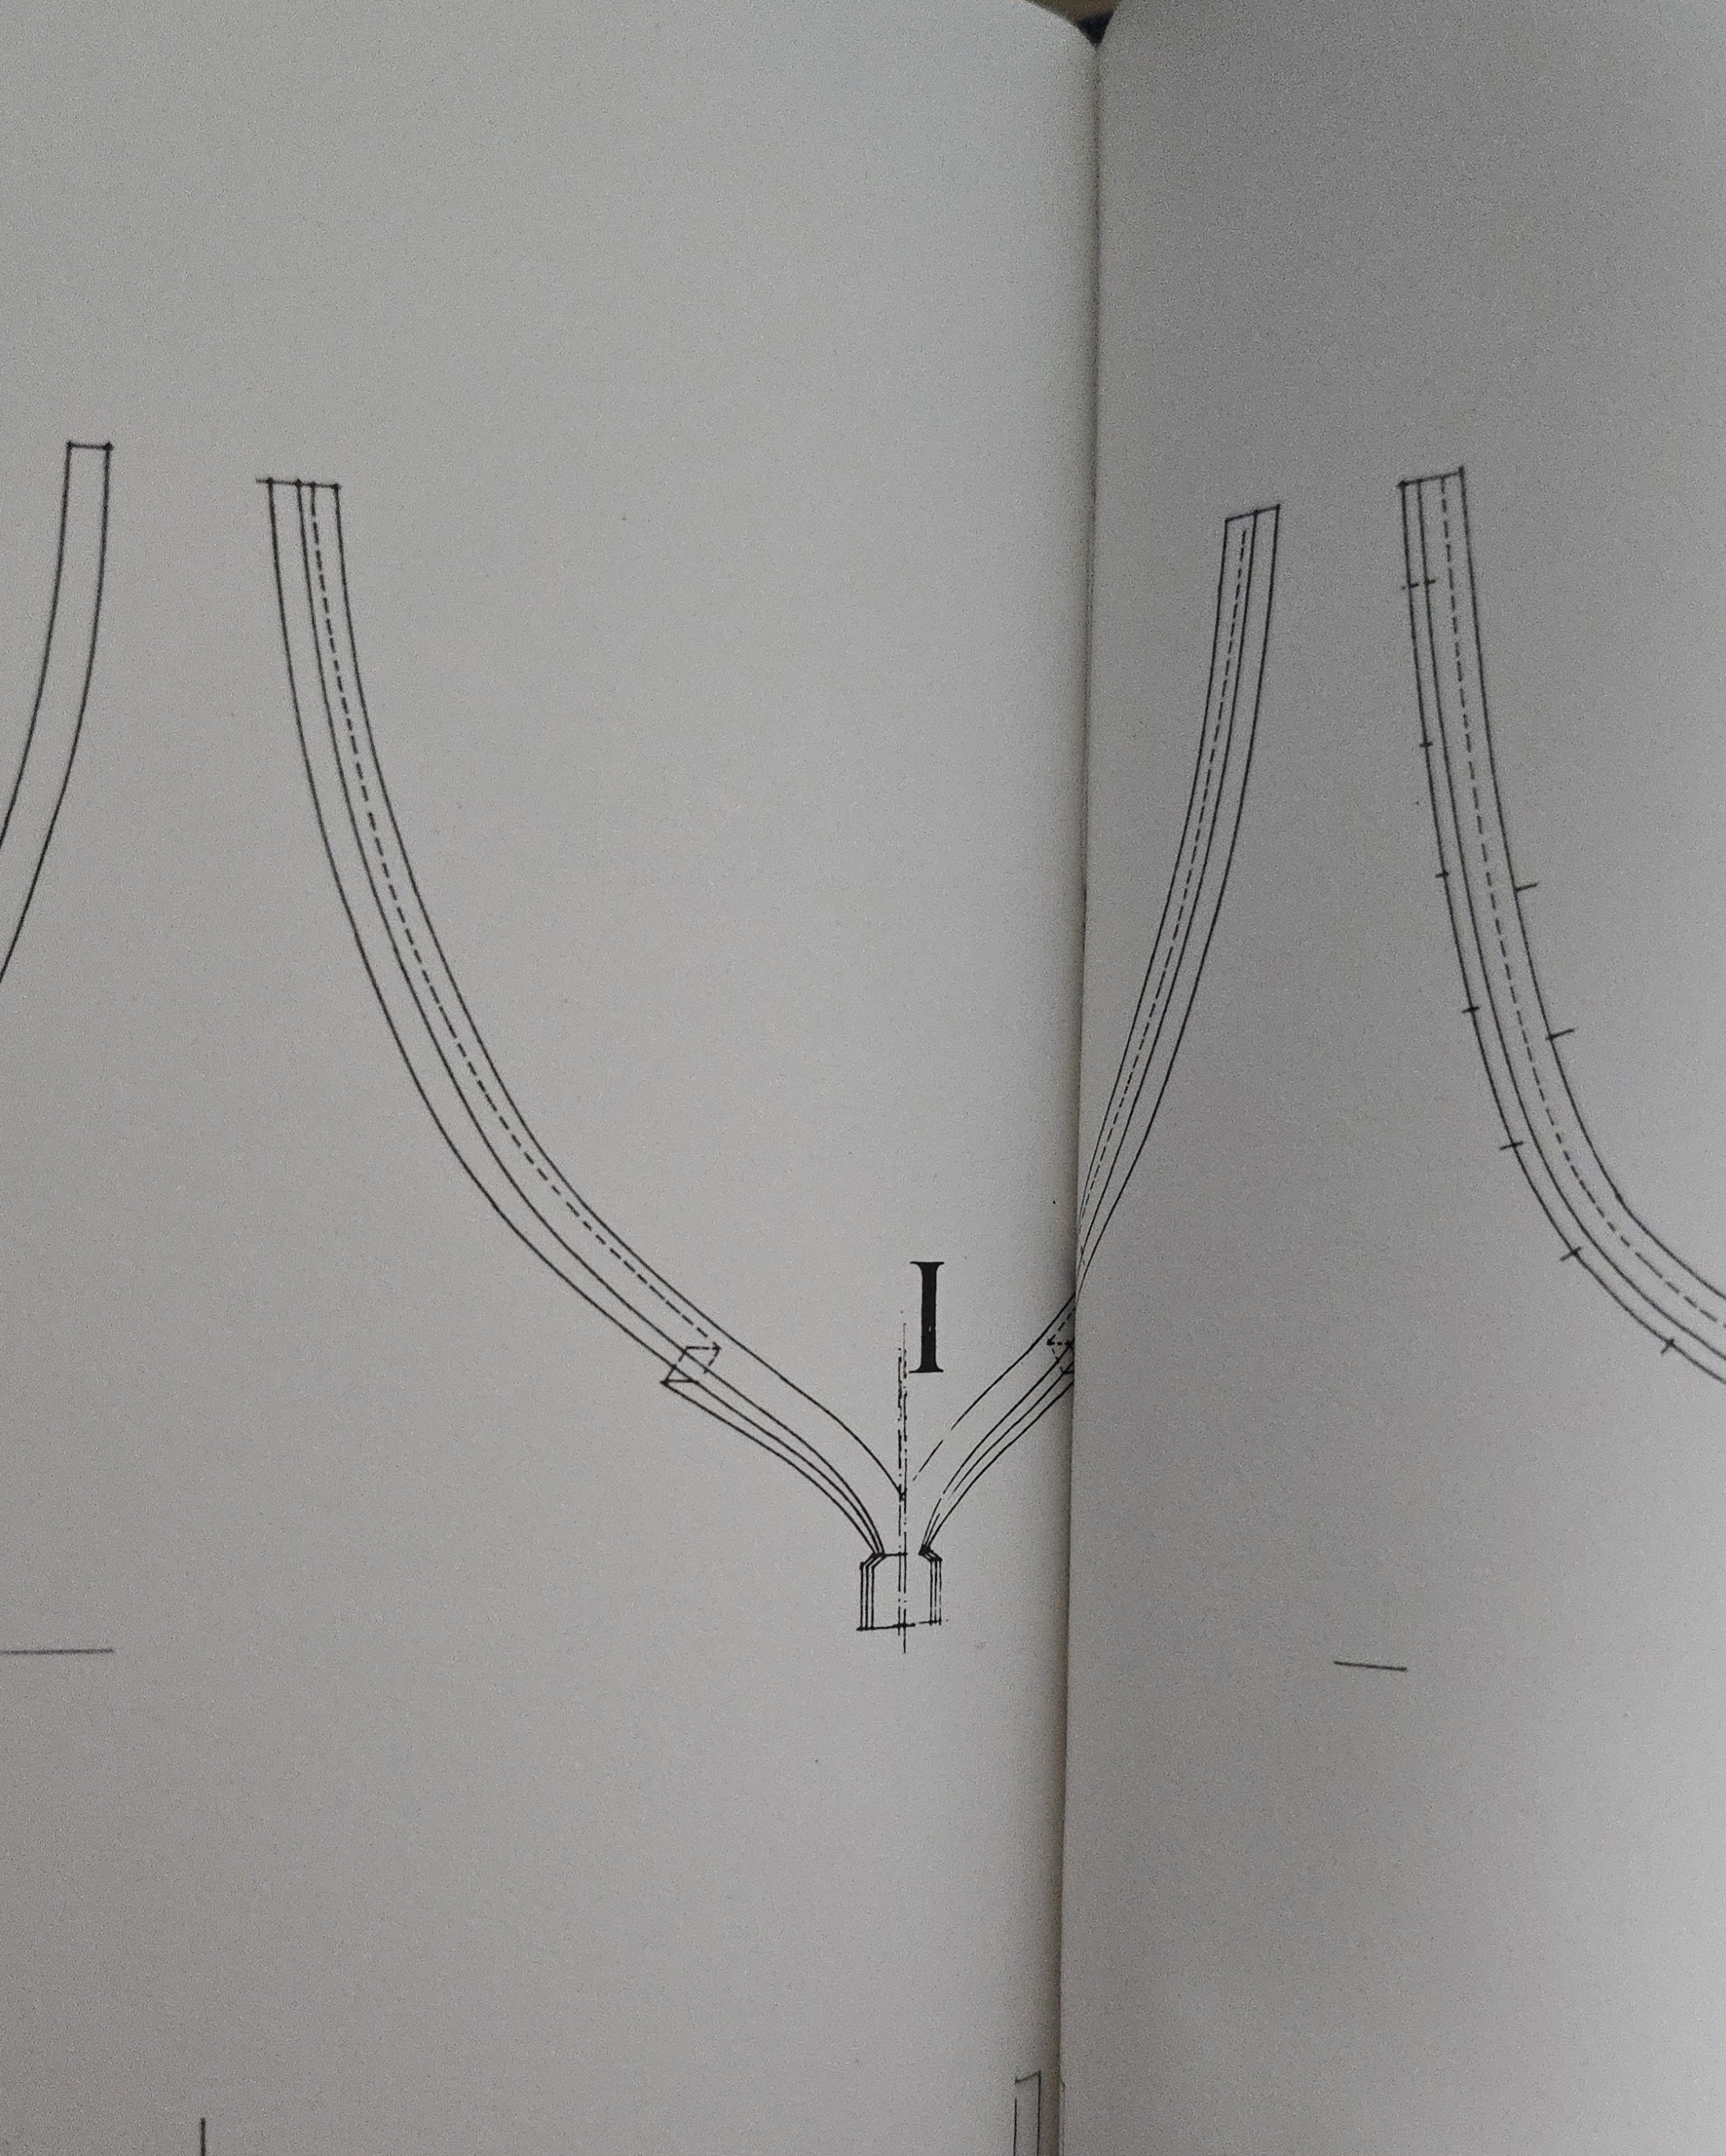
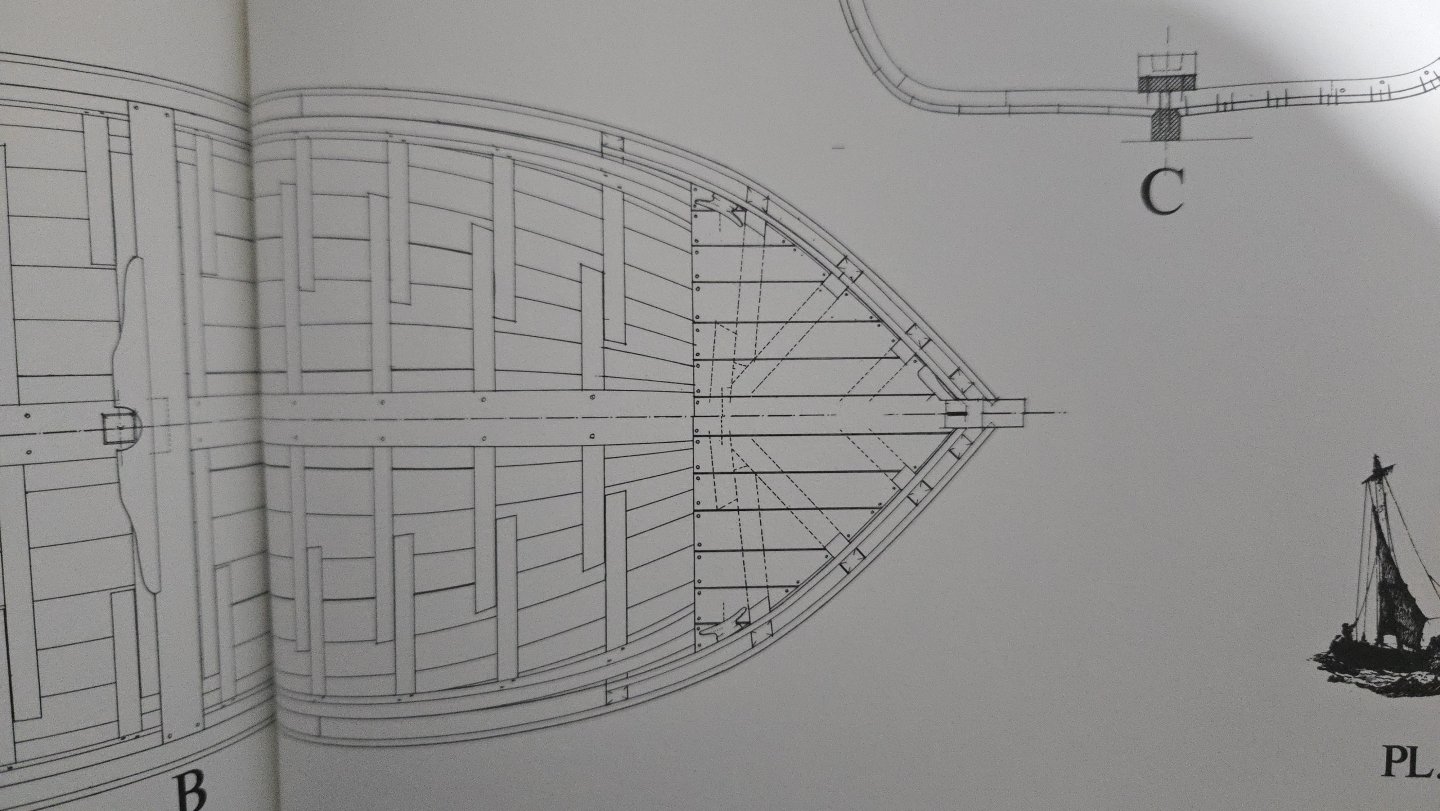
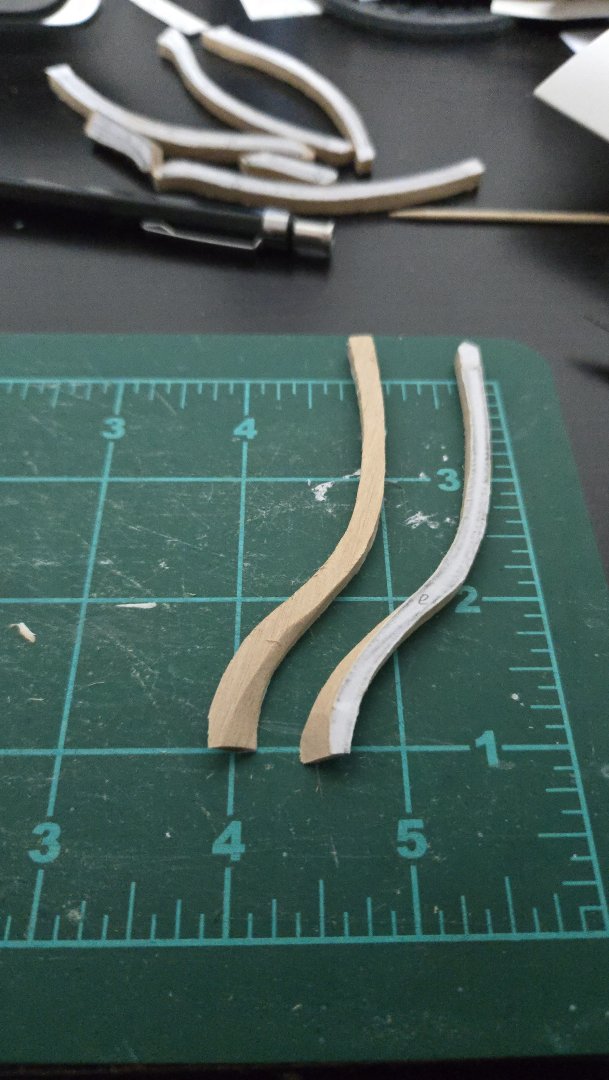
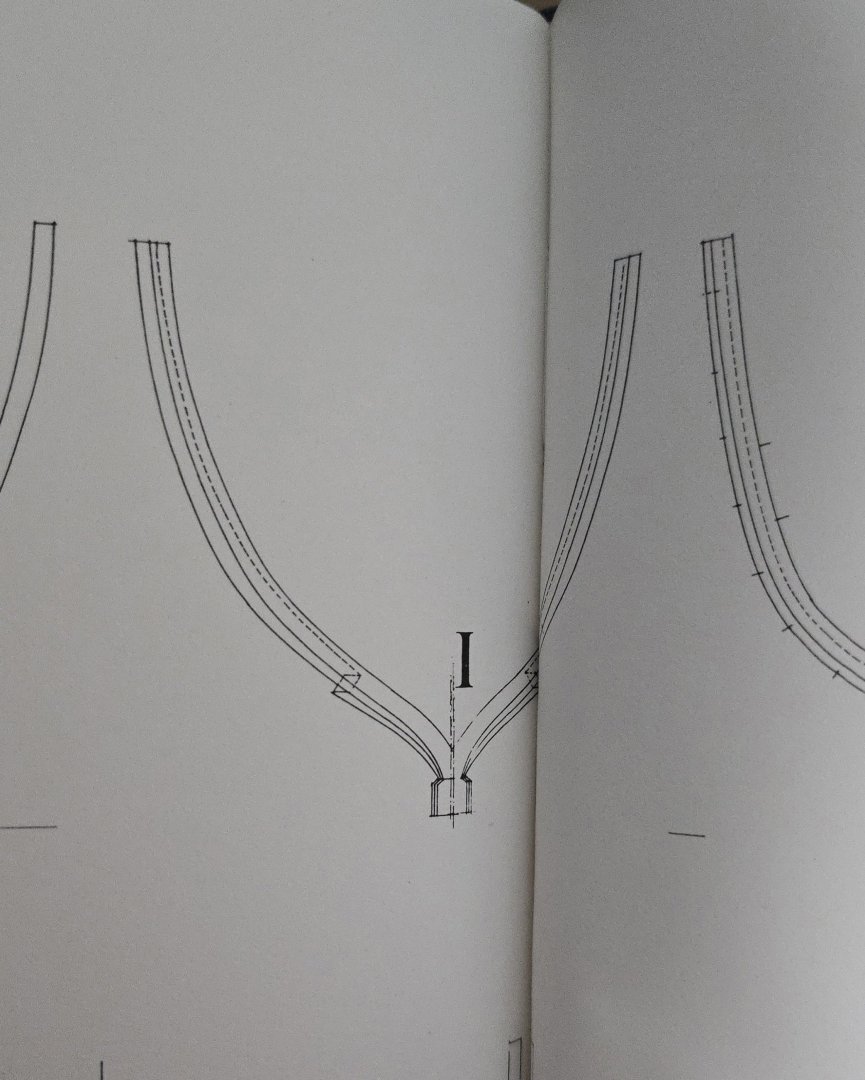
Cant frames E, the aftermost frames, were also fairly straightforward to make. That said, I've realized that my plan to just extend them to the keel isn't going to work, as they really should end at the bearding line on the deadwood. Working out how to properly fit these is going to be very difficult, and I do wish the planset had drawn how they actually fit instead of showing them going full-length to the keel. Overall I'm finding the plan set to be very useful, but I have found a number of issues, and I'm confused by many of the choices made in drafting the cant frames especially--I haven't even gotten to cant frames A and B yet, where as I've mentioned before, the plans don't show the end of the frame pieces. Another issue is frame 1, which is slightly canted forward. Unlike the other cant frames, but like the full frames, it has a floor piece--actually, two of them, which you have to properly angle. As can be seen, the frame plans show the futtocks as nevertheless extending all the way to the keel, doubling the floors: While the side and top view show the futtocks as ending well before the keel, barely overlapping the floors, and leaving space so that cant frame C can butt up against the floors of frame 1 and the keel: Definitely a bit odd. I was curious how others have handled this. The only actual build logs I've seen are on a french modeling forum where you need an account to view images. Another site, though, shows photos (without commentary) of a build. From what I can tell, they left the frame 1 futtocks full-length and butted frame C up against them. This certainly seems like a simpler solution, requiring just one cut across the bottom of frame C instead of two. Source: https://www.alexshipmodels.com/2016/12/10/le-bateau-de-lanveoc/ At this point, I'm wondering if I should glue the full frames in place and run some battens to help determine how to place the cant frames, or if I should make another jig plate of a waterline to add below the existing one. Either option seems like it would be extremely helpful to work out the placement issues caused by the oddity of the plan set. In the meantime, while I ponder what to do, I'm pre-fairing the frames, which are currently extremely chunky compared with how they should be.

- 139 replies
-
- 5
-
-
- ancre
- Bateau de Lanveoc
- (and 2 more)