JacquesCousteau
-
Posts
1,374 -
Joined
-
Last visited
Content Type
Profiles
Forums
Gallery
Events
Everything posted by JacquesCousteau
-
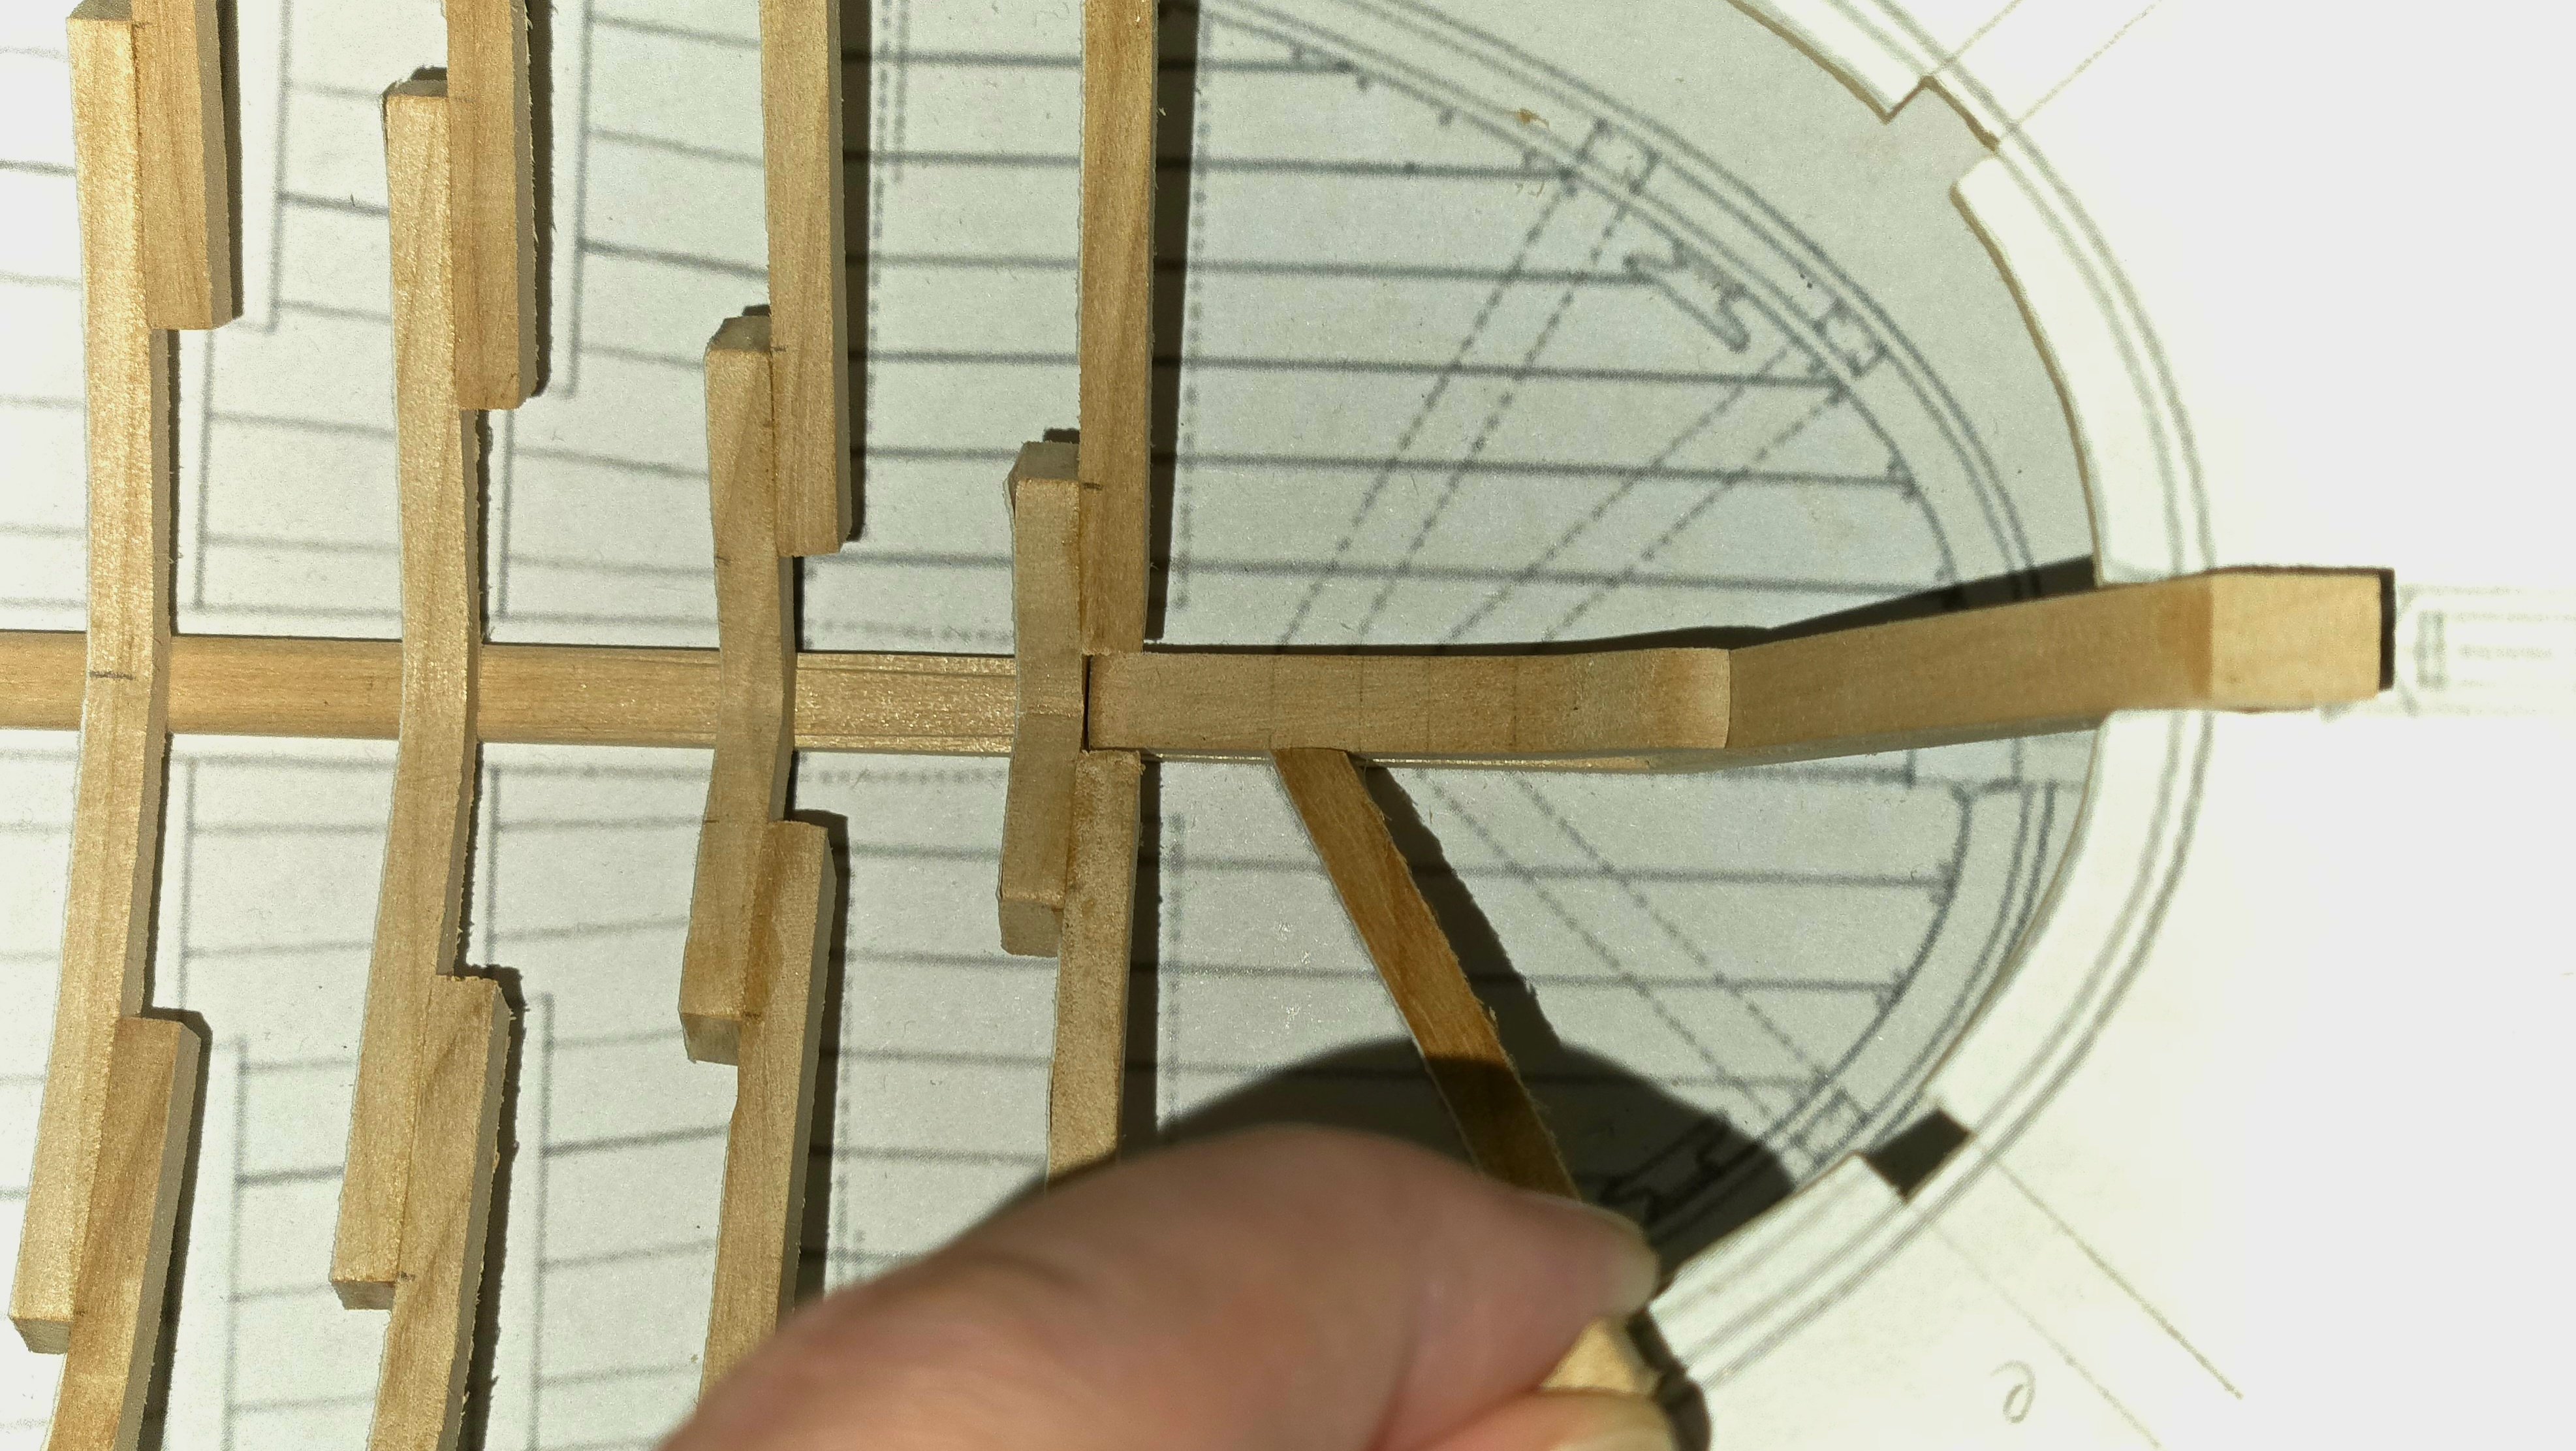
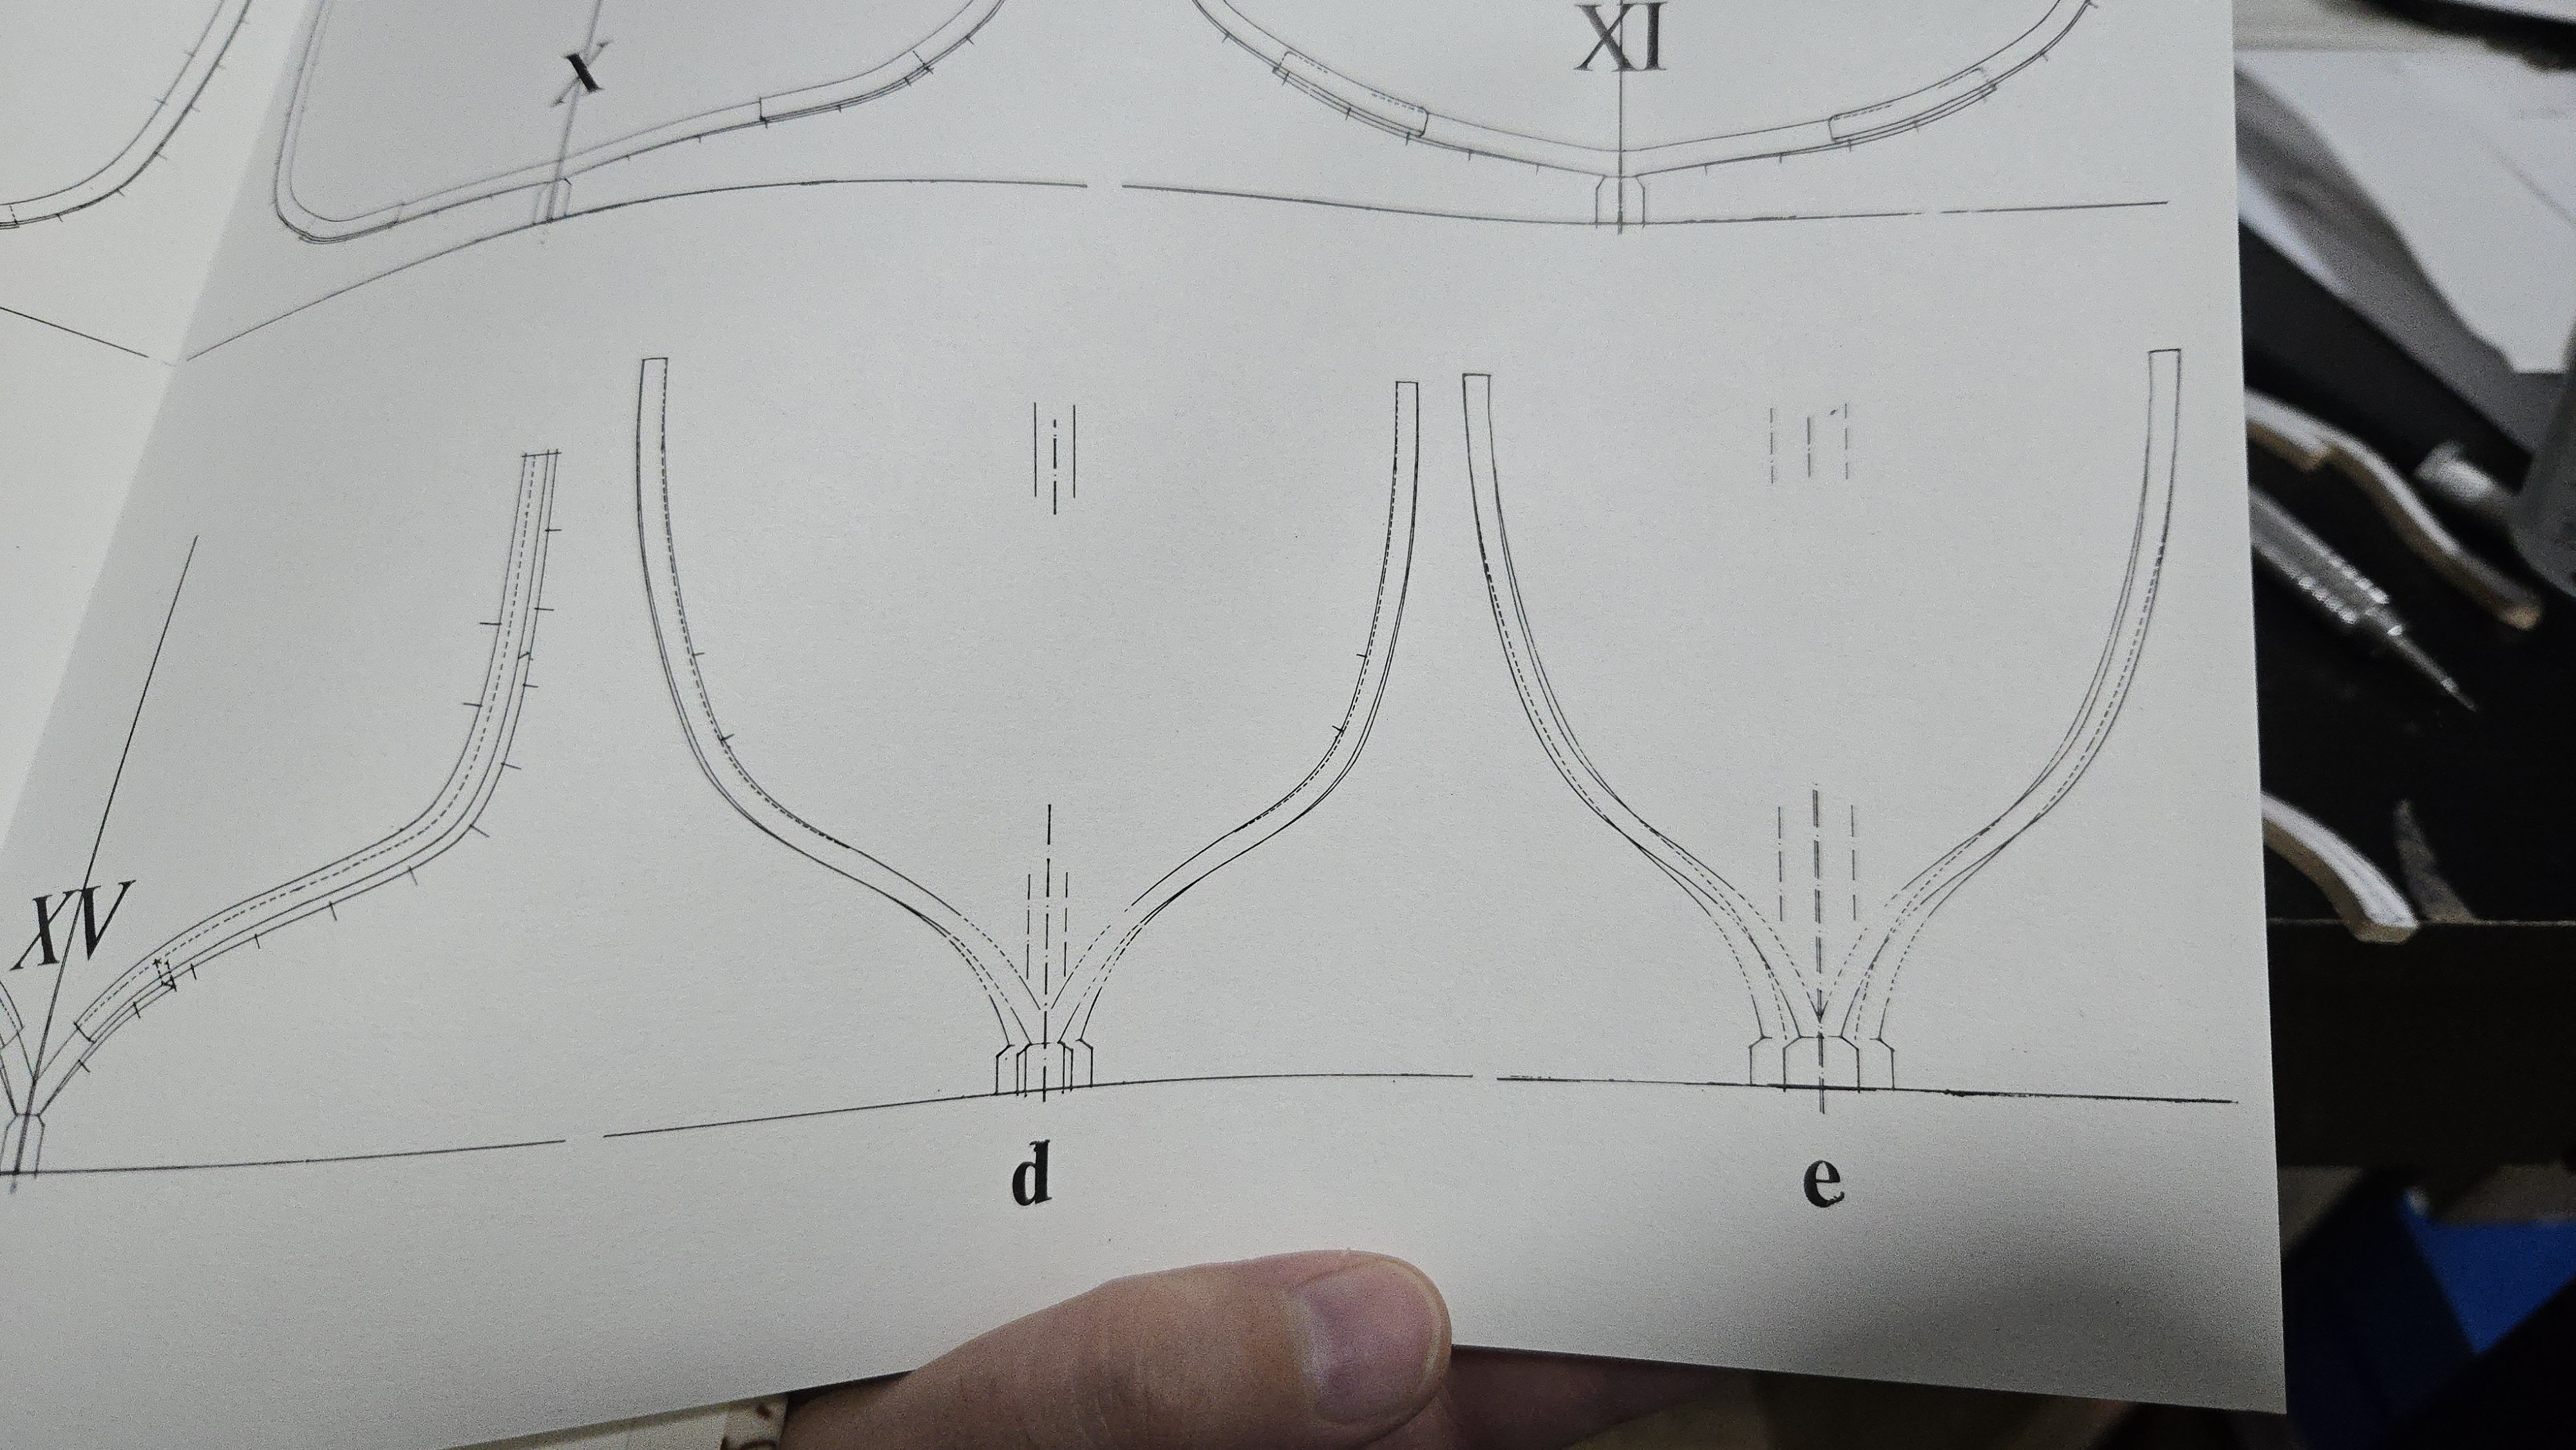
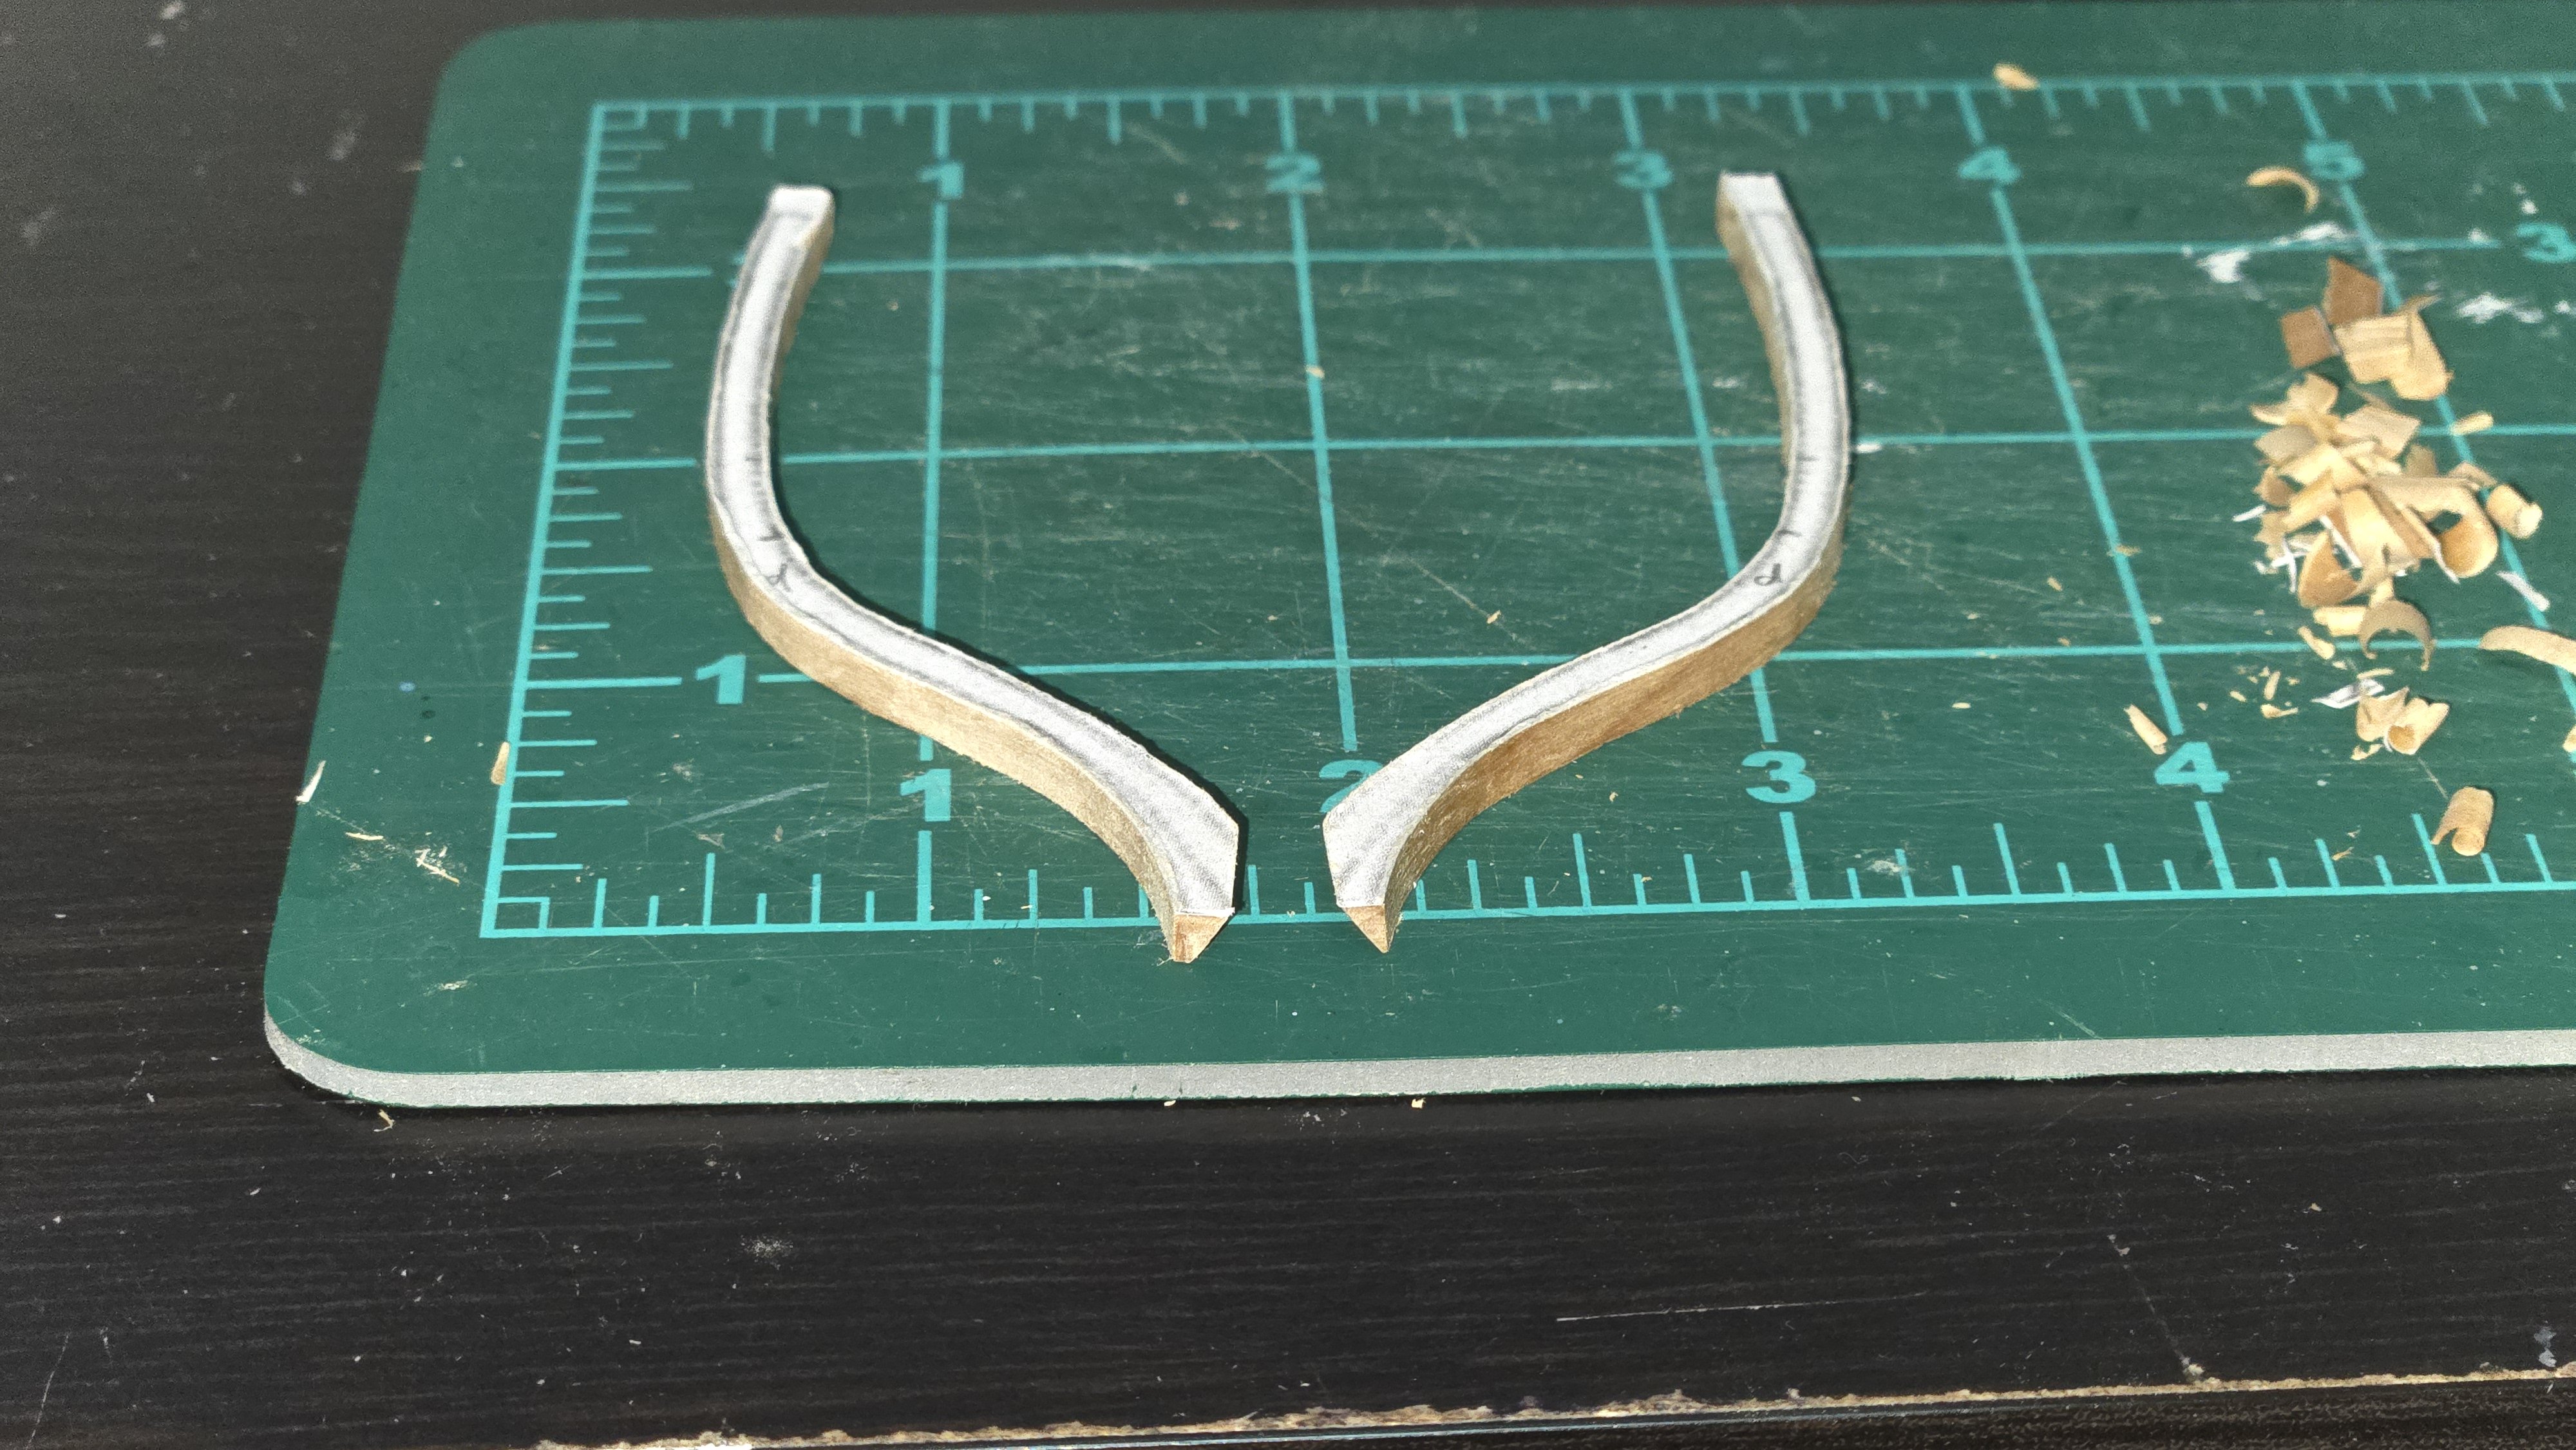
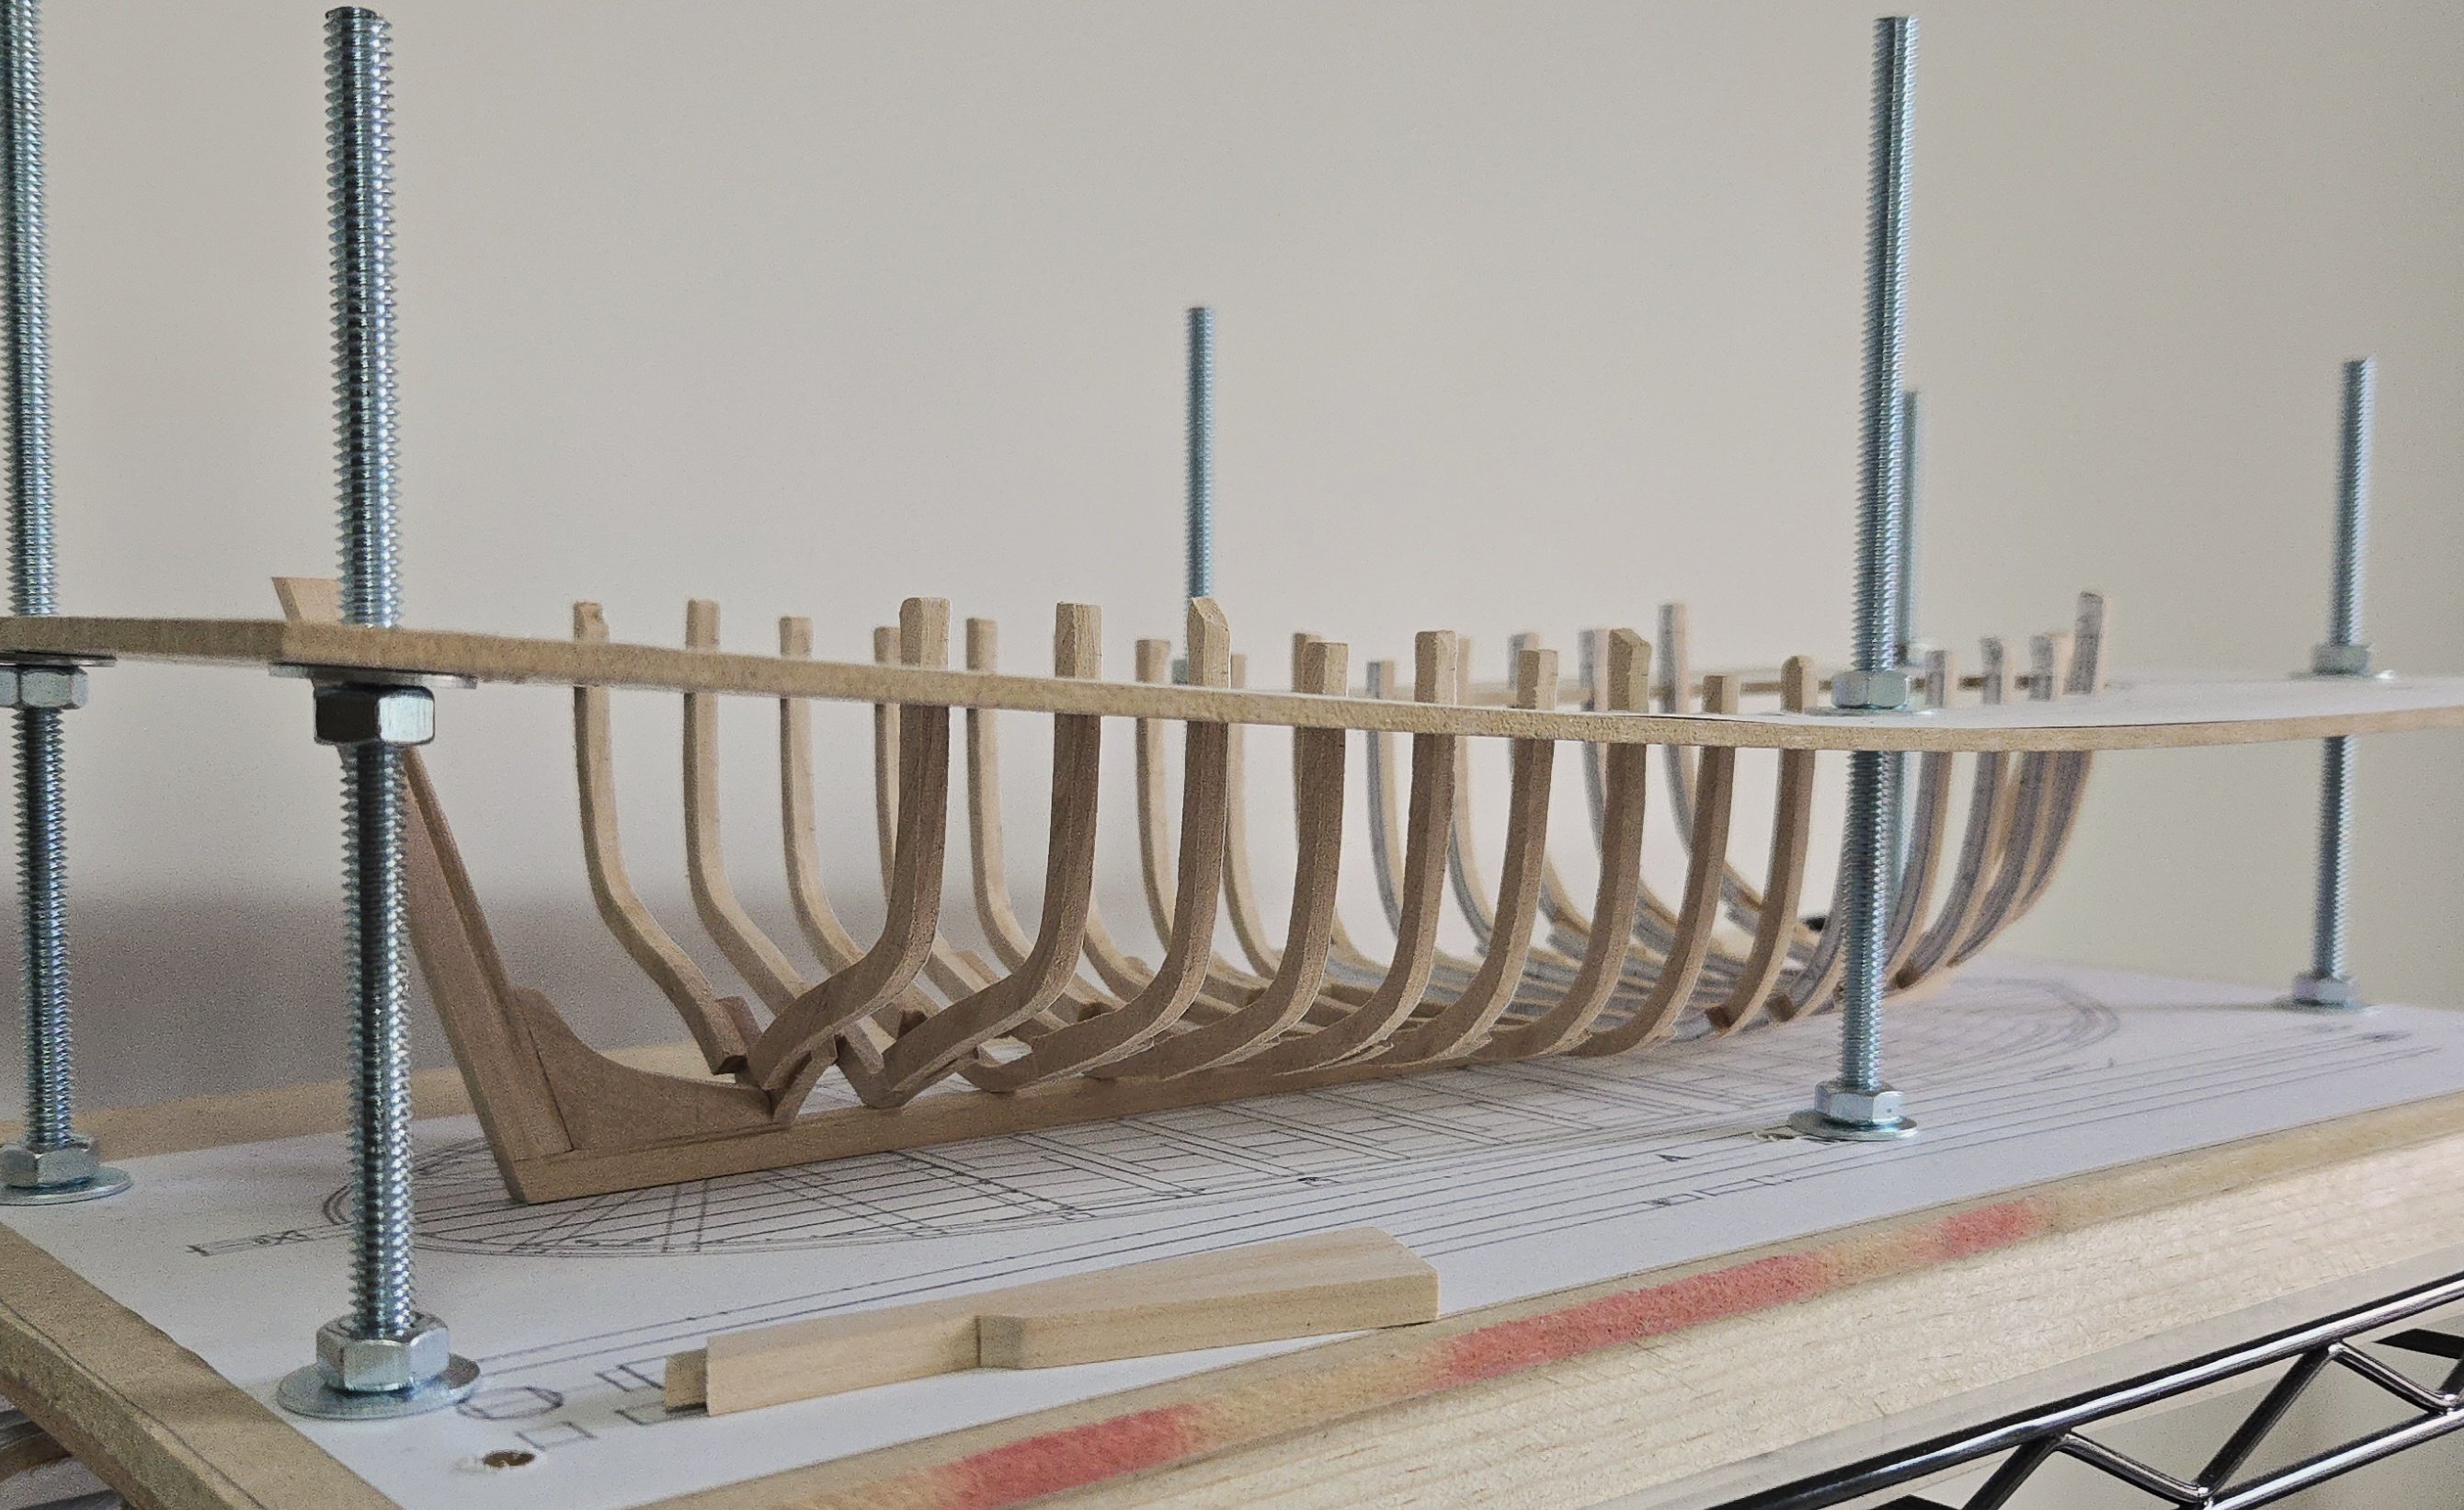
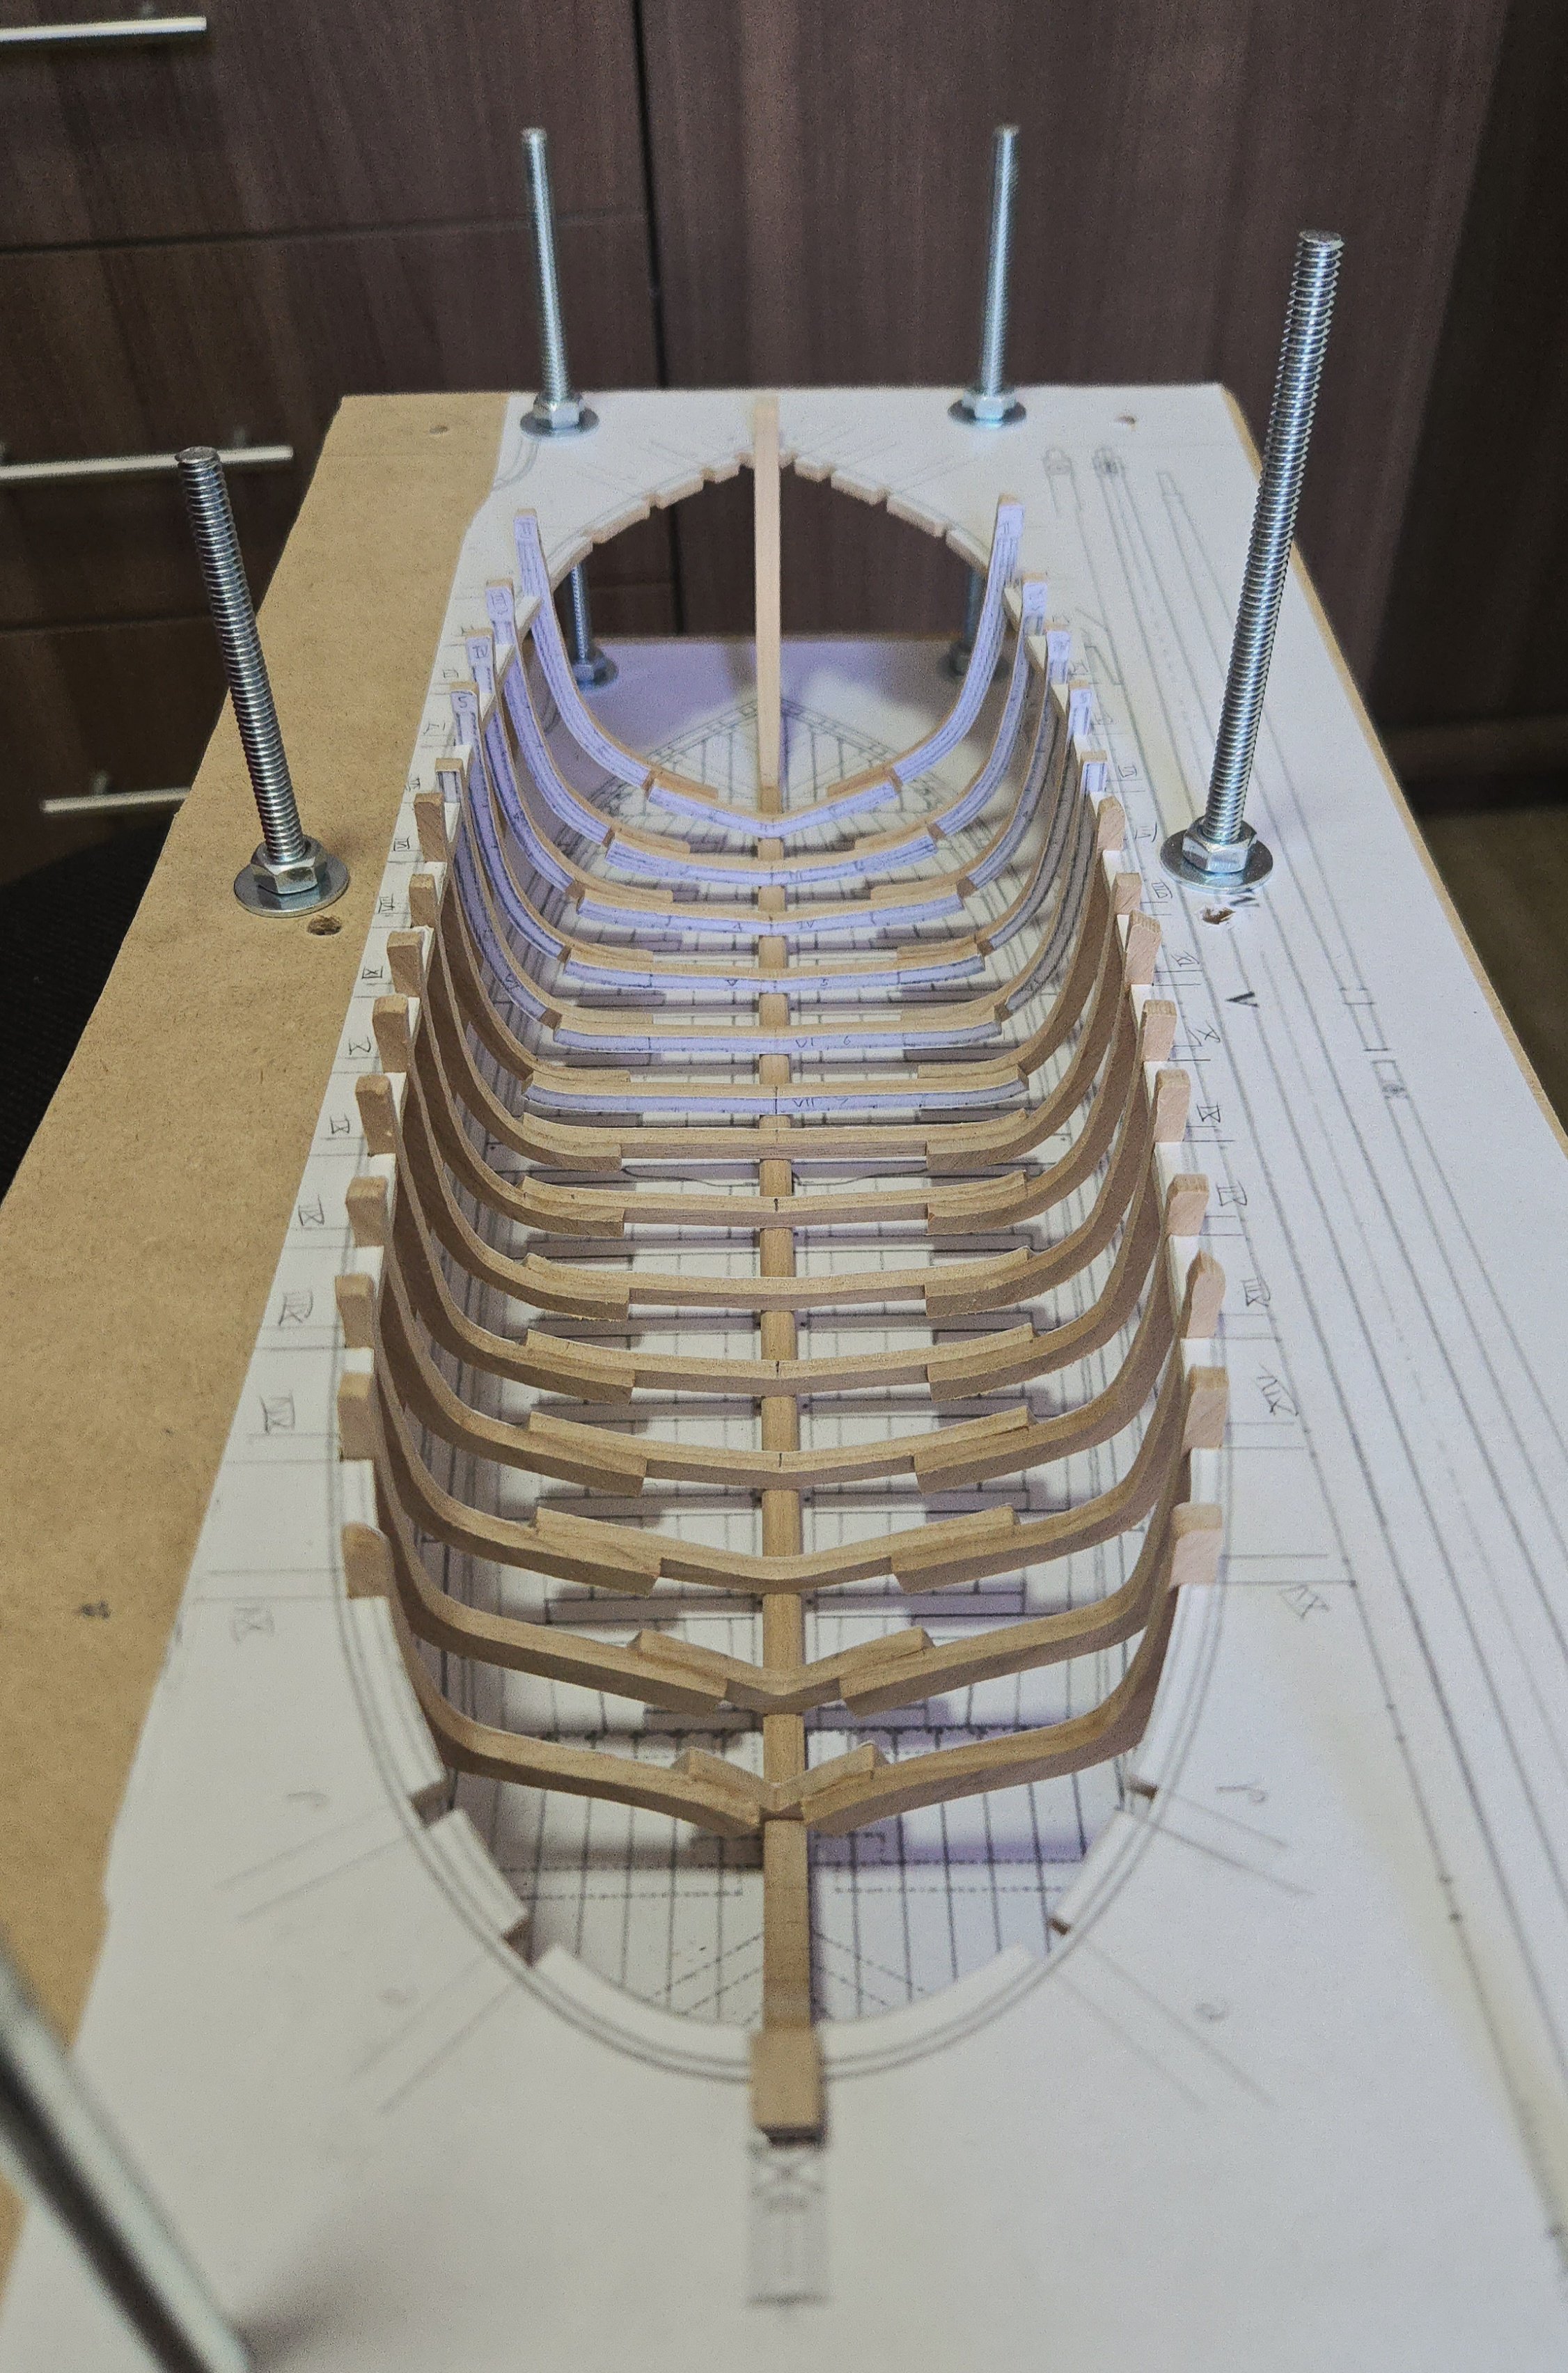
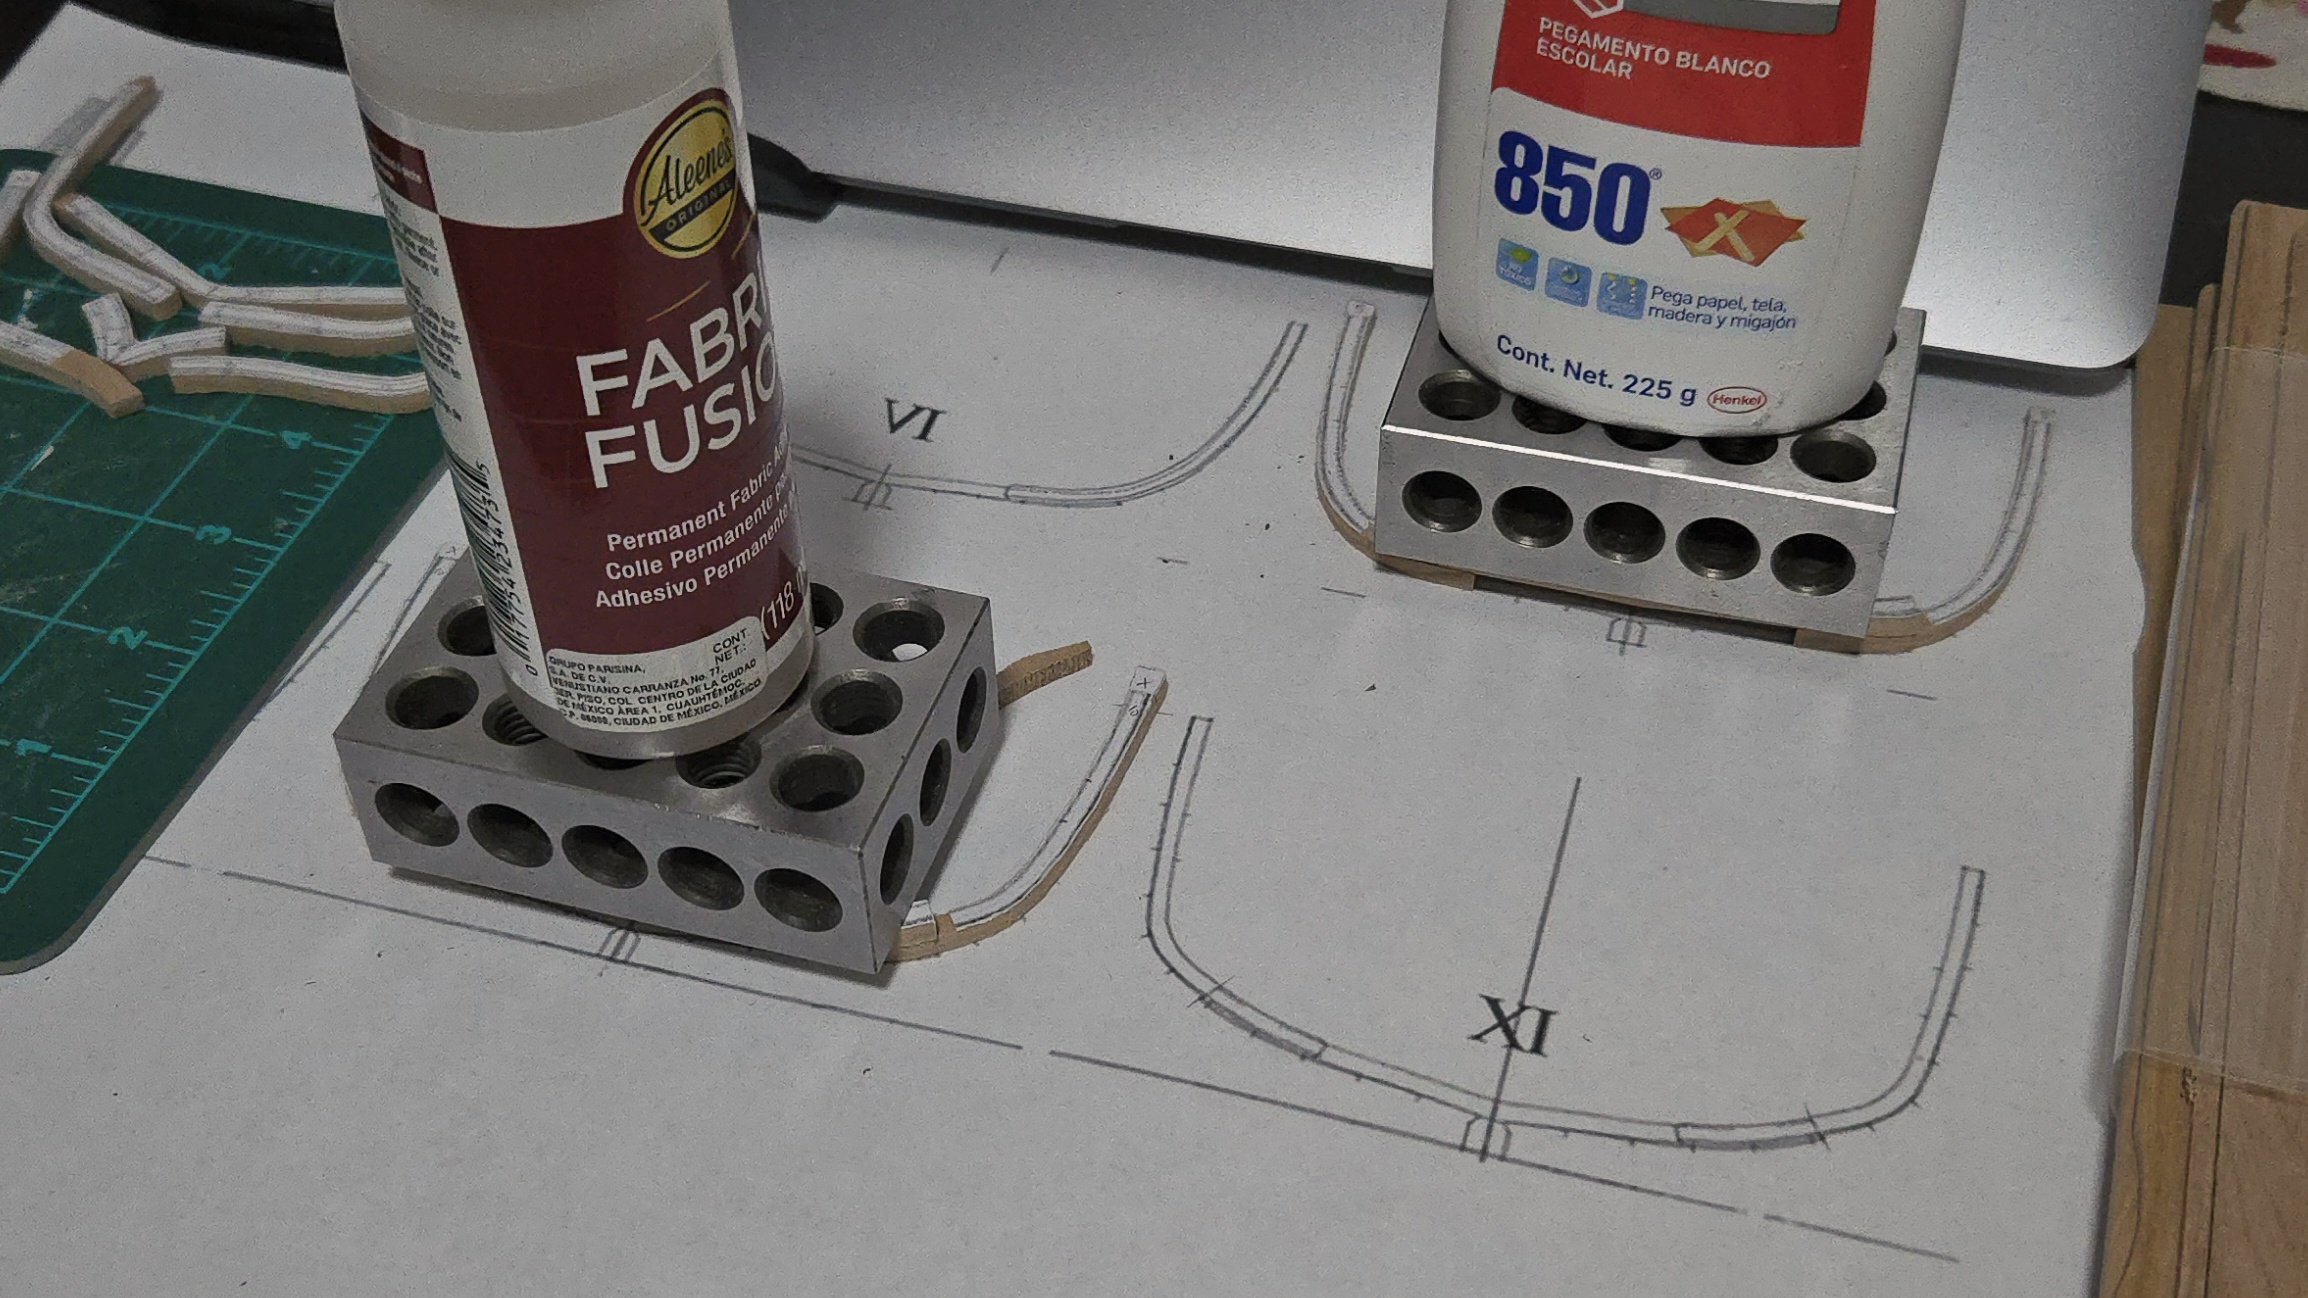
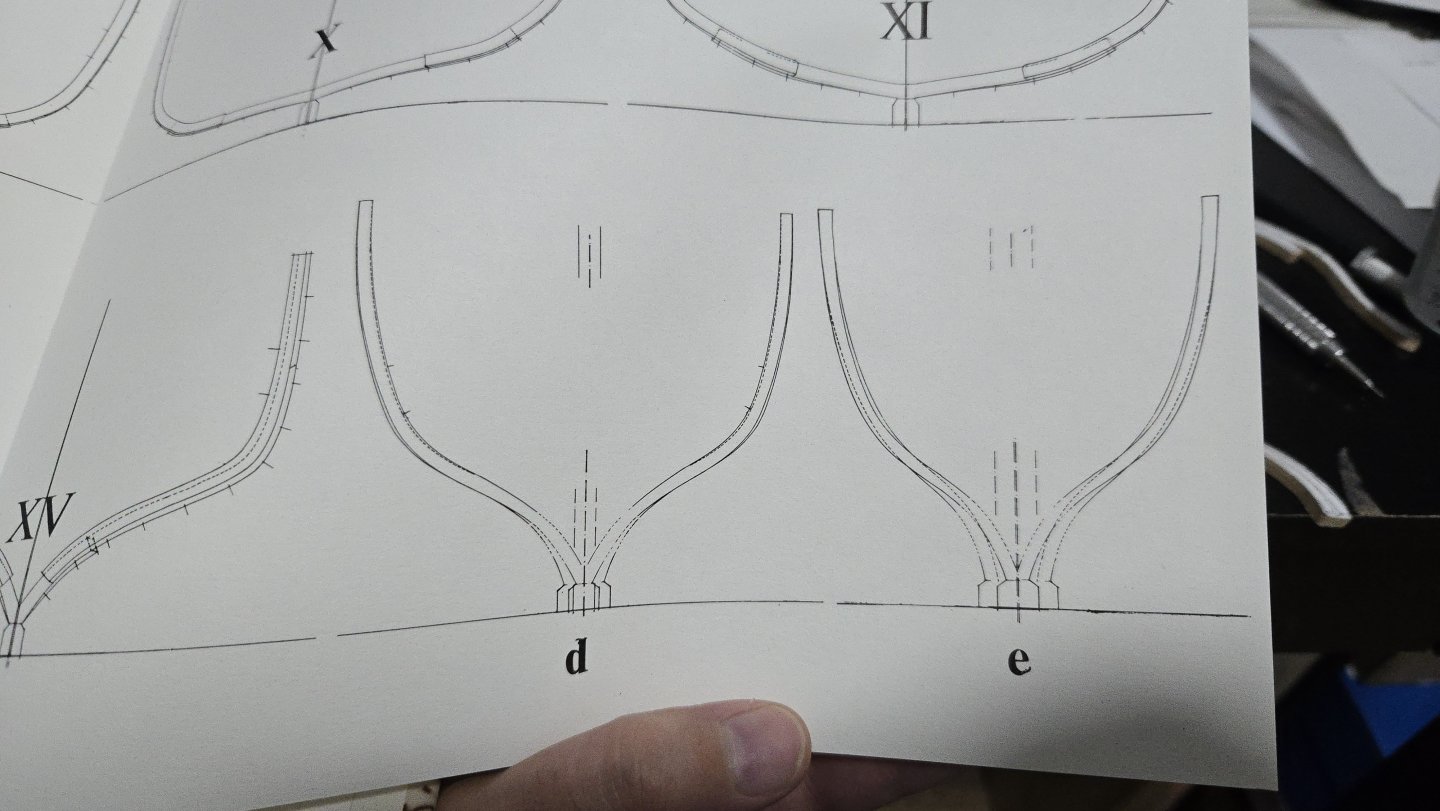
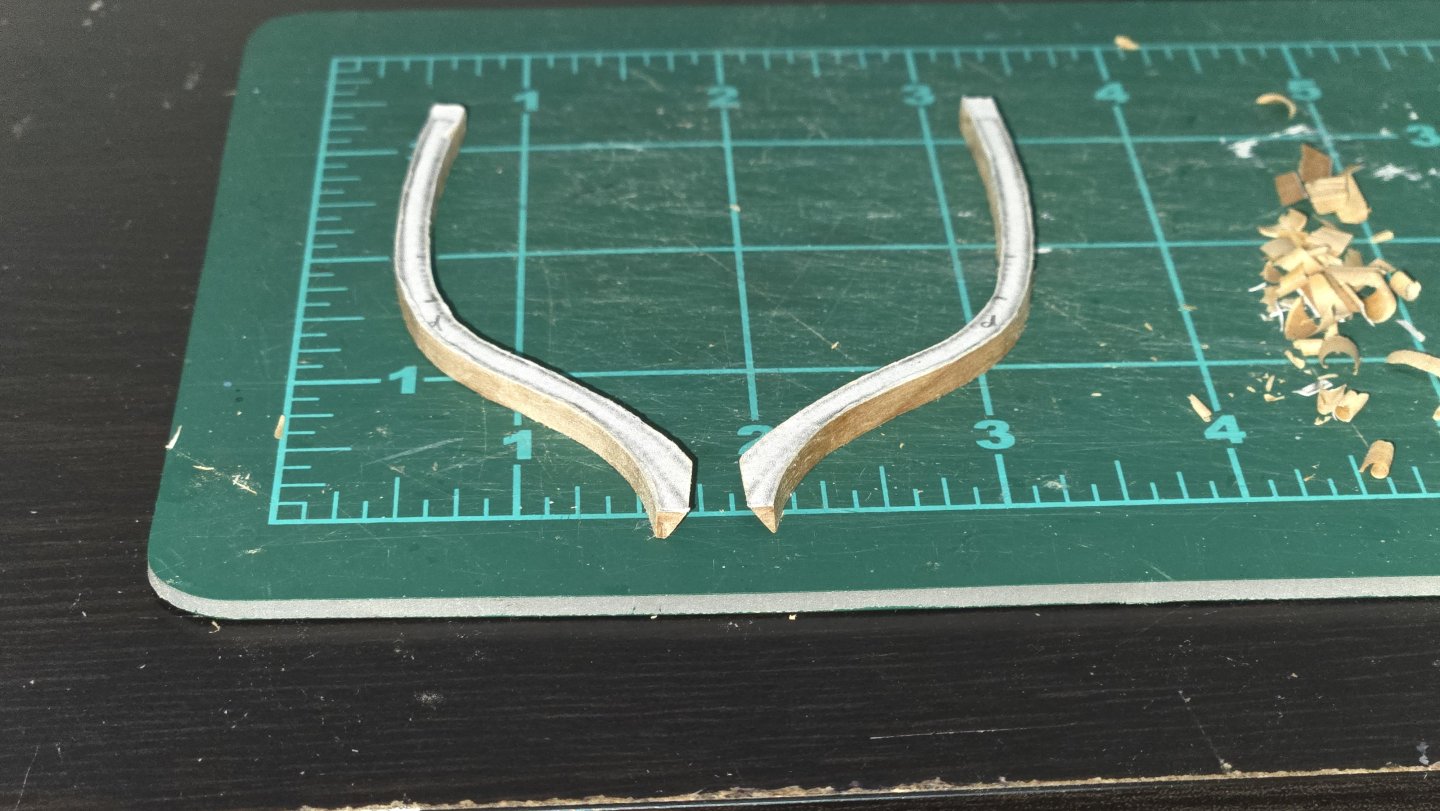
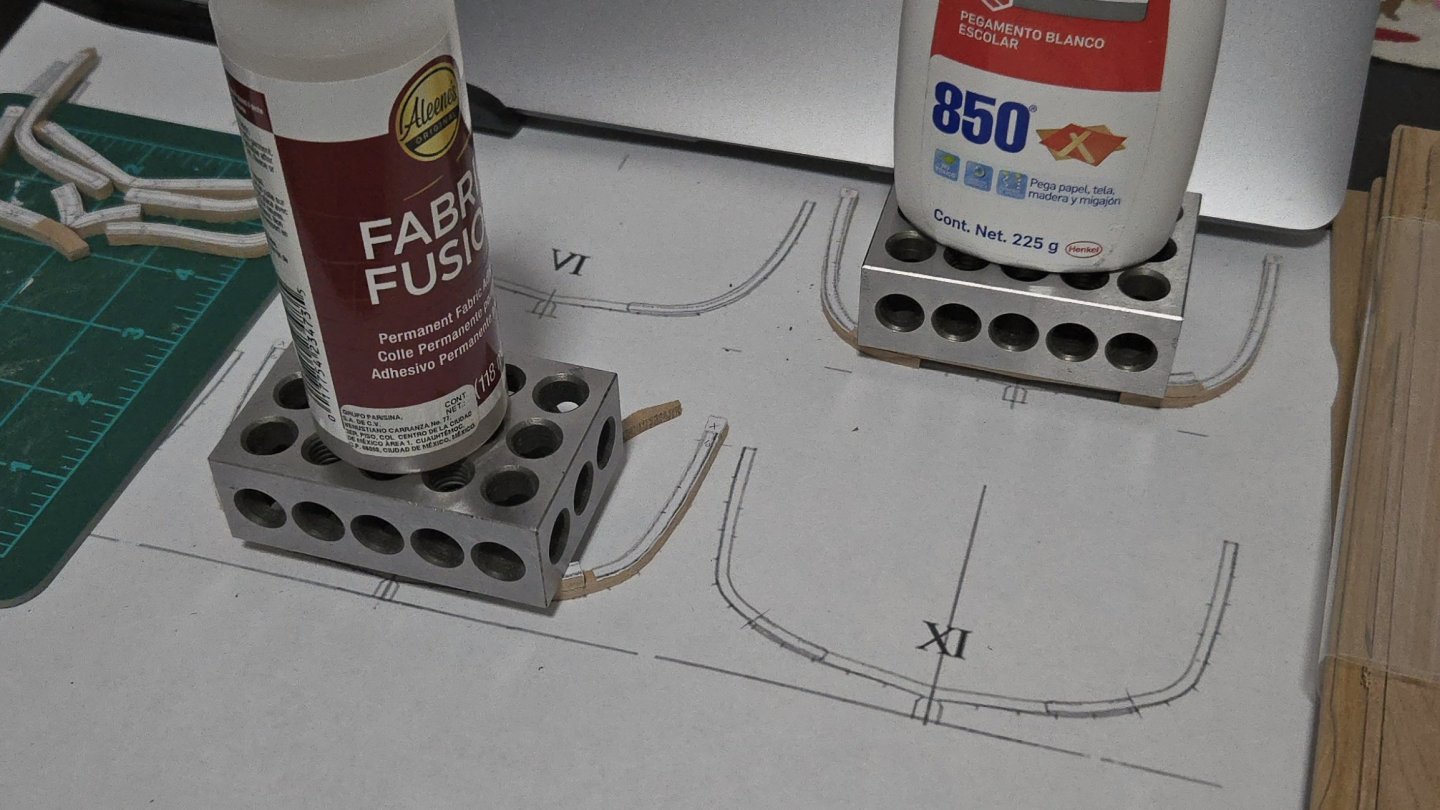
 Next up are the cant frames. I've never made these before, so I started with frame pair D near the stern as it seemed the simplest. That said, it was still a bit tricky. As can be seen, the frame drawings show this as reaching all the way to the keel: While the side view shows it as merging into the deadwood a little higher than that. I should note that other drawings make it clear that the deadwood isn't supposed to be notched or anything. Rather than try to fit it as on the side view, I think I'm just going to make it full length to the keel and, once it's glued to the deadwood, see how it turns out with fairing. I began by trying to cut the inner angle. This took a lot of patient, minimal trimming and checking fit. Given the angle and all the jig pieces blocking the view, it's a bit tricky to hold the frame in place to check fit. You need to check alignment both in terms of landing on the deadwood correctly, not to high, low, or off fore-and-aft, and make sure the part that's hanging between the jig and the deadwood is properly lined up from the top down, as otherwise it will really throw off the hull shape. Meanwhile, without a notch or anything, the piece wants to slide all over the deadwood. All of which is to say, apologies for the poor photo quality of the test fit below! Eventually I got the inner angles about right. In contrast, beveling the bottom of the other side was much easier, I just had to pay attention to the changing grain direction around the curve.
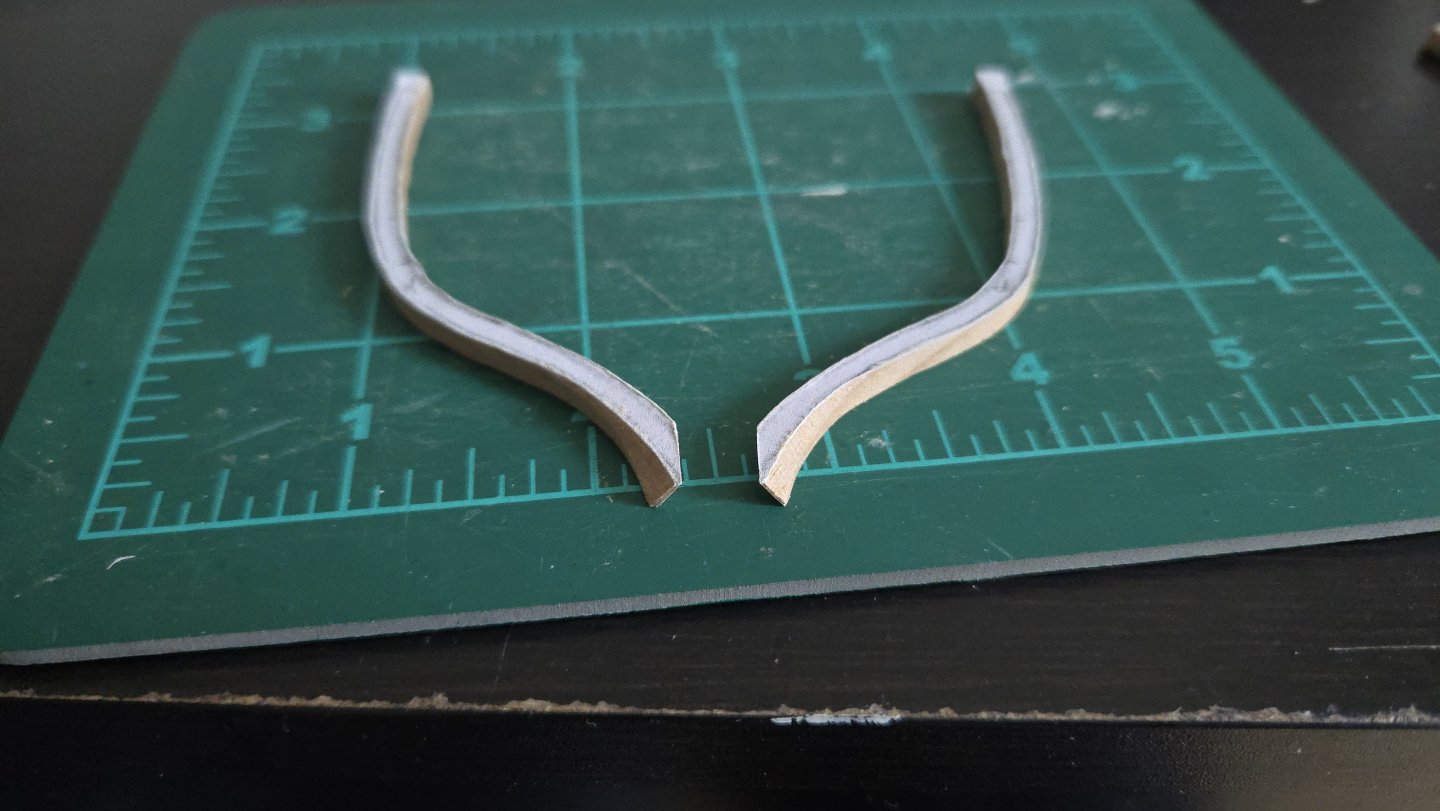

- 139 replies
-
- 12
-

-

-
- ancre
- Bateau de Lanveoc
- (and 2 more)
-
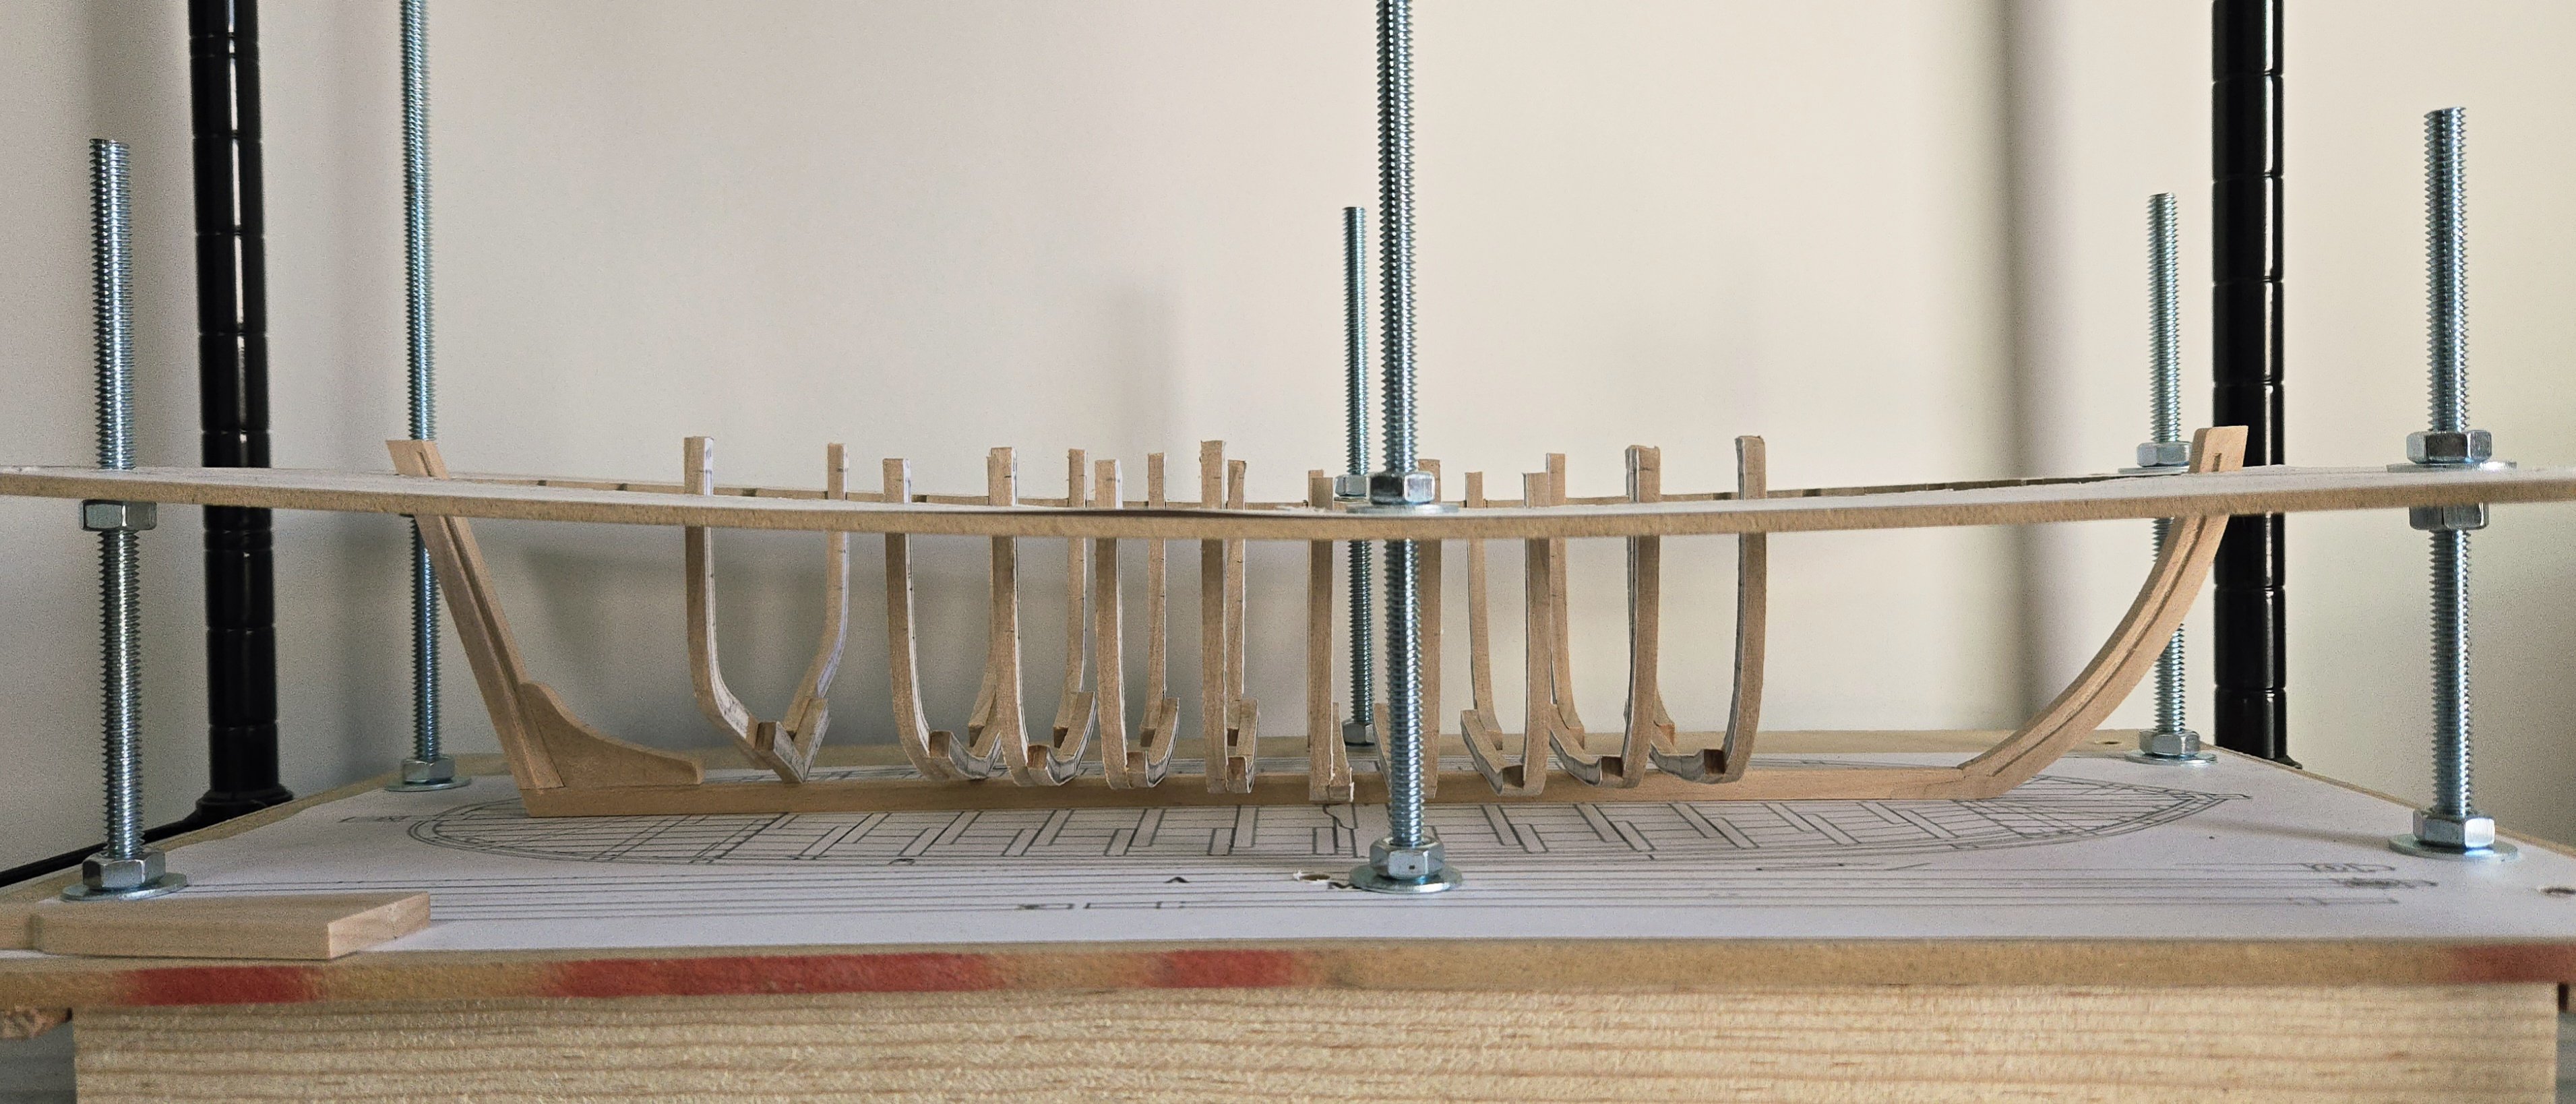
Thanks, all, for the kind words and likes! Finishing up the bulkheads was straightforward. I want to note that a pair of 3-2-1 blocks can serve as an effective temporary hull clamp. These have been an incredibly useful purchase. While there have been a few tools that seemed vital that I haven't really used at all since purchasing, like my set of digital calipers, the 3-2-1 blocks have been really helpful in all sorts of ways. Definitely a worthwhile purchase. The transom was a bit tricky, as it has a curve running side to side across it and it needs to fit into a tricky angle at the stern. The kit design handles this in a really interesting way. The transom is made of two thin layers, which is easier to curve than a thick layer, and there's a small bulkhead, which gets placed in an angled slot. Ths bulkhead has the proper curve across its surface and two protrusions that fit into openings in the inner transom layer in order to properly position it. After that's attached, the outer transom layer is glued in place, lining it up with markings laser-cut into the inner layer to properly position it. It's a smart system, and attached the inner layer worked great. But, I ran into trouble attaching the outer layer. The inner layer has vertical grain, so it's easy to bend across the curve. The kit has vertical grain on the outer layer, as well. When I laser-cut the pieces, though, I set the outer layer with horizontal grain, apparently (it was a while ago and I don't quite remember) thinking that the grain on an actual transom would probably run horizontally. This meant, though, that even though it's made of thin 1/32‐inch basswood, it was practically impossible to bend the outer layer into shape. I nearly snapped the bulkhead trying to clamp it to the curve. It probably would have been possible to do it by fully soaking the piece in boiling water and letting it dry clamped to a curved form, but by the time I realized that, it was already soaked in glue on one side, and I thought that method would probably leave marks in the soft wood. Instead, I used it as a template to cut a new outer transom with vertical grain. This of course curved easily into shape. I also decided to add the centerboard control rod. From what I can tell, on an actual vessel this was most likely made of chain, but the centerboard fits very tightly in its case, and a solid rod will allow me to push it down from the top. Instead of doing a single rod, though, I'm going to try doing a 2-part rod with the joint right about at deck level when the centerboard is pulled up (which I'll arrange later, the rod is currently left overlength). This should allow the centerboard to be operated through a small hole rather than a large slot in the deck. At this point, the framework is complete.


-
Thanks! Like I mentioned, one of the changes I was considering was to deepen the cockpit a bit. The more research I did, though, I found contradictory information. Chapelle describes these vessels as having "deep" cockpits, although without giving any measurements or including the cockpit floor in his plan. He does, however, describe there as being at most five floors laid directly over the frames, which would seem to suggest a pretty low cockpit. The kit design, in contrast, is for a cockpit about 18 inches deep (not counting the coaming), with a very short bench about 9 inches off the cockpit floor. Dee Dee's build (which I should note is based on Midwest's kit) includes what I think is a convincing reconstruction of Chapelle's written description. Below, a figure in the cockpit showing the unaltered depth. I should note the figure was drawn for my Canoa de Rancho build and is likely an inch or two on the short side for Maine c.1880. The small size of this vessel is clear. Looking beyond Chapelle, other sources show or suggest something different. Looking at the construction drawing of the Ranger (in my previous post, and I should note that at 21 feet 10 inches long it's less than a foot shorter than my model), the floor is shown to be about 1.75 feet below the deck. This is pretty similar to the kit design, although the Ranger has a taller bench, about 1.25 feet high, which seems much more comfortable than the 9-inch-tall bench given by the kit. According to Ansel, who physically visited the vessel, "Standing in the cockpit, you notice that it is a good working height if you are handling lobster traps" (24). Less than 2 feet high sounds a little short for comfort to me, but I've never handled a lobster trap, so I'll take his word for it. Some photos, like the one in my last post of the Lucille, also seem to show a similar cockpit. While the Lucille's helmsman is seated, I think his foot is on the floor rather than up on the seat, and it looks like the cockpit is about knee-high. So, how to square Chapelle's description of a deep cockpit with the other evidence of shallower ones? Well, when I was starting this build, I hoped to build the most accurate model I could of a Muscongus Bay Lobster Smack, but I increasingly don't think there's a single "type." Rather, there were a wide assortment of vessels that can be clustered together by some definitive features--sloop rig, centerboard, cockpit, and overhanging stern to allow for handling fishing gear without snaring the rudder--but which didn't necessarily coincide in secondary characteristics, such as the depth of the cockpit (or the presence of a beakhead/clipper bow, for that matter). And that's not to mention change over time, of which I think we can trace the general outline of but can't speak to every detail (or, given limited evidence, to necessarily distinguish which differences between vessels come down to historical development and which are explained by differing local design traditions, owner preference, etc). So, for the cockpit depth, I don't think there's one accurate way, but a few different ways, any of which will provide a reasonably accurate model as long as care is taken to find evidence for them. So, all that said, I decided to only slightly deepen the cockpit to a little under 2 feet deep (at scale), but, following the example of the Ranger, to raise the bench to a more useful height. I shaved and sanded a bit over 1/16‐inch off the support for the cockpit floor on the backbone. I'll also be planking the deck and using the kit design as a false deck, which will add an extra inch (full scale) to the depth. I trimmed a corresponding amount off the bulkhead that runs across the bottom of the cockpit. This is another area I'll be modifying. As seen in the photo below from the kit instructions, the kit leaves the sides of the bulkheads whole. It doesn't look bad at all, but isn't quite accurate. Photos and the diagram of the Ranger show that the actual frames would have been much thinner, and possibly covered by ceiling planks. I have yet to decide exactly how I'll handle this, but either way, I'll need to remove the sides of the bulkheads at some point. My plan is to leave them in place for planking, but not to glue the planks to them, and to remove the bulkhead sides after planking, leaving the bottom to seat the floors. With that in mind, I drew some lines to indicate where to cut later across the bulkheads, and slightly scored them so it will be easier to remove the unnecessary material later. These tasks completed, I began gluing the bulkheads in place along the backbone. I used my 3-2-1 blocks, as seen, to hold them perpendicular. However, I soon realized that, as I was focused on getting everything perpendicular to the backbone, I wasn't paying enough attention to the alignment, and there was a bit of a twist to bulkheads 4 and 5. Using rubbing alcohol, I removed them and reattached them, keeping a closer eye on alignment from every direction. By now, I'm nearly done with gluing the bulkheads in place.


-
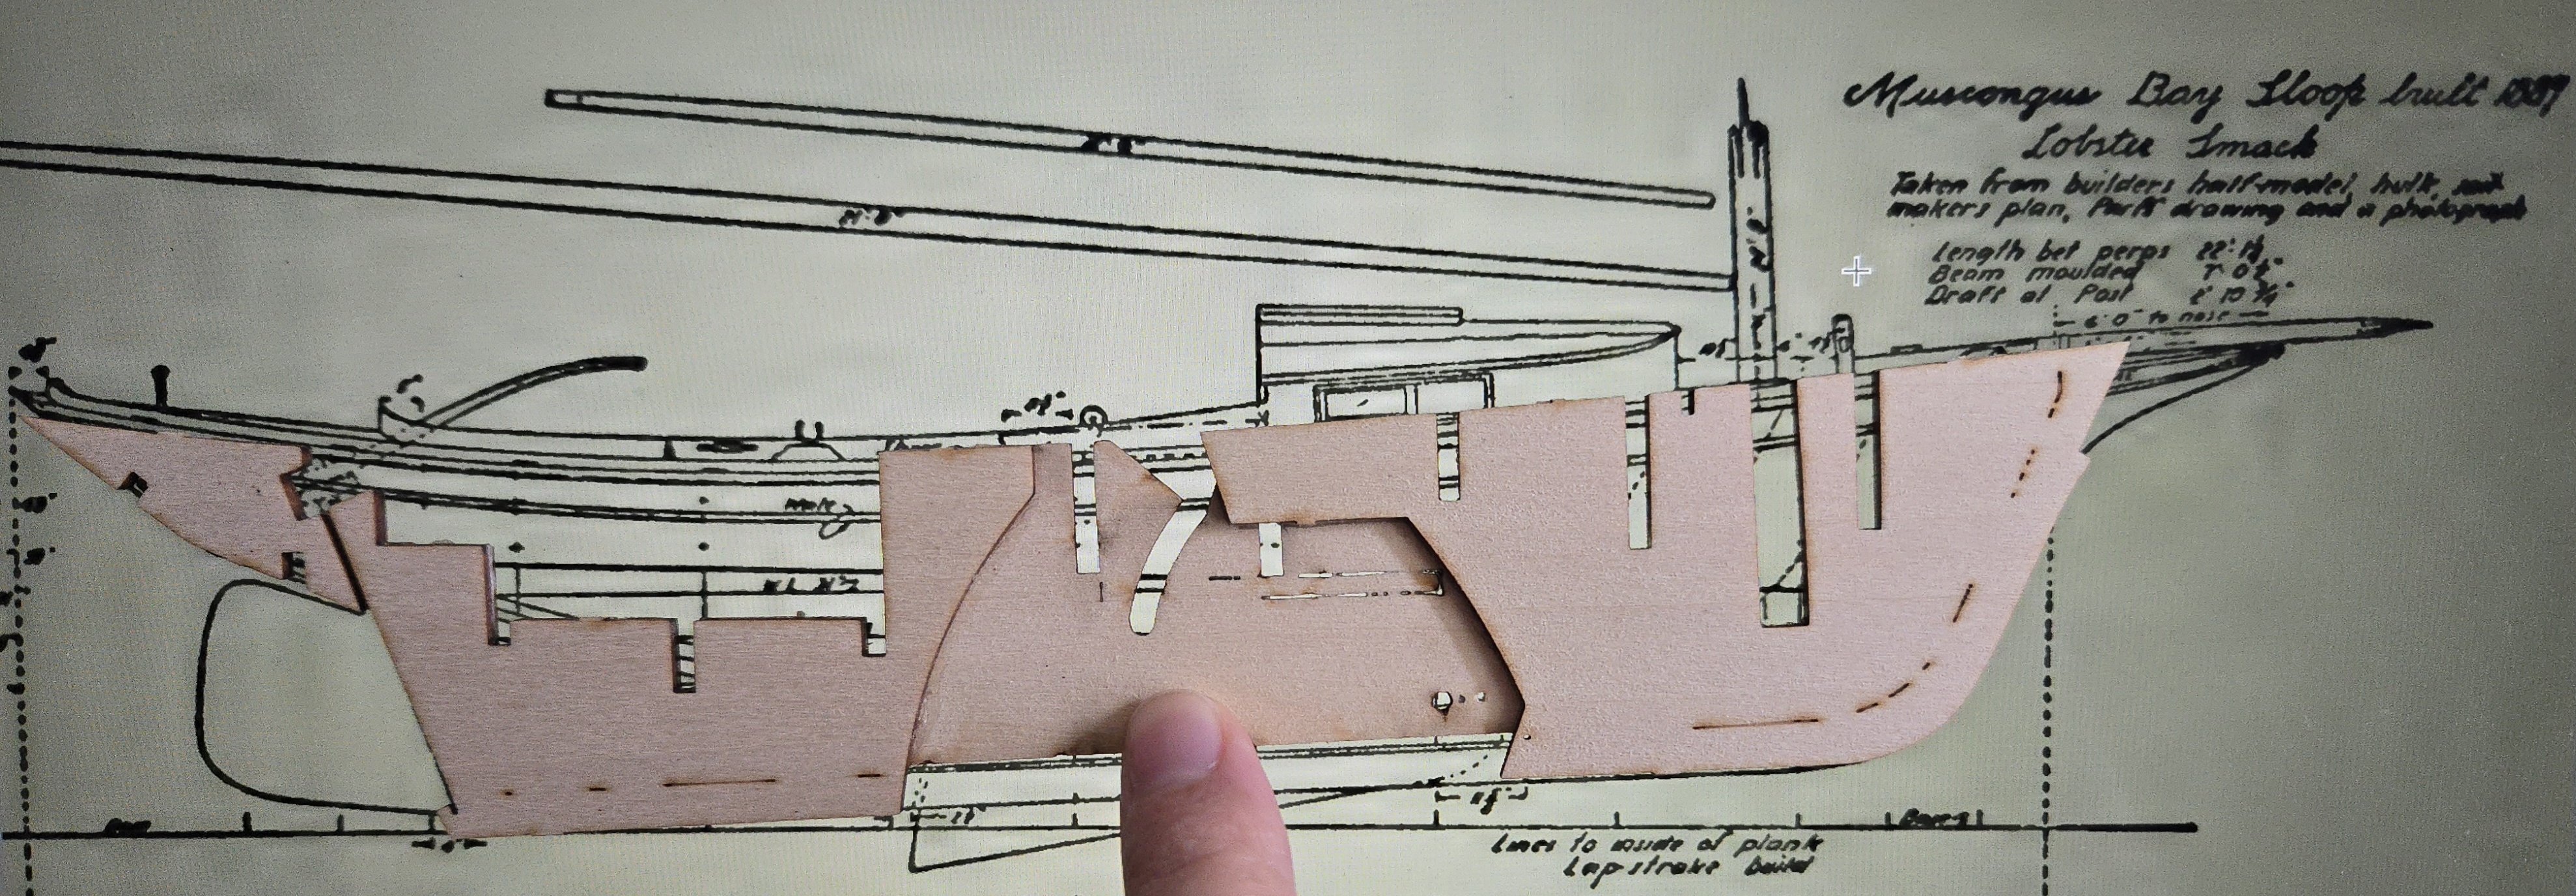
(Post broken into two due to length.) History and Design Maine’s coast is famously rugged, and Muscongus Bay is, according to the Maine Coast Heritage Trust, “especially mercurial,” regularly swept by southwest winds. The bay is dotted with islands and, by the nineteenth century, had several small towns along its shores, including the town of Friendship on the east side of the bay, and Bremen to the northwest. The bay is apparently still known today for its fisheries. The Muscongus Bay Sloop, and from it, the similar but larger Friendship Sloop, developed on the bay in the years after the American Civil War. Maine had long been the center of a large fishing industry, including both inshore and offshore fishing, with influence between the two. Centerboards came into use around the middle of the nineteenth century, and in the 1860s and 1870s, boatbuilders in Bremen, Bristol, and Friendship began adding centerboards, sloop rigs, and partial decks and cuddies to open rowboats, in order to create a vessel suited for inshore fishing. According to Chapelle’s American Small Sailing Craft and Duncan’s Coastal Maine, these were usually lapstrake-planked vessels, usually 16 to 26 feet long, with minimal drag, a coaming to help keep the cockpit dry. They were often relatively lightly built and intended for work during the warmer months of the year, and their masts were generally unstayed. Duncan, especially, suggests that they shared some design elements (but in miniature) with the Gloucester clipper schooners then in use for fishing the banks offshore (Duncan, 426). Caravel planking seems to have come into use in the 1880s. Goode’s The Fisheries and Fishing Industries of the United States (1884-1887) describes the Muscongus Bay lobster fishery as using “small square-sterned sloops, open in the after part, but with a cuddy forward. They are all built with center boards, and some are lapstrake” (Vol. III, 670). From the 1880s onward, the type underwent substantial changes. As Duncan notes, the expansion of rail and steamship lines into Maine’s middle coast in the 1880s made Boston’s fresh fish market available to Maine’s fishermen, who now could have their catch available to consumers there within a day. The expansion in the market created a need for a larger, more seaworthy fishing vessels capable of meeting year-round demand (Duncan, 427-428). At the same time, as Duncan and Chapelle discuss, the clipper schooner design used for offshore fishing was increasingly criticized as unsafe, leading to a shift toward proportionally deeper and wider schooners. These changes appear to have shaped the design of Muscongus Bay’s inshore workboats, which became increasingly larger and deeper, leading to the development of the Friendship Sloop (named after the town that became known as the center of their construction, although they were built elsewhere). The Friendship Sloop was substantially larger, often 30-40 feet long, usually had two headsails and stays, and had a deeper hull and keel instead of a centerboard. The type, which increasingly supplanted the earlier centerboard sloops, became quite popular as a fishing vessel and, eventually, as a yacht, leading to a great deal being written about it. Bringing together different sources, then, it’s clear that the Muscongus Bay Sloop is something of a moving target—far more so than the Friendship Sloop, at least. Its cabin and deck arrangement could vary, it could be lapstrake or caravel-planked, and might or might not have a clipper bow. Chapelle’s plans in American Small Sailing Craft show essentially a shallower, smaller variant of the Friendship Sloop with a centerboard, featuring a a prominent cabin. Notably, these plans seem to have been used as the basis for the Model Shipways kit, as well as the kits by Midwest and Bluejacket (at least, I think so based on photos). Source: Chapelle, American Small Sailing Craft, 267. Chapelle based his plans in part on builder’s half-hull models, a hulk in Kennebunk, and a model in the National Watercraft Collection. Notably, he says that the hulk was caravel planked, and that the National Watercraft Collection model, “though finished caravel, was evidently intended to represent a lapstrake boat, judging by the model builder’s use of a lower moulding on the sheer strake” (Chapelle, The National Watercraft Collection, 253). Although his plans say that the vessel was lapstrake planked, the 3-D view doesn’t show this, and as far as I’m aware, none of the model kits of Muscongus Bay Lobster Smacks show lapstrake planking. But other sources show quite a different-looking vessel. This photo in Duncan’s Coastal Maine shows a Friendship Sloop in the center and what he identifies as a Muscongus Bay Sloop in the foreground. The latter is not only distinctly smaller than the former, but has a much smaller cabin, an unstayed mast, and lacks the clipper-style bow with the prominent beakhead of the larger vessel, instead having more of an upright stem. Source: Duncan, Coastal Maine, 430. Photos show similar-looking vessels in a range of sizes, such as the small Secret, shown below (which, in other photos, has a small bowsprit and jig). Described in the caption as a small Friendship Sloop, it looks more like the vessel Duncan identified as a Muscongus Bay Sloop but lacks even the cabin forward. Source: https://penobscotmarinemuseum.historyit.com/items/view/digital-collection/190393/search?resultsMode=search&searchInterfaceId=1&search=eyJycSI6WyI4NjM5Il0sImlwIjoxLCJvYiI6InNjb3JlIiwibyI6ImRlc2MiLCJwcyI6MjQsInYiOiJncmlkIiwicmNpIjoxLCJzc2YiOjEsInByZSI6MSwicmEiOltdLCJ2aWV3TW9kZSI6ImdyaWQiLCJwZyI6MH0= There’s also this rather larger vessel, identified in the caption as the Muscongus Bay Sloop Lucille, built in 1900. Notably, it also lacks the beakhead, again having a rather vertical stem, and despite its size, seems to have an unstayed mast. Based on the visible strake lines near the bow, it may be lapstrake planked, although it’s hard to tell. Source: https://penobscotmarinemuseum.historyit.com/items/view/digital-collection/198660/search?resultsMode=search&searchInterfaceId=1&search=eyJxIjp7InNmMTI3IjoibXVzY29uZ3VzIn0sIm9iIjoic2NvcmUiLCJvIjoiZGVzYyIsInBzIjoyNCwidiI6ImdyaWQiLCJyY2kiOjAsInNzZiI6MCwicHJlIjoxLCJpcCI6MSwicmEiOltdLCJ2aWV3TW9kZSI6ImdyaWQiLCJwZyI6MX0= Similarly, the reconstructed plan of the Ranger included in Willits D. Ansel’s “The Boat as Record” shows a vessel similar in many respects to that shown in Chapelle’s plan, but a little deeper, with more pronounced drag, and lacking the beakhead. Interestingly, it also apparently had a pair of stays in its original configuration, before being given more extensive shrouds after conversion to a yacht. Source: Ansel, “The Boat as Record,” 26. All of which is to say, there’s a lot of variety among Muscongus Bay Sloops. I think this points to some of the problems with assuming a “canonical” design will hold true for a vessel type. While Chapelle’s plans have clearly been influential, various aspects of the design he gave weren’t necessarily typical. As a workboat, every Muscongus Bay Sloop was different, based on the needs of the job, resource availability, owner preference, and the boatbuilders’ own styles and traditions. Based on sources like these, I’m considering a few modifications to the kit design. The biggest change would be to switch from caravel planking to lapstrake planking. This would be a challenge, but I think a fun one. I’m also planning on not adding stays to the mast—while the Model Shipways kit includes them, possibly because it’s intended as a learning experience, the Midwest kit doesn’t, and sources seem pretty clear that stays were rare (though not unheard of) on these vessels. I’m also considering reshaping the stem to do away with the beakhead, and possibly to get a slightly more upright/curved stem instead of the current stem that juts forward (which would, in turn, require slightly reshaping the foremost bulkheads as well). Finally, I’m thinking of slightly deepening the cockpit, as I’ll discuss in the next post.


-
I’m starting to reach the point in this build where I’ll be making some modifications (besides the rescaling), so I think time to talk a little bit about the sources I’m using and the history of the vessel type. Like I’ve mentioned earlier, the Muscongus Bay Lobster Smack (also often just called the Muscongus Bay Sloop) is a very popular model and quite a bit has been written about it. I’m certainly not breaking any new ground here. Sources There are many useful sources on this vessel. Howard I. Chapelle wrote at some length about the Muscongus Bay Lobster Smack and its successor design, the Friendship Sloop, in several books. His early work American Sailing Craft (New York: Kennedy Brothers, Inc., 1936) briefly touches on the Muscongus Bay type on page 34, but is mostly focused on the Friendship Sloop. More useful is his The National Watercraft Collection (Washington, D.C.: Smithsonian Institution, 1960), which includes a photo and a description of a model in the eponymous collection (pp. 253-254), and especially American Small Sailing Craft: Their Design, Development, and Construction (New York: W.W. Norton & Co., 1951). This last book includes a set of plans and a 3-D view of the hull, which Chapelle reconstructed from several sources (more about which later) as well as a fairly detailed description (pp. 266-269). Chapelle’s plan seems to be the basis of this kit. Besides Chapelle’s work, I’ve also found it very helpful to consult Willits D. Ansel’s “The Boat as Record,” pp. 19-26 in Lipke, Spectre, and Fuller, Eds., Boats: A Manual for their Documentation (American Association for State and Local History; Museum Small Craft Association, 1993). Ansel’s brief chapter about how to read a vessel’s history through the physical traces left on its hull takes as its example the Muscongus Bay Sloop Ranger, held in the collections of the Maine Maritime Museum (a vessel which I haven’t been very successful in finding many photos of). While Ansel shows how the Ranger changed over time as it became a yacht, the article also includes a construction drawing, including scantlings, for a reconstruction of how the sloop likely looked when it was built as a fishing boat. I’ve also consulted Roger F. Duncan’s Coastal Maine: A Maritime History (New York: W.W. Norton and Co., 1992), and Lincoln Paine’s Down East: An Illustrated History of Maritime Maine (Second Edition; Lanham: Down East Books, 2018; Originally Published 2000), for context on Maine’s maritime history and its lobster fishing industry. As for primary sources—that is, sources created at the time of the vessel’s use—Volume 5 of Souvenirs de Marine by François Edmond Pâris includes a sail plan (Plate 244), and there’s a very brief description in G. Brown Goode, The Fisheries and Fishery Industries of the United States (Washington: Govt. Print Off., 1884-1887), specifically in Vol. III, p. 670. More useful, though, have been a number of photos available online through the Penobscot Marine Museum (https://penobscotmarinemuseum.historyit.com/public-sites/home/digital-collection). The search function is a little wonky, and I’ve found many more photos of Friendship Sloops than of the earlier Lobster Smack type, but these images are extremely useful, especially for working out details that aren’t shown in plans. They’re also interesting as a window into fishermen’s lives and livelihoods in the era. The undated photo below, for instance, shows the old hull of a sloop hauled up on shore with paint worn or stripped off, in front of a huge pile of lobster traps: Source: https://penobscotmarinemuseum.historyit.com/items/view/digital-collection/261929/search?resultsMode=search&searchInterfaceId=1&search=eyJxIjp7InNmMTI3Ijoic2xvb3AiLCJjdXN0b21fZmllbGRfOTgwIjoibmF0aW9uYWwgZmlzaGVybWFuIGNvbGxlY3Rpb24ifSwicGciOjEsIm9iIjoic2NvcmUiLCJvIjoiZGVzYyIsInBzIjoyNCwidiI6ImdyaWQiLCJyY2kiOjAsInNzZiI6MCwicHJlIjoxLCJpcCI6MSwicmEiOltdLCJleCI6eyJjdXN0b21fZmllbGRfOTgwIjoxfSwidmlld01vZGUiOiJncmlkIn0= While the photo below, also undated, shows Edward F. Woods and his daughter Mary Benton in front of several workboats, including a Friendship Sloop, on the waterfront of Eastport, Maine. Woods was apparently the oldest sailor in Eastport at the time. Source: https://penobscotmarinemuseum.historyit.com/items/view/digital-collection/259752/search?resultsMode=search&searchInterfaceId=1&search=eyJxIjp7InNmMTI3Ijoic2xvb3AiLCJkYXRlIjp7InN0YXJ0IjoiMTkwNS0wMS0wMVQwMDowMDowMFoiLCJlbmQiOiIxOTA1LTEyLTMxVDExOjU5OjU5WiIsIm9wZXJhdG9yIjoiaW50ZXJzZWN0aW5nIn19LCJwZyI6MCwib2IiOiJzY29yZSIsIm8iOiJkZXNjIiwicHMiOjI0LCJ2IjoiZ3JpZCIsInJjaSI6MCwic3NmIjowLCJwcmUiOjEsImlwIjoxLCJyYSI6W10sImV4Ijp7ImRhdGUiOjF9LCJ2aWV3TW9kZSI6ImdyaWQifQ== Finally, there are a lot of great build logs on ModelShipWorld of this vessel type. Among them, Dee Dee’s build is particularly interesting, not just because he made an excellent model, but because he includes a lot of interesting discussions about the type’s history and design. In particular, he talks about the replica Muscongus Bay Sloops built in the 1970s, and how their addition of stays on the mast seems to have been behind a number of accidents (basically, the unstayed mast was flexible enough to spill air when hit by an overpowering gust, which the stayed mast could not do). Unfortunately, many of the photos in the log don’t load for me, but it’s an excellent source. These sources have given me a few ideas about how to modify the kit design into something a little different.


-
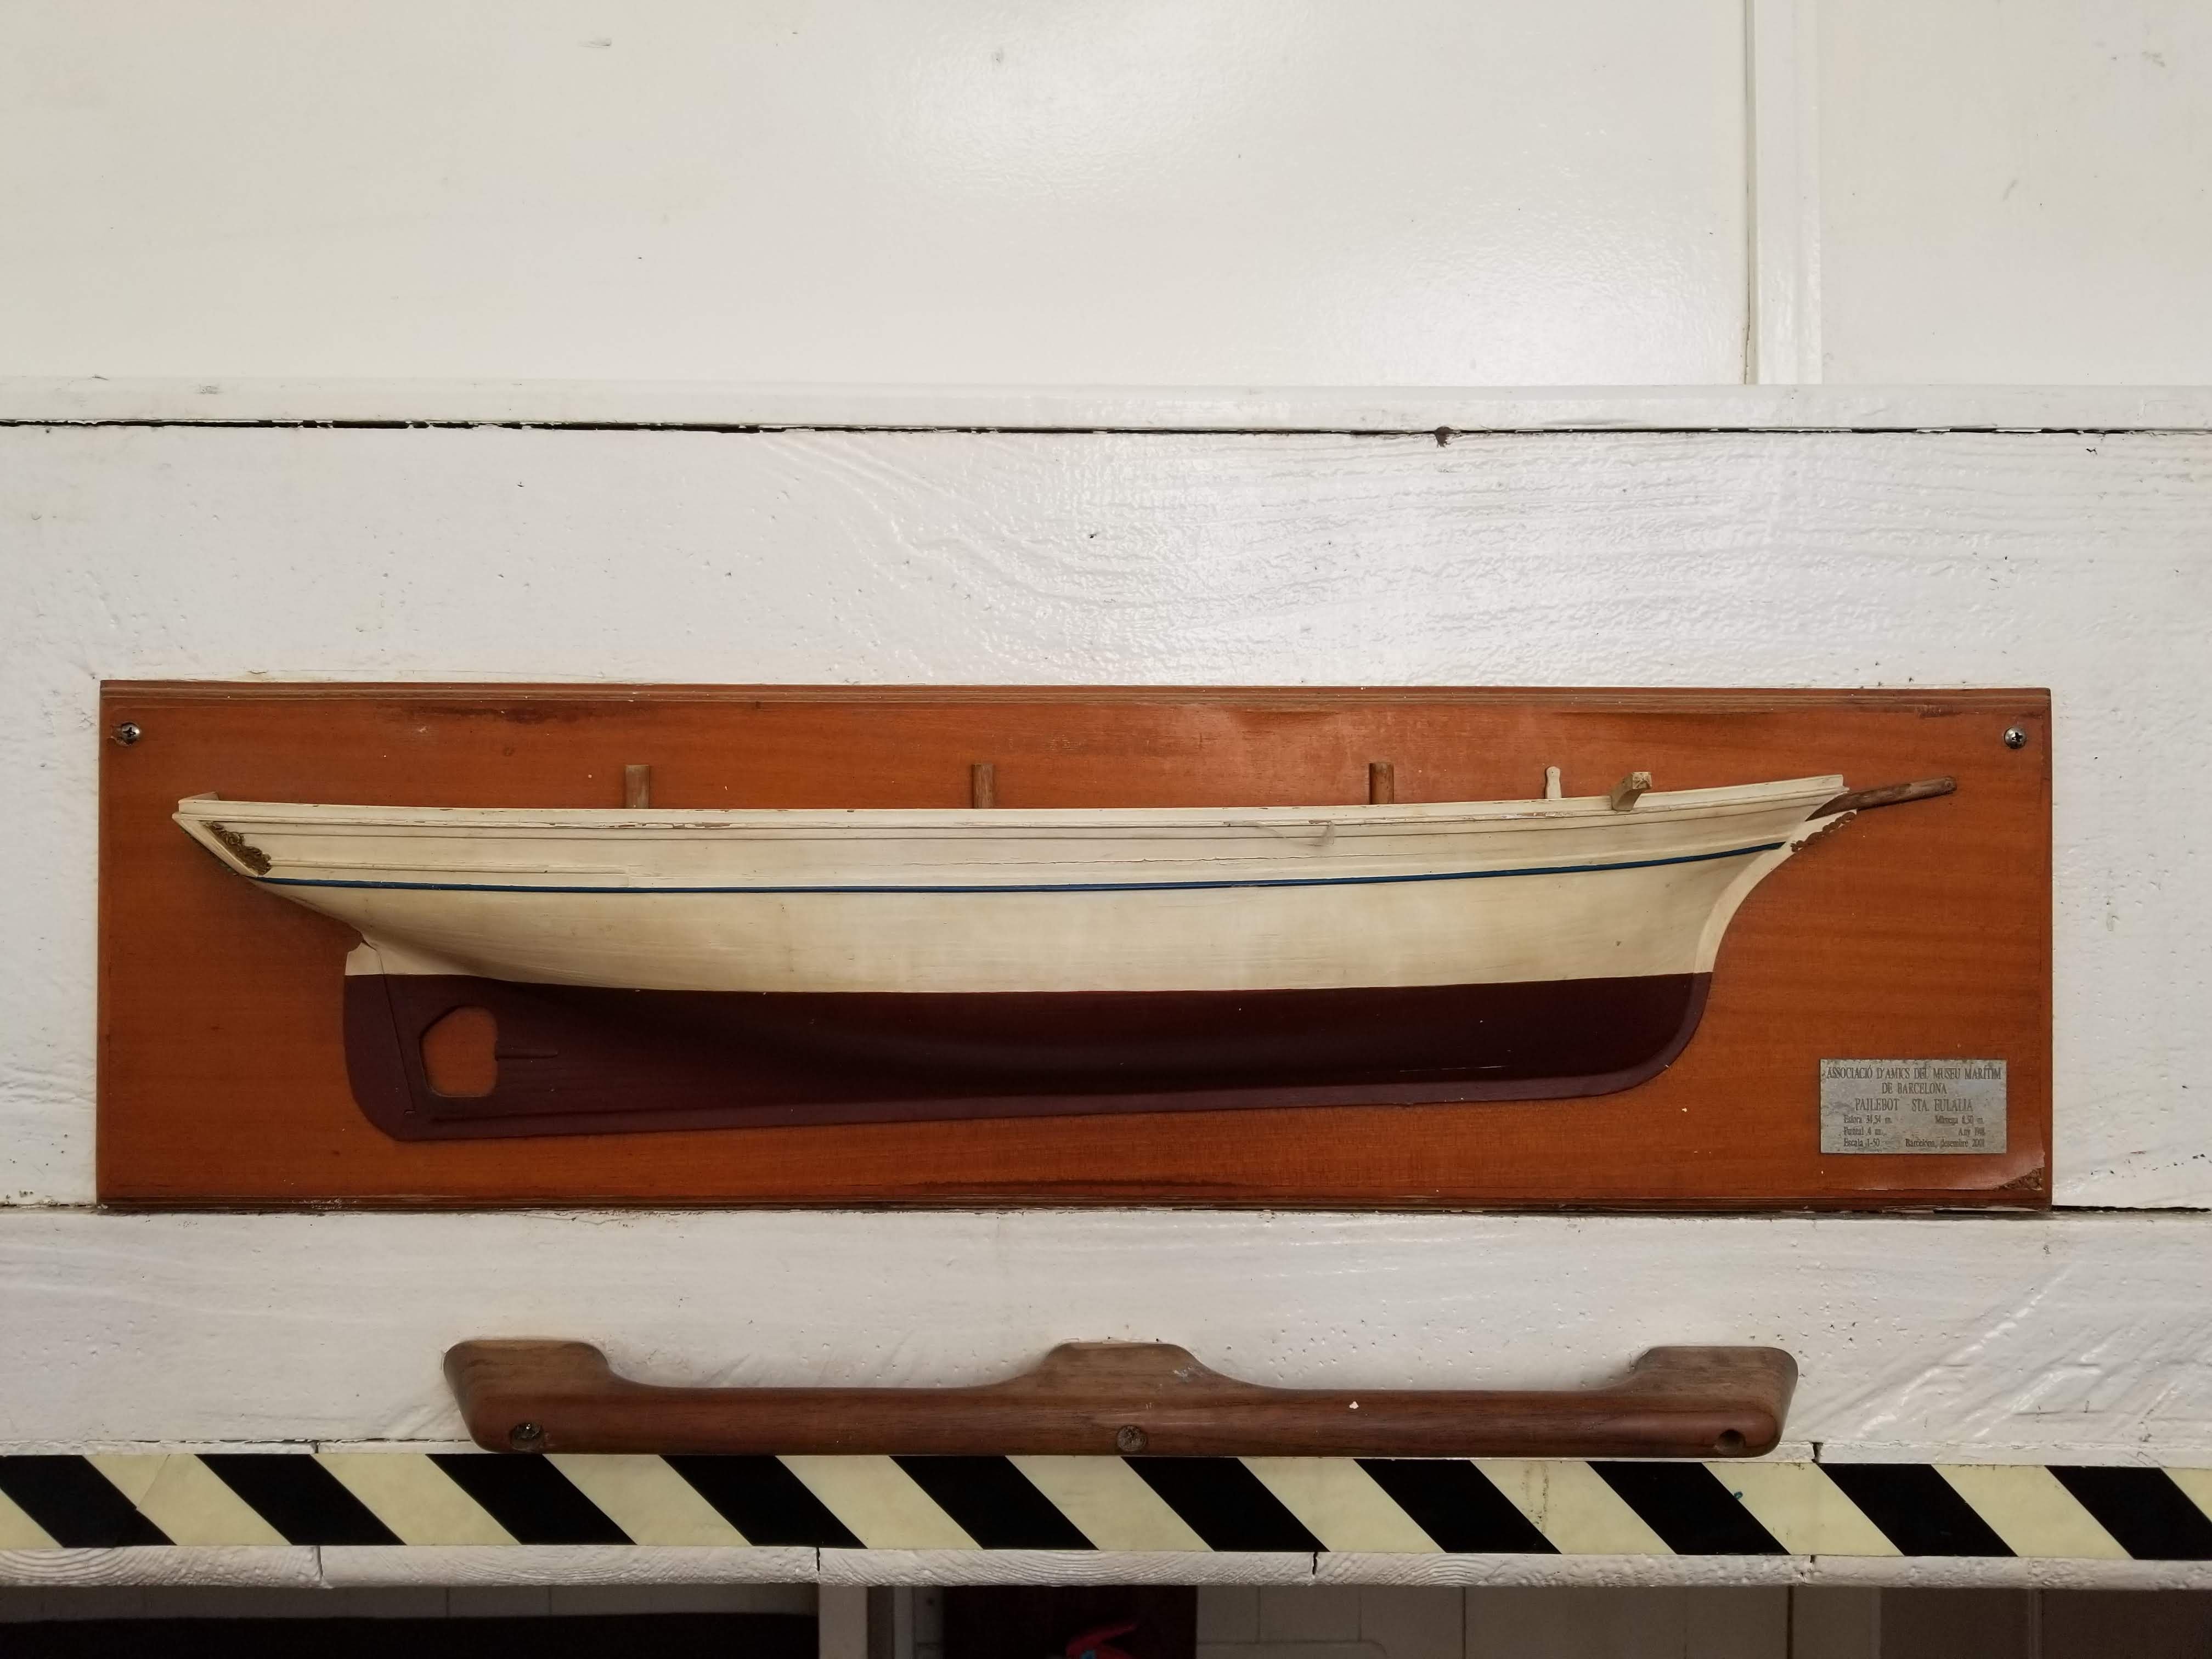
As someone who got started in this hobby after visiting the Santa Eulalia (below, a photo of the half-hull model that's hanging on the cabin wall in the actual ship), I know which one I would choose. But it really depends on what you're interested in. Which ship catches your attention more? I'd say that, if you want to try kitbashing, the Santa Eulalia would be a very good option. The Barcelona Maritime Museum has a plan set available, and there are lots of photos.

-
Very interesting project, I'm looking forward to following along! I came across Piedrabuena's fascinating story while I was working on my lancha chilota model, which as you note is a similar type of vessel. I have to wonder how common these small sloops were on the Argentine side of the Straits of Magellan, I haven't found all that much yet about Argentine workboats from the period. I'd be curious to know how the plans were made, as I'd guess they're a reconstruction. Very nice start!
-
Congratulations, it looks great! Very nice work for a first or a seventh model, you clearly built a lot of skills over the course of the build.
- 177 replies
-
- 2
-
-
- Sherbourne
- vanguard models
- (and 3 more)
-
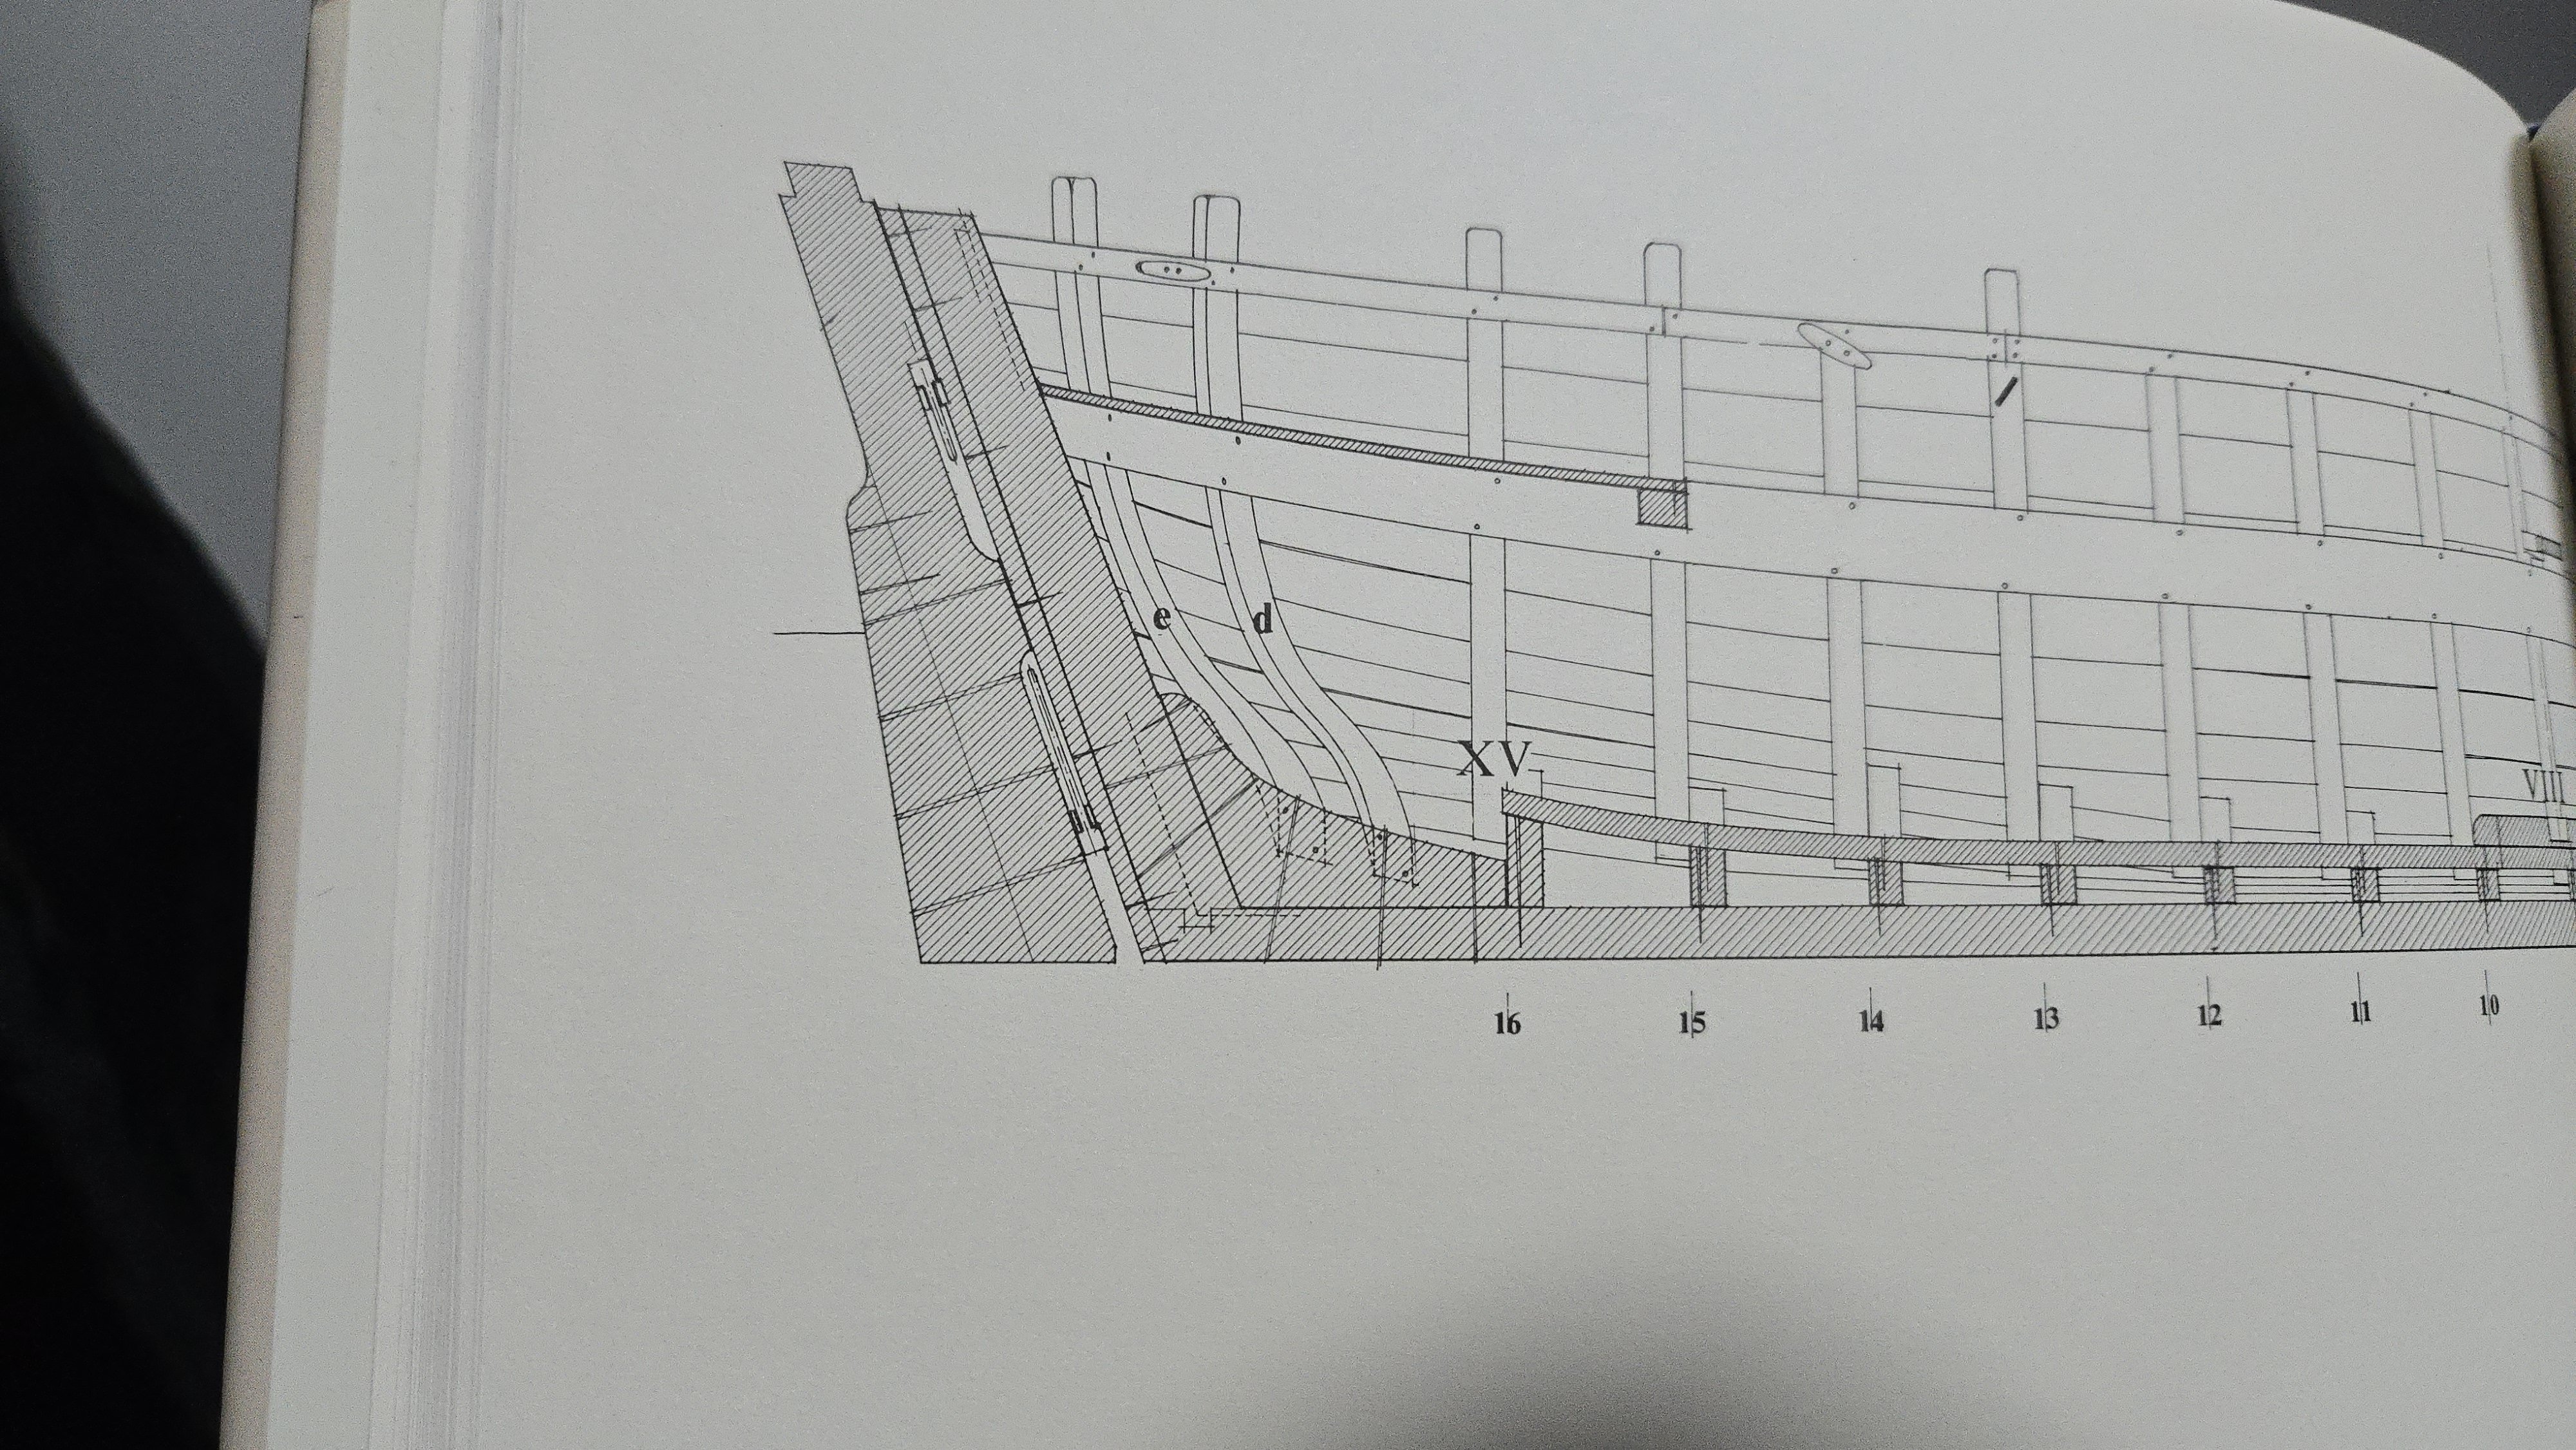
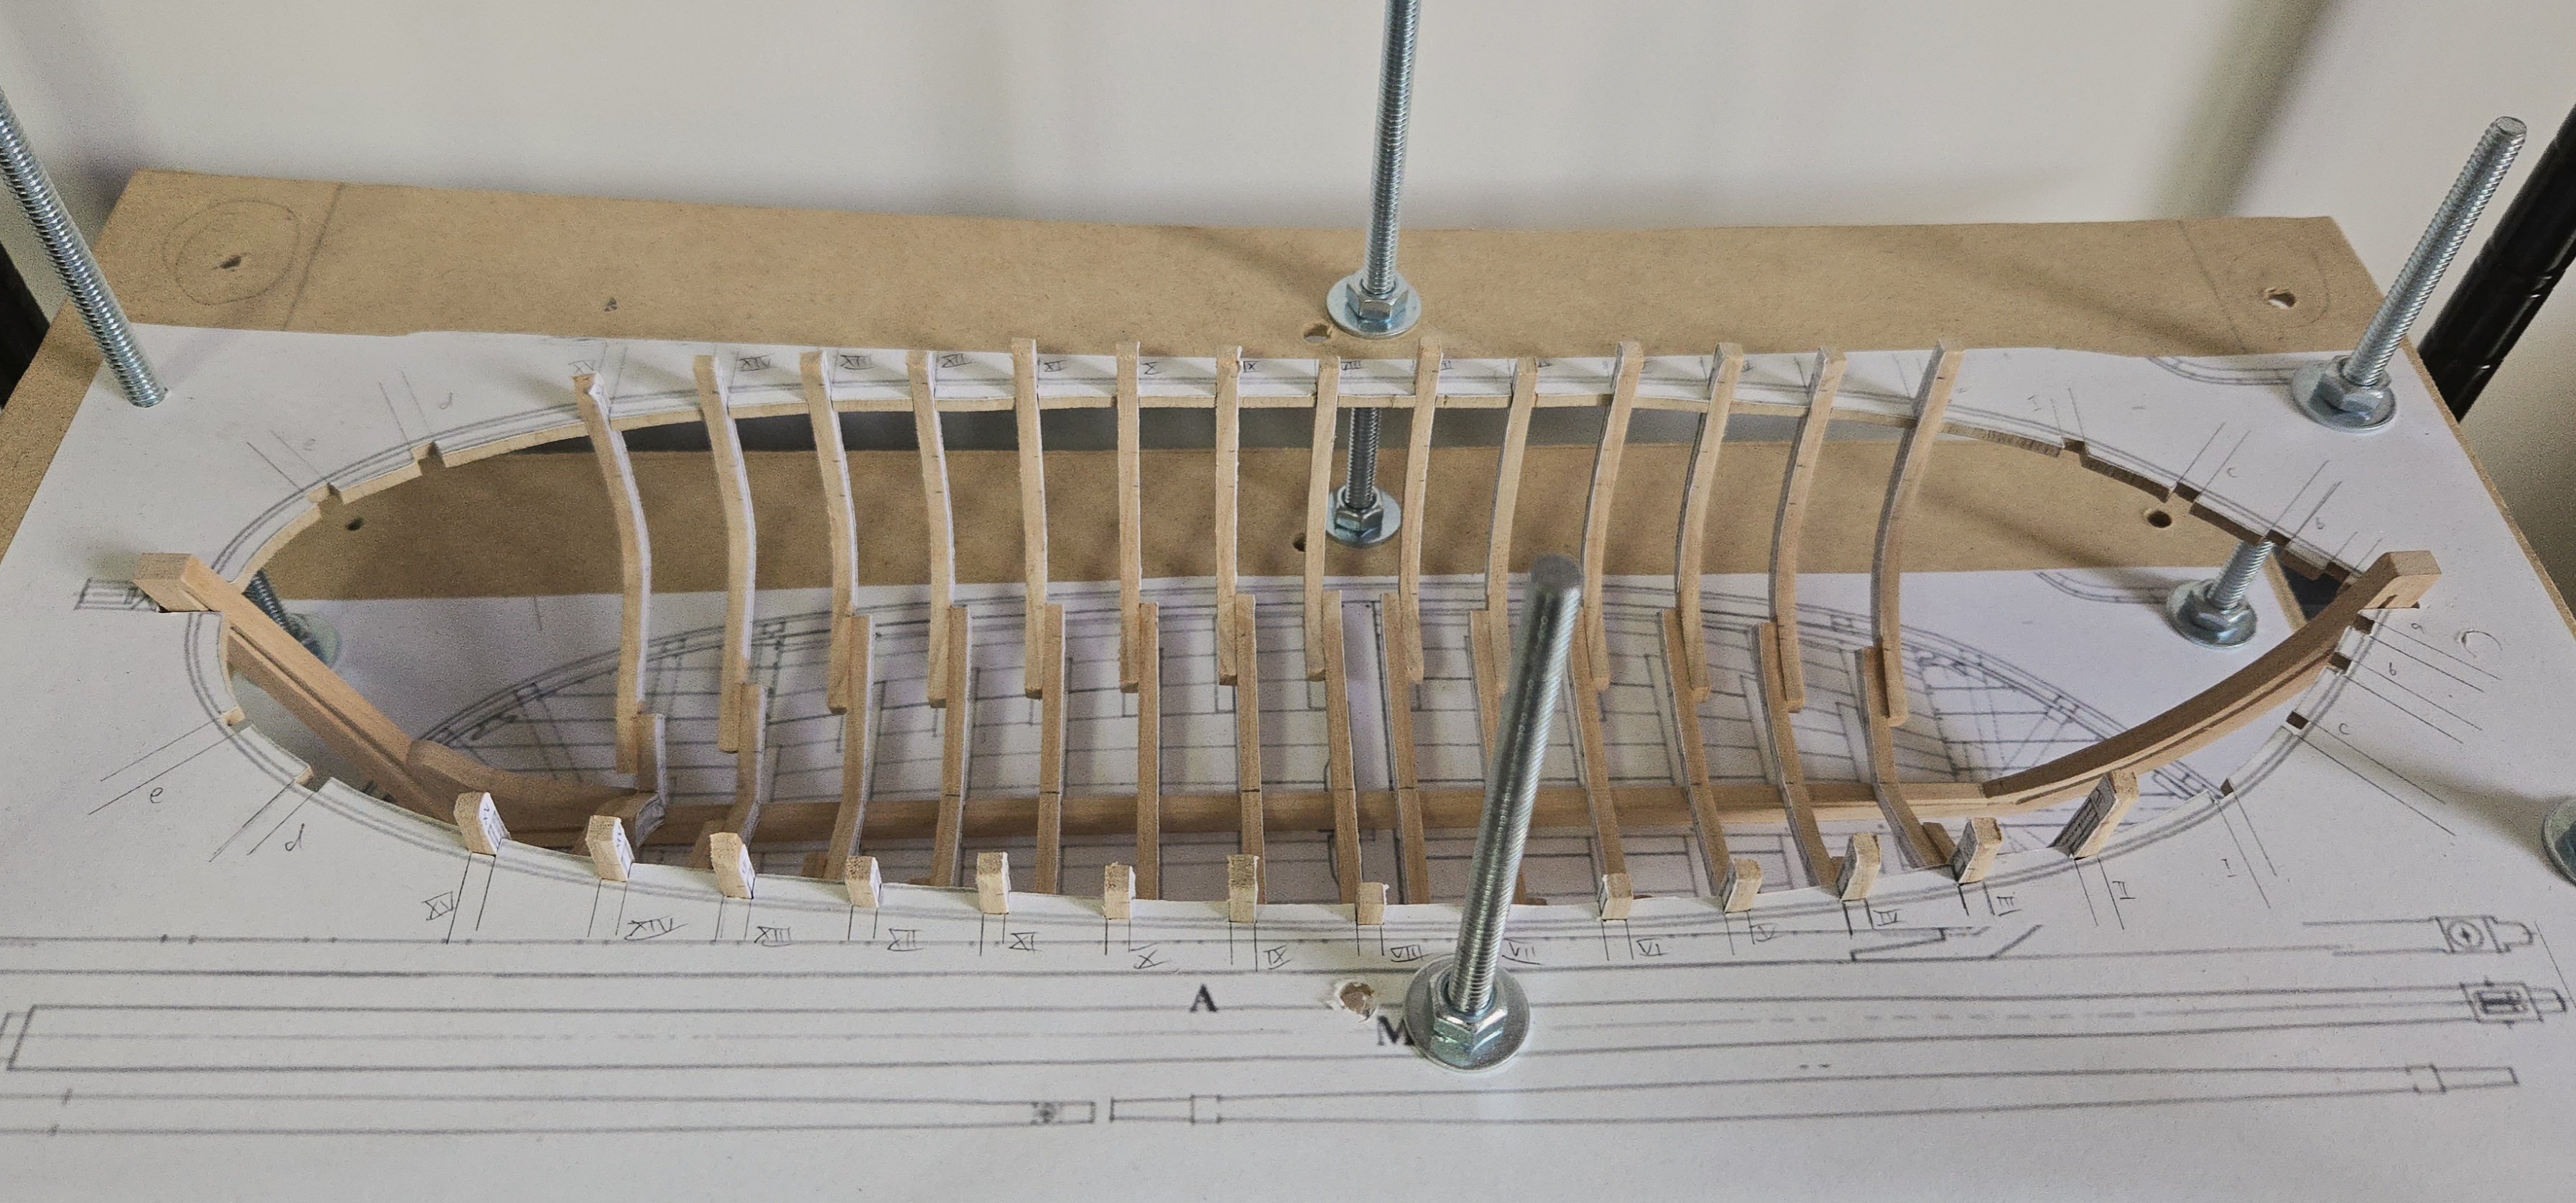
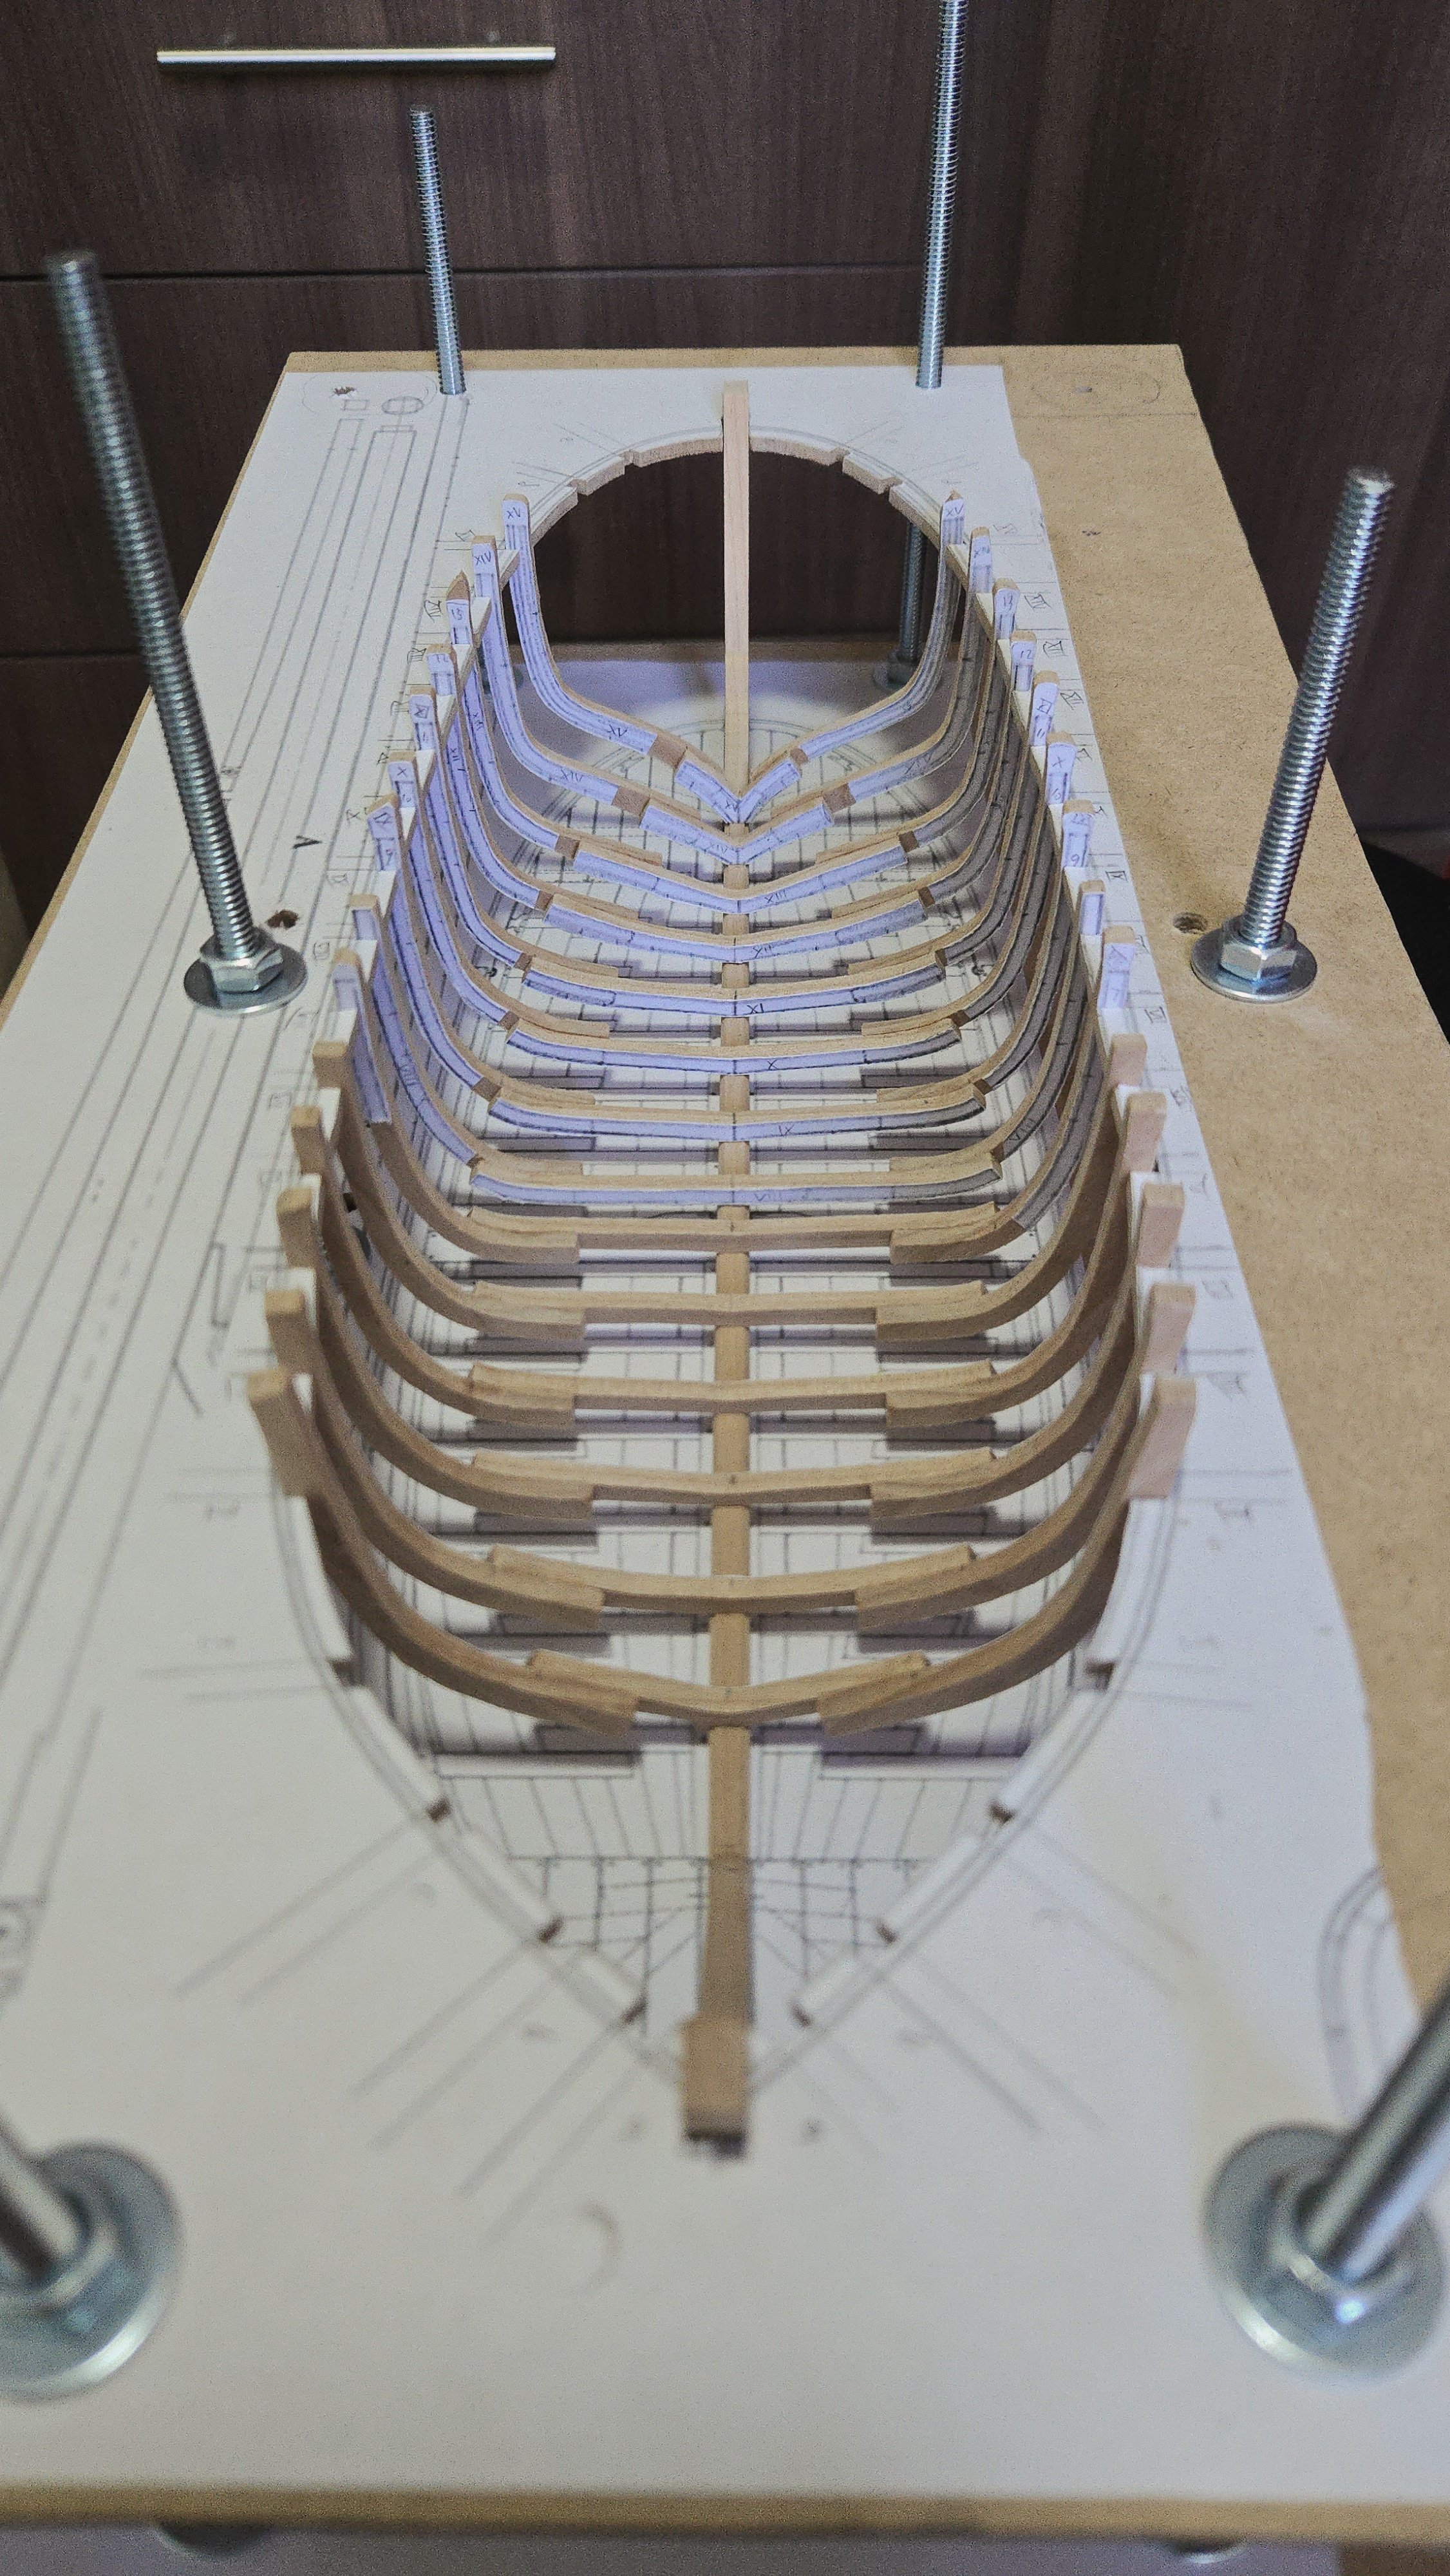
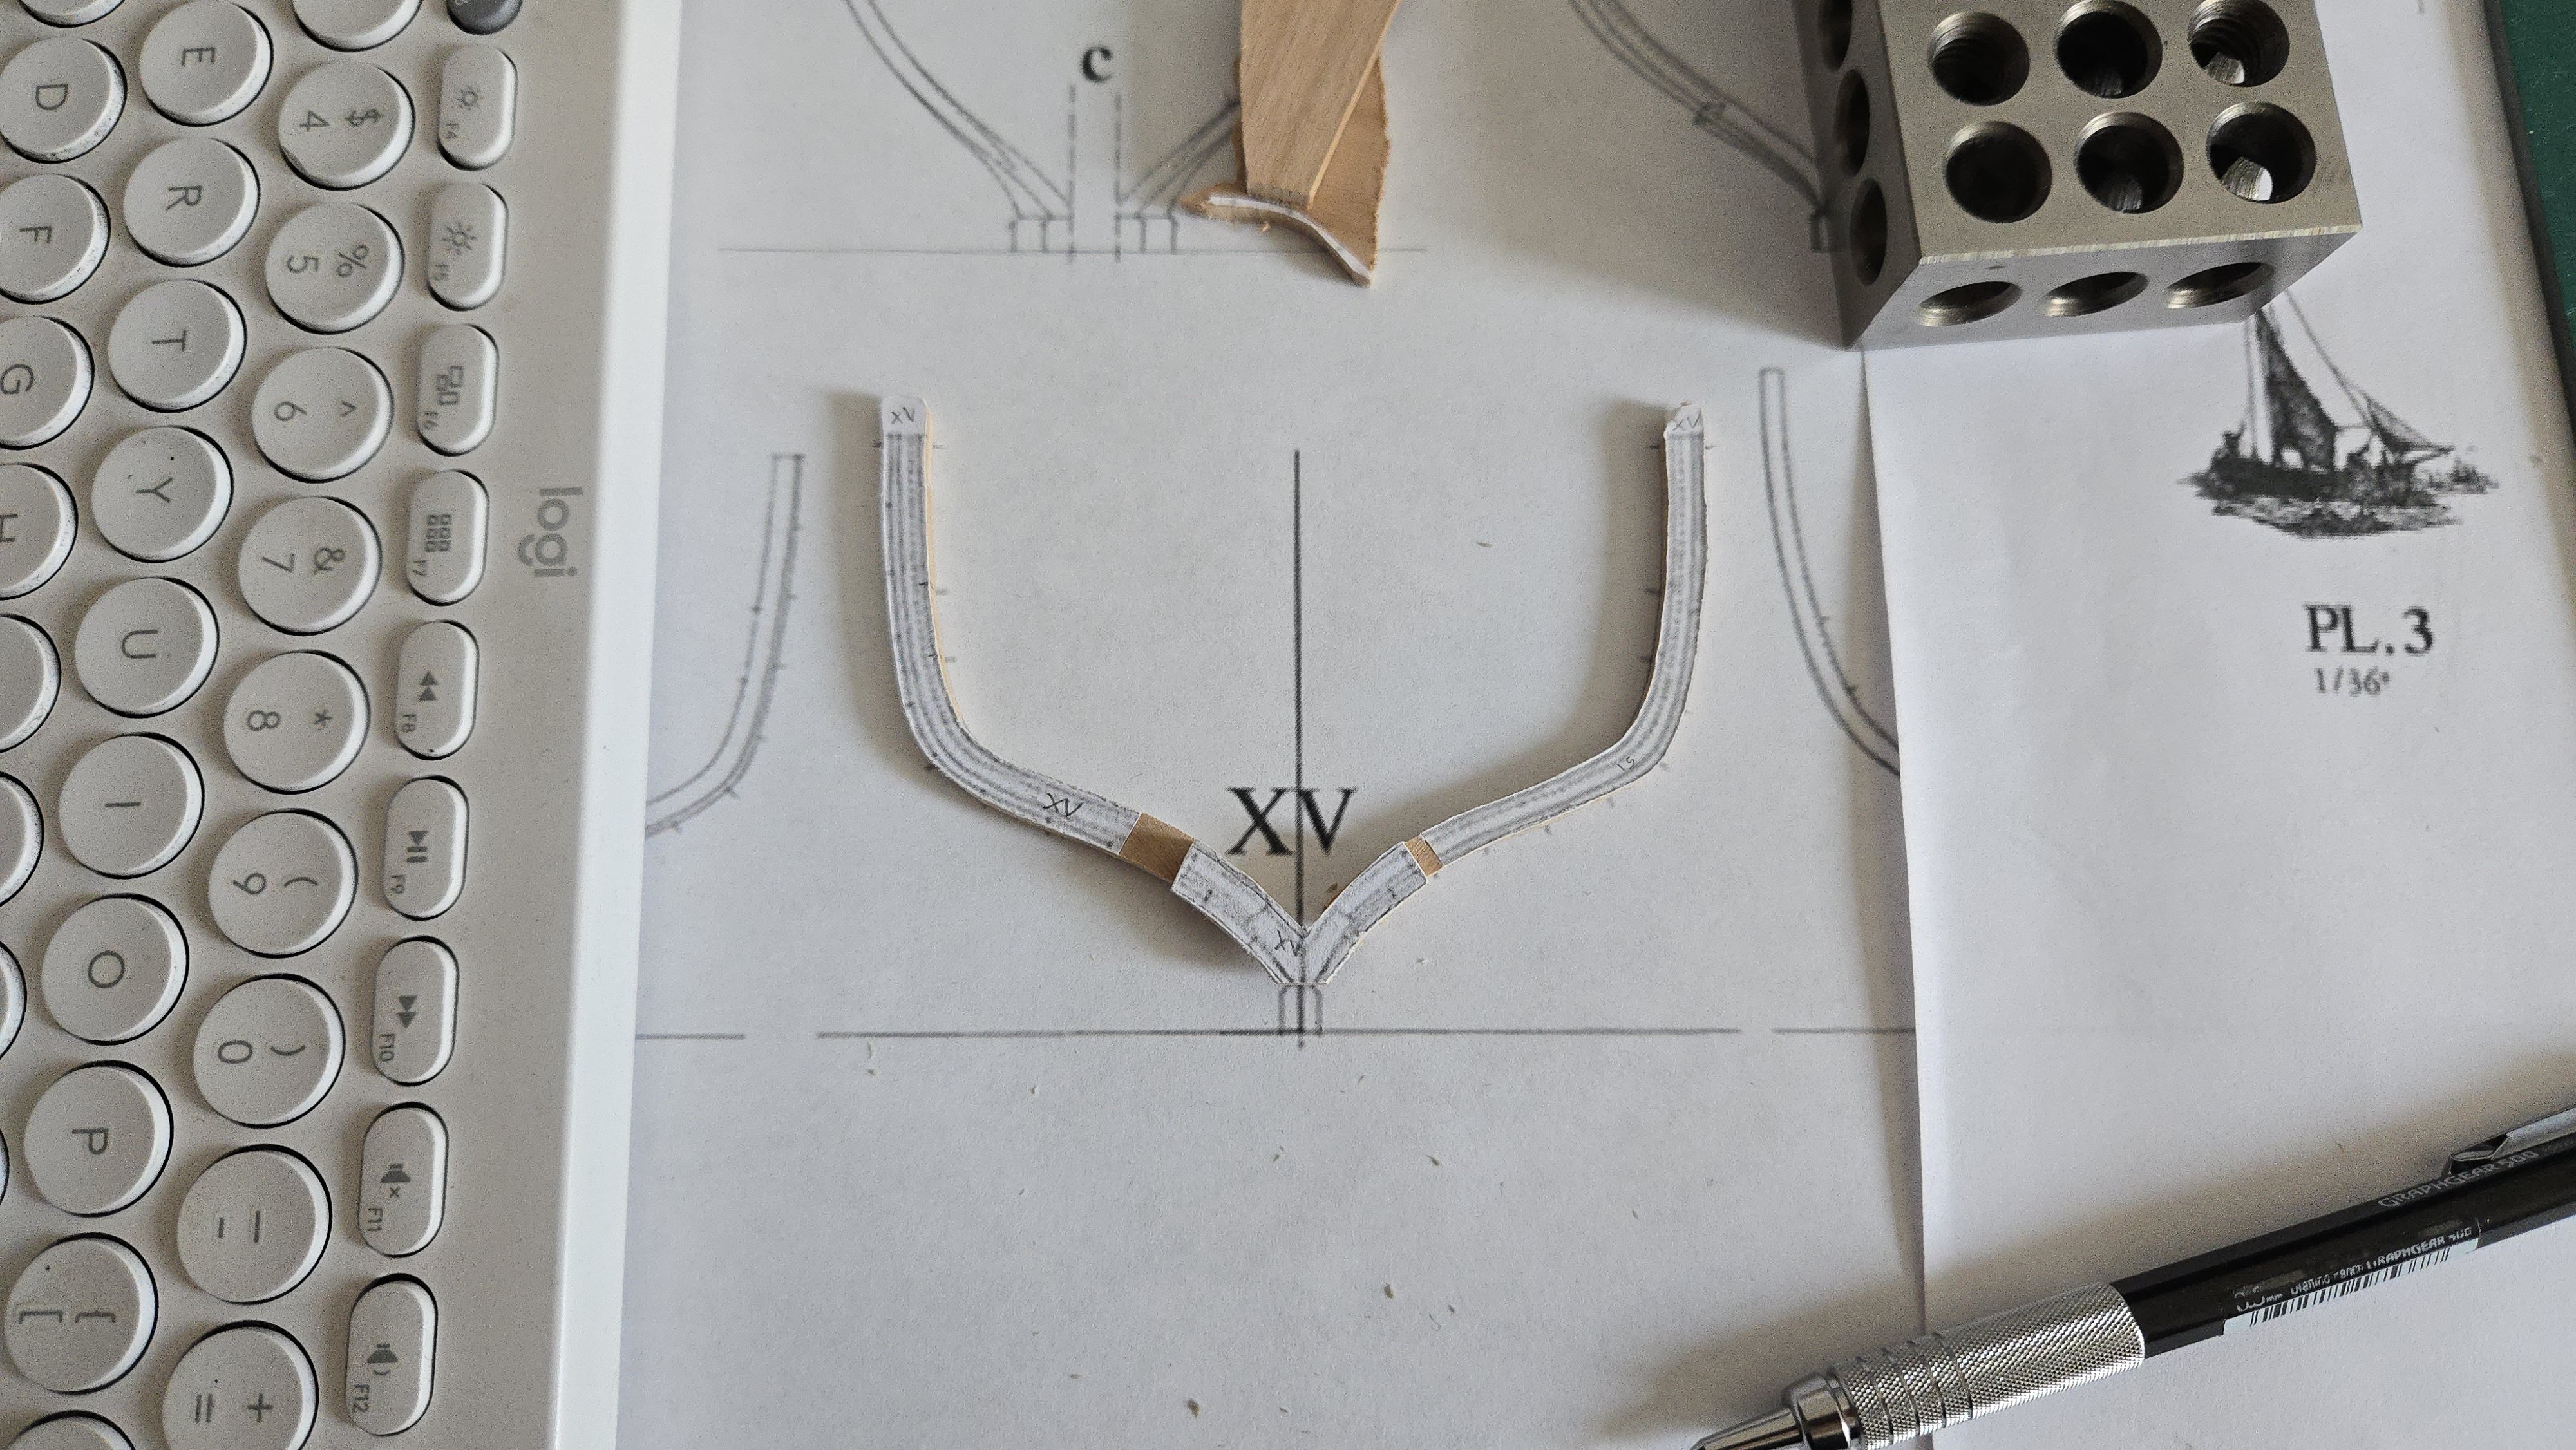
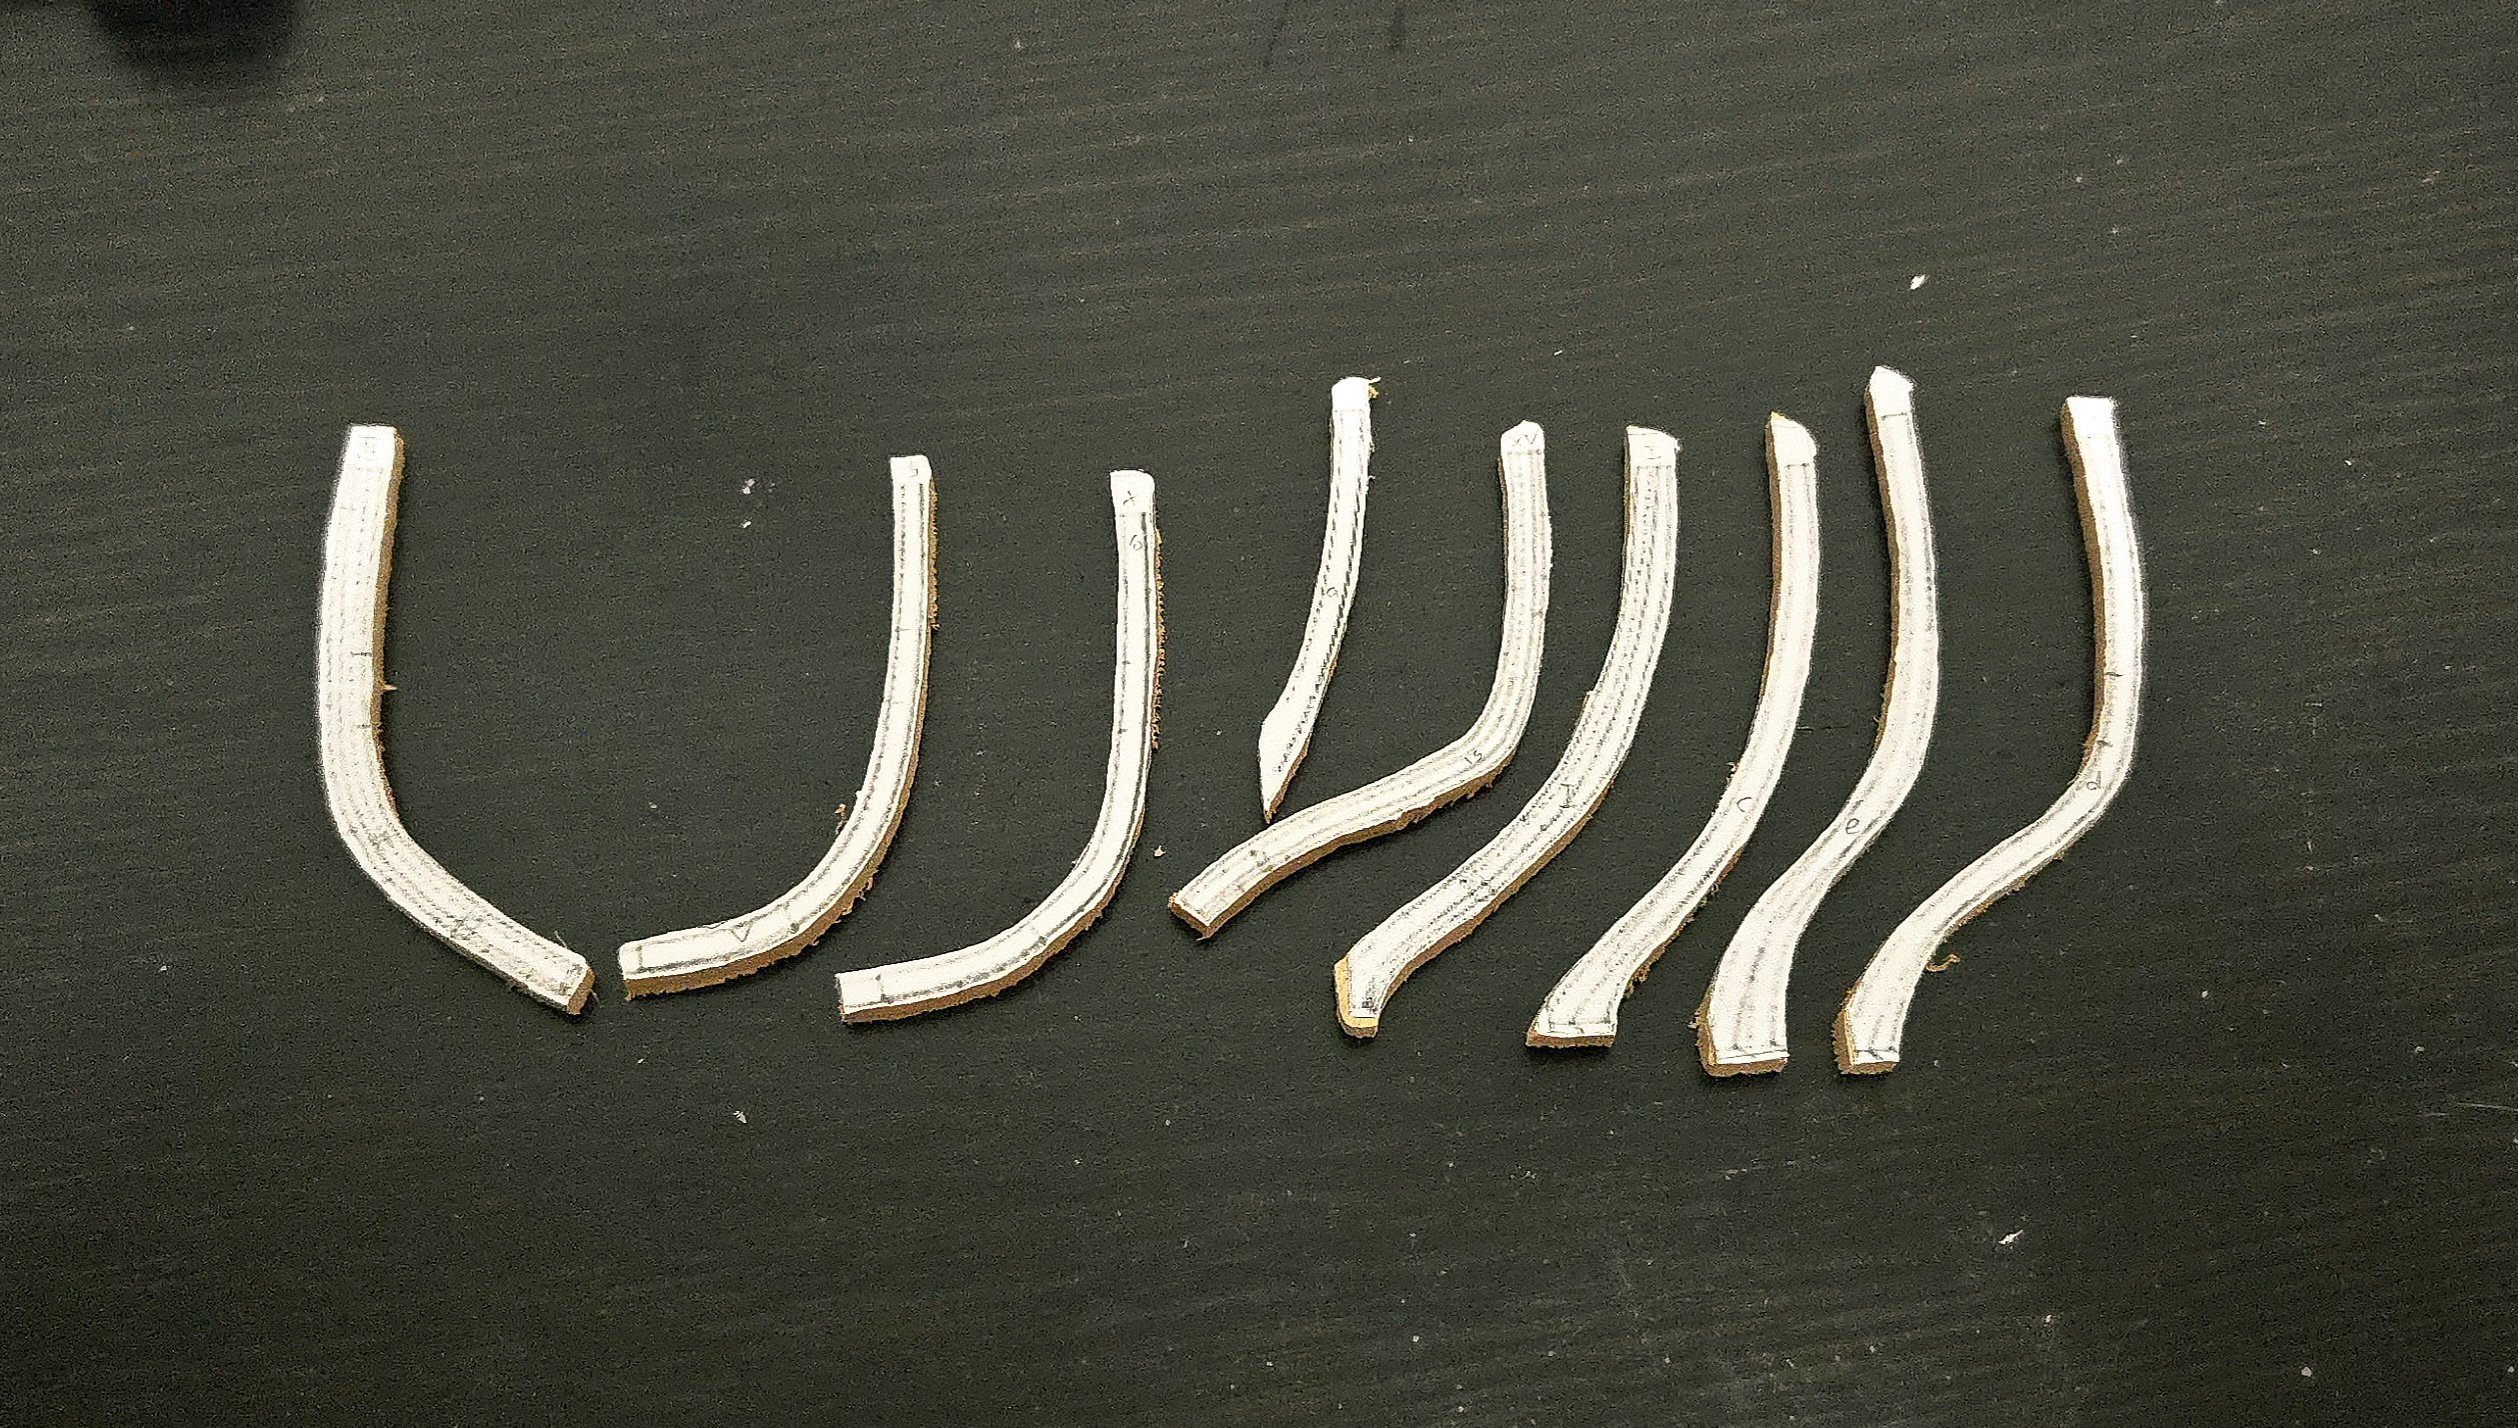
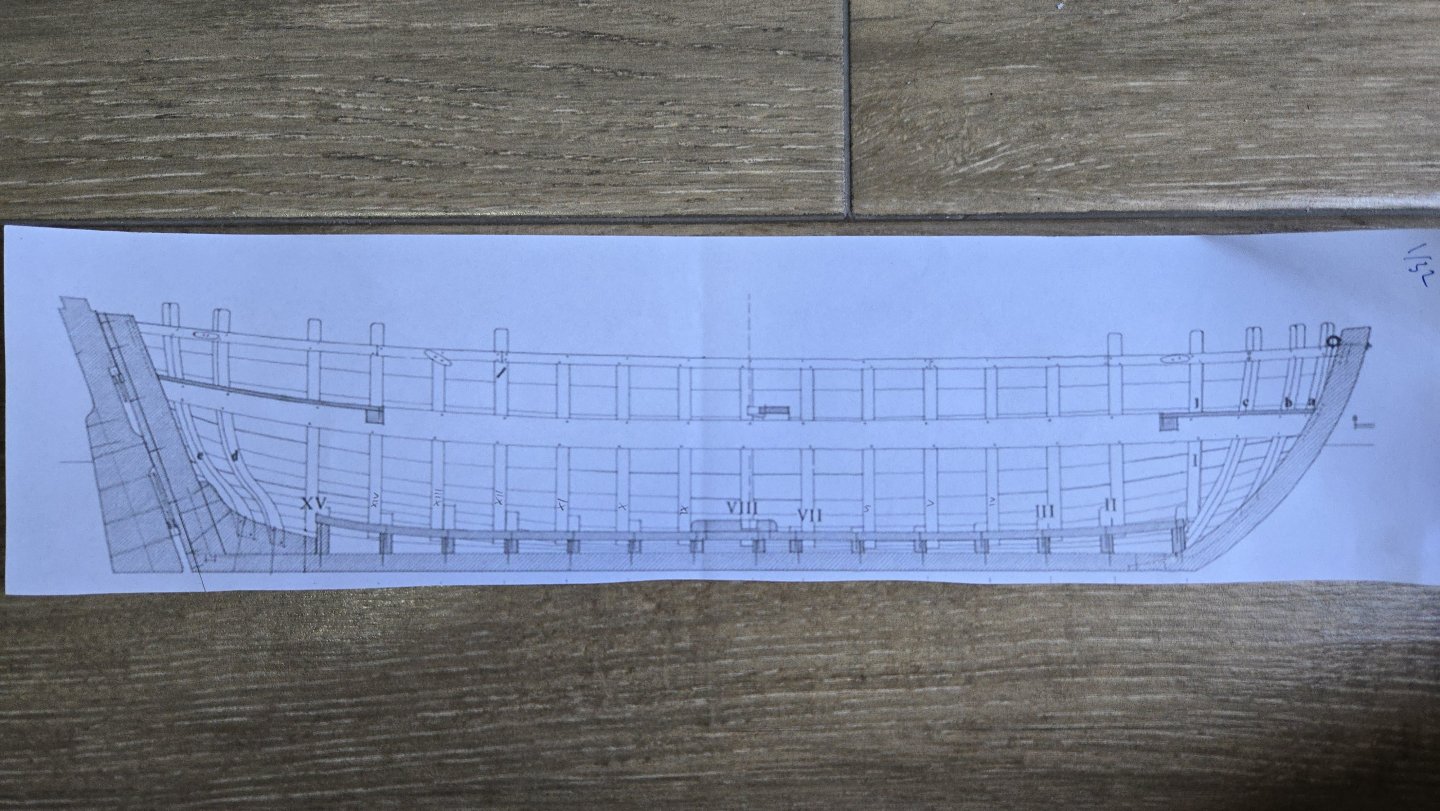
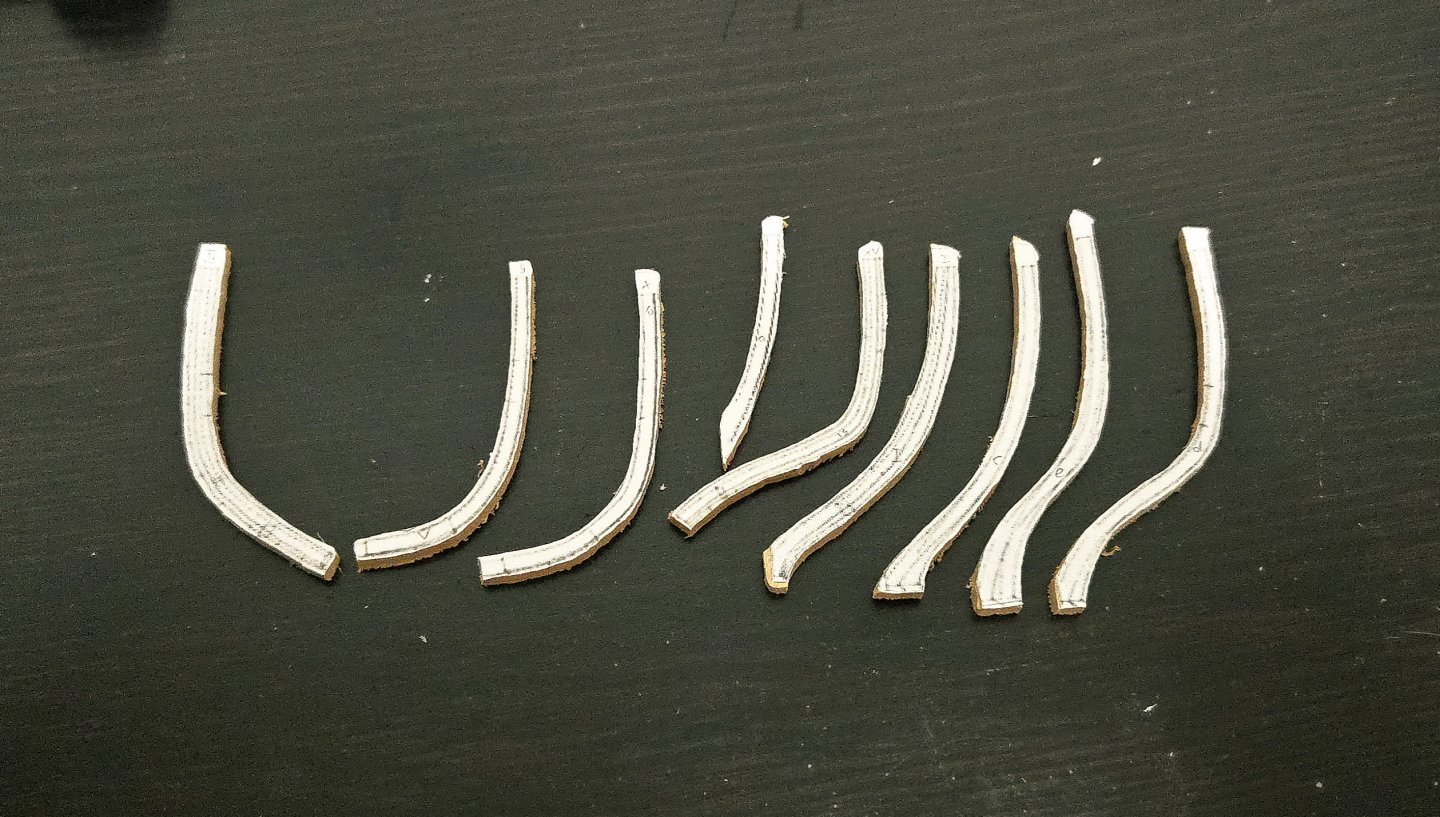
Two more frames--II and III--glued up and dry-fit. At this point, only the cant frames are left. The shape of the hull is really starting to come together by now. But, an issue. Looking at the side view in the plans, you can see that several frames are supposed to extend beyond the sheer. But of the frames I've made so far (II-XV), only II extends beyond the sheer. XII, XIV, and XV all end at the sheer, following the frame sheet of the plans, when the side plans show them as extended. It's a little hard to tell because I've left all frames a little long, which I suppose means I can try to extend them a bit, but maybe not quite as much as given in the plans. I have to admit that this is very frustrating--part of the point of buying a plan set like this, instead of developing this all from scratch, is that you assume the plans will be consistent between sheets. Ah well, I guess that the extensions will just be a little stumpy compared with the plan sheet.


- 139 replies
-
- 11
-
-
-
- ancre
- Bateau de Lanveoc
- (and 2 more)
-
Model shipways HMS Vanguard
JacquesCousteau replied to jefferyconley038's topic in Wood ship model kits
I wasn't aware that Model Shipways had ever offered that model, but it looks like they did for a short time. You might want to check out this build log for the kit: -
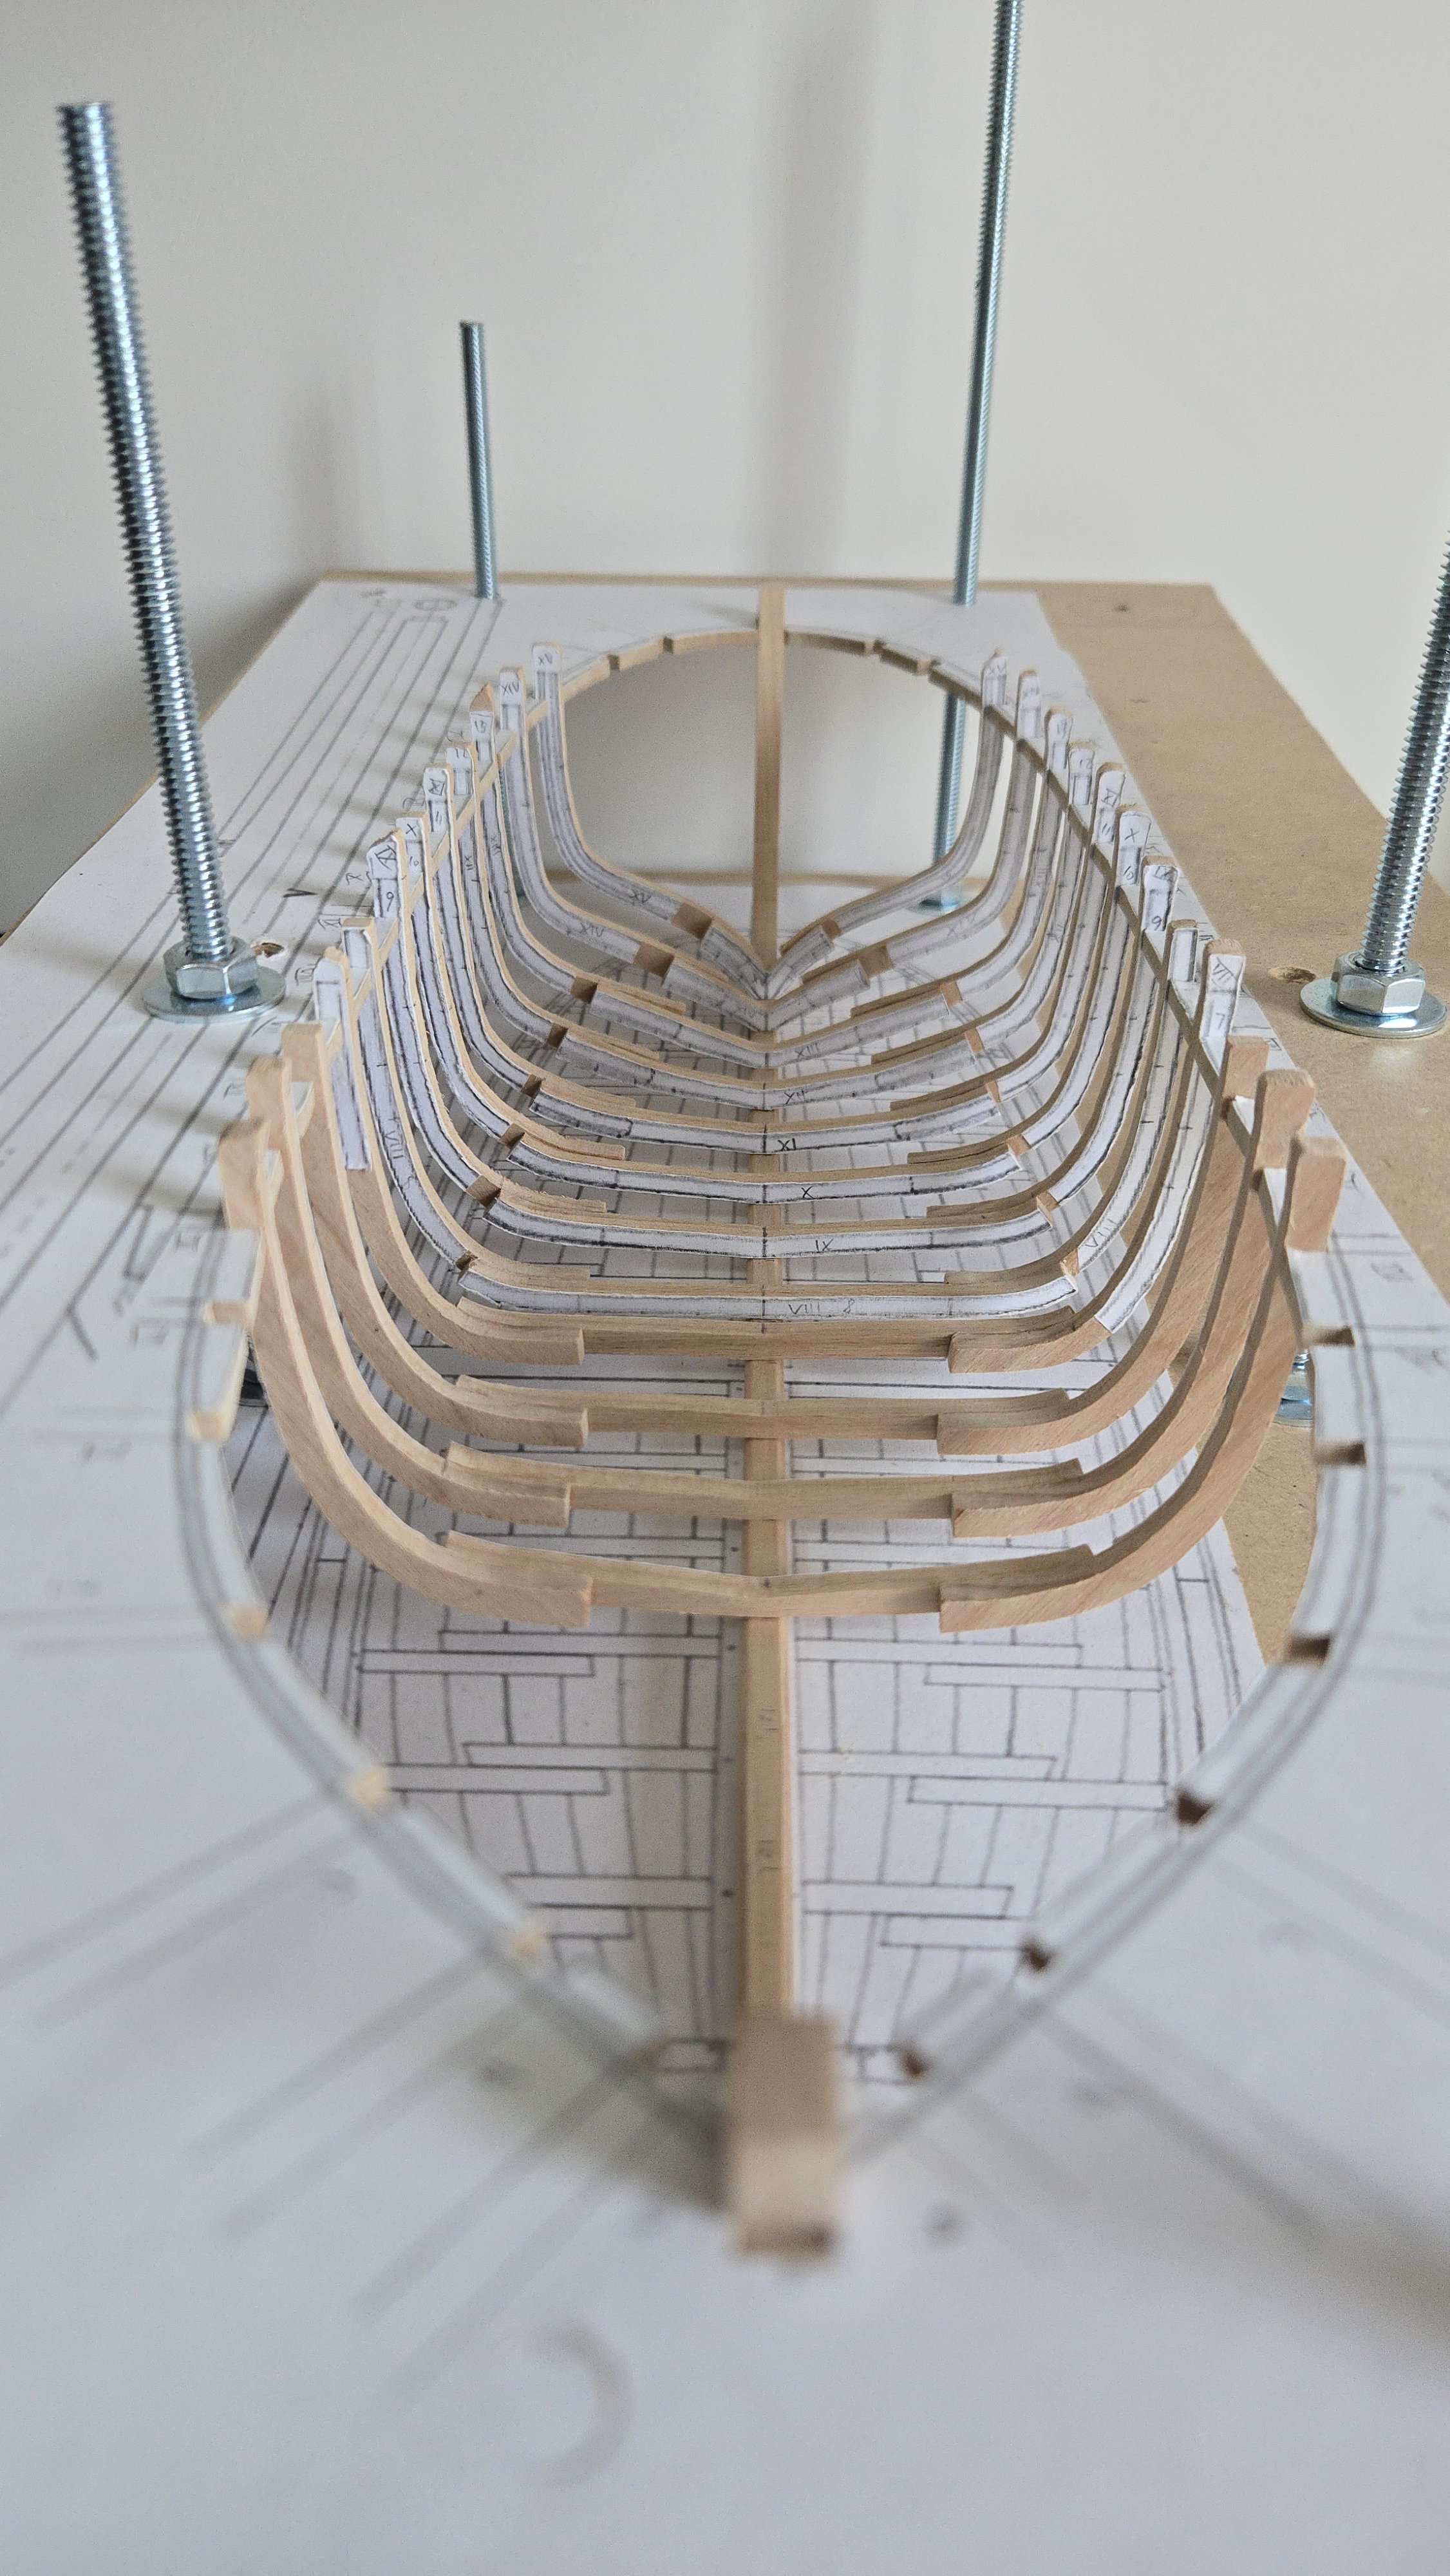
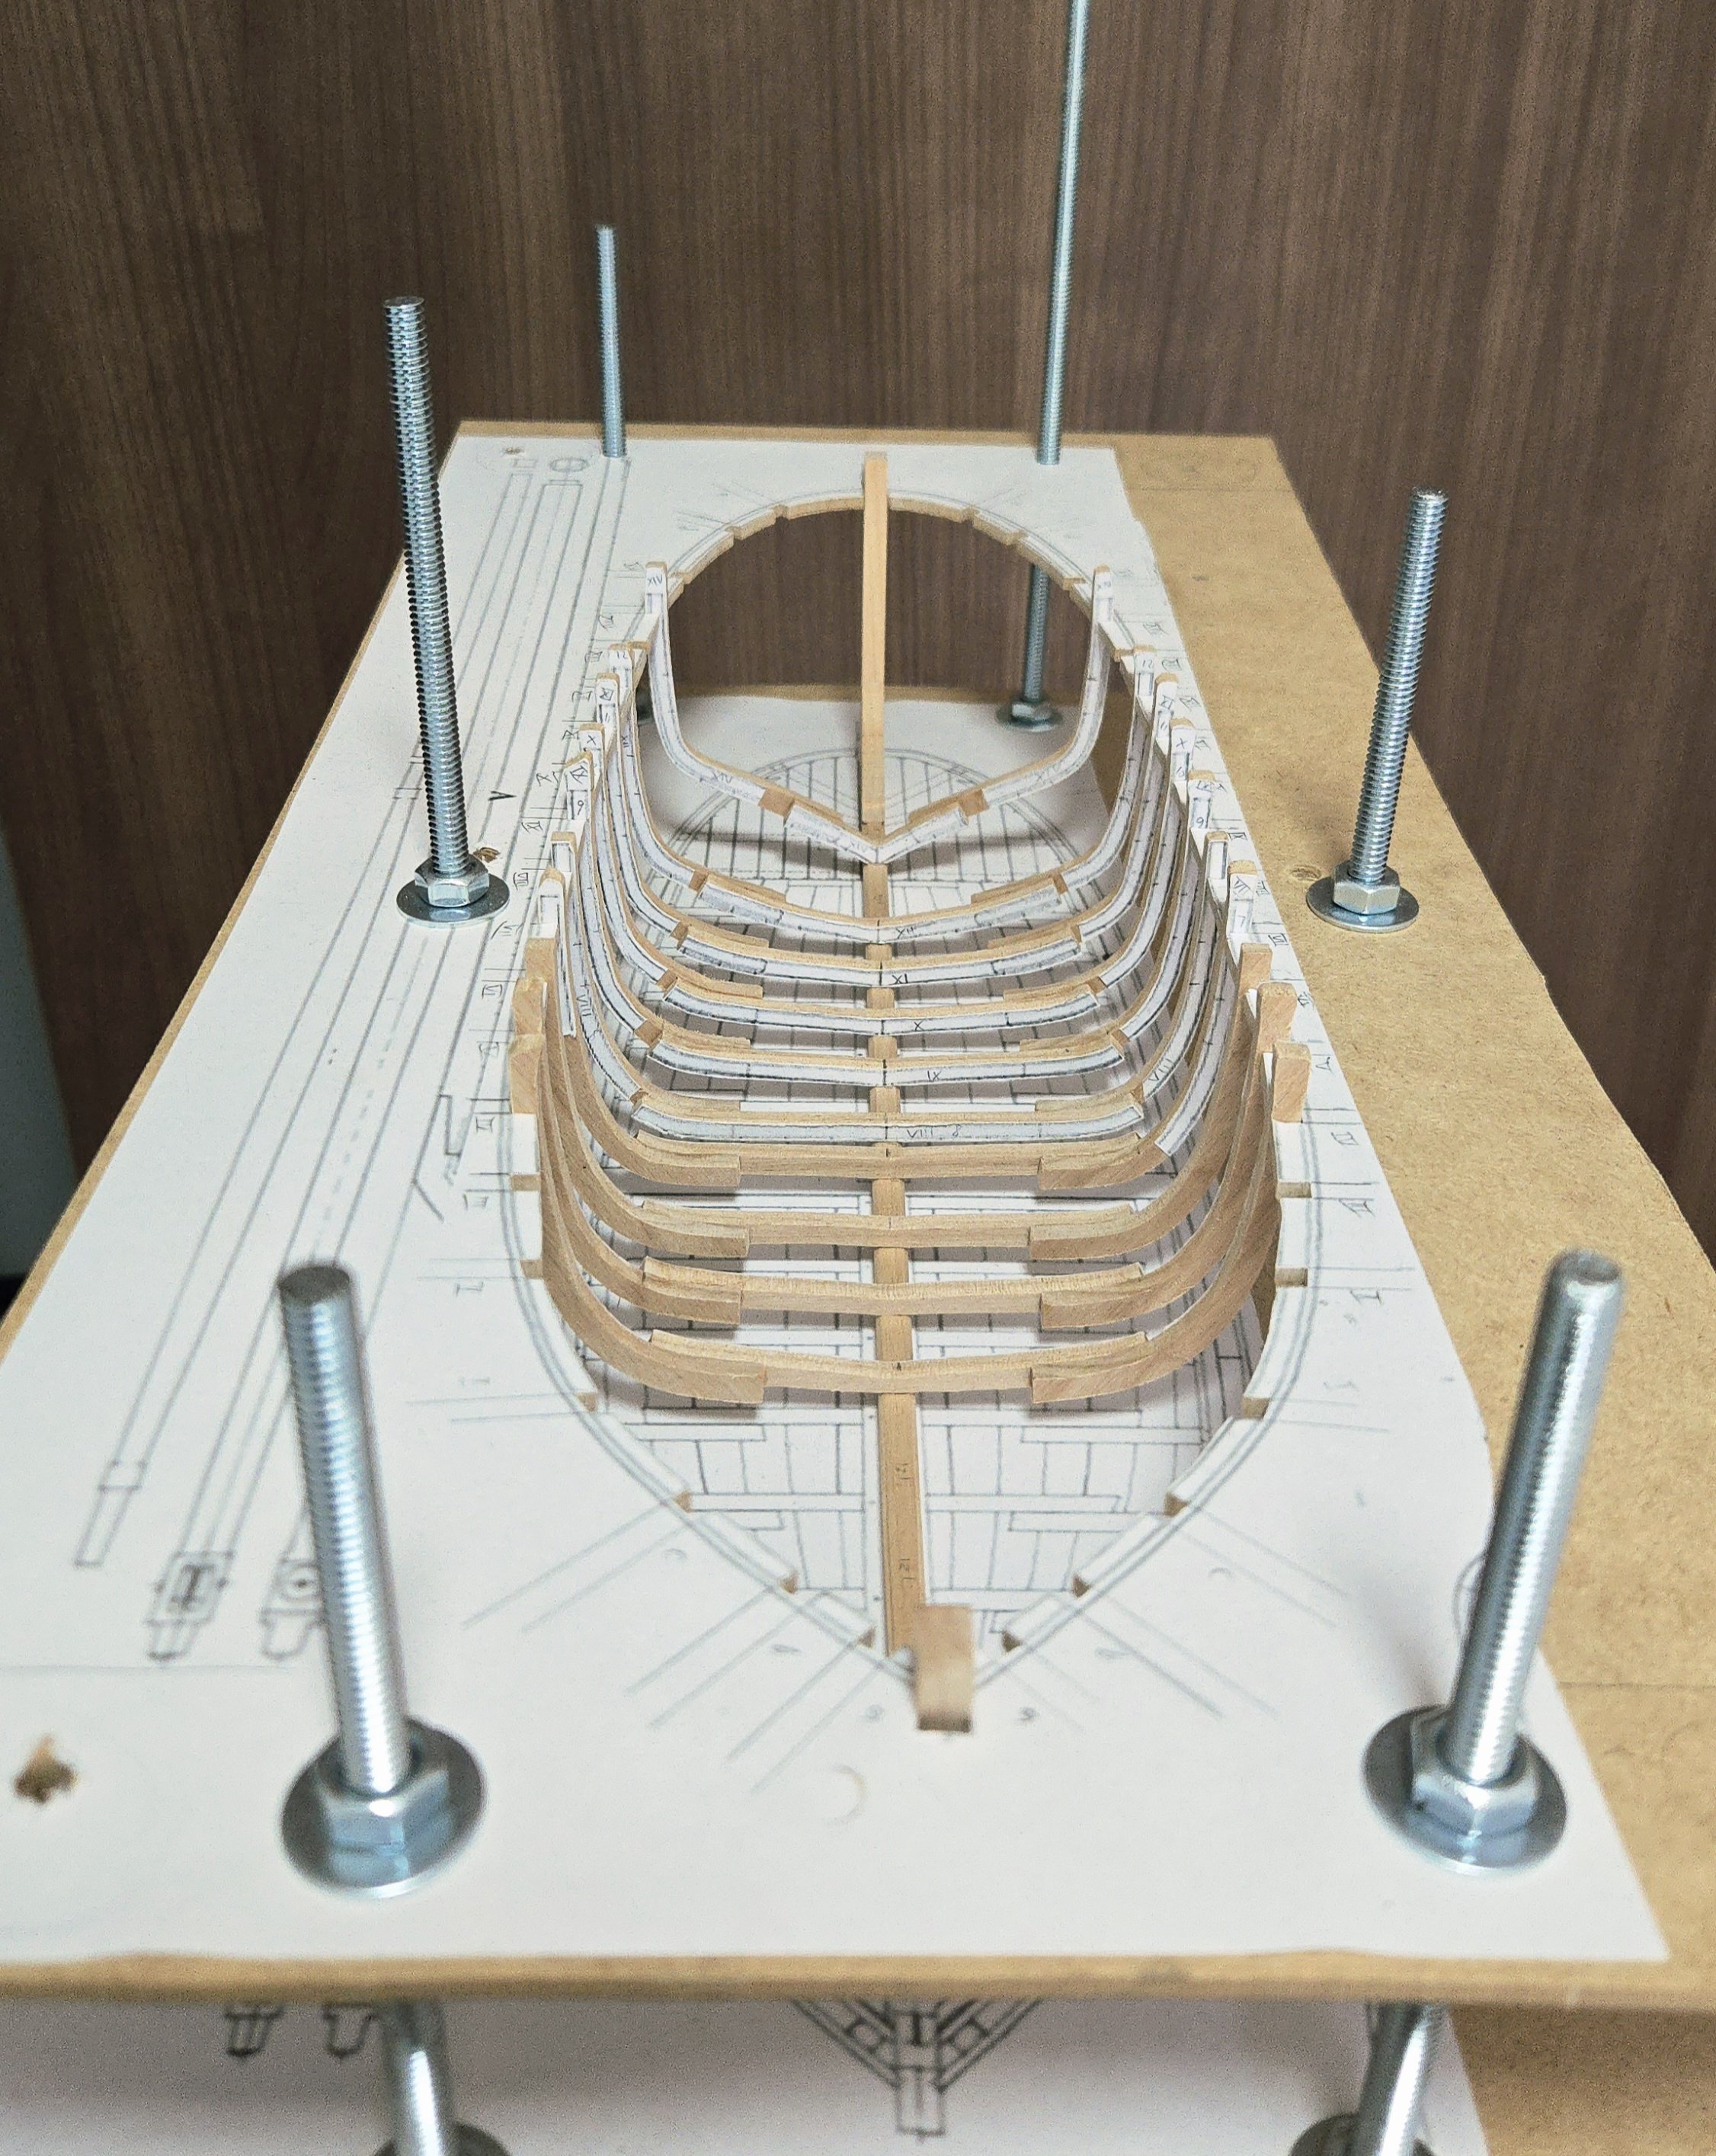
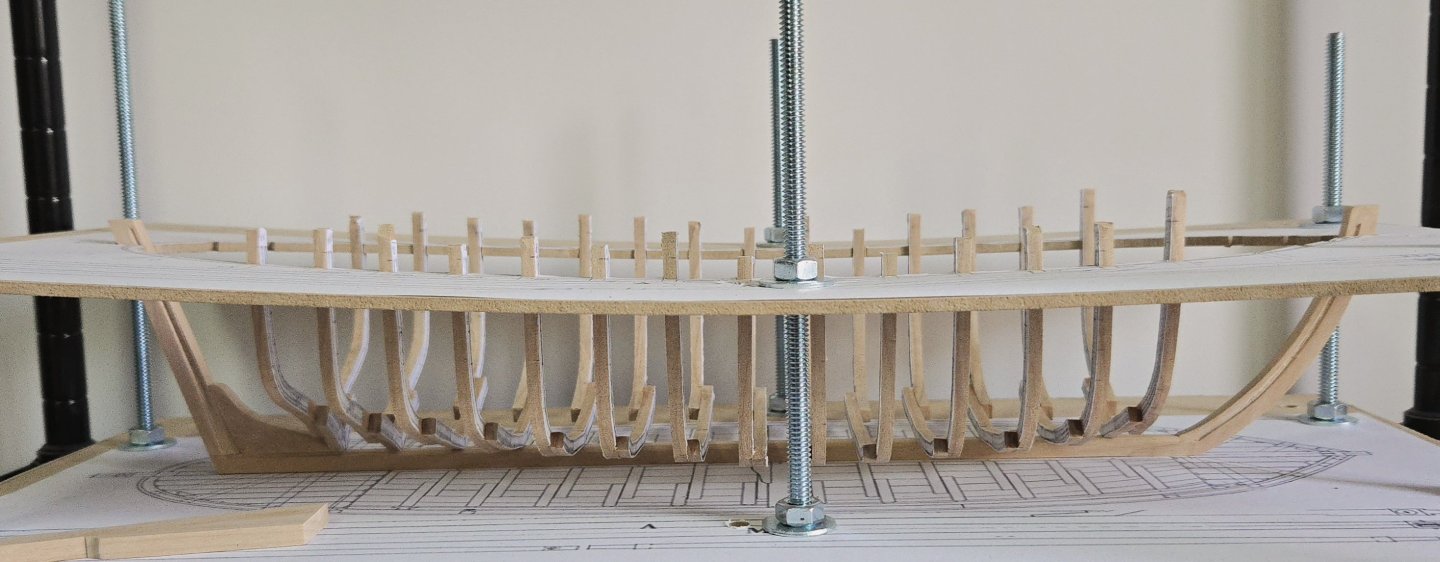
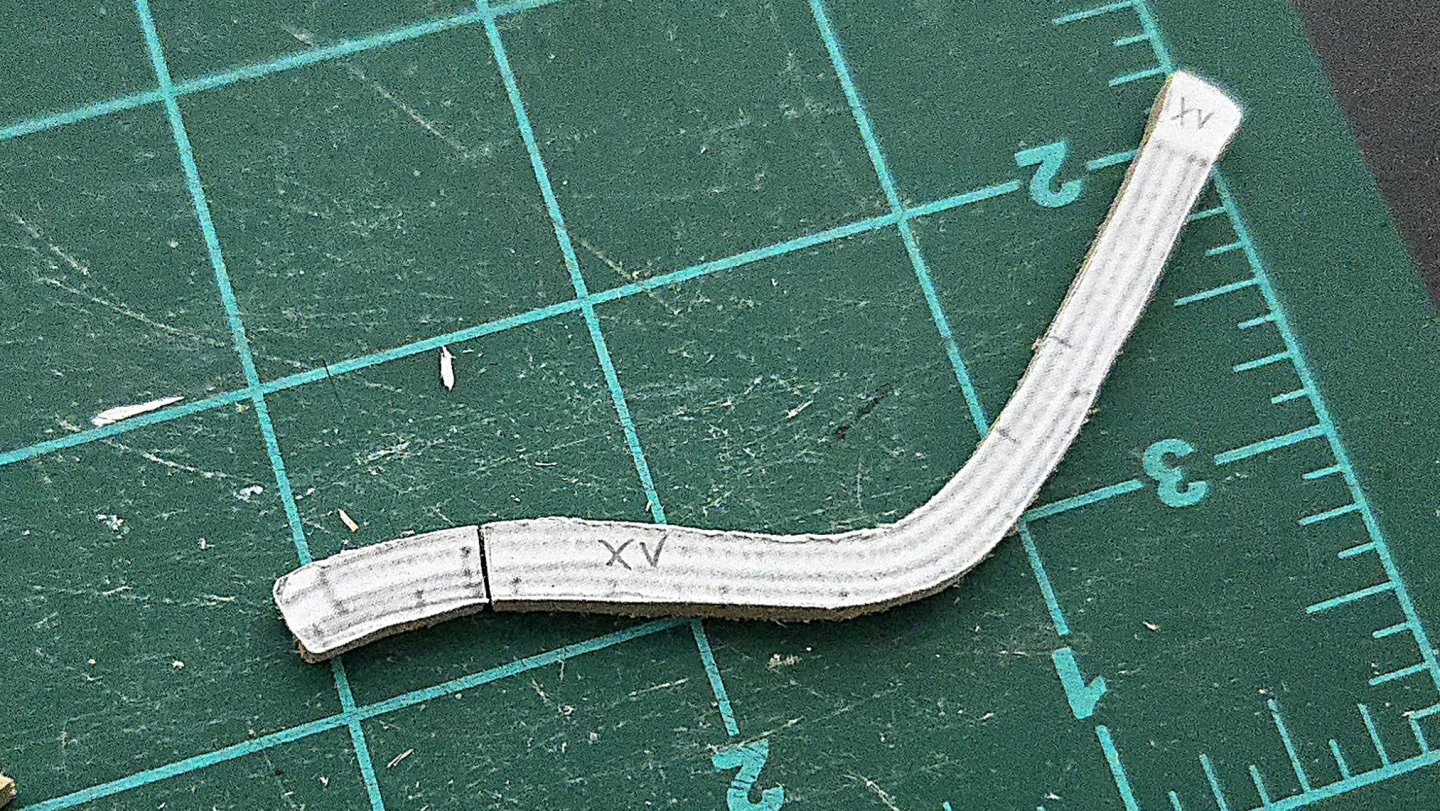
Well, once again I said I was looking forward to getting back to work on this build, and then made very little progress. I made a few more frames, and, while working on autopilot, accidentally trimmed one futtock at the wrong point, as seen below, and had to remake the piece. Despite that, yesterday I reached an important milestone: upon cutting out the frame pieces below, I have now finally finished sawing out all the frame parts! (Unless I have to remake more...) It certainly took a while to reach this point, and indeed, pretty much every aspect of this build is going slowly. There are a few reasons for this. I can only access the fretsaw in the carpentry workshop. I've only been able to attend a few times over the past month, and have been focused there on making a tea box, so I haven't had much time for sawing. The plan sheet takes up pretty much all my workspace at home, making it a bit of a hassle to glue up the frames, and the sanding generates a ton of dust--even with a mask on, I prefer to do it on out balcony, but that means I can only sand during the day when it's not raining (and when we haven't hung laundry there to dry). Not to mention that slowly sanding the frames is pretty tedious work. But this build is more of a marathon than a sprint. Two more frames were glued up last night: At the moment, I have ten frames glued up and dry-fit, although they'll need a lot more shaping before they can be glued. I'll also need to figure out the cant frames soon.


- 139 replies
-
- 9
-
-
- ancre
- Bateau de Lanveoc
- (and 2 more)
-
Congratulations, very nice job! I love the look of lateen-rigged vessels, and it's been interesting to follow your build log. The model fits well alongside the rest of the fleet. Looks like you may need another shelf soon!
- 65 replies
-
- 1
-
-
- sultan
- Artesania Latina
- (and 2 more)
-
Thanks! There will be some much more substantial modifications to come, but I'm still figuring them out. For example, Chapelle's plans don't specify how far below deck the floors or seats should be, to my eyes the kit design looks a little short so I'm considering deepening the cockpit a bit (which Dee Dee, in his build log, seems to have done, but most of the photos don't load for me). So I'll need to work that out before I glue anything into place.
-
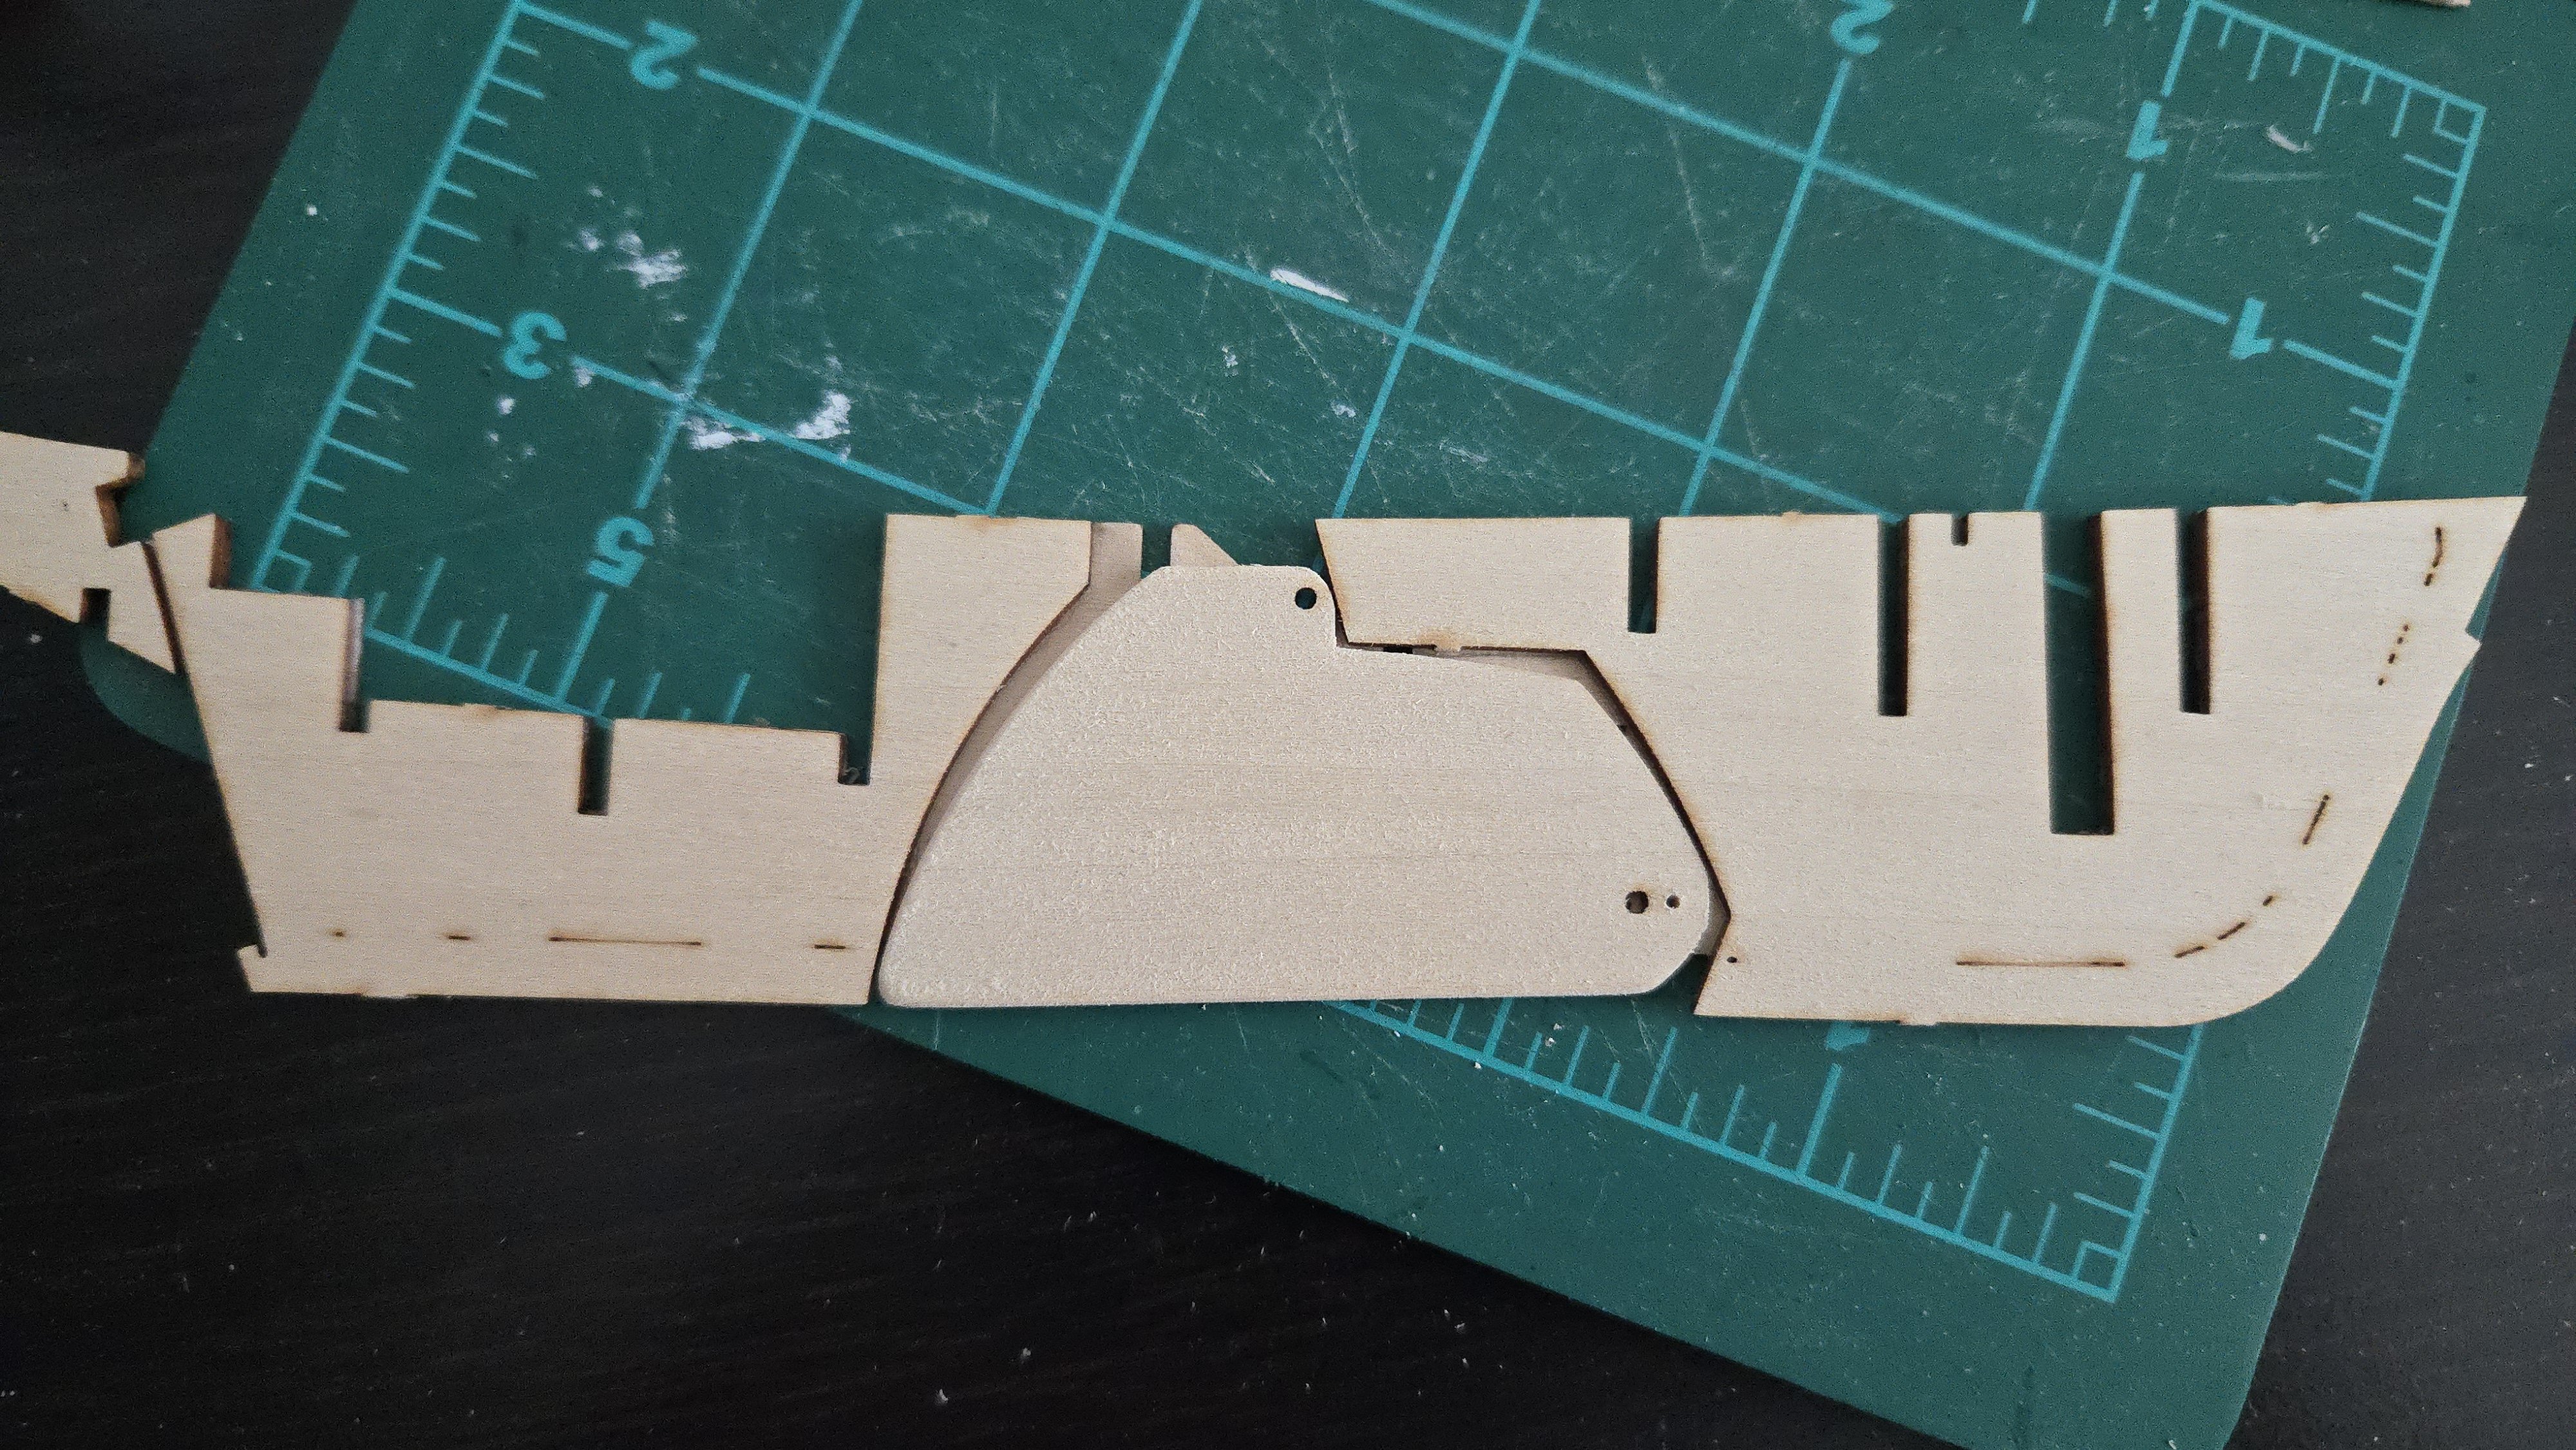
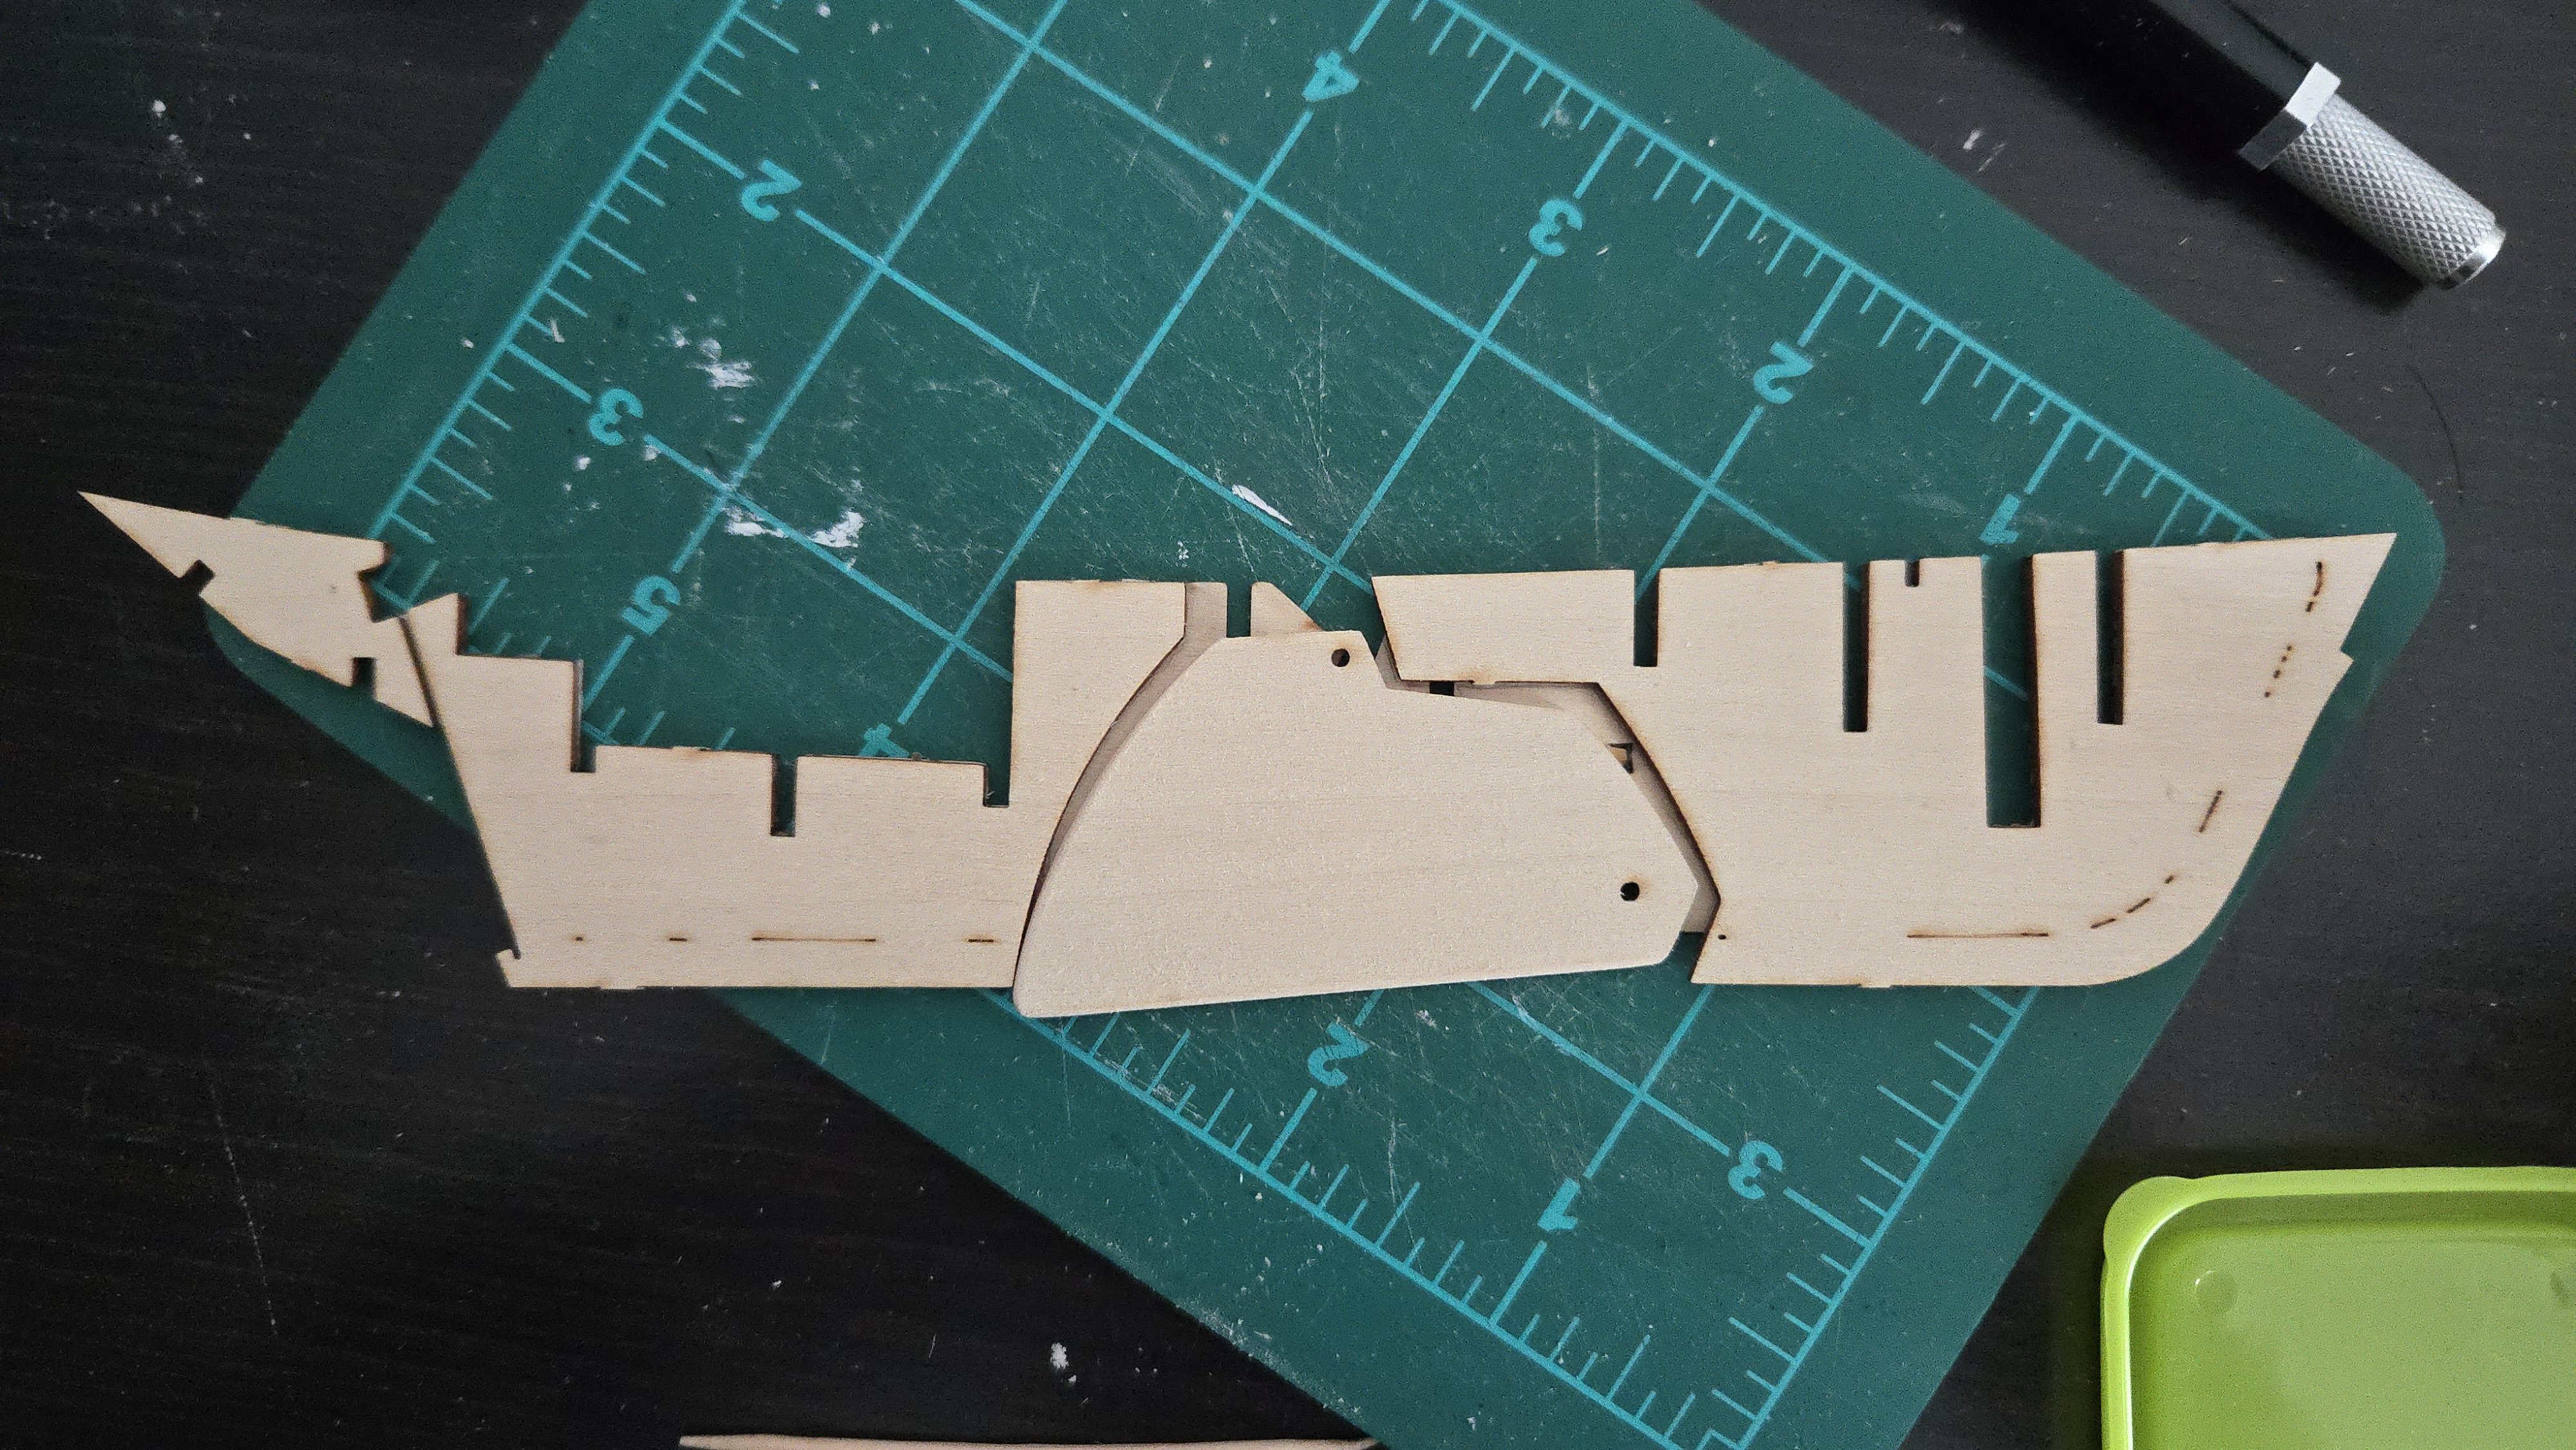
Given that the backbone is slightly wider, proportionally, than in the kit design, I needed to do some reshaping to get the bulkheads to properly fit. This was actually a very straightforward process. I used sanding sticks and mini files to slightly widen the slots. Bulkhead five, which has a narrowed slot at the top for the centerboard, especially needed shaping. In order to avoid removing too much material from the bulkheads, which would screw up the bottom edge where bulkhead meets keel, I also thinned the backbone at each slot. Thankfully my square mini-file is 1/8-inch square, the same thickness as my bulkheads, so this was simple to do. They aren't the straightest file lines, as the file sometimes skated across the surface rather than registering properly, but everything will be covered. Bulkhead 4, which is built in two parts around the centerboard, was a little tricky to properly fit due to its complex design. I had to trim the supports back a bit. For whatever reason, it didn't seem to need a groove filed in the backbone to fit properly--I filed more of a groove on the port side, but the bulkhead half just kind of hovers above it. It may need a little more fairing compared with the other bulkheads, but it should be fine and seems to line up pretty well with the other bulkheads. I also accidentally widened the slots for bulkhead 10, the transom, a little too much, making a very loose fit. I think the transom itself, which I still need to make, should hold it in place well, though. In any case, here is the backbone with all slots prepared: And here, the bulkheads dry-fit in place.


-
Thanks, Paul! The makerspace was really a lot of fun. The one I used had a lot of other equipment, too, including a CNC machine, a 3D printer, and a Cricut machine. If I had had more time, I would have loved to experiment with more of the tools there. I've progressed a bit more on the backbone. I'm still working out exactly how the centerboard pull will work, as it seems like a more accurate option may be a jointed or chain pull running through a small hole rather than a rigid rod running through a slot, as the kit would have it. At least, that's how I read Chapelle's diagram, which seems to have a small block or something for a rope or chain pull to run through? I could be wrong, though, I'm still considering my options. In any case, I'll be able to add the centerboard pull a little later, so I went ahead and glued on the starboard backbone piece. Despite using the spacers, I somehow got it a little high foreward. The backbone is straight, though, and I'll be adjusting the slots anyway to accommodate the slightly thick bulkheads. The only problem I can see this causing is that the backbone side pieces provide extra gluing surface to affix the ends of the planks, but I can always add an extra piece to build this up if necessary. In any case, I trimmed the top flush. I then drilled the new hole for the centerboard pivot through the starboard side, and added a length of copper wire for the pivot point. Next up, the reinforcing pieces. When prepping these in Lightburn, I left these parts with the doubled cut line I mentioned above, as it seemed fine if they turned out slightly undersized. After adding them, the backbone is pretty solid. Next up, I'll be attacking the bulkheads and backbone with files to get the slots properly sized.


-
Welcome! Very nicely done on the Lobster Smack, and great job on the full-scale boats! Starting a build log is the best way to get answers to any questions you have.
-
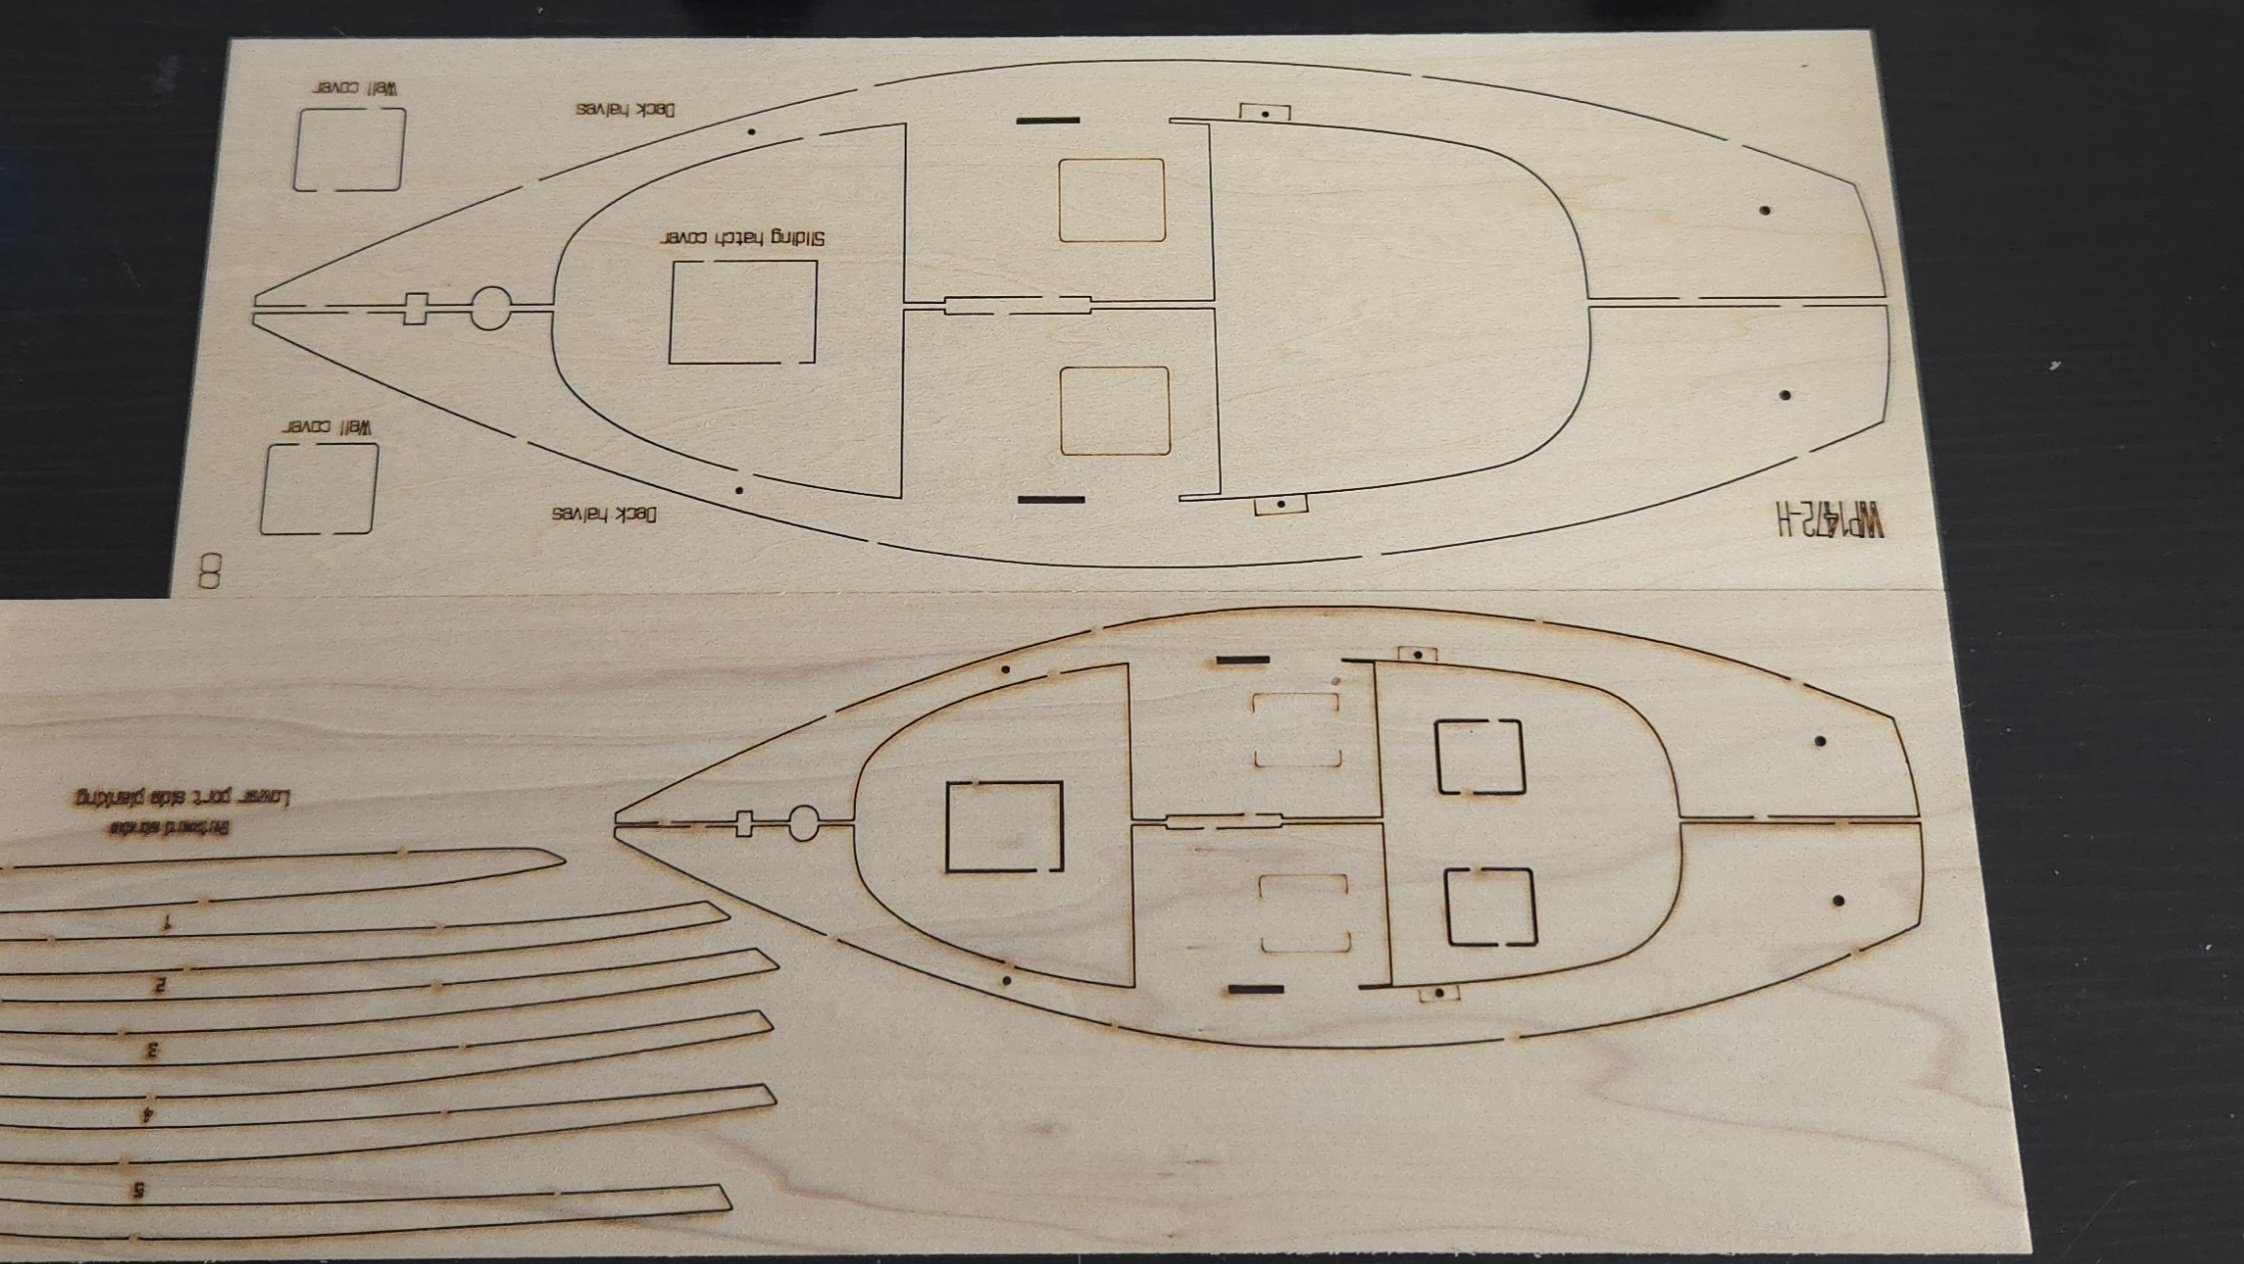
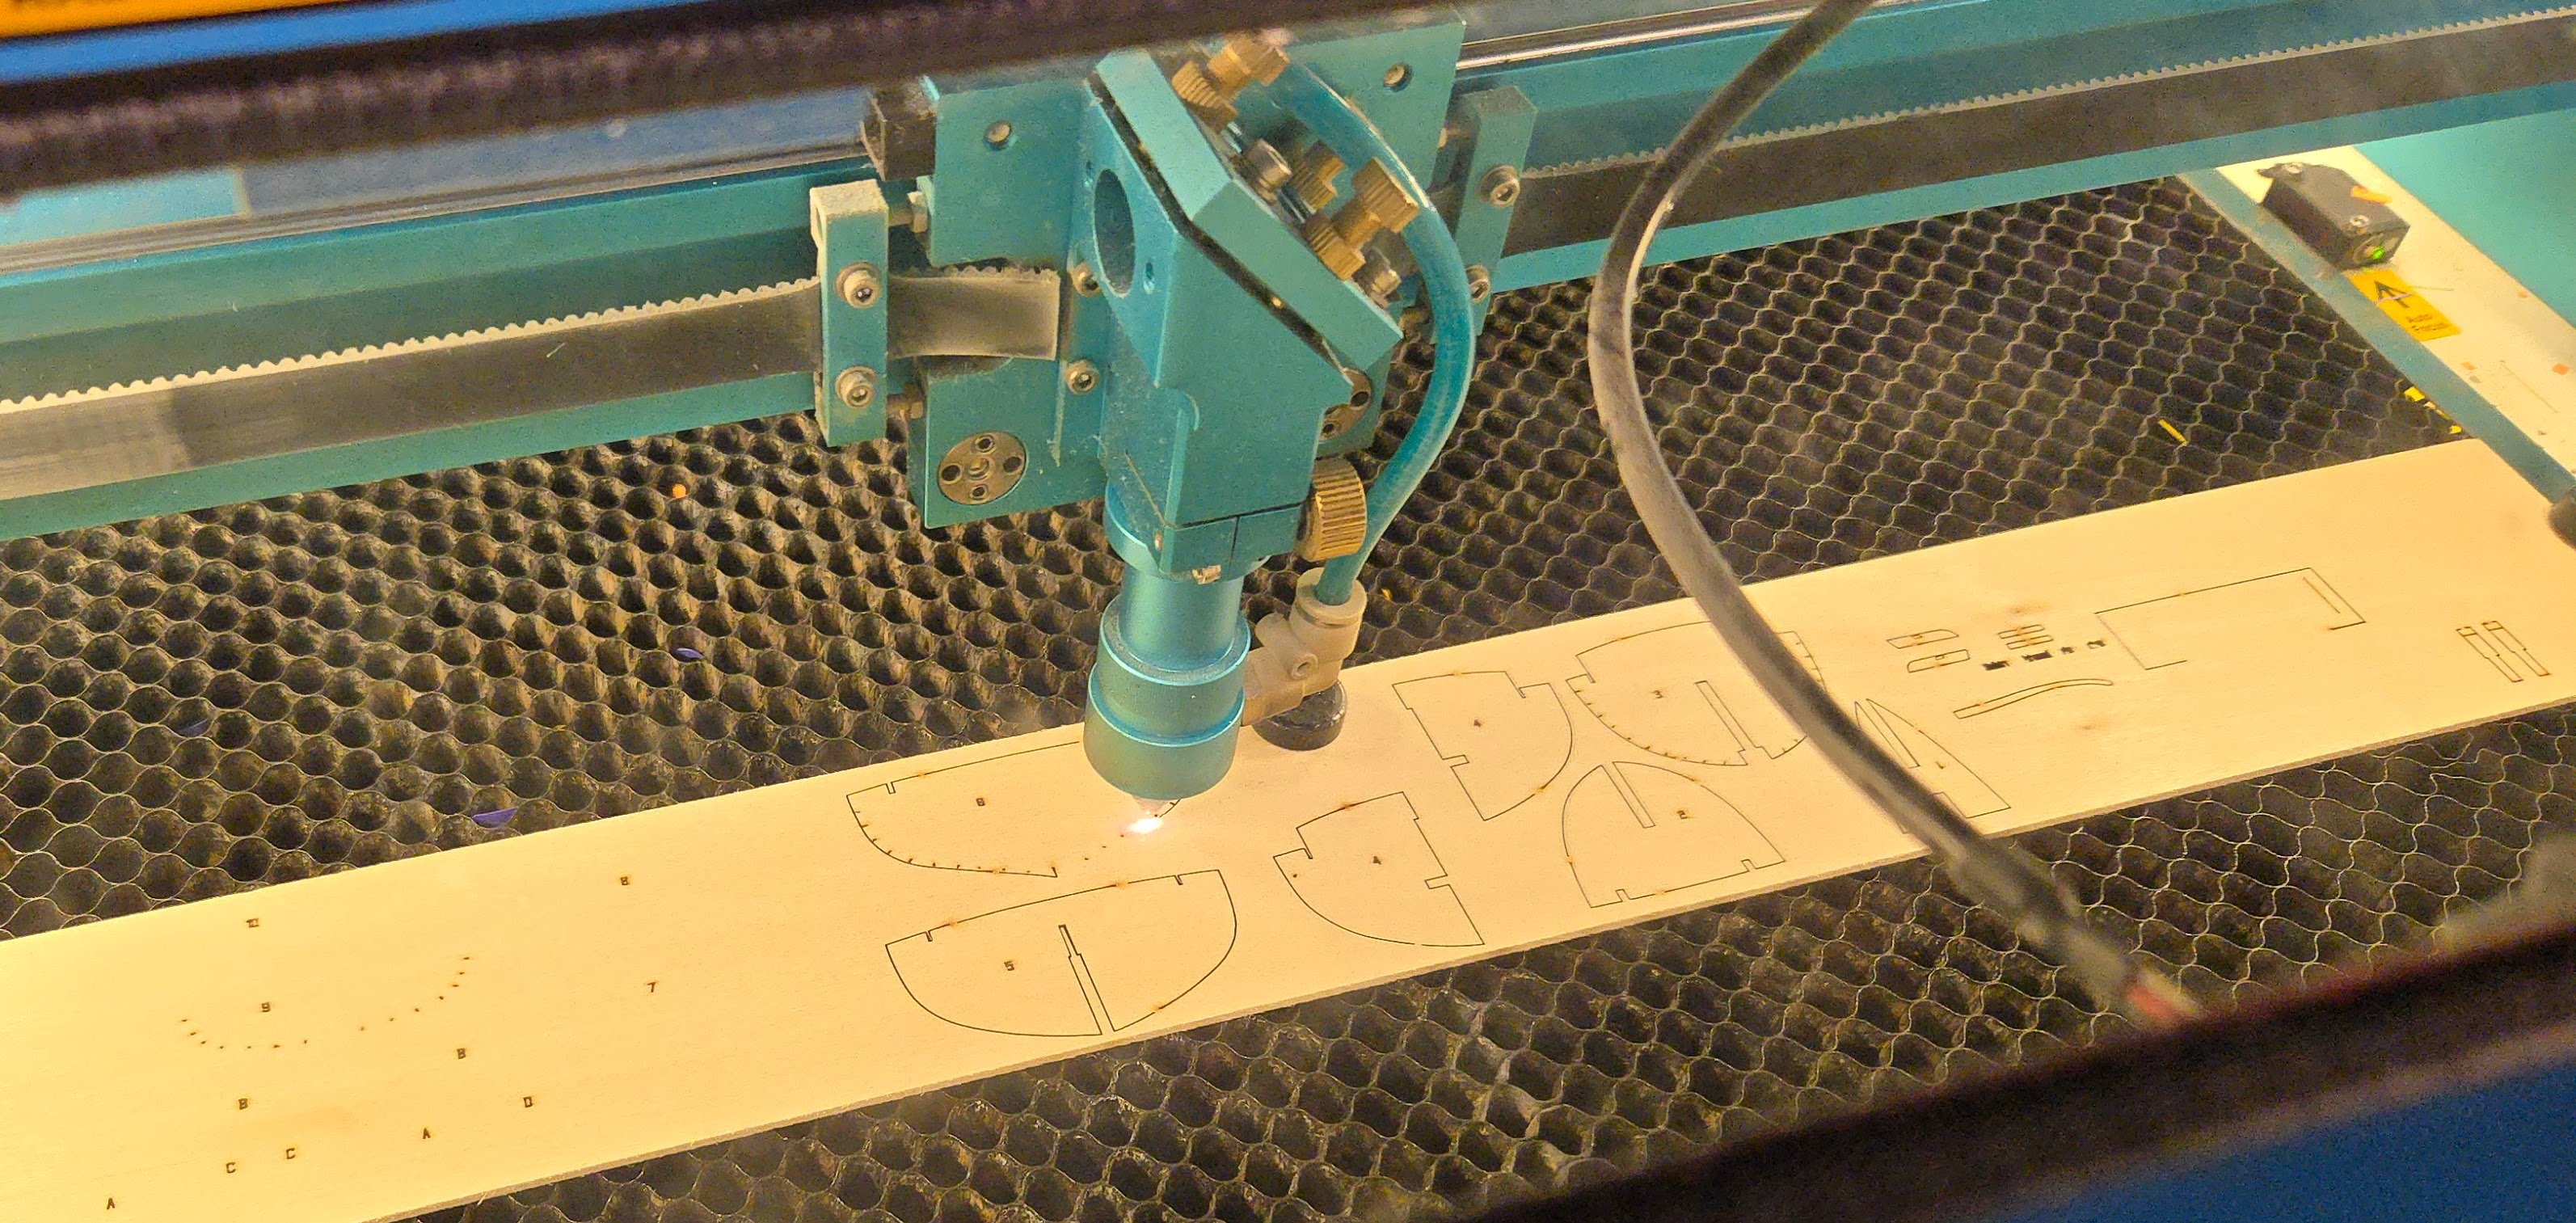
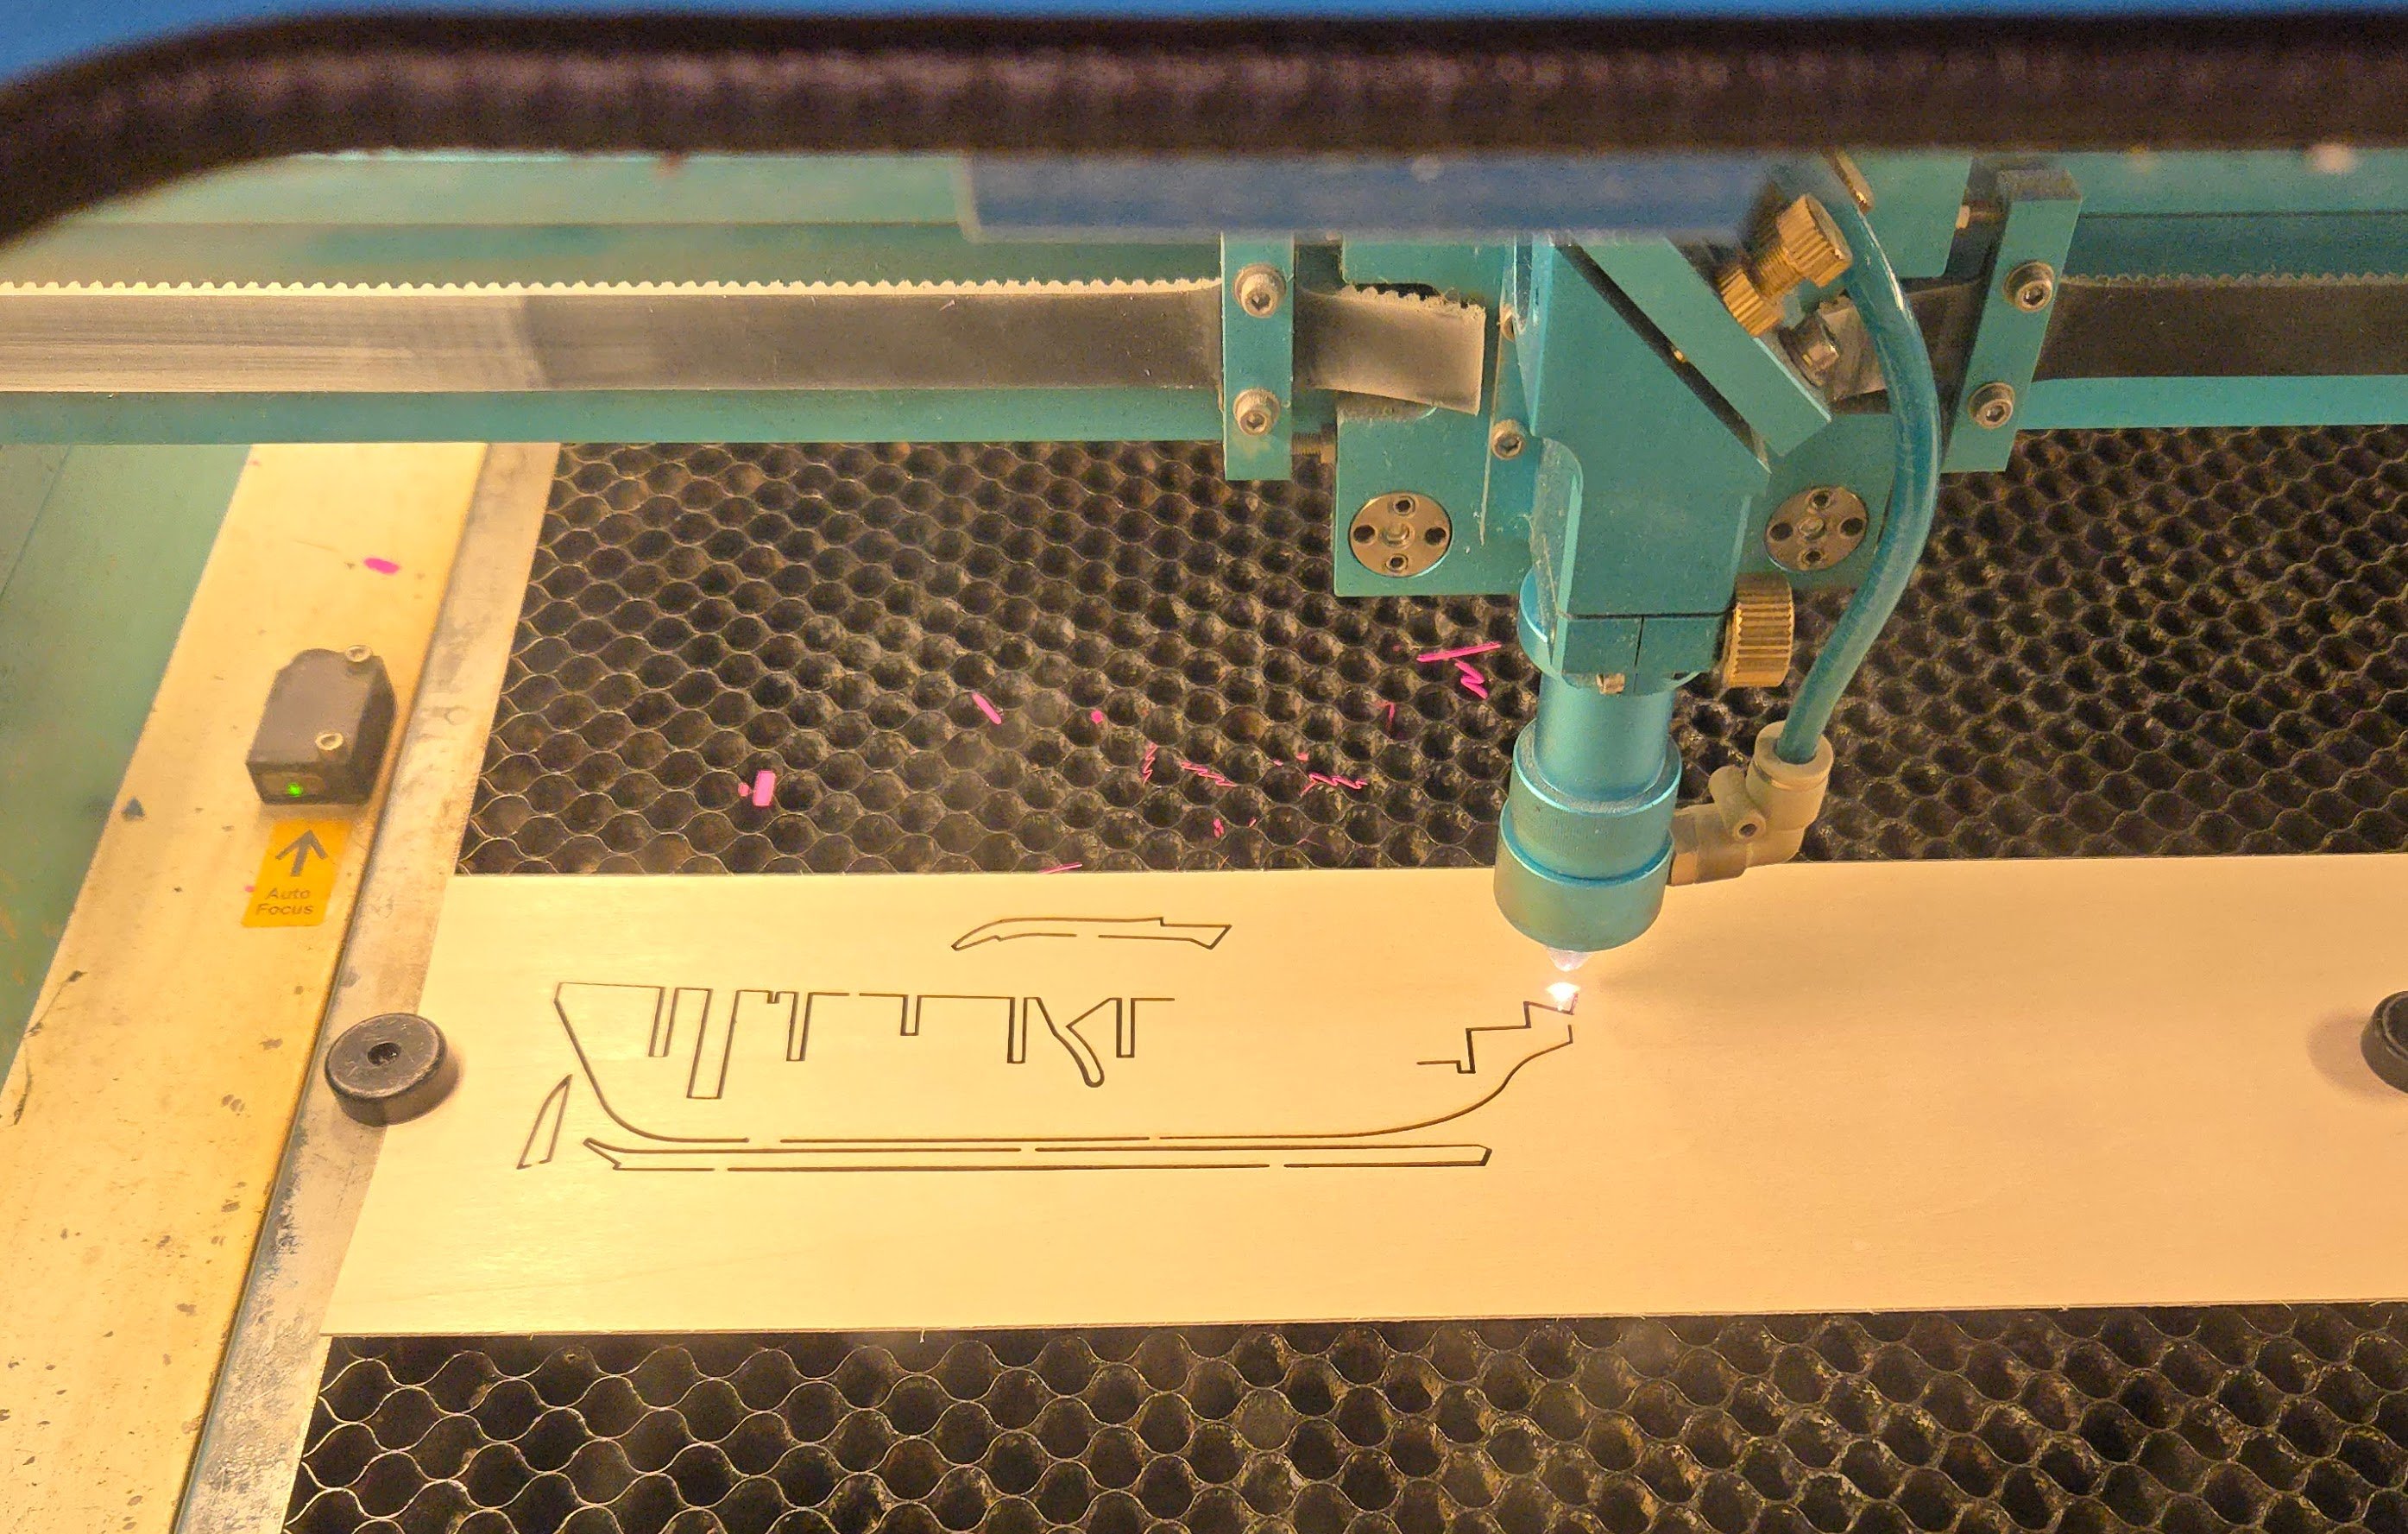
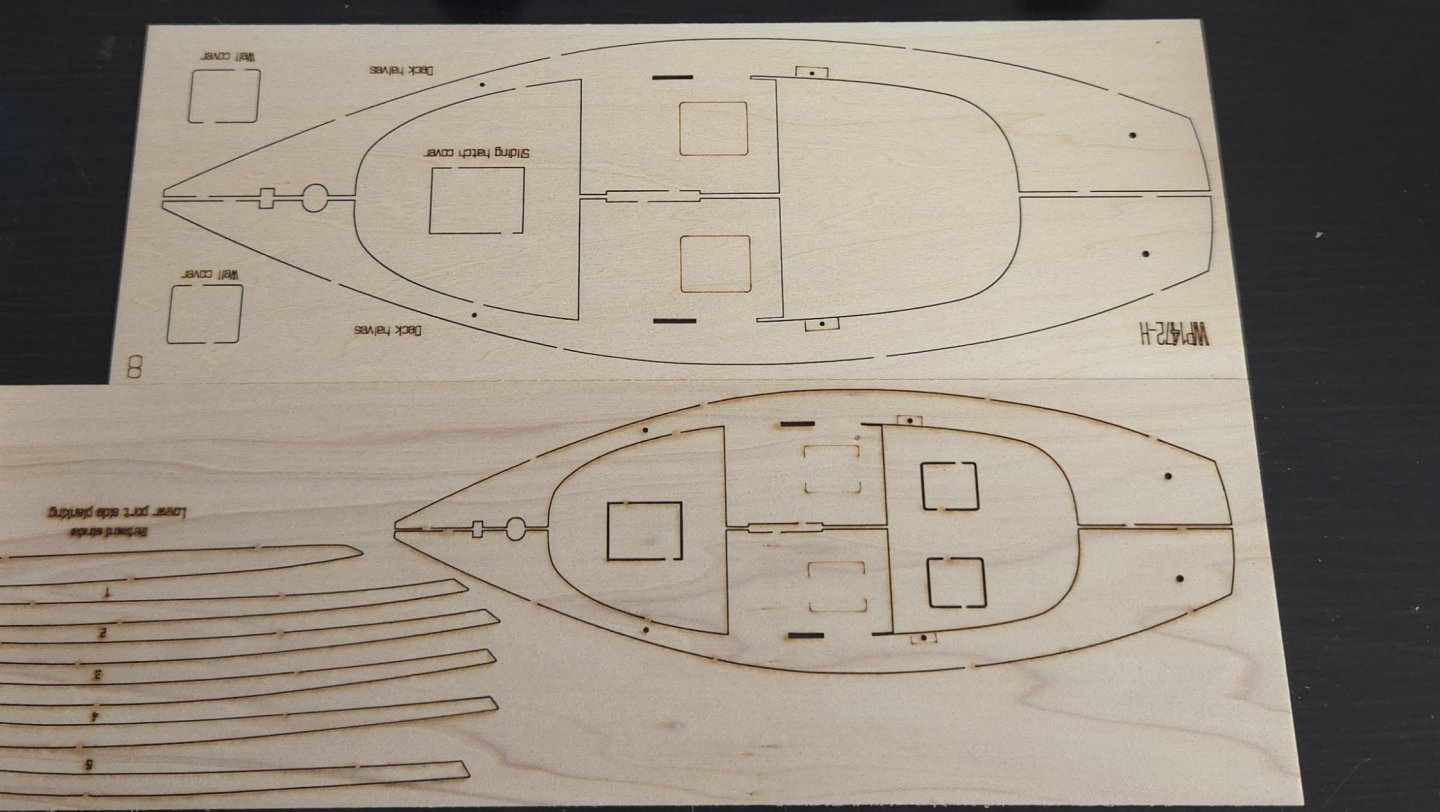
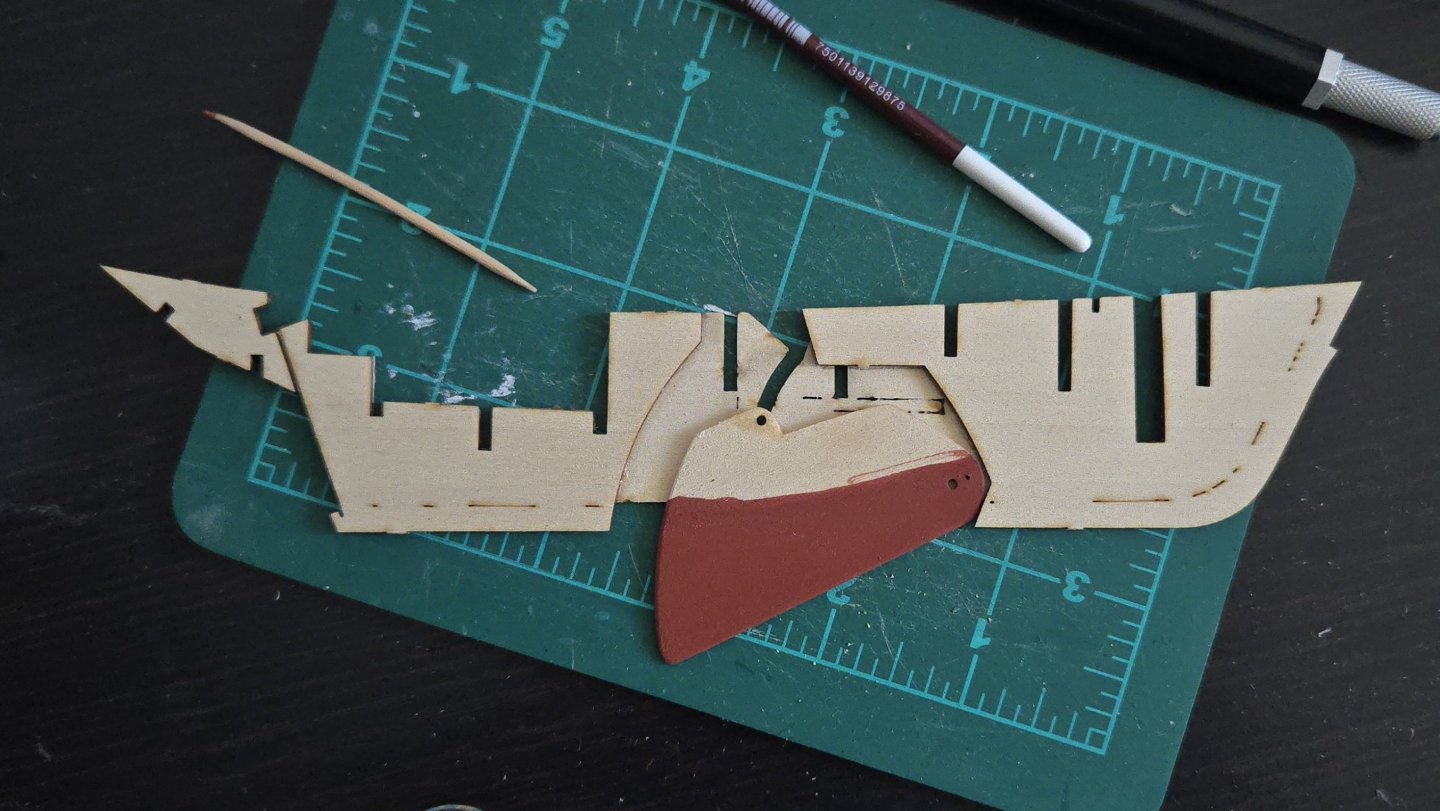
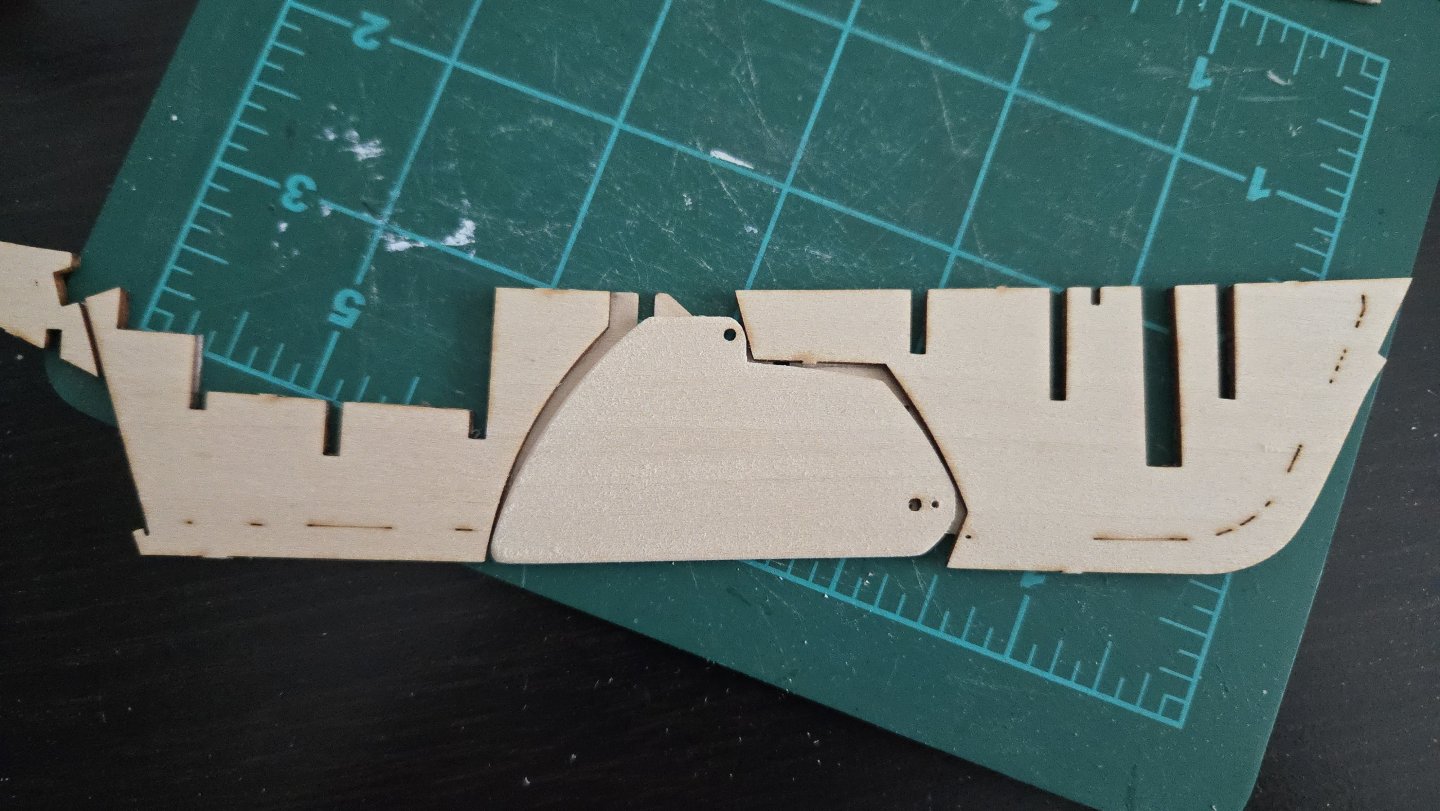
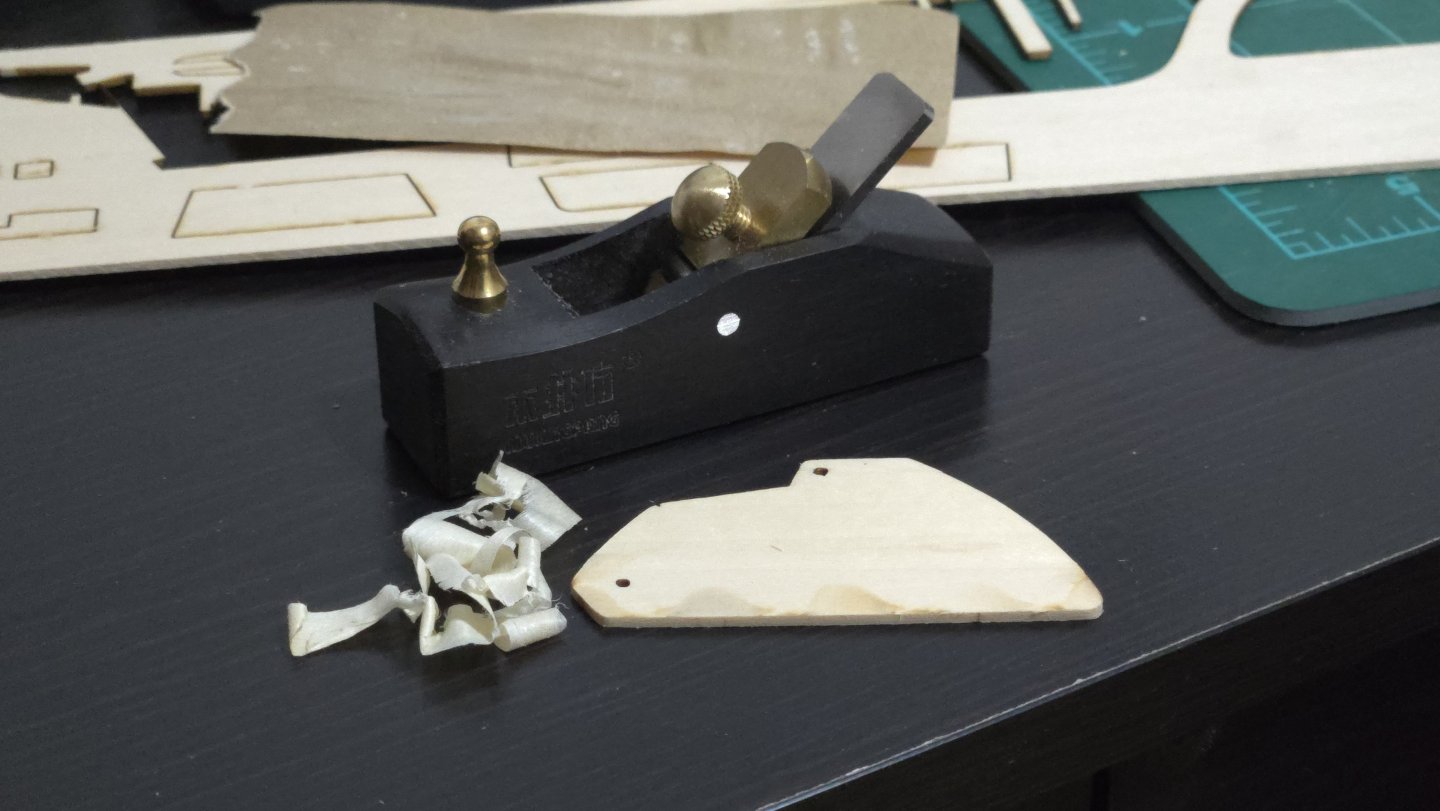
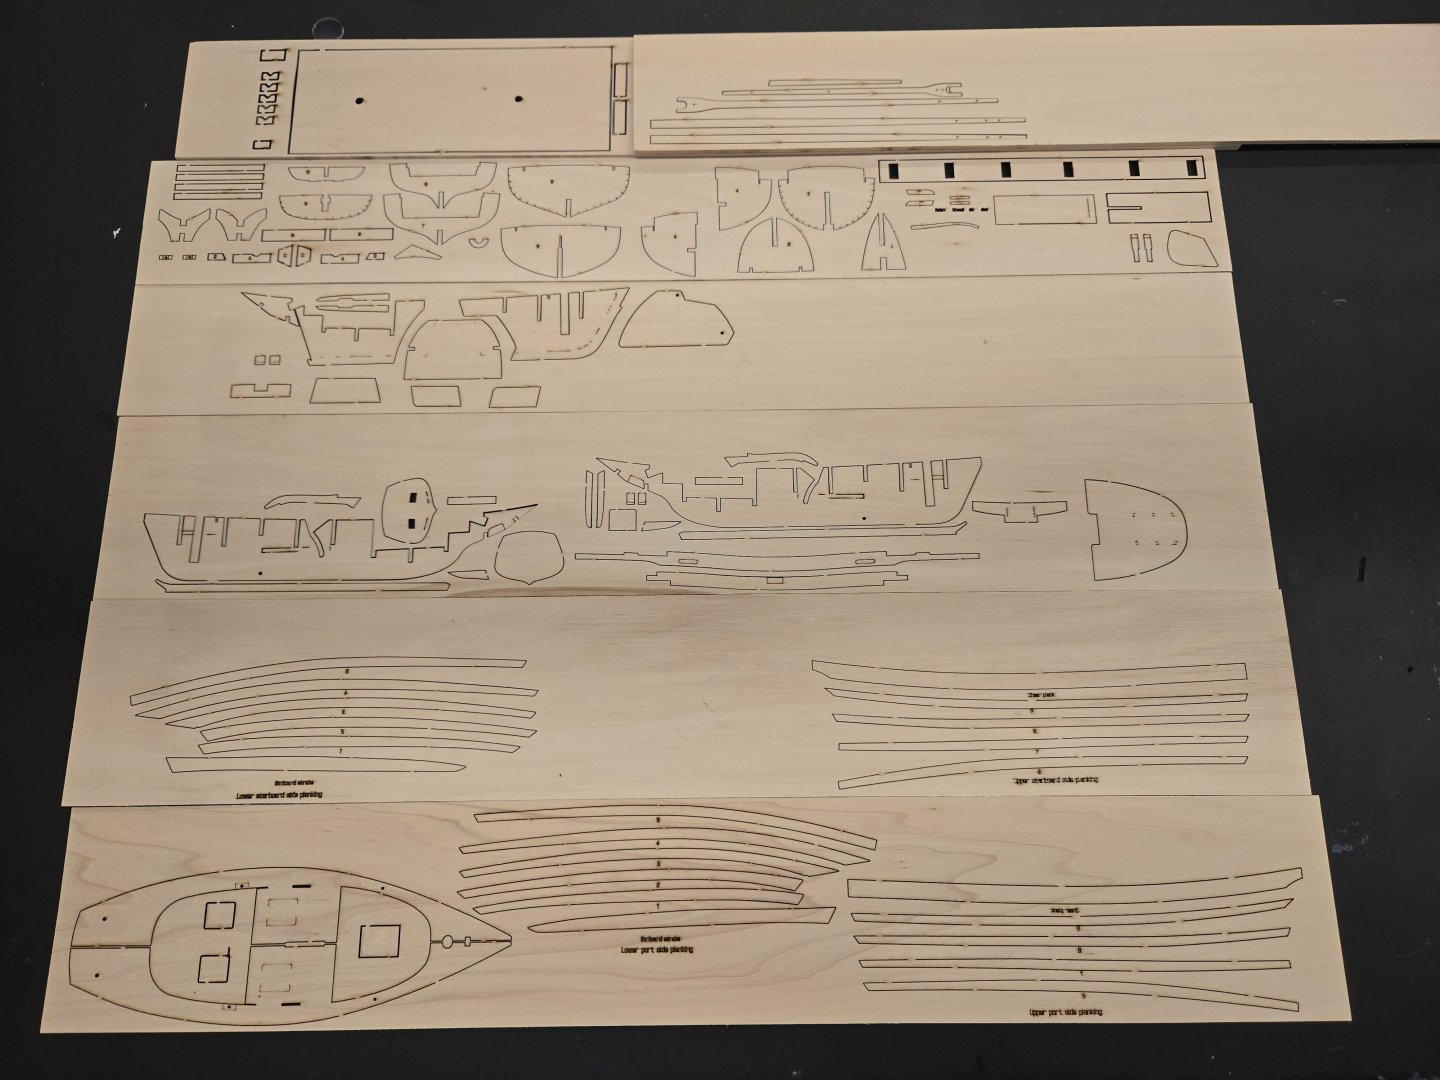
After finishing my build of a Lancha Chilota about a month ago, I thought that my next build would be a Brazilian Jangada fishing raft. However, as I began reading for it, I realized that it would take a lot longer than I expected before I could start making sawdust. I would need to do a fair bit of research up front, which is a hard to do right now as my job is currently in a busy period. So, I decided to put the Jangada on the backburner for now, and start a new build that I've already done a lot of the background research for: a Muscongus Bay Lobster Smack, based on the Model Shipways Shipwright Series. I had originally planned on building this way back in 2023, but my kit never arrived in Mexico, and by the time I finally was able to get it in the US, I was focused on other builds. Despite putting it off for a while, though, I'm looking forward to this model. I quite enjoy building these sorts of fishing boats. This one has very nice lines, and being based on a kit, it should be a bit of a more straightforward build with less time and effort up front to figure out the underlying structure. This is quite a popular model with a lot of excellent build logs, for both the Model Shipways kit (which I have) and the Midwest kit, many of which have personalized it by diverging from the kit in some way. I also hope to do something a little different with it. First, I decided to rescale the kit from 1:24 to 1:32, making for a smaller, easier-to-display model in the same scale as most of my other builds. This will really highlight the design differences between the Lobster Smack and the Lancha Chilota--both gaff sloops of similar lengths, but meant for totally different purposes. Rescaling the kit means not using any of the kit materials. In theory I could have just gone with a totally different scratch-build, but as will be seen, the rescaling process was pretty quick, and (as long as I didn't screw up) should result in a nice model without needing to do all the work of developing the hull from scratch. Rescaled, the model has a total hull length of about 8.5 inches, corresponding to a vessel a bit over 22.5 feet long. The second big difference is that I will be diverging from the kit design to follow other sources in a number of aspects. Although the kit uses carvel planking and has stays, most Muscongus Bay Lobster Smacks used lapstrake planking and lacked stays, for example, and many seem to have lacked the beakhead on the kit version. I'll discuss this in more detail later, but the kits is heavily based on Chapelle's plans for the vessel, yet the vessel that he drew plans for seems slightly atypical in some respects. I'm still working out exactly how I'll modify the design, but the basic framework will be the same, so I've begun work on that. (I'm not really sure if this log should be in the kit or scratch-build section, as it's an oddity. I seem to remember seeing builds based on kit plans located in the scratch section, hence my decision. Moderators, please feel free to move it if necessary. Thanks!) Rescaling I started this model in late 2024 while visiting family in the US. When I moved to Mexico and had limited space in my luggage, they kindly offered to hold onto the kit for me until I could take it later. While visiting, I realized that I could use the local public library's free makerspace to rescale the kit. I began by scanning all the part sheets, and the very friendly makerspace staff were able to show me how to import the files into Lightburn and set them up for laser cutting. (Here I should probably note that the scans and files are strictly for my personal use, not for the purposes of piracy.) Despite my lack of experience, I found Lightburn pretty easy to use, but there were a couple things to be aware of. I had to rearrange a lot of parts to fit on the basswood sheets I used. When I imported the scan, I needed to do a fair bit of cleaning and removing artifacts, as it interpreted a lot of darker spots in the wood as lines to cut. It also generated a double line around all parts, because it traced both sides of the laser cut, so I needed to erase one of the lines to avoid double-cutting. For my test piece, I chose to use the inner line, which (as I should have realized) led to a slightly undersized piece. For the actual parts, I used the outer line, except for in the slots in the backbone and bulkheads. This is because I was not able to scale down the thickness of all the wood, so the bulkheads and keel are slightly thicker, proportionally, than they are on the actual kit. Before too long, I had the full rescaled "kit" ready to go. I was not able to figure out the exact settings to minimize burning, so quite a few of the cuts have some scorching around them. As I'll be painting the model, this won't be a problem. The makerspace staff were really friendly and helpful, and a lot of people were interested in the project. This was definitely a lot faster than trying to cut all the parts by hand, and I would definitely be interested in using a laser cutter again if possible (it certainly would make my Bateau de Lanvéoc build a lot faster...). As can be seen, the rescaled model will be a good bit smaller than the kit. Kit deck above, rescaled version below. Framework After traveling back to Mexico, the parts sat around while I worked on other builds, until yesterday night, when I began building the backbone structure. It fits together well. It's a great idea to include spacers in the kit to align the backbone parts while gluing, as I often find that parts slide a bit when clamping. I should note that, while the kit uses slightly different shapes above the centerboard slot for each side of the backbone, I just copied one side to reduce my workload in Lightburn. It's interesting to see how well the backbone matches up with the plans included in Howard I. Chapelle's American Small Sailing Craft (1951). To simplify the laser cutting and use only readily-available wood thicknesses, I made the centerboard of the same 1/16‐inch thick basswood as the central backbone part. Of course, it needed to be thinned to allow for movement, so I planed it and sanded it thinner. I then ran into a slight problem. Lining up the pivot point, the centerboard would not be able to be fully raised as it contacted the backbone at several points. The centerboard pull rod also wouldn't be aligned with the slot. This was easy to fix. I trimmed a bit off the top of the centerboard and relocated it a bit forward, drilling a new pivot hole. This allowed it to fit and aligned the pull rod hole with the slot. I decided to paint the hull red below the waterline, so I painted the visible portion of the centerboard. I'm still deciding on the above-water hull color. I like the look of a darker hull, so I'm thinking either black or a sort of bottle green, both of which seem to have been common enough fishing boat colors in the US northeast in the period (although it's hard to tell which is which from black-and-white photos). I also used a dab of superglue to reinforce the area around the centerboard pull hole. That's where the build's at, very enjoyable so far. In future posts, I'll discuss a bit more about the history of this vessel type, sources, and the changes I'll be making.


-
hull finishing
JacquesCousteau replied to serpe's topic in Painting, finishing and weathering products and techniques
Sounds like an interesting plan! You may want to consider using wooden treenails, instead, as they can be made in scale and are more accurate than brass. Searching a bit on this site should bring up lots of examples and instructions. -
Off to a nice start! I'm curious to follow along and see how the model turned out.
-
Congratulations, very nicely done! Good call on redoing the rigging to get it right, it looks excellent.
- 86 replies
-
- 3
-
-
- Model Shipways
- Norwegian Sailing Pram
- (and 3 more)
-
Very nice work, and glad to hear the good news about your health!
- 457 replies
-
- 6
-

-
-
- sternwheeler
- Hard Coal Navy
- (and 1 more)