JacquesCousteau
-
Posts
1,383 -
Joined
-
Last visited
Content Type
Profiles
Forums
Gallery
Events
Everything posted by JacquesCousteau
-
 Thanks, all, for the advice, it's very helpful! There are some metal parts that I can get away with making from paper, like the band that holds the bowsprit to the stem. Many parts of the rigging parts will have to be metal, though, as will the rudder hinges, due to the pressure they'll be under. I'm going to take a look and see if any etching or solvent-based primers are readily available, but if not, it looks like I can get blackening solution here for only a little more than it costs in the US.
- 312 replies
-
- 3
-

-
- Chile
- Latin America
- (and 6 more)
-
Sorry to hear about the interview results, but the Polar Research Institute sounds like it was a fantastic trip! Very cool that you were able to see the original photos.
-
Nice work! It's very interesting to hear about ownership patterns, it helps to explain a lot about what life onboard must have been like.
-
It may be helpful to post screenshots or links showing what you mean by AL's instructions and the other build log's methods. In general, many kits provide poor instructions on planking that produce frequently inaccurate results. It's up to you how much that matters to you. In general, the planks will need to be narrowed quite a bit near the bow. Lining off your hull can be very useful for figuring out the required taper.
-
Fascinating, I hadn't realized. I grew up in Montana and may well have driven past where the photo was taken.
- 732 replies
-
- 6
-
-
- Lula
- sternwheeler
- (and 1 more)
-
Very nice work! It's so hard to tell color from black and white photos. I assume that the car and the vest on the guy next to the car are black. In which case, the trim looks to be a slightly less dark color? (Although it might also just be differences in reflectivity or something). I'd say that, if you like red, it's your vessel and you should go for it, as long as it's a dark red I think it could be a reasonable interpretation. Plus who's to say they didn't change the trim color at some point? Maybe one day there was a sale on dark red. Also, looking closely at the photo, I noticed for the first time that Lula has its home port written on the stern. Does it say "Great Falls"?
- 732 replies
-
- 6
-

-
-
- Lula
- sternwheeler
- (and 1 more)
-
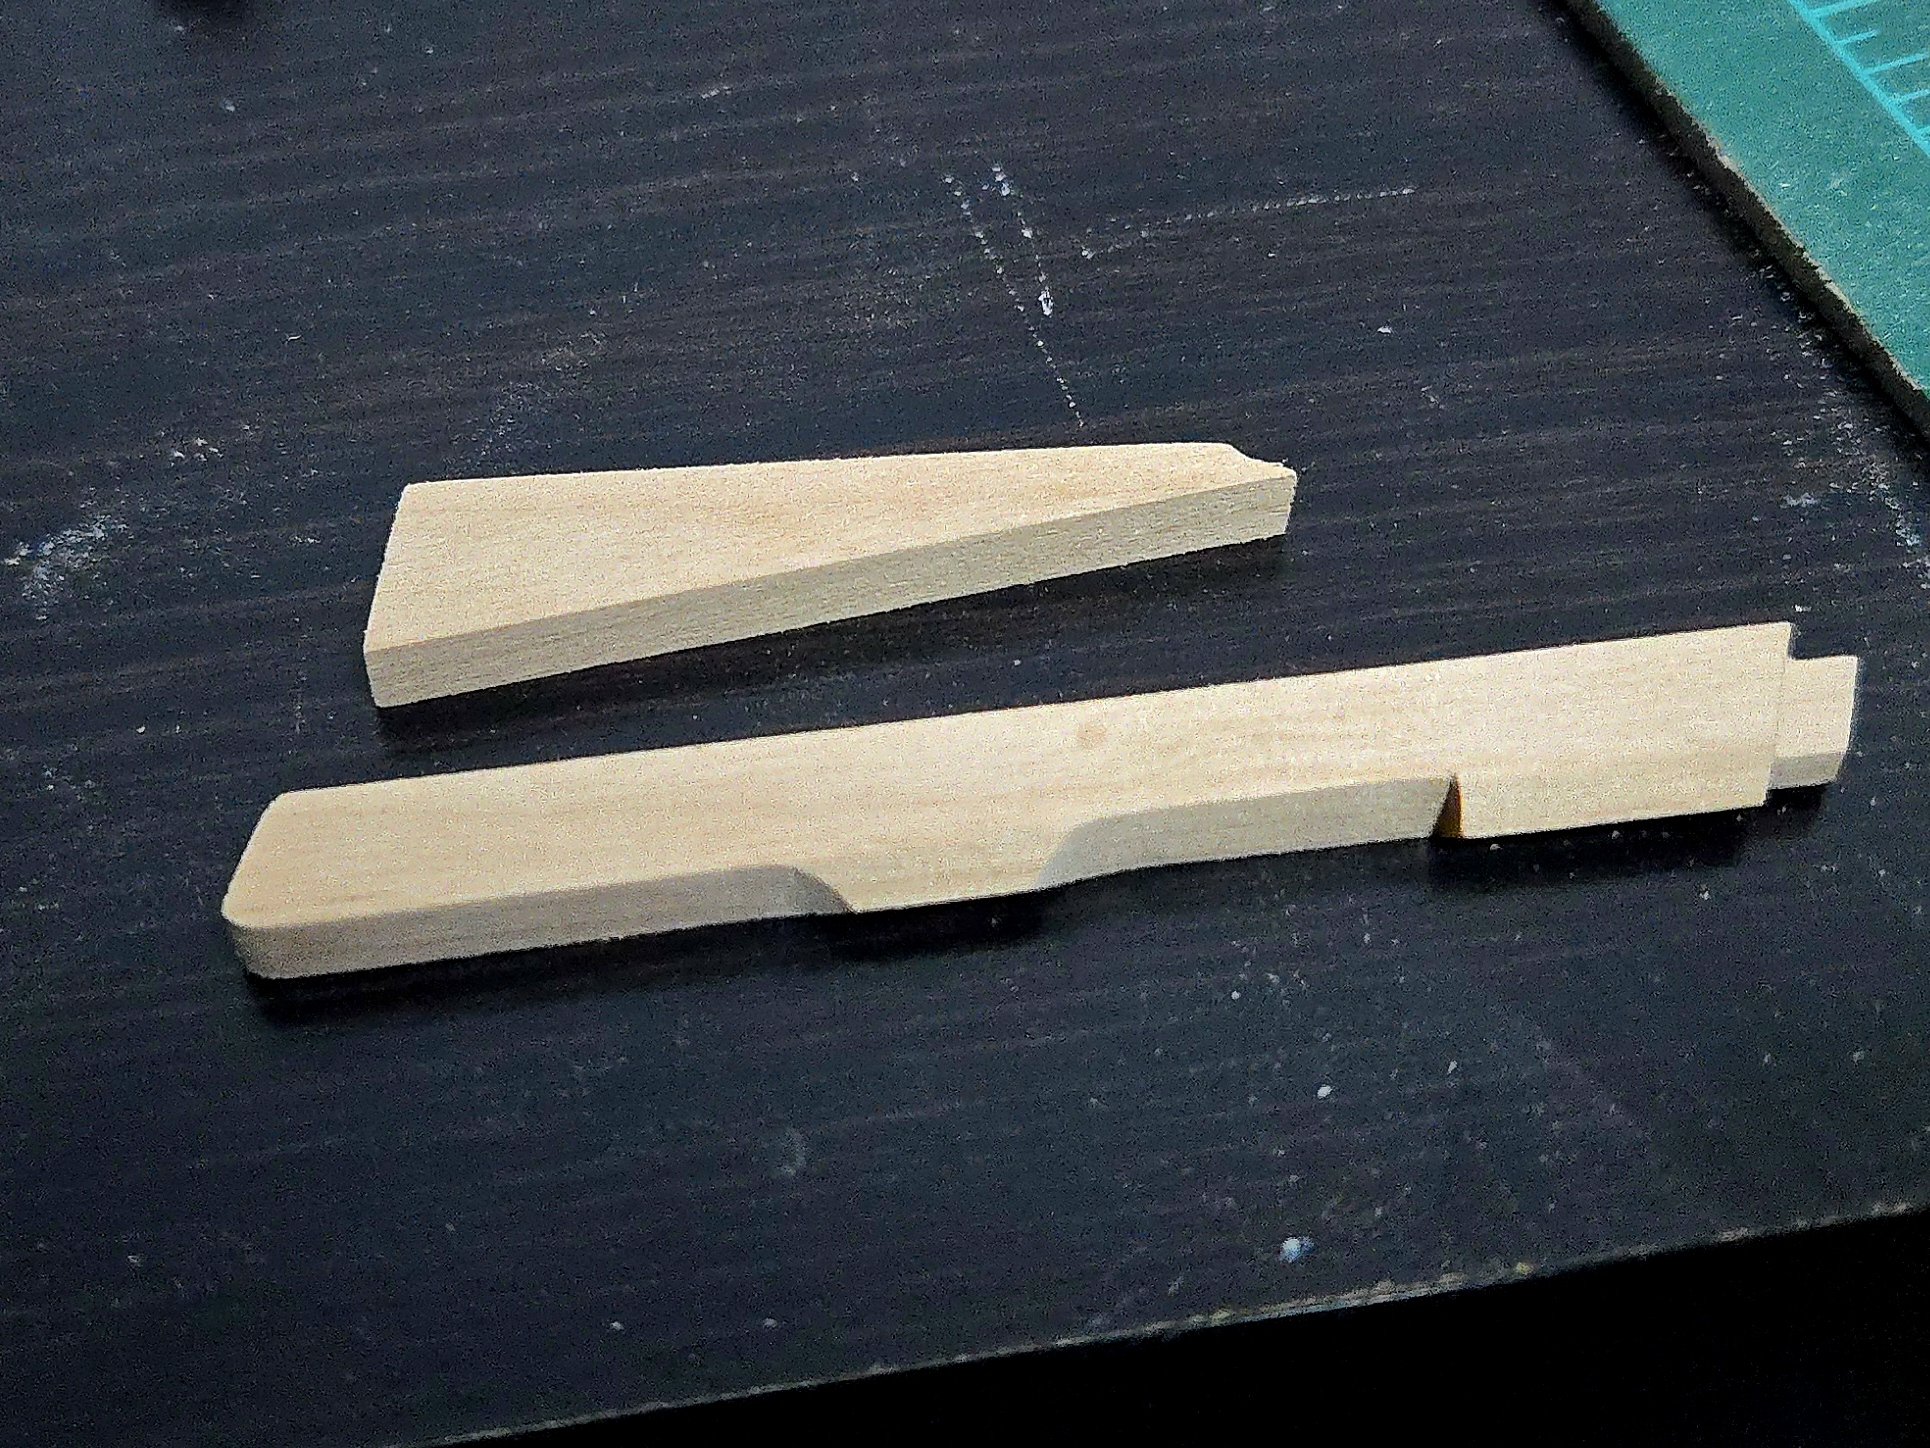
Apparently it's a classic for a reason! Thanks! I'm definitely going to be borrowing some techniques from your Santa Caterina build, although the Bateau is a bit simpler. I've made progress on the keel assembly, first rough-cutting the stem, deadwood, and sternpost and then finalizing the shape with an x-acto knife, sandpaper, a mini-plane, and files. The sternpost was the easiest part to shape. I decided to include the tenon shown on the plans to practice my carving, although I'm not sure if I'll actually carve a mortise into the keel--getting the right angle and locations will be a little tricky, and the joint will be entirely invisible once I glue the sternpost to the keel. I decided to leave the front edge of the deadwood a little wide for now. A frame will be butted up against it, and I want to make sure everything will line up on the build board rather than risk trimming it too short now. I also will need to thin it (well, part of it at least--actually, I should double-check how much of it is thinned) for the rabbet. The stem was a little tricky to sand on the interior edge and still needs some shaping on both sides in the photo below. Lacking a spindle sander, I wrapped a bit of sandpaper around a gluestick and found that to work pretty well. I tried to position the stem lengthwise along the grain, but the joint at the bottom is still a little fragile, so I'm leaving some excess that I'll trim once it's glued to the keel. Getting the joint right between the keel and stem was tricky. For keel no. 2, I cut a strip of the right dimensions but overlength, and worked on the joint first. That way, I could trim off a bit of the foreward end of the joint if I thinned it too much, without making the keel too short. The aft end will be trimmed once the whole keel structure is assembled. It took a lot of fine filing and checking, but I finally got a joint I'm happy with. While there's a slight gap in the photo, keep in mind that the parts aren't being pressed together in the photo. One odd issue I've encountered is that, although all the parts thus far have been cut from the same sheet, the bottom of the stem is slightly thinner (by maybe 1/64-inch or less) than the rest of the parts. I'm not really sure how it happened, I guess there's a low part on the sheet. It's not really a problem as the keel assembly as a whole needs to be thinned very slightly to match the dimensions, but it was definitely a surprise. In any case, nothing is glued yet except for the two parts of the rudder, but if the parts are assembled, it starts to look a little like a boat (especially if they're placed together over the plans). Next up, I need to shape the rabbet and get the build cradle ready.


- 139 replies
-
- 9
-
-
- ancre
- Bateau de Lanveoc
- (and 2 more)
-
@KeithAug I have only painted a few very small metal parts, but mostly just touch-up work or parts that were barely handled. I thought I remembered that Thukydides's Alert build made extensive use of painted brass, but upon double-checking, I see that he did a mix of painting and blackening because he wasn't wholly satisfied with the paint. Blackening may be the way to go, especially for parts like the anchor chain.
- 312 replies
-
- 4
-
-
- Chile
- Latin America
- (and 6 more)
-
Excellent point! Thankfully it will be a while until I get to the floorboards, so I can ponder my choice. On the build, it's been one step forward, one step back, with a good learning experience. I started work on the keel assembly. Rather than try to do a perfectly straight cut with the fretsaw to remove the keel from the alder sheet, I preferred to use a sharp blade and a straightedge, cutting from both sides of the board. Innumerable cuts later, I had a rough keel. I flattened the rough edge through planing and some sanding, and then worked at cutting out the joints at the fore and aft ends. As on the rudder, I'm finding the alder to be a real joy to work with. Before too long, I had myself a keel! But, there was a problem, as shown below. I shaped the keel following the top plan sheet, which showed a notched joint with the sternpost. After cutting out the joint, I noticed that the bottom plan sheet doesn't show the joint. Apparently the joint is entirely internal. I would have thought that the top plan sheet would have shown this with a dashed line in this case, as it does for some other parts, but this was an incorrect assumption on my part. In any case, the lesson is to always double-check the parts against multiple plans before cutting. Maybe an obvious point, but clearly something I needed to learn the hard way first. At least I still have plenty of alder left in this thickness to try again!


- 139 replies
-
- 7
-
-
- ancre
- Bateau de Lanveoc
- (and 2 more)
-
Thanks, @Keith Black and @Glen McGuire! Yes, I would definitely include the metal straps. Speaking of metal, I'm rapidly approaching the point where I'll need to start adding some metal parts for the rudder hinges and rigging. I'm trying to decide how to proceed with them. On one hand, I already blackened the turnbuckles back during my canoa build, and the blackening process itself is not difficult and seems to give good, even results (assuming I can buy any blackening fluid here). On the other hand, the blackening process entails working with some rather toxic chemicals that are hard to get rid of, which I don't love working with. So, I was considering just painting the metal, but to do that properly I'll need to pick up some metal primer and a better gunmetal paint than I can make by mixing the craft paints I have, and I'm not sure how well it will turn out compared to blackening (especially for the anchor chain--painting a chain seems difficult). Besides this, I'm pretty slow at metalworking and suspect I'll need to learn how to solder, so visible progress on this build may slow down a bit.
- 312 replies
-
- 4
-
-
- Chile
- Latin America
- (and 6 more)
-
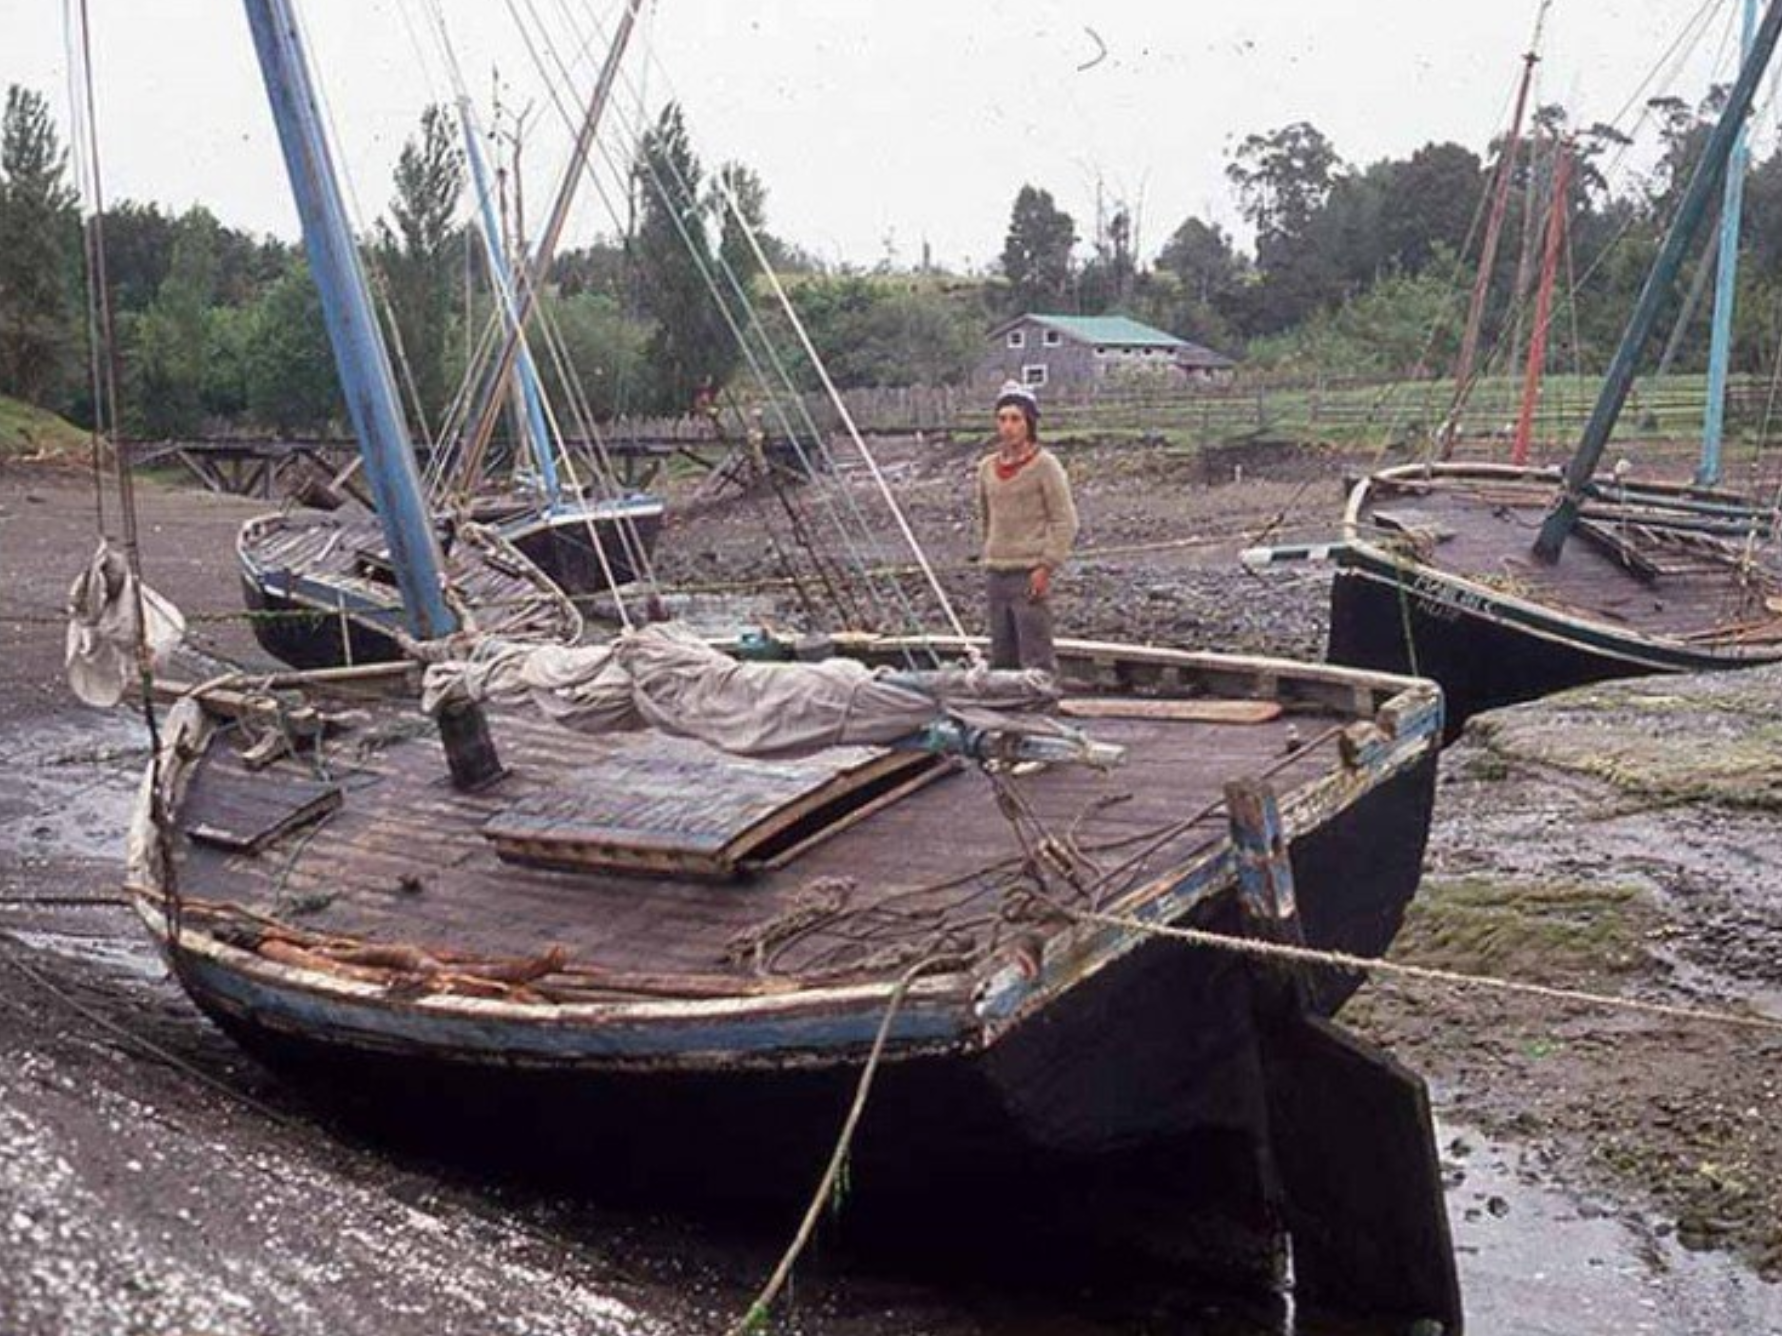
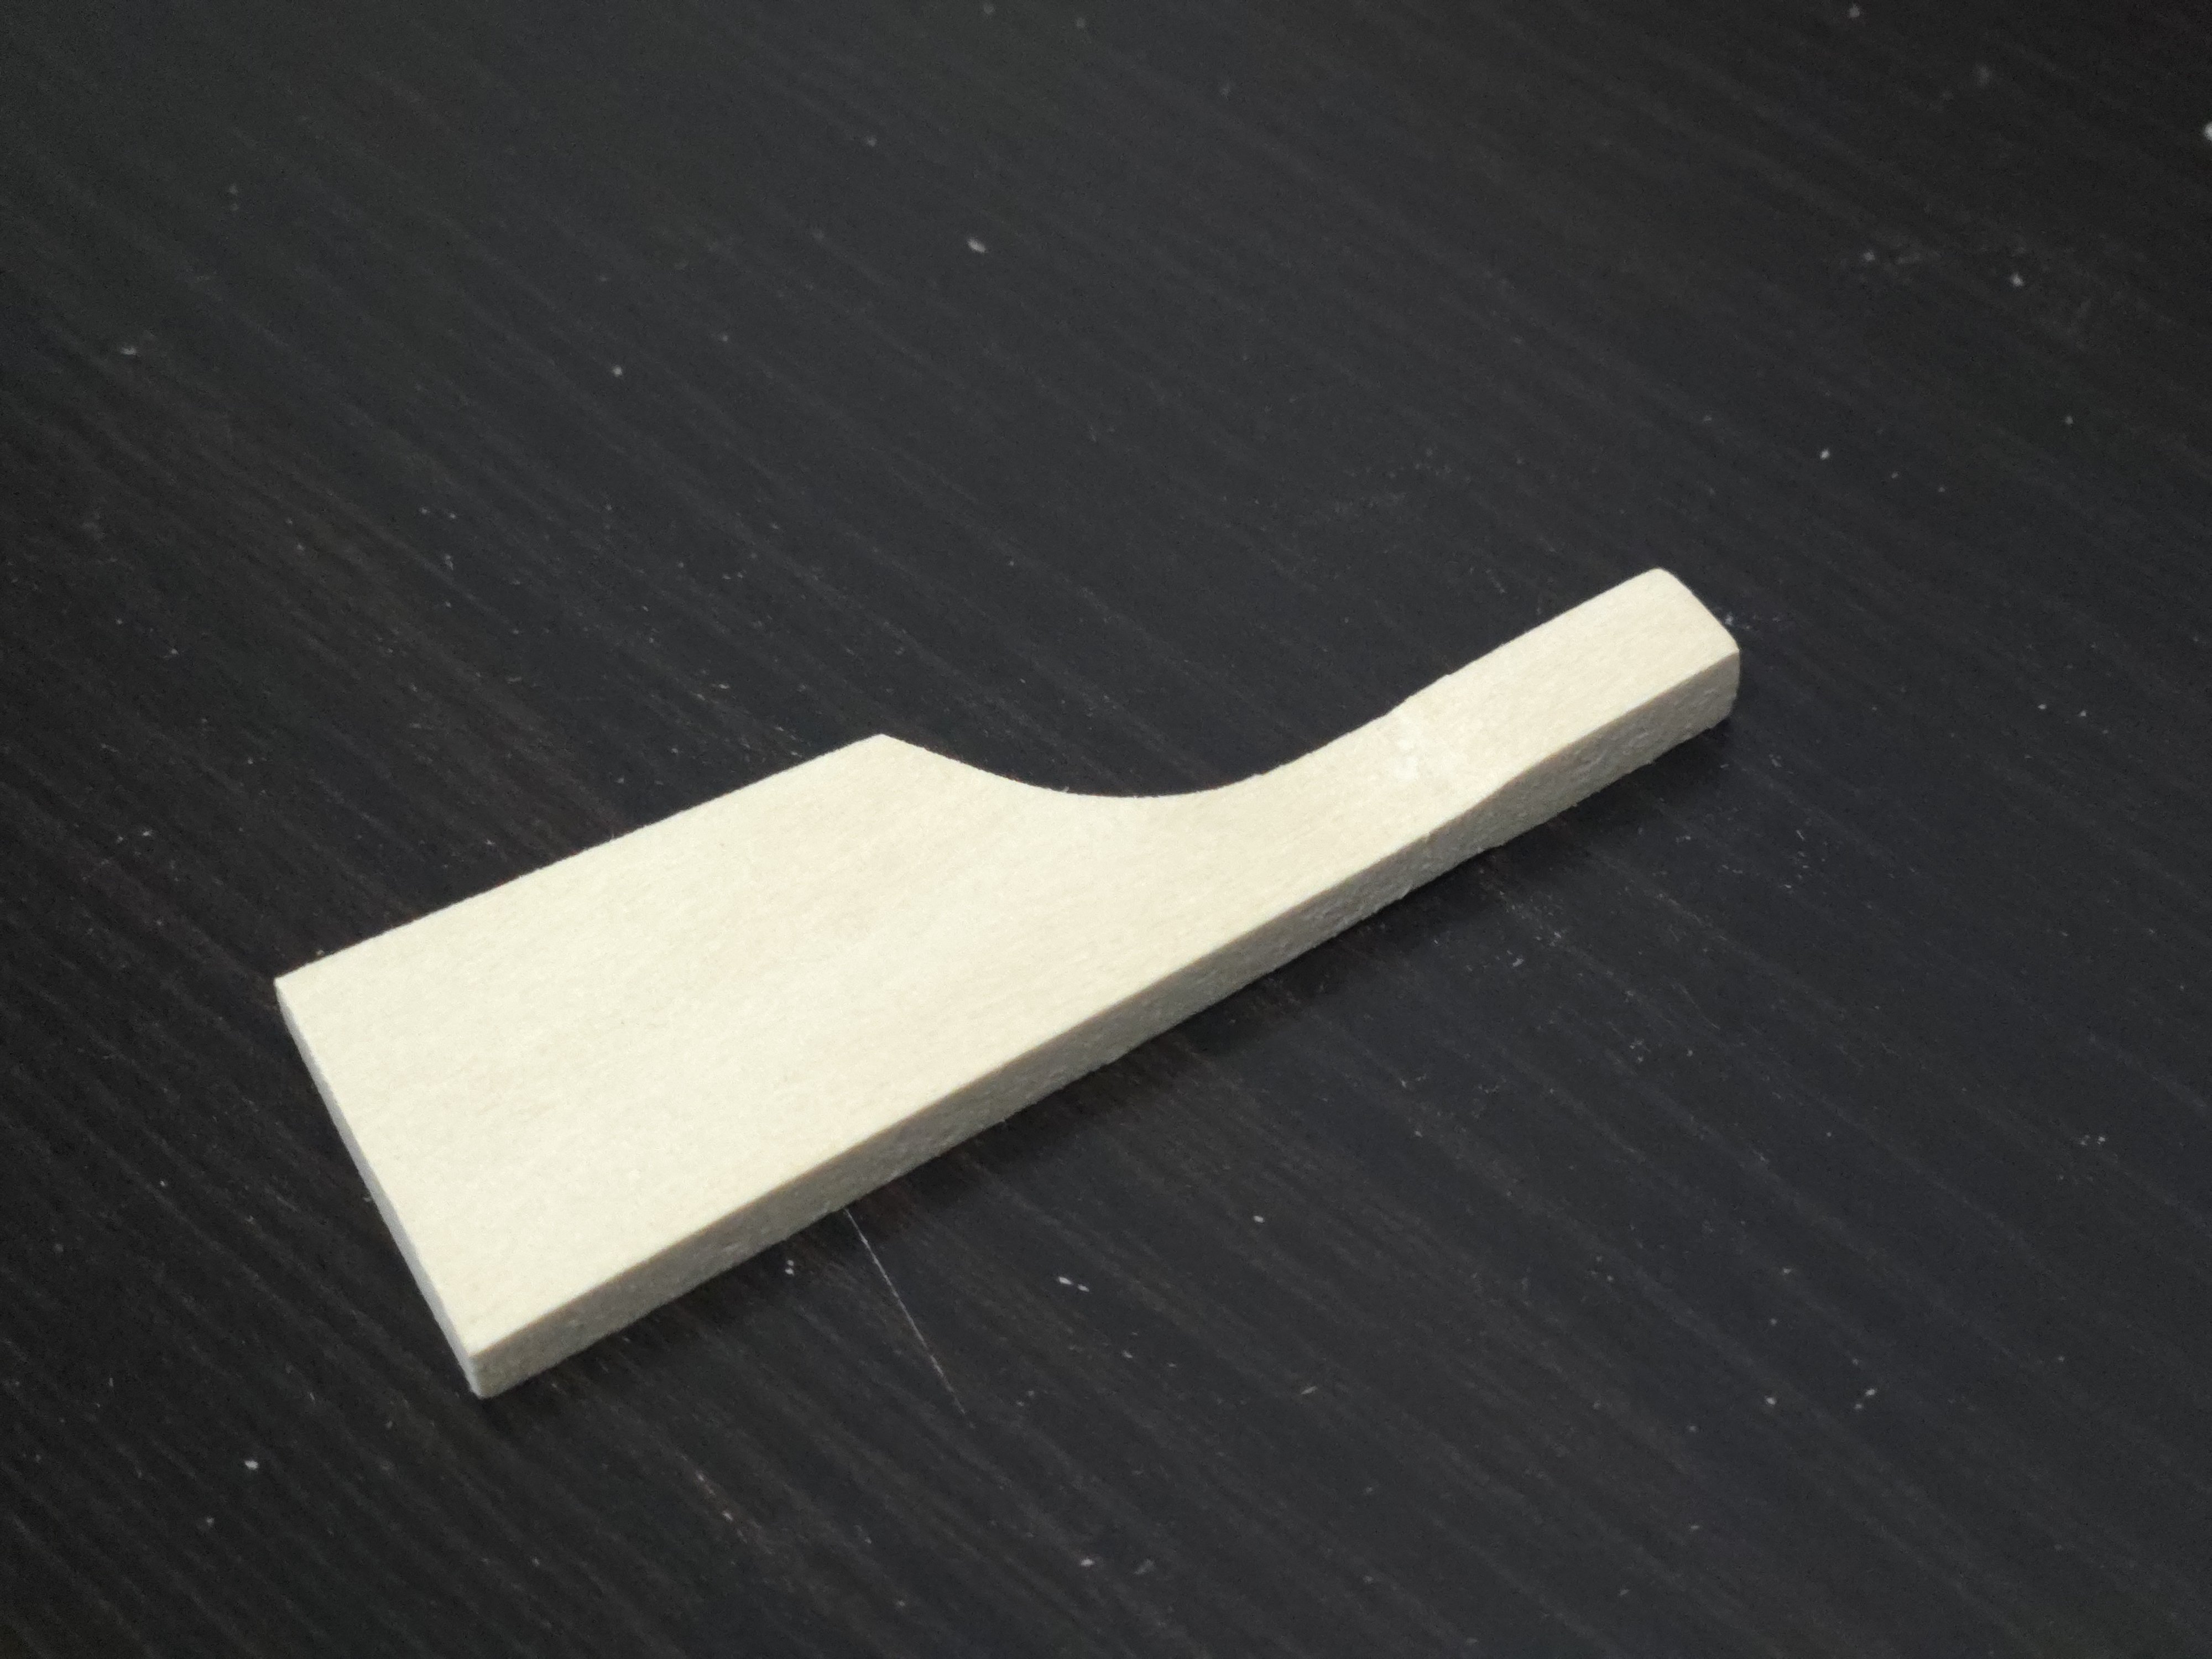
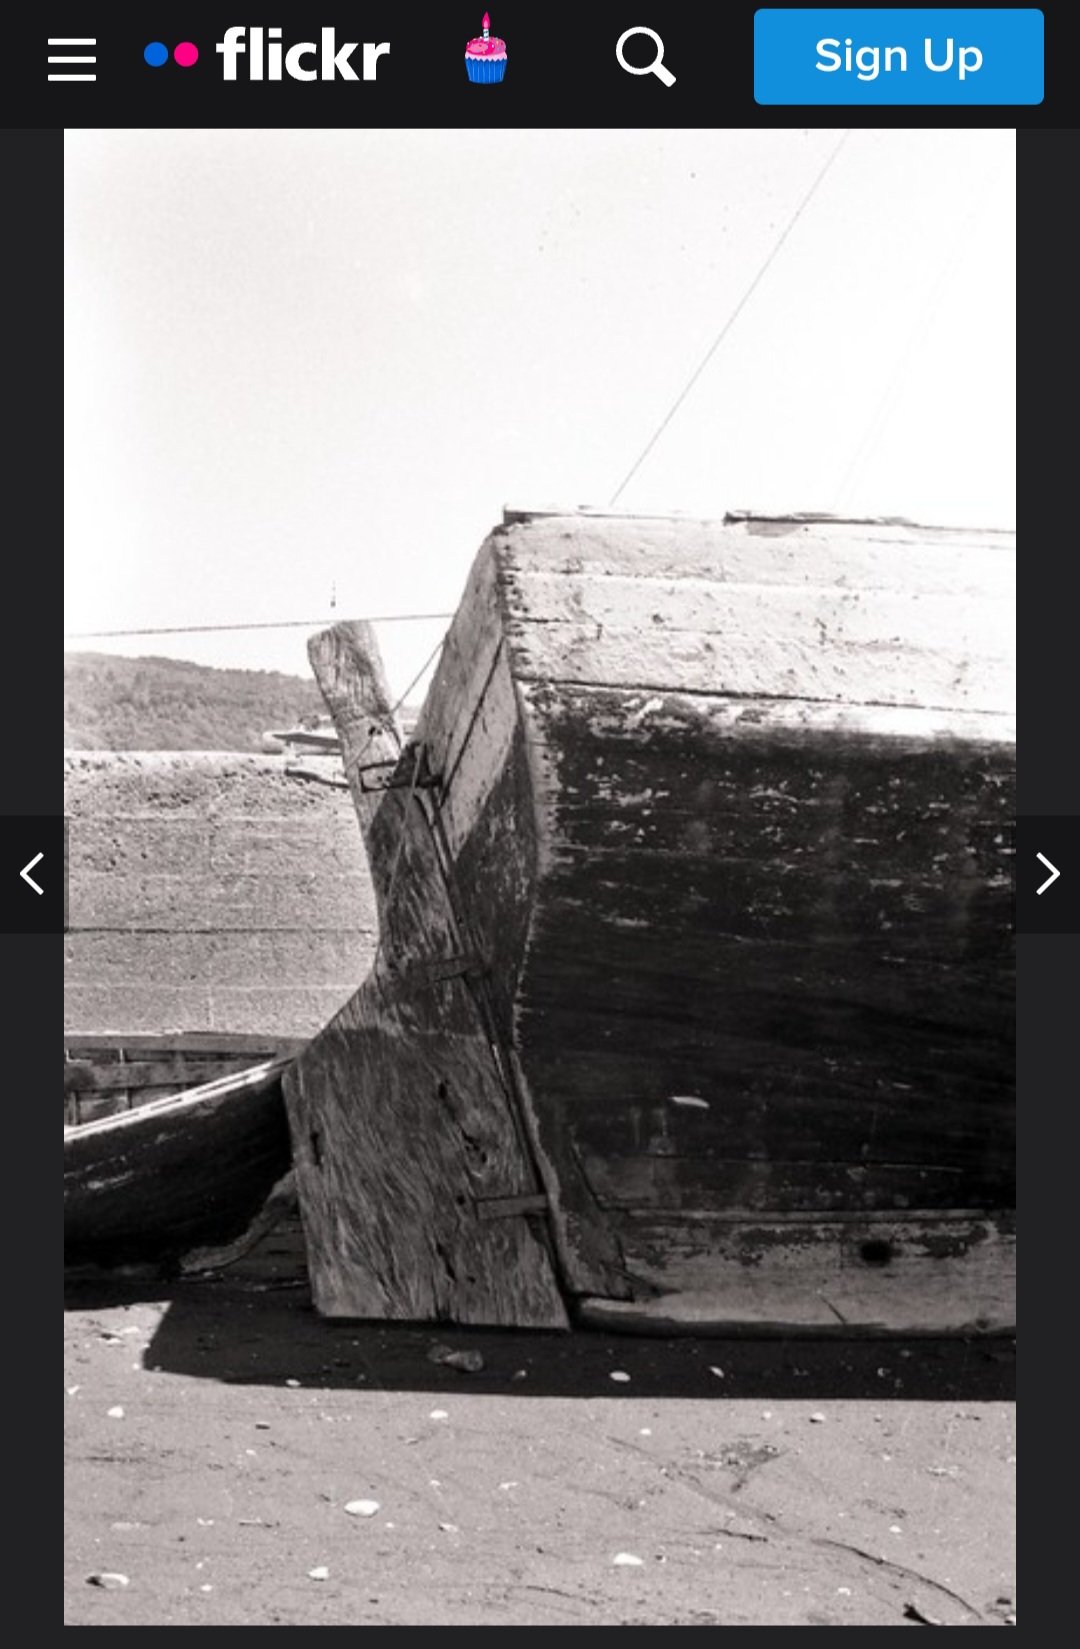
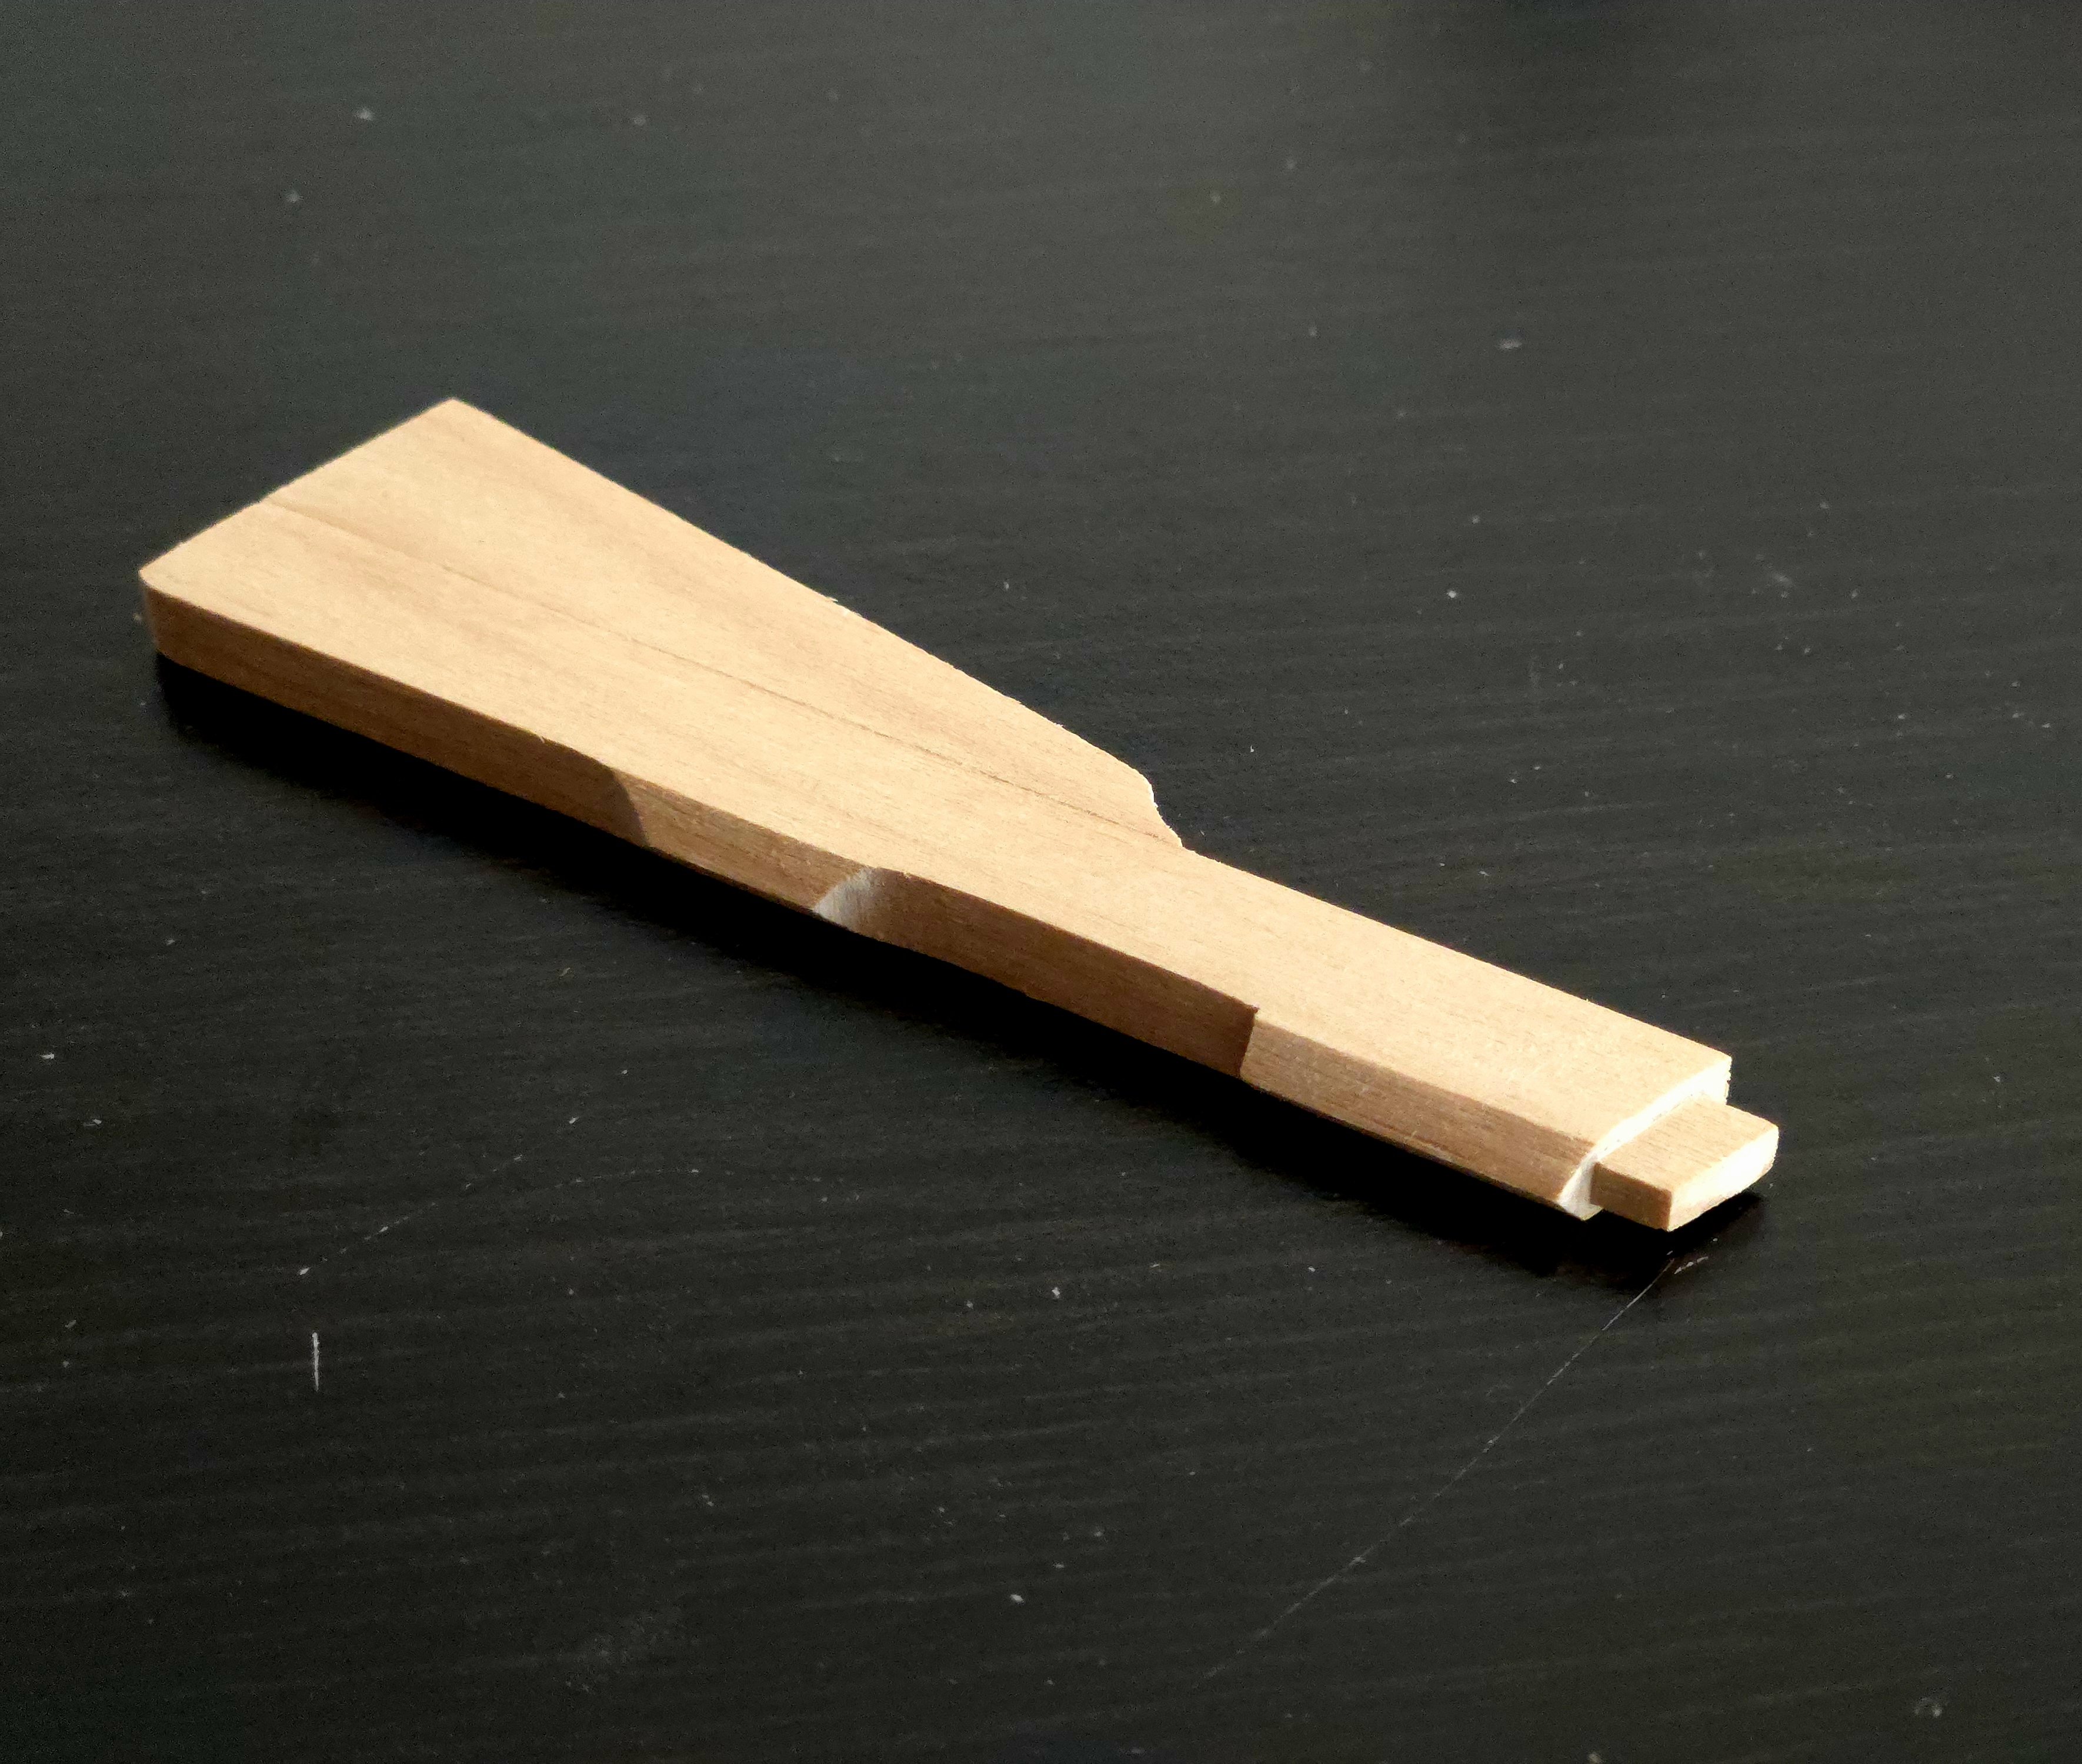
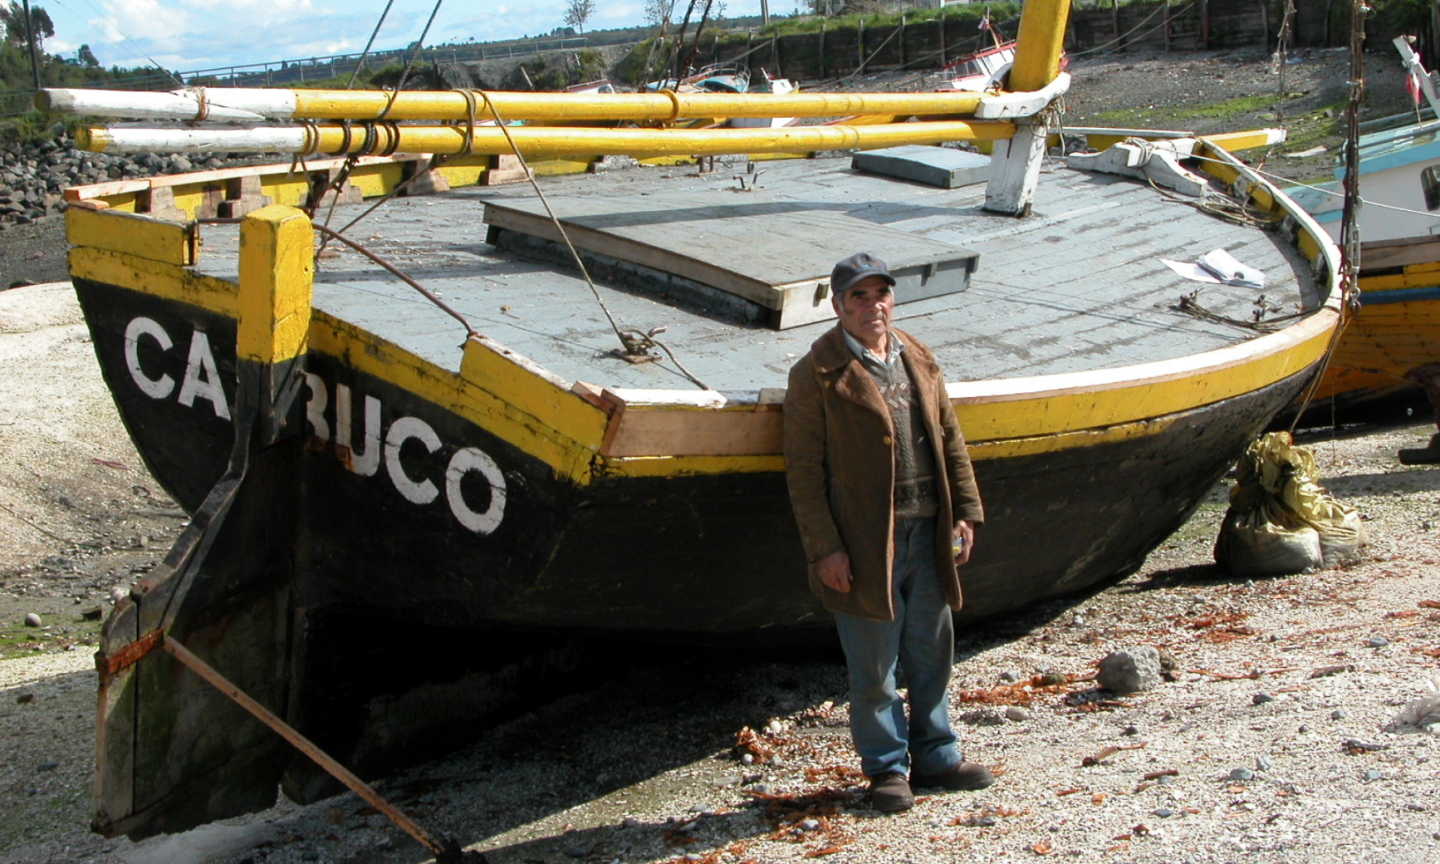
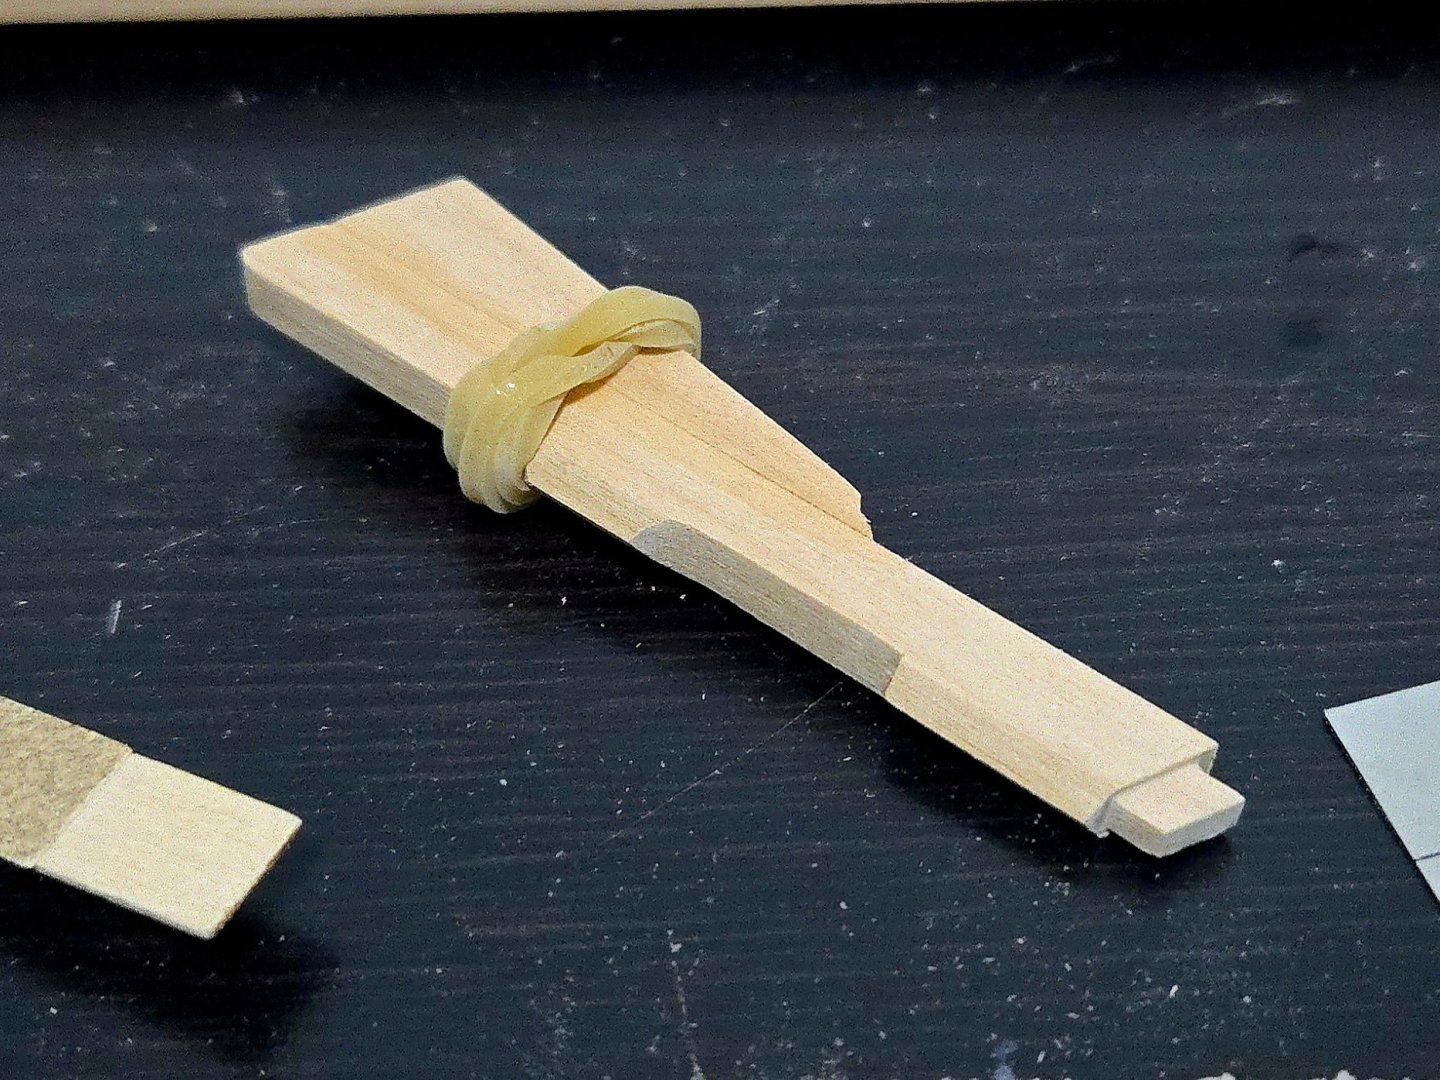
I’ve made some progress on the rudder. The plans show a multi-part, rather complex rudder, below, in which the rudder shaft is particularly thick at the top where the tiller is inserted. However, not all lanchas had rudders constructed in such a way. The rudder below, for instance, shares the thicker top of the rudder shaft, but seems to be constructed entirely from a single piece of (very heavily worn) wood. Source: https://www.flickr.com/photos/luchinmardones/5312311416/ I decided to go for a single-piece rudder, created from basswood of the same thickness as the keel, but left thick at the top and narrowed slightly below. After drawing up a rudder shape and leaving it a little wide to allow for shaping, I used a fretsaw to cut it out of a basswood sheet. So far, so good. The same day, I also made the rudder for my new Bateau de Lanvéoc build, which has a much narrower, more vertical profile. Perhaps influenced by this, I thought that the rudder I made for the lancha looked too long. So, while shaping it, I trimmed a bit off the end. Although I think it looks good, there’s one problem: if you look at the photo above, or the one below, it’s very noticeable that many (although not all) lanchas tend to have rather large rudders, probably to help deal with the poor turning abilities that Vairo noted in his article. The rudder I made may now be a bit on the short side. Source: https://www.carlosvairo.com/galeria-puerto-montt-lanchas-chilotas I can leave it as it is, but there may be a work-around. One detail that stood out to me about the Quenita (the lancha that my plans are, in theory, based on) is that, as seen below, its rudder had an extension attached to the end. Possibly the rudder was damaged and repaired, or perhaps the owner decided that its turning abilities were lacking and so tacked on an extra strip of wood to try to correct it. Source: http://lanchaschilotas.com/dscn7150-2/ This, then, might be another option. I’m a bit torn between liking the looks of the slimmer rudder, and liking the aspects of telling a story with the model by having an extended rudder.


- 312 replies
-
- 10
-
-
- Chile
- Latin America
- (and 6 more)
-
Thanks, that is very unambiguous indeed! It still seems very odd to me that they wouldn't add anything to protect the frames and hull planking, but unless I find other sources showing otherwise, the interior will be left unplanked then.
- 139 replies
-
- 2
-
-
- ancre
- Bateau de Lanveoc
- (and 2 more)
-
I did the "garden hose"‐ type loops on my dory, which I modified to include a sail. To make them, I wrapped the string around a plastic brush bristle protector tube, as the white glue didn't really stick to it. As for whether to go with simpler loops or complex coils, I suppose it depends on the effect you're going for--a yacht or a workboat? A useful source may be the many photographs at the following link of Friendship sloops (which are quite similar to the Muscongus Bay smack), both working sloops and yachts: https://penobscotmarinemuseum.historyit.com/search-interfaces/search/digital-collection/0/1/1/1?rq[0]=8639&ip=1 (You can also search at that site for sloops in general or for Muscongus Bay, but my impression was that most of the clearest photos were of Friendship Sloops.)
- 59 replies
-
- 3
-
-
- muscongus bay lobster smack
- Model Shipways
- (and 2 more)
-
Thanks, @Bryan Woods! Thank you, @Waldemar, for the information. It's good to know that this is in fact just another method of making a keel. Limber holes are an interesting idea. I'd have to double check once I have the plans in front of me again, but I don't think they're shown. They seem to me like they would be a good idea to include, unless there was some reason why they would have preferred to bail out each section between frames individually (I can't imagine why, though). This also raises a couple other minor issues with the plan set. First, unless it's written about in some section of the monograph I haven't gotten to translating yet (which is entirely possible), there doesn't seem to be any sort of pump. Maybe this vessel is still small enough that they would have just bailed it by hand, or maybe they were using some sort of separate small pump that wasn't an integral part of the boat, but it's something to look at. Second, the monograph follows the Paris Souvenirs de Marine drawing, and the Musee de Marine model, in not including any sort of floor planking, just a two-part keelson. Perhaps this was accurate, but it seems unlikely to me. Without floor planking, passengers and cargo would be directly on the frames or pressing the hull planking from the inside, causing a lot of wear and tear that could be very easily avoided. So, I may add some floor planking. Even with a monograph, apparently there's always more to research!
- 139 replies
-
- 4
-
-
- ancre
- Bateau de Lanveoc
- (and 2 more)
-
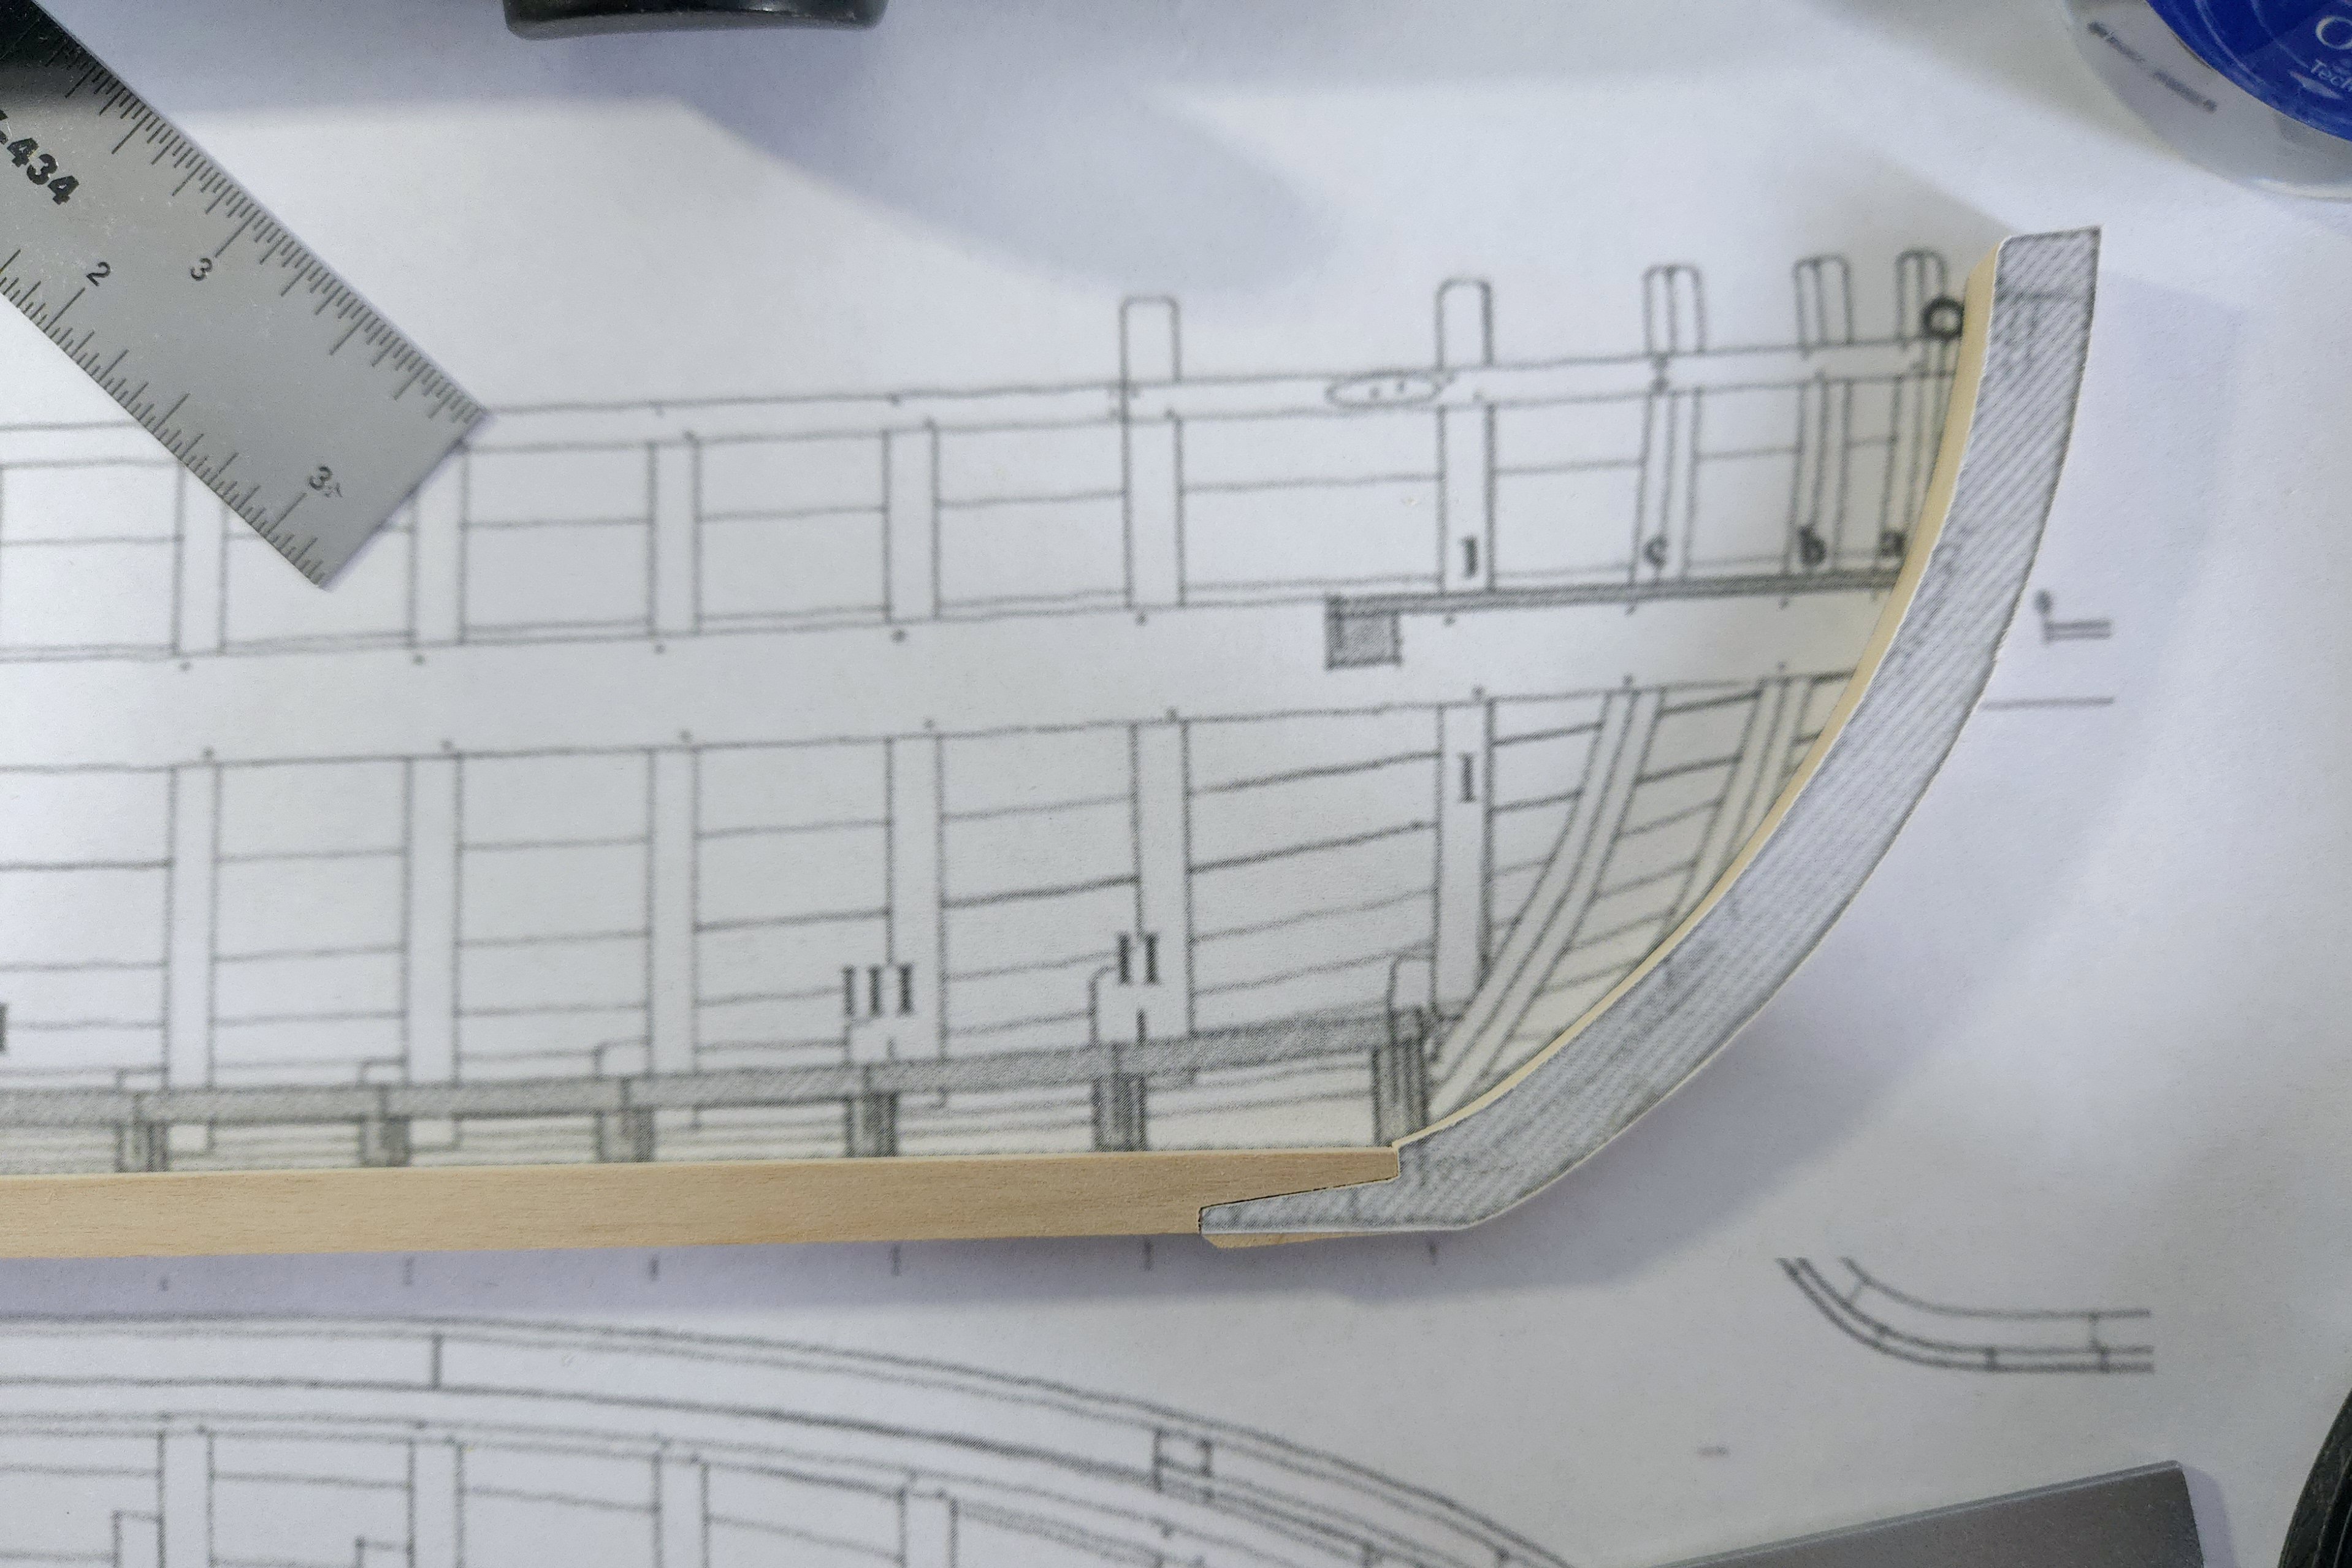
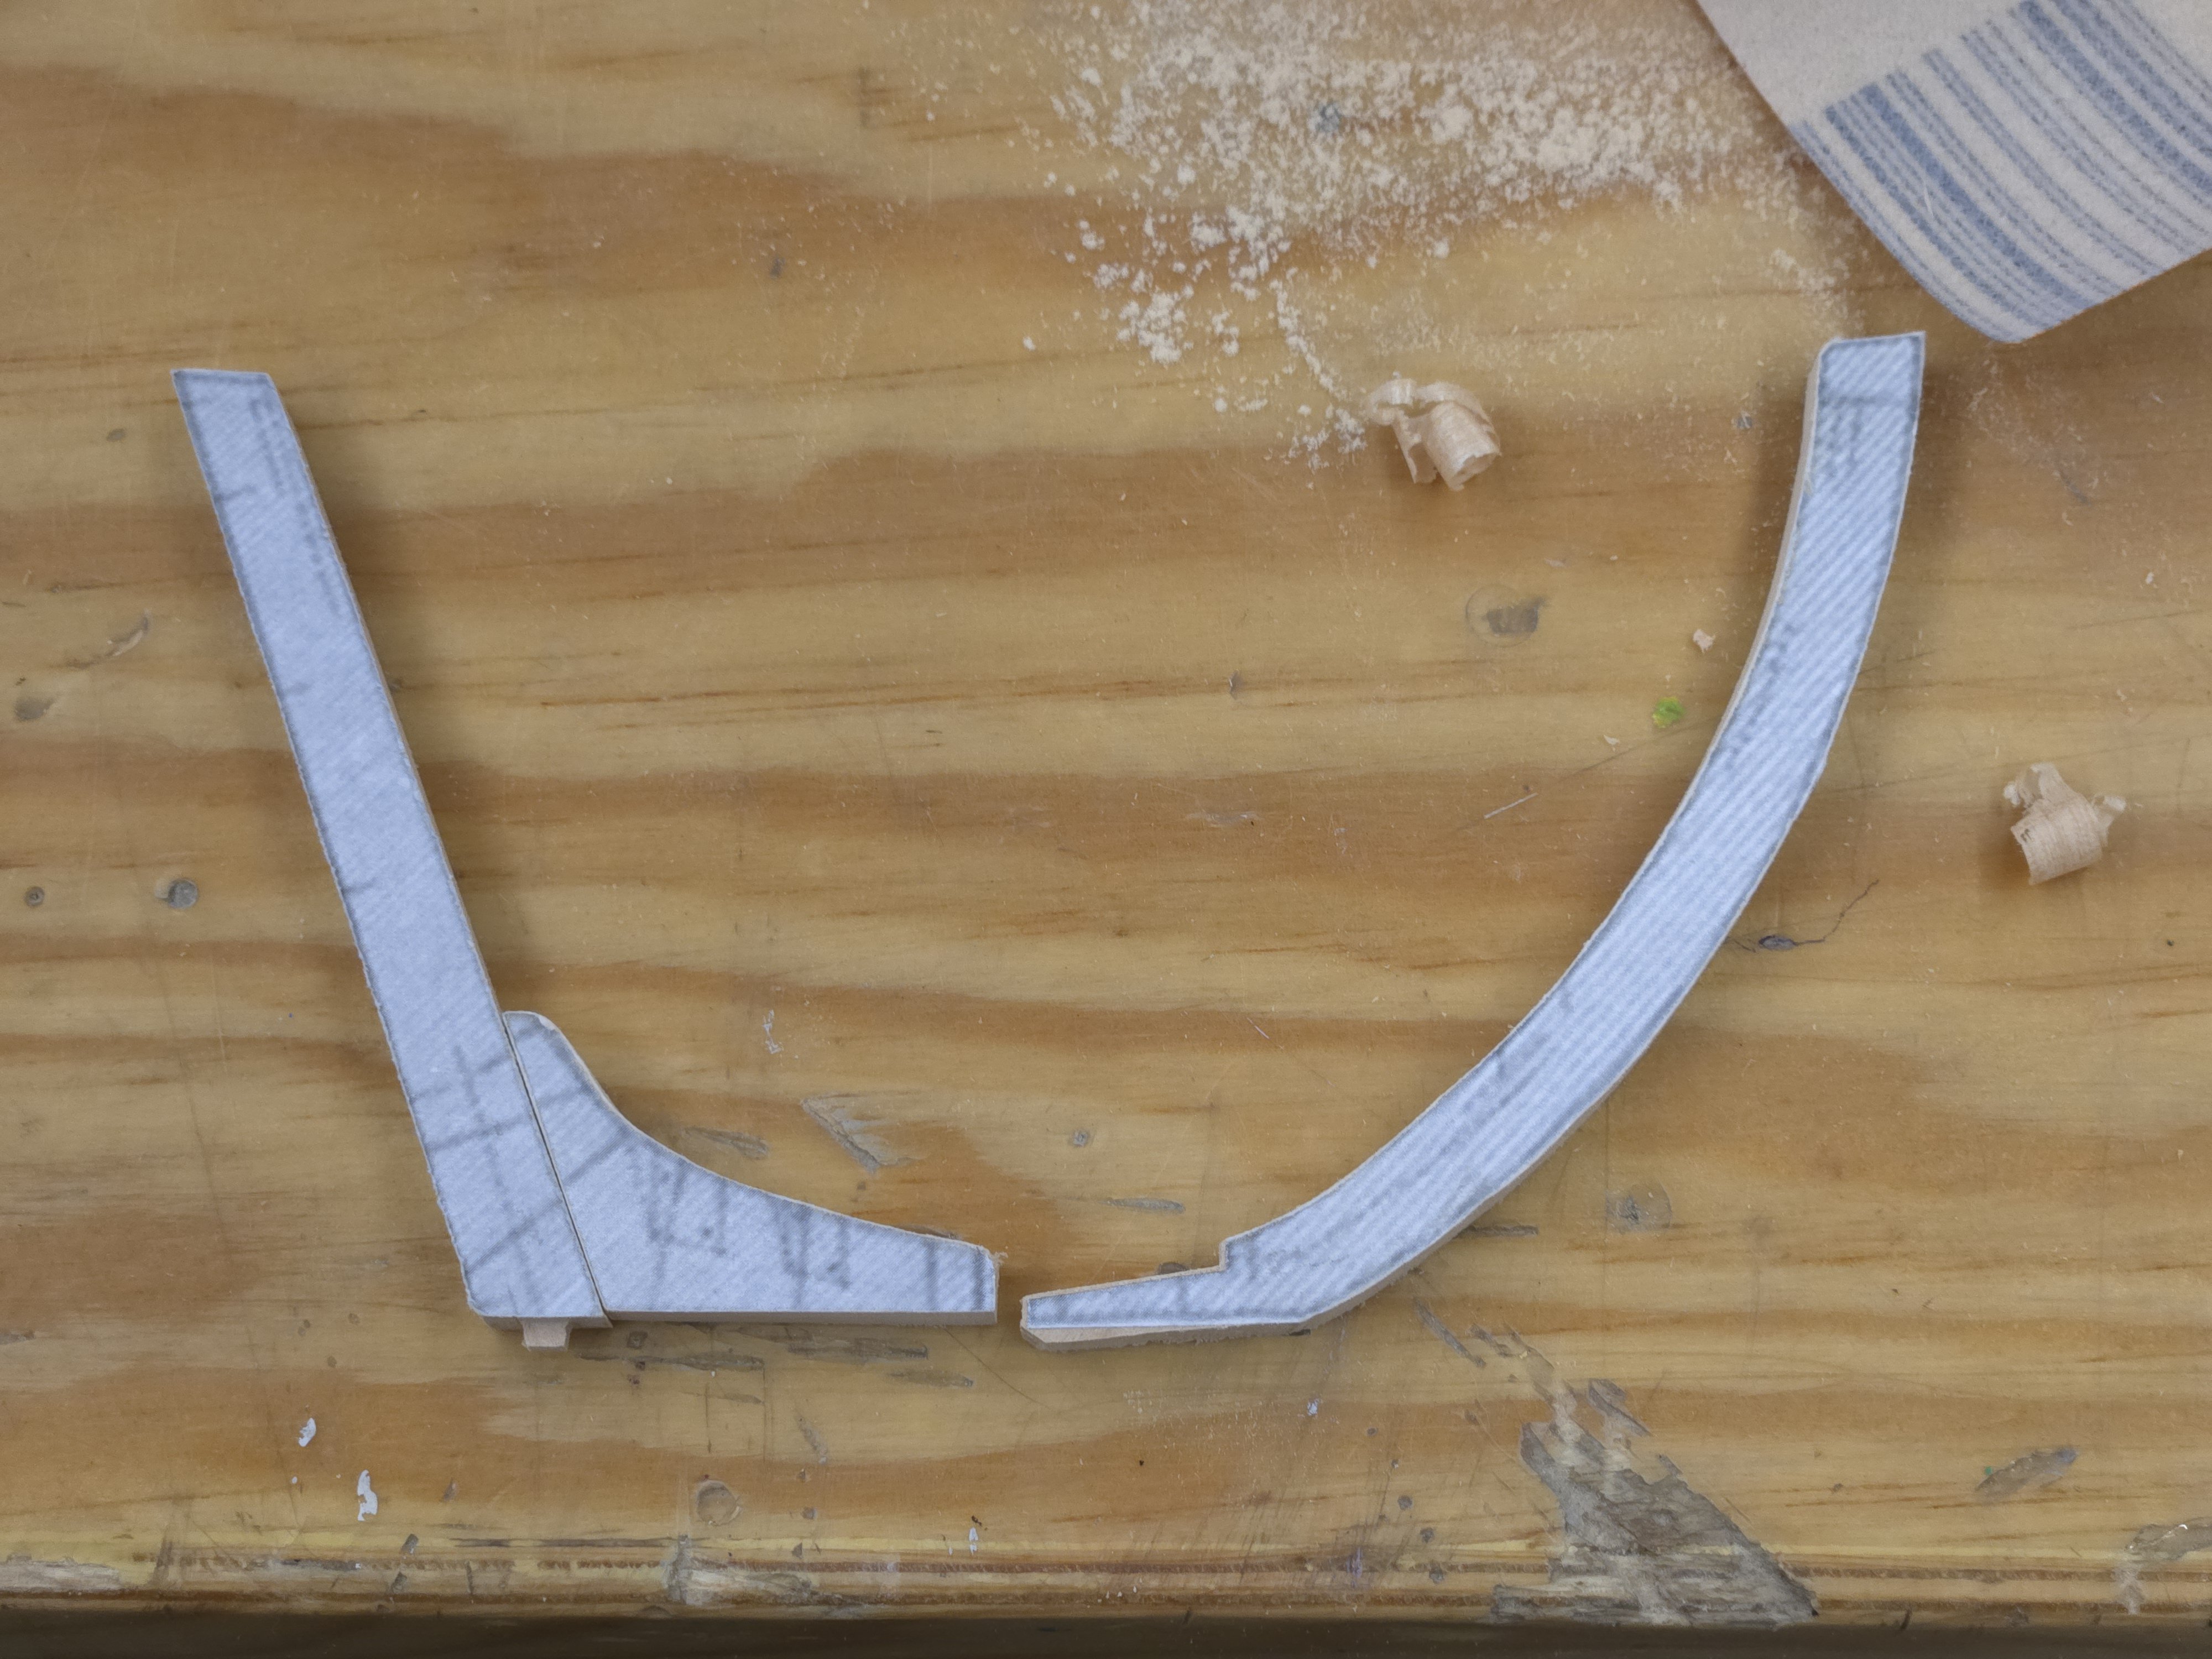
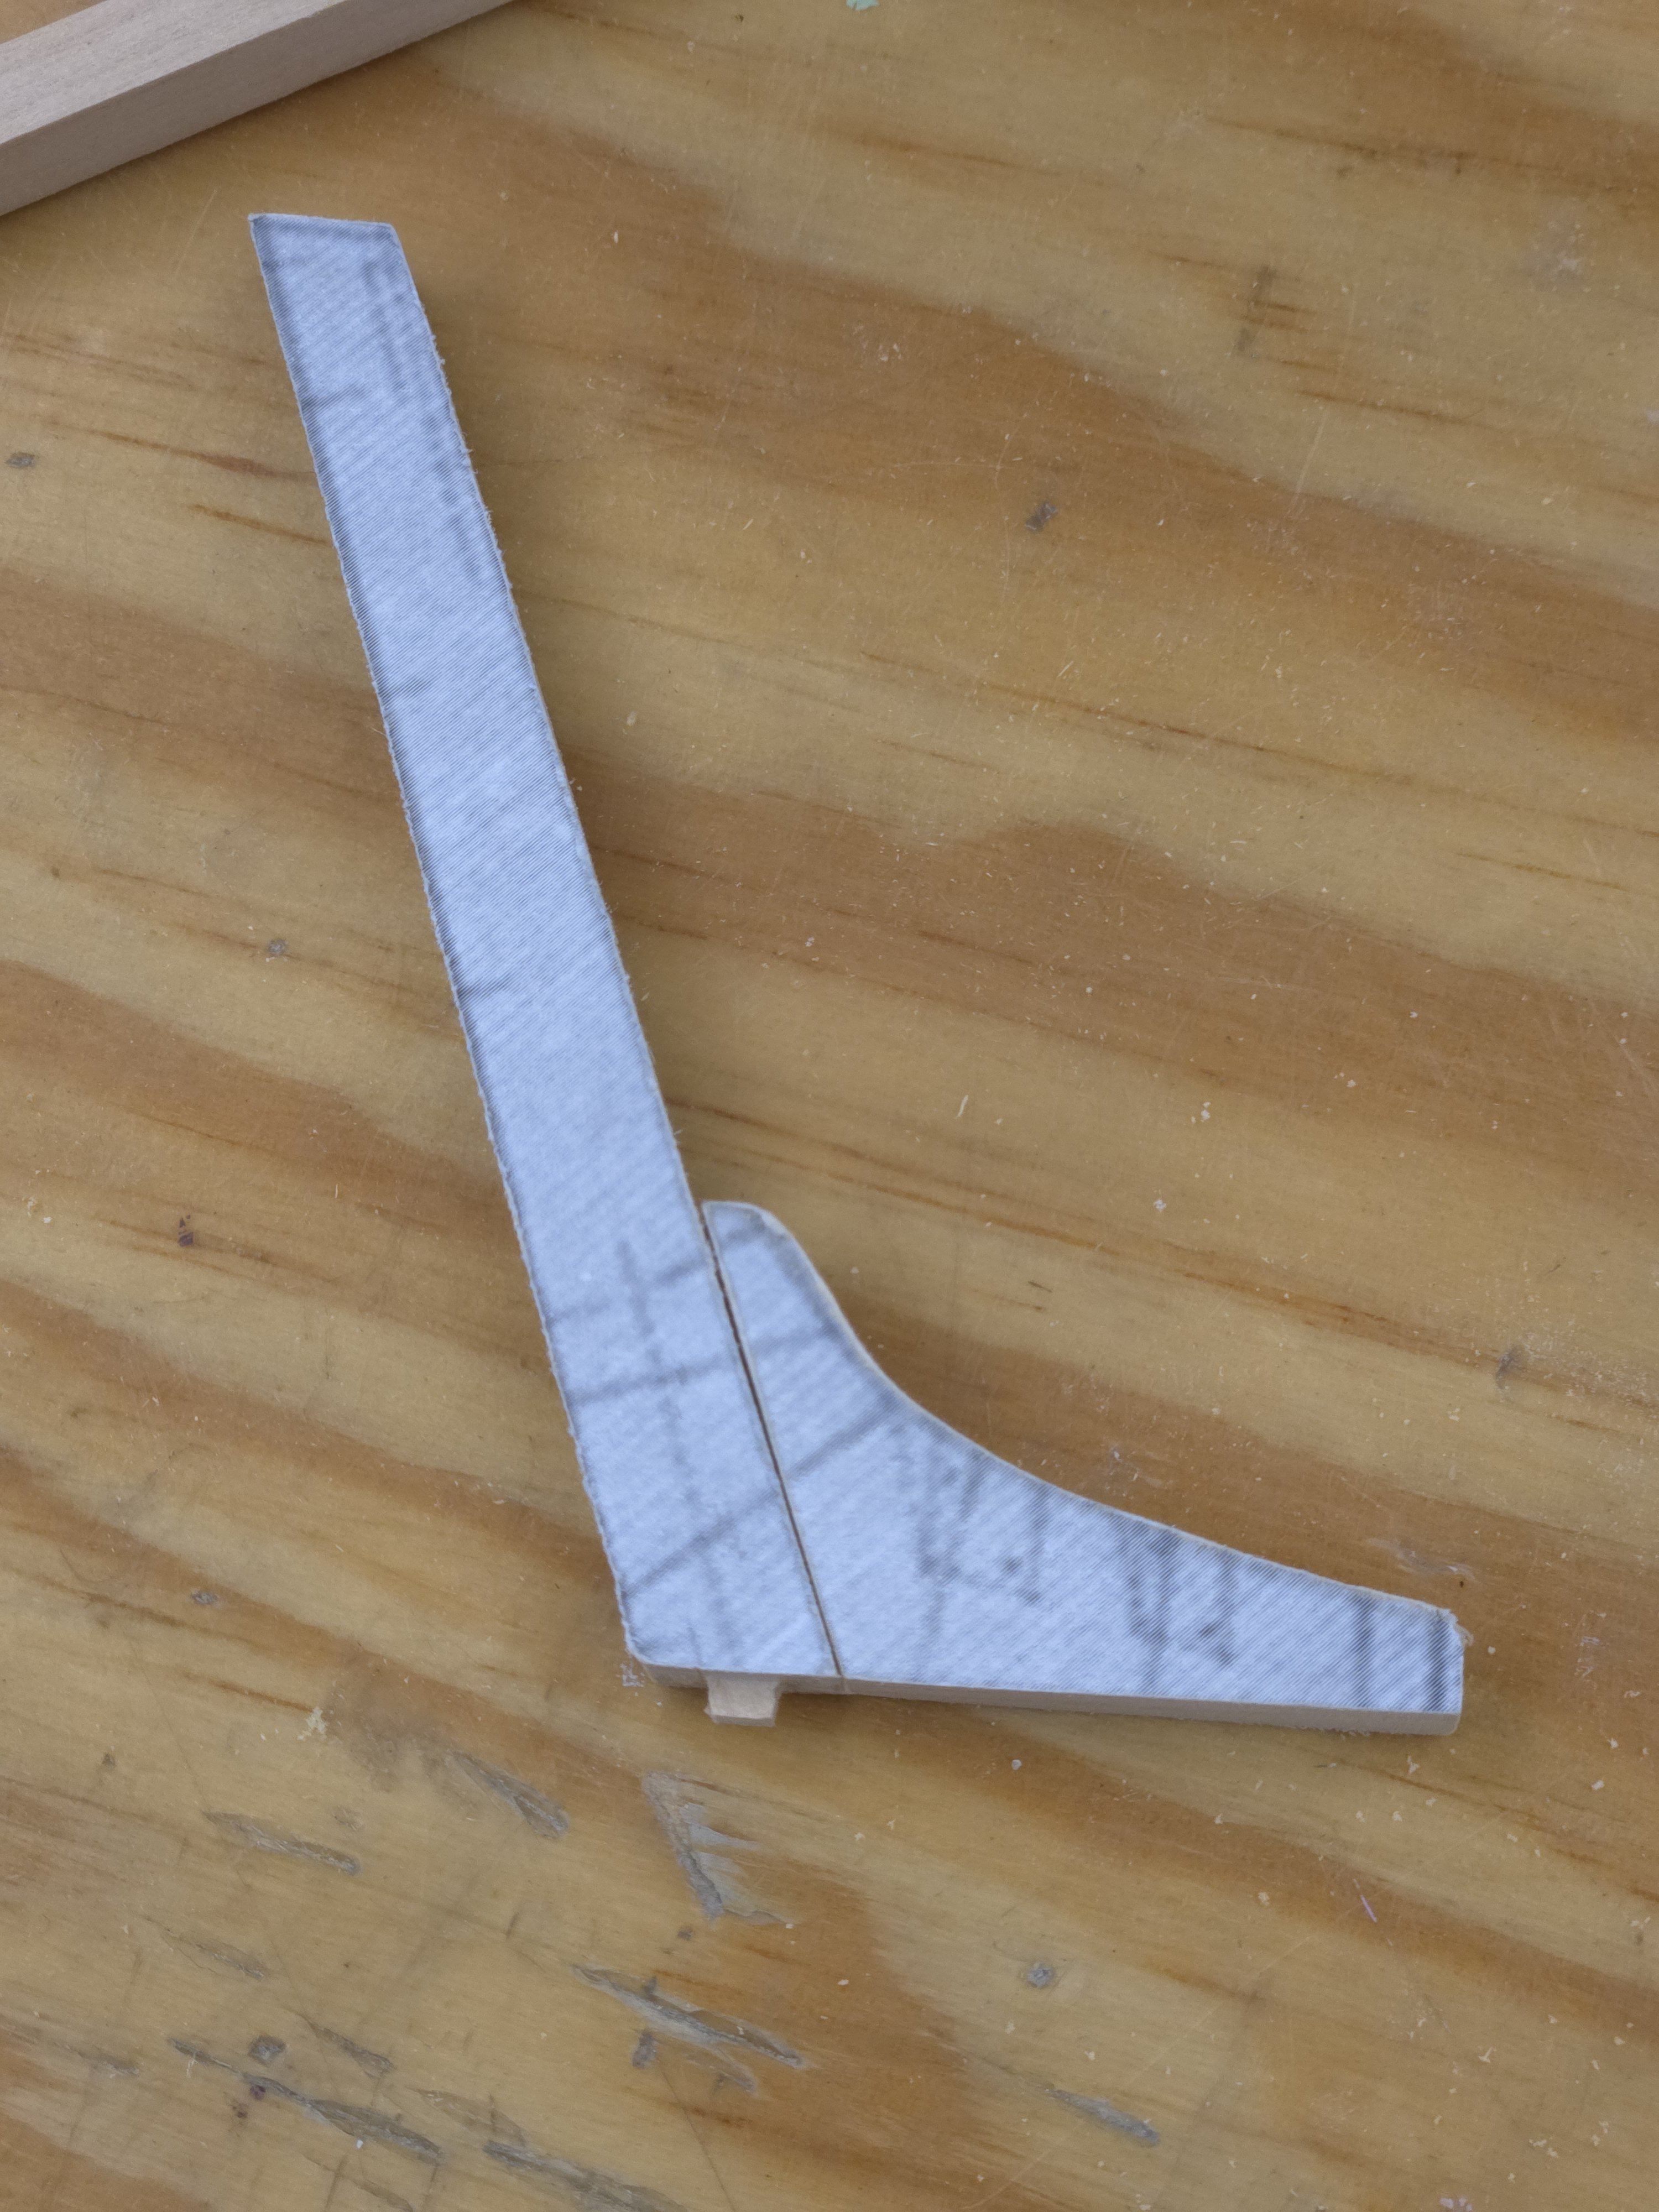
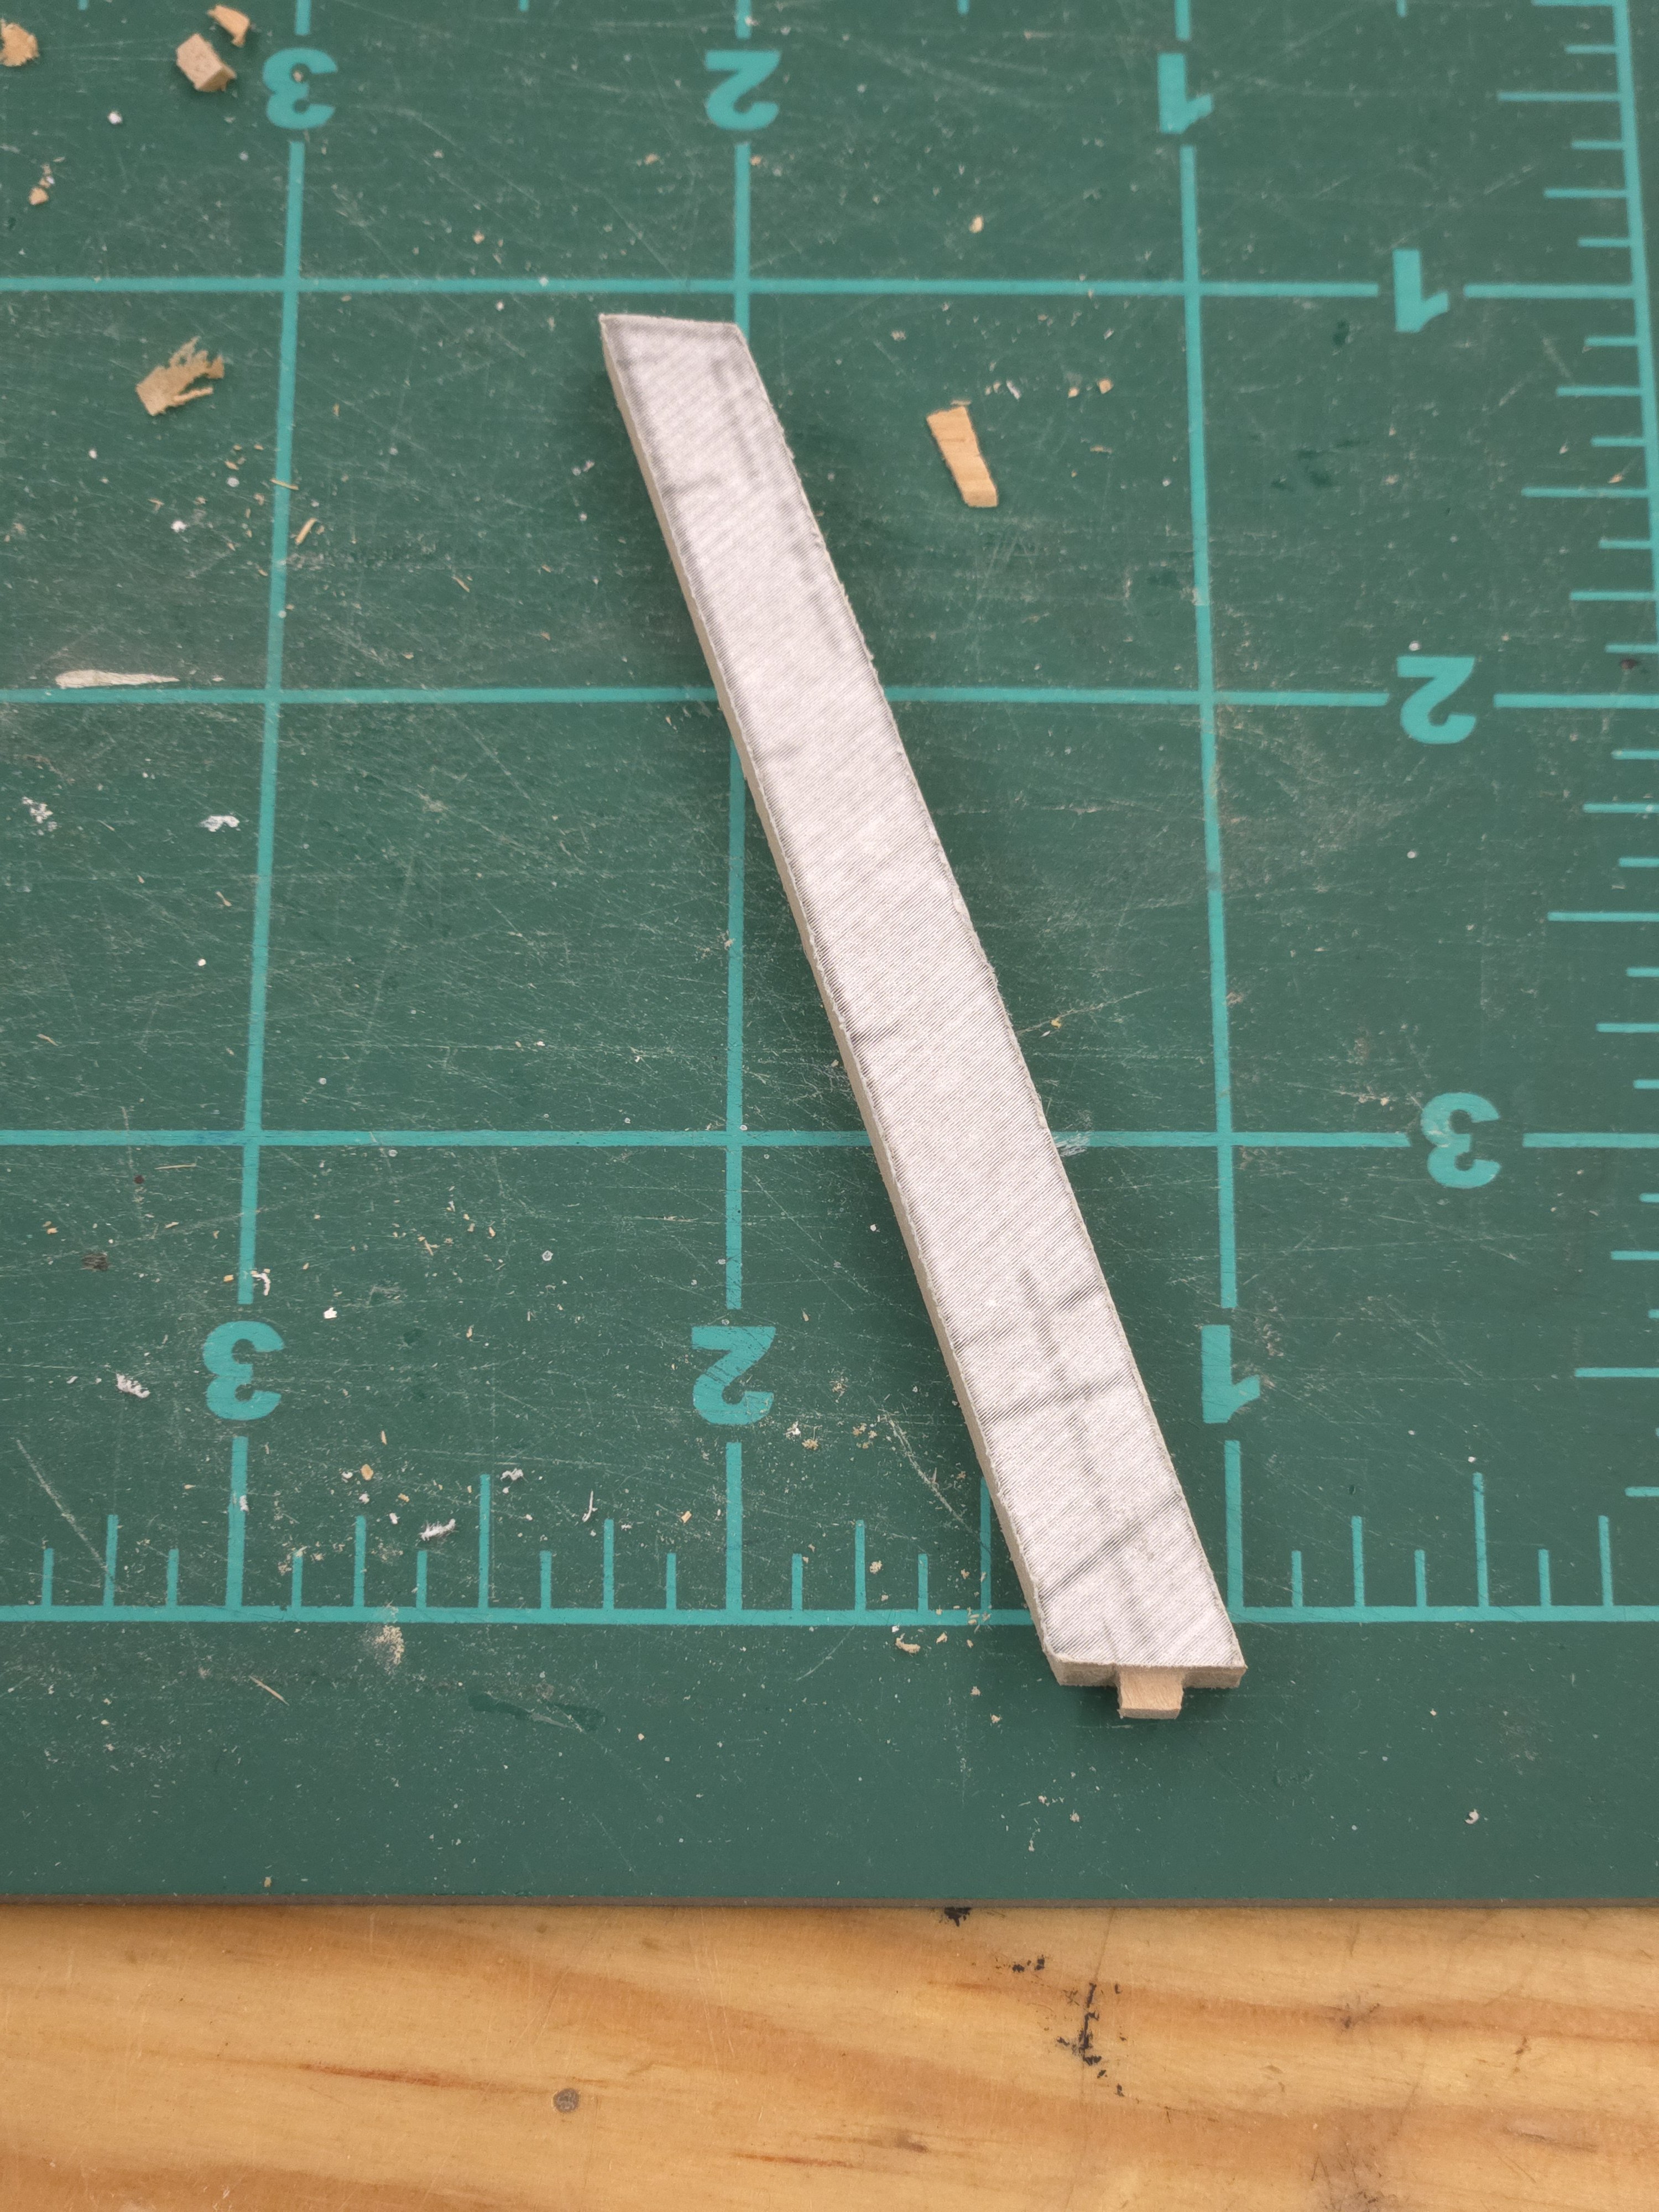
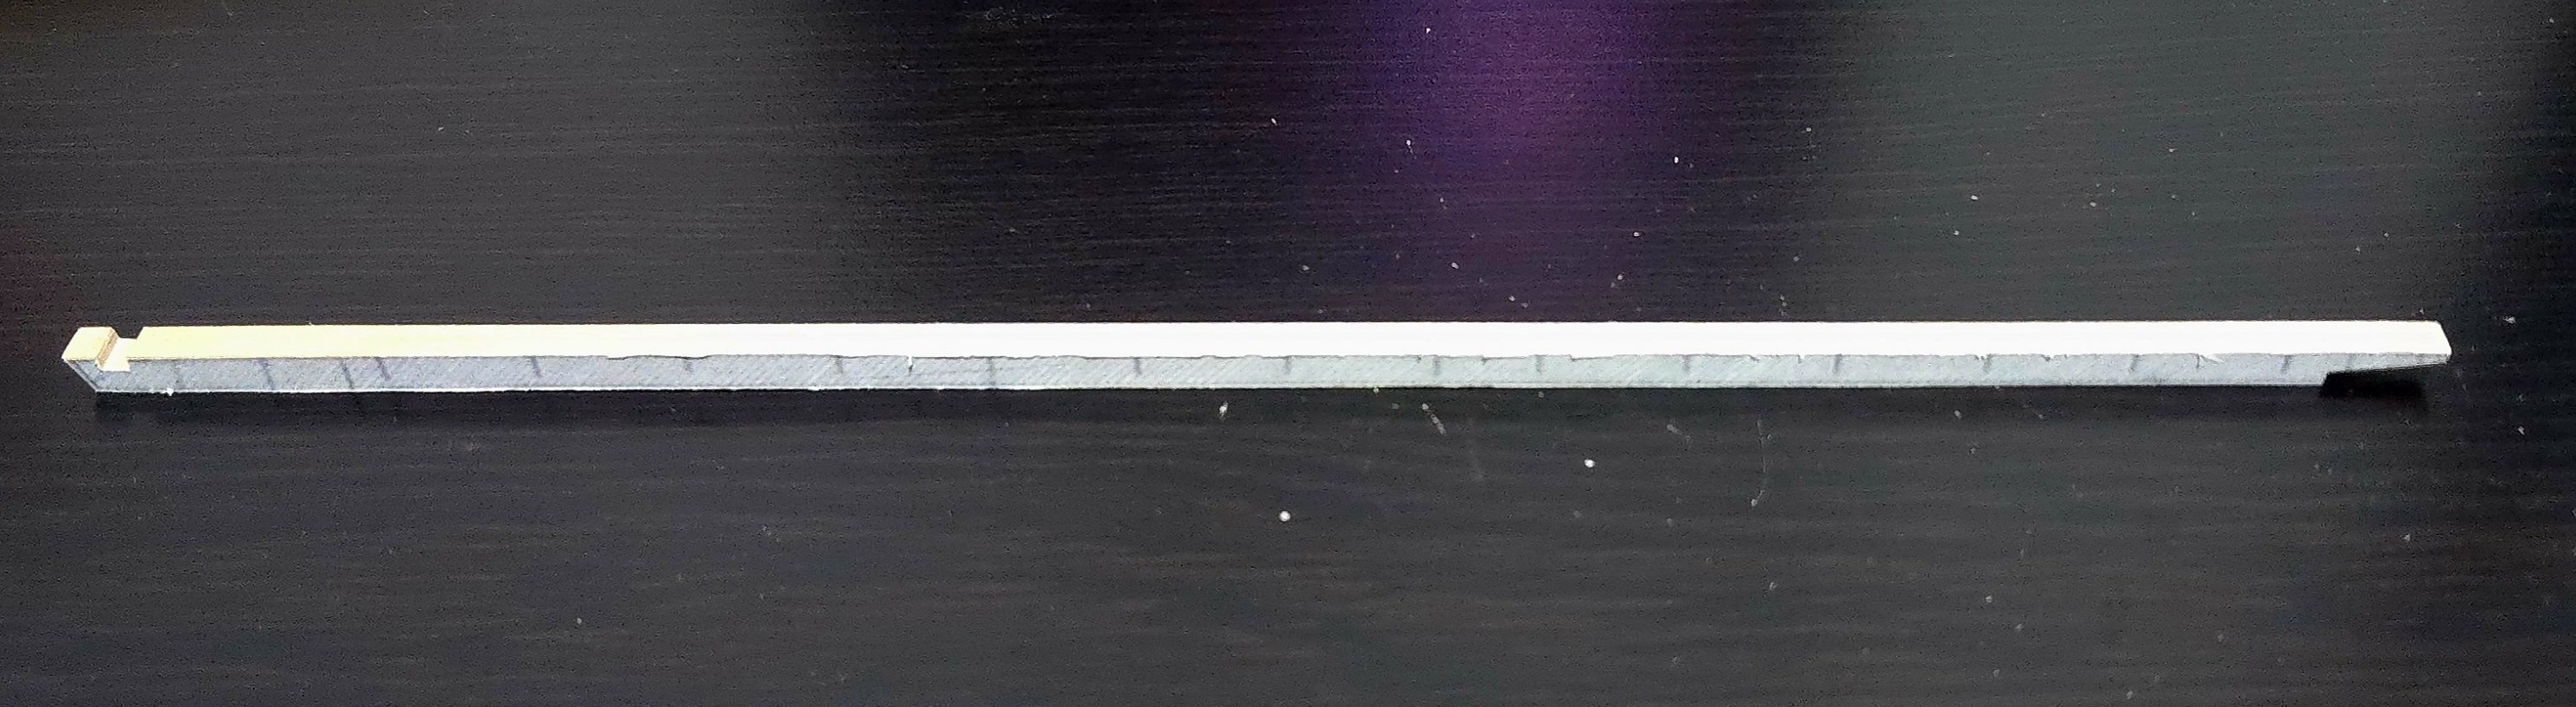
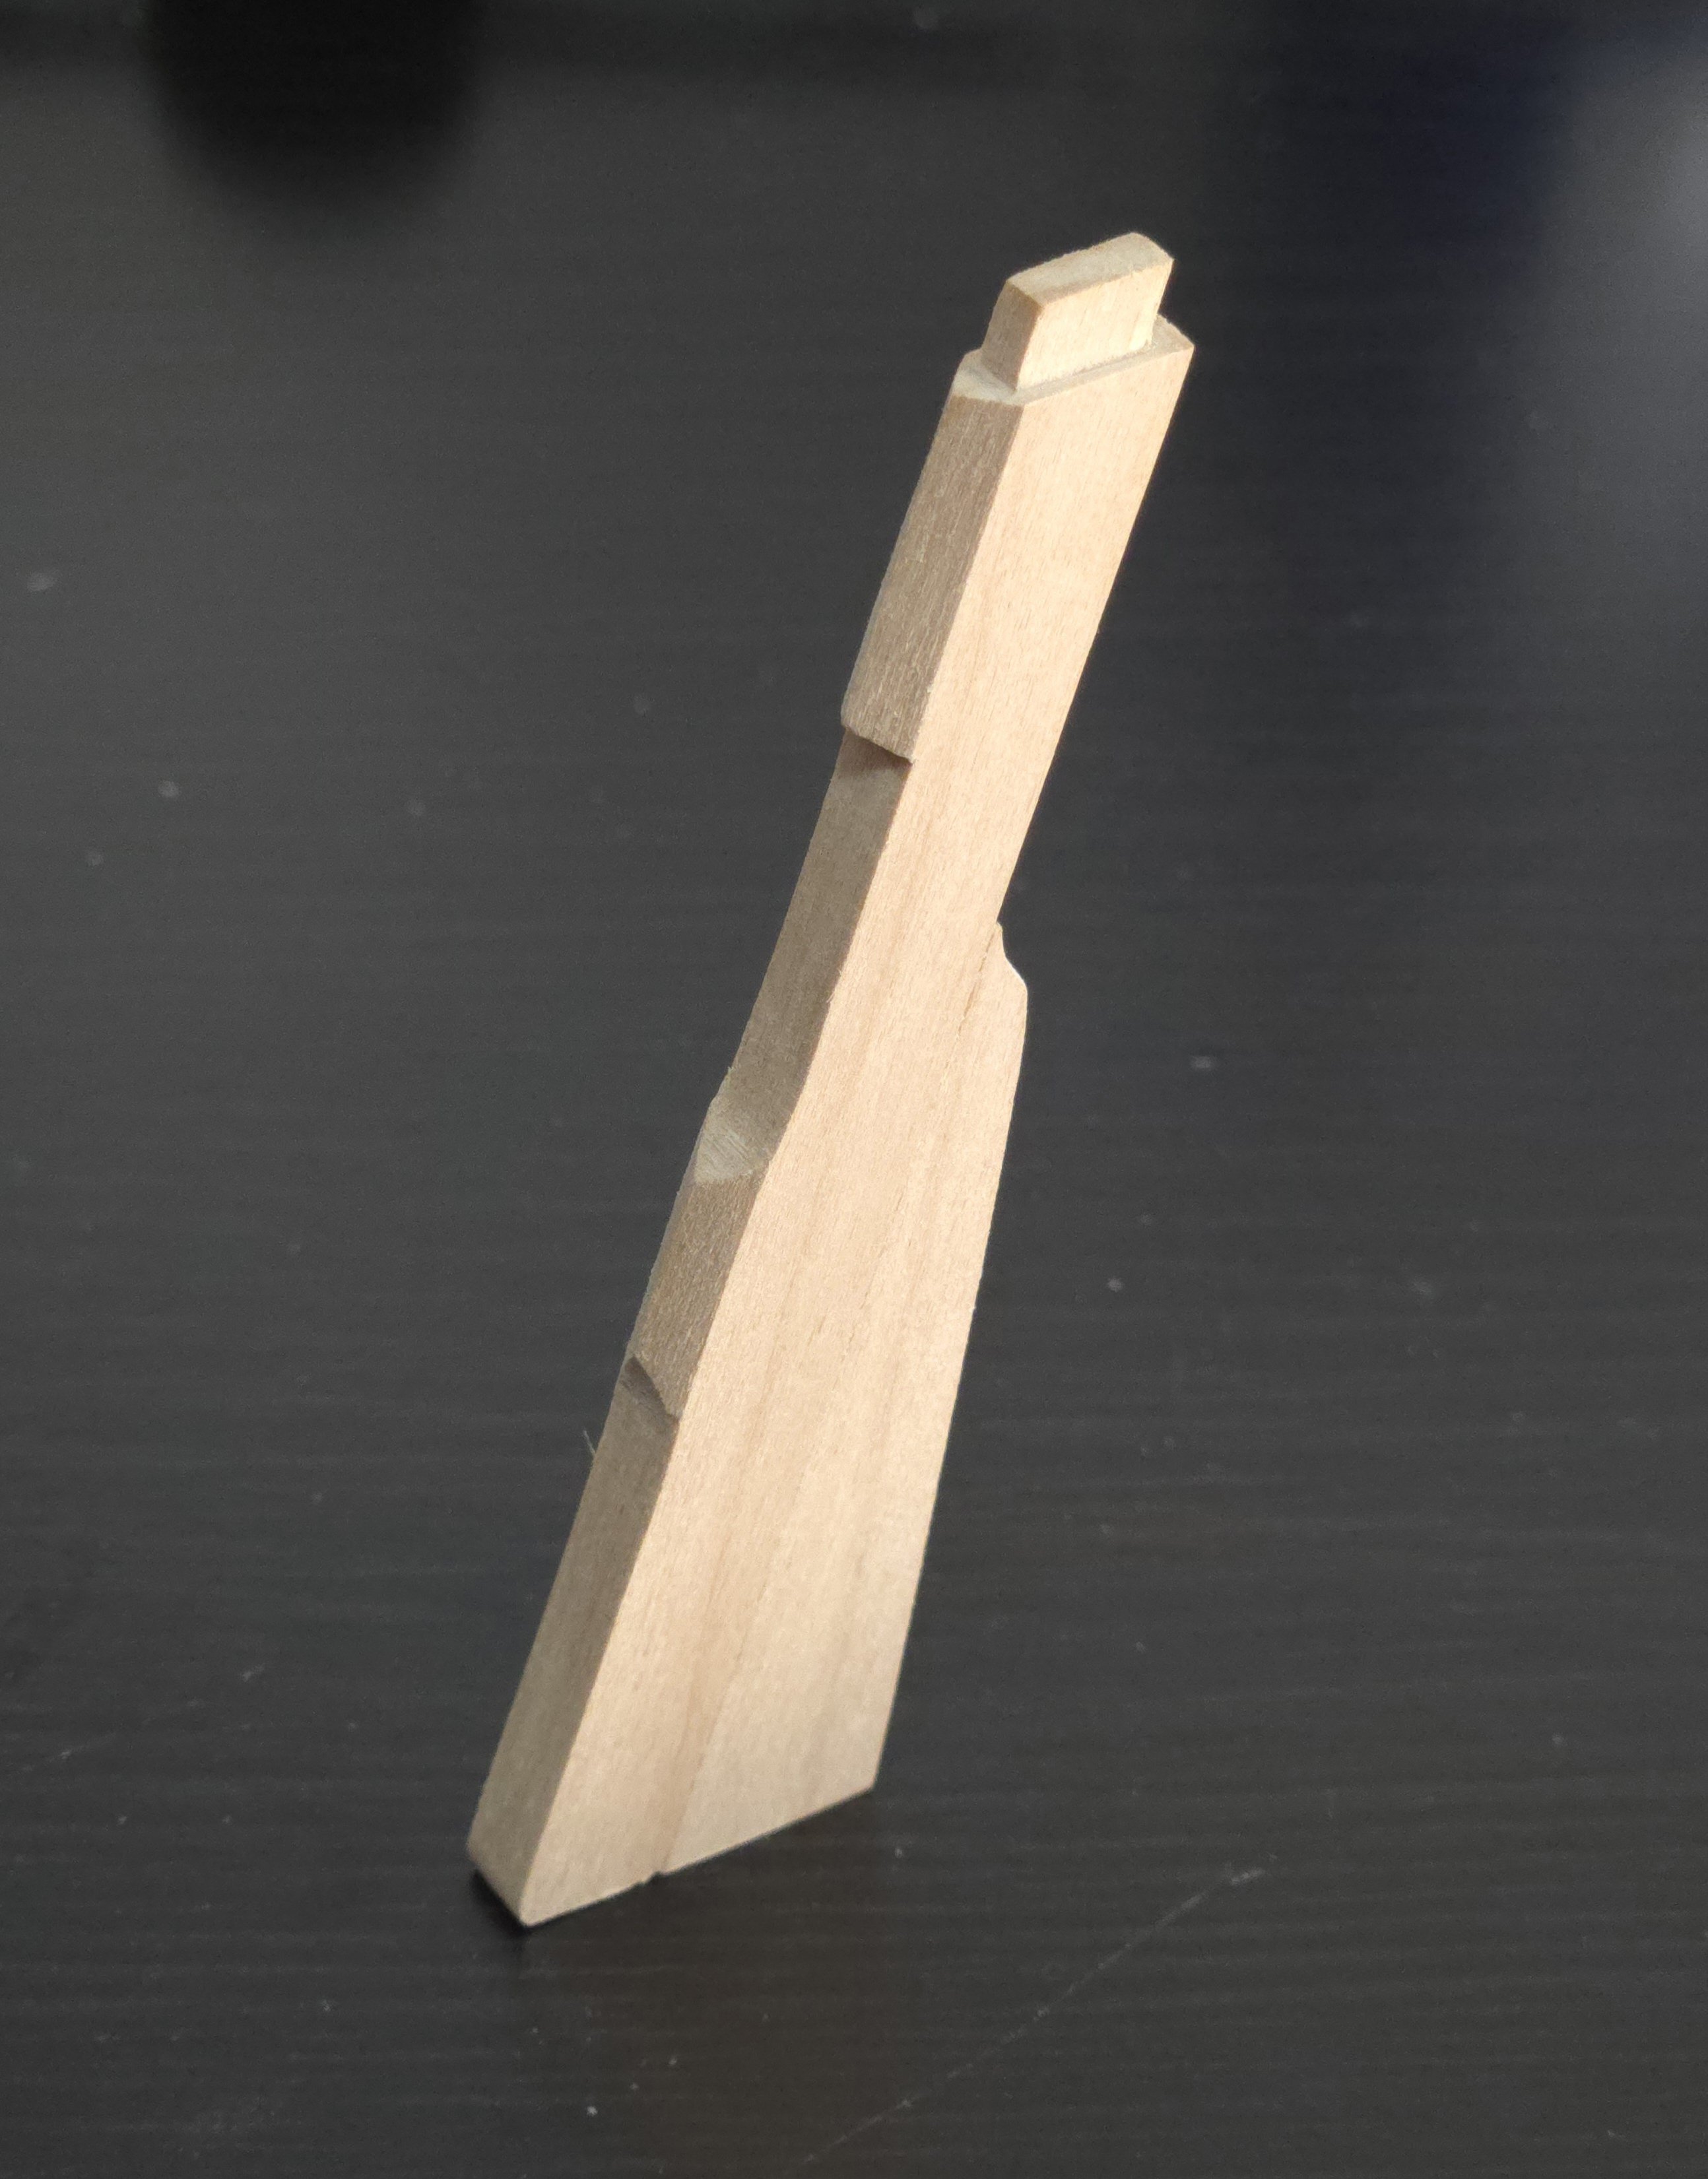
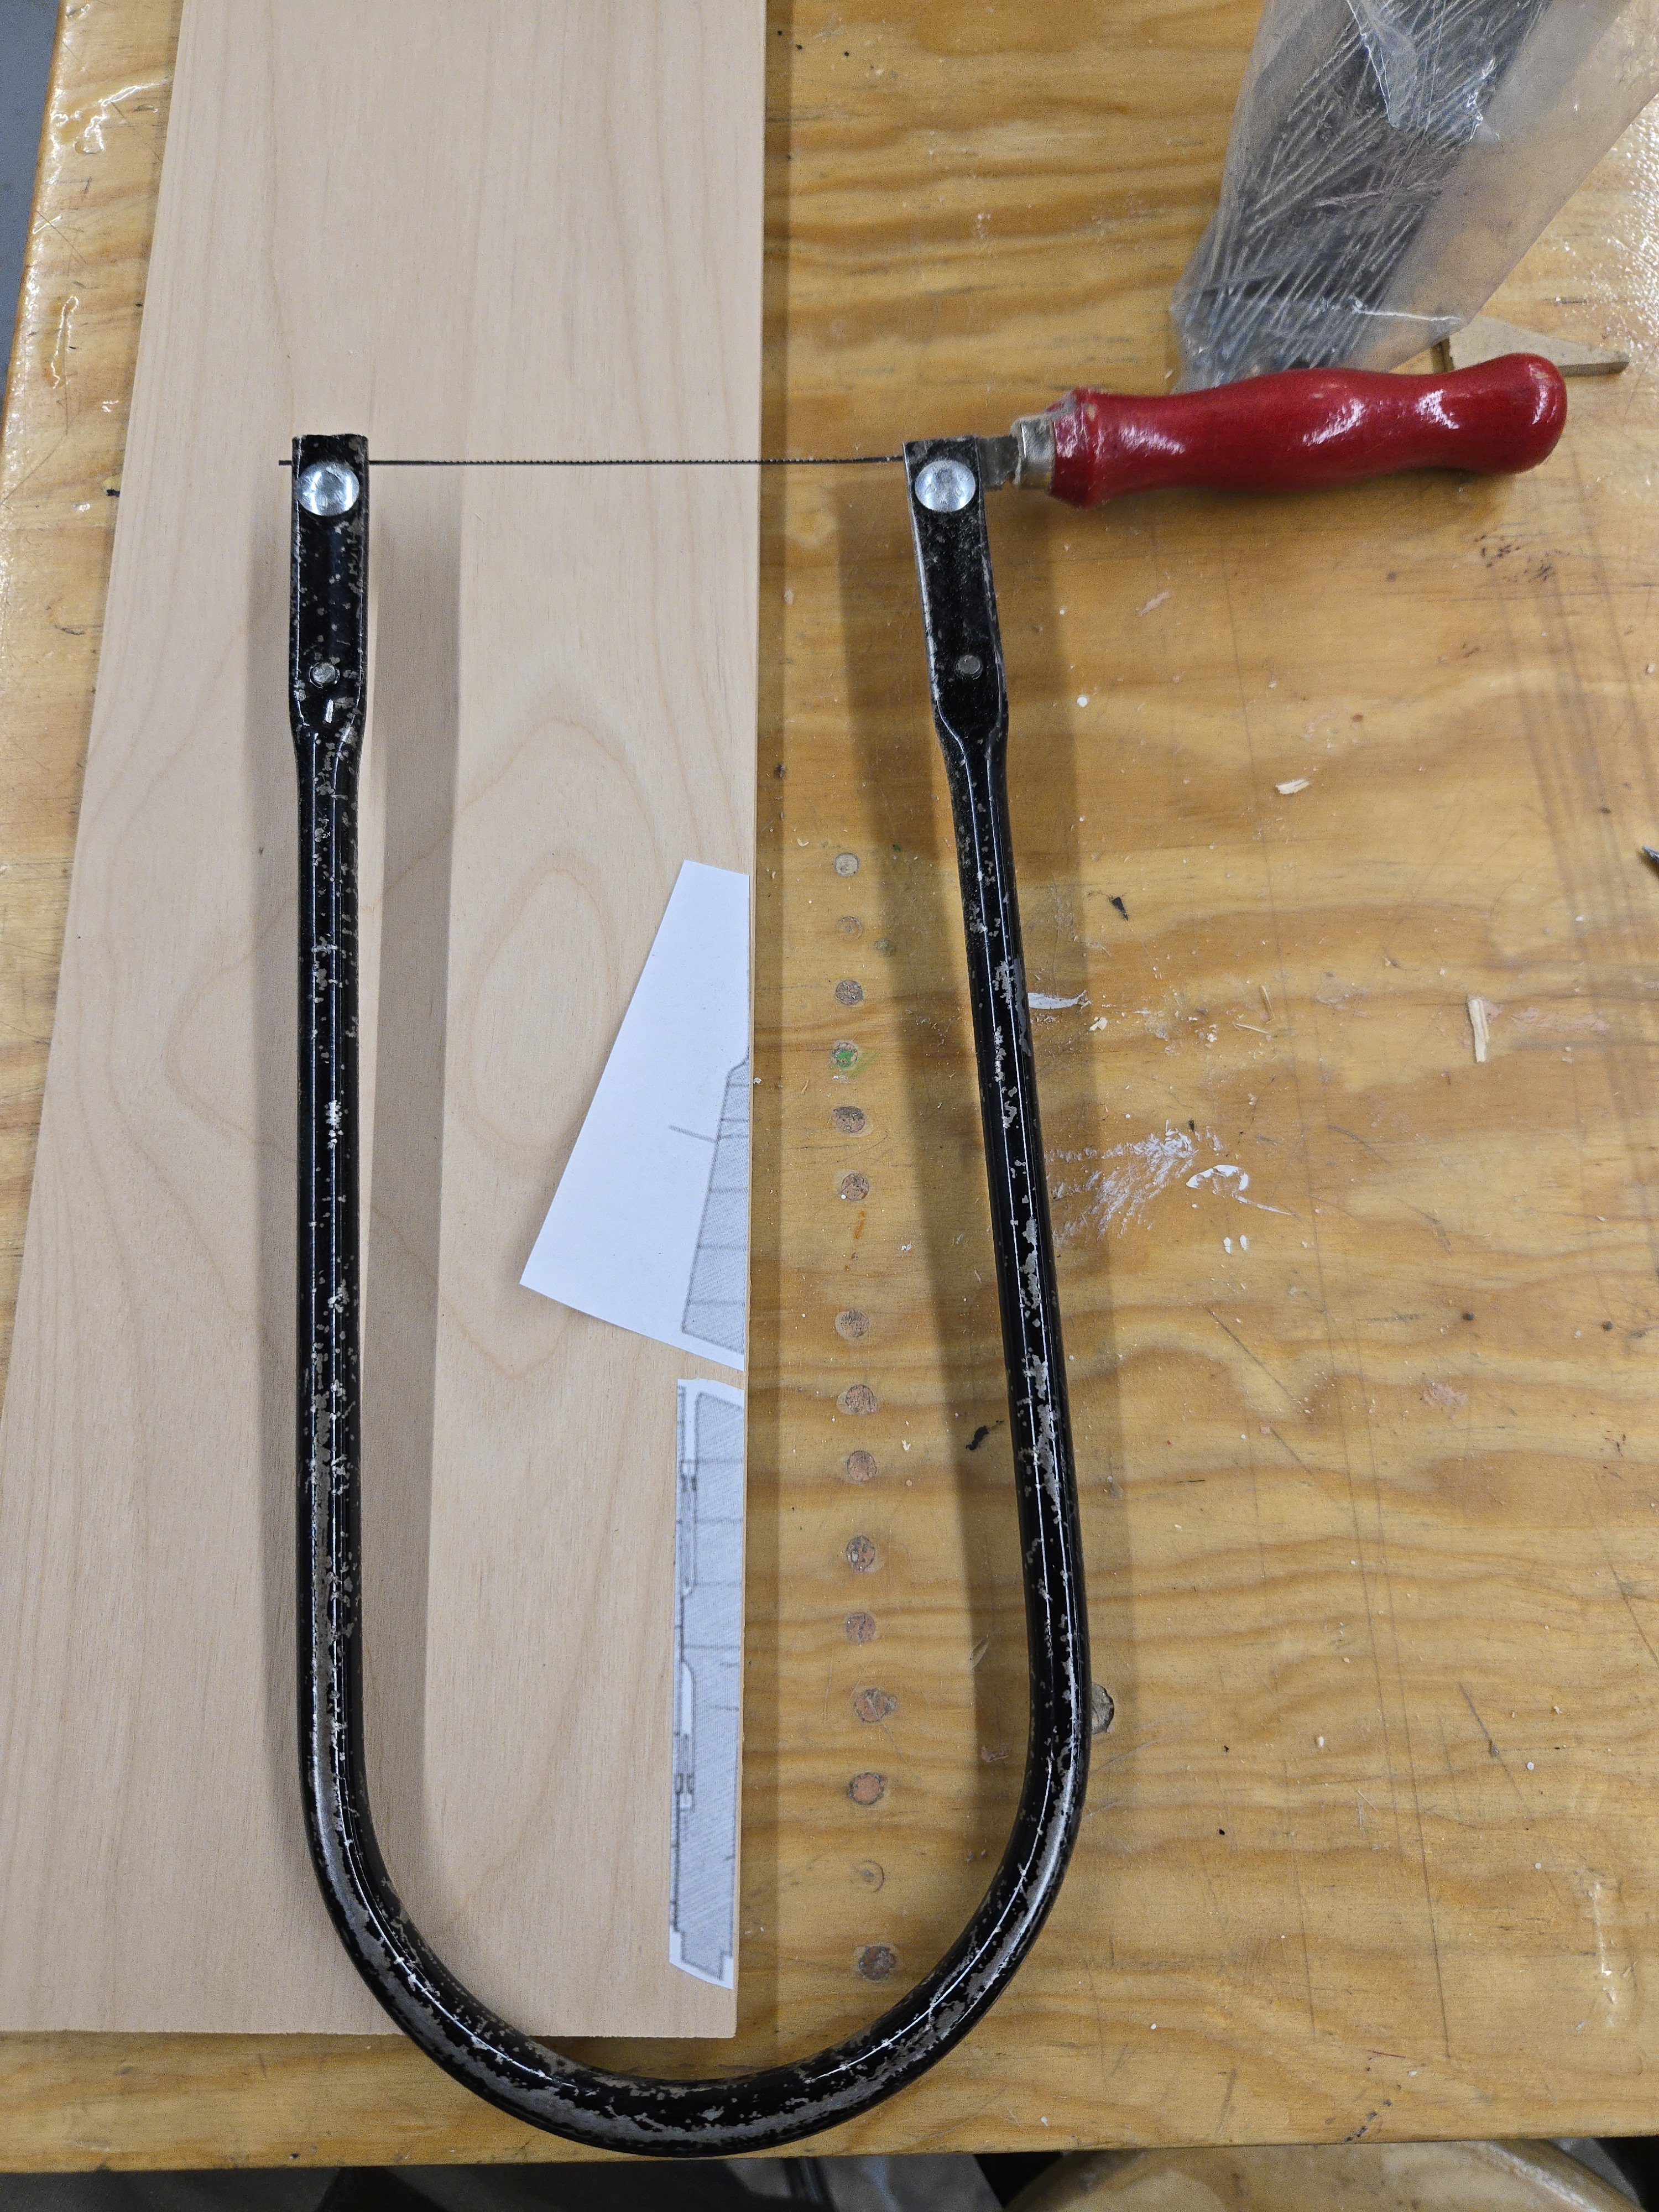
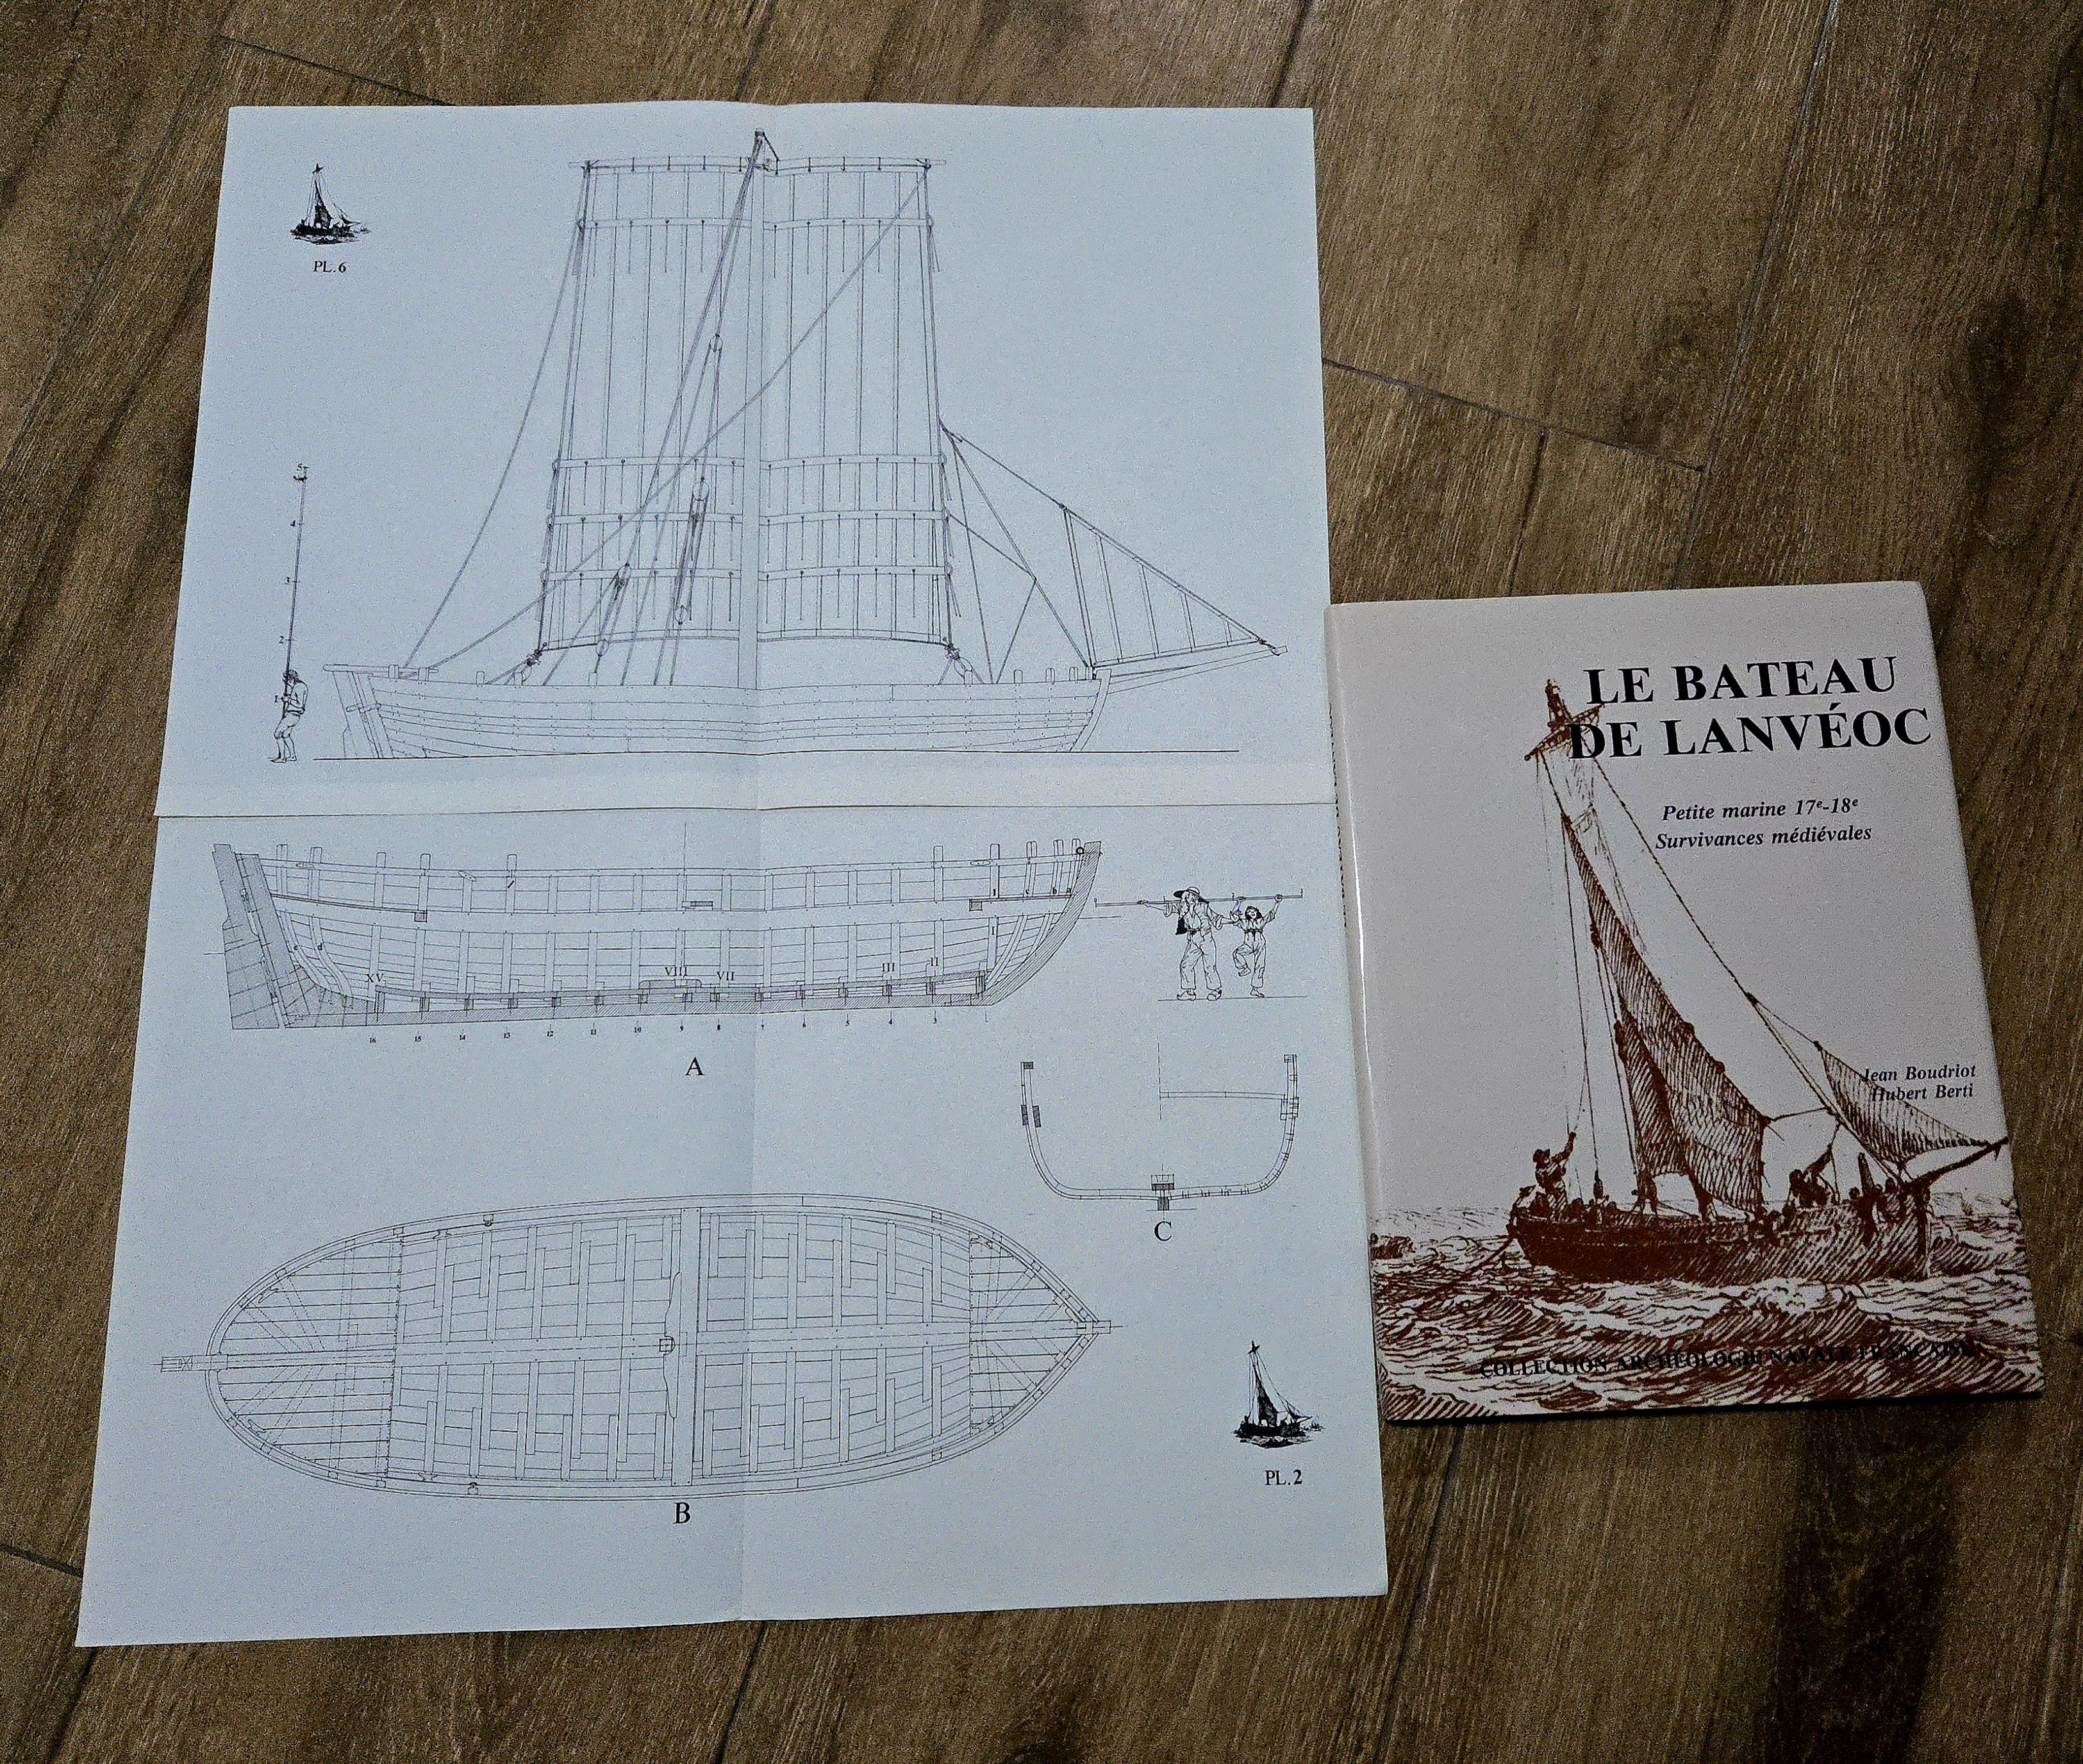
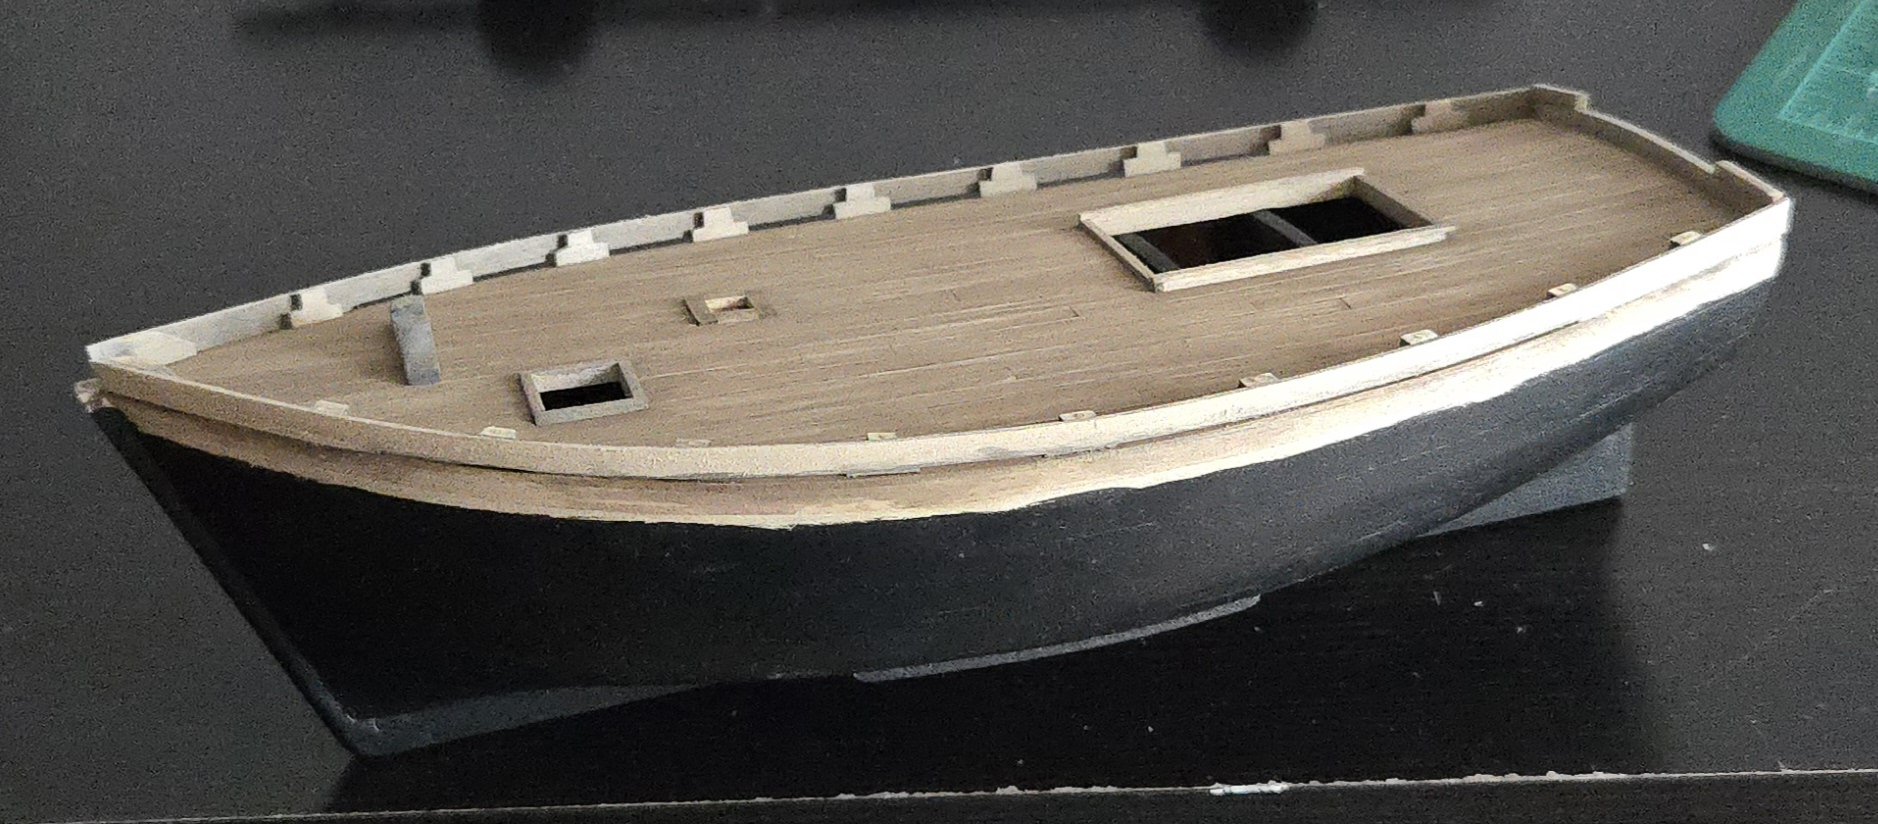
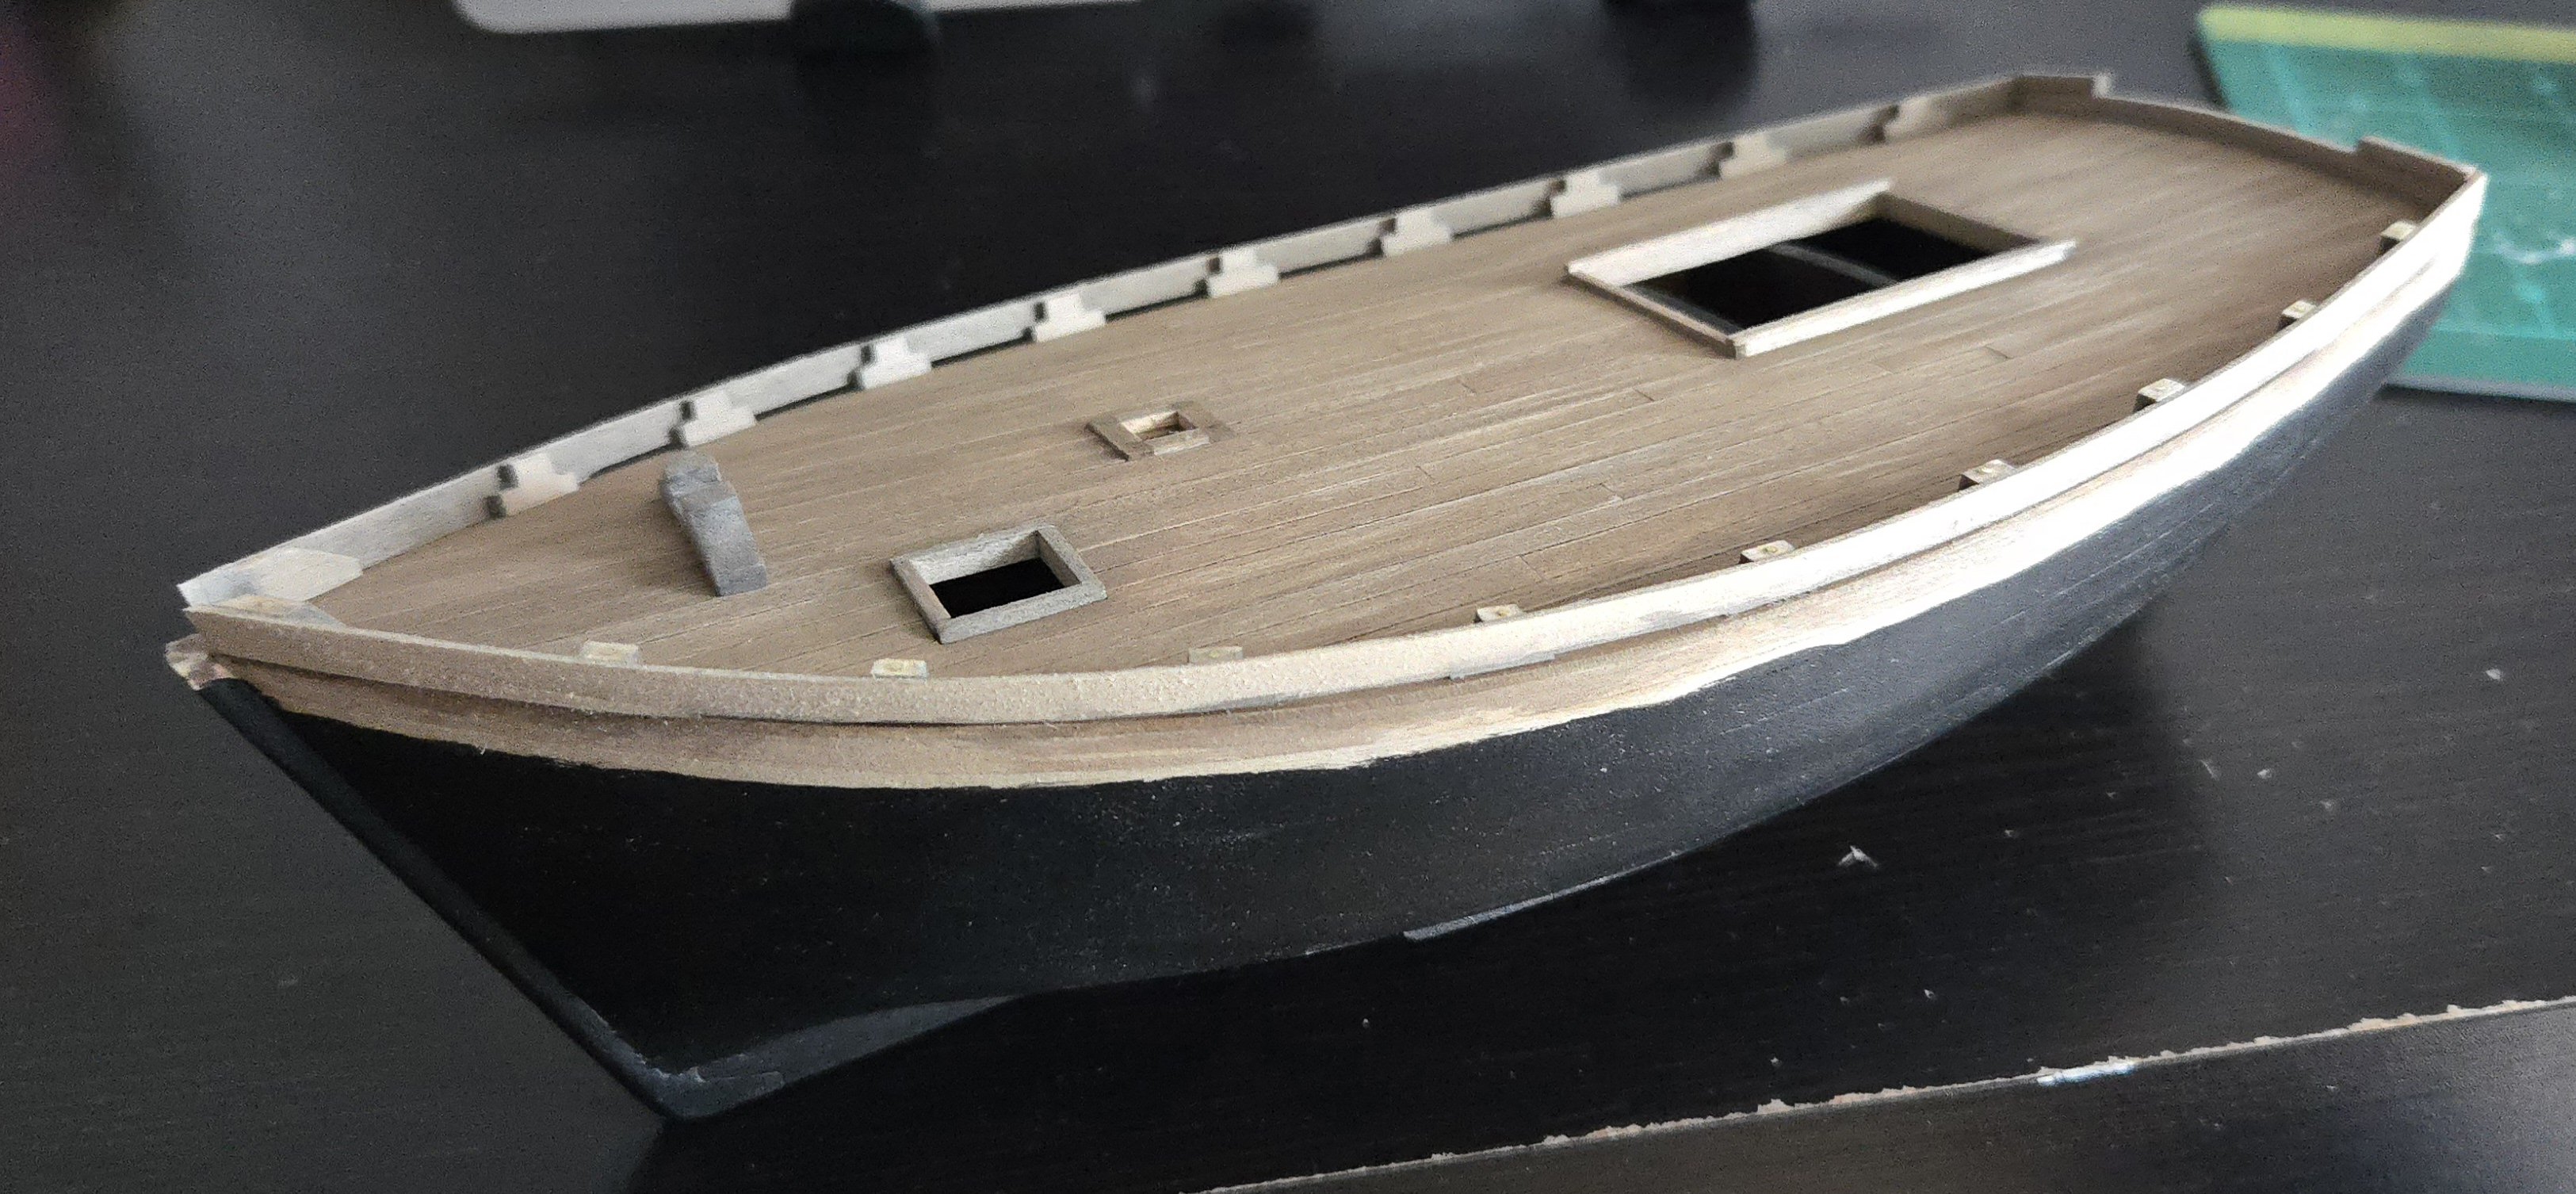
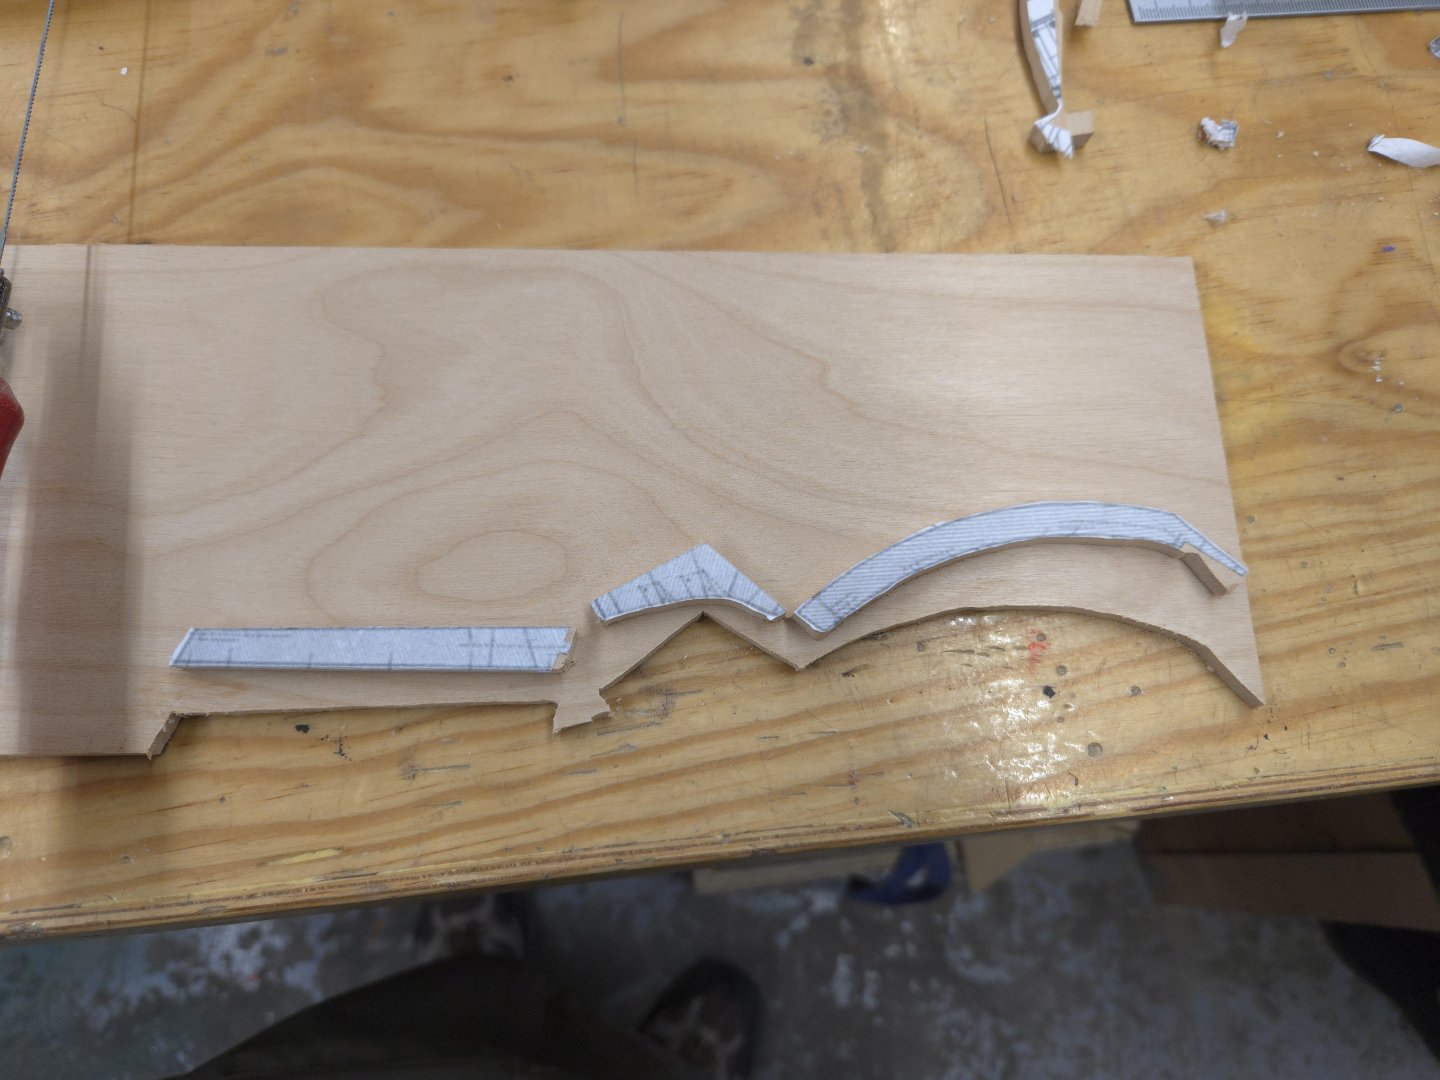
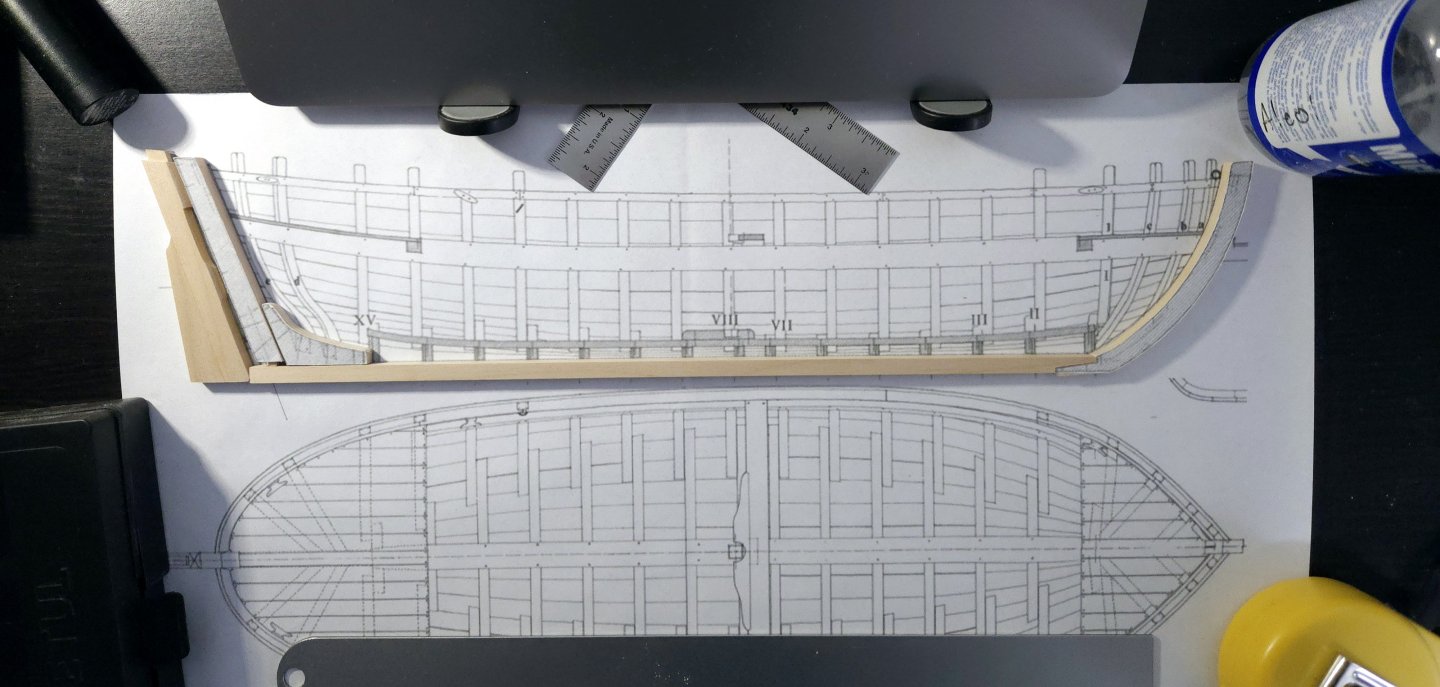
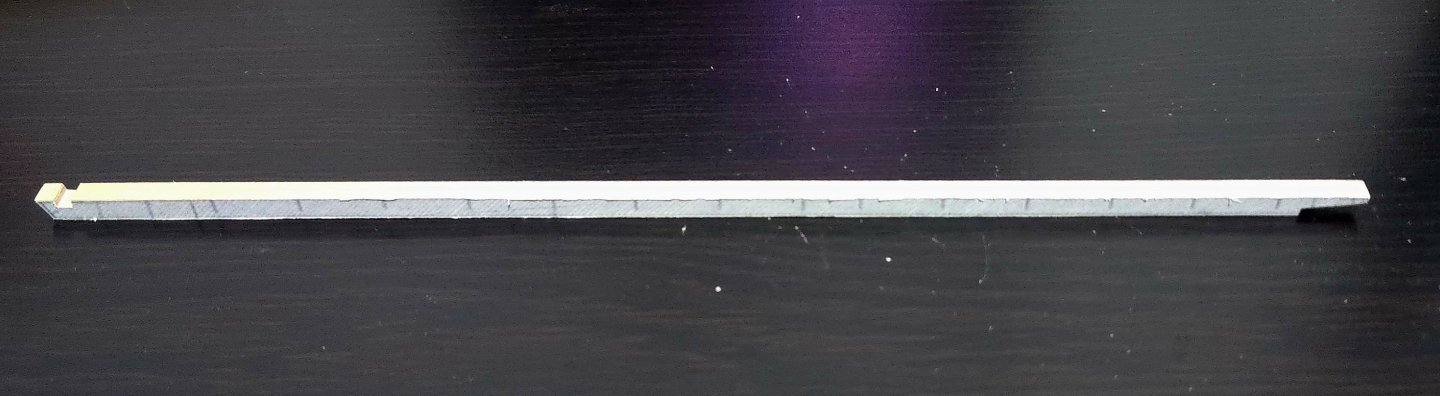
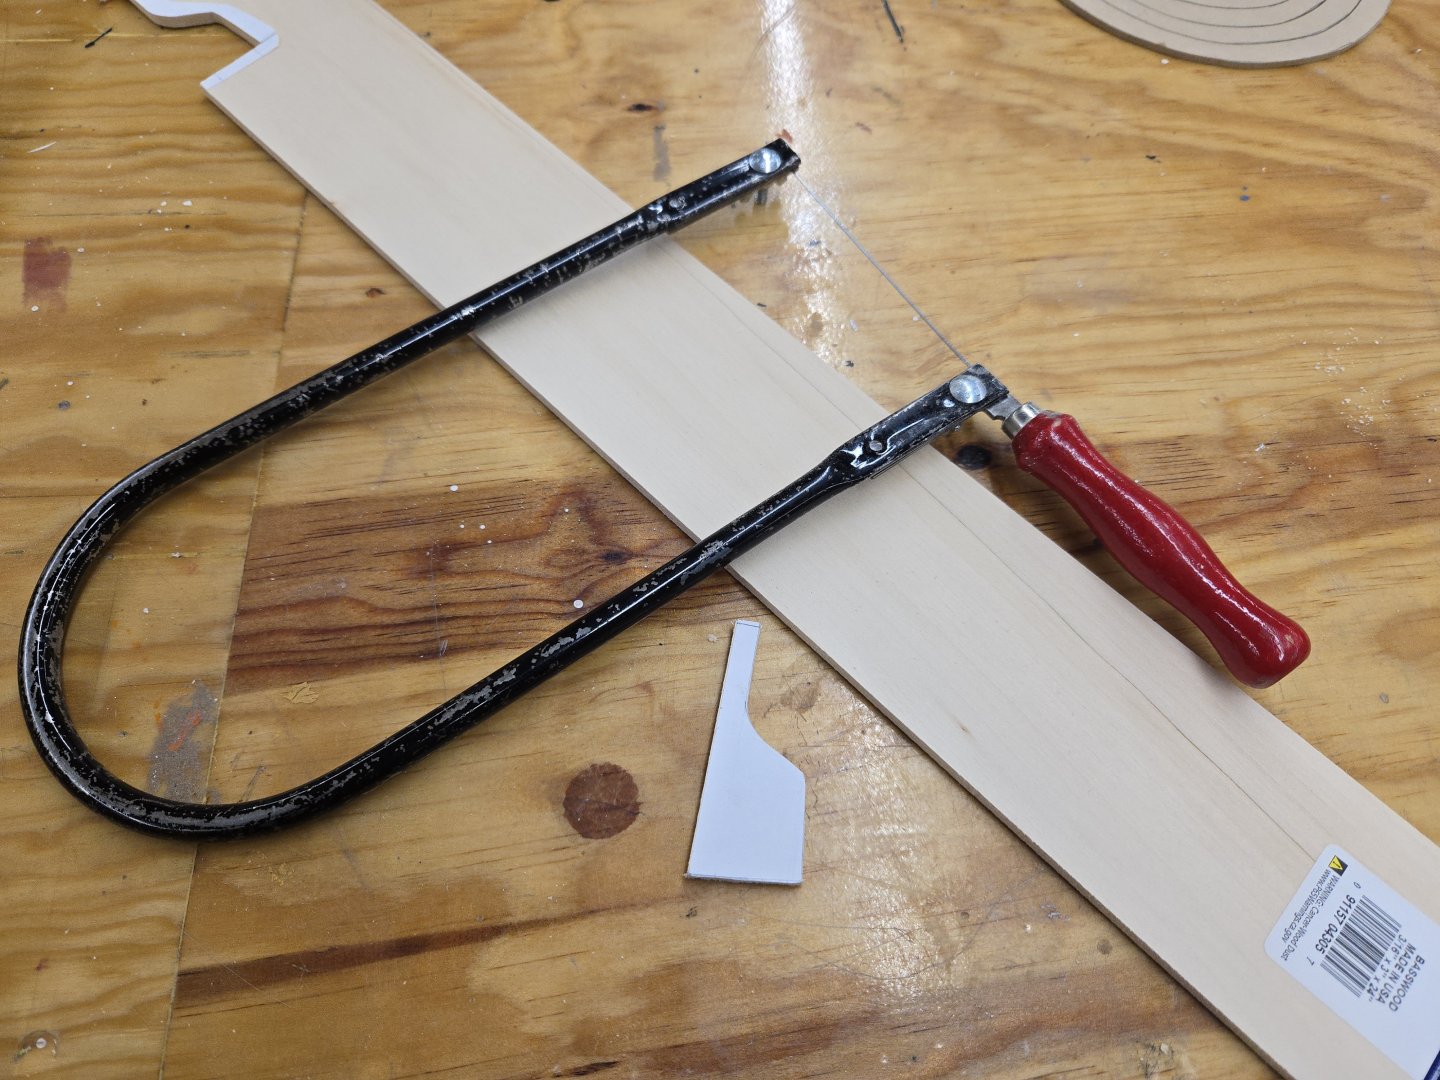
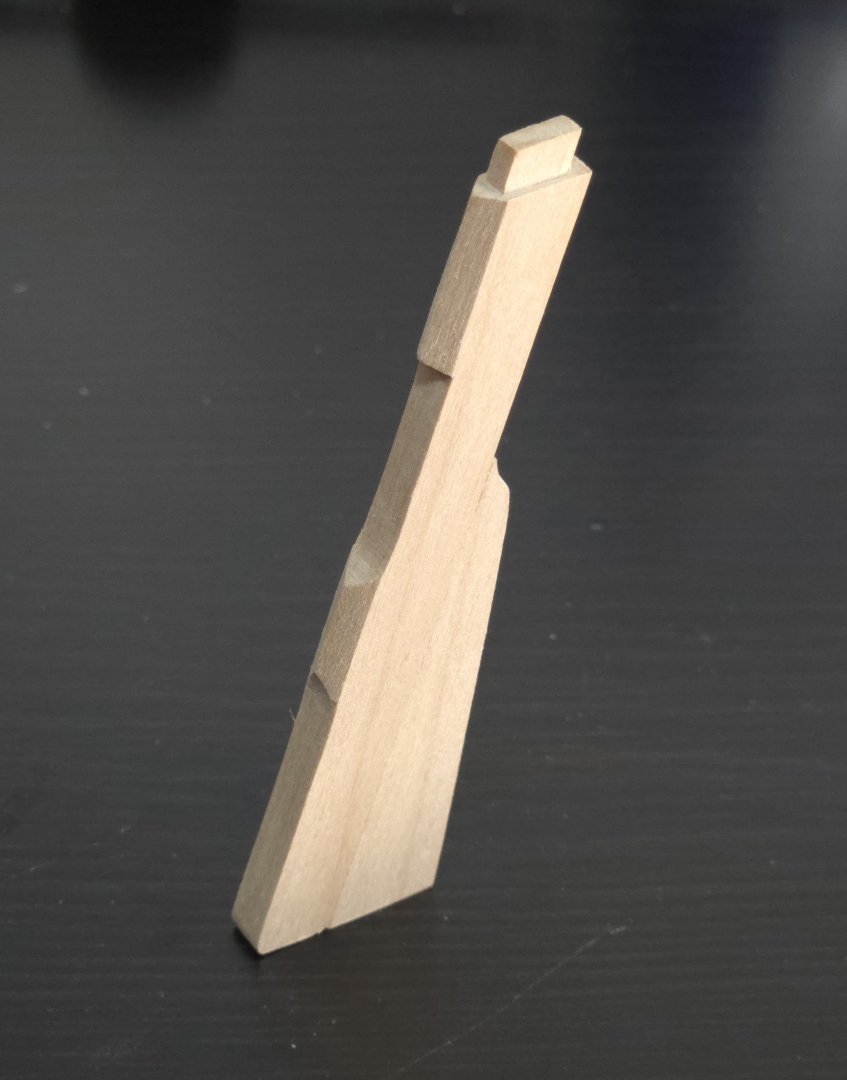
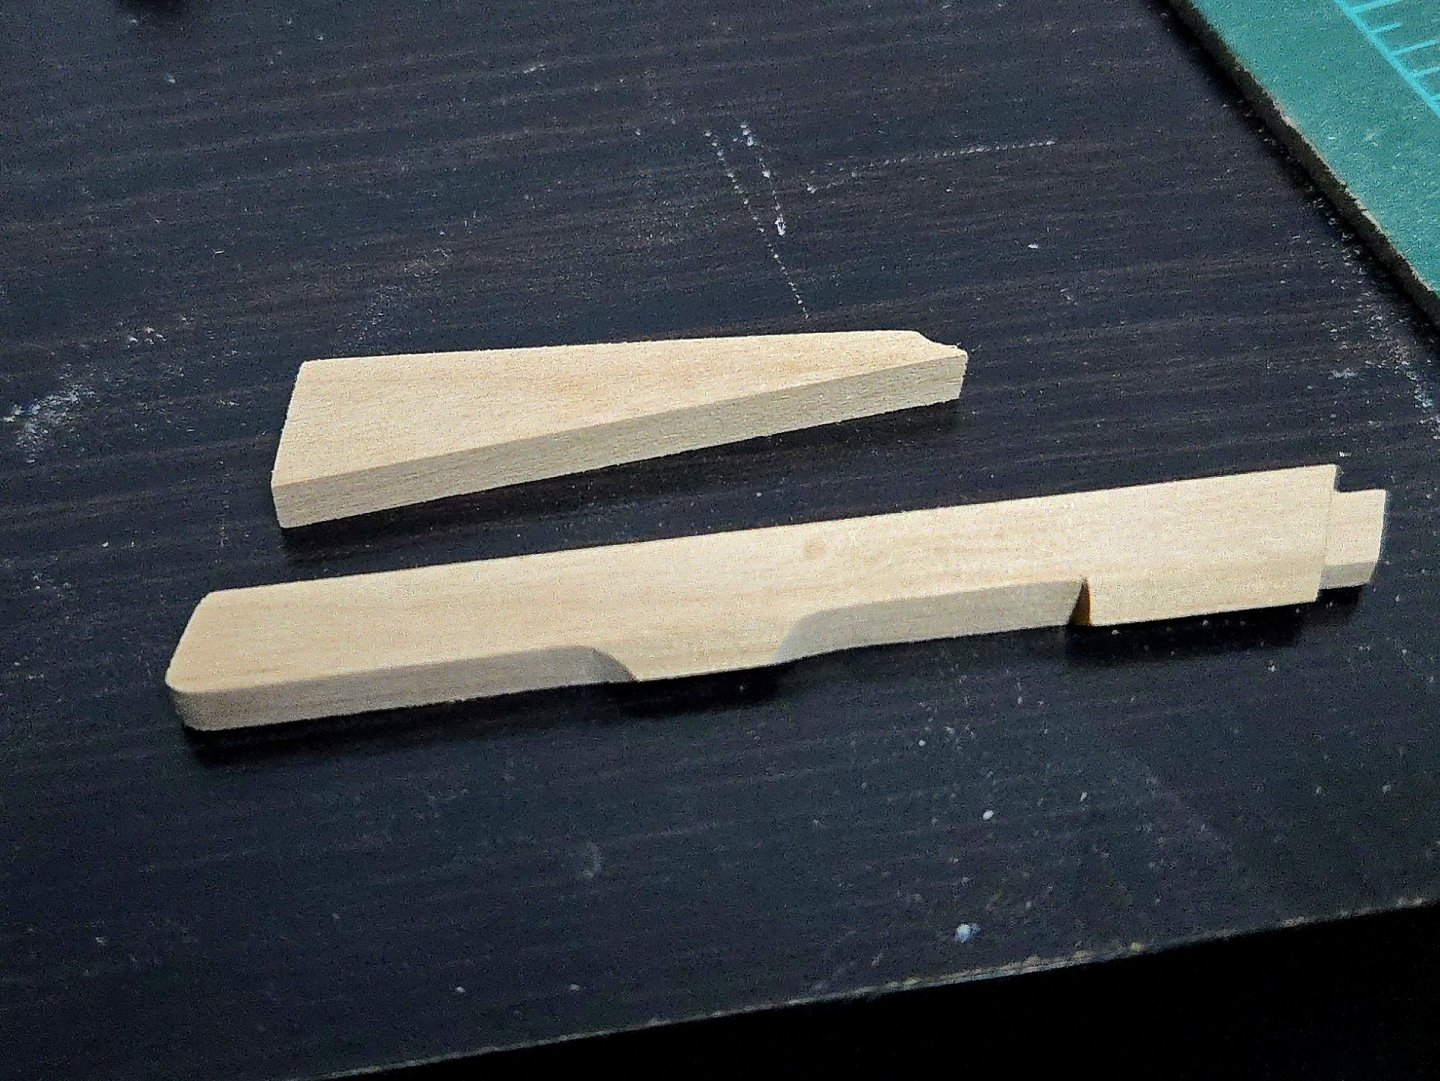
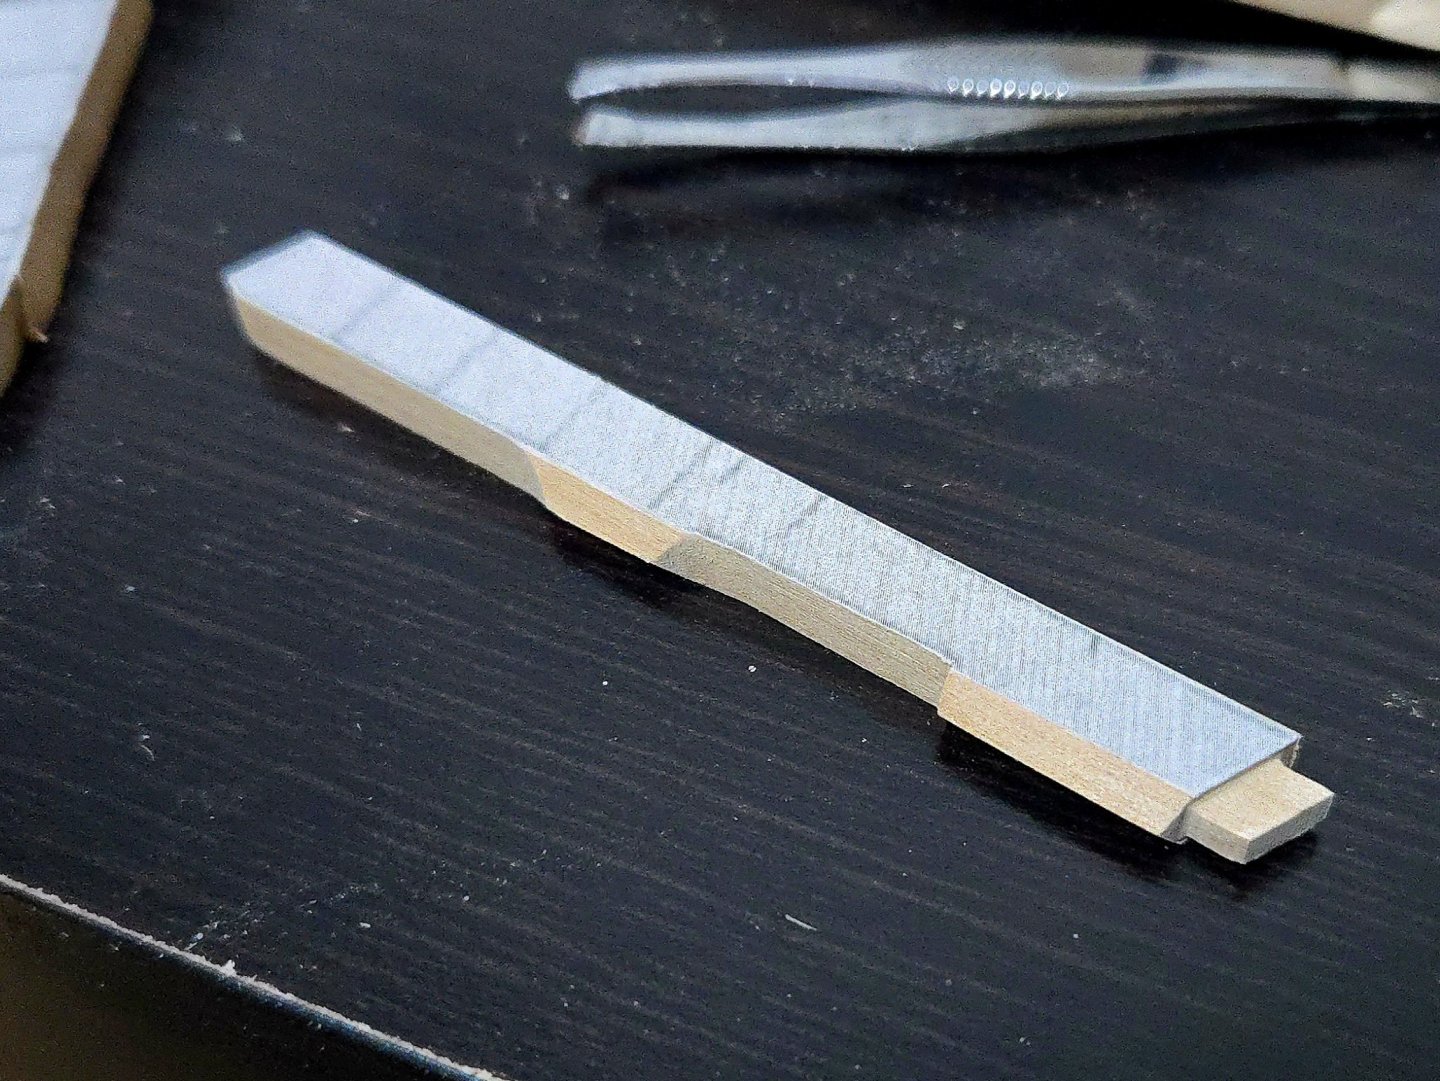
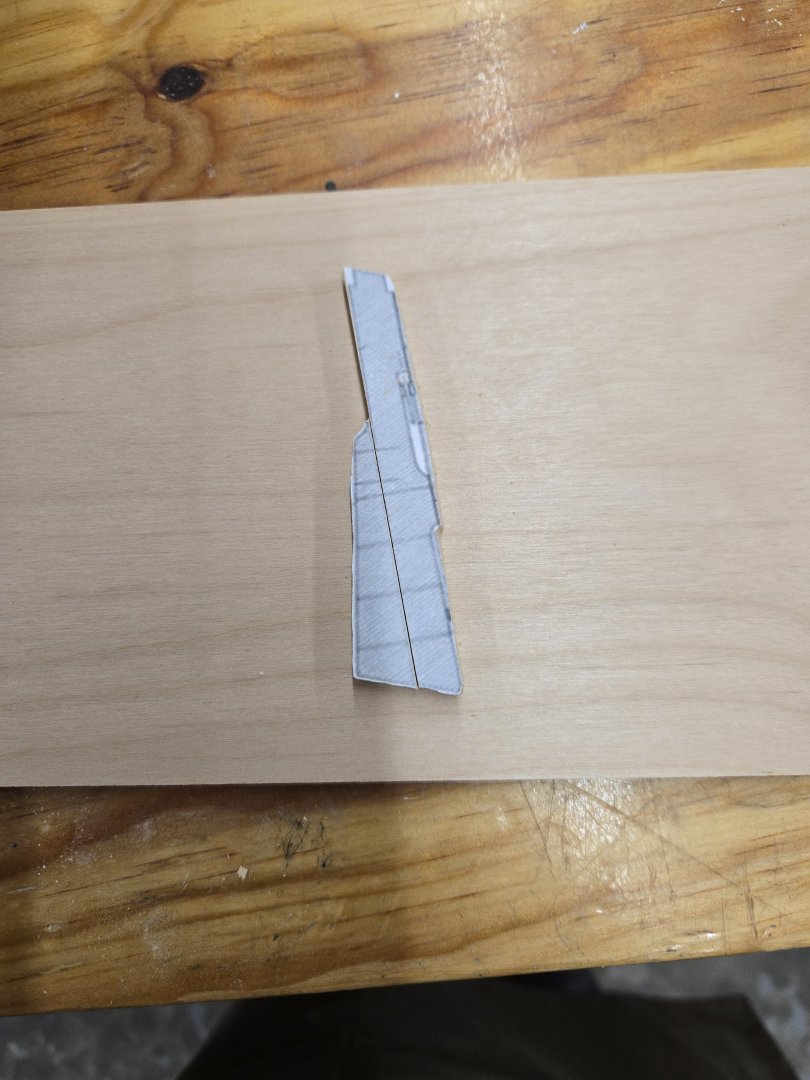
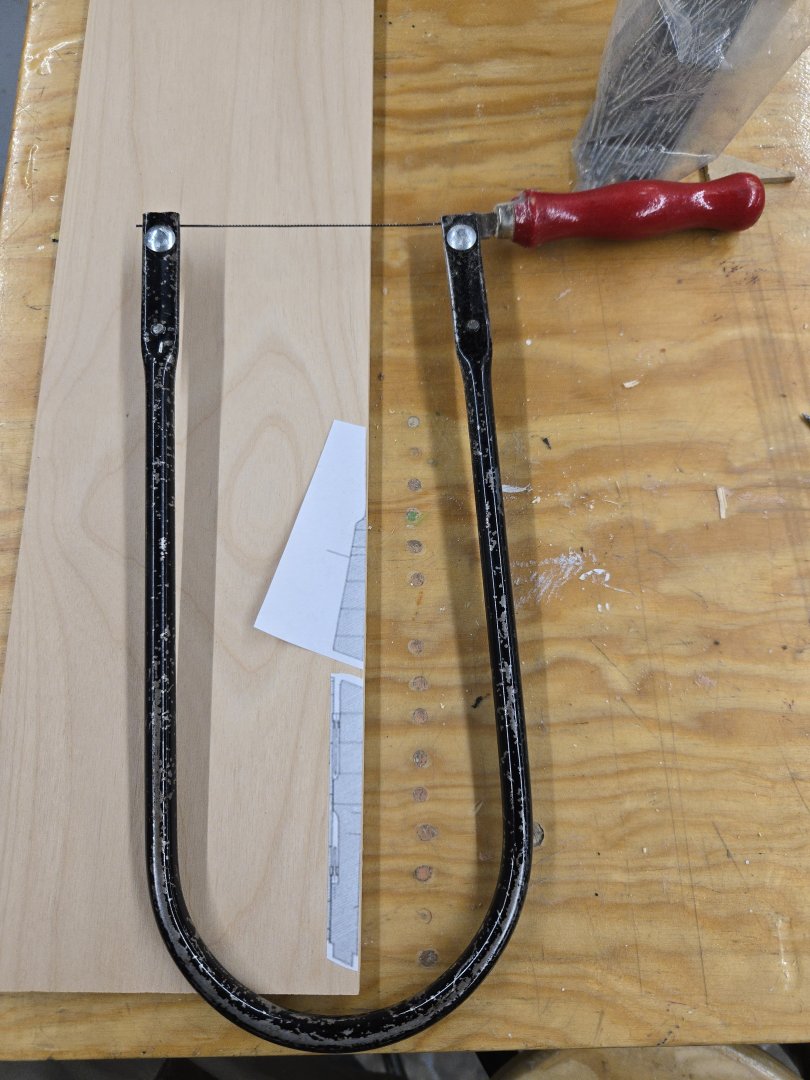
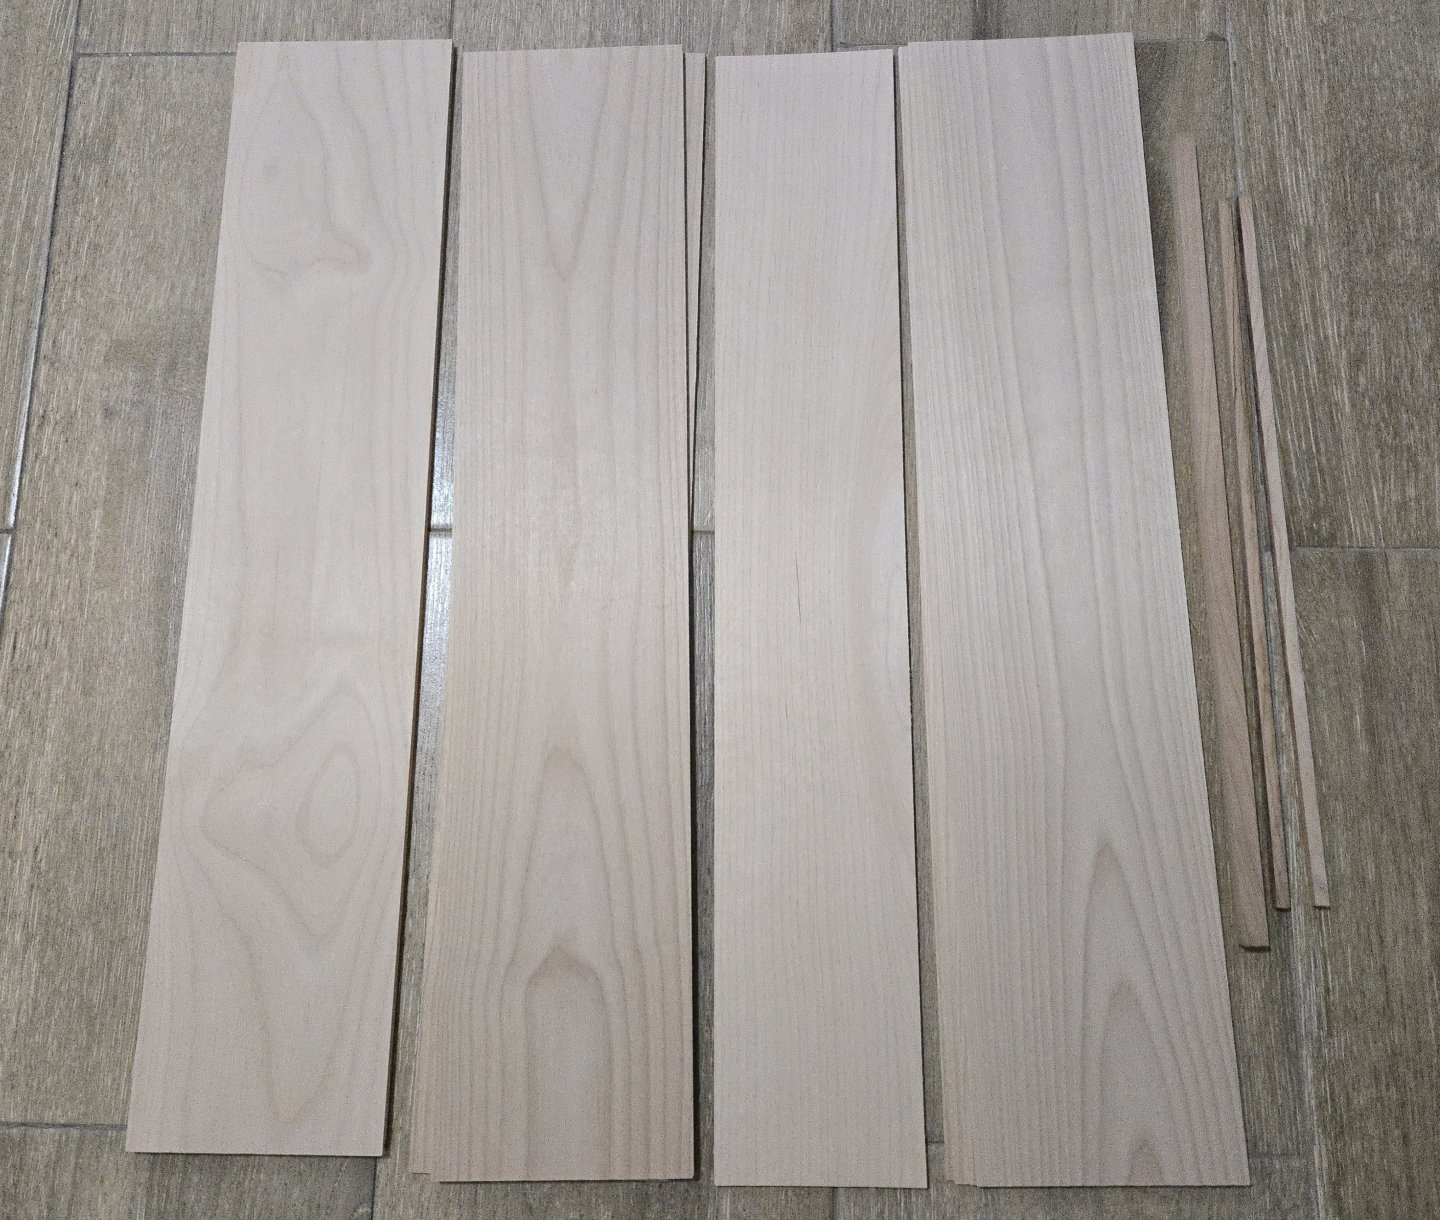
Thanks, @Paul Le Wol! There will still be plenty of research to come for the Lancha Chilota and enough other Latin American workboats to keep me busy for a long while. Not to mention that I'll definitely be on the lookout for more details about the Bateau than are in the monograph, although any research will be tricky without speaking French. I definitely enjoy research and sharing what I find. But sometimes it can be a lot to keep up with, and its nice to have something where I can focus more on the woodworking and construction aspects. Thank you @François de Saint Nazaire! Or should I say "merci." I'll have to add "tonnerre de Brest!" to my French phrasebook, which otherwise is just words like "quille," "modèle," "proue," and others that are close enough to english or spanish that I recognize them. Although I didn't end up having as much time for the Bateau in my carpentry class as I had thought I would, I did make some progress--and sawdust! First, I began preparing the build cradle. Although some people seem to be able to build POF just fine without one, I thought it seemed like it could only help to have one. To start, I extended the lines of the frames outwards on the plan view and marked the frame numbers. I then glued the plan sheet to an mdf board. Next I will cut the mdf top part of the cradle to size (it will extend equally on both sides of the hull) and cut out the shape of the hull, creating a form for the frames to follow. I also need to get a thicker base, which will have the same plan view of the hull. For the model itself, I decided to start with the rudder. This is made of the same 7/32-inch thick alder that I'll be using for the keel, stem, and sternpost (and possibly a base, as well). Although the rudder on the Musee de Marine's model Bateau seems to be one piece, the monograph plans show it in two pieces. I began by gluing the plan drawings to the alder, to cut out with a fretsaw. I'll be doing the same process for the frames, so this was good practice for them. There were two things that I learned. First, it's vitally important to hold the fretsaw vertically, especially when cutting thick pieces of wood like these, and its very important to cut a bit outside the line so that any inward angle to the saw doesn't cut into the body of the piece. Second, I'll need to think more about where I place the pieces on the sheet before sawing, which wasn't such an issue when I learned how to use the fretsaw on small pieces but is much more important when I'm cutting from a big, unwieldy sheet. I'm right-handed, so placing the pieces to be cut on the bottom right of the sheet seemed like a good way to leave room for me to hold the wood in my left hand while sawing. While this is true, the clamps that I was using to hold the notched cutting platform to the workbench kept me from holding the wood sheet properly lengthwise to the platform. Instead I was forced to hold it awkwardly perpendicular to the platform, in such a way that I was squished up against the workbench and some cuts weren't quite as straight or as smooth as I would have liked. In the future I may try placing the templates in better locations, or try placing enough parts to be cut together that I can first trim off a chunk of the wood sheet and be left with a much smaller piece to manuever. Other than the issues noted above, the parts cut out pretty easily, although there was a good bit left for final shaping. The alder saws quite well. Back at home, I began final shaping with x-acto knives, files, and sanding blocks. In most ways, the alder is a joy to work with. It's soft enough to be readily carveable with a knife, but it holds edges very well and sands beautifully. It's noticeably harder than basswood, which makes it more difficult to over-sand. The only thing I don't love is that it produces a much finer sawdust than basswood, which makes clean-up a bit trickier when working from the home office. I may have to look into getting a small shopvac or something, although it would be tricky to operate while my wife is working (we share the home office). After shaping, I sprayed a bit of alcohol and easily removed the paper templates. The gluestick residue is quite easy to remove, at least as long as you don't leave it for several months. Once that dried, I glued the rudder parts together, leaving the line of the bottom for final shaping after everything was attached. Although the close-up photography reveals a few areas to touch up, overall I'm very very happy with how the rudder turned out. I'm looking forward to further progress and am enjoying the alder. Next up: the keel, stem, and sternpost.


- 139 replies
-
- 11
-
-

-
- ancre
- Bateau de Lanveoc
- (and 2 more)
-
Excellent job on the boat, it really turned out great! The exposed plywood issue sounds annoying, but for what it's worth, I don't notice it in the photos. The crew is a fantastic touch, too, I'm sure the new owner will love it.
- 55 replies
-
- 6
-
-
-
- Le Martegaou
- billing boats
- (and 1 more)
-
Welcome!
-
Very nicely done!
-
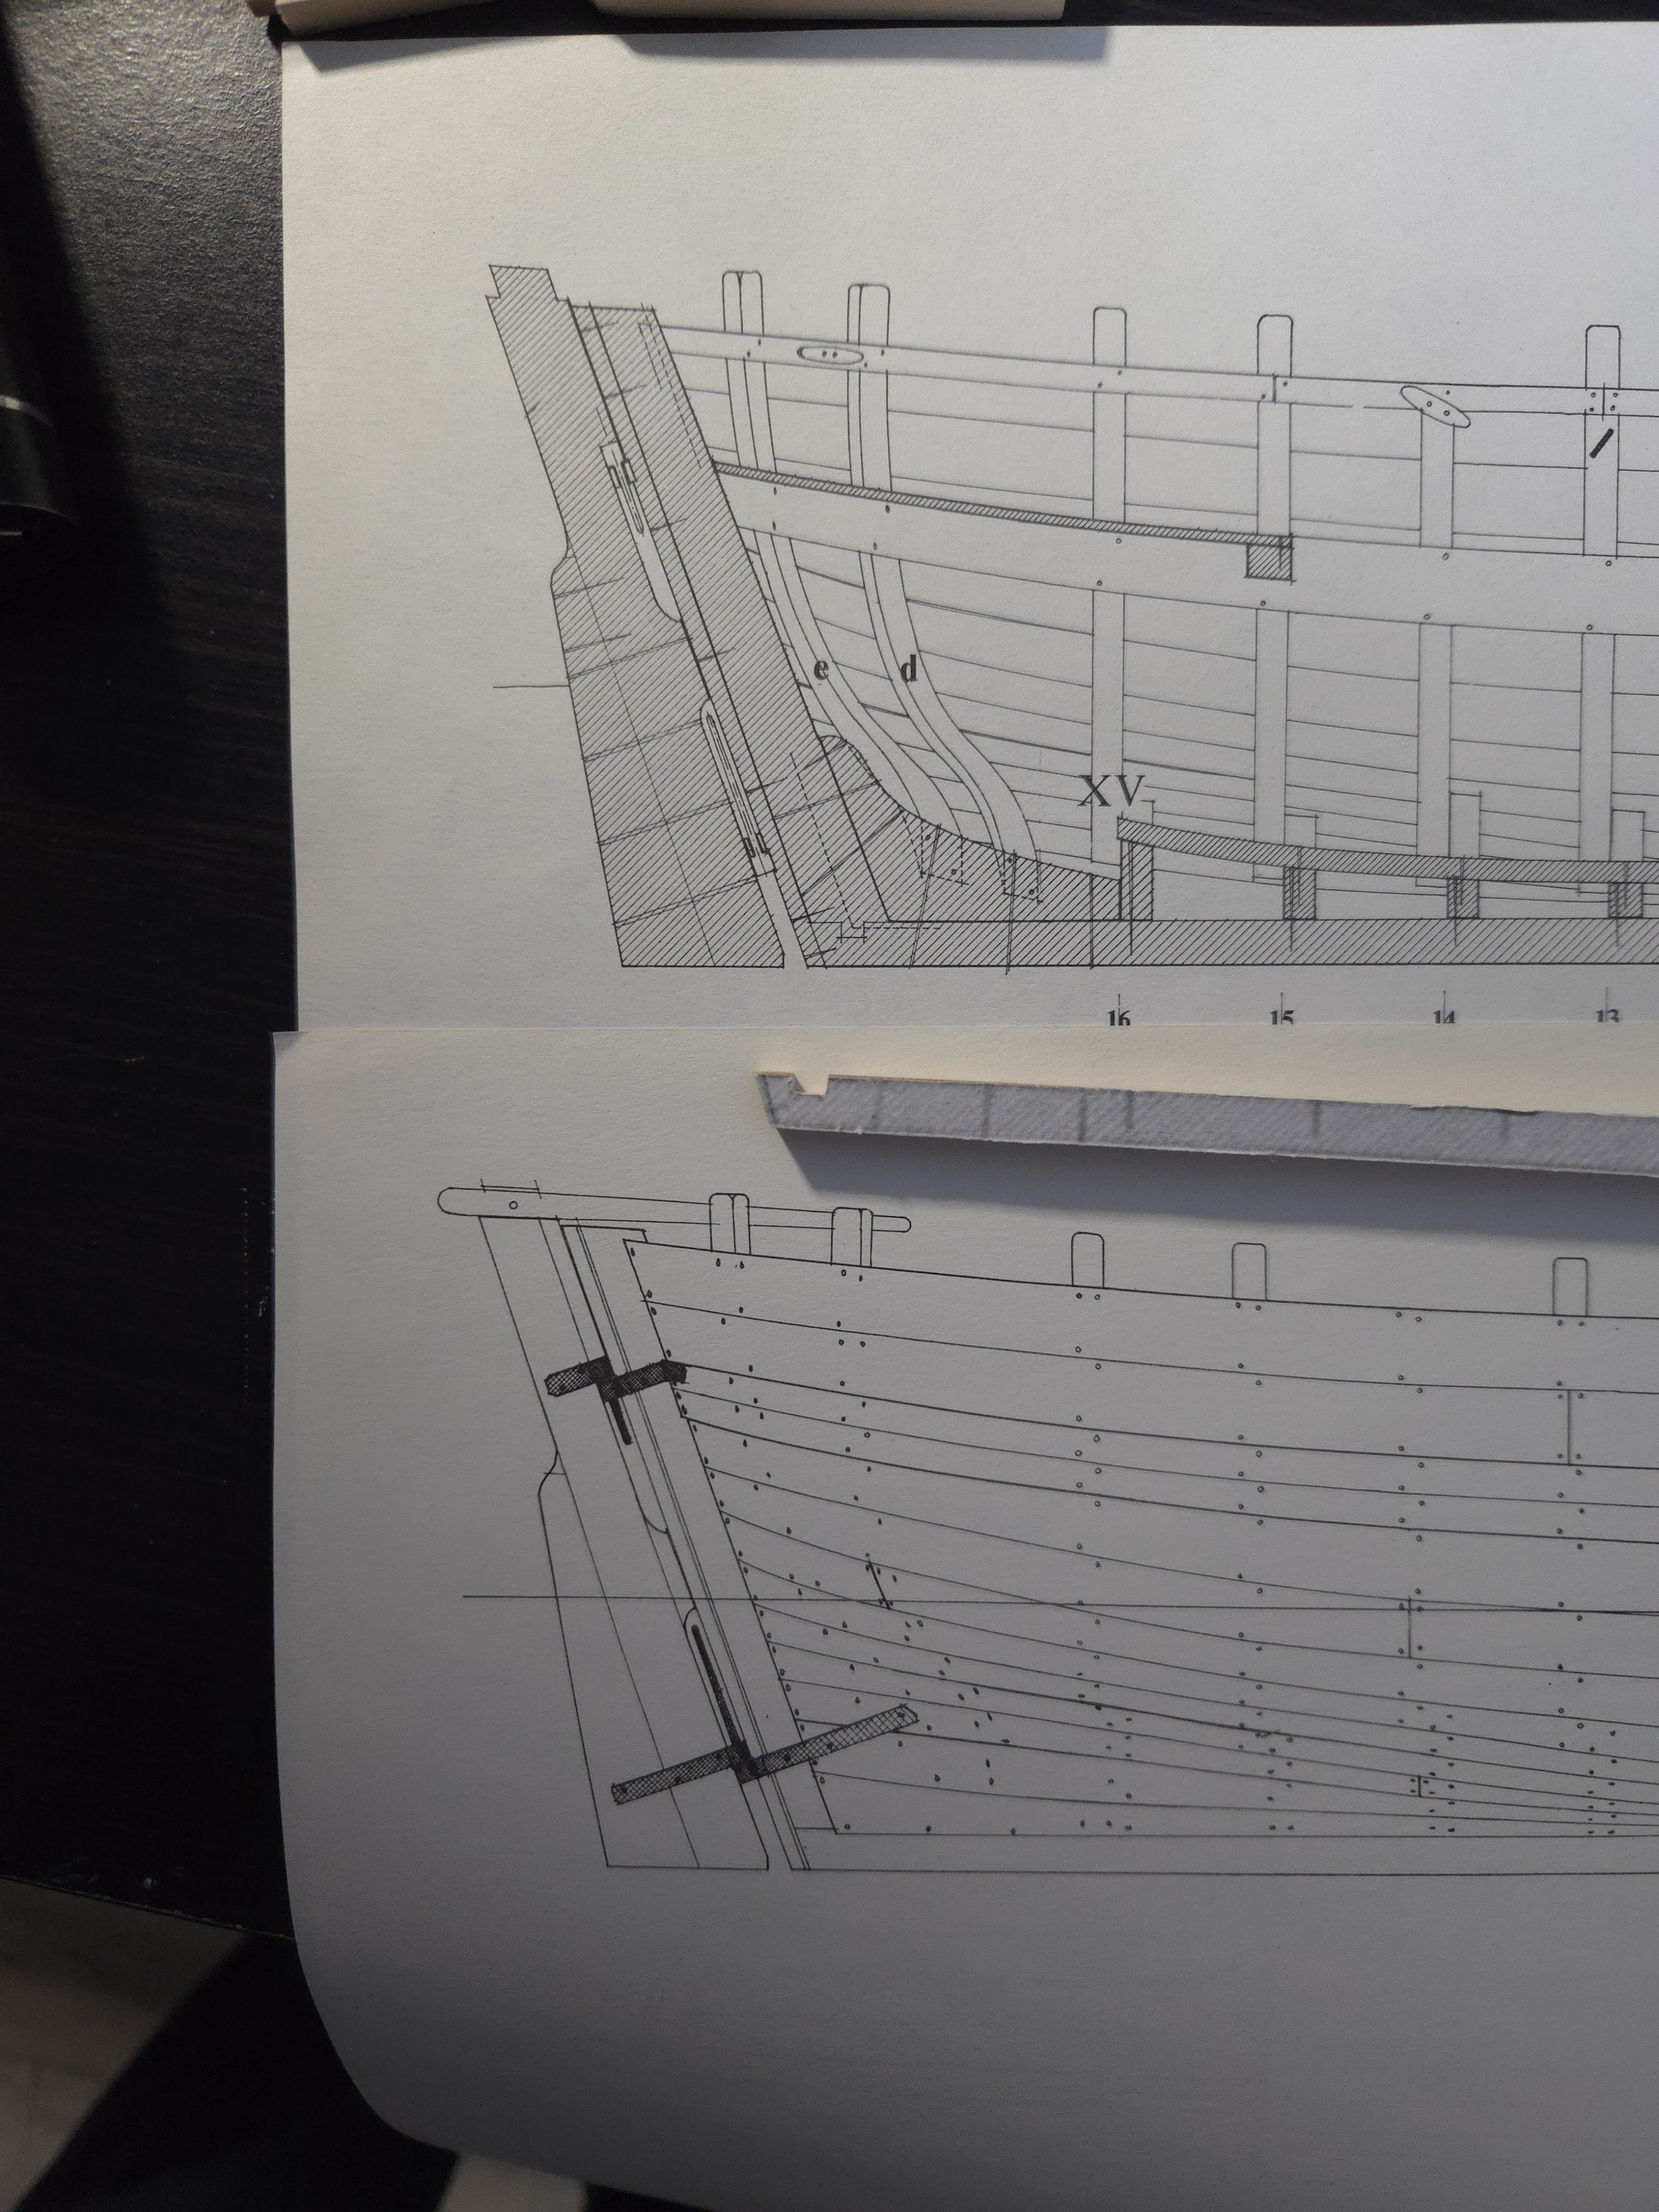
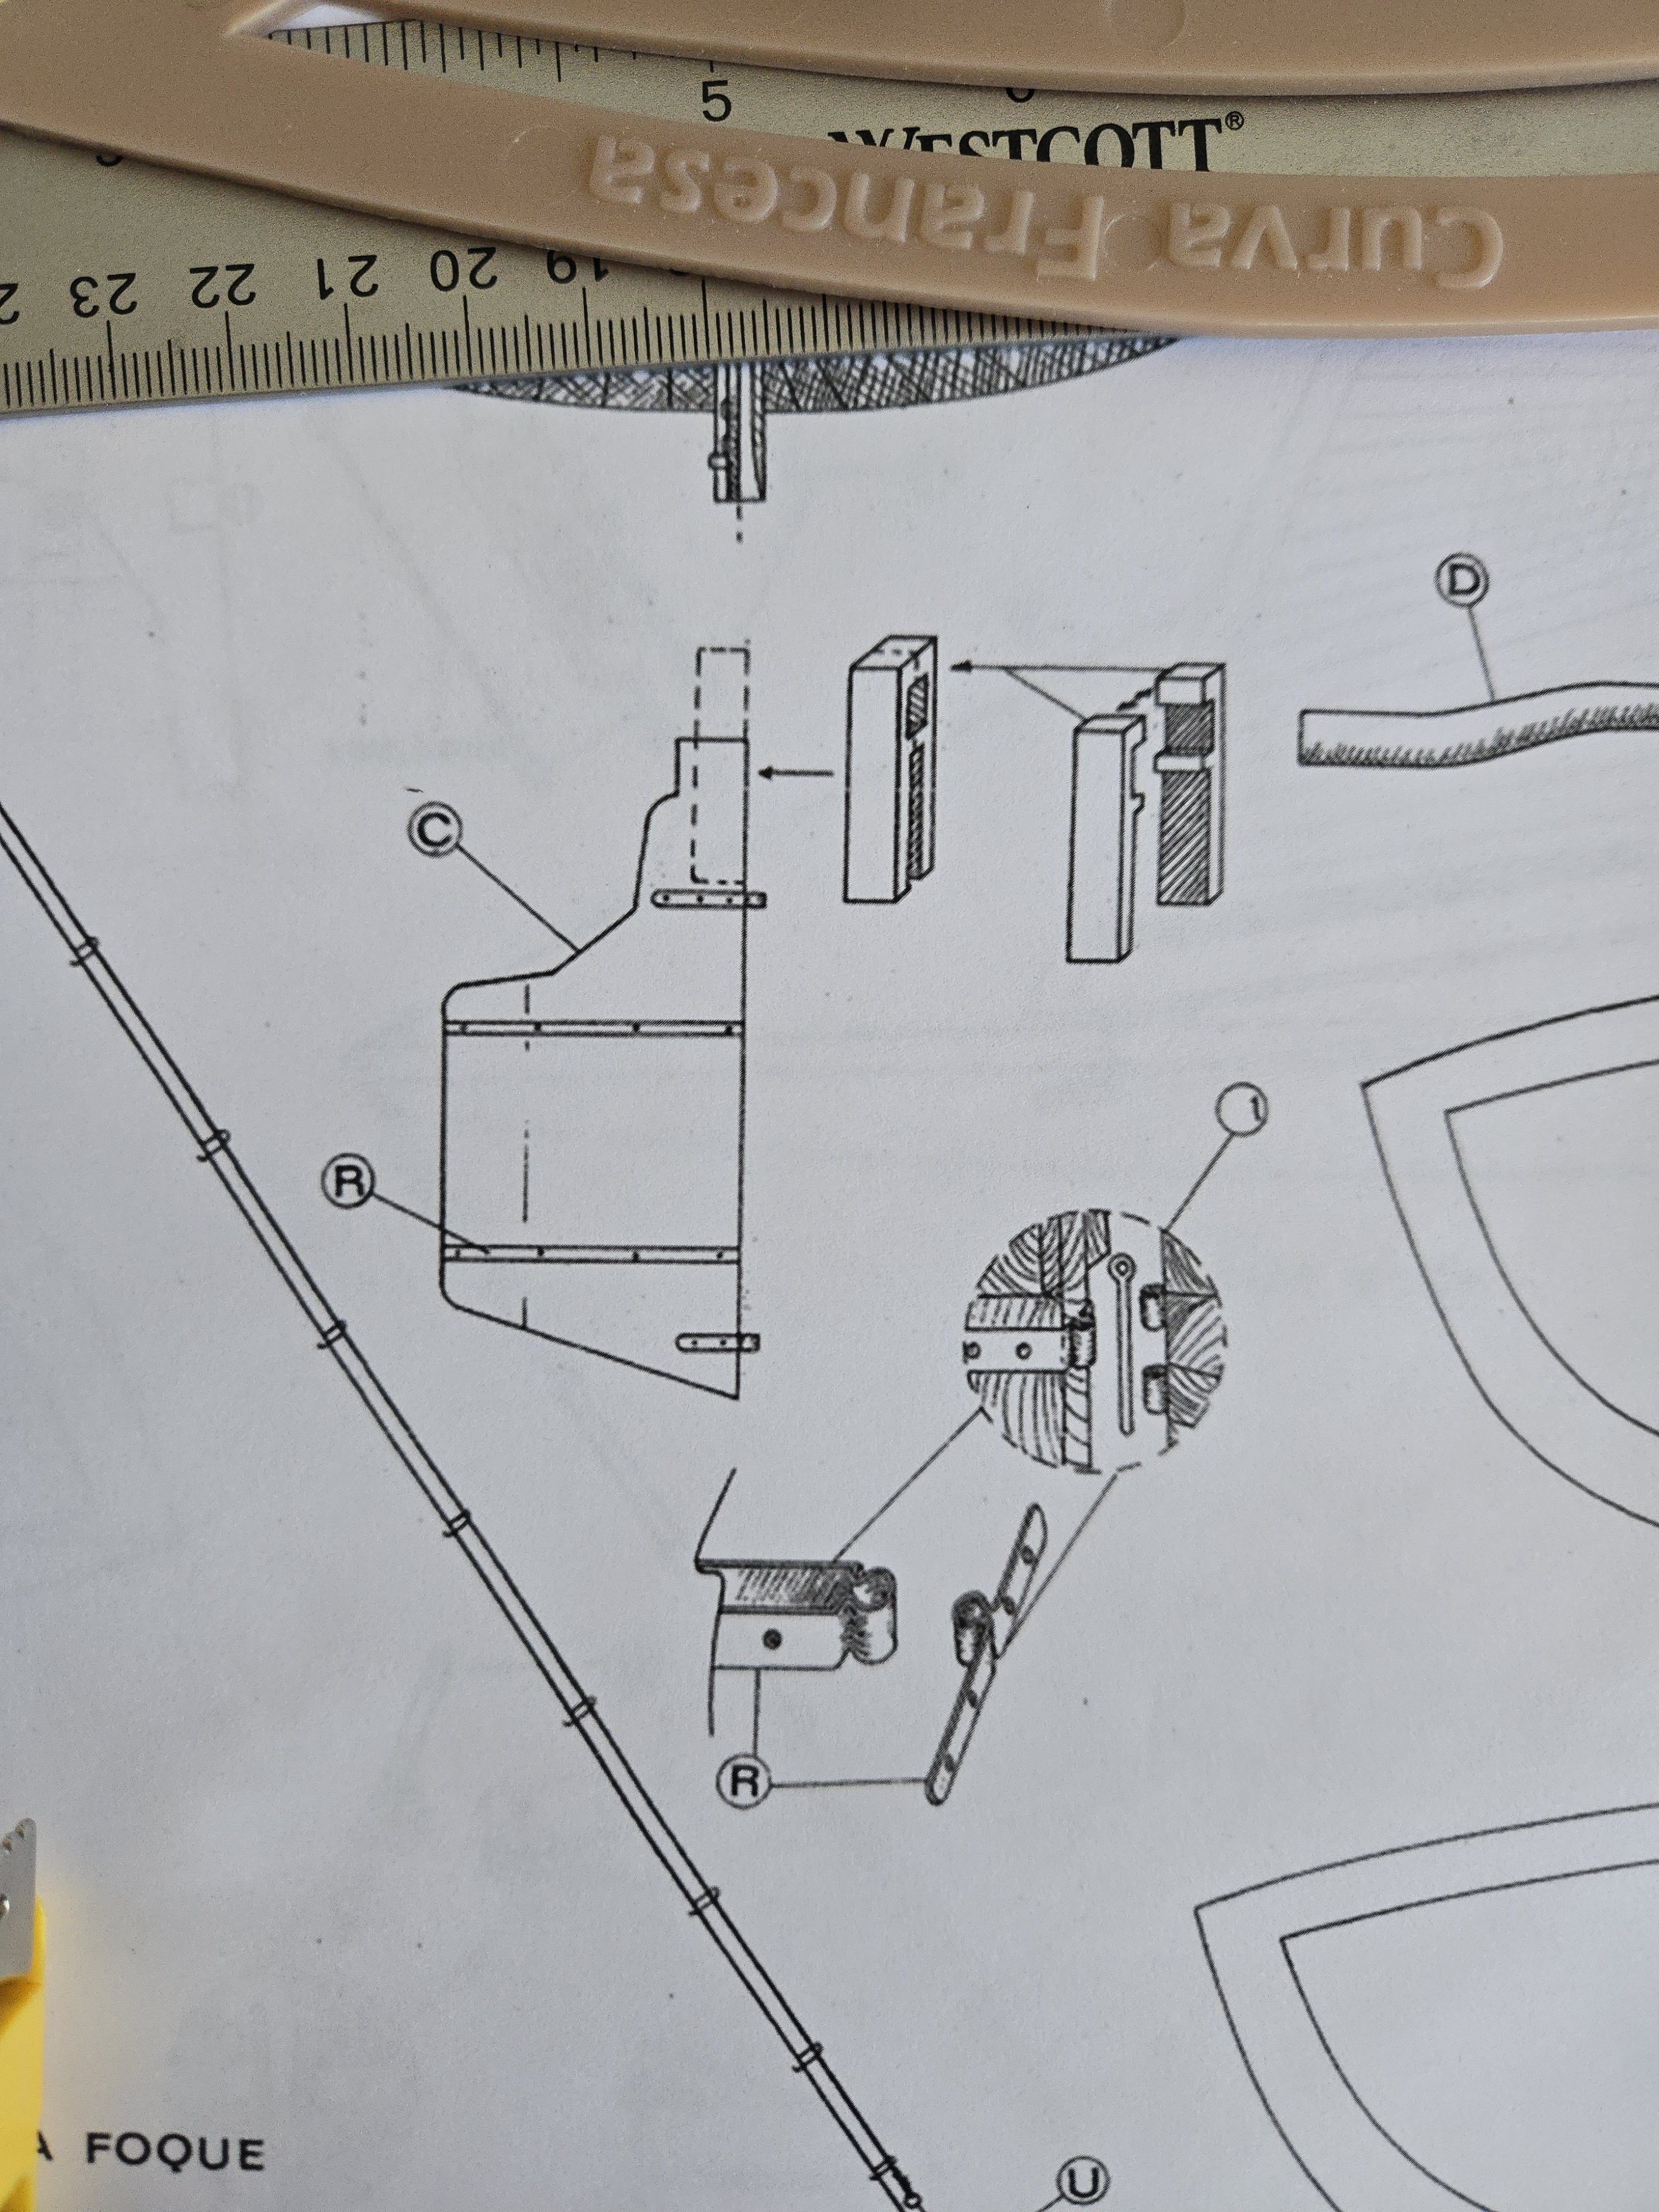
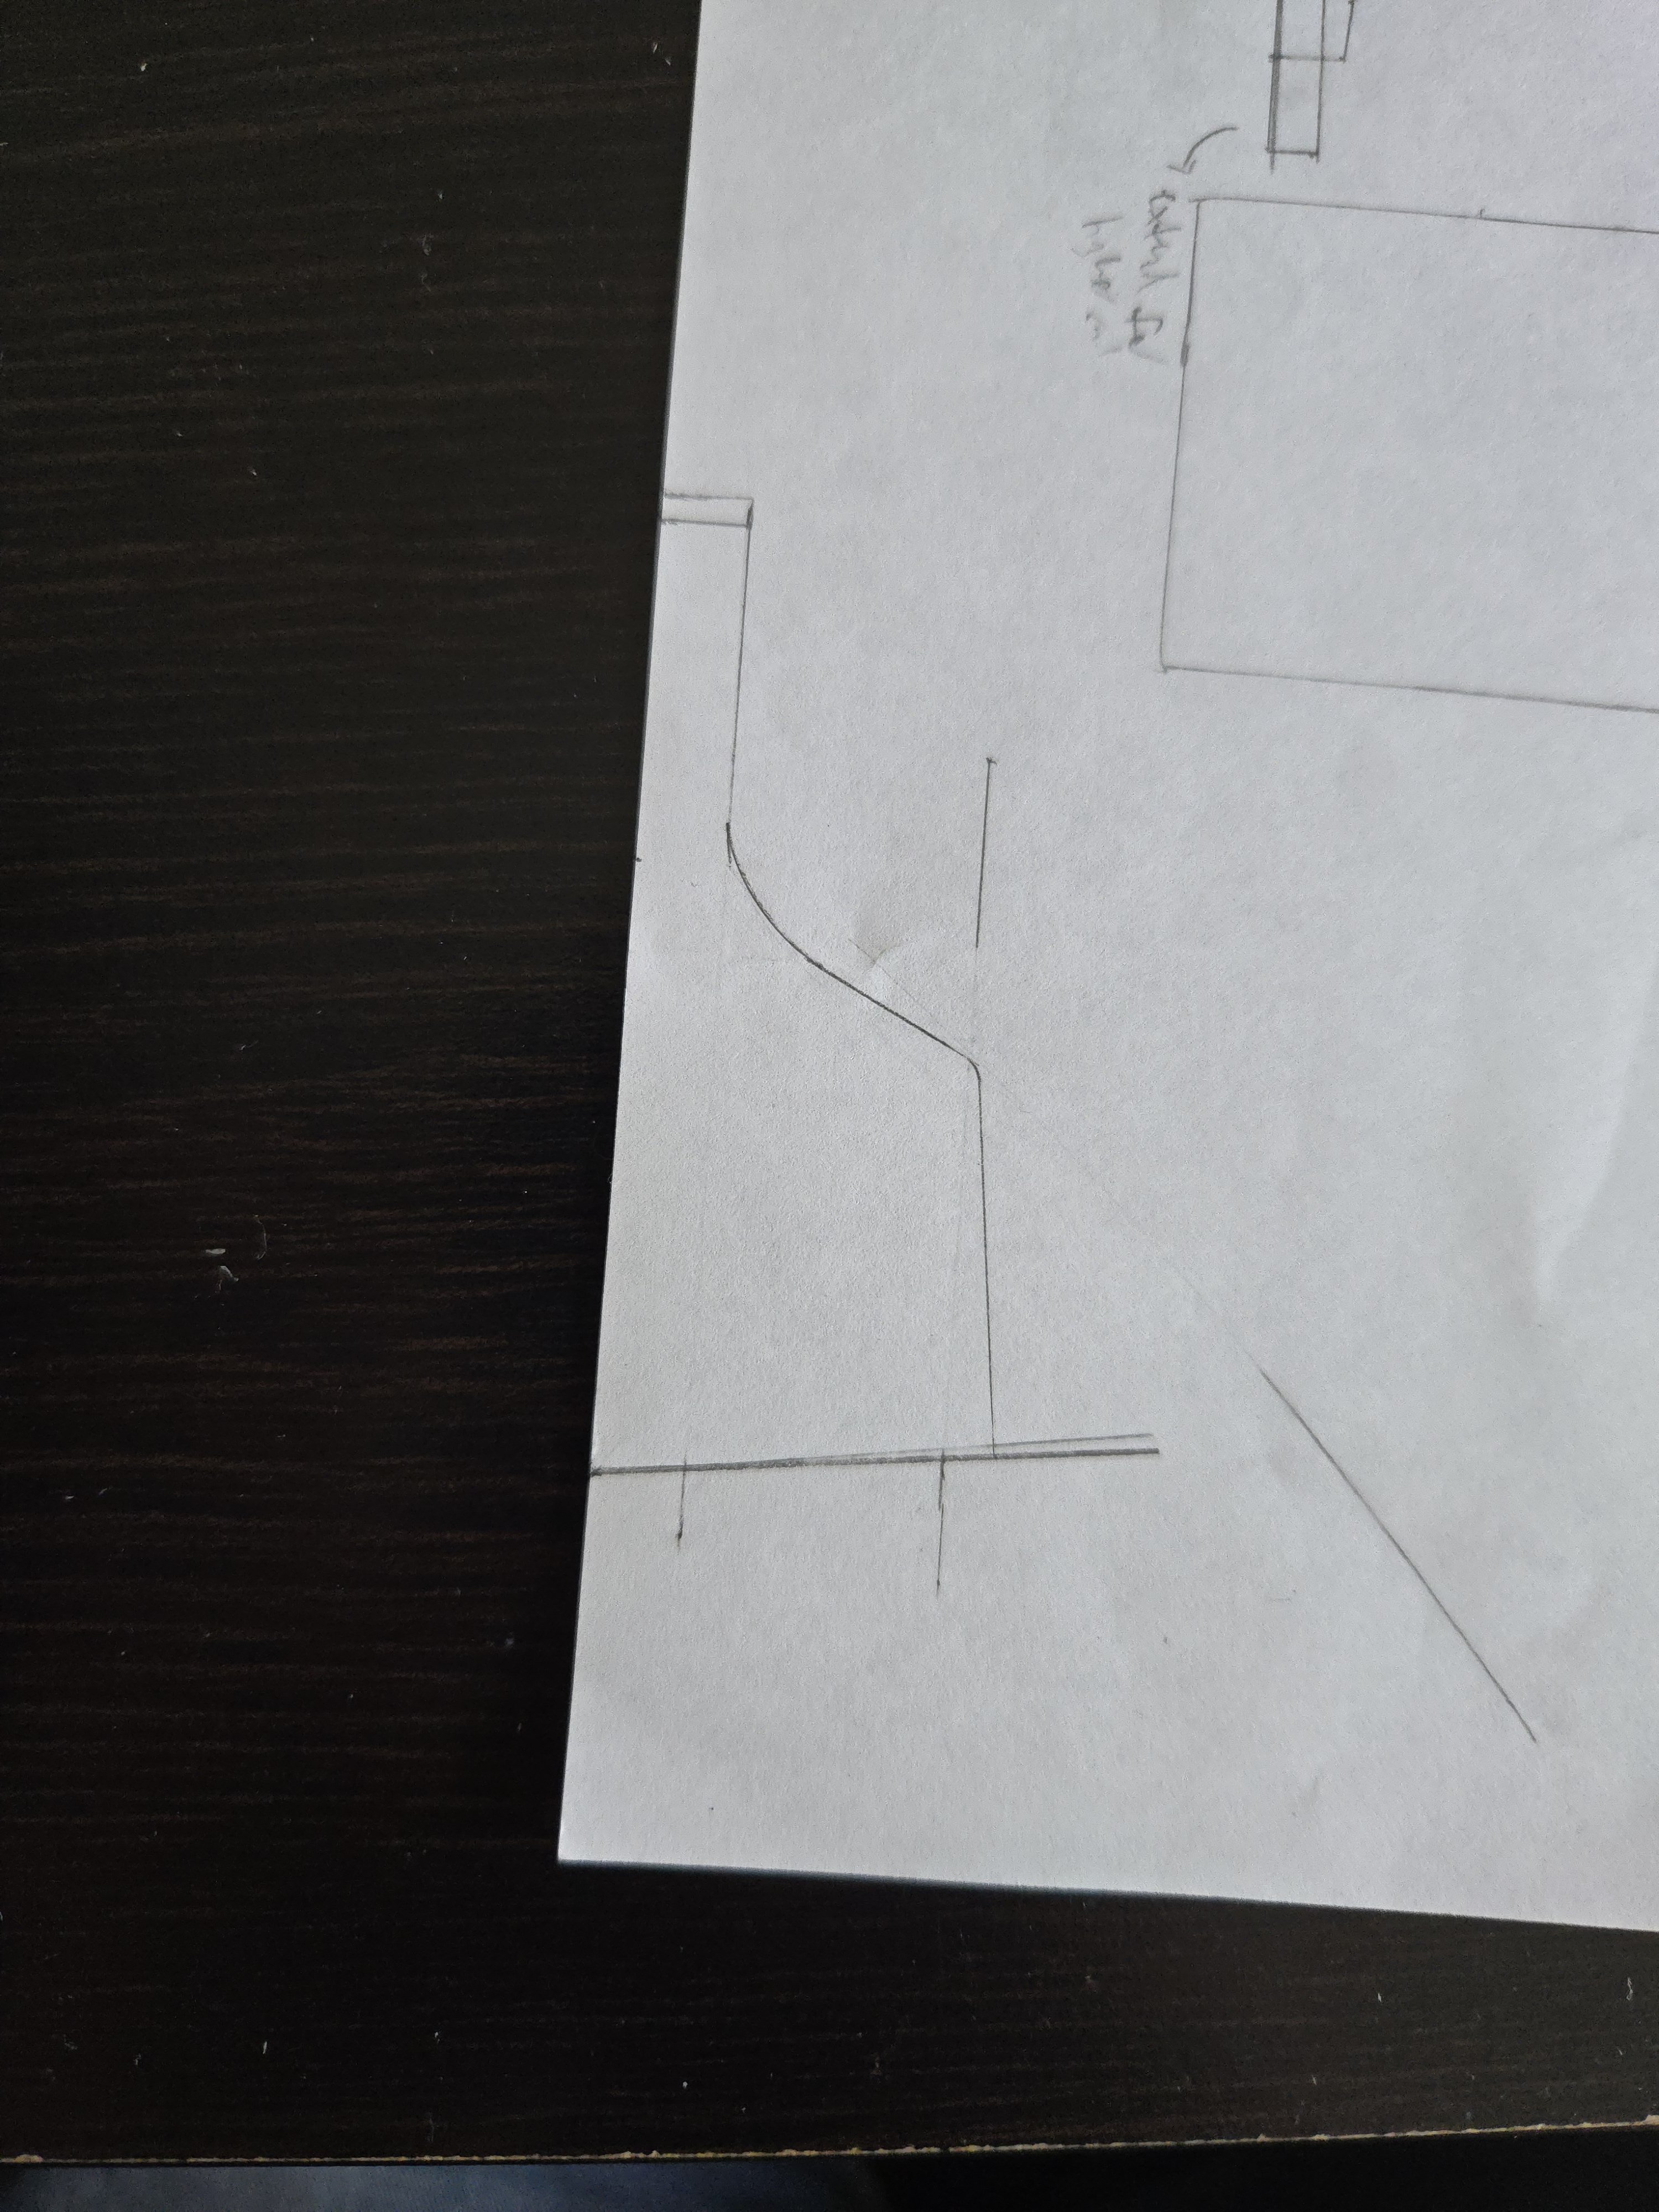
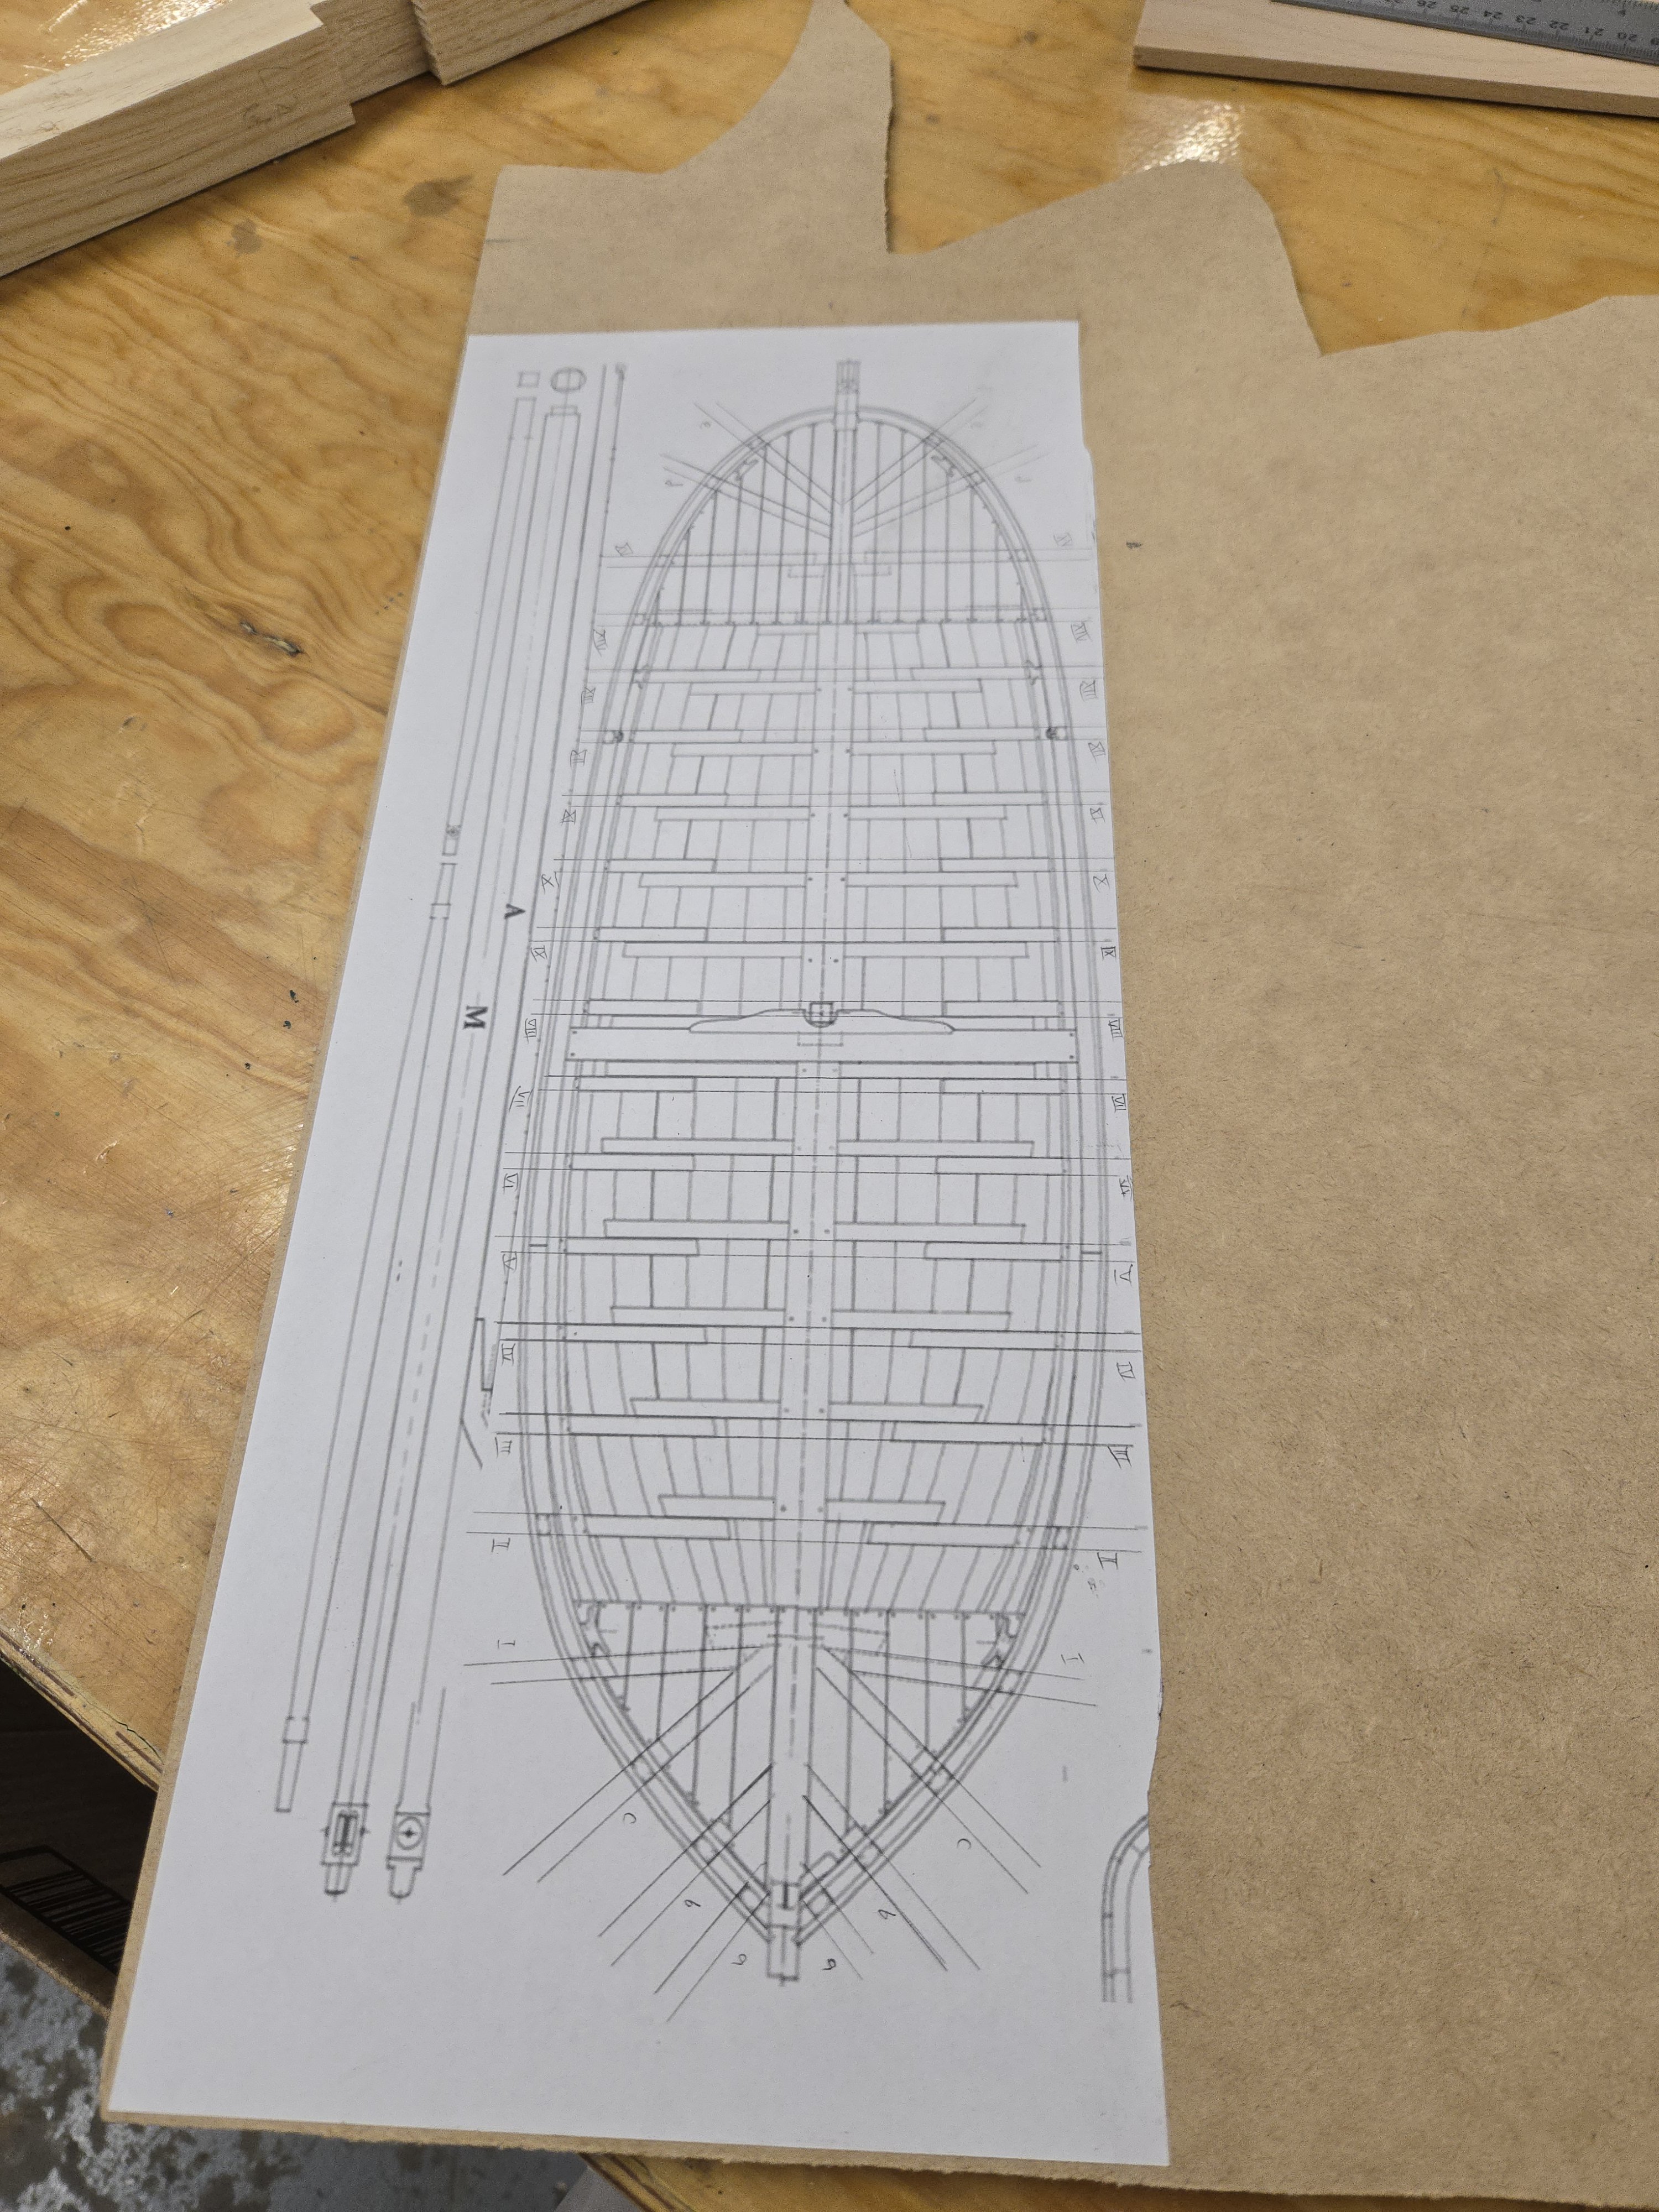
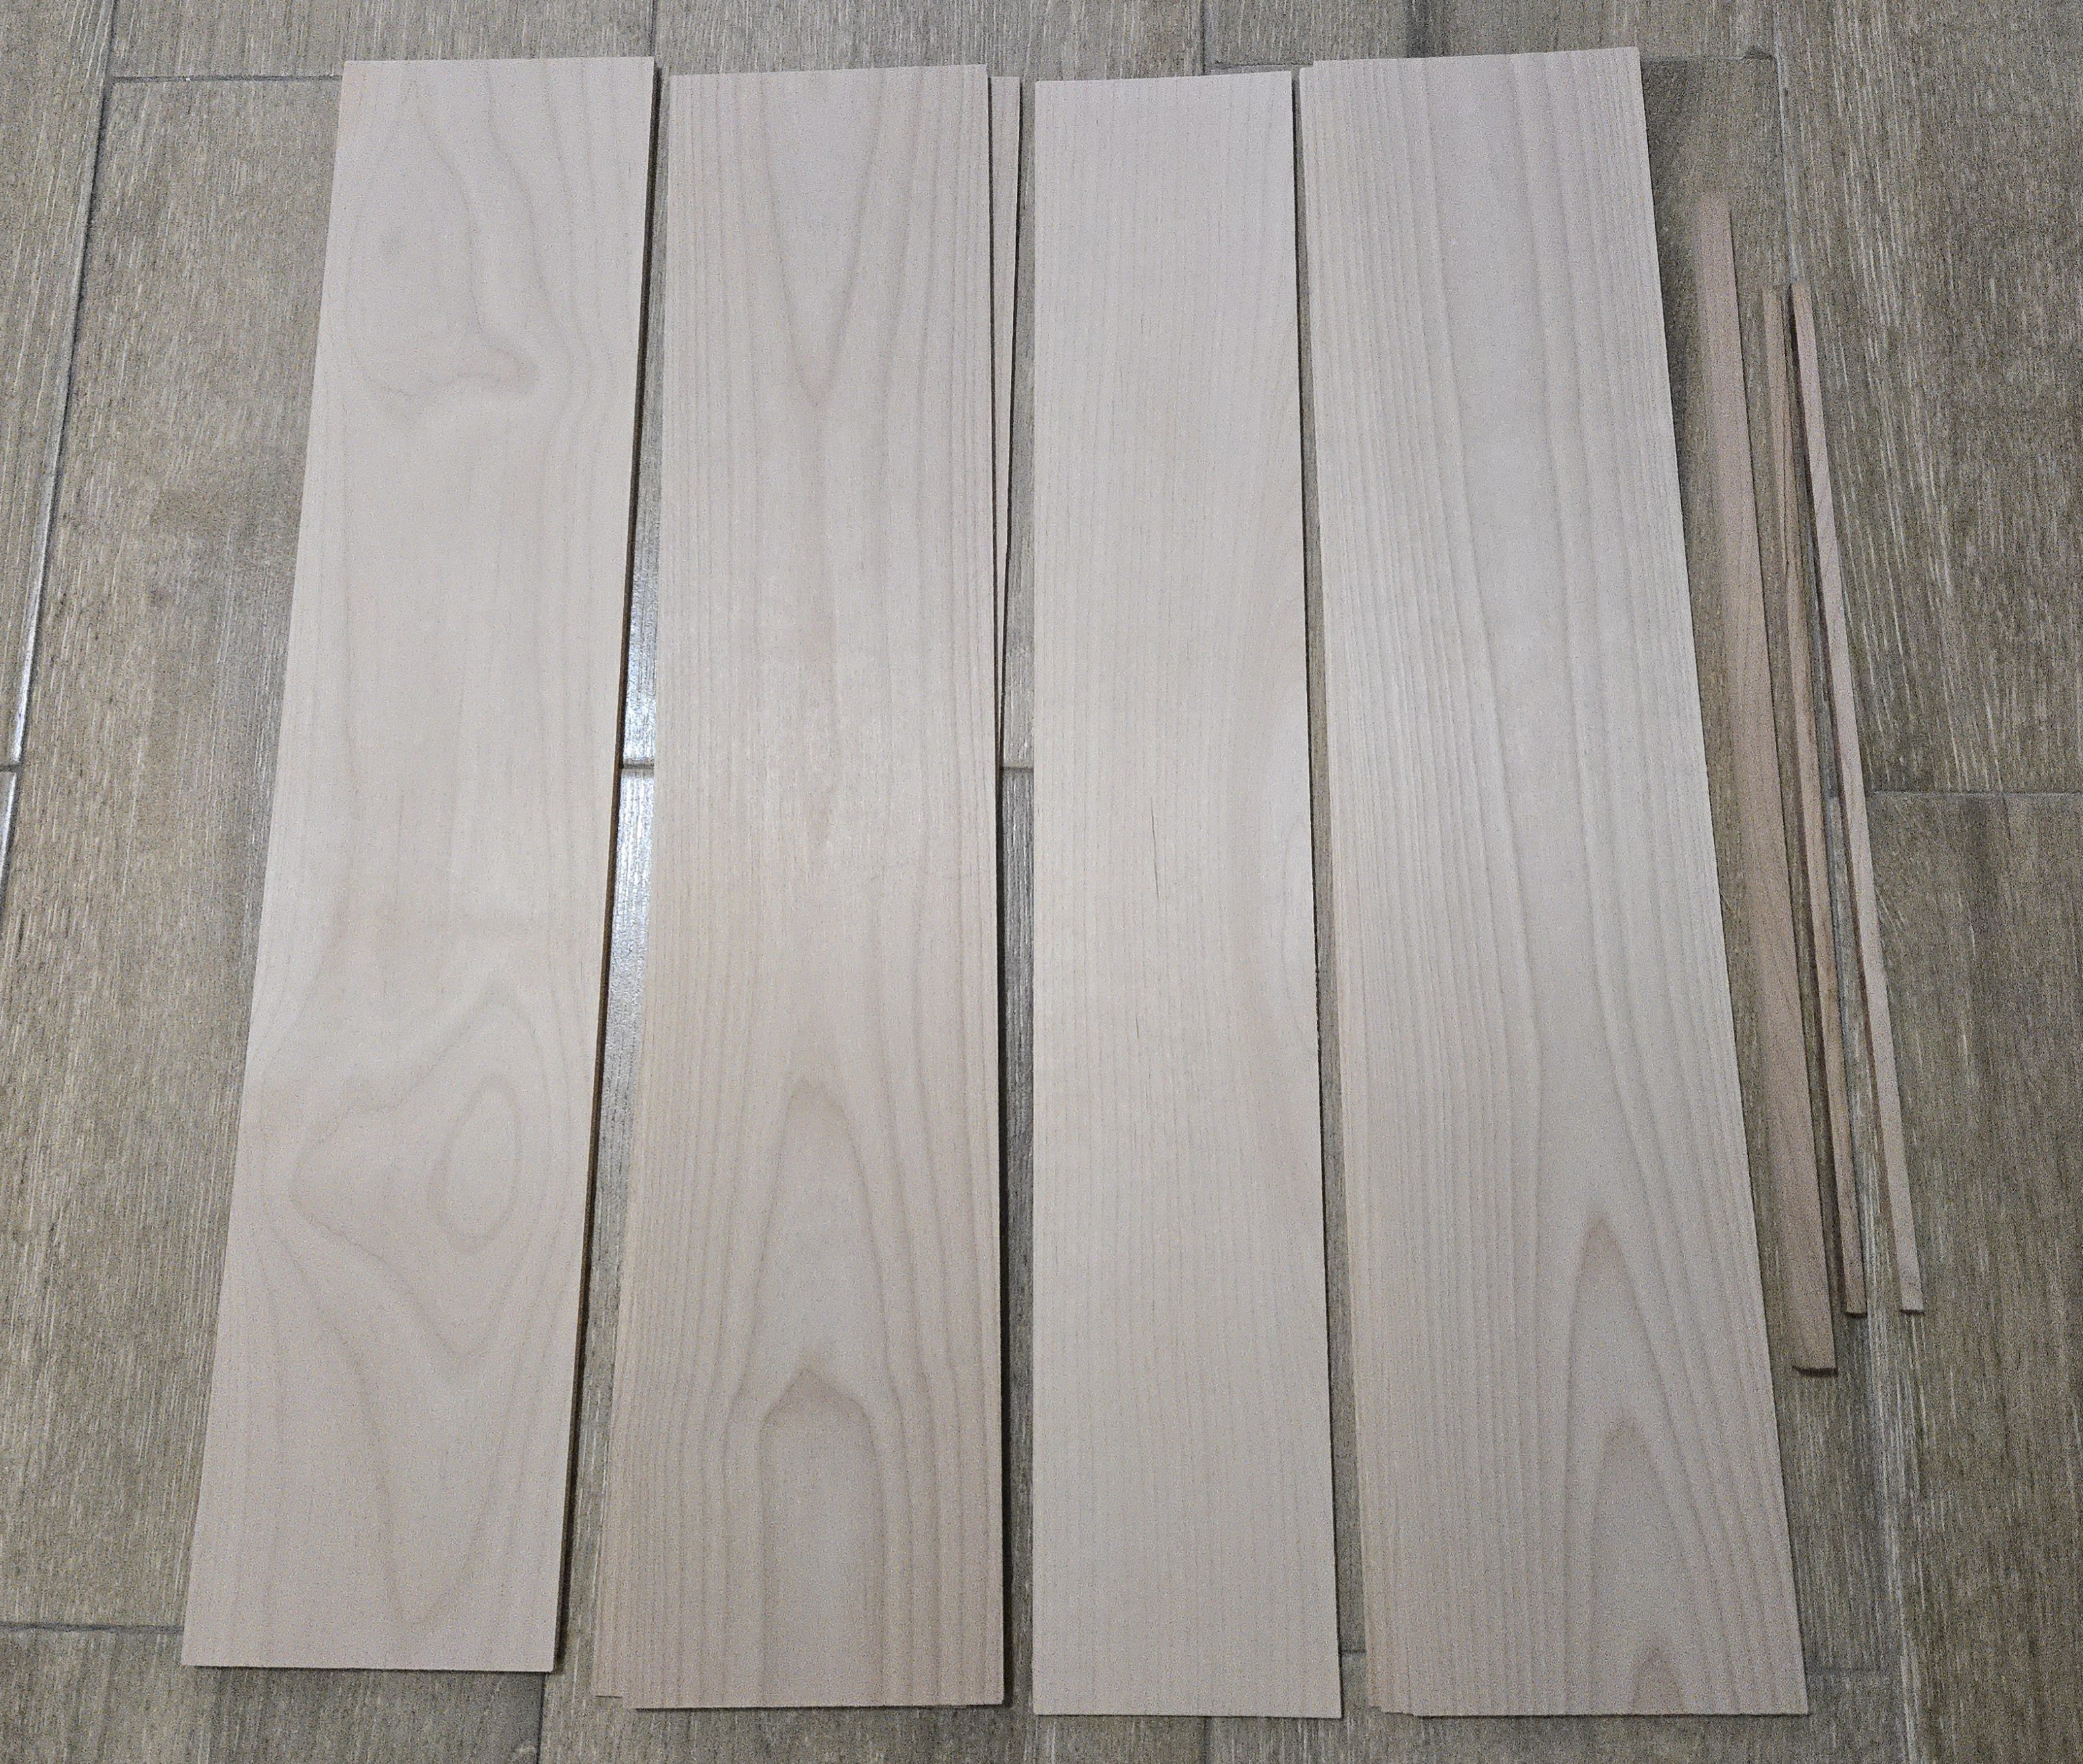
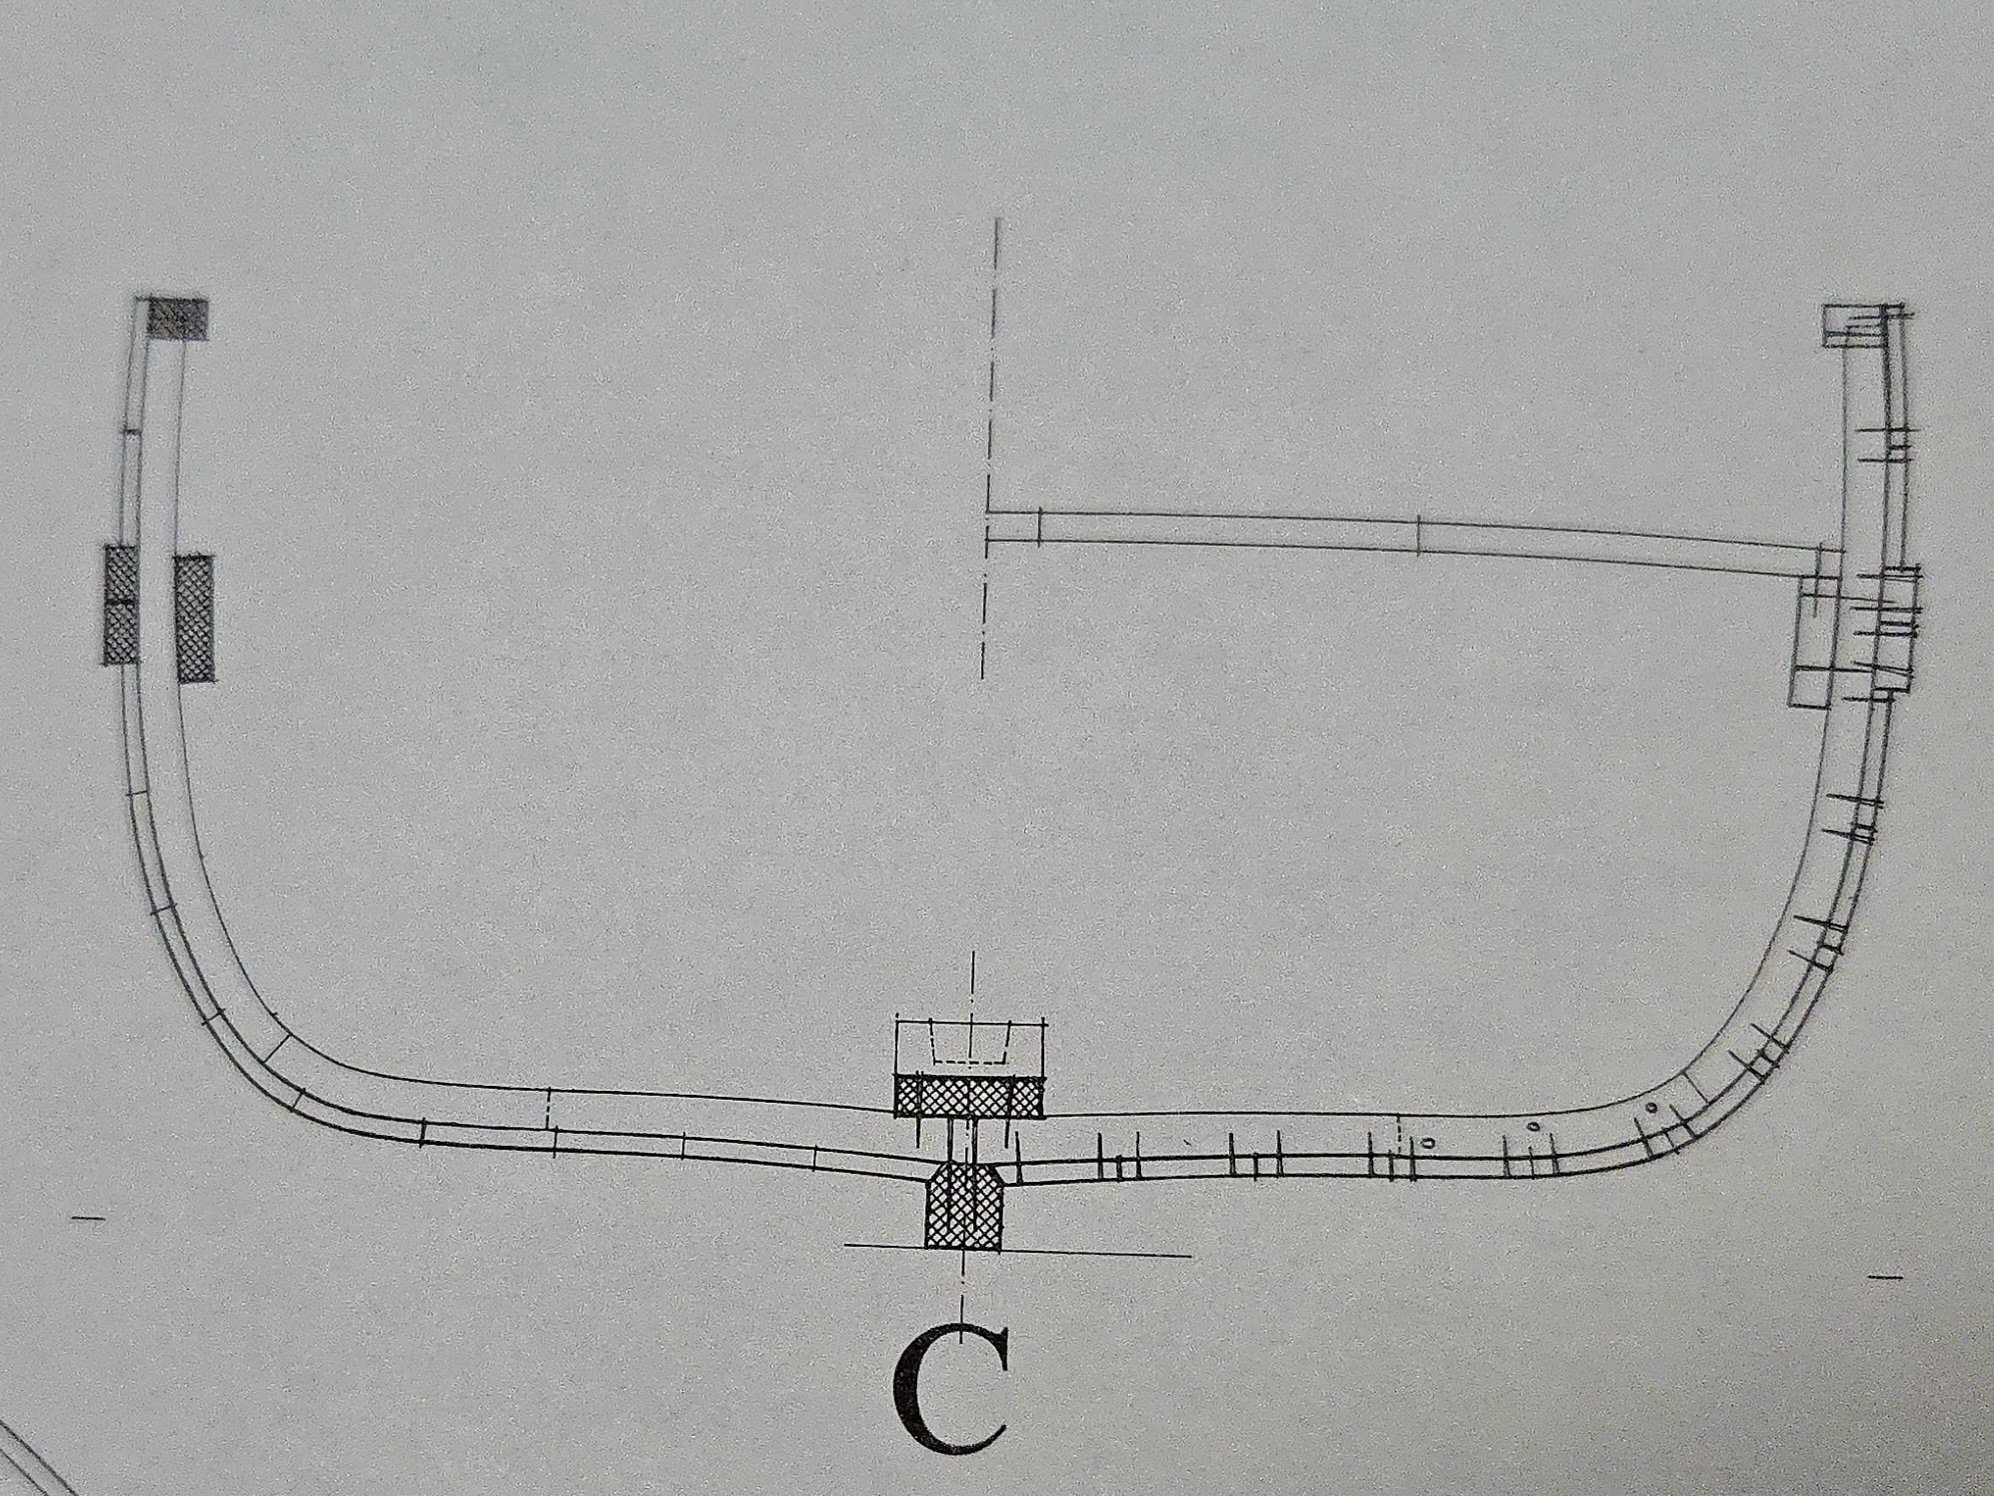
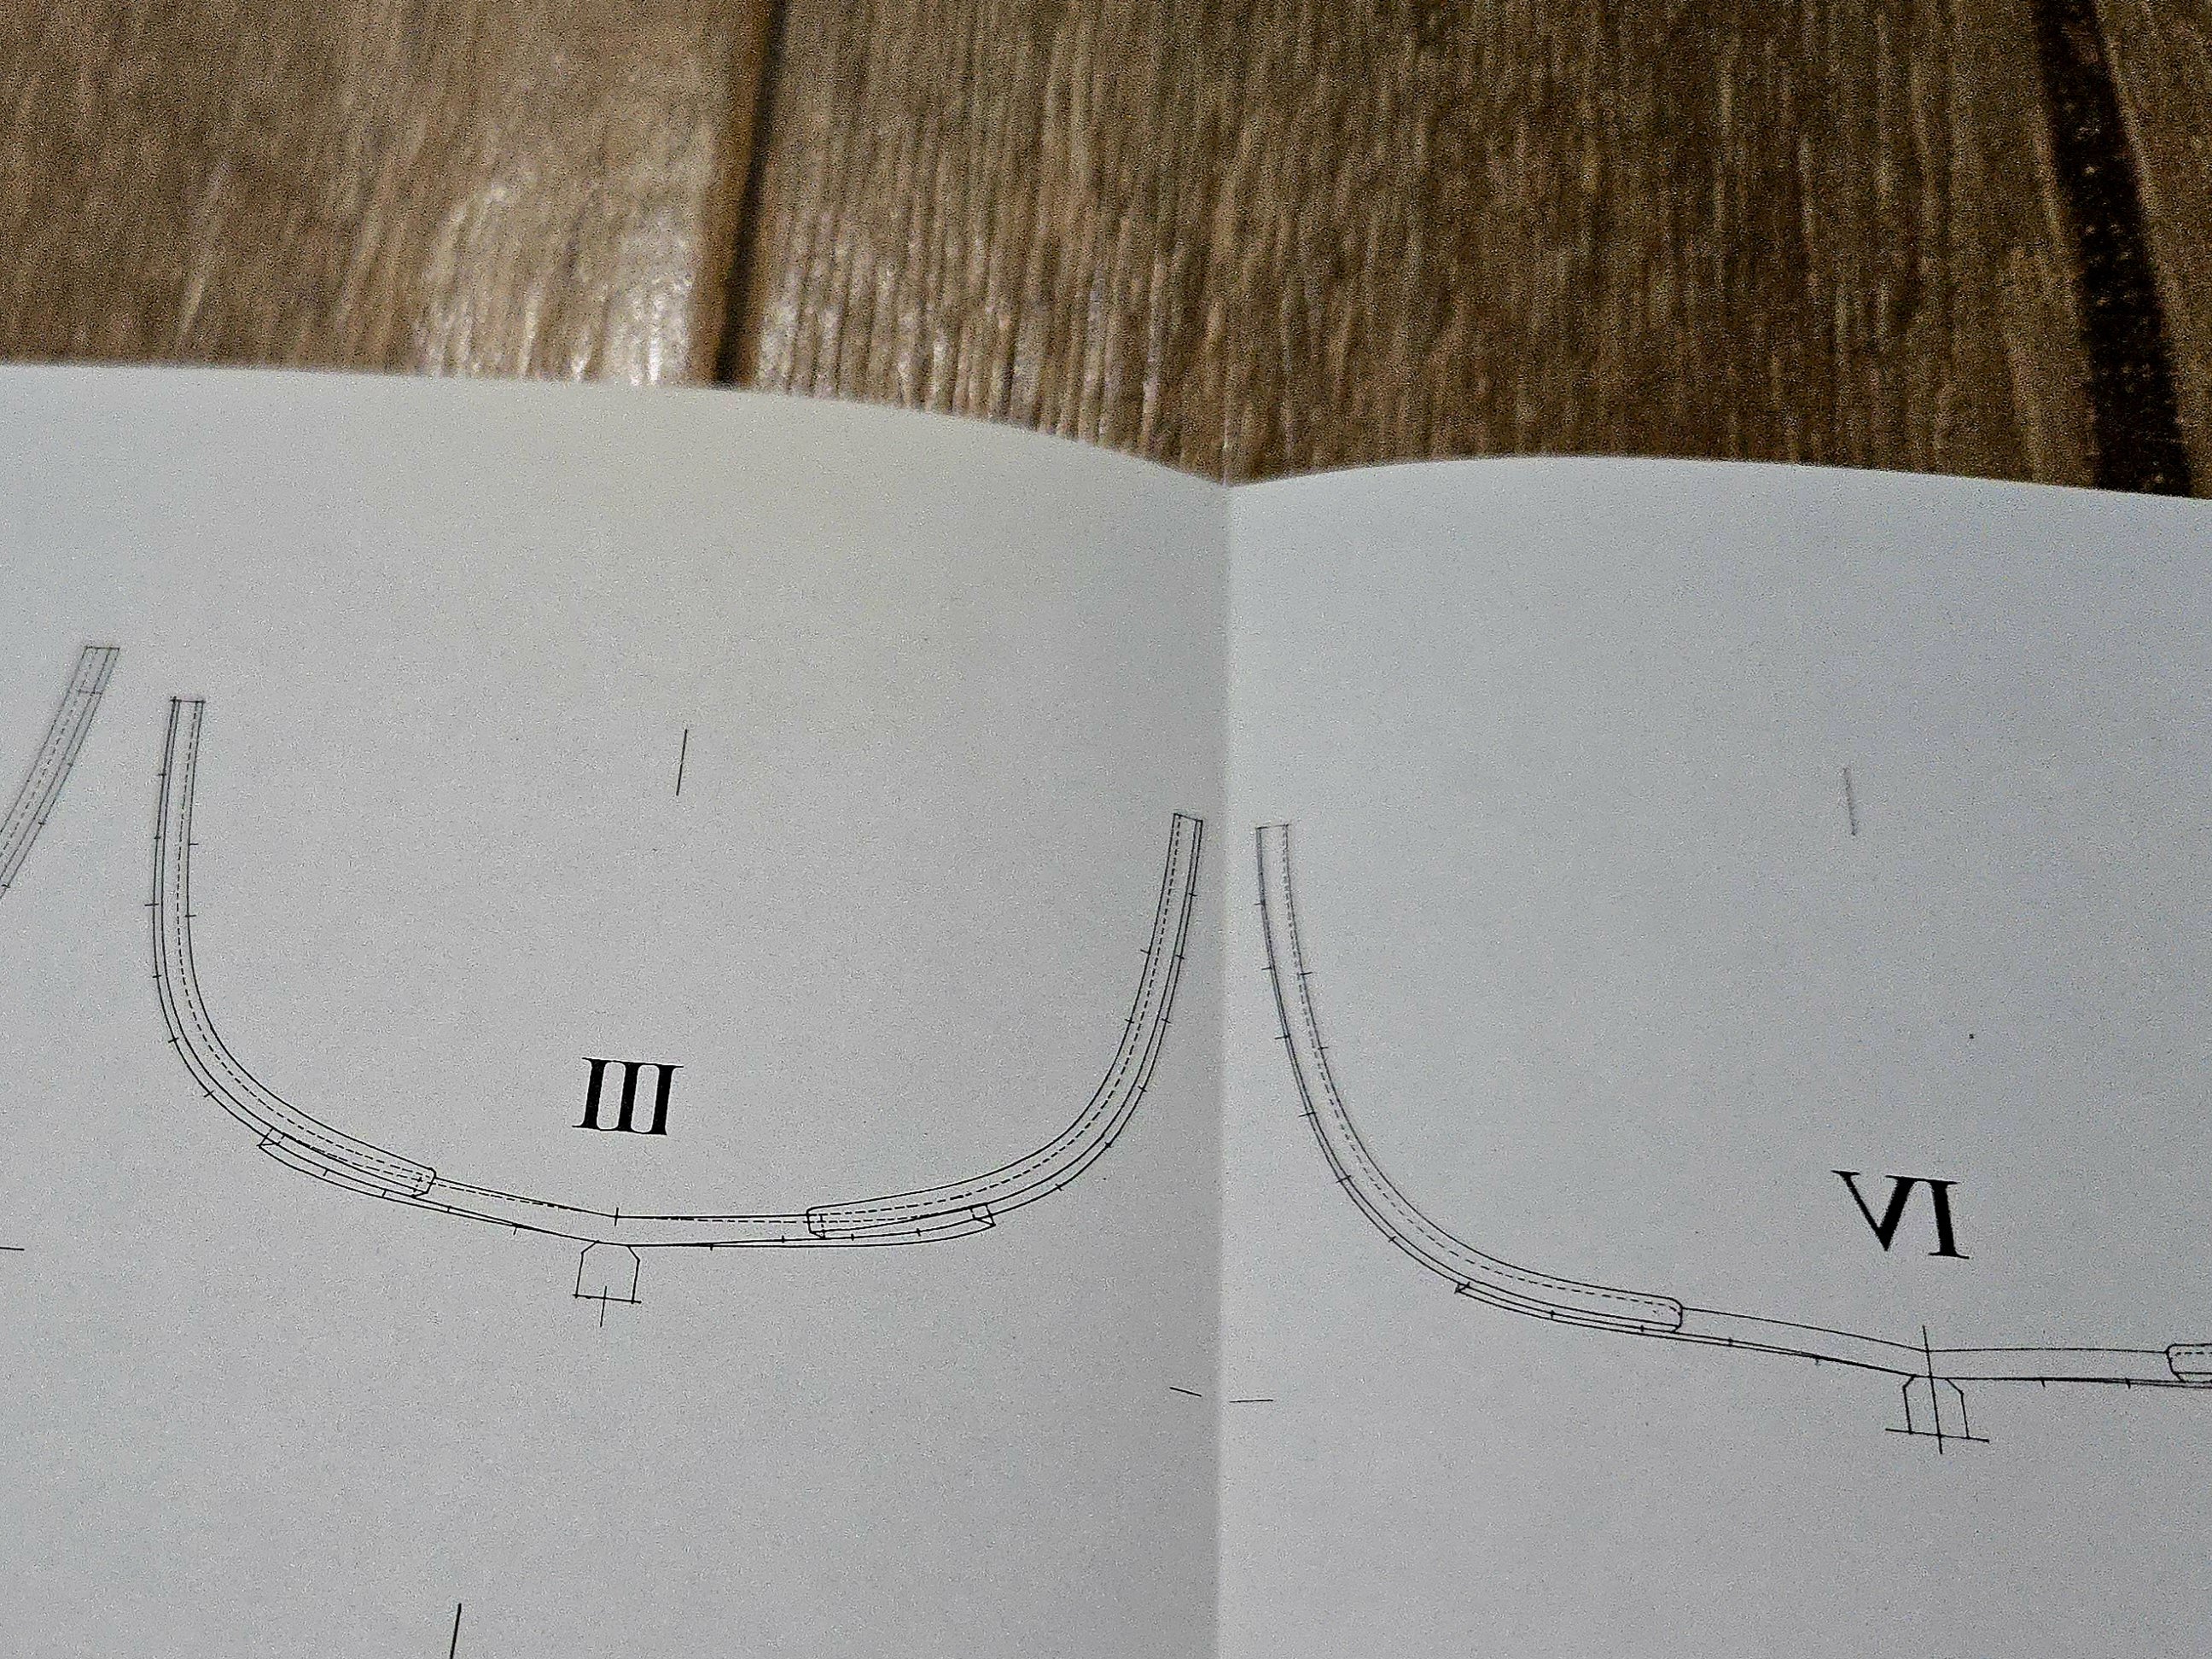
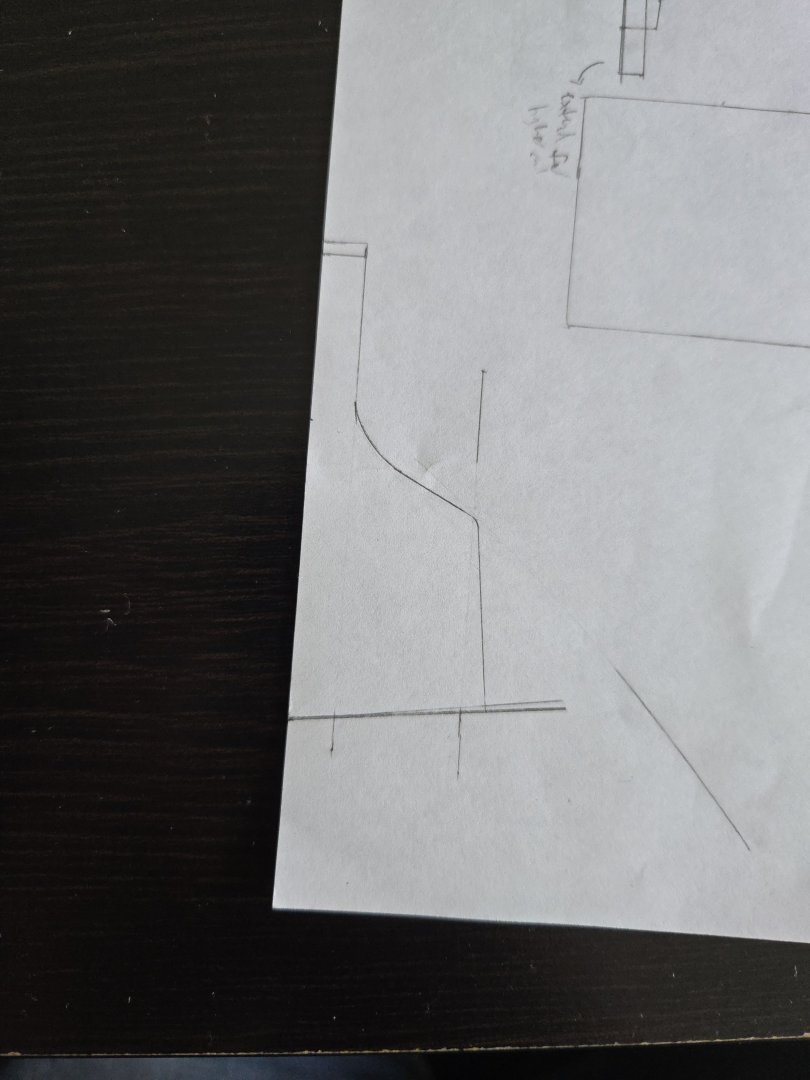
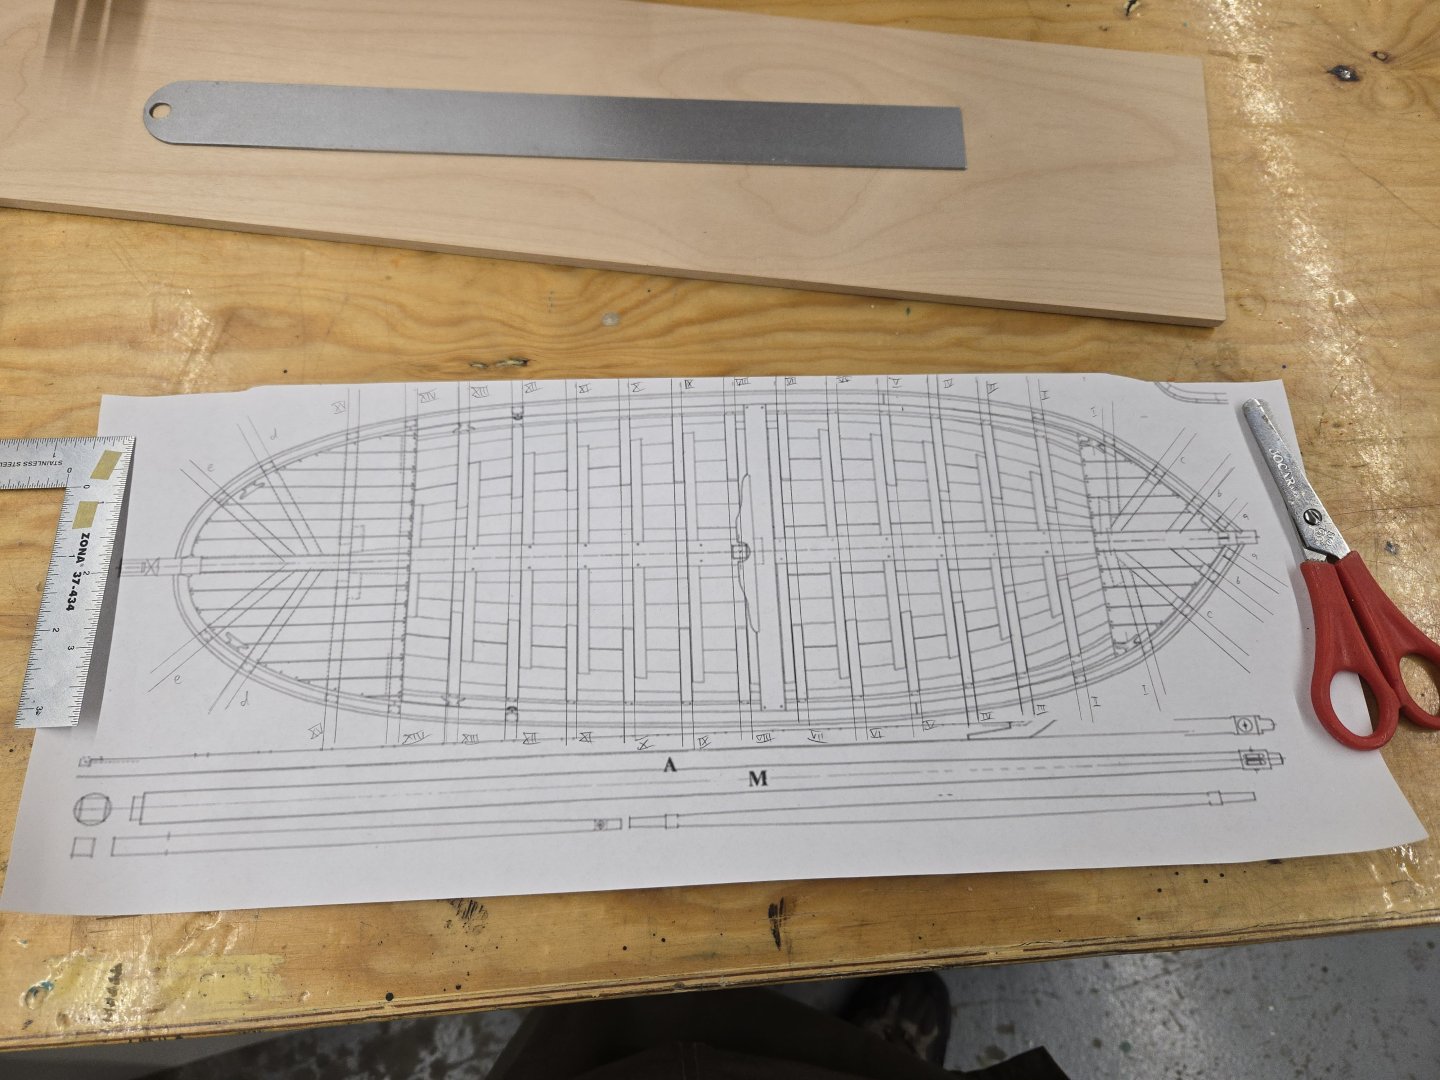
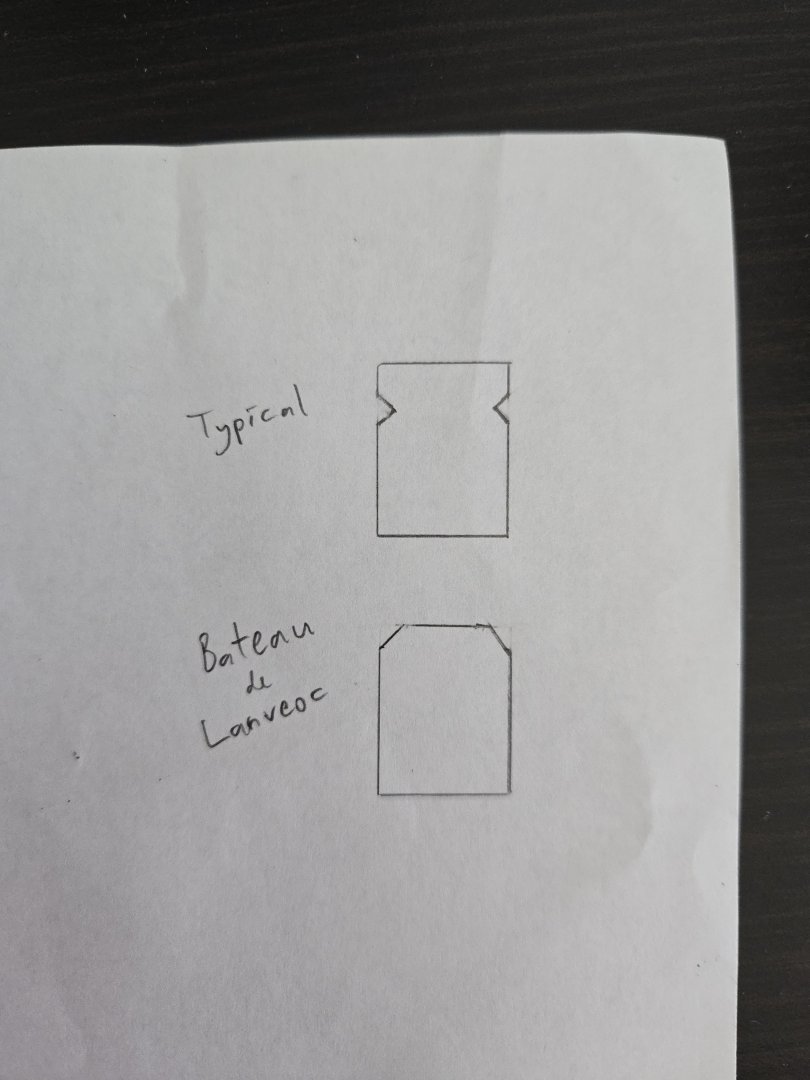
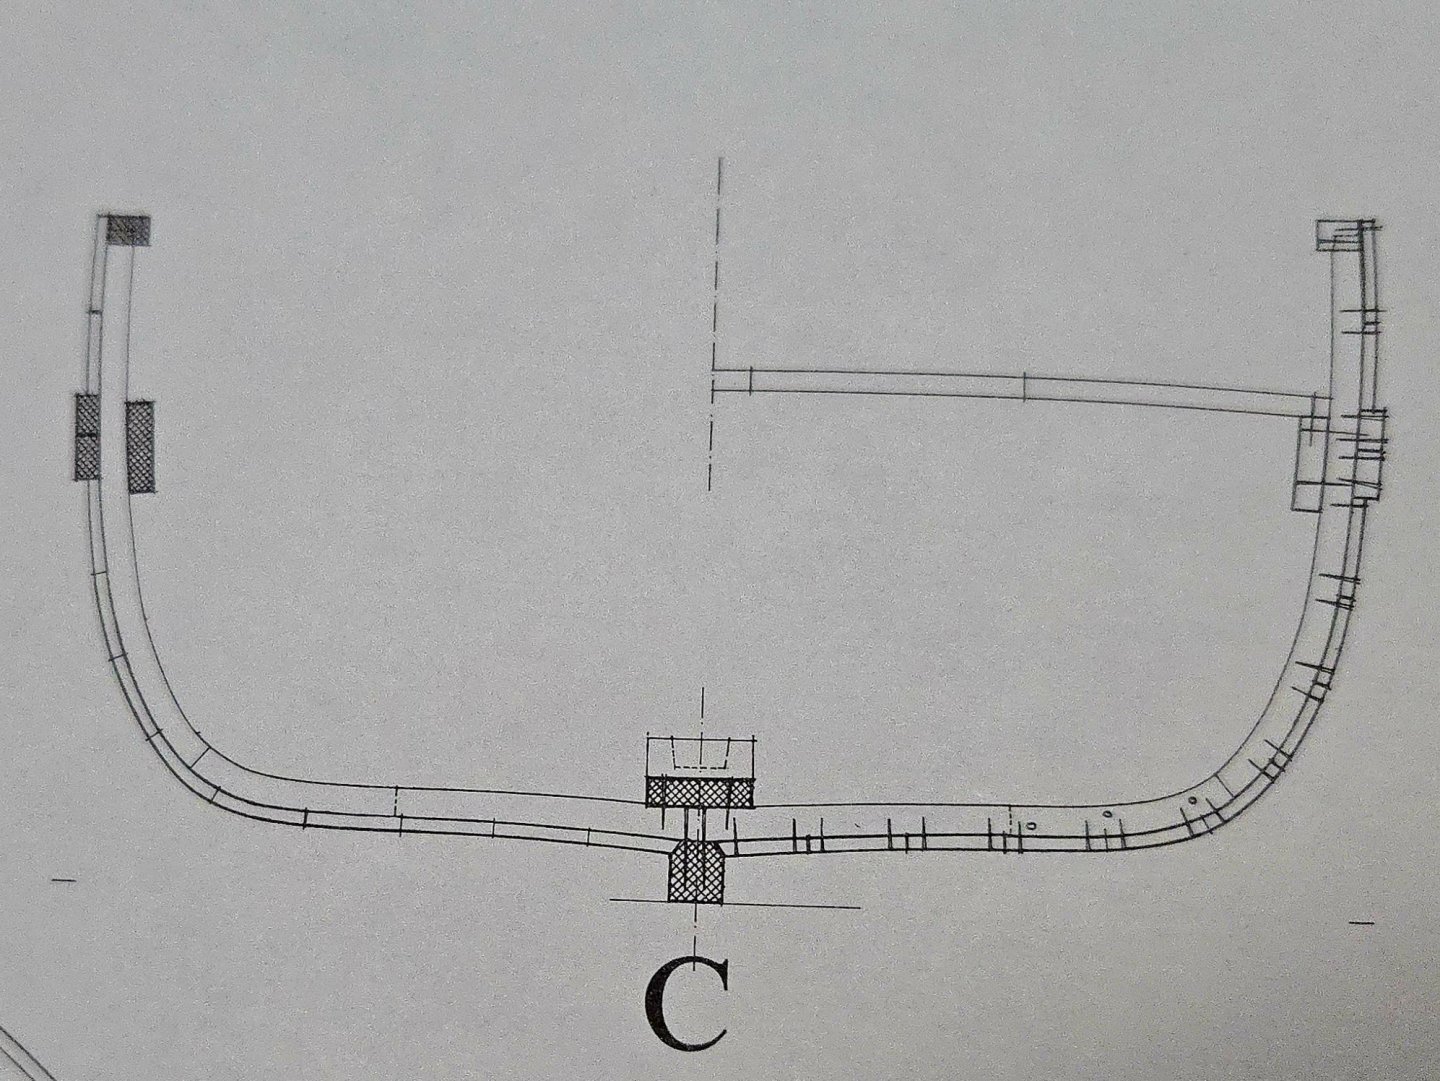
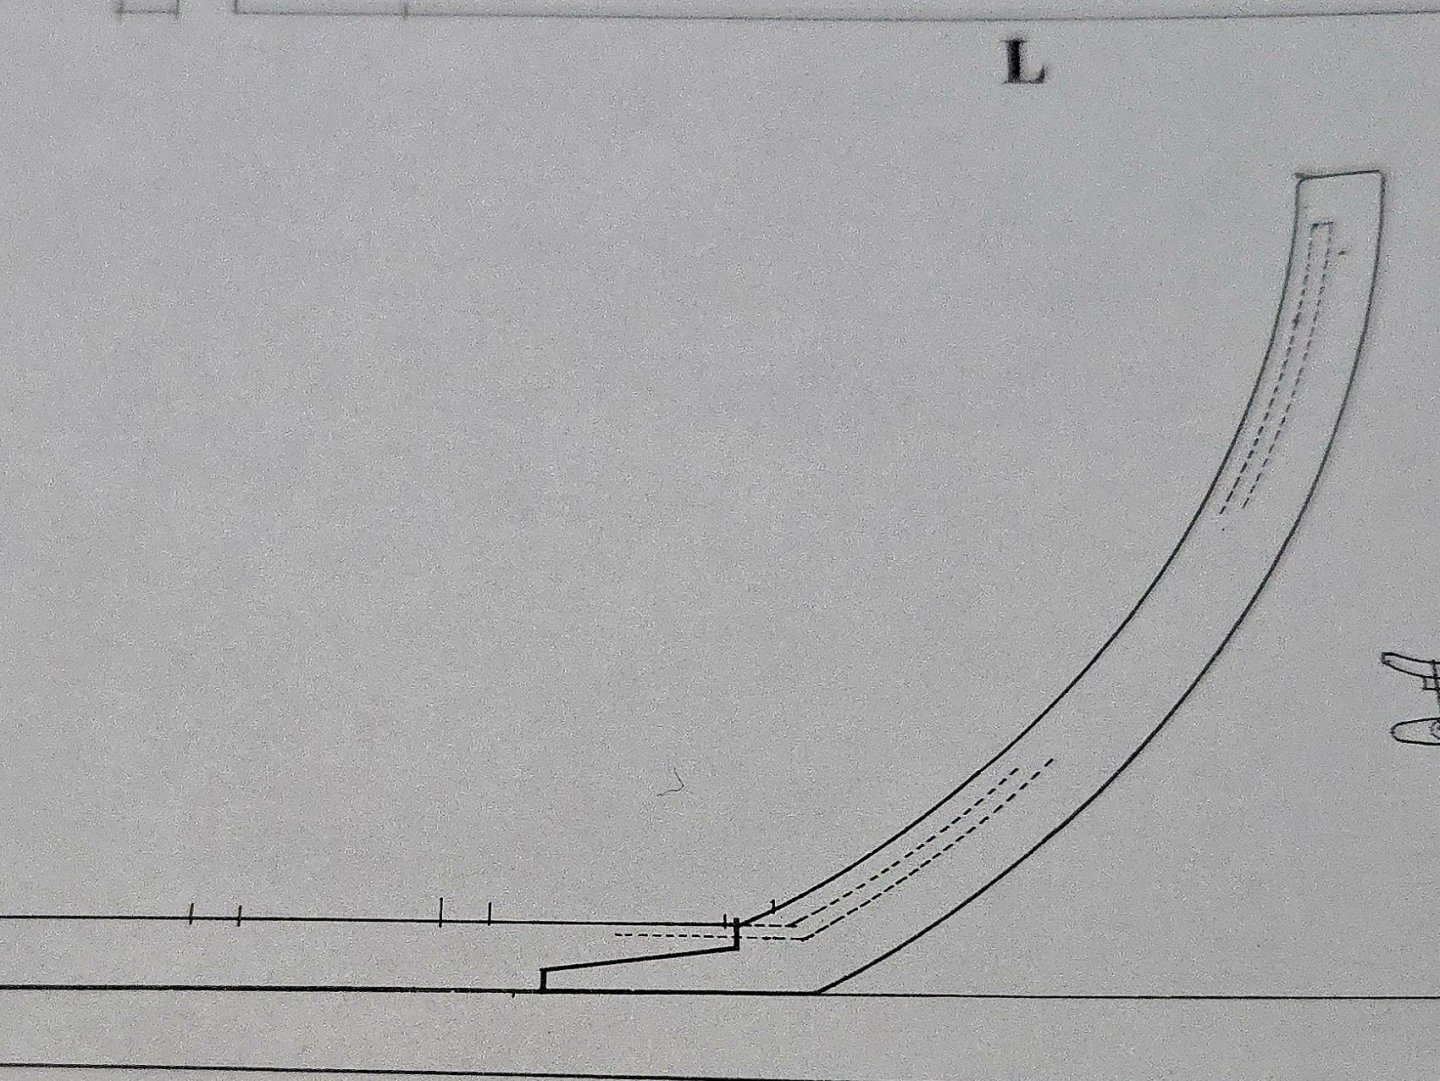
With my Lancha Chilota build about to shift from wood-working to rigging, I decided that it’s a good time to start another build. Once again, I’ve selected a relatively small, “traditional” workboat. This time, though, I have a complete plan set, which in theory should cut down on the second-guessing I’ve experienced in many other builds. There’s also a fair bit already written about this vessel, so I will not be doing as much research as on my Latin American builds. This will be a major step up in complexity from what I've built before, but I'm looking forward to the challenge. Since I started modeling, I’ve wanted to do a Plank-on-Frame build, and I’ve been fascinated by Ancre’s monographs. I was lucky enough to be able to access a few, mostly for warships, via the library, and I was amazed by the level of detail they show. But the ones I was really interested in were for the small and mid-sized working boats. I initially thought I might build the Gozzo Santa Caterina, but the model would be quite tiny in my preferred 1:32 scale, plus a few existing build logs pointed out a few issues with the monograph’s plans. Instead, I decided to go with the Bateau de Lanveoc. The monograph has a lot more detail on the type’s history than is given for the Gozzo, although unfortunately I could only get it in French—my phone’s translate function will be getting quite the workout. The Bateau’s hull is very simple, with fewer parts than even the Gozzo, which makes it ideal for a first full POF build. More importantly, I think it’s a very interesting vessel. The single square sail looks almost anachronistic on a boat from the 1800s, and the hull, while far from sleek, looks quite charming to me. To my eye, the keel/stem/sternpost assembly look reminiscent of what I’ve seen for earlier, much larger Atlantic vessels, while the framing looks more like what I’ve seen for Mediterranean vessels. I’ve rescaled the plans from 1:36 to 1:32, bringing the model in line with my Canoa and Lancha builds. After considering several wood options, I decided to build primarily out of alder, with cherry for the mast, yard, and bowsprit. From what I’ve read, alder is harder than basswood and not as hard as cherry, and it sands and holds an edge well without fuzzing like basswood. Its Janka Hardness is comparable with Alaskan yellow cedar. While I know that some recommend against using Alaskan yellow cedar for framing, saying that it’s too soft, this model has fairly bulky frames that should mitigate against this. It seems like it should be very workable with hand tools. I’ve actually had the alder for quite some time, as I placed an order for the wood from Ocooch Hardwoods last year in Chicago to celebrate finishing my most intensive quarter of teaching yet. Ocooch was able to mill the wood to custom sizes down to a minimum of 3/64-inch thick for the planking, and I found their customer service and shipping to be excellent. The cherry for the mast (plus some sheets) I got from Modeler’s Woodshed, where Joe also did an excellent job with the order. Unlike Ocooch, Modeler’s Woodshed and mill down to 1/32-inch-thick (or apparently even thinner). In my experience, both businesses are good options, and you can’t go wrong with either (at least if you’re in the US, I have no idea how international shipping would go). I foresee this being a pretty slow build. Things are going to ramp up at work soon, so I’ll be pretty busy. Plus, much of the work of cutting out frames and other parts will have to be done at the carpentry workshop I’ve been participating in—where I can access a fretsaw and other tools that I don’t really have the space for at home—which I’ll probably only be able to attend once a week for the foreseeable future. I should also note that I’m considering a few different ways of building this. One option is to do a complete build, painting the exterior black (as the actual vessels were tarred on the outside) and leaving the interior natural. Another possibility is to do something like an Admiralty-style model, leaving it unplanked below the wales to show off the frames and construction methods, and leaving the wood all natural. In this case, I could either build it with the mast and rigging (which would be interesting but takes up quite a bit more space) or do it as strictly a hull model. I’ll have to decide eventually, but there are a lot of frames to cut before I get to that point. For this first post, I want to leave things on a question that I have before I make any sawdust. Looking at the drawings, it seems like the rabbet in the keel is quite different from what I’m used to seeing. Generally, the keel rabbet is a v-shaped notch (with the angle of course changing over the length of the keel). But from the plans, it seems like the rabbet over most of the keel is simply a 45-degree angle cut along the top of the keel (see simplified drawing below). The rabbet runs directly into the frames. Moreover, there do not seem to be any notches in the keel for the frames, or in the frames for the keel, which would bring the bottom of the frames a bit lower on the keel. Finally, the keelson is also not notched and seems to just sit on top of the frames, leaving space between each. This means that there’s nothing (except the spaced frames) to seat the end of the rabbet. To me, this seems like a very strange design that, on an actual vessel, would very easily leak along the seam of the keel and the planking. Yet this seems to be what the plans show (see below) and what was done on this build: https://www.alexshipmodels.com/2016/12/10/le-bateau-de-lanveoc/ Below: Cross-section of hull showing keel and frames. The lack of frame notches is apparent. Below: Side view of the construction showing the lack of keel notches and the space between the keel and the keelson. Below: Side view of stem and fore part of keel with rabbet marked in dashed line. You can see how the rabbet is a notch along the stem, but then runs straight into the top of the keel. Below: Frames, once again the lack of a keel notch in the floors is evident. (Sorry for the blurry photos, I’m not very good at close-up photography on my phone). So, am I reading the plans wrong, or is this how I should actually build it?


- 139 replies
-
- 9
-
-
- ancre
- Bateau de Lanveoc
- (and 2 more)
-
Congratulations, really fantastic job! The paint scheme is really sharp. Looking forward to following along on your next builds.
- 81 replies
-
- 5
-
-
- Norwegian Sailing Pram
- Model Shipways
- (and 1 more)
-
Looks like a fun build!
-
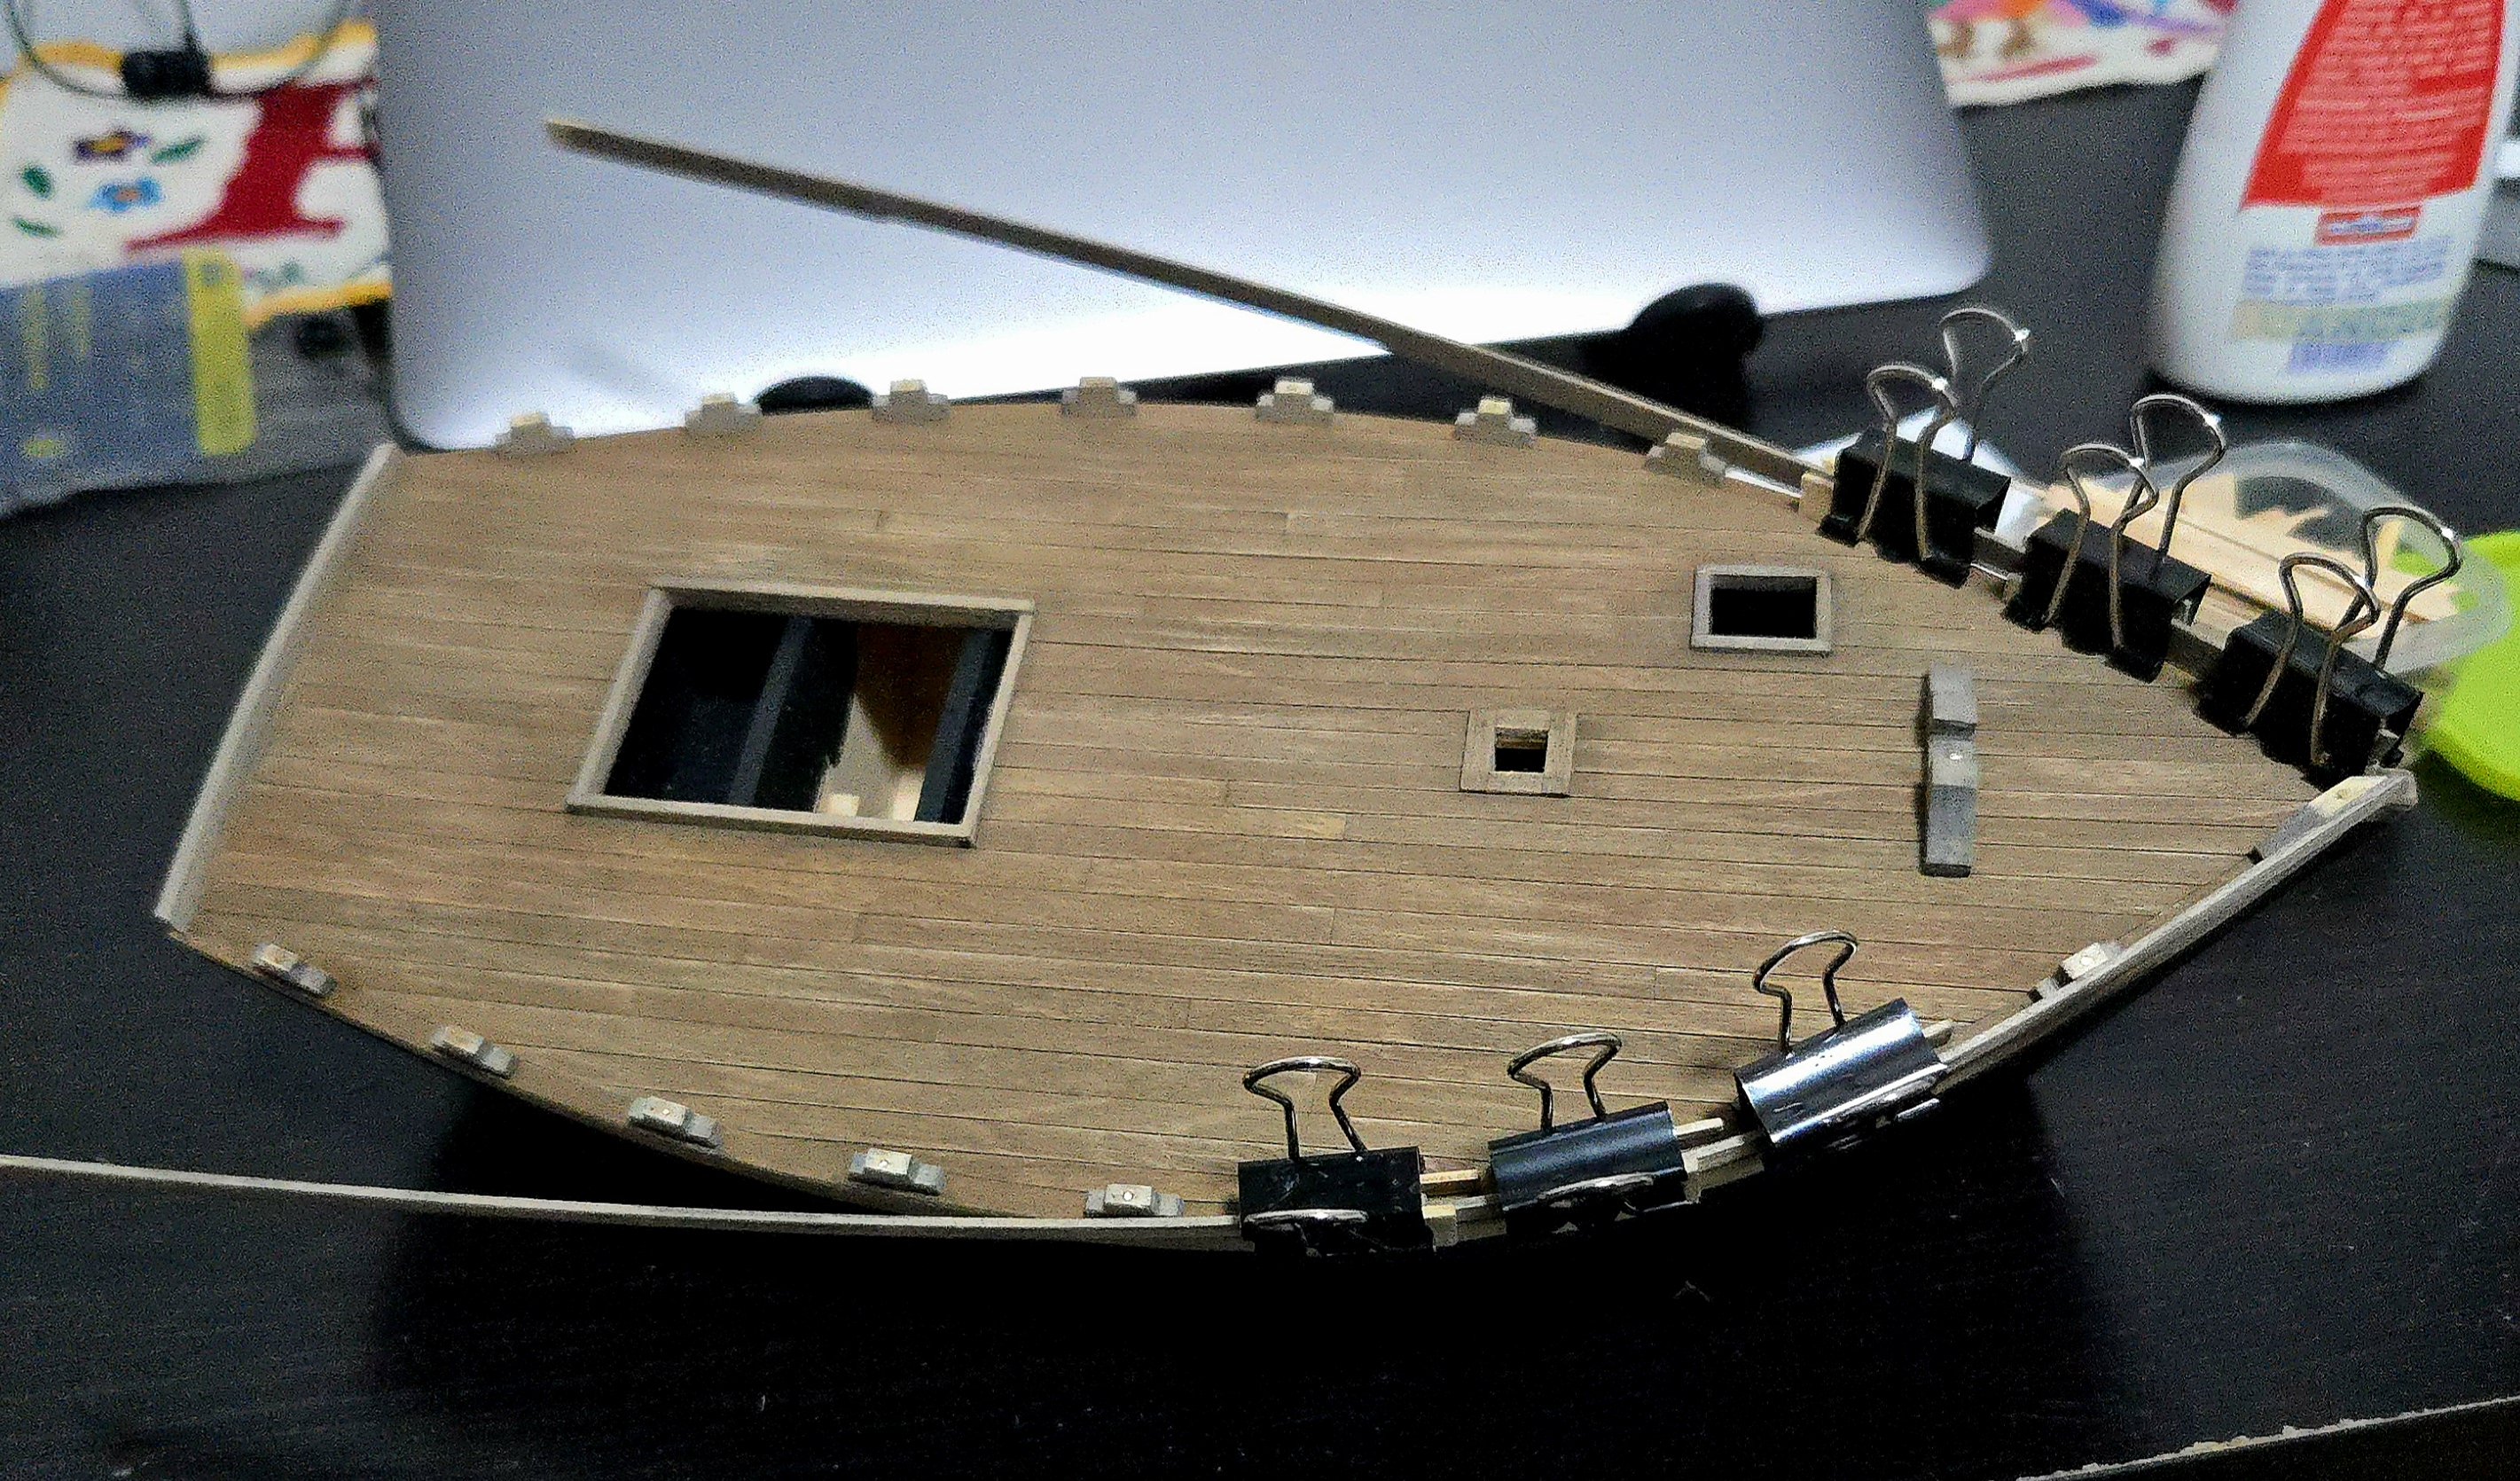
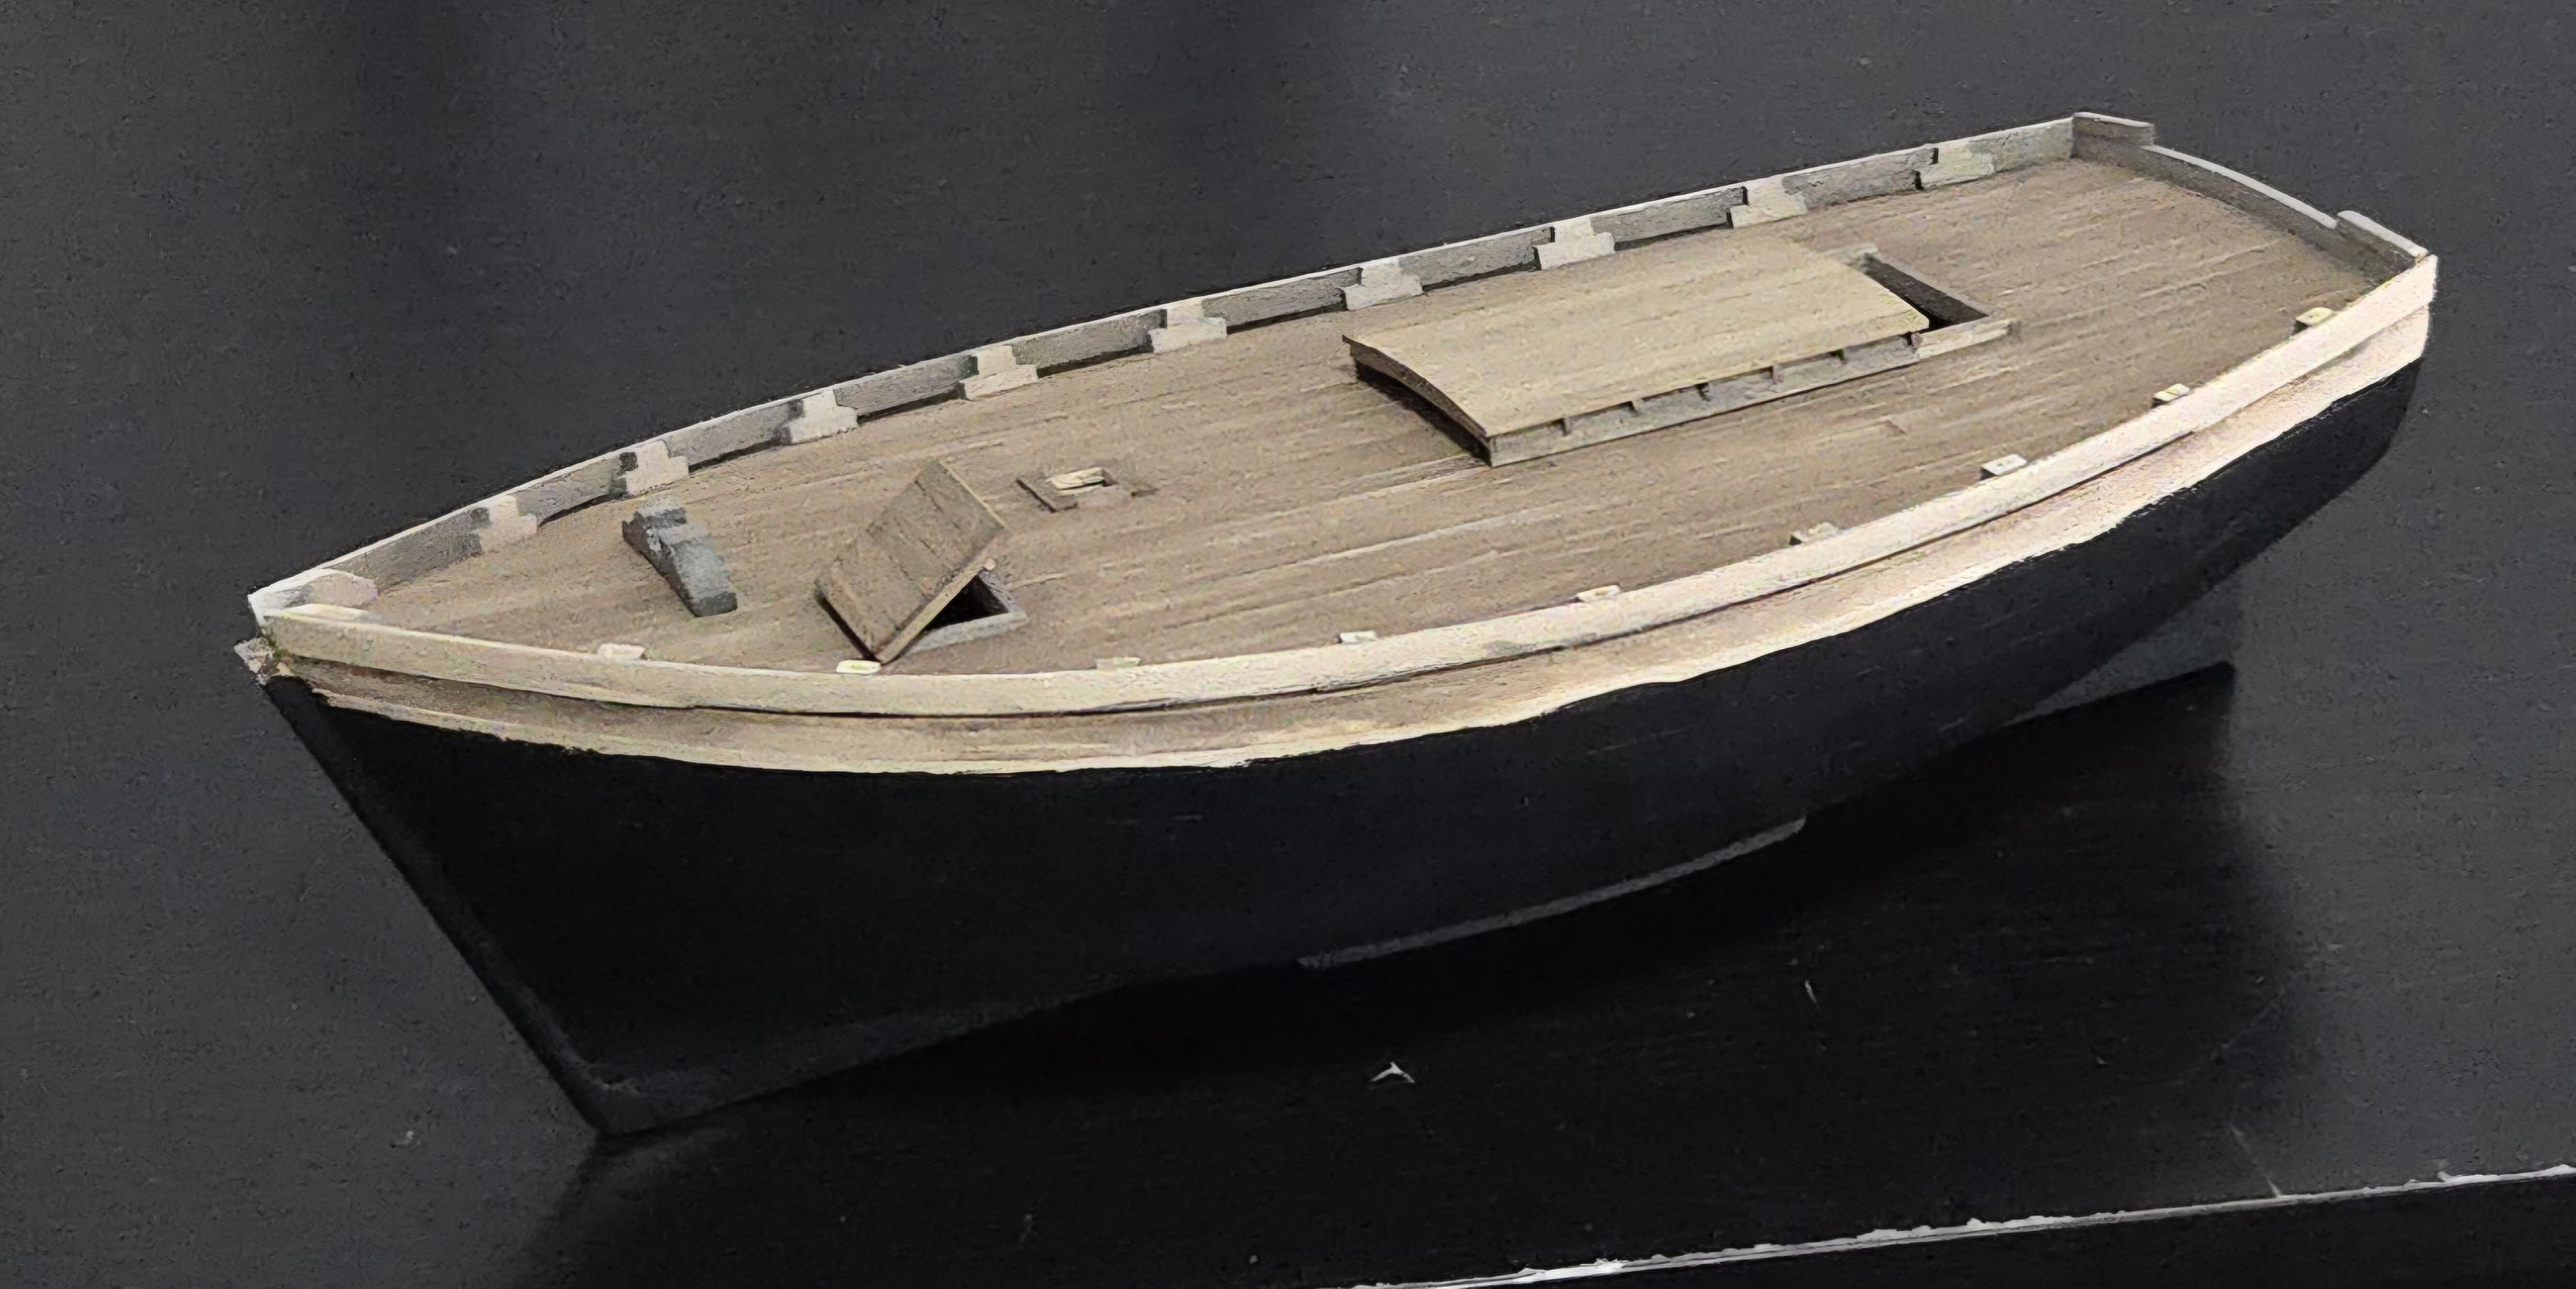
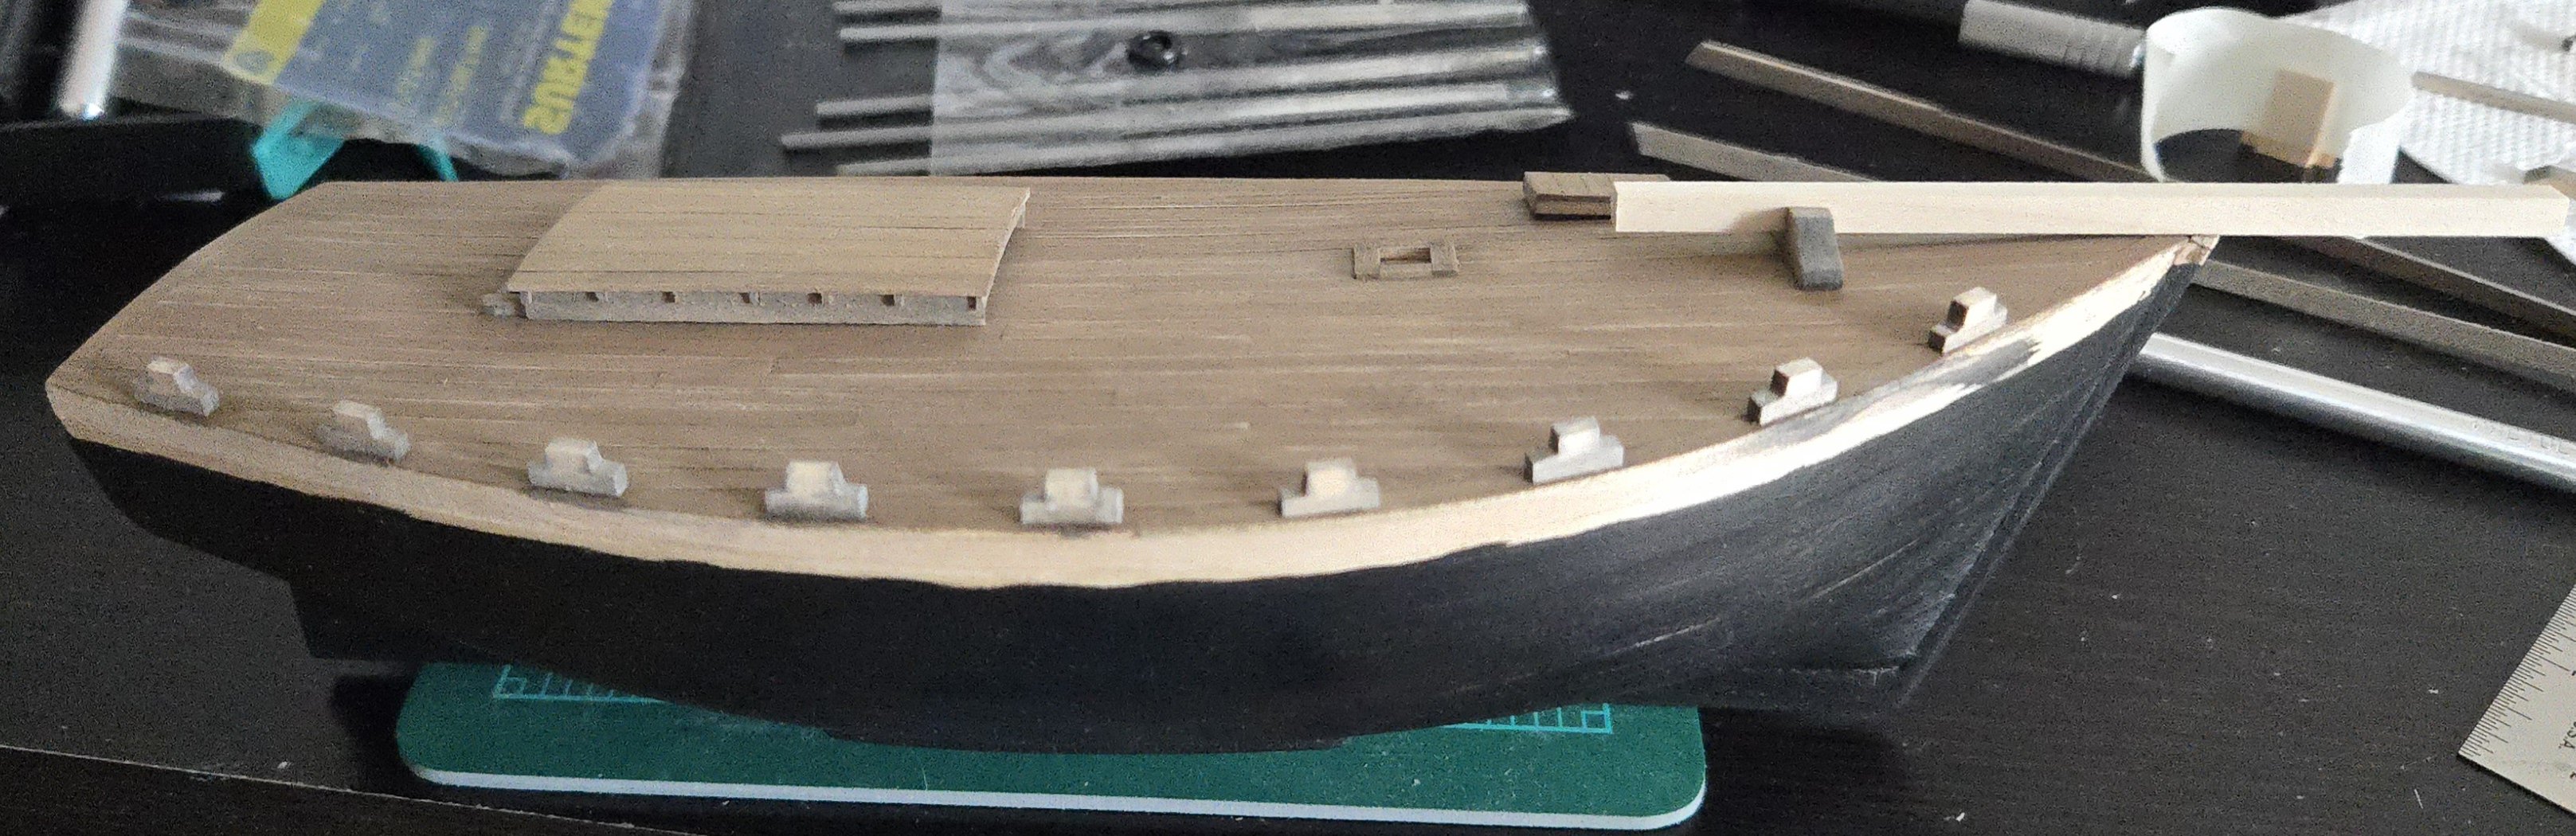
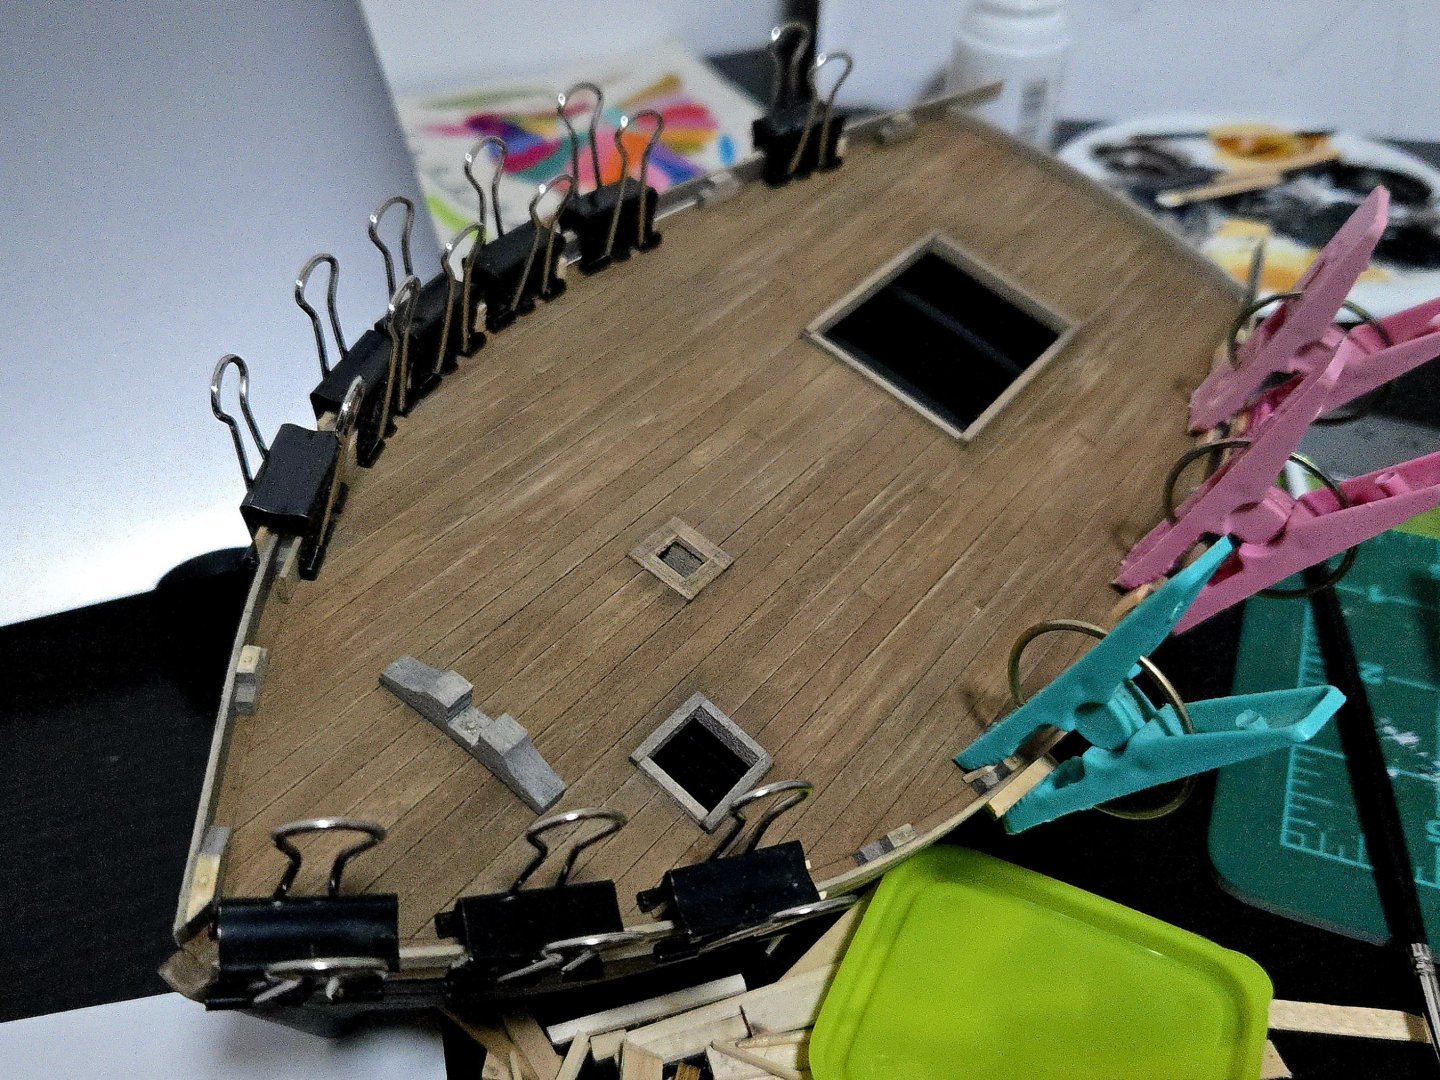
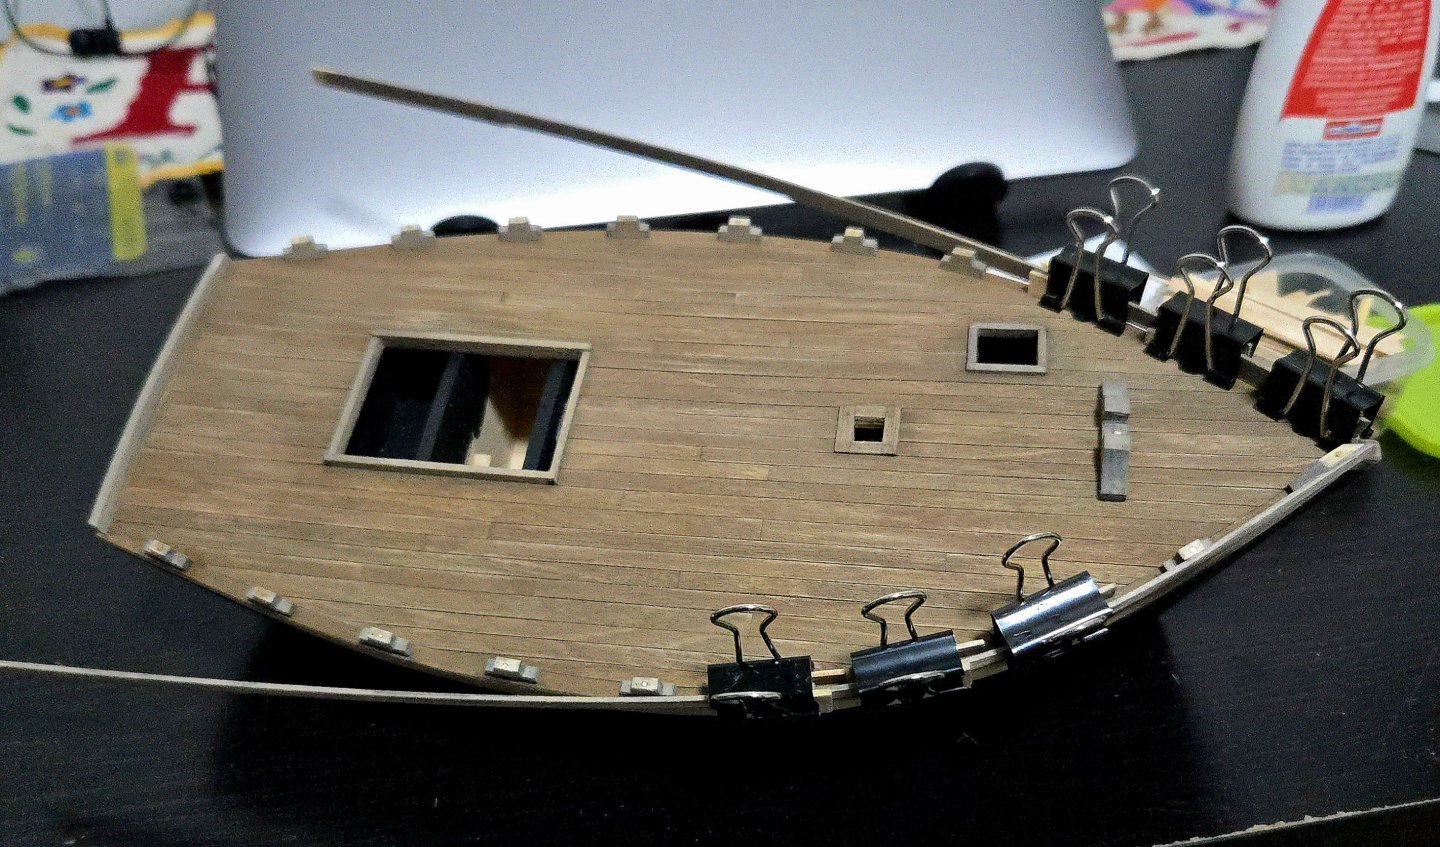
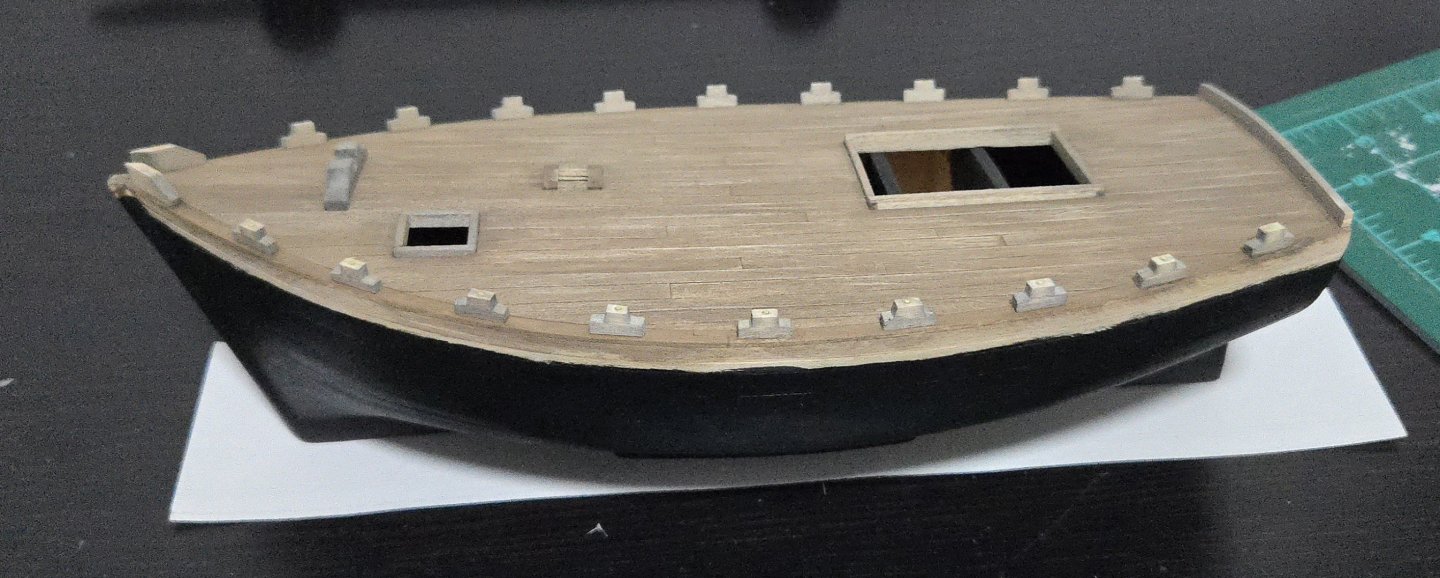
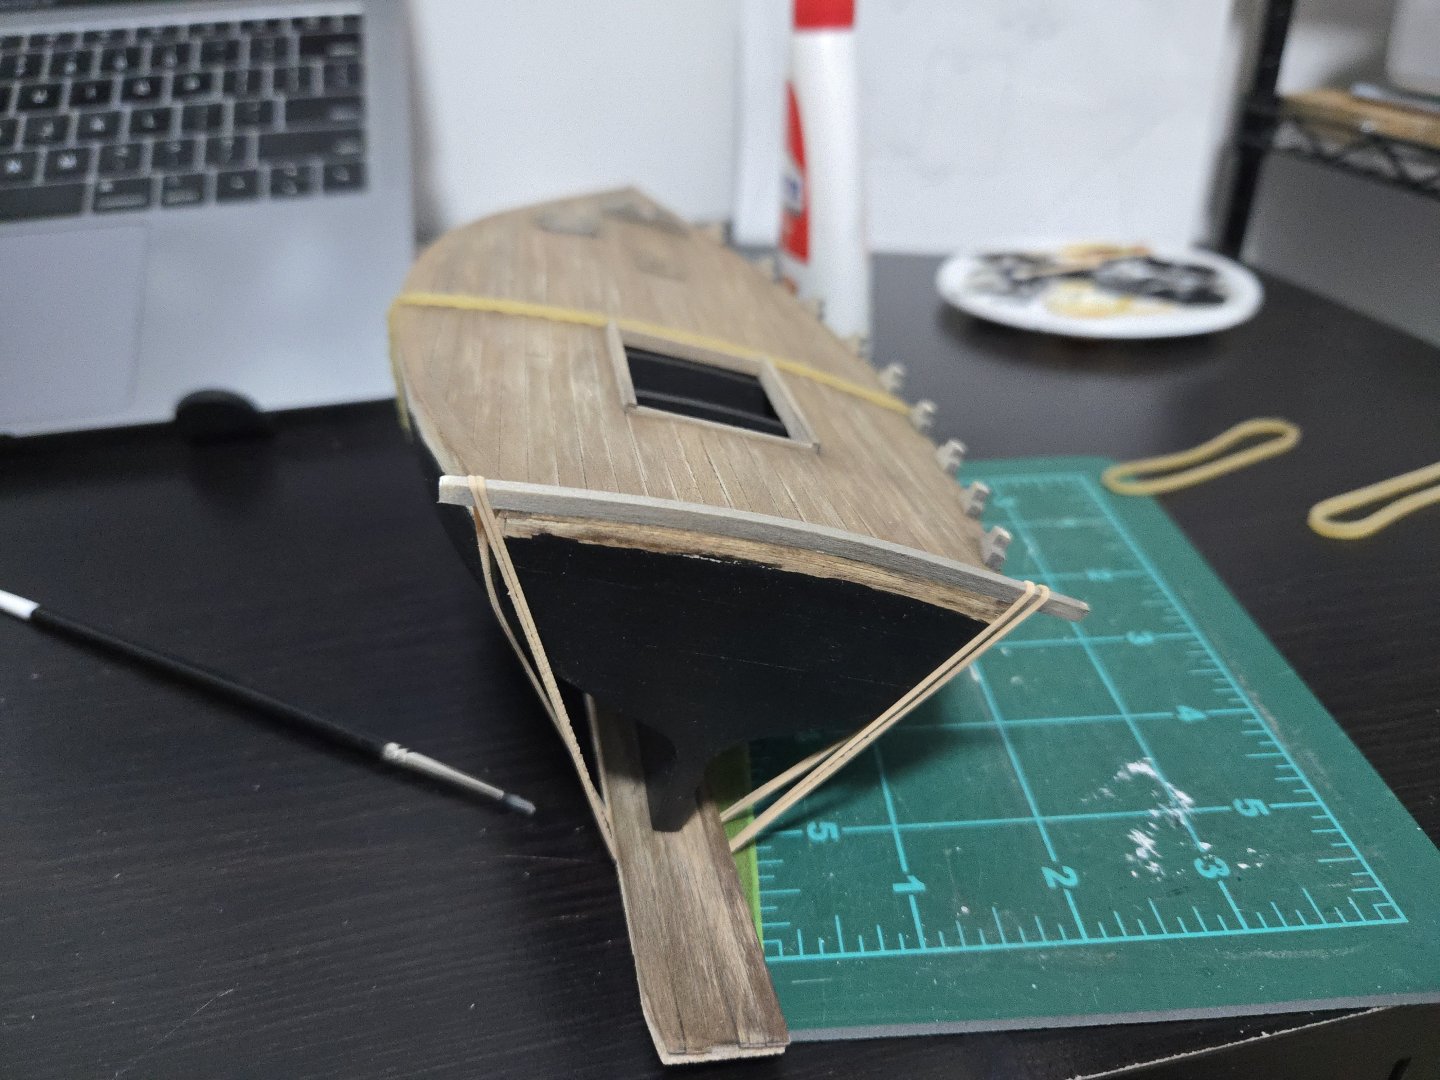
Thanks, Keith and Wefalck! At this point, the model looks more like a boat than ever. Gluing and pinning the port stanchions (and knightheads) was a much faster process than on the starboard side. Especially pinning them, I did a much better job this time of making sure the hole was sufficiently cleared before gluing in the pin. Adding the bulwarks took a bit more time. I started at the bow. I realized that the wood needed to take a bit of a curve upward in the middle of the hull to fit properly, so I dampened it and clamped overnight so it would take the proper shape. I then worked my way back, cleaning up excess glue as I went. Finally, I added the corner pieces of the aft rail and trimmed off the excess bulwark length. Next up, I need to paint the topsides and add the cap rails. Based on photos, some lanchas didn't have cap rails, but most did, plus they'll cover the brass pins in the stanchions. I wish I had copied the templates for the covering boards, that would make this much easier. With hatch covers temporarily placed:


- 312 replies
-
- 8
-
-
- Chile
- Latin America
- (and 6 more)
-
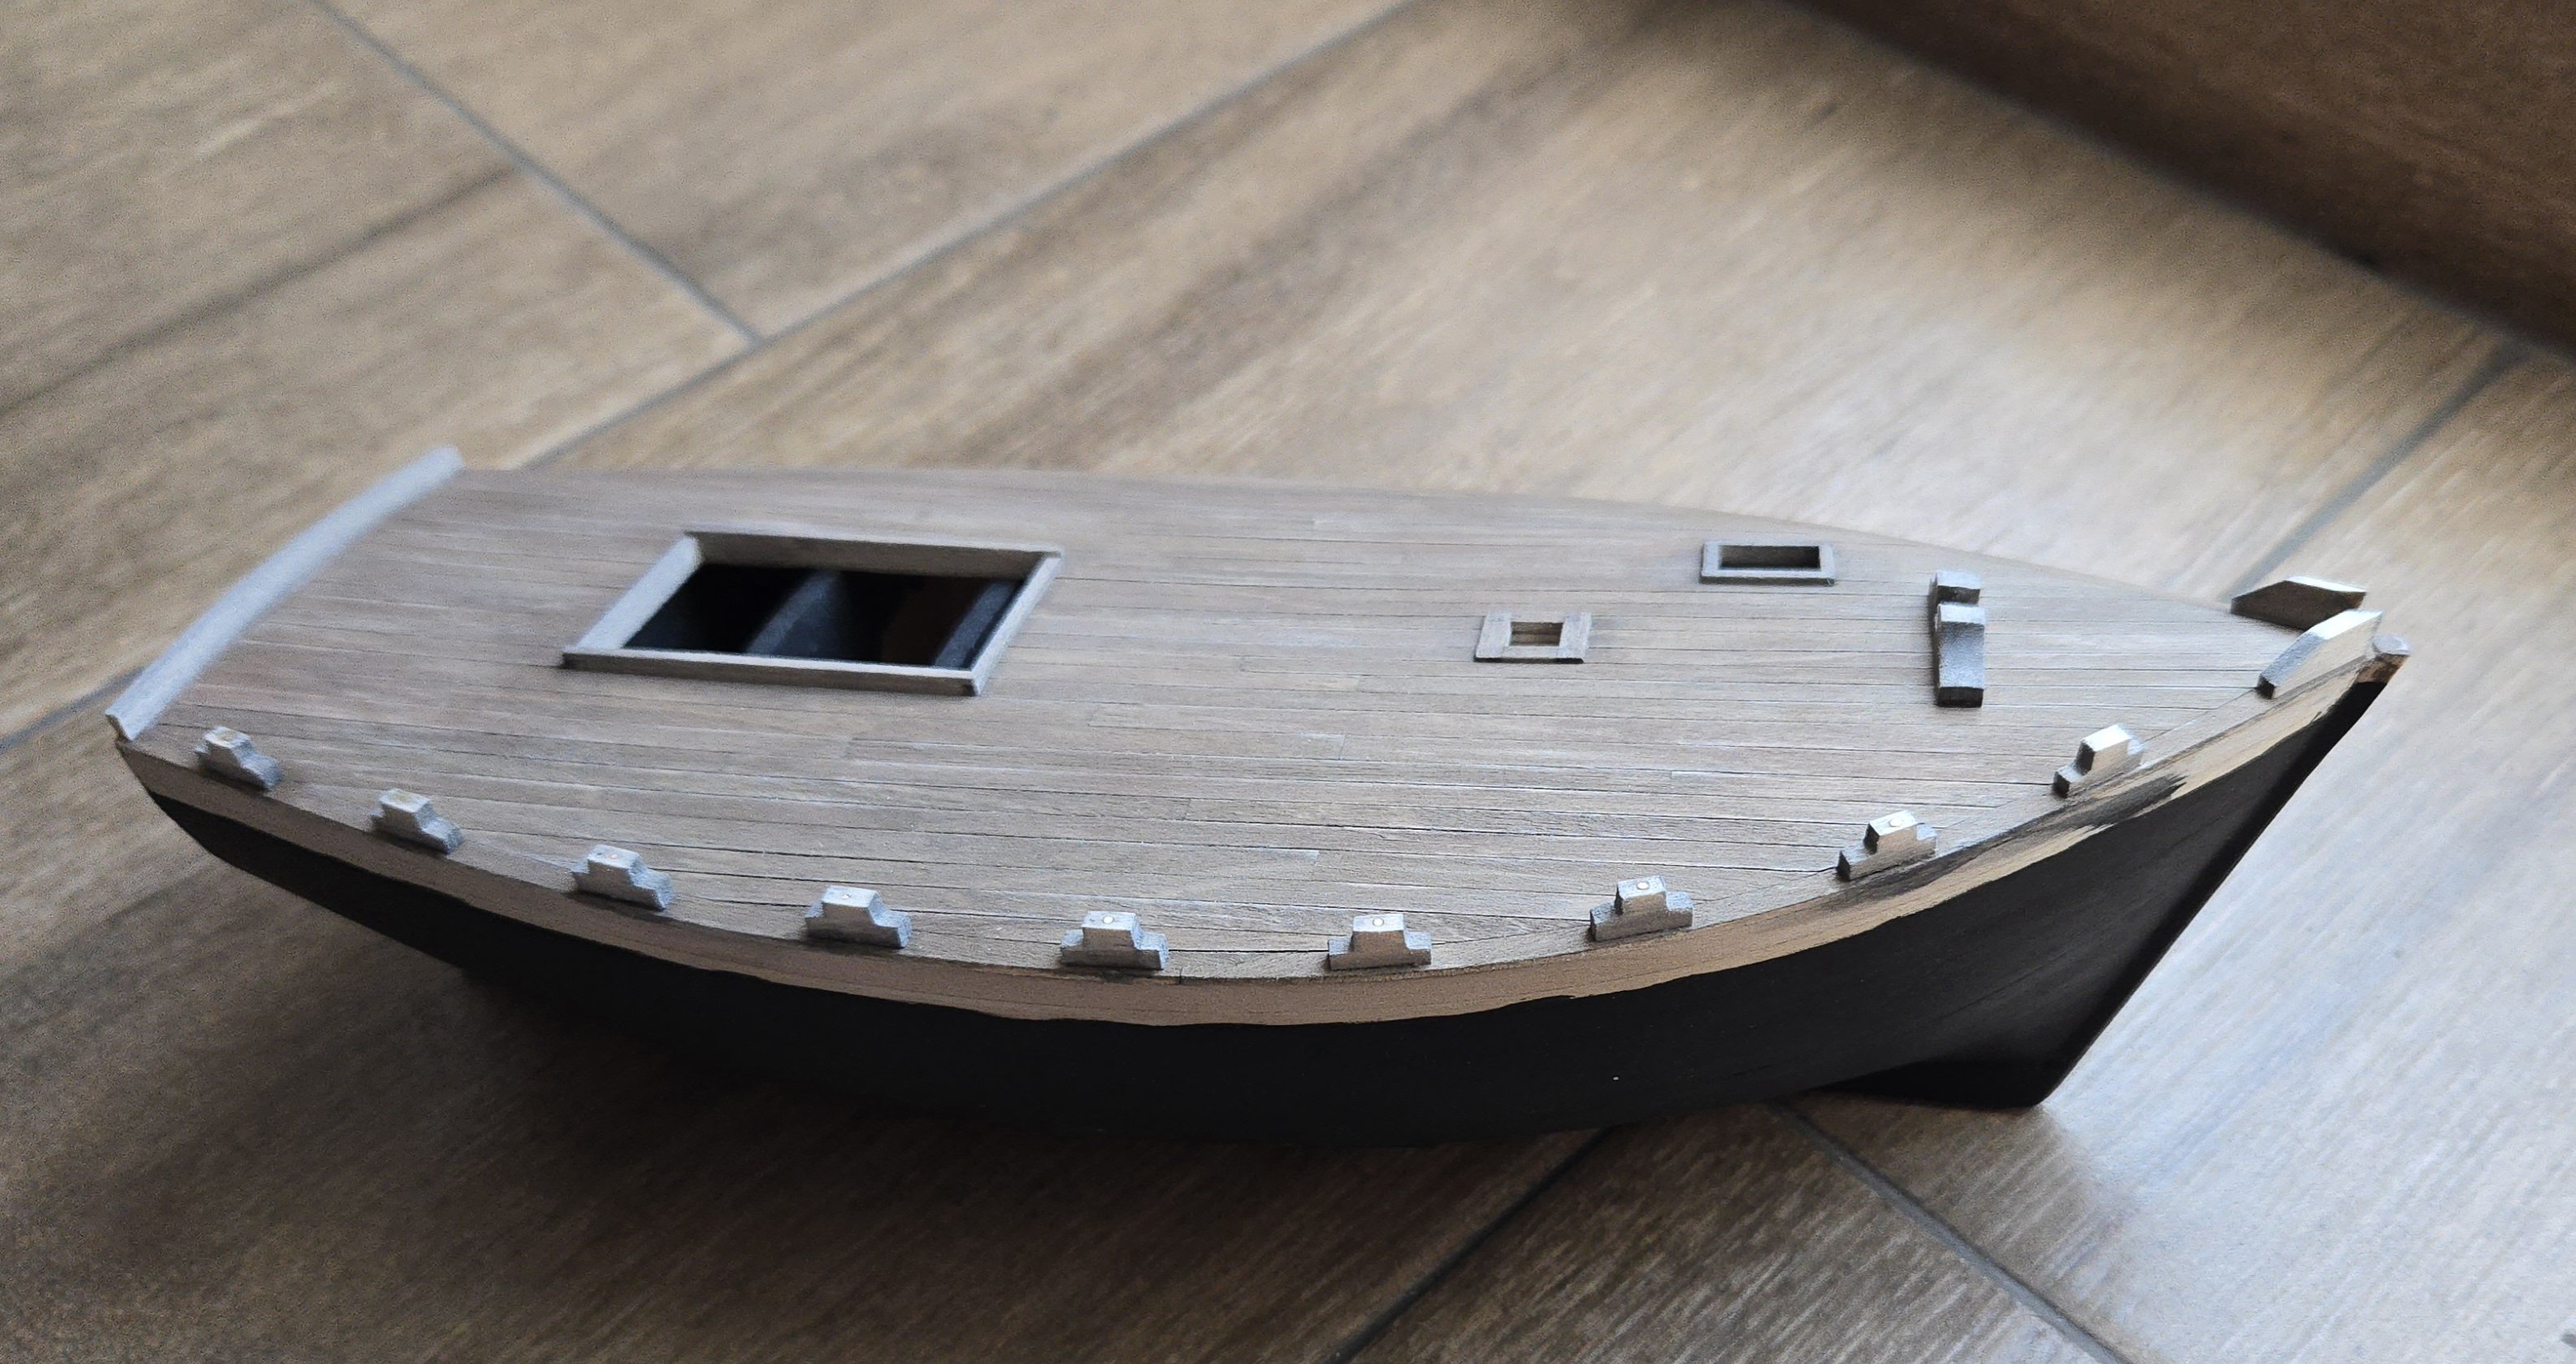
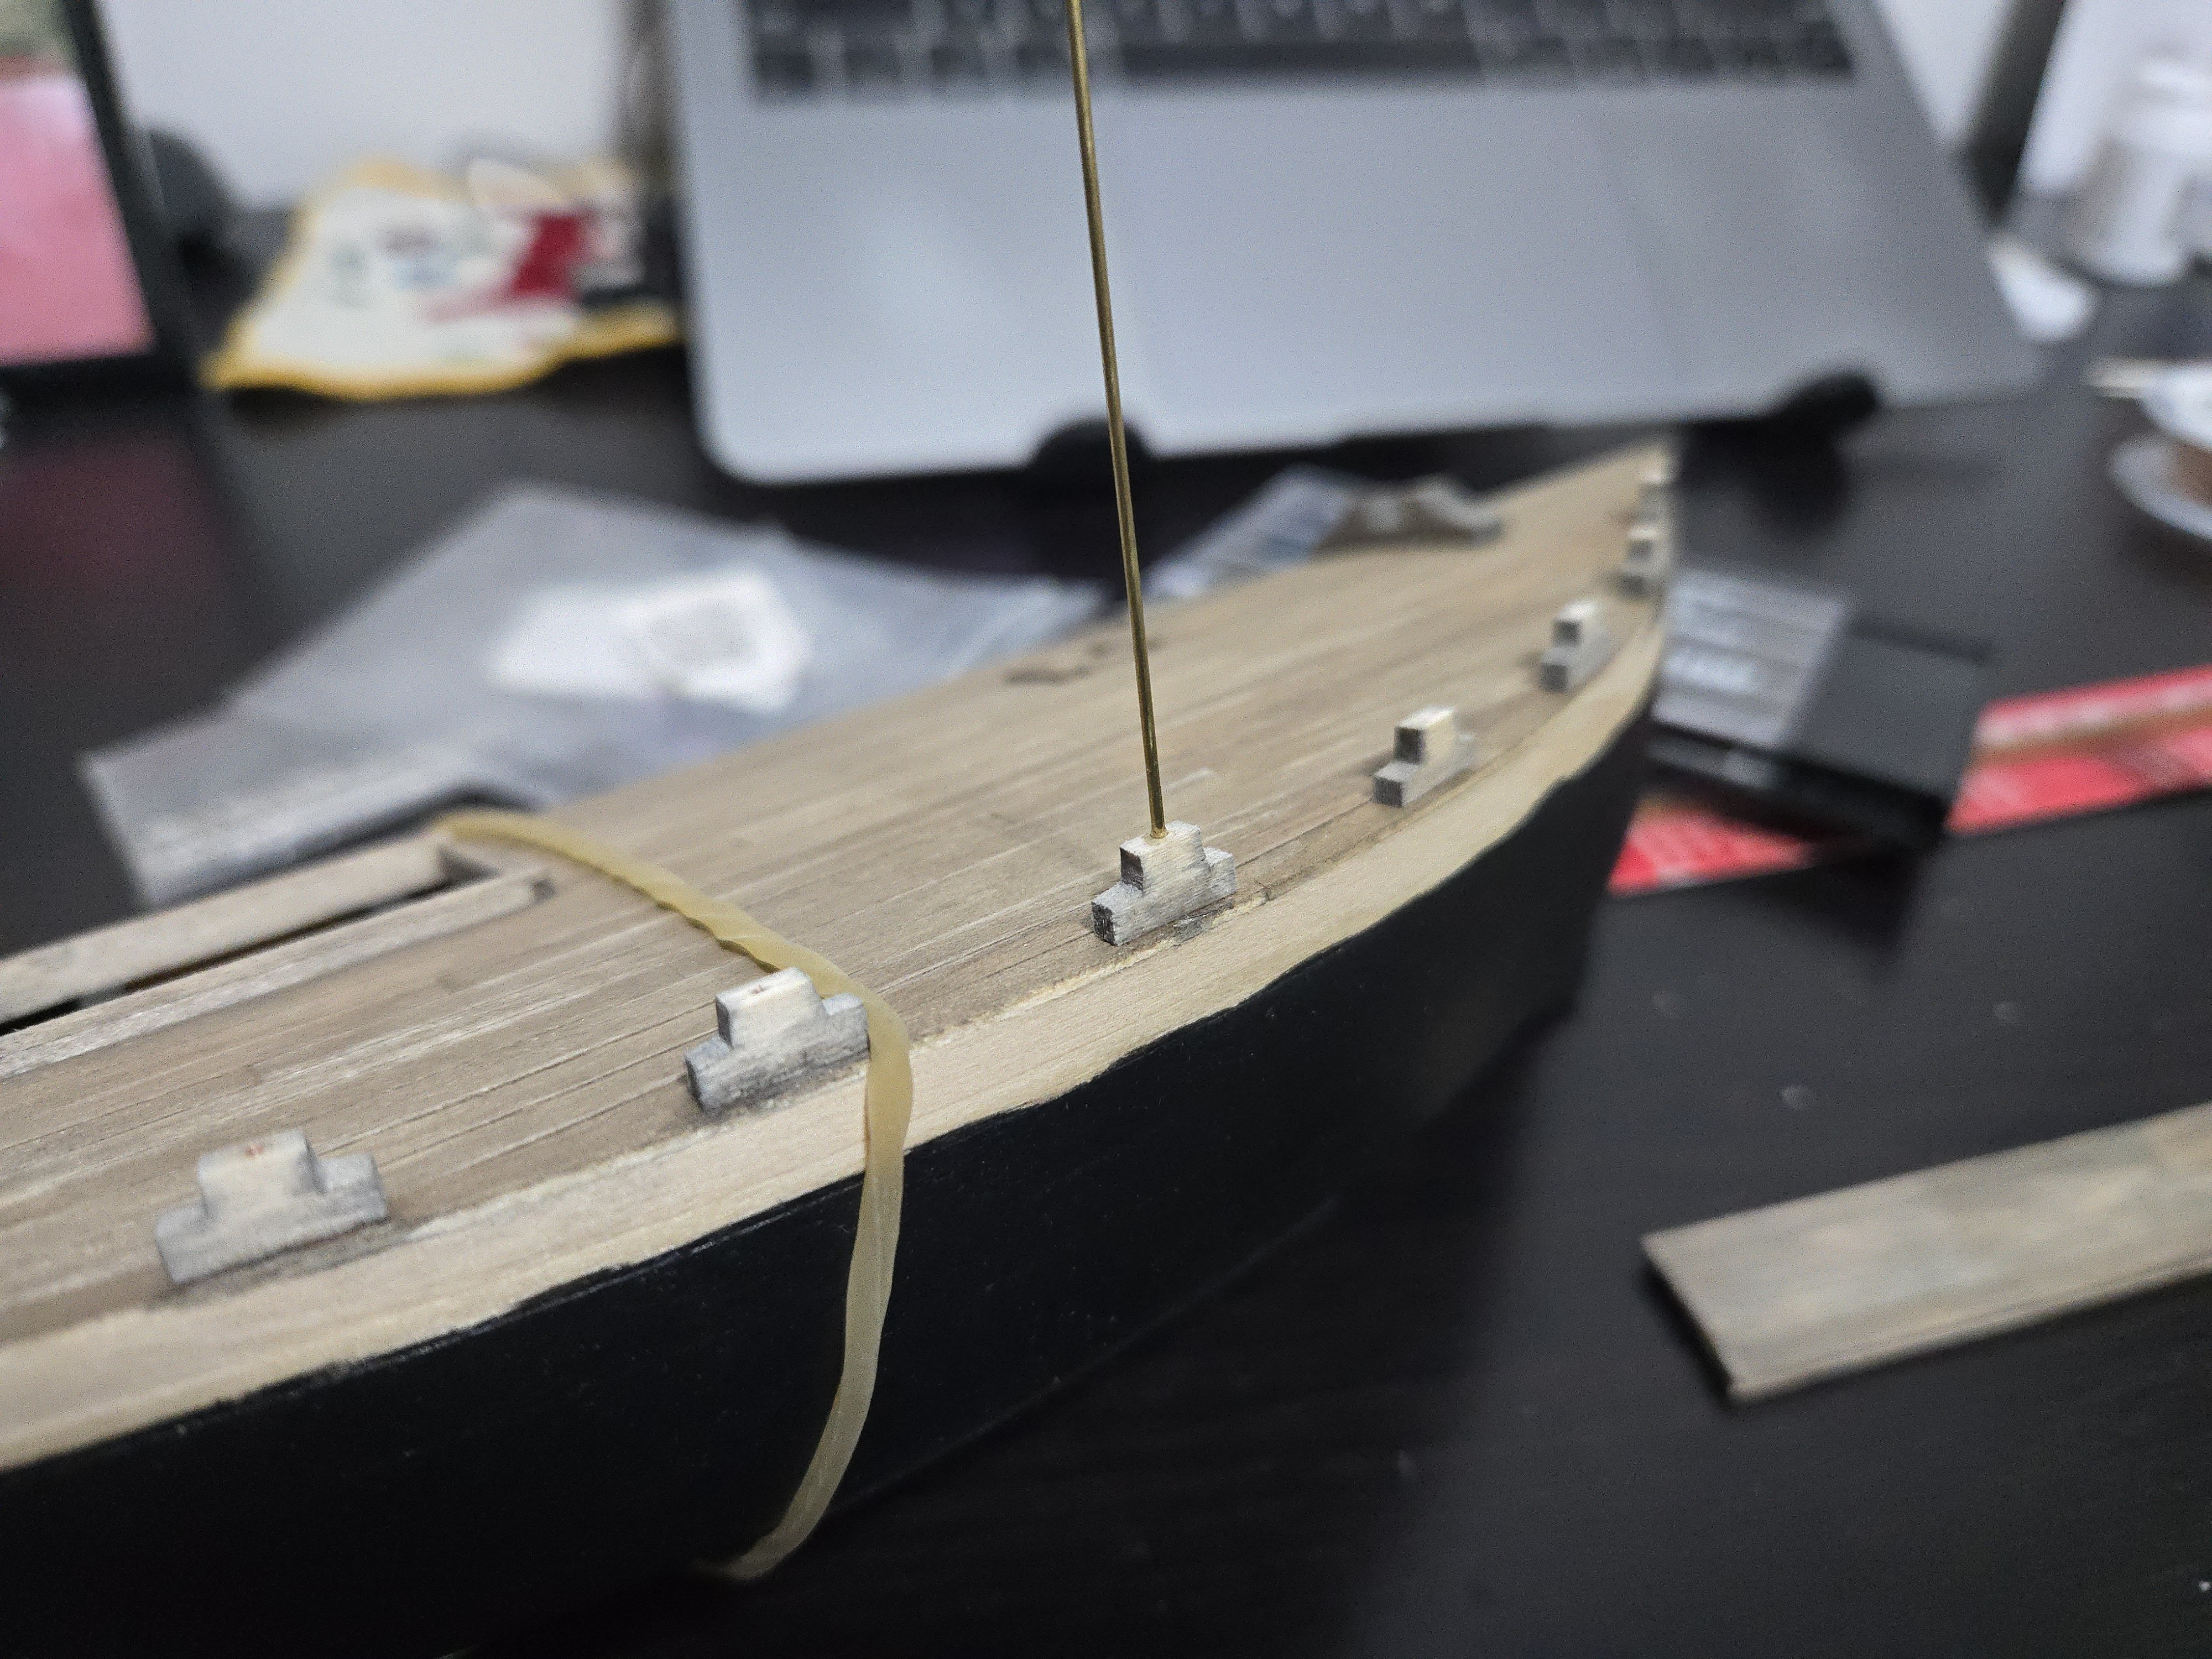
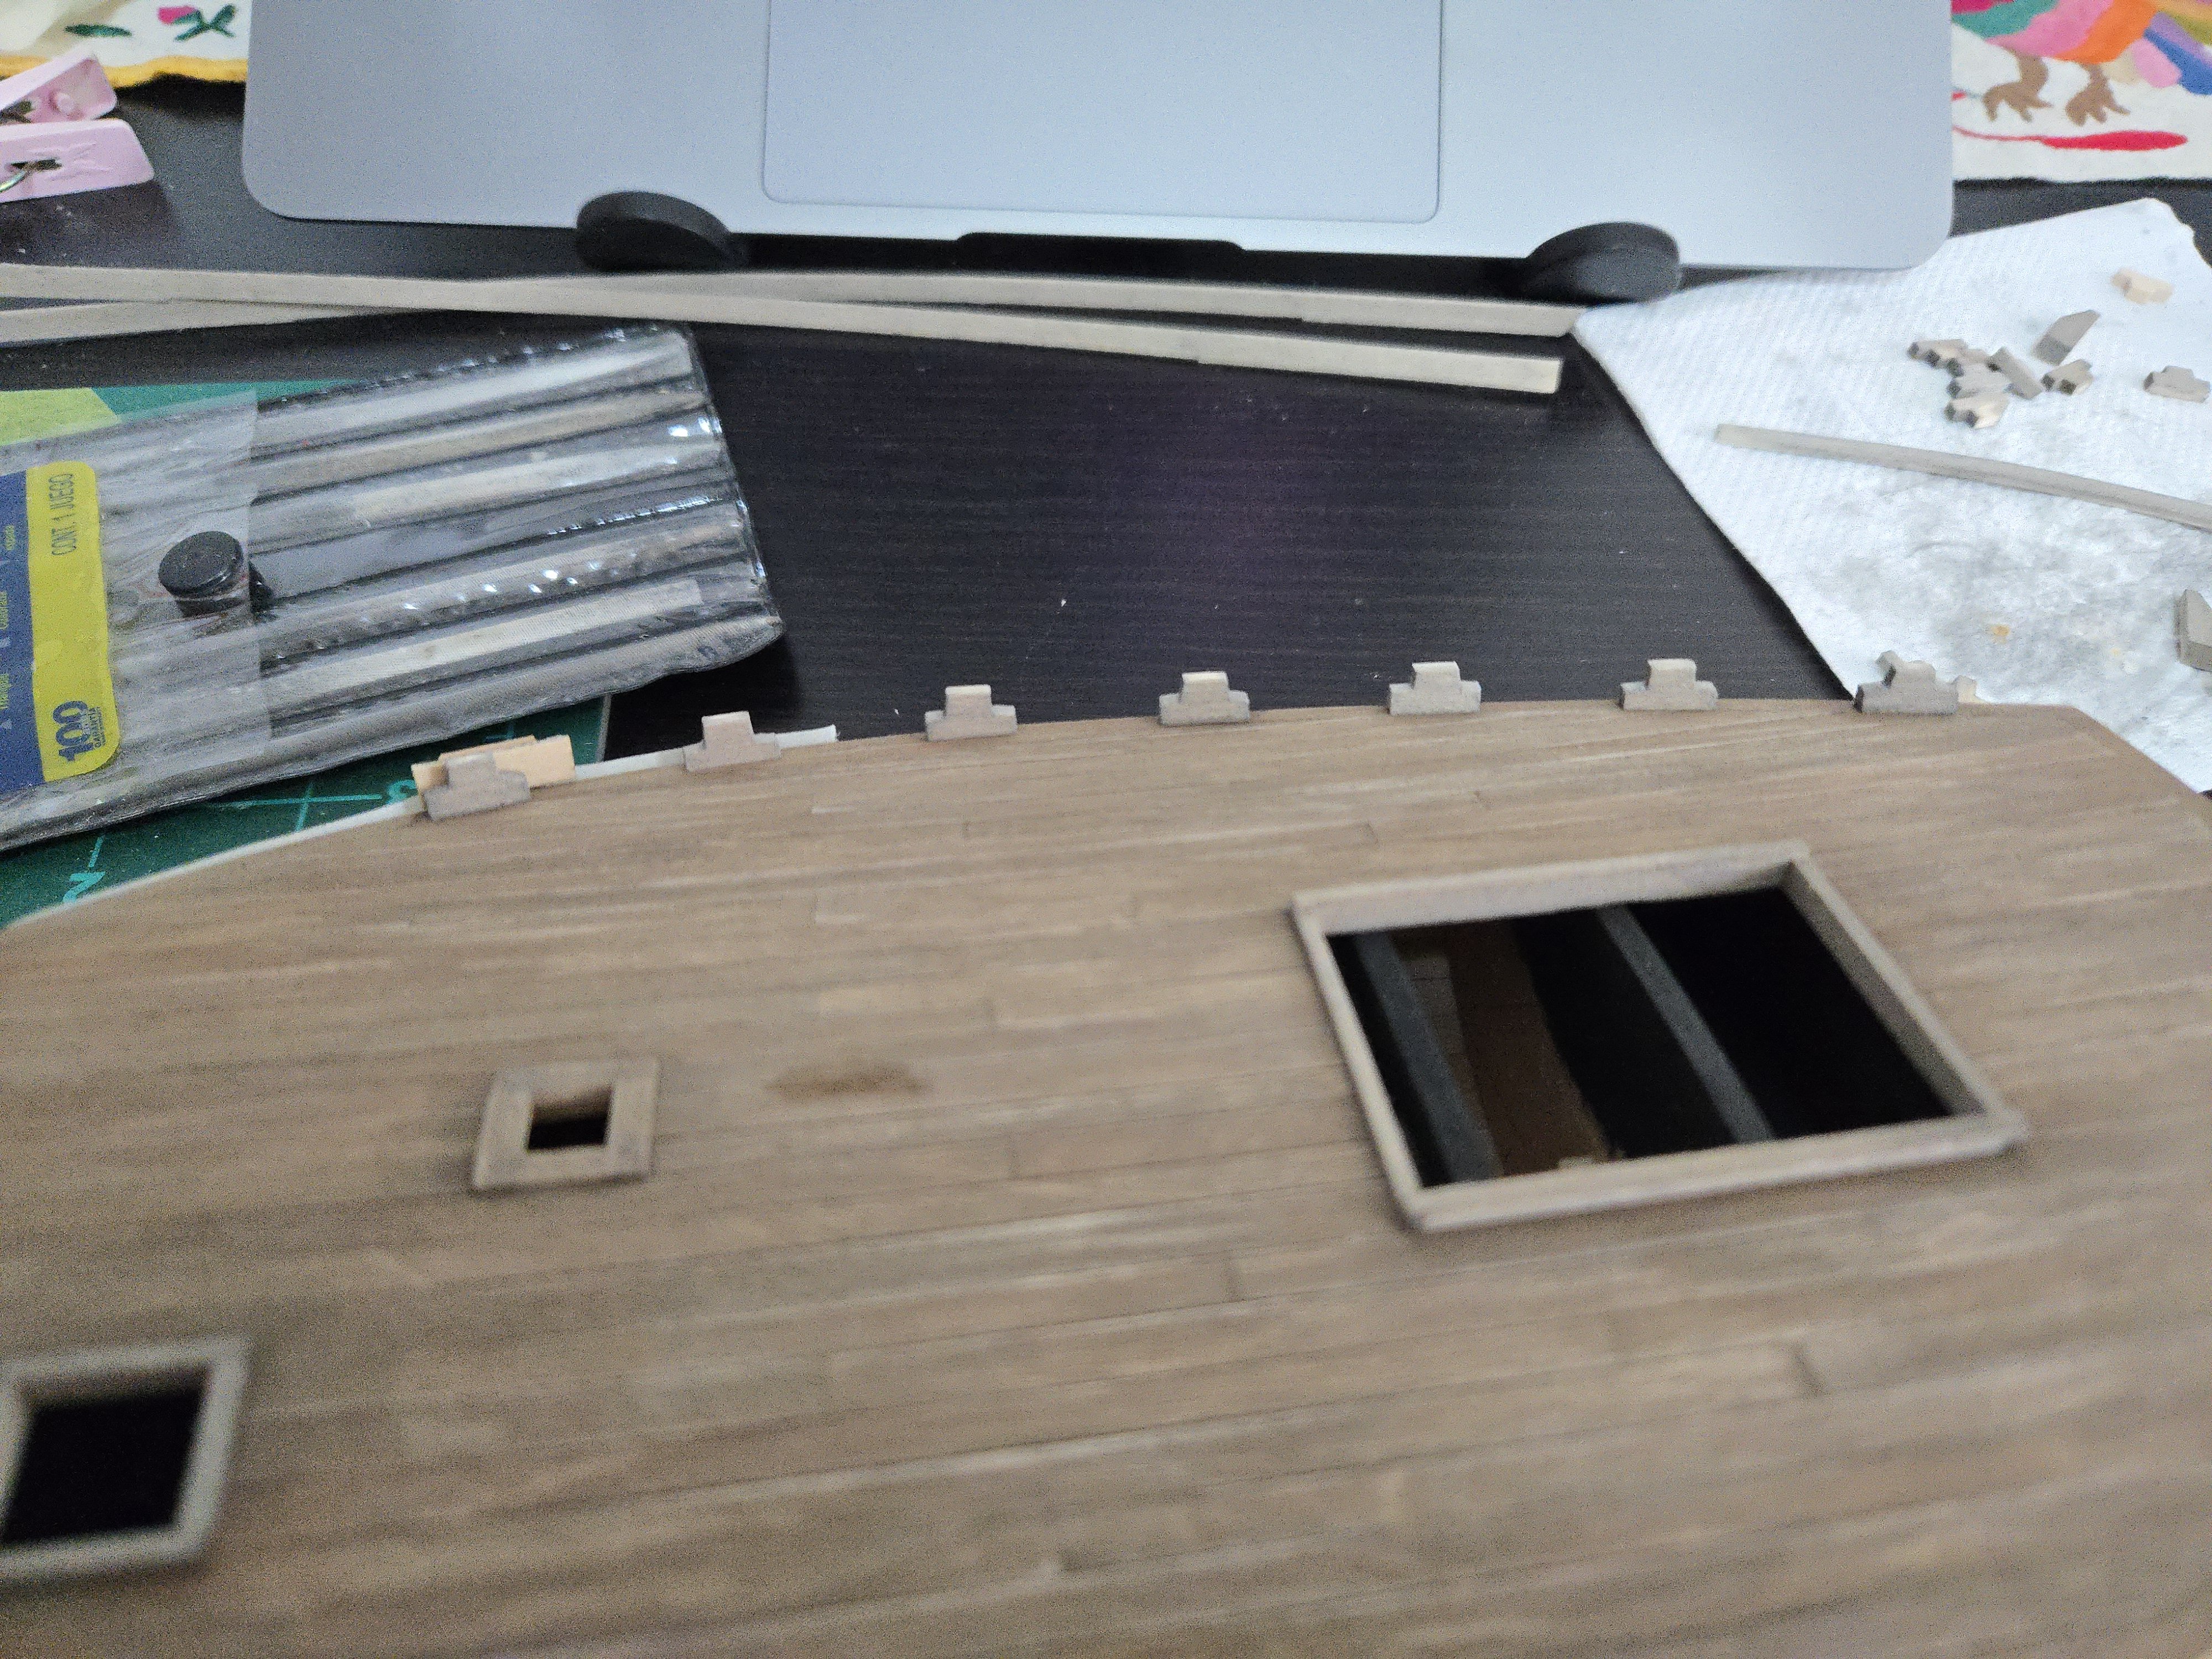
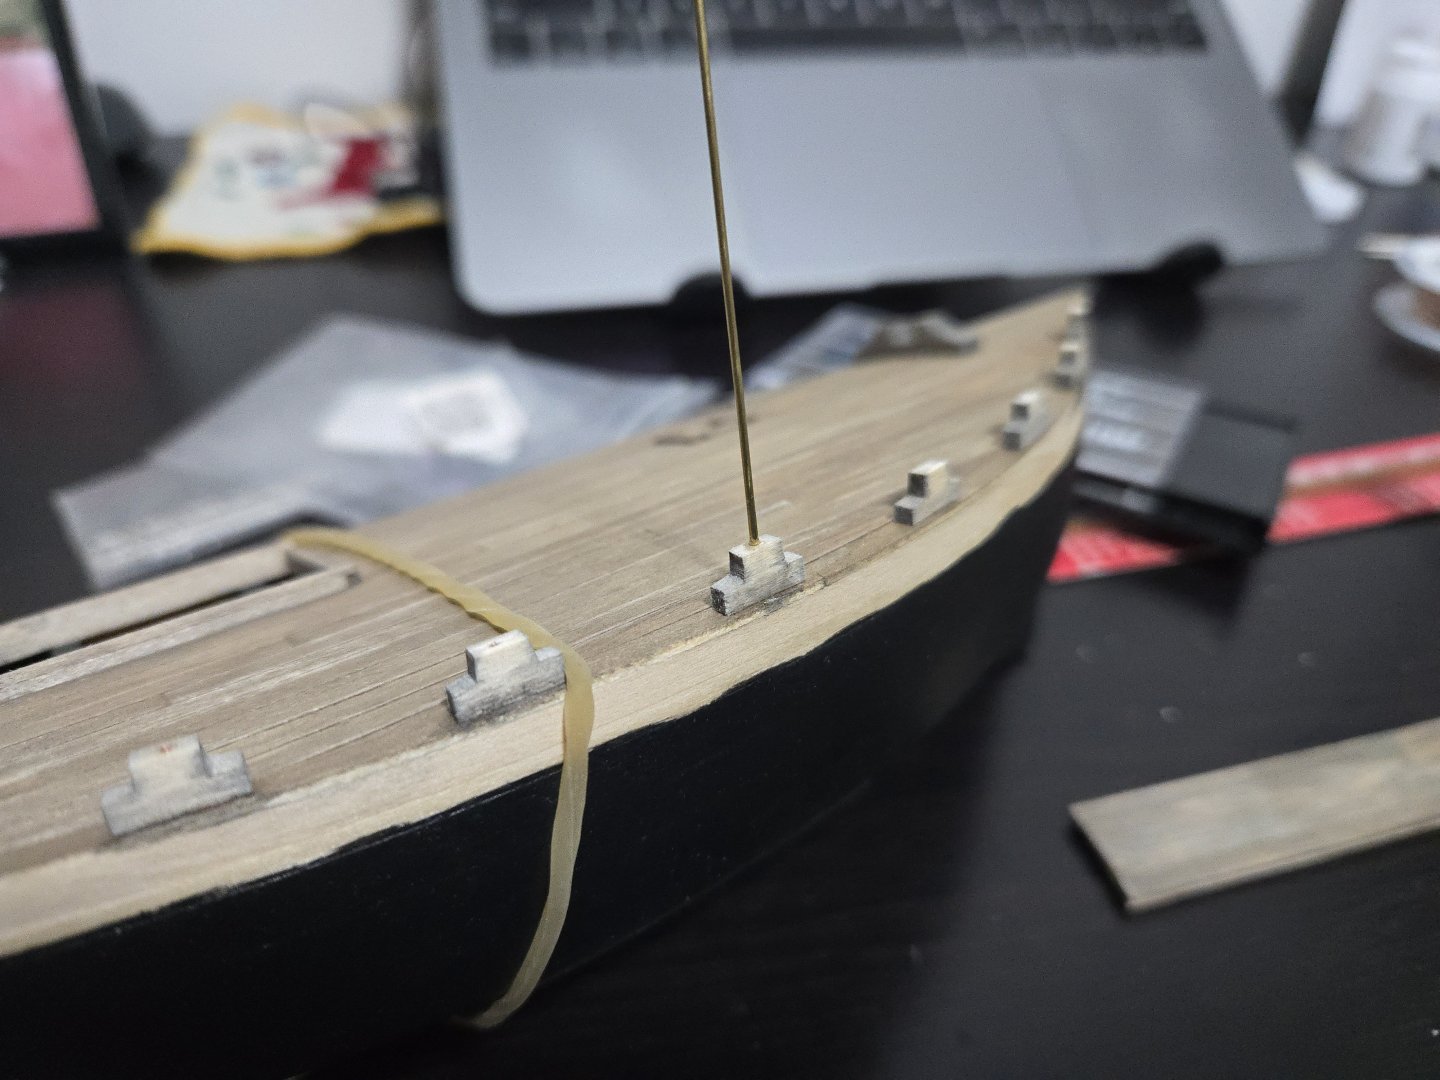
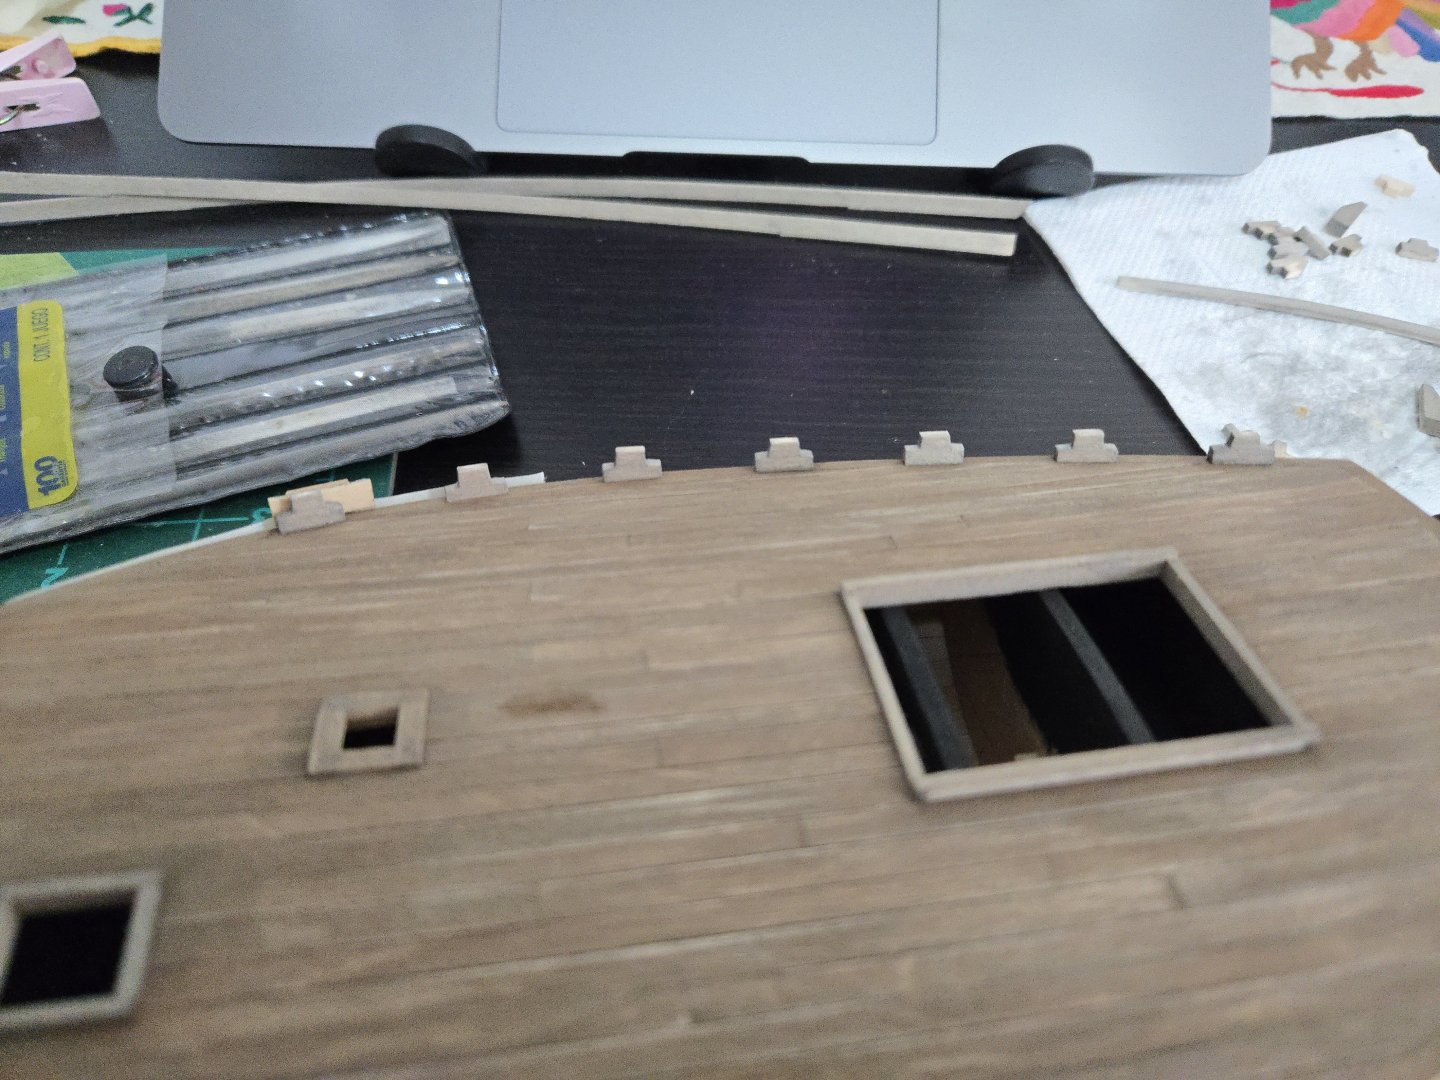
I think that's what they did, but I haven't found a clear photo. Many of the more recent lanchas for which better photos exist have lower bulwarks with less prominent stanchions. To pin the stanchions in place, I started with wire (covered in superglue and inserted into pre-drilled holes). But after only a couple I realized that the wire was extremely difficult to push into the hole, as it obviously bends very easily. So I switched to a thin brass rod. This worked better, but still has a tendency to get stuck before getting to the necessary depth. I also added the stern rail, first leaving it overlength for ease of gluing and later cutting to size. This will form the lower level, but there will be a second layer at the corners to meet the height of the bulwarks. I also tapered the bowsprit with a mini plane and sandpaper. Finally, I added the bow stanchions/angled blocks (I'm sure there's an actual name for these) to fit around the bowsprit. Next up, the port stanchions.

- 312 replies
-
- 9
-
-
- Chile
- Latin America
- (and 6 more)
-
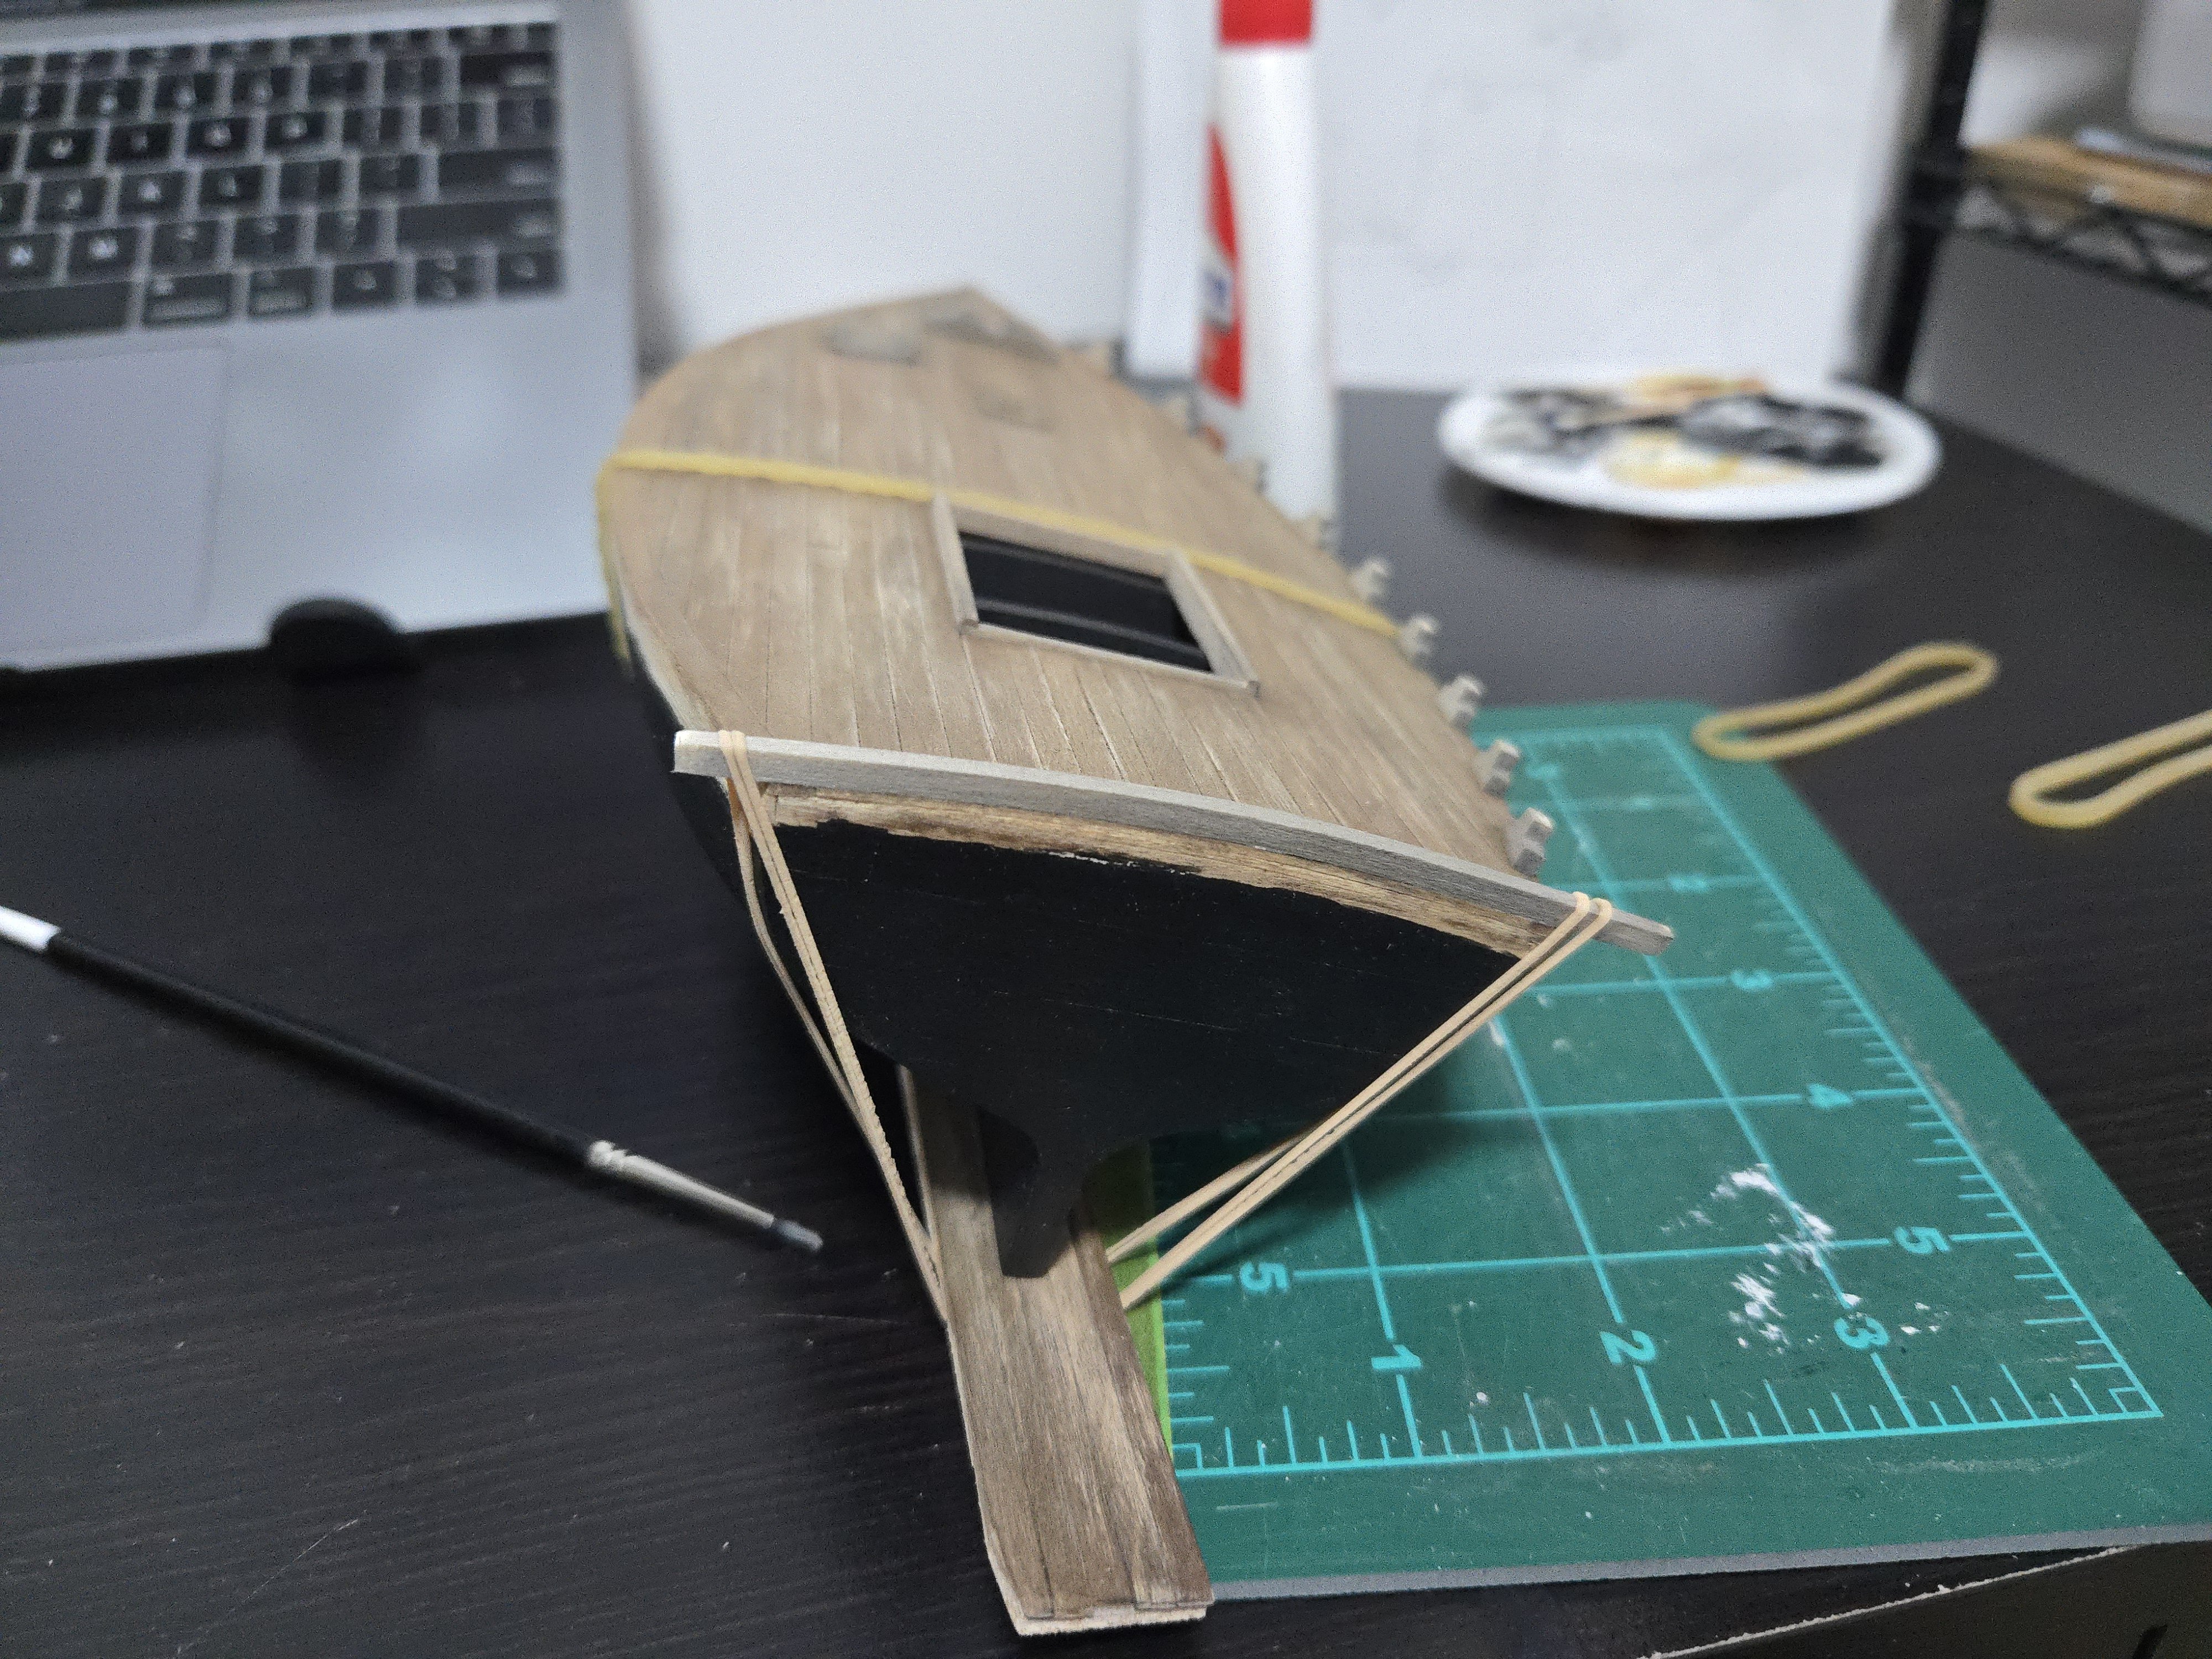
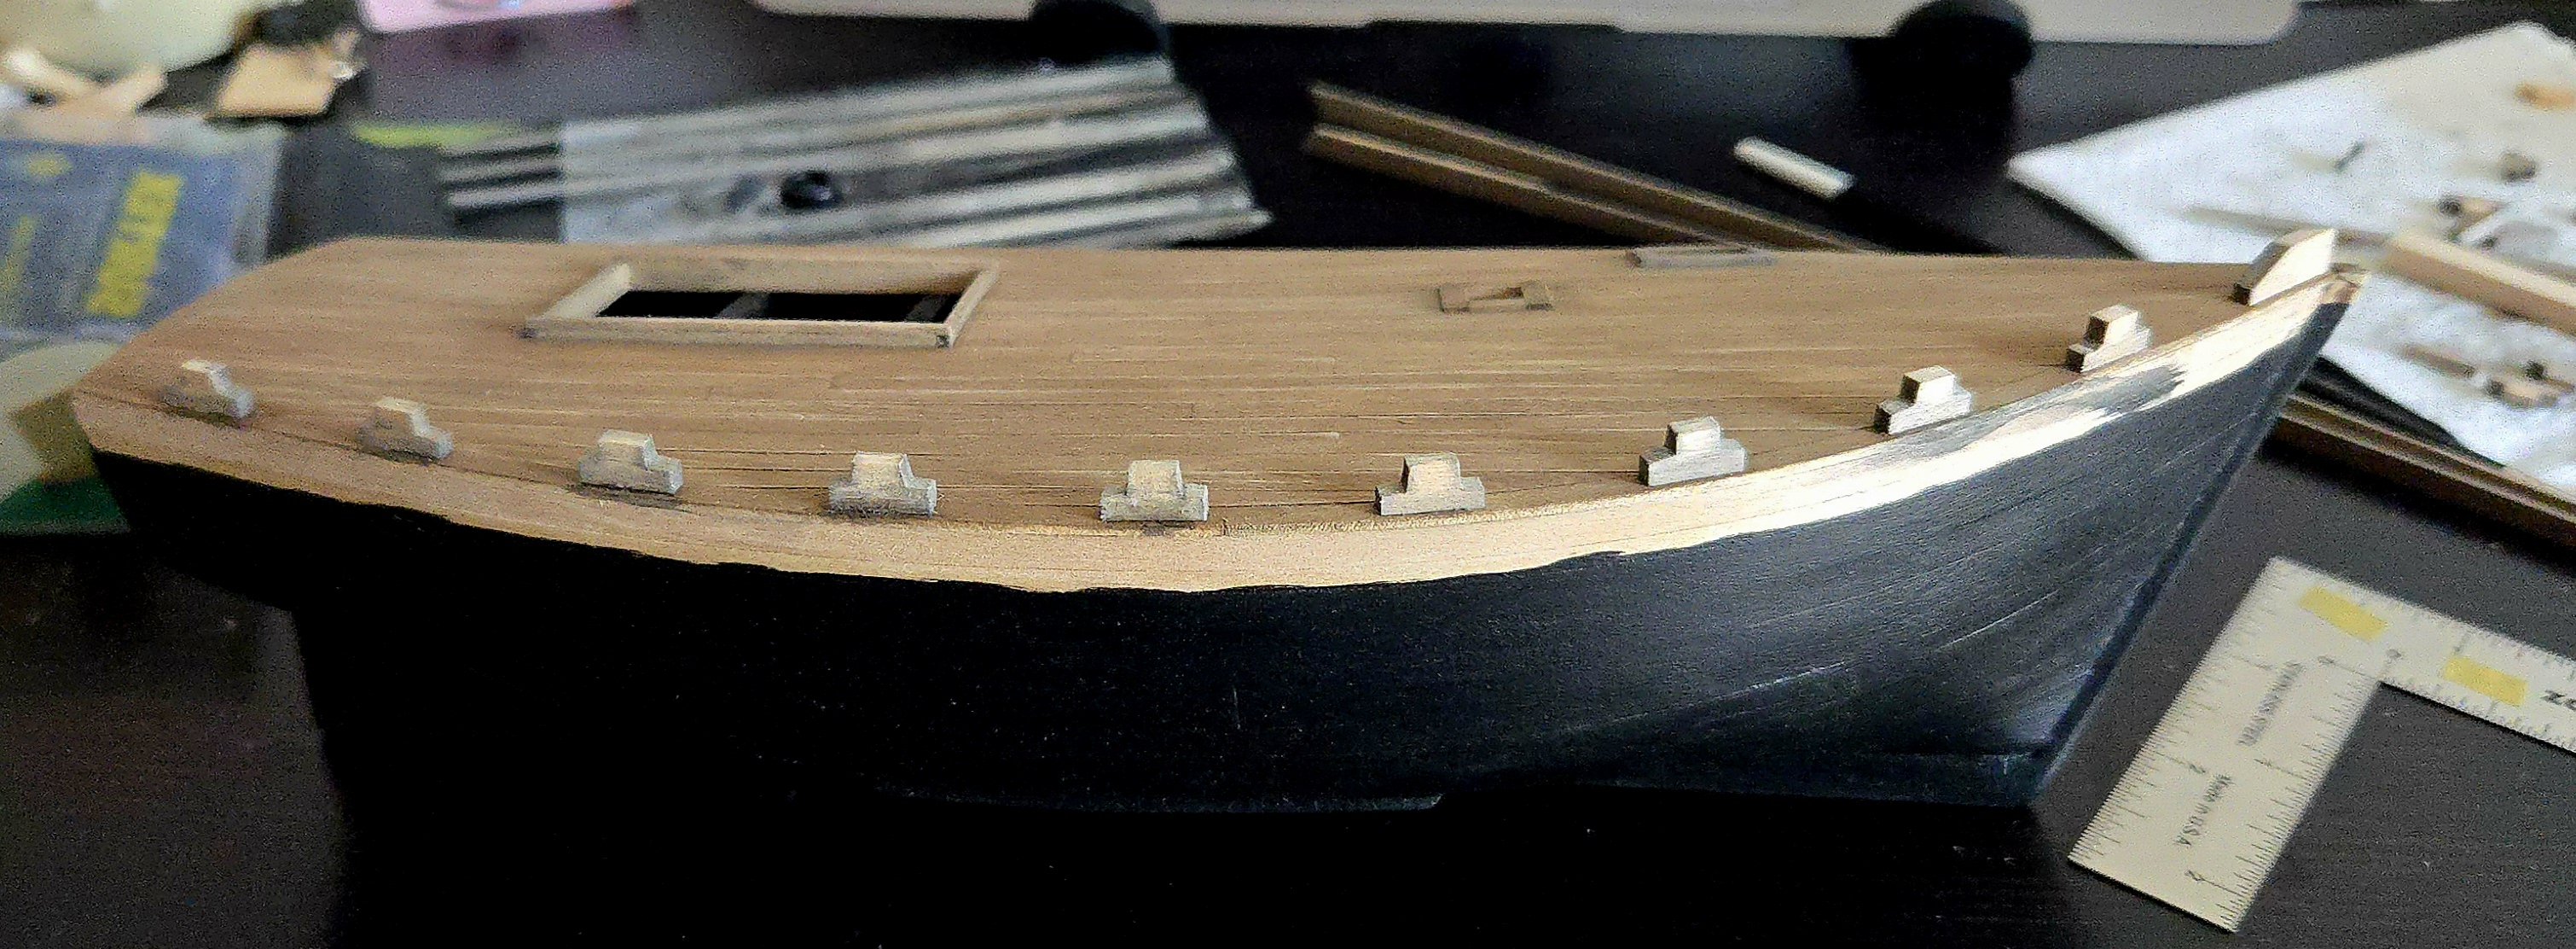
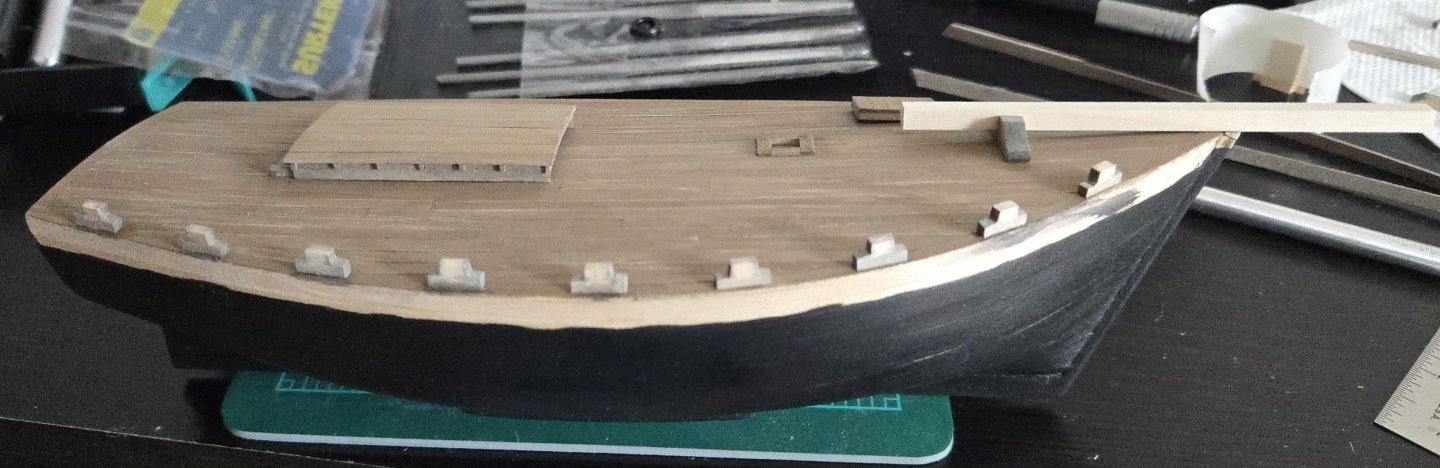
Thanks, Chris! I think there's a lot that I could be more precise about, but each build--and each part of the build--is a chance to improve. I've been working on the stanchions. Case in point about imprecision: while I was planning on doing ten stepped stanchions per side (besides the stern rail and the angled blocks around the bowsprit), I slightly adjusted locations while gluing and ended up with nine per side. I decided that this was fine, as this is a slightly small lancha. The bow block is not glued in the photo below. In order to properly fit the bow blocks, I now had to fit the bowsprit saddle, which I had already colored with a gray wash. I ended up placing this a bit further back than given in the plans, and than may have been typical, because I thought it looked better. Nonetheless, I did make sure to find at least a photo or two of lanchas with a similar bowsprit saddle location. The bowsprit still needs to be shaped. Next up, the port stanchions, aft rail, and angled blocks. I also will be testing drilling through the stanchions and the bowsprit to pin these in place with wire or brass rod, as they are not particularly securely glued and I would hate to snap them off by accident.

- 312 replies
-
- 11
-
-
- Chile
- Latin America
- (and 6 more)