JacquesCousteau
-
Posts
1,383 -
Joined
-
Last visited
Content Type
Profiles
Forums
Gallery
Events
Everything posted by JacquesCousteau
-
 Looks great! I'm very curious to see how it goes planking with styrene.
 -
Nice work on the chainplates, they couldn't have been easy! Although I've never built it, I've repeatedly seen posts saying that the longboat is surprisingly challenging due to being a small boat at a pretty small scale, with only one layer of planking that is visible inside and out. I'm not sure if it would really be all that much easier than this one.
-
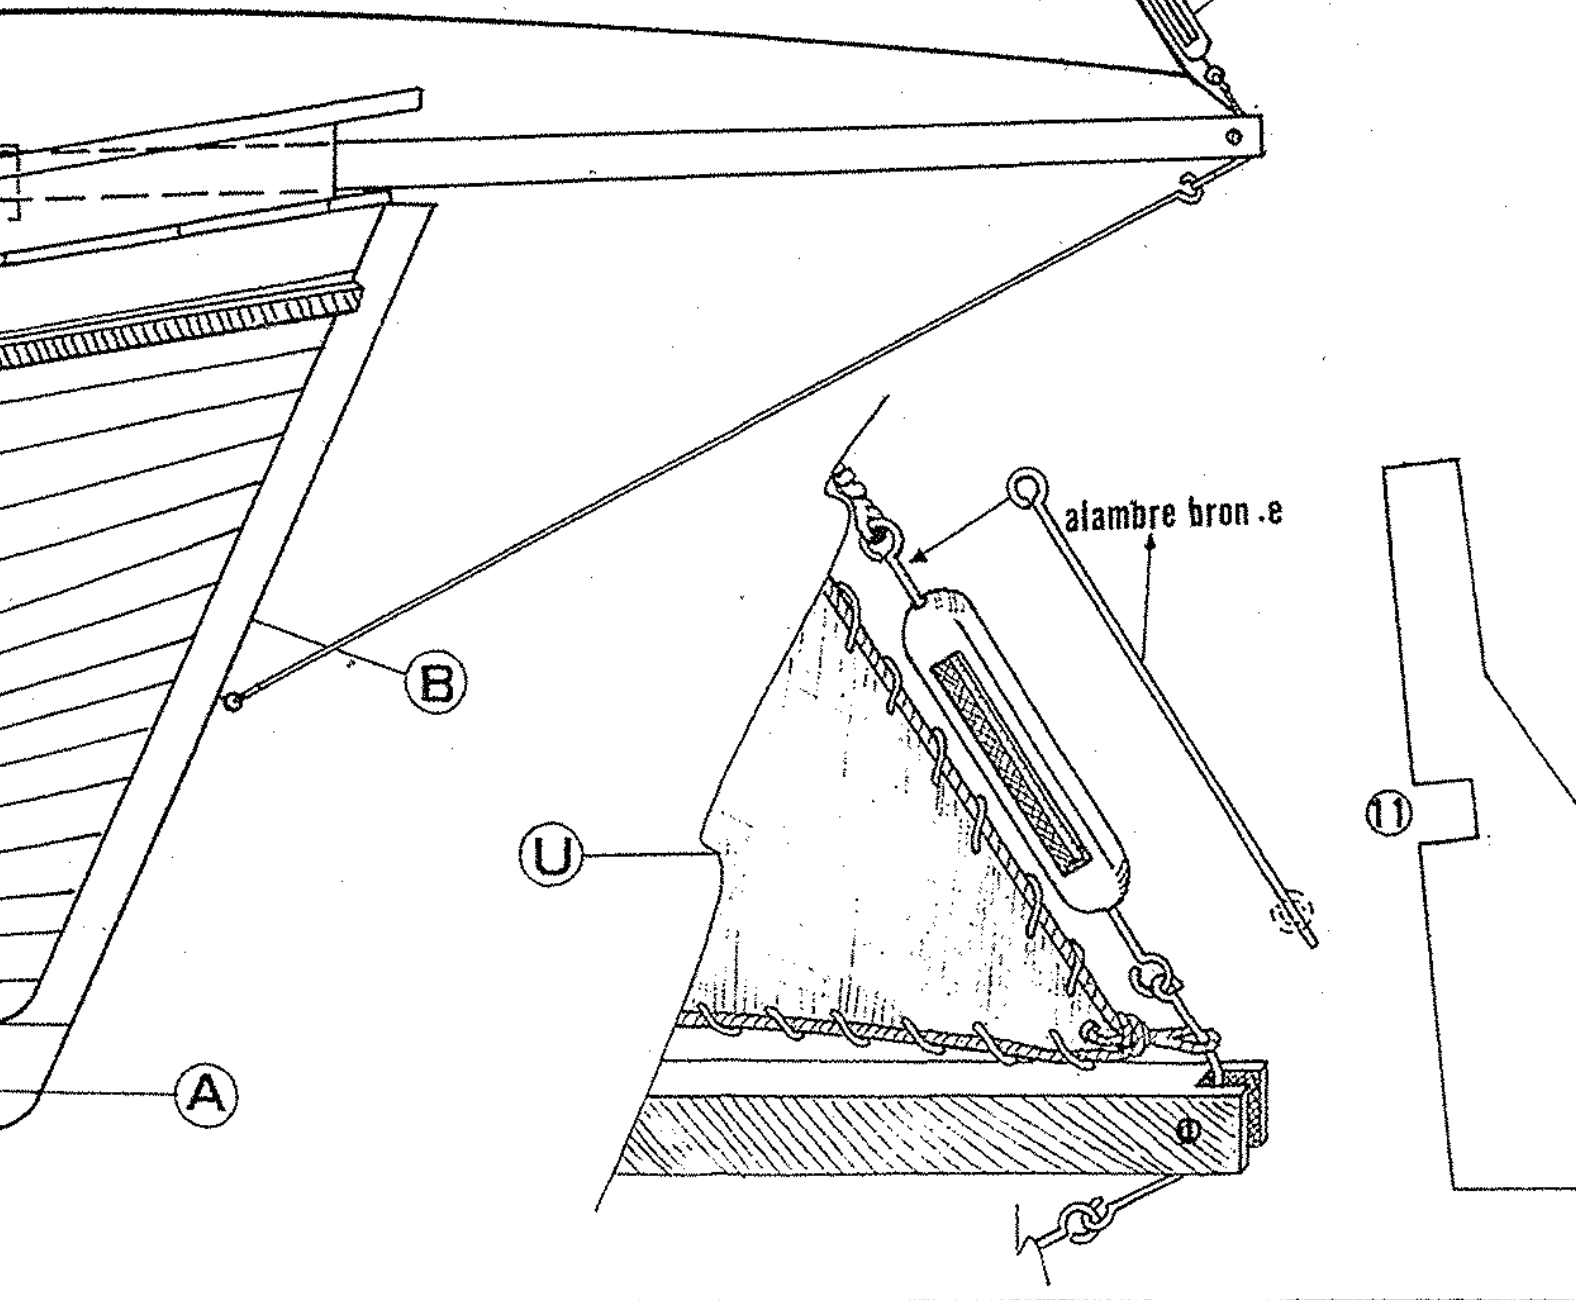
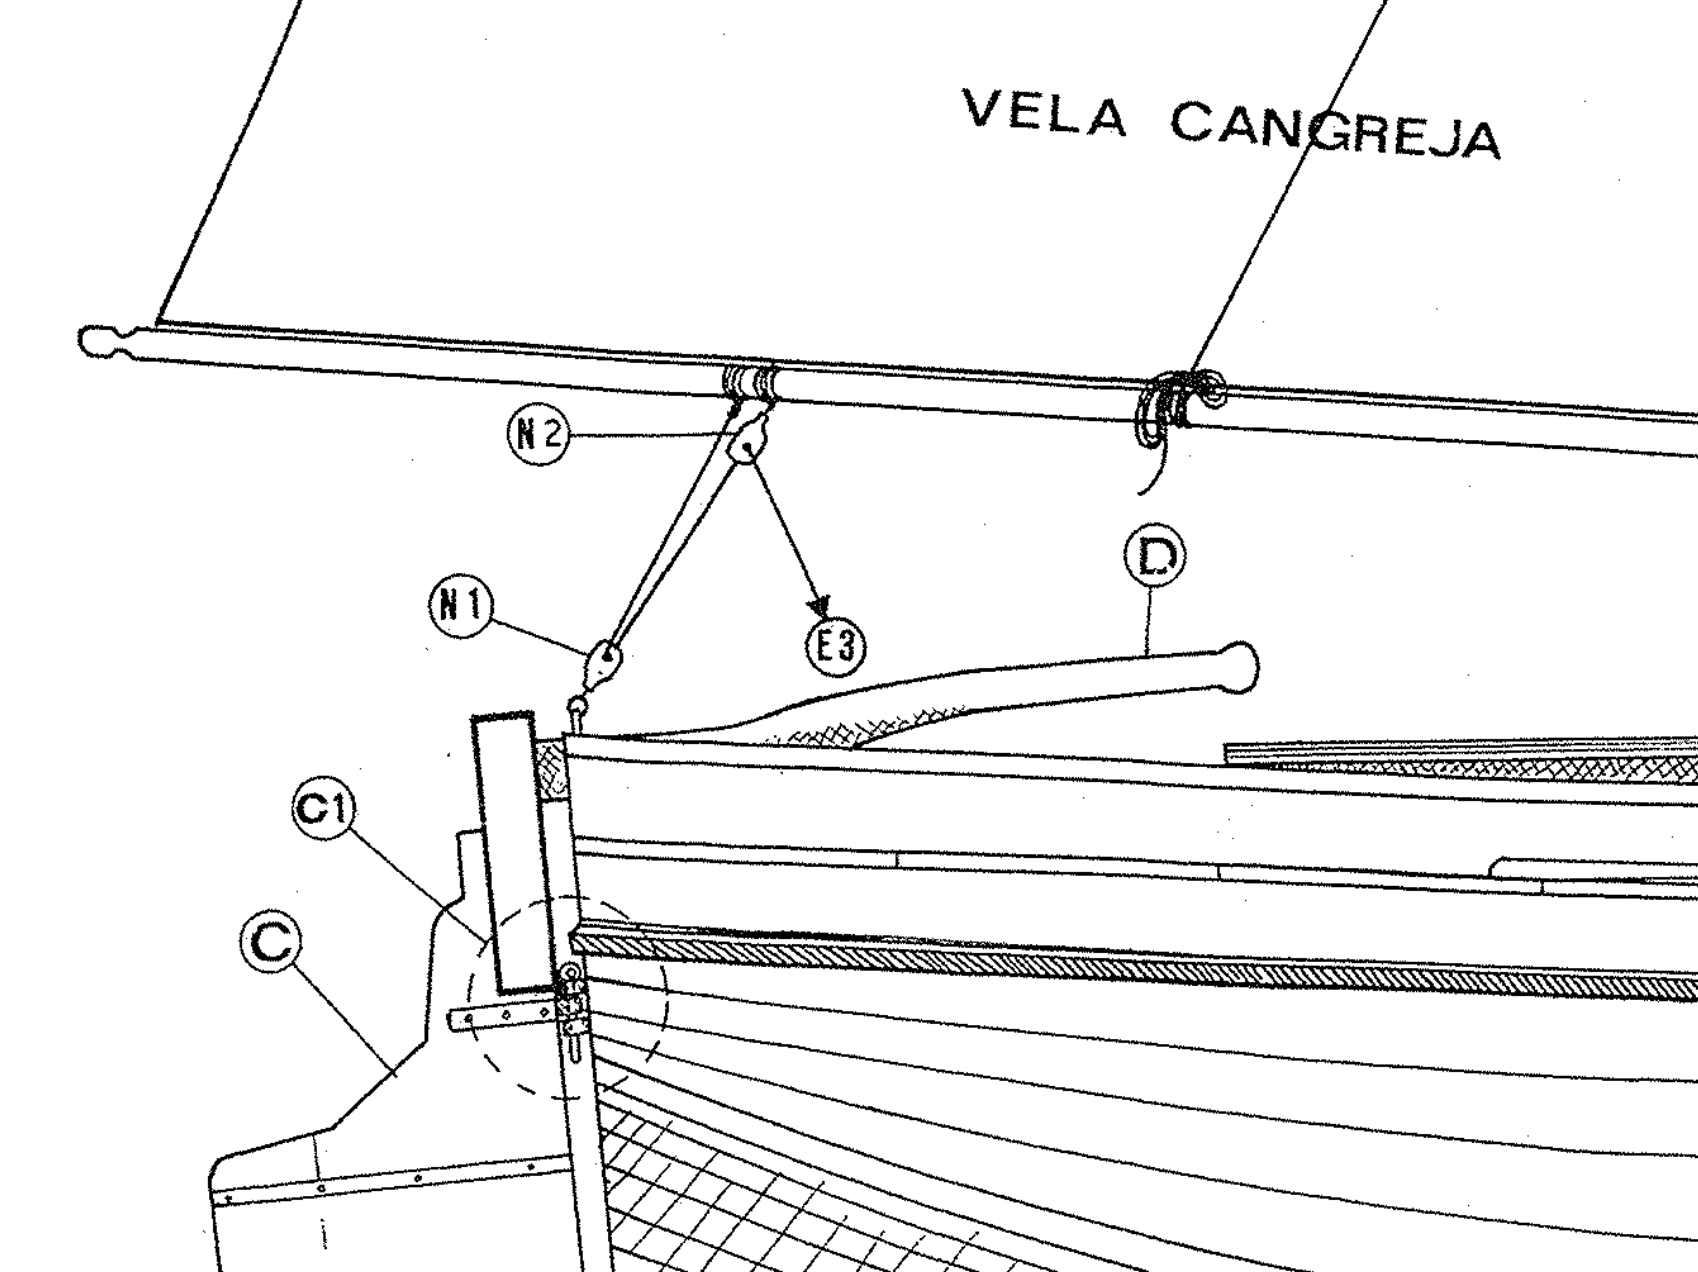
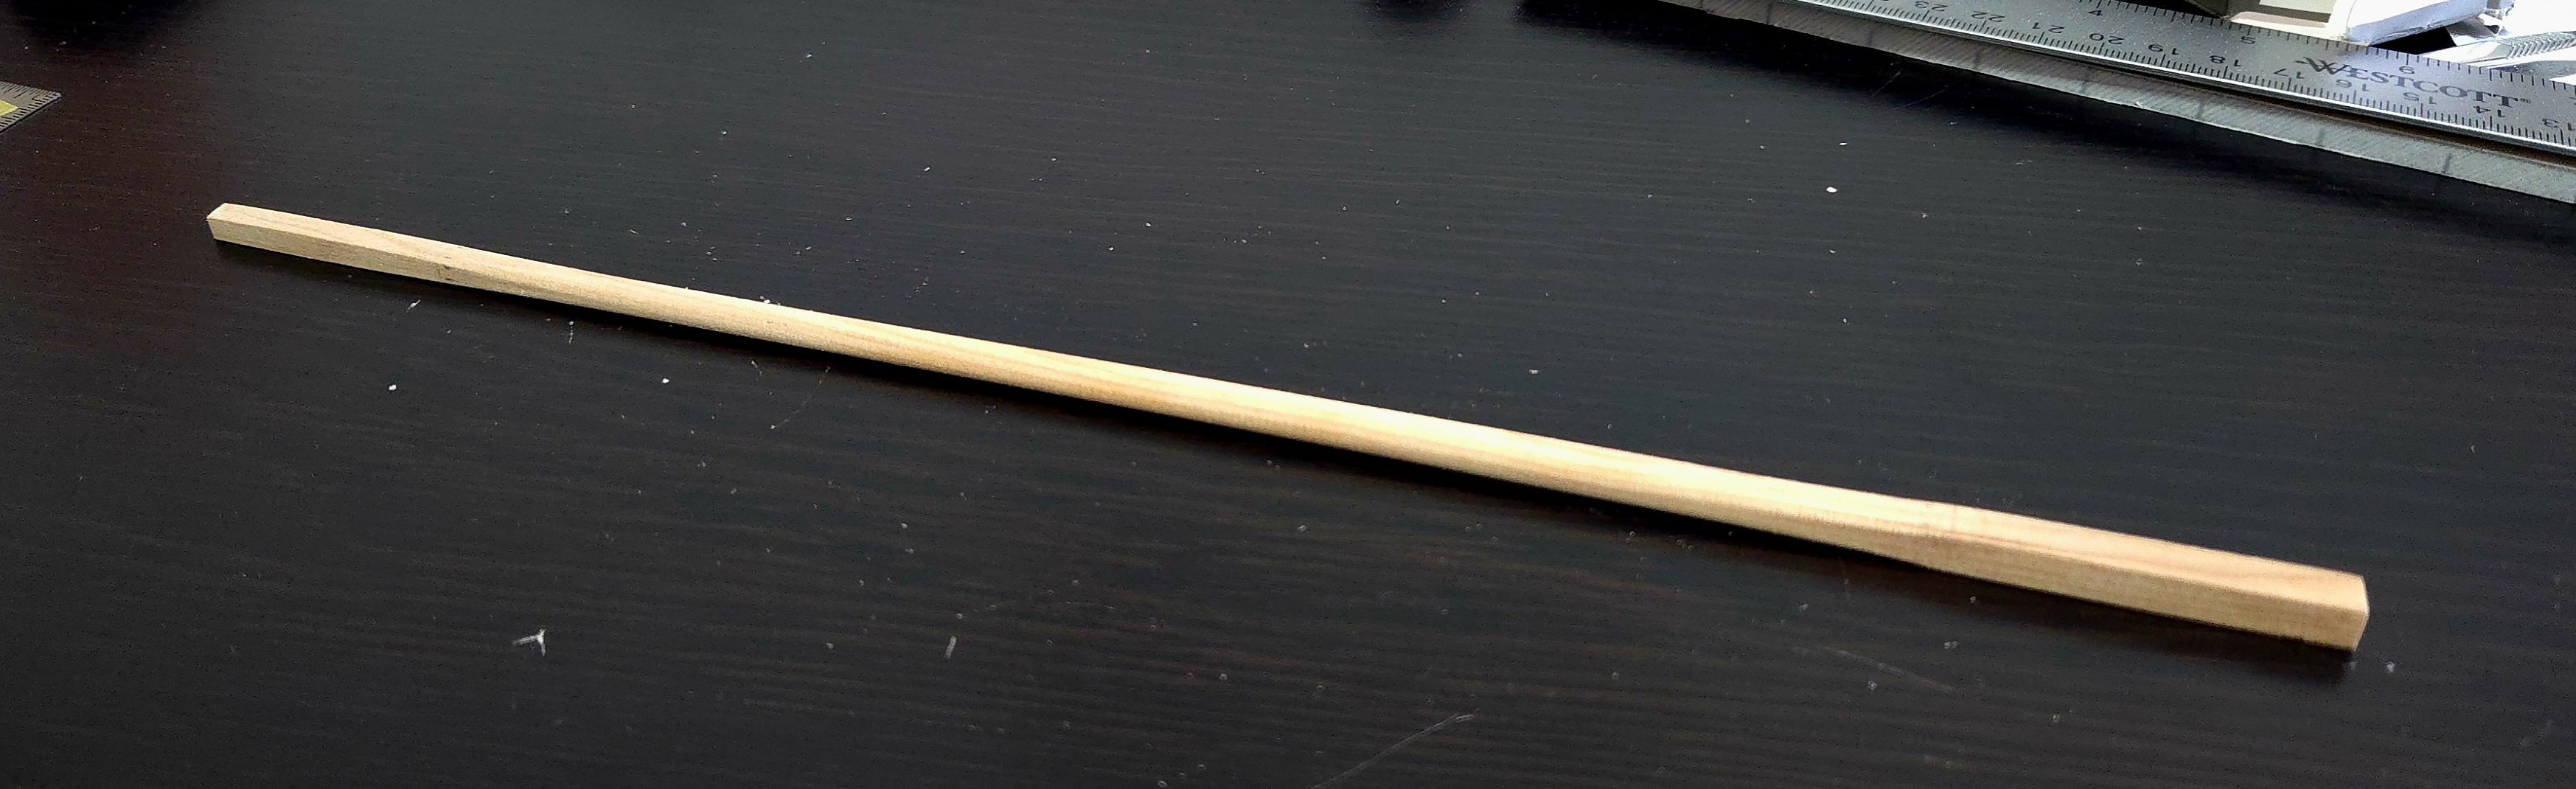
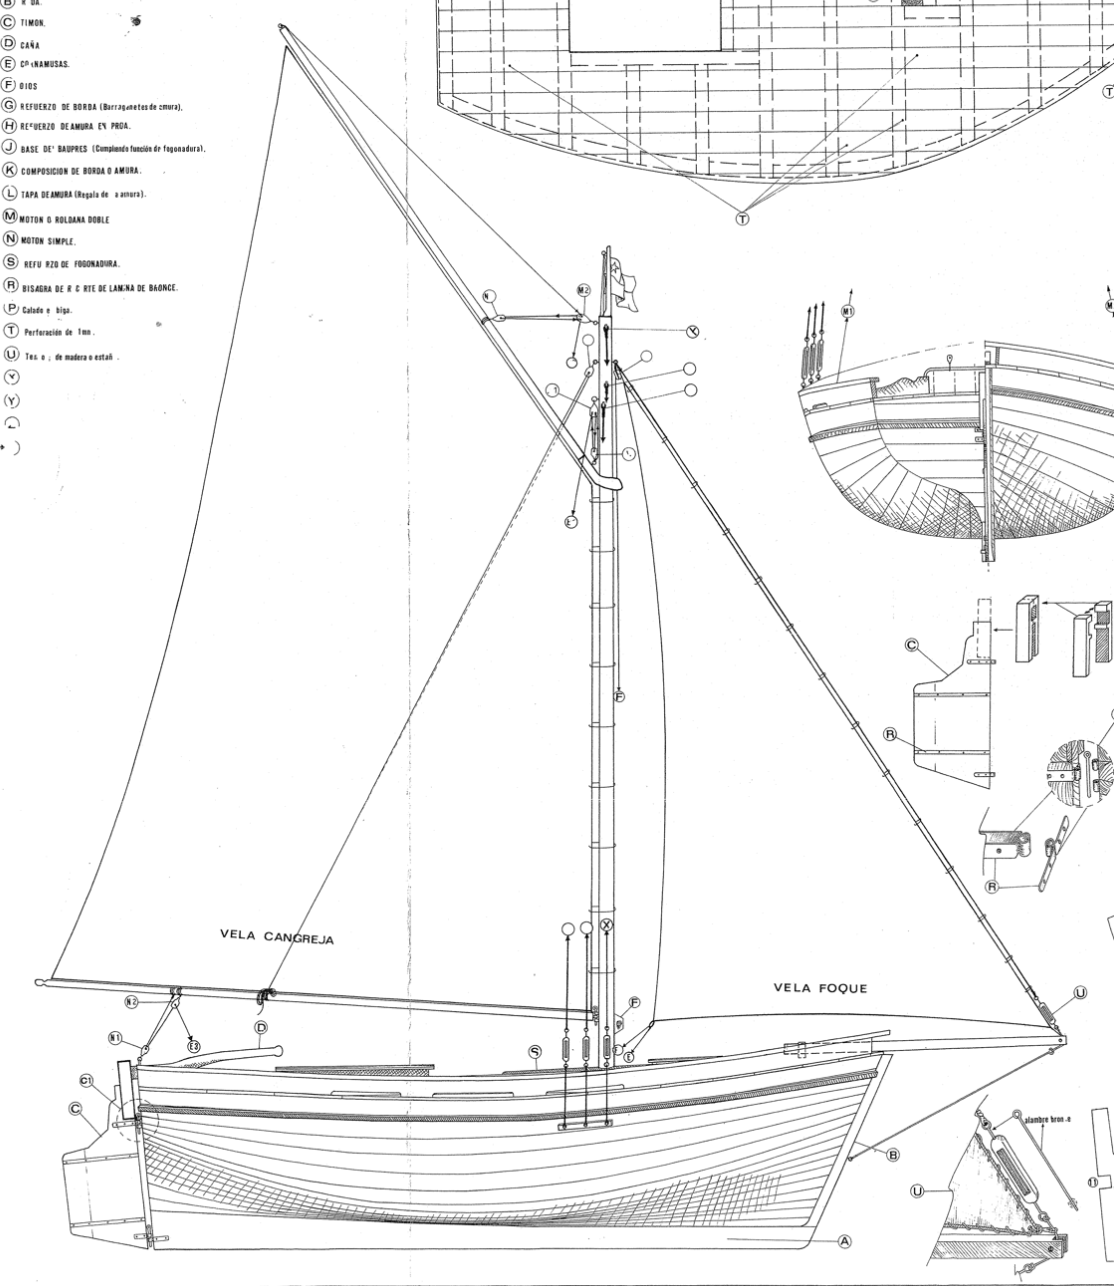
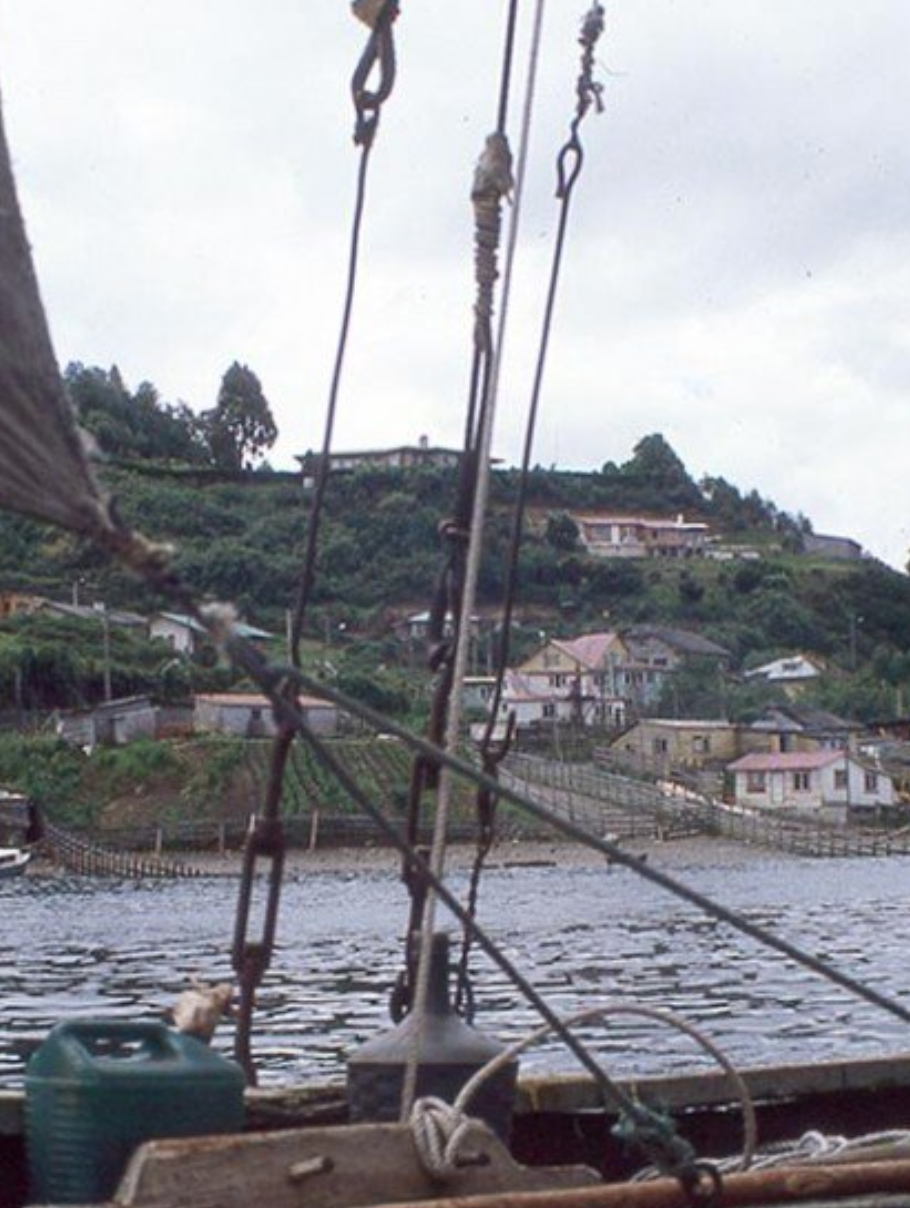
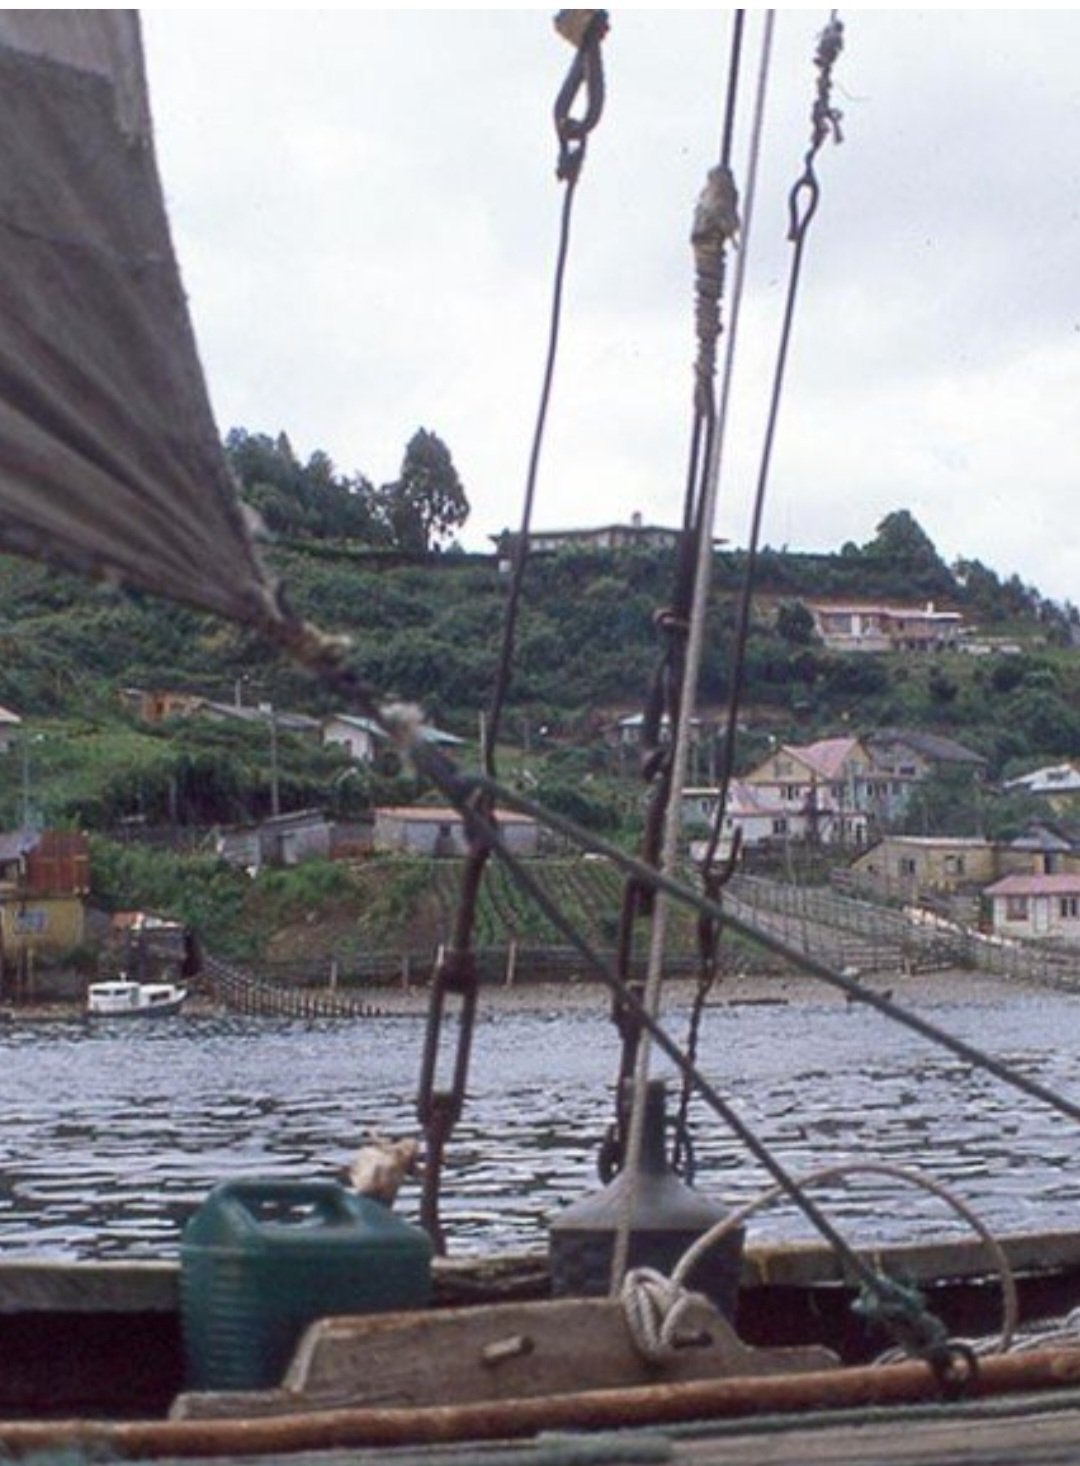
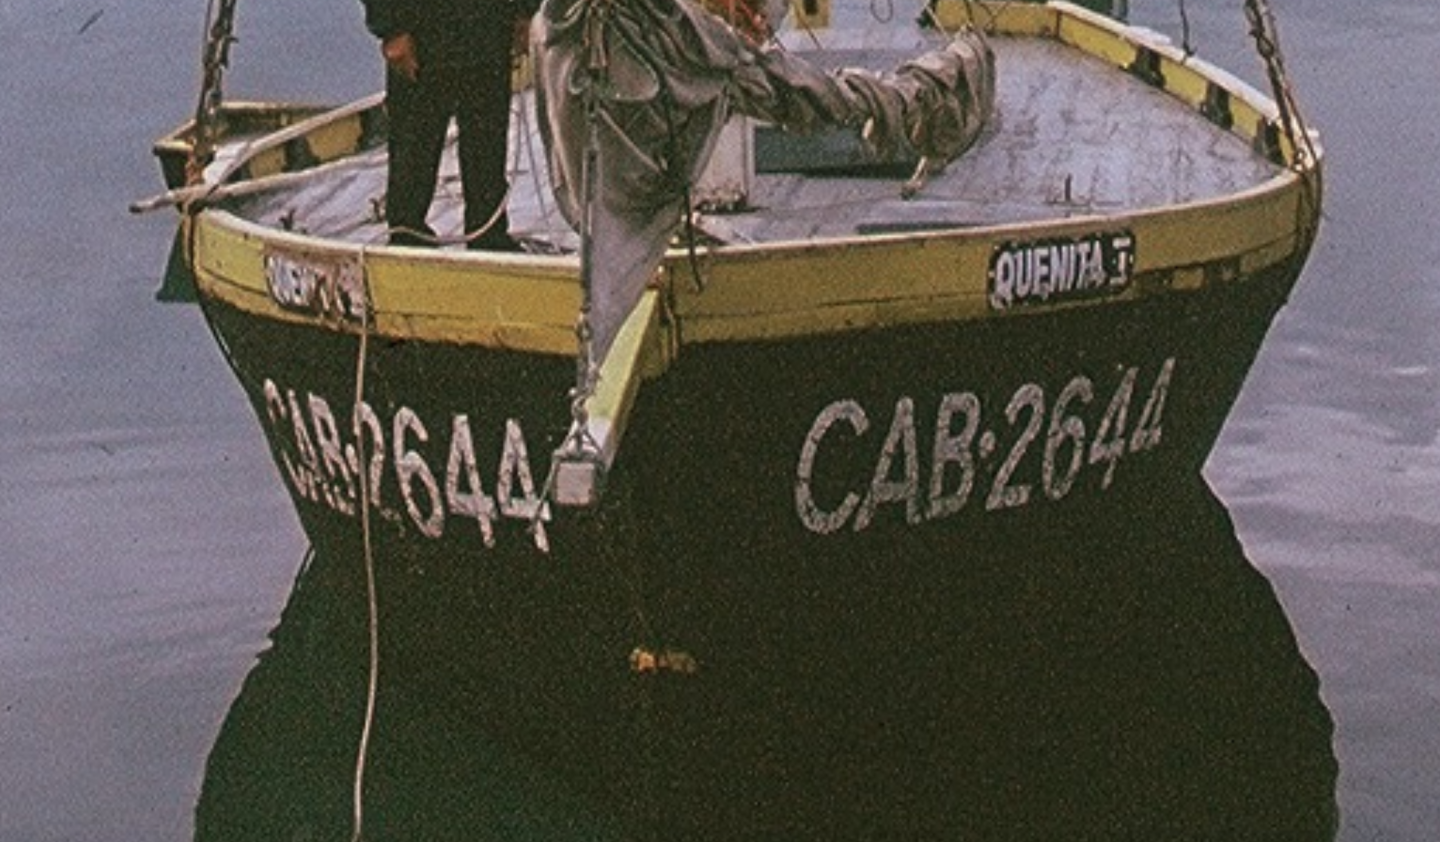
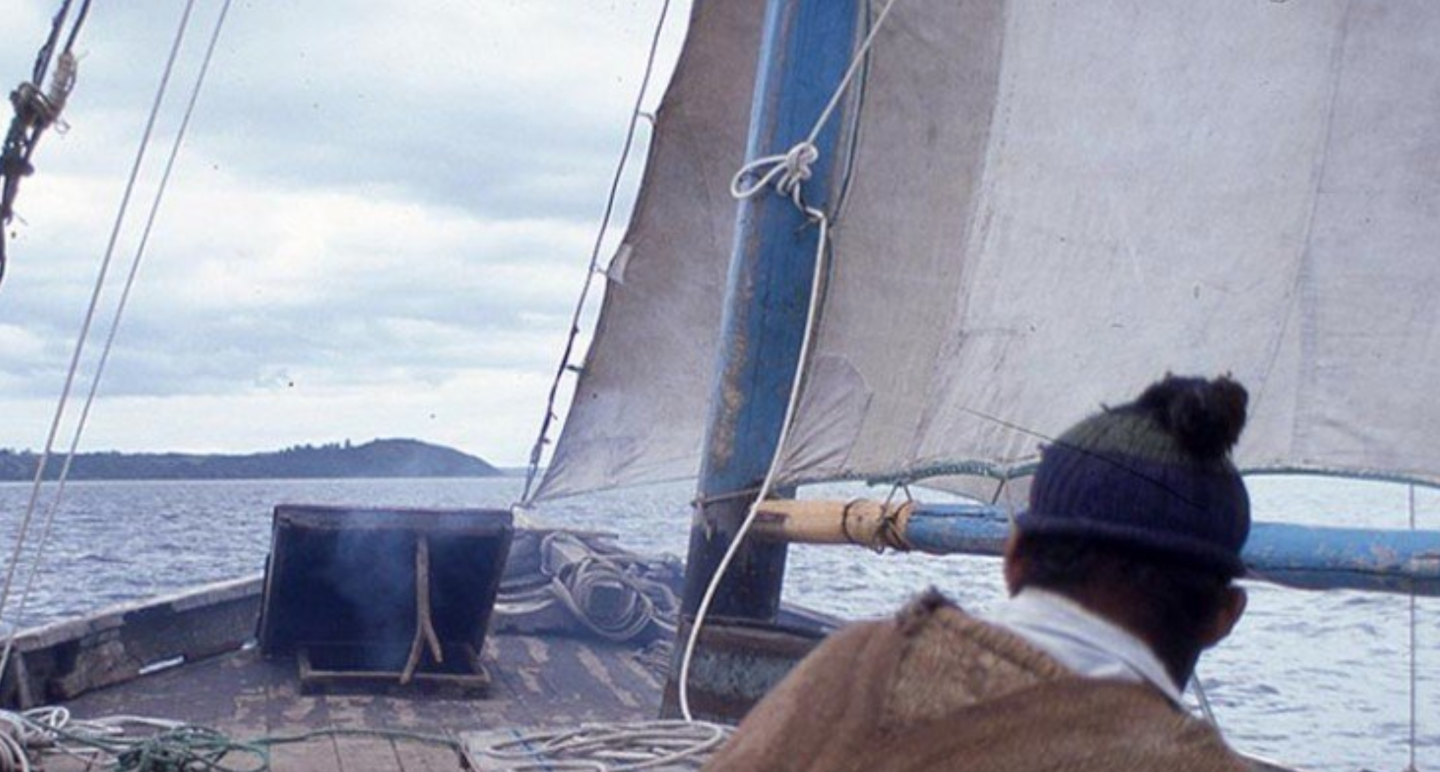
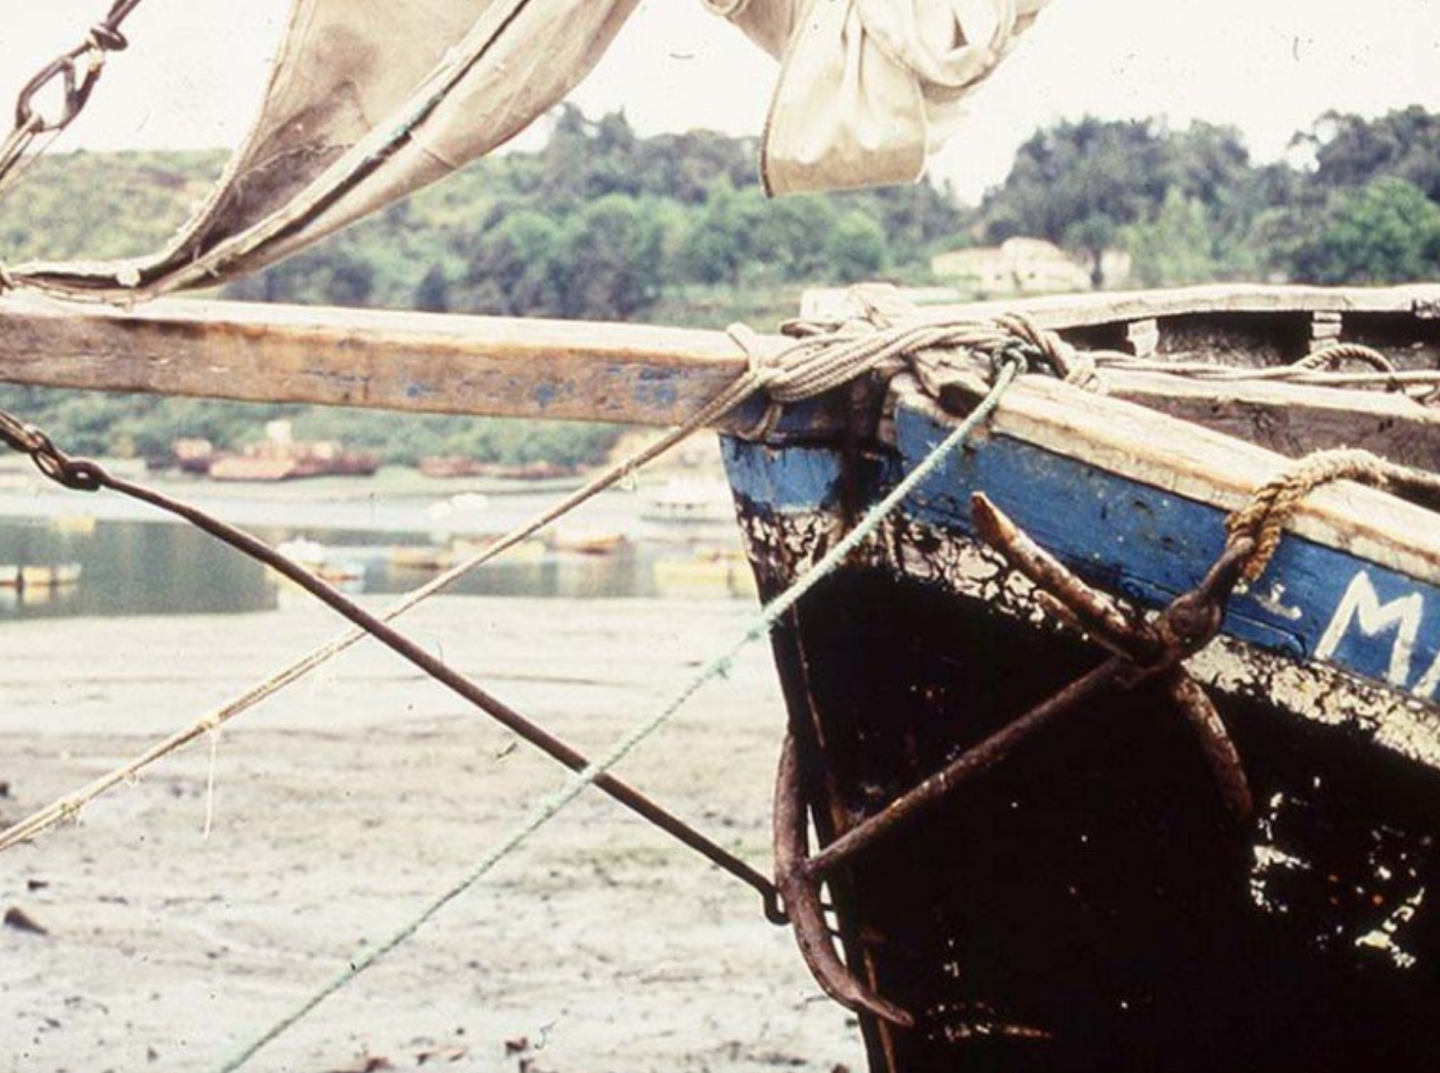
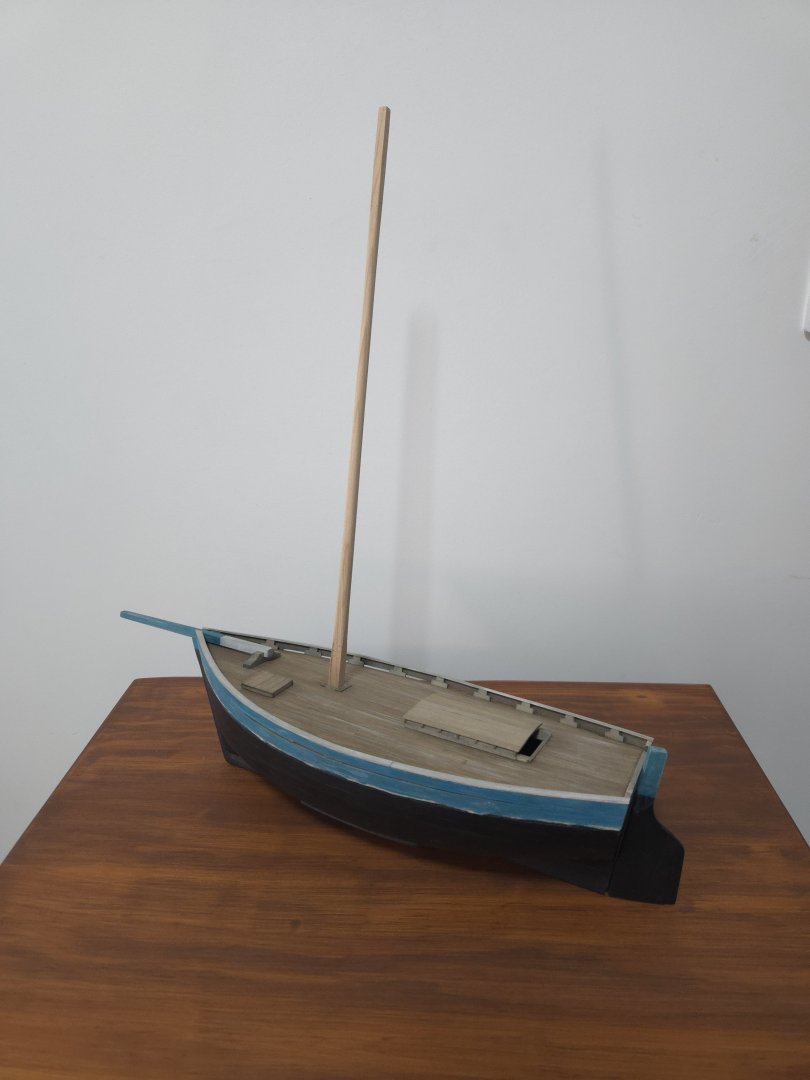
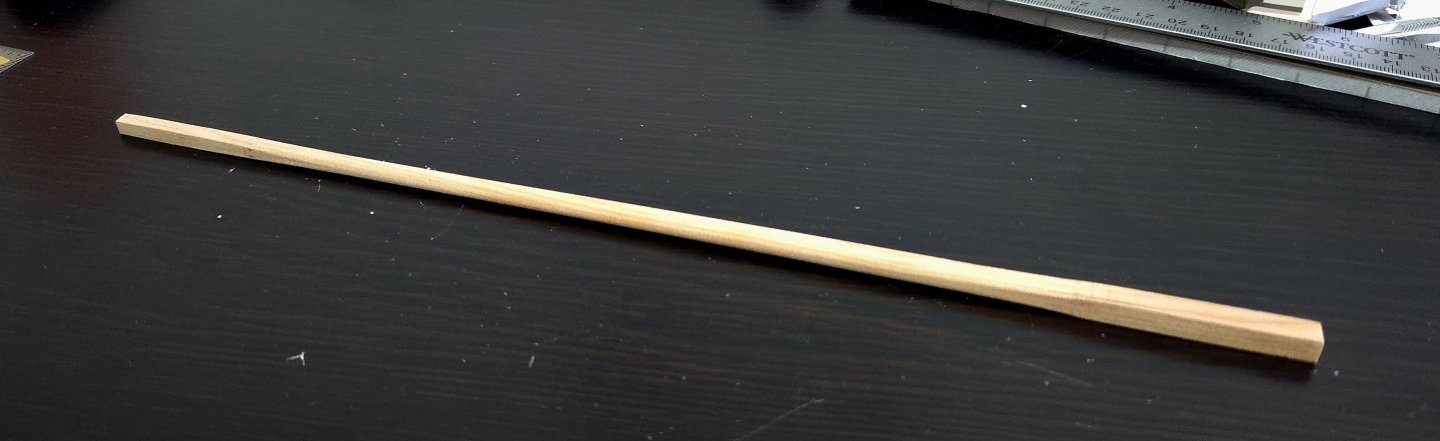
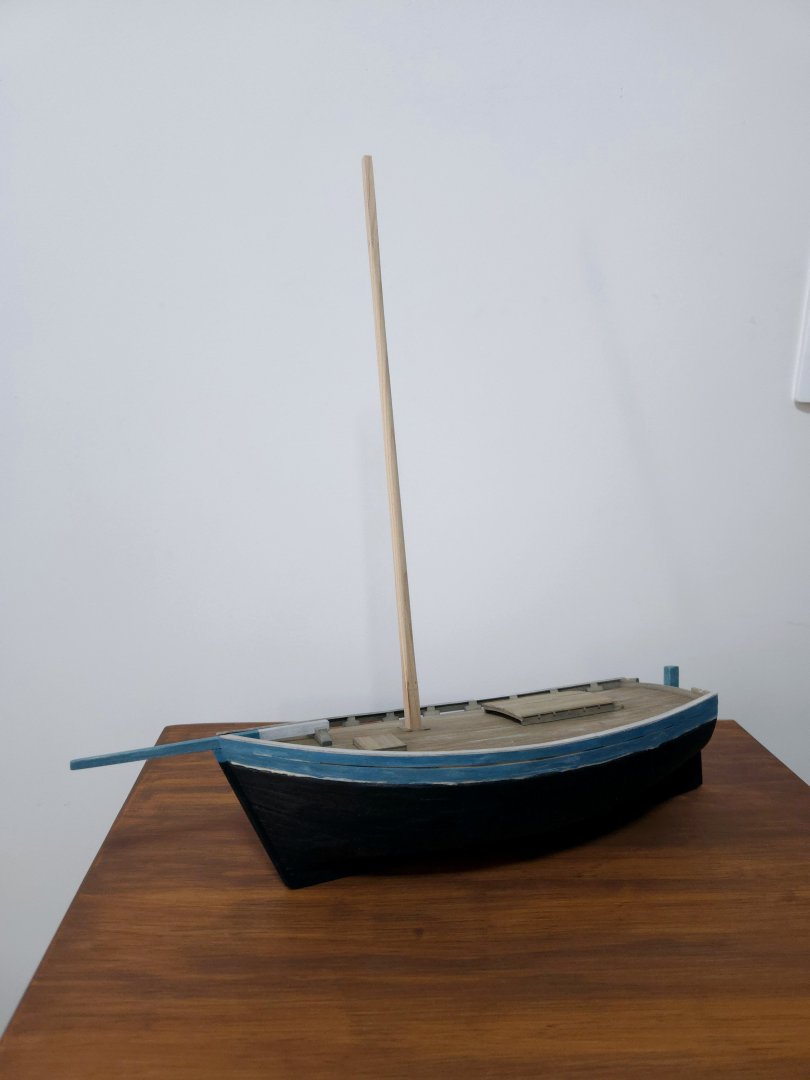
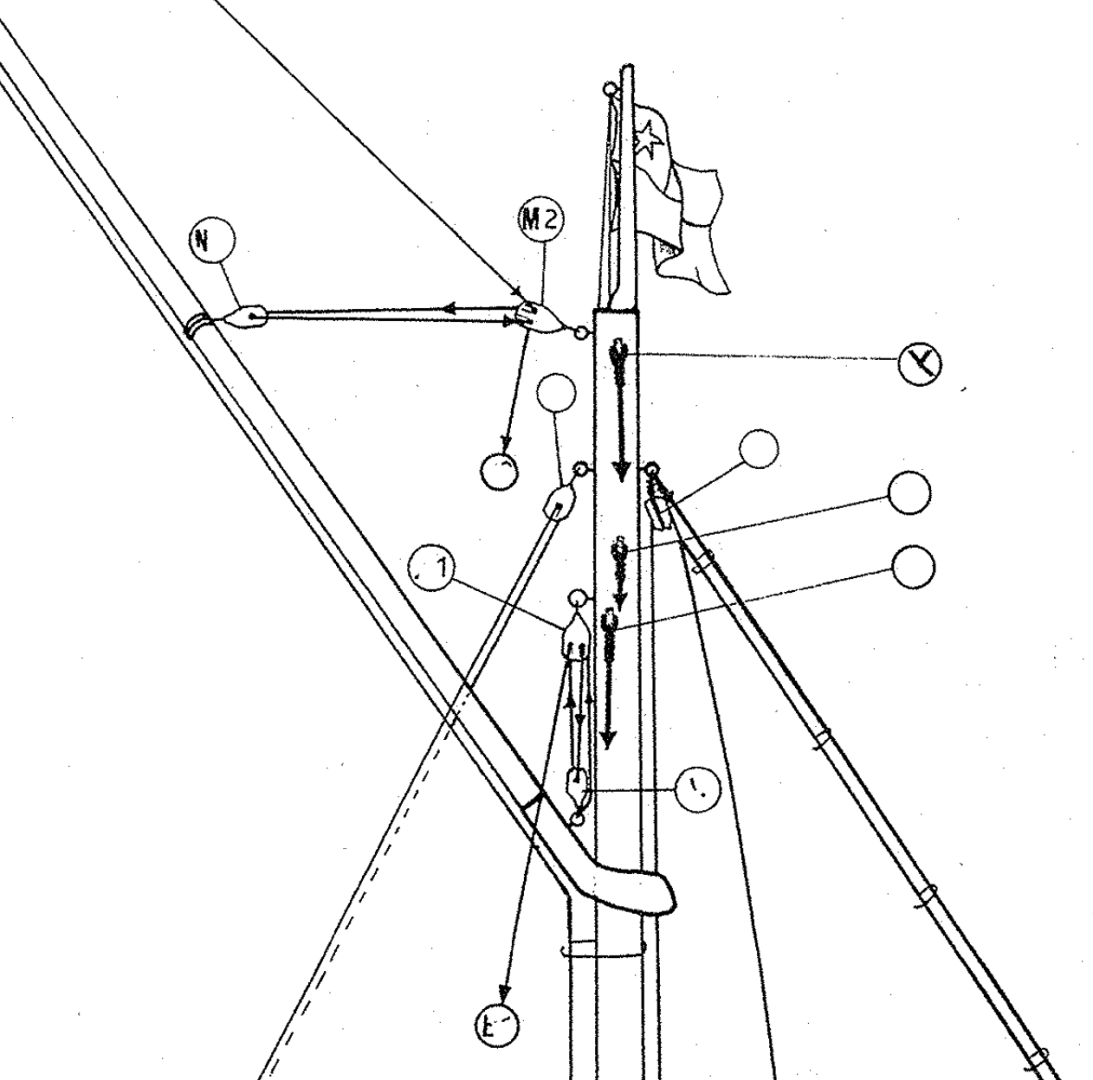
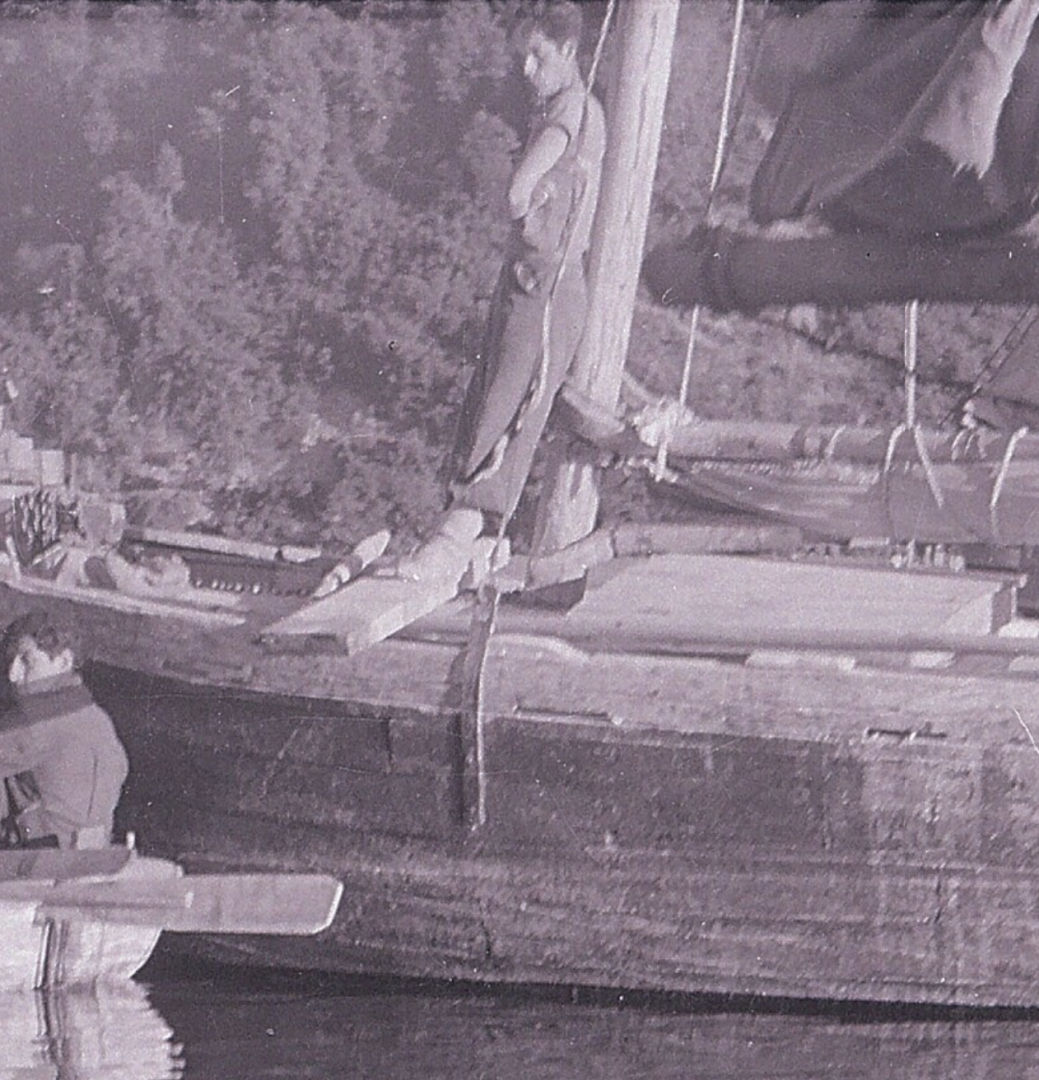
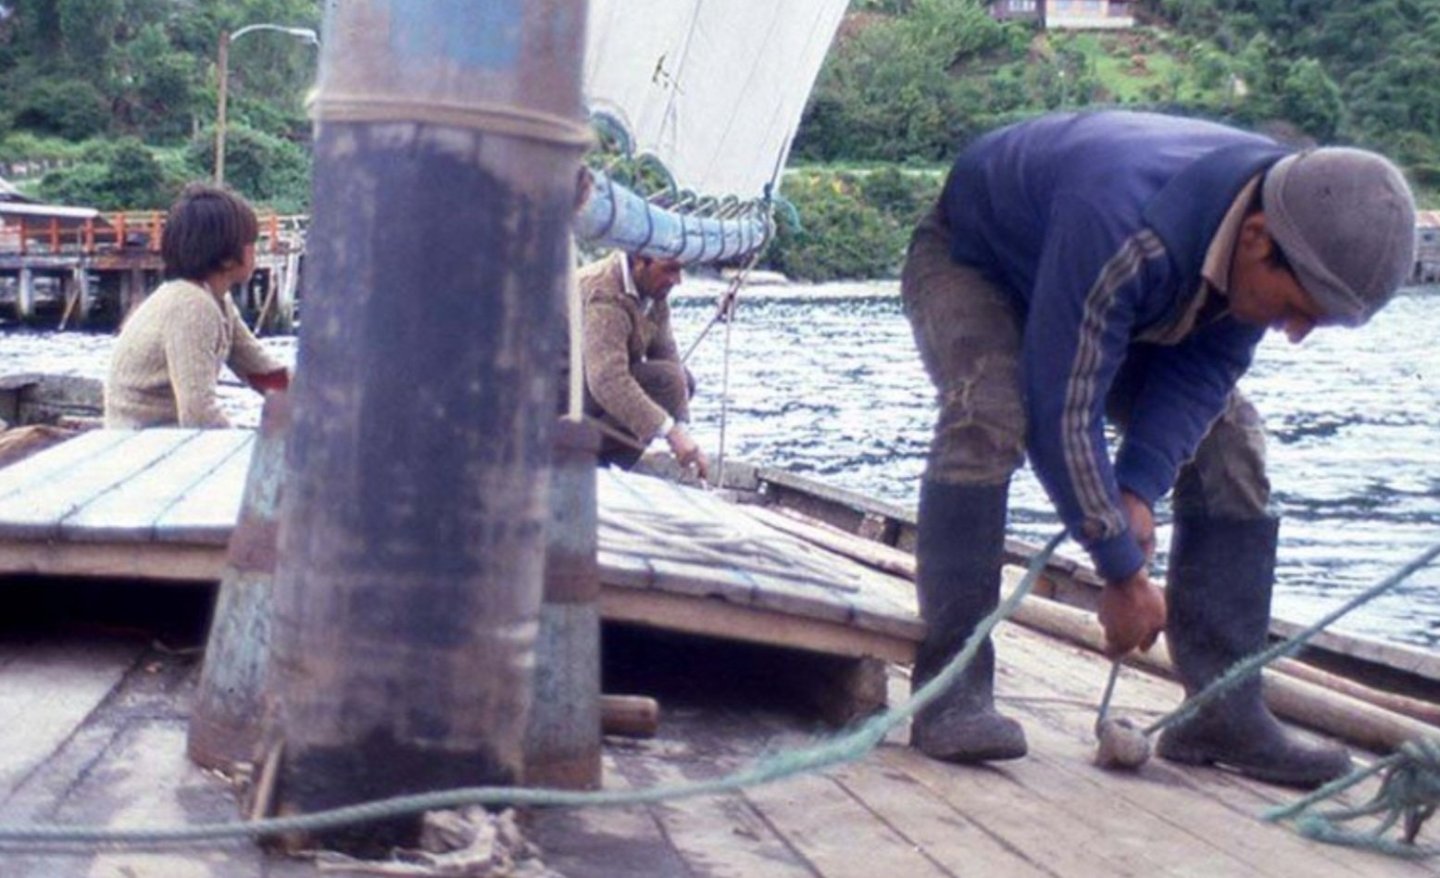
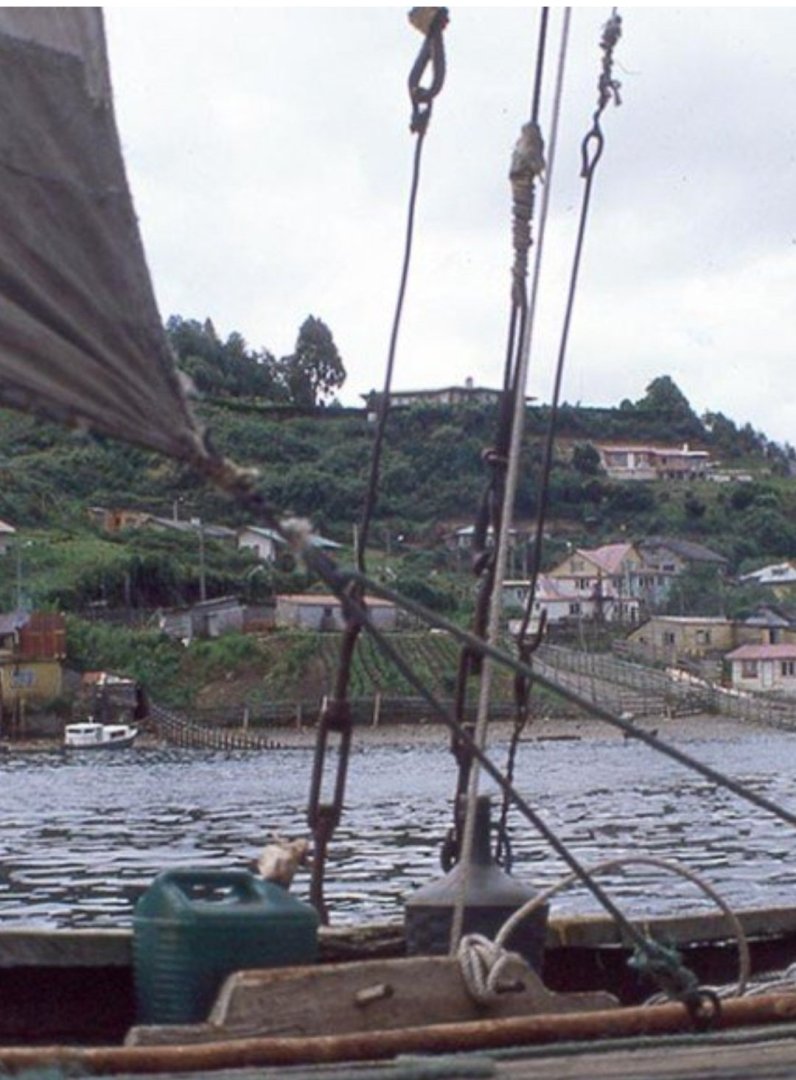
Masting and Rigging, Part 2: Bowsprit and Running Rigging Bowsprit Rigging The plans show the bowsprit rigging in detail. They show a notch with a sheave in it at the tip of the bowsprit. Nestled in it is a bent metal rod with a hook in both ends, connecting below to the bobstay and above to a turnbuckle that, in turn, connects to the forestay. The tack of the jib is attached to this metal rod below the turnbuckle. This does not necessarily seem quite accurate, though. There are some photos that may depict something like this, although they’re not very clear. In the photo below, it’s unclear if the bobstay is culminating in some sort of lashing around the bowsprit, or if it’s entering some sort of notch or sheave (although in that case, it’s not clear what the lashing would be for). It also appears to show a rope bobstay, if the frayed knot on the stem is anything to go by. Source: https://www.flickr.com/photos/luchinmardones/5202830330/in/photostream/lightbox/ But in most images where details can be made out, there seems to be a sort of bracket around the tip of the bowsprit with eyebolts on top and bottom, and no notch/sheave. Here I think we can see such an arrangement on the Quenita, which does have a turnbuckle to connect to the forestay. The tack of the jib also seems to be tied around the bowsprit. I should note that there’s a possibility that this is not in fact a metal bracket but just a rope lashing, but that seems like it would be a much weaker arrangement: Source: http://lanchaschilotas.com/wp-content/uploads/2011/03/9863788-R2-E004.jpg In other images, it looks more like they just looped the forestay directly to a loop of wire coming off the bracket, assuming it is a bracket and not a lashing. (Incidentally, I believe that the white rope belayed around one of the mast hoops is for the vang, which does not seem to have been a feature of every lancha.) Source: https://www.carlosvairo.com/galeria-puerto-montt-lanchas-chilotas This image, also by Vairo, doesn’t quite show the bracket, but does show the loop in the forestay around a sort of bullseye (or thimble?) with what may be a rope lashing or some sort of wire used to join the forestay. It also shows (mostly—it’s blocked by the anchor) how the bobstay could be attached to the stem, not by an eyebolt as shown on the plans, but with what looks like more of a wire loop running into the sides of the stem. Incidentally, the bobstay here is shown to be a metal rod with hooks in the ends rather than a wire or rope. It’s also very clear that there is no running rigging attached to the tack of the jib. Source: https://www.carlosvairo.com/galeria-puerto-montt-lanchas-chilotas I think that I can make a convincing bowsprit bracket out of cardstock, painted and glued with wire loops drilled through it into the bowsprit to affix the forestay and the bobstay. As I've mentioned, it's not wholly clear that the bracket actually was common earlier on, but it seems like a reasonable and realistic option. Running Rigging Finally, I should briefly mention the running rigging. In general, the plans are pretty accurate about this, although they show all blocks attached to the mast with an eyebolt, which is not necessarily correct (although photos are not very clear on what is correct, then). Peak and throat halyards and their associated blocks appear to be accurately shown on the plan. The jib sheet runs through a loop in the clew of the jib, which photos (including one shown above) confirm is correct. The main sheet is lashed to the boom, runs through the block on the traveler, then through the block on the boom, and finally is belayed on deck, as appears not just in the plans (below) but also in a number of photos. The topping lifts are slightly more complicated. The plan shows them as a single line. It’s lashed to the boom ahead of the sheet (just above “D” in the image above), runs up through a block attached to the masthead between the peak and throat halyard, then back down to the other side of the book where it’s lashed again. This is quite different from how topping lifts are shown in John Leather’s The Gaff Rig Handbook, although then again, other parts of the lancha’s rig don’t quite conform to the book either. It’s tricky to find good photos of the topping lift on lanchas, because many photos are of docked/beached lanchas, in which case the halyards were often led down and lashed around the gaff and boom and look quite similar to a topping lift. In any case, photos seem to conform to the plans. In the photo below, for instance, there’s clearly no block or anything affixed to the topping lift at left: Source: https://www.carlosvairo.com/galeria-puerto-montt-lanchas-chilotas Finally, the plans don’t mention vangs. Many photos of lanchas don’t show them, but there are a handful that do. Given that they seem to be rare, I think I will just leave them off my build. Back to the Build To create the mast, I took a ¼-inch square piece of cherry and cut it to the proper length, deciding to go with about 112% of the length (so slightly shorter than the average I worked out). Next, using my mini-plane, I tapered it on all sides. I then measured out where the crosstrees and boom gooseneck would be located. Between these, I marked out a rough 7-10-7 split (erring on the side of not cutting enough) to cut an octagonal cross section. I used a simple jig to hold the mast while cutting this with my plane—the jig came from a version of the Model Shipways Muscongus Bay Lobster Smack kit that I resized to 1:32 scale and made with a library laser cutter as a fun project (the “kit” will be built eventually). After making an octagon, I sanded the center section of the mast smooth and round. The masthead still needs to be finished. From what I can tell from photos, it should be trimmed on all but the back sides, with the flagpole attached to the fore side. Besides the mast, I also added the cap rails and trimmed them to size, and filed out the notches in the aft rail that seem to have been used for sculling oars. The build is coming together!


- 312 replies
-
- 6
-

-
- Chile
- Latin America
- (and 6 more)
-
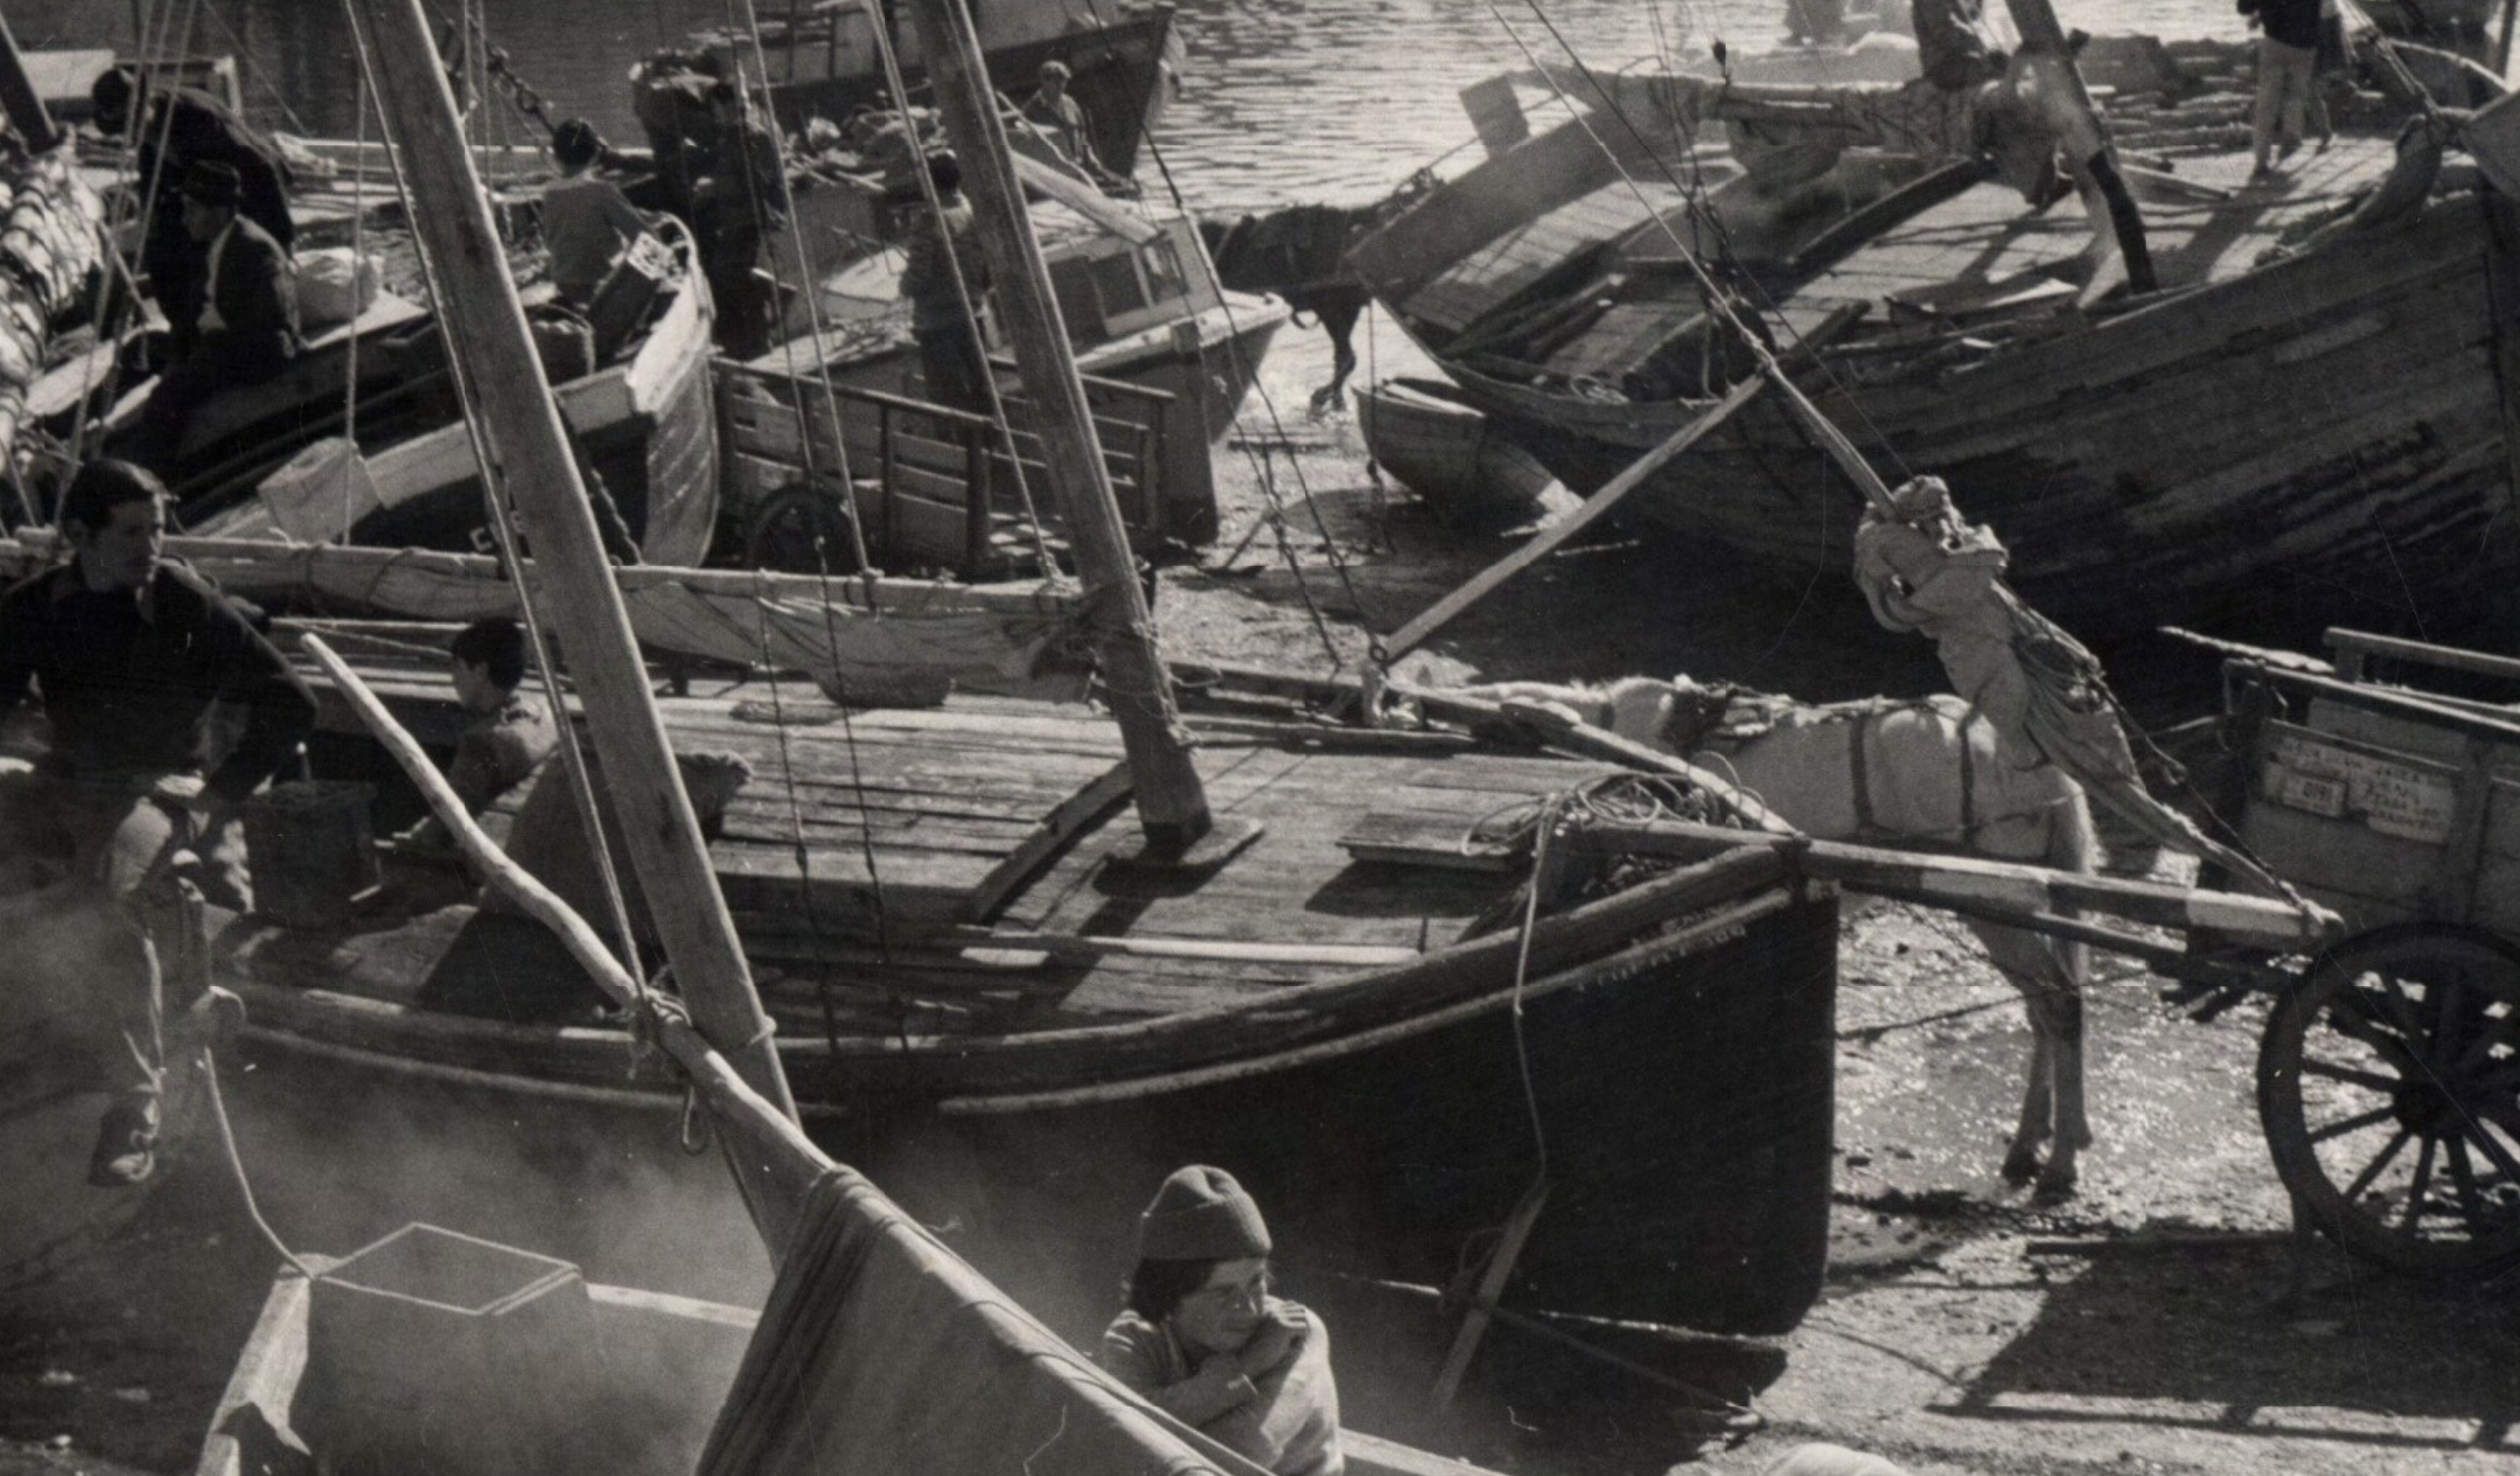
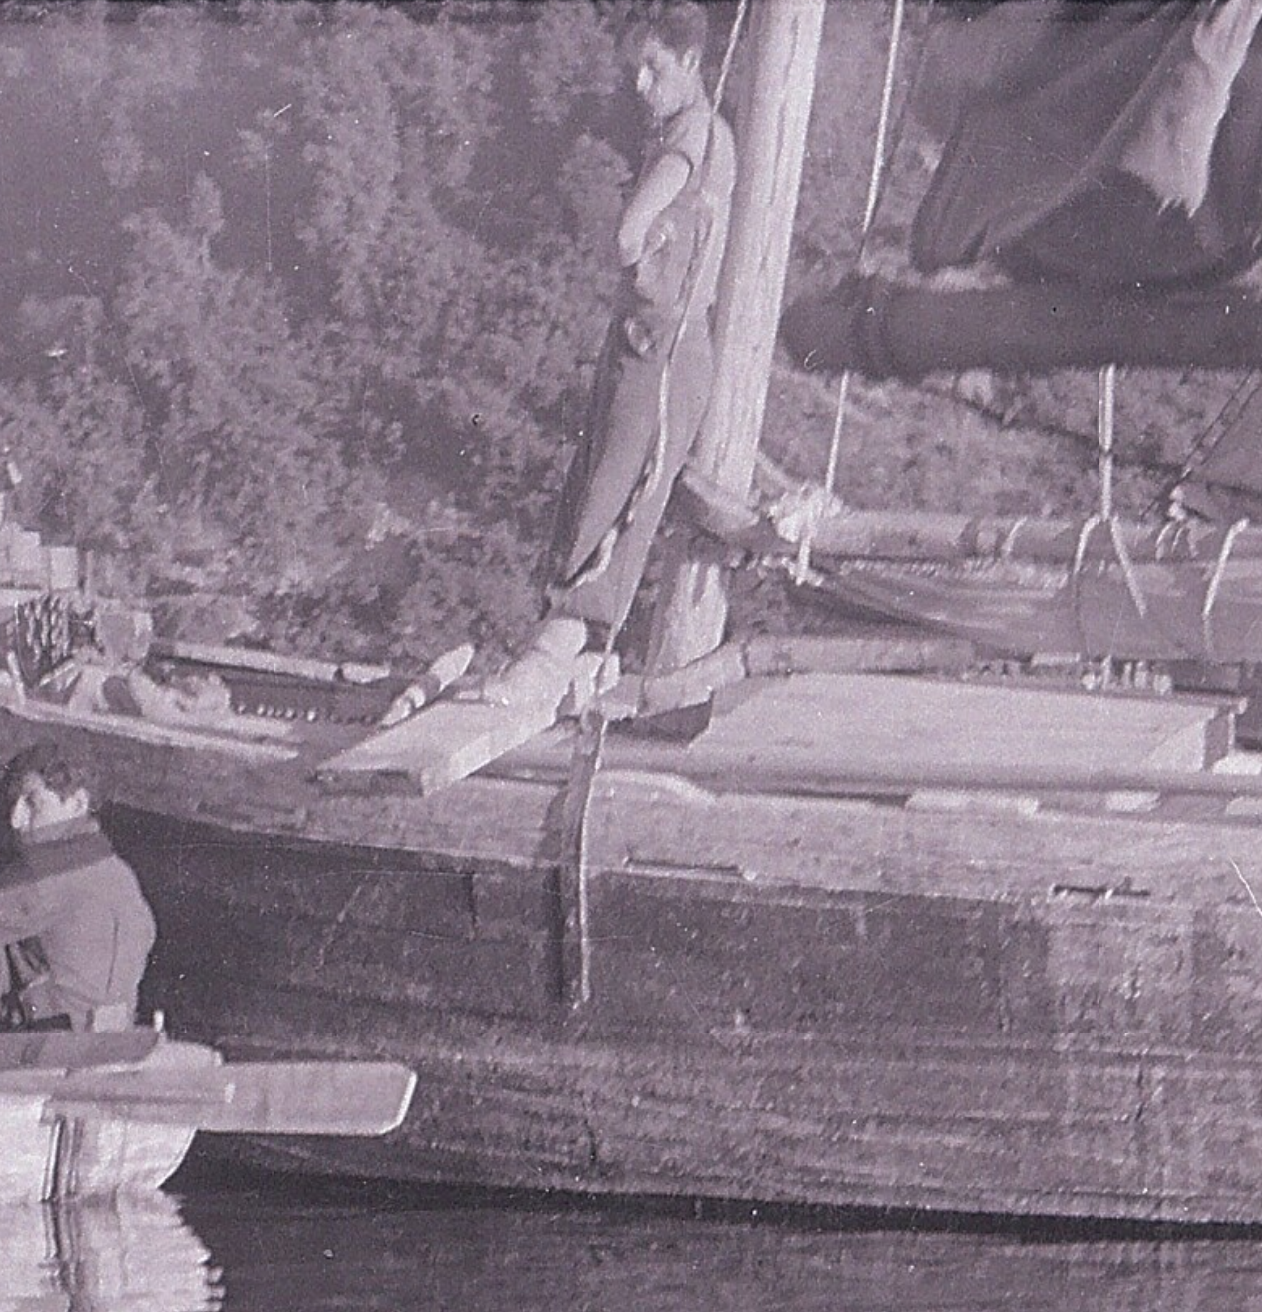
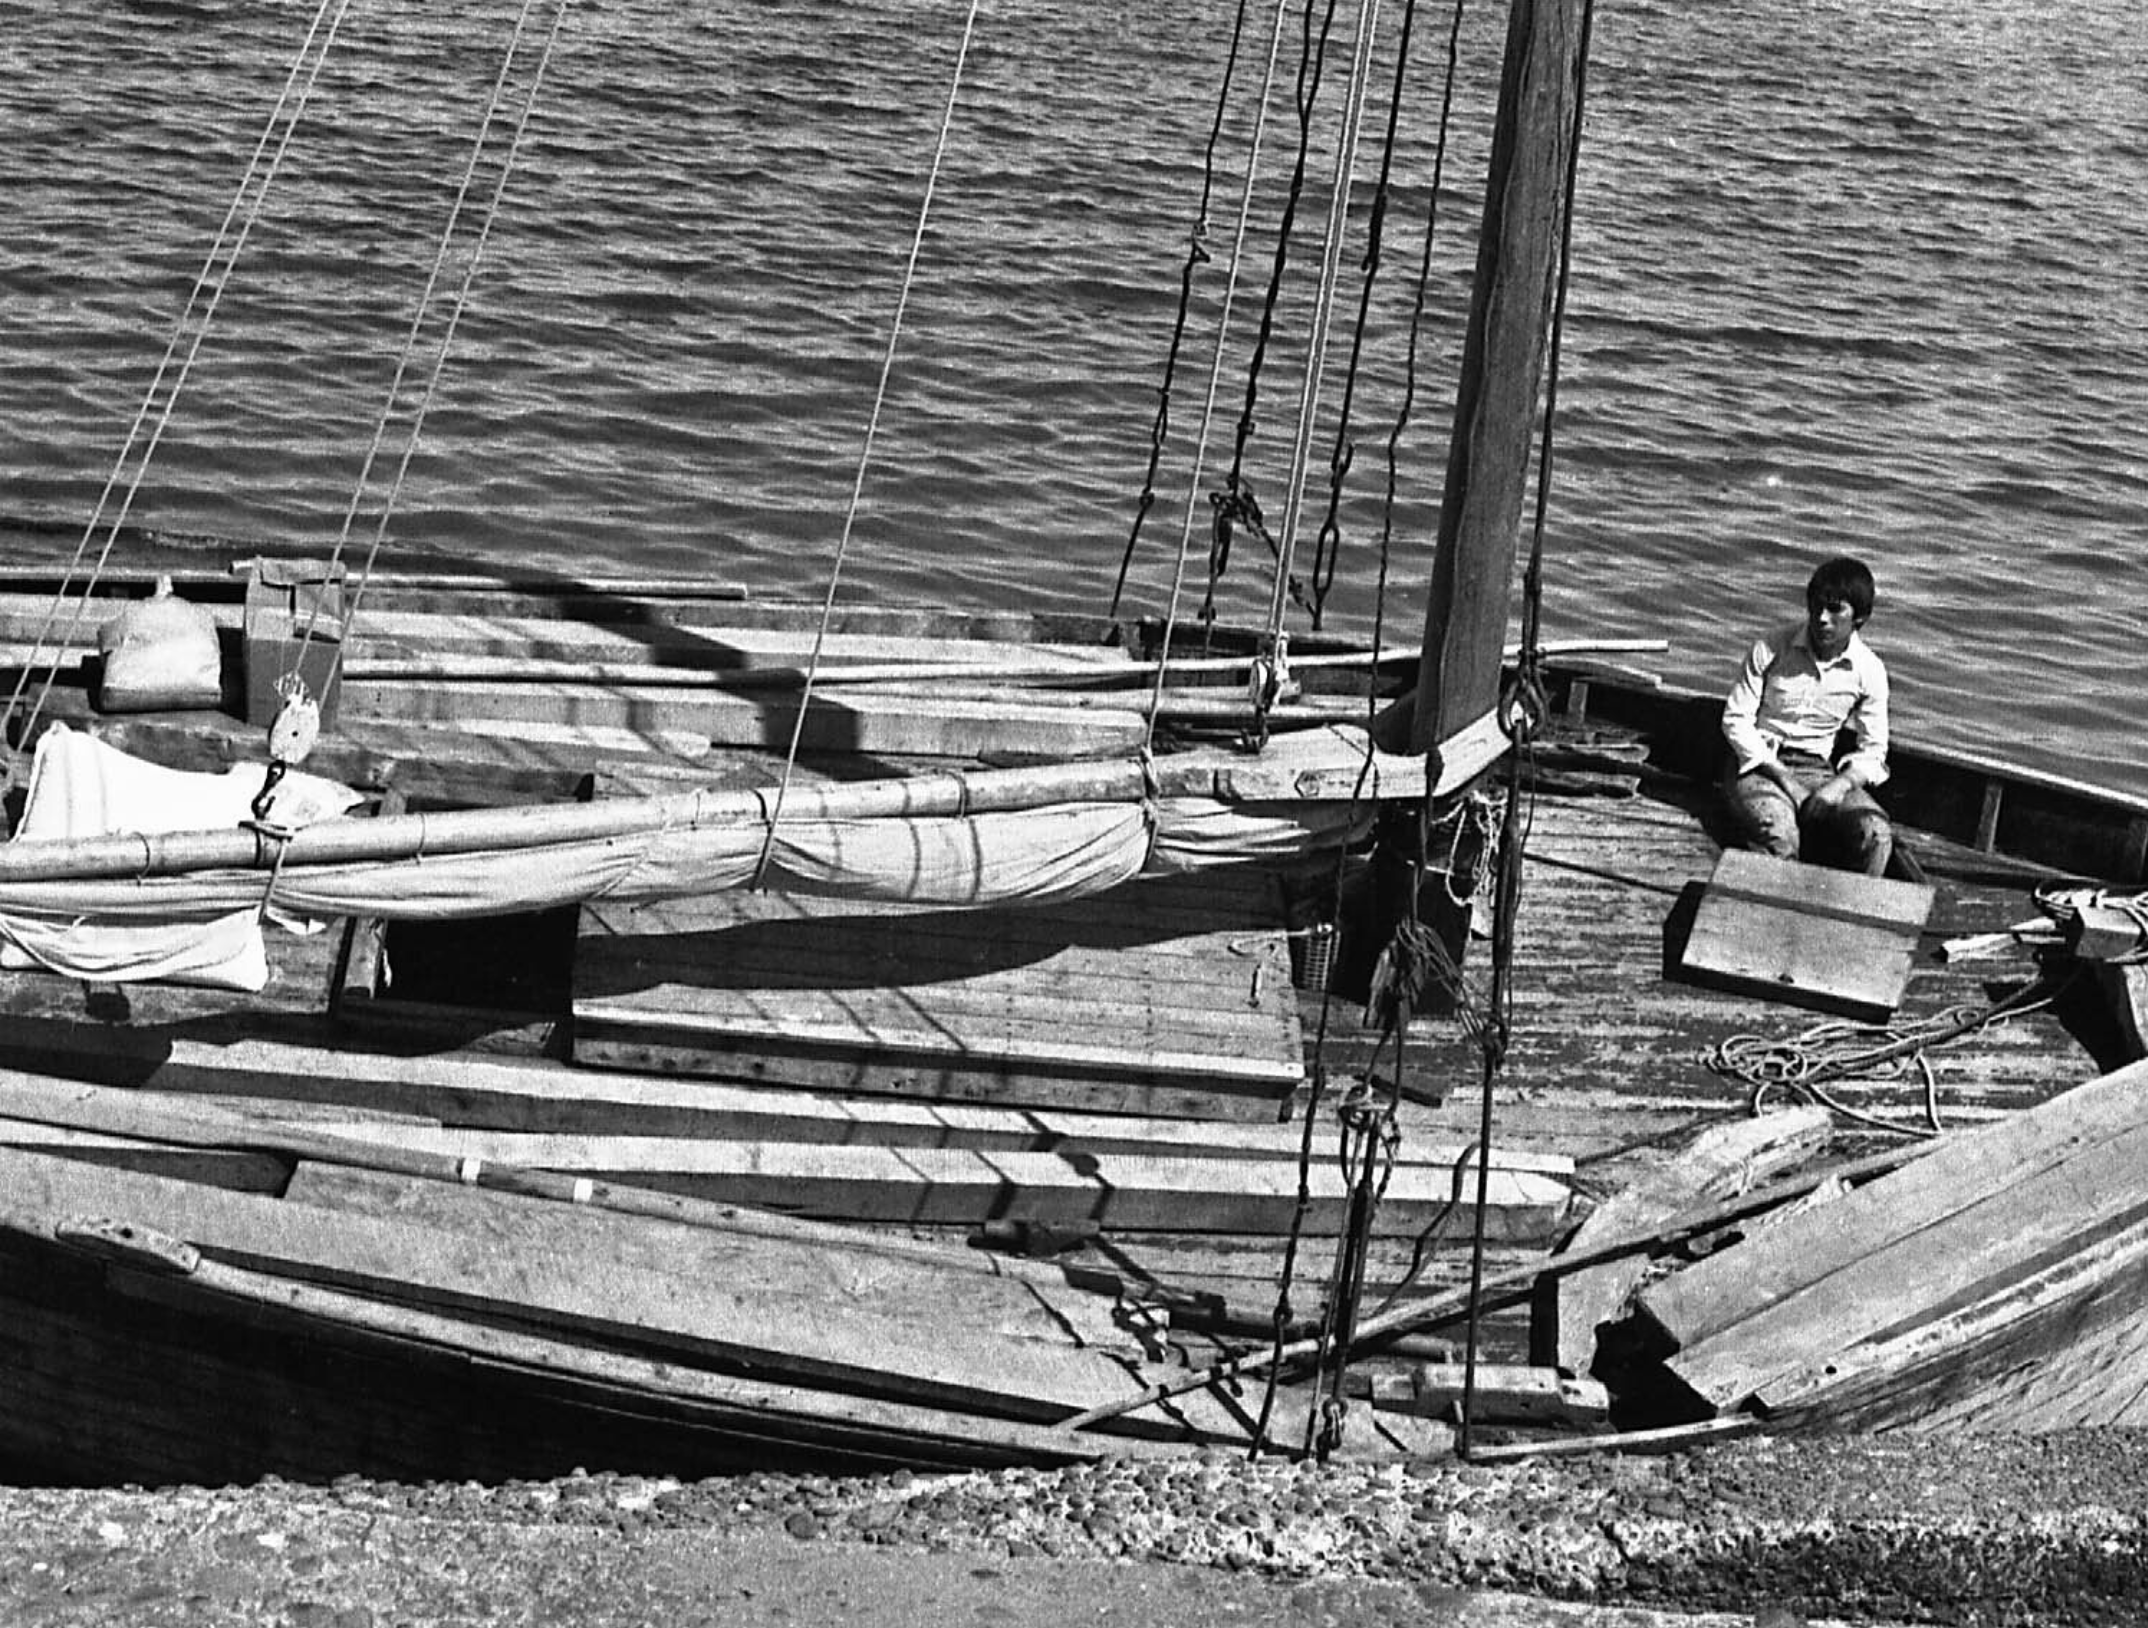
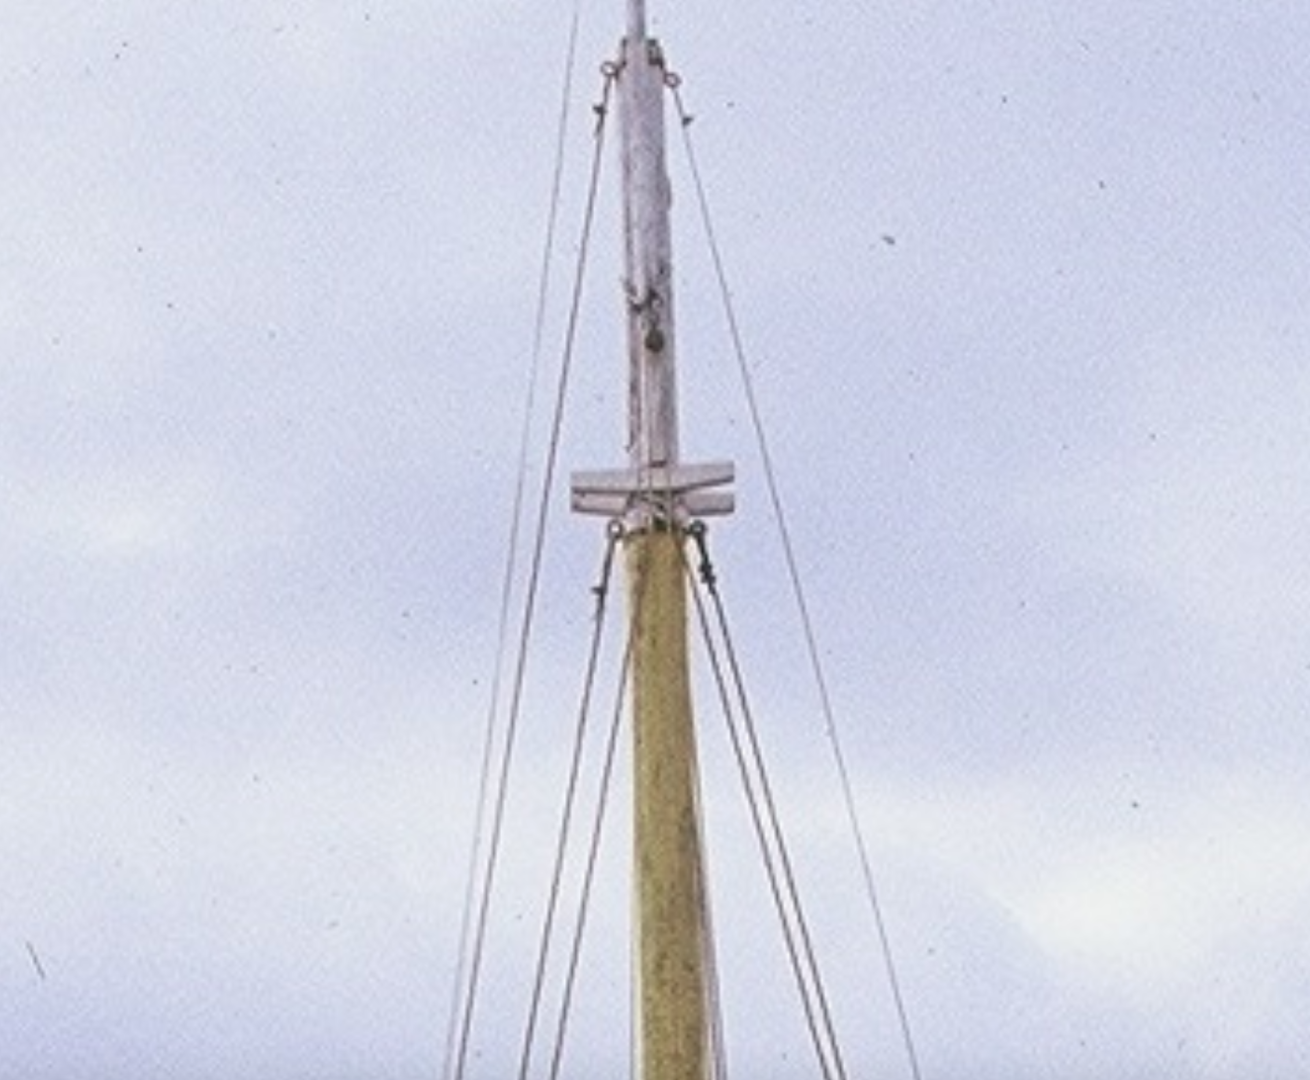
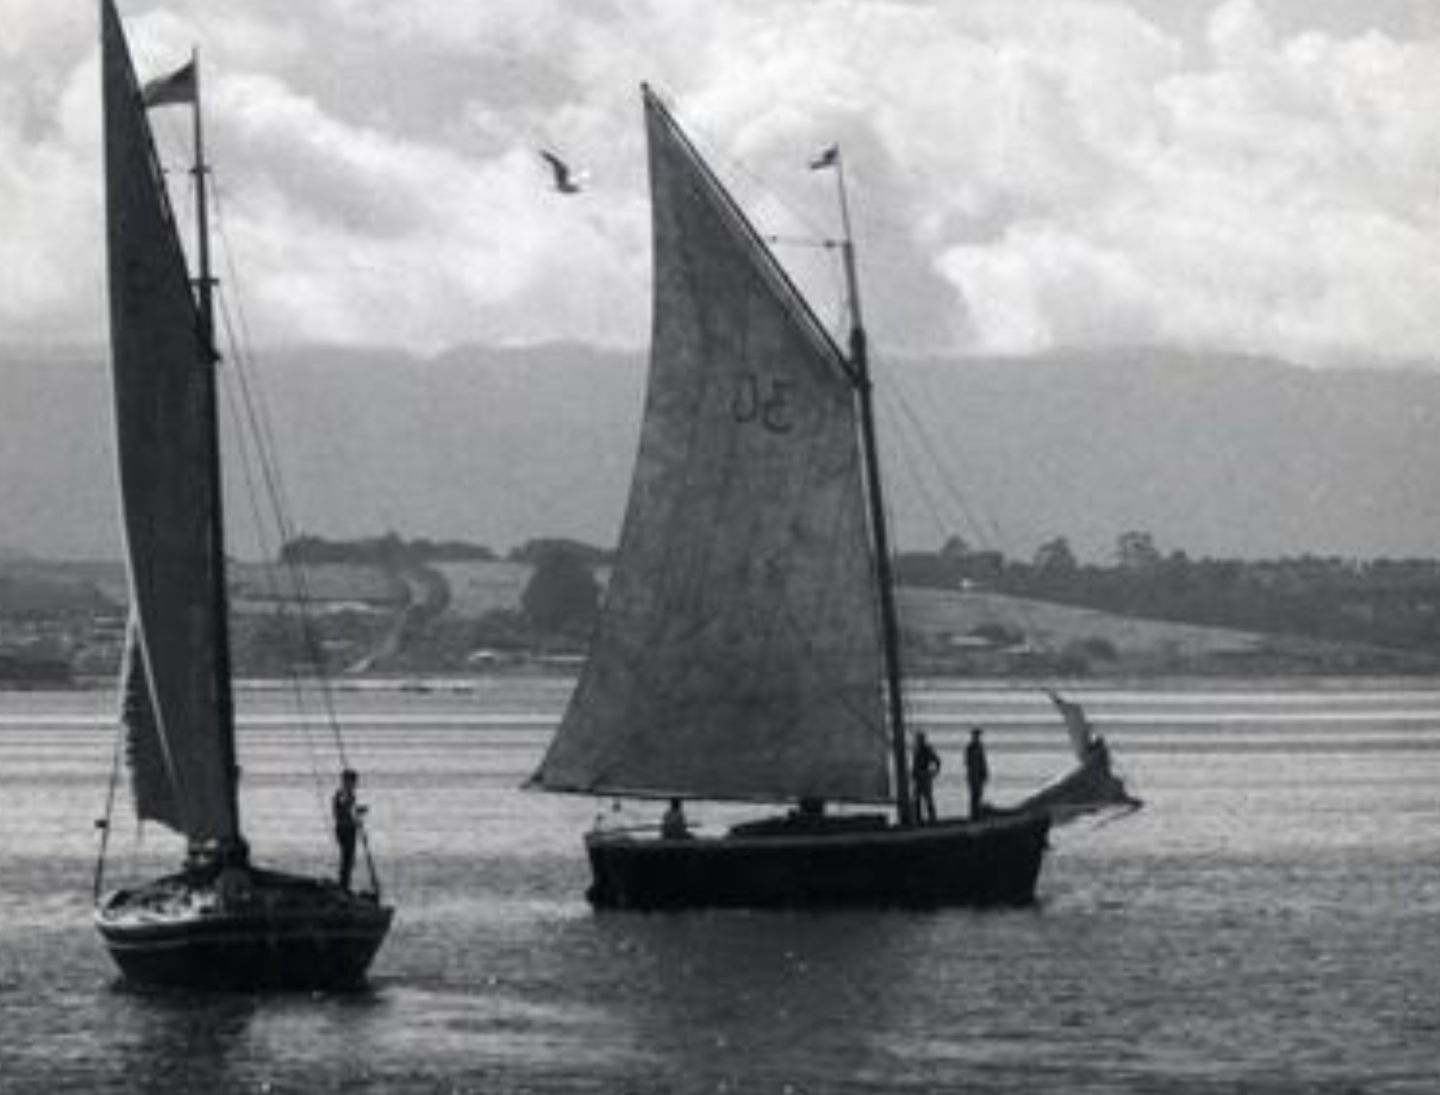
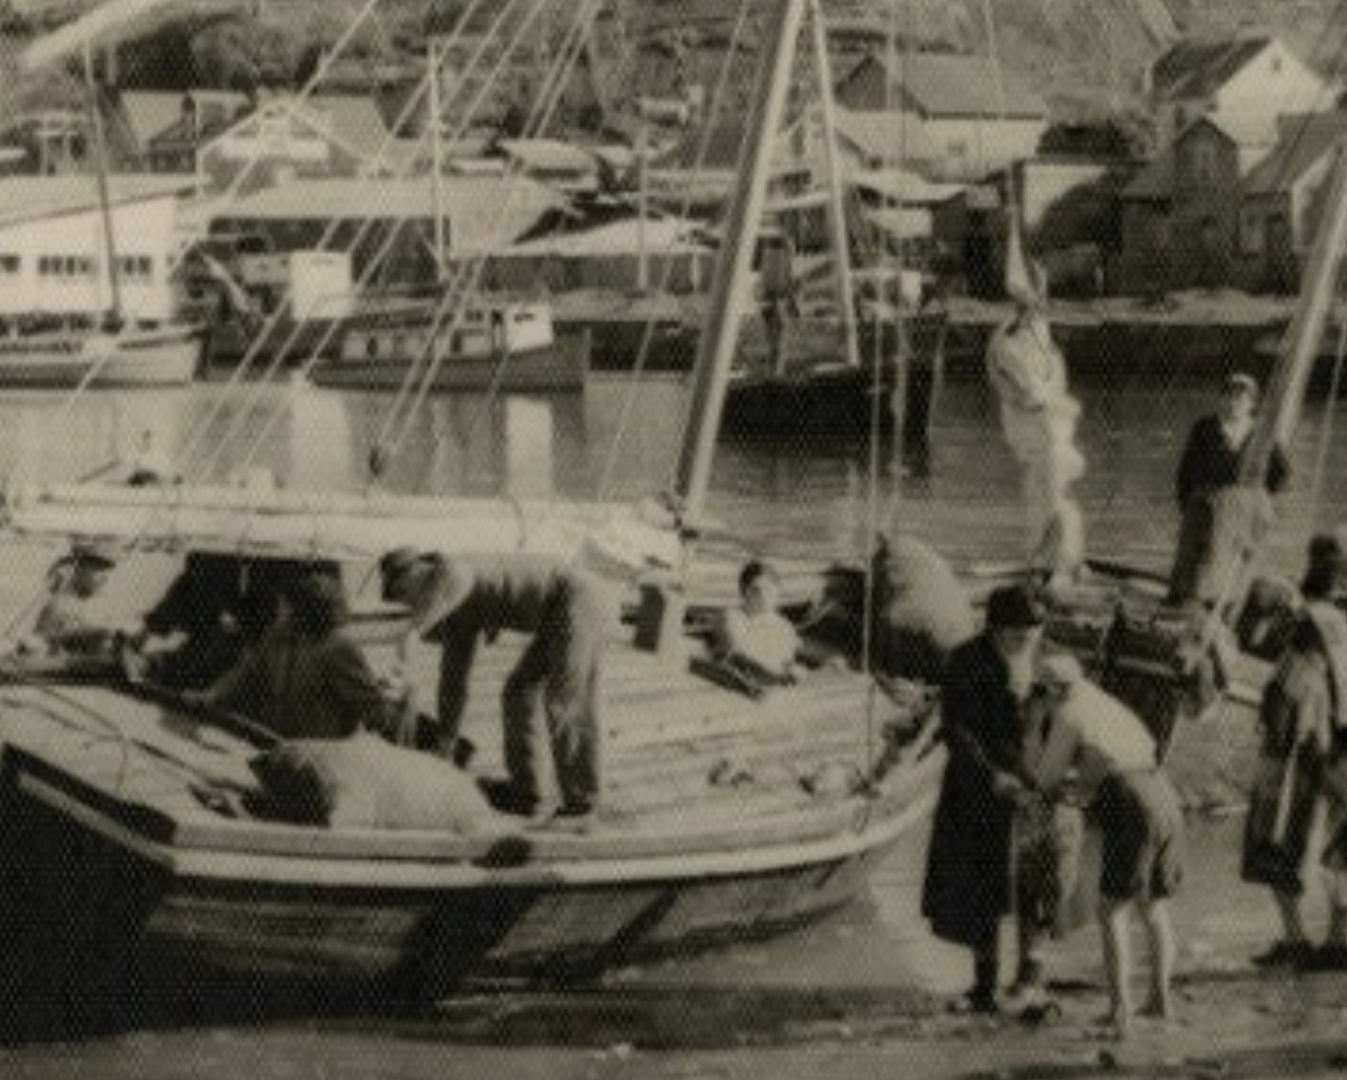
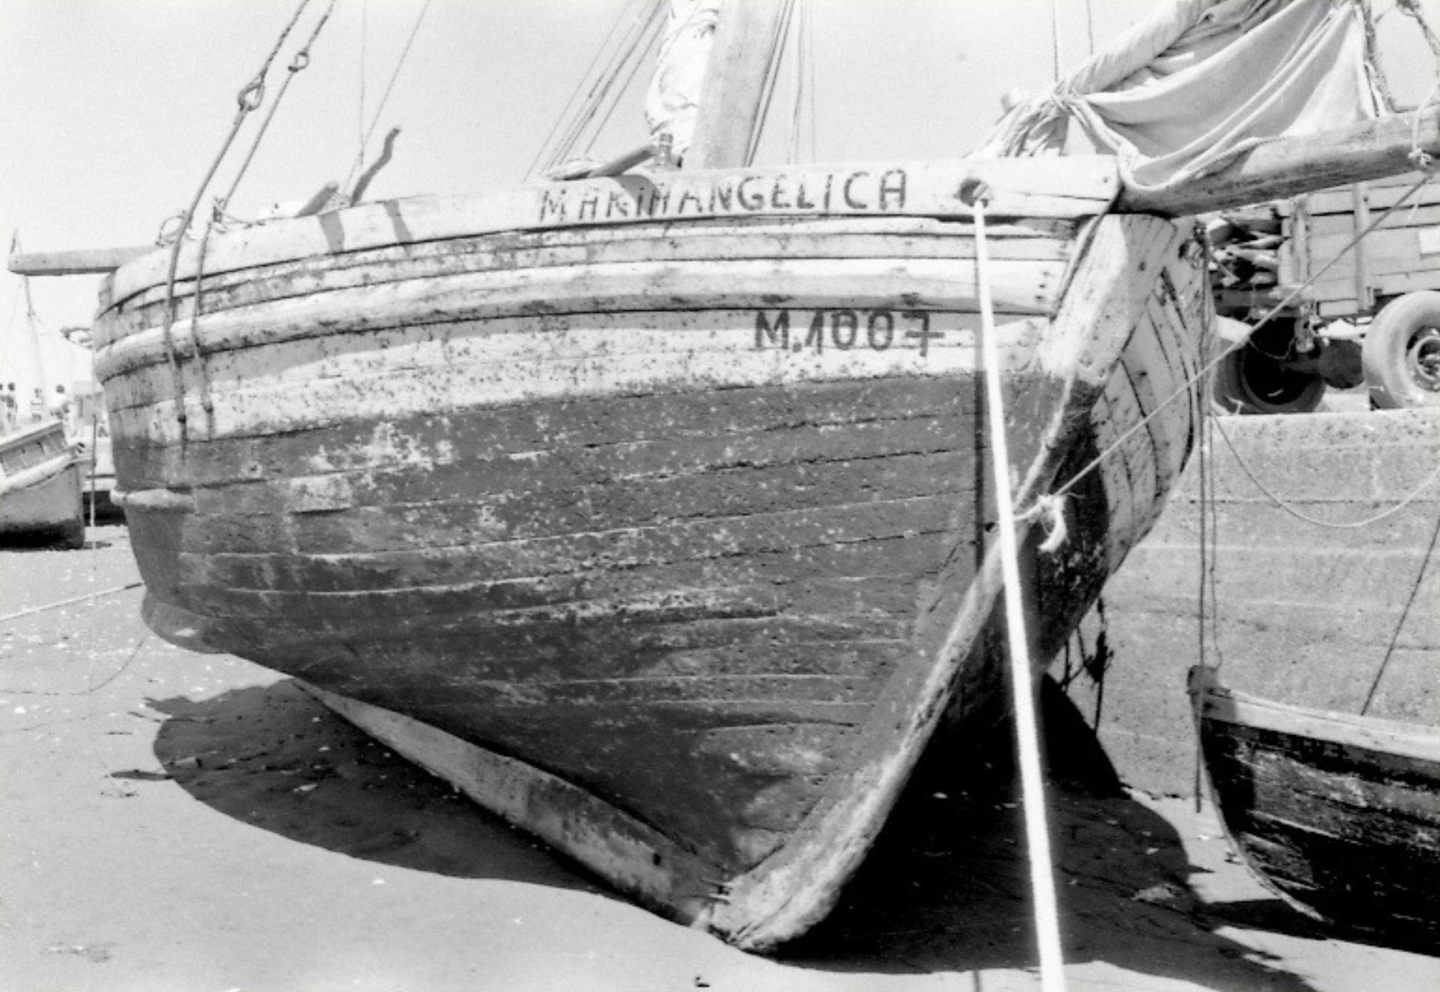
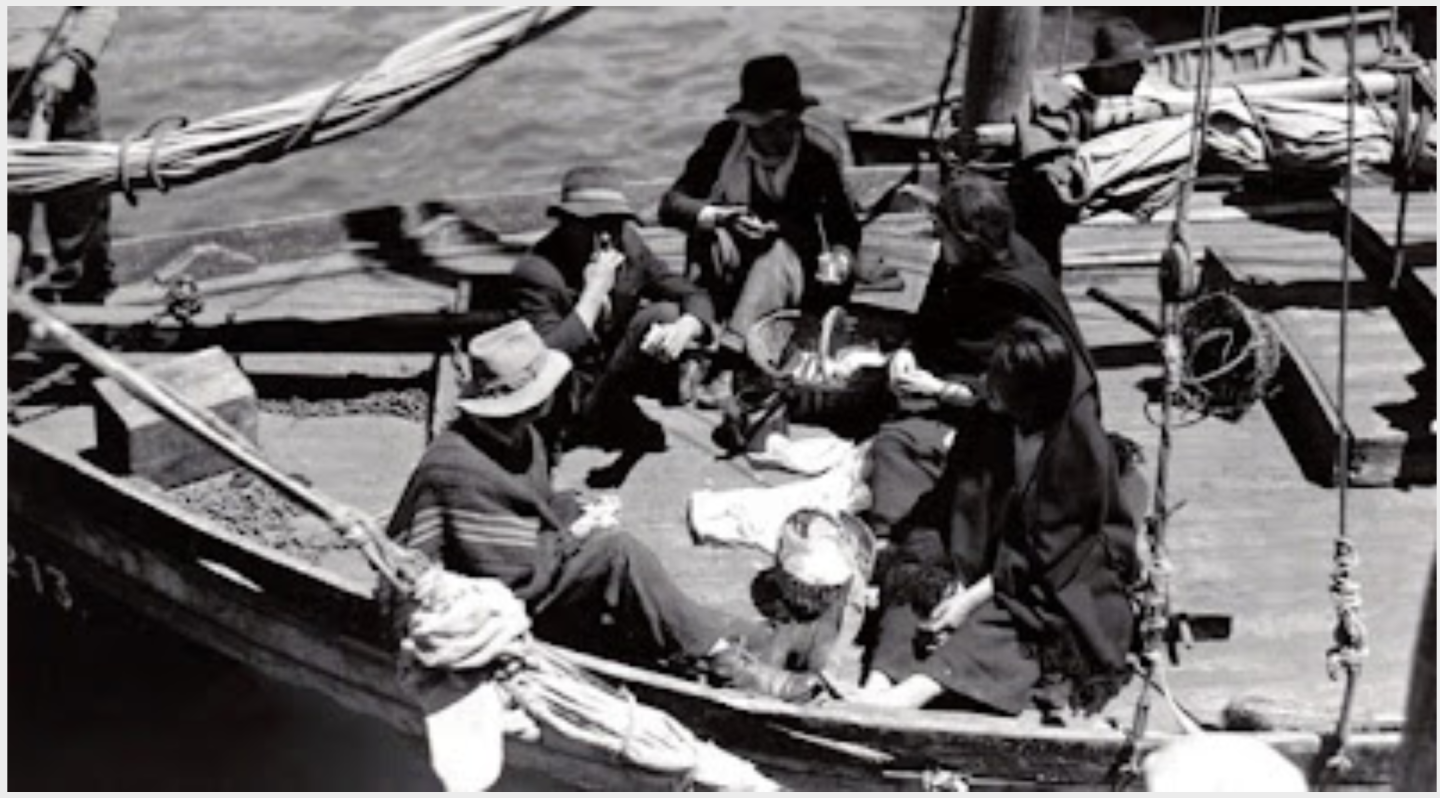
Thanks, all, for the likes and helpful comments! Progress has slowed a good bit recently. First it was because I was trying to work out how to make the shrouds, and especially how to make them accurately, but as I worked on that, I decided that I may as well figure out all the rigging details now. Although the lancha is a very simple vessel, relatively speaking, it's nonetheless much more complicated than anything I've built before, and there was a lot for me to learn. John Leather's The Gaff Rig Handbook was helpful in working things out, although the lancha differs differs in a lot of regards from what he shows. As I’ll show below, there are a few points where the plans diverge from common practice or are outright inaccurate according to photo evidence, although they’re generally correct and I would have had a much harder time figuring things out without them. Apologies for the giant post and for repeating in it a few photos and points discussed earlier! I wanted to get everything in a single post (well, actually, two posts) that would be useful not just to explain things, but also for me to go back to and re-read as necessary. Masting and Rigging, Part 1: Masts and Shrouds Overview In general, the lancha chilota used a pretty standard gaff rig. Standing rigging was limited to a forestay running from the masthead to the tip of the bowsprit, a bobstay to counteract the upward pull on the bowsprit, and a number of shrouds to the side of the mast (I should note that at least some of which might actually be backstays—I’m not totally clear on the distinction in cases when the lines are running more to the side of the mast than aft of it, and some small vessels have what look like shrouds to me but they’re called backstays). Running rigging consisted of the jib halyard and sheets—there does not seem to have been a downhaul on the jib tack—for the jib, and for the gaff, a throat and peak halyard, topping lifts, the main sheet, and, in some but not all lanchas, vangs on the gaff. While the gaff has jaws to hold it around the mast, the boom is attached with a gooseneck. The plan sheet's rigging diagram is shown below; some specific parts will be shown in more detail as necessary. The Mast As mentioned in an earlier post, I determined from photos that the mast given in the plans is a bit shorter, proportionally, than was typical. There are a few other interesting points, too. As the plans correctly show, lancha masts were usually square in cross-section at the deck. They then become round around where the boom is attached (via a gooseneck). The mast stays round throughout the area where the mainsail is attached, then switches back to a square cross-section for the mast head. There are also a pair of small crosstrees located at about this point, which are not shown on the plans. Finally, there’s a small flagpole attached to the front of the masthead and extending upward (and not simply pointing out of the top of the masthead, as shown on the plans). While there was a fair bit of variation in the photographed mast height to hull length proportions that I checked earlier, checking for the location of the gaff and especially the crosstrees by the same procedure revealed much greater consistency. In a sample of six photos with the gaff set, the gaff intersected the mast 69.4-75.7% of the way up the mast, with an average of 72.7% up it. The crosstrees were all located very consistently between 84.3-87.8% of the way up the mast, averaging 85.4%. The dimensions given by Garnham’s diagram (which doesn’t include the gaff) is very close to this, at 83.7%. Finally, photos showed the boom located roughly knee- or thigh-high above the deck. Masthead and Shrouds As mentioned above, the plans (and many photos) show three shrouds per side, two attached low on the masthead and one near the top. Eyebolts are used to attach all shrouds on the plans (as well as the blocks for the throat and peak halyards and the topping lift). They also show the forestay attached to an eyebolt, with the block for the jib halyard attached to the same point. Eyebolts may not have actually been used, though. They may have appeared in more recent lanchas: the masthead of the Quenita, shown below in closeup from the front, clearly has eyebolts as part of a metal band around the mast for one pair of the lower shrouds and for the upper shrouds. But, one pair of shrouds is looped around the mast itself at the crosstrees. It’s hard to tell how the forestay is attached, but it’s not an eyebolt—it looks to possibly be looped around or through the masthead (and around the flagpole). (It’s also not clear how the flagpole is attached to the masthead, as there are no visible bands; it may have just been nailed or screwed into the masthead, as it would have borne very little strain). Source: https://lanchaschilotas.com/wp-content/uploads/2011/03/9863788-R2-E004.jpg Older photos seem to show all shrouds looped around the mast without eyebolts, with the lower two pairs supported at the crosstrees, as seen below. It’s not clear to me what sort of ledge in the mast supports the upper pair of shrouds. Source: https://www.memoriasdelsigloxx.cl/601/w3-article-1805.html The lancha on the left of this photo seems to have a second, smaller crosstree at the top of the masthead, but upon closer inspection, it looks to be more of a spreader, with the shroud coming off of the end. Source: https://www.bibliotecanacionaldigital.gob.cl/bnd/629/w3-article-164339.html It’s also worth noting that, while the plans and many photos show three pairs of shrouds, some photos show two per side or even just one per side. The photo below from 1960, for instance, shows just a single shroud on each side. Incidentally, the chainplate in this case runs inboard of the rub rail, rather than around it. Source: https://www.bibliotecanacionaldigital.gob.cl/bnd/629/w3-article-613546.html While the lancha in this photo, from 1959, has two per side (as does the lancha in the top right): Source: https://www.bibliotecanacionaldigital.gob.cl/bnd/629/w3-article-164247.html This raises the question of how the shrouds were attached to the hull. I’ve discussed this a bit in earlier posts, but here I’d like to be a bit more systematic to clearly identify different possibilities. According to Edwards, based on research done at midcentury, “Most lanchas now have standing rigging of steel wire, which has all but replaced the rope used formerly. The rigging is set up with rope lanyards rove through rigging eyes and chain plates. Manufactured fittings such as turnbuckles and rigging shackles are rare. Many of the metal fittings are fashioned from miscellaneous scraps of iron which are bent crudely and adapted to use as marine hardware. Often, lengths of wire or iron chain are made up in rather ragtag assemblies to repair broken shrouds and stays.” (p.34, from Clinton R. Edwards, “The Lancha Velera of Chiloé,” The American Neptune Vol. 26 No. 1 [1966]: 33-36). The image above is notable in that there are no turnbuckles anywhere. Instead, it looks to me like there are loops in the ends of the shrouds and the chainplates—at least some of which look to be made of thin metal rods rather than a flat “plate”—with some sort of lanyard, whether rope or wire, joining the loops. Similarly, this image of a lancha with a single shroud per side seems to show more of a flat chainplate with a hole in the top, but a similar lanyard arrangement to connect to the shrouds. (Incidentally, it also shows what looks like a bracket around the end of the bowsprit at top right, although I suppose it could be a rope lashing, and a chain bobstay. The bowsprit details are described below.) Source: https://www.bibliotecanacionaldigital.gob.cl/bnd/629/w3-article-164721.html The photo below is interesting. There are no turnbuckles visible. The aftmost chainplate is a single piece and extends, bending, quite a ways above the wale, ending directly in a hook that hooks directly to the shroud. The fore shroud has a shorter chainplate and is connected to the shroud with a smaller hook. Source: https://www.flickr.com/photos/luchinmardones/5202830330/in/photostream/lightbox/ Turnbuckles were present in reduced numbers early on, becoming more common later, but were often used in conjunction with assemblages of wire, rope, and metal bars. The image below from 1950 shows two shrouds in detail. The leftmost one has a small turnbuckle at the bottom, apparently attached directly to the chainplate. There is then a twisted segment of wire, with what looks like rope servings, running to a loop through some sort of bullseye or heart that the shroud is wrapped around. The shroud at right has a crude hook connecting to the chainplate; with a wire shroud either looped around it or seized to it with what looks like rope. Source: https://ceph-puerto-montt.blogspot.com/2009/02/album-del-recuerdo-imagenes-de-nuestra_22.html In the photo below, it’s interesting that the aftmost shroud pair is thinner than the other two (a fairly common feature), and doesn’t seem to have any turnbuckles to tighten the shroud. None of the turnbuckles have shackles. While the foremost and center port shrouds, and the foremost starboard shroud, all have a turnbuckle each (along with wire loops and hooks), the center starboard shroud is a little different. The turnbuckle there is attached to the chainplate (which seems to culminate in a small hook) with a small double loop (of wire?) and is joined directly to a loop in the end of the wire shroud. But the turnbuckle is also doubled by what seems to be a hooked rod, which ends somewhere unclear. The port foremost shrouds are also joined by a hooked rod, as well. (The photo is also interesting in that it shows very clearly that the blocks for the throat and peak halyard were internally stropped and had hooks. The throat halyard hooks into an eyebolt in the gaff, while the peak halyard appears to hook around some sort of lashing.) Source: https://www.flickr.com/photos/luchinmardones/5232587713/in/photostream/ Even by the 1980s, the shroud setup could be fairly haphazard, as many Vairo photos show. The image below shows a mix of turnbuckles, hooked rods, looped wires, and rope seizings on the three shrouds. (It also shows the jib sheet consists of a single line, belayed to the deck on both ends, running through a loop at the clew of the jib.) Source: https://www.carlosvairo.com/galeria-puerto-montt-lanchas-chilotas Initially I had been planning on just doing two shrouds per side, as this is not a very large lancha. However, I’m reconsidering now, as I’m wondering if three shrouds will provide more force to keep the forestay from bending the mast forward. If I do three, though, I’ll need to work out how to connect the topmost shrouds to the masthead, as it’s not totally clear in photos. For the chainplates, I think that using the turnbuckles on about half the shrouds or so makes sense, but rather than making shackles, I’ll just be using hooks and wire loops, as they seem more accurate. The chainplates will need to simply have a hole in them rather than the loop I’ve already made, meaning that I will need to do a lot more brass drilling than I have before, and some of the chainplates should be a hook (as Paul suggested) rather than a flat metal sheet. Finally, I'm considering just placing the chainplates outside of the rubbing strake, rather than under it, as both methods are accurate and it would be much easier to not have to precisely file out slots on the inner side of a thin strip of basswood. Next up: the bowsprit and the running rigging.


- 312 replies
-
- 5
-
-
- Chile
- Latin America
- (and 6 more)
-
Congratulations, very nice job! It looks great. Also, is that a lobster smack I see in the background?
-
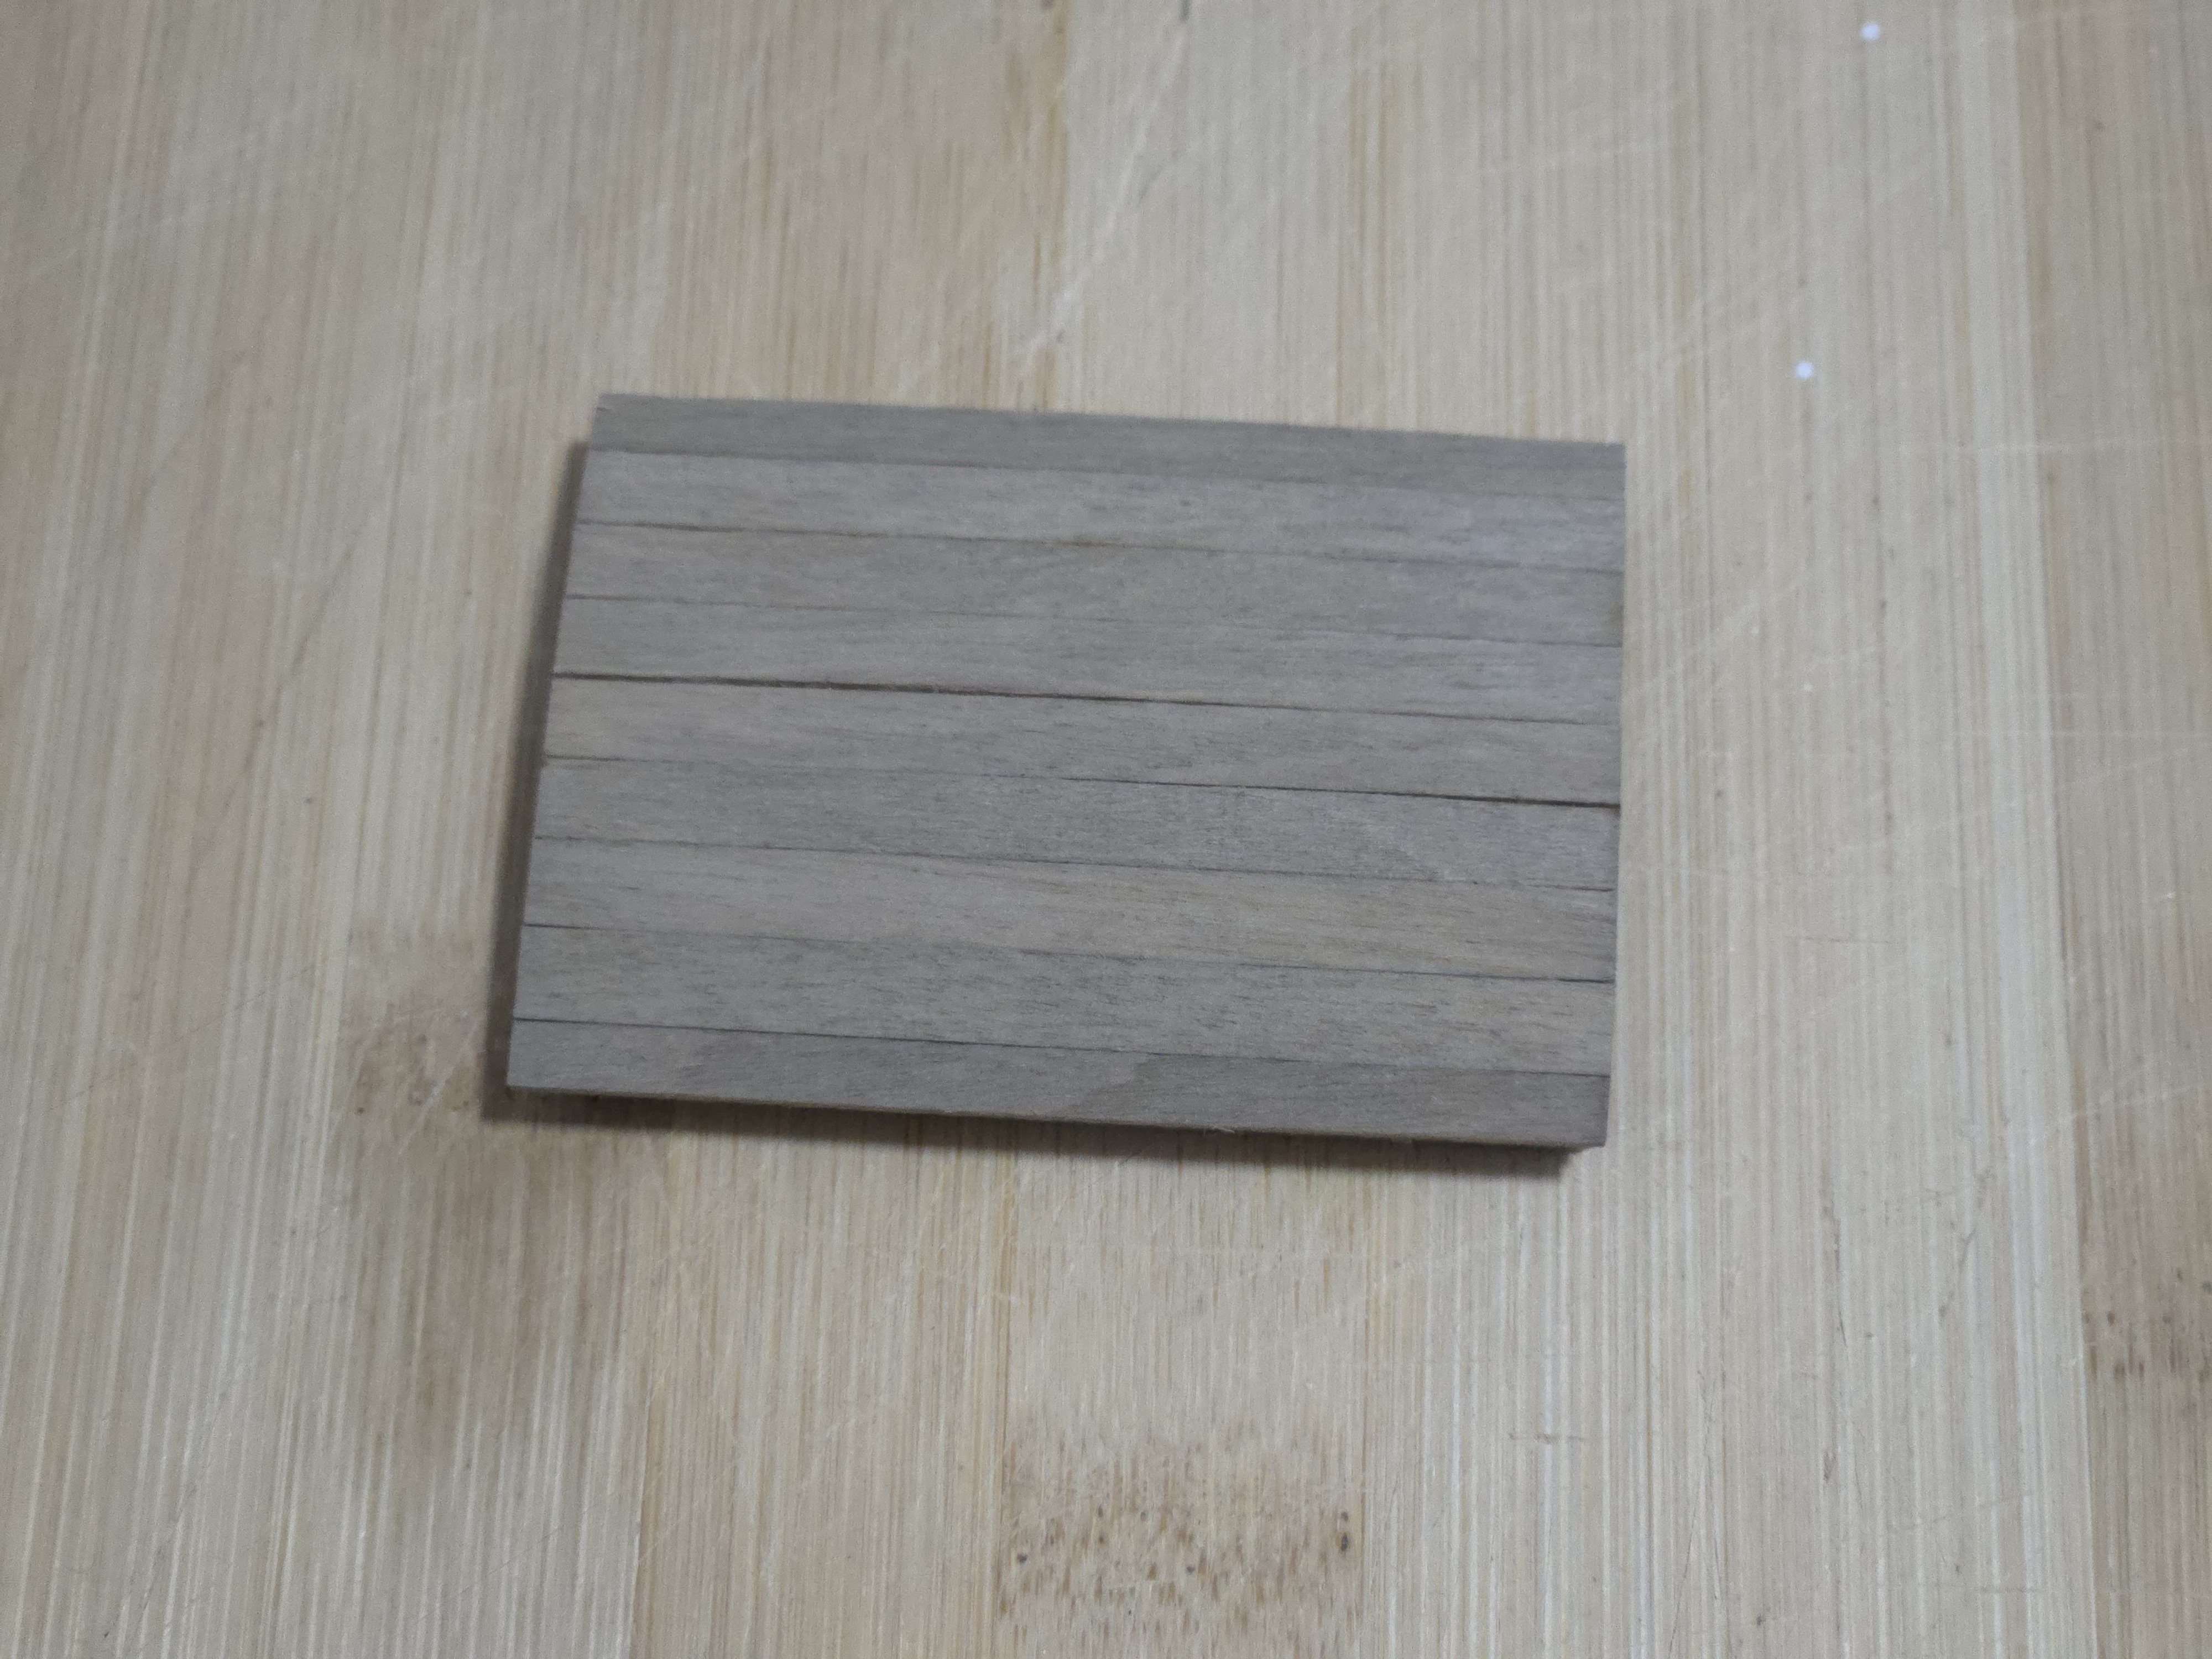
Nice start, the cherry looks great!
-
Yep, just making sure that it's properly stuck down to get rid of any gaps. You can use your finger, but a hard, rounded shape works best.
-
If you search a bit, there are a lot of posts asking these same questions, and a lot of different answers. On tape, Tamiya masking tape works very well and their "for curves" tape can be curved to follow a waterline--something impossible with other tapes, making it very useful. The most important thing with masking is to burnish the edge by running something over it (I use the round non-brush end of a paintbrush) and to first paint over the edge of the tape with some sort of matte transparent paint or varnish. This will seal any gaps and prevent paint from seeping under the tape. On paint and primer, everyone seems to have their own way of doing things. Many use Vallejo or Tamiya modeling acrylics, which seem to have a wide range of colors. I use cheap craft acrylics and mix different colors. In either case, you want to thin your paint (check if you do this with water, alcohol, or something else) a good bit and use multiple coats. Your first coat will look terrible, but you'll sneak up on a nice finish after several coats. Painting this way avoids the out-of-scale effects of a thick coat of paint, and helps to preserve detail under the paint. And that's not to mention that a lot of people have success doing interesting things with enamels or other types of paints. As for priming, it really depends. In general, woods take paint pretty well and you don’t need a primer for paint adhesion (as you would for metal or plastic), but it can have other uses. Paint can raise the grain on wood (especially on basswood), so you'll usually have to sand after your basecoat to get a smooth finish. Applying some sort of sealer at the start can be useful for this, as well as to prevent gaps from forming if the wood expands and shrinks over time from humidity differences. If you're painting a light final coat and your wood is really varied in color, it could be useful to even things out with a gray basecoat. In general, I'd recommend just checking out what people do in build logs, see what effects you like, consider what's feasible for you, and copy that.
-
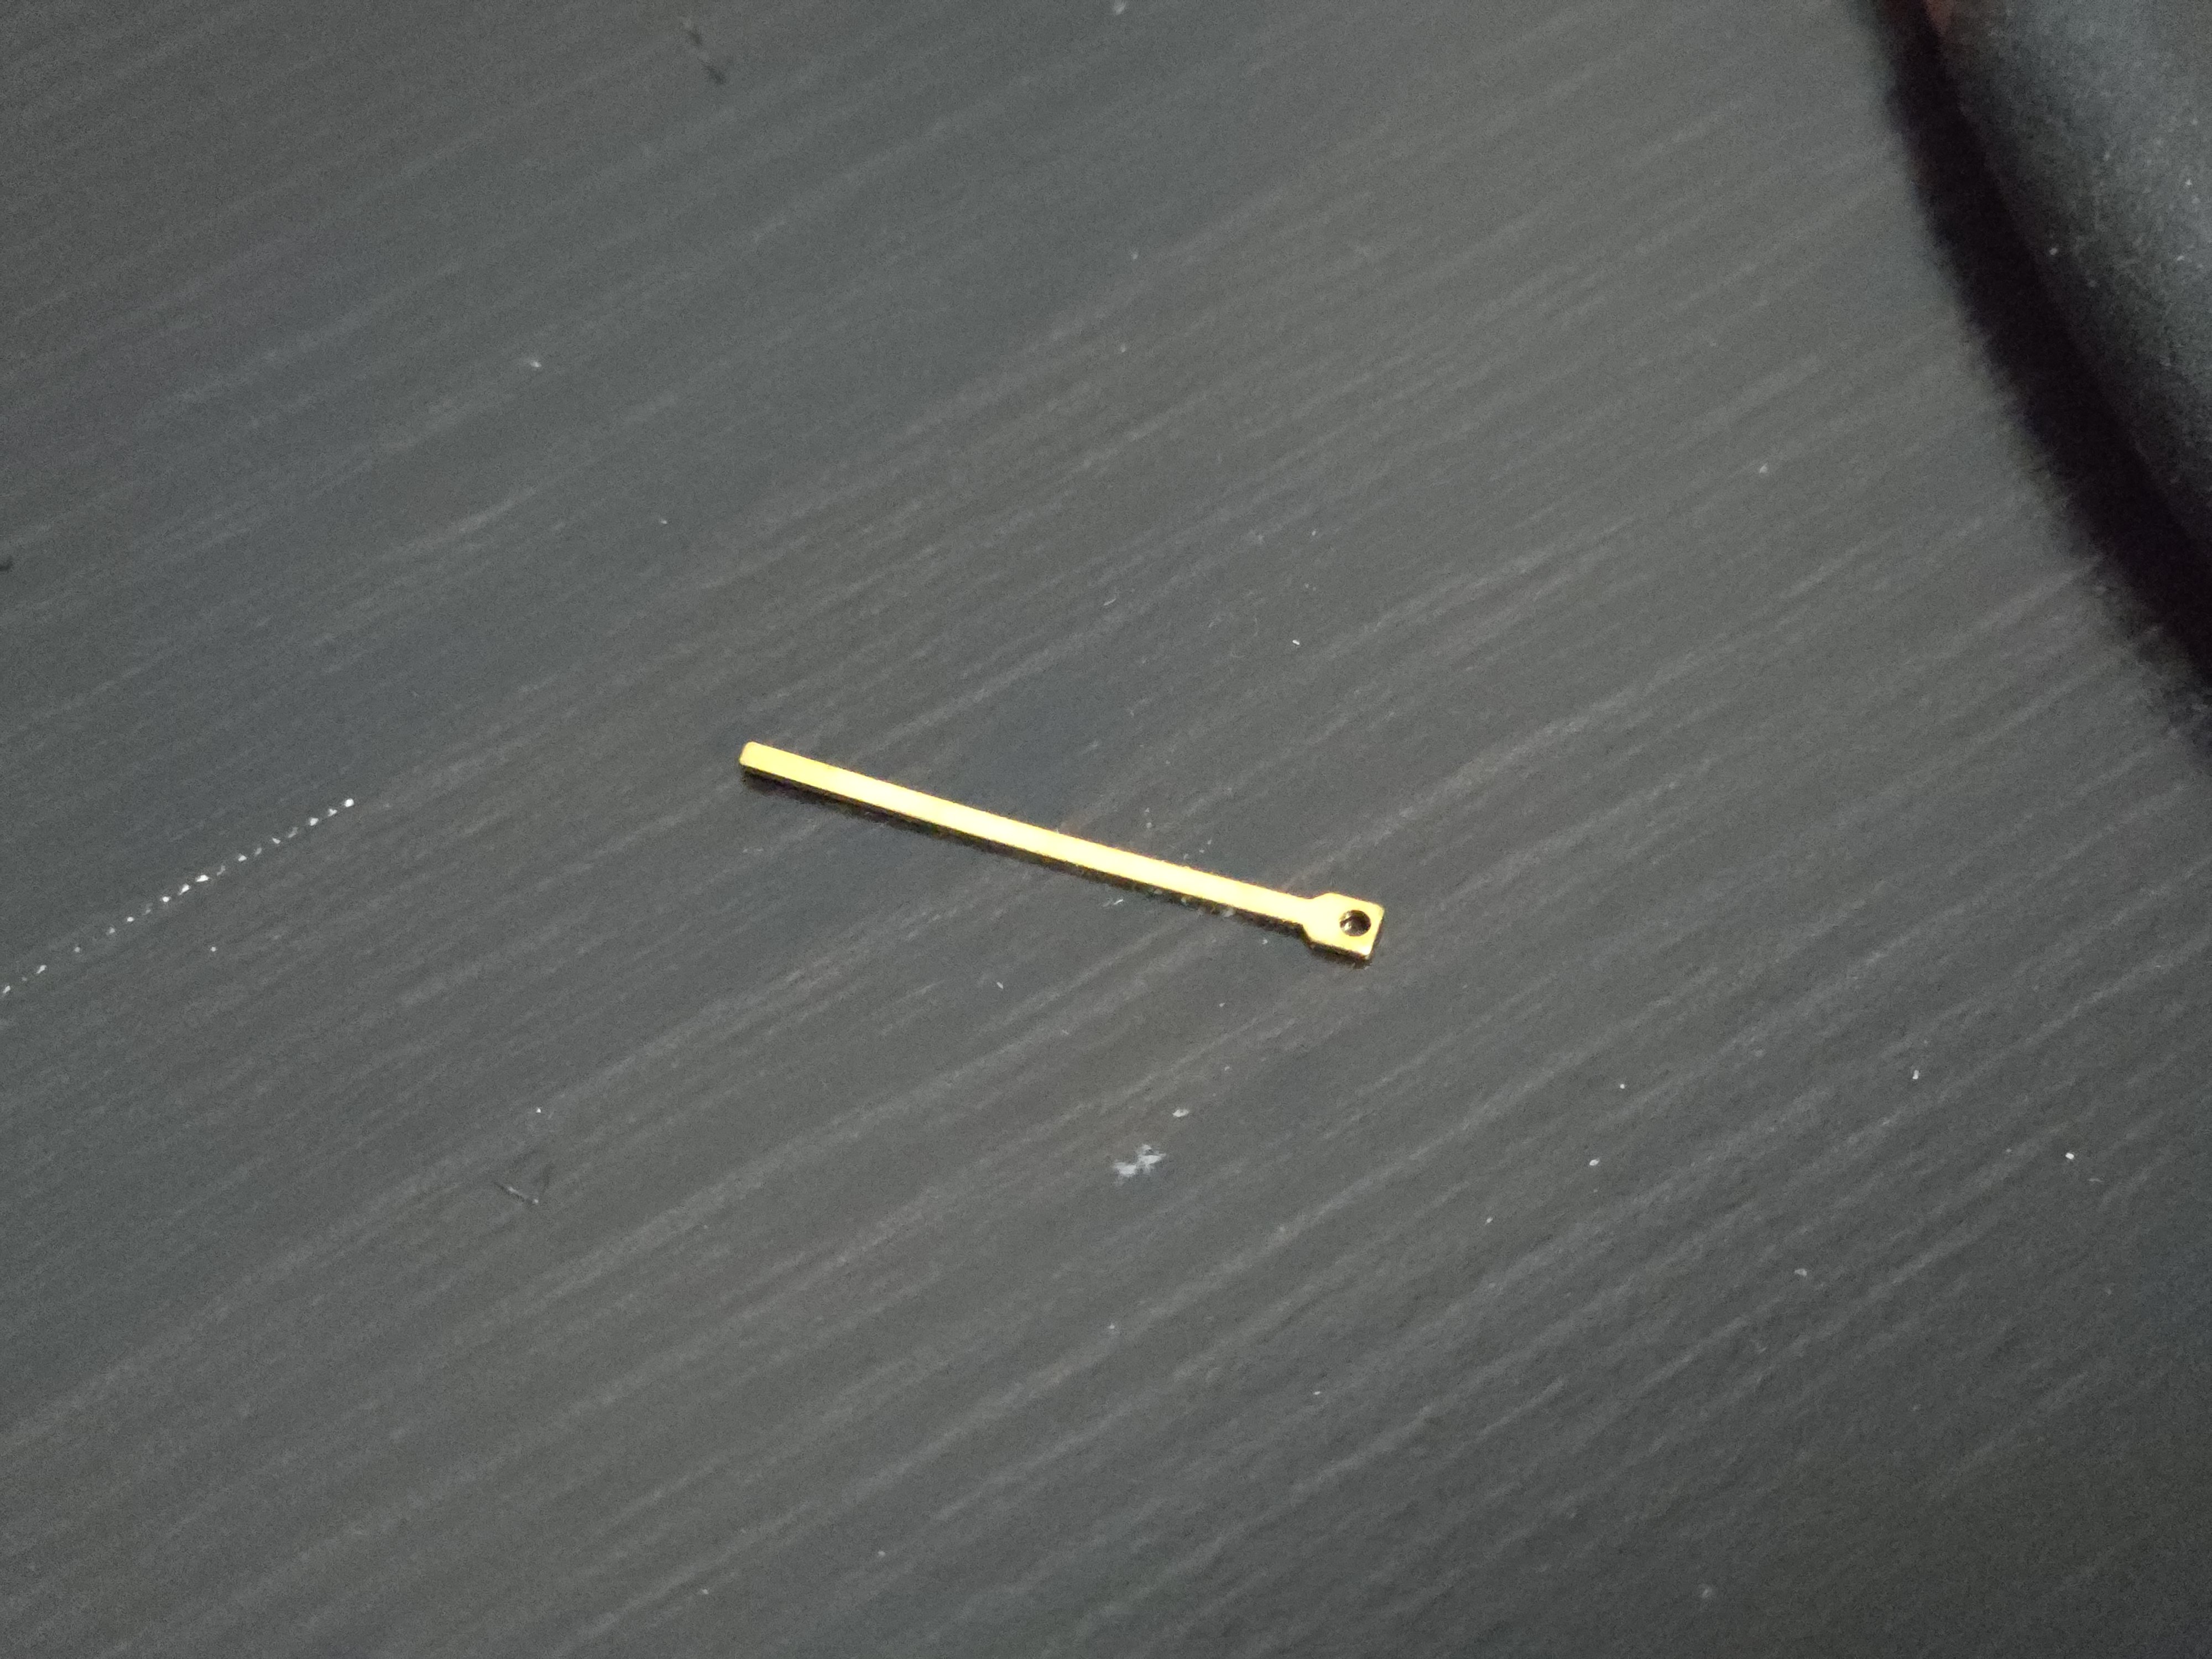
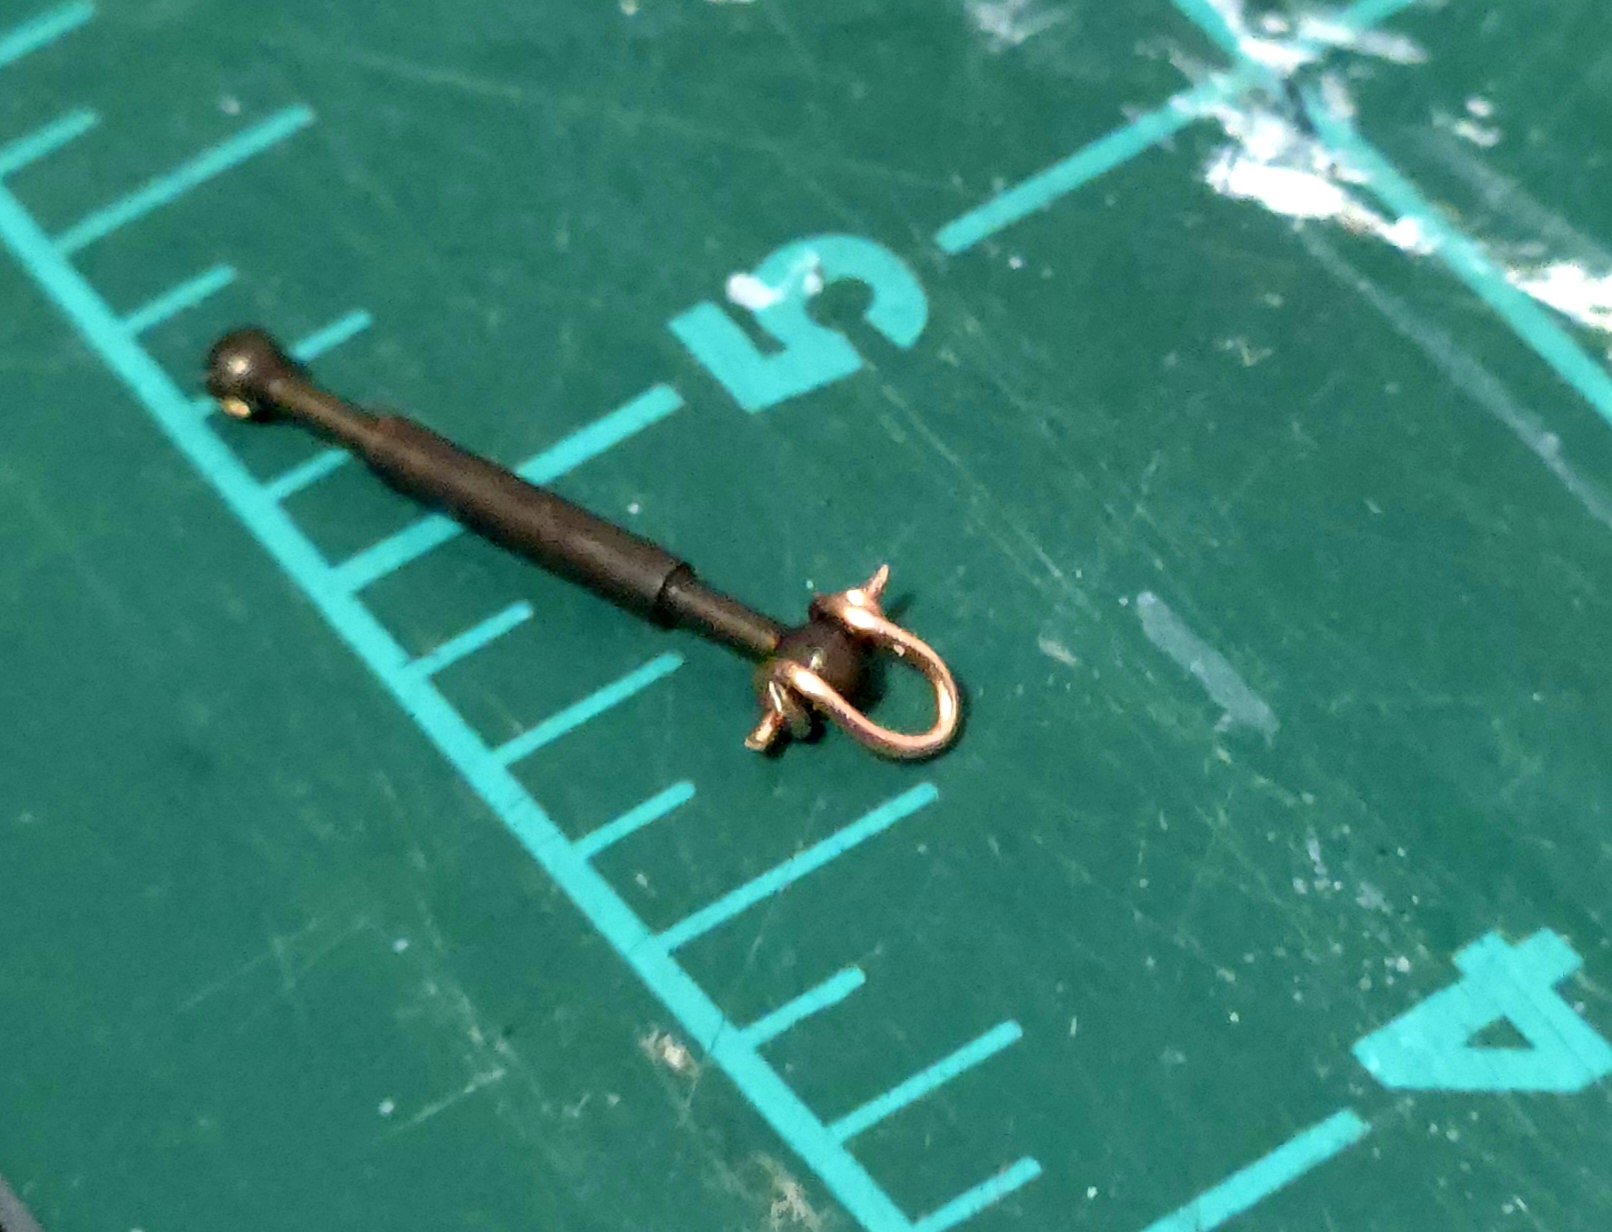
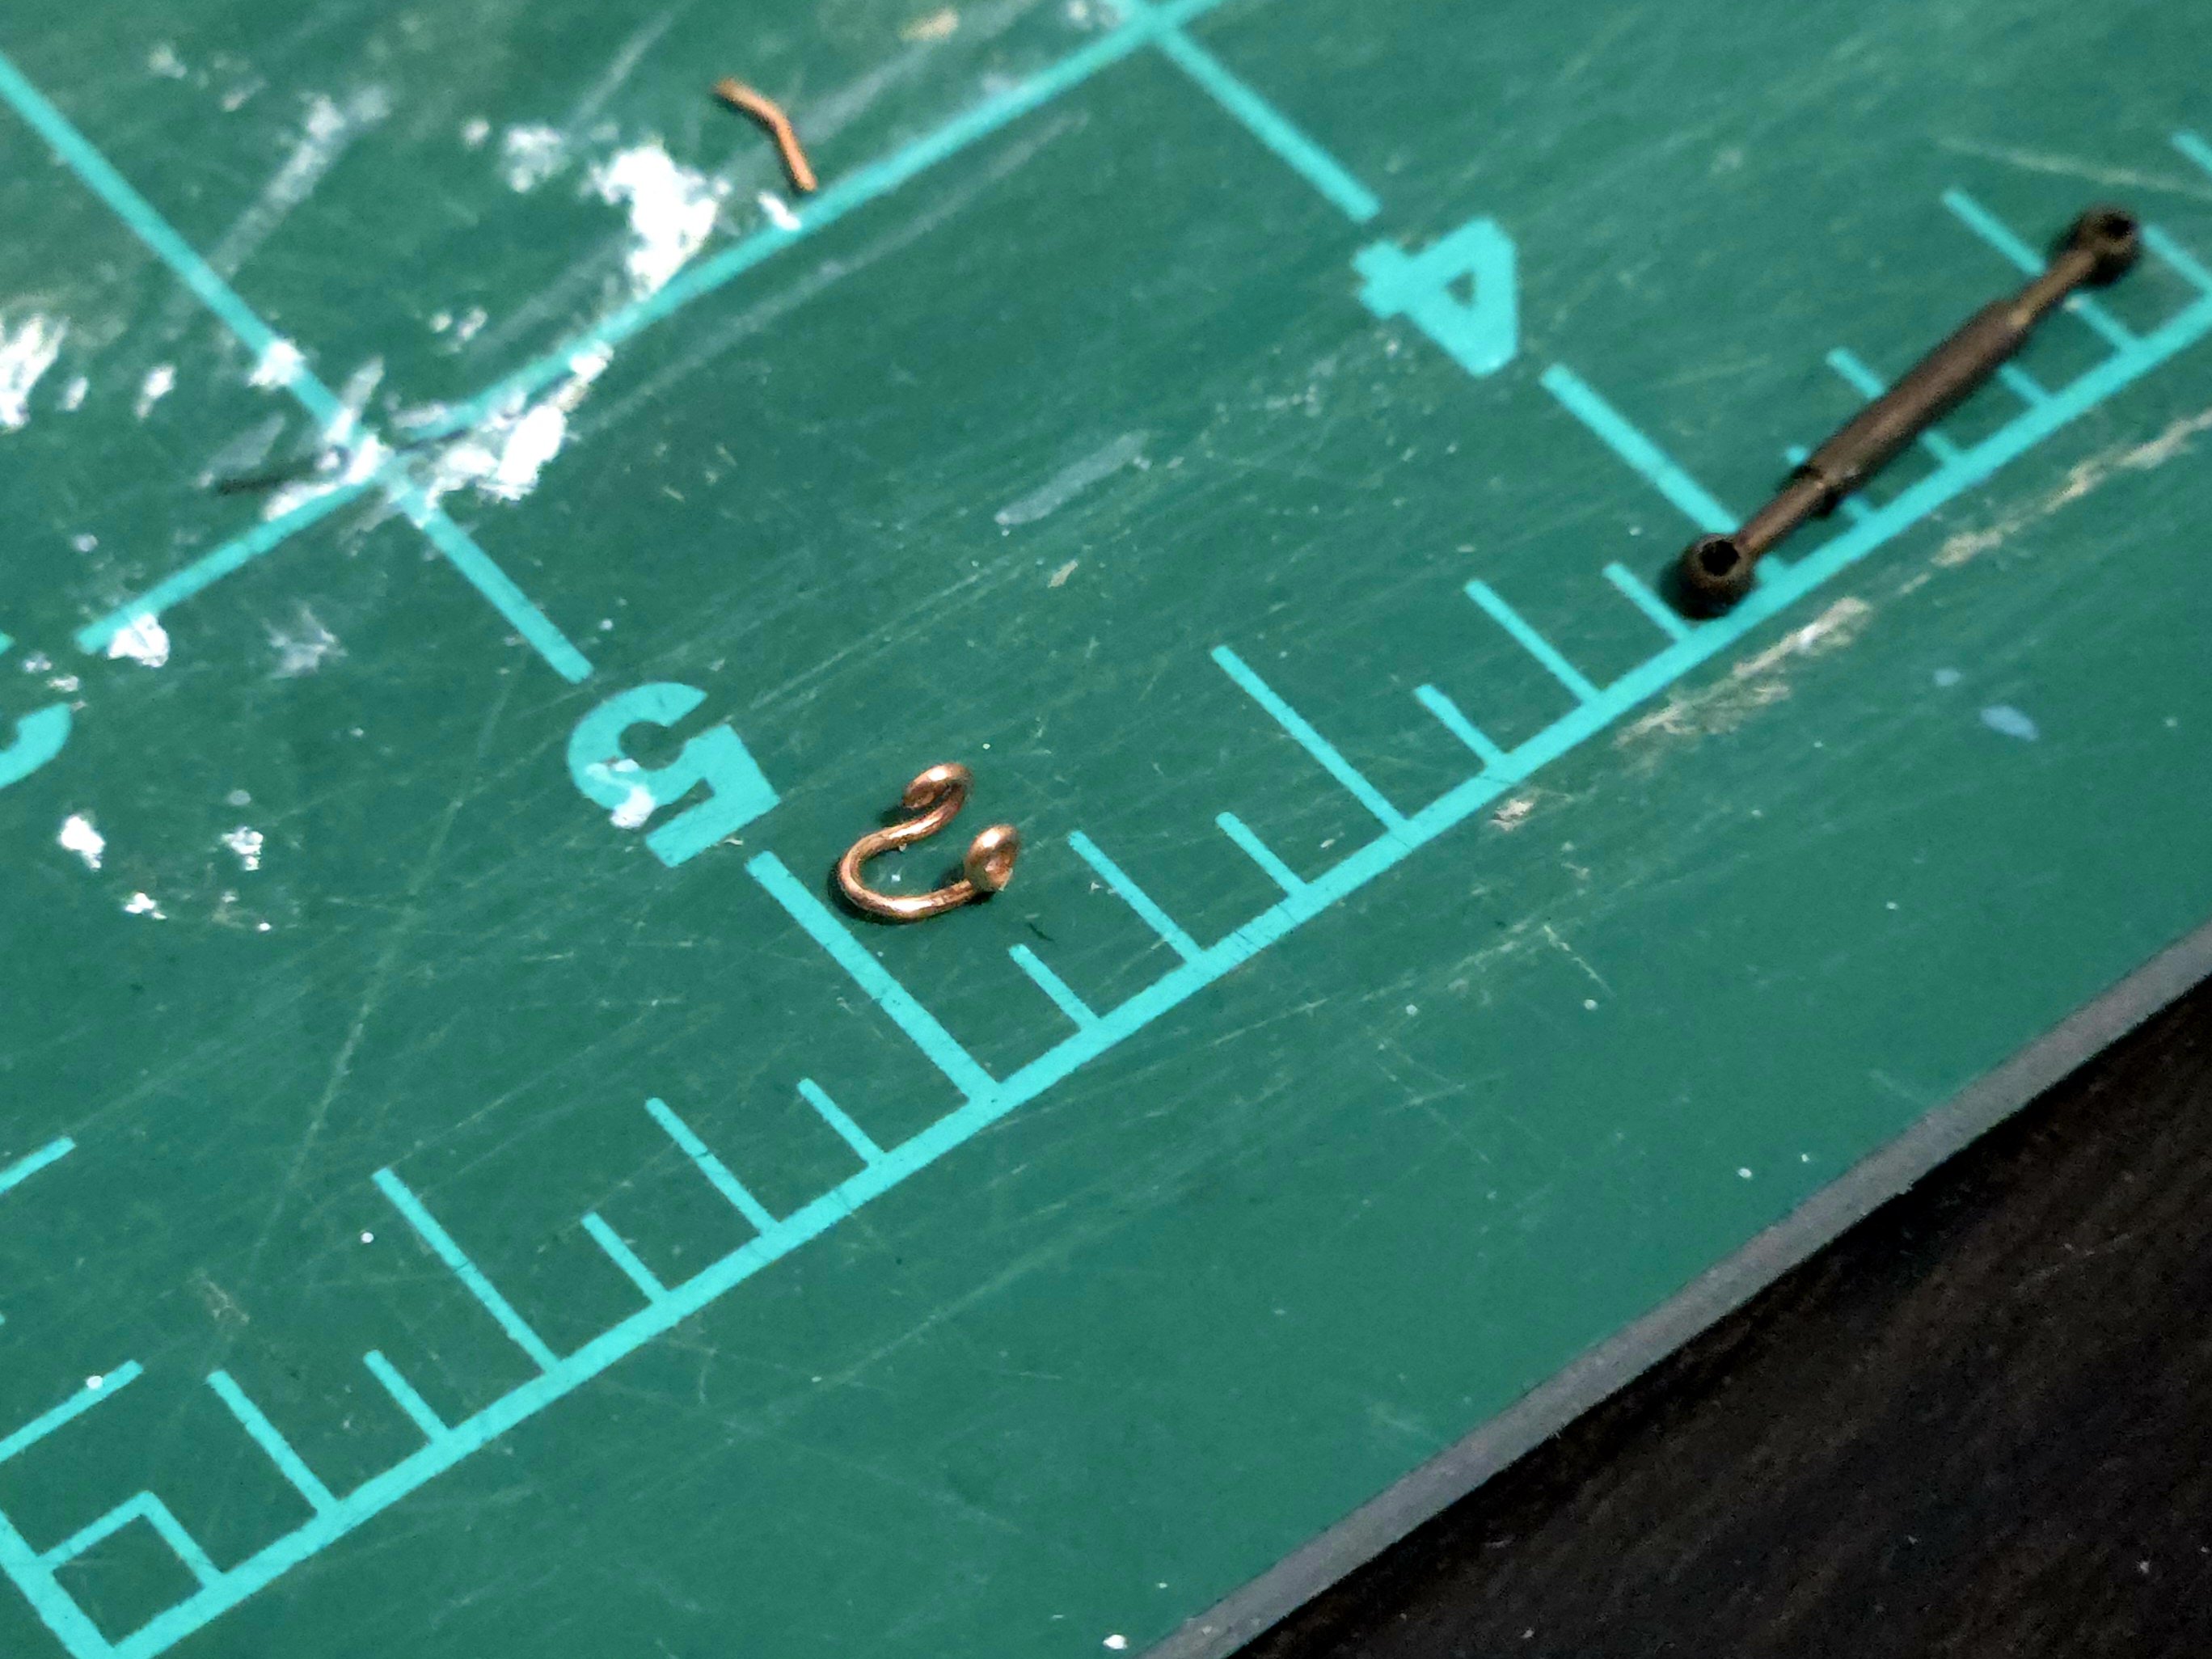
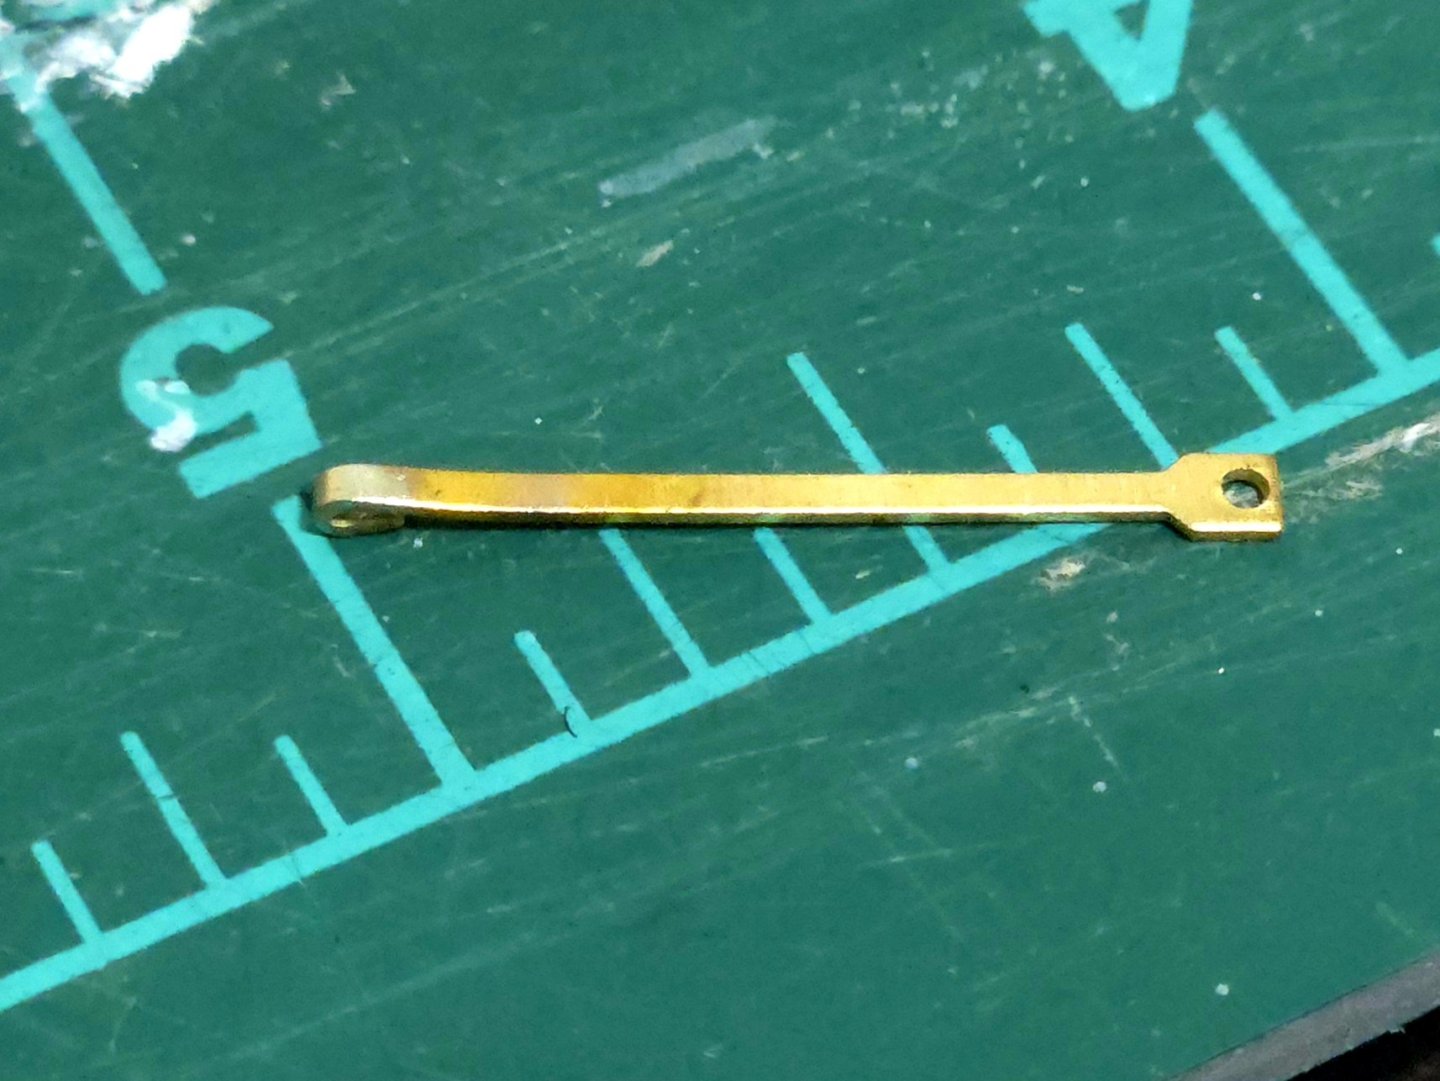
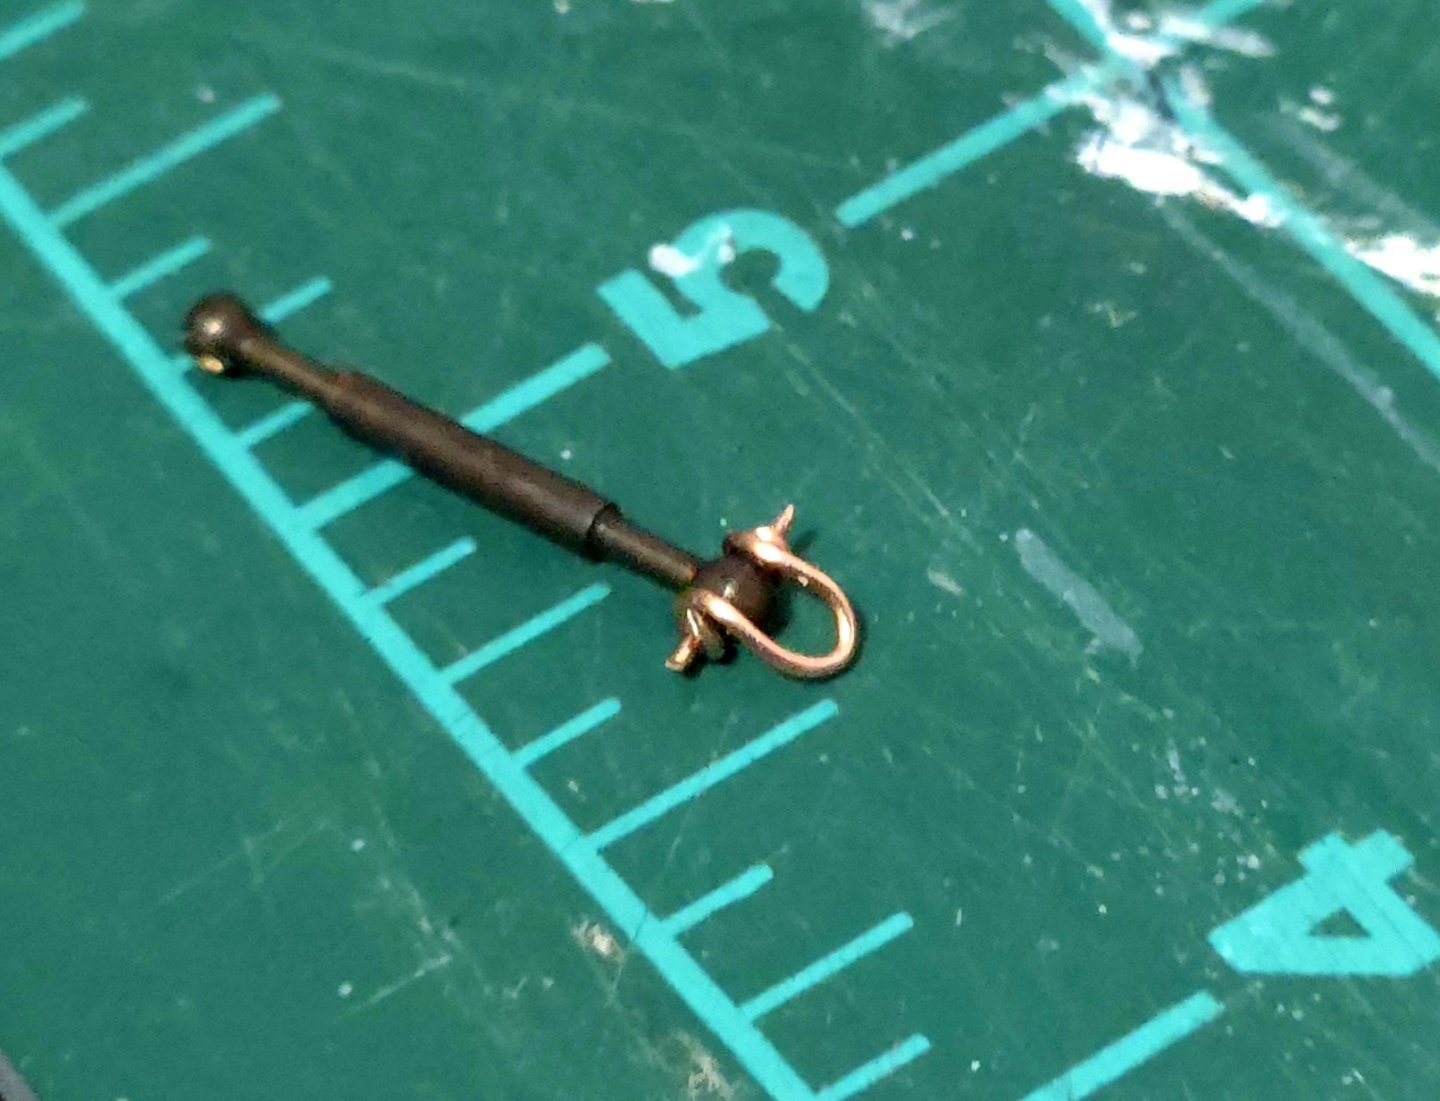
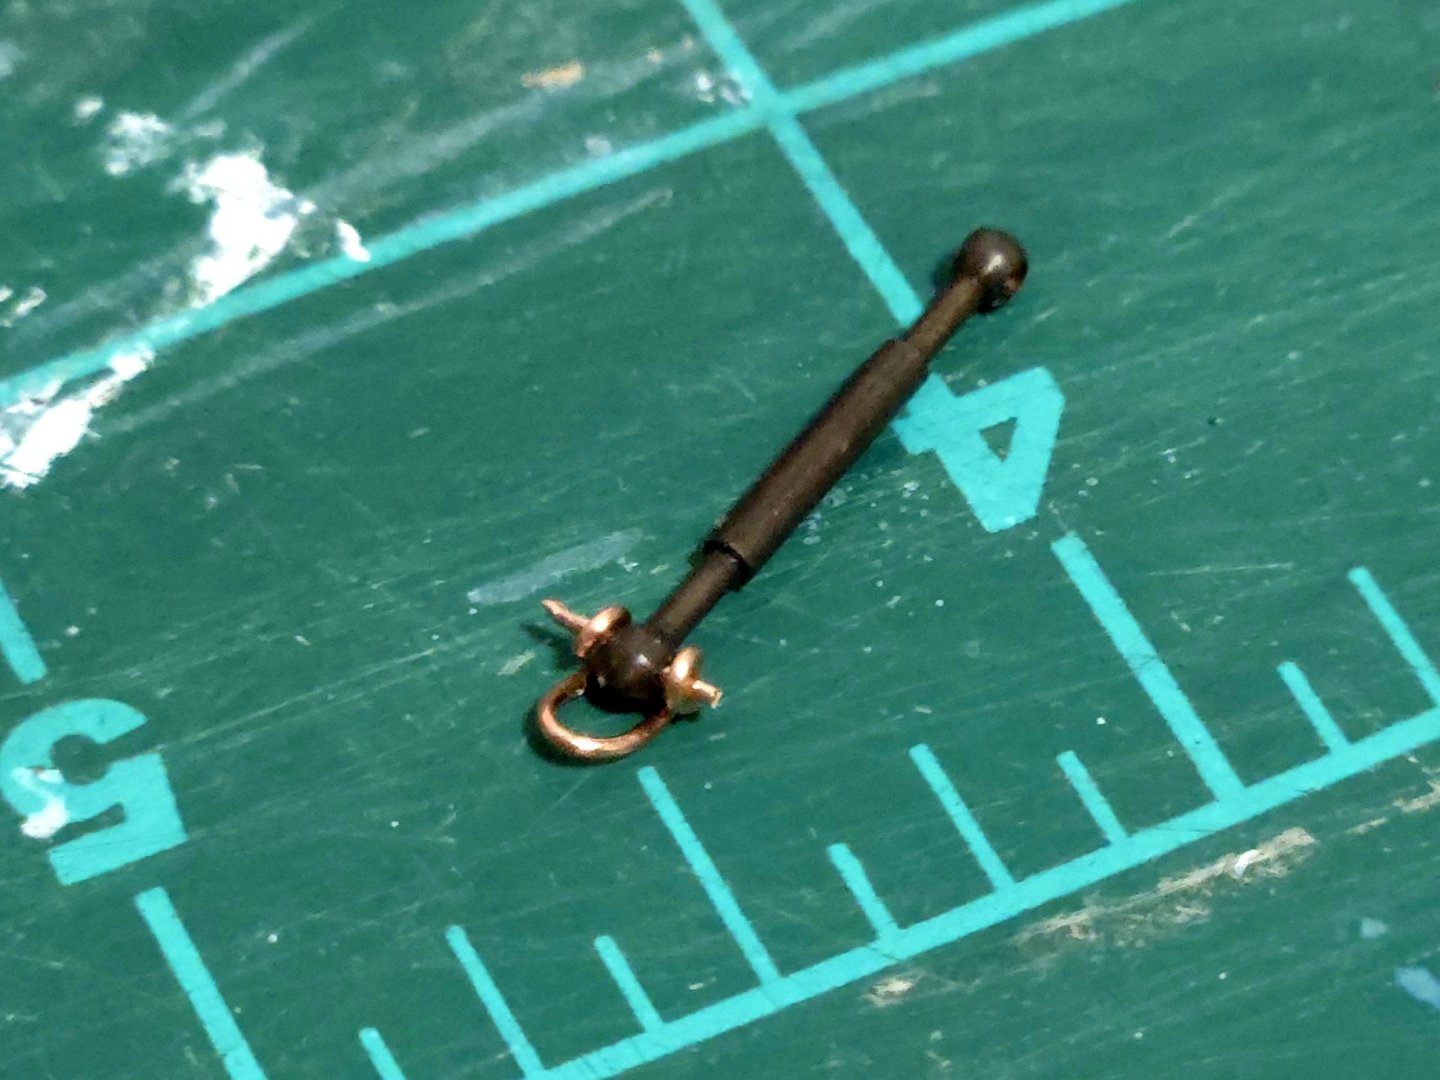
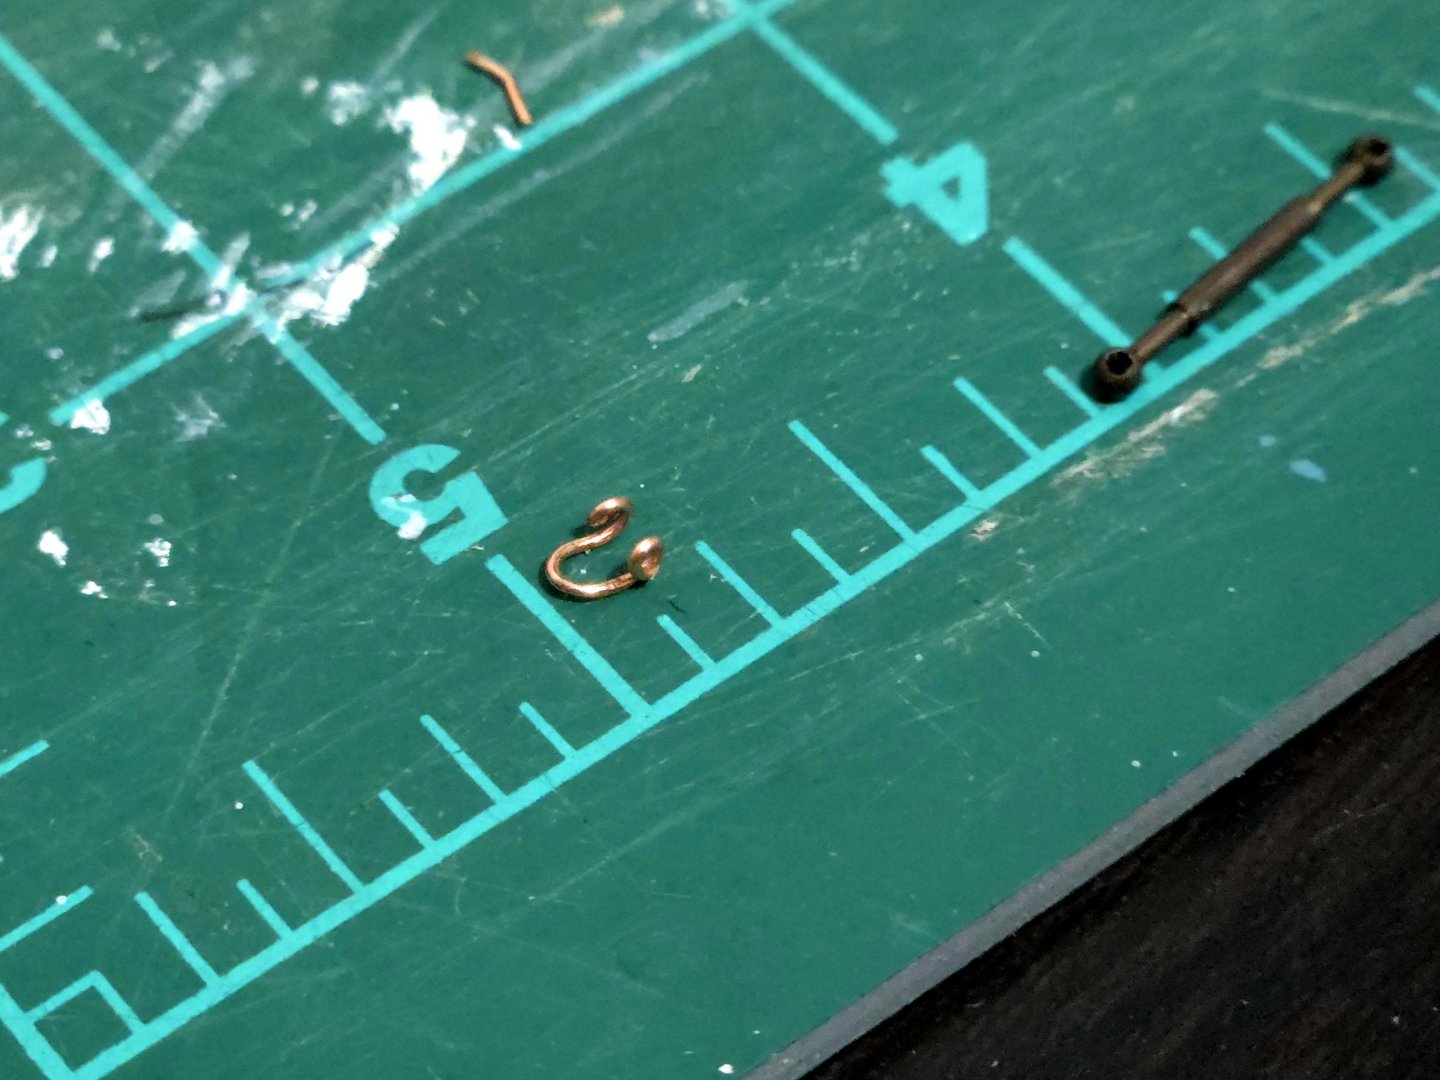
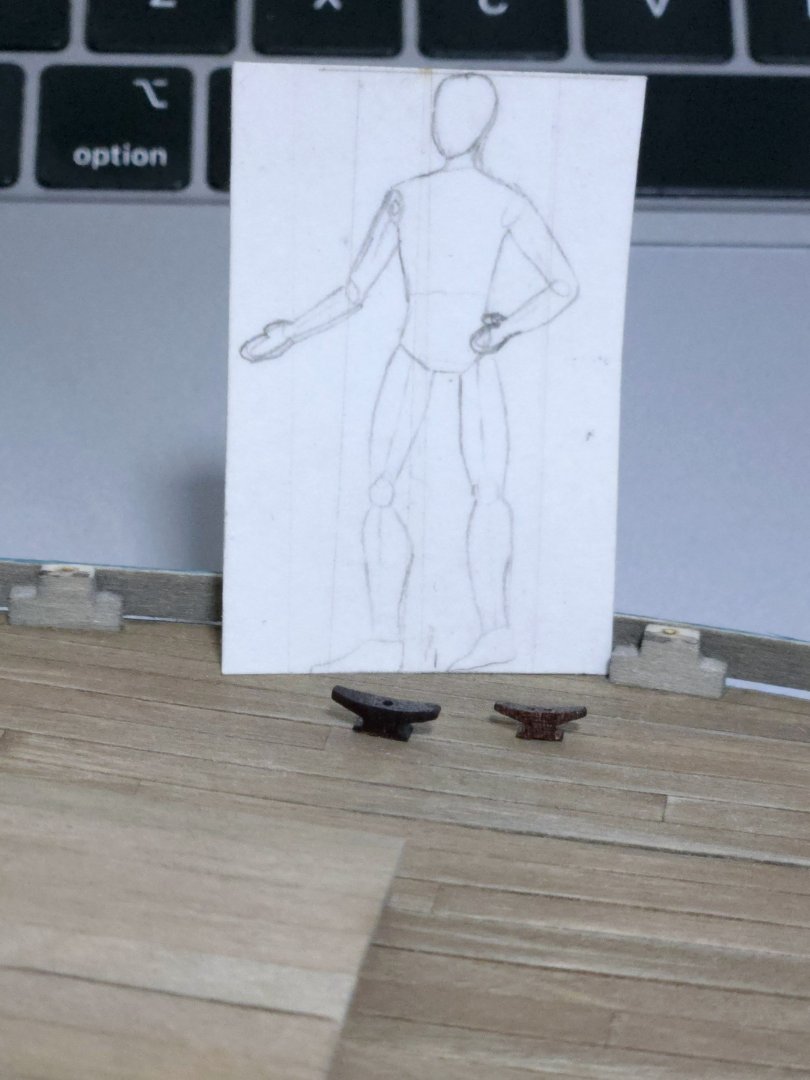
Thanks, Paul! I'm still figuring out the rigging, but in the meantime, I wanted to start considering some options for deck fittings and rigging metalwork. First, there were a number of cleats arranged on the lancha's deck. The plans show them as around 7 mm long at this scale, while the dimensions Graham gives would be about 10 mm at this scale. A while ago, I bought a number of cleats from now-defunct Crafty Sailor for this and other builds, so I finally took out the 7.5mm and 9mm cleats to see how they look. Size-wise, I felt the 9mm cleat looked appropriate (figure to scale). However, as you can see in the image below, the cleats are quite dark and really stand out against the deck, while most photos show cleats pretty much the same color as the deck. (Not to mention that they're a slightly different shape, although it wouldn't be noticeable with a turn of line belayed around them). Source: https://www.carlosvairo.com/galeria-puerto-montt-lanchas-chilotas So, I'll need to decide between trying to lighten the pre-made cleats with a mix of sanding and washes, and just making my own. In any case, I need to make the rather large double-cleats that were placed on deck in strategic locations (see the rigging photo, below), so for consistency's sake just making everything may be better. As for the rigging metalwork, I already have some turnbuckles that I blackened a long while ago. What I don't have is a way to connect them to the rest of the rigging. I experimented with using copper wire to make a shackle, drawing on the design used by @Paul Le Wol for his Glad Tidings build although without yet making a jig or soldering anything. This was a bit finnicky, and the final design would need to be tightened up a bit, not to mention blackened or painted and to hathe excess wire cut off, but I was surprised by how it turned out. (Not as good as Paul's, but better than I expected without any soldering or jig.) While this was a fun experiment, and Paul's method seems like it works great, it's not certain that Chilotes would have actually had shackles on their turnbuckles. The photo below, for instance, seems to just show wire looped directly to the turnbuckle or attached with large iron hooks, although the bottom edge where they connect to the chainplate isn't very clear. (The photo also shows the blocky double-cleat I mentioned earlier). Source: https://www.carlosvairo.com/galeria-puerto-montt-lanchas-chilotas Finally, the chainplates. Way back when, having found plain brass strip to be a little tricky to work with, I bought some simple Billings "chainplates" as I figured their seemingly thinner metal may be easier to handle. I also figured that, if I didn't like the look of the blocky end, I could just trim it off. By now, I'm not sure if super glue alone will really stand up well to the shear force from the rigging, but I may be able to drill my own smaller holes to secure the chainplate. Meanwhile, to test creating a simple loop at the top, I folded the tip back on itself. I found it very easy to bend and, when I went to anneal it, the annealed part turned silver. I'm not sure if this is a normal reaction to annealing, or if it means these are not actually brass.

- 312 replies
-
- 8
-
-
- Chile
- Latin America
- (and 6 more)
-
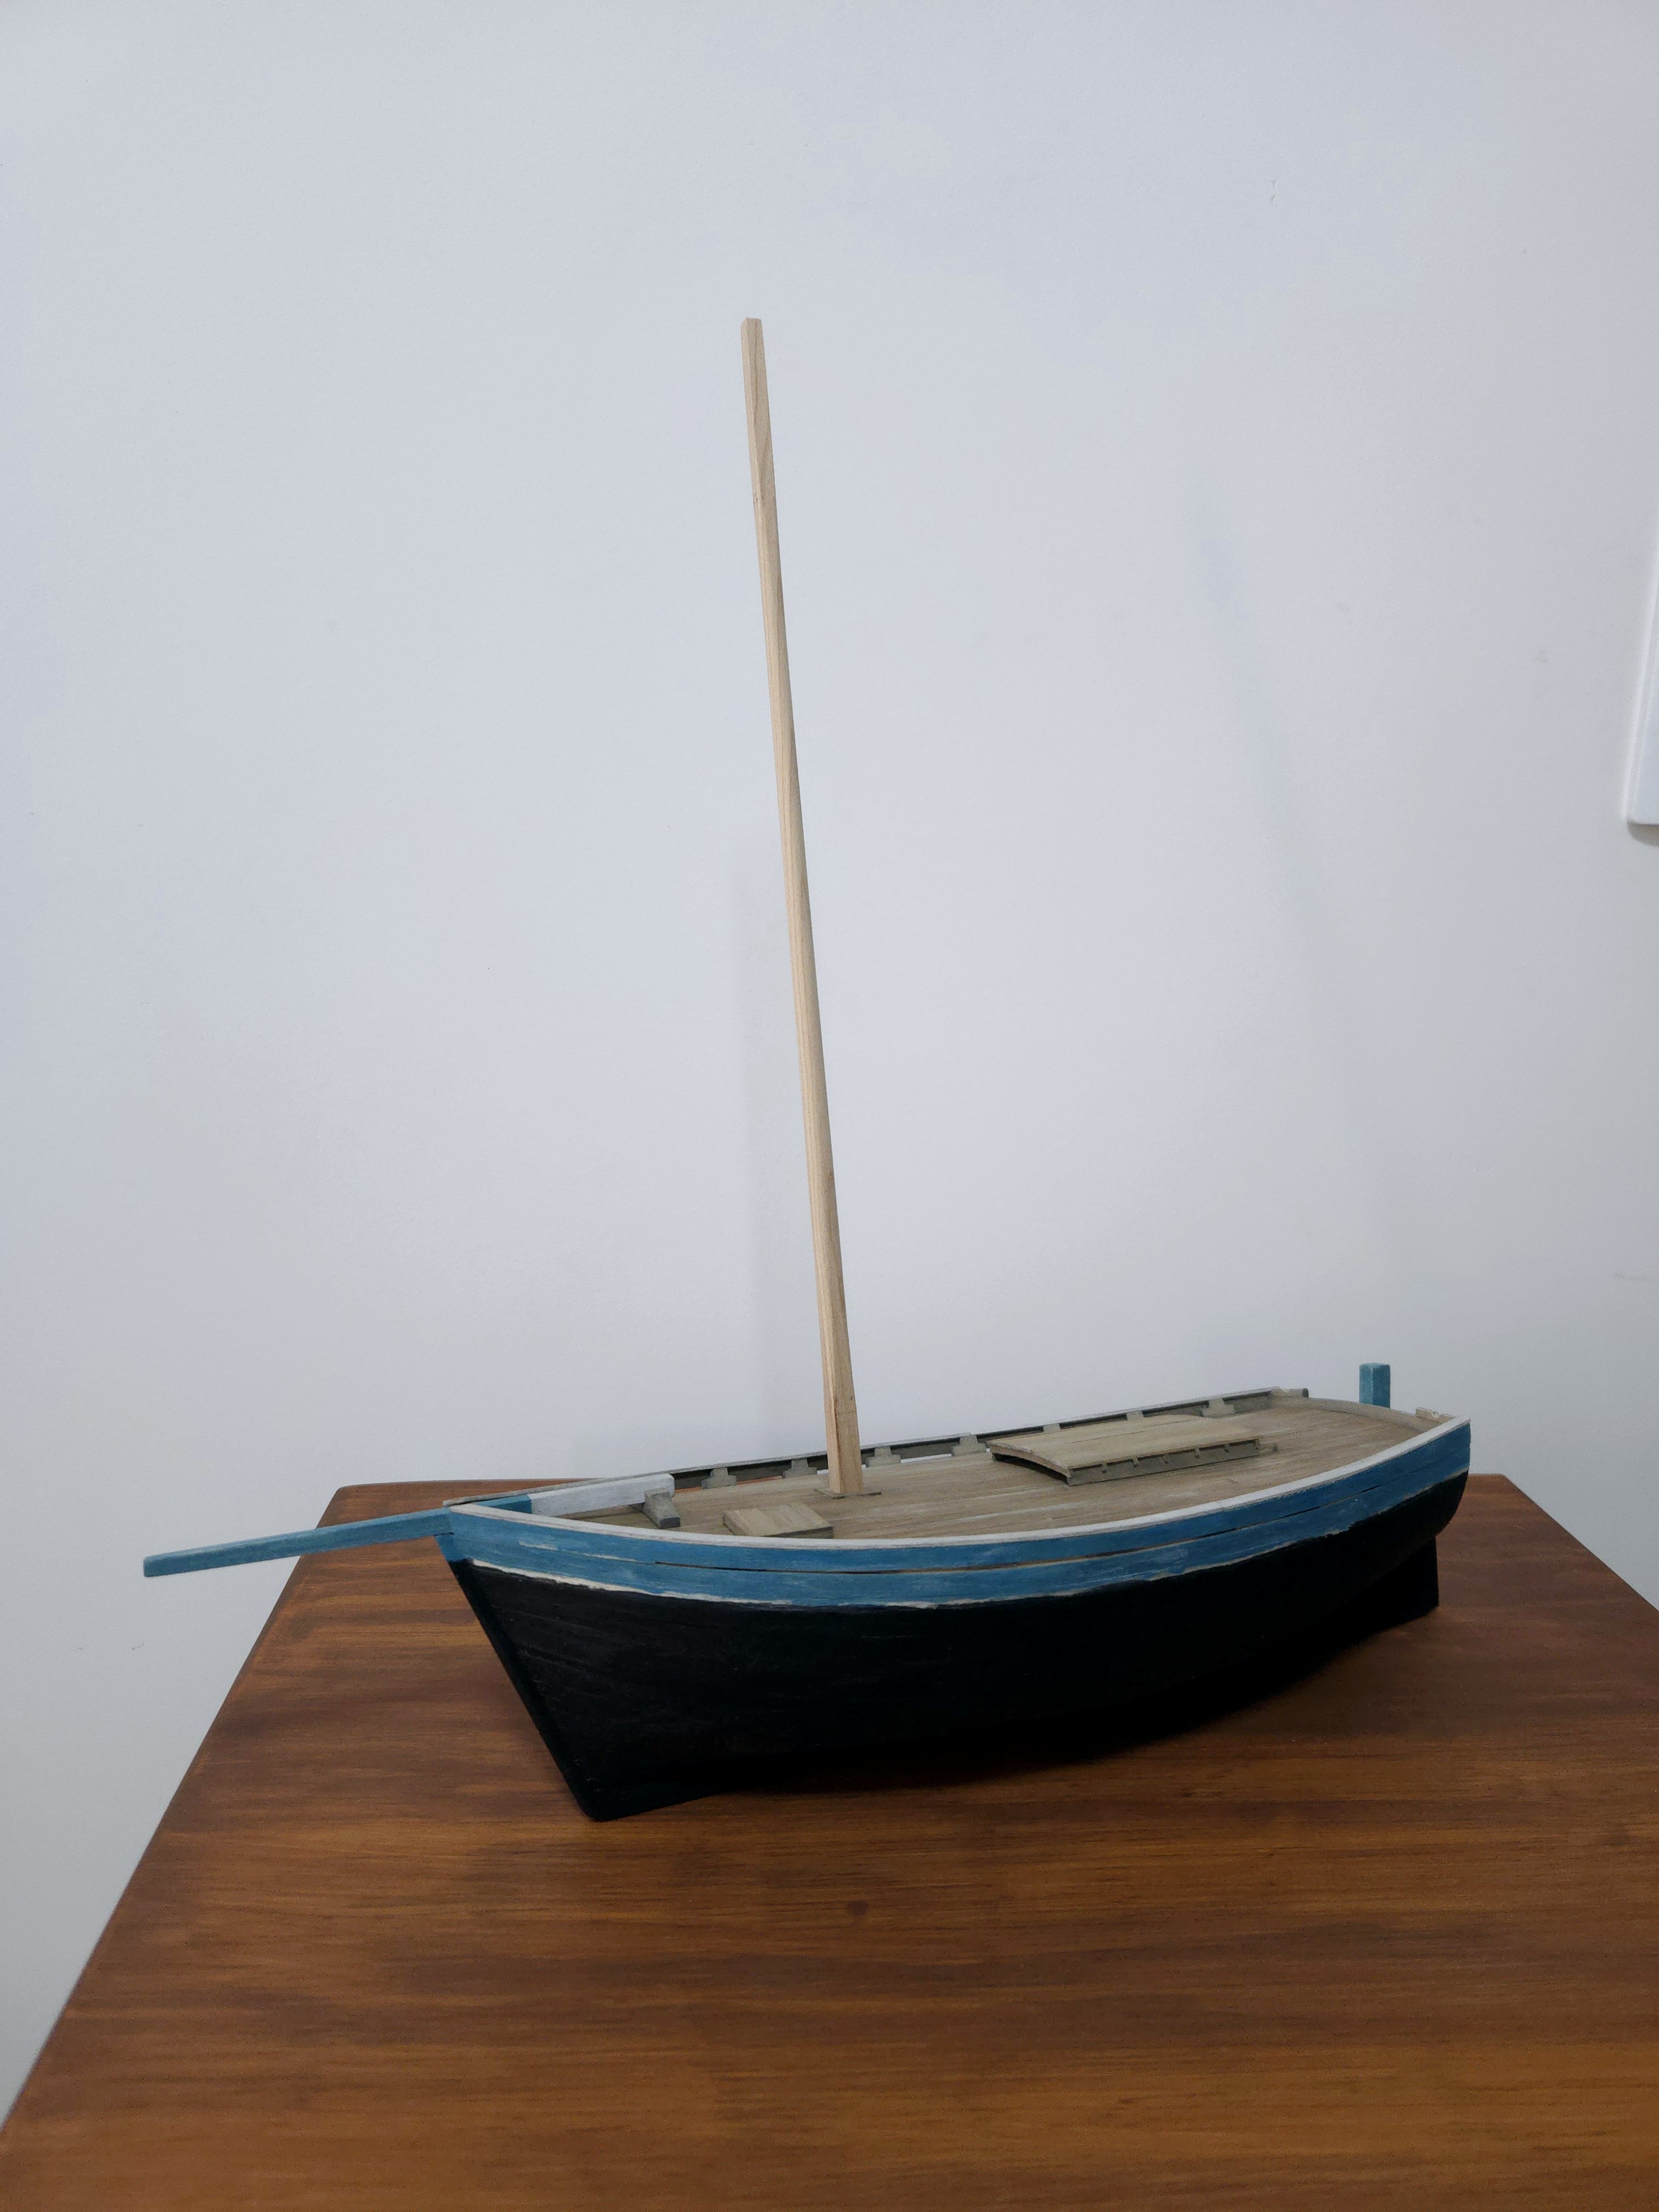
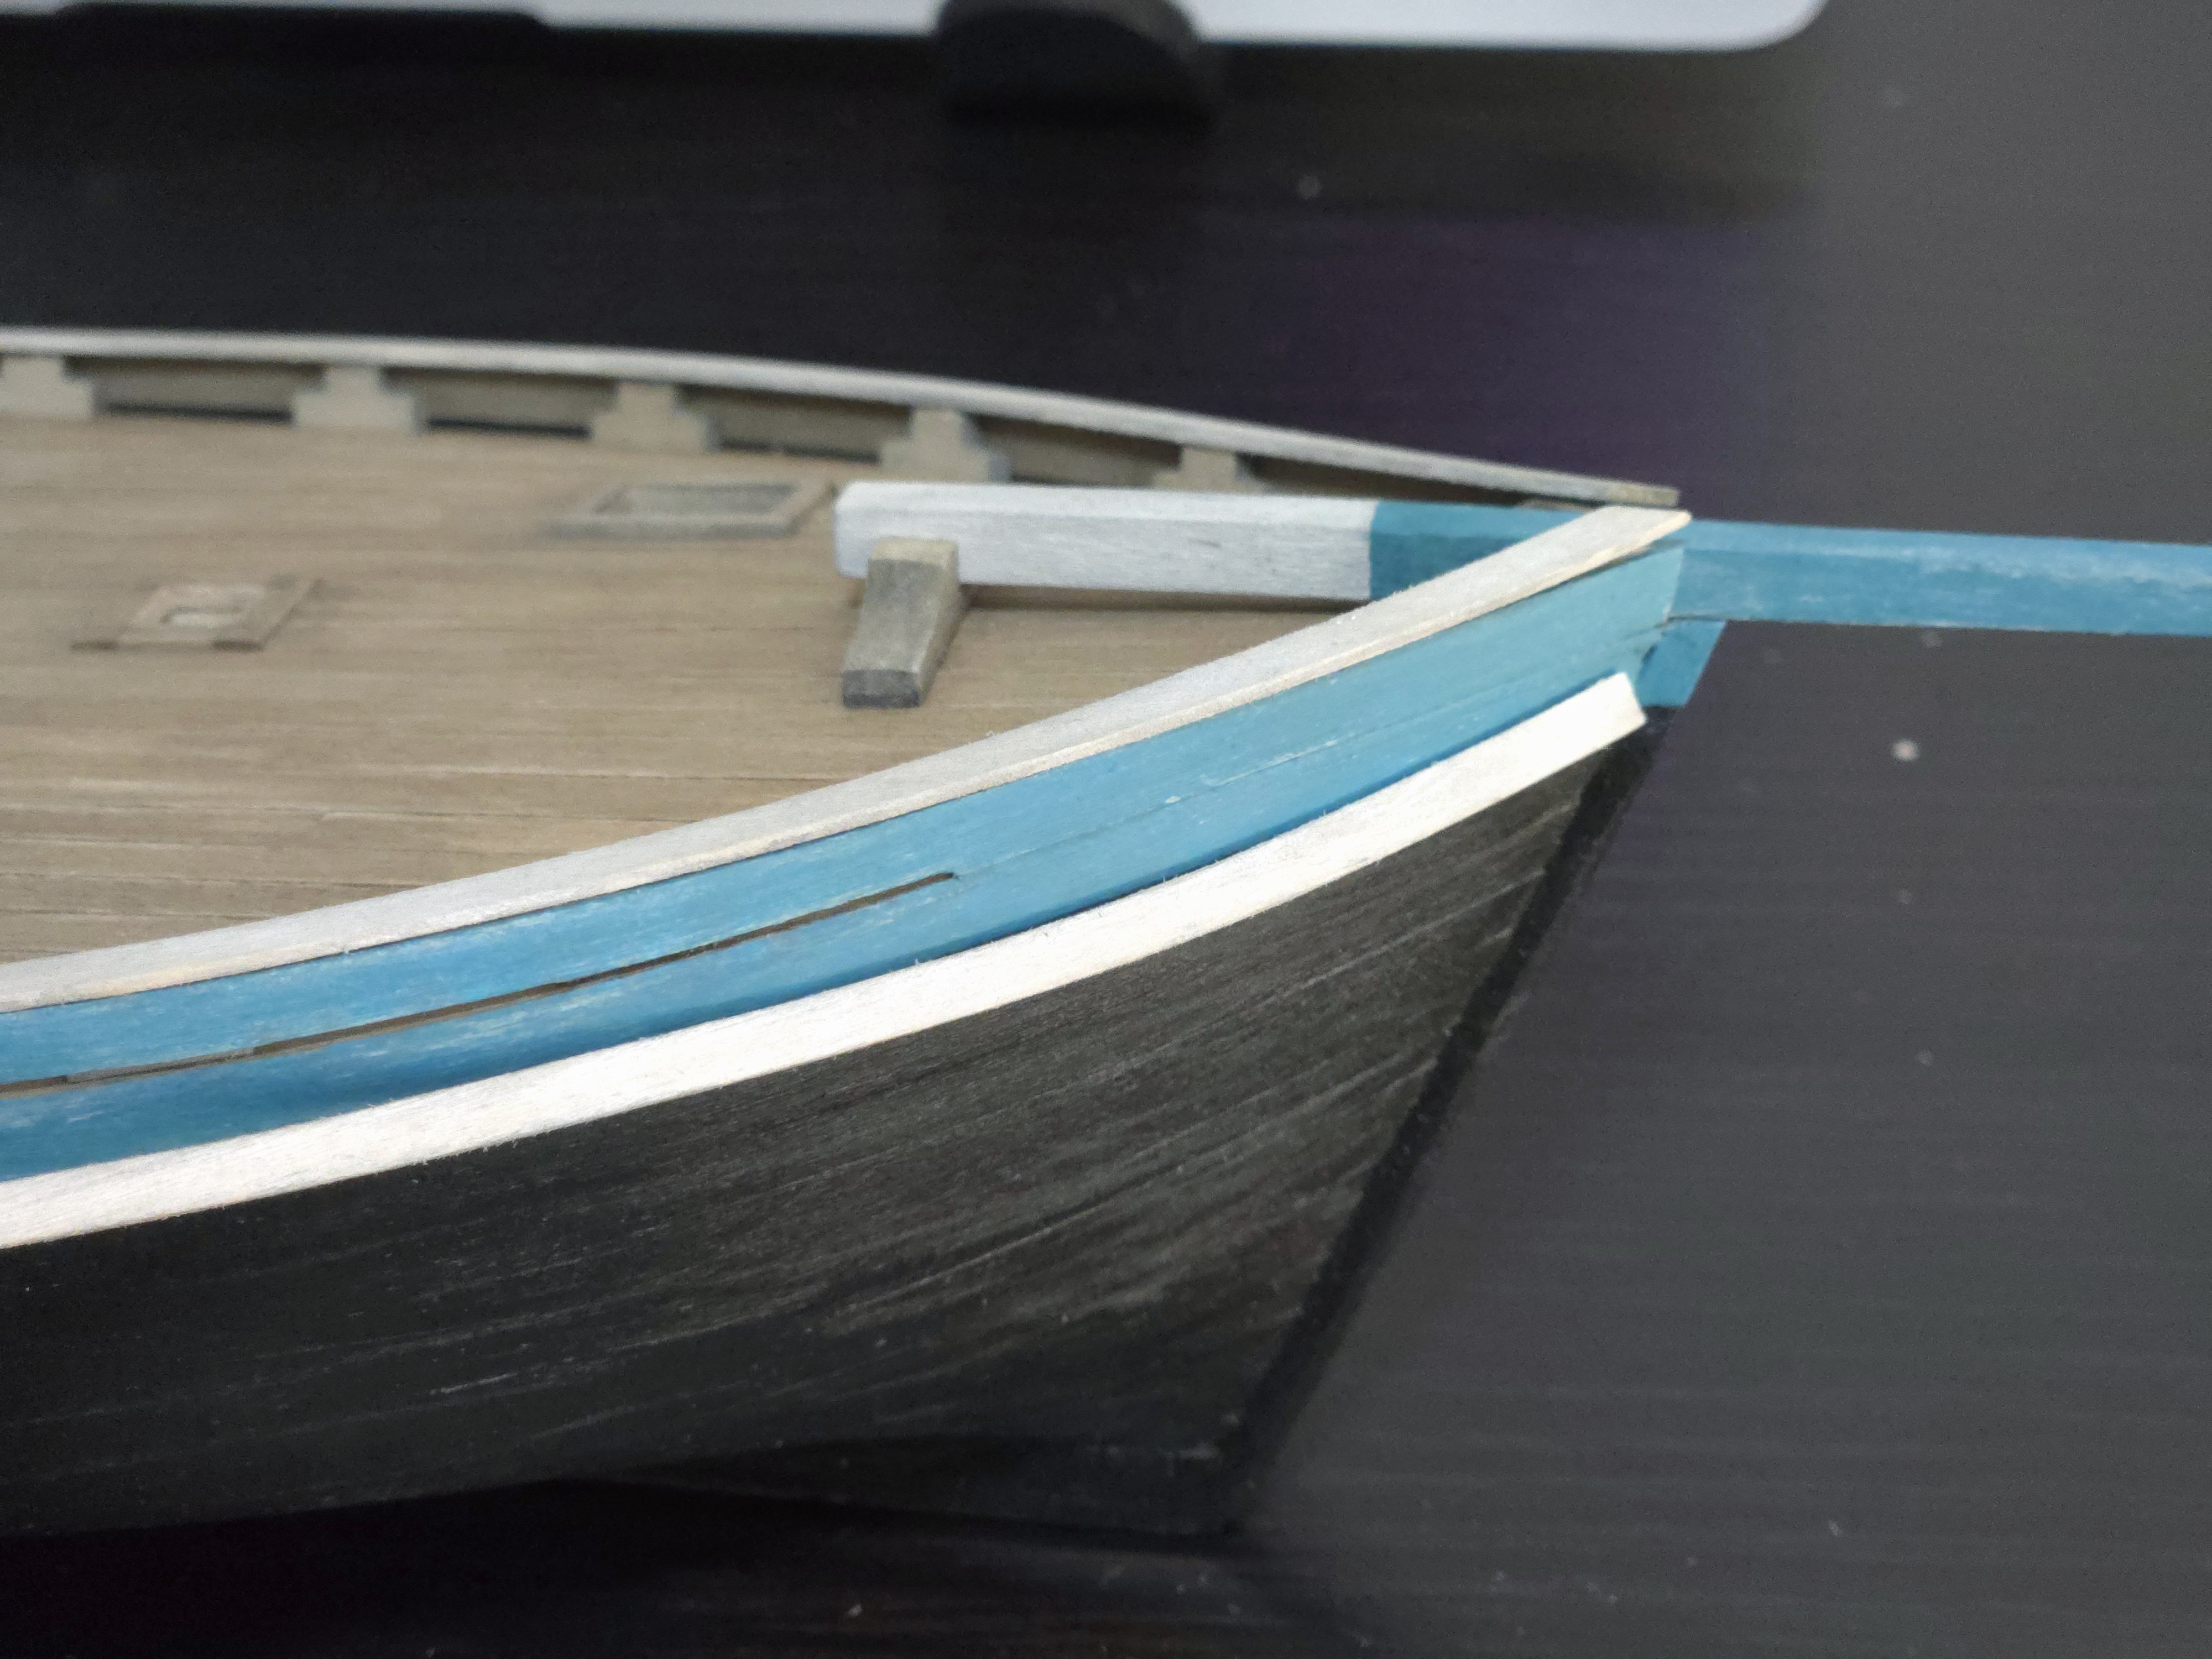
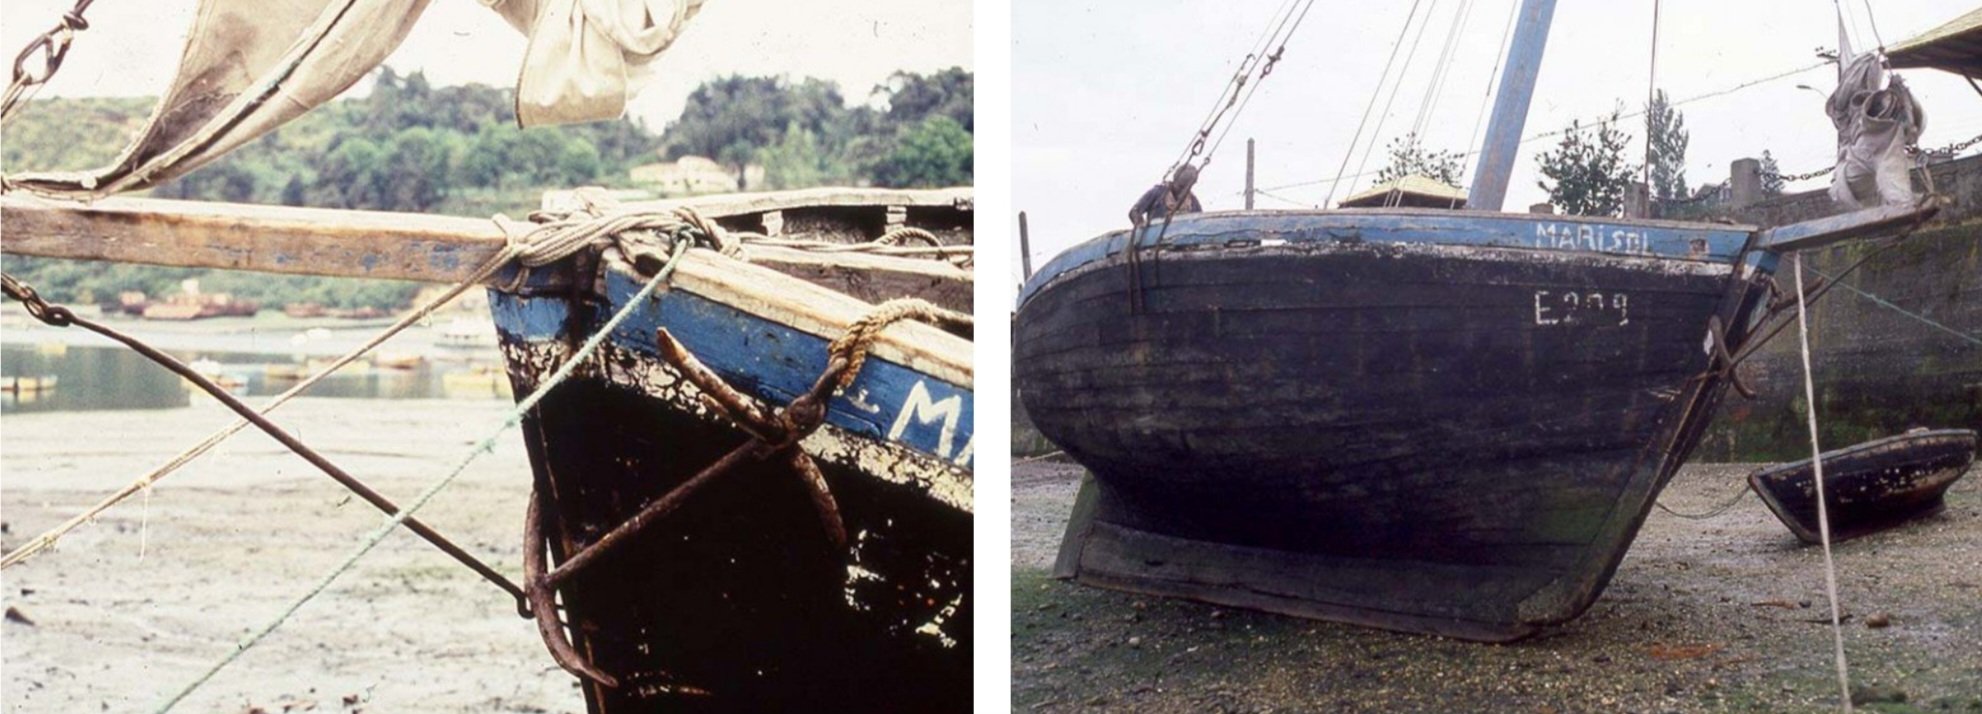
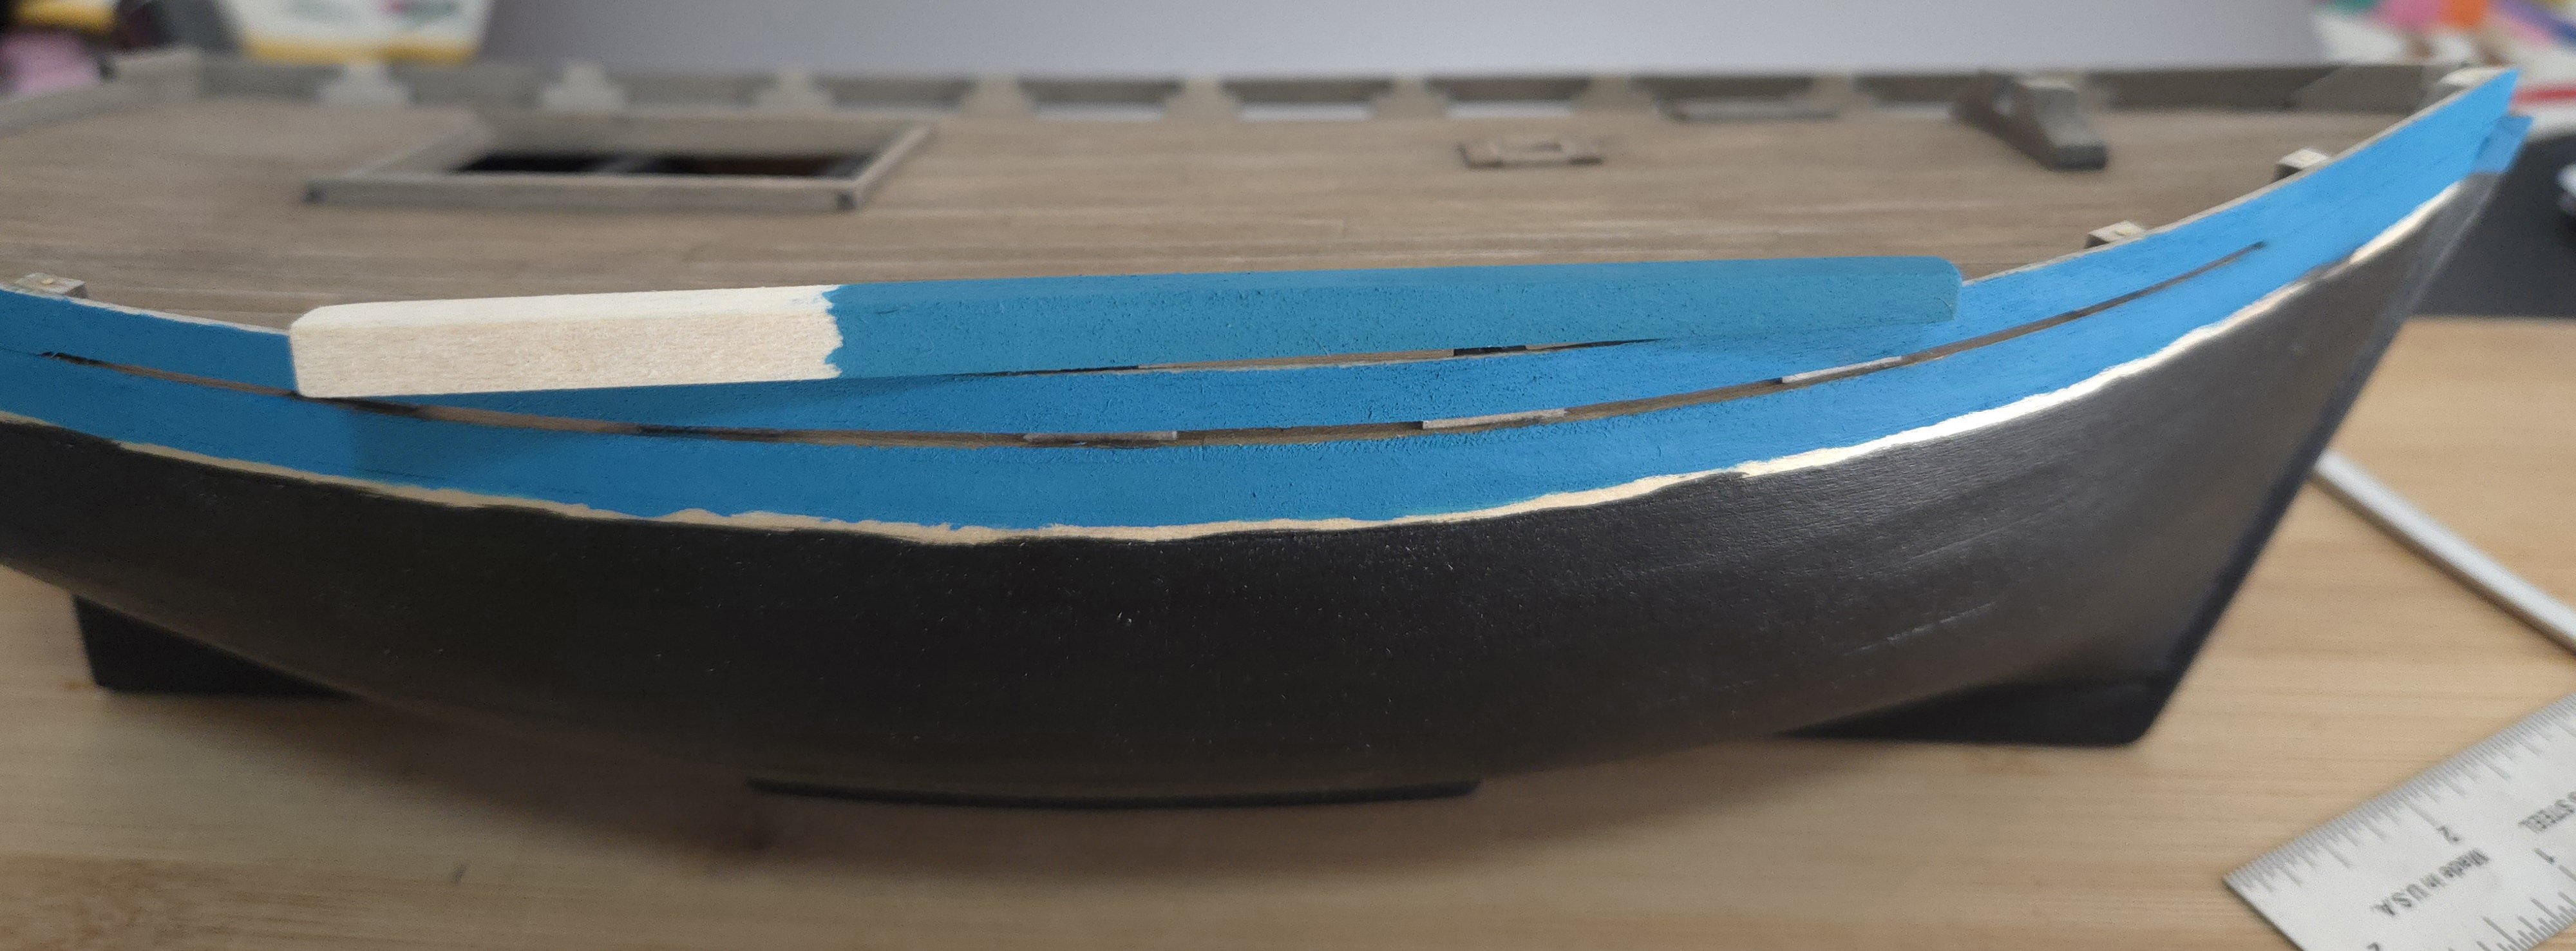
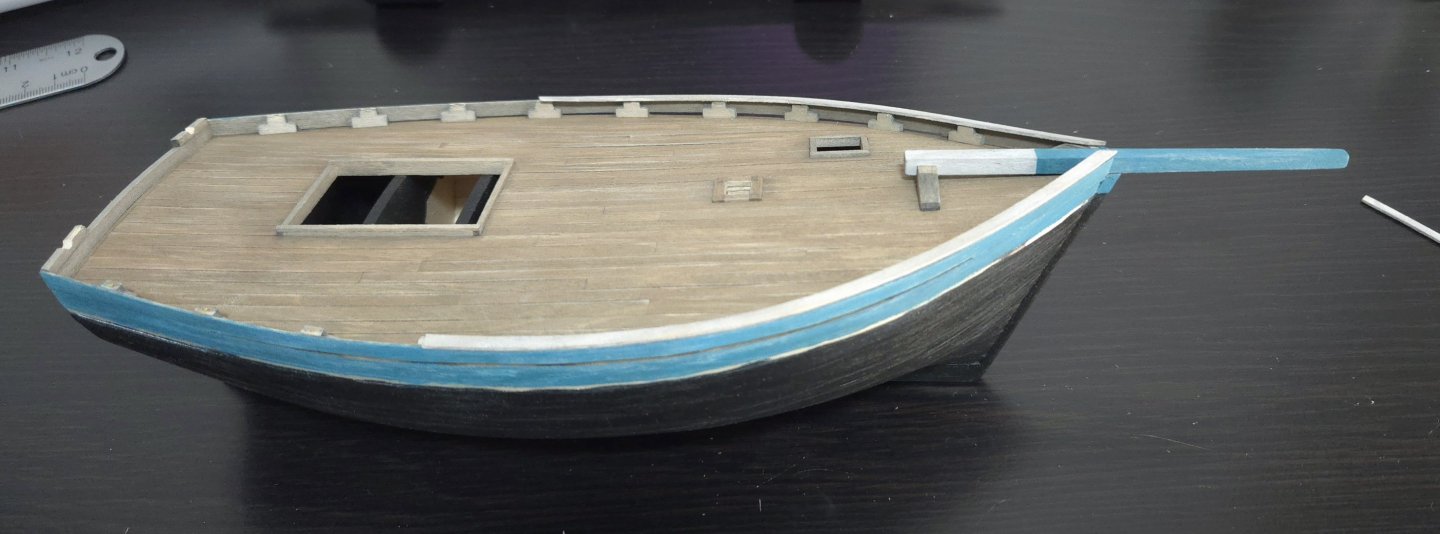
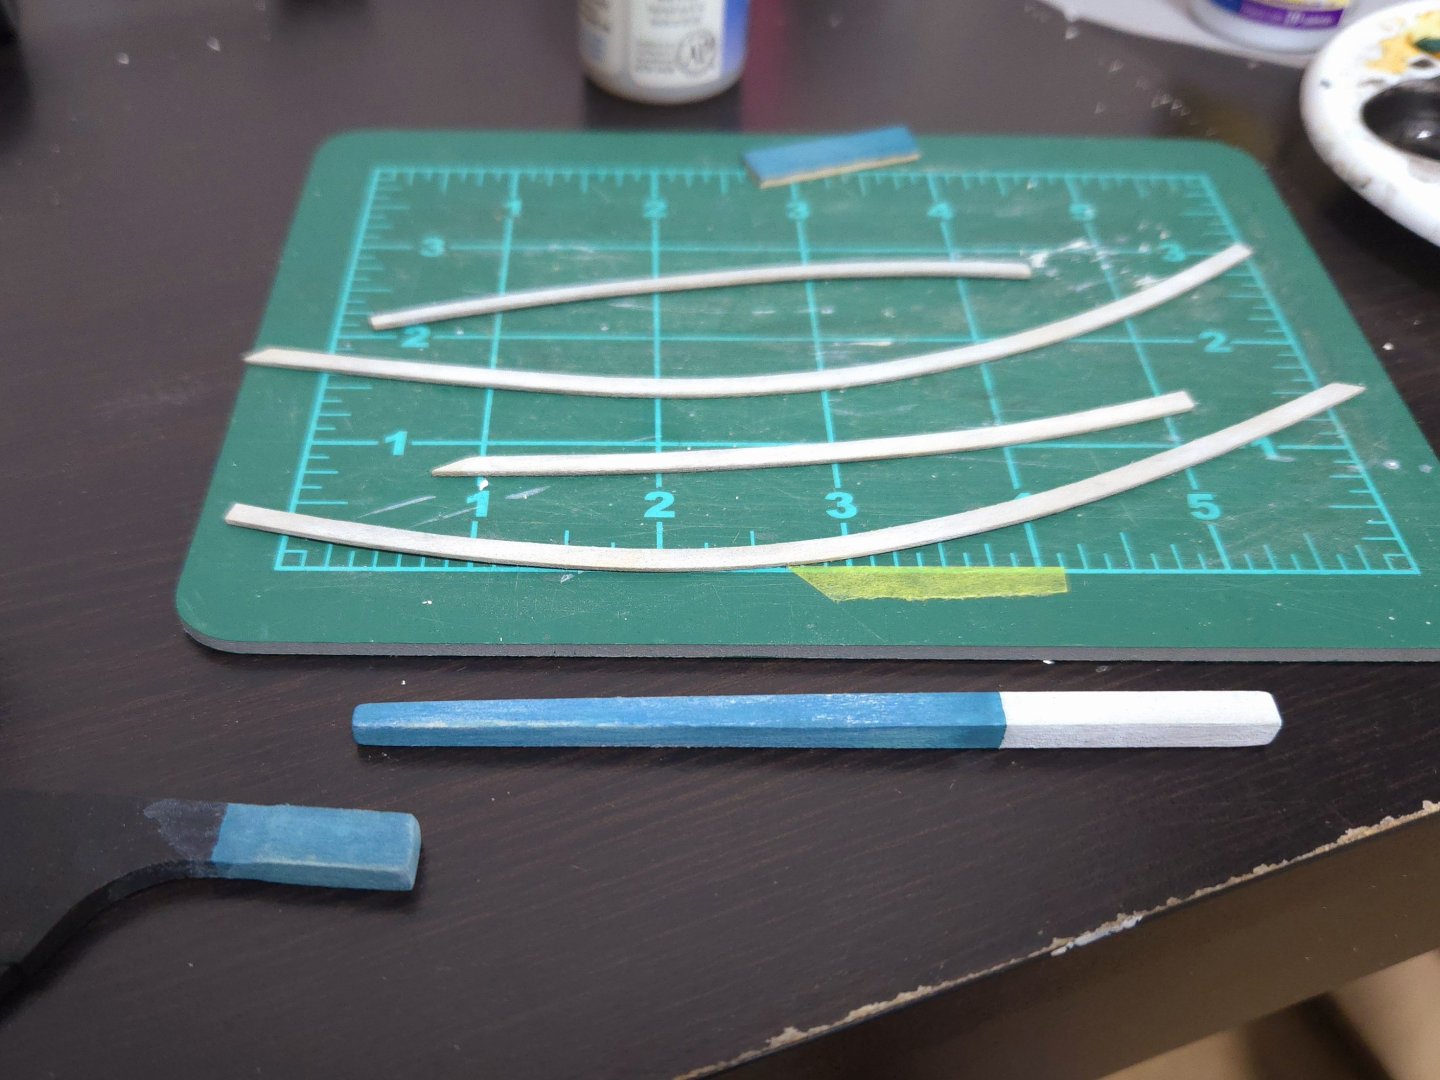
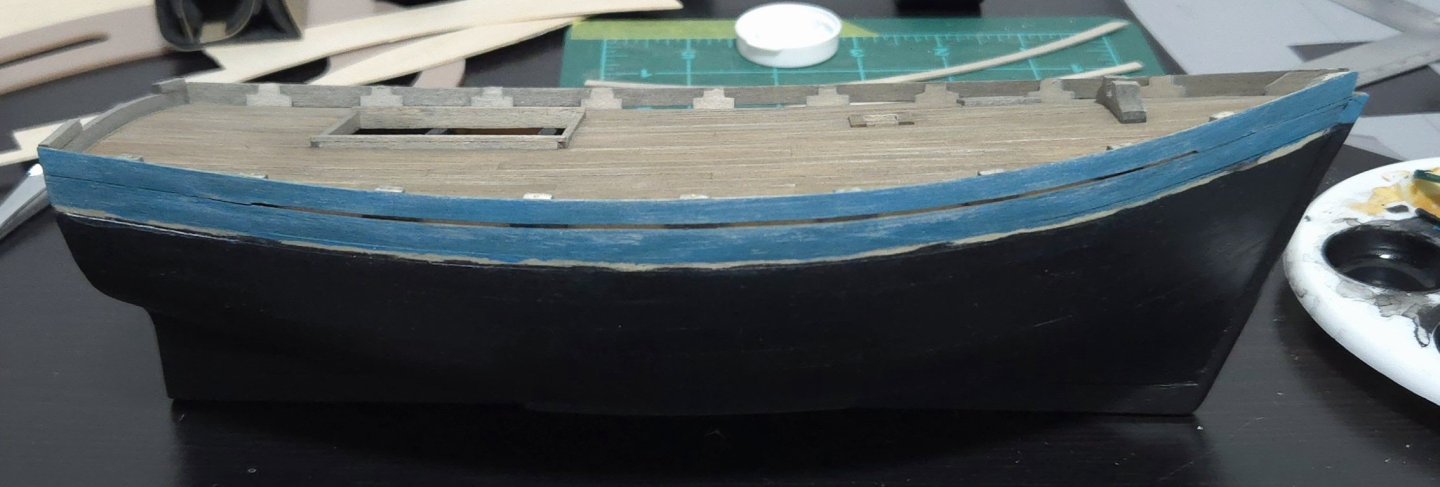
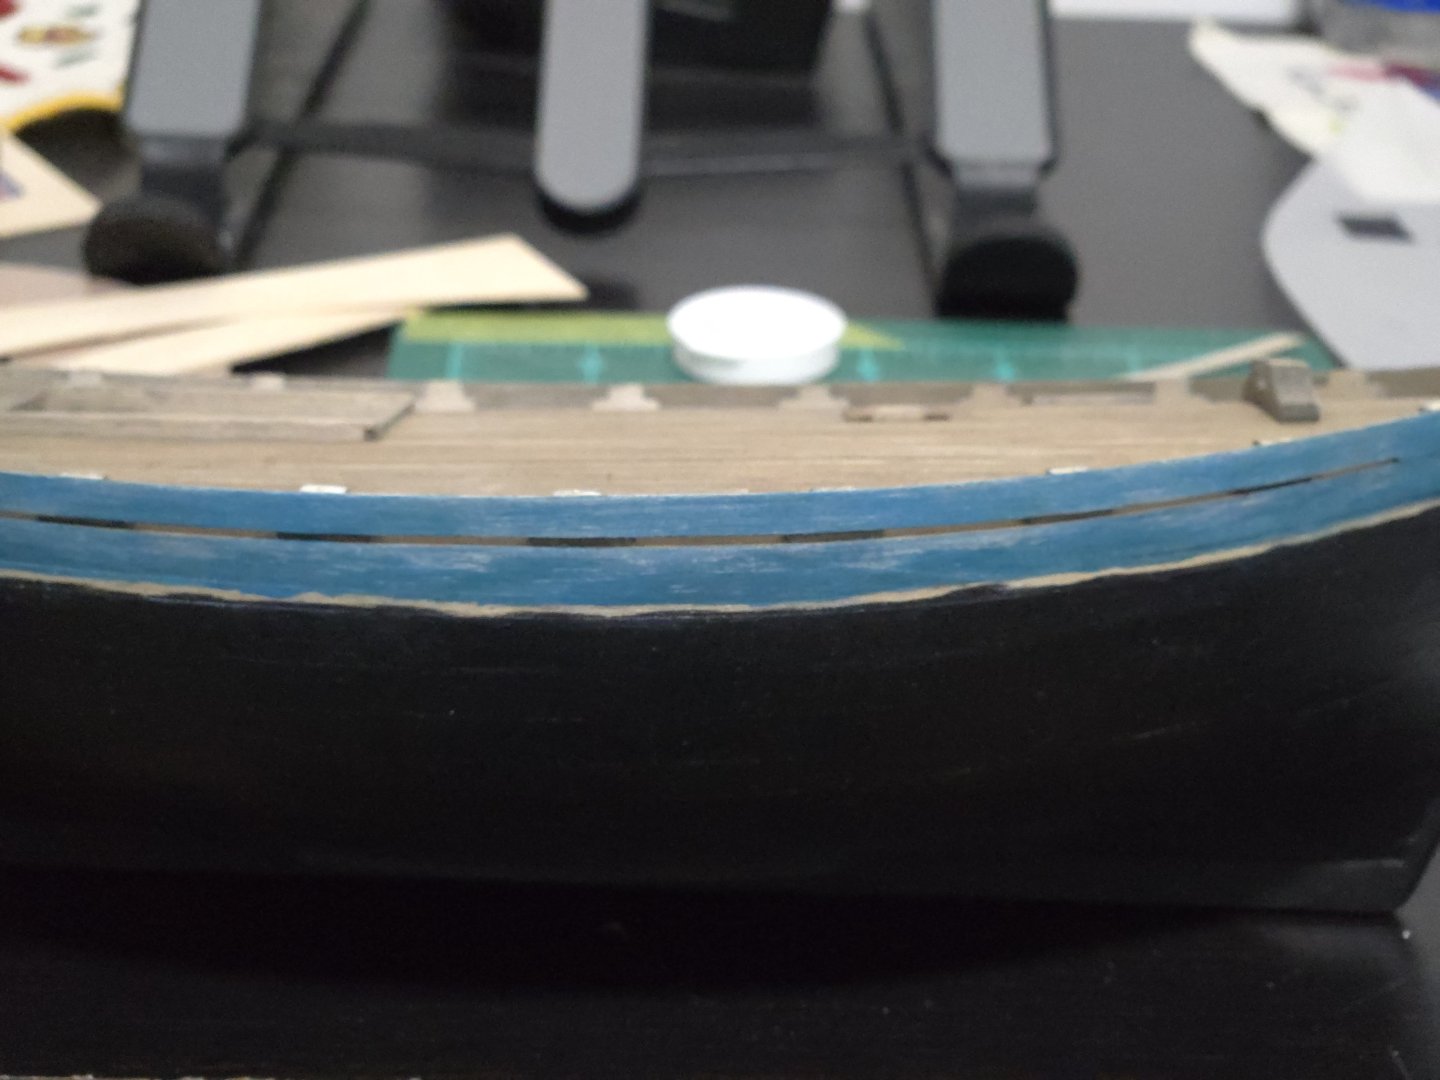
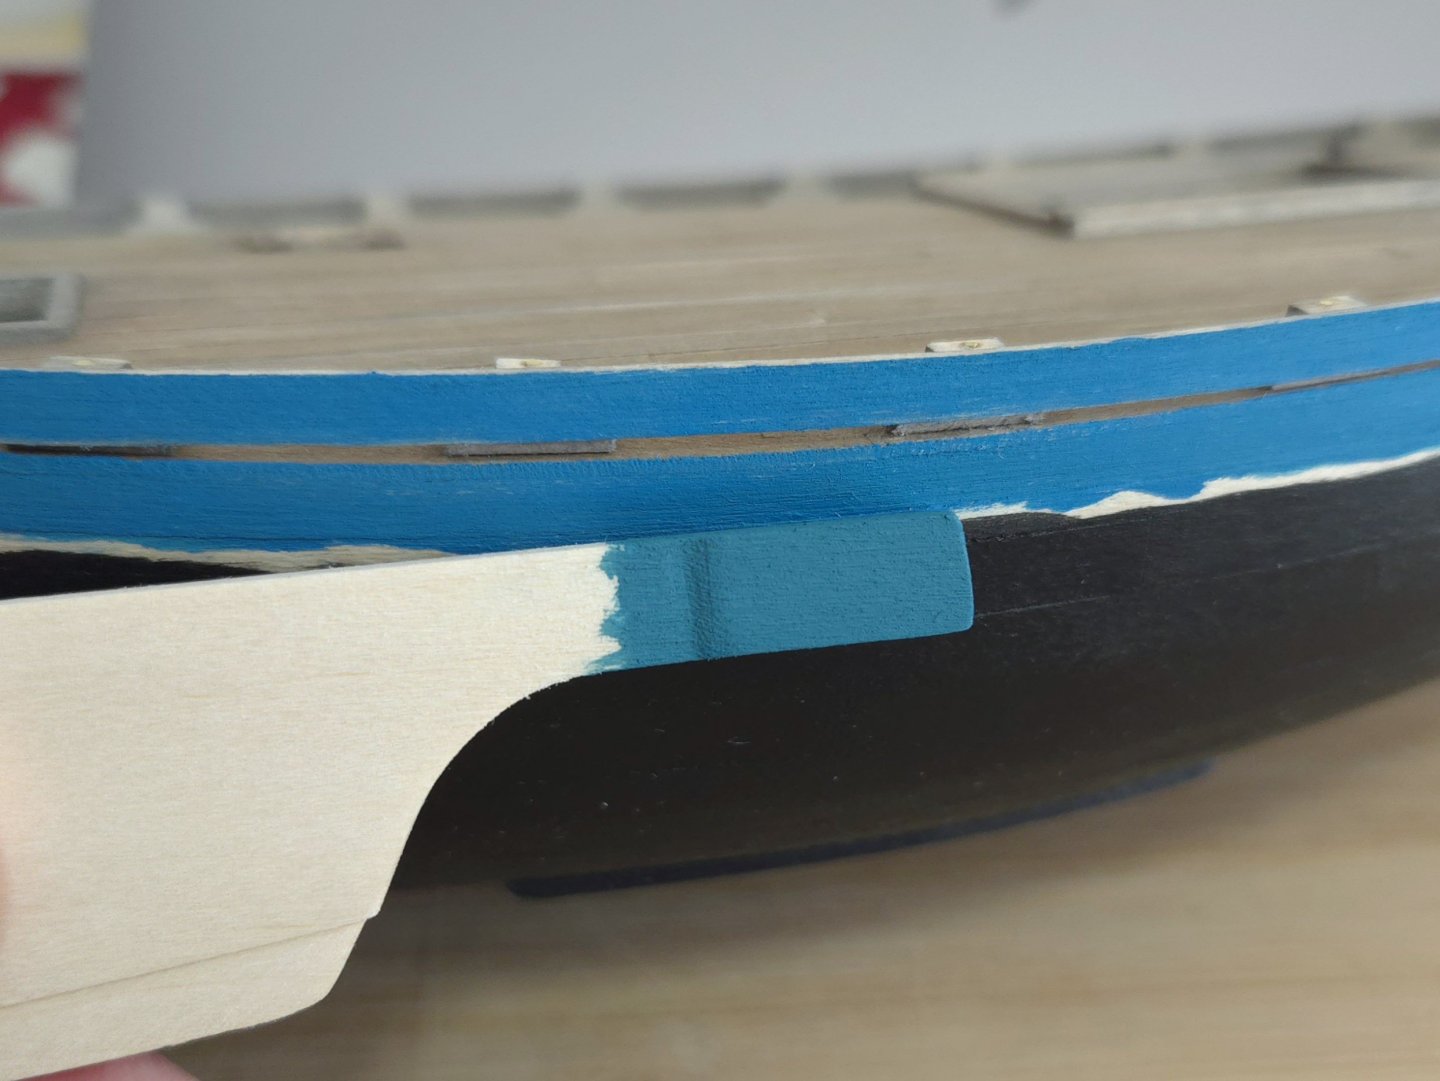
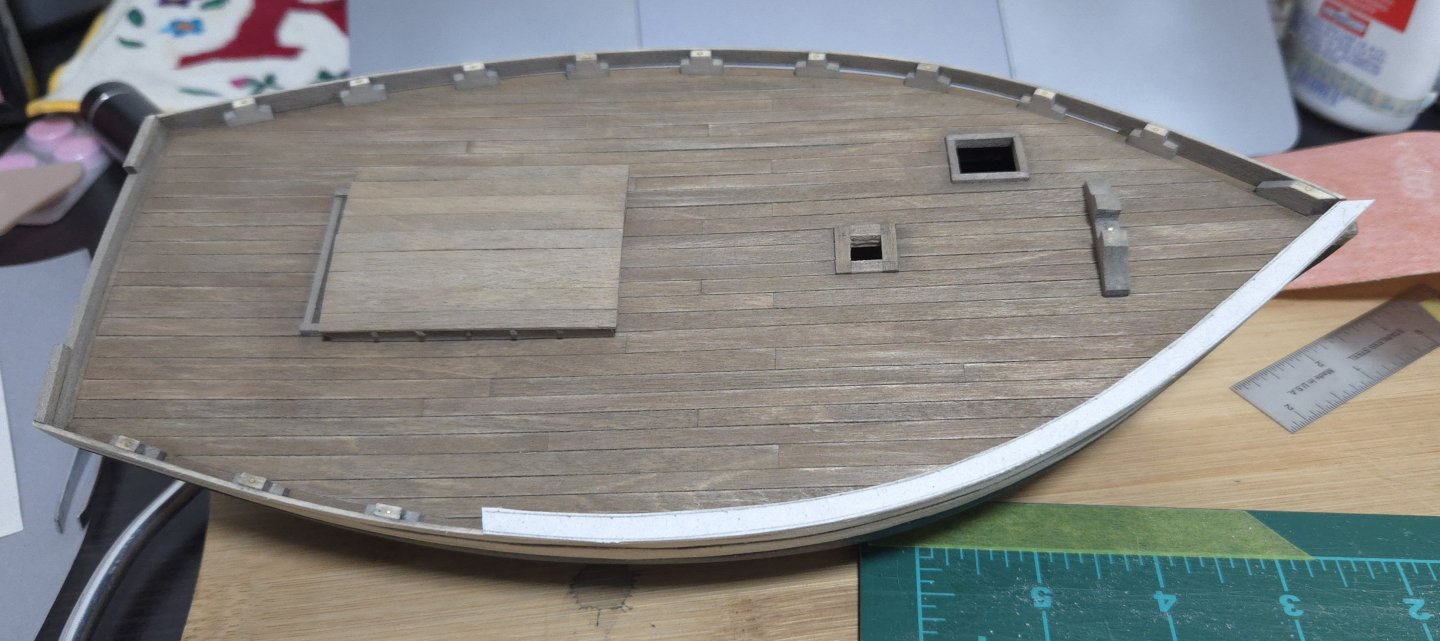
Thanks, Gary! While I'm overall happy with how my Canoa de Rancho build turned out, I think I handled the weathering a bit inconsistently there. I could give reasons for why that might be the case on a real Canoa, but for this build, I wanted to be consistent from the start. I put it away over night and came back to it with fresh eyes. I ended up deciding that the final coat of white wash had been excessive, and applying a very light wash of the blue-green shade to correct. I've also painted the cap rails and the aft end of the bowsprit. A lot of lanchas have white rails, so I went with that, first applying a bit of dark wash to tint the wood, and then adding a few layers of white wash. On its own, it looked good, but it looked too bright on the model itself. I added another dark wash on top and think it appropriately matches the rest of the hull now, as you can see below (with only the fore rails in place, not yet glued). Seeing the cap rails made me rethink my plans for the rubbing strakes. I was originally going to paint these black like the lower hull, but I now think a white stripe could nicely set off the blue above. (There's photo evidence of both ways of painting rubbing strakes). In white, it would look something like the photo below (although a good bit more scuffed-up and scratched): Speaking of rubbing strakes, I can't add them until I attach the chainplates for the shrouds at the right angle, as the rubbing strakes will run on top of them. Based on photos, there were lanchas with chainplates outside, and lanchas with the chainplates inside. But I suspect that those with chainplates bent around the exterior had wales rather than rubbing strakes--you would hardly want to weaken a wale by running a chainplate through it, but if you were just adding a rubbing strake as a fender to protect the hull, you would want it to run outside of everything for better protection. (Garnham's cross-section drawings show that only some, not all, lanchas were built with distinct thick wales.) All of which is to say, I think it makes sense for me to run the chainplates under the rubbing strakes. But to do that, I need to figure out the mast dimensions and where the shrouds will attach. I have three main sources on the mast dimensions. First, the plans. Second, dimensions taken by José A Garnham from a somewhat larger lancha (about 4.5 feet longer than what I'm modeling) and included in his diagram of said vessel. Third, a large number of photos. It's worth noting that the mast includes the mast itself, and a separate pole often used for a flag. For now I'm focusing on the mast, not the flagpole. It should also be noted that photos of lanchas in the early 20th century seem to generally depict shorter masts than on later lanchas. As I'm modeling a roughly midcentury vessel, I focused only on the more recent photos (1940s-1980s). More than precise measurements, what I'm looking at is the ratio of hull length to mast height. In many other vernacular watercraft around the world, a set of proportions govern the mast size, and I wouldn't be surprised if the sane held true for Lanchas Chilotas. The actual ratio used could vary: maybe it was based on keel length, maybe on breadth, or maybe something else, and it may have measured the mast length including the portion under the deck. Given that most of these dimensions are unclear in photos, and lanchas generally had similar proportions, I decided to just calculate the ratio of mast height (from the deck upward) to hull length from stem to stern, both of which are easy enough to see in side views. If not enough infornation to figure out what proportions lancha builders actually used (which conceivably could vary between places and/or builders), it should be enough to provide me with a ratio that will result in a mast that looks the right size. Interestingly, the plans and Garnham diagram give pretty different ratios in comparison to the photos. The plans depict the mast height above deck (discounting the flagpole) as exactly equal to the hull length. Garnham's diagram, meanwhile, shows a mast 96% of the length of the hull. These are not all that different from each other, but counting pixels on photos consistently shows proportionally longer masts, ranging from 105% of the hull length, up to 129% of hull length. The average from photos gave a mast 116% of the hull length (still discounting the flagpole). It's possible that hull length measures aren't that precise, as the camera usually wasn't directly to the side of the lancha so there's a slight angle, but 1) in the worst cases I added a few pixels to the hull length to compensate, and 2) in one case where I had two photos of the same lancha, one from directly to the side and one from a slight angle similar to that present in some of the other photos, I took both ratios and found a difference of just 1%, suggesting that the other measures wouldn't be off by that much. Overall, it seems that the plans give too short of a mast, although it's within the observed range of mast heights if Garnham's measurements are taken into account. Yet Garnham's measurements are a definite outlier, about 10% shorter than even the shortest masts found through photographic evidence, and 20% shorter than the average proportions from the photos. It's not that I think Garnham is wrong, but the vessel measured doesn't seem to be wholly typical. (To be fair, I suspect that his book, which I can't access, gives more complete information on masting than I've been able to scrounge up with the few diagrams of his still available on his website.) So, I think it will make sense to make a rather longer mast for my build. I think I'll stick to the short end of the observed spectrum, as it will make the model easier to display and store, but somewhere around 112%-116% of hull length seems reasonable. Next, I'll need to figure out exactly where the shrouds will be on the mast, which will require working out the standing rigging.

- 312 replies
-
- 7
-
-
- Chile
- Latin America
- (and 6 more)
-
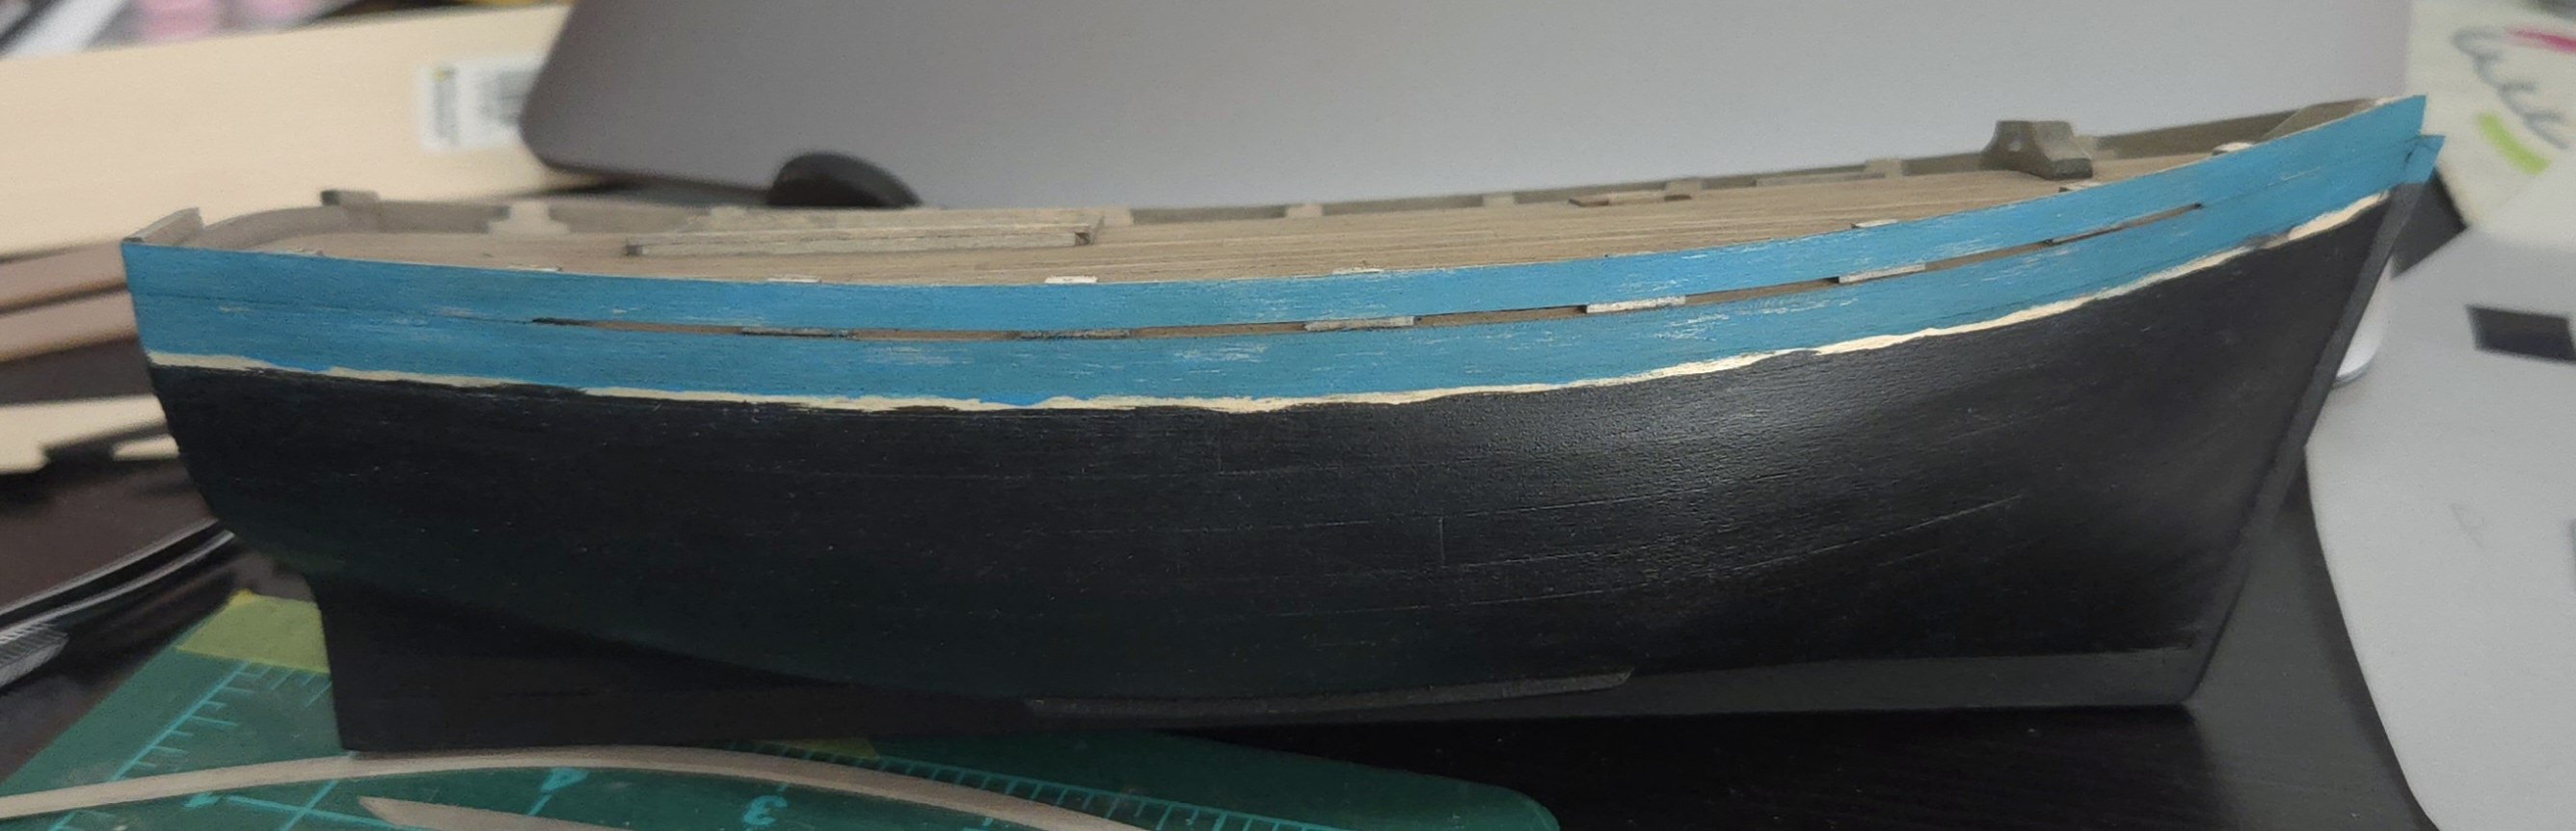
I did a bit more weathering to the topsides. Tests with a thin white wash seemed promising, so I decided to go for it. Seeing it on the full hull, though, I don't know if I added a layer too many and overdid it. Weathering is tricky!
- 312 replies
-
- 9
-
-
- Chile
- Latin America
- (and 6 more)
-
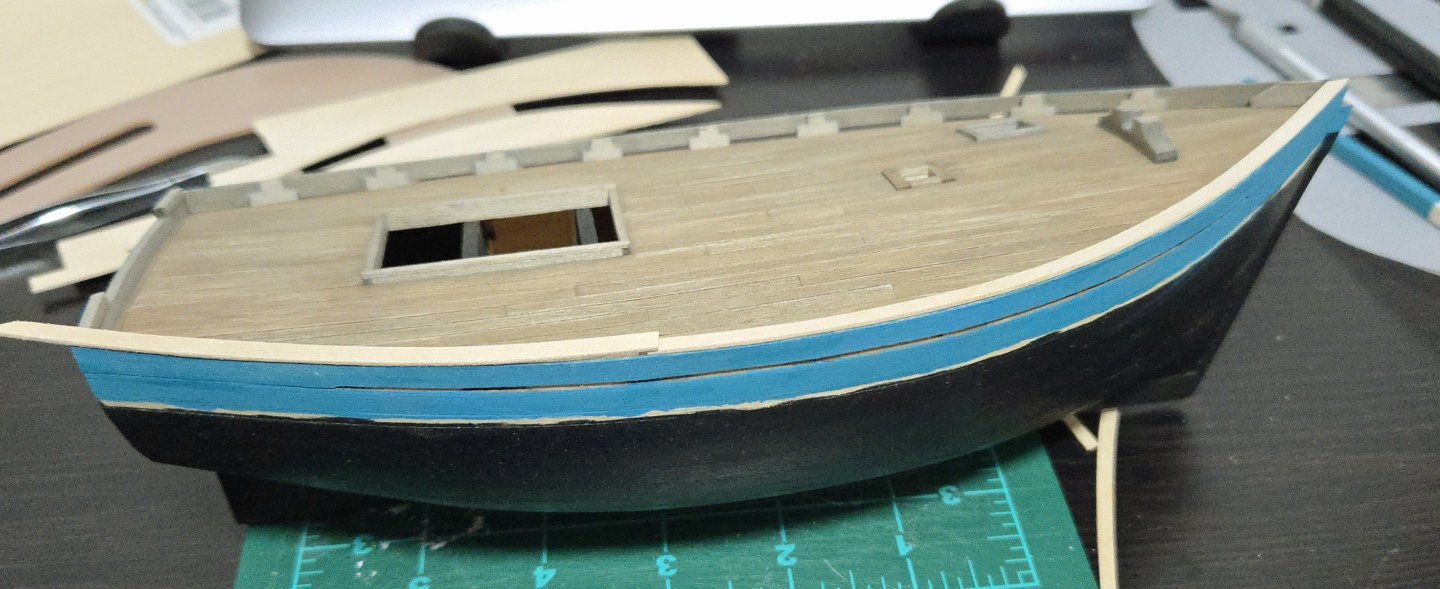
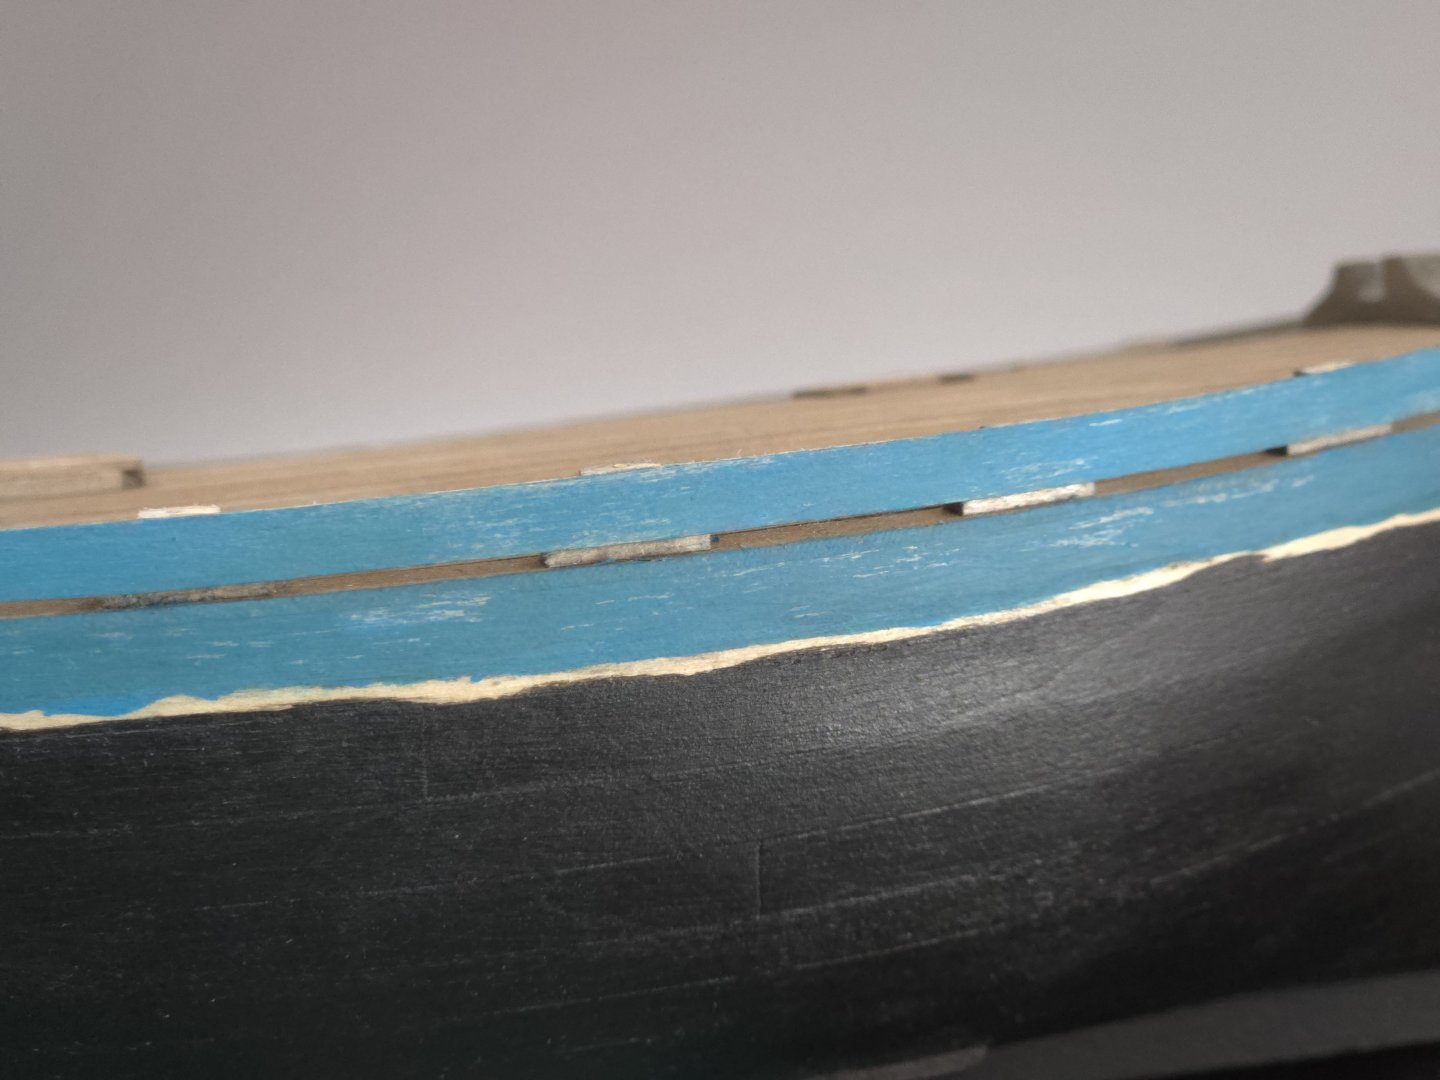
A bit more progress. First, I've cut the cap rails approximately to size--the width is good, I just need to get the joints right and trim the aft end. From what I can tell, these would have been simple butt joints, possibly to reduce the complexity of repairing them. I've colored the underside with a black wash, the top will be white. I also did a bit of weathering to the topsides, drawing inspiration (but not really copying) the work that FriedClams did on his dragger build. I didn't want to go overboard on the weathering. Some lanchas were certainly quite weathered, like that shown below: Source: https://www.carlosvairo.com/galeria-puerto-montt-lanchas-chilotas But others were in better condition--still used, but not quite so ragged. Source: https://ceph-puerto-montt.blogspot.com/2009/02/album-del-recuerdo-imagenes-de-nuestra_22.html?m=1 To get the look I wanted, I did a bit of light sanding here and there with a relatively rough-grit sandpaper. This left some scrapes of bare wood exposed, and in other places let the different tones of the earlier paint coats come through, creating slight variations that add to the look. I then added a dark wash to help even things out a bit and reduce the brightness of the exposed wood. I especially tried to apply the wash more heavily under the scuppers to suggest drainage stains. I may play around with a few more washes, especially after the rub rail is added. I plan on treating the bottom of the hull in a similar way.


- 312 replies
-
- 7
-
-
- Chile
- Latin America
- (and 6 more)
-
No worries! Yeah I've definitely learned my lesson on this and will be getting the english version for future purchases.
- 139 replies
-
- 1
-
-
- ancre
- Bateau de Lanveoc
- (and 2 more)
-
Thanks! I actually had considered getting the English version, but Ancre's shipping options are a little tricky. You can either pay relatively little for shipping without tracking and with an estimated delivery time of a couple weeks to a couple months, or you can pay quite a bit for tracking and faster shipping. I had had some trouble receiving packages in Chicago, so I needed the tracking number. I saw some purchasing options besides Ancre itself that were much cheaper, but they only had the French version, which is what I went with. There are some other Ancre books I'm interested in, but with my experience with this one, I'd definitely prefer to buy the English version. I'll probably wait until we visit Europe sometime in the next few years to get them, though.
-
Thanks, adding a bit of a light brown worked perfectly! In the photo below, the bulwarks are still in the original, while the head of the rudder is in the revised color. It's a much better match for the look I was after. Yes, the color schemes chosen over time undoubtedly reflected the price and availability of different paints over time. Once more colors became cheaply available, Chilotes adapted to adding a splash of color to personalize their lanchas.
- 312 replies
-
- 9
-
-
- Chile
- Latin America
- (and 6 more)
-
It must feel great to be able to finally add a yard! You're doing really great work, and its all the more impressive considering the tiny scale. Although I suppose 1:96 must seem huge after all those ships in bottles...
- 301 replies
-
- 5
-

-
-
- Constitution
- Bluejacket Shipcrafters
- (and 1 more)
-
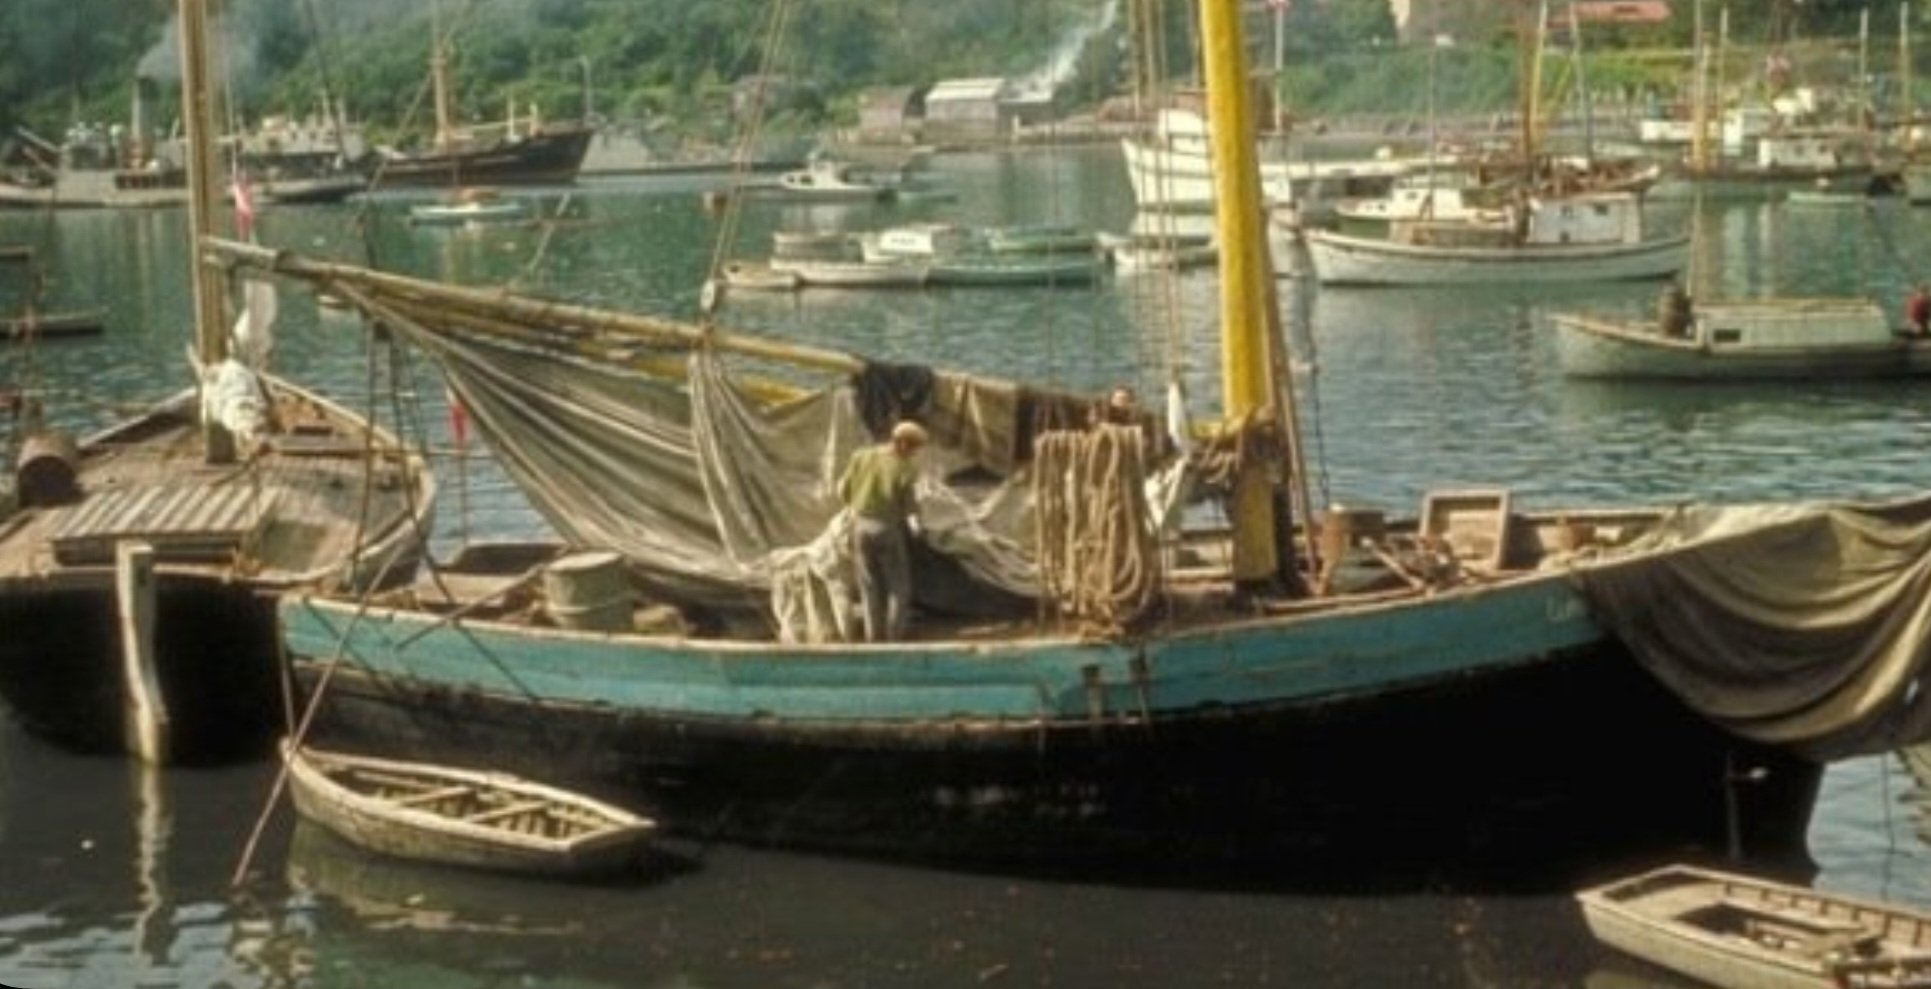
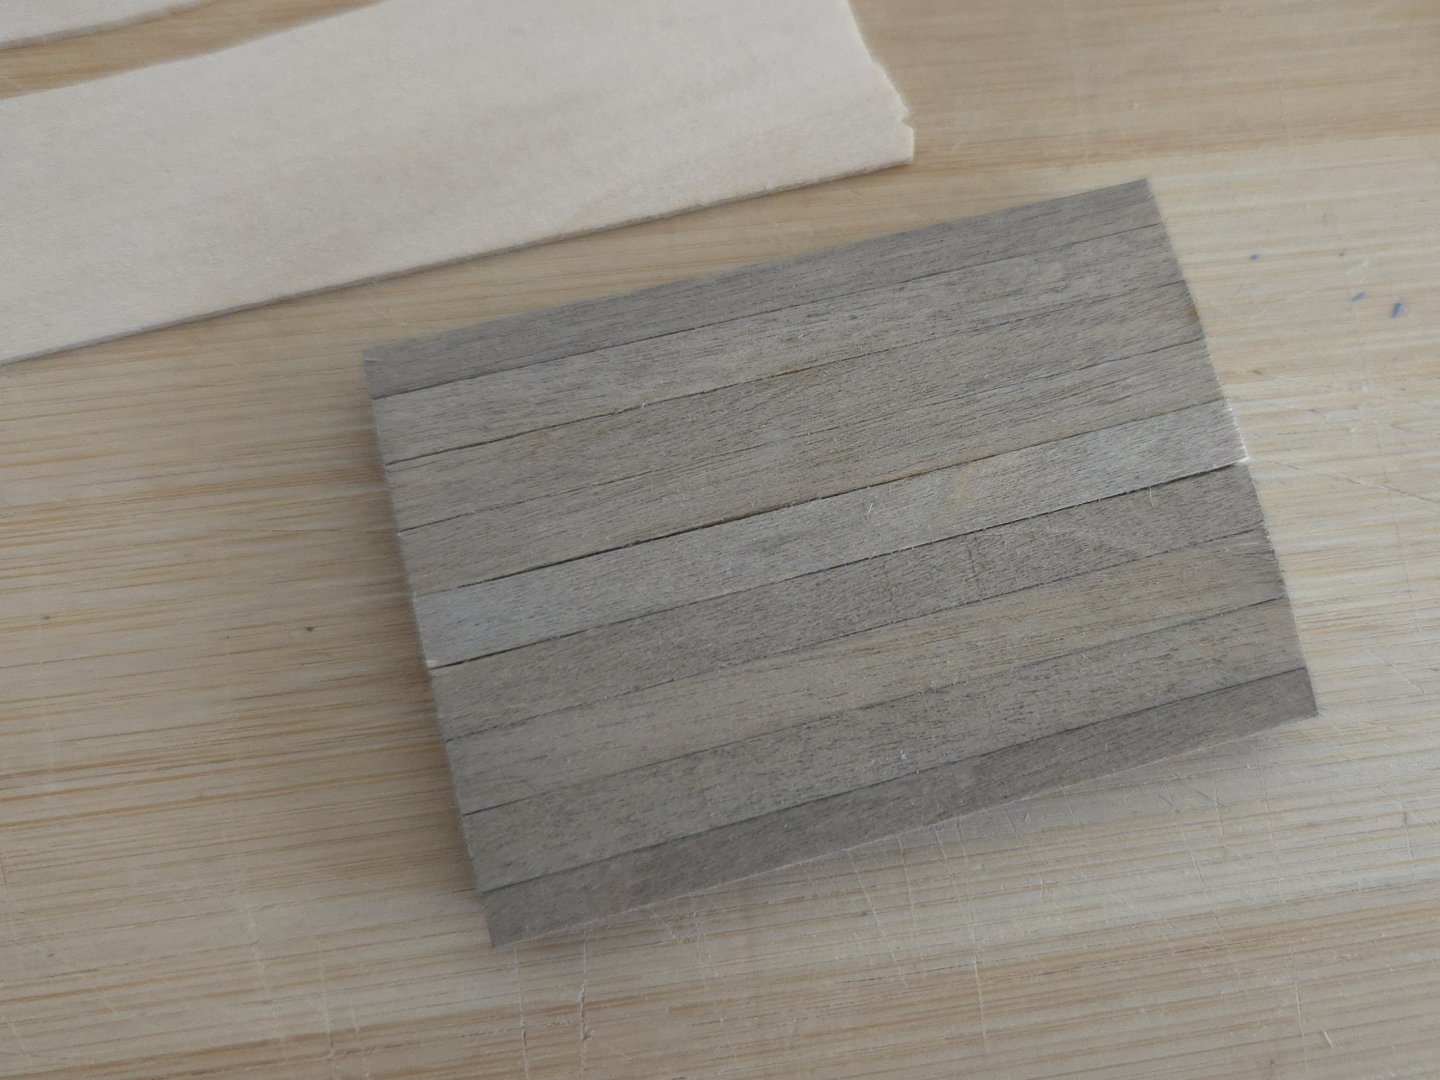
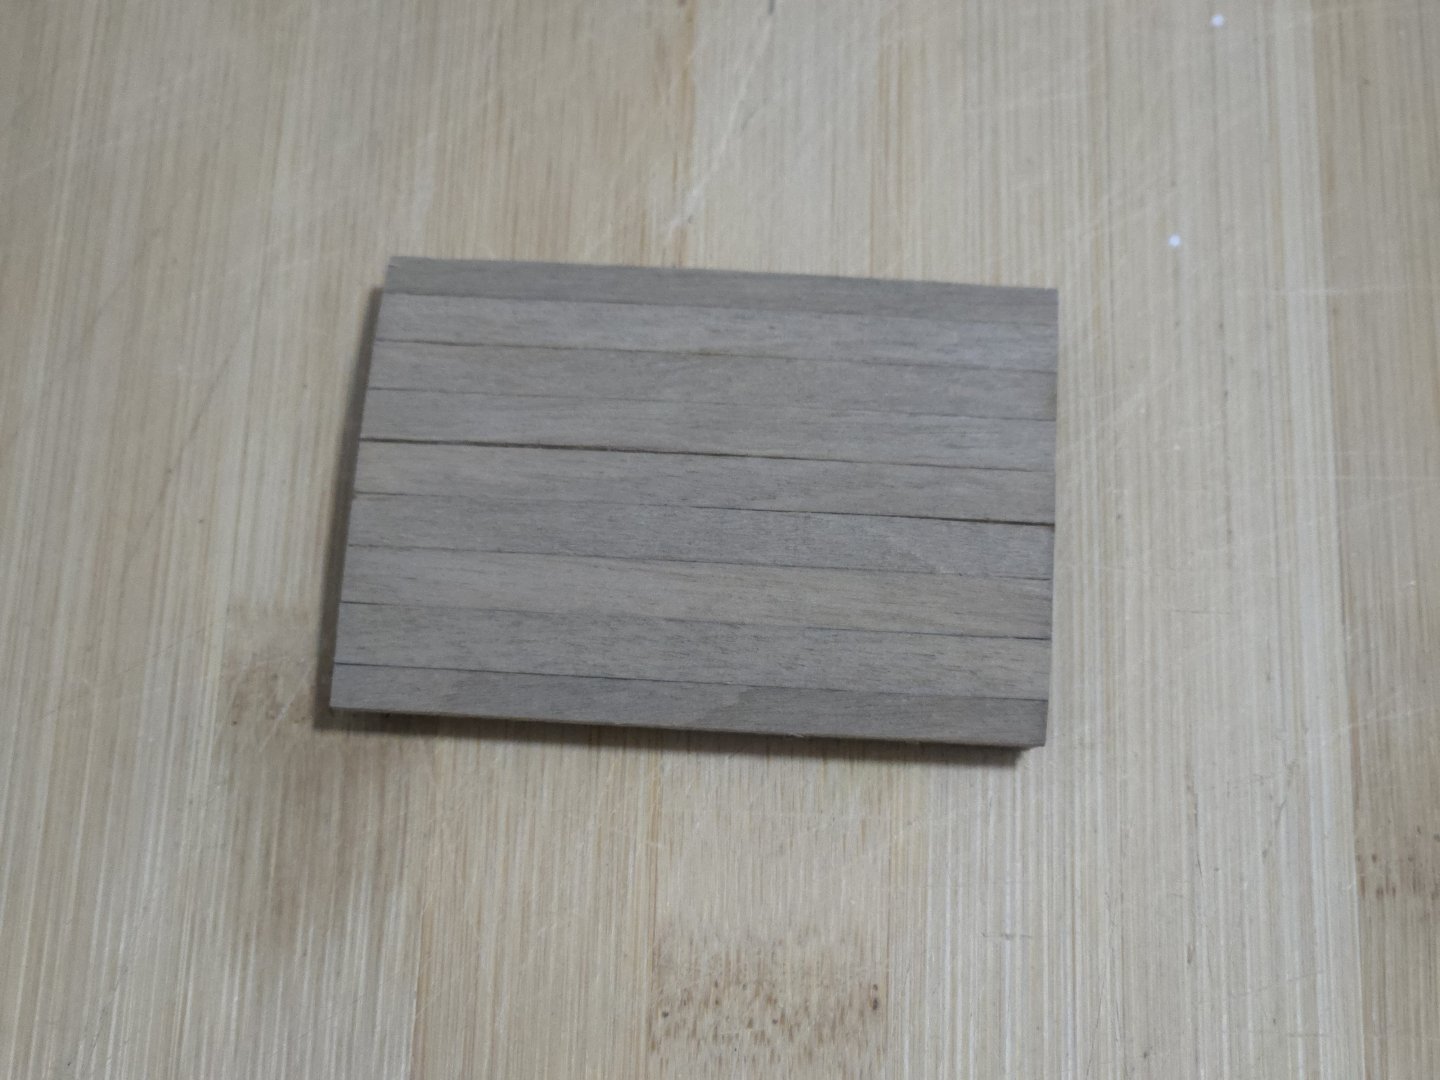
A bit more progress before getting to the metalwork and rigging. First, due to wood contraction after successive washes, fairly large gaps had opened up around one of the planks in the main hatch: These looked excessive to me, so I used alcohol to remove the plank and replaced it with a pre-colored one. Still some tiny gaps, but much less noticeable: I've also started making the cap rails. And painting the topsides. Sources agree that the "classic" color scheme was a black hull with perhaps white wales or topsides. However, from photos it's clear that a wider range of colors came into use in the second half of the 20th Century. I particularly like the blue-green topsides shown below in a photo from 1964: Source: https://ceph-puerto-montt.blogspot.com/2009/02/album-del-recuerdo-imagenes-de-nuestra_22.html?m=1 My first attempt at getting the paint right was done late at night, and the color seemed close. But seen in the light of day, it looks much too intense: I added a bit of cream color to lighten it, and a bit of orange, which, being from the opposite side of the color wheel, should reduce the intensity a bit. The bowsprit received a coat of this. As seen below (the bowsprit is on top), the color difference is minimal. I'm not sure if this means I should add a bit more orange or what. (The ragged edge between colors, which looks terrible now, will be covered by pre-painted rubbing strakes.)


- 312 replies
-
- 8
-
-
- Chile
- Latin America
- (and 6 more)
-
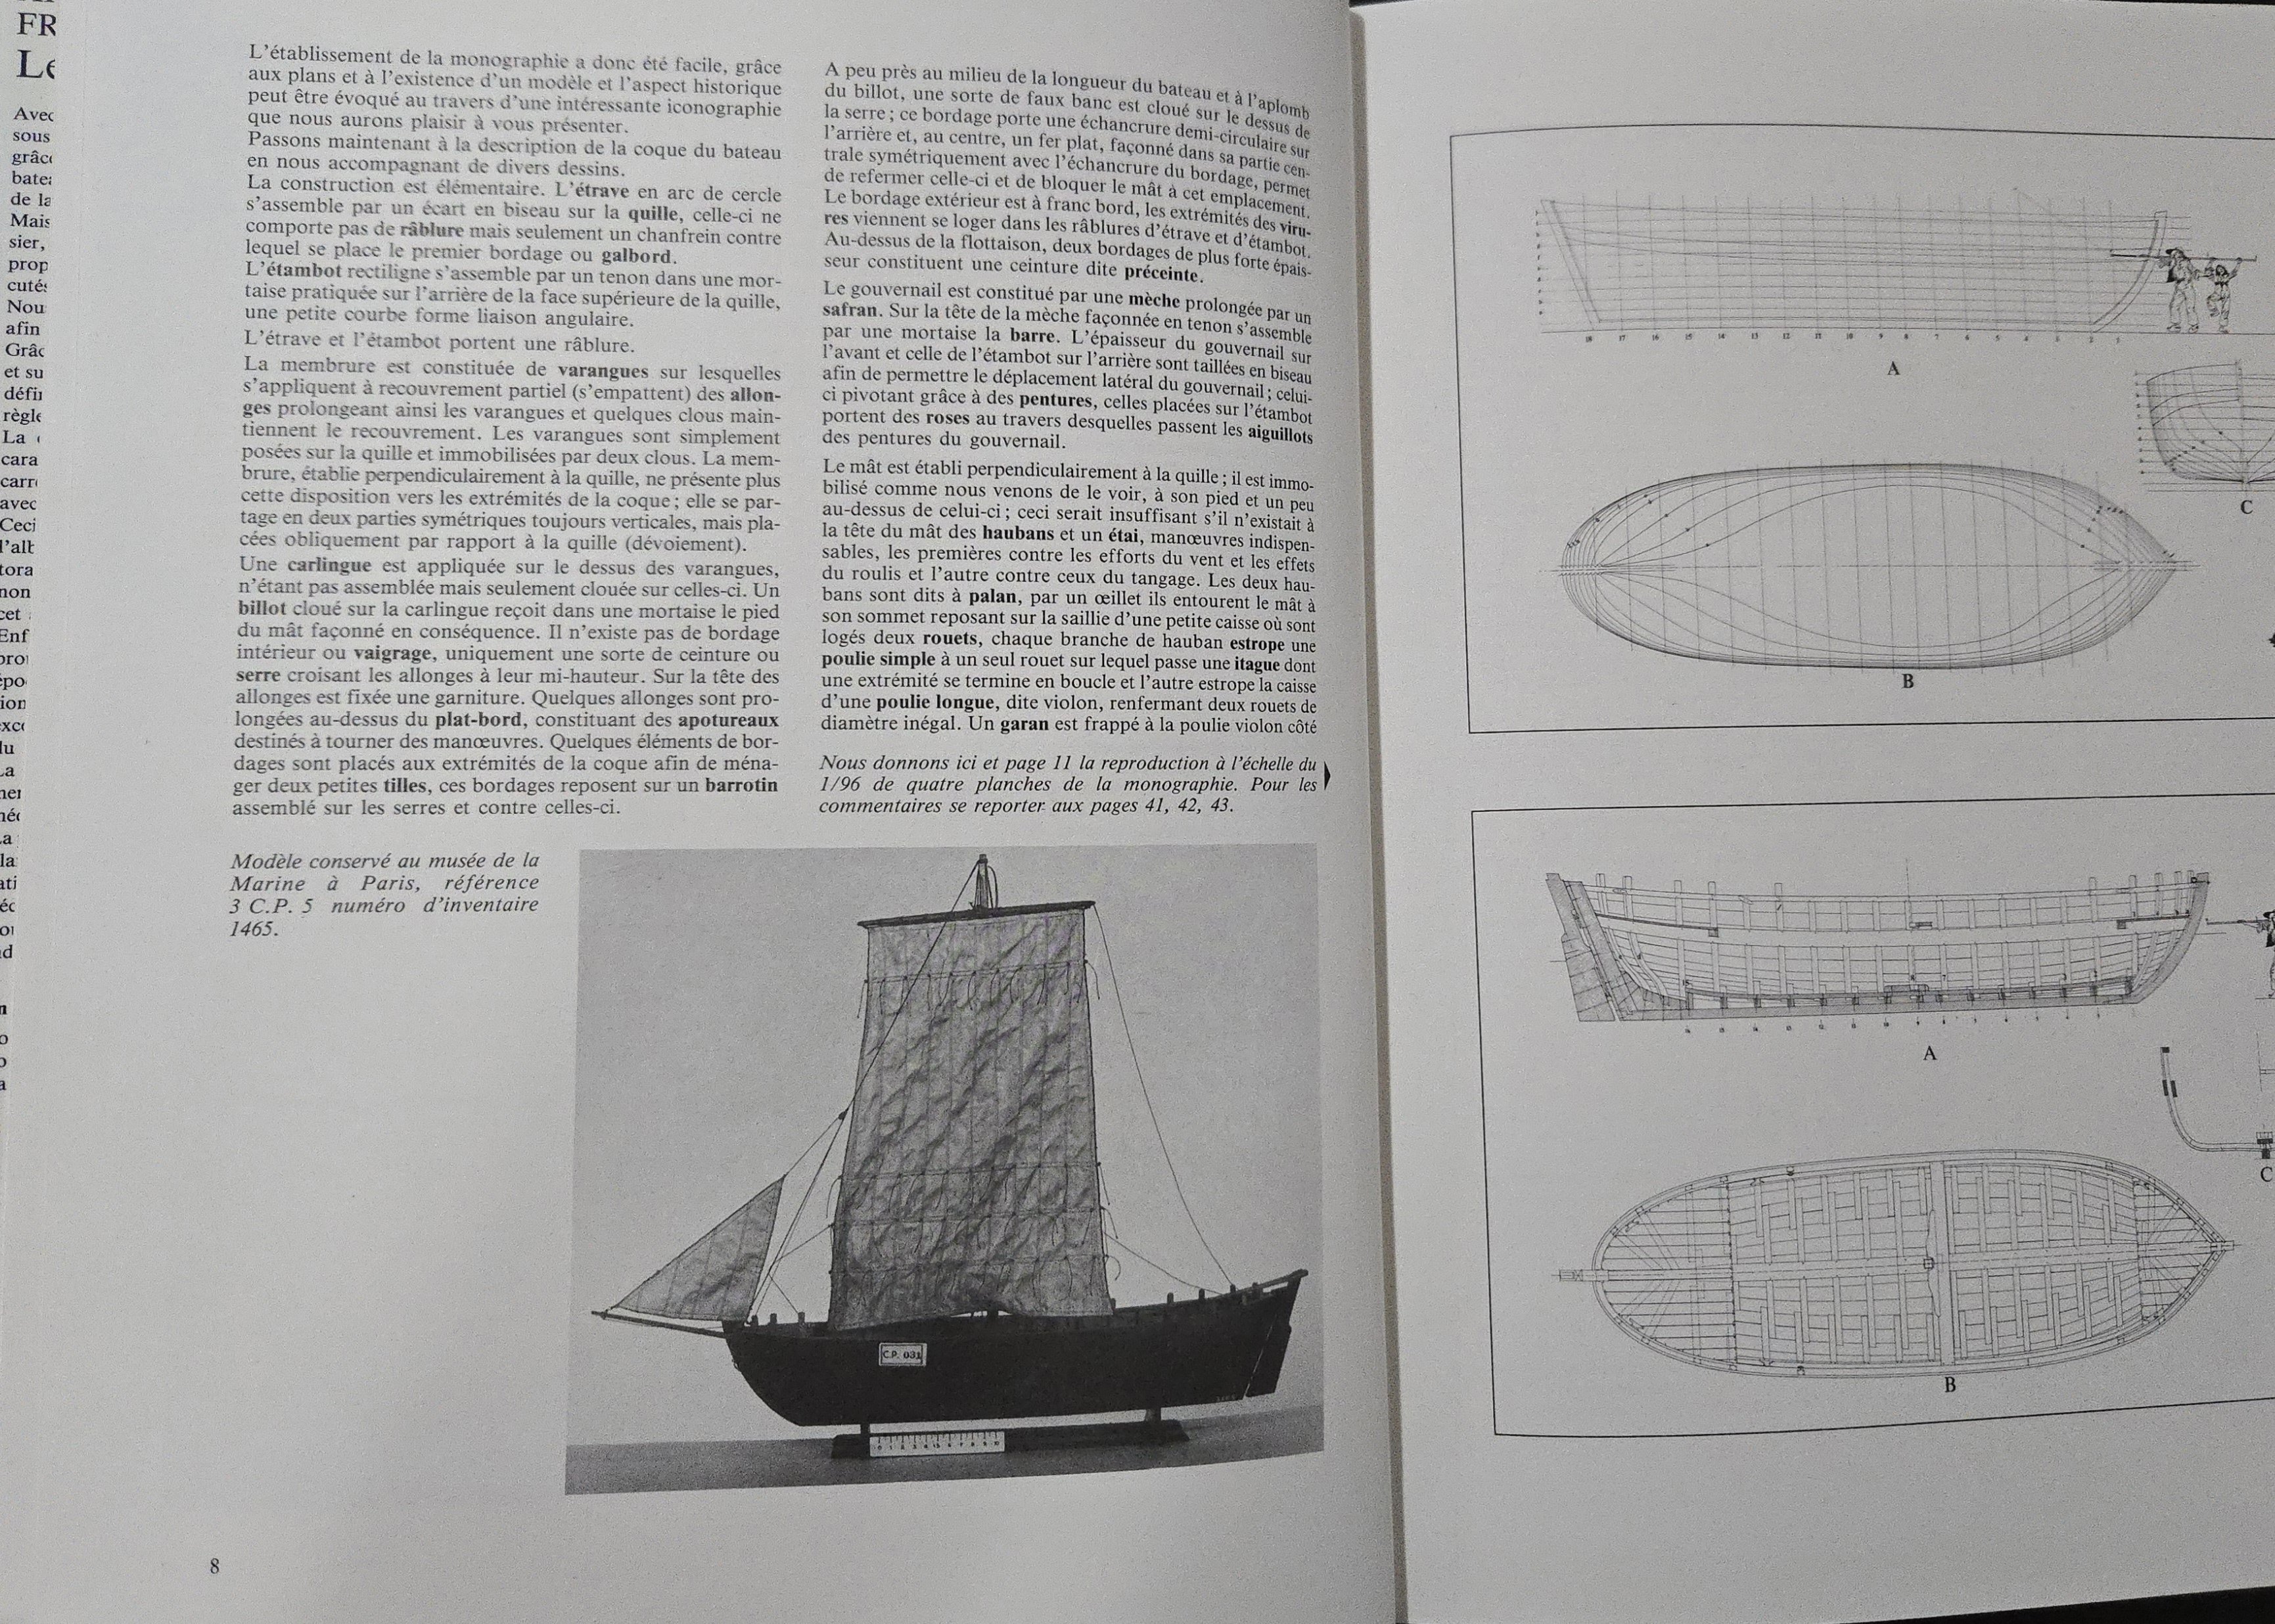
Sure! In the French version they're on page 8, in the left column: In the original French, "L'étambot rectiligne s'assemble par un tenon dans une mortaise pratiquée sur l'arrière de la face supérieure de la quille, une petite courbe forme liaison angulaire." And just a few lines above it, "Passons maintenant la description de la coque du bateau en nous accompagnant de divers dessins."

- 139 replies
-
- 1
-
-
- ancre
- Bateau de Lanveoc
- (and 2 more)
-
Thanks for clarifying about the album titles! At the moment, I haven't yet made a decision about the limber holes. On one hand, they do seem like a necessity in pretty much any vessel. On the other hand, there are a lot of details I don't know. I'm not really sure about their location. Placing them a bit off from the keel such that they don't intersect a plank seam seems straightforward enough, but it's not clear to me how far forward and aft they extend--would the cant frames have them? While the limber holes on larger vessels seem to have been a few inches across, I'm not sure how large they would be on a vessel of this size. Looking in other Ancre monographs, it seems that the limber holes are shown on large ships like the Salamandre, but not on the small vessels like the longboat or the gozzo. Willits Ansel's book on whaleboats, meanwhile, does show some very small limber holes. In any case, I think it would make the most sense to add them (if I do) after the frames are attached to the keel and faired. It'll be a while until I'm at that step, so I have a lot of time to look around for more information.
- 139 replies
-
- 2
-
-
- ancre
- Bateau de Lanveoc
- (and 2 more)
-
Thanks, @Waldemar, for the catch on the title! The monograph mostly calls it the Album de 1679 and says it was likely made for Colbert, so I got the names mixed up when it came time to write. Indeed! I find that's usually how research goes. In trying to answer one question, you inevitably find more questions. Thanks, @François de Saint Nazaire! That image is quite useful for thinking about the shift from square to lug sail. It's interesting that it includes the lateen sail, which makes perfect sense for a Mediterranean vessel like the trabaccolo. A similar sail "family tree" for Brest workboats probably wouldn't have the lateen sail, which there was limited to the mizzens of larger ships, but would have a gaff come it al some point alongside but not replacing the lug.
- 139 replies
-
- 2
-
-
- ancre
- Bateau de Lanveoc
- (and 2 more)
-
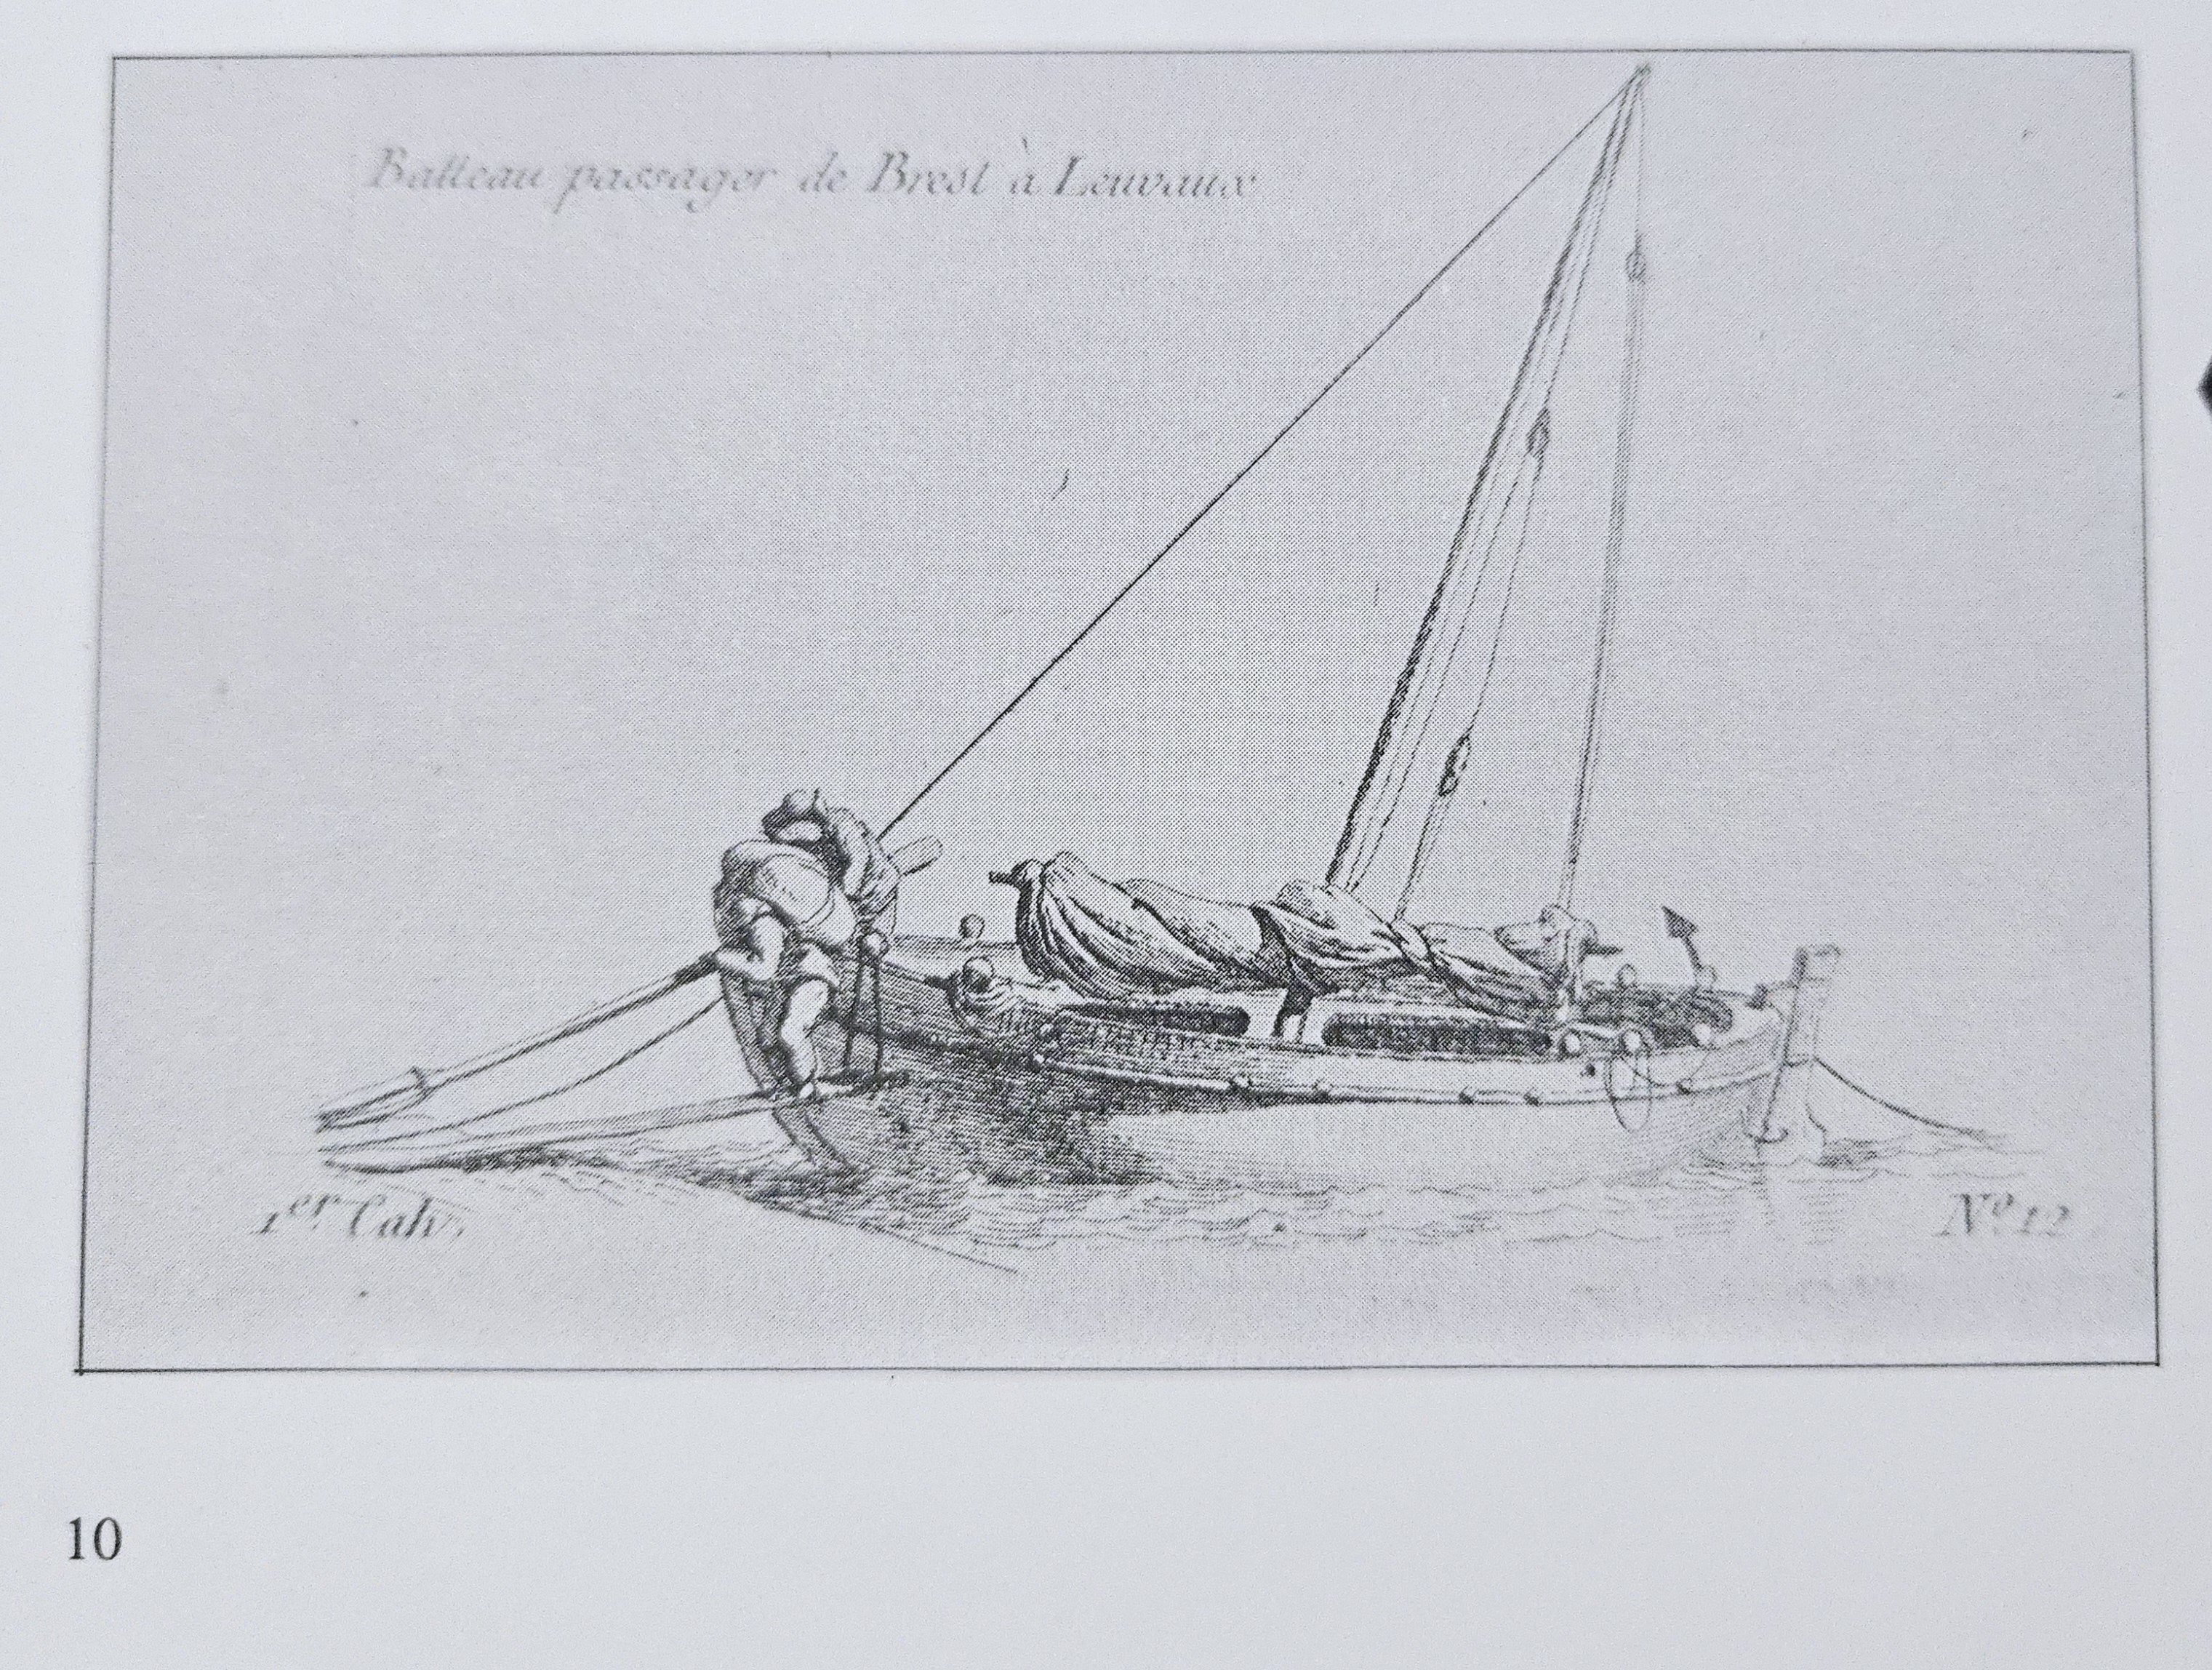
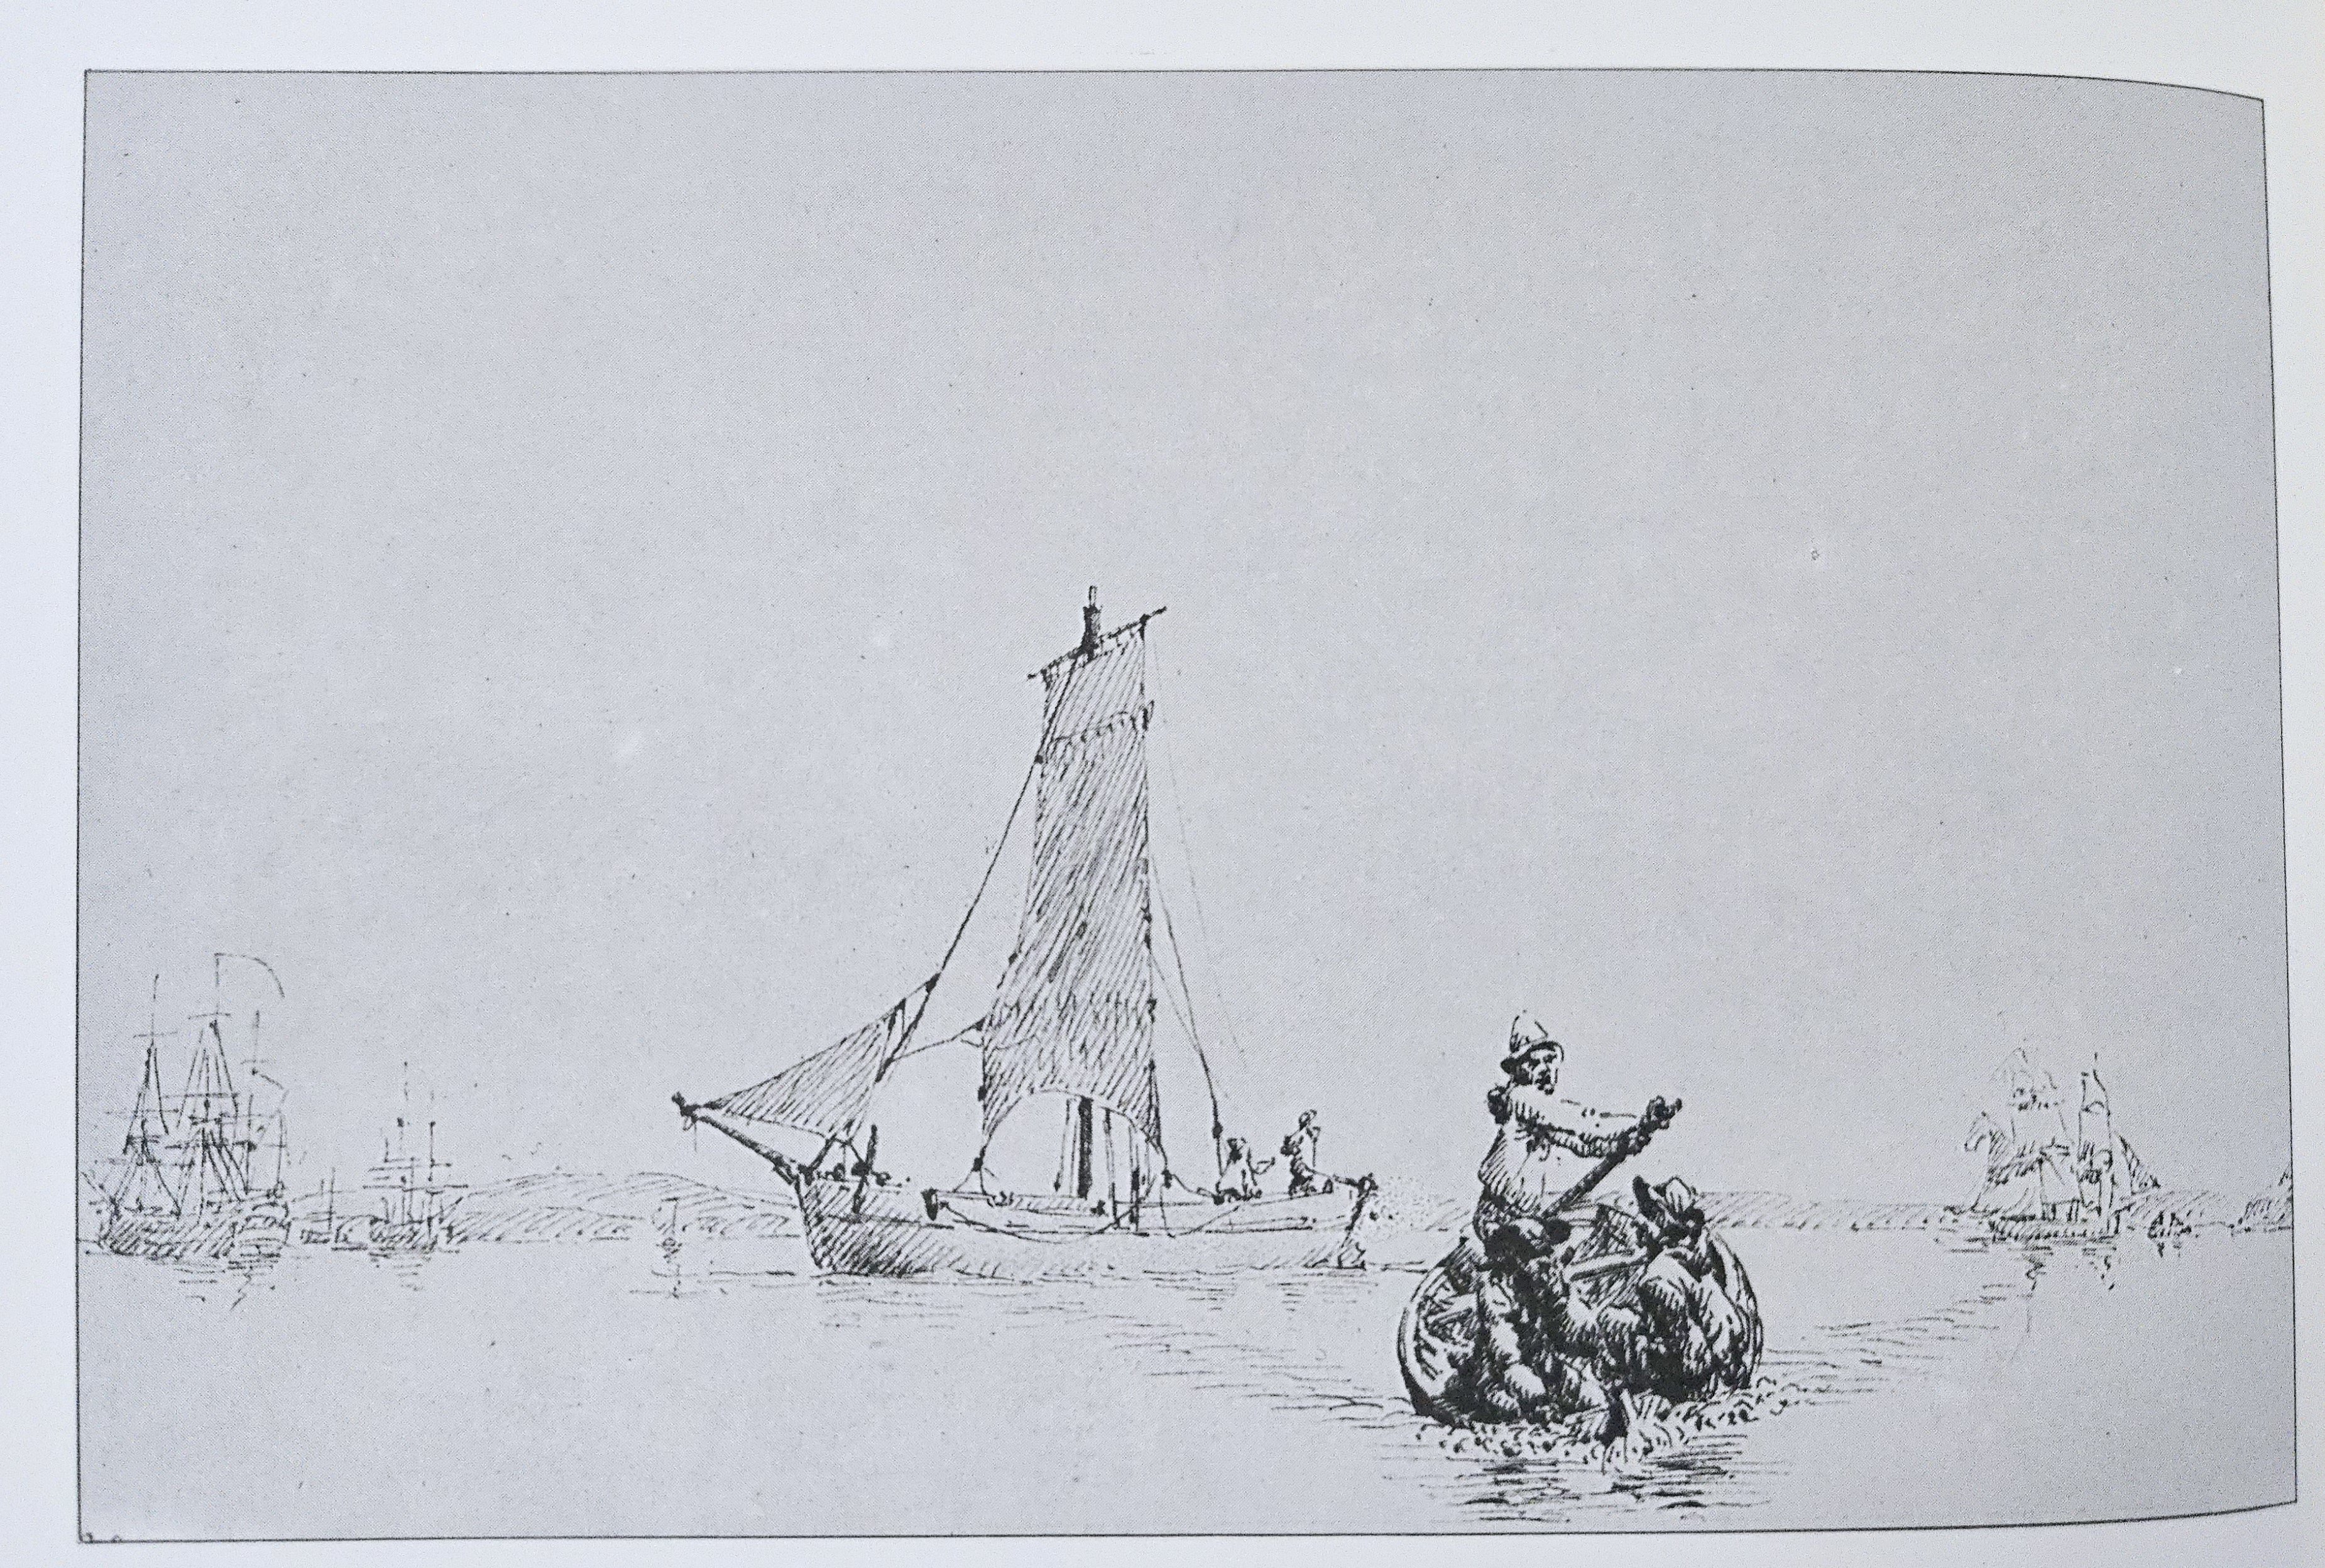
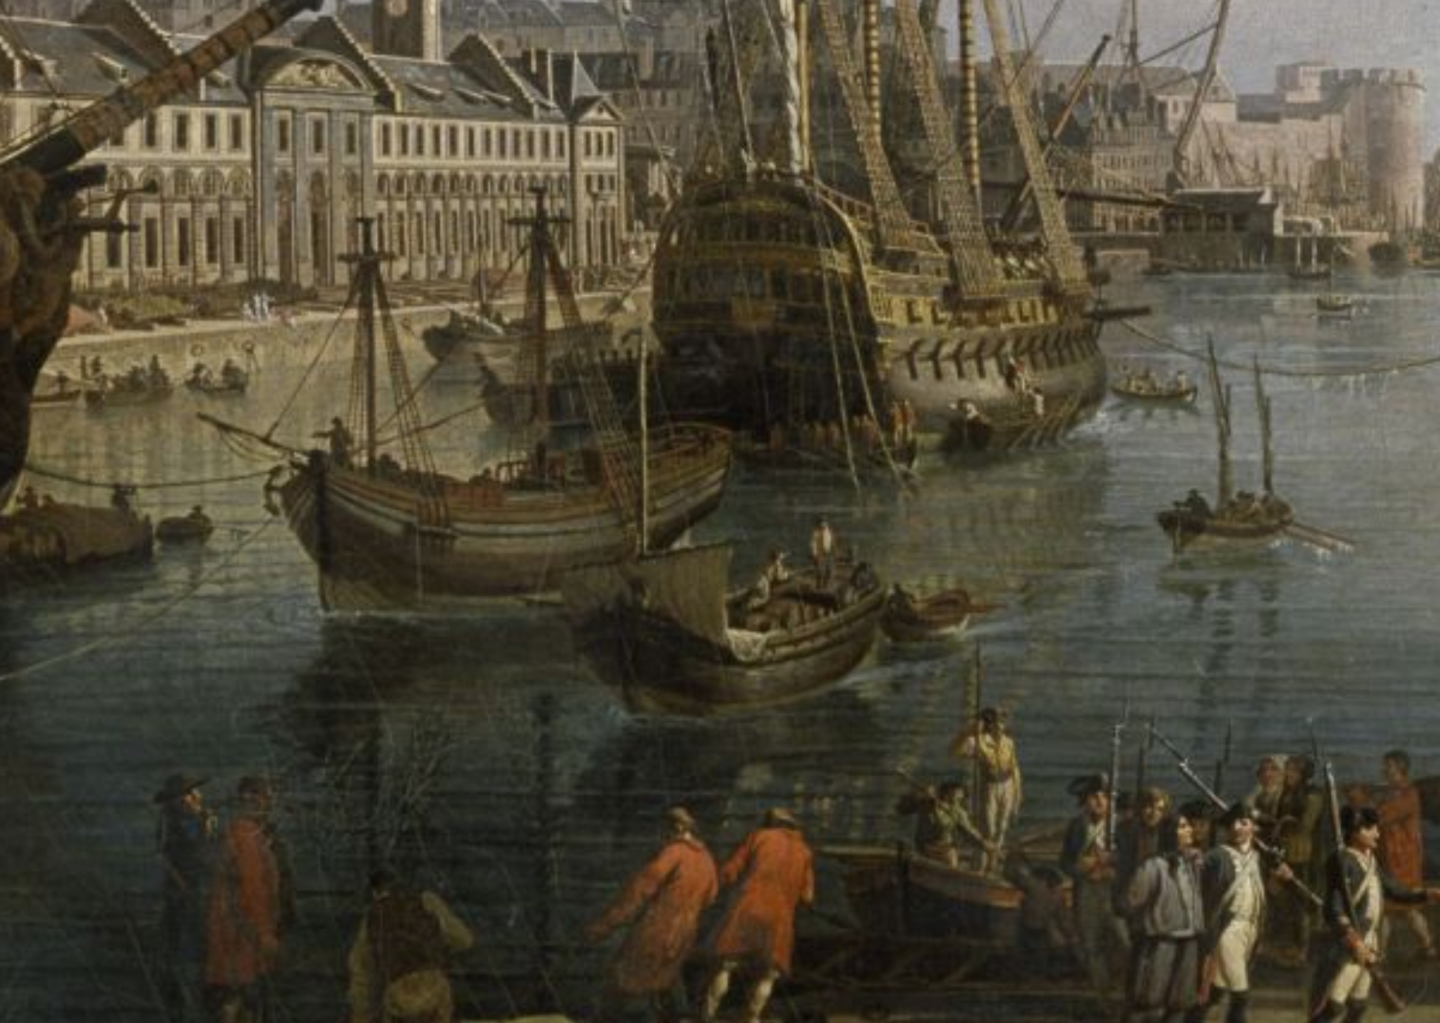
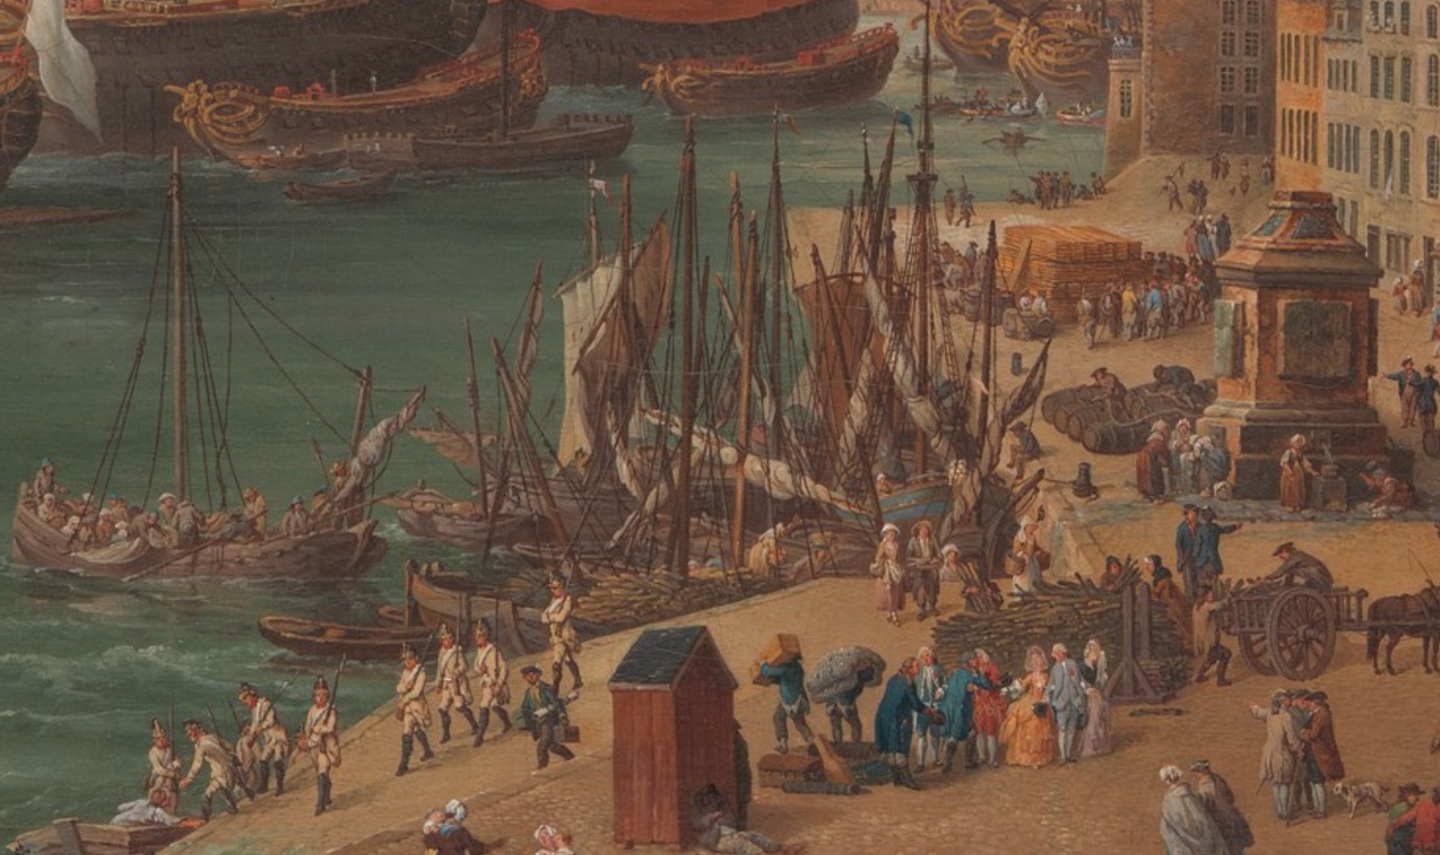
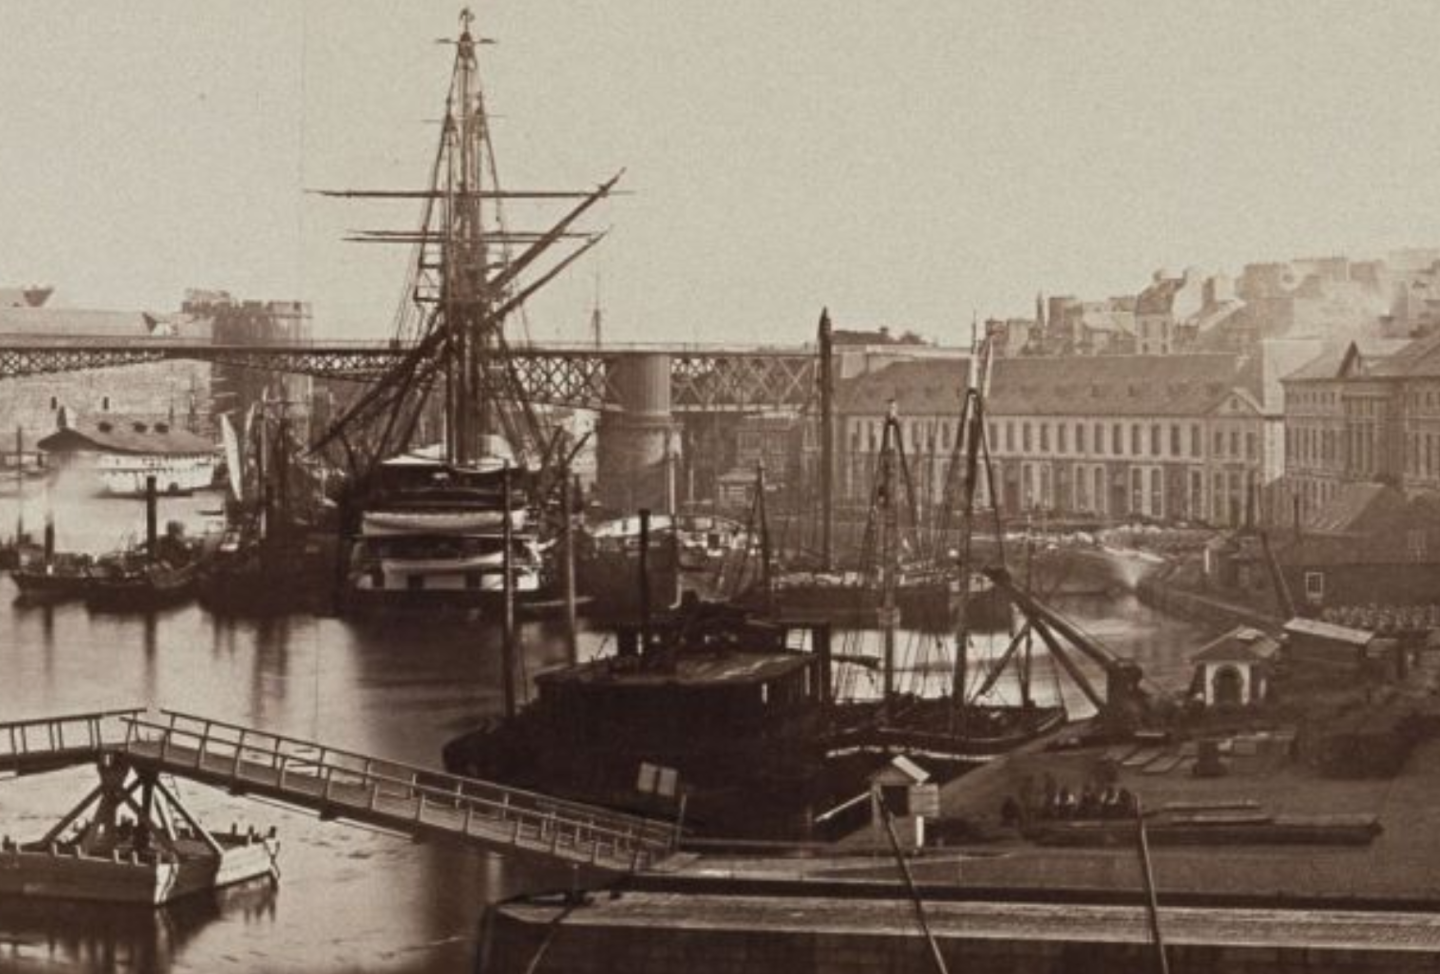
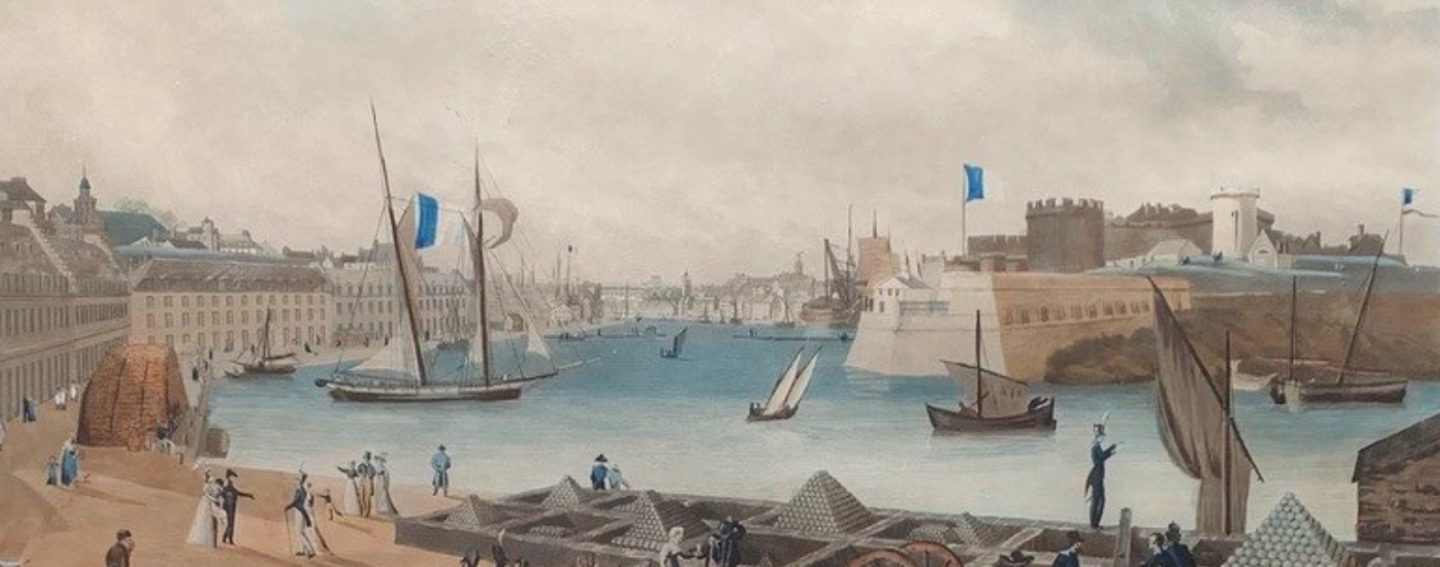
Bateau de Lanvéoc: History and Design, Pt. 2 of 2 Uses and Activities Getting into what Bateaus were used for requires going a bit beyond the monograph, especially into visual sources. As discussed, while differences between fishing vessels and cargo Bateaus are somewhat visible in images, Bateaus were also quite similar to many harbor lighters and barges, and it can be difficult to distinguish them in images, in part because they may have been the same vessels (although there were also clearly plenty of simple, slab-sided barges, as well). In any case, such vessels show up frequently in paintings of the port of Brest. See, for instance, the double-ended vessel in a detail from Jean-François Hue's 1795 painting "View of the Inner Harbor of Brest," below, which has a single mast at the bow (I'm not sure if it normally would have a mast in the center that has perhaps been unshipped). Source: https://mnm.webmuseo.com:8443/ws/musee-national-marine/app/collection/record/9937 While paintings like these show that vessels like the Bateau played a major part in work and daily life in Brest, they don’t give a great sense of what they were actually doing. In contrast, this detail from Henri Joseph van Blarenberghe's 1773 work, "The Outer Harbor of Brest," is much more useful. The two-masted vessel at left, its decks crowded with passengers, seems to be a ferry of some sort. In contrast, at least some of the vessels docked at center are clearly dedicated to carrying freight—a couple have firewood stacked high. The docks near these small vessels also give some indication of types of cargo. From the foreground back, there are apparently passengers and their luggage (perhaps getting ready to board the ferry), stacks of firewood, a large number of barrels (containing what, it’s hard to say), and milled lumber, possibly for the arsenal and shipyard. https://www.metmuseum.org/art/collection/search/435673 Similarly, the Ozanne drawing below (shown in the monograph) shows a Bateau loaded with firewood and hay. Firewood, besides being useful for homes, was also undoubtedly necessary for the Arsenal’s production. The drawing also shows two other Bateaus, at left and right, the rightmost one apparently loaded with passengers—a common theme in many of Ozanne’s drawings, which regularly show extremely crowded Bateaus. Notably, the vessel on the right seems to have placed the halyard 1/3 of the way along the yard rather than in the center, perhaps—although this is far from certain—hinting at a use of the square sail as lugsail, as mentioned earlier. The Decline of the Bateau As mentioned earlier, the brief description in Paris’s Souvenirs de Marine, written in the late 1800s, mentions that the Bateau de Lanvéoc had by then fallen out of use, but neither Paris nor Boudriot/Berti discuss how or why the vessel disappeared. Brest remained an important naval base in the 1800s and continued to grow, and it seems unlikely to me that demand for such small ferries, cargo haulers, and lighters around the port declined, although I’m not sure if any railroad construction or improvements in terrestrial roads took place or would have had an impact. However, after the Bateau and similar square-sailed vessels had been used for over a century, there does seem to have been a technological change away from the square sail in the 1800s. Paris’s Souvenirs de Marine includes plans for a gabare—roughly translatable as a barge or a lighter—from “the west coast of France,” shown below. While the capacious hull form doesn’t look all that different from the Bateau de Lanvéoc, especially in cross-section, the vessel is decked and equipped with a gaff-rigged mainsail and a lug mizzen, and the written description states that such vessels were often brig- or schooner-rigged in Brest. As is well-known, the gaff sail became common on the mizzen of large ships beginning in the late 1700s. On smaller vessels, it does not seem to have been very common around the Brest roadstead, where, as has been seen, the square and lug sail dominated, although Paris’s Souvenirs de Marine includes a small gaff-rigged sloop said to be from the Island of Ouessant, off the coast of Brest, from the very end of the 1700s. It seems that, in areas where the gaff sail was not common previously, the gaff diffused downward from larger ships into the rigs of smaller vessels, likely due to its ease of handling and weatherliness. This change only lightly impacted fishing vessels, many of which were already fore-and-aft rigged with lug sails, to a limited extent, although gaff-rigged fishing sloops did emerge in Brittany by the late 1800s or so. But, if the Paris plans are anything to go off, the lighters used in Brest’s naval base do seem to have shifted over to the new rig, abandoning the previous square sail. Given the close connections between the Bateau de Lanvéoc and Brest’s harbor lighters, it seems that the type would have thus been replaced by different rigs. This may seem contradictory—didn’t I just suggest earlier that the square sail survived on the Bateau, despite the presence of more weatherly lug sails, because it was well-suited for the limited sailing qualities demanded of an in-harbor ferry and lighter? It’s not entirely clear to me why this shift away from the square sail happened when it did. Perhaps the gaff sail offered advantages in ease of handling over the lug sail, or perhaps military influence—where the gaff sail was becoming increasingly common—simply was decisive. In any case, images from the early 1800s are suggestive of a slow change. The detail shown below from a painting of Brest by Louise-Ambrose Garneray, likely painted between the 1820s and the 1840s, is interesting in showing a rather wider range of rigs on small workboats than earlier artwork. At right, there’s a two-masted vessel, possibly lug-rigged like the single mast that appears at right foreground, and there’s a small single-masted vessel of the Bateau type (although possibly lug-rigged) at right-center. Yet there’s also a gaff-rigged vessel docked to the left of the schooner, not to mention possible gaff rigs on at least some of the small vessels under sail at center/center-left. Comparing images like this to the Ozanne drawings and earlier depictions, the slowly-growing presence of the gaff rig is evident. Source: https://www.proantic.com/en/1159293-louis-ambroise-garneray-port-of-brest.html# In any case, the Souvenirs de Marine description of the sailing gabare notes that it, too, was replaced by the advent of steam over the 1800s, the advantages of which for maneuvering around a crowded harbor or for maintaining a regularly-scheduled ferry service can be imagined. I believe that you can see both types in the detail, below, from a photo of the Brest arsenal in around 1861. There are a number of small steam vessels at the left, while the vessel with white trim at center-right looks to my eyes to have a gaff-rigged main mast and a lug on the mizzen (while the foremast’s rigging is not entirely clear), perhaps being a larger version of the type of gabare shown by Paris. There do not seem to be any square-rigged small vessels by this time, although there are a handful of possible luggers. Source: https://mnm.webmuseo.com:8443/ws/musee-national-marine/app/collection/record/10019?expoCtxt=ePkH4LF7A0ZfTk5qcklmfp5zSUWJa0VBvkJxRn55cmJxKsgeYG2lbwcACuENAQ$$ Conclusions and Further Questions The notes above, while far from conclusive, still help to establish what makes the Bateau de Lanvéoc an interesting subject to model. In particular, I think that it’s very interesting to see that, even for such a simple vessel, detailed written descriptions exist of their design process, scantlings, and mast proportions, allowing a very thorough reconstruction of not just the vessel type, but of the way boatbuilders arrived at the final vessel. This sort of information would be incredibly helpful to have for Latin American workboats, but is unfortunately often lacking in their cases (not entirely, though: I do wonder whether José A. Garnham documented this among Chilean Lancha builders, and this sort of information has survived for the Saveiro builders of Bahia, Brazil). The images are also helpful to envision how this vessel was used, in ways that possibly will shape the model. As mentioned in an earlier post, my build’s final presentation will most likely be focused on the vessel’s construction, but I have toyed with the idea of depicting it as a working boat. Initially, when I read that the Bateau could be used as a fishing boat, I thought that it could be interesting to depict it as such, but I discarded that idea after finding substantially more information about Bateaus as ferries or cargo vessels. I won’t be displaying it as a crowded ferry boat, but possibly a small load of firewood and barrels could be an interesting and historically-accurate depiction. That said, there are still a number of questions I have about the Bateau, although I’m not sure how I would go about answering them. I’d be interested to know more about the connections between the square and lug sail in and around Brest, especially to get more evidence as to whether the Bateau’s square sail was ever raised in a fore-and-aft position inside the shrouds for use as a lugsail. This could be useful to help understand the square rig’s seemingly anachronistic survival. Second, I’d be interested to know more about design differentiation between the Bateau and other small workboats in the surrounding area. By the 1790s or so, were there actually marked differences in hull form and rig between the Bateau and local fishing boats, as the Paris Souvenirs de Marine plans and images seem to suggest, or was the Bateau truly used not just as a ferry and cargo vessel but also for fishing, as some of the shipbuilding manuscripts suggest? Am I correct that there was a growing specialization in vessel design over time? Were the differences visible in the Paris plans just a reflection of differences in building location, such that Lanvéoc had a different building style than, say, Plougastel or Douarnenez, or did these differences also reflect different intended uses, say, fishing vs. cargo-hauling? Third, relatedly, I wish I knew more about the actual work done by the Bateau, and especially about the routes it traveled. Was the Bateau generally just used within the Brest roadstead itself, or was it also used for longer voyages further along the coast, and if so, where to? This would impact the utility of the rig and hull design in different conditions. Fourth, who owned these vessels, and how was the labor of sailing them and building them organized? Were they operated directly by their owners, or did traders more often own multiple vessels? Were ferry routes monopolized, or did each vessel compete for passengers? Information on this could help us to understand how much capital Bateau owners had, and what sorts of pressures they were under to adapt new technologies in order to compete for market share (which could help explain the eventual demise of the square sail). Who crewed these vessels? Did they tend to be family affairs, as was often the case of lanchas chilotas, or were hands usually hired? How much overlap was there between sailors on Bateaus, sailors on other small coastal vessels, and deepwater sailors? This would help us to better understand life on and around Bateaus and how their sailors understood themselves. What about the Bateaus used as lighters employed around the arsenal? Were they owned and operated directly by the navy, or hired out? This also might shape changes over time in the rig and hull design, based on the navy’s preferences and the influence they had over procurement. Finally, who built and designed Bateaus? Were there specialized Bateau builders, or did small boatyards make a wide variety of workboats such that a Bateau might be built alongside a fishing lugger? Did their builders ever build larger vessels? This could also influence changes in the Bateau over time. I don’t know if I’ll be able to answer any of these questions over the course of the build, but I’ll keep an eye out.

- 139 replies
-
- 6
-
-

-
- ancre
- Bateau de Lanveoc
- (and 2 more)
-
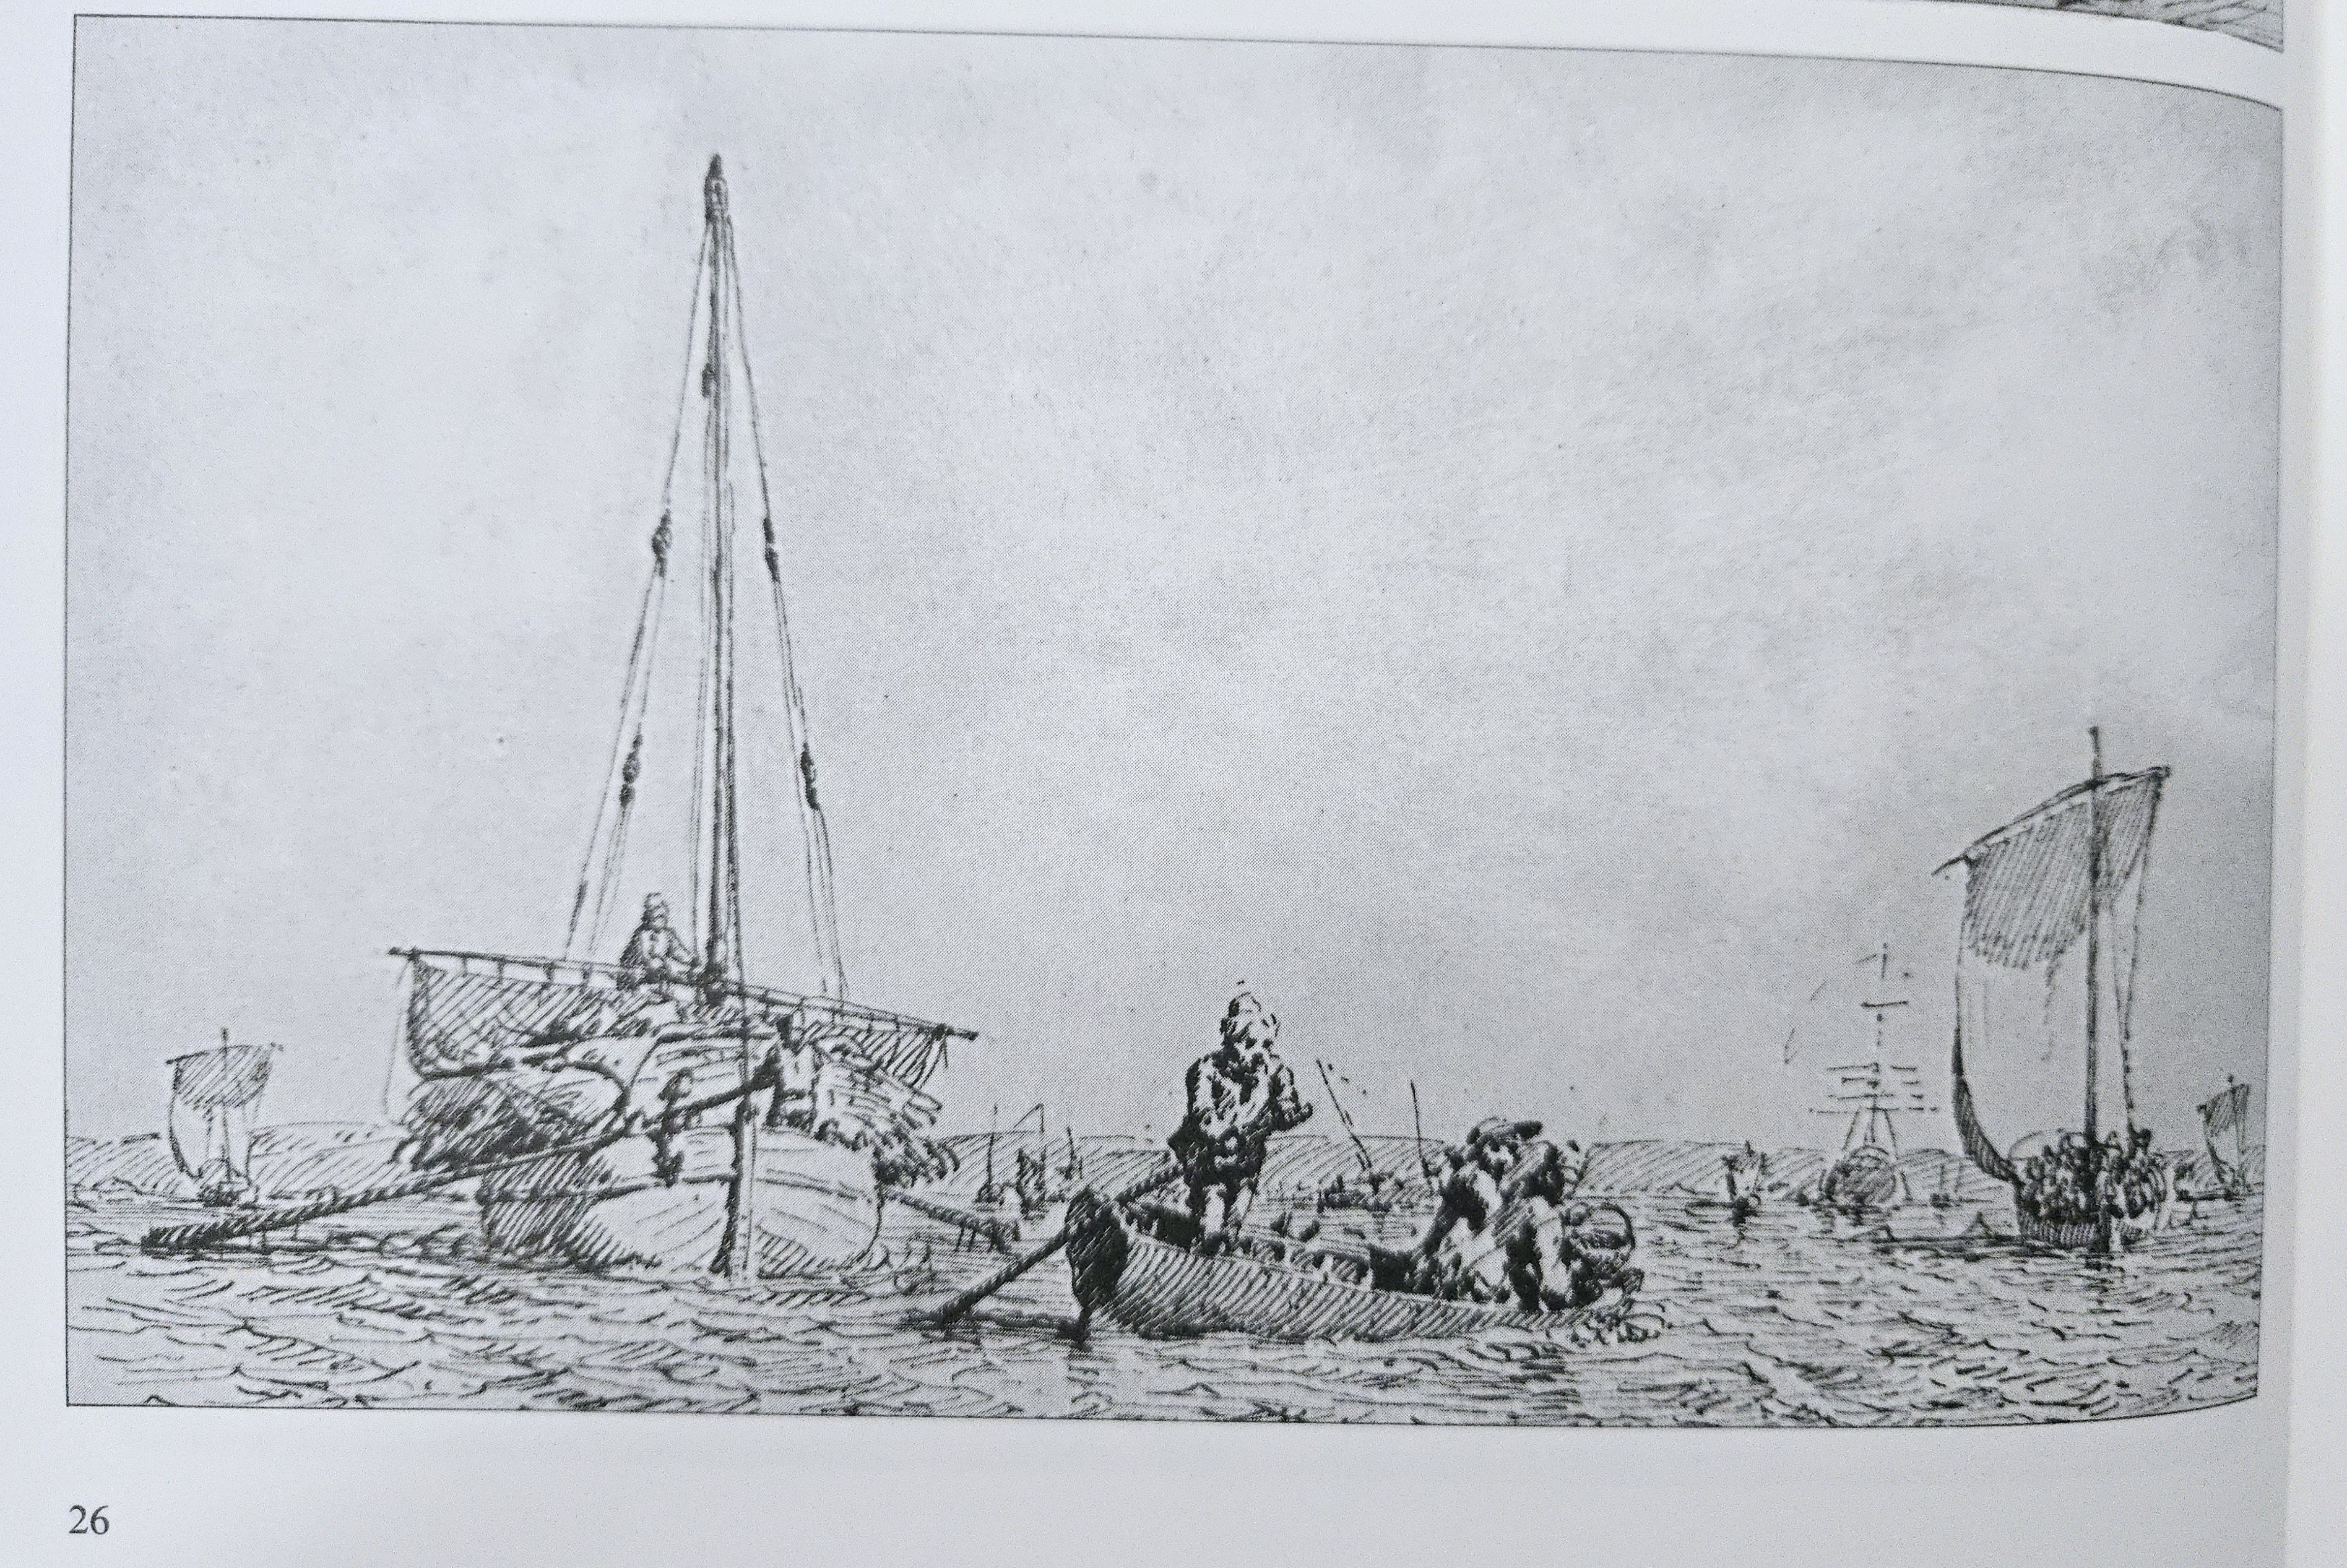
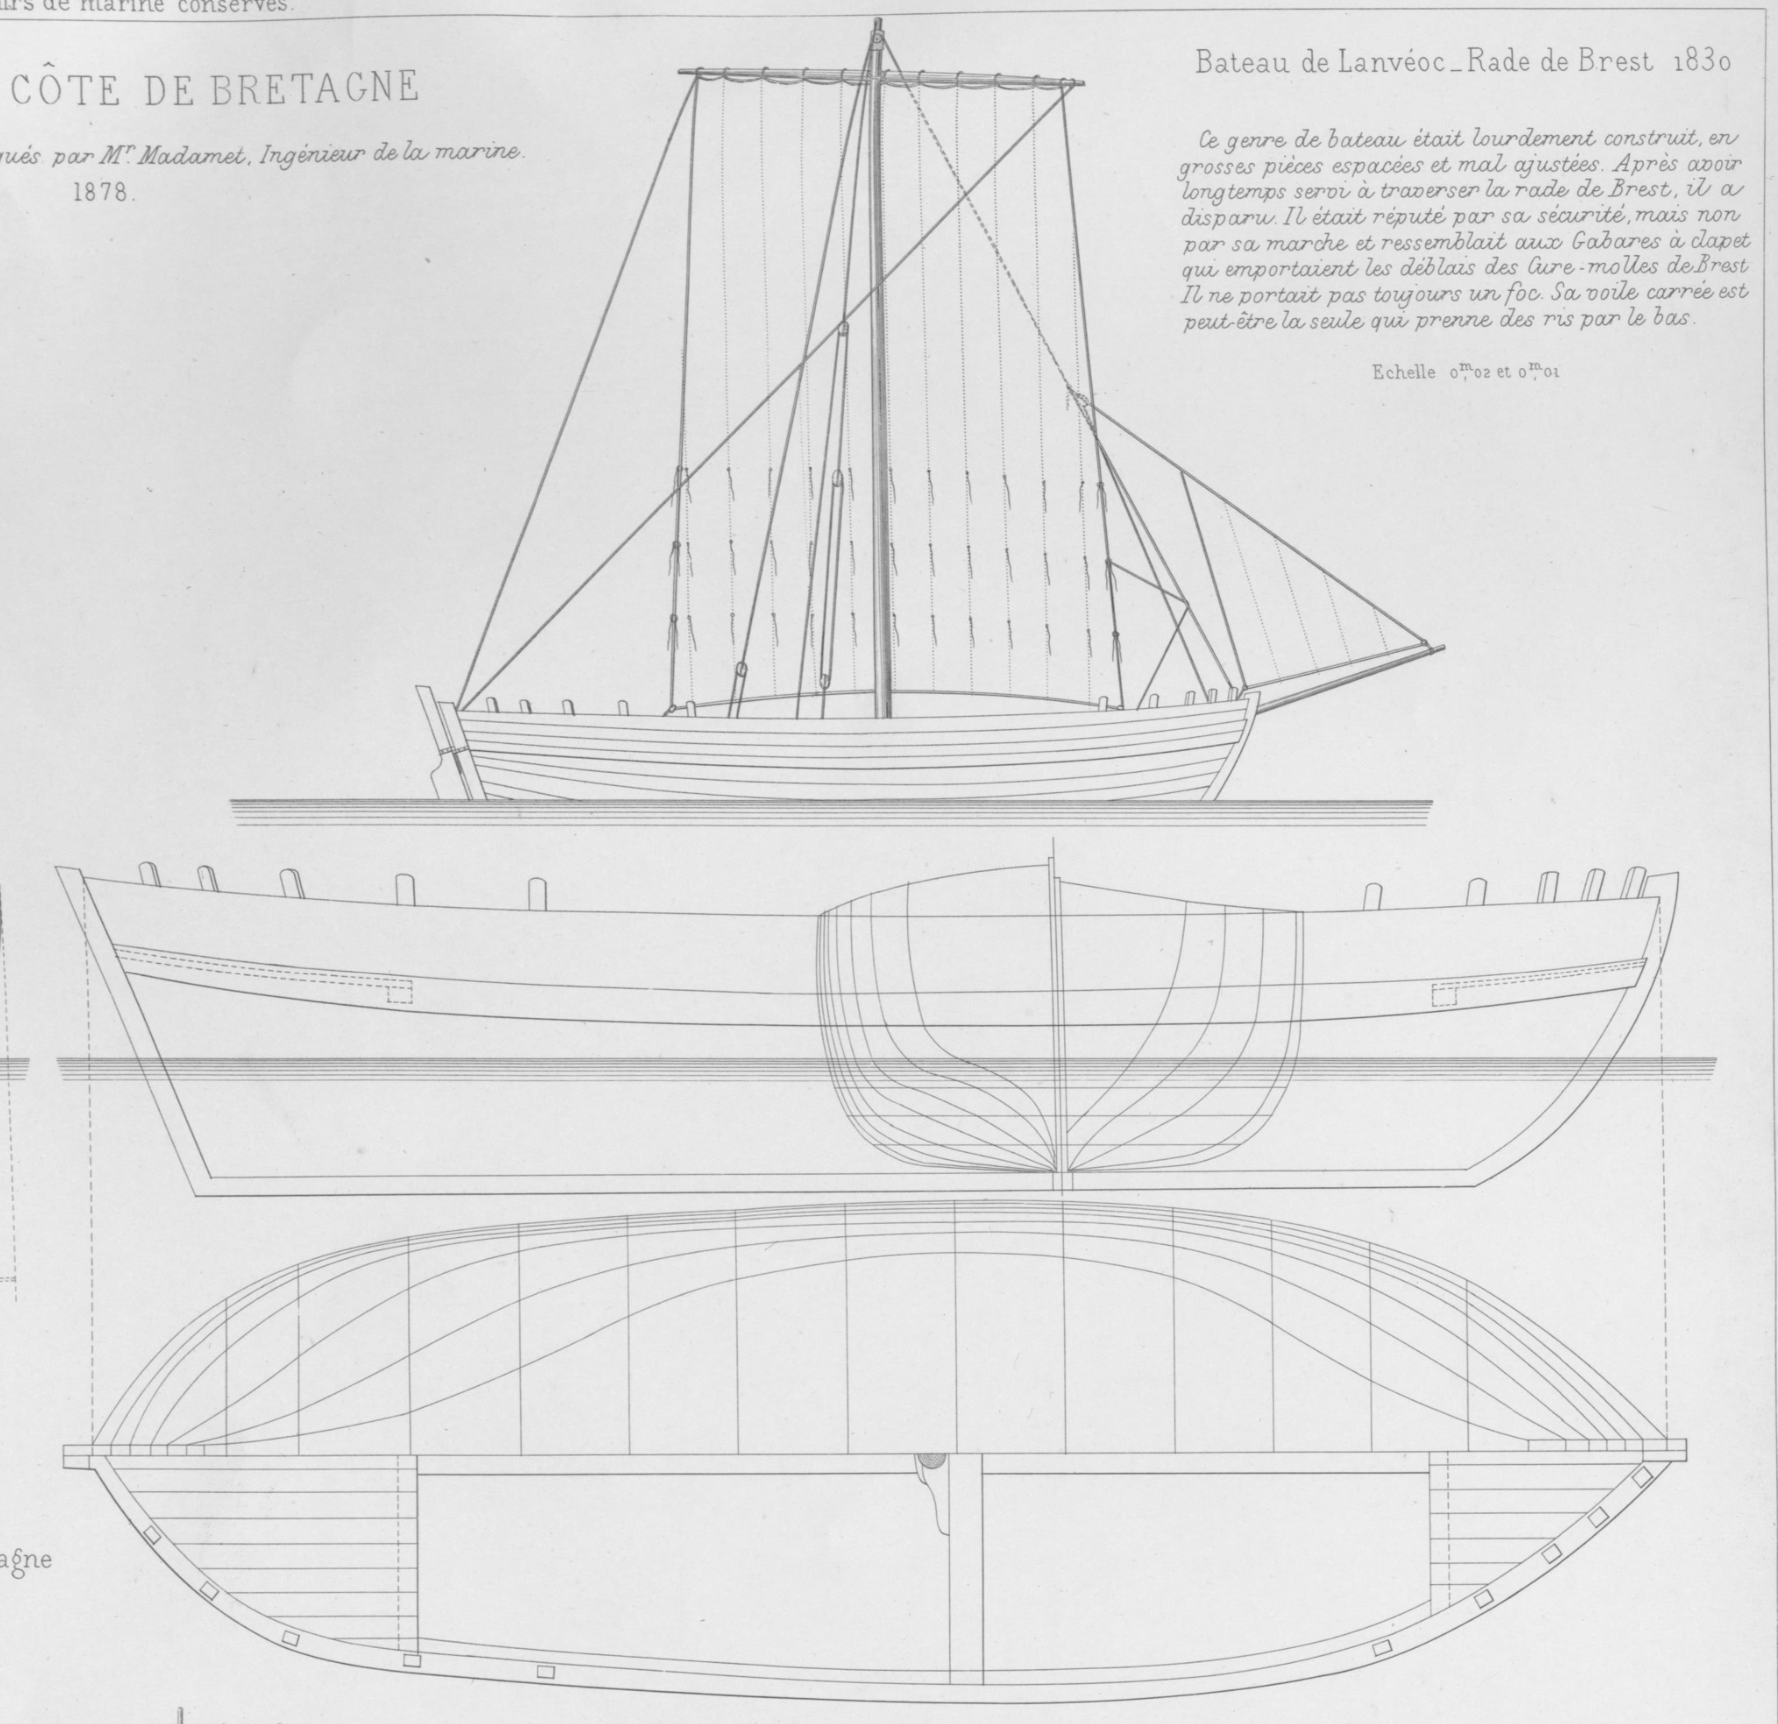
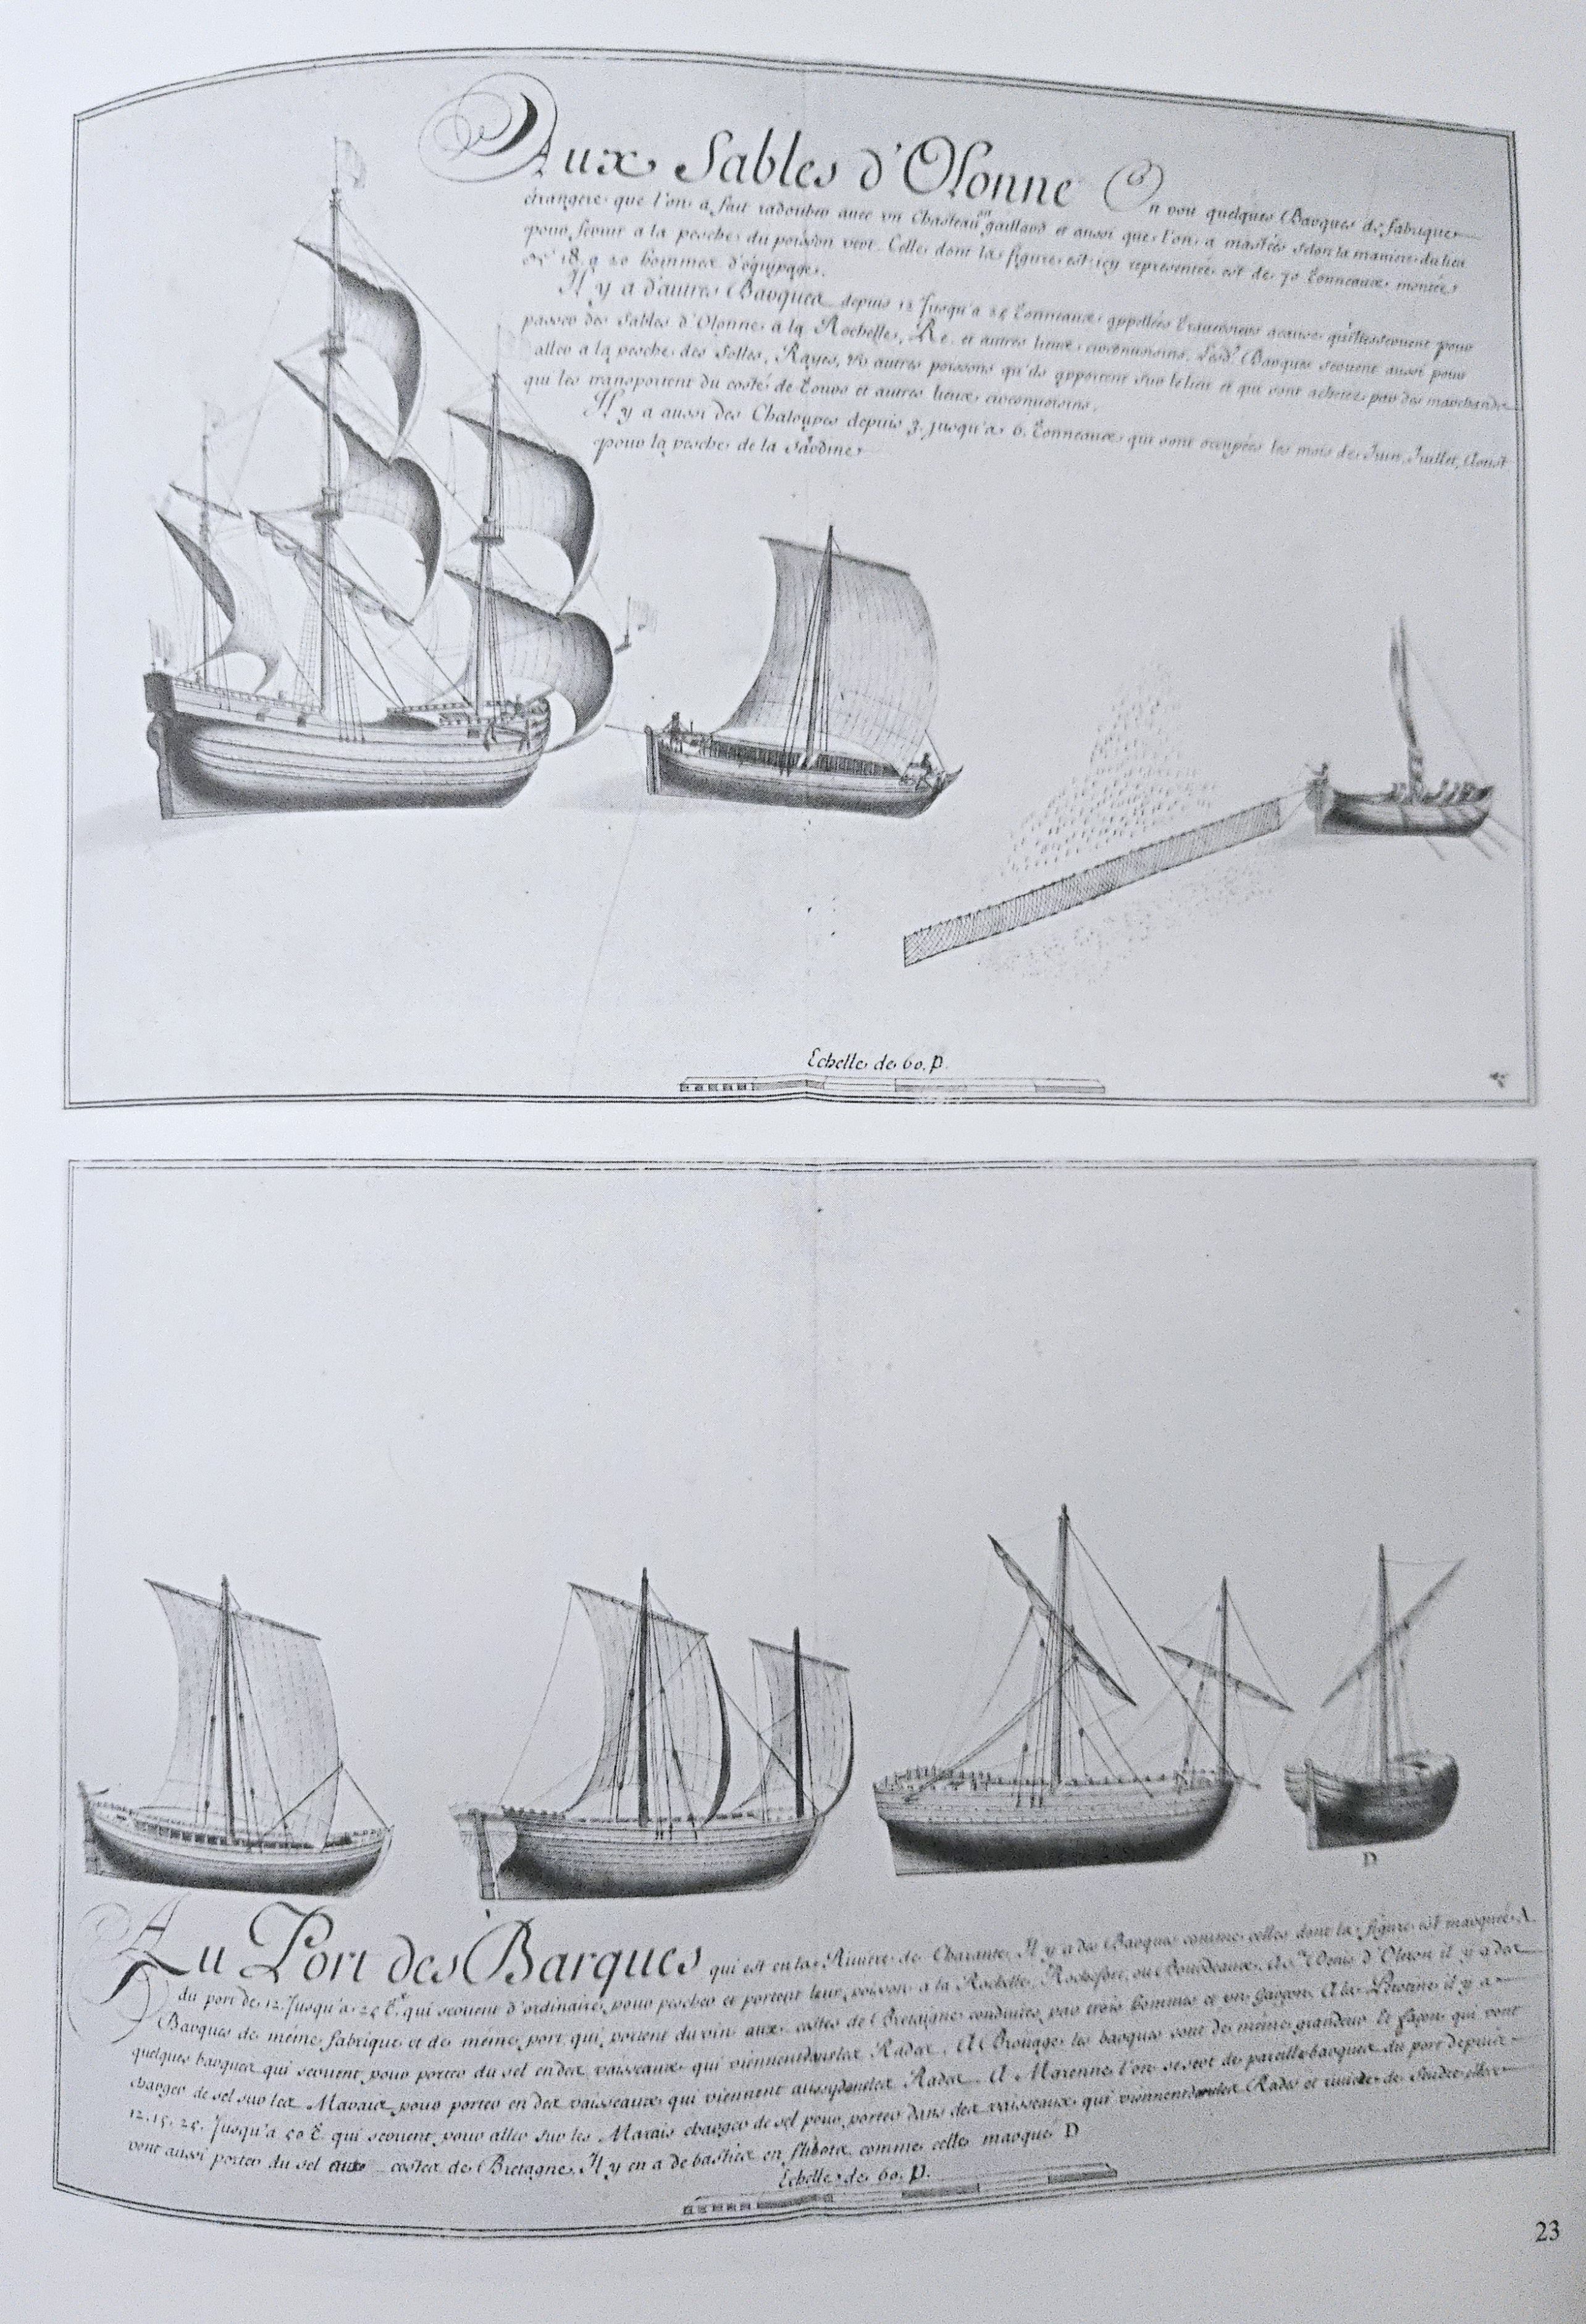
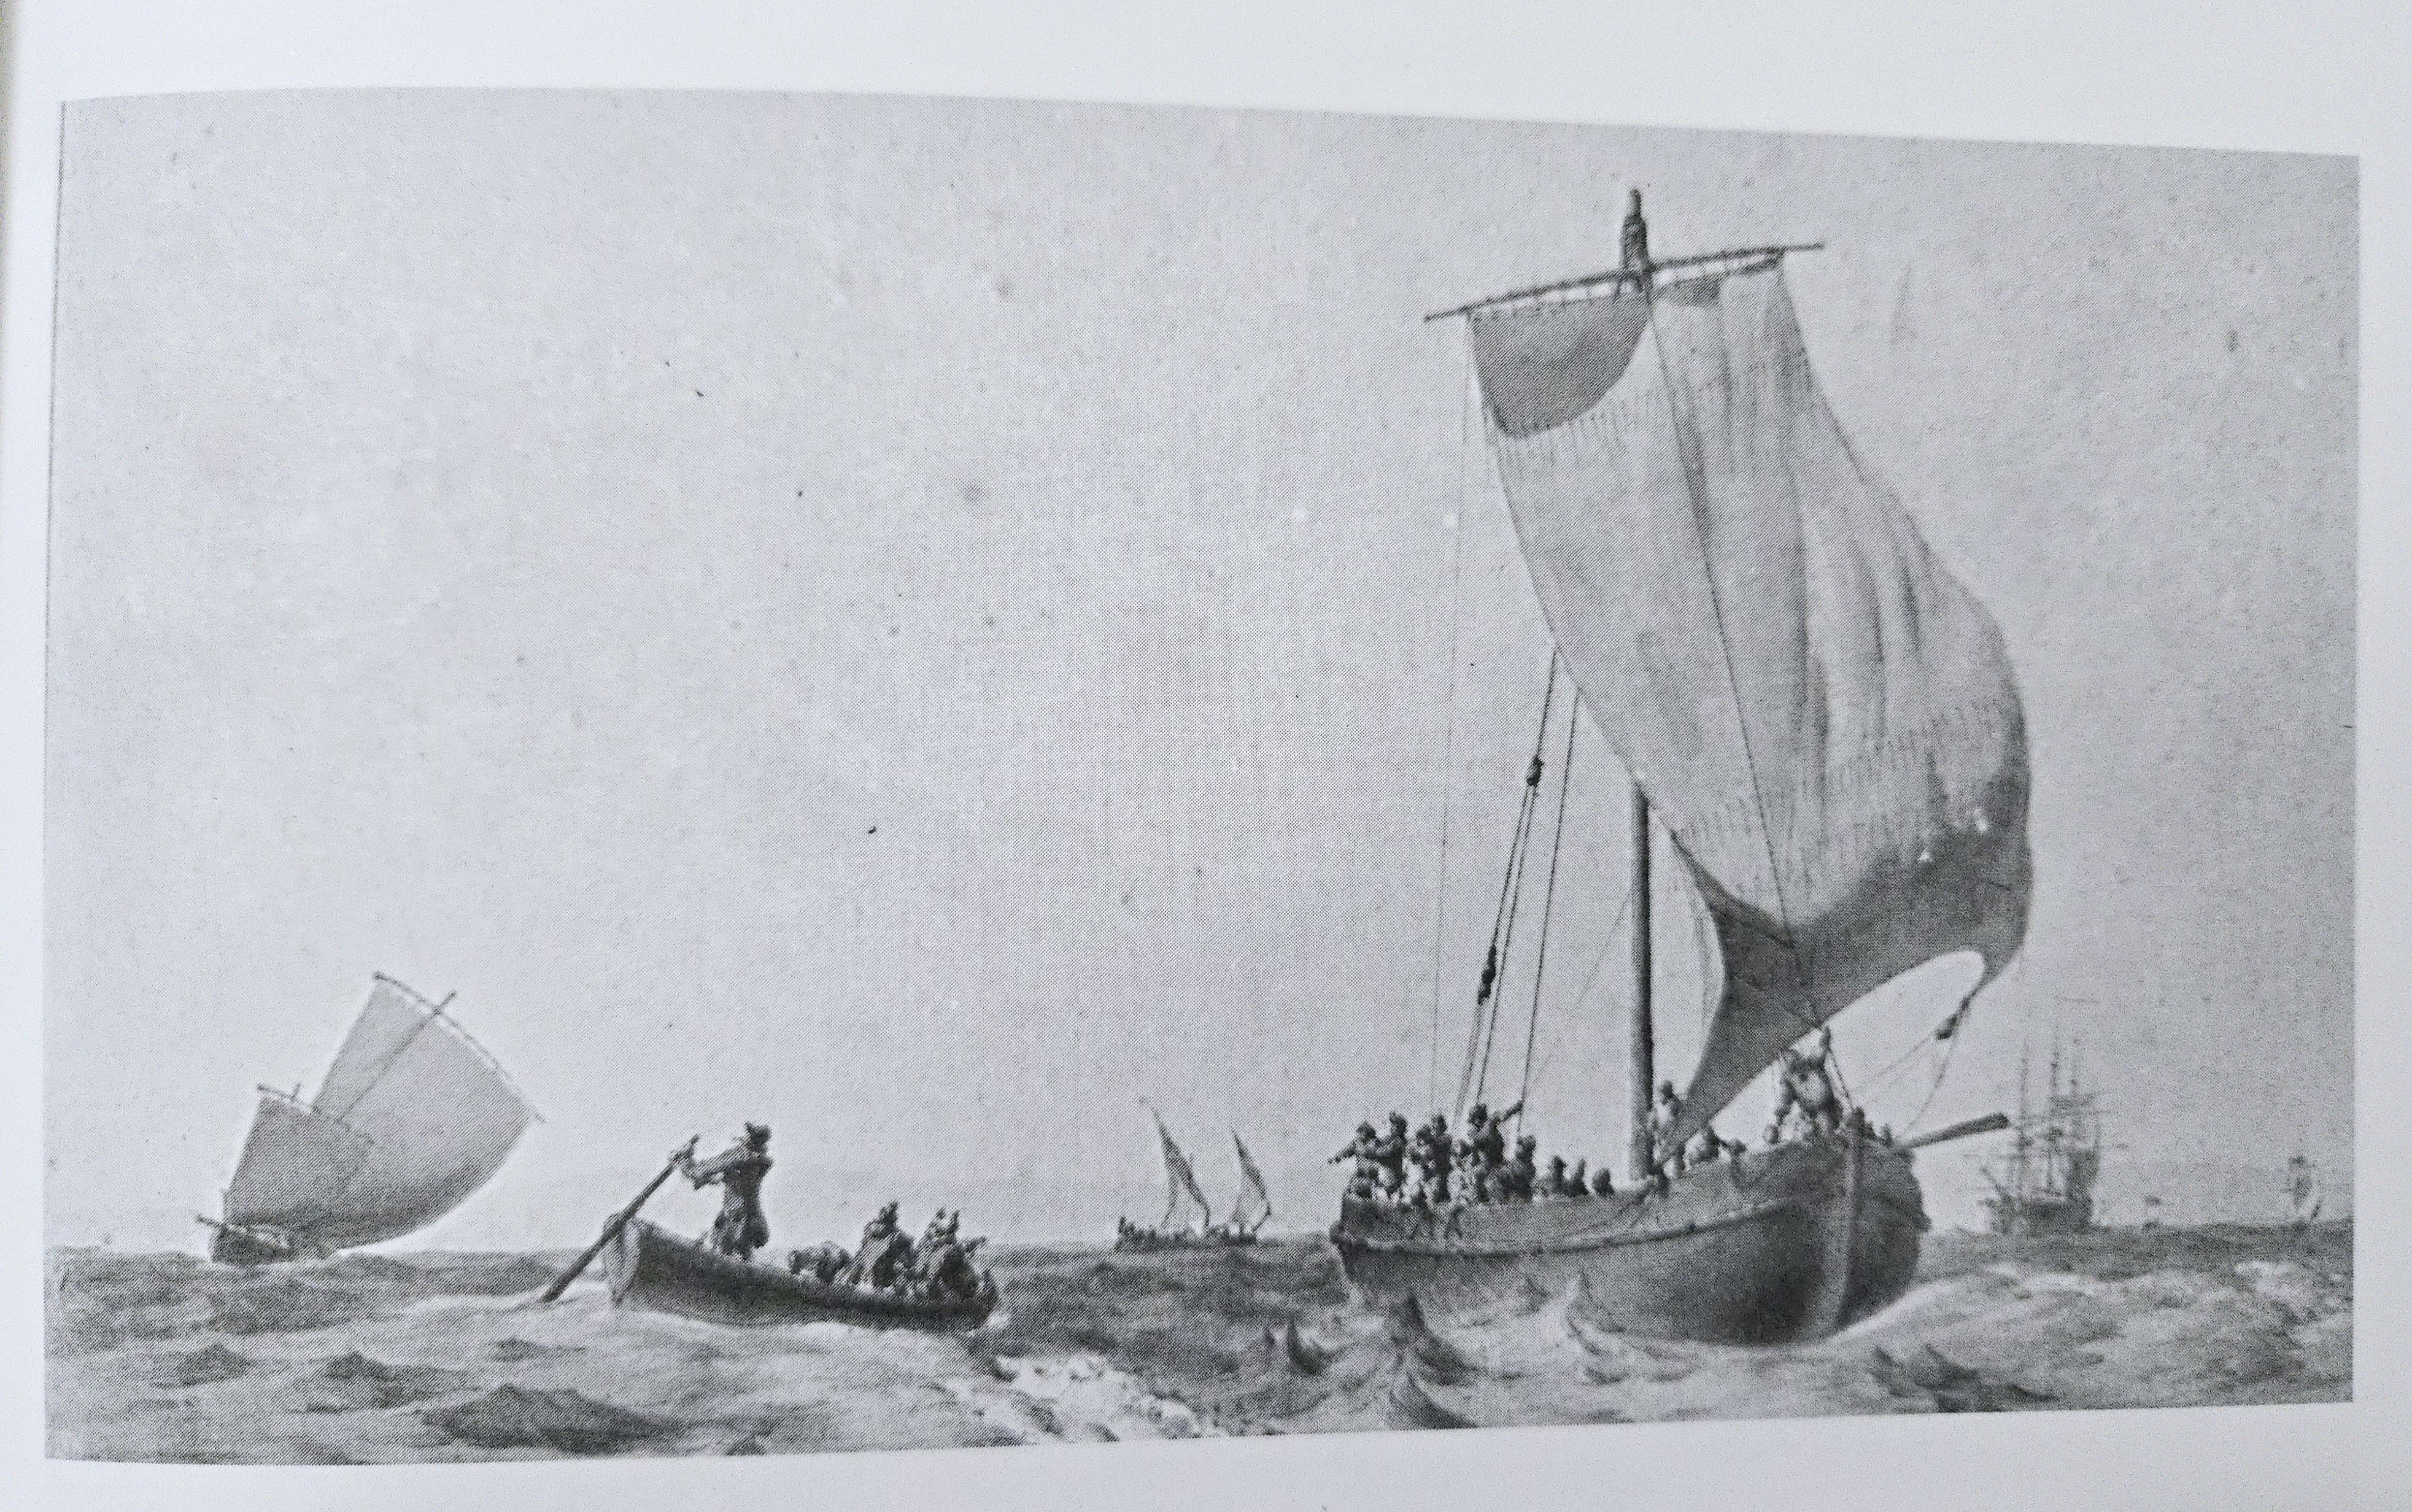
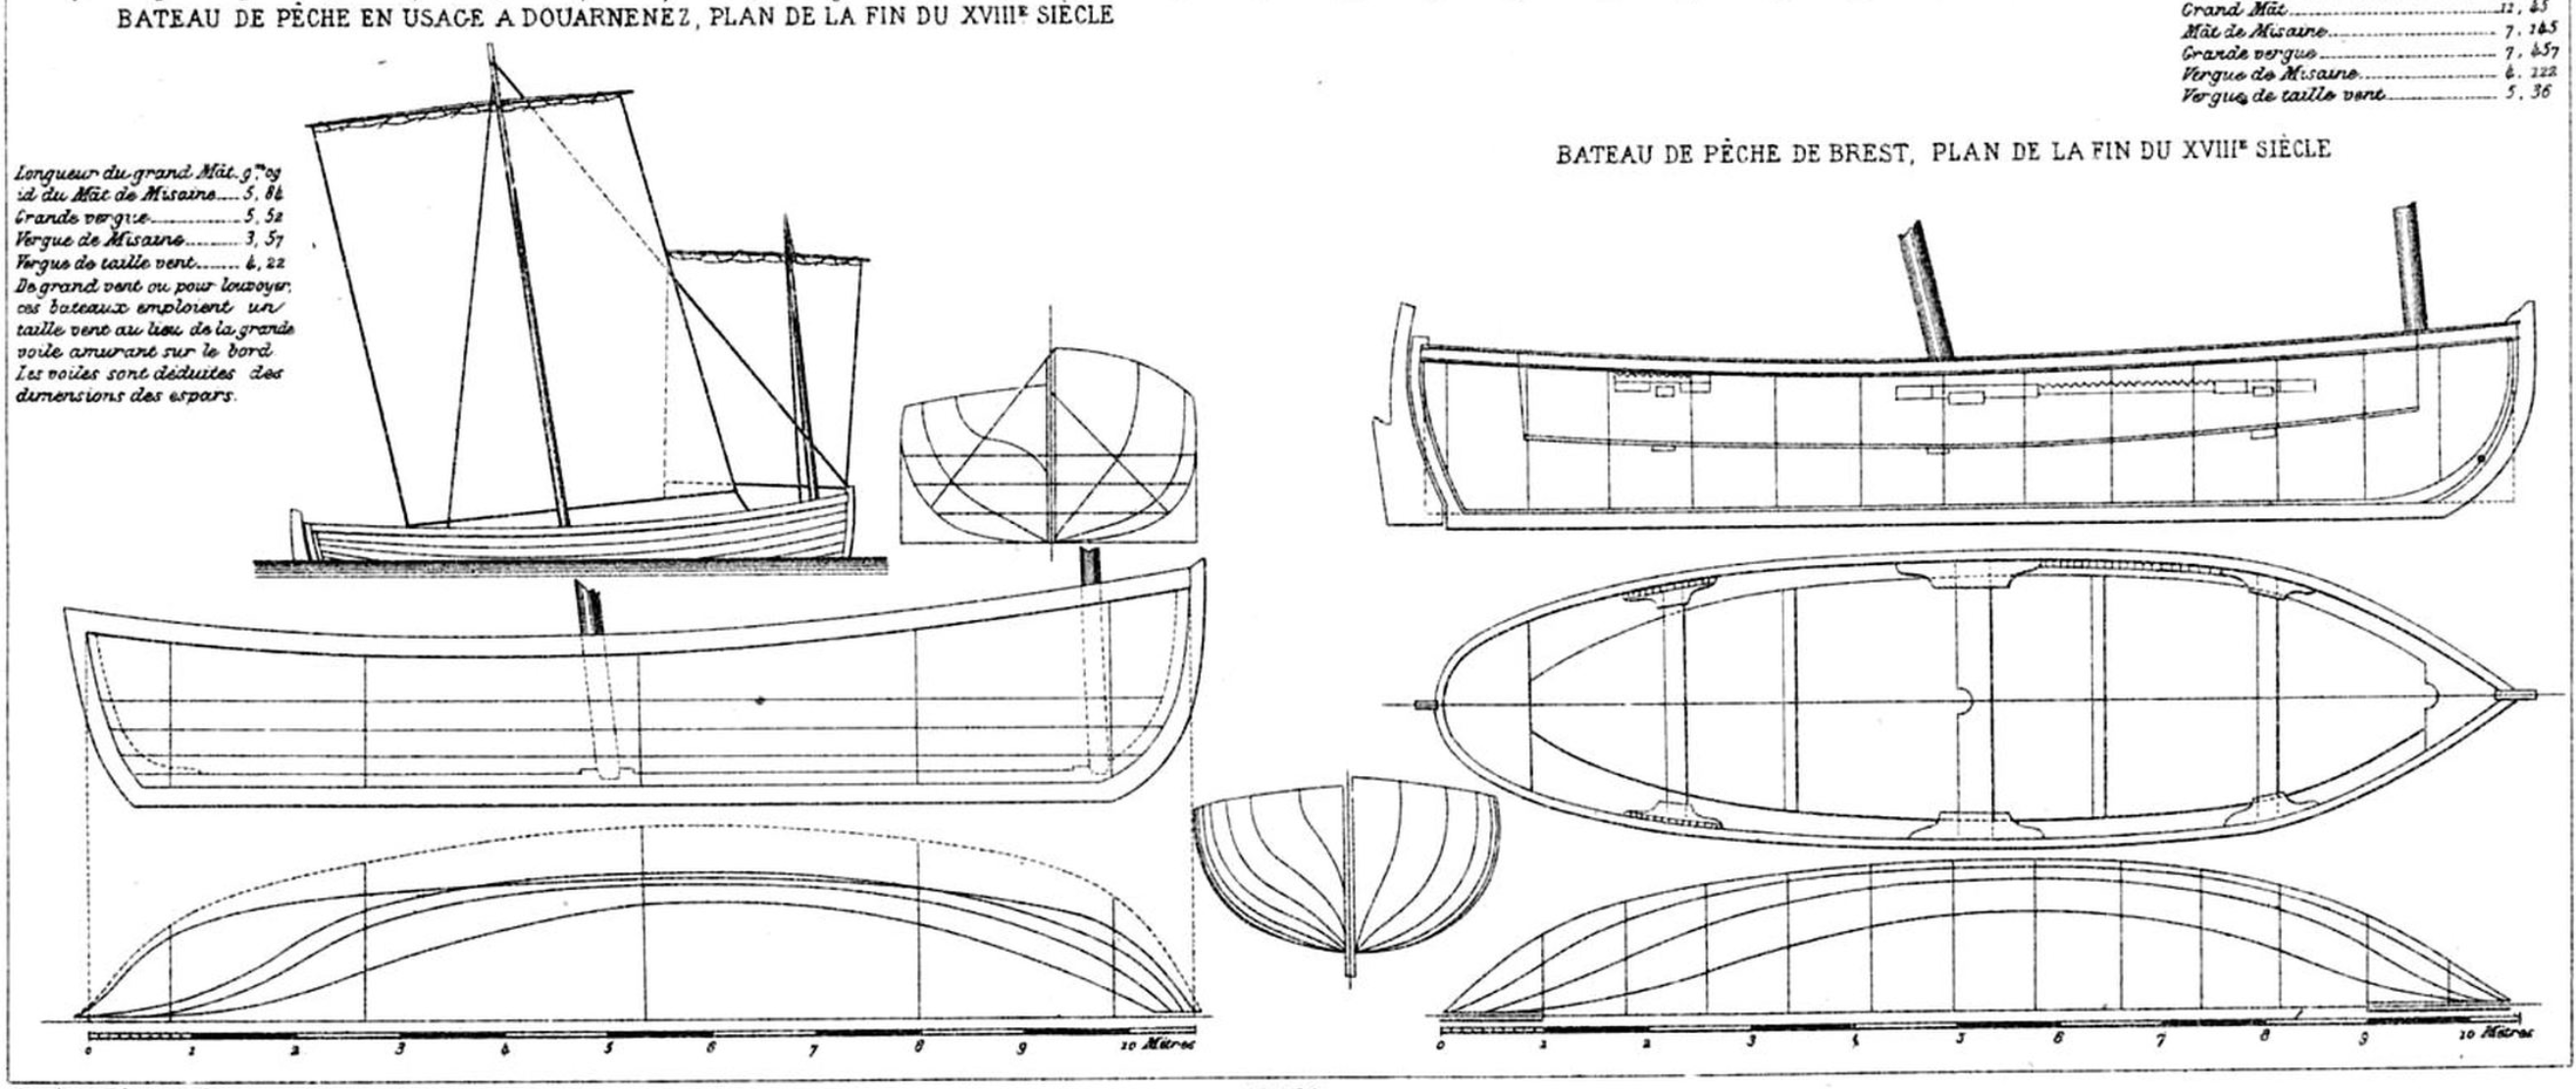
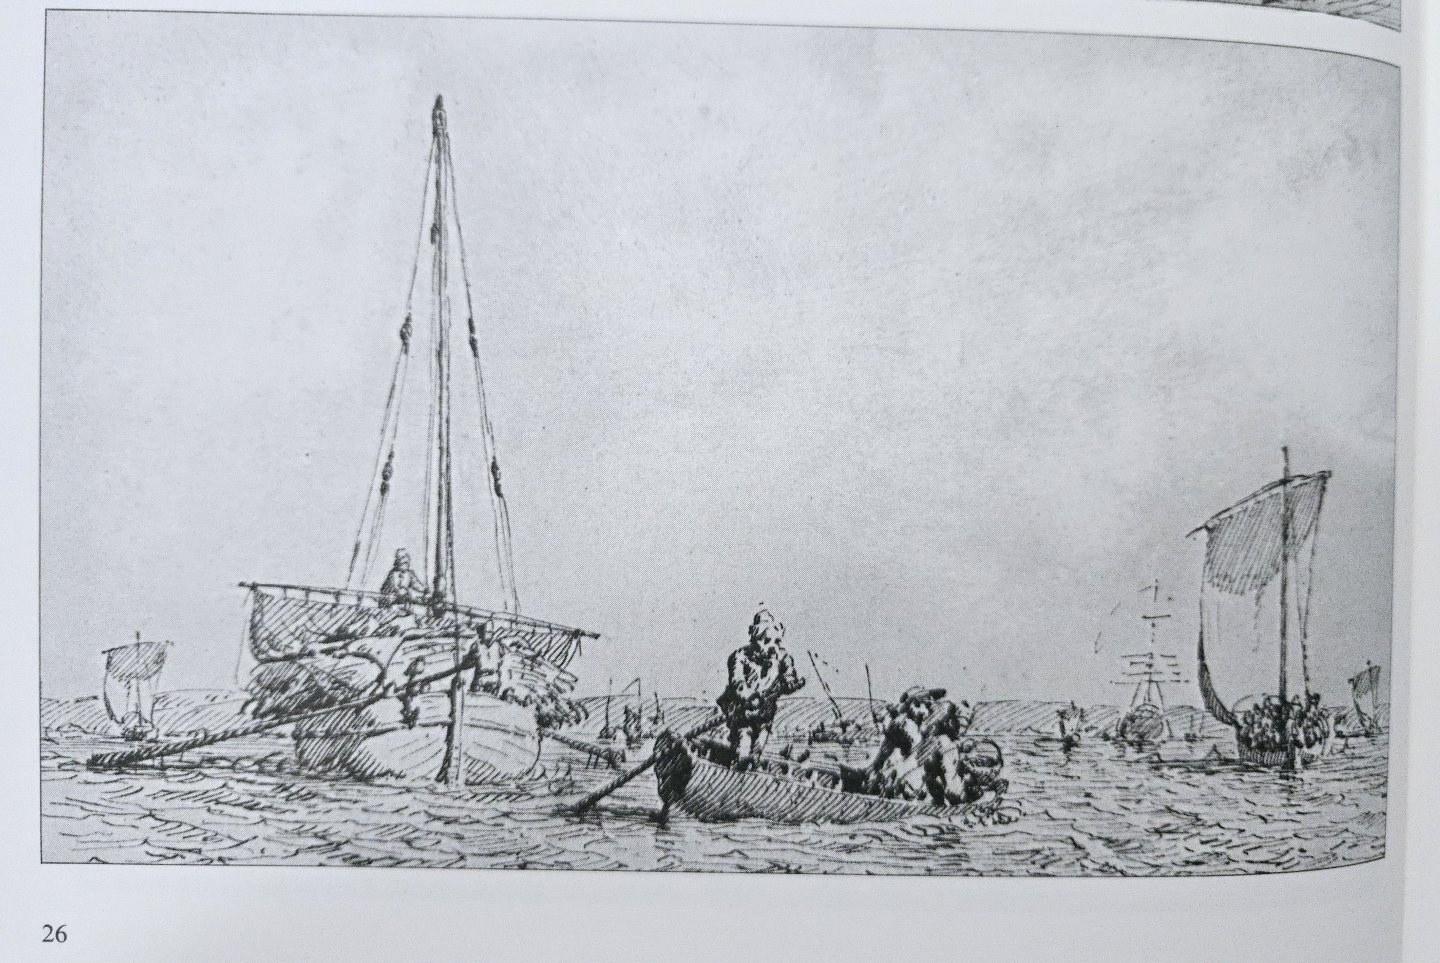
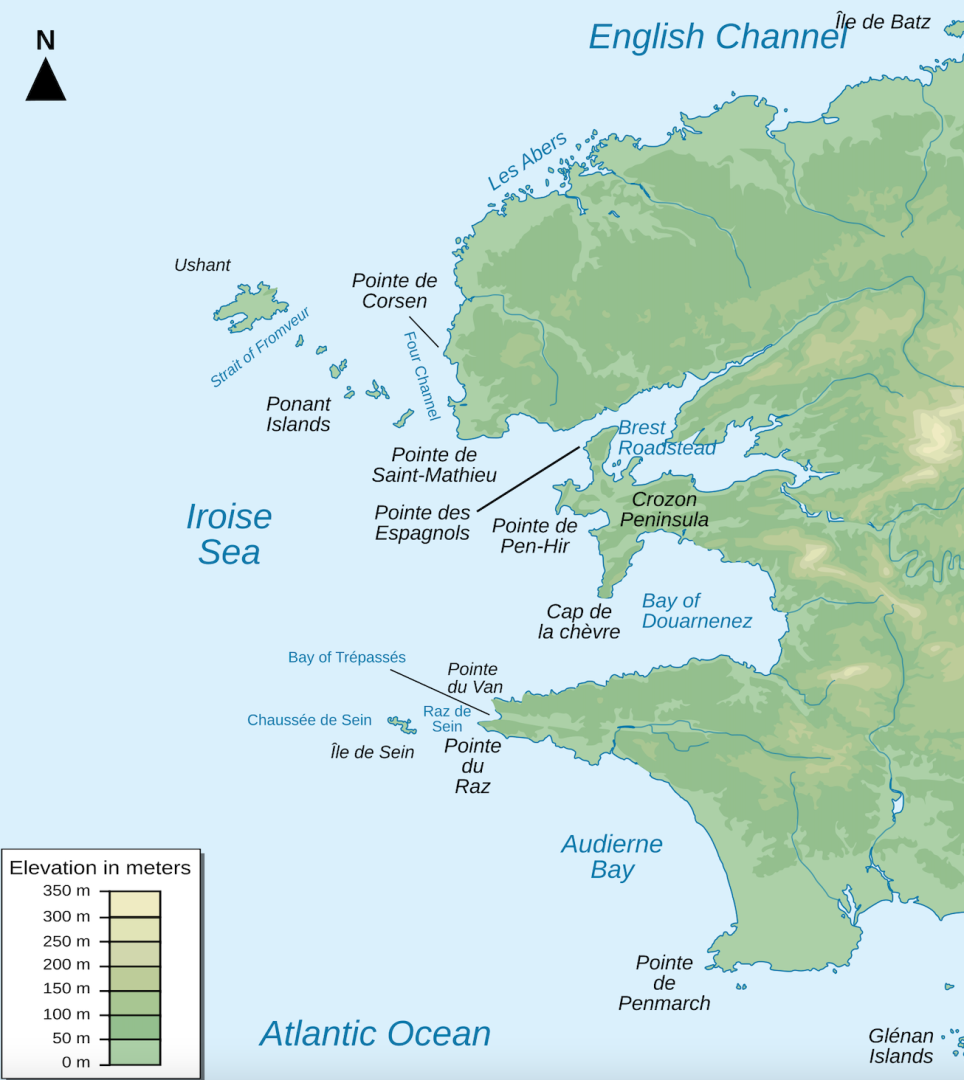
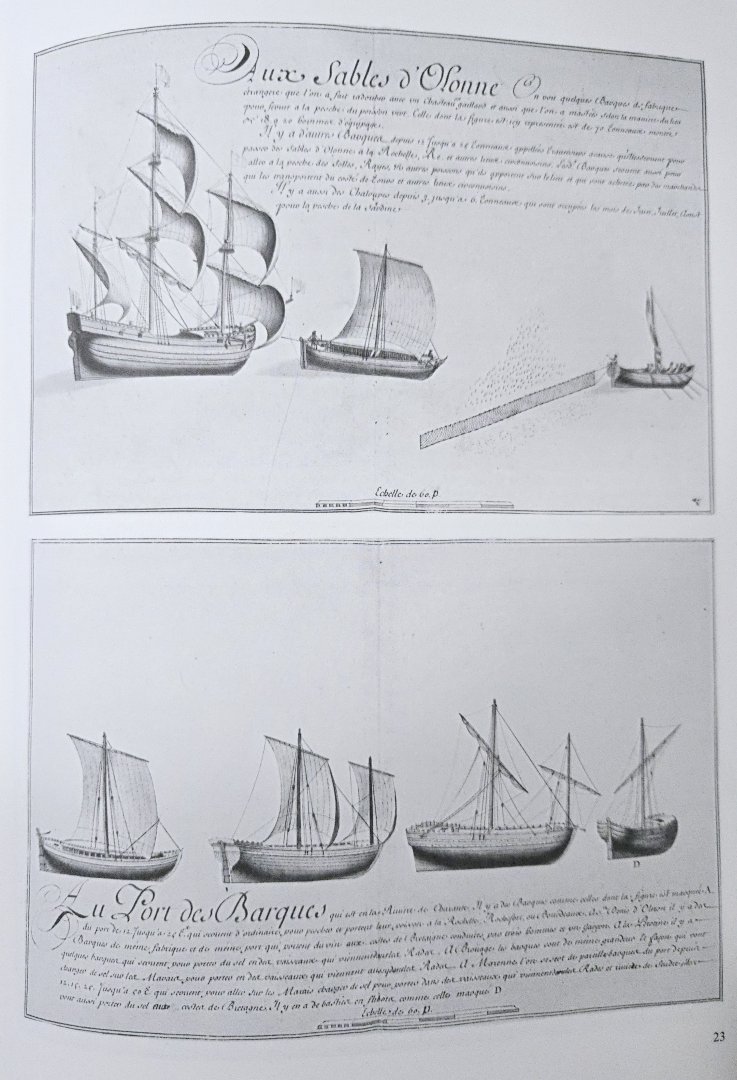
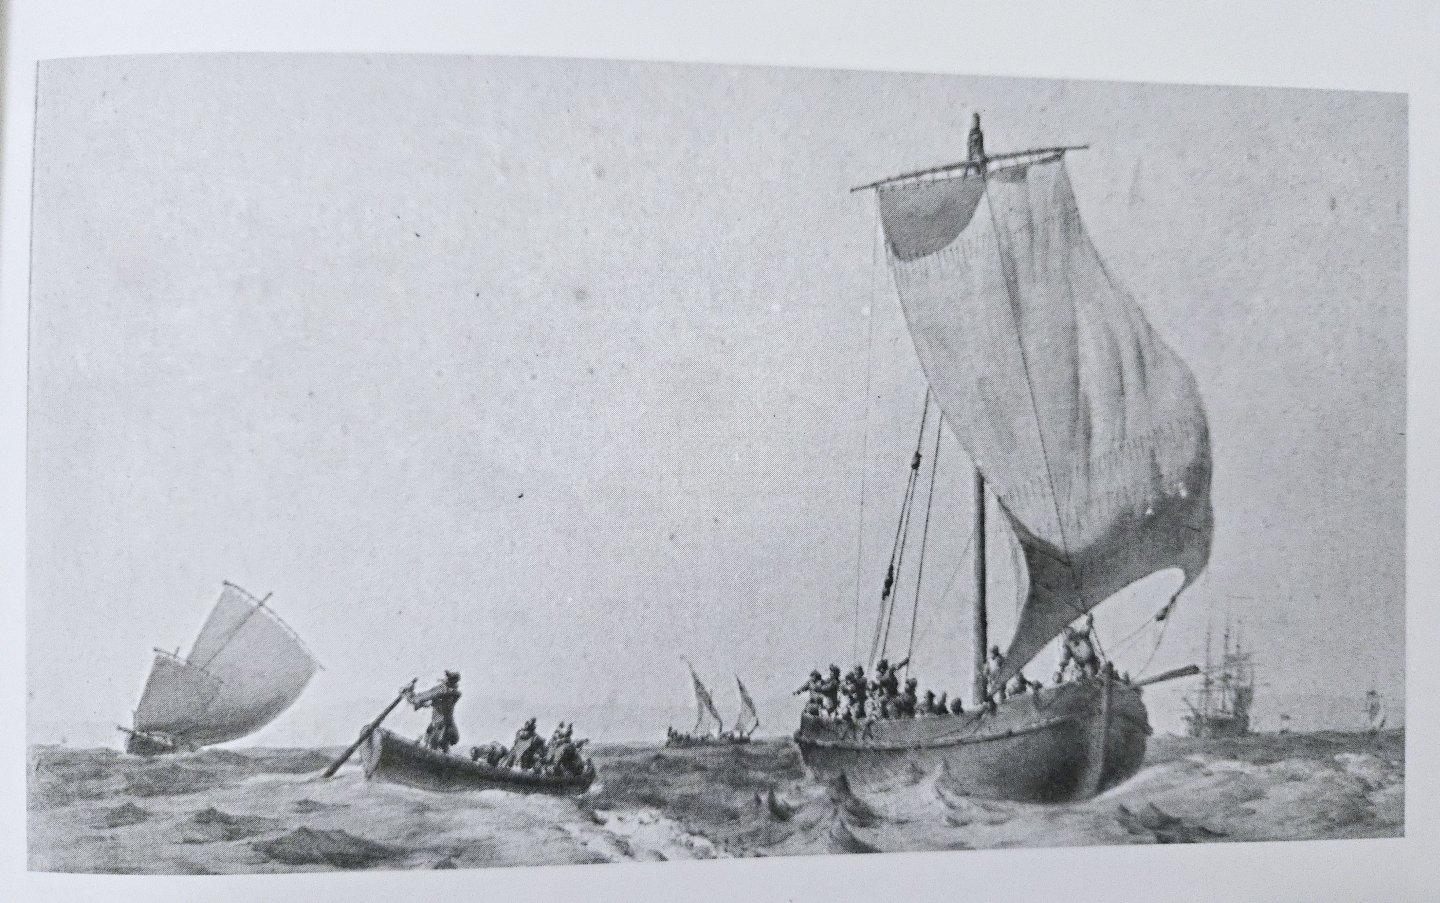
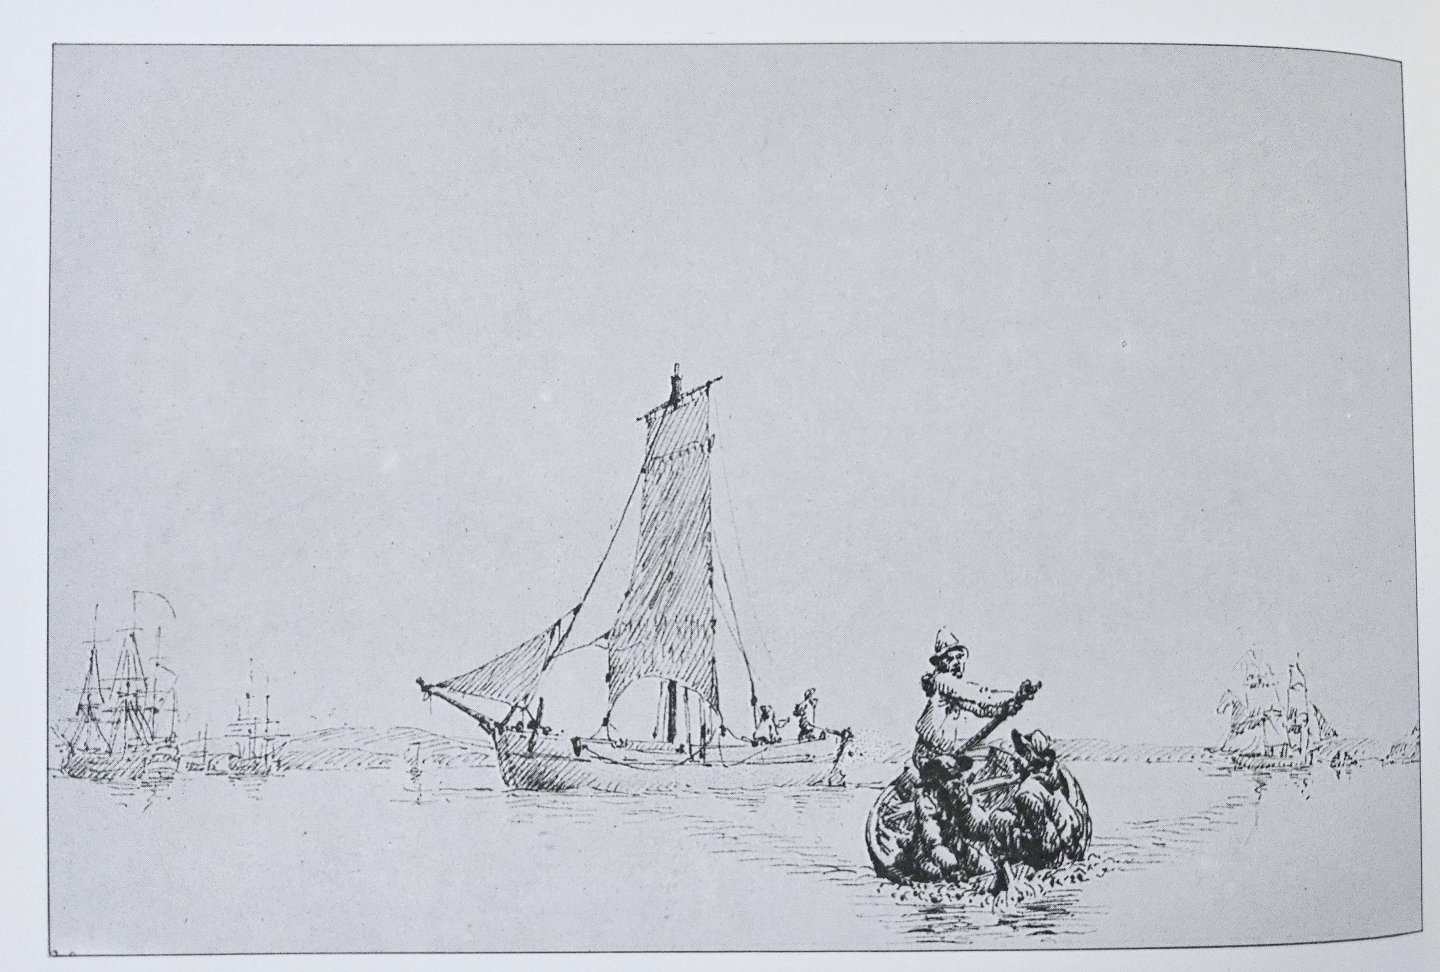
Bateau de Lanvéoc: History and Design, Pt. 1 of 2 I've been reading more of the monograph. It's been rather slow going. While it's amazing that my phone camera can scan and copy text from photos, the translation it gives is frequently quite bad, especially where maritime terminology is involved. It's fine with sentences like "Let's move on to the description of the hull of the boat with various drawings," but in other cases you get: "The rectilinear stunt is assembled by a tenon in a squirrel on the back of the upper face of the keel, a small curve angular bonding. The bow and stunt wear a scribble. The embers consist of varangues on which apply to partial recovery (empat) of the allones thus prolonging the varangues and some nails hand-hold the covering." After some confusion, I realized that by "stunt" it means sternpost, "scribble" is rabbet, "embers" are frames, etc. No clue how it got "squirrel," but it's at least clear it's talking about a mortise and tenon joint there. Google Translate and Deepl are better, though not without their own headscratchers. Anyway, the monograph has a lot of interesting information and large-format images. Taken together with some other sources, there's quite a bit that we can know about this vessel type. To summarize, the Bateau de Lanvéoc was a fairly well-defined vessel type and part of a family of broadly similar square-rigged, one- and two-masted, decked and undecked, double-ended or transom-sterned workboats that were common in the area around the port of Brest from the mid-1600s (if not earlier) up into the first decades of the 1800s. Before proceeding, I should note that the following is not in any way conclusive. There is plenty out there published about French workboats that I have not read due to lack of access and the language barrier, and it is entirely possible that some or all of my suppositions below are proven wrong in these other sources. There’s a reason why it’s important to speak the local language when researching something. Nonetheless, I think it can be useful to lay out some of my thinking on this even at an early stage—after all, this is a forum, not a peer-reviewed publication. Brest and its Environs The port of Brest is located in Brittany at the northwestern tip of continental France, where the English Channel meets the Bay of Biscay. The Iroise Sea--as the waters offshore are called--is frequently harsh, subject to severe storms and strong tides. The meeting of different currents also produces an ecological hotspot offshore marked by rich marine life. The shoreline, which is pierced by numerous inlets and dotted with small islands, is in places quite rocky and cliff-lined, although other areas are marked by beaches and mudflats. There are two large bays in the area, separated by the jagged Crozon Peninsula: the Brest Roadstead to the north, a large and well-protected bay with Brest on its north shore, and the Bay of Douarnenez, with a fishing port of the same name, to the south. Lanveóc is a small town on the north shore of the Crozon Peninsula, about 11 miles across the roadstead from Brest. Source: https://commons.wikimedia.org/wiki/File:Iroise_sea_map-en.svg Although the area had long been recognized for its fantastic natural harbor, it became increasingly strategically important after the establishment of a naval base at Brest in 1631, and especially the creation of a major naval arsenal in 1669. Brest never became a major commercial hub on the level of ports like Nantes and Bordeaux, which had much larger populations and merchants with substantial trade connections with the rest of the world. Nevertheless, the military base and its needs for supplies and people spurred a great deal of commercial and transport activity in the area. As a result, the Brest region developed a number of types of small workboats, of which the Bateau de Lanvéoc was one. Such vessels needed to be rather strongly-constructed and seaworthy, to deal with the harsh conditions offshore, but also capacious and capable of operating in the shallow waters close to shore. I should note here that, while “Bateau” is the generic French word for “boat,” in what follows I’ll be using it to refer specifically to the Bateau de Lanvéoc type. Design and Appearance of the Bateau de Lanvéoc There are several sources allowing for the detailed technical reconstruction of the Bateau that Boudriot and Berti undertake in the monograph. The lines of a roughly 38-foot-long Bateau were taken off in 1830 and included in Admiral François Edmond Paris's Souvenirs de Marine, as shown below. The description states (to roughly translate): “This type of boat was heavily constructed, of large, widely spaced, and poorly fitted pieces. After having been used for a long time to cross the harbor of Brest, it disappeared. It was renowned for its safety, but not for its sailing qualities, and resembled the barges that carried away the residue of the Brest dredges. It did not always include a jib. Its square sail is perhaps the only one that is reefed from below.” More importantly, there are several detailed technical descriptions of these vessels' design. Blaise Ollivier's 1740s dictionary manuscript discussed in some detail the hull proportions and scantlings of small fishing and ferry boats (traversiers) in Brittany as a whole, including vessels very similar to the 1830 plans. In the 1750s or 1760s, a shipwright named Morineau at Rochefort further down the coast wrote a manuscript in which he included numerous details establishing the proportions used for working out the hull form and structure of a vessel very similar to that shown in Souvenirs de Marine, though rather larger (nearly 60 feet long). Morineau's proportions are confirmed by nearly identical details given by the engineer Pierre-Alexandre-Laurent Forfait, whose 1788 work Traité élémentaire de la mâture des vaisseaux establishes the mast and sail proportions for the same type of vessel, as well. These sources also show how Bateaus were single-masted up to a length of about 60 feet, beyond which they gained a small foremast. Taking especially Morineau and Forfait’s information, the monograph proposes a vessel type defined by a set of proportions between length, width, and mast/sail size. Other sources discussed in the monograph highlight similarities in design and construction between passenger and cargo Bateaus, fishing boats, and lighters used in Brest. Taken together, it seems clear that boatbuilders from the mid-1700s onward, if not earlier, until the decline of the Bateau, were working with well-established proportions, creating vessels both double-ended or with transom sterns (but otherwise quite similar). Indeed, the monograph also includes a number of plates from the Album de Jouve (edit: and not de Colbert as I initilally wrote) of 1679, such as those shown below, showing small one-and-two masted vessels used for transport and fishing, some of which are very similar to later vessel. The main change over the years appears to have been the addition of a bowsprit and jib to some (though not all) such vessels by the mid-1700s, to improve steering qualities and to help better set the bowlines on the square sail. (It bears mentioning that Boudriot and Berti suggest that the basic proportions of mast/sail to hull dimensions established for the Bateau de Lanvéoc were likely used for medieval square-riggers, as well. I don’t really know enough about medieval vessels to comment on this, beyond mentioning that A: I’d be curious to know if more recent archeological finds show anything about this, and B: I wouldn’t be surprised if there were regional variations in medieval square-rigger proportions.) The other main source presented in the monograph is the numerous drawings of bateaus made by French naval officer and marine artist Pierre Ozanne in the late 1700s. Ozanne's works show a wide variety of Bateaus, but confirm details of the hull and rigging given in the written sources. Some Bateau depicted are quite small, such as the 20-footer below, while others are much larger: Ozanne depicted Bateaus at sail in all kinds of weather, including in squalls and becalmed, as below: A note must be added about the sail itself. As is clear, the Bateau de Lanvéoc was defined in part by being rigged with a single large square sail (besides the jib, which not all Bateaus used). The use of such an apparently clumsy and unweatherly sail on a relatively small working vessel can seem anachronistic, and perhaps it was by the time lines were taken off in 1830. But two points should be made. First, the square sail was not necessarily as unweatherly as it appears, especially because in the 1600s into the 1700s, there was often less of a clear distinction between a square sail and a fore-and-aft lugsail (which was also commonly in use around Brest) than present-day categories suggest. As Ian McLaughlan states in The Sloop of War, on at least some small vessels (especially those used in the Bay of Biscay) it was possible to raise a square sail placed fore-and-aft inside the shrouds with the halyard placed not in the center of the yard but 1/3 of the way from the end, effectively turning it into a sort of lugsail. It’s unclear whether this was ever done on the Bateau de Lanvéoc. I do not see any clear examples in the Ozanne drawings, although one Bateau in the background of one image (which will be posted in part 2) seems to have the halyard placed at the yard’s 1/3 point rather than in the center. Sail types also became increasingly differentiated over time. But using the vessel’s square sail as a fore-and-aft lug would not have been without precedent in the region. (I should note that it’s possible that the monograph answers this question, but the rather chaotic automatic translation of the rigging details is a bit hard to parse, especially as my own knowledge of rigging terminology is lacking). Second, it seems likely that there was some degree of specialization that differentiated the Bateau (at least in its larger forms) from other vessels and hence its use could help explain the rigging and design, although information here is contradictory. On one hand, Morineau’s proportions from the mid-1700s are stated to apply to both a ferry (traversier) and a fishing boat, some of the small Bateaus shown by Ozanne are stated to be used as fishing vessels, and Ollivier described the Bateau as both a fishing and a ferry boat. On the other hand, other sources suggest a greater degree of specialization by the end of the 1700s, especially between fishing and cargo/ferry vessels. The drawing below by Ozanne (included in the monograph) particularly highlights the differences in rig between the large Bateau at right, and the lugger at left of the type that came to be known as a Plougastel Boat. More clearly, Paris’s Souvenirs de Marine also includes plans of fishing vessels from Brest and Douarnenez from the end of the 1700s, as can be seen below. Besides the distinct lugsail rigs (which look to be practically identical to the Plougastel Boat), they show quite different hull lines from the Bateau de Lanvéoc, being much sharper and with a less boxy hull form. I mention this to suggest that the Bateau’s seeming anachronism in a period of apparently growing specialization may suggest that it was simply well-suited for the type of work it performed. In thinking this, I’m drawing on Eric McKee’s writing in Working Boats of Britain: Their Shape and Form (which, while based on the UK, offers much more generalizable thoughts about factors shaping boat design and change). As McKee notes, quite simple and seemingly anachronistic work designs and rigs often continued in use for quite some time, despite broader changes in boat technology, when they were appropriate for local conditions and uses. While fishing vessels, depending on their target species, may have needed to operate some distance offshore and had to haul their catch to market quickly, the Bateau may have fallen out of favor for such purposes and come to specialize in other uses. At least by around 1800 or so (if not earlier), based on images (as will be discussed below), it more often seems to have been used for hauling passengers and cargo, and serving as a lighter, around the Brest roadstead and perhaps to nearby harbors. Speed and weatherliness were presumably less important in this role than cargo capacity, stability, and maybe ease of handling. To be continued…


- 139 replies
-
- 4
-
-
-
- ancre
- Bateau de Lanveoc
- (and 2 more)
-
Looks like an interesting build, and a good home for the Peerless!