flyer
-
Posts
1,016 -
Joined
-
Last visited
Content Type
Profiles
Forums
Gallery
Events
Everything posted by flyer
-
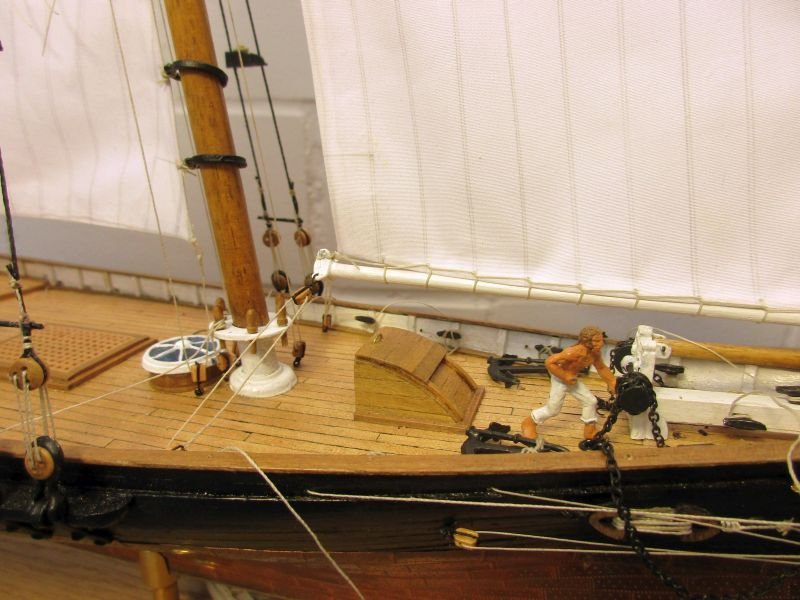
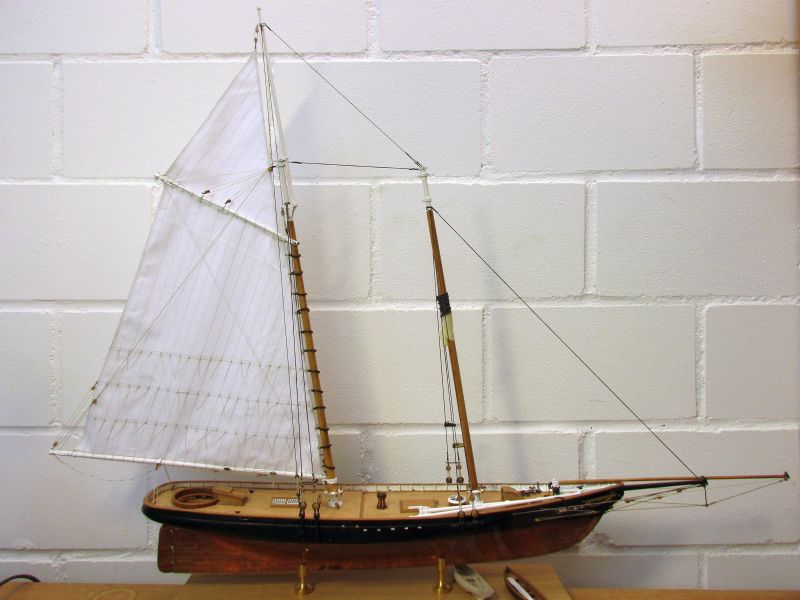
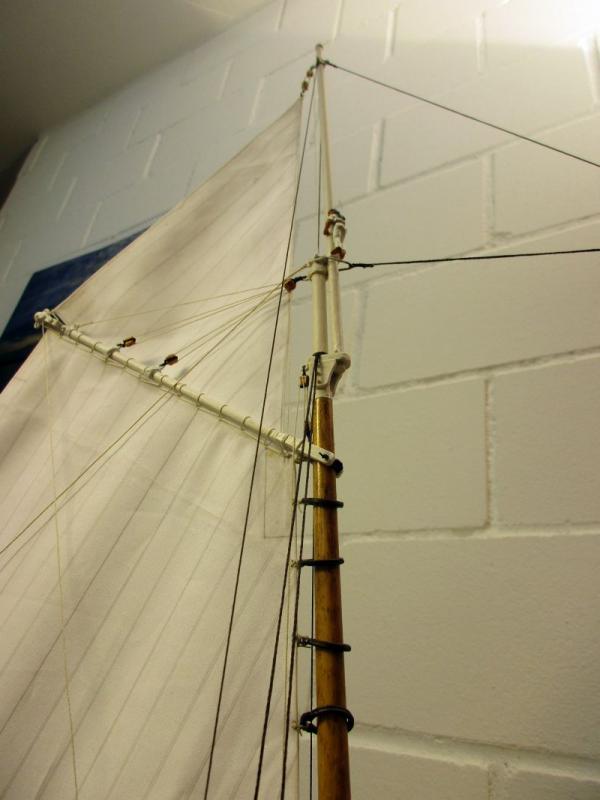
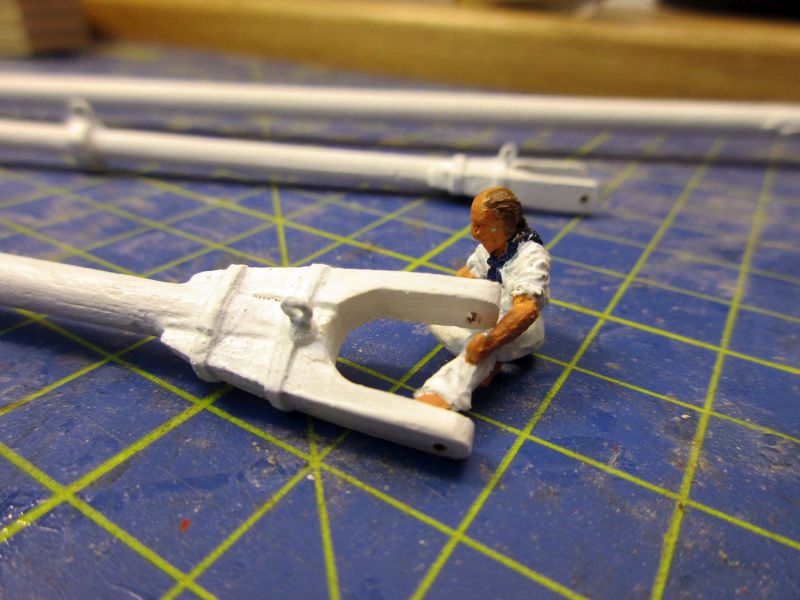
 the boats In my clever books and the web I was looking for installation details of the davits with their boats. A clear example of "how to..." wasn't to be found and I had to revert to some more or less educated guesswork. The davits most probably could be turned inboard and you would then have had the option to stow the boats on deck. However the paintings in John Rousmaniere's book seem all to show the boats hanging outboard. Most period davits show some stays from the davits head to the deck and one between the heads. Those were probably for stabilisation as well as a help for turning the davits. The tackles for the boats are straightforward usual ones with a double and a single block with a hook. One of the attaching points on the davits I use for the straps and will wind them diagonally around the boats. Originally the probably used some sort of tape but I took 0.5 mm thread instead. davits on starboard side installed the boat is pulled up into position on the port side
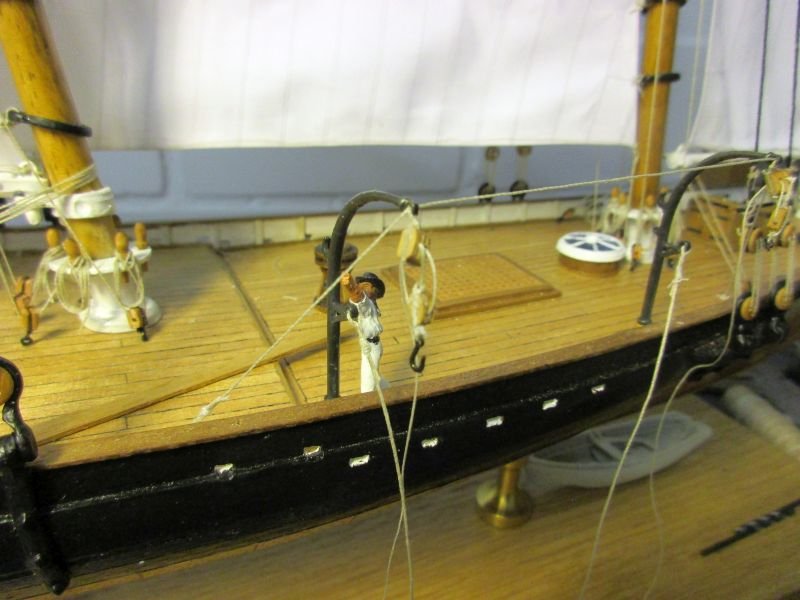

-
Hi B.E. Thank you for taking us along on your exciting 7-year-adventure (and for rebuilding that outstanding log). You created a real work of art and a reference for other builds and builders. I'm looking very eagerly forward to the next adventure. Cheers Peter
- 366 replies
-
- 4
-

-
- pegasus
- victory models
- (and 2 more)
-
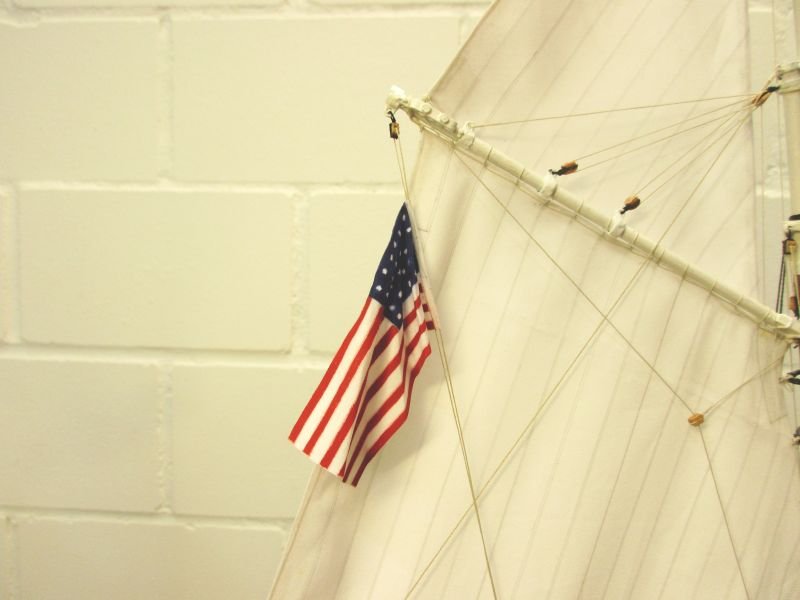
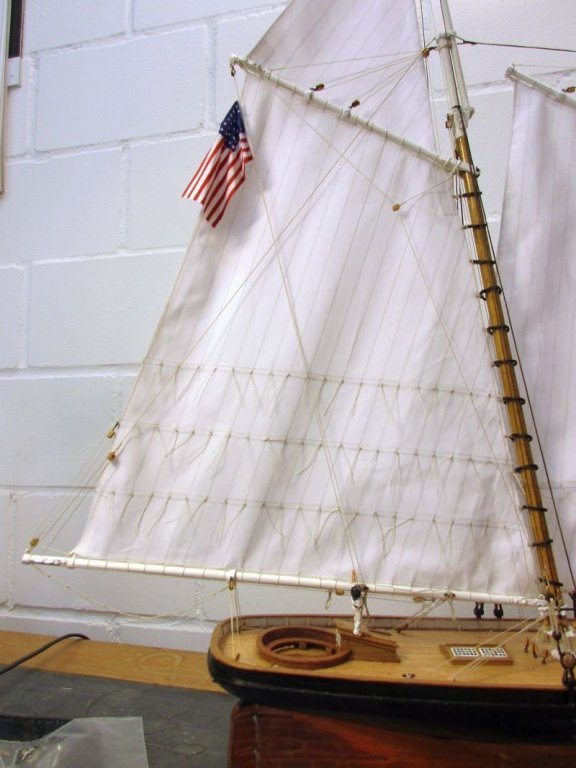
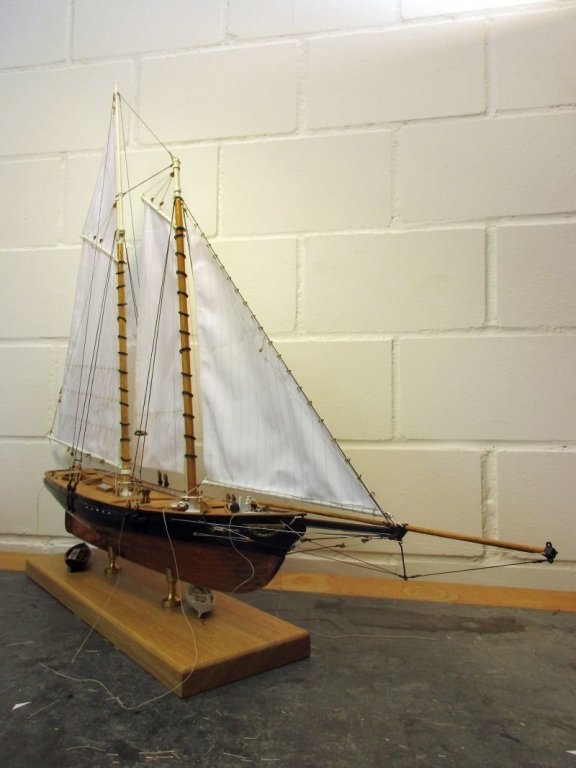
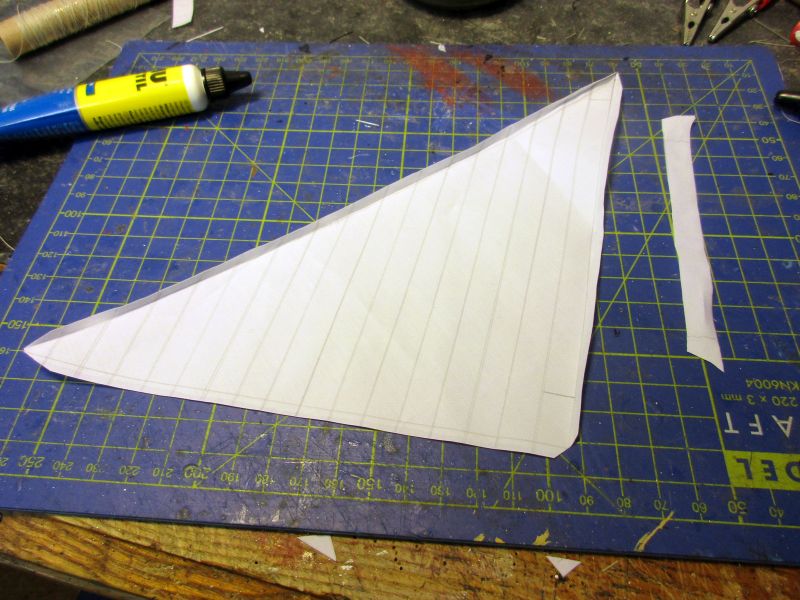
showing the flag The flag coming with the kit was too coarse, stiff and historically incorrect. During 1851 the flag changed from 30 to 31 stars with the admission of California as a state. Although I love the Californian Republic I made only a 30 star flag because it seemed simpler and America perhaps only had this on board when leaving the US for Europe. The flag was hand painted onto the same fabric as I used for the sails. The stars are just small, irregular dots and the 'hand made' clearly shows but I like it. It was then hoisted according to the kits drawings. Attaching the flag line to the boom always seemed the logical solution to me, although I had to learn, while rigging Pickle, that the navy way was again the complicated one by attaching the flag line at the rail and having to adjust it with each shifting of the gaff. printed template and hand painted flag compared to the kit's flag looks acceptable

-
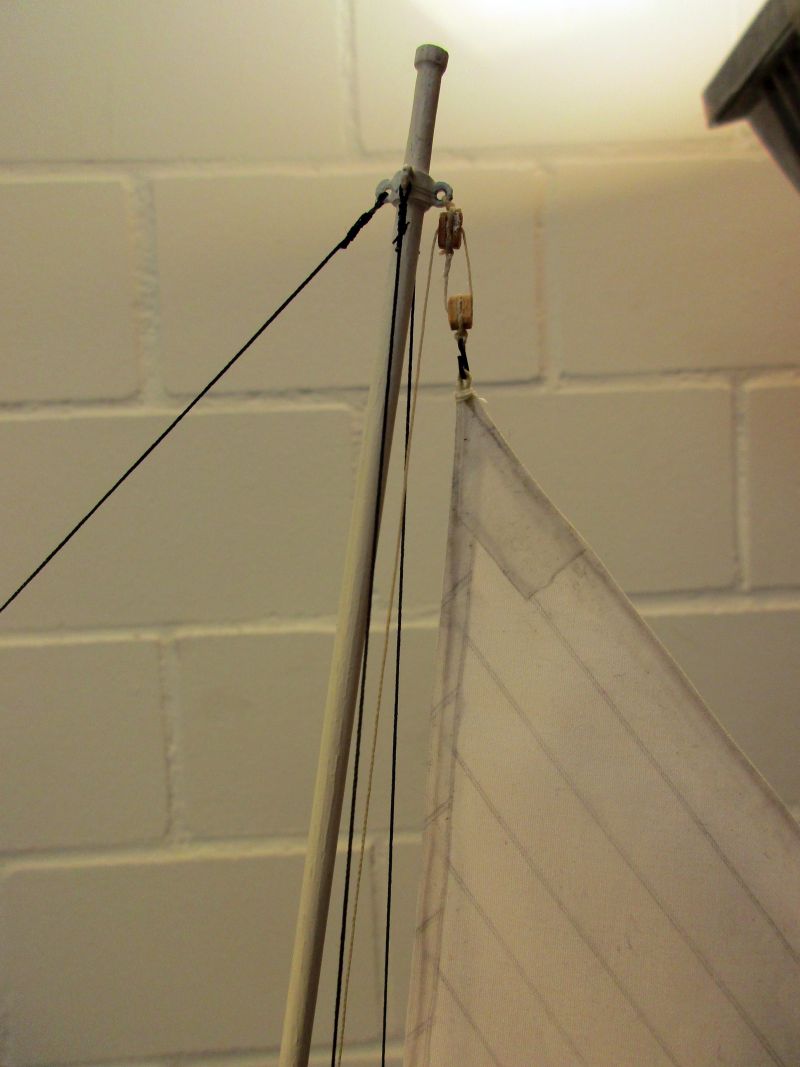
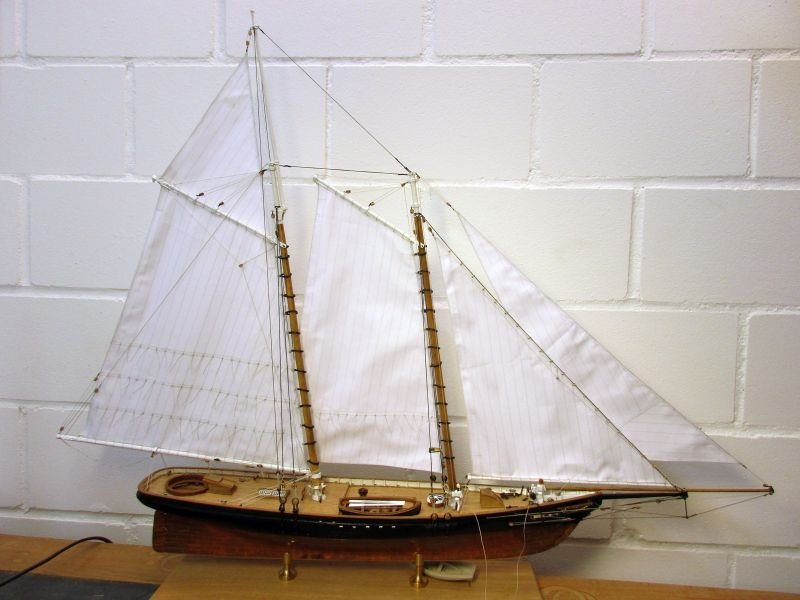
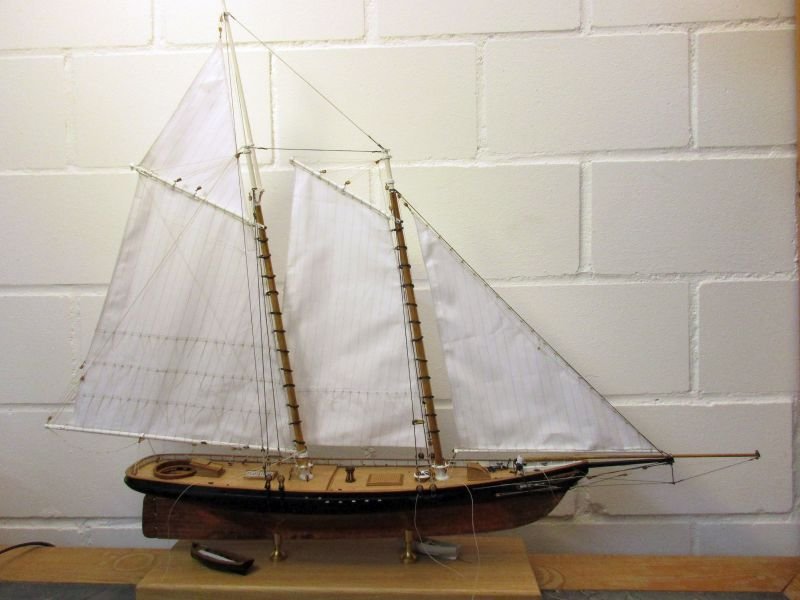
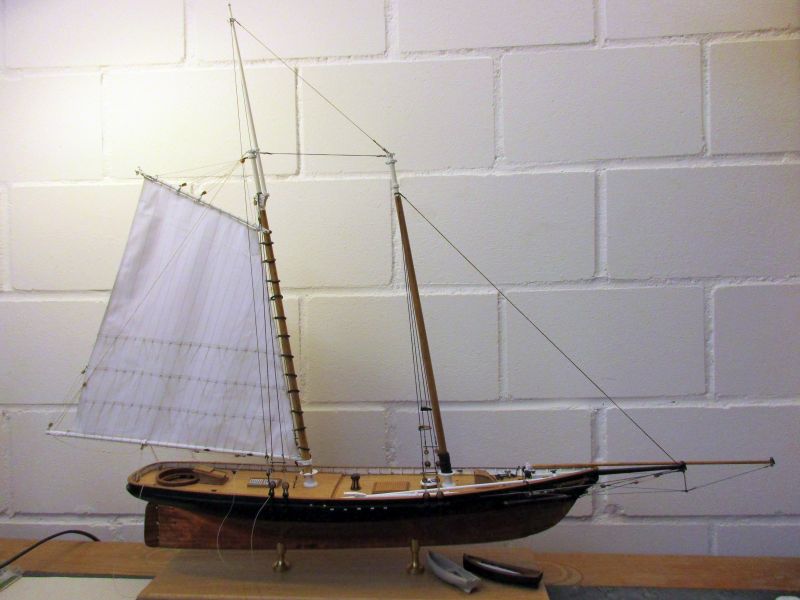
The outer jib was the last sail to be hoisted. The making was similar to the other sails. I used again the lighter Amati rigging hooks to set it "flying". The sheets were lashed to the sail according to a picture found in Lees. i decided to thrust the kit's instructions and added the disputed block for the gaff topsail's tack. Although I still wonder about its usefulness the rig looks better with it. There remain still a few loose ends to be stowed. Next will be boats and the flag. all sails set (and the gaff topsail tack runs now through an additional block) sheet lashed to the outer jib mast tops still a few loose ends to stow
-
Hi Dave Thank you. BTW: If Wikipedia is correct then 1/8” scale is equal to a metric scale of 1:96. Now the Amati plates are 1:64 or 1:72. If you would build in 3/16" scale you could use all those myriads of fittings in 1:64. I'm looking forward to your build log in whatever scale you decide on! Cheers peter
-
My dear Martin and B.E. Please be aware that you may leave yourselves open to an accusation of "murmuring" and you could be requested to bear the consequences according articles 20, 21 and 22 while Martin also most probably committed an offence against article 2 of the Royal Navy Articles of War. Martin, very nice detail and it will always be visible - at least to the thousands, or so, of followers here in MSW. Cheers Peter
- 467 replies
-
- 2
-
-
- fly
- victory models
- (and 1 more)
-
Hi Hamilton Thank you. I would like it if you tried that simplified sail making. Sails add much to the beauty and are the raison d'être of all that masts and rigging of a sailing ship. About that block: I agree with you, however it seems not to change much in the way the tack arrives at the mast foot - it goes to the block on deck anyway but needs more pull because you have to overcome the friction of an additional block. On the other hand, reconsidering it, I see that it helps to lead the tack well clear of the flag line. Perhaps a reason for the particular arrangement. Well, I still can install it. However, after my botch job on the tack of the jib sail I'm still looking for possible improvements of that situation. In the meantime I will have fun with the outer jib. Take care peter
-
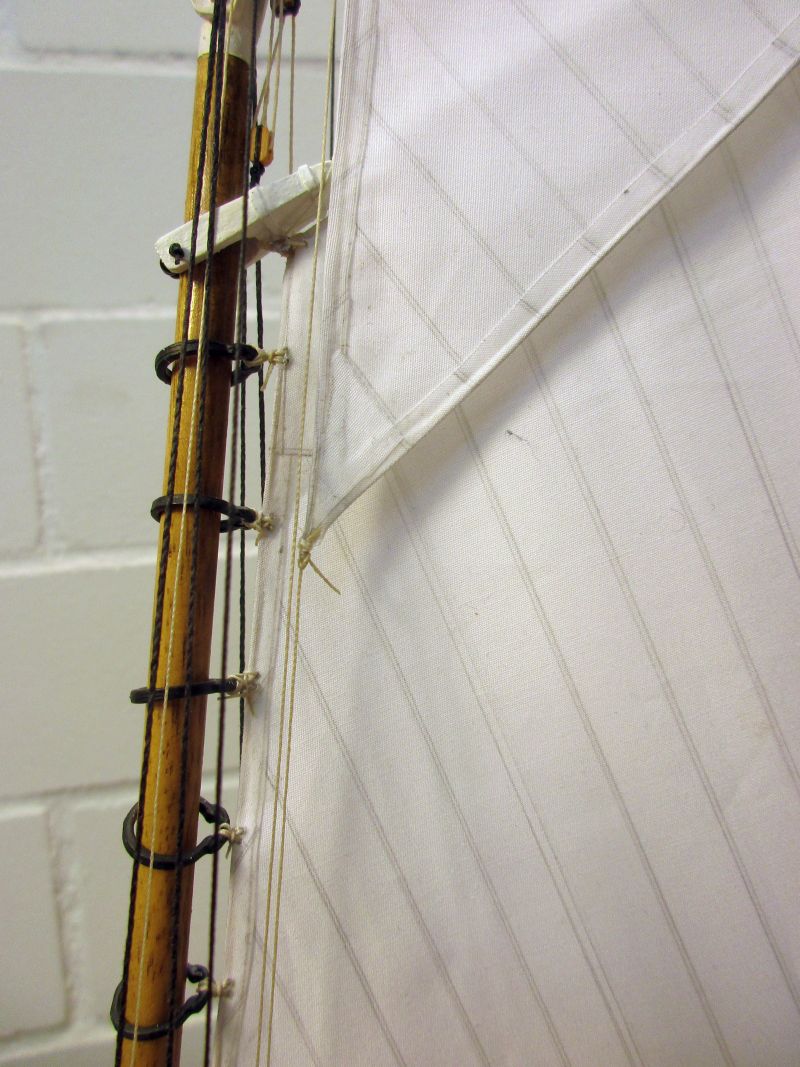
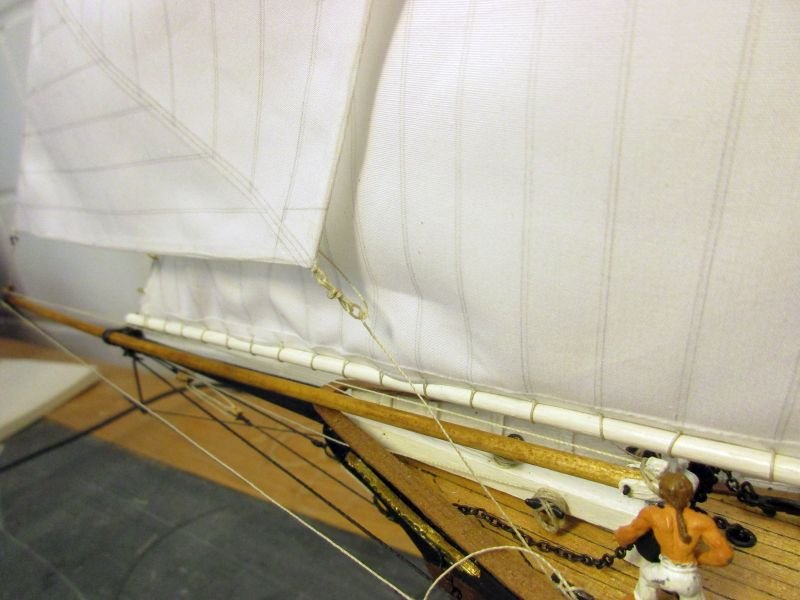
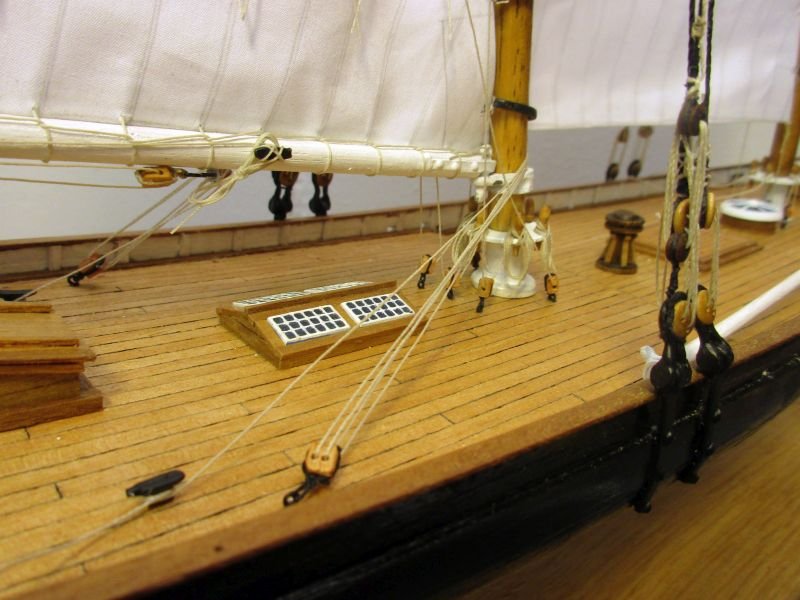
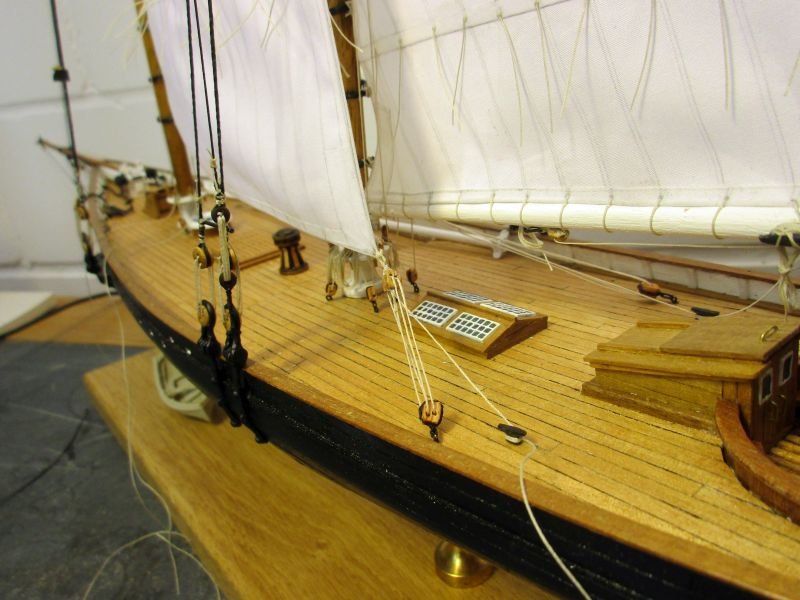
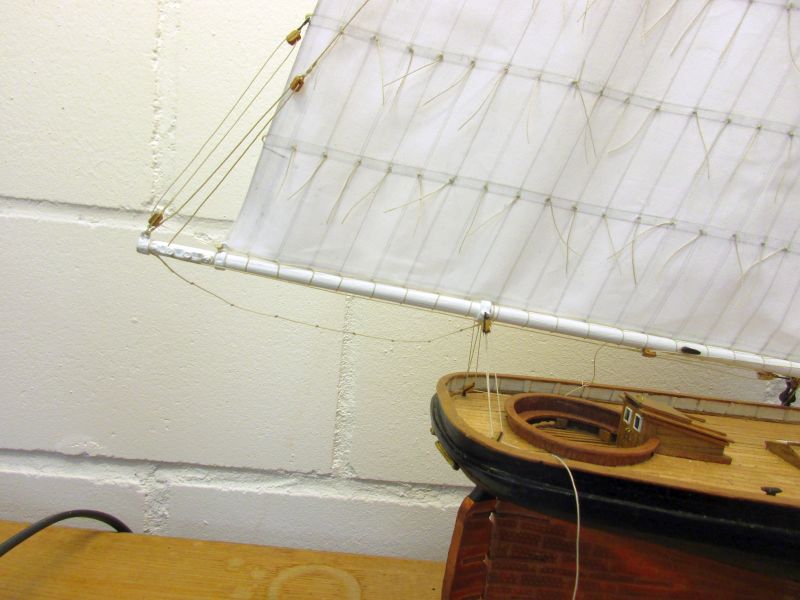
The jib was pencilled and glued the same way as the other sails. For the hanks, attaching it to the jib stay, I used the kit's brass rings. Several alternatives similar to the Pickle's hanks looked less convincing. Due to the altered stay I had fix the forward clew a bit differently. I'm not happy with the way it looks now - next time I build this ship I will take the stay through the bowsprit in front of those rings. The eyebolts for the lower blocks of the sheet tackles were set into the waterway. The kit's instructions have them on the rail. I didn't believe that. Then I had to tighten the already finished lanyard of the stay tackle. Fortunately it was fixed with diluted white glue only and could be loosened with some water. Lesson learned (again): don't coil your ropes before the stable door is closed - as Jack Aubrey perhaps could formulate, using another one of his inappropriate sayings. jib is set a small leftover 2mm block leads the down hauler forward clew - looks a bit dislocated boom end with sheet tackles almost in racing condition
-
Hi Martin Yep, perhaps. Right now I'm considering 7 projects, from Revenge or a bettered Wasa to Agamemnon, Vanguard, Diana, a rigged Confederacy and Cutty Sark. The big question is where to berth the finished ship. Perhaps you heard of that problem - even the best of all admiralties has limits. Cheers peter
-
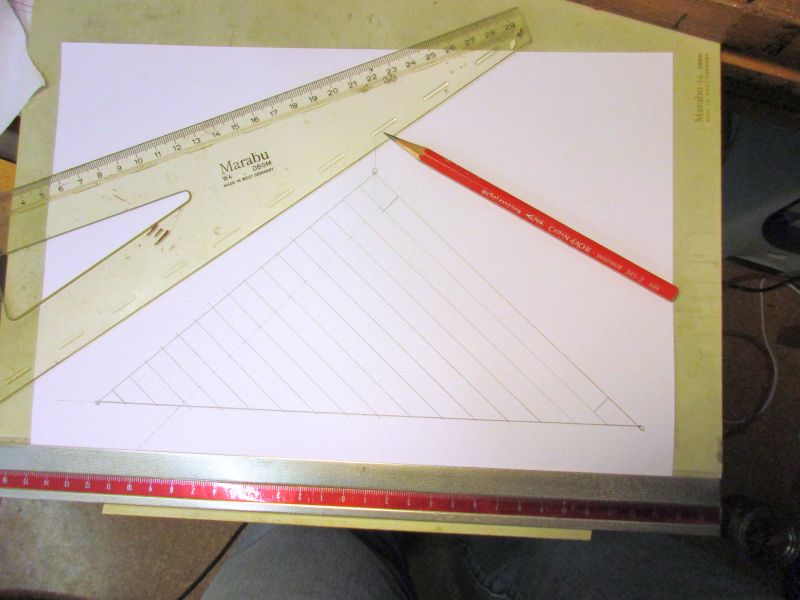
The next sail, the jib, needs a bit more planning. By changing the rigging of the fore stay, I was bringing it more inboard and changed the sail size as well. The sail from the kit plan was adapted to the new stay. Then I cut a paper template and checked it against the model. After resizing it twice I had a fitting sail template. The boom had to be shortened as well, of course. paper template for the jib sail
-
Thank you, Martin. Should be rather straightforward from now. Only the size of the jib with the differently set up fore stay must be checked. Then only the outer jib and finally the boats remain. Almost time to start thinking about the next project. Cheers peter
-
The fore gaff sail was made and set the same way as the main gaff sail. The main difference was the missing boom. The sheets with tackles are installed as per kit instruction. I mainly use the kit blocks but try to improve their appearance by rounding the corners a bit with a nail file. fore gaff mast foot upwind sheet around the mainmast downwind sheet about two thirds of the whole sail area are now set

-
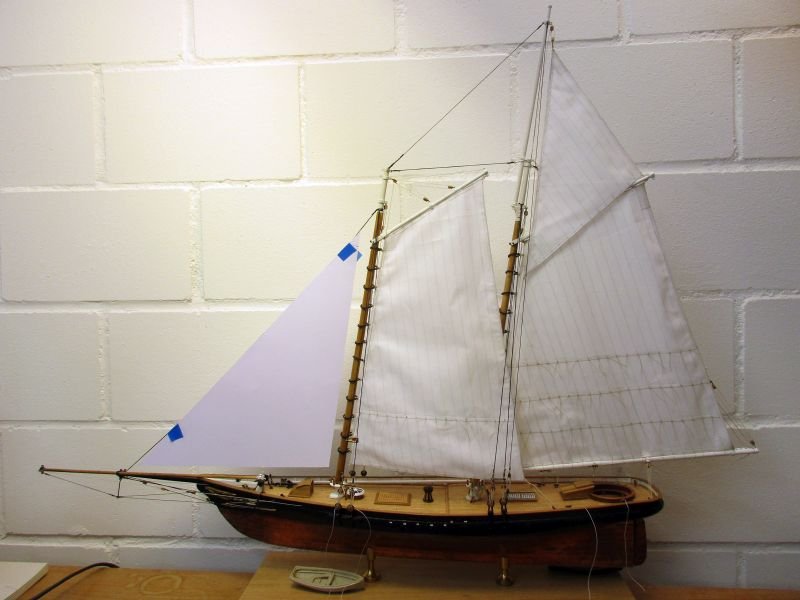
Many thanks, Nils. Much easier to work with canvas on a small yacht than with steel on a huge liner. Wouldn't you like to try another sailboat after sending your behemoth ocean liner onto her maiden voyage (through your living room, or wherever)? So do I, Tim. Yes, it seems, that those boats were only in place when she wasn't racing. As the jib boom went overboard quite early, and because I like the kit's appearance with the additional outer jib, I will show her in the configuration before winning the race and also with boats. As I also mentioned before, a ship without boats looks somewhat unfinished or even abandoned to me. Anchor davits: I know of only one model showing them. Perhaps they really had anchor davits for convenience and offloaded them together with the boats when racing. On the other hand, those anchors in the kit would probably weigh just around 50 to 100 kg. It should be possible to manhandle them with a few sailors and perhaps a provisional tackle to the masthead. (No permanent mast tackles were mentioned anywhere for America.) Hence, I'm afraid, my America's crew will have to shed some sweat to rise or drop the anchors. Cheers peter
-
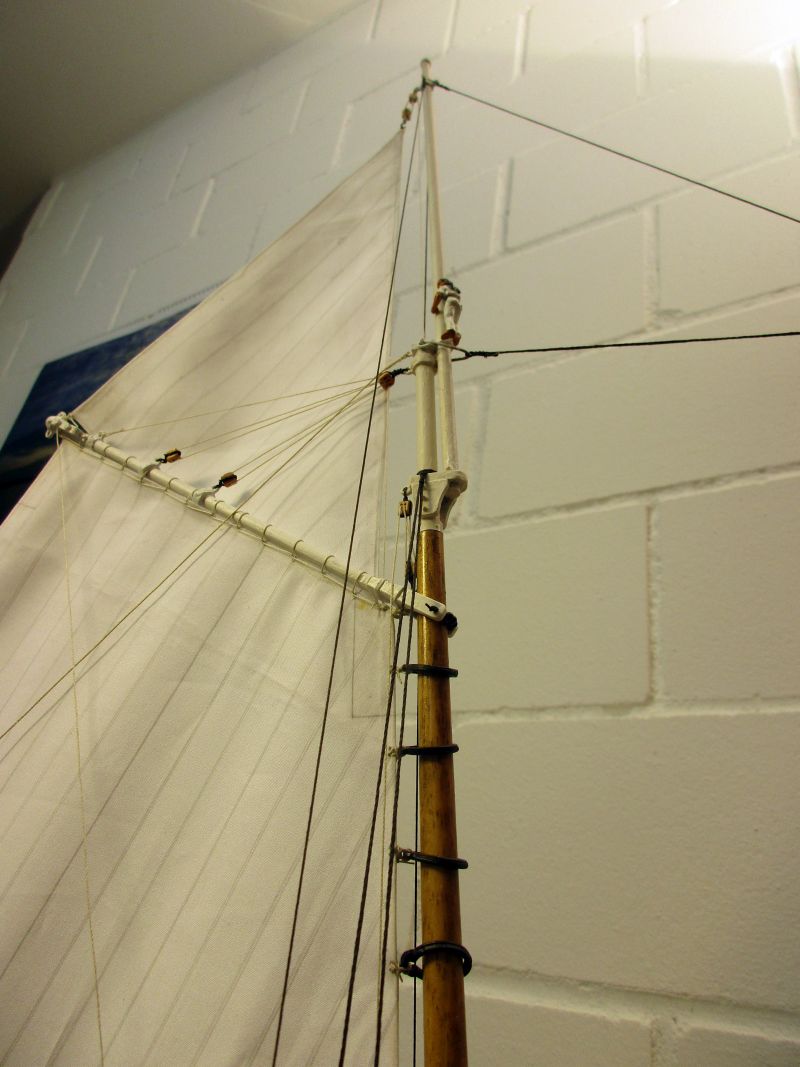
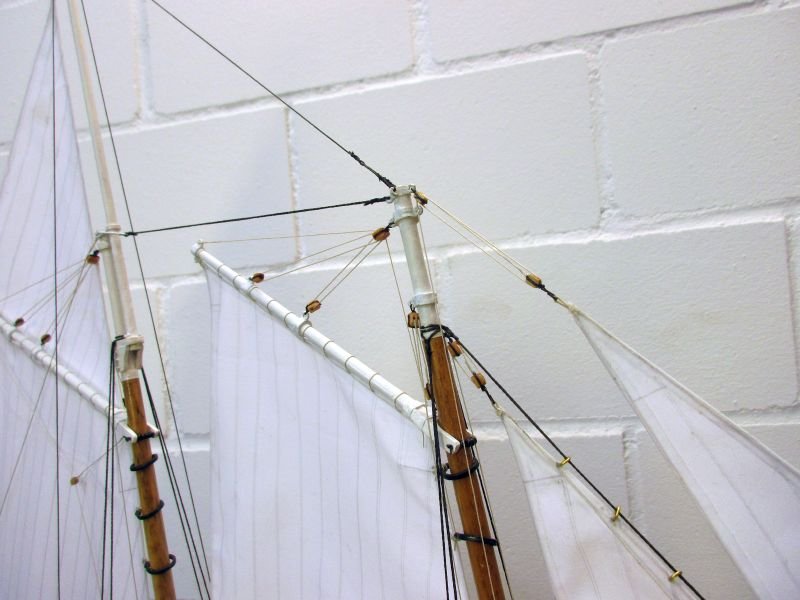
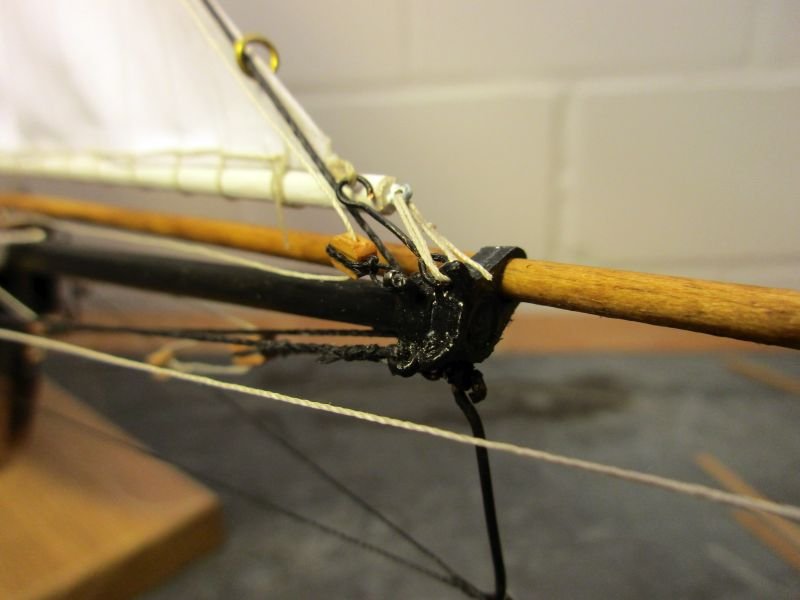
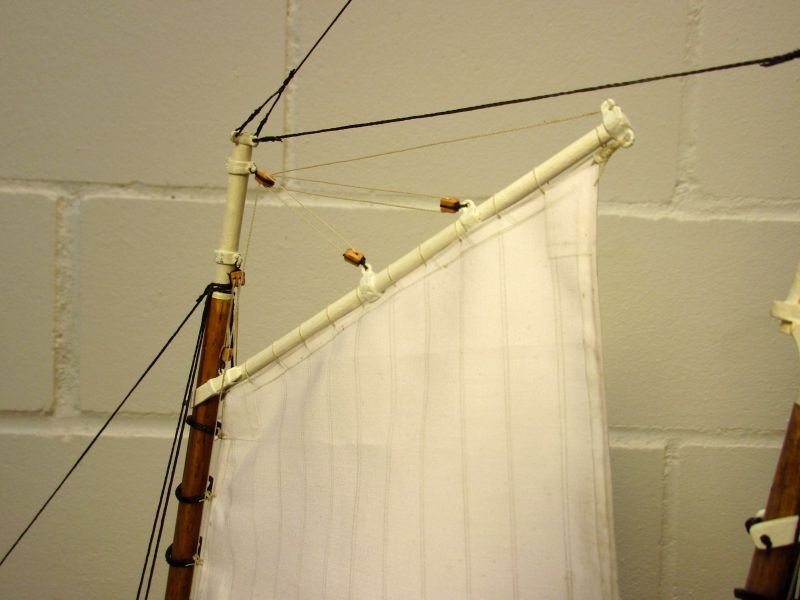
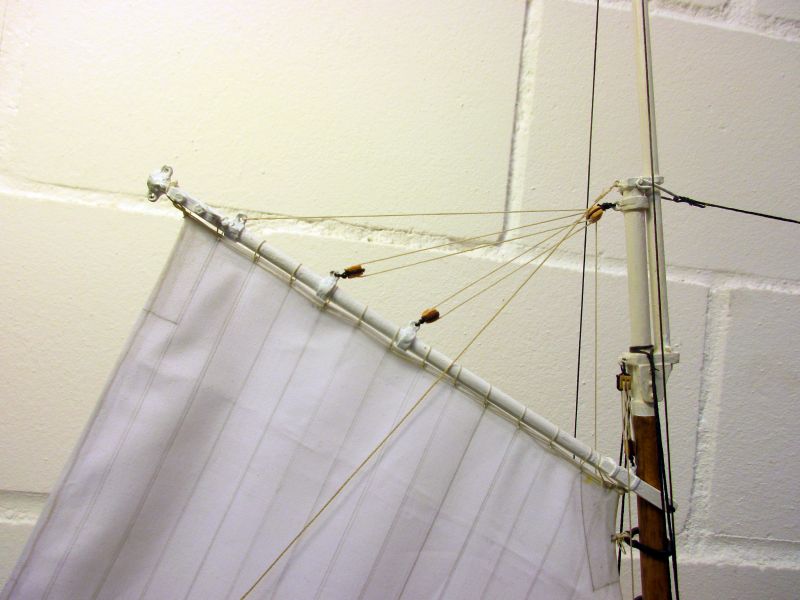
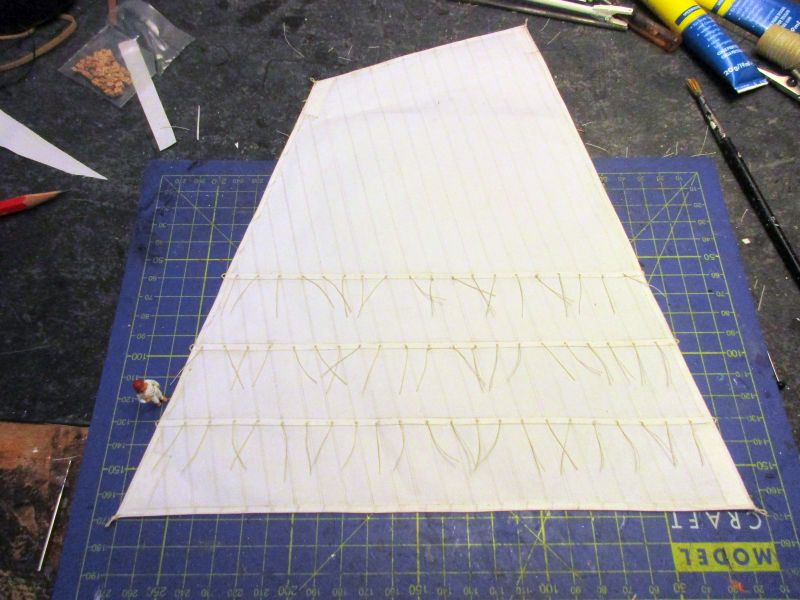
The gaff topsail is set and it draws. I made two little changes to the kits instructions. The tack was led from the sheave on the outer part of the gaff directly to the block on deck. I couldn't make any sense of that block which the kit fastens on a long line from the inner end of the gaff leading the tack towards the deck. According to the KISS principle I left it off. Another block was added because I didn't want to lead the sheet directly onto its belaying pin. By leading it through a block on deck I could half the pull on the pin and had an arrangement similar to the sheet and the tack. After setting the sail I made a sailor go to the topmast to illustrate the difficulties one would have working on a topsail lashed to the topmast (don't ask me how the poor sailor got there and back). Now I think more than ever that the topsail set flying, as the kit does, would have been the sensible solution for a racing machine. lower corner with sheet attached top halliard (the slim hook is a leftover Caldercraft part) mast foot with additional block for the sheet the sail is set and the simplified leading of the tack clearly visible this working station looks scary even under calm harbour conditions

-
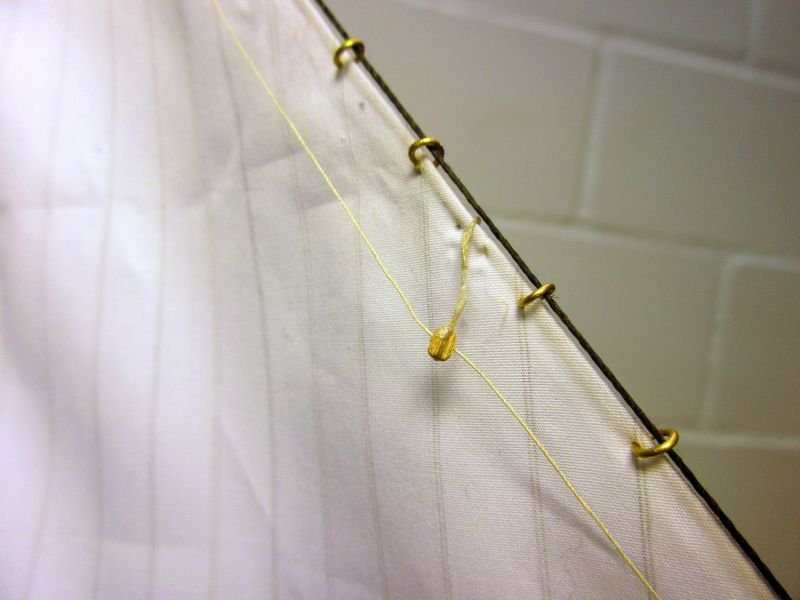
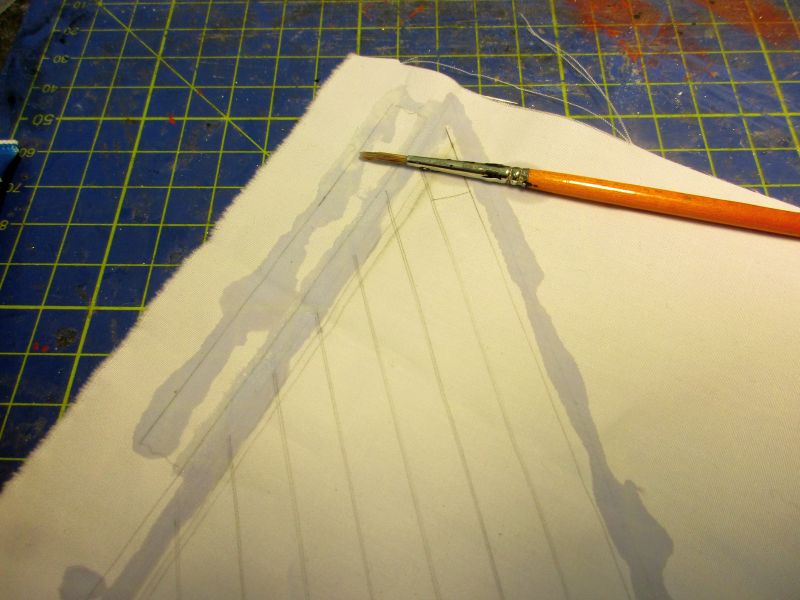
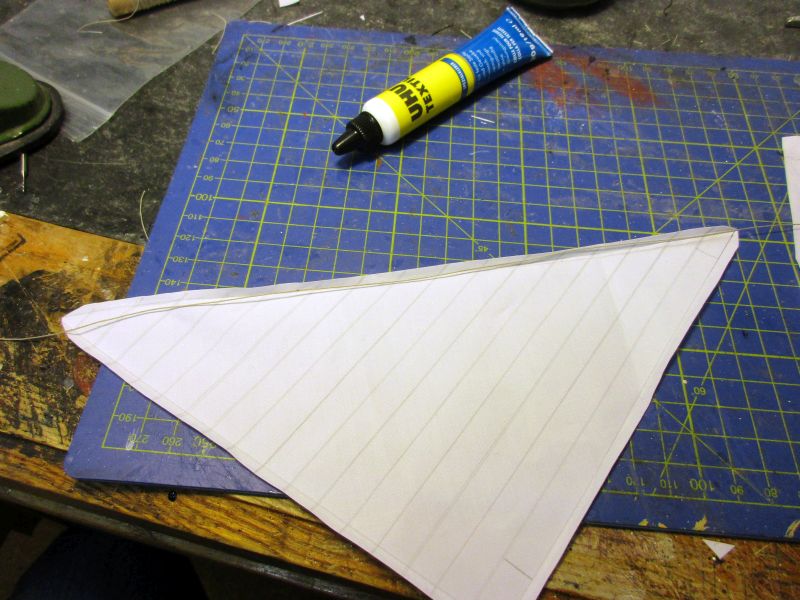
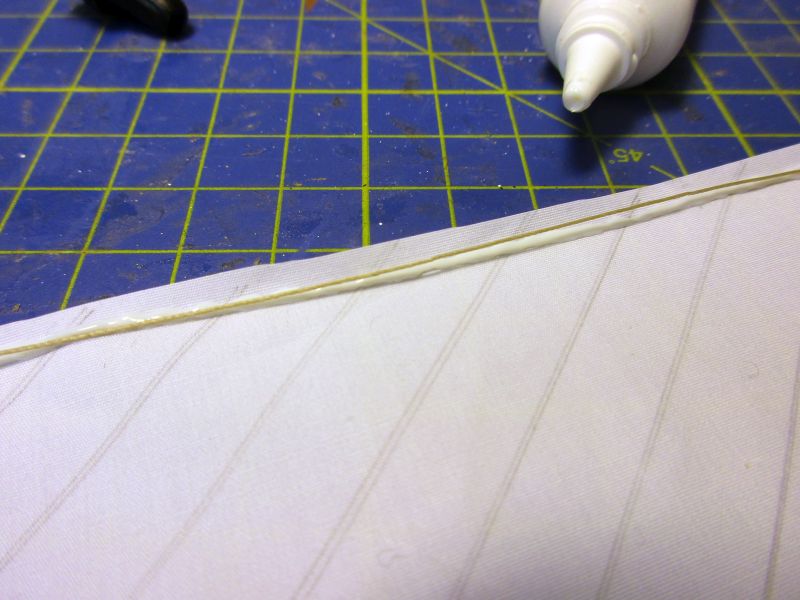
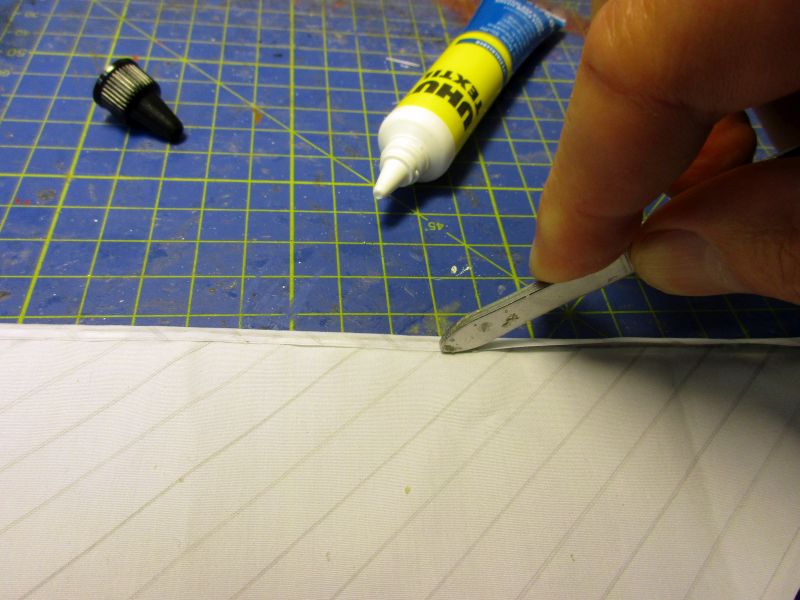
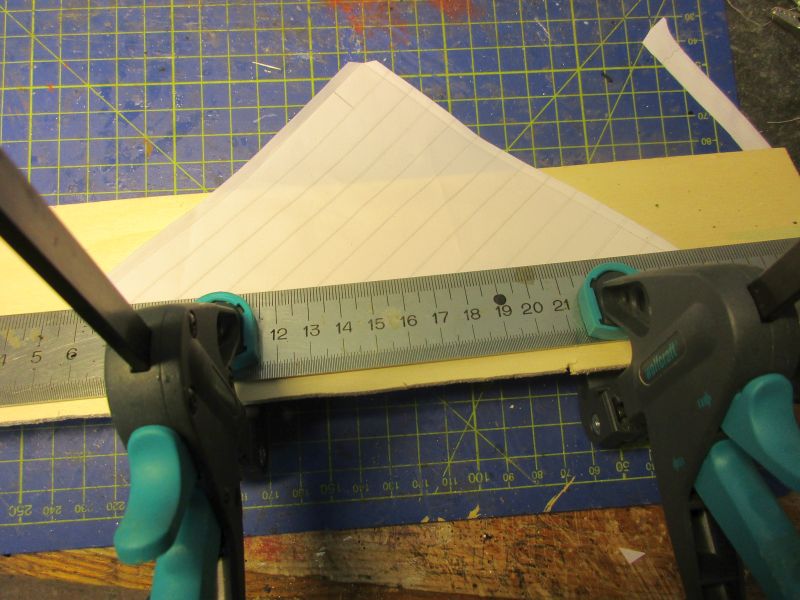
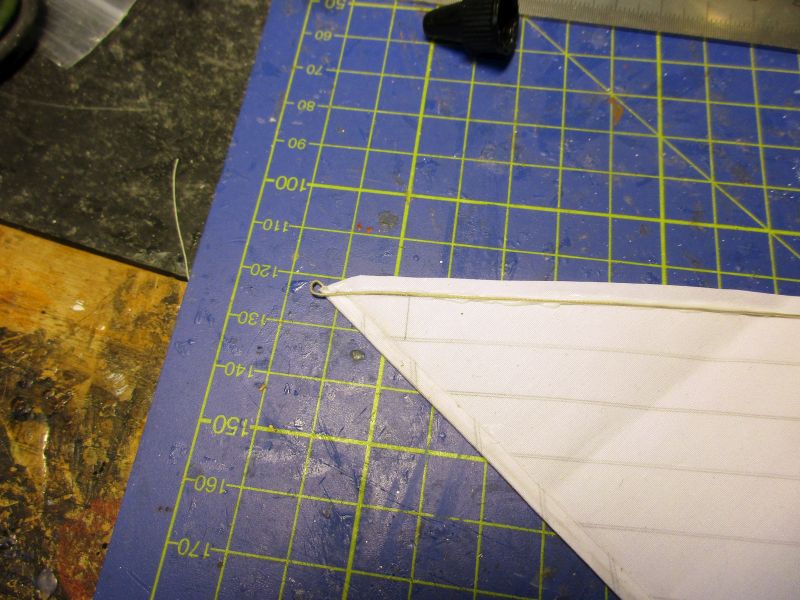
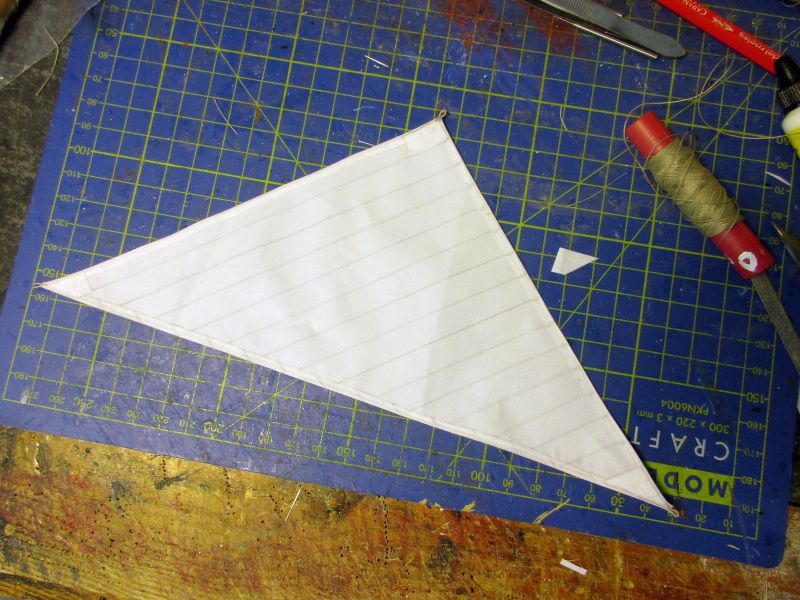
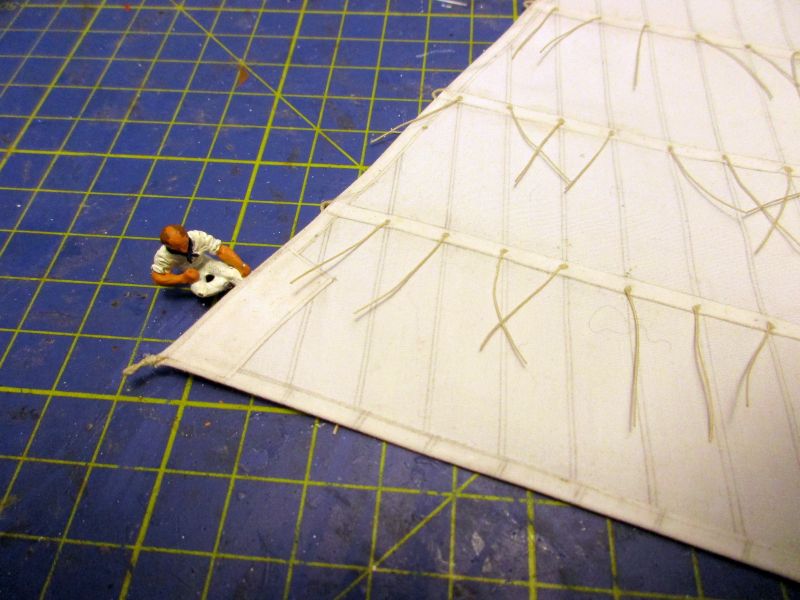
Next was the gaff topsail. First I pondered about the way of setting it. On the newer pictures in Rousmanieres book its luff is attached to the topmast but the kit sets it 'flying'. As actual work up on the topmast could be difficult without ratlines to go there or crosstrees to stand on I followed the simpler kit version as seeming more probable for the original racing version. The sail was first drawn on paper and then its size checked against the model. Then the sail was drawn with pencil on both sides of a piece of fabric. The material for the hems is added along the sides. The seams between the clothes are just double pencil lines. A stripe for the tablings was also marked. A problem was one wrongly drawn line (Of course one of the last on the second side - greetings from Mr. Murphy). First I tried to rub or scratch it off. This just got me a dirty, scratched sail with the line still there but made me a bit more optimistic for the longevity of my pencilled seams. Then I found that with luck I could cover that offending mistake with the hem and so made it disappear. All the edges where I would cut with my the scissors were now soaked with diluted textile glue to avoid fraying. After drying sail and stripe were cut with the sharpest scissors I could find in the house. The hems were pre-bent to facilitate gluing. The bolt rope, with a strength of 0,5mm, was laid into the hem, glue added and the hem closed around the bolt rope. The hem was pressed with the rear end of a pair of tweezers to improve the connection between fabric and glue. The boltrope was lead around the corners, leaving some extra length to form a cringle and the procedure repeated for all sides. (If e.g. reef cringles were requested along one side I would just puncture the edge of the sail twice with my strong pin, lead the boltrope outside the hem for a few mm, with some slack in it, and then continue inside the hem again.) Again I decided to use classical cringles on the corners instead of the kit supplied brass grommets. The freshly glued hems were pressed while drying. Then the tablings were cut to size, glued onto the sail and pressed again. The cringles got a small lashing to fix them. Now the finished sail was well ironed to fix the glue. And then some expressions - not to be repeated before this noble gathering here - where heard. When I tried to rig the finished sail it was too large - despite the earlier test with the drawing. I had to redo the leech and cut off the width of one cloth in the process. A good soaking with water fortunately weakened the textile glue enough to enable me to pull off the tablings again and to reopen the hem. sail drawn on paper... ...and on both sides of the fabric. That fabric is light enough that you may pencil along the lines on the paper, just visible through it. lines to cut soaked with diluted glue sail (and stripe for tablings) cut, first hem pre-bent bolt rope inside of the hem some glue added pressing the fresh hem to improve adhesion corner with cringle homemade sail press finished sail with tablings

-
Hi Nils Excellentissima! (I'm again running out of superlatives...) This is an intriguing little question about the position of the vents. Do you think some poor sailors had to adjust them frequently or did they just have perhaps one cruise position and then perhaps one according to the prevailing winds at an actual anchorage? Thank you for inspiring us. Cheers peter
- 2,625 replies
-
- 7
-
-
- kaiser wilhelm der grosse
- passenger steamer
- (and 1 more)
-
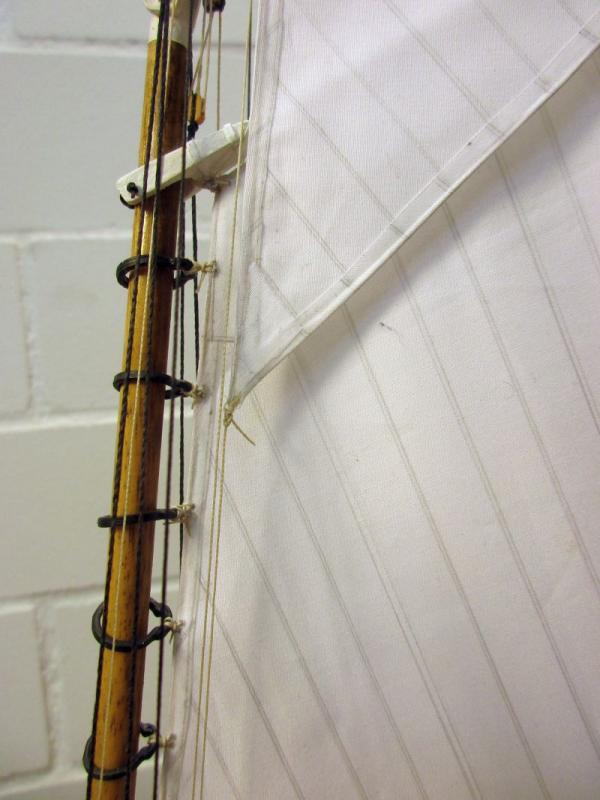
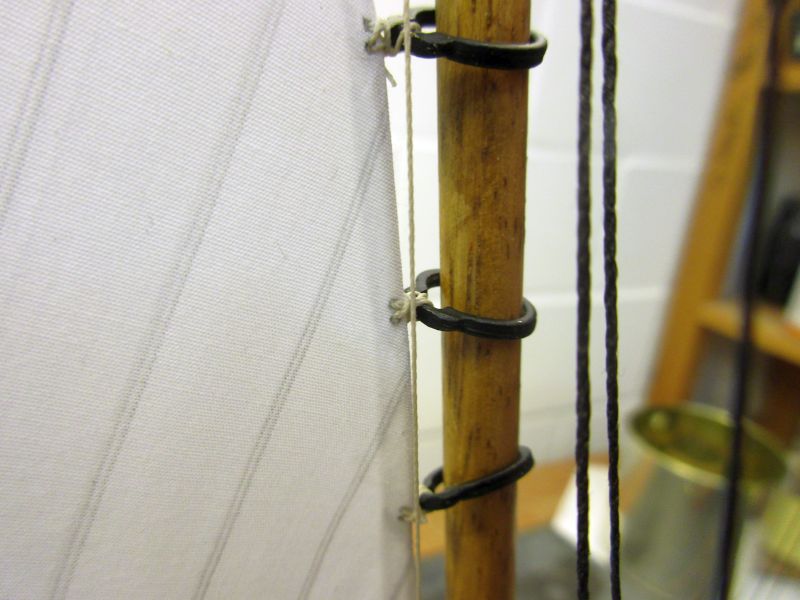
To set the sail I mainly followed the kit's instructions. Exceptions are the lashings of the sail to the mast hoops. I prepared double holes in the hem of the sail for a double lashing according to an example in Lees' book. I use a thick pin to puncture the sail fabric also for reef points. An additional feature is the single horse I added on the part of the boom overhanging the stern. And whenever I use rigging hooks I take some leftover Caldercraft or Victory parts. I'm still asking myself if there shouldn't be a down hauler on the gaff to assist the handling of that large sail. On the other hand I believe that the rigging was intentionally kept as simple as possible. There are also no brails on the spanker and they probably just could have used the sail to pull down the gaff. This simple rigging seems to match the illustrations in 'The low black schooner'. gaff rigged lashing to the hoops mast foot and boom single horse rigged quite an impressive main sail
-
Hi Martin Nice progress and nice working place. I wouldn't have the patience to add all those details - I am probably too eager to see a build finished. On the other hand, 'building under the influence' - I noticed that bottle of IPA on your workbench - , might help and increase your patience. Would you recommend it? Cheers peter
- 467 replies
-
- 1
-
-
- fly
- victory models
- (and 1 more)
-
Hi Nils and Martin Thank you for the visit and the compliment. Hi Hamilton Ratty? Your sails look great to me. But I think it's very difficult to make seams truly in a scale of 1/64 or similar. That's why I just paint them on with a sharp pencil. The same is true for the boltrope which may look a bit plump when stitched onto the edge of the sail. Gluing it onto that edge is something I never figured how to do. Therefore I glue it into the hem. This is another idea I found in a thread in MSW which I cannot find again. My way of sail making is just a few combined ideas adopted from MSW. A tutorial could therefore have a smell of plagiarism. But you will find more details in my Pickle log and I can try to show a step by step progress when making one of the following sails. And of course pencilling and gluing is quite fast and easily done. The question remains however, how my sails will stand the onslaught of time. The pencilled lines probably will fade but I hope that at least the glue will hold for a few decades. Stitched sails on the other hand could keep in shape for centuries. Cheers peter
-
Running rigging; setting sail The first sail to set was the schooners main sail, the spanker. Trying to make the sail with the fabric provided with the kit didn't work - it was too flimsy. I couldn't mark the seams with pencil as the fabric was too elastic and deformed under the pencil. Therefore I took the same - a bit stiffer - cotton I used for Pickles sails. As Americas sails were made of cotton I didn't dye it. All the seams between the clothes of the sail, as well as the reef bands and doubling in the corner were marked with a thin pencil. The hem was glued with the bolt rope put into it. To make cringles the bolt rope was taken out of the hem for a short distance. Trying to use the brass grommets from the kit did not provide good results and I made traditional clew cringles. I know, that especially between foot and luff, most probably a grummet inside the bolt rope was used but for simplicity I reverted to the old fashioned cringle. Now stripes for tablings and reef bands were cut and glued onto the sail. Finally the reef points were thread into the bands and the whole sail well ironed to fix the glue. sail maker at work it's a huge sail
-
Thank you Nils. Martin, it should improve. There were some rumours that at least you will very soon live in a great country (again)!? (This baffles me a bit as I always found it to be a great country - with room for some improvements, but great anyway). Hamilton, thanks. Yes, the boats will be hanging from iron davits, roughly amidships and outboards. There are illustrations in Rousmaniere's book showing such an arrangement. And a very happy new year to all of you! peter
-
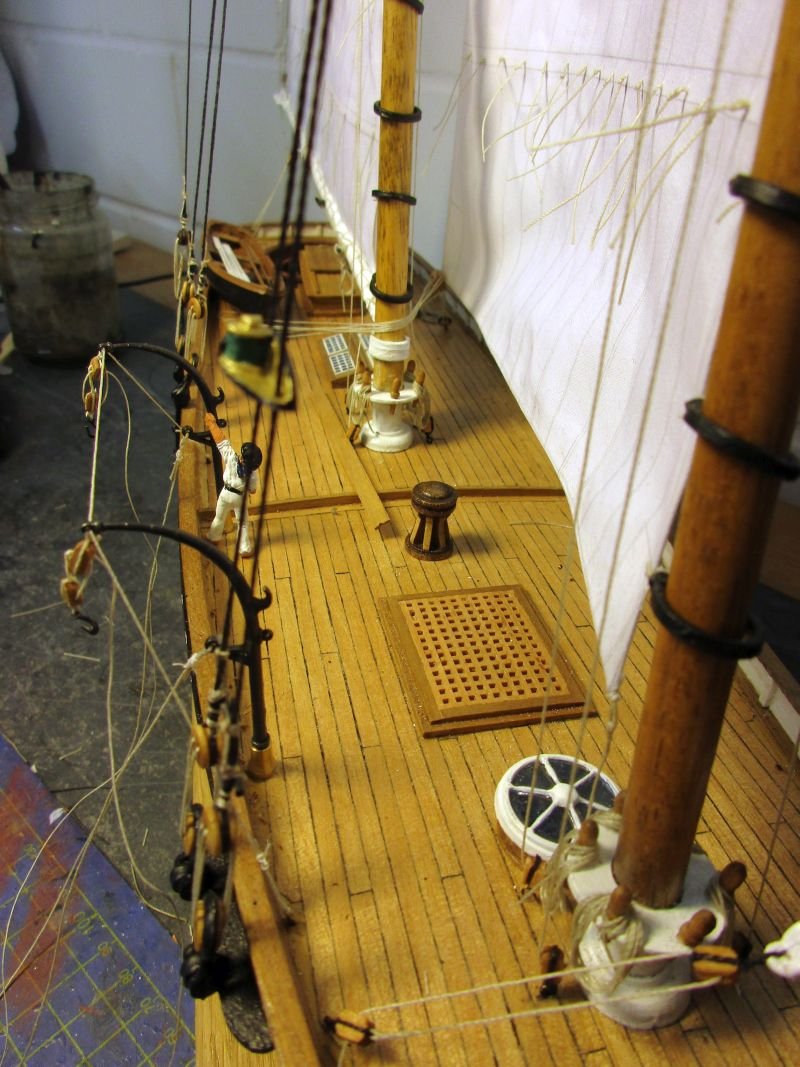
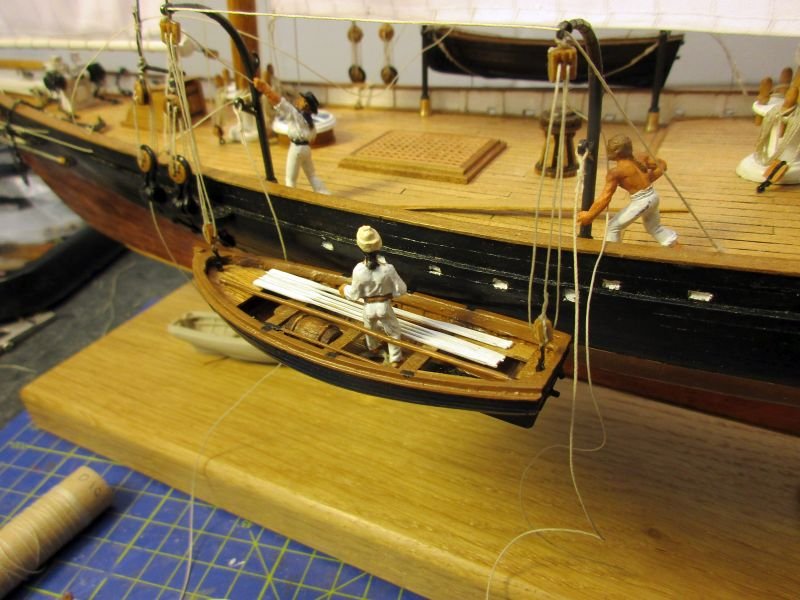
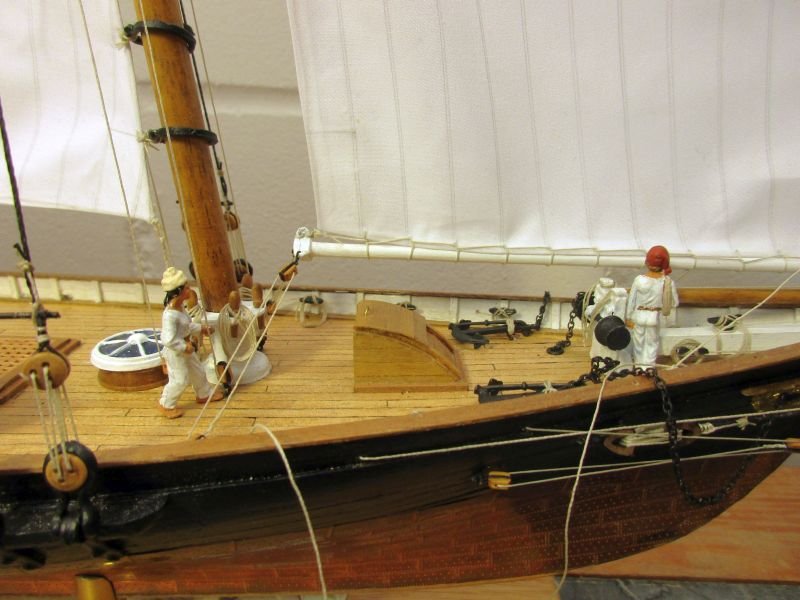
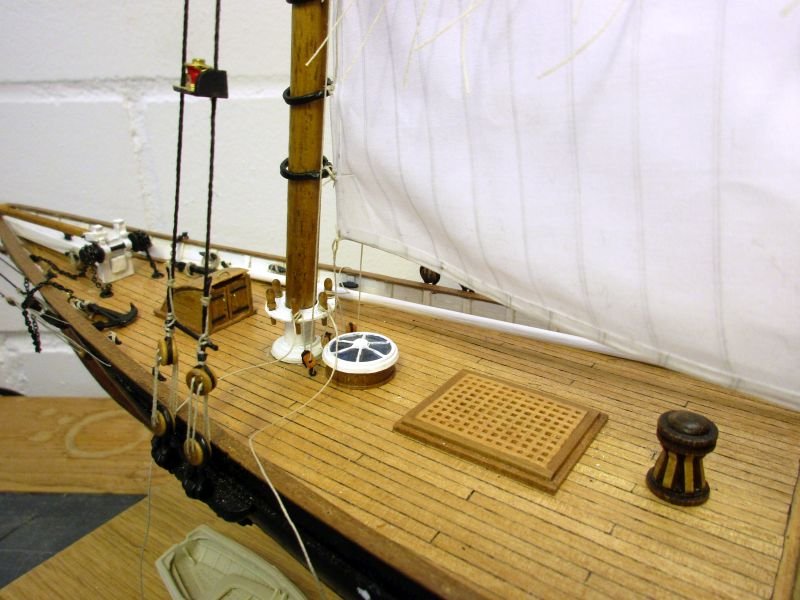
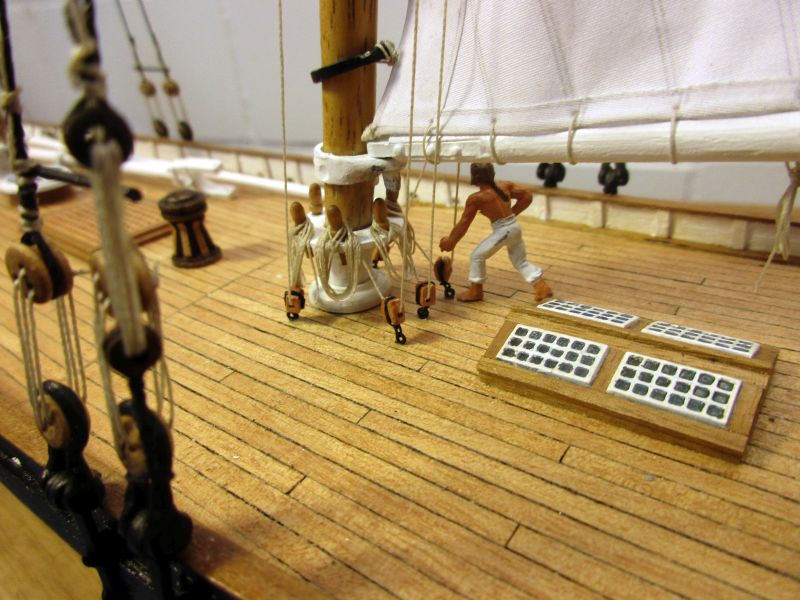
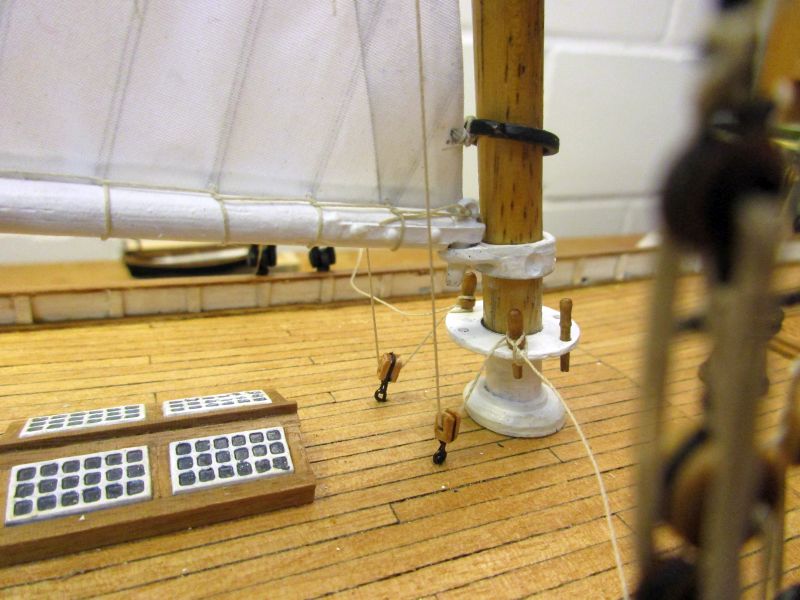
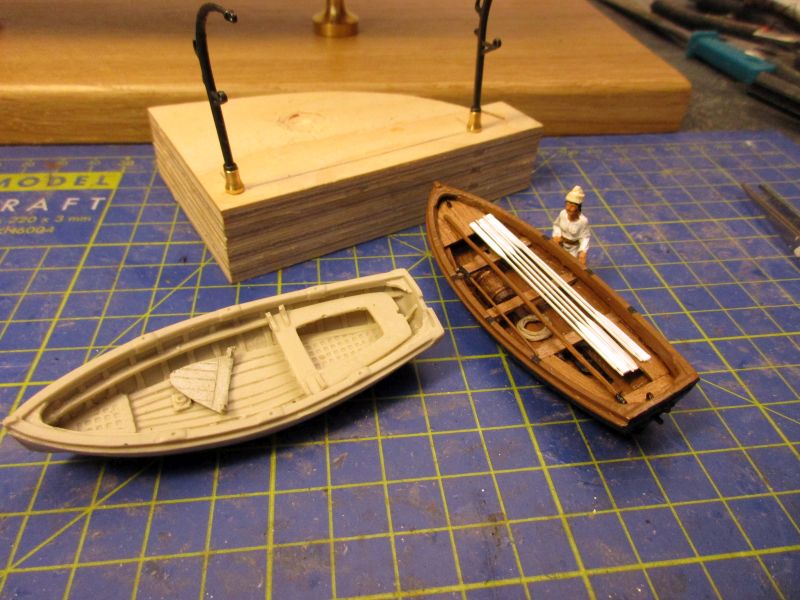
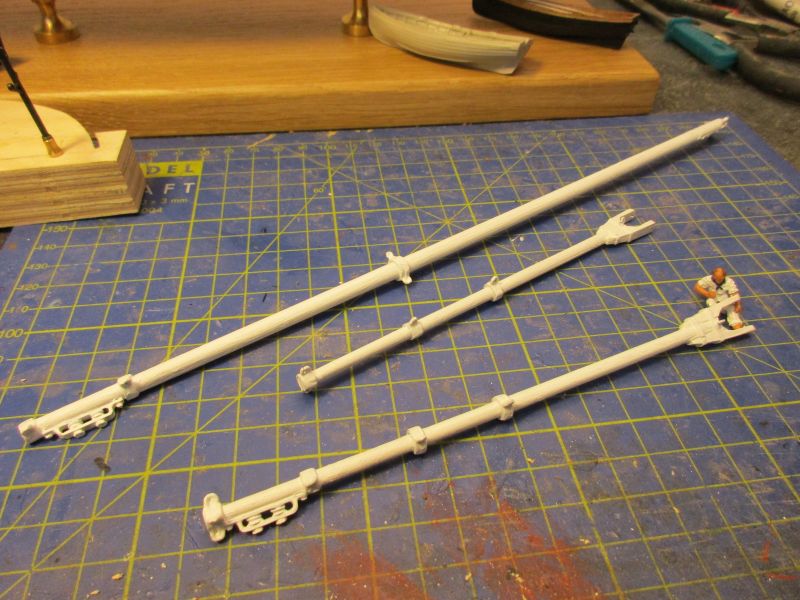
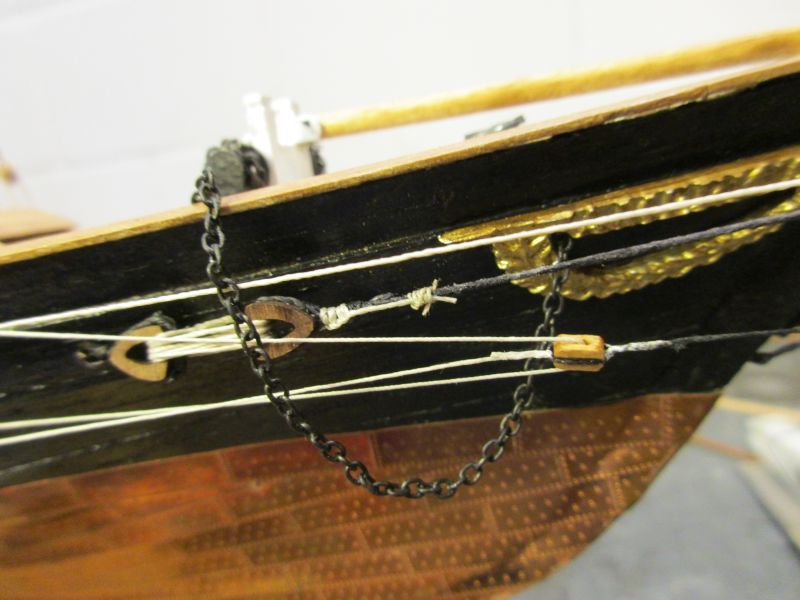
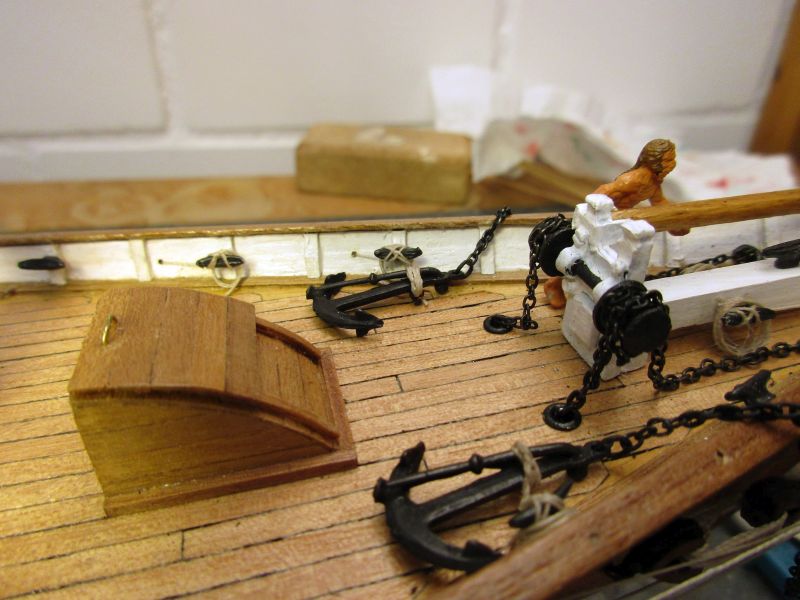
booms, anchors, boats The booms were constructed as instructed by the kit. The only little addition were the iron (cartridge paper) hoops to hold the tongues of the gaff. boom and gaffs detail of the gaff The anchors were installed as instructed by the kit. The anchor chain hanging over the bulwark and chafing on the lanyards of the bowsprit rigging seems a bit strange but I couldn't think of a better arrangement except just letting the anchor hang outboard below the hawse pipe. However there it would cause some drag which should be avoided in this racing machine. Another question was how the anchors were handled as no permanent gear is installed. Being comparatively small I guess they were manhandled with the help of some temporary tackles. anchors stowed the chain will probably chafe on the bowsprit rigging I will install two boats as depicted for example in John Rousmaniere's book. I ordered 2 quaicraft model boats with a length of 83mm in scale 1/64. The raw boats show acceptable details and seem about right in size and style for America. However the first painted example looked too much like plastic. After dismantling again the small decks and the thwarts were made from wood and some details were added, such as a rudder, a water barrel, boathook and oars which are leftovers from other kits and a mast. Now I have to find out how to attach the boats to my cast metal Amati davits and how to install all on America. raw and finished boat - in the background a mock up for the installation of davits and boats
-
Thank you Hamilton. The previously built Pickle and several clever books are a great help for me. Cheers and a happy new year to all peter
-
Congratulations Tim. A very nice corner stone for a great fleet, I'm sure (even if that allegory is a bit listing). To the Cutty Sark and beyond! I'm looking forward to that build log. Keep up the good work peter
-
Hi Tim She is really looking great. Ahem... now that you have nearly finished her, do you already know, where you will apply next those considerable skills you demonstrated? Cheers peter