


flyer
-
Posts
1,016 -
Joined
-
Last visited
Content Type
Profiles
Forums
Gallery
Events
Everything posted by flyer
-
 Hi Bob I'm unsure if you want to use the saddle for the gaff (upper piece of wood) or boom (lower...). The gaffs yaws vertical movement was controlled by the 'Gaff Throat Halliard'. If you don't have information about that in your Petersson, I could help. The saddle is used to support the booms yaws and was fixed to the mast. Cheers peter
 -
Hi Bob The question about that 28 in your post on top of this side intrigued me. After all I will have to answer it for myself when I will reach the same stage of the build (in 10 years or so). Again I looked for an answer in Lees' book. It seems that 28 refers also to the small inset in the plan marked 'Mizzen boom tackle detail' and shows in fact the boom sheet. Lees writes about that: '...A double block was sized into a strap around the boom inside the taffrail; another double block was strapped to an eyebolt in the transom. The standing part of the sheet was made fast to the strap of the lower block and the hauling part belayed to a cleat in the deck.' That cleat would be your 28. And obviously the 'eyebolt in the transom' is missing in the plan and could be in line with the other eyebolts behind position 28. For the rigging of your next project I highly recommend that book The masting and riggging of English ships of war 1625 - 1860 by James Lees. It's a tremendous help with questions about rigging and also helps to correct mistakes sometimes even in building manuals as good as those from Caldercraft. Cheers Peter
-
Hi Mark and Mort Thanks for the hint about that book. Couldn't order it via amazon.com in the US but could order it via amazon.de (shipped from the US!) for double price! Wondering what kind of strange politics are at play here. Well, we should keep politics off this forum but perhaps I'm nevertheless allowed say that the louder the politicians yell, the more I detest them. In politics stupidity is not a handicap. Napoleon Bonaparte Cheers peter
- 366 replies
-
- 5
-

-
- bellerophon
- victory models
- (and 2 more)
-
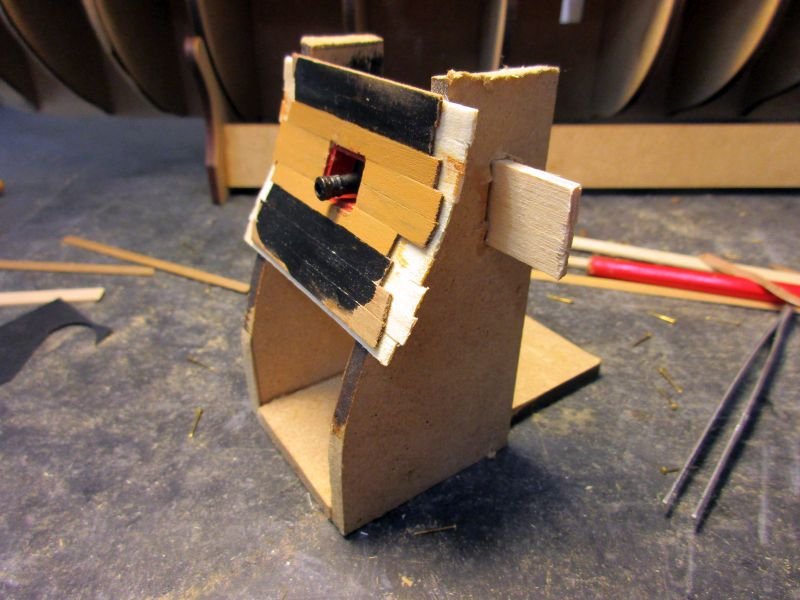
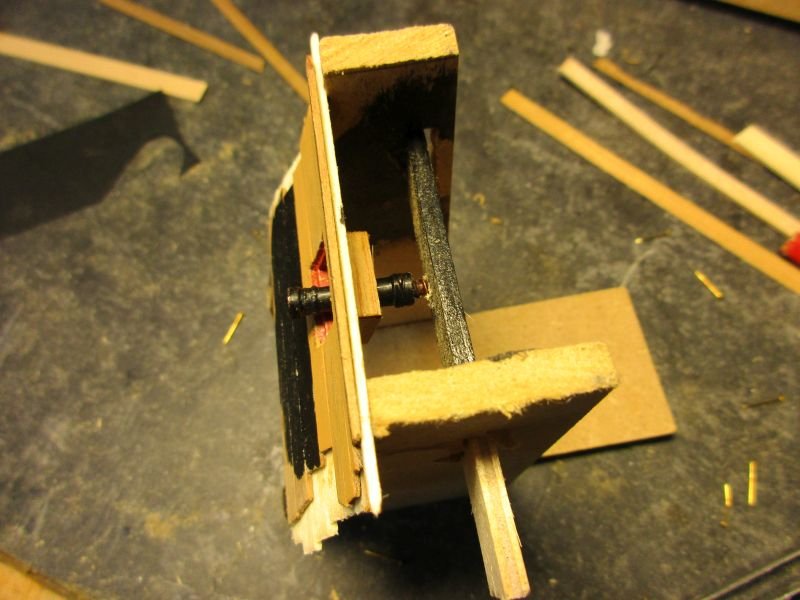
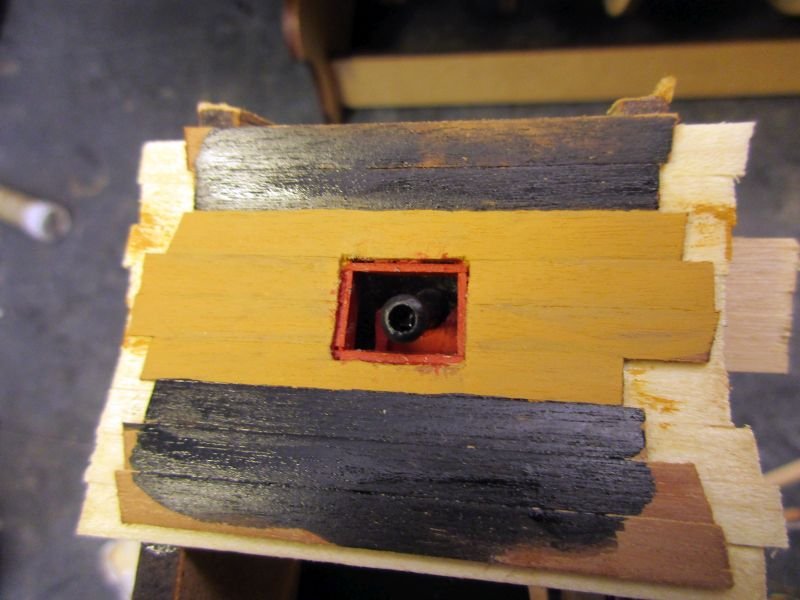
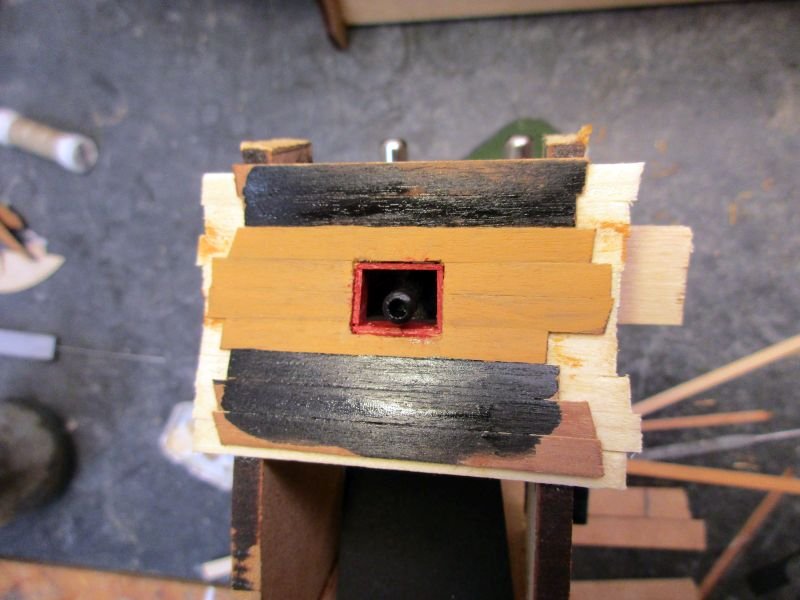
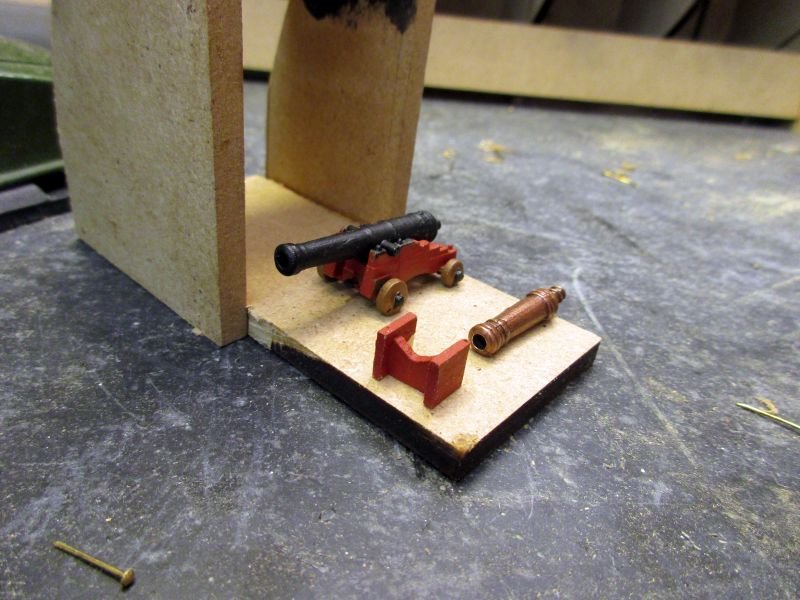
test bed for dummies Two leftover parts from the 5mm sheet with the frames were put together to simulate the profile of the ships side; a strip similar to the strips holding the dummy guns was installed and the whole thing roughly planked. A first trial dummy carriage was put together from three simple parts and painted red. The installation on the test bed went easily and the overall impression is quite acceptable and an definite improvement. The really tricky part was the installation of the (very rough) gun port frame in 4 separate pieces which showed that even a limited access to the inner sides was desirable. However after already having broken off two upper pieces of the frames I put in both inner walls on the lower gun deck before going on. This should add some stability and I will leave off the lower gun deck for the time being. the test bed Slightly reworked gun carriage for the upper gun deck and dummy carriage for the lower gun port with dummy carriage added in the second picture
- 366 replies
-
- 12
-
-
- bellerophon
- victory models
- (and 2 more)
-
Hi Michael Very good looking sails with tremendous details. And I'm happy to read that you know how to treat tobacco properly and with all due respect (even if it's not Cuban, regrettably). Keep up the good work Peter
-
Hi Tony Thank you. Regarding the victory plans, I don't know for sure which of the 3 ships they are representing but as the basic variant is Vanguard it should be her. Some differences among the sister ships might show up during about 30 years after being built. There is an oil painting in the NMM in Greenwich with the title 'Scene in Plymouth Sound in August 1815' (BHC3227) which was painted in 1816 and should be a quite reliable source. Unfortunately the small reproductions in the web don't show the exact details of the disputed area. Your Bellerophon is a gem and I hope you will post more pictures. Cheers Peter
- 366 replies
-
- 5
-
-
- bellerophon
- victory models
- (and 2 more)
-
Your Bellerophon is a gem and I hope you will post more pictures. Cheers Peter
- 28 replies
-
- 1
-
-
- bellerophon
- 74 gun
- (and 1 more)
-
Hi Alan Thanks for your input. I presume those plans in the NMM depict the situation as built. Any idea about the configuration at Trafalgar? I guess, I will have to decide quite soon depicting what time and in which configuration / colour scheme I want to build her. I have noticed your scratch built Billy Ruffian before and admire you for that enormous task you took in hand. Being lazy, I'm glad to have a kit to tinker with. Cheers Peter
- 366 replies
-
- 3
-
-
- bellerophon
- victory models
- (and 2 more)
-
Awe-inspiring, beautiful work, Nils. And you did it in just 26 months and all from scratch - a masterpiece! Keep up the good work. Peter
- 2,625 replies
-
- 4
-
-
- kaiser wilhelm der grosse
- passenger steamer
- (and 1 more)
-
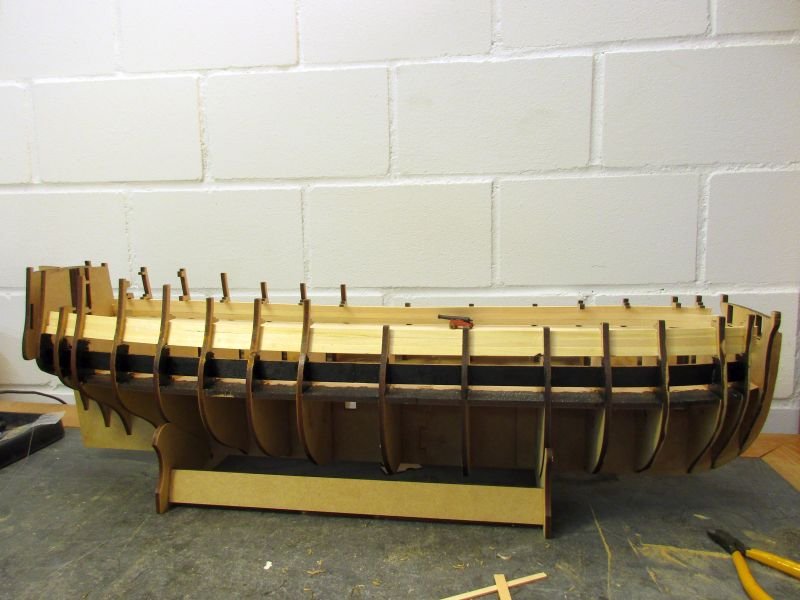
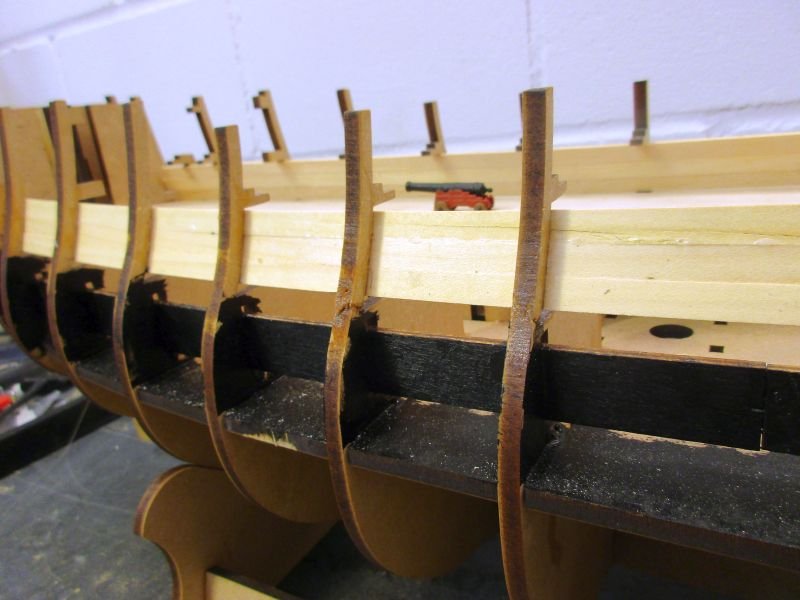
The kit has arrived - all 13kg of it! The first look at the parts was promising. From different logs here I knew about what to expect and I wasn't disappointed. However a few minor points seem a bit debatable: The stern decoration was unfortunately just for my version made as white metal casting instead of the nice, a bit flexible plastic parts for the other variants. Some additional adjustment work will be needed here. As mentioned in another log the guns, carriages and especially the carronade carriages may need a replacement or a rework to be up to the standard of e.g. Caldercraft gun kits. It's a pity, that a kit of this quality offers those very nicely made but also very strange parts. The skeleton Fitting keel and frames together went quite smoothly. While putting in the plywood strips which are the base for the dummy guns on the lower gun deck I decided to try to leave the upper gun deck open while putting on first and second planking. The idea is to have access to the inside of the hull to facilitate the installation of some dummy carriages for the dummy guns. After installing the first inner bulwark on the lower gun deck however I found that they constrict access to the dummy guns altogether due to the tumblehome of the hull. To find out how to install and what kind of dummy carriages I decided to build a simple test bed for dummies. impressive size... access to the lower gun ports from the inside is almost blocked
- 366 replies
-
- 11
-
-
- bellerophon
- victory models
- (and 2 more)
-
Build log HMS Bellerophon Introduction A model of a ship of the line from the Napoleonic wars was something I wanted to build for a long time. From the range of kits available I ended up with 2 favourites. The selection of those two was because of kit quality (should be good), scale and size of the finished model. As my last 4 projects were all in 1/64 I tended towards the same scale. Finally I had to choose between Caldercrafts Agamemnon (64) and Victory models Vanguard (74). The decision for Vanguard was made because of the following points: - the 74 is the classical ship of the line -I can build the Bellerophon variant which I like for her direct connection with Napoleon (Here, in Switzerland, he had a much bigger influence (not all negative) than Nelson). - copper plates are of better quality - the scale is with 1/72 close enough to my favoured one and... - the overall size is 10% less. As additional information source I will use Brian Laverys book 'The 74-gun ship Bellona' from the Anatomy of the Ship series. After checking the available build logs and comparing them with the Bellona plans as well as with the Bellerophon plan in 'The Ships of Trafalgar' I think that I will check and perhaps alter a few points: - The bulwark of the quarter deck must probably be lower in its forward part to be similar to Bellerophon plans in the internet or to Bellona's profile. I will have to find out if the heightened bulwark was an later alteration and if it was in place in 1805. However in the book 'The ships of Trafalgar' is a plan for the Bellerophon which shows the lower bulwark variant. plan from the kit... ...and from the one available from NMM (on my wish list) The rail on top of the foremost gun ports is here interrupted. On other plans it is running through in one piece. As Bellerophone's skipper I will install a continuous rail (looks smarter). - The kit's gun carriages are very nicely cast and show a lot of details - but look different from all the examples available in books or the internet. I have no idea where they found a prototype like that. Replacing them would be a lot of work and money. I will try to rework them a bit. - The dummy guns on the lower deck are not quite satisfactory. Possible solutions would be replacements by full guns (again expensive and requiring a lot of work for an mediocre improvement) or the installation of 'dummy carriages' similar to those used by Michael (md1400cs) on his fantastic Vasa. - The stern should gain a bit more transparency. I could make lighter side galleries and leave a door to them open. I guess to change the whole stern construction to enlarge the visible part of cabin and wardroom would be too much work for a small and hardly visible gain. However the taffrail overhanging the skippers balcony seems to low - overshadowing the cabin windows. The Bellona model looks a bit different. I will try to cut back that overhang a bit. - The question if any, how and what sails will be bent on will be decided when starting on the masts. - I haven't decided yet if the colour scheme will be pre- or post-1800. The Nelson scheme has a dark elegance but hides the wood...
.jpg.1055f404192a3d063d853d1e24f5d34a.jpg)
.thumb.jpg.f5dd63fca70add6f8108c9fa35880549.jpg)
- 366 replies
-
- 11
-
-
- bellerophon
- victory models
- (and 2 more)
-
Being a long time silent admirer of your Vanguard build I'm glad to offer some small help about the main braces. The plans are correct but not easy to read. According to James Lees 'The Masting and Rigging of English Ships of War' the standing part of the brace is made fast to the side of the ship by an eyebolt and the running part runs from the yard back through a sheave in the side of the ship to a cleat (or a post) on the inside. Having just started on my own Bellerophon kit I hope to be able to occasionally shamelessly profit of your excellent build. Thanks and keep up the good work. cheers Peter
-
Squirrels conspiring with deer to steal the peaches and some racoons lurking in the background - you live in a treacherous neighbourhood. Perhaps you could try to pick the peaches one day earlier. If they will get them again you may also have a mole in your house Don't give up the harvest! Cheers Peter
- 467 replies
-
- 1
-
-
- fly
- victory models
- (and 1 more)
-
Hi Martin Nice progress on your flying horse. Just one question: Why don't you support your gangways with the same type of knees you use for the gang boards? That way you wouldn't have to plant those somewhat out-of-place pillars. Nice picture of the new neighbours too! BTW, I had a running fight against the deer over my garden for the last 30 years or so. Fence, electric fence, higher fence just to keep a little bit of the vegetables for our own (and give some flowers a chance to bloom before being eaten). And I absolutely don't like fences (or walls) along borders. Trying to train our housecats to hunt deer didn't impress neither cats nor deer. Good luck! Take care Peter
- 467 replies
-
- 1
-
-
- fly
- victory models
- (and 1 more)
-
Hi Martin Why fix the guns immovable in place at all? On my last 2 armed projects (Granado and Pegasus) the guns are only hold in place by their rigging, by breach ropes and tackles. Thus they have a little sideward and longitudinal play of perhaps 2 respective 1 mm. Having some play and being not too rigidly fixed I think they take the occasional nudging quite easy. So far none broke loose despite some quite hard knocks. I know it's too late to consider for the already fixed guns but you could try it in the waist. Keep up the good work. Peter
- 467 replies
-
- 2
-
-
- fly
- victory models
- (and 1 more)
-
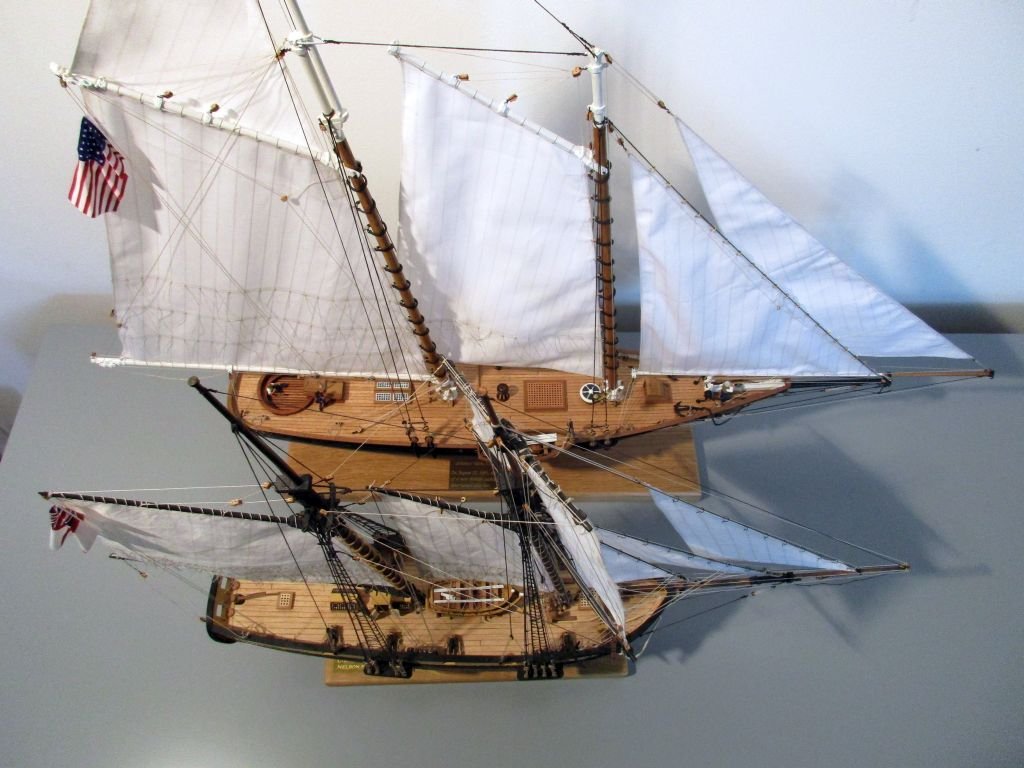
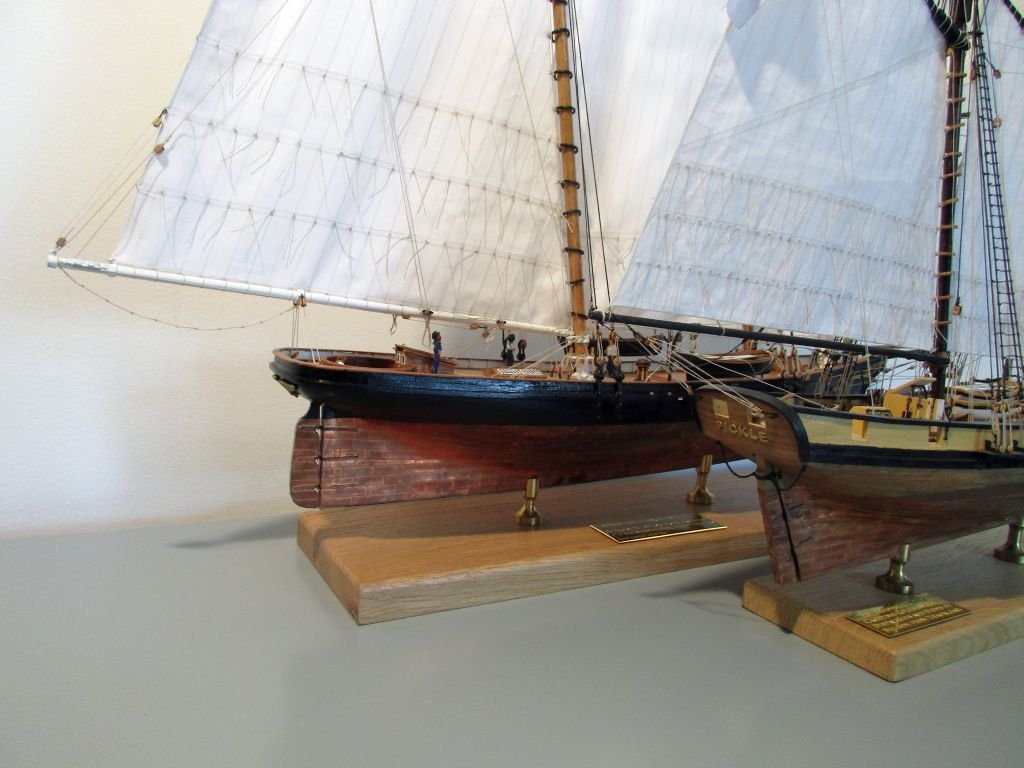
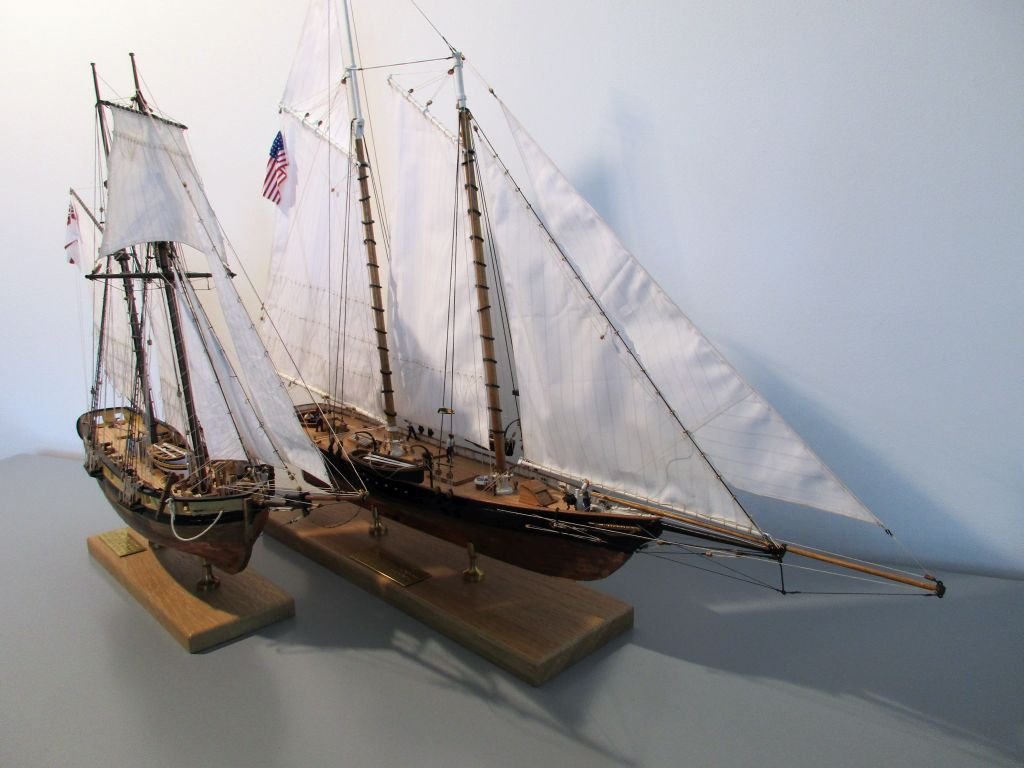
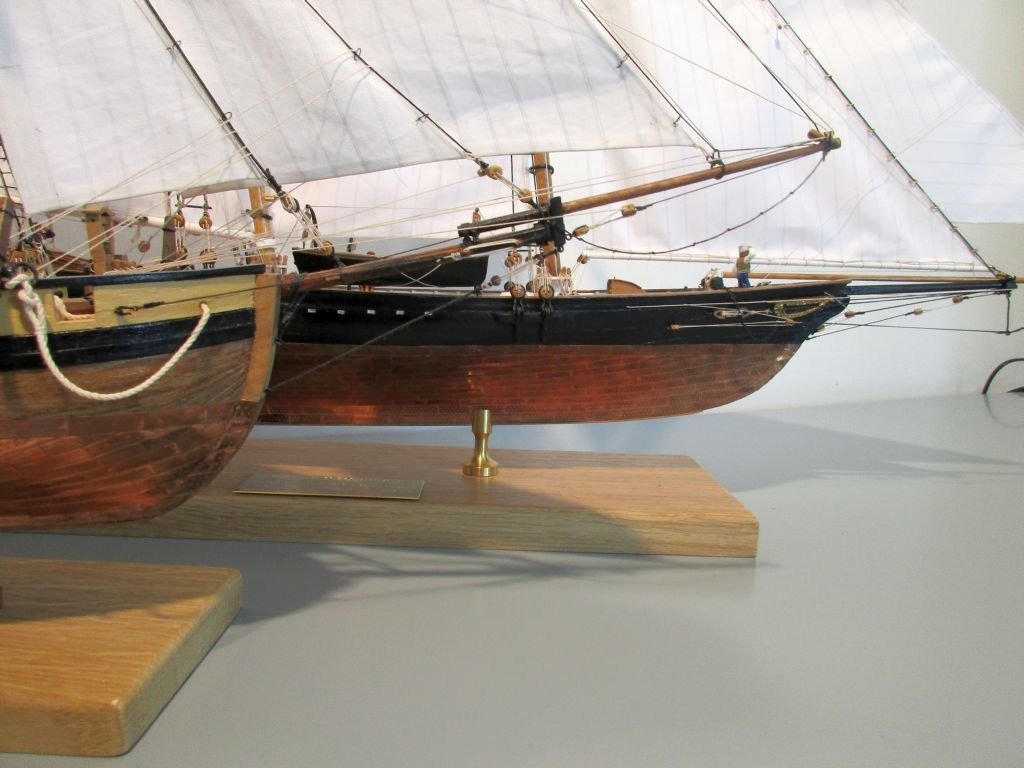
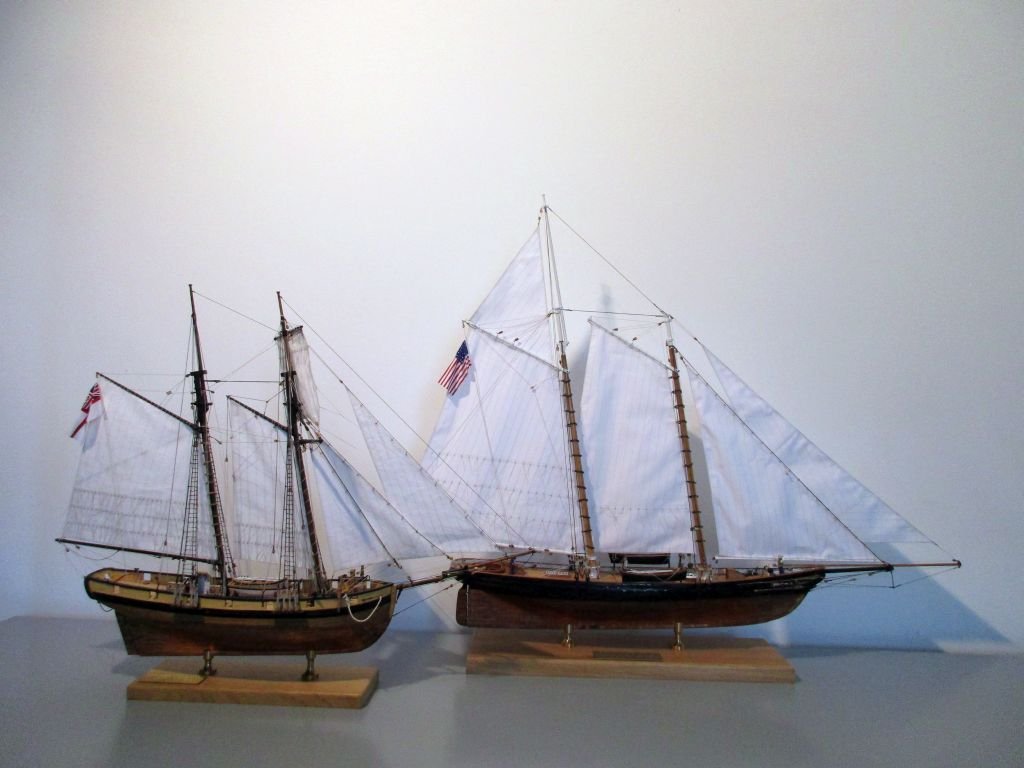
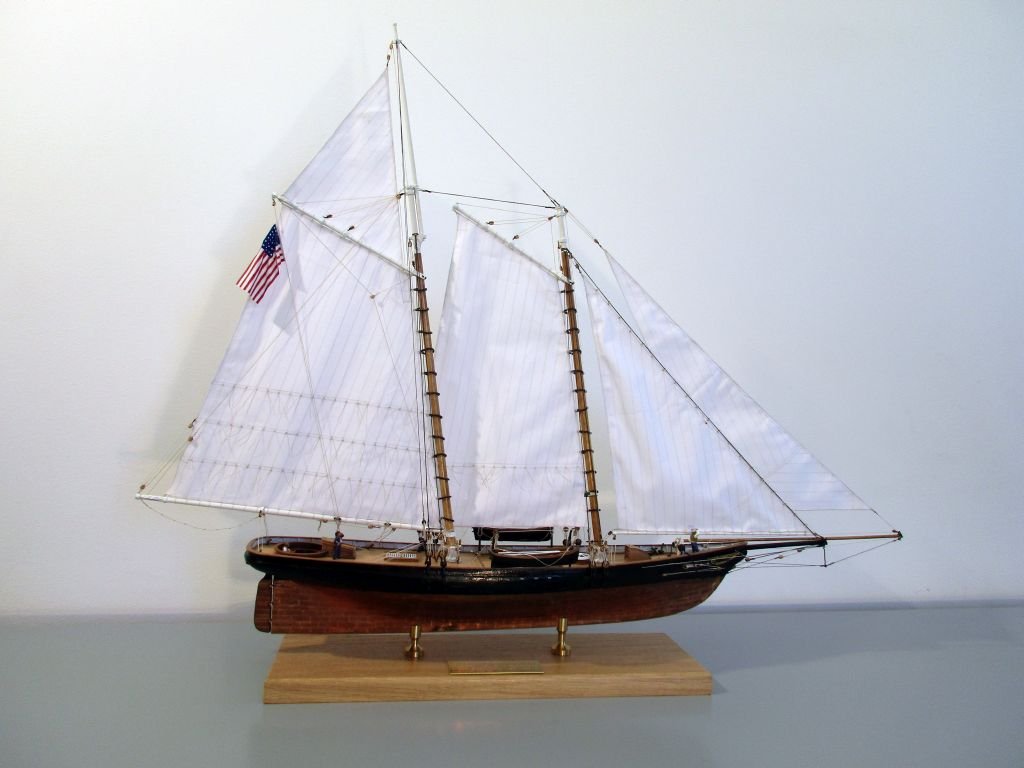
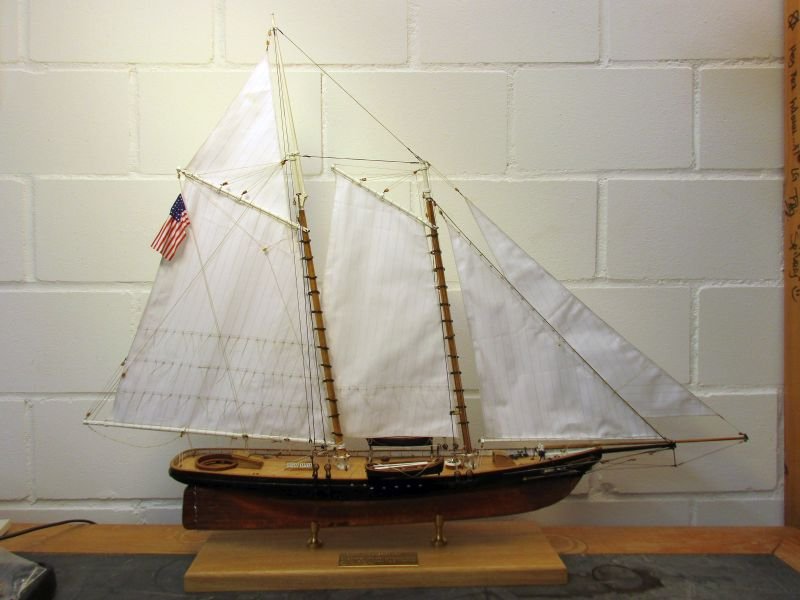
final photo session The last 2 projects were put side by side for a photo session. They are built in roughly the same scale (1/64 and 1/66). I find it quite interesting to compare those two schooners, Pickle from about 1800 and America from about 1850. Although they were built for different purposes both were built as seaworthy vessels and for speed. Although Pickle may have needed about 20 sailors alone to serve her carronades she had with a complement of about 40 still a much more numerous crew than America with about 7. It seems that the deliberately kept simple rig of America gave a better speed and was easier to work. the widest part of the hull is about 30% further aft on America Pickle must have been cramped: less hull volume and six times the crew of America. round stern versus square stern a sharper bow for speed about double the sail area on America - no wonder she went ahead
-
Hi Nils Wonderful work again. You put so much work and detailing into the lifeboats - it would almost be a pleasure to sink with your ship! Peter
- 2,625 replies
-
- 3
-
-
- kaiser wilhelm der grosse
- passenger steamer
- (and 1 more)
-
Thank you very much, Martin. Next will be a ship of the line - although I have no idea where to place the finished model. On the other hand I will have about 3 to 5 years to solve that problem. Favourites are Agamemnon and Bellerophon - leaning towards the later. The direct connection not only to Trafalgar but also to Napoleon himself fascinates me. She will also need a bit less space and the different (1/72) scale should still be near enough to 1/64 to enable the use of all the practical experience from the last projects. Cheers Peter
-
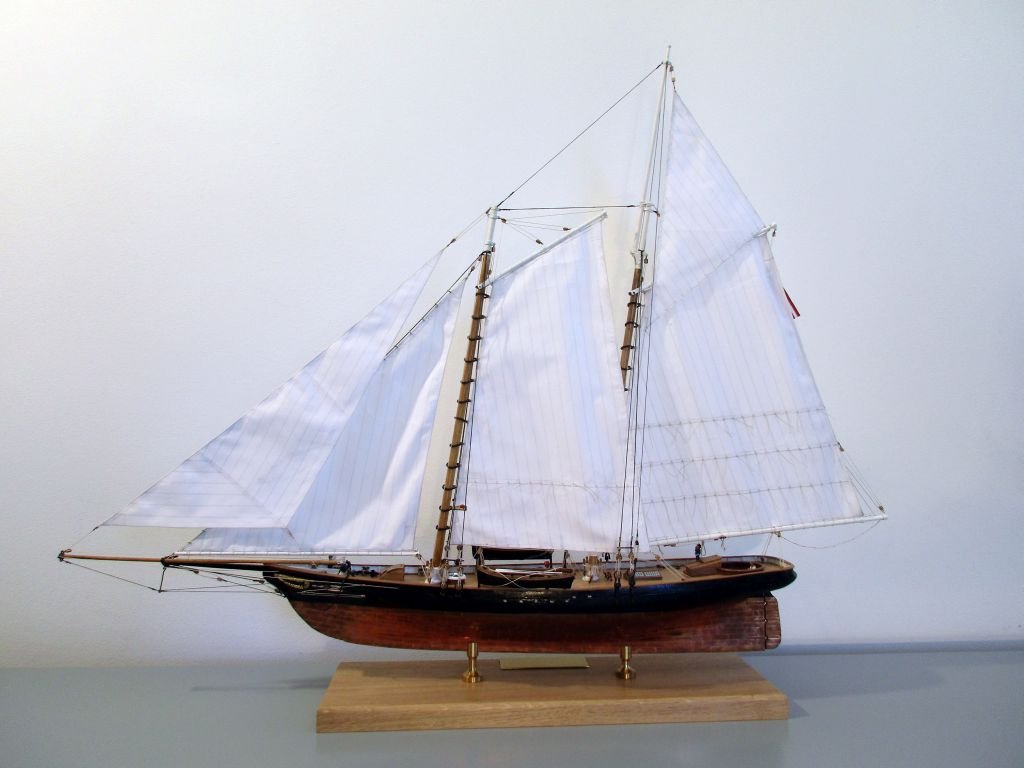
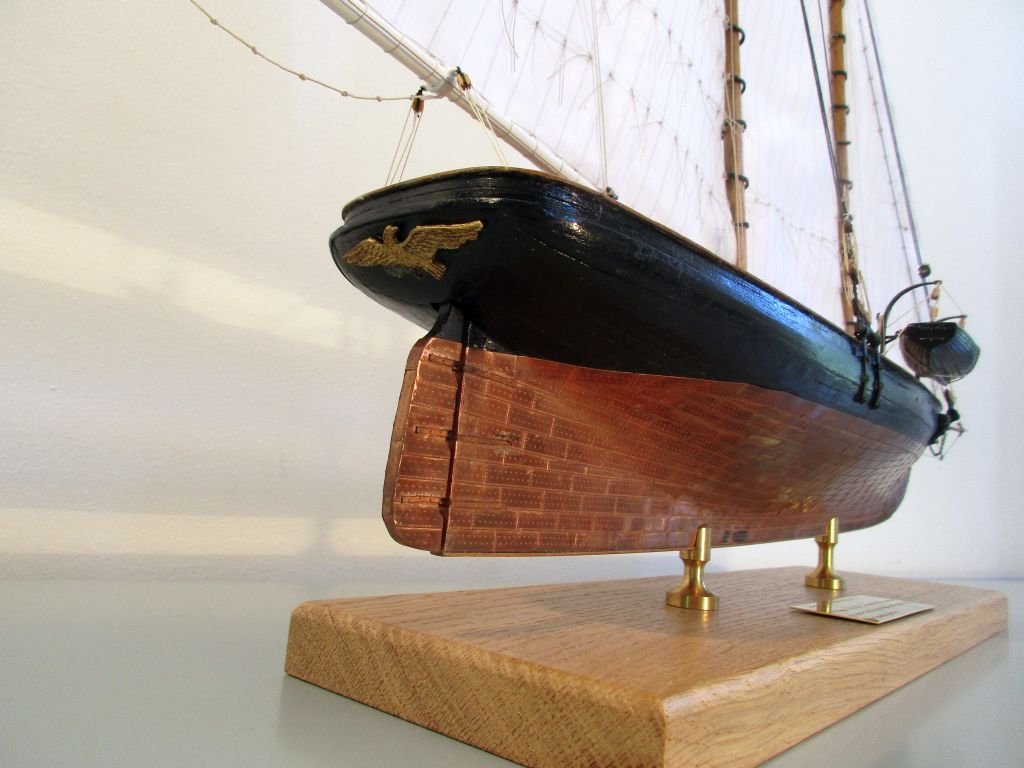
finished! Before America could set sail for her maiden voyage she was the object of a photo session: conclusion Despite several shortcomings definitely a interesting and rewarding kit. I would very much appreciate a reissue e.g. by Dusek. The general kit conception is ok and the scale 1/66 (even better would be a standard 1/64) is a good choice for America. Building with the actual documentation could be difficult for beginners and clearer and more detailed instructions would help. Among the other possible improvements could be real copper plates, better deadeye strops and a general rethinking if white metal parts could be replaced by photo etched brass parts. The layout of the rigging, especially the standing rigging of the schooner topmast, should be rechecked. Also the construction and exact form of the stern could be clarified. And I still don't believe in areas of vertical running short planks on the stern as they are used here or also in the Cutty Sark kit.
-
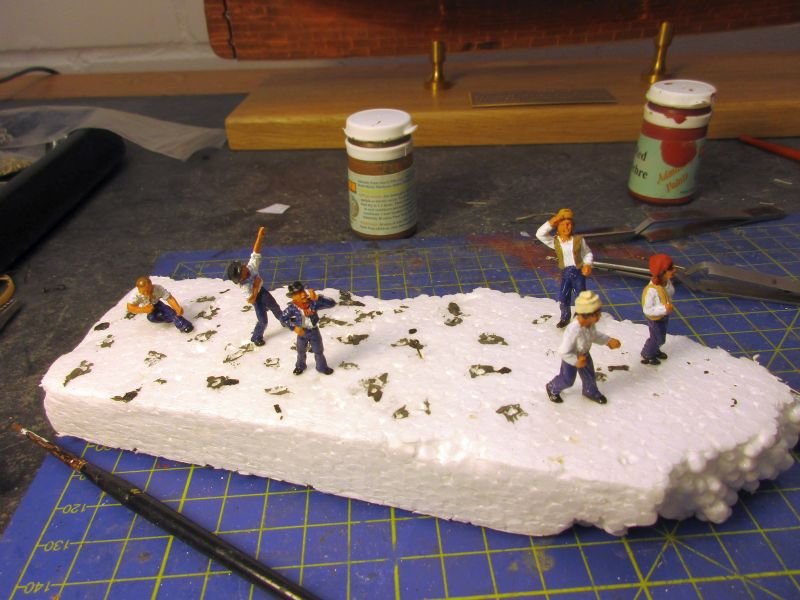
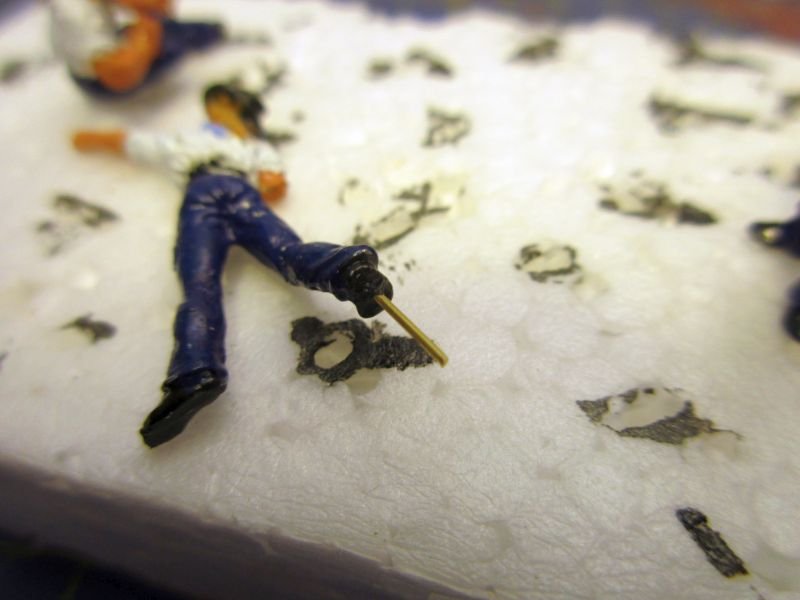
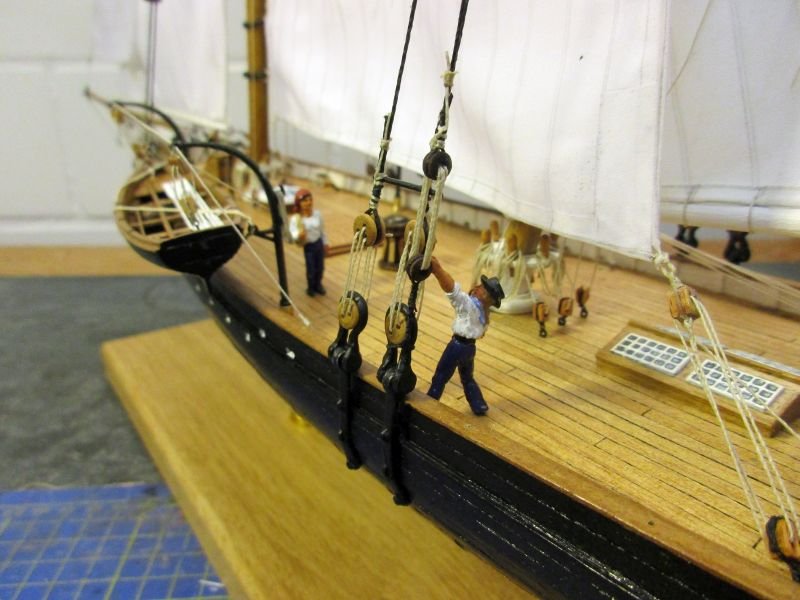
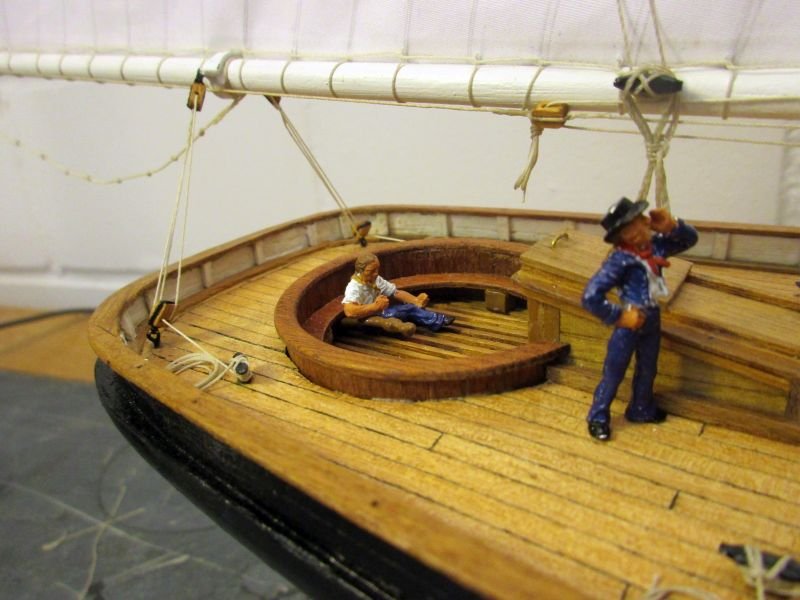
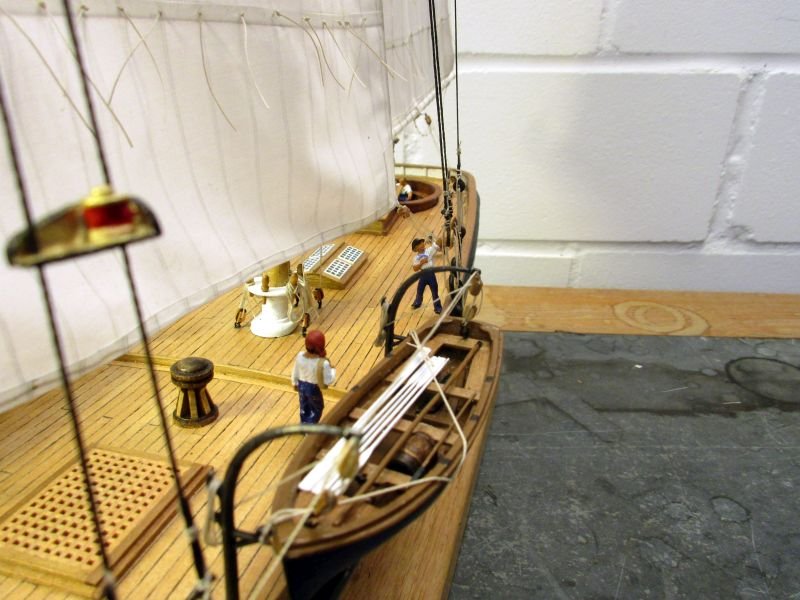
the crew I wanted America to have a crew. Not to overdo it I thought about 5 sailors could be on deck. A helmsman and a skipper or first mate should be among them. I hired some candidates from Amati and Mantua. To fix them on deck I drilled a 0,5 mm hole into one foot of each figure and glued a short length of brass wire into it. A discreet 0,5mm hole in the seams between the deck planks is then sufficient to hold a figure in place without additional glue. (Only the sitting sailor, doing duty as tiller man, had his hole drilled in a different place. Since that operation he seems a bit angry and refuses to listen or to speak to me.) The figures were painted. They all get blue trousers, white shirts, blue jackets and black shoes. Not being under the strict navy discipline they immediately added some personal items, such as woollen caps or coloured bandanas and some took their jackets off. But still they look reasonably smart. After placing them on deck I only have to set up a stage for the final pictures before America sails. Raw crew figures brass wire in the foot crew ready to board a fairly busy deck a (still sullen) helmsman and the skipper the first mate adjusting the rigging the lookout in the bow

-
Thank you, B.E. A thought worth to consider - on the other hand I heard that my friends cleaning lady sometimes lacks a bit in subtlety. peter
-
Thank you, Martin. No, I will give her 'in the raw' to a friend as a dust collector for his office. I will try to convince him of a case. Sure Nils, glad to help, if possible. It is a Quaycraft boat cast in resin. I bought it from cornvallmodelboats and they have something in 1:144 - but alas not covered by a tarpaulin. http://www.cornwallmodelboats.co.uk/acatalog/quaycraft-boats-1144.html Cheers peter
-
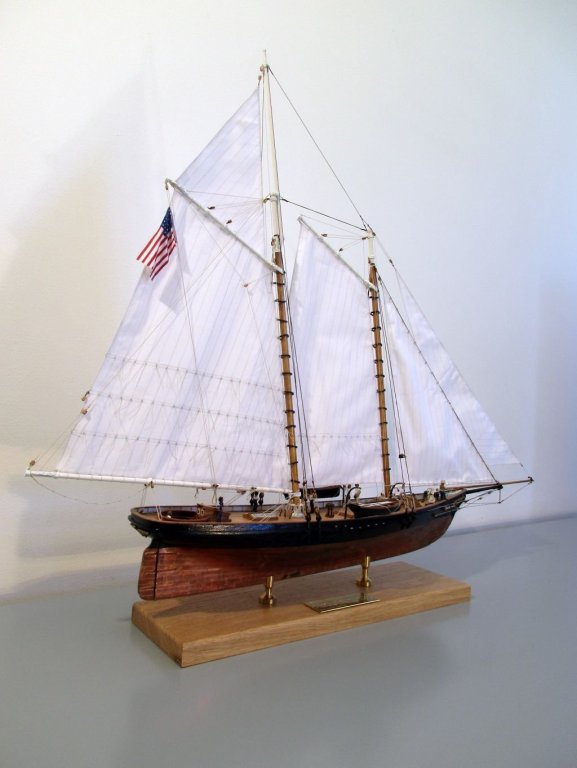
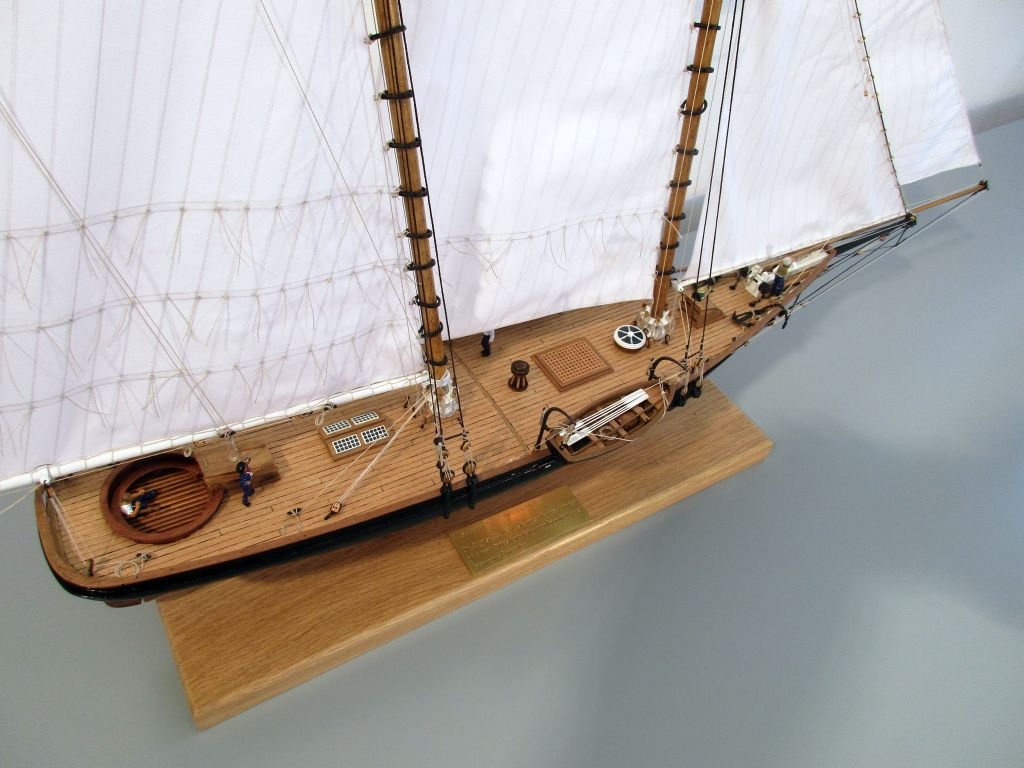
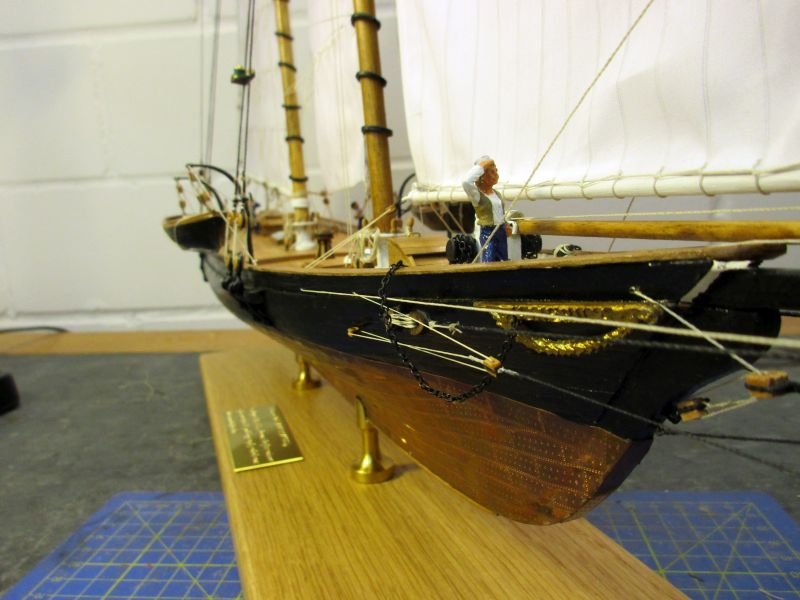
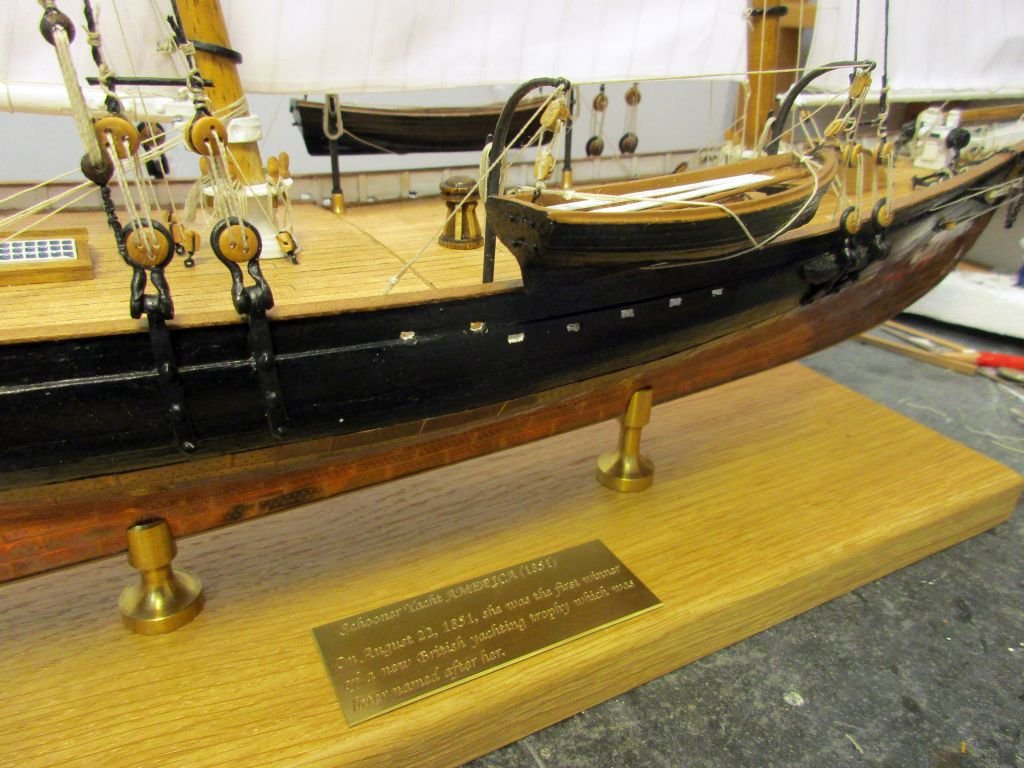
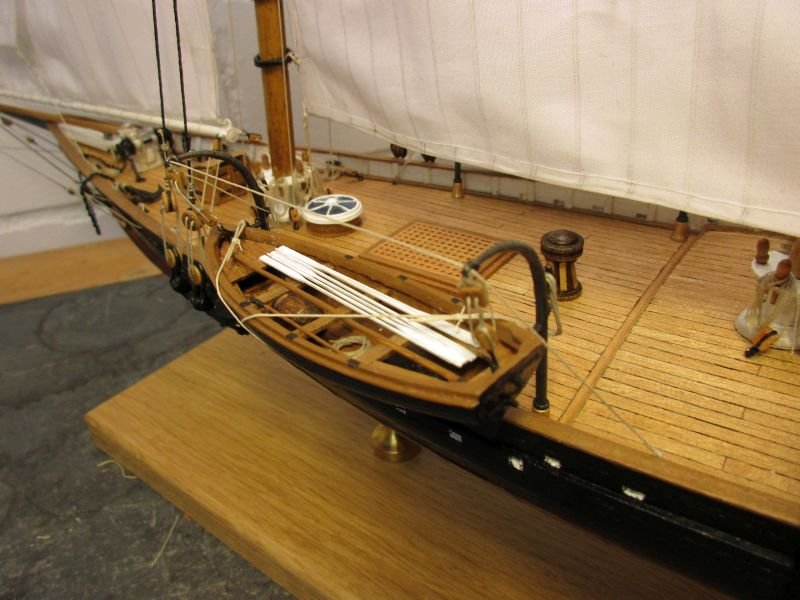
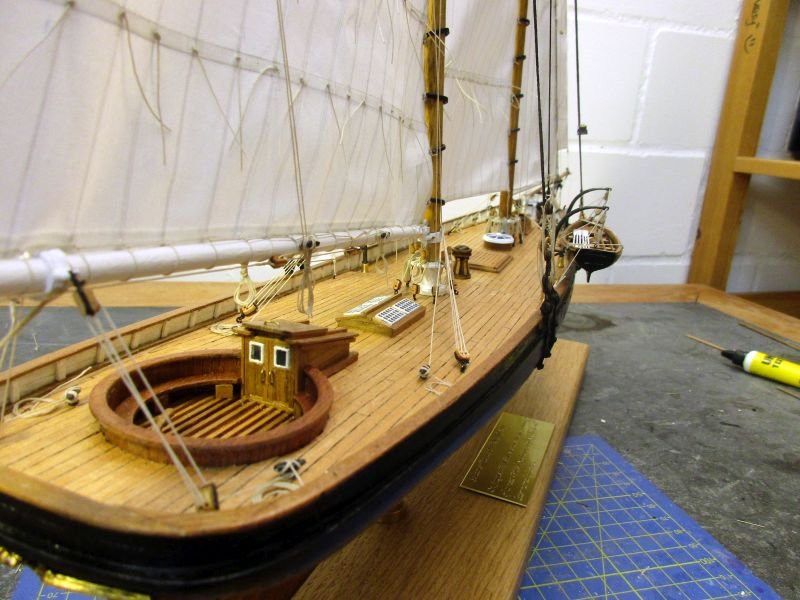
Back in my wharf I had the boats stowed and the loose ends trimmed. America was almost finished. I also had a brass nameplate made with the engraving: Schooner Yacht AMERICA (1851) On August 22, 1851, she was the first winner of a new British yachting trophy which was later named after her. stowed boats and nameplate boat on portside almost ready to sail - only the crew is missing
-
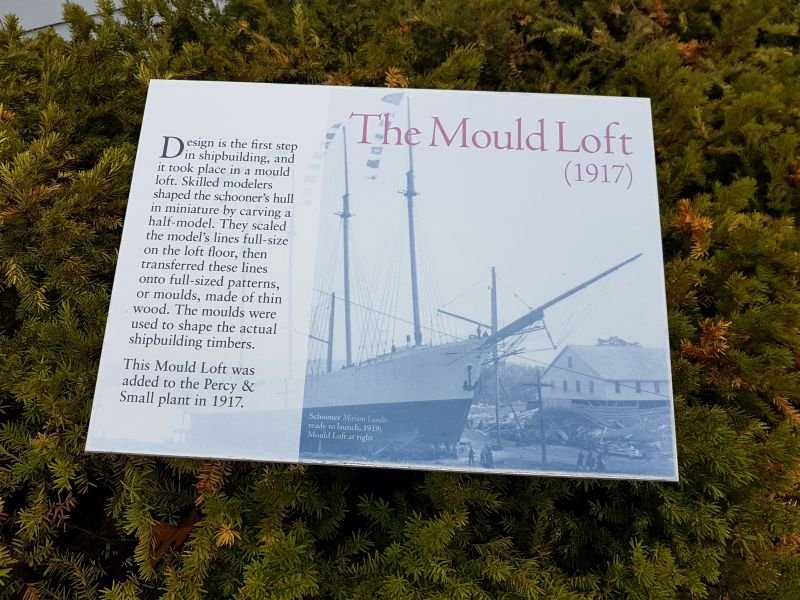
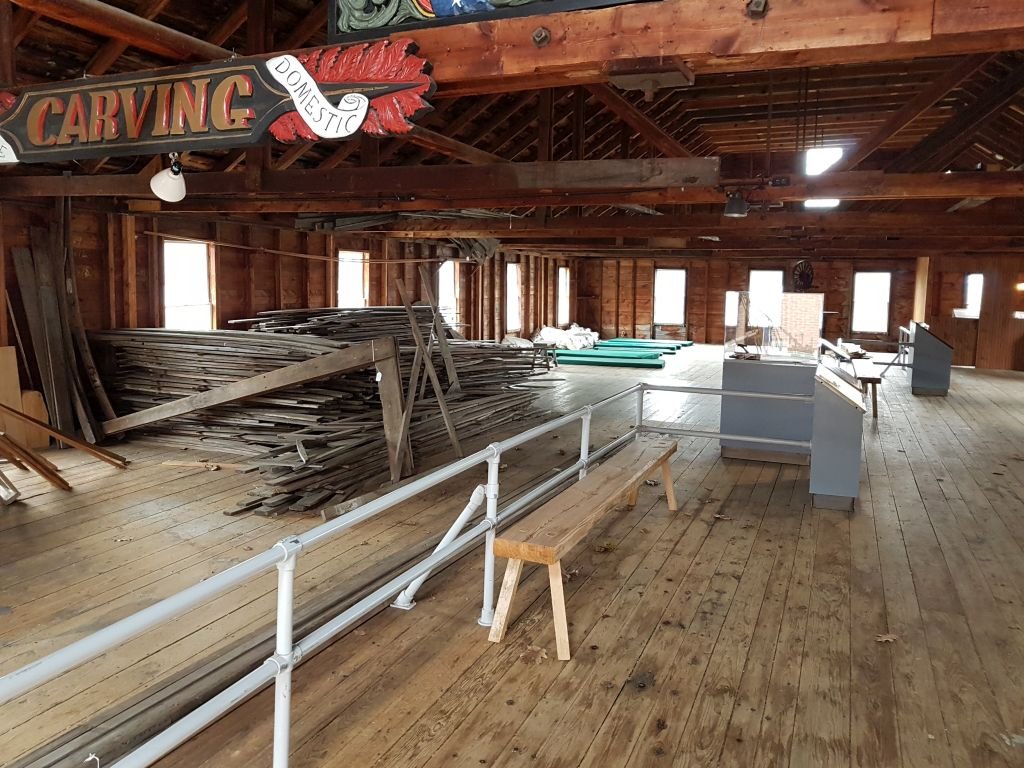
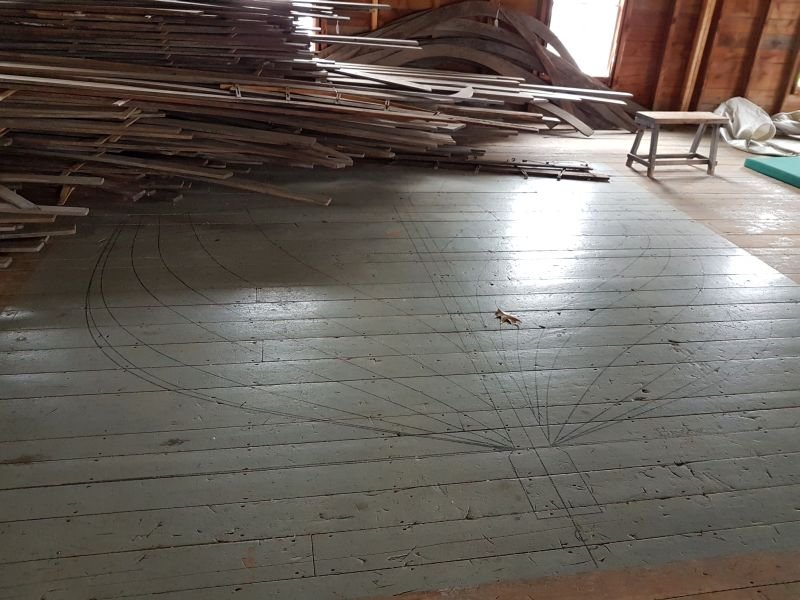
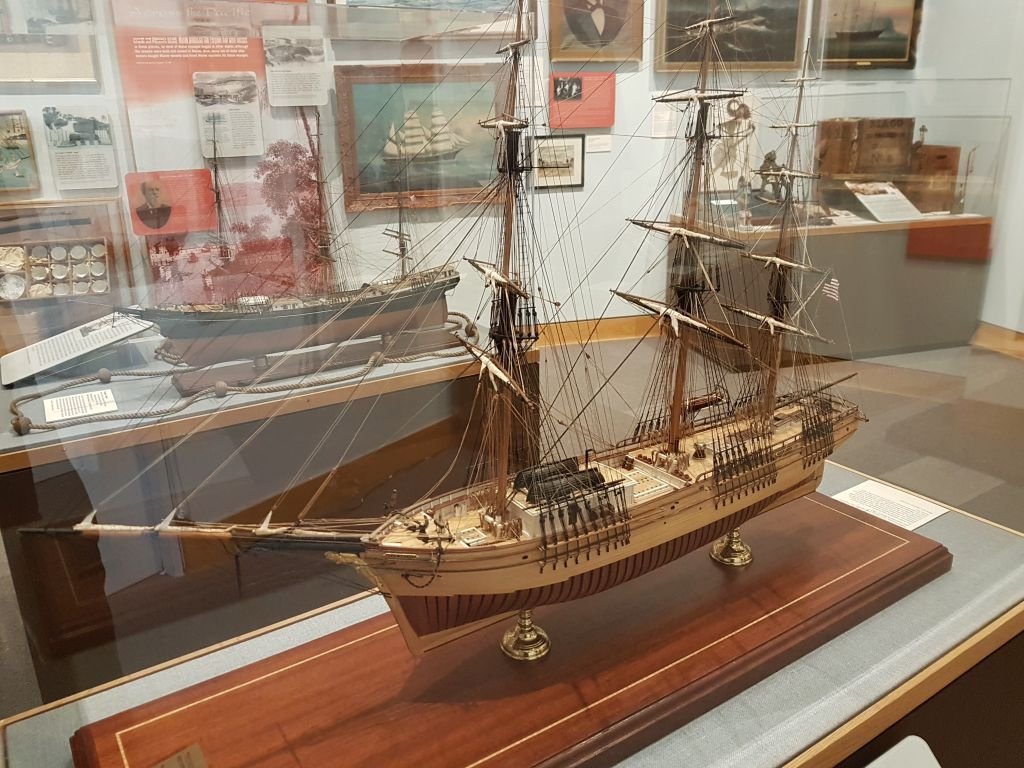
Hi Nils Thanks. Unfortunately that boat had to be stowed for good and the picture shows only a passing moment. I think with all sails set on America a boat in the process of being hoisted - or lowered - wood look somewhat false. Hi Martin Yep and not only a beautiful coast but also inhabited by delightful people. A visit to the grand old lady in Boston unfortunately was omitted this time but Bath really compensated for that. I found some Sam Adams' beers at least drinkable. The seasonal summer ale was quite good although their IPA was rather a bit bitter. The Admiralty and her mysterious ways - too bad about that missed museum. Perhaps the next few pictures may compensate a bit... Cheers peter a model of the clipper Snow Squall built in 1851 (!) The following pictures show the interior of the Mould Loft - one of the several buildings from the time the Museum still was an operating wharf. The Mould Loft's function is explained in the first one. I found this very informative and interesting.
-
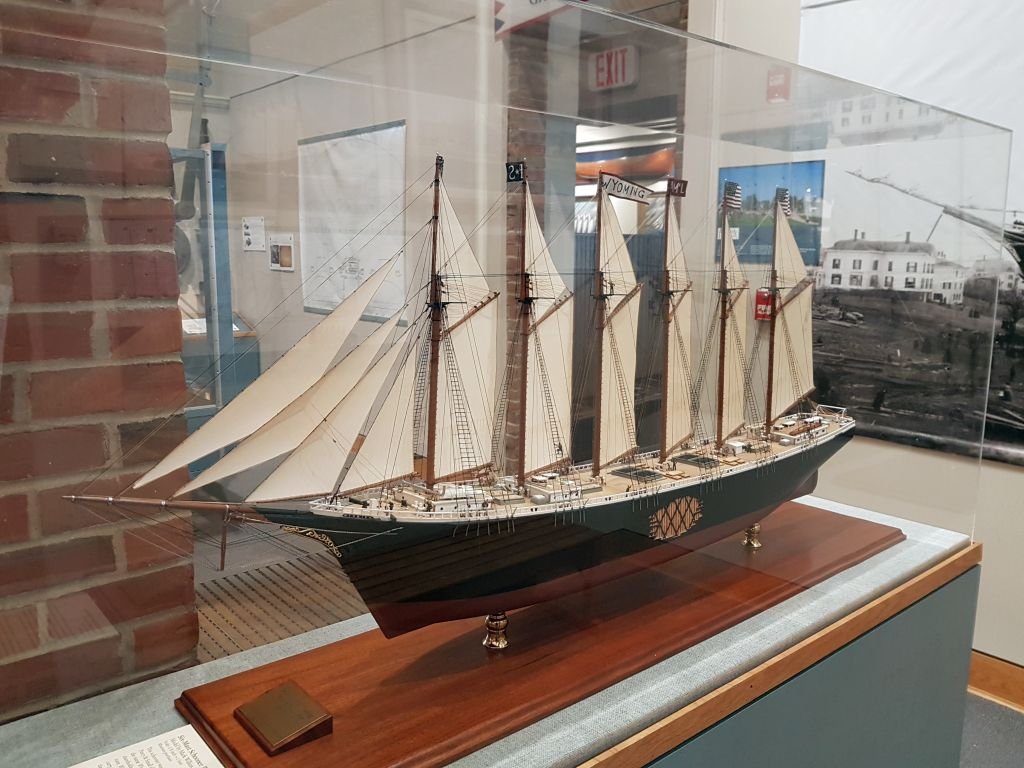
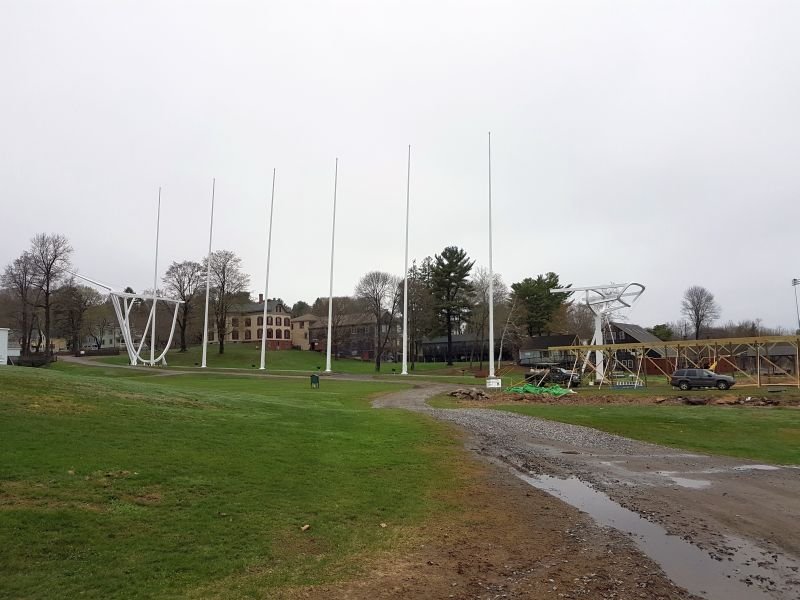
The work on America (the schooner) was suspended for 2 weeks, while I visited America (the continent). We made a trip from New York to Boston and up the coast of New England to Bar Harbor - a wonderful region and truly wonderful people. As we visited before the season begun, we met hardly any tourists (except us) and it all was very peaceful and only occasionally a bit cold or wet or both. near Bar Harbor (Maine) In Bath I had the opportunity to visit the Maine Maritime Museum (meanwhile the Admiralty was successfully scouting the town for a decent pub). A great location with very interesting exhibits. It seems that altogether several thousand ships were built in Maine and among them hundreds or thousands of schooners. A truly astonishing example was the wooden schooner Wyoming, launched in 1909, with 6 masts and an overall length of 445ft or 135m. A museum and an area well worth a visit. a fine model of the Wyoming in scale 1/8 inch = 1 foot or 1:96 a sculpture depicting the real size of the Wyoming - look at the cars!

.jpg.e49ca03a80db3d90af9803badf66f67b.jpg)
