flyer
-
Posts
1,016 -
Joined
-
Last visited
Content Type
Profiles
Forums
Gallery
Events
Everything posted by flyer
-
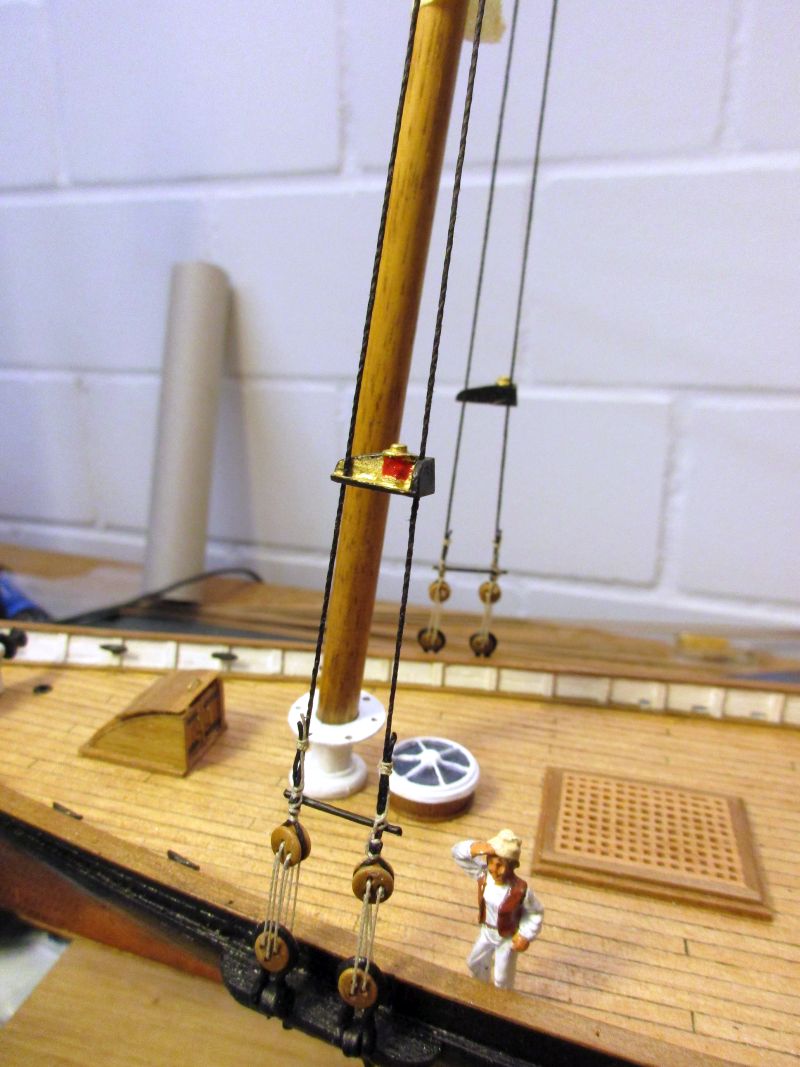
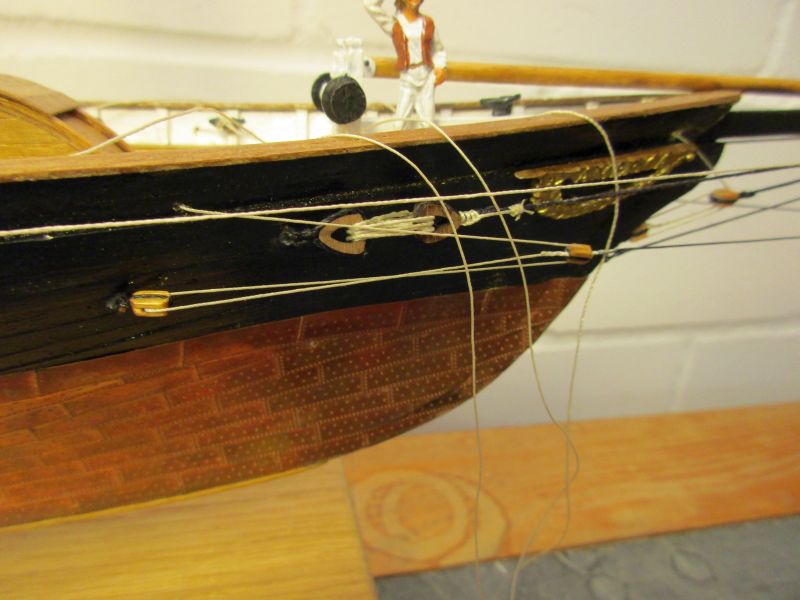
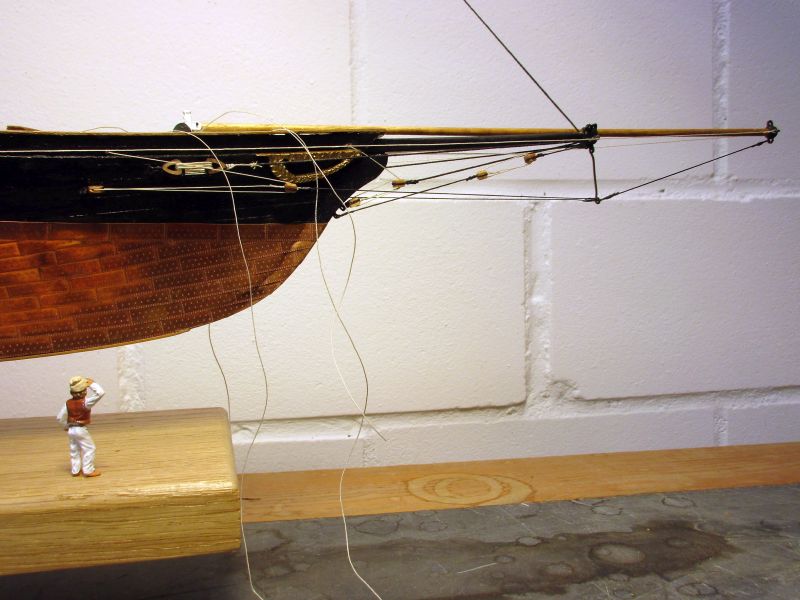
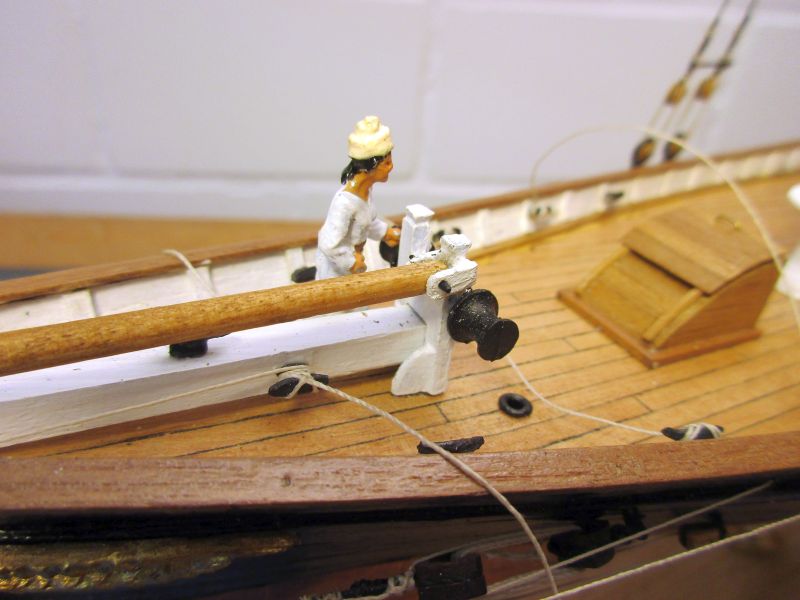
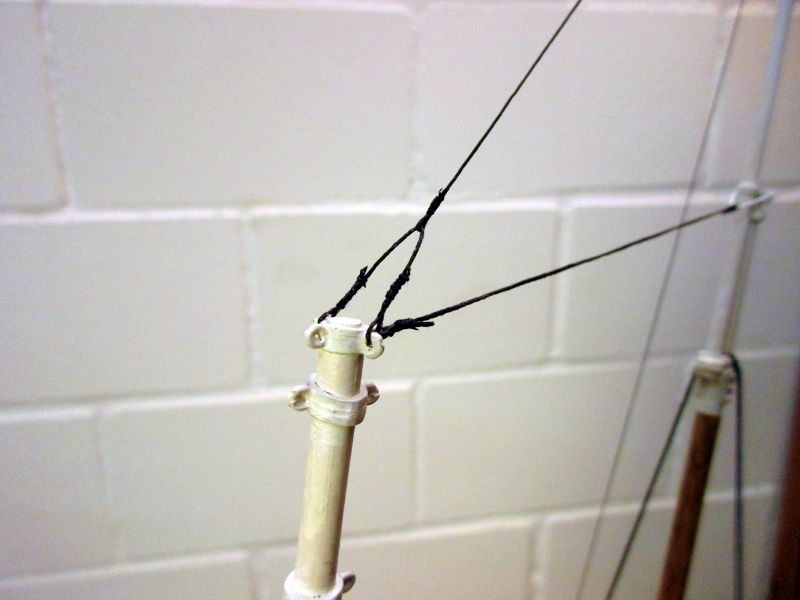
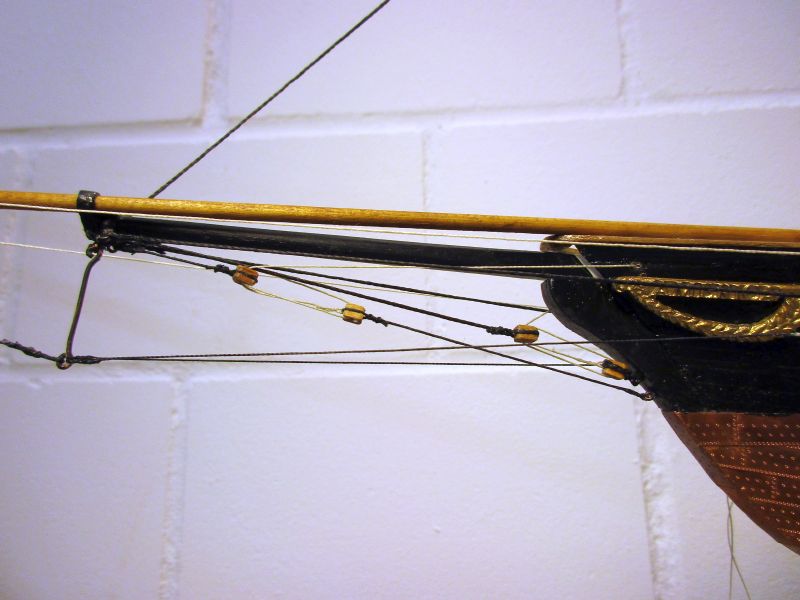
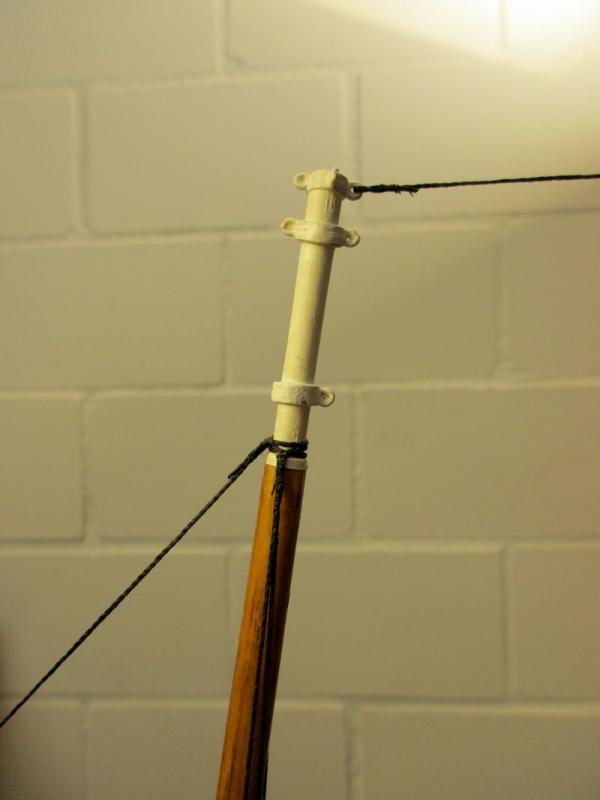
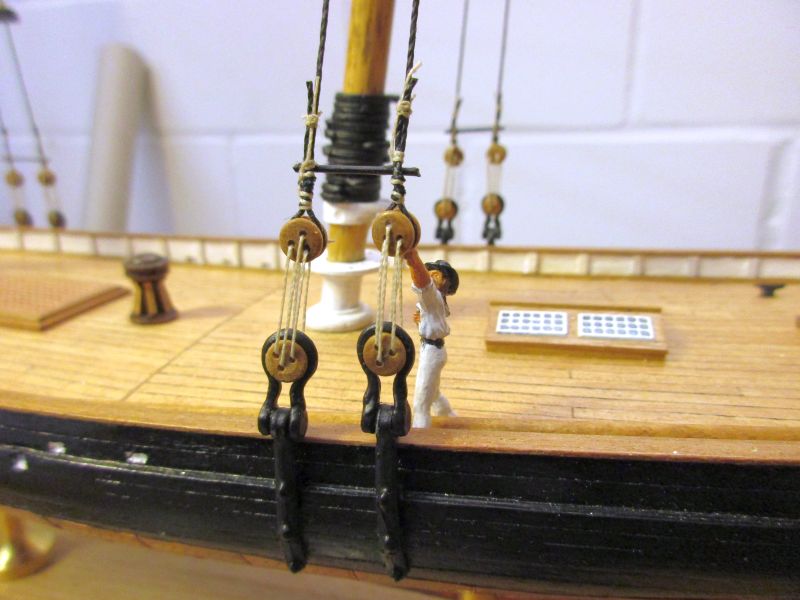
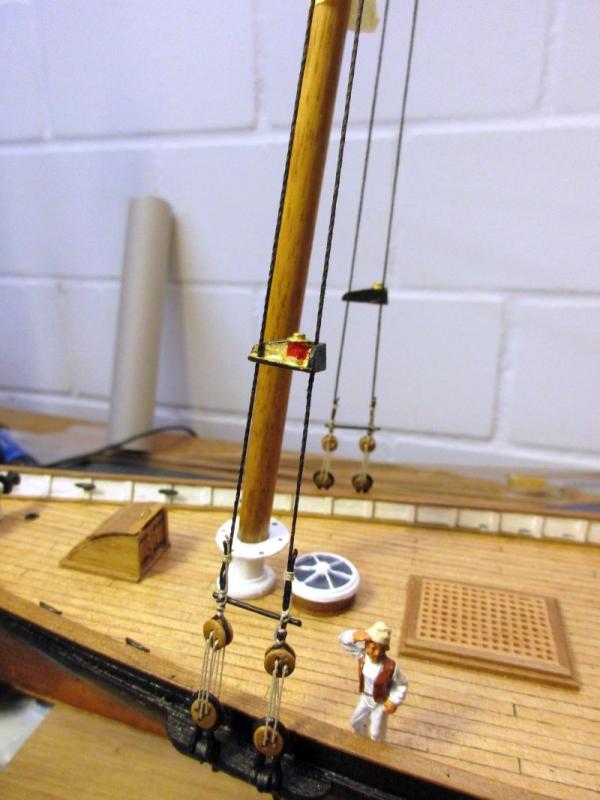
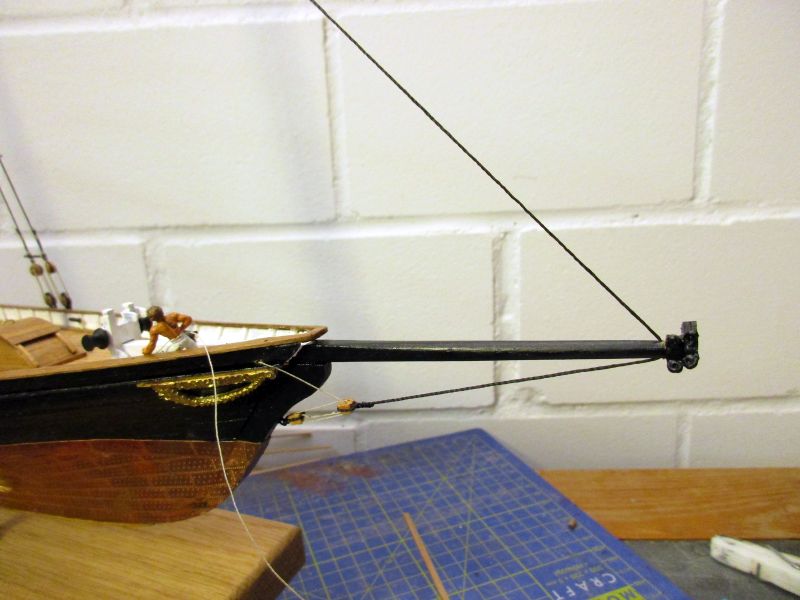
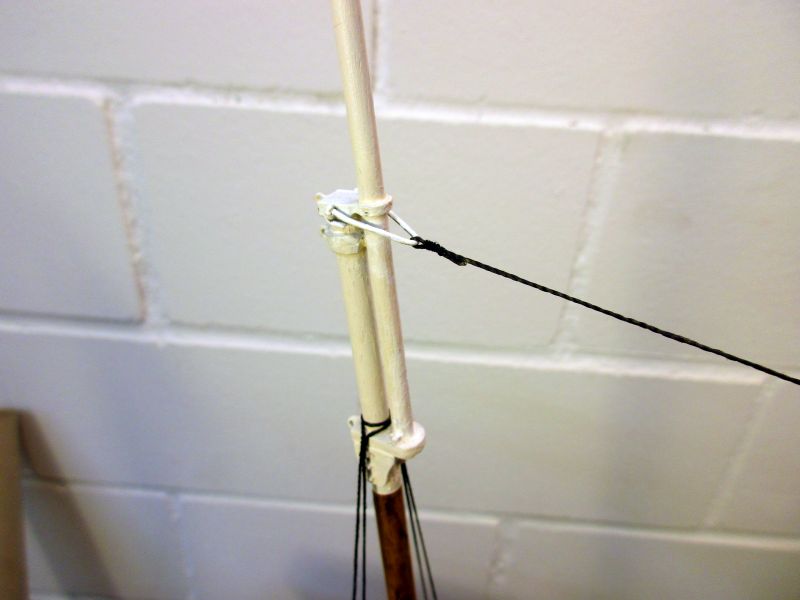
 The bobstay was now set up below the jib stay tackle. I used 0.5 black thread and set up a 0.25 natural thread tackle to a block on its own eyebolt on the bow. The bowsprit shrouds were next. Unfortunately I found only 3 of the 4 needed cast thimbles in the kit. The good news were 4 wooden hearts in about the right size which I could localise in my 'leftovers drawer'. For the shrouds I used 0.75 black with 0.25 natural thread for the lanyards. bobstay and jib stay tackle wooden hearts for the bowsprit shrouds In between the work on the bow the main topmast standing rigging was installed. The topmast stay was made of 0.5 black thread and set up as instructed by the kit. That rope triangle for the forward end seemed a bit strange was however the logical solution with the 'eyed rings' provided by the kit. fore mast head with schooner stay and main topmast stay Generally, while working on the rigging, I was occasionally in a dilemma. According to the sources, the aim of the ship builder was to provide a relatively simple rig, taking a New York pilot schooner as a model. On the other hand some of the kit's proposals were rather complicated such as this stays forward end or the bobstay. I was looking for technically plausible solutions with the available material but as my clever books (Lees and others) mainly cover the period up to 1830 I was sometimes lost at sea. Anyhow, that the main topmast has no shrouds seemed correct. However those prominent backstays definitely were incorrect and to leave them off, as other kits propose, I thought inappropriate. Either to leave the topmast bare or to have supports forward and aft seemed more logical. I therefore balanced the topmast stay with a pair of backstays attached to the lower deadeye of the lower mast shrouds. This isn't an open contradiction to the contemporary paintings and is covered by Marquardt's book. The 0.5 black thread of the backstays was set up with wooden thimbles (from the 'leftovers drawer') and a 0.25 natural lanyard. topmast backstay lower end Now the jib boom inner end was fixed. An additional bolt through the ears on the bowsprit betting and the rear end of the jib boom holds it. jib boom inner end Installing the dolphin striker wasn't easy as I was unable to identify that part in the kit's box. After several tries I made one of 0,8mm brass wire. Of course the eye on the bowsprit broke when I installed it (one of those days) but could be replaced with an eyebolt. The martingale stay is 0.5 mm black thread and the two back ropes 0.25. I used some Amati 3mm blocks to set up the lanyard made of 0.1 mm natural thread. Finally the jib boom guys (not sure if that's the correct name) were set up with 0.25 natural thread. I decided against the use of 'tarred' rope as they are put directly to cleats. dolphin striker with martingale stay and back ropes standing rigging completed (except a few loose ends)
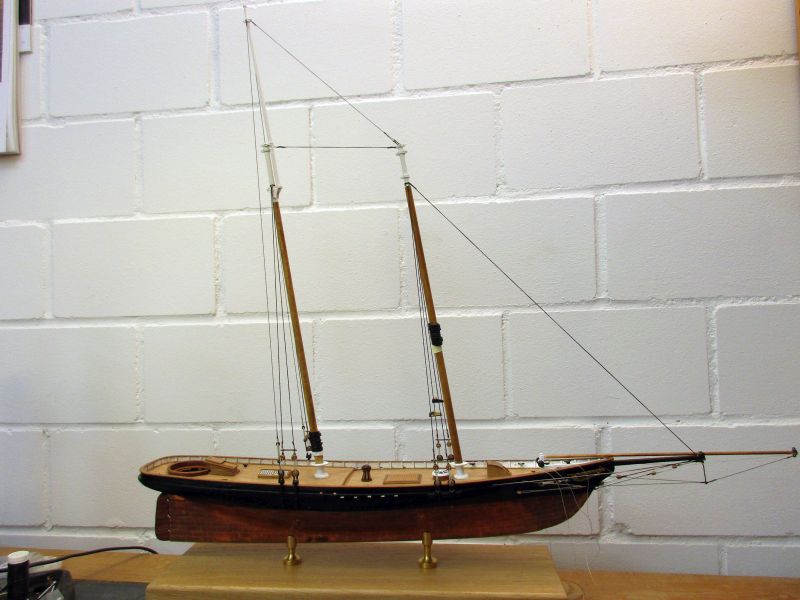
-
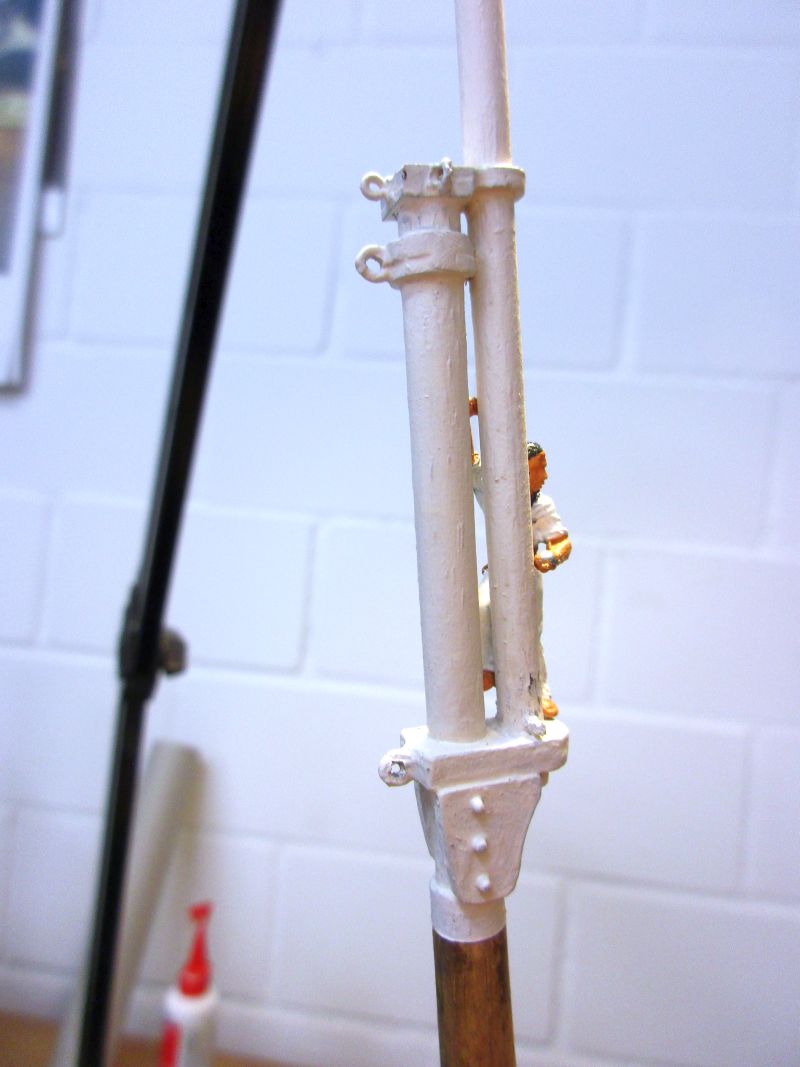
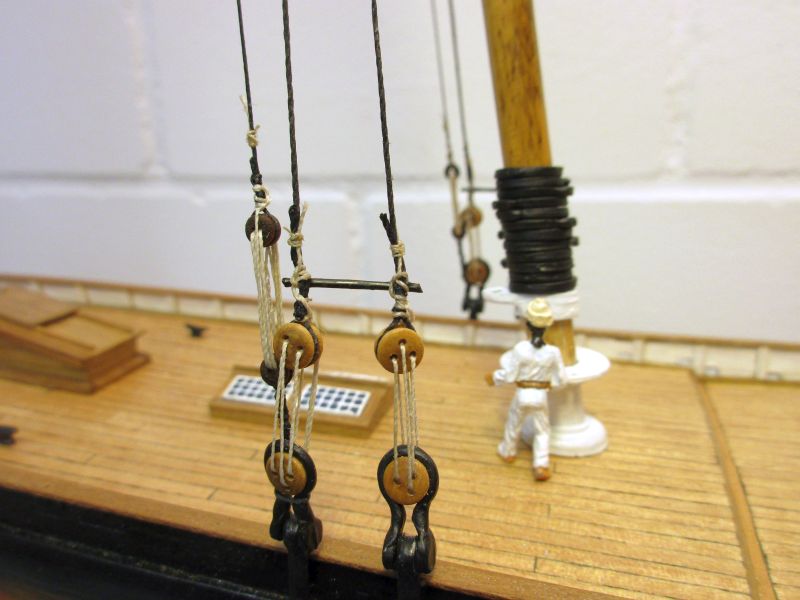
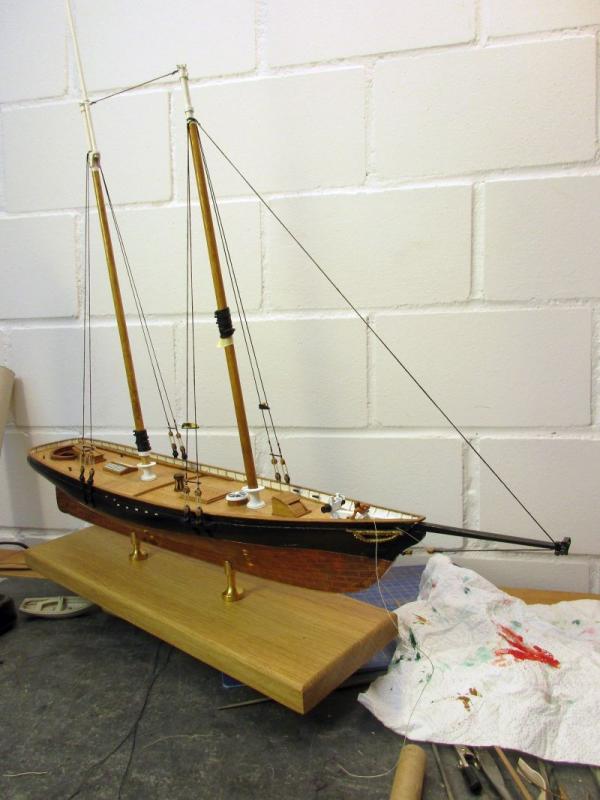
standing rigging The masts were completed, stepped for good, fixed with epoxy and the white colour touched up. For the standing rigging I decided to use rope strengths according Marquardt's book (The Global Schooner) and check the run of all ropes and lines with Marquardt and Lees. I was - and am - a bit sceptical about the accuracy of the kit's drawings. For example the mainmast shrouds are set up in a traditional way while the fore mast shrouds are led through rings at the masthead. And the fore stay (which seems to be rather a jib stay) looked strange, set up fix between two other eyebolts. And that unnecessary complicated bobstay looks almost ridiculous. For information about possible corrections I had a look at the different pictures of other models in the web and the available pictures and drawings of the schooner. Somewhere I read that America's rigging follows roughly the layout of a typical New York pilot boat. Therefore I had a look at the available pictures especially of the Phantom kit from Model Shipways. The similarity is in fact clearly visible and I could take some inspiration from there. I use a mix of leftover and new Amati and Caldercraft lines in black and natural. As small schooners may have no mast tackles, I left them off. The shrouds were set up with black 0.75 line with a traditional loop around the masthead - on mainmast and on the fore mast where a convenient shoulder below the rings at the masthead is even already available. The deadeyes seem a bit big but I had to stick with them. As mentioned earlier I installed only two pairs of shrouds for the mainmast. For the schooner stay I used the same 0.75 thread and set it up with two false splices. It seems strange to have no way of easy adjustment but I found no other examples e.g. of an installation similar to that on Pickle. The fore stay is in fact missing and what is there instead is rather a jib stay. It was attached to the mast head just above the shrouds with a spliced eye - in a traditional way. Without any crosstrees I couldn't use a spliced eye with a mouse as for the traditional fore stay, but treating it as a jib stay solved that problem. The lower end needed some adjustment as well. A normal fore stay would be set up with deadeyes. A jib stay however could go through a bowsprit sheave and brought back to the bow to be set up with a tackle or thimbles. The second solution is in fact used on the pilot boat Phantom. As the bobstay in the kit's drawings looks false I thought that the artist perhaps did mix up a simple regular bobstay with the tackle for the jib stay which would be just overhead. And this is my solution: The upper part of that double tackle will hold the jib stay to a ringbolt in the bow, while a bobstay with a single tackle will lead to a second eyebolt just below. Thus giving roughly the same impression as the kit but present a functional rig. The jib stay is made from 0.75 black thread with a 0.25 natural lanyard. Finally unused ringbolts at the mastheads where filed off and the white colour touched up. main mast head - all set up according to kits instructions fore mast head with shrouds and jib stay attached in a traditional way two pairs of main mast shrouds fore mast shrouds - I drilled two 0.7mm holes through the position lights, thread the shrouds through them and fixed it with a drop of glue. lower end of jib stay with tackle first part of standing rigging completed
-
Thank you, Hamilton. Good idea to sand the belaying pins - they look a bit heavy anyhow. Cheers peter
-
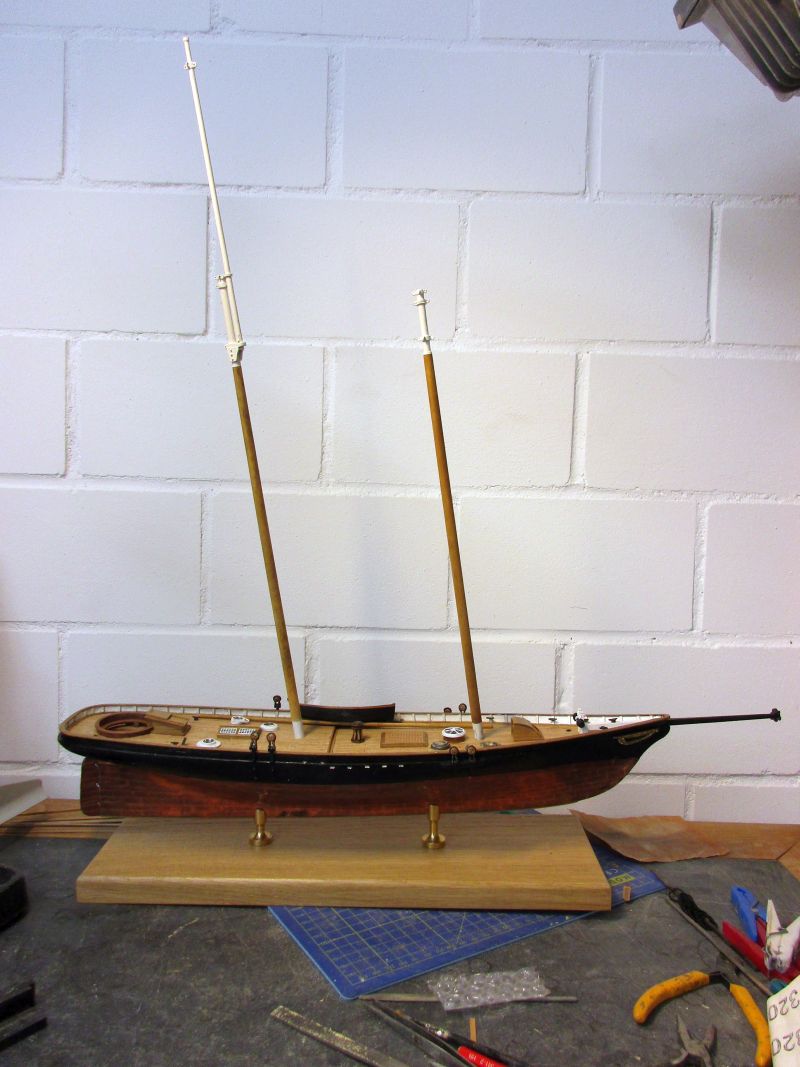
masts The masts were made as per kit instruction. I usually put the parts of the masts together before stepping them. So far I had no problems to put the shrouds in place around the already standing topmasts. A little fid was added for said topmast. A considerable problem (or several of them) was (were) presented by the cast parts. Of course the openings for the mast parts were too small. Reworking them was tricky and several parts broke. Epoxy or drilling holes for new ringbolts to replace those broken off were the solutions. I decided to paint the mast hoops in black metal, guessing they were cast iron - copper or brass are also seen on other models. Next will be the stepping of the masts. another broken cast part despite generous white washing the new fid remains visible provisionally stepped masts


-
Thank you , Martin. I might probably have heard once hinted that elegance and America are not always thought to be synonymous , but here they certainly are ( and we shouldn't forget SS United States). Hi Hamilton This same kind of stand was used on Pegasus and Pickle and I'm thinking about remounting Granado on a similar one. But be aware that those brass columns need reworking of the slits. For the base I tried first a plank from Amati in some unknown hardwood but it was much too red. Common Swiss oak from the wood shop looks much better and I'm quite sure that some Canadian hardwood (perhaps even the ever present maple) would look fine. Hi Tim Nice to hear from you. Yes, the pictures in the book seem clear about that topmast rigging. However the version I mentioned with a smaller backstay to the lower deadeye of the after lower mast shroud cannot be ruled out by the same book. I'll try that. Sails? Sure, but I don't know yet if the fabric from the kit will do. I'll have a try and if not, there is still enough left from Pickle to make a full set of sails. Cheers peter
-
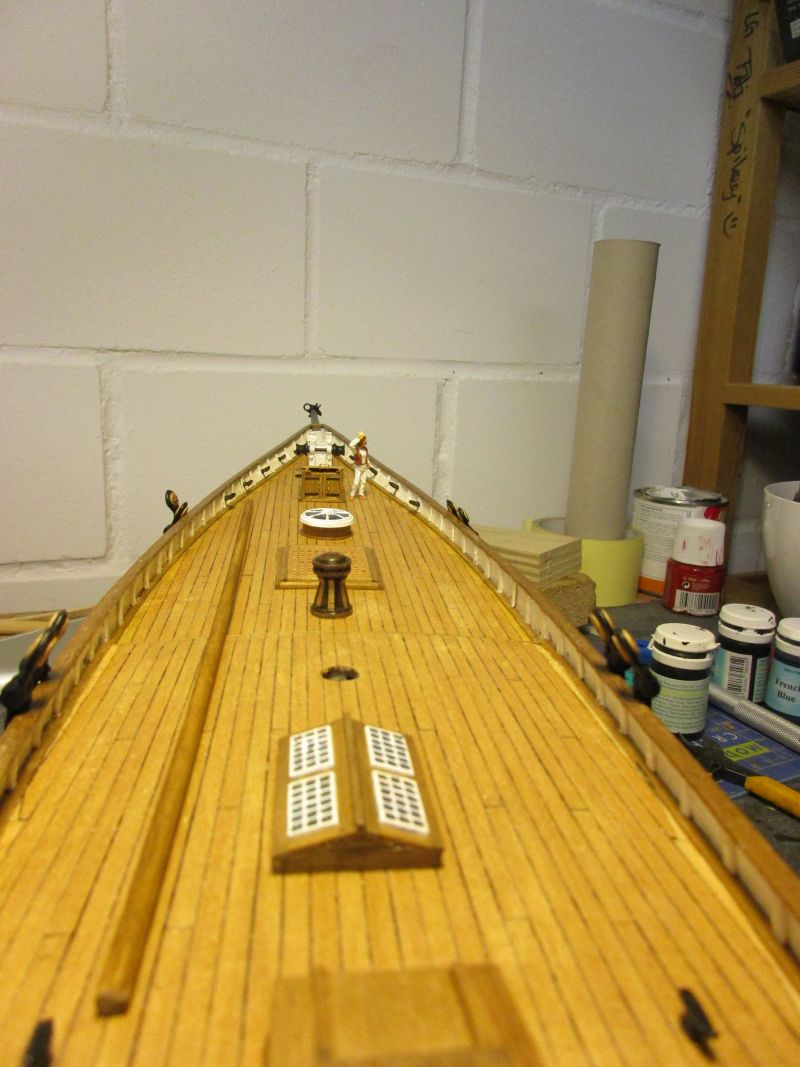
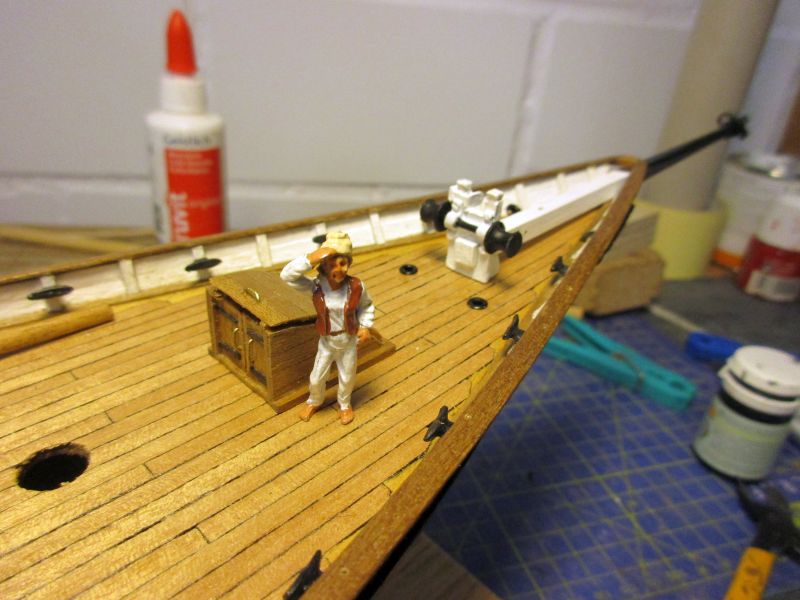
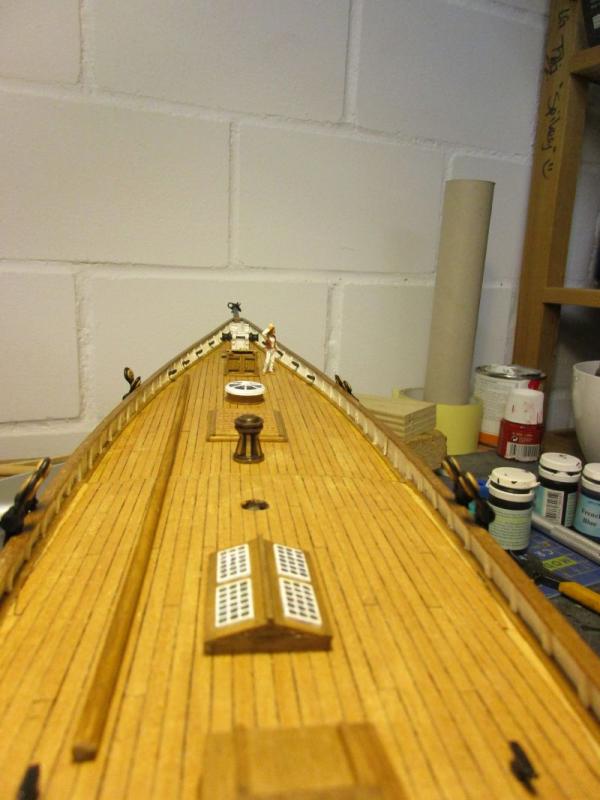
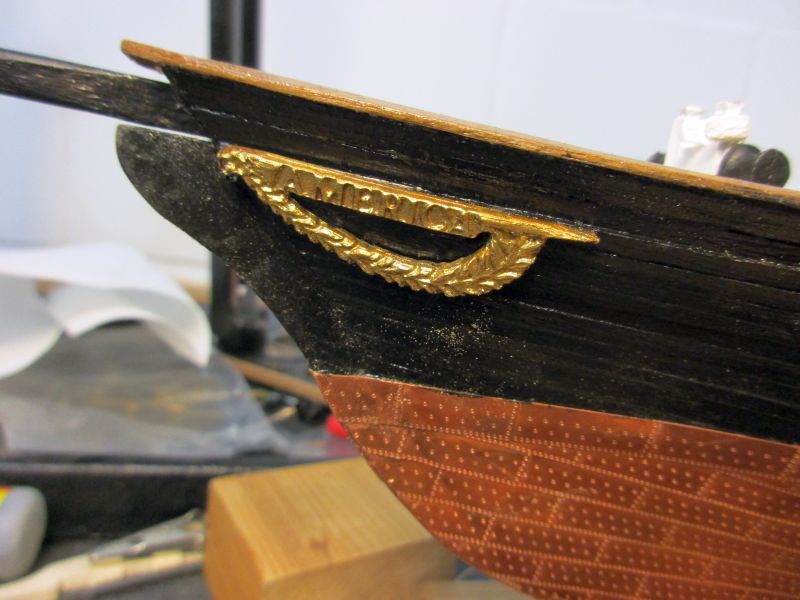
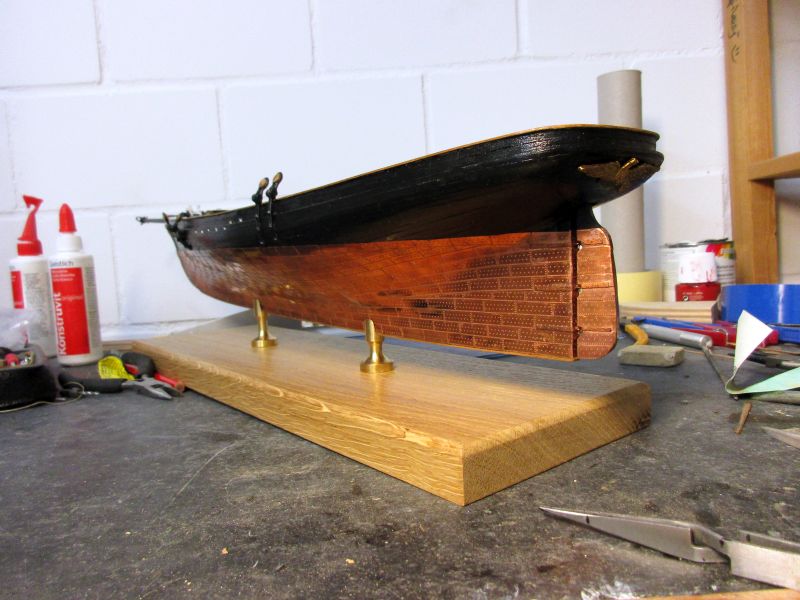
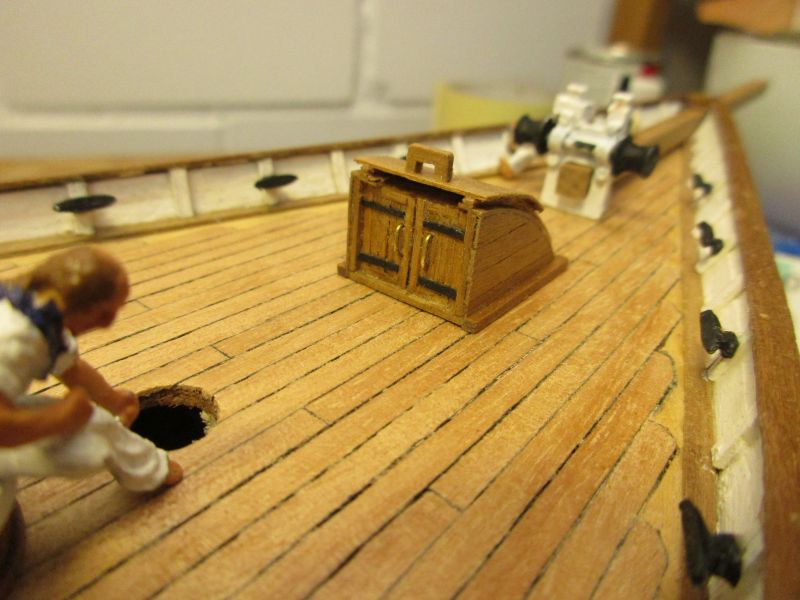
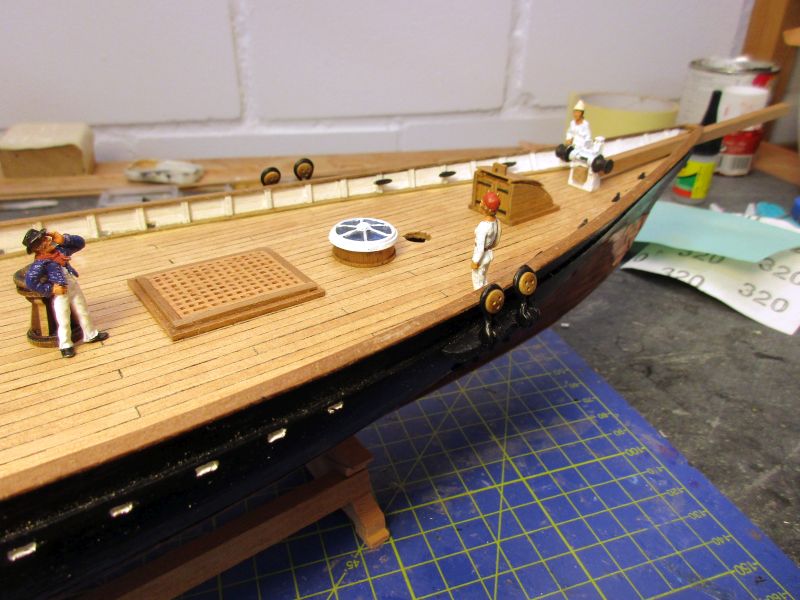
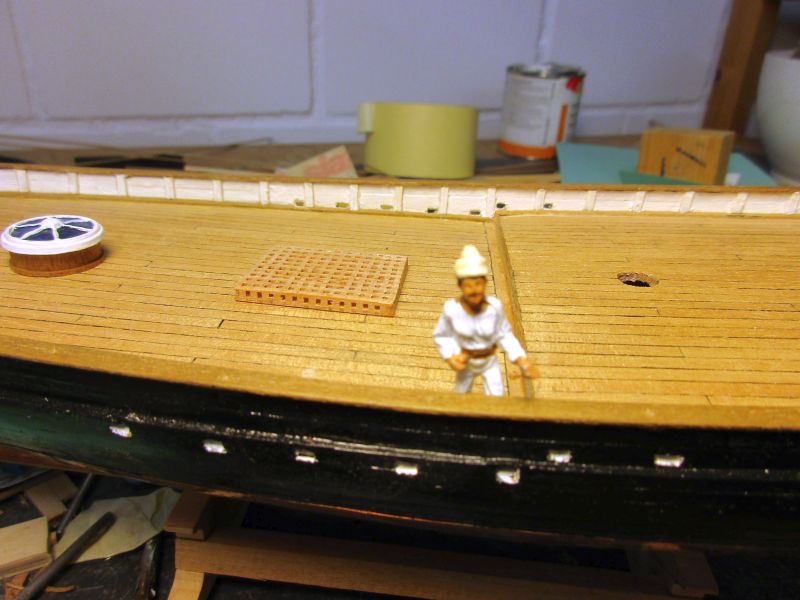
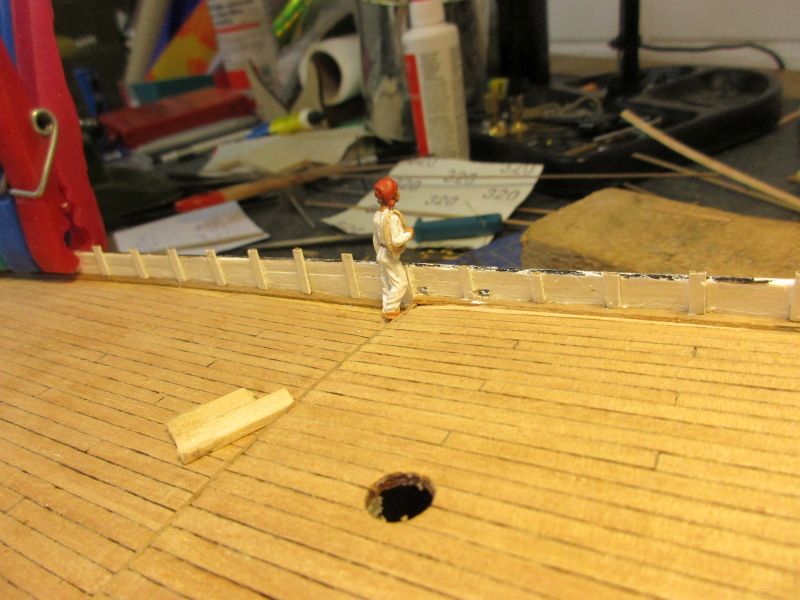
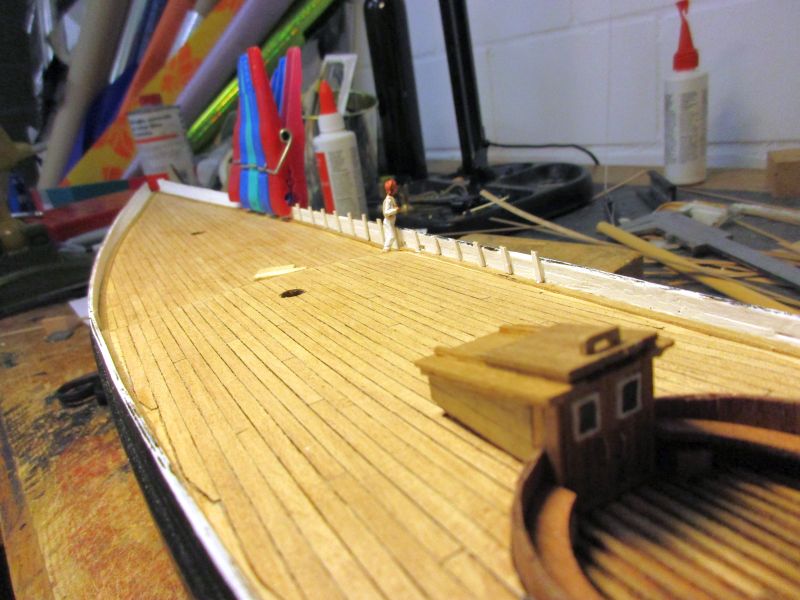
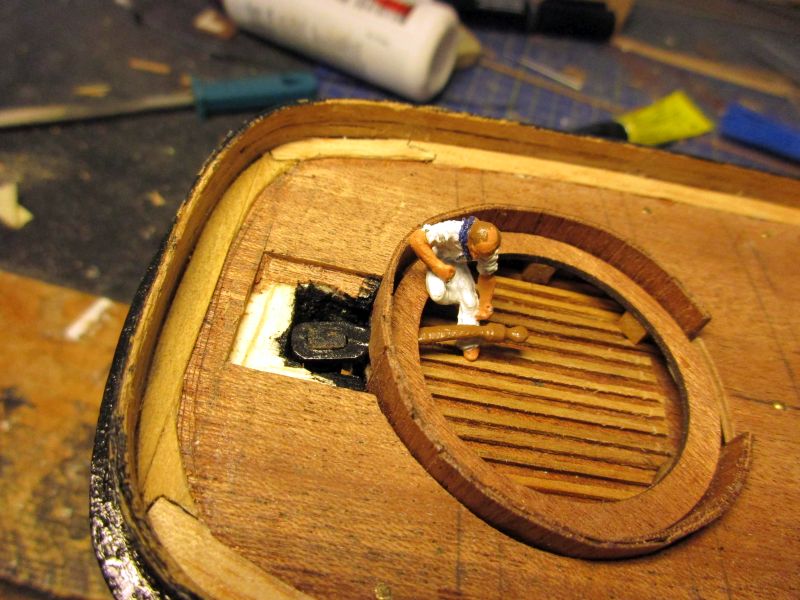
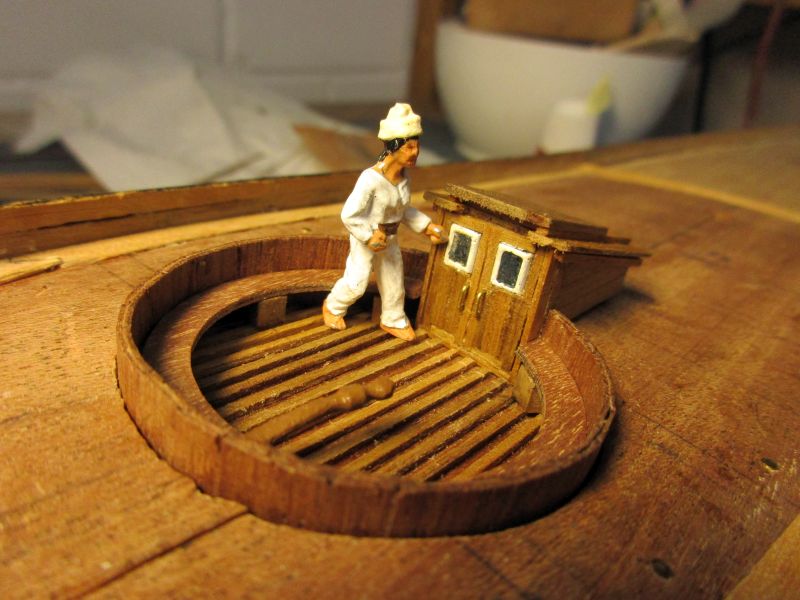
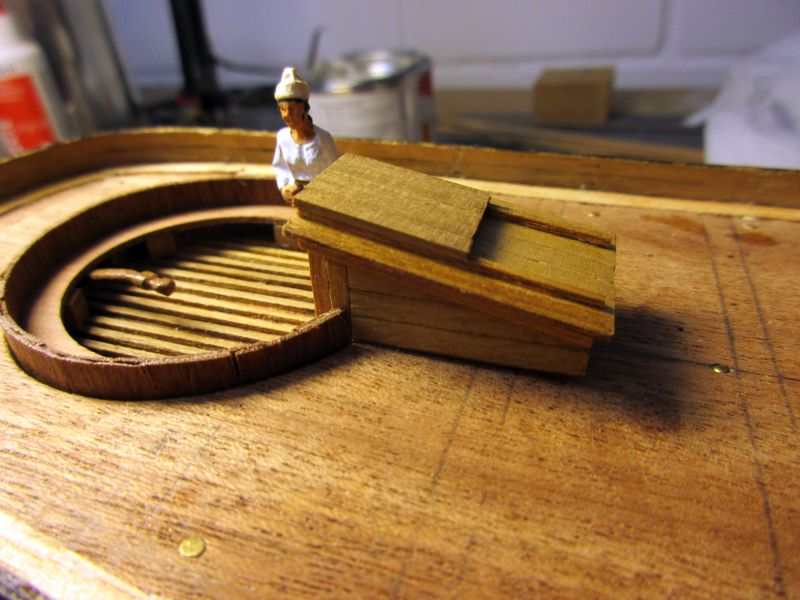
The deck furniture is finished and installed. Also the tubes for the anchor chains are in place and with some luck all fit with the two nameplates on the bow. The forward companionway got a new handle for the sliding roof (the one in the cockpit as well) and is fix installed. The bowsprit as first part of the masting is in place and the jib boom ready for installation. forward companionway with new handle The fully furnished deck seems still spacious the nameplate got again a light treatment with wood stain to get a warmer gold colour the stand Before starting to make and install the masts, the schooner got onto her definitive stand: Two Amati bras columns on an oak plank from the local woodshop. Now America looks almost like she is swimming and her elegance begins to show. she swims!

-
Hi Frank Nice to hear from you. I'll go quickly and pay your newest junk a visit... Hi Hamilton I left the pegs - or stumps of them - on the chain plates because I was afraid they wouldn't resist the pull of the shrouds enough without them. And on the last 2 I finally run out of luck. They broke in 3 places but I hope that after mending with epoxy they will hold. While at it, I also strengthened the others with some epoxy below the deadeyes where one snapped while pinching it. And I'm glad you're rethinking the decision not to post a log on Syren and look forward to it... Cheers peter
-
Hi Frank Finally I found your newest piece of lovely junk - or lovely piece of junk? Foreign languages always baffle me. But not your build. It's great and again also great fun to watch in the making. Take care peter
-
Hi Martin Thank you for the compliments. Flying into SFO we sometimes had the opportunity to look at the Pacific Northwest and the beautiful mountains (or rest thereof) from the air. Breathtaking it is (and I doubt that the Matterhorn still would look that impressive after it exploded ). Once I had the opportunity to make a displacement flight from Tokyo to Nagoya (thanks to all the unpleasant aftermath of the Fukushima disaster) which takes you just around Fujiyama - really the archetype of a volcano. But some of those in the Pacific Northwest are almost rivalling it. Cheers peter
-
Hi Nils What a astonishing gem Tadeus is making! That 'totem pole ladder' would however be too old fashioned for your steamer. No I was thinking more of something like the boarding steps on your Pegasus but constructed as metal rungs in form of individual hoops which serve as step and handheld as well. Cheers peter
- 2,625 replies
-
- 5
-

-
- kaiser wilhelm der grosse
- passenger steamer
- (and 1 more)
-
Hi Hamilton Or I was just lucky. Still 4 more of those deadeyes to install and the 2 spares already used... Question: When attaching the lanyards to the deadeyes did you ever feel that those soft strops bent around the lower deadeyes could open up again by the pull? Cheers (and how is Syren coming along?) peter
-
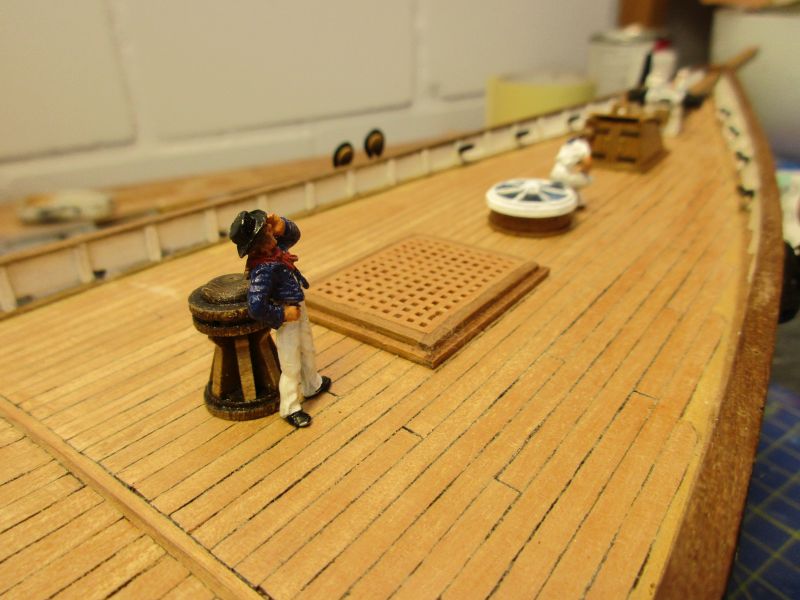
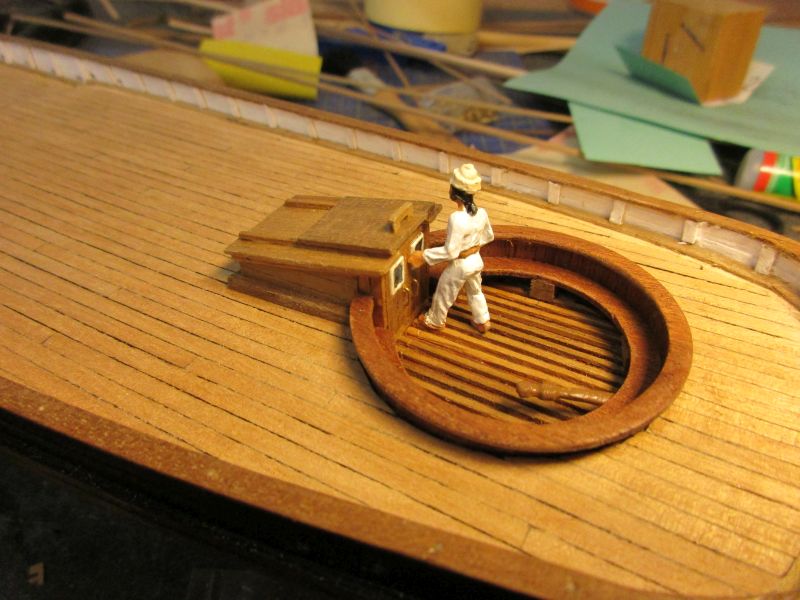
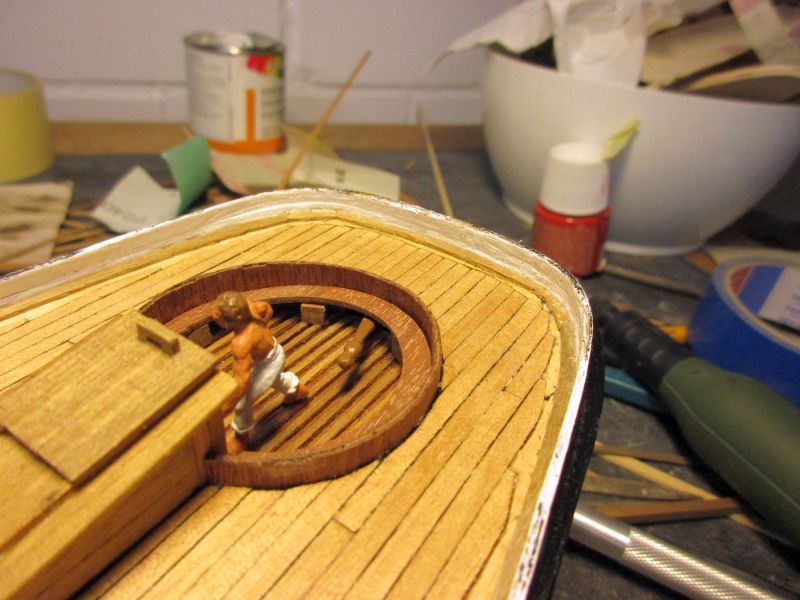
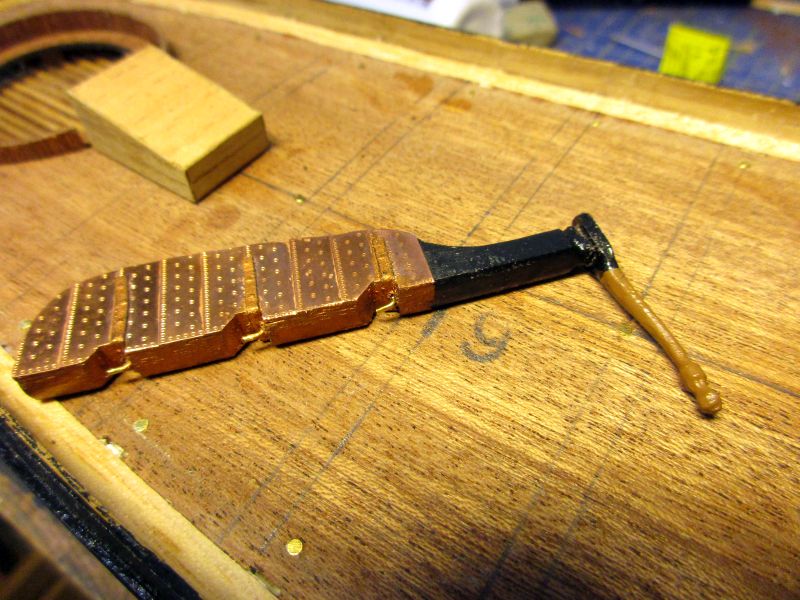
deck furnishing Looking at the various illustrations available of America and several models I notice a certain uncertainty about the exact layout of the deck furnishing. The cockpit seems rather clear-cut, as well as the skylight in front of it and that pretty little round skylight behind the fore mast. The rest differs: The gratings are sometimes companionways and the fore companionway is either there or missing. I decided to put the grating in place and leave the final installation of the fore companionway until after bowsprit and anchors have been installed. Skylights and gratings as well as the capstan were put together according to kits instructions. Only the sides of the big skylight were additionally planked with 3mm strips. The deck below the grating was painted black. I find it looks as well as a real opening below and was much easier to make than really cutting through the deck. The doors of the fore companionway were glued from 1mm strips with cartridge paper hinges and door handles from brass wire - all similar to the companionway in front of the cockpit. skylight it seems the bosun doesn't like that worker sitting on the skylight The forward companionway is not yet glued in place. It looks like that wooden handle of the sliding roof will have to be replaced by brass wire anyhow. Geoff Hunt versus William Turner - or - those ... backstays Marine painters were not always painstakingly sticking to every little detail of the rigging like Geoff Hunt. William Turner for example was more concerned about light and colour - he was basically a landscape painting impressionist, after all. (Me, although I'm trying to build model ships in Hunt's style, I often end up with something like a cartoon in Turner style...) Marine painters also not always had full access to their object and sometimes had to paint from memory or drafts. This could explain a certain ambiguity about America's schooner mast topmast backstays. In some pictures you see lines leading to the topmast head but it's never fully clear if those are flag lines or backstays. May be the painter was far from certain himself. Quite certain however is that no backstays were installed in the manner the kit depicts them: similar to the lower mast shrouds. However I didn't want to leave that poor topmast without any support from the side and the back. Fortunately I found in Marquardt's book ( Karl Heinz Marquart: The Global Schooner) a remark concerning backstays of smaller craft (he cites Steel):" ...hooked to a thimble of a strap round the lower dead eyes and sometimes with a lanyard and thimbles. " You even find an illustration on page 173. This will then be my solution: Only two deadeyes per side for the schooner mast and topmast backstays lashed to the aftermost of them. This decision came in handy when I broke the first two deadeye strops while trying to bend them around those channels. As usual in a mamoli kit there is just enough of everything and no spares. channels and deadeyes for the fore mast shrouds those parts forward of the mast are not yet glued in - but I think the companionway makes sense and should stay


-
Hi Nils Once in a while I have to stop the silent admiring and tell you once again: simply fantastic work! Just a question concerning that questionable but fantastic crew ladder: It seems a 'de luxe' solution just 'for crew only' (but I appreciate your care for the common crewman). Do you think they still could also have used simple steps mounted on the side of that wall, similar to the entry steps on the side of a 18th century sail ship? Cheers peter
- 2,625 replies
-
- 4
-
-
- kaiser wilhelm der grosse
- passenger steamer
- (and 1 more)
-
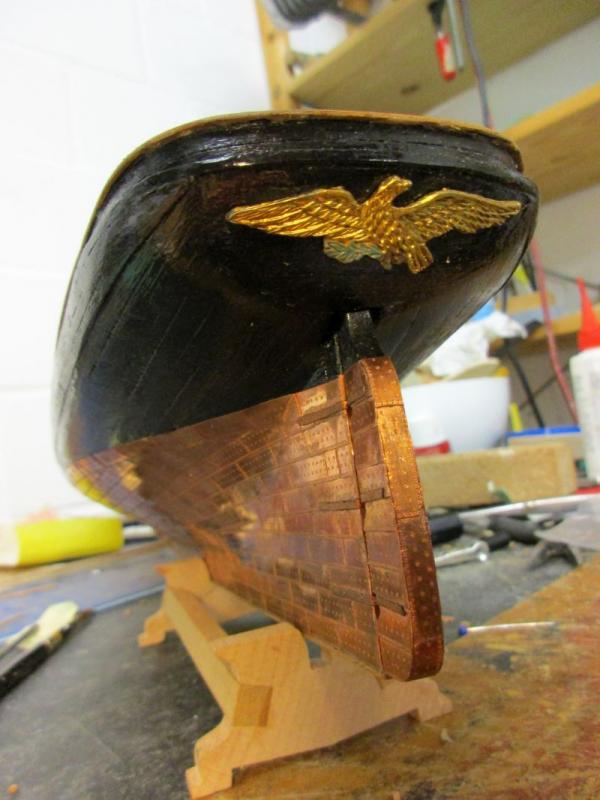
This morning I felt a bit sick, but working to build this beautiful America helped. The bulwark is now finished with the - rather tricky - capping rail. The rounded parts in the stern were made from glued stripes as suggested by the kit. The second try was better than the first but the strip quality (or lack thereof) caused some problems. Then the cockpit was completed using the kit provided parts. Here, the capping proved to be tricky again. The kit's part was cut open and bent into position, then glued with epoxy and fixed with nails for the drying. It sits a of centre. Apparently it moved a bit while I tried to fix it. The relative sizes of bench and capping rings were unfitting - another shortcoming of that kit. The companionway is in place as well and I started on the furnishing of the deck. As a goodie I already placed the eagle on the stern. It was weathered a bit with walnut stain and the lower part painted to resemble the picture in John Rousmanieres book. bulwark finished with capping rail cockpit finished the eagle has landed
-
Hi Martin No, our roadrunners are usually less beautiful and wear jogging shoes, but don't get attacked by coyotes (only hawks - happened to a friend of mine). But that deck! Did you really swab it this morning?? Take care peter
- 467 replies
-
- 2
-
-
- fly
- victory models
- (and 1 more)
-
Hi Martin Absolutely great work on your belfry. And a lovely view, but....where are the cows? Take care peter
- 467 replies
-
- 1
-
-
- fly
- victory models
- (and 1 more)
-
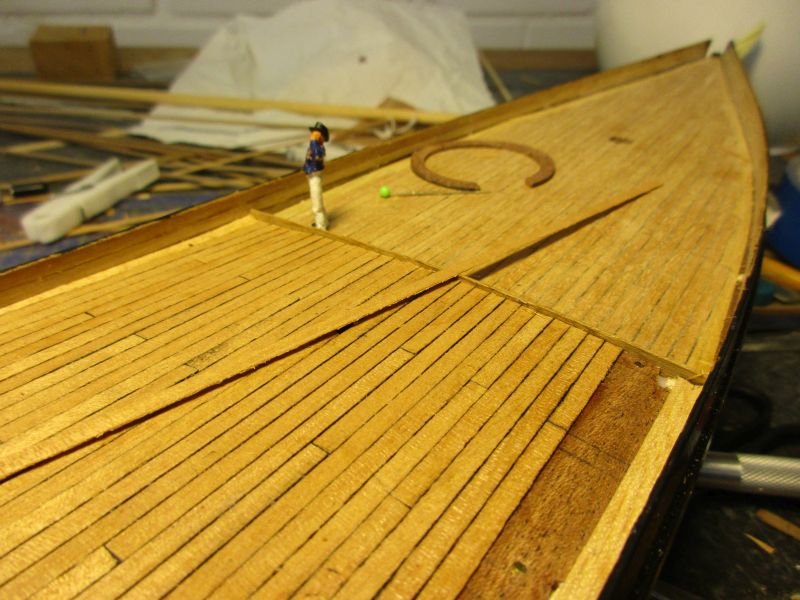
The afterdeck was now planked and both decks sanded and scratched to get them smooth. Then the stanchions were glued onto the inner bulwark side. The scuppers were gnawed through but proved to be rather tricky and don't look too good. Working from inside to the outside they ended up on different heights, sometimes just infringing on the upper edge of the wales and correction was difficult. afterdeck nearly completed deck finished stanchions being glued on first 2 scuppers...that seaman isn't happy about their quality either
-
Hi Hamilton Thank you. Yes, I suppose Switzerland could be dryer than your place. However the part I live is the most foggy region of whole Europe. But only if it doesn't rain. Or snow. But judging by some movies you still win the humidity contest. Personally I went no further northwest than SF which was cool and humid enough - I still ask myself how they could celebrate a summer of love and peace there, back in the 60ties, without freezing their mildewed behinds off. Never mind. Come to Switzerland. Not only the landscape also the food and the wine are fine. People are a bit grumpy, but you get used to it. Hi Nils Thanks. Yes, I love to work with those Amati plates. Cheers peter
-
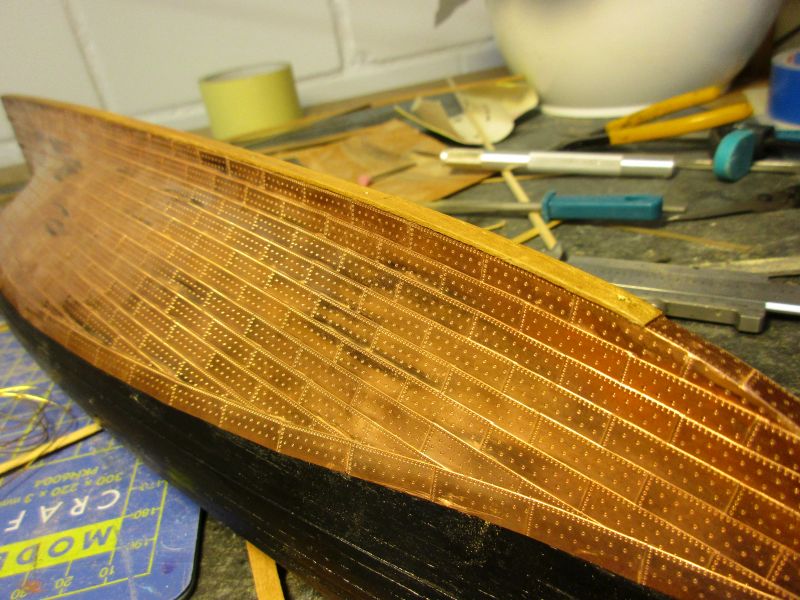
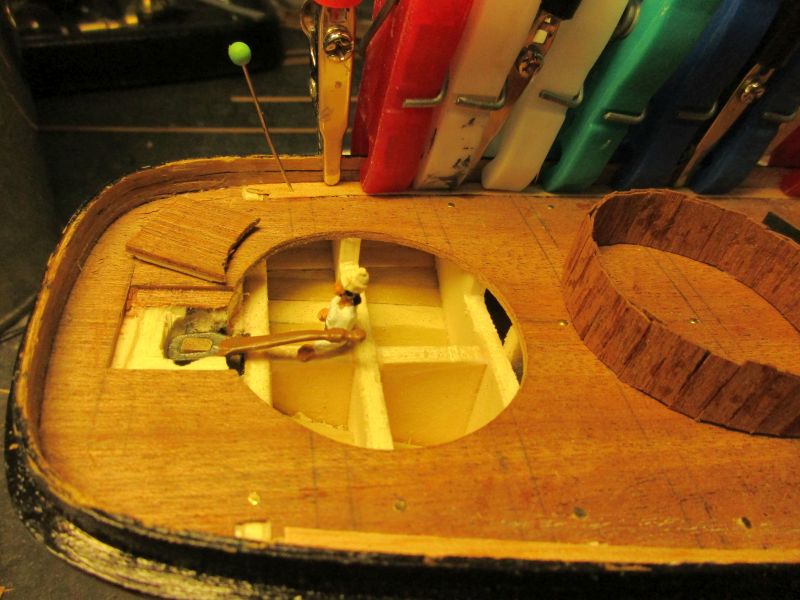
Before starting on the cockpit and rudder I put on a false keel also to protect my copper plating during work. To insert the cockpit parallel to the deck I had to scratch away first some material on the bulkheads below. In the aft part of the cockpit a slit was cut out for the tiller. Then the base of the cockpit was inserted, the rudder hanged and the tiller glued in place. The tiller arrangement which brings it forward below the bench seems a bit strange but I didn't find any examples with the tiller above the bench. This seems a cumbersome way of steering and could perhaps have favoured the installation of a wheel later on. The companionway was built more or less according to the instructions. Two handles made from brass wire will facilitate the opening of the doors. While dry fitting it, I found I had to lift up its forward end a bit to get the doors at right angles to the cockpit floor. The gap will be covered by the base rail. The cut out part of the deck above the rudder head is in place again - only provisionally, you never know. Now planking of the after deck can start. false keel (1x5mm strip) dry fit of rudder and tiller slit for the tiller I guess it would be easier to steer with the helmsman sitting on the floor... the companionway is in place but not yet glued in

-
Hallo Nils Alles Gute zum Geburtstag! peter
- 2,625 replies
-
- 7
-
-
- kaiser wilhelm der grosse
- passenger steamer
- (and 1 more)
-
The fore deck is completed. While dry-fitting the tiller before starting on the afterdeck I found that I need better access to the rudder head. I therefore cut out a section of the deck. The new building sequence is now: Waterways - cockpit - deck planking. dry fitting the tiller
-
Hi Martin Ain't I? Thank you. Flat- or highlands - wherever you go the cows are already there... Cheers peter
-
Hi Hamilton There is always something new in another build log of a known kit and you may open chances for other builders to avoid (or reproduce) possible mistakes. Admiralty and band saw: Maybe if you try to convince the admiral that you absolutely have to use a chainsaw at the dining table she will compromise on a small Dremel or Proxxon tool. That's basically all I need for the kits - however you can produce a lot of sawdust with those and some hand-sanding as well. Dining or ship building - sometimes it's hard to choose your priorities. Take care peter
-
Hi Hamilton We all have that moments with broken spars, wrongly cut rigging, lost parts etc... Mr Murphy seems to like model ship builders (and I am quite sure real ship builders as well). But... !Congratulations on the finished America! Oh, and please reconsider your decision not to keep a log for Syren. Other people would like to admire your work. Cheers Peter