flyer
-
Posts
1,016 -
Joined
-
Last visited
Content Type
Profiles
Forums
Gallery
Events
Everything posted by flyer
-
 Hi B.E. If you really want to disappoint me, you must try much harder. Again you had a lot of useful information. I know Brian Lavery’s reputation (his book is still missing in my library – this will have to change) but the there are situations where I think you couldn’t pull any boat behind (e.g. very heavy weather). And logic tries to tell me that the ingenuity of the 18th century carpenters should also find solutions for removable kneed thwarts (just fix the knees to the thwarts and put removable bolts trough the knees would work). While I don’t know B. Lavery’s sources I expect that for example the contemporary models would seldom show all the equipment as one boat would be sufficient to represent all because everybody knew then where the rest was stowed. By the way, I also noted the extensive use of red color on that contemporary model. All the deck furnishing and even the foot of the mainmast were red. That’s a bit too ‘bloody’ for my liking. Therefore I will have to bear the reputation of being a skipper which doesn’t like the usual amount of bloody color on his deck. And I also noted that in both examples the spare spars are already painted – ready to use. This was another open question you provided with an answer. On my Granado I also had the problem where to stow the boat (and such a vessel must have at least one boat). The solution there was to show it in the progress of being hoisted out hanging by the respective tackles. But this time I'd like to try something else. For the time being I will work to stow the smaller boat inside the blue cutter on special supports and I will try for a solution to fix the blue cutter on the spars with a minimum of visible chocks but still in a conceivable way with a solid hold. Thank you. Cheers Peter
 -
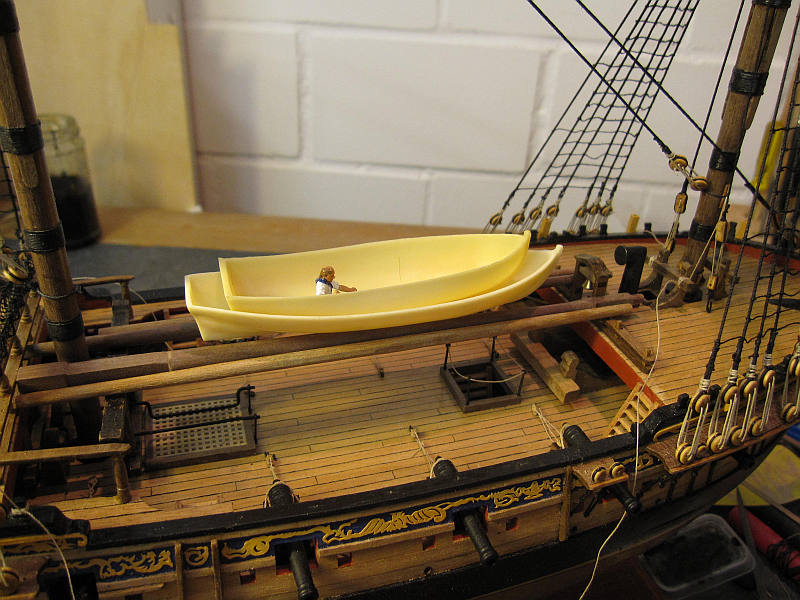
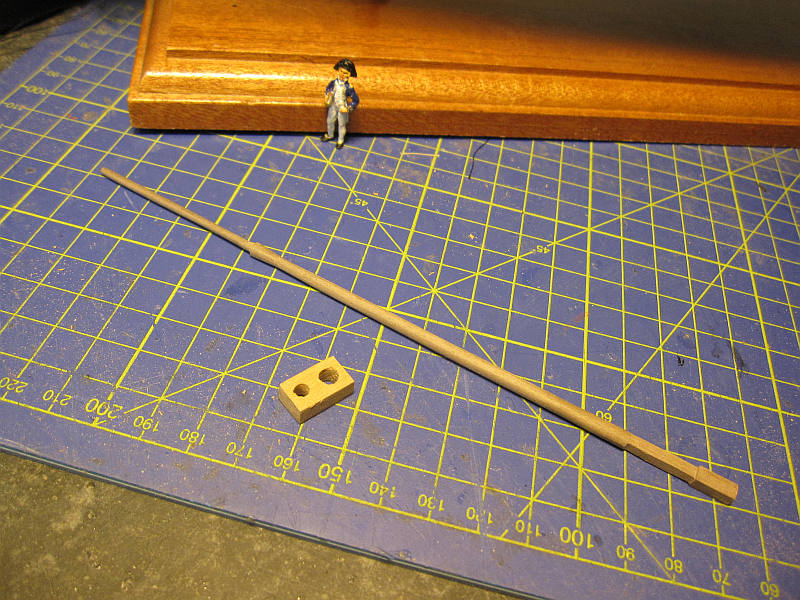
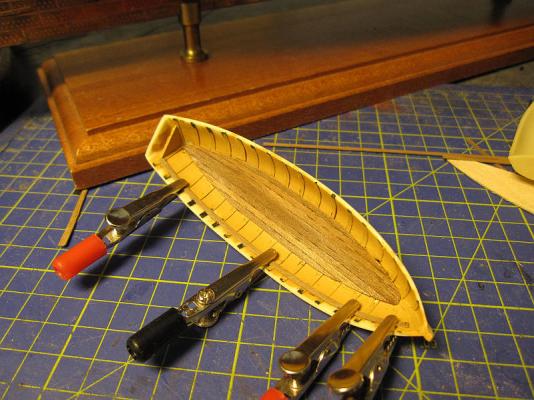
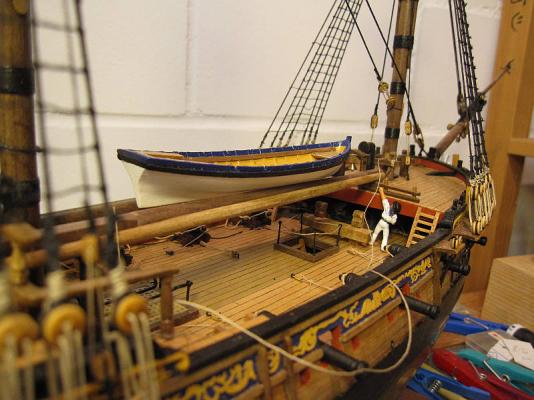
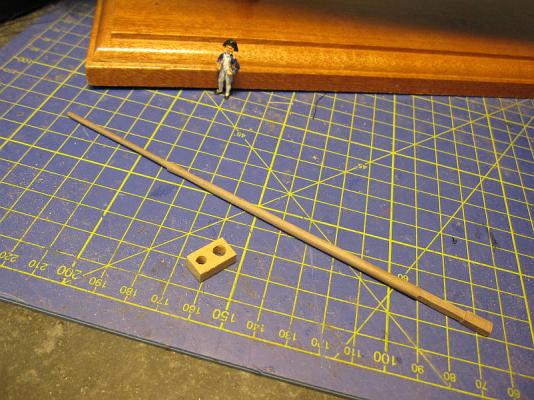
Hi B.E. Oops and I was secretly hoping that you could give a hint or at least an educated guess. Well I presume that those supports were made by the ship’s carpenter according to the actual needs and the KISS rule. Therefore I will just set two short stubs in 45° angle, leaning towards each other, onto a beam. Two of those will lie across the spare spars (or inside the bigger boat) and support the hull of the boat in 4 points. Cheers Peter First try of a boat support

-
Hi Mobbsie Thank you. As I will stow the smaller cutter inside the blue one, there will be no further detailing of this boat. But on the smaller cutter I will try some detailing with oars etc. Hi Martin Thanks. Fortunately there are some etched brass oars included in the caldercraft kits and they will do for my level of detailing. Hi Michael Thank you. I think those little caldercraft kits give an acceptable result for a moderate amount of work although it’s only a resin shell with a few attachments. As we “suffer” presently from a partly southern Californian climate here in central Switzerland (daytime temperature 35°C but about 500km to the next beach) I try to minimize the amount of any actual work. Take care Peter
- 431 replies
-
- 2
-

-
- pegasus
- victory models
- (and 1 more)
-
Hi Paul Every time I think you reached perfection in detailing, you add another level. Outstanding! I wish you joy with your new child – but better do not count on a ship modeler. I think what you should hope for is some mild tolerance, the same I’m getting from my daughters. By the way, this is not a gender question - one is an engineer! Cheers Peter
-
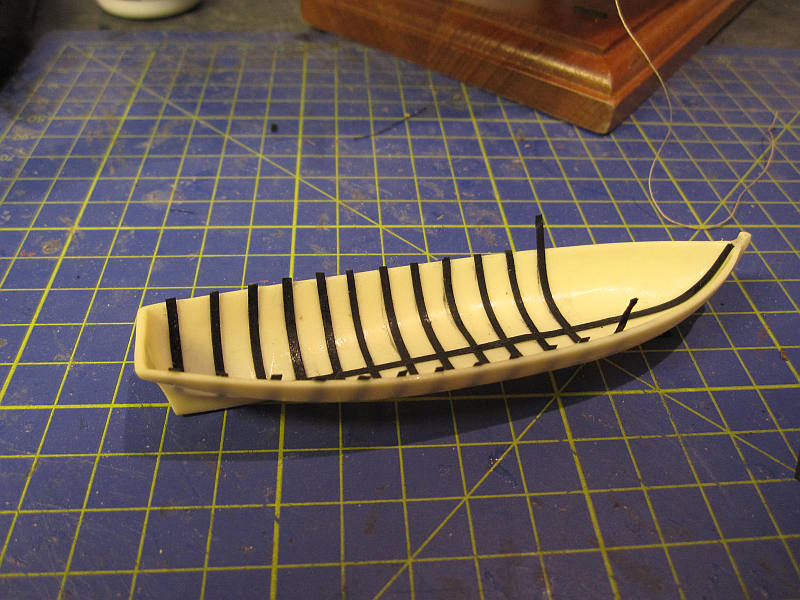
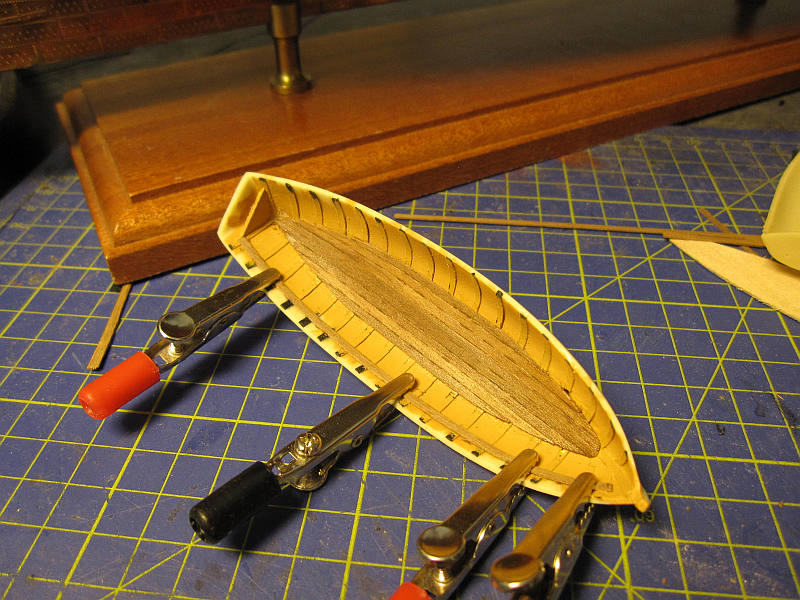
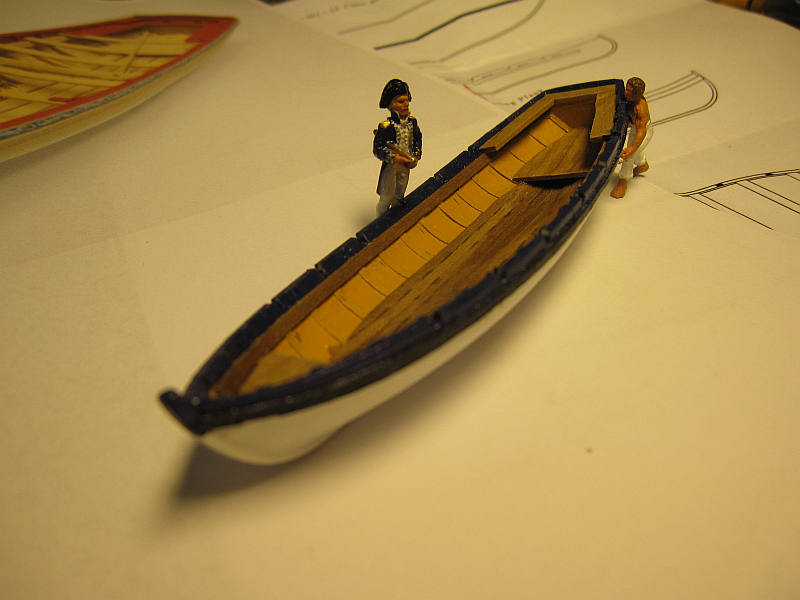
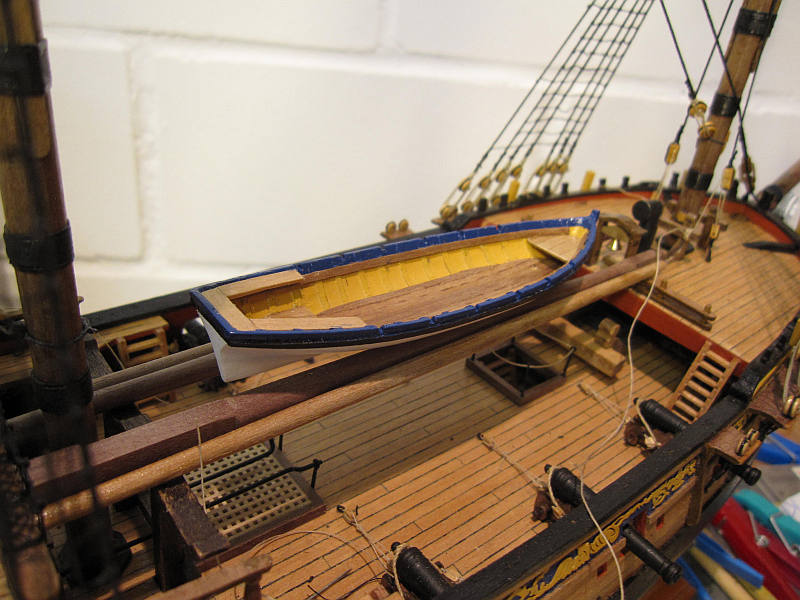
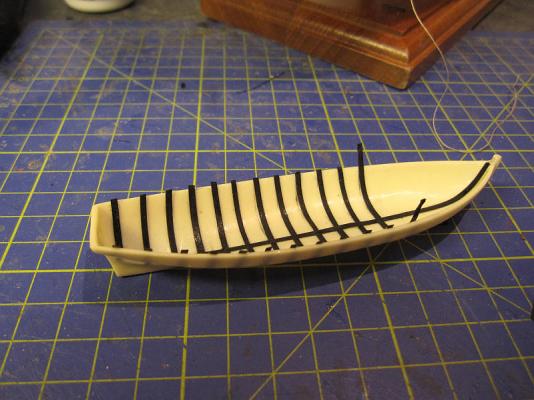
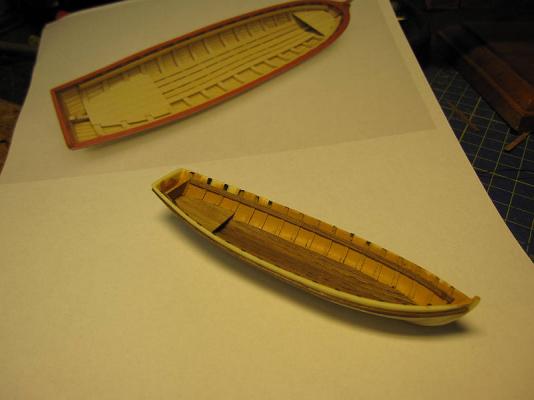
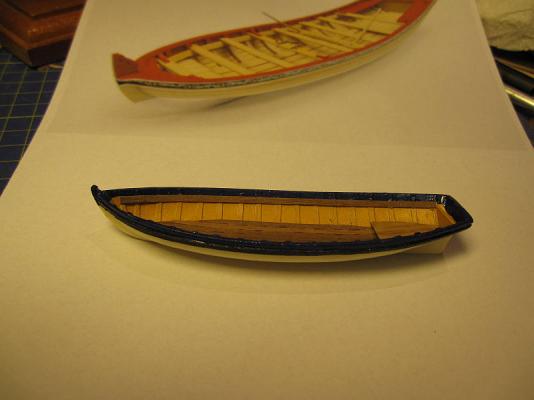
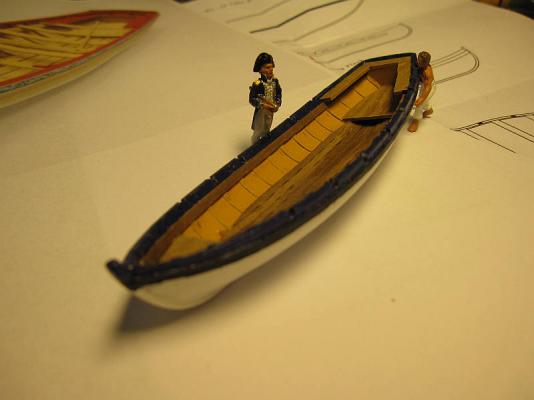
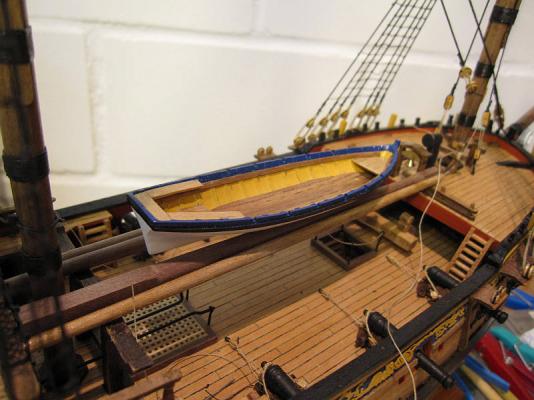
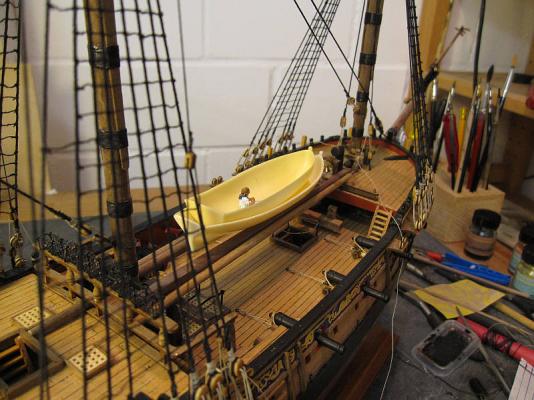
In between the work on the masts I started on the first boat, Caldercrafts 24’ cutter. The rips were made according CC’s instructions. Contrary to them the floorboards were not mounted on the prepared piece of plywood but directly on the floor. A cockpit floor and a small ’deck’ up front (I wonder what’s that actually called?) were added. For those 2 details and a lot more information I used Chuck’s beautiful longboat as source – thank you, Chuck. The rowlocks were filed into the side as per CC’s instruction. Further detailing of the boats interior will not be made as the smaller cutter will be stowed inside this one. For the coloring I followed mostly the instructions and just added some blue to make it ‘the blue cutter’. The rips are made from cartridge paper Floorboards are added and the risers are being glued in place Cockpit floor added (the boat sits on a copy of Chuck’s longboat- that’s a perhaps a bit impertinent) It’s now the ‘blue’ cutter Front platform added Cockpit seats added – the captain inspects the new boat Provisionally stowed – looking at those pictures I think I will have to make a kind of support to keep the boat stable on the spars

- 431 replies
-
- 5
-
-
- pegasus
- victory models
- (and 1 more)
-
Hi Aldo Thanks for looking in. I got the impression that you are taking a break in the work on your Pegasus, concentrating on your wonderful Triton. Another one lost to the dark art of scratch building…? Hi Ray Thank you for the sound advice. Of course it’s a bit of a dilemma – after finishing the rigging there will not be enough space to fix the spars and boats. I guess those ‘ships-in-a-bottle-problems’ are part of our hobby and you probably would meet them even if building in original size. We know it from other work areas, e.g. trying to bring the furniture into the new house and realizing you should have done it before fixing the roof… The spars are still provisionally mounted and I delay the definite fix as much as possible until I will have missed the optimal point… Take care Peter
- 431 replies
-
- 1
-
-
- pegasus
- victory models
- (and 1 more)
-
Hi Chris Your Victory will be a marvelous work of art. Concerning sails - I prefer to have some on a sailing (!) ship. Out of laziness I showed them furled on my last 2 builds (and will do the same on Pegasus). Therefore I appreciate any help with the sails included in the kit. I was wondering about the coppering on your Victory. Believing that the point of those left and right copper plates was to put them on overlapping (where the ‘missing’ line of nails would be covered by the next plate, creating a regular nail pattern over the whole area) I now get the impression that you put them on side by side. Perhaps you can help me with some questions: Were they plates actually put on overlapping on the prototypes? Wouldn’t it be easier (and perhaps cheaper) to make just one sort of plates, where the overlapping part covers the nails of the plate below? Excellent as they are this wouldn’t be a problem with the nail heads to be covered. And what’s the point of left and right plates if you put them on side by side? You create a nail pattern were plates seem not properly attached on 2 sides.? Thank you for clarification. Take care Peter
-
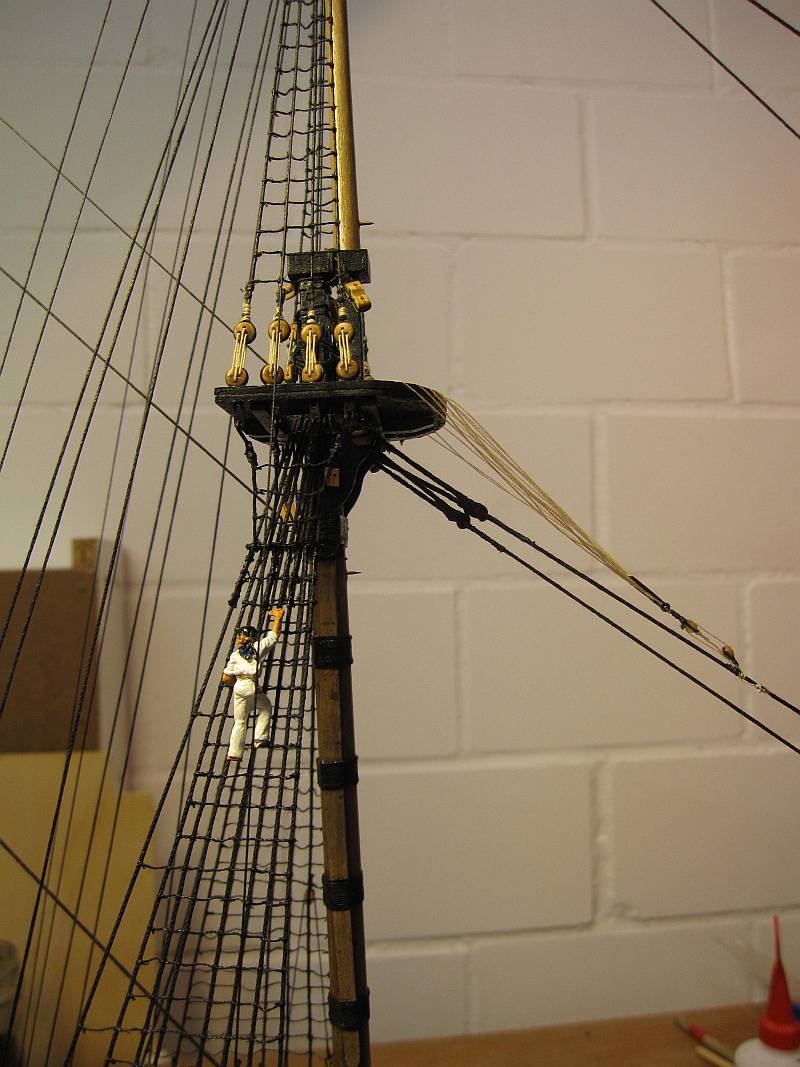
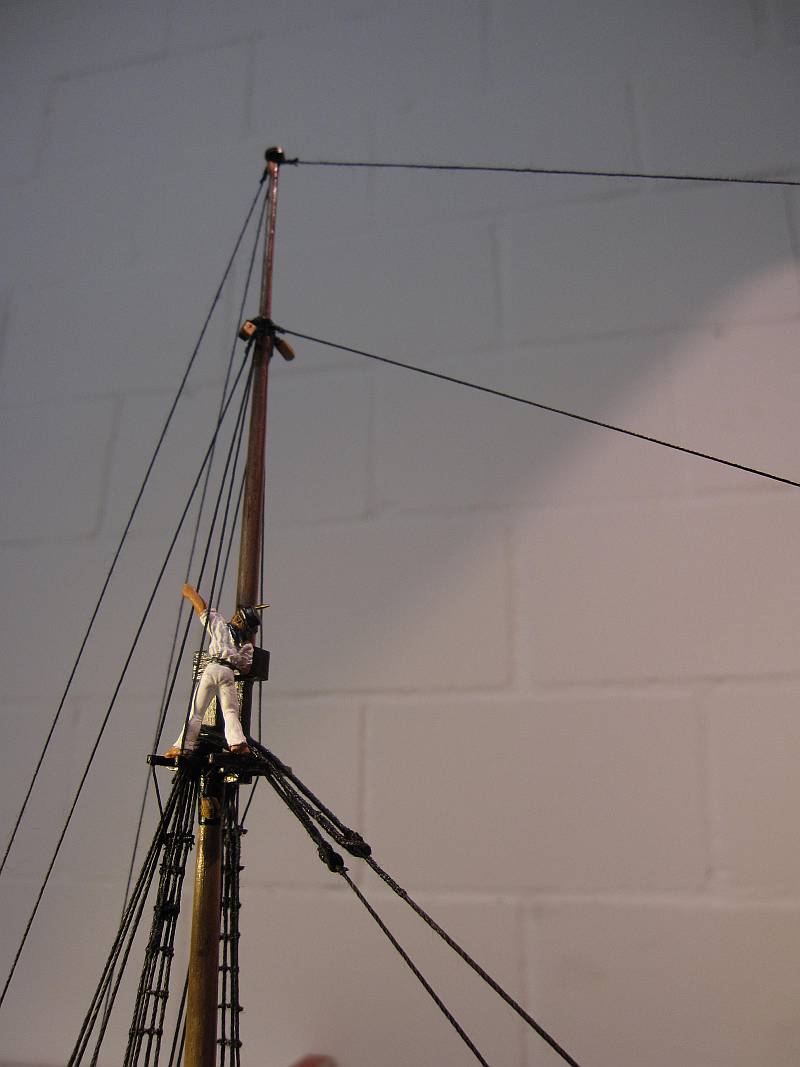
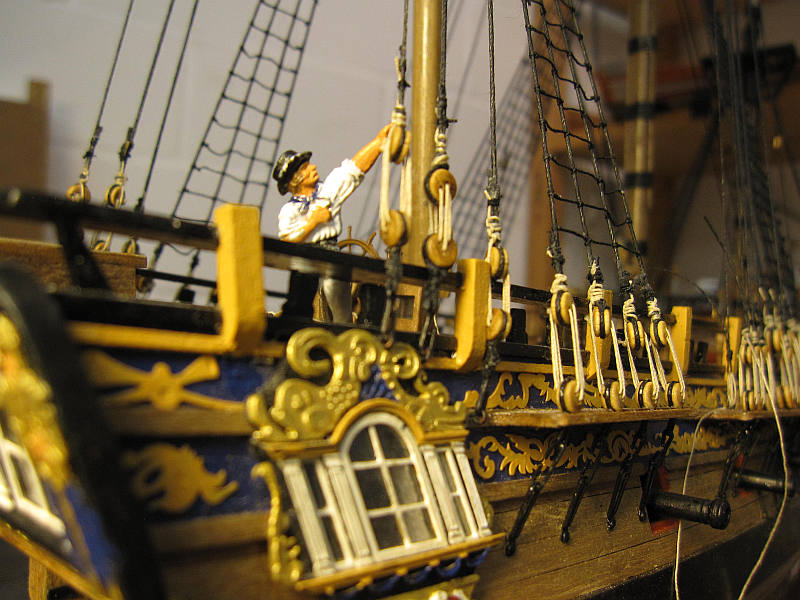
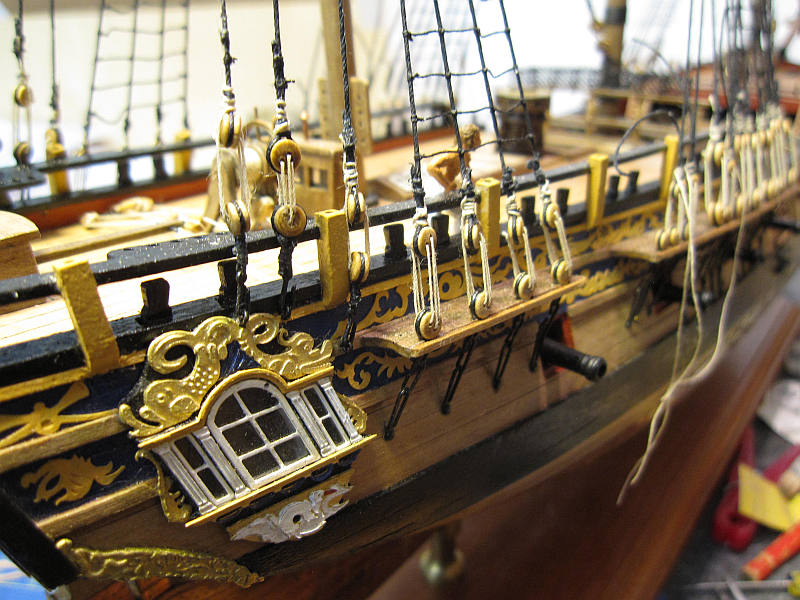
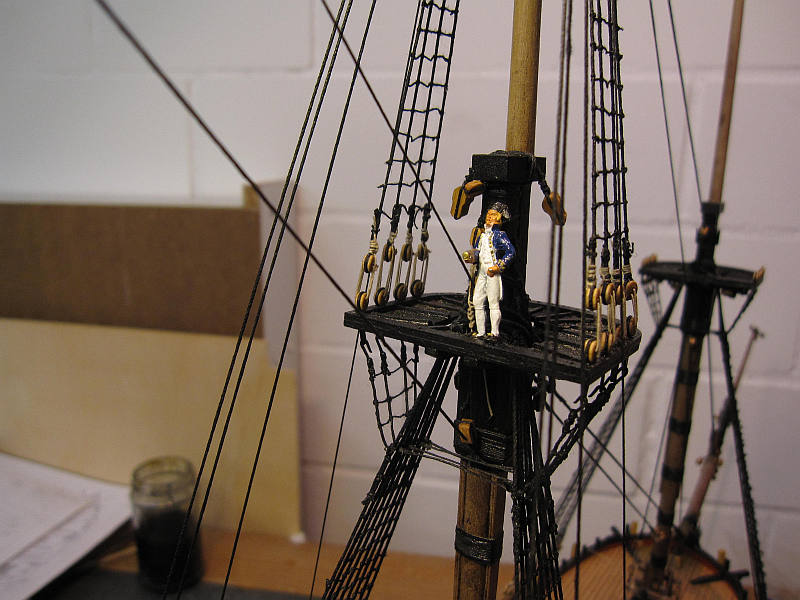
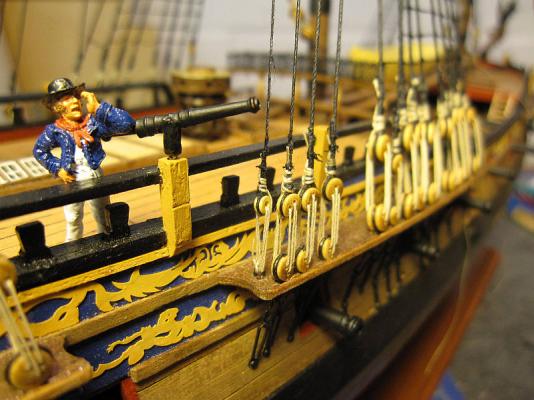
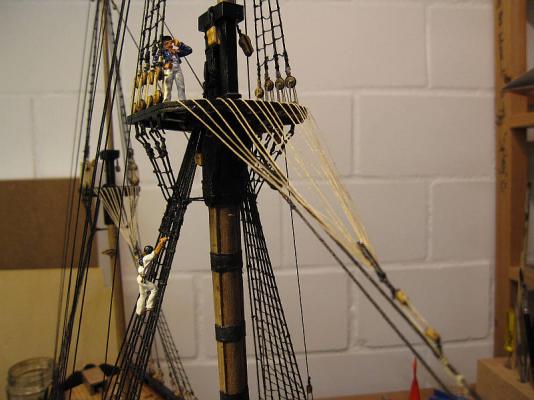
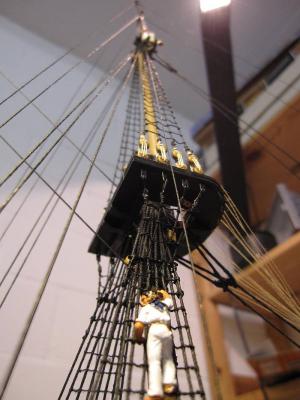
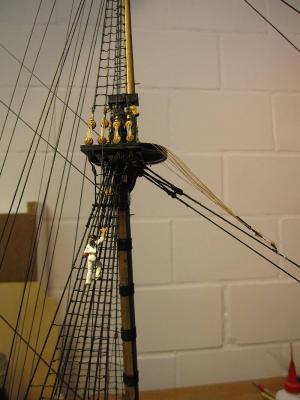
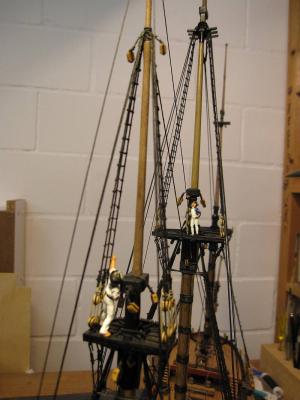
The standing rigging on the main mast was now finished. Amati’s 2,5 mm deadeye with a single hole seemed worth a try as wooden thimbles. They look ok. The bosun is happy about the new thimbles. Installing the crowfoot on the main top I saw that I had made 2 mistakes on the mizzen: First I took the wrong (0,2) thread and for the euphroe block I only took one photo etched part while you better use the two identical parts together, glued back on back. I will have to rig the mizzen crowfoot again. Main top with finished standing rigging Ascending to the main top Main topmast trestletrees Foot of the foremast with topmast stay and preventer stay


- 431 replies
-
- 4
-
-
- pegasus
- victory models
- (and 1 more)
-
Hi Michael You are overdoing the compliments a bit (but I like it). :blush: :blush: I’ve heard of that other place in Hamburg from a friend, but only about the model railroad, not that airport. Amazing is the word! Cheers Peter
-
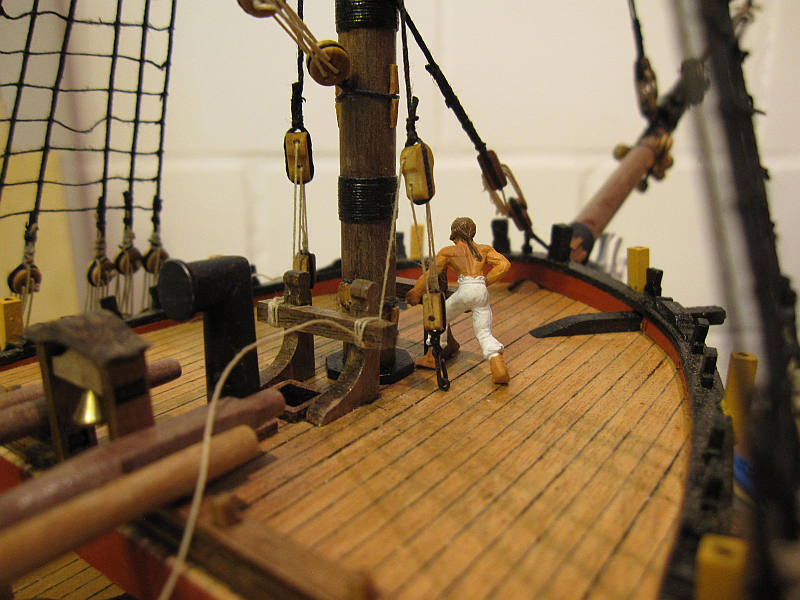
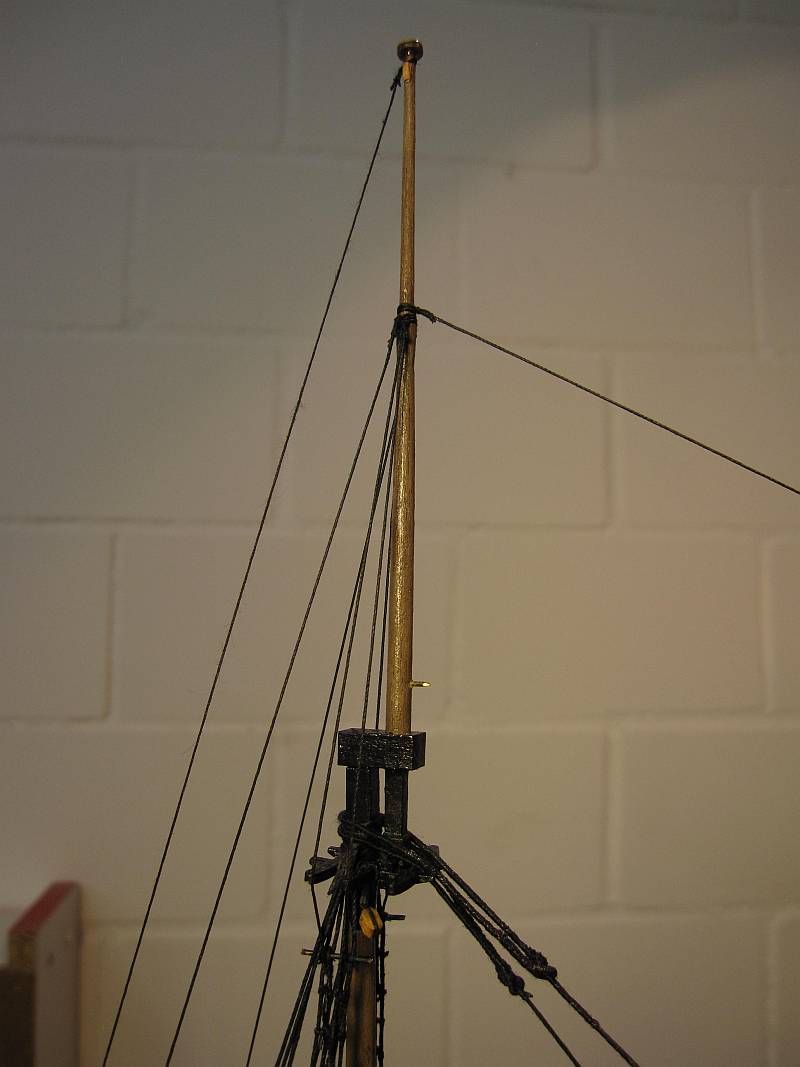
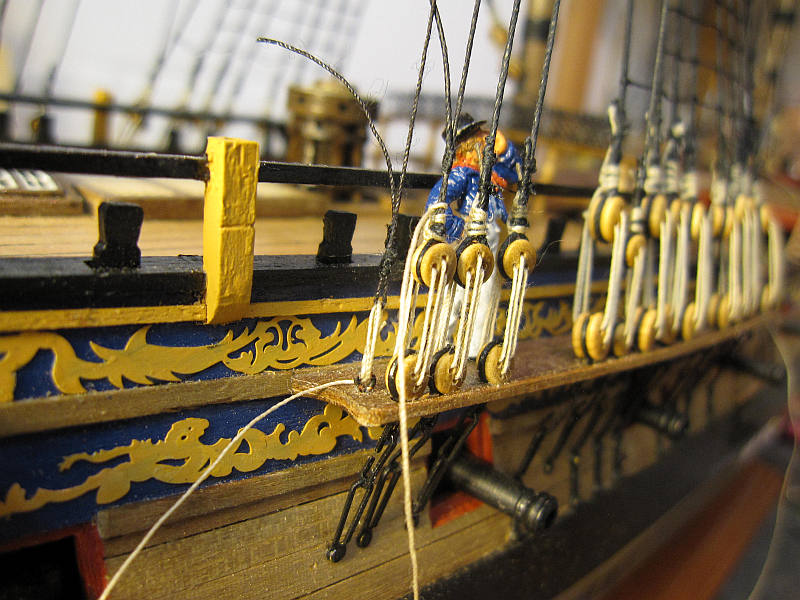
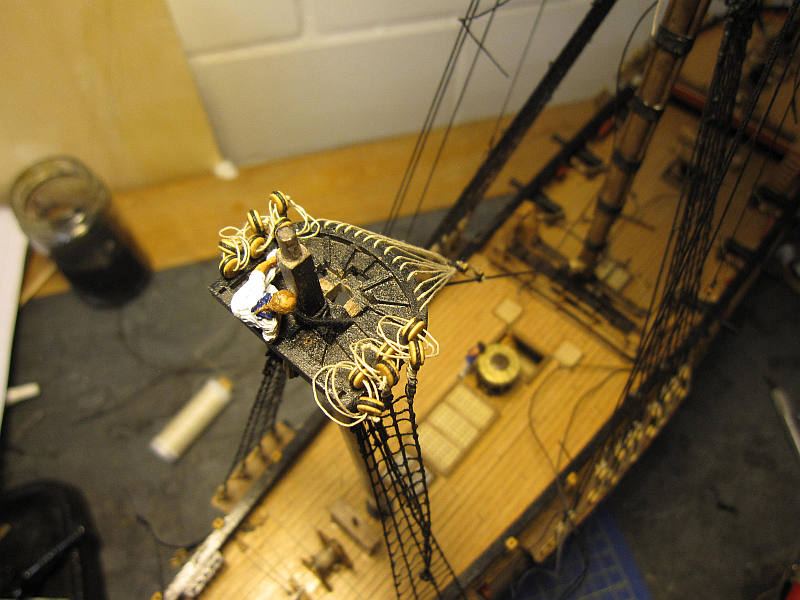
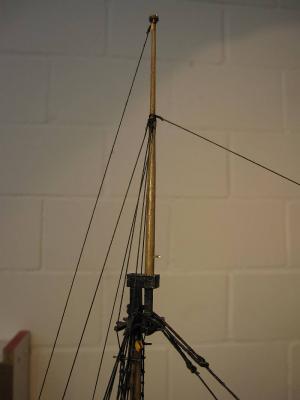
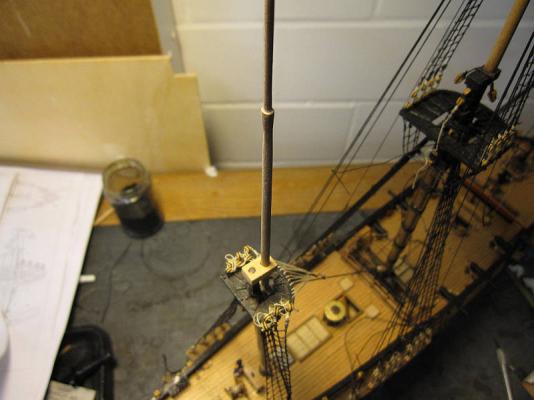
Now the work on the main topgallant mast could continue. The shrouds were a straightforward job (no ratlines!!!!!). The size of the backstays had to be corrected. Again they should be made of the same rope as the stay. The lower ends however presented a problem. According to the plan and James Lees a thimble should be used. As such parts are not provided with the kit I used a small dead eye on the backstay of the mizzen topmast but this looks somewhat oversized. Now I tried to simulate it with just an eye split. But this looks wrong as well. Therefore I ordered the smallest thimbles available from cornwallmodellboats and will have a try. While waiting for them I started fixing the spare spars with some hidden nails in preparation for placing the ships boats. Those will be Caldercrafts 24’ cutter and 19’ launch. Work on main topgallant mast has been stopped after the first backstay Unsatisfactory lower backstay end with spliced eye Mizzen topmast backstay with rather large deadeye Spare spars in place and shells of boats placed provisionally


- 431 replies
-
- 2
-
-
- pegasus
- victory models
- (and 1 more)
-
Thank you Mobbsie
-
Hi Mobbsie Not only the copper shines, but also your workmanship. And reworking the rudder is a very good point, almost always neglected in kits instructions (and promptly forgotten on my build). Take care Peter
- 1,279 replies
-
- 1
-
-
- agamemnon
- caldercraft
- (and 1 more)
-
Hi Michael Yes, LX lets me drive their A330 and 340’s. And of course our company offers the best seat of any star alliance members in any class. A good thing with my job is that you are occasionally able to visit ships and museums all over the world (Stockholm, Greenwich, San Francisco, San Diego, Boston, Barcelona, Madrid, Paris…) while working and get actually paid for it. One of the bad things is of course an ATC on strike. Actually they claim to work normally. Although there are some places over here where it makes hardly any difference if they are on strike or not (no, I didn’t mention Spain). Those 2000 hours, did you log them on small aircraft or did you spend some working time on airliners? And there really is of course also a button in my office which I push to get another drink, but just coffee, and, oh, there are some more... And one big benefit is of course the view from my office window if the time is right. I guess you know that harbour... Take care Peter

-
Hi Timmo Thank you, but isn’t brilliant a bit shiny? Hi Aldo Thanks, but no, I’d rather not. Hi Frank Thanks mate, but I’m a bit unsure – considering the way you make your ship appear - if ‘looks like new’, coming from you, really is a compliment. Take care Peter
- 431 replies
-
- 1
-
-
- pegasus
- victory models
- (and 1 more)
-
Thank you, B.E. By hindsight it actually was fun. Peter
-
Hi Chris Your Victory looks a truly wonderful ship. However her size could somehow reach a ‘critical mass’ in the eyes of the admiralty when discussing where to berth the finished model. Therefore a smaller model of a heavy frigate would probably fit better in many a household. Although Shannon is somehow similar to Diana there are still quite a few points in her favor besides those already mentioned: Not only has she British and American connections but also French – her lines seem based on those of the captured French frigate Hebe. http://www.kenthistoryforum.co.uk/index.php?topic=14775.0 And the fact that she was also mentioned in Patrick O’Brian’s books won’t really reduce her chances for a commercial success. Perhaps a kit variant to build Hebe would also be possible (albeit I have no idea of their relative sizes). I only hope that you find somebody to produce the kits for all your splendid models. There is still Bellona and didn’t you also build a Cutty Sark? Keep up the good work. Cheers Peter
-
The New topmast could be set up using the existing rope work. Initially the top cap was left off so the shrouds and stays could slip over the new mast. Then they were set up with the old deadeyes and new lanyards. Only one ratline broke and had to be retied. Now it’s better than new and it was an interesting piece of work. The captain checks the new topmast from the main top Backstays are in place again A last critical gaze from the captain – all is well


- 431 replies
-
- 4
-
-
- pegasus
- victory models
- (and 1 more)
-
Hi Mobbsie According to the web he was probably an American aerospace engineer, Major Edward A. Murphy Jr. But whatever he was, I’m really glad it seems he was not associated with the development of the Swiss army knife. A point for us Swiss. Hi Martin Yes, it’s finished now and it really was an interesting little project. Fortunately only one ratline had to be retied. Cheers Peter
-
Hi Chris Thanks for the compliments. Haunted by those pillars…what a blood-curdling thought… No, seriously, it’s much easier than I thought to make a replacement yourself and to patch up that little mistake. Of course there are some small possibilities for improvement in that kit, such as providing square strips (of sufficient size) for upper masts and yards or the question of the size of the mizzen top investigated by Blue Ensign, but… This is still the most wonderful kit I have been building , classes better than those from Corel or Mamoli (they are quite good) and rivaled only by Caldercrafts Granado (perhaps you happen to know the designer of that kit??!). Perfection is unaffordable – I really appreciate that you continue striving for it. Thank you Peter
- 431 replies
-
- 1
-
-
- pegasus
- victory models
- (and 1 more)
-
Hi Andy Yes, if the beast throws you off, you have to go back into the saddle again as fast as possible. I guess that’s also true for flying horses. Cheers Peter
- 431 replies
-
- 1
-
-
- pegasus
- victory models
- (and 1 more)
-
The broken topmast and its cap were dismantled. I left the Shrouds etc. fixed to their dead eyes but I will have to set them up again with new lanyards. At least it shall be possible to keep the ratlines and the deadeyes. The new mizzen topmast and a new cap are ready to replace the broken parts. I decided against making an all new mizzen top from scratch – I’ve got a lot of extra work already and am too lazy to double or triple it The captain musters the new topmast and cap The mizzen top ready for a new topmast The new parts provisionally in place .

- 431 replies
-
- 2
-
-
- pegasus
- victory models
- (and 1 more)
-
Hi ZyXuz Thank you for that valuable hint. In fact I tried something similar during the first repair. But because I left all the shrouds and the stays in place I was only able to insert a perhaps 1cm long piece of wire into the mast. I gave not enough strength and broke again. Hence the replacement with an all new topmast. Otherwise I’m sure that your method could save many a broken spar. Cheers Peter
- 431 replies
-
- 1
-
-
- pegasus
- victory models
- (and 1 more)
-
Hi Mobbsie Slowly but steady. Pictures will follow. And that Mr. Murphy...a British subject, isn't he? Tut-tut! Hi B.E. Thanks. Cheers Peter
-
Hi Mobbsie It seems that coppering wasn’t following one simple set of rules. There are some examples as the famous model of HMS Bellona or you could watch the actual coppering on USS Constitution – which are of course following different rules. The Gore Line is a line where the pattern of the courses of the copper changes. It may be or may not be necessary to introduce some. On my so far only example of a coppered hull (Pegasus, of course) I tried to follow those two examples and the instructions in Edwin B. Leaf’s ‘Ship modeling from scratch’. There he says: The top of the copper is usually about one foot above the load waterline, so the first step is to establish the top of the copper, even though you’ll actually be starting at the bottom when you apply the plates. … Establish the pattern for the coppering which is influenced by the shape of the hull. The courses of the copper do not follow the lines of the planking. You don’t have to line out every row, just the general flow and the gore lines(…).Because of the curvature of the hull successive parallel courses of plates would result in the ends of the courses curving up radically toward the ends. … Since the upper plates overlap the lower ones, and the forward plates overlap the after plates, start attaching the plates to the hull at the keel and sternpost. … Note also that the first row on each side of the keel slightly overlaps the keel or sternpost. … So far, so good but still I really didn’t know how to establish the gore lines before the coppering. In the end, I did mark the upper line of the copper and simply started coppering the way he tells us - bottom and aft. Whenever I felt it necessary I put in some ‘stealers’ at the stern. In the process of coppering upwards I actually never felt a gore line was necessary so I just continued upwards. Of course I worked alternating on both sides to keep symmetry. The waterline was coppered with two lines of horizontal plates, the way it’s shown in the book. On USS Constitution there is one horizontal line of plates. Of course you could continue the normal pattern, cut the plates along the water line and cover the cut edges with a small batten – Bellona style. Phew…I hope this helps! Cheerio Peter