wefalck
-
Posts
6,651 -
Joined
-
Last visited
Content Type
Profiles
Forums
Gallery
Events
Everything posted by wefalck
-
I gather such parts are not (die-cast) zinc, but rather white-metal ... However, they shouldn't be black anyway, but painted in whatever the colour the ship would have been painted in, often white or green for instance. Railway or figure modellers have a lot of experience with white-metal parts and there is a lot of information on the Web, how to work with such parts.
-
Do things always have to have names? Sometimes people just make something that seems useful to them, without thinking that someone else wants to 'classify' it. It's an unusual rig anyway, with a lug that has boom etc.
-
 I think in Europe we get mainly birch. Steamed beech might be actually better, because it is very malleable. I tend to hesitate to kind of disaggregate wood by squashing it, but making a sort of compound material with white glue as binder could be an idea to try out. Rather than hammering, I may try out the wire-rolling mill I recently acquired - just feeding it in over a certain length. As the distance between the rollers can be preset, it can be done in a controlled and repeatable way.
 -
Thanks, Nils. I did see those before, but apart from the hefty price they also did not offer a suitable variety of poses. I have not (yet) worked with these resins coming out of 3D-printers, but understand that they are rather brittle, so difficult to carve etc.
-
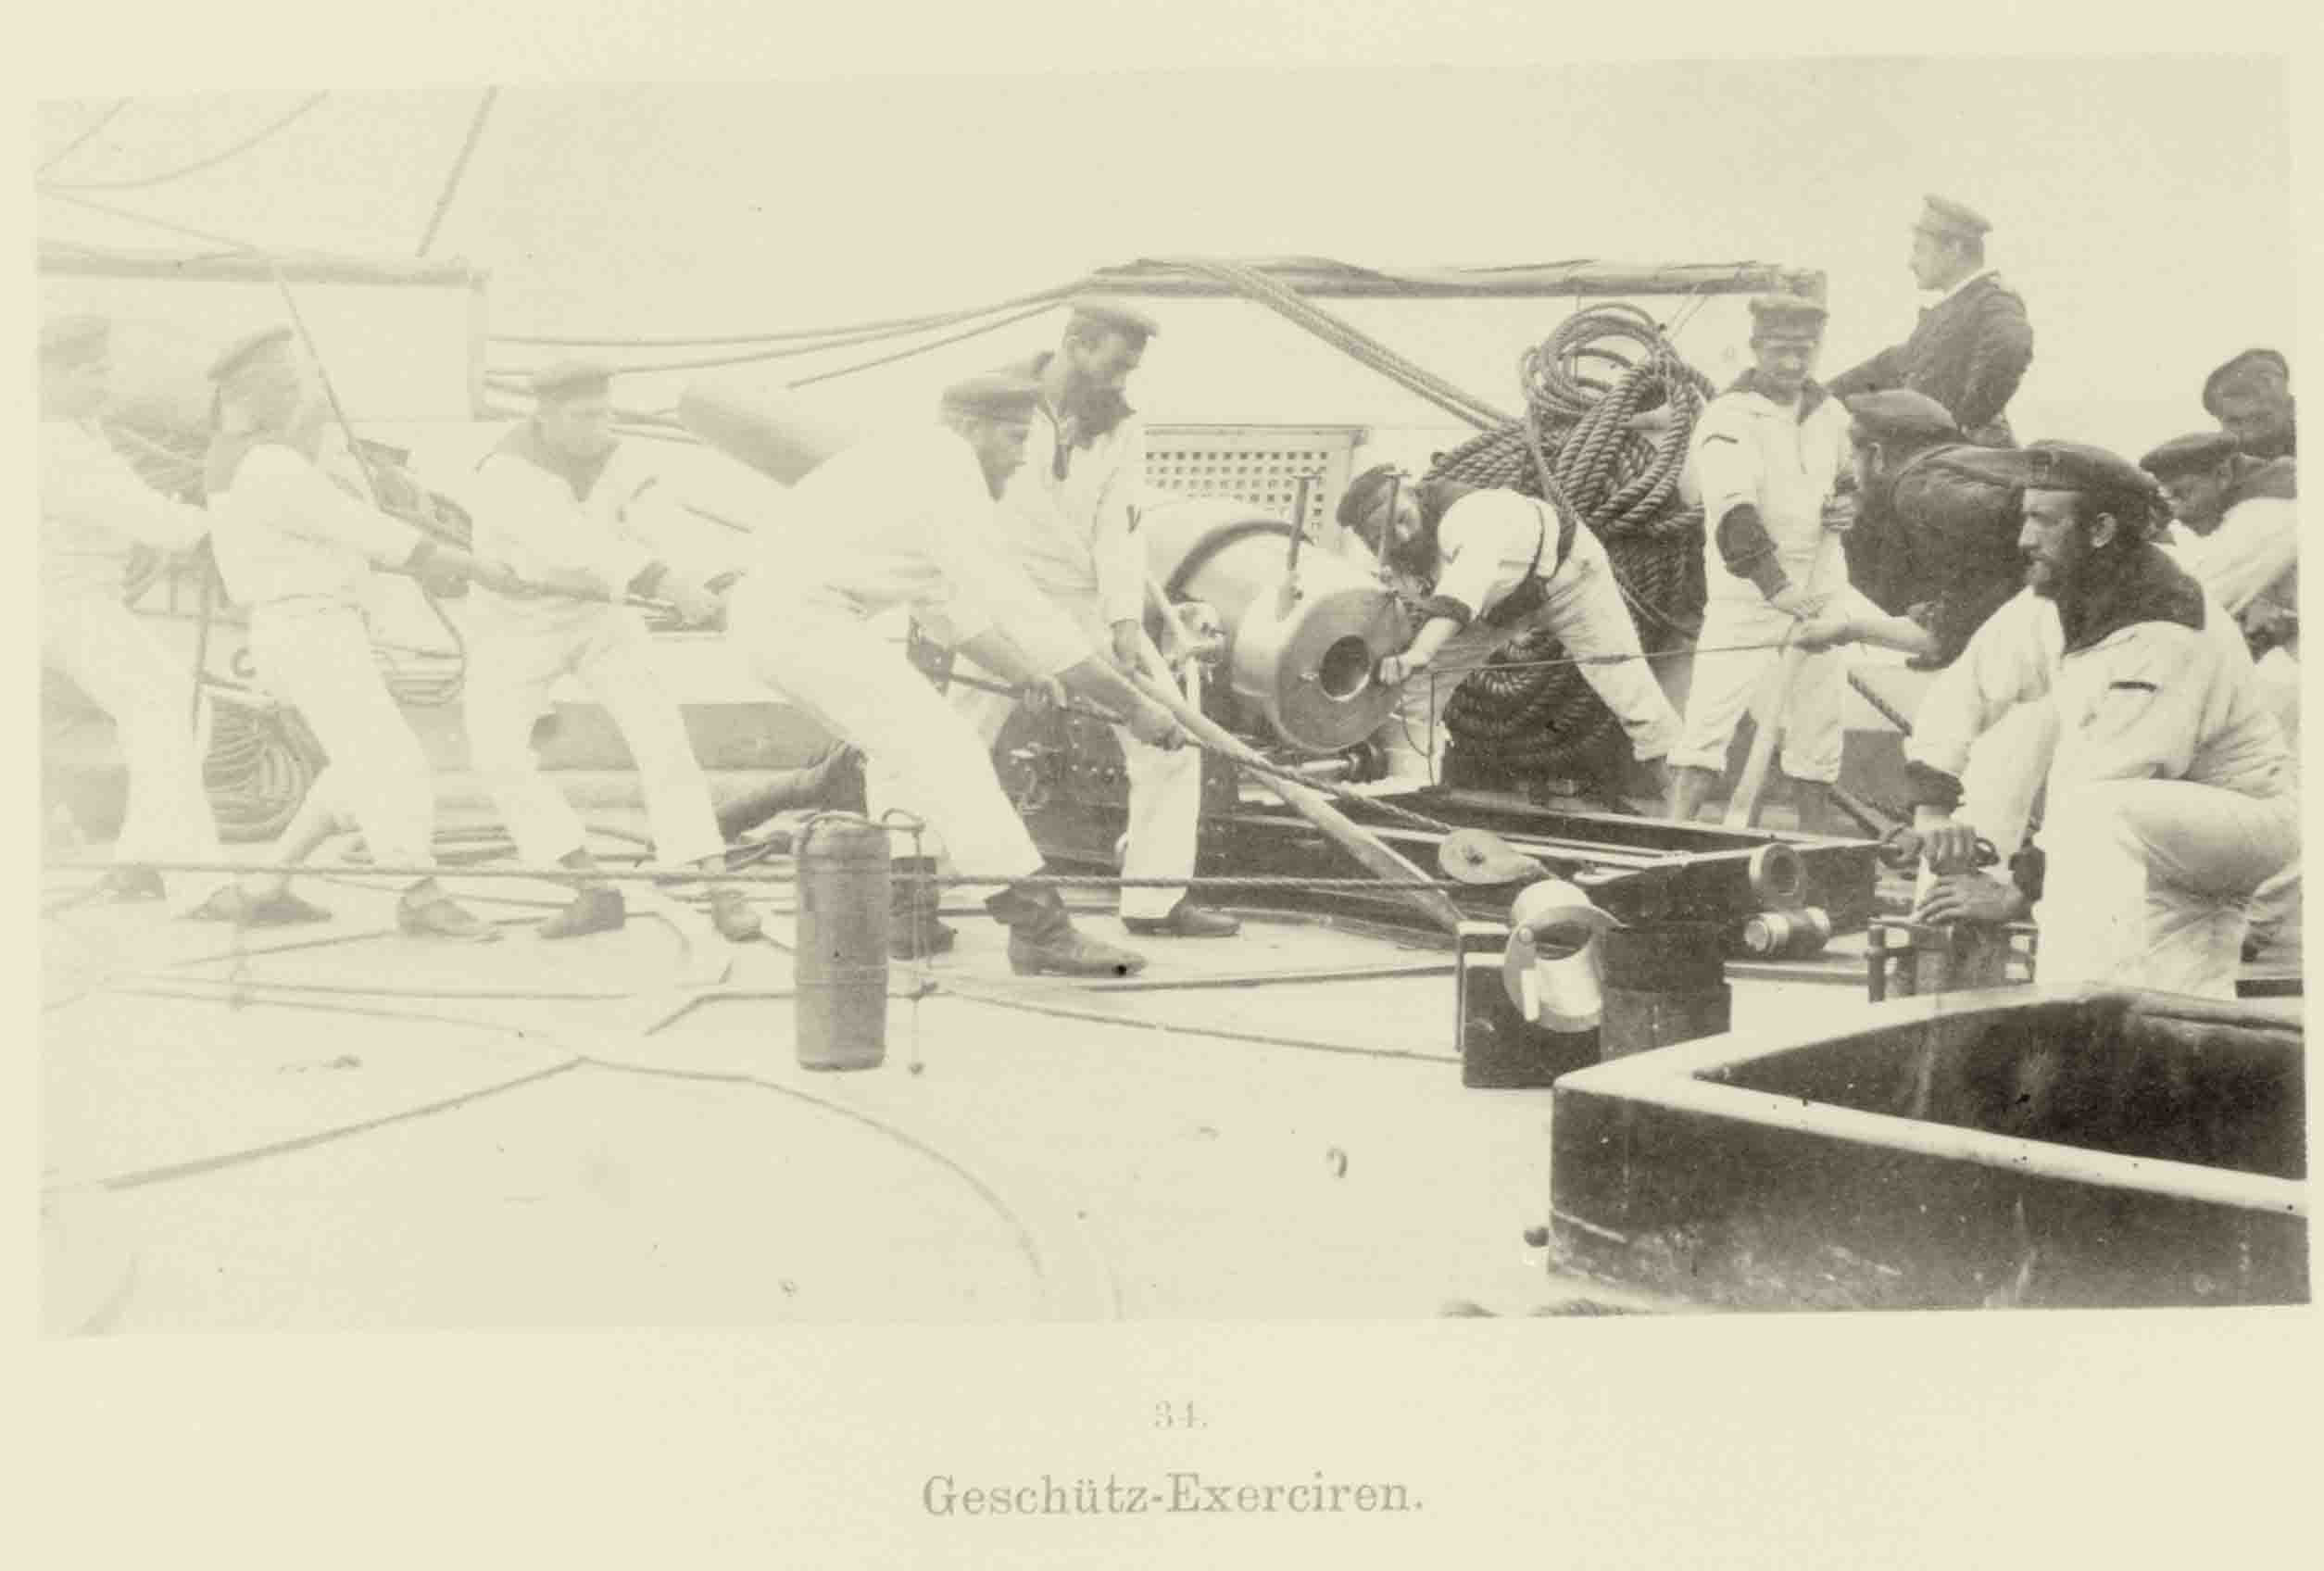
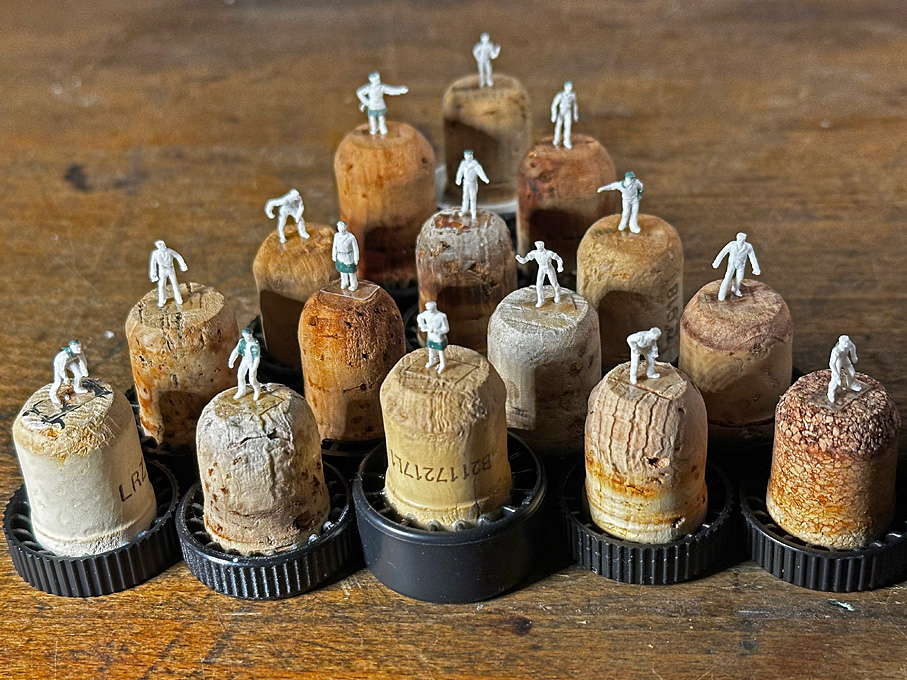
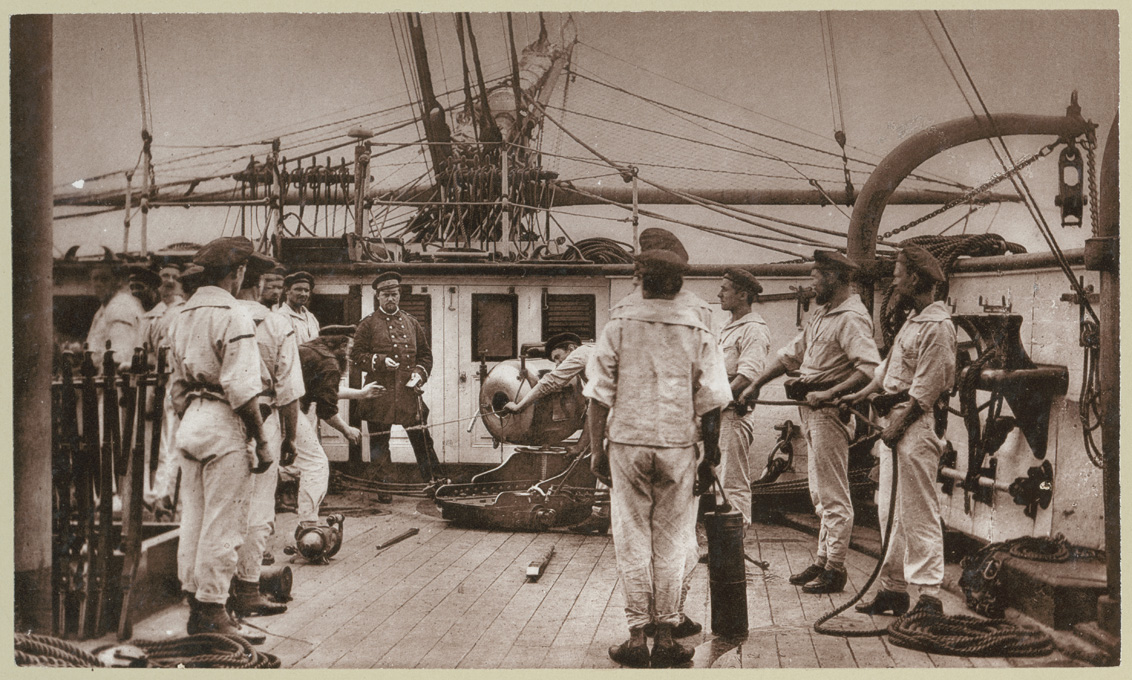
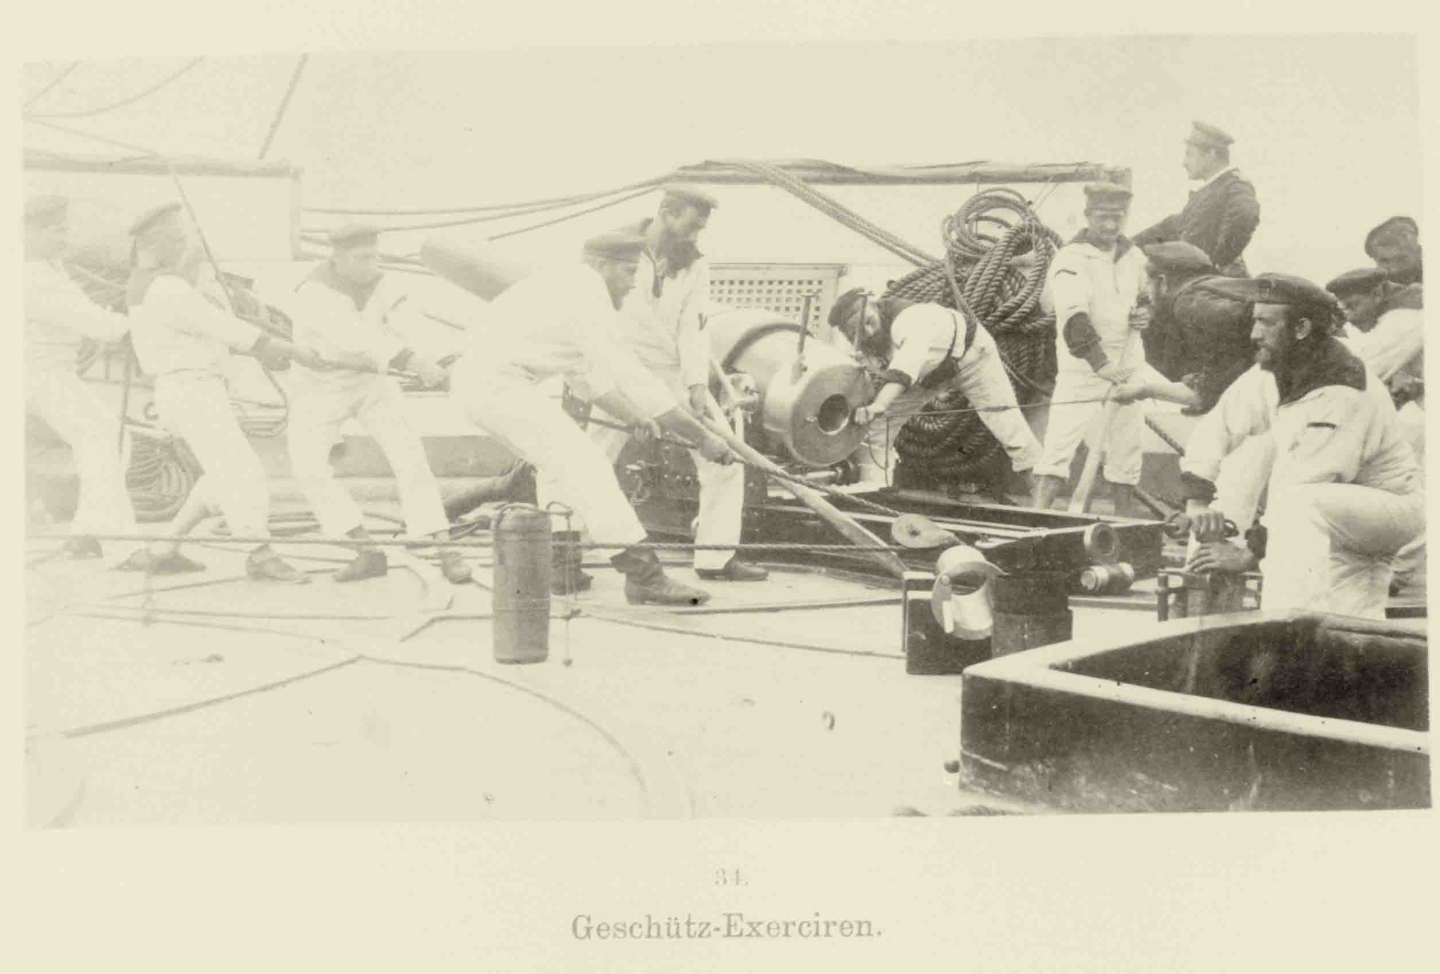
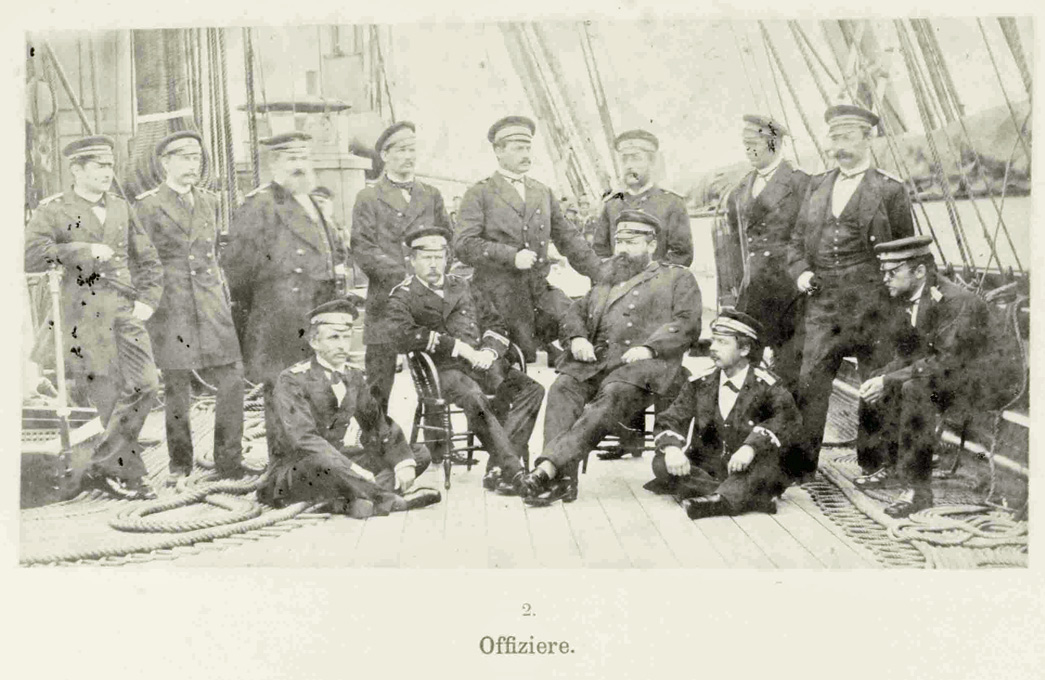
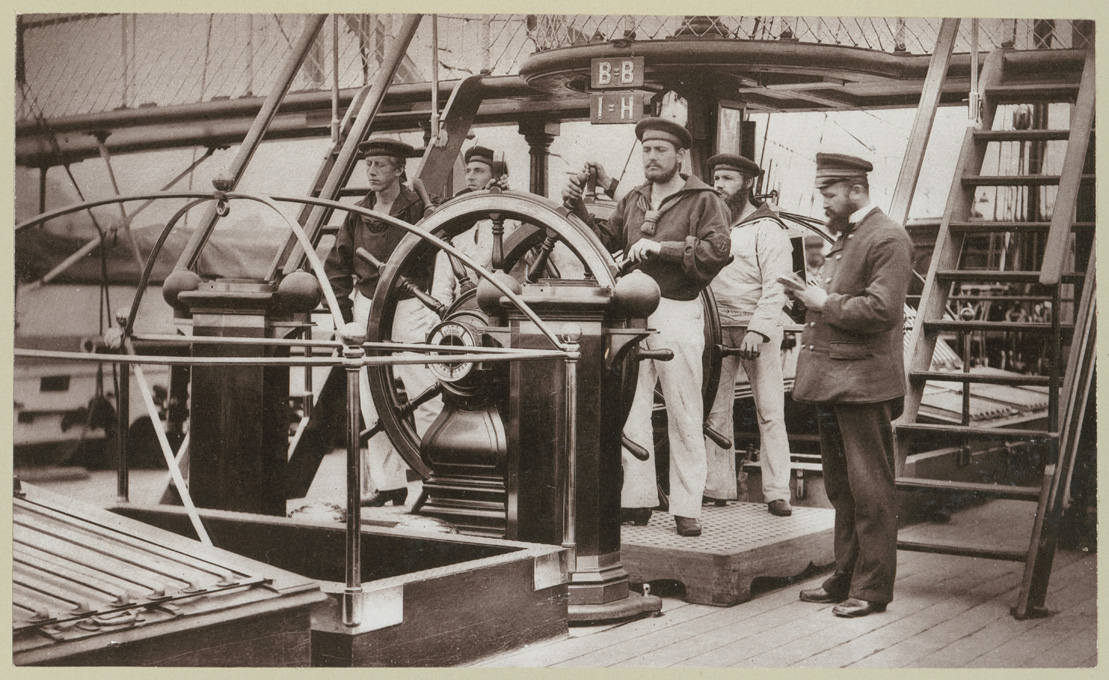
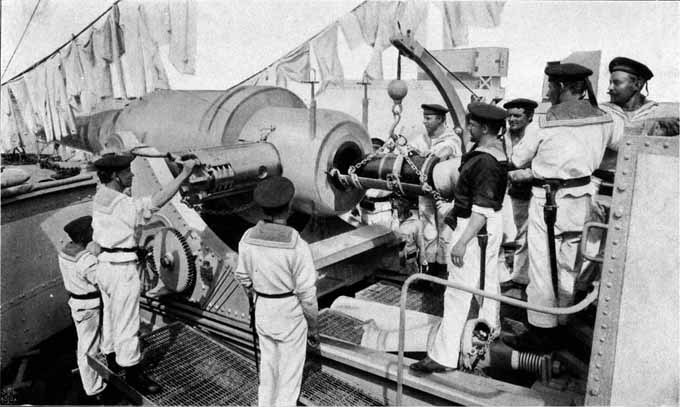
The Crew The WESPE-Class had a complement of around 80 crew, of which 3 where officers. This seems to be quite a number for a ship of only 46 m length. Unfortunately, there is no information on the different duties and the distribution of ratings. There are some crew photographs from the 1900 to 1910 era, but they manly show officers and petty-officers and in addition, they come from the short periods during which the boats were commissioned for exercises in groups and may show crew from a whole flotilla. Gun drill on the WESPE-class around 1900 The intention was to show some gun-drill on the boat, as in the historical photograph above. There are about ten ratings visible and a couple more or so may be hidden behind the gun. There would be probably also a petty-officer in charge. On the bridge there would be two men at the helm and a couple of officers. In total, I estimated that about 15 figures would be needed to present a reasonable picture of activity. Below the gun there would some ten men or more manning the cranks with which the gun is trained. In the boiler-room, some further ten crew would be working hard on stoking the fires, trimming coal etc. The same number of crew, would be on the off-watch. The machine would be tended by perhaps three to four engineers and petty officers. I am sure there are other duties, such as maintenance, signalling, plus a certain number on off-watches, but there is no information available on how these ships were ‘run’. Officers of SMS HERTHA 1874-1877. Source: https://senckenbergarchiv.de/kolonialesbildarchiv/. Uniforms The 1870s were a time of transition as far as the naval uniforms are concerned. In the early years of the Empire much of the features of the uniforms of the Prussian navy were retained. To a certain degree the uniforms also followed the general fashion in terms of the height of the waste-line, the width of trousers and blouses, the shape of the caps etc. By the early 1880s the uniforms of all ranks were quite consolidated and were changed only in details until the early years of WW1. There is abundant information on these later years and on officers’ and petty-officers’ uniforms, but information on ratings in the early years is quite scarce in the primary and secondary literature. In particular, information on working kits is not very detailed. Normally, a certain ‘kit’ would be ordered for certain duties, but photographs show a certain variety of items worn and how they were worn, for instance some men would have the sleeves rolled up, while others would not. Helmsmen on SMS HERTHA 1874-1877. Source: https://senckenbergarchiv.de/kolonialesbildarchiv/. Photography was still rather new then and it was difficult to take ‘action’-pictures with the cumbersome equipment of the day. When a sailor had his likeness taken in a professional photographic studio, then it was in his Sunday-best parade-uniform and not in workaday fatigues. The same applies actually to all ranks. There are fortunately a couple of photo-albums from training-cruises in the mid-1870s (e.g. of the cruise of SMS HERTHA to the Far East in 1874-1877) which on purpose show the real-life of the crew, as much as was possible with the equipment of the day, thinking of heavy tripods and large-format cameras with wet glass-plates. These photographs are an important source of information on how the uniforms really looked like and how they were worn for different duties, although virtually all situations were ‘posed’. Gun drill on SMS HERTHA 1874-1877. Source: https://senckenbergarchiv.de/kolonialesbildarchiv/. Apart from photographs, there are a number of printed works can be considered as primary sources, as they were published at the time, and just two or three secondary publications, which mostly reproduce the plates from earlier publications: ANONYM (1872): Uniformierungs-Liste der Königlich Preußischen Armee und der Kaiserlich Deutschen Marine. Zweite bis zu Gegenwart fortgeführte Auflage.- 114 p., Berlin (E.S. Mittler & Sohn). ANONYM (1887): Die Uniformen der Deutschen Marine in detaillierten Beschreibungen und Farbendarstellungen (Reprint 2007, Melchior Verlag, Wolfenbüttel).- 61 p., 18 Taf., Leipzig (Verlag von Moritz Ruhl). BURGER, L. (1864): Uniformierung der preußischen Marine, Originalzeichnungen.- Über Land und Meer, Bd. 12, Jg. 6, Nr. 31: 487 u. 489. HENCKEL, C. (1901): Atlas des Deutschen Reichsheeres und der Kaiserlichen Marine einschließlich kaiserlicher Schutztruppen in Afrika in ihrer Uniformierung und Einteilung.- 32 pl., Dresden (Militär-Kunst-Verlag MARS). Lintz, G., Raecke, K.-H. (1978): Die königlich preußische Marine.- Z. für Heereskunde, 275: 20-21. Marineamt [Ed.] (1984?): Die Geschichte der Matrosenuniform.- 79 p., Wilhelmshaven (Marineunterstützungskommando). NOESKE, R., STEFANSKI, C.P. (2011): Die deutschen Marinen 1818–1918. Organisation, Uniformierung, Bewaffung und Ausrüstung.- 2 vols.: 1336 p., 304 pl., Wien (Verlag Militaria). RUHL, M. [Ed.] (1887): Uniformen der deutschen Marine in detaillirten Beschreibungen und Farbendarstellungen, nebst Mittheilungen über Organisation, Stärke etc., sowie einer Liste sämtlicher Kriegsfahrzeuge und den genauen Abbildungen aller Standarten und Flaggen.- 98 p., 26 pl., Wolfenbüttel (Reprint 2007 by Melchior Historischer Verlag). RUHL, M. (18936😞 Die Deutsche Marine und die Deutschen Schutztruppen für Ostafrika in ihrer neuesten Uniformierung.- 78 p., 20 pl., (Faksimile Fines Mundi). RUHL, M. (1892): Uniformen der deutschen Marine.- Starnberg (reprint 1989). SCHLAWE, K. (1900): Die deutsche Marine in ihrer gegenwärtigen Uniformierung.- 98 p., (M. Ruhl). WALDORF-ASTORIA [Hrsg.] (193?): Uniformen der Marine und Schutztruppen.- 14 p., 8 pl., München (Waldorf-Astoria Zigarettenfabrik). ZIENERT, J. (1970): Unsere Marine-Uniform – Ihre geschichtliche Entstehung seit den ersten Anfängen und ihre zeitgemäße Weiterentwicklung von 1816 bis 1970.- 451 p., Hamburg (Helmut Gerhard Schulz Verlag). Gun drill on SMS HERTHA 1874-1877 – note the high heels of the shoes at this time. Source: https://senckenbergarchiv.de/kolonialesbildarchiv/. Preparing the Figures Starting point is a set of unpainted figures by Preiser in 1/160 (N-scale). Compared to HO-scale the selection is much smaller and the sets of unpainted figures are not so easy to find. Individual figures were selected on the basis of their poses, but very few had vaguely useful dresses. Some of the railway officials formed a suitable a basis for the officers and petty-officers. Fortunately, the figures are small, some 10 to 11 mm in height, so only a rather summary representation of their attire needs to/can be achieved. All figures required quite a bit of carving and sculpting with ‘Green Stuff’. The single-breasted jackets of the railway staff had to be converted into the double-breasted, longer frock-coats of the time. The peak-caps of 1960s officials (many of the figures were originally modelled by Preiser in the early 1960s) looked quite different from those worn by naval officers in the 1870s – German (naval) peak-caps underwent a significant change in appearance between the 1870s and the early post-WWII years. Naval ratings required more substantial carving: jackets had to be cut away and blouses tucked into high-waist trousers had to be carved. Safety helmets were cut away and the characteristic sailor’s cap sculpted with ‘Green Stuff’. Shovels etc. were cut away and hands drilled for more appropriate implements. The sailors also got their traditional large collar. The crew-member at various stages of modelling Unfortunately, I forgot to take a ‘before’ picture, but the one above shows the 15 figures at various stages of the carving and sculpting exercise. Amputations and reassembly à la Dr. Frankenstein are difficult at this small scale and were not attempted with few minor exceptions. Again, a text-heavy post, but it serves myself as a memo of my deliberations and what I did. To be continued ....
- 935 replies
-
- 14
-

-
😲 I remember the excitement when around my 6th birthday this time 62 years ago Lego came up first with wheels. Several family members gave me wheel sets - a bit boring, but then you couldn’t have enough of them. I think Lego went down a contraproductive avenue educational wise, but perhaps not revenue wise … looking forward to more progress on the Renault …
-
I would go for similar appearance of all blocks. Though on a real ship blocks may have been obtained from different sources over time and as need arose, on a model this may look a bit 'unprofessional'. While on 'artisanal' style models wooden blocks certainly would be first choice, I think for 'realistic' style models, particularly those in smaller scales, 3d-printing is the future. Such blocks would need to be painted, as the resin is always somewhat translucent. The minimum size of wooden blocks you can machine on a CNC-mill is limited by the size of drills and milling cutters that are practical. I gather on hobby-machines the limit would be somewhere around 0.5 mm diameter for milling cutters and 0.3 mm for drills - from this you can calculate the mimium size of block you can make.
-
Ships' boats where quite exposed to the elements and in bad weather at risk to be damaged or swept overboard. I think most loose items would have been only put into them when needed. Lowering the boats during the age of HMS BEAGLE was a fairly time-consuming procedure - enough time to bring the required items up from storage. The exception was the 'life-boat' mentioned in an earlier post, which would have been kept with all the essential equipment on board.
-
Yep, nothing matches that old-time mahagony 👍🏻
-
Never tried that and it depends on the chemistry of the solution. Some products may not work with certain metals. I would get myself a small plastic beaker, big enough for the biggest part and pour just enough of the solution to cover the parts. Let it react and take it out, when ready. Process one piece by one piece, so that you can control the process better. If possible use plastic tweezers, not metal one. If you don't have/cannot get hold of plastic tweezers, two toothpicks will do the job as well. In this way, you minimise the amount of solution used. BTW, never pour used solution back into the original container, that should only contain fresh, unused solution (that is standard good chemical lab practice to avoid contamination).
-
BTW, I found building-logs very useful to record what one has done (for later reference) and also to get (constructive) feedback and useful ideas. Much more useful than any small-talk in model-shops (which I rarely went to, even in the days, when they still existed) or meetings.
-
Just catching up after a week of travelling (business/pleasure) and I agree with the others that it turned out to be an excellent model 👍🏻 Where do you keep such a fragile item? We shipmodellers put our models under glass, but I have the feeling that aircraft-modellers rarely do that. I noticed two things on the figure of the mechanic: the moustache and the wrist-watch. Both seem to be a bit anachronistic for the period. After the first gas-attacks, such moustaches were quickly banned (as were beards) for land troops because they prevented the proper fit of the gas-masks. And wrist-watches came into more general use only in the 1930s or so - their tiny and hence expensive mechanism made them only affordable for officers. Only due to WWI production techniques, such as stamping the wheels, wrist-watches became cheaper.
-
You will be using a few ml at a time only. Don't dunk your parts into the bottle! You probably won't even consume the chemistry in these few ml with your parts. So get a small chemicals bottle from the chemist, lable it properly and you are good for a few more parts. Once the blackening process takes too long, this is an indication that the solutions is becoming spent. You can let it dry then (out of reach for children and pets, of course) and dispose of it in the general waste. The quantities of Se etc. from a fre ml of solution are minute and will not harm anyone. Even if there were rubbish scavengers on the tips of Mexico, the material will be dispersed in the general waste. I know, certain people would throw their arms into the air about the above, but one has to be reasonable and practical.
-
A glass-hard spindle on bronze-bushing, properly lapped-in, at that time was considered superior to ball- or roller-bearings in terms of cocentricity. And they live long, when kept oiled properly. Today, the quality of (pre-stressed) roller-bearings is equal. My watchmakers lathe has a glass-hard spindle on glass-hard steel bushing - still probably the best you can get for fine work.
-
You have the propeller-makers decals - I was about to ask
-
Everything you ever wanted to know about this (and other) lathe(s): http://www.lathes.co.uk/atlas/index.html But beware, it may make you drool, when you see what kind of attachments etc. once were available.
-
Somehow, I overlooked that these are pencils. Then there are not acrylics (probably). They are what is called 'artistis water colour pens'. They have been around for decades. Unlike normal coloured pencils that are bonded with a greasy substance (not sure what they used), the pigments in them are bonded with a water-soluble binder (chatCPT could probably tell you what it is). The problem from my point of view is that after application the pigment remains water-soluble. One has has to keep this in mind for the following steps in painting. Applying light coats of varnish could solve the problem. I suppose the Tamiya 'clear' lacquers are water-based acrylics? That would explain the smudging effect on your 'wood' layers, because you partly redissolved the pen-pigment, particularly when applied by brush.
-
These acrylic paint pens (assuming that is what the AK pens are also) are handy and their soft sharp tip allows good control - in the meantime I have a whole range of Faber-Castell Pitt Artist's pens.
-
Steamboats and other rivercraft - general discussion
wefalck replied to Cathead's topic in Nautical/Naval History
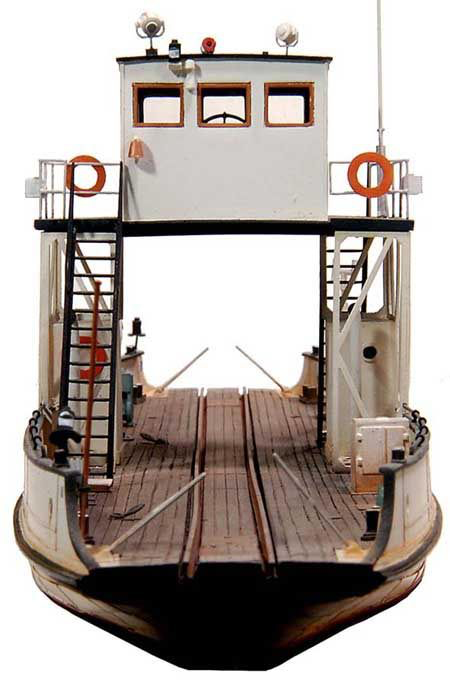
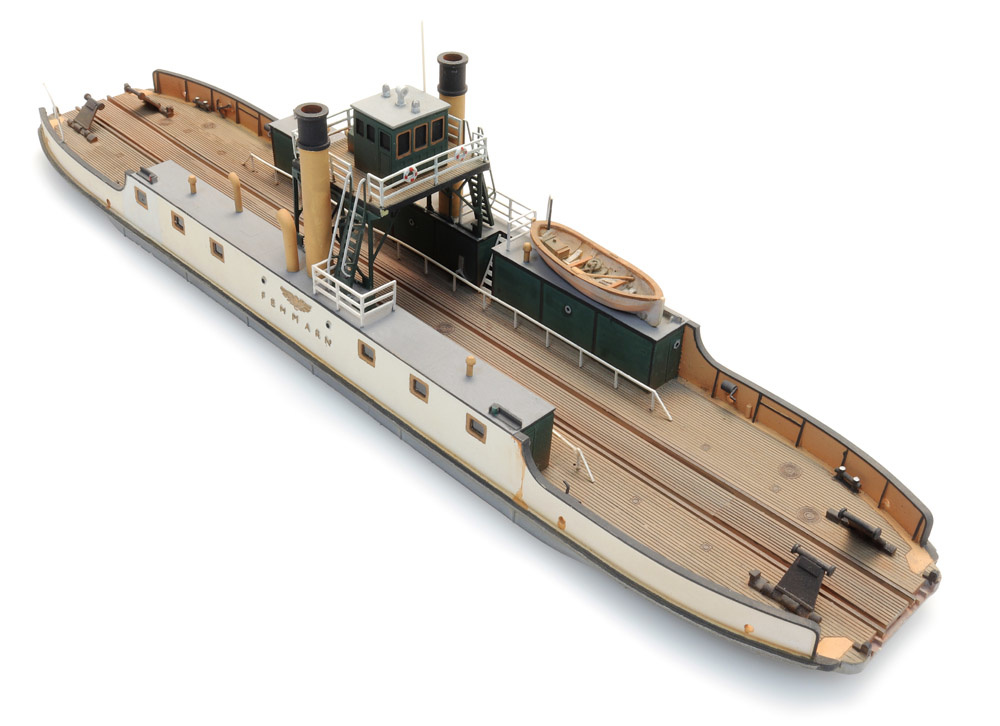
The Dutch company Artitec makes some resin-kits of small German railway ferries around the island of Rügen (I think) in HO- and N-scale: https://www.artitecshop.com/en/railroad-ferry.html https://www.artitecshop.com/en/wittow-ferry.html https://www.artitecshop.com/en/ferry-fehmarn.html - This one I remember seeing in operation, when we spent our summer holidays with may grandparents up at the Baltic coast.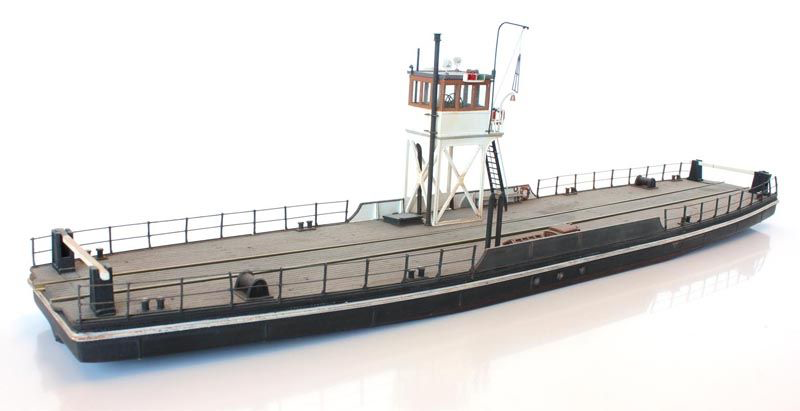
- 281 replies
-
- 9
-
-
- Steamboats
- riverboats
- (and 3 more)
-
Steamboats and other rivercraft - general discussion
wefalck replied to Cathead's topic in Nautical/Naval History
I seem to have read of similar examples from Russia, where tracks were laid across frozen lakes to provide short-cuts, rather than going around the lakes.- 281 replies
-
- 4
-
-
- Steamboats
- riverboats
- (and 3 more)
-
Steamboats and other rivercraft - general discussion
wefalck replied to Cathead's topic in Nautical/Naval History
Interesting subject! These 'Trajekts', as we call them in Geman and neighbouring languages, once have been quite common at places, where it would have been too difficult, not cost-efficient, or impossible to build bridges. Some of them are still in operation, although bridge-building has become more daring in recent years and they were laid off. In some cases there was joint use by railway carriages and vehicles. - On Lake Constance, between Switzerland and Germany was one in operation for many years. - At lower reaches of the River Rhine one took whole trains, including the engine - At the German Baltic coast several connected islands with the mainland to allow through trains. - There used to be a two-stage one that connected the German mainland with the island fo Fehmarn and then on to the Danish island of Lolland. In the 1960s the small rail ferry to Fehmarn was replaced by a bridge. I once took, just for the fun of it, the through-train from Hamburg to Copenhagen along this route. - The once famous Trelleborg to Sassnitz train-ferry that connected Stockholm with the rest of Europe via Germany was discontinued after 111 years of service in 2020.- 281 replies
-
- 5
-
-
- Steamboats
- riverboats
- (and 3 more)
-
Indeed, making the split at the long part and soldering there, as druxey said, would have been my first thought too. Also silver-soldering with some paste might have been easier and stronger.
- 2,699 replies
-
- 4
-
-
- heller
- soleil royal
- (and 9 more)
-
I inherited a whole bunch of pre-war(?) unisolated ones from my father. In general, they are much better stamped/folded and close better, than what you get today.
-
Indeed the SAVOIE (1914): https://www.cgn.ch/en/savoie.html. We had an extended Sunday-lunch cruise. Warming up the engine: Getting ready to put to 'sea':
- 935 replies
-
- 10
-