egkb
-
Posts
1,632 -
Joined
-
Last visited
Content Type
Profiles
Forums
Gallery
Events
Everything posted by egkb
-
 Looking Very Smart there Jeff .. Yup I too found Carronades to be quiet 'Trying' (and regards 'Trying' please insert appropriate swear words 😉😖 ) Luckily I only had 4 to do .. Keep Up The Good Work Eamonn
- 86 replies
-
- 2
-

-
- pickle
- caldercraft
- (and 1 more)
-
Looking forward to the photos David .. I haven't worked with Pear but I hear it is wonderful stuff (Nigel 'NMBrook' who posts/posted on here uses it a lot if I remember) I always fancied on Holly for deck work but couldn't source any so I too used Maple and I'm not disappointed .. I must see if I can locate any before starting my next build, probably have a year or two to find it at the speed I operate 😖 The assembly instructions for Pickle are a serious step up from Ballahoo aren't they ? I downloaded a copy some time ago to help out with my Ballahoo build.. Mind you Ballahoo's Instructions were pretty much 'There's a pile of wood now Make Ship from It.. Simples' 😉 All The Very Best David.. Eamonn
- 1,039 replies
-
- 2
-
-
- ballahoo
- caldercraft
- (and 2 more)
-
Hey There David ... Thanks again for looking in, it's nice to be back building again.. I really must post a photo of the new build space I created (massive clean up first though ) I would love to see what you have done with Pickle though .. Post a couple of photos on here if you like, I don't think anyone would mind! but as you know a Log is the way to go (We have all seen the brilliant job you did on Ballahoo in Completed Models Section, so deffo nothing to worry about) If you don't fancy on Posting on here could you pop a few photos into a PM to me.. As you know Pickle is one build I plan on doing as I love the smaller vessels (I saw a model of her in Portsmouth a couple of years ago, and there is a full size replica out there somewhere too.. both interestingly look different to the Caldercraft Kit Version, I wouldn't mind finding out why, I guess She evolved over her lifetime ) I'm back in work tomorrow so there won't be any major updates for a few days.. Thanks Again For Looking In All The Best Eamonn
- 1,039 replies
-
- 2
-
-
- ballahoo
- caldercraft
- (and 2 more)
-
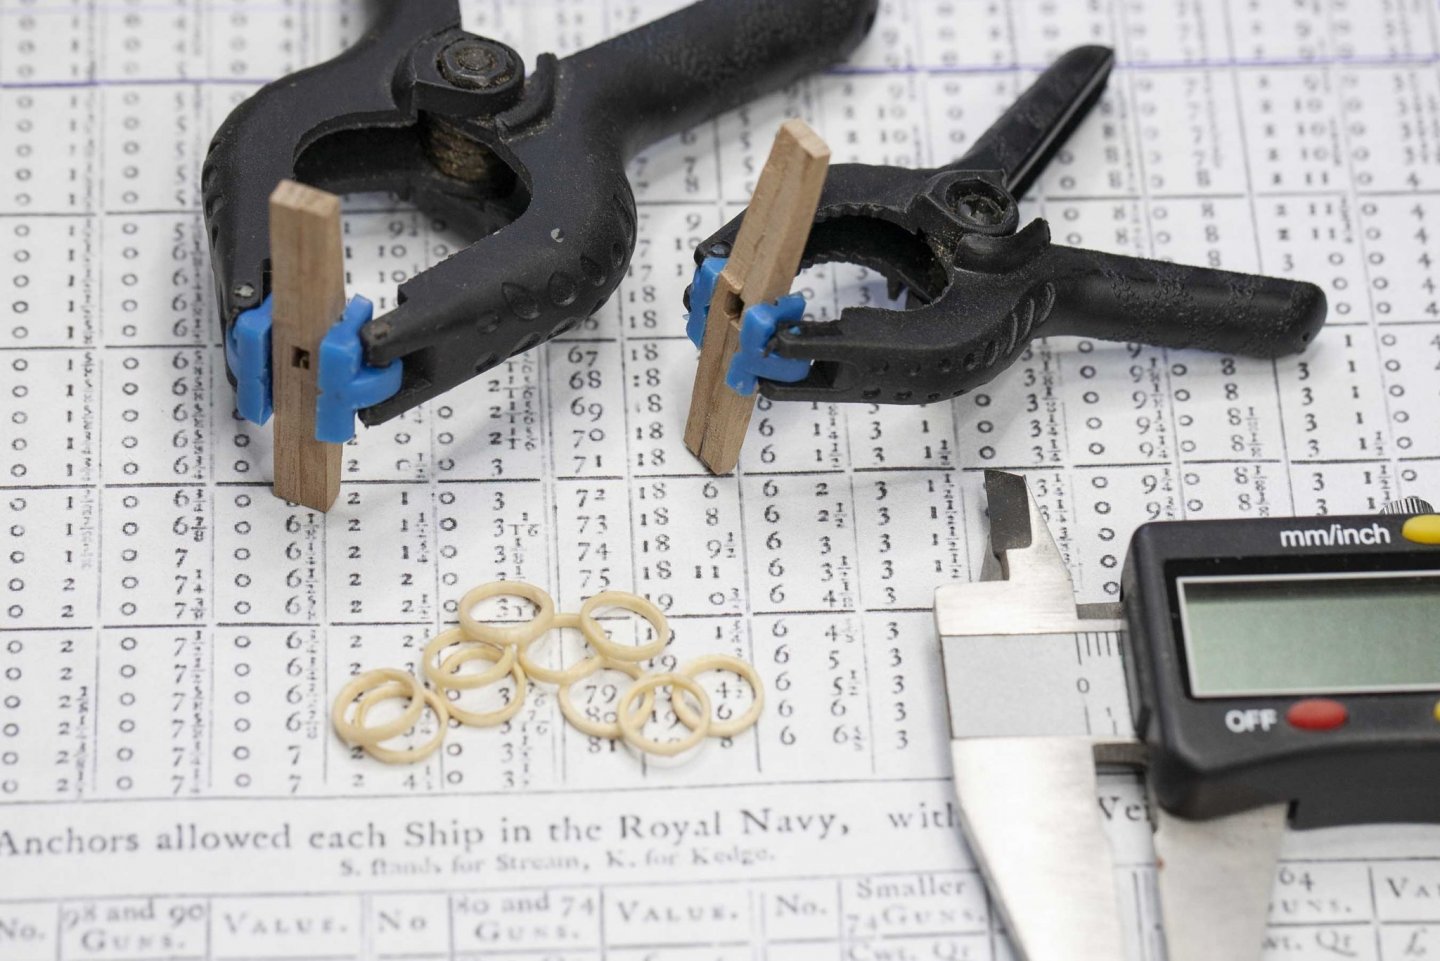
Hi Folks ... I decided to get the Anchors out and re-size the Stock .. Ages ago now you may remember me mentioning that these were waaay off scale so after more exhaustive research (opening a folder I created called Anchor Dimensions.. knew it would come in handy) I have begun to resize the Stocks.. Original Kit supplied ones are 5.0 cm long and I need then 4.2 cm Long so I'm sanding 0.4 cm off each end (substantial difference when taking Scale into account).. Each stock comes in two pieces which I glued (with pva) together for convenience of Sanding/Shaping. I will separate them later and assemble the anchor properly being sure to leave the slight 'gap along middle' between the two sections as per Full Scale versions.. No Photos at the moment .. I mean who wants to look at bits of wood gluing ... I know I know.. Just Kiddin' it's kinda what we do 🙃 😉 OK I'll go take some ... Oh, did I mention I finished the Mast Hoops last thing was giving them a light coat of Wipe On Poly. All The Best and Thanks for Taking The Time To Drop By. Eamonn
- 1,039 replies
-
- 9
-
-
- ballahoo
- caldercraft
- (and 2 more)
-
Hey Again Tom .. HMS Jalouse looks a nice boat ! The basics will be the same for her as Ballahoo (and most other kits for that matter) so you shouldn't have any problems there.. Just take your time (possibly not as much time as I did to be fair .. I think the actual war my boat was in ended quicker than my build time !) and have fun with it.. remember stuff may go wrong but there is little that can't be fixed and errors that seem dreadful at the time will hardly be noticed later (if noticed at all in fact) Oh, if you wanna see a wonderful Build Log of a smaller boat check out Dirks Sherbourne (Dubz is his user name & Sherbourne is a Cutter) Dirk takes you through step by step (as many on here do.. I had some brilliant help from the folks here) and remember techniques that apply to Ballahoo, Sherbourne or Syren etc will apply to Jalouse .. sooo keep Looking/Following other build logs and Builders ! And if in doubt scream and shout.. We will laugh take a look and help you out ! 😇😇 All The Best Eamonn
- 1,039 replies
-
- 2
-
-
- ballahoo
- caldercraft
- (and 2 more)
-
Hey There Tom ... I tend to look at my Ballahoo and laugh as well ..😁😉 . Tis nice to hear from a new visitor too and not so far away either. One of the main things I learned here is to just get stuck into a build and not to over-think it toooo much (by all means research what you are trying to achieve but don't let doubts bog you down or stop you from making the first cut ) Find the right boat for you and get stuck in, there will always be someone on here who will have built it first, so read up on what they did (and didn't do!) and away you go.. Ballahoo was perfect for me as I love smaller craft and I decided to really go to town 'Super detailing' her, though the bare kit makes a darn nice build anyhoo (See Ballahoo by DavidM, in completed kits) I got held up in my build with major home improvements and not having access to a build space or any tools/research material (all in storage) Thankfully I'm pretty much set up again and have been tipping n' tapping in the background here.. I can heartily recommend the Ballahoo as a first step.. and do set up a Build Log so others can follow long and help out as needed.. I happen to know an expert on the Ballahoo Main Boom circa 1805.. 🙃🙂 All The Best Mate .. Eamonn
- 1,039 replies
-
- 4
-
-
- ballahoo
- caldercraft
- (and 2 more)
-
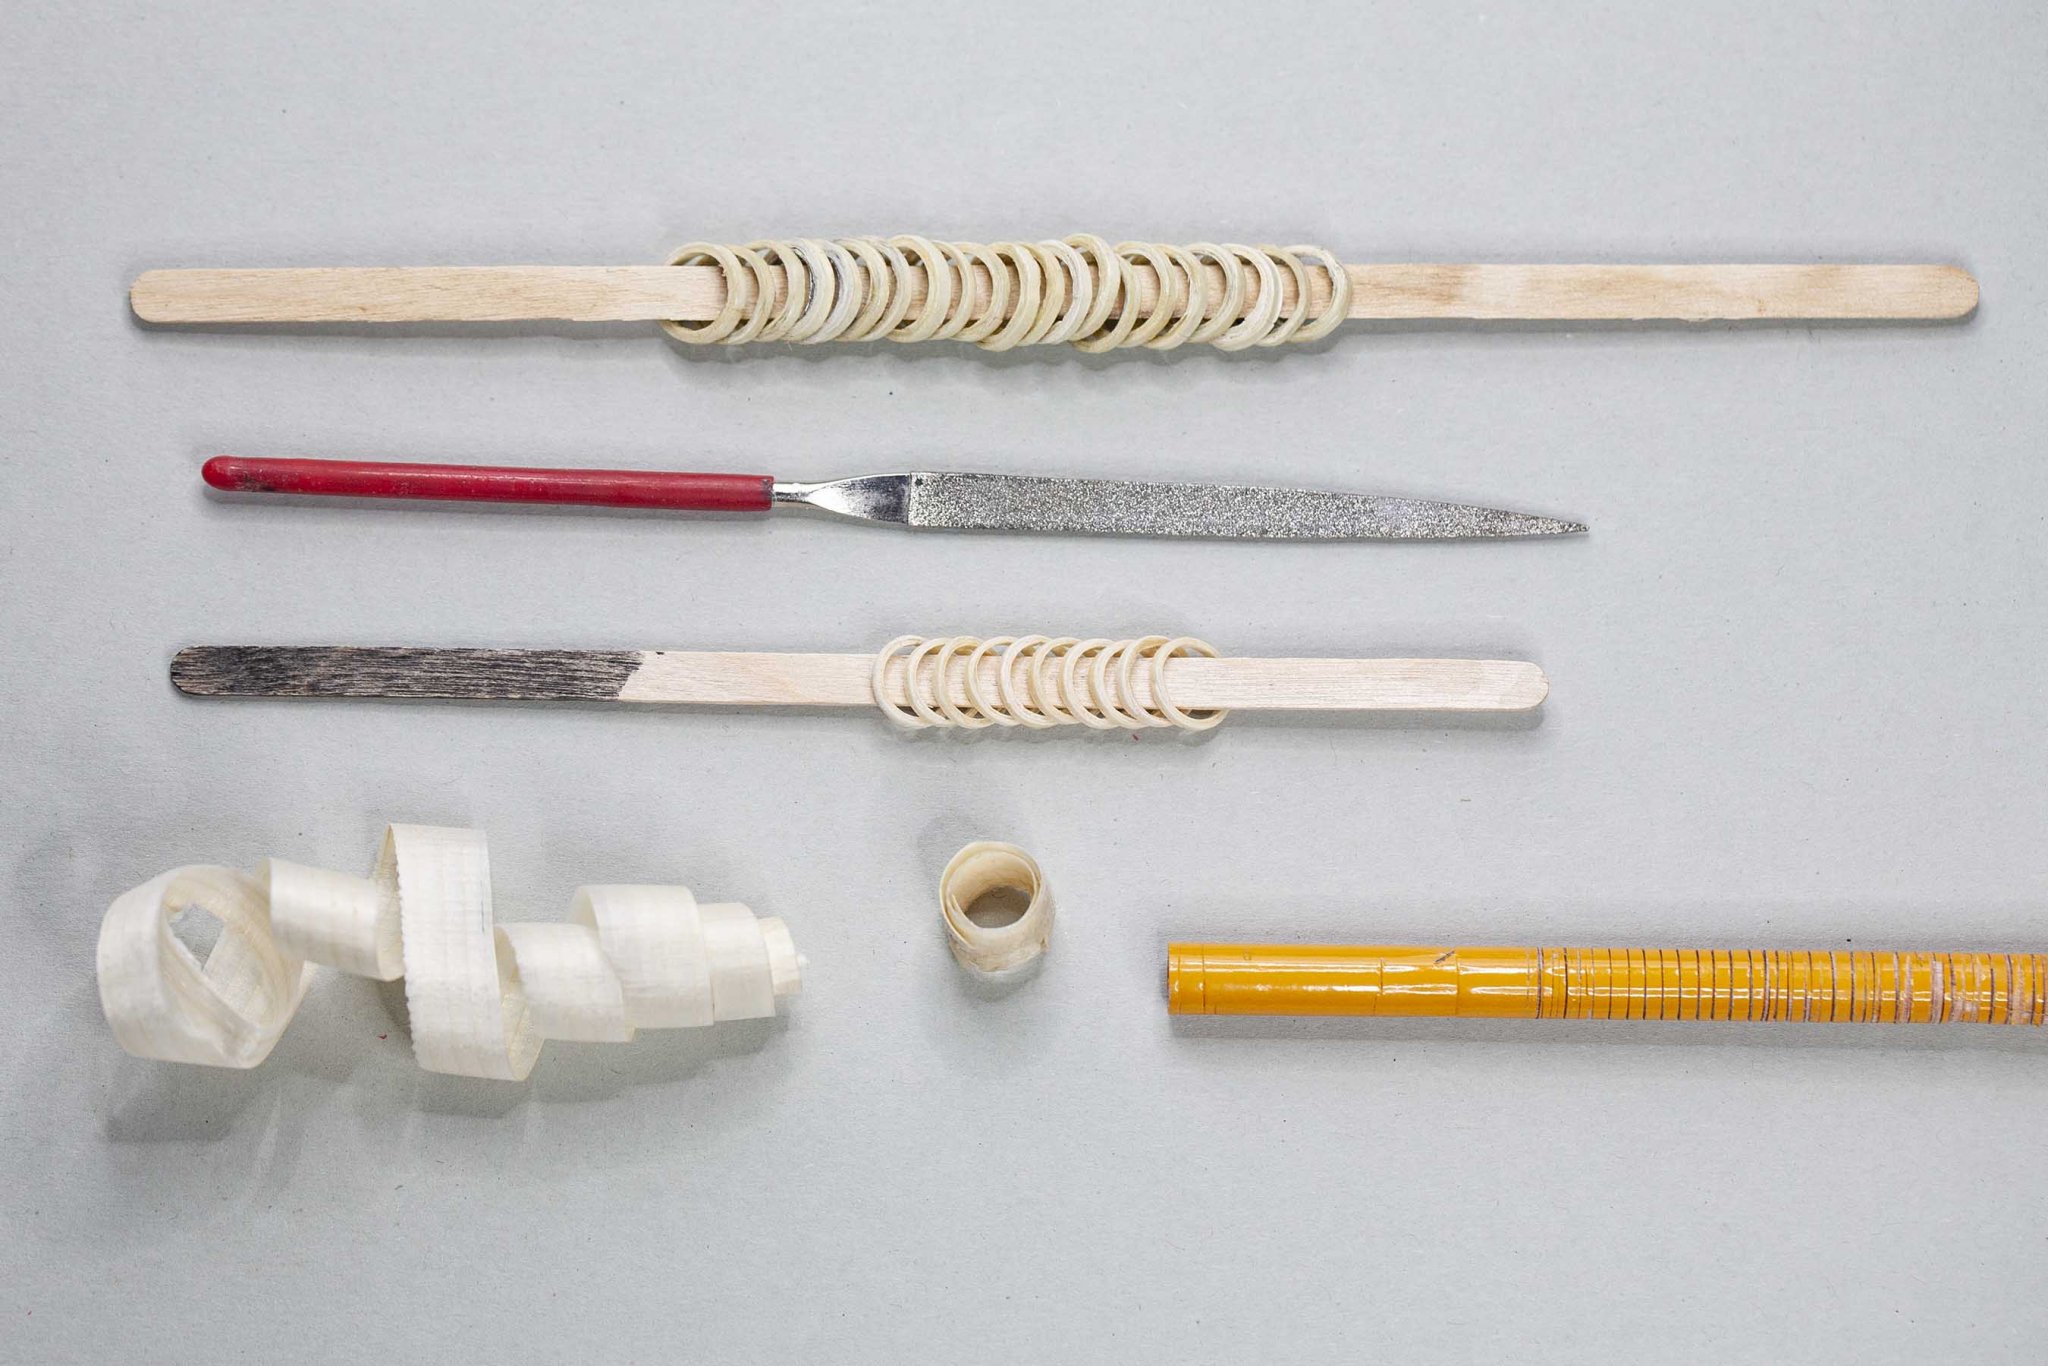
Back Again Folks .... I sanded the Hoops I'll be using to pick my final 7 or 8 from (they are on the stirring stick with the black bit in centre of photo) Those on the top are the recently made Cream Card/Paper versions I was going to use until I discovered the Video as posted yesterday.. Also in shot are my Wood Shavings, Pencil used and abused 😃 to shape the Shavings and a left over piece I cut the Hoops from on the lathe.. Oh I wrapped the pencil in Tin Foil (Cooking Foil) to stop the glue sticking to it (worked a treat, no need for 'release agent' just Cooking Foil shinny side up) I will put the Hoops in place as soon as I'm happy with them (possibly more sanding and a coat of Wipe On Poly to seal ) Thanks For Stopping By Folks Eamonn

- 1,039 replies
-
- 10
-
-
- ballahoo
- caldercraft
- (and 2 more)
-
Cheers Mate, can't take credit though as I first got the idea from Dee_Dee who if I remember correctly used Birch Bark or similar, sadly it didn't really work for me (prob wrong variant near me) I Googled Mast Hoops just to get an idea of the size/scale etc and up popped a You Tube video of a chap making them from Wood Shavings for his scratch build of Yacht America .. I'll take a looksie for the vid and pop a link in here.. I'm not on my Build Room Computer at the mo .. Back in a mo ........... ......😆 Here it is, well worth a Looksie.... All The Very Best Mate ... And Ta for Dropping By and the Likes E
-
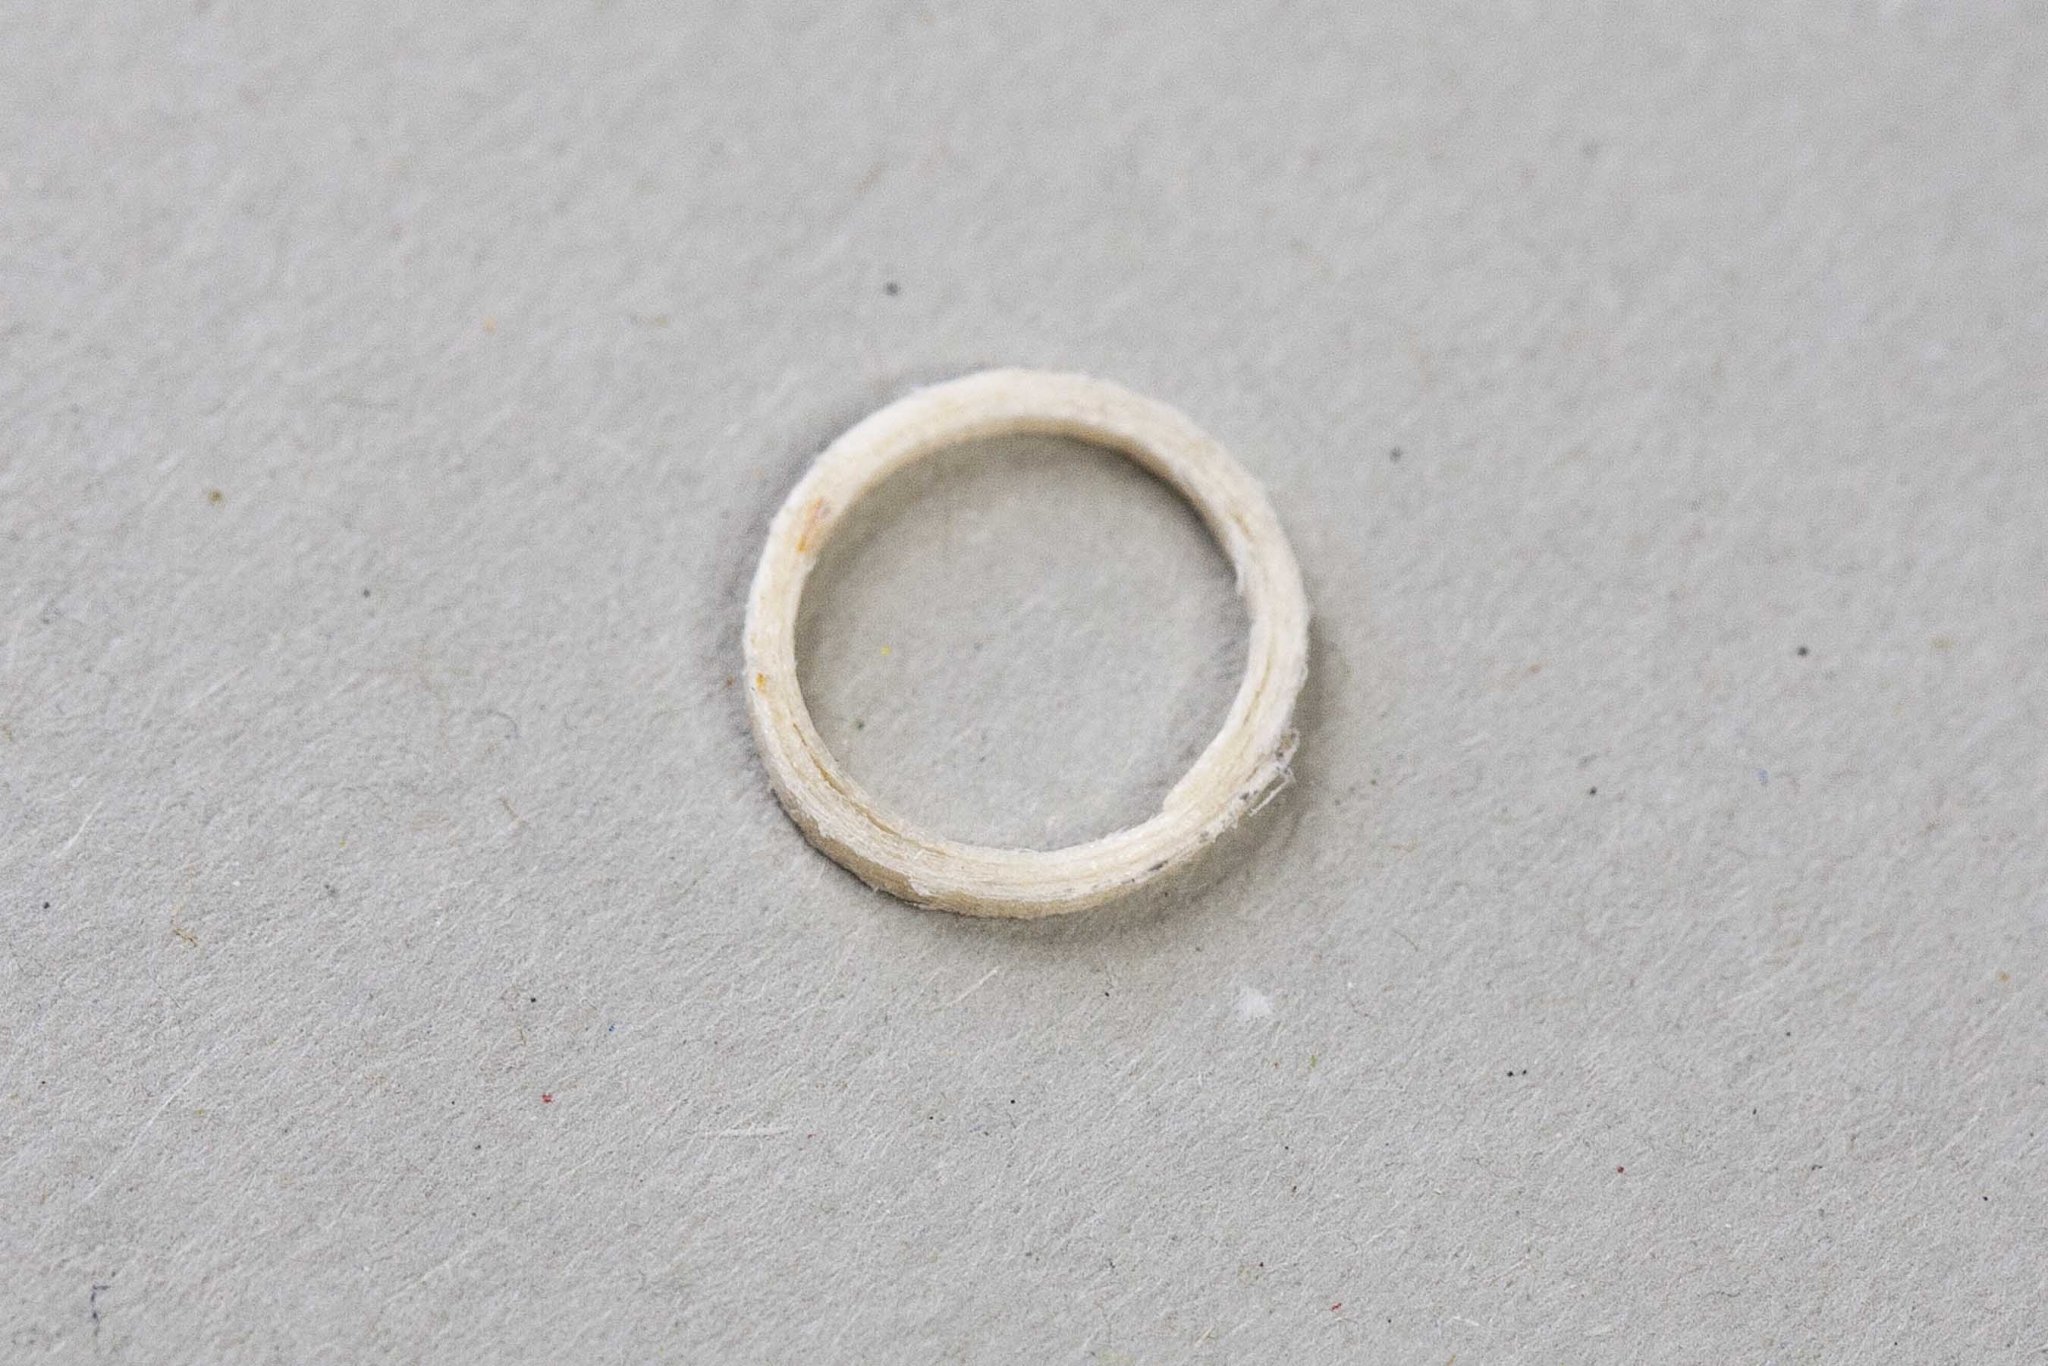
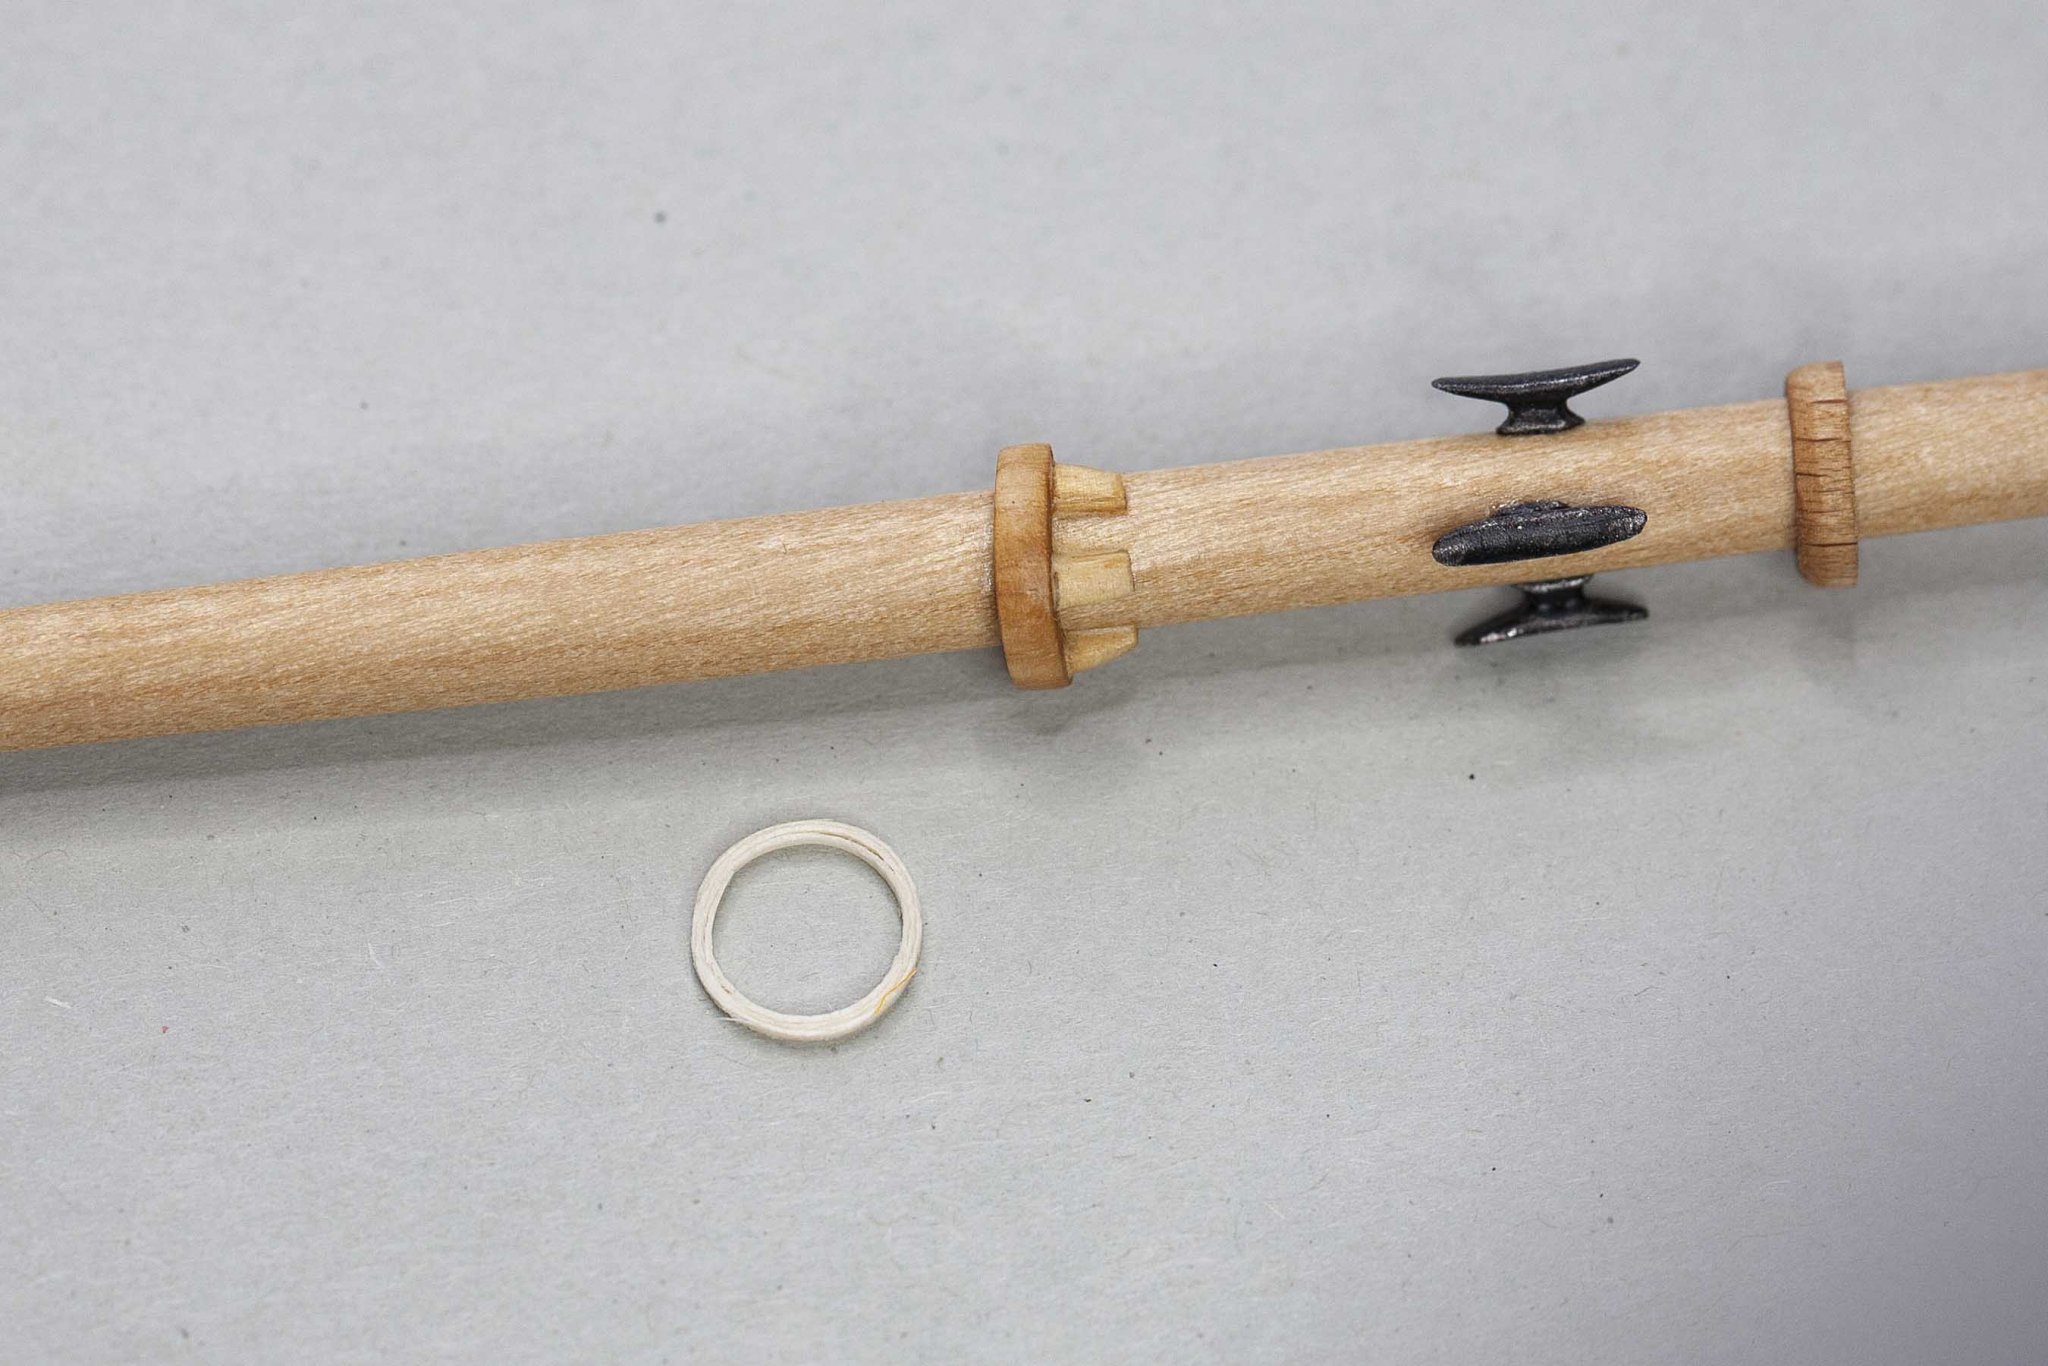
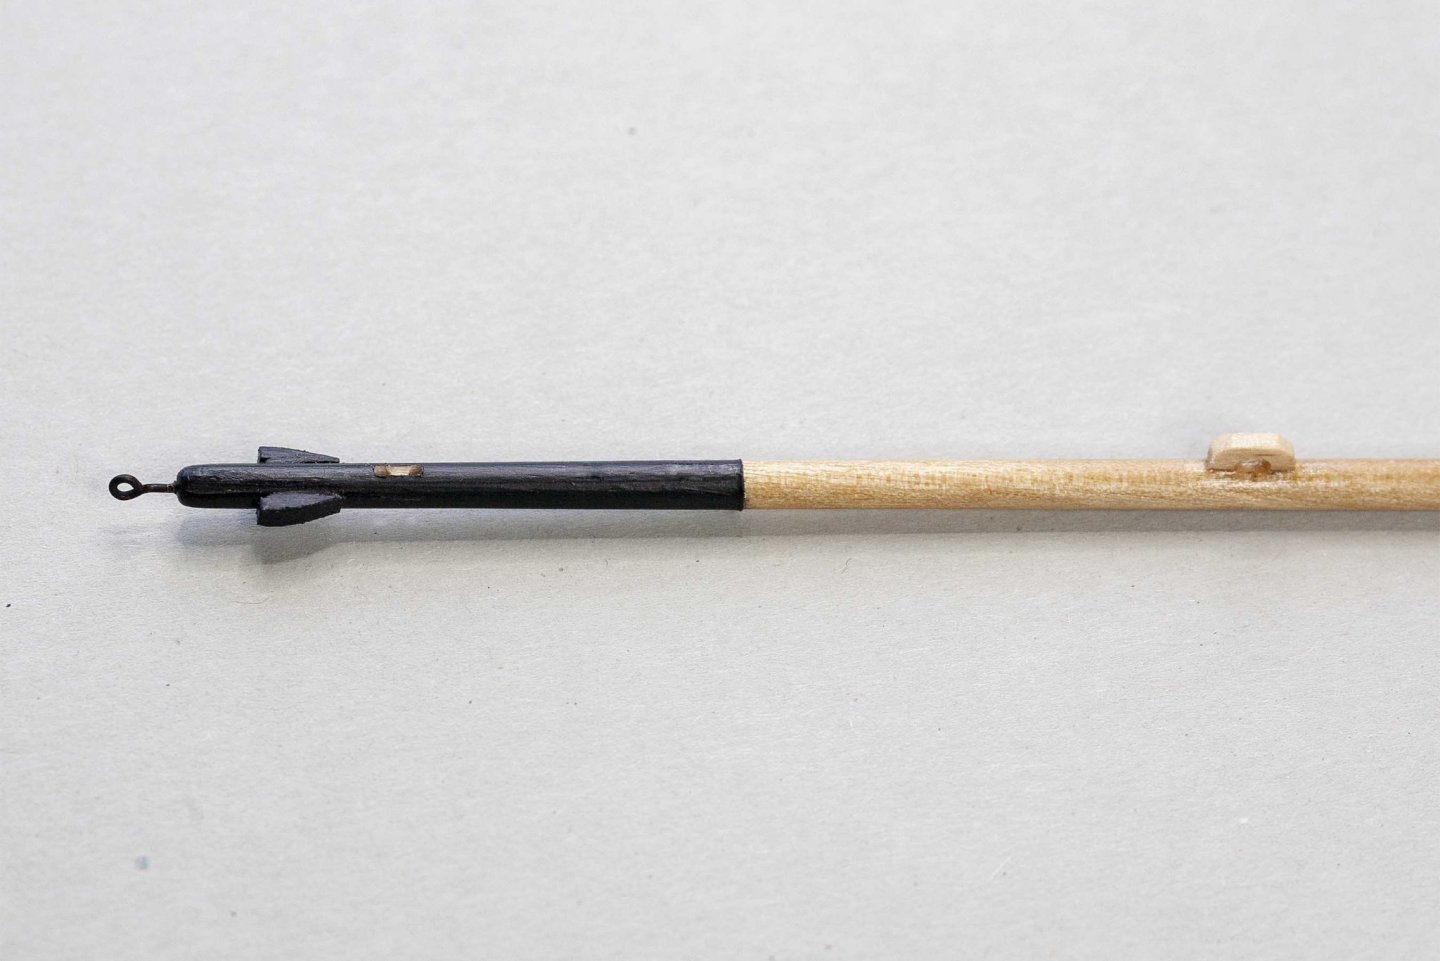
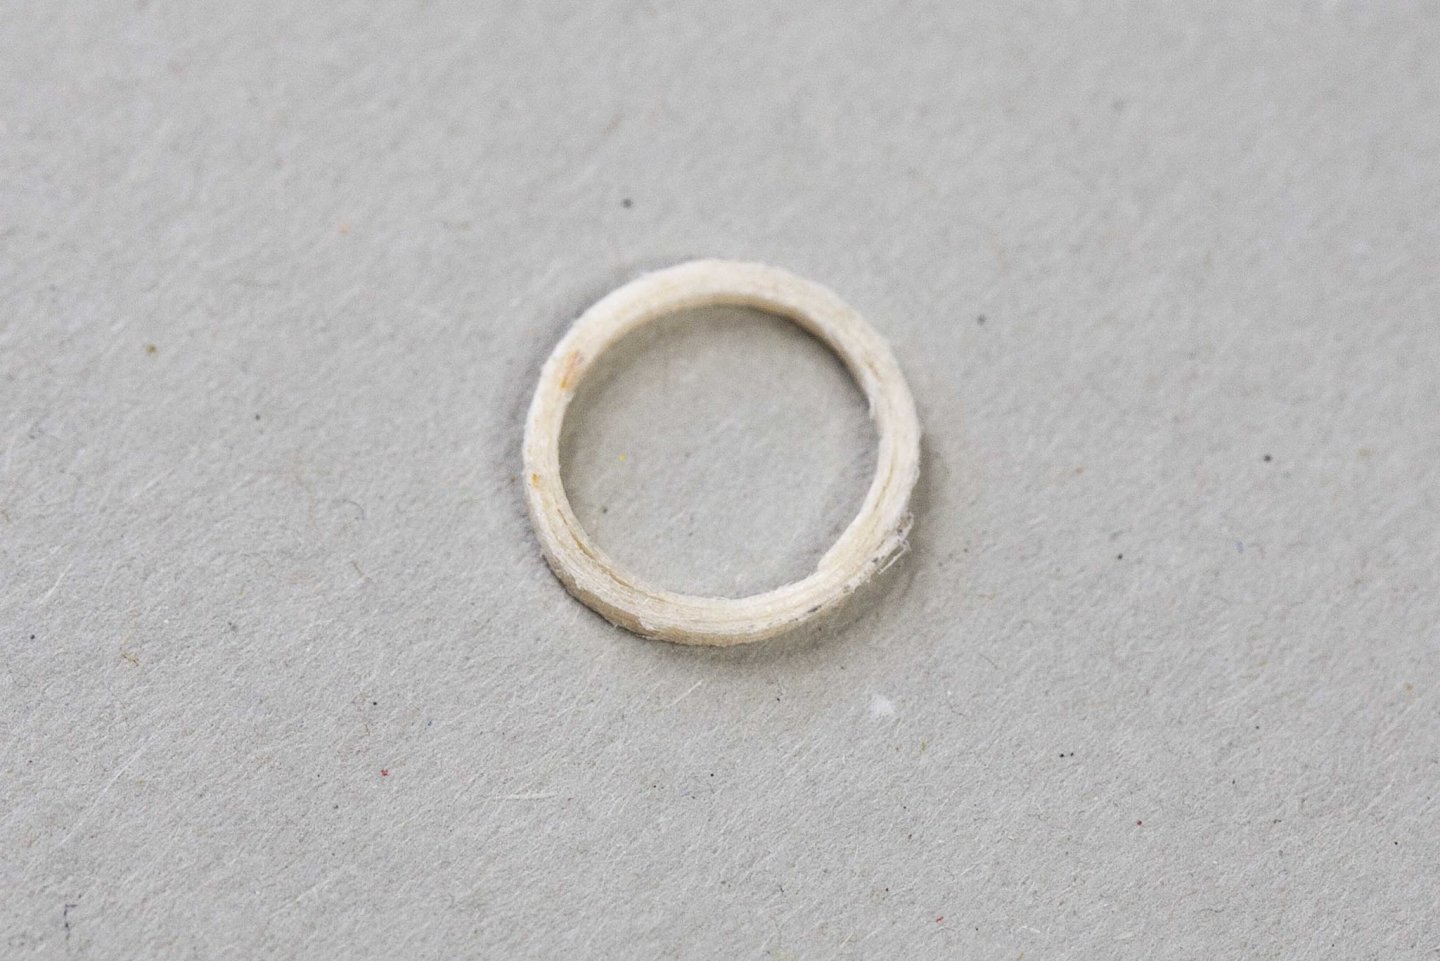
Hey There Jason .. Ermmm I may have slightly oversold my knowledge re Main Booms, just slightly ! LOL (I would deffo recognise one though 😄 ) ... Here are a few photos.. Yup! Actual Photos Woo Hoo. They are of The End of the Main Boom, a Sample Mast Hoop and The Boom support on the Mast with Mast Hoop for scale.. The photo of the Mast Hoop by itself is of the Hoop in its 'raw' state, made from wood shavings wrapped around a suitable sized dowel, in this case a round profile pencil, then glued.. Once the glue has set I put the whole assembly into a mini wood lathe and holding (carefully at both ends!) a craft knife I gently lowered the blade to the revolving pencil till the rings were separated.. It is un-sanded and pretty much straight from manufacture, I lightly cleaned it up and sanded it gently on the other photo, it still needs further sanding cleaning and staining. I made approx 15 with this method in very short time, I will use the best 8 or so (further research needed here lol) Any Questions please ask away.. Particularly about Ballahoo Schooner Booms circa 1805 😉 Spoiler Alert.. They are Wooden ! All The Very Best Folks And Thanks For Dropping By And Giving A Like.. Eamonn

- 1,039 replies
-
- 12
-
-
- ballahoo
- caldercraft
- (and 2 more)
-
Hi Folks.. Update Time Again .. I have almost completed the Main Boom (after much research, then some more research for good measure.. am now widely acknowledged as the local authority on Schooner Booms circa 1805.. conclusion.. I can confirm they are the bits that stick out from the mast in a front/back direction 😉 😐) and decided to revisit my Mast Hoops, the original attempt was done quiet some time ago and though satisfied I'm by no means fully happy with them.. I have as we speak some newer versions done and variations on same using Cream coloured paper and also some long wood shavings made specifically.. (Hopes are high for the wood shavings.. there I said it !... Of course this has just put a jinx on them 😖 😇 ) I will post some photos shortly, or as soon as I clean off the work table cos right now the words Blast Radius apply to it with wood shavings all over the gaff (sic) All The Best For Now Eamonn .. The Ballahoo Main Boom Expert
- 1,039 replies
-
- 5
-
-
- ballahoo
- caldercraft
- (and 2 more)
-
Hi B.E. brilliant Build as usual.. Regarding the Bowsprit and it's Shrouds.. I rather suspect in the real world the Shroud on the Anchoring Side (if you follow) would have been loosened off and hauled up out of the way of the Anchor and its associated rigging/cable during Anchoring operations.. Hope this makes sense.. All The Best Eamonn
-
Great to see the three of them together Rob .. Really shows the relative sizes (The latest is a monster in comparison ) Hope you are feeling better ! All The Very Best Eamonn
-
Hi All .. I working away in the background here (On the Main Boom and its fittings at the moment) and researching Rigging on these schooners .. I was getting stuck into this a few years ago when I had to pack all away to get on with Home renovations. This is definitely an occasion where MSW comes in handy as I have been going back over my discussions with Jim_Smits (Who completed a flippin' wonderful Ballahoo, take a looksie folks if you haven't already done so) and as a result am a bit happier at where I left off all those years ago... 🙂 Now I can research properly and see what level of detail I wish to include in the Standing Rigging.. Dirk (Dubz) has made me want to step it up a few levels (Thanks Dirk .. 🙄 by the way) so it may be time to dust off the ol' Serving Machine .. Won't post any photos of my work on the Boom as tis only a wee bit of wood work etc .. I'll wait till there is something more substantial 😉 All The Very Best Folks Eamonn
- 1,039 replies
-
- 3
-
-
- ballahoo
- caldercraft
- (and 2 more)
-
Hey there E .. The shipyard is still a tad cluttered but spacious (I know this sounds contradictory lol) I still need to lay it out correctly and get to grips with where everything will go.. but for the moment I have some stuff sitting about in plain sight if you follow (so I can more easily locate it) and bit by bit they will start to find their natural home, for now I am locating all items associated with Rigging (tweezers, blades, wire, string/rope, blocks etc) .. I'll post some photos of it as soon as it looks presentable ☺️ Thanks for Stopping By Folks and for all the Likes Eamonn
- 1,039 replies
-
- 3
-
-
- ballahoo
- caldercraft
- (and 2 more)
-
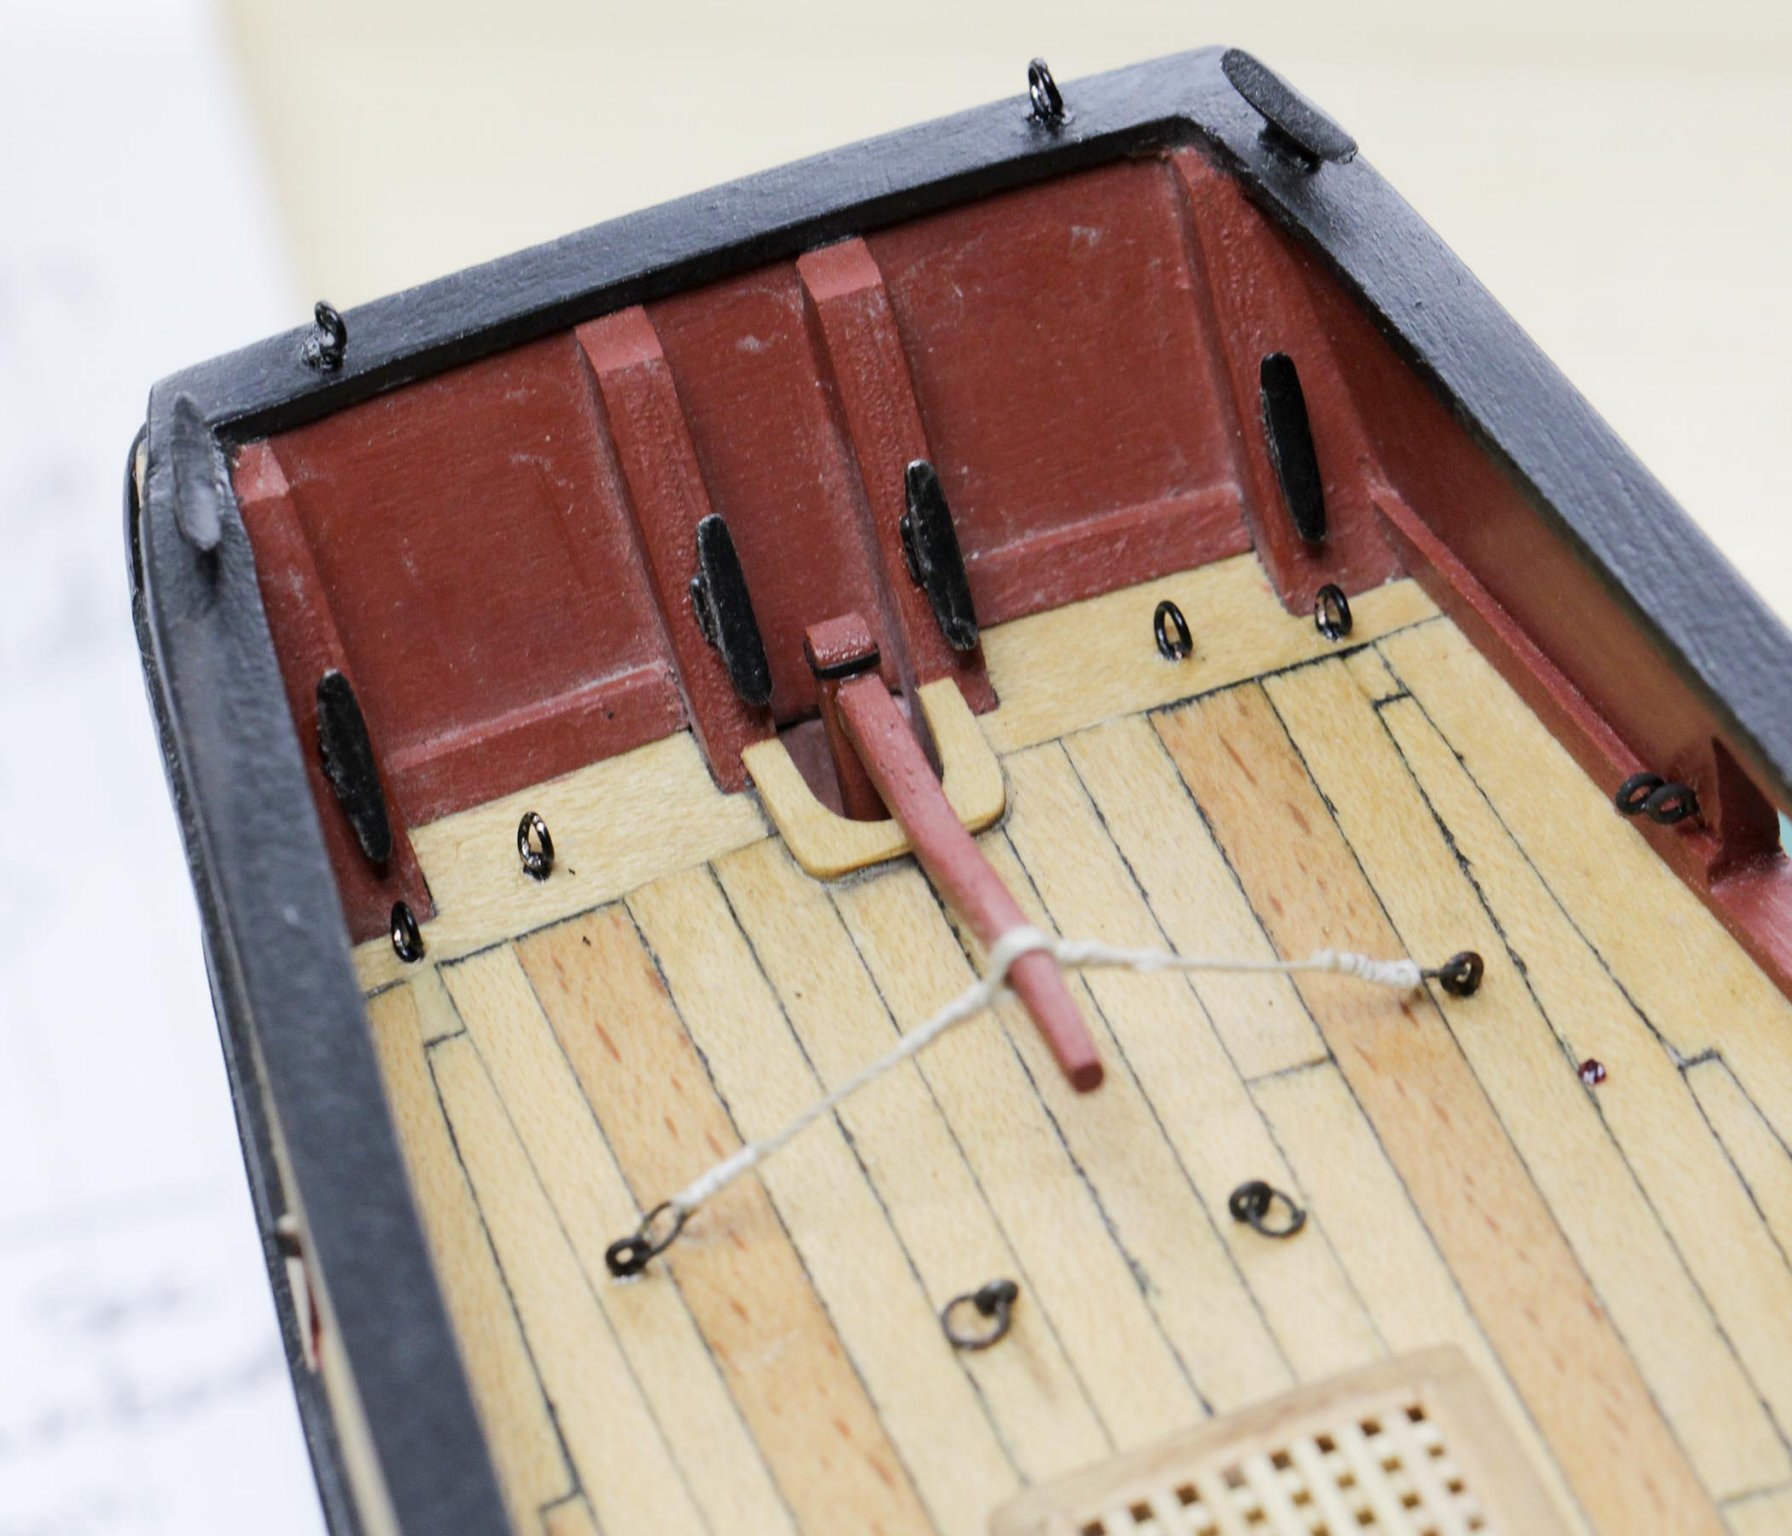
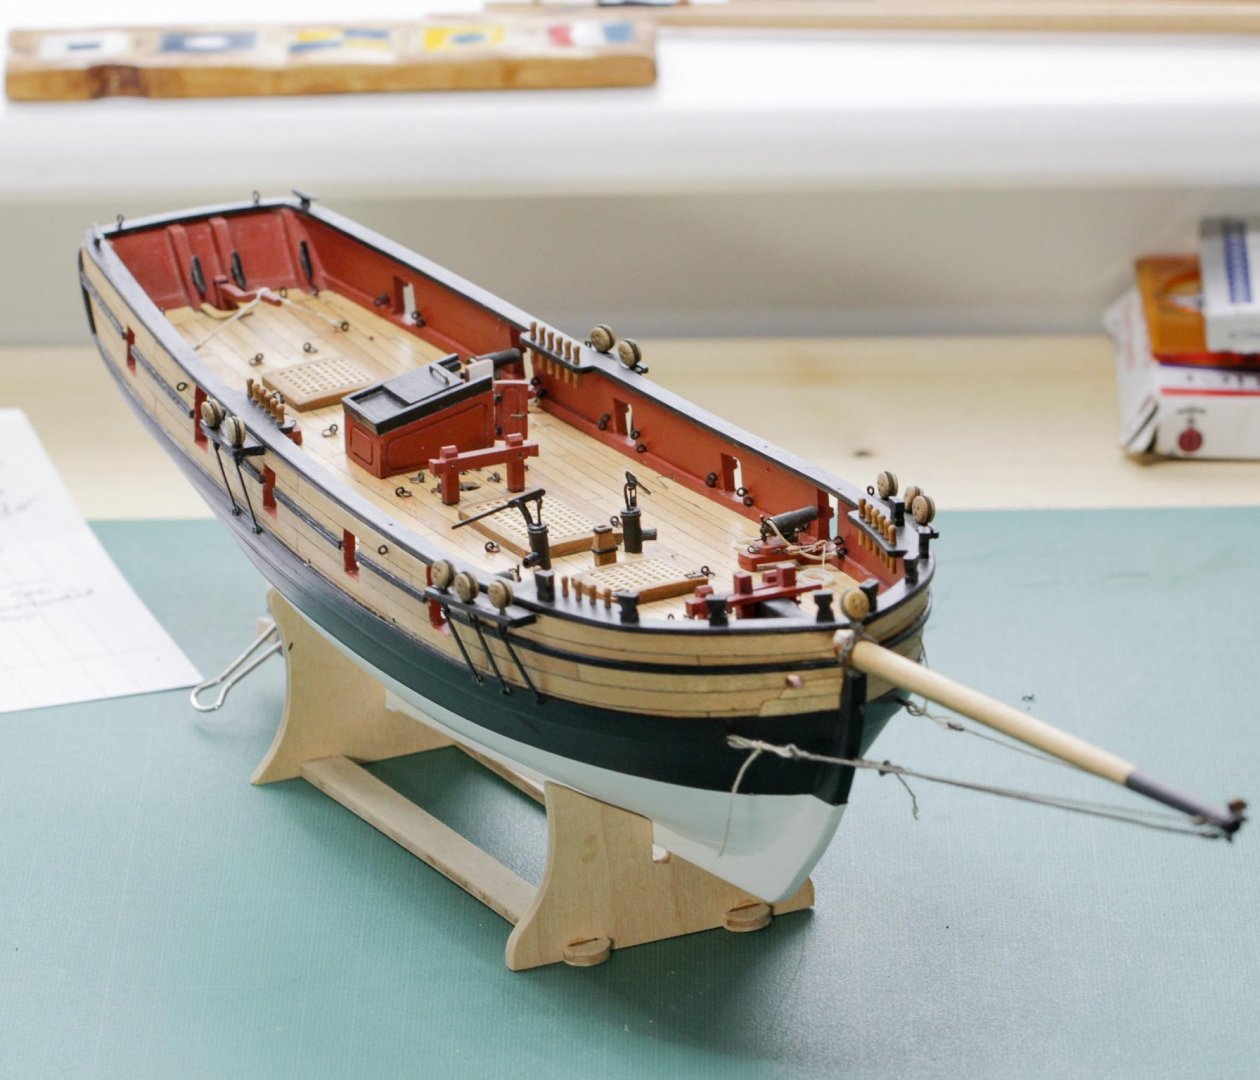
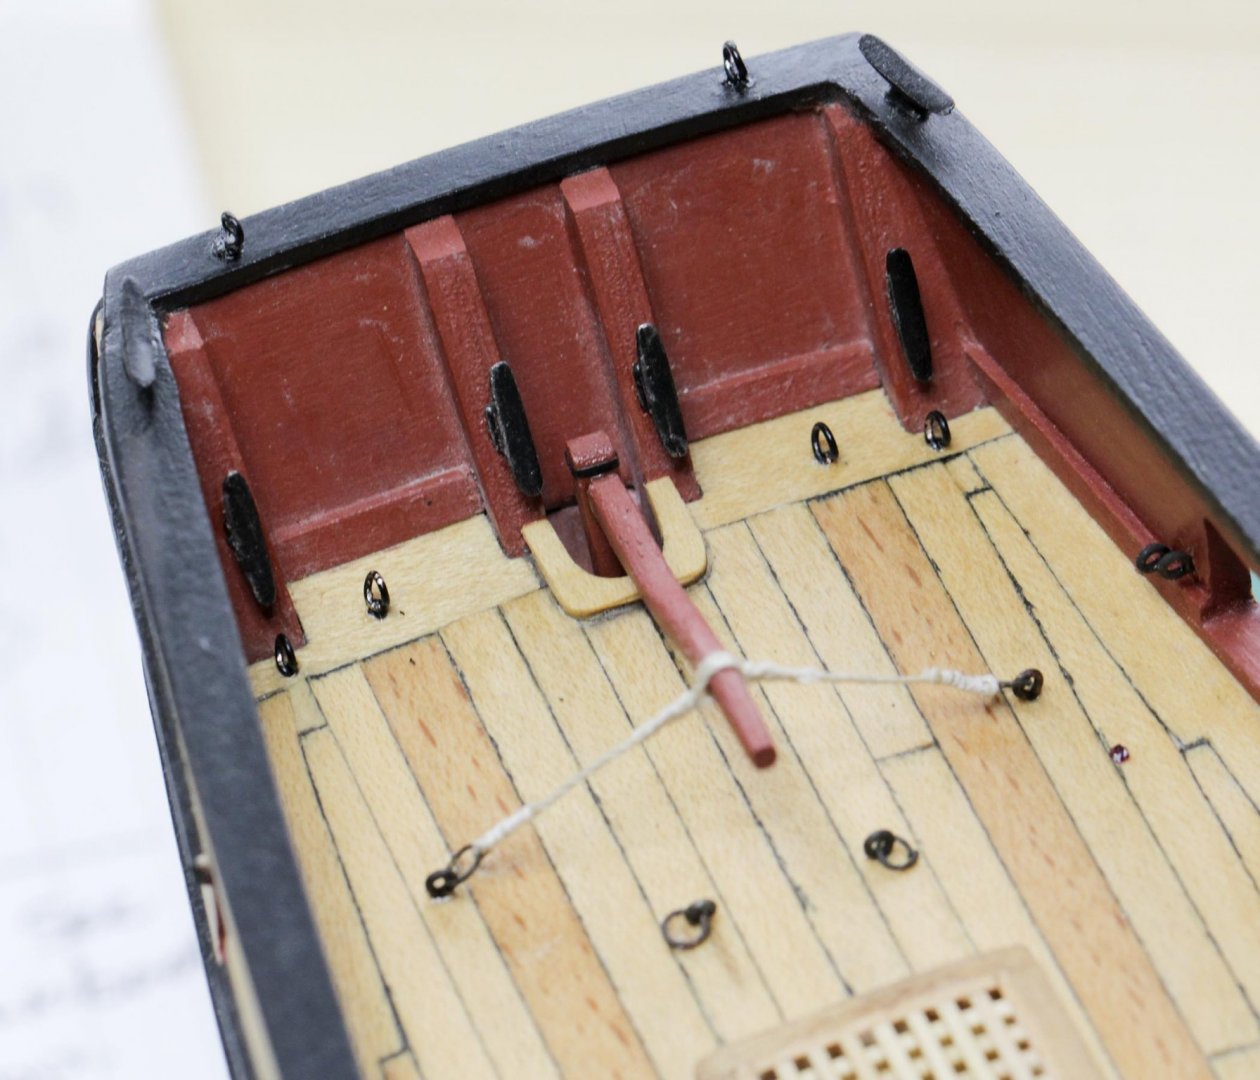
Hi Again Folks .... Well I found my Notes and decided to put The Ballier onto my new Build Table at long last ! .. 😎😁 I discovered that I had left off at putting eye Bolts in the Transom area, so I got the 0.5mm Black wire out (a recent purchase to avoid having to chemically blacken) and twisted up 6 eye Bolts .. Needless to say my first one went flying across the room when I came to trim the excess off, Hmmmm.. I wasn't gonna let the wee devil escape that easily so I hunted it down and found it lurking under the Ballier Plans 🙂 Six holes drilled later and the glue came out .. all going like clock-work so I decided to call quits on my First Day (cough cough ..Hour) Back .. Oh by the way there are actual Photos coming up here ... Try to contain the excitement there folks 😉 All The very Best From Glacial Boat Yards Eamonn PS latest additions are the 2 eye Bolts on the Transom Taff Rail & the 4 on Deck at the Transom itself
- 1,039 replies
-
- 15
-
-
- ballahoo
- caldercraft
- (and 2 more)
-
Hey Again Haiko .. Re the Rake Angle .. The Deck Templates should give you the correct Rake when you get to the point where you are slotting the Masts in position.. You can test by offering the Mast Dowel through the Hole in the deck and locating the step (Slot) in the False Keel Thingy ! If Ye Follow 😁 All The Best Mate Eamonn
-
Hey There TBE .. I'm following this nice build along, and admiring your method (The 'if in doubt ask, taking advice then getting stuck in and building' Method.. It is sooo easy to over think things and be afraid to make a cut) on so complex a vessel (My first build is Ballahoo which is probably 1/4 the size of Peggy, and I still (for one reason or another) haven't finished lol 😁) Anyhoo I'm just here to suggest be careful making the Masts Steps 'Vertical' .. Usually there is a 'Tilt' towards the Stern (called Rake) but they are indeed Vertical in a Left to Right sense.. Others on here will be able to confirm or deny this as regards Peggy .. I just didn't want to see you going too far along and not being easily able to correct any error (if indeed there is one at all I wish to note .. 😕😎) All The Very Best, and I hope you don't mind me butting in.. Eamonn
-
Thanks for the Heads-Up TLS.. I shall seek ye out and follow along 😁 All The Very Best Eamonn
-
Finished !! ... Jeez TLS .. At this rate you will have completed Victory before I even finish opening The Sherbourne box 😂 She looks the Business by the way, and as Edwardk (Jon) above says she really compliments The Ballier ! Roll On The Next Build (Oh and don't forget to post a 'Heads-Up' on here so we can follow along from the get go) All The Very Best Mate Eamonn BTW I'm looking at the Sherbourne Box as we speak which means you probably have Victory planked as far as the Lower Gunports by now ... 😁😁
- 104 replies
-
- 1
-
-
- sherbourne
- caldercraft
- (and 1 more)
-
Hey There Edward ... Out of Ordinary indeed, and not before time.. I rather suspect I'm going to have to learn all the basics of Boat Building all over again .. but for the moment (Room Preparations and Honeymoon aside) I'll have to rummage out all my Notes and Re-Visit my Lees etc, but at least I'll have a place to do this where I can spread everything out for a few days if needs be and not be in the way .. 🙂 Cheers Mate Eamonn BTW The rain has been going all day here too.. We won't even mention that Hurricane Looking doo-dah heading our way either.. 🙄
- 1,039 replies
-
- 1
-
-
- ballahoo
- caldercraft
- (and 2 more)
-
++++++++ Newsflash+++++ Latest++++++++ OK Folks ... New Build Room aka Attic Conversion/3rd Floor aka North Face of the Eiger (Lot of Stairs to Climb) is complete and I have just installed the new work 'U' shaped bench and gave it a wipe of Danish Oil .. Everything is back from storage and Ballahoo herself is now in the Build Room .. Woo Hoo (OK not actually on the Table but sure near enough 😊 ) only a bit of tidying away and I can begin filling my shinny new shelves with Boat Building Paraphernalia .. Now where did I leave all that Rigging Research I did over the past few years ? Darn It .. Honeymoon Cruise around Italy coming up in a couple of weeks then I can get down to finishing The Ballier and opening another Build Log for ... Hmmm possibly Sherbourne (Have a few on the waiting list, but I always liked 'The Sherry' .. ) All The Very Best Folks From 'Moving Along Nicely Boatyards' (Formerly Known as Glacial Boat Building Ltd) Thanks For Stopping By Eamonn
- 1,039 replies
-
- 6
-
-
- ballahoo
- caldercraft
- (and 2 more)
-
Hey There Rob .. That first photo made me go 'Wow' !.. What a Sweet looking build, loving the colours too . All The Very Best Eamonn
-
LOL .. Gots to have the ol' turny thing at the back 😉🤣 Eamonn
-
Hmmm those Bitts etc do look a bit 'chunky' for sure .. I just popped over to Dirks (Dubz) build and compared .. Bit of sanding may take care of that.. Take a looksie yourself .. What I did on Ballier was to build a wee Man out of scrap timber (to scale) and used him to judge thickness, size, etc (then picture holding the stuff yourself at full scale and see if it feels correct, we tend to make things too big and heavy and this will give you a better feel for it.. a good guide is 'if it looks too big then it probably is ) I think the size of cannons are grand btw .. Keep the updates coming All The Best Eamonn
-
Nice Crisp Looking Work Going On There Mate ! Is that a Rudder I see .. 😎 All he Very Best Eamonn
- 104 replies
-
- 1
-
-
- sherbourne
- caldercraft
- (and 1 more)