


Wintergreen
-
Posts
1,002 -
Joined
-
Last visited
Content Type
Profiles
Forums
Gallery
Events
Everything posted by Wintergreen
-
Thank you @KeithAug - yes I try to have valid reasons for not making progress and bobbing around skerries and islands seems to work 😉 Hej @Niklas and thank you! About the oars, it has something to do with practise I guess 🙄. These were my first attempts at oarmaking and I'm quite happy with the outcome.
-
HMS Euryalus 1803 by rlb - 1:48 scale
Wintergreen replied to rlb's topic in - Build logs for subjects built 1801 - 1850
Hi there, Just found this log and since both volumes of Euryalus sits on my shelf I thought it useful to bring a chair and a bowl of popcorn to follow along here. Looks like you off to a good start Ron. Nice and neat work this far. Keep it up!- 122 replies
-
- 3
-

-
- Euryalus
- Plank-on-frame
- (and 4 more)
-
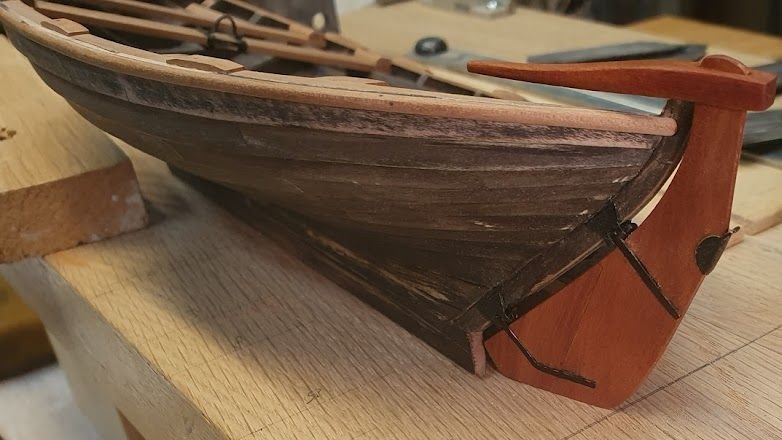
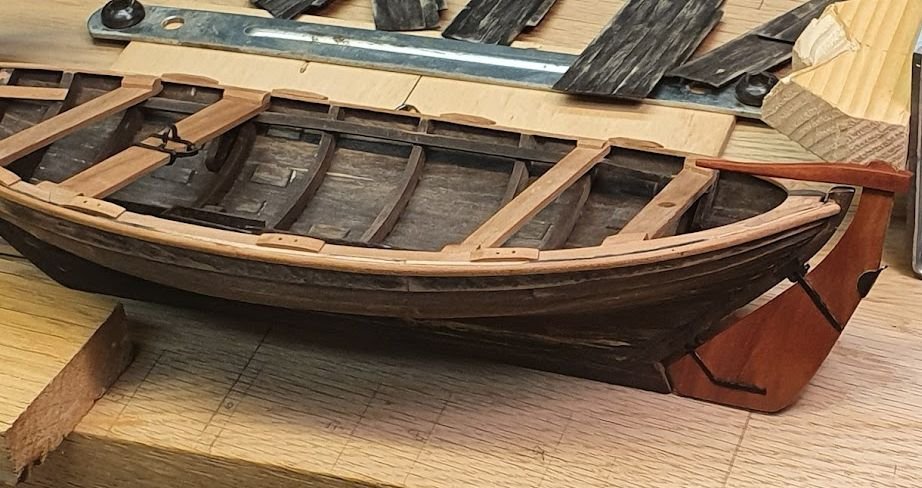
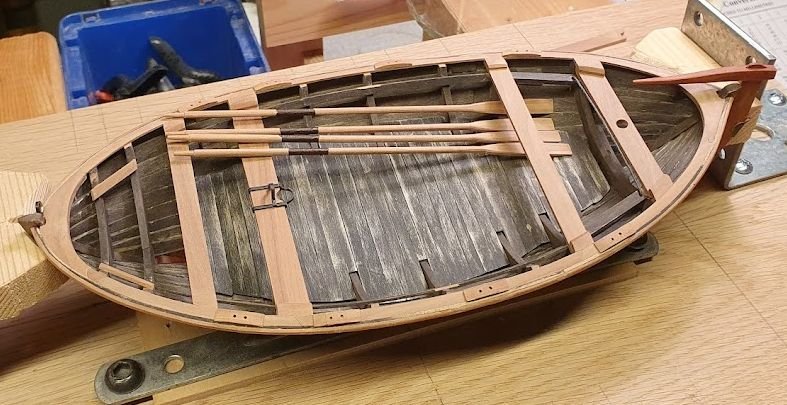
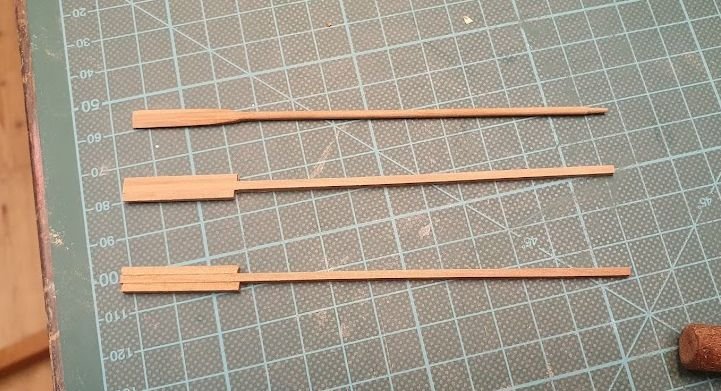
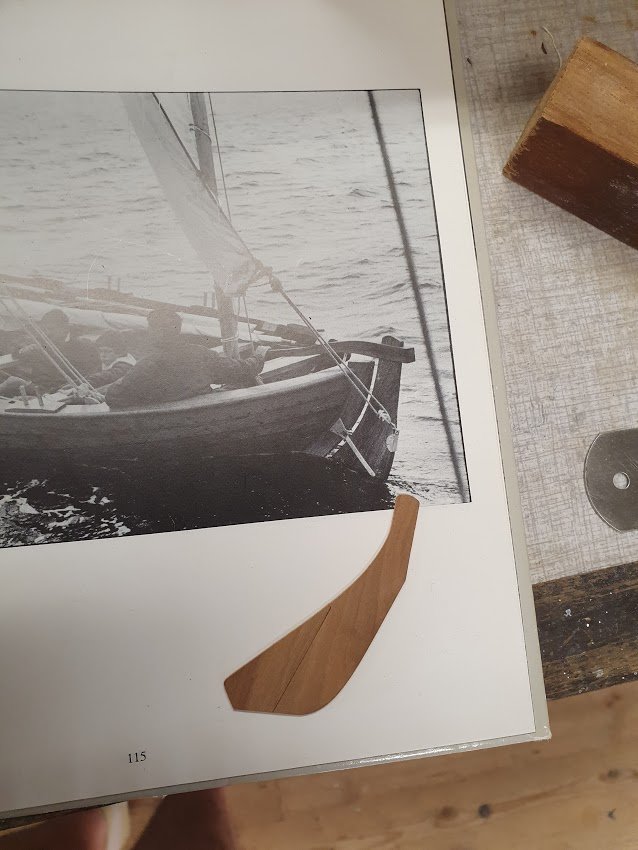
So, here I am 5 months later... Have I managed with any progress on the little build? In fact, yes. But only in the last weeks. Apart from the usual sailing around the Swedish archipelago, a spell with the dreaded c-illnes stirred up my fall. Treatment to commence soon. Whish me luck. The forecast looks good though. It was diagnosed at an early stage and all that, and I'm not too worried to be honest. It does have an impact nevertheless and I'm not looking forward to the cyto treatment. Yuck. Anyway, when I left you for summer activities I had just started with the rudder. Gudgeons and pintles, hum, I don't know if that's what they are called on small craft as well. The gudgeon is doubled to prevent the rudder from unshipping. The reason must be that the mizzen tackle is fastened at the aft end of the rudder. And that is because the mizzen sail needs a boom that extends beyond the aft end. Parts are painted and then the wood is oiled with paraffine oil. It gives a nice tan to the wood I think. With the rudder in place I'm in for all the "bits and pieces", like oars (or sweeps if you prefer). The book mentions that a single pair was delivered with the boat. But it can obviously take four pairs, so I settled for an in between decision of two pairs. IRL measurement is 12 feet long. In scale that is 122 mm. The handle diameter is about 45mm IRL (1.5mm scale). The blade width is 5 1/4 " (about 4,5mm). First picture depicts three stages of construction. Second pic, lazily stowed in the boat. The chafe protection is just painted 😉 Next up will be mast and spars. well, the masts are already made but they need some tackles and stuff. And sails. And sprit poles. Enough to keep me occupied and out of the deep dark pool of thoughts. Til next time - ta!
- 240 replies
-
- 11
-
-
What isn't a fiddly business at 1:64? Haven't said it before, but I think the stern galleries came out really nice. Good job Henke! Keep it up!
-
Looking good Vaddoc! And I feel your pain when you realized exactly what piece you maimed. Ouch. Keep it up!
-
Well, great that you are able to help out. What a recource for your son. We will wait here til you come back 😉
- 153 replies
-
- 1
-
-
- Ancre
- Bruno Orsel
- (and 2 more)
-
Coming together nicely there Henke! Precise work on those bits and pieces 🙂 Sorry to read about your personal burden. Hope you and yours can find strength together! Keep it up!
-
Great progress GL! The word tabernacle comes to mind for the "mast erection" part. I don't know if that is correct or not. Cheers!
- 153 replies
-
- 3
-
-
- Ancre
- Bruno Orsel
- (and 2 more)
-
What everyone else said! Excellent build and well performed!
-
Vaddoc, seems like you're in for a challenge here 😉 About scarfing, on a lapstrake boat of any size I'd assume every strake is always two pieces. It would be really hard to get a watertight fit in stem and stern at the same time with one full length strake. And since the strakes are in two (or more) pieces the scarfs are always staggered. Probably a couple of feet apart. (maybe that was not the question though). Trust your eyes and not so much the mathematics in the laying out.
-
The answer would be - it depends 😉 Ships configuration changes over time. First as built, then the first owner adds something. Later maybe a change of career and other alterations are done. Then a ship can go from working boat to leisure craft and yet more alterations are done. If you could set a date on the pictures you've found I guess you will see that they depicts the ship at different stages of its service life. Finally, just make a decision and go with that. In this case you are the master shipwright and have all the power to decide 😉 Keep it up!
-
David, you're doing a fine job with the rigging. The ratlines looks absolutely smashing, nice and even all the way. Well done!
-
I hear you wefalck. 🙂 Instead of 1:30 I could go with 1:60 or the more common 1:64 or why not 1:96? However, I'm not really into these miniature jobs (yet). With greater skill down the line - maybe.
-
Thank you @popeye the sailor! Glad you could join us 😉
-
Okey, I see. Well, as you've noticed I work in 2D. It works for me and I'm reluctant to invest in the time needed to learn all the features of 3D.
-
Indeed Mark. My guess is that the boat has "some" degree of weather helm and the way the mizzen is sheeted counteracts that. A section of the book is about the sea trials, I will look into that and see if there are any remarks about balance.
-
Welcome Vaddoc. As for printing there are a couple of alternatives. One is to use the local printing shop and another is any of the online services available. Cost and ease of use will be the decisive points. The loose plan is to gather as much as possible on an as large sheets as possible and then cut it up myself. If sheet size is a limitation I'll just have to split items so they fit.
-
Hi guys! No progress to report. Quite the contrary. The software I use crashes on me regularly, which makes progress painfully slow and no fun at all. It probably has to do with an old and slow PC with too little memory. I probably also need to update the software (TurboCAD De luxe). Both actions require funds, which are a bit scarce at the moment. This will probably be sorted come July. "Sorry for the inconvenience" 😕 Or as another well known character says: "Ayll be back!"
-
Yes, as is the standard of your work Vaddoc! I can't give any advice on finishing but the hull looks great. Job well done! Keep it up!
-
Thanks Vaddoc! The material for the mast partners were blackened so I just sanded that away and then painted them when glued in place. So no priming done actually. Maybe a bit lazy, but the acrylic paint seems to adhere just fine. Cheers!
-
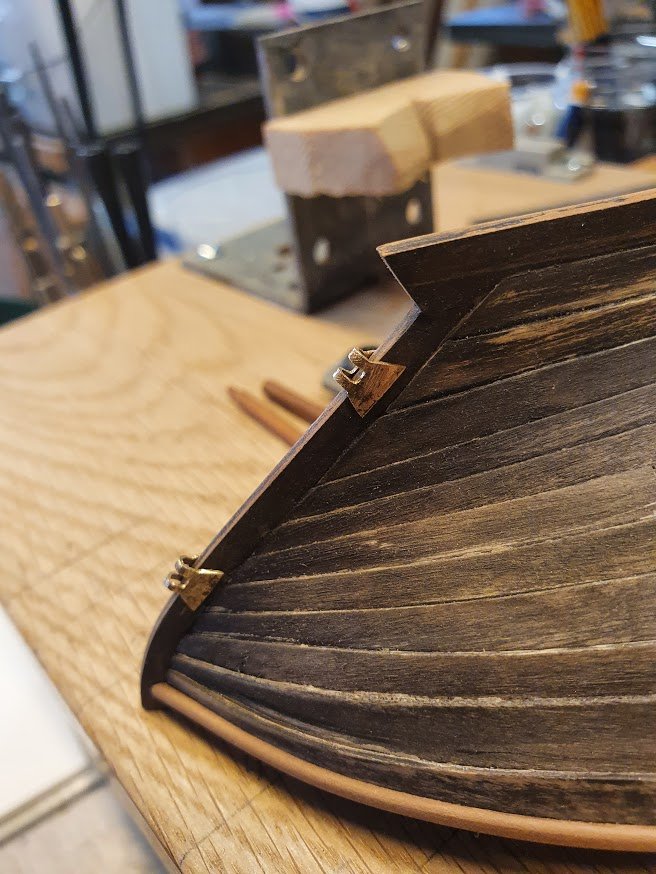
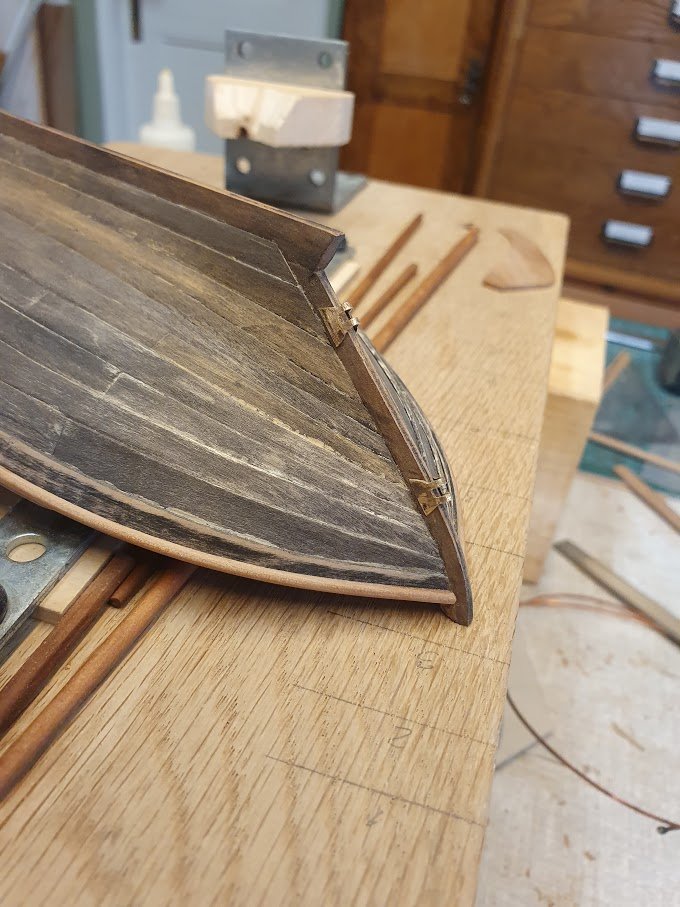
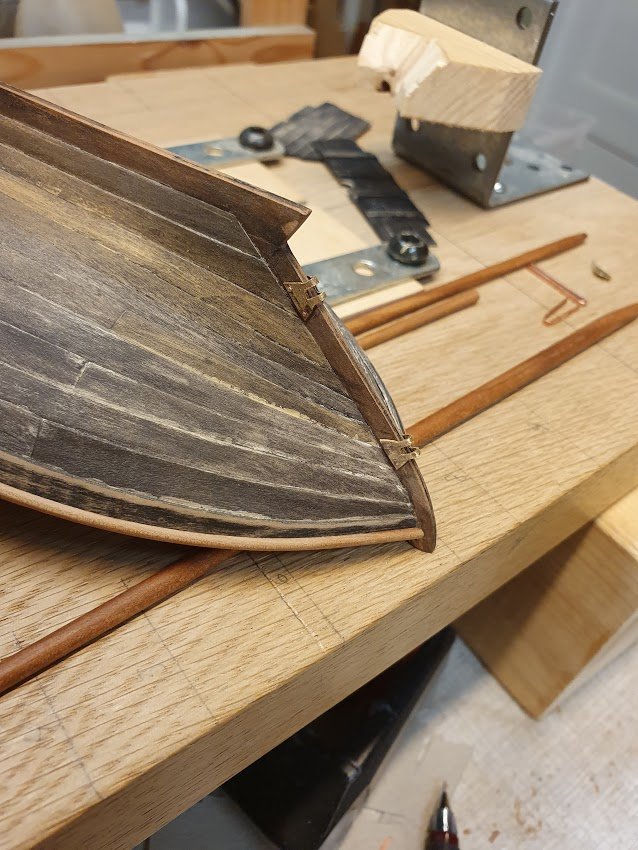
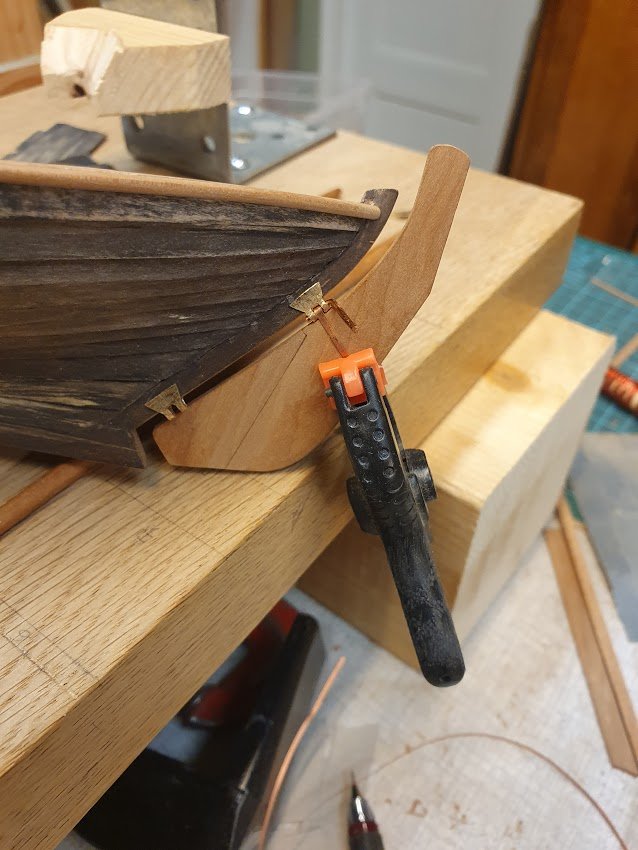
Another wee update. All the usual excuses. You know them all. And also thanks for likes and comment! More ironwork (or more like brass and copper actually). This time, the rudder. I also had to fabricate the rudder. Since work on the model has been, well, intermittent at best, I've failed to take progress shots. To get the shape right for the rudder card stock was used for template. The the rudder was made of two pieces, just like the real one with a hooked joint. I made it slightly over sized on purpose to be able to file and shape it to size later. The joint is slightly emphasized thanks to sanding off the sharp edge. About the gudgeon and pintles, not really gudgeon since the rudder will be held in place with a bolt. Now pictures! CA:d in place. Test fit. Now I realized I wasn't quite happy with the gudgeons. They should sit closer to the stern to close the gap between sternpost and rudder. The pintle is from copper wire and flattened in a tool I build when doing my Regina yacht. It is actually to size, a shivering 0.2mm thick, which translates to the correct 1/4" real world dimension. Gudgeons being repositioned. I just pryed the off, showed them further in and glued again. Also enhanced the fastening with real rivets, 0.5mm in dia. The book shows four on each side, but I recon two will suffice for both strength and display purposes. That was all I had this time. Til next time, ta!
-
I guess the laminated plank stock is thin enough to take the bending without too much fuzz. Otherwise I would be hesitant to use laminated wood, since it will be stiffer than solid. Can't wait to see the inside when planking is finished 😉
- 153 replies
-
- 1
-
-
- Ancre
- Bruno Orsel
- (and 2 more)
