Wintergreen
-
Posts
1,002 -
Joined
-
Last visited
Content Type
Profiles
Forums
Gallery
Events
Everything posted by Wintergreen
-
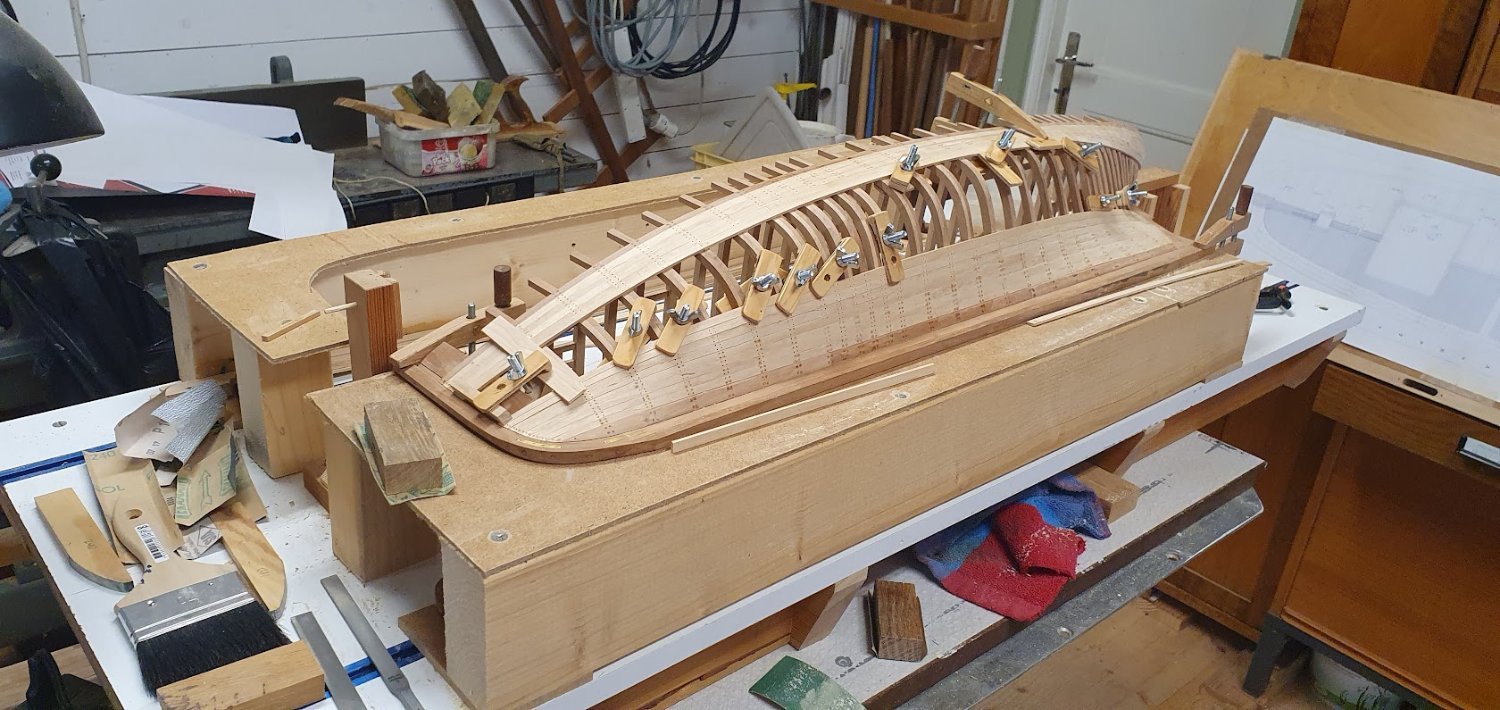
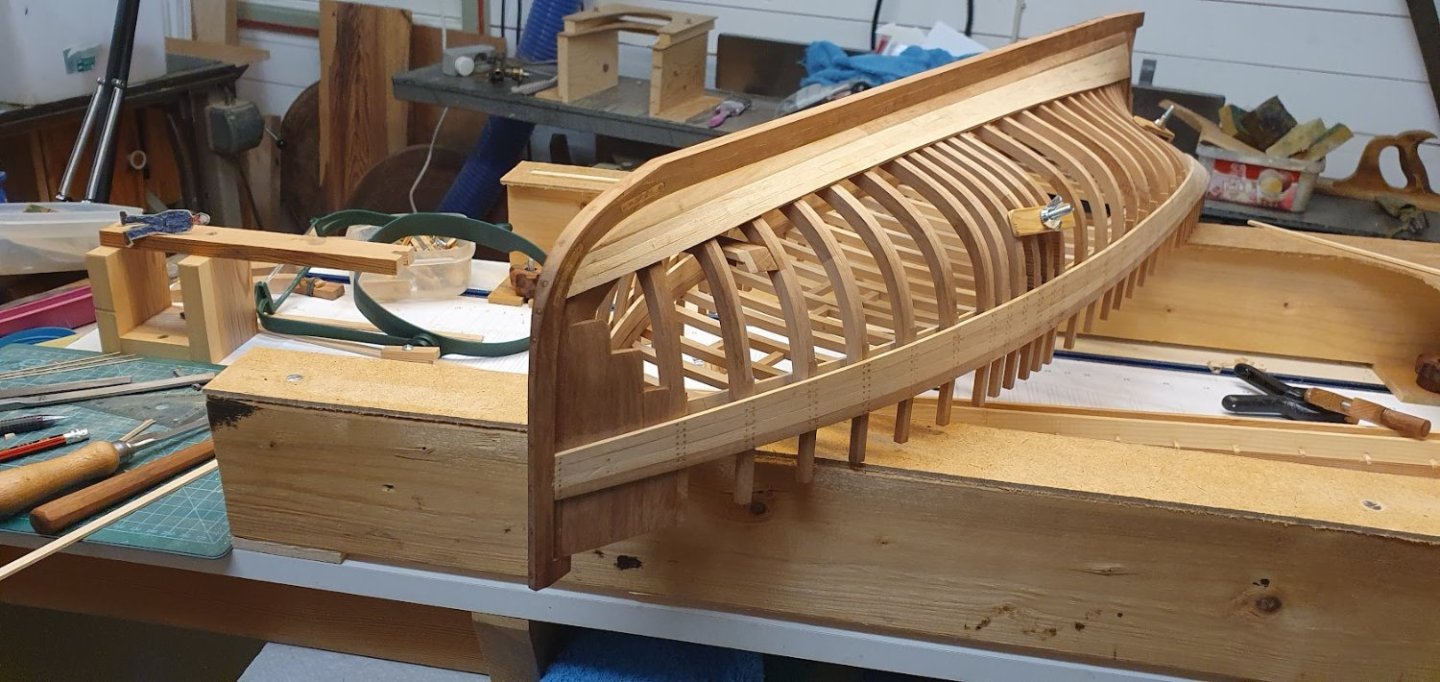
Thank you Mark, you are absolutely correct in you assumption! There are several ways to skin a cat, sorry, to plank a hull. Planking with the hull upright wasn't working practically. Why not upside down then. Well, I couldn't fit the hull on the building board in a secure and safe way. Would need a second board. Also, access to the inside, handling clamps and such is not possible hull upside down. In all fairness it must be said that I bugged up a bit in laying the deck structure, but I can still reach in and fiddle with clamp despite the deck beams when on its side. So basically I just dreamed up a jig that would hold the hull somewhat secure laying on its side. The jig looks sturdy but flexes at the stem part. No worries though since I planked the beam shelf inside. The hull is rigid. Why two? Well, I cut the planks in pairs and it seemed efficient to do the planking switching sides. Also, the room for creeping errors is less when you constantly can check that the plank ends meet at opposite side of stem and stern. Now I plank two strakes on one side, one going down and the other going up the hull, then flip the hull over and repeat. The planks has some shape to them and cutting two blanks at the same time saves time and brain cells.
-
Nice black smithing! Very neat hardware. Maybe you want to shave off the lower edge of the rudder a fraction. The reason being to prevent the rudder from un-shipping if the boat is grounding. Again, just a minor detail. I also think you are correct in giving the rudder a shaped cross section, even shipwrights of old must have had an eye for that I presume. Keep it up!
-
Thank you Andy, Per and John. 🙂 Progress is actually quite good given available time. I'm happy.
-
Hello all, just a quick update. Yes, there is still progress. Slow and steady 😉

-
Cheerful build on hold....drop plank phobia
Wintergreen replied to bigcreekdad's topic in Wood ship model kits
Guess a lot of us have... How about addressing something other than the issue that keeps you from the build? Plan for rigging, do some other small tasks. Usually, practise makes perfect, and if we always stop at the same step, we will never succeed. I know my planking on my current build is not perfect. There are gaps and other ugliness, but I've decided that I'm fine with that. My goal is to finish the build and at the same time practise some lost skills. Hopefully my next hull will be fairer. Kind'a - just do it! That said, if you can pinpoint what the trouyble is there are a lot of members here that will help you sort it out. -
What Steven said. Very nice progress 🙂 One little thought about the stringer. While it does look good on the model I think it would probably not been let into the frame tops. Mostly for the additional exposed endgrain from the notches. Yes yes, the stringer itself blocks some water intrusion, but I think it would eventually open up and let water in since it is subject to some forces. Instead, pragmatically bolted to the frames without any notches. Keep it up!
-
Pin Vise vs. Hand Vise?
Wintergreen replied to Balclutha75's topic in Modeling tools and Workshop Equipment
I guess that comes down to how the various trades has evolved in different countries. Like how dentists work in one countr vs another, watchmakers, jewellers and so on. I too have marvelled over this where one tool that is prevalent locally can not be found elsewhere or overseas, and vice versa. -
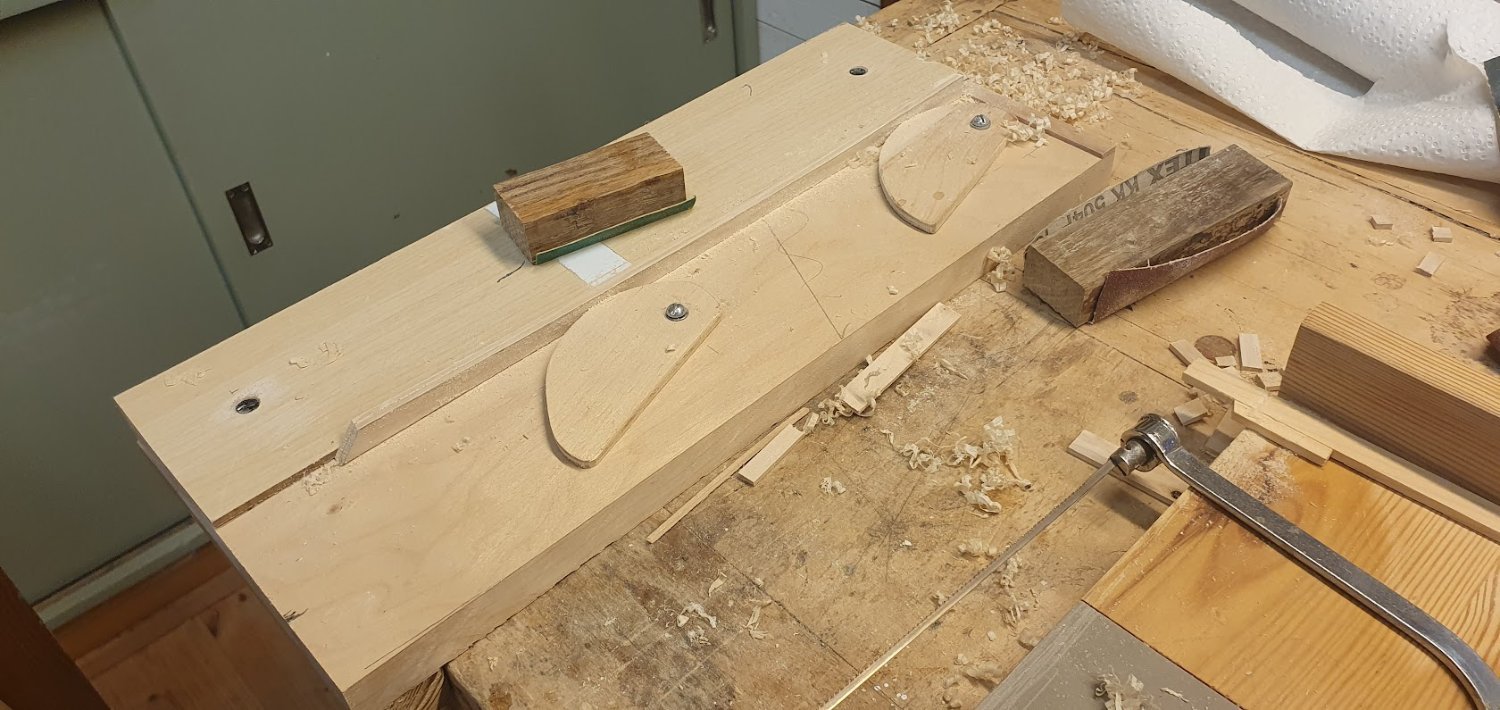
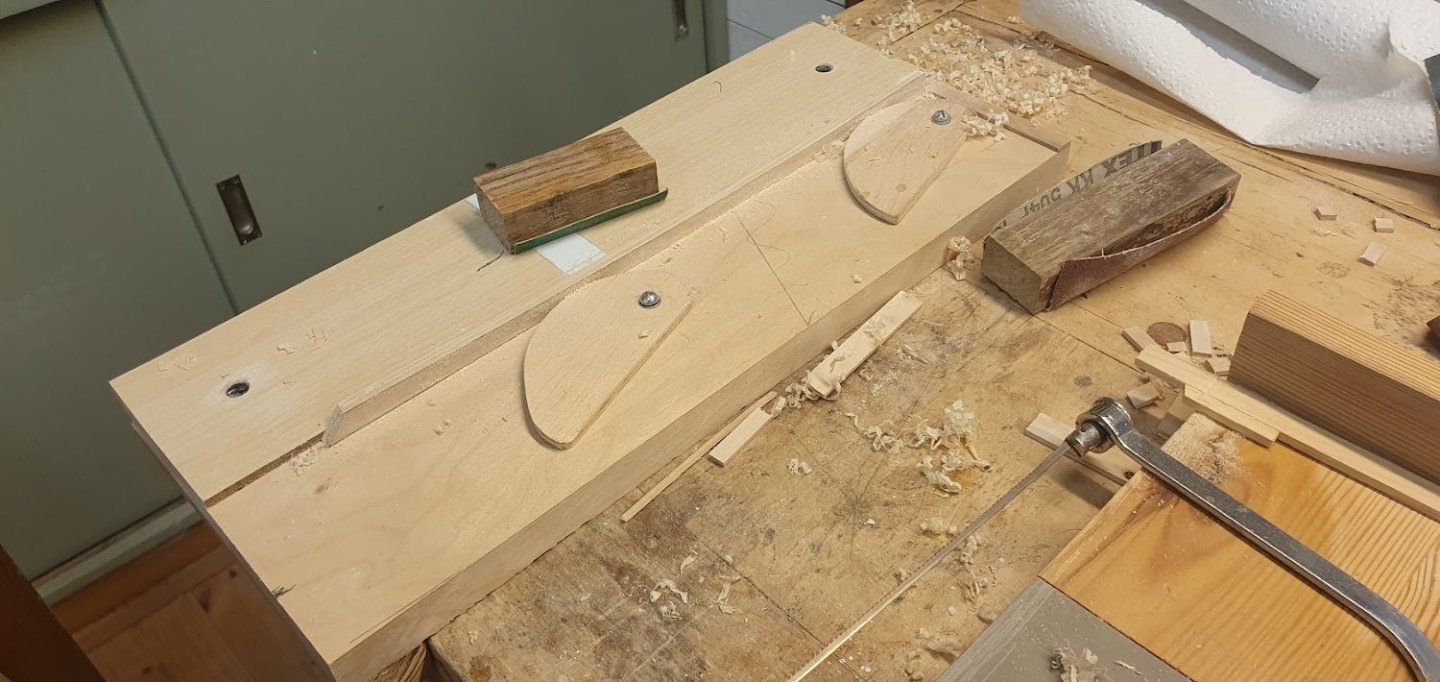
Hi @Mark Pearse, the design is influenced from one of the master builders here on MSW. Initially I had four excenters opposing each other, but I quickly removed one side and glued a steady support to one that side instead. There is not enough friction for the pieces to stay in place without additional force. So the strip holder is a two hand job, one hand to apply pressure with the help from one or both the excenters and the other hand to operate sanding block or low angle block plane. I am left handed which is why the right hand is left to do the simple task of applying pressure. I have yet to figure out how to sand/plane convex shapes in an efficient way. Adding small pieces for support is one way, but probably not the best.
-
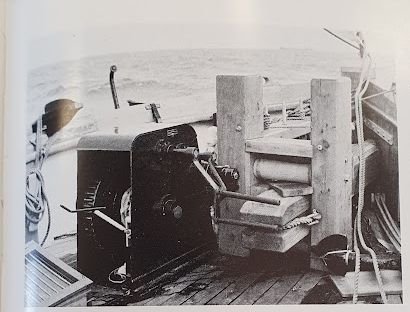
Very nice and well fabricated windlass Erik! I really like the hull form in the picture above in your previous post. You can quite easy see the resemblance with the Swedish cog that I built a couple of years ago. Keep it up!
-
I'm sorry John, it just slipped my tungoe. Let me rephrase... Watching some rugby. It seems to be green against black and for rhe moment one team has more points than the other. May the best team win!
-
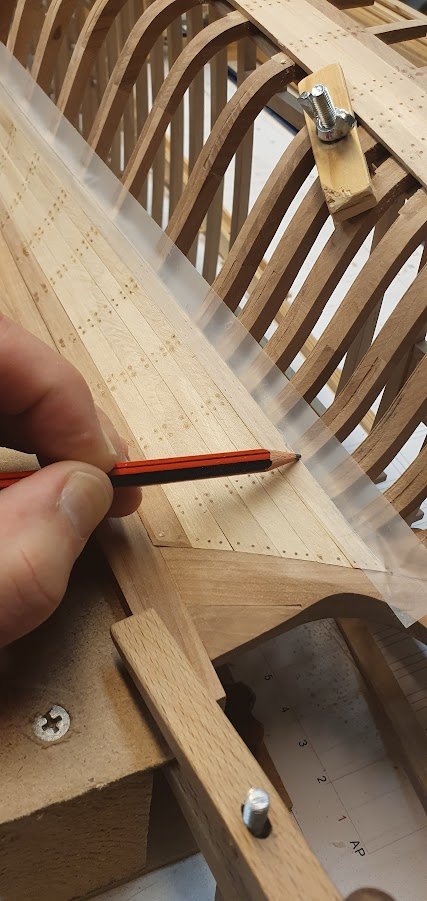
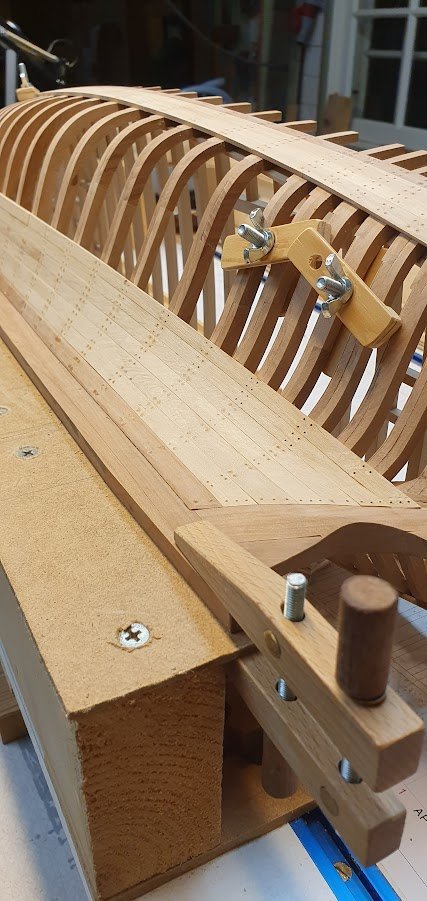
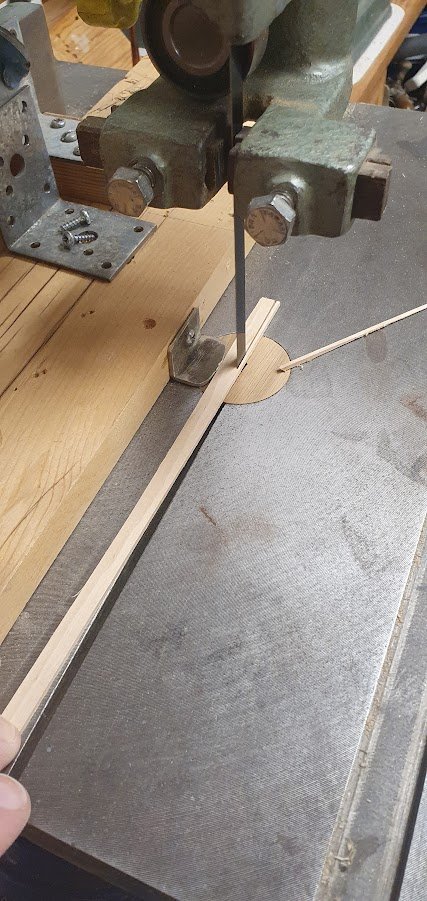
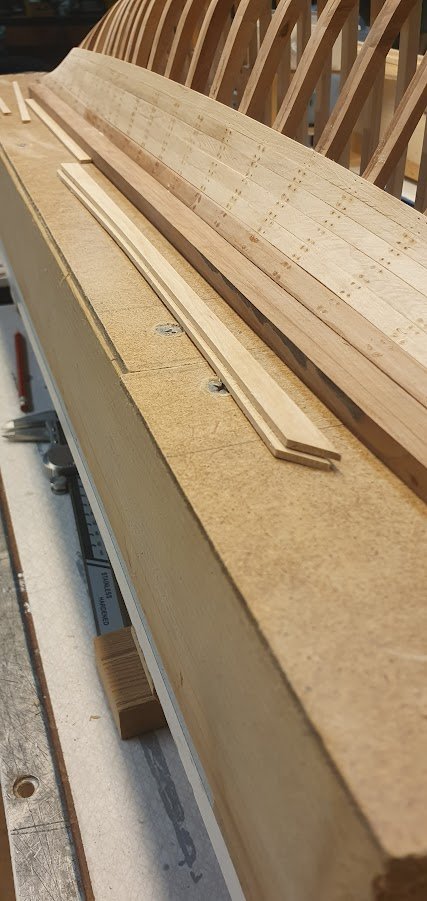
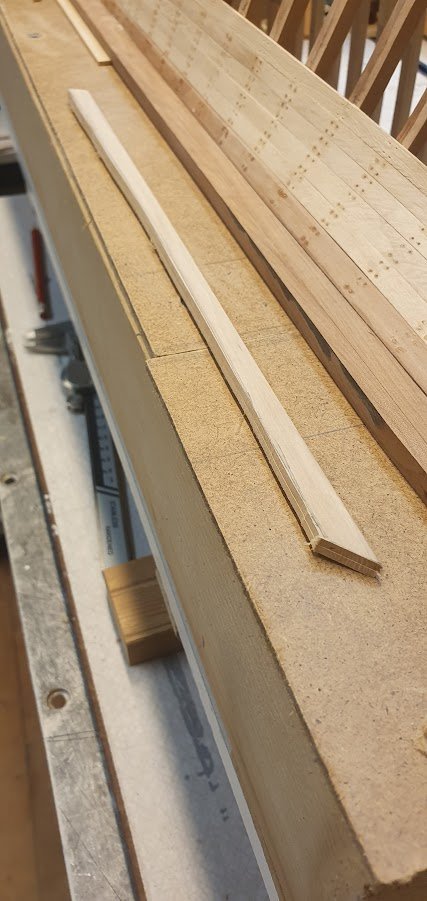
Hello to all, thanks for likes and comments along the way. 🙂 Planking along here. Just thought that I would show my take on the spiling business. It is not unique, in fact, it is what Chuck shows in one of his planking tutorials. It goes like this... 1. Use quite broad, frosted tape and run a pencil along the edge of the previous plank. 2. Since the sides should be more or less identical, I work the planks in pair. Put the tape on the plank and also take a short strip around the ends to keep them together. 3. Over to the gigantic band-saw and cut along the scribbled line. 4. Since it is a bit wavy, sanding is needed to smooth the curve out. Here you can see my contraption for holding planks and other narrow stuff while planing or sanding. 5. Over to the band-saw again and cut the planks down to width, or more likely, a bit over sized, but closer to spec at least. With a short support on the band-saw fence equal width is easy to maintain over curved stock. 6. After that, more sanding and now down to specification. It is a bit of a struggle since the planks spring down under pressure, so care must be taken to have support and not to sand away too much. 7. And finally, after a steam bath, glued and clamped in place. Holes drilled for treenails. It doesn't really show on the picture but extensive care is taken to have the plank sit firmly in the rabbet and also beveled to sit tight against the previous strake. 11 strakes done, 12 to go... yay, almost at half way! Now it's time for some WC Rugby. All Blacks against Ireland in quarter final 2. It will be a humdinger of a match (we hope :-D) And yes, It's All Blacks all the way, of course! Cheers!

-
I agree in what Keith said above, your painting skills is really something to aspire to. Beautiful!
-
Apologies to Vaddoc for temporarily hi-jacking his thread. Chapmans Architectura Navalis don't show that level of detail. But I found a couple of other leads. 1. Underhills "Plank on frame models" vol 2, plate 3, shows a ships boat (probably from a merchant man from the looks of it) and it has double knees on every thwart. 2. Short story first. A long while ago my wife saw a brown book about model ship building and thought "well that is a brown meager looking book, lets buy it for hubby". As it turns out it was a joy to read. Lovely language and descriptions. The book in question is "Ship model builders assistant" by Charles G Davis. First edition was 1926. Anyway, in chapter 17 "Boats" Davis refers to a publication from US Gvt called "Standard Boats of the US Navy" and he describes it as details as down to the last nail and screw. Then Davis goes on to refer to a French publication as "In one of the six volumes of ship's plans, published in France and compiled by Admiral de Paris, there is a set of plans showing the shape of each sized boat used in the French navy at the time". Unfortunately there is no reference list in the book so I don't have any more information about that publication. If not exactly what you are looking for it is at least something. Glad to help 🙂
-
Looks good Vaddoc! Colouring is a challenge, to say the least. White is good choice, never really wrong (and maybe not right every time either). @allanyed I don't know if that detail shows on Chapmans Architectura Navalis, but there is a plate with ships boats in there. Keep it up!
-
It does look steady though 🙂 Ah, masts, that's in the distant future for me, but it is looking good Alan. I also liked the "after" water on your carving. Big improvement. Keep it up!
-
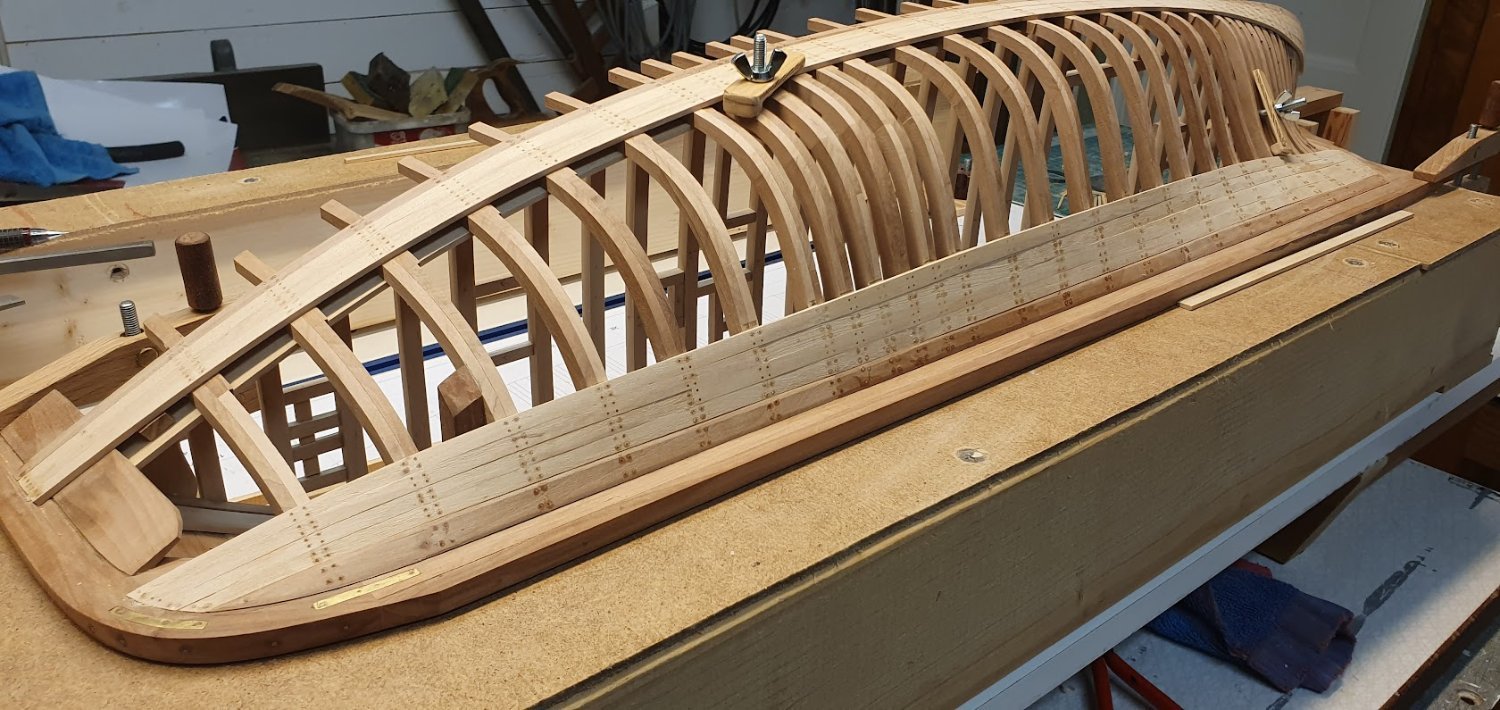
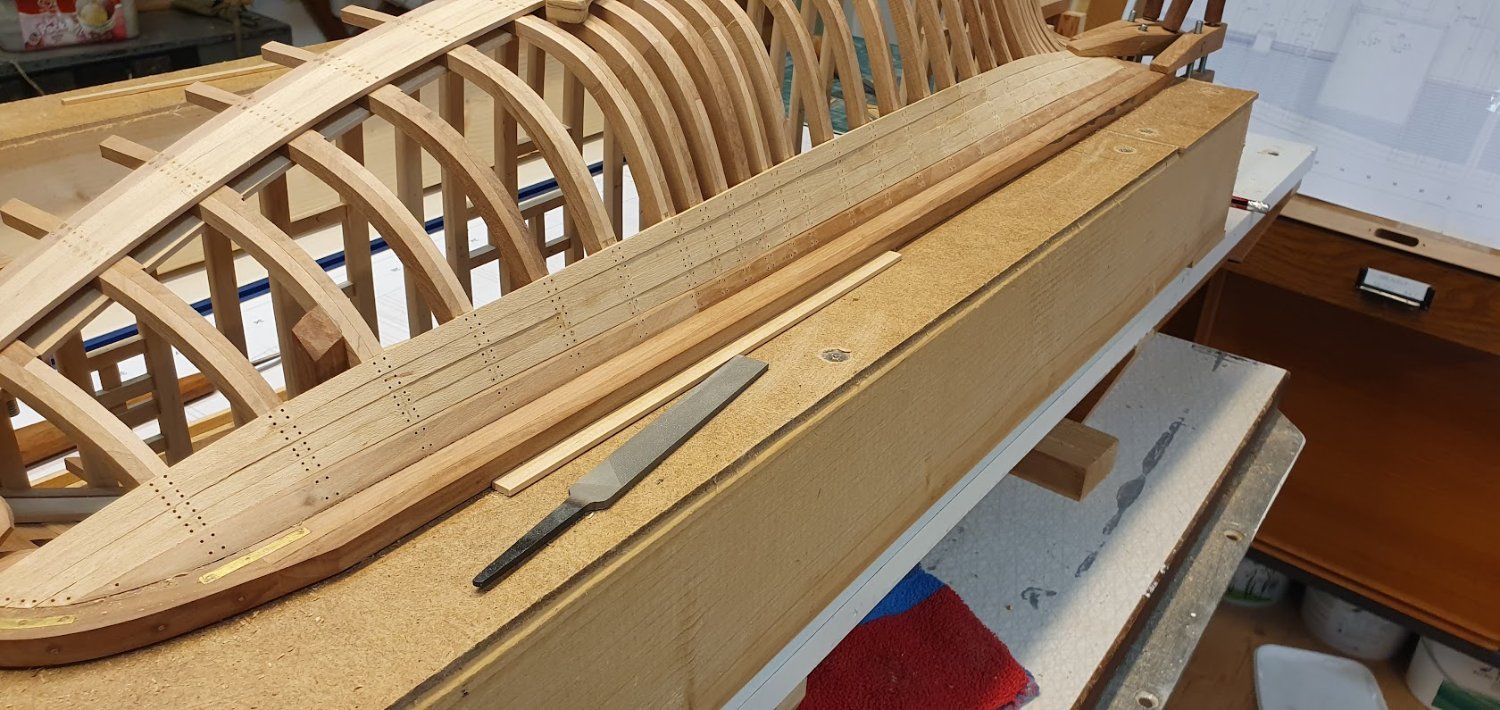
Not much to show really, but I decided to break the monotony of planking with another exciting task, tree-nailing 😄 Well, not that drawing bamboo and drilling myriads of small holes is less monotone, but anyway, better do it section by section. Holes are marked with a pointy awl before drilling and holes are about 6-7 mm deep to stop short in the frame. For planking I use diluted regular carpenters white glue and for the tree nails it's CA, medium viscosity for any that wonder. And with tree nails, or trunnels. However, on the real ship it was bolts with nut and washers. Back to the shed.


-
Thank you for the kind words Nils and don't worry, it is still a long time left of building at my current speed (or lack thereof).
-
Ah, I see Andy @FlyingFish, well, I do measure the gap and divide by the number of strakes left to fit. I also know that the thorough practice is to use lines or strips and dividing the hull in sections as to have a nice run of all planks. That is for the next build though... Right now I'm more interested in having a reasonably fair (i.e not perfect) run of the planks.
-
Trials and tribulations! But the end result looks very good. Your perseverance paid off Vaddoc. I am also glad to see that there is some kind of time study official in the vicinity to keep an eye on you 😉 😄 Keep it up!
-
Thank you John, that is true. We are our own worst critics. Thanks also for the likes guys. Thank you Andy. I am not quite sure what you mean. In case of spiling, that is needed for the upper part of the transom because those planks twist in a very unnatural way. In the bow it is more a question of keeping a firm eye on the lay of the planks. They have a tendency to dip down when looked on from a front. Also, I try to stick to the mentioned number of strakes from the book and hence I know the width of the planks midships and at the bow. But basically, I'm just wingin' it 😄
-
Mark, that depends on preferences. Yes, four days of marvelous sailing, then the engine gave in. We were counting on at least 25-30 days of sailing 😞 Over to the build. Painstakingly slow this planking business. Last time I planked a hull was over 30 yrs ago. Glad I already decided to paint the boat so I can hide the imperfections (because there are, trust me). I also don't bother to have a tidy workshop so you other guys out there won't feel so bad about yours. 😄 Cheers!
-
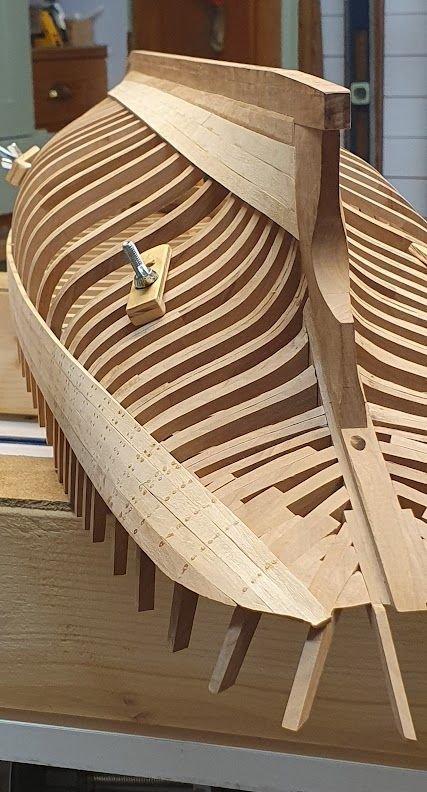
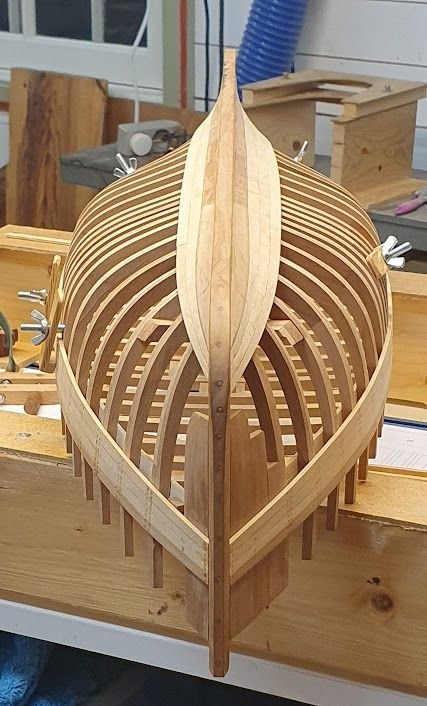
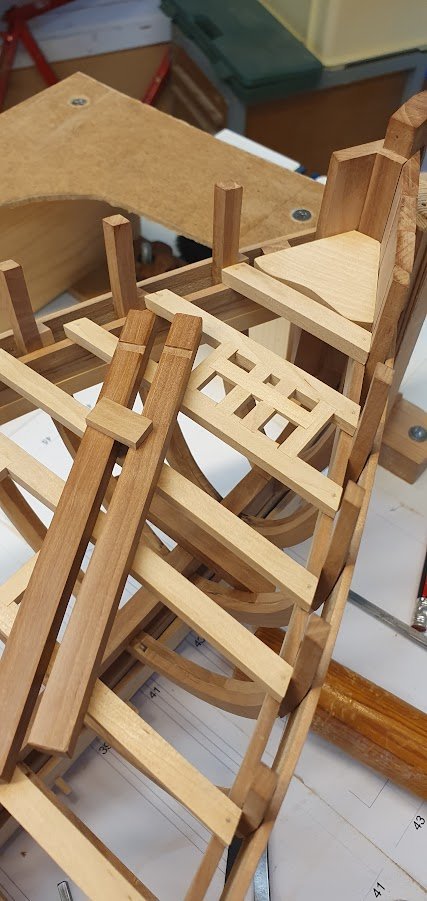
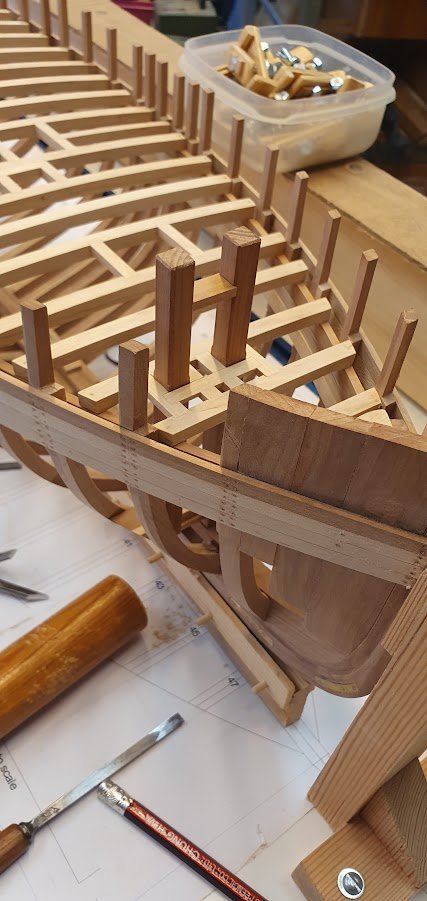
Hi all, first real update for the season. Okay, so the potential "bobo" was the arrangement for the bowsprit. The drawing only show one post but luckily I was a bit slow to build during the spring and had a look in the book. Of course there should be two posts to support the bowsprit. So, some more bracing was needed as well as a step for the heel of the second post. Tow pictures showing the small progress that in no way correlates to the hours it took. But, hey, that's true for every part of a scratch build right? I will leave them there and come back later for detailing. Note, only dry fitted at this time. Now on to the garboard...
-
Hi all, Just to let you know that I'm still around and slowly turning my attention to the shop again as the days grow shorter. Updates to come.
-
Never heard of him, so I had to some reading up on the subject. And no, Captain Horatio Pugwash has not been aired on Sweden television. I think I'm old enough to know that since being raised by "Fem myror är fler än fyra elefanter" (that will due for a funny translation) which was a 70's children show that educated us toddlers in subjects like "above", "below", "in front of", "behind". Memory games, and the interesting characters of "Spara" and "Slösa" (two females, one economic and the other spending). For the audience, my knowledge about Pugwash is down to Wikipedia: https://en.wikipedia.org/wiki/Captain_Pugwash The page contains some useful strong language to use when things not go to plan 😄