Wintergreen
-
Posts
1,002 -
Joined
-
Last visited
Content Type
Profiles
Forums
Gallery
Events
Everything posted by Wintergreen
-
Yes, extra waterlines and futtock lines helps when later the frames are created. It is futtock lines they are called, isn't it? When I first tried my luck on drafting from a original plan I had to few and over time when drafting the frames the hull shape became more and more like an egg without distinct features. I know now that when I return to that object I have to redo just about everything... Anyhow, your work is looking good!
-
Very nice work there Trussben. About the lettering, if I had had CNC-capabilities, what you did is exactly how I would have done it.
-
John, Jim, Keith, B.E, druxey - thanks for dropping by. It is always appreciated. And also thank you to all that "liked" my posts. @druxey - apology accepted. Nah, no need for apologies! With so many active build logs here on MSW it is impossible to be up do date on ever single one. Nevertheless I'm delighted that you did drop by 🙂 and yes, this Christmas will be merry in more than one meaning... apart from my health-clearance we will have all our four grandchildren over for Christmans eve (yes, we start it on xmas eve, see this excellent J Ross clip over on Youtube: https://www.youtube.com/watch?v=wjcGAKU23Qc&ab_channel=TheJonathanRossShow they actually get it all right however the cod fish is an old tradition coming from up north while the goose blood soup is from the far south of Sweden. I'm a bit disappointed that they left out honorable mention of the herring though). And yes the OP Andersson is quite strong with an alcohol of about 40%... The grandchildren are ranging from 2 months old to nearly 7, so it will be a blast in more then one sense 😄
-
Looking good B.E. I remember that druxey mounted the oars in position on his barge he build here a couple of years ago and it looked really nice. Another option is to stove three-four inside and the rest on a neat little stand beside the boat. You'll figure it out I'm sure 🙂
- 106 replies
-
- 2
-

-
- Admirals Barge
- Vanguard Models
- (and 1 more)
-
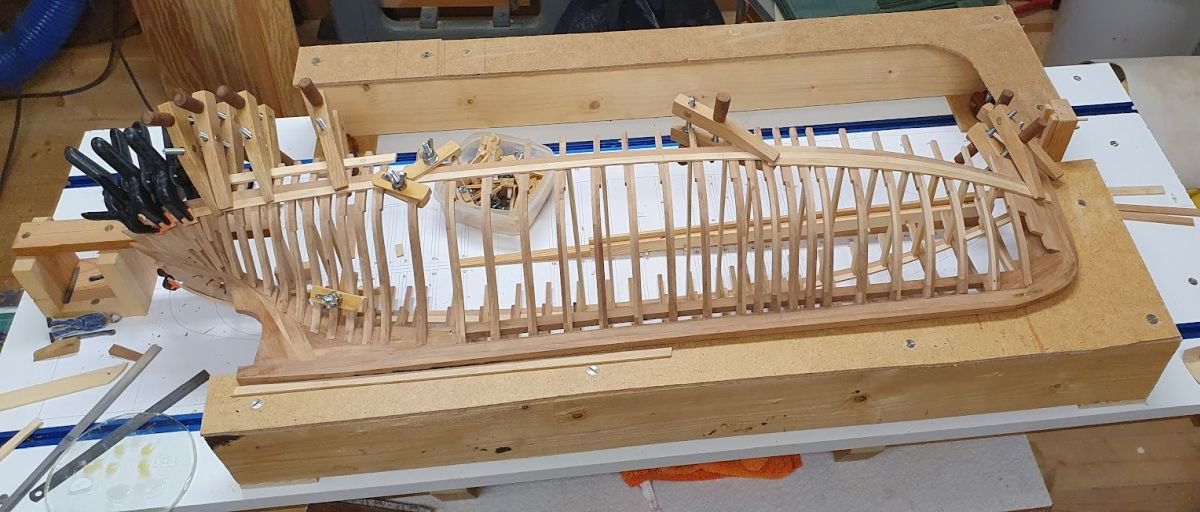
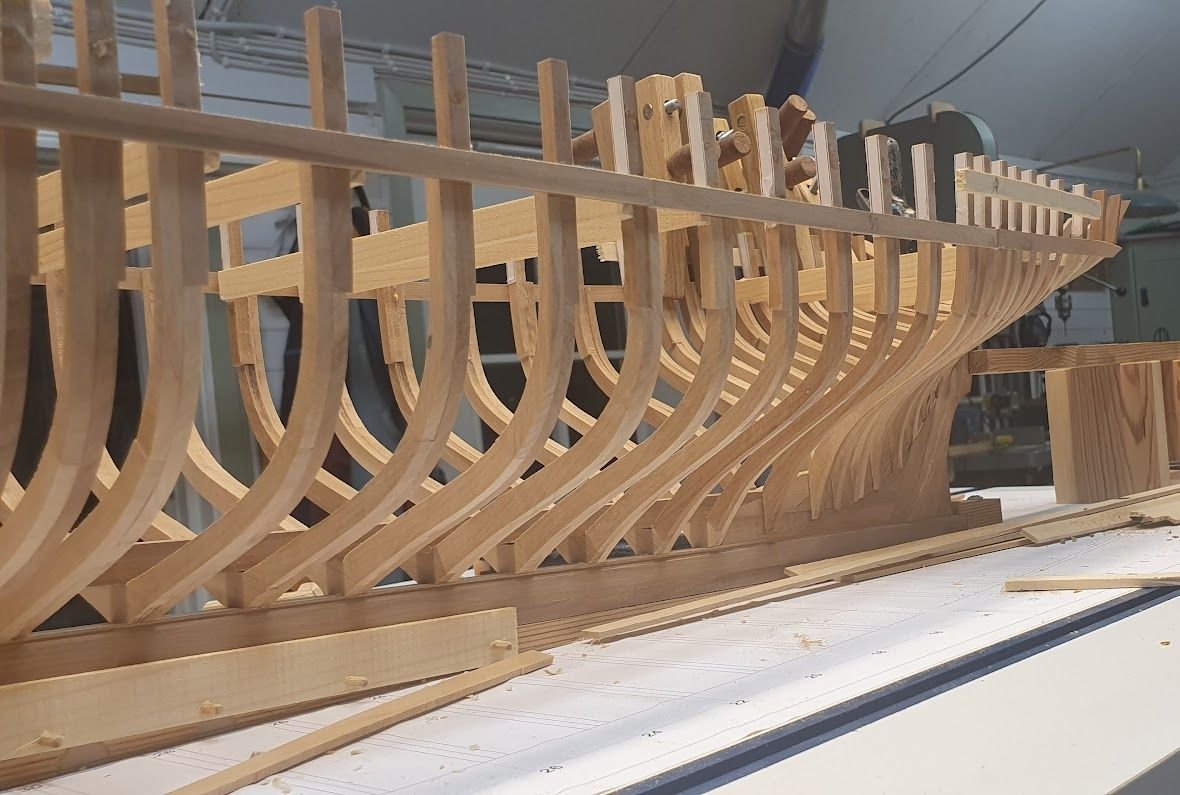
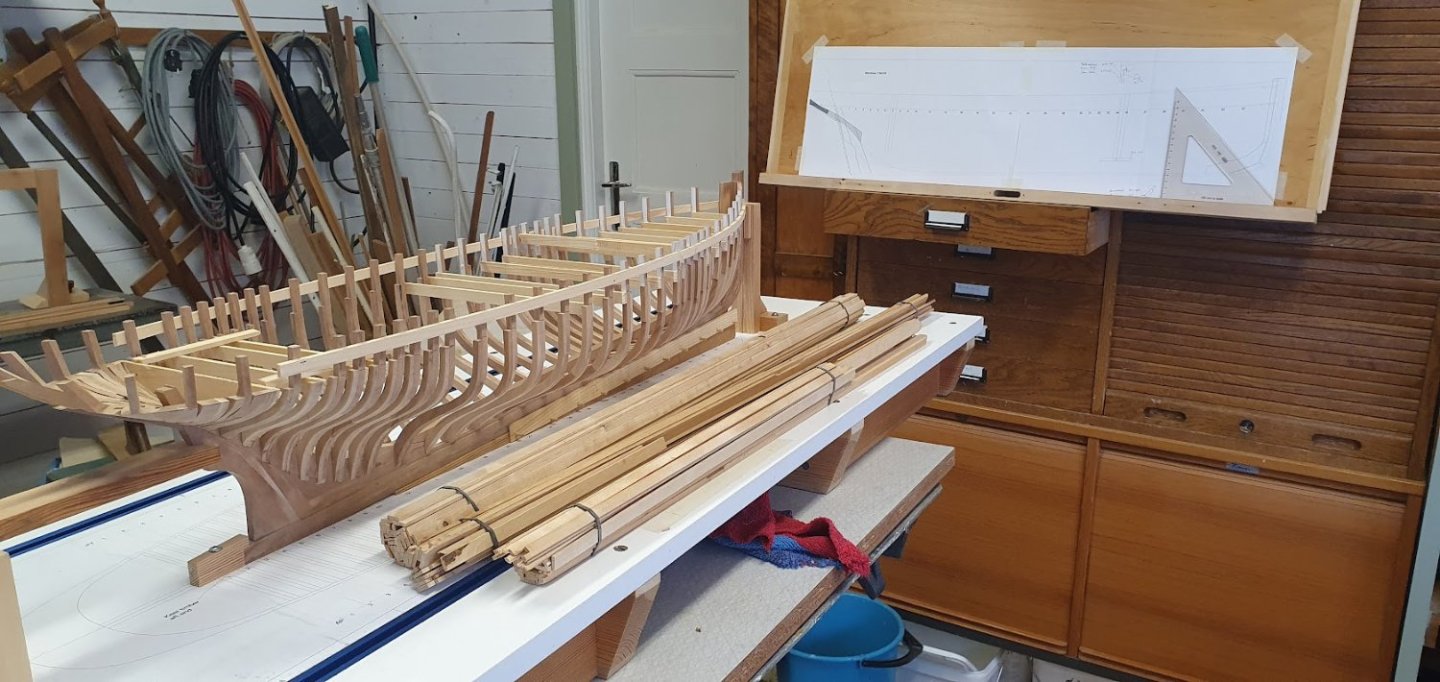
So, first bit of planking is underway. I have gradually removed the pine-boards to get more access. For the first strake I left them on, but once no2 was in place I pried them away. The stanchions will be sand so don't worry about the glue residue. One thing I remember about planking is that it is necessary to work on both sides interchangeably. Otherwise the hull will end up with the form of a latin gondola... Then about the workplace, I do most of the work on the center island standing. For me it is easier to move around. Of course it comes down to personal preference. Having the hull upright while planking made it hard to see how the planks lined up and fitted against each other. For sanding purposes I put together a simple horizontal hull-holder with the "shape" removable by screws. But, since swapping the hull from side to side is done a couple of times per session I made one more. Now I just can flip the hull over and work on the other side. It is also really easy to see all contact points and get a good fit. Two complete bands done and no3 is started. When no4 is in place attention will move to the inside and prepare for the deck.
-
I like the attention to consequence of details, meaning the oars are obviously too short for single bank, as you say. So, what do to? Keep the originals and pretend like it's nothing or go the extra mile and manufacture new oars that fit the setup. Probably some kit builders would ignore and stick to the provided set. I like the extra mile you took, B.E. 🙂 And I would even say that the oars score on the druxey-scale 😉
- 106 replies
-
- 2
-
-
- Admirals Barge
- Vanguard Models
- (and 1 more)
-
Nicely done B.E! It is a bit hard to envision the size of the barge even though I understand that the cutting mat i 10x10mm. Toss in a ball point pen and it will be obvious how delicate the build is. The mdf does shame the overall impression. If it was me I would paint it. Maybe not white, but off white or something similar white-yellowish or so. Not too prominent anyway. Or why not use the shape as template and do a build-up support instead? It would be "lighter" in impression compared to the quite sturdy mdf-supports?
- 106 replies
-
- 2
-
-
- Admirals Barge
- Vanguard Models
- (and 1 more)
-
Keith, they weren't really wrong, only suspicious. And when cancer is the issue you are sick until proven otherwise. And yes, they're going to patch me up for normal business down there. It has been interesting to have the stomia. I understand that people can get more or less paralyzed having one, but not me. Choice of clothes is a bit different, but apart from that I have even been down to a public beach with my brothers for a swim. Only a curious 6-yo confronted me with "What's that??" So I gave him a quick explanation. His dad was nearby and surely overheard the discussion and I left it to him for the follow up 😄 @FlyingFish, @Jim Lad, @mtaylor - thank you guys! Very much appreciate the kind words ❤️
-
Hi guys, just a quick update that I wanted to share with you. Had an appointment with the dr today an they've finally agreed upon that there are no signs of anything malicious in my liver whatsoever! Will be scheduled for a final surgery after new years and then I'm done! 😀 T'is the season to be jolly, fa la la la laa, la la la la!
-
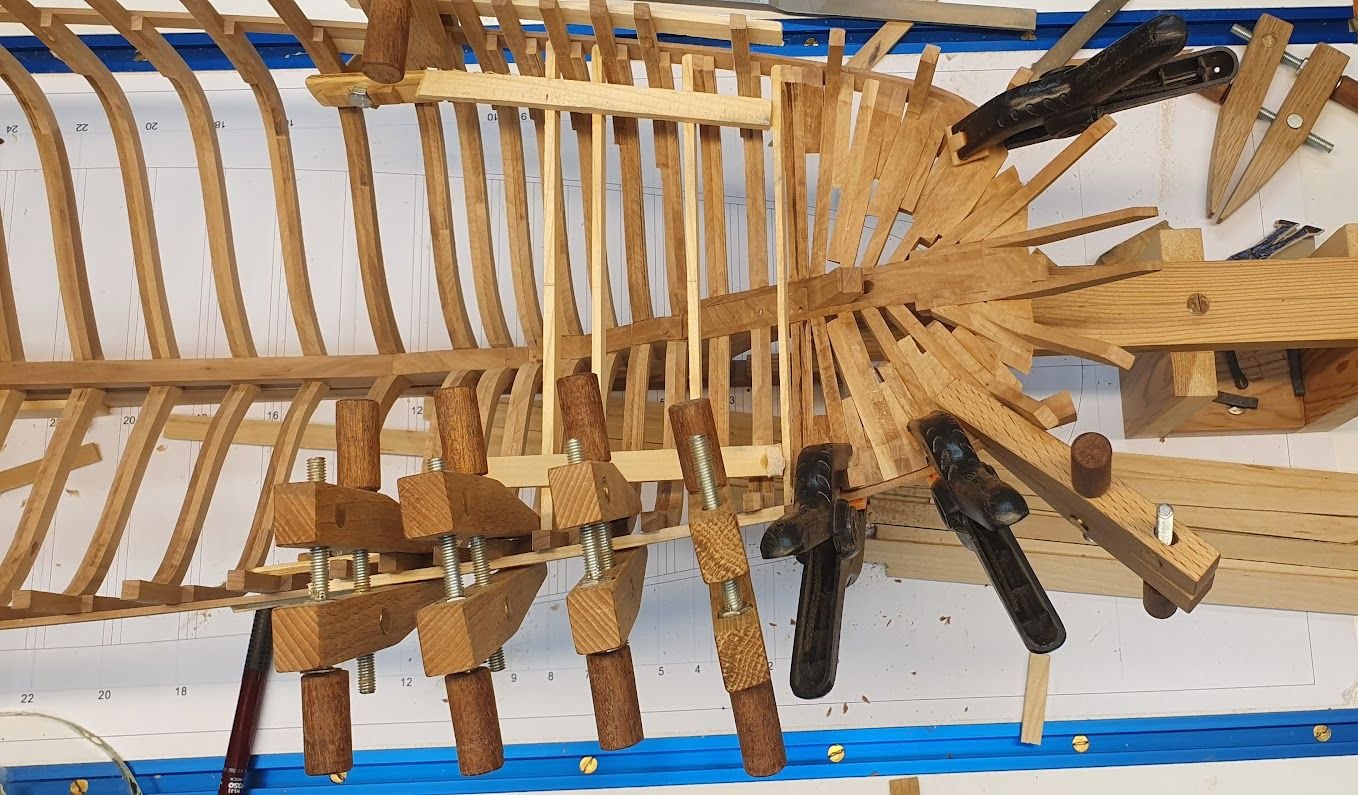
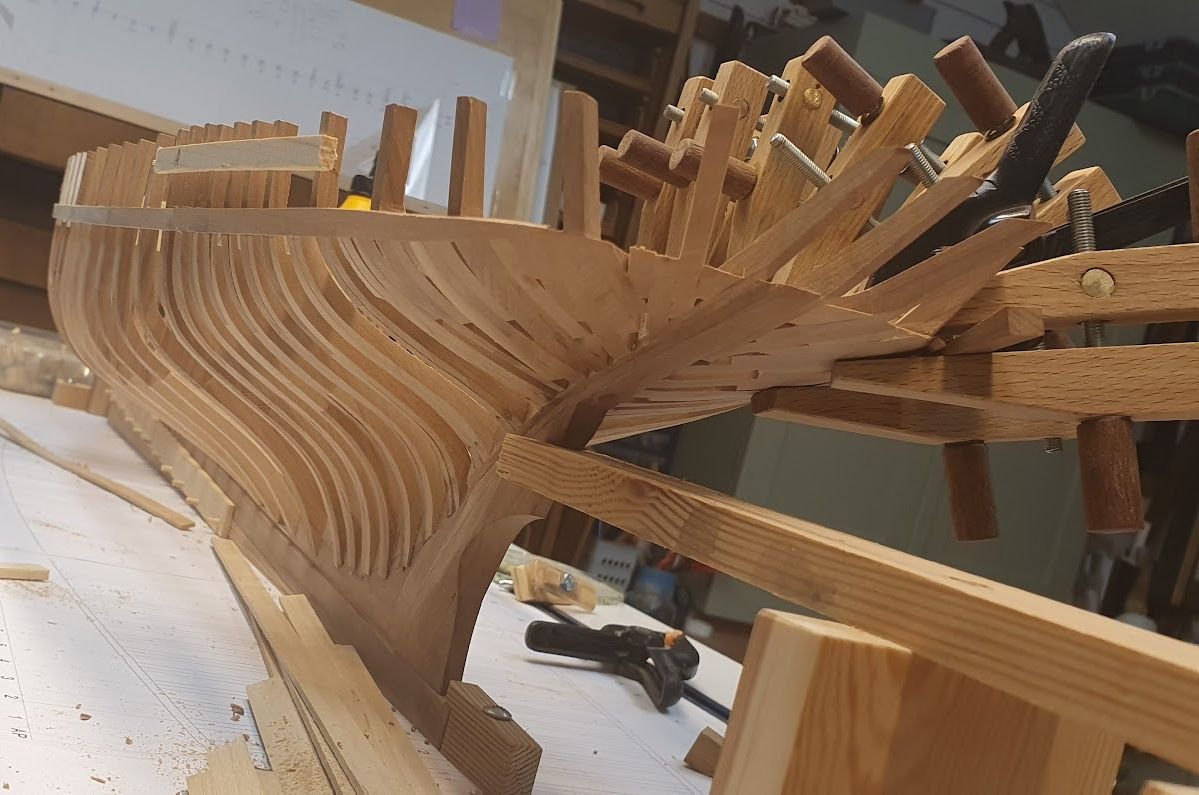
So, let's see how the first run of the planks turned out, shall we? The complete run of planks is four pieces, which is what the Danes used on the real one. The after most needed some persuasion to get into shape (and really, don't we all? 😉 ) To make the piece more negotiable I used my home made steam box. 5 minutes in the Finnish sauna and let sit overnight and it was bent like an old salt. Here below you see the port piece being glued while the starboard one is persuaded to sit tight. Another angle And here are two shots from different perspectives. This is before any trimming, which is evident is needed. In the last photo the starboard piece is glued in place. A small wedge is used to force last little tip up against the hull. Also, it is a good picture showing how the entire rear end is filled with timber. The real shipwrights had the argument that they couldn't be bothered trying to calculate where each plank ended, so they filled it with timber.
-
🙂 "least worst" option goes hand in hand with the common "not too bad" option, I just love the UK-English language ❤️ (honestly I do!) "Bloody excellent" though, would be my way of react to what you show us B.E. Keep it up!
- 106 replies
-
- 6
-
-
- Admirals Barge
- Vanguard Models
- (and 1 more)
-
And another thing, please show us a screenshot of the plans so we can admire the selected ship 😉 As you state, Nelsons navy is well represented here on MSW as well is the French navy.
-
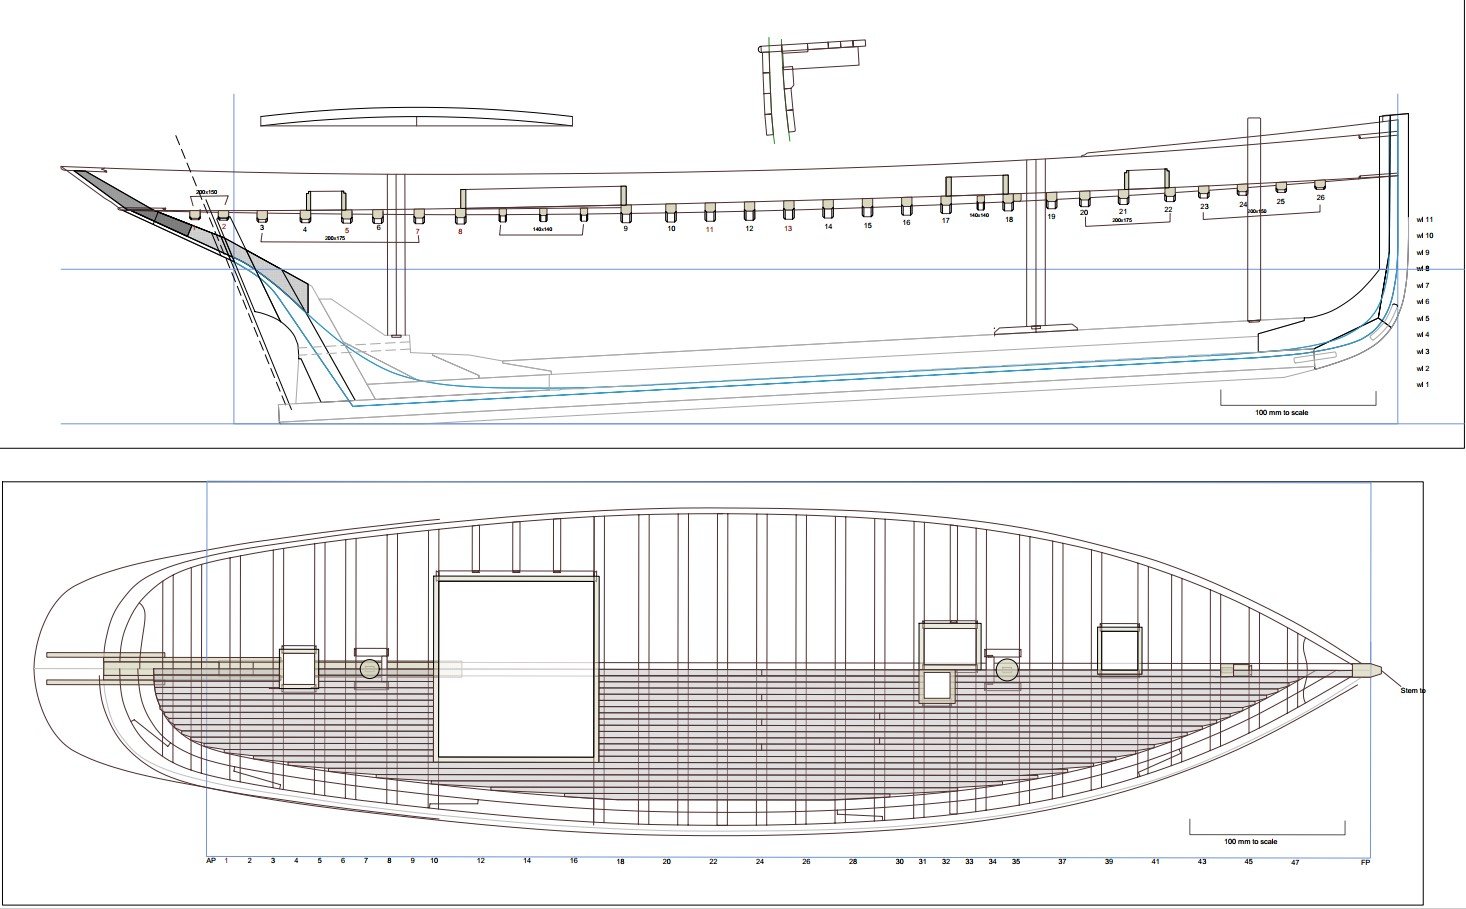
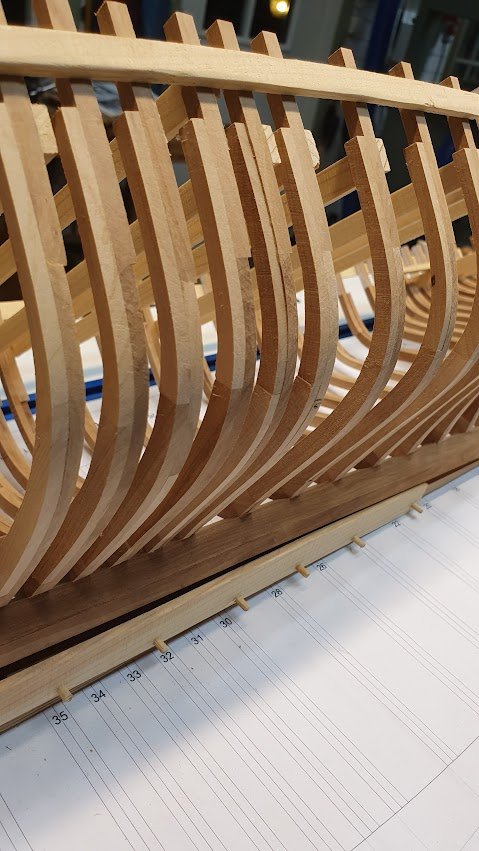
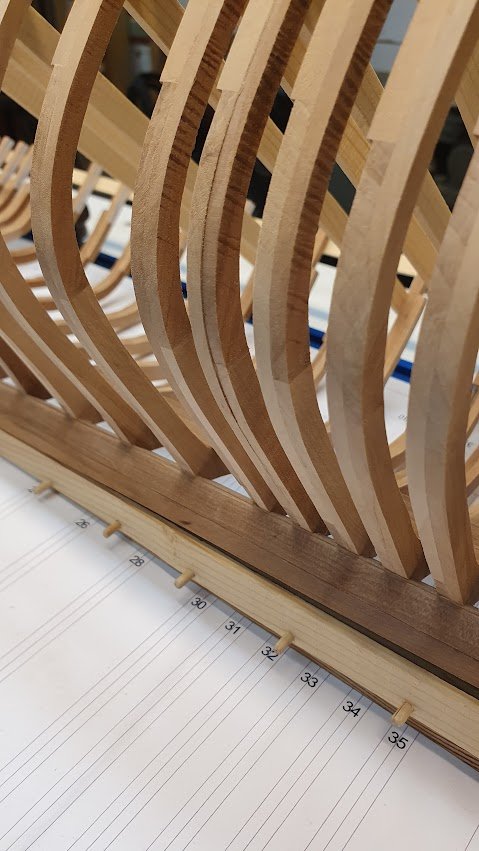
Greetings Anguirel! The reason for the station lines ending "inside" the outer keel line is that at those areas the keel timber is cut away, a recess, to let the planking run smoothly to the end of the rabbet. You will see this if you look on the first pages of many builds here. I attach a picture of my own build as well for reference. But to answer your question on where the water lines should end - I would treat the keel as full width during the drafting and end the waterlines accordingly. Then, when you start to build the ship, keel and frames are faired so that the shapes make sense. I had troubles understanding this as well and thought in the end that once building it would be clear. Hope this helps and if I'm completely wrong I hope someone will correct me. Sinceramente
-
Thank you B.E and welcome along for the ride! I have chosen the scale, 1:30, so the boat would be reasonably sized (i.e. not too big) but still manageable to get a lot of detail in. We're not all like EdT that can do fully detailed HMS V at 1:96 (1/8 imperial). And it's actually my first (almost) fully framed model. The C is a bummer, really. My take was to be open with it, both in family but also at the job and here as well. The outcome is uncertain for most, but then life as a whole is not to be taken for granted either. "All we have to decide is what to do with the time that is given us" /Gandalf
-
Yes John, it really was ... not! At first I just walked away, but then I realized that I probably had a chance to unglue it with water before the glue set permanently. Which actually worked quite well. I will assess the situation today after work. Going forward I will switch to regular carpenters white glue (outdoors edition) instead of the aliphatic resin I used for the first planks. Reason is a long setting time compared to the resin that sets within 5 minutes. It will give me a little longer peace of mind fiddling with the clamps and all.
-
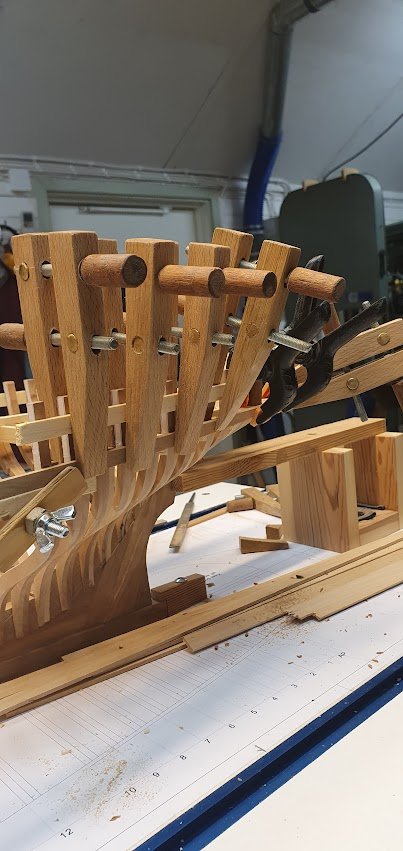
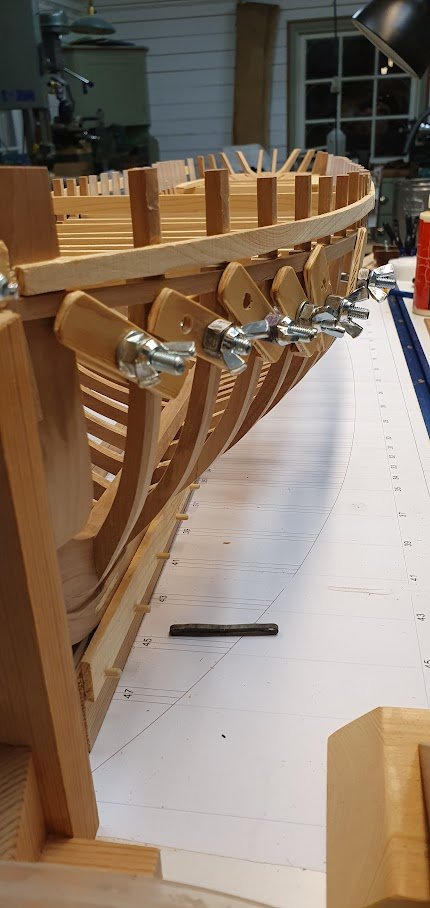
Thanks for likes and comments 🙂 Today was the day apparently... first strakes fitted and glued. A small step for mankind, but a big step for me. And of course... when doing the starboard side the first strake came up too high. Had to un-glue the forward piece and glue again (no pictures on the mishap though). The clamps are a derivative of EdT:s clamps from the Naiad book. I've seen other renderings as well around here on MSW. I made some 15 or so as to never run out of clamps (can't have too many, right?). Til next time, ta!
-
Interesting thread this one. The two Speedwell volumes are patiently waiting in my library. But regarding your renders of the carvings Chuck... I can't even begin to understand how you do it in the computer. But then, I don't have to. I think I'll just pull up a chair in the back row and admire your work. 🙂 Keep it up!
-
I bet the panels look quite good at an ordinary watching distance (i.e. more than 9 inches anyway). Finicky work, but well executed B.E. Keep it up!
- 106 replies
-
- 3
-
-
- Admirals Barge
- Vanguard Models
- (and 1 more)
-
Thank you guys for the encouragement! Well, I've been messing around with the software again. Below you can see my setup for the plans. It's an old drawer that's been converted, or "up-cycled" to a display board. Works like a charm. Also in the picture are all boards for the planking. Birch if you want to know, ripped from the big plank in a previous post. This is the status of my plans. I think I have the most important pieces there now. It is a bit blurry because it is an image of an image... looks perfect in PDF, which I use for printing. Planking.. any day now 😉 Cheers!

-
Yes, that was another thought I had. However, that engages some difficulties about very thin pieces to laminate. 😮 Can't really tell from the pictures, but I guess the thickness is somewhere around a mm or 1-2/32"?
-
What Yves said, nice save B.E! Keep it up!
- 106 replies
-
- 3
-
-
- Admirals Barge
- Vanguard Models
- (and 1 more)
-
A noob question here, but what would the option be? Several shorter pieces steam bent to fit or how would one do it?
-
That is some excellent planking you're showing us in the previous post! I am a bit nervous for my own planking since I have planked only two hulls and that whas 30+ years ago. Keep it up!
- 118 replies
-
- 4
-
-
- billing boats
- meta 484
- (and 1 more)
-
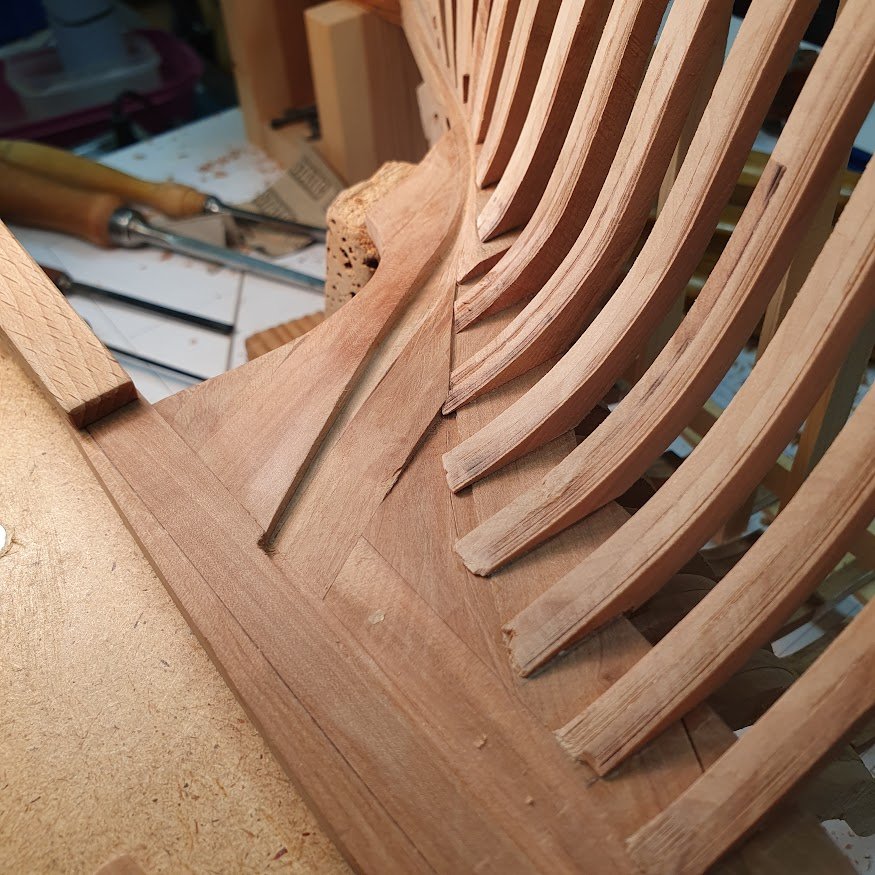
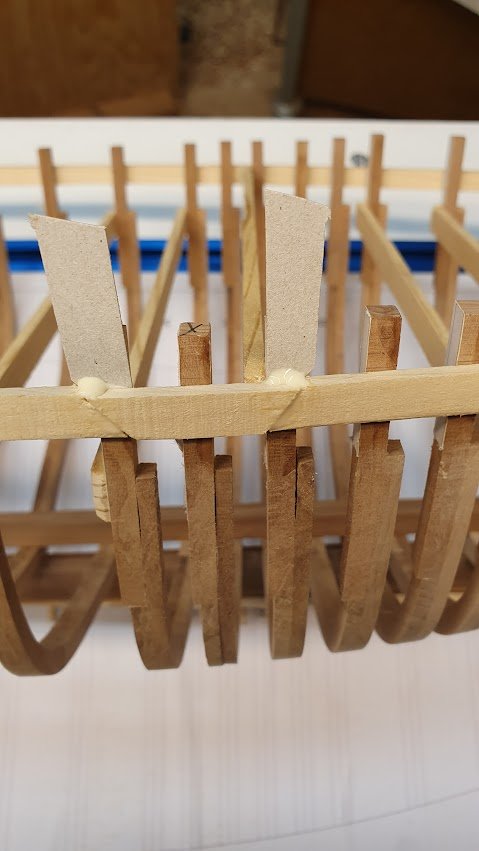
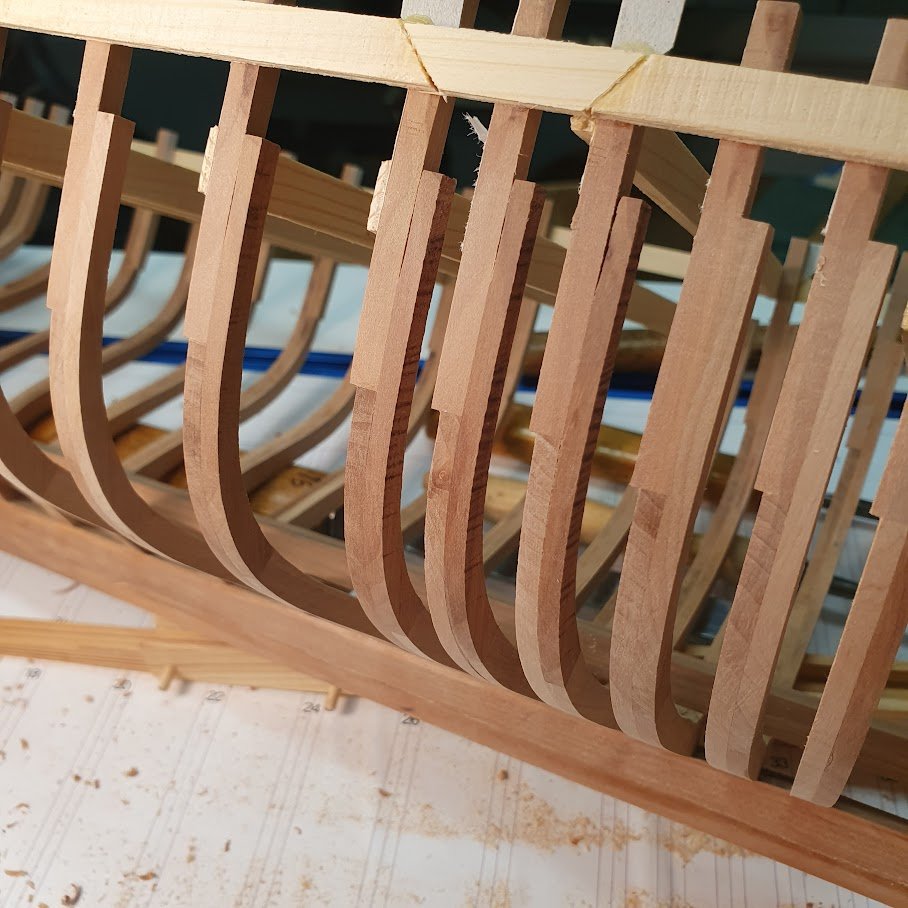
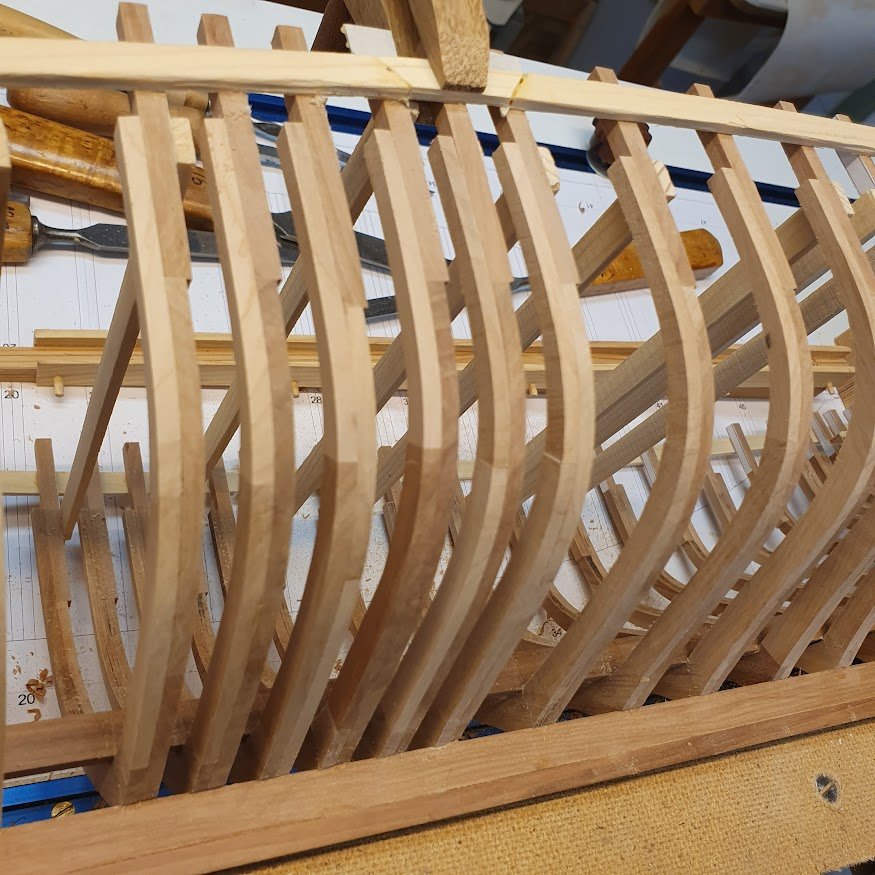
Indeed so @KeithAug 🥶 Another little issue that needed some kind of fix was one frame in particular. The frames are buildup in two layers and they were sanded smooth a while ago. As can be seen in the following two pictures, this frame sits a bit low. Luckily the only one, and equally so on both sides. The step is less than a millimeter but with Murphy hanging around you can bet that some of the planking will meet there and will then have a lot more sanding to do to even out the hull. As can be seen in my pictures I have glued a soft pine strip to keep everything in place. What I simply did was to cut the pine strip on adjacent frames, carve it loose and squeeze in some cardboard strips to force the culprit outwards. Like so. In the above picture the step is quite obvious. Then it was a matter of more sanding and voilá! Sorry about the out of focus picture above. Seems like the phone camera honed in on the dust and shavings instead of the smooth frames. Guess we're all guilty of that sometimes... Thanks for likes and comments guys!
-
Hello John! Glad you popped by my blog 🙂 It is true, just let the chisel down and walk away. I tend to recognize these days quite early on, but it's so frustrating when you were planning for a day in the shed. Well well, nothing happened to the model and what was broke is now fixed. Today is a new day! Exercise is already handled, onto breakfast and then some snow showelling to clear a path to the shed. First snowfall for the season, some 200mm/8". But it will thaw away coming week.