kruginmi
-
Posts
630 -
Joined
-
Last visited
Content Type
Profiles
Forums
Gallery
Events
Everything posted by kruginmi
-
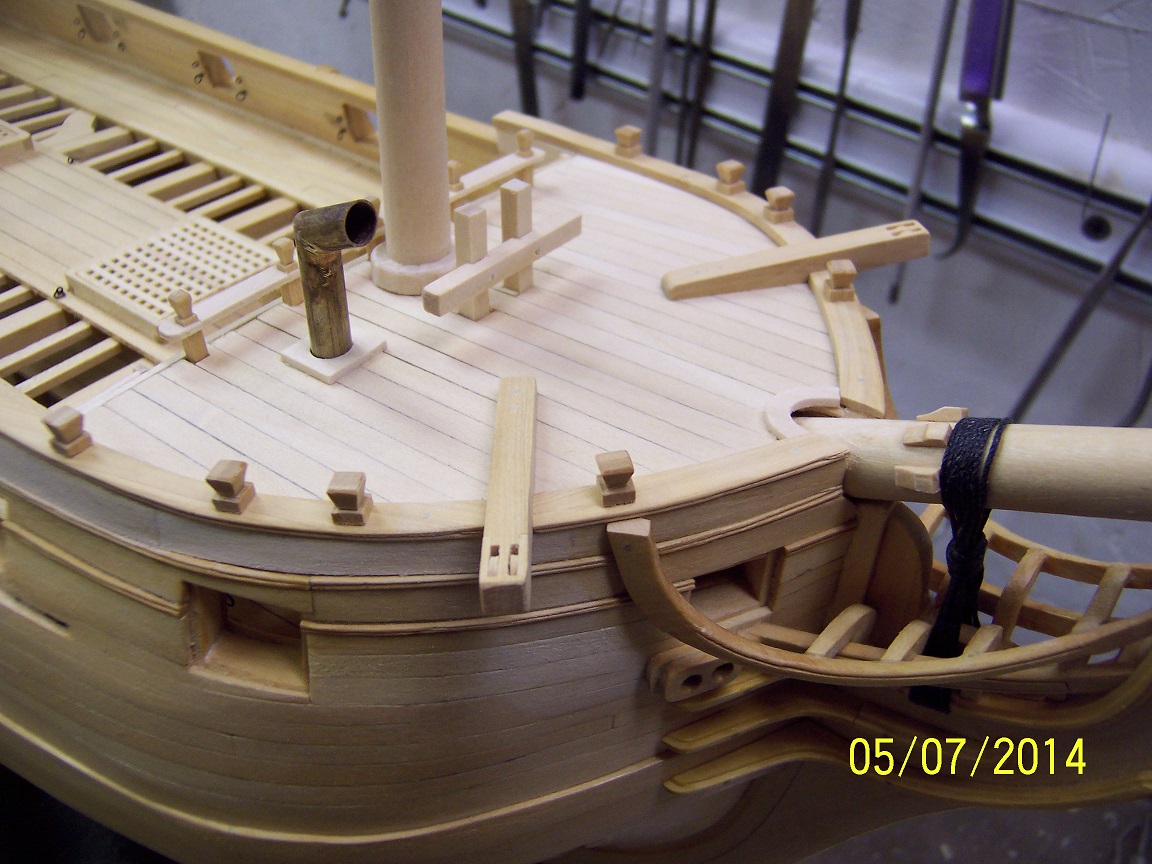
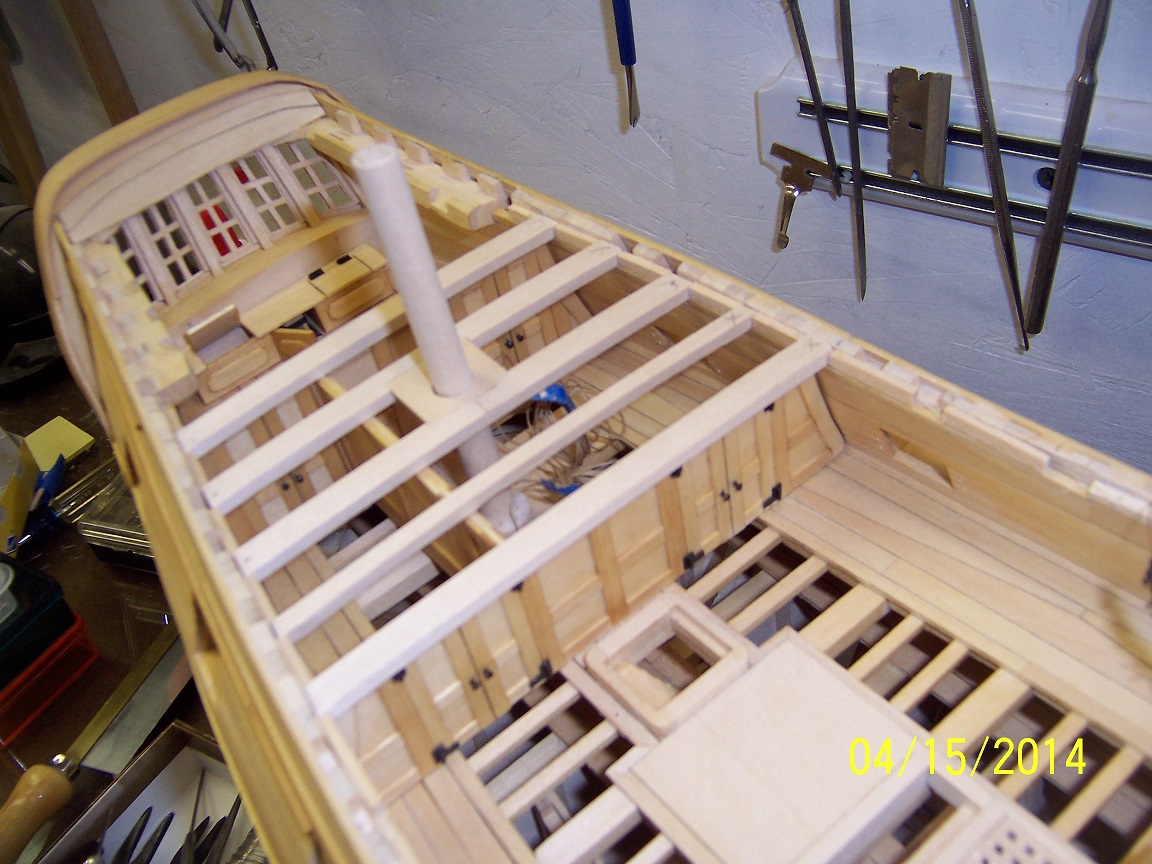
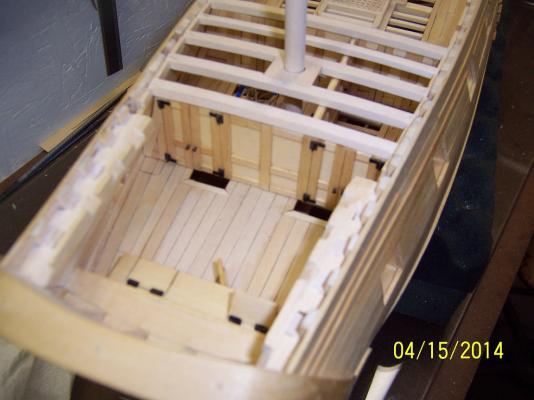
 It seems like every day I add things that now make a significant difference in the look. Yesterday was the timberheads, gluing the cap rails down and assembling and fastening the ladders. I have talked / covered how this was done in other parts of the build so I just attach some new photos: Boy, that camera angle sure makes those ladders look totally crazy width wise. That is optics. I have the cleats, blackening the chimney and the eking rails left before gel coating and moving back to the quarterdeck. Stay Building my Friends, Mark
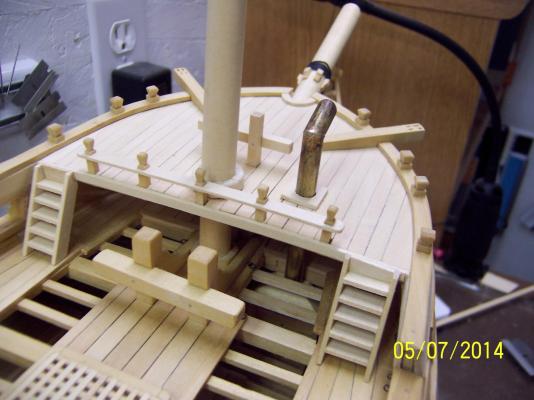

- 268 replies
-
- 16
-

-
So many details that take so much time and never seem to end! The other big thing is the worry that you will forget something then plank over, making it next to impossible to go back and put it in. So glad you have not had any of those moments. Looking great. Everything is coming together for you! So much planning up front has produced results. Mark
-
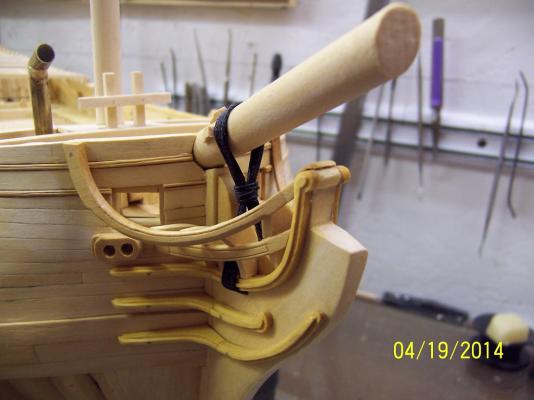
Continuing to hammer away at the forecastle as time allows. The floor planking is complete and this evening I pretty much got the cap rails. They are not glued as of yet: This leaves the tie down posts which affix to the cap rails, cleats, 2 ladders, blackening of the chimney and the eking rails. Oh - the scroll transition piece from upper to lower railing. The list continually shrinks. I am amazed at how much the look of the ship has changed in the last couple of weeks. Tracing the exposed deck beam onto some paper was VERY key to making the deck plank cover up board quite easy. It does not cover up the entire deck beam to give some more grip / glue area to the ladders. My plan for the tie down posts is, once their locations are known, to drill a hole for a dowel through the cap rail. Then the tie down post will be tack glued above this hole. Once set, I will drill from the bottom and then insert the dowel. Less things to juggle and should insure an accurate fit. Stay Building My Friends, Mark


- 268 replies
-
- 10
-
-
Thanks Nils, The list of things to do is definitely shrinking but the hours required always stay out there a bit. Seeing glimpses of things completing is a good push to press on. Hope that cap rail process goes smooth! Mark
-
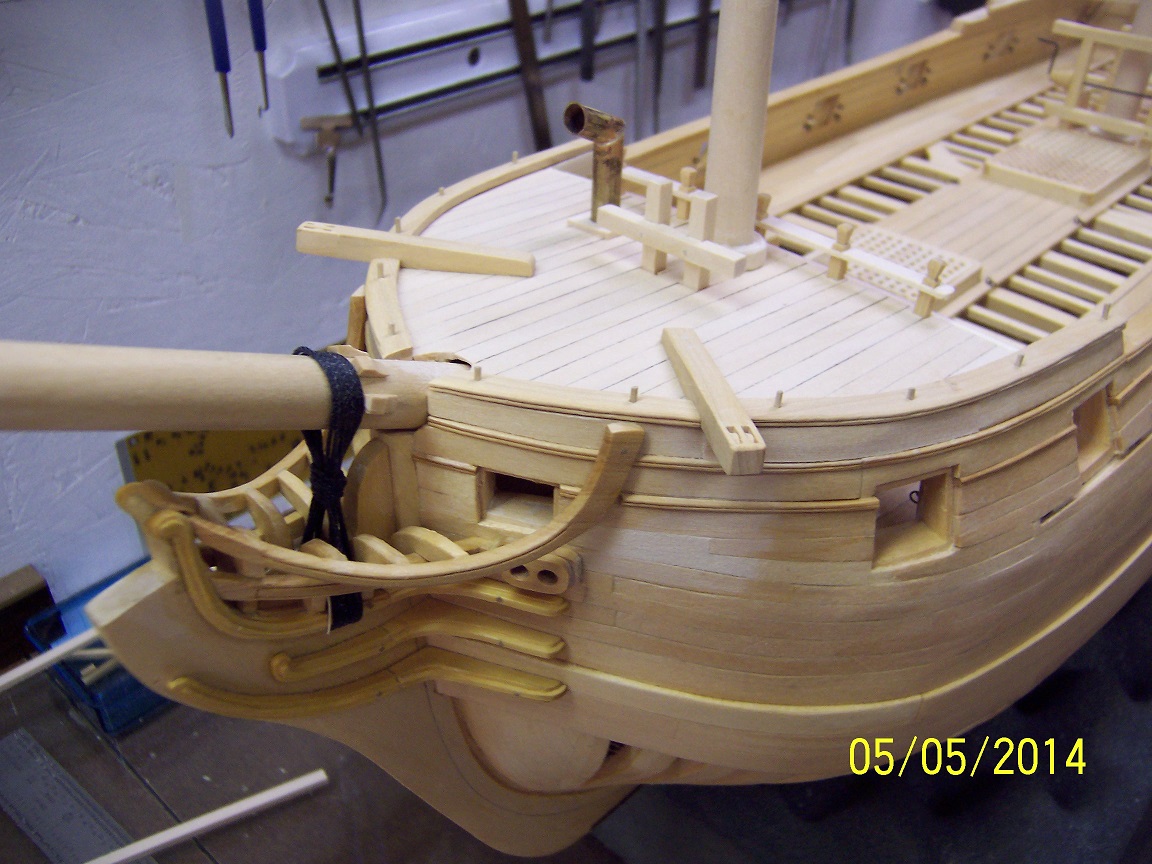
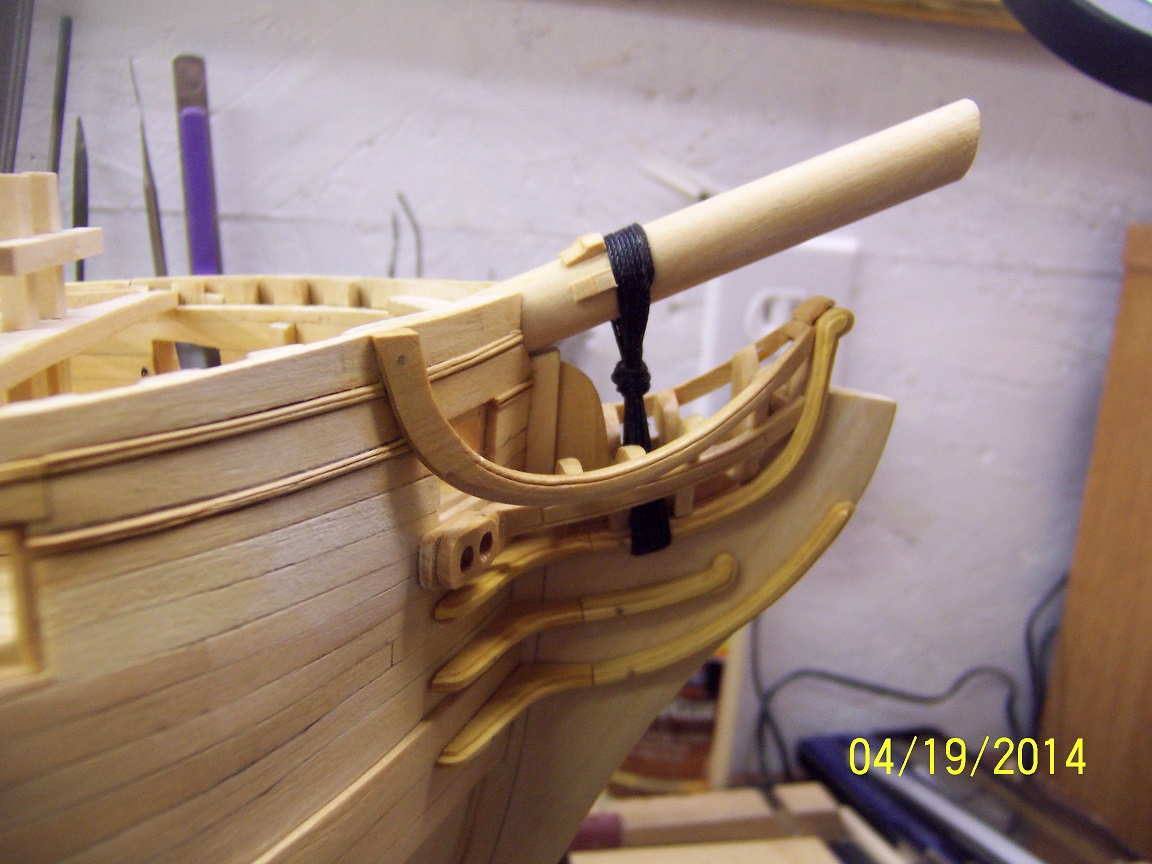
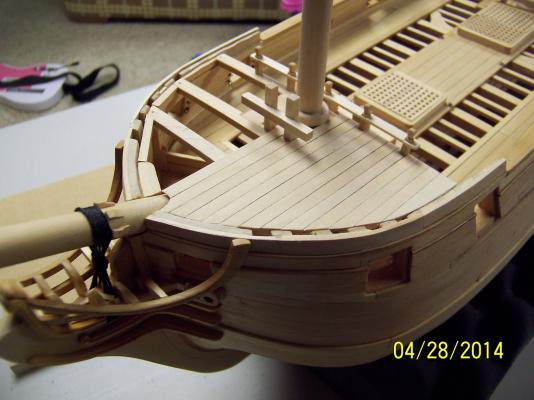
On to the catheads! I decided to opt for a stylized cathead, one that didn't include the section underneath the forecastle. This was in keeping with not including the knees. To simplify things I decided to plank the forecastle first and then add the catheads. I will probably chisel them in just a tad for added realism. I have only planked one side currently to allow me to know exactly where the beams are. Both sides will eventually be planked. It was at this point that I sanded everything perfectly level between the internal and outside planks. A cap rail will cover the ribs, ends of the floor planks and outside planks. I cut some boxwood to the correct dimension of the catheads and measured out there targeted locations. At this scale (1/48) my preferred method of defining sheaves is to cut out everything except the center, then rebuild (essentially as built practice). This meant lots of careful chiseling. Which isn't obvious here is that I did add a mortise past the sheave hole for the mating piece to fit into for strength. For the sheaves I lathed down some boxwood. They fit perfectly in the sheave slots and I was quite happy at the result. I finally added an angle to the inboard cathead to simulate it going below deck. I still need to dowel it solid in place but it is definitely a keeper. When I add the cap rail it will really make this strong. Now I just need to duplicate on the other side (but not forget to include the hole for the chimney in the planking!). Stay building my friends, Mark


- 268 replies
-
- 10
-
-
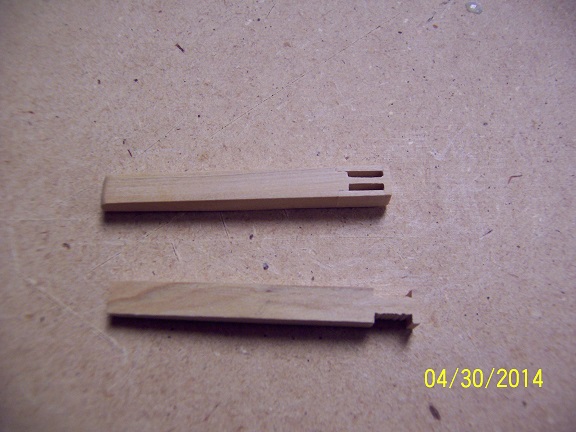
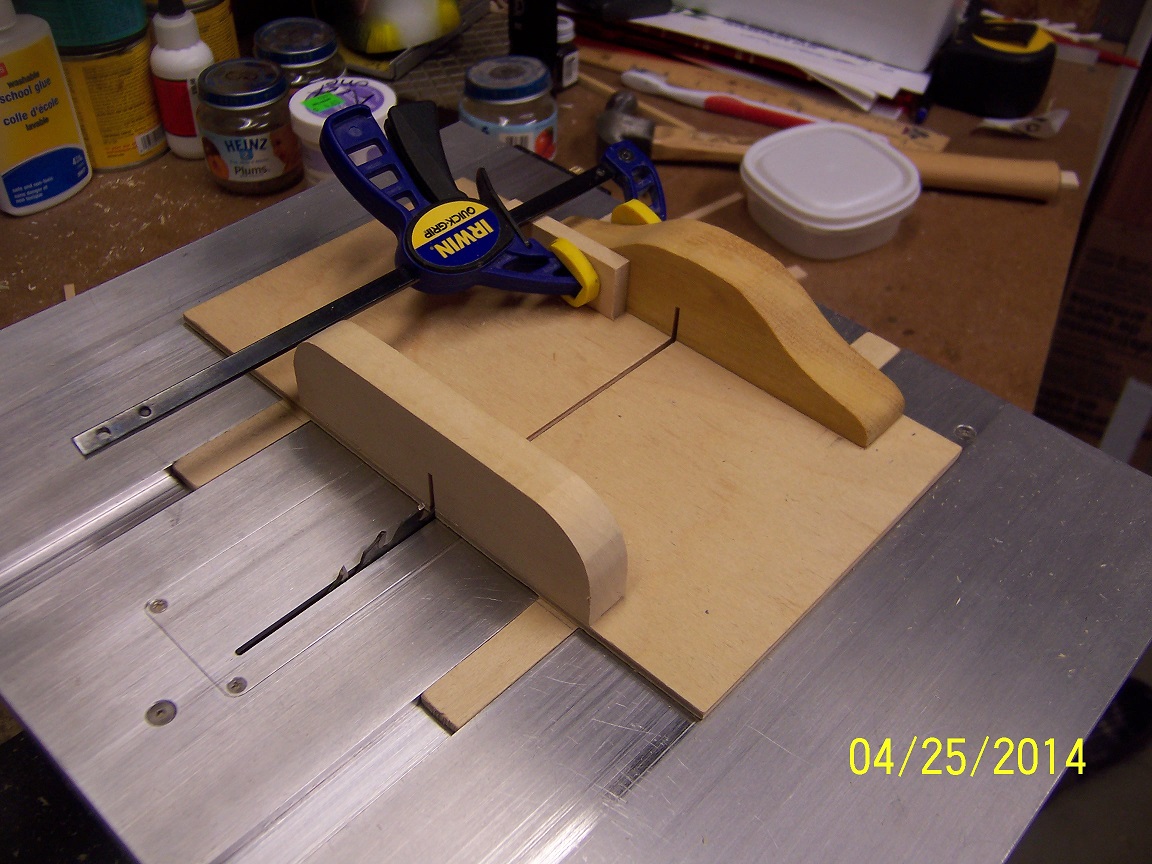
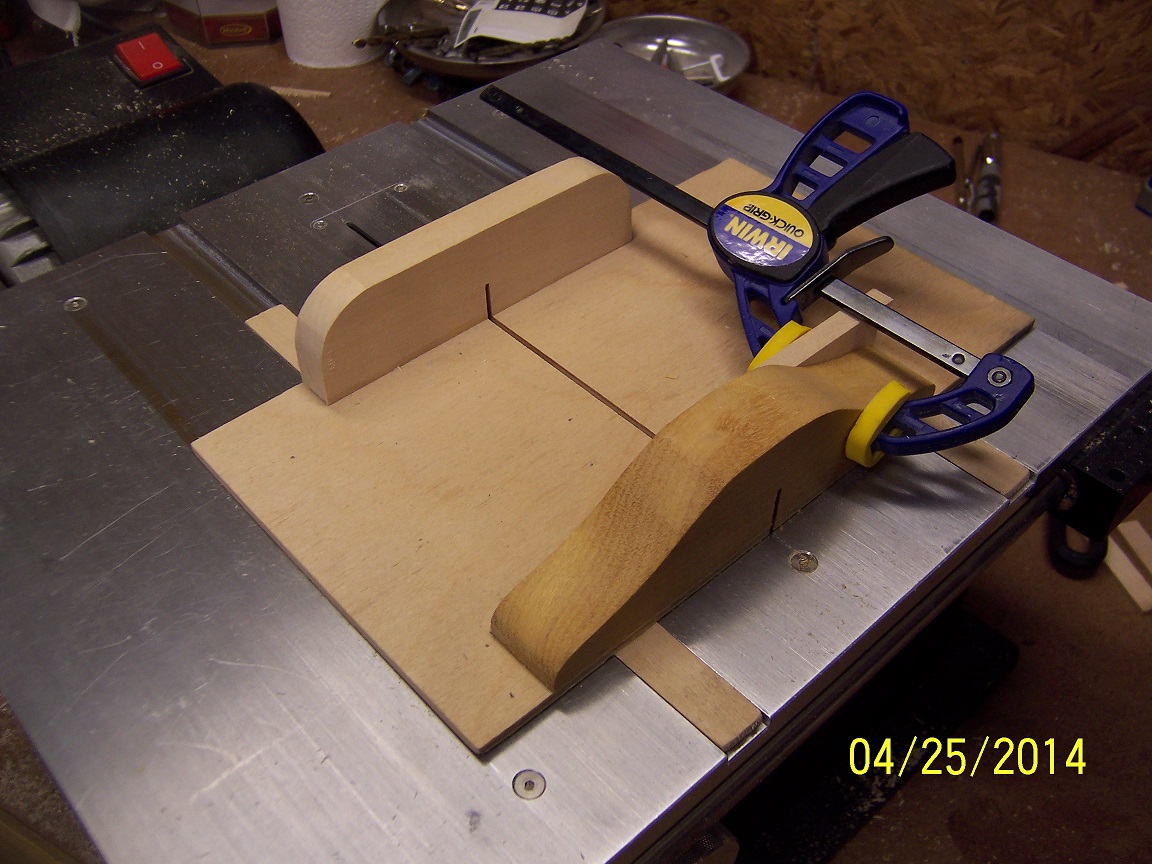
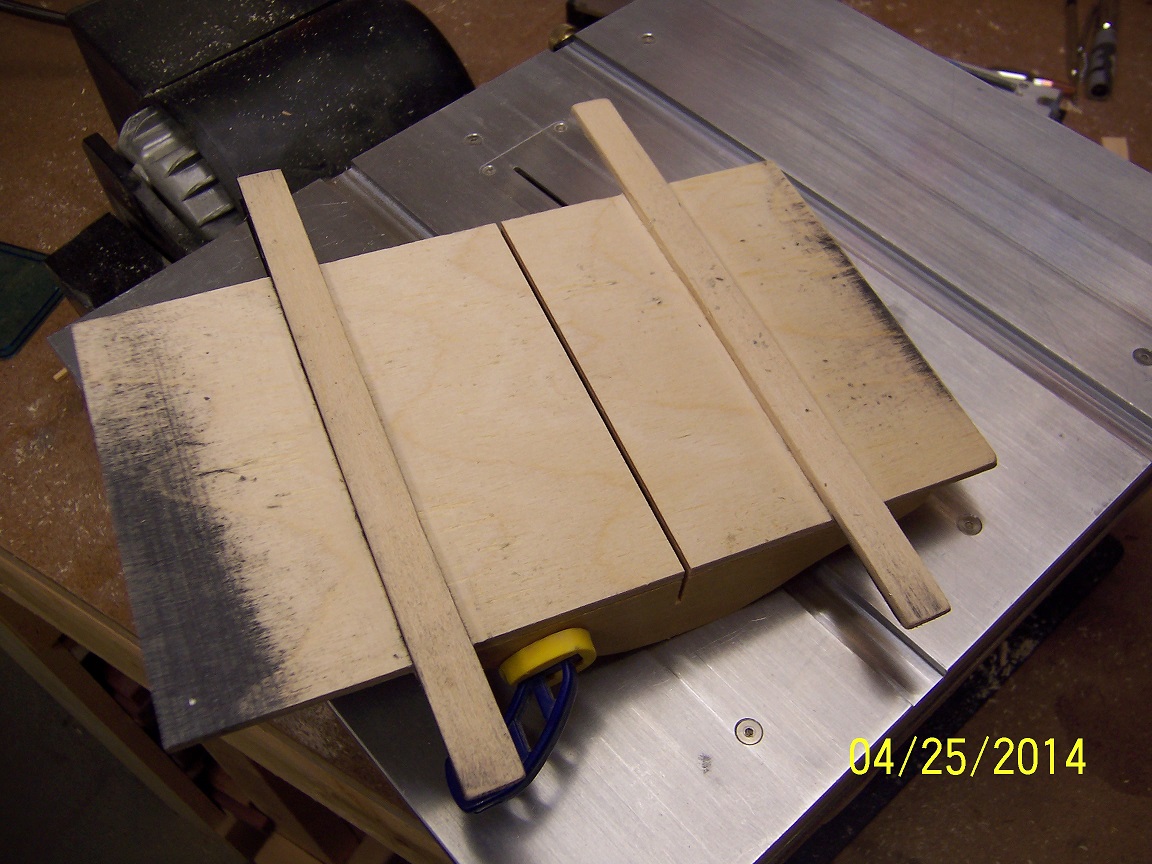
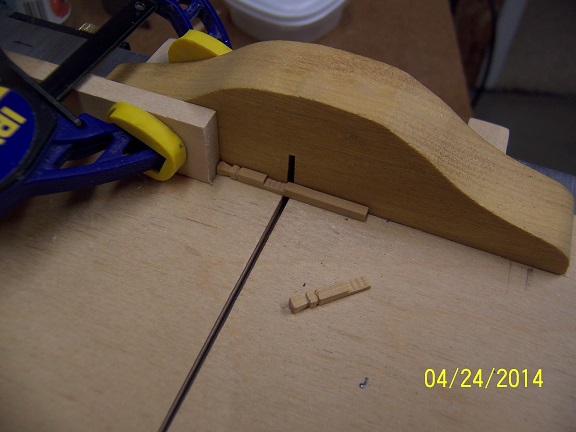
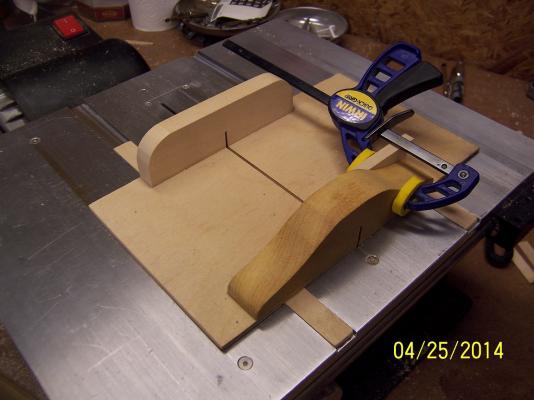
I have had a couple of queries with regard to my Byrnes saw sled so I thought I would give some data on this. I originally cut some wood strips that fit into the saws slots. Not too tight or loose, just right. I then grabbed a piece of thin plywood and glue tacked it onto the wood strips while they were on the saw. I tried to get everything as squared up as possible but this wasn't critical. When dry I ran the blade through the first third of the plywood. I then glued the top block onto the plywood (which held the now slightly separated pieces together). Then back on the saw and cut almost through all the plywood. Now attention to detail is critical. I affixed the back block using a square to insure it was ABSOLUTELY 90 degrees to the now visible cut mark. Once dry I run a clean run all the way through the plywood which adds the cut mark to the blocks also. That pretty much sums it up. As I have said previously, I use this almost every time I work on the model. I need to cut anything at a 90 degree angle, it is done on the sled. Any other angle I also use the sled with appropriate hold downs. I consider it very safe and very controlled. Stay building my friends, Mark


-
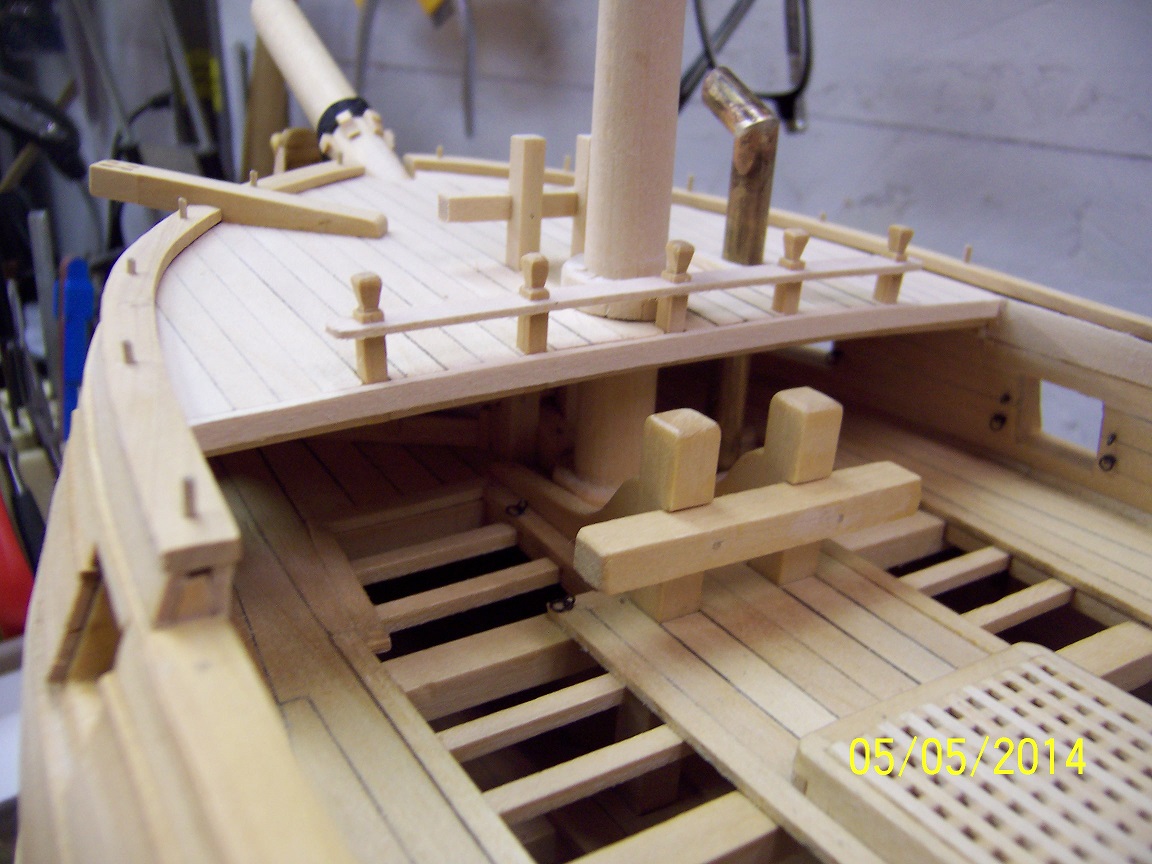
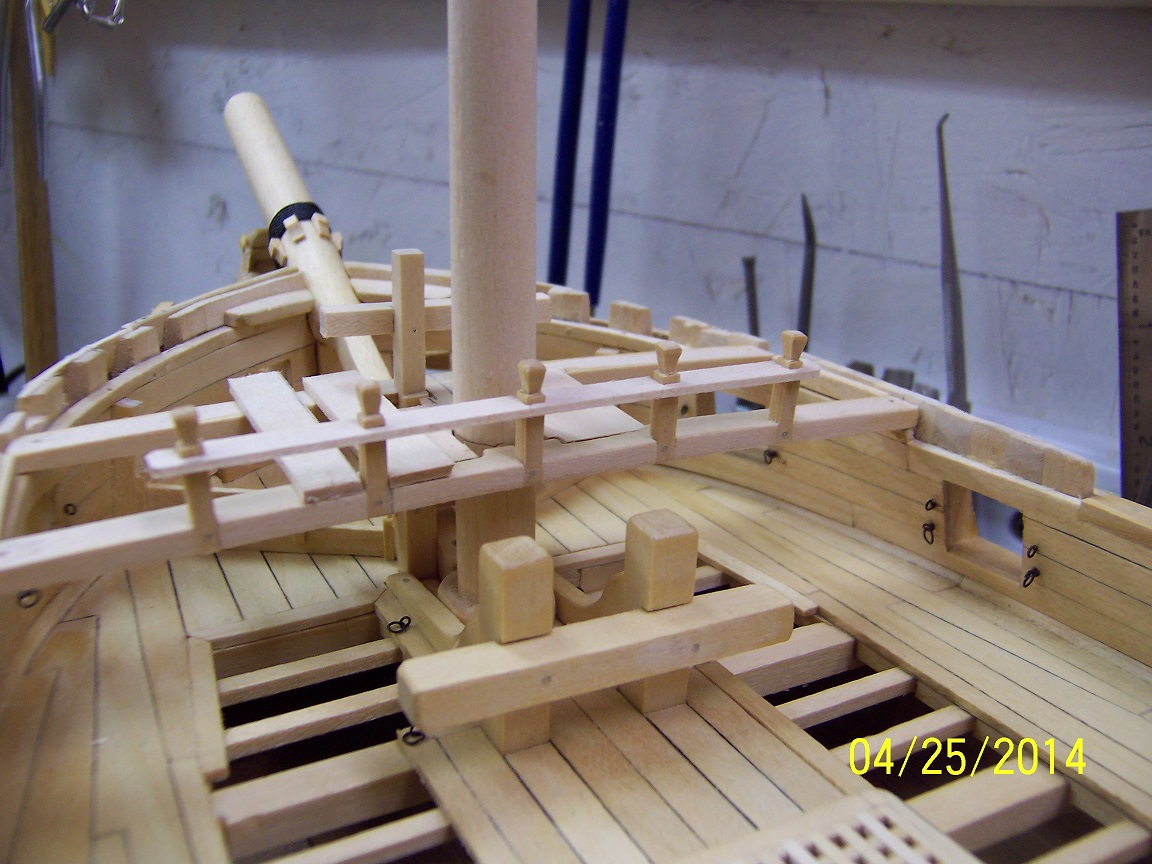
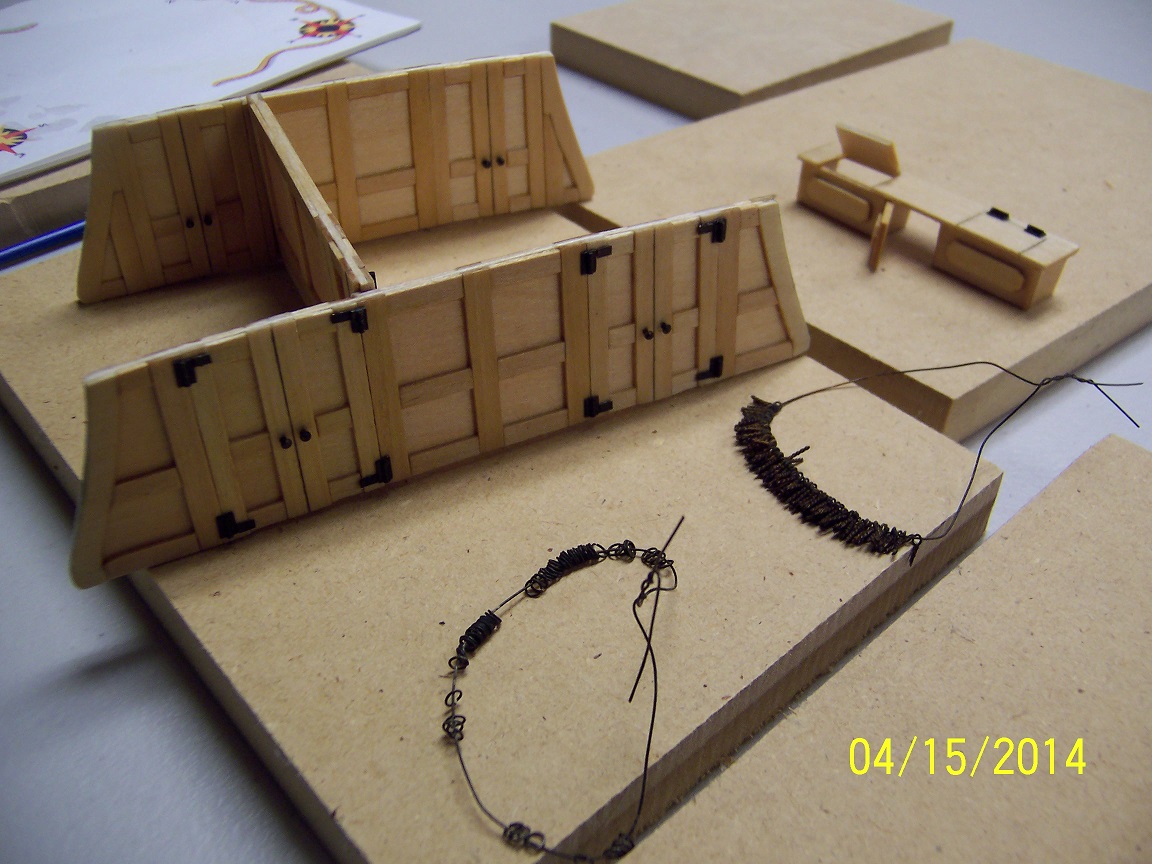
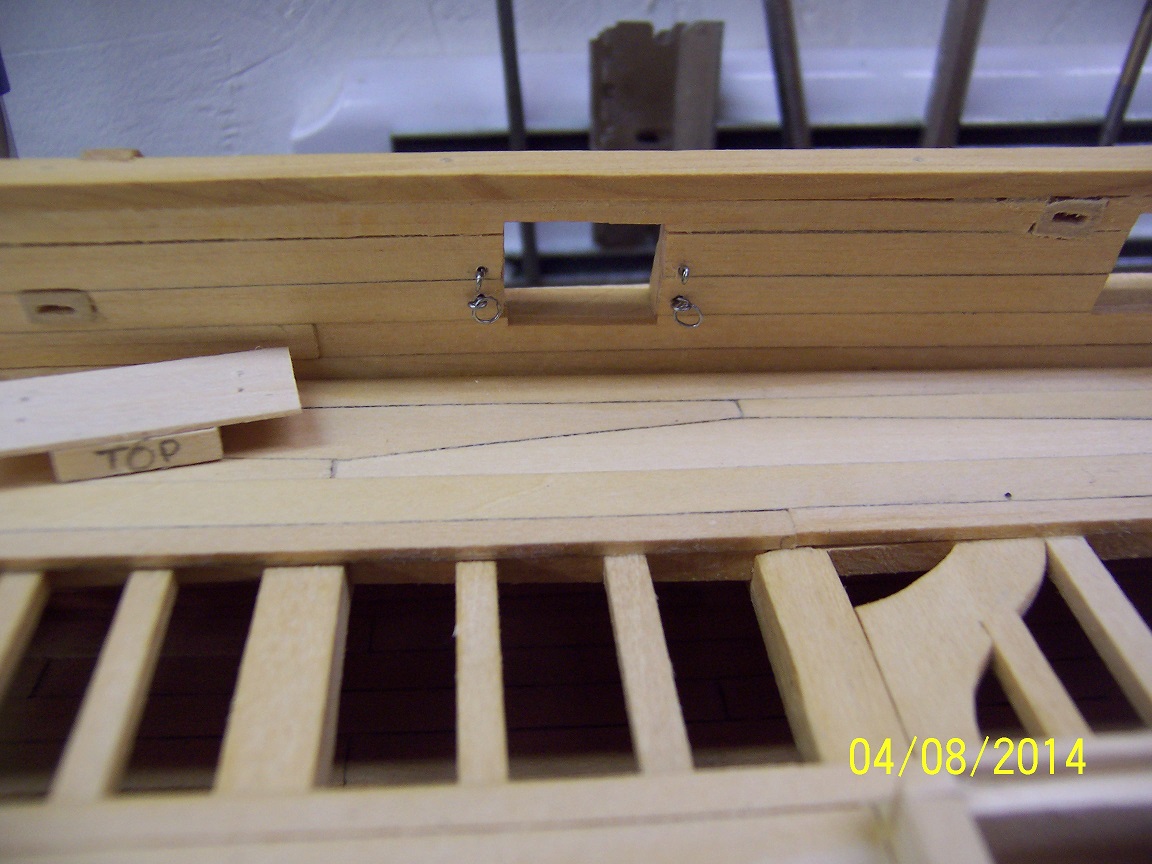
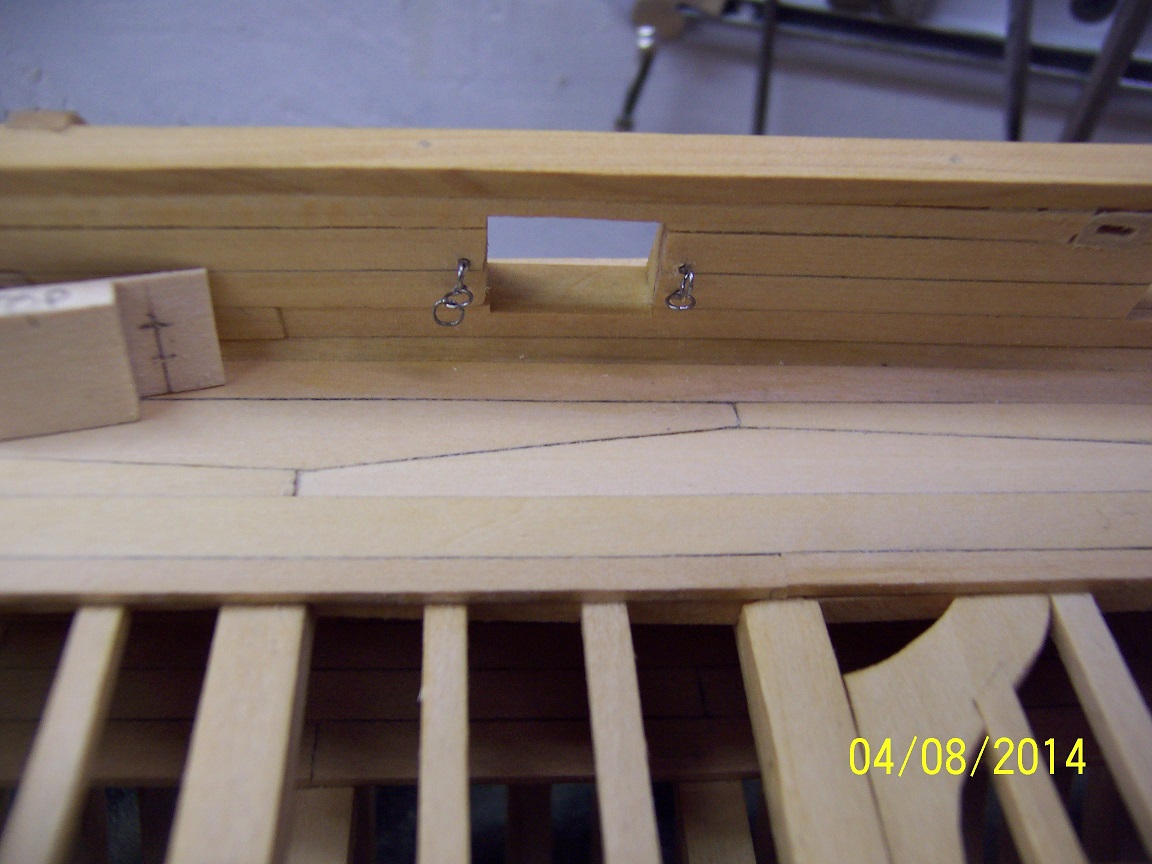
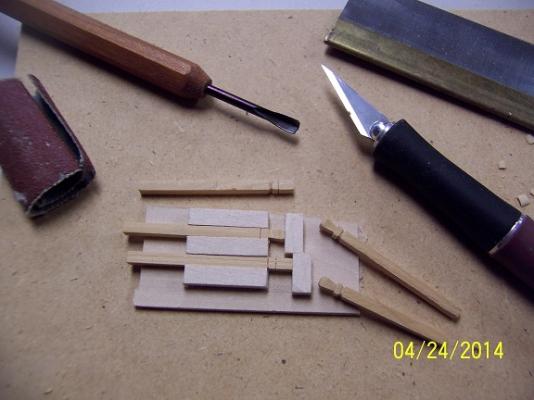
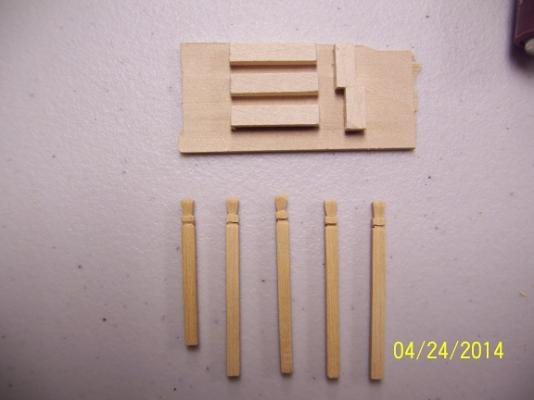
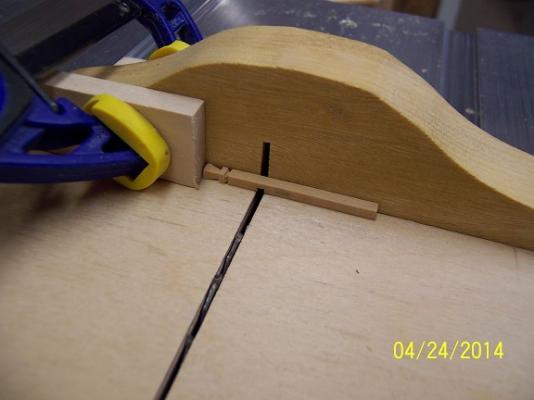
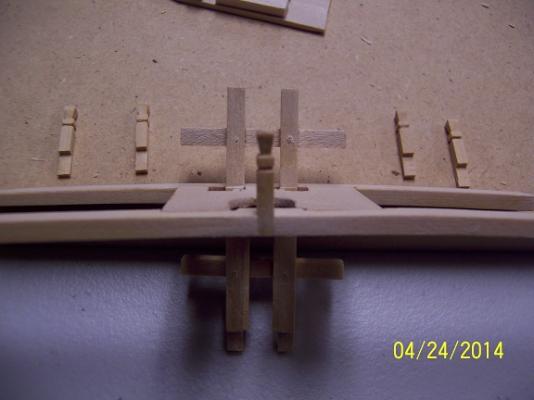
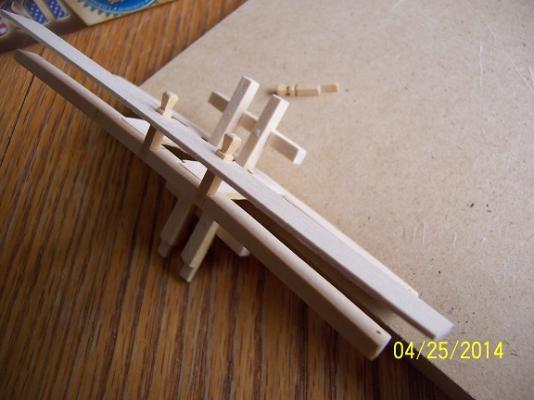
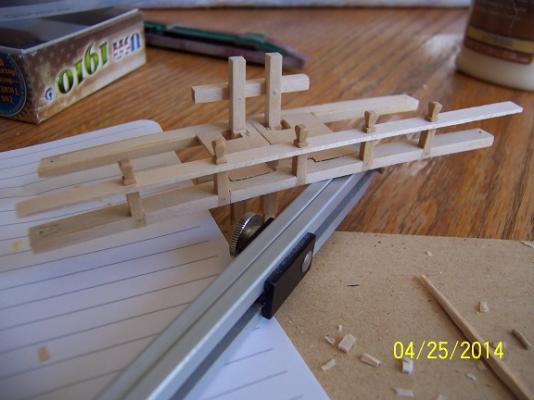
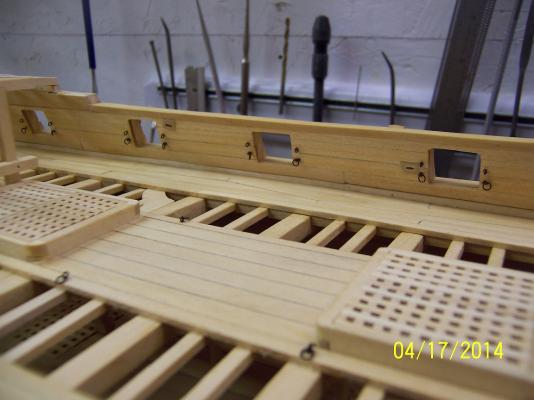
Thanks for all the kudos, looks and likes! Grant - for most of the ideas you have picked up here, I can probably refer to other builds where I snagged them. Tim - I don't know if I am as good as lucky! As i thought about the forecastle it became obvious two things had to happen first. I had to pry off the top level outer planks since they were sanded down slightly more than they should have been and replace them. Not too hard and easy to do. The second was the railing had to be done now (or a factor of 10 in hardness later). This was a half height railing (would not conform to OSHA standards) of five posts. For strength I opted to mortise them into the deck beam. After all the planking is attached I will attach a cap piece running the length of the beam to cover the end of the planks as well as most of the generated mortises. First order of business was to generate five posts that had some carving done to their tops as well as a plank shelf running the length of the railing. I cut a notch around the post for the 1/32inch shelf to slide into for support and maintain constant height. To do this I always like a jig: Once the post work was done I cut the post to half width where it connected with the deck beam using my Byrnes saw. I always use a sled that I have built if I am not ripping down lengths of wood. The whole sled moves with everything else anchored. Very solid, very safe and easy to make several accurate cuts on different pieces of wood. A micro-chisel was used to smooth down any bumps left by the saw blade. I then attached one post at a time, starting from the center. I also doweled the mortised section into the deck beam. After each post was affixed I used a piece of oversized wood for the shelf and cut the slot for the post into the shelf. This allowed one slot to be focused on at a time which was easy as opposed to five at the same time. Working outwards it didn't take too long to get all the posts in and the shelf fitting snug. Then I simply cut the shelf down to size lengthwise and width wise. An important item to remember was that the deck planks have not been attached (so that size needs to be accounted for). When I put the railing on the ship I put down a couple of pieces of plank thick wood for visual comparison. I will add small pieces of wood to fill the gaps in the shelf behind each post. This system worked out a lot easier than I had thought and I feel much more confident on the railing work on the stern now - which is a good thing. Lots of ways to do things, but this worked for me. Next up is the mast partner and then the catheads. Stay building my friends, Mark


- 268 replies
-
- 14
-
-
Joe - looks great, very impressive! So what are thinking about: next ship of the line / work boat, small scale / large scale, newer / older, rigged / admiralty. We need a hint.... I do know that whatever it is I am going to follow along, mark
-
Hey Eamonn, Define 'Novice.' I am looking at the Ballahoo and it might be your first proper wood build but the experience and care you bring to sure puts you above a novice. I actually think that anyone that actually finishes planking a hull automatically graduates to 'Been there, done that' classification. This is my first scratch so I am right in there with you what ever the classification - hah, hah. After four hours in the front flower beds (winter is officially over in Michigan) I needed to do something that showed I was finally off that gun deck. So...the gammoning jumped out, which included the necessary cleats: I didn't know where the cleats should be positioned and did some over thinking for awhile. Finally I grabbed the line I intended to use and loosely put in the gammoning which took less than 10 minutes. After insuring the lines were clearing all the headwork and looked right I lightly marked a line on the bowsprit where the cleats should fall. Pull off the gammoning and make some cleats. I did keep the cleats parallel with the bowsprit and equal spaced, which required the front face of the lower cleats to have a slight angle. I had hoped for 8 frappings (I believe they are called) and it worked out perfectly with the gammoning hole drilled out so many years ago. I might eventually replace this but there is no rush since this can be done anytime with full access. Stay Building My Friends, Mark P.S. Happy Easter
-
Everything is fair game in the hobby of modeling! You always view things with a slightly different eye around the house. Great use of the brush for a great recovery. Probably ended up being better than the original. Mark
-
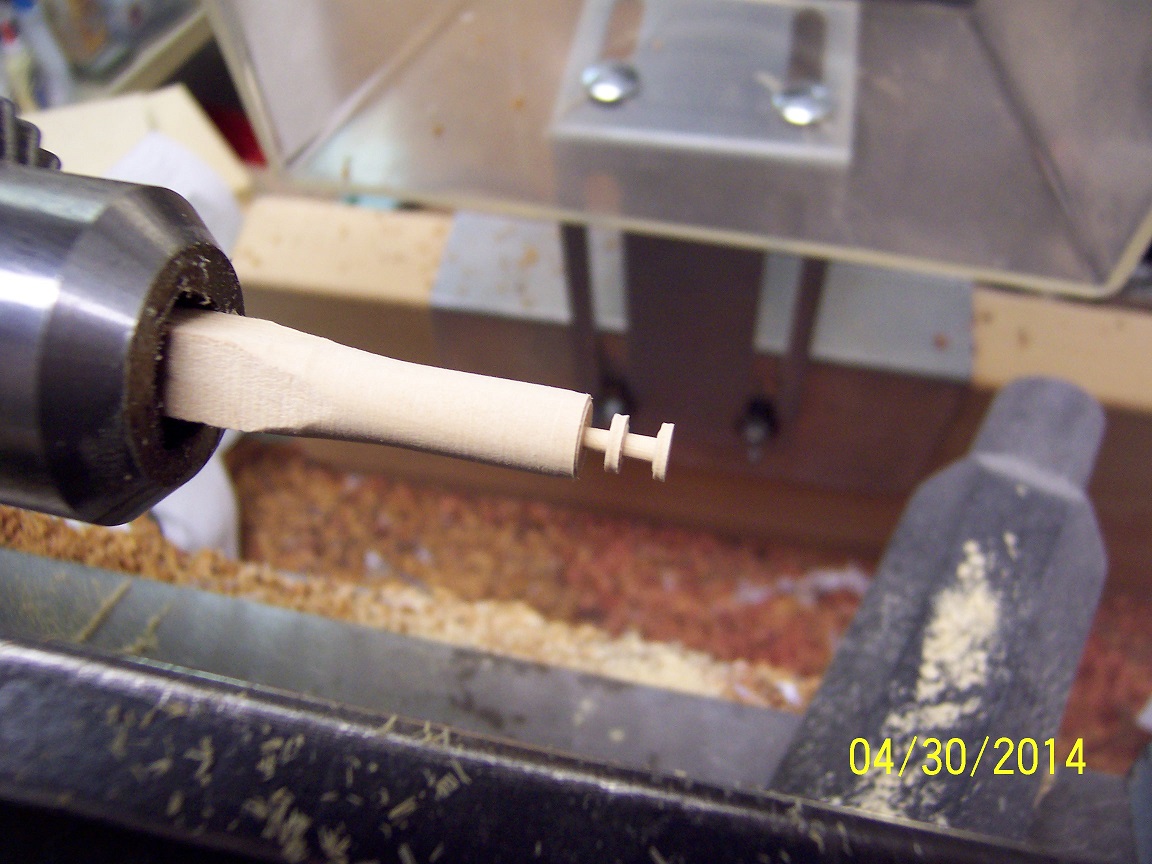
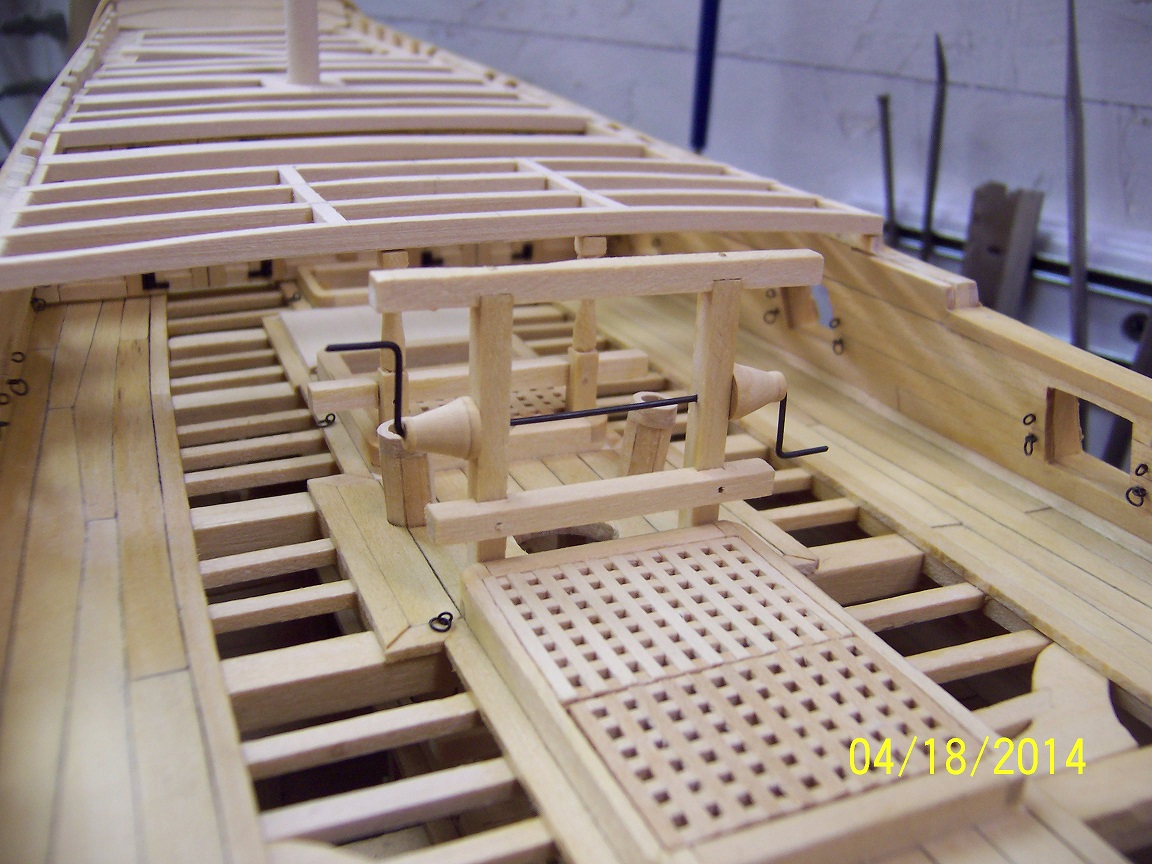
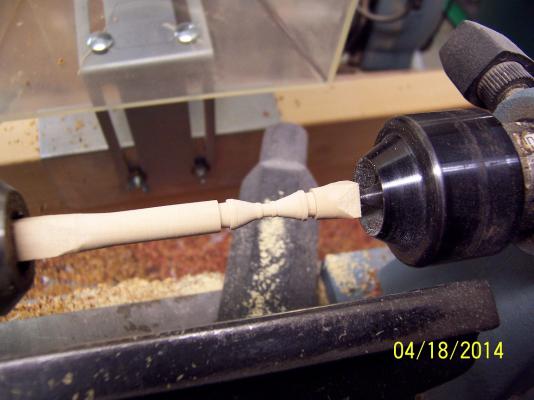
Wow, board looks pretty active right now. Lots of great work going on all over the forums. Thanks for everyone checking in. To finish off the gundeck for this go around I needed the simplified windlass on the posts. This afternoon I decided to dig in and was done in less than an hour. I used boxed wood, chucked it up on my lathe and pretty much free handed it to the dimensions required: Once sanded and cut off, I used some brass rod and bent up the handles pretty quick. To allow me to install this I did make the handles in two pieces - one that is most of the length, and one that just goes in the opposite drum. Blacken the brass, a little bit of super glue and it is done: I am moving to the forecastle. Stay Building My Friends, Mark

-
I really like the look and that new figurehead is fantastic. I really like that type of cutaway, really draws the viewer in (novice or expert). I know what you mean about the dust. I do the best I can but it is really a losing battle at most times. I try not to look down into the spaces too often to not get too depressed! Mark
-
Another 8 hours in the books (time flies when you are having fun). I did a lot of touch up, the secret: The spindle sander provided the sawdust. I would put some glue on my finger, use the mini-trowel to push it into the offending space, and then rub sawdust over everything. After a few minutes I used a scraper to remove a majority of the overflow and once dry sandpaper to finalize. Worked like a charm. The majority of the time was on those 90 eyebolts and 40 rings, and the assorted fitting, drilling, blackening, resetting (and on the floor finding the errant drops). I am pleased with the result. Just have one more thing to button up this gun deck and move to the forecastle. I have also actually fitted the bowsprit. To set the gammoning cleats I thought the easiest was to have it solid on the hull so visually everything would be in alignment. Stay building my friends, Mark

-
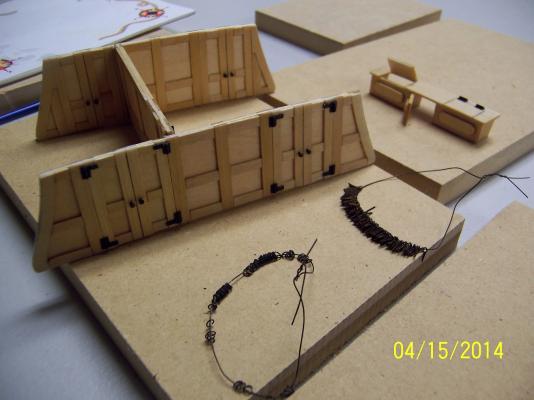
Thanks Greg and Michael and all the likes / looks. I appreciate them, this build has been a long time in coming! With spring break being over with all the trips / visits / teenage angst I can finally get back to work. First on the list was the 90 eyebolts and 40 rings (18 gunports, 5 eyebolts per, 3 rings per). Just pull up a cozy chair, have a good magnet nearby to find all those AWOL pieces and a mere 3 hours later they were done: Since I needed to blacken them, it was a natural to finally get all those hinges done to allow everything to blacken in one bunch. I sliver soldered a thin rod onto a cut rectangular piece of brass then super glued this along with another small piece of brass to achieve the look I wanted. These were also used for the rear lockers. Then everything had a coat of gel coating. I did make this job easier when I suddenly realized I didn't need hinges on both sides of the door! Then of course you have the obligatory draft install to check out the final look: Another notch in the complete column. Now for some clean-up, the addition of a small windlass, affix all that cannon tackle and I will declare the gun deck complete. Maybe by tomorrow night? Stay Building My Friends, Mark


- 268 replies
-
- 11
-
-
As one who has 10+ years on my current build (calendar time, not work time) I totally understand. The great part is that the build is always waiting. A very nice Titon, look forward to seeing the progress. Stay building my friends, Mark
-
Thanks Eamonn for the kind words. I am trying to make this the year of finishing things and I have been laser sighted on the Druid. The Lady Anne is always at arms length (put in ordinary) and is definitely next on the list (with hope to also finish prior to the end of the year). I am actually asked by the Admiral how the progress is going so that is a good thing. I have been keeping track of time spent (and wood used) and am constantly amazed at how the numbers keep climbing up. With continued focus I am hoping to complete in the June time frame.... Stay building my friend, Mark
-
Looking great Joe! Just returned from the Chicago Science and Industry Museum and the ship in the central aisle of the ship modeling area is the Prince. This is a half open / framework exposed, half fully planked model. I took a look at the forward ports and the maker (didn't record his name) did place a cannon there but, like you said, it was obvious it could never be fired with out significant deck re-arrangement! That sure is a splendid ship to model though. Clean lines and great detail. Stay Modeling My Friend, Mark
-
For a second go I used the shank of a drill bit to achieve around a 50% reduction in ring size for the eyebolts affixed to the hull. The hanging ring I kept at the 4P nail size. This achieves the look I had in my mind. I now have to find my Zen, a comfortable spot and produce 90+ of the eyebolts. Then after cleaning and blackening I will put them aside until the gun deck is totally gel coated before gluing them in using CYA glue. I hope this ends up being this weekend! Stay Building, My Friends, Mark

-
Nils, I am right with you in all you say. I tell people my aim is better than folk art (no slam against folk art) but primarily it is Krug quality. A site very much like this (over 10 years ago) had me stretch and decide I could undertake the Druid and I love adding all the individual features. I also enjoy showing my kids that I am interacting with people all over the world (such as Germany). Rigging is a stretch for another build (hah hah). You find a subject that gives the motivation to keep at it. Pegasus is a wonderful ship and you are doing it more than justice. Stay building, my friend. Mark
-
Now that ship has a little bit more than just some bark! Nice going Nils.
-
Thanks everyone for looking, with your motivation I am almost buttoning this gun deck up! One of the last things is to affix the cannon tackle (port tackle eybolts on top, breeching ringbolts on bottom each side of cannon). For my prototype I used 28 gauge wire and a 4p nail. It looks to me I need to go with a smaller nail. Given that their will be no cannon I am also leaning towards having no breaching ring hanging off the ringbolt for a cleaner look (the right side of the pic). Any comments? -mark
-
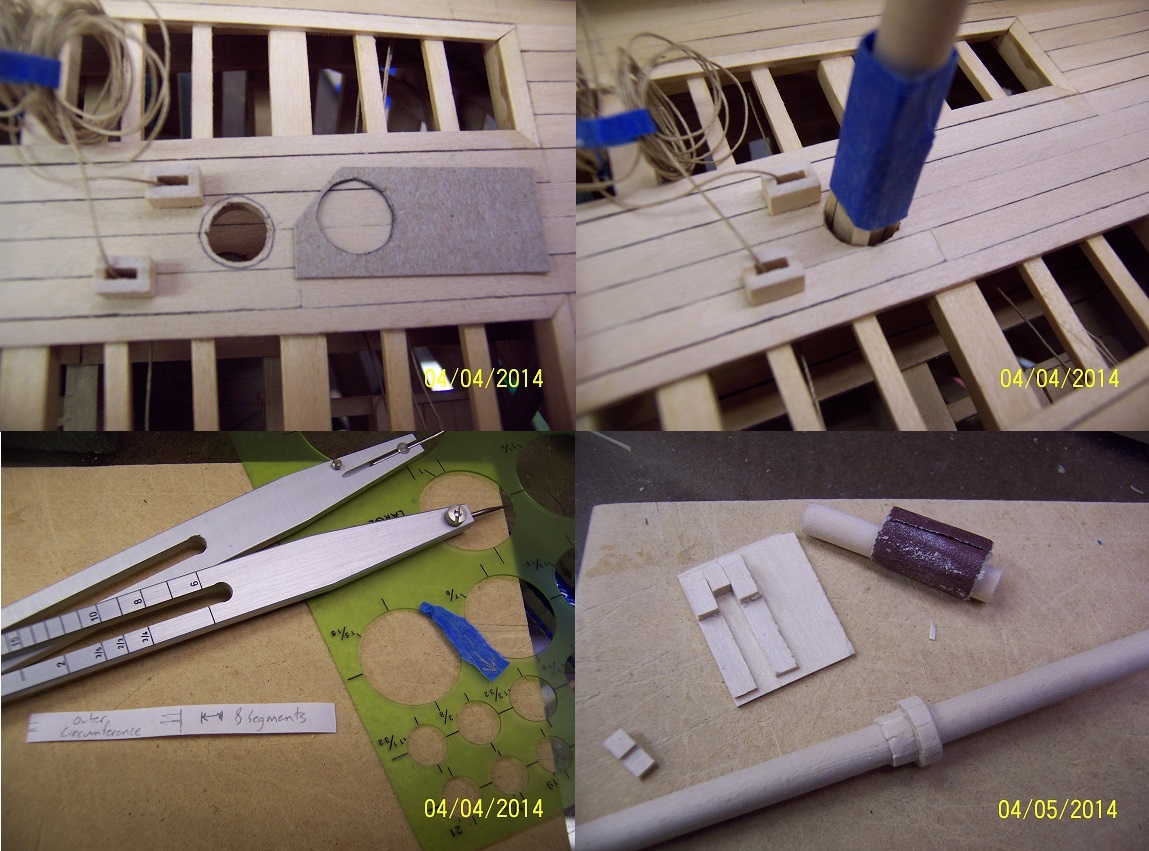
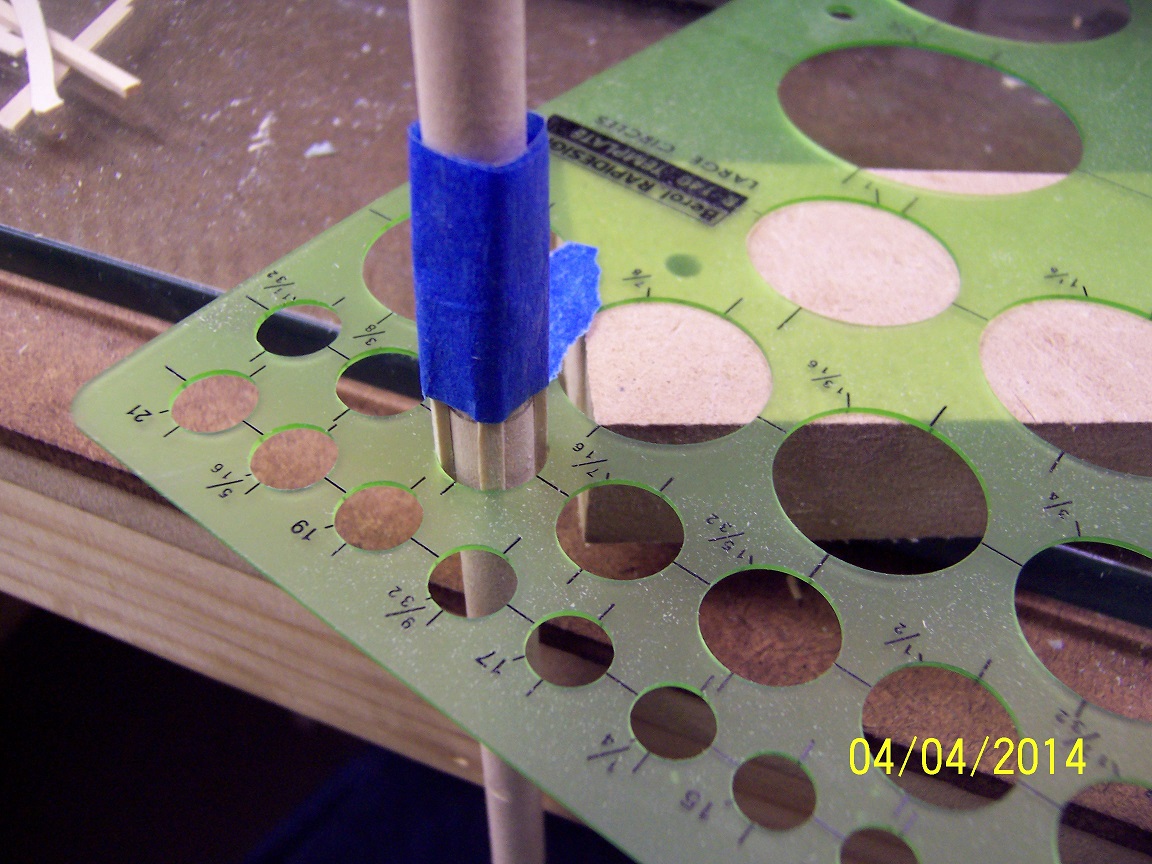
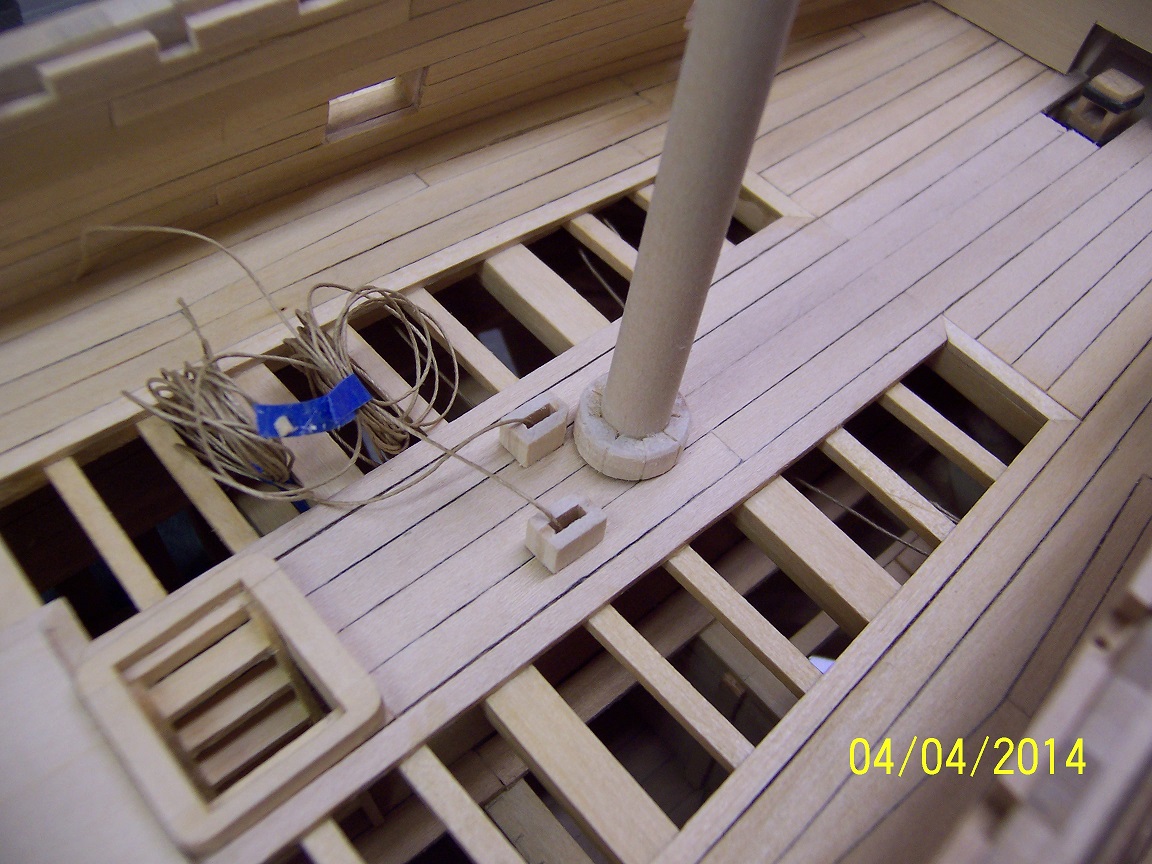
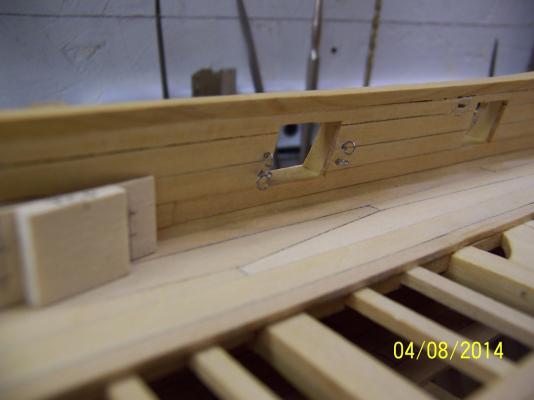
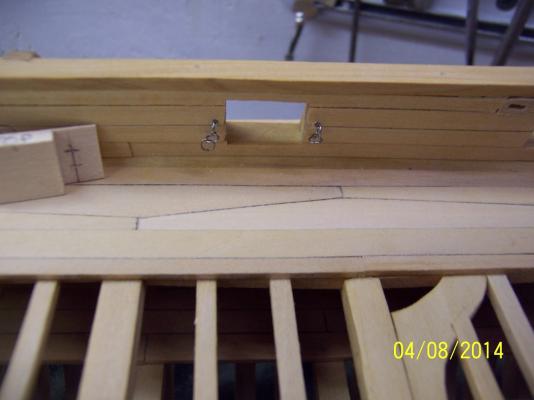
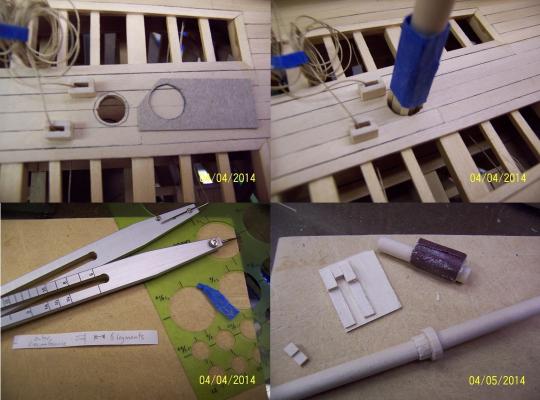
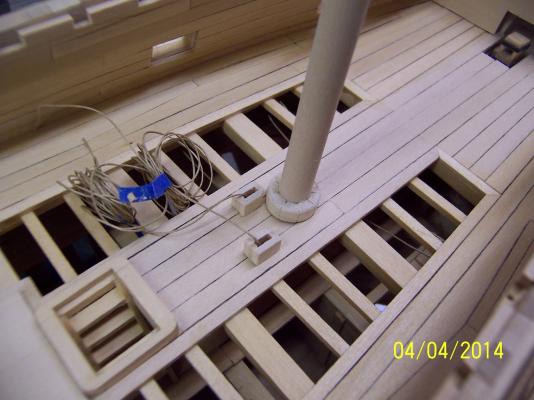
Thanks Nils, Ed, Jay and Russ for the compliments. Jay - yes those slots are for the channels. Almost a whoops there since I had almost glued in the molding over them before almost by chance remembering I needed to keep that clear. The actual channels are roughed in and off to the side currently. Now for the mast partners. I had never really thought these through but had 'assumed' the normal fashion a ring and slip it over the mast and rest on the deck. As I went over what had to be done I had one of those ah-ha moments where I realized the process was almost as complicated as the 'real' process. Why not? (bashing / scratch is so liberating - hah, hah). First obstacle was that the deck hole was currently a snug fit for the mast and had to be enlarged, but by how much? I affixed four 1/32" pieces to the mast and measured the resultant opening. Also VERY important to trace the deck profile onto the mast since the partners are not at 90 degree angle to the mast. This was then transferred to the deck and the hole suitably enlarged. I measured the outside circumference of the new hole to define a uniform wedge size. Then using some wood from the scrap pile (I believe 1/8") I cut out that width and using a jig cut the tail down to the target 1/32". The back of the wedge was sanded to the profile of the mast and the edges hand cut to the necessary bevel. Each wedge had to be checked against the deck profile (drawn onto the mast) to insure the correct slant was added to the deck mating section. Once all the wedges were attached there was point sanding to smooth / round things out. I should note that I periodically checked the fit against the deck as the wedges were attached. I still have some more refining to do but it works out to around an hour per mast partner. Still have the main and foremast to do, hopefully today. -mark

-
Welcome and good luck Bob. If your pegboard is any indication you are well equipped and organized! Slow and steady.... -mark
-
I really like the idea of the 'steal' for a slightly mismatched set of cannon. I keep thinking how to add those little touches that make the model your own for my own builds. Keep having fun. -mark