kruginmi
-
Posts
630 -
Joined
-
Last visited
Content Type
Profiles
Forums
Gallery
Events
Everything posted by kruginmi
-
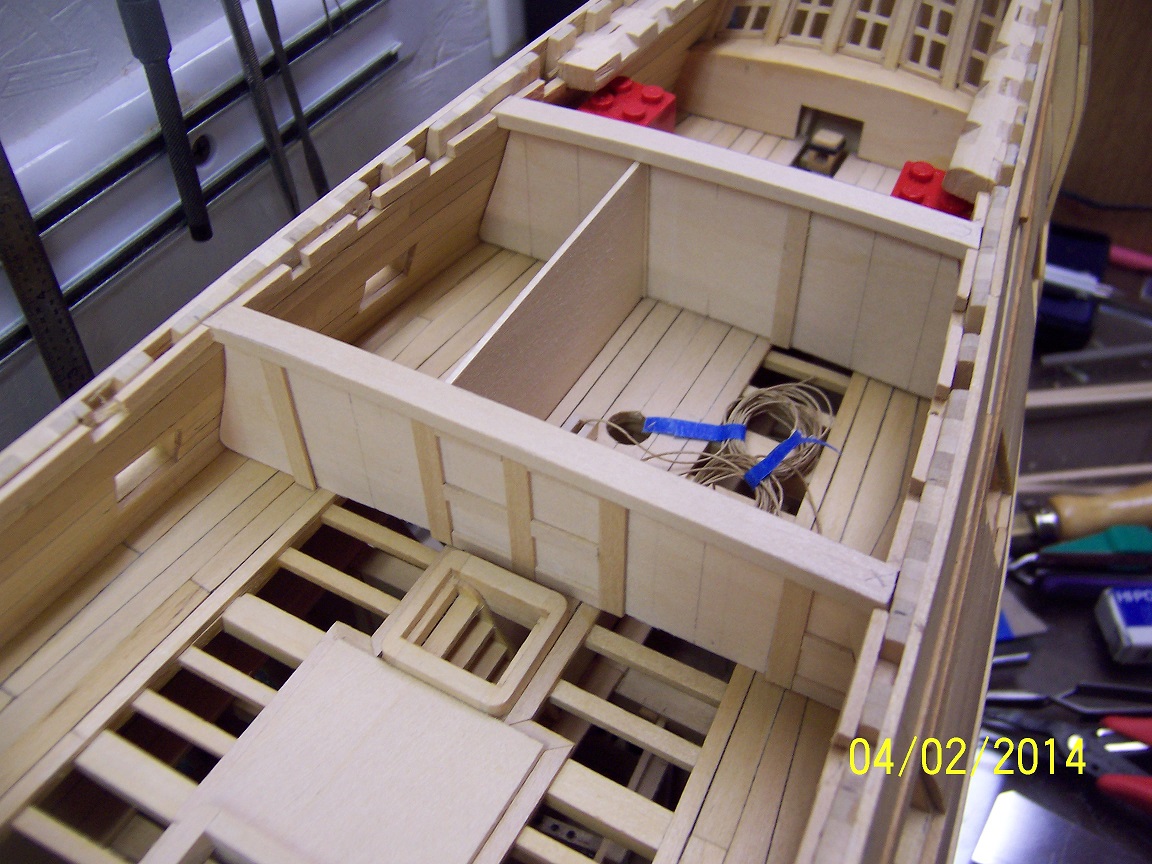
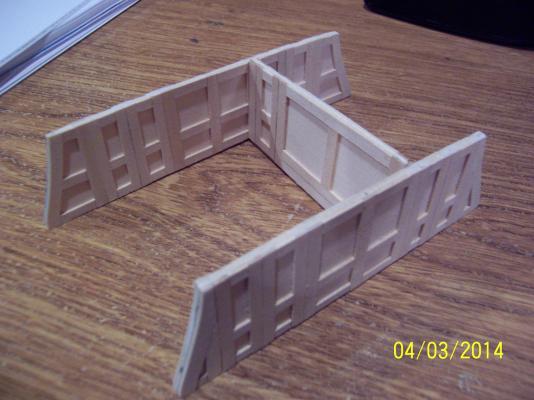
 Thanks for all the likes! 7 hours and 180 pieces of wood (and counting) the bulkheads are pretty close to done. Still need the hinges and door knobs to make the doors pop and the gel coating will help accentuate the paneling. I also will add some pieces on the fore and aft panel between the beams to clean up the top edge and provide some added strength to keep it from shifting in the future. With the deck extension the British added these bulkheads are pretty far under the quarterdeck lip. I will keep a gap in the floor planking for some glimpses. Now on to the mast partners..... -mark
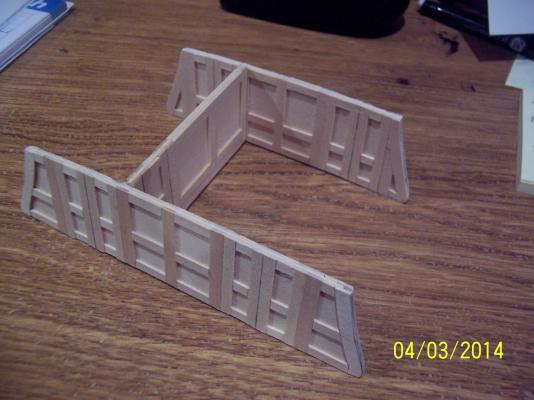

- 268 replies
-
- 11
-

-
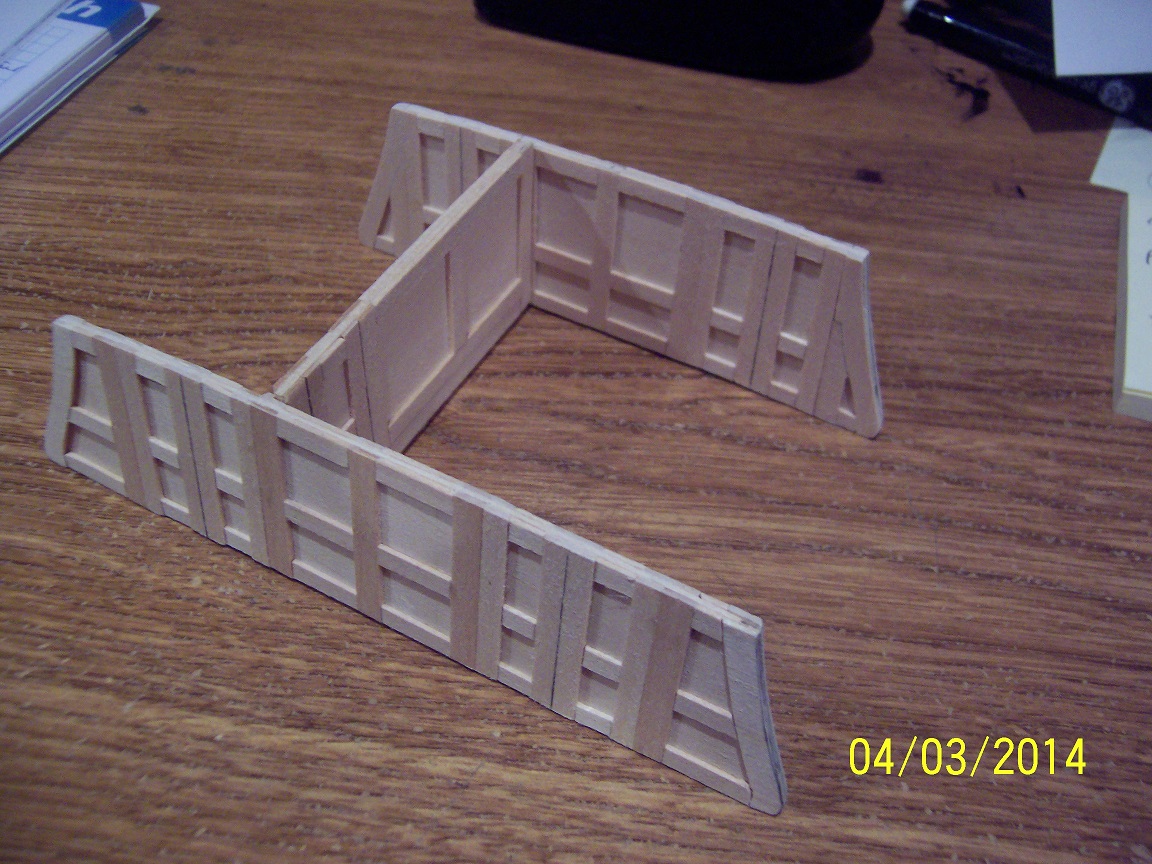
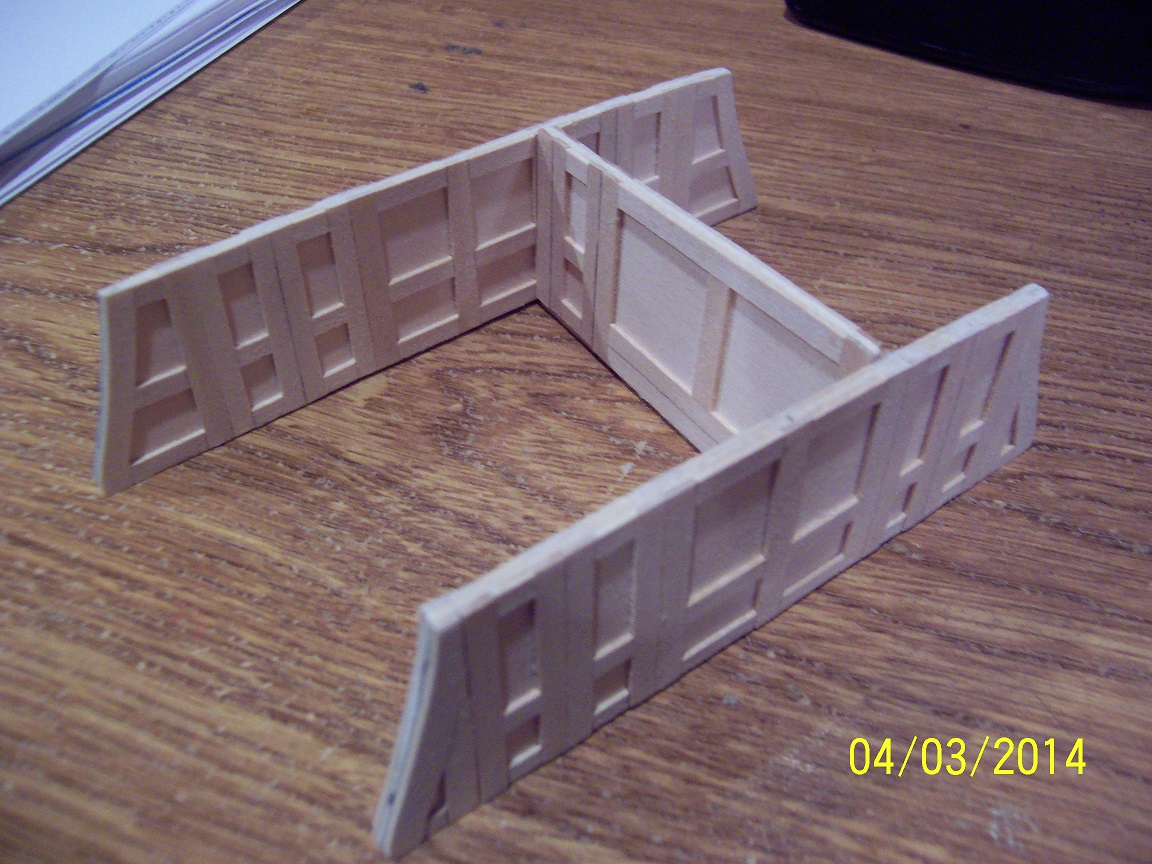
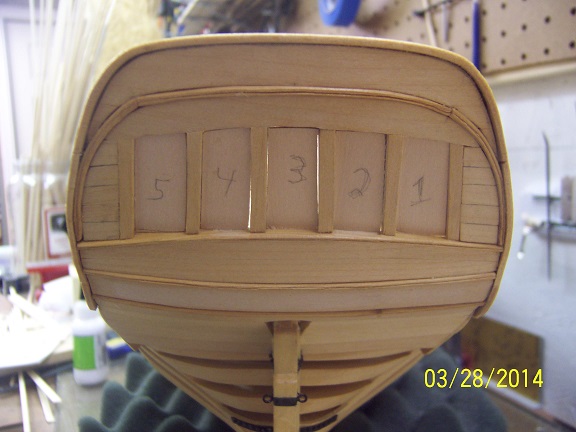
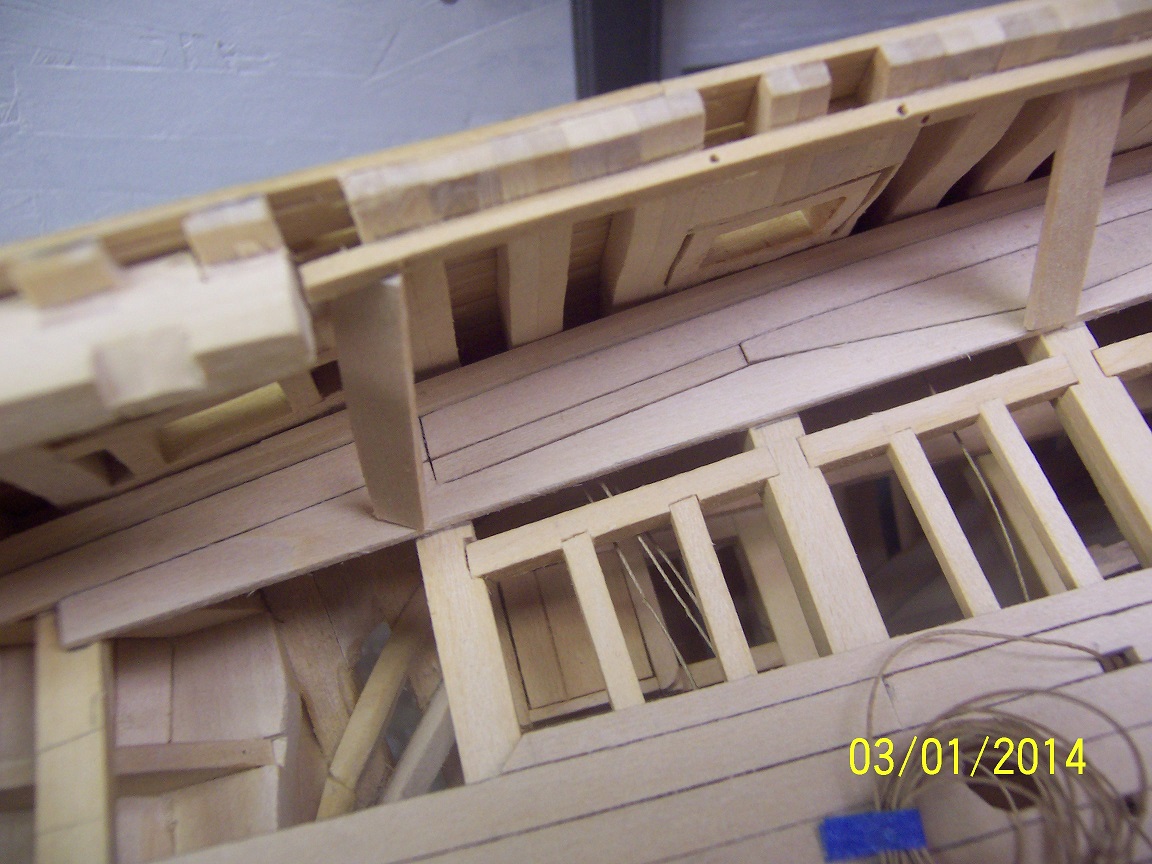
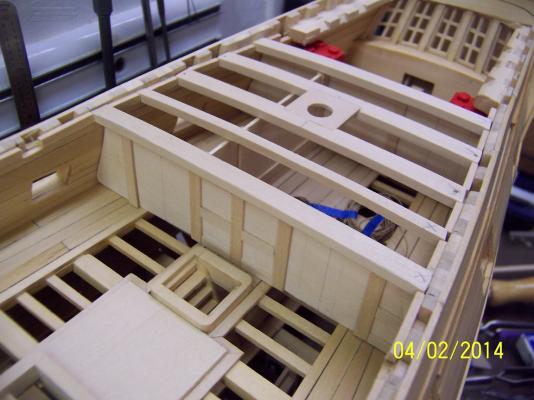
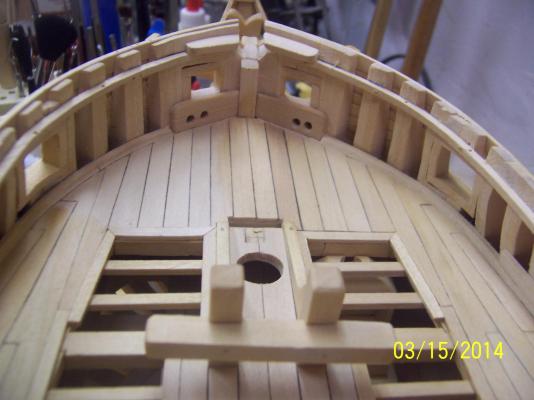
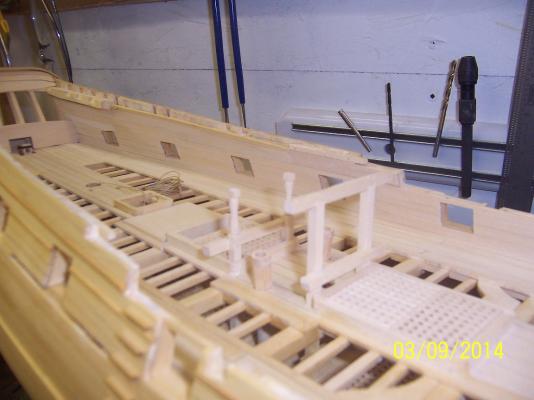
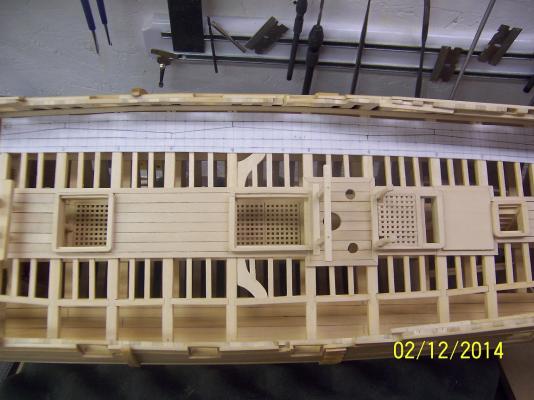
On to the bulkheads! The windows ended up being 66 different pieces of wood, it will be interesting to see how many pieces are used for these 3 panels. The approach for the 3 panels (2 cross ship, one bow and aft connecting) was to use a 3 ply sandwich of 1/32" basswood, used on other builds in this forum. The middle piece is a solid piece of wood with the 2 other being trim pieces added to give the look of fancier paneling. The initial form was defined through the use of cereal box cardboard. If any one needs that detail let me know, but needless to say it took around 3-4 iterations before I was satisfied (around a full size Cheerio box - hah, hah). Once I was satisfied with the fit I transferred to the basswood and cut out: The panels were cut to fit under a defined deck beam, flush with the rear edge. You can see in the above photo the Legos used to help hold things up (another great idea from this forum). I then defined the doorway locations which required more effort than I thought. The original location looked great but upon trying the panel in location was obvious had an issue with the location of the stairs to the berth deck. I moved them farther out but then realized the door locations had to be equivalent on the aft bulkhead for the connecting partition to work and, of course, they were now too far out. So....third time the charm and I got to an acceptable location: The connecting panel was added and the trim work to allow them to connect. I added some preliminary trim pieces to check out the pattern I sought after, but it is still incomplete. The doors will not have windows added to them. A final check required before the push to complete the panels was to add the other quarterdeck beams. I love it when a plan comes together: Tonight the plan is to complete the trim pieces on all three panels, add solid 3/32" pieces of wood between the beams on the fore and aft piece for strength and a more finished look. The metalwork for the hinges and door knobs will be this weekend. Then the pieces get stored away until the cannon carriage bolts are affixed. Not too much work, but a tremendous change in visual appeal. -mark


- 268 replies
-
- 14
-
-
Hi Joe, just checking in - quite a nice build you have going there. Looks very clean and the colors really make the result pop. Well done! - mark
-
Thanks David, For all the sharp pointy tools around here, I will save the belts for post modeling activities! Those windows were just something that has been on the short list for awhile and for whatever reason I had been hesitant to start them. Now that they are in the rear window (hah, hah) I am beginning the bulkheads for the captains cabin. My goal is to finish up the gun deck within two weeks (not including the capstan). BTW: This means no cannon. For this model I had always envisioned only including the things that were permanently attached to the hull. The emphasis had always been on the hull as a whole (thus the mono-color with a little black metalwork). I am thinking about putting a single cannon and an anchor on the base nameplate (off ship). I can't say I have seen too many examples of this but I have thought about this a lot. Mark
-
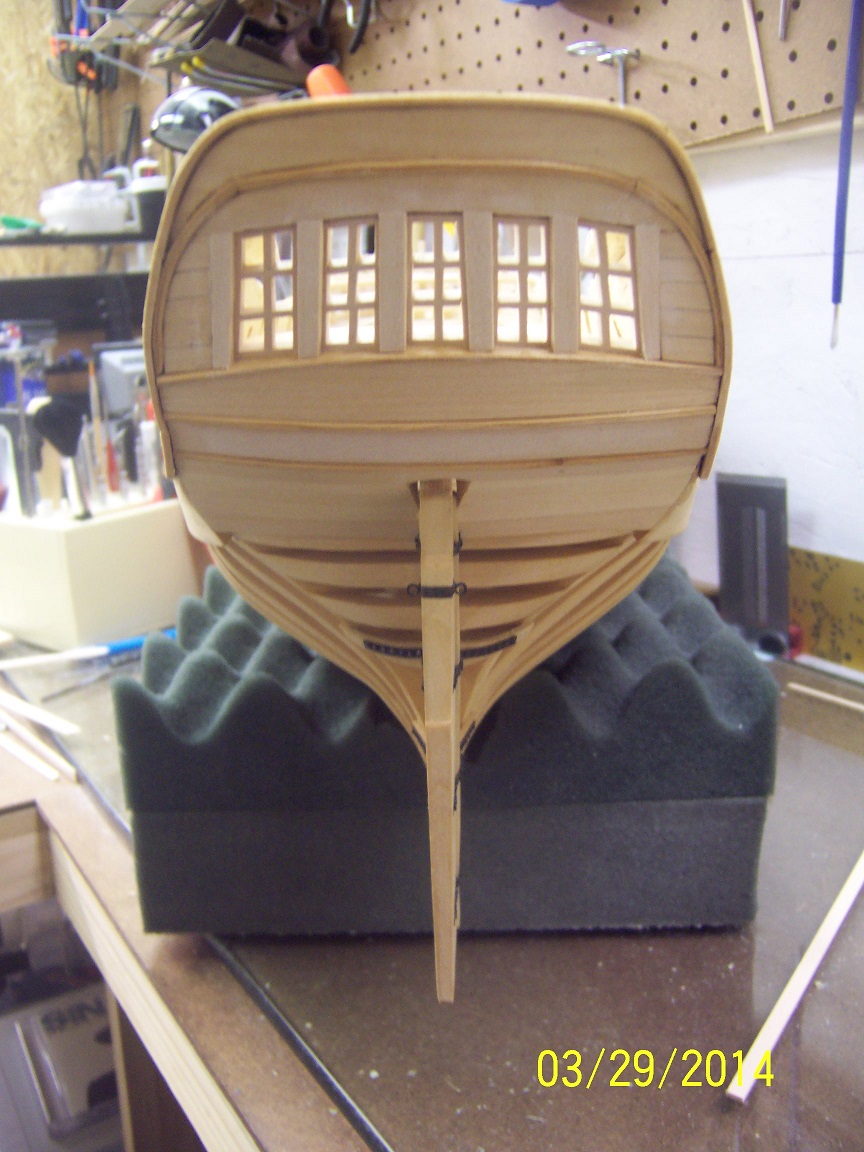
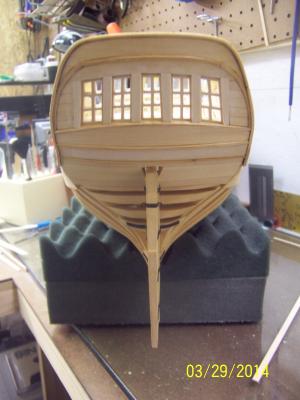
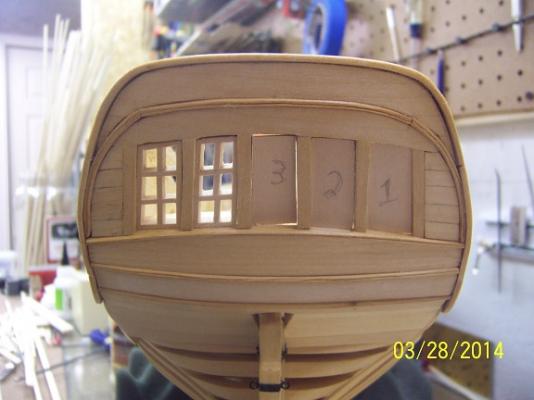
After a few more hours in the shop I managed to get the remaining windows complete and sanded to shape. Even with all the templates there still was a few minor gaps that bugged me. After looking at the stern closely I realized the key was to remove the external planking between the windows and replace with some slightly larger to cover the initial window frames. Didn't take too much time to make this change. I still have not applied the gel coat to the new pieces which will make the finish much more uniform. I did clean up the internal edges with some very thin molding pieces (though it will invisible to view). -mark
-
Rick, You sure are off to a very solid start. I sure envy your location for research and access but like building the Victory, Portsmouth is on my bucket list. Keep the pics coming! Mark
-
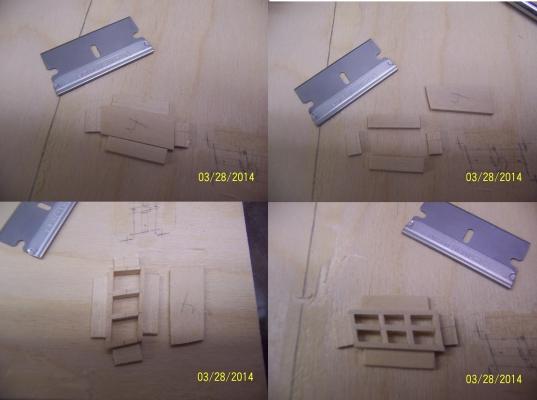
There is a saying when I was in the Army that no plan survives first contact and that was certainly true with the stern windows. Being flexible and open to modifying your approach (without becoming overly exasperated) is an important part of this hobby - a lesson well learned over and over for me! The stern windows are nothing but angles (and nothing 90 degrees). To start I cut 1/16 inch templates, slowly cutting away as I custom formed them to the necessary openings. Note: the frames also angle inwards. Once these were made I could make the actual frames off ship (a good thing): 1. I glued down scrap straight wood pieces to capture the outline. 2. The template was taken out 3. The outline of the window was measured out and glued together 4. The horizontal cross members were added and glued 5. The vertical cross members were added and glued 6. Sand the top face totally flat with a sanding block 6. A razor blade was used to remove the outside forms 7. A razor blade was used to gently remove the window 8. The back of the window was sanded flat and the joins cleaned up 9. Through trial and error, the frames were gently sanded on their sides to fit into the window opening. 10. With a good fiction fit I put the original template against the outside window to help push into place Stand back and breathe. Repeat four more times. Each time I have done this the results have been better. The main issue I had was that I had originally intended to mortise and tenon all the frame pieces for all the frame pieces. I tried and tried some more. With all the angles I just wasn't successful in producing an end result that was tight and looked right. I finally had one of those moments when I stepped back and opted to try just using butt joints. Given the outside form I was able to really hold the frame and apply outside pressure so this decision paid off. Especially given that the final window was protected and affixed on all four sides I am okay with this change. -mark

-
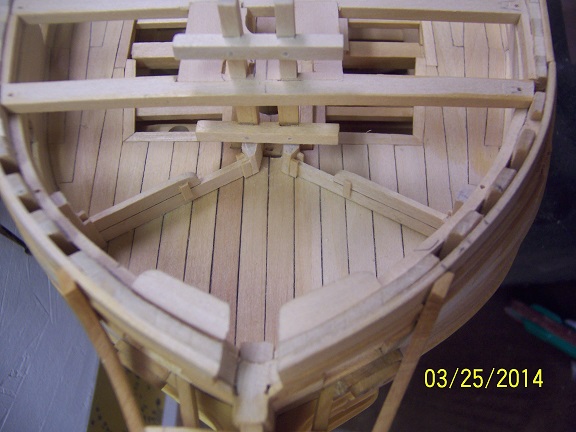
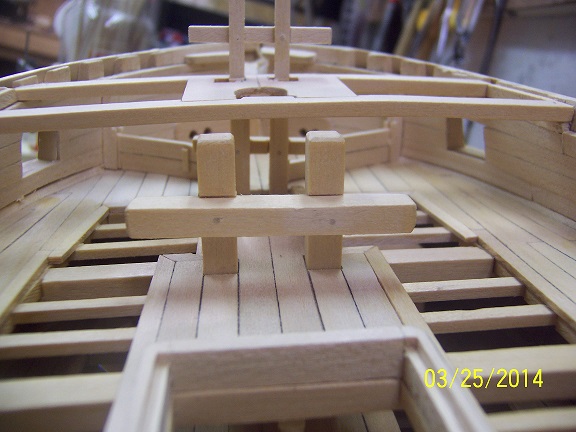
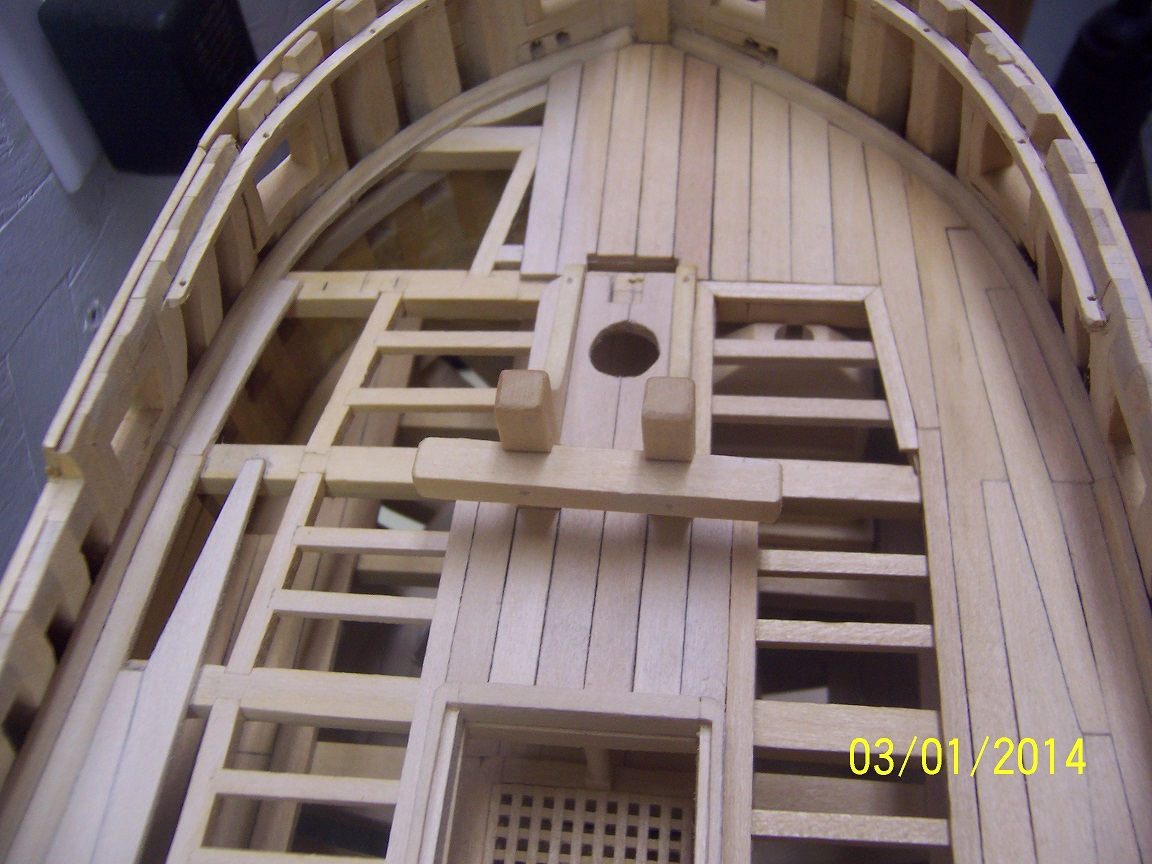
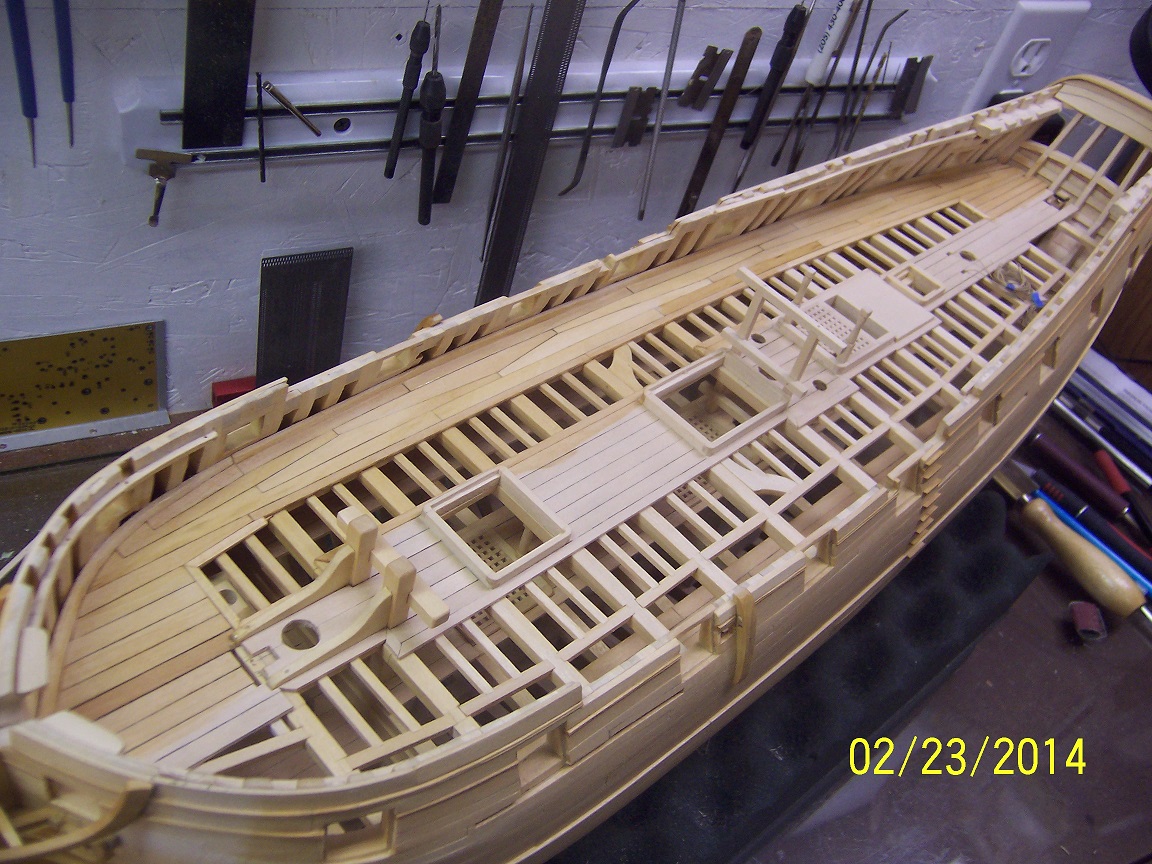
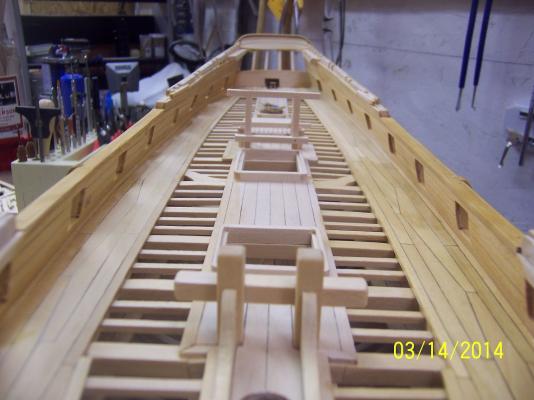
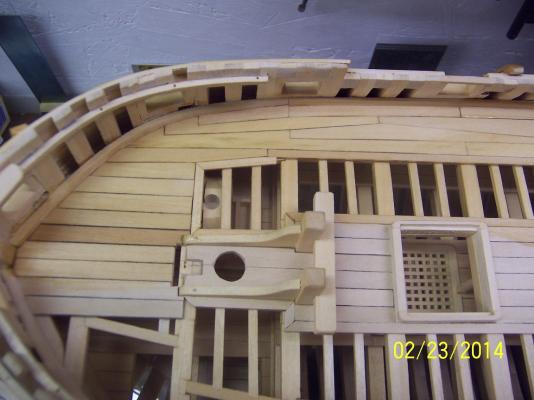
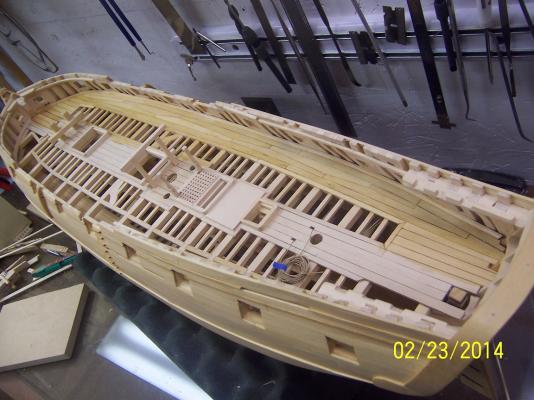
With some time back on the ship I decided to tackle the manger. This was not on the plans but something I have thought about adding for a awhile (plan bashing?). This area is obscured but still can be seen if you are triple jointed (hah, hah). I designed this on the fly and probably ended up with about two and a half hours total. I had several starts and stops but relaxed and finally evolved to a solution that I liked. This is the view from the middle gun deck and what will be visible from the finished viewpoint. For background, these temporary walls contain the slime and mud brought up on the anchor cables. Given the location and look it was a natural place for any animals (eg pigs, cattle) brought on board to be penned up - thus the name manger. -mark


-
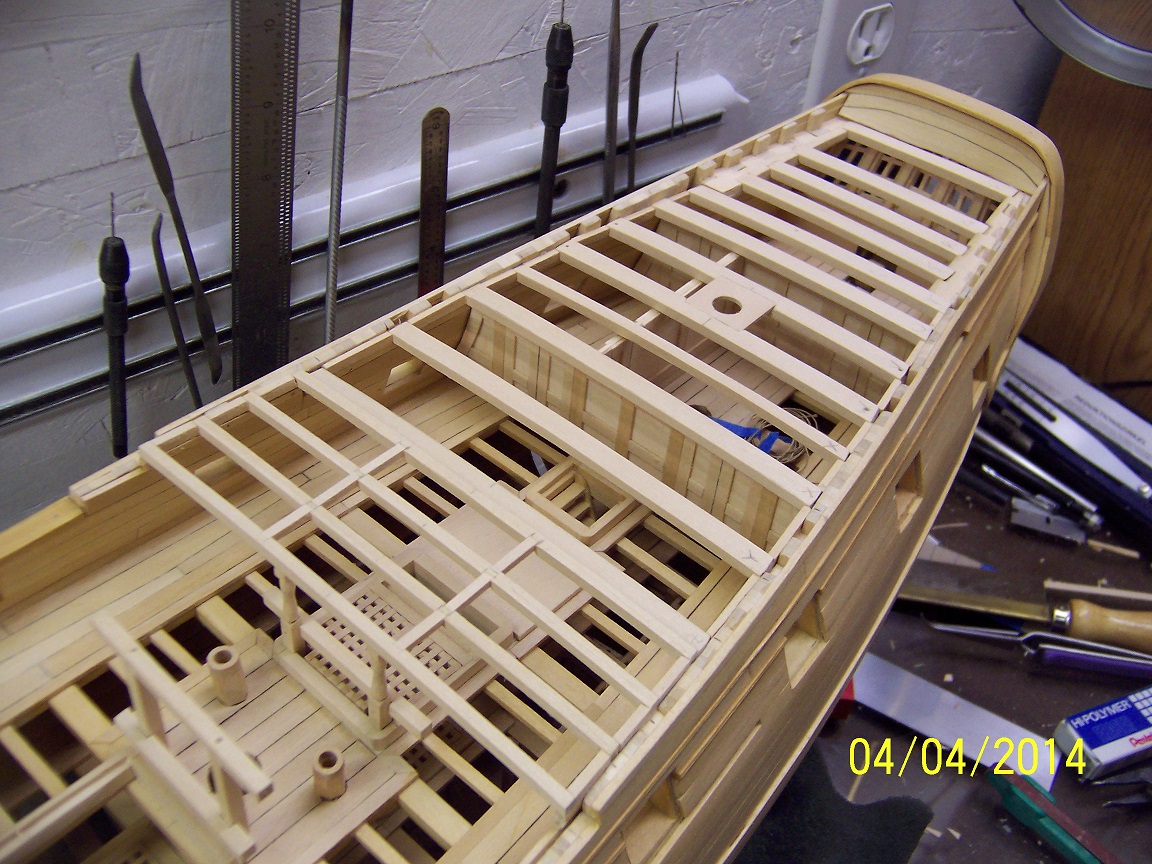
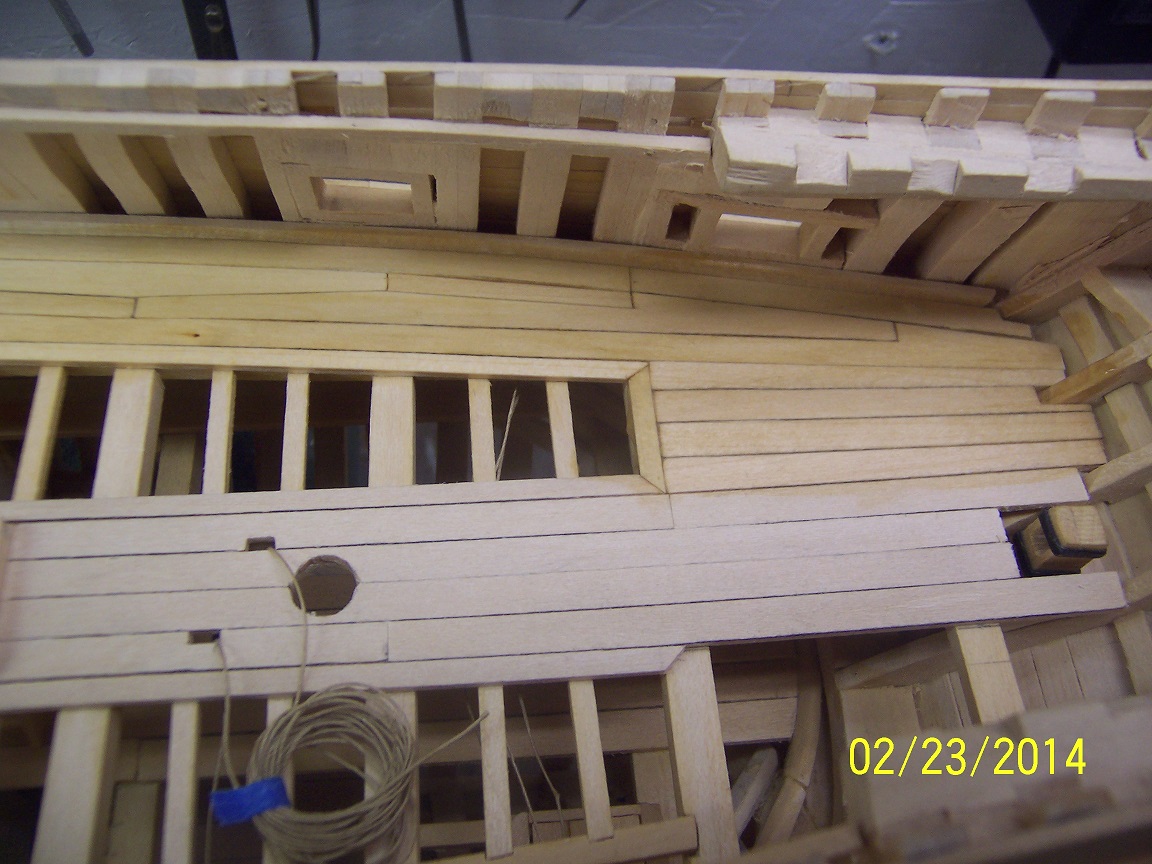
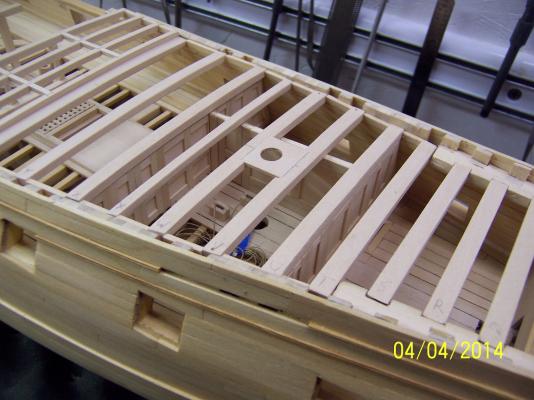
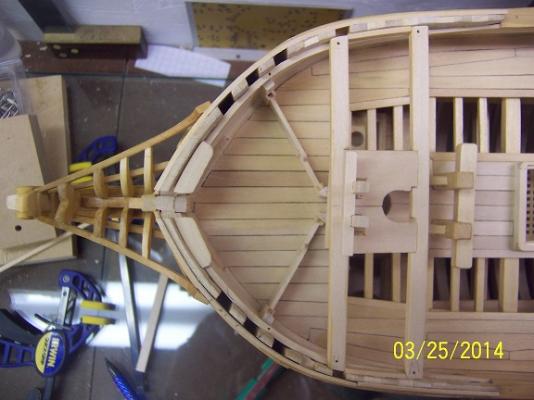
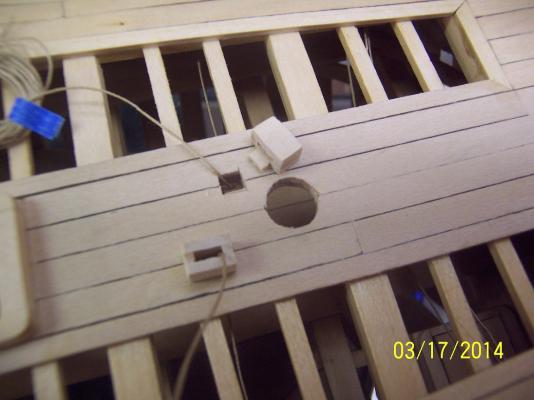
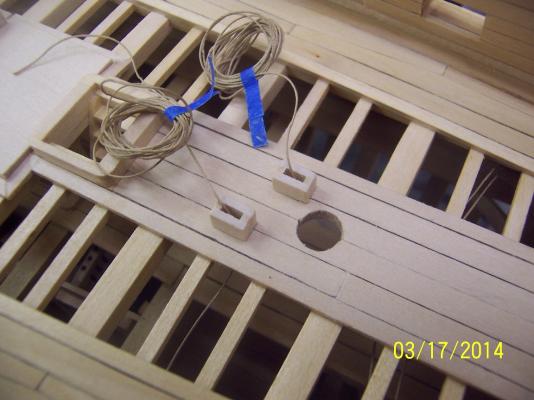
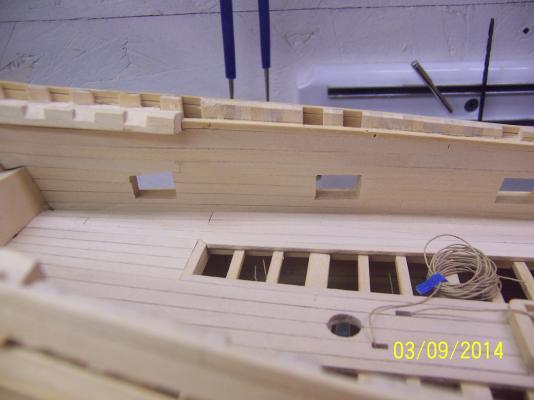
Thanks for looking. Everyday I have tried to get something done in the workshop. Today was two items: one, the boxes for the steerage cables on their way up to the quarterdeck and two, finishing the bow wall planking. For the cable boxes, I didn't want to use just a flat glue joint so I extended one side down into the floor planking: The height of these boxes is equal to the size of the other coamings on the deck. Pretty straight forward but really cleans up the look. The second item was another major milestone - completion of the bow wall planking (and thus - all of the gundeck planking). Next up is more sanding, the stern window frames, the hinges for the stern lockers and then the bulkhead partitions. -mark
-
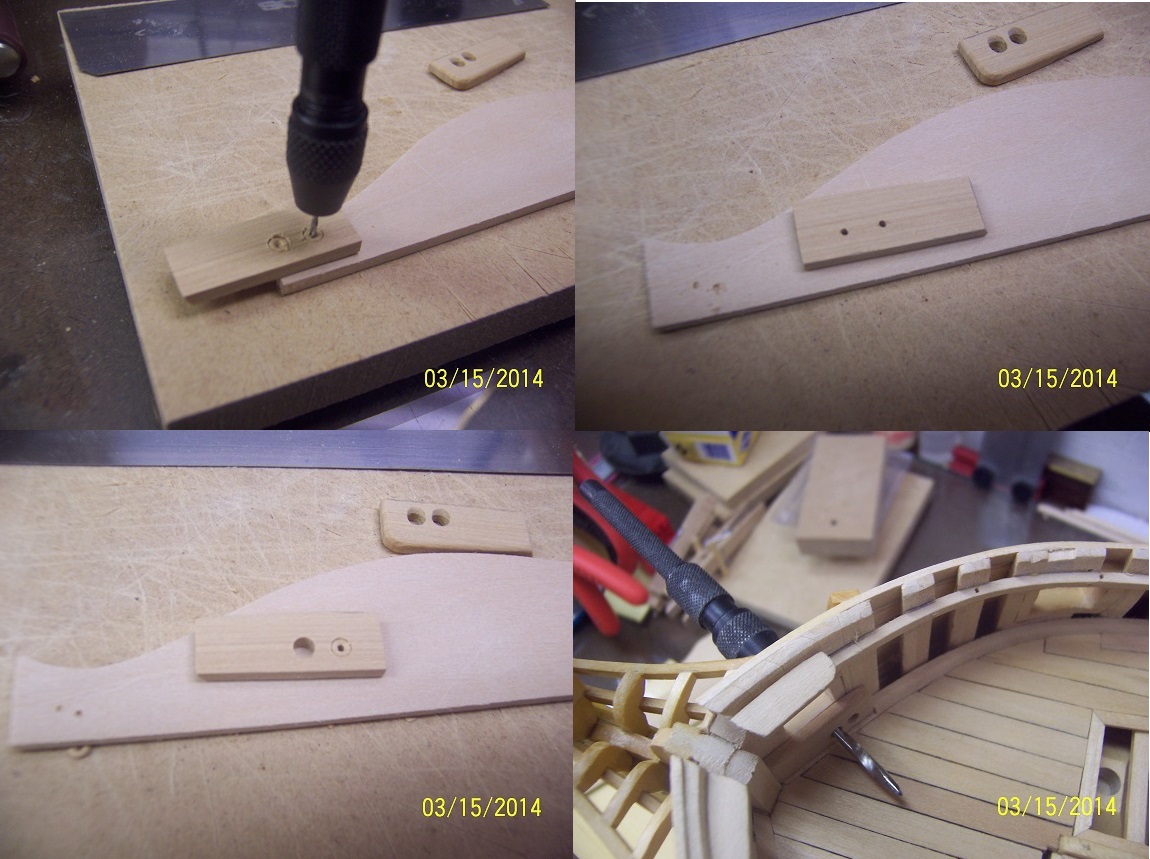
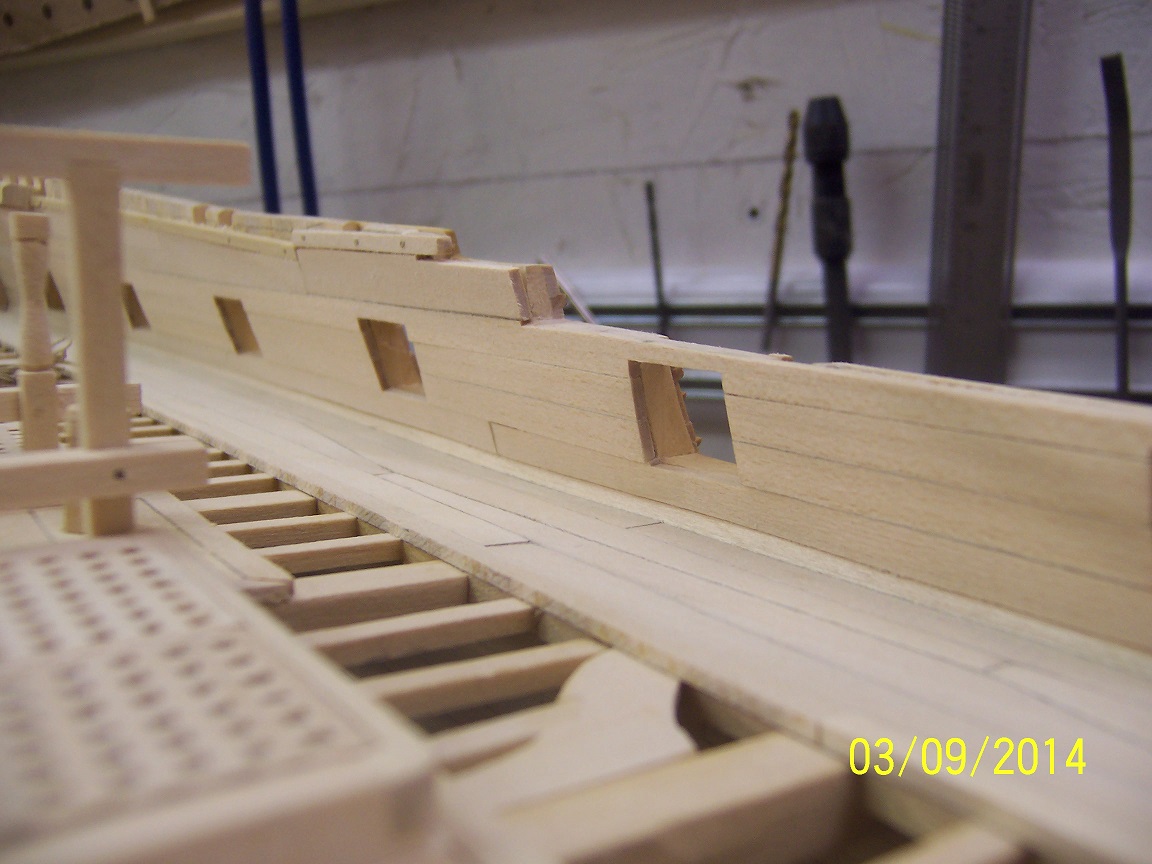
Today was the internal hawse hole linings. Given the size of the holes and proximity to the edge of the pieces, opted for boxwood for this detail work. First used some basswood to size things out though. This lining will project out from the other wall planking by 1/32 (1/2 the width of the 1/16 wall planking). The initial prototype built on the waterway just didn't look right and it was obvious this thick stuff needed to go down to the deck. So, after measuring out the required distance I chiseled out the waterway. Once I had the hawse hole lining roughed out I put it in place and did a light drill from the outside to place the location of the two hawse holes. Once this was done the piece was removed and (as shown in the next pic) I used a smaller drill to locate these locations to the other (finished) side. I could then drill the full size hole from both sides to avoid tear out and get a very neat and accurate hole. I then used a file to put in a shallow groove providing a smooth groove leading to the deck. Once put in place the drill showed a clean smooth hole through the whole hull I sized to fit under the first opening then rounded the edges exposed to the wall planking. This will make the planking neat and tidy. Now I can move on to the final bow planking. -mark

-
Bill, great build - keep the pictures coming! Just one thing - throw a tool or two out of place on your bench, maybe an errant piece of wood or some paper. Way too clean. Love the Connie. -mark
-
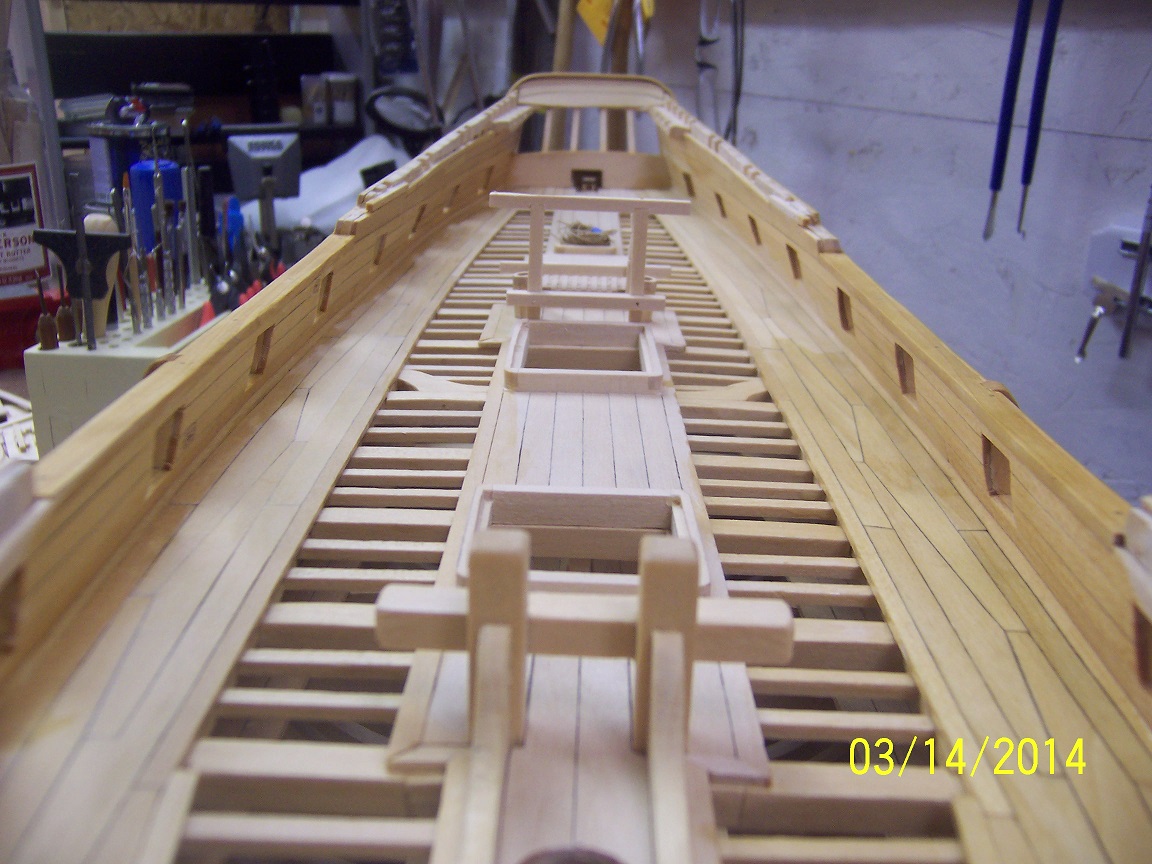
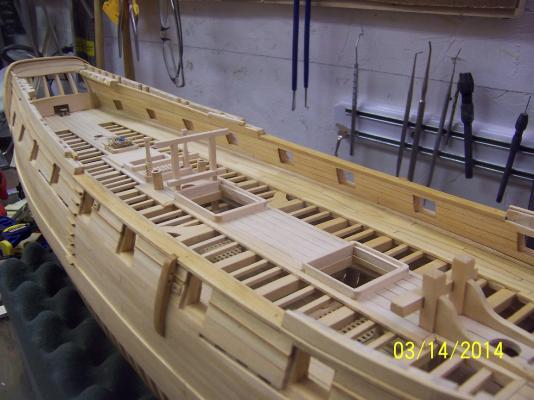
Still plugging away and actually have a lot of fun. I am now putting stuff on that will actually be easily seen in the finished product. The big additions lately are the cap rails over the mid-deck section. I used boxwood for these because of its hardness, given the potential for banging around during the construction to come. Pretty much everything else is basswood. This morning I got the chesstrees re-attached and the pass through hull sheaves on one side of the ship. Still many details to work (eg I am adding a manger, window sills) on the gun deck - my goal is to finish this section up early next week. Lots of sanding, sanding, sanding. I have partially gel coated completed sections of the hull to highlight the plank seams, this will be 100% as the assemblies are finalized. -mark

-
A hull to be truly proud of. Congratulations. You have set a high standard for the rest of the ship! -mark
-
Sailor, I tried directing the oldest one and that failed so I am just letting my 9 year old go with whatever he likes- just so long as glue is involved. John and all the likes - thanks for stopping by. I have been working on the wall planking as the next step: I have refined my theorem: Sand until you believe you are 100% - you are actually 25%. Repeat for the same time period - now you are 50%. Do two more times and you will be done. I have thought I had gone over these walls so many times smoothing them down. Well, start putting the planks and all the irregularities arise out of the smoothed walls to create a landscape looking more like the moon than a polished piece of glass. With the last pic you can see the deck addition clamps put on by the British forward of the quarterdeck. My belief is that I am currently at the 50% mark for sanding. Still room for improvement but should be there later tonight. The bow is currently untouched. -mark

-
Version 2.0. What a little sleep and doodling during some (boring) meetings can do to you. This is a cargo ship so simpler is probably better. Still some embellishments, sanding and finishing to go but this is the version I will go with. Now to start getting those walls planked. Mark
-
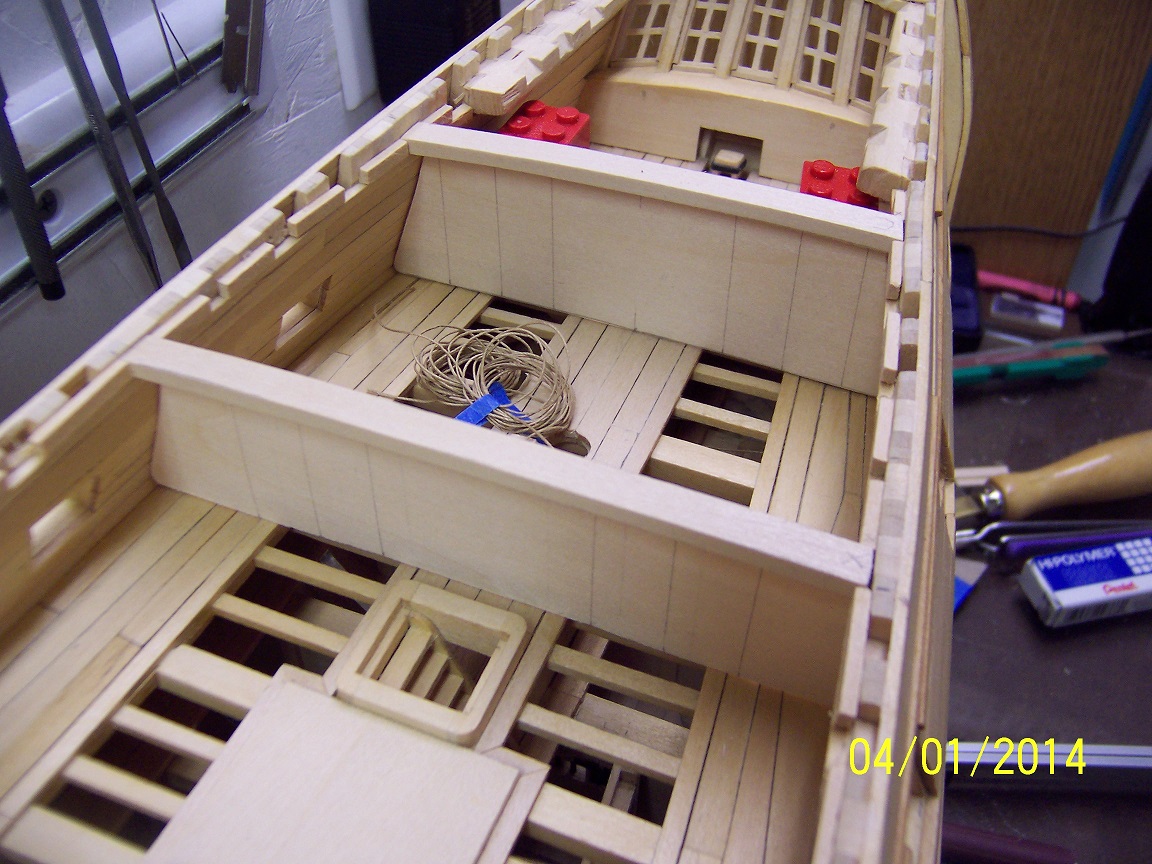
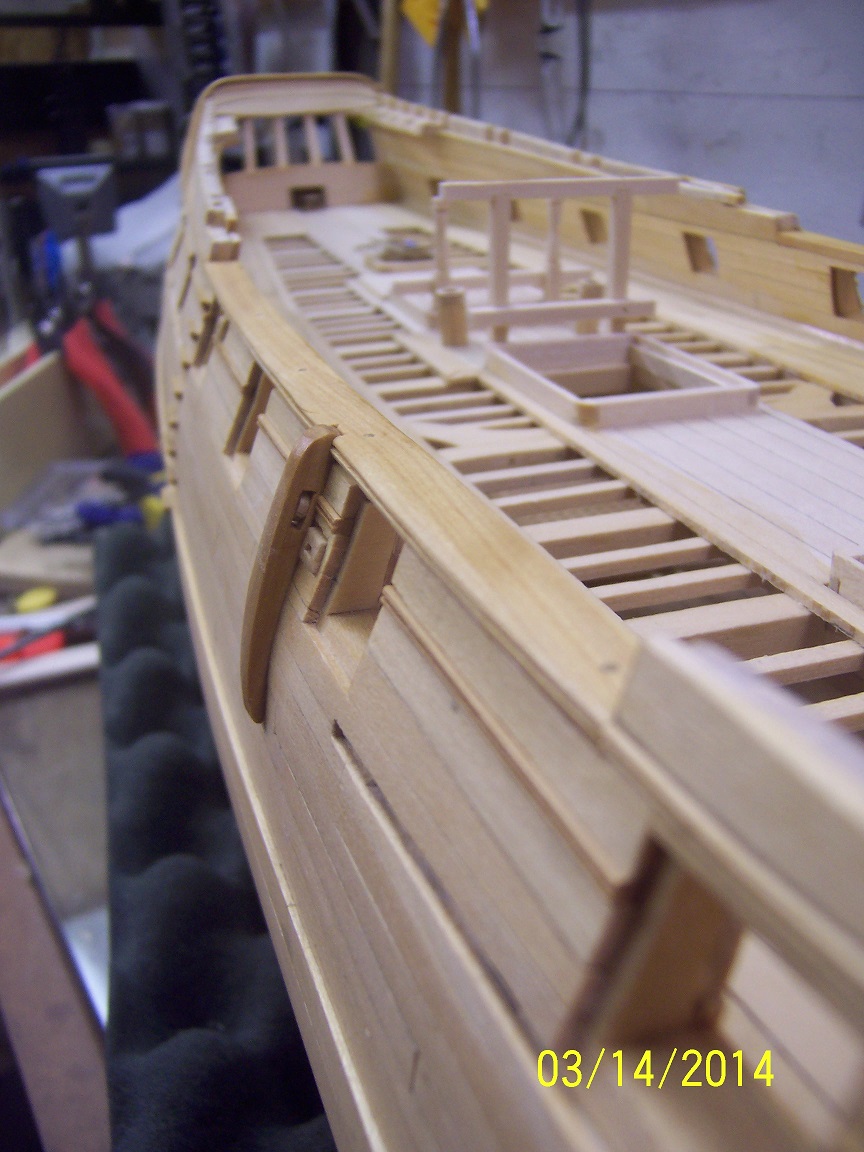
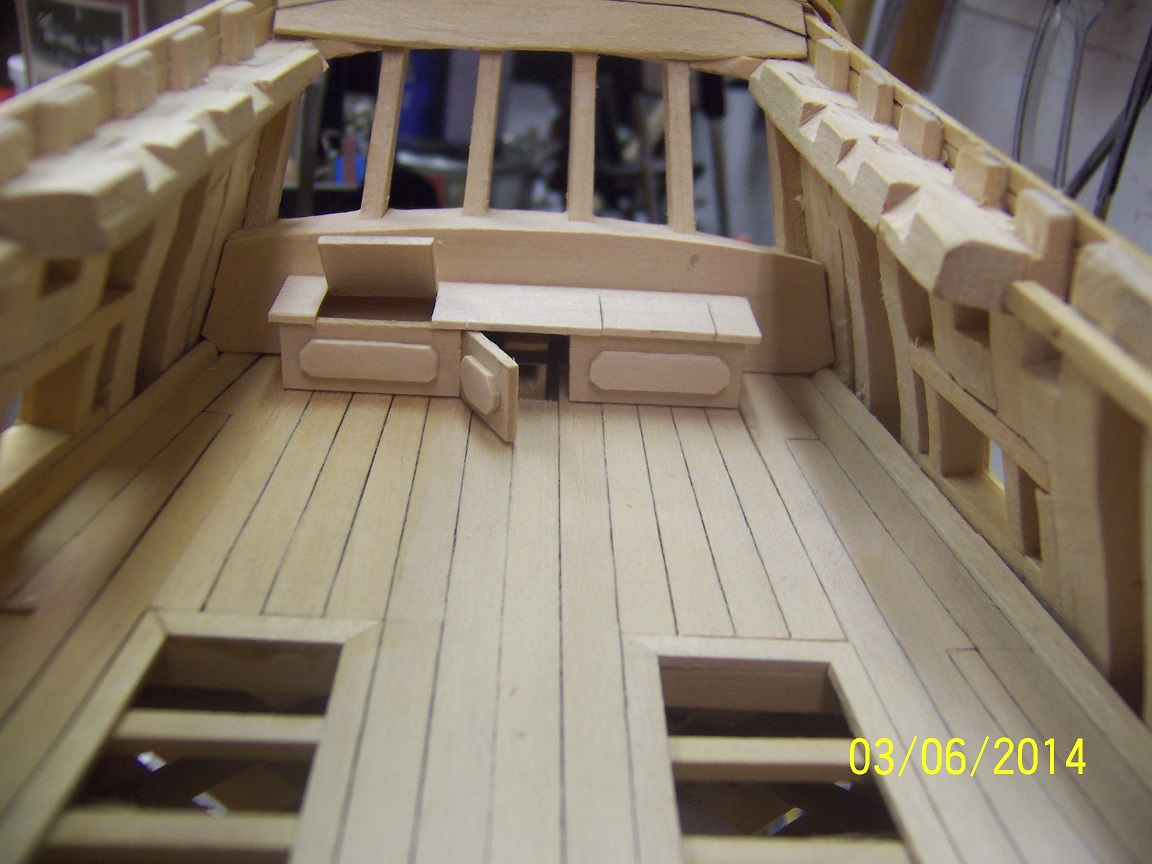
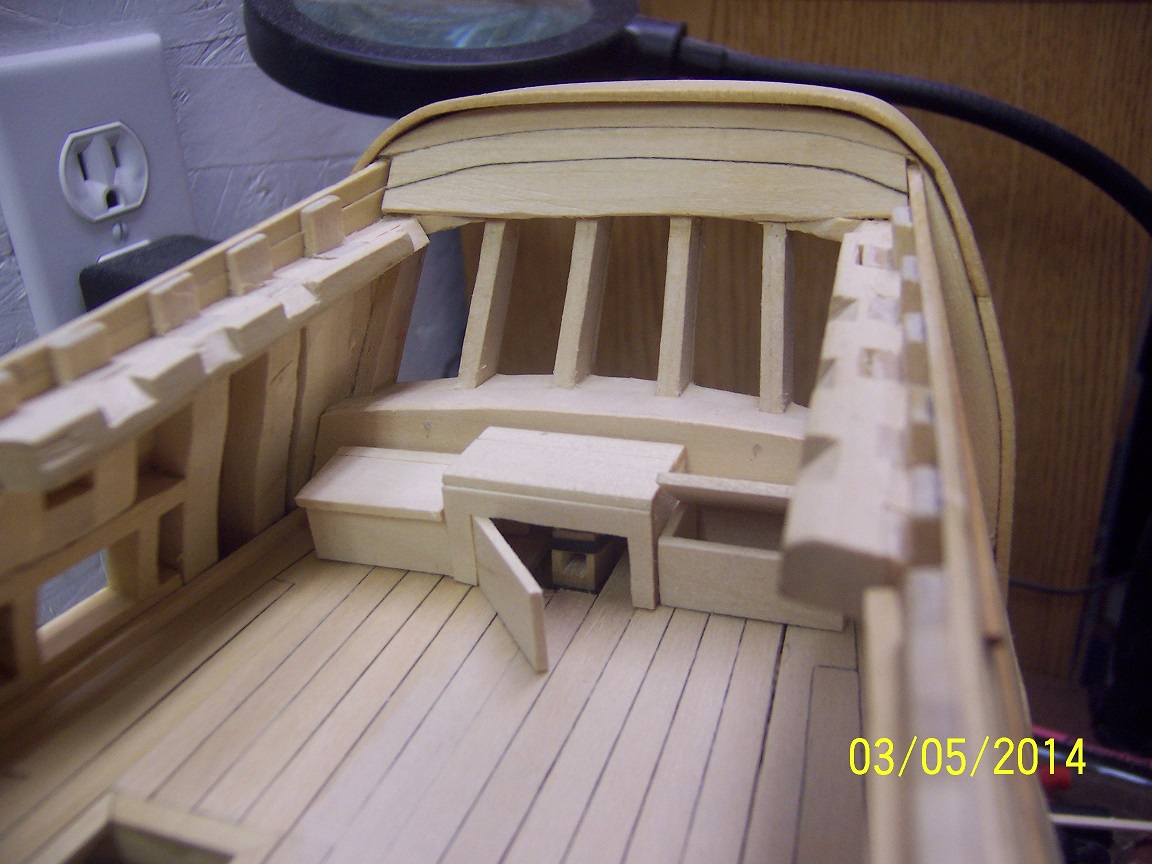
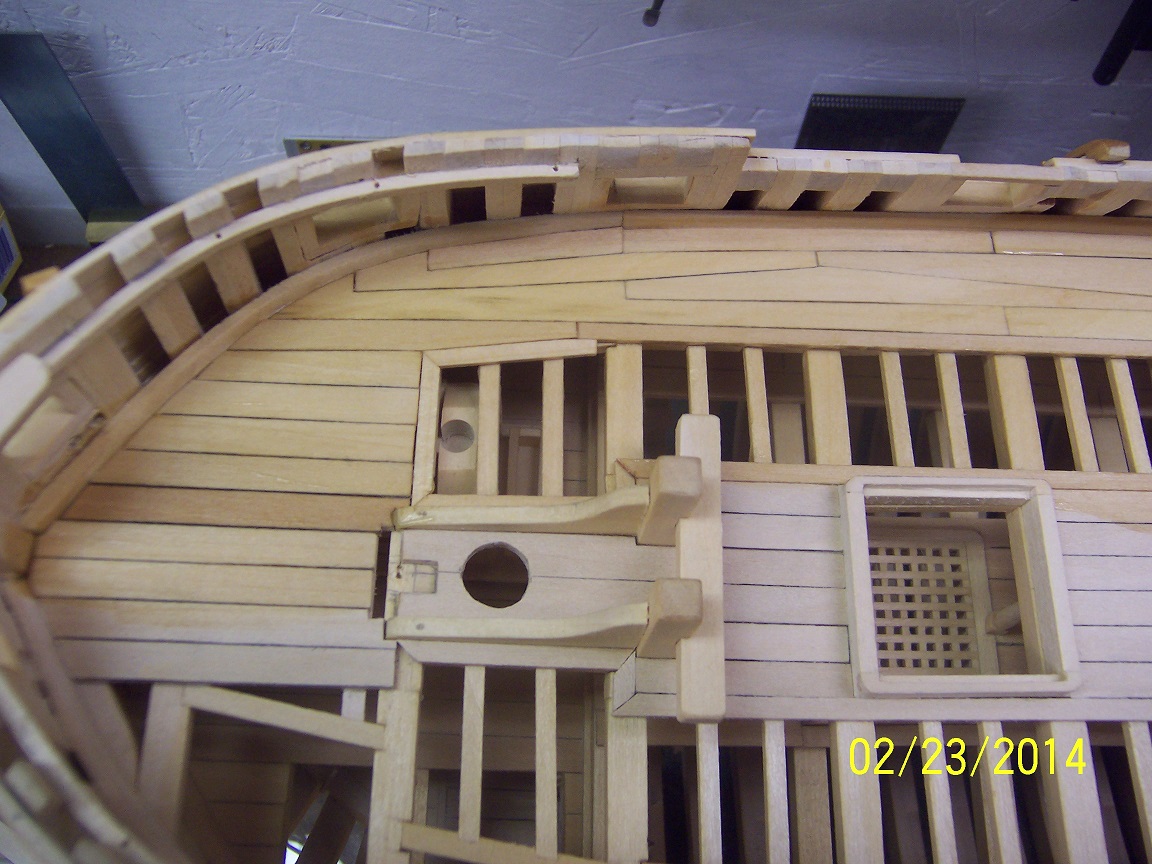
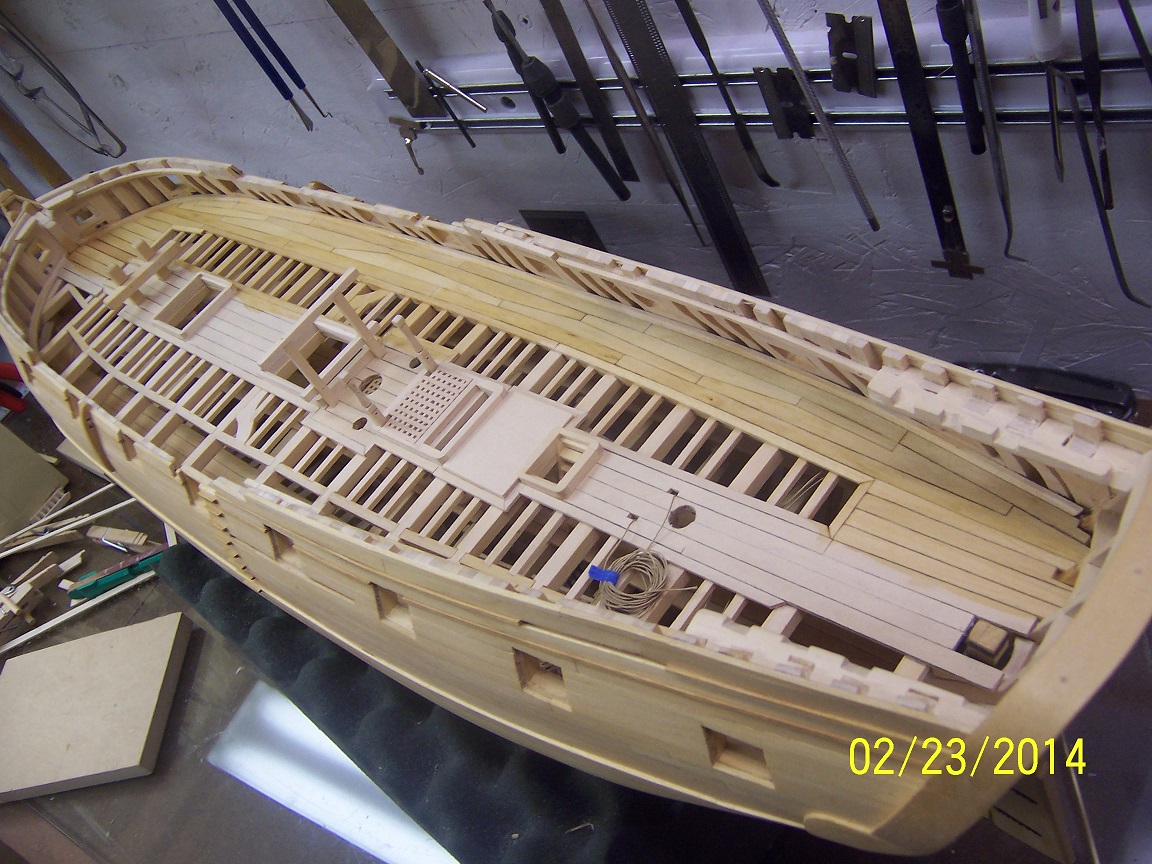
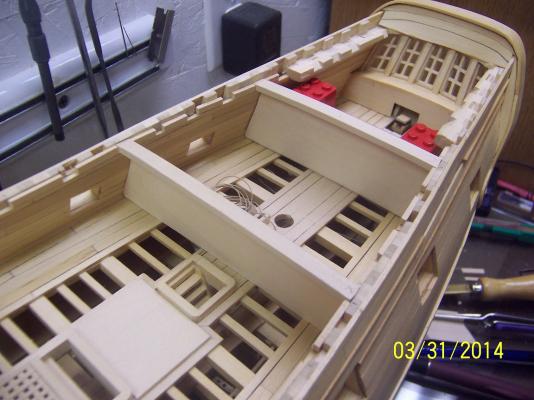
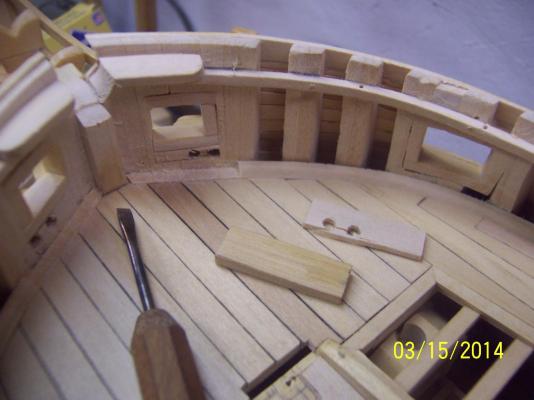
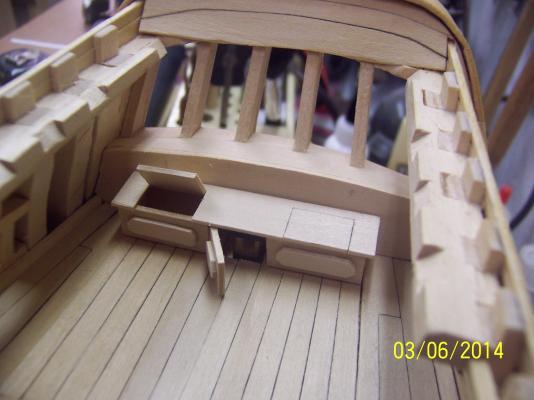
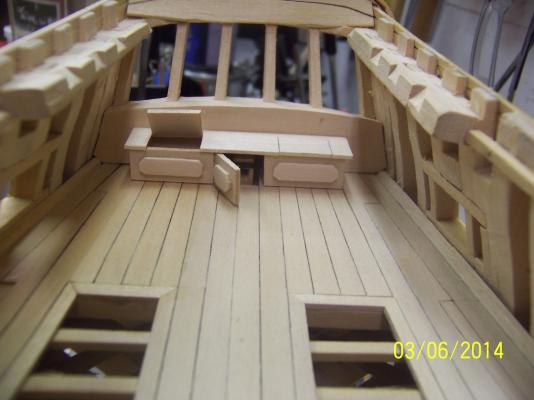
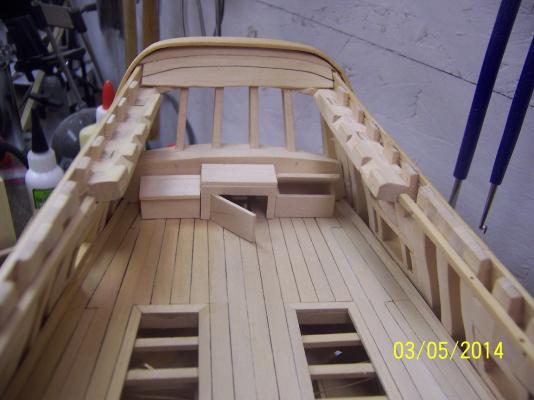
On to the lockers. These aren't on the plans but the rudder head required a cover and I decided to spruce things up a bit. I prototyped a first vision (nothing is glued down): I am thinking the rudder head locker should be less wide and stick a little farther into the cabin. The side lockers should have less depth and maybe a little less height. I don't think I will extend them to the bulwarks on either side. Once decided on how it will look, there will be hinges, knobs and trim added to clean up the final version. Pretty much lost to view under the quarterdeck but there will be glimpses if you look hard enough. Suggestions invited. - mark

-
The F-14 (glue splattered, fingerprinted, hacked off the stem) is a thing of beauty to my son. I am trying to pass on the merits of modeling but the first four kids (I have six) have shown little to no interest. The youngest (at four) is still a little early. He has become excellent at patience for his age. I won't go into the pull of digital games (a topic for another part of this forum). I do have a couple of basic ship kits in the wings but for now I let him pick his own subjects to keep any momentum going.... For myself, I think the stern fixtures around the rudder cap is up next for treatment - then on to the wall planking. mark
-
Luckily, this will not be masted or rigged......(even the masts shown will be eventually cut down a little more). Still sizeable, but manageable. My better half has said she likes the look of a rigged ship, but I will get only one in the house of this size. Still undecided as to which ship that will be, but I do like 1/48th scale. Being practical that scale eliminates anything over a 36 gun ship. Mark
-
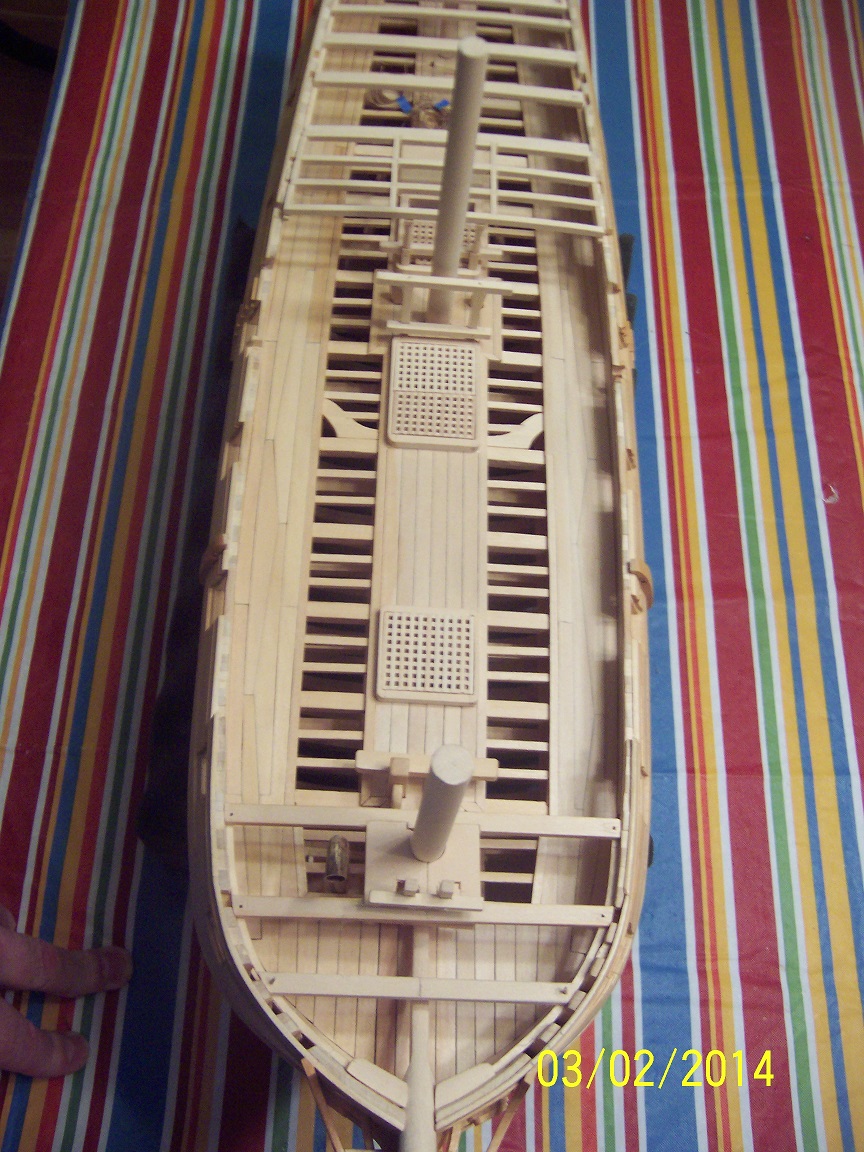
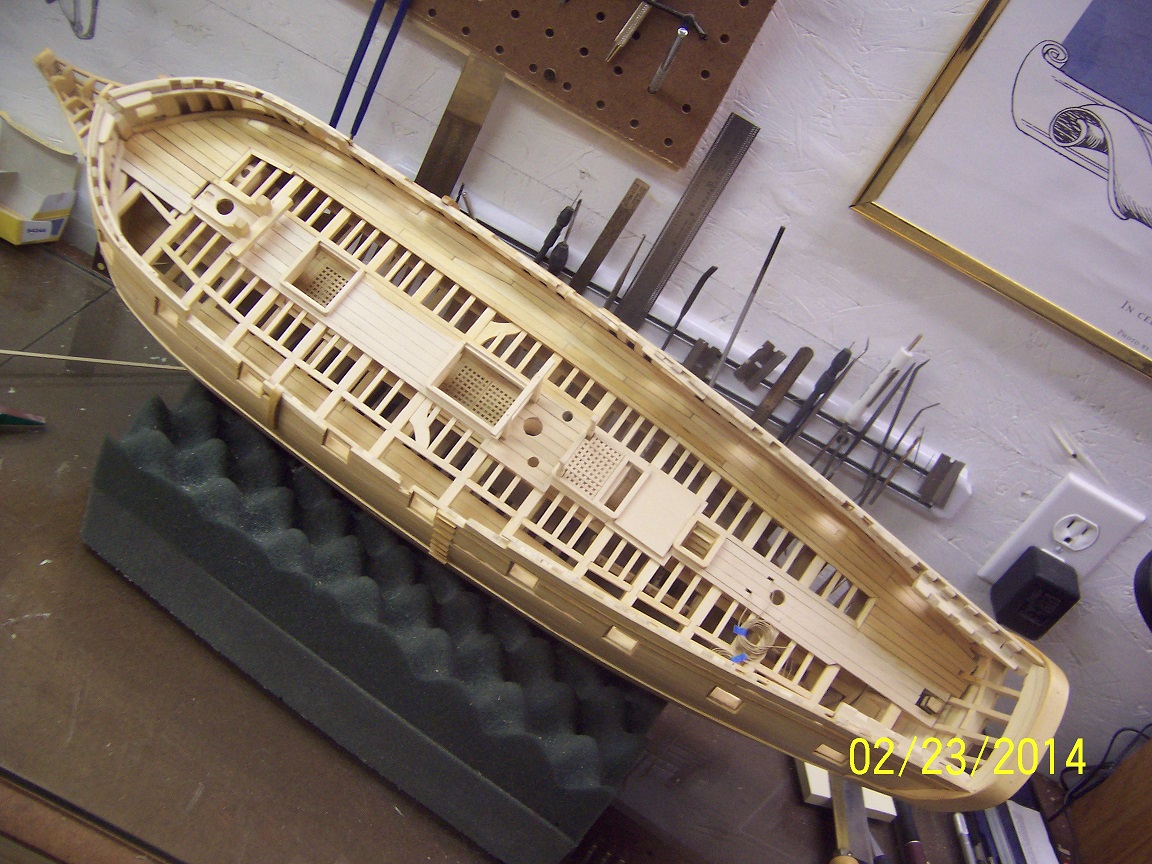
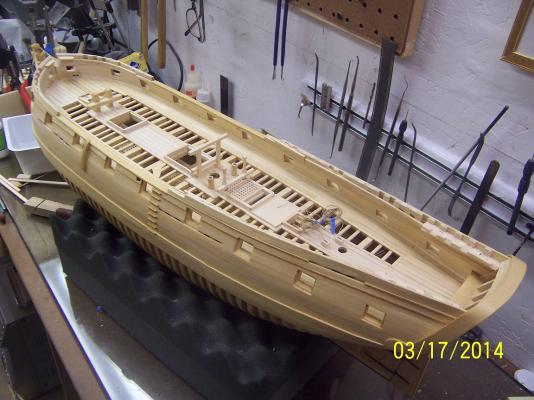
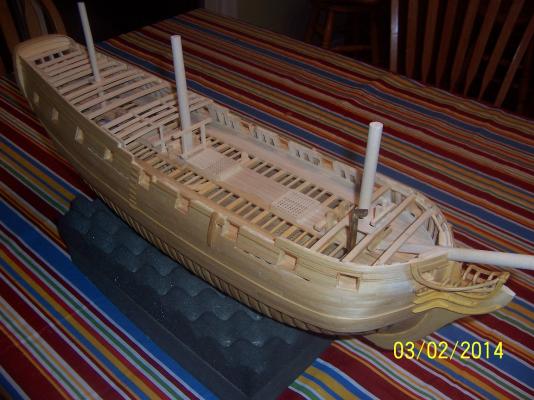
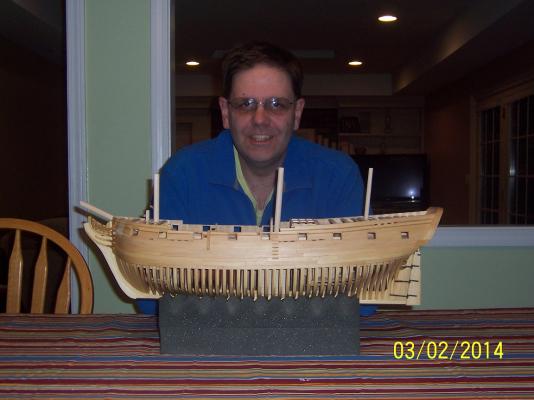
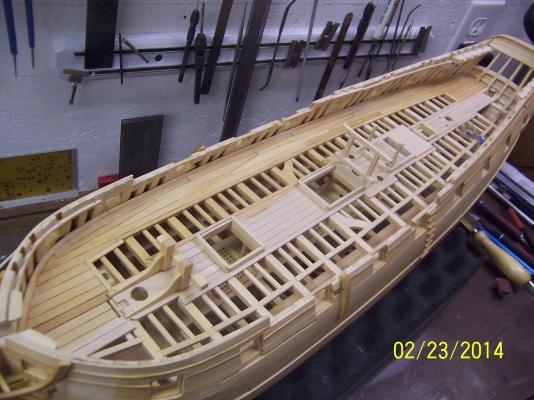
A pretty big milestone in my build - the gun deck planking baseline is complete! I had hoped to finish it this weekend but had had my doubts. Finally I was able to stand back and view the deck as envisioned. Still lots of details to work on for this deck before I can move up but I take the victory today. I did put everything that had been laid aside back on to insure I still had everything as well as see that nothing had changed fit wise. Finally to add some proportionality I provide a view of myself and the ship. Tonight I move on to my 9 year old's F-14 plastic model (last hope in the family). mark

-
Thanks for all the likes (and looks), I am still pounding away at the port side. Making those irregular planks at the bow / stern sure take some thought and time. One they are attached though, the work pays off. A lesson learned is to always use basswood first. Even if I move to other woods I will always have a supply of at least 1/16th inch basswood boards for prototyping and trying things out. I do start with paper, but that wrinkles and folds and can only get you so close. Basswood is pretty easy to work with and will generate a 1:1 template for very little cost (even if the first one or two don't work out). At the other end of the ship I am still looking at a gap that I hope to fill by tomorrow night: My current plan shows this ship finishing up the middle of the year at the current pace and tasks remaining (making it around 13 years since the first cut). I even caught myself looking at some plans thinking about the next one. Must focus! Lots of things left to do. -mark


-
Finally got the starboard side all planked up (with a coat of gel coat). It became evident pretty quickly that in order to plank the outer sides (with locking planks) you need to have the plan in place for the bow and stern planking. This was my first go at this. These areas are totally covered up by the quarter deck and forecastle but I still wanted something seemed plausible with my knowledge. The result was: The gel coat enabled the seams to really pop so all this hard planking work was not lost (hah, hah). I ended up using a trim outline (around half a plank width) to frame in the open area of the deck. So there is no end grain visible. It really seemed to tidy things up and give a finished look to it. So, when I take a step back and look at the final view of the cut out deck (at least the starboard side) I am left pretty happy with my efforts. It took a little longer than anticipated - but what doesn't in this hobby? I am relying on the stern planking on the wall to clean up the join with the floor. I need to construct a rudder head box along with a seating / storage area in this section. So on to the port side and trying to produce close to a mirror result. - mark


-
If you look at the nail varnish removers, some of them will be pure Acetone. So yes, you use it by itself.
-
James, I use Acetone to clean the metal prior to blackening. This is easily procured in small quantities as nail polish remover in most stores that cater to such. In my Druid build I show a couple of pics on the process that I use - pretty straight forward. Mark
-
Thanks for the good information Gary. Constantly learning in this hobby. This evening I had some time and have diagrammed out my plan for the outside planking. I had wanted to include some locking planks for the experience in making them and also the look they provide. With the space available I am opting for two regular plank runs, one on both sides of the locking planks. The final run is the trim piece that totally encircle the open space. I am still undecided if I should work from the mid section to the outside or from the hull towards the middle, but will probably work from the outside in. Lots of sanding and fitting in my future. mark
-
I looked in a lot of my books and this subject is just not talked about (is this rigging or hull?). However, 'Sailing Man of War' by Peter Goodwin does talk about this on pages 135 - 138. He talks about the use of tensioning tackle to take up issues with cord stretching from temperature and humidity, and not affixing the line to the spool. He also talks about that around 1815 hemp tiller rope was replaced by rawhide to reduce this play. I am assuming affixing to the spool is for smaller wooden craft without recourse to the above. For my ship (again, I have an out because it was built for cargo) I will drill through the spool at the center point and pull up the two separate lines through this hole and affix. Then the lines around the drum will be pulled over this hole so it can't be seen. Since I do not have miniature people to rig this up with one line it is either this or somehow splice them together. Mark