glbarlow
-
Posts
4,126 -
Joined
-
Last visited
Content Type
Profiles
Forums
Gallery
Events
Everything posted by glbarlow
-
 Excellent planking. You’ve done really nice work.
 -
I’d much much rather see you keep it at ¼ scale. Cheerful is plenty big. Plus with Cheerful built and hopefully Winnie finished someday I’d much rather have the three ships in the same scale. It would influence my decision. I’m running out of places to put completed models. That’s my vote anyway.
- 1,784 replies
-
- 5
-

-
- winchelsea
- Syren Ship Model Company
- (and 1 more)
-
Nice work, the stern is looking great.
- 399 replies
-
- 1
-
-
- winchelsea
- Syren Ship Model Company
- (and 1 more)
-
Sure, after I’m done with the Winnie I just started and hope to keep my attention on to completion
- 1,784 replies
-
- 1
-
-
- winchelsea
- Syren Ship Model Company
- (and 1 more)
-
We really should go the extra mile to convert to metric.
- 29 replies
-
- 10
-

-
-
Thanks for the hint, I learned on Cheerful the same thing, even up to half planked I realized I needed more fairing on the bow near the keel. Fairing is so critical to get right.
- 840 replies
-
- 6
-
-
- winchelsea
- Syren Ship Model Company
- (and 1 more)
-
Maybe three years from now, I have this Winnie thing going
- 1,784 replies
-
- 3
-
-
- winchelsea
- Syren Ship Model Company
- (and 1 more)
-
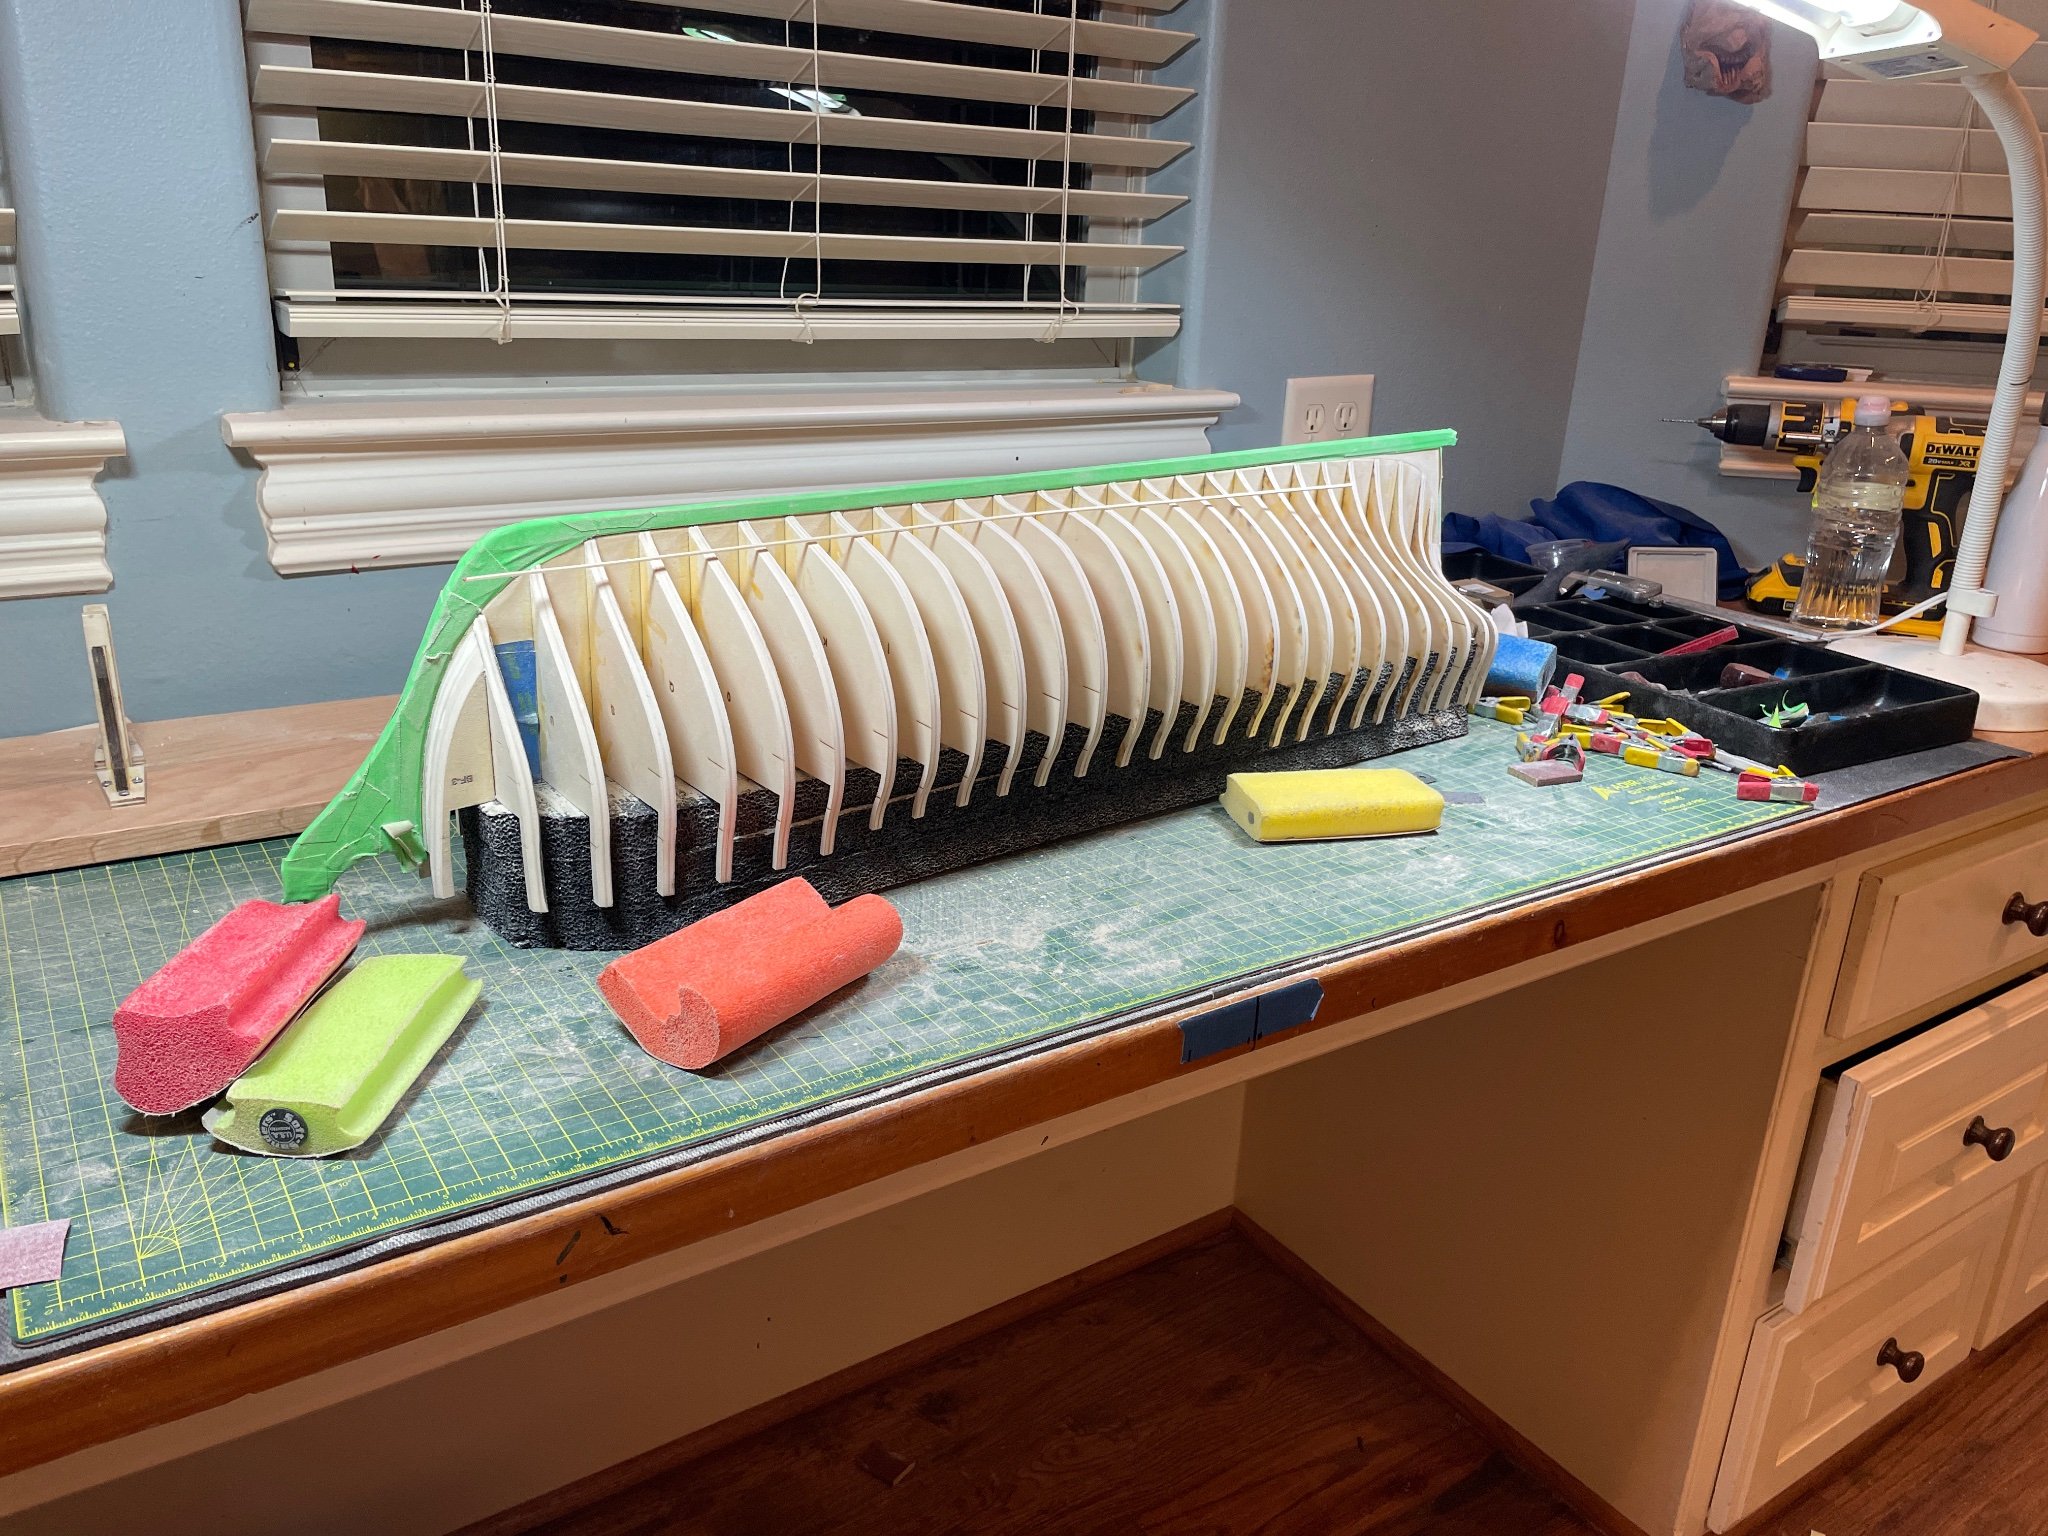
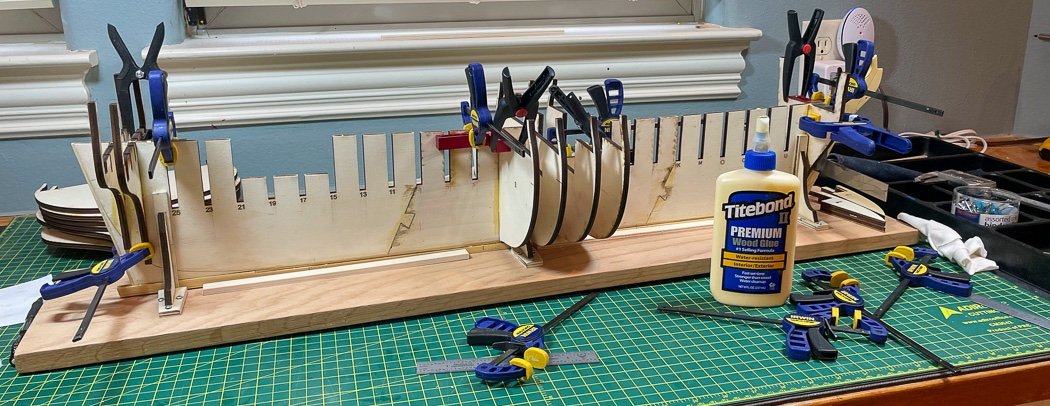
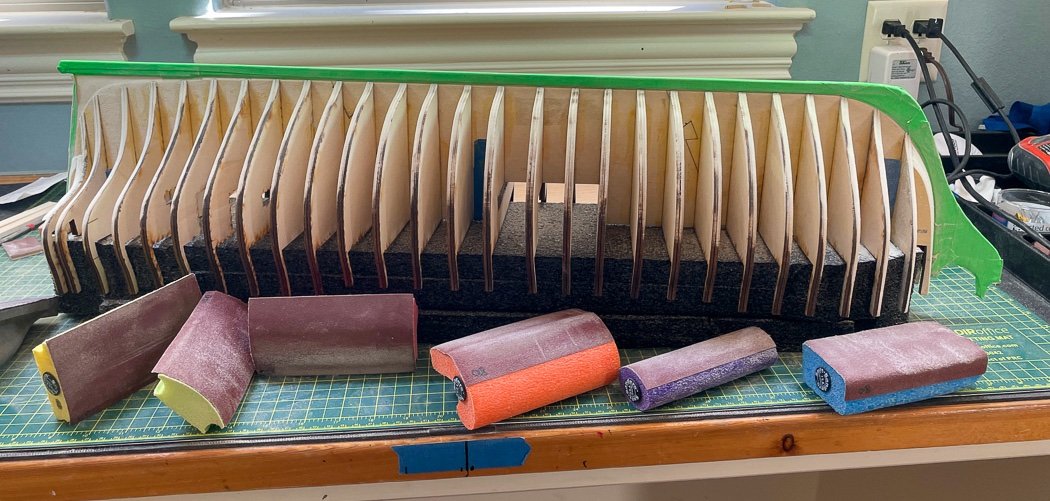
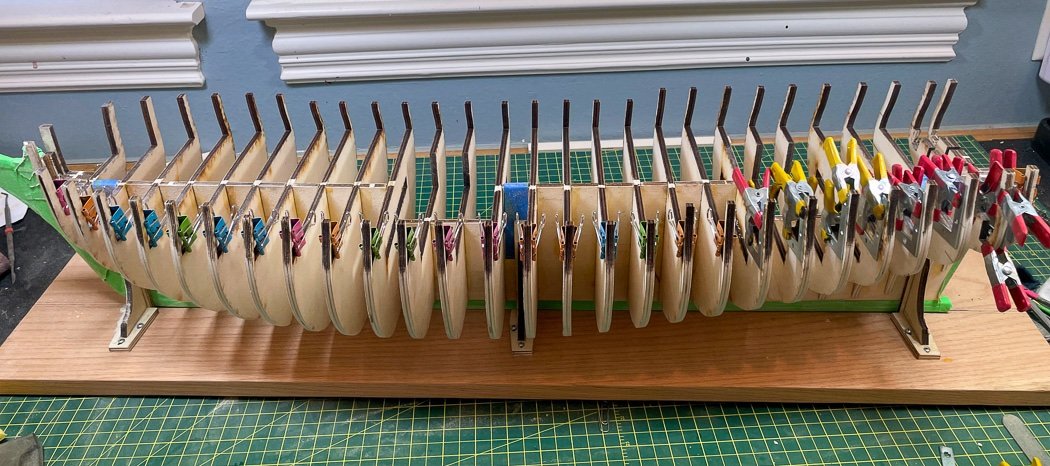
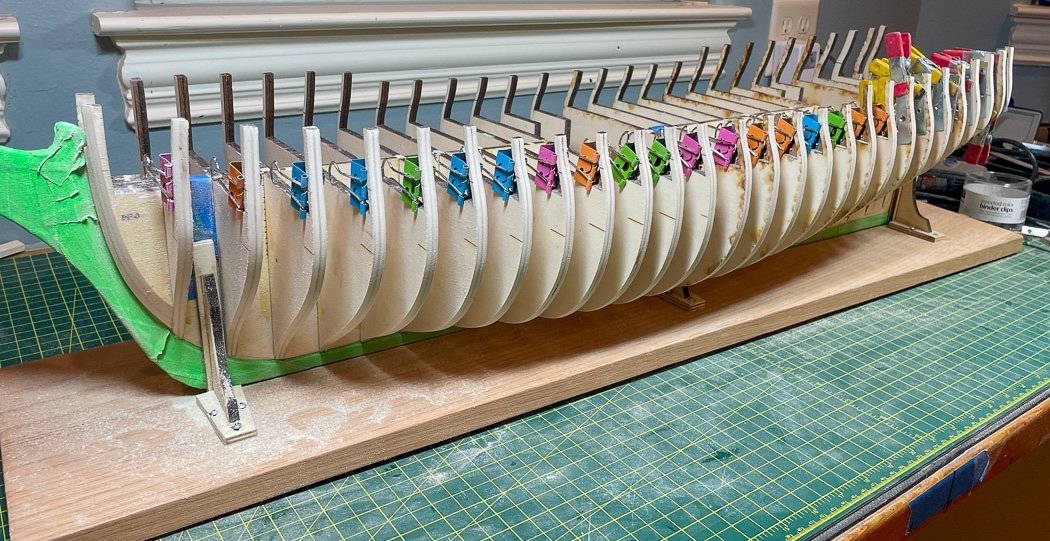
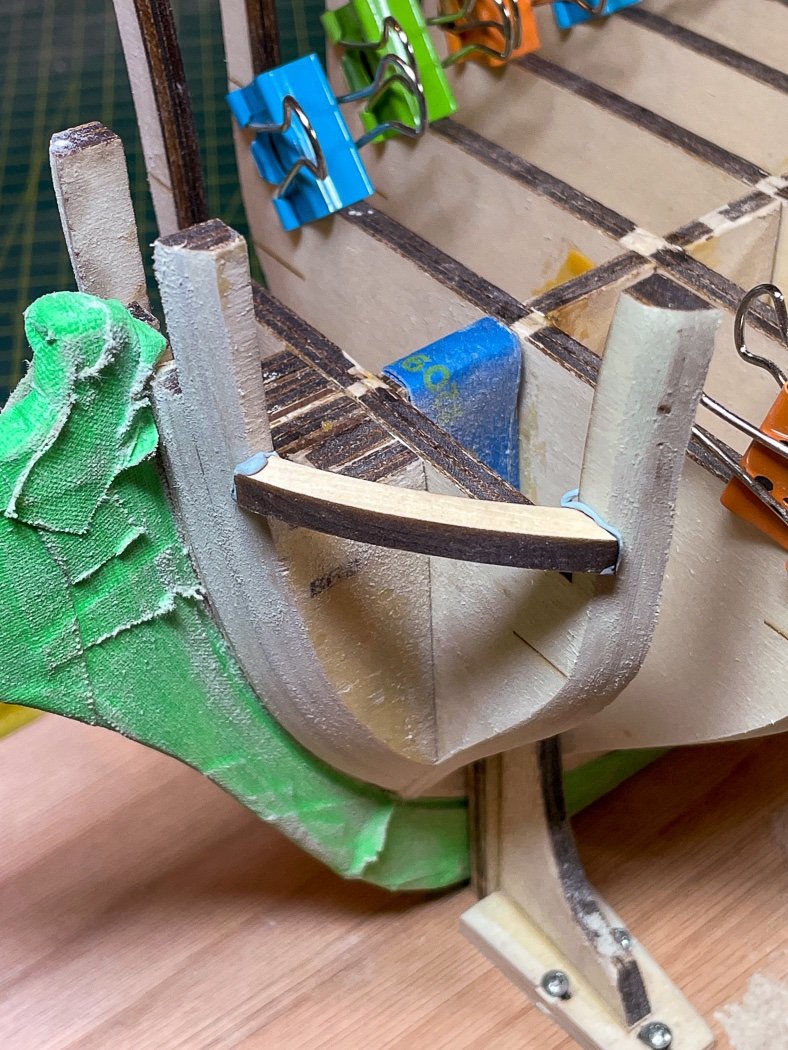
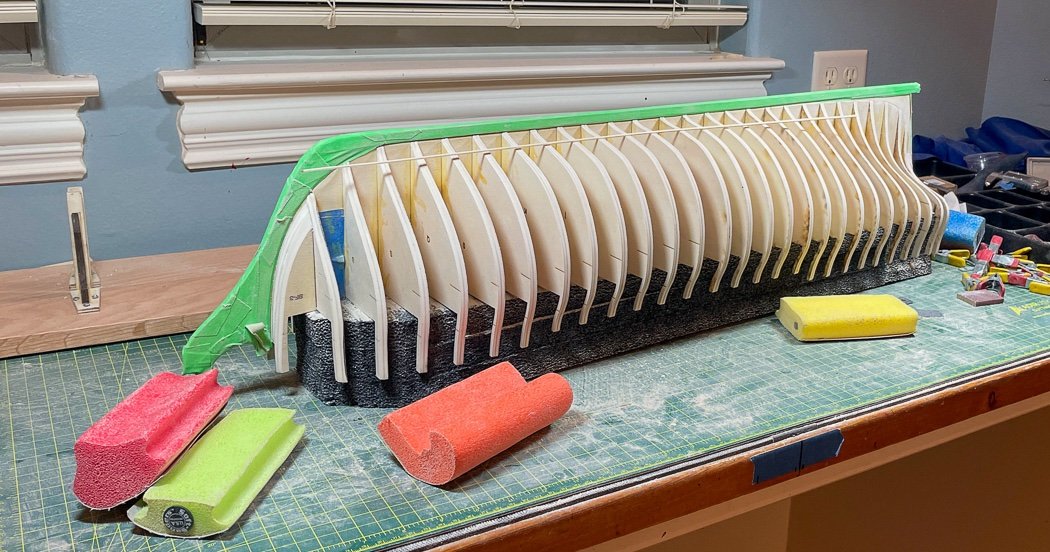
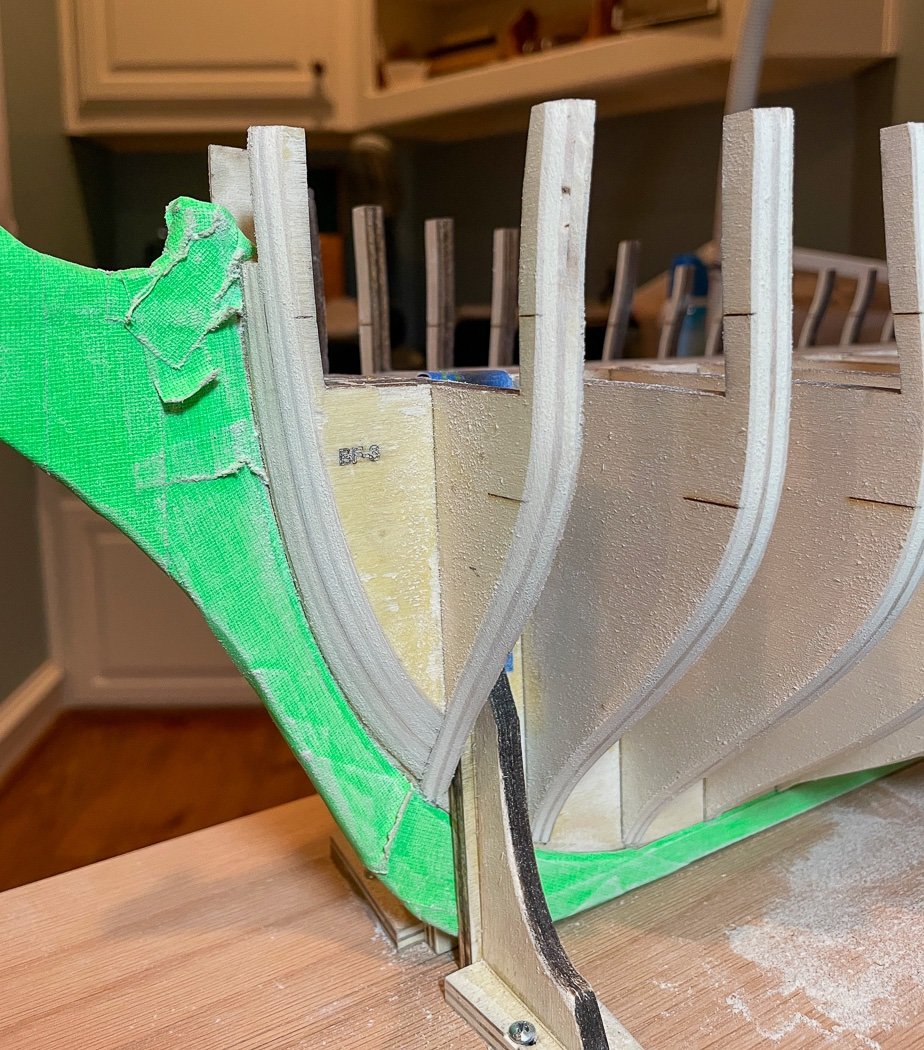
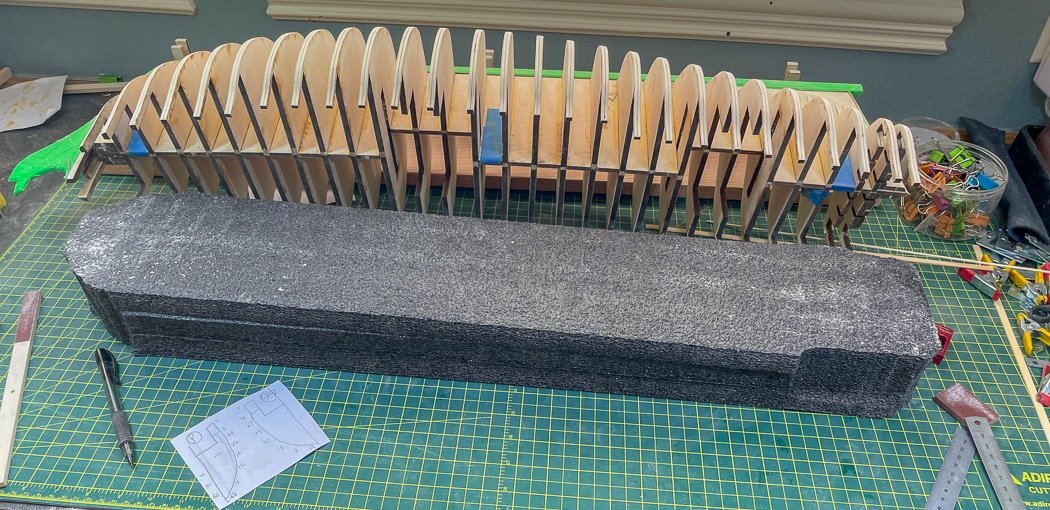
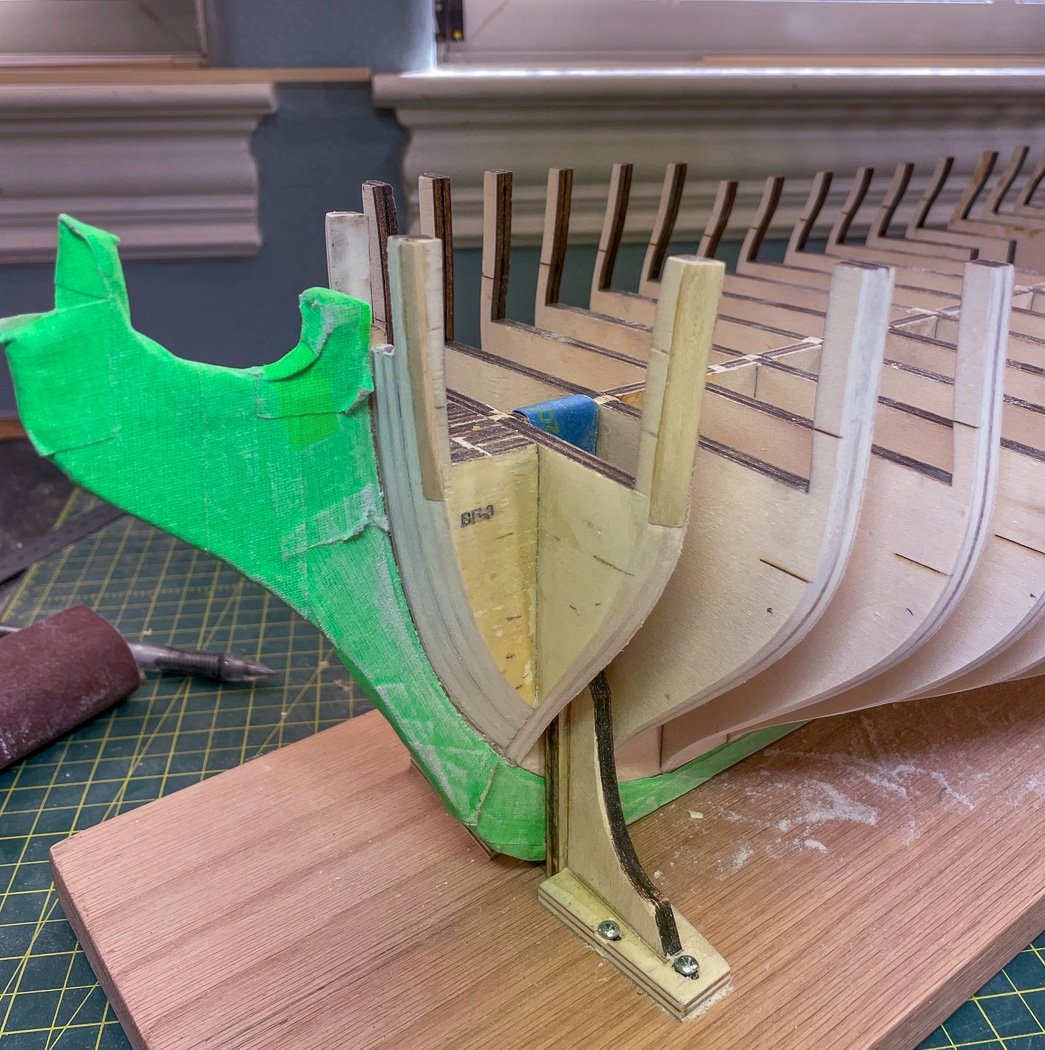
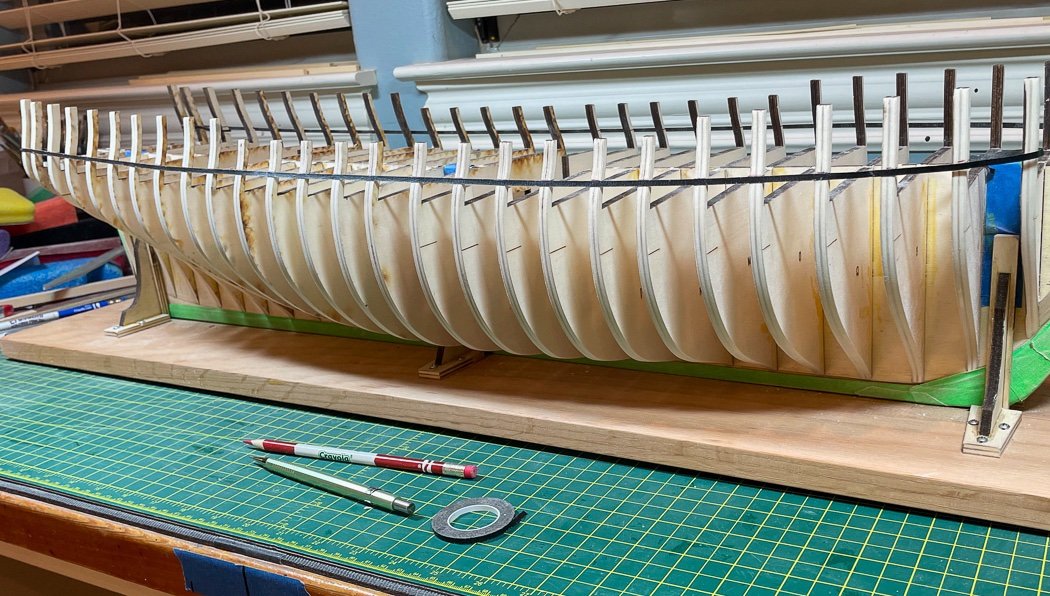
Fairing the Frame As all modelers know the most enjoyable and favorite part of every wooden ship model is fairing the frame. In fact many buy models, fair the frame, then throw the rest of the kit away so they can fair another one …Not! The step before fairing is building the frame by gluing on the bulkhead, in this case 28 of them just about an inch apart (great for planking, fairing not so much), and keeping everything squared up. Everyone has their own way and I’ve tried a lot of them. I found these mini-squares perfect for the job, clamping one to each side of the bulkhead and both to the frame ensures a square bulkhead. I used Titebond II for its fast set up time. Even still it was a day of gluing four at a time starting from opposing ends and the middle out, go away for an hour, come back and do it again. I recently bought a new iMac, Apple in their wisdom sent me two “trade-in kits” (large box with packing included) to send back my old one for a credit. The hard foam packing in the second one came in handy. With the help of my scroll saw I now have a handy and sturdy holder for Winnie to rest upside down. I forget who here on the forum first told me about Soft Sanders, they are the perfect tool for fairing along with multiple grits, 80, 100, 120, 180, 220, (I also have 320 and 400 for later in the build) of their adhesive sandpaper attached. The multiple shapes makes it easy…or easier, nothing about fairing is easy… to flow with the various curves as the fairing process began. As a photographer I often use gaffer tape from Amazon. It’s great because it has the thickness and holding power of duct tape but it leaves no residue when removed as long as I don’t leave it on too long. So that’s what I use to protect the AYC stem and keel as I sand as it’s more durable than blue painter tape. I’ll remove and replace it after the fairing is done. It isn’t cheap, but worth it for me. After almost two days it was time to flip her over and fair the fragile extensions. Chucks binder clip and L-bracket recommendations worked great. Ironically the only extension I broke, one near the stern, was when I was adding the L-bracket and the binder clip snapped off cracking the extension as it did. I changed to small clamps after that, the width of the L-bracket and bulkhead is a bit much for my clips. A little Titebond in the crack, a splint on the sides and L-bracket to hold it straight while it dried and I was back in business, not my first broken extension. After three days I was nearly there with the basic fairing, lots of sanding and running of the batten, I didn’t want to sand too much at the extension level until after the port framing is done, it is now fairly faired according to my eye and my handy batten. Then the first of the many mistakes in my future: In my zeal to get a smooth run I faired too much at the port side bow. Winchelsea has more of a blunt bow than my Cheerful, it being a frigate not a cutter. I must note though it was faired really well, just not faired correctly per the design. I learned this - fortunately early enough to do something about it - by test fitting the laser cut bow port curve provided in the chapter 1 parts. The easier thing to do was just sand it to fit, it was really off by just a millimeter or two at the filler and at the first frame, but it wouldn’t be right. The hardest thing would be to throw it all out and start over, but of course it’s wood and that wasn’t necessary. I know how these small errors at the beginning can compound and lead to more problems later. So I had to make it right now, no matter how small it might seem. As we all know if it’s made of wood it can be fixed with patience and creativity. So after first taking precise measurements up and down the filler and first bulkhead and with encouragement from Chuck I firmly glued wood strip (Titebond becomes integrated and stronger than the wood itself) to both. This photo is after adding the wood, before final shaping it to fit. (An earlier photo before wood added and shaped.) Using the measurements, matching those to the same location measurements starboard, and frequently test fitting the bow port lining pieces, I got it back to right. I haven’t fully sanded the addition to the first bulkhead, I’ll wait and to that once the port linings are installed and I do final fairing on the extensions. This took a full days work just on this, slowly sanding, checking, sanding, checking. Also in the photo, I made a sanding stick with Soft Sander adhesive paper of different grits on both sides and cutting a strip from the bulkhead ply scrap to match the width of the bow fillers. As others have pointed out and all Winchelsea builders know, the bow has a tricky curve going from near flat to an almost ninety degree turn, this sanding stick along with the soft sanders help me slowly create it. A lot of wood has to be removed from the fillers. I’m still not sure I have it right and will be checking it again and again before the first plank. Next up is the port linings, I lot of little pieces of wood to cut and fit (here I come Byrnes saw and Byrnes sander). The first step of that is using the engraved laser lines to mark a smooth running flow for the port sills. As Chuck notes in the monograph the reference lines are a good starting point and for the most part a perfect fit, but there are a few frames that for whatever reason are off a bit. I found this 1/16th black crepe chart tape on Amazon. It has enough adhesion to hold on wood for a while, provided the dust is wiped off first he said knowingly, to allow me to find and get a good look at the flow before marking the bulkheads at the top of the tape. So now it’s off to saw port linings. Thanks for stopping by. I realize you have a choice in the many outstanding Winchelsea build logs to read, I appreciate your taking the time to read mine.


- 840 replies
-
- 23
-
-
- winchelsea
- Syren Ship Model Company
- (and 1 more)
-
They get harder to see after you finish that glass of wine there on the bench. 😂
- 362 replies
-
- 3
-
-
-
- Amati
- Lady Nelson
- (and 2 more)
-
Did you prime or etch the brass tube before painting, it looks great? Will you be adding the steering ropes, are there blocks on the main deck for steering rope to go through? And if you don’t plan to, what size rope would be appropriate? (about two years from now what I get mine to this point I’ll come back and read this post😊)
- 1,784 replies
-
- 3
-
-
- winchelsea
- Syren Ship Model Company
- (and 1 more)
-
I’ll add it to my Christmas list, I’m not hopeful 🤪 but thanks for clarifying there are micro AND mini mills.
-
I thought that’s how your drilling holes in round objects using a V block,, so I guess I misunderstood.
-
Put a set on my Christmas list😊 The Chuck I have doesn’t fit the M70 mill though it does fit the lathe. Can’t seem to find a small enough one to fit it about 3mm max I’m guessing. ?
-
Completely agree, only I use 320 grit to smooth and 400 grit to soften every edge. It’s subtle and it takes time but it’s not a race to the next blog entry and makes a big difference done throughout the model. I’m always impressed and inspired by your attention and skill with small detail work, it adds so much to the model. It’s refreshing to see as I’m grinding my way through Winchelsea’s skeleton. What carving tools did you use other than files, if any. I need to find that V block. I need an area in my workshop labeled “tools inspired by Derek.”
- 345 replies
-
- 6
-

-
-
- Duchess Of Kingston
- Vanguard Models
- (and 1 more)
-
I’ve done both, both work so it’s really your choice
- 505 replies
-
- 3
-
-
- vanguard models
- Sphinx
- (and 1 more)
-
That’s really excellent detailed work on the cap rail. I hope to borrow that some day.
- 607 replies
-
- 2
-
-
- winchelsea
- Syren Ship Model Company
- (and 1 more)
-
Leaving the frieze long is a simple step but a masterful idea I’ll remember. did you use the fruitwood gel on your figurehead? It looks great, for me it seemed to cake on so I’m sure I’m doing something wrong with the thick gel stain.
- 642 replies
-
- 2
-
-
- winchelsea
- Syren Ship Model Company
- (and 1 more)
-
After spending Thanksgiving week with family I spent the last two days fairing and still have more to go. Can’t quite get the bow right and don’t want to take too much off doing it. My recently neat and clean work shop is that no more. A more detailed post to follow, when I can lift my sanding arm again. Yay for sawdust…

- 840 replies
-
- 16
-
-
- winchelsea
- Syren Ship Model Company
- (and 1 more)
-
The Kell tightens from the sides, so down to zero. There are two versions, one for large and one for small chisels so it more the maximum width.
-
I’ve found Admiralty Ironworks Black looks great on wood for more of a Matt finish than the Dull (really gloss) black. I used it on Cheerful’s booms and spars to a nice effect. Your wales look great. Not a soul would know if the scuppers connect to the waterways, like you id not attempt that.
- 857 replies
-
- 5
-
-
- Sphinx
- Vanguard Models
- (and 1 more)
-
Jim Byrnes now recommends Martindale blades, which I use on my Byrnes saw. A new blade from Jim costs $17, why fool around with old blades. I maintain the saw as Jim recommends an periodically clean the blade with alcohol before much of anything builds up. I’ve had, and cared for, the saw for at least 20+ years and have had zero problems with it other than replacing the blades I use only twice during those 20+ years. I did cut through the stop on the cross cut table once, Jim sent me a replacement. As someone said, let’s support the maker of the best tools modelers could find and buy what we need from Byrnes Model Machines.
-
Jim Byrnes now recommends Martindale blades. I replaced the old Thurston blades on my Byrnes saw, they are perfect for model size cutting.
-
I followed Derek and the you tube video he referenced by using various grits of adhesive sandpaper, 220, 320, 400, 800, 1000, 1200 adhered to a flat tile (or glass). That plus the Kell honing guide and a small amount of honing fluid on the sandpaper works great. Once they’re sharp the 400-1200 is all I use to keep them tuned up to a 30 degree edge (½ inch of the chisel extended from the guide). Don’t forget to condition them by flattening the back side, just run them perfectly flat on your sharpening surface a few times. Stone or sandpaper paper, the Kell guide was a game changer for me. Mine are perfectly sharp now.