


glbarlow
-
Posts
4,126 -
Joined
-
Last visited
Content Type
Profiles
Forums
Gallery
Events
Everything posted by glbarlow
-
 Thank you, I put a lot of work in the log hoping to help others as I’ve been helped.
 -
Thanks Bob, I think there’s plenty there for you get started😊 I hope that it does, as I have been by so many others.
-
Thank you for saying so Chris, in no small reason due to your equally gorgeous design
-
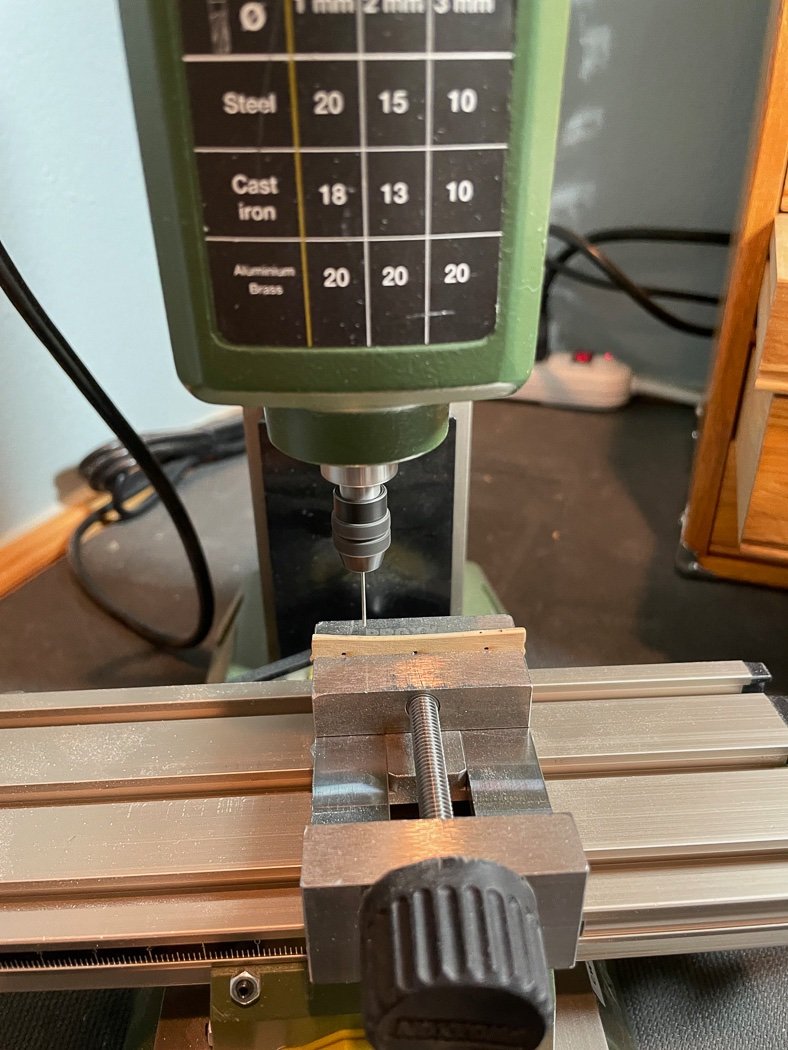
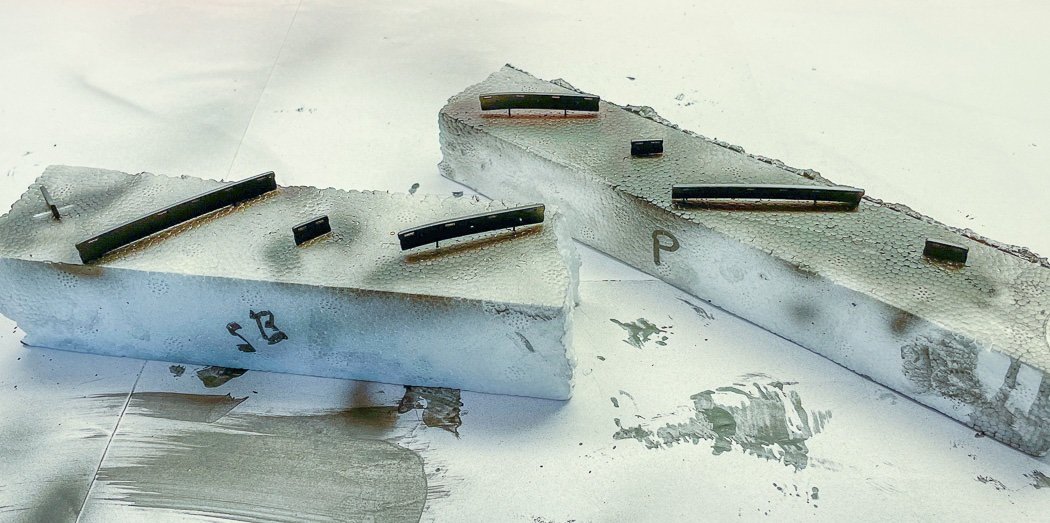
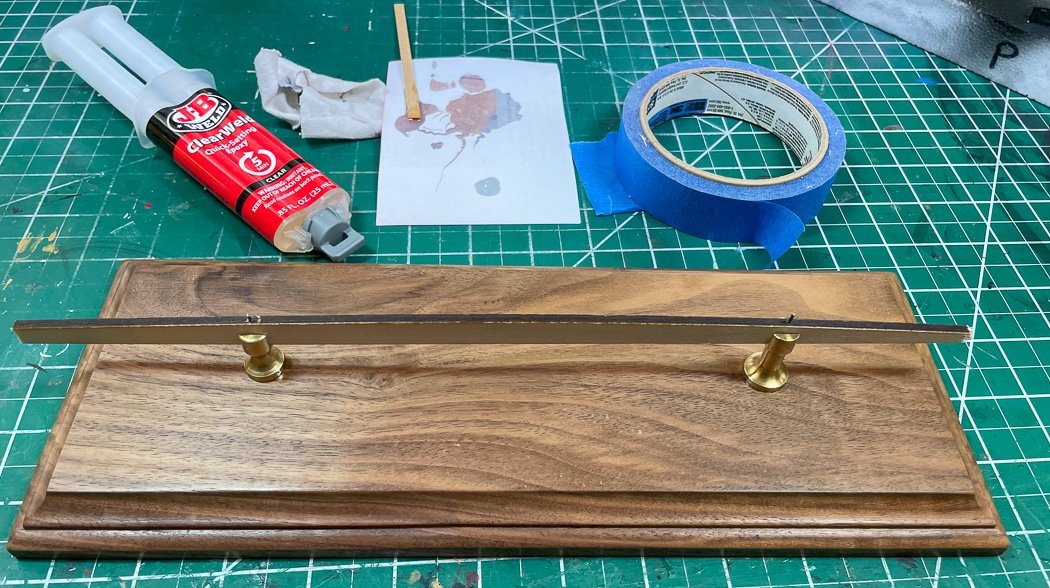
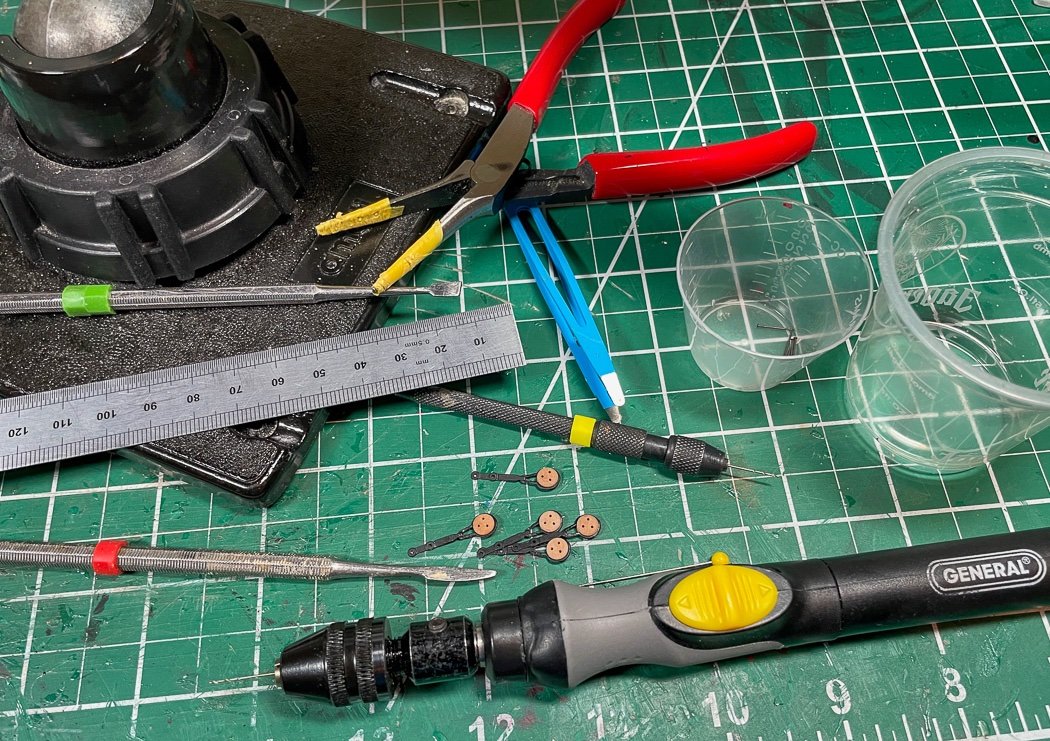
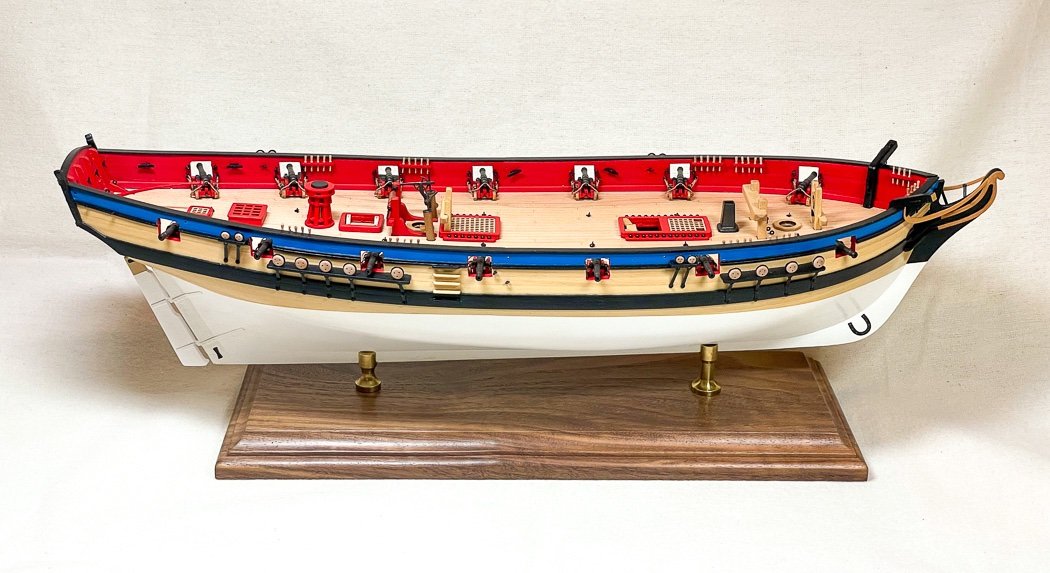
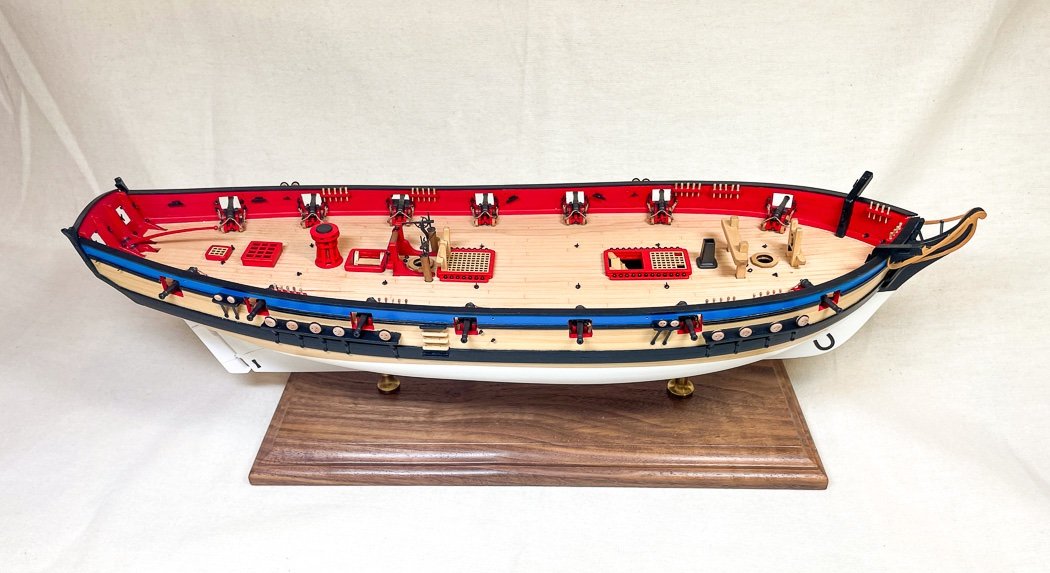
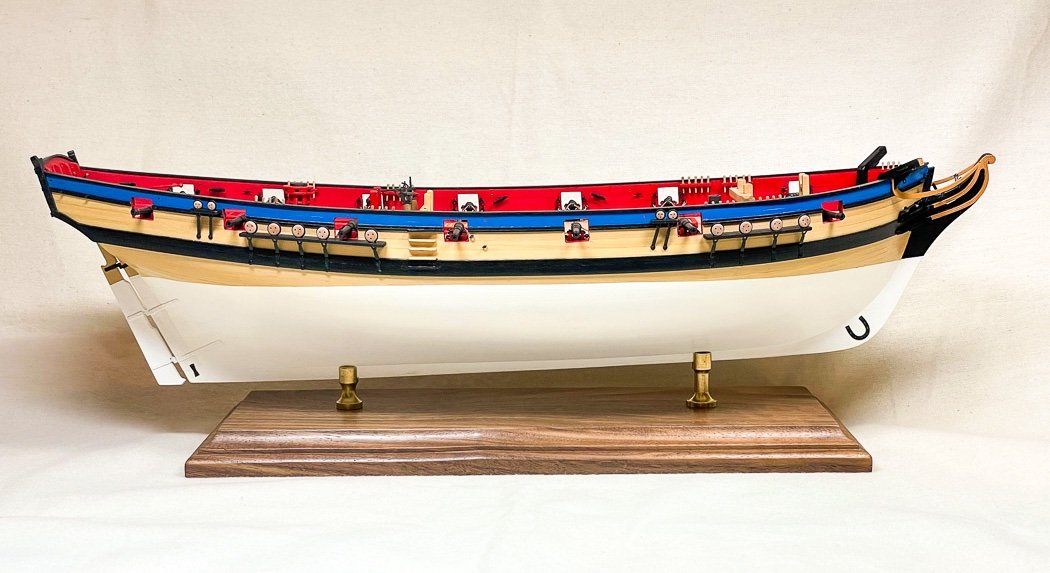
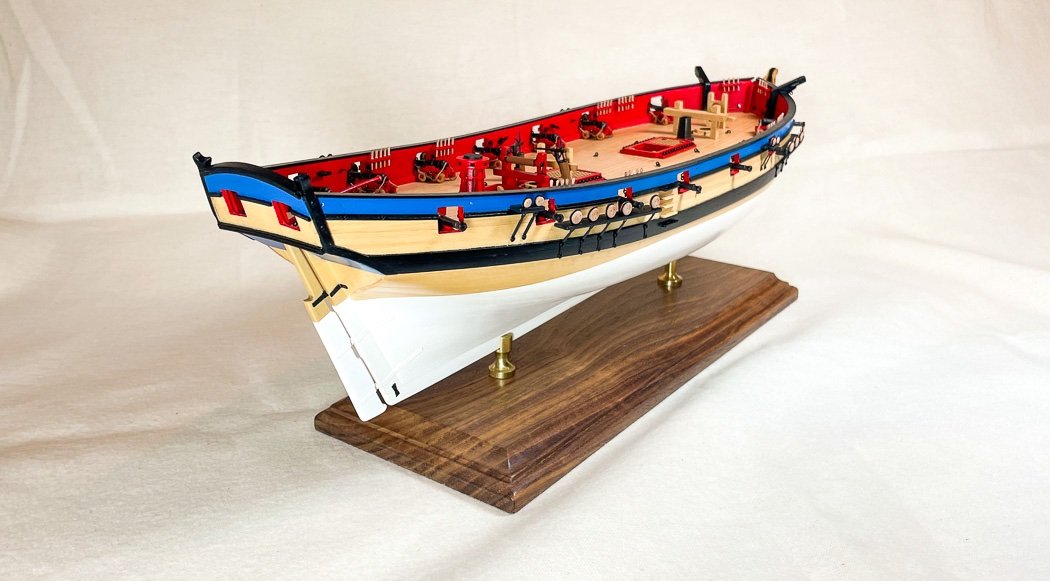
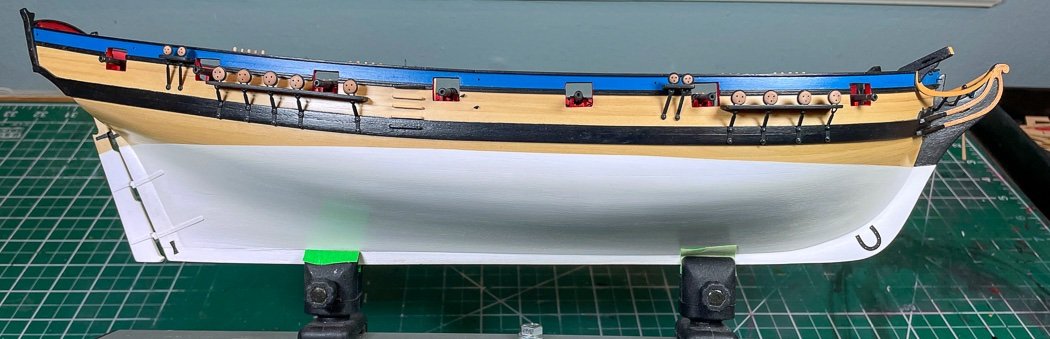
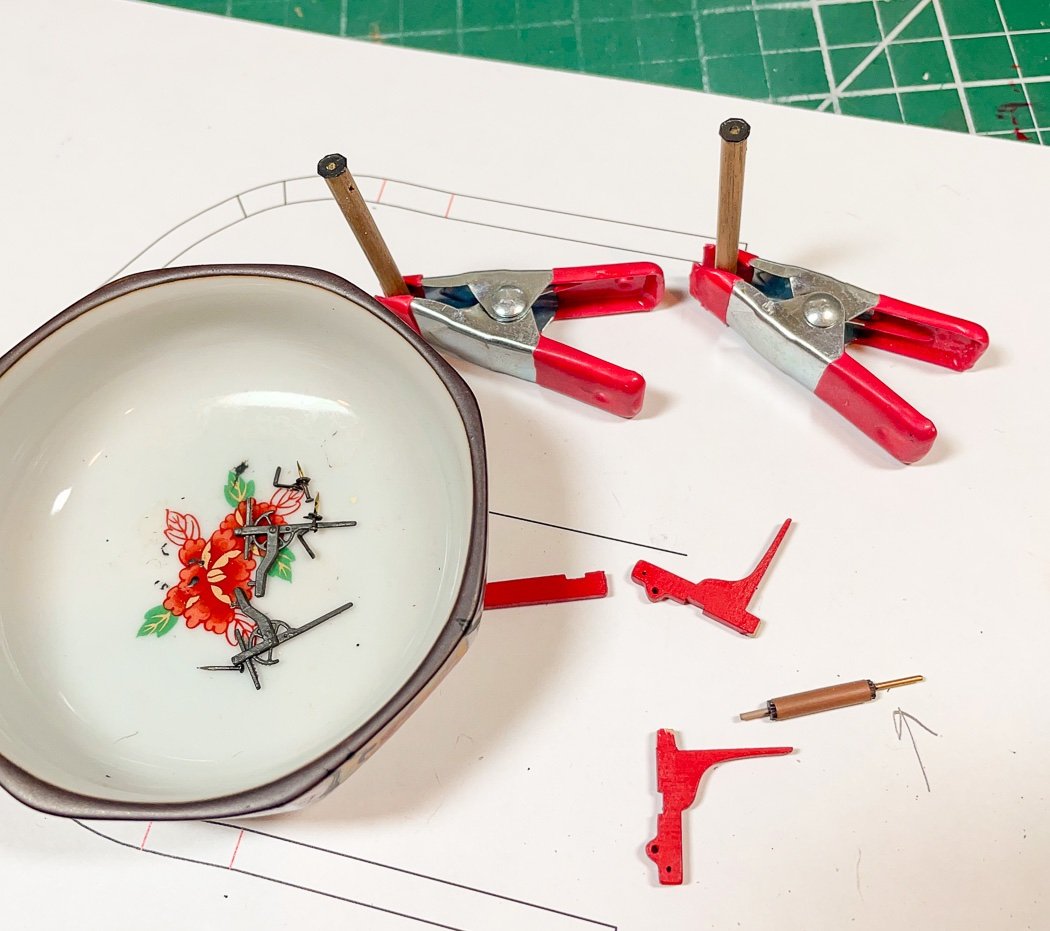
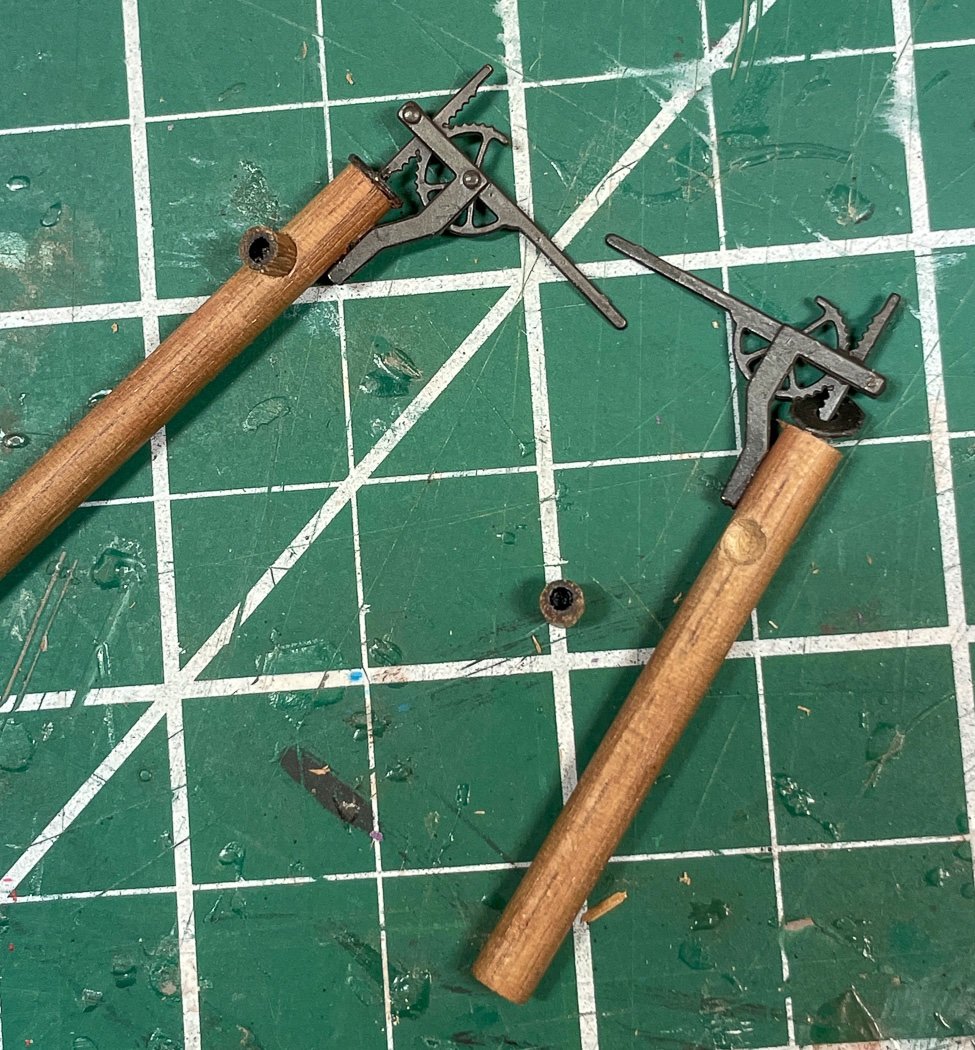
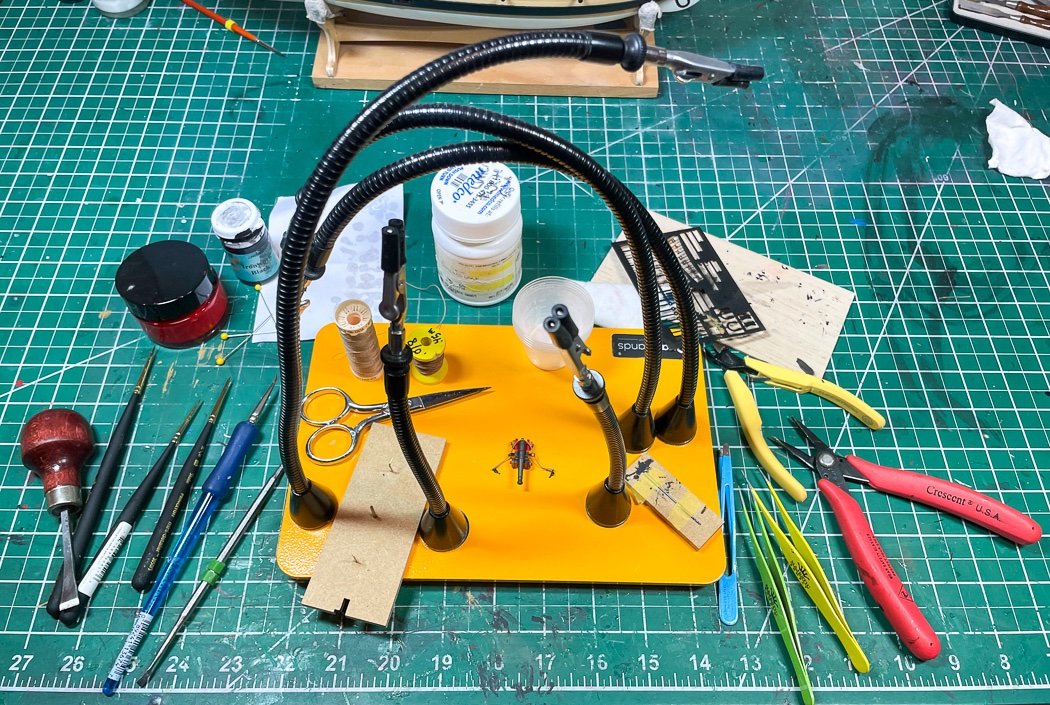
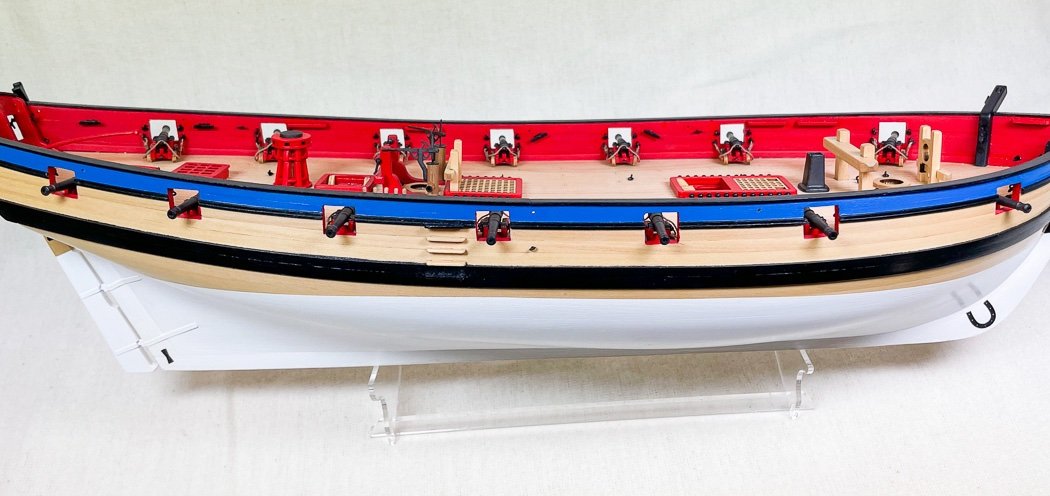
Finishing the hull The last step for completing the hull are the channels, strops, and deadeyes. In anticipation of that I sanded and finished (with WOP of course) my walnut mounting stand and epoxied the brass pedestals using a scrap of the same board size as the keel for alignment. All of my models are mounted this way, I like the polished look of the finished walnut and brass not to mention the firm, epoxied attachment of the model to the board. As I mentioned way back at the beginning of this log I drill the holes for this mount at the start of the build well past the keel into the bulkhead former for strength. I also add a brass plate with the name and year (so I remember), Flirt’s plate is on the way. Halex Awards is a fast, economical source for these plates. Can’t pass up the chance to use my fancy tools, The mill is handy here as a drill press to drill straight and centered holes in the back side of the channels for placing the mounting pins. With those pins (the brass nails from the kit cut to size) glued in the next step is bringing out the air brush for painting the channels Admiralty Dull Black. I like the look of the airbrush painted parts on Flirt, though I’m not sure its necessarily faster than brush painting. As I’ve mentioned it takes as long to clean properly the airbrush as it does to paint with it, still it’s worth it. Glad I’ve come over to the dark side with airbrushing…just for some things, I still prefer brush painting. Here’s my collection of tools used to for adding the deadeyes to the strops and that assembly to the hull via the channels. The colored band on the tools are also an idea I got from my dentist, making them easy to identify when I’m reaching for them I got them from a dentist supply website. Kit PE strops can be a real pain to assemble, however Vanguard has done as good a job as I’ve seen with Flirt, all one piece with enough etched detail to provide as realistic appearance as you can get and making assembly an easier task. Of course nothing about forcing apart the loop wide enough to insert the deadeye is ever that easy. I first primed the PE strops and then painted them Admiralty Iron Works Black, which held up pretty well to the stretching, I added the tape around my pliers (which on this particular pair have no grip on the business end, just flat metal) to further minimize scratching - still I had touch up work to do which I did with 20/0 and 10/0 brushes, I like coordination and dexterity tests… This drill, which is actually a battery powered screwdriver with a separate drill chuck attachment, I found on Amazon via the courtesy of another MSW member, it is perfect for this gentle work. Although a bit bulky, it is slow, exactly what I want for drilling a hole that can’t be too deep. It’s almost like spinning the pin vise myself in terms of rotation speed, this delicate work doesn’t need Dremel speed. I got the required angles by measuring the distance between the bottom of the strops using the plans and the next strop. It’s a slow process but there’s only 26 total, so it didn’t take long to complete. And with that the hull is complete. Here are a few photos, just using my off white cloth and iPhone. (you may notice the pumps are not aligned, recall I have not glued them in so I can remove them later to work on the rigging around the wench and bits). I’ve enjoyed the build of this Vanguard Models Master Shipwright Version hull. Chris has a great design and puts so much into little extras I didn’t notice or think about until I compared them mentally to other models I’ve made in the past. The design, the very detailed instructions (thanks @James H), and the quality of all the components and wood results in a model that modelers of all skill levels can be successful building, if they take their time of course. So thanks @chris watton! I am not leaving Flirt as an “admiralty model,” I intend to fully rig her starting with making my own boxwood masts. However at this point I am going to place this build on ‘Pause.’ Absolutely nothing to do with this wonderful kit, it’s just that the pull of starting Winchelsea has become too strong. With the hull complete I’m at a good point to temporarily shelve Flirt, pause this log, and begin Winchelsea. Thank you for following this build, I appreciate the likes and especially the comments. I hope you’ll join me as I begin my Winchelsea log linked below in my signature.
-
My Alaskan Yellow Cedar built Cheerful is already starting to "mellow" like Chuck's Photo - It catches a little sunset light from a window across the room and I just marvel at how it appears - I love the stuff and will be building Winchelsea from more of it...a lot more...
-
Acetone bath, rinse in distilled water, then prime or blacken (one or the other depending on purpose/finish) is how I do PE.
-
No need to prime wood, you should though prime PE.
-
Try rubber cement for attaching plans to wood, easy to remove and keep the wood clean.
-
May I suggest next time at least using overlapping thirds so all the joints aren’t in one place.
- 505 replies
-
- 8
-

-
- vanguard models
- Sphinx
- (and 1 more)
-
I’m really glad my input was helpful. The hull looks wonderful with that warm glow WOP provides when done right, which you clearly did. Well done!
- 345 replies
-
- 4
-

-
-
- Duchess Of Kingston
- Vanguard Models
- (and 1 more)
-
Then….wow!
-
Did you hand paint the black and white squares? Sorry if this was explained elsewhere, it looks really good.
-
I have both, the Kell guide I got on Derek’s recommendation after I had little luck using the Veritas one, especially for the mini 1/8th chisel. It’s beautifully made but the single roller was just too tricky for a chisel honing novice like me. The Kell guide makes it very easy to get sharp chisels. I highly recommend it and have a Veritas guide for sale if anyone wants one. No angle guide is needed, just follow the chart measuring the distance of the chisel from the guide bar, I made a little gig and can quickly set the angle.
-
Don’t think that matters much, I have strips of 3x5 inch sandpaper in 5 grades, but don’t always use the 220 or 320 grade. It has to be big enough for that, a little bigger for the weight. Only thing to be sure to do is have one edge of the sandpaper meet the edge, this used only when honing the flat side of the chisel. I actually use a smooth large floor tile left over from my kitchen renovation.
-
I won't be to this point shortly but I'll enjoy the journey to get there - soooo beautiful...
- 1,784 replies
-
- 3
-
-
- winchelsea
- Syren Ship Model Company
- (and 1 more)
-
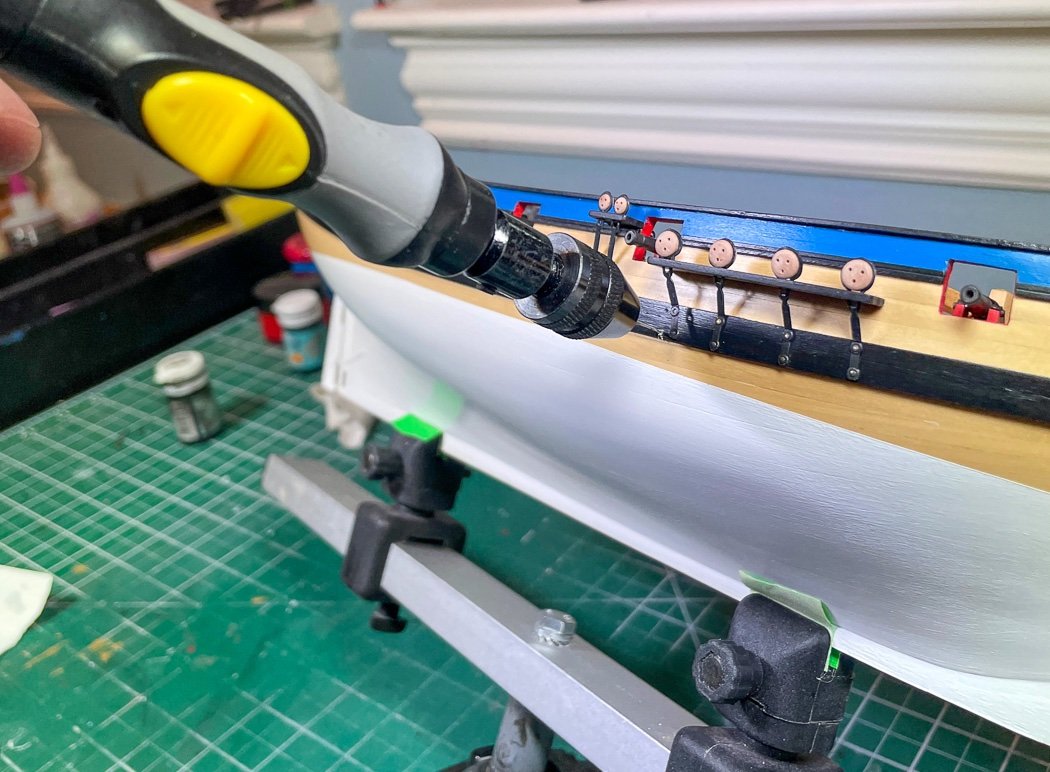
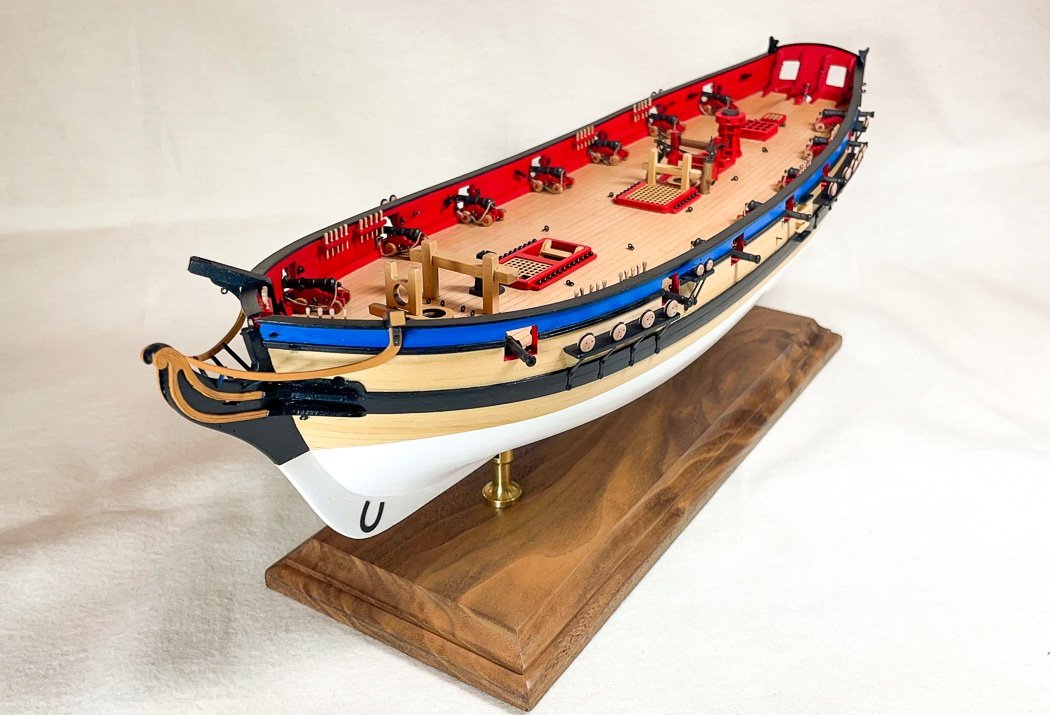
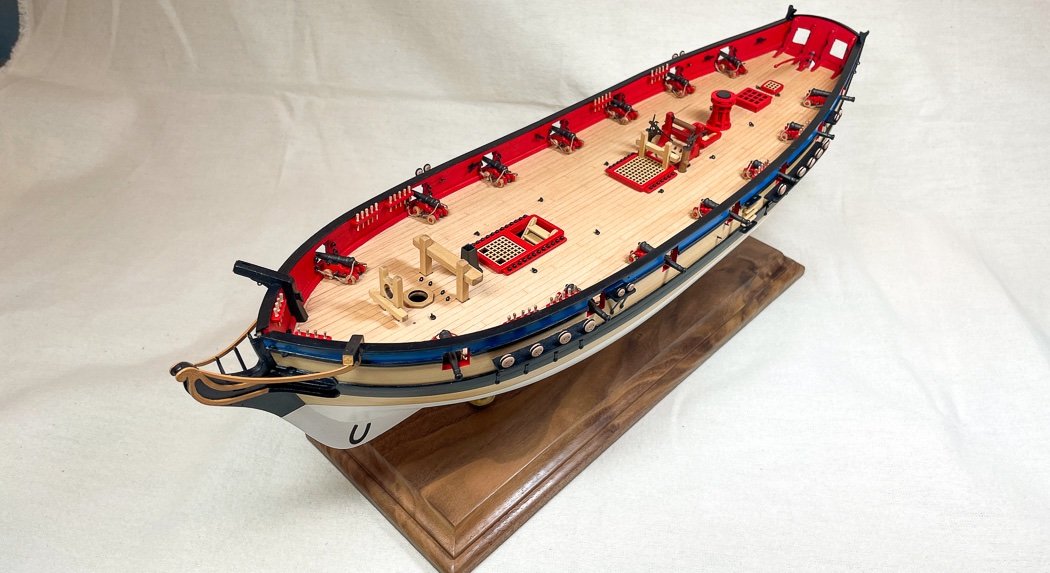
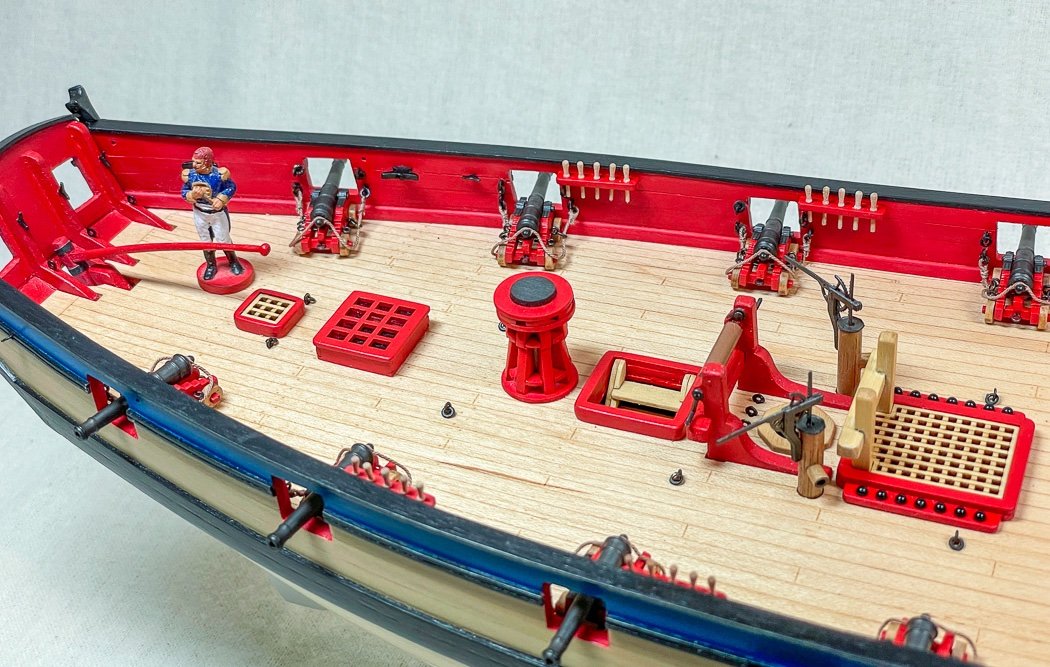
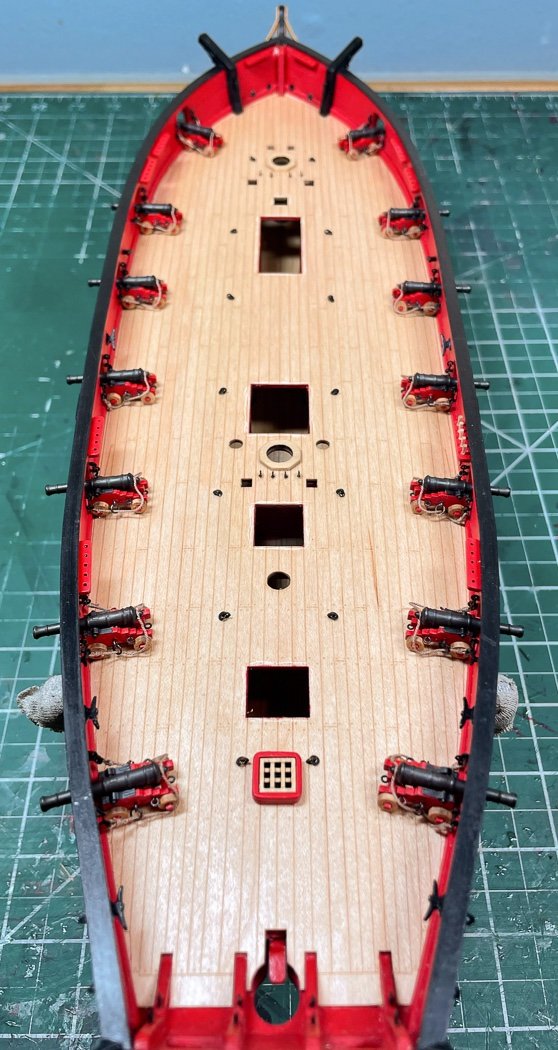
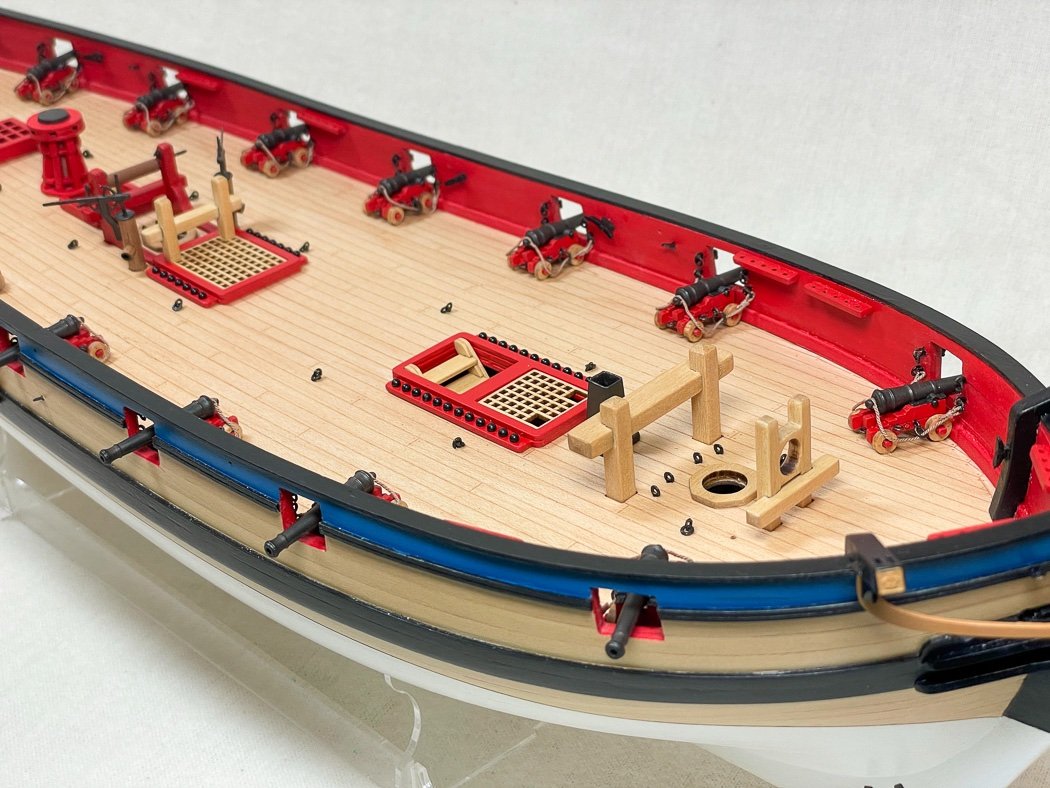
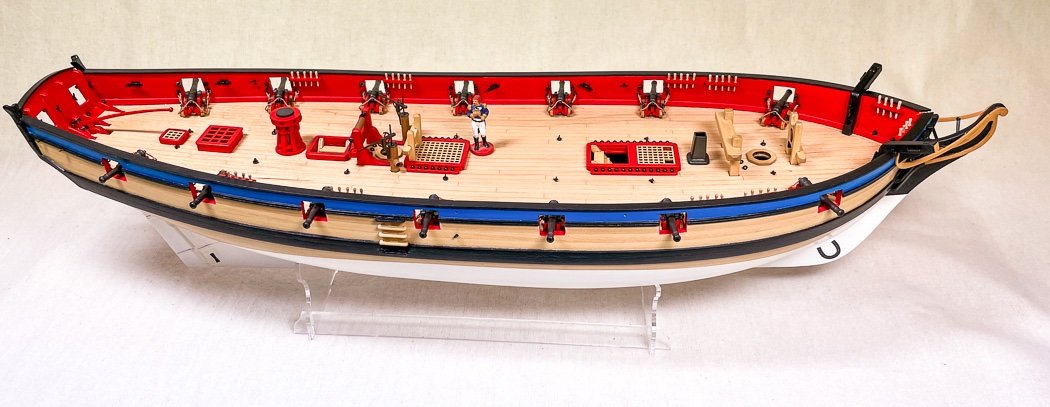
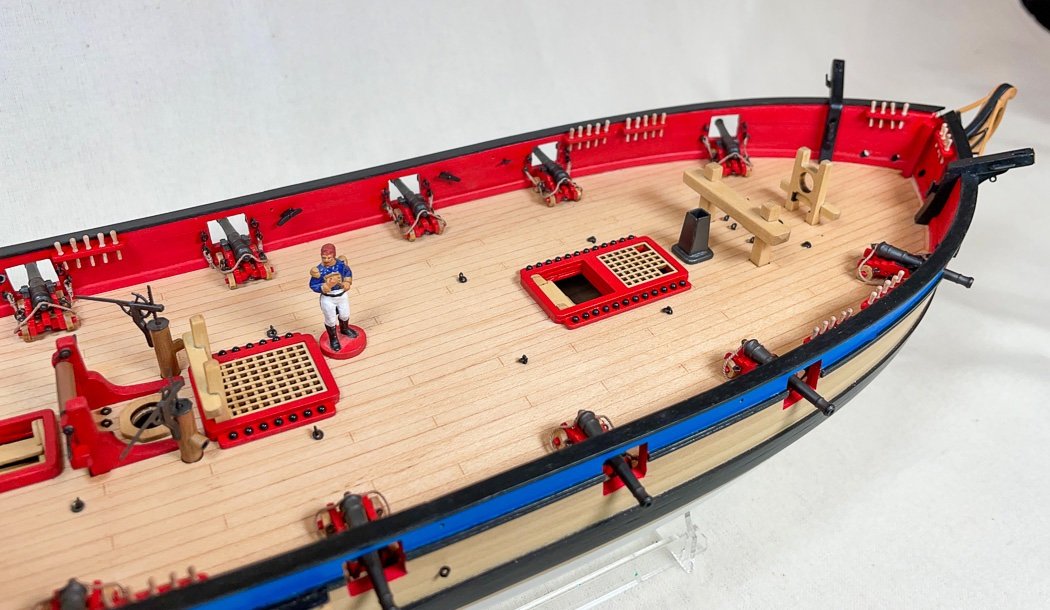
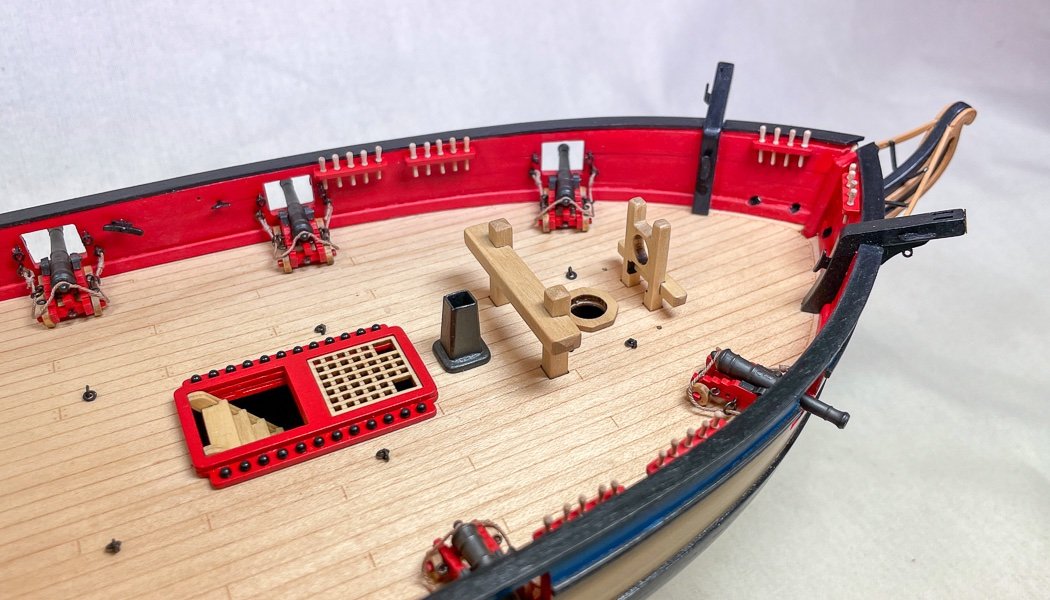
The Deck As seen in my last post I have made and painted most of the deck furniture. I elected not to paint anything black and instead spent a lot of time removing char so that some could be left natural with just a single coat of WOP. Some of the pretty boxwood deserved not to be painted over. I tried to draw a balance between what was red and what is natural, try as I might I couldn’t remove a satisfactory amount of char from the winch, so red it became. It had its own challenges besides that, one of the small resin ‘axels’ broke off so I had to replace it with a bit of brass rod, after it was assembled the other side broke, that I just had to glue. I’m sure it was my fault but in my opinion the resin winch would be less of a wench wth a brass rod all the way through for stability, the thin plastic is a tad fragile. (PS: don’t tell my wife I borrowed one of her sushi serving dishes). As I assembled the pumps it dawned on me there was no way for the water to drain as it is presented in the instructions. So I drilled a hole in the side the dowel about a third of the way in. After drilling a hole in the center of a smaller dowel and painting the inside Admiralty Paints Ironworks Black (left rough on purpose) plus a brush of weathering powder I cut it to a few millimeters and inserted that into the drilled hole - and now water can flow across the deck. Of course I added weathering power to the metal parts after painting them Ironworks Black. Once I had them fitted to the deck I stopped short of gluing them in. Looking ahead to the rigging diagrams I noted there are a number of ropes passing through and belayed around the winch and main bits. Those would be difficult to access working around the pumps, so I’ll pull them out and glue them in once the rigging in that area is complete. With everything made it was time to complete the deck work, first up was the port battery. It’s a little bit amazing I used everything in this photo to build 14 of the tiny little cannon shown sitting in the middle. A production line of sorts and a great deal of patience is required to make these little dudes. As small as they are they take the same steps as a larger version, just less to hold on to, along with various tools and jigs. As I noted in the earlier post, for the starboard battery I used commercial eyebolts and rings on the cannon and the kit provided PE versions on the bulwarks. Again I rigged the breaching ropes off the ship, first making them with a jig, then attaching one to each cannon. I glued the cannon to the deck and then the breaching rope to the bulwarks in that order. Again apologies to Derek for any part I played in his rigging the gun tackle on his Speedy, no way would I attempt that on this model. The barrels first were primed with black and the weathering powder added before assembly. I also weathered the trunnions after bending them on my little jig, then adding them to the carriages. One installed I used my soft weathering brushes to buff up the barrels. The resin barrels in the kit are so much nicer than the old brass or cast metal versions, they have nice detail and finish up easily. Definitely a major upgrade. With that the deck is complete. I didn’t get out the cameral or lighting gear for this, just an off-white cloth, my work lights, and my iPhone 12 Pro. While it takes pretty decent photos it did create a lot of white balance problems with my off-white cloth. So anyway, here are some quick and basic photos. The stern, with a visit from Admiral Cochrane. The bow and midships. I had a bit of trouble with the chimney. This is a folding piece of brass PE, which is nice as long as you fold it the right way, I didn’t and ended up with a piece broken off which I glued back on with CA. I painted it Ironworks Black on top of the black primer and added weathering powder. I use Rusty Brown almost always as I did here (the name is misleading given the effect), however for fun I coated the inside and top edge of the chimney Smokey Black rather thickly and didn’t buff it. It came out kinda nice and provides an excellent touch of detail to the deck. And midship. Here you can see I used 8mm belaying pins from Crafty Sailor. Unlike most commercial wood belaying pins these are much more in scale, they come in multiple lengths, I may could have gone down a millimeter, but this length will come in handy once rigging begins. The last step for the deck is the channels, strops, and deadeyes, and that’s up next. Thank you for stopping by, for the likes, and especially the comments. Until next time…
-
Thanks Bob!
-
Thank you for your comments. I use the seizing method I’ve shown for at least 90%, of the rigging I do on any ship. It’s essentially a fishing lure knot, lots of YouTube videos on that I’m sure. I’ve done hundreds but I’d struggle to do one without the Quadhands (or the cheap third hand I had before). It’s easy once you get the hang of it. That a clove hitch for ratlines, a half hitch for a few other things and you have all you need.
-
At the last show he attended
-
You should make a replacement for Chuck’s lost mini-me with all that skill and hardware.
-
With the practicum why not try building it and not giving up? There are plenty of AVS logs here to consult. What’s the worst that could happen, a less than perfect model, so what there are plenty of those around. Some logs are really bad work, but they are trying. Give it a shot, start a log, ask questions. I’ll follow
-
Nice neat work, and everything does fit…almost. I’m sure enlarging rudder port done easily enough with your skills.
- 857 replies
-
- 2
-
-
- Sphinx
- Vanguard Models
- (and 1 more)
