


glbarlow
-
Posts
4,130 -
Joined
-
Last visited
Content Type
Profiles
Forums
Gallery
Events
Everything posted by glbarlow
-

review build Small Building Slip
glbarlow replied to James H's topic in REVIEWS: Model Shipwrighting Tools, Parts and fittings
Take a look at the several Lady Nelson build logs on this site including mine. None that I’m aware of use this building slip, if it’s still available. You certainly need a build board or cradle from the very start, but if a cradle is not included with the kit it’s something you can easily make yourself. It doesn’t need to be elaborate, just a place to set the ship while you’re working on it. The build log of others are a great source for help and reference, especially for models like LN where instructions are sketchy, I encourage you to check them out and refer to them as you move along in your own build. Welcome to MSW and best of luck building Lady Nelson -
Always your call if you’re satisfied with the planking you should leave it unpainted. I would with Flirt if it weren’t for the problems I had with the stem. The boxwood is so nice. Your painting looks great, nice tight lines. As always, Derek clever with the filler to “line” the oval gun ports. What would be the point really if something didn’t break off for us to have to fix. The WOP job looks really nice as well.
- 345 replies
-
- 4
-

-
- Duchess Of Kingston
- Vanguard Models
- (and 1 more)
-
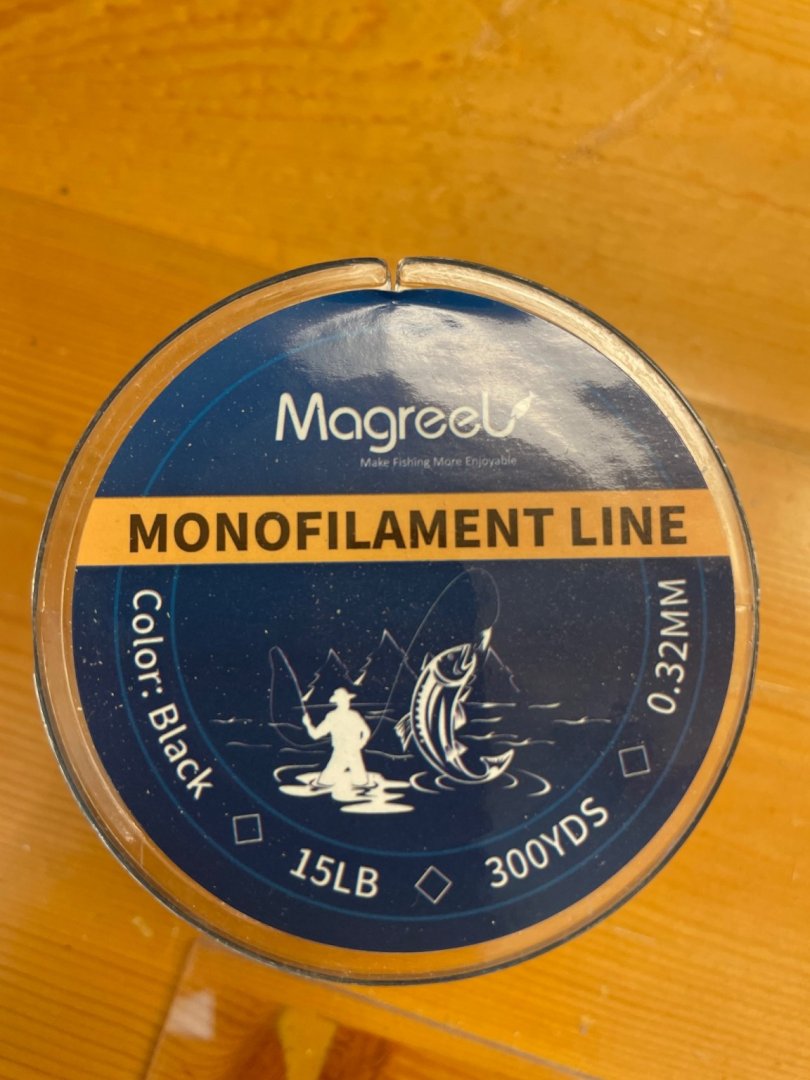
Here’s what I got. Note the diameter on lower right.
-
I just searched it on Amazon, there are several brands. I don’t recall the diameter, I tested a few small drill bits on scrap wood until I got a fit I liked. Not my idea by the way, credit goes to Chuck.
-
Try 15 pound black fishing line, I found it on Amazon. It’s what I’m using on Winchelsea.
-
Trying to understand white balance
glbarlow replied to Gaetan Bordeleau's topic in Photographing your work. How to do this.
That’s the best part of a curious mind😊 -
Trying to understand white balance
glbarlow replied to Gaetan Bordeleau's topic in Photographing your work. How to do this.
I’m an active pro NPS photographer, I think you may be a bit out of touch. I know lots of very capable and experienced hobbyists. Just like any hobby, including modeling, there are those that express as fact expertise they don’t necessarily have. These are the ones I often see in Facebook camera groups and warrant a good laugh. There are far more who are curious, seek to learn, and produce some amazing images. It’s a mistake to generalize and assume you are the expert where others aren’t or that every “amateur” is devoid of the technical knowledge of photography and the artistic creativity necessary to produce good work. But I am far afield of the topic of White Balance, I doubt you’ll change your views so I’ll just let it go and move on. It just bothers me that someone that was once in the field doesn’t respect the wide range of talent out there today. -
Trying to understand white balance
glbarlow replied to Gaetan Bordeleau's topic in Photographing your work. How to do this.
Thousands of hobbyist photographers would disagree. A very small percentage of photos are published in the few remaining magazines. I recommend you access Instagram or 500pix and search wildlife, nature, street, travel, portrait, and landscape photography for evidence of images neither taken by pros or iPhones (though there’s plenty of those too). All the good ones employ technical expertise to set up creative composition, very few if any use Auto. -
Trying to understand white balance
glbarlow replied to Gaetan Bordeleau's topic in Photographing your work. How to do this.
Auto can vary shot to shot. I recommend you set on flash, which is a constant 5500, as well as a constant green/magenta setting optimal for flash which may vary more than the Kelvin settin in Auto. -
Trying to understand white balance
glbarlow replied to Gaetan Bordeleau's topic in Photographing your work. How to do this.
I shoot all my build log photos with my iPhone 12 Pro mostly because it’s a pretty good camera, in that case or casual photography for most people, like those that use Auto on their cameras, your statement might hold. Anyone doing serious photography, I offered up my website as example, certainly has a need for understanding the technical aspects of photography for a capturing a quality image. Not wave lengths or museum rules technical but definitely manipulating how the camera captures the image including in some cases managing RGB channels. Perhaps it’s a misunderstanding of “technical” in this scenario, or perhaps the camera is in Auto. -
That is a good tip, one I will definitely use going forward. Thanks!
- 840 replies
-
- 3
-
-
- winchelsea
- Syren Ship Model Company
- (and 1 more)
-
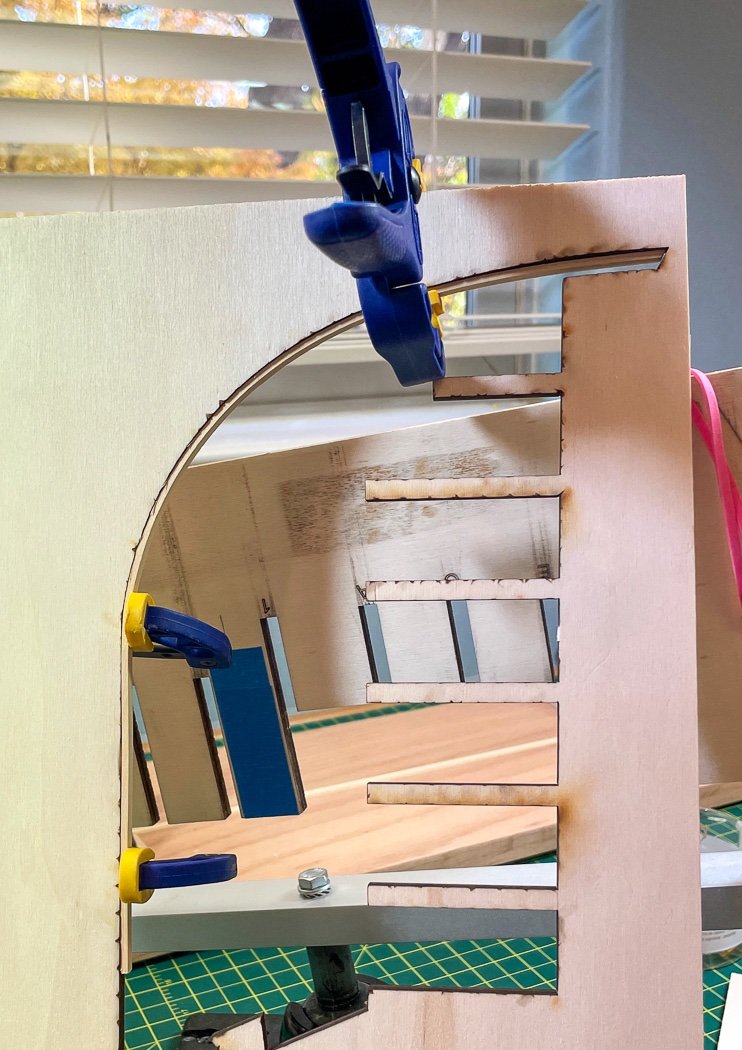
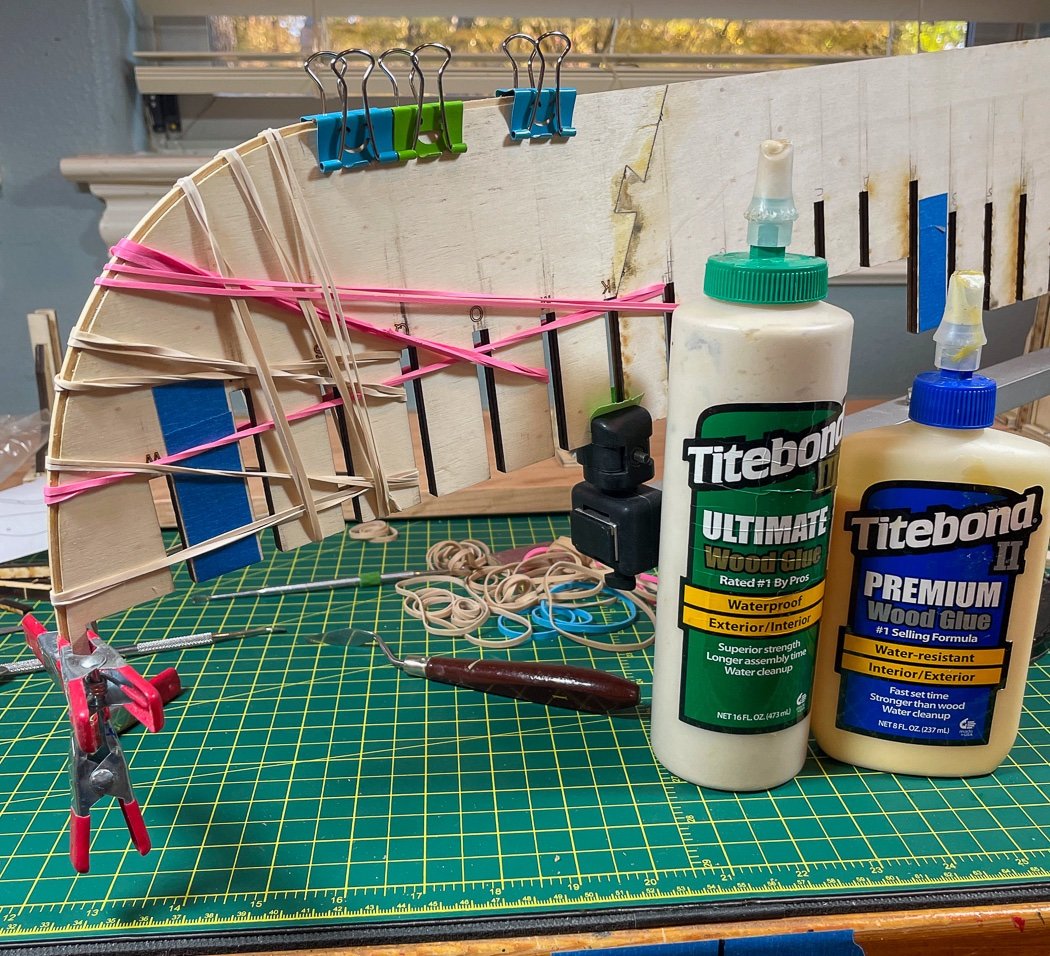
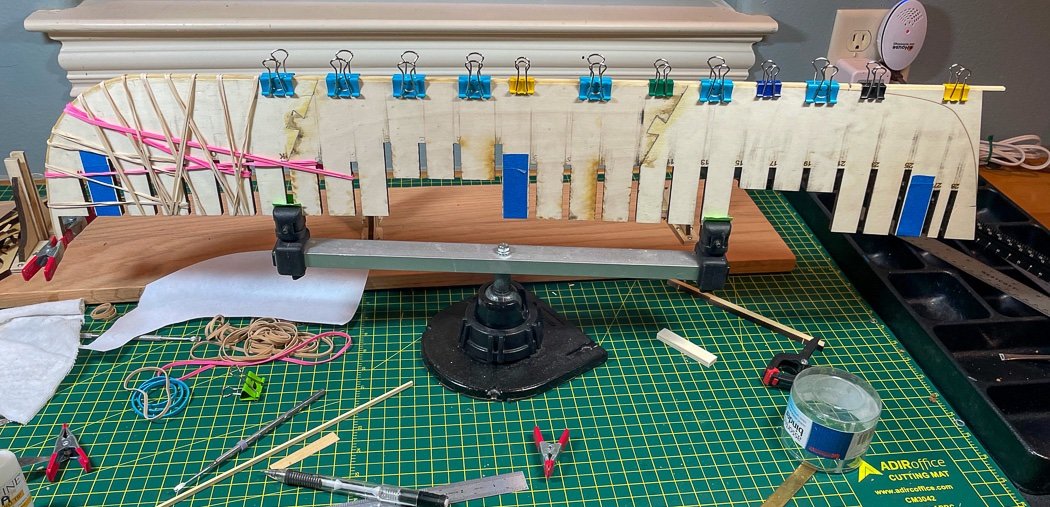
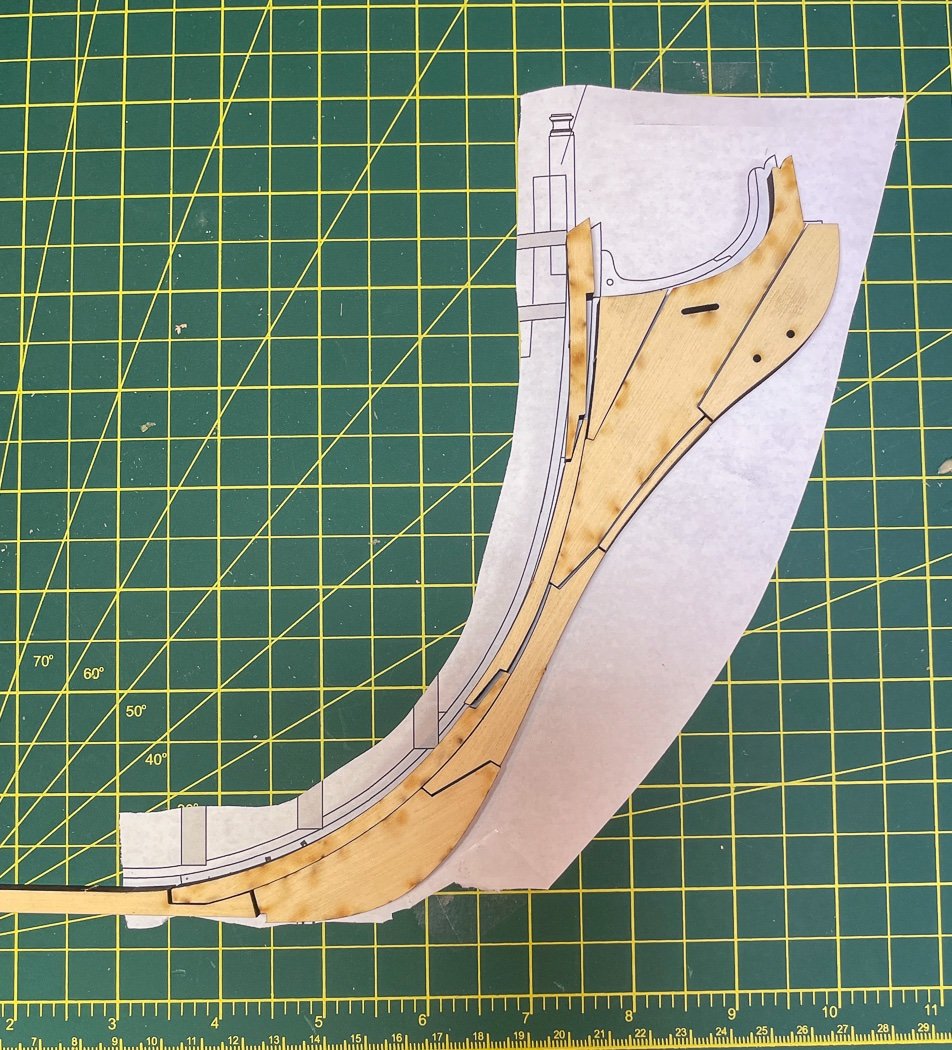
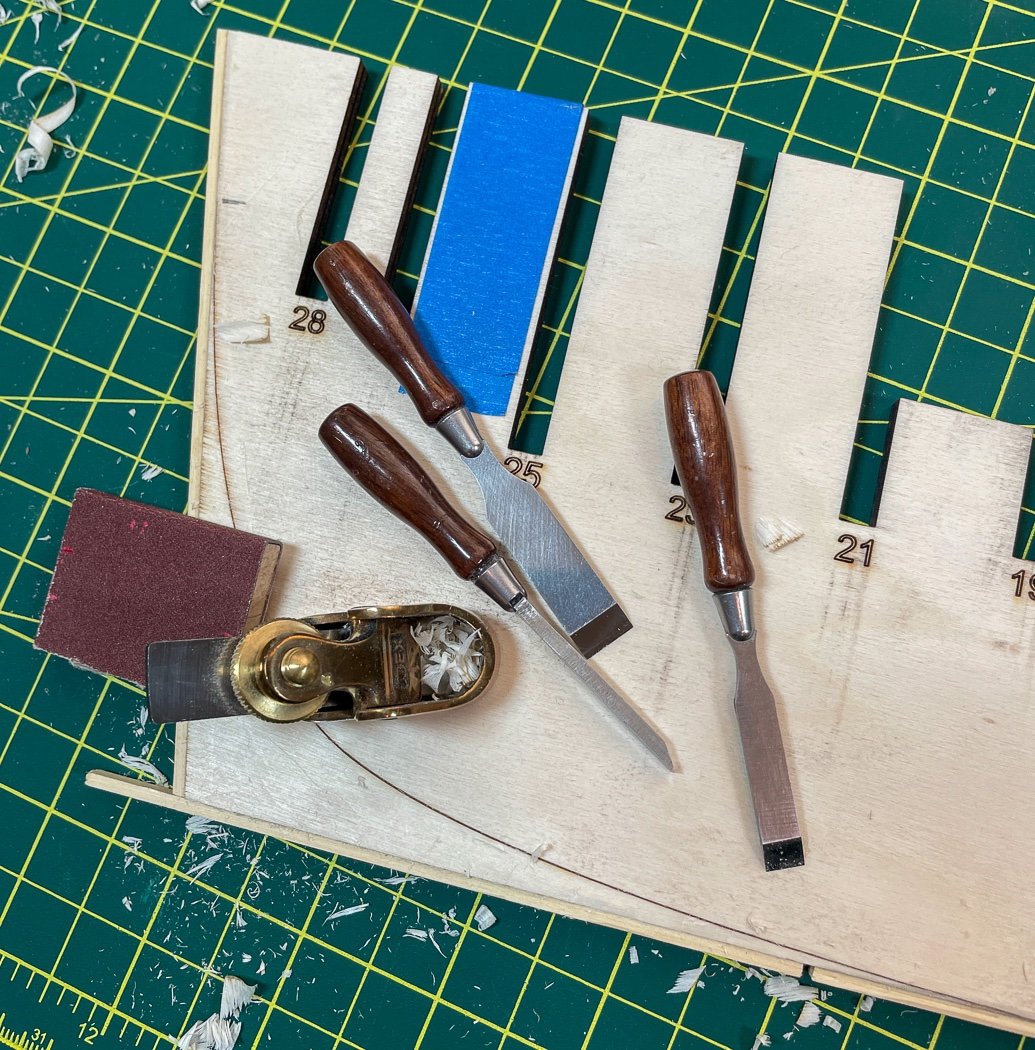
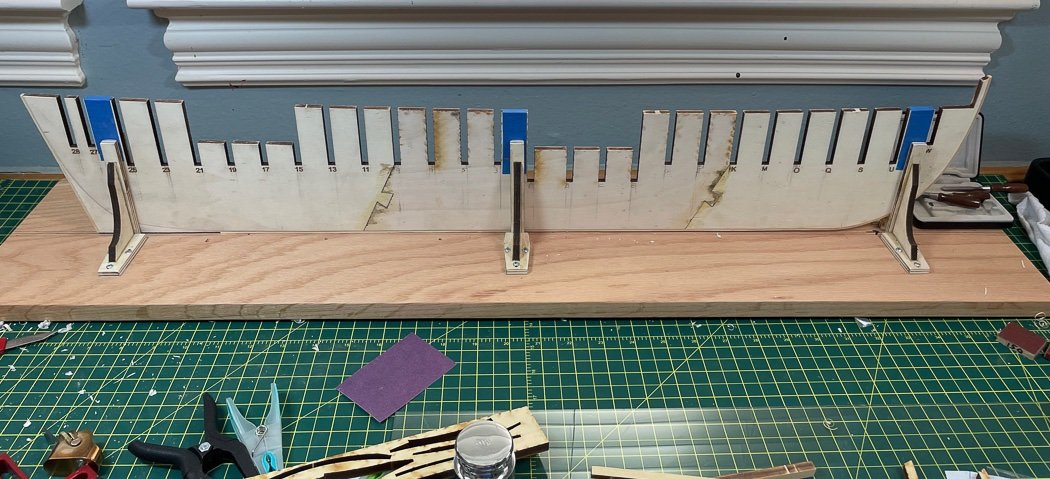
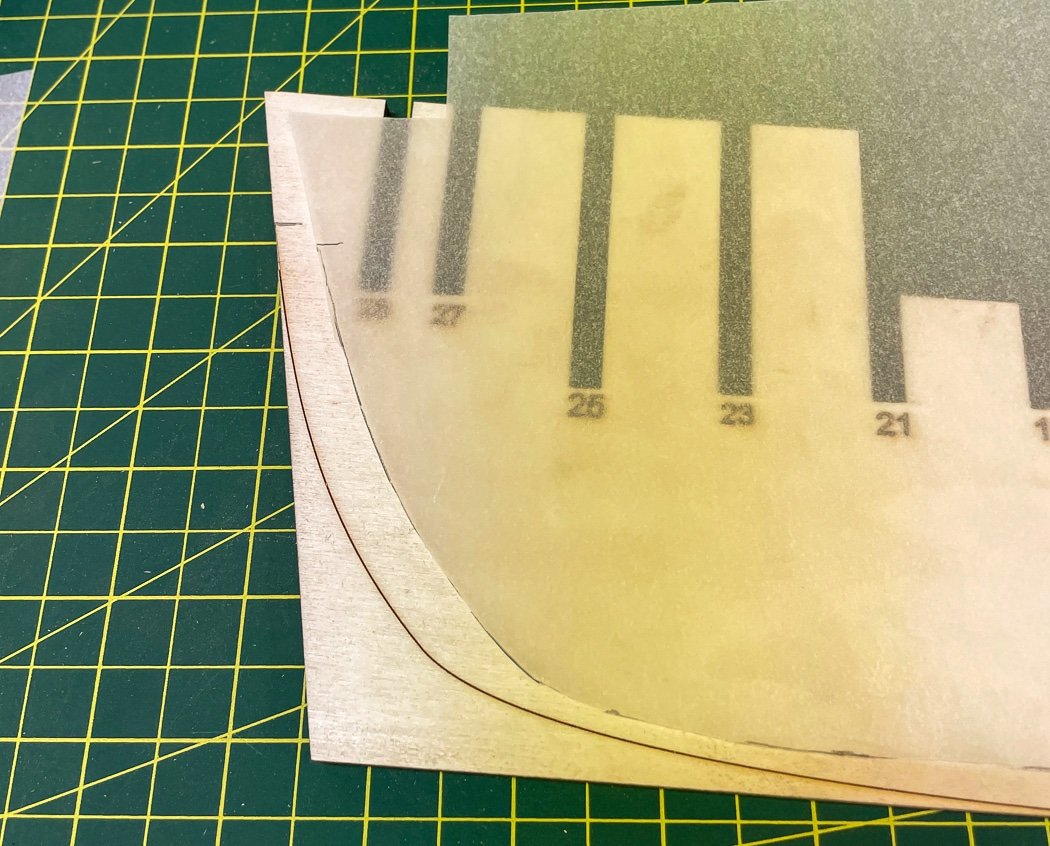
Former, Rabbet and Stem Work has begun, so an update. Using my 1KG weights and the acrylic sheets I bought as a flat surface I glued the three sections of the bulkhead former together with Titebond. I initially wondered why the middle one was reversed from the other two (easy to tell with the laser engraving and burn marks). Then I read Chuck’s reason why, the laser doesn’t cut perfectly 90 degrees, by reversing certain parts he gets them to fit together perfectly…oh, that makes sense. Just another example of the planning and thought Chuck puts into these builds. While that was drying I assembled my build board using the brackets obtained from Syren and my nice piece of oak from Home Depot. I initially made the brackets tight to the former, knowing I’d have to add a little slack to accommodate the ¼” keel and stem once attached, easy to do with the slots already in the brackets…loosen, adjust, retighten. It was good I did, despite the care in using weights, gluing only two sections at a time, and the acrylic surface, I had a slight (very slight) warp in the former’s center. No problem, after a day sitting in the tight fitting build board it straightened itself out, You go build board. I pre-bent the rabbet strip using the billet the bow section was cut from. Though it didn’t need much I heated it with my plank bending travel iron by holding it near the curve and letting the steam do the work. I could have bent it on the ship, but why when it was so much easier pre-bent. We know we can never have enough clamps, for this particular job I can also never have enough rubber bands. At first I thought centering it would be a challenge and so I cut a little wood gauge. It turns out the wood used for the rabbet is essentially the same size as the middle layer of the ply- just follow the lines. The gauge did come in handy for removing excess glue. I started with TiteBond II but then remembered from Cheerful the Titebond III dries more clear and more importantly gives me a few more minutes set up and alignment time. Not to be repeated here, he said emphatically, Cheerful dropped from my work table with the skeleton mostly complete and shattered, I had to start over... it was unrecoverable ... not a good day. What didn’t shatter was a single Titebond glued joint, so it really is, as it claims, stronger than wood. Also probably the one and only chance I'll have to use the Amati keel clamp. My Ibex thumb planer is perfect for running a slight bevel on the former along the keel after the rabbet is installed, just one long smooth pass. My freshly sharpened Veritas chisels along with a little sanding block made short work of carving out the deadwood below the bearding line. Chuck’s suggestion of temporarily gluing a rabbit strip at the stern (the stern keel section is different than most models, it covers this area without the rabbet strip used for the rest of the keel). I left a space and left it long with spot glue to hold it. It made for a perfect reference for how much to remove, I just popped it off when I was done. Next up is the stem. I cut out its drawing from my second print of the plans, placed it under the acrylic sheet and, not being very good at puzzles, assembled the pieces. Nothing is glued here yet look how well it all fits together. I recall from Cheerful my first impression of Alaskan Yellow Cedar was like this, not that great. The transformation once it is sanded and finished with WOP is amazing, I’m looking forward to seeing the completed stem. So far my only challenge is removing laser char. Fortunately that isn’t done between the pieces that fit together, makes for a nice tarred fitting as Chuck notes, but I do have to remove it for outward facing wood. I worked on the bottom of the keel for practice and I still haven’t removed it all. I’m always thinking I’ll sand to much off and the whole model is toast (actually that’s the opposite of the problem, it looks like toast with the laser char:-). I’m using a sharp #11 blade as a scraper and 220 grit sandpaper, but if there are any secret methods out there I’d like to hear them. I’ll be sanding the forward of the stem once its all assembled so I don’t mess up the fit. I’ll save the rest of the keel bottom after its on the ship. So none of this is news for the many Winchelsea builders already far ahead with their logs, but it’s fun and news to me. Maybe the next new builder will find this mildly interesting. I should just include this line on the bottom of every post from here on I suppose. Thanks for the likes and your comments. thanks to all those Winchelsea builders in the group for their inspiration, and thanks to Chuck for the help I’ll invariably ask for as I move along.
- 840 replies
-
- 17
-
-
- winchelsea
- Syren Ship Model Company
- (and 1 more)
-
Trying to understand white balance
glbarlow replied to Gaetan Bordeleau's topic in Photographing your work. How to do this.
Interesting discussion and a lot of good points. For once in this post there aren't a bunch of so called experts trying to out-expert one another but instead shared ideas and perspectives based on experience and background and nature of photographic work. I shoot creatively, nothing like Justin describes is a part of my detailed, and creative or not, technical process in capturing an image. Digital photography eliminates the need for gray and Color X-rite cards (I had both back in the day) unless you're held to the rules Justin must comply with. I shoot only RAW, with that White Balance is what I want it to be to create a pleasing landscape scene (www.glennbarlow.com if your interested) in post processing. I spend as much time in Lightroom and Photoshop as I do taking the image. Of course all the post processing work and camera white balance setting done won't help if you can't technically take a proper image, you have to know how to manage the camera first and the creative composition second. My only point here is photography is a broad ranging field. Landscape isn't portraits, portraits aren't forensic, forensic isn't scientific, even if the same camera and lens (All Nikon for me) is used. I just converted from DSLRs to Mirrorless, Nikon's Z7ii, Sony, and Canon mirrorless are opening new technical and subsequently creative possibilities for photographers. I did it mostly because it reduced the weight of my backpack by 12 pounds including the lenses I carry, but still. Bottom line, everyone's opinion and perspective of technical and creative photography stems from the perspective of their photographic experience and work purpose and everyone is right. Back to the topic of White Balance; shooting RAW I can change white balance to whatever works for me in post, including that of a 18% gray card should I choose. I can't be random about it when photographing my grandchildren, those images must be technically correct, more of that is done in camera based and driven by the Profoto B10 flash I normally use or skin tone if no flash is involved. Even with the sophistication and processing power of today's camera it's worth noting that Auto White Balance (my camera has multiple Auto options) is turning over the color decision over to the camera. Since I shoot in RAW it doesn't matter, I can adjust it in post, however if shooting .jpegs there are less capability to correct it. Auto can result in different white balance results shooting the same image minutes apart or by moving the camera a few degrees since the processor in the camera is judging different things to determine what it deems to be an optimal white balance. And while you can set your own white balance (e.g. 5500) the Daylight, Flash, and Cloudy settings are also fixed settings that don't allow the camera to decide and generally all you need. I used to leave my camera on Cloudy for landscape work on my old cameras (its warmer) but Auto 1 on my newer Nikons is right more than its wrong, so that's what I use now. One last point, inside fluorescent lighting messes with white balance more than anything nature can do, that's where shooting RAW can really come in handy if you're not subjected to rigorous rules for image capture, or you want to be technically correct to capture a creative image of your model. Last, last point. Color is color, it's what our eyes and brain interpret it to be. Arguing over who's method for achieving the best color is like arguing over who has the best looking grandchild, what's the point. Clearly mine are. (again Justin's record rules notwithstanding). -
If I send you some brass will you make hinges for me😂🤣. Really great work, one of the reasons I embarked on my own Winnie.
- 642 replies
-
- 1
-
-
- winchelsea
- Syren Ship Model Company
- (and 1 more)
-
Hopefully you can take the second one slower and enjoy it more. Your first entry was July 31st, it will take me a least a year to carefully build this model. You track runners are just too fast🤣.
-
I always taper the top of the next plank laid up to the untapered bottom of prior one. Your Cheerful is looking great.
- 112 replies
-
- 3
-
-
- Cheerful
- Syren Ship Model Company
- (and 1 more)
-
Make sure you’ve got a sharp center line marked and a crisp outline of the deck furniture locations. You’ll need that soon.
-
I suppose I should consider a case for some of my models, but I’ve never thought to want one. Not sure where I’d get one here anyway. I just blow and brush them off from time to time.
- 857 replies
-
- 3
-
-
- Sphinx
- Vanguard Models
- (and 1 more)
-
I’ll just follow along from back here. 😊
-
Well done, the carpentry and paint work are terrific.
-
Thank you for saying so, though it might be more challenging to provide something useful for Winchelsea, it is my goal to be helpful with my logs.
- 840 replies
-
- 5
-
-
- winchelsea
- Syren Ship Model Company
- (and 1 more)
-
Cleaned it up after pausing Flirt, it will be a mess again soon enough. 🙂
- 840 replies
-
- 3
-
-

-
- winchelsea
- Syren Ship Model Company
- (and 1 more)
-
That was a very tough step in the build process, congratulations on getting it done so well.
-
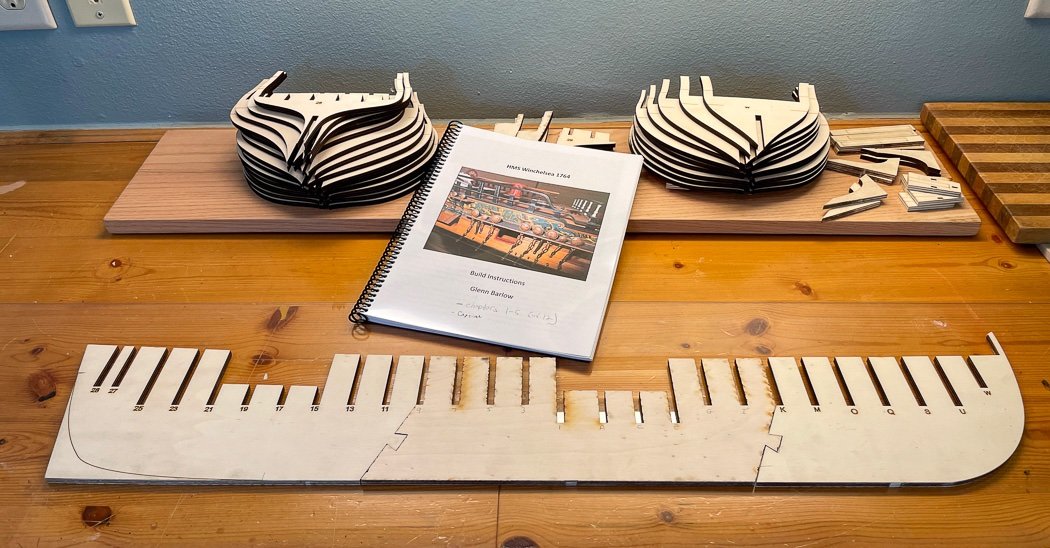
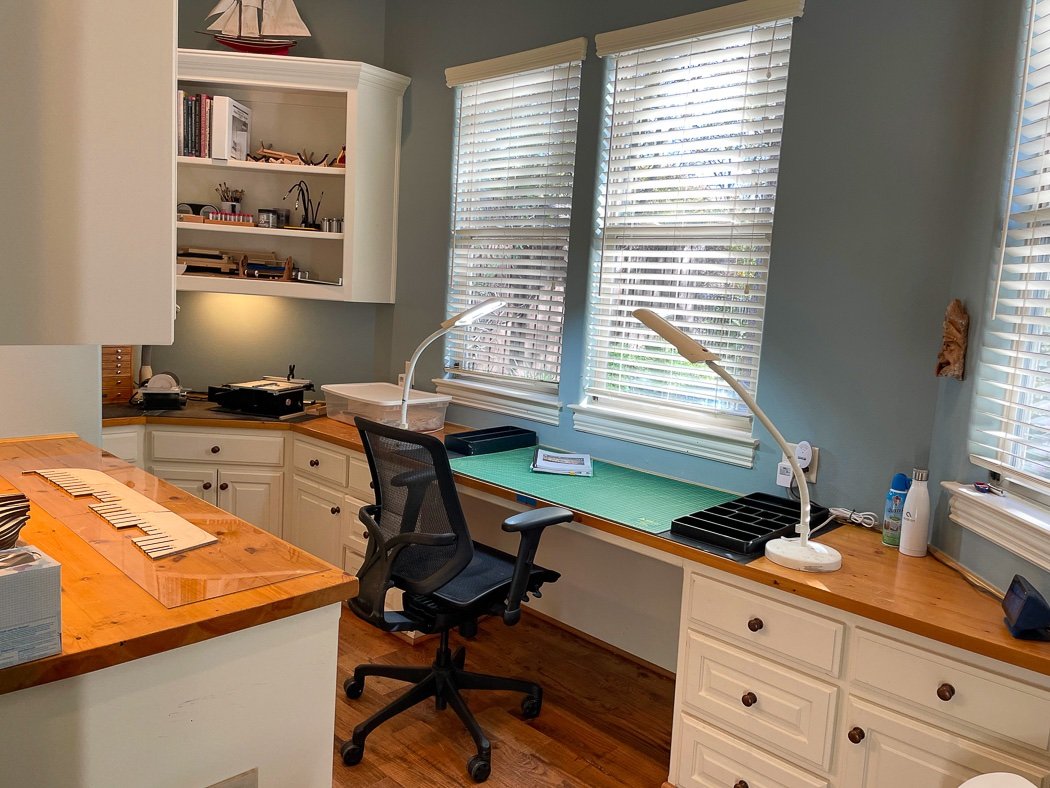
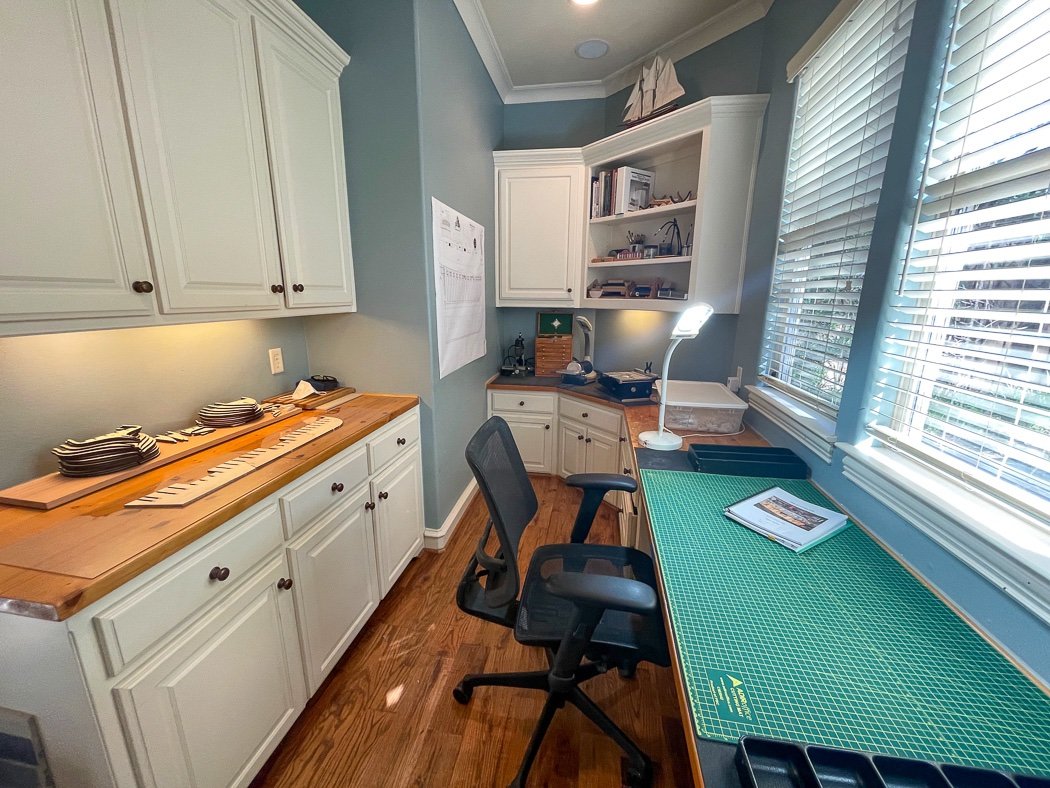
Having gathered the material and paused my previous Flirt build I’m ready to start Winchelsea. First I had to do a few modifications to my workshop to accommodate the much larger Winchelsea by increasing my workspace width. I’ve opted for Alaskan Yellow Cedar, after building Cheerful using it I know just how nice a wood it is when finished and how satisfactory it is to work with. It’s all there in the white topped plastic box in the corner ready to go, along with the first several chapters of laser cut parts. Since the plans are too large for the counter where I normally keep them I stored my Pegasus framed draft and hung the plans using velcro fasteners. In theory I can remove them without damaging the wall and easily change which sheet of the plans is hanging. I guess I’ll find out. I printed two copies of the plans. As I discovered with Cheerful it’s handy to have a set I can cut up at various stages of the build. I opted for the starter kit from Chuck. I have no desire to cut my own bulkheads or find the lite-ply to cut them from. I’m more than content with Chuck’s already perfectly cut set. I’ll get to know it really well during the fairing stage - after I figure out how to fair something this huge without breaking it or me. I started by transferring the bearding line using tracing paper. Interesting that the middle section is reversed from the other two with the laser etching. I also bought 1/16th acrylic sheets on from Amazon to provide a nice flat surface for it and the stem. And finally the build board, I went to Home Depot to pick up some MDF or something cheap but this scrap piece of beautiful oak called out to me. I sanded the edges and put a coat of WOP on it (why not) and will next add the brackets. Finally, my thanks to Chuck for this incredible design, his detailed chapter instructions, and parts that go with each. I’m well behind so many great Winnie builds already in progress and at every stage of construction. I know I’ll greatly benefit from those many build logs already posted, thank all of you for taking the time to post and explain your work. I doubt I’ll have much to add (if you've seen my other logs you know that won't stop me:-), yet I will enjoy sharing my progress as well as I move along. Let’s begin!
- 840 replies
-
- 21
-
-
- winchelsea
- Syren Ship Model Company
- (and 1 more)

