HOLIDAY DONATION DRIVE - SUPPORT MSW - DO YOUR PART TO KEEP THIS GREAT FORUM GOING! (78 donations so far out of 49,000 members - C'mon guys!)
×


glbarlow
-
Posts
4,120 -
Joined
-
Last visited
Content Type
Profiles
Forums
Gallery
Events
Everything posted by glbarlow
-
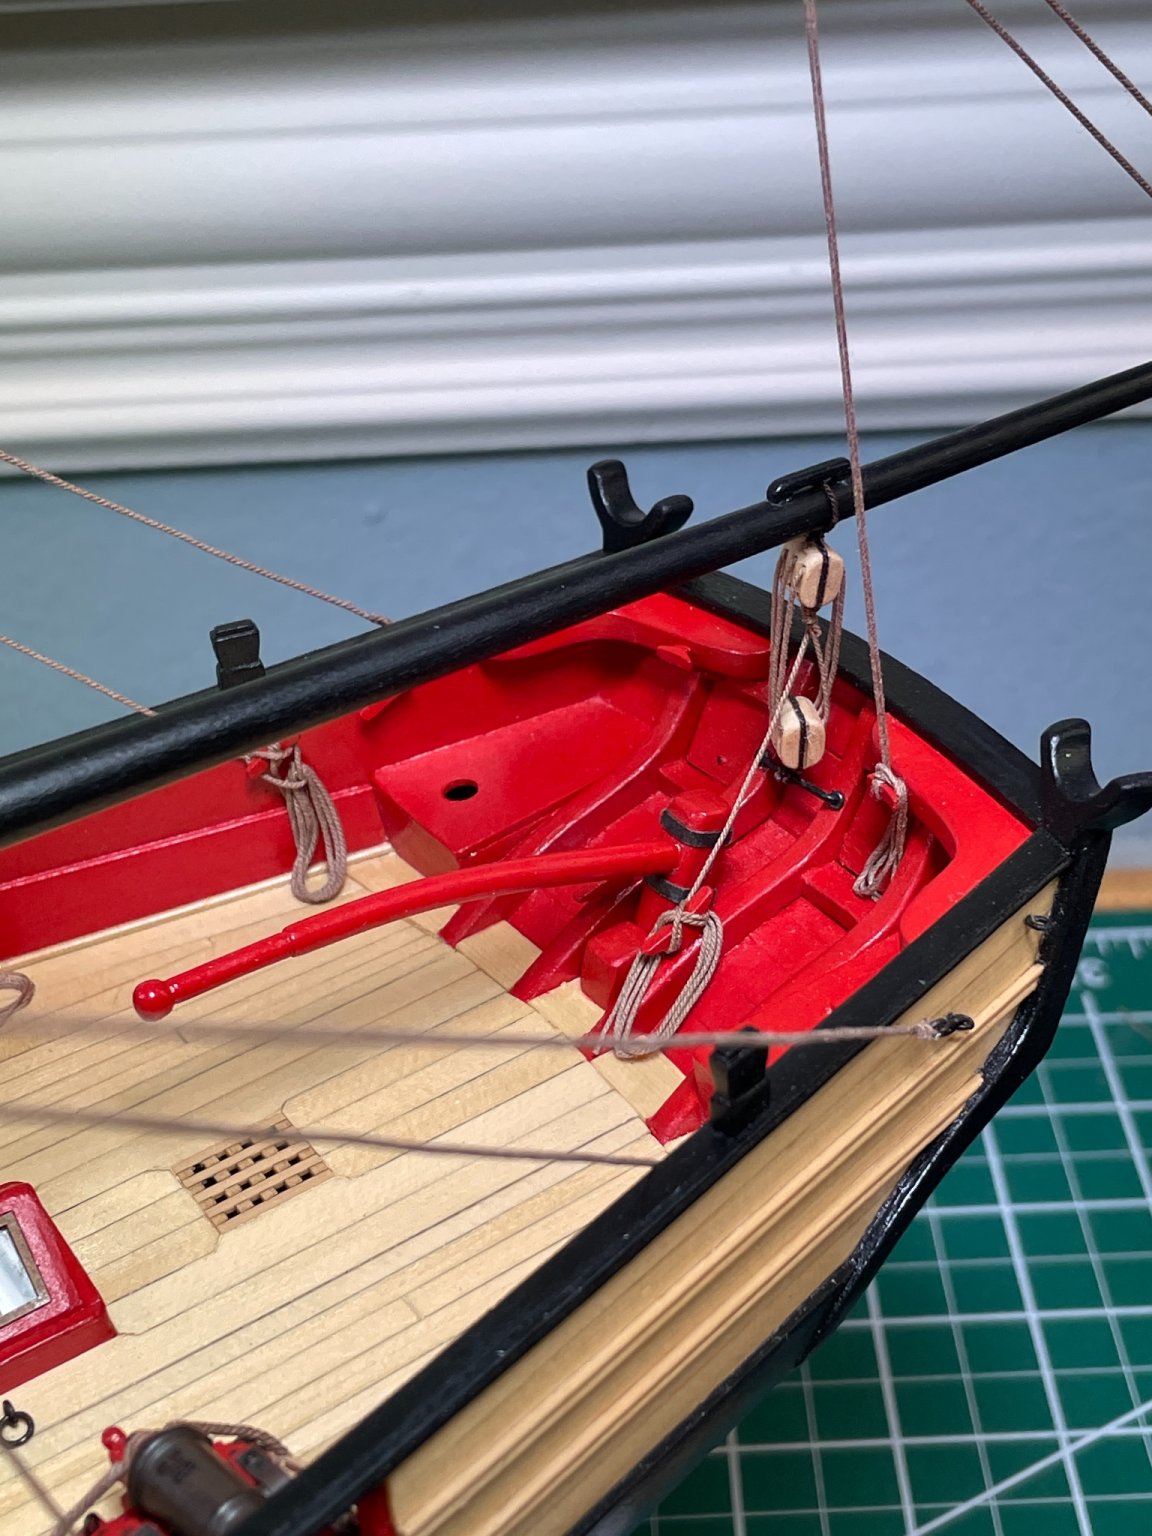
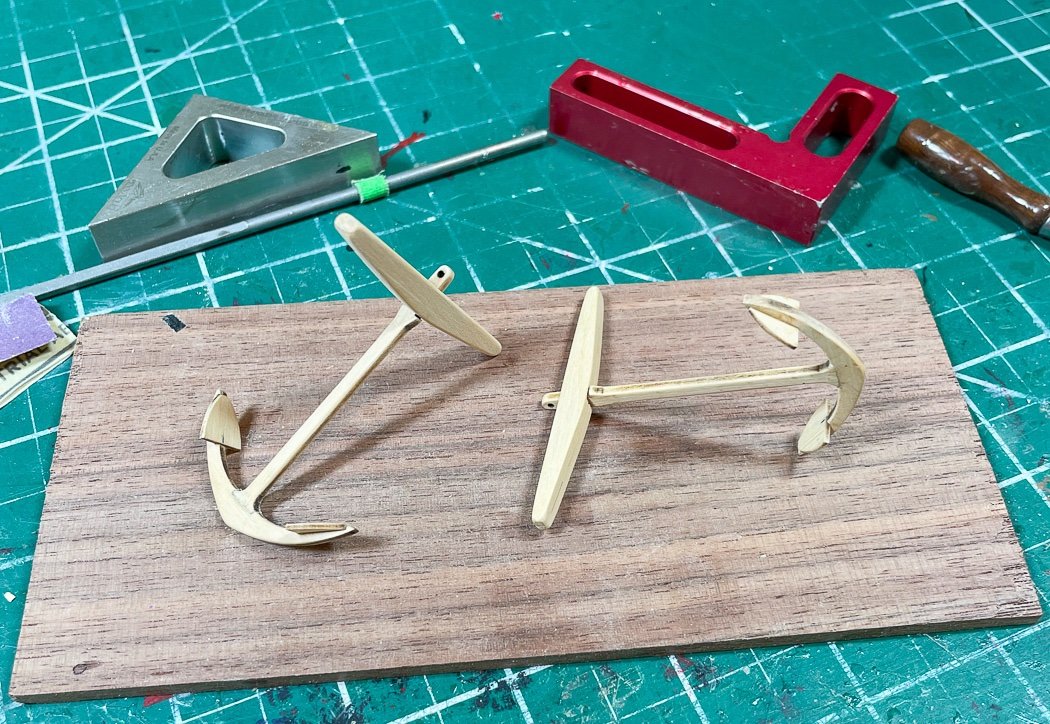
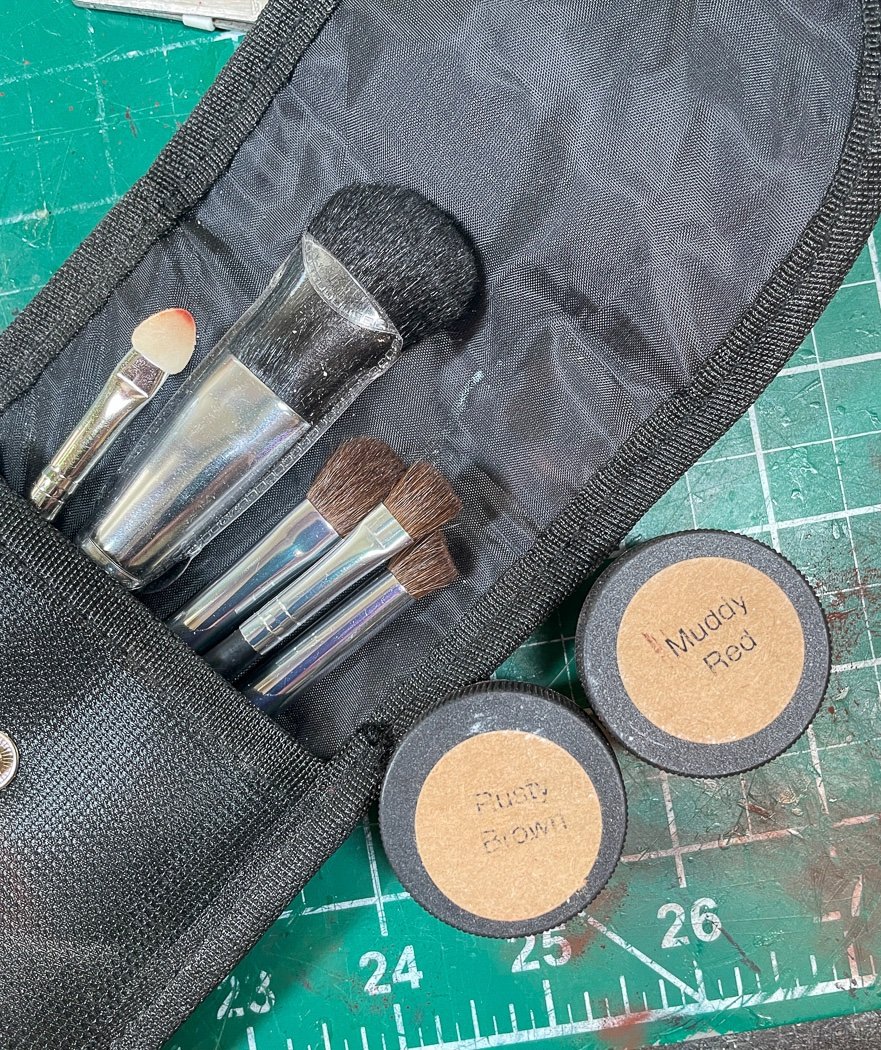
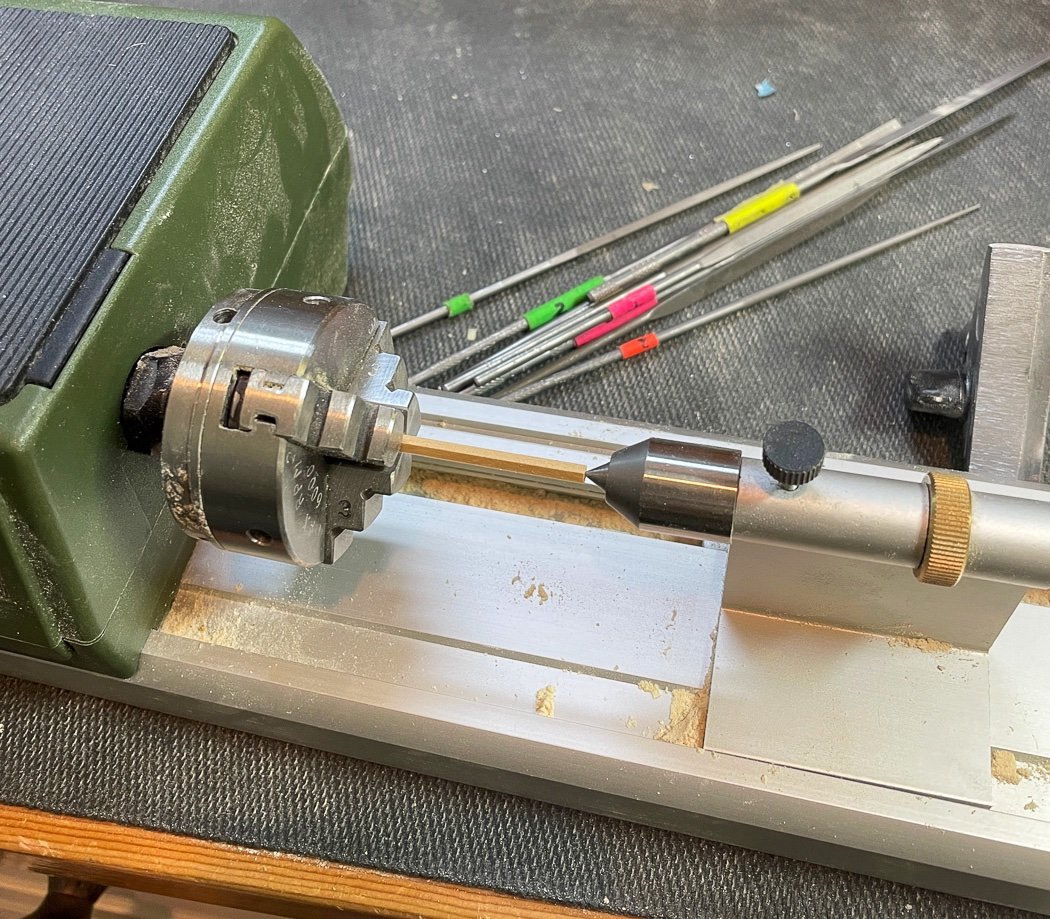
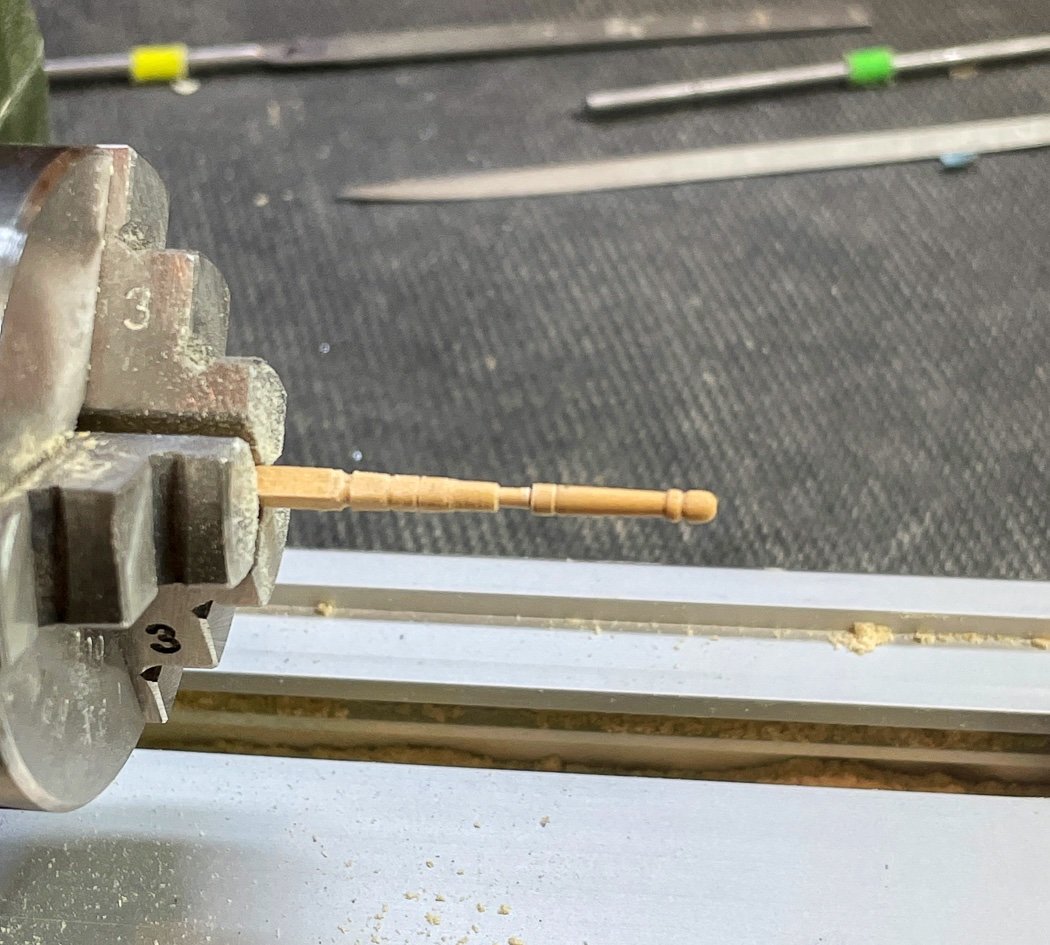
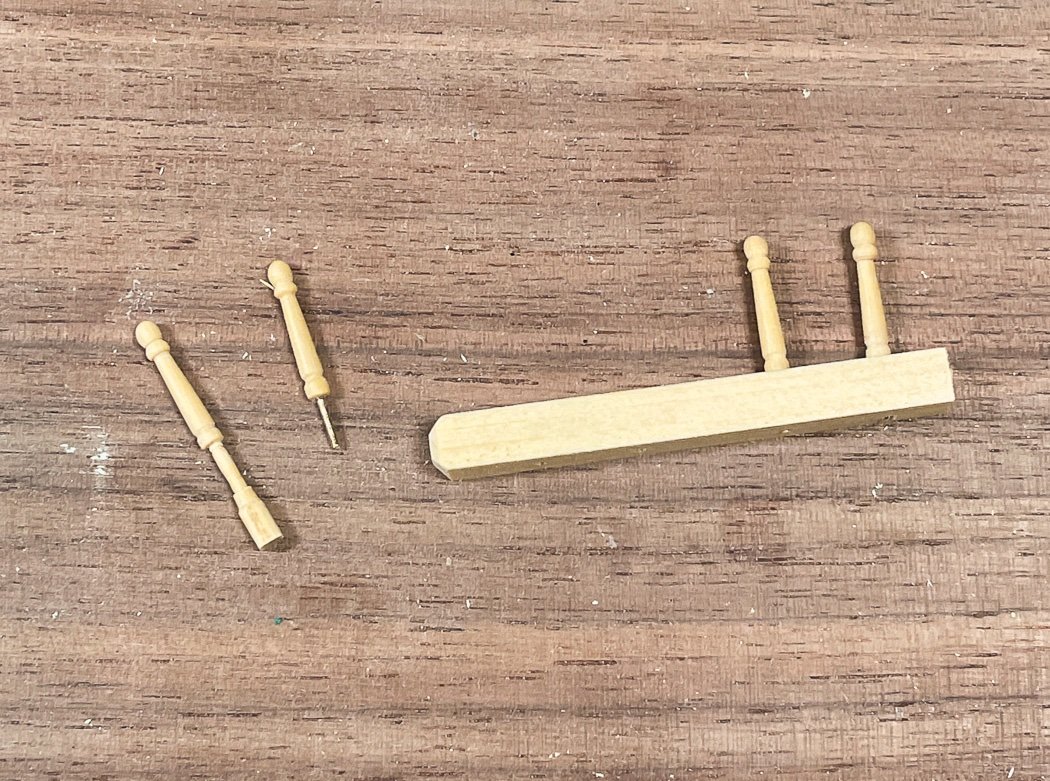
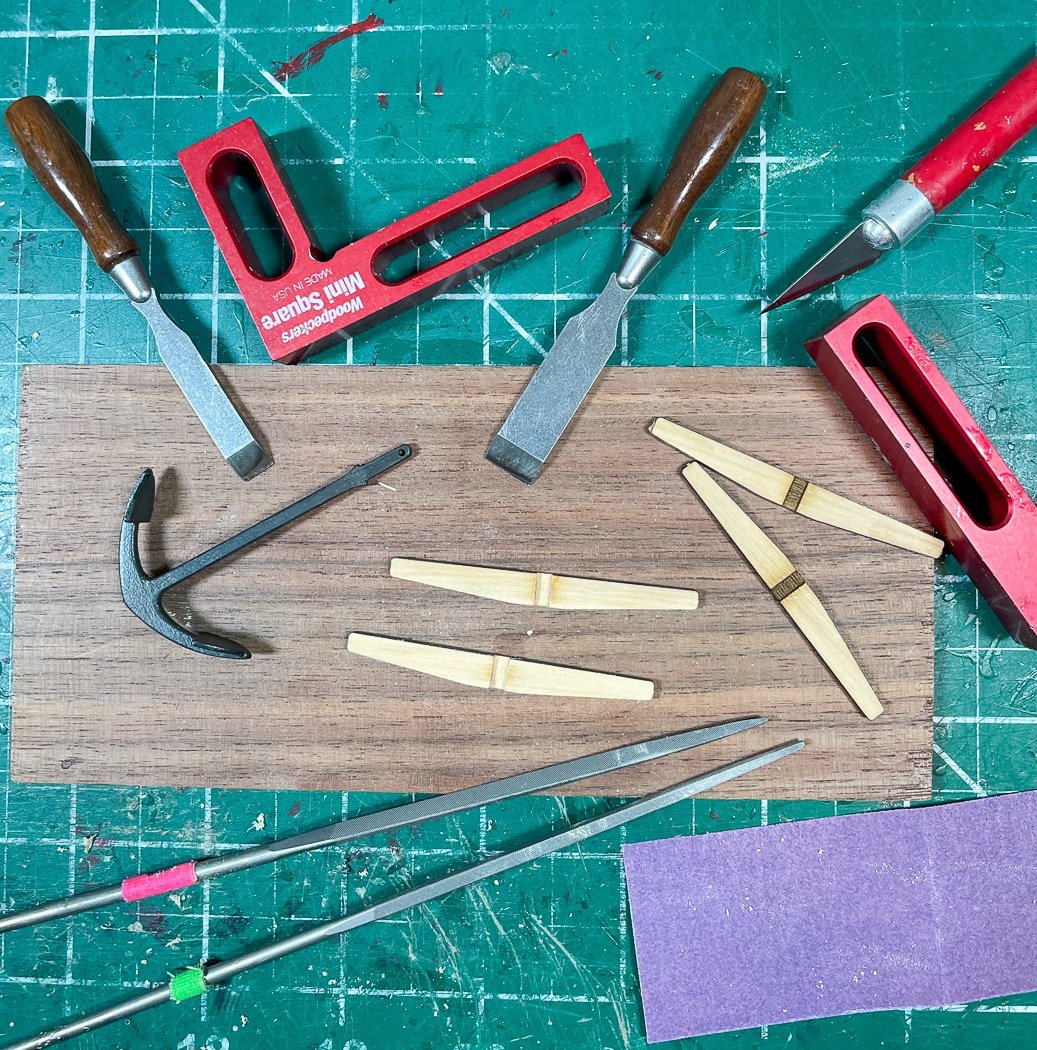
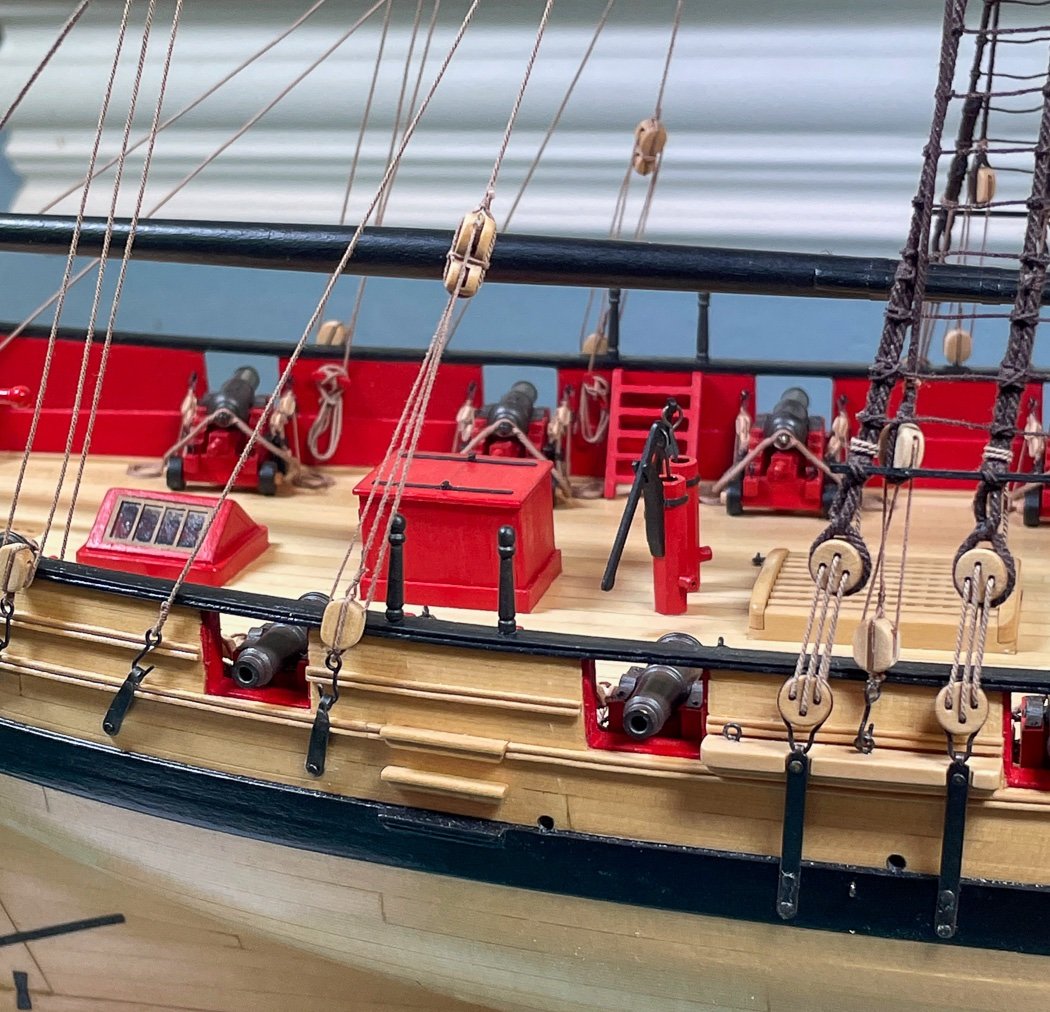
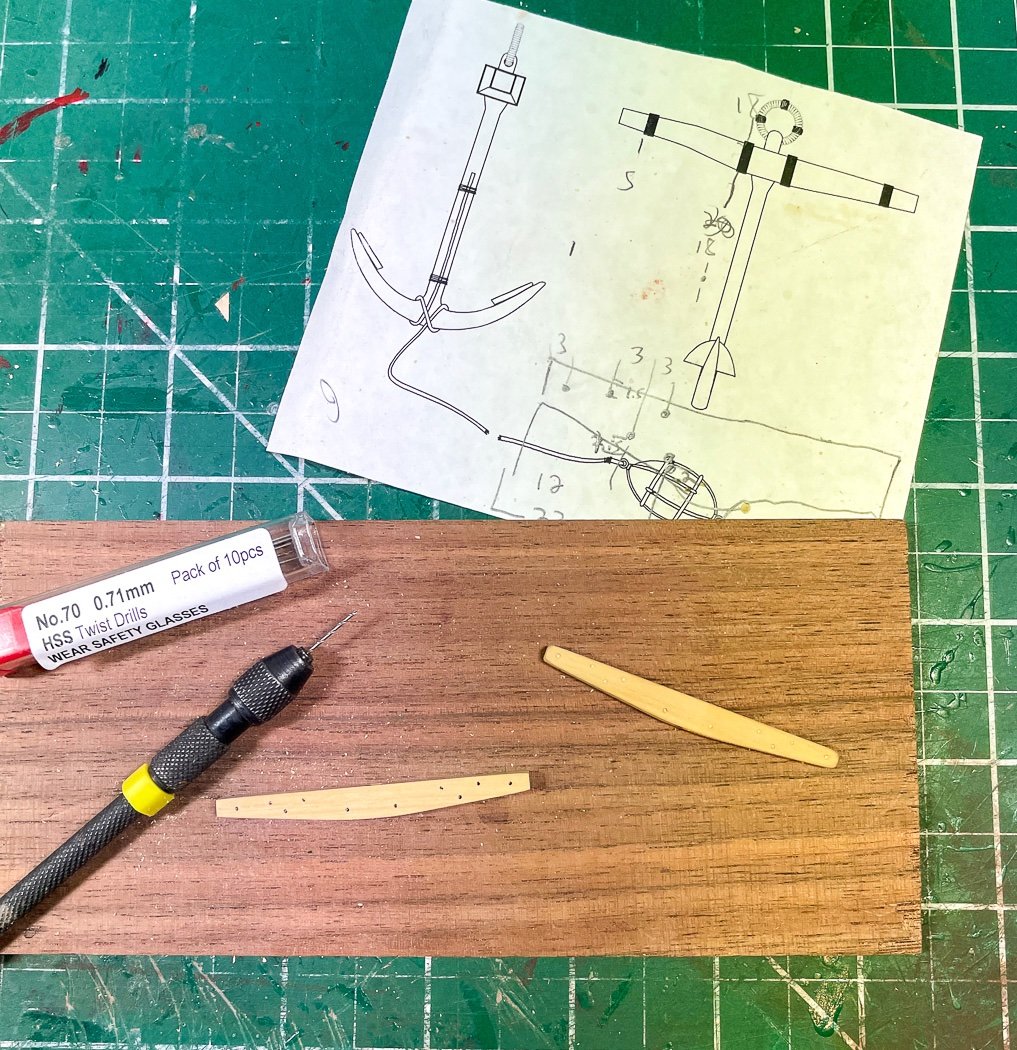
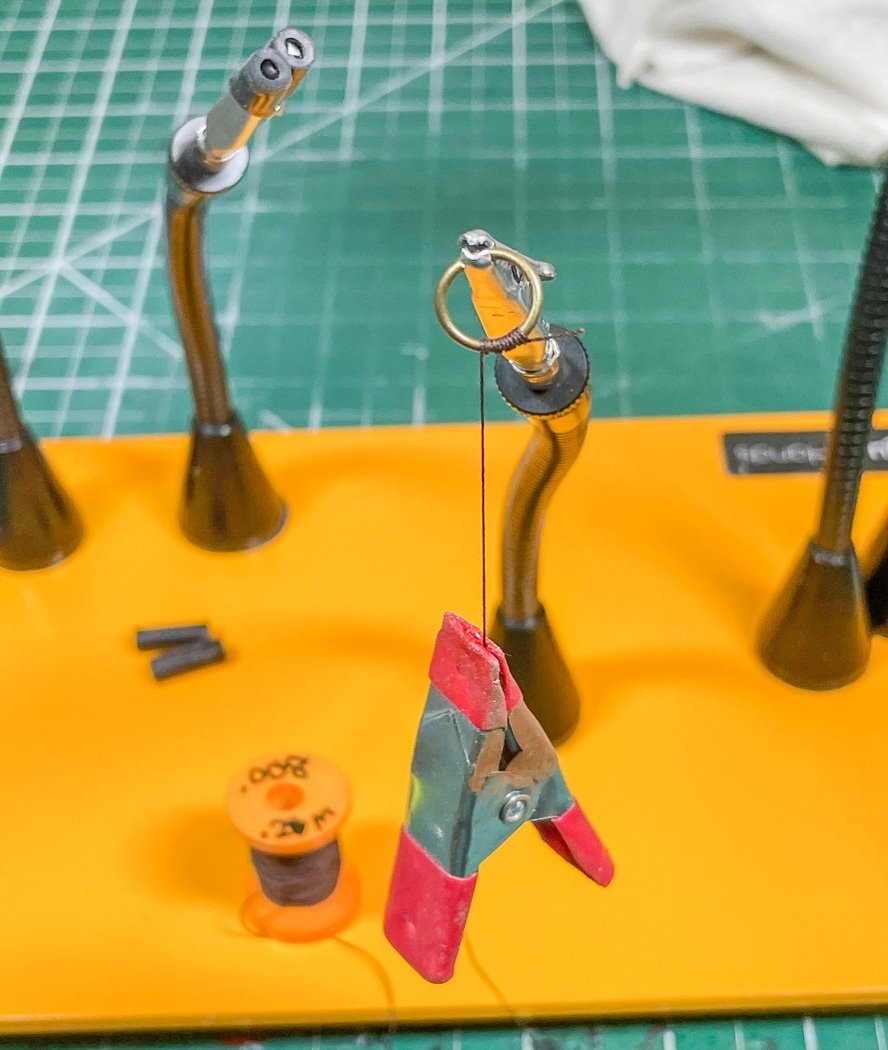
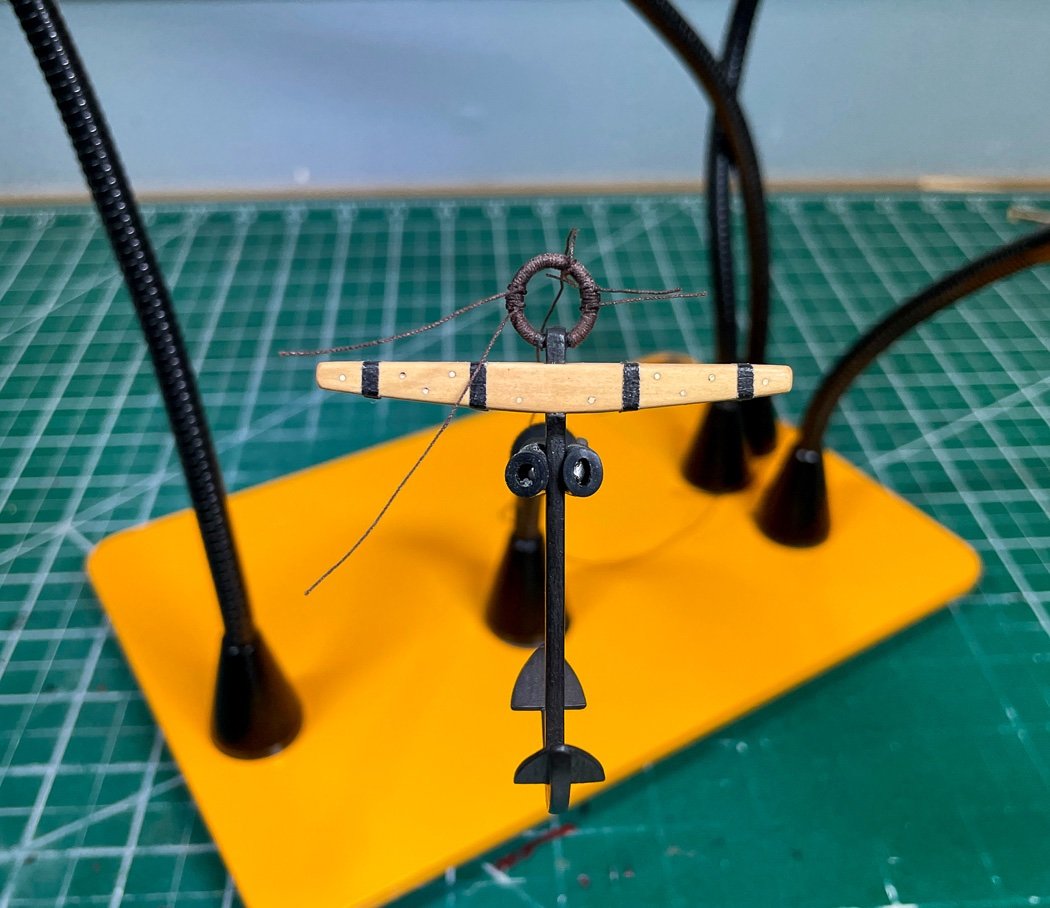
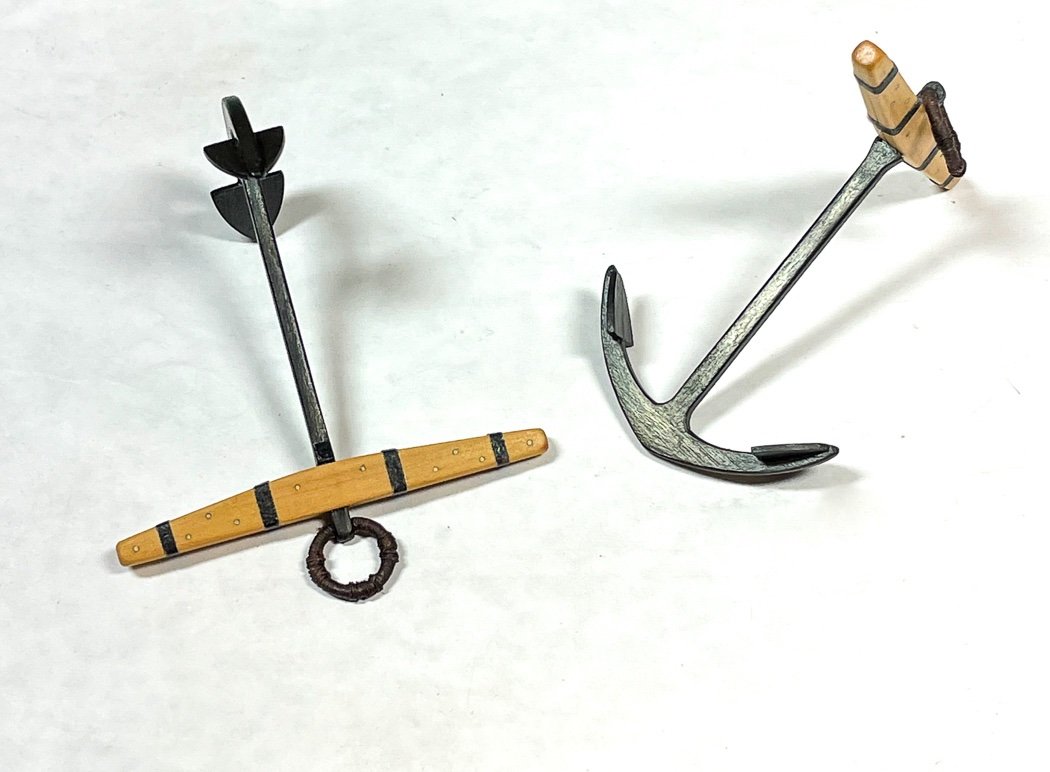
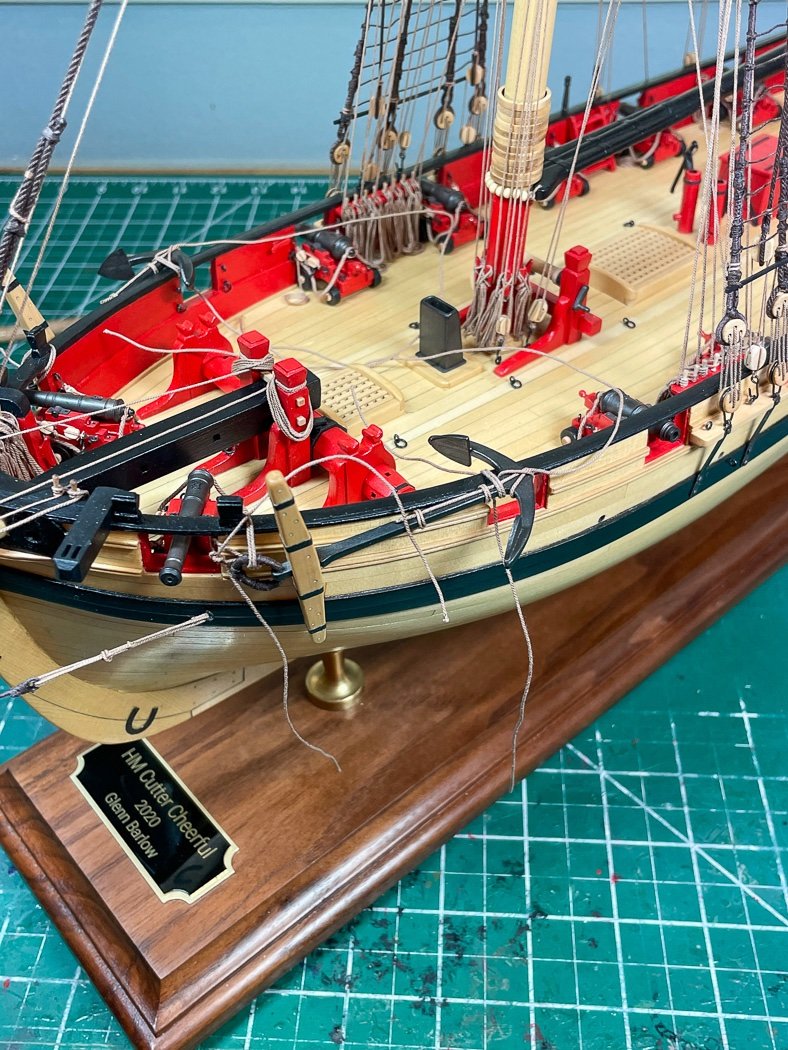
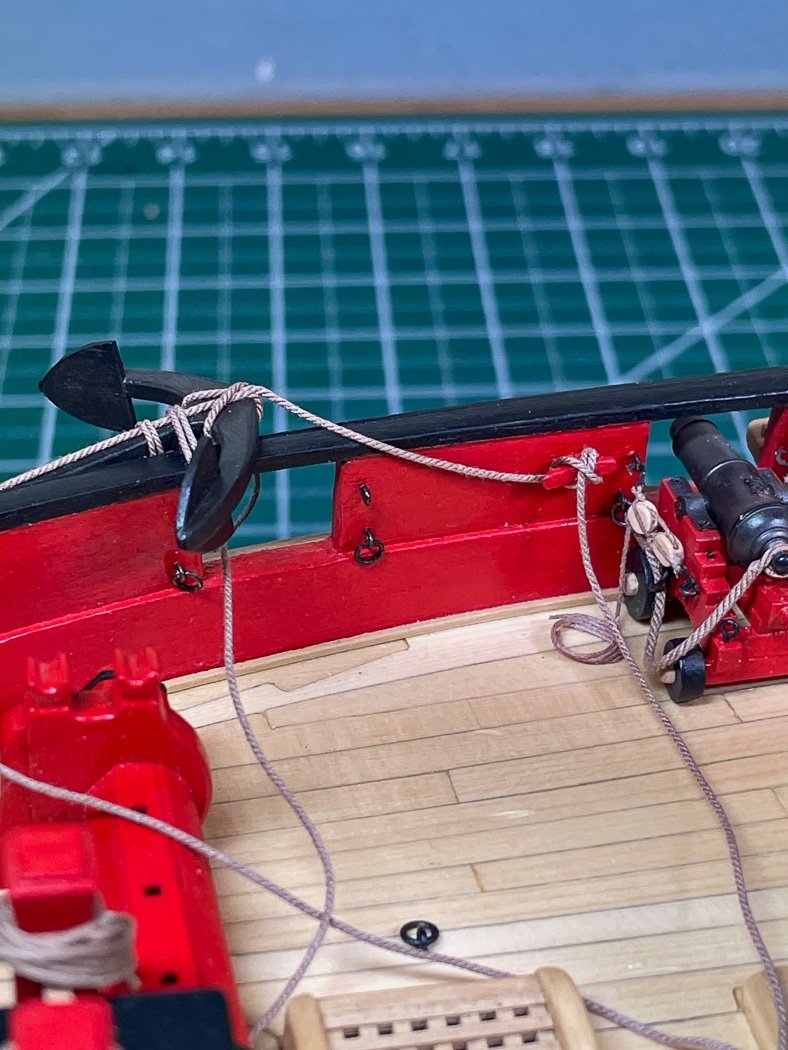
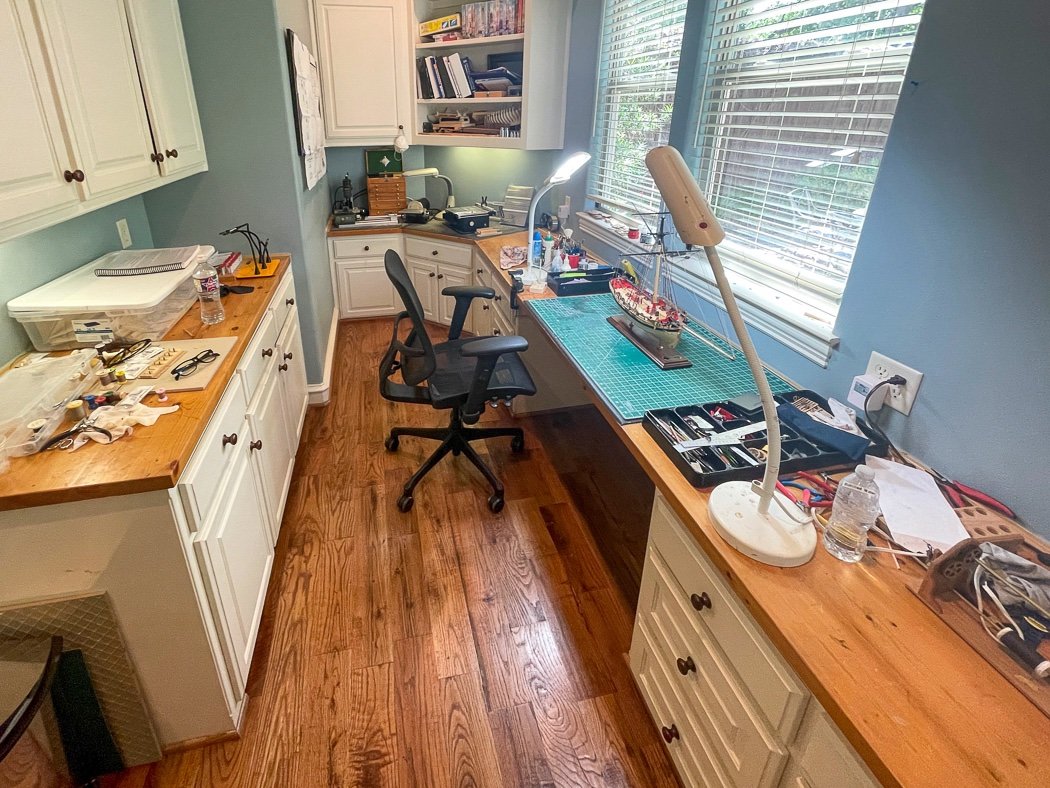
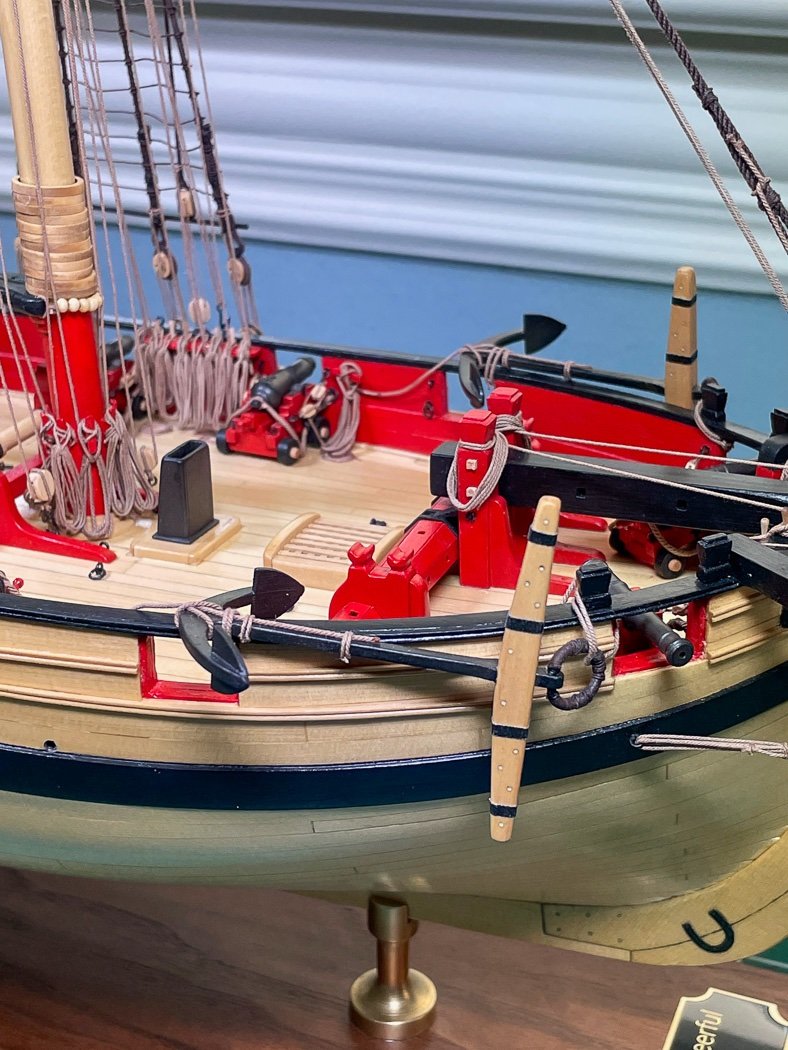
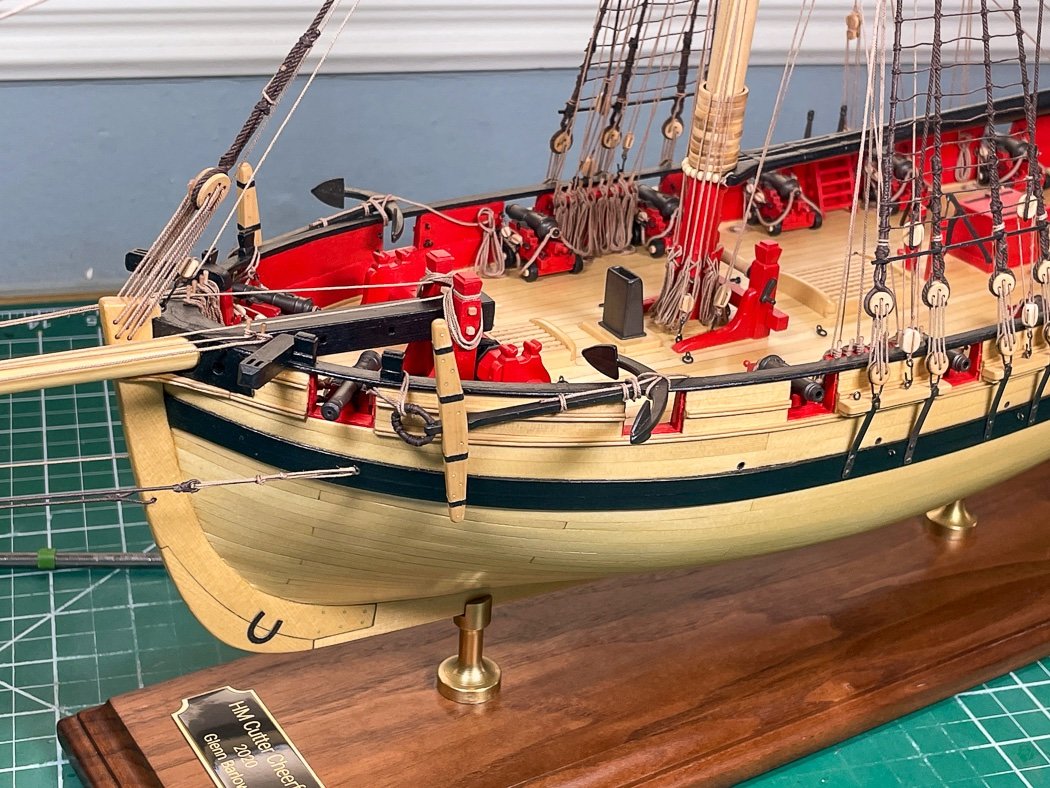
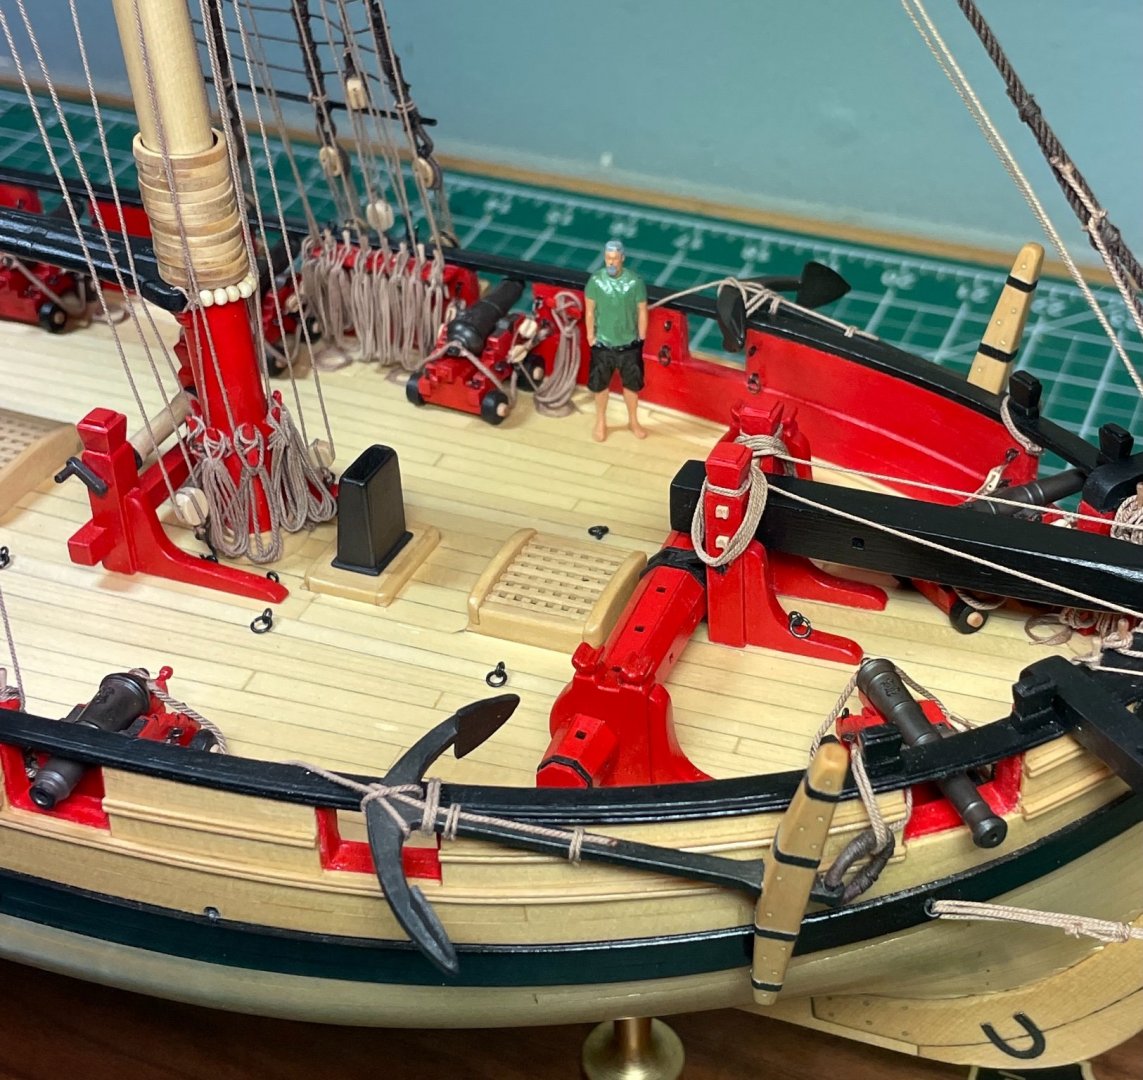
 I have elected not to include a flag or the optional anchor buoys (though I did make one up) mostly because I want the focus to remain on the wood. So I have the stanchions and anchors left to complete my model. Stanchions There are four stanchions, two for each of the boarding ladders. They are a small but visible detail, one I enjoyed making and another example of what I’ve learned during my build. It was back to the lathe starting with a 3/64 square strip of boxwood. I started with the tail stock but quickly discarded it - I didn’t need it for the spars I didn’t need it now. I used only files to create these. I kept it simple given I had to make four that looked alike. I couldn’t quite get my iPhone to focus on the stanchion, so the image is a bit fuzzy. On the left side you can see a few practice runs for the impact of various files. I found my #2 barrette and #2 triangular the most help in shaping after I’d rounded the stock first with a larger #0 barrette file. Both the lathe and these high quality files (I had lots of cheap ones) joined my workshop during this build, great modeling tools they are. I’ve improved with the lathe, it took only seven attempts to get four I liked. I didn’t get all exact matches, more like two of a kind for one side and two for the other. I started by thinking I’d make a nice tenon at the base but decided it might not be strong enough and/or be too large a hole to drill in the cap rail so I opted to pin them with cut off brass nails (I have hundreds of these). I made the little practice board for testing a clean fit to the cap rail and a visual check to be sure I had two that looked good together, with all the rigging there isn't a lot of room along the cap rail to work. The stanchions are ‘metal’ so that meant back to my process (or to be more precise the process I learned from Chuck’s monograph) for getting wood to look like metal. First my Admiralty Iron Works Black paint then to Doc O’Brien’s weathering powders and my soft brush set. The set comes with twelve different powders, I’ve only used Rusty Brown throughout my build, first on the carronade barrels and then applied to every “metal” piece since including parts of the windlass and winch and actual metal pieces for the deadeye strops and stay belays. I got the powders from MicroMart, if you’re interested in weathering your work I highly recommend this brush set I also got from there. I used 4 brushes in sequence for anything I weather. The first small one to apply (oops, just noticed the small one is missing from this photo), the flat round one to remove excess, and the third and fourth to burnish/polish it in. I don’t really see the affect until the last brush is used, feather light, to bring out the ‘metal’ luster. It is my goal for there to be no evidence of the powder remaining once I’m done brushing, other than on my hands and everything around me. I drilled holes into the cap rail and added the stanchions to both sides. I’d been happier if I’d drilled these back when the cap rail was installed but it worked out, no damage. The stanchions should have a hole through the ball on top with a rope run through down to the bottom boarding step on either side. For cosmetic reasons I elected not to add either, the ship is at sea, the rope isn’t needed. On a side note I am no longer worried about mini-me’s ability to climb aboard or exit the ship, he’ll be fine now. Anchors The anchors begin with another excellent mini-kit from Syren Ship Model Company, multiple times during my build I’ve enjoyed assembling these kits from Chuck’s website. While in theory each could have been scratch built, I’m equally sure there is no way I’d want to attempt that or obtain anything like these lasered pieces of art. Chuck does throw a light curve by leaving the winch to be completely scratch built, so I did do that. It is also an opportunity to meld four pieces of wood into a single “iron” anchor. Here are the how they all come together before they later turn into realistic anchors. Having sanded the edges in the appropriate places, glued it all together, and filled the (very small) gaps with filler, it’s through the ‘metaling’ steps of Iron Works Black paint and Rusty Brown weathering powder. The stocks require the notch to be improved to fit the anchor, but not too improved - there should be a gap in the center third to allow the wood to breath (not that I’ll be dropping it in any water). That requires some careful work to deepen the notch but not too deep. There is some adage about measure twice cut once, I go more for the measure what you measured and then measure it again, then decide if you measured it right. After a lot of sanding to shape these stocks, including a taper from middle to end viewed from the top,, I was going to use black filament for the bolts, but decided I started with the pencil and wood filler method back with the keel, might as well finish with it. I made sure to account for where the “iron bands” would go using the plans, once again measuring my measurements. Here the holes are drilled with a #70 bit. With the bolts added I simulated the iron bands with black masking tape cut into 2mm strips. I used this black tape in multiple places on Cheerful for the first time having used black card on previous models, I’ve also tried shrink wrap plastic tubing. For me the black masking tape is a much better option to apply, and in my opinion a better look when its finished, especially after the coat of WOP I added to the stocks. The pudenning took some patience to slowly wrap .008 dark brown line around the ring and add a shorter second layer on top of that in three places. More exciting was getting the completed ring to fit into the holes of the relatively fragile anchor without breaking anything. So while I could have bought third party metal anchors with pre-made stocks, the Syren mini-kit allowed me a near scratch build opportunity to create my own “metal” anchors. I have to say while they may look it, these weren’t simple to complete. It took me a couple of days, much longer than I would have guessed when I started with the assembly, shaping, weathering, bolting, etc.. Nonetheless it was very rewarding to have the end product, a fun last last item to build. I chose a bit of a different path in rigging the anchors to the ship. I had decided months ago not to cut holes into the main hatch and run hawsers, my anchors would be in a stored mode. It’s the first time I’ve done that on a model, I just liked the cleaner look for Cheerful. For that same reason I didn’t add coils to the ratlines or the optional buoys. Fortunately there is a perfectly placed cleat on the bulwark to tie off the rope. On my ship the hawsers and anchor buoy are brought up from below deck as we enter the harbor by my able crew. I started this build log with a photo of my then nice and neat work area. It is anything but nice and neat now, it will take me a couple of days to put it back together again. As it got close to the end I just quit putting stuff away, there are scraps of wood and rope everywhere and there are a couple of cabinets I’m afraid to open at the moment. I’ve spent a lot of hours here this past thirteen months (excuse the distortion from using my iPhone’s wide angle setting). Today my four year old grandson saw the boat sitting there and once again asked "when can I play with it?" With that my anchors are secured and my build is complete. I will post final photos of my HM Cheerful to close out the log once we return from an extended July 4th weekend at our lake house. A quick thank you to all my British friends for the holiday we are about to celebrate for the 245th time, with regrets to King George. Thank you for all the comments and the likes, they are genuinely appreciated. Thank you for taking the time to stop by.
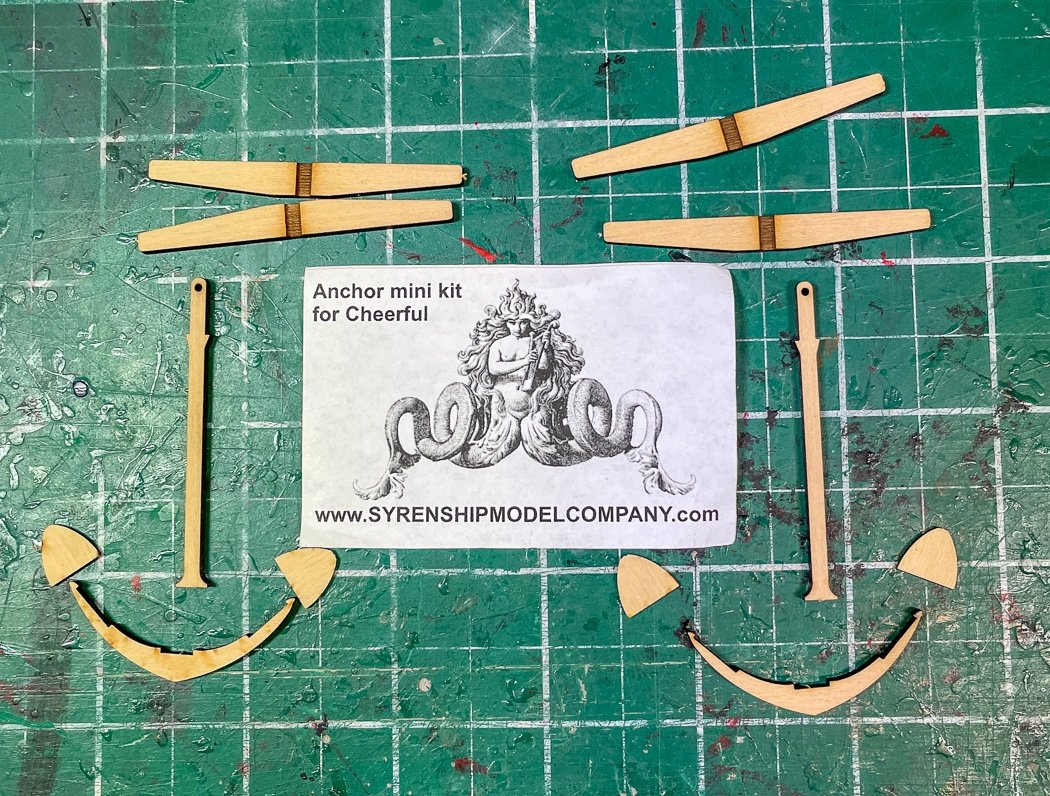

- 778 replies
-
- 16
-

-
- cheerful
- Syren Ship Model Company
- (and 1 more)
-
Thank you both for the comments, they are really appreciated. Still one build post to go before the final photos.
-
Thank you, I appreciate the comments. I’m going to take a photo of the workshop now to include with my final post, clean doesn’t apply now. I let it go as I was closing in on the finish line. I’m really glad the log is helpful, that’s been my intent all along.
- 778 replies
-
- 2
-
-
- cheerful
- Syren Ship Model Company
- (and 1 more)
-
The mini kits and excellent design really helped, I’ve learned so much. Glad my log helps.
-
I’m done. Post to follow in a few days on stancions and anchors, plus another after i take final photos. Meantime, mini-me takes a look around
- 778 replies
-
- 15
-
-
- cheerful
- Syren Ship Model Company
- (and 1 more)
-
Just be sure your blocking doesn’t prevent you from centering the mast including it’s rake. I didn’t add anything because I know from experience I want a bit of play when it comes time to step the mast. You should consider painting those carriages red. They will stand out unpainted. But it’s your model. First hand experience is the best teacher.
-
Well done! Excellent photography as well. I now have my go to log when I build my barge.
- 185 replies
-
- 2
-
-
- queen anne barge
- Syren Ship Model Company
- (and 1 more)
-
I made my scrapper from a piece of brass about 1-1.5mm thick for the trim on Cheerful. Didn’t sharpen the edges, did lots of light passes. I was a bit surprised how well it worked.
-
I’ve learned so much having built Cheerful since this log was done. Still some good information I think.
-
The gun port pattern should near equal the first planking. Hold up a strip of that lime wood below it, it should be close. There is some room to sand them to match before the second planking, which covers both the pattern and the first planking. I hope you’re taking advantage of looking at several other build logs, there are many here on the forum.
-
I use black masking tape, not so thick and hard to shape card. Examples are on my Cheerful log
- 114 replies
-
- 1
-
-
- Lady Nelson
- amati
- (and 1 more)
-
It’s looking great, looking forward to following your progress.
-
Jeff! How have you been, where did you go…? 😁
-
Really not a decision you have to re-bend them. Nothing will work otherwise. The Model IS representative of a British cutter, maybe not a named one, but it’s still a cutter. There’s not that much flexibility other than a name on the stern.
-
Come on back to your build. Let’s see how it’s going. 😀
- 26 replies
-
- 1
-

-
- First Build
- lady nelson
- (and 2 more)
-
Thanks for the reference. I’ll follow along and offer what help I can. The log was originally done on another site, I copied it and posted here on MSW so the posts appear a bit long since I combined them. There are some nuances to LN, I recommend reading through a few logs to take advantage of what others learned. My biggest recommendation for any modeler is to learn Chucks plank bending technique. It’s a game changer and worth the time. The LN is a nice model to learn it on. Have fun and don’t be reluctant to ask for help. Every experience level is represented in this forum. I’ve not met one that wasn’t willin to help.
-
This email works: thewoodmansshed@gmail.com I’ve used it to order just this past week.
-
Figurines and ornate carving added to your already impressive list of skills. Adapting wildly different figures to convert to your vision is very impressive. This model will end up being quite the conversation starter when you’re finished. Amazing work BE!
- 185 replies
-
- 2
-
-
- queen anne barge
- Syren Ship Model Company
- (and 1 more)
-
Looks like a very nice fit. Not to early to decide if you’re painting them black or leaving them natural. Both have been done. Getting the curve by the Wales is tricky, good job!
- 274 replies
-
- 1
-
-
- Cheerful
- Syren Ship Model Company
- (and 1 more)
-
I posted this as a reply on Derek’s log about technique I discovered making rope coils (described in post #687 and shown above). I thought it might be helpful as additional information here. I made and rejected a lot, but in the end I think they look worthy of Cheerful. So here it is: A couple of nuances I did with my modified approach that might help: a. the loop is top side over bottom to start it, then continue that loop for a full 360 degree turn before putting over the pin on the coil jig, it’s easy to stop with the first loop but it doesn’t look as good. b. Pulling the top rope for tension (referring to post #687) is a bit of the art, not too tight, not too loose, before painting the clear acrylic. c. The smush after it’s dried is, for me anyway, what makes them more realistic. I even paint the inside of bottom the bottom loops of the finished coil with a little water so it’s not so stiff. d. The clear acrylic helps, it dries more natural than watered down glue), but it isn’t a true adhesive so the CA on the back side of the loop is essential in holding it all together. e. My jig has one size for cleats another for pin rails. The difference is the size of the loop and the length of the coil. It’s specific to 1:48 Cheerful, I’ll have to make a new one for a 1:64 model.

- 778 replies
-
- 11
-
-
- cheerful
- Syren Ship Model Company
- (and 1 more)
-
Thanks for the reference 😁. A couple of nuances I did with my modified approach that might help: a. the loop is top side over bottom to start it, then continue that loop for a full 360 degree turn before putting over the pin on the coil jig, it’s easy to stop with the first loop but it doesn’t look as good. b. Pulling the top rope for tension (referring to my post #687) is a bit of the art, not too tight, not too loose, before painting the clear acrylic. c. The smush after it’s dried is, for me anyway, what makes them more realistic. I even paint the inside of bottom the bottom loops of the finished coil with a little water so it’s not so stiff. d. The clear acrylic helps, it dries more natural, but it isn’t an adhesive so the CA on the back side of the loop is essential in holding it all together. e. My jig has one size for cleats another for pin rails. The difference is the size of the loop and the length of the coil. It’s specific to 1:48 Cheerful, I’ll have to make a new one for a 1:64 model. I hope this helps. I made so many and rejected so many to get ones I liked. I’d make more probably if I hadn’t run out of rope. At some point my mini-me standing on the deck said ‘enough, move on. The detail in your rigging looks great by the way. Such detail and precision.
- 725 replies
-
- 1
-

-
- vanguard models
- speedy
- (and 1 more)
-
I’m glad you’re enjoying the log and appreciate your comment. I’m not sure what I’m going to do when I finish it. It’s been a great year (when not much else was great about the year) building it.
- 778 replies
-
- 1
-
-
- cheerful
- Syren Ship Model Company
- (and 1 more)