Sonofagun
-
Posts
37 -
Joined
-
Last visited
Content Type
Profiles
Forums
Gallery
Events
Everything posted by Sonofagun
-
 Yes, I did assemble the entire keel, stem and aft deadwood and used it to help keep the frame spacing. I think the trickiest part of the hull was assembling the hawse pieces. Hahn’s drawings do a very decent job of preparing the individual pieces. i got very lucky and only had to redo them once! The model is a great deal of fun and will keep you occupied for hours. There were a few times when I would get frustrated and need to take a break. But you get hooked by the bug... If you haven’t purchased THE FULLY FRAMED SHIP MODEL series of books by David Antscherl and Greg Herbert, I would highly recommend it! At least to start with the first book of the series. It has an unbelievable amount of information that is useful for any ship modeler. Very well written. Just a suggestion. I wish I had purchased and read them much sooner than I did!
- 50 replies
-
- 1
-

-
- rattlesnake
- brig
- (and 1 more)
-
HMS Enterprise by AlexBaranov - 1:36
Sonofagun replied to AlexBaranov's topic in - Build logs for subjects built 1751 - 1800
What a wonderful model! It makes me believe I am looking at a model made when the ship was being built! Love the colors you are using. The carvings are beautiful! Very clean lines. Attractive ship. I can see why someone of your talent would be drawn to modeling her. Great job! -
On my Hahn RATTLESNAKE, I placed the first and last whole frame the first thing. Supported them to make certain they are 90 degrees from the frame jig. Then you can place the keel,WITHOUT GLUING IT, To help keep the frame spacing from top to bottom. I don't know if you are already doing this. Just thought I would throw the suggestion out there.
- 50 replies
-
- 2
-
-
- rattlesnake
- brig
- (and 1 more)
-
Welcome Torstein! I am sure you are finding there is much to learn in ship modeling. You can learn a great deal by reading the building logs on this site. The members here are terrific and are very willing to help. Do not hesitate to ask any questions you may have. Bryan
-
Nice, neat modelling -as your usual standard. What size are the loops to control the valves of the faucets on your stove? Fantastic scale!! Nice shot locker in the background, also! Great job. Happy Thanksgiving!
-
I have every confidence that you will do a brilliant job (as usual)' I would advise not to partake of whisky to calm your nerves during your build as you may end up emptying another bottle and have a compulsion to build another (ship in a bottle) and end up in a vicious cycle! Just kidding. I am looking forward to you facing the challenges of this build! Good luck, Danny! Bryan
-
Working Comfortably on Upper Rigging
Sonofagun replied to capnharv2's topic in Masting, rigging and sails
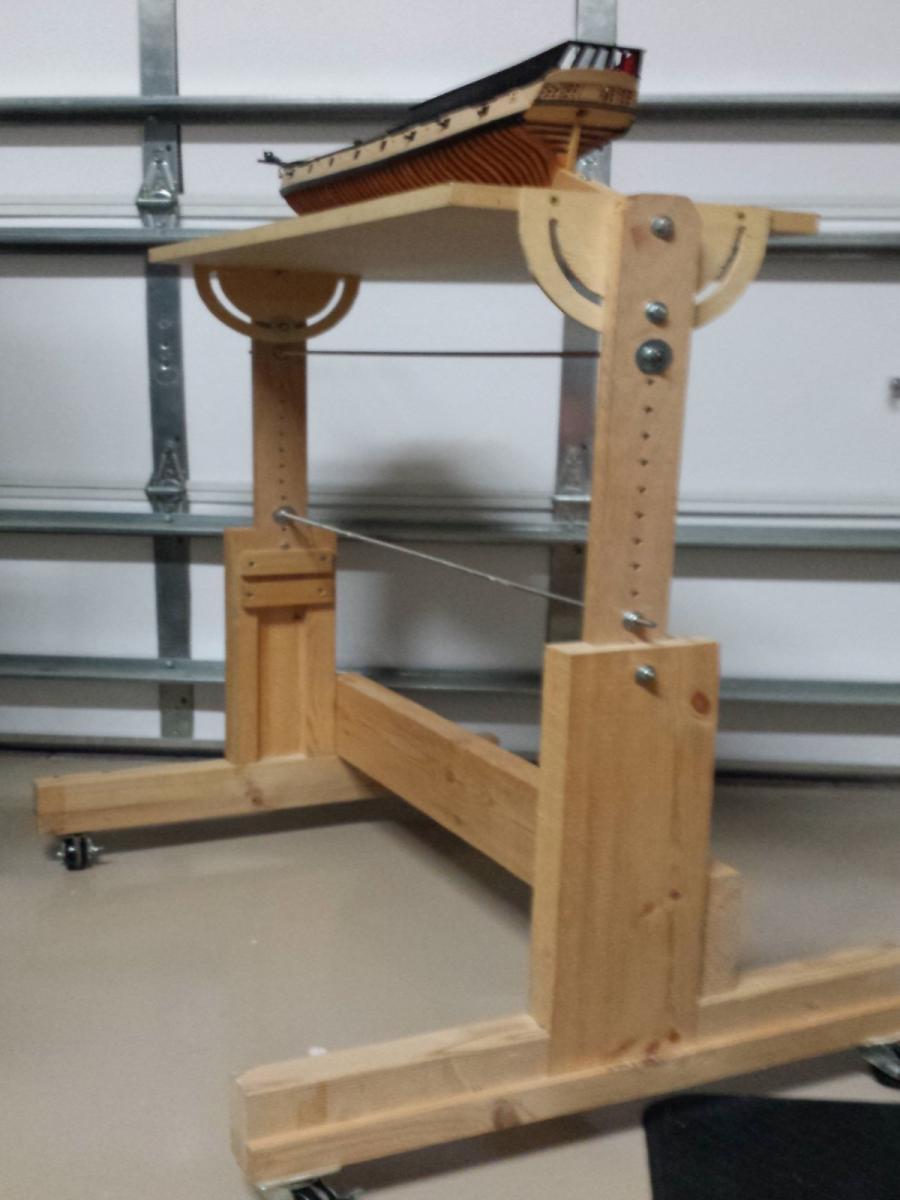
This is the picture. Kind of self evident on construction. The support boards , supporting the building board, are 1/2 inch oak. The slotted boards for tilting purposes are 1/8th inch plywood. I put a little bar soap on the upright guides to help them slide better ( the uprights coming up from the base) The base is wide and more substantial with weight to be stable.
-
Working Comfortably on Upper Rigging
Sonofagun replied to capnharv2's topic in Masting, rigging and sails
I will see what I can do tomorrow. I have never posted pictures on MSW before. I know I will have to 're-size' them. I don't have to report to work until early afternoon. So I will try for the morning. If not tomorrow, then soon. Bryan -
Working Comfortably on Upper Rigging
Sonofagun replied to capnharv2's topic in Masting, rigging and sails
I built a movable, height adjustable , swivel top 'table' to hold my building platform. I built it from 2x4s, 2x6s, some 1/8th inch plywood to act as swivel guides to be screwed to the building board, some threaded rod, nuts and bolts, and put it on wheeled lockable casters. It was quite easy to build and serves my purposes very well. It is small enough to easily turn it to whatever direction I need. I can tilt the platform to more easily work on the interior of the model. The one I built, was my 'prototype' , so I can modify it for my next build (if I need to). I'm sorry that I don't have pictures of it immediately available . If you are interested, let me know and I can try to place some on this forum. Bryan P.S. I got the idea from Danny's build of his VULTURE when he had mounted his model on a rod to have it able to swivel. At least I think it was his VULTURE build! The 'table' is pretty darned stable. I've had it for over a year and it still works as well as the day I finished it. -
Danny, Just got a chance to catch up on your build. Still settling into our new home - not without some major problems. Looks like all my shop equipment made it all right! Yea! I want to tell you how impressive your VULTURE looks! You must be very happy with your results. Cannot imagine you would have any regrets. She is beautiful. Congratulations on your continued accomplishments.
-
Setting flags - which way does the wind blow?
Sonofagun replied to rodgerdodger's topic in Masting, rigging and sails
You have to consider actual wind direction and the resulting apparent wind, ( the combined affects of actual wind speed and direction being affected by the speed and direction of the ship ) . In a square rigged vessel , most of the time the wind would be coming over one of the stern quarters. The ship's forward motion would move the flag's free end a little toward the stern from what the actual wind direction would have it go. The harder the wind is blowing, the less affect the forward motion of the ship would matter as the ship can only go as fast as its waterline dictates. (There is a formula for this but it would take too long for me to find it at this moment). Basically, though, a heavy displacement ship gets stuck in its own 'trough' and cannot rise over the ridge in front. So, in a strong breeze. The flag would be snapping pretty much in the same direction of the actual wind. In a lighter breeze, the apparent wind would have a more powerful factor in the direction of the flag. At anchor, the flags would be pretty much straight to stern as the ship, being tethered by the anchor rode, would be at the mercy of the wind -
Mark, Really nice work! You are advancing quite nicely this go-round! Before you know it, you will be planking and seeing that beautiful ship emerge with its fine lines. Congratulations on reaching this point of the build! Call me crazy, but I think framing is one of the more fun parts of building. What the heck, just being in the shop is fun, right? Bryan
-
Thanks Danny, for your suggestions on planning my new workshop! You clicked on a few very practical ideas I had not considered. Your build is amazing. Very nice work. I agree with the others, the degree of detail makes the model look like a larger scale.
-
Danny, Thanks for sharing this finicky portion of the model. I always learn so much from your posts. I will be moving into a new home with a workshop that is more than twice as big as my current place. It Will be 12 x20 feet with 10 foot ceilings. Any pointers? All I have now is keeping my sawdust producing equipment ( saws, sanders, etc) from my finish and assembly area. I also want to thank you for inspiring me to build a stand alone, adjustable height, tiltable work station for my current build. Next build, I will add a gantry to the board. Again, thank you kindly, Bryan
-
Gun Port Lids
Sonofagun replied to wq3296's topic in Discussion for a Ship's Deck Furniture, Guns, boats and other Fittings
This may be a REAL STRETCH but, any chance the bulwarks were painted red to cut down on night blindness? On modern day boats, the gauges are backlit in red light because a typical white light is a little more difficult for the eyes to accommodate when going back to the darkness of night. Any reflected light from the bulwarks would reflect in red, being easier to then peer into the night. Kinda out there, but, who knows? -
Tung Oil Finish?
Sonofagun replied to cdogg's topic in Painting, finishing and weathering products and techniques
Sorry for the late entry into this thread. Just wanted to say that Formby's tung oil is not pure tung oil. I believe it contains some shellac. With pure tung oil, if the finish begins to thin or dull with time, you simply can add more tung oil. Don't know if this would be the case with Formby's. You may have to take additional steps. This may or may not be a concern. Also, to aid absorption of the tung oil into the wood, try heating the tung oil By placing a container of it in a hot water bath. -
Very nicely done! How did you get Donald Southerland to narrate? Wow, you could do voiceovers for the guy!
-
CA glue and metal fittings
Sonofagun replied to cdogg's topic in Metal Work, Soldering and Metal Fittings
I like epoxy myself. Mostly due to its far superior shear stregnth when compared to ca glue. I would hate to see some wood to metal bond in some later inaccessible area to be hit by an errant tool and be instantly unretrievable, not to mention impossible , to reinstall. I saw on another forum that epoxy, when the two parts are still separate, cleans easily with rubbing alcohol. When the two parts are mixed and still not hardened, they clean up with white vinegar. Have not tested this myself so if anyone is willing to try this with their next venture of epoxy use, let us know. You can buy small syringes, in some places, without a prescription (like insulin syringes) that could be used to draw up small amounts of the two parts for making epoxy, using separate syringes of course. Then wash out the syringes with rubbing alcohol. -
Just running through this thread and noticed someone had quoted an author as using turpentine or benzene to dissolve beeswax. Please note that benzene is a known carcinogen with any type of contact you may have with it. By the way, I use conservator's wax. Very easy to use. Will liquefy at very low temperatures. A little goes a long way.
-
When faced with this problem previously, someone mentioned that scraping the char away with a single edge razor works well and removes very little wood. Tried it. It is a very good and efficient method. May seem a little daunting at first, but really, it is easy and takes almost no time at all. I did not, however, try gluing the charred parts together. I will be interested to hear the results of the tests.
-
This completes a very well written pair of books. Very clearly demonstrates by word and pictures the methods the author employs to produce his excellent results. It is very easy to read and follows a good logical progression of assembly. In my humble opinion, it is right up there with the SWAN series! My computer lost the ability to open and read the included CDs so I am anxious to see the information on them! Could not agree more with the others that Mr. Tosti and the good people at SeaWatch Books did ship modelers a huge service by publishing these books.
-
Hi bjoern, I looked up ayous wood on the Internet. It is not as dense as hard maple and not as rot resistant. It is also subject to staining from fungus. (but then Holly is also subject to staining and it is used in model ship building). Ayous is used in sculpture. It is not recommended for wood turning. Ayous wood has a density rating of 0.38, while hard maple's rating is 0.50, making hard maple more dense. So, I guess I would do a little more research, but it might be OK. Just know more about the wood and how you might have to treat it if you want it to last or if it is stable enough to invest your time to do your model in this medium or if you should hold out for another wood species. Hope this helps a little, Bryan
-
Dan, Been following your build since inception. This is my first comment. She looks incredibly beautiful in every respect! I am envious of your cannon. I an doing mine now, as well as working on the capstans. I find the gun carriages a bugger. I have a jig but still so much fiddly work with so many pieces. Following your method on the capstans, so far so good! Your build log has helped me immensely! A big thank you! Bryan