CaptainSteve
-
Posts
1,858 -
Joined
-
Last visited
Content Type
Profiles
Forums
Gallery
Events
Everything posted by CaptainSteve
-
 A few quick searches did establish that boats of this period were indeed made from Oak wood - though I didn't find anything which specifically related to construction materials and techniques for the boats aboard the HMS Bounty. Going out on a limb here, I'm guessing that Bligh - as the stoic naval officer and strict disciplinarian that he was - would have insisted upon regular maintenance of everything onboard the Bounty. I can't imagine that a mere six weeks at sea would've affected their little boat to a great degree. As for weathering my Launch, well, I've never been in favour of this with earlier builds - but if someone wants to come up with something that looks really good, then I just may change my thinking.
 -
You are steaming ahead, Alde !! She's looking very good indeed. (I'm stuck on mine at the moment until I can get to the hardware store to stock up on a few things)
-
Before work begins on the planking, there are a few things that need to be done. For starters, as I intend to leave the upper part of my hull natural, the planks will need to be stained. The bottom part - to the waterline - will be painted white. The laser-cut template sheets have already been sanded, coated with a sanding sealer and lightly sanded again. I really like the colouring which Keith used - a 50/50 mix of Golden Teak and Old Baltic (I think - will recheck, Keith). If I don't go with this, then perhaps a mix of the Golden Teak with a stain called White Japan (75/25 ??), to give a paler yellowish hue to the planks. Over the coming days, I will bend and test-fit the planks before staining this coming weekend. As for the tree-nails, I'm trying to source some darker coloured toothpicks - don't rightly know if these are available. Failing this, then a number of contributors to the Kit-Basher's forum have suggested a few options which could work nicely.
-
Back in the old days, Alde, that would've been more true than it is now. In the '60's (I think) there was even a player nicknamed Capt Blood. But nowadays, the first sign of blood flowing sees a player subbed off the ground - medical rules and HIV and all that. Like Keith, I'm not really a fanatic (am I forgiven, Bindy ??), though I do like to watch the games. And, yeah, it's much faster paced than American Gridiron or Soccer or Rugby. The closest approximation would be Gaelic Football. Anyways, enough of that before I get slapped down for allowing this log to go off-topic.
-
Ahh ... 'tis the fair maiden, Bindy. And which of the teams wouldst you support ??
- 625 replies
-
- 1
-

-
- bounty launch
- model shipways
- (and 1 more)
-
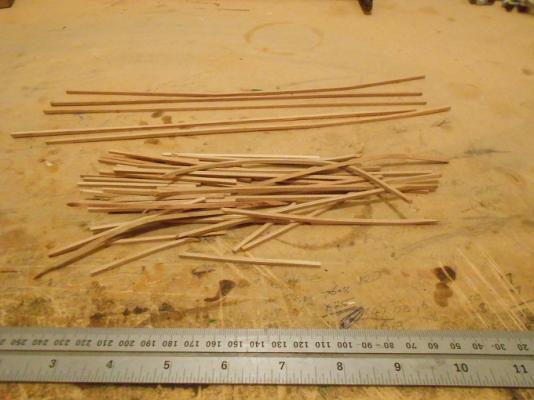
Just to muddy the waters regarding what material to use for the cant and 'tween frames, I have checked my boneyard ... ...and have discovered that I should have enough pieces of sufficient length to make these - but only just barely. Of course, some will need to be re-soaked to straighten them before re-bending to fit where they need to go on my Launch. Am I dumb enough to try this ... ??? Do you REALLY need to ask that question ??
- 625 replies
-
- 2
-
-
- bounty launch
- model shipways
- (and 1 more)
-
Good point, Keith. Now I really am leaning towards using the strips of Sapelli I have left over from a previous kit. There are at least three lengths of these - each approx 30inches in length. If I use them for the cant and 'tween frames, then I would stain the cherrywood frames in Walnut to match. The frames would all be brown. I had already decided to stain my planks using Old Baltic, which will give them a golden/yellowish hue much like yours. (As the football season is upon us again, this is a tempting idea for a Hawthorn supporter such as myself.) I'll have a re-read through your log to try to determine just how much I will need.
-
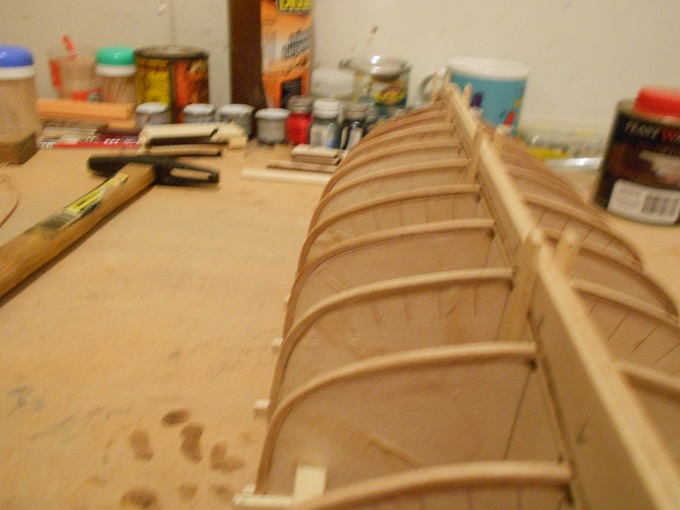
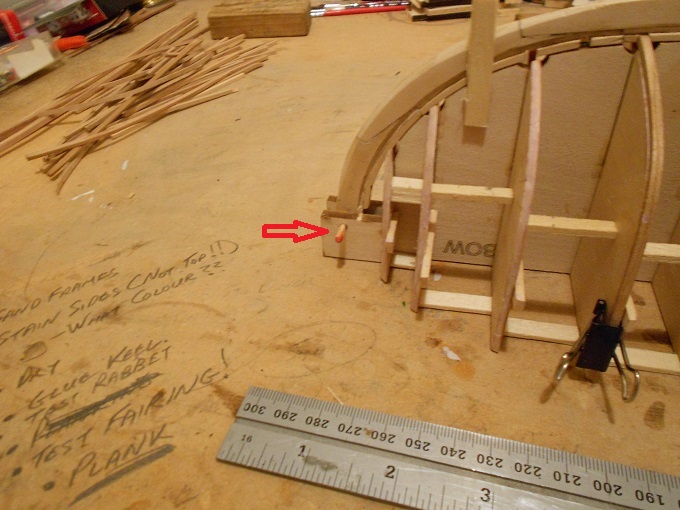
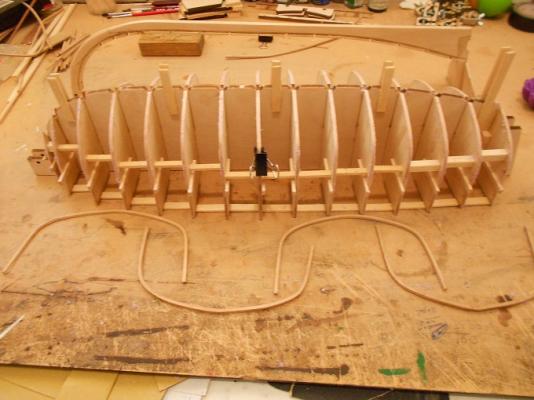
The battle of Cherrywood Framing was fought to a decisive end last eventide, with the Twelve finally being vanquished and bending to CaptainSteve's will. Twas a hard-fought battle, and many occasions came whence our hero didst strongly consider a Viking funeral: ('Tis a large match-stick which ye shouldst note was used to affixeth the stem piece to the bow alignment blocks.) As has been written by many of the heroes who have come a-fore, skeletons aplenty didst plague our brave adventurer. Indeed, so many of these undead beings haunt CaptainSteve's boneyard that he ponders whether or not enough material remains to battle the Cant and 'tween Frames which the Plans have prophesied. "'Twouldst be a close thing," he was heard to say, forlornly. As sucheth, our gallant hero is currently considering whether or not to form an alliance with strips of the Sapelli tree, salvaged from past battles. "Two millimetres in width, they are. In depth, they be the same. Of dark reddish-brown they be in hue." Were CaptainSteve to take this path, then 'twouldst be necessary to dye the fruit of the Cherrywood tree already affixed. Verily, he is most in favour of a Walnut dye, as the planking shalt be of Ye Olde Baltic. "Wouldst make a nice contrast, methinks," he declared. "What sayeth thee ??" he asked of the assembled horde.


- 625 replies
-
- 4
-
-
- bounty launch
- model shipways
- (and 1 more)
-
Very true, Keith ... especially considering that we've had a Queen for the last 50+ years. And thanks for the heads-up on the cherrywood and rope. Unfortunately a little late for me with the frame material (see below). EDIT: But useful advice for the rope, considering I will most likely be adding a bow-sprit.
-
Getting there, Alde ... slowly. Yours is looking very nice. Though I do hope you are wrong about the full-frame thing. I bet you were most satisfied to be able to pop it off the Jig.
- 625 replies
-
- 1
-
-
- bounty launch
- model shipways
- (and 1 more)
-
Arrgeth !! Ye cannot pleaseth all of the people (and their nephew's 5yr old daughters) all of the time !! As for the cherrywood, now that I'm paying more attention to the flow of the grain, it is becoming easier.
-
That's looking good, Alde. But I do hope you are wrong about the continuous frames causing the hull to bulge out. I removed a few frames from mine to re-do (as they didn't conform to the jig closely enough for my complete satisfaction) and, even though I am making full-frames, the overall U-shape held quite well. As my bone pile grows, I am starting to worry if I'll have enough cherrywood to do the cant and 'tween frames.
-
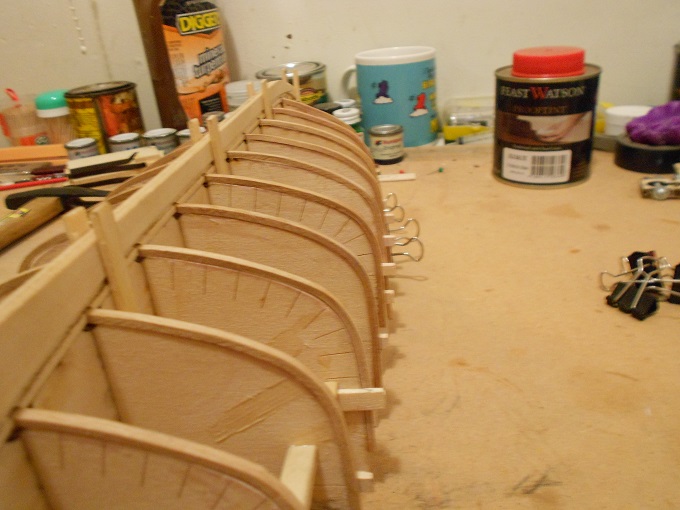
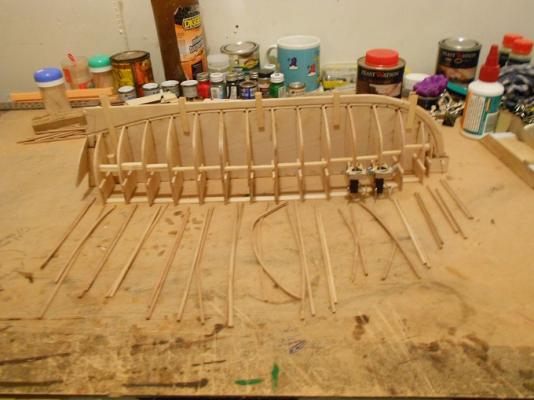
The battle of Cherrywood Framing continues to be fought valiantly by our hero. CaptainSteve hath this very day removed from his Building Jig all of the temporary tabs, as these tended to hinder and block his main weapon, namely the Fearsome Curling Iron of Wood-Bendery. Having studied extensively the battle-plans of the One known as Keith (formerly Amfibius - what happenedeth there ??), CaptainSteve feels that he now possesseth a better grasp of the ways of his foe, namely the Cherrywood Frames: "Tis most important," didst Sir Keith sayeth unto him, "that thou understandeth the Ways of the Grain!!" Indeedeth, armed with this highly potent knowledge of his foe's weakness, our hero has now conquered Six of the Twelve and can report that he is mostest happy with them. "But thy boneyard doth containeth already too many !!" he declared mournfully. Noteth that the foreground of the picture above doth contain four frames removed from a-fore. CaptainSteve continues to worketh with frames of 9inch, foregoing the claims of the One known as Bob The Builder that, verily, four and one-half of an inch shouldst be enough for any Man. (Or, indeedeth, Woman. Hath thou not read-eth the Kama Sutra, Bob ??) "These I have laid bare, for the standards of my fore-bears they didst not meet. I shall recycle them !!" And with this statement, he didst leap back into the Fray.
- 625 replies
-
- 3
-
-
- bounty launch
- model shipways
- (and 1 more)
-
Arrr ... I had a go at bending the frames on tonight and broke the first three before giving up in disgust and turning to you guys. I really didn't expect it was going to be this difficult !!! To this point, I have cut the strips provided in half, giving 12inch lengths, which have been soaking in water for more than 24 hours. I noticed straightaway that these would be too long, as the ends would protrude beyond the tops (bottom, when inverted to build) of the building jig. Thus, the cherrywood has now been cut back to 9 inch lengths (the 3-inch leftovers should work as cant frames). In despair, I went back over the other Bounty Launch build logs. In particular, I note Amfibius' method of applying a steam-iron as he bent his frames quite successfully around his jig. I am using a curling iron which I have had great success with in the past. I also note that Keith appears to have done away with the temporary tabs on his build. Already, I notice that these tabs seem to be more of a hindrance than a help. Currently, I am thinking of popping all my temporary tabs (which seemed like such a good idea at the time) and purchasing one of those tiny steam irons that travelling salesman-types carry with them on business trips. Further I noticed that the instructions suggest cutting the cherrywood pieces to lengths of approx 4.5 inches. In effect, this means the wise one (Bob "The Builder" Crane) is saying that two separate pieces would be used for each frame, obviously joining up underneath the keel. To me, this seems unnecessary, particularly given that mine were breaking not in the centre, but at the most severe turns where the underside becomes the sides of the boat (not sure of the correct terminology here, "bilge" perhaps.) I think I need to sleep on this one !!!
-
I'm in !!! I reckon you and your son will make this ship do Captain Jack proud. Arr ...
-
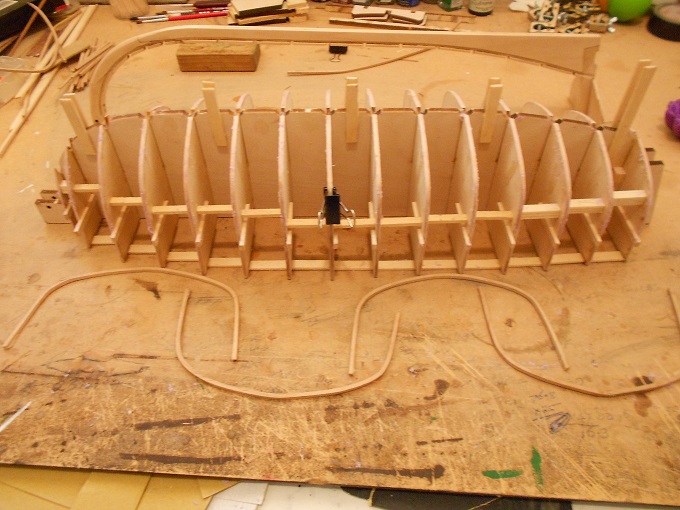
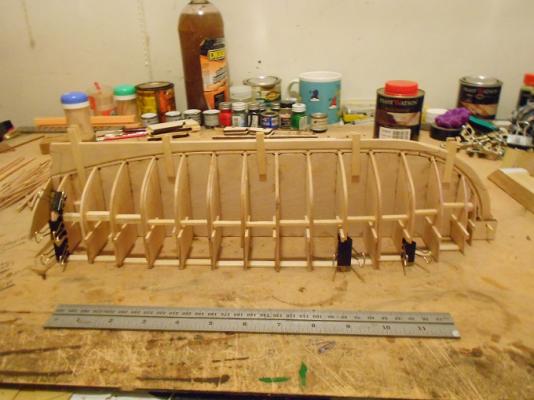
I'll certainly be leaving the sheer plank alignment tabs in place, and I understand what you guys mean by using these as anchor points. What I meant was that the temporary tabs that have been added to assist with frame positioning will have to go once planking begins. I guess that's why they are called "temporary" tabs. Quick update - with the addition of the transom last night, the Building Jig is now complete. I'm happy with it ... even if I do say so meself. (Not overly happy with MS' decision to stamp "TRANS" into this piece ... so I sanded it back a bit to the point where the word is no longer engraved into the transom, but it is still visible. I guess that paint/stain will take care of this problem much later.) On to the frames ....
-
OK. Thanks again, guys. Will definitely pay close attention when it's planking time.
-
Love that one, MuzzleLoader ... Especially useful considering I'll soon be adding tree-nails to my Bounty Launch ... and I specifically wanted something darker in colour so they will show up against the planking.
-
Thanks for the heads-up, Alde .... Although, I'd always expected they'd be removed when it comes time to plank. Won't they be in the way ??
-
Tom, I've been following every update on your build to date. That's some excellent framing you've done. I'm certain I'll be looking back many, many times in the months to follow when I (finally) get around to doing mine.
-
Alde, You've made some real progress there. To be honest with ya, I can see the bumps a little. And, yeah, I get that you'd probably like to get her looking smoother. Other than echoing what Keith says above, if you find than certain parts are becoming a little too thin and you are concerned about holes appearing from sanding too much, then, just maybe you might consider the post I added here a page back. It will mean more work and MORE sanding, but hopefully you'll end up with your hull looking the way you would like it to.
-
Slog, They look really good ... but, I gotta say, it does seem like you've gone to an extreme amount of work just to be able to shoot down mosquitoes !!! There are sprays for those suckers, nowadays.
-
Hmmm ... both of you are correct. The difference in my case is that I had already done the bevelling. As it turns out, no damage will be done, as I have just finished removing ALL the sheer alignment tabs (using just water and a razor knife). I am just about to begin re-attaching these to the CORRECT sides. ADDENDUM: Done and fixed !! Once the glue is dried, I'll reapply a little wax.
- 625 replies
-
- 1
-
-
- bounty launch
- model shipways
- (and 1 more)
-
Arrrrrrrrrrrrr … This morning, CaptainSteve be NOT a happy pirate !! Arising early to begin putting together my Building Jig, I have just discovered what a truly funny and hilarious man is Bob Crane (Model Shipways kit designer). Look, I had read ahead in the Plans accompanying this kit. I consider this to be important particularly when building the hulls of a kit in order to grasp the concepts needed to ensure that I end up with a properly ship-shaped ship (or boat, in this case). And I had noticed the section Assembling the Building Jig (pg 8) which states “… that the sheer tabs from mold 9 through 15 are on the forward side of the molds and from 8 through 1 are on the aft sides of the molds.” In hindsight, perhaps I should have thought this point thru a little better. But, on previous POB kits which I have done, I have always reversed the second half of the bulkheads. Primarily, this allowed me to take advantage of the natural fault of laser-cut pieces which will have a slight angle to them. And so, when reading the above point regarding Assembling, I simply took it to mean exactly this. Indeed, I had taken this into consideration when bevelling Moulds 9 thru 15 and had followed the Bevelling Marks accordingly. But, No !! It would appear that Bob, with his stunning sense of humour (and, indeed, as per the relevant picture on Plan Sheet 2, which I admit I hadn’t considered) intended for all of the sheer tabs to be placed on the OTHER side of each of the mould formers. And this is in spite of placing the Alignment markings for sheer tab placement (AND the Bevelling marks) on the forward side of each of these pieces. In addition, Photo 3 on pg 7 shows clearly these tabs being placed on the side where these alignment/bevelling markings are located. Chortle Chortle Guffaw. Oh, Bob, you crack me up !!! I am currently wondering if I should tell Bob what I think of him, or, indeed, if I should inform him that, at one point in my life, I used to be a Martial Arts instructor (albeit many, many moons ago) … Or, perhaps, I should save THAT little detail as a surprise for when I turn up at Model Shipways door-step to thank him personally for his little joke !! Of course, none of this would have mattered had I left the bevelling until later on. But I just figured that it would be easier to do while the formers were lying flat. I guess that I am just going to have to proceed as I had intended and take particular care when it comes time to attach my Sheer Planks – and, perhaps, make some minor adjustments at that point. ADDENDUM: I've just had a re-check through the logs of others here on MSW who are building/have built this kit. With the exception of Amfibius, nobody else fell into Bob's little trap. Fortunately, I note that it does not appear to have made any difference to Keith's build whatsoever !!
- 625 replies
-
- 2
-
-
- bounty launch
- model shipways
- (and 1 more)
-
SOS, When recently making the boats for my USS Constitution, I soaked a piece of cloth in tea for several hours and then left it to hang outside for almost a week. The colour came out quite good, but there was less of a streaking effect than I would have liked. However, as my sails were also rolled, this did not really concern me too much. Might I suggest trying a mix of very strong black coffee ?? Also, as Wefalck mentions, be mindful of the thickness of cloth which you use. I chose a piece of white cloth cut from a child's dress. Finally, cut back on the amount of cloth you use. Your piece should only be approx 1/4 to 1/3 of the actual sail area. Here's a link to where I was making my sails. Hoping this helps you with your excellent boat !!