.jpg.f26acc9a74319261612561bfa7da1303.jpg)
vaddoc
-
Posts
1,605 -
Joined
-
Last visited
Content Type
Profiles
Forums
Gallery
Events
Everything posted by vaddoc
-
.thumb.jpg.6fd4c1b78768bb3efd745ab810936005.jpg)
A question about glue.
vaddoc replied to danbloch's topic in Building, Framing, Planking and plating a ships hull and deck
I think Jaager's post summarises things well, although I use epoxy a lot for laminating wood. For this task contact cement does not look too appropriate. For wood-wood you can't really go wrong with PVA. Yellow (aliphatic) PVA has very short opening time, white gives you more time to adjust the pieces. However, if you coat a large surface of thin wood with PVA it will absorb the moisture and buckle (does not happen that much with plywood). To avoid this you can wet the opposite surface. -
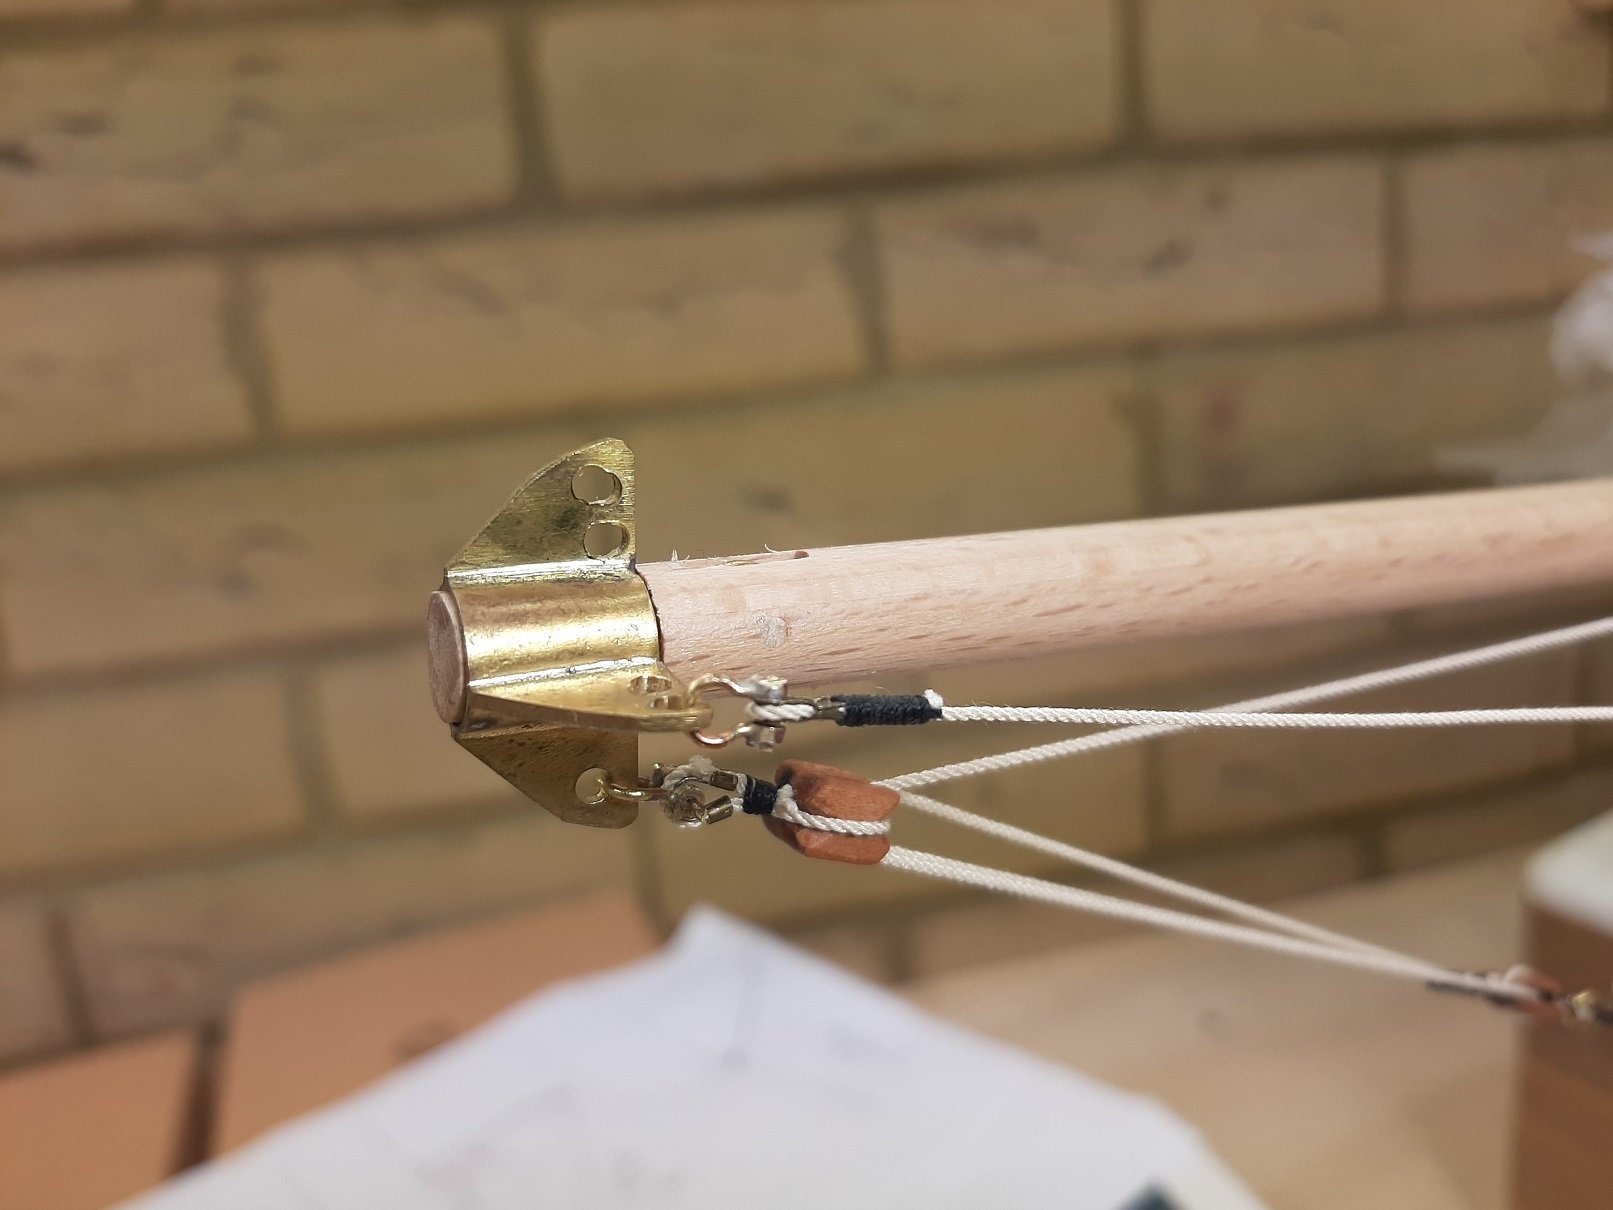
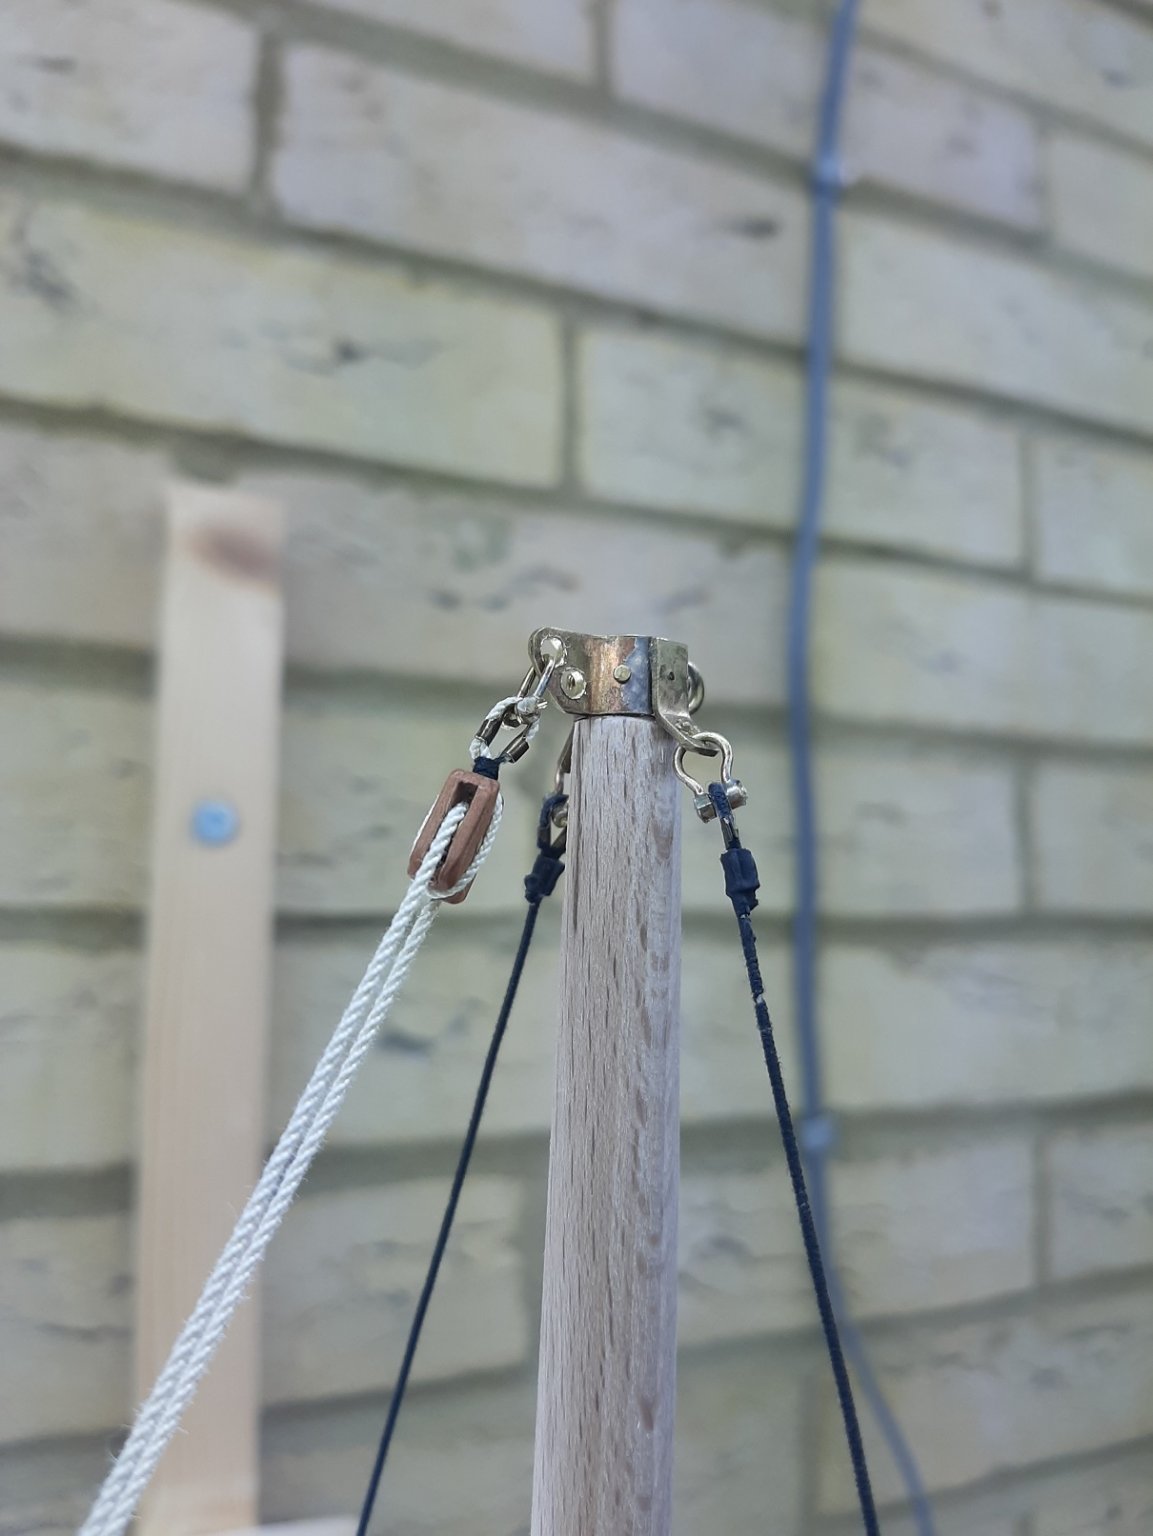
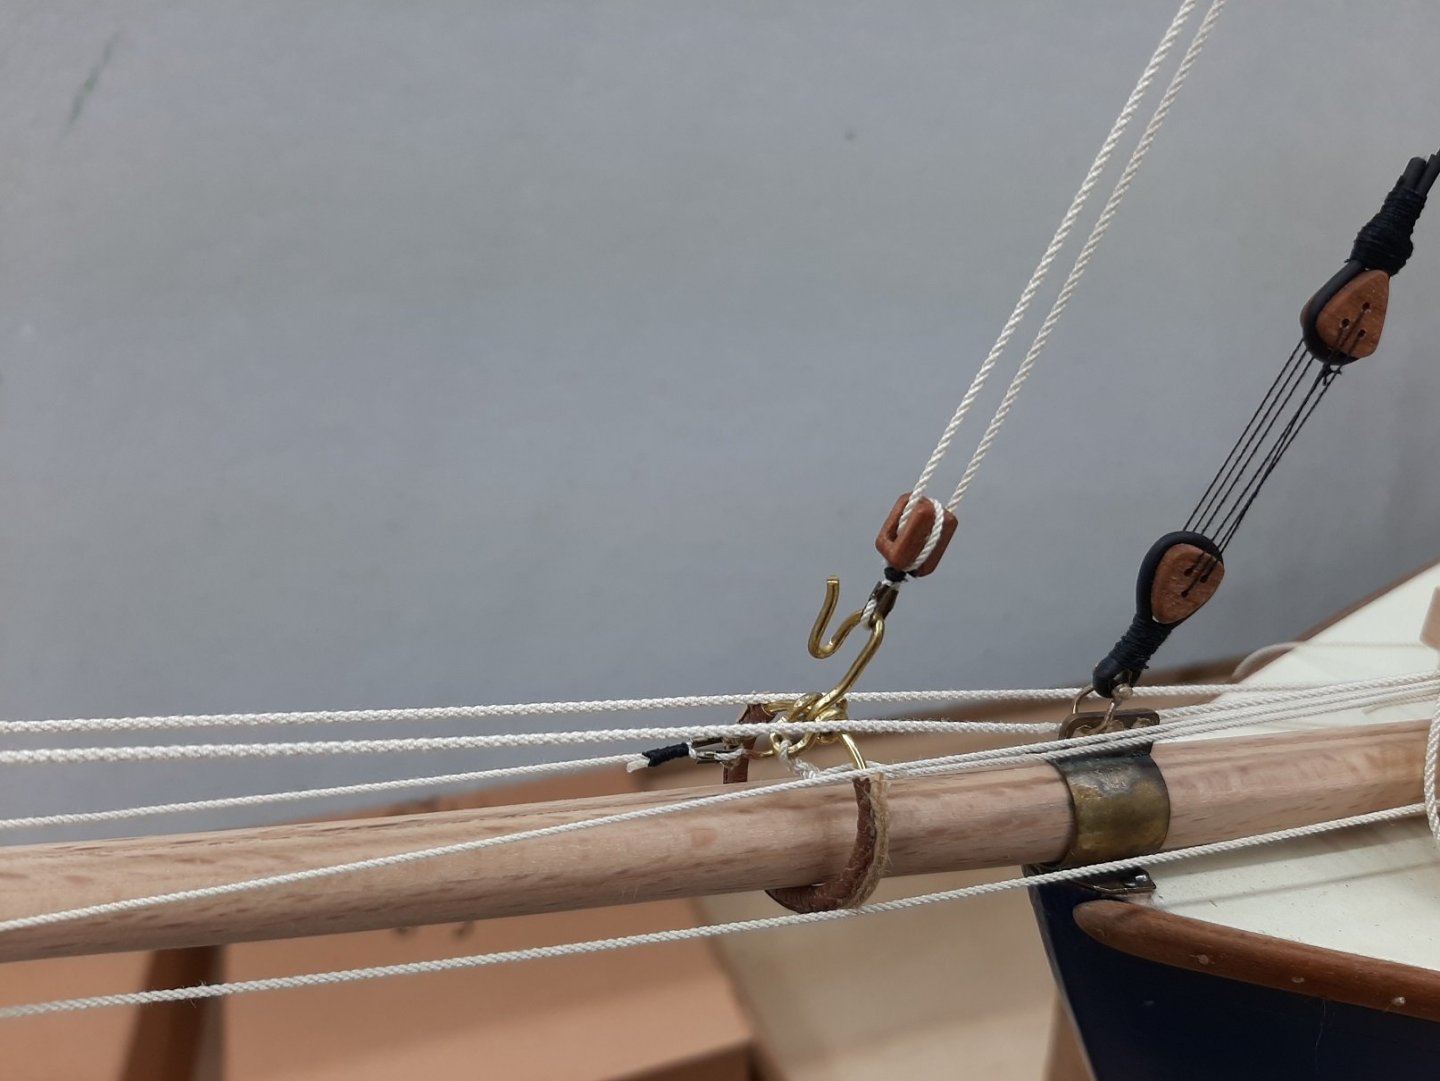
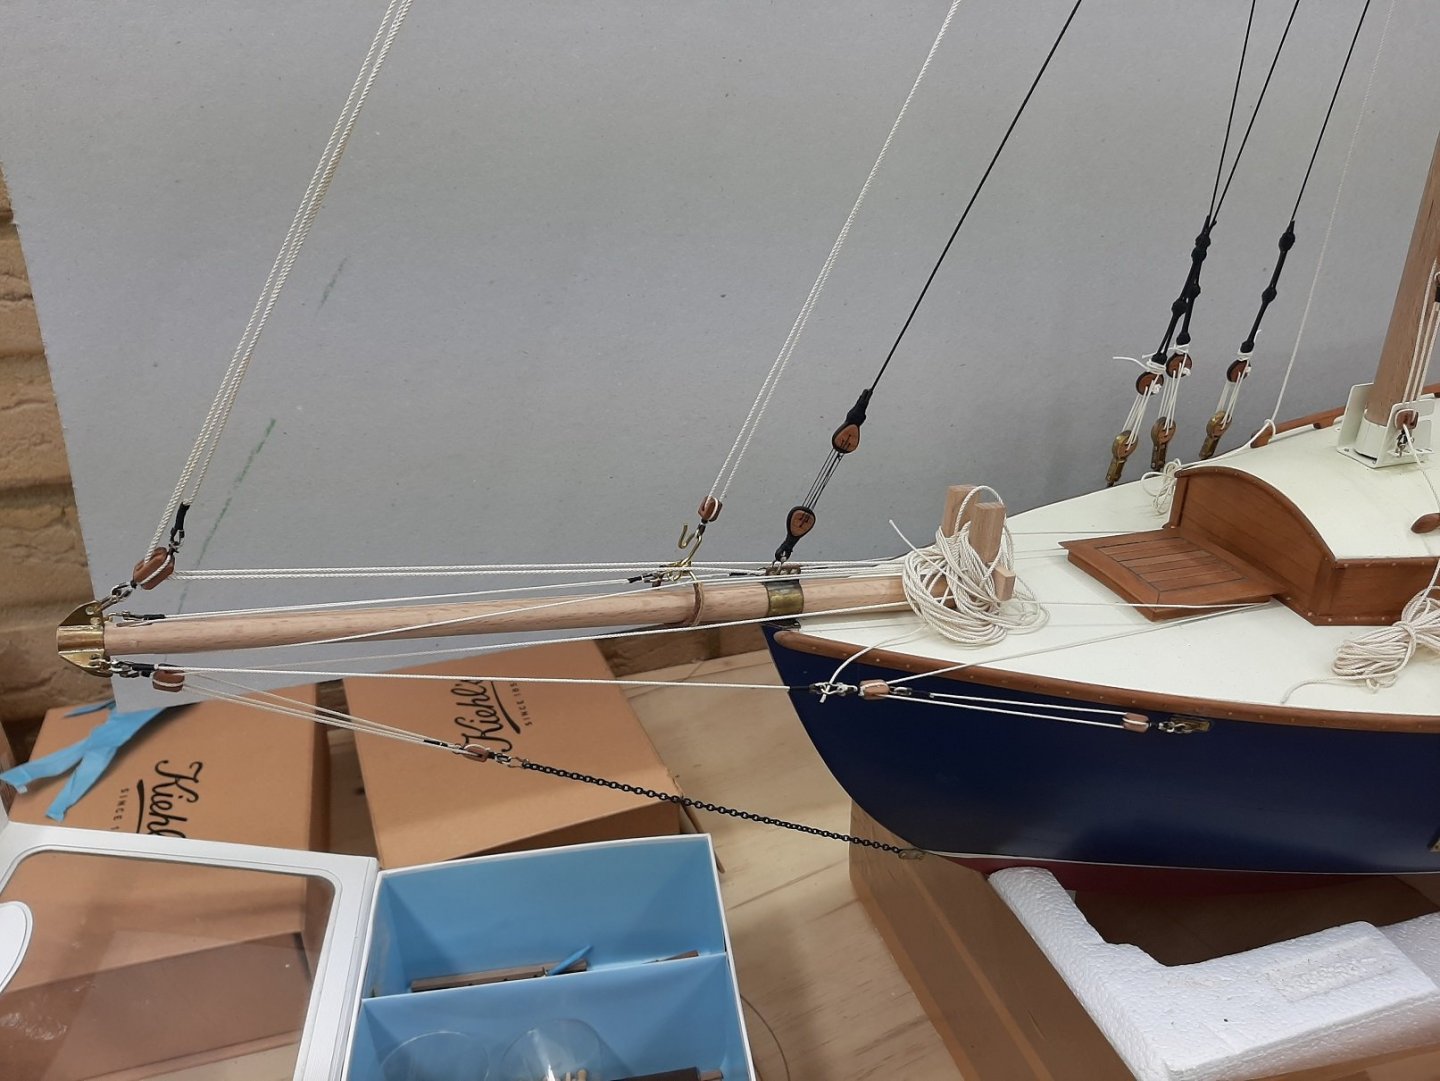
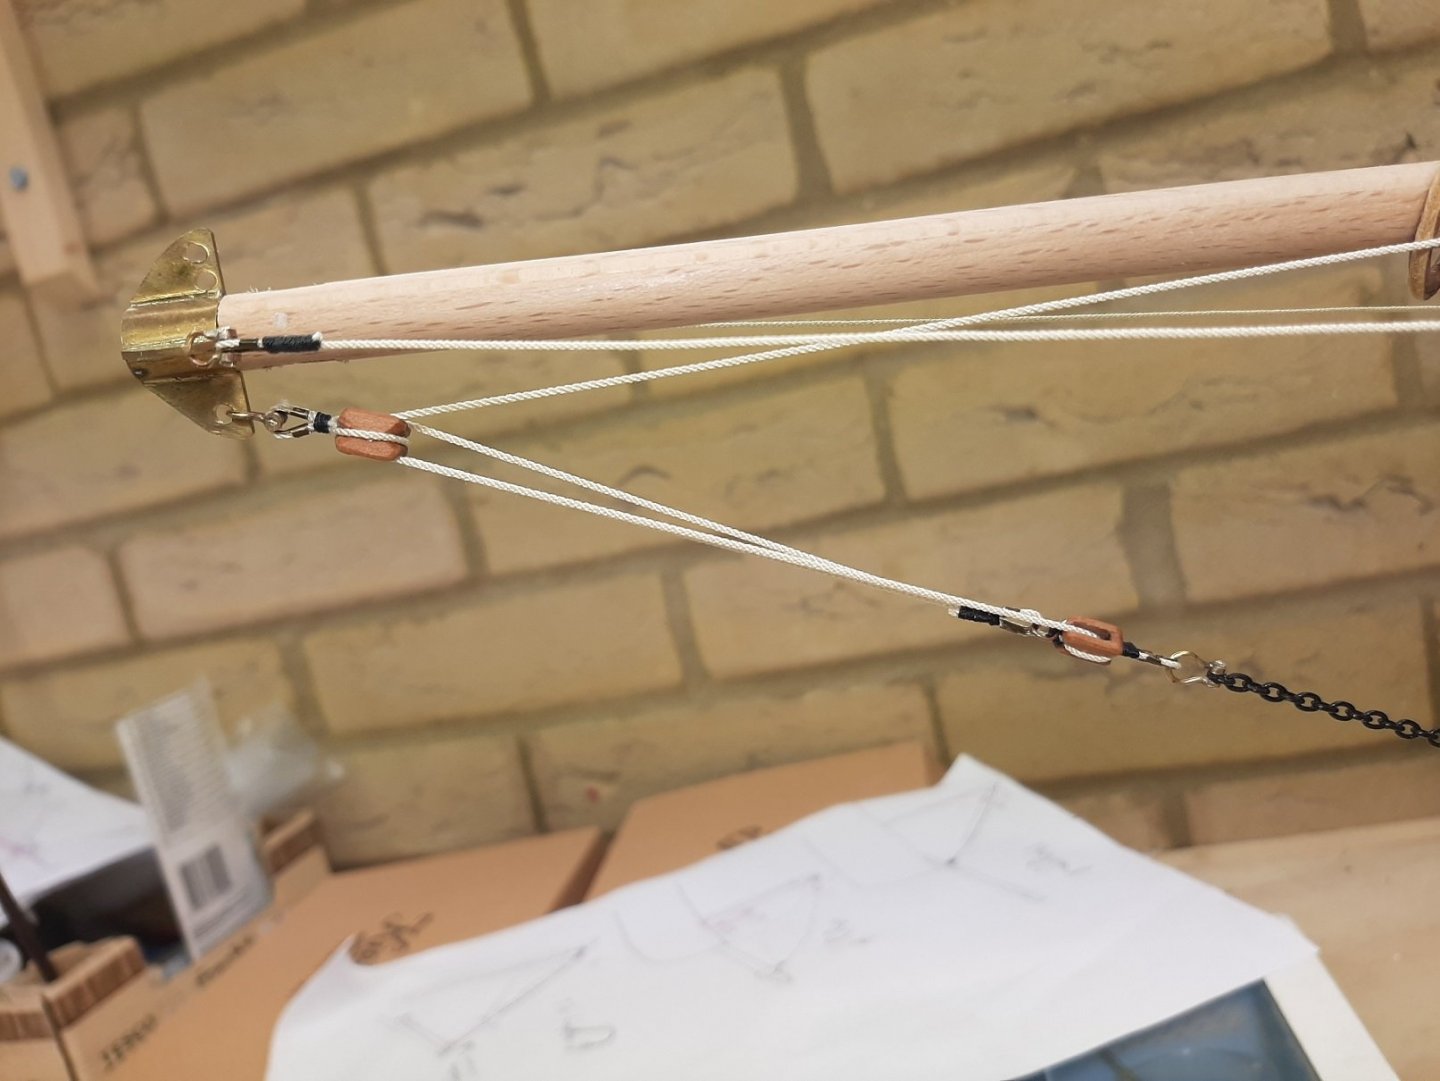
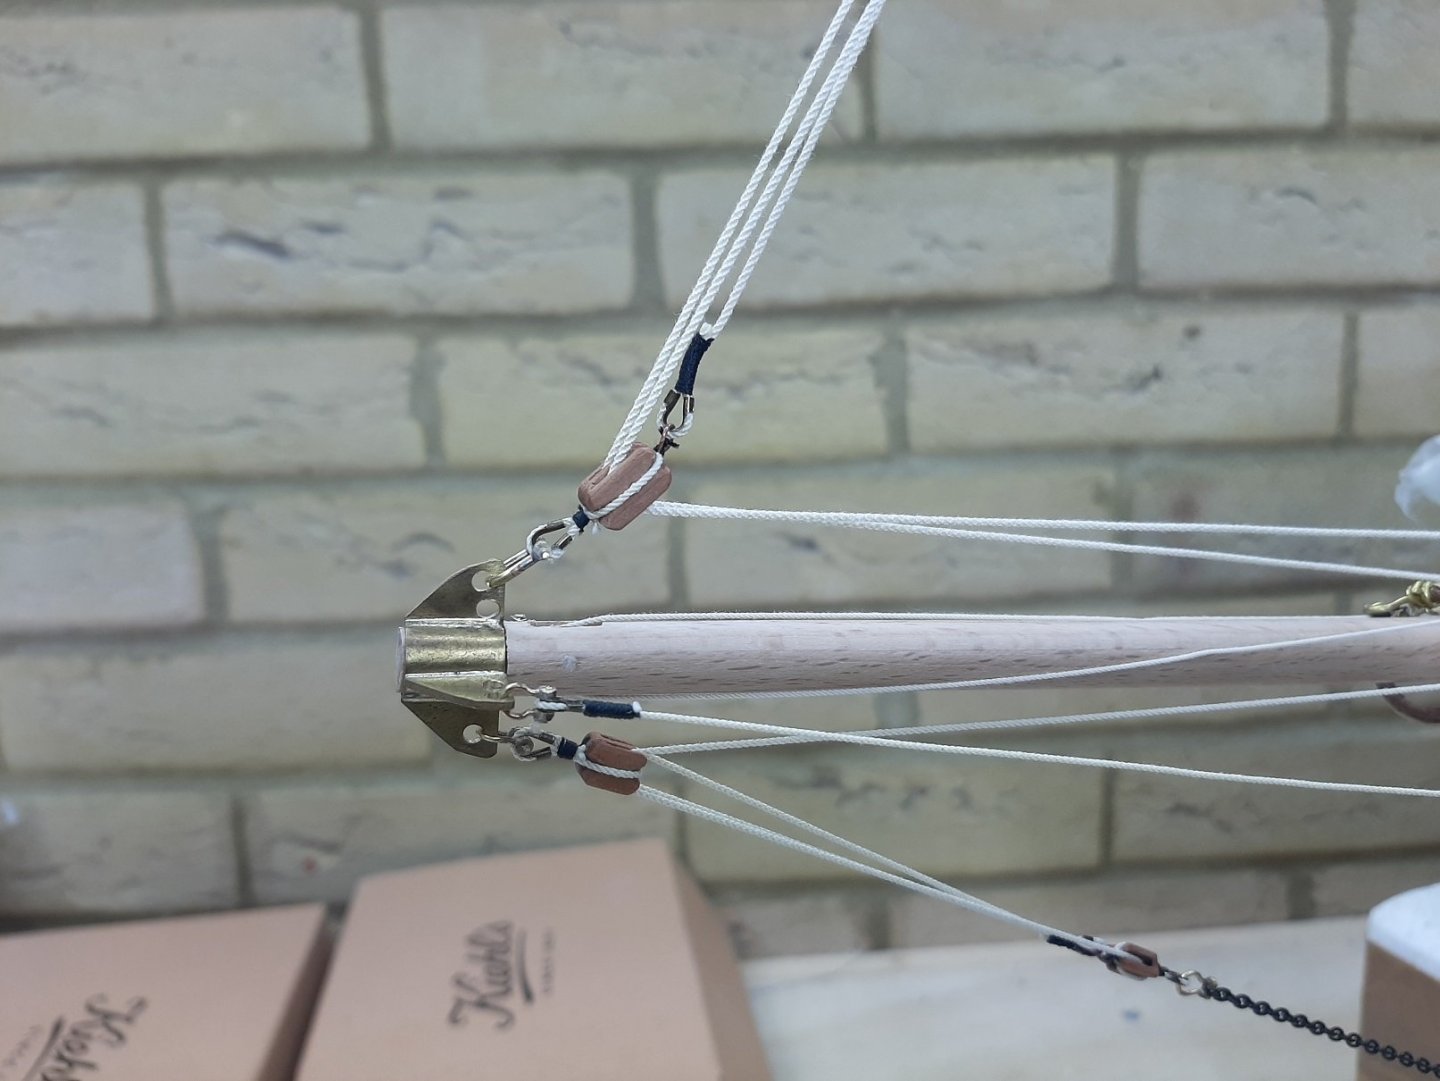
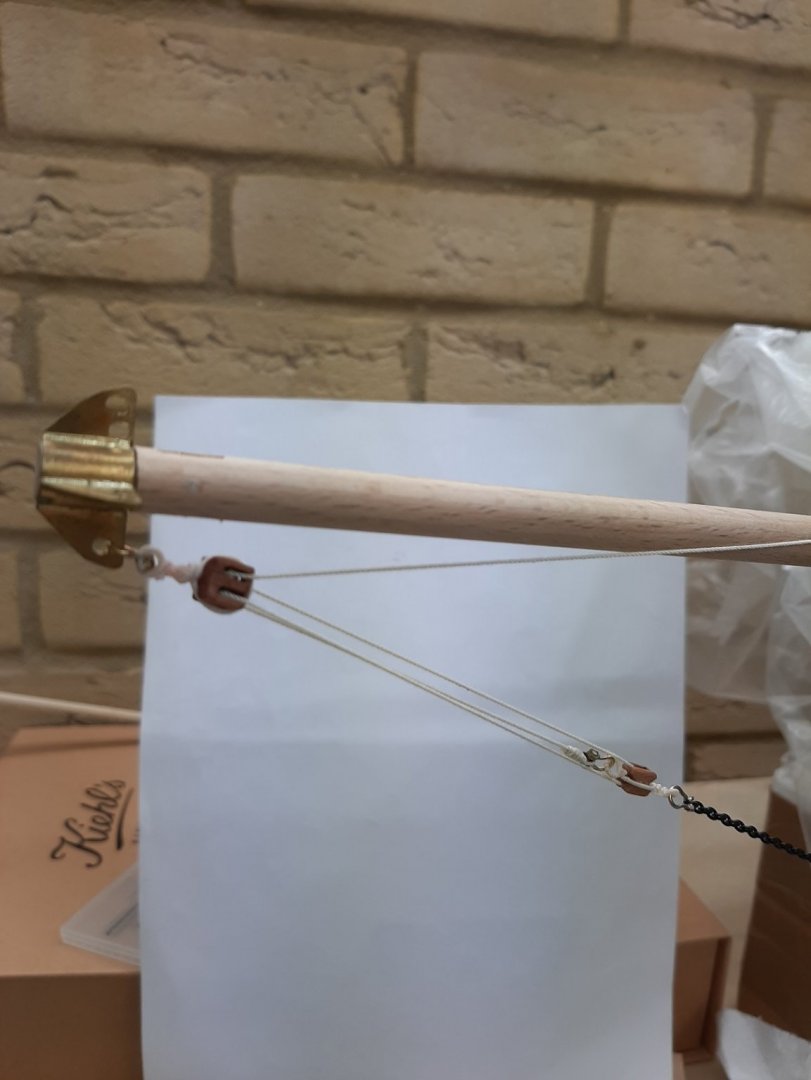
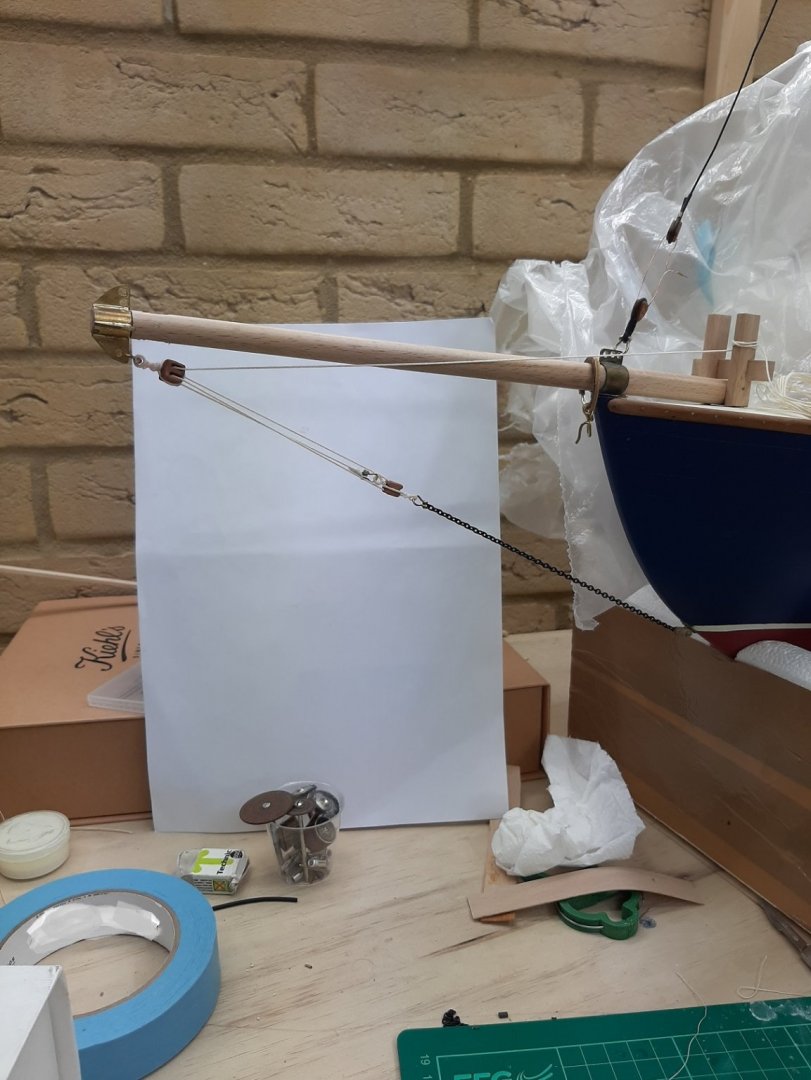
Many thanks Keith, indeed the plan is for full sails. The rigging is actually quite beefy and potentially could take a lot of tension. The shackles are also strong. There are 2 weak areas though that might give in. One is the cranse iron that took too many bumps and is just nailed (ca glue on the nails). The other is the backstays, I did not take into account that they would need to actually take some serious load so they are not as strong as i would like. The pull of the main sail should take some of the load off. However, it will mostly have the sails furled. Due to the functional blocks, hoisting sails is easy. Hopefully not long before we find out!
-
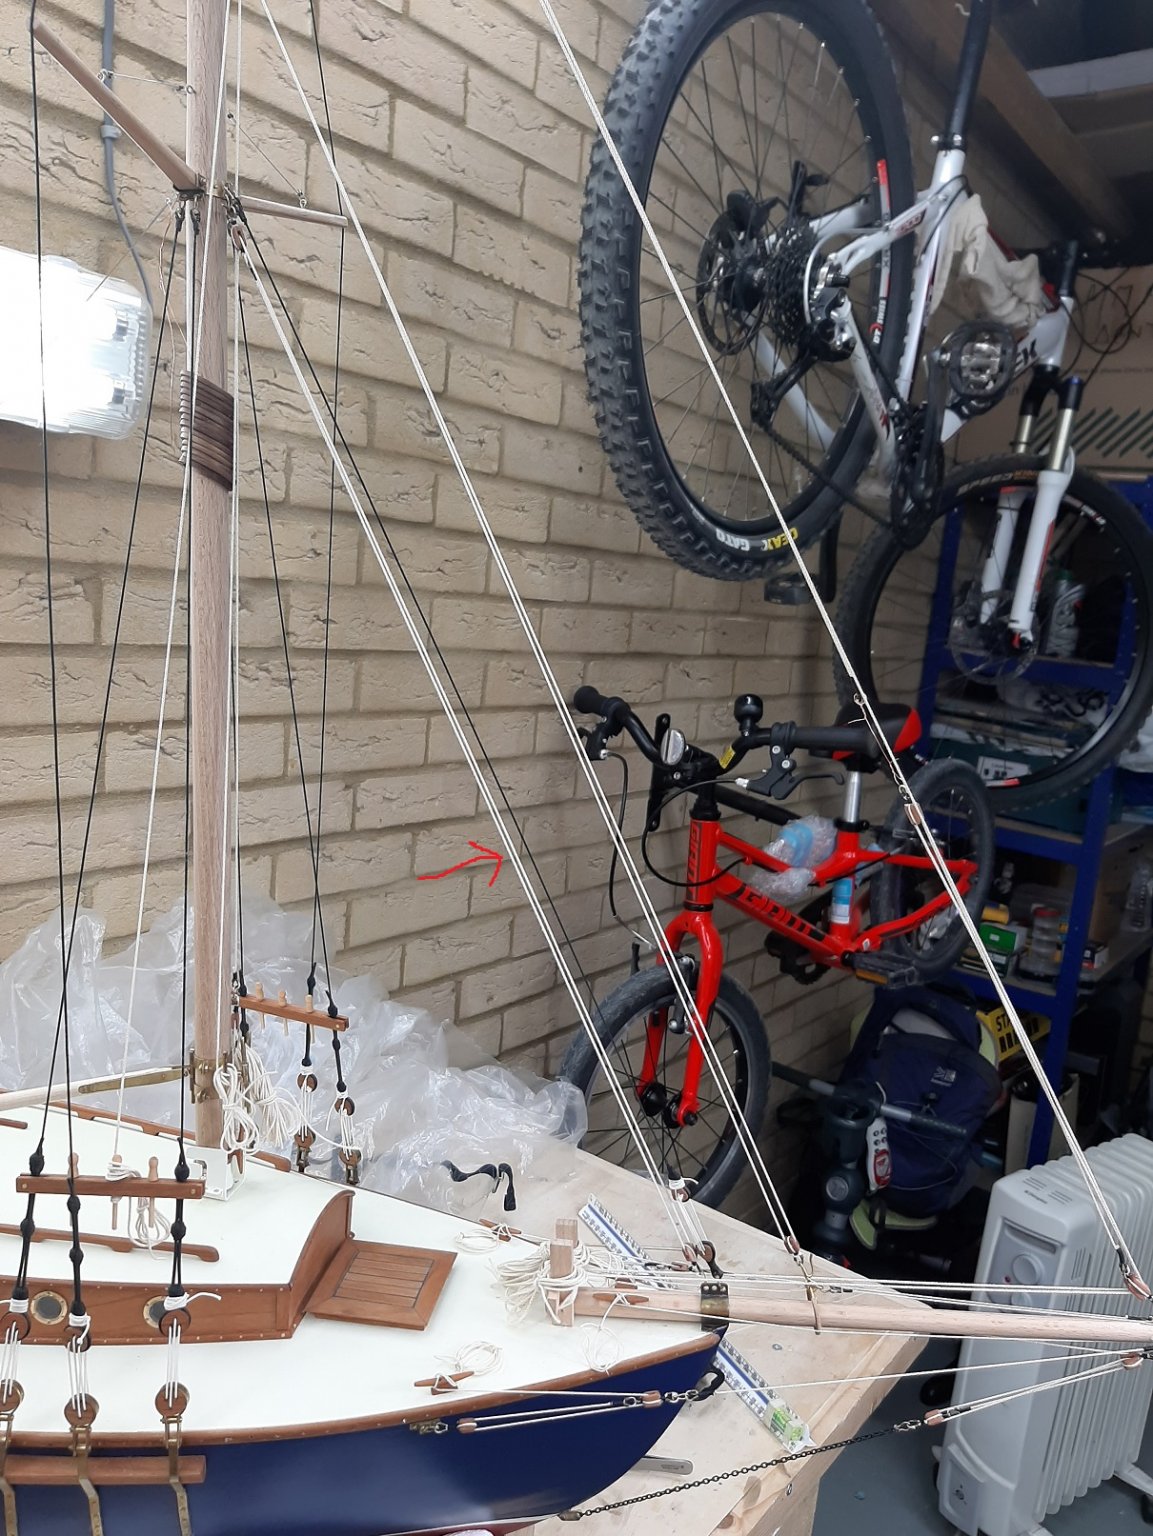
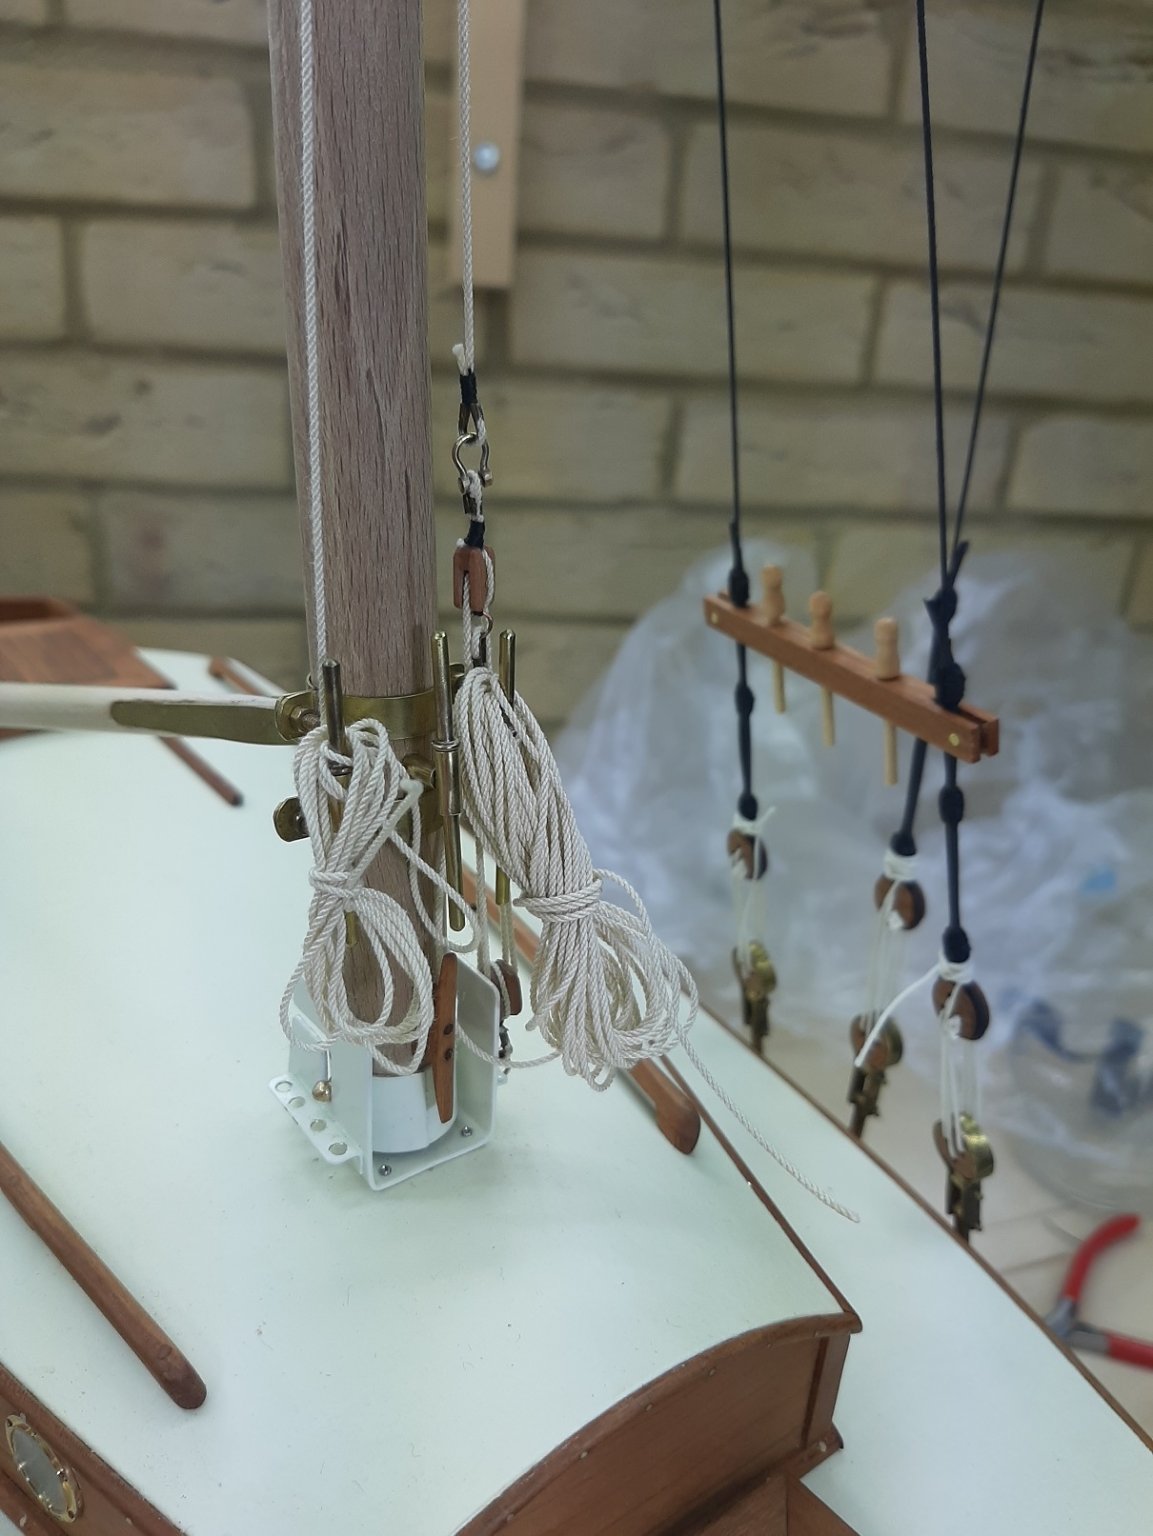
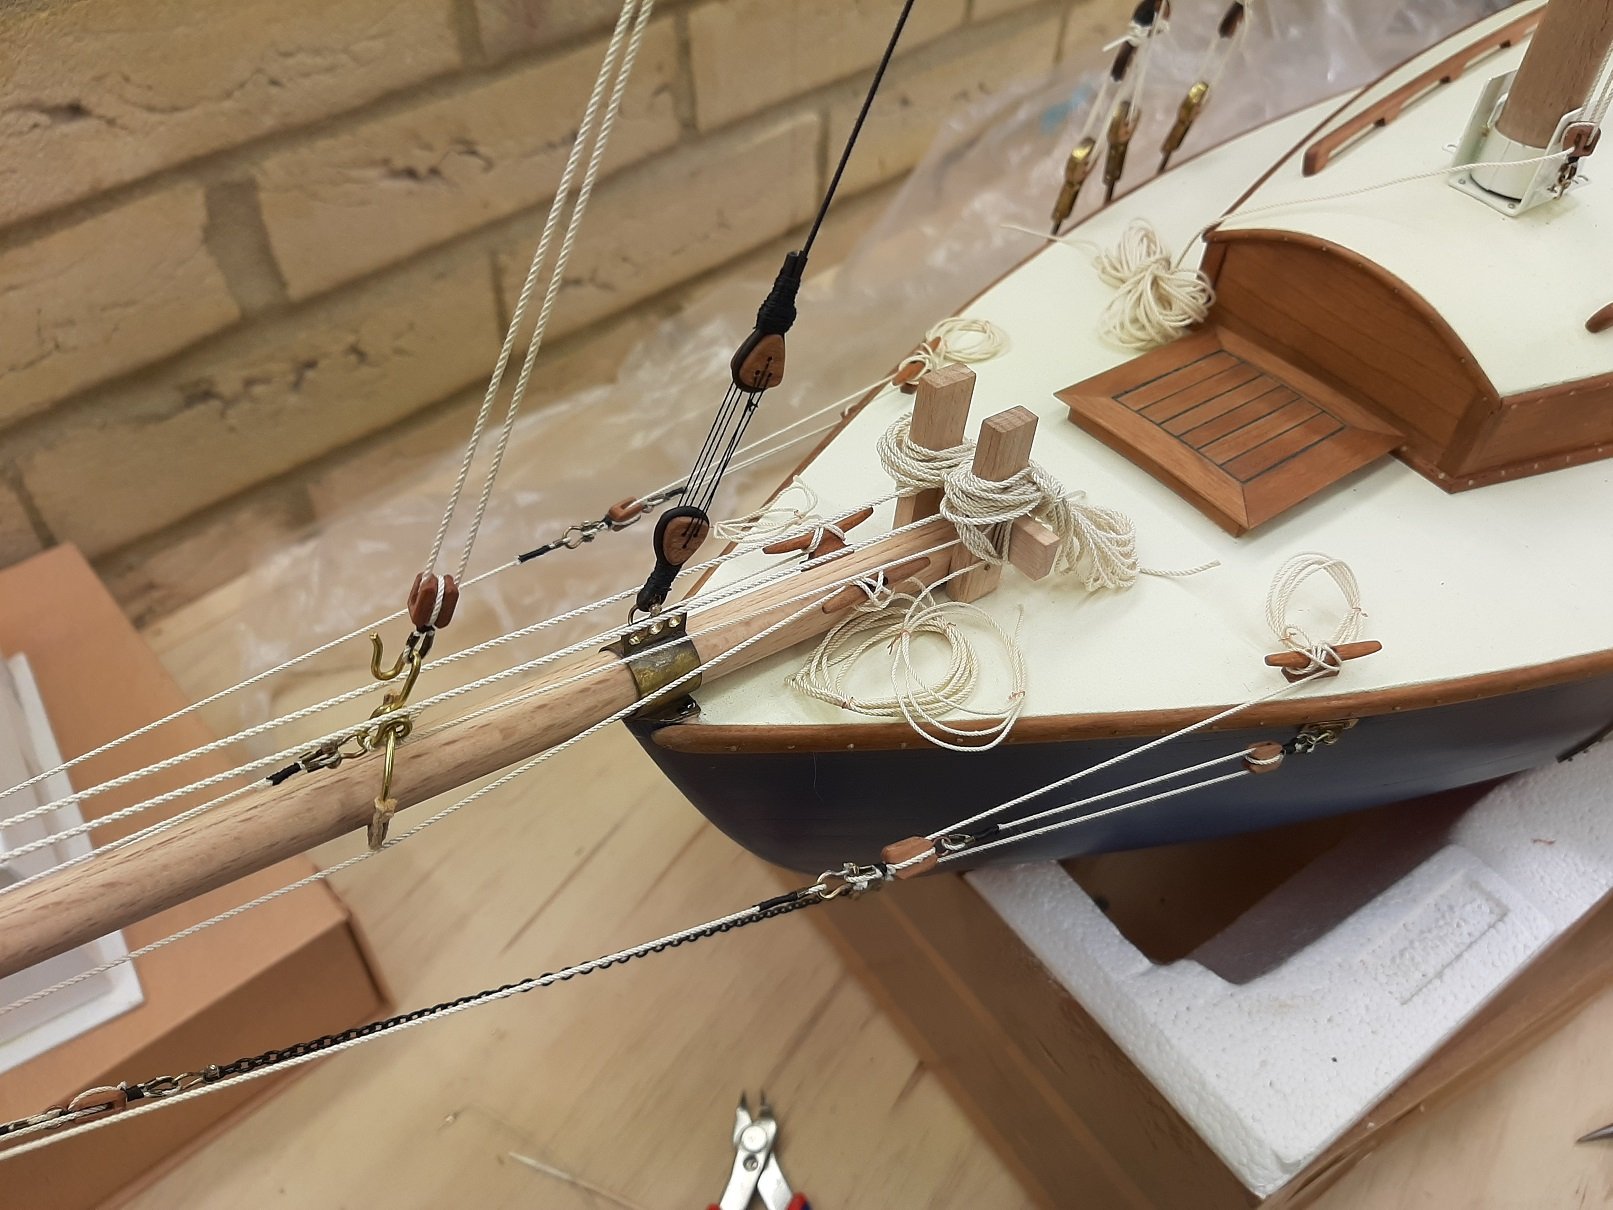
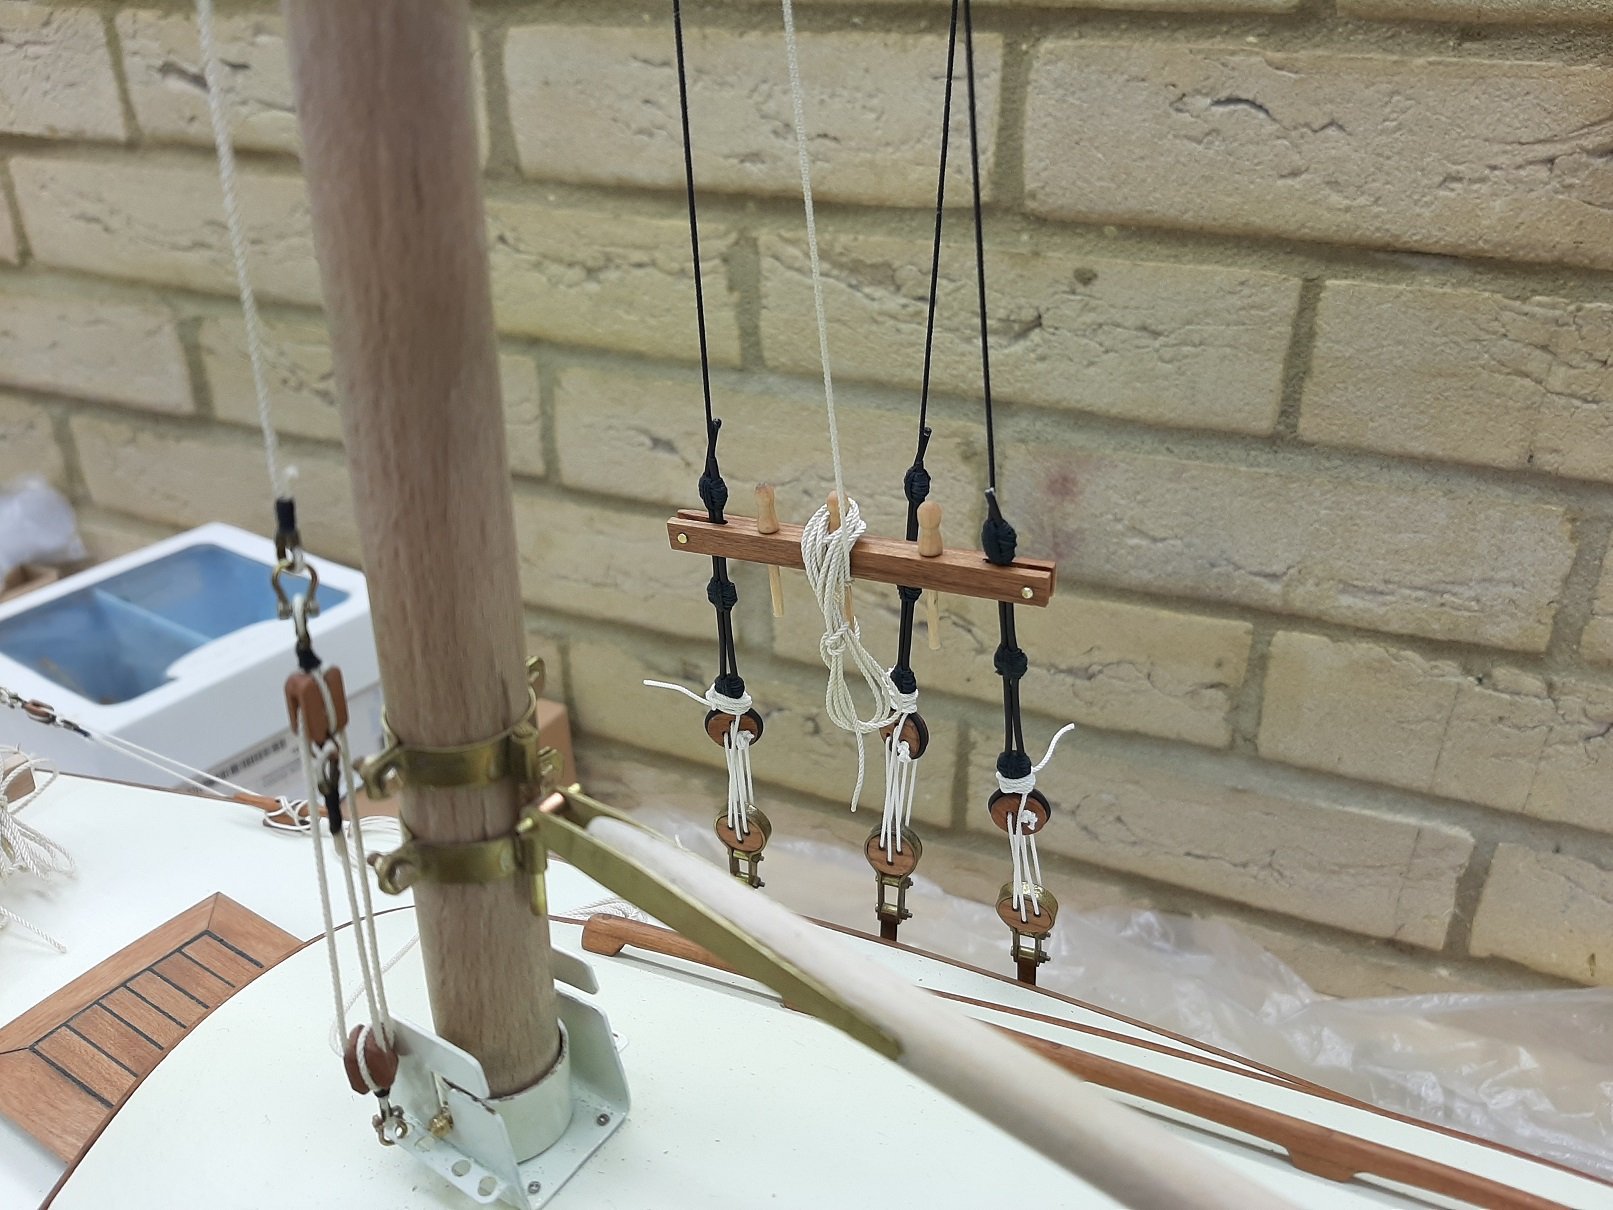
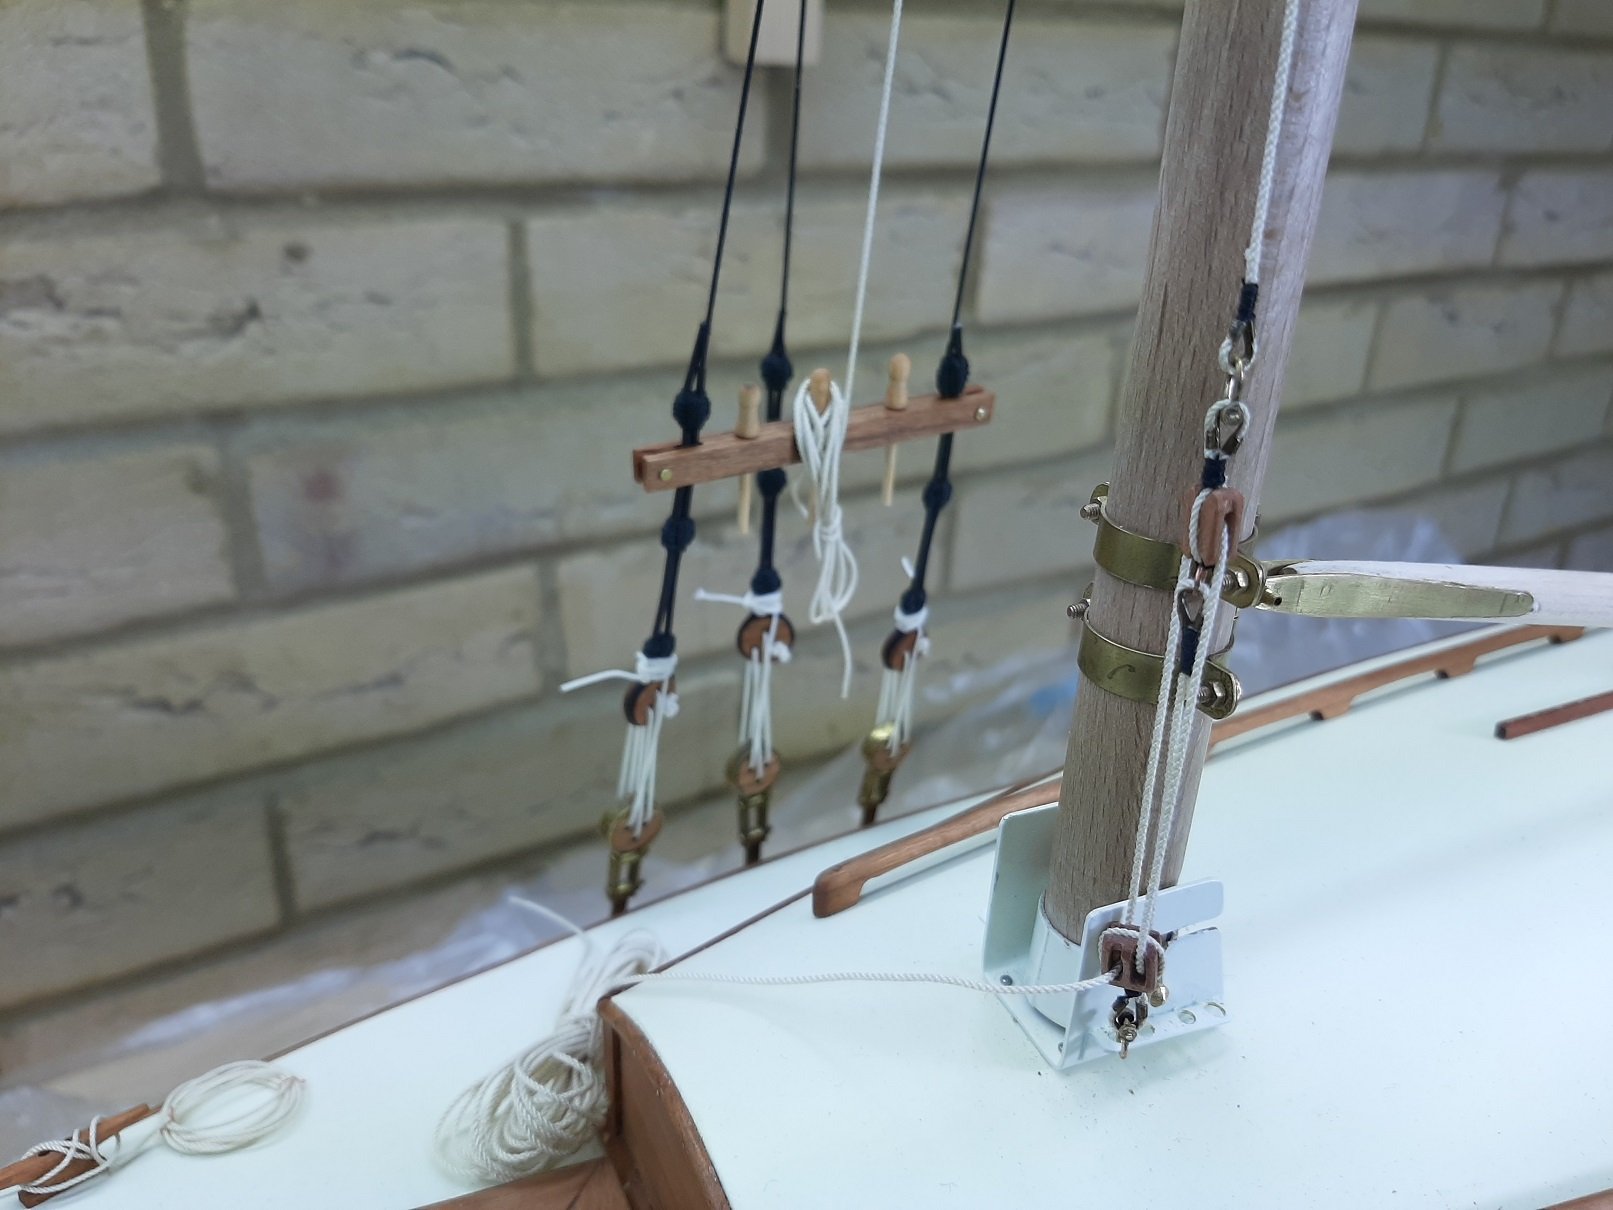
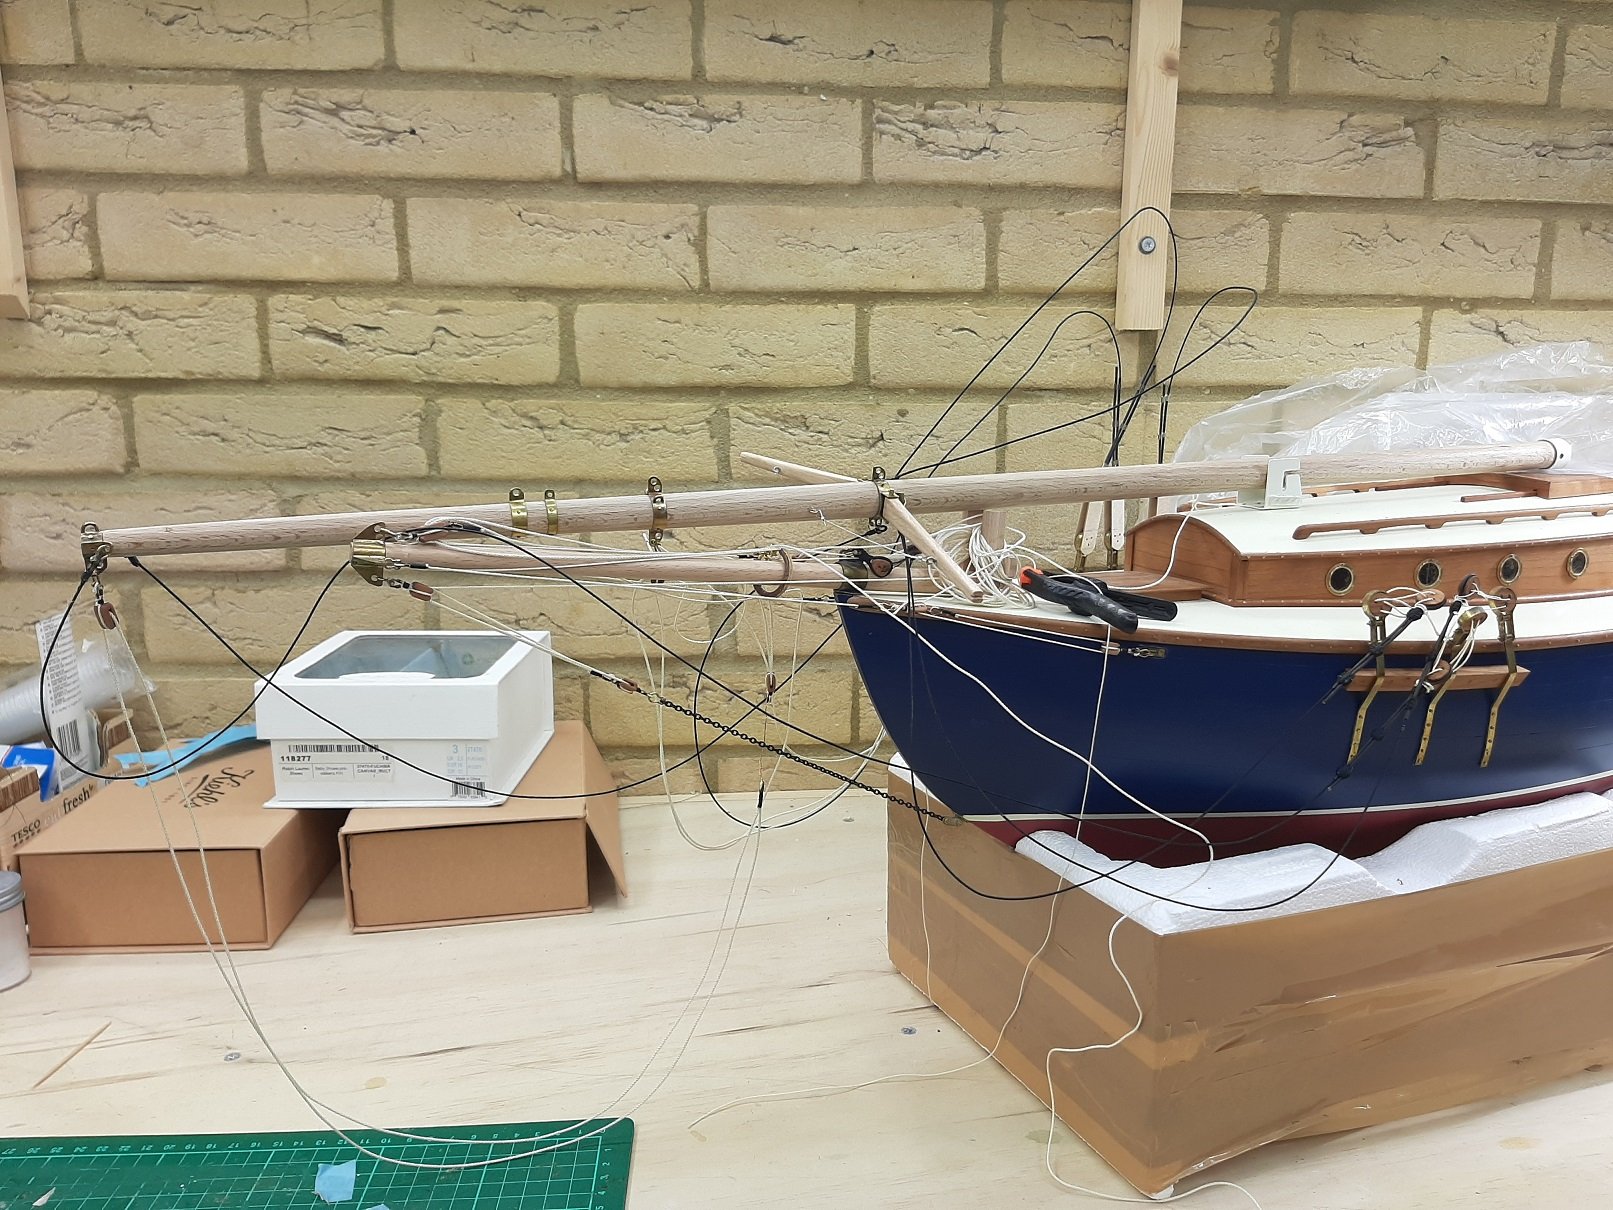
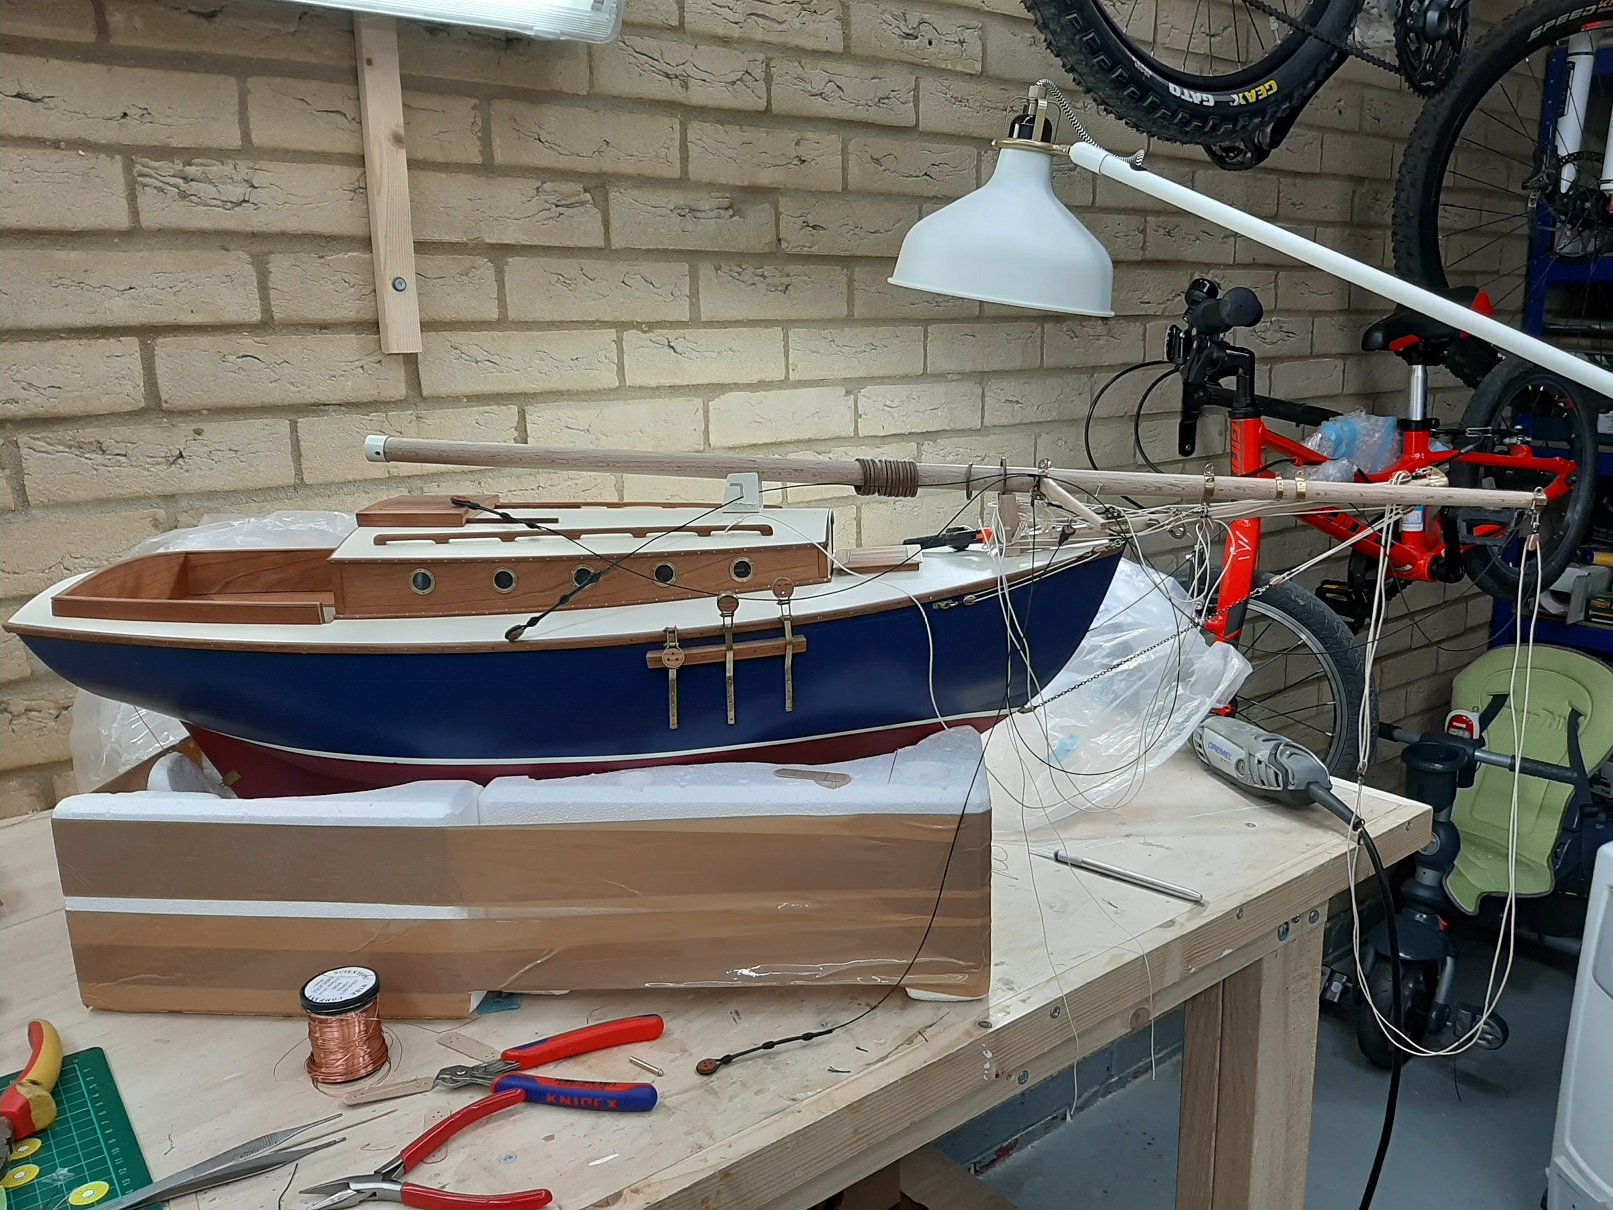
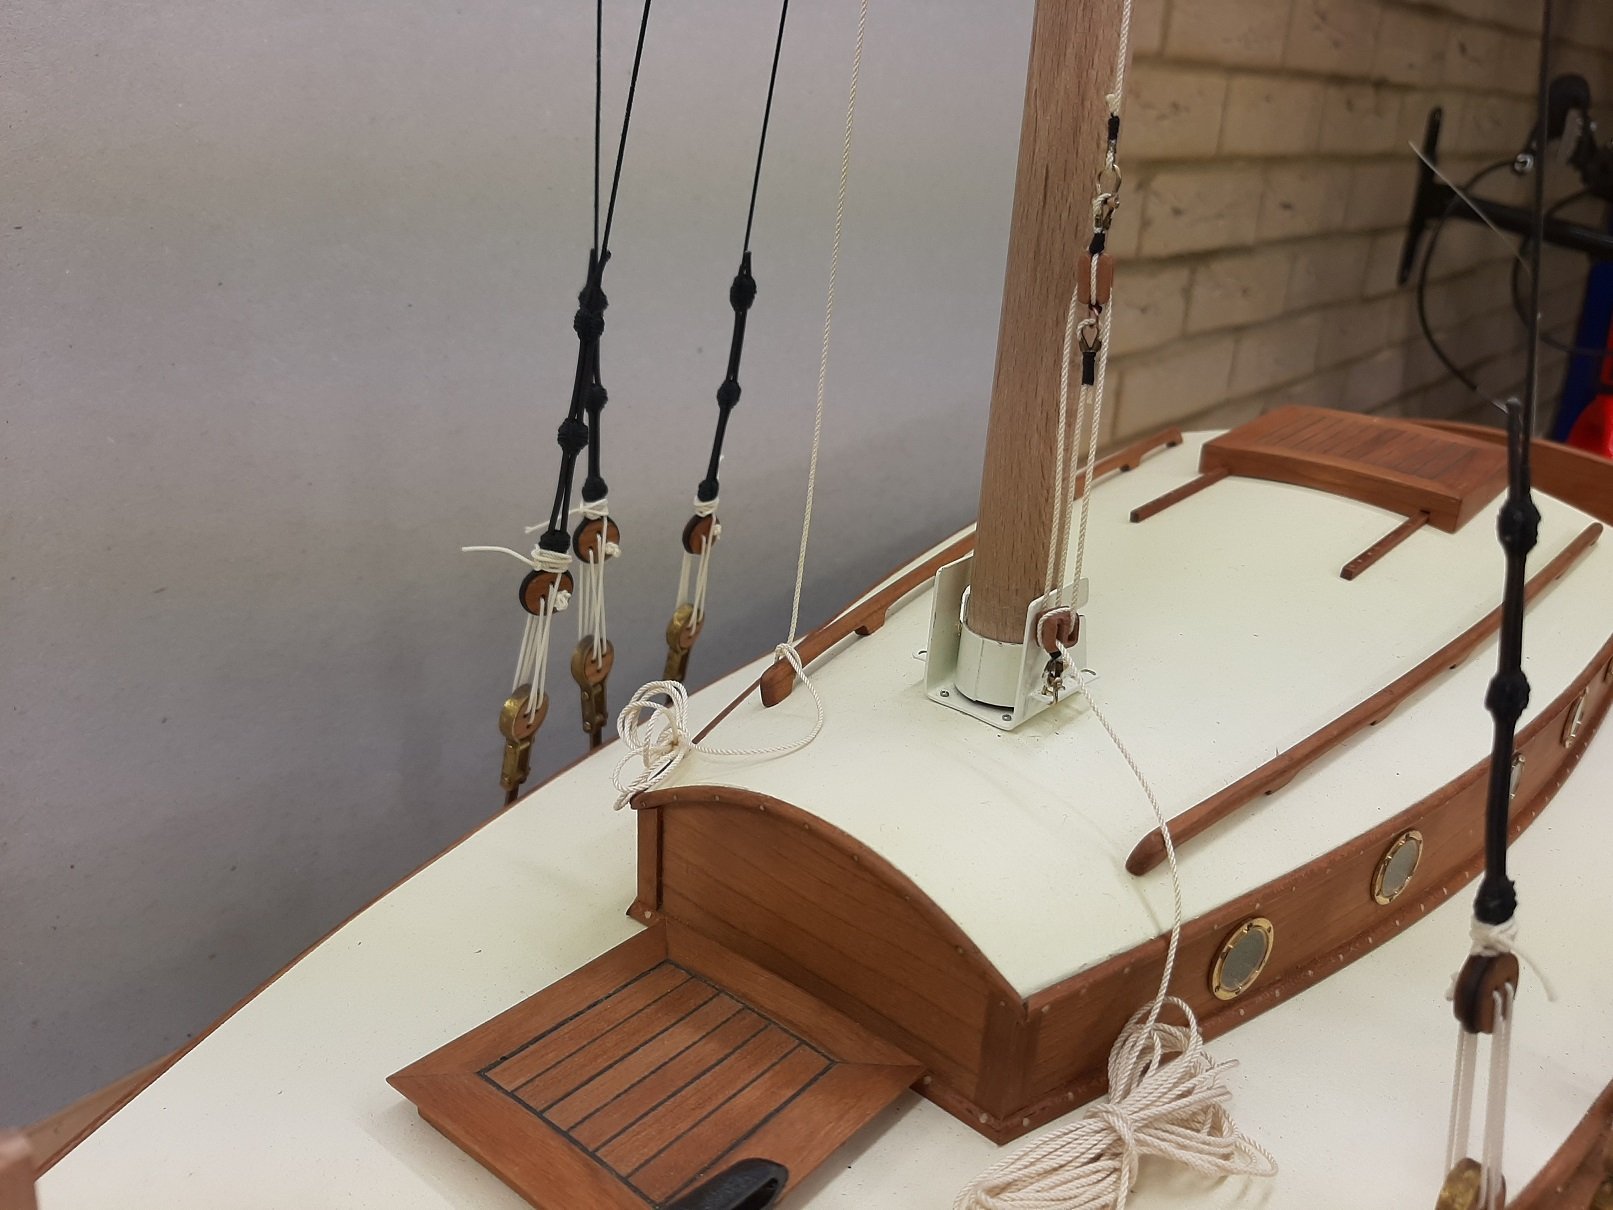
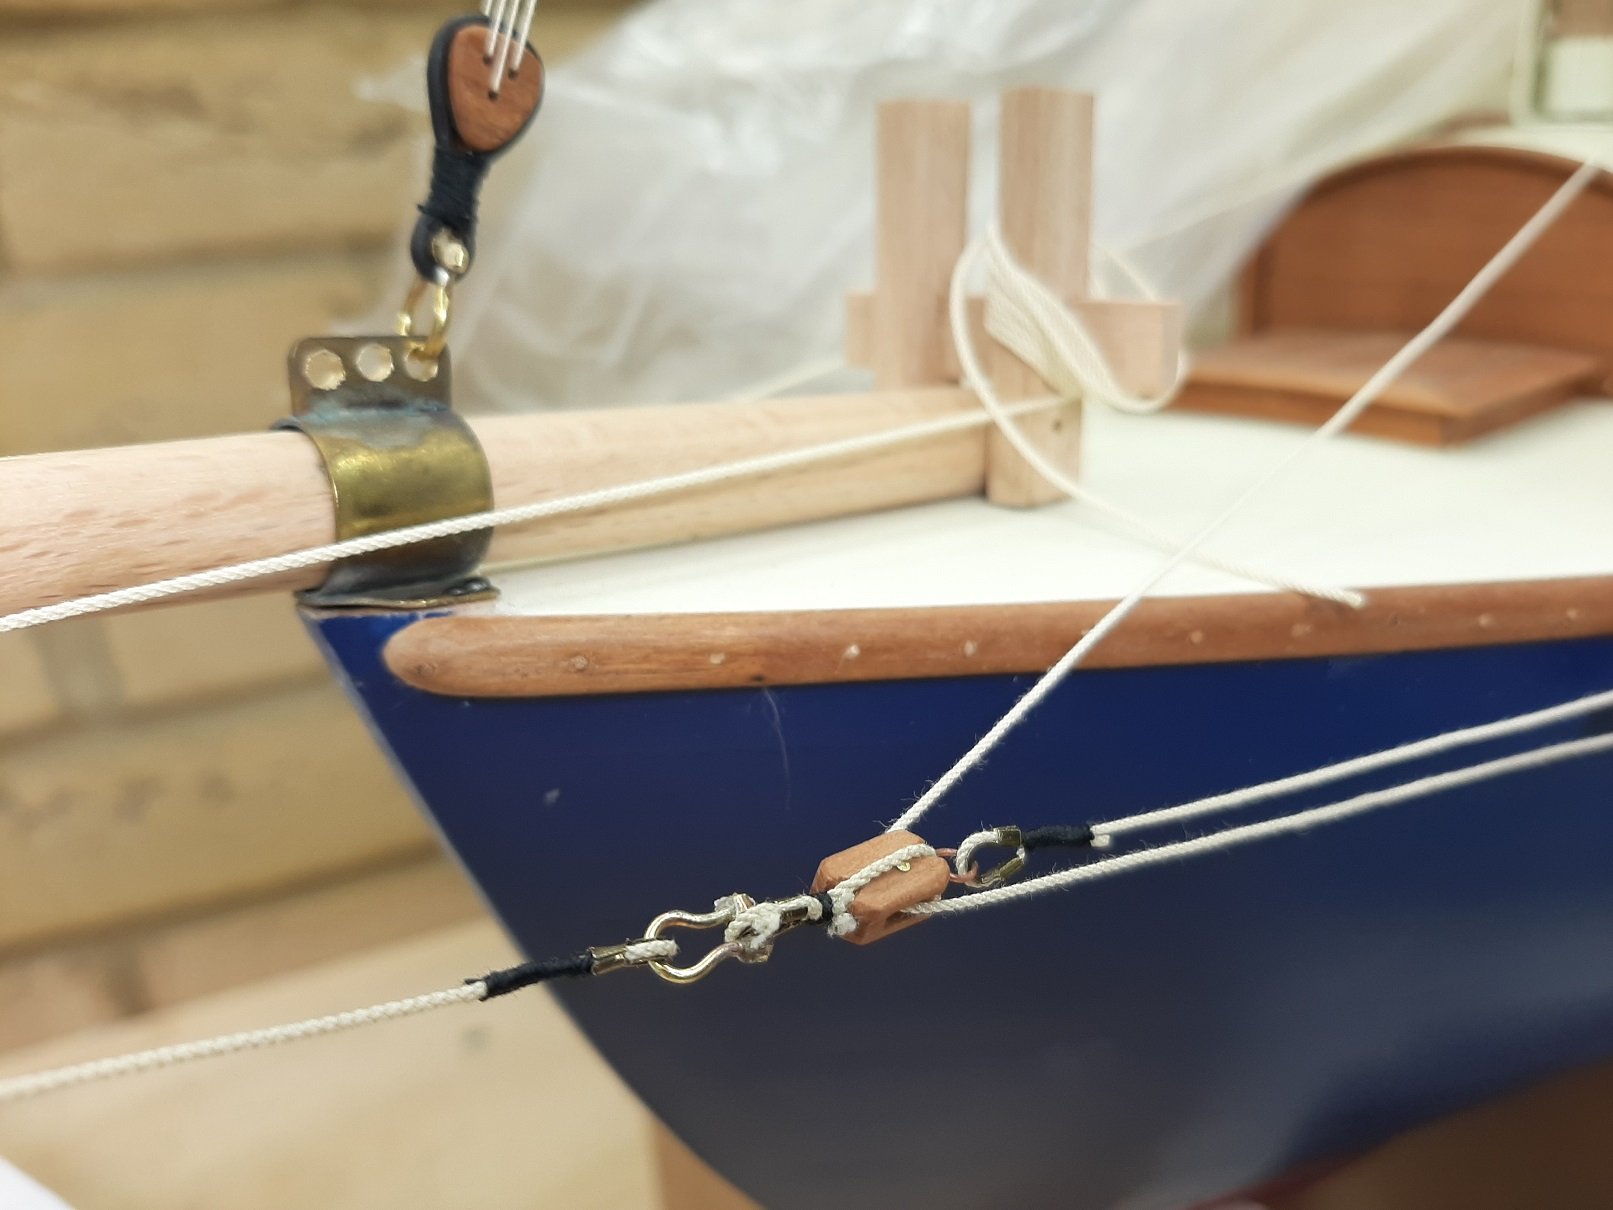
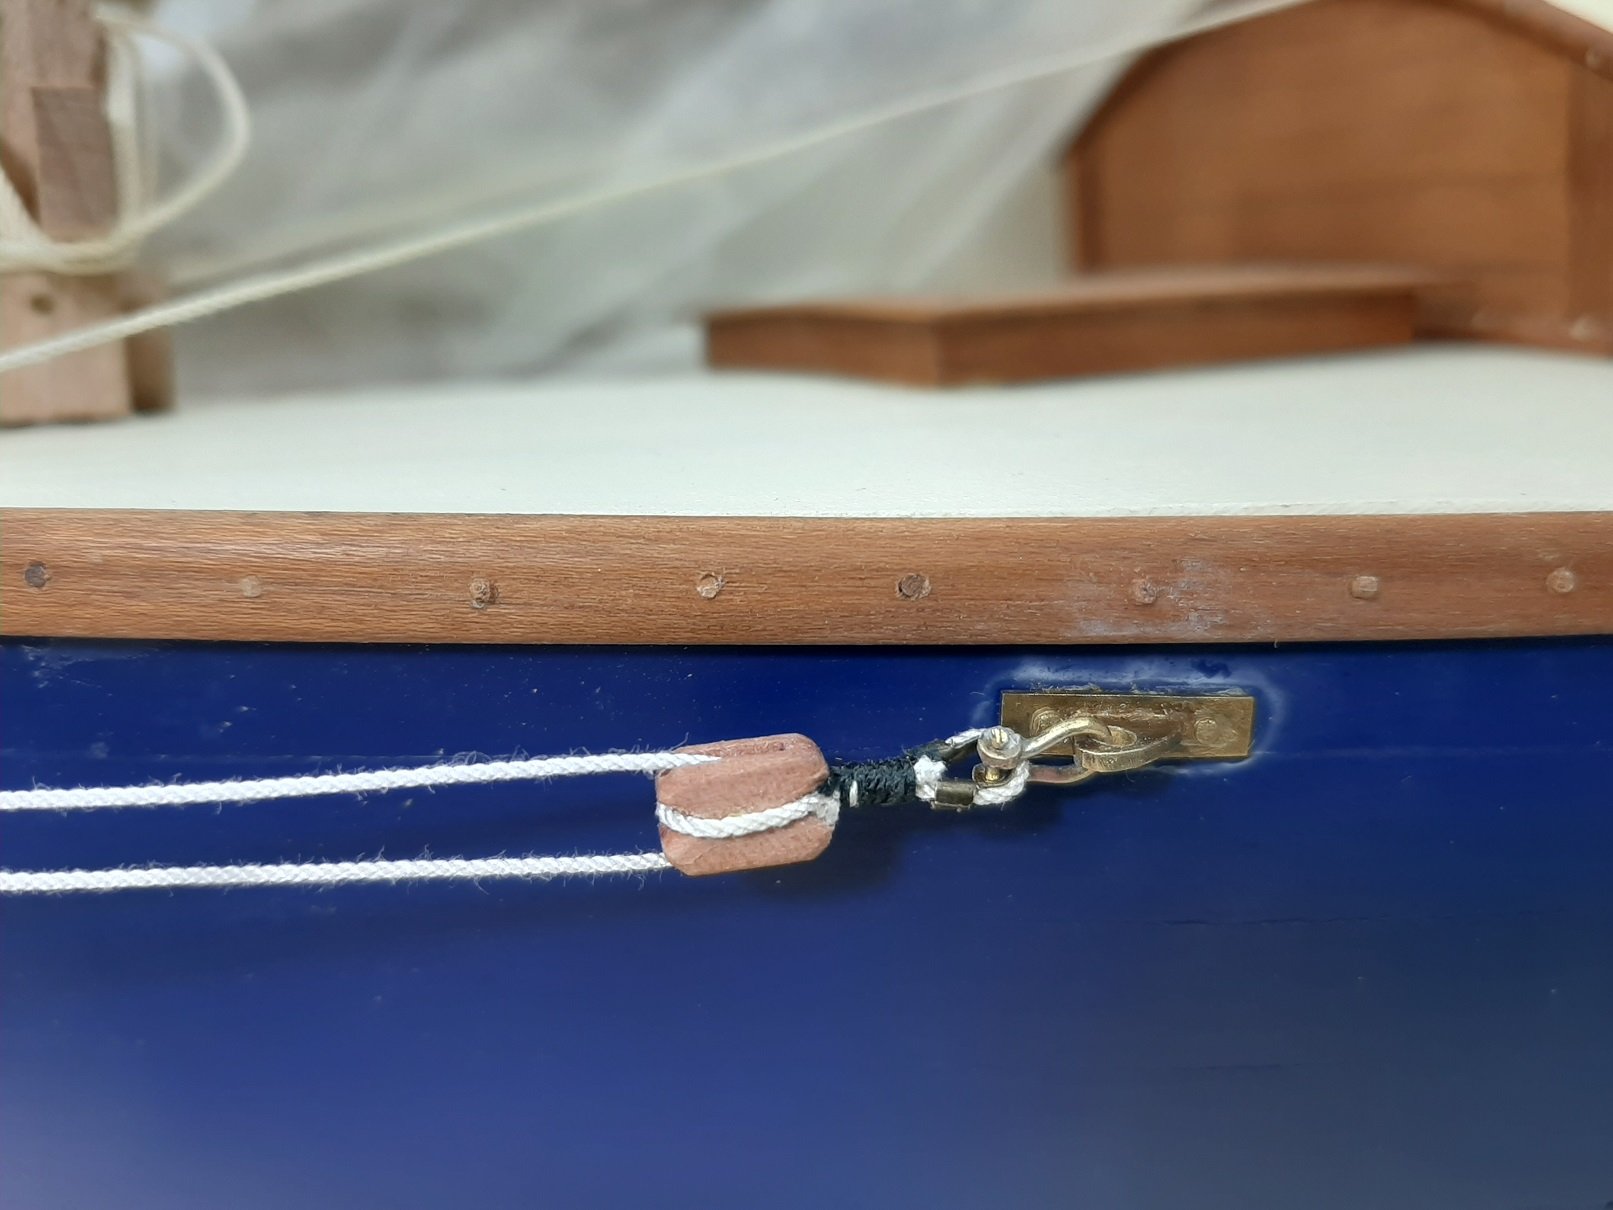
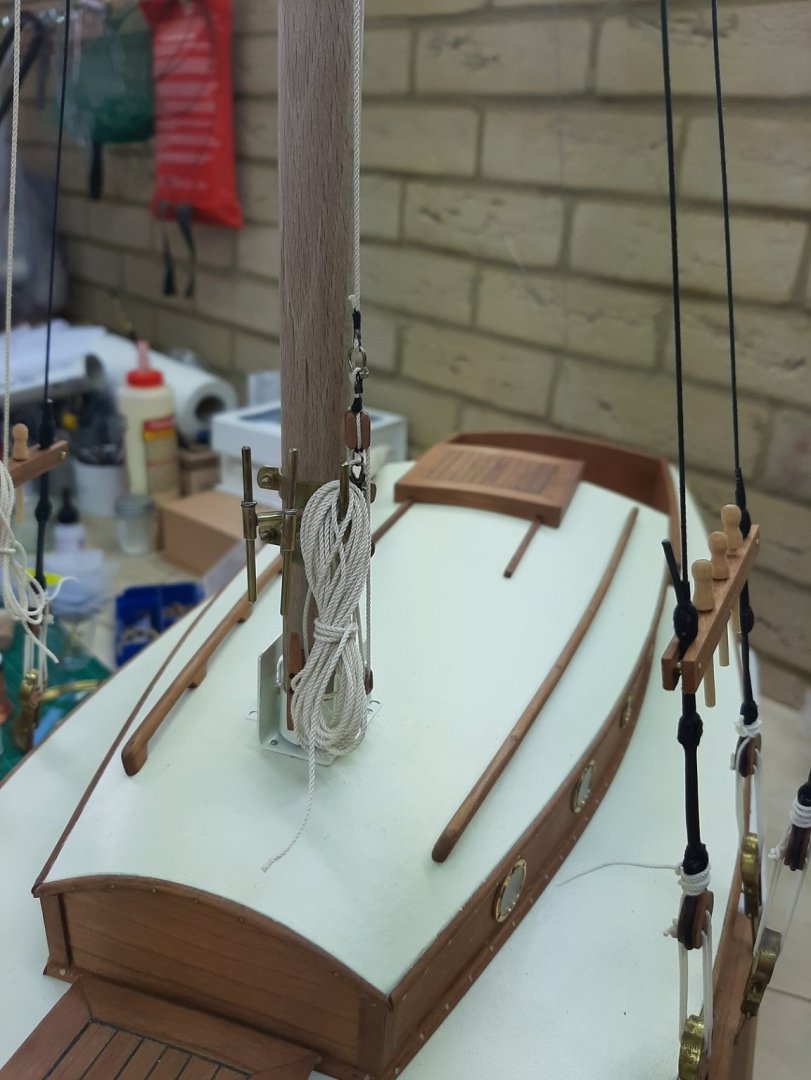
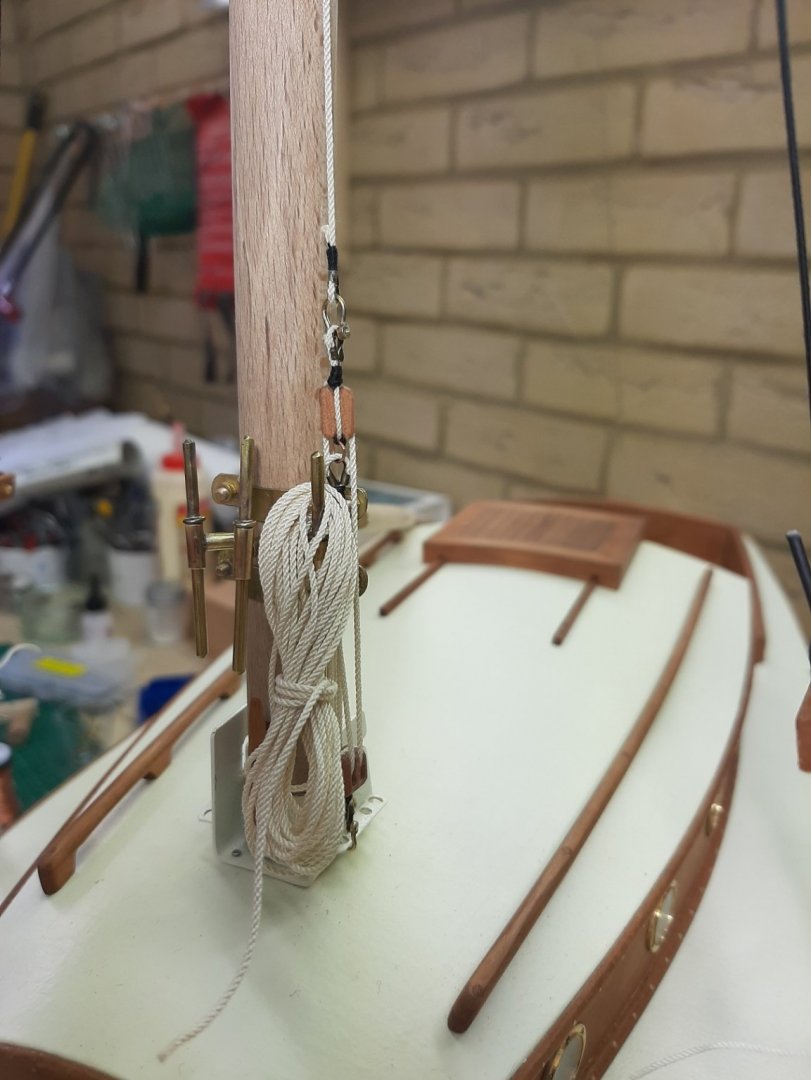
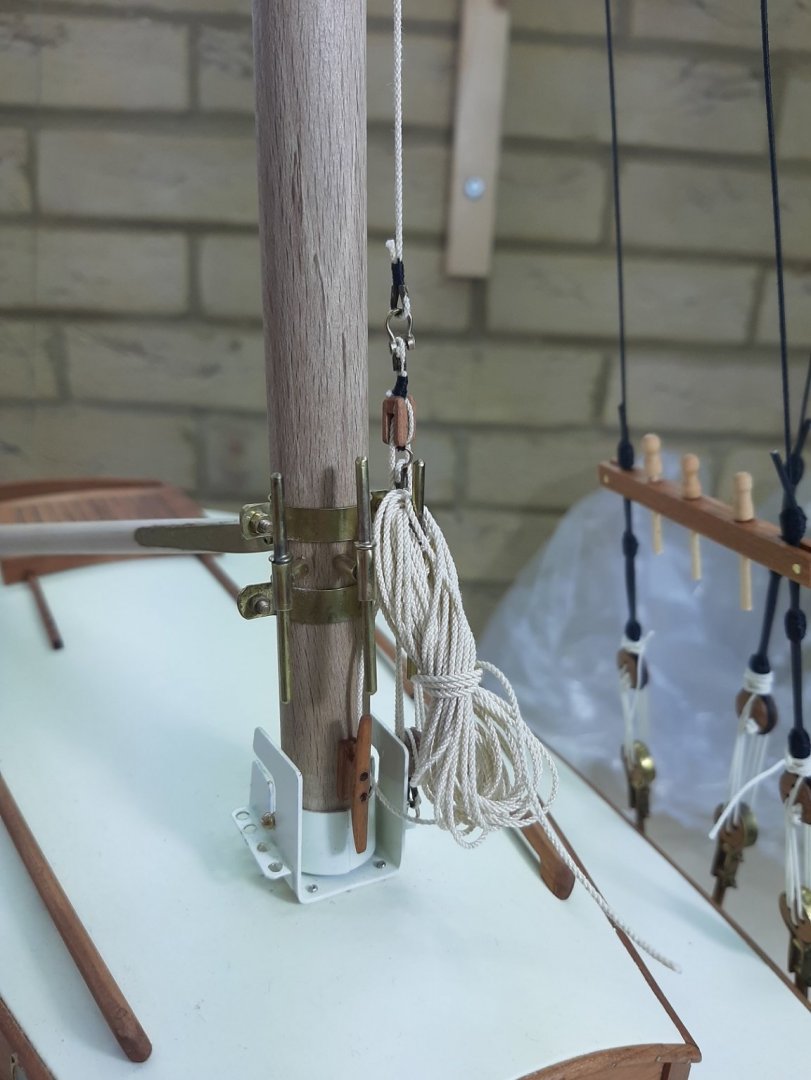
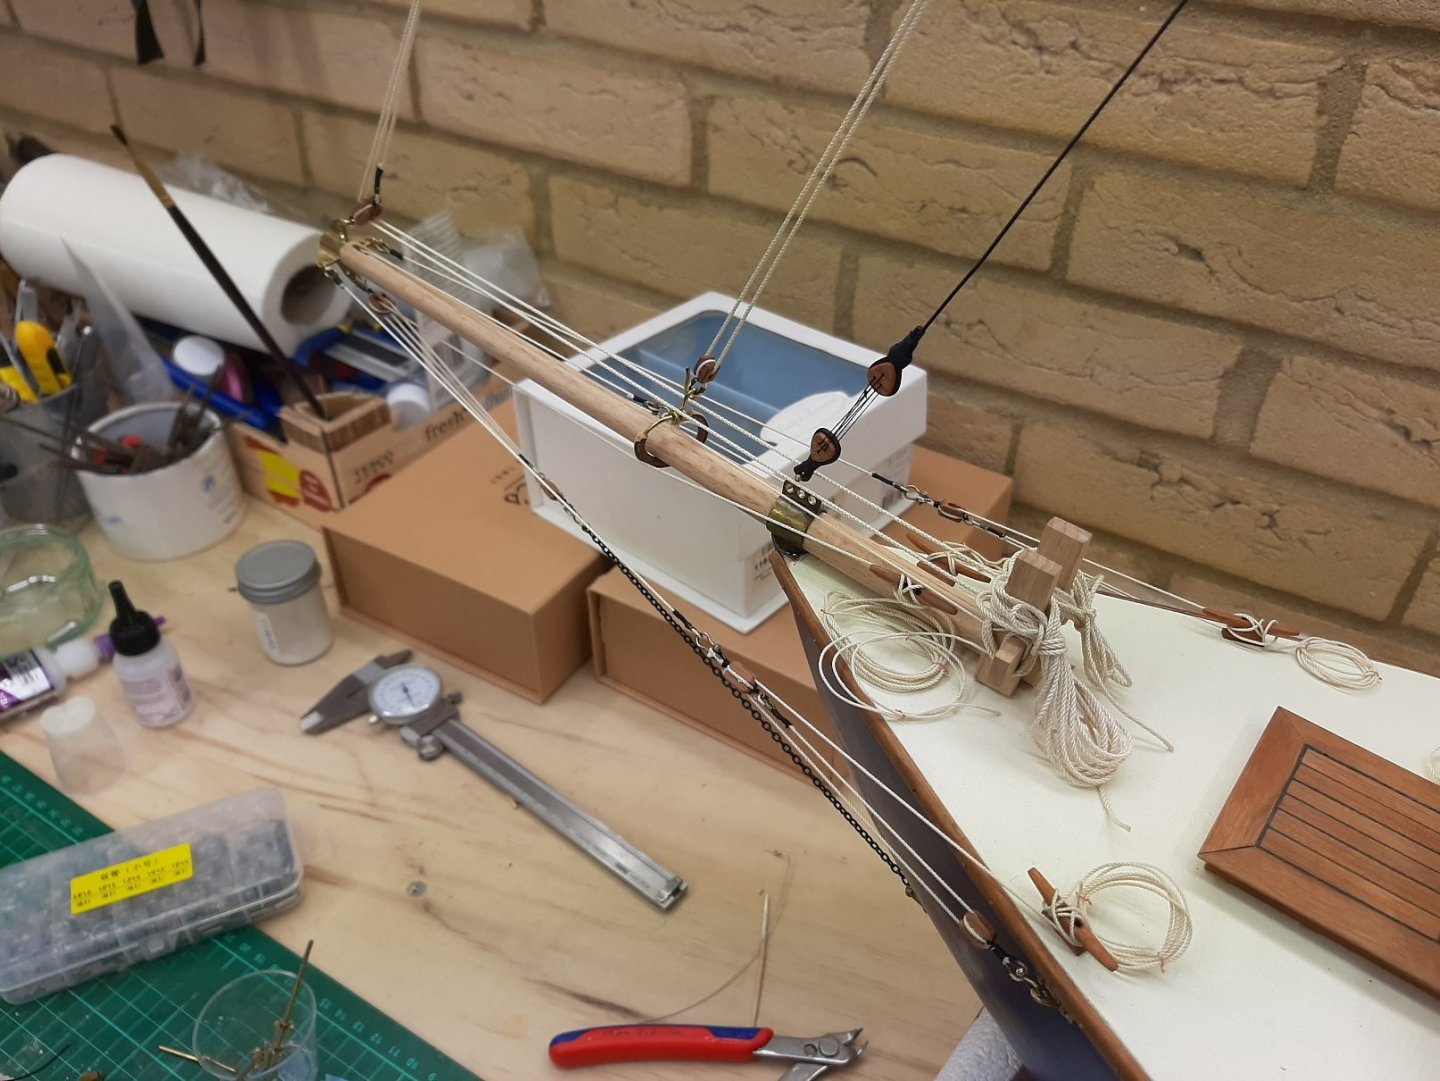
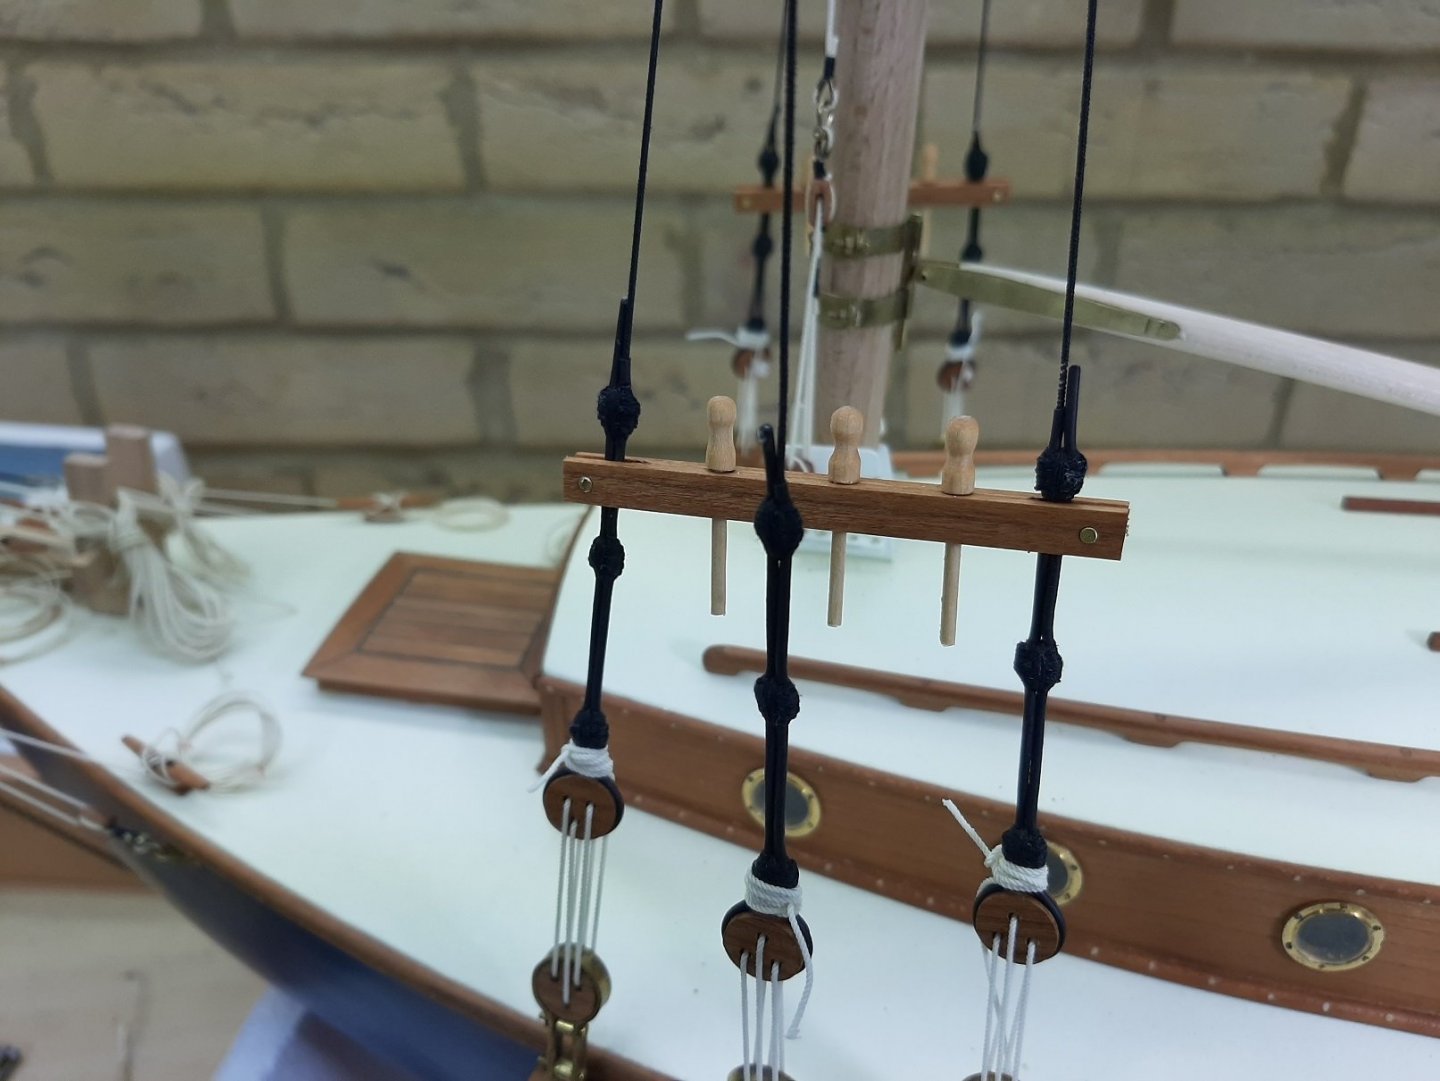
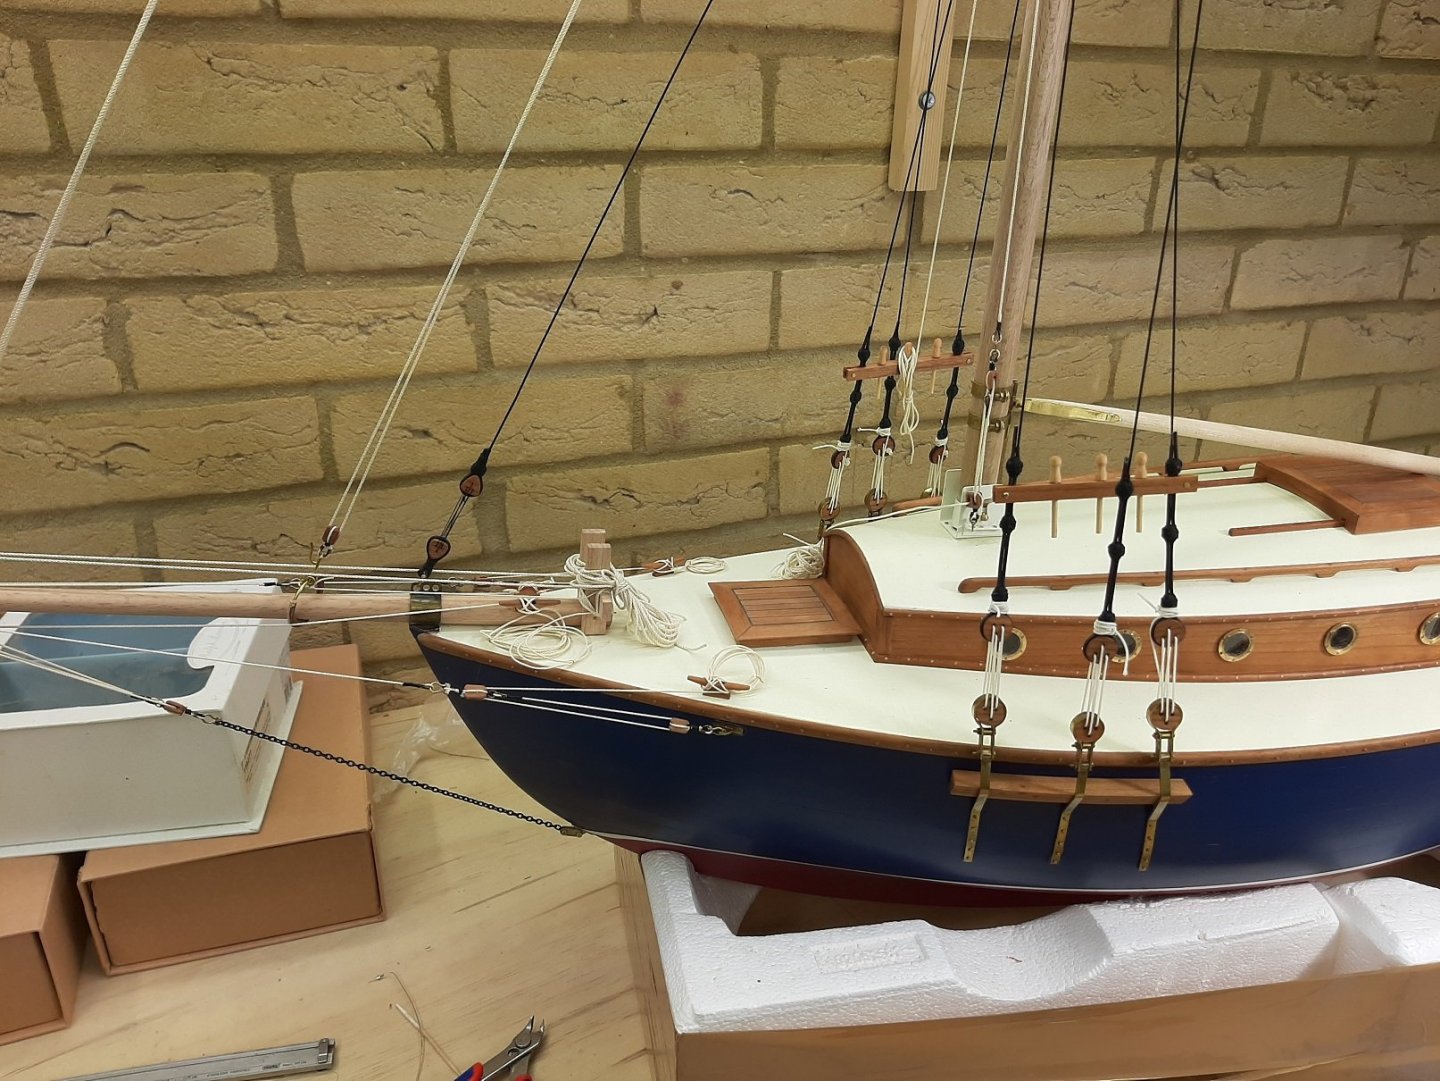
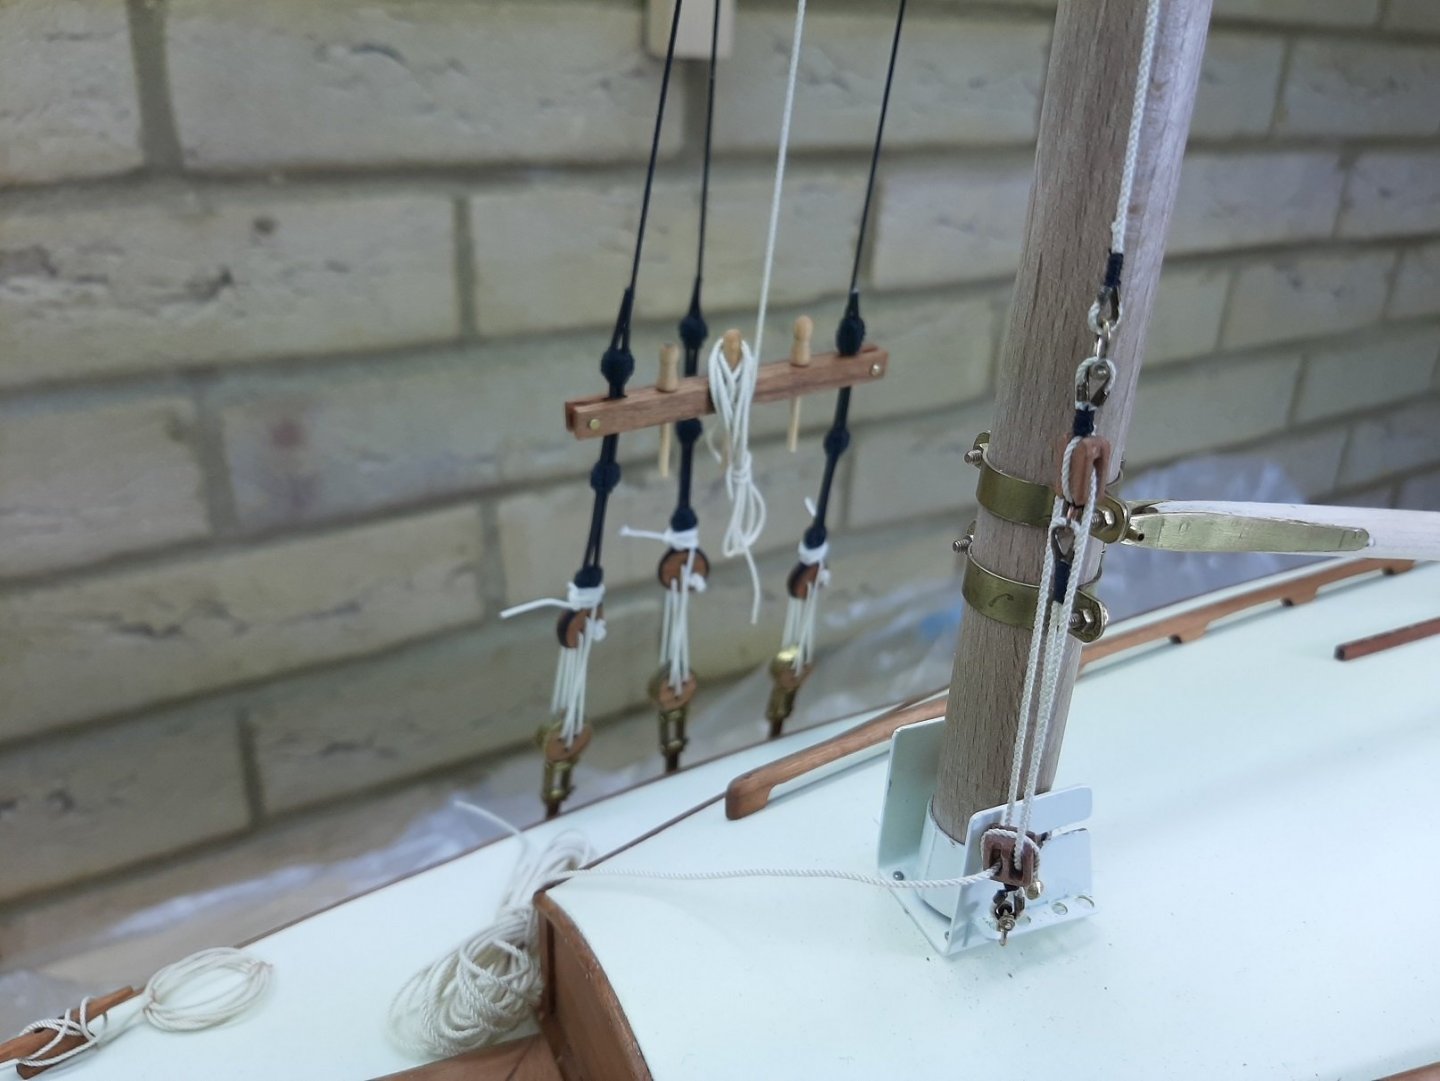
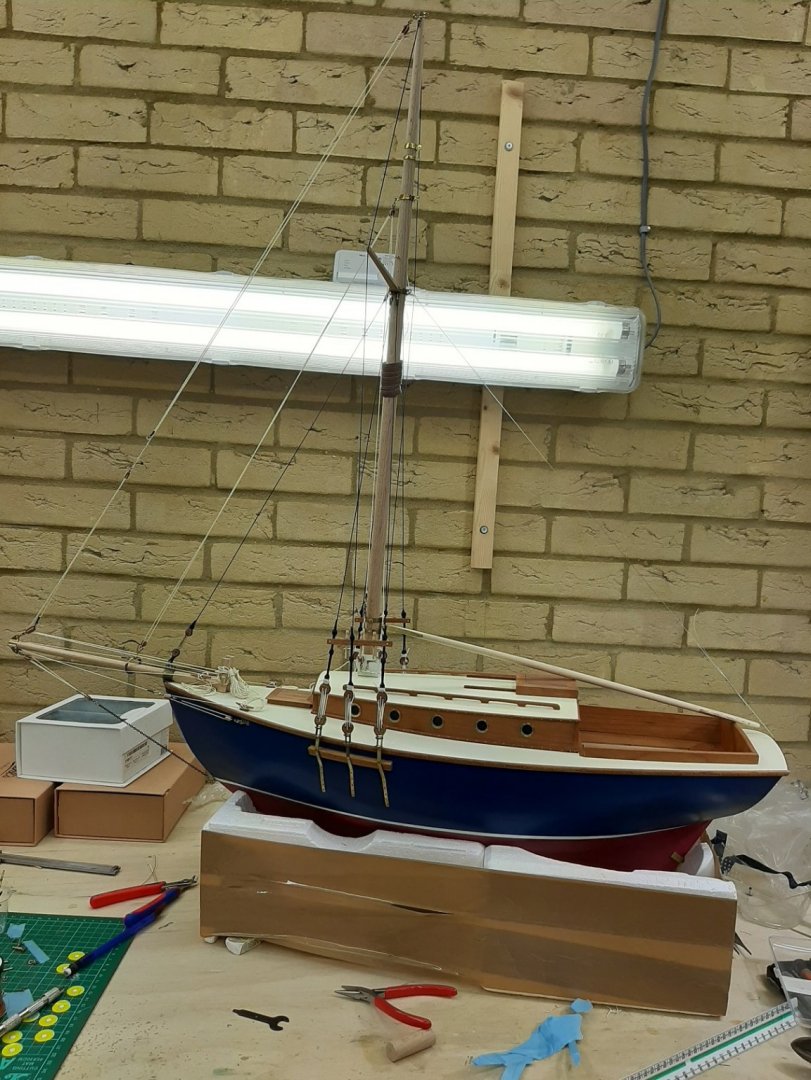
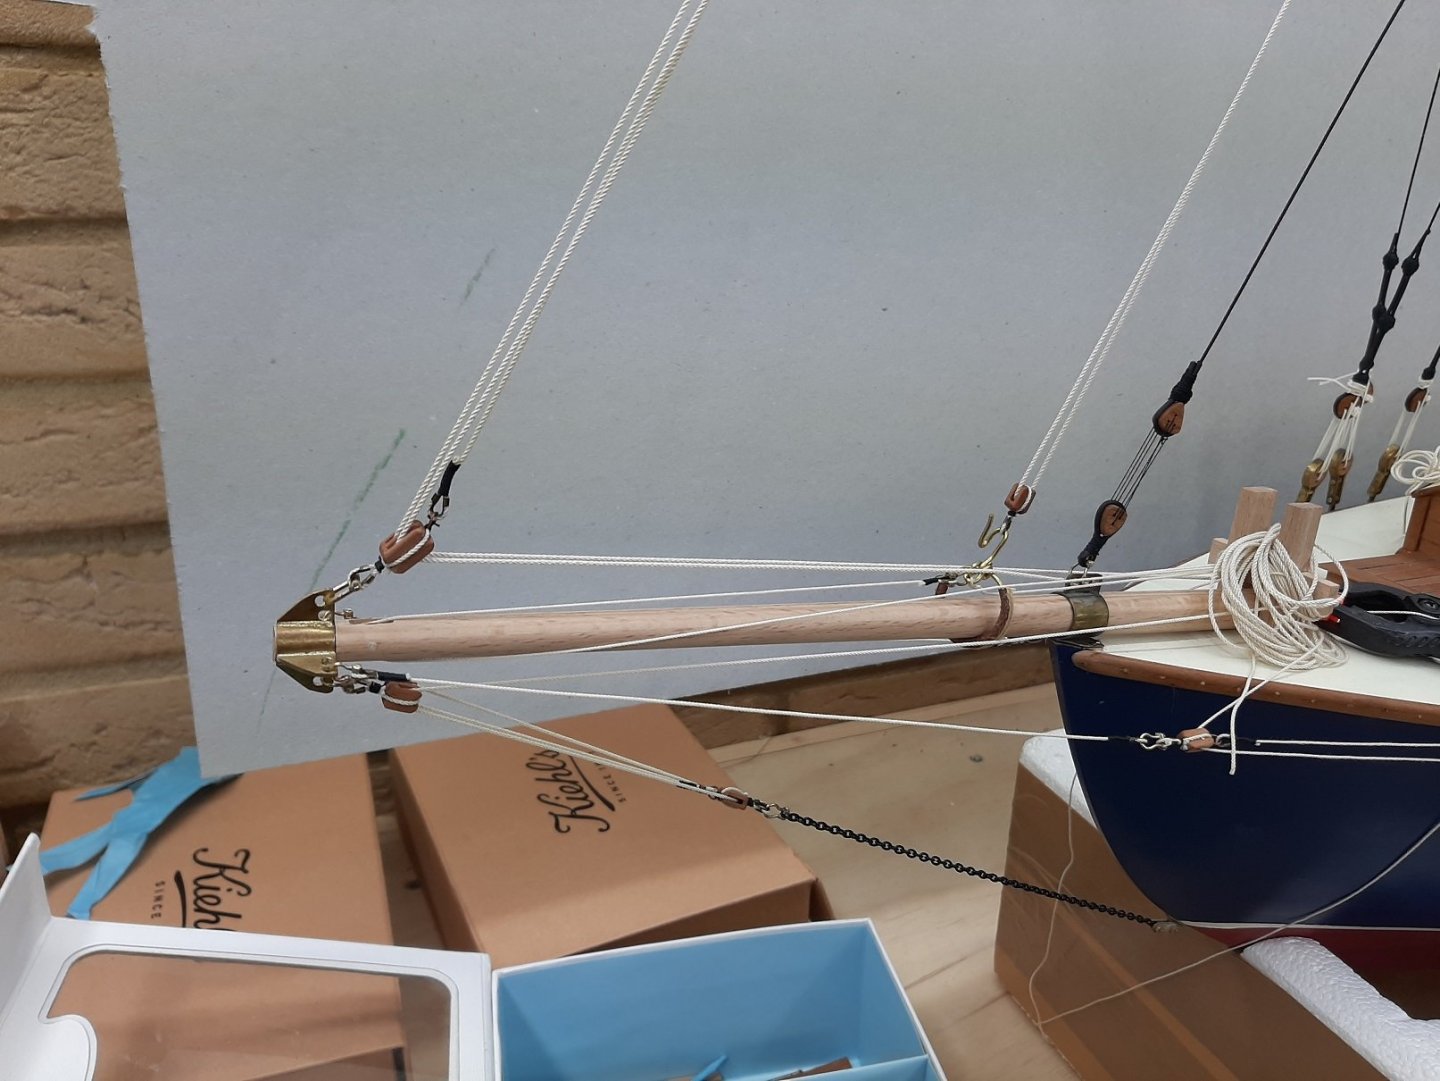
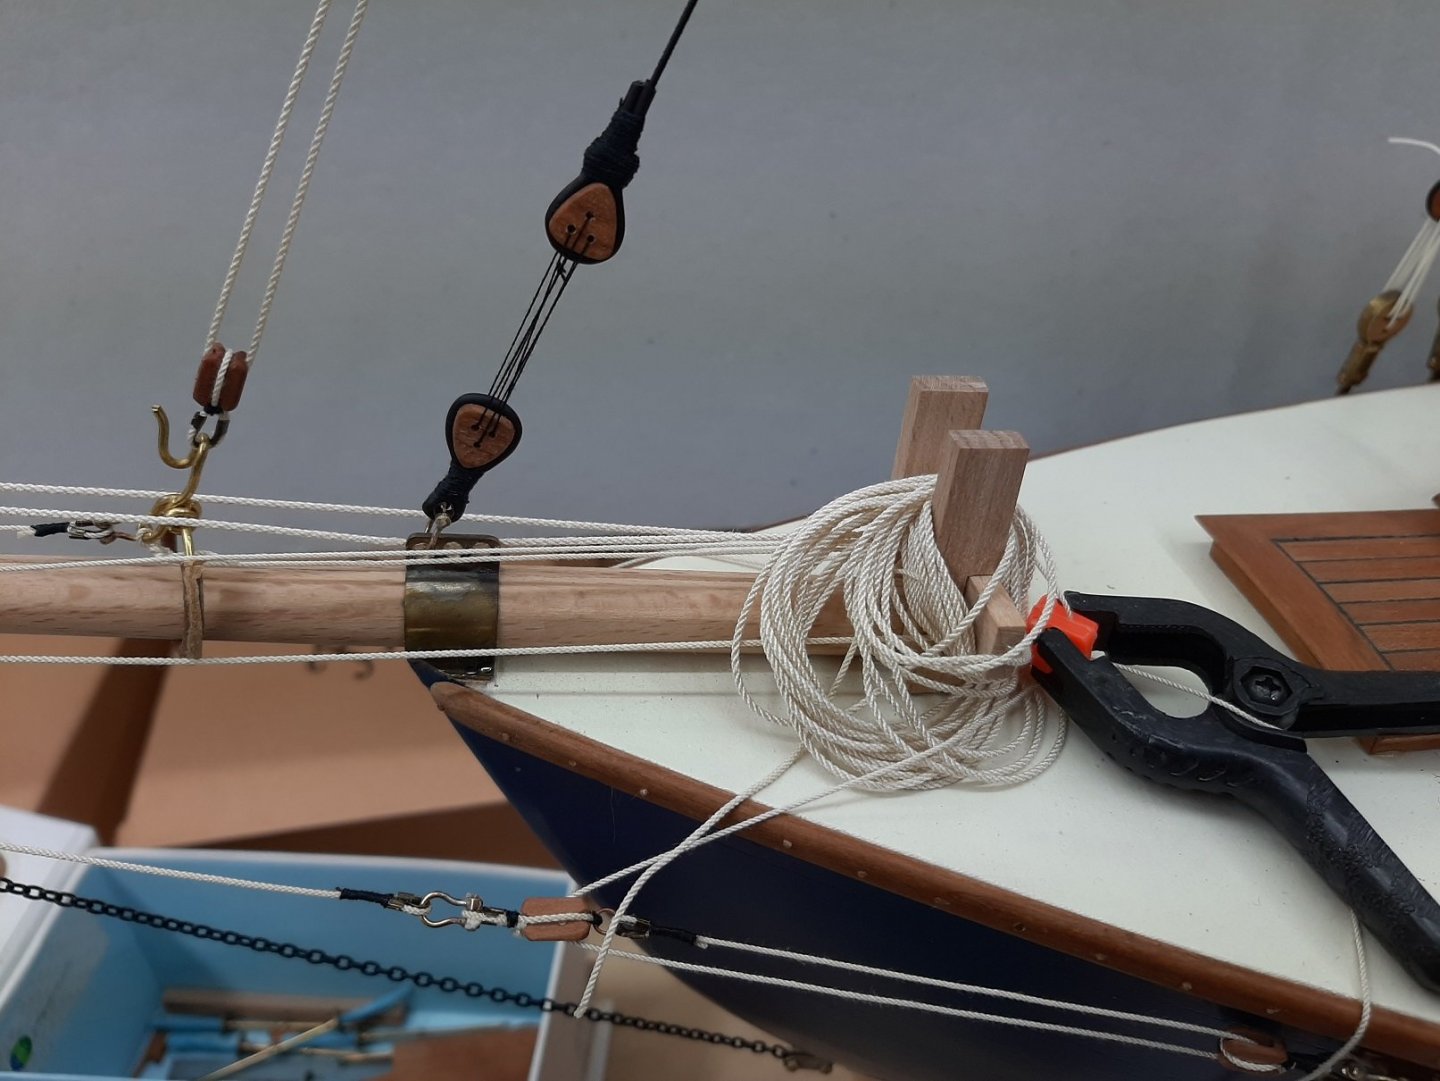
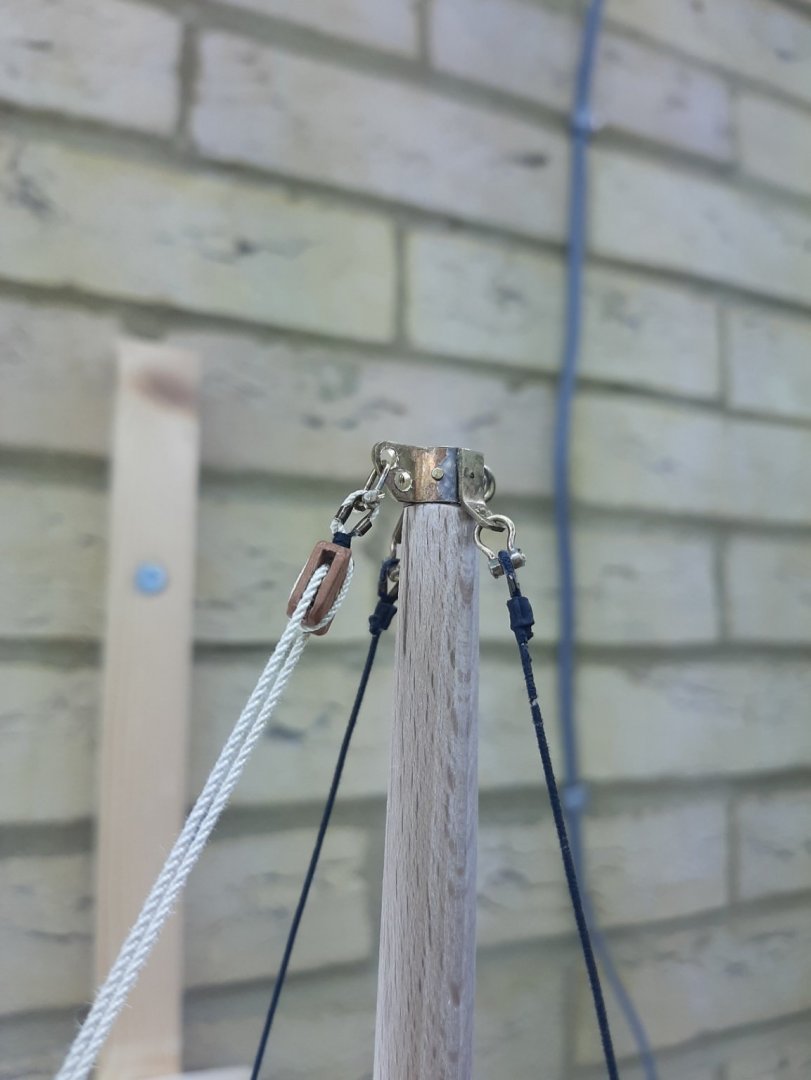
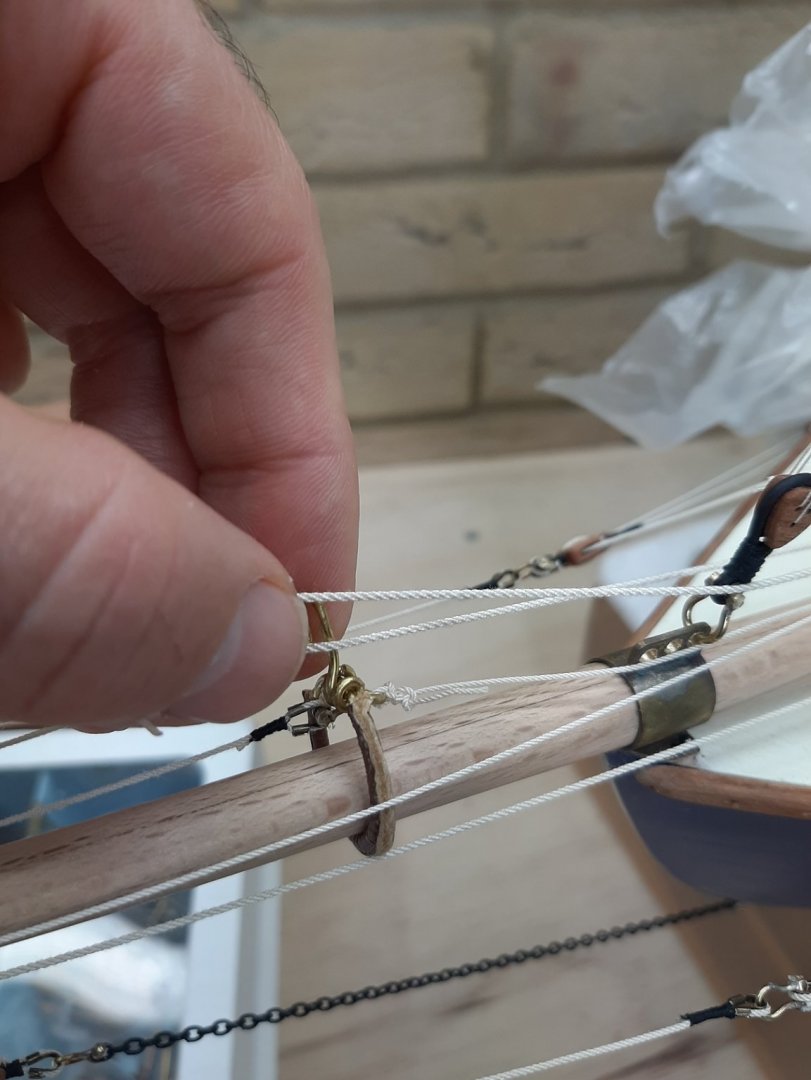
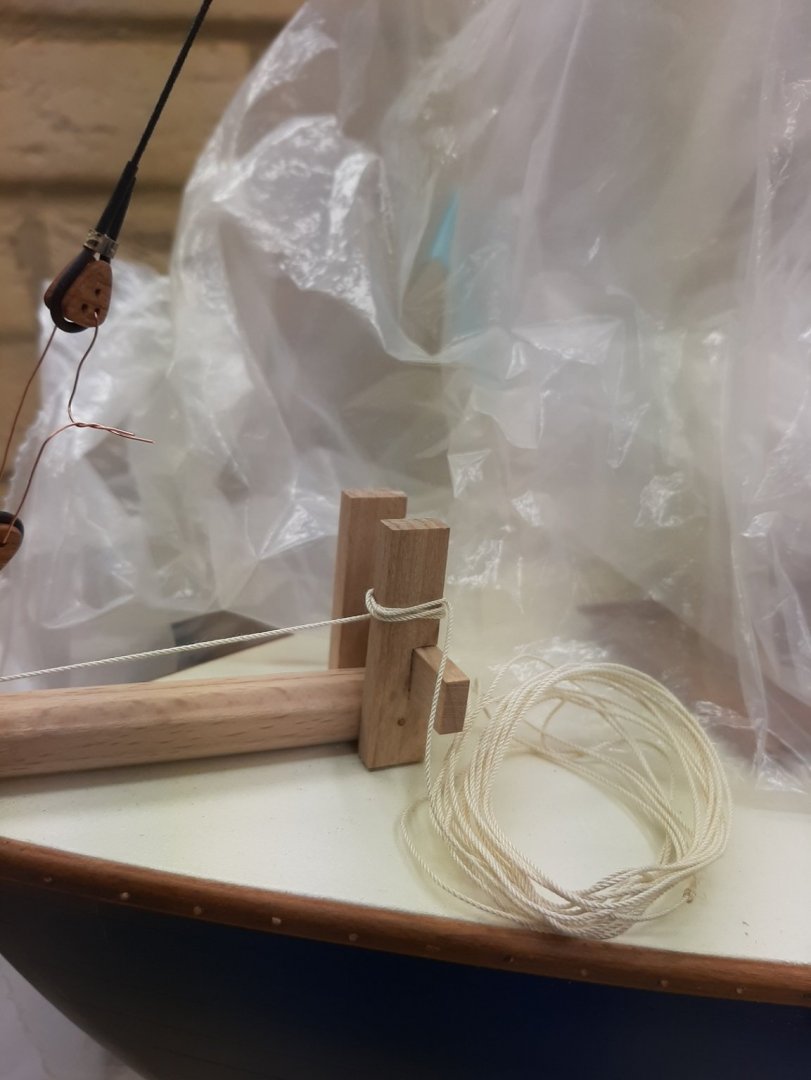
Thanks Bedford! My 5 year old daughter popped in the garage, saw the boat and asked "why boats have so many cables?" I did a bit more work today, it is really a very enjoyable part of this journey. This is how I work now, I have a pot of blocks, one with shackles and my box full of ropes. I added to the mast the three brass pin holders I had prepared many months ago and also added a cleat. I hope I won't run out of point to tie lines coming from the mast top, I think I could add a couple of more cleats to the mast-I d rather not though Next I added the rigging for the staysail. The single block that would be attached to the head of the sail is temporarily attached to the crance iron with a bit of copper wire. Plenty of pins to tie the bitter end! I also put some proper rope to the forestay tensioner. The mast hardware is certainly becoming very busy-it will get even busier. The bow is now completed, just a loose line needed to the bobstay chain. Of course, there will be 6 lines from the sails that will need to be sent aft and 6 cleats will be needed, maybe to the outside of the cockpit coaming. Next some work will be needed on the boom and gaff as they should be next to go on the boat.


-
Beginner tooling list
vaddoc replied to Paul Gardner's topic in Modeling tools and Workshop Equipment
Start building and buy tools as you go, you will know what you should get. According to the scale and whether you scratch build or not, your needs might be different. You will however accumulate a lot of staff so first get a large work bench (or two)! Regards Vaddoc -
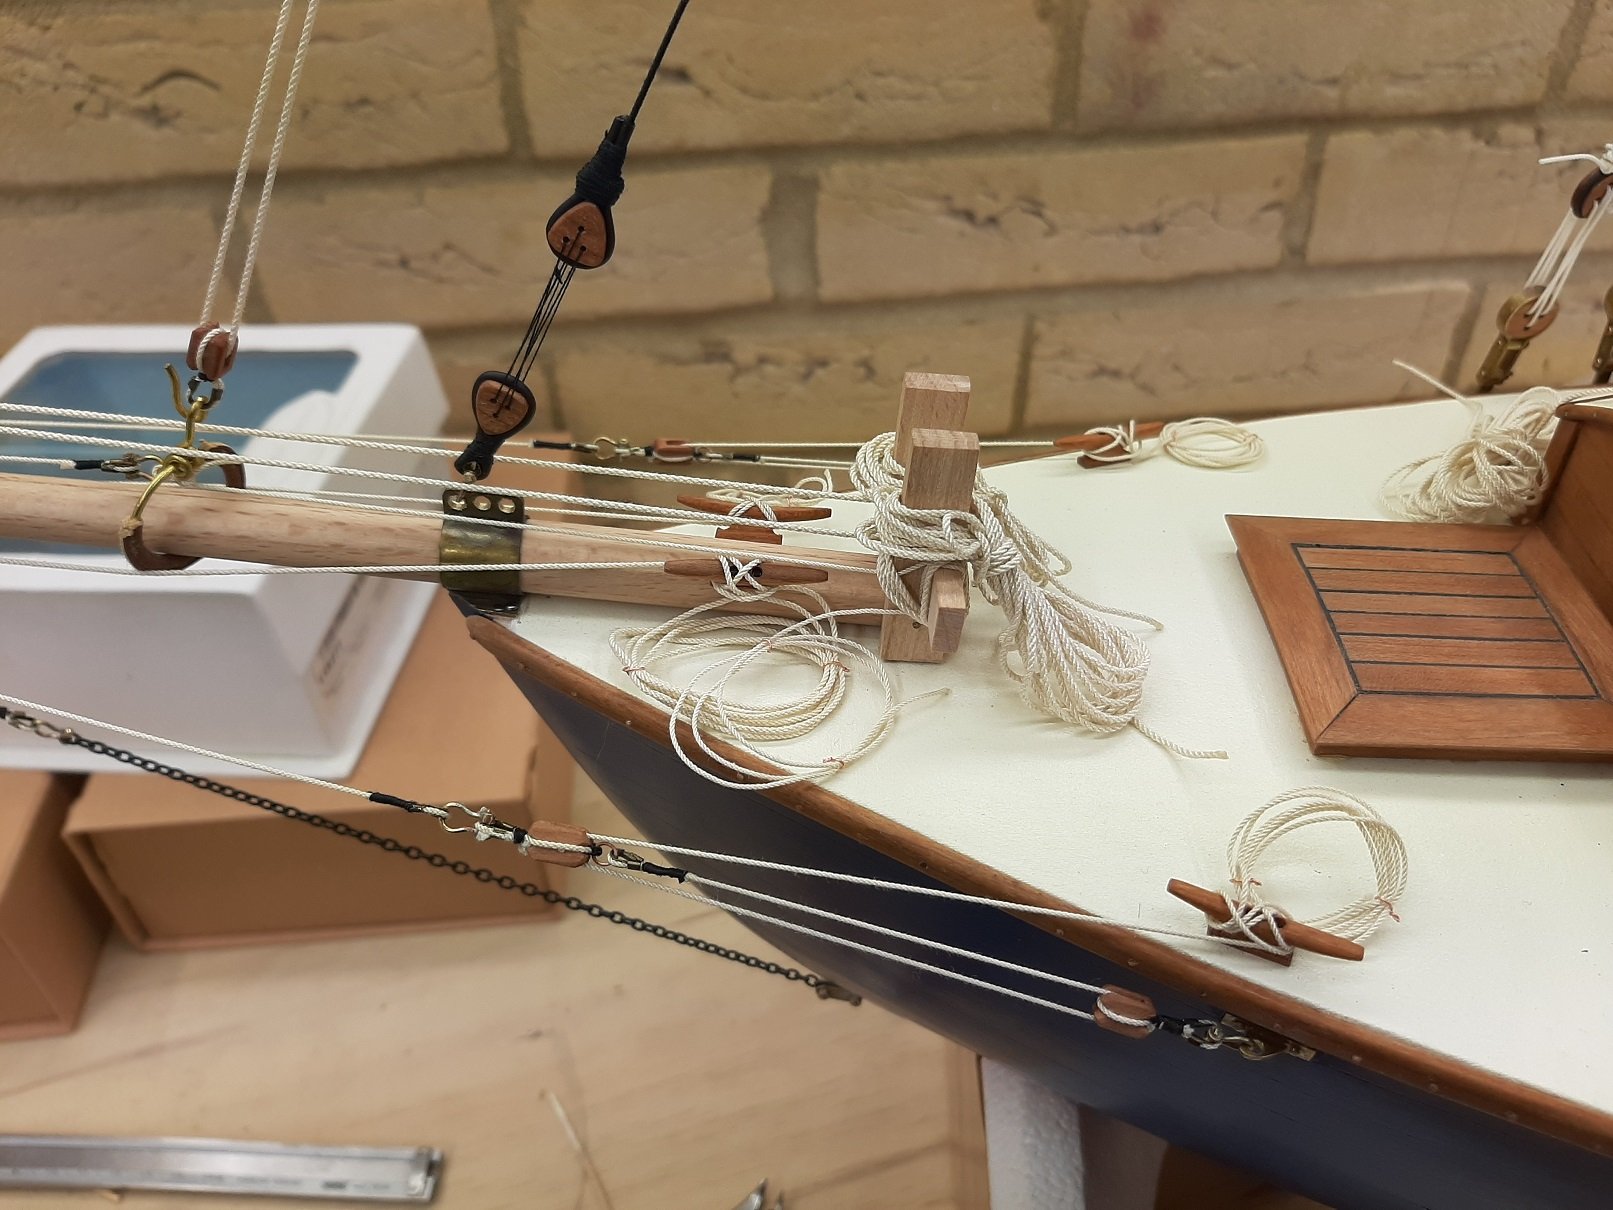
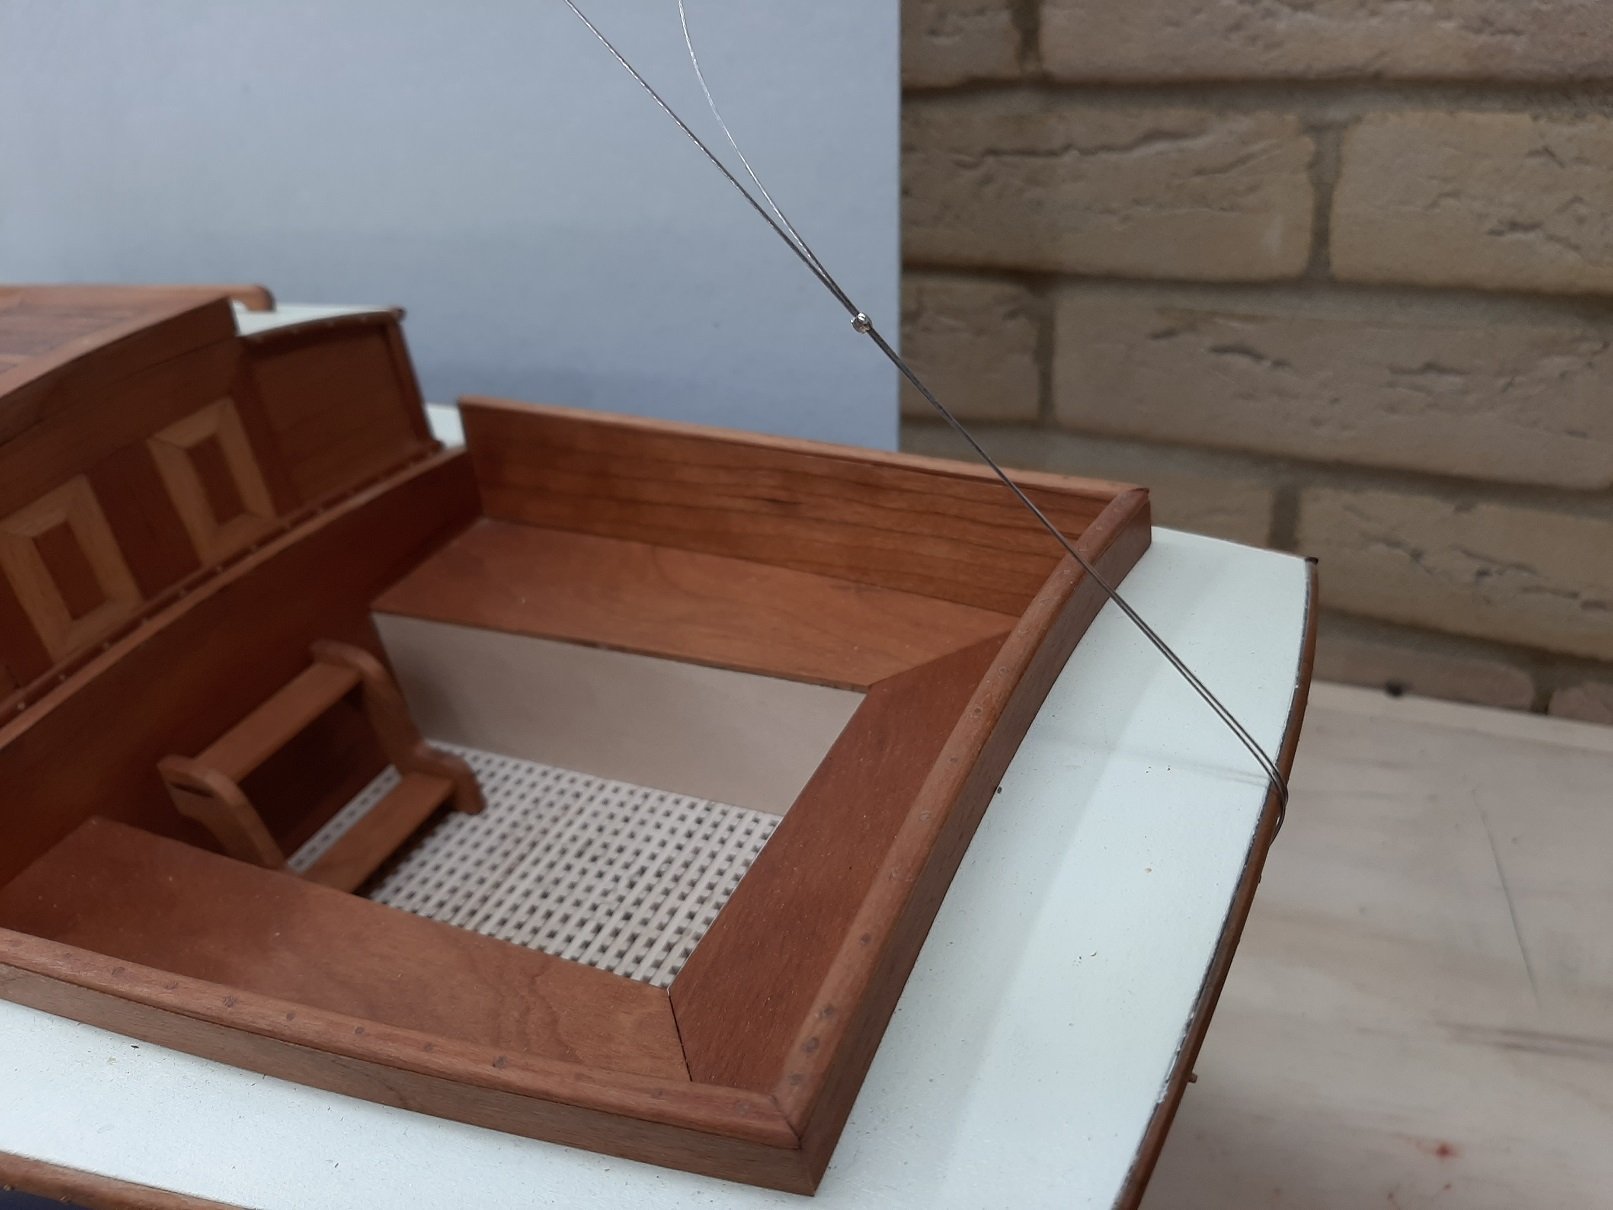
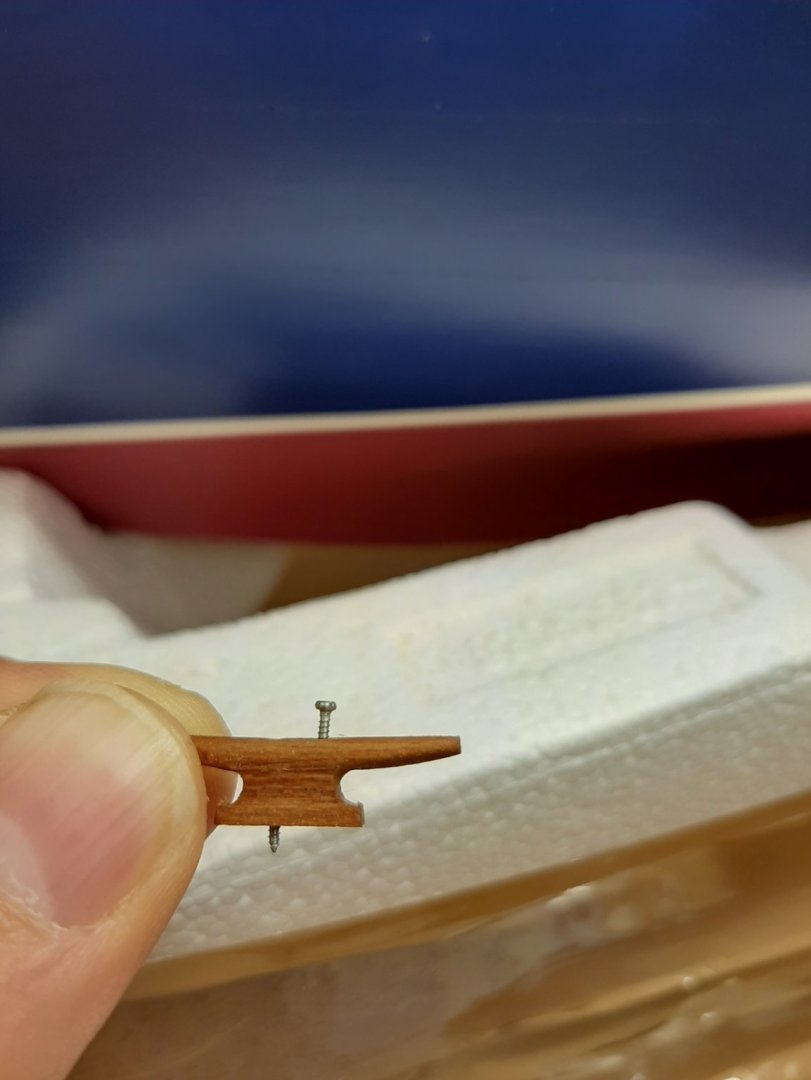
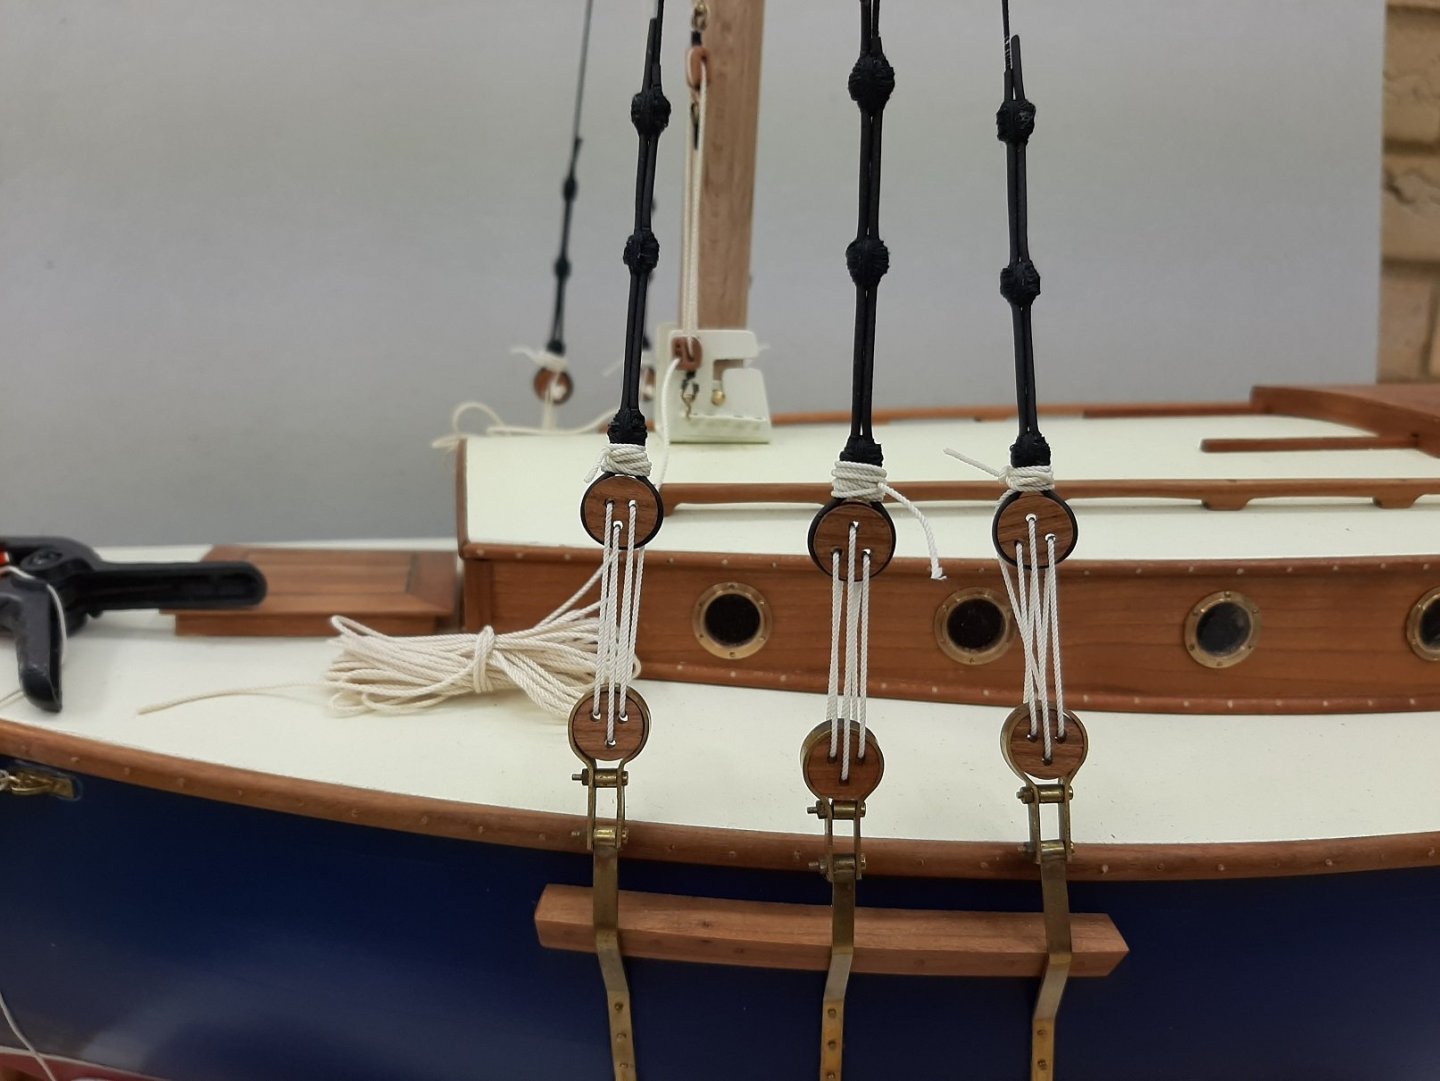
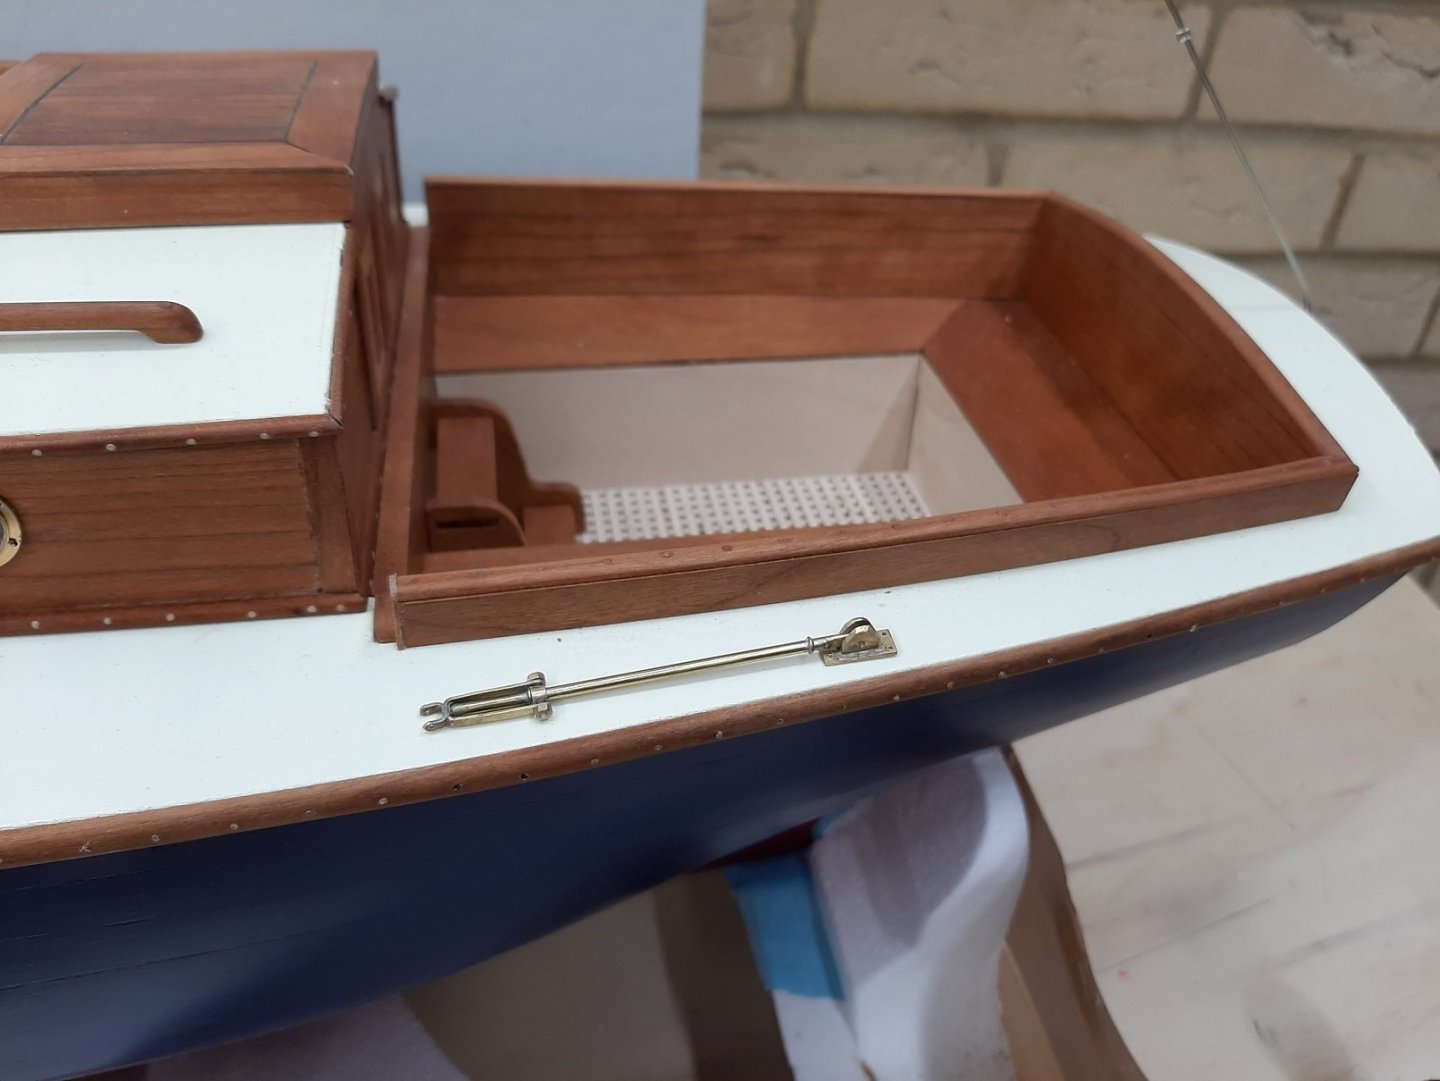
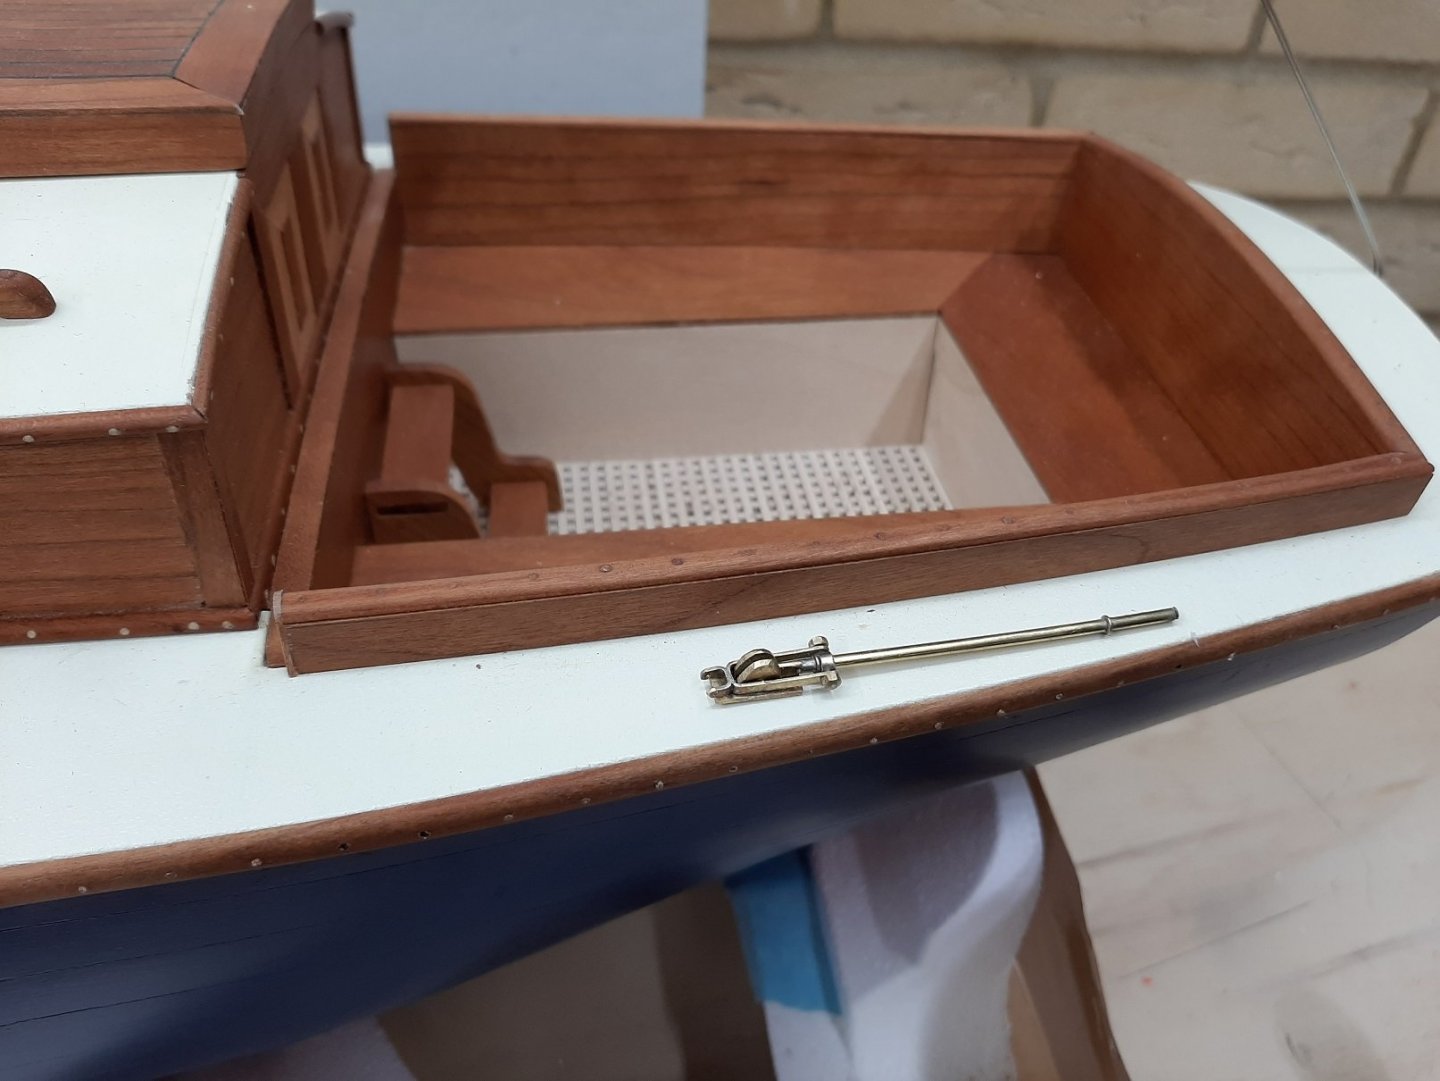
Thank you all for your likes and comments! Today I installed a few cleats to tidy up a bit the boat. The cleats are very securely attached with 1 mm stainless steel screws. The bow looks much more tidy now. I thought of installing a pin rail but I think the heel timbers would certainly be used to tie ropes so maybe it will not be necessary. I am not sure how to arrange the excess rope so for now I used fine copper wire to hold the loops I also installed pin rails on the shrouds and temporarily the boom, mainly to know were on the mast to install more cleats and pins The boat is very big so difficult to get it all in a photo


- 536 replies
-
- 10
-

-
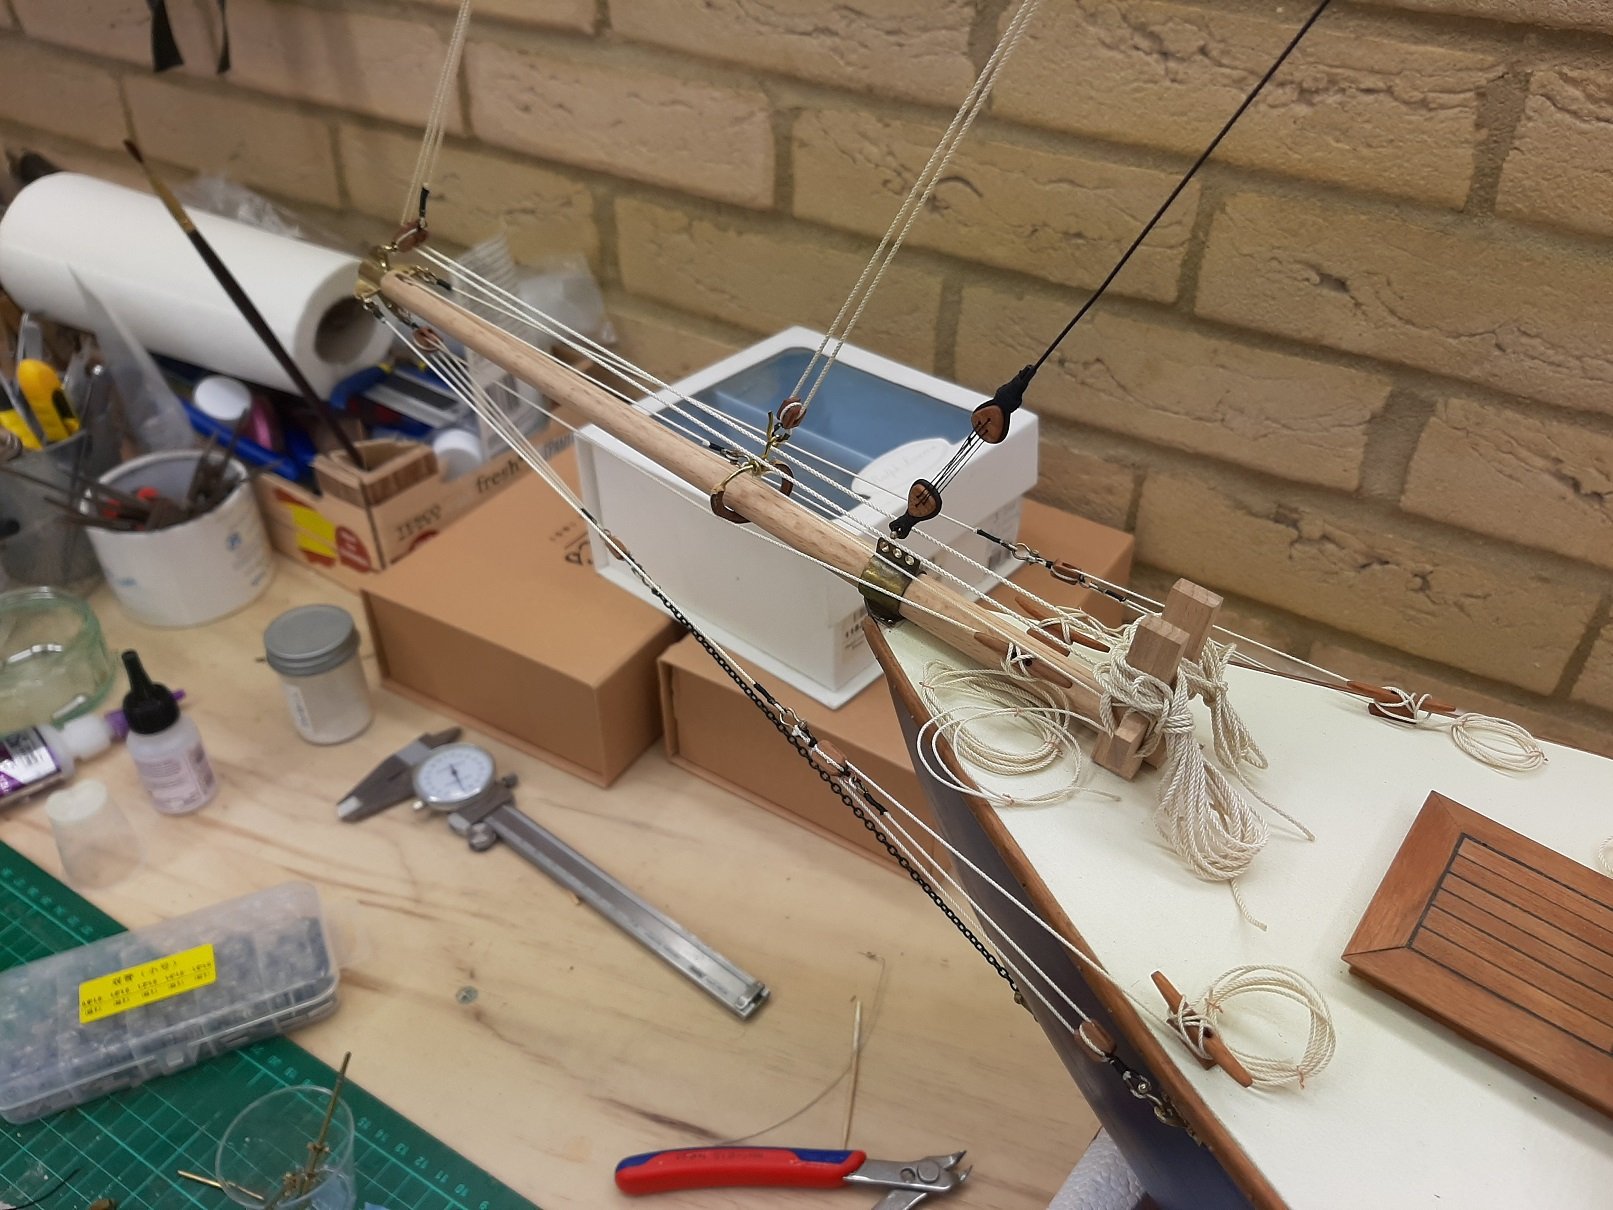
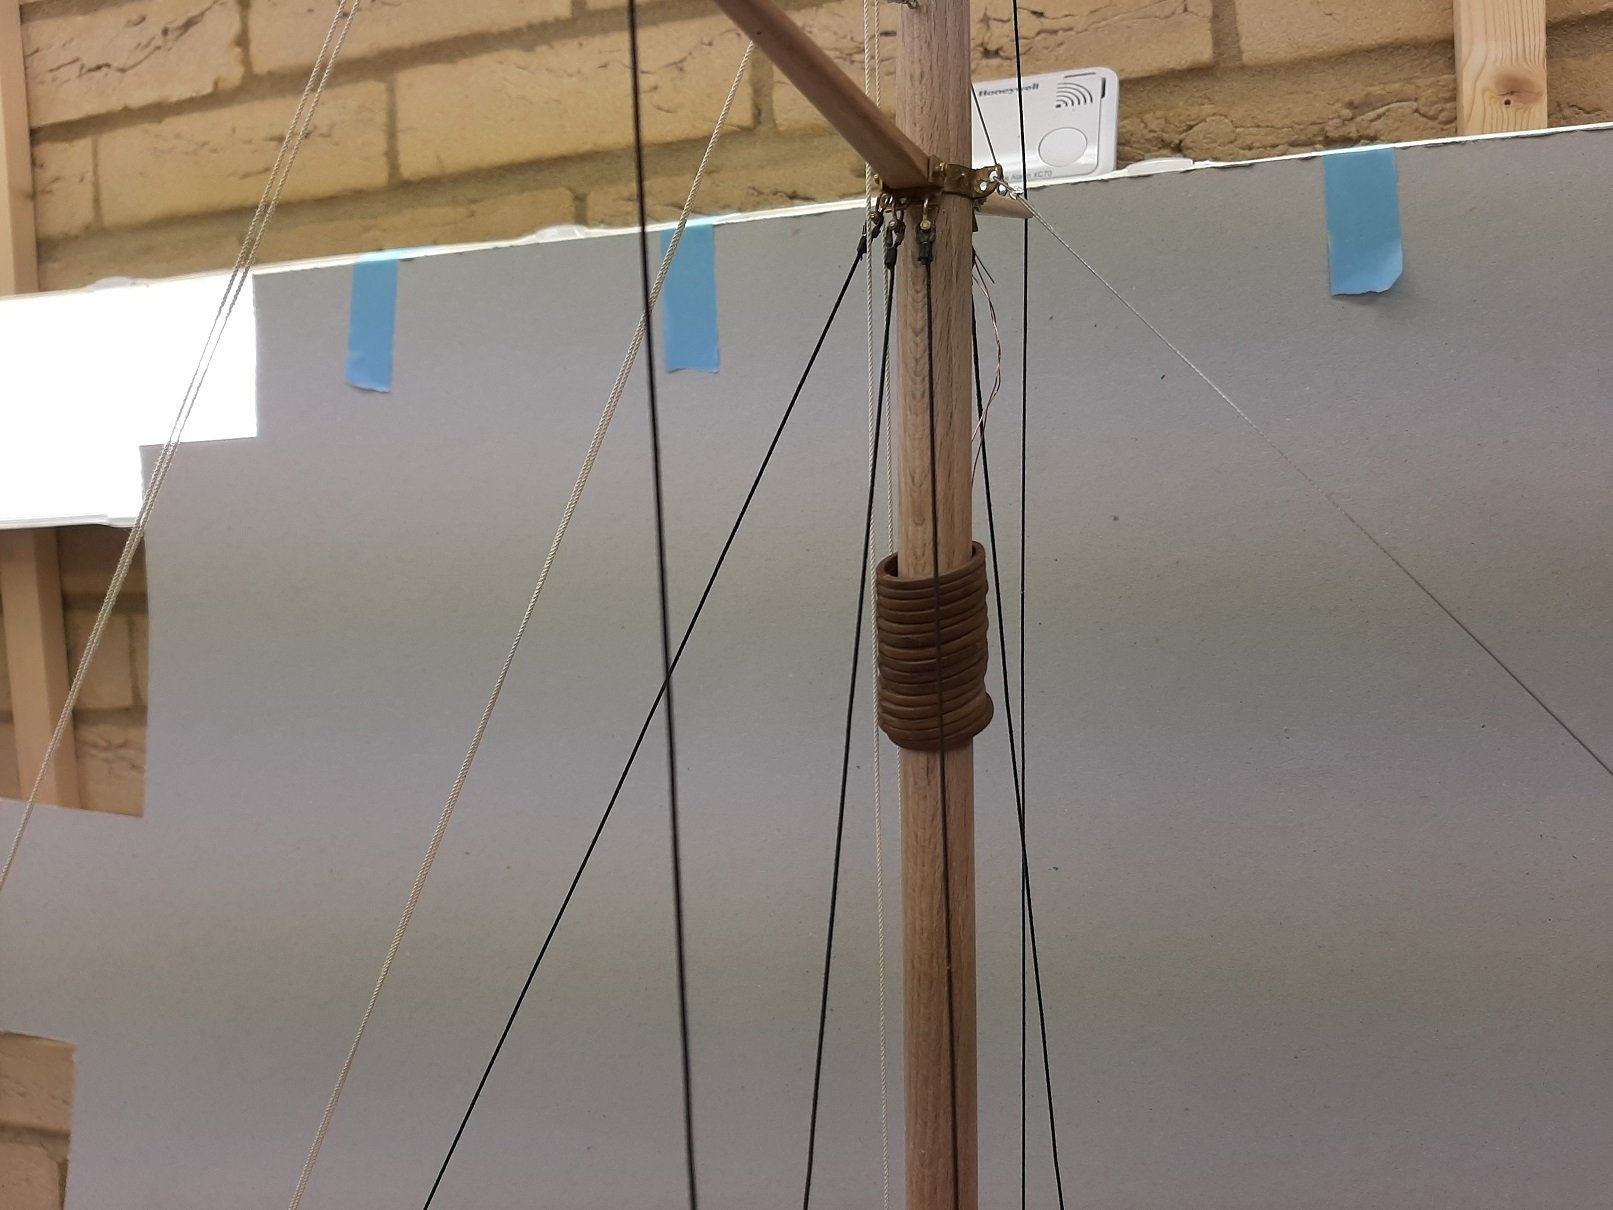
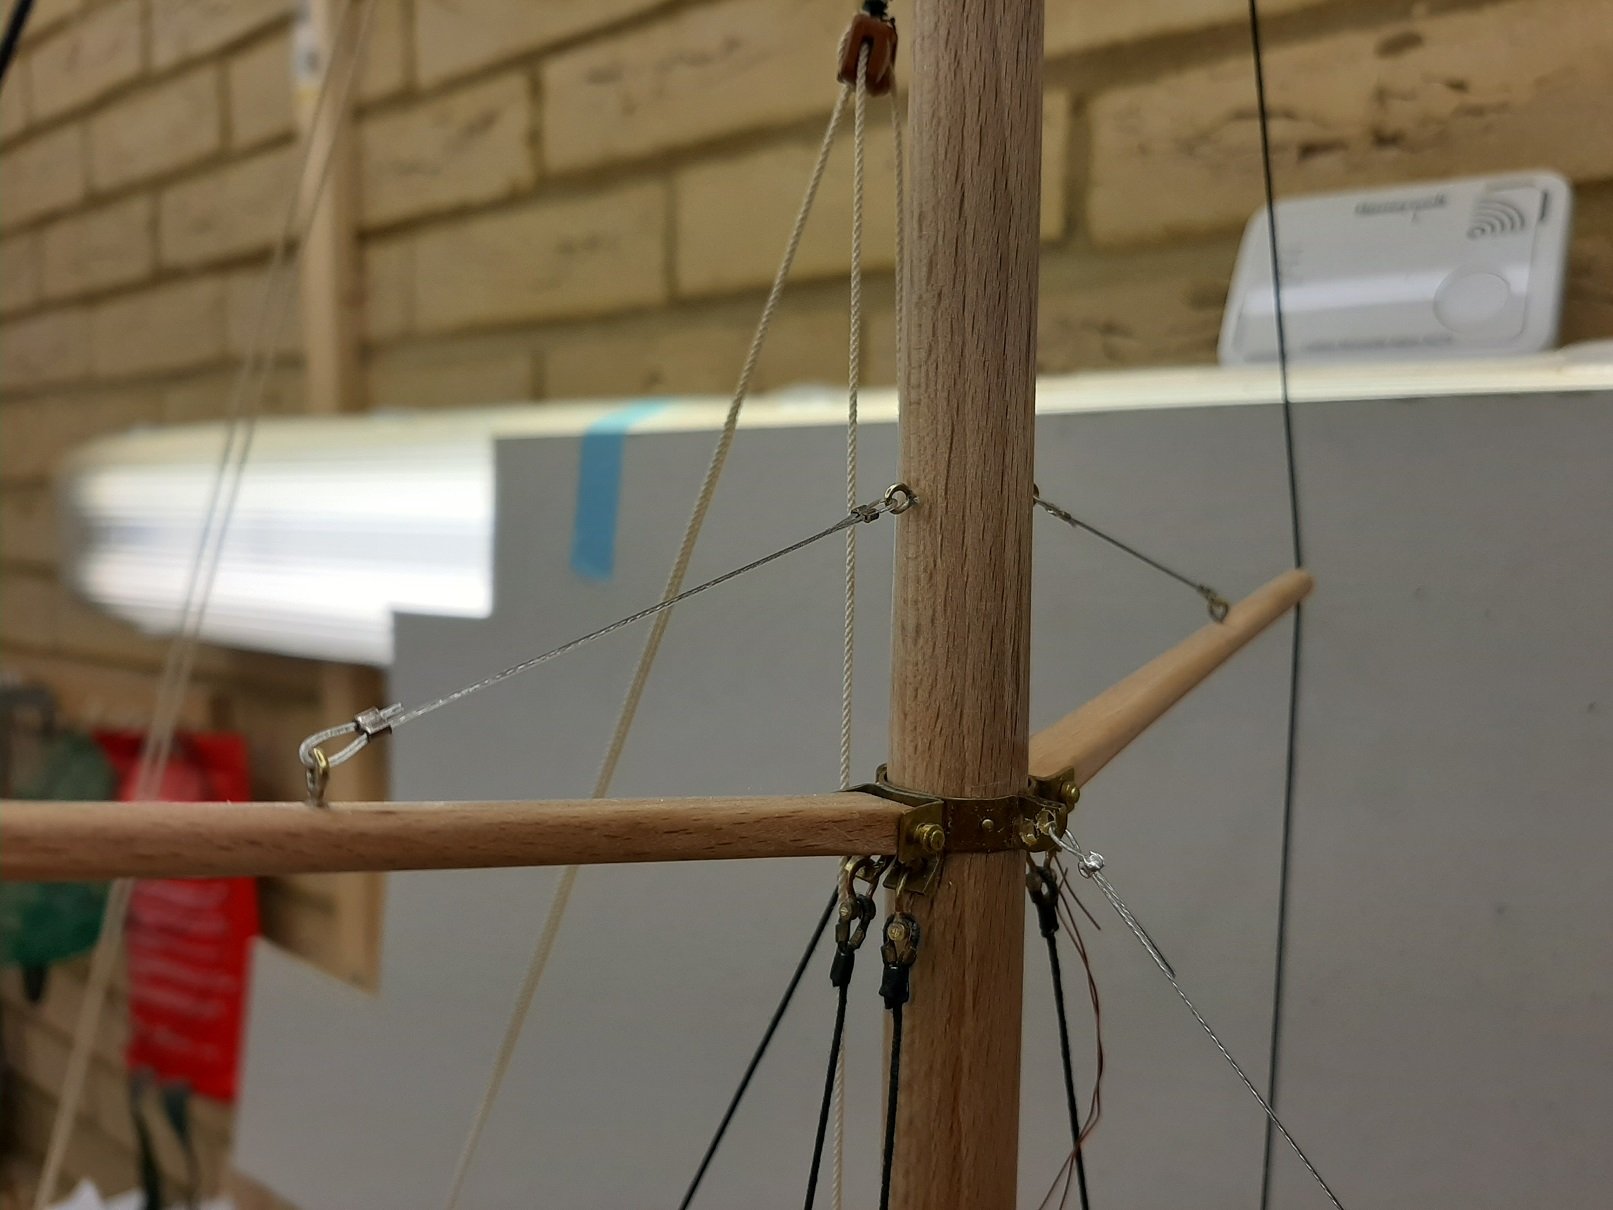
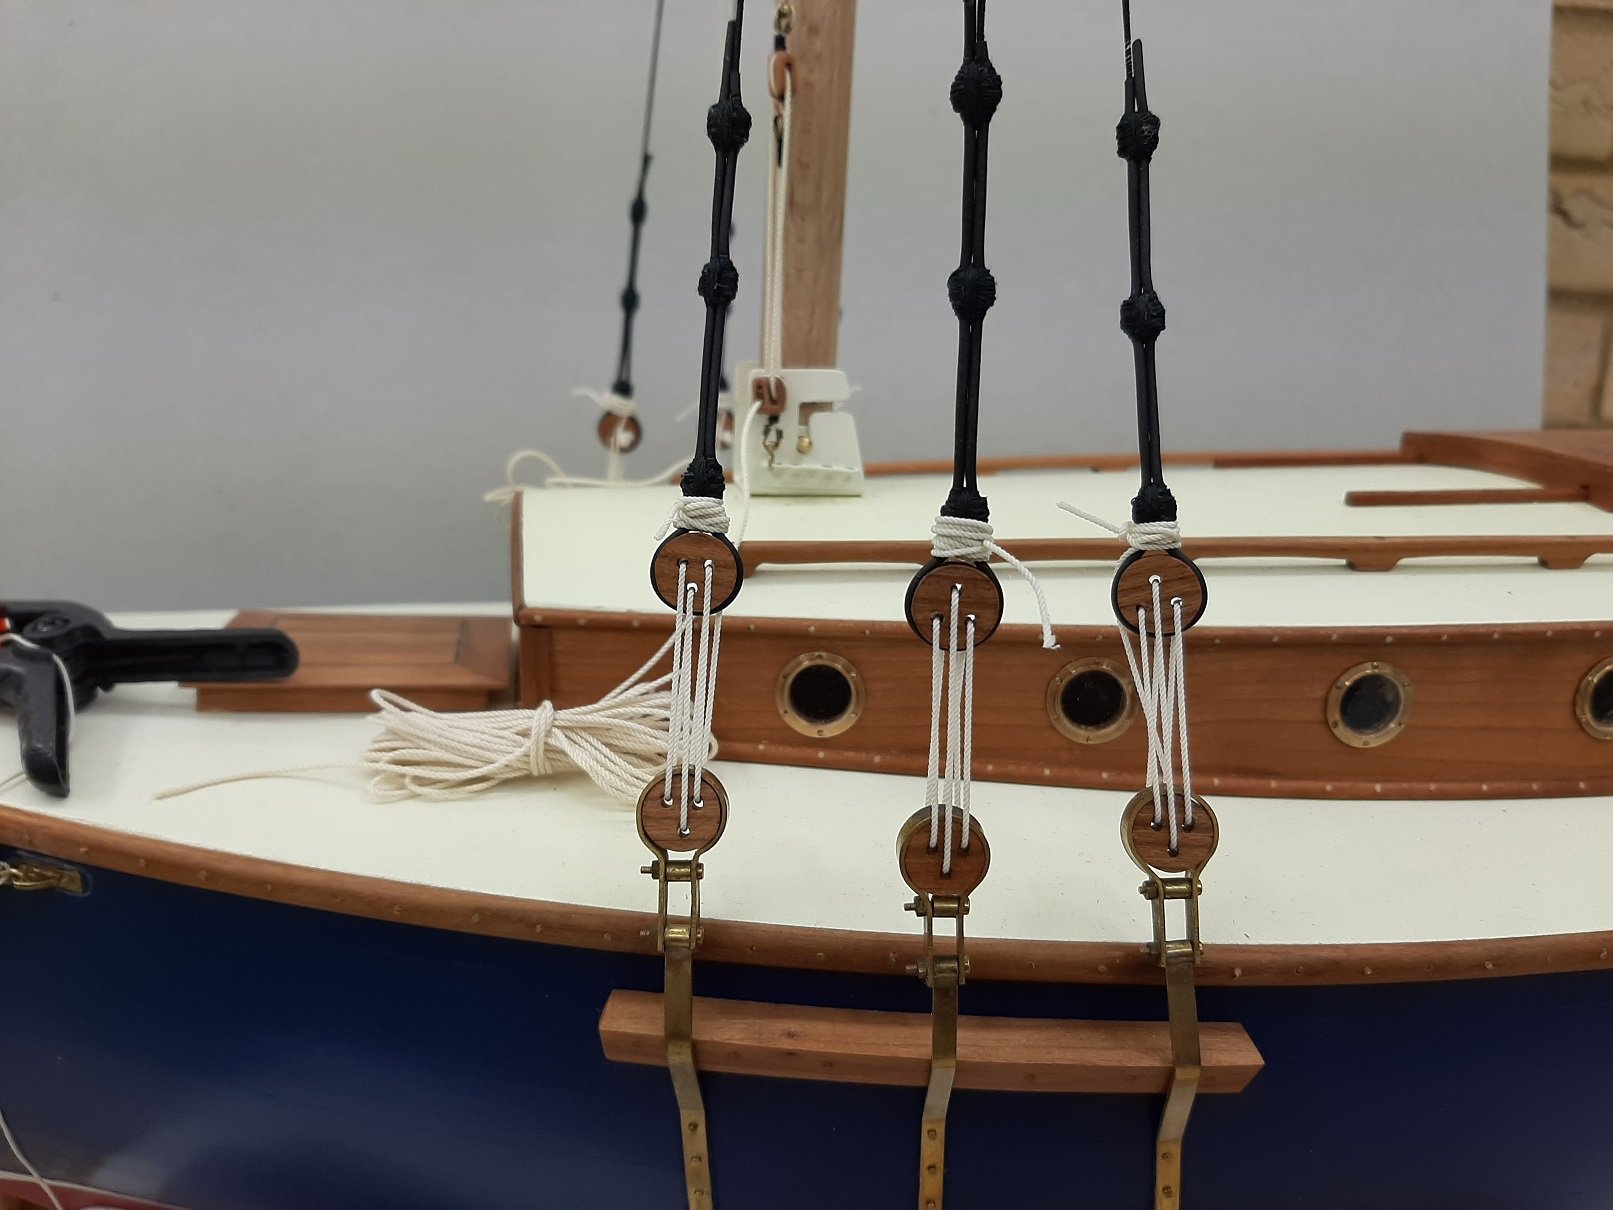
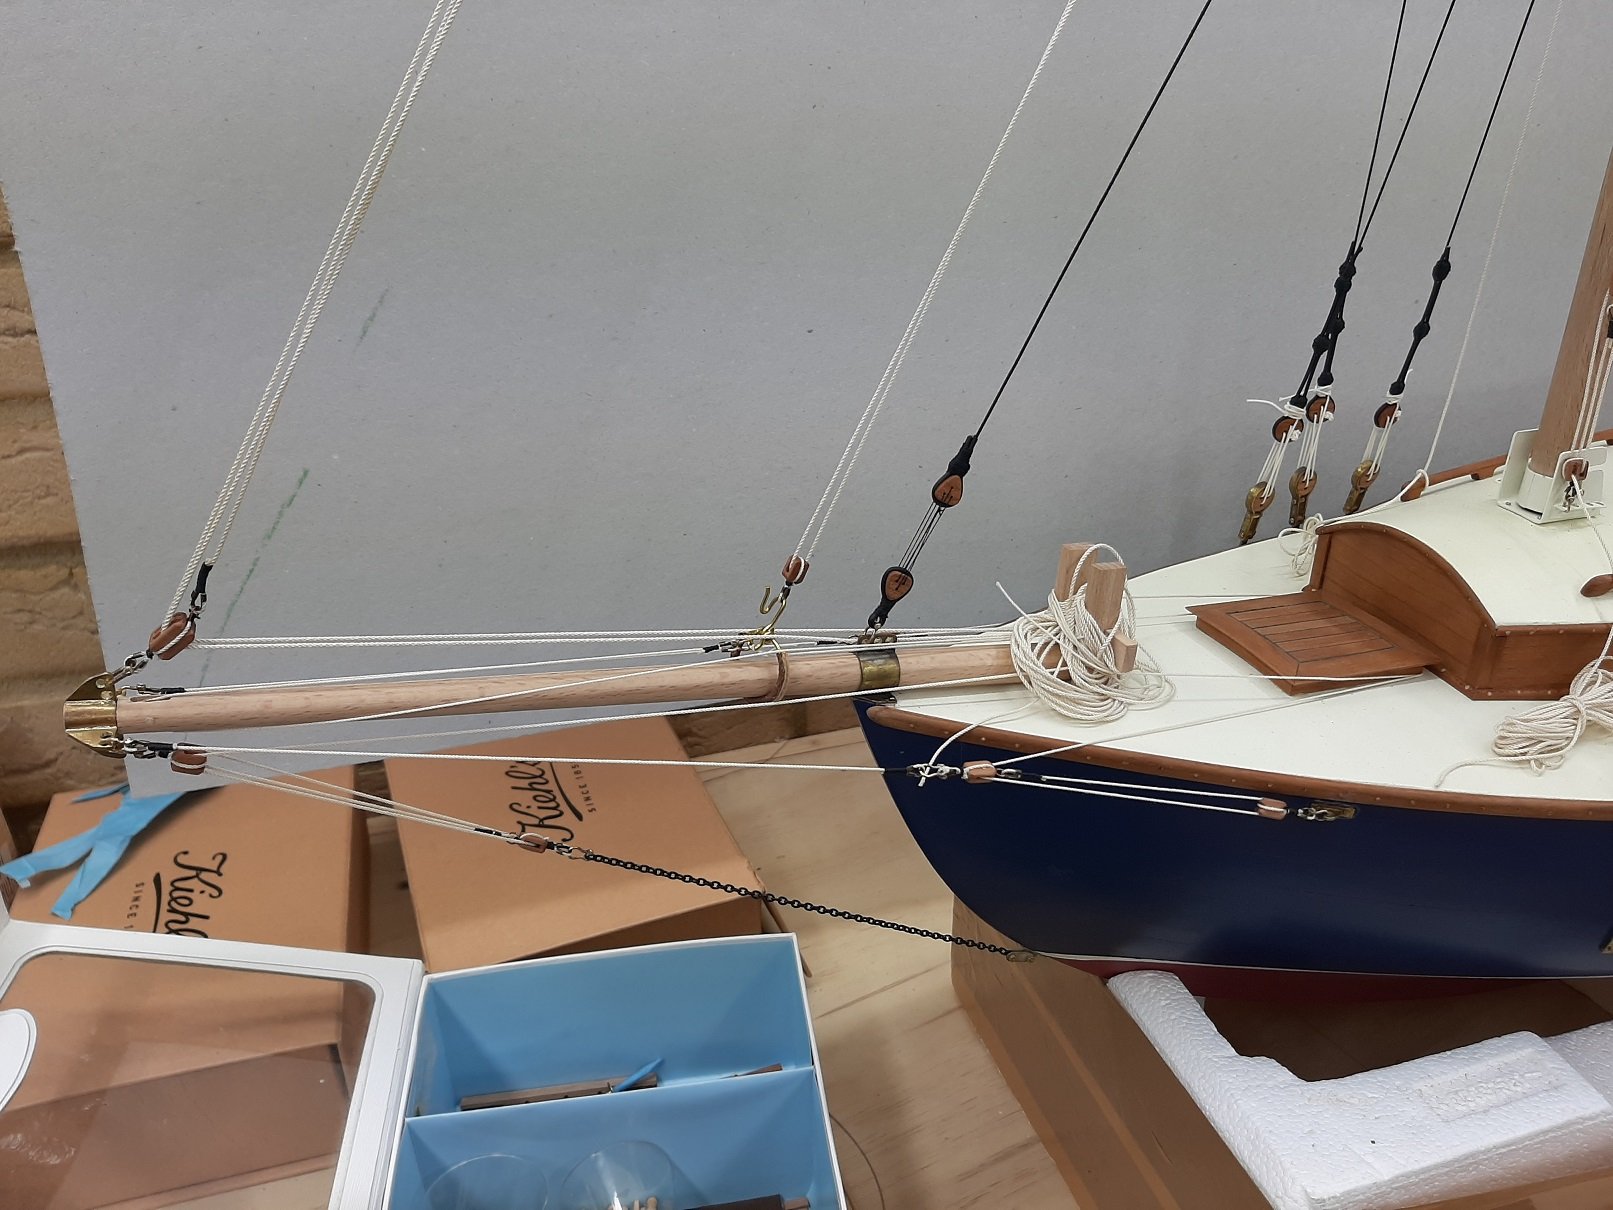
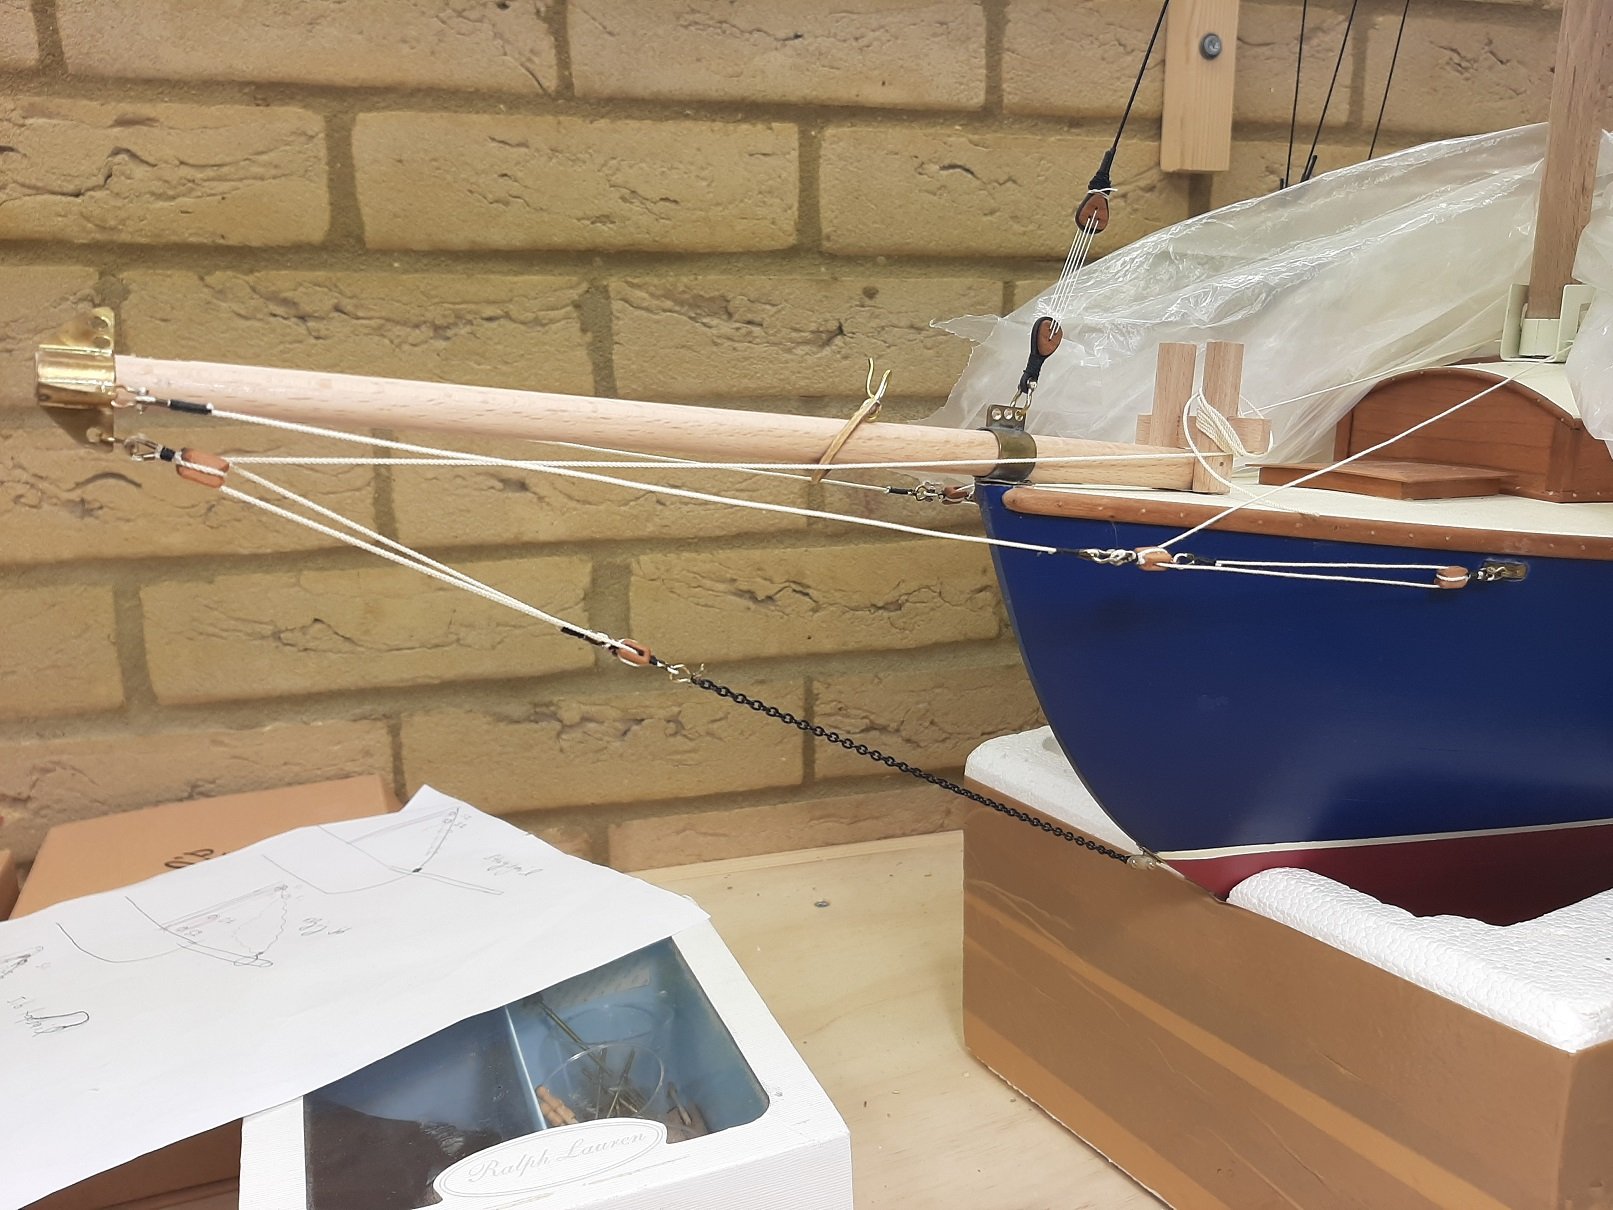
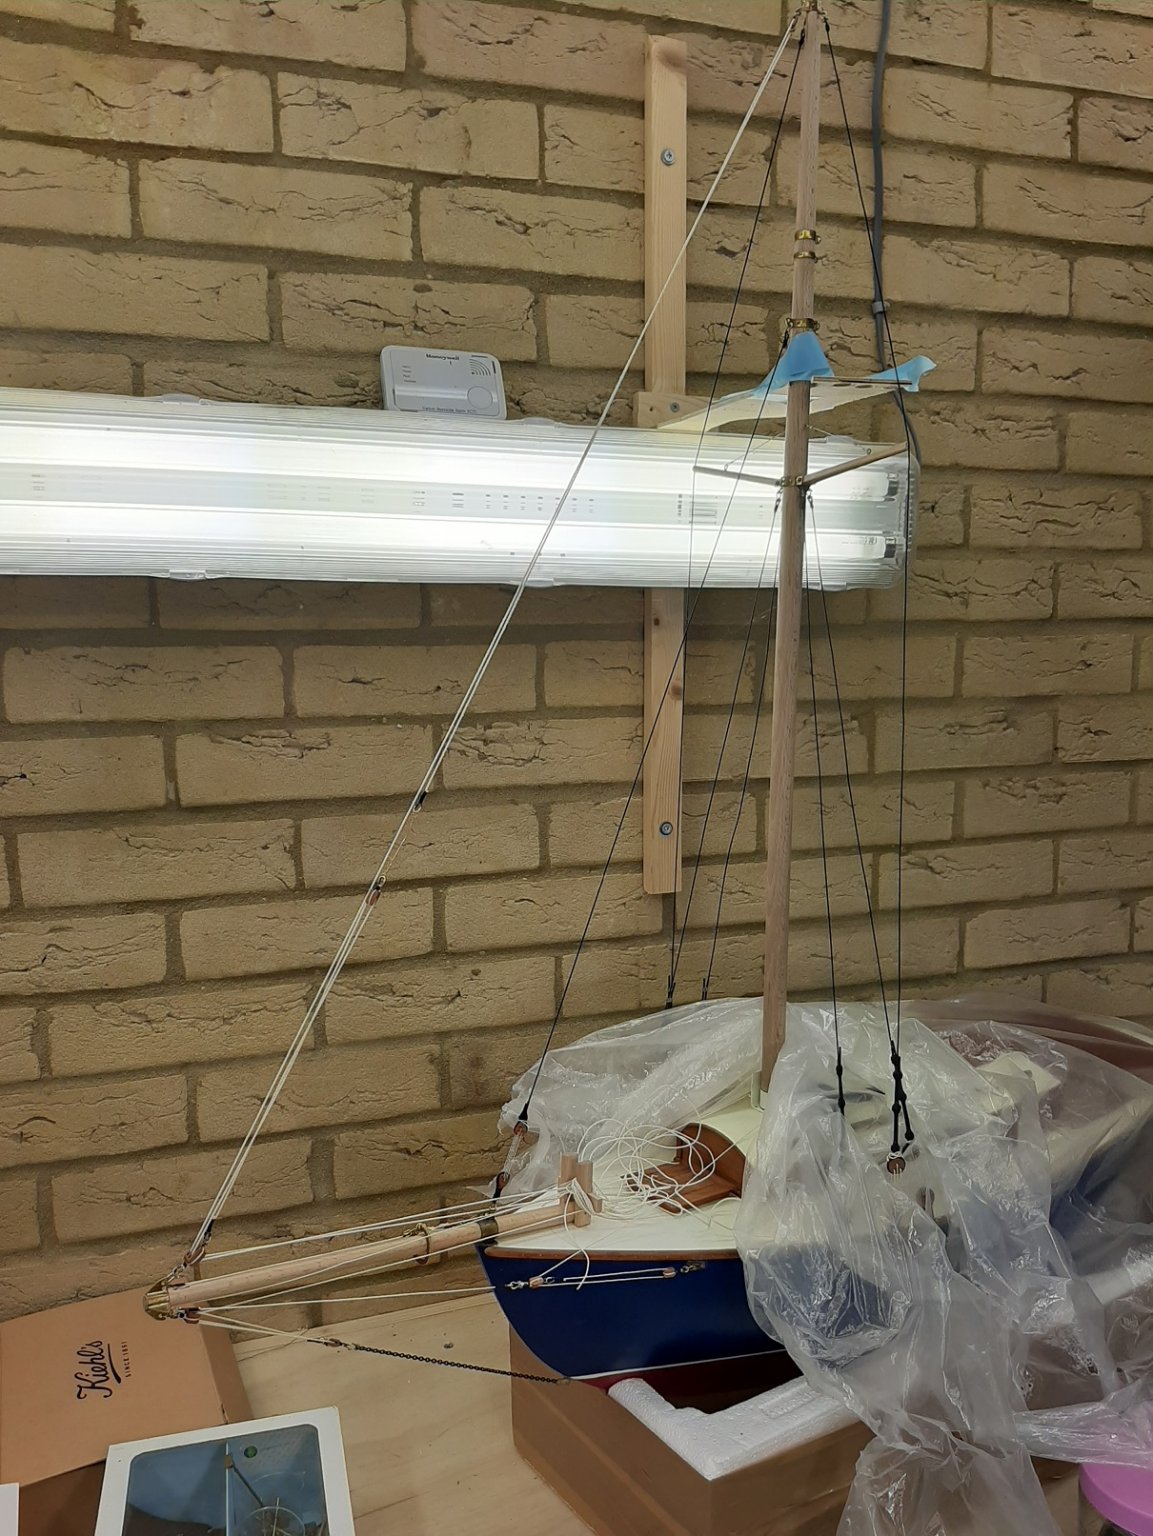
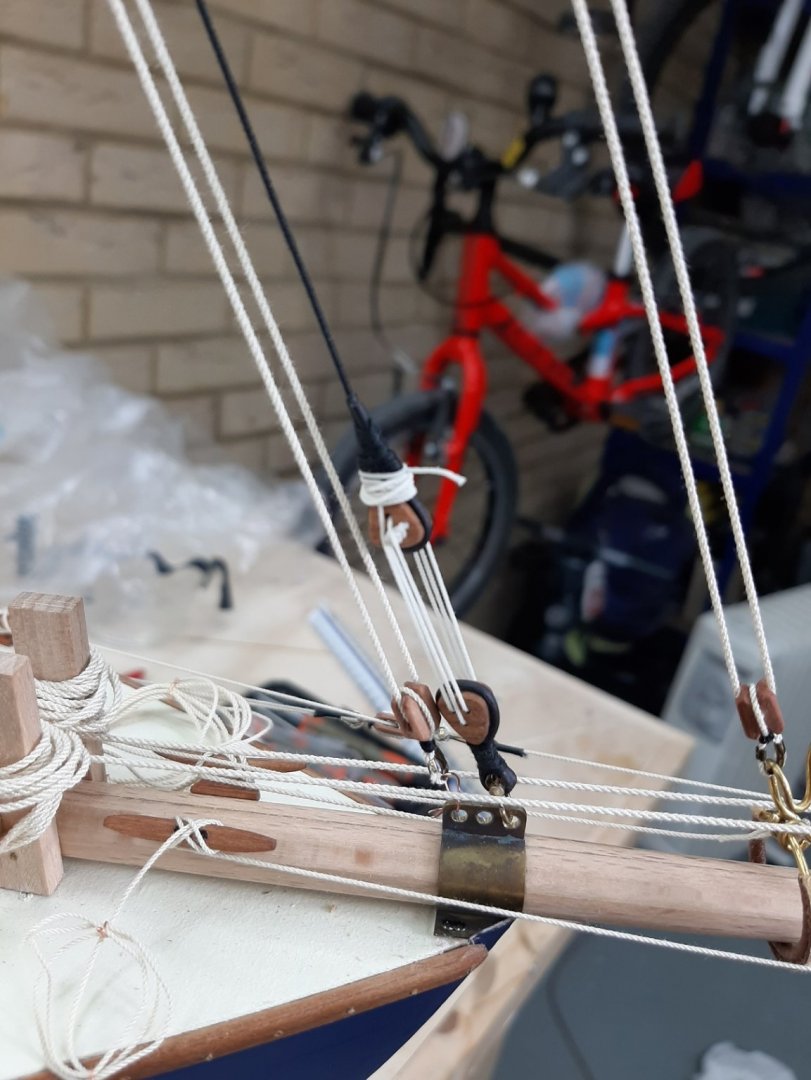
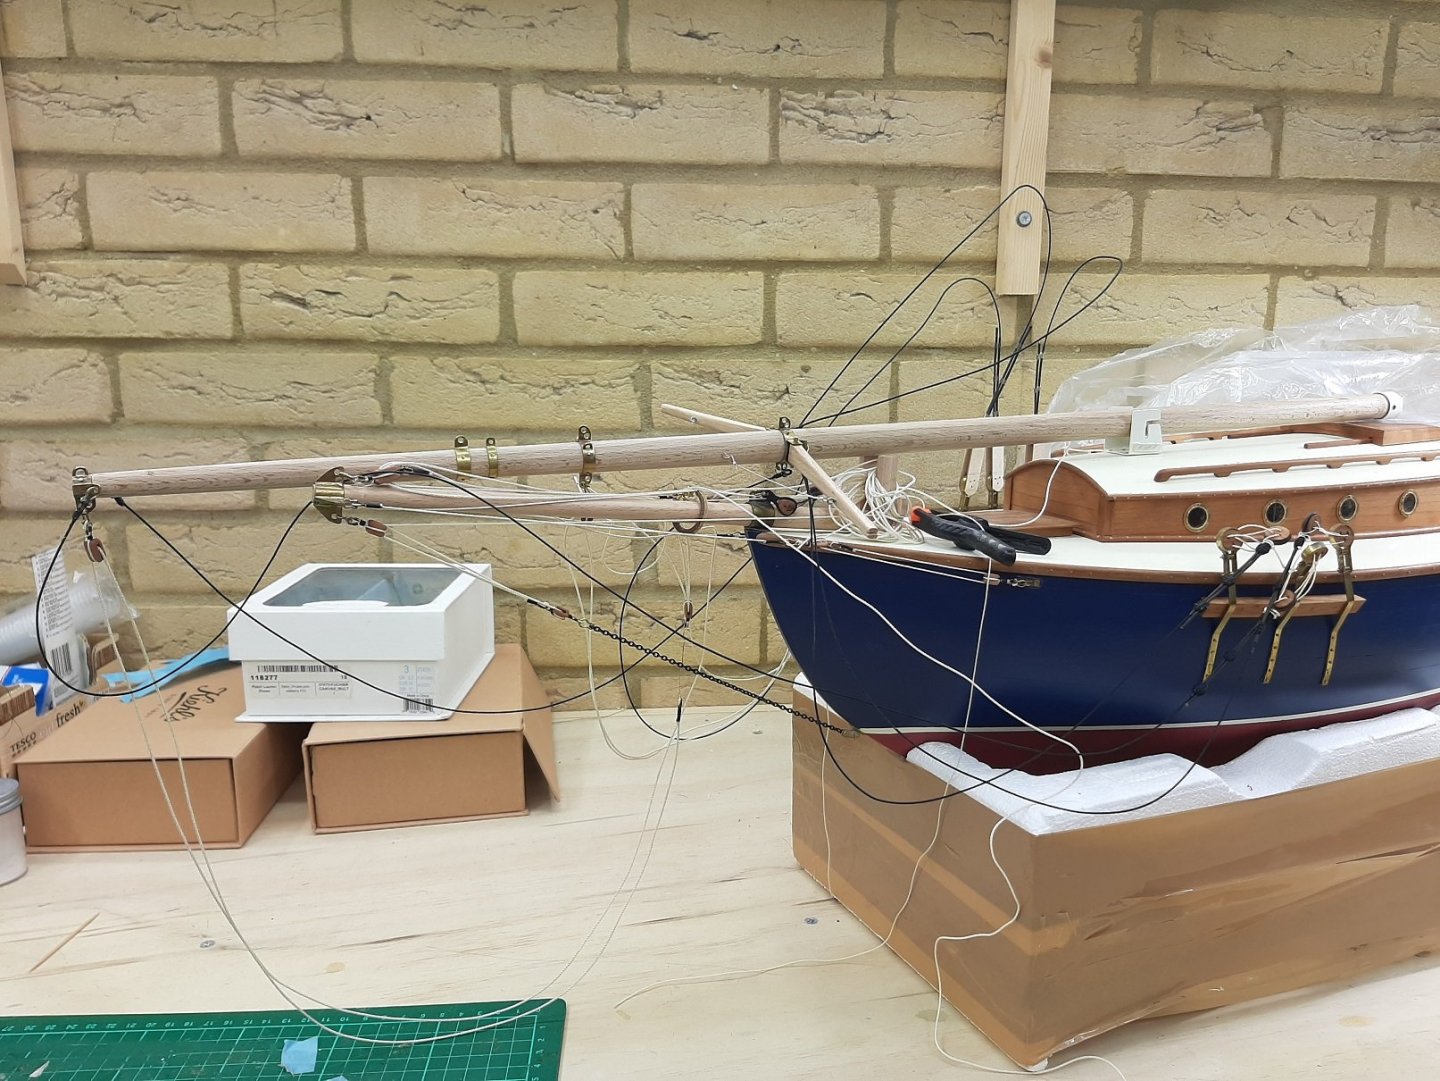
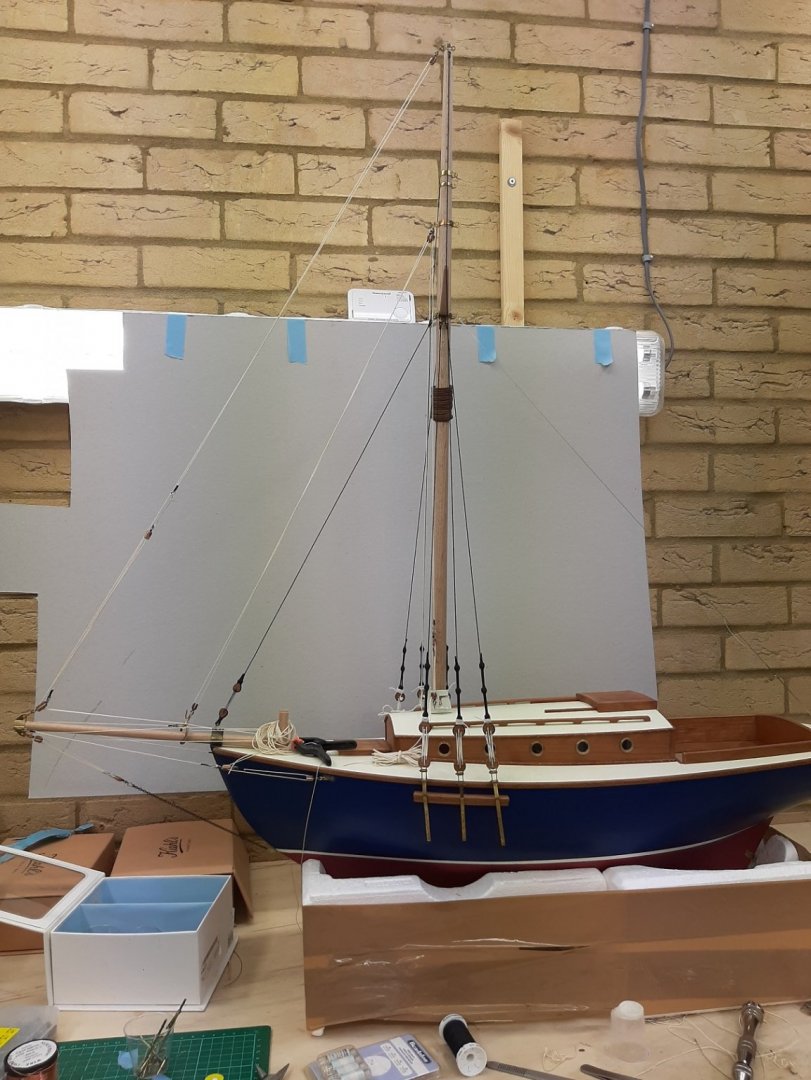
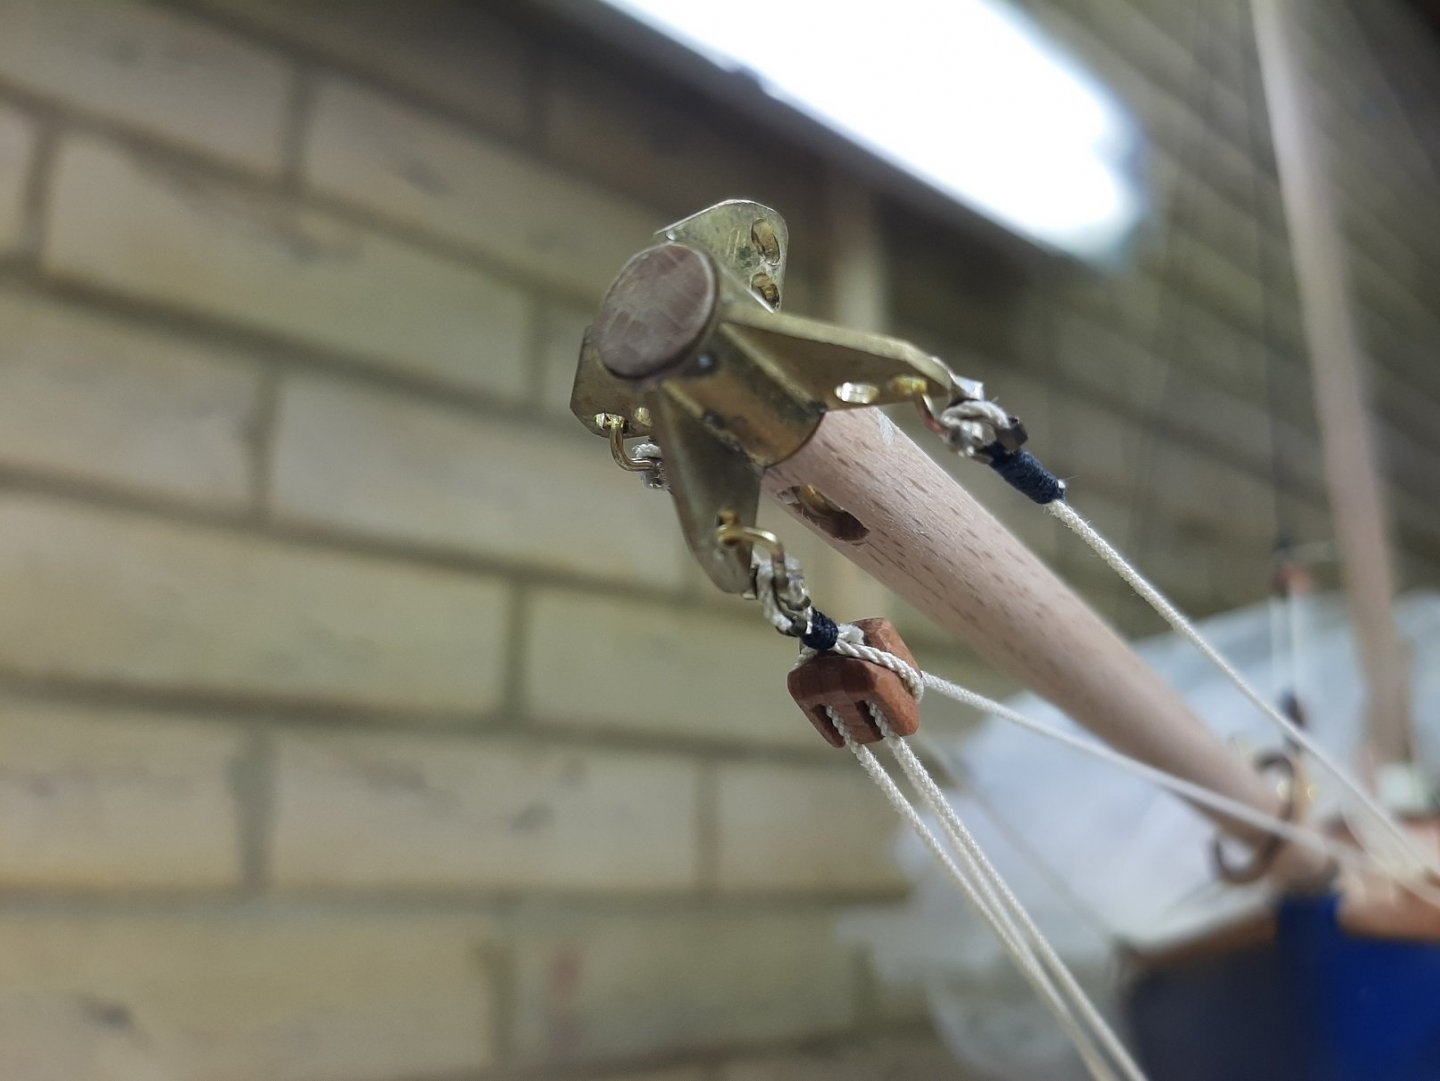
Thanks Keith, indeed ageing eyes is the main problem! Carl, I agree, gluing some white panels on the walls and also ceiling should be a relatively easy solution to get some light reflections. Today, I continued work on the boat and overall was a very satisfying day. I brought down the mast to pass the hoops and then I secured it properly to the tabernacle with the brass axle. It kind of looked like a shipwreck. I then tied the proper ropes on the dead eyes. I replaced the wire ropes holding the spreaders and added a temporary wire aft to hold the mast. The backstays should be doing this but I will at them last otherwise they will be constantly in the way. So now the mast stands on its own. The Highfield levers I think should be placed somewhere here, next pics show the open and close position Adding the rigging is really good fun, it is very satisfying to see the boat slowly being completed. The next photos show the rigging that is already in place. So bob stay and both whisker stays are ready as well as the out and inhaul of the traveler. The forestay is in place. The jib topsail goes all the way to a block at the top of the mast and is actually a self tensioning stay. The two ends now tied with a bit of wire would normally attach to the sail The jib is a flying jib and as such needs a lot of tension. The block that is attached to the traveller would normally be attached to the jib. At the mast there are two blocks and two lines reach the deck. The starboard one just ties and loosely sets the tension, then the port blocks put some real tension. Now, I really need to start adding some cleats, there are now many lines that need to be tied somewhere. I am hesitating though as there will be a lot of components in this very small boat so I don't want to be in a position needing to pull some cleats out. This is now great fun, hopefully I ll make some more progress this week.


- 536 replies
-
- 11
-
-
But a drill press is a great thing to have.
-
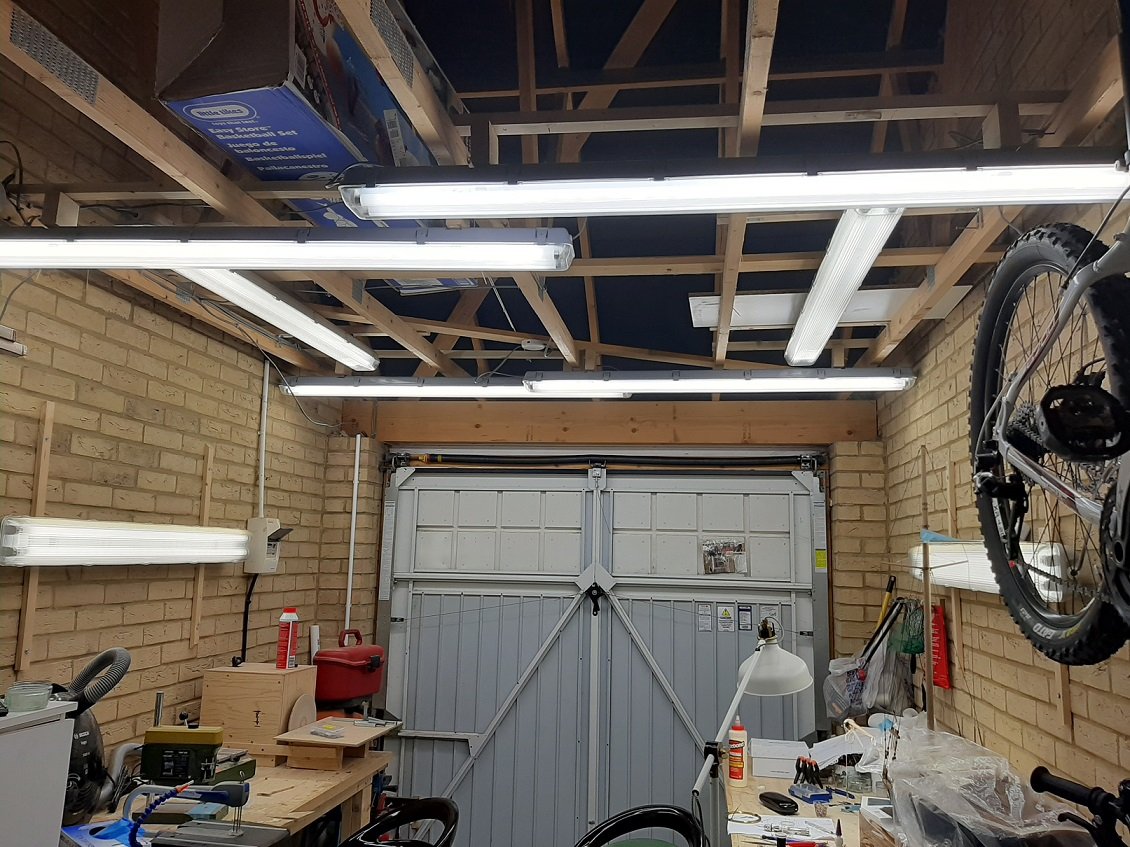
Thanks Bedford! The real problem is that my garage walls are bare brick with no ceiling so light does not reflect. At one time I considered painting the walls and boarding up the roof but it was just too much work and expenses.
-
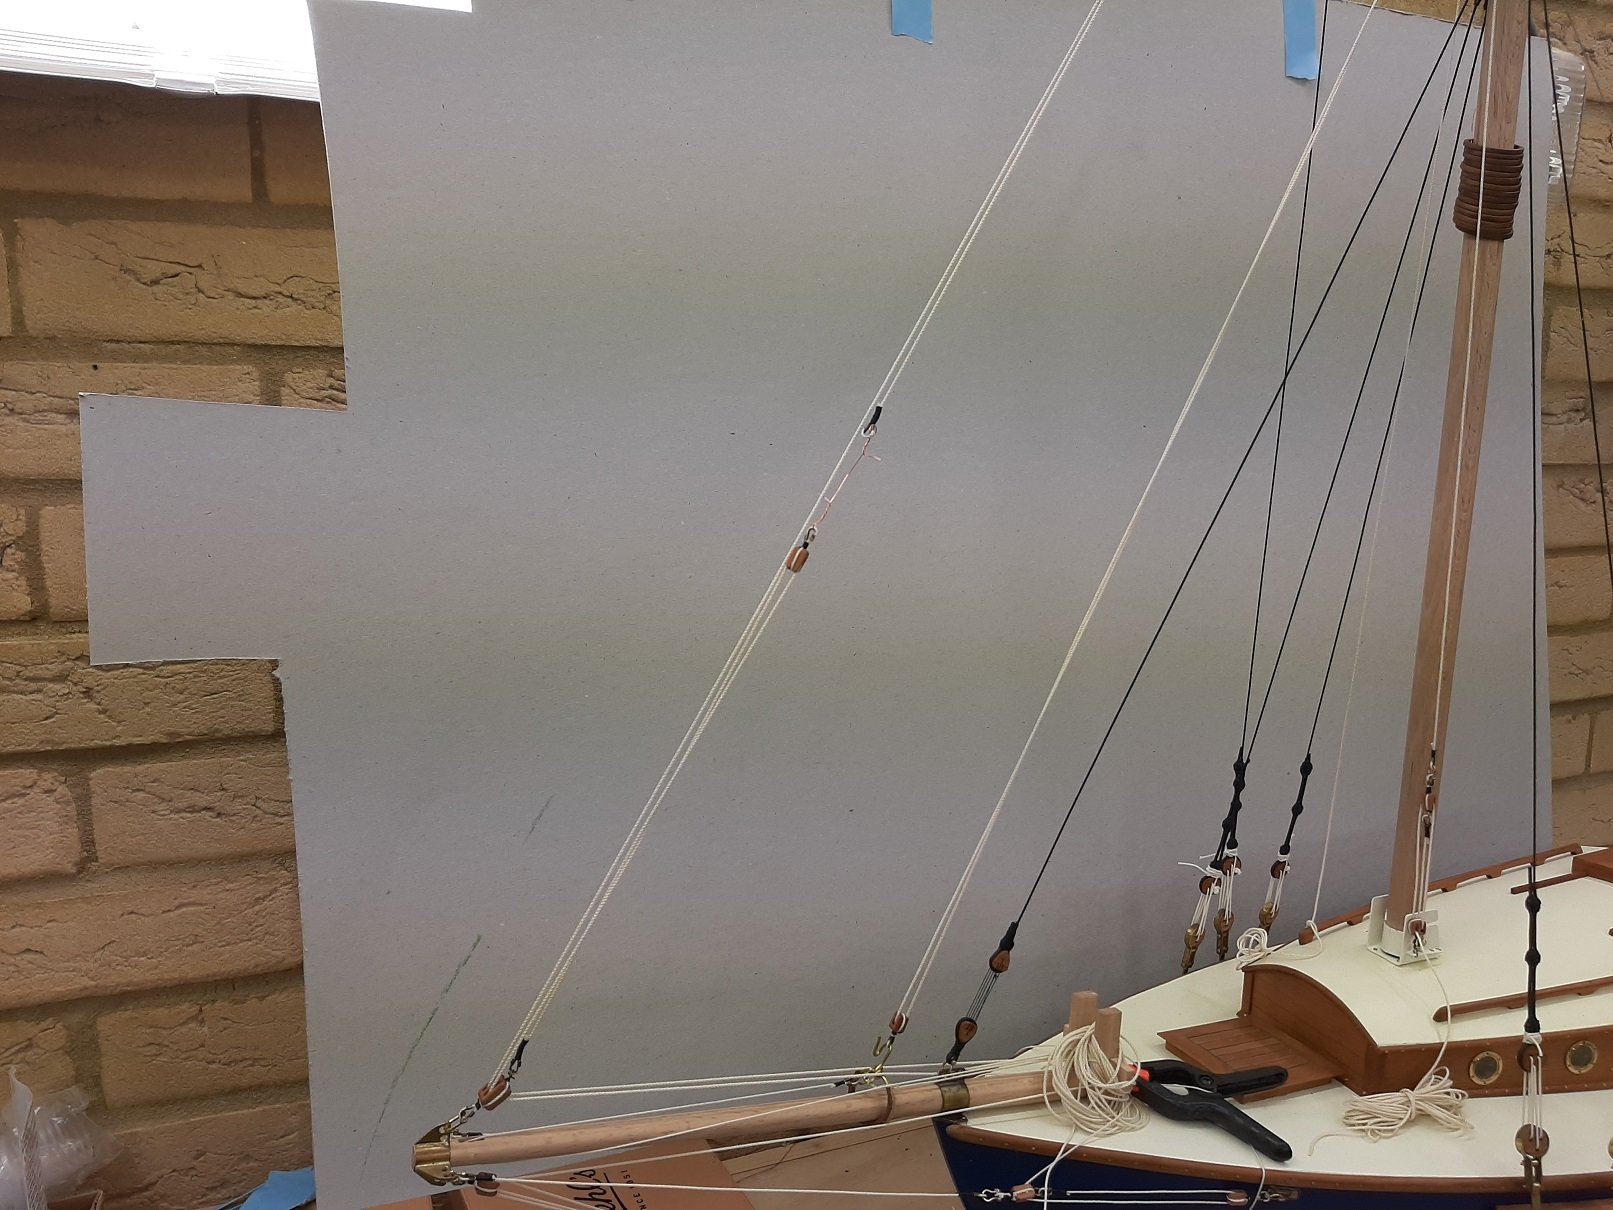
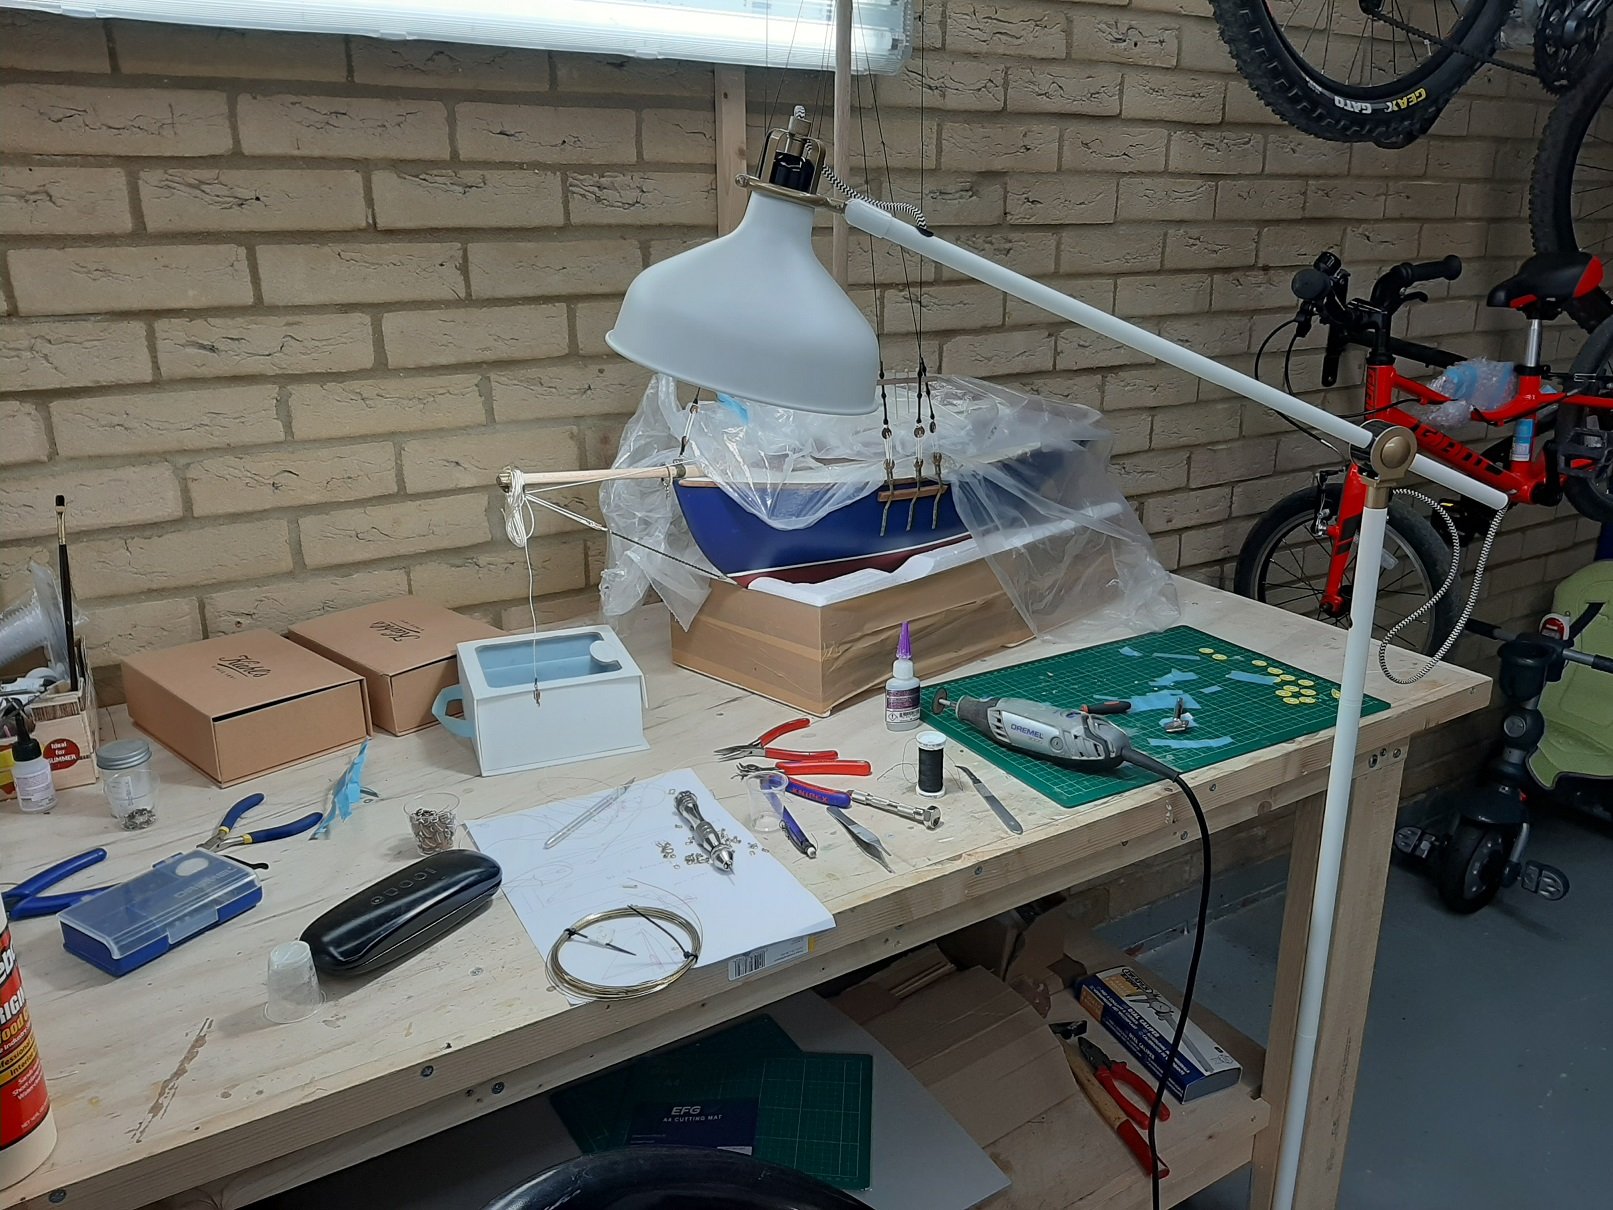
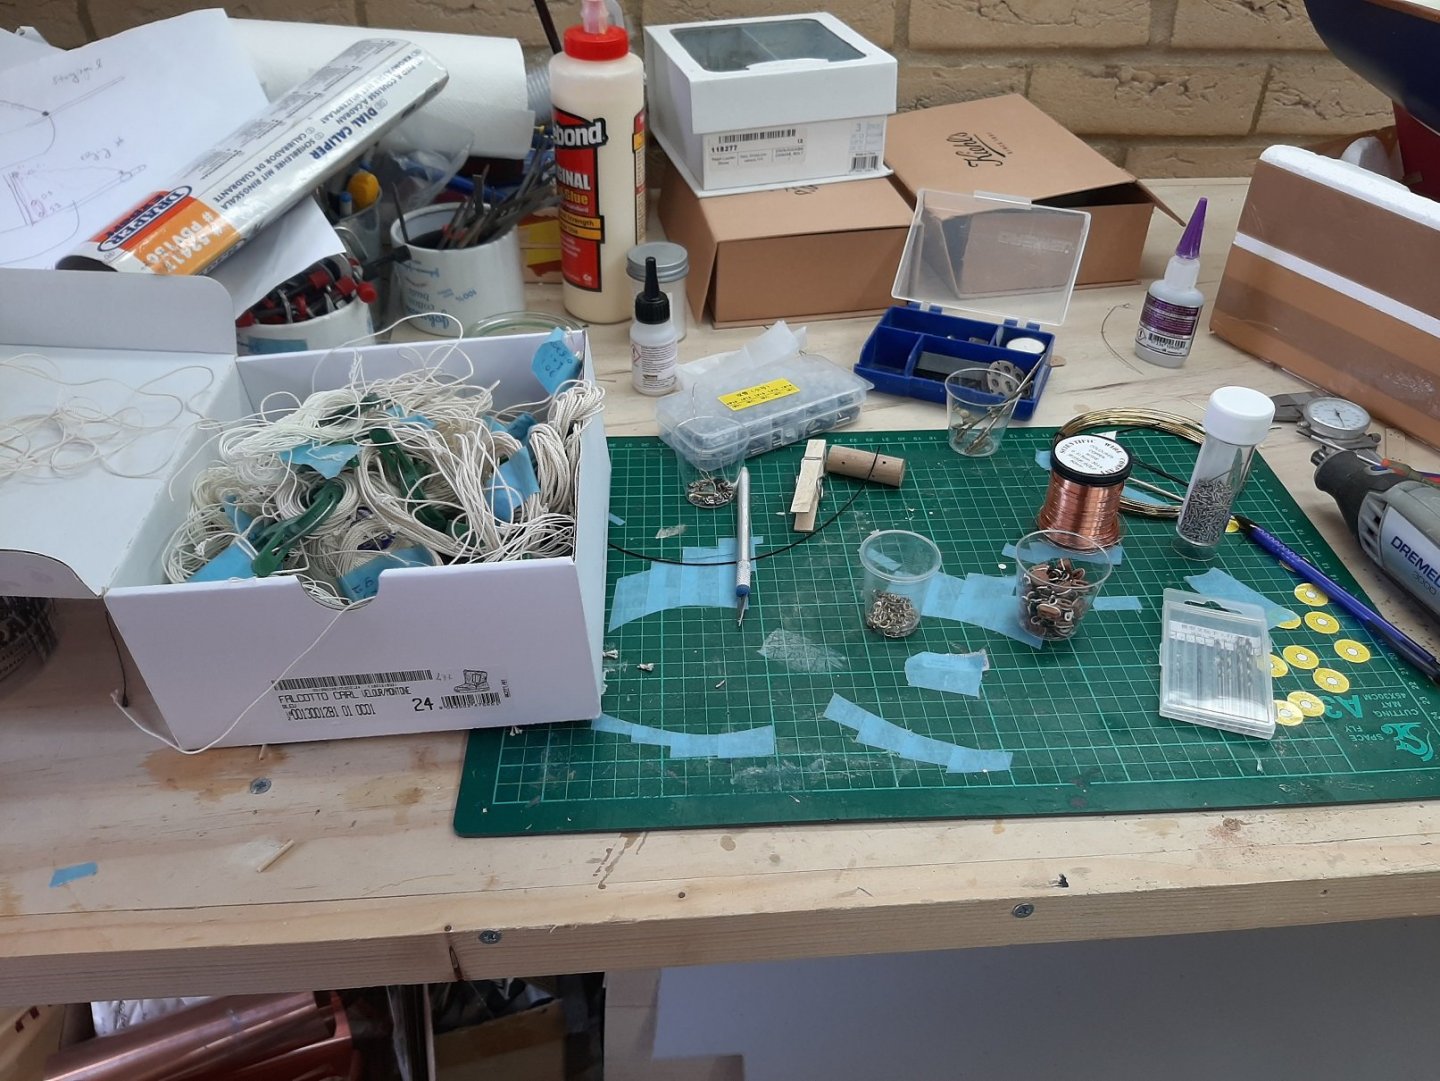
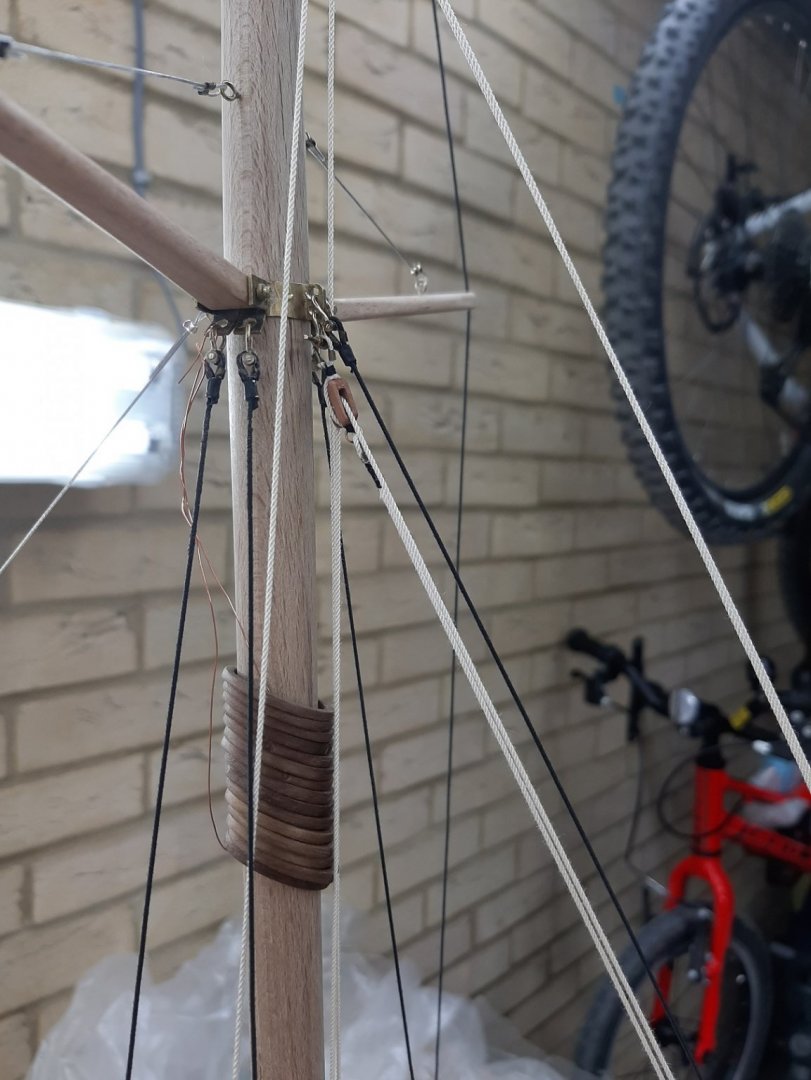
It was raining today so no cycling. The children were tired and the admiral had no jobs for me. That meant I had lots of time to work on the boat! Before moving on to the boat though, a small word on lighting. I have about 1000 W of fluorescent lights but it is actually not enough. I think that for the detailed work I do, I would need twice as much. I bought a lamp from IKEA and paired it with a daylight bulb producing 5000 lumen. This made a huge improvement. This is how my work area looks like now Today I replaced the bob and whisker stays using the newly stropped blocks. I think they look much better. It is a bit difficult to capture the boat well on photos, it is very big and my cheap samsung phone is struggling. Next I installed the outhaul for the traveller and a line to haul it back in. I also installed the line for the flying jib which also acts as a self tensioning stay. In the next photos there is a piece of copper wire joining the two ends that would normally be attached with shackles to the flying jib or to each other when the jib is furled. I have just starting the rigging and already I have 7 lines to find cleats for. There will be many more by the time the boat is done. I will finish rigging the bowsprit area however and then decide where to install more hardware. Today was a lot of fun, hopefully I ll be able to do a bit more work soon. Regards Vaddoc


- 536 replies
-
- 10
-
-
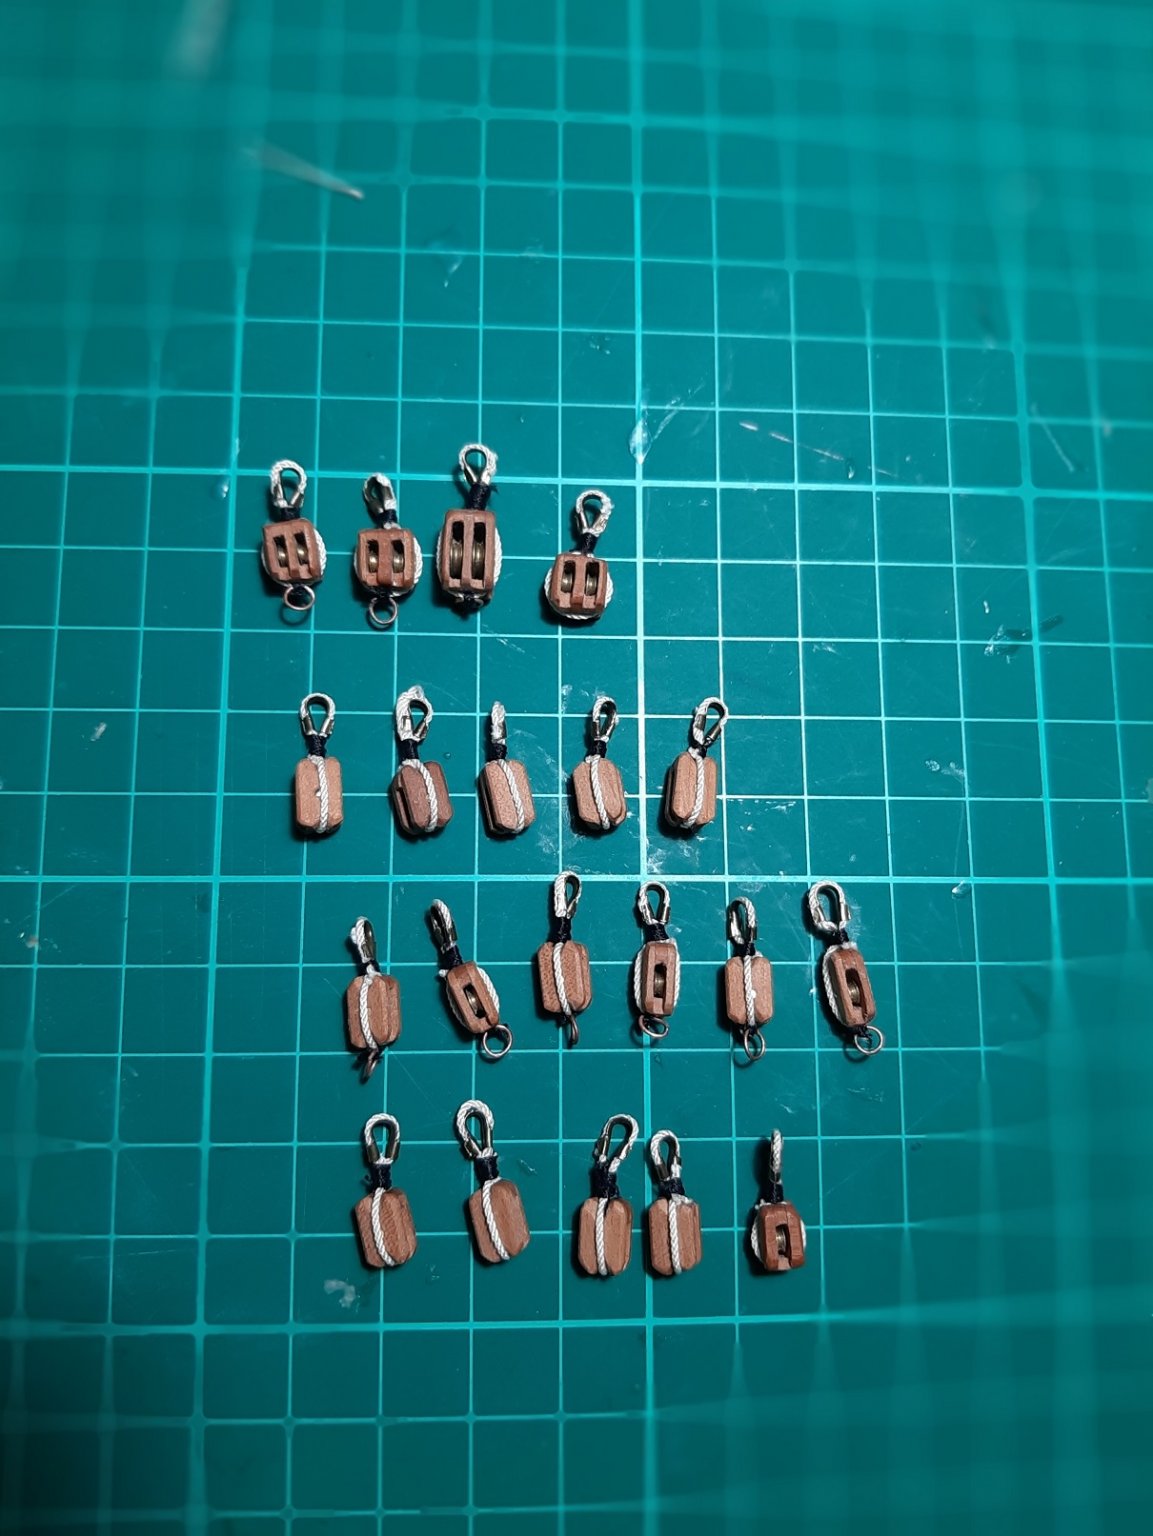
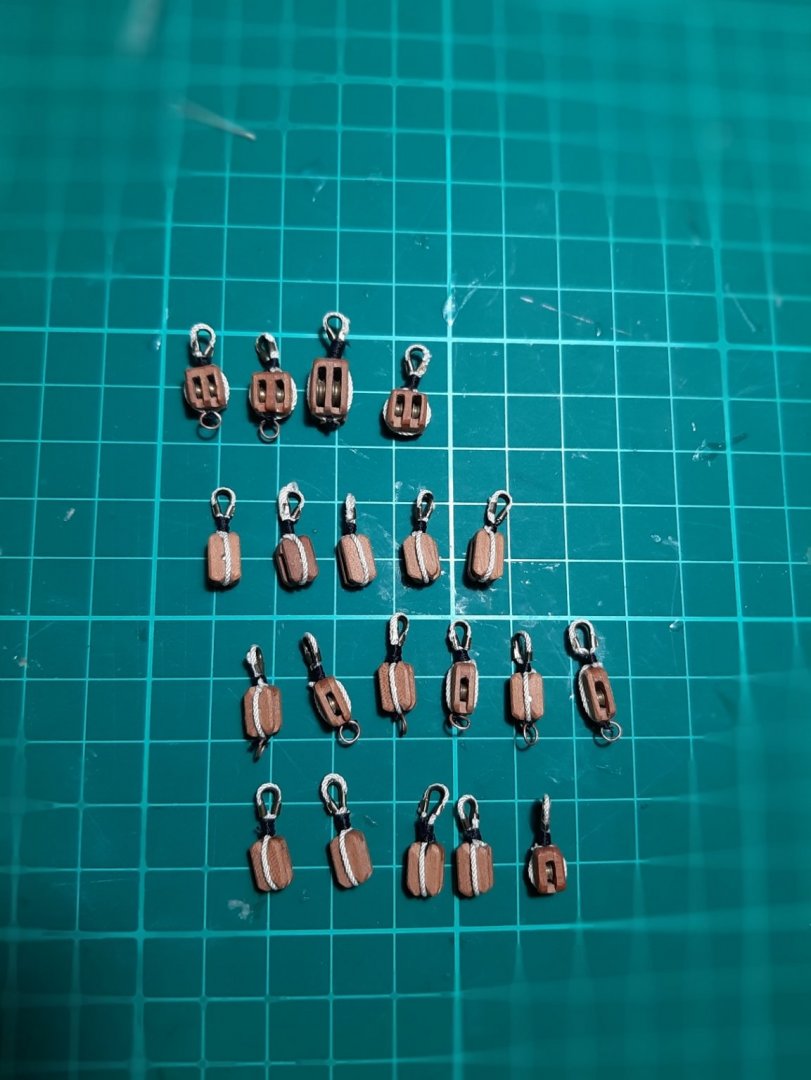
No winches in my boat Mark! Plan is to make rigging as complex as possible (to learn and for fun), I d like to have many ropes and blocks. Also, I made many blocks because making them is so complex and time consuming that I did not want to go back to it. I counted the blocks I have ready, they are 50 in different configurations. I hope they will be enough.
-
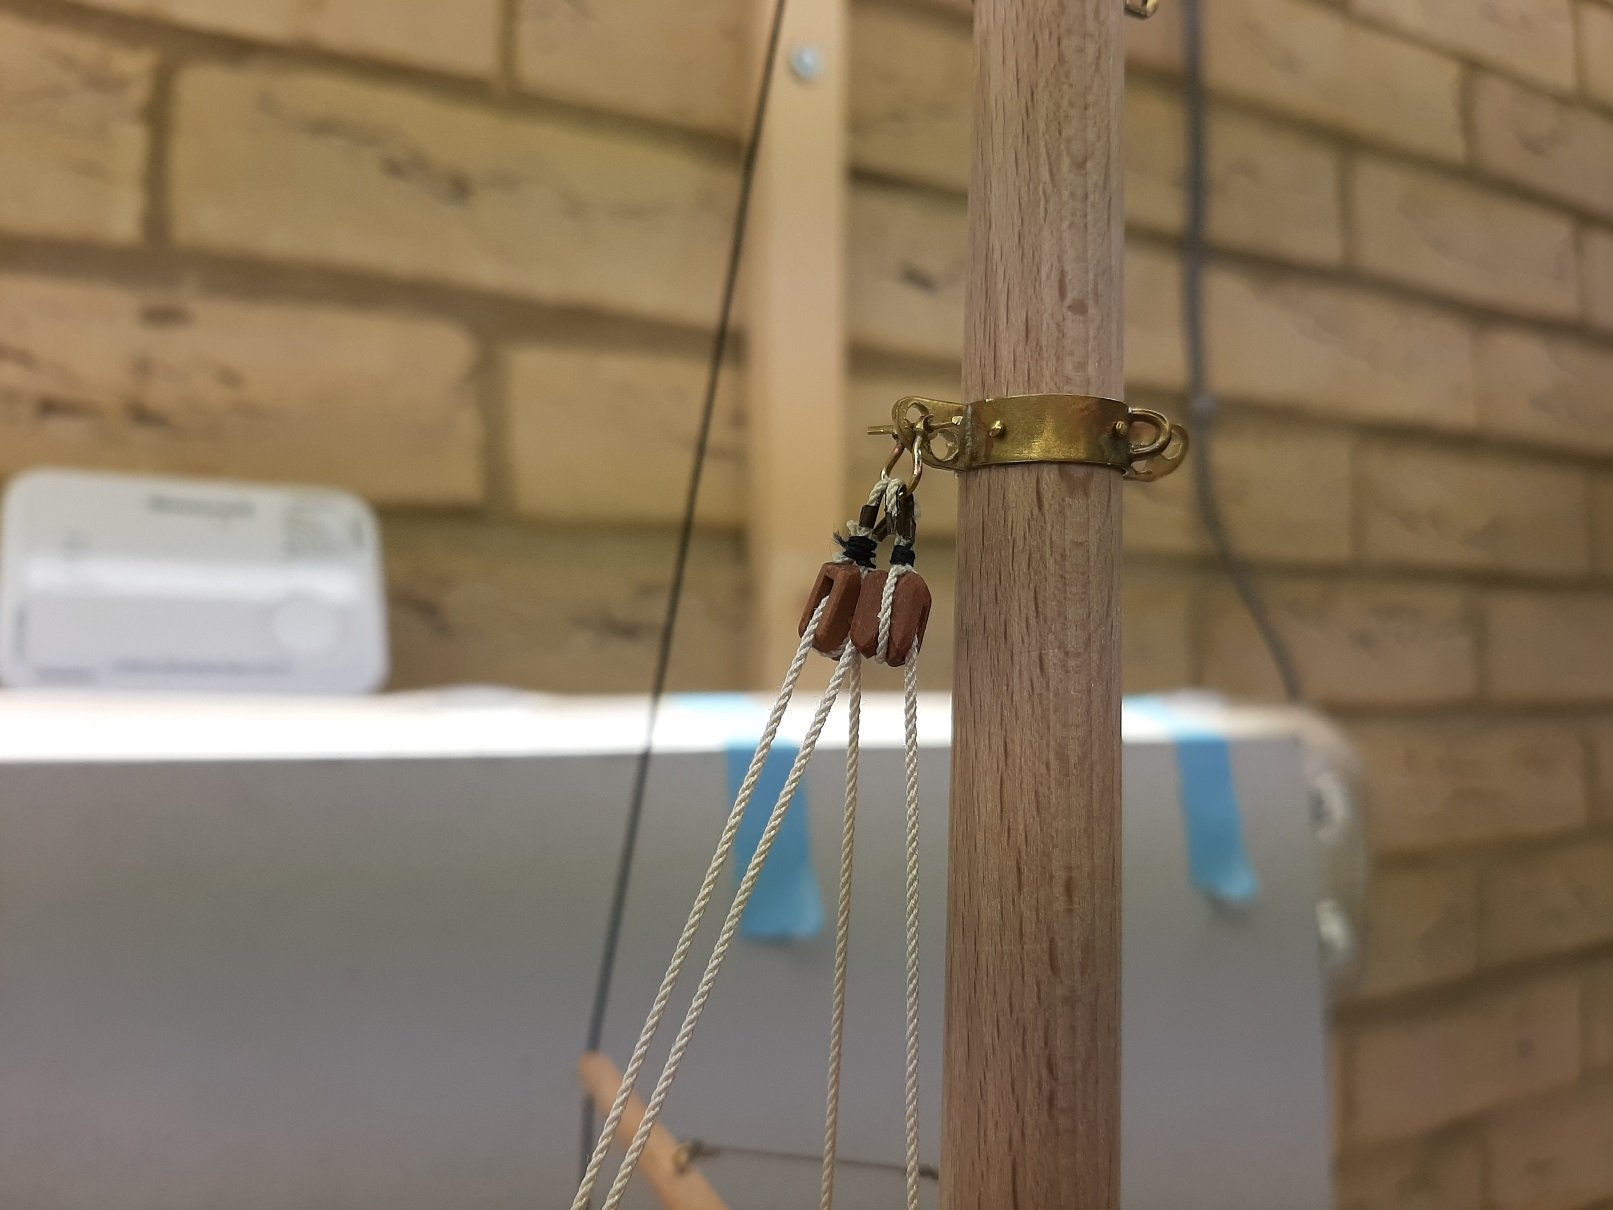
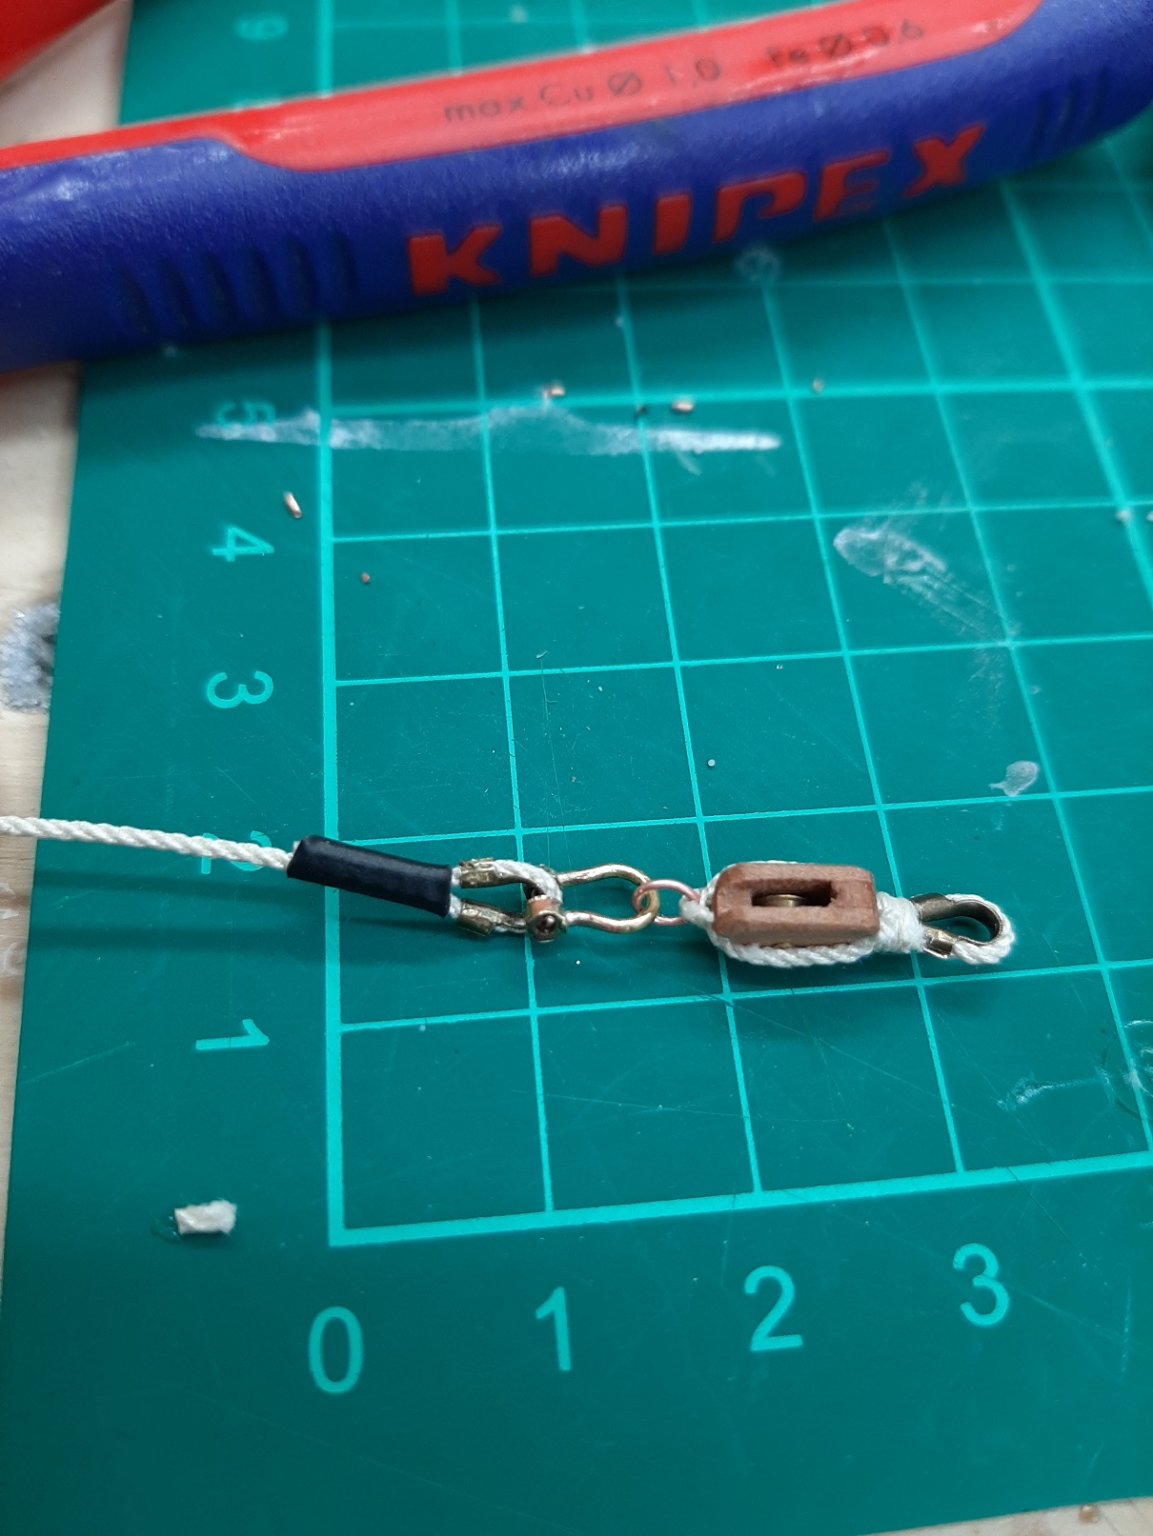
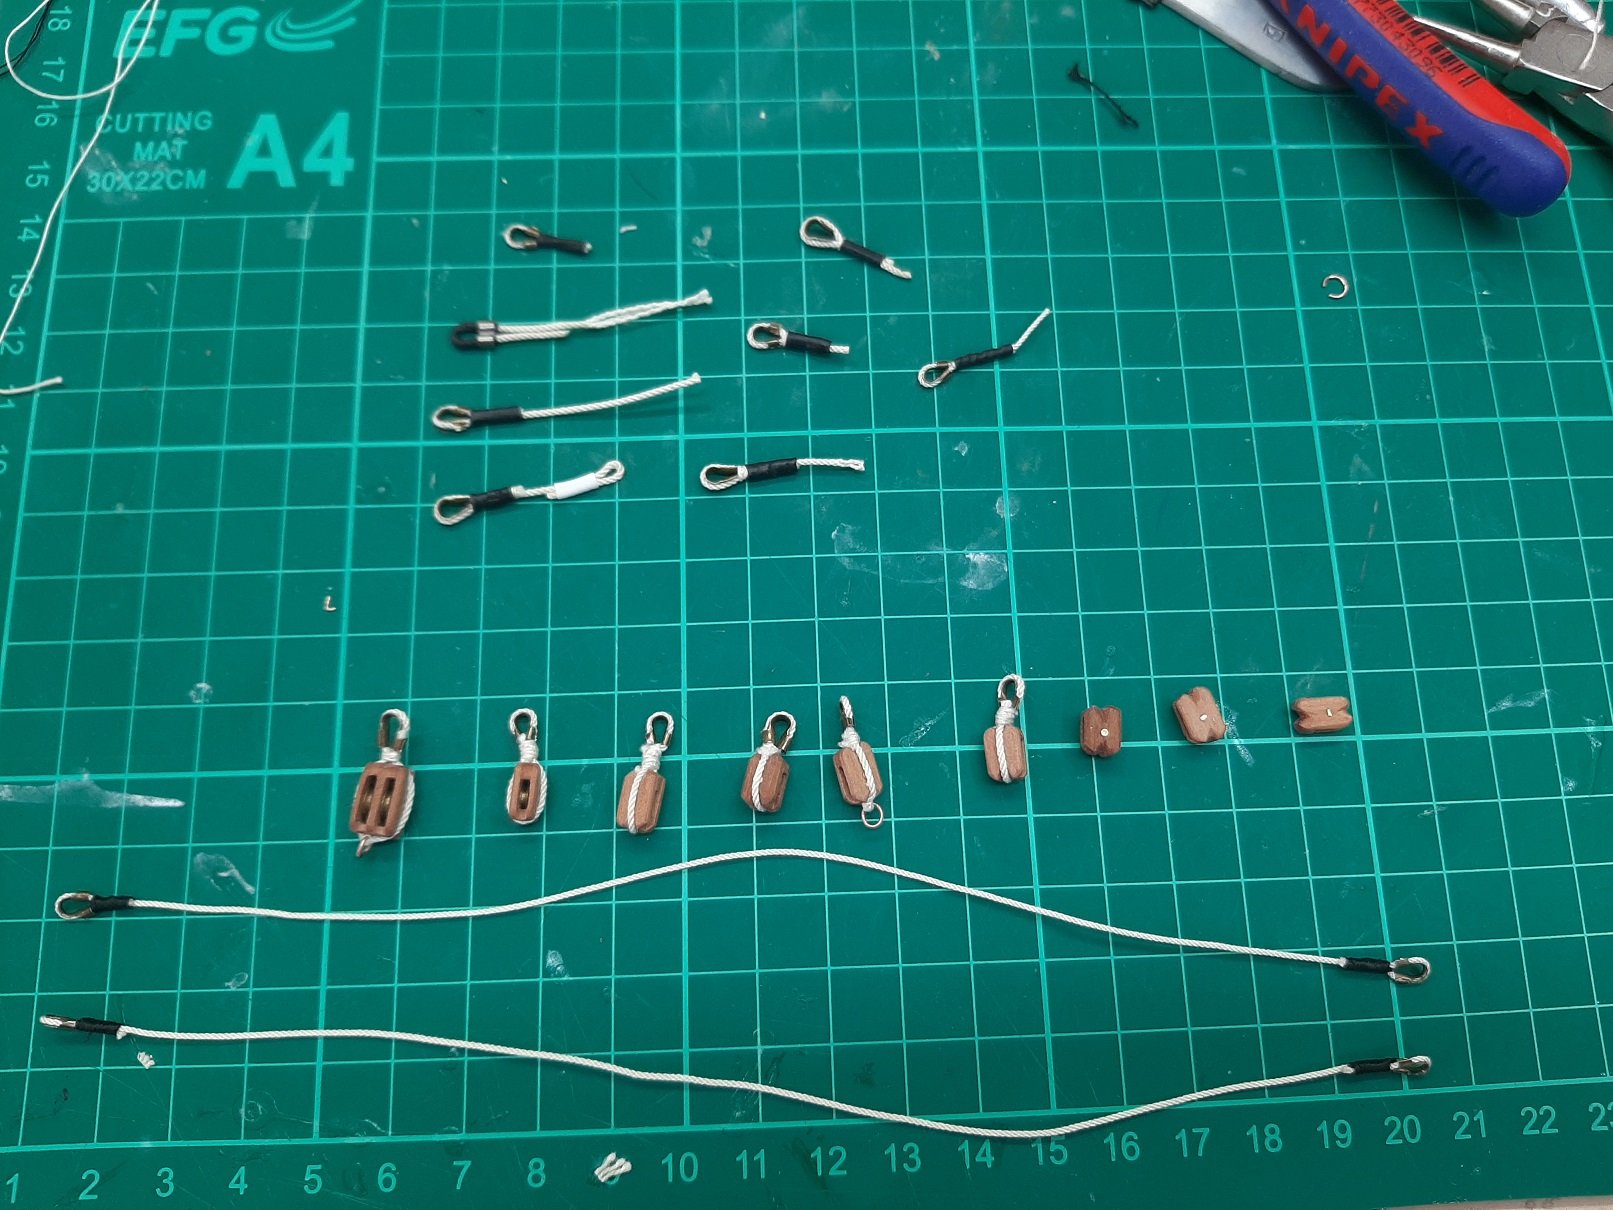
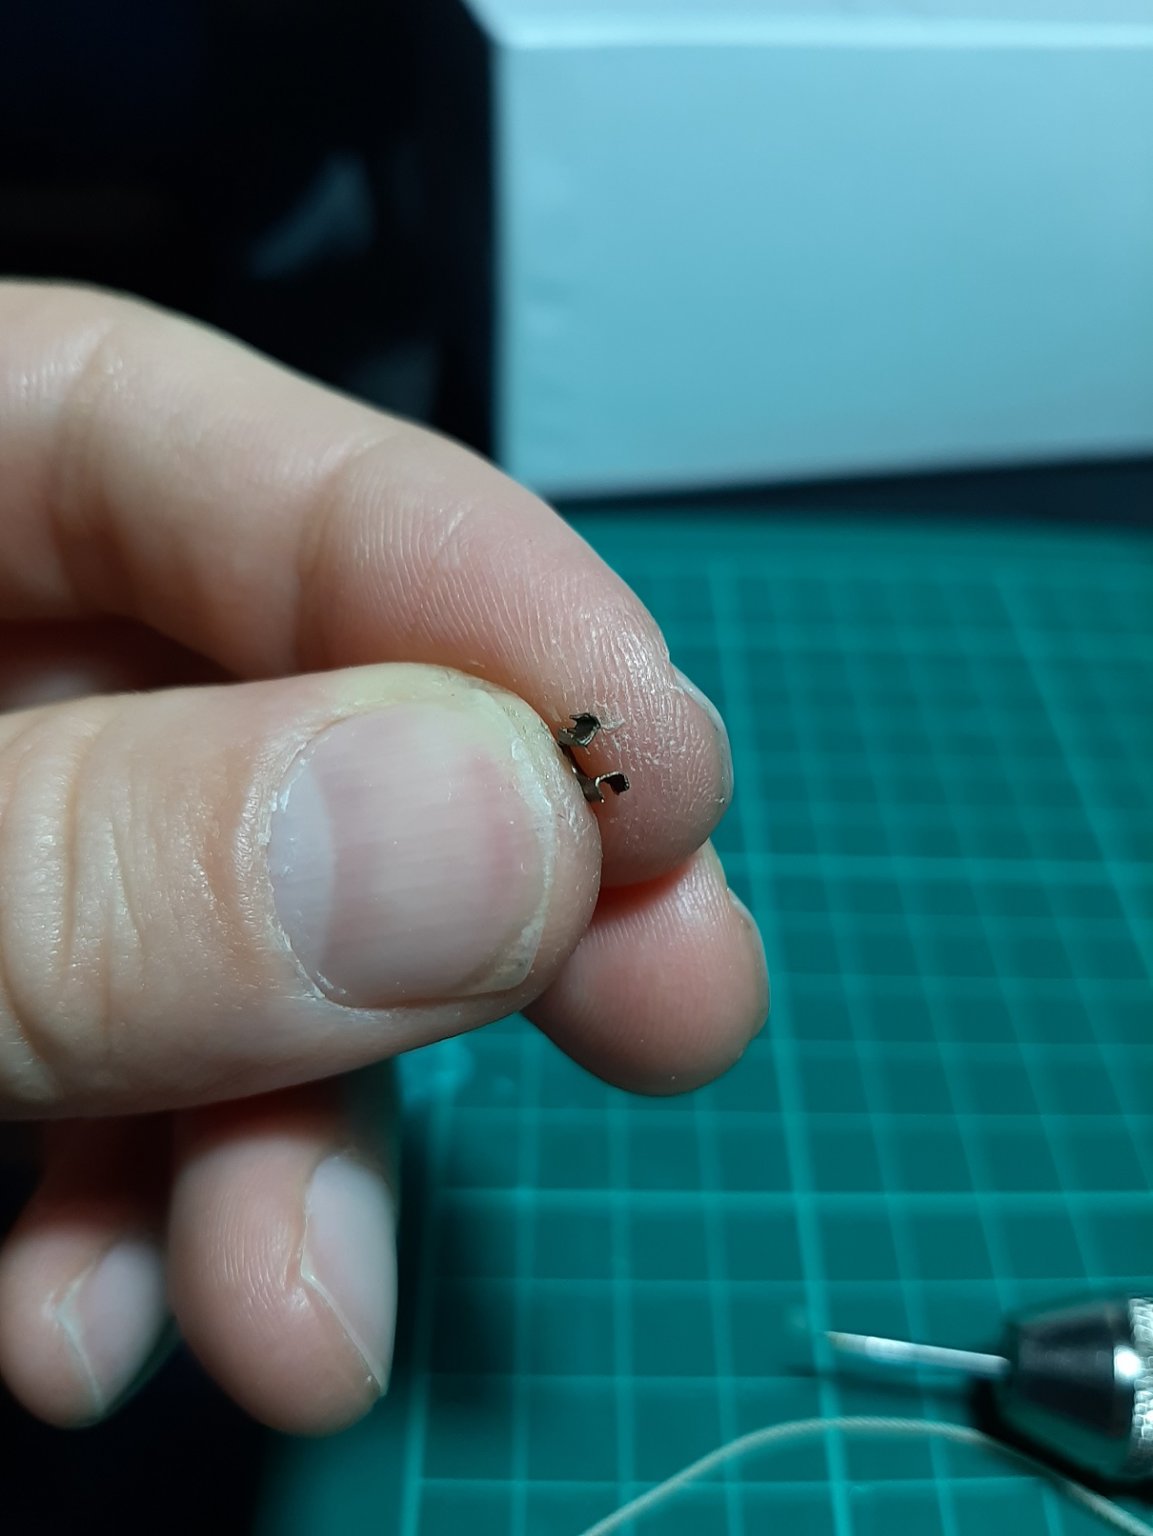
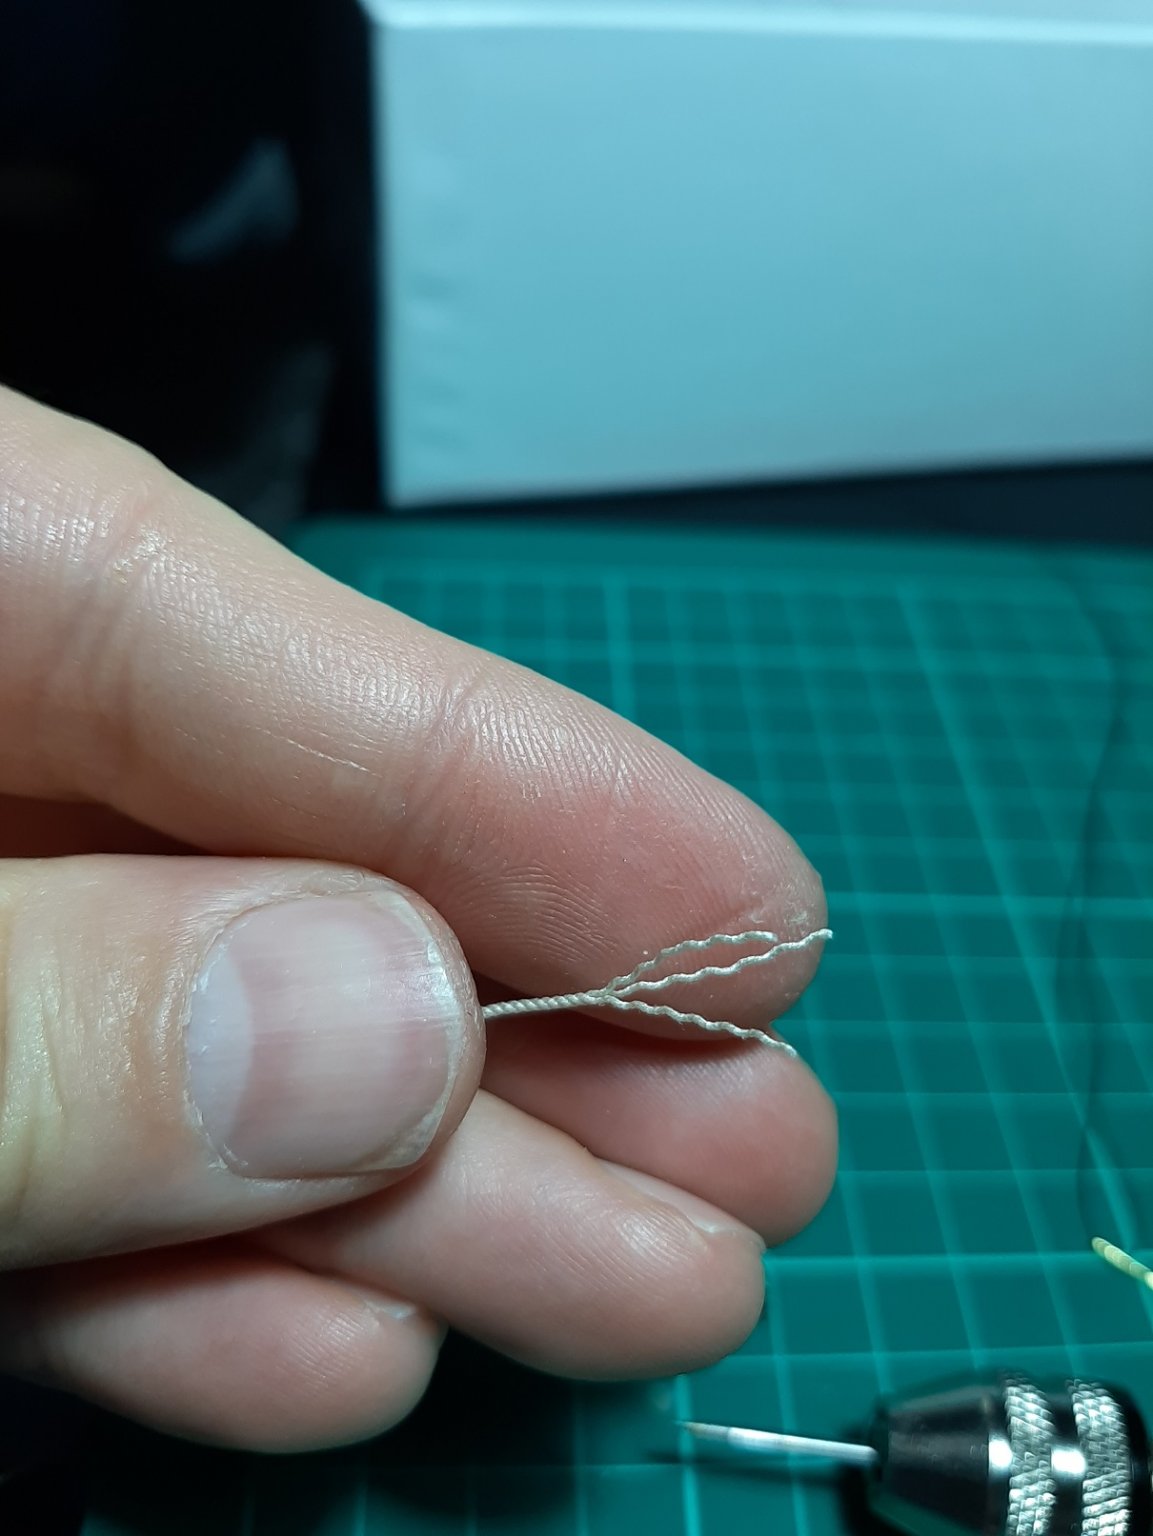
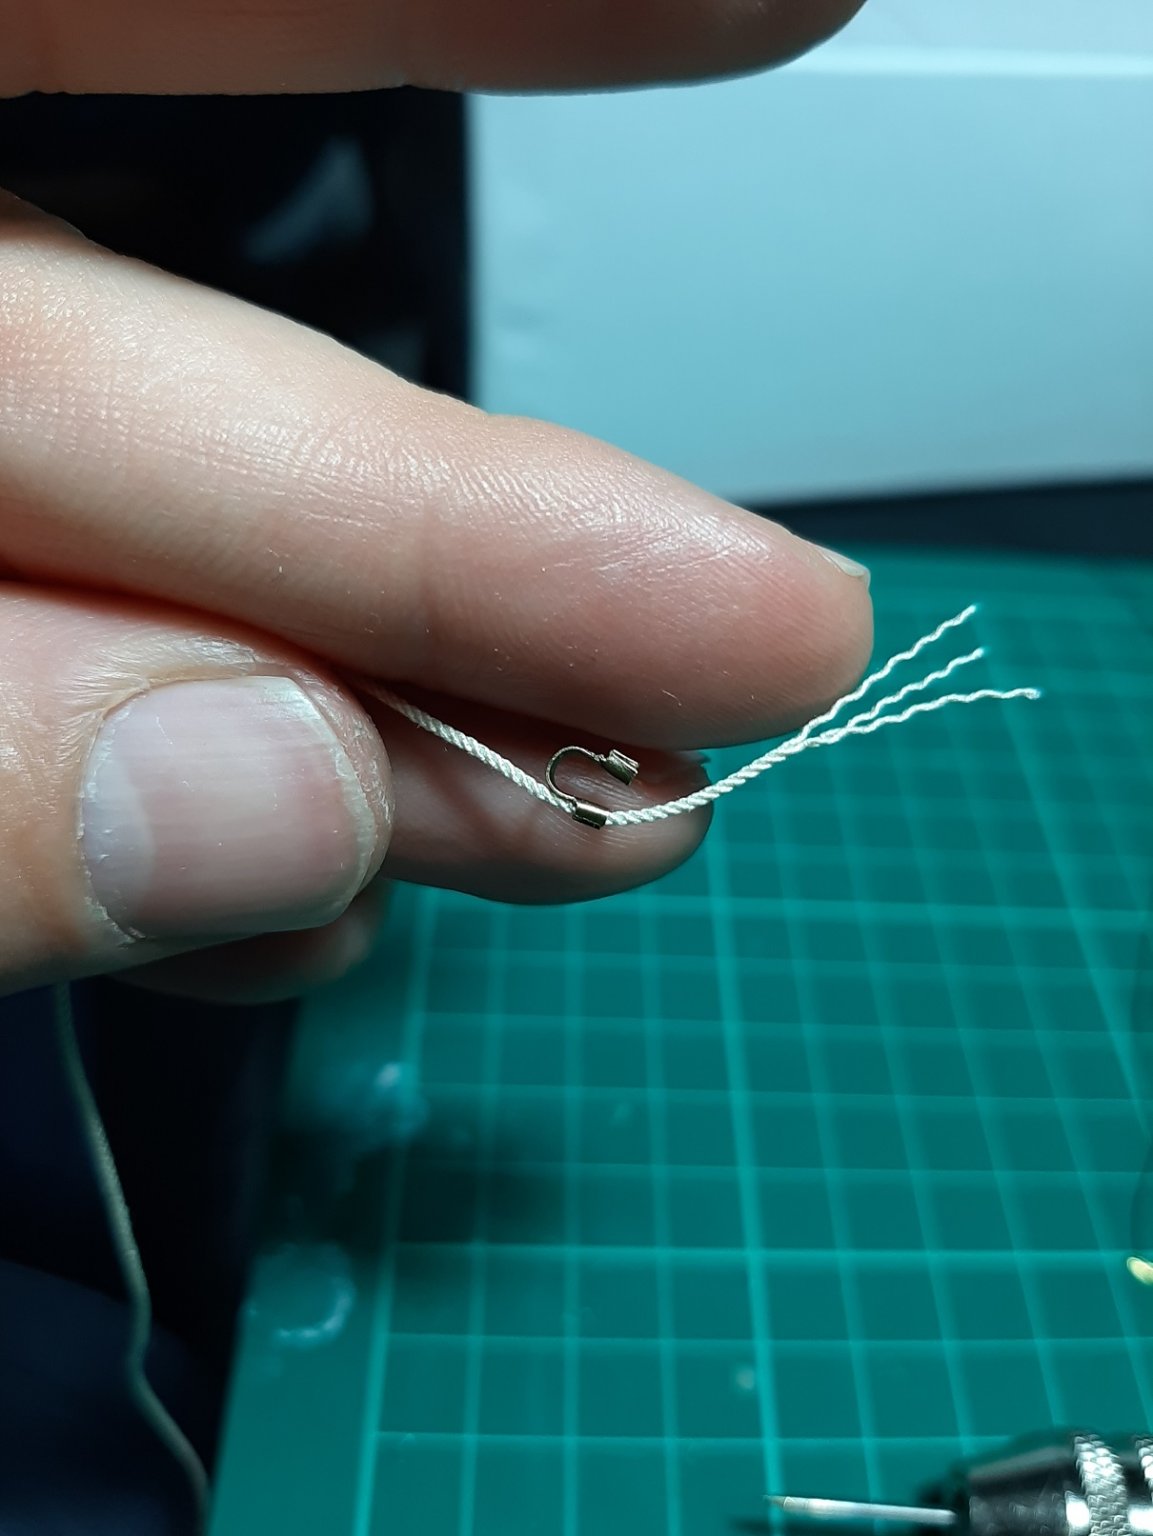
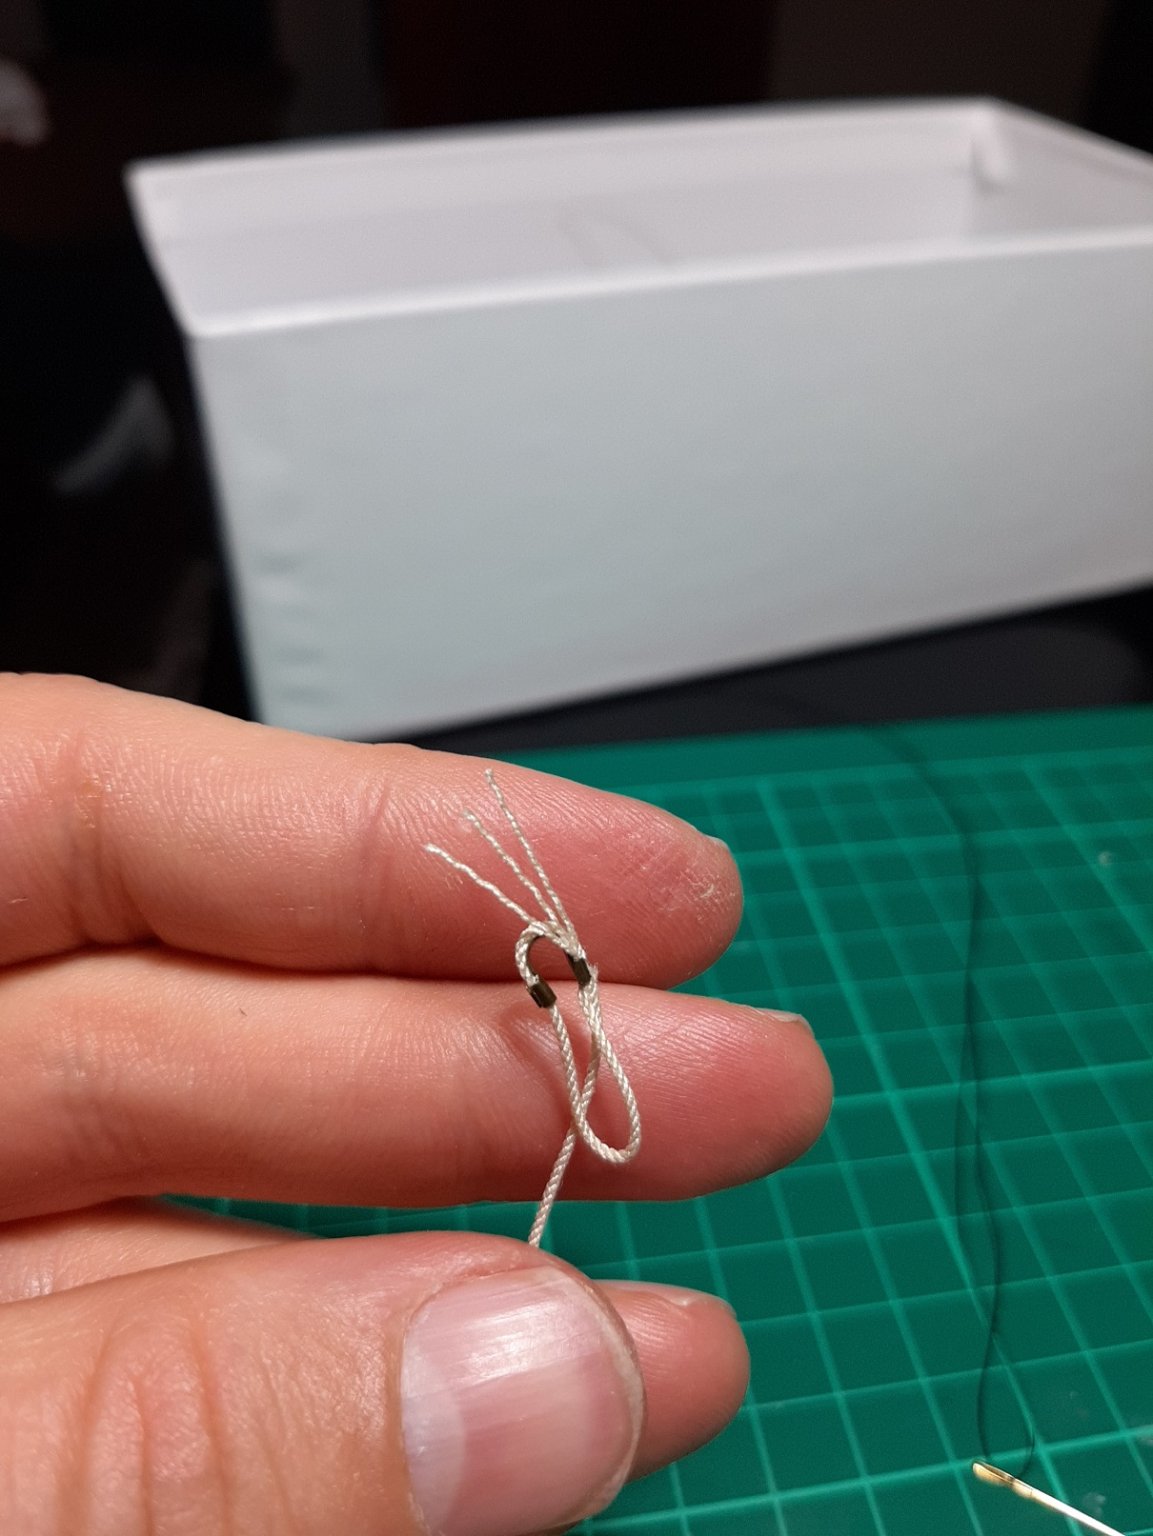
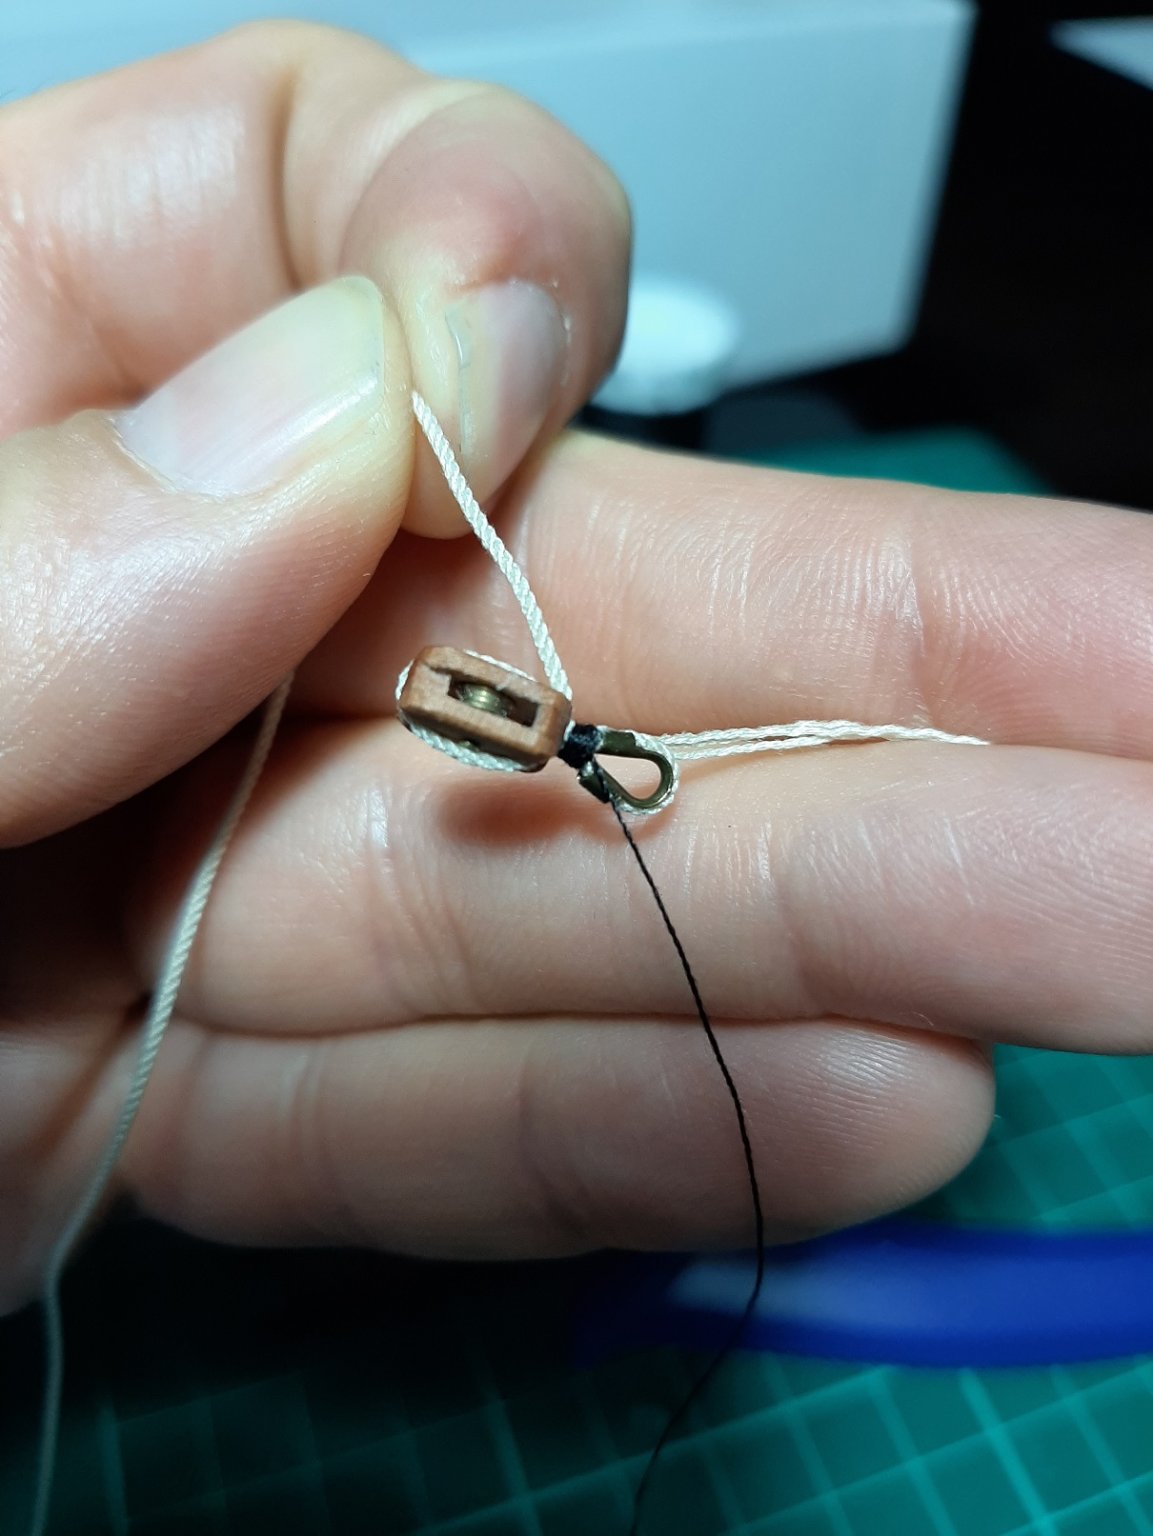
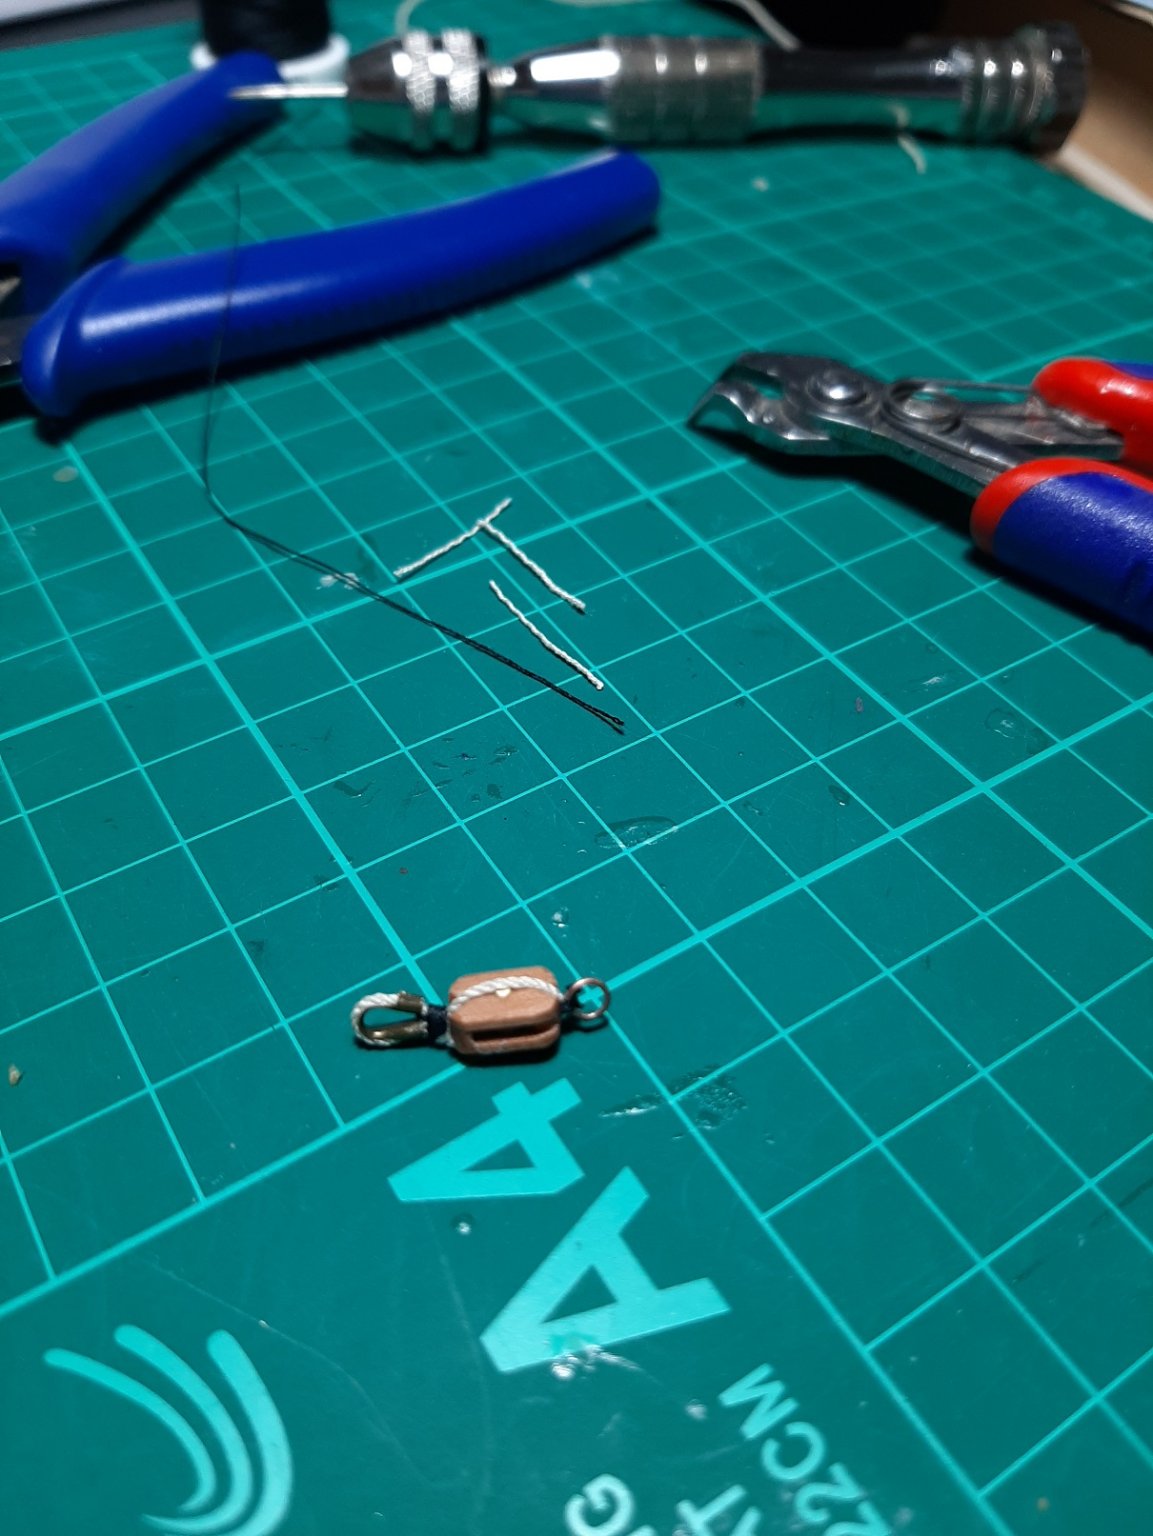
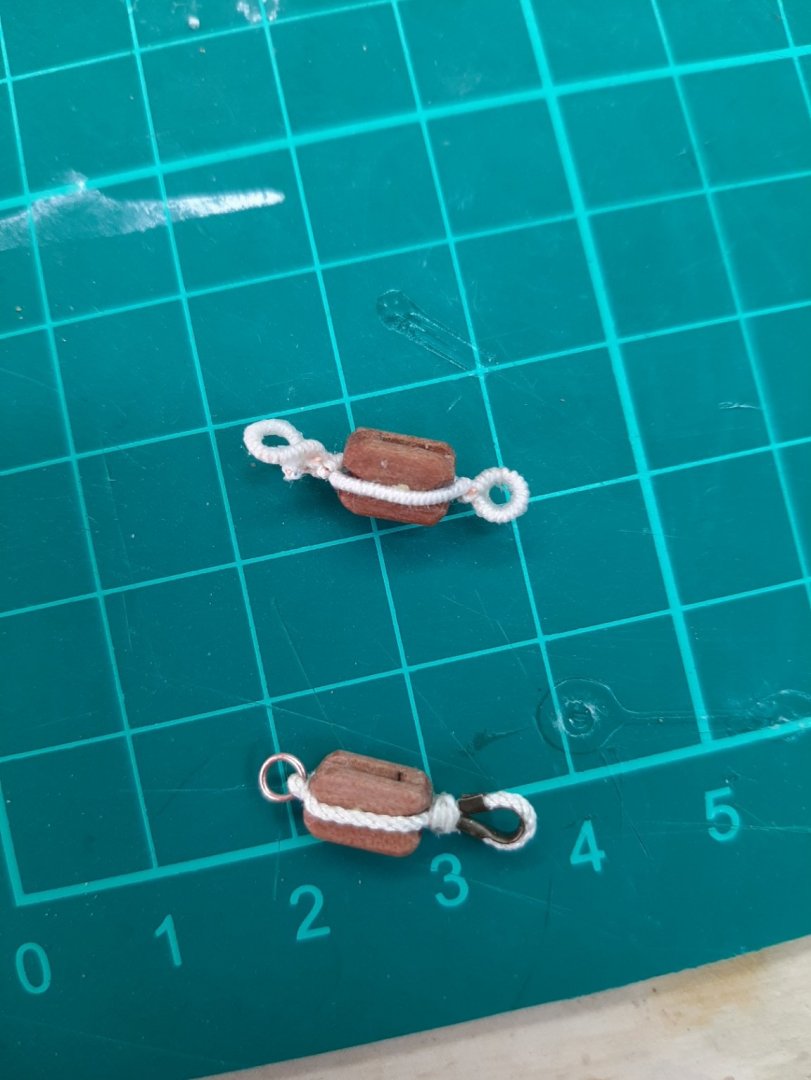
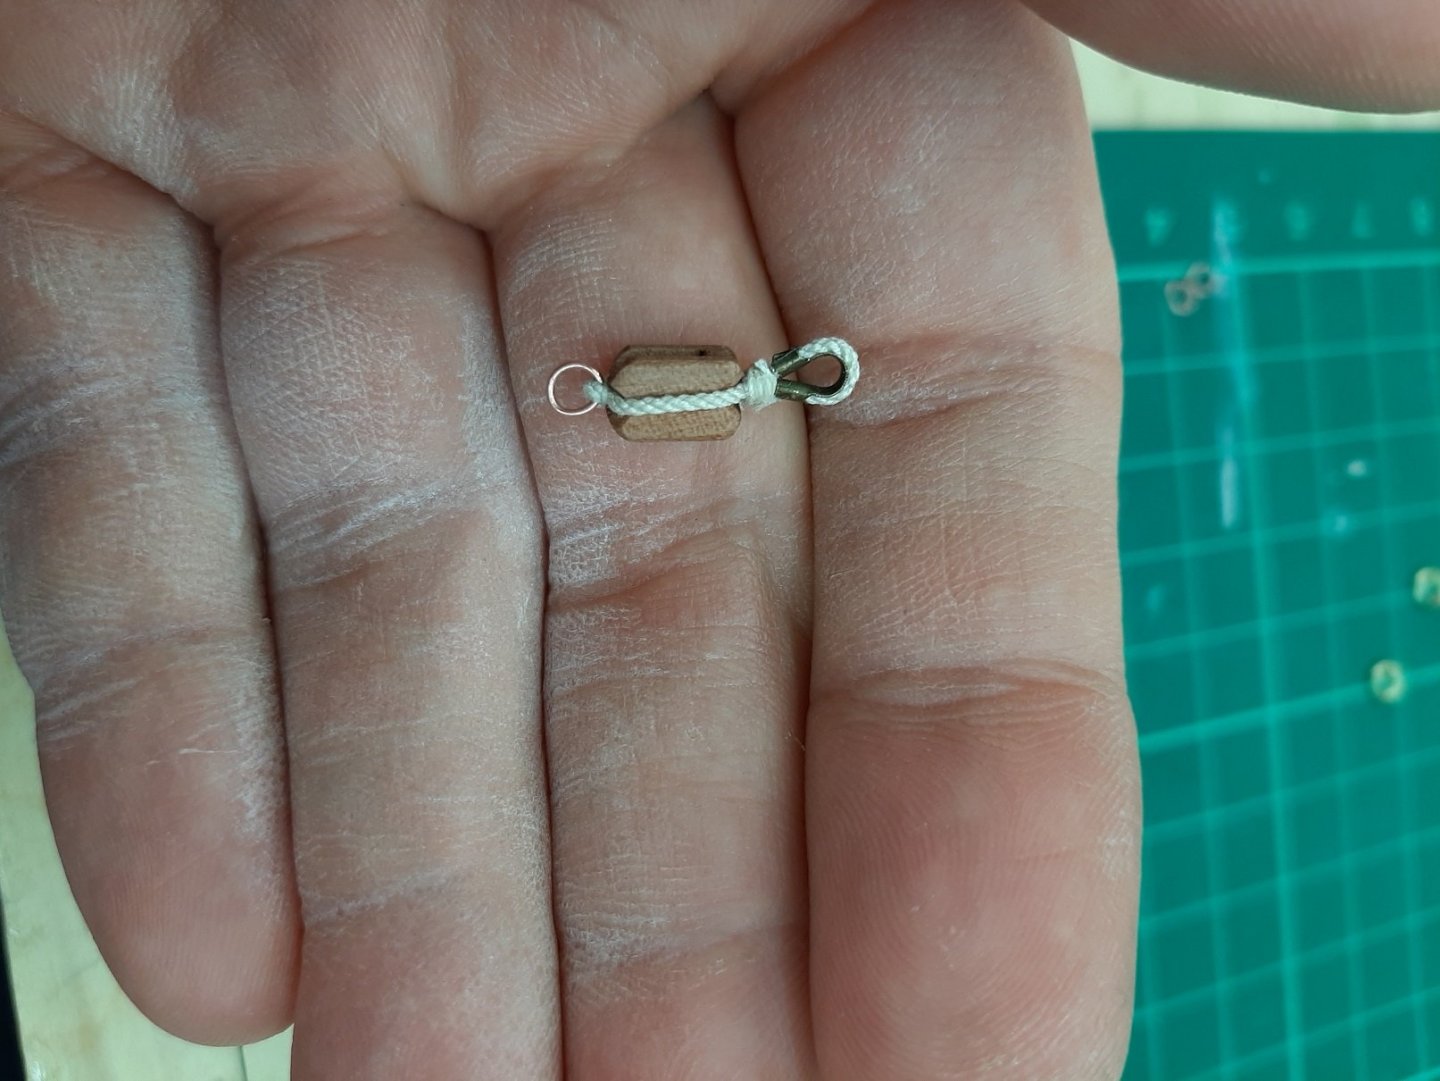
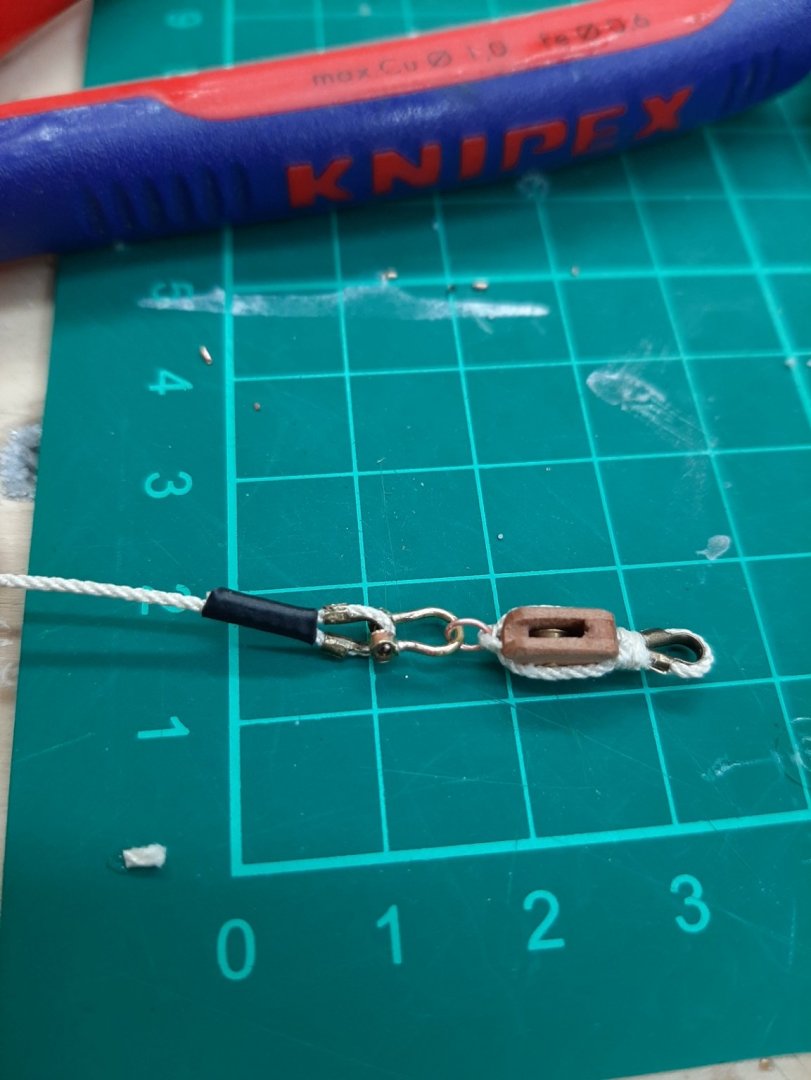
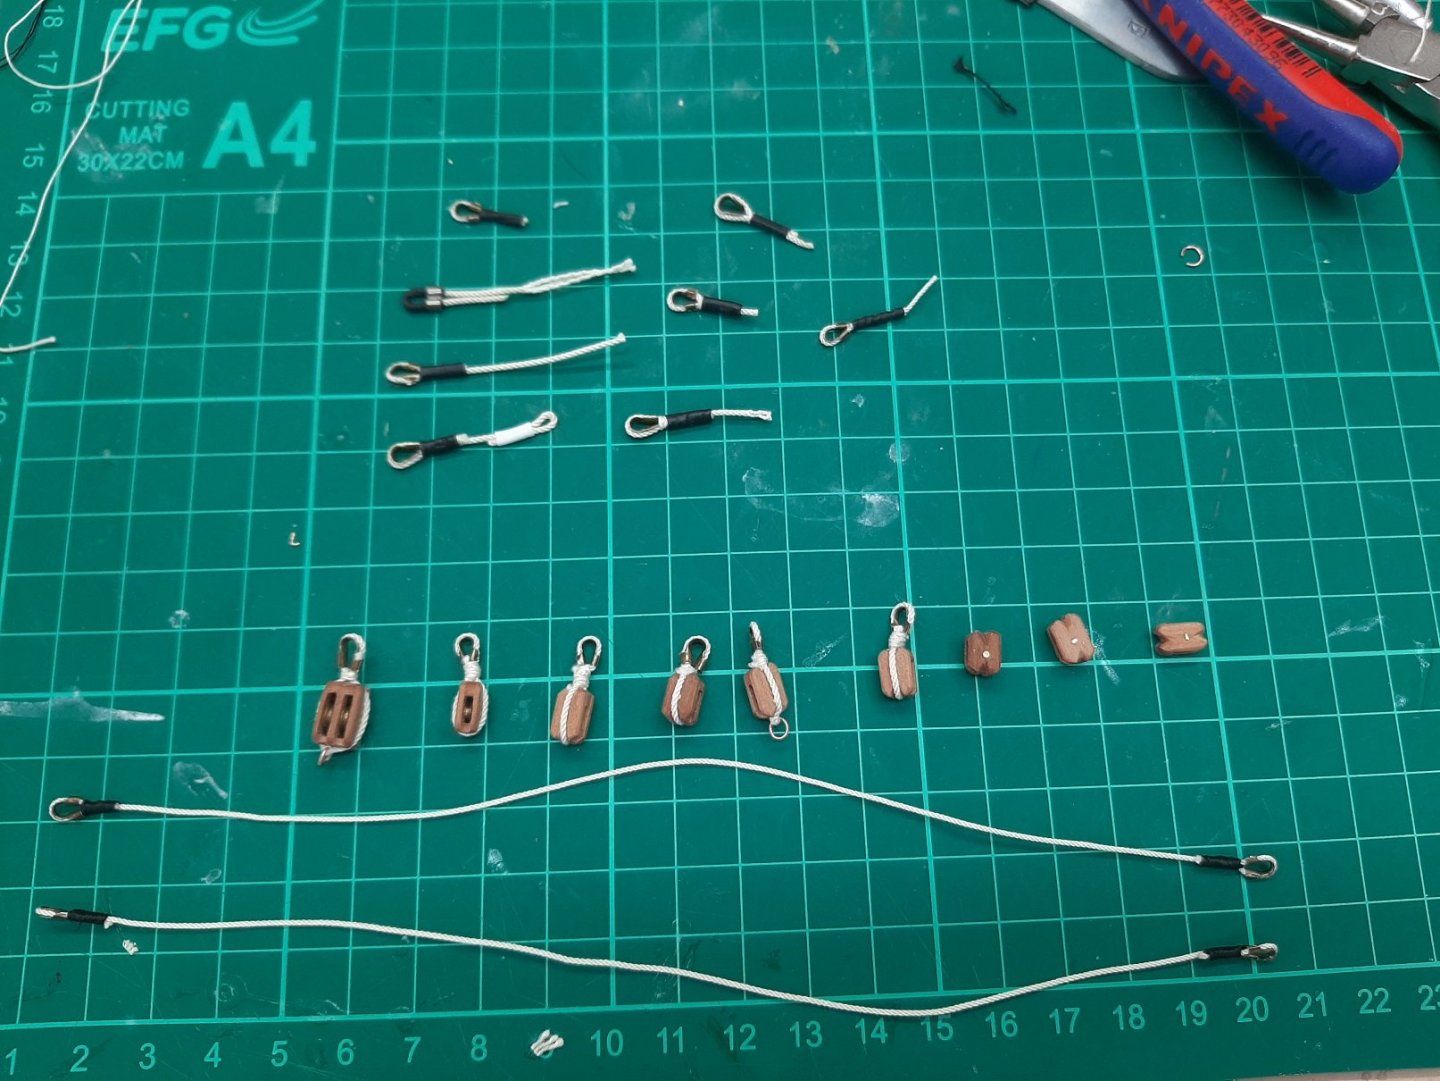
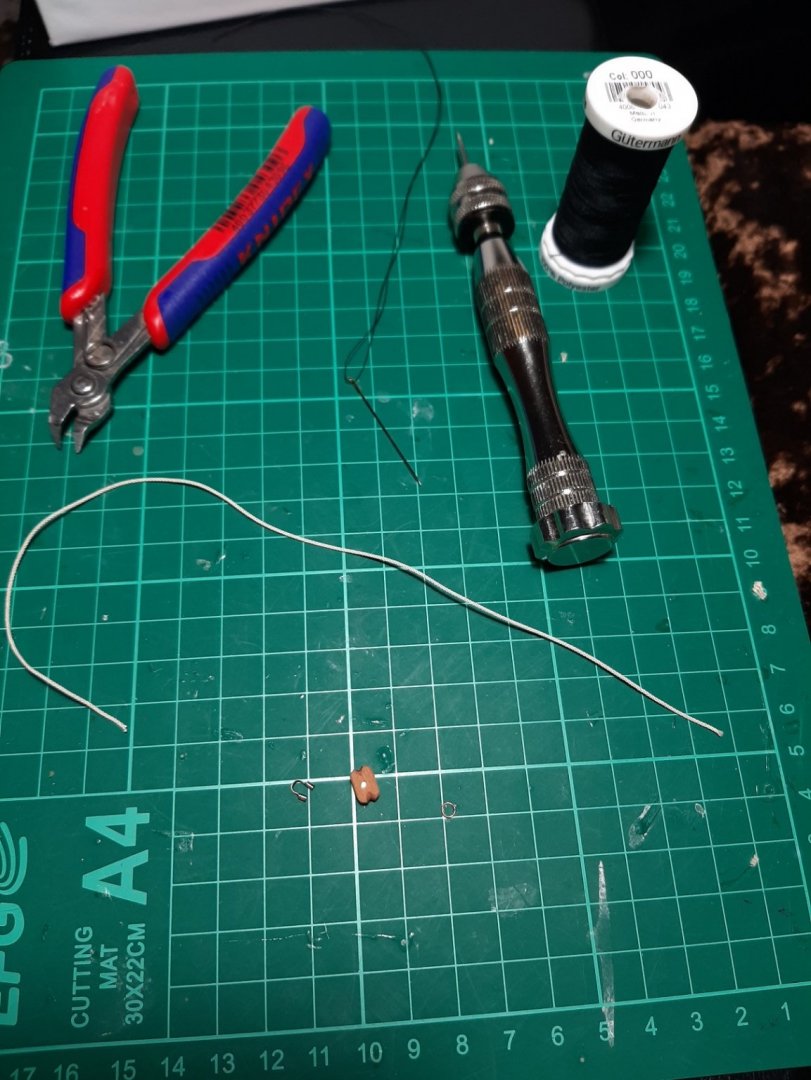
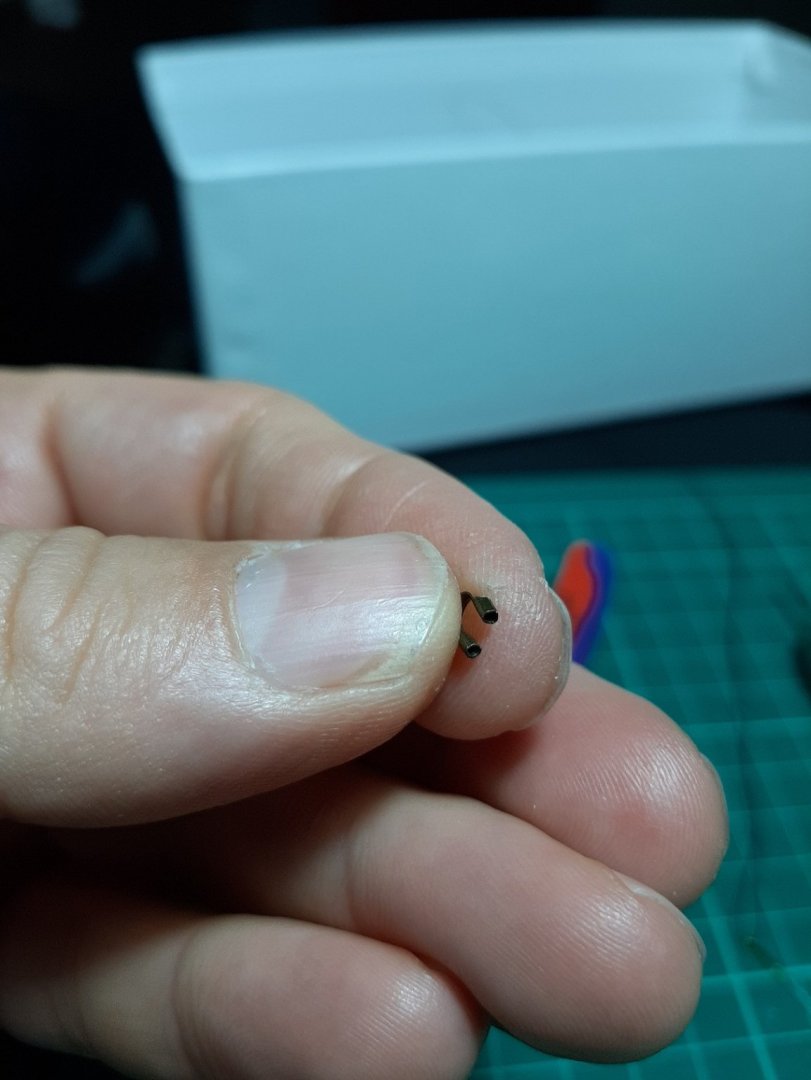
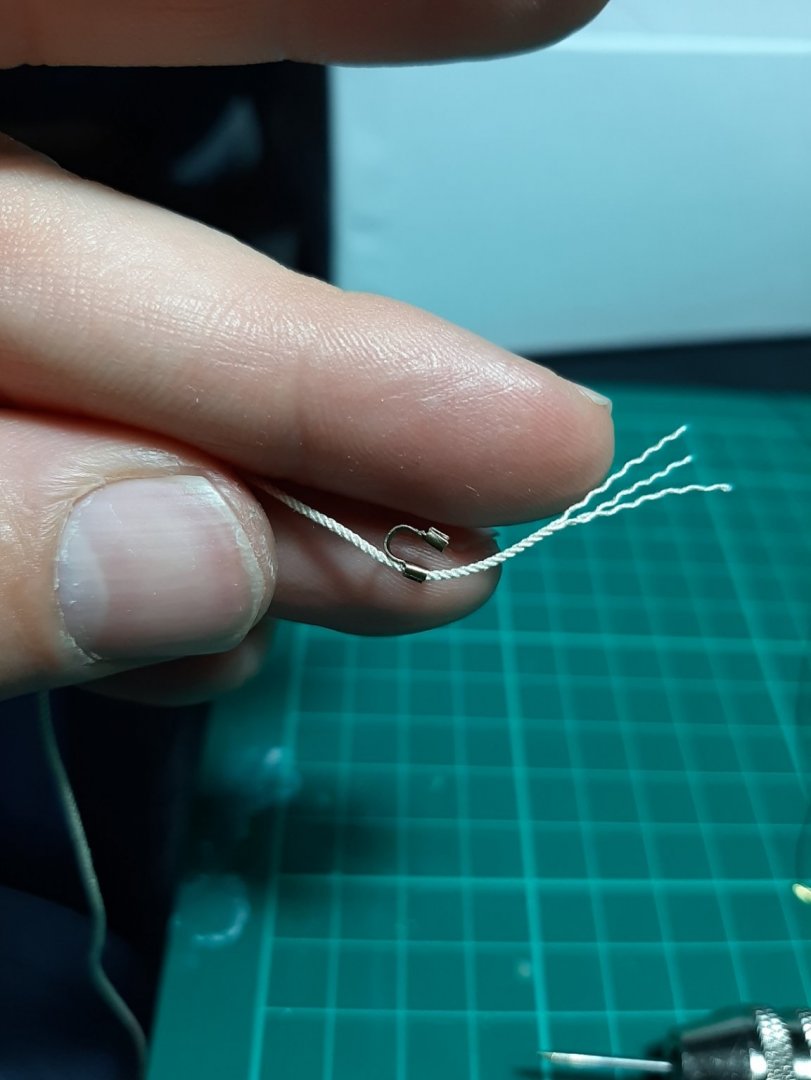
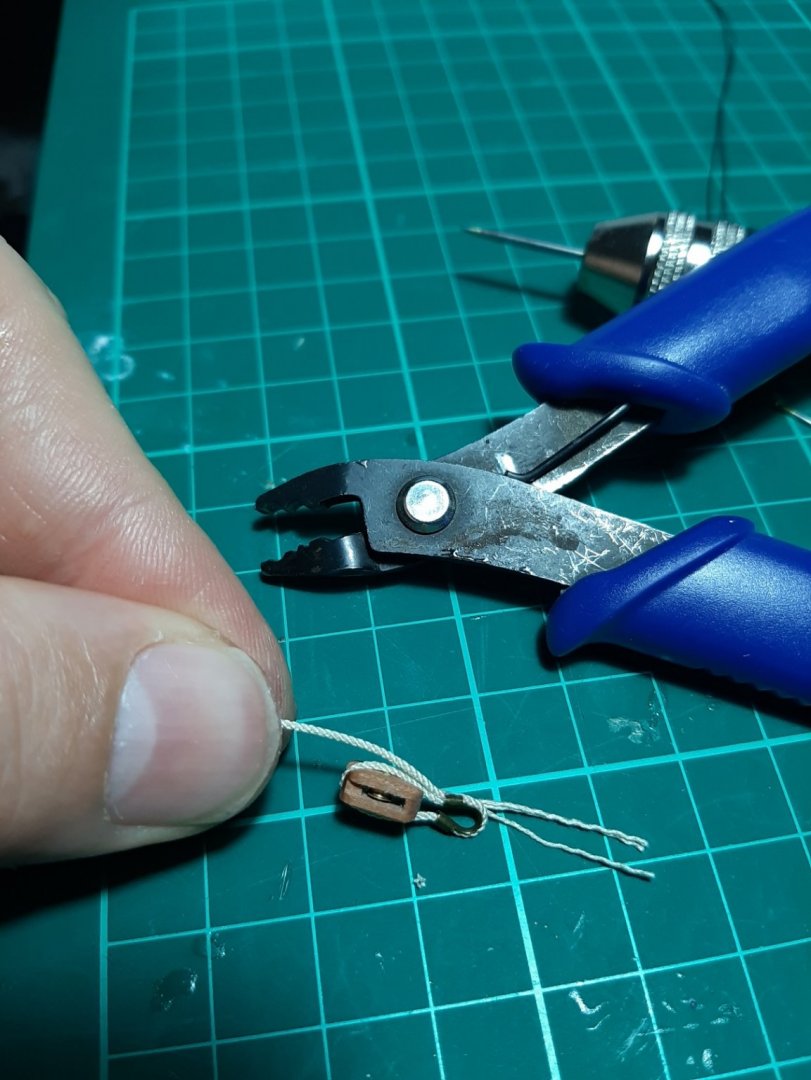
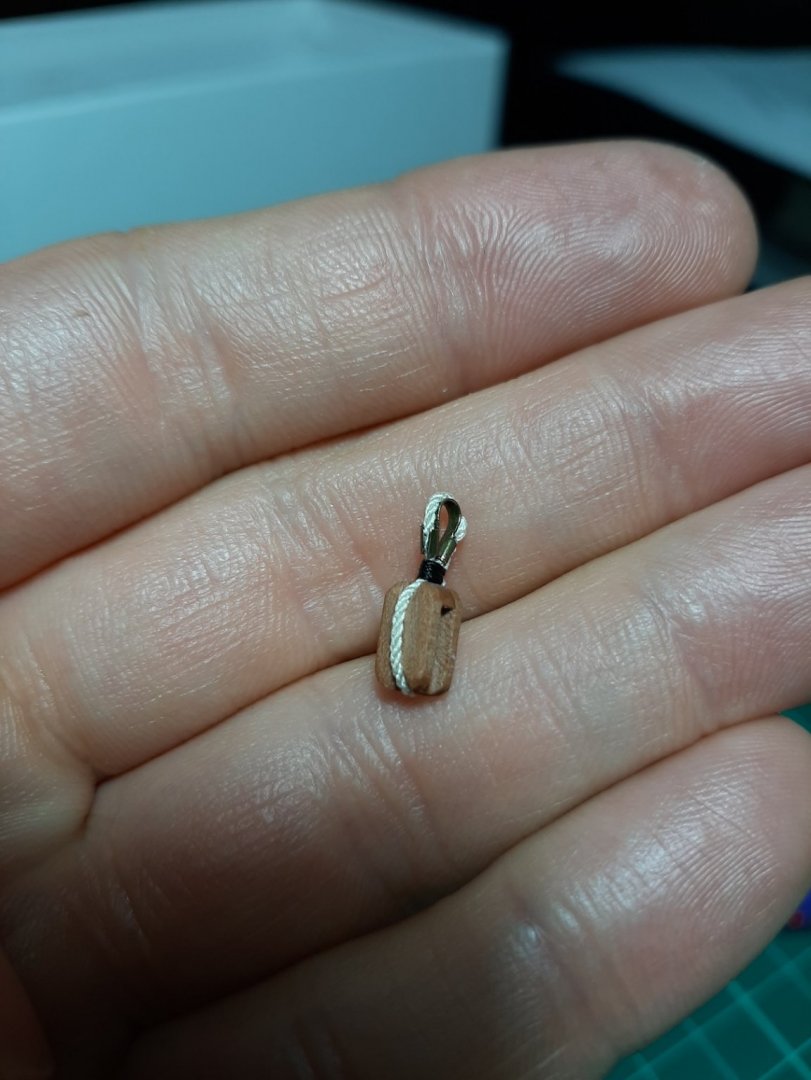
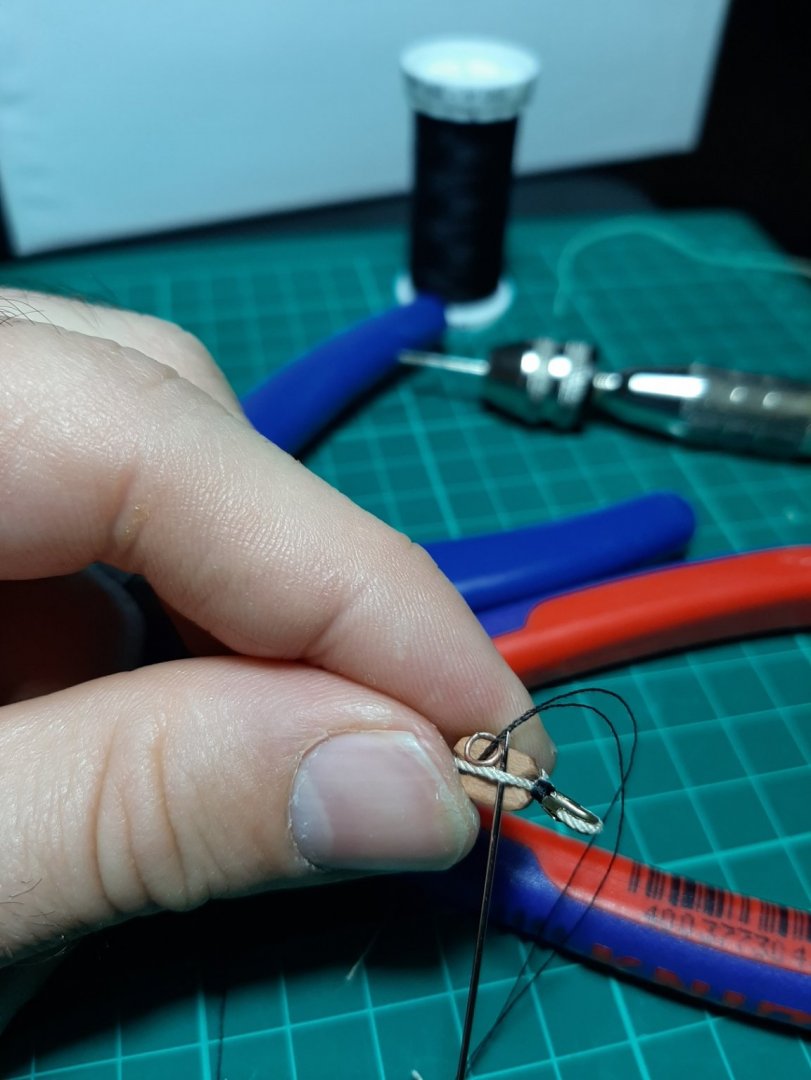
Well, it is one step forward and two steps backwards! I thought with the coronavirus situation I would have plenty of time for the boat but this is not the case. As the little ones do not go to school, we have to do an awful lot of work to keep them busy and keep some pace to their education. So I ve been doing a lot of painting and drawing, made model boat, trains and trucks from various materials, played board games etc. Going back to the boat, I decided that I do not like the way that I stropped the blocks with copper wire served with thread. The blocks took so much work to make that it did not do them justice. Ideally I would like to use rope and splice the ends. In the Ketch, my previous model, I used splicing extensively but all ropes there were three strand ropes so easier to splice. The rope I make now is made of threads and not strands and splicing is almost impossible. I experimented for weeks, mainly trying to use heat shrink tube. Michael's suggestion to use it on the shrouds was fantastic but despite all my efforts,I could not make it work on the blocks or the rope ends/thimble. Bellow are some of the failed attempts. They don't look too bad but I could not standardise a method and was not happy with these results This is the old strop versus a proper rope one So finally I found a relatively easy way to do it, giving consistent results I am happy with. So here it goes: A few tools, a copper/brass ring with soldered ends, thread and needle, some rope and a brass electrical connector thingy is needed. First, I open the ends of the connector carefully to preserve the round shape and to not leave sharp edges Then I flay a bit the ends of the rope. I secure the rope on one connector. Which side the rope end is matters. Then do the loop and secure the rope and the threads to the other. This is the most difficult step, there is a learning curve Ready to be tied. Despite the crimping, pulling on the rope ends the loop size can be adjusted. Tied with fine polyester thread, the ends buried underneath with the usual loop trick . I decided to use black and highlight the stropping rather than try to hide it. Tying the thread around the rope is relatively easy as the rope is secured in the crimps Ready! This block though will have an eye, this is simply tied with black thread I like this method, gives consistent results and the blocks are reasonably strong I now have to strop another 40 or 50 more blocks. Humongous work on these blocks and in the future, no one will ever know! Oh well, that's life! Stay safe all!


-
Beech and maple respond superbly to heat bending
-
Epoxy over PVA
vaddoc replied to dkuzminov's topic in Building, Framing, Planking and plating a ships hull and deck
😉 ground coffee is essentially wood dust! Epoxy is strong but brittle. For used as glue when gap filling is needed, for filleting, for laminating, it needs to be thickened. It increases the strength, reduces brittleness and makes it much less runny. If sanding is needed, it makes sense to use a filler that sands easily. I ve worked a lot with epoxy and I like talk powder. I think that the way your idea could work would be to mix some epoxy with talk powder, wood dust or whatever similar and actually glue thin strips of wood on the inside of your planking. This would resemble a "cold mould" construction and should be pretty solid. It will be lots of messy work though, maybe best to go for filler pieces or more bulkheads -
Epoxy over PVA
vaddoc replied to dkuzminov's topic in Building, Framing, Planking and plating a ships hull and deck
How and where are you planning to apply the epoxy? If you plan to fillet the joint of bulhead and plank from inside of the hull, best to thicken the epoxy with talk powder (or anything else, i ve used ground coffee in the past) to consistency of peannut butter and apply. It should work fine. Epoxy is a bit messy though. Uncured epoxy from hands cleans with vinegar but best to wear gloves -
Is there a trick to making deadeyes?
vaddoc replied to Schooners's topic in Masting, rigging and sails
Why not use wood sheet? Make circles, roughly cut them out and then shape round with the disc sander. Or make paper templates with circles and the positions for drilling, drill the eyes, then again cut out and shape with the disc sander. The grooves around can easily be made with the thin 0.5 mm proxon grinding wheel attached to a dremel. Finish with sand paper. -
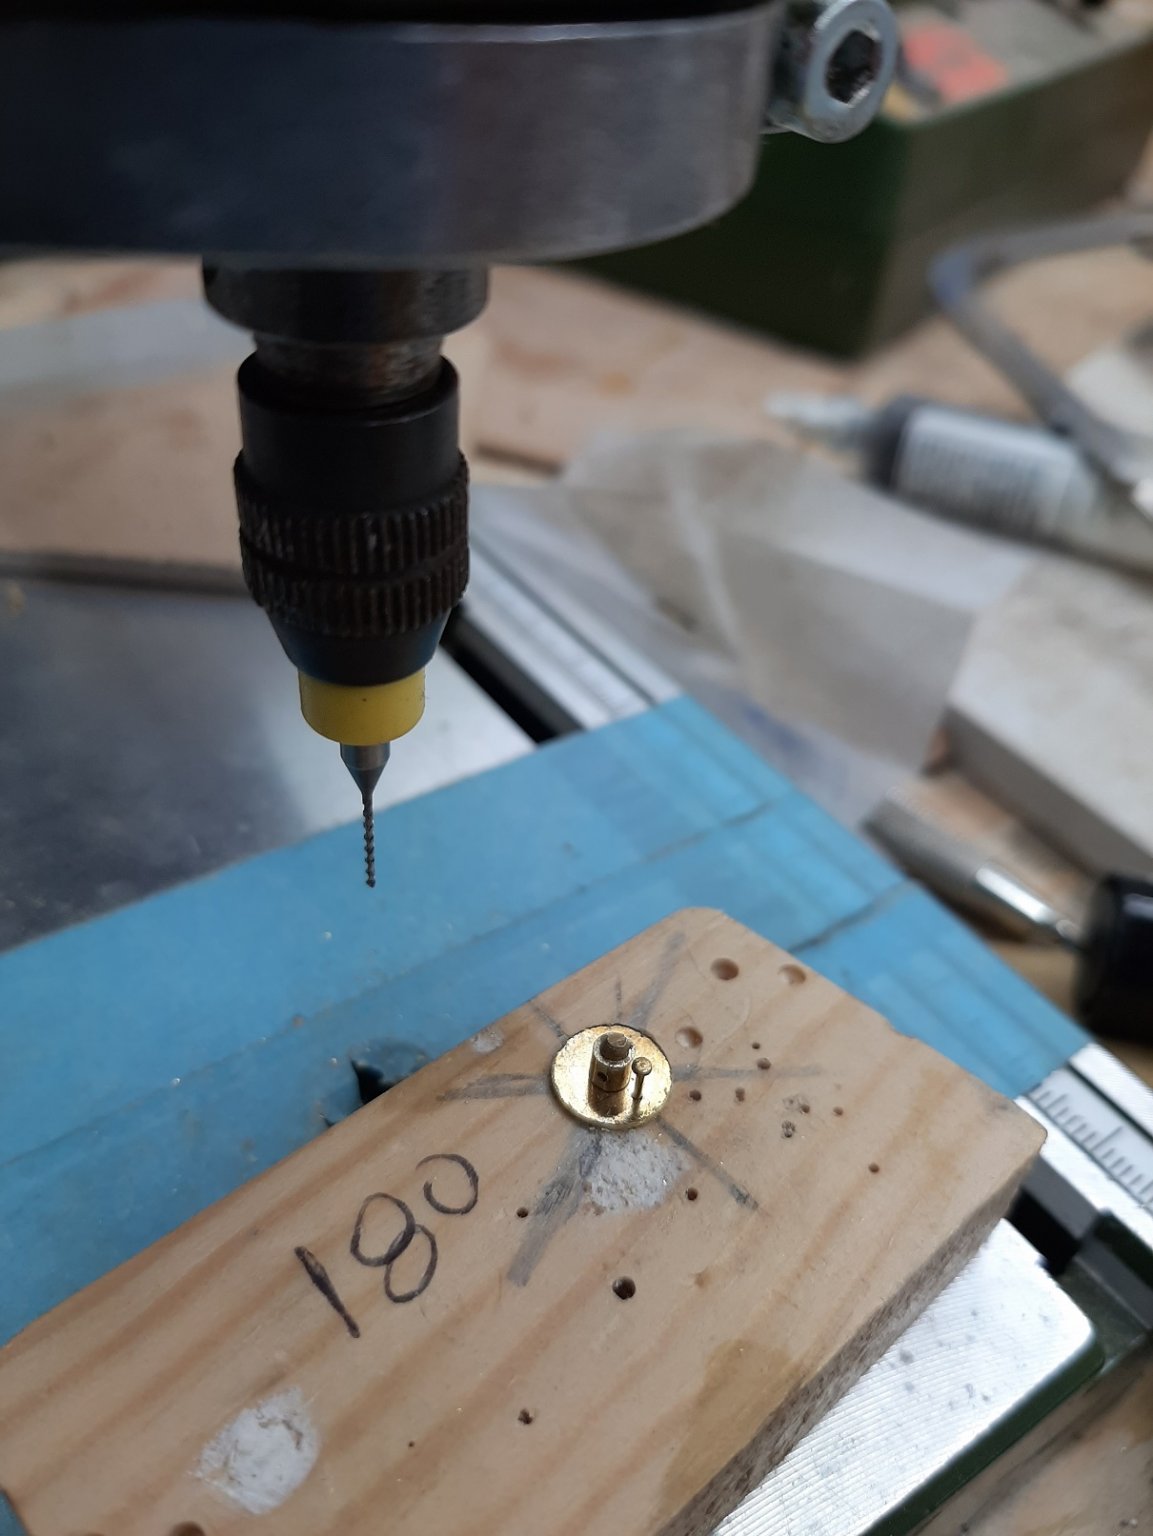
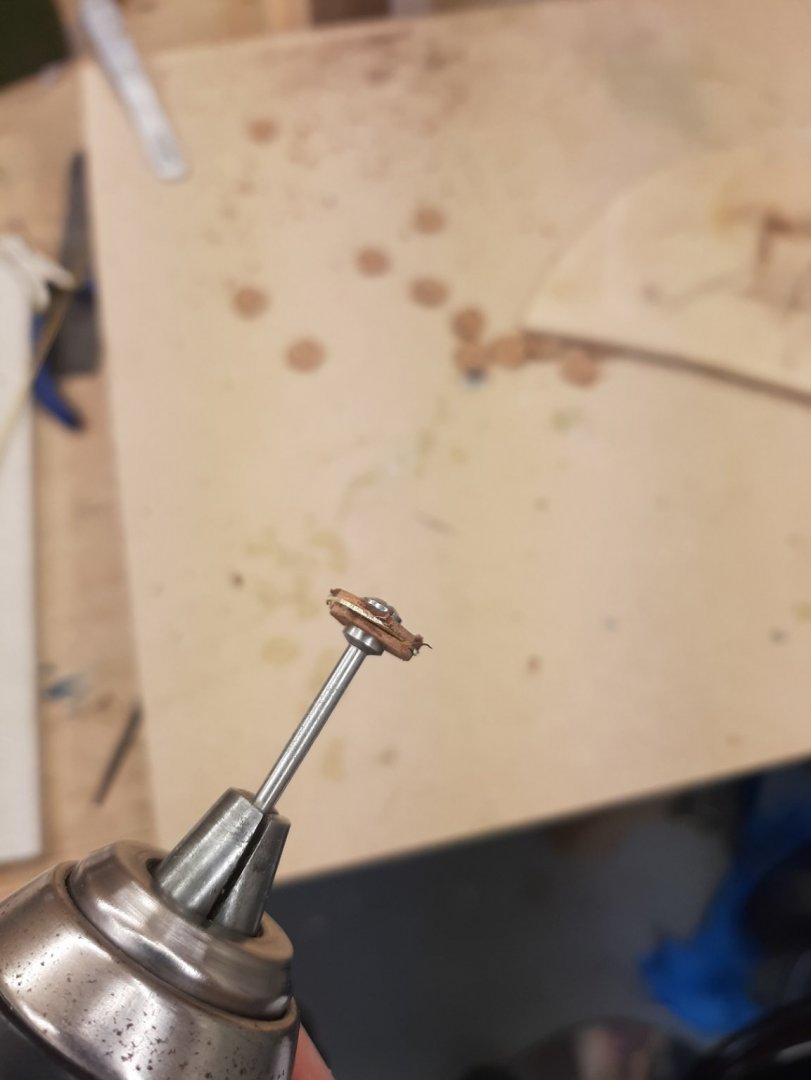
Very interesting info Mml I recently had to drill some difficult holes. The photo shows 2mm brass rod, with a sleeve made from 3 mm tube soldered around it, so a pretty solid thing. The hole going through is 0.8 mm, this is 0.03 inches. I used the TBM 220 Proxon drill press (8500 rpm) and cheap chinese carbide drills and they drilled through in no time. Still I broke 2 drills to make 8 pieces but this was me not keeping the piece securely. The Dremel goes up to 33000 rpm but I doubt I would be able to drill with steel bits
-
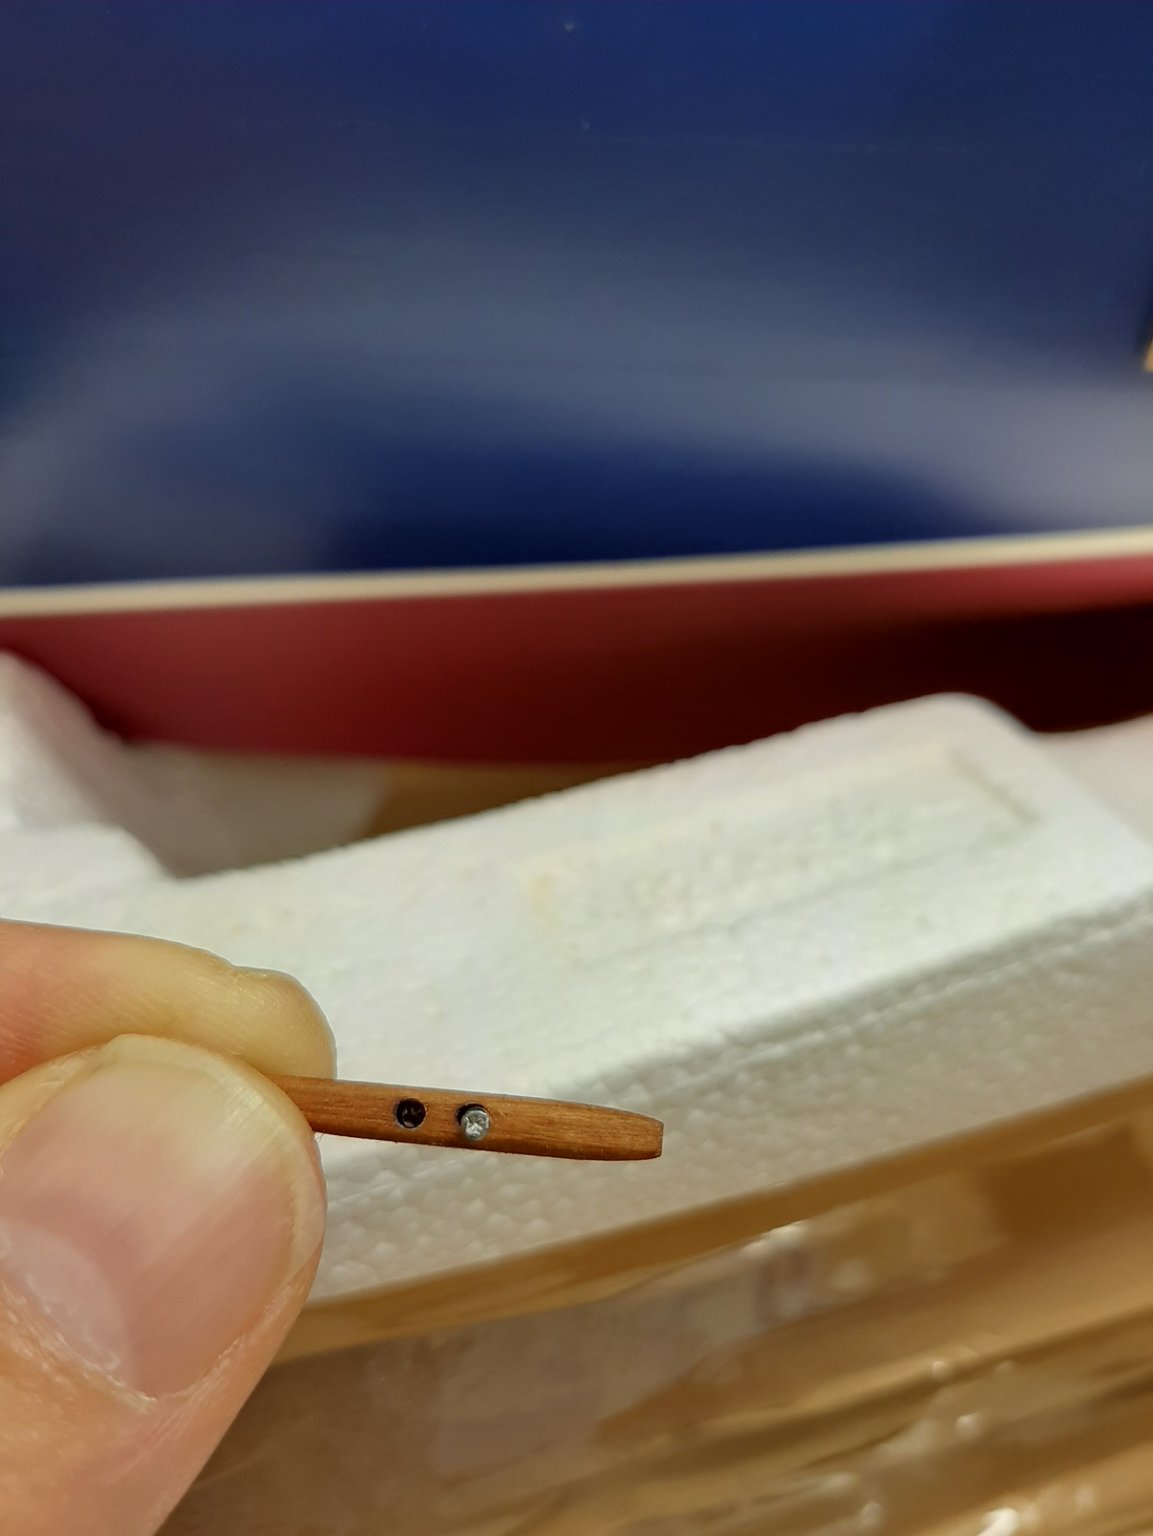
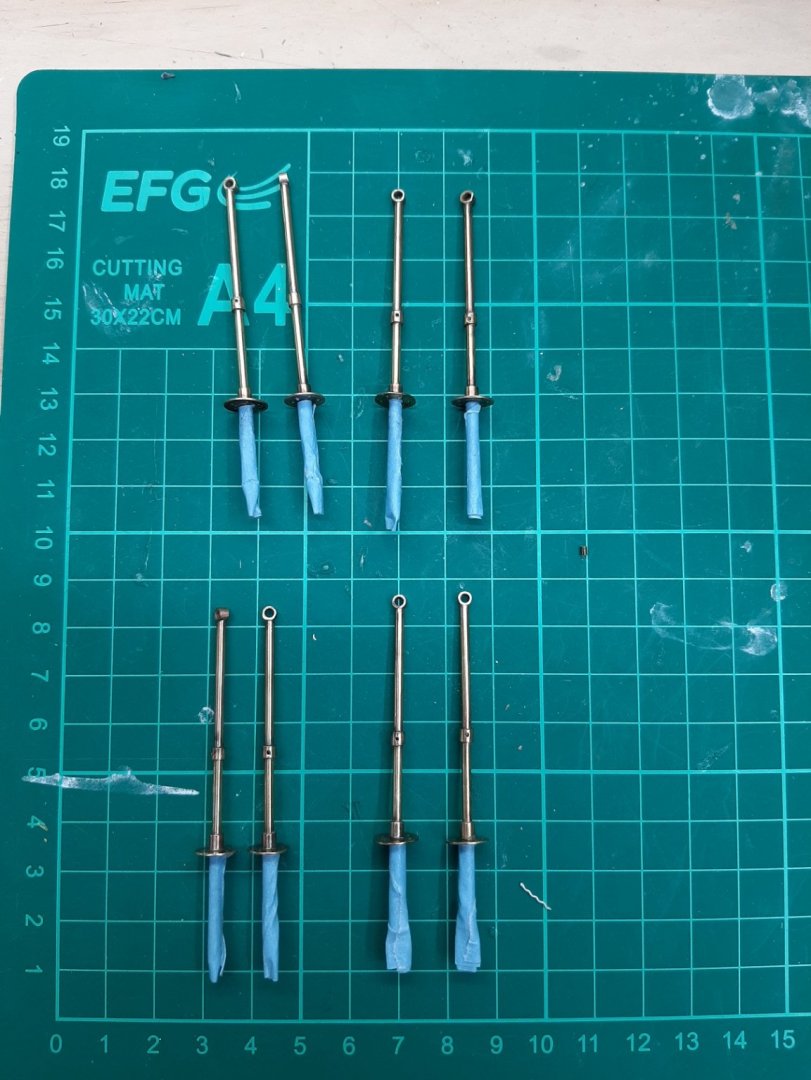
I think I hit a milestone today as I installed the bobstay, the first bit of rigging to go on the boat. I am not entirely sure where to attach the line on the boat, I think I ll add cleats to the bowsprit and maybe a couple of belaying pins to the heel. Maybe another pin rail is needed. I also finished the poles for the rails. They are not all identical but at least there are 4 pairs. The tape protects the part that will be glued as I applied some renaissance wax to the rest. I could not restore the brass colour, the copper kept appearing in the surface. A bit of internet search indicated that my pickling solution was contaminated with iron which makes the brass copper colour as it removes the zinc from the surface. So I ll need a new solution, I think I ll use citric acid this time. I though that rigging would be relatively quick but this is not the case. It takes time and I will need very many shackles so I ll start making some more Vaddoc

-
Dave, I have very little experience but I have always struggled to drill brass with steel drills and had the same issues. However, using Tungsten carbide with my drill press, no issues at all.
-
Lol, Carl this would mean going to waste the 150 m of rope I spent weeks making! Maybe best to press on...Indeed, Mark, not all countries are continents!😄 In England we are like sardines in a can.
-
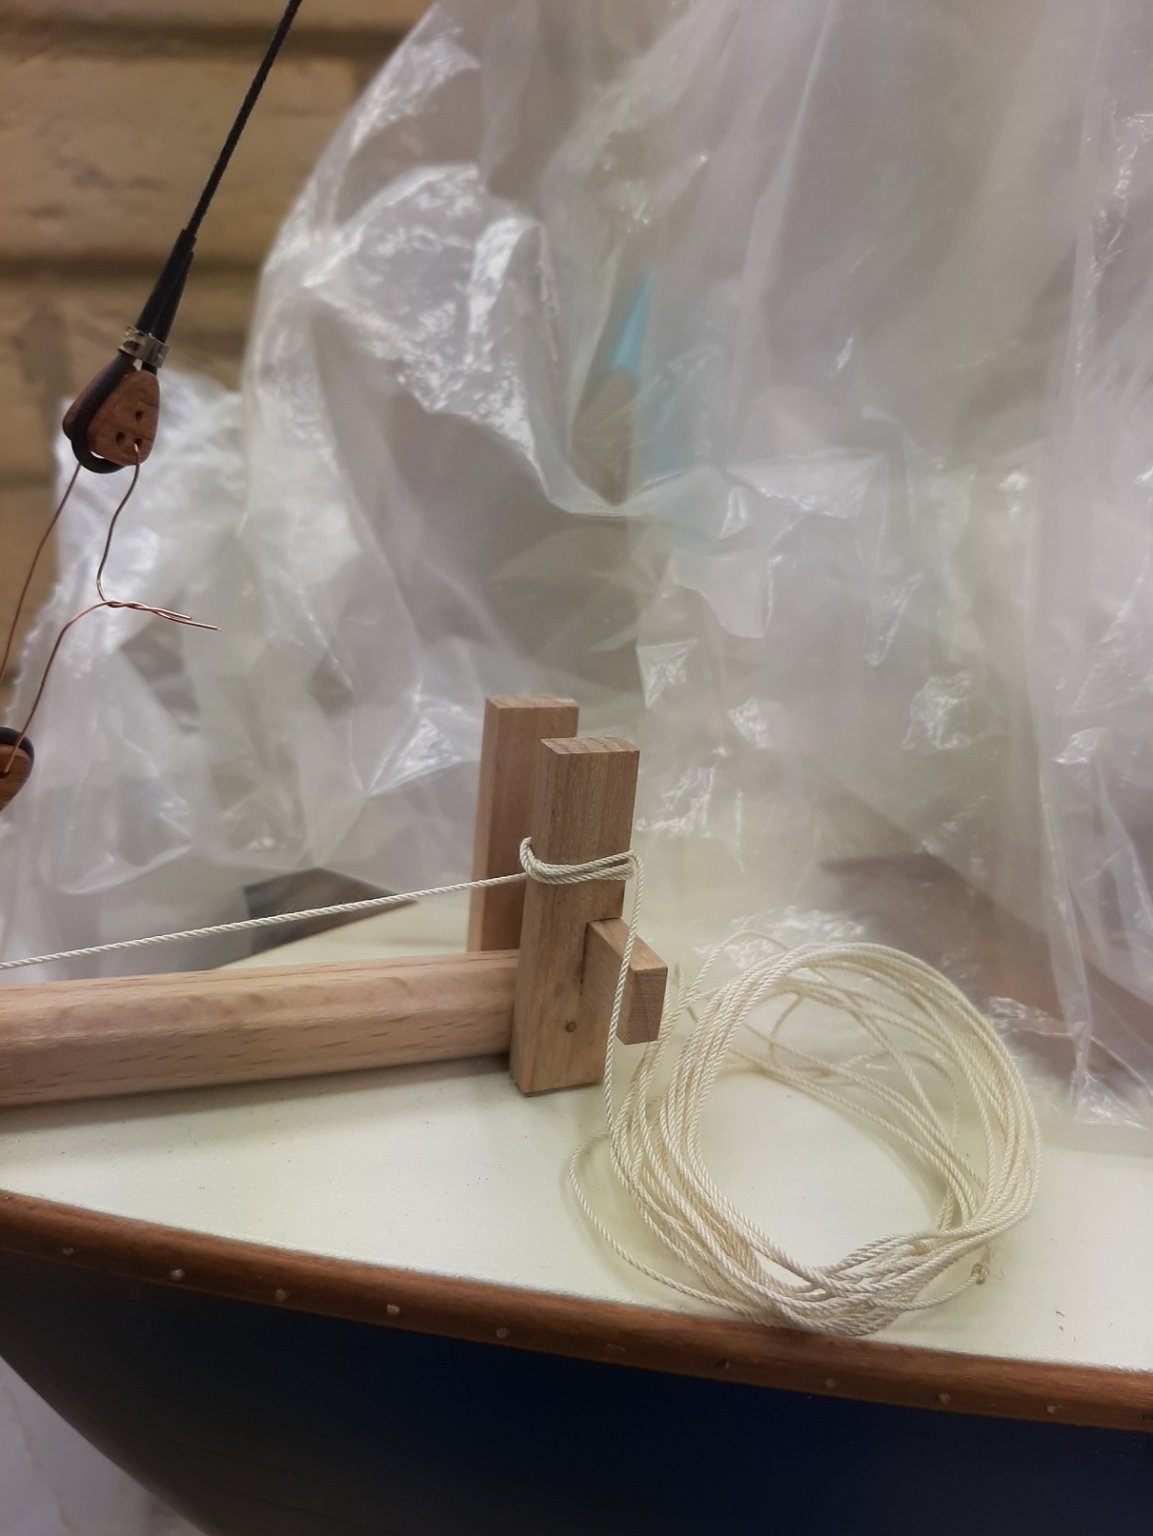
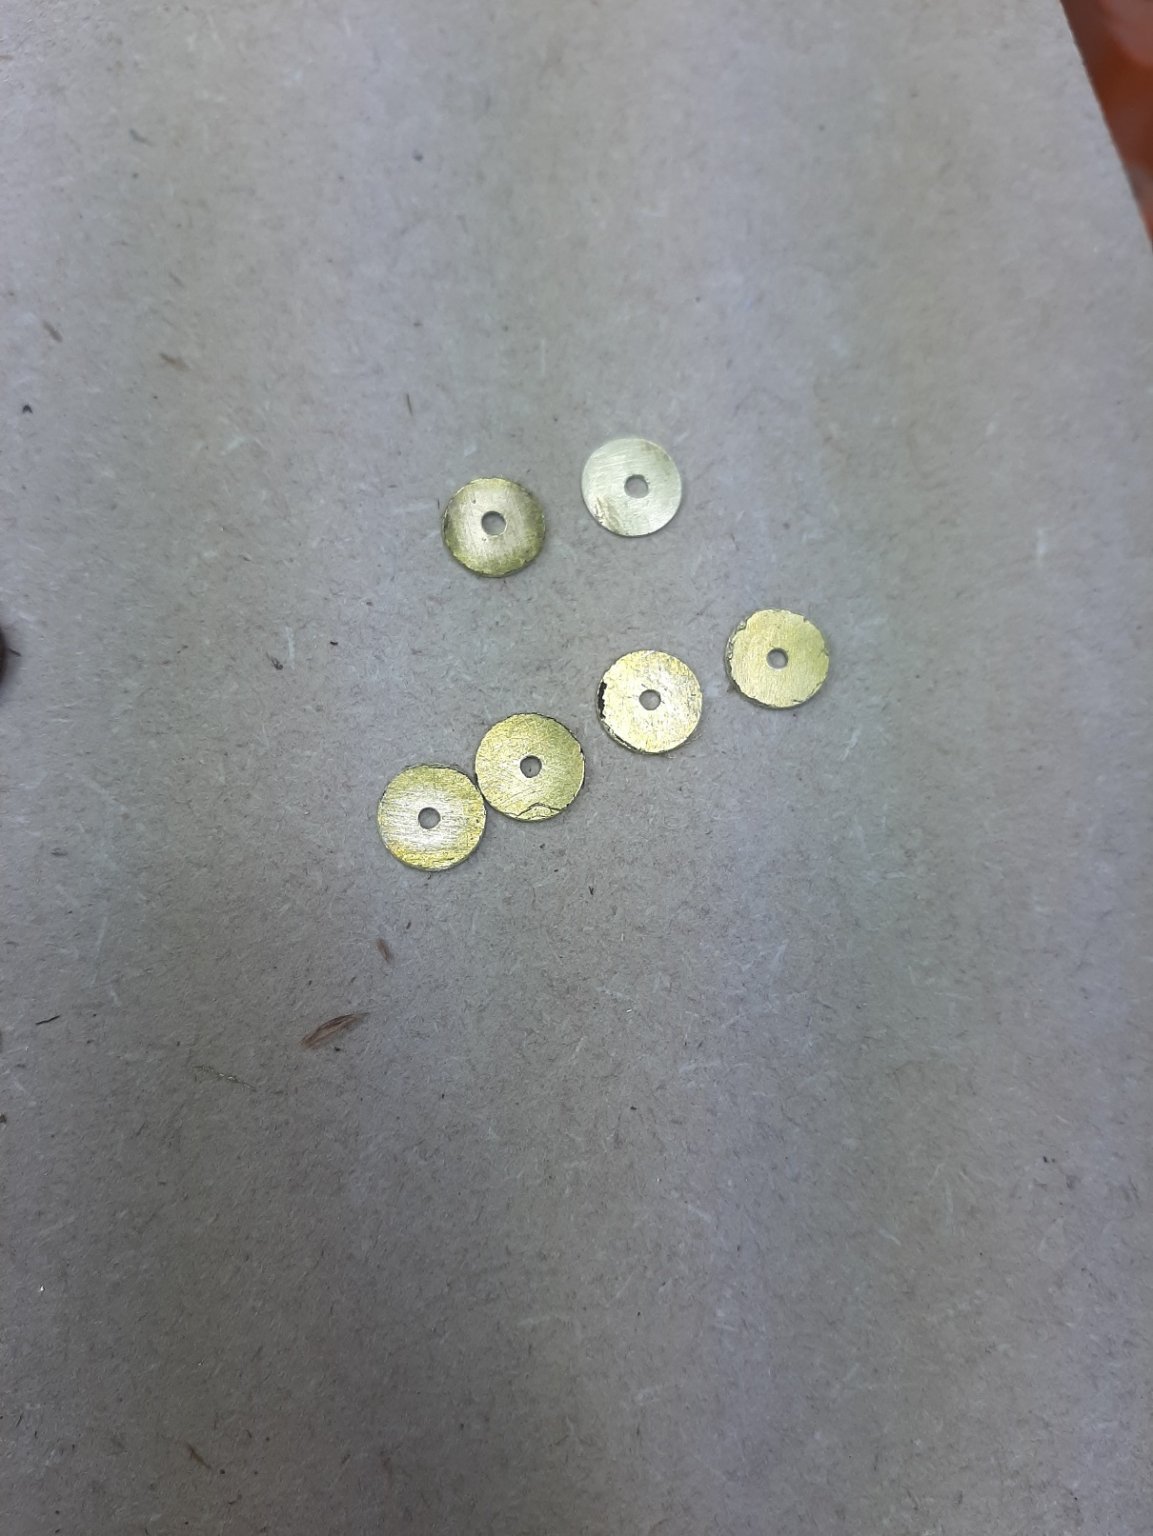
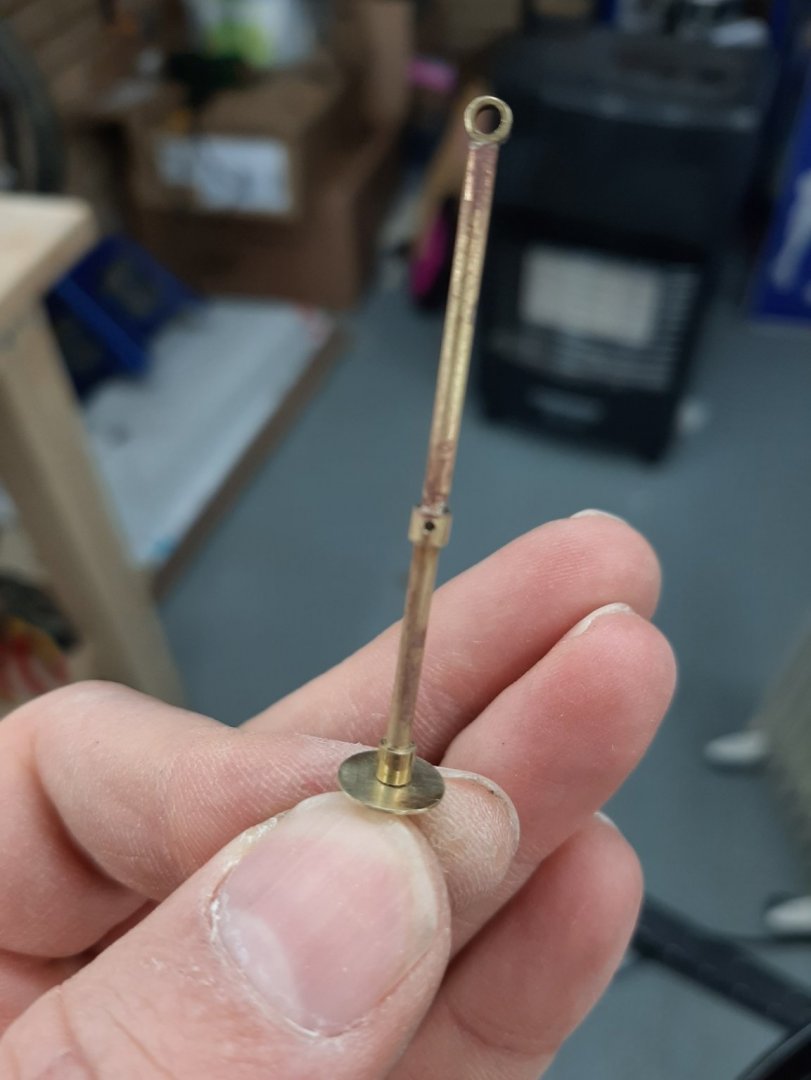
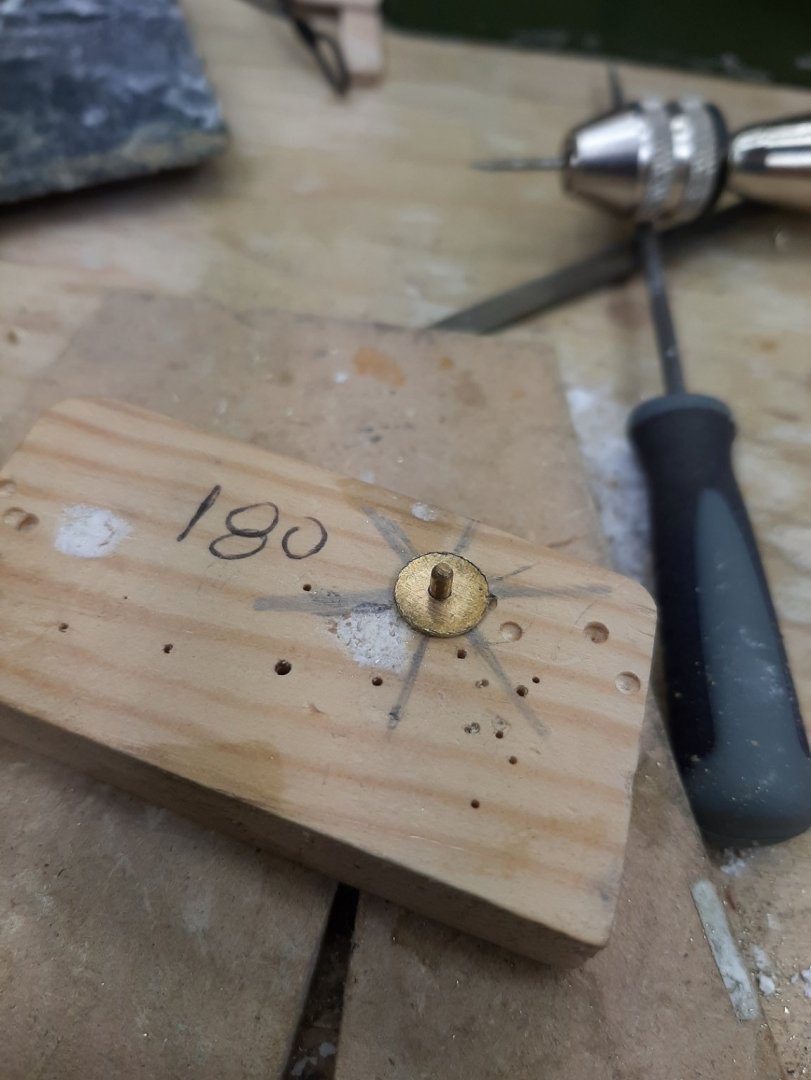
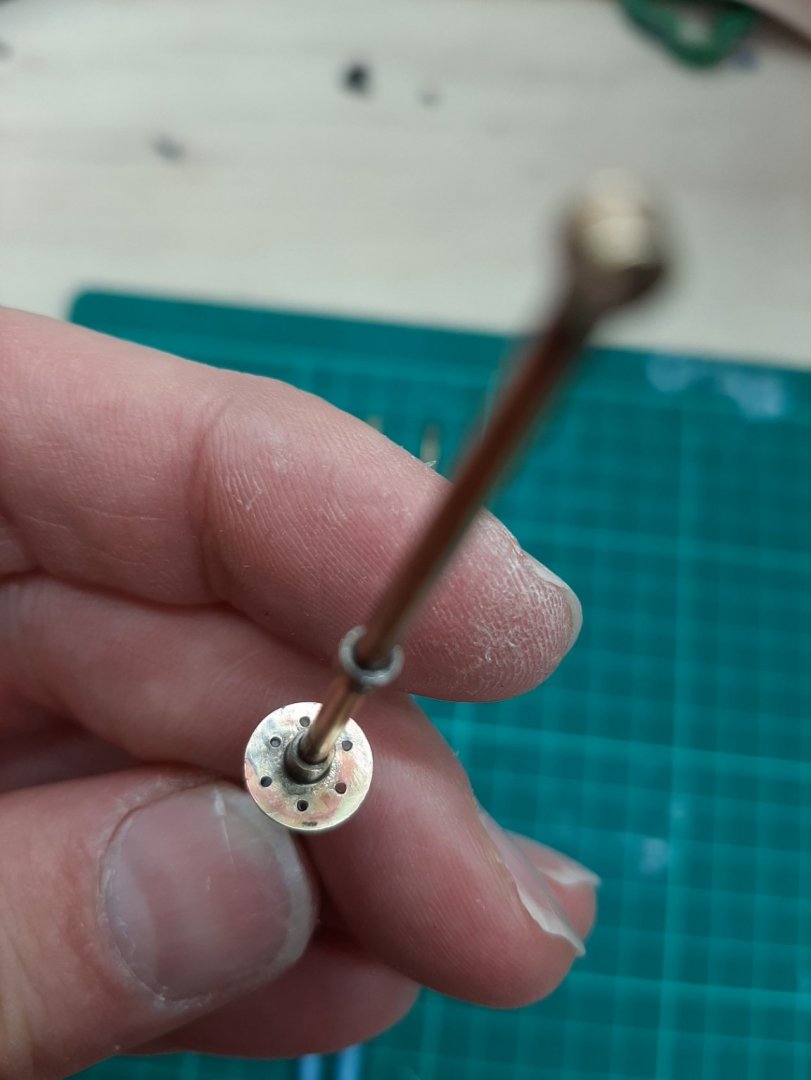
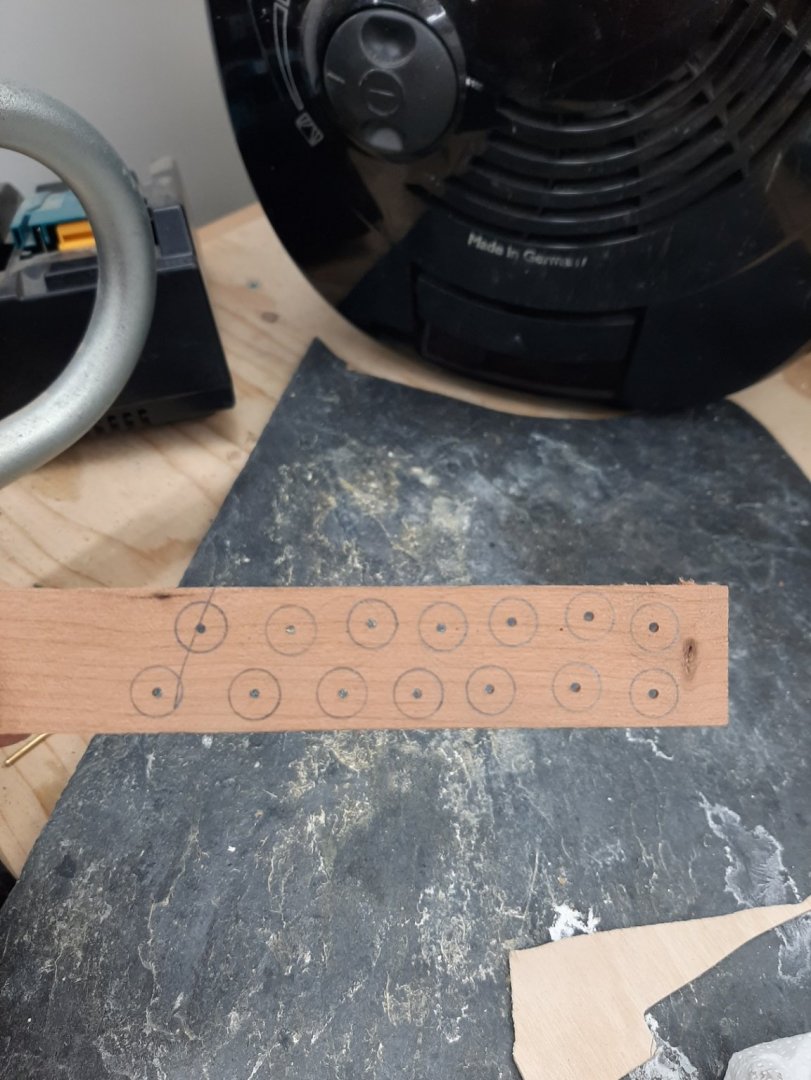
I did a tiny bit of work today but I managed a breakthrough! To complete the rails, I needed discs made of brass at 7 mm diameter with a central hole of 2 mm. I looked for brass washers but could not find them in these exact dimensions. There are Jewellers tools that cut discs of any size but are expensive. I ve been scratcing my head for days now but finally I figured a way to make discs from brass sheet. Needs a fair bit of tools but nothing too specialised. I used the Dremel bit for mounting grinding discs, the screw has a diameter of 1.3 mm. I drew 7 mm circles in thin scrap wood and drilled a 1.3 mm hole in the middle. I cut small pieces of brass with a hole in the middle. I sandwitched it all, mounded the assembly on my cordless drill and started grinding against the rotating disc sander. The result was excellent. This is a process to make a few discs, not for mass production. I opened the hole to 2 mm on my drill press. This needs care as it is easy to make the hole off center This is how each rail is supposed to be, The shaft, the disc and the sleeve at the bottom will all be soldered together. The shaft will be glued through the deck and there will be 4 brass nails through the disc and into the deck. The next photo shows scrap pieces but the final rail will be something like this.


- 536 replies
-
- 11
-
-
Mark and Carl, it is a BIG baby! Even as a half hull! I think after completion I will take the masts down in all my models and pack them away, to come out in 20 years time... Bedford, I tried the hairdryer and it seemed the wrong tool for the job. The heat gun came in and it was much better, more controlled and consistent. Safer as well as it was the admiral's hairdryer!
-
Just caught up GL. Great news she is safely back. The boat looks fantastic, I enjoyed going through the planking very much! I am surprised that you had so many straight edges and so little spilling was needed. This is a very elegant hull, pure wood poetry! Bad luck with the crushed wood. 2.5 mm strips can be very hard to bend into place. Did you use any heat? You may have mentioned it but I must have missed it, what wood are you using for the planks?
-
Well Keith, the Yawl is I think next on line but at 1:10 scale it will be equally huge so the Deben needs to leave the shipyard first (and go where? I do not have the answer)
-
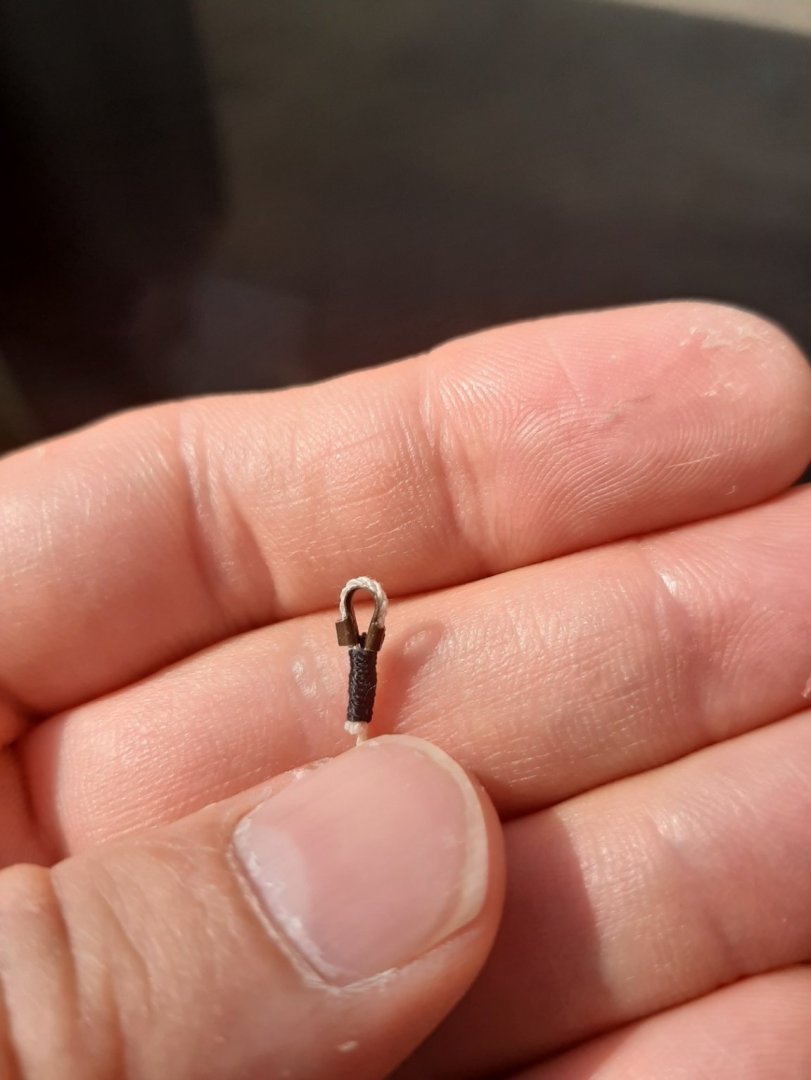
Thanks GL I used Beadalon wire, I think this is 0.65 mm. This is a great wire as it is encased in a plastic transparent wrap. It is served with ordinary black thread in my home made serving machine. Brass electric wire crimps are used for thimbles. The seizing in these is beadalon crimps blackened with black gesso, as they were made a long time ago but now I would use the smallest size fishing crimps wrapped in thread-this gives a more elegant result.
-
Regarding Stay Brite 1. Does it have gap filling properties or pieces need to touch as in silver soldering? 2. Do you use a torch or a soldering gun in high setting?