catopower
-
Posts
1,900 -
Joined
-
Last visited
Content Type
Profiles
Forums
Gallery
Events
Everything posted by catopower
-
 Thanks Chuck. I think it will look pretty decent in the end, even though I can see various flaws while I'm building it. I agree the instructions aren't the clearest. When you get to the adding of those ribs, and probably in many other places, it's kind of a guessing game as to what's going on. It makes sense when you're done with a step. But, when you get to something new, sometimes you've got to stare at it and look over the parts for a while until it becomes clear how things are supposed to go. My one piece of advice is to stick closely to the laying of those planks. Overlap up to the line marking where the next plank goes, but don't cross it. Also, keep in mind that the planks at the stern will eventually be level with the stern post. Well, at least on mine I guess. On the Wonder Dog, it's probably the same, but I don't know that for sure. Good luck with it though!
- 175 replies
-
- 4
-

-
- hanse kogge
- shipyard
- (and 1 more)
-
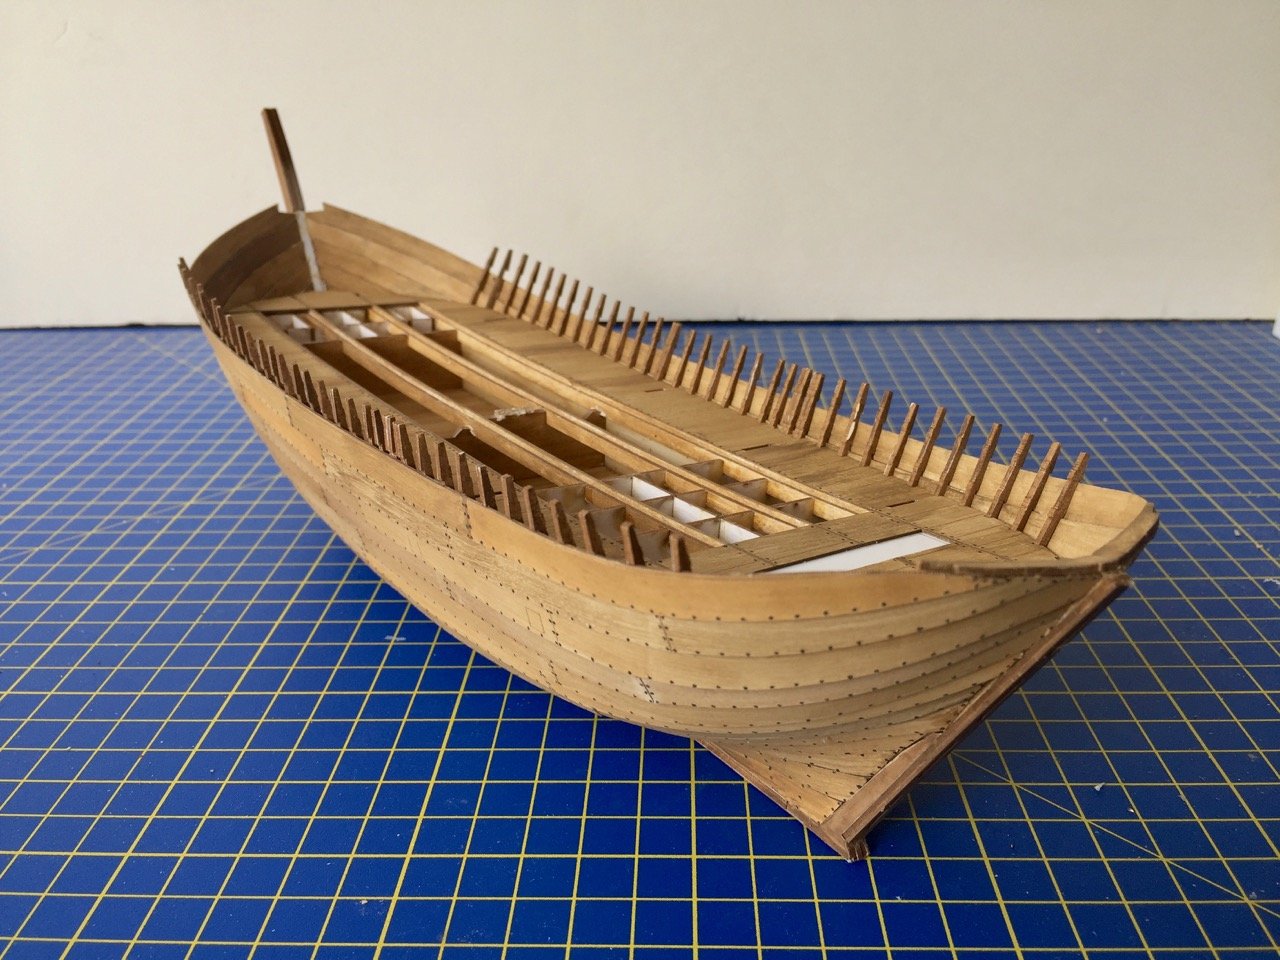
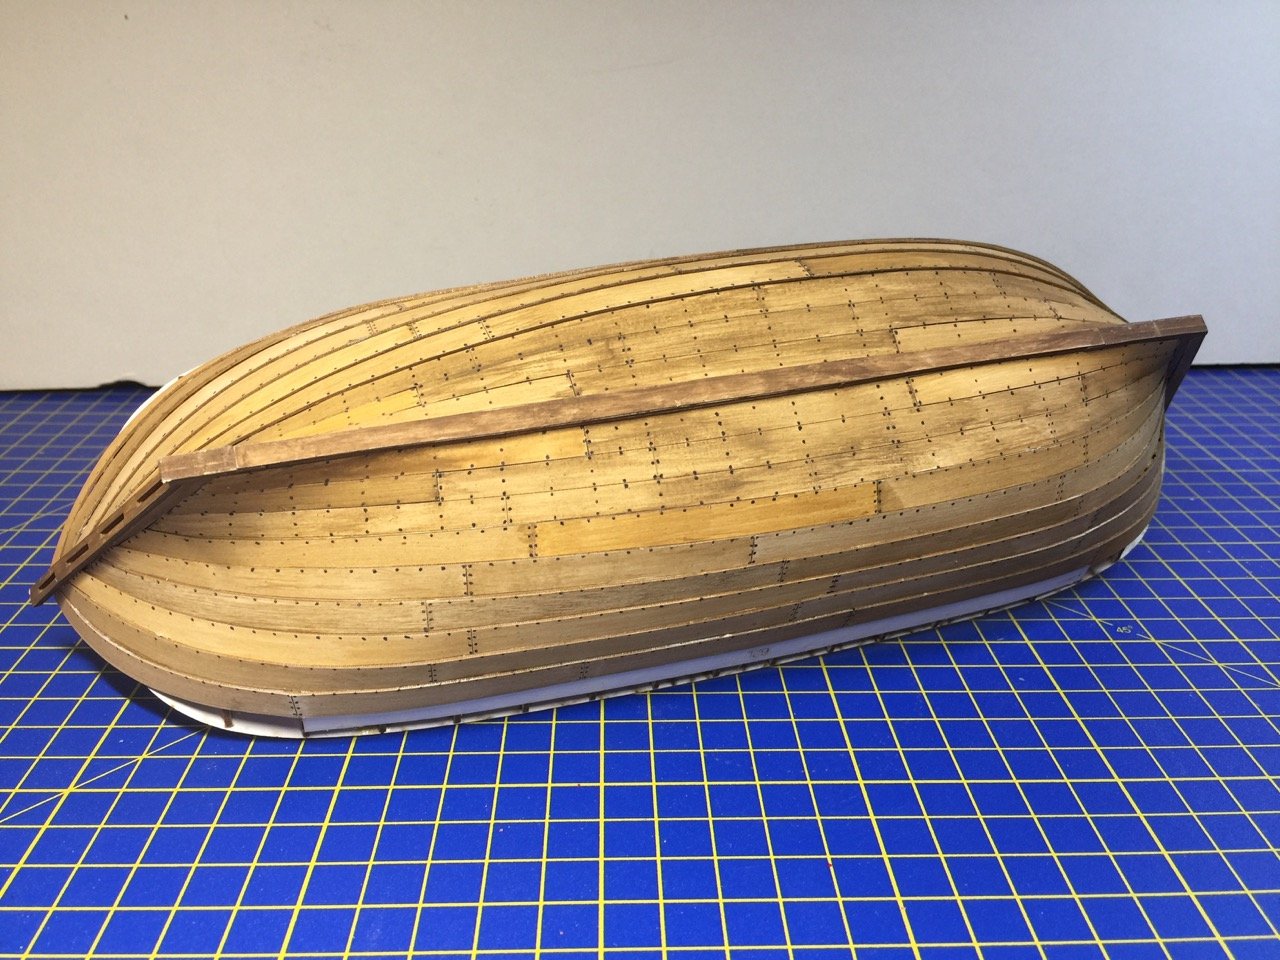
So, I ended up adding the ribs, which was a change from all the planking. It was hard to keep track of them as they are all different. I had it all worked out, but try as I might, I managed to lose track at one point, so I just had to figure out where I went wrong and do the best I could. The ribs are each numbered, but number is engraved on the part itself. It's so tiny that someone looking at the model would NEVER see it. Unfortunately, that also made it really difficult to tell which number rib I was looking at, even when wearing magnifying lenses. But, they are in order on the sheet, so I just went down the line and, near the end, found that I was off somewhere. I don't think it's a big deal. I ended up fashioning a pair of the pieces from scrap card stock. It's too soft to cut easily, even with a scalpel blade, so I hit the paper with a shot of thin CA, which made it stiff as plastic. Then, I could shape the part fairly easily. The only difficulty was the small size of the part. But, I managed. Now, the one thing about models where parts are all pre-engineered and pre-cut is that at some point, you find out how far you were off in the laying down of those planks. Because it's a clinker hull, the ribs are shaped to fit, like a shallow saw tooth, against each plank. Clearly, after all the planks have been laid down, I'm off by a couple millimeters, as the shape of the ribs doesn't quite match the lay of the planks. Again, I don't think it's a big deal, as you can't really see any of this at this scale once the planks are all in place. Still, it's a little disconcerting when you get to this step. You just have to ignore the need for perfection. This isn't a feature of just these card models. I've found this is also true on some of the Woody Joe kits of traditional Japanese boats, in which all the parts are laser cut. If you don't build it precisely as intended, you end up with little imperfections. And, it's nearly impossible to build a kit like this without having little imperfections. It's just the nature of the kit.
- 175 replies
-
- 15
-
-
- hanse kogge
- shipyard
- (and 1 more)
-
Over there, they're saying "some countries use decimal points instead of commas. And I have no idea why." Chuck, I know what you mean. Yes, mine had the commas too – I eventually just adapted. But, I of course first read a ratio of 6:0??? Followed by a 25:0 and a then a 5!
- 175 replies
-
- 3
-
-
- hanse kogge
- shipyard
- (and 1 more)
-
Chuck, check the ratios again. They're really weird the way they are written. My instruction book actually says 6 : 0.25 : 0.5. I've never seen rations written with numbers less than 1 like that. In the first place, it's really hard to read, and even harder to measure "6:0.25:0.5". So, I "Normallized" it by multiplying everything by 4. So, now it's 24:1:2 Same ratios, but easier to work with.
- 175 replies
-
- 4
-
-
- hanse kogge
- shipyard
- (and 1 more)
-
Thanks James. Captain Hook, thanks for the comments, but those aren't my sails – I have yet to make mine! Tim, send me a photo and I can tell you if I had similar problems there. Not having the instructions anymore, I don't know what section 24 is Edit: Tim, I just looked at my own build log and there's a photo of step 24! So, I know what you're talking about. Yes, I had some issues there too. I have the lower hull painted black, so some issues are pretty well hidden. Also, I found that because the ship has a chine hull, imperfections in the seams between planks are not so noticeable as well. A strip of wood behind any gaps is the most useful thing to do, as it will keep any stray light from shining out through the cracks. I had to do this in many places, and now I'd even forgotten that those gaps exist. This would be a bigger issue on a hull that's round with fair curves. This ship has a lot of stuff sticking out.
-
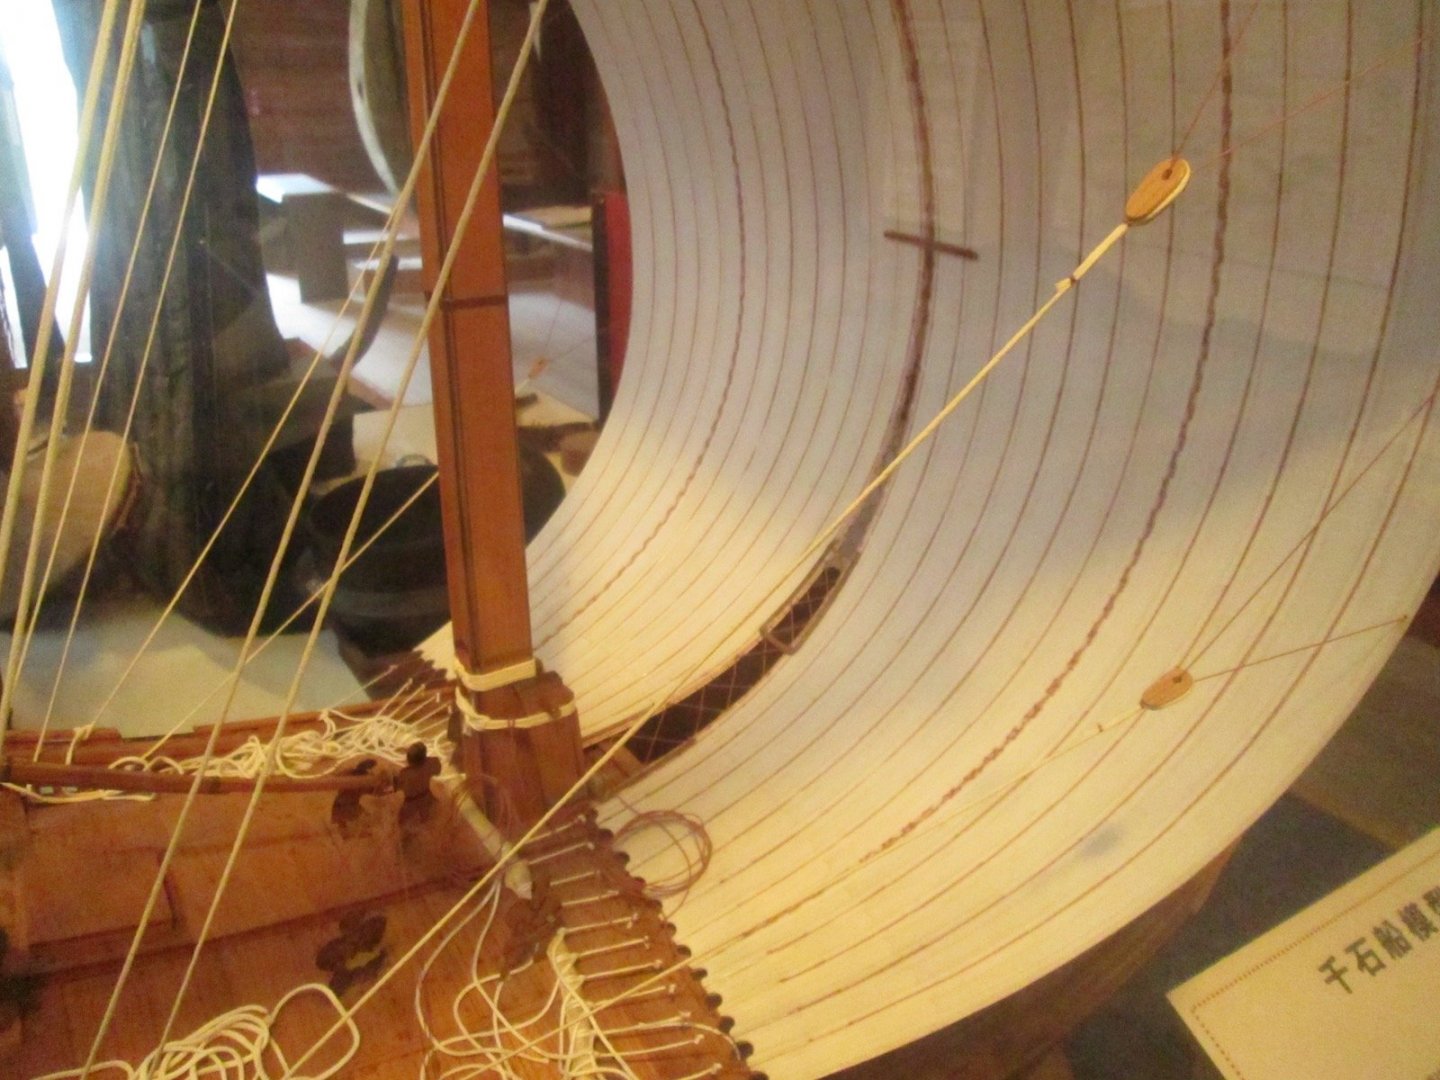
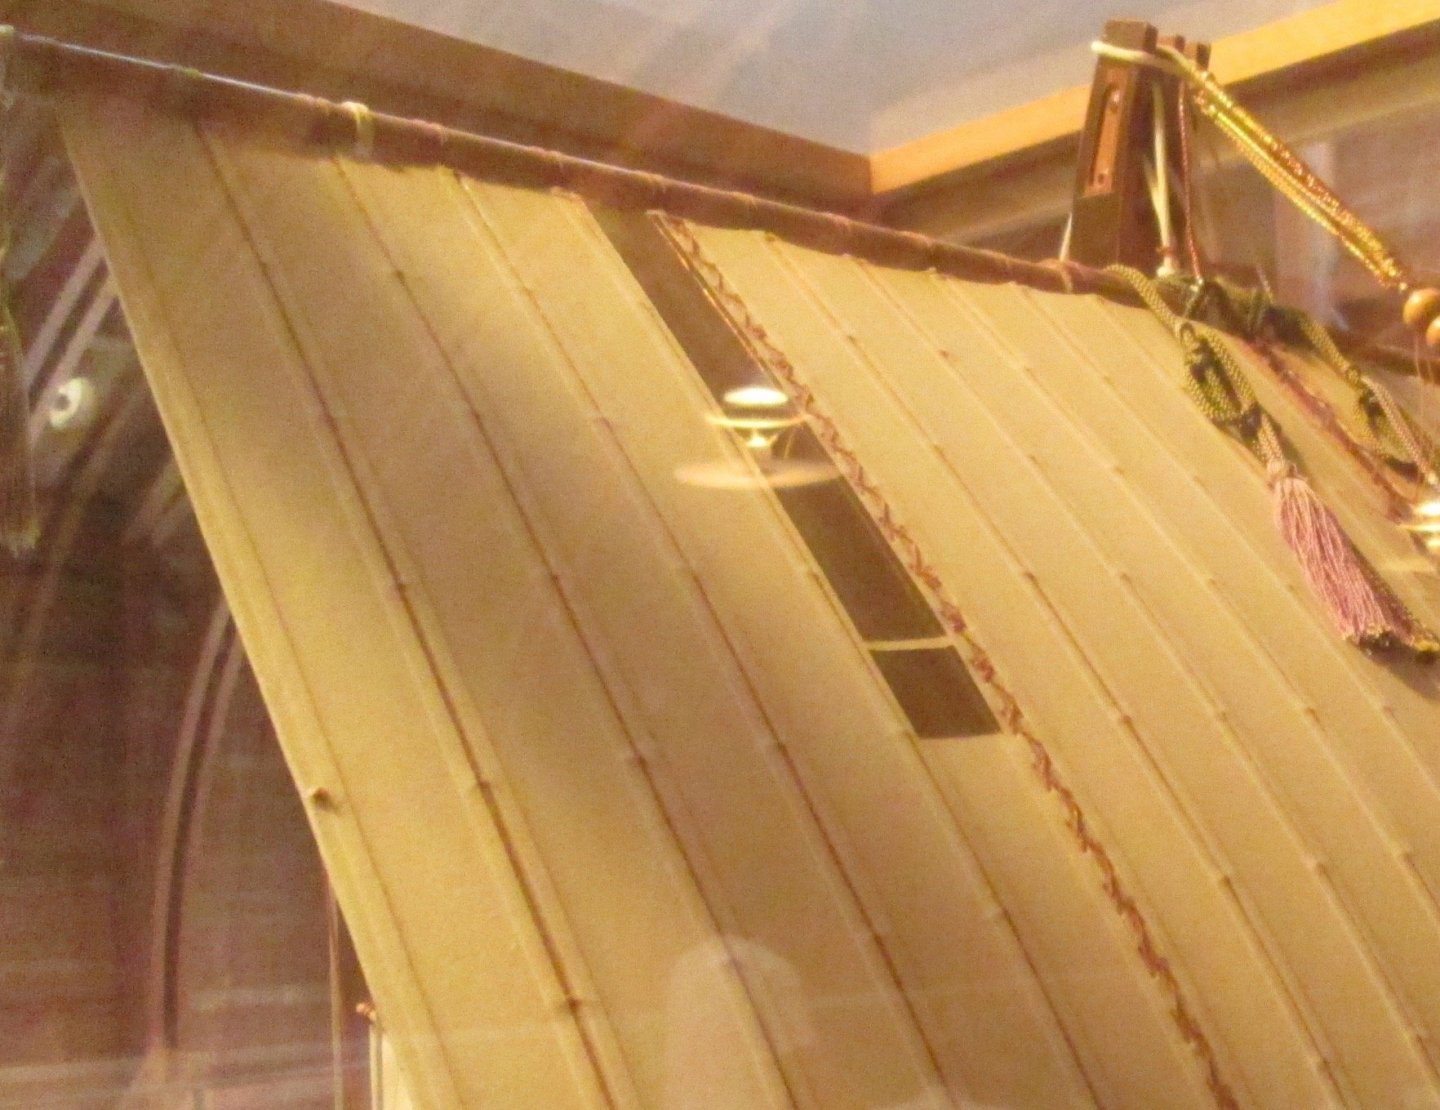
Hi Tim, Actually, I managed to get some scans of the last few pages. That was all I needed. Turns out at this point it's pretty much identical to the Higaki Kaisen instructions. But, thanks for the offer! How is your build coming along? It's nice to know that others are building this and the Higaki Kaisen kit. Hi Druxey, Unfortunately, at 1/72 scale, I can't do a whole lot of detailing to the sails. I can only simulate the overall appearance. I'm going to have to model a smaller craft that has significant sails so I can really show the details of the Japanese sails. Probably be a subject in 1/20 or 1/10 scale, but it's not at the top of the "Next Projects" list. Ekis, cog, Thanks for the nice comments. I'm nearing completion. I already have the main yard ready to go. Just have to make the small one for the bow sail. Then, I just have to decide on how I want to make the sails. Right now, I'm thinking I might just sew most of the seams, but the sail panels are grouped into four sections, and these sections appear to have more noticeable lacing between them, particularly the seam at the center of the sail. Found a photo I took of a model – I think it was at the Sea Folk Museum in Toba. This model was built at 1/30 scale I believe. Maybe it was even 1/20. I don't recall, and unfortunately I can't find a photo of the whole information card at its base. But, you can see in the last photo that each sail panel is folded over, so the modeler could successfully tie the panels together. Then, you can see the lacing between the groups of panels. Also, most models of Kitamaebune show black sections on the sail, usually in the form of rectangles. These markings identify the ship owner. I found some examples recorded somewhere. I'll try to incorporate this on my model. Higaki Kaisen belong to the Higaki trade guild, so you don't see the sail markings on them. They're identified by the diamond shaped lattice work on their bulwarks. Off to meditate on the sails...
-
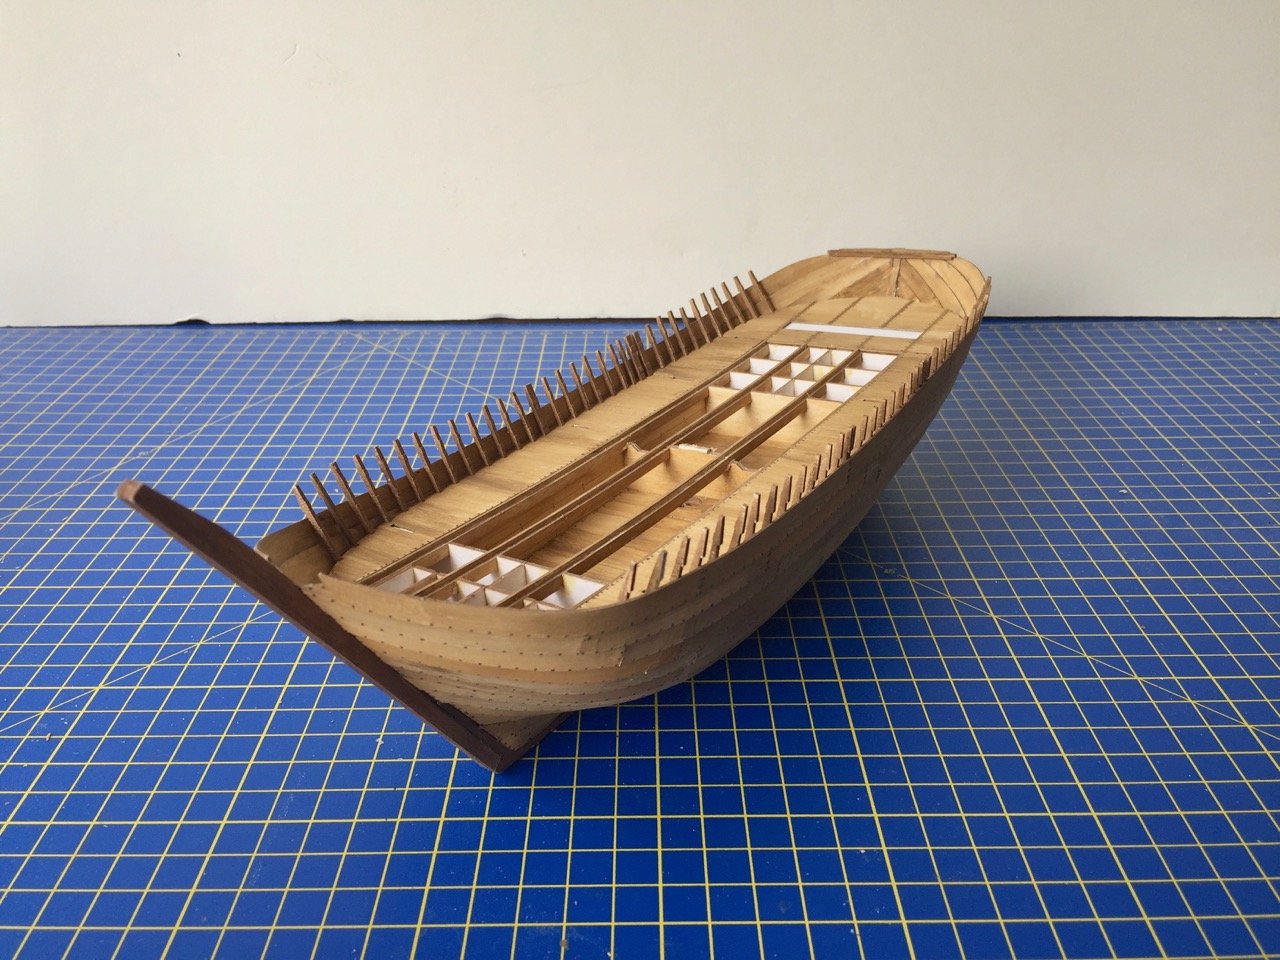
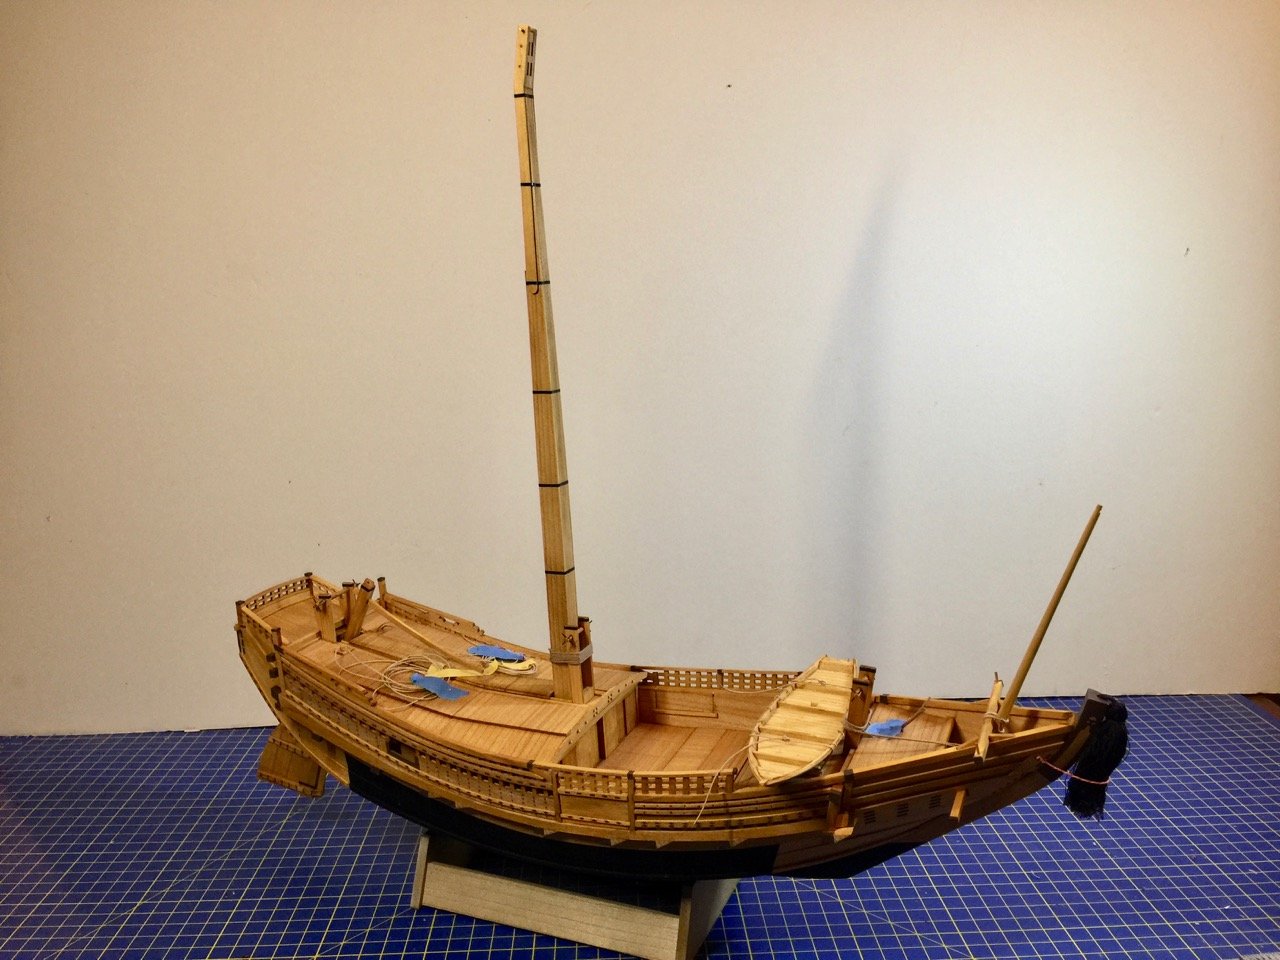
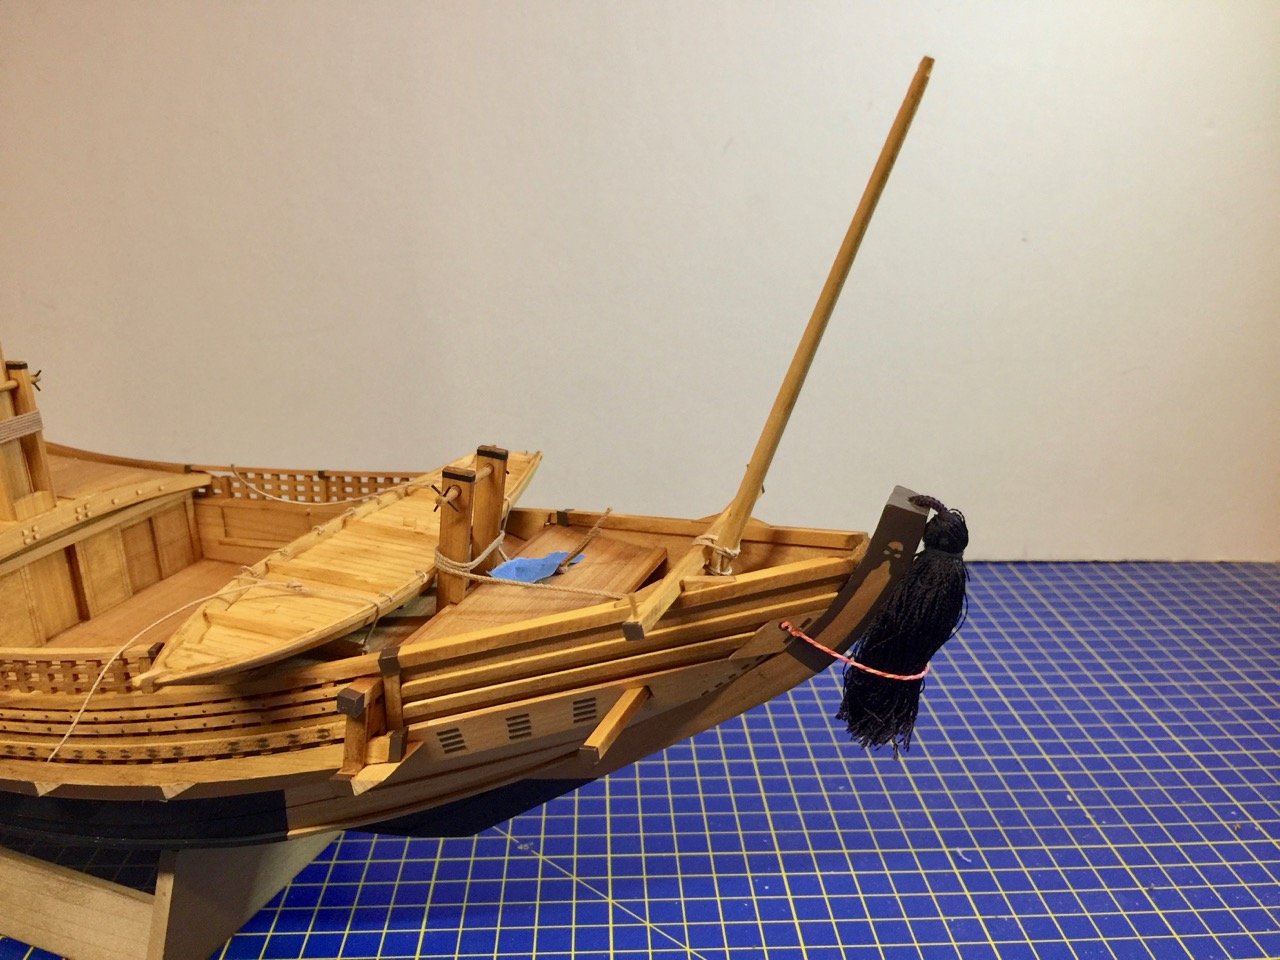
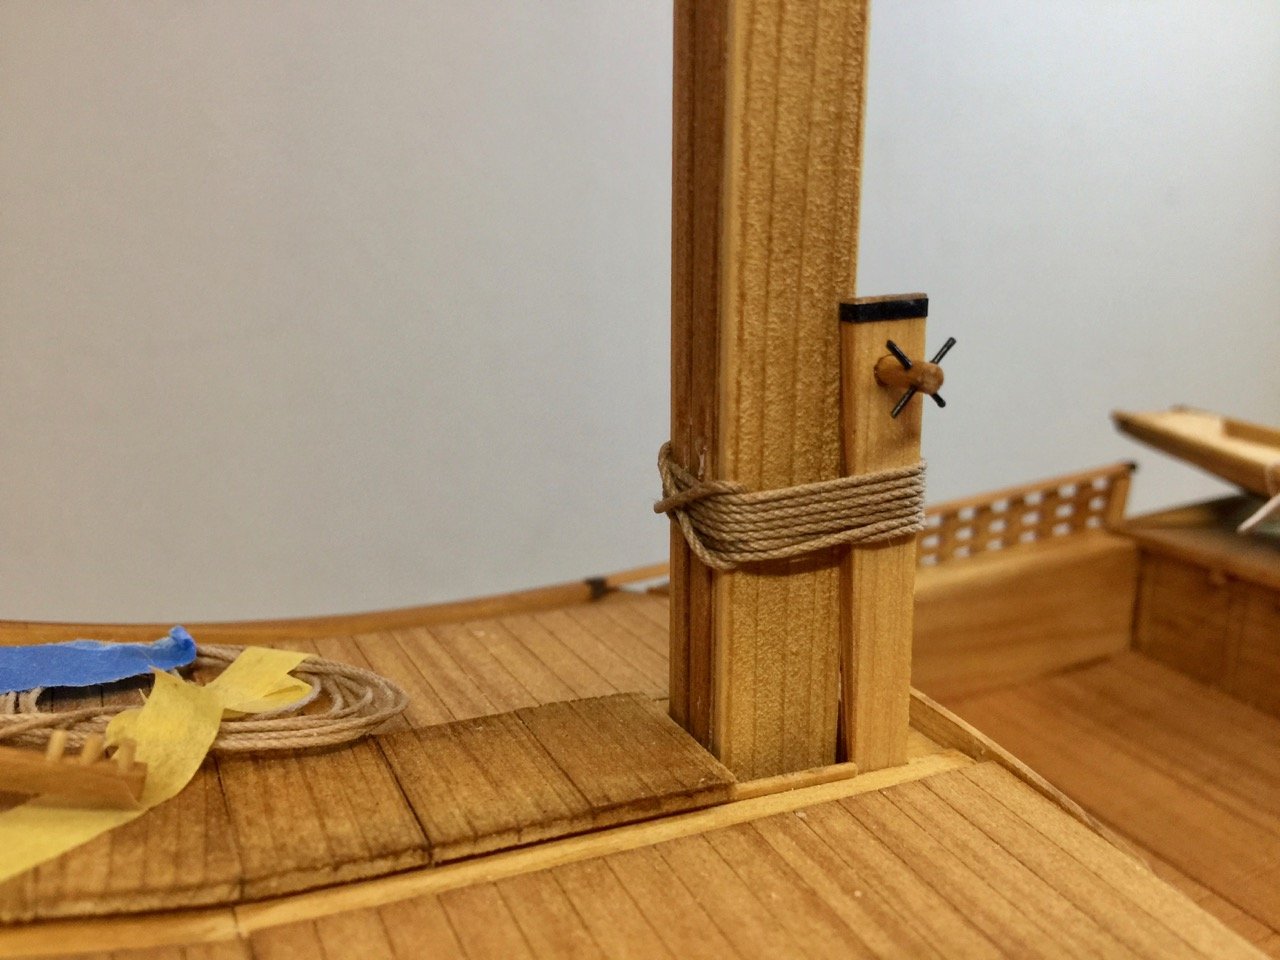
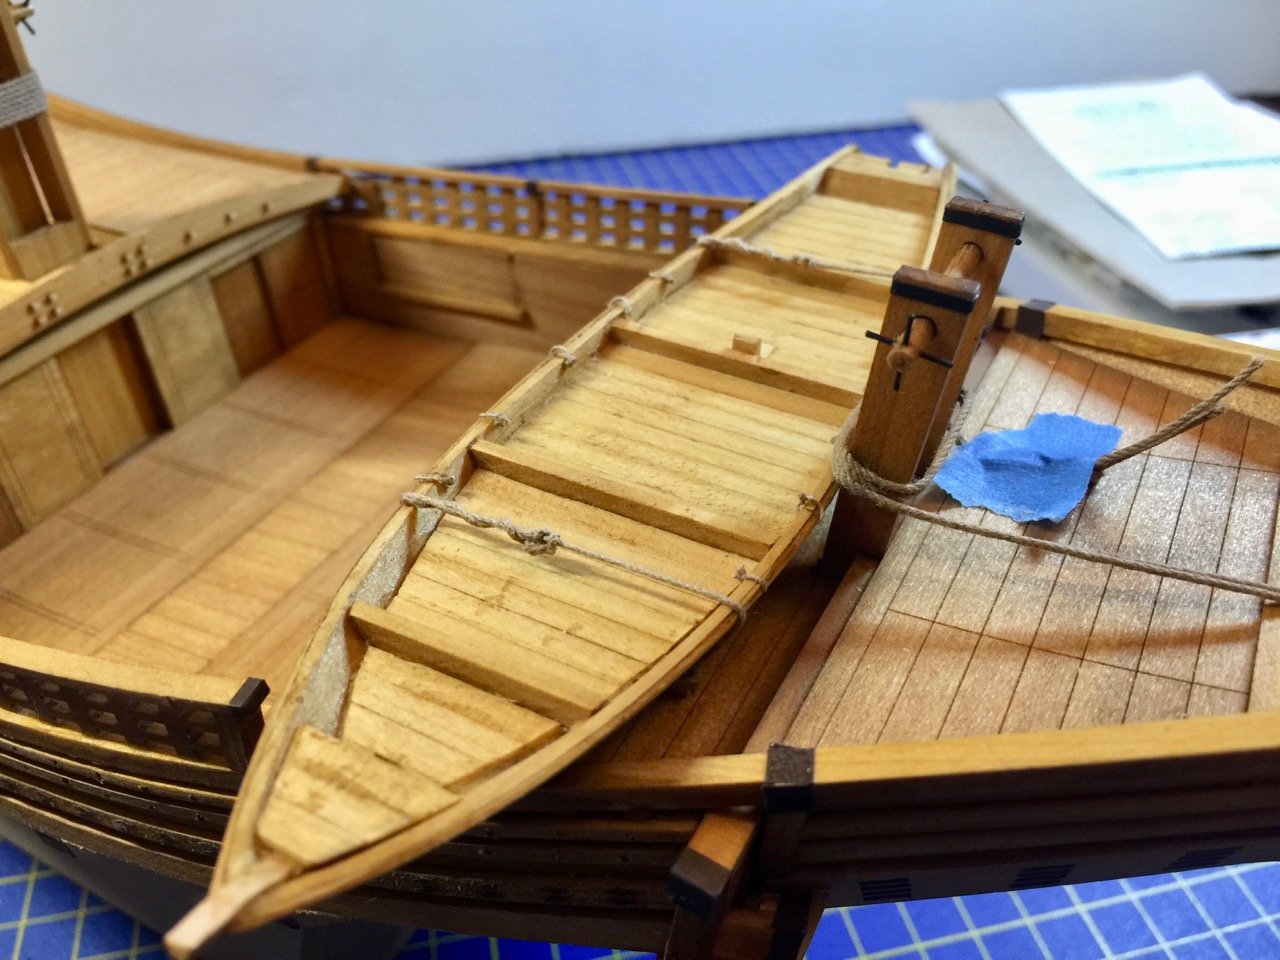
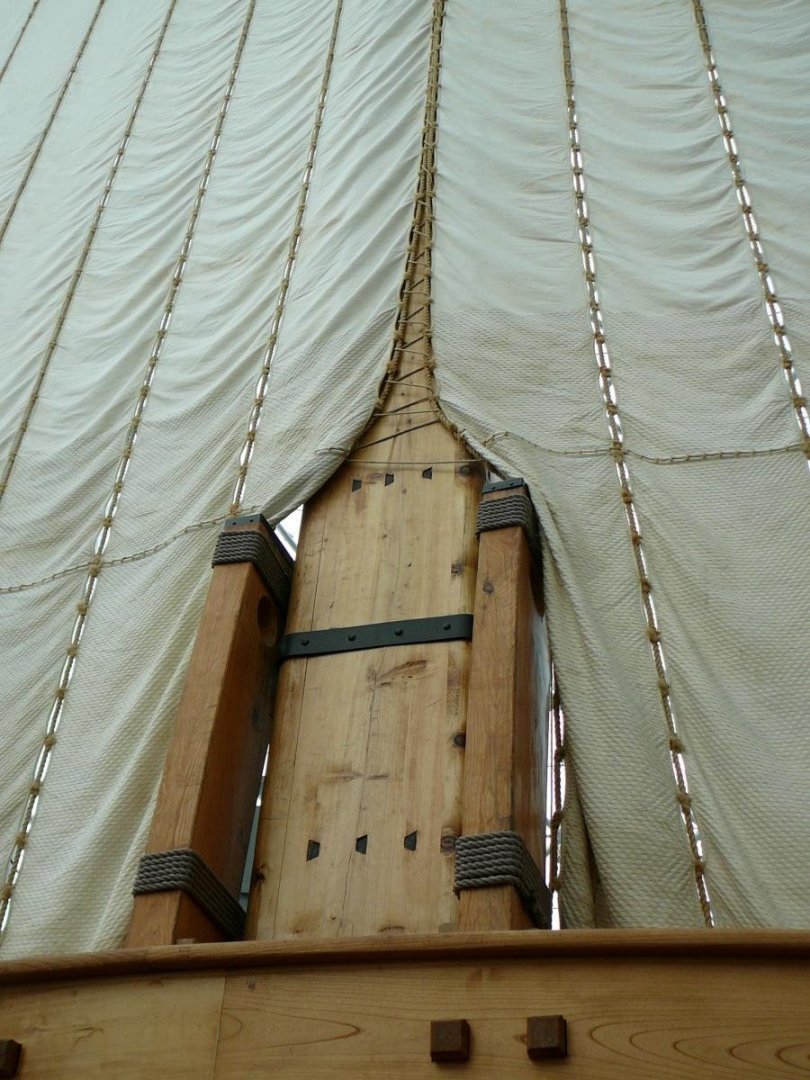
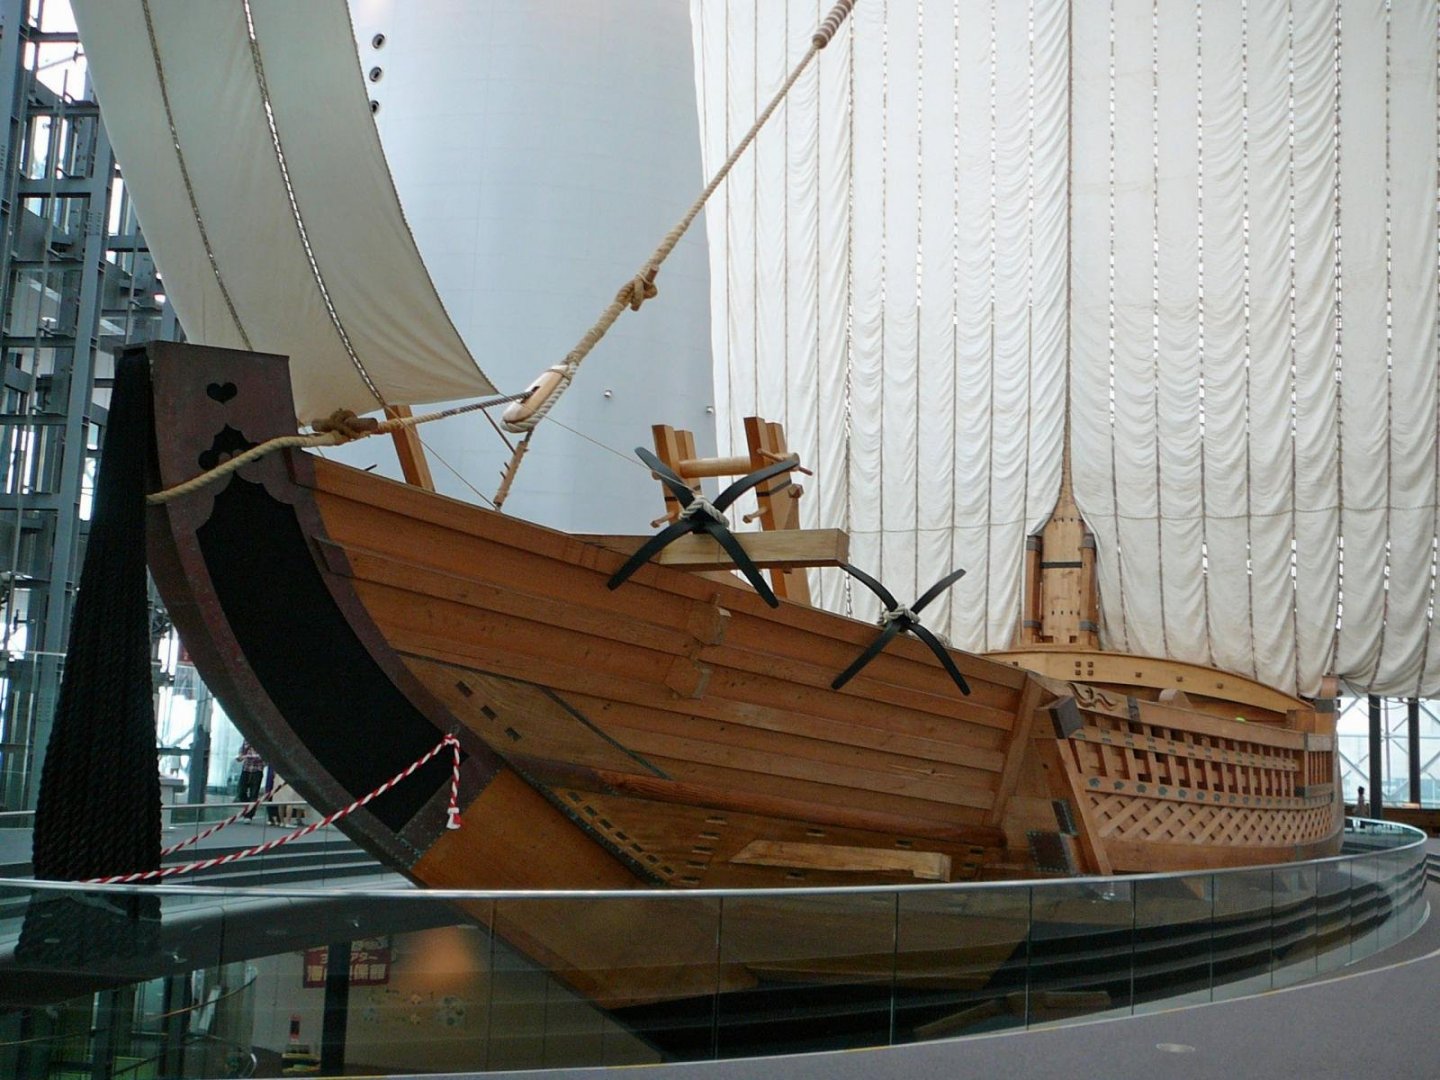
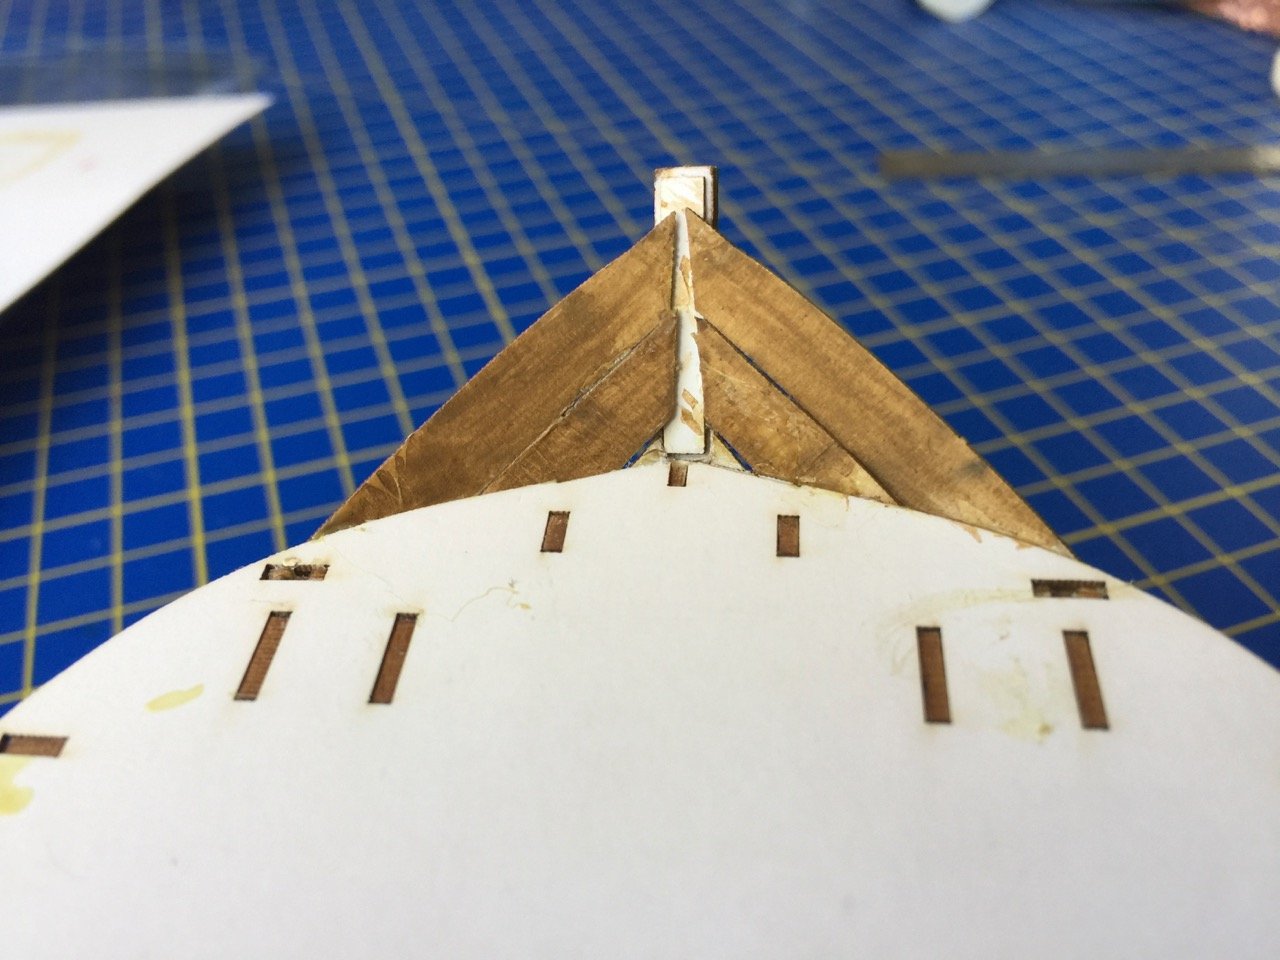
Managed to misplace the instruction booklet for this Woody Joe kit. Fortunately, at this stage, the model is nearly identical to the Higaki Kaisen kit, which I've built before and still have the instructions for. I haven't needed to deal with the sails yet, but I have been studying some photos I took of museum models to get some ideas. I went ahead and added the main mast and worked out a way to fit the small bow mast. The main mast, I had built months ago, so it's been ready to mount for some time. For the bow mast, I fashioned that out of some of my hinoki supply and fit it into place. I placed it just forward of the foreward most beam at the bow, which allowed me to lash the mast to it for strength. I added a very simple rectangular piece of wood for the mast step, and fit a piece of brass rod into the base of the mast to help secure it to the deck. I also added some lines to chocks I made for the tenmase, the small boat I placed on the foredeck. I forgot to mention that I added a pair of small eyebolts on either side of the bow and made a piece of red and white rope that's used to hold the sagari (the tasssle hanging from the stem) from swinging about. I used white line that I'm told is cotton, but I'd swear it was linen line. Anyway, I used some red gouache paint on one length of line. It gave me the brightest looking color for the rope that I've been able to get. I then twisted this and a piece of white line to make the final red and white rope. This worked well enough, but had to be careful with the gouache, as it stays water soluble even after it dries. I'll be spraying the whole model with some matte laquer, so this will hopefully stabilize the paint in the rope. I also got out the mini drill press and drilled holes to add bars to the windlass barrels. These would actually have been wood, but it seemed to be a lot simpler to use some wire I have on hand. They look pretty good here, but I'm sure these wouldn't have been iron, so I'm going to mix some paint to try to match the rest of the wood and paint these. Securing the main mast was easy enough. There is a pretty simple lashing that makes several turns around the whole assembly. I'd seen one photo that had this nice crossing of the rope behind the mast, so I thought I'd work that in. Looks a lot less plain this way. Finally, here's the tenmasen up close, now secured to the deck, with excess line trimmed off. Next, it'll be time to make the sail. Haven't decided how I want to do it, but I have some ideas. We'll see which one wins out.
-
Just my 2 cents, but I think you'll actually have an easier time, and a better looking model, if you just remake the boom and gaff. Probably didn't take you all that long to do, and you can clearly do a good job with those. Resewing the sail will possibly leave you with something that stands out on the model.
-
I know this doesn't really help you, but In the old days, they just gave us a big hunk of balsa, and the instructions "now, carve the block to the shape of the stern". That said, you do have the shape of the deck and the side profile from the drawing. It's all covered up by planking, so you don't have to worry about how good it looks. It just has to be functional.
-
Problem is going to be that this kit is out of production. Even Expo, which does not appear to sell AL kits can't provide parts that don't exist. The missing parts should be laser-cut parts, and if you have the sheet they came from, then you have a pretty solid outline of the parts and can simply reproduce them. That's the beauty of working in wood.
-
Hi Chuck, I think I can get by with simply covering those ends over. There is actually a piece that's supposed to cover the ends, and that, in turn, will be underneath the stern castle structure, so I don't think it will be a problem. But, when it comes to it, who knows? I may just trim those ends off anyway. On the nails, I actually painted mine a dark gray, adding a bit of 3 to the 30. But, Druxey had a good idea about using a Pigma marker pen. I've already committed to painting and didn't want to change horses mid-stream. Should work and might make a quick job of the nail heads.
- 175 replies
-
- 5
-
-
- hanse kogge
- shipyard
- (and 1 more)
-
Finished up with those nails and they look okay. Not perfect – I have to work on technique there. But, they'll do. Adding a rope around the sagari, the tassle hanging from the tip of the stem. I wanted this to be a bit decorative, so I found some white linen line and used gouache to color it. So far, this has produced the brightest colors. Main problem right now is that I seemed to have misplace the kit instructions! Not a total loss, as I've built the Higaki Kaisen kit, which is very similar, and I'm at the stage were I'm basically going to rig the mast and sail. That part is pretty much identical to the Higaki Kaisen kit. Also, I have the instructions for that kit, should I need to reference something. Not sure how I'm going to handle the sail. I'd like to add a bow sail – don't know what the Japanese term is for this. Probably an omote no ho, which is the equivalent of "face" or "bow" sail. Have to figure out how to mount that one. Also, I want the bow sail and the main sail to match in terms of material and construction. Since I'm going to have to scratch build the bow sail, I think I'm going to have to do the same with the main sail. Luckily, I just had some sail sewing practice for two other projects, so I'm fairly ready for this one. Only question is how detailed and accurate I'm going to make these sails. The real sails are make up of some 18 narrow vertical panels that are laced together. Several panels make up a group that is more loosely laced to the next group. A total of maybe 4 groups then make up the main sail. This lacing will open up the gap between the panels, spilling air when the wind gusts, making them effectively self reefing. Not sure if I can really reproduce this appearance at this scale. But, I need to try. I found a couple photos that help to illustrated what I mean about the way Japanese sails are made. These were posted last year by member marcjp in Bob Riddoch's Higaki Kaisen build log, but they really help out here. If you look closely, you can see how the vertical panels are separate pieces that are laced together. Note the division of panels at the base of the mast. Anyway, this is what I'm starting to work on now, making sails that reflect or simulate these details. The sails provided in the kit are actually very good, and they have a printed pattern that gives them a bit of this effect. In fact, someone was amazed when they saw the sails on my Higaki Kaisen model, thinking I had sewn them. So, they must look pretty convincing on their own. Clare
-
Hello Johnny007, I think you picked a great kit for a first build and like the way you approached it. You are clearly doing a fine job with it and it's coming along well, very quickly. For marking the waterline, there are fancy tools available, but all you really need is a book or books or blocks high enough to rest a pencil on top. The beauty of this is that the pencil won't wander up and down as you're drawing the line. Looking forward to following the rest of your progress. Clare
- 63 replies
-
- 1
-
-
- bounty jolly boat
- artesania latina
- (and 2 more)
-
Finished up the painting of the sail. Was a nice break from planking – I understood what I was doing, for the most part! I have a slight issue showing up with the hull planking – the plank ends at the stern shouldn't be overlapping the sternpost like this. Looking ahead in the instructions, it doesn't like like this should cause any problems, but seeing this as your building the model is a little troubling. Meanwhile, planking the hull continues. As you have seen, I'm high up enough on the hull that the inboard side of the planks are becoming exposed, so they have to painted prior to installation. Note that the stem (and hence the bow) is on the right. So, the planking continues and I'm now preparing the deck for installation.

- 175 replies
-
- 9
-
-
- hanse kogge
- shipyard
- (and 1 more)
-
Looks excellent bolin. The tarp and the metal tabs look very realistic. Nicely done.
- 83 replies
-
- 3
-
-
- finished
- billing boats
- (and 1 more)
-
Chuck, yes, I thinned everything. Just for the record, the paints included in the kit are artist acrylics. They are from a Polish company called Renesans. In the early days of these boxed laser-cut kits, they just included the paint tubes. Later, I think Shipyard bought it cheaper in bulk and filled their own jars. Just curious, which color numbers come in the Wütender Hund kit? Clare
- 175 replies
-
- 4
-
-
- hanse kogge
- shipyard
- (and 1 more)
-
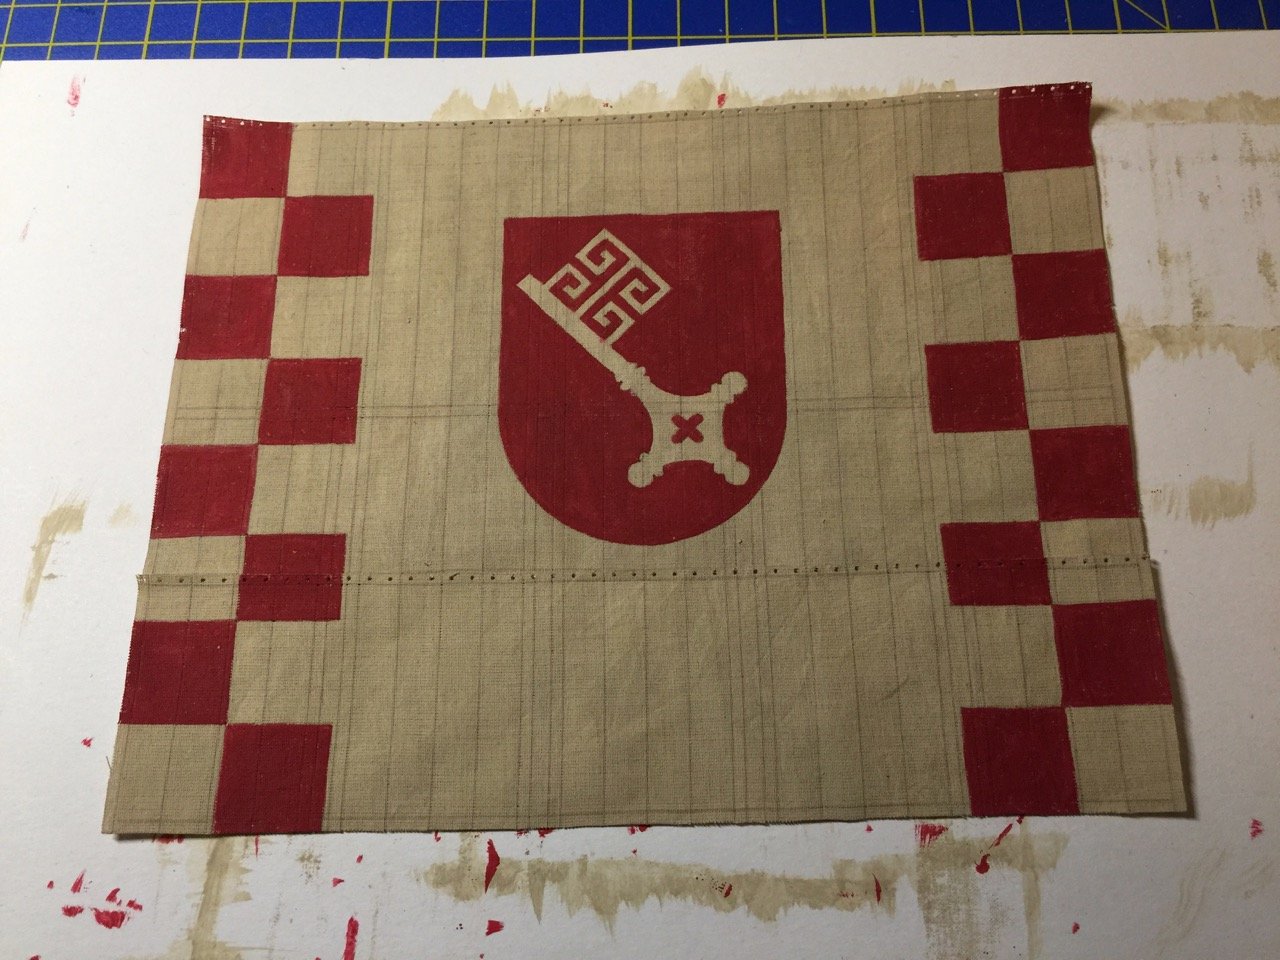
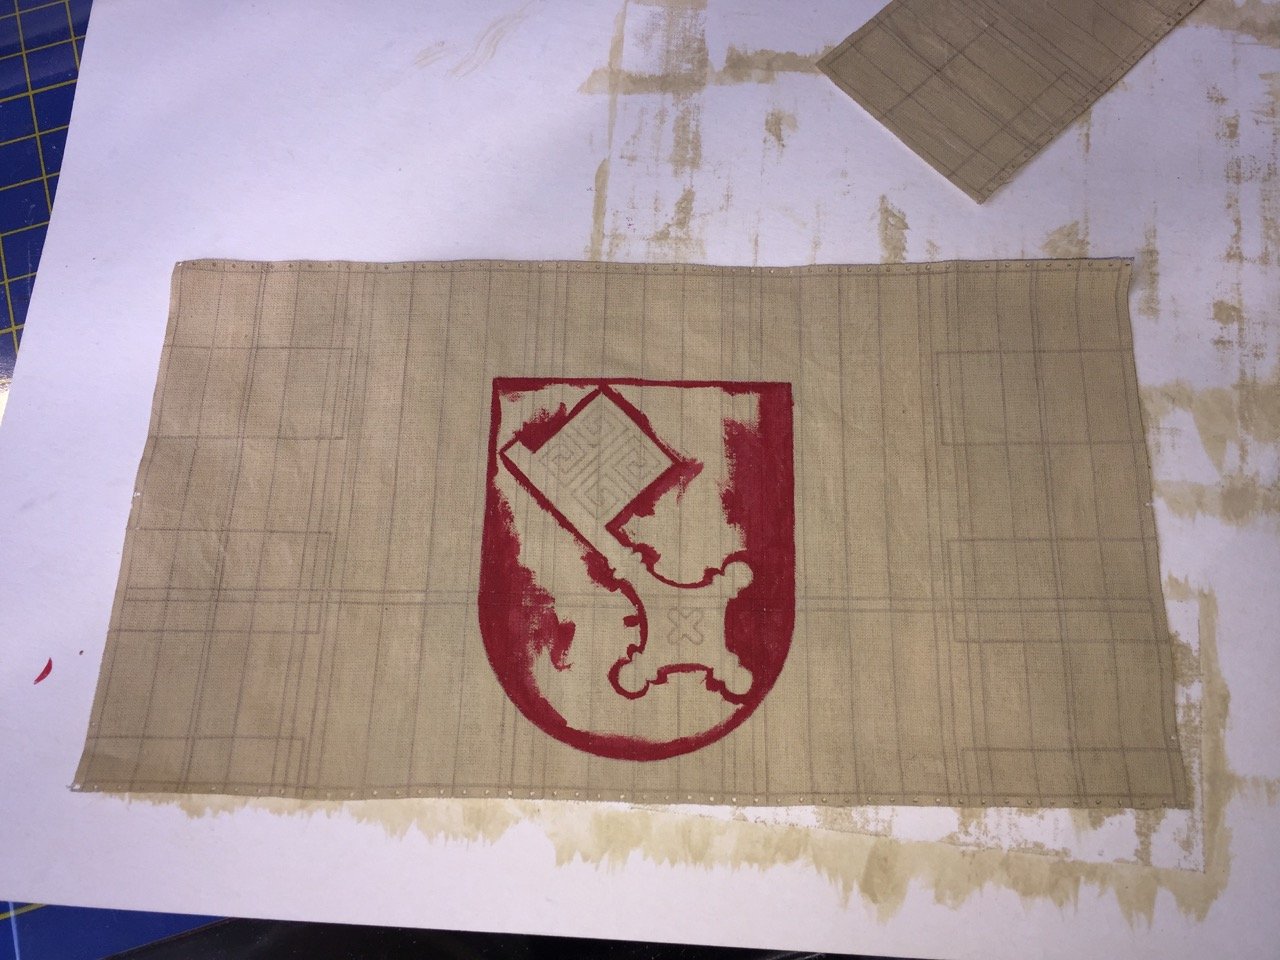
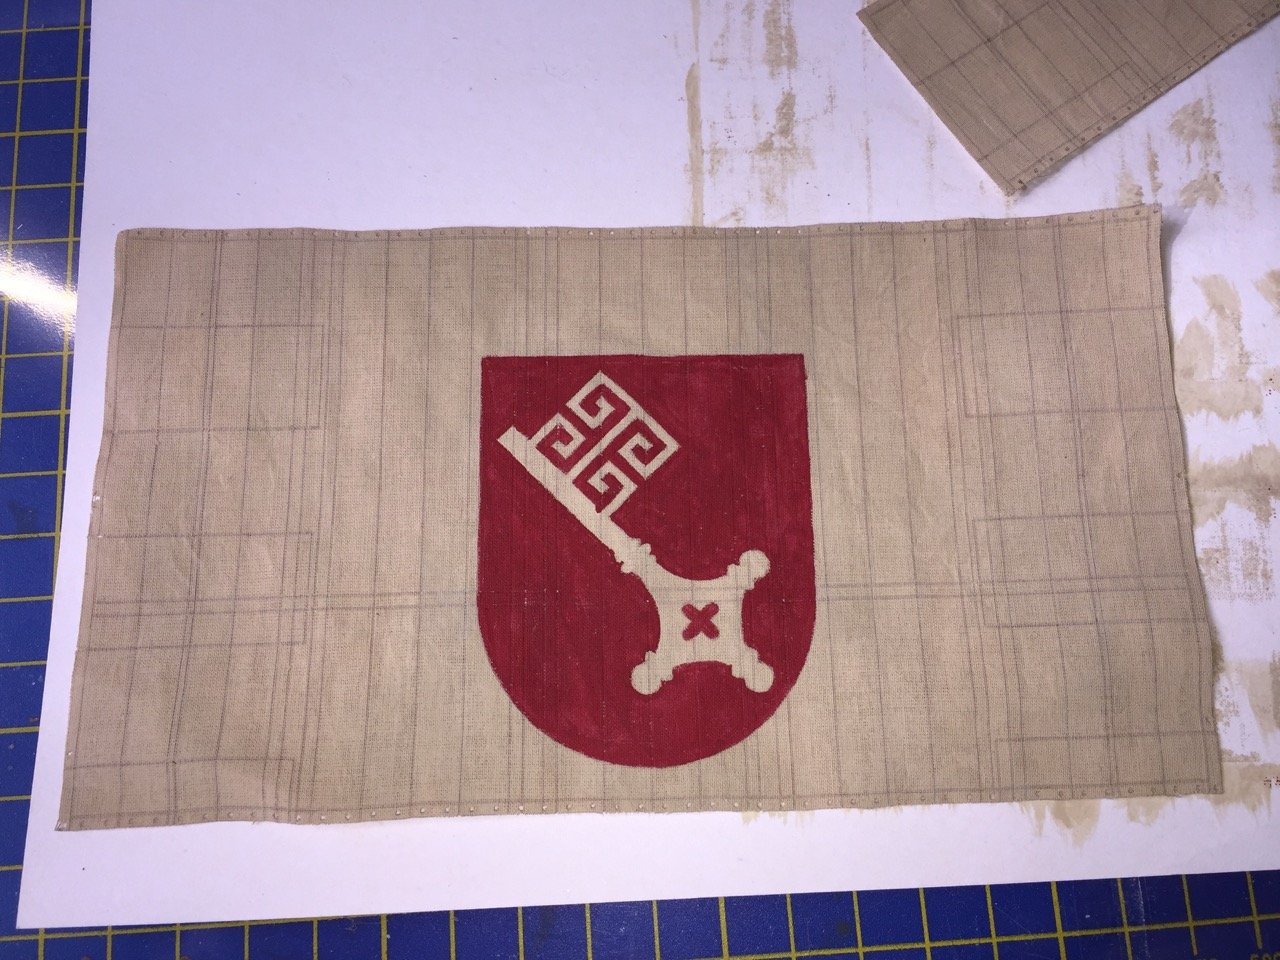
Today, I painted the red sheild on the sail. It was definitely challenging painting right up to the inside of the printed lines of the pattern. As you can see, I started by working out the edges of the pattern first, then filled in the middle. The red paint included in the kit is a very, very intense red. the instructions weren't very clear on painting the red color. But, when I look back, I think it is trying to say to mix it with the sail color mix I made earlier. However, I also wanted to darken it a bit. So, I made a batch of red, mixed with the sail color mixture, and added a dab of black paint to it. I wasn't sure how this would look, but I think it works okay. The above image shows the shield painted with what looks like a key image. Definitely a challenge, but I really enjoyed the painting task. One thing I ended up with is a bit of the red color bleeding through to the back side. I tried painting this out on the back with the sail color, which seems to be working okay, for the most part. Next, I have to paint the checkerboard pattern along the edges of the sail. Also, I finished prepping the next couple planks which I'll also be adding to the hull. Clare
- 175 replies
-
- 8
-
-
- hanse kogge
- shipyard
- (and 1 more)
-
Hi Chuck, glad you've started anyway. Yes, I mentioned earlier in my build log that I found I had to thin down the 03 paint so that the lines showed through. Also, that I found it works best to let this dry 24 hours before applying the next color. The streaks that are formed by the brush strokes seem to be normal and I have found that they mostly end up looking a bit like wood grain. Once you get past the fact that they're actually brush strokes, you'll see it that way. My paint ratio mixture is approximate. I just made a batch of the mixture, so that I'd have some generally consistent color mix. But, if you read my notes on the build, you'll see that I actually made a couple different shades. The Hanse Kogge kit does have me add any green to the finish. I think that's a way to get a more naturally weathered look. After applying that final wash (again giving each paint layer 24 hours to dry), I think everything will kind of blend together a little better. Clare
- 175 replies
-
- 3
-
-
- hanse kogge
- shipyard
- (and 1 more)
-
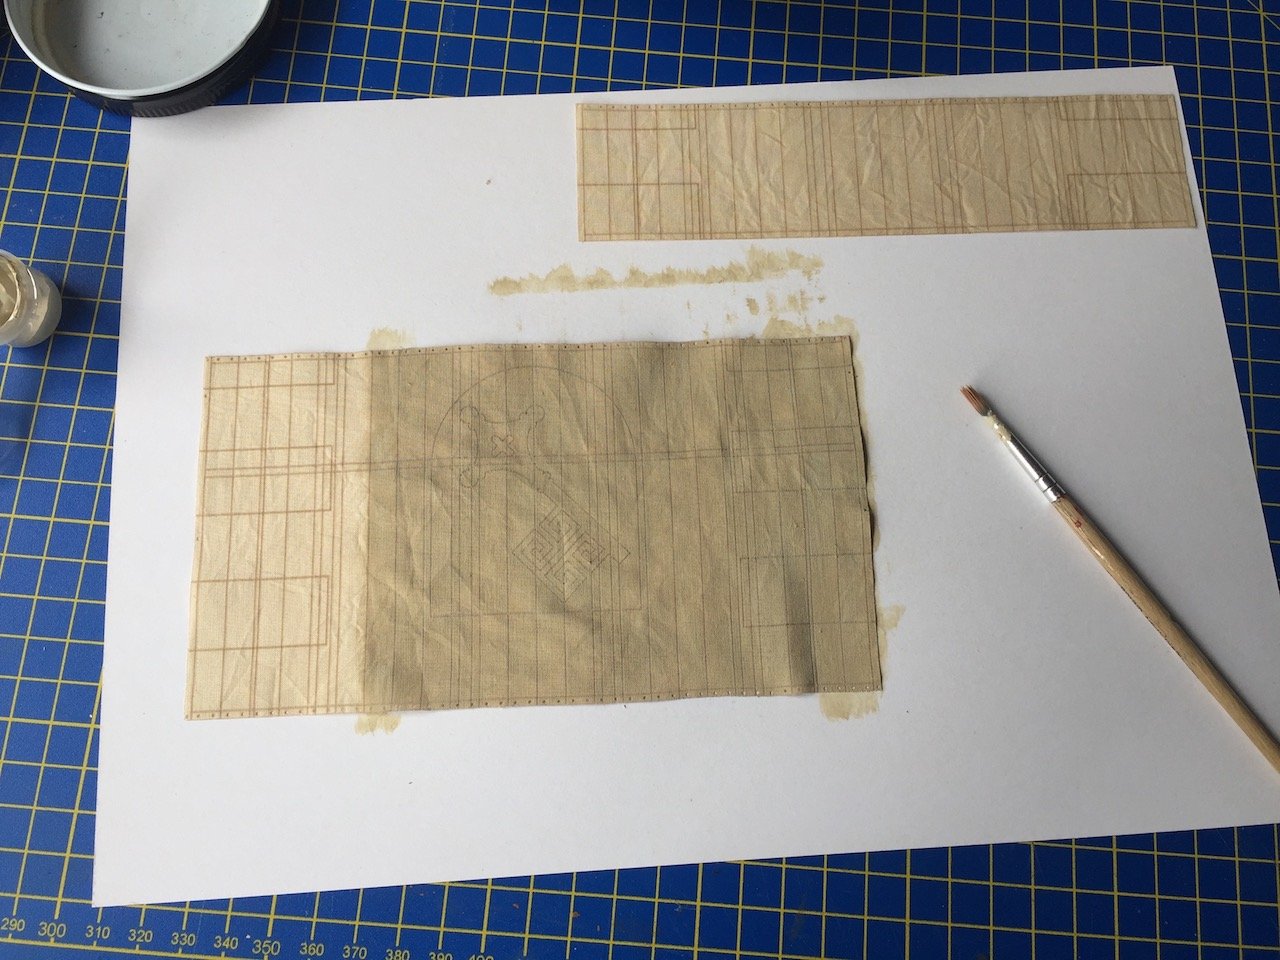
And now for something completely different... Decide that while I'm moving slowly and carefully forward on the hull planking, I'd take a moment to start working on the painting of the sails. There's a single square sail on the ship, with a bonnet laced to the bottom, making 2 pieces to the sail. The sail will be painted with red checkerboard pattern along the sides, and a red shield in the center, bearing a key-shaped pattern. The sail cloth is first painted with a mixture forming a dirty beige color, which actually looks very good for a weather cloth look. In the photo below, you can see where I've painted most of the main sail, but the left side and the bonnet have yet to be painted. The instructions weren't very clear here and I just assumed it was best to paint the whole sail with this mixture first before painting the red markings. I think the beige undercoat will help keep the red paint from bleeding through a lot. Though, maybe it should be allowed to bleed through completely? Anyway, having fun and will start painting the red patterns tomorrow. Clare
- 175 replies
-
- 6
-
-
- hanse kogge
- shipyard
- (and 1 more)
-
Wasn't Paul Lynde in the center? Chuck, I hope you will start a build log. I'm curious about the differences between the Hanse Kogge and the Wütender Hund. And, I think the proper line would be: There's no need to fear. Unter Hund is here!
- 175 replies
-
- 3
-
-
- hanse kogge
- shipyard
- (and 1 more)
-
Hi bolin, I like what you did with the deck houses. Looking forward to seeing what you come up with for the tarpaulin.
-
Chuck, if your's is Under Dog, does that make mine Shoeshine Boy?
- 175 replies
-
- 4
-
-
- hanse kogge
- shipyard
- (and 1 more)
-
Hi etubino, No, the only "tools" in the kit are the brushes I showed in the photos. I don't exactly know that the tools is that is shown in that picture. A tiny awl, maybe? I plan on simply using a sewing needle to make holes large enough to pass thread through. Probably soak the end of the thread with thin CA glue and then cut a sharp tip after the glue has dried, giving the thread a built-in needle. Clare
- 175 replies
-
- 3
-
-
- hanse kogge
- shipyard
- (and 1 more)
-
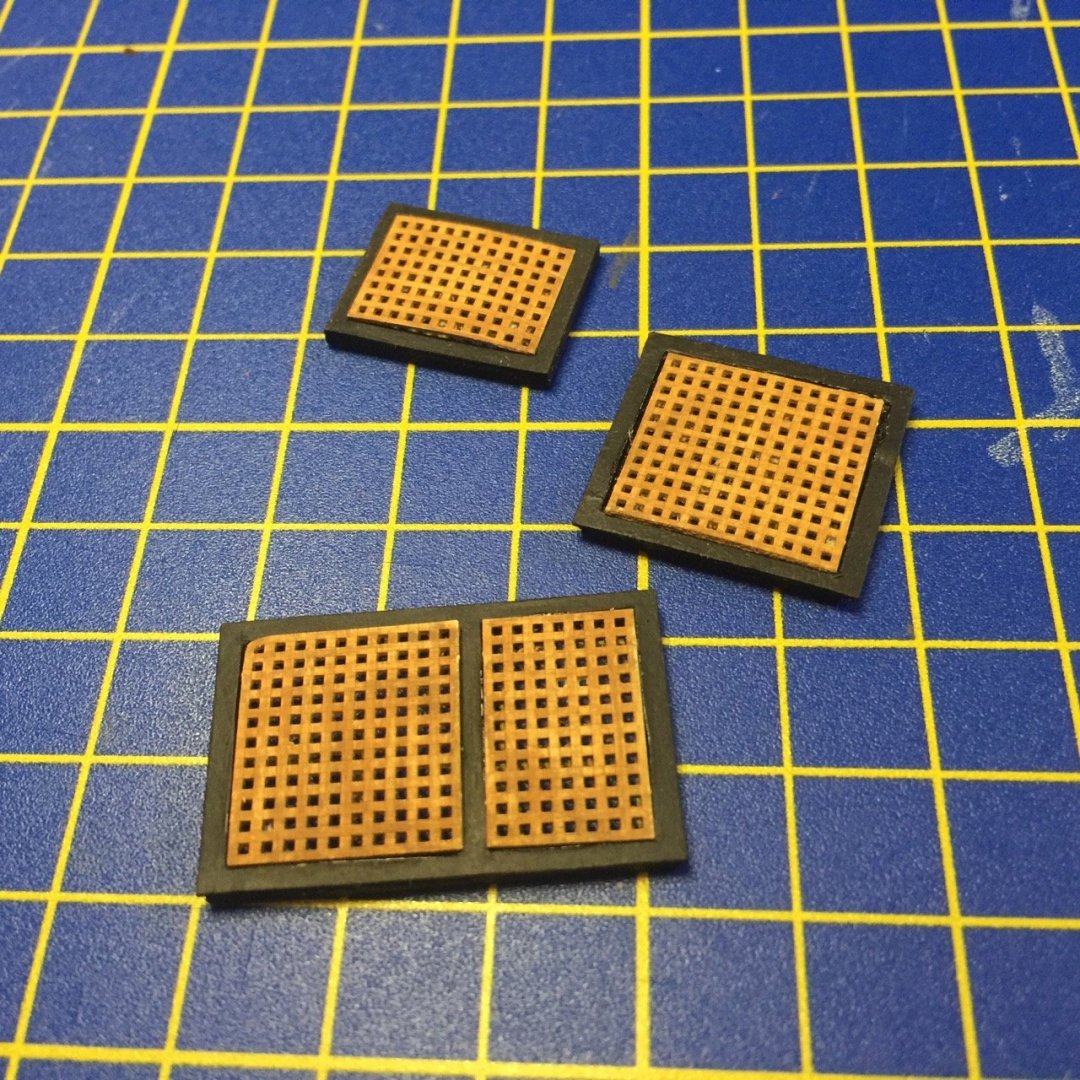
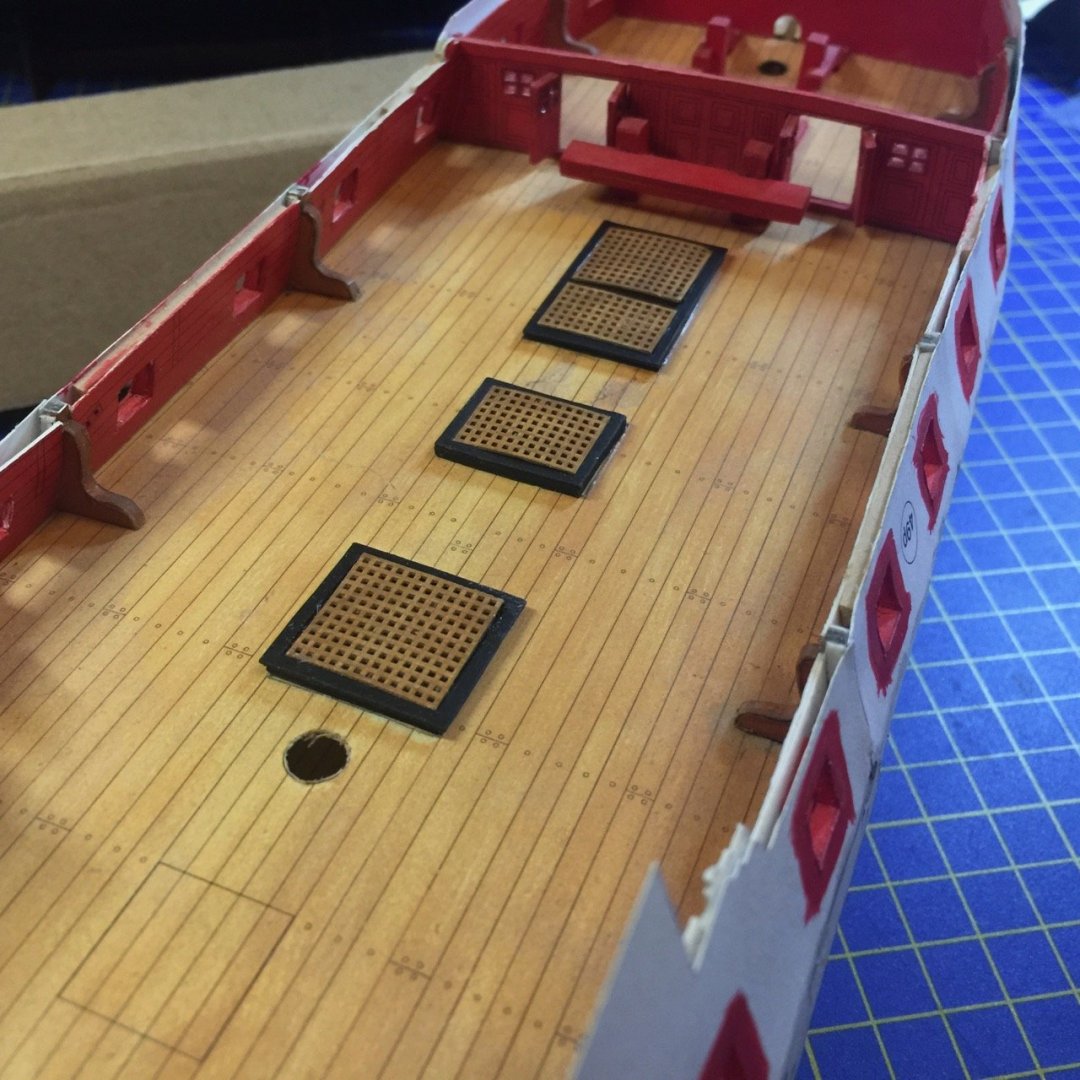
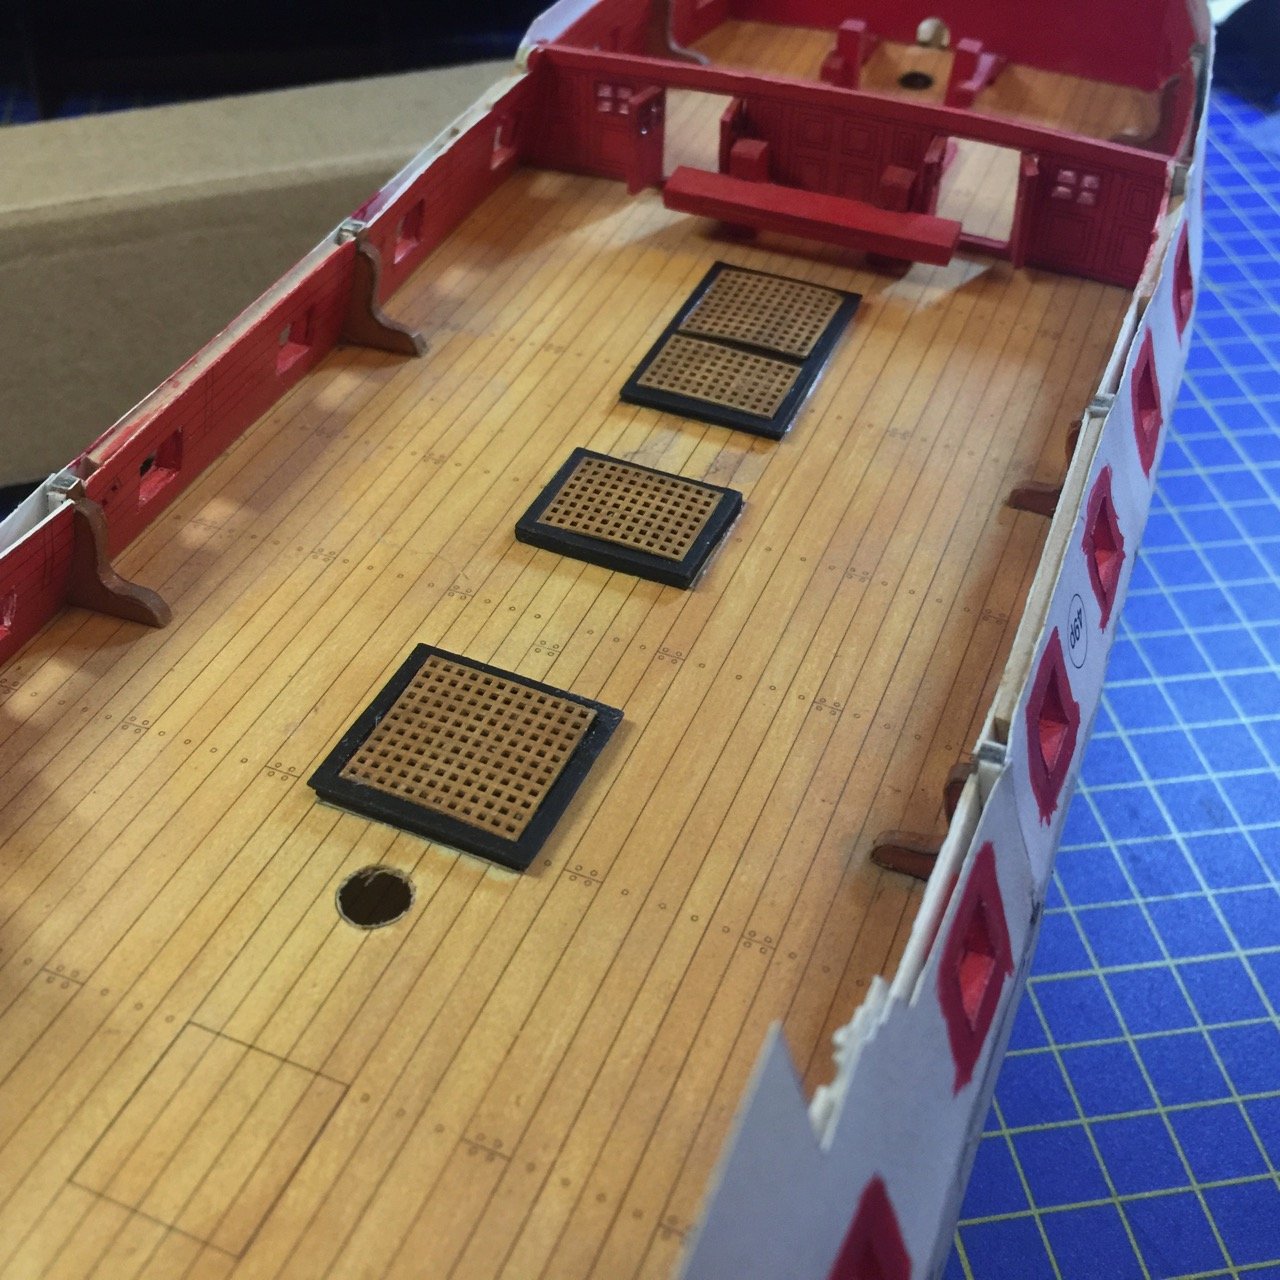
And since it was clear that I had some parts sitting around that were pretty much ready to onto the model, I went ahead and added the hatch coamings and gratings. The gratings were from the GPM laser-cut detail set. These have all the holes nicely cut, but oddly enough, there was still a paper backing – the laser didn't cut all the way through the holes. I opened these up by slicing off the back of the gratings. Now, the holes go all the way through. Not that you can see through the ones on this deck. Don't get too excited about the progress. I was just looking over the model and found something I could do easily. I'll get back to the other projects I need to finish now, but this was a fun distraction... Clare