

molasses
-
Posts
455 -
Joined
-
Last visited
Reputation Activity
-

 molasses got a reaction from dgbot in OGALLALA by molasses - FINISHED - 1/96 scale - BOTTLE - Prairie Schooner
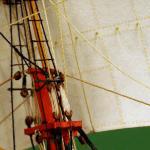
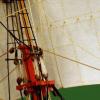
I am working on a display base, nearly complete, and have had the mast folded down and back up again, twice, as dry runs to identify and adjust for problems with the lines before putting the ship into the bottle. On one of those dry runs I passed the ship through a ring slightly smaller than my bottle's neck to verify that it will fit - a must do to prevent the disaster of getting the ship stuck in the neck.
I've just about given up on making and installing coils of rope on the pinrails and cleats. I made a fixture for making some coils - which turned out okay - but I found them very difficult to install in many places. I should have made and installed them as I tied off each line instead of as a separate step. I may try again starting with the easy ones to get to instead of the hardest ones.
I received the Micro-Mark Pro-Etch Kit and set out on the learning curve - which is rather steep to successfully make usable photo-etch parts on the first try. It took me three.
After ordering I set about drawing in my drawing program the etched letters I wanted on two brass discs - one as a seal for the bottle and one on the display base. Keeping it simple, I planned to remove lettering on one side of the discs that I would later fill with paint, black letters on the brass discs. When the kit arrived I read the instruction book multiple times and identified all the tools and materials in the kit.
Following the instructions, I made the masks for both sides of a disc and printed them on the backside of the mask transparency film. Follow the instructions carefully. The black areas of the mask are the areas that need to be removed from the metal and this mask will be printed backwards (flipped horizontally) so that the print is on the backside of the film. After the ink is dry the two masks are perfectly aligned, print side to print side and taped together.
The print side of the mask transparency. The face side of the disc with reversed
lettering and the back side with interruptions in the circle so that the disc will stay
partially attached to the square of base metal. The black is what will be removed,
half-way through from both sides with most of the edge all the way through.
With directions in hand I cut two 2.5 inch / 64 mm squares of .005 inch /0.13 mm thick brass sheet. Before I opened the package of photo-resist film I set up a darkened work area lit by a single yellow "bug" bulb, then opened it, removed the resist and cut two squares, put them in an envelope lined with black paper, and returned the photo-resist film to its package and sealed it shut. This film hardens in UV light. I prepared a brass square by wet sanding each side of the square with a provided 3200 grit sanding pad until very shiny and so that the water sheeted across the square. I pulled one piece of the resist from the envelope, peeled off the inside cover film and, like applying a decal, attempted to lay the resist film on the wetted square, get it aligned to the edges of the square and adhered to the square without bubbles of air or water between the film and the brass. This turned out to be rather difficult and I had problems with it. On my second through fourth tries I submerged the brass square in just enough water to cover and applied the resist film through the water. (An old school decal application trick.) I did the same to the back side.
While doing this I had the Pro-Etch laminater plugged in and warmed up. I cut two squares of carrier sheet (card stock with one side treated so that it is glossy and smooth) slightly larger than the brass squares. I made a sandwich of the photo-resist covered brass square with the two squares of carrier, glossy side to the photo-resist and ran it through the laminater twice, flipped over and turned 90 degrees for the second pass and let it cool in a black envelope.
Next the cooled, laminated brass square (carrier sheets set aside) is slipped between the two masks and centered, then placed in the center of one of the Plexiglas squares provided, the other Plexiglas square placed on top and clamps applied at the four sides. All of this has been done with minimal exposure to UV light, just the yellow "bug" bulb - a suggestion in the directions.
Again per the instructions I exposed each side of this sandwich to full sun at local noon for 20 seconds. The UV light hardened and turned the photo-resist in the areas not masked a deep blue from its original light blue. I disassembled the sandwich and returned the brass square to a black envelope while I set up for the next step and put away what I wouldn't need right away.
I prepared a solution of sodium hydroxide and water per the instructions, removed the outer protective layer of the photo-resist film from both sides and submerged the brass square in this solution. This chemical reacts with the masked and un-hardened photo-resist film, softening it so that it will brush away. This is the most important part of the process, if the film is not completely removed from the areas to be chemically etched it won't etch properly. This is where I messed up in my first two tries; for the third and fourth tries I used my 2.75X Opti-Visor and inspected and brushed with the solution and inspected and rinsed and brushed some more until I was certain that every bit of resist was removed from the areas that needed to be etched. I made use of a hand held magnifying glass with the Opti-Visor to make sure every bit of un-exposed resist film was gone.
The second brass disc with blue photo-resist and bright brass showing through the
areas that will be etched. I thought this was good enough but it was not. Many areas
did not etch properly, especially from the backside, due to my lack of diligence.
Paying close attention to the instructions, I set up the equipment for the actual photo-etching. I had to supply a rinse bucket and a smaller rinse bowl, both filled with water. I warmed the bottle of ferric chloride in hot water running from the tap before filling the etching tank. I plugged in the aerator (to circulate the etching solution) and submerged the brass square. I set a 5 minute timer.
Etching in process. There's a clamp on the hose to prevent the etching solution from
flowing back into the pump plus the pump is placed on two pieces of foam packaging
to raise it above the solution level.
After five minutes, I removed the brass square from the etching tank (turned off the aerator and pinched shut the hose clamp - the fumes must be assumed to be nasty) rinsed and re-rinsed to inspect the progress. Most of the double side etching at the edge of the disc was cut through, so I turned the brass square 180 degrees in the clamp, returned it to the solution (turned on the aerator and released the clamp) and waited three minutes. Upon inspection, it was done and I rinsed it in hot tap water before setting it aside and cleaning up.
Now, to see the results. I poured out just enough of the sodium hydroxide (undiluted this time) into one of the trays provided to cover the brass square. Full strength this chemical removes the photo-resist from the brass with a little help with a brush. When cleaned of the resist the brass was rinsed in hot water from the tap and set aside.
Here's my first try with some practice with black enamel to fill in the letters. There are
several places where the photo-resist did not adhere and laminate properly as a result
of my difficulty with getting the resist in place as directed and etching solution got into
them from an edge exposed to etching solution. I had no more problem with this using
the submerged technique of applying the photo-resist film. Many places in the lettering
have incomplete depth because I didn't get all the masked film removed the way I should
have. Micro-Mark was right when they said this was the most important step.
Third and fourth tries, both appear perfect. The lettering has not been filled with enamel
yet, just the result of better photographic technique learned since the photo of the first
disc. I didn't even bother stripping the second attempt since I could see that I had not
removed all the masked and un-hardened photo-resist film. The discs are 1.73 inch / 44
mm in diameter.
I am very pleased with the Micro-Mark Pro-Etch Kit. It has everything needed except for a yellow "bug" bulb and the two rinse buckets I provided. I bought a better pair of rubber gloves than the single use, throw away gloves supplied in the kit for my second session when I made the last two discs. I also added a small in-line on/off switch to the aerator electric cord so I would not have to crawl under my work bench to unplug it when I needed to turn it off.
The process does have a steep learning curve, a mistake made anywhere in the process will affect the results. READ AND STUDY THE INSTRUCTIONS and MAKE SURE YOU UNDERSTAND EACH STEP.
I hope my experience helps others learn from my mistakes.
As you can see from my name plates I've set myself a dead line of the 29th of this month - one year from my first post for Ogallala. A year is long enough and I'm getting tired of looking at it.
Dave
-
 molasses got a reaction from hexnut in OGALLALA by molasses - FINISHED - 1/96 scale - BOTTLE - Prairie Schooner
I have gone over all the components, touching up paint and completing final touches, and there's nothing for it but to stuff this thing in its bottle.
One last photo of the eight components to be assembled inside the sphere while still outside.
From lower left across: four prairie segments and the front and rear wheel assemblies. The
wheels each have a thread leading through holes in the prairie segments to help locate them
in their places. The lower hull is near center held with a clamping tool I made for this project -
more on that when in use. The upper hull with rigging is at the upper left. At upper right is the
sphere on its stone display base. I had it made by a local stone counter-top installer from a
remnant from one of his jobs. It is mostly light tan with streaks of red and black through it
picking up and complimenting Ogallala's colors. The base has the finished medallion
permanently attached and an X-Acto knife for size reference. Click the image.
I finished the medallions with a chemical blackening agent, sanded them until only the lettering remained black then sprayed them with clear lacquer. I'll post more on the base later.
I cleared off my work area for the group photo and made sure (again!) that everything is ready. No excuses left.
Dave
-
 molasses got a reaction from Piet in OGALLALA by molasses - FINISHED - 1/96 scale - BOTTLE - Prairie Schooner
I have gone over all the components, touching up paint and completing final touches, and there's nothing for it but to stuff this thing in its bottle.
One last photo of the eight components to be assembled inside the sphere while still outside.
From lower left across: four prairie segments and the front and rear wheel assemblies. The
wheels each have a thread leading through holes in the prairie segments to help locate them
in their places. The lower hull is near center held with a clamping tool I made for this project -
more on that when in use. The upper hull with rigging is at the upper left. At upper right is the
sphere on its stone display base. I had it made by a local stone counter-top installer from a
remnant from one of his jobs. It is mostly light tan with streaks of red and black through it
picking up and complimenting Ogallala's colors. The base has the finished medallion
permanently attached and an X-Acto knife for size reference. Click the image.
I finished the medallions with a chemical blackening agent, sanded them until only the lettering remained black then sprayed them with clear lacquer. I'll post more on the base later.
I cleared off my work area for the group photo and made sure (again!) that everything is ready. No excuses left.
Dave
-
 molasses reacted to mtaylor in OGALLALA by molasses - FINISHED - 1/96 scale - BOTTLE - Prairie Schooner
Go for it, Dave. We're collectively holding our breaths.... ok.. maybe just me. We'll have to wait for the others.
-
 molasses got a reaction from captainbob in OGALLALA by molasses - FINISHED - 1/96 scale - BOTTLE - Prairie Schooner
I have gone over all the components, touching up paint and completing final touches, and there's nothing for it but to stuff this thing in its bottle.
One last photo of the eight components to be assembled inside the sphere while still outside.
From lower left across: four prairie segments and the front and rear wheel assemblies. The
wheels each have a thread leading through holes in the prairie segments to help locate them
in their places. The lower hull is near center held with a clamping tool I made for this project -
more on that when in use. The upper hull with rigging is at the upper left. At upper right is the
sphere on its stone display base. I had it made by a local stone counter-top installer from a
remnant from one of his jobs. It is mostly light tan with streaks of red and black through it
picking up and complimenting Ogallala's colors. The base has the finished medallion
permanently attached and an X-Acto knife for size reference. Click the image.
I finished the medallions with a chemical blackening agent, sanded them until only the lettering remained black then sprayed them with clear lacquer. I'll post more on the base later.
I cleared off my work area for the group photo and made sure (again!) that everything is ready. No excuses left.
Dave
-
 molasses got a reaction from augie in OGALLALA by molasses - FINISHED - 1/96 scale - BOTTLE - Prairie Schooner
I have gone over all the components, touching up paint and completing final touches, and there's nothing for it but to stuff this thing in its bottle.
One last photo of the eight components to be assembled inside the sphere while still outside.
From lower left across: four prairie segments and the front and rear wheel assemblies. The
wheels each have a thread leading through holes in the prairie segments to help locate them
in their places. The lower hull is near center held with a clamping tool I made for this project -
more on that when in use. The upper hull with rigging is at the upper left. At upper right is the
sphere on its stone display base. I had it made by a local stone counter-top installer from a
remnant from one of his jobs. It is mostly light tan with streaks of red and black through it
picking up and complimenting Ogallala's colors. The base has the finished medallion
permanently attached and an X-Acto knife for size reference. Click the image.
I finished the medallions with a chemical blackening agent, sanded them until only the lettering remained black then sprayed them with clear lacquer. I'll post more on the base later.
I cleared off my work area for the group photo and made sure (again!) that everything is ready. No excuses left.
Dave
-
 molasses got a reaction from themadchemist in OGALLALA by molasses - FINISHED - 1/96 scale - BOTTLE - Prairie Schooner
I have gone over all the components, touching up paint and completing final touches, and there's nothing for it but to stuff this thing in its bottle.
One last photo of the eight components to be assembled inside the sphere while still outside.
From lower left across: four prairie segments and the front and rear wheel assemblies. The
wheels each have a thread leading through holes in the prairie segments to help locate them
in their places. The lower hull is near center held with a clamping tool I made for this project -
more on that when in use. The upper hull with rigging is at the upper left. At upper right is the
sphere on its stone display base. I had it made by a local stone counter-top installer from a
remnant from one of his jobs. It is mostly light tan with streaks of red and black through it
picking up and complimenting Ogallala's colors. The base has the finished medallion
permanently attached and an X-Acto knife for size reference. Click the image.
I finished the medallions with a chemical blackening agent, sanded them until only the lettering remained black then sprayed them with clear lacquer. I'll post more on the base later.
I cleared off my work area for the group photo and made sure (again!) that everything is ready. No excuses left.
Dave
-
molasses got a reaction from hexnut in OGALLALA by molasses - FINISHED - 1/96 scale - BOTTLE - Prairie Schooner
I am working on a display base, nearly complete, and have had the mast folded down and back up again, twice, as dry runs to identify and adjust for problems with the lines before putting the ship into the bottle. On one of those dry runs I passed the ship through a ring slightly smaller than my bottle's neck to verify that it will fit - a must do to prevent the disaster of getting the ship stuck in the neck.
I've just about given up on making and installing coils of rope on the pinrails and cleats. I made a fixture for making some coils - which turned out okay - but I found them very difficult to install in many places. I should have made and installed them as I tied off each line instead of as a separate step. I may try again starting with the easy ones to get to instead of the hardest ones.
I received the Micro-Mark Pro-Etch Kit and set out on the learning curve - which is rather steep to successfully make usable photo-etch parts on the first try. It took me three.
After ordering I set about drawing in my drawing program the etched letters I wanted on two brass discs - one as a seal for the bottle and one on the display base. Keeping it simple, I planned to remove lettering on one side of the discs that I would later fill with paint, black letters on the brass discs. When the kit arrived I read the instruction book multiple times and identified all the tools and materials in the kit.
Following the instructions, I made the masks for both sides of a disc and printed them on the backside of the mask transparency film. Follow the instructions carefully. The black areas of the mask are the areas that need to be removed from the metal and this mask will be printed backwards (flipped horizontally) so that the print is on the backside of the film. After the ink is dry the two masks are perfectly aligned, print side to print side and taped together.
The print side of the mask transparency. The face side of the disc with reversed
lettering and the back side with interruptions in the circle so that the disc will stay
partially attached to the square of base metal. The black is what will be removed,
half-way through from both sides with most of the edge all the way through.
With directions in hand I cut two 2.5 inch / 64 mm squares of .005 inch /0.13 mm thick brass sheet. Before I opened the package of photo-resist film I set up a darkened work area lit by a single yellow "bug" bulb, then opened it, removed the resist and cut two squares, put them in an envelope lined with black paper, and returned the photo-resist film to its package and sealed it shut. This film hardens in UV light. I prepared a brass square by wet sanding each side of the square with a provided 3200 grit sanding pad until very shiny and so that the water sheeted across the square. I pulled one piece of the resist from the envelope, peeled off the inside cover film and, like applying a decal, attempted to lay the resist film on the wetted square, get it aligned to the edges of the square and adhered to the square without bubbles of air or water between the film and the brass. This turned out to be rather difficult and I had problems with it. On my second through fourth tries I submerged the brass square in just enough water to cover and applied the resist film through the water. (An old school decal application trick.) I did the same to the back side.
While doing this I had the Pro-Etch laminater plugged in and warmed up. I cut two squares of carrier sheet (card stock with one side treated so that it is glossy and smooth) slightly larger than the brass squares. I made a sandwich of the photo-resist covered brass square with the two squares of carrier, glossy side to the photo-resist and ran it through the laminater twice, flipped over and turned 90 degrees for the second pass and let it cool in a black envelope.
Next the cooled, laminated brass square (carrier sheets set aside) is slipped between the two masks and centered, then placed in the center of one of the Plexiglas squares provided, the other Plexiglas square placed on top and clamps applied at the four sides. All of this has been done with minimal exposure to UV light, just the yellow "bug" bulb - a suggestion in the directions.
Again per the instructions I exposed each side of this sandwich to full sun at local noon for 20 seconds. The UV light hardened and turned the photo-resist in the areas not masked a deep blue from its original light blue. I disassembled the sandwich and returned the brass square to a black envelope while I set up for the next step and put away what I wouldn't need right away.
I prepared a solution of sodium hydroxide and water per the instructions, removed the outer protective layer of the photo-resist film from both sides and submerged the brass square in this solution. This chemical reacts with the masked and un-hardened photo-resist film, softening it so that it will brush away. This is the most important part of the process, if the film is not completely removed from the areas to be chemically etched it won't etch properly. This is where I messed up in my first two tries; for the third and fourth tries I used my 2.75X Opti-Visor and inspected and brushed with the solution and inspected and rinsed and brushed some more until I was certain that every bit of resist was removed from the areas that needed to be etched. I made use of a hand held magnifying glass with the Opti-Visor to make sure every bit of un-exposed resist film was gone.
The second brass disc with blue photo-resist and bright brass showing through the
areas that will be etched. I thought this was good enough but it was not. Many areas
did not etch properly, especially from the backside, due to my lack of diligence.
Paying close attention to the instructions, I set up the equipment for the actual photo-etching. I had to supply a rinse bucket and a smaller rinse bowl, both filled with water. I warmed the bottle of ferric chloride in hot water running from the tap before filling the etching tank. I plugged in the aerator (to circulate the etching solution) and submerged the brass square. I set a 5 minute timer.
Etching in process. There's a clamp on the hose to prevent the etching solution from
flowing back into the pump plus the pump is placed on two pieces of foam packaging
to raise it above the solution level.
After five minutes, I removed the brass square from the etching tank (turned off the aerator and pinched shut the hose clamp - the fumes must be assumed to be nasty) rinsed and re-rinsed to inspect the progress. Most of the double side etching at the edge of the disc was cut through, so I turned the brass square 180 degrees in the clamp, returned it to the solution (turned on the aerator and released the clamp) and waited three minutes. Upon inspection, it was done and I rinsed it in hot tap water before setting it aside and cleaning up.
Now, to see the results. I poured out just enough of the sodium hydroxide (undiluted this time) into one of the trays provided to cover the brass square. Full strength this chemical removes the photo-resist from the brass with a little help with a brush. When cleaned of the resist the brass was rinsed in hot water from the tap and set aside.
Here's my first try with some practice with black enamel to fill in the letters. There are
several places where the photo-resist did not adhere and laminate properly as a result
of my difficulty with getting the resist in place as directed and etching solution got into
them from an edge exposed to etching solution. I had no more problem with this using
the submerged technique of applying the photo-resist film. Many places in the lettering
have incomplete depth because I didn't get all the masked film removed the way I should
have. Micro-Mark was right when they said this was the most important step.
Third and fourth tries, both appear perfect. The lettering has not been filled with enamel
yet, just the result of better photographic technique learned since the photo of the first
disc. I didn't even bother stripping the second attempt since I could see that I had not
removed all the masked and un-hardened photo-resist film. The discs are 1.73 inch / 44
mm in diameter.
I am very pleased with the Micro-Mark Pro-Etch Kit. It has everything needed except for a yellow "bug" bulb and the two rinse buckets I provided. I bought a better pair of rubber gloves than the single use, throw away gloves supplied in the kit for my second session when I made the last two discs. I also added a small in-line on/off switch to the aerator electric cord so I would not have to crawl under my work bench to unplug it when I needed to turn it off.
The process does have a steep learning curve, a mistake made anywhere in the process will affect the results. READ AND STUDY THE INSTRUCTIONS and MAKE SURE YOU UNDERSTAND EACH STEP.
I hope my experience helps others learn from my mistakes.
As you can see from my name plates I've set myself a dead line of the 29th of this month - one year from my first post for Ogallala. A year is long enough and I'm getting tired of looking at it.
Dave
-
molasses got a reaction from Piet in OGALLALA by molasses - FINISHED - 1/96 scale - BOTTLE - Prairie Schooner
I am working on a display base, nearly complete, and have had the mast folded down and back up again, twice, as dry runs to identify and adjust for problems with the lines before putting the ship into the bottle. On one of those dry runs I passed the ship through a ring slightly smaller than my bottle's neck to verify that it will fit - a must do to prevent the disaster of getting the ship stuck in the neck.
I've just about given up on making and installing coils of rope on the pinrails and cleats. I made a fixture for making some coils - which turned out okay - but I found them very difficult to install in many places. I should have made and installed them as I tied off each line instead of as a separate step. I may try again starting with the easy ones to get to instead of the hardest ones.
I received the Micro-Mark Pro-Etch Kit and set out on the learning curve - which is rather steep to successfully make usable photo-etch parts on the first try. It took me three.
After ordering I set about drawing in my drawing program the etched letters I wanted on two brass discs - one as a seal for the bottle and one on the display base. Keeping it simple, I planned to remove lettering on one side of the discs that I would later fill with paint, black letters on the brass discs. When the kit arrived I read the instruction book multiple times and identified all the tools and materials in the kit.
Following the instructions, I made the masks for both sides of a disc and printed them on the backside of the mask transparency film. Follow the instructions carefully. The black areas of the mask are the areas that need to be removed from the metal and this mask will be printed backwards (flipped horizontally) so that the print is on the backside of the film. After the ink is dry the two masks are perfectly aligned, print side to print side and taped together.
The print side of the mask transparency. The face side of the disc with reversed
lettering and the back side with interruptions in the circle so that the disc will stay
partially attached to the square of base metal. The black is what will be removed,
half-way through from both sides with most of the edge all the way through.
With directions in hand I cut two 2.5 inch / 64 mm squares of .005 inch /0.13 mm thick brass sheet. Before I opened the package of photo-resist film I set up a darkened work area lit by a single yellow "bug" bulb, then opened it, removed the resist and cut two squares, put them in an envelope lined with black paper, and returned the photo-resist film to its package and sealed it shut. This film hardens in UV light. I prepared a brass square by wet sanding each side of the square with a provided 3200 grit sanding pad until very shiny and so that the water sheeted across the square. I pulled one piece of the resist from the envelope, peeled off the inside cover film and, like applying a decal, attempted to lay the resist film on the wetted square, get it aligned to the edges of the square and adhered to the square without bubbles of air or water between the film and the brass. This turned out to be rather difficult and I had problems with it. On my second through fourth tries I submerged the brass square in just enough water to cover and applied the resist film through the water. (An old school decal application trick.) I did the same to the back side.
While doing this I had the Pro-Etch laminater plugged in and warmed up. I cut two squares of carrier sheet (card stock with one side treated so that it is glossy and smooth) slightly larger than the brass squares. I made a sandwich of the photo-resist covered brass square with the two squares of carrier, glossy side to the photo-resist and ran it through the laminater twice, flipped over and turned 90 degrees for the second pass and let it cool in a black envelope.
Next the cooled, laminated brass square (carrier sheets set aside) is slipped between the two masks and centered, then placed in the center of one of the Plexiglas squares provided, the other Plexiglas square placed on top and clamps applied at the four sides. All of this has been done with minimal exposure to UV light, just the yellow "bug" bulb - a suggestion in the directions.
Again per the instructions I exposed each side of this sandwich to full sun at local noon for 20 seconds. The UV light hardened and turned the photo-resist in the areas not masked a deep blue from its original light blue. I disassembled the sandwich and returned the brass square to a black envelope while I set up for the next step and put away what I wouldn't need right away.
I prepared a solution of sodium hydroxide and water per the instructions, removed the outer protective layer of the photo-resist film from both sides and submerged the brass square in this solution. This chemical reacts with the masked and un-hardened photo-resist film, softening it so that it will brush away. This is the most important part of the process, if the film is not completely removed from the areas to be chemically etched it won't etch properly. This is where I messed up in my first two tries; for the third and fourth tries I used my 2.75X Opti-Visor and inspected and brushed with the solution and inspected and rinsed and brushed some more until I was certain that every bit of resist was removed from the areas that needed to be etched. I made use of a hand held magnifying glass with the Opti-Visor to make sure every bit of un-exposed resist film was gone.
The second brass disc with blue photo-resist and bright brass showing through the
areas that will be etched. I thought this was good enough but it was not. Many areas
did not etch properly, especially from the backside, due to my lack of diligence.
Paying close attention to the instructions, I set up the equipment for the actual photo-etching. I had to supply a rinse bucket and a smaller rinse bowl, both filled with water. I warmed the bottle of ferric chloride in hot water running from the tap before filling the etching tank. I plugged in the aerator (to circulate the etching solution) and submerged the brass square. I set a 5 minute timer.
Etching in process. There's a clamp on the hose to prevent the etching solution from
flowing back into the pump plus the pump is placed on two pieces of foam packaging
to raise it above the solution level.
After five minutes, I removed the brass square from the etching tank (turned off the aerator and pinched shut the hose clamp - the fumes must be assumed to be nasty) rinsed and re-rinsed to inspect the progress. Most of the double side etching at the edge of the disc was cut through, so I turned the brass square 180 degrees in the clamp, returned it to the solution (turned on the aerator and released the clamp) and waited three minutes. Upon inspection, it was done and I rinsed it in hot tap water before setting it aside and cleaning up.
Now, to see the results. I poured out just enough of the sodium hydroxide (undiluted this time) into one of the trays provided to cover the brass square. Full strength this chemical removes the photo-resist from the brass with a little help with a brush. When cleaned of the resist the brass was rinsed in hot water from the tap and set aside.
Here's my first try with some practice with black enamel to fill in the letters. There are
several places where the photo-resist did not adhere and laminate properly as a result
of my difficulty with getting the resist in place as directed and etching solution got into
them from an edge exposed to etching solution. I had no more problem with this using
the submerged technique of applying the photo-resist film. Many places in the lettering
have incomplete depth because I didn't get all the masked film removed the way I should
have. Micro-Mark was right when they said this was the most important step.
Third and fourth tries, both appear perfect. The lettering has not been filled with enamel
yet, just the result of better photographic technique learned since the photo of the first
disc. I didn't even bother stripping the second attempt since I could see that I had not
removed all the masked and un-hardened photo-resist film. The discs are 1.73 inch / 44
mm in diameter.
I am very pleased with the Micro-Mark Pro-Etch Kit. It has everything needed except for a yellow "bug" bulb and the two rinse buckets I provided. I bought a better pair of rubber gloves than the single use, throw away gloves supplied in the kit for my second session when I made the last two discs. I also added a small in-line on/off switch to the aerator electric cord so I would not have to crawl under my work bench to unplug it when I needed to turn it off.
The process does have a steep learning curve, a mistake made anywhere in the process will affect the results. READ AND STUDY THE INSTRUCTIONS and MAKE SURE YOU UNDERSTAND EACH STEP.
I hope my experience helps others learn from my mistakes.
As you can see from my name plates I've set myself a dead line of the 29th of this month - one year from my first post for Ogallala. A year is long enough and I'm getting tired of looking at it.
Dave
-
 molasses got a reaction from robnbill in First Attempts at Photo-Etch with Micro-Mark Pro-Etch
I received the Micro-Mark Pro-Etch Kit and set out on the learning curve - which is rather steep to successfully make usable photo-etch parts on the first try. It took me three.
After ordering and waiting for delivery, I set about drawing in my drawing program the etched letters I wanted on two brass discs - one as a seal for the bottle and one on the display base. Keeping it simple, I planned to remove lettering on one side of the discs that I would later fill with paint, black letters on the brass discs. When the kit arrived I read the instruction book multiple times and identified all the tools and materials in the kit.
Following the instructions, I made the masks for both sides of a disc and printed them on the backside of the mask transparency film. Follow the instructions carefully. The black areas of the mask are the areas that need to be removed from the metal and this mask will be printed backwards (flipped horizontally) so that the print is on the backside of the film. After the ink is dry the two masks are perfectly aligned, print side to print side and taped together.
The print side of the mask transparency. The face side of the disc with reversed
lettering and the back side with interruptions in the circle so that the disc will stay
partially attached to the square of base metal. The black is what will be removed,
half-way through from both sides with most of the edge all the way through.
With directions in hand I cut two 2.5 inch / 64 mm squares of .005 inch /0.13 mm thick brass sheet. Before I opened the package of photo-resist film I set up a darkened work area lit by a single yellow "bug" bulb, then opened it, removed the resist and cut two squares, put them in an envelope lined with black paper, and returned the photo-resist film to its package and sealed it shut. This film hardens in UV light. I prepared a brass square by wet sanding each side of the square with a provided 3200 grit sanding pad until very shiny and so that the water sheeted across the square. I pulled one piece of the resist from the envelope, peeled off the inside cover film and, like applying a decal, attempted to lay the resist film on the wetted square, get it aligned to the edges of the square and adhered to the square without bubbles of air or water between the film and the brass. This turned out to be rather difficult and I had problems with it. On my second through fourth tries I submerged the brass square in just enough water to cover and applied the resist film through the water. (An old school decal application trick.) I did the same to the back side.
While doing this I had the Pro-Etch laminater plugged in and warmed up. I cut two squares of carrier sheet (card stock with one side treated so that it is glossy and smooth) slightly larger than the brass squares. I made a sandwich of the photo-resist covered brass square with the two squares of carrier, glossy side to the photo-resist and ran it through the laminater twice, flipped over and turned 90 degrees for the second pass and let it cool in a black envelope.
Next the cooled, laminated brass square (carrier sheets set aside) is slipped between the two masks and centered, then placed in the center of one of the Plexiglas squares provided, the other Plexiglas square placed on top and clamps applied at the four sides. All of this has been done with minimal exposure to UV light, just the yellow "bug" bulb - a suggestion in the directions.
Again per the instructions I exposed each side of this sandwich to full sun at local noon for 20 seconds. The UV light hardened and turned the photo-resist in the areas not masked a deep blue from its original light blue. I disassembled the sandwich and returned the brass square to a black envelope while I set up for the next step and put away what I wouldn't need right away.
I prepared a solution of sodium hydroxide and water per the instructions, removed the outer protective layer of the photo-resist film from both sides and submerged the brass square in this solution. This chemical reacts with the masked and un-hardened photo-resist film, softening it so that it will brush away. This is the most important part of the process, if the film is not completely removed from the areas to be chemically etched it won't etch properly. This is where I messed up in my first two tries; for the third and fourth tries I used my 2.75X Opti-Visor and inspected and brushed with the solution and inspected and rinsed and brushed some more until I was certain that every bit of resist was removed from the areas that needed to be etched. I made use of a hand held magnifying glass with the Opti-Visor to make sure every bit of un-exposed resist film was gone.
The second brass disc with blue photo-resist and bright brass showing through the
areas that will be etched. I thought this was good enough but it was not. Many areas
did not etch properly, especially from the backside, due to my lack of diligence.
Paying close attention to the instructions, I set up the equipment for the actual photo-etching. I had to supply a rinse bucket and a smaller rinse bowl, both filled with water. I warmed the bottle of ferric chloride in hot water running from the tap before filling the etching tank. I plugged in the aerator (to circulate the etching solution) and submerged the brass square. I set a 5 minute timer.
Etching in process. There's a clamp on the hose to prevent the etching solution from
flowing back into the pump plus the pump is placed on two pieces of foam packaging
to raise it above the solution level.
After five minutes, I removed the brass square from the etching tank (turned off the aerator and pinched shut the hose clamp - the fumes must be assumed to be nasty) rinsed and re-rinsed to inspect the progress. Most of the double side etching at the edge of the disc was cut through, so I turned the brass square 180 degrees in the clamp, returned it to the solution (turned on the aerator and released the clamp) and waited three minutes. Upon inspection, it was done and I rinsed it in hot tap water before setting it aside and cleaning up.
Now, to see the results. I poured out just enough of the sodium hydroxide (undiluted this time) into one of the trays provided to cover the brass square. Full strength this chemical removes the photo-resist from the brass with a little help with a brush. When cleaned of the resist the brass was rinsed in hot water from the tap and set aside.
Here's my first try with some practice with black enamel to fill in the letters. There are
several places where the photo-resist did not adhere and laminate properly as a result
of my difficulty with getting the resist in place as directed and etching solution got into
them from an edge exposed to etching solution. I had no more problem with this using
the submerged technique of applying the photo-resist film. Many places in the lettering
have incomplete depth because I didn't get all the masked film removed the way I should
have. Micro-Mark was right when they said this was the most important step.
Third and fourth tries, both appear perfect. The lettering has not been filled with enamel
yet, just the result of better photographic technique learned since the photo of the first
disc. I didn't even bother stripping the second attempt since I could see that I had not
removed all the masked and un-hardened photo-resist film. The discs are 1.73 inch / 44
mm in diameter.
I am very pleased with the Micro-Mark Pro-Etch Kit. It has everything needed except for a yellow "bug" bulb and the two rinse buckets I provided. I bought a better pair of rubber gloves than the single use, throw away gloves supplied in the kit for my second session when I made the last two discs. I also added a small in-line on/off switch to the aerator electric cord so I would not have to crawl under my work bench to unplug it when I needed to turn it off.
The process does have a steep learning curve, a mistake made anywhere in the process will affect the results. READ AND STUDY THE INSTRUCTIONS and MAKE SURE YOU UNDERSTAND EACH STEP.
I hope my experience helps others learn from my mistakes.
Dave
-
 molasses got a reaction from Mfelinger in First Attempts at Photo-Etch with Micro-Mark Pro-Etch
I received the Micro-Mark Pro-Etch Kit and set out on the learning curve - which is rather steep to successfully make usable photo-etch parts on the first try. It took me three.
After ordering and waiting for delivery, I set about drawing in my drawing program the etched letters I wanted on two brass discs - one as a seal for the bottle and one on the display base. Keeping it simple, I planned to remove lettering on one side of the discs that I would later fill with paint, black letters on the brass discs. When the kit arrived I read the instruction book multiple times and identified all the tools and materials in the kit.
Following the instructions, I made the masks for both sides of a disc and printed them on the backside of the mask transparency film. Follow the instructions carefully. The black areas of the mask are the areas that need to be removed from the metal and this mask will be printed backwards (flipped horizontally) so that the print is on the backside of the film. After the ink is dry the two masks are perfectly aligned, print side to print side and taped together.
The print side of the mask transparency. The face side of the disc with reversed
lettering and the back side with interruptions in the circle so that the disc will stay
partially attached to the square of base metal. The black is what will be removed,
half-way through from both sides with most of the edge all the way through.
With directions in hand I cut two 2.5 inch / 64 mm squares of .005 inch /0.13 mm thick brass sheet. Before I opened the package of photo-resist film I set up a darkened work area lit by a single yellow "bug" bulb, then opened it, removed the resist and cut two squares, put them in an envelope lined with black paper, and returned the photo-resist film to its package and sealed it shut. This film hardens in UV light. I prepared a brass square by wet sanding each side of the square with a provided 3200 grit sanding pad until very shiny and so that the water sheeted across the square. I pulled one piece of the resist from the envelope, peeled off the inside cover film and, like applying a decal, attempted to lay the resist film on the wetted square, get it aligned to the edges of the square and adhered to the square without bubbles of air or water between the film and the brass. This turned out to be rather difficult and I had problems with it. On my second through fourth tries I submerged the brass square in just enough water to cover and applied the resist film through the water. (An old school decal application trick.) I did the same to the back side.
While doing this I had the Pro-Etch laminater plugged in and warmed up. I cut two squares of carrier sheet (card stock with one side treated so that it is glossy and smooth) slightly larger than the brass squares. I made a sandwich of the photo-resist covered brass square with the two squares of carrier, glossy side to the photo-resist and ran it through the laminater twice, flipped over and turned 90 degrees for the second pass and let it cool in a black envelope.
Next the cooled, laminated brass square (carrier sheets set aside) is slipped between the two masks and centered, then placed in the center of one of the Plexiglas squares provided, the other Plexiglas square placed on top and clamps applied at the four sides. All of this has been done with minimal exposure to UV light, just the yellow "bug" bulb - a suggestion in the directions.
Again per the instructions I exposed each side of this sandwich to full sun at local noon for 20 seconds. The UV light hardened and turned the photo-resist in the areas not masked a deep blue from its original light blue. I disassembled the sandwich and returned the brass square to a black envelope while I set up for the next step and put away what I wouldn't need right away.
I prepared a solution of sodium hydroxide and water per the instructions, removed the outer protective layer of the photo-resist film from both sides and submerged the brass square in this solution. This chemical reacts with the masked and un-hardened photo-resist film, softening it so that it will brush away. This is the most important part of the process, if the film is not completely removed from the areas to be chemically etched it won't etch properly. This is where I messed up in my first two tries; for the third and fourth tries I used my 2.75X Opti-Visor and inspected and brushed with the solution and inspected and rinsed and brushed some more until I was certain that every bit of resist was removed from the areas that needed to be etched. I made use of a hand held magnifying glass with the Opti-Visor to make sure every bit of un-exposed resist film was gone.
The second brass disc with blue photo-resist and bright brass showing through the
areas that will be etched. I thought this was good enough but it was not. Many areas
did not etch properly, especially from the backside, due to my lack of diligence.
Paying close attention to the instructions, I set up the equipment for the actual photo-etching. I had to supply a rinse bucket and a smaller rinse bowl, both filled with water. I warmed the bottle of ferric chloride in hot water running from the tap before filling the etching tank. I plugged in the aerator (to circulate the etching solution) and submerged the brass square. I set a 5 minute timer.
Etching in process. There's a clamp on the hose to prevent the etching solution from
flowing back into the pump plus the pump is placed on two pieces of foam packaging
to raise it above the solution level.
After five minutes, I removed the brass square from the etching tank (turned off the aerator and pinched shut the hose clamp - the fumes must be assumed to be nasty) rinsed and re-rinsed to inspect the progress. Most of the double side etching at the edge of the disc was cut through, so I turned the brass square 180 degrees in the clamp, returned it to the solution (turned on the aerator and released the clamp) and waited three minutes. Upon inspection, it was done and I rinsed it in hot tap water before setting it aside and cleaning up.
Now, to see the results. I poured out just enough of the sodium hydroxide (undiluted this time) into one of the trays provided to cover the brass square. Full strength this chemical removes the photo-resist from the brass with a little help with a brush. When cleaned of the resist the brass was rinsed in hot water from the tap and set aside.
Here's my first try with some practice with black enamel to fill in the letters. There are
several places where the photo-resist did not adhere and laminate properly as a result
of my difficulty with getting the resist in place as directed and etching solution got into
them from an edge exposed to etching solution. I had no more problem with this using
the submerged technique of applying the photo-resist film. Many places in the lettering
have incomplete depth because I didn't get all the masked film removed the way I should
have. Micro-Mark was right when they said this was the most important step.
Third and fourth tries, both appear perfect. The lettering has not been filled with enamel
yet, just the result of better photographic technique learned since the photo of the first
disc. I didn't even bother stripping the second attempt since I could see that I had not
removed all the masked and un-hardened photo-resist film. The discs are 1.73 inch / 44
mm in diameter.
I am very pleased with the Micro-Mark Pro-Etch Kit. It has everything needed except for a yellow "bug" bulb and the two rinse buckets I provided. I bought a better pair of rubber gloves than the single use, throw away gloves supplied in the kit for my second session when I made the last two discs. I also added a small in-line on/off switch to the aerator electric cord so I would not have to crawl under my work bench to unplug it when I needed to turn it off.
The process does have a steep learning curve, a mistake made anywhere in the process will affect the results. READ AND STUDY THE INSTRUCTIONS and MAKE SURE YOU UNDERSTAND EACH STEP.
I hope my experience helps others learn from my mistakes.
Dave
-
 molasses got a reaction from cristikc in First Attempts at Photo-Etch with Micro-Mark Pro-Etch
I received the Micro-Mark Pro-Etch Kit and set out on the learning curve - which is rather steep to successfully make usable photo-etch parts on the first try. It took me three.
After ordering and waiting for delivery, I set about drawing in my drawing program the etched letters I wanted on two brass discs - one as a seal for the bottle and one on the display base. Keeping it simple, I planned to remove lettering on one side of the discs that I would later fill with paint, black letters on the brass discs. When the kit arrived I read the instruction book multiple times and identified all the tools and materials in the kit.
Following the instructions, I made the masks for both sides of a disc and printed them on the backside of the mask transparency film. Follow the instructions carefully. The black areas of the mask are the areas that need to be removed from the metal and this mask will be printed backwards (flipped horizontally) so that the print is on the backside of the film. After the ink is dry the two masks are perfectly aligned, print side to print side and taped together.
The print side of the mask transparency. The face side of the disc with reversed
lettering and the back side with interruptions in the circle so that the disc will stay
partially attached to the square of base metal. The black is what will be removed,
half-way through from both sides with most of the edge all the way through.
With directions in hand I cut two 2.5 inch / 64 mm squares of .005 inch /0.13 mm thick brass sheet. Before I opened the package of photo-resist film I set up a darkened work area lit by a single yellow "bug" bulb, then opened it, removed the resist and cut two squares, put them in an envelope lined with black paper, and returned the photo-resist film to its package and sealed it shut. This film hardens in UV light. I prepared a brass square by wet sanding each side of the square with a provided 3200 grit sanding pad until very shiny and so that the water sheeted across the square. I pulled one piece of the resist from the envelope, peeled off the inside cover film and, like applying a decal, attempted to lay the resist film on the wetted square, get it aligned to the edges of the square and adhered to the square without bubbles of air or water between the film and the brass. This turned out to be rather difficult and I had problems with it. On my second through fourth tries I submerged the brass square in just enough water to cover and applied the resist film through the water. (An old school decal application trick.) I did the same to the back side.
While doing this I had the Pro-Etch laminater plugged in and warmed up. I cut two squares of carrier sheet (card stock with one side treated so that it is glossy and smooth) slightly larger than the brass squares. I made a sandwich of the photo-resist covered brass square with the two squares of carrier, glossy side to the photo-resist and ran it through the laminater twice, flipped over and turned 90 degrees for the second pass and let it cool in a black envelope.
Next the cooled, laminated brass square (carrier sheets set aside) is slipped between the two masks and centered, then placed in the center of one of the Plexiglas squares provided, the other Plexiglas square placed on top and clamps applied at the four sides. All of this has been done with minimal exposure to UV light, just the yellow "bug" bulb - a suggestion in the directions.
Again per the instructions I exposed each side of this sandwich to full sun at local noon for 20 seconds. The UV light hardened and turned the photo-resist in the areas not masked a deep blue from its original light blue. I disassembled the sandwich and returned the brass square to a black envelope while I set up for the next step and put away what I wouldn't need right away.
I prepared a solution of sodium hydroxide and water per the instructions, removed the outer protective layer of the photo-resist film from both sides and submerged the brass square in this solution. This chemical reacts with the masked and un-hardened photo-resist film, softening it so that it will brush away. This is the most important part of the process, if the film is not completely removed from the areas to be chemically etched it won't etch properly. This is where I messed up in my first two tries; for the third and fourth tries I used my 2.75X Opti-Visor and inspected and brushed with the solution and inspected and rinsed and brushed some more until I was certain that every bit of resist was removed from the areas that needed to be etched. I made use of a hand held magnifying glass with the Opti-Visor to make sure every bit of un-exposed resist film was gone.
The second brass disc with blue photo-resist and bright brass showing through the
areas that will be etched. I thought this was good enough but it was not. Many areas
did not etch properly, especially from the backside, due to my lack of diligence.
Paying close attention to the instructions, I set up the equipment for the actual photo-etching. I had to supply a rinse bucket and a smaller rinse bowl, both filled with water. I warmed the bottle of ferric chloride in hot water running from the tap before filling the etching tank. I plugged in the aerator (to circulate the etching solution) and submerged the brass square. I set a 5 minute timer.
Etching in process. There's a clamp on the hose to prevent the etching solution from
flowing back into the pump plus the pump is placed on two pieces of foam packaging
to raise it above the solution level.
After five minutes, I removed the brass square from the etching tank (turned off the aerator and pinched shut the hose clamp - the fumes must be assumed to be nasty) rinsed and re-rinsed to inspect the progress. Most of the double side etching at the edge of the disc was cut through, so I turned the brass square 180 degrees in the clamp, returned it to the solution (turned on the aerator and released the clamp) and waited three minutes. Upon inspection, it was done and I rinsed it in hot tap water before setting it aside and cleaning up.
Now, to see the results. I poured out just enough of the sodium hydroxide (undiluted this time) into one of the trays provided to cover the brass square. Full strength this chemical removes the photo-resist from the brass with a little help with a brush. When cleaned of the resist the brass was rinsed in hot water from the tap and set aside.
Here's my first try with some practice with black enamel to fill in the letters. There are
several places where the photo-resist did not adhere and laminate properly as a result
of my difficulty with getting the resist in place as directed and etching solution got into
them from an edge exposed to etching solution. I had no more problem with this using
the submerged technique of applying the photo-resist film. Many places in the lettering
have incomplete depth because I didn't get all the masked film removed the way I should
have. Micro-Mark was right when they said this was the most important step.
Third and fourth tries, both appear perfect. The lettering has not been filled with enamel
yet, just the result of better photographic technique learned since the photo of the first
disc. I didn't even bother stripping the second attempt since I could see that I had not
removed all the masked and un-hardened photo-resist film. The discs are 1.73 inch / 44
mm in diameter.
I am very pleased with the Micro-Mark Pro-Etch Kit. It has everything needed except for a yellow "bug" bulb and the two rinse buckets I provided. I bought a better pair of rubber gloves than the single use, throw away gloves supplied in the kit for my second session when I made the last two discs. I also added a small in-line on/off switch to the aerator electric cord so I would not have to crawl under my work bench to unplug it when I needed to turn it off.
The process does have a steep learning curve, a mistake made anywhere in the process will affect the results. READ AND STUDY THE INSTRUCTIONS and MAKE SURE YOU UNDERSTAND EACH STEP.
I hope my experience helps others learn from my mistakes.
Dave
-
 molasses got a reaction from ccoyle in First Attempts at Photo-Etch with Micro-Mark Pro-Etch
I received the Micro-Mark Pro-Etch Kit and set out on the learning curve - which is rather steep to successfully make usable photo-etch parts on the first try. It took me three.
After ordering and waiting for delivery, I set about drawing in my drawing program the etched letters I wanted on two brass discs - one as a seal for the bottle and one on the display base. Keeping it simple, I planned to remove lettering on one side of the discs that I would later fill with paint, black letters on the brass discs. When the kit arrived I read the instruction book multiple times and identified all the tools and materials in the kit.
Following the instructions, I made the masks for both sides of a disc and printed them on the backside of the mask transparency film. Follow the instructions carefully. The black areas of the mask are the areas that need to be removed from the metal and this mask will be printed backwards (flipped horizontally) so that the print is on the backside of the film. After the ink is dry the two masks are perfectly aligned, print side to print side and taped together.
The print side of the mask transparency. The face side of the disc with reversed
lettering and the back side with interruptions in the circle so that the disc will stay
partially attached to the square of base metal. The black is what will be removed,
half-way through from both sides with most of the edge all the way through.
With directions in hand I cut two 2.5 inch / 64 mm squares of .005 inch /0.13 mm thick brass sheet. Before I opened the package of photo-resist film I set up a darkened work area lit by a single yellow "bug" bulb, then opened it, removed the resist and cut two squares, put them in an envelope lined with black paper, and returned the photo-resist film to its package and sealed it shut. This film hardens in UV light. I prepared a brass square by wet sanding each side of the square with a provided 3200 grit sanding pad until very shiny and so that the water sheeted across the square. I pulled one piece of the resist from the envelope, peeled off the inside cover film and, like applying a decal, attempted to lay the resist film on the wetted square, get it aligned to the edges of the square and adhered to the square without bubbles of air or water between the film and the brass. This turned out to be rather difficult and I had problems with it. On my second through fourth tries I submerged the brass square in just enough water to cover and applied the resist film through the water. (An old school decal application trick.) I did the same to the back side.
While doing this I had the Pro-Etch laminater plugged in and warmed up. I cut two squares of carrier sheet (card stock with one side treated so that it is glossy and smooth) slightly larger than the brass squares. I made a sandwich of the photo-resist covered brass square with the two squares of carrier, glossy side to the photo-resist and ran it through the laminater twice, flipped over and turned 90 degrees for the second pass and let it cool in a black envelope.
Next the cooled, laminated brass square (carrier sheets set aside) is slipped between the two masks and centered, then placed in the center of one of the Plexiglas squares provided, the other Plexiglas square placed on top and clamps applied at the four sides. All of this has been done with minimal exposure to UV light, just the yellow "bug" bulb - a suggestion in the directions.
Again per the instructions I exposed each side of this sandwich to full sun at local noon for 20 seconds. The UV light hardened and turned the photo-resist in the areas not masked a deep blue from its original light blue. I disassembled the sandwich and returned the brass square to a black envelope while I set up for the next step and put away what I wouldn't need right away.
I prepared a solution of sodium hydroxide and water per the instructions, removed the outer protective layer of the photo-resist film from both sides and submerged the brass square in this solution. This chemical reacts with the masked and un-hardened photo-resist film, softening it so that it will brush away. This is the most important part of the process, if the film is not completely removed from the areas to be chemically etched it won't etch properly. This is where I messed up in my first two tries; for the third and fourth tries I used my 2.75X Opti-Visor and inspected and brushed with the solution and inspected and rinsed and brushed some more until I was certain that every bit of resist was removed from the areas that needed to be etched. I made use of a hand held magnifying glass with the Opti-Visor to make sure every bit of un-exposed resist film was gone.
The second brass disc with blue photo-resist and bright brass showing through the
areas that will be etched. I thought this was good enough but it was not. Many areas
did not etch properly, especially from the backside, due to my lack of diligence.
Paying close attention to the instructions, I set up the equipment for the actual photo-etching. I had to supply a rinse bucket and a smaller rinse bowl, both filled with water. I warmed the bottle of ferric chloride in hot water running from the tap before filling the etching tank. I plugged in the aerator (to circulate the etching solution) and submerged the brass square. I set a 5 minute timer.
Etching in process. There's a clamp on the hose to prevent the etching solution from
flowing back into the pump plus the pump is placed on two pieces of foam packaging
to raise it above the solution level.
After five minutes, I removed the brass square from the etching tank (turned off the aerator and pinched shut the hose clamp - the fumes must be assumed to be nasty) rinsed and re-rinsed to inspect the progress. Most of the double side etching at the edge of the disc was cut through, so I turned the brass square 180 degrees in the clamp, returned it to the solution (turned on the aerator and released the clamp) and waited three minutes. Upon inspection, it was done and I rinsed it in hot tap water before setting it aside and cleaning up.
Now, to see the results. I poured out just enough of the sodium hydroxide (undiluted this time) into one of the trays provided to cover the brass square. Full strength this chemical removes the photo-resist from the brass with a little help with a brush. When cleaned of the resist the brass was rinsed in hot water from the tap and set aside.
Here's my first try with some practice with black enamel to fill in the letters. There are
several places where the photo-resist did not adhere and laminate properly as a result
of my difficulty with getting the resist in place as directed and etching solution got into
them from an edge exposed to etching solution. I had no more problem with this using
the submerged technique of applying the photo-resist film. Many places in the lettering
have incomplete depth because I didn't get all the masked film removed the way I should
have. Micro-Mark was right when they said this was the most important step.
Third and fourth tries, both appear perfect. The lettering has not been filled with enamel
yet, just the result of better photographic technique learned since the photo of the first
disc. I didn't even bother stripping the second attempt since I could see that I had not
removed all the masked and un-hardened photo-resist film. The discs are 1.73 inch / 44
mm in diameter.
I am very pleased with the Micro-Mark Pro-Etch Kit. It has everything needed except for a yellow "bug" bulb and the two rinse buckets I provided. I bought a better pair of rubber gloves than the single use, throw away gloves supplied in the kit for my second session when I made the last two discs. I also added a small in-line on/off switch to the aerator electric cord so I would not have to crawl under my work bench to unplug it when I needed to turn it off.
The process does have a steep learning curve, a mistake made anywhere in the process will affect the results. READ AND STUDY THE INSTRUCTIONS and MAKE SURE YOU UNDERSTAND EACH STEP.
I hope my experience helps others learn from my mistakes.
Dave
-
 molasses got a reaction from justsayrow in First Attempts at Photo-Etch with Micro-Mark Pro-Etch
I received the Micro-Mark Pro-Etch Kit and set out on the learning curve - which is rather steep to successfully make usable photo-etch parts on the first try. It took me three.
After ordering and waiting for delivery, I set about drawing in my drawing program the etched letters I wanted on two brass discs - one as a seal for the bottle and one on the display base. Keeping it simple, I planned to remove lettering on one side of the discs that I would later fill with paint, black letters on the brass discs. When the kit arrived I read the instruction book multiple times and identified all the tools and materials in the kit.
Following the instructions, I made the masks for both sides of a disc and printed them on the backside of the mask transparency film. Follow the instructions carefully. The black areas of the mask are the areas that need to be removed from the metal and this mask will be printed backwards (flipped horizontally) so that the print is on the backside of the film. After the ink is dry the two masks are perfectly aligned, print side to print side and taped together.
The print side of the mask transparency. The face side of the disc with reversed
lettering and the back side with interruptions in the circle so that the disc will stay
partially attached to the square of base metal. The black is what will be removed,
half-way through from both sides with most of the edge all the way through.
With directions in hand I cut two 2.5 inch / 64 mm squares of .005 inch /0.13 mm thick brass sheet. Before I opened the package of photo-resist film I set up a darkened work area lit by a single yellow "bug" bulb, then opened it, removed the resist and cut two squares, put them in an envelope lined with black paper, and returned the photo-resist film to its package and sealed it shut. This film hardens in UV light. I prepared a brass square by wet sanding each side of the square with a provided 3200 grit sanding pad until very shiny and so that the water sheeted across the square. I pulled one piece of the resist from the envelope, peeled off the inside cover film and, like applying a decal, attempted to lay the resist film on the wetted square, get it aligned to the edges of the square and adhered to the square without bubbles of air or water between the film and the brass. This turned out to be rather difficult and I had problems with it. On my second through fourth tries I submerged the brass square in just enough water to cover and applied the resist film through the water. (An old school decal application trick.) I did the same to the back side.
While doing this I had the Pro-Etch laminater plugged in and warmed up. I cut two squares of carrier sheet (card stock with one side treated so that it is glossy and smooth) slightly larger than the brass squares. I made a sandwich of the photo-resist covered brass square with the two squares of carrier, glossy side to the photo-resist and ran it through the laminater twice, flipped over and turned 90 degrees for the second pass and let it cool in a black envelope.
Next the cooled, laminated brass square (carrier sheets set aside) is slipped between the two masks and centered, then placed in the center of one of the Plexiglas squares provided, the other Plexiglas square placed on top and clamps applied at the four sides. All of this has been done with minimal exposure to UV light, just the yellow "bug" bulb - a suggestion in the directions.
Again per the instructions I exposed each side of this sandwich to full sun at local noon for 20 seconds. The UV light hardened and turned the photo-resist in the areas not masked a deep blue from its original light blue. I disassembled the sandwich and returned the brass square to a black envelope while I set up for the next step and put away what I wouldn't need right away.
I prepared a solution of sodium hydroxide and water per the instructions, removed the outer protective layer of the photo-resist film from both sides and submerged the brass square in this solution. This chemical reacts with the masked and un-hardened photo-resist film, softening it so that it will brush away. This is the most important part of the process, if the film is not completely removed from the areas to be chemically etched it won't etch properly. This is where I messed up in my first two tries; for the third and fourth tries I used my 2.75X Opti-Visor and inspected and brushed with the solution and inspected and rinsed and brushed some more until I was certain that every bit of resist was removed from the areas that needed to be etched. I made use of a hand held magnifying glass with the Opti-Visor to make sure every bit of un-exposed resist film was gone.
The second brass disc with blue photo-resist and bright brass showing through the
areas that will be etched. I thought this was good enough but it was not. Many areas
did not etch properly, especially from the backside, due to my lack of diligence.
Paying close attention to the instructions, I set up the equipment for the actual photo-etching. I had to supply a rinse bucket and a smaller rinse bowl, both filled with water. I warmed the bottle of ferric chloride in hot water running from the tap before filling the etching tank. I plugged in the aerator (to circulate the etching solution) and submerged the brass square. I set a 5 minute timer.
Etching in process. There's a clamp on the hose to prevent the etching solution from
flowing back into the pump plus the pump is placed on two pieces of foam packaging
to raise it above the solution level.
After five minutes, I removed the brass square from the etching tank (turned off the aerator and pinched shut the hose clamp - the fumes must be assumed to be nasty) rinsed and re-rinsed to inspect the progress. Most of the double side etching at the edge of the disc was cut through, so I turned the brass square 180 degrees in the clamp, returned it to the solution (turned on the aerator and released the clamp) and waited three minutes. Upon inspection, it was done and I rinsed it in hot tap water before setting it aside and cleaning up.
Now, to see the results. I poured out just enough of the sodium hydroxide (undiluted this time) into one of the trays provided to cover the brass square. Full strength this chemical removes the photo-resist from the brass with a little help with a brush. When cleaned of the resist the brass was rinsed in hot water from the tap and set aside.
Here's my first try with some practice with black enamel to fill in the letters. There are
several places where the photo-resist did not adhere and laminate properly as a result
of my difficulty with getting the resist in place as directed and etching solution got into
them from an edge exposed to etching solution. I had no more problem with this using
the submerged technique of applying the photo-resist film. Many places in the lettering
have incomplete depth because I didn't get all the masked film removed the way I should
have. Micro-Mark was right when they said this was the most important step.
Third and fourth tries, both appear perfect. The lettering has not been filled with enamel
yet, just the result of better photographic technique learned since the photo of the first
disc. I didn't even bother stripping the second attempt since I could see that I had not
removed all the masked and un-hardened photo-resist film. The discs are 1.73 inch / 44
mm in diameter.
I am very pleased with the Micro-Mark Pro-Etch Kit. It has everything needed except for a yellow "bug" bulb and the two rinse buckets I provided. I bought a better pair of rubber gloves than the single use, throw away gloves supplied in the kit for my second session when I made the last two discs. I also added a small in-line on/off switch to the aerator electric cord so I would not have to crawl under my work bench to unplug it when I needed to turn it off.
The process does have a steep learning curve, a mistake made anywhere in the process will affect the results. READ AND STUDY THE INSTRUCTIONS and MAKE SURE YOU UNDERSTAND EACH STEP.
I hope my experience helps others learn from my mistakes.
Dave
-
molasses got a reaction from augie in First Attempts at Photo-Etch with Micro-Mark Pro-Etch
I received the Micro-Mark Pro-Etch Kit and set out on the learning curve - which is rather steep to successfully make usable photo-etch parts on the first try. It took me three.
After ordering and waiting for delivery, I set about drawing in my drawing program the etched letters I wanted on two brass discs - one as a seal for the bottle and one on the display base. Keeping it simple, I planned to remove lettering on one side of the discs that I would later fill with paint, black letters on the brass discs. When the kit arrived I read the instruction book multiple times and identified all the tools and materials in the kit.
Following the instructions, I made the masks for both sides of a disc and printed them on the backside of the mask transparency film. Follow the instructions carefully. The black areas of the mask are the areas that need to be removed from the metal and this mask will be printed backwards (flipped horizontally) so that the print is on the backside of the film. After the ink is dry the two masks are perfectly aligned, print side to print side and taped together.
The print side of the mask transparency. The face side of the disc with reversed
lettering and the back side with interruptions in the circle so that the disc will stay
partially attached to the square of base metal. The black is what will be removed,
half-way through from both sides with most of the edge all the way through.
With directions in hand I cut two 2.5 inch / 64 mm squares of .005 inch /0.13 mm thick brass sheet. Before I opened the package of photo-resist film I set up a darkened work area lit by a single yellow "bug" bulb, then opened it, removed the resist and cut two squares, put them in an envelope lined with black paper, and returned the photo-resist film to its package and sealed it shut. This film hardens in UV light. I prepared a brass square by wet sanding each side of the square with a provided 3200 grit sanding pad until very shiny and so that the water sheeted across the square. I pulled one piece of the resist from the envelope, peeled off the inside cover film and, like applying a decal, attempted to lay the resist film on the wetted square, get it aligned to the edges of the square and adhered to the square without bubbles of air or water between the film and the brass. This turned out to be rather difficult and I had problems with it. On my second through fourth tries I submerged the brass square in just enough water to cover and applied the resist film through the water. (An old school decal application trick.) I did the same to the back side.
While doing this I had the Pro-Etch laminater plugged in and warmed up. I cut two squares of carrier sheet (card stock with one side treated so that it is glossy and smooth) slightly larger than the brass squares. I made a sandwich of the photo-resist covered brass square with the two squares of carrier, glossy side to the photo-resist and ran it through the laminater twice, flipped over and turned 90 degrees for the second pass and let it cool in a black envelope.
Next the cooled, laminated brass square (carrier sheets set aside) is slipped between the two masks and centered, then placed in the center of one of the Plexiglas squares provided, the other Plexiglas square placed on top and clamps applied at the four sides. All of this has been done with minimal exposure to UV light, just the yellow "bug" bulb - a suggestion in the directions.
Again per the instructions I exposed each side of this sandwich to full sun at local noon for 20 seconds. The UV light hardened and turned the photo-resist in the areas not masked a deep blue from its original light blue. I disassembled the sandwich and returned the brass square to a black envelope while I set up for the next step and put away what I wouldn't need right away.
I prepared a solution of sodium hydroxide and water per the instructions, removed the outer protective layer of the photo-resist film from both sides and submerged the brass square in this solution. This chemical reacts with the masked and un-hardened photo-resist film, softening it so that it will brush away. This is the most important part of the process, if the film is not completely removed from the areas to be chemically etched it won't etch properly. This is where I messed up in my first two tries; for the third and fourth tries I used my 2.75X Opti-Visor and inspected and brushed with the solution and inspected and rinsed and brushed some more until I was certain that every bit of resist was removed from the areas that needed to be etched. I made use of a hand held magnifying glass with the Opti-Visor to make sure every bit of un-exposed resist film was gone.
The second brass disc with blue photo-resist and bright brass showing through the
areas that will be etched. I thought this was good enough but it was not. Many areas
did not etch properly, especially from the backside, due to my lack of diligence.
Paying close attention to the instructions, I set up the equipment for the actual photo-etching. I had to supply a rinse bucket and a smaller rinse bowl, both filled with water. I warmed the bottle of ferric chloride in hot water running from the tap before filling the etching tank. I plugged in the aerator (to circulate the etching solution) and submerged the brass square. I set a 5 minute timer.
Etching in process. There's a clamp on the hose to prevent the etching solution from
flowing back into the pump plus the pump is placed on two pieces of foam packaging
to raise it above the solution level.
After five minutes, I removed the brass square from the etching tank (turned off the aerator and pinched shut the hose clamp - the fumes must be assumed to be nasty) rinsed and re-rinsed to inspect the progress. Most of the double side etching at the edge of the disc was cut through, so I turned the brass square 180 degrees in the clamp, returned it to the solution (turned on the aerator and released the clamp) and waited three minutes. Upon inspection, it was done and I rinsed it in hot tap water before setting it aside and cleaning up.
Now, to see the results. I poured out just enough of the sodium hydroxide (undiluted this time) into one of the trays provided to cover the brass square. Full strength this chemical removes the photo-resist from the brass with a little help with a brush. When cleaned of the resist the brass was rinsed in hot water from the tap and set aside.
Here's my first try with some practice with black enamel to fill in the letters. There are
several places where the photo-resist did not adhere and laminate properly as a result
of my difficulty with getting the resist in place as directed and etching solution got into
them from an edge exposed to etching solution. I had no more problem with this using
the submerged technique of applying the photo-resist film. Many places in the lettering
have incomplete depth because I didn't get all the masked film removed the way I should
have. Micro-Mark was right when they said this was the most important step.
Third and fourth tries, both appear perfect. The lettering has not been filled with enamel
yet, just the result of better photographic technique learned since the photo of the first
disc. I didn't even bother stripping the second attempt since I could see that I had not
removed all the masked and un-hardened photo-resist film. The discs are 1.73 inch / 44
mm in diameter.
I am very pleased with the Micro-Mark Pro-Etch Kit. It has everything needed except for a yellow "bug" bulb and the two rinse buckets I provided. I bought a better pair of rubber gloves than the single use, throw away gloves supplied in the kit for my second session when I made the last two discs. I also added a small in-line on/off switch to the aerator electric cord so I would not have to crawl under my work bench to unplug it when I needed to turn it off.
The process does have a steep learning curve, a mistake made anywhere in the process will affect the results. READ AND STUDY THE INSTRUCTIONS and MAKE SURE YOU UNDERSTAND EACH STEP.
I hope my experience helps others learn from my mistakes.
Dave
-
 molasses got a reaction from druxey in First Attempts at Photo-Etch with Micro-Mark Pro-Etch
I received the Micro-Mark Pro-Etch Kit and set out on the learning curve - which is rather steep to successfully make usable photo-etch parts on the first try. It took me three.
After ordering and waiting for delivery, I set about drawing in my drawing program the etched letters I wanted on two brass discs - one as a seal for the bottle and one on the display base. Keeping it simple, I planned to remove lettering on one side of the discs that I would later fill with paint, black letters on the brass discs. When the kit arrived I read the instruction book multiple times and identified all the tools and materials in the kit.
Following the instructions, I made the masks for both sides of a disc and printed them on the backside of the mask transparency film. Follow the instructions carefully. The black areas of the mask are the areas that need to be removed from the metal and this mask will be printed backwards (flipped horizontally) so that the print is on the backside of the film. After the ink is dry the two masks are perfectly aligned, print side to print side and taped together.
The print side of the mask transparency. The face side of the disc with reversed
lettering and the back side with interruptions in the circle so that the disc will stay
partially attached to the square of base metal. The black is what will be removed,
half-way through from both sides with most of the edge all the way through.
With directions in hand I cut two 2.5 inch / 64 mm squares of .005 inch /0.13 mm thick brass sheet. Before I opened the package of photo-resist film I set up a darkened work area lit by a single yellow "bug" bulb, then opened it, removed the resist and cut two squares, put them in an envelope lined with black paper, and returned the photo-resist film to its package and sealed it shut. This film hardens in UV light. I prepared a brass square by wet sanding each side of the square with a provided 3200 grit sanding pad until very shiny and so that the water sheeted across the square. I pulled one piece of the resist from the envelope, peeled off the inside cover film and, like applying a decal, attempted to lay the resist film on the wetted square, get it aligned to the edges of the square and adhered to the square without bubbles of air or water between the film and the brass. This turned out to be rather difficult and I had problems with it. On my second through fourth tries I submerged the brass square in just enough water to cover and applied the resist film through the water. (An old school decal application trick.) I did the same to the back side.
While doing this I had the Pro-Etch laminater plugged in and warmed up. I cut two squares of carrier sheet (card stock with one side treated so that it is glossy and smooth) slightly larger than the brass squares. I made a sandwich of the photo-resist covered brass square with the two squares of carrier, glossy side to the photo-resist and ran it through the laminater twice, flipped over and turned 90 degrees for the second pass and let it cool in a black envelope.
Next the cooled, laminated brass square (carrier sheets set aside) is slipped between the two masks and centered, then placed in the center of one of the Plexiglas squares provided, the other Plexiglas square placed on top and clamps applied at the four sides. All of this has been done with minimal exposure to UV light, just the yellow "bug" bulb - a suggestion in the directions.
Again per the instructions I exposed each side of this sandwich to full sun at local noon for 20 seconds. The UV light hardened and turned the photo-resist in the areas not masked a deep blue from its original light blue. I disassembled the sandwich and returned the brass square to a black envelope while I set up for the next step and put away what I wouldn't need right away.
I prepared a solution of sodium hydroxide and water per the instructions, removed the outer protective layer of the photo-resist film from both sides and submerged the brass square in this solution. This chemical reacts with the masked and un-hardened photo-resist film, softening it so that it will brush away. This is the most important part of the process, if the film is not completely removed from the areas to be chemically etched it won't etch properly. This is where I messed up in my first two tries; for the third and fourth tries I used my 2.75X Opti-Visor and inspected and brushed with the solution and inspected and rinsed and brushed some more until I was certain that every bit of resist was removed from the areas that needed to be etched. I made use of a hand held magnifying glass with the Opti-Visor to make sure every bit of un-exposed resist film was gone.
The second brass disc with blue photo-resist and bright brass showing through the
areas that will be etched. I thought this was good enough but it was not. Many areas
did not etch properly, especially from the backside, due to my lack of diligence.
Paying close attention to the instructions, I set up the equipment for the actual photo-etching. I had to supply a rinse bucket and a smaller rinse bowl, both filled with water. I warmed the bottle of ferric chloride in hot water running from the tap before filling the etching tank. I plugged in the aerator (to circulate the etching solution) and submerged the brass square. I set a 5 minute timer.
Etching in process. There's a clamp on the hose to prevent the etching solution from
flowing back into the pump plus the pump is placed on two pieces of foam packaging
to raise it above the solution level.
After five minutes, I removed the brass square from the etching tank (turned off the aerator and pinched shut the hose clamp - the fumes must be assumed to be nasty) rinsed and re-rinsed to inspect the progress. Most of the double side etching at the edge of the disc was cut through, so I turned the brass square 180 degrees in the clamp, returned it to the solution (turned on the aerator and released the clamp) and waited three minutes. Upon inspection, it was done and I rinsed it in hot tap water before setting it aside and cleaning up.
Now, to see the results. I poured out just enough of the sodium hydroxide (undiluted this time) into one of the trays provided to cover the brass square. Full strength this chemical removes the photo-resist from the brass with a little help with a brush. When cleaned of the resist the brass was rinsed in hot water from the tap and set aside.
Here's my first try with some practice with black enamel to fill in the letters. There are
several places where the photo-resist did not adhere and laminate properly as a result
of my difficulty with getting the resist in place as directed and etching solution got into
them from an edge exposed to etching solution. I had no more problem with this using
the submerged technique of applying the photo-resist film. Many places in the lettering
have incomplete depth because I didn't get all the masked film removed the way I should
have. Micro-Mark was right when they said this was the most important step.
Third and fourth tries, both appear perfect. The lettering has not been filled with enamel
yet, just the result of better photographic technique learned since the photo of the first
disc. I didn't even bother stripping the second attempt since I could see that I had not
removed all the masked and un-hardened photo-resist film. The discs are 1.73 inch / 44
mm in diameter.
I am very pleased with the Micro-Mark Pro-Etch Kit. It has everything needed except for a yellow "bug" bulb and the two rinse buckets I provided. I bought a better pair of rubber gloves than the single use, throw away gloves supplied in the kit for my second session when I made the last two discs. I also added a small in-line on/off switch to the aerator electric cord so I would not have to crawl under my work bench to unplug it when I needed to turn it off.
The process does have a steep learning curve, a mistake made anywhere in the process will affect the results. READ AND STUDY THE INSTRUCTIONS and MAKE SURE YOU UNDERSTAND EACH STEP.
I hope my experience helps others learn from my mistakes.
Dave
-
 molasses got a reaction from Dubz in First Attempts at Photo-Etch with Micro-Mark Pro-Etch
I received the Micro-Mark Pro-Etch Kit and set out on the learning curve - which is rather steep to successfully make usable photo-etch parts on the first try. It took me three.
After ordering and waiting for delivery, I set about drawing in my drawing program the etched letters I wanted on two brass discs - one as a seal for the bottle and one on the display base. Keeping it simple, I planned to remove lettering on one side of the discs that I would later fill with paint, black letters on the brass discs. When the kit arrived I read the instruction book multiple times and identified all the tools and materials in the kit.
Following the instructions, I made the masks for both sides of a disc and printed them on the backside of the mask transparency film. Follow the instructions carefully. The black areas of the mask are the areas that need to be removed from the metal and this mask will be printed backwards (flipped horizontally) so that the print is on the backside of the film. After the ink is dry the two masks are perfectly aligned, print side to print side and taped together.
The print side of the mask transparency. The face side of the disc with reversed
lettering and the back side with interruptions in the circle so that the disc will stay
partially attached to the square of base metal. The black is what will be removed,
half-way through from both sides with most of the edge all the way through.
With directions in hand I cut two 2.5 inch / 64 mm squares of .005 inch /0.13 mm thick brass sheet. Before I opened the package of photo-resist film I set up a darkened work area lit by a single yellow "bug" bulb, then opened it, removed the resist and cut two squares, put them in an envelope lined with black paper, and returned the photo-resist film to its package and sealed it shut. This film hardens in UV light. I prepared a brass square by wet sanding each side of the square with a provided 3200 grit sanding pad until very shiny and so that the water sheeted across the square. I pulled one piece of the resist from the envelope, peeled off the inside cover film and, like applying a decal, attempted to lay the resist film on the wetted square, get it aligned to the edges of the square and adhered to the square without bubbles of air or water between the film and the brass. This turned out to be rather difficult and I had problems with it. On my second through fourth tries I submerged the brass square in just enough water to cover and applied the resist film through the water. (An old school decal application trick.) I did the same to the back side.
While doing this I had the Pro-Etch laminater plugged in and warmed up. I cut two squares of carrier sheet (card stock with one side treated so that it is glossy and smooth) slightly larger than the brass squares. I made a sandwich of the photo-resist covered brass square with the two squares of carrier, glossy side to the photo-resist and ran it through the laminater twice, flipped over and turned 90 degrees for the second pass and let it cool in a black envelope.
Next the cooled, laminated brass square (carrier sheets set aside) is slipped between the two masks and centered, then placed in the center of one of the Plexiglas squares provided, the other Plexiglas square placed on top and clamps applied at the four sides. All of this has been done with minimal exposure to UV light, just the yellow "bug" bulb - a suggestion in the directions.
Again per the instructions I exposed each side of this sandwich to full sun at local noon for 20 seconds. The UV light hardened and turned the photo-resist in the areas not masked a deep blue from its original light blue. I disassembled the sandwich and returned the brass square to a black envelope while I set up for the next step and put away what I wouldn't need right away.
I prepared a solution of sodium hydroxide and water per the instructions, removed the outer protective layer of the photo-resist film from both sides and submerged the brass square in this solution. This chemical reacts with the masked and un-hardened photo-resist film, softening it so that it will brush away. This is the most important part of the process, if the film is not completely removed from the areas to be chemically etched it won't etch properly. This is where I messed up in my first two tries; for the third and fourth tries I used my 2.75X Opti-Visor and inspected and brushed with the solution and inspected and rinsed and brushed some more until I was certain that every bit of resist was removed from the areas that needed to be etched. I made use of a hand held magnifying glass with the Opti-Visor to make sure every bit of un-exposed resist film was gone.
The second brass disc with blue photo-resist and bright brass showing through the
areas that will be etched. I thought this was good enough but it was not. Many areas
did not etch properly, especially from the backside, due to my lack of diligence.
Paying close attention to the instructions, I set up the equipment for the actual photo-etching. I had to supply a rinse bucket and a smaller rinse bowl, both filled with water. I warmed the bottle of ferric chloride in hot water running from the tap before filling the etching tank. I plugged in the aerator (to circulate the etching solution) and submerged the brass square. I set a 5 minute timer.
Etching in process. There's a clamp on the hose to prevent the etching solution from
flowing back into the pump plus the pump is placed on two pieces of foam packaging
to raise it above the solution level.
After five minutes, I removed the brass square from the etching tank (turned off the aerator and pinched shut the hose clamp - the fumes must be assumed to be nasty) rinsed and re-rinsed to inspect the progress. Most of the double side etching at the edge of the disc was cut through, so I turned the brass square 180 degrees in the clamp, returned it to the solution (turned on the aerator and released the clamp) and waited three minutes. Upon inspection, it was done and I rinsed it in hot tap water before setting it aside and cleaning up.
Now, to see the results. I poured out just enough of the sodium hydroxide (undiluted this time) into one of the trays provided to cover the brass square. Full strength this chemical removes the photo-resist from the brass with a little help with a brush. When cleaned of the resist the brass was rinsed in hot water from the tap and set aside.
Here's my first try with some practice with black enamel to fill in the letters. There are
several places where the photo-resist did not adhere and laminate properly as a result
of my difficulty with getting the resist in place as directed and etching solution got into
them from an edge exposed to etching solution. I had no more problem with this using
the submerged technique of applying the photo-resist film. Many places in the lettering
have incomplete depth because I didn't get all the masked film removed the way I should
have. Micro-Mark was right when they said this was the most important step.
Third and fourth tries, both appear perfect. The lettering has not been filled with enamel
yet, just the result of better photographic technique learned since the photo of the first
disc. I didn't even bother stripping the second attempt since I could see that I had not
removed all the masked and un-hardened photo-resist film. The discs are 1.73 inch / 44
mm in diameter.
I am very pleased with the Micro-Mark Pro-Etch Kit. It has everything needed except for a yellow "bug" bulb and the two rinse buckets I provided. I bought a better pair of rubber gloves than the single use, throw away gloves supplied in the kit for my second session when I made the last two discs. I also added a small in-line on/off switch to the aerator electric cord so I would not have to crawl under my work bench to unplug it when I needed to turn it off.
The process does have a steep learning curve, a mistake made anywhere in the process will affect the results. READ AND STUDY THE INSTRUCTIONS and MAKE SURE YOU UNDERSTAND EACH STEP.
I hope my experience helps others learn from my mistakes.
Dave
-
molasses got a reaction from themadchemist in OGALLALA by molasses - FINISHED - 1/96 scale - BOTTLE - Prairie Schooner
I am working on a display base, nearly complete, and have had the mast folded down and back up again, twice, as dry runs to identify and adjust for problems with the lines before putting the ship into the bottle. On one of those dry runs I passed the ship through a ring slightly smaller than my bottle's neck to verify that it will fit - a must do to prevent the disaster of getting the ship stuck in the neck.
I've just about given up on making and installing coils of rope on the pinrails and cleats. I made a fixture for making some coils - which turned out okay - but I found them very difficult to install in many places. I should have made and installed them as I tied off each line instead of as a separate step. I may try again starting with the easy ones to get to instead of the hardest ones.
I received the Micro-Mark Pro-Etch Kit and set out on the learning curve - which is rather steep to successfully make usable photo-etch parts on the first try. It took me three.
After ordering I set about drawing in my drawing program the etched letters I wanted on two brass discs - one as a seal for the bottle and one on the display base. Keeping it simple, I planned to remove lettering on one side of the discs that I would later fill with paint, black letters on the brass discs. When the kit arrived I read the instruction book multiple times and identified all the tools and materials in the kit.
Following the instructions, I made the masks for both sides of a disc and printed them on the backside of the mask transparency film. Follow the instructions carefully. The black areas of the mask are the areas that need to be removed from the metal and this mask will be printed backwards (flipped horizontally) so that the print is on the backside of the film. After the ink is dry the two masks are perfectly aligned, print side to print side and taped together.
The print side of the mask transparency. The face side of the disc with reversed
lettering and the back side with interruptions in the circle so that the disc will stay
partially attached to the square of base metal. The black is what will be removed,
half-way through from both sides with most of the edge all the way through.
With directions in hand I cut two 2.5 inch / 64 mm squares of .005 inch /0.13 mm thick brass sheet. Before I opened the package of photo-resist film I set up a darkened work area lit by a single yellow "bug" bulb, then opened it, removed the resist and cut two squares, put them in an envelope lined with black paper, and returned the photo-resist film to its package and sealed it shut. This film hardens in UV light. I prepared a brass square by wet sanding each side of the square with a provided 3200 grit sanding pad until very shiny and so that the water sheeted across the square. I pulled one piece of the resist from the envelope, peeled off the inside cover film and, like applying a decal, attempted to lay the resist film on the wetted square, get it aligned to the edges of the square and adhered to the square without bubbles of air or water between the film and the brass. This turned out to be rather difficult and I had problems with it. On my second through fourth tries I submerged the brass square in just enough water to cover and applied the resist film through the water. (An old school decal application trick.) I did the same to the back side.
While doing this I had the Pro-Etch laminater plugged in and warmed up. I cut two squares of carrier sheet (card stock with one side treated so that it is glossy and smooth) slightly larger than the brass squares. I made a sandwich of the photo-resist covered brass square with the two squares of carrier, glossy side to the photo-resist and ran it through the laminater twice, flipped over and turned 90 degrees for the second pass and let it cool in a black envelope.
Next the cooled, laminated brass square (carrier sheets set aside) is slipped between the two masks and centered, then placed in the center of one of the Plexiglas squares provided, the other Plexiglas square placed on top and clamps applied at the four sides. All of this has been done with minimal exposure to UV light, just the yellow "bug" bulb - a suggestion in the directions.
Again per the instructions I exposed each side of this sandwich to full sun at local noon for 20 seconds. The UV light hardened and turned the photo-resist in the areas not masked a deep blue from its original light blue. I disassembled the sandwich and returned the brass square to a black envelope while I set up for the next step and put away what I wouldn't need right away.
I prepared a solution of sodium hydroxide and water per the instructions, removed the outer protective layer of the photo-resist film from both sides and submerged the brass square in this solution. This chemical reacts with the masked and un-hardened photo-resist film, softening it so that it will brush away. This is the most important part of the process, if the film is not completely removed from the areas to be chemically etched it won't etch properly. This is where I messed up in my first two tries; for the third and fourth tries I used my 2.75X Opti-Visor and inspected and brushed with the solution and inspected and rinsed and brushed some more until I was certain that every bit of resist was removed from the areas that needed to be etched. I made use of a hand held magnifying glass with the Opti-Visor to make sure every bit of un-exposed resist film was gone.
The second brass disc with blue photo-resist and bright brass showing through the
areas that will be etched. I thought this was good enough but it was not. Many areas
did not etch properly, especially from the backside, due to my lack of diligence.
Paying close attention to the instructions, I set up the equipment for the actual photo-etching. I had to supply a rinse bucket and a smaller rinse bowl, both filled with water. I warmed the bottle of ferric chloride in hot water running from the tap before filling the etching tank. I plugged in the aerator (to circulate the etching solution) and submerged the brass square. I set a 5 minute timer.
Etching in process. There's a clamp on the hose to prevent the etching solution from
flowing back into the pump plus the pump is placed on two pieces of foam packaging
to raise it above the solution level.
After five minutes, I removed the brass square from the etching tank (turned off the aerator and pinched shut the hose clamp - the fumes must be assumed to be nasty) rinsed and re-rinsed to inspect the progress. Most of the double side etching at the edge of the disc was cut through, so I turned the brass square 180 degrees in the clamp, returned it to the solution (turned on the aerator and released the clamp) and waited three minutes. Upon inspection, it was done and I rinsed it in hot tap water before setting it aside and cleaning up.
Now, to see the results. I poured out just enough of the sodium hydroxide (undiluted this time) into one of the trays provided to cover the brass square. Full strength this chemical removes the photo-resist from the brass with a little help with a brush. When cleaned of the resist the brass was rinsed in hot water from the tap and set aside.
Here's my first try with some practice with black enamel to fill in the letters. There are
several places where the photo-resist did not adhere and laminate properly as a result
of my difficulty with getting the resist in place as directed and etching solution got into
them from an edge exposed to etching solution. I had no more problem with this using
the submerged technique of applying the photo-resist film. Many places in the lettering
have incomplete depth because I didn't get all the masked film removed the way I should
have. Micro-Mark was right when they said this was the most important step.
Third and fourth tries, both appear perfect. The lettering has not been filled with enamel
yet, just the result of better photographic technique learned since the photo of the first
disc. I didn't even bother stripping the second attempt since I could see that I had not
removed all the masked and un-hardened photo-resist film. The discs are 1.73 inch / 44
mm in diameter.
I am very pleased with the Micro-Mark Pro-Etch Kit. It has everything needed except for a yellow "bug" bulb and the two rinse buckets I provided. I bought a better pair of rubber gloves than the single use, throw away gloves supplied in the kit for my second session when I made the last two discs. I also added a small in-line on/off switch to the aerator electric cord so I would not have to crawl under my work bench to unplug it when I needed to turn it off.
The process does have a steep learning curve, a mistake made anywhere in the process will affect the results. READ AND STUDY THE INSTRUCTIONS and MAKE SURE YOU UNDERSTAND EACH STEP.
I hope my experience helps others learn from my mistakes.
As you can see from my name plates I've set myself a dead line of the 29th of this month - one year from my first post for Ogallala. A year is long enough and I'm getting tired of looking at it.
Dave
-
 molasses got a reaction from WackoWolf in First Attempts at Photo-Etch with Micro-Mark Pro-Etch
I received the Micro-Mark Pro-Etch Kit and set out on the learning curve - which is rather steep to successfully make usable photo-etch parts on the first try. It took me three.
After ordering and waiting for delivery, I set about drawing in my drawing program the etched letters I wanted on two brass discs - one as a seal for the bottle and one on the display base. Keeping it simple, I planned to remove lettering on one side of the discs that I would later fill with paint, black letters on the brass discs. When the kit arrived I read the instruction book multiple times and identified all the tools and materials in the kit.
Following the instructions, I made the masks for both sides of a disc and printed them on the backside of the mask transparency film. Follow the instructions carefully. The black areas of the mask are the areas that need to be removed from the metal and this mask will be printed backwards (flipped horizontally) so that the print is on the backside of the film. After the ink is dry the two masks are perfectly aligned, print side to print side and taped together.
The print side of the mask transparency. The face side of the disc with reversed
lettering and the back side with interruptions in the circle so that the disc will stay
partially attached to the square of base metal. The black is what will be removed,
half-way through from both sides with most of the edge all the way through.
With directions in hand I cut two 2.5 inch / 64 mm squares of .005 inch /0.13 mm thick brass sheet. Before I opened the package of photo-resist film I set up a darkened work area lit by a single yellow "bug" bulb, then opened it, removed the resist and cut two squares, put them in an envelope lined with black paper, and returned the photo-resist film to its package and sealed it shut. This film hardens in UV light. I prepared a brass square by wet sanding each side of the square with a provided 3200 grit sanding pad until very shiny and so that the water sheeted across the square. I pulled one piece of the resist from the envelope, peeled off the inside cover film and, like applying a decal, attempted to lay the resist film on the wetted square, get it aligned to the edges of the square and adhered to the square without bubbles of air or water between the film and the brass. This turned out to be rather difficult and I had problems with it. On my second through fourth tries I submerged the brass square in just enough water to cover and applied the resist film through the water. (An old school decal application trick.) I did the same to the back side.
While doing this I had the Pro-Etch laminater plugged in and warmed up. I cut two squares of carrier sheet (card stock with one side treated so that it is glossy and smooth) slightly larger than the brass squares. I made a sandwich of the photo-resist covered brass square with the two squares of carrier, glossy side to the photo-resist and ran it through the laminater twice, flipped over and turned 90 degrees for the second pass and let it cool in a black envelope.
Next the cooled, laminated brass square (carrier sheets set aside) is slipped between the two masks and centered, then placed in the center of one of the Plexiglas squares provided, the other Plexiglas square placed on top and clamps applied at the four sides. All of this has been done with minimal exposure to UV light, just the yellow "bug" bulb - a suggestion in the directions.
Again per the instructions I exposed each side of this sandwich to full sun at local noon for 20 seconds. The UV light hardened and turned the photo-resist in the areas not masked a deep blue from its original light blue. I disassembled the sandwich and returned the brass square to a black envelope while I set up for the next step and put away what I wouldn't need right away.
I prepared a solution of sodium hydroxide and water per the instructions, removed the outer protective layer of the photo-resist film from both sides and submerged the brass square in this solution. This chemical reacts with the masked and un-hardened photo-resist film, softening it so that it will brush away. This is the most important part of the process, if the film is not completely removed from the areas to be chemically etched it won't etch properly. This is where I messed up in my first two tries; for the third and fourth tries I used my 2.75X Opti-Visor and inspected and brushed with the solution and inspected and rinsed and brushed some more until I was certain that every bit of resist was removed from the areas that needed to be etched. I made use of a hand held magnifying glass with the Opti-Visor to make sure every bit of un-exposed resist film was gone.
The second brass disc with blue photo-resist and bright brass showing through the
areas that will be etched. I thought this was good enough but it was not. Many areas
did not etch properly, especially from the backside, due to my lack of diligence.
Paying close attention to the instructions, I set up the equipment for the actual photo-etching. I had to supply a rinse bucket and a smaller rinse bowl, both filled with water. I warmed the bottle of ferric chloride in hot water running from the tap before filling the etching tank. I plugged in the aerator (to circulate the etching solution) and submerged the brass square. I set a 5 minute timer.
Etching in process. There's a clamp on the hose to prevent the etching solution from
flowing back into the pump plus the pump is placed on two pieces of foam packaging
to raise it above the solution level.
After five minutes, I removed the brass square from the etching tank (turned off the aerator and pinched shut the hose clamp - the fumes must be assumed to be nasty) rinsed and re-rinsed to inspect the progress. Most of the double side etching at the edge of the disc was cut through, so I turned the brass square 180 degrees in the clamp, returned it to the solution (turned on the aerator and released the clamp) and waited three minutes. Upon inspection, it was done and I rinsed it in hot tap water before setting it aside and cleaning up.
Now, to see the results. I poured out just enough of the sodium hydroxide (undiluted this time) into one of the trays provided to cover the brass square. Full strength this chemical removes the photo-resist from the brass with a little help with a brush. When cleaned of the resist the brass was rinsed in hot water from the tap and set aside.
Here's my first try with some practice with black enamel to fill in the letters. There are
several places where the photo-resist did not adhere and laminate properly as a result
of my difficulty with getting the resist in place as directed and etching solution got into
them from an edge exposed to etching solution. I had no more problem with this using
the submerged technique of applying the photo-resist film. Many places in the lettering
have incomplete depth because I didn't get all the masked film removed the way I should
have. Micro-Mark was right when they said this was the most important step.
Third and fourth tries, both appear perfect. The lettering has not been filled with enamel
yet, just the result of better photographic technique learned since the photo of the first
disc. I didn't even bother stripping the second attempt since I could see that I had not
removed all the masked and un-hardened photo-resist film. The discs are 1.73 inch / 44
mm in diameter.
I am very pleased with the Micro-Mark Pro-Etch Kit. It has everything needed except for a yellow "bug" bulb and the two rinse buckets I provided. I bought a better pair of rubber gloves than the single use, throw away gloves supplied in the kit for my second session when I made the last two discs. I also added a small in-line on/off switch to the aerator electric cord so I would not have to crawl under my work bench to unplug it when I needed to turn it off.
The process does have a steep learning curve, a mistake made anywhere in the process will affect the results. READ AND STUDY THE INSTRUCTIONS and MAKE SURE YOU UNDERSTAND EACH STEP.
I hope my experience helps others learn from my mistakes.
Dave
-
 molasses got a reaction from gjdale in First Attempts at Photo-Etch with Micro-Mark Pro-Etch
I received the Micro-Mark Pro-Etch Kit and set out on the learning curve - which is rather steep to successfully make usable photo-etch parts on the first try. It took me three.
After ordering and waiting for delivery, I set about drawing in my drawing program the etched letters I wanted on two brass discs - one as a seal for the bottle and one on the display base. Keeping it simple, I planned to remove lettering on one side of the discs that I would later fill with paint, black letters on the brass discs. When the kit arrived I read the instruction book multiple times and identified all the tools and materials in the kit.
Following the instructions, I made the masks for both sides of a disc and printed them on the backside of the mask transparency film. Follow the instructions carefully. The black areas of the mask are the areas that need to be removed from the metal and this mask will be printed backwards (flipped horizontally) so that the print is on the backside of the film. After the ink is dry the two masks are perfectly aligned, print side to print side and taped together.
The print side of the mask transparency. The face side of the disc with reversed
lettering and the back side with interruptions in the circle so that the disc will stay
partially attached to the square of base metal. The black is what will be removed,
half-way through from both sides with most of the edge all the way through.
With directions in hand I cut two 2.5 inch / 64 mm squares of .005 inch /0.13 mm thick brass sheet. Before I opened the package of photo-resist film I set up a darkened work area lit by a single yellow "bug" bulb, then opened it, removed the resist and cut two squares, put them in an envelope lined with black paper, and returned the photo-resist film to its package and sealed it shut. This film hardens in UV light. I prepared a brass square by wet sanding each side of the square with a provided 3200 grit sanding pad until very shiny and so that the water sheeted across the square. I pulled one piece of the resist from the envelope, peeled off the inside cover film and, like applying a decal, attempted to lay the resist film on the wetted square, get it aligned to the edges of the square and adhered to the square without bubbles of air or water between the film and the brass. This turned out to be rather difficult and I had problems with it. On my second through fourth tries I submerged the brass square in just enough water to cover and applied the resist film through the water. (An old school decal application trick.) I did the same to the back side.
While doing this I had the Pro-Etch laminater plugged in and warmed up. I cut two squares of carrier sheet (card stock with one side treated so that it is glossy and smooth) slightly larger than the brass squares. I made a sandwich of the photo-resist covered brass square with the two squares of carrier, glossy side to the photo-resist and ran it through the laminater twice, flipped over and turned 90 degrees for the second pass and let it cool in a black envelope.
Next the cooled, laminated brass square (carrier sheets set aside) is slipped between the two masks and centered, then placed in the center of one of the Plexiglas squares provided, the other Plexiglas square placed on top and clamps applied at the four sides. All of this has been done with minimal exposure to UV light, just the yellow "bug" bulb - a suggestion in the directions.
Again per the instructions I exposed each side of this sandwich to full sun at local noon for 20 seconds. The UV light hardened and turned the photo-resist in the areas not masked a deep blue from its original light blue. I disassembled the sandwich and returned the brass square to a black envelope while I set up for the next step and put away what I wouldn't need right away.
I prepared a solution of sodium hydroxide and water per the instructions, removed the outer protective layer of the photo-resist film from both sides and submerged the brass square in this solution. This chemical reacts with the masked and un-hardened photo-resist film, softening it so that it will brush away. This is the most important part of the process, if the film is not completely removed from the areas to be chemically etched it won't etch properly. This is where I messed up in my first two tries; for the third and fourth tries I used my 2.75X Opti-Visor and inspected and brushed with the solution and inspected and rinsed and brushed some more until I was certain that every bit of resist was removed from the areas that needed to be etched. I made use of a hand held magnifying glass with the Opti-Visor to make sure every bit of un-exposed resist film was gone.
The second brass disc with blue photo-resist and bright brass showing through the
areas that will be etched. I thought this was good enough but it was not. Many areas
did not etch properly, especially from the backside, due to my lack of diligence.
Paying close attention to the instructions, I set up the equipment for the actual photo-etching. I had to supply a rinse bucket and a smaller rinse bowl, both filled with water. I warmed the bottle of ferric chloride in hot water running from the tap before filling the etching tank. I plugged in the aerator (to circulate the etching solution) and submerged the brass square. I set a 5 minute timer.
Etching in process. There's a clamp on the hose to prevent the etching solution from
flowing back into the pump plus the pump is placed on two pieces of foam packaging
to raise it above the solution level.
After five minutes, I removed the brass square from the etching tank (turned off the aerator and pinched shut the hose clamp - the fumes must be assumed to be nasty) rinsed and re-rinsed to inspect the progress. Most of the double side etching at the edge of the disc was cut through, so I turned the brass square 180 degrees in the clamp, returned it to the solution (turned on the aerator and released the clamp) and waited three minutes. Upon inspection, it was done and I rinsed it in hot tap water before setting it aside and cleaning up.
Now, to see the results. I poured out just enough of the sodium hydroxide (undiluted this time) into one of the trays provided to cover the brass square. Full strength this chemical removes the photo-resist from the brass with a little help with a brush. When cleaned of the resist the brass was rinsed in hot water from the tap and set aside.
Here's my first try with some practice with black enamel to fill in the letters. There are
several places where the photo-resist did not adhere and laminate properly as a result
of my difficulty with getting the resist in place as directed and etching solution got into
them from an edge exposed to etching solution. I had no more problem with this using
the submerged technique of applying the photo-resist film. Many places in the lettering
have incomplete depth because I didn't get all the masked film removed the way I should
have. Micro-Mark was right when they said this was the most important step.
Third and fourth tries, both appear perfect. The lettering has not been filled with enamel
yet, just the result of better photographic technique learned since the photo of the first
disc. I didn't even bother stripping the second attempt since I could see that I had not
removed all the masked and un-hardened photo-resist film. The discs are 1.73 inch / 44
mm in diameter.
I am very pleased with the Micro-Mark Pro-Etch Kit. It has everything needed except for a yellow "bug" bulb and the two rinse buckets I provided. I bought a better pair of rubber gloves than the single use, throw away gloves supplied in the kit for my second session when I made the last two discs. I also added a small in-line on/off switch to the aerator electric cord so I would not have to crawl under my work bench to unplug it when I needed to turn it off.
The process does have a steep learning curve, a mistake made anywhere in the process will affect the results. READ AND STUDY THE INSTRUCTIONS and MAKE SURE YOU UNDERSTAND EACH STEP.
I hope my experience helps others learn from my mistakes.
Dave
-
molasses reacted to Chasseur in OGALLALA by molasses - FINISHED - 1/96 scale - BOTTLE - Prairie Schooner
Hey Dave,
It all looks wonderful. I really appreciated the PDF on the figures.
The aforementioned is a great pice of literature for the scale modeller. Way to go Mate!
Jeff
-
molasses reacted to DSiemens in Bermuda Sloop by DSiemens - FINISHED - BOTTLE - aka building in super mini scale
The lasr part as far the ship goes is the sails. I just trace them the best I can and compare them to the ship and trim them. Once thier ready I glue them in place. The main sail I just glue to the gaff so I can wrap it around the ship when going in/ I make sure to keep the wind direction in mind so all the sail look uniform. Doesn't make sense to have the sails leaning i multiple directions.
I actually had to finish this ship fast to include it in a show for the Rocky Mountain Shipwrights. I didn't include all the running rigging this time.
For the sea I put just a little bit of clay in the bottle and flatten it out. I held it over a hot burner for a few seconds to make melt the bottom. This just makes sure the clay sticks to the bottle. I give it a few minutes to dry and then it's ready to go.
I cut the ship off with a dremel and carefully fold the mast back being sure the main sail curls around the ship and doesn't crinkle. Once in the bristles pop the mast back up. I put a little white glue on a tooth pick and get it between the ship and the sea to glue it down. I then use a small piece of wire to glue the forward stays down.
-
molasses got a reaction from Piet in OGALLALA by molasses - FINISHED - 1/96 scale - BOTTLE - Prairie Schooner
One more step and he will be out of the taller grasses. I considered putting the scout on a horse but decided against it - I didn't want to make a horse.
-
molasses reacted to DSiemens in Bermuda Sloop by DSiemens - FINISHED - BOTTLE - aka building in super mini scale
Thank's Augie. I've actually thought of making one as a necklace for the Admiral. I"m not sure it's her style though.
Thanks Omega and Jesse.
I cut the lower part of the mast and glued on the upper section. I used a few less bristles this time so that it was thinner. I then measured again to make sure it wasn't to tall.
I got a little ahead of my self with the rigging I suggest having the mast and bow in place. For the rigging I usually cut way more then I need. to. It's easier to trim it afterward. I start the rigging with the back stays. To do these I tie an overhand and put it over the mast with even amounts going to either side. I then glue them to the thread already on the side of the ship.
As the lines are glued down I check the rake of the mast so that the lines are tight and the rake is correct. Because I haven't had enough torture tying it the first time I did it again. I then glued the spars boom and gaff in place and added the forward stays. On a normal ship in bottle the forward stays run to holes or thread blocks and then out the bottle where they can be pulled to pull the masts up. There's no way to drill a hole in this bow and thread blocks can look bulky at this scale. So I use a trick I learned from Heather Rogers. I pull the line tight and put a little super glue on it. When the glue dries the line will stay straight. This also works for lines that you want to model as being slack if they were full scale. I cut them short so I can glue them in place once the ship is in the bottle.
-
molasses got a reaction from augie in OGALLALA by molasses - FINISHED - 1/96 scale - BOTTLE - Prairie Schooner
One more step and he will be out of the taller grasses. I considered putting the scout on a horse but decided against it - I didn't want to make a horse.