


Bob Cleek
-
Posts
3,374 -
Joined
-
Last visited
Content Type
Profiles
Forums
Gallery
Events
Everything posted by Bob Cleek
-
These ought to get you "squared away" for your build. They are all inexpensive enough that you should be able to cover them out of "pocket money" and she'll never notice it. If the packages arriving may pose a problem, have them shipped to a friend. Grizzly H2993 Machinist's Square Set, 4-Piece - - Amazon.com 2", 3", 4", and 6" squares set. May be used in conjunction with each other. Essential for squaring in tight spaces. $28.45 12'' Adjustable Sliding Combination Square Ruler&Protractor Level Measure Set | eBay Full featured combination square, protractor, center finder, bubble level, and 12" steel rule/straightedge (useful for cutting with a hobby knife as well as measuring.) $15.56 Thin-Beam Square (micromark.com) Invaluable for cutting thin stock, particularly sheet stock. $19.95 from MicroMark, but if you sign up for their email catalog advertisements, these are one of their "loss leaders" when they have sales and can be had for half price on sale. Train Buddy regularly sells the same square for $17.39. Thin-Beam Square - Train Buddy™ but, when comparison shopping, don't forget to factor in the shipping to the total cost.
-
Actually, there's another ship modeling forum on the internet that's infamous for ignoring intellectual property rights. Let's not go there. Keep it real.
-
Perhaps it would be useful to check with the NRG's copyright attorney. Don't go by me, but I believe that works which did not carry the copyright notice on the document (e.g. (C) or "copyright" with the date and name of the claimant) before April 30, 1989 are not copyrighted. For works first published on or after March 1, 1989, use of the copyright notice is optional. Before March 1, 1989, the use of the notice was mandatory on all published works. These documents were found in the 1960's without a copyright notice on them, so are older than March 1, 1989 and, without a copyright notice would not be copyrighted, or so it would seem. Better to ask your attorney so you can sue your attorney if a copyright holder sues the NRG, but just sayin'.
-
I'm not sure if by this is indicated that your are carving the workpiece while holding it in your hand. If so, it is far better to secure the workpiece solidly and then use both hands to control the carving tool. Two hands are better than one and the Kevlar gloves aren't as necessary. Maybe this is a no-brainer, but I've seen guys trying to do small carving when holding the piece in their hand and in that instance, yes, Kevlar gloves are highly advisable! Two hands on the cutting tool also makes for far more steady and precise cuts. A jeweler's vise of some sort which can be held firmly in a larger vise to hold small parts securely should be part of any modeler's tool kit. Fortunately, they are inexpensive, so buy the best professional model you can find. Cheap Chinese knock-offs abound! This style of jeweler's vise is also very good for pulling wire through a draw plate. The serrations on the jaws are sized to hold various gauges of wire. The head of these jewelers' peg clamps screws off so it can be mounted in a bench vise instead of being held in the hand. It will hold all sorts of shaped pieces by moving the pegs around as needed. This Stanley portable bench vise is probably the best of its type on the market. It can be moved so the workpiece is presented at any angle.
- 17 replies
-
- 2
-

-
- windlass
- Dutch model
- (and 2 more)
-
I've recently come to realize how important it is that "Torque is good. Speed is not so good." It's not just the burning issue with sanding, but it applies in all things. High speed micro-motors have become very popular in recent years. Their small size offers advantages, particularly in terms of battery powered tools, as does their lower price in some instances, but high speed cutting tools are much more difficult to control and a slip that ruins a workpiece is much more likely to occur. There are lots of cute 12 VAC cutting tools on the market now that will easily stall out if you try to hog through hard wood. They're made for cutting balsa and basswood and that's about it. While manufacturers replace torque with speed, it's not an even trade. A lot is lost in the translation. Another problem with high speed electric motors is that if you slow them down with a rheostat speed controller, you don't get any corresponding increase in torque. You pretty much have to get them spinning at high speed to get much done with them in any case. This is most apparent if one compares steam engines with internal combustion engines. A 5 HP steam engine will drive a 25' displacement hull at hull speed turning a large propeller slowly with its high torque. It takes a 25 HP low torque gas or diesel engine to do the same spinning a small propeller at high speed. The steam engine will last virtually forever with far less maintenance. The gas or diesel engine will wear out in relatively short order and require far more maintenance until it does. There's no free lunch.
-
3M makes the right tool for that job: Feathering Disc Adhesive. The 3M stuff is relatively expensive. Less expensive abrasive disc adhesives are on the market. Disc adhesive permits the easier removal of worn out discs than rubber cement, although the two may appear the same. One application of the disc adhesive will permit removing a used disc and replacing it with another without adding more adhesive for a few discs before more adhesive needs to be added. It cleans off the surface easily with acetone, or by rolling it off by hand. Sold in auto body and fender repair supply stores or on line. Here, again, the Byrnes machine has the advantage in that less expensive cut abrasive sheets in standard sizes can be used and no adhesive is required. The savings over purchasing proprietary abrasive belts is another advantage of the Byrnes thickness sander.
-
I think your first effort is quite promising. "If at first your don't succeed, try, try again." as the saying goes. I'd suggest that you try making up the "square" shape by taking one piece with the smaller dimensions and then gluing "cheeks" onto the middle of that to yield a larger square section for the larger diameter of the middle of the windlass. Then work the thinner ends and the thicker middle section down to the finished octagonal shapes. That might be a bit easier to work a smooth transition between the thicker middle and the thinner ends. Sharp tools and thinner cuts are the trick. Sneak up on the shape. Don't try to get it perfect with large "bites." Other than that, I think you've got the approach down pretty well. Walnut may or may not be easy to work, depending upon the grain and hardness of the particular piece of walnut you are working. If it works for you, go for it.
- 17 replies
-
- 2
-
-
- windlass
- Dutch model
- (and 2 more)
-
A single layer of planking requires careful layout and fitting, while double planking covers a multitude of sins. It's easier to bend two layers of thin plank than a thicker one, until you get the hang of it. Actually, single planking is easier in my opinion because it's easier to clamp to the frames. Kit manufacturers opt for the double planking because it offers the less-experienced builder an easier go of it and because they can get away with less expensive wood for the first layer. Today's top quality models seem all to be single layer planking, sometimes with the planks laser-cut to save the builder having to spile their own planks. I think many modelers find their first single planked model marks the end of their double planking days. Other's mileage may vary, of course.
-
Ah, yes. It happens. Go to a local craft or bead store and I'm sure you will easily find something that fits the scale of your model perfectly. They are just round beads. They come in a million colors and sizes. No problem.
-
Great news, Michael. I'm looking forward to watching you back at work soon!
-
I hear you on that! It seems to be a problem just about everywhere outside the US, if comments on MSW are any indication. I see that Barrie, Ontario is only about 145 miles from Buffalo, New York. An affordable Jim Saw may be closer than you think. If my memory of his prior posts serves, MSW forumite Kevin Kenny, who lives in Trinidad and Tobago, has found it impossible to obtain many modeling essentials in his homeland and solves that problem by stocking up on tools and supplies whenever he visits his daughter in New York. He may be able to share some pointers on how that works for him.
-
I agree! You just assemble a plastic kit. "Glue part number 5A into hole number 5B" and so on. There's no need to understand what the part is called or what its function might be. To a greater extent, particularly with earlier wooden models, be they ship or otherwise, at least before laser cutting, is was just assumed by the manufacturers that their customers has some basic understanding of what they were building and adequate woodworking skills to cut and fit the parts together. Unfortunately, many of recent generations are often clueless when it comes to the manual arts and the high schools by and large abandoning their shop classes hasn't helped any, either. Anybody starting in out in sailing ship modeling would do well to start by reading Chapelle's Boatbuilding and learning how a wooden boat is built from the lines up. That will make their modeling tasks much more understandable. Of course, such advice would be sure to fall on deaf ears in this age of instant gratification. How many kids today know "righty-tighty, lefty-loosey?"
-
You must be a ruthless culler!
-
It might have been a good start twenty years ago, but nothing more. Continually acquiring related research materials as one goes along is an essential part of this hobby. The technology of modeling has increased and complexified tremendously in the twenty years since that was written. I would say that any of the then-contemporary "how-to-do-it" books are fairly obsolete by now, save for the very few "classics." Avoid anything with the words "How to" in the title. For example, you will hear about frequently-recommended books on how to build kits, but they will have been written in the days of double "plank on bulkhead" construction long before laser-cut parts and photo-etched fittings became commonplace and they really fall short of addressing what a quality kit can produce today. They are generally a waste of money. There will always be yet another "must-have" volume to acquire. If someone starting out asked me, I'd advise them to first acquire the "classics" that have stood the test of time, such as the books by Davis, Underhill, Longridge, and The Ship Modeler's Shopnotes I and II on modeling technique and Chapelle on American period vessels, if that's your focus of interest. Wrap your head around that information, then take it from there. Also, don't limit your selections to specifically ship modeling books, either. Any good book on any of the related crafts will contribute to making you a better modeler. You will, eventually, want to know about various wood species and their qualities, how to cut, turn, and carve wood, how to finish wood, how to fabricate metal parts and join them together, how to sew, how to make your own scale cordage, how to read "lines drawings" and do drafting, both manual and CAD, if that's your cup of tea, and on and on. This is what makes this hobby one that can stay with you for a lifetime.
-
This sounds like great stuff! Not only does it provide the advantages you mentioned, but it's unbreakable! Regrettably, "expensive" is an understatement, though. A 4'X8' sheet of the stuff runs around $1,500! Optium Museum F 0001 Tue-Vue Specialty Sheet - 48 x 96 x .125 (acplasticsinc.com) I've "saved" the site address in my "favorites" in case I win the lottery one day.
-
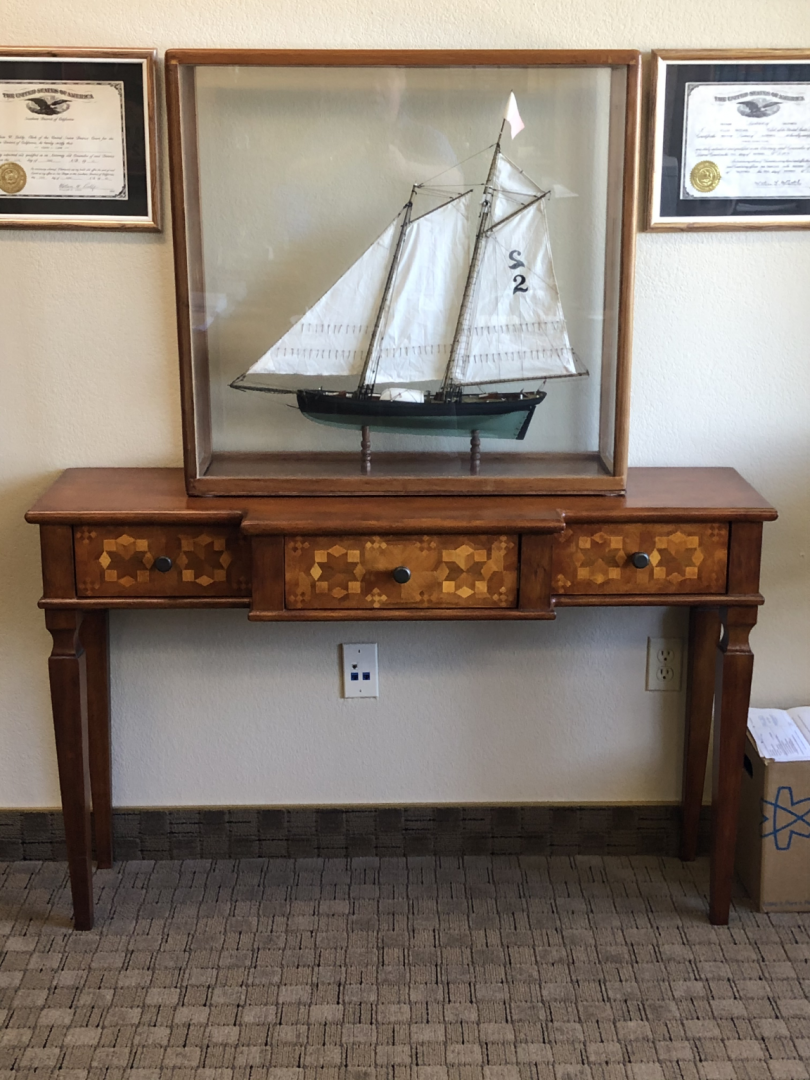
Got it! That should keep the case solidly in place on the base. I addressed that problem by cutting a rabet in the base edge which the case sets down on. The side of the rabet keeps the case from sliding around.. "Different ships, different long splices!" I used your "notched mitered corner" method on this case pictured below for rigidity as you do. It was built before I'd added epoxy to my armamentarium. I was concerned about the strength of the glued corners given the relative narrowness of the framing, which, for aesthetic reasons, I didn't want to make larger. It was made from a particularly nice plank of hard old-growth redwood I happened to have on hand. This case has held up well for over 35 years, two wives, three kids, and several moves. The somewhat narrow table has always been screw-fastened to the wall, which was a good thing in the big 6.9 magnitude Loma Prieta earthquake! We native Californians learn to adapt to our environment!
-
Hi Oakvander,
I'm located in Petaluma, CA, just north of San Francisco. I've spent my life in the maritime community here (my dad was in the shipping business with American President Lines.) I've been involved with other models folks sought to donate to the local museums through my connections with the late Karl Kortum, the founder of the San Francisco Maritime Museum. (I am an attorney by profession and a local maritime historian by avocation.) I've been building ship models on and off, as well as building, sailing, and maintaining my own wooden yachts for over fifty years. I've studied ship models "in person" in maritime museums in the U.S. and Europe. While I don't consider myself a "professional" in the field, I have to say that I can't imagine there is any museum that would be interested in accepting this model for any purpose other than to sell it off to a decorator or auction house, which for their purposes, would not be worth the effort because of the cost to restore it to marketable condition may well exceed the value of the model itself once it's restored. This isn't to suggest the model is "worthless," but only that those in the business of buying and selling models are looking to make a profit and little else. Moreover, the model is of a vessel with absolutely no local connection, so museums wouldn't be interested. Finally, as is becoming apparent from the posts in your thread, the model itself has no remarkable provenance, although we do know it appears to be a copy of the 16th Century NMG model whose prototype itself cannot be identified.
As someone mentioned, there may be a library, a yacht club, or a waterfront bar that might be interested in it for use as decor, but I doubt any of these would pay money for it nor provide an IRS deductible donation receipt for it for anything more than the statutory $500 maximum limit without a written appraisal for it that satisfied the IRS requirements. Here again, none of these would be interested in the model unless it was restored, the cost of which would far exceed the amount of any net recovery from a charitable donation deduction.
Another problem with selling models is that they are very expensive to ship anywhere because their cases must be properly crated to prevent breakage and they require very special handling by specialist shippers. They rarely survive a long-haul ride in the back of a semi-trailer. Here again, the shipping and special handling costs could well exceed the market value of the model, so the market area is likely to be limited to local buyers.
If the above discouraging assessment proves to be the case after their further efforts, I'd hate to see this otherwise nicely built model end up in the back of a Goodwill truck or the like. As I have done with deserving models before, I would be happy and grateful to "give it a good home," and restore it for my own "collection," which is hardly what anyone would call "museum quality," but interesting nonetheless. I hate to see well-build models die. However, the economics of it all being that the most I can justify offering for the model is to restore, preserve, and and appreciate it. If that it appears to the owners to be the best option left to them, I'd be happy to have it.
If you or they wish to discuss it further with me, you can contact me at robert@cleek-elin.com or phone at 415-408-8464.
BOB CLEEK
- Show previous comments 13 more
-

Hi Bob. Thanks for your input. It sure seems like the same model to me.
It's not known how it got here. One of the former owners of the house where the model is currently was a bigwig at Barclays, which is based in London. I imagine he could easily have afforded to have it shipped by the most expensive means possible. But I don't know whether it was the guy from Barclays who brought it into the house or another former owner, an architect.
It's been a fun research project. I've enjoyed learning about the world of ship models. Hopefully the owners will decide the fate of the model soon.
-
I also wanted to mention that Dr. Kriegstein suggested that the fact that the model was built by John Franklin is unlikely to change the price estimate significantly. Yet, one of the other forum members just replied indicating that it could. Your thoughts?
You mentioned previously that Mr. Wall has a gallery where he sells models. I wasn't aware of that until you told me. So, if we got him to do an appraisal, might he make an offer to purchase it (seems like a potential conflict of interest)? Also, would he expect the owner to ship the model to him? They're probably not going to want to do that.
-
Ah... The Barclay's Bank connection is a possible explanation. Being a San Francisco native, I recall Barclay's Bank back in those days. It was a British bank that opened a US subsidiary. They marketed themselves as "ever so veddy British" and played on the cache' that they were somehow "higher class." (Remember this was the era when James Bond was considered the ultimate in "cool," instead of the quaintly misogynistic lout he appears to be in his old movies today.) A model like this would exactly be the sort of thing they would have in their SF financial district branch office or conference room. Banks used to have fancy lobbies when customers had to spend time waiting in line for a teller back before ATM machines. (Wells Fargo had (has?) a stage coach and company museum in their Montgomery Street branch lobby around the same era.) I wouldn't be a bit surprised if some executive took it home when there was a move and it was no longer needed... or would no longer be noticed missing.

I agree with Dr. Kriegstein that the fact Franklin built the model wouldn't change the value appreciably. As a model, it is what it is and it does have its limitations. Franklin was known as a collector and an authority on Navy Board models, but he was not known as a model builder. His being the builder should definitely be told to Wall if an appraisal is done. it's not insignificant, but, while of interest, I also don't see anybody paying more for it on that account. I greatly respect the forumite who made the comment that it may increase the value, but I'm afraid his goodwill and best wishes got ahead of him in that instance. There are really only five or eight ship model builders in the world alive at any time whose works are so highly regarded and well recognized that their handiwork automatically draws attention in the marketplace. Ship models are like any work of art: They don't realize their highest prices until the artist is dead!
Yes, Wall does sell models, although at this point is seems that he also is doing a fair amount of appraisals, consulting, and restoration and conservation work. I've noticed of late that the quality and price point of his gallery offerings has decreased somewhat in recent years. He used to have a fair number of fine older models of high quality, along with some works by well known contemporary master modelers, but of late it seems he's filled out his offerings with less interesting stuff, including simply nicely made kit models! He still apparently has two or three of the well-recognized professional modelers who seem to sell their works through his gallery. Here's his current inventory you haven't seen it already: Current Inventory – American Marine Ship Model Gallery
I don't know if Wall accepts models for sale on commission or buys them outright and sells them on his own account.. He doesn't hold auctions, as far as I know. I would expect that he would want the model in his gallery if he were going to try to sell it. Any buyer would want to at least see a model in person before buying and a wise collector paying a good price for a select model would probably want it professionally examined and appraised.
Bob
-
I used to use this method of corner joint before I started using epoxy resin adhesive. I got lazy and tried "pinning" the corners with metal pegs after assembly with the epoxy adhesive, sort of as a "belt and suspenders" approach to make sure everything was fastened securely. It seems to produce a strong joint and I'm not even sure the pegs are necessary, since a lot of the rigidity of the structure comes from the panes set in the grooves. The one problem I've yet to devise an easy solution to is cleaning the glass on the inside of a case that's taller than the length of my arm! I've tried folding a sponge over the end of a stick and wrapping the sponge in terrycloth toweling held in place with duct tape. It's still tedious business. The next case I build, I will wear clean nitrile gloves in the hope of avoiding a fingerprint somewhere deep on the inside of the glass!
-
Tell her "Better these sites than porn!" I'm sure you can figure out how to avoid getting caught. Most model-building husbands acquire those skills early on. If you have trouble figuring it out, just study how she buys clothes and kitchen gadgets on line!
-
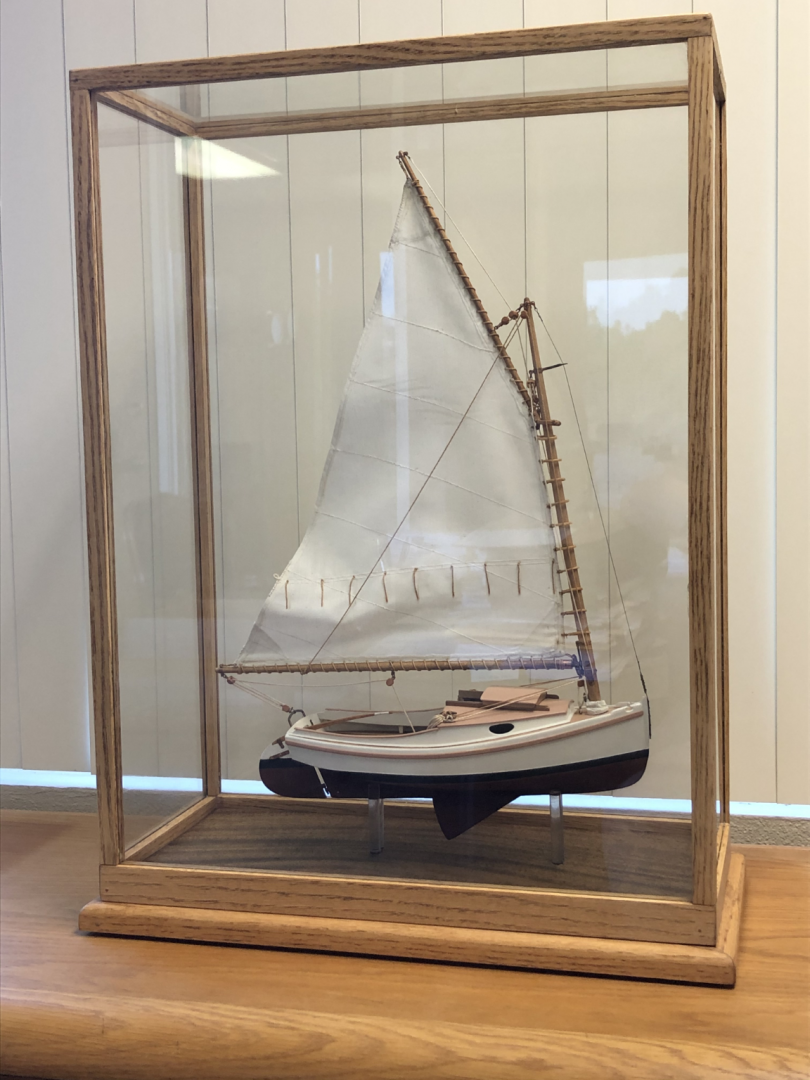
There is at least one article on building cases in one of the Shipmodeler's Shop Notes volumes and perhaps a few posts about case making on the forum, but the search feature didn't help any when I looked for them. It's a simple enough project to make a case, although it helps to have three arms! A decent table saw is a must and you'll need to have a way of making very exactly accurate 45 degree angle cuts. This is where your Jim Saw will really come in handy! A picture framer's 45 degree corner clamp is also very handy, although one can build their own jig for this purpose easily enough. I've found the best-priced glass can be sourced from places like Michael's that do custom framing. Ask them to cut to the exact dimensions you specify and buy the picture framing glass with the UV-blocking filtering in it. I've also used simple window glass, which is a bit cheaper, but I've found a glazer's shop may not cut to the exact measurements you request and may not have the thinner glass you'd likely prefer. Construction is pretty simple and any article on building cases will give you the details. You can pick whatever method you prefer. I like glass because it doesn't scratch like the plastics can and it's less expensive. It's easier to clean, too. I've found that you can't build a glued box plexiglas case unless you are a pro. They use special proprietary adhesives that dry to an invisible weld at the corners and if your adhesive (I've tried CA) goes anywhere that you don't want it, you'll have a mess that is relatively impossible to buff out unless you are using the professional proprietary adhesive which is only sold to licensees, I believe. If you prefer plastic, you can always build a wood frame case and glaze it with plastic. Plastic out-gasses and that troubles me in terms of archival quality. Others' mileage varies in that respect, of course. One can buy case kits, but they are expensive and the size selection is limited. Purchasing a professionally built case has always been prohibitively expensive in my estimation, although I have the tools to do it in house myself, so I'm biased in that respect. Most of the case kits on the market do not include the glass or plastic. Shipping the fragile built case from the manufacturer is quite expensive, as well. I expect the special handling and insurance is costly. After trying a number of construction methods, I've settled on what I've found to be the most simple. I make two rectangles with 45 degree mitered corners. these define the shape of the top and bottom of the case frame. The top rectangle has a saw kerf cut into the inside sides of it, as well as on the bottom sides of it. (A table saw blade kerf just matches thickness of the glass I use. It should be a tight fit.) The top rectangle is assembled with the glass held in place in the saw kerfs. The corners are glued with thickened epoxy adhesive and allowed to set. Diagonal holes are then (carefully) drilled at right angles to the joints and a dowel or metal pin (or two, depending on the size of the case) is inserted into the hole(s) at each corner and glued with epoxy or CA. The bottom rectangle is assembled in the same fashion, but without the glass, of course, for which reason it will only need saw kerfs on its top sides. Then four posts are cut and saw kerfs run on the two inside sides of each post. (All this kerf cutting will take careful measurements to ensure the kerfs on the posts will be in line with the kerfs in the top and base.) The entire case is then assembled with the edges of its glass sides being captured by the saw kerfs in the top and bottom rectangles and the side posts and the side posts are glued with epoxy to the top and bottom rectangles. (Here again, fitting is critical. A little bit of extra depth in the saw kerfs is helpful. Do not force the glass panes into the kerfs. Don't ask me how I know this!) When this epoxy is cured, again carefully, drill one or two holes in the top and bottom rectangles at each corner and insert a dowel or metal pin cemented with epoxy or CA. The holes for the metal pins can then be filled with a bit of furniture refinisher's wax or putty and will be virtually invisible. If you use dowels, they can be sanded flush. This wooden framed glass box is the top of the case. A base, upon which the model will rest, must be built to accept the "box" cover when it is placed over it. A rabet in the base board edge secures the case over the base and keeps it from slipping around. If one desires, holes can be drilled in the edges of the frame of the glass box and through into the edges of the baseboard rabet and a nail, brass escutcheon pin, or other unobtrusive fastener provided to slide into the holes with a "slip fit." these will prevent a disaster from occurring if someone attempts to lift up the case by the "box" instead of the baseboard, thinking it's all attached and whacks the model with the box! This is particularly relevant to small models that hamfisted cleaning ladies seem to think the can just throw around when they are dusting! It is important to provide a means for air circulation in a model case. Otherwise, an acidic atmosphere can be trapped in the case environment and cause deterioration of the model. The acid out-gasses from various sources within the case environment, including PVA adhesives and without air circulation, can reach destructive levels over time. Only a very small hole is required. A space of an eighth of an inch between the side of the baseboard rabet and the box bottom rectangle and a space of and eighth of an inch between the baseboard and the bottom of of the "box," provided by something like those adhesive felt "buttons" they sell for putting on the lower back edges of picture frames so they don't mark up the walls should be sufficient. The "rule of thumb" is that there should be one square inch of "hole" in a case for every one cubic yard of a case's interior volume, so it doesn't take much to provide enough circulation. An alternate method of providing ventilation is to make the base rectangle higher than the size of the rest of the framing rails and drill a few ventilation holes through the back of it. This "heavier" base rectangle side can also be more aesthetically pleasing, particularly if the baseboard plinth upon which the model is mounted is raised up a bit. See: Nautical Research Guild - Article - Ephemeral Materials in Ship Models (thenrg.org) for more details on preventing acid deterioration in ship model cases. So, there you have it. It's not rocket science, but it does take care and accurate measurements and cutting. Building a case for a 36" model yourself can easily save you several hundred bucks! Oak case with mahogany plinth made using the above-described method. Note the thicker bottom rectangle sides: Detail of baseboard construction with glass box removed showing the mahogany plinth on a plywood baseboard with mitered oak trim around the edges:
- 19 replies
-
- 12
-
-

-
And the hobby-oriented retailers frequently have lower-quality less expensive things which, if you search on line, you can find in much higher quality versions for sometimes even lower prices. Consider these online retailers for "ideas." Note also that if you sign up for the email advertisements and catalogs, they are frequently running quite deep discount sales: Micro-Mark - The Small Tools Specialists ⚙️ (micromark.com) Model Expo - Historically accurate wooden model kits made in the USA (modelexpo-online.com) Check out jewelers' supply houses like: OttoFrei.com - Jewelry Tools & Findings Since 1930 Rio Grande Jewelry Supply Jewelry Tools | Jewelry Making Supplies | Wholesaler | Stuller Esslinger Watchmakers Tools and Watch Parts Contenti Jewelry Making Tools | Contenti (Watch for the sales. Prices are often cut drastically, especially around inventory tax time.) Also, check out eBay for any of the things you are looking for. There are often close-outs and tons of Asian knockoffs (buyer beware on those, though.) The Used dental and medical tools on eBay are often great bargains, particularly for tweezers, forceps, dental burs, scalpels and such. One surprisingly fertile area to mine on eBay is the manicurists' supplies. Small paintbrushes for painting women's nails can be had at amazingly low prices compared to the art supply stores. The same goes for abrasive boards and rotary tools. The drafting instrument section on eBay is also excellent for finding useful used drawing instruments such as scales, straight edges, ruling pens, and proportional dividers, often for pennies on the dollar for what they originally cost. While eBay is full of junk, if you know what you're looking for, there are great bargains to be had. I just scored a brand new Buffalo Model 16 dental lab engine and handpiece, a total retail value of close to $1,000.00 for seventy-five bucks on eBay. It was listed as a "steampunk decor item" with the caveat that it was not operational. Knowing they were still in production, I took a chance it might be repairable. It turned out the motor brushes, which are shipped uninstalled with the new units, were never installed and lost, and the belt and one of the pulley wheels was missing. Buffalo is shipping me the missing parts for $45.00. Life is good! EquipmentCatalog_2013.pdf (buffalodental.com) Home - Buffalo Dental Manufacturing Co. Inc. As you may have guessed, I like to shop for tools like Imelda Marcos likes to shop for shoes. One thing I've learned, though, is not to buy a tool until you need it and then, unless it's something relatively disposable, buy the best quality tool you can afford, and never pass up a good deal. You usually have to buy a cheap tool twice. A good tool should last a lifetime, or close to it and they are a joy to behold. It's certainly true that many a model has been built with the most basic of tools and very few of them, so don't let collecting tools get in the way of your modeling. Just start picking them up as you go and before you know it you'll have more tools than time to use them. Start saving now for your JimSaw! Byrnes Model Machines Home Page
-
I need my tubes cut
Bob Cleek replied to brunelrussell's topic in Metal Work, Soldering and Metal Fittings
This thread shouldn't be eliminated. It should be preserved for posterity. It proves that determination and thought will provide the solution of most any daunting modeling challenge. As they say, "It shows you're thinking!" All to often, someone posts a question, gets the answer, and then argues about why it can't be done that way. -
Copper hull plates cut
Bob Cleek replied to Gabri's topic in Metal Work, Soldering and Metal Fittings
I'll 'third" Allen's suggestion regarding the omission of the copper plate tacks: Please don't! We've got a whole generation of models with the "pox." Three hundred years from now, based on the few models then extant, modelers will be arguing on some other ship modeling forum that "contemporary" models in museums prove the fact that copper plate was held on by three-inch headed round-headed rivets! A note about cutting copper sheet with a lever-action paper cutter (my preferred method) or with scissors: You will likely find that in cutting strips of copper sheet on a paper cutter, the off-cut strip will curl to the side. A strip of cut copper sheet can easily be straightened out by placing one end in a vise and the other in a pair of pliers and pulling hard in a straight line away from the fixed side. When I have a bunch of strips to straighten, I place one handle of a pair of vise-grip pliers in my big bench vise with the grip holding tension set to hold the strips, and then place one after the other into the vise-grips in succession for pulling without having to continually re-adjust the vise-grips in the vise to hold each strip. Using another pair of vise grips on the "pulling" end will also prevent hand-fatigue if you have a lot of strips to straighten. Squeezing an ordinary pair of pliers tight enough to hold the strip while you pull on it can put a lot of repetitive strain on your hand holding the pliers. -
Gluing Toe Rail
Bob Cleek replied to Ed Gibbons's topic in Building, Framing, Planking and plating a ships hull and deck
An excellent approach! Thanks for sharing it.


