archjofo
-
Posts
1,500 -
Joined
-
Last visited
Content Type
Profiles
Forums
Gallery
Events
Everything posted by archjofo
-
 Fantastic work !
 -
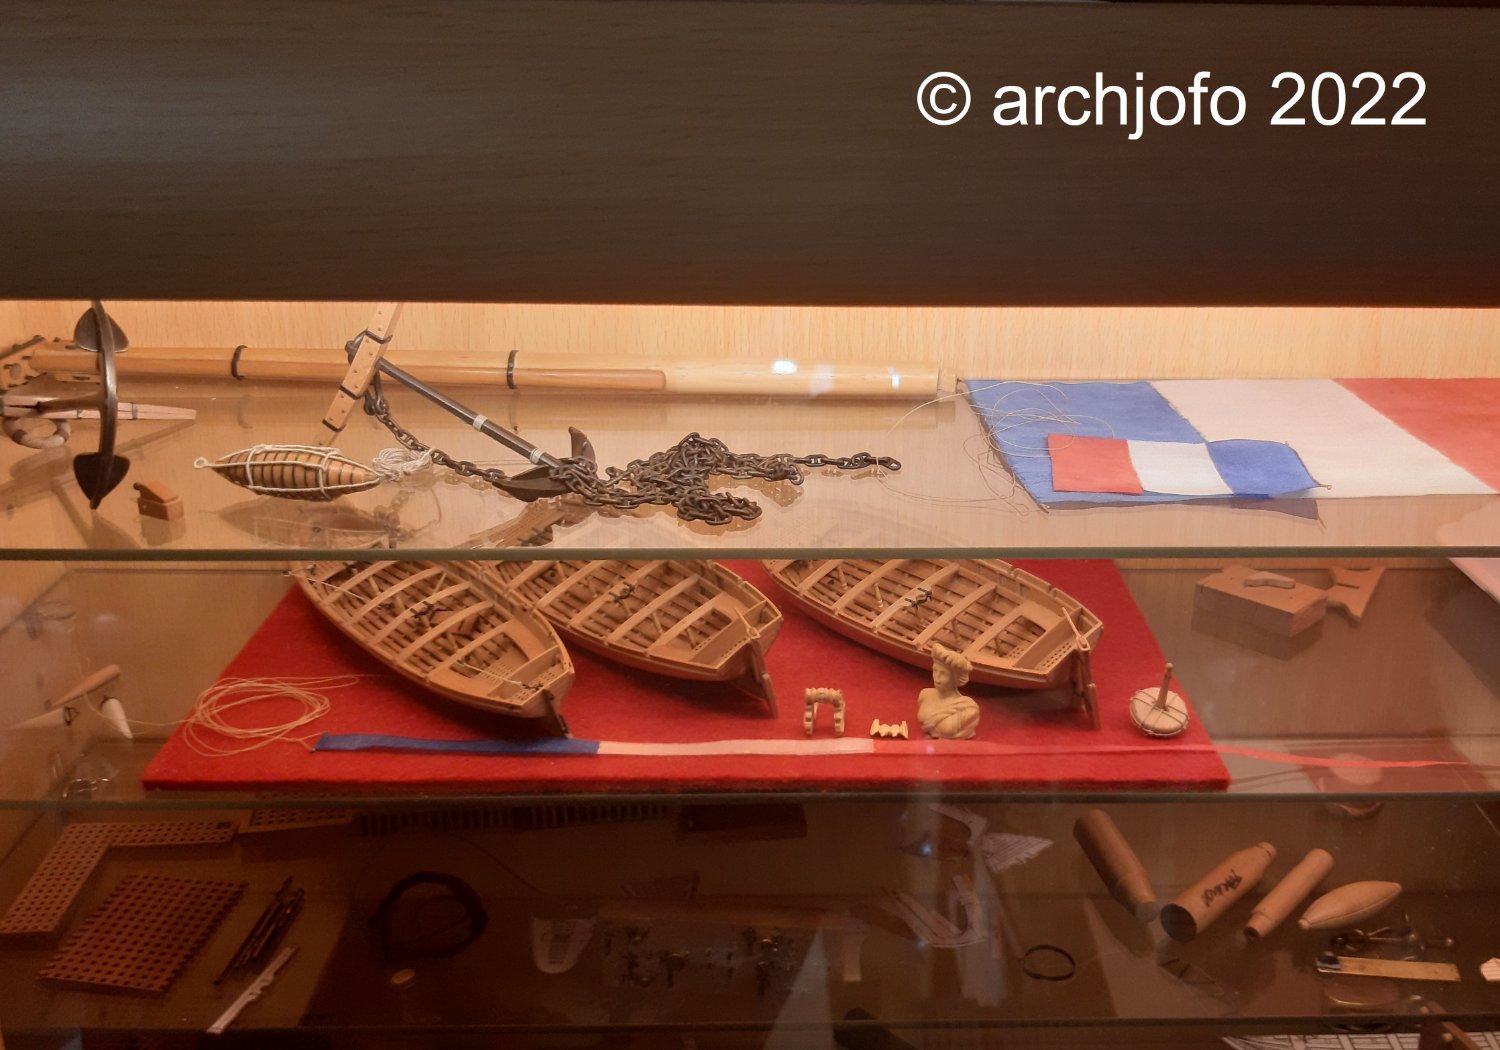
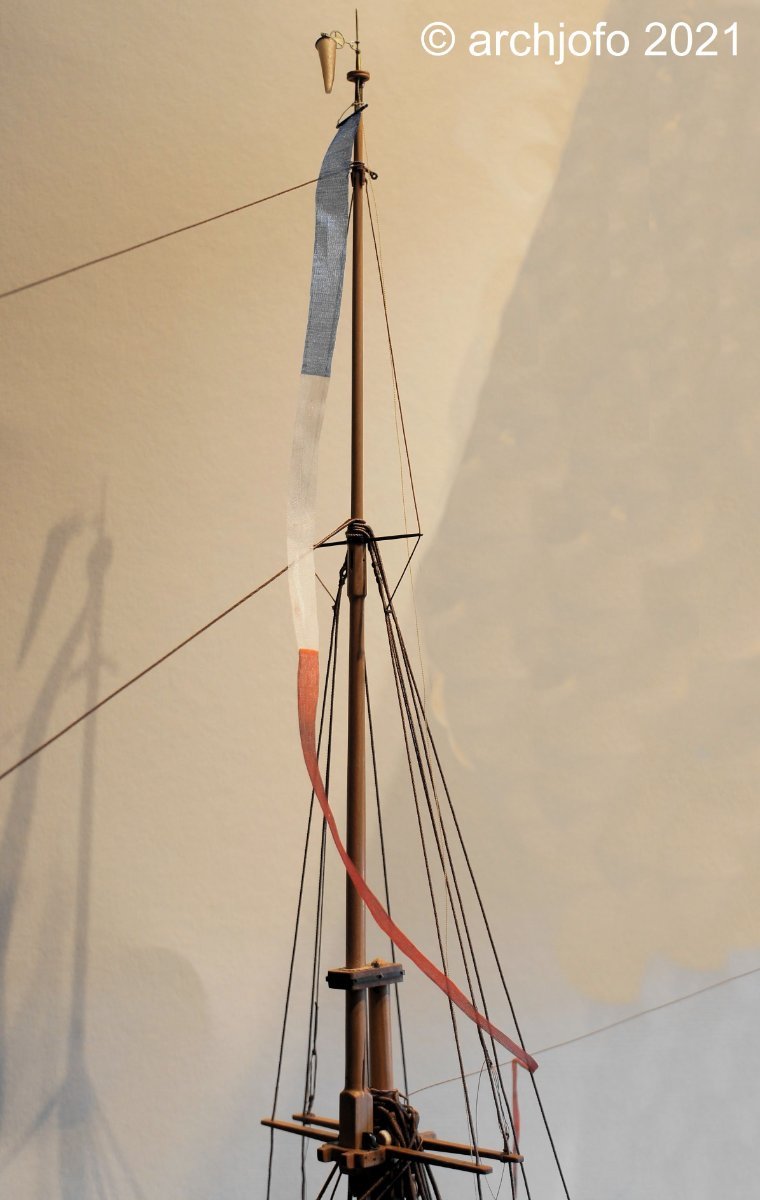
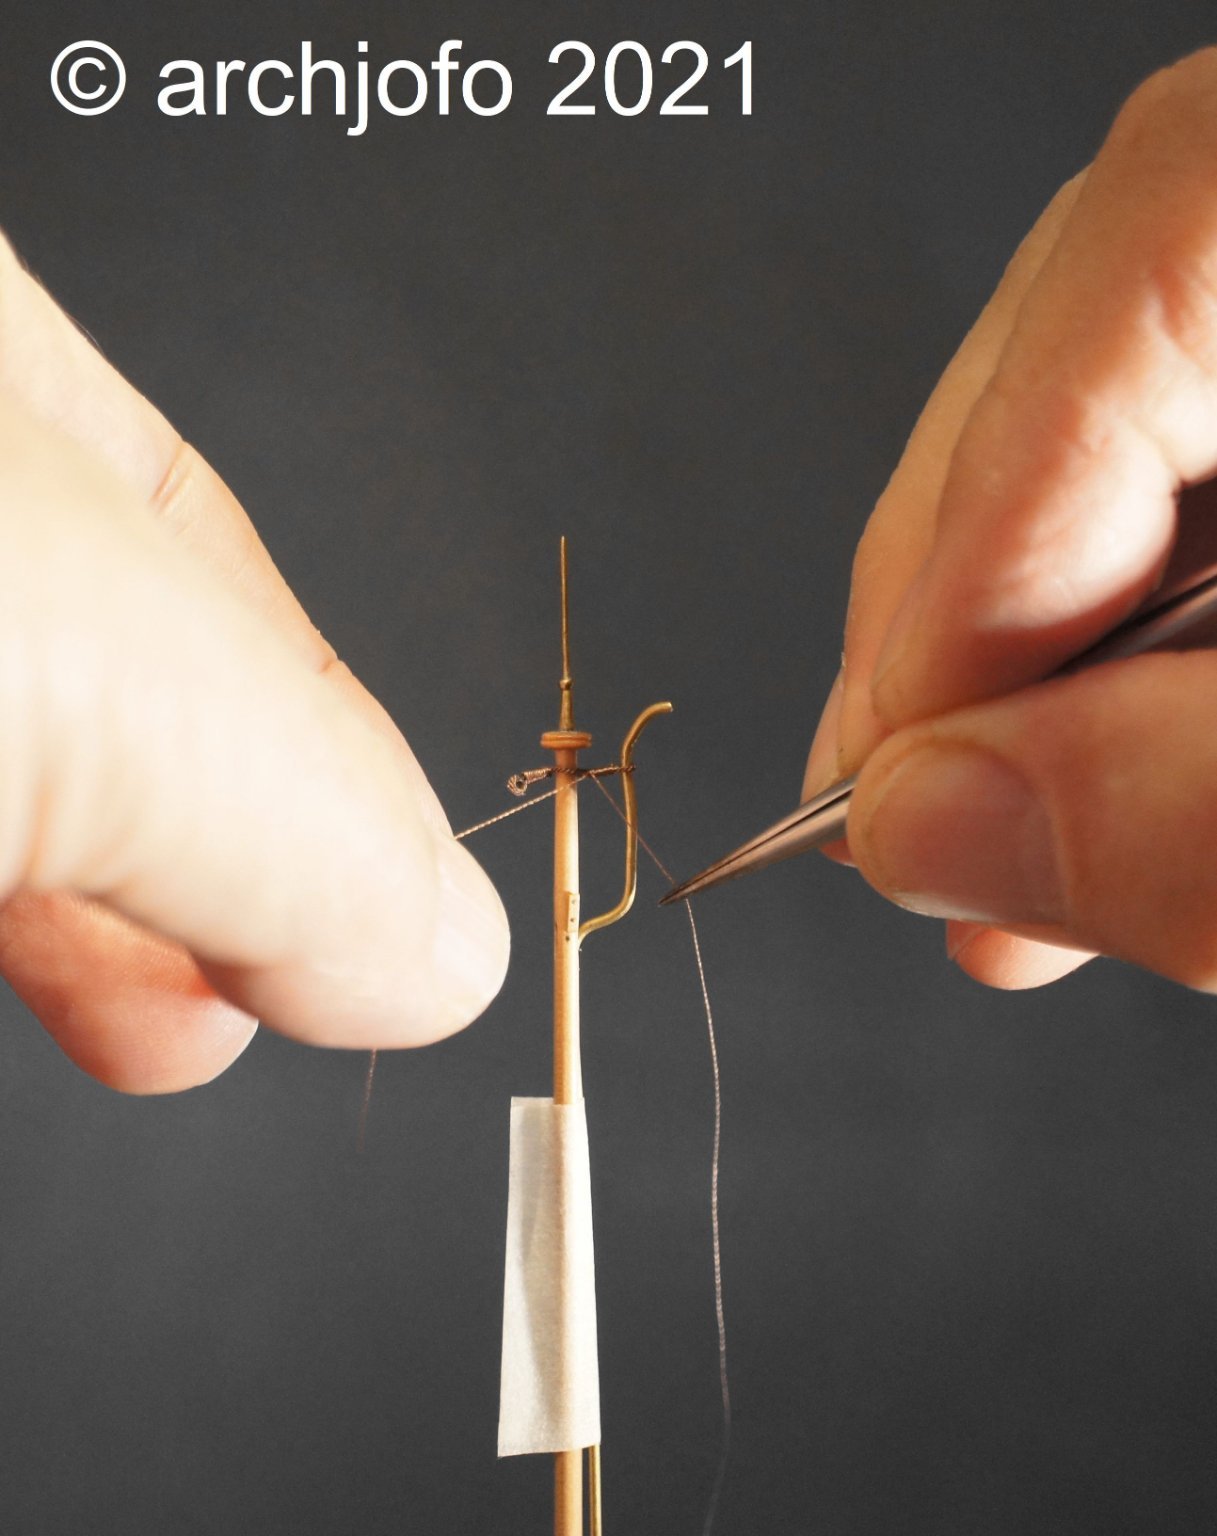
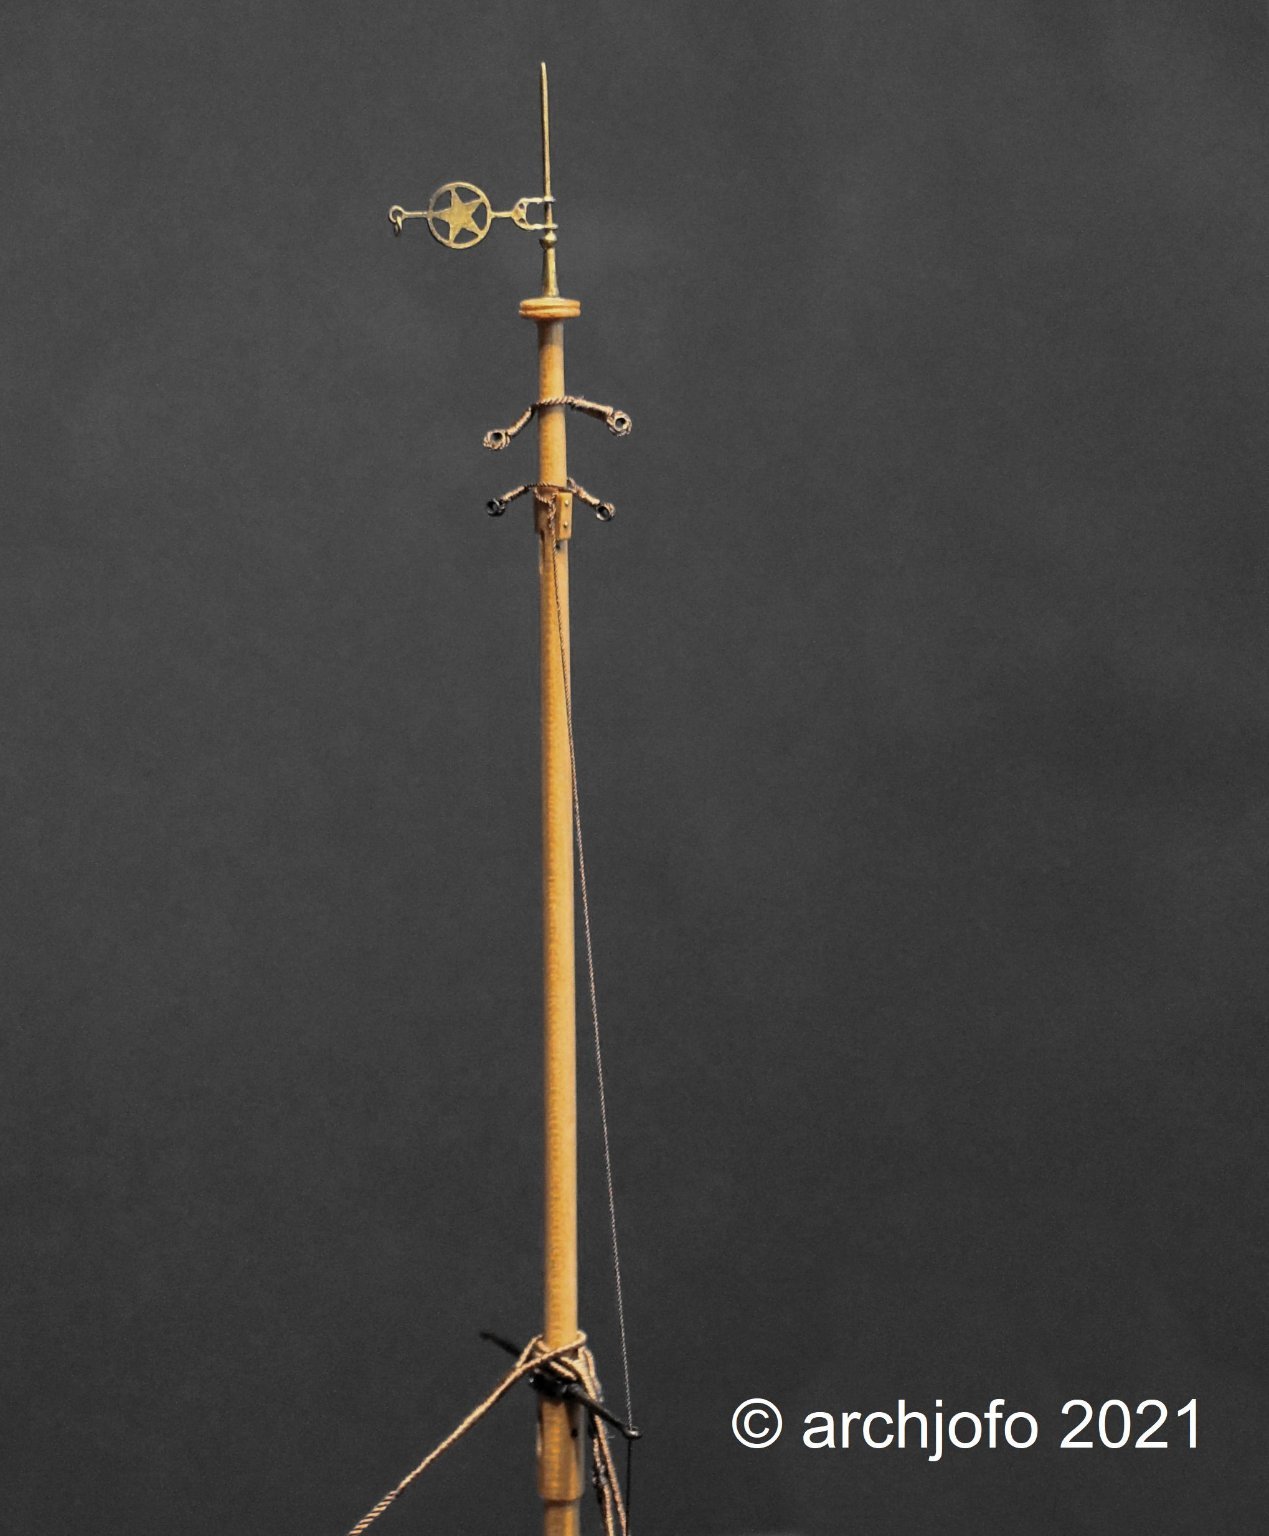
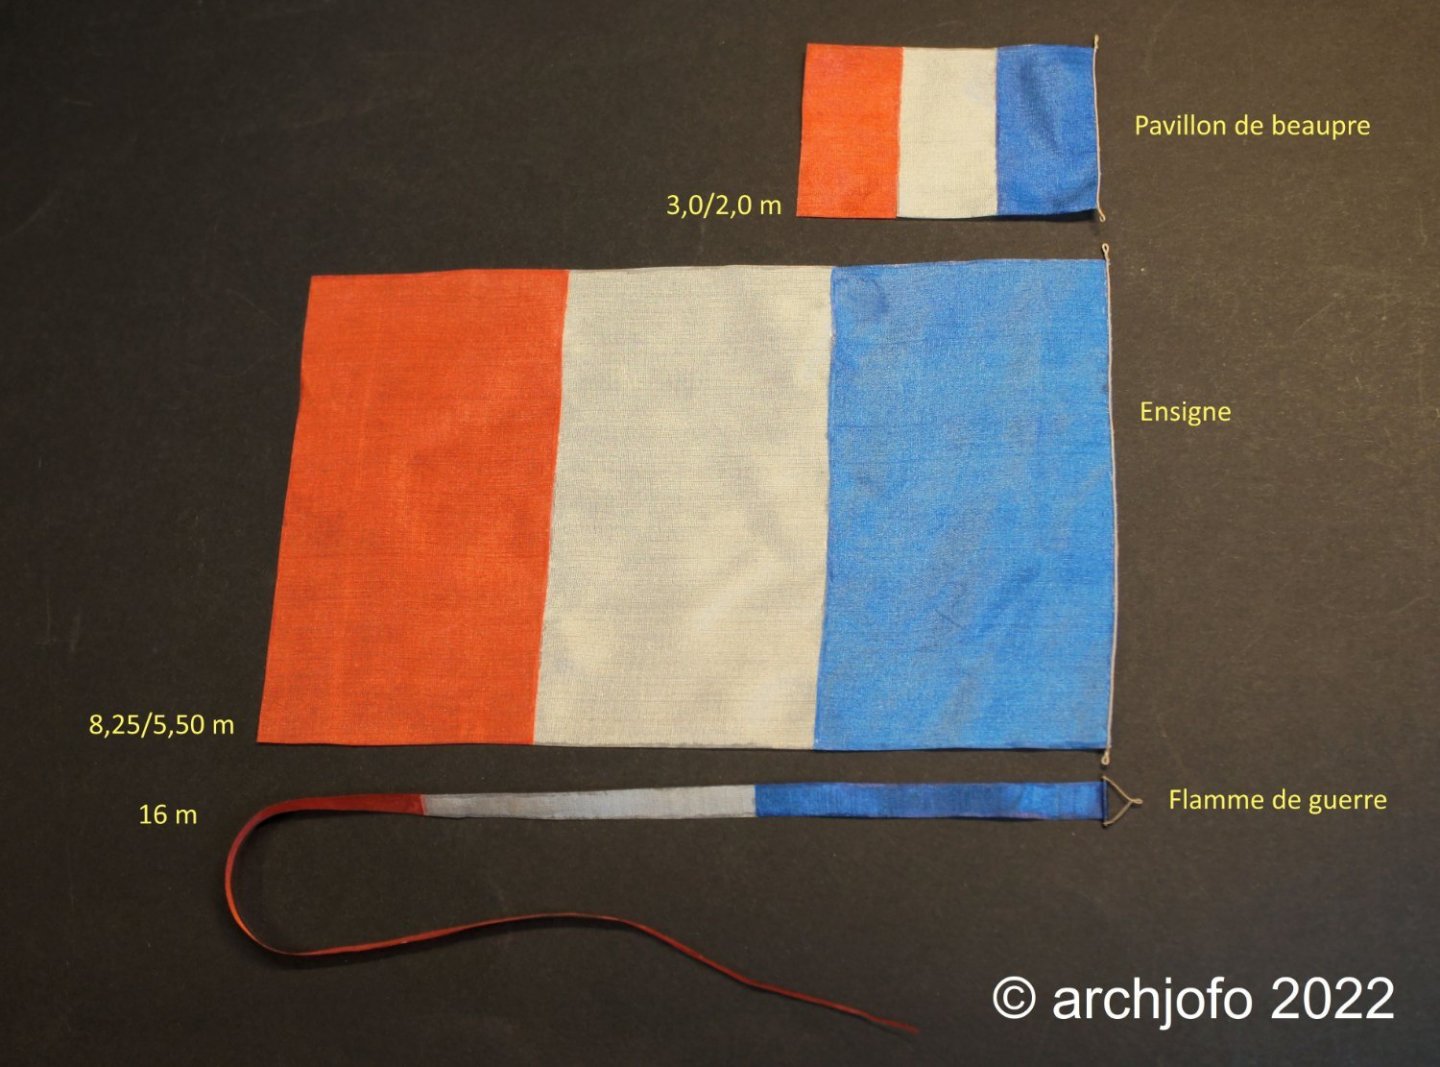
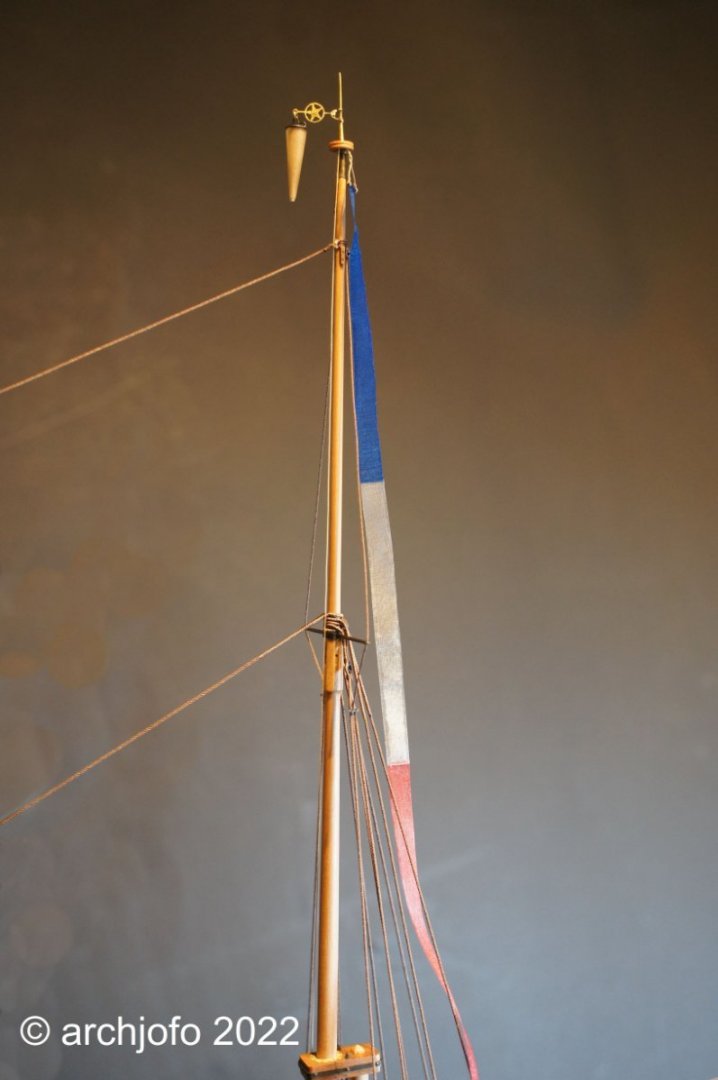
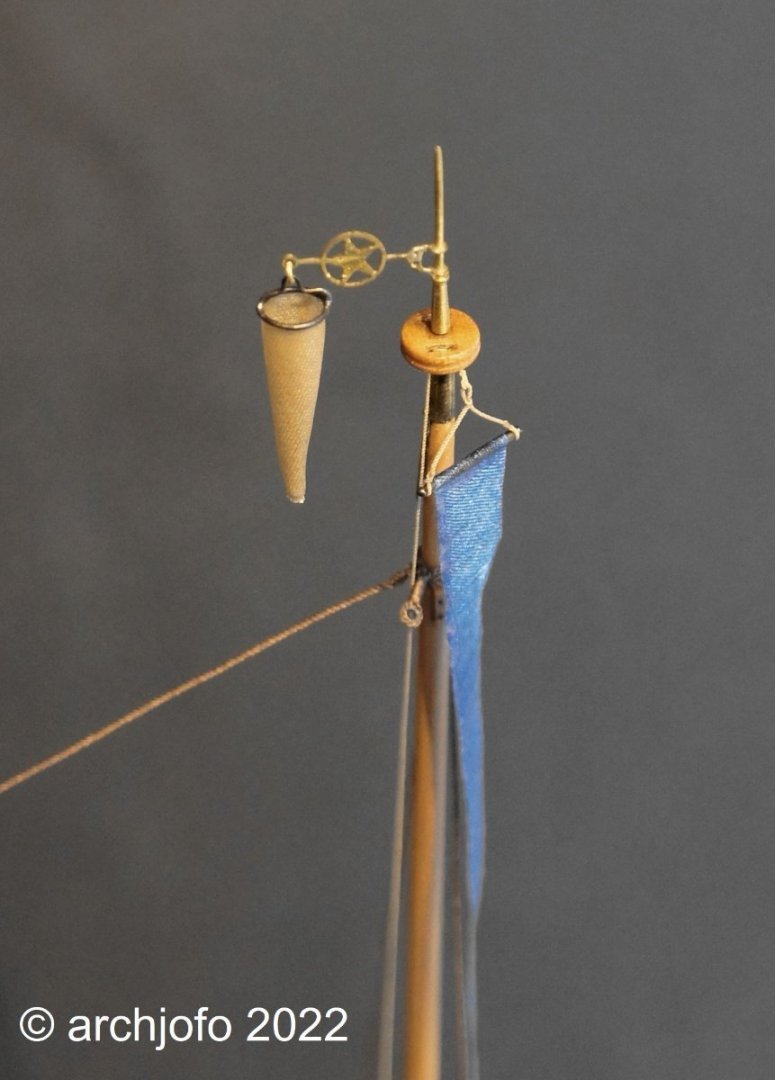
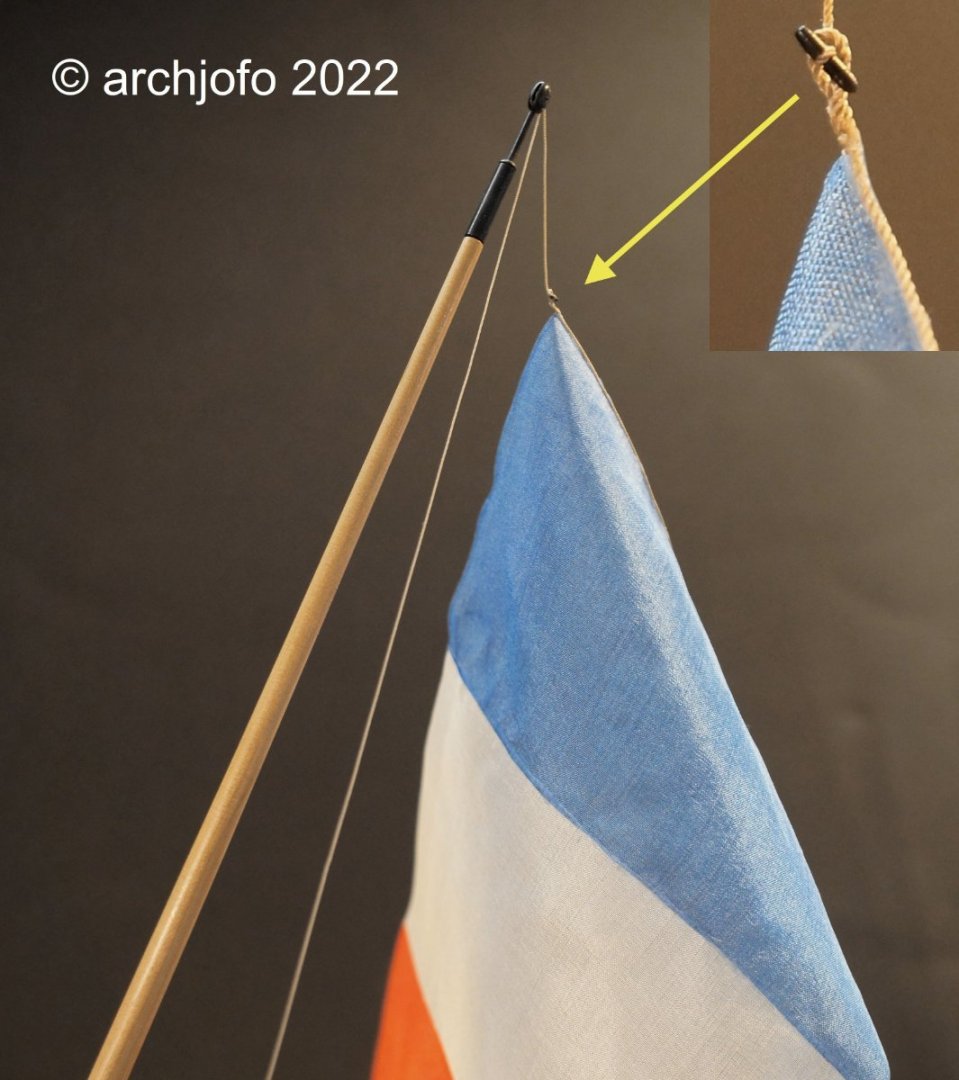
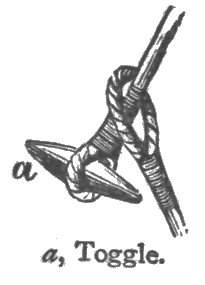
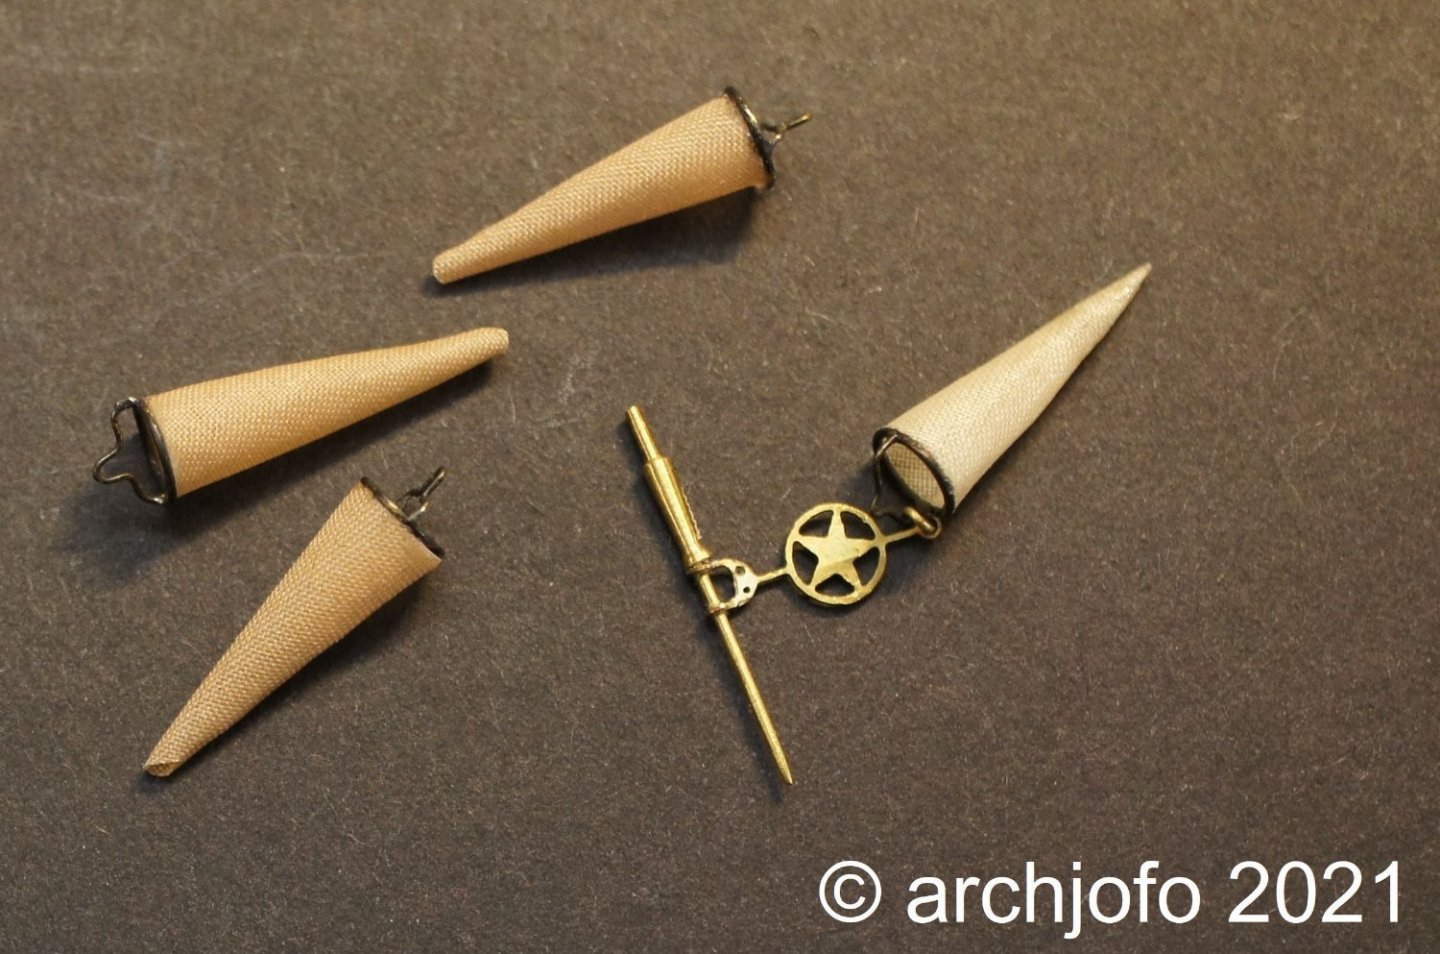
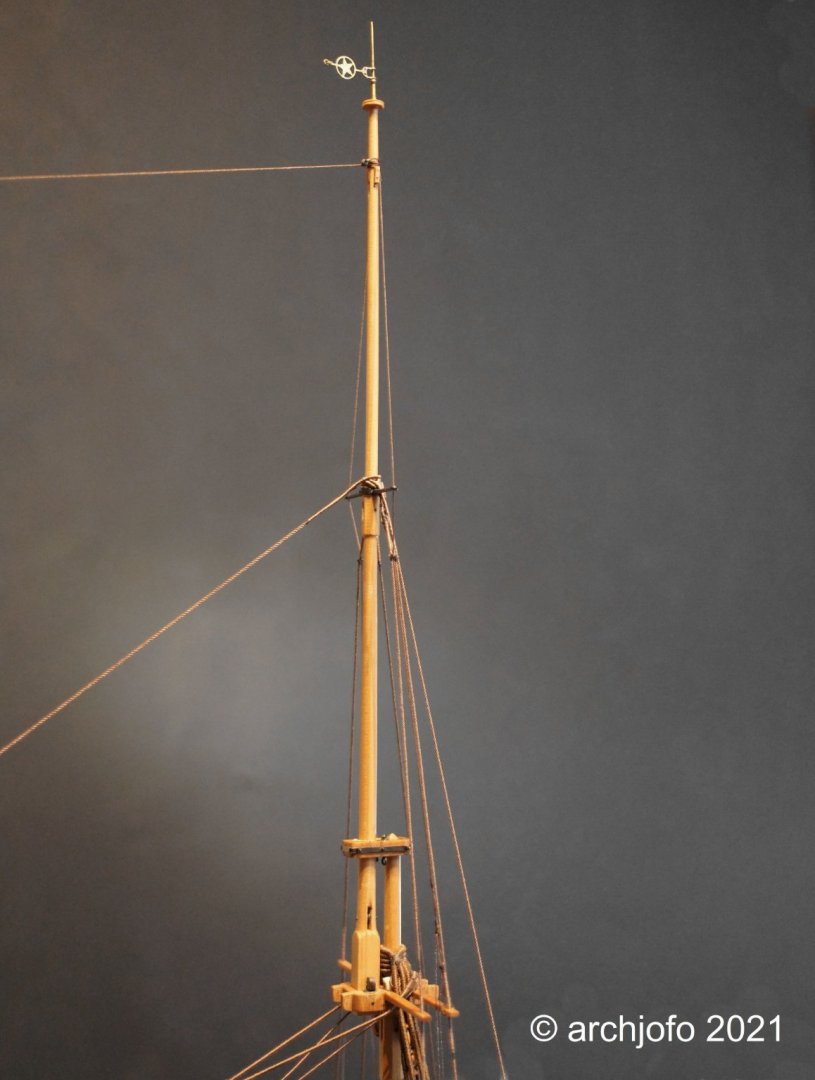
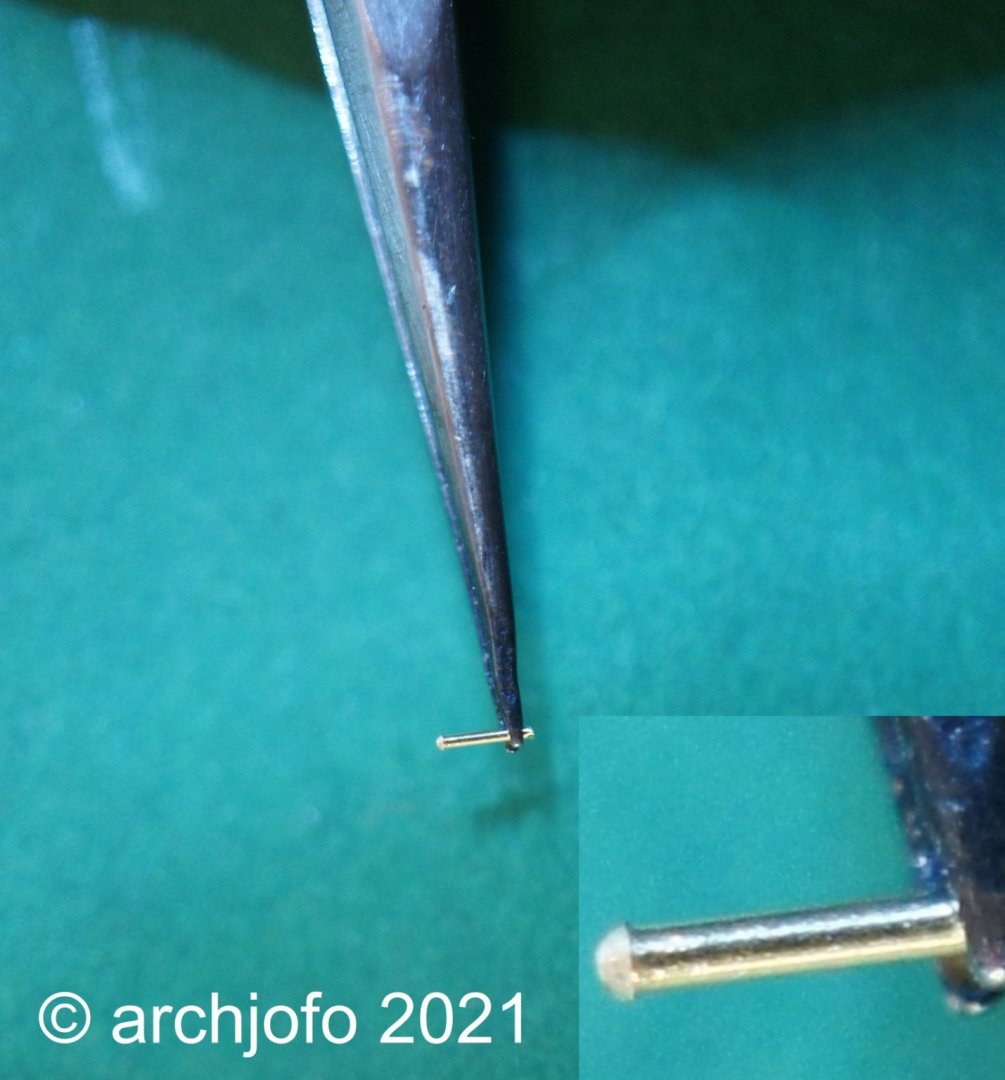
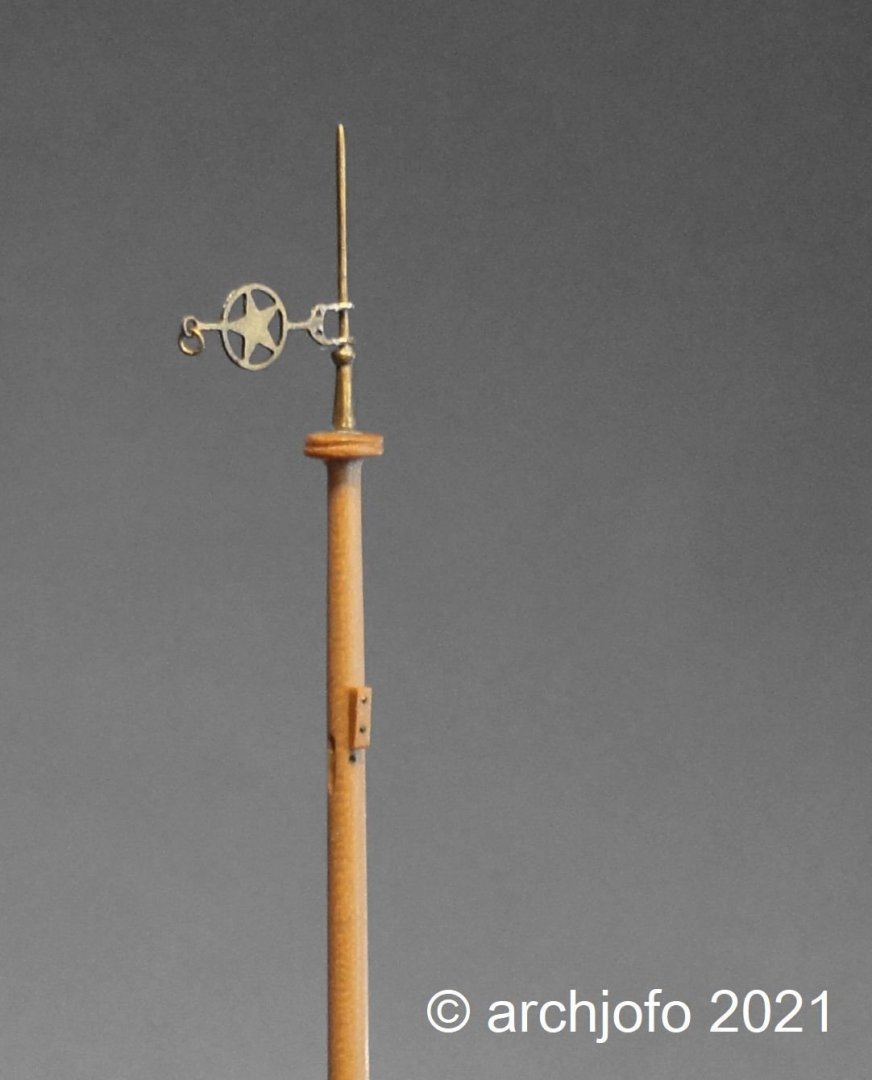
Continuation: War pennant (flamme de guerre) I continued with the making of the flags and the long pennant for the La Créole. The following picture thus shows the finished flags and the flamme de guerre with indication of the original sizes. In the next two pictures, the war pennant can be seen again on the model, especially the detail on the flag button with the flag line sheared through and the pennant wood. I provisionally sheared the flag line of the large flag at the gaff through the iron single block at the nock.For the detail to attach the flag line to the eye of the boltrope, I used a toggle as in the original. Source: Wictionary However, the final assembly of the flags and the long pennant will be done just before the model is completed, as this fine silk fabric is not very durable. So until then, off it goes into the "evidence room" with the other "suspects" until the final installation. To be continued ... PS: Macro shots are merciless ...

-
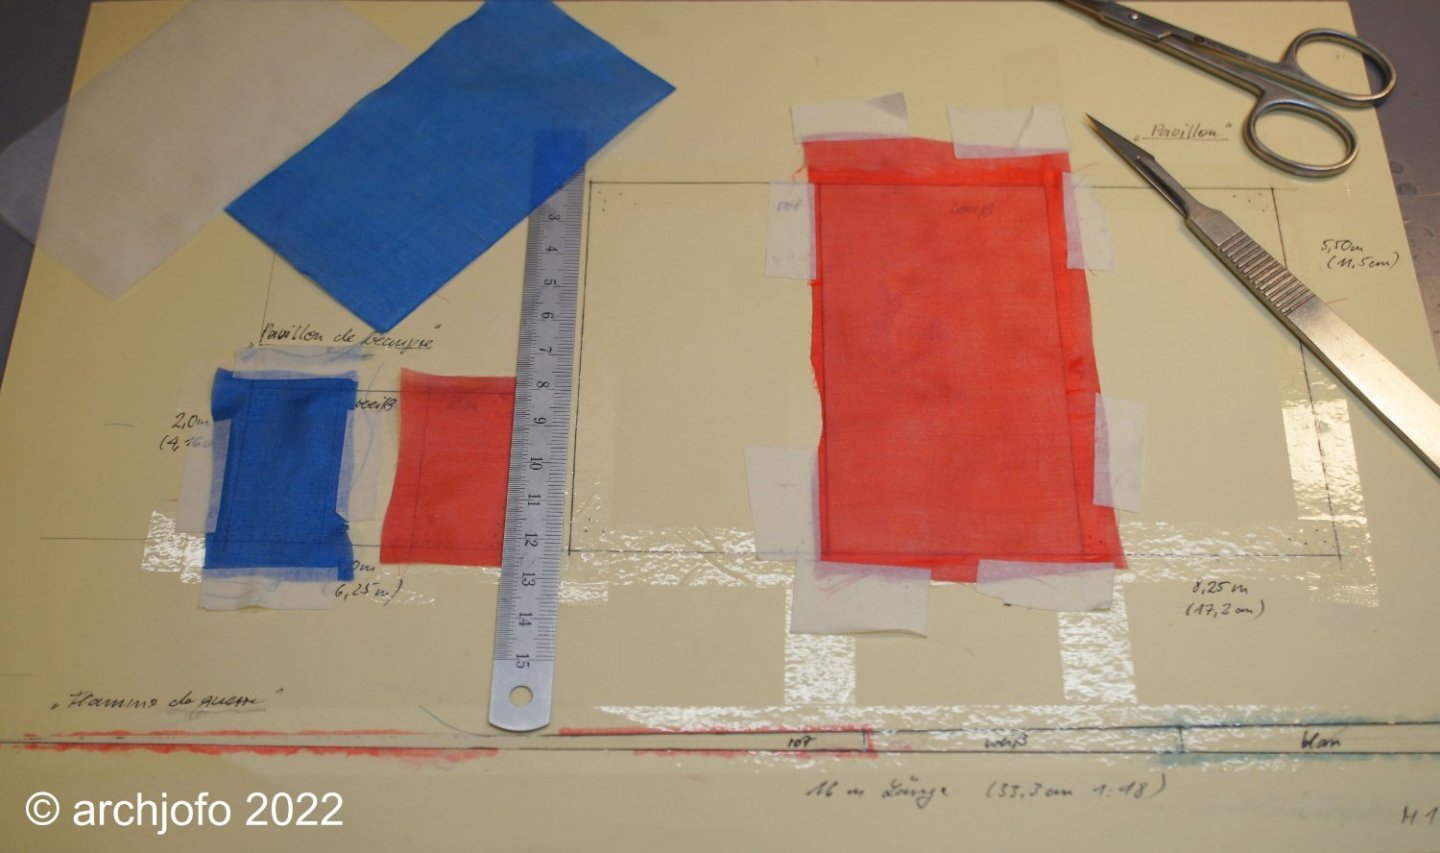
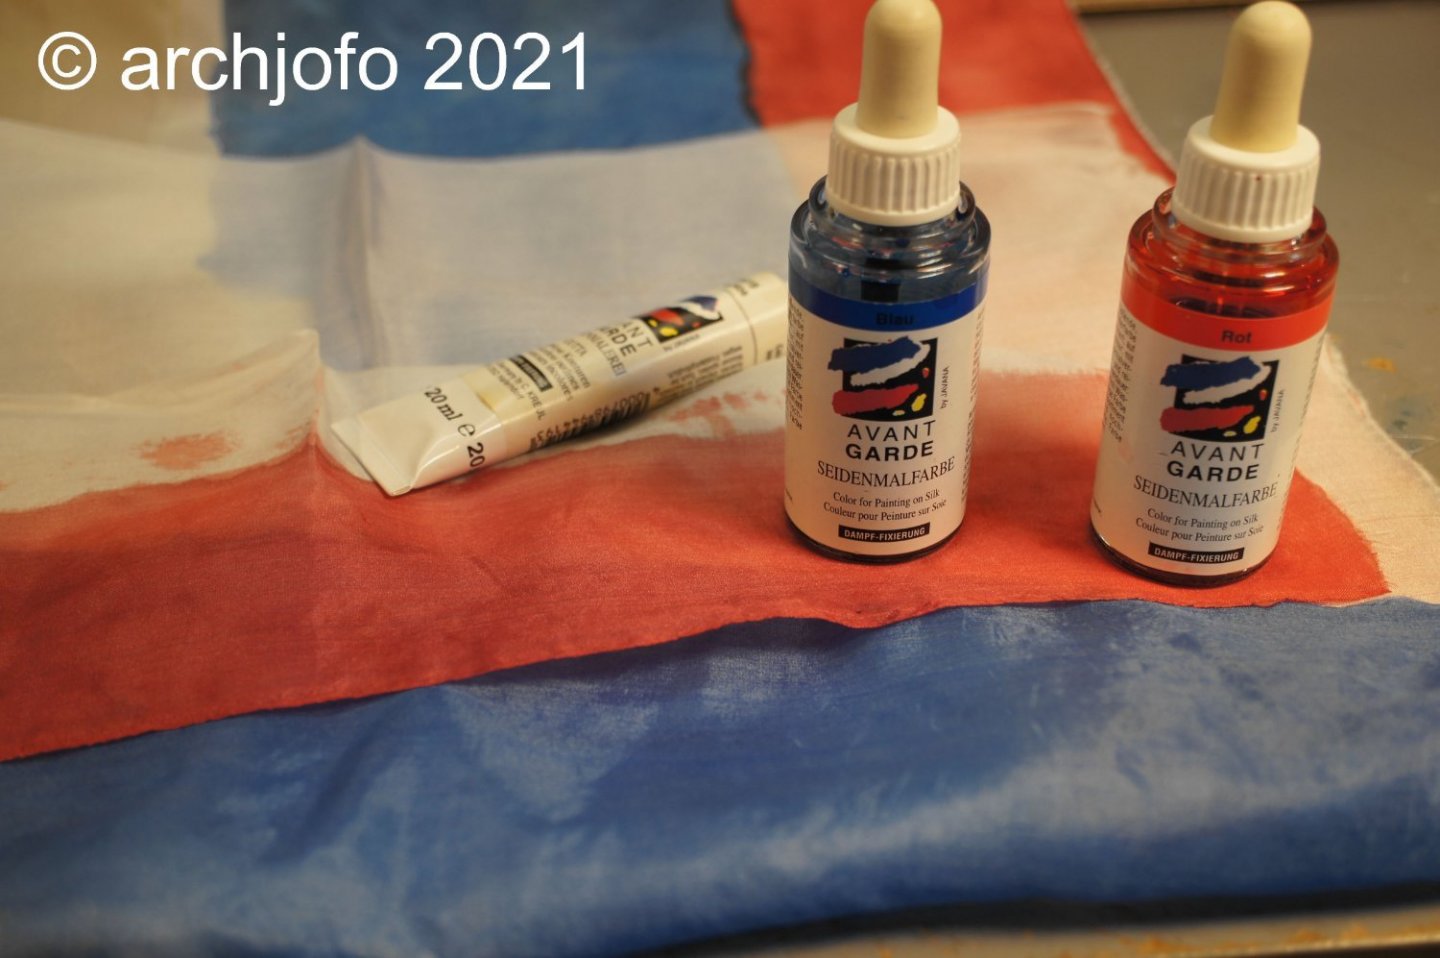
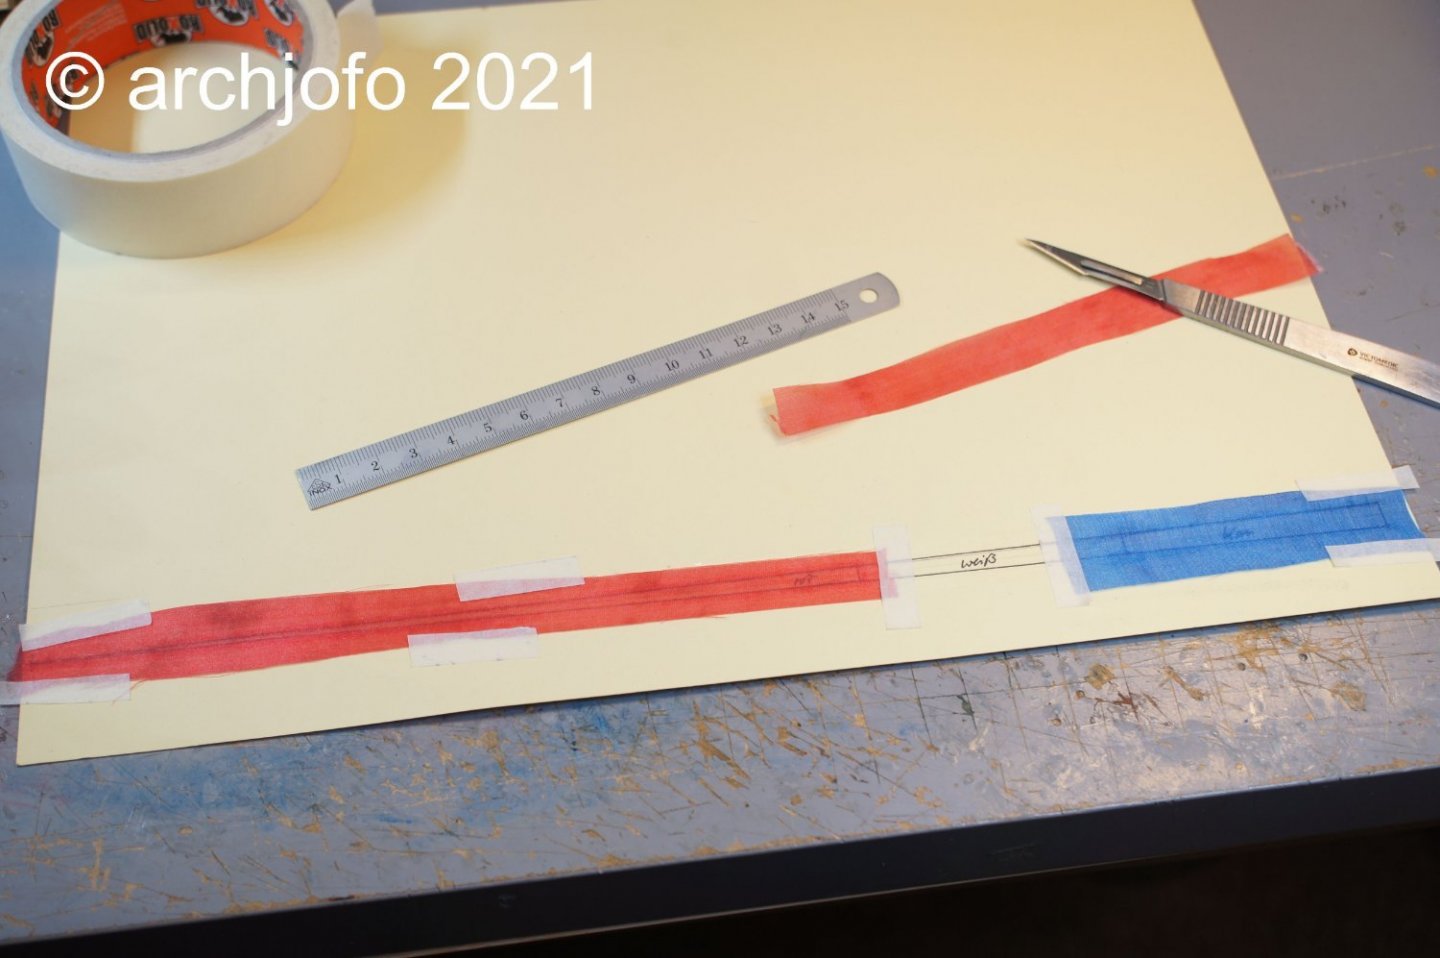
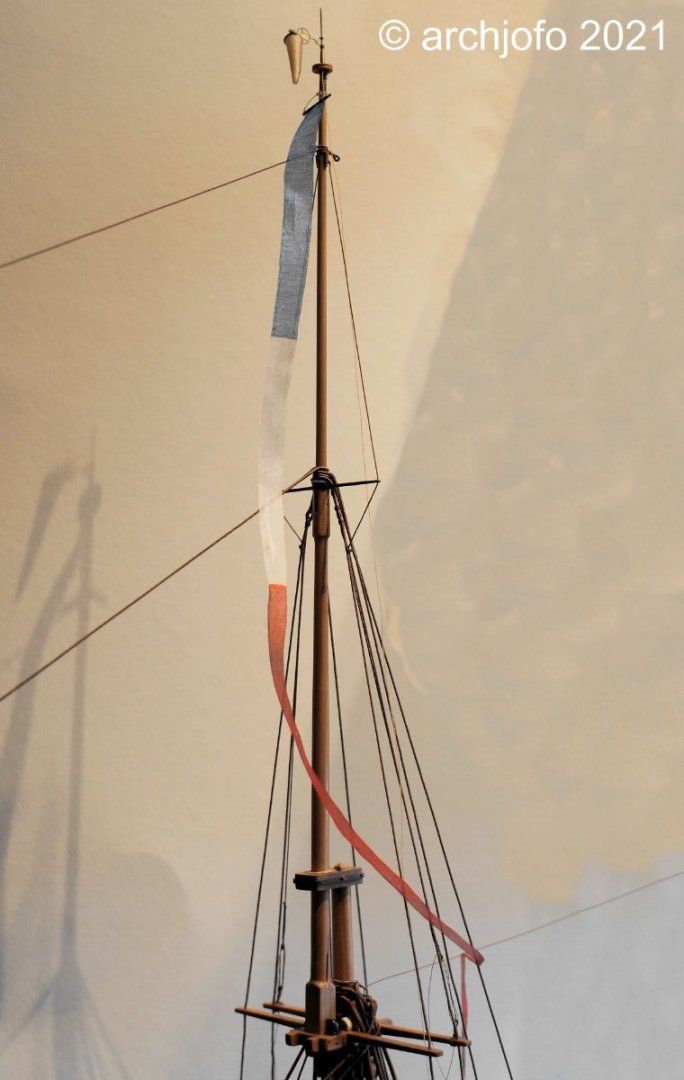
Commissioning or war pennant (flamme de guerre) After I was able to clarify (details here LINK) how big the commissioning pennant of the French corvette was, the thought came about which material it should be made of. In order to transfer the lightness of the original pennants to scale, only fine silk fabric came into question for me, which I had to dye accordingly. As in the original, I put the pennant together from three parts (tricolor). The pennant edges were carefully coated with white glue according to the template. After the glue had dried, the pennant parts could be cut out with a scalpel and glued together. The silk used is a very filigree fabric and slightly shimmering through, which was also intended. Therefore a mishap happened when cutting the pennant. So the end of the pennant has become a little crooked. Nevertheless, I wanted to see how the long pennant looked on the model and then temporarily hoisted it for a picture on the main mast and am so far satisfied with the result. Ultimately, I now know how to make the pennant and can get to the final and exact production. I'll use the same method to make the flags. Up soon …
-
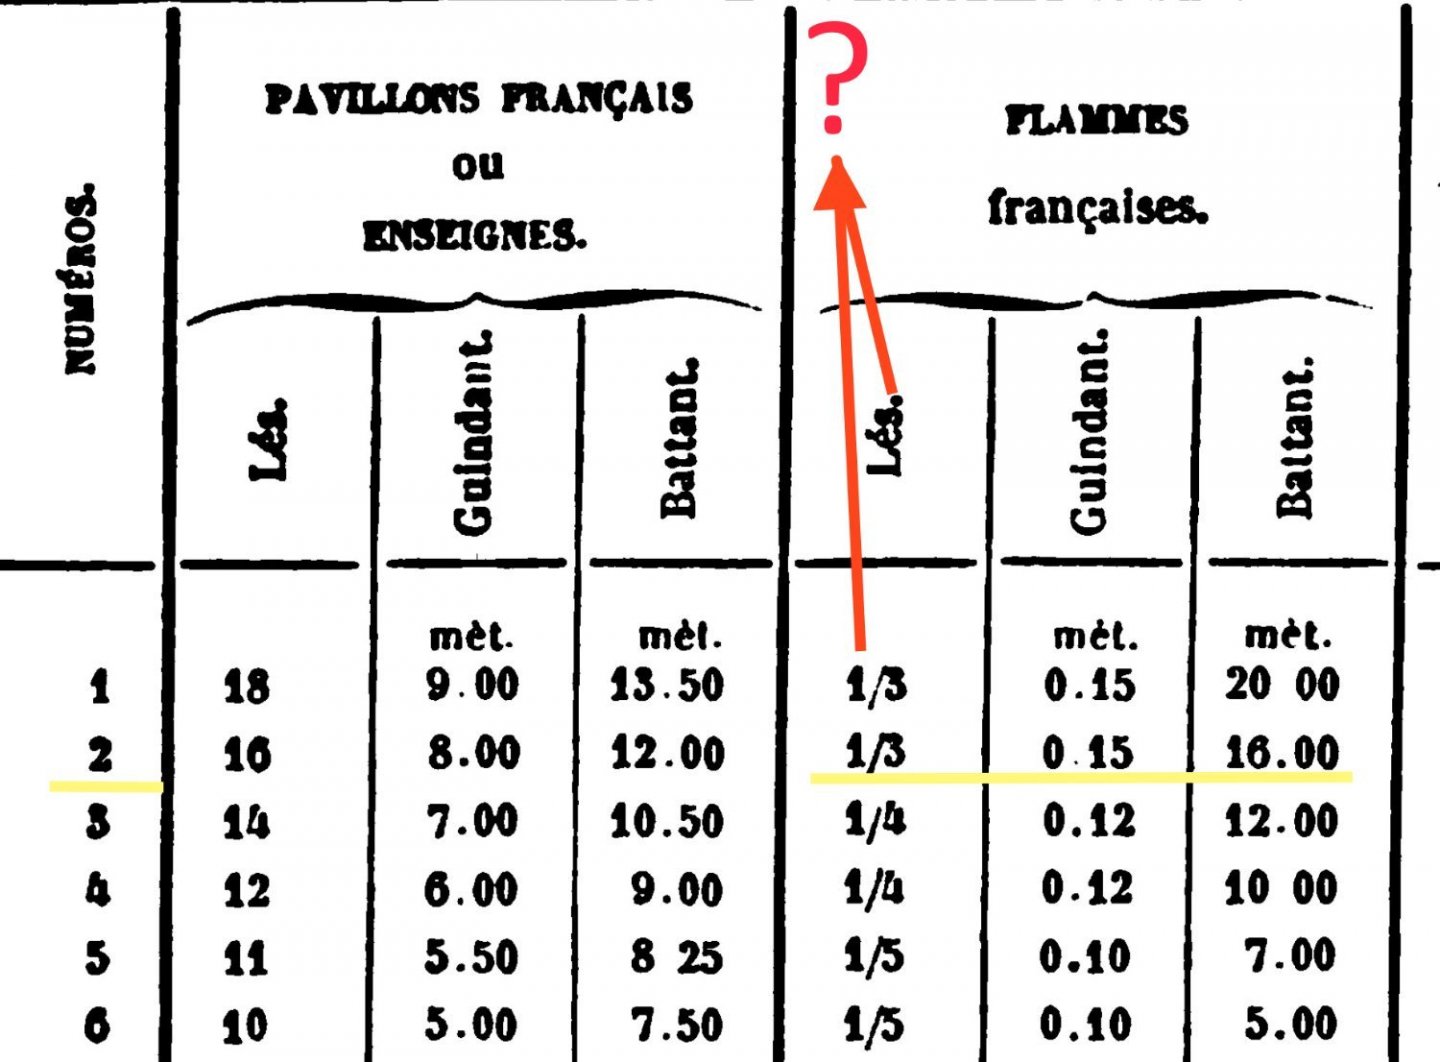
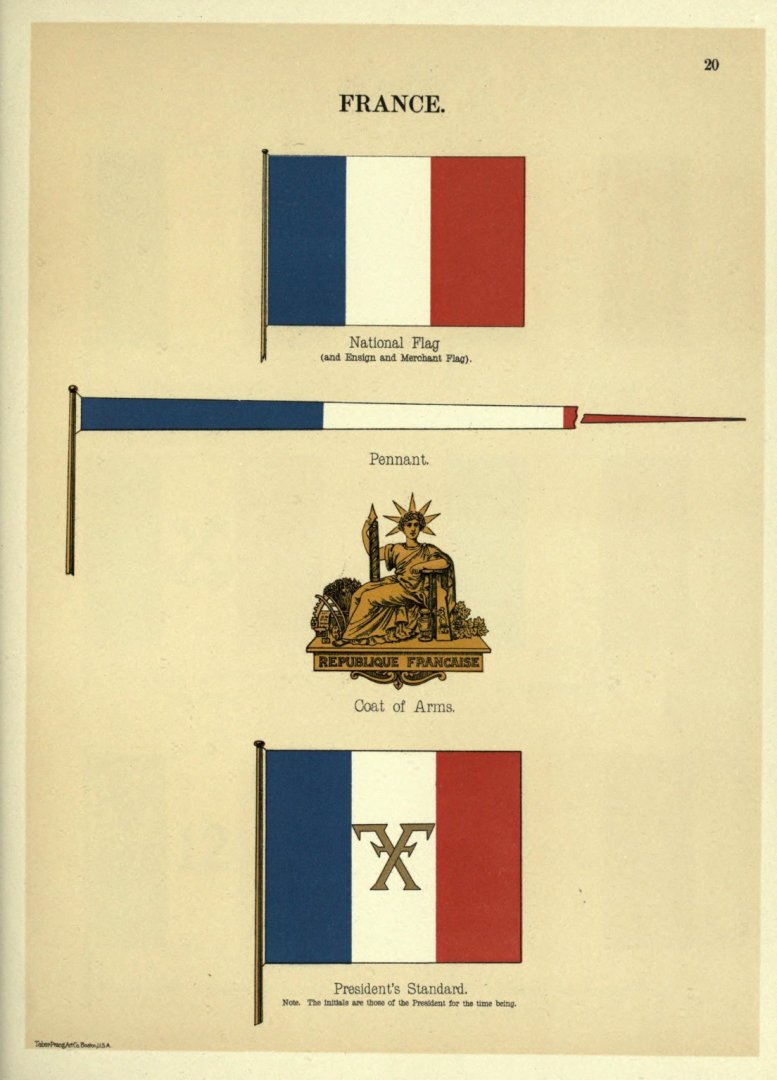
Hallo, in the meantime, a fellow modeler Eberhard @wefalck directed me to a publication on how large the flags and pennants were. Here I show excerpts of this book - LE GRAS, M.A.: Album des pavillons, guidons, flammmes de toutes les puissances maritimes- Paris 1858: Meanwhile, with the help of Eberhard @wefalck I was able to clarify one thing, what the column marked with a question mark means. This means the fabric web width, which was accordingly 50 cm. Thus, after correctly classifying the type of ship, the sizes of the flags and pennants can be determined. Accordingly, the large pennant of the La Creole was 16 m long and the width was 15 cm. The pennant/tricolore was divided as follows: Starting at the masthead 20% blue, 20% white and 60% of the length waving red.

- 1 reply
-
- 2
-

-
Hello, In the meantime, a fellow modeler Eberhard @wefalck directed me to a publication on how large the flags and pennants were. Here I show excerpts of this book - LE GRAS, M.A.: Album des pavillons, guidons, flammmes de toutes les puissances maritimes - Paris 1858: Meanwhile, with the help of Eberhard @wefalck I was able to clarify one thing, what the column marked with a question mark means. This means the fabric web width, which was accordingly 50 cm. Thus, after correctly classifying the type of ship, the sizes of the flags and pennants can be determined. Accordingly, the large pennant of the La Creole was 16 m long and the width was 15 cm. The pennant/tricolore was divided as follows: Starting at the masthead 20% blue, 20% white and 60% of the length waving red.
-
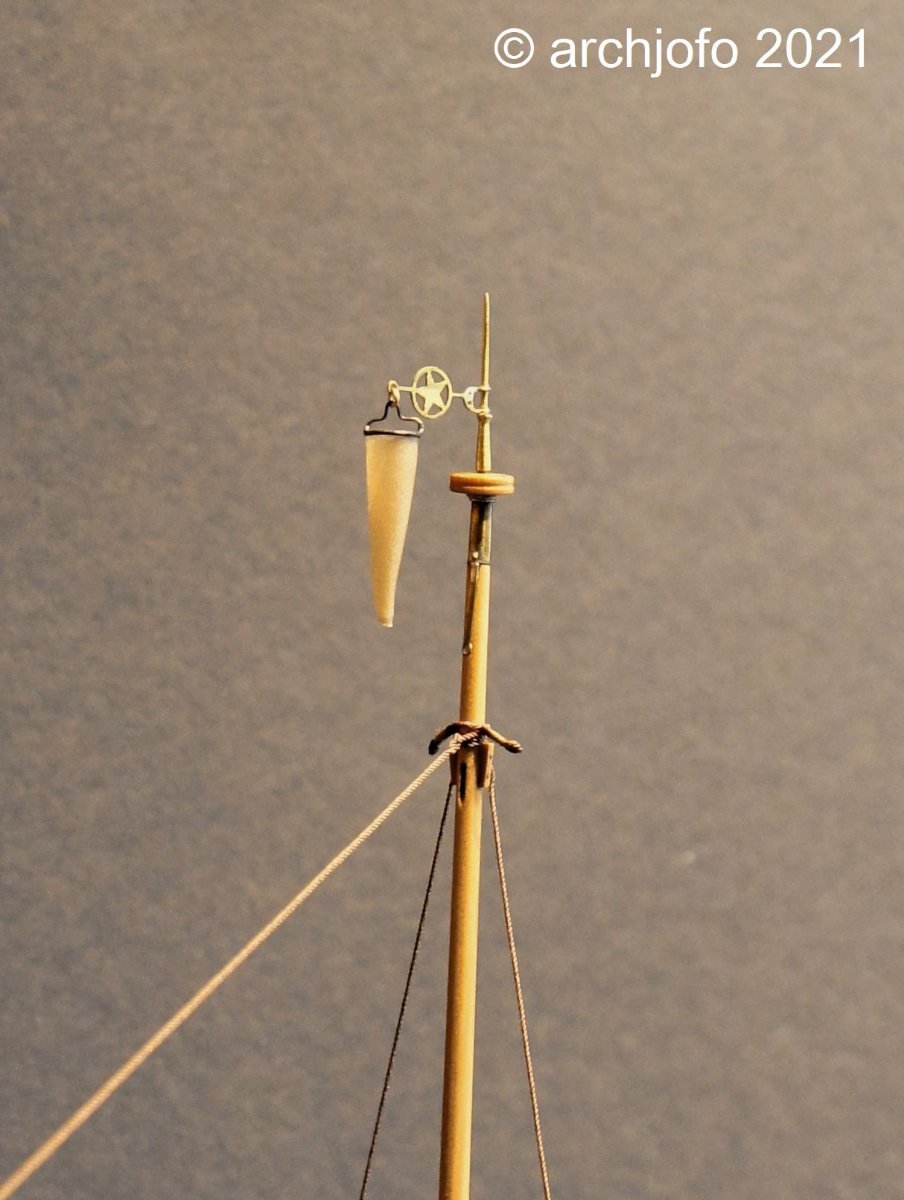
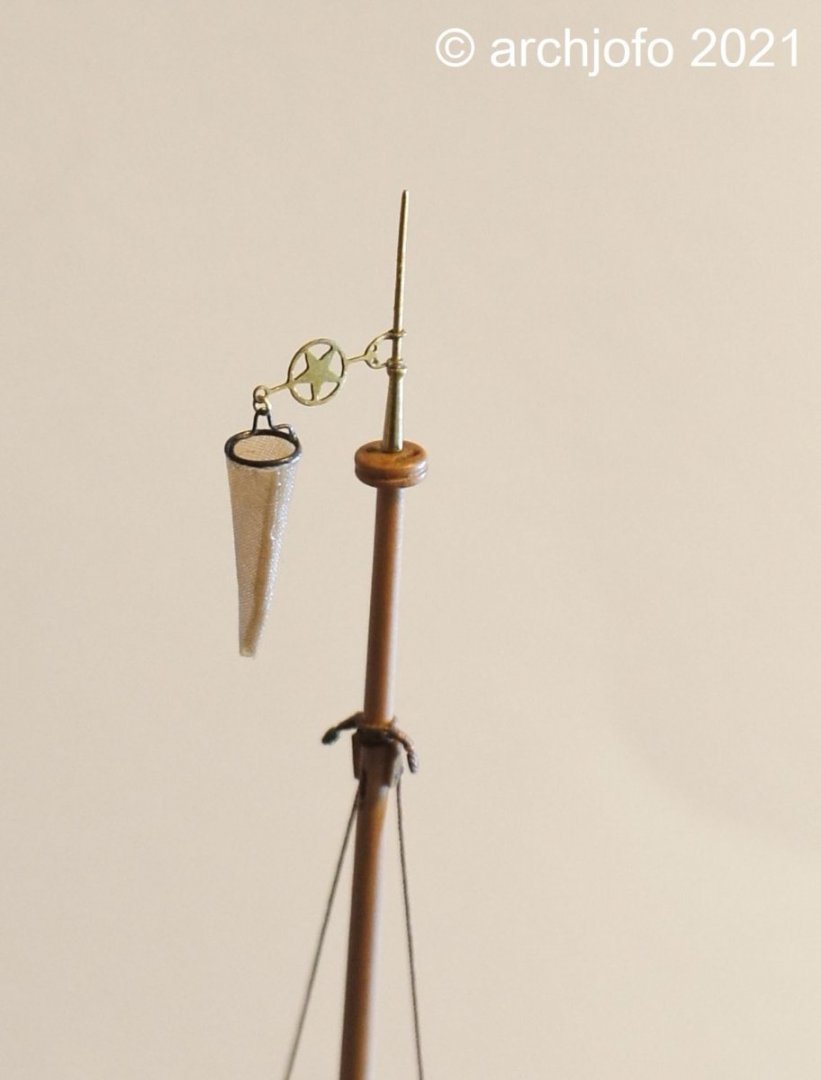
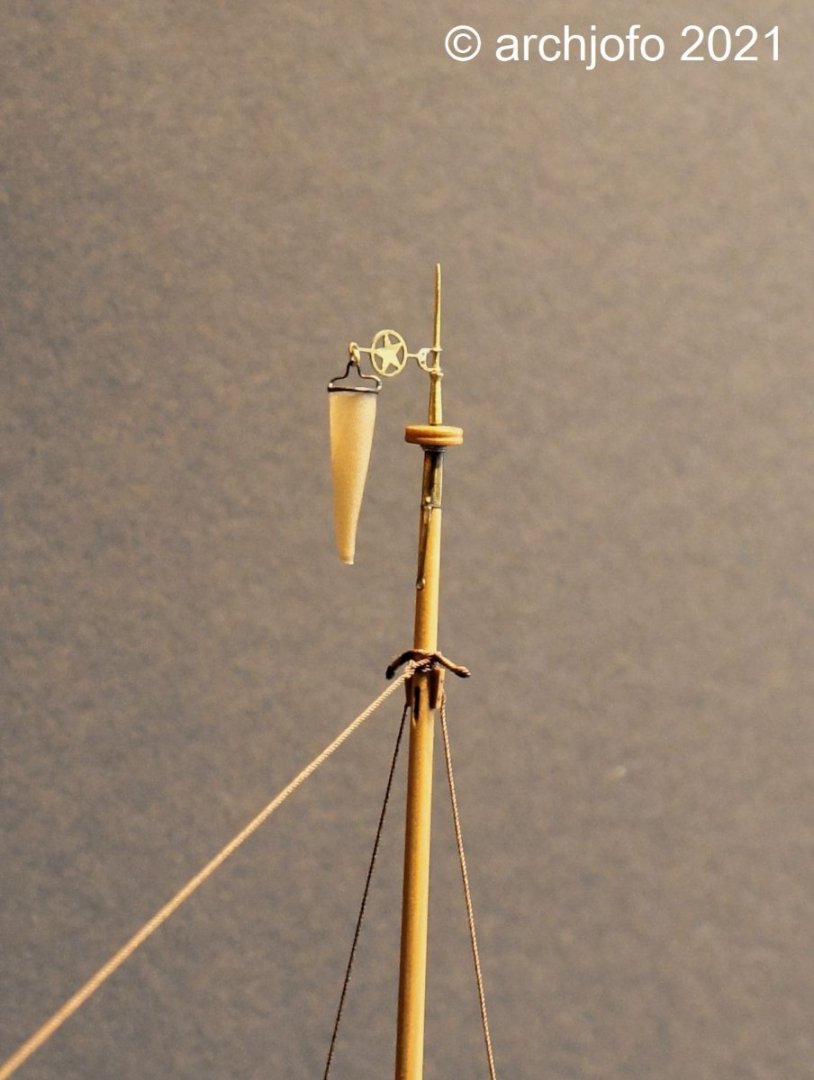
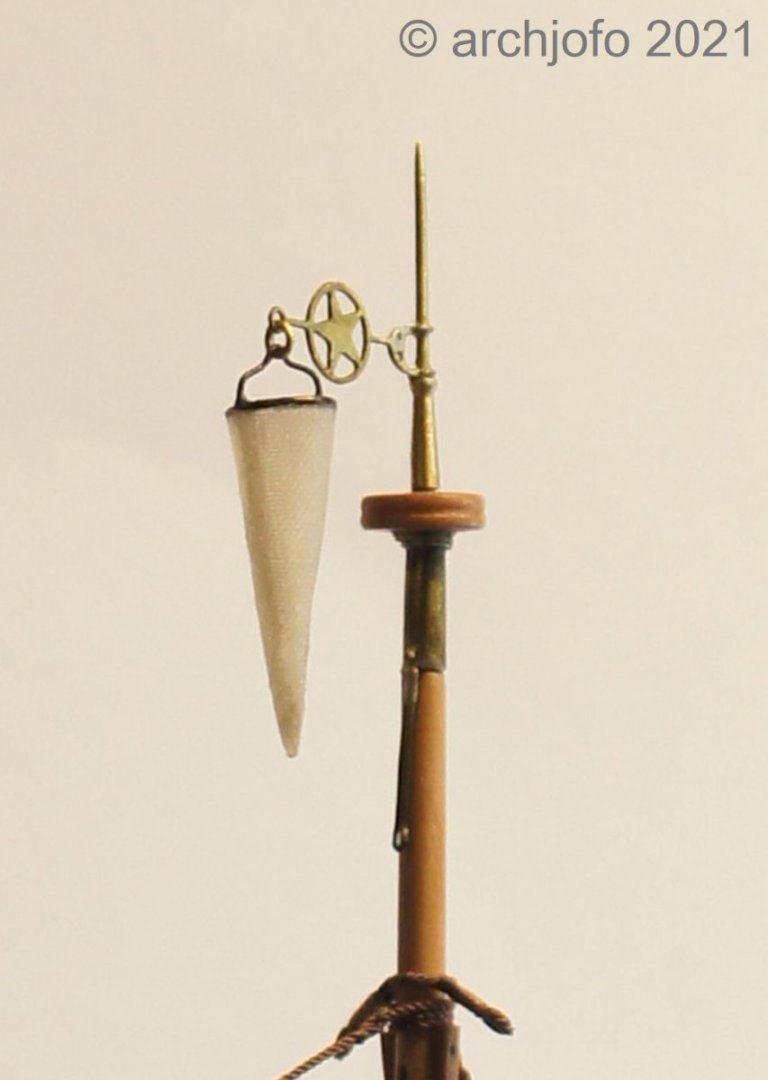
@druxey @Keith Black Hello, thank you for the interesting comments. Continuation: Main masthead with weather vane and war pennant (flamme de guerre) To take into account the discussion about the flow technique of a windsock, I now made the windsocks with a small opening at the top for the three masts. I dyed the silk a little darker. The next picture shows the weather vane (girouette) with windsock (Manche de vent) on the foremast. And here again in a modified form, the arrangement of the weather vane with windsock on the main mast. Now I will start the first attempts for the war pennant. To be continued ...

-
Brig Le FAVORI 1806 by KORTES - 1:55
archjofo replied to KORTES's topic in - Build logs for subjects built 1801 - 1850
This is once again a great performance from you. The hull is absolutely great. -
Hello, thanks to all for the interest in my report. I think it is okay with the silk fabric so far. In a German forum we are discussing the issue that the windsock should be open at the top, because of the flow technique.

-
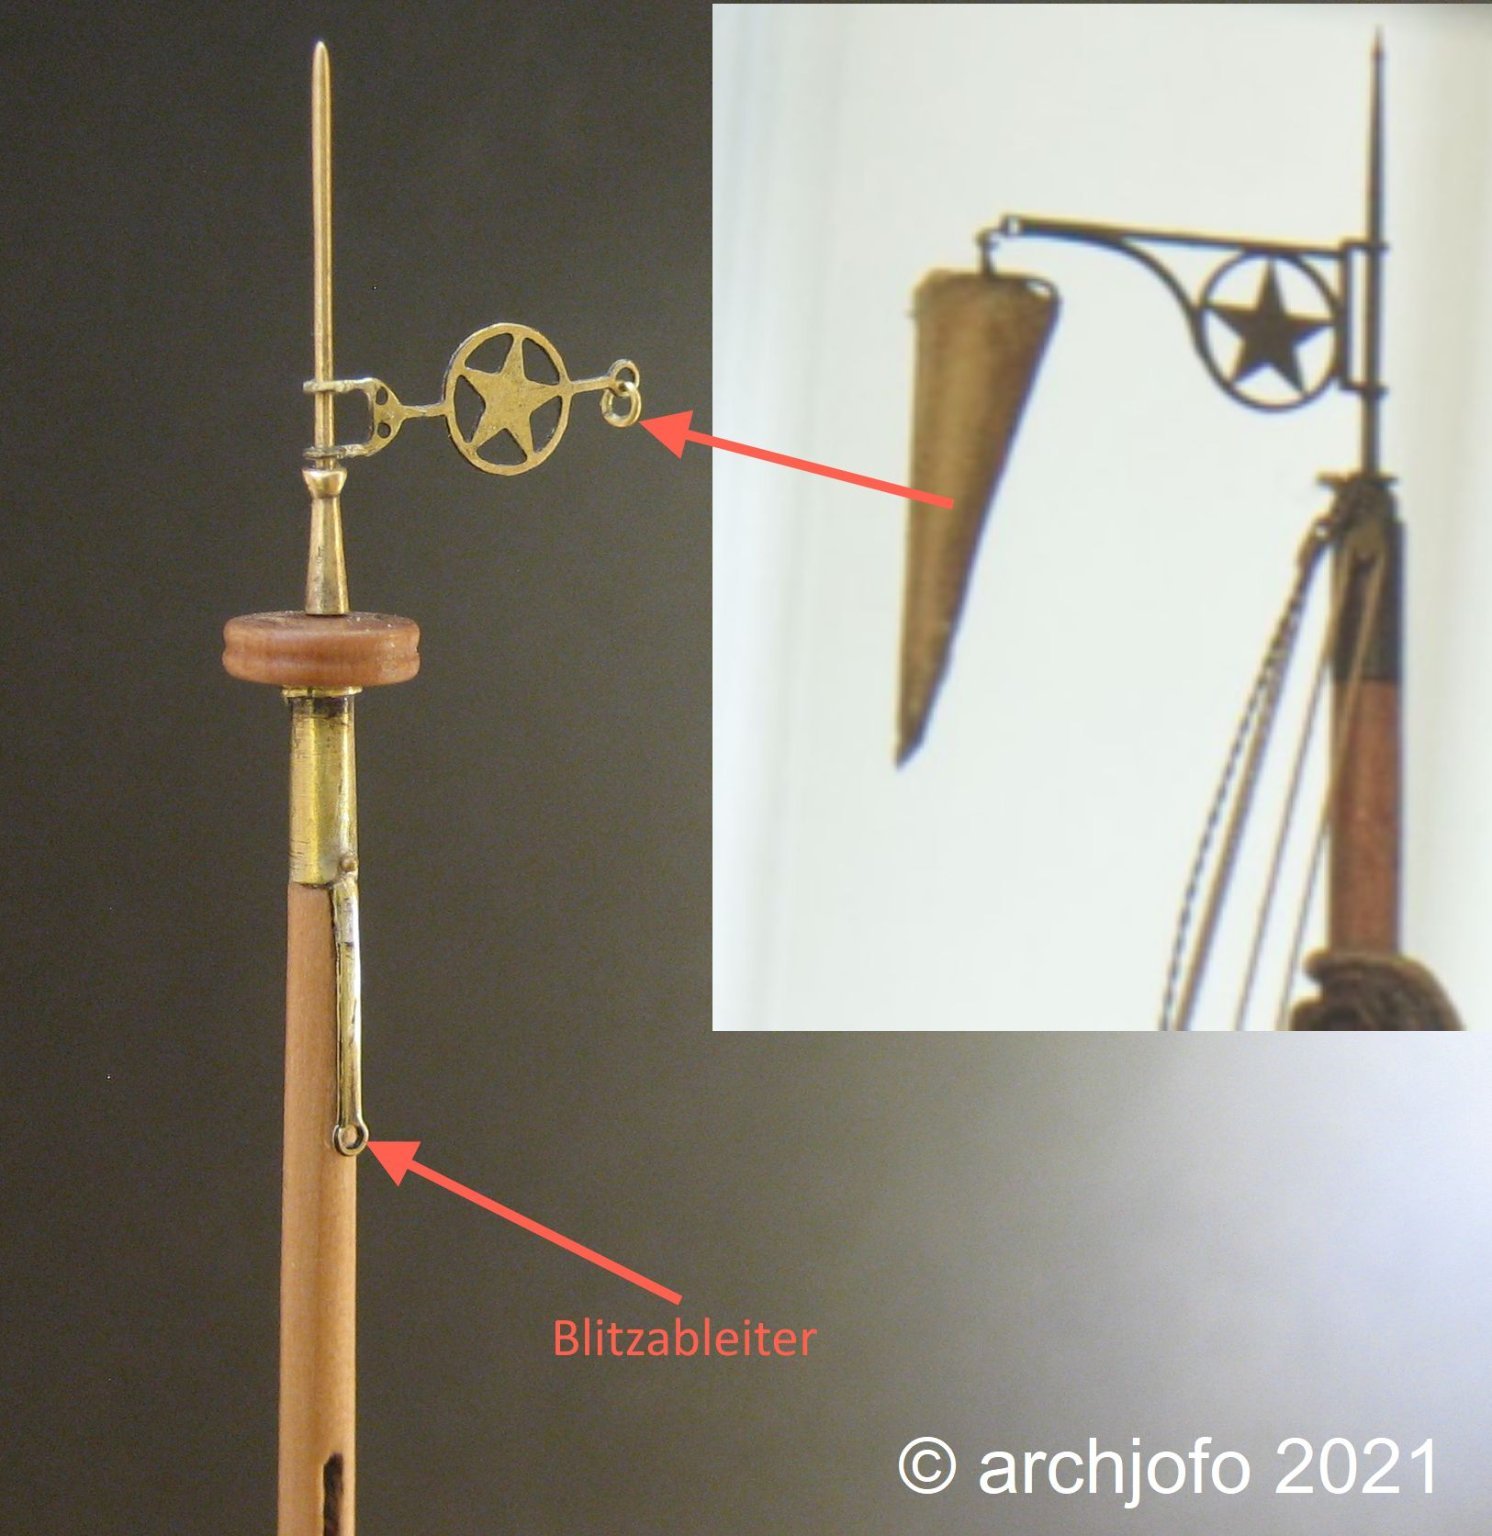
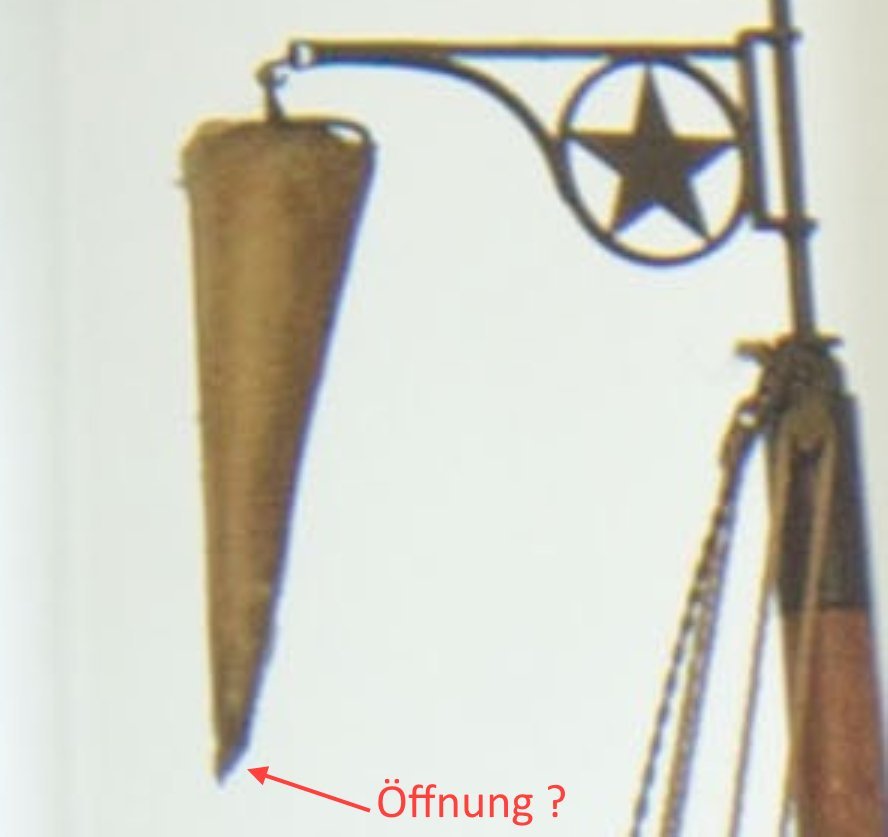
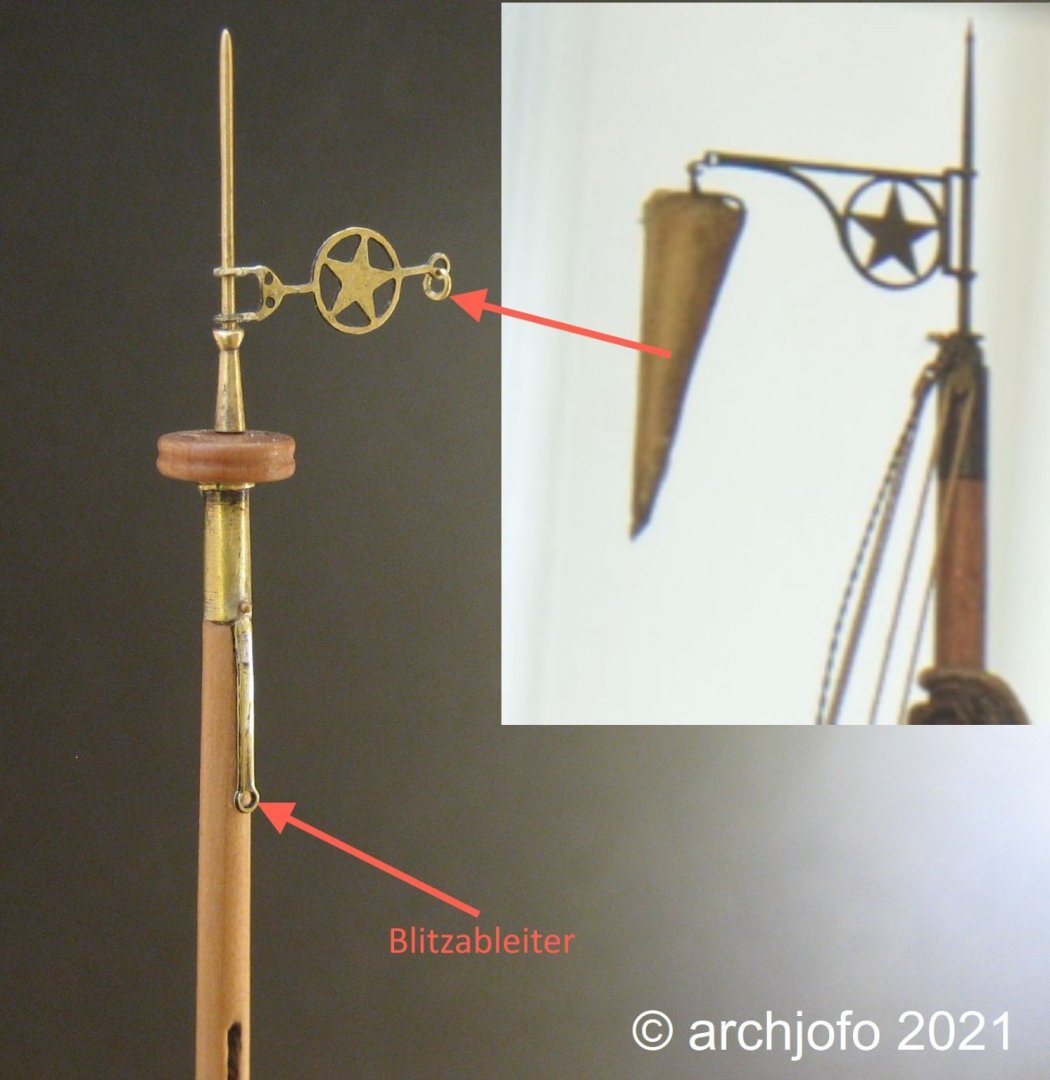
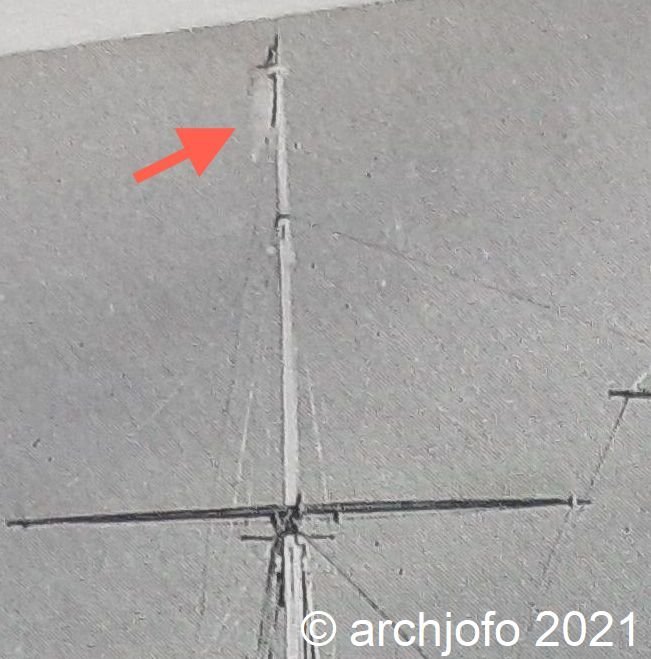
@mbp521 @Keith Black Hello Brian and Keith, thank you both for the wishes for Christmas and the New Year. Main mast top with weather vane and war pennant (flamme de guerre) It's hard to believe, but there are still a few details to be clarified on the masthead of my French corvette. Thus, in addition to completing the standing rigging, I also deal with the final clarification of these details, which I always find a pleasant distraction in between. Sooner or later it has to be done anyway. Source: Monograph by J. Boudriot, detail of the original model By providing a picture of the mast top of the L'Inflexible from 1835 (model in the Musée National de la Marine-Rochefort) by Daniel @dafi, I am able to complete the corresponding detail. What I previously thought to be the remains of a flag or a pennant based on an old black-and-white photo of the Paris model clearly turned out to be a windsock that was attached to the end of the weather vane by means of a small crossbar. The weather vanes of La Créole and L'Inflexible are basically designed similarly and the lightning conductors are also present in both. In this respect, I can confidently attach this windsock to the weather vane of La Créole and regard it as historically correct and documented, even if it is neither drawn in the monograph nor currently available on the original Paris model. In this context I also try to clarify how the war pennant or home pennant could have looked in detail. Of particular interest are the length, the lay rope, integration into the flag line, pennant wood, etc. The flag line of the war pennant drove through one of the two discs in the flag button. For the production of the windsock and the war pennant, I thought of silk fabric, which in my opinion comes closest to the desired scale in terms of its fine structure. Let's see what the first attempts bring to light. More about this soon ...
-
Hello friends, Today I would like to ask the experts whether you have any knowledge of pennants of the French navy at the beginning of the 19th century? For my French corvette La Créole 1827 I unfortunately have too little information about the length, width and attachment to the mast head. I have read that the Pennants were usually a considerable length, sometimes reaching half the length of the ship. I would be very happy if you could give me information and picture examples.
- 1 reply
-
- 2
-
-
I wish you all a wonderful Christmas and many happy moments surrounded by your loved ones!
-
@druxey Yes, I turned them on my Unimat SL. The profile can certainly still be optimized.
-
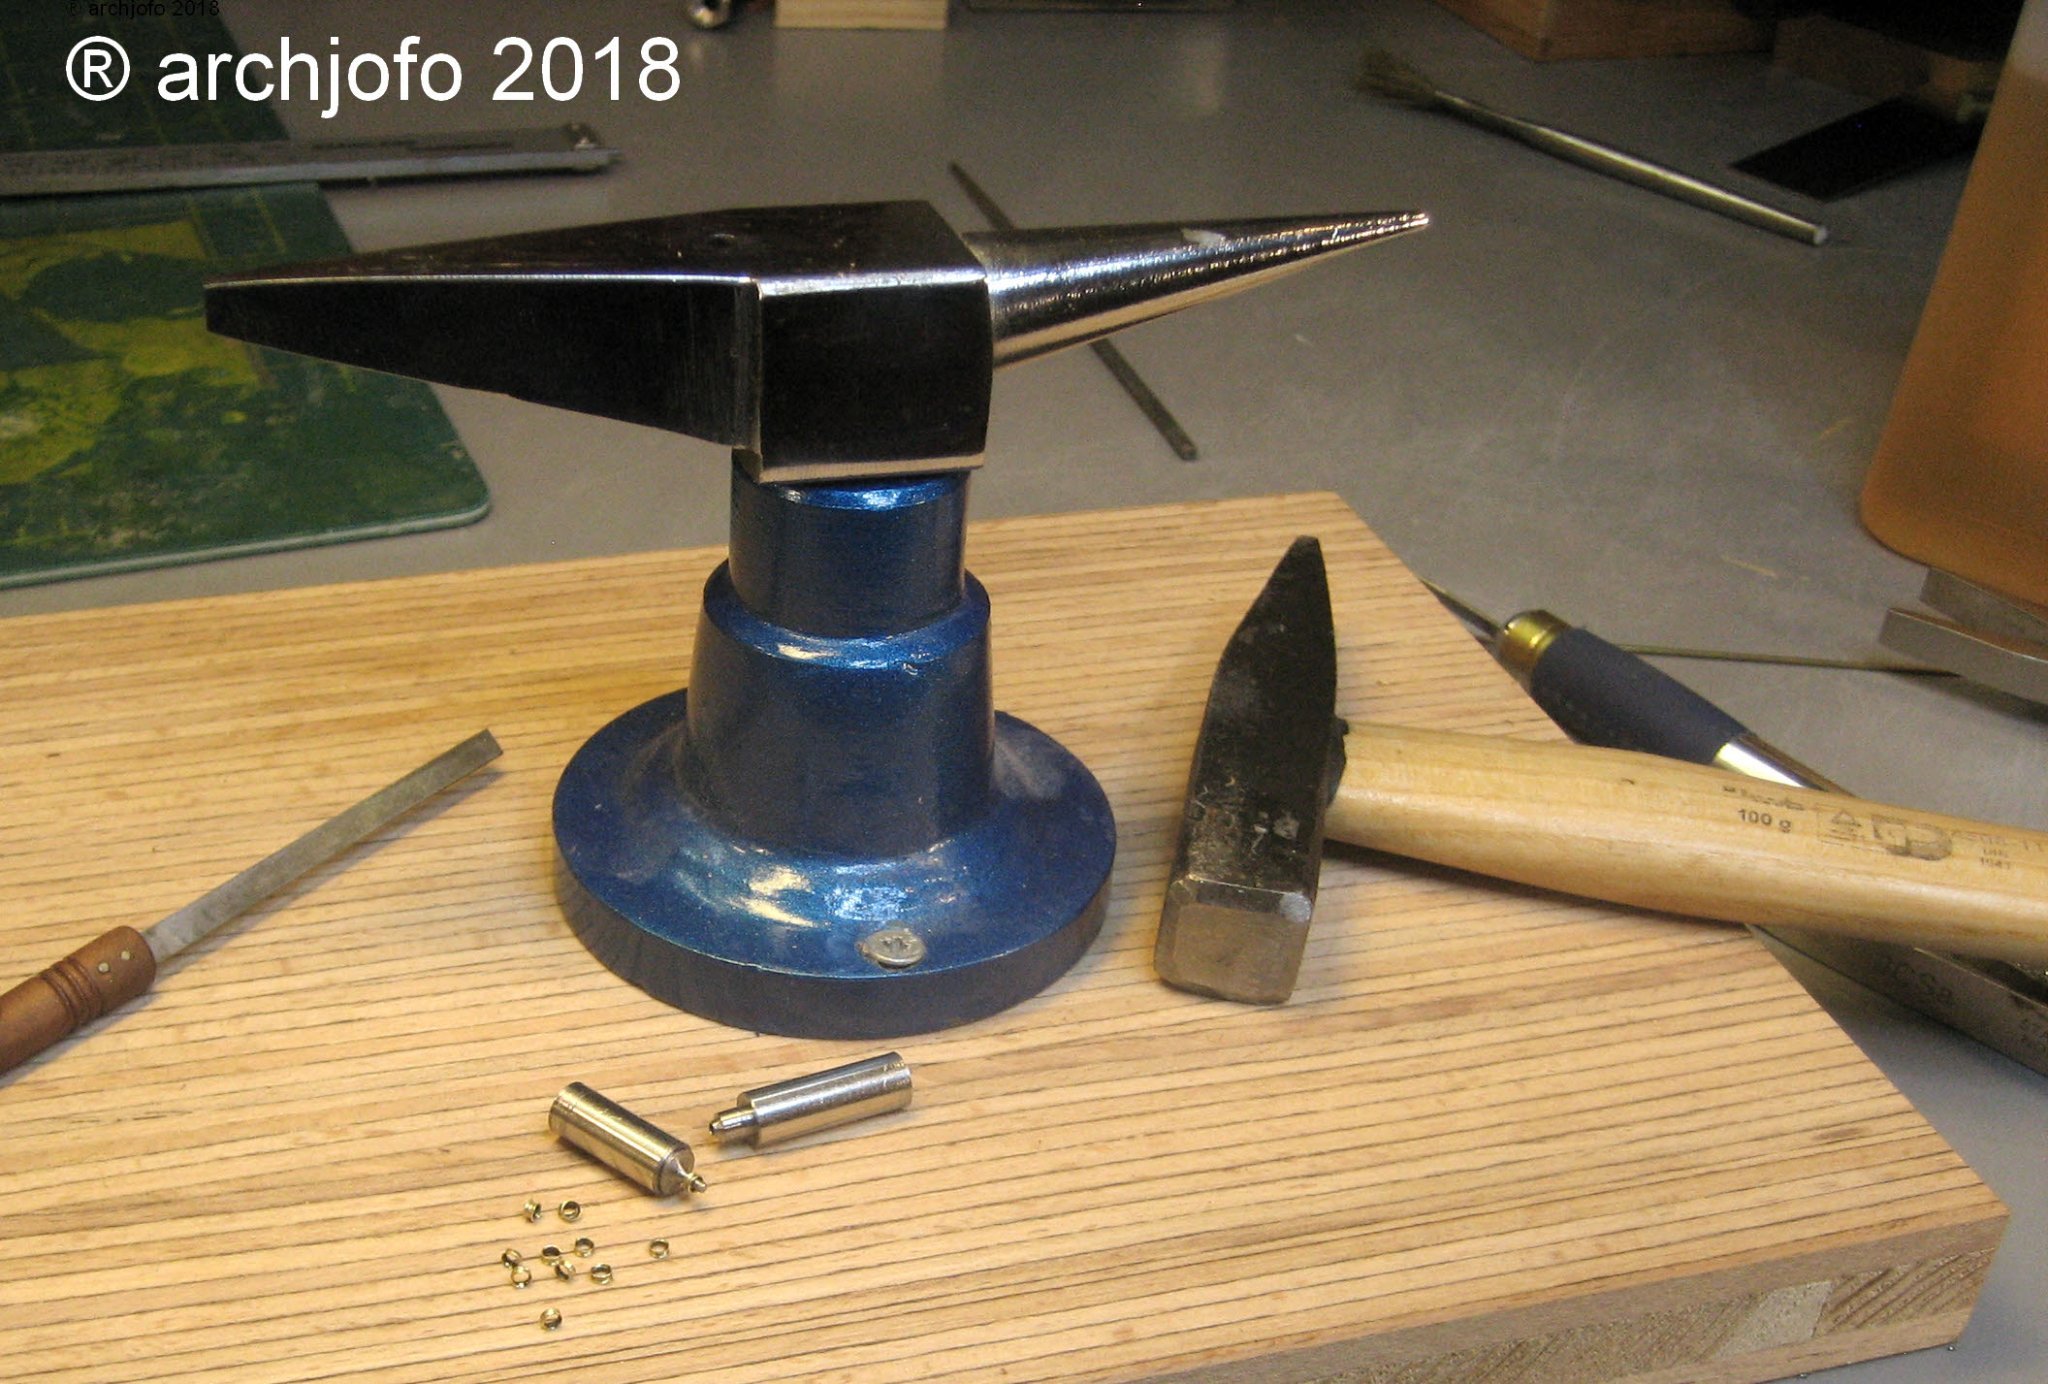
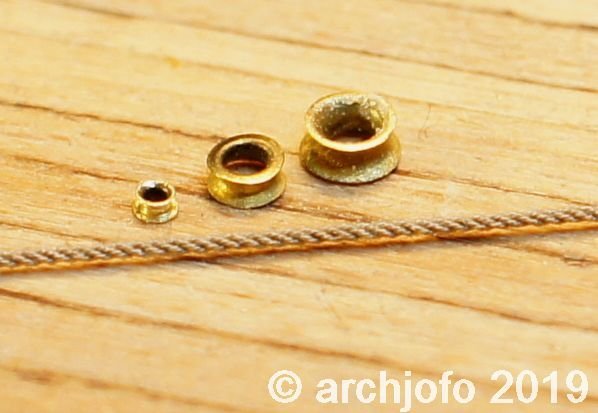
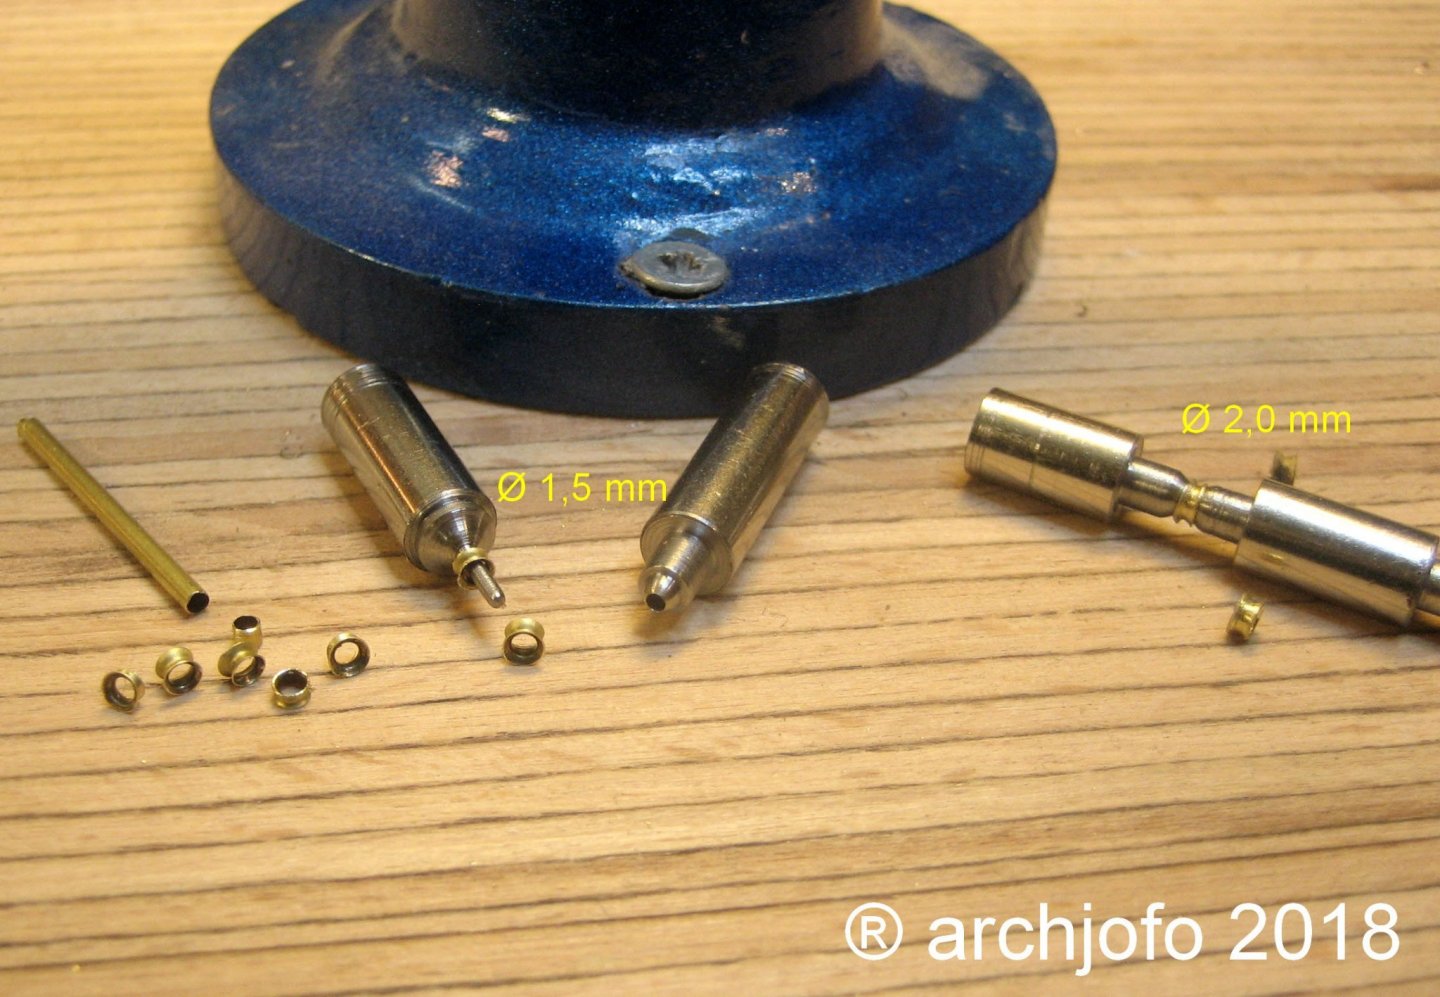
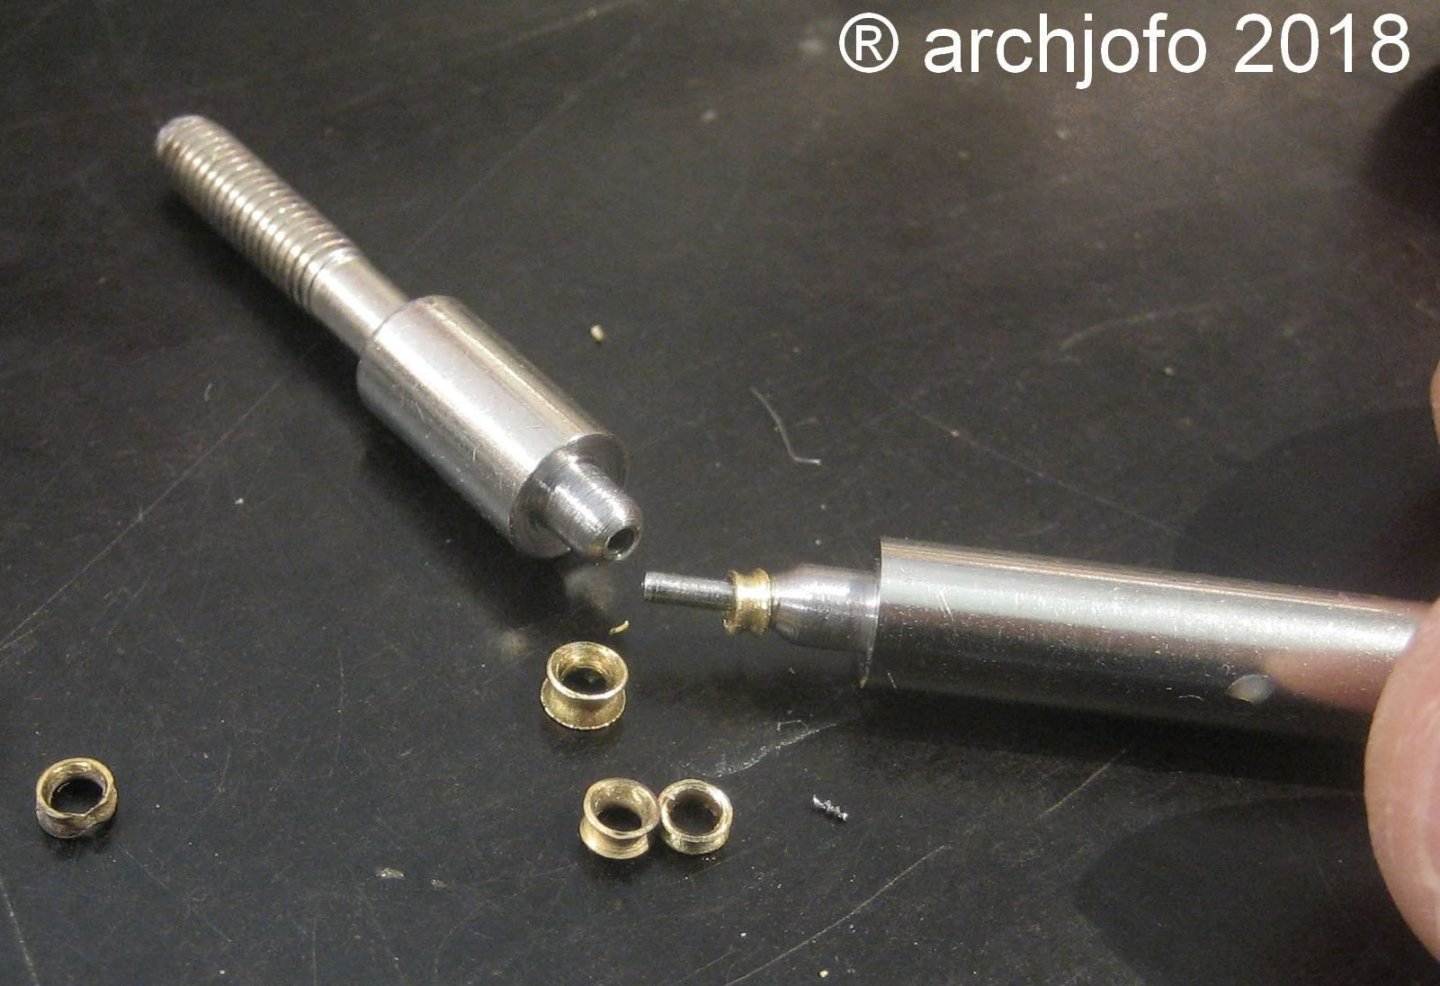
@druxey Hello, first of all I would like to thank you for the appreciation of my work. Of course, I'll be happy to show you how I make the thimbles. I hope that the following pictures explain this as far as possible. Should there be any unanswered questions, please don't be shy and just ask.

-
@albert Hello, thank you for the recognition of my model.
-
Continuation: Standing rigging of the royal masts Meanwhile I am already installing the royal shrouds of the foremast. To keep the distances of the thimbles more or less equal, I use a correspondingly curved piece of wire for the installation. See you soon ...

-
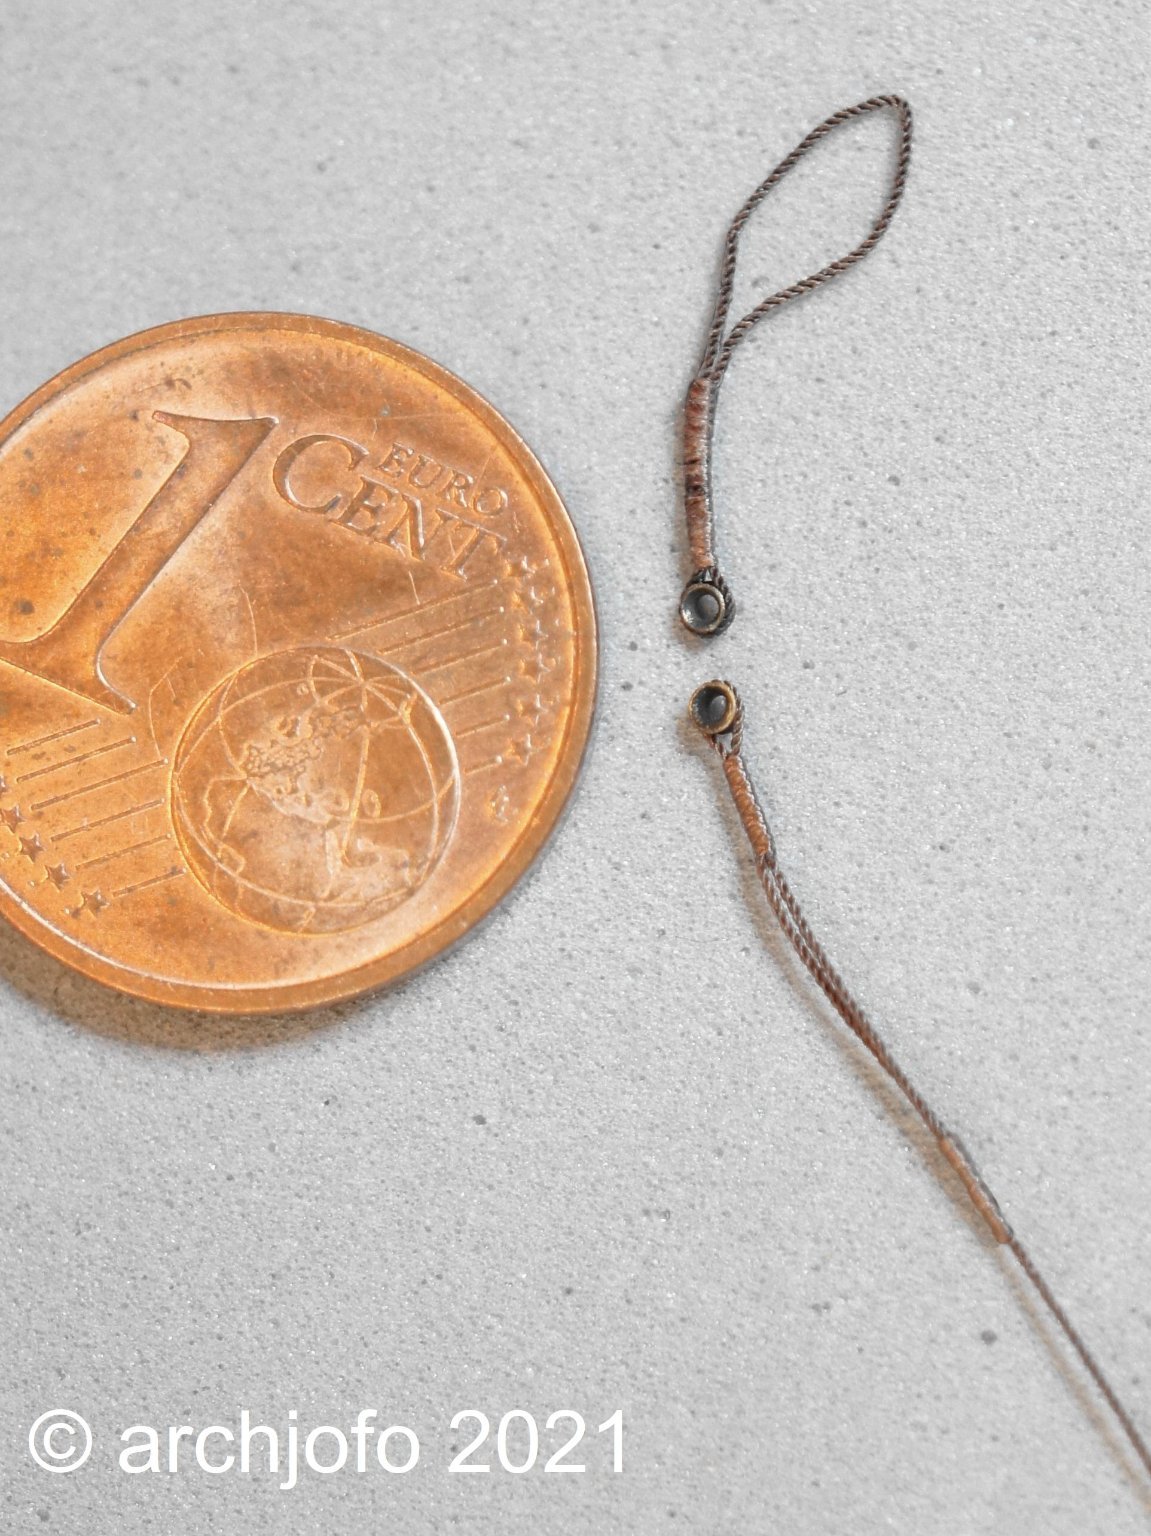
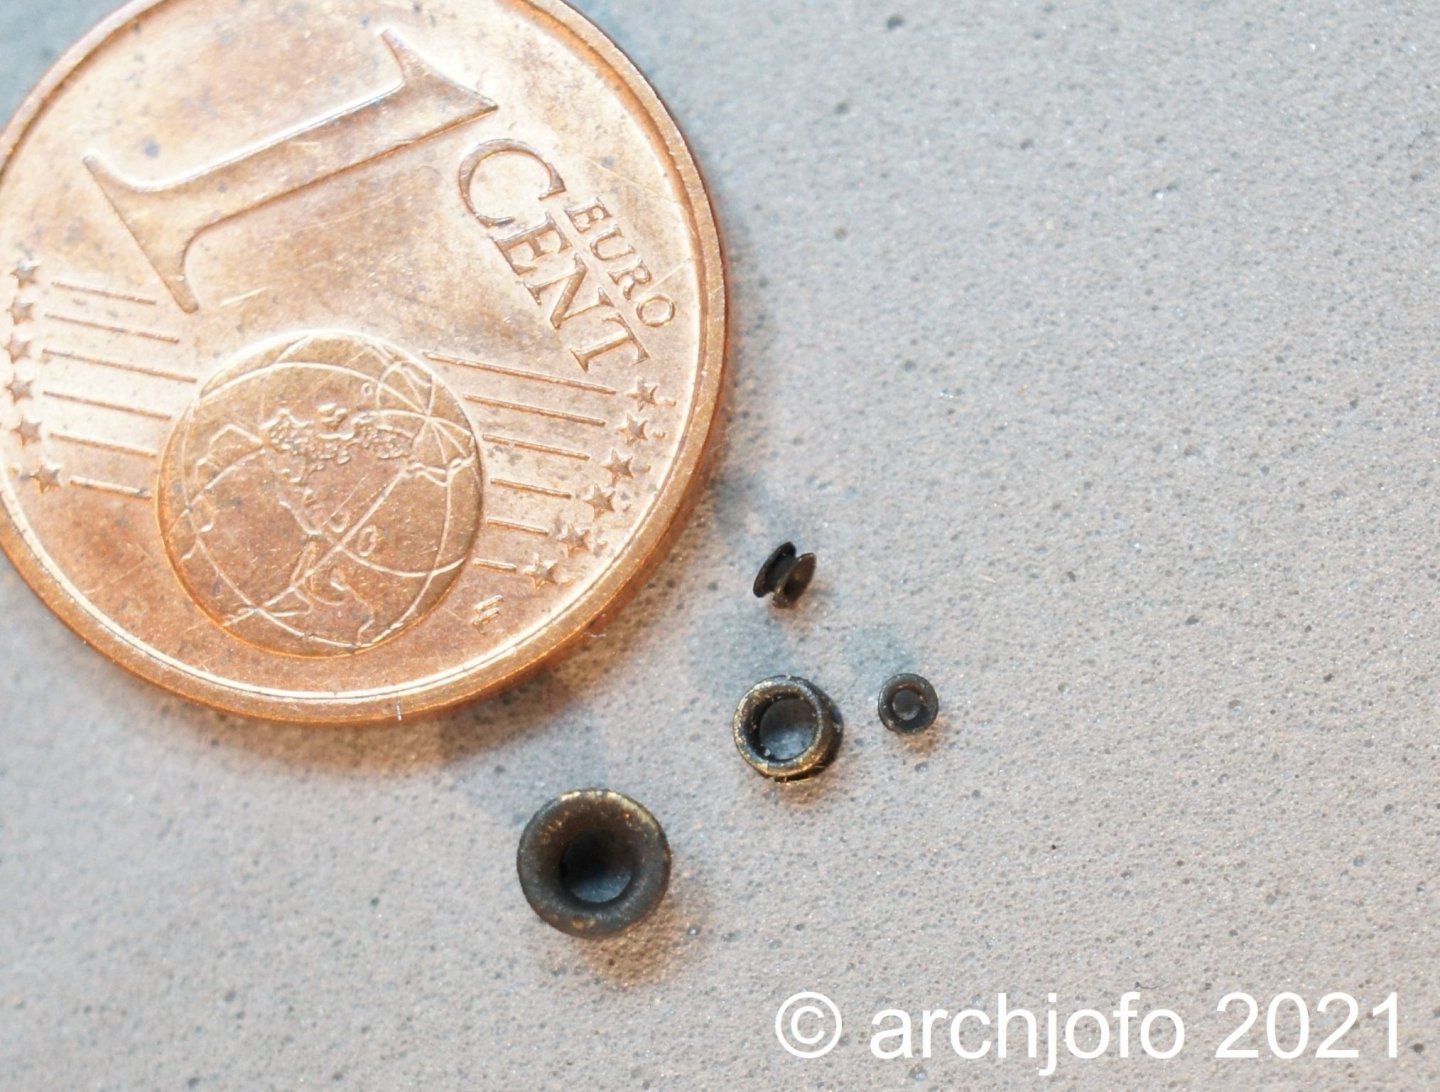
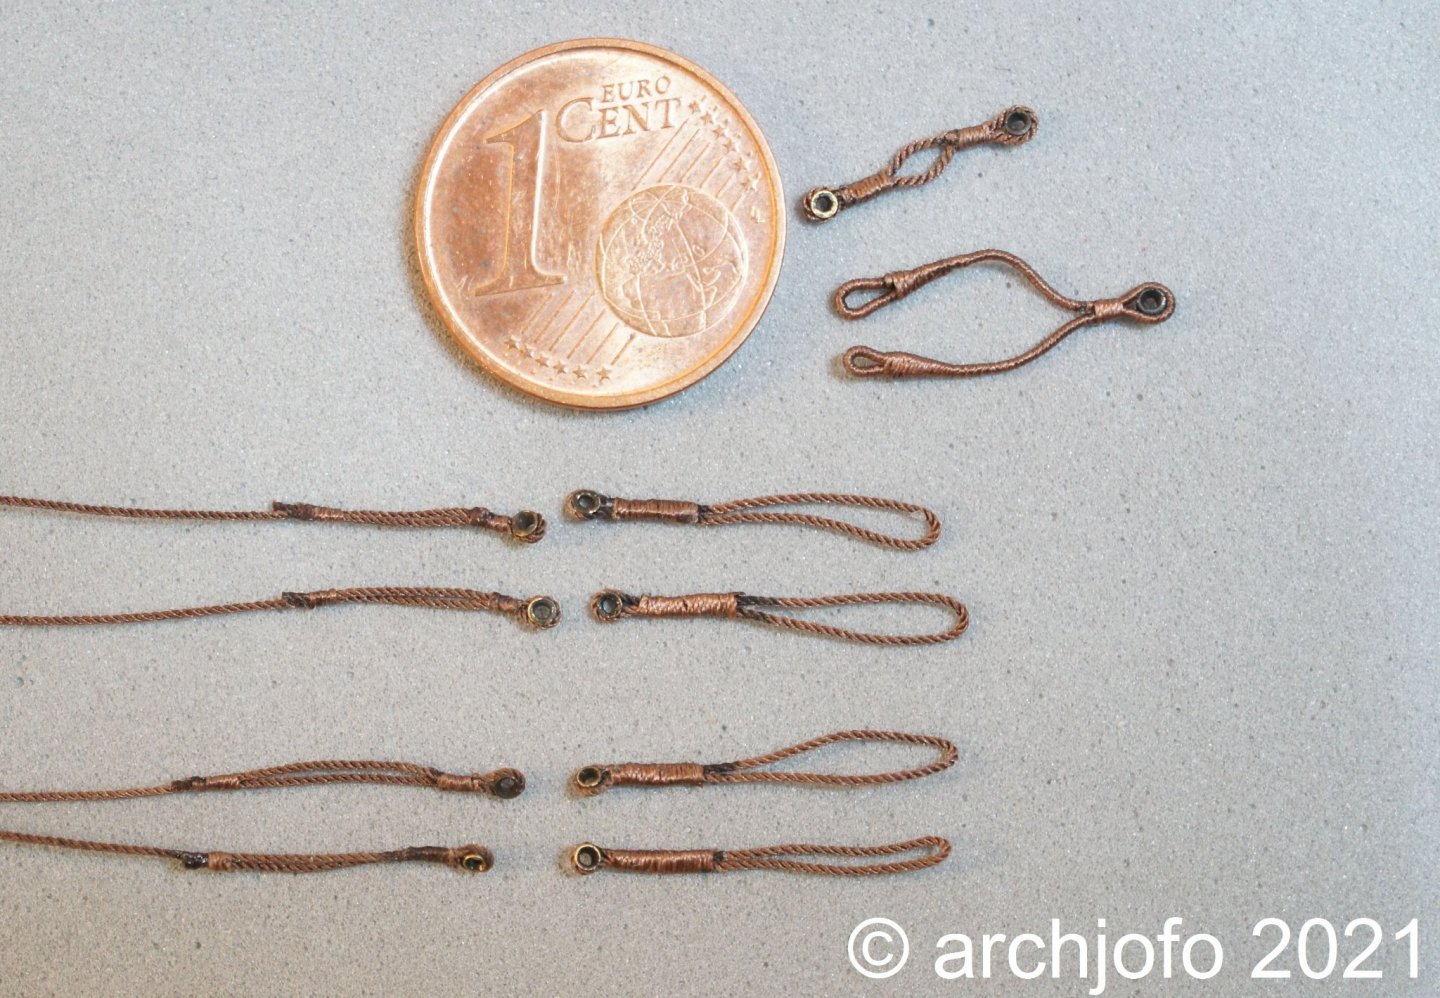
@giampieroricci Thanks for the recognition. I admire your work as well. I would also like to thank everyone else for the many LIKES. Continuation: Mizzen topgallant and mizzen roayl shrouds The shrouds on the royal mast on my corvette have a model scale of 0.25 mm. The following picture shows a prepared shroud with integrated thimble (ø 0.9 mm) and the counterpart for the lanyard lashing, which is attached to the end of the crosstree of the topgallant mast. In this context I show again the thimbles I used on this model, which are made of blacked brass. The smallest thimble has a diameter of around 0.9 mm. The mast trucks that were stupidly glued in place by me when building the topgallant masts are of course extremely cumbersome when laying the shrouds and stays. It is very problematic when attaching the stay collars with the integrated thimbles. So I tried to carefully remove these mast trucks again. This worked quite well for the fore and main mast. With the mizzen mast, on the other hand, it did not work with the best will in the world without causing damage. As an alternative, I therefore tried to install the collar for the lifts of the mizzen royal yard directly on the model, which ultimately succeeded with the help of a corresponding device. I tried the first variant with a rope ø 0.35 mm for the collar and with thimbles ø 1.2 mm. The dominance of this collar on the royal mast top bothered me and seemed immeasurable to me. So I started another attempt with a rope ø 0.25 mm for the collar and with thimbles ø 0.9 mm, which now suits me much better. So the next picture shows the completed standing good of the mizzen mast, starting with the crosstrees. Which means I can then move on to the main mast to attach the royal stay and shrouds there too. I have already prepared the royal shrouds for the main and foremast with other corresponding rigging components as shown in the last picture. Up soon …


-
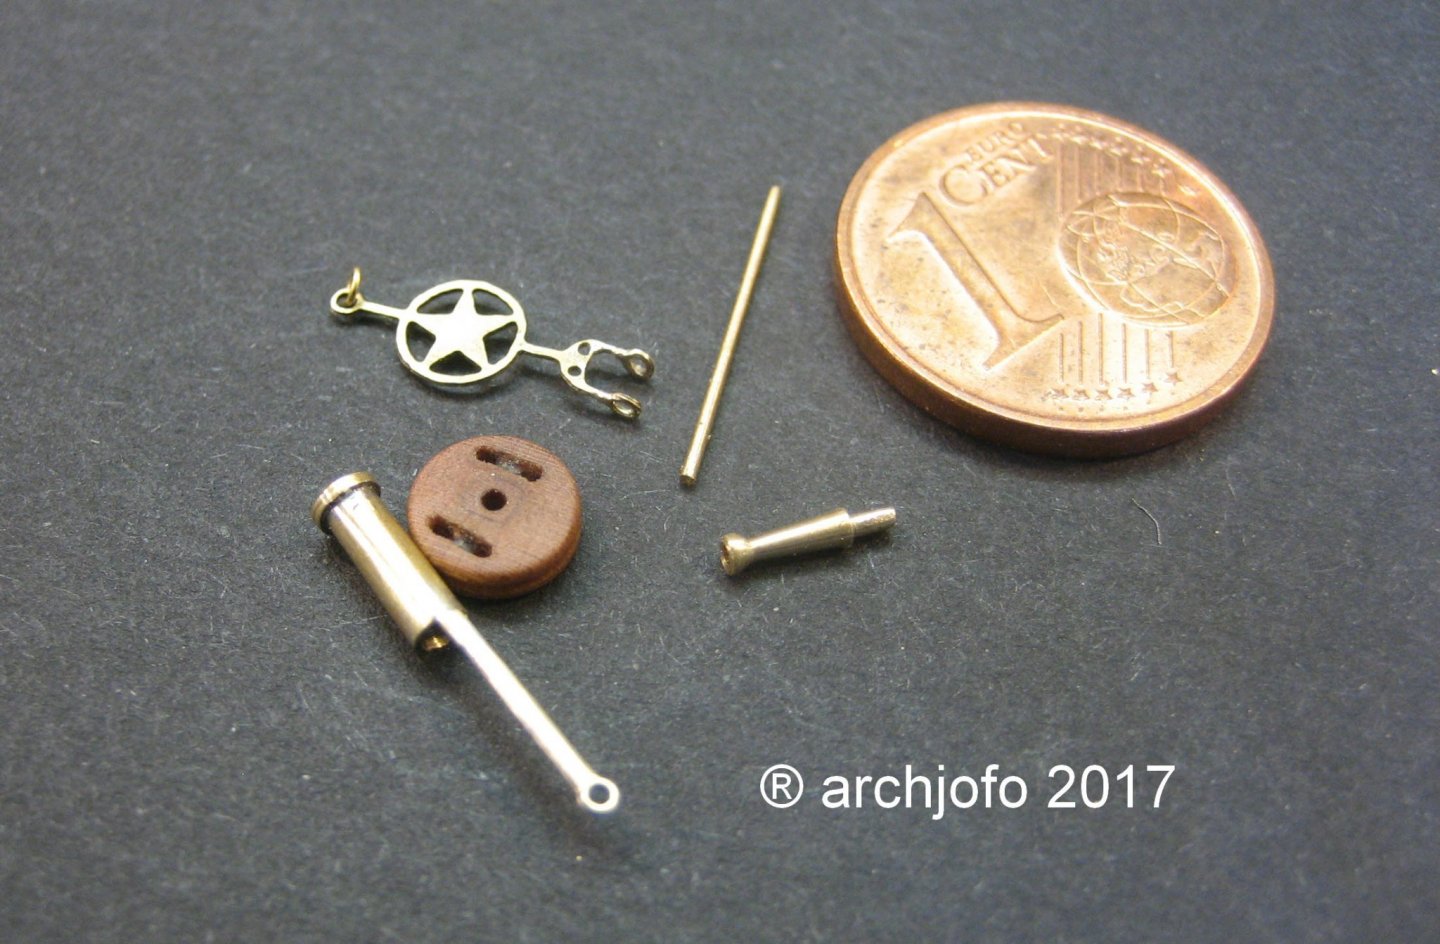
@j.guydal Bonjour Jaques, merci beaucoup pour ton commentaire positif. @druxey Hello, thank you for the compliment. Yes, it is a weather vane. In German it is also called a Verklicker. The special thing about it is that the commissioning pennant has been attached to the top of the main mast. That's what the little ring is for. I will only attach this pennant at the very end, as they are very long and would therefore be a hindrance to the rigging work.
-
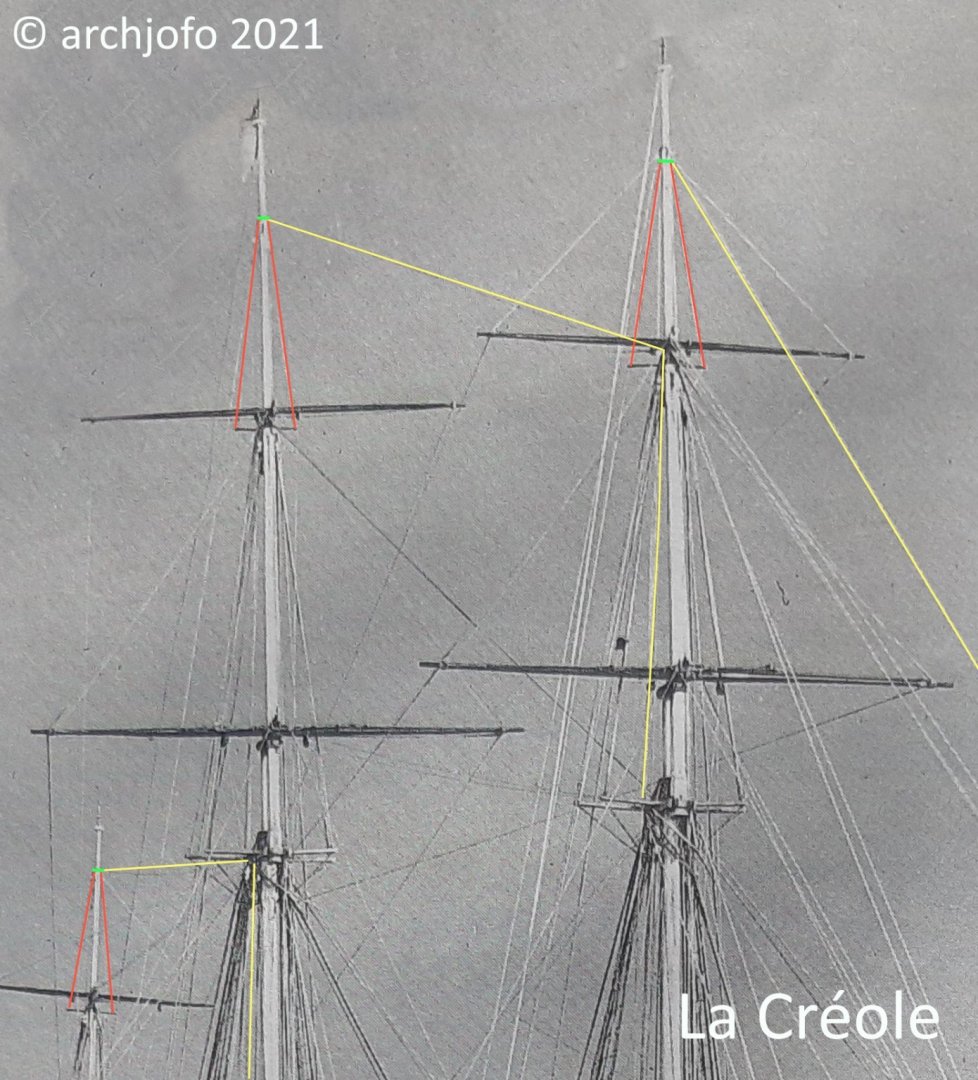
Standing rigging of the royal masts Before I lash the boats, I would like to finish off the standing rigging as a whole. To complete the standing rigging of the royal masts (shrouds, stays), a few more detailed clarifications and preparations were required. As can be seen in the image section of the upper rigging of the original model, the royal masts are very filigree components. In the model, the royal masts are between a maximum of 2 to 3 mm thick. In the picture I have the stays marked in yellow and the royal shrouds in red. Source: Monograph by J. Boudriot, detail of the original model Since neither the plan nor the description of the monograph contain any specific information on how the edition of the royal stays and shrouds should look in detail, I tried to find relevant information in relevant sources (literature, internet). Unfortunately, I was unable to get much information on this. Somehow the stays and shrouds have to be given a fixed position. Therefore, I orientated myself on the book by KLAUS SCHRAGE - RUNDHÖLZER, RUNDHÖLZER, RUNDHÖLZER, RUNDHÖLZER UND SEGEL page 92, Fig. 255. There you can see cleats on the royal masts. Accordingly, I tried to make these cleats as suitable as possible. In the first step, the fastening of the cleats (model size 2.8 mm / 1.2 mm) had to be clarified. For this I needed tiny bolts, which I made from brass wire ø 0.25 mm using the method of a Russian model maker. Furthermore, the ropes for the royal shrouds (mizzen mast ø 0.25 mm or fore mast and main mast ø 0.35 mm) and the stays (ø 0.25 mm or ø 0.40 mm) were made with the rope making machine manufactured. There was also the question of how to manage the lifts for the royal yards. There was only one royal shroud per side. In this respect, the thimbles for the royal lifts could not be integrated. So I made a mast collar with two thimbles (ø1.2 mm). A serving of these thin ropes was not given in the original either. The stays are placed with one eye on the cleats. The stays were brought down using thimbles and fixed with lanyard lashings. I still have to clarify these fastening details. The location of the cleats on the royal masts was above the sheaves for the royal halliard, as can be seen in the following picture (mizzen royal mast). Sequel follows …

-
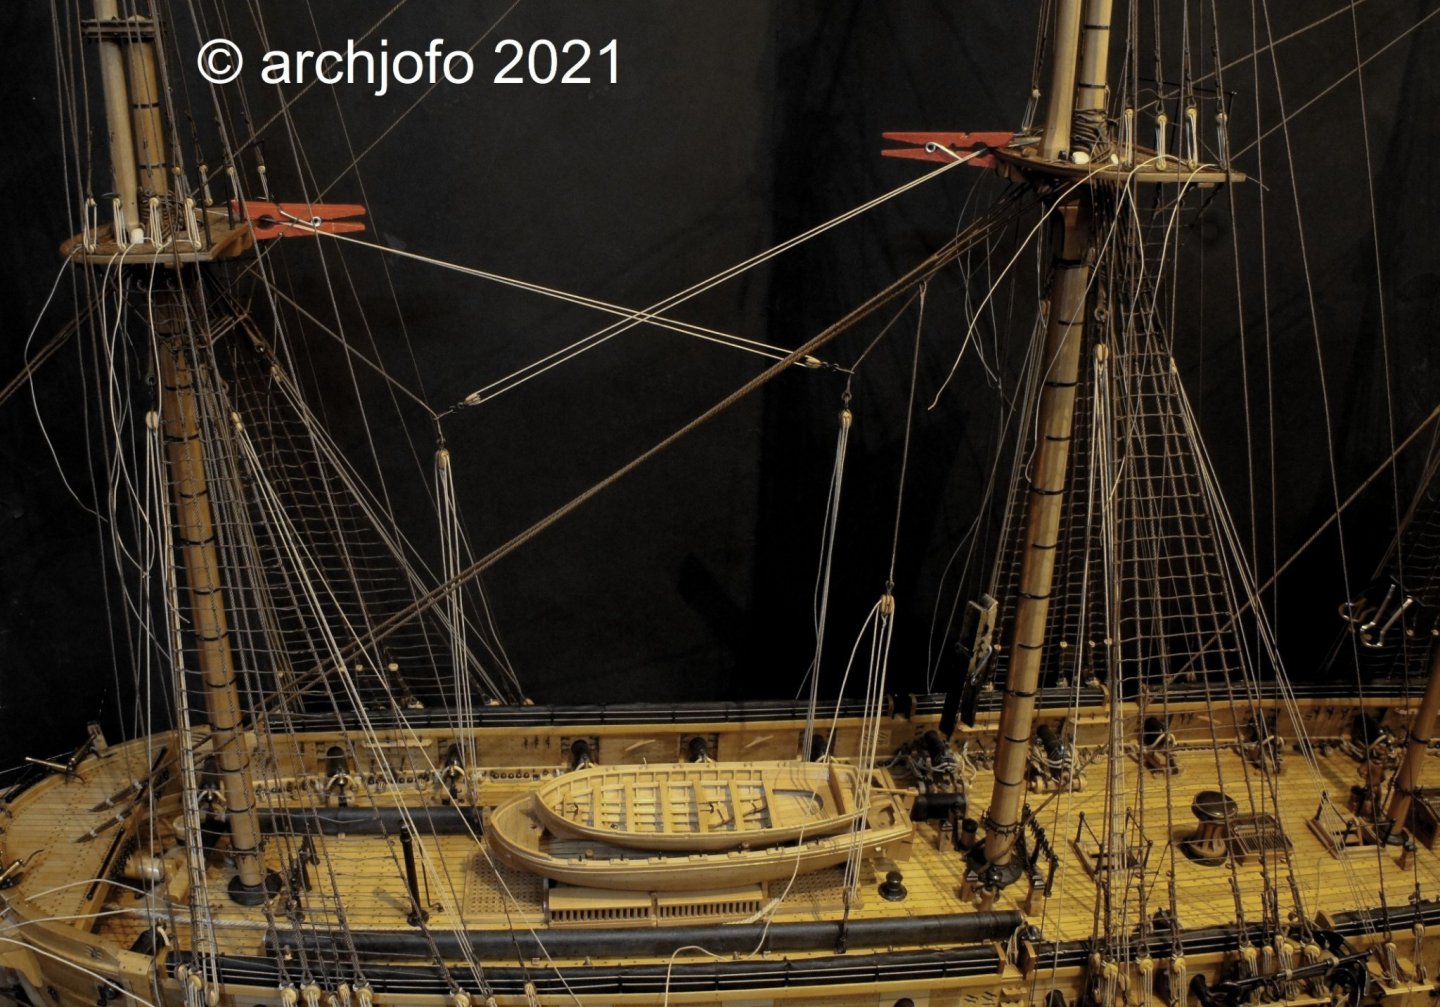
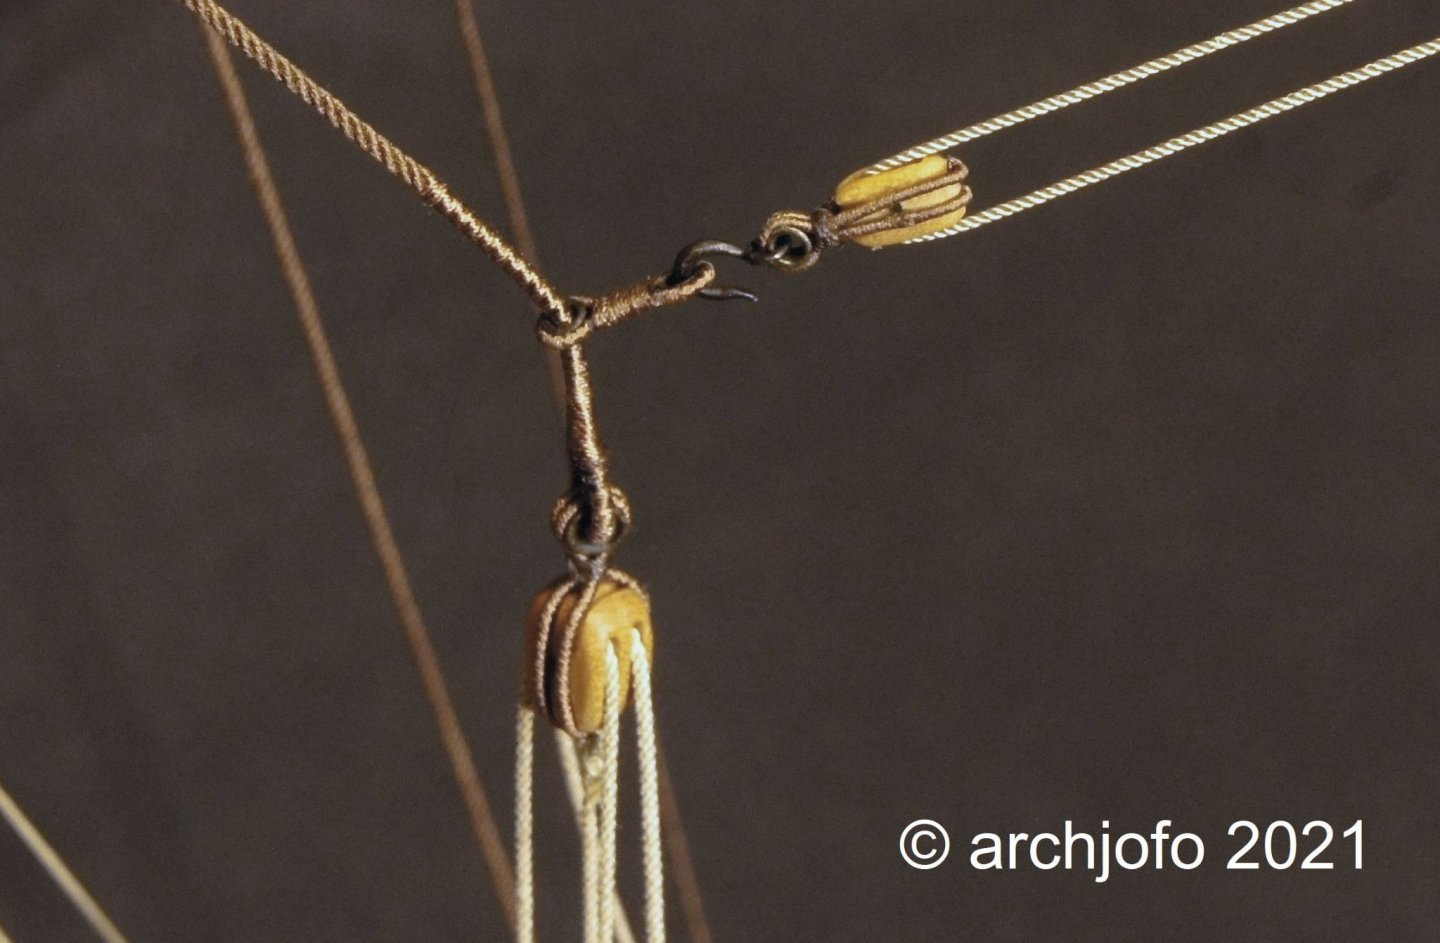
@druxey Hello, thanks for the interest and the nice comment, and all the others also for the many LIKES. Continuation: Garnet tackel - Palan d'etai To check that the garnet tackels do not collide with pendants and guys, I attached them provisionally before final assembly. As already described, there is nothing in the monograph of J. Boudriot about the attachment of the granet tackle to the tops. Accordingly, I am guided by the representations in the Atlas du Génie maritime and by the photos from the original model. Accordingly, it can be seen that the attachments of the two garnet tackels to the tops were made on the starboard side. In the next picture a single block for guidance and the pendant with the tackle can be seen in detail: After the garnet tackle installation is complete, I will begin lashing the chaloupe and pinasse. The exact details of this still need final clarification. To be continued ...
-
Addendum: garnet tackle - Palan d'etai I almost forgot something. Because to secure the garnet tackle, eyebolts still have to be attached to the deck. I also found out that according to the Paris model, the hauling part for the garnet tackle, which is attached directly to the mainstay, has to be led over a single block. So for this purpose some parts had to be made, which can be seen on the following picture (double block with swivel hook only for size comparison): See you soon ...

-
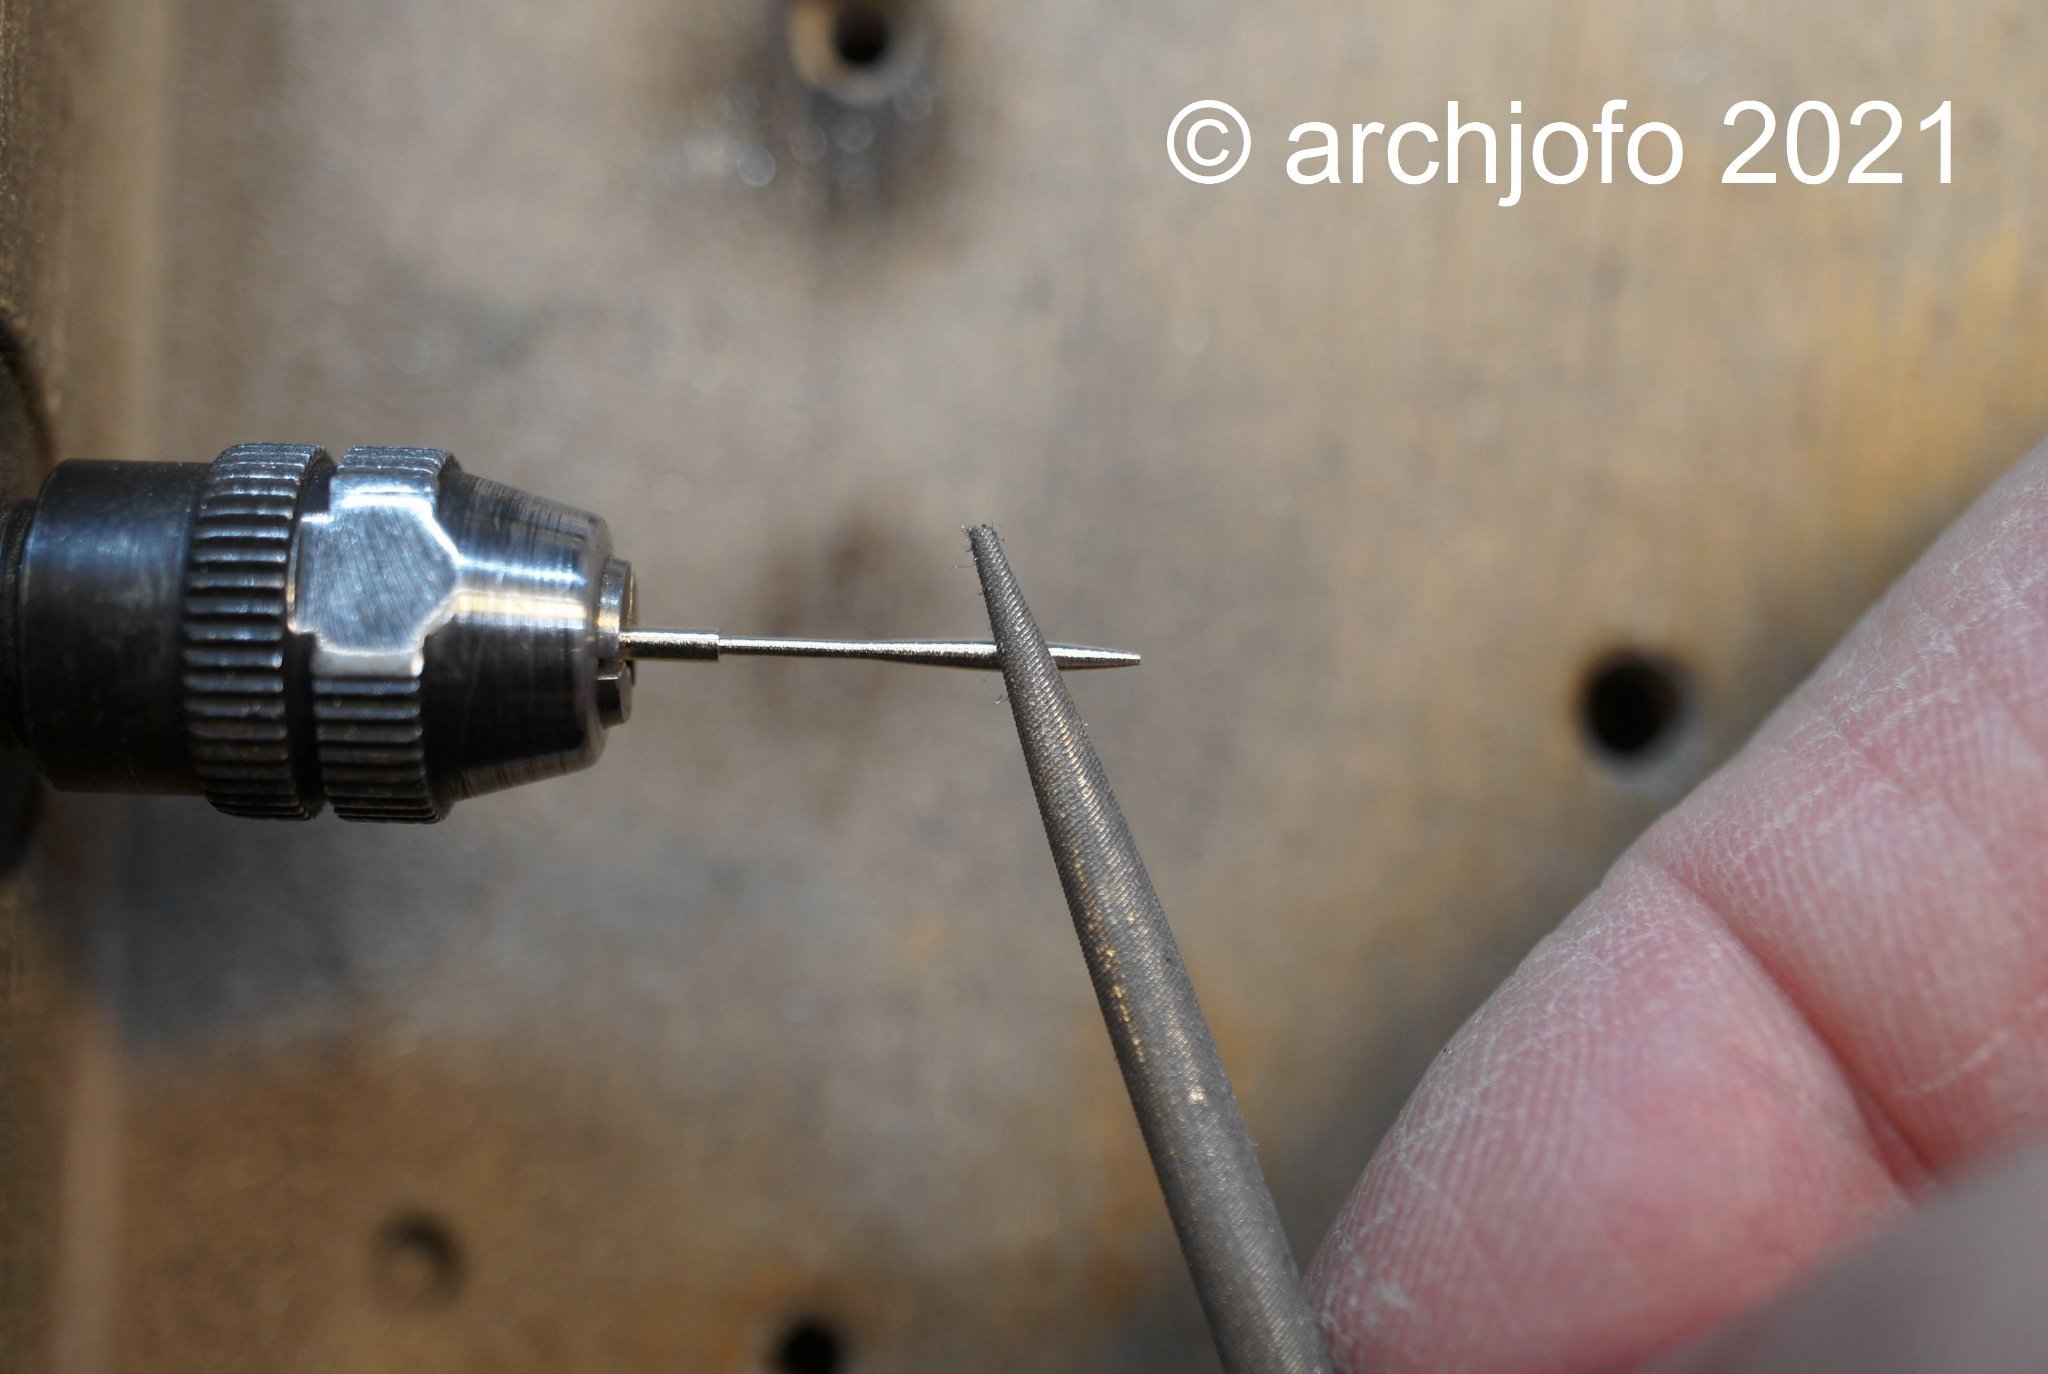
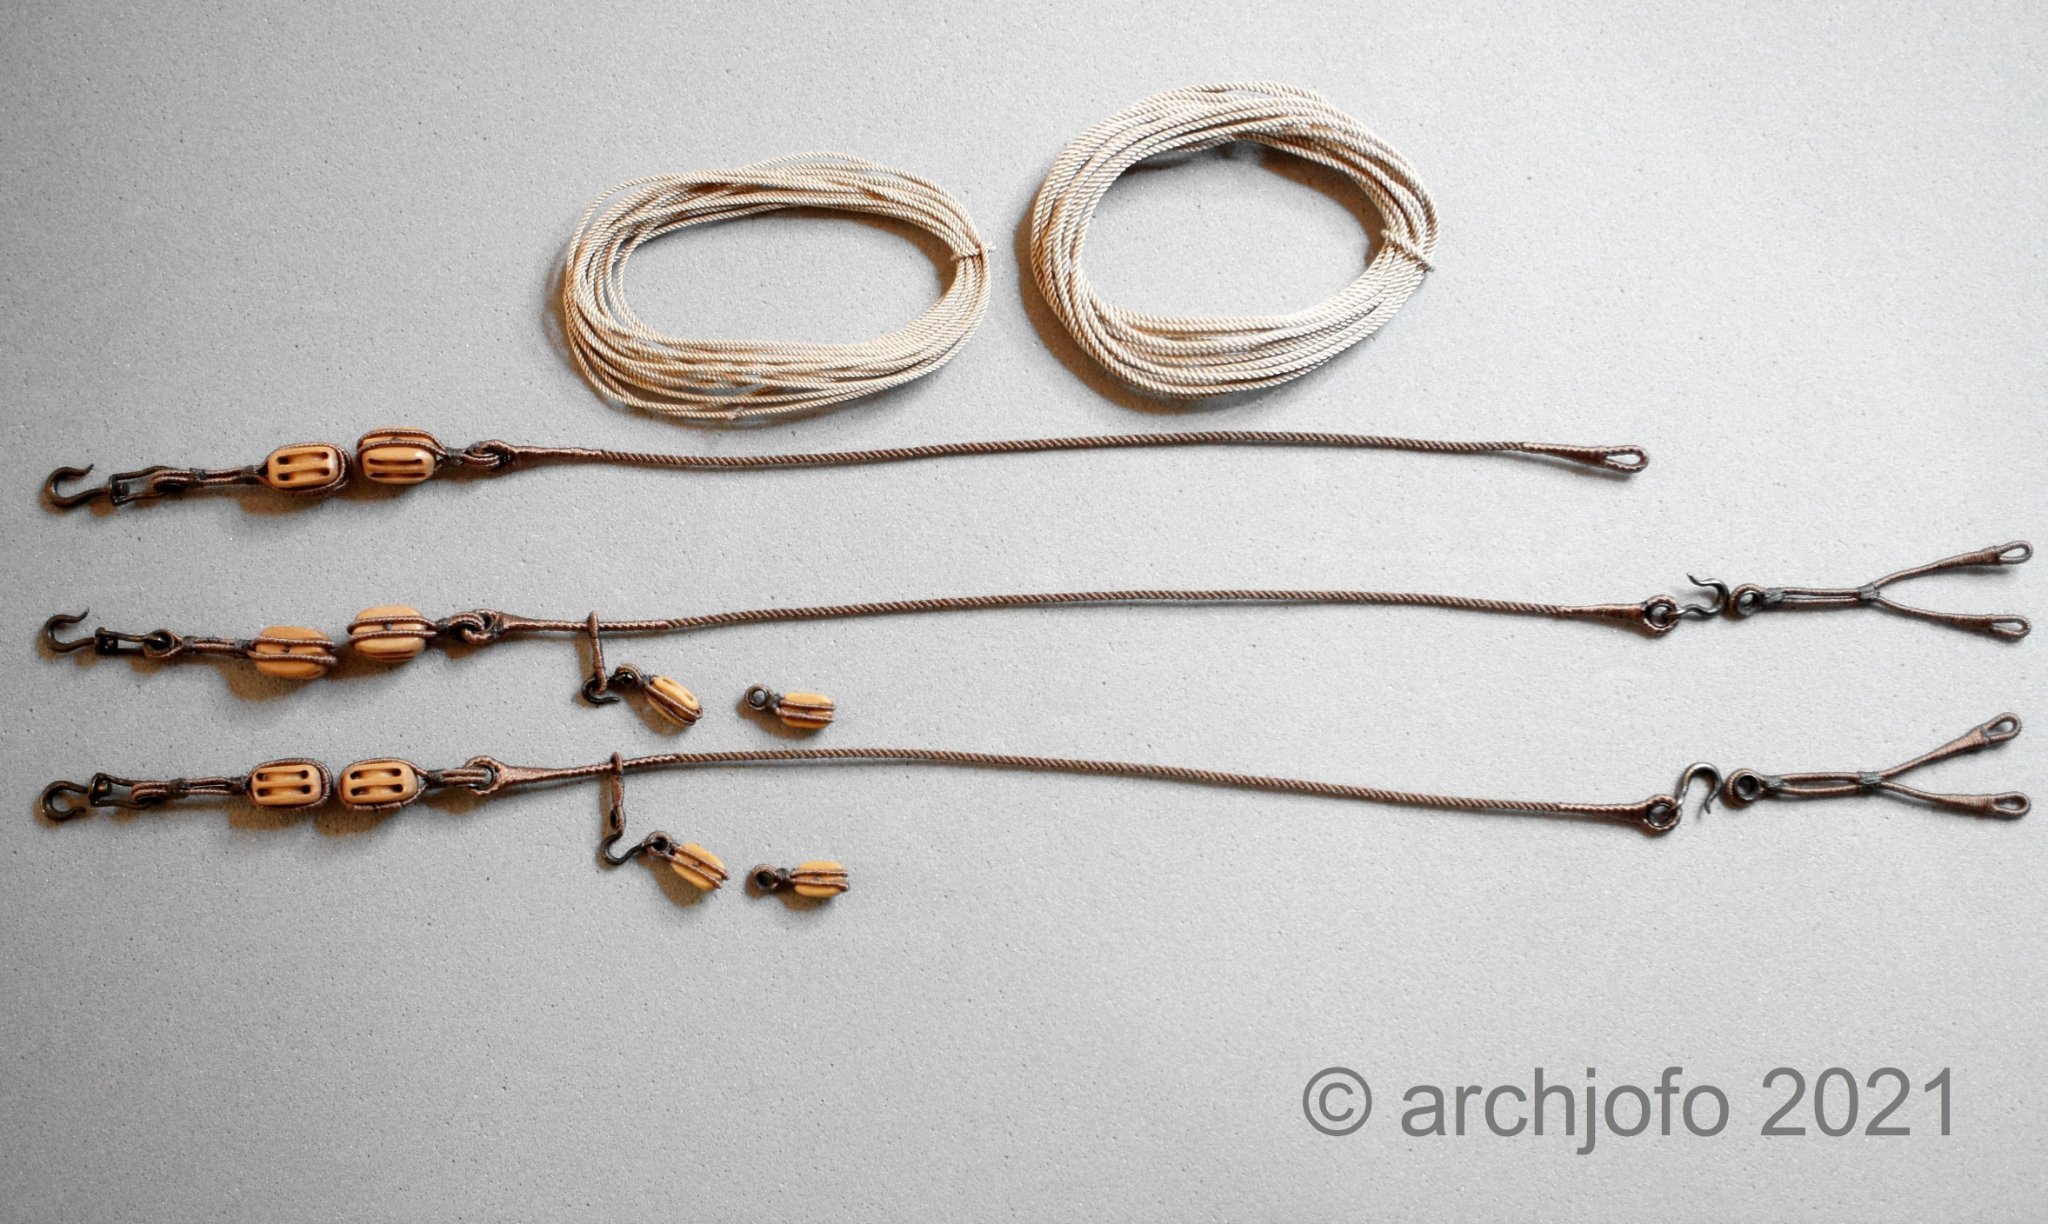
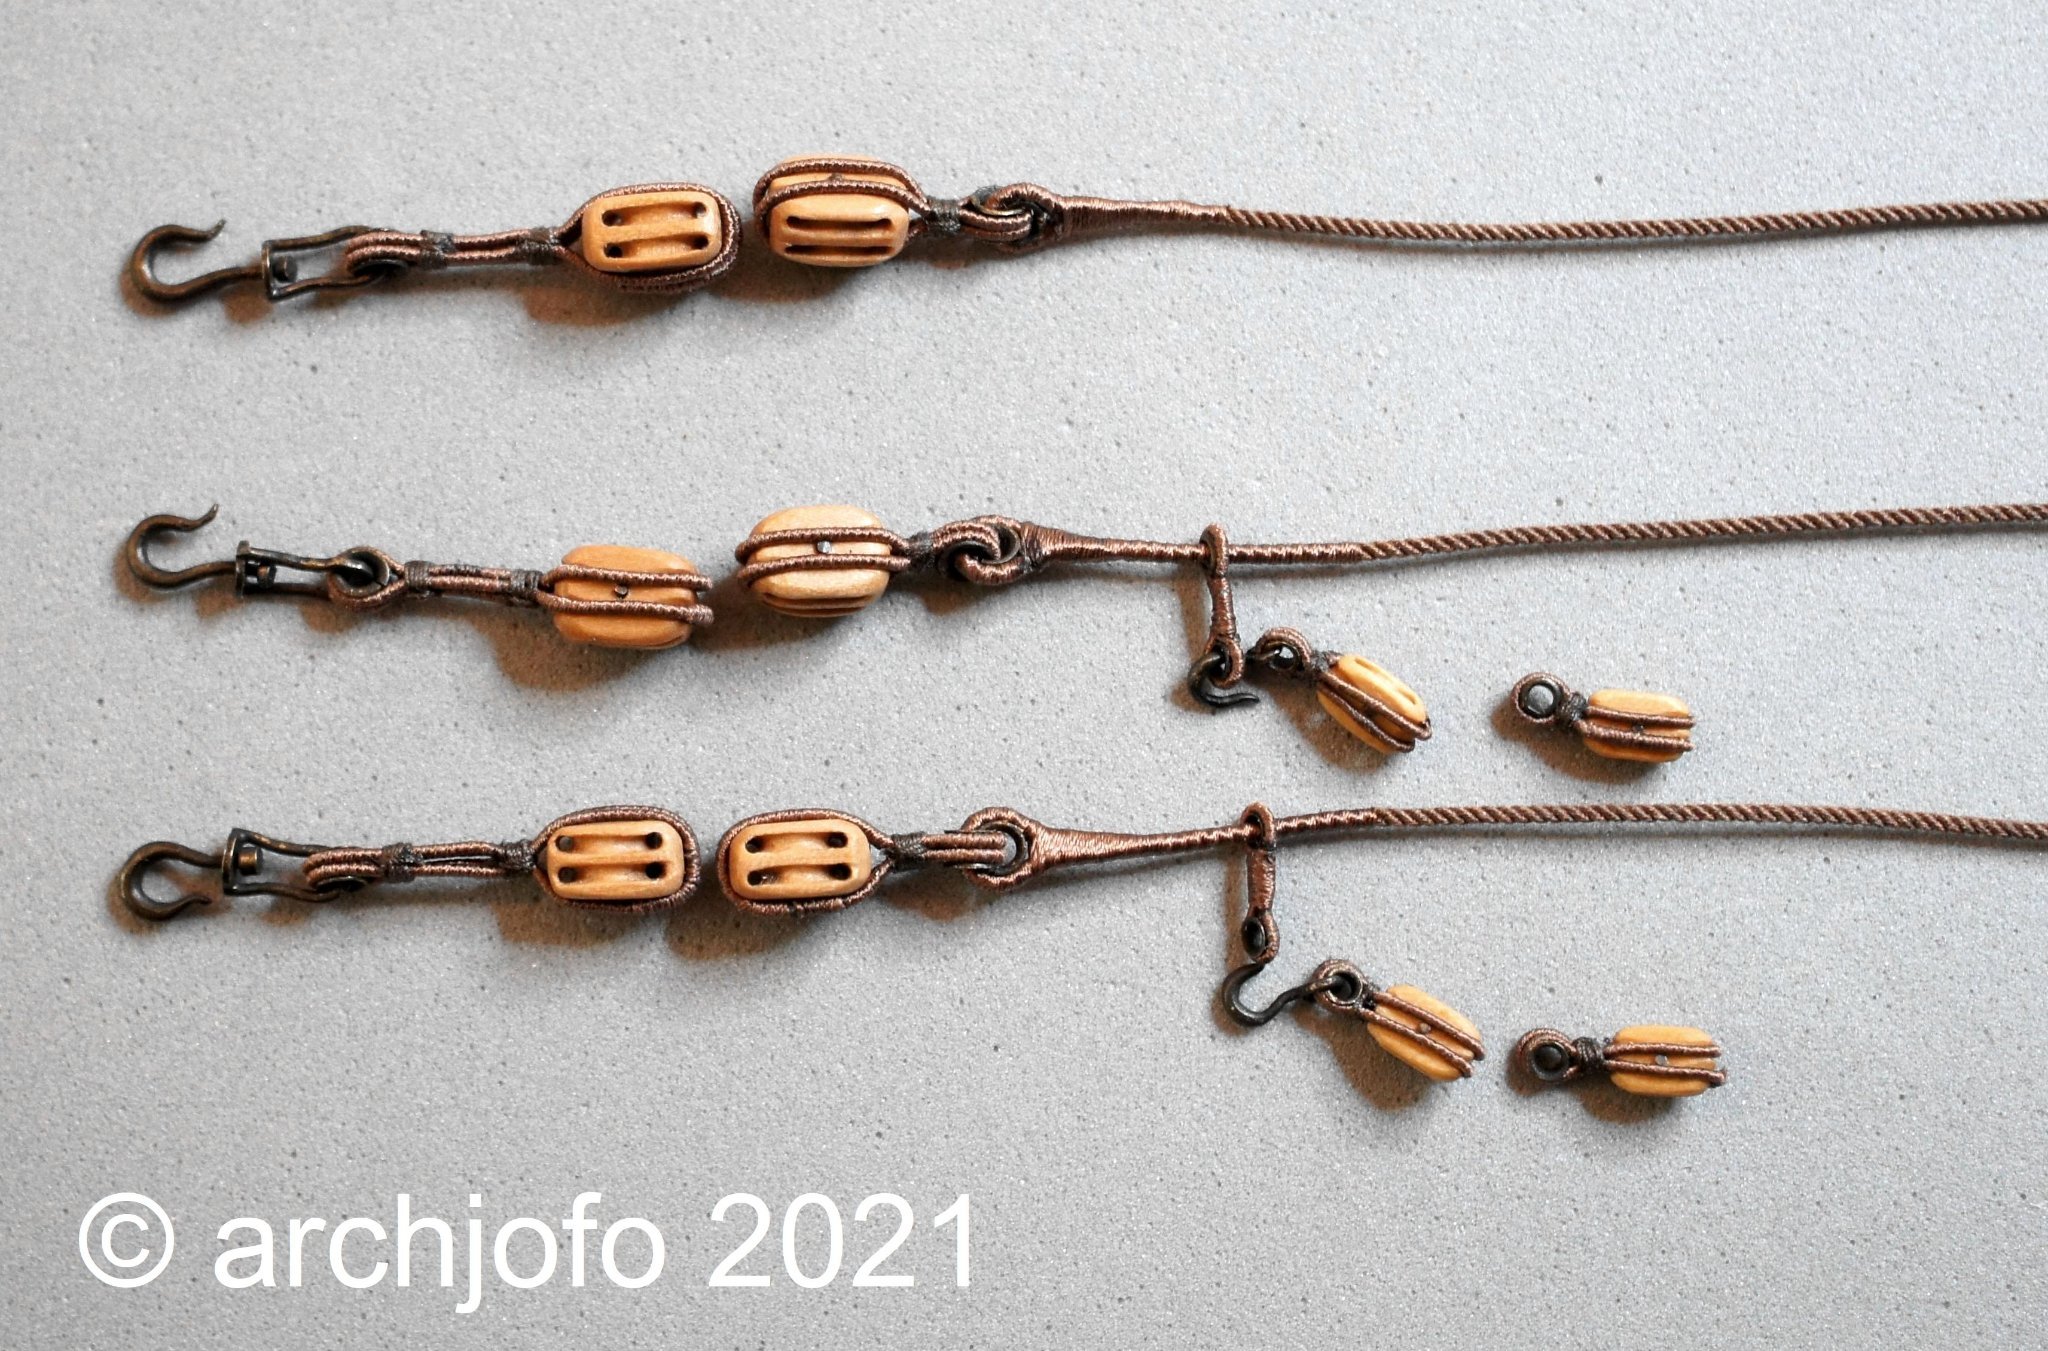
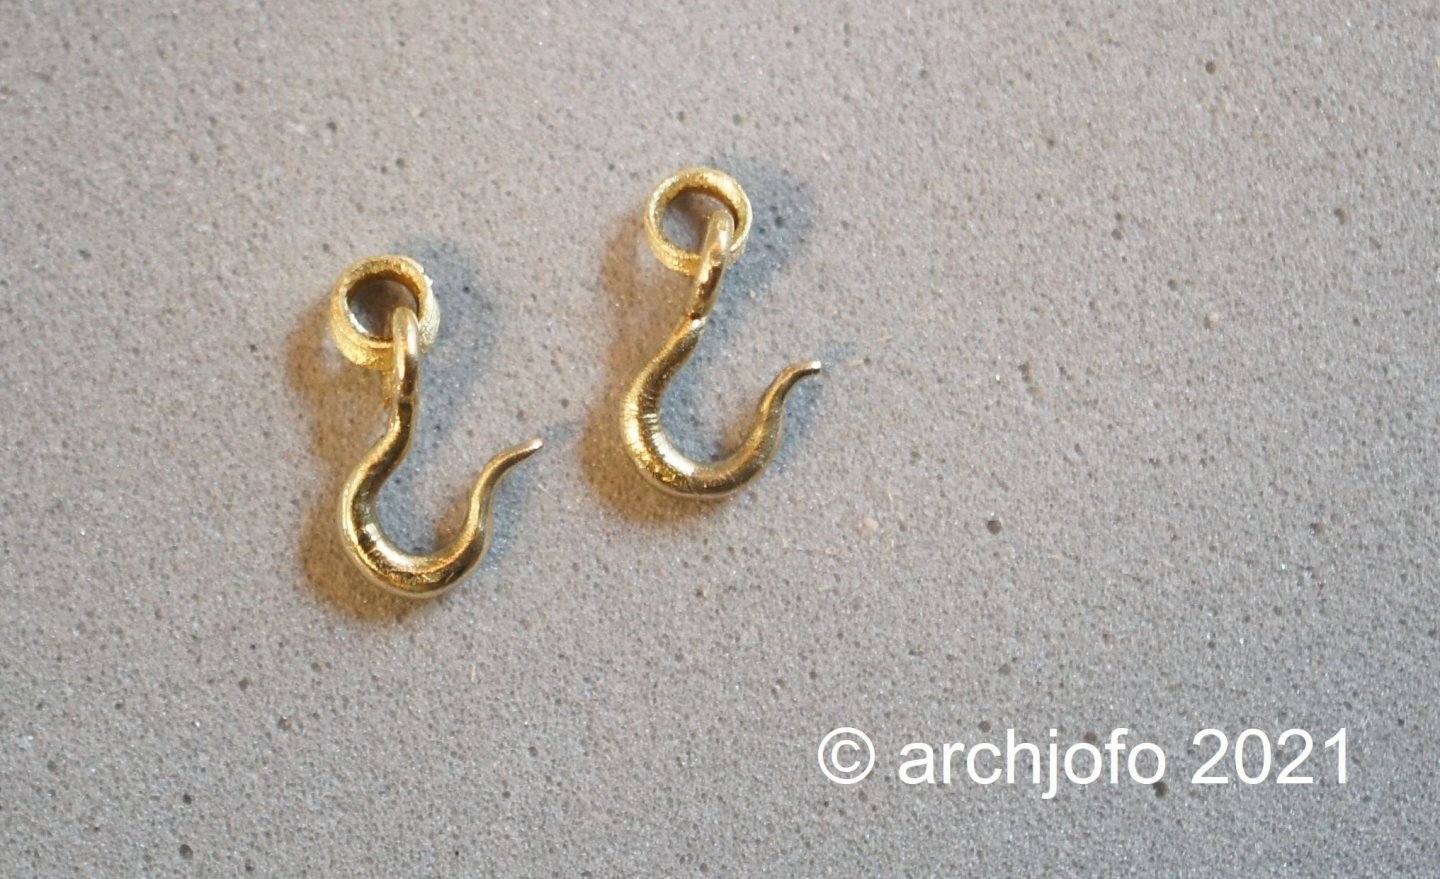
Continuation: Garnet tackle - Palan d'etai In the meantime I have finished all the components for the garnet tackles. The pendants were hung up on a specially made mast collar with a thimble. I made these hooks with thimbles using my own method. For this purpose, an 18 mm long brass rod with a diameter of 1.2 mm was turned off with a needle file on the Proxxon fine grinder so that the thickened areas were created at the corresponding points on the hooks. I made the thimbles in the tried and tested manner from brass tubes. The next picture shows the finished hooks with thimbles, not yet blackened. The other two pictures show all components of the 3 garnet tackles: - 6 double blocks, 3 of which have swivel hooks for the tackles - 4 single blocks for the guides, 2 of them with hooks - 2 guide elements - 2 mast collars (one tackle was lashed directly to the stay with an eye) - ropes ø 0.46 mm and ø 0.67 mm (original ø 32 mm or ø 22 mm) - 3 pendants ø 0.90 mm (original ø 43 mm) Sequel follows …


-
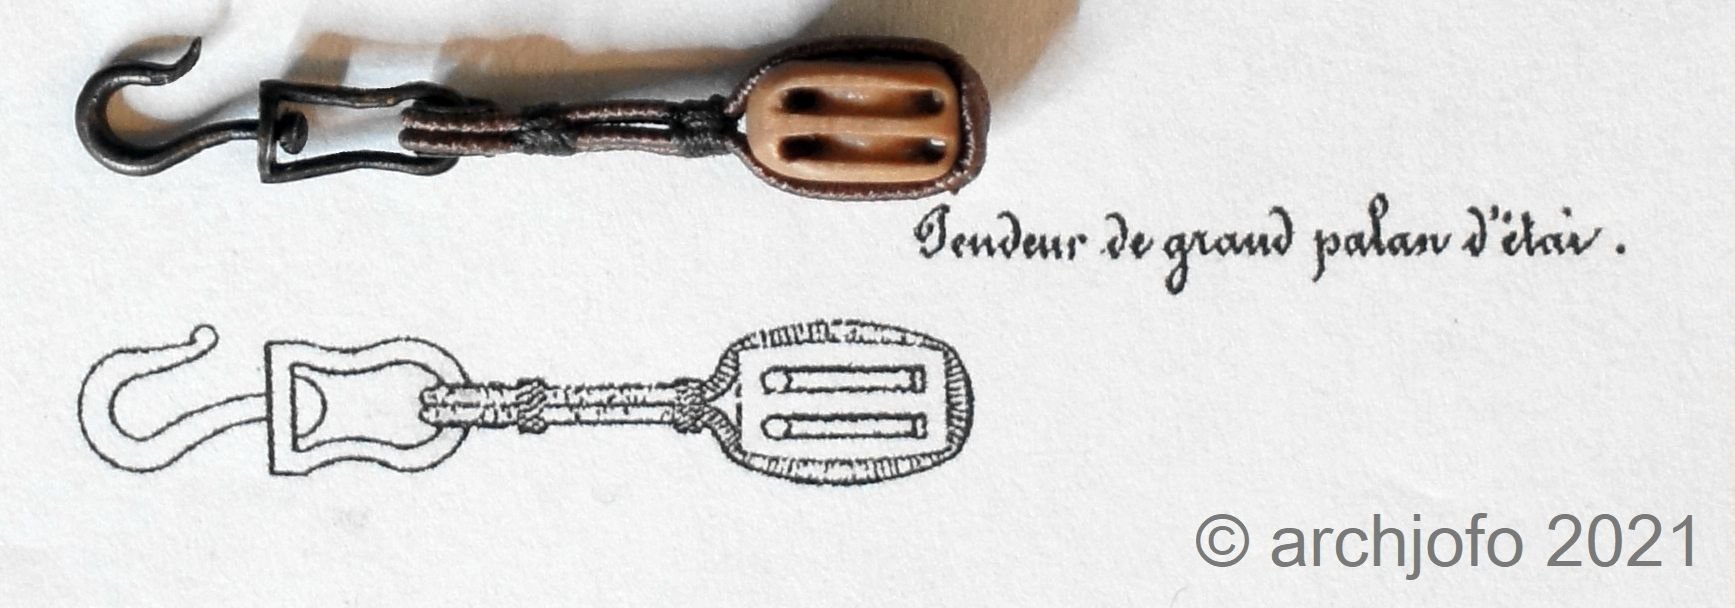
Hi there, the first strop for the heavy garnet tackle block with (croc à émerillon) the swivel hook is ready. The others are then produced in the same way. Quelle: Atlas du Génie maritime, annexe Nr. 1, Pl. 2

-
USF Essex by mtbediz - FINISHED - 1:50
archjofo replied to mtbediz's topic in - Build logs for subjects built 1801 - 1850
Fantastic work ! -
Hello John, congratulations on the very nice and very informative construction report, with many suggestions. In addition, a wonderfully built model ship.
- 160 replies
-
- 1
-

-
- cheerful
- Syren Ship Model Company
- (and 1 more)