Stuntflyer
-
Posts
1,197 -
Joined
-
Last visited
Content Type
Profiles
Forums
Gallery
Events
Everything posted by Stuntflyer
-
 Bob - I ran into the same problem or at least I think so. By "plumb" I think you mean that the risers are not vertical. I was able to get the windlass close enough to the riser so that the pin was hardly noticeable. Not that your going to do that now, just found your dilemma interesting. Whether your solution is right or wrong, I wouldn't know. I just like the way you are able think outside the box. Mike
- 277 replies
-
- 2
-

-
- model shipways
- 18th century longboat
- (and 1 more)
-
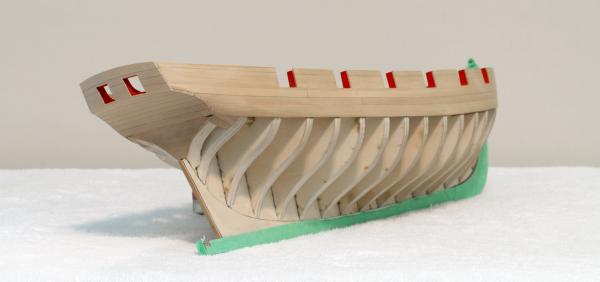
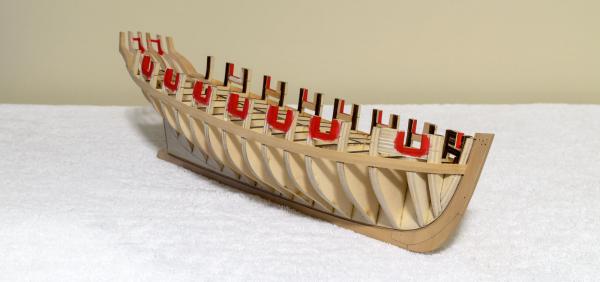
With those last two planks installed, I could see where I over sanded a few of the bulkheads in the fairing process. I found five areas that needed a 1/64± shim. I ripped them from some laser cut soft ply I had lying around. Once glued, I sanded them to the proper curve.
- 452 replies
-
- 15
-
-
- cheerful
- Syren Ship Model Company
- (and 1 more)
-
Maury, Jason, thanks! Ian - I actually did read the instructions. I was just over thinking the process. Bob - Ha ha! we'll see who ends up being the follower. Mike
- 452 replies
-
- 2
-
-
- cheerful
- Syren Ship Model Company
- (and 1 more)
-
After applying seven coats of black onto the wales, possibly more still needed, I'm finally ready to move onto the next chapter. The first two belts of planking below the wales are completed. My tendency to complicate things got in the way of my progress. I first tried making the drop planks from 1/4" stock only to find out that it was not wide enough. In the end I just followed the instructions. I made them from a small piece of 1/16" sheet reduced to 3/64" using the thickness sander. That worked out just fine.

- 452 replies
-
- 13
-
-
- cheerful
- Syren Ship Model Company
- (and 1 more)
-
Cutter Cheerful 1806 by rafine - FINISHED
Stuntflyer replied to rafine's topic in - Build logs for subjects built 1801 - 1850
Bob - Everything looks great! I did the area between the ports like you did, using built up planking. Works great as long as the pieces are pre-bent where necessary. I'm looking forward to your getting ahead of me. It will help me as I plod along while learning from you. Mike- 525 replies
-
- 4
-
-
- cheerful
- Syren Ship Model Company
- (and 1 more)
-
Maury - I see what you mean. I've applied three thinned coats so far, each one looking better than the one before. It still needs more.
- 452 replies
-
- 1
-
-
- cheerful
- Syren Ship Model Company
- (and 1 more)
-
Hello Erik, I just came across your Longboat build. It's looking very nice so far. It's a fun build. Enjoy! Mike
- 222 replies
-
- 1
-
-
- 18th century longboat
- model shipways
- (and 2 more)
-
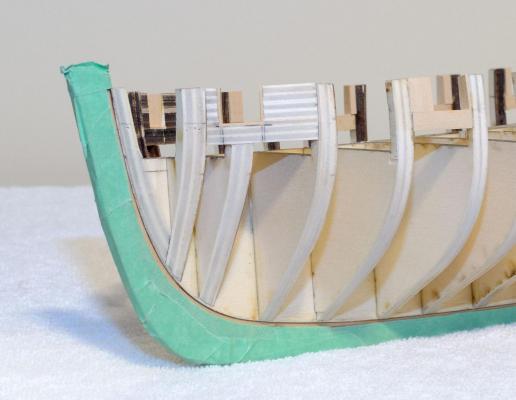
Before adding the second layer of wales I applied a coat of Wipe-on poly to the planking. The wales were gradually reduced in thickness about 1" from the stem until they were almost paper thin. Trying to paint the upper wales edges while on the ship is not something I would be comfortable doing. With that in mind I prepainted the edge that would be close to the planking and stem. When gluing the wales, I tried to use as little glue as possible as I wanted to avoid any glue seepage past the painted edge. There was some seepage, though very little, and I was able to remove it easily using a moistened Q-tip. Now I just need to finish painting the wales before starting on the remaining hull planking.

- 452 replies
-
- 11
-
-
- cheerful
- Syren Ship Model Company
- (and 1 more)
-
Bob, Jay, thanks! I really do appreciate all the comments and "likes". I'm getting ready to do the second layer of the wales. I hoping to get them done on the first try this time. My difficulty in making the fashion pieces was enough to make me rethink my approach to the various tasks ahead. Anyway, I should have something to show this week if all goes well. Mike
- 452 replies
-
- 2
-
-
- cheerful
- Syren Ship Model Company
- (and 1 more)
-
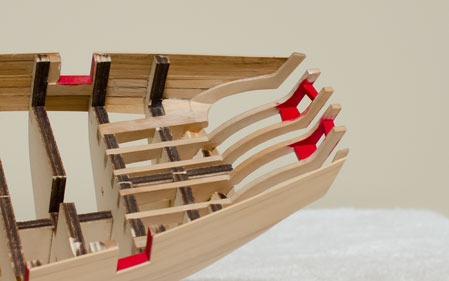
After four previous attempts I can say that I'm now happy with the way these fashion pieces look. The first photo shows were the counter has more curve at the bottom compared to the template. I was trying to shape the fashion pieces to follow the curve of the counter. This resulted in the pieces being too wide and misshaped. It might not look like much but trying to cover this area of the counter with the fashion pieces changes everything. The solution was to shape the fashion piece correctly and sand the counter, if necessary, to blend into the shape of the fashion piece. To be honest, very little sanding was necessary which really surprised me. In addition, it wasn't necessary to force the bottom of the fashion piece to a more pronounced curve like I had to before. Once installed they were sanded down to roughly 3/64" in thickness. Now the pieces have a gentle curve and a more delicate shape overall.


- 452 replies
-
- 15
-
-
- cheerful
- Syren Ship Model Company
- (and 1 more)
-
I wish I could say that I'm done making these fashion pieces but I can't. Gonna give it another try as I think I can do better. Hat's off to those who manage to get it right the first time.
- 452 replies
-
- 4
-
-
- cheerful
- Syren Ship Model Company
- (and 1 more)
-
I decided today to re-do the fashion piece. Too much taper at the bottom and the slightly widening section at the top really bothered me. The piece was easy to remove since I used PVA to adhere it. I made another and more accurate card stock template of the shape. This time I traced the shape onto the hull so I could see what the piece would look like once installed. I glued the piece to the hull with the tracing just showing outside the fashion piece. When the fashion piece was dry I removed the pencil marks with some alcohol on a Q-tip. At the bottom of the fashion piece the curve is quite pronounced and it is important to get a tight fit between the fashion piece and the first layer wales. I was able to finesse the curve a bit more by using a cloths iron. I adhered this area with CA. Although it might be hard to see in the photos (as the fashion piece angles inward at the bottom) the result seems closer to what the plans call for, I think.
- 452 replies
-
- 5
-
-
- cheerful
- Syren Ship Model Company
- (and 1 more)
-
Just wanted to post a small update that took a lot of trial and error to get halfway right. The result, seen here, is the first of the two fashion pieces.

- 452 replies
-
- 13
-
-
- cheerful
- Syren Ship Model Company
- (and 1 more)
-
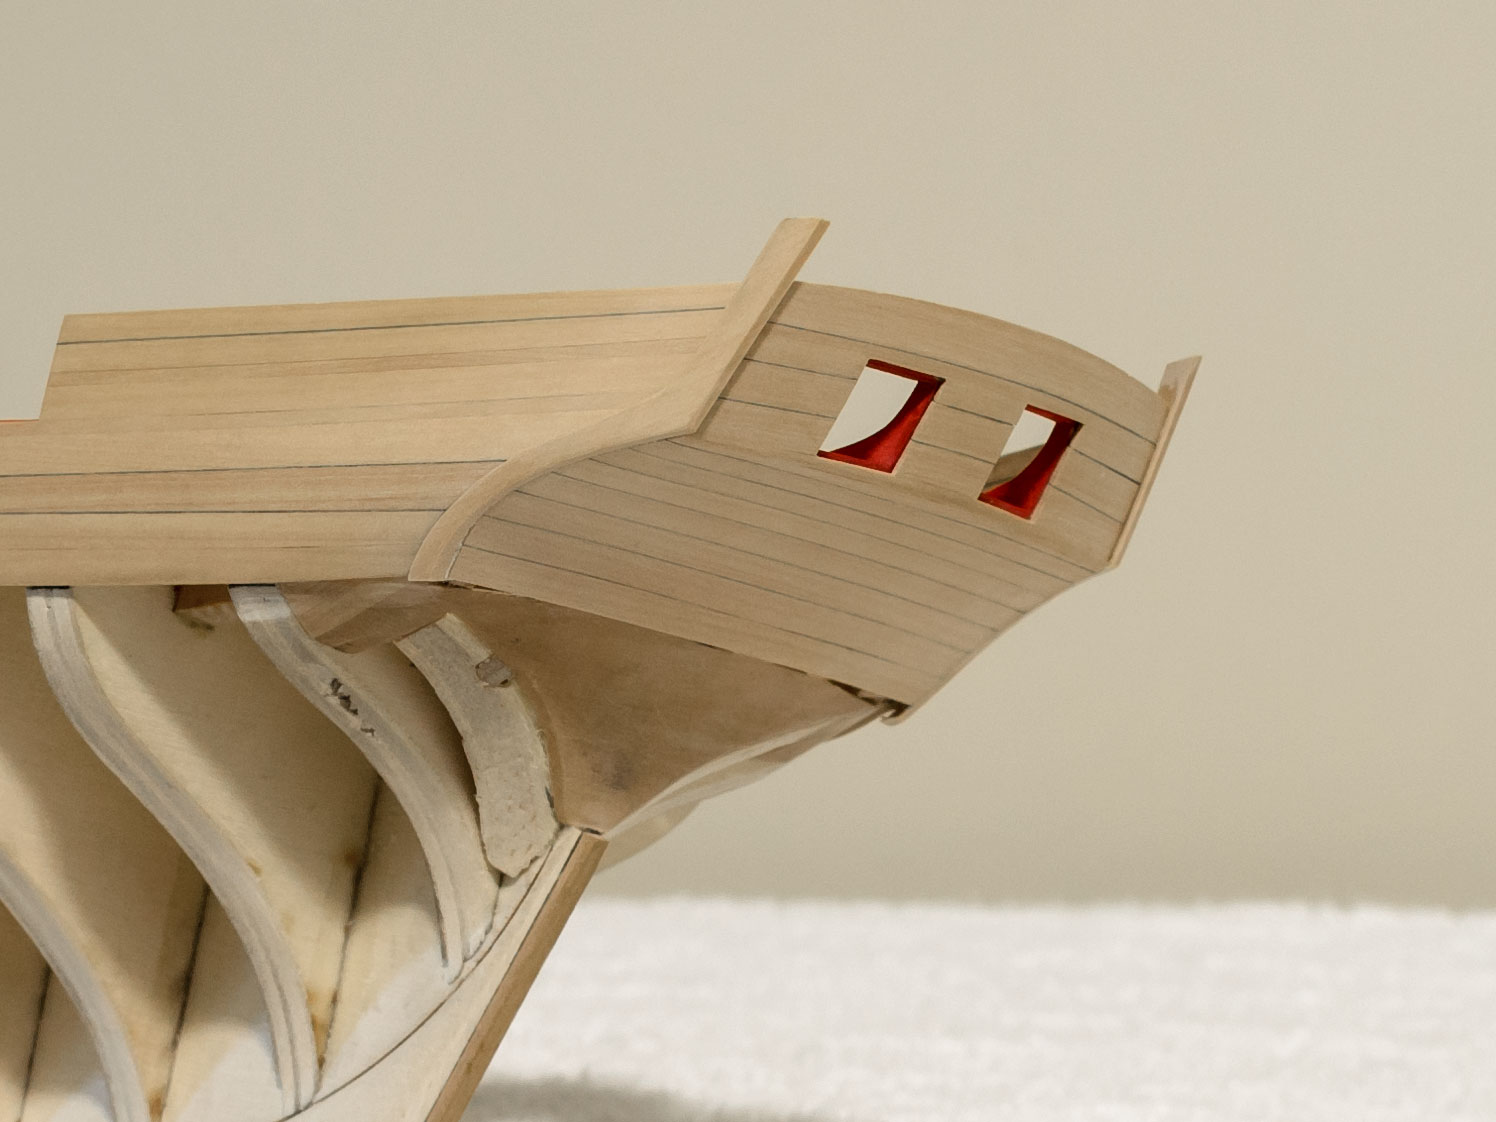
Bob, it was nice meeting you too. I will be following your Cheerful log which is looking great,btw! While planking the counter and transom, I ran into a few issues that had to be resolved. The back of the stern frames had to be shimmed an additional 1/32" so that the counter planking would sit 1/8" above the square tuck filler piece. This is important because the square tuck is 1/8" thick and should be close to flush with the counter planking before sanding. While planking the transom I noticed that the last 3/16" plank would not cover the remaining stern frames, so I went with a wider 1/4" plank. If I had gone with a 3/16" plank, I would not have been able to achieve the proper curve at the top of the transom. I didn't think of it at the time but I could have used a tick strip to determine the proper width for the four planks.
- 452 replies
-
- 13
-
-
- cheerful
- Syren Ship Model Company
- (and 1 more)
-
Cutter Cheerful 1806 by rafine - FINISHED
Stuntflyer replied to rafine's topic in - Build logs for subjects built 1801 - 1850
Looks great Bob! I'm looking forward to your future posts. I'm sure that you will be ahead of me in no time. Mike- 525 replies
-
- 1
-
-
- cheerful
- Syren Ship Model Company
- (and 1 more)
-
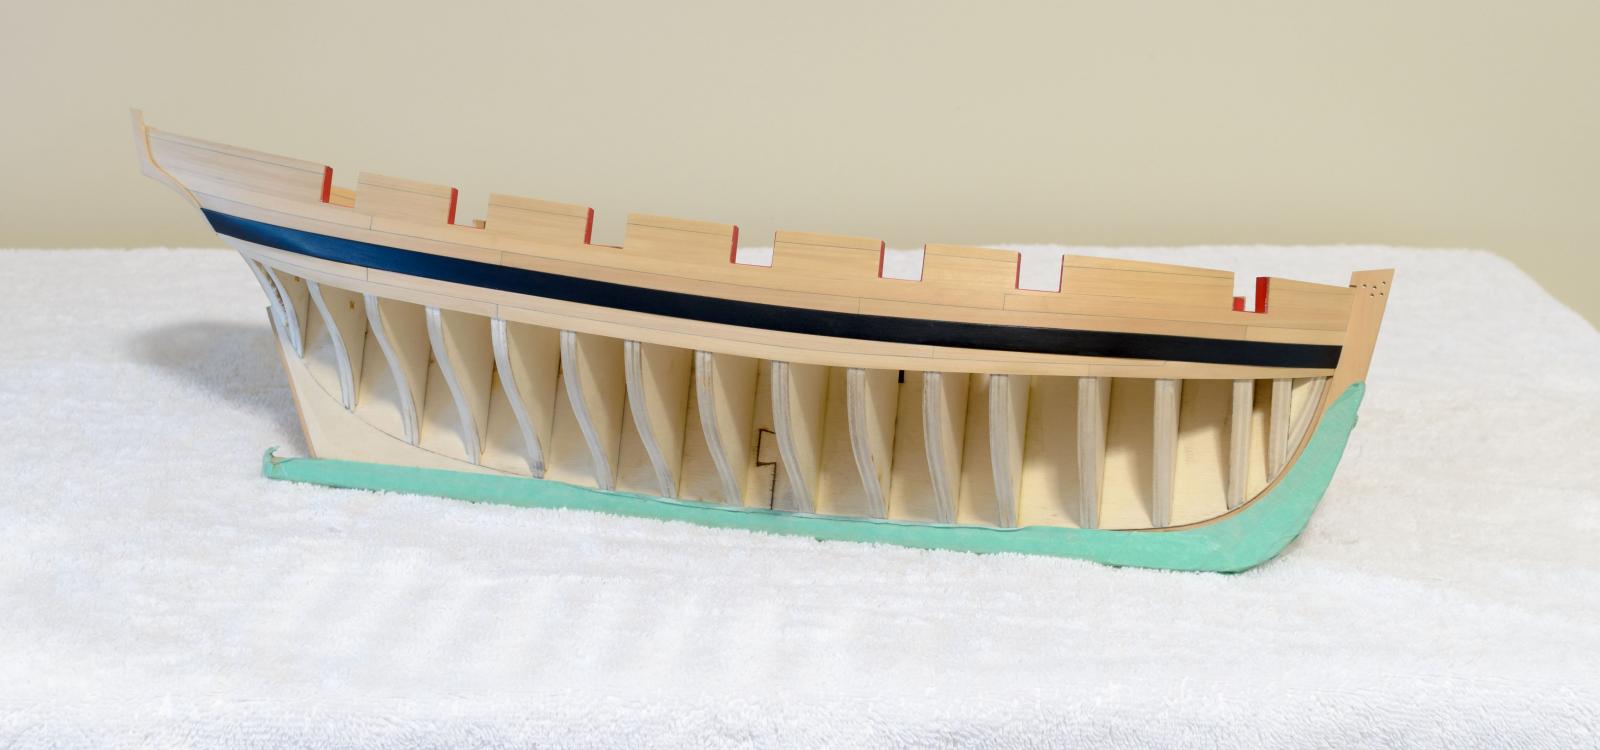
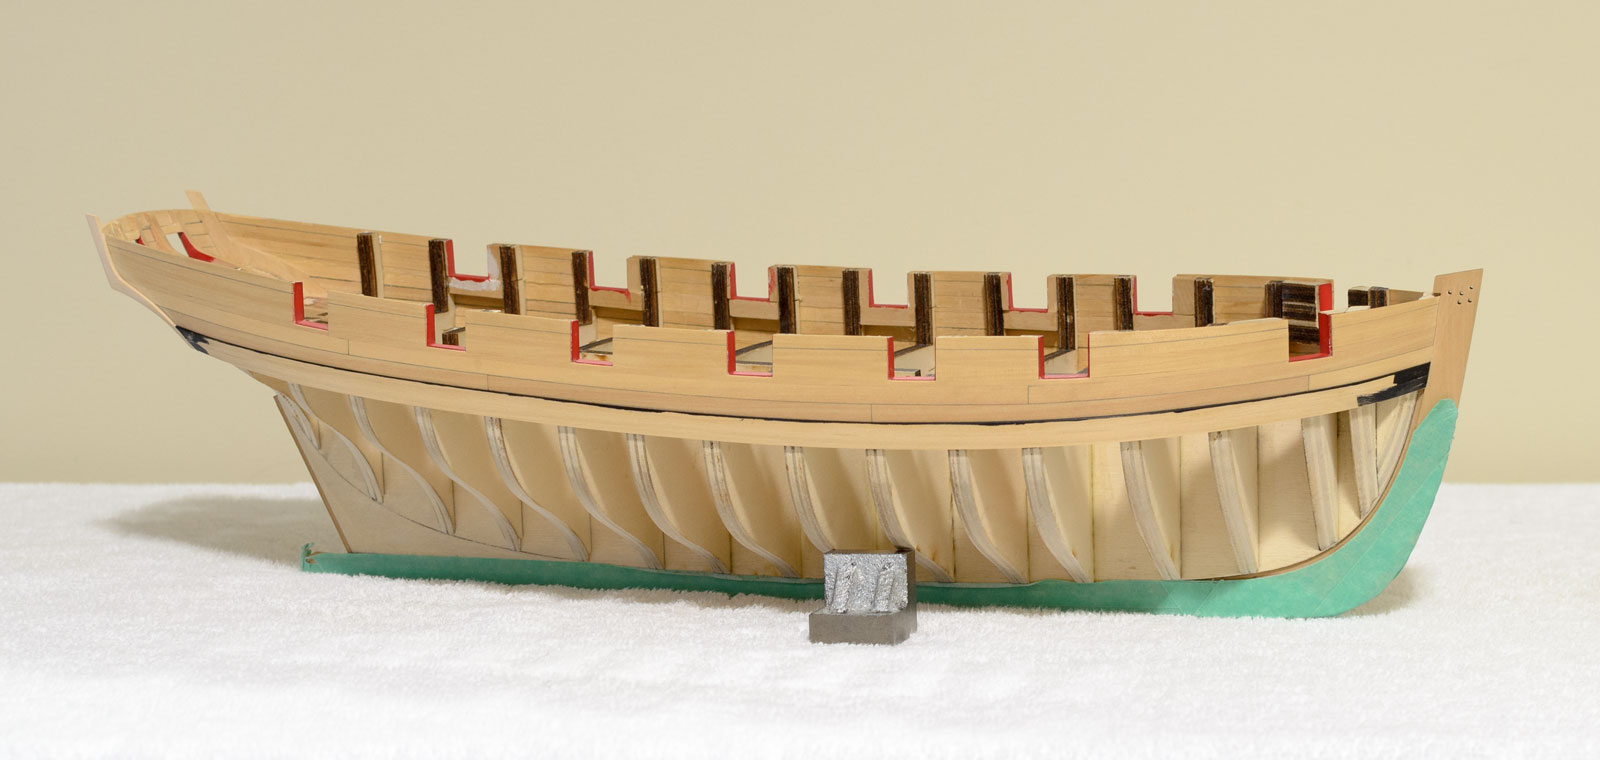
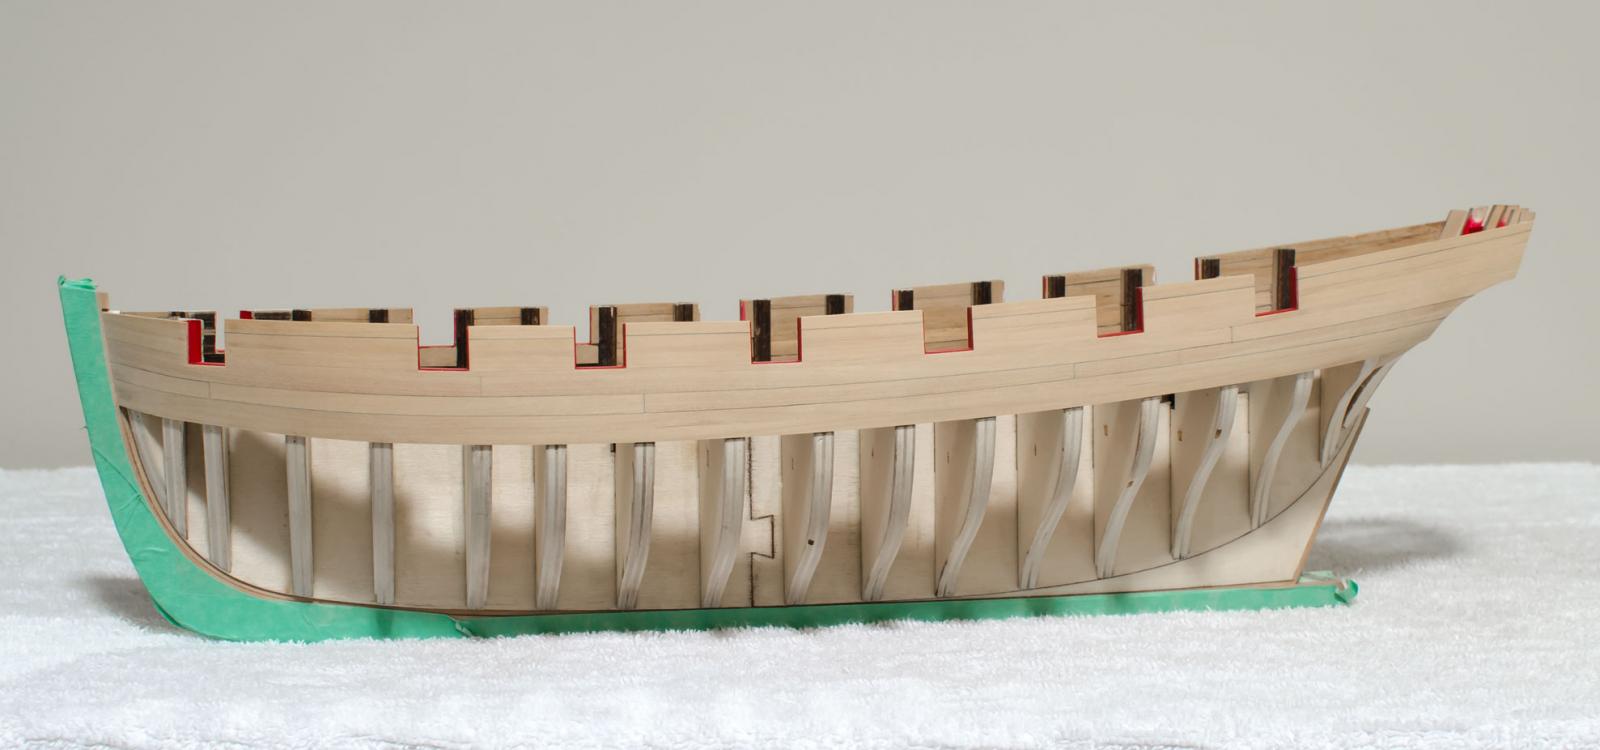
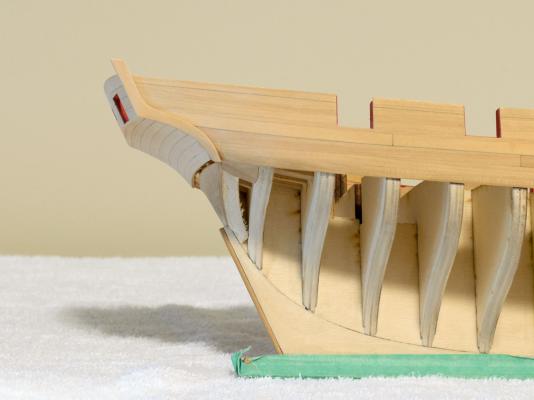
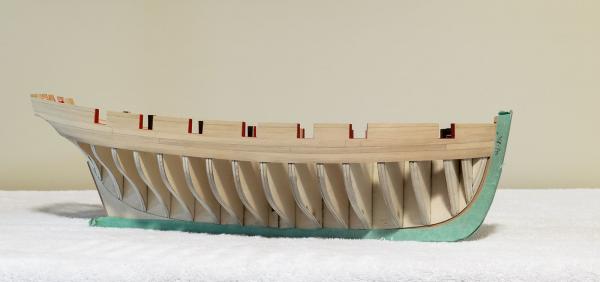
Planking of the port side above the wales is now completed. Both sides have had an initial sanding with 180 grit. In preparation for the stern planking the outside stern frames were thinned to 1/16" in thickness. I'm looking forward to getting started on the planking so I can tighten up this area which is still somewhat fragile.
- 452 replies
-
- 18
-
-
- cheerful
- Syren Ship Model Company
- (and 1 more)
-
Very nice as usual Chuck! When do you thin down those stern frames? Mike
- 1,051 replies
-
- 1
-
-
- cheerful
- Syren Ship Model Company
- (and 1 more)
-
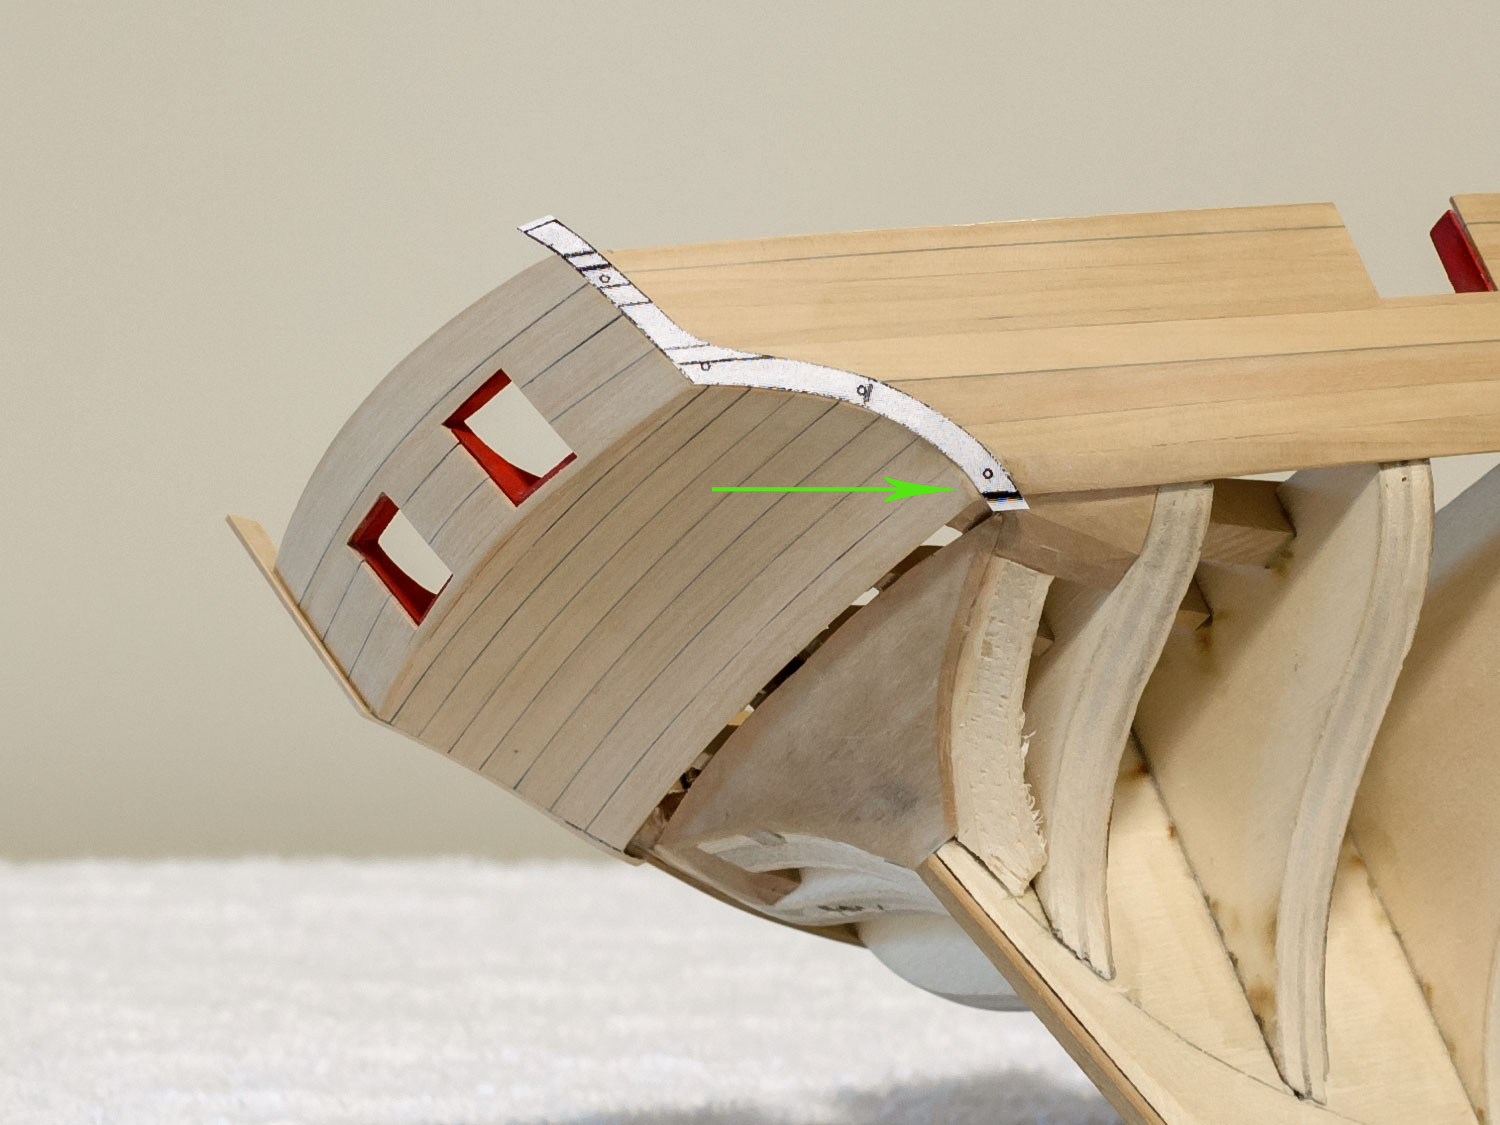
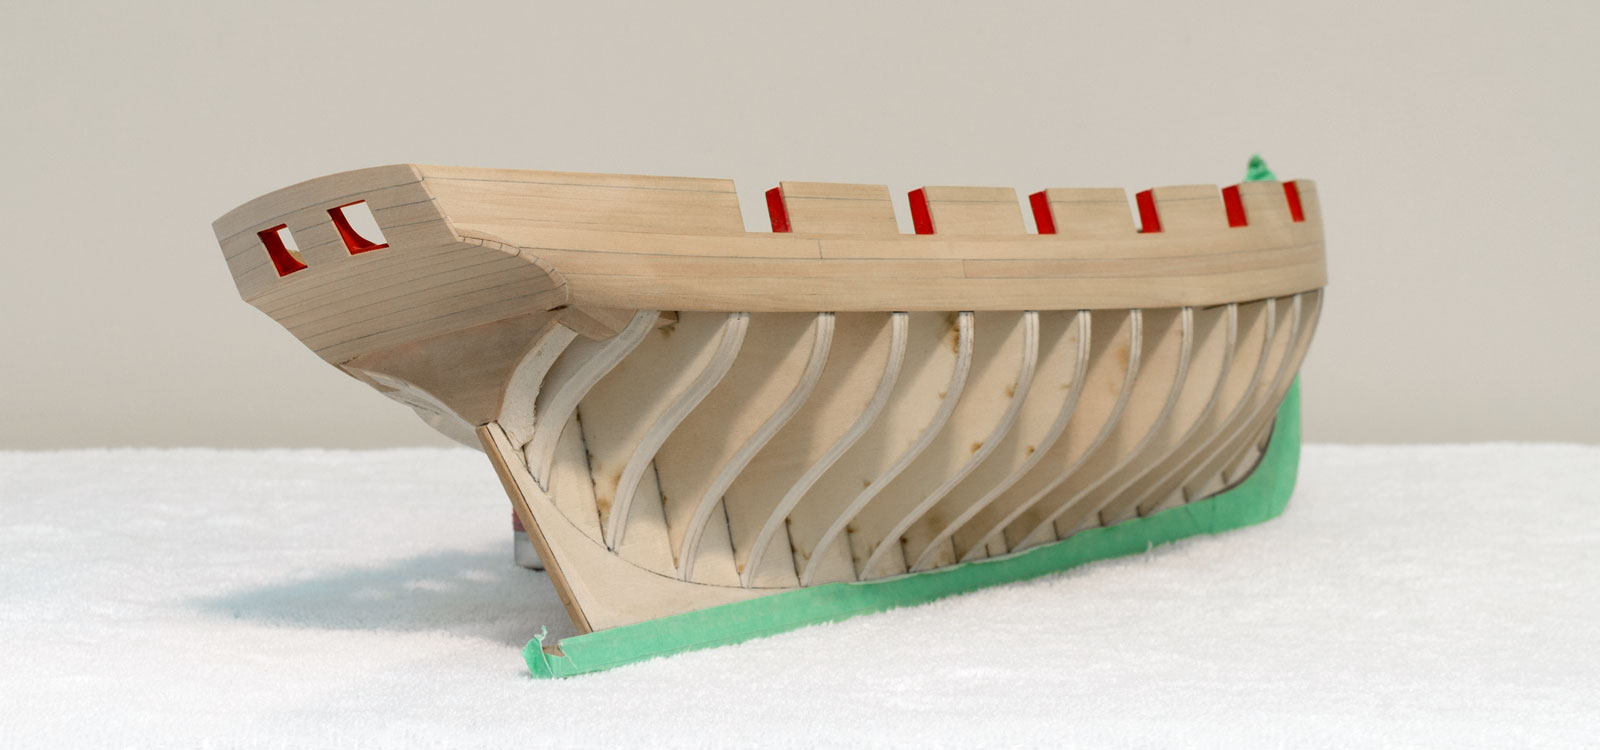
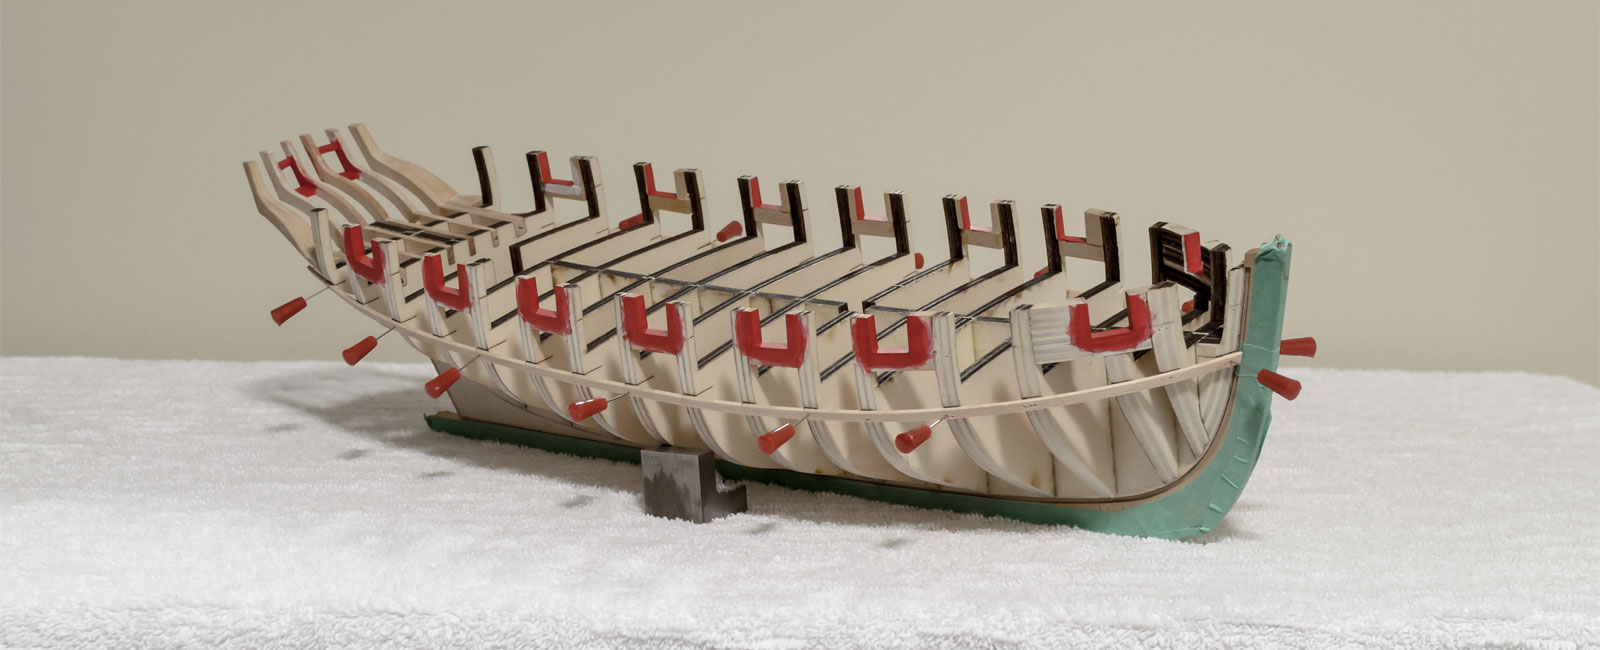
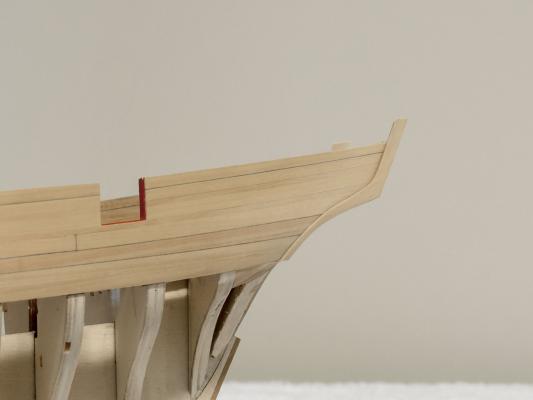
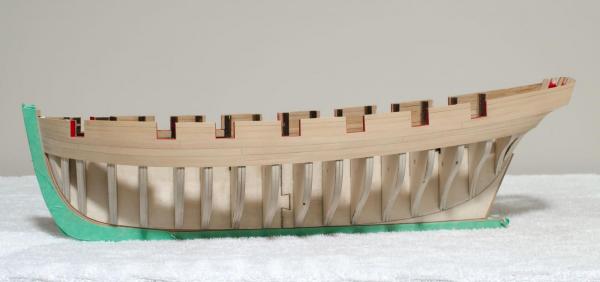
Planking above the wales has proven to be a rather time consuming process as a lot of time was spent getting a good fit between the gun ports. At one point I realized that I had the wrong curve, aft of the last gun port, which required a more upward sweep. Rather than replacing the whole plank I just added a filler piece after the curve was corrected. The filler piece is small and will eventually be covered by the fashion piece. Photo showing one side completed above the wales and the small filler piece at the stern.
- 452 replies
-
- 17
-
-
- cheerful
- Syren Ship Model Company
- (and 1 more)
-
Hi Ken, I just got through reading your log. As you know I saw your model at the last NJ meeting and you are doing a great job on her. I didn't realize how nice looking a ship Rattlesnake was. Some of the parts you made are quite small and they look great too. You must be a very patient guy. Btw; I share your thoughts regarding Jason's wood, really high quality stuff. Anyway, count me in on the watch list. Mike
-
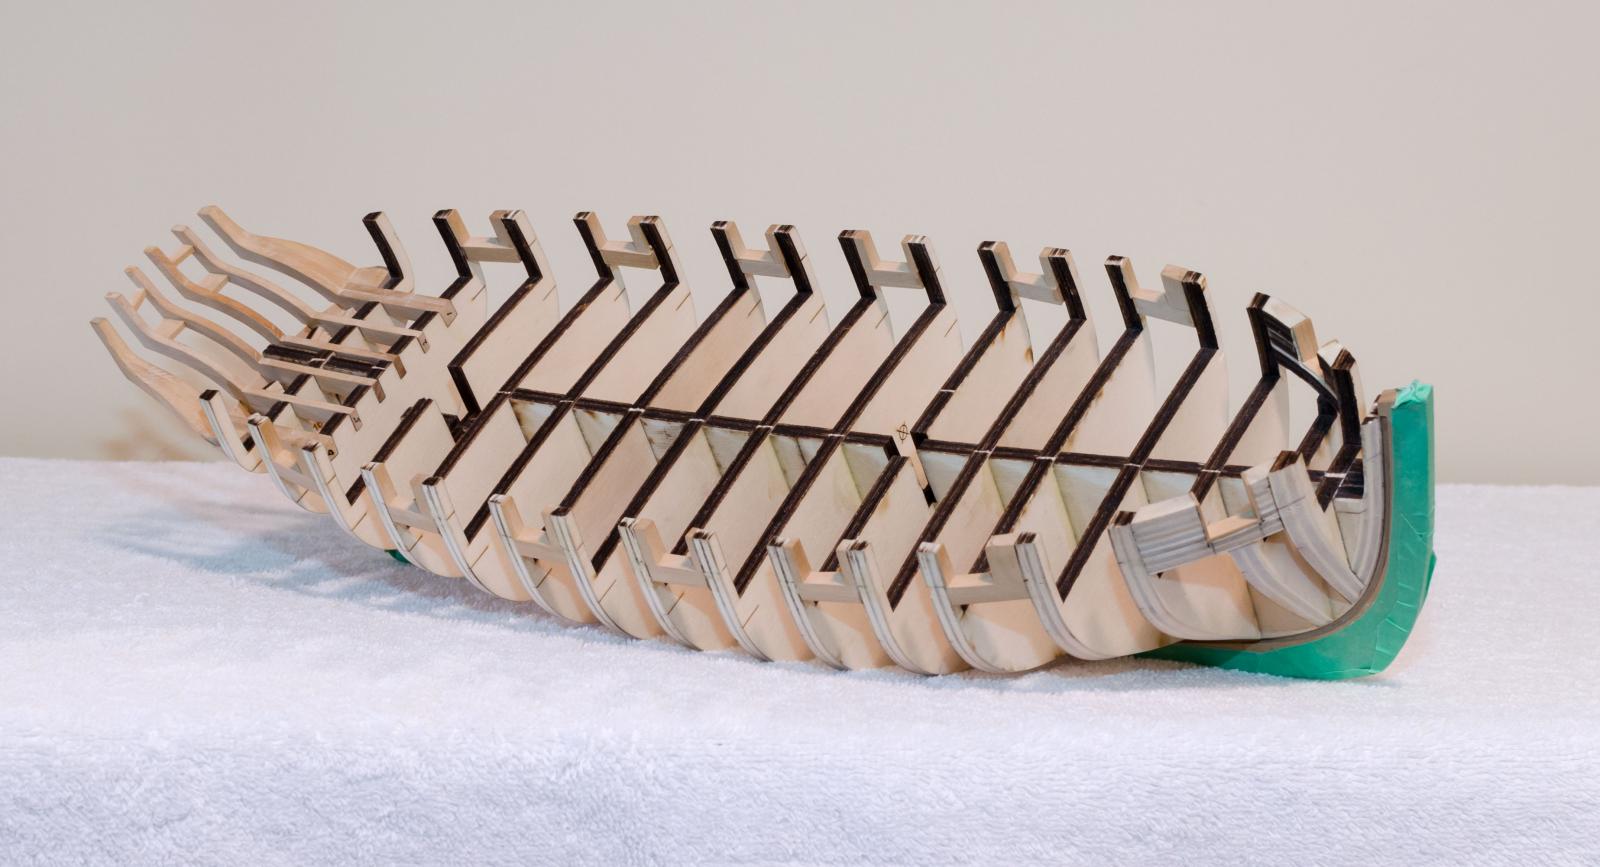
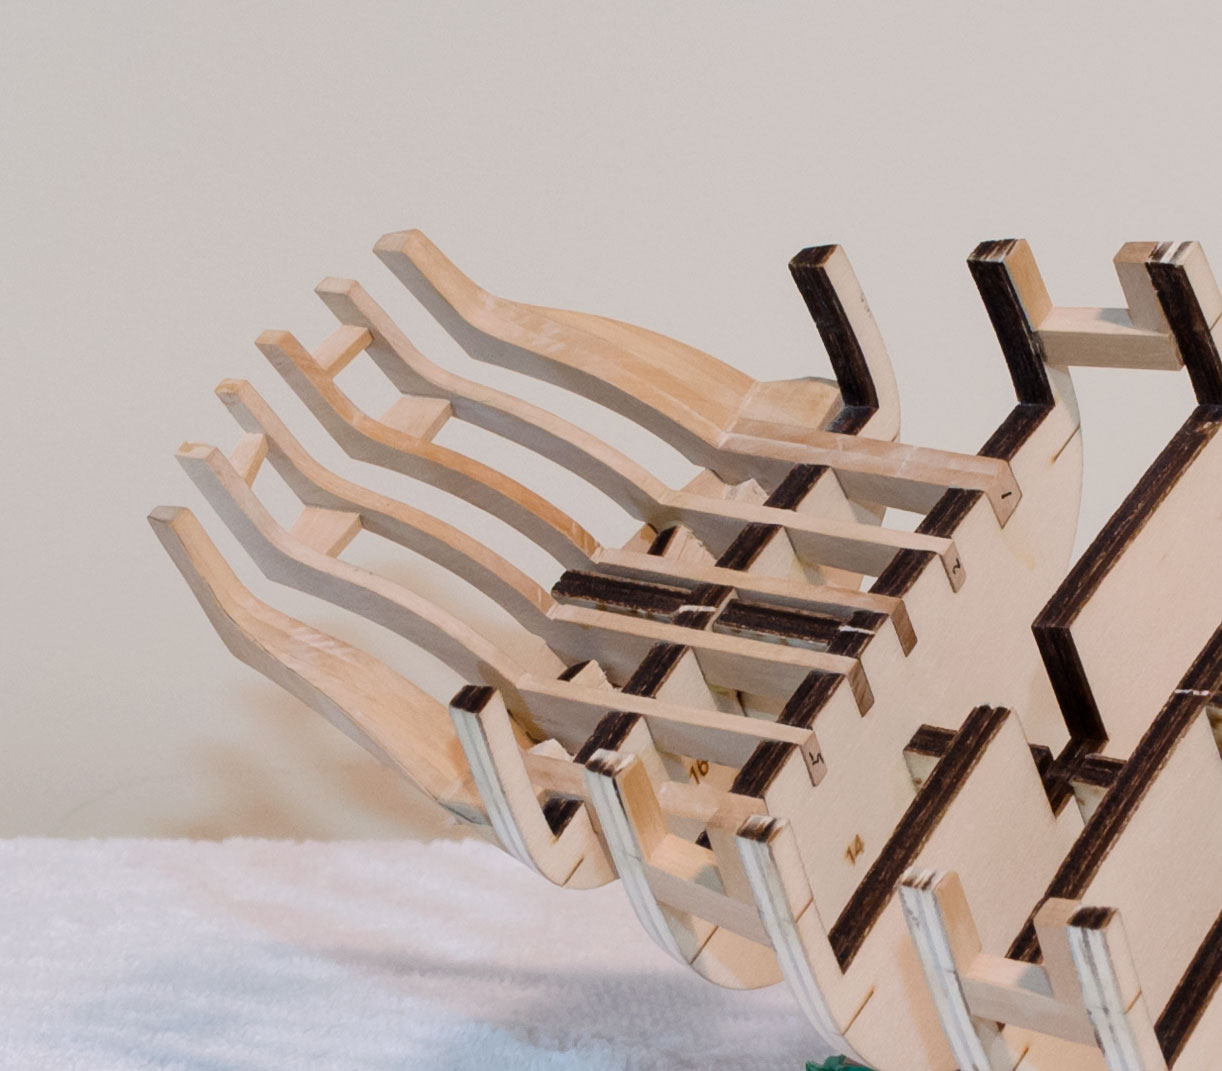
I'm now onto the hull planking starting with the first of the two wale layers. I made sure that each plank fit nicely into the stem to avoid as much sanding as possible. I don't have the clamp and glue technique sorted out yet so I just worked my way aft by hand and glued two or three bulkheads at a time. Although the wale location was previously marked, I did make some tiny adjustments as I went along. This was especially true where I had to ensure that both wales end up at the same location where the break of the counter and square tuck meet.
- 452 replies
-
- 18
-
-
- cheerful
- Syren Ship Model Company
- (and 1 more)
-
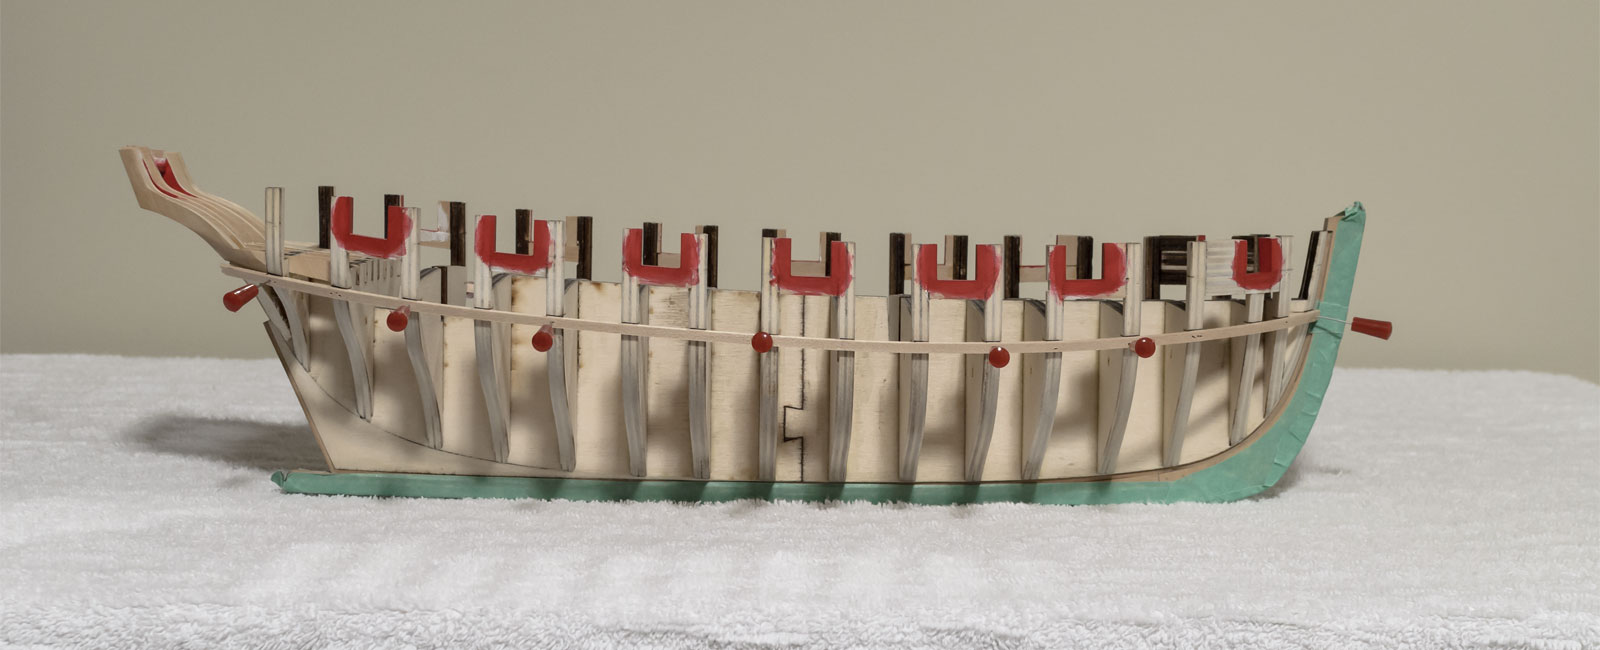
I was able to complete the port painting after applying about 15 thinned coats of red over a dark pink base. The temporary battens marking the bottom edge of the wales were pinned evenly on both sides of the hull. For the most part the batten runs matched the reference lines along the bulkheads very closely.


- 452 replies
-
- 15
-
-
- cheerful
- Syren Ship Model Company
- (and 1 more)
-
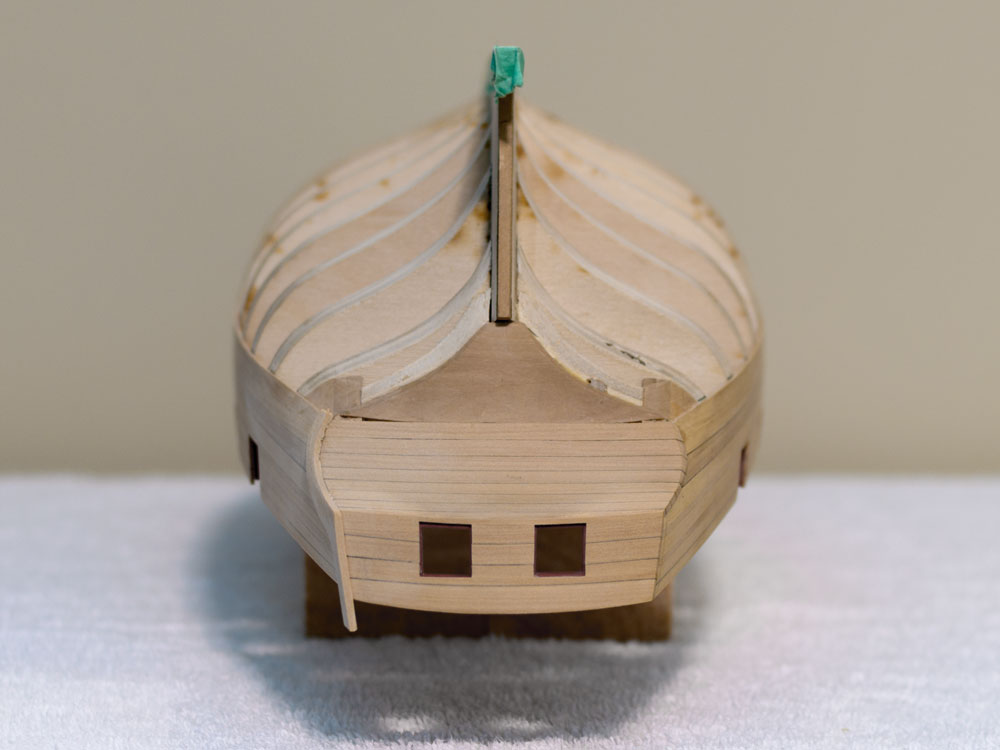
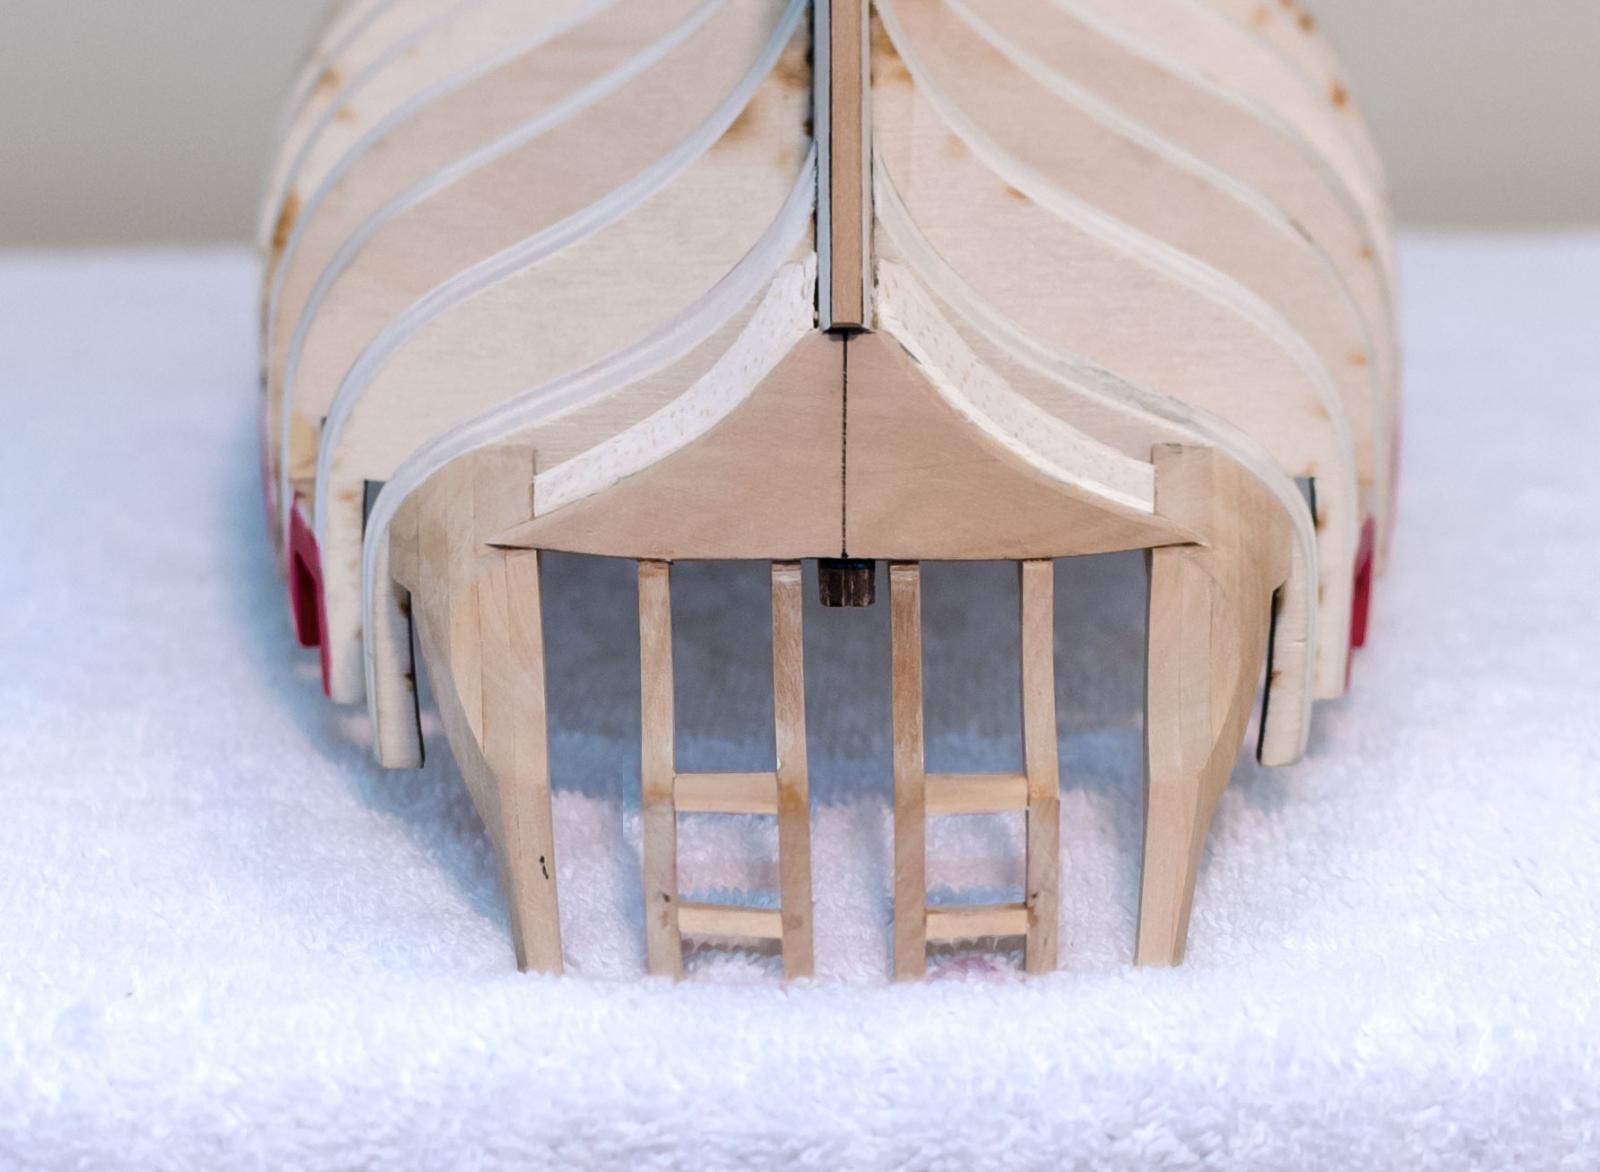
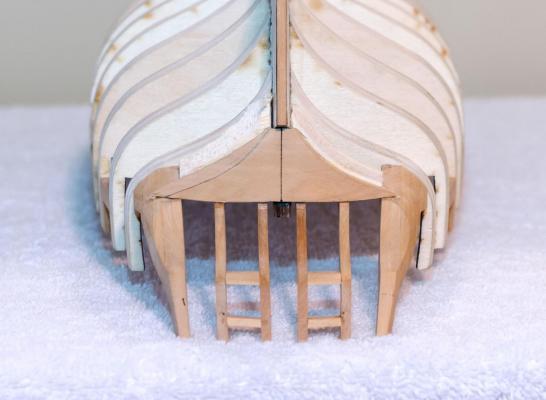
Before moving too far into chapter three, here is a photo showing the final sanding of the square tuck
- 452 replies
-
- 10
-
-
- cheerful
- Syren Ship Model Company
- (and 1 more)
-
Chuck, What would be a good color for the red paint? I have tried Winsor and Newton and they seem to work well. I see that you used Crimson on the Winchelsea
-
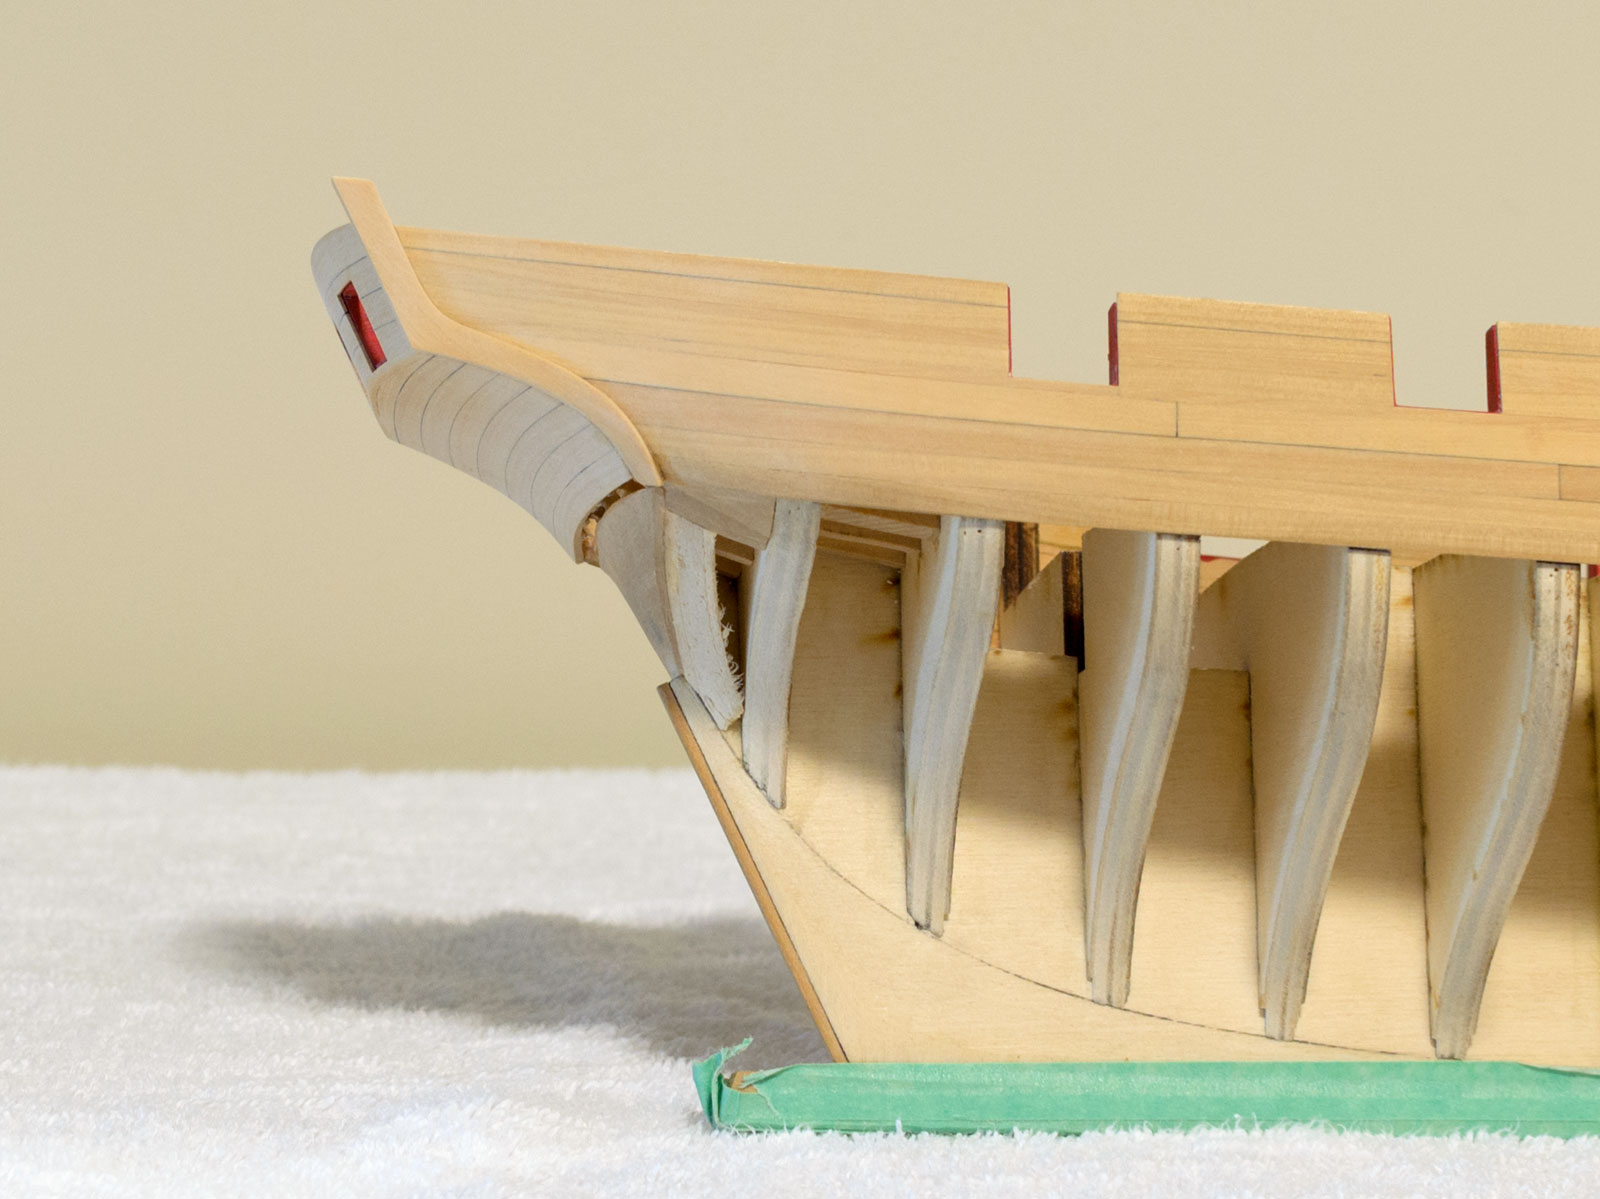
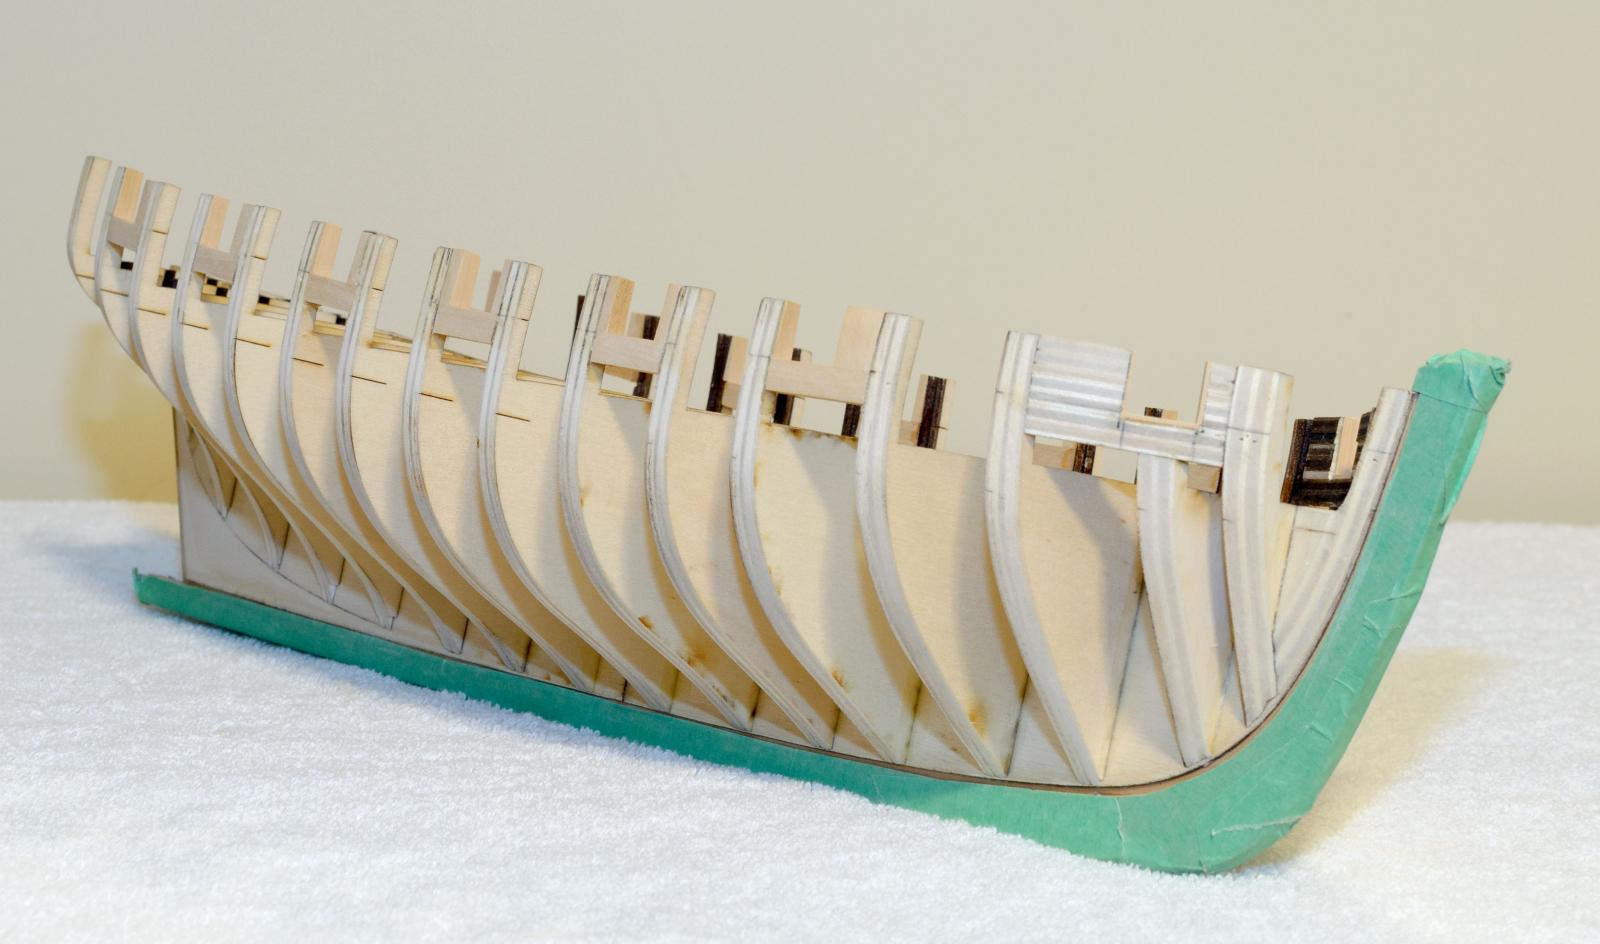
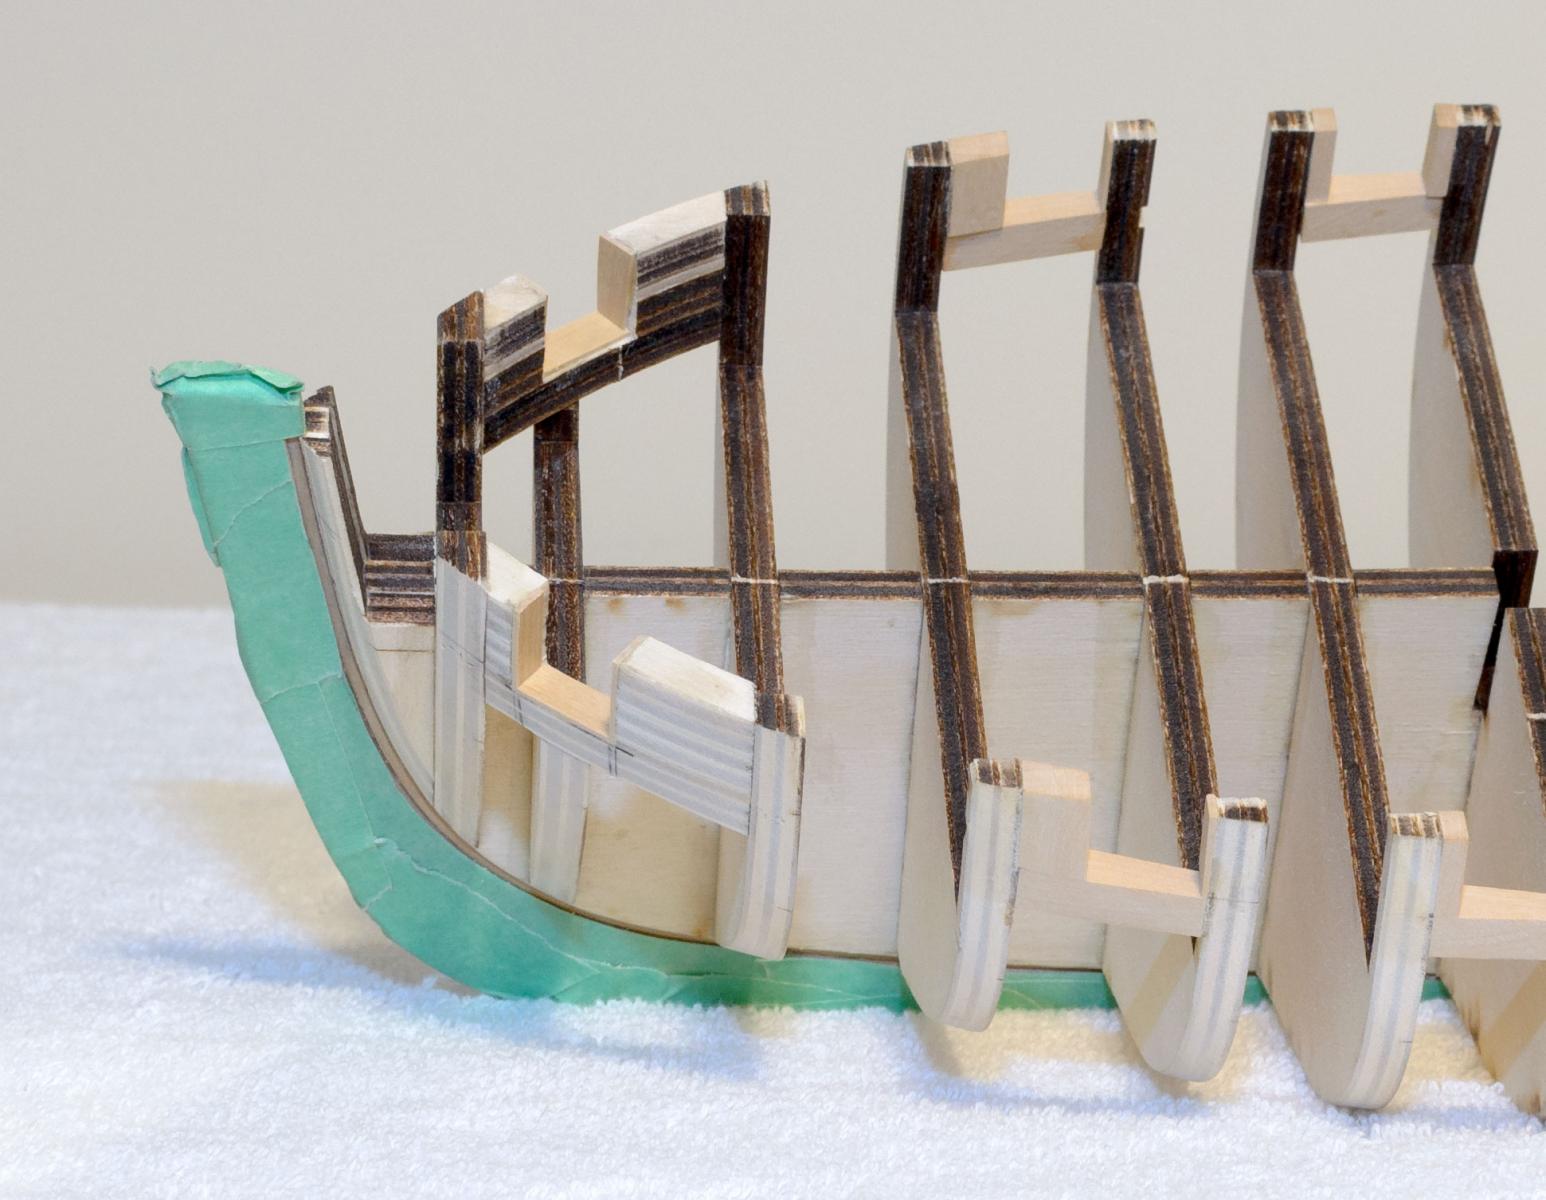
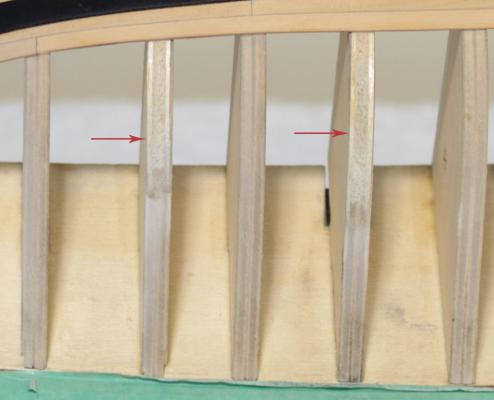
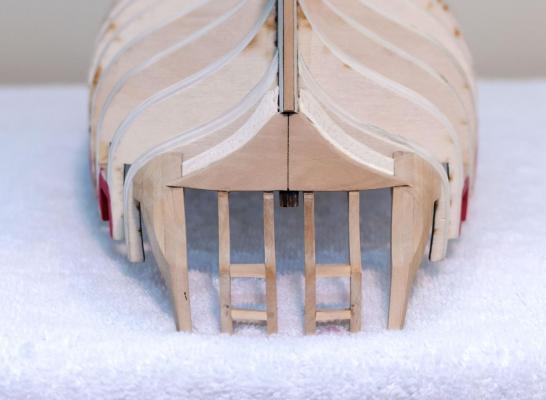
When first reading chapter two I kept wondering how this was all going to come together smoothly. It's interesting to see how Chuck has put this to work in such a logical way thus making the process much easier than it looks. Rather than cutting the stern frames individually, each frame X, Y and Z were stacked together and cut as one piece. Each of the two outer frames ZZ were stacked three together. A tiny amount of PVA was used to hold the parts together while cutting them with the jigsaw. I used Elmer's Washable School Glue to adhere the drawings to the parts. The disc sander and oscillating drum sander cleaned things up nicely afterwards. Given the accuracy of Jason's boxwood sheets and Chuck's laser cutting the fitting of the stern frames was a breeze with no sanding necessary. Frames ZZ were faired as Chuck describes in his practicum. Though apparently simple, I found that the two stern ports were very challenging to make. They are awkward to hold and care must be taken while making adjustments to the angles. They should be positioned parallel to the waterline. The square tuck piece was then added along with the filler pieces glued behind it. The photo shows the port side after being faired. A lot of material had to be removed in order to get a batten to run smoothly over the hull.


- 452 replies
-
- 16
-
-
- cheerful
- Syren Ship Model Company
- (and 1 more)
-
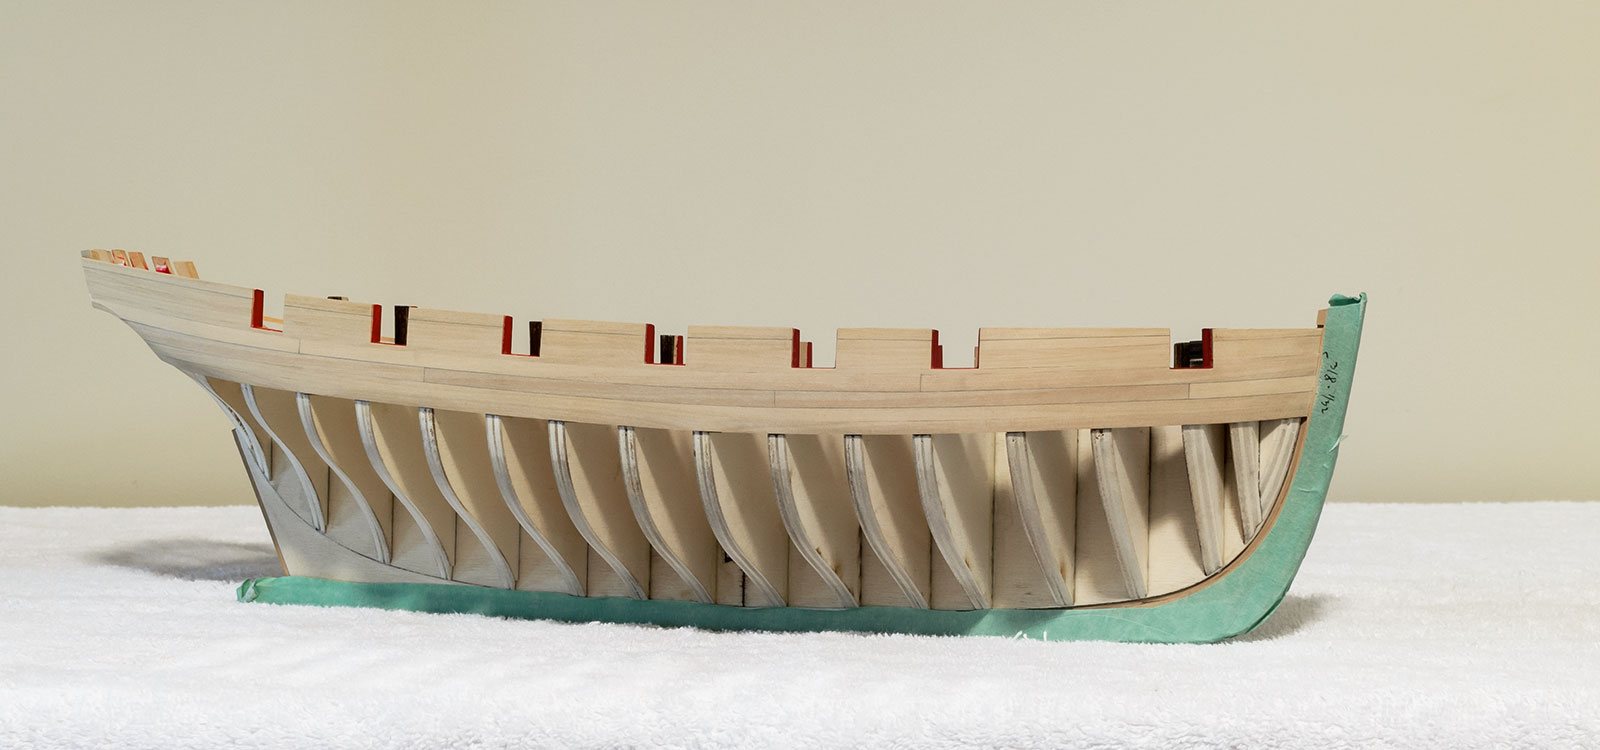
The port sills, port uprights and chase ports are now finished. I opened up the chase ports by 1/32" on each side so I could line them with 1/32" boxwood strip. I wanted to have a clean look and knew that this would achieve that. This should make it a lot easier to paint them when the time comes. With the final sanding of the sills and uprights completed I took another look at the hull fairing and did some more fine tuning. It seems like the more you look the more you find.


- 452 replies
-
- 16
-
-
- cheerful
- Syren Ship Model Company
- (and 1 more)