scott larkins
-
Posts
489 -
Joined
-
Last visited
Content Type
Profiles
Forums
Gallery
Events
Everything posted by scott larkins
-
 Luck dude. I ended up with over 800 knots for all the lines, top and bottom.
 -
Enjoy tying those rat lines buddy. Unless you have really good eyes, I suggest a lit magnifying glass. Those knots are small.
-
Got, thanks for that new pic. Explains it much better.
- 440 replies
-
- 1
-

-
- niagara
- model shipways
- (and 1 more)
-
Ken, What size wood was normally called for at the top of the timberheads? I'll be building the Niagara when I'm not with my Rattlesnake soon and I'm beginning to look now at the Niagara sites to cut down on oops moments. And let me add, proof of concept was not a major factor in the Rattlesnake either.
- 440 replies
-
- 3
-
-
- niagara
- model shipways
- (and 1 more)
-
Looking good. Can't see in the pics but did you leave plenty of space between the lower masts and the middle masts where the shrouds are run. Make sure to leave a little extra for the lower yard arm lifts.
-
Looks like those worked out pretty well for you.
-
Thanks. The furling is a little tough. The cloth does not fold up very well for the scale. One last note when threading the running rigging. Look ahead, thread it and give it a little tug before you tie it up. Do this to see if you accidently wrapped your current thread around an older thread. This is very easy to do. I've had to rethread twice so far but better to do it now before you have to put the CA glue on to keep the knot from untying. And if you are working with two sets of ropes on different side of a yard arm, don't tie and clue one side before the other until you double check to make sure the yard arm is level and even and the ropes are tight.
- 264 replies
-
- 1
-
-
- rattlesnake
- model shipways
- (and 1 more)
-
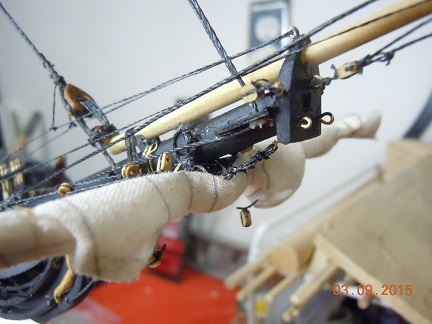
Another angle. You can see the inner and outer guys in this pic. In this case I added an extra pin back by the anchor to put the outer guy ropes on.
- 264 replies
-
- 2
-
-
- rattlesnake
- model shipways
- (and 1 more)
-
And finally the spirit sails and ropes. I still have to put on the jib booms triangle sails. Pics on that will come.

- 264 replies
-
- 1
-
-
- rattlesnake
- model shipways
- (and 1 more)
-
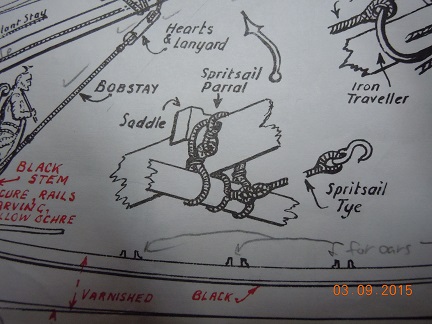
And the illustration of what it looks like from the plans.
- 264 replies
-
- 1
-
-
- rattlesnake
- model shipways
- (and 1 more)
-
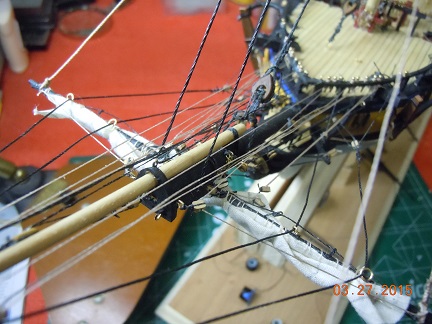
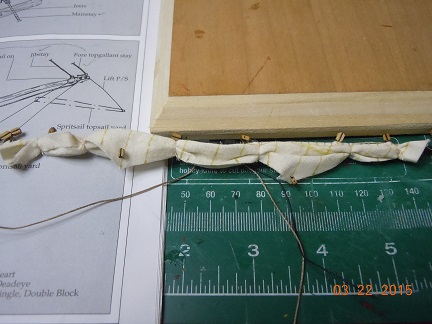
And here is the spirit sails. Man there were a lot of lines to put on. I had to add a few more pins to the front rail to make places for all of the ropes since I am adding the sails to this model. This pic is of the spirit sail parral which is the ropes that attach the spirit sail to the jib boom.
- 264 replies
-
- 2
-
-
- rattlesnake
- model shipways
- (and 1 more)
-
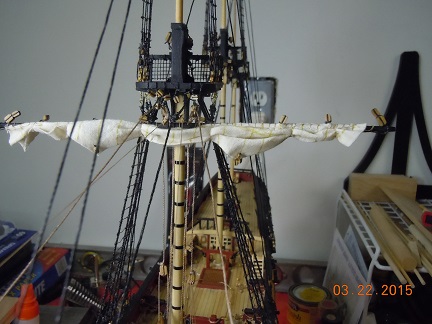
Here is the front of that fore mast lower sail. The furling is a little cleaner now.
- 264 replies
-
- 2
-
-
- rattlesnake
- model shipways
- (and 1 more)
-
Next I put the fore mast lower yard arm up. Keep in mind that this takes some work. Be sure to look at the plans and the instructions to see the different angles of the attaching points. It takes some time to put on that yard arm and the related blocks under the mast platform and on the deck. It gets a little tough putting the lower blocks on at the base of the main mast with everything that is already down there. If you are reading this and haven't cluttered that area up yet, put those blocks on now. It will save some headache later. Also, be careful when attaching the yard arm while working around the rat lines. You don't want to snap any lines or break the wood. You also have to put certain ropes around the yard arm before putting in place, like the attaching blocks. There is no way to put those threads on after the yard arm is put in place. Again, thinking ahead. I didn't if you were wondering, but I did catch my tweezers on the shrouds and rat lines a few times. You can also see the spirit sail brace lines now put back, properly in place. LOL

- 264 replies
-
- 2
-
-
- rattlesnake
- model shipways
- (and 1 more)
-
Then furl the sails. This pic does not show my final furl. I had to do a little tucking after I pulled it up. You will see that in further pictures.
- 264 replies
-
- 4
-
-
- rattlesnake
- model shipways
- (and 1 more)
-
And the back side. Again, keeping in mind the foot ropes and blocks. Almost messed up a couple of times, fortunately you can simple pull the threads back out.

- 264 replies
-
- 2
-
-
- rattlesnake
- model shipways
- (and 1 more)
-
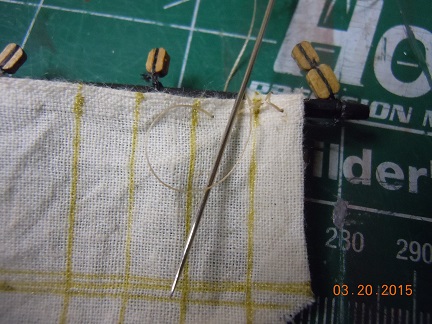
Next came the sewing of the sails onto the yard arms. I use a simple technique. I'll try to explain it here. First I simply tie on the end of the rope to the yard arm at the end. I put the thread through the front of the sail, keeping in mind the position of the foot ropes and blocks which will be on the back side of that sail. Then I wrap the thread over the yard arm and between the sail and the thread on the front of the sail. So don't pull the thread all of the way through tight to the sail before you put the other thread under it. Continue down the sail until you get to the other end.
- 264 replies
-
- 2
-
-
- rattlesnake
- model shipways
- (and 1 more)
-
Then I put on then put on the blocks that are used to raise and lower the sails.
- 264 replies
-
- 2
-
-
- rattlesnake
- model shipways
- (and 1 more)
-
I cut out a little extra on the sides so they could be folded over and clued. As I said I was not stitching so I used sewing tacky glue. I simply glued, tacked and placed it between two pieces of flat metal that I have.
- 264 replies
-
- 2
-
-
- rattlesnake
- model shipways
- (and 1 more)
-
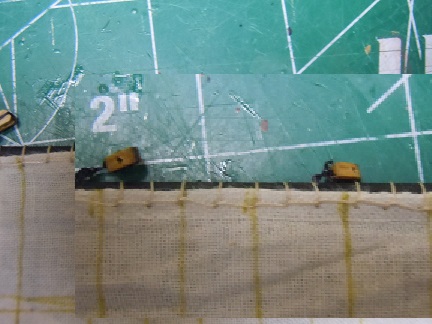
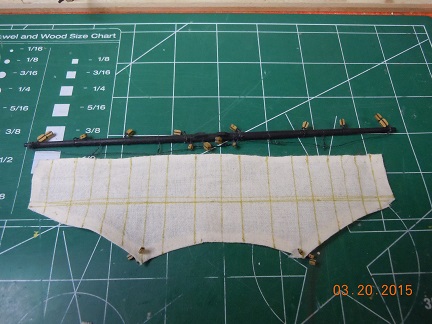
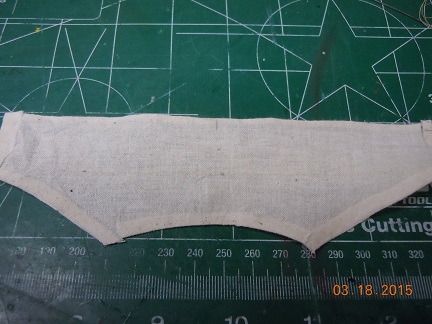
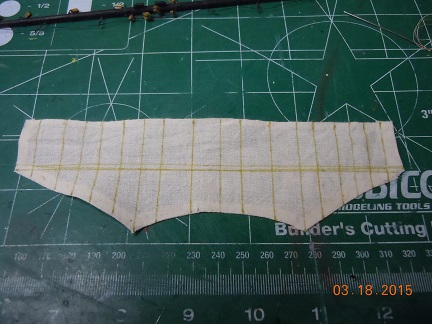
Here is my starting point for each part. Since I am furling my sails, as per the instructions, you cannot cut a full piece of cloth. It would simply be too bulky. As per the instructions, cut about 1/3 size. I then marked the stitch lines with a fine tan marker. Due to the scale and really, the lack of cloth, I found stitching too difficult. Since the sails are furled I felt it would be a sacrifice I was willing to make.
-
Starting the running rigging now. I decided to start with the jib boom and the spirit sails. The instructions start with the masts first but as you all know, the instructions are more like guidelines anyways. I started the spirit sails and got as far as stringing up the spirits sail braces when I realized I goofed. Not majorly. I was trying to think ahead like I've said before, but this time I was not thinking far enough ahead. If you follow this log, I suggest you put on the fore mast lower sail. The braces for the spirit sails have to be strung up behind that lower yard arm. That is why that yard arm needs to be up. Cost me about a weeks worth of time to correct it. Also, I'm finding that you need lots of extra string when tying the running rigging to the pins and cleats. You end up cutting a lot of string off once you are done with the tying, so be aware of that. It kind of disappointed me but it is what it is. Anyways, pics and explanations follow.
-
Yeah, we do notice.
-
I can only suggest you review some of the other build logs to help your decision.