


scott larkins
-
Posts
489 -
Joined
-
Last visited
Content Type
Profiles
Forums
Gallery
Events
Everything posted by scott larkins
-
 Ken, Everything I've seen has had the carriages about the same color as the gunwales .
 -
Looking good man!
-
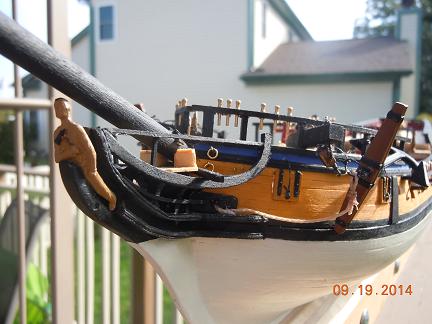
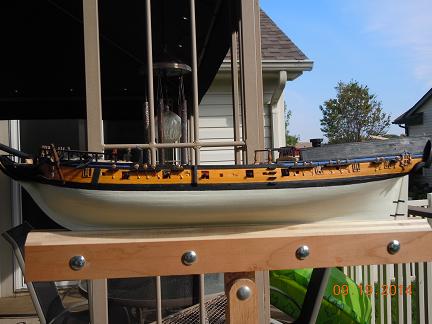
I took a few pics outside to get a better feel for how the colors work in natural light. Enjoy.


- 264 replies
-
- 11
-

-
- rattlesnake
- model shipways
- (and 1 more)
-
Thanks Pett. I liked that blue too. I chose this color scheme from a professional's job I found on the web and liked how the blue was just enough to accent the other colors.
-
I've got to keep your steps on mind as I'l be headed here soon. Can't wait to see the pics where you put these in place. Very well done pieces.
-
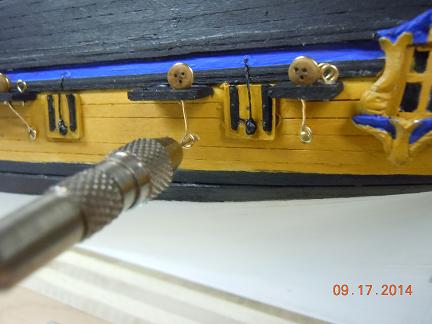
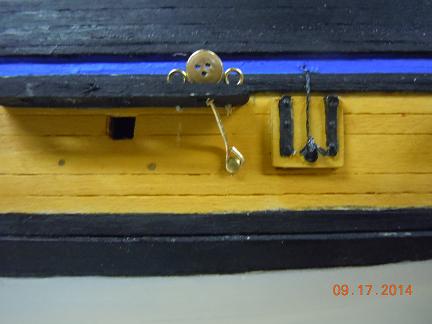
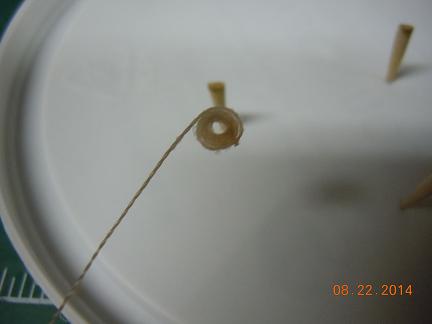
These next few steps are what I am calling the half way point. I say that becasue I am, for the most part, done with the ship haul and am now moving on to the masts and rope work. This last step was putting the dead eyes on the side of the ship. I first put on the wood shelves on the side of the ship according to the plans. I used the same wood that was used for the bottom haul of the ship. I cut them to size and notched them out according to the plans. Next I used the planking wood for the top of the ship and glued it over the notched edges. Sanded the final shape and then painted and glued in place. Most of the following work was done under a large well lit maginfying glass. No accounting for these old eyes. I hate getting old. First I wrapped the wire around the dead eye with my fingers and then used a pair of forceps to hold the wire in place as I turned the dead eye1.5 times. Make sure the the three holes are lined up correctly. Once the wire is wrapped it is very difficult to rotate it in the wire. Then I snipped off the extra wire with a small pair of wire cutters. I then measured out an equal length of wire for all of the wire pieces so I had commonality. Not all of the wires had the exact same length because some are more angled than others on the shelves depending on their relation to the mast. I had at first measured out and marked a spot on the side of the ship according to the plans where the bottom of the chains, or in my case wire, should be nailed to the side. Once I put the dead eye through the shelf I placed the nose of a small pair of forceps on the nail spot and wrapped the wire 180 degrees around the forceps. I then pulled the dead eye out and finished wrapping and snippting the wire to make a hook that the nail would be inserted through. I then put the dead eye back through the shelf and drilled a starting hole for the nail. You can see better here those nail marks I was talking about above. I had to make sure the wire was bent accordingly and then inserted the nail with just a dab of CA glue and put in place. Bam, done. Move on to the next one and repeat.


- 264 replies
-
- 6
-
-
- rattlesnake
- model shipways
- (and 1 more)
-
Thanks for the comments guys. For my Niagara I will definetly not coil the ropes. Too late now but that's okay. I'm planning on keeping the sails furled anyways and the yard arms down as if in port. So perhaps some digantaries will be on board before the disasterous maiden voyage. More to come.
-
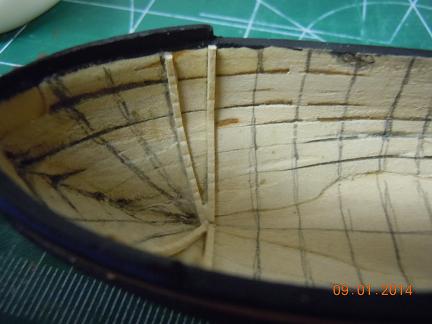
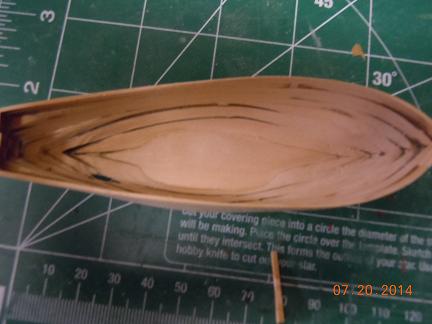
Continueing the life boat work. Here I've started the ribbing on the inside of the boat at the bow. The pencil marks are lining up where I'll be putting future ribs. Bow ribbing is all done. Instead of soaking the wood in water or a water ammonia mix I'm making tiny crinckles in the wood by pinching the wood between my thumb nail and index finger. Makes just enough of a bend as you progress. I'm also only ribbing half way into the boat instead of using one whole piece. Saw the frustation of others and came up with a different process.

- 264 replies
-
- 6
-
-
- rattlesnake
- model shipways
- (and 1 more)
-
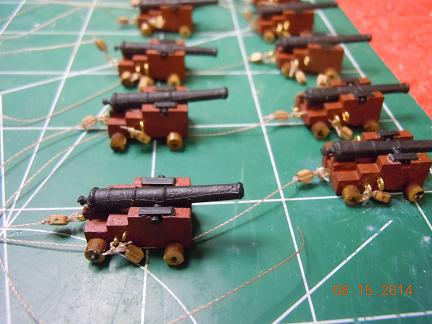
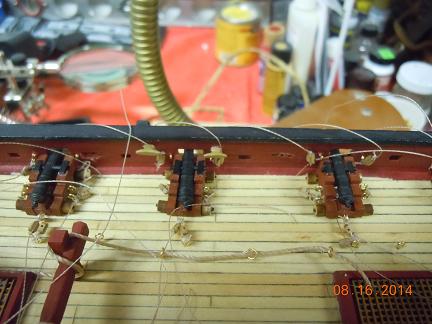
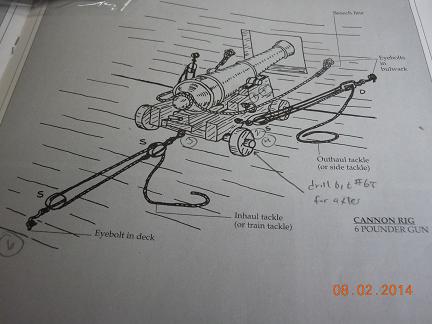
Okay, making progress on the cannons. Here are the cannons with the blocks added. Here is the blocks added to the walls. Nothing really to say about either step. Simply tie on and add a small dab of CA glue to hold in place. Here is the process of roping the cannons into place. Not that easy considering the small confined spaces on deck. I used a my big lit magnifying glass and two pairs of tweezers to get this done. Again, a small dab of CA and let dry. Then a dab of CA glue on the deck and droop the rope into place. Let dry and cut as close to the glue as possible. Then the next step of adding the coiled rope. I tried this step of putting the cut off tip of a tooth pick in a plastic lid and coiling the rop around the tip. Didn't work so well. I had a game change next. I ended up putting a dab of CA on a plastic lid and letting it dry. Once dry I then used some Sobo glue and ran the glue on the rope and let slightly dry. Then I used a magnifying glass and started coiling the rope around the CA glue point. I would use my finger to push the rope down and squeeze the glue out to glue the rope together. Again, let dry. Then I used a chisel excel blade to pry the coiled rope off. Cut off the access rope. Done. Add coil to rope on the deck and glue in place.


- 264 replies
-
- 8
-
-
- rattlesnake
- model shipways
- (and 1 more)
-
Looks really good.
-
Your skills so rock man. Very nice. I don't think I'll ever get that skill.
-
Jon, All seems to be moving along great. What I find really great about this process is that we all have basically the same model and plans yet I have not seen a single one of us make the exact same ship. Whether that be woods used, paint schemes, a little flair of woood work here or there, etc. etc.. It truley is great to see how we all put our own little flair into each of our constructions. You seem to be coming along really well with what you have. Yeah, I had a few "insert curse word" moments with the planking to and had to remove two planks to get things right and I'm sure if a real model maker were to look under my hull paint job he would shake his head in disbelief, but I learned what worked and what didn't and how to plan better for my next build. As long as you are happy with your ship, having fun, learning and so forth, it is time and money well spent. I think everyone here would agree with me if they haven't already said it. Keep plugging along, looking forward to more.
-
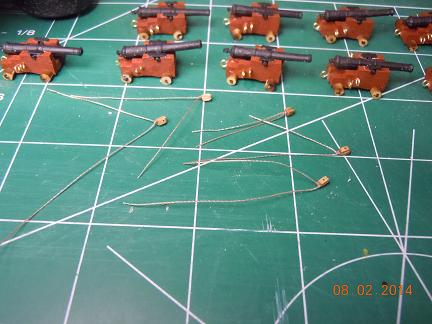
Here is a pic of the two ropes and blocks for the cannons. The use of a large lit magnifying glass was very helpful. For the one block that has the extra rope I first made a knotted loop, put the extra string through the loop and then over the block and close the loop. Yep, didn't always work well but I'm getting there. Got 60 total blocks to make, I'm up to 50 right now.

- 264 replies
-
- 3
-
-
- rattlesnake
- model shipways
- (and 1 more)
-
Thanks guys, I actually did try the sanding of the inside first because I did see that comment. It said to put the boat together first without the clue, draw a line on each piece that was sticking out, take the boat apart and sand to the line. I paraphrase. I must have been more heavy handed than the guy who put that together because I snapped one wall and said screw it. I'm not kidding, that little boat is tough to make. That is one reason I stopped where I did. My wife was standing behind me with the straight jacket just waiting for that last moment when I was going to loose it. Didn't happen though. I learned when to say enough. Perhaps that is a great lesson when working with these small models. Know when to say when. LOL.
- 264 replies
-
- 1
-
-
- rattlesnake
- model shipways
- (and 1 more)
-
That's coming along really well. I noticed that the pic with the foremast looks like there is a grain to it. What kind of wood did you use to get that? Or are you really good with a brush?
-
Those came out nice Bill.
-
Wow, that is coming along well. I can't wait to see further progress on this build. Keep up the good work man.
-
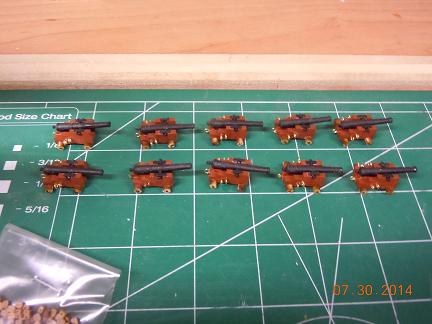
With the eye bolts in hand it was time to continue the cannons. Cannons are pretty easy to put together. Like I said seveal pages ago when I did my first cannon to line up the cannon ports, you will have to put that piece at the back to make sure the cannon is level. And you will have to be careful drilling the holes for the axles. It would be easy to bust through the bottom of the carriage. These are the blocks that will be put at the back of the cannons that you see in the picture below. I figured I'd get the blocks all tied up first before I attempt to put them on the cannons or the gunwales. As I'm working on this model I am learning to think ahead and make things, well..... as easy on myself as I can. There's no accounting for size issues though. These old eyes just ain't what they used to be.

- 264 replies
-
- 3
-
-
- rattlesnake
- model shipways
- (and 1 more)
-
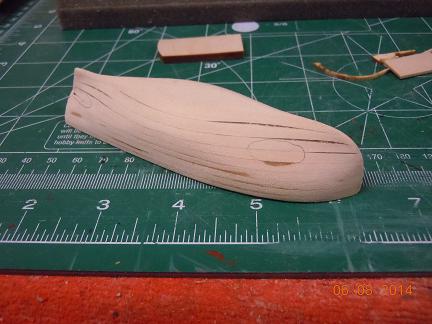
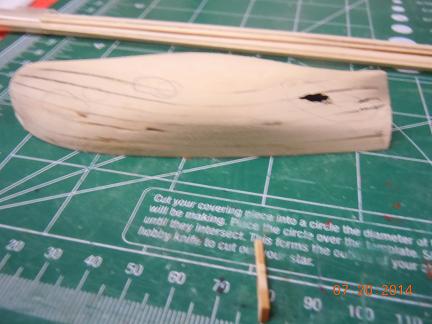
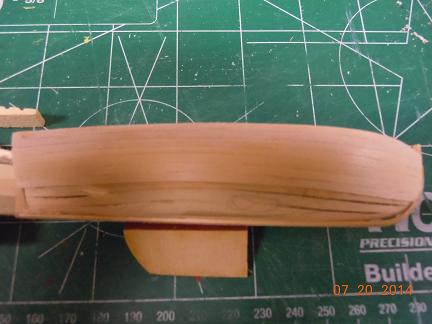
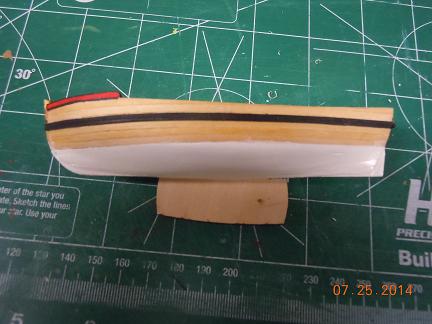
While I continued to wait I started sanding the life boat. Gluing it together wasn't a problem. Just use the tabs and some clips. I used a drummel and hand sanding. The drummel was good and bad. It certainly got things sanded quicker because there is A LOT of sanding here. The bad thing was that the walls got thinner quicker than I expected, and, well ...... you can see from the pics above I had a few oopses. Not sure if I have any suggestions on sanding. If you are insane enough to do this by hand, they'll take you out in a straight jacket. Just be careful. This is where the drummel was really needed. My fingers were too large for the tight areas and got tired too quickly using simple sand paper. Almost went for that straight jacket. LOL Good thing I was going to plank the outside of the boat anyways. I used the smaller planking for this that I did for the gunwales. That wood worked really well for this small boat. I would suggest you plank the transom first before the sides. I also, just like the actual Rattlesnake, had to angle the front of each plank for the bow piece. Planking all done. Outside is painted according to the plans. Came out pretty well I guess. I put the inside off for later since my eye bolts came in for my cannons.


- 264 replies
-
- 2
-
-
- rattlesnake
- model shipways
- (and 1 more)
-
Well, I ran out of eye bolts. Seems MS only sent me enough to do half of my ship. So while I waited I did some other pieces. Here is one of the two anchors. I found that the wood top piece (actually metal) center hole was too big for the anchor neck. I was going to put them together using epoxy anyways, I just had to use a little bit more. It was helpful to use bees wax on the string. Took a little of the fold out of it. But for the big anchor rope I also had to put the string in a vice and hang some weights over night to help. I'm pretty happy with how this came out.

- 264 replies
-
- 3
-
-
- rattlesnake
- model shipways
- (and 1 more)
-
Man, I was feeling pretty confident in doing my planking on my Niagara when I get there, but now, I'm not so sure.
-
Decking came our really nice. Can't say about those cannons. Just finished building mine. I've got the eye bolts on the gunwals and the cannons. Now comes the dreaded roping of 10 cannons. Keep up the good work. You'll be passing me soon and then I can look at your log for inspiration.
-
Thanks LB. It's my first build so it's trial and error for me too. I'm really getting ready to build the Niagara when I get done with this build. Some of the things from the snake will transfer, which is good, but after reviewing the plans and instructions, I will still have more to learn.
-
Laxet, Well you seem to talk about a lot of errors that you made but it still seems to be coming along really well. I'd be pretty happy with what you've done so far. Keep it up.