NRG Photographic Model Ship Competition - All eligible to enter - Reduced memberhsip fee - JULY 31 ENTRY DEADLINE
×
New Banner Ad Sponsor - Epic Engravers - Great plank bending machine (also bends thin metal sheets) and unique engraved coins to label your model displays!
×


BareHook
-
Posts
430 -
Joined
-
Last visited
Content Type
Profiles
Forums
Gallery
Events
Everything posted by BareHook
-
I had similar issues, I just added shim material where needed to get a fair smooth curve for the planking. Ken
-
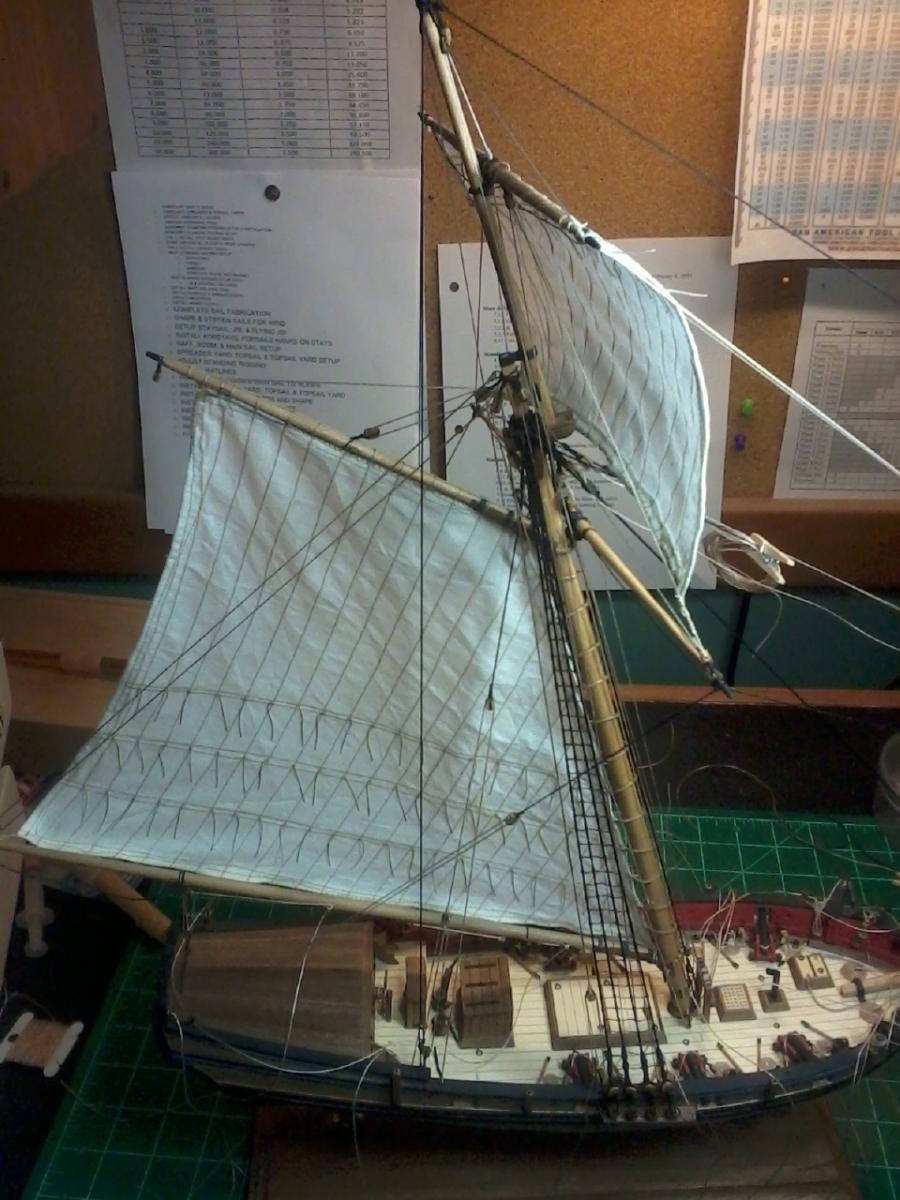
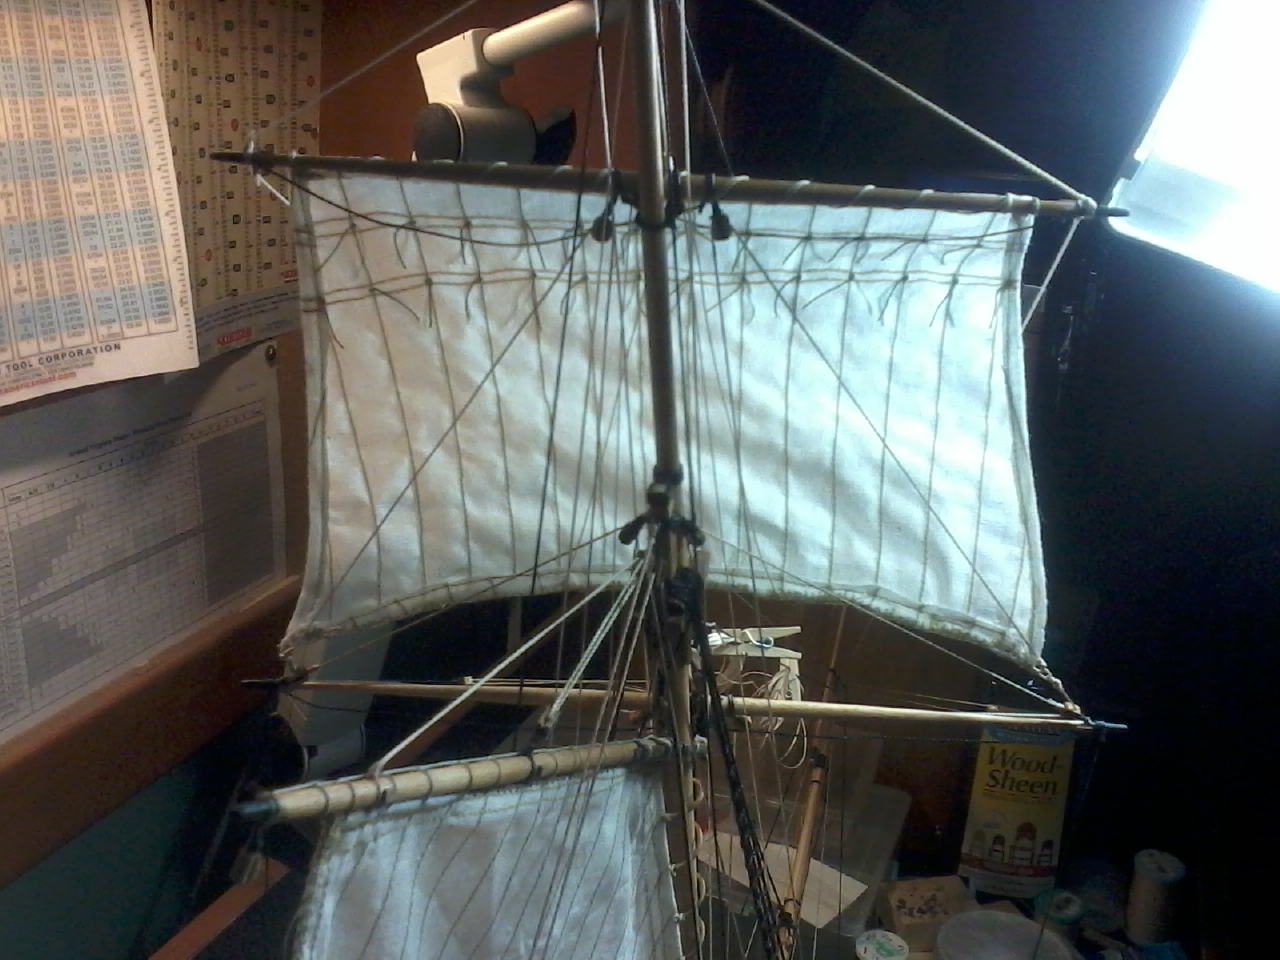
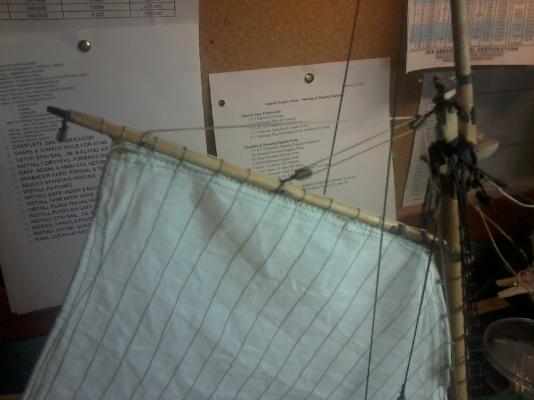
I finally got my sailmaker to complate the topsail. I must say, anyone who has done sails for a full square rigged ship, my hats off to you! I'm overall happy with the results, but it was certainly challenging. I shaped the sail, then stiched it to the topsail yard and then loosly rigged it to the spreader yard. I then hung this assembly with the topsail yard halyard and attached the yard parrels. Next the spreader yard jeers. Then I did the sheets, clewlines, and lifts. I then added two buntlines which I cleated at the spare shroud cleats #3. Finally I did the Braces for both yards. I can now see the light at the end of the tunnel, just 3 foresails, rope coils, swivels and final clean/touchup. Ken


- 110 replies
-
- 4
-

-
- armed virginia sloop
- model shipways
- (and 2 more)
-
Brett The tags are there on purpose, to hold the parts in the parent sheets of wood. Be especially careful when you decide to remove the window frames, plus they are very hard to tell apart once removed. Regarding the laser cutting, there are two things you must do: You need to sand the edges square, into a right angle to the surface. When laser cutting, the cut is narrower on top, so when you look at the edge, it will have a slight angle to it. I bonded some sandpaper to a block of wood and laid the parts on top of another block, then lightly sanded the parts to a square angle. You need to remove at least some of the charred wood from the laser cutting, the charred wood will not hold a strong bond with adhesive. With both these steps, be careful not to remove too much from the bulkheads. For the false keel, keel, and stem, lightly sand square to get a clean fit between them, especially the scarf joint to the bow piece. Ken
-
Brett, I also attached the stem, false keel and bulkheads before cutting the rabbet. You just have to follow the curve of the hull to see what angle the planks will be butting against the keel. I just took my time and trimmed away at it with a curved blade knife, which I found worked better than the strait chisel type blades. I also created a sample plank a couple inches long that was bonded to gether with both layers to help me get the correct depth of the rabbet, especially at the stem. I would lay it along the edges to check the fit for final planking. Ken
- 129 replies
-
- 1
-
-
- armed virginia sloop
- model shipways
- (and 1 more)
-
Hmmm, methinks many participants may be on holiday for the season. I have no idea, but I am curious as to whether or not she survived her icy stay there? Since she appears to have a wood hull.
-
Nice deck planking! I'm interested to see how you do the outer deck planks where you may need to create notches or such for nibbing the planks, to avoid a sharp thin tapering plank. On my AVS kit I did the margin plank last and cut it to fit around the completed planking. There have been a lot of descriptions for planking both ways, margin first or last and I'm still undecided whether or not it makes much of a difference. Ken
-
Regarding single or double planking, are you planning to paint the hull? or keep a natural finish? I double planked mine, but could have got away with single planking if I painted the hull, but wanted the natural walnut on the hull, so did the second layer. Your prep time is well spent and will show once you start laying the planks. Ken
-
I don't know about using 2 strands or such, but you pretty much have it correct. The permanent ropes that hold the masts, including between two masts are generally referred to as "Standing Rigging" and the ropes used to attach and adjust sails is "Running Rigging". The various sizes are dependant upon the amount of load the rope must be able to handle. Example1: The main sail halyard rope will be quite a bit larger than the flag halyard rope, which is just used to haul up a flag. Example2: The shrouds are the heavy permanent ropes that support the masts side-to-side, while the ratlines are smaller ropes tied between the shrouds to form a rope ladder for the crew to climb, since they only need to support the weight of a person climbing. Ken
-
Micro-Mark also sells an electric screw driver that matches up with their mini drill chuck
-
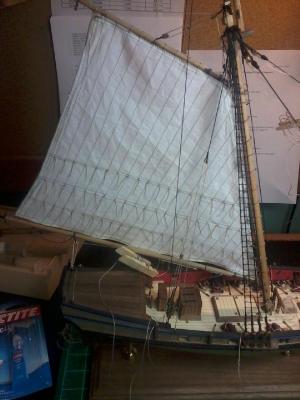
Hmmm, with regards to keeping running rigging tight, how do I keep the traveler tight to the portside and the boom taught against that? As far as stiffening, I tend to agree. The sail looks good, but the wrinkles stand out in photos. I just need to figure out the best method, I'm thinking either spray starch or brush on dilluted PVA and shape it with a blow drier. Any suggestions? I know I should have done it before it was hung, but I got on a roll last nite. Thanks Ken
-
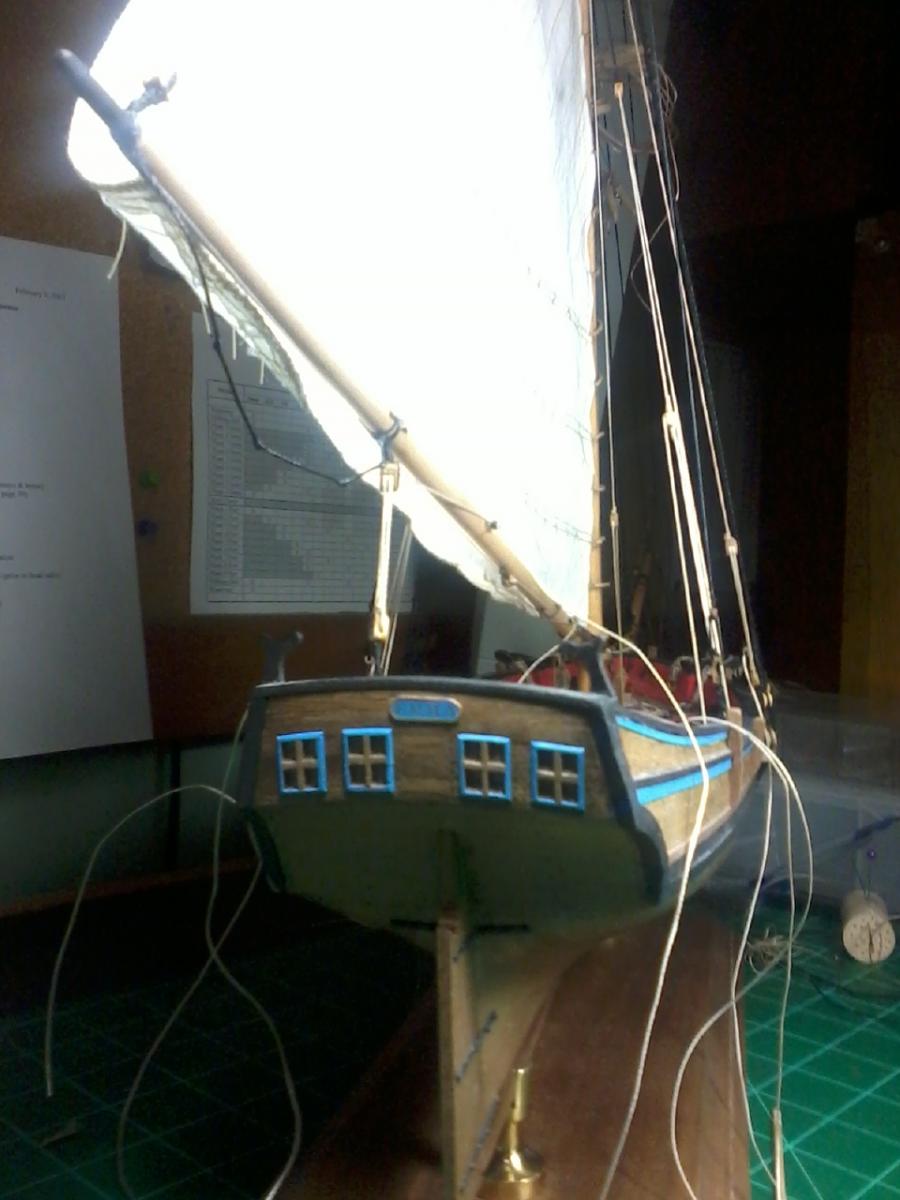
The lights were one of the deviations that I did from the plans. I ended up with the bottom/top frames following the curve of the stern and deck and opted to have the frames radiused on the outer edges and protruding slightly beyond the surrounding planking. I liked the look better and it sort of made them stand out a bit rather than blending into the planking pattern. Ken
-
After working on the rigging portion of my first ever kit, I will be using the twisted screw style eyebolts in all locations where rigging attachment is required, the strait shaft just pulls out too easily. The strait shaft style is fine the non-functioning deck and hatch bolts, but its a real bummer when you're trying to tension a rigging line and the bolt pulls-out. Ken
-
The Mainsail is hung, but I still have a bit of rigging to complete on it. The sails a lot more work than I expected, but the look is rewarding, though a far cry from perfection, those other sail fabrication posts make it look too easy! The bolt rope are just about impossible and not very visible, so they will be left off the remaining sails, and the zigzag stitch will form the edges. I attached the reef lines with a single half-hitch sewn through the sail, then had to stiffen/straiten them by isolating/holding them strait with masking tape and applying dilluted PVA. I'm undecided whether to attempt putting some wind shape into the sails or just leave them as-is, will see how they look when more are added. Ken


- 110 replies
-
- 2
-
-
- armed virginia sloop
- model shipways
- (and 2 more)
-
Looking really good, the bulkhead braces really stiffen things up. Be careful of the bulkhead extentions, they will snap off if you sand them too hard during faring. I agree with Alistair, the window frames are tricky, I had to review the plans several times before I got a feel for how they should be. Also dont forget to check and fair as needed the deck framing tops of the bulkheads, with mine there was varying heights that needed sanding to get a reasonable camber and smooth transition between bulkheads for the subdeck panel to mount . Ken
-
It's nice to see another AVS getting started. Feel free to ask for input, there is a lot of experience on this site with this kit, I'm nearing completion with mine. Are you planning to work with any of the practicums available? I used this one, the cost was right for me. http://www.modelboatyard.com/avs_articles.html Ken
-
Belaying to knightheads and timberheads
BareHook replied to Landlubber Mike's topic in Masting, rigging and sails
On my AVS kit, I just did 2 wraps and a single lock wrap then the bundled coil of line over that. Ken -
Henry, Thanks! Its suprisingly nice for the price, all the drawers are felt lines as well.
-
I use this one available from harborfreight.com, currently on sale for $79.99, but not sure what shipping would be to various locations.
-
The links below the deadeyes are made of metal rod and straps. It appears the deadeyes are stroped with metal rods that then attach to the metal straps which are bolted or nailed to the hull though the bottom holes. I agree the upper supports or gussets are additional wood supports. Note, the drawing shows the channel angled down toward the water to show depth and width of the plank, but in actual installation, it should be horizontal or only seen on edge in that side view. You could probably estimate the width of the channel, or it may appear in another view where you can measure it. Ken P.S. The 2 links between the deadeye and the 2-hole strap are the same, the one above is just rotated like a chain link, so is seen on edge. Check out the link below, very similar chainplates to yours. http://modelshipworld.com/index.php?/topic/487-chain-plates/
-
Cutting/Sanding Brass?
BareHook replied to esion's topic in Metal Work, Soldering and Metal Fittings
Normal sandpaper should be fine, but when edge sanding it may only be effective at deburring a trimmed edge. The narrow edge will tend to cut through the abrasive on the paper and leave a groove where the sand is gone. -
Sanding is a good point! The AVS was very difficult to sand at the junction from planks to keel (especially at the bow and stern) since it is an angled junction with a sharp joint instead of a smooth radiused transition.
-
Cutting/Sanding Brass?
BareHook replied to esion's topic in Metal Work, Soldering and Metal Fittings
Brass is pretty easy to shape and work with, being a soft metal. You can trim, sand, or hammer it to get what you want. With regards to finishing, it can be repolished with a dremel but would need a clearcoat of paint to keep from oxidizing. Brass is usually representative of "iron" parts on a ship and would be chemically blackened or painted black. If you search in the section for painting and finishing, there are several threads on blackening metal. Ken -
On my AVS kit, I added the keel, then cut the rabbet and planked the hull. I think this worked well because I was able the shape the ends of the planks to butt flush against the keel for a clean joint. Leaving the keel off, you would have to have the ends extended and shape them all together to meet the keel, hmmm, that sounds like I might work well also, but I've never tried that method. Ken
-
See attached link for a practicum on making eyebolts and hooks. The eyebolts just won't have the last bend. http://www.modelboatyard.com/hooks.html
-
I'm working on the sails for my AVS, and I'm not sure how long the reef lines on the sail would be? I'm guessing maybe 2 feet on each side of the sail, which would be 1/2 inch at model scale? Please verify, Thanks! Ken