BareHook
-
Posts
430 -
Joined
-
Last visited
Content Type
Profiles
Forums
Gallery
Events
Everything posted by BareHook
-
Amazing carving! If I may toss in a comment, I dont think overall narrowing of the head is required, but more around the cheeks and mouth to make the jaw portion more narrow and protruding. Of course, I cannot even imagine ever attempting to carve such a piece and it is already an amazing piece of art. Ken
-
Rob, Thanks for the feedback! I have lots of build ref docs I can email you, just let me know. I replaced the deck planking with Holly from Hobbymill. The planks were a pleasure to work with, very precise and no edge cleanup required. I did the caulking by painting the edges after cut n initial fit with black hull paint from Model Expo. Ken
-
Kimberly, There is a thread in the rigging forum that talks about sewing your own sails. I hope to have my mainsail complete in the next week or so. Thanks, Ken
-
USS Hornet? Are those B25's on deck?
-
Need help with the shrouds on Revell - Santa Maria
BareHook replied to Kimberley's topic in Masting, rigging and sails
I haven't figured out how to include links, but if you search "Barehook" in the Kit Build Logs in Progress section, mine will be one that come-up. Ken -
Need help with the shrouds on Revell - Santa Maria
BareHook replied to Kimberley's topic in Masting, rigging and sails
I found the clove hitch to be pretty easy once I tied a few and got into it. They were a lot easier for me by clipping one end and tying with the other end using tweezers, they were easy to align and tighten to the needed spacing. Check out my build log of the AVS, as I just finished doing these. Ken -
Need help with the shrouds on Revell - Santa Maria
BareHook replied to Kimberley's topic in Masting, rigging and sails
Then its time to practice your ratlines and clove hitches, or you can just use half-hitches Ken -
Need help with the shrouds on Revell - Santa Maria
BareHook replied to Kimberley's topic in Masting, rigging and sails
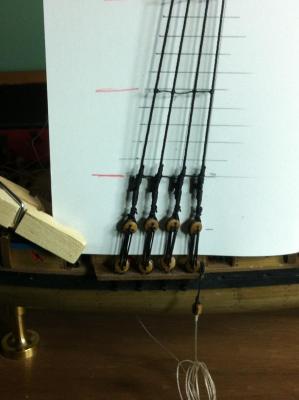
Yes, they are made from rope and part of the "standing rigging" so you will use black colored rope, thye should have some type of sizing guide. The circles are blown up larger details of the mast connections Regarding the chainplates and deadeyes, the shroud rope should wrap around the circumference of each deadeye. You want your shrouds to lie alongside each other without any crossovers, tapering out the the chainplates. You might consider doing them in pairs rather than all-at-once, to help keep them neat. Go back n forth, attach 2 portside, then the same 2 on starboard etc... Also dont trim off the excess until all standing rigging complete, so you can do fine adjustments to the tension and angle of the masts. Ken -
How about lead content in the metal castings and or solder used.
-
If you do a search on the subject, you will find several conversations addressing this. Generally carpenters or quality white glue such as weldbond is used throughout for most wood to wood applications with epoxy for high strength applications or metal bonding and CA (super glue thin and gel) for small parts, metal and some planking methods used.
-
From Assoc Press Archeologists have recovered five more cannon from the wreck Blackbeard's flagship, the Queen Anne's Revenge. The largest of the guns raised Monday weighs about 3,000 pounds. The wreckage of the ship is in Beaufort Inlet. Project Director Billy Ray Morris says historians think the largest cannon was made in Sweden, indicating that Blackbeard had guns from different countries. State officials say about 280,000 artifacts have been recovered from the wreck. The Queen Anne's Revenge ran aground in 1718.
-
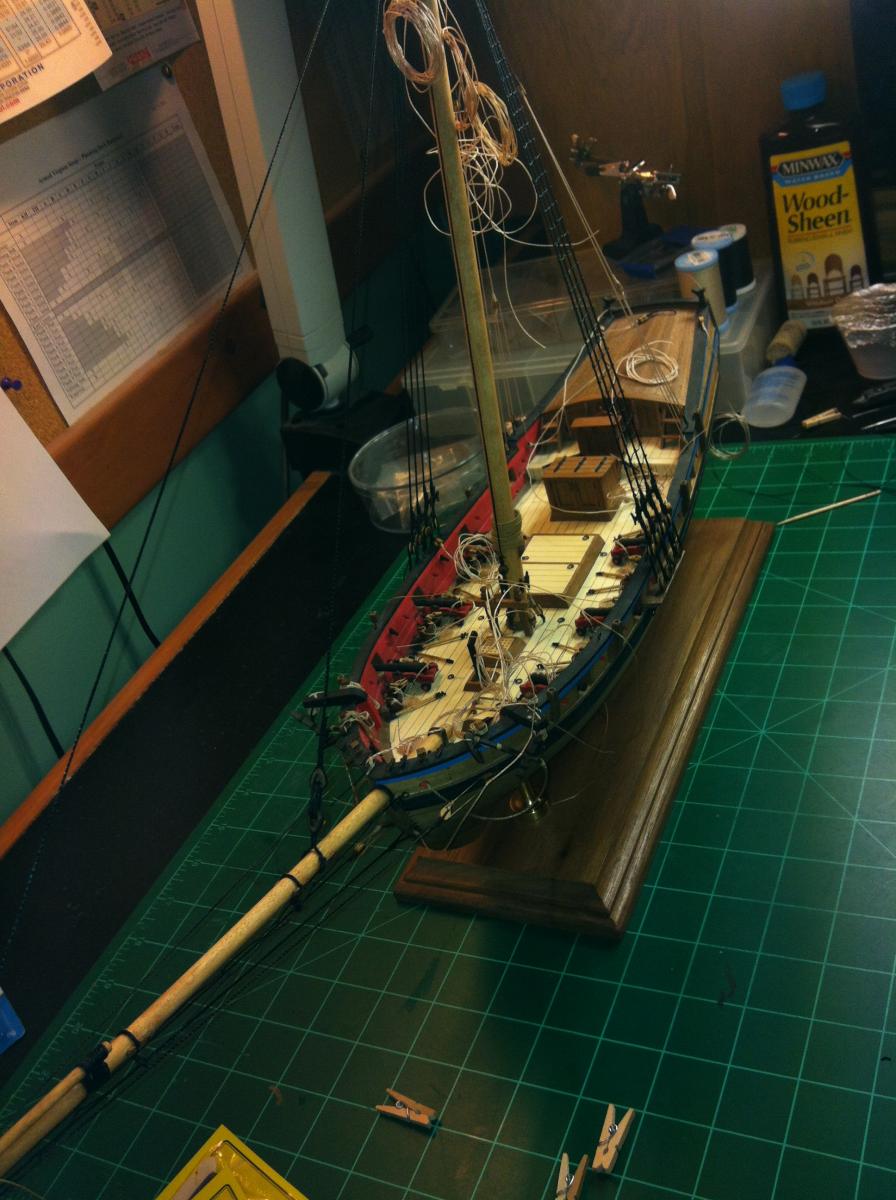
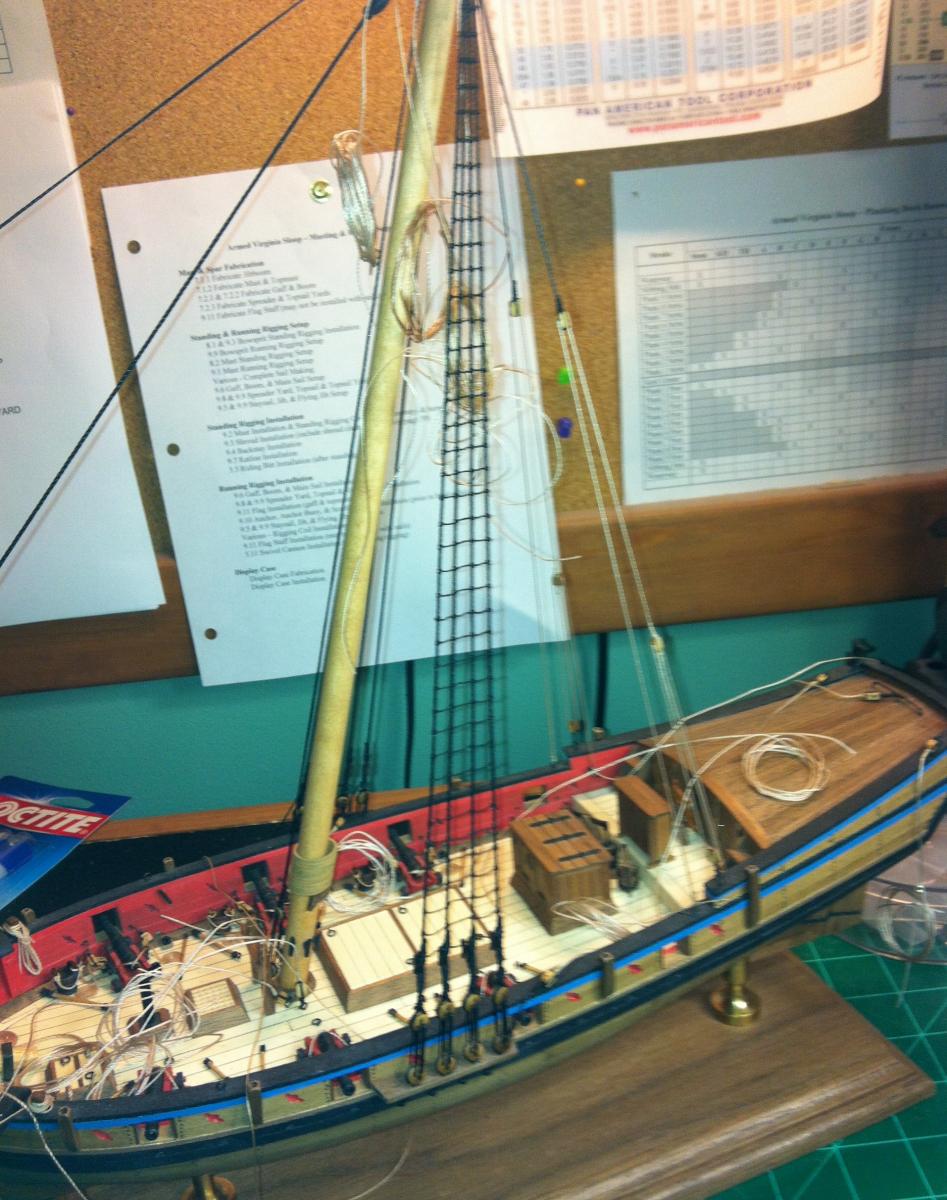
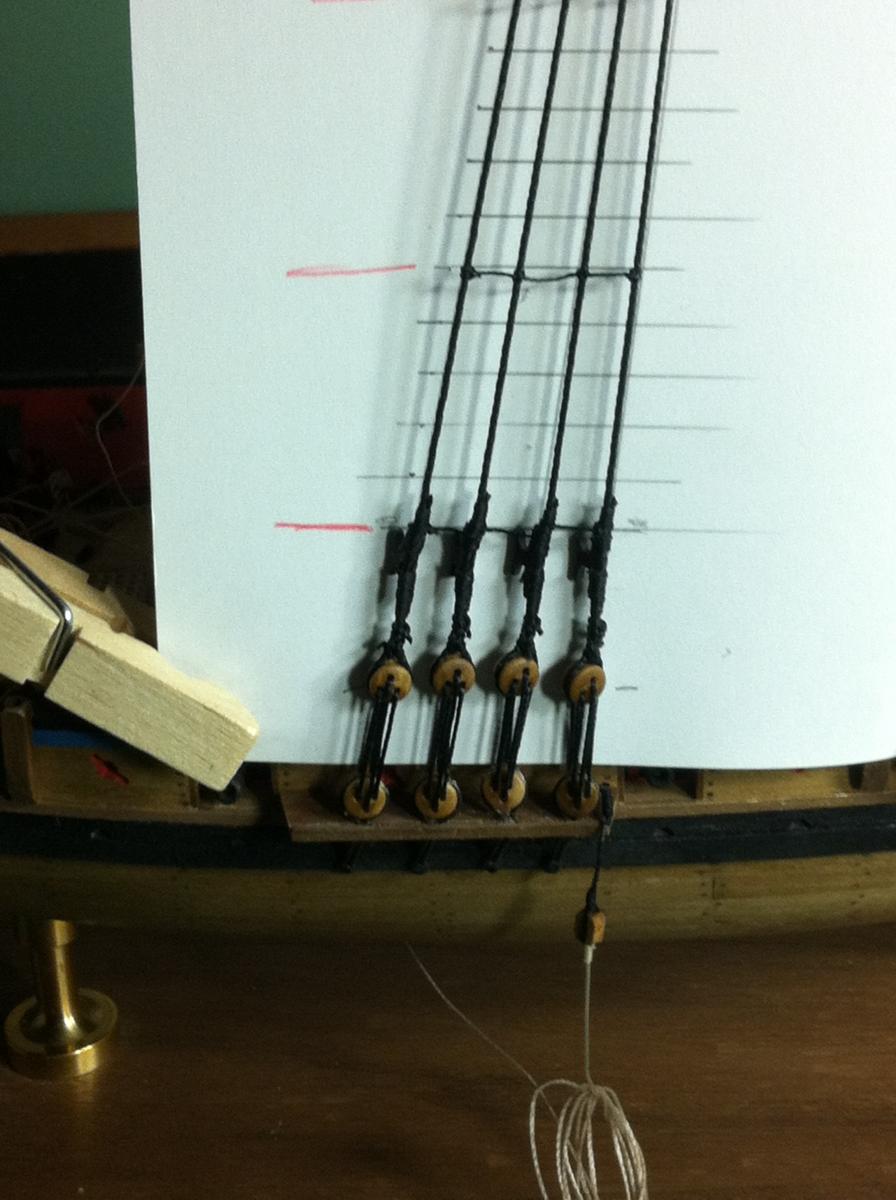
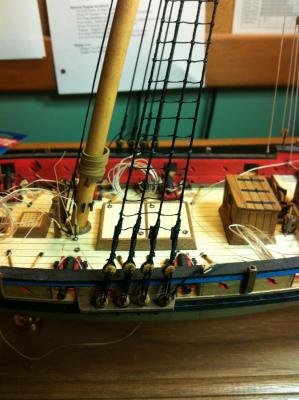
The ratlines are complete and I'm very happy with the results I also added one additional row on each side below the cleats per Alistair's suggestion. I found the clove hitches worked very well and retained their tightness until locked with dilluted white glue, and I was able to trim the tag ends very close. I also used .012 black line instead of the .021 per the instructions for better size contrast and more accurate sizing. Confession: I decided not to serve the standing rigging on this build, but will try it in future builds I plan to invest in the serving machine in the near future. I'll install the Topmast fore and aft stays and then I need to set up and install the main sail. I'll probably have her rigged on (at my best laymans guess) a port tack? Where the main and fore sails are rigged to the port side and the top sail angled with the starboard side forward. I'm probably going to stiffen/shape the sails a bit with hairspray while a fan is blowing on them. Please provide info if my terminology is wrong, thanks! Ken
- 110 replies
-
- 1
-

-
- armed virginia sloop
- model shipways
- (and 2 more)
-
How to do deck edging?
BareHook replied to SpencerC's topic in Building, Framing, Planking and plating a ships hull and deck
On my AVS kit, I did the planking first, then added the Nibbing Strakes after. I traced the shape with tracing paper and transferred it to wood plank. I cut it out slightly oversize so it could be fine tuned by sanding for an accurate fit. Ken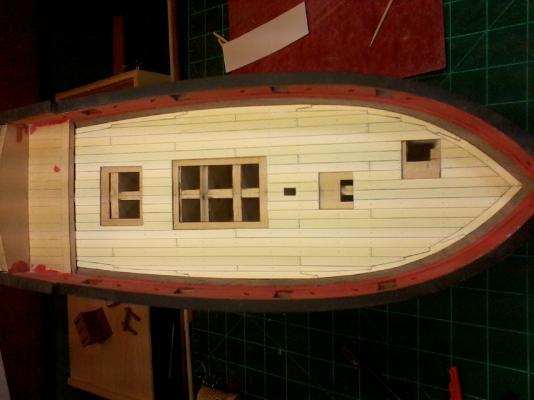
-
I would occasionally discard dried "pellets" from the needle to keep it wet, plus when I pushed the plunger it tended to keep flowing, so you just "bop" (for lack of a better tech term) your way down a row of holes.
-
With plastic sails, maybe pierce the corners with a hot needle or use a small drill in a rotary tool? Not sure about rigging order, but I've found they generally follow how you would do it on an actual ship which would be from the bottom up. I haven't built a plastic model in about 35 years though and am just on my first wood model so... Ken
-
I used the elmers putty as well on my AVS. I used an adhesive syringe with a largish needle a bit larger than the holes to insert the putty. It worked pretty well and there was less sanding and cleanup after, you just have to keep the tip sealed with electrical tape or such so it doesn't dry out in the needle. Ken
-
Thanks Alistair! I'll look at those lower ratlines, maybe tie them and see how they look. I must say, the ratlines over the deadeye lashings is more difficult as you must get it aligned on the first clinch since you cannot slide it or adjust it after its tight. I haven't noticed much in color change on the decks, I used minwax waterbase satin finish for all the wood. It will be interesting to see what it does over time. I like it because there is no intense odor or fumes, it smells a bit like armourall tire treatment. Ken
-
There are a few topics on sewing sails in the rigging forum that are worth checking out.
-
Hmmm, not sure if she would be interested in more sewing jobs, will check though. Also I can only afford her rates due to family discount
-
Duh... Sorry clove hitch, not crow hitch semantic typo...
-
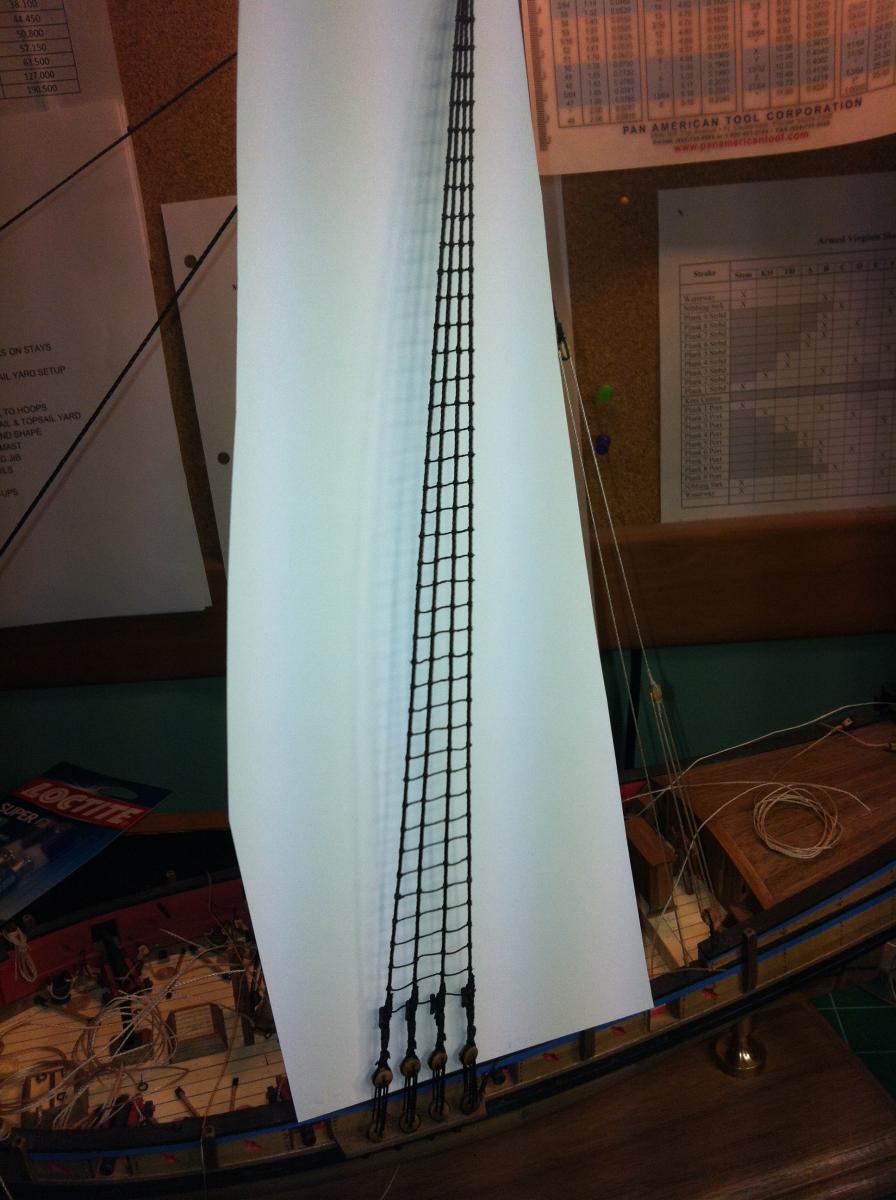
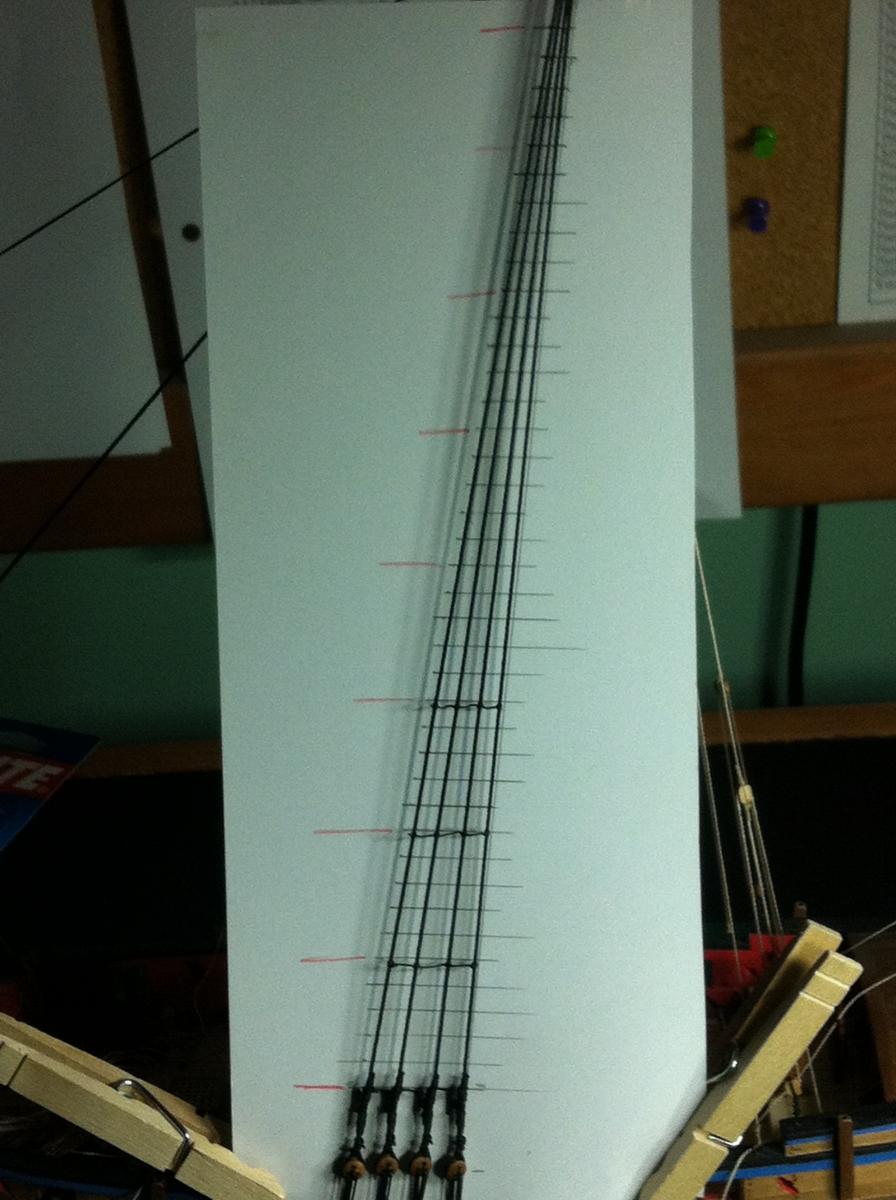
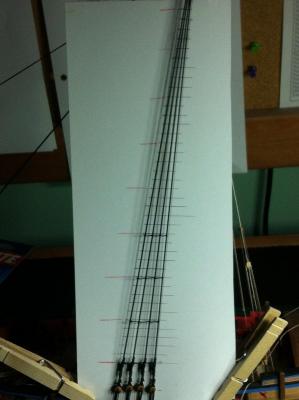
The port ratlines are now completed. I'm happy with how they turned out. I used the clove hitch at all 4 points and just trimmed the ends off close. Once I got the method down, I found it pretty easy. I started with every 5th to hold the spacing and then filled in from the bottom up. The template clipped in place behind really helps as well for keeping your spacing, and providing a contrasting background for grabbing and knotting the ratlines. Following this method, I found it easier to tie by clipping one end of the string and working with the other end for the first knot: Clip one end to the edge of the template card, near the height of the ratline, remove after first knot. Tie the center two knots, adjust height with small tweezers. Tie the outer two knots, adjust height with small tweezers. Repeat until the section filled between every fifth that were first installed. Double check alignment and tightness of all ratlines tied in group. Lock all knots with dilluted white glue. After glue has dried, trim off ends and start next group. I was able to complete a set of 4 ratlines in 10-15 minutes. Ken


- 110 replies
-
- 2
-
-
- armed virginia sloop
- model shipways
- (and 2 more)
-
Nice cooper works! If you make a single barrel, do you bond to a shorter dowel or just saw it and bore down for a recessed cover?
- 662 replies
-
- 1
-
-
- bonhomme richard
- frigate
- (and 1 more)
-
RATS! Starting the ratlines, first discovery is I cannot make the cowhitch at the ends hold tight with the .012 line so I'm going with the clove hitch at the ends as well and live with small tag ends protruding. The alignment card guides work well, I'm doing every 5th ratline to hold the spacing then will fill in the rest. question regarding the ratlines near the top, the spacing gets really close, should I just knot them close and call it good, or leave them off? The main mast standing rigging is complete and I'll add the topmast after after the ratlines and getting the mainsail lashed to the mast rings. Sail making going slow, I tried threatening keelhauling if the sailmaking doesn't start producing soon, but with her being the Admiral, my threat carries no weight. Ken
- 110 replies
-
- 1
-
-
- armed virginia sloop
- model shipways
- (and 2 more)
-
Post the question here and you'll get many answers Traditional copper plating, painted white for white lead? Gold... what else is a pirate to do with all that treasure
- 118 replies
-
- 3
-
-
- jolly roger
- lindberg
- (and 2 more)
-
Or create a ficticious story as to what happened. "The captain of the French frigate was a brutal tyrant and fell victim to mutiny when his first mate and the crew took the law in their own hands and went on to become the scourge of the Carribean..." Ken
- 118 replies
-
- 2
-
-
- jolly roger
- lindberg
- (and 2 more)