HOLIDAY DONATION DRIVE - SUPPORT MSW - DO YOUR PART TO KEEP THIS GREAT FORUM GOING! (Only 20 donations so far - C'mon guys!)
×


Beef Wellington
-
Posts
2,249 -
Joined
-
Last visited
Content Type
Profiles
Forums
Gallery
Events
Everything posted by Beef Wellington
-
 Richard, Hamilton - thanks for the kind words Ferit - You're far too kind! There are a number of items that of course I see and wished I could have gone back to redo, but I'm happy with the learning experience. I love a quote that I saw on someone else's log "Thats what first builds are all about, second builds" Anja, David, ZyXuz, Timmo, Sjors, Andy, Jim - thanks for the birthday wishes! When I saw all the comments I was thinking that somehow there must have been a lot of progress on my ship while I was sleeping...but sadly no I've not been able to get much time in the shipyard recently, but I can feel her calling out to me...too many outside projects and nice weather. Jim - looking forward to see you moving forward again!
- 800 replies
-
- 1
-

-
- snake
- caldercraft
- (and 1 more)
-
HMS Windsor Castle?
-
I've read others have had challenges with the alignment of the stern and quarter galleries but you seemed to have nailed it Ray. Coppering looks great as well.
- 536 replies
-
- 1
-
-
- diana
- caldercraft
- (and 1 more)
-
Cruizer-class Brig-Sloops of the Royal Navy
Beef Wellington replied to molasses's topic in Nautical/Naval History
David, once again a very interesting insight, fascinating research. Maybe for an upcoming episode you could cover a battle where the Cruizer class is victorious, I already know where the HMS Penguin story heads.... :-). Thanks for posting. -
Love the display stand, the little brass plaque that CC seem to provide on their newer kits really makes it look like a museum display. Well done, great idea.
-
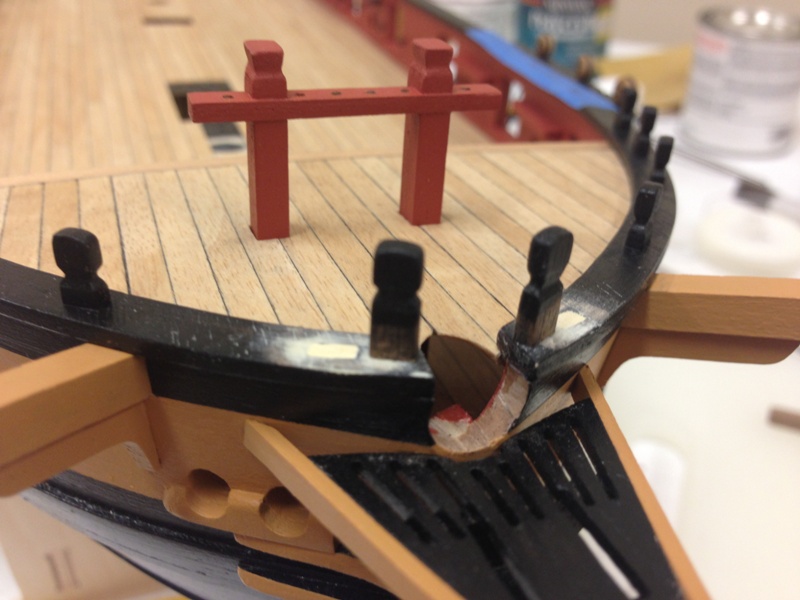
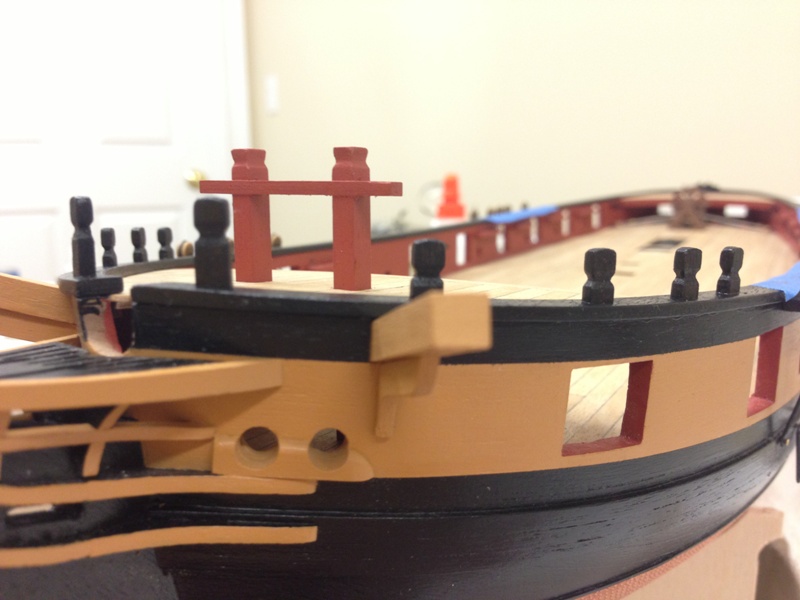
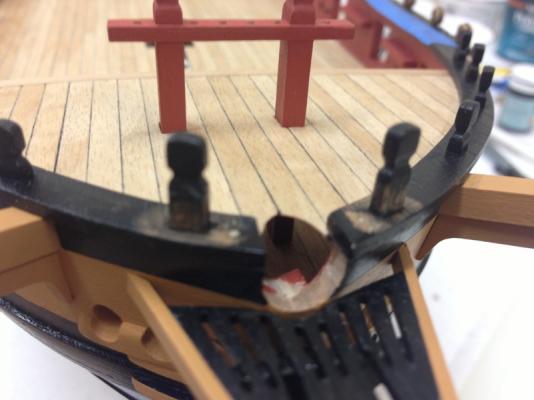
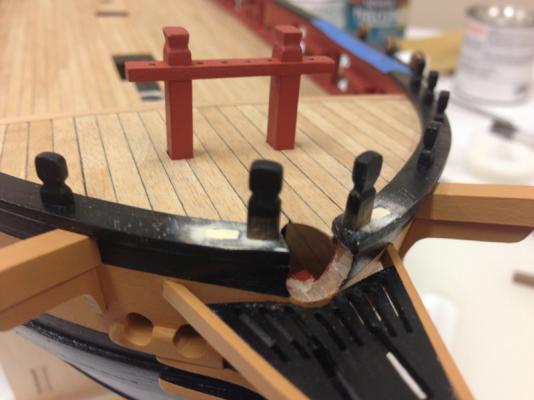
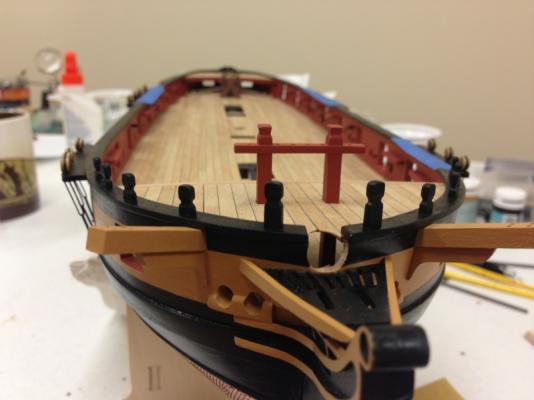
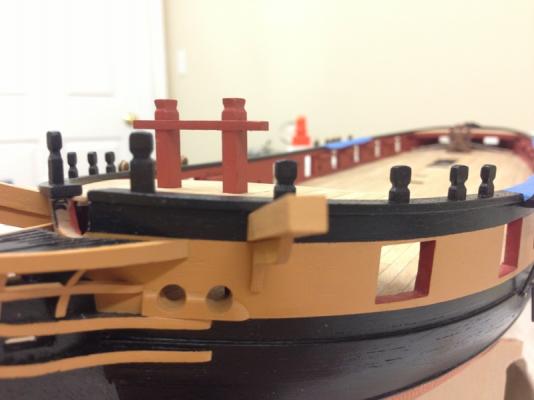
Thanks all for the comments... This is why I seem to make such slow progress, decided that I couldn't live with the knightheads as they were so had a go at fixing. Photos pretty self explanatory, removed the paint, loosened the PVA glue by saturating with rubbing alchohol and filled the holes. I then shortened the knightheads by the thickness of the rail and pinned securely in place. Much happier with the result and the deviation from the plans, I'll leave everything else as is.

- 800 replies
-
- 6
-
-
- snake
- caldercraft
- (and 1 more)
-
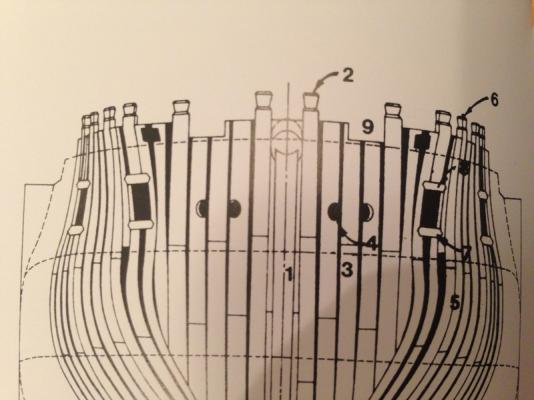
Hamilton, you're too kind...and I'm still pondering. After some reading I found the following (not for the Snake of course), clearly shows the timberhead above a port, so that could be OK. However, this also shows the knightheads much closer to the bowsprit (as Hamilton describes) and sort of what I would have expected for this to be a pretty fundamental to any ship design. I'll wait for others thoughts and opinions before I resort to anything drastic with the knightheads.
- 800 replies
-
- 2
-
-
- snake
- caldercraft
- (and 1 more)
-
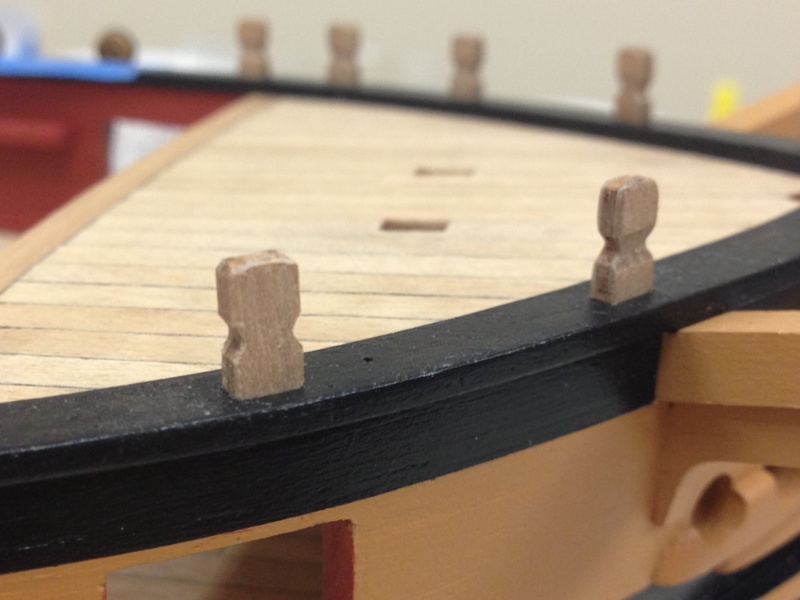
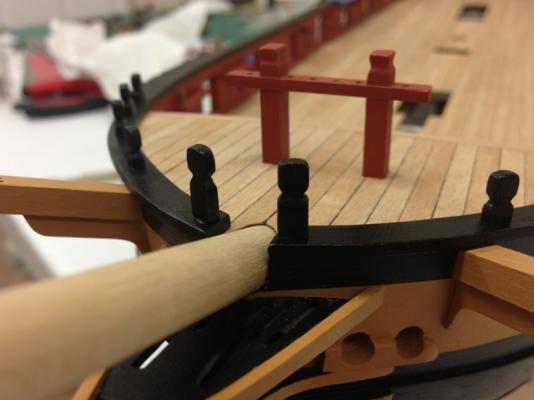
Hi Sjors, the ones at the front are (I believe) called knightheads and should be taller.
-
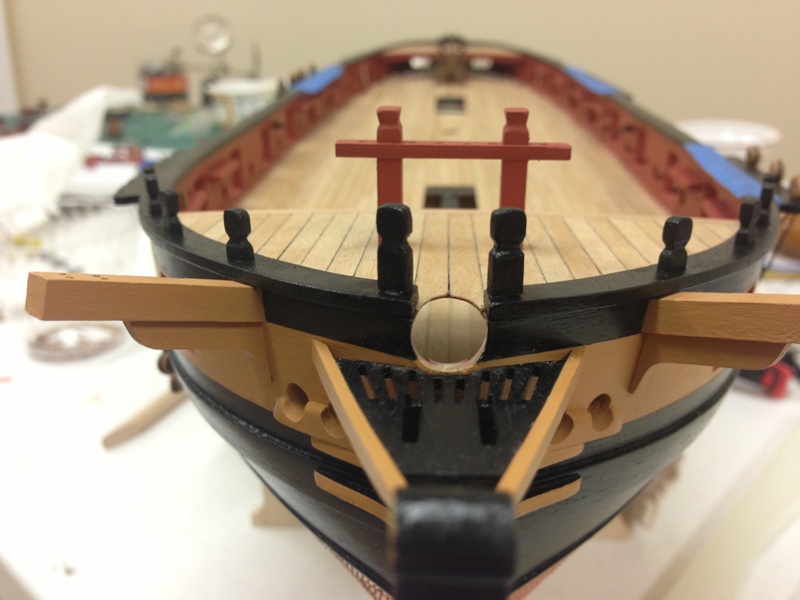
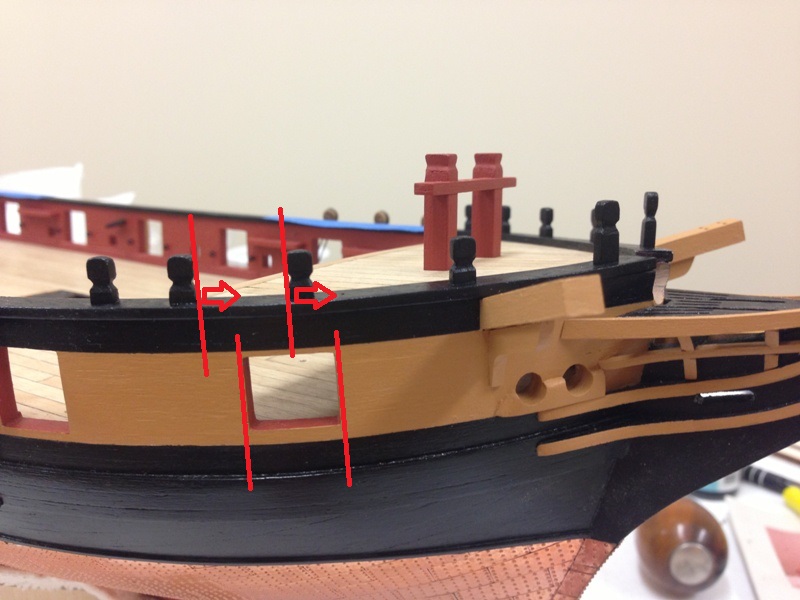
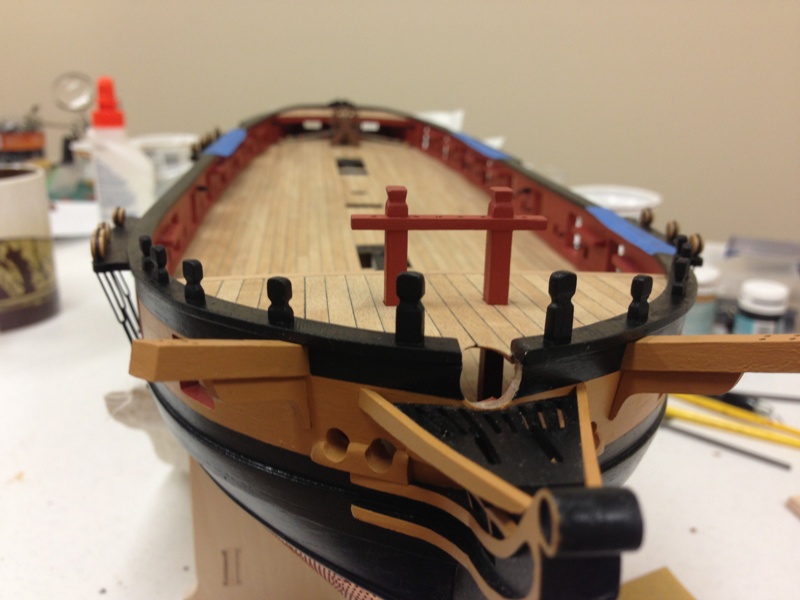
Carl, good to hear from you Building 18 carronades is quite frankly, tedious! Haven't had much in the way of build time recently but I'm getting close - they are simply very fiddly and with so many to do its a task I need to break up. Worked on getting some more of the structural bow details on, namely the timberheads and the fore pinrail. I had already cut the holes for the pins of the pinrsil before I had installed the fore platform as it would be next to impossible to do afterwards. Photos are pretty self explanatory. I decided to try and shape the timberheads a bit to give them less of a 'cut out of plywood' look which was pretty straightforward. First picture shows the before and after comparison. One thing I'm not sure of and as always would appreciate comments and suggestions. The second photo shows the side profile once complete, and I have timberhead sitting right over the bridleport which doesn't seem quite right. These were placed into the holes pre-cut in the capping rail, but books I references seem to indicate that these would have been adjacent to the port (see second picture). The difference is quite a bit and the plans are less than clear on this. Not sure I can change anything, but I wonder if the capping rails should have met at the front of the bow, this would be closer but still not completely right. It would also prevent the bowsprit from fitting unless the ends were trimmed. None of this is mentioned in the instructions of course, and of course it wasn't apparent until I was cleaning my paintbrush! Are the knightheads too far apart, should they be closer to the bowsprit?


- 800 replies
-
- 3
-
-
- snake
- caldercraft
- (and 1 more)
-
I hope so Chris, HMS Shannon would be fantastic, and I can't believe much modification would be needed to make others of the class either (bit like the Vanguard/Belerophon/Elephant kit), and surely would be more of a commercial bet with Trincomalee having been restored as well. Now, how quickly can I get one?
-
Dave - both Trincomalee and Unicorn are Leda class frigates, the latter having the modified stern which is not quite as attractive as the earlier Trincomalee. I have a personal connection with Unicorn as we used to have our wardroom functions on her (can probably guess from my avatar!). The other benefit of Unicorn is that she is arguably the most original of all the ships of sail simply because she never came out of ordinary so has never had any restoration work done on her.
-
Chris, before I saw your last post I was going to suggest the Leda class, interesting option to go with the traditional or modified stern in one kit.
-
Hi Ferit, I'm embarrassed I've only just been able to catch up fully on your beautiful Berlin build log. The ship you made really doesn't look like a kit at all, and the wood tone and your detailed craftsmanship have really done her proud. I love that you described yourself as an "obsessed beginner" - there is nothing wrong with positive 'obsession' like yours, although I'd argue with the 'beginner' - looks like you've mastered so much already. The ship looks very natural as if the crew have just popped below for bit to eat, I love that look. Great stuff, can't wait to see more.
-
Hi Mobbsie, that coppering looks fantastic, a lot to get through! I assuming that the Aggie comes with the same white metal gudgeons/pintles as the Snake, and it look like you had a similar curve to the corners of your rudder rebates. Its probably worth squaring these off as well as the pintles to make sure you get a good fit. I'm also wondering if you'll run into challenges gluing the pintles in place with the raised dimples on the plates preventing these adhering very well. The Snake instructions recommend to simply paint the inside surface with copper paint, its really not noticeable when finished.
- 1,279 replies
-
- 1
-
-
- agamemnon
- caldercraft
- (and 1 more)
-
Pete - Yes, I did trim the pintle, otherwise it wasn't possible to mount the rudder with the gudgeons already attached to the sternpost.
-
Hi Pete - I didn't widen them, all I did was to square the corners up to allow the gudgeon and pintles to seat properly. If I remember correctly, these also needed some filing to get them nicely squared up. Nothing tricky, just the usual patience needed and was happy with the way things turned out.
-
My humble opinion is that there is probably little to be gained by filing down the rivets, you can get a pretty close fit as is which is really not noticeable - hadn't even really thought about it until you asked the question! Interesting idea, would love to see how you tackle it if you decide to go down that path. I think I'd be more worried about getting scratches on the copper plates. The colour I used is Tamiya XF-52 Flat Earth - unfortunately my local store doesn't have much selection. I tried the Admiralty walnut but thought it too bright, and I'm not very good (I found) at mixing colours.
-
Mike, you're Badger is looking terrific! Curious how you made the hooks on the blocks, and whether these were what you used to rig the cannon. Very impressive!
-
Hi Sjors, is it also an option to keep the piece you have, but make some wooden 'bases' for the metal part? That would allow the metal piece to be lifted up into what looks like correct alignment. I'm sure you'll figure it out, shes looking good!
-
Ray, you're way more experience than me, but I definitely agree with your approach. I don't know why CC put the coppering so far into the build instructions, it just seems to make it that much harder to manage and like you I liked to have the freedom to work on the hull without worrying about breaking anything delicate. I love the way she is looking already, the planking, wood tone and the black look very nice indeed!
- 536 replies
-
- 1
-
-
- diana
- caldercraft
- (and 1 more)
-
Stergios, you must be confusing me with someone else! I'm learning this stuff just as much as the next man, sharing my thoughts only because I really value those of others - sure its not the only way. I didn't consider the 24lb'ers simply because I wanted to keep as historically accurate as I could, purely my own personal preference. Looking forward to seeing what you decide.
- 1,144 replies
-
- 1
-
-
- snake
- caldercraft
- (and 1 more)
-
Hamilton, druxey, Richard, BE - appreciate the support guys Mort - I went with the block size in the instructions (don't have them in front of me).
-
Hi Stergios, I'd still recommend you figure out the ladder placement as part of this. A difference of 1-2mm in the block placement will mean the difference between the ladders fitting and not, its much easier to move the location of the blocks to than reconfigure the ladder - you may end up with the stair treads not being parallel. Look forward to seeing what I'm sure will be an excellent result!
-
Coming along nicely, great start to your coppering Richard. Looking forward to seeing more progress.
-
I spent a lot of time dry fitting the various components and had completed the aft ladders to determine where the various rudder steering lines need to go so they don't interfere (the plans are horrible in this respect). This took a bit of playing, but once done, I knew I could position the blocks, wheel and tiller arm with confidence - I think its the only way to do it to prevent an issue because once the aft platform is fixed it would be difficult to fix. The rigging of the aft carronades also need to be factored in as well as it gets pretty cramped back there. I ended up having to make my own tiller arm as I had an accident with the kit piece.