
HOLIDAY DONATION DRIVE - SUPPORT MSW - DO YOUR PART TO KEEP THIS GREAT FORUM GOING!
×


KenW
-
Posts
1,231 -
Joined
-
Last visited
Content Type
Profiles
Forums
Gallery
Events
Everything posted by KenW
-
 Thanks. Russ and Jim as well as the ’likes’. I find that carving isn’t so bad if you slow down, divide the piece into smaller parts and keep at it (slowly). Cheers.
- 122 replies
-
- 2
-

-
- independence
- privateer
- (and 1 more)
-
Hey Dave - My intention is to rigg her including furled sails. We’ll see.
- 122 replies
-
- 4
-
-
- independence
- privateer
- (and 1 more)
-
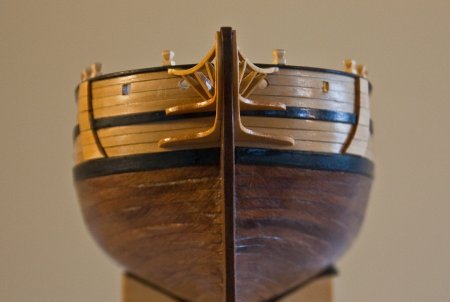
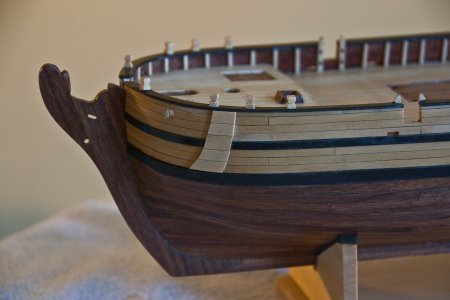
The carvings are installed on the hull; as well as the aft cap rail. I also made a tiller. I like the way the boat is shaping up and I think the quarter badges look good. I’m almost ready for the boat to be launched. I need the swivel gun posts and I have to blacken the guns and mount them. The gun carriages are already put together.
- 122 replies
-
- 11
-
-
- independence
- privateer
- (and 1 more)
-
Thanks Dave. I’m not really that good. As long as you stay about 3-6 feet away it’s OK. Cheers.
- 122 replies
-
- 2
-
-
- independence
- privateer
- (and 1 more)
-
I carved and assembled the Quarter Badges. If anybody is interested, I used the same technique as I used to carve the stern transom decorations. First, study the plan’s carvings and divide it into several components. Then make a copy of, in this case, the quarter badges from the plans and print several copies. Next make cut outs each component. Glue these small cut outs to the wood you want to carve, and then glue that to a large piece of wood. Carve the component and when you are satisfied, place the piece of wood into Isopropyl Alcohol (91%). After about an hour or so, carefully use your Xacto knife to remove the carving from the piece of wood. Let the carving dry overnight. For my quarter badge I’m making my window on a 1/32 sheet of walnut and glueing the carvings once the window frame is finished. The walnut is a good contrast to the box wood. Once all the pieces are finished and glued, I trimmed the excess walnut and produced a quarter badge. Now, I just have to stain, urethane, and mount the carvings on the boat.
- 122 replies
-
- 12
-
-
- independence
- privateer
- (and 1 more)
-
Bob: Is there a site to find out what plans are available from the Smithsonian? Sounds like a great resource.
- 359 replies
-
- 5
-
-
- prince de neufchatel
- model shipways
- (and 1 more)
-
Excellent workmanship. Very impressive. If you think that the barrel has too much scheen, try Weathering Power. On a scrap piece, of course. Great gun.
-
Thanks Dave. I'm not sure how much carvings merchant ships had in 1775 either. And, I doubt they would've added some just because they were going into the privateer business. But, like you say, I like the way it looks.
- 122 replies
-
- 1
-
-
- independence
- privateer
- (and 1 more)
-
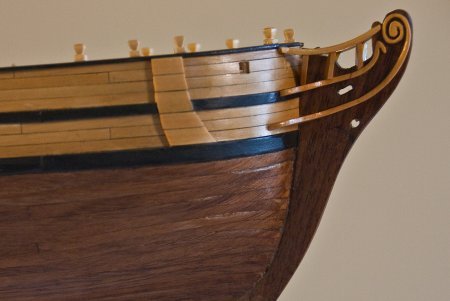
I added the various carvings on the stem. I have two cheek knees and a head rail. I left off the middle rail because I felt it made the area look too crowded. The fancy carvings are similar to the kits, but I borrowed the design used by Clair Hess on his model. I like the result. My next task is to explore the possibility of making the quarter badge windows.
- 122 replies
-
- 13
-
-
- independence
- privateer
- (and 1 more)
-
Thanks Dave. Thanks to the 'likes' as well.
-
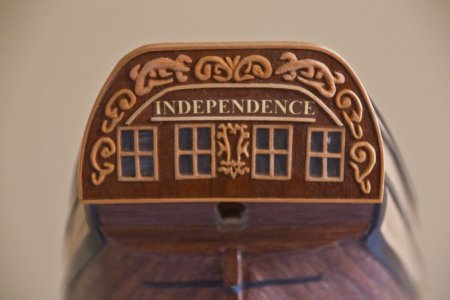
Finally, I finished the transom. I knew that I wasn’t going to be able to use the dye-cast metal transom supplied in the AL kit as it was now out of scale. I had to set about making my own. I ran into a problem, however, because I made the windows just a little bit too big. One of the carvings wouldn’t fit. So I left it off and made a variation of the smaller carving to fill in the space. I’m satisfied with the result. A view of the other side with the knees added. The carvings on the stem will be next.
- 122 replies
-
- 10
-
-
- independence
- privateer
- (and 1 more)
-
Your work looks greag. What is a - "flex shaft with the small pen-sized head" on a Dremel? I saw Mike make belaying pins, I'm never able to get a proper round boxwood strip unless the original piece is square. Cheers.
- 421 replies
-
- 4
-
-
- medway longboat
- Syren Ship Model Company
- (and 1 more)
-
I corrected my error on my earlier entry. The red ensign was used by all civil and military ships not under the command of the Admiral-of-the-Blue or the Admiral-of-the-White.
- 421 replies
-
- 4
-
-
- medway longboat
- Syren Ship Model Company
- (and 1 more)
-
Richmond is correct. That Red Ensign doesn't have the 'red X' for Ireland. You want this one.

- 421 replies
-
- 7
-
-
- medway longboat
- Syren Ship Model Company
- (and 1 more)
-
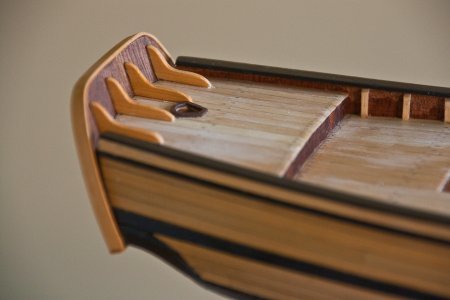
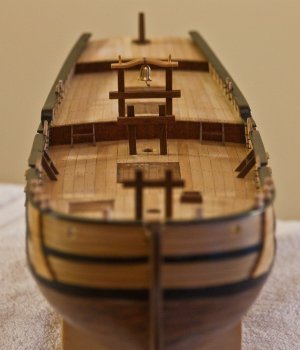
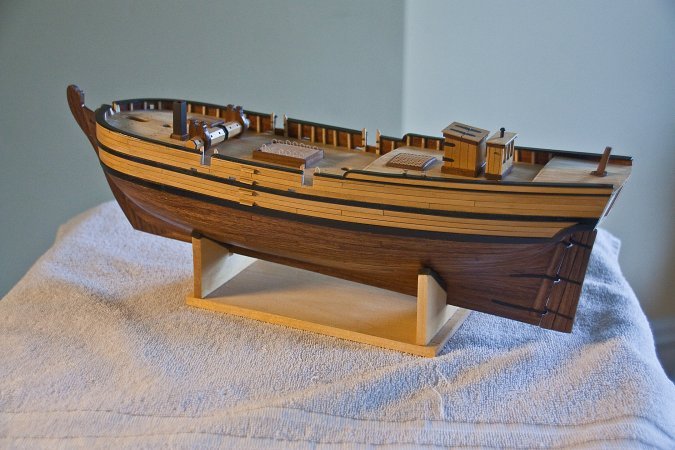
I made more deck ‘furniture’. First is the bilge pumps. I used the pump kit from Syren’s Cheerful. I made the pumps shorter because I felt the resultant pump looked better on this boat. I added the other stairs for personnel coming aboard over the side. Also, I made the bits, including the main bit with the ship’s bell. The bell is the only item from the original kit that I’ve used. Neither the pumps nor the bits are glued on yet; so they may look akilter. I like the way the bow looks with its ‘side burns’. The transom will be next.
- 122 replies
-
- 8
-
-
- independence
- privateer
- (and 1 more)
-
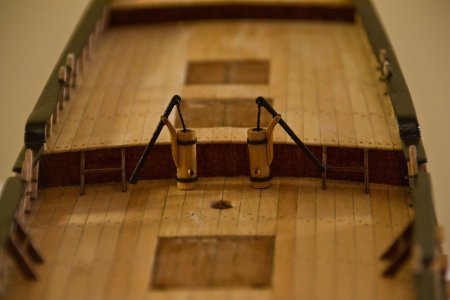
I’ve resolved to add entries to this log more often. So, I made two changes to my Independence. I added the gunwale posts in the bow area and the anchor bumpers. (I don’t know if ‘anchor bumpers’ is the correct name, but it is descriptive.) This reminds me that I need to drill the holes for the anchor cables.
- 122 replies
-
- 10
-
-
- independence
- privateer
- (and 1 more)
-
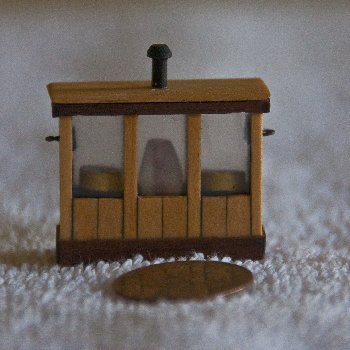
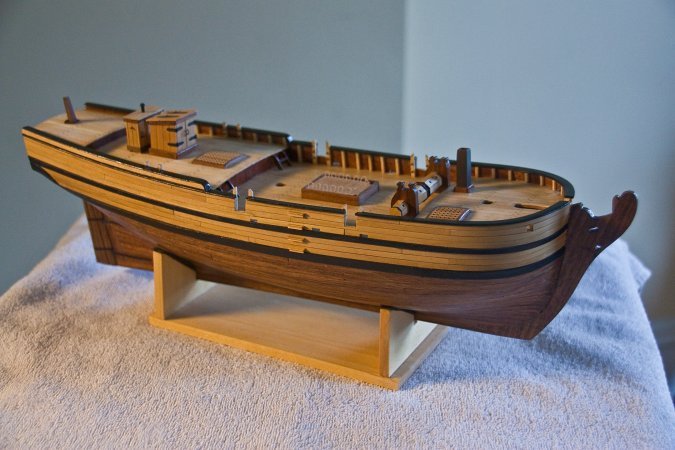
I’m surprised at how long it’s been since my last entry. A death in the family, another surgical procedure and a great family reunion have happened, but I have been working on my model during a along these two months. I have to make entries more often. Anyway, this is where I am at present. I made the binnacle. I based my design on some models being built in my club and a few photos I found on the web. As my friend at the club said, “All binnacles were the same. Two compasses with a lantern in the middle.” I made the cap rails from a1/32 inch sheet and some strips. I finished planking the side and completed the cap rail all the way to the stern. Also, I made the rudder and attached it to the hull. And I added stairs from the water line up the hull and a ladder from the main deck to the quarter deck So I have some more deck furniture to make, and the transom and stem carvings, as well as the quarter badges to create.
- 122 replies
-
- 11
-
-
- independence
- privateer
- (and 1 more)
-
I really like your workmanship. I have a question - When blackening the gun barrels, how long do you leave the barrels in the acetone and muriatic acid? Don't want to make any mistakes. Thanks.
- 128 replies
-
- 3
-
-
- mordaunt
- battle station
- (and 1 more)
-
Really like the wreath. Great carving; it would look good even without the pencil. Cheers
- 128 replies
-
- 4
-
-
- mordaunt
- battle station
- (and 1 more)
-
Outstanding workmanship! Really good looking model. Cheers.
- 128 replies
-
- 3
-
-
- mordaunt
- battle station
- (and 1 more)