Jond
-
Posts
876 -
Joined
-
Last visited
Content Type
Profiles
Forums
Gallery
Events
Everything posted by Jond
-
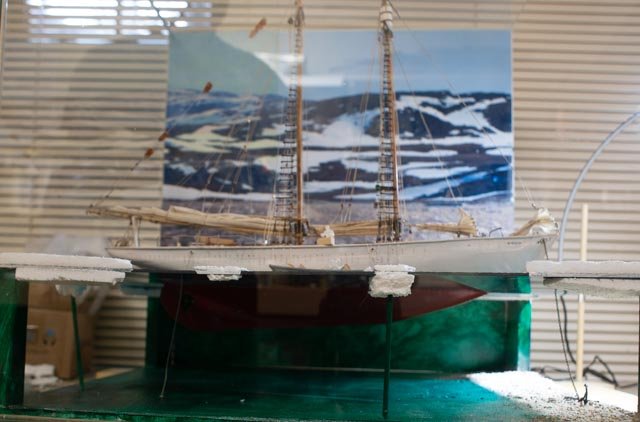
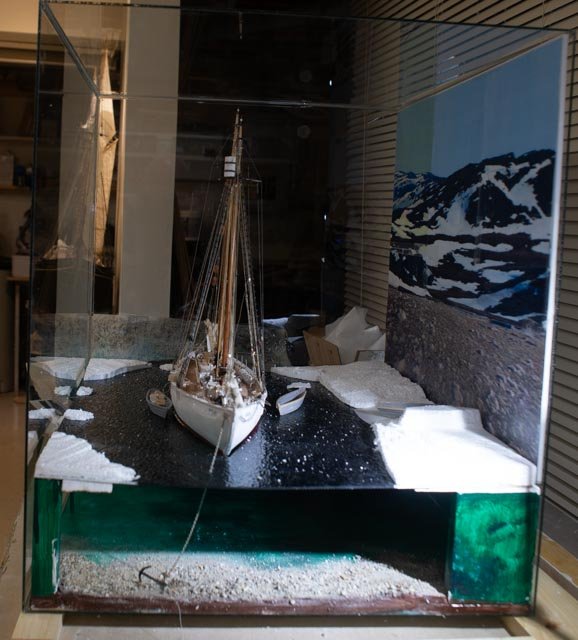
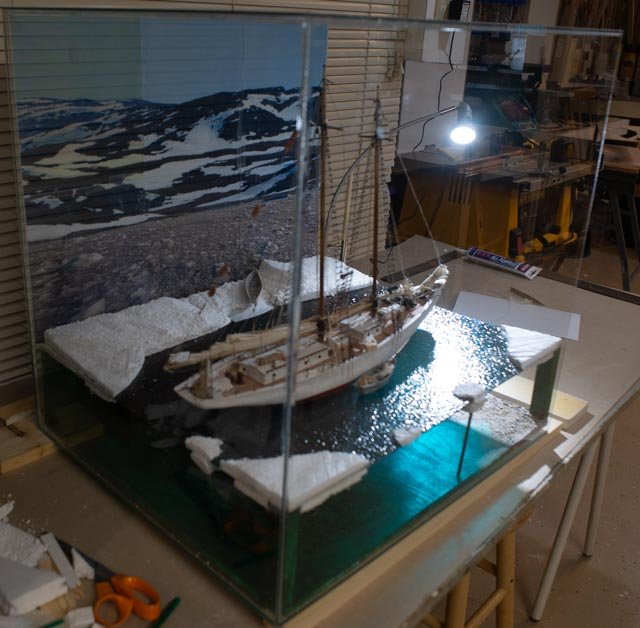
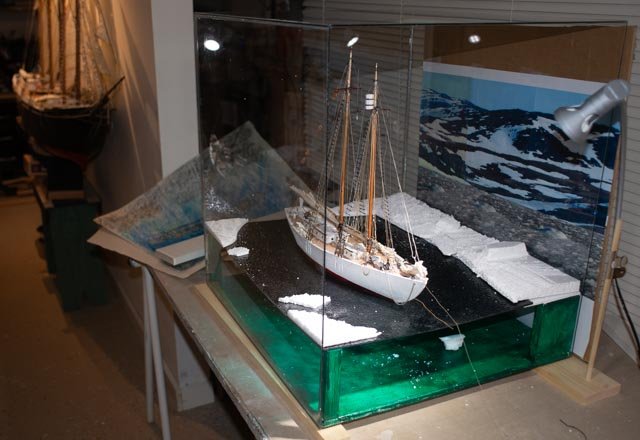
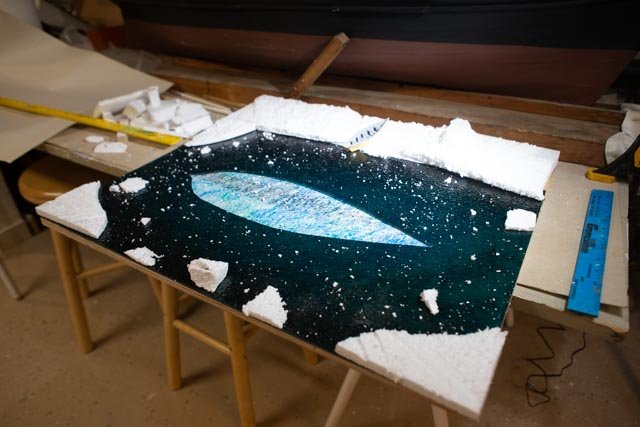
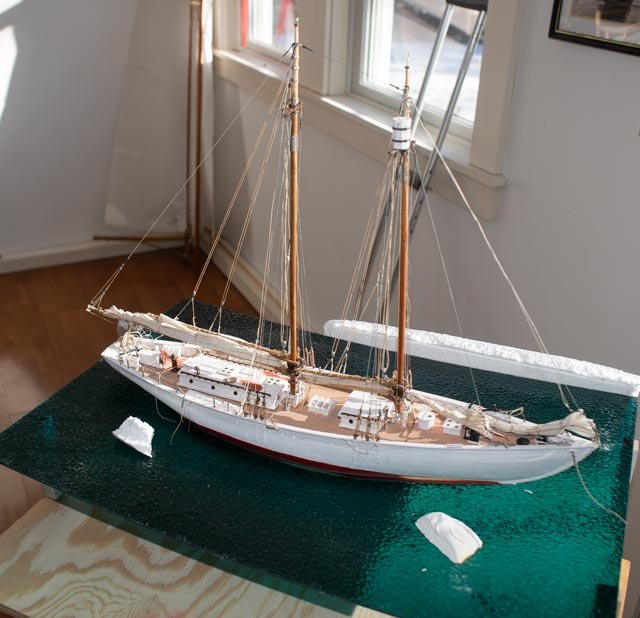
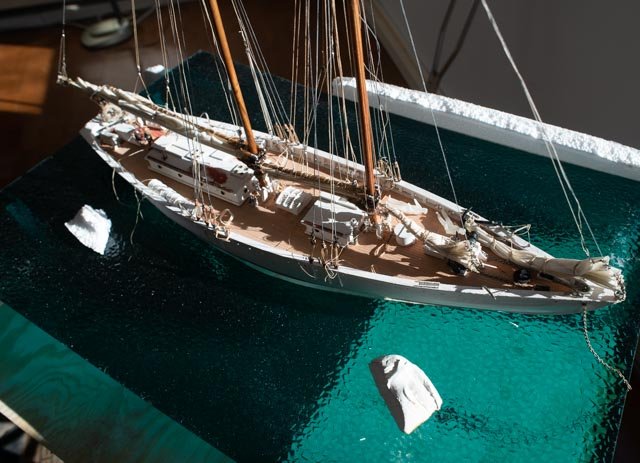
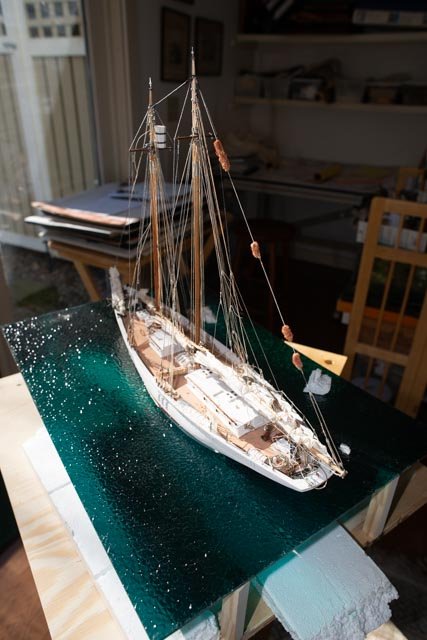
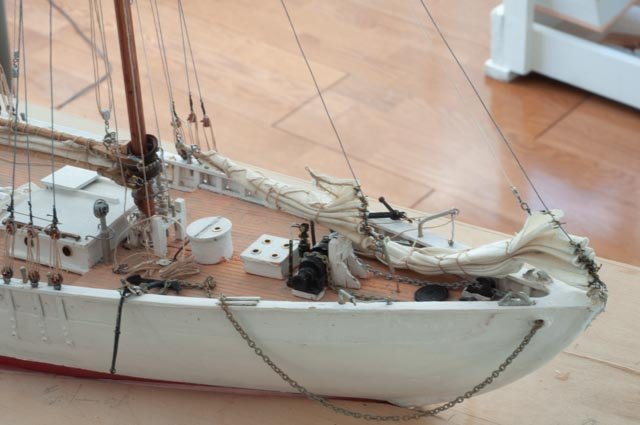
 Post 34 Diorama update I was supposed to complete the dories by now but have had too many distractions. Working down the punch list I now have Bowdoin sitting in the glass box [ sideways so I call pull it out etc.] Here are some views showing where we are. Here I fixed up the collage print to fit the box. It is just six sheets of normal printer paper scotch taped together. I am trying not to just add another $40 to go get it blown up , but may loose that argument Here we see under water. The bow anchor on the beach [ poetic license as it would have been further forward] also there is an aft anchor line that runs down through the open water to water below. The ice is both above and below the water. I have learned that I should do ice differently underwater as it is different. I hope to visit the Maine Maritime Academy soon to see john Gardiners model where he did work on accurately depicting different types of ice. I hesitate to add more mixed blue color to the water. I hope to learn form artists this summer what to do to make it better next time. Here is the bow shot. Again, see the dark water looking down light. The anchor shows up well. Now looking back into the light, we have active sparkling water Here is the scene. This will be the story line. I talked about it before. As to the figures I am at a point where I have in the past used unpainted figures and believe I shall here too. The reason is the eye will go to the people if they are painted out and to the schooner if they are just there. How about that for a forum discussion. It is also another hobby area I have not yet entered, and I fear is a very slippery slope. Poorly painted figures may be worse than unpainted figures. I bought ten and there are only a few that will be on board. I may try one to see what happens, but later. Here I add a close-up bow shot just because it is fun. With all the water and things, one might not notice there still is a punch list. All Lines are now on, but several are yet to the coiled and hung. Here we have the proto-type dory for the last time. The replacements are now planked and in a week should be ready to launch. These lapstrake proto types will go to an early 1902 sardine schooner I built a few years ago in the same scale or to a friends 3/16 scale Bluenose where due to scale they are the right length. cheers
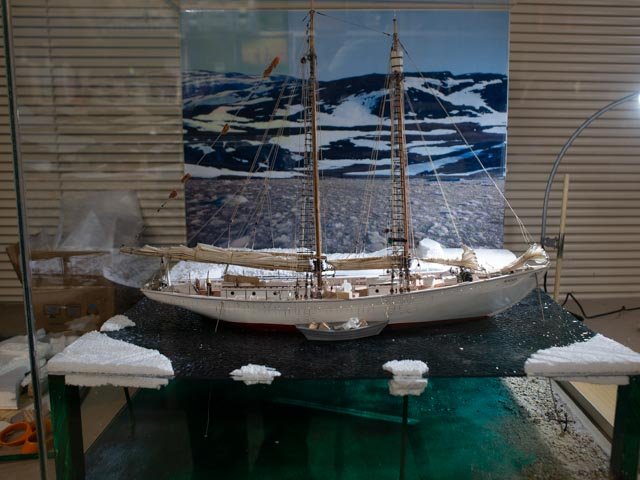
-
Gary thanks for the encouragement. experimentation is actually fun. It is amazing to try something and have it actually work. I am struggling but will succeed in making the dories correctly. stay tuned cheers
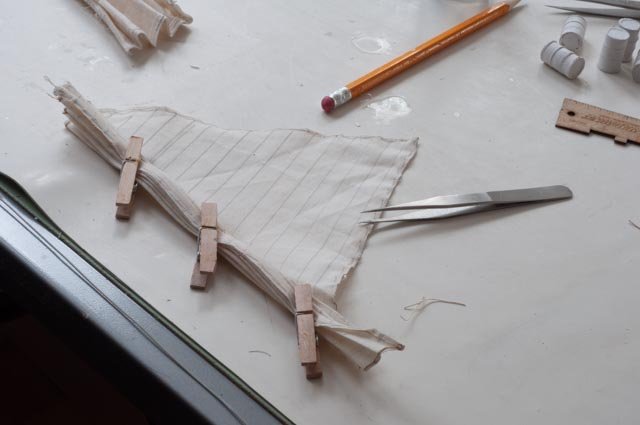
-
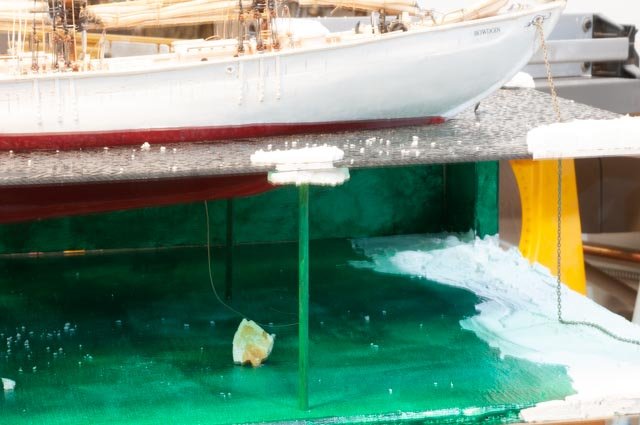
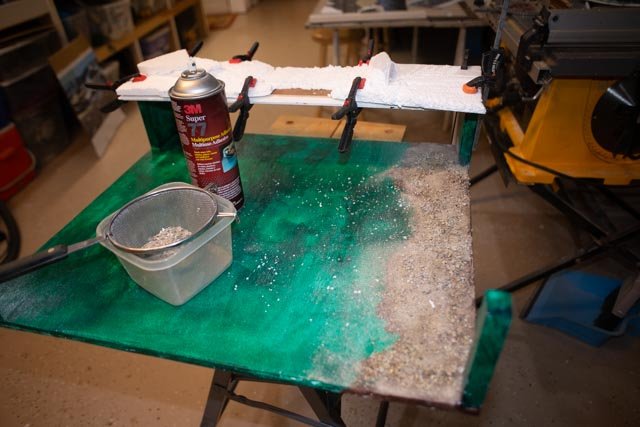
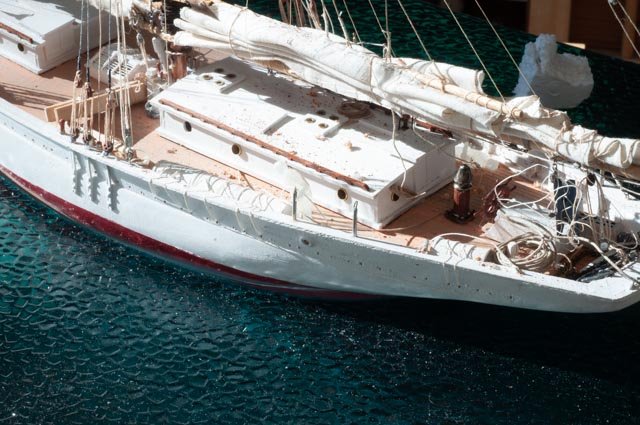
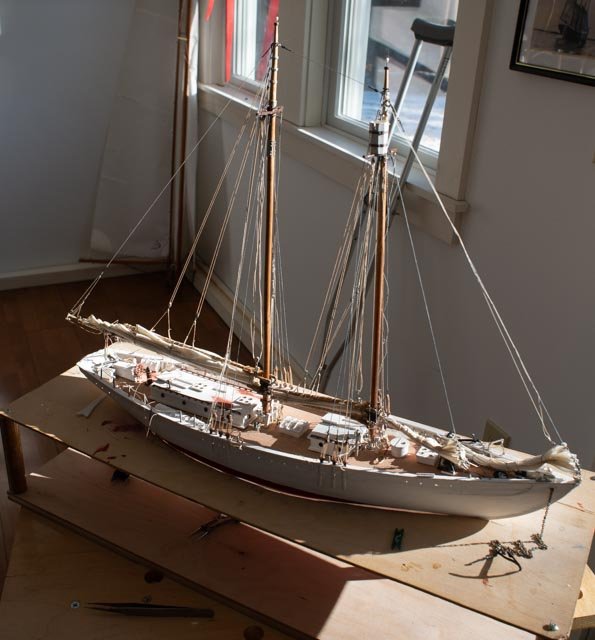
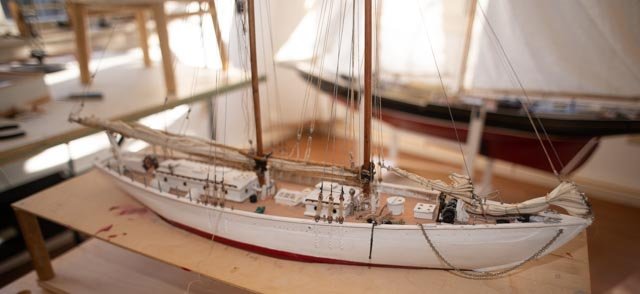
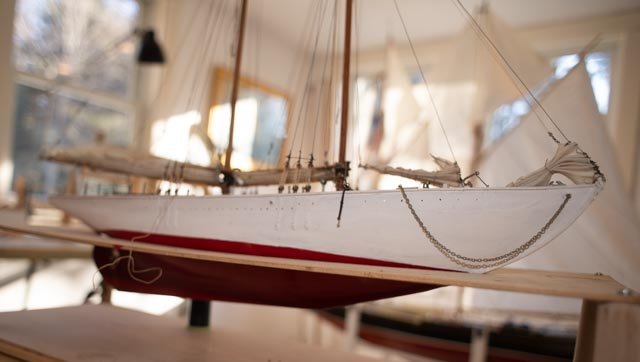
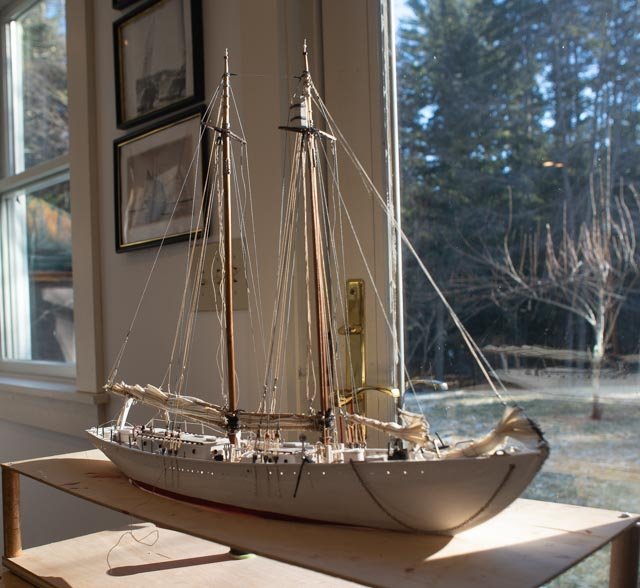
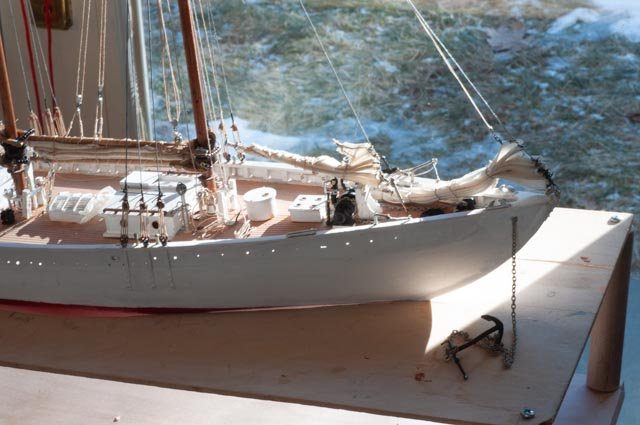
Post 33 Weekend update…getting near the end As suggest in recent postings, there is a light at the end of this tunnel. A few more things are done, and we are now getting diverted into other items needed for the museum opening. Two large schooner models are coming next week for a quick clean up and discussion on casings. So, for the three or four outstanding areas of Bowdoin we have a little progress. Hull and overall During the travels many dogs lived on deck. The photos show obvious impacts out side of swabbing season. Here I have used soft pencil to show staining under the scuppers. Also I have complete the light brown under coat on all the blocks, dead eyes and pins. I will come back now with the dark brown cover up. The missed spots again showing some ware. I studied the running lights and found they are not like the standard fishing schooner. In this BRHS archive photo [ and a few other views] , there was a single board about 8 inches wired up high between the 15-inch ratlines to allow feet to find there way. The lamps were then suspended. Talking with Bluejacket, they sent me some lanterns to try out. Here we see the results. The sewing lines still setting up and ready to trim Deck and rigging. I met again with Capt Will and we went over more details and suppositions. He supported that they would have had the turnbuckle and chain on the boom until they first sailed. I like that because making turnbuckles can be easier that getting lines through those tiny 1/8 block beckets. Here we see chains in place hold the boom rigid against the crutch. Also, a little brass paint to brighten up the binnacle in honor of the ready departure home. Here we in final inspection I really needed to get one more slat in the ratlines. The dory oars were handy to make the spread in the shroud. Lesson learned on the length of the splice. Oh well those who read this will know. Here I have installed the pump handles. I made them once and lost them, so a quick remake was needed. Also, the bell is in place. I chose to remove the crutch because it would be very hard to see and the bell crowds the crutch. ....my excuse is weak......they are about to sail. Diorama I need a few supports to keep the acrylic flat. I chose to paint out some small dowels the same color as the water. I then buried them in a small ice formation. I am not sure if that highlights them, so some artist advice may suggest I move them to be less noticeable. The Bowdoin was in close to the beach. There was a ten-foot average tide. In this view with the added beach they are in 18 feet of water. I felt that was reasonable enough to replicate their position in Refuge bay. Here you see the result. I dabbled with two brushes, medium gray and dark brown to create the background color. I then sprayed adhesive and dropped in separate sand and small pebbles. I did two layers and it looks OK to me. My critics say I need to sink the anchor in…..I think if it sits on top, it is easier to see. Dories update next time Cheer

-
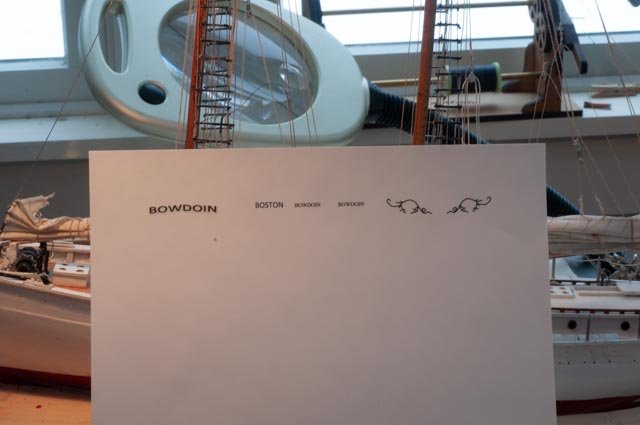
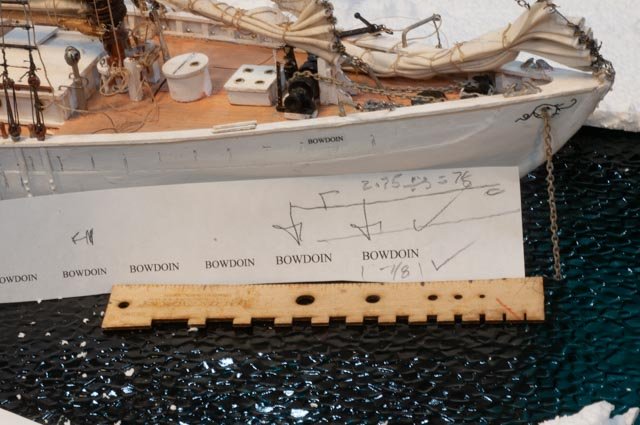
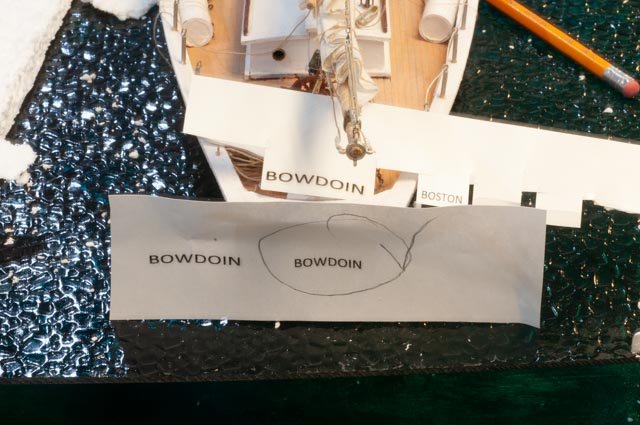
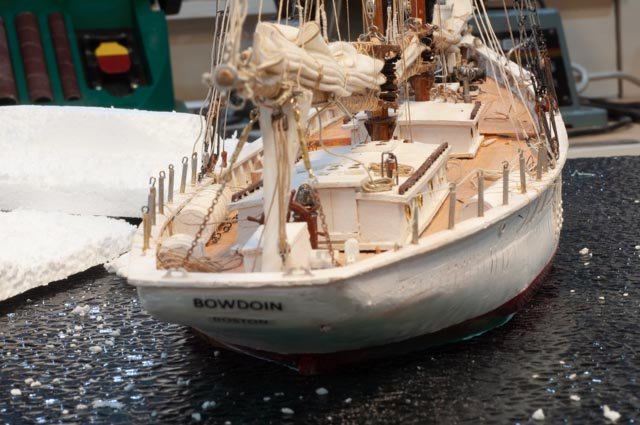
Post 32 Getting names on the hull Naming is always a fun area. Thank goodness for computers and peel and stick. On previous builds I did all the work in Turbo Cad and then using layers could print white on black for black hulls. This time the hull is white so all I need is font and size. For the filigree [ or what ever it is called] around the the anchor hawser pipe, I used the Bluenose method. I took a photo and pasted it into Turbo Cad. I then scaled it to full size. I then locked it and added a layer. I traced all the lines. Before I got to the formatting, I went through the names and figured it would be easier just to switch to MS Word. I transposed the fine line filigree to word and just covered it over with thicker lines. That smoothed out the curves. The whole thing is small at this scale, so I did not get carried away. The lettering was a little harder. I wanted to stretch the spacing just a bit but word does not seem to do that[ or better said I do not know how to do that]…I found a font that was close and printed out a few sizes Here is the first attempt. The filigree was the right size, so I went ahead and printed it on peel and stick Here the filigree is on and the anchor chain re fitted. The name was to small, so I decided to put it on aft of the right location and then do some samples. Here I am choosing the right size for the forward name board Here we are checking it out for the transom. Here is the forward name board. I would love to be able to stretch it with out thickening the letters. even it cad it did that to me. You can see i have drilled the acrylic for the anchor Here is the transom. In the early days she hailed from Boston.you can see the pencil lines of over winter drain stains under the scuppers. all for now Cheers

-
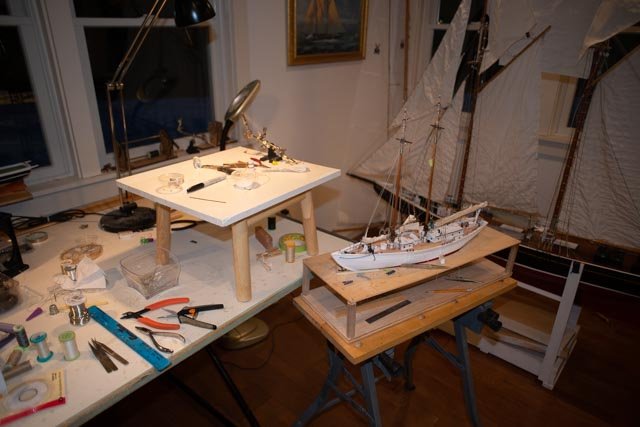
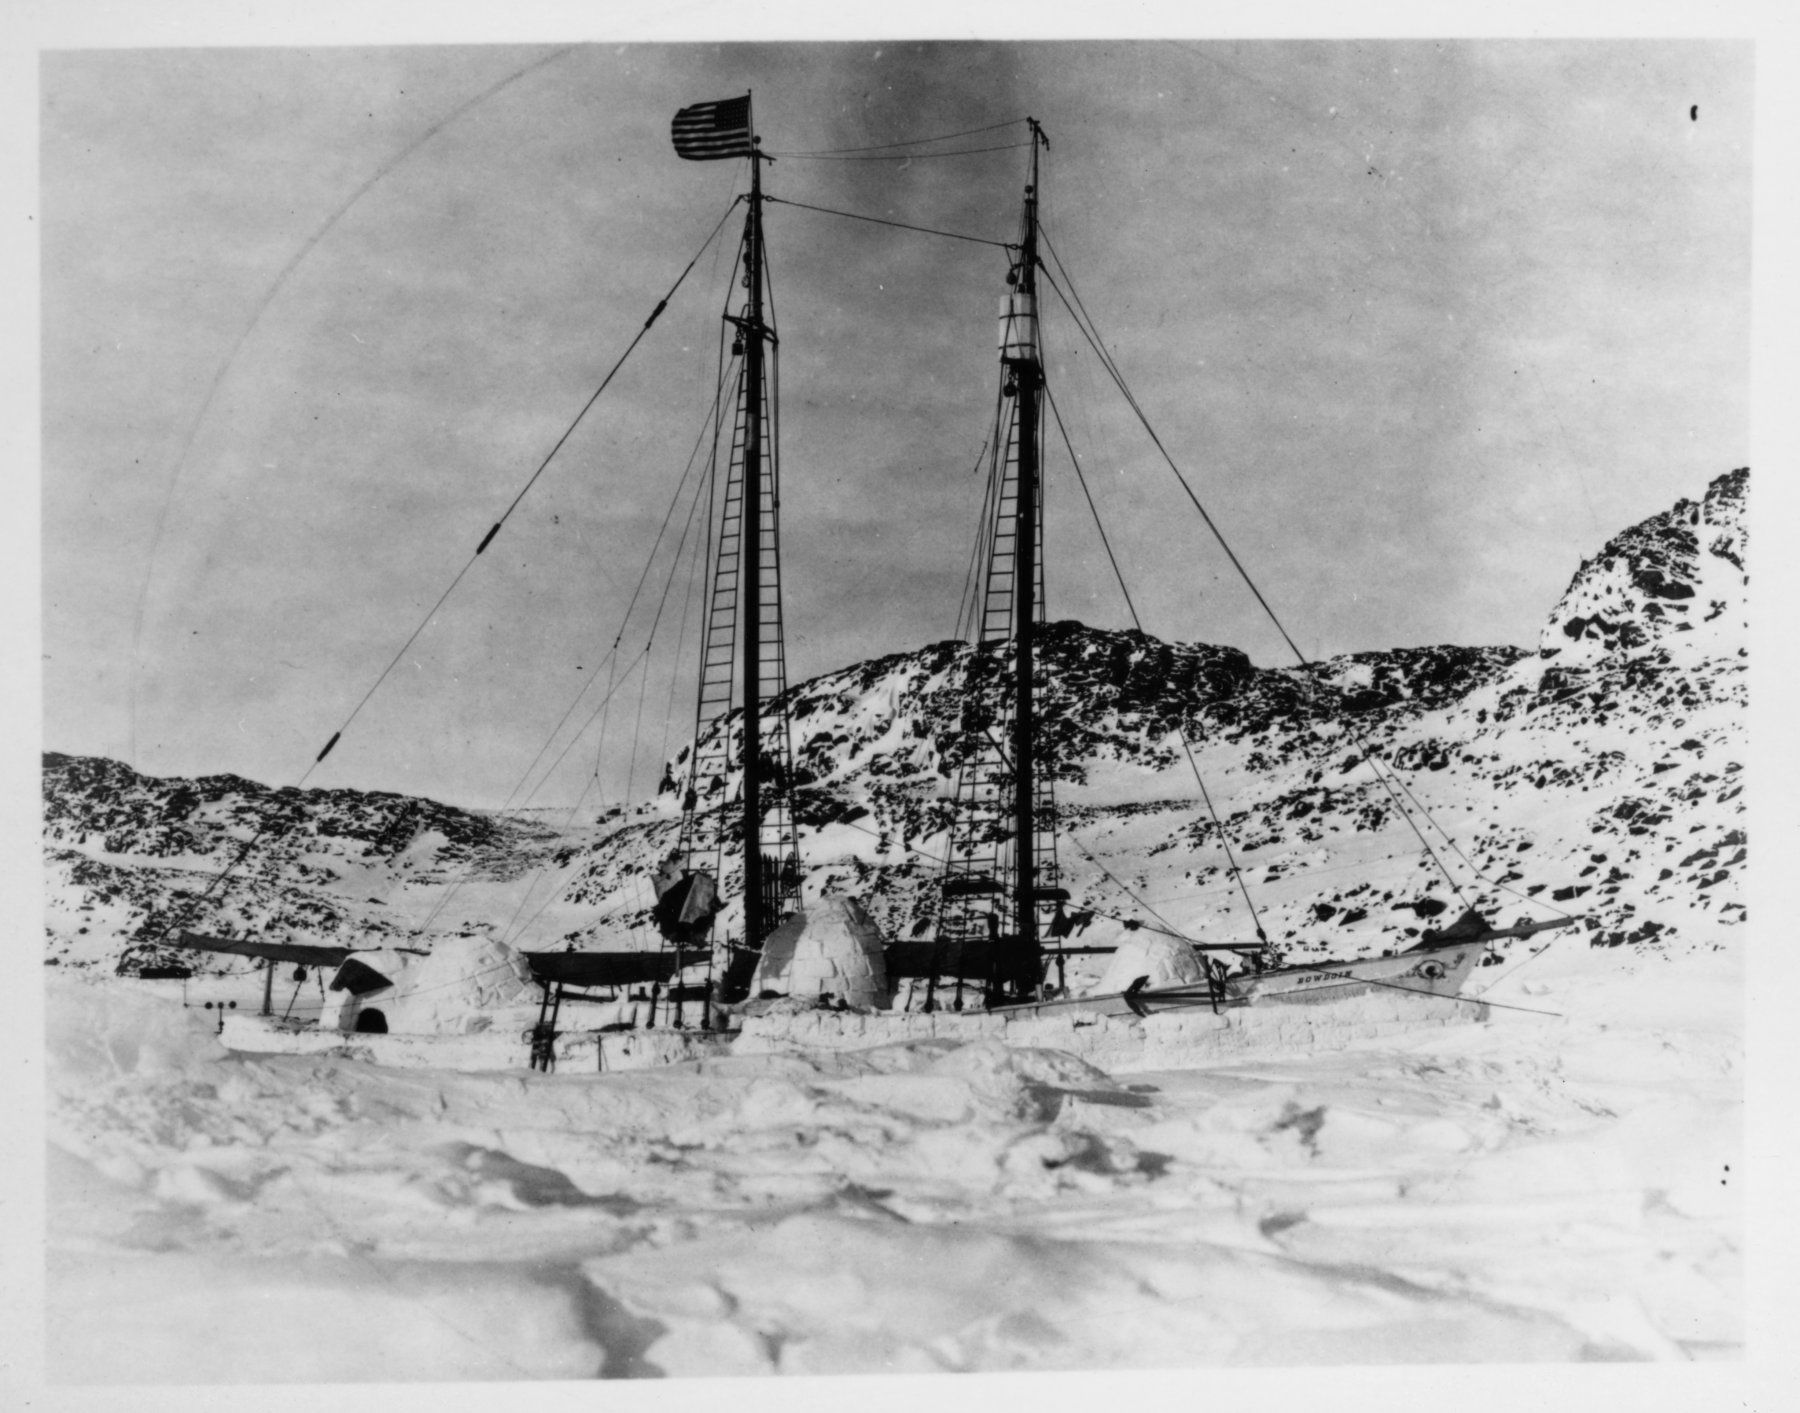
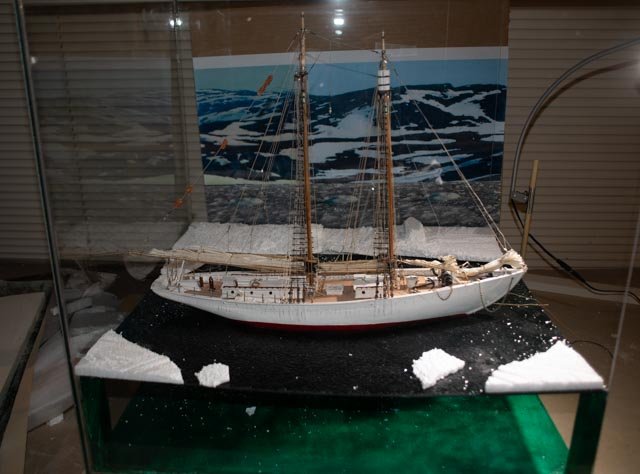
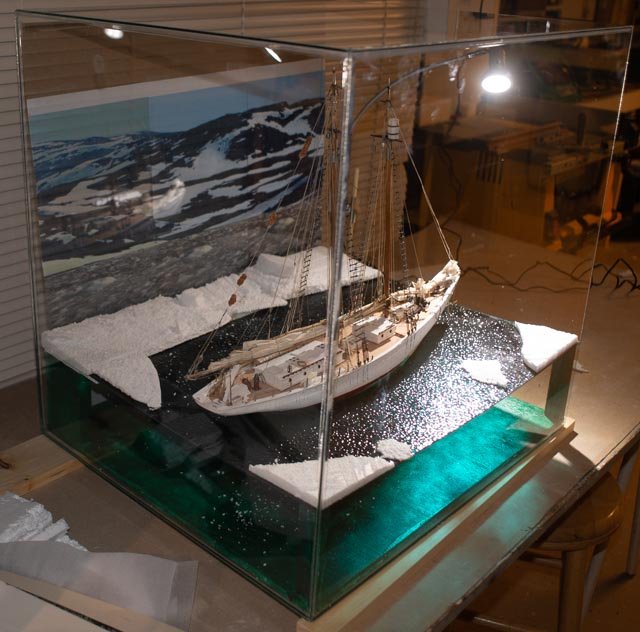
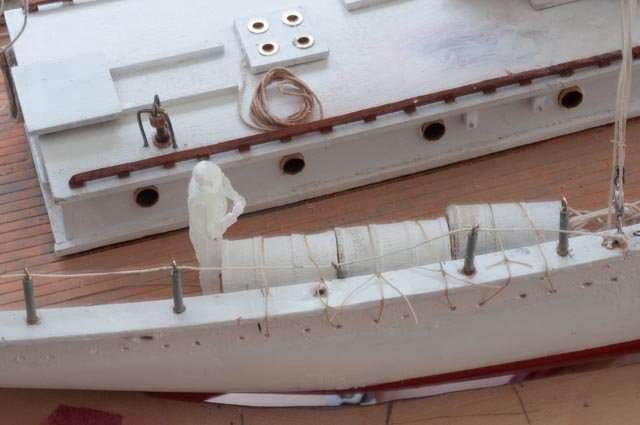
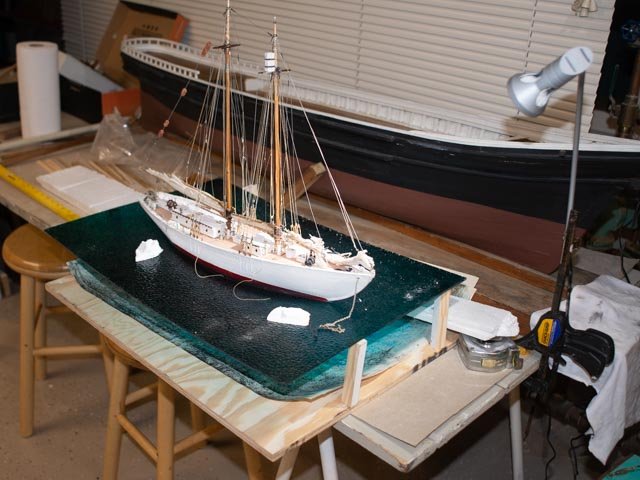
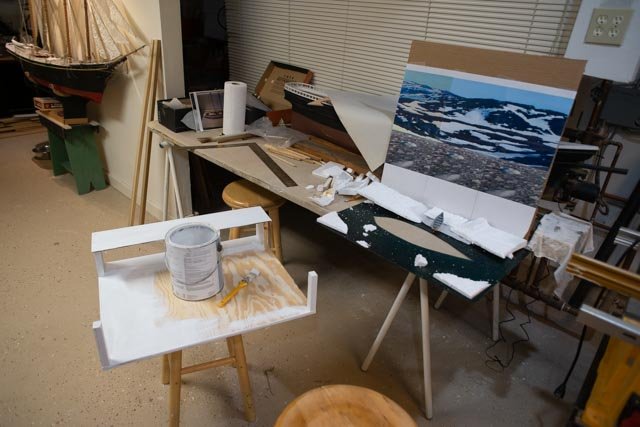
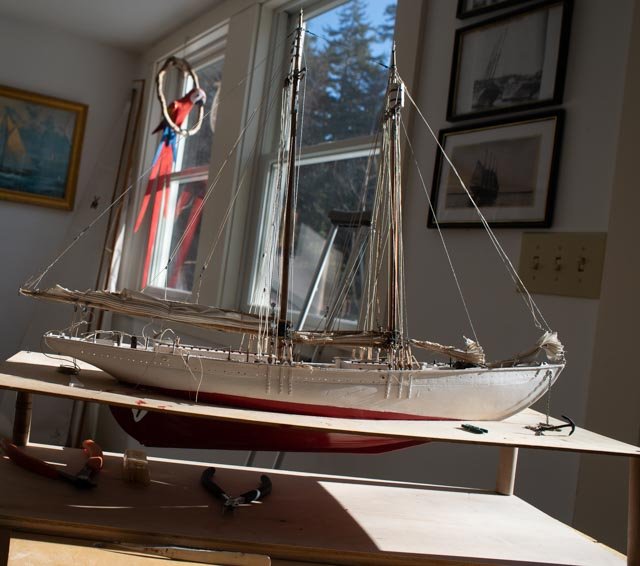
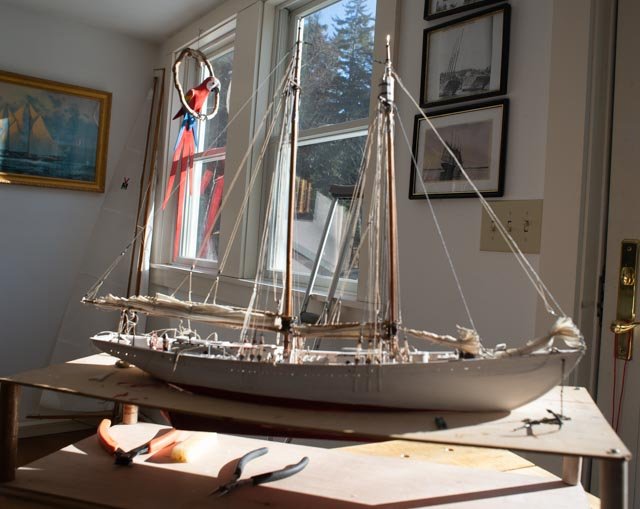
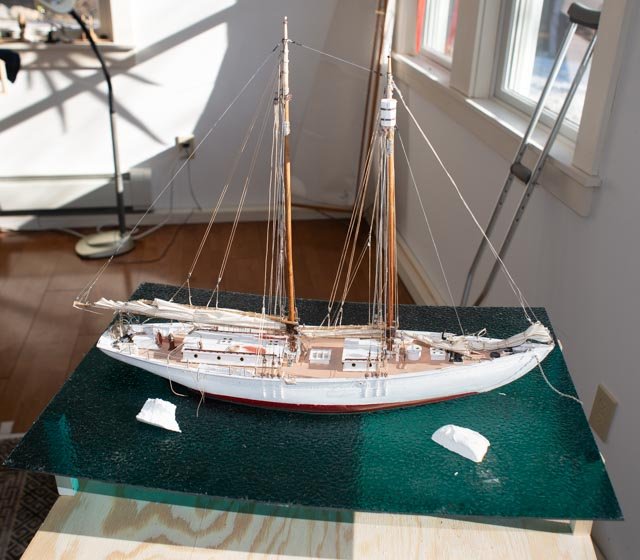
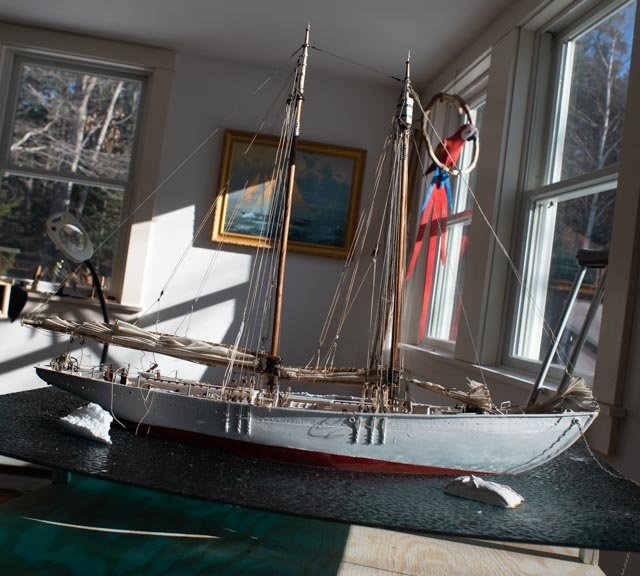
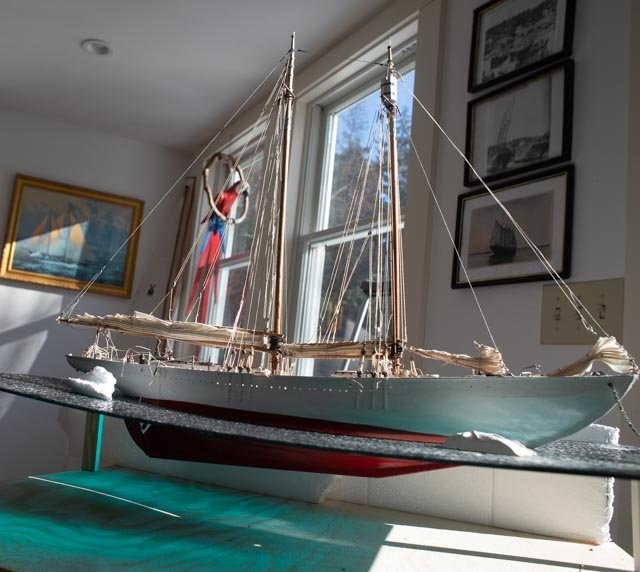
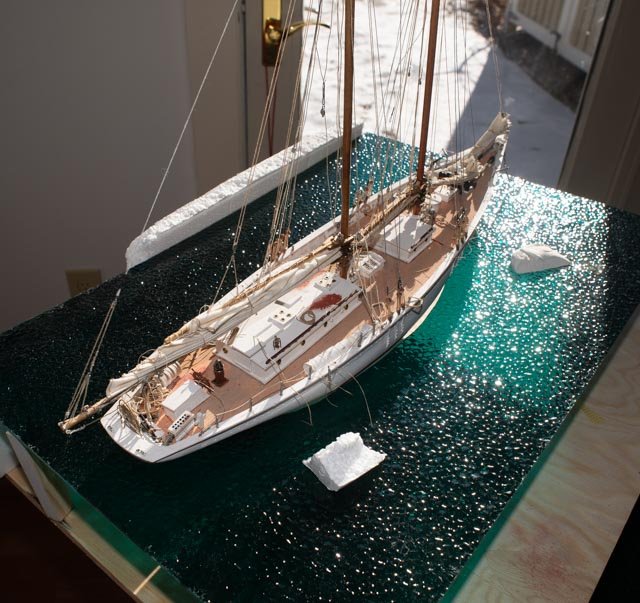
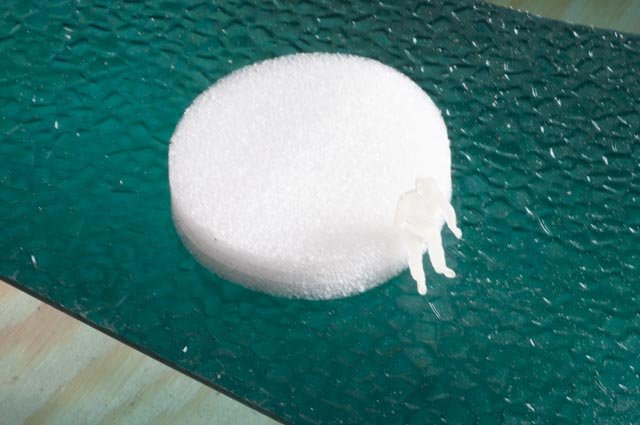
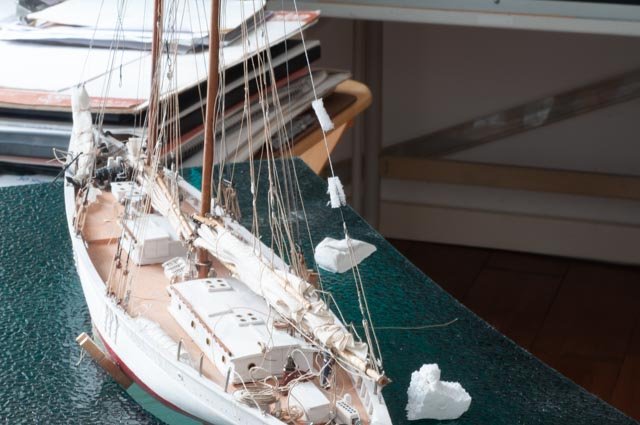
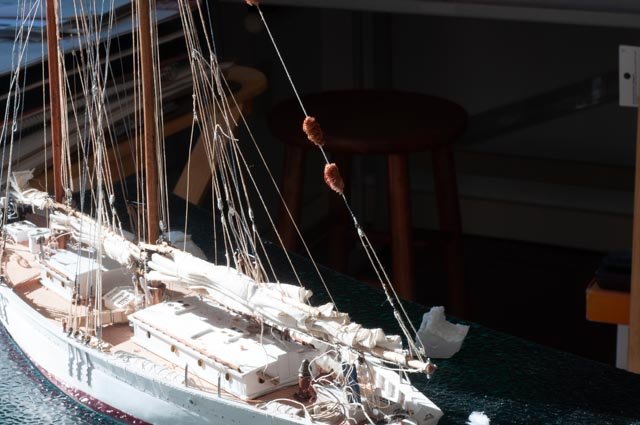
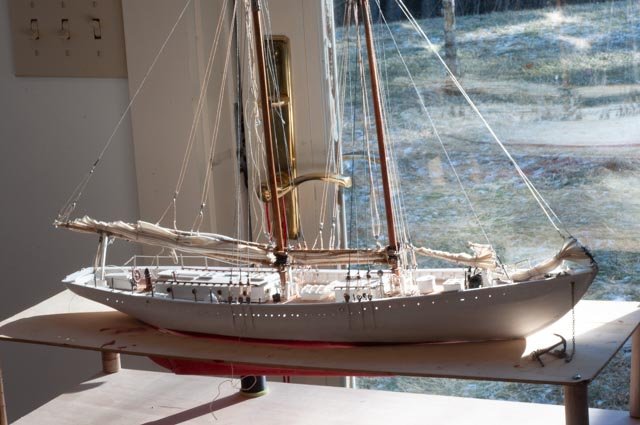
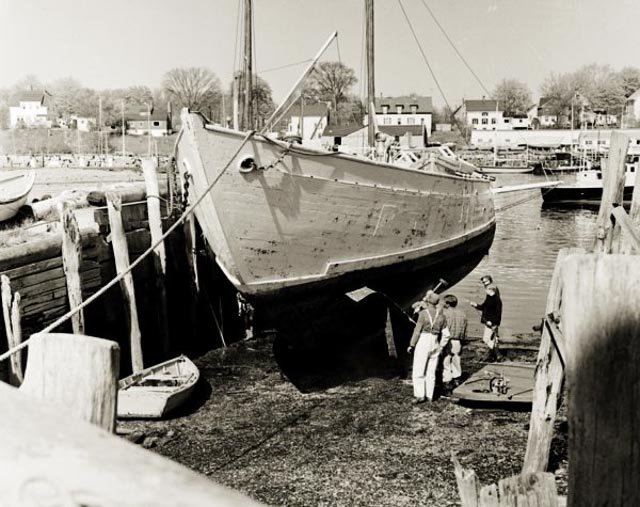
Post 31 Diorama : the first look…..time to decide I put everything together to see what I have and if I think I can make it work. I bought a glass box with ID to be 24 wide, 21 deep and 24 high. I set it on its side so I could slide things in and out to experiment. I set some trim planks under as I shall attach them to the ply wood base to receive the glass. I will likely put weather striping all around to soften the glass seat. On the exterior I have an extended plank with a dowel to hold the display lamp [ our morning sun]. We laugh at that a bit as the sun is in its 24 hour mode this time of year , so morning sun is a concept. I have the schooner facing east, the beach, so I guess it all makes sense. As a reminder this is the view from which our diorama is based. I bought this image on line. The story will be posted with sequential pictures. For the diorama we state: BOWDOIN in morning light in July 1924. Using ash from the wood stove and sand from the beach on the ice, the sun melted around the Schooner as well as a way out of Refuge bay where they had just spent over 300 days frozen in ice, the crew readies her to go home. All fuel and most supplies were taken about fifty yard off the bow to the beach for safety. As part of the expedition, a structure was built primarily to set up equipment to measure the changes over time in the magnetic pole. A Marconi aerial was set on the mast tops and a radio was set on board to have transmitted the first arctic radio to talk to the world. The crew enjoyed listening almost every day. Before melting the ice, the crew had to fill the hold with stone ballast from the beach to replace the weight of the supplies brought north for the long winter. Some fifty dogs and several Inuit helpers will be taken home as Bowdoin sails south. let's see it...... So here we have the first of three views if one is walking by the display. You are looking down sun, so the water is flat and the hull and rigging picking up direct light. The box is all painted out a dabbled green at the moment. I bought some blue but want some artist advise as sometime leaving it simple is the best advice. Whwere you see the light green strip of about 3 inches is now spackled out and becoming under water shore line holding the anchor. Walking on center we shall see the crew using the dories to ferry the last of the supplies on board before sailing. They should be properly on the port side [ dory tackle location if needed] . I believe I will move them around to the starboard viewed side s in last dory post. Future postings coming as I need to paint up a dory to check it out. What I love is this changing light as we move aft and see the effect of sun sparkling on the water, dark shadows on deck and back lighting of the rigging. You can see my amateur collage in the back ground. The two photos are cropped arctic views to try to depict the far shore as see in the first over view, taken from a comparable hill top on the south side of Refuge Bay. Coming up Getting names and things on the hull Completing about ten more lines in the rigging The bell and running lights, the anchor through the water Completing the box and its base. Building up the underwater shore near the beach, making the ice look better and adding supports to flatten the water. Resizing the collage on foam core to site inside the glass. And the dories cheers

-
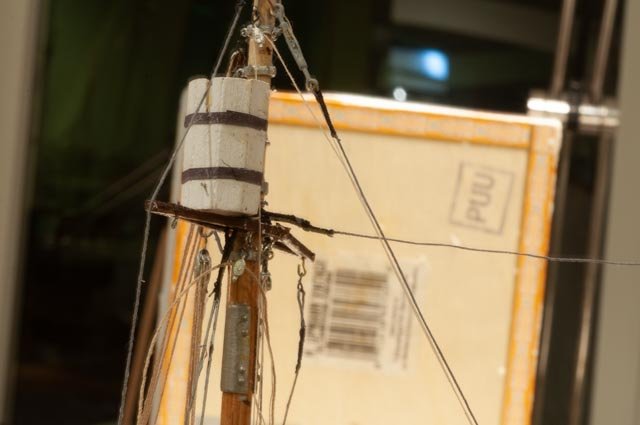
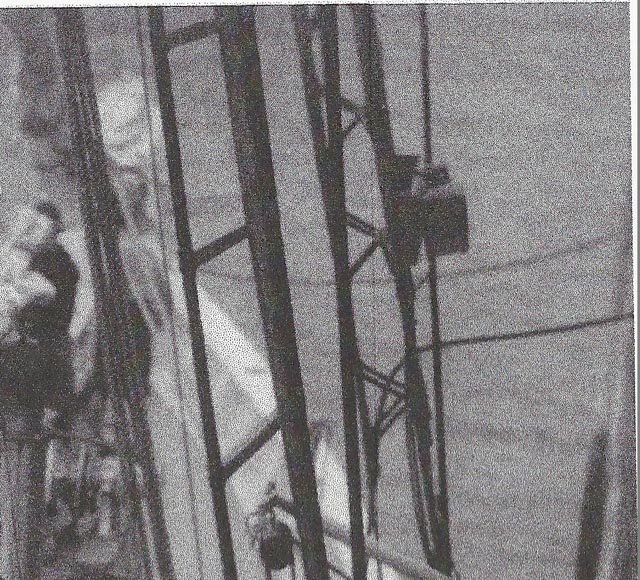
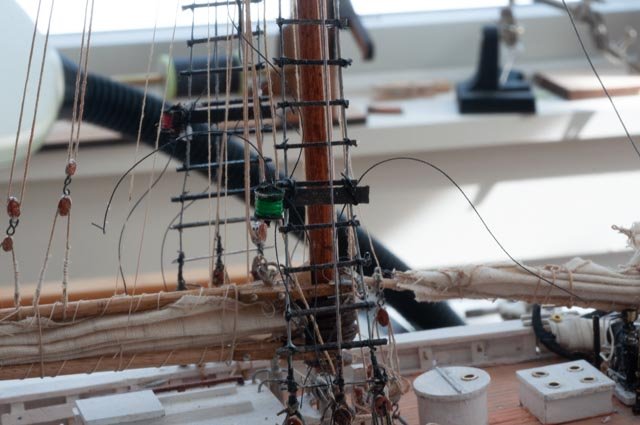
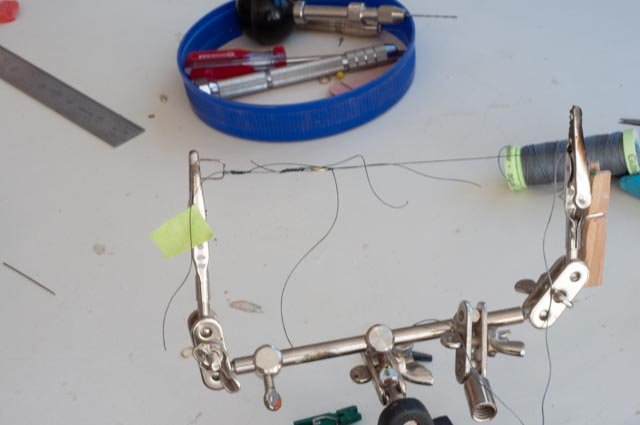
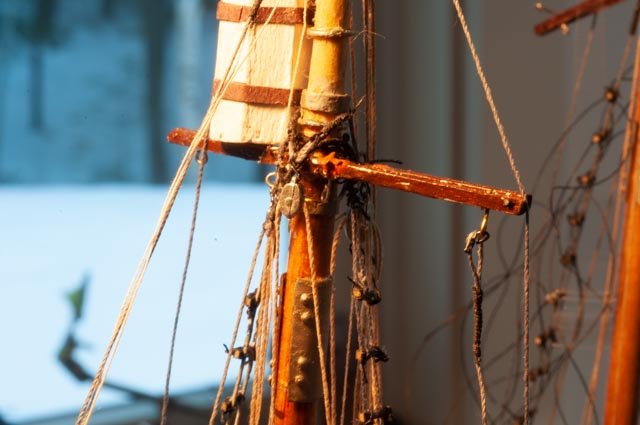
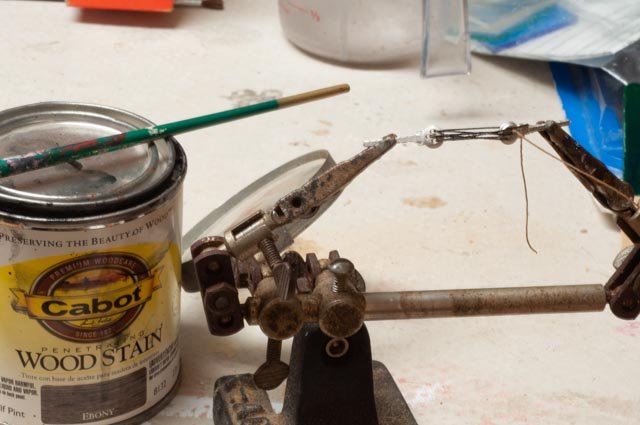
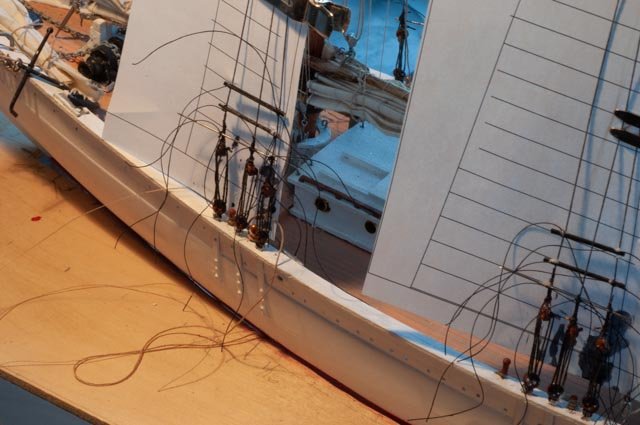
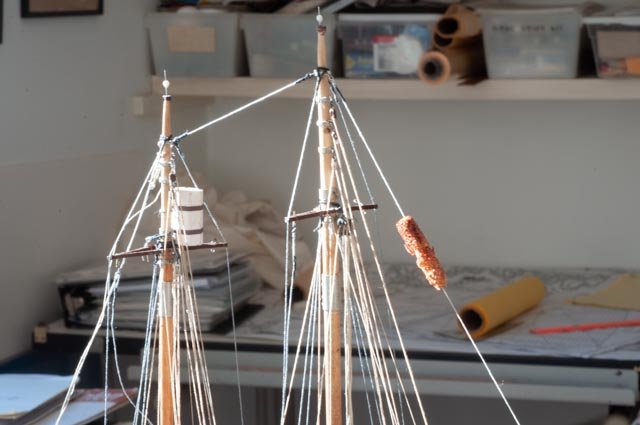
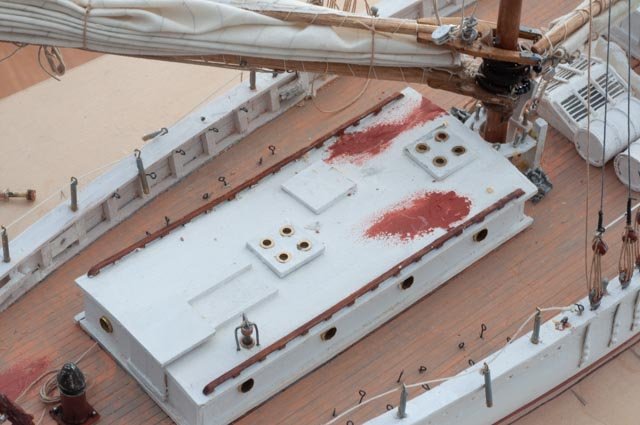
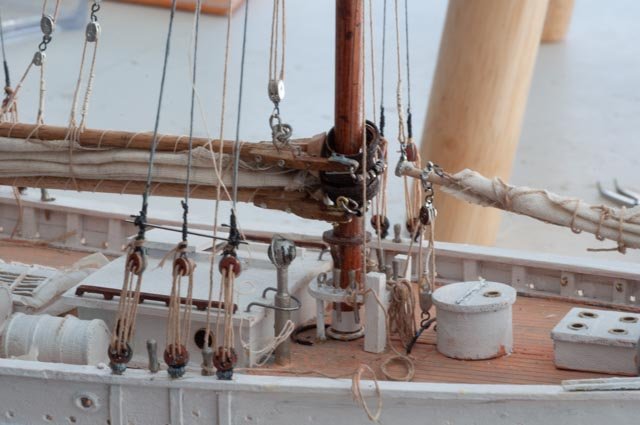
Post 30 Ratlines and anchor tackle This is a very brief update to record a good weeks work on tying ratlines. First of all , I went back to sit with Capt Will McLean and clarify a few things. The anchor tackle is inded two lines. The heavy line is made to the rail pin and hold the double block. The second line is made off to itself and include a three part lighter line to rig the anchor. Here I made up the becket to lash the formats above the shroud loops and hold the double block. Here we see her in place. This explains the three blocks I saw in an old photo. Topping lift, halyard and this anchor tackle. I need to get these painted out as they were all dark wood. Here we see the production line for the ratlines. I worked on all four at the same time. Here at the top I found that the splice on the shrouds came a bit too far down to allow enough spread. I put a cut tooth pick through to spread the lines and get a top slat in place. I have ordered another batch of blocks, and lanterns to make up running light assemblies, so I can make up the last of the rigging. All for now…..I am working the diorama. Cheers
-
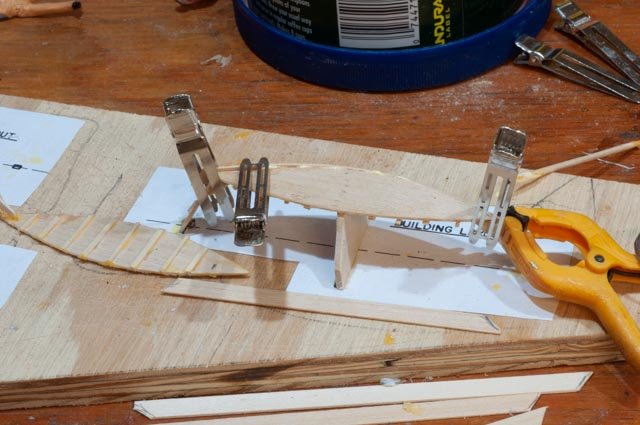
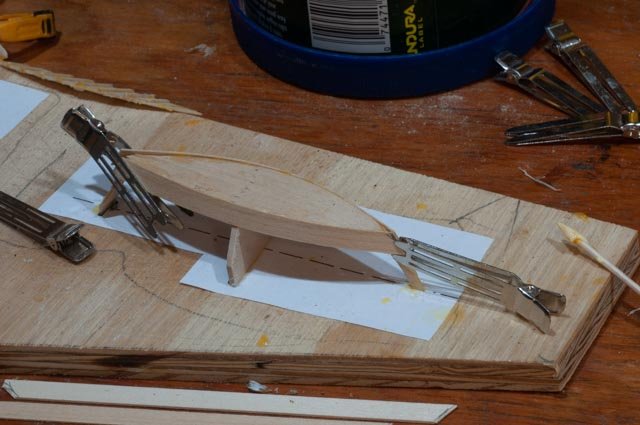
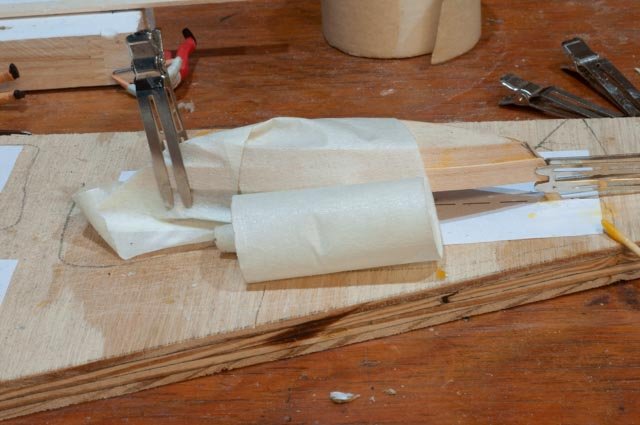
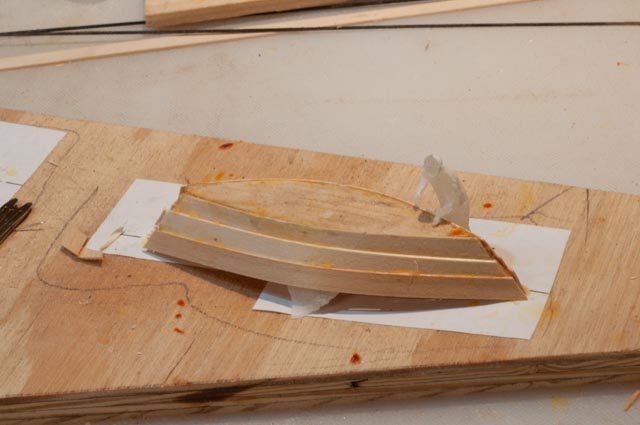
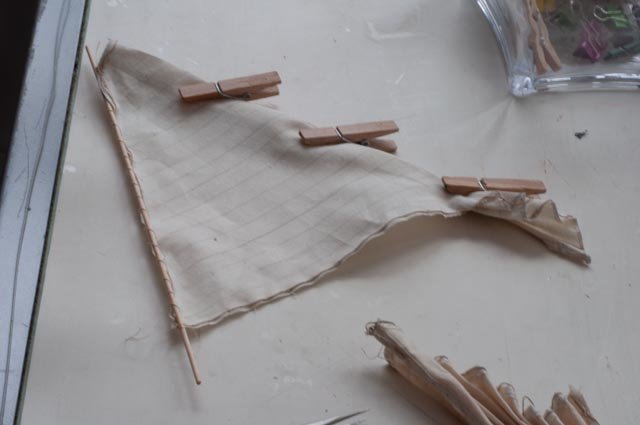
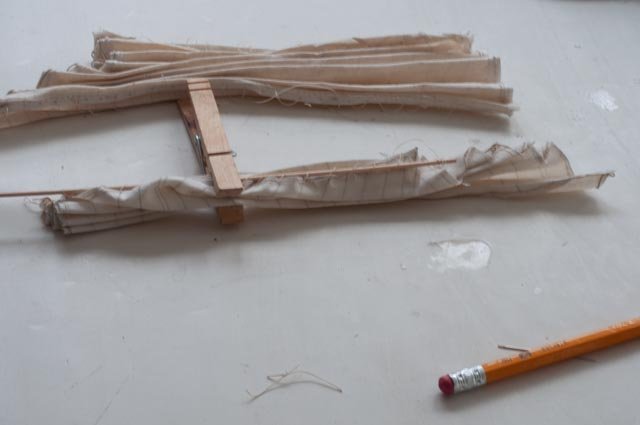
Post 29 Dories part 1 I do this in two parts because it is a story. The first part is everything up to date on building dories for Bowdoin. The next chapter shall include whatever I do to either rebuild or rehab and complete the dories. I have struggled with mini dories and yawl boats since I started some 6 years ago to build them. When I solve it, I shall have several rebuilds to do. The two key issues for me are first with a 3 to 5-inch build, unlike a 12-inch-long and up build, the wood at 1/32” is the same strength. Therefore, bending twisting and more importantly clamping becomes a real problem, at least for me. Secondly its exacerbated with my continued difficulties with the magic touch of CA instant glues. They just don’t work for me in wood. So, forgetting previous builds I approached this one with an open mind. I even read the instructions and tried to follow them. Here I was on the way. The crew is setting up the assembly of bottom, stem and transom. Here after several unsuccessful attempt to use the full side 1/32” by about ¾”sheets……I even soaked them and pre-bent them to no avail. So, for attempt two, I figured why not make them with three ¼” wide planks, the way they really were built, and see if the bending and clamping is easier with narrower pieces. Here I recovered the bottoms etc. and set them up again. Here we go with the first plank…so far so good Here goes plank two. As this is a trial run there is no attempt to spile the planks. Also, patience is needed as I used wood glue and waited an hour or more for each step. Here we bend it around. The force is almost reduced to where masking tape can hold it. There is struggle here to clamp, but we eventually get it. Here we got the 3rd plank on. T’was a bit messy, so let’s see if we can use it. Oops…not enough masking tape on the mold so we must cut it out. Not good for shop efficiency if we want to reuse the jig and make more dories. I was encouraged enough to make up the material and make the other two. Well let’s get the gunnels on. Here the inner gunnel is glued as hull planking for dory 2 and 3 trial runs are coming along. Here we see with masking tape the molds came right out for dory 2 and 3. The first dory has seats and grey priming. I will paint it out white with dark gunnel and make up some oars. The dories will be afloat, so they will all get finished. Finally, we see for the diorama, one dory will be transferring the last supplies on board before leaving Refuge Bay northern Greenland in late July 1924. Thoughts about a part 2 This is part one because I need to decide. I have a dead line so I will finish these to have them ready. I need to do two things in part 2. Learn to create spline lines for these or other dories so the planks are more proportional. Second reconsider the lapstrake method I chose because it was so prevalent in the 1920’s and easy to build. Dories obviously came and went. In the 1930's photo I have shown for other details in a recent post, including the white color, they were not lapstrake but butt jointed. So, what to do. As of now I plan to use lapstrake because they we so prevalent in the early days of Maine and other New England fishing schooners. These dories though were only 16 feet long so maybe. I suspect they bought them from one of the many shops around Boothbay. All the more to study We’ll see what comes with an attempt to do both types, butt or lapped. To do the butt [ i already tried and failed] I believe I will need two more molds All for now Cheers

-
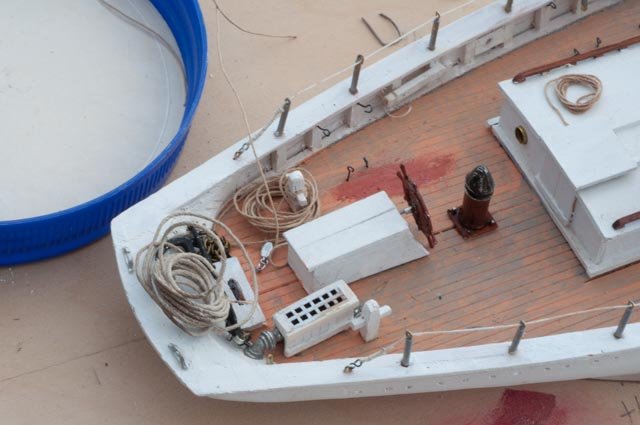
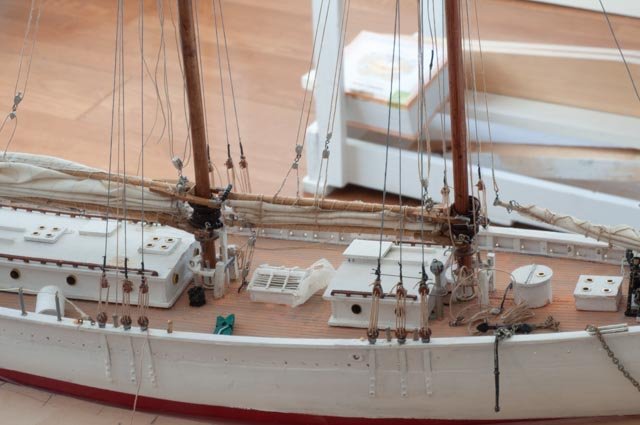
Post 28 Working deck rigging and starting the diorama parts Here are a few more things getting done as we move along trying to get to a completion list. I see three more areas, the deck including dories, completing all rigging and the non-schooner diorama. Deck… Remember the barrels…. Here we see a cropped BRHS photo showing the lashing goes over the barrel, then over the cap rail and logic says back through the scuppers to the ring on the deck. There is another photo from the side where with a magnifying glass, one sees little vertical lines going from the rail to the scupper. Therefor this way I believe is the right way. It makes sense because it was easy to do and the barrels came off and on regularly. They were all stored ashore over the winter. The barrels were counted as ten on the first voyage and here they line up right to the shroud. In this cropped BRHS photo we see two barrels turned up. More important we create the mystery. I have 1947 photo of white dories. This non sunlit photo makes it unclear they were white. The gunnel is clearly dark In this cropped BRHS photo the mystery is solved. The sun lit dories are clearly white In this cropped BRHS photo we see small manila line on the barrels. We also see the yawl / whitehall type launch. This is taken in 1930’s. Confuring with Capt Will, we both agree the early fit out was bare bones , so I will only do three dories So here on starboard I have three barrels lashed. Here on port we see I have four barrels installed and lashed. A question might be ..did they take all barrels round trip?. I only made seven. I am, thinking after all else is done I may make three more, along with some boxes. Lube oil and other materials were on deck, but the hold storage would have been much reduced so either way I am OK I believe. i also do not want to block hawse pipes. As to the dories, let’s say I am working on them. I will tell that story another day Rigging,,, remember the need to tar the dead eye lashing and ratlines. Here I put up a dummy lashed dead eye with the same cotton line and dabbled the ebony stain that I like for its oily look. It seemed OK so I went ahead and did the ones in place Here we see them on one side with the started ratlines. They are always tedious and tough on the back while sitting so still on a stool. If I do two all around each day that is roughly two weeks…we’ll see . I have 100 more to do on Charles Notman as soon as i finish Bowdoin.. Now the diorama Just a teaser…for me to as I am making this up as I go. Here we see in a cropped internet photo of July 1924 in refuge bay. I bought this image on line. I will be showing a view from the side. In other photos we shall explaining the winter set up, the shore was perhaps 50 yard off the bow. It would be too complicated for me at this stage to try to replicate the camp…….maybe in the future. We shall have several photos around explain the camps in Baffin island 1922 and here in Greenland 1924. The point is ice is melting and the crew are thinking about going home First up we need to remove the schooner and start cutting and carving Styrofoam to look like ice. See the brand new just out of the amazon box portable LED light giving us morning sun. too much back ground light to see now. You can see a friend 1:48 scale Flying Cloud behind.it is great to get more people into this wonderful hobby. His grand father built a normal 1:96 and started this model years ago. Here is general lay out. I pulled the acrylic to the fore ground and have about 5 inches of flat ice beyond. You can see my first dory sitting on the ice. To prime it i had fun and chose yellow. I will do gray like the inside and then lightly paint the white over so it looks a little more used. I assume one dory aboard one on ice and the third??? In this view, I have built up the bottom. It is a fraction under 24" by 21" deep and the ice is 5 inches up. that means about 20 feet of water. so the bottom will be painted as water. My practice collage of practice cropped photos tries to show the remaining frozen harbor running to the shore line. This is my place holder I ordered and received a LED portable spot light and ordered a glass box that is ready to pick up tomorrow. Not sure how to manage with my cast…. Next, I need to paint out the wood stand to look like water. Much to do Cheers


-
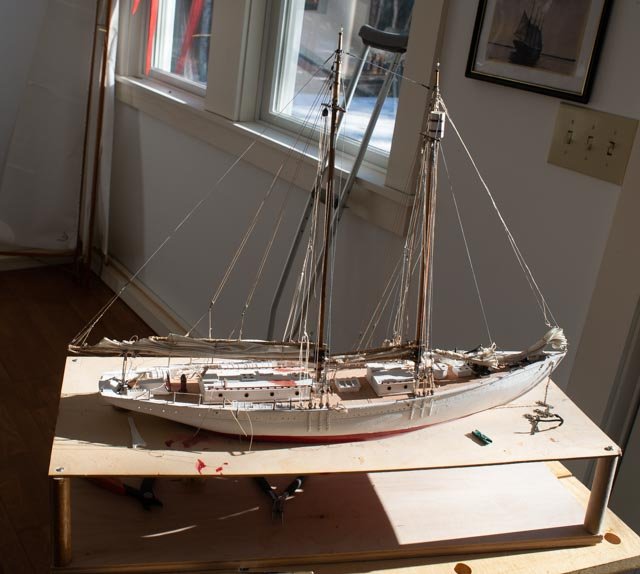
Post 27 Lighting for diorama display I came down the other day in the morning to use our friendly winter sun to try to figure out what to do for the museum display. The following process is hardly scientific, but it helped me figure out where I may be going. I started off with the plywood base, as one option remains [ but unlikely] to do Bowdoin in solid ice. To me there are a few lighting options. I think I want to depict morning light. The question then comes to angle. First up is straight into the sun. There are indeed shadows on deck, but it is very regular. Rigging looks fine. Bending down for the onside look to pick up the hull below water, we have an oops. The sun is hitting the hull. I would have to diffuse that somehow. Turning roughly 45 degrees, meaning the light to be at the back corner of the display box, we have interesting shadows. More shadow over the water and I believe more striking on deck focused on one side. Bending down there is no sun on the hull on this side Now let’s try the acrylic. Looking with the bow headed into the sunrise, i think it looks ok from this angle Bending down I find the soft light interesting. Turning 45 degrees again I prefer the shadow on deck. Bending down we see how much fun this acrylic sheet can be to see both above the water and the hull below. Maybe we add a seal!!! The side light is not quite as interesting as above. Now going forward as if approaching the exhibit, we are looking a bit down sun. The water is alive but flat. i can sort of see through it. That is OK because as one walks by the exhibit the water changes. Going past the stern we are looking into the sun and wow the sparkle is just exciting. I also like the back lighting in the rigging. In the earlier post the added rigging of lazy jacks and baggywrinkles, and they all picked up more light. So yes, I am over my head but onward we go. I think somewhere between dead on sun and 45 degrees off line sun will work. I need to sort out the box and the fixture to achieve this. I must say in simple research I was taken back to learn the cost of a display box for all this. wow. I am not sure I am ready to build my own but $400 including shipping is a bit much for just one model. I found a local glazier who is building me a box in clear glass for about $100 and I just orders a small sun... LED exhibit spot light that is. now I need dories. All for now jon
-
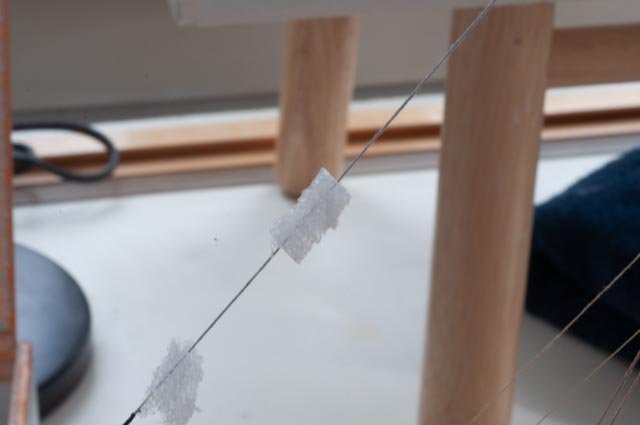
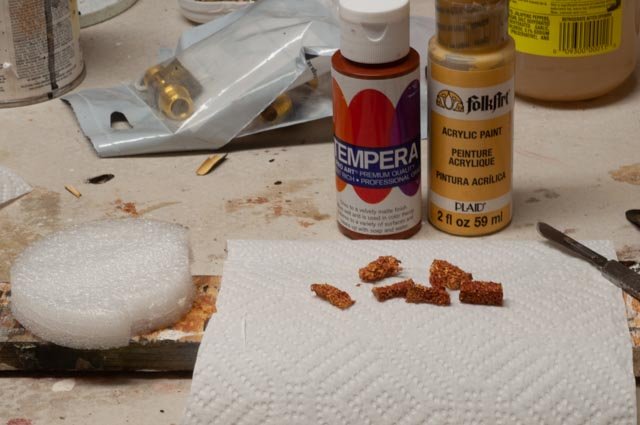
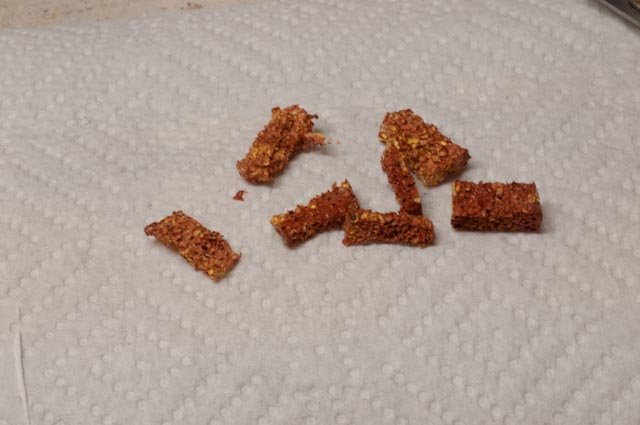
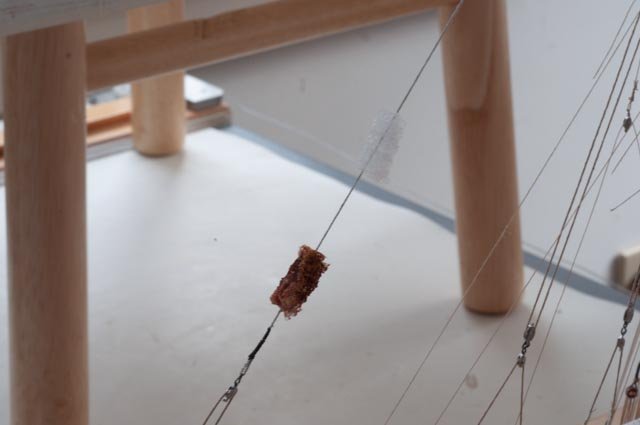
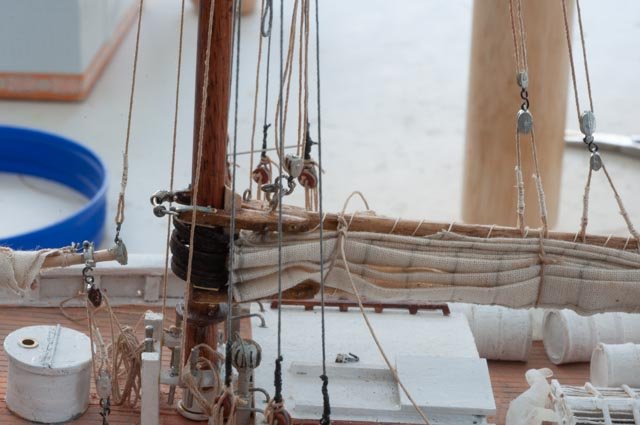
Post 26 Baggywrinkles These little guys have not yet been solved on my watch. I am determined to figure something out. First of all, where do they go. After some time researching I have pulled together 4 views and put them on a sheet at approximately the same size. Sorry for the pencil, its not very dark , but here are the results. Comments are for each photo top to bottom. Photo 1 from BRHS archive 1923 on Foxe Basin I believe. The projections are two inches and the marks are either 3/8’ spaces or 1/8”baggywrinkles. Photo 2 my photo of Bowdoin sialing in windjammer parade a few years back. Here we see the same pattern and get a good feel for the color Photo 4 from BRHS sometime in 1930 [ I need to go back and try to see if better dated] set up for rigging refit. Looks like only one is left Photo 4 from BRHS named Bowdoin sailing out of Boothbay mid 1930’s the pattern respects what is more clear in forst two photos So, in conclusion, the topping lift is about 15” long. Therefor the 1/8” is about 7/8”. That sets up the spacing for three single and one double about 7/8’ long Now How to make Some one told me that pipe cleaners would work, but I have no idea where to buy and then how to remove material and keep intact. So here I have a bubble wrap disk. I set it on the acrylic for a better view. Our crew is curious too…and he walks on water? Here I cut and split and put in place to see concept. they are 3/4 long which i feel is close enough as they are likely baggier than scale. tough to match perfectly. Here we look form behind. Perhaps just a little post trimming maybe and we can get there, but first to get the color. I took a dark yellow undercoat and while still wet painted on a brown Not bad?....well perhaps good enough Here I have set one in place using “ super fabric glue” before making them all. Here we have the bottom two on, dry trimmed, and touched up. the lazy jacks are in place now and add a lot to the rigging look. i have some trimming and making off of lines to complete the image. Here the top double may need another effort to trim and touch to round the edges. All in all I think we have baggy wrinkles. I am still interested in learning more methods. An advantage of this bubble wrap type material is it added so little weight to the topping lift there is no sag. All for now cheers
-
Post 25 Working on things We never get done fussing. I share here a few things going on. Time fix up the cabin roof minus ventilators for the age Time to try to patch the deck where I removed the kit box that was not evident in the photos. The little eyes in the deck are for the oil drums that go there instead. The started eyes in the cap rail were a mistake as I found the barrels were just lashed. I find the exhaust pipe interesting. I have a photo in a book that shows no exhaust pipe even at the bit in 1928. I can not in=mage not having the loop on deck to keep following seas from flooding the engine. The 1089 phot shows the exhaust further forward than to day. Thus, this pipe have moved several times I suspect. I am glad that the piece in the kit is as short as it is because just like other fishing schooners of the era this is quite realistic in size. You may recall the foresail gaff jaws are too low and into the rings. Here we have fixed the alignment bringing the shoe [ flapper not sure the proper name] into contact with the mast. Here we have my next area. The shroud lashing lines are clearly hemp and tar in this internet photo. Will McLean told me that even to date the ratlines are all tarred too. I will get out my favorite ebony stain and do some damage here. Now the quandary. Those that followed me on Charles Notman may remember my failures to sew 1:48 scale baggywrinkles. So here one the images that comes up …. perhaps some sponge and then paint it???? Any ideas would be appreciated. All for now Jon
-
Thank you everyone who is following along and encouraging this effort. My new one leg condition has slowed me down but this month I want to visit Castine and see the John Allen model of the ice and igloo scene. You will see in my next post i think i am settling in on what the " diorama" is about. Nic I will definitely visit you when the leg is better and i am getting to and from Castine. I still love using your parts and things. cheers
-
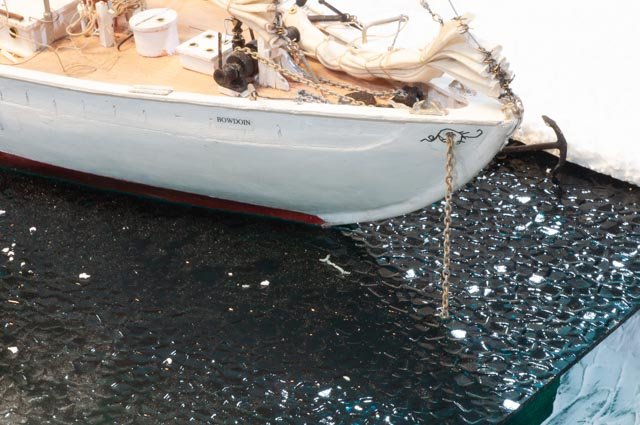
Post 24 Use of lighting for diorama …first experiment Following up on visual variation I found placing Bowdoin in the morning sunlight, I played around a little bit. Here are few images that temp us to try many more variations. Here we have normal daylight in a shop or museum. Little extra fill in overhead light. Fun to see Bluenose in the back ground, but otherwise not inspiring. Please assume the plywood is either white ice or the acrylic sea....... Here still in normal light we rotate down taking advantage of the water 1/8 plywood sheet. One viewer suggestion is to cover it in spackle like ice. What’s fun is we see the bottom under the water/ ice Now here we start some fun. Sunlight pouring into the port side low like morning. The starboard side is in full shadow. I love the rigging side lighted and the light pouring through the scuppers. Under the same lighting, the guest would move up and have this interesting view of the side lighted deck. I need to try this with white on wood for ice and the blue acrylic sheet. I am not sure what is different here other than angle of the camera. the look is startling. I think I am on to something. I need LED Day light from the back of the display. So the challenge is to re create this view back in my work shop area using light fixtures. on the other hand the reflection in the window is a nice touch. maybe a window box one way glass behind with the display against a wall. I’m definitely going above my pay grade here. one thing I can do is make sure all the scuppers are open... I am caught up now as this series of photos was before the operation on my knee. I hobbled to the computer this morning to post this. I will be hen pecking at clean up and completing things like lazy jacks and everything inside before finishing with the ratlines. I hope afrer this next month I will be up and around and back into the diorama. dead lines are a bummer but we need to get this done. cheers
-
I agree with those who say they have removed the little holder on the scroll saw that prevents uplift. I can not explain it, but it just seems to cause more trouble than it solved. I have a nice delta variable speed saw with heavy plate. I slow the blade way down and stay 1/16 away. on anything thinner that 1/8 there is a little praying going on too. Then on the inside cuts I stay a little out of that and then use a hand held wireless Dremel to mini drum sand. as to the spindle sander. it is new to me, last summer, and I have a lot to learn. for large projects it is great. for carving multiple planks for dories etc it is great too. I bought 240 grit, the finest they offer. I wish I could slow down the motor and honestly turn on and off the oscillator. anyway enough shop talk....we all need to go back to work ...smile cheers jon
-
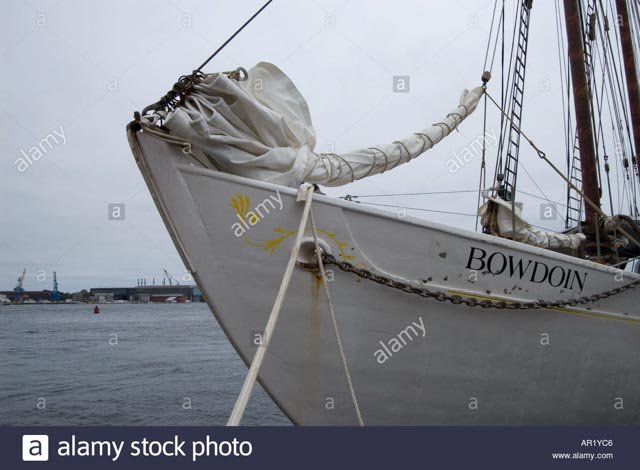
post 23 correction on bow sprit I had to fix this error quickly. I write it off to hobbling on my full leg cast with oxi pills and a 4 month old puppy I am to watch as I try to study. just another oops. The photo in the previous post I have taken out. It was mislabeled. After looking over it more closely, it is not the Bowdoin. Here we see one of two photos of Bowdoin from BRHS archives in Refuge bay winter 1924, I am pretty sure. See the mountains behind. I will be studying this issue more as I plan to tell the amazing story of the recue on the rocks at ice out. Here you see the small rigged bow sprit that took the jib forward perhaps 6 of more feet. In the Book it said this spar was ruined by the ice but apparently helped in sailing north. In this photo, clearly part of the Refuge Bay saga, there is another image of the bowsprit. So yes it did exist and if it turns out to have been in place at ice out in 1924, I may need to add it. The mislabeled photo I posted too quickly clearly is a different schooner headed north. I will study more to try to determine if it were Gertrude Thebaud that MacMillam had to use one year when Bowdoin could not sail. Sorry for oops but I am also glad I figured it out Cheers


-
Keith I am so happy to have gone wandering today and found this build. Notwithstanding the incredible quality, it is your process I love watching to develop the frames from limited drawings. I bought a scroll saw last year so I could advance my schooners to include frames. I find the continual lift of the blade an issue even with the one way blades. I tend to break the frames on the inside cut if the wood is too thin. I since bought a spindle sander. I find it too strong and great for shaping but difficult for very delicate pieces as many frame shall be. Somewhere between the two I will make some frames. anyway I look forward to following and learning
-
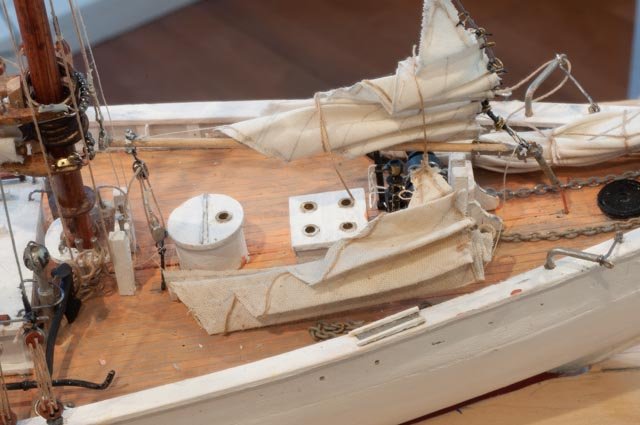
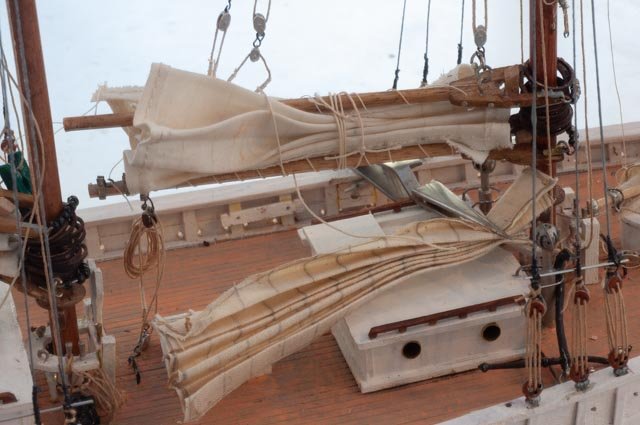
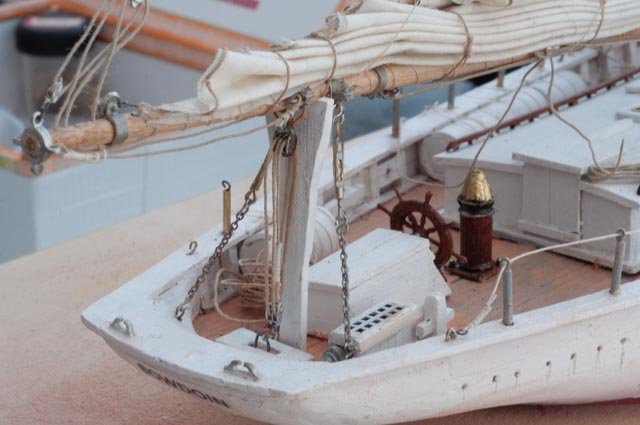
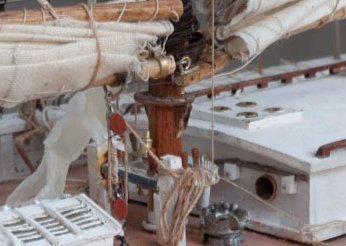
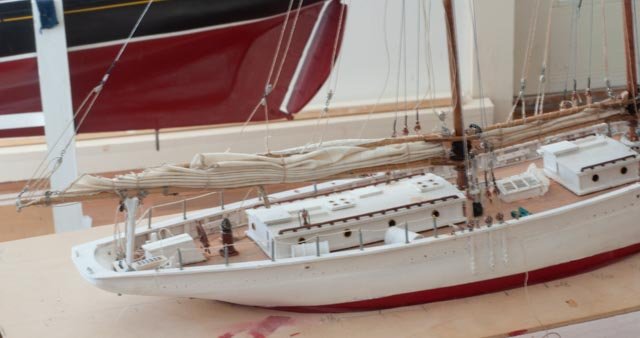
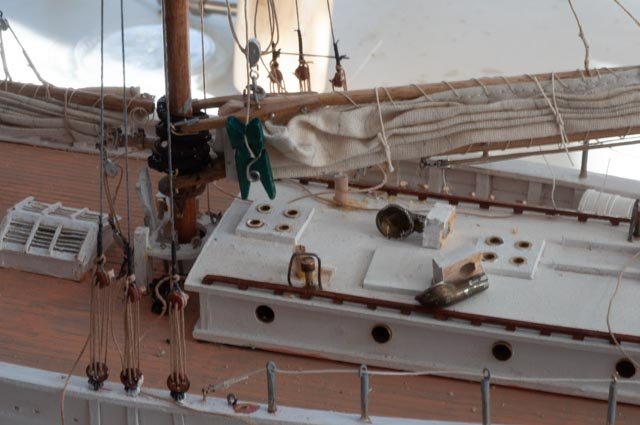
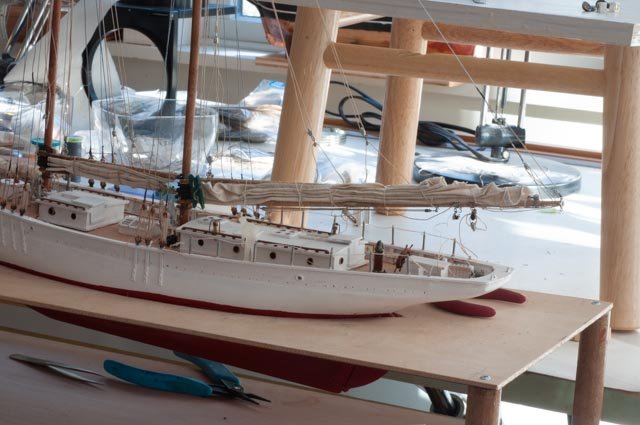
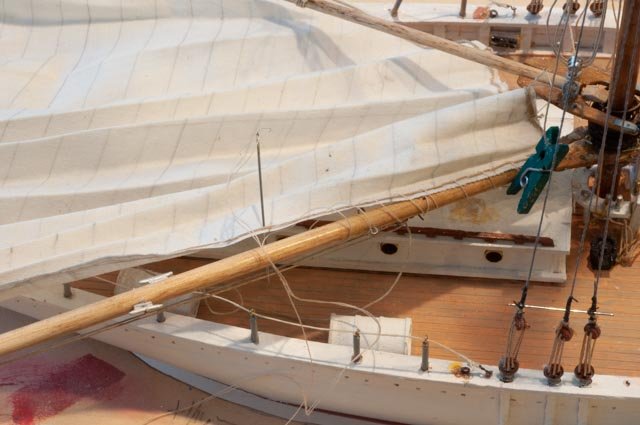
Post 22 One more point before we look at the sails Captain Will believes, and I would concur, that the several details we see aboard today most likely were not on the first launched Bowdoin. She was an economical build and in Will's words would have been bare bones. No heat in the captain cabin etc. So, for a few details as we move to wrap up the hull work. Here the nice bronze lips on the hawse pipe would likely just been a harder wood painted out white. This photo simply confirms that the last re-planking in1984 did not include the sheathing Almost completed the sails Here we are all set with the main sail. A few oops though; there are always a few. The aft bridle broke, and with my new fully casted leg I decided to just tuck it in. It looks fine but a few of us will know. More important is the gap ahead of the flaked luff and the hoops. These hoops are so delicate. I am glad I had a few extra in place. It will take some tweaking to get that right. Here we move forward and see the foresail. It is ok but the gaff jaws are too low. They need to ride on the shoe above the hoops. I am really happy with the improved jumbo and jib. In several photos the jib rides as shown draped to the port bulkhead. It was the starboard anchor that was active. In this internet photo they show the modern application of stowing the jib. I choose not to use this method although it is clearly better than on deck. During the winter the jib was removed and stored below in the photos , but we found in more older photos a sail cover was made for it. I will be showing the schooner after winter and preliminary ice break up Repulse bay 1924. Thus the covers are off and we are getting ready to leave. This is just before the famous session on the rocks. It’s a story I will share in a posting that I hope we can display at the museum. Here we have some nice back lighting on the foredeck. I am always amazed at how lighting can significantly change the whole experience of viewing a model. One final shot is a teaser. I moved the model into the sun to play with light. I need to study lighting for the display. I see no reason not to use our nice Maine morning sun to try a few angles out. I will work on this and probably have a few postings on the results and my quest to create scene. Here is a back lit photo …….sunrise maybe?? Now that we have these sails figured out, although a few more hours of tucks and repairs, we need to address one factor. The bowsprit……yes the bowsprit. Donald McMillan, a true seaman rigged a bowsprit on his early voyages .Perhaps to improve the weather helm, perhaps because the deck was so covered with storage that he needed the stretched out his profile. In Allen’s book he talks about this [ not the technical side] and how every time the ice destroyed it. I do not plan to model this bow sprit but feet it is important to share All for now cheers

-
Andrew very nice application of the sheathing. I looks like they added steel sheathing over the planks at some point between 1946 rebuild and the 1969 photo of its removal. Nothing has not jumped out yet in the reading I have been able to find. I plan to go up to Rockland and see if I can get more info from Jim Sharp. the only issue would be to decide between planks with barely visible joints or really smooth. cheers jon
-
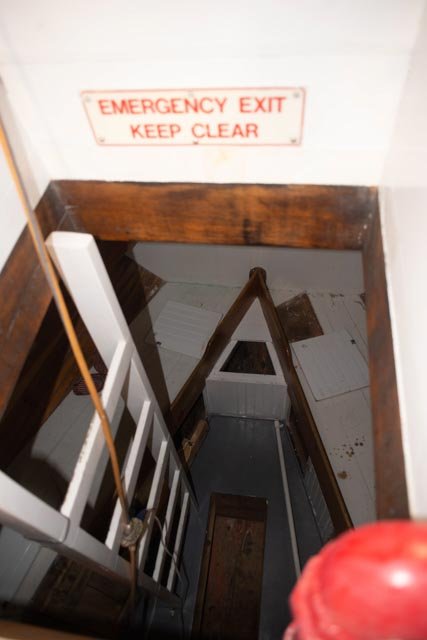
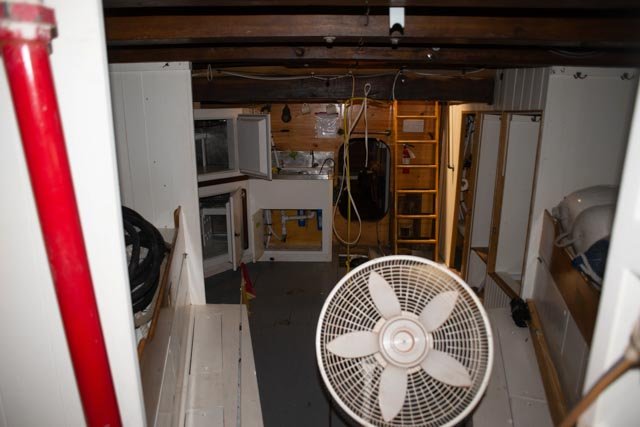
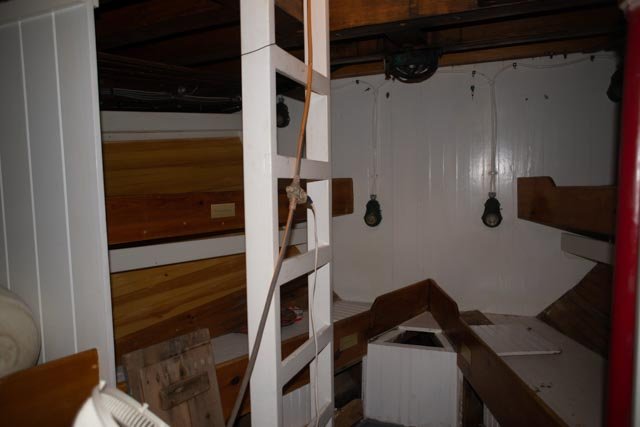
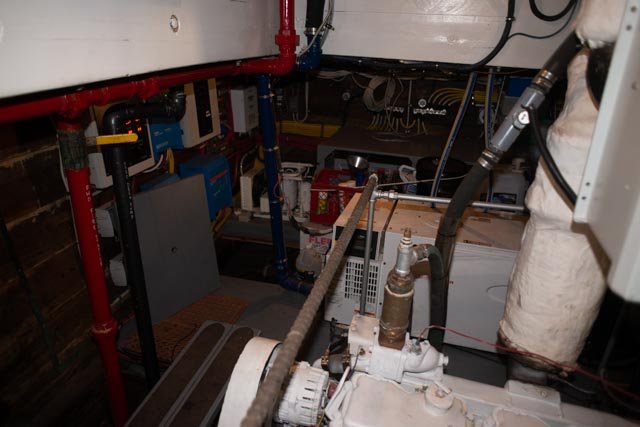
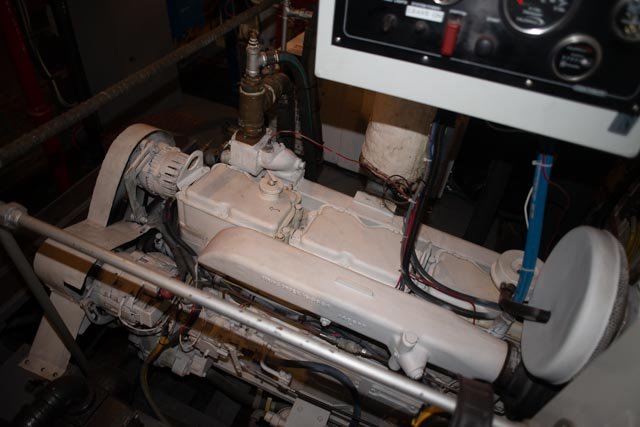
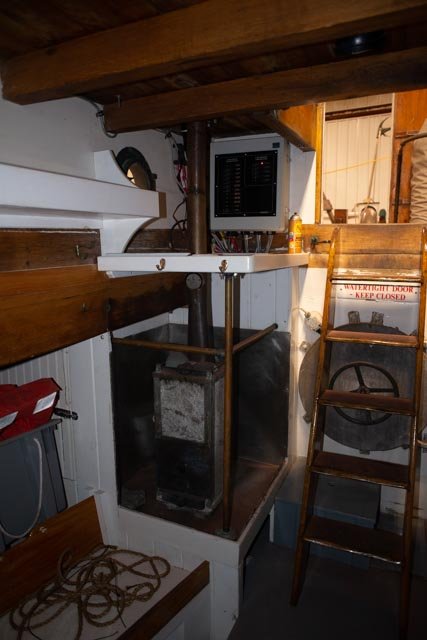
Post 21 Let’s put together more images for the record of our inspections to date of the real Bowdoin Below decks Here we descend to the focsle. This was the emergency hatch. I am trying to figure out is this was included under the igloo for even more ventilation option in the 1922-23 photos. Below looking aft we see where they all lived through the winters. Note the water tight bulkhead Below looking forward we see this watertight bulkhead just aft of the chain locker Inside the engine room we see the electrical plant on the starboard side. The water tanks are below. Those fire lines are all new. Forward is another watertight bulkhead. the electrical plant had to operate through the winter over. Here we see the 1984 replacement Cummings engine. It was selected partly because it fit seats with the previous 1946 Cummings 100 horse power Cummings. The Hydraulic unit is on the front. These hoses run the winch. Here we see an old heater in the captain cabin. Will thought it had been added perhaps after WWII. His reading suggests no one stayed in the captain cabin over the winter in the 1920's. They did build an igloo to keep access to the electrical plant that ran all winter. Will said the chart desk is original Here the apparent watertight bulkhead separating the engine room with the captain cabin.I say apparent as they had to close the hatch!!! In this view we see the final water tight bulkhead separating a large aft lazarette from the captain cabin. Lots of ships stores are in here. A few final hull details We showed this before in another view. This bracket is an interesting piece. It makes sense to significantly strengthen this joint considering the schooner would ride up on ice. There is no way to date it, so for now i will not add it. Here we see obvious water-cooling openings that the really detailed modeler might want to show. You can see above the planking replacement that is going on. maybe just a little hole? This steel shoe opens an interesting subject. It was presumable completed as part of the 1984 rebuild. But what was there first? In this photo from 1969 I believe Jim Sharp is removing the sheathing. Note it is metal sheeting over wood. Will believe that was not original. In the John Allen Book documenting MacMillan's life, they talk about the heart wood sheathing that was original. See the white paint is covering an obvious layer of plank over plank. Will said that went from as shown in photo about one foot above the waterline to a few feet below. If that is the case, I may need to go all the way back and add a layer of sheathing…… My first reaction is no way at this point, but I need to address it, somehow. Anyway, Will said in 1984 they realized that the over layer of heartwood may have helped with ice protection, but it promoted plank rot that led to rebuild in 1946, 1969 and 1984. Today the outer sheathing is no longer there as there is no intent on wintering in the arctic. Next up the mainsail Cheers

-
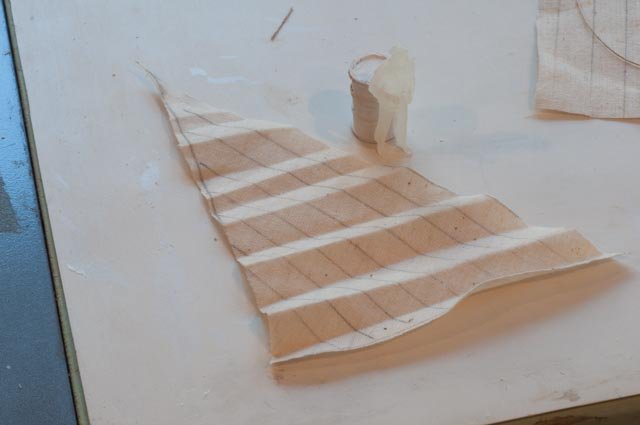
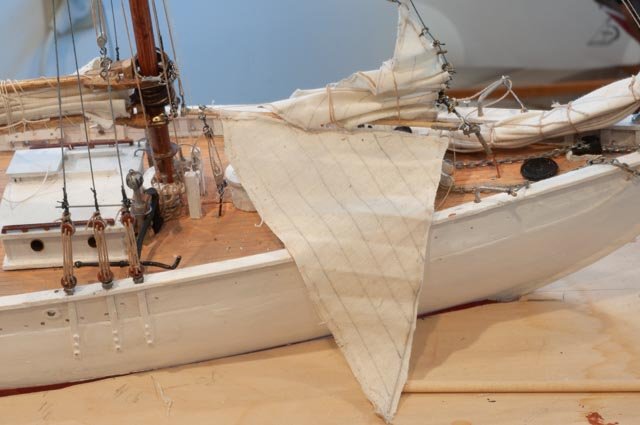
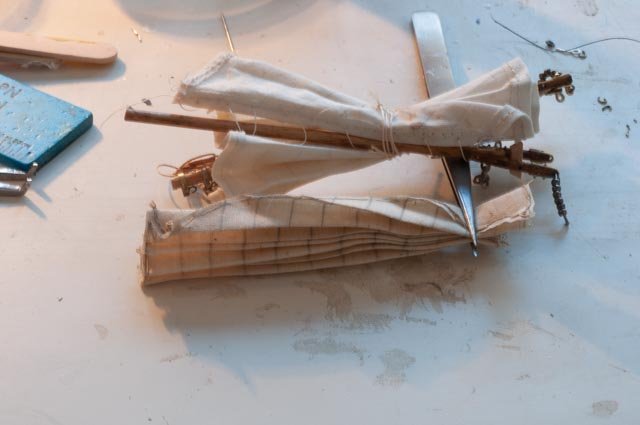
Post 20 Time to make the final mainsail Once down a slippery slope we need to go all the way. I was not happy with the old method of bias tape edges at this scale. As a reminder here is the detail of the main luff. Kind of bulky but could be ok for my current level. Also notice here after a bit of research the consensus is the ventilators were clearly not on board in 1924. Here I have removed them. the small heat vent will likely go ...I am still thinking about that one. Looking at the overall sail however I am no longer happy with this and she must come off. A few lessons learned say do not remove the spars Here we have taken the finer grade muslin, added the fray stop and pencil lined it before adding the bolt rope. I then made several folds and ironed them. Now we need to sew on the bolt rope and a temporary gaff so the remaining flakes will be realistic Here we compare the new sail with the old. I am much happier. Now can I sew it on without much damage. Sewing to the boom is no big deal……no worries oops is coming. if you look hard you can see here what did not see at this point. I don’t have intermediate photos of sewing the gaff but it was a bit tricky as I needed to place the bridles, and try to maintain the folds as I went. next time we will put it together and trey to complete the sail stage. cheers
-
Thanks Bob With the 100 year birthday coming up, I hope we can uncover a fleet of Bowdoin models. cheers
-
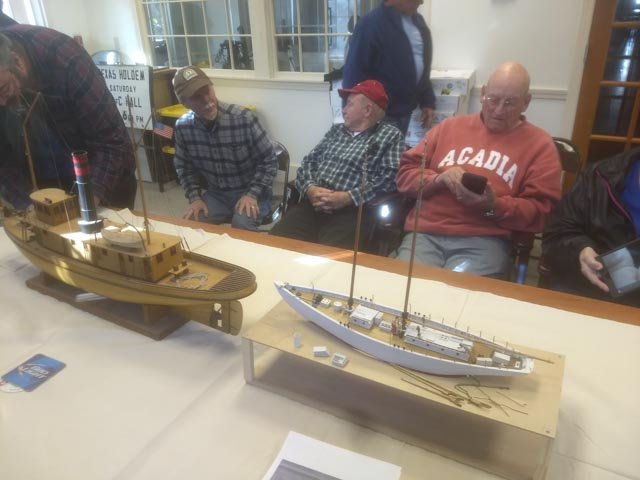
Post 19 Trips to the guild I wanted to share some input that I have gotten from trips to the Downeast Shipmodelers guild in Bath Maine. We meet monthly and yes lunch out is an option. I took Bowdoin with me early last fall and again this month. In the fall view one sees I was way early. the dialogue at that time was to gain ideas about how to make a diorama using acrylic. The model was still in its basic kit form and I had just started the detailing. This was the session where I learned not to depend on bass wood if I was going to begin getting into finer wood details. Also, seeing both the schooner Bowdoin and the seatug Seguin at a Maine modeler’s session should not be a surprise. When I returned a few weeks back I had the acrylic resolved and wanted to learn about making ice and snow as well as small figures. · The gentleman speaking on the left is an expert in 3d cad and 3d printing. He is developing a working marine ship crane…just amazing. · It was the gentleman on the right how sent me links to YouTube on exactly what I would need to make ice if I were to do the whole thing myself…..wow a whole new hobby. I need to be careful. Here is the link he sent to me. link https://m.youtube.com/watch?v=yWKuKOd7Npw Here I have small pieces of Styrofoam to float around on the acrylic…..no one was impressed. Much to do here in this photo the new jib is in place and the other sails are not yet changed. Also the ventilators are still on the main cabin..... so notwithstanding my lack of mobility for the next month, i need to figure out how or what to build to complete the scene. Cheers jon
-
Thanks for continued encouragement. Just to make this more difficult, I went out in the woods for my daily romp with our new 4 month old lab puppy. It has been cold with little snow and ice has formed up under the leaves. oops...I went down and tore up my left knee. I am hobbling around now and need to stay with the crutches until we get sewn back up or what ever they plan to do. at least this one is only a few feet long. The good news is that it will make me think more about the placement of tools. I am forever getting up to get something. I suppose the alternate is to get two of everything. I have 6 tweezers now but one is continuously just out of reach cheers jon
-
Andrew looking good. I believe the prep work you did on the deck will really look really good. It is so much fun to build models of schooners and other ship or brigs that we can go see. With luck she will be back in the water next summer. cheers jon
- 106 replies
-
- 3
-

-
- bowdoin
- BlueJacket Shipcrafters
- (and 1 more)
-
Post 18 Back to sails. a new jumbo I have been plugging away with the new technique to replaces sails. Wow a real step back as a few things don’t mind and many others do. Here we see the new truncated jumbo. The angle of the luff is more square to allow better folding and less stress on the stay. The bolt rope is going on as well Here we lay out the new sail to be sure that after folding we shall be the right length. Here after fold and iron we check again. Better to redo at this stage than any more. now we sew on all thos little chain links to make the hanks. we then need a new stay to run through them. Now to the downside. Each time I remake this sail, I need to build and replace the stay. It is served line spliced in place. Here you see the completed splice. Here is the set up for higher elevation splicing. Each model, I get a little better at figuring this out. Bluenose is keeping an eye on us. There three new and two replacement sails still waiting for her and she wants to know when it is her turn again. Not this year I fear. OK now we need to replace the foresail I have gone through the familiar steps and before trying to replace the sail are sure what we have will fit and be an improvement. For this sail I chose to accept whatever consequence and remove the boom and gaff……yes an oops is coming Here we are all in place and many painful repairs and tweaks made. The oops was simple. The bridles are rigged to the peak halyards and remain rigged to the mast. The lashing of the gaff should not have been done off the schooner….oops lessons are only learned by trying. all for now