Jond
-
Posts
876 -
Joined
-
Last visited
Content Type
Profiles
Forums
Gallery
Events
Everything posted by Jond
-
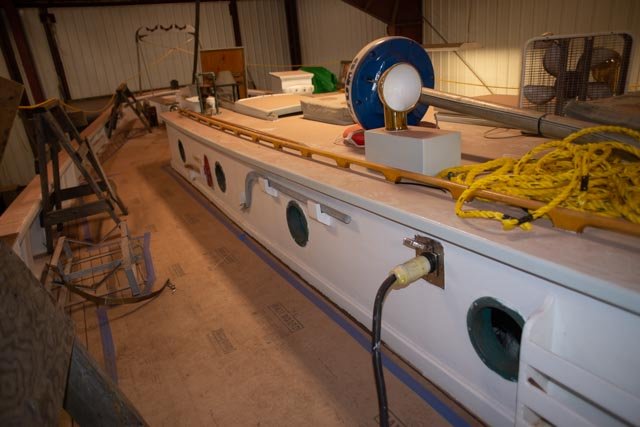
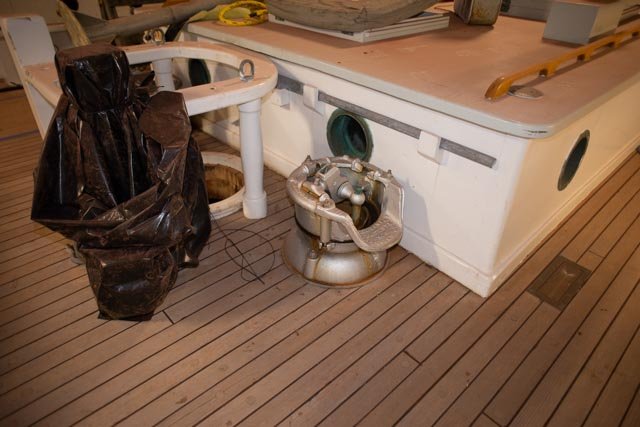
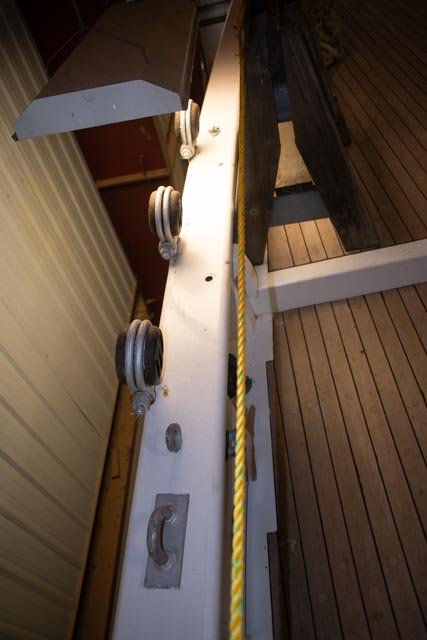
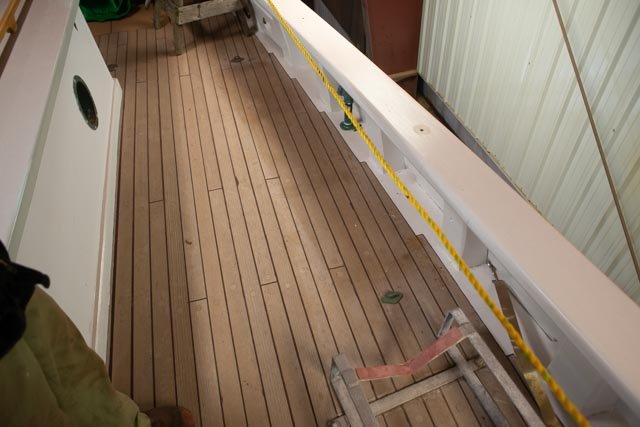
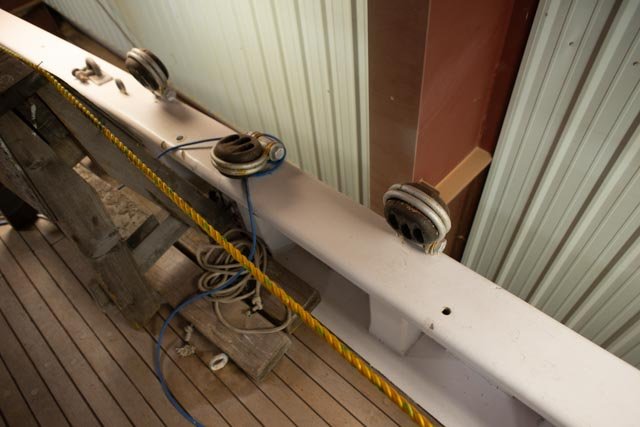
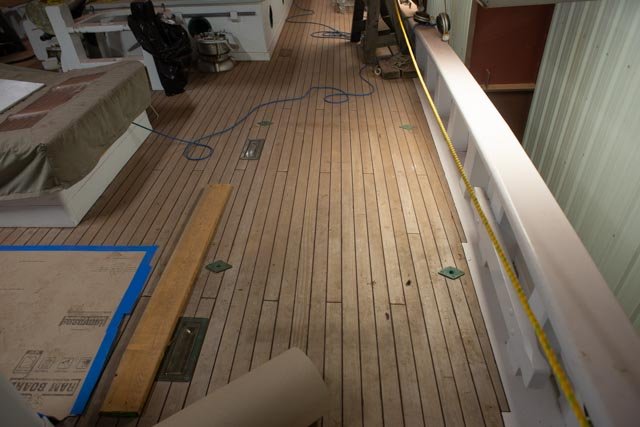
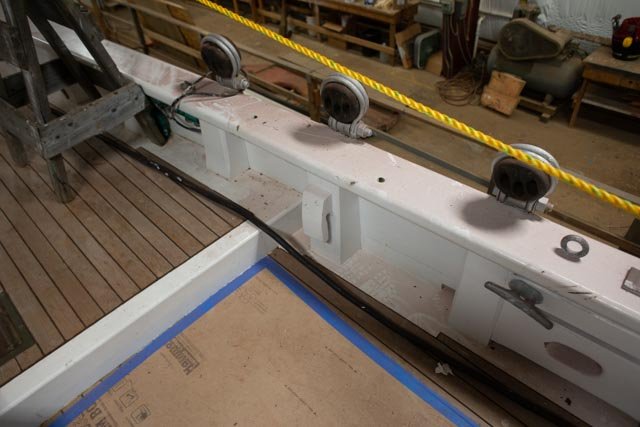
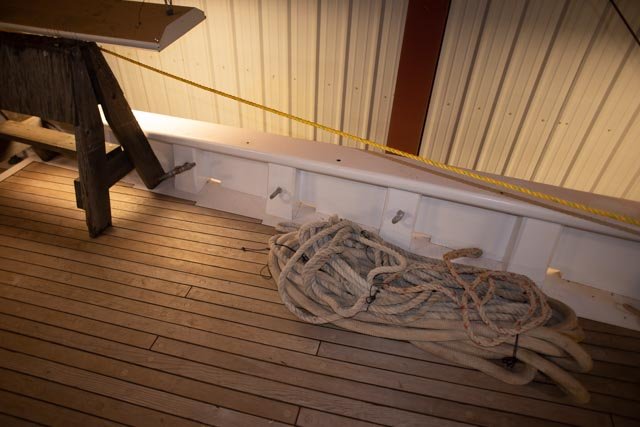
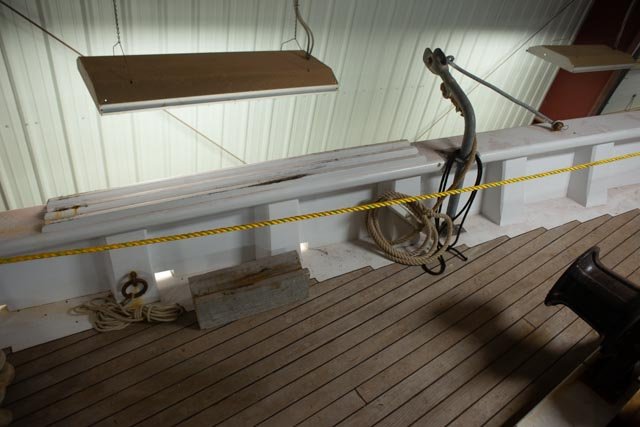
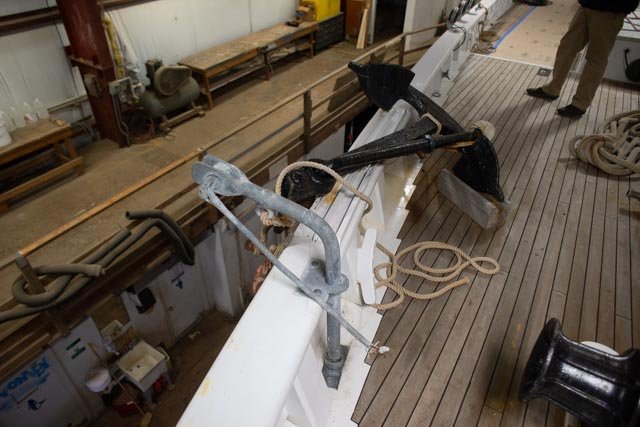
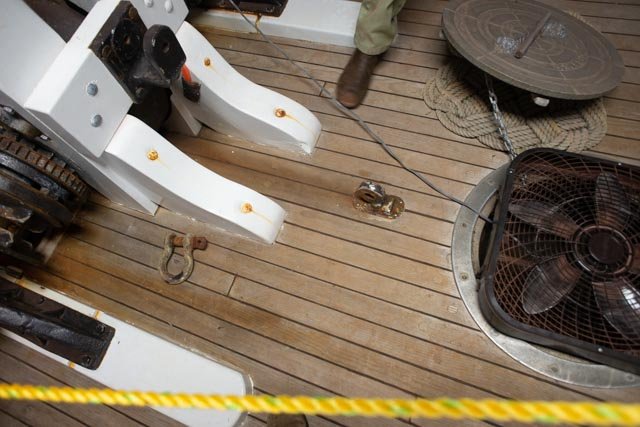
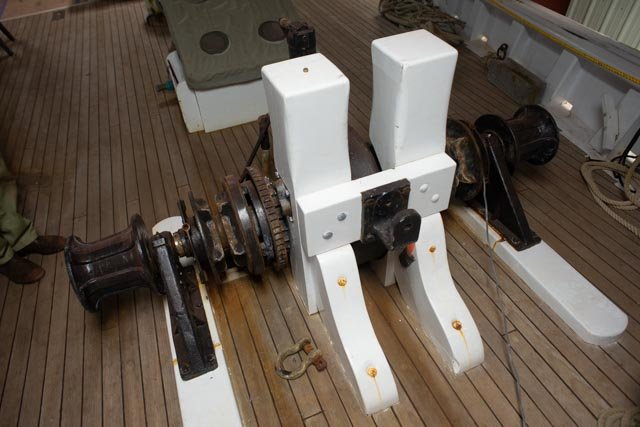
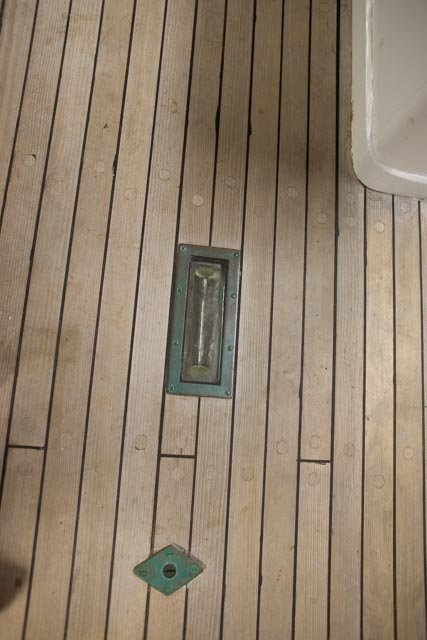
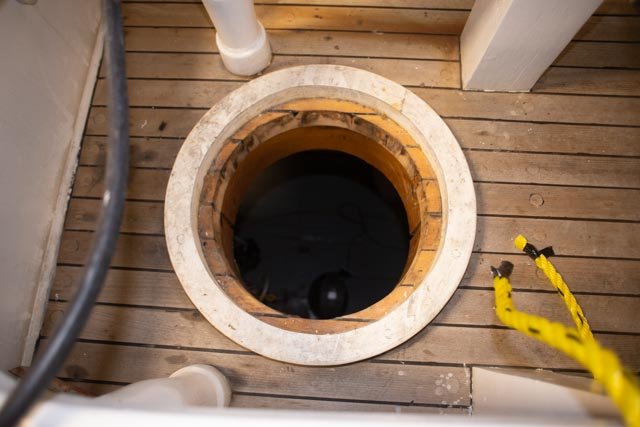
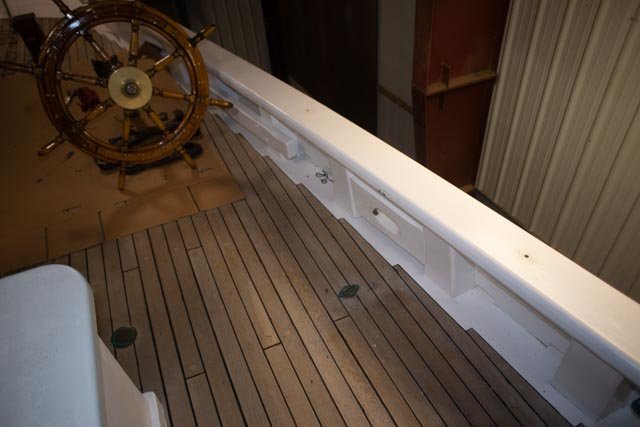
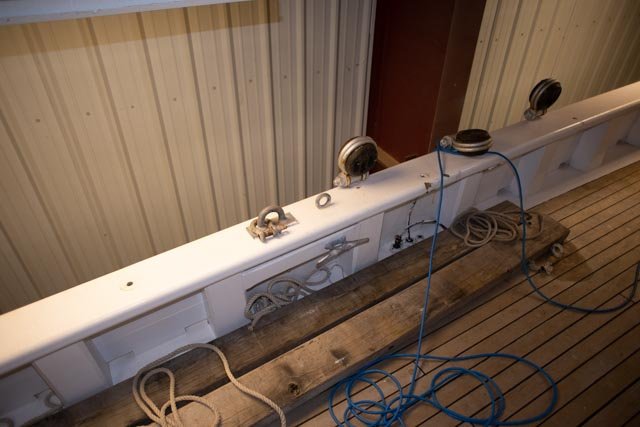
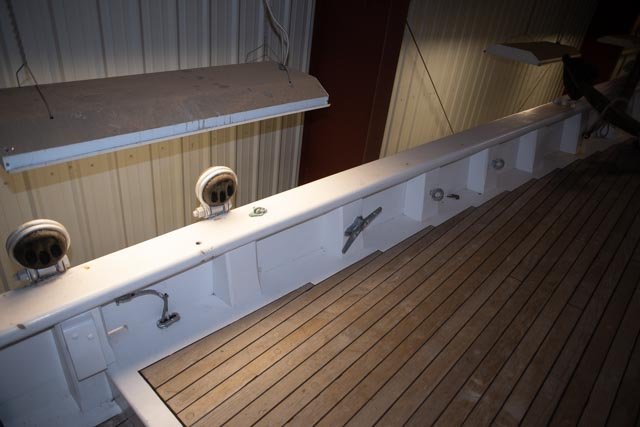
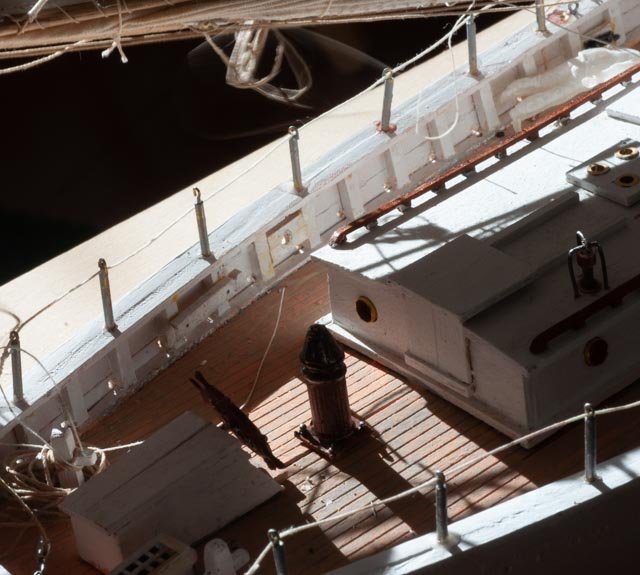
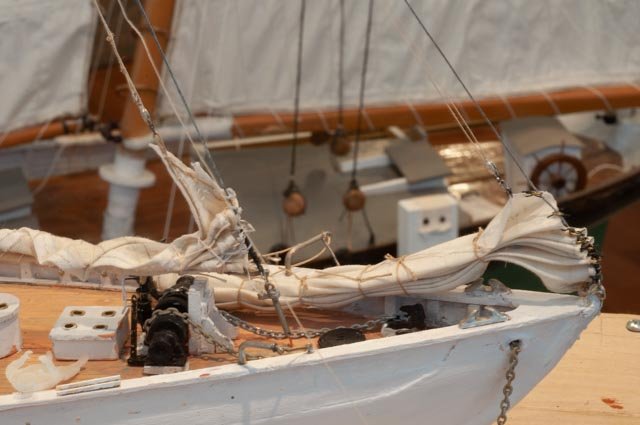
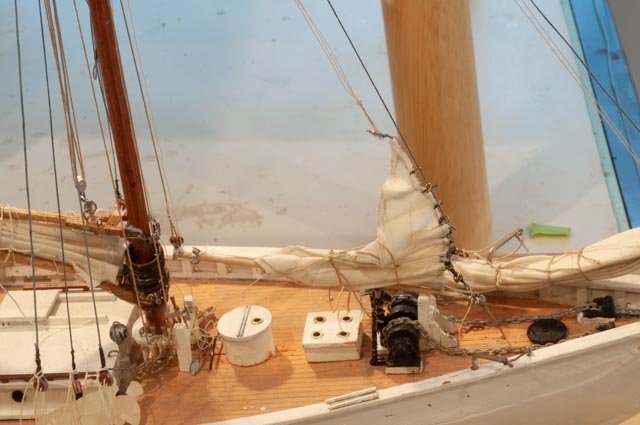
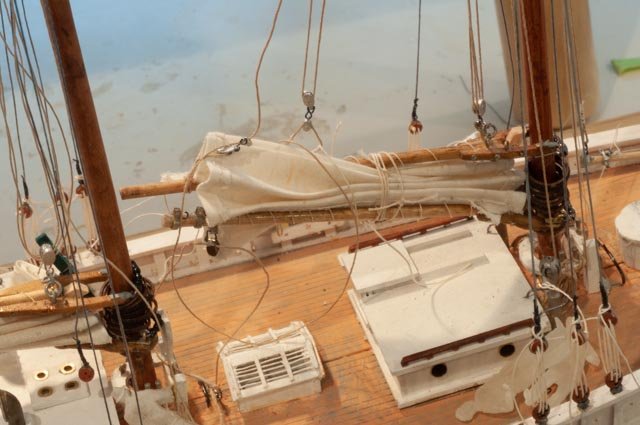
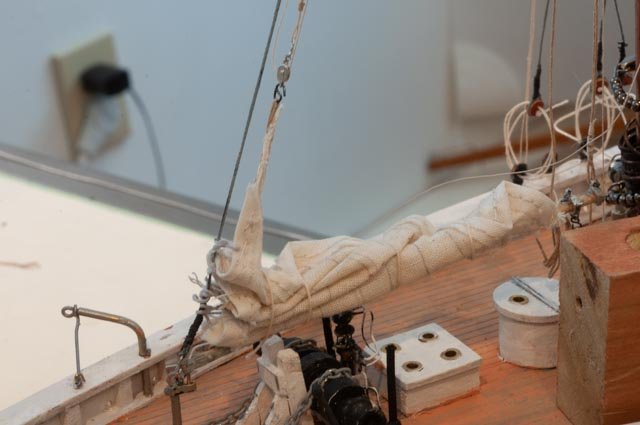
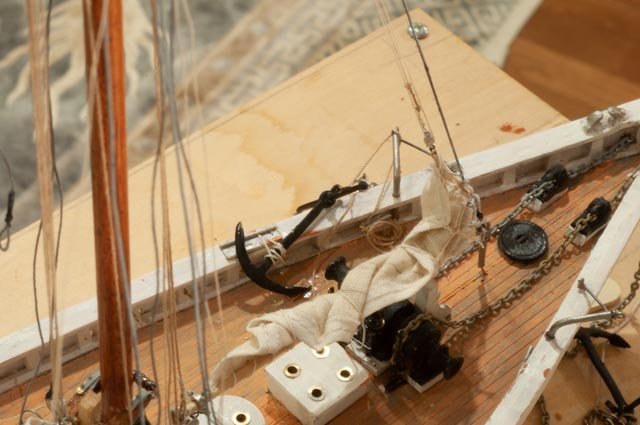
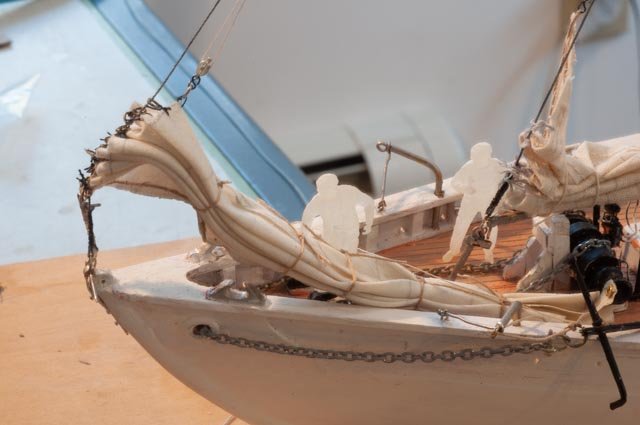
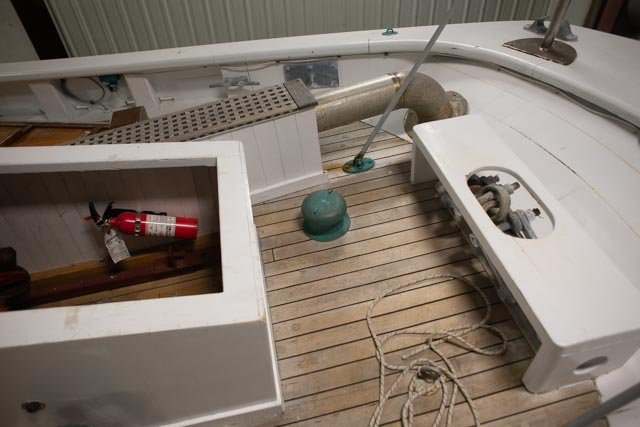
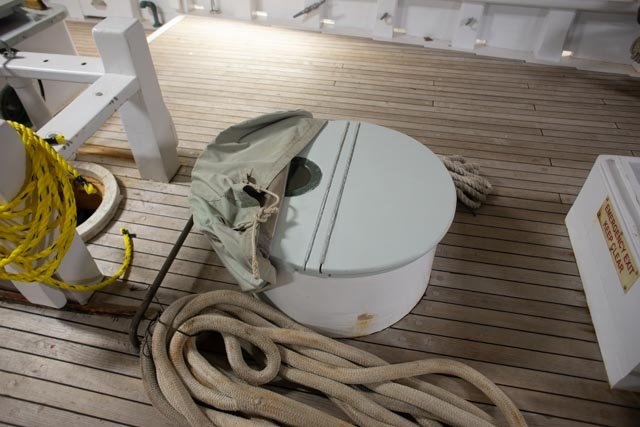
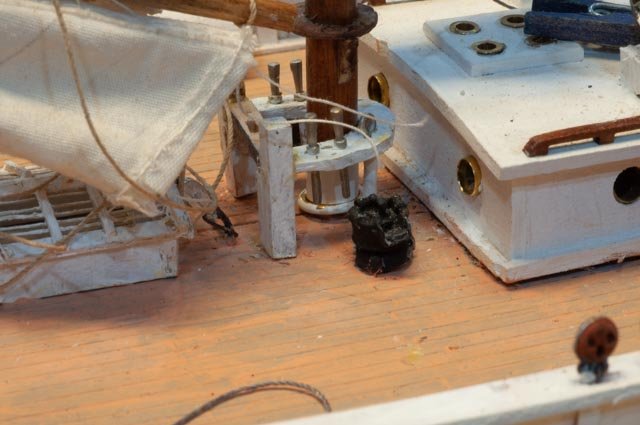
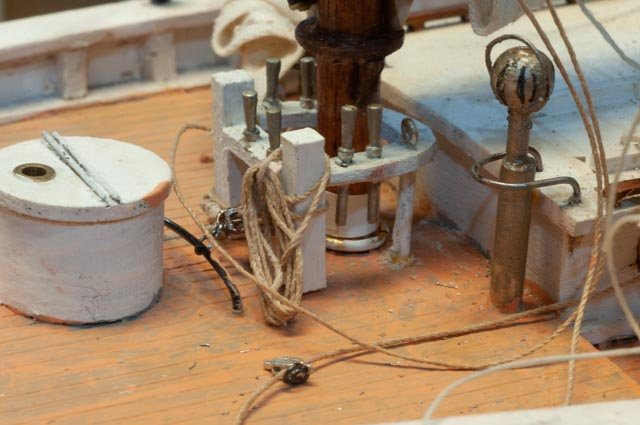
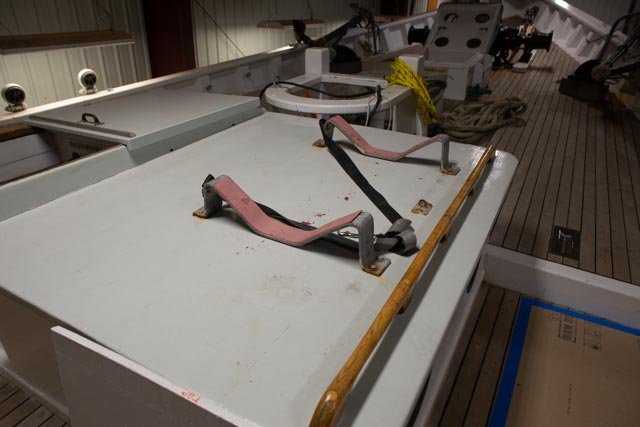
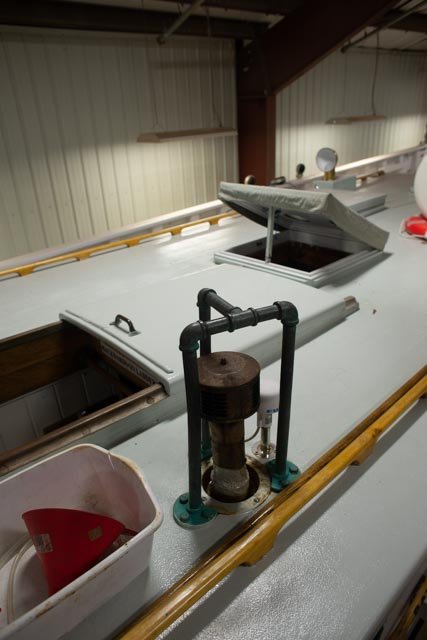
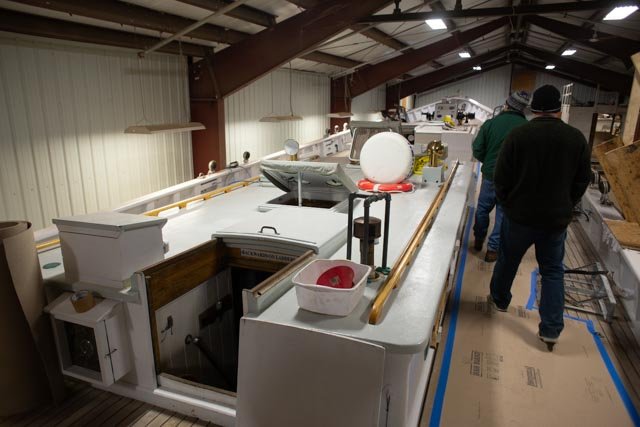
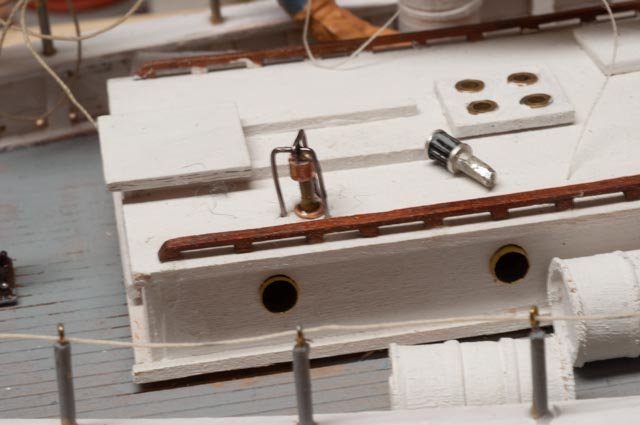
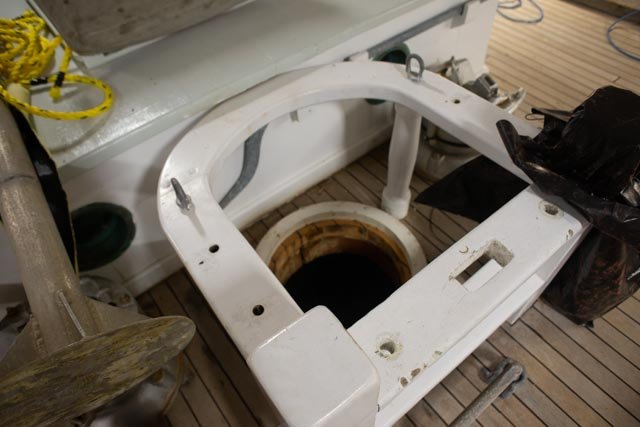
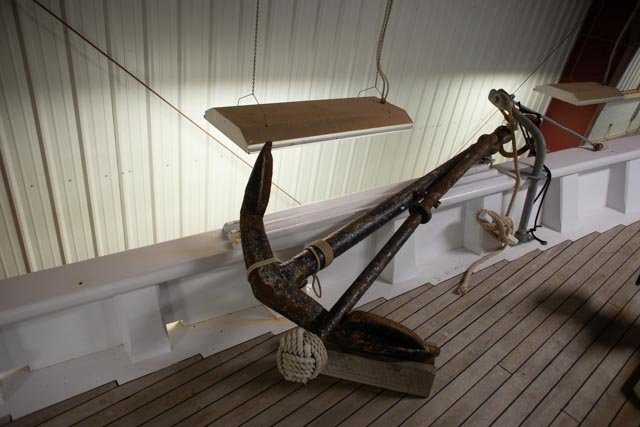
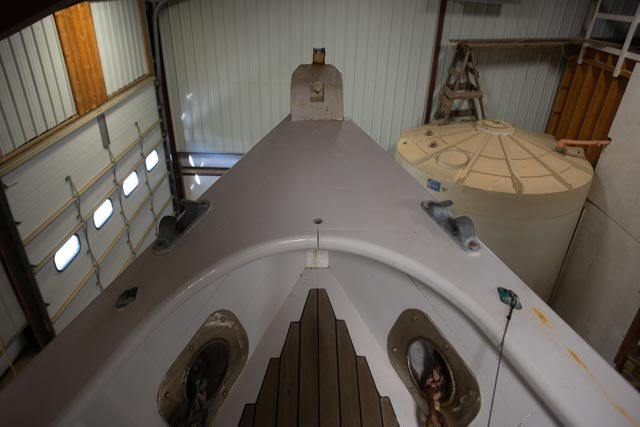
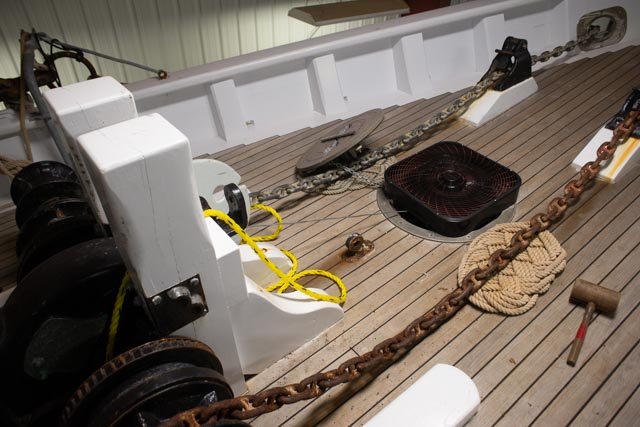
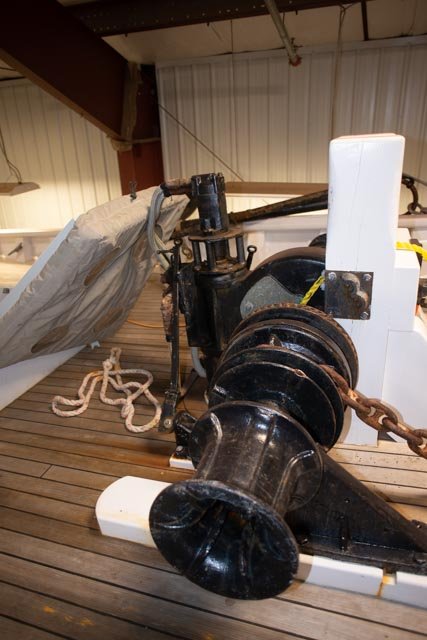
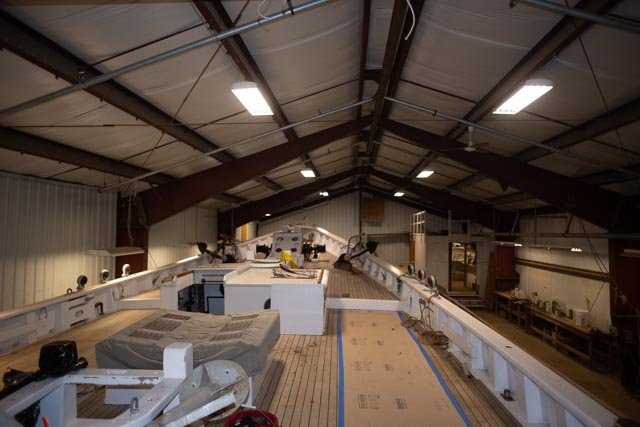
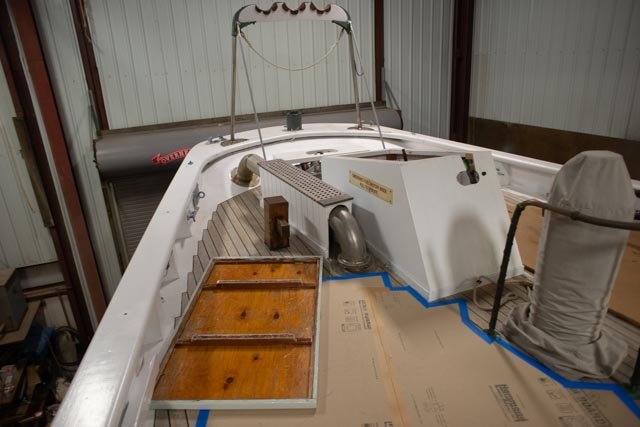
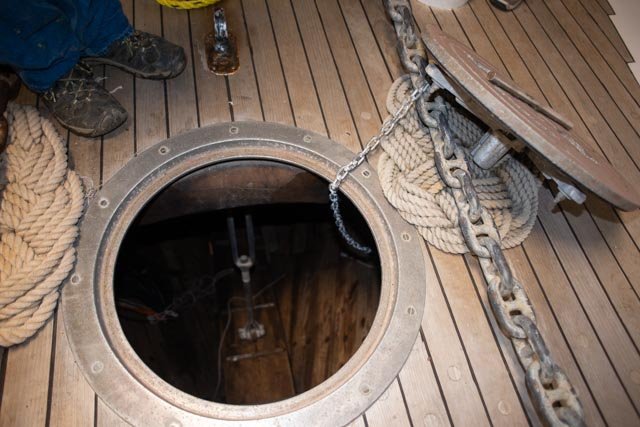
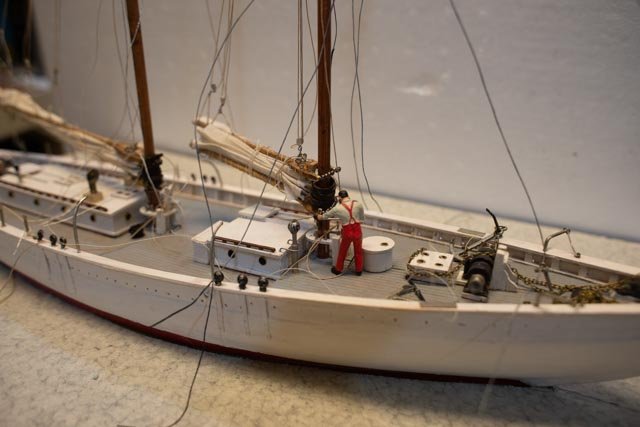
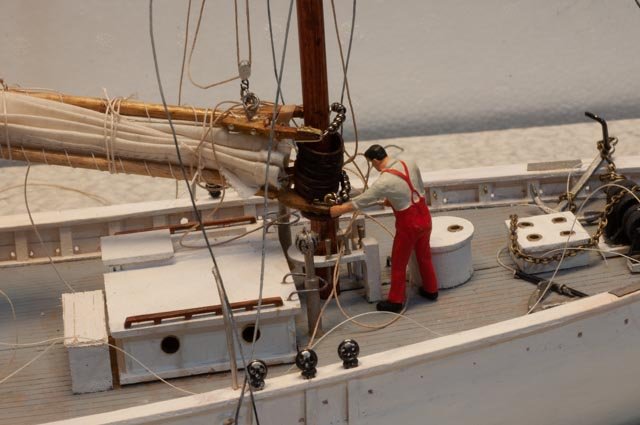
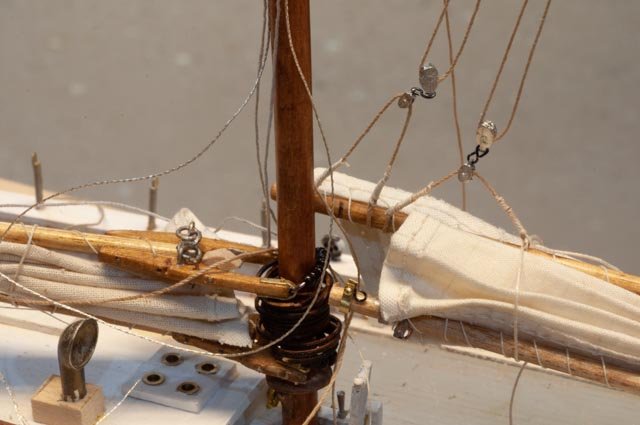
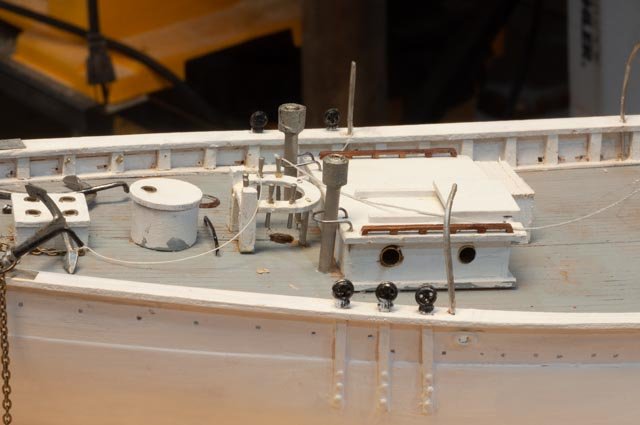
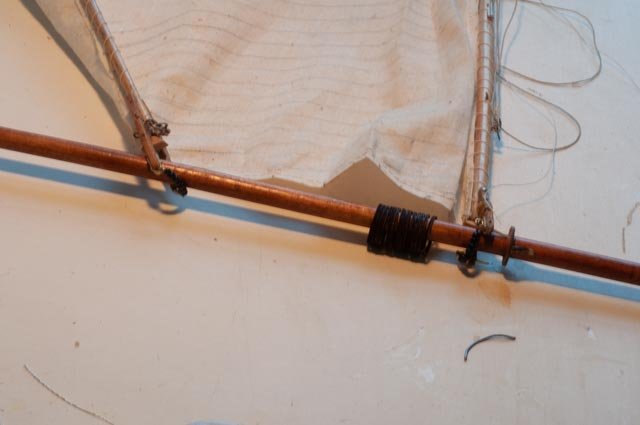
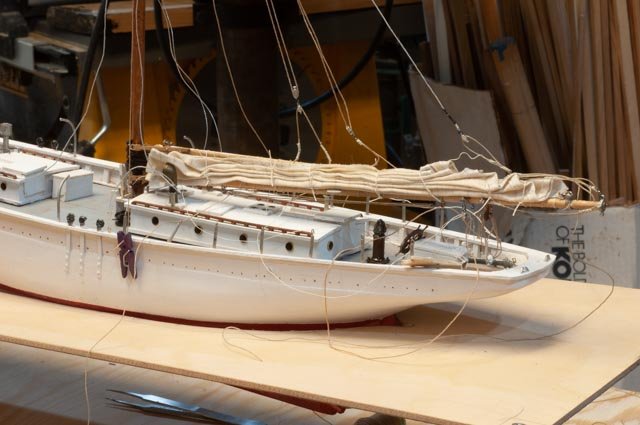
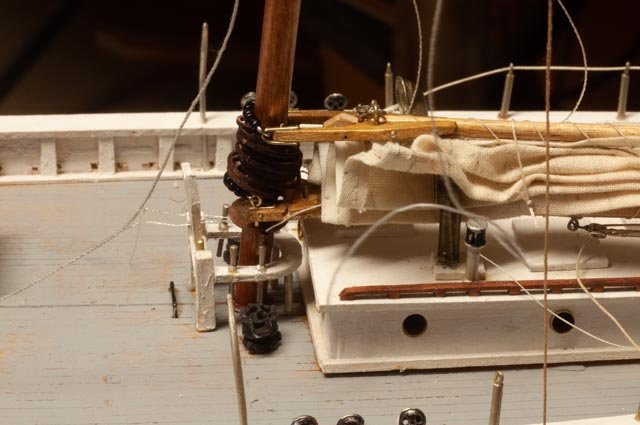
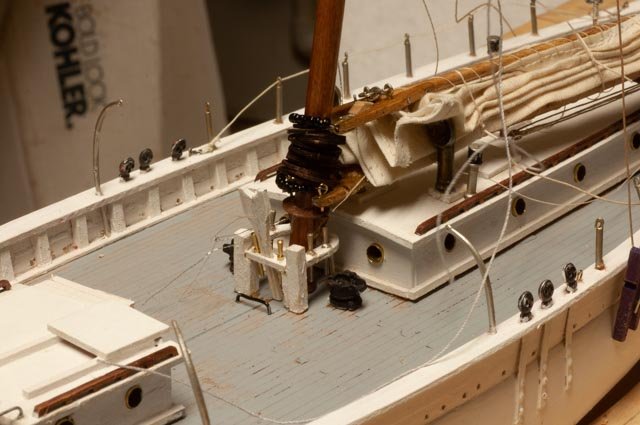
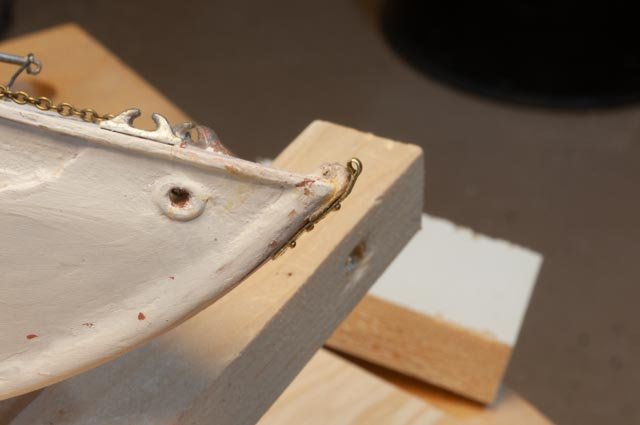
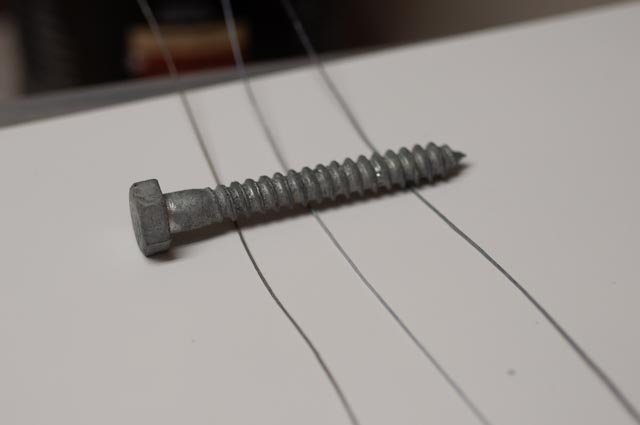
 Post 17 Visit on Bowdoin with Captain Will Mclean I was thrilled to have the chance to revisit Bowdoin with her captain this morning to discuss how some things are rigged today, and to share his sense of what might have been different in 1924. I thought as I ran home to write up these notes that they may be of value to logging this build. I share them here and focus this review to completing the deck. To start off Will knows these are the original pumps and hey are galvanized. The fire line is new and the stand is for the radar. Here on the starboard side of the cabin we need to make and store a handle. Here for the port side pump, the handle goes on the front of the cabin. At the port side main deadeyes, we confirm this is the main peak whip line large ring and cleat. Looking forward on the rail we learned that the main throat halyard is belayed. The forward hole if for a pin used for dory lines or other temp rigging. Looking at the recently replaced deck we see a renewal of the lashing technique. Small rings we used to lash deck boxes today and both deck boxes and barrels in the past. Moving to the foremast rail, we find two more pin holes. If I can remember correctly, the jib halyard to port and jumbo halyard to starboard, just before the shroud and the peak and throat halyards for the foresail between mid and aft deadeye. Will told me they do not currently use this large ring as there are no whip lines on the foresail. They do however use it to connect the main boom tackle it they are going way down wind, Moving forward, we see the fittings to receive eye-bolts to lash down boats There are also a few deck prism to send light below. As we turn around and look forward, we find a thumb cleat. Will said this is rarely used. The main sail and foresail are actually raised directly by about 4 crew. If one was alone and wanted to pull the line forward to the winch this cleat might be used. My guess that it could have been used to bring the sheet for the jib aft, making it off the the angle cleat when weather was bad. There are several comments to the sailing with just the Jumbo and foresail when in the ice. We’ll talk more next summer when she is rigged again. Here we see rings for the forward sheet blocks. There are two pin holes above that are for cleating but also two cleats. I have sent back to will two old photos show variation of sheeting for further discussion. Here we are at the anchor rigging. A few things to discuss. The tackle to raise the anchor out of the sea is lashed around the mast above the spreaders. It serves both sides. That solved a mystery to me as the three blocks are visible in old photos , but I was not sure which was which. It is lashed and in the center and goes to the port side pin rail. Another point was the purpose of the wooden cleat for the lashing. When preparing to drop anchor the heavy line is made around the anchor and cleated. The smoothness of the wood cleat makes is safer to let go. From my previous visit, here is the anchor and better view if the sodden cleat. The anchors were rescued from the navy yard in 1946 and there is no record of a loss. Thus, we believe these are the original ones. The chock for the fluke is quite large compared with old photos. Looking below into the peak….forward lazarette..., we see through the turnbuckle into the chain locker. Will confirmed there are three shots of chain for each anchor and the locker is full. Thus, the book talking about 240 fathoms was a little off. Perhaps they meant 240 feet. Also please note these are new hull planks. last time I was here this was a hole. Above the deck we see the end of the turnbuckle. Two flat plates with spacers capture that fitting and provide for a shackle at the top for the jumbo stay. There is a gudgeon like fitting to receive a pin from the jumbo boom gooseneck. Looking at this lazarette hatch and the various angles, I am no longer sure this stay has been moved aft. We shall check sail dimensions later. The bitts hold a secret. See the fitting forward for the see saw arms. Oh yes, indeed, in the after lazarette, they keep the pump handles in case the hydraulics fail and they need to manually use the winch. Here is a detail of the prisms. Will believes they would have been there in the original deck to light up the hold and aft part of the foc'sle. Finally we solved my boot mystery. Will confirmed that the canvas boots are painted white and they sit inside this wooden ring. We also solved the rigging of the pin rails. The large rings that I thought were for snatch blocks, they do not use now. the two aft pins are for lazy jacks, and the two forward pins are for topping lift and boat tackle. The front two pins are for sheets...I had incorrectly assume use of the Bitt as on the Bluenose II. He said no they used either port or starboard pin. It looks like something to see next summer. So lots of data. I hope I got most of the right. Visiting the real ship is always a blast. As to the work, I saw about 5 guys working away at the planks and all looks good so far to be done by next summer. I have pictures from below that may come into a later posting. We checked out the hydraulic system among other things All for now…back to the sails
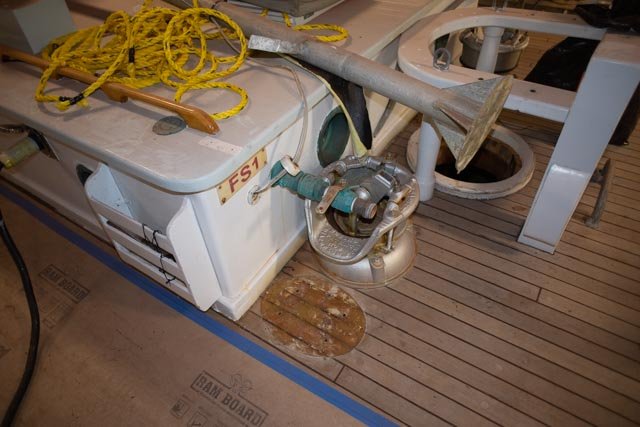

-
thank you Andrew. I was down at the real boat yard this morning and went all through her. There could definitely be some hidden ghostly crew members. i am thrilled to have been able to jump onto this build as the real Bowdoin is i mile from my shop getting a new bottom. We all have lots to learn. cheers jon
-
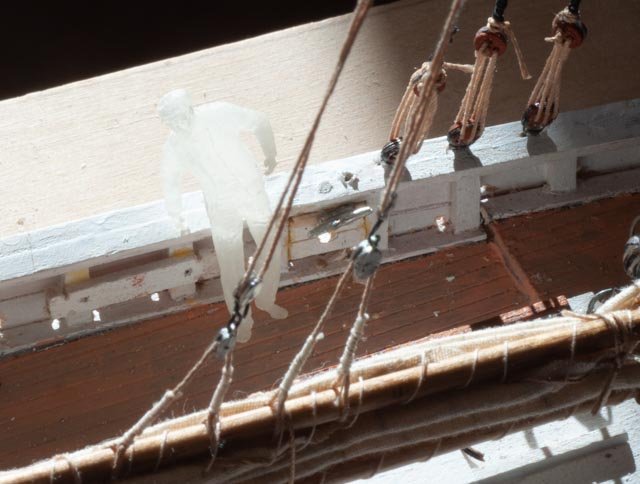
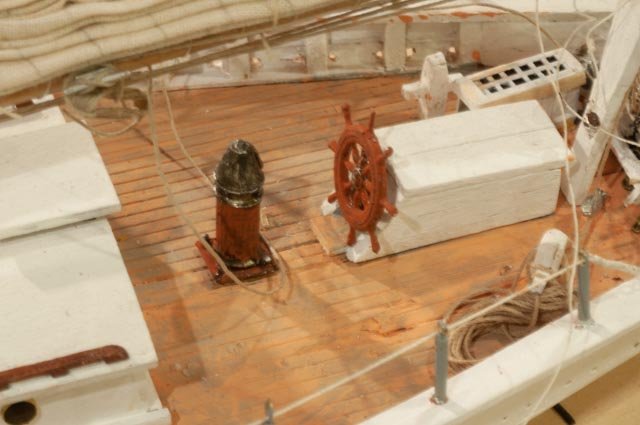
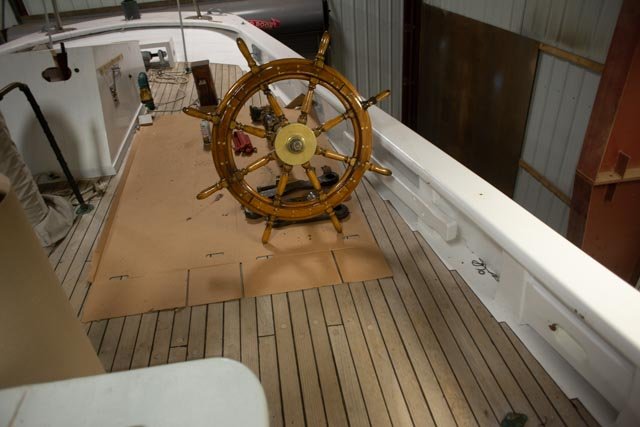
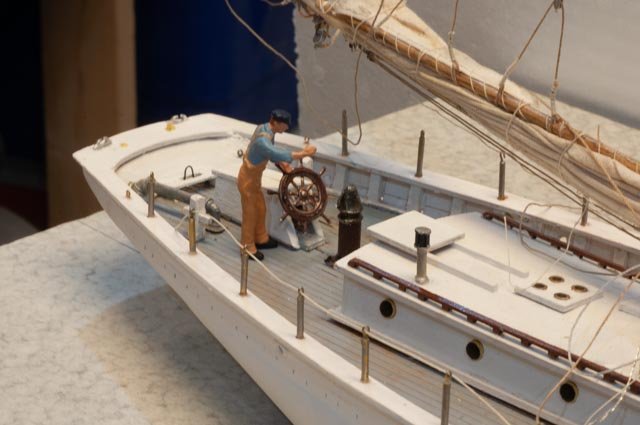
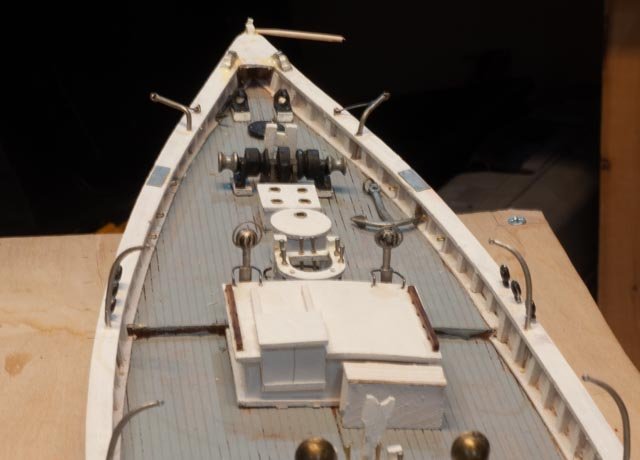
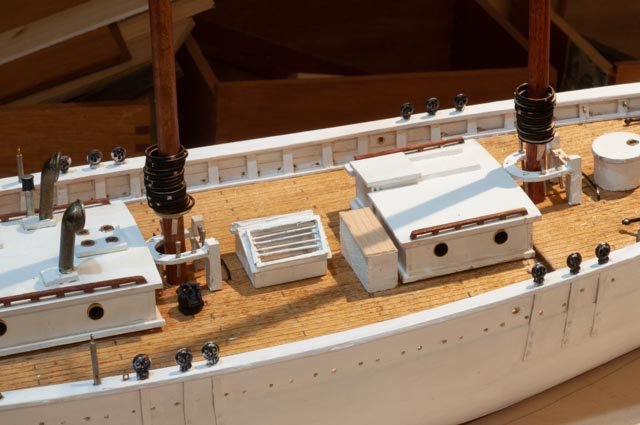
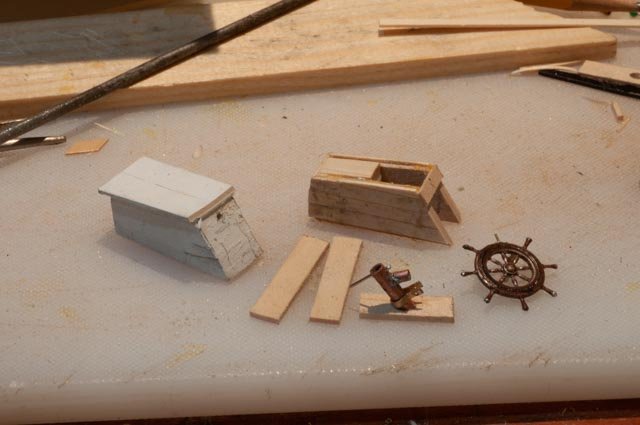
Post 16 More deck work…. Let’s add some bulkhead fittings and let’s try to make metal casting look like varnished wood. Here we see the nicely finished wheel that is varnished. We want to get closer to that look. Also we see the inside of the aft hawser pipe that is framed to take load off the planking and a large line cleat on the two stanchions. Please note the deck ring. I assume this takes a snatch block to direct a dock line back to the large wooden cleat. Here we see a large ring and cleat to take the main peak halyard whip line. It is just aft of the stays and overlaps the safety rail. I adjusted the first rail stanchion allow fitting it all in. Here we see the midship hawser pipe reinforcing and large wooden cleat. There is also a diagonal cleat directly above the hawser pipe. I need to confirm its purpose. Here we look way forward and confirm the anchor lashing set up. Now how did we do???? First, we have the mid ship hawser pipe bracing and large cleat. This is just under the peak halyard cleat. Second, we see the Peak Halyard whip line set up near the main shrouds. The throat whip cleat is to starboard. Here on a sunny morning we see the aft hawser pipe set up. Here is a top view at the port main shrouds of the whip cleat. Our crew member is inspecting. Here is fore mast cleat and hawser pipe. Our crew has become a ghost. The shrouds have also now been lashed So, what happened to the wheel? Here I tried a rich brown paint as an undercoat Finally, here I used a cue tip with hand poly to see if I could get it to shine. The morning sun is helping. I could see lots of minute touch painting i need to do in these photos. Some of it will compete with the aging, but still needs to be done. All for now, I am still working on the sail rebuilds


-
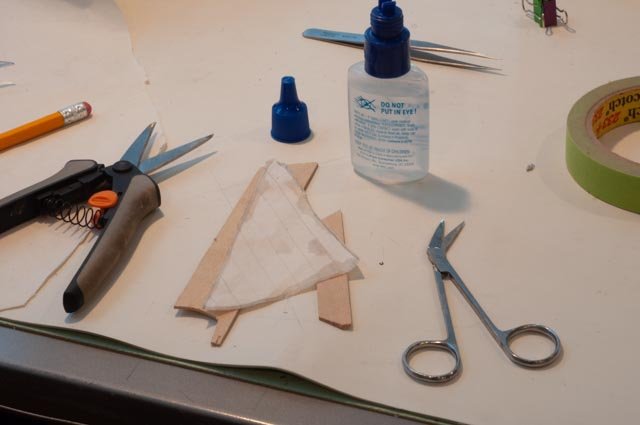
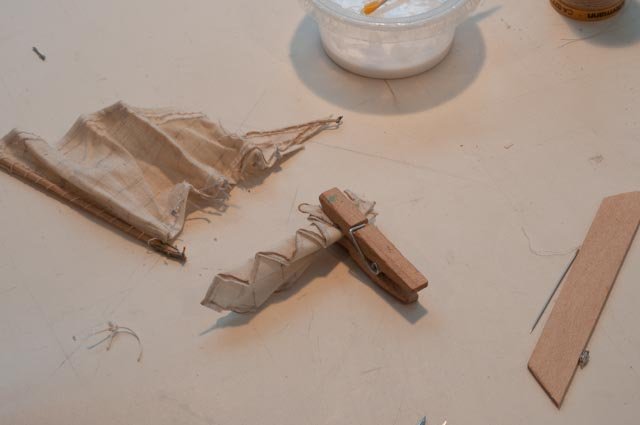
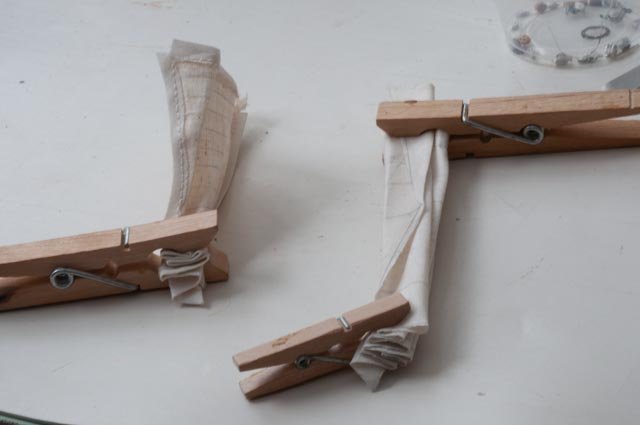
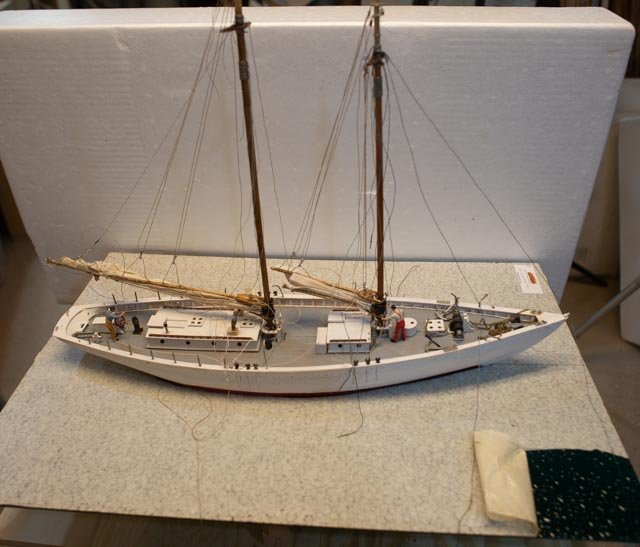
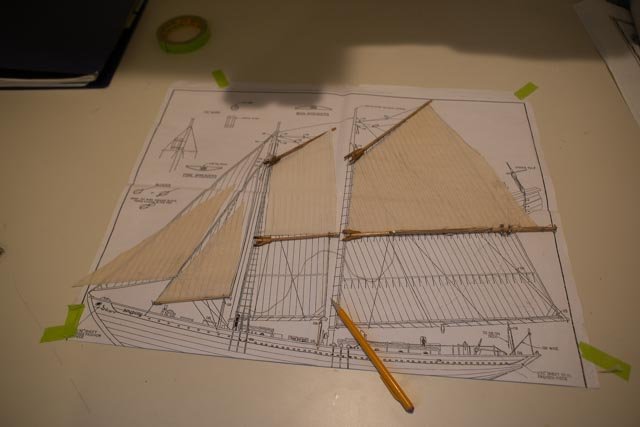
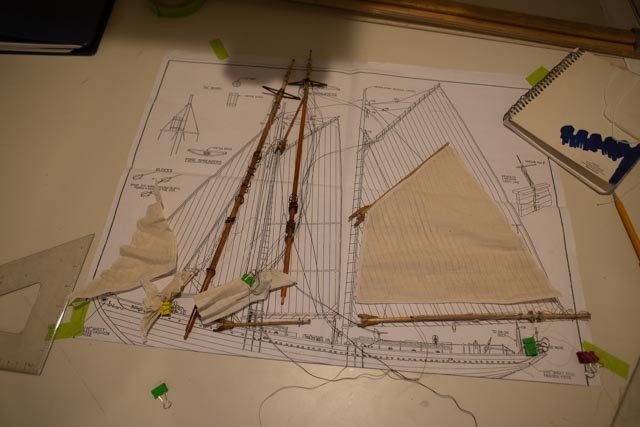
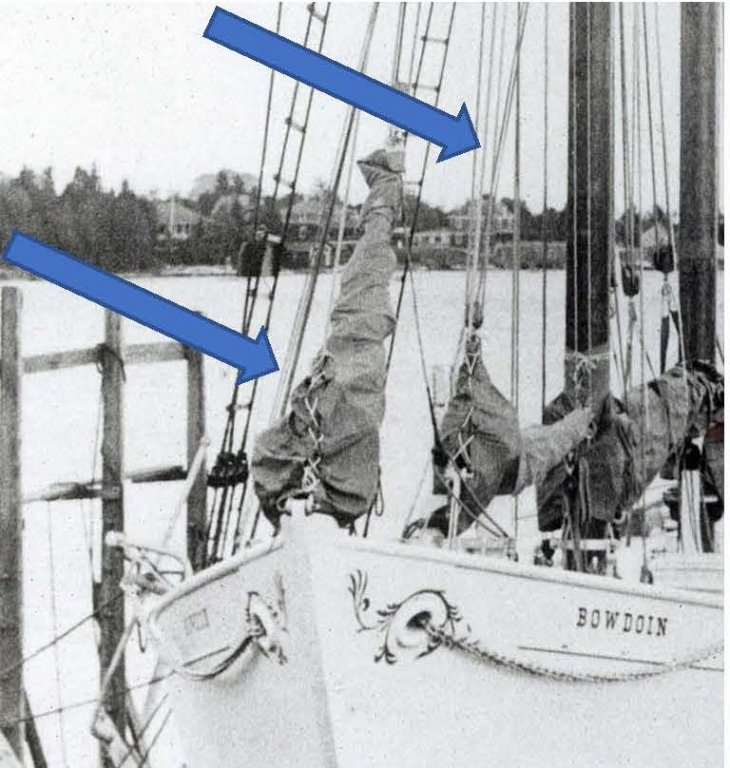
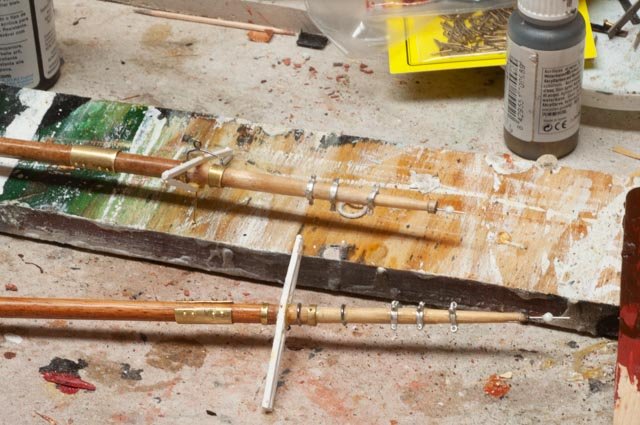
Post 15 Update on experimental sails I do not feel too bad because I premised my earlier posting with the concept I was experimenting to make furled sails at this scale. Now that all four sails were made either 1, 2 or in one case three times, I think I am ready to try to make the sails. Let’s follow recent progress. Here I have taken the jib and tweaked it a bit to tease the rings down over the splice. I have opted to lay the sail to the port side as shown in several photos, as I am zeroing in on the scene to be getting ready to sail as the ice has just melted, or we have just anchored and are getting ready to put things away for the long winter. Here is a detail of my third attempt to make the jumbo. I have reduced the cloth a little bit, upgraded the weave and applied the fray stop glue. Here I went a bit too far and too fast. I added the bolt rope to see how that effects the folding and then folder up the sail and gave a touch of steam iron to hold it Here I should have seen the two problems. The tack is folded back into the sail and the foot has become too short. also with the newer finer weave of the muslin, I think the camel color to replicate hemp on the bolt rope is a bit dark. I will look at more photos and see if i should use a lighted color thread. the .05 mm hemp is just too thick and stiff so i found the Gutterman thread work well. I have only found the larger sizes in polyester, but use cotton for splice serving as it take white glue so well.. Here I went ahead to install the jumbo to see how it would come together. i had to rerun the stay and that is now quite difficult to fit to the mast. I like the tighter folding on the sail, but the short length does not work for me. For those really watching, you will also notice the bolt rope is to port…oops. Anyway, this is a one-day job to do as the steps become more routine Looking aft to the foresail, we now see how this will be improved if I can take the time to rebuild. The Bias tape goes away at this scale. So in conclusion: to make sails furled on a new scale model, one must expect to make all sails twice and some three times. Each time hopefully gets easier...we'll see. all for now
-
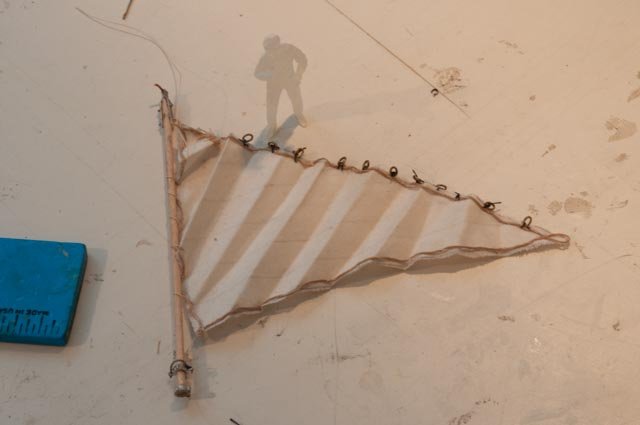
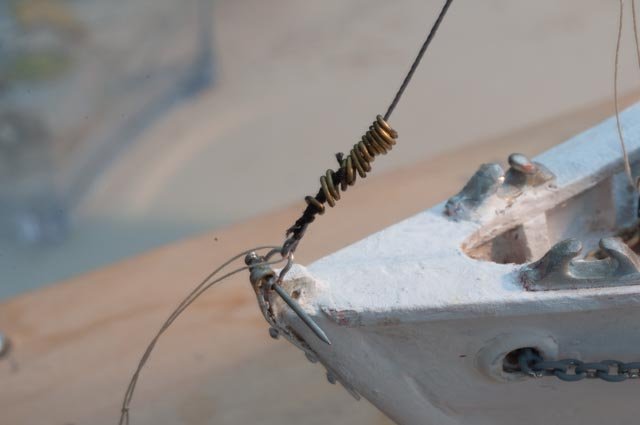
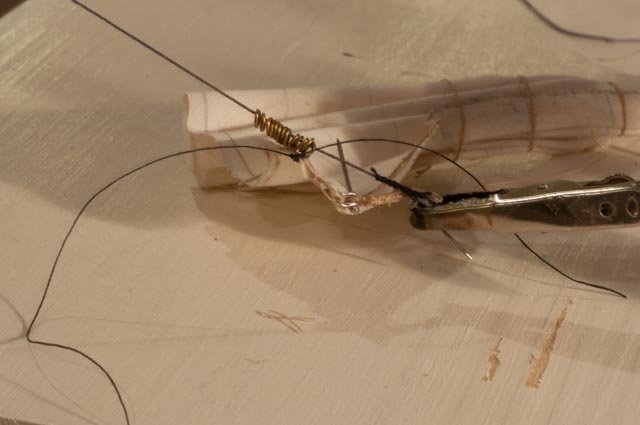
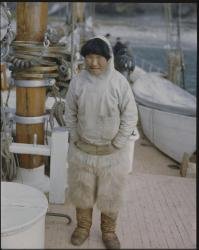
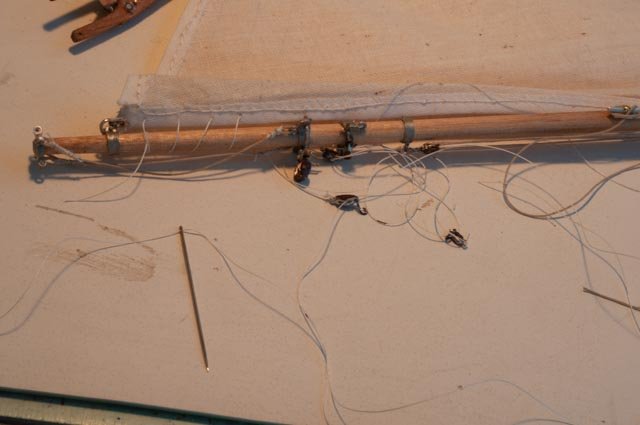
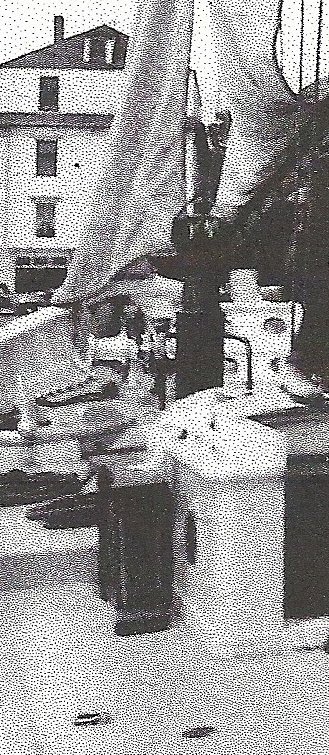
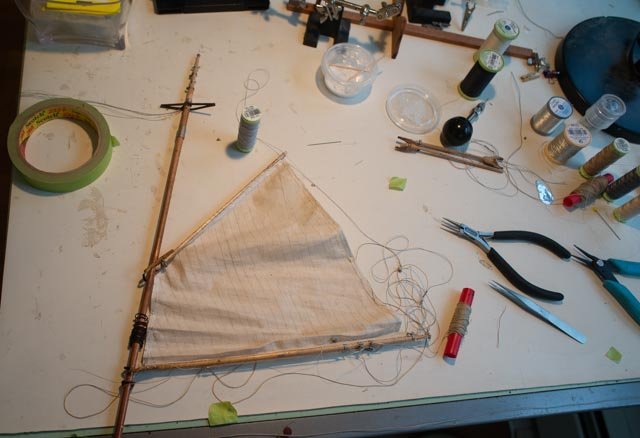
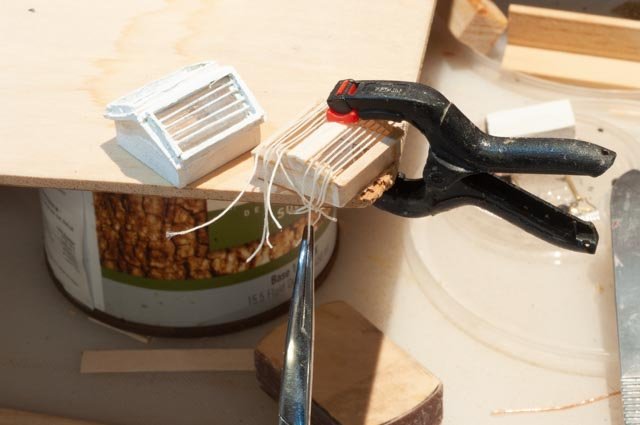
Post 14 Time to work again on the sails I have used the same method from my earlier builds that include a muslin cotton to replicate the duck cloth canvas sails of the era. I like the spots on the natural unfinished muslin but suffer from the looser weave. I went back to Joann’s and got some help. I came home with the finest weave muslin and some edge fray preventing glue in an applicator. First let’s look at the jumbo. It is in place but not really up to snuff Looking from the forward end the twist in the stay could be fixed but these is just a lot of mass along the boom. I tied off the hanks with gray cloth just to see the color as was trying to figure out how to make small enough rings Looking forward one clearly sees the flakes are just too big and the bias a bit thick. the good news though is the anchor is properly lashed. In this photo you see the first attempt to build up the jib on the left. I used the regular muslin and added the bias tape sewn to the perimeter. It just does not fold right and the edges just look wrong for this small tightly flaked sail. On the right I have cut out a piece of finer weave muslin [ $6 per yard instead of $4 per yard with the word premium on the label] cloth much more rectangular than before, as an experiment. I assumed that the flaking would stack better and not twist the stay like the jumbo. See this old photo from BRHS of the perfect flaked jib. If I were a genius, I might get close to this image. So here I found a solution to make the hanks. I took left over anchor chain, about 15 links to the inch and cut every other link. This gave a great size and shape. Before attaching the sail, it rides right down to the stem cap and shackle. I also made up the double spliced lashing for the sail tack. Here is the proper rigging of the tack om the current Bowdoin. Here I am sewing on the hanks. I made 13 to be realistic in the number, but they are close together. I was sewing through the anti-fray glue and it worked great. All the lines are pencil. the strong lashing is clear here too. Finally, here I have first installed the jib to see if it will work. I need to work carefully and tease the hanks down over the slice now the thread is filling the gap inside the ring. Also, the lashing with double splice is too stiff. I may need to fake that more with the soft pliable line. In this picture it is distorting the whole stay. Also, just for fun, I got ten new ‘Shapeway’ 1/48 scale figures. I found this resource when building Bluenose and like the non-painted look for some applications. We’ll see if I get brave and paint them out. They may need heavier coats and hats made of sculpy. All for now

-
Tom Thanks for the encouragement. I have seen some common ground in your build. I have gone through it a few times as I have the same kit. My plan will be to bash it to a merchantman but that is down the line. I just learned I will be out in Buffalo area next spring. I am thinking on trying to drum up interest for a day trip to Erie. I am not sure if Niagara sails then but hopefully she will be in port. one learns so much by visiting replicas. cheers and thanks or following along. I have some new figures coming so that might be an interesting way for me to get in more trouble. jon
-
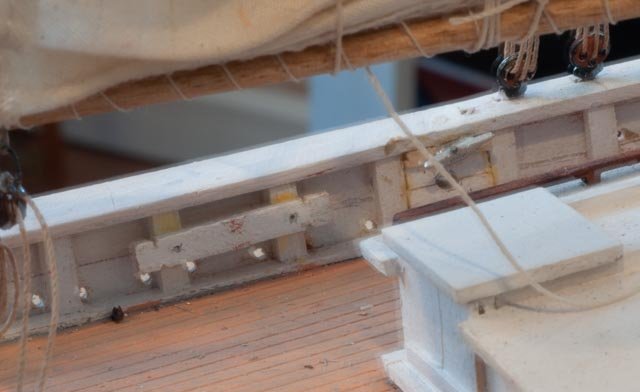
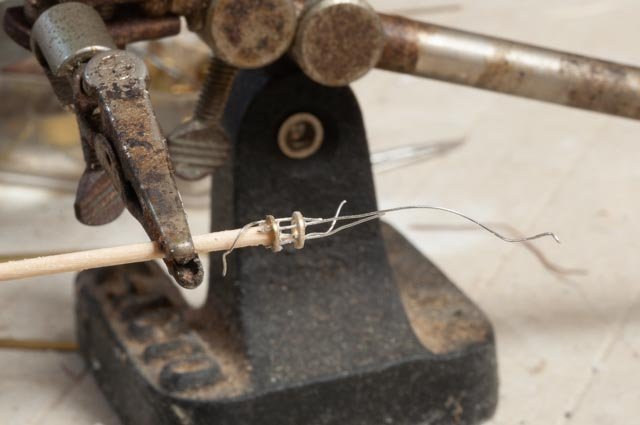
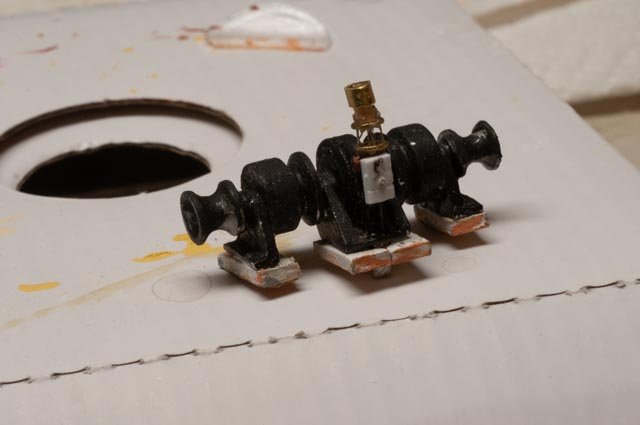
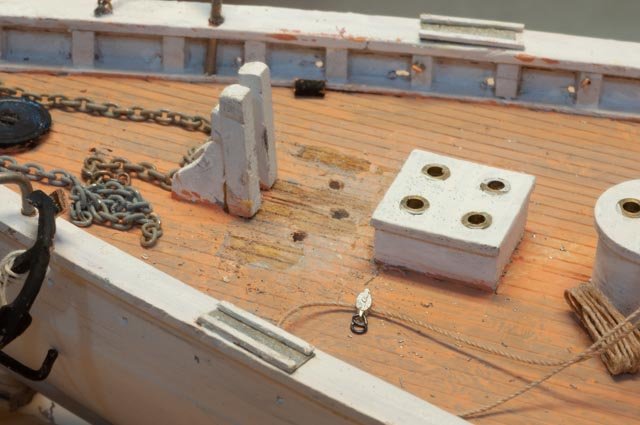
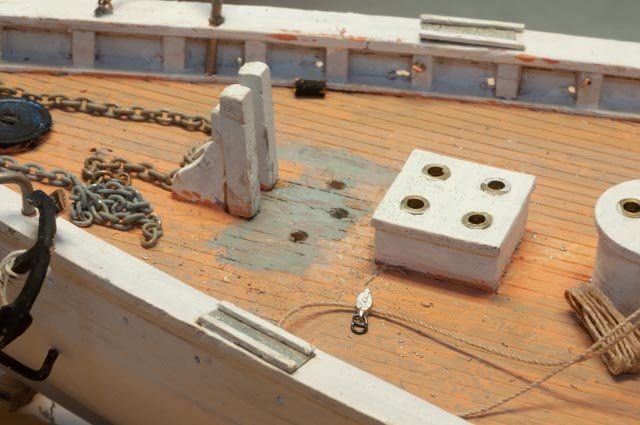
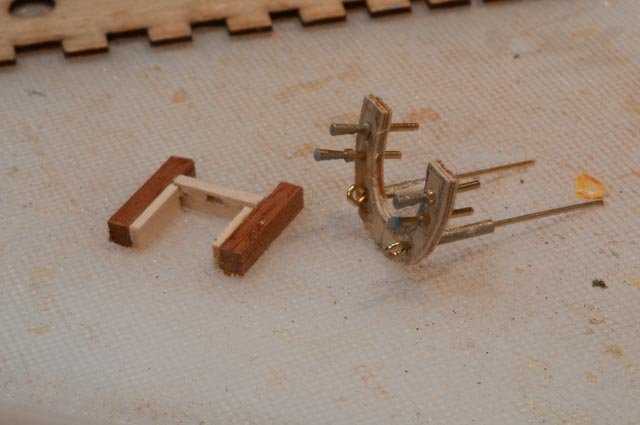
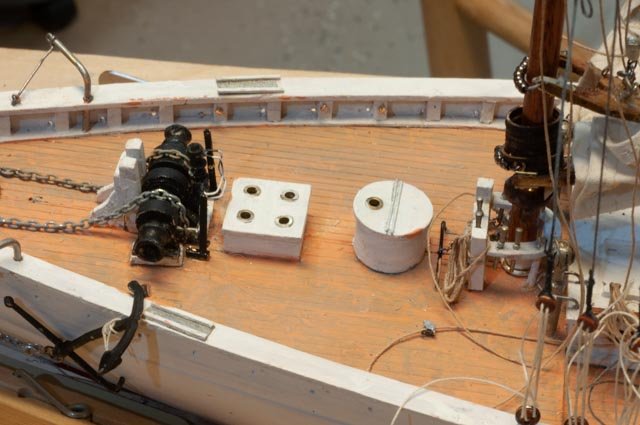
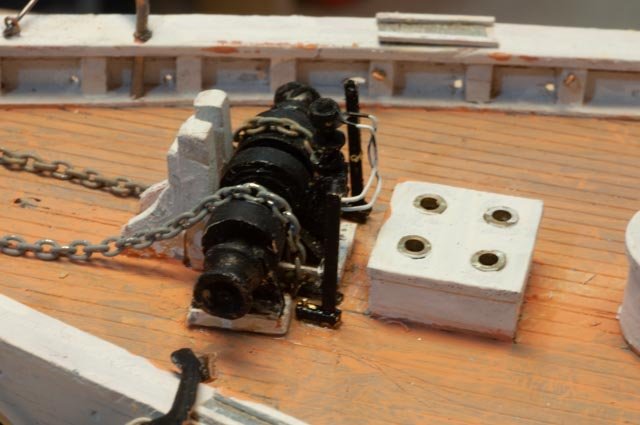
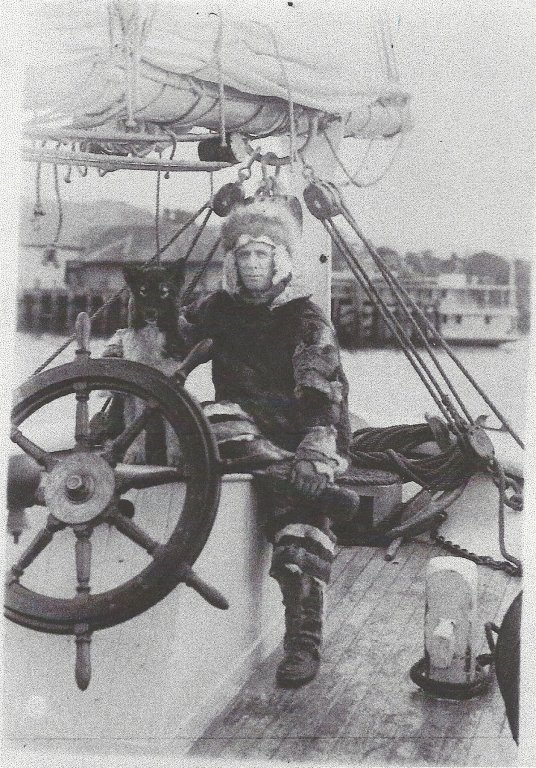
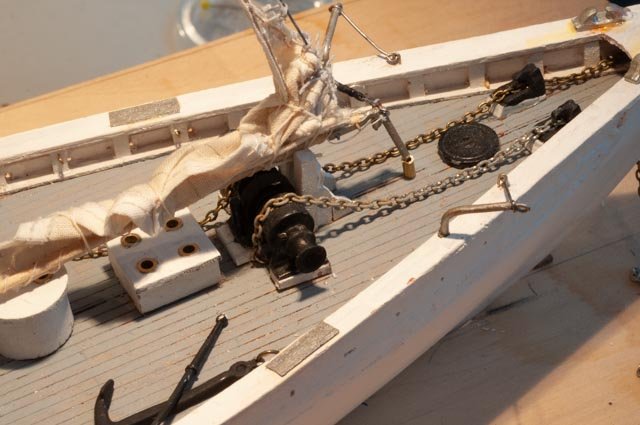
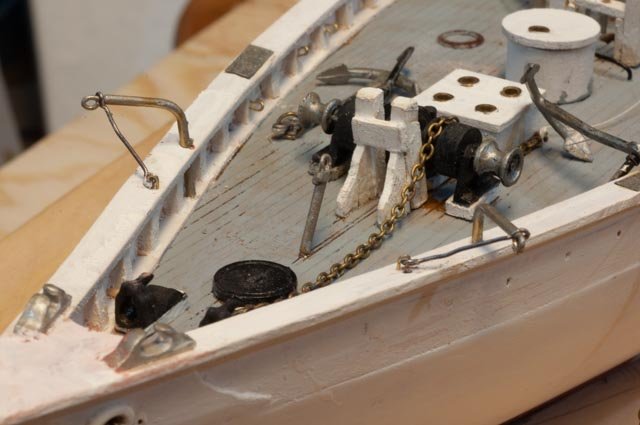
Post 13 I want to share a few more images from research and then start to show some attempts to adjust the build. · Here on the new Bowdoin deck we see a few rigging details. The ring will take the main sheet and feed it to the aft port bit. The bronze hub on the starboard side must be to take up dock lines aft anchors and the like. I need to verify before I add it. · The wheel is nicely finished and polished. In the history Donald M discusses finding the wheel when it was removed in 1946. I see no other evidence that it is updated. I need to change coloring to simulate the wood finish · Here on the focsle vent we see piano hinges. It did not lift off. · This one is fun. In the early days there are several pictures showing the main boom supported by a traditional Crutch. It is show in two different locations. I plan to use this detail from a BRHS photo. i also see the turnbuckle and chain supporting the boom. I am debating about adding that detail before i settle on what is happening in the diorama. · Here we have the new cover over the hot exhaust as recently rebuilt. I have yet to find any old photos of this cover. it makes so much sense and was probably a nice seat in the cold north. For those late watches. Now let’s start some upgrades First of all, the winch. In 1946 Donald M tells of the rescuing the original winch at the Boston Navy yard. There is no talk in the 19 78-84 rebuilds of touching it, so for now I assume it is original. Also the key is the hydraulic piston to run it. I hope to learn more about that. · First up is to build the piston driver for the winch · Here the winch is removed, and the piston is in place ready for paint. I will add the hydraulic hoses after paint. I chose styrene because I have 4 hosed to glue into it · With the winch off I can clean up the deck and smooth out the two added anchor chain holes. I learned from one reading that there were 240 fathoms of anchor chain on board. · Here like the rest of the deck there is an under wash of mid gray to affect a reverse attempt to muddy scuffed surfaces. This got the warm tan [ peach actually] wash over. · In order to add the rings on the pin rails I would it best just to remove and rebuild them. For the rebuild, I used harder wood and plywood since sanding and painting would cover them and they would be stronger. · Here we are back together · Here is close up of the winch in place and anchor chain secured and the hydraulic hoses in place.. i added the hand brakes by the casting does not exactly copy the winch. I chose not to attempt the band brakes that on the real one are inboard for the anchor chains. There are also stops on the bitts to figure out. · Here is detail for the main mast. Note the stuffing [ boot] that I could no add as part of this fix. · here is the fore mast back in place. the large galvanized rings I am pretty sure take the snatch block for the halyards to feed forward to the winch. · Finally, here is my version of the exhaust pipe cover. The main sheet block is in place and the aft anchor in place. More next time Cheers

-
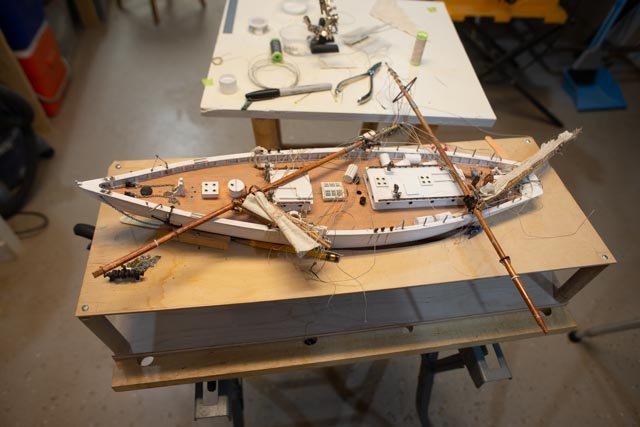
Post 12 End of year last chance to do it right Sometimes we all get to a point where we need to stop, go back and do it again. As I run up to the end of the year, I am there……so sad. Here we are set up to work on the shrouds. I worked through the foremast and was getting the peak and throat halyards for the main partially installed when I realized that if I go much farther , I must accept whatever I have. In the mean time I am reflecting on more photos and more examples where if I want to do it as 1924, I need to go back. The next series don’t show all but many examples of what I mean. In the first posting I showed a photo with a boat crib across the main cabin roof. Here we see the new boat has a crib and lashing for a small craft, likely a kayak running fore and aft. This one is easy. Having gone below I can verify this is the original or at least very old stove pipe in the skipper’s cabin. Now another ‘what to do’…looking forward we see the small brass air vents. Those in the kit are quite large. But… Here in a BRHS photo we not only see a better view of the forward focsle Charlie nobles that I talked about before, but I see no ventilators at all on the main cabin. the crew is standing right there. Do I remove them? The Cummings diesel engine was not installed until 1946. It was a gift to Donald MacMillan. I wonder if that was the addition of the vents??? Also, there is no second small stack as included in the kit design. Do I remove it ??? Looking below it makes no sense as to what it would have been for. It would be easy to remove, so I shall wait for more information Here is the fix I made for the small stacks. Now to the final coloring. In this old photo from BRHS, one of the few colored versions, we see a few interesting details. The painted deck is clearly warm tan. Also, the boot for the masts are white and stuffed into a ring. Hard to do now without removing the mast Here is the ring today and it is wood. Clearly the original detail. also note that the large galvanized rings through the rail. I will confirm but I believe these would have held the temporary blocks for the peak and through halyards to go forward tot he winch. there are no deck rings as on a fishing schooner and the line looks right. So here I am as I complete the year. I pulled out lines and unstepped the masts. I have the deck colored and have removed all the pin rails to rebuild and the winch to rebuild. Next time we get much of that back together, but it is time to party All for now happy new year
-
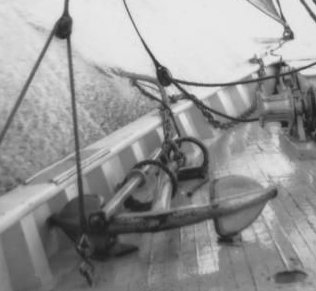
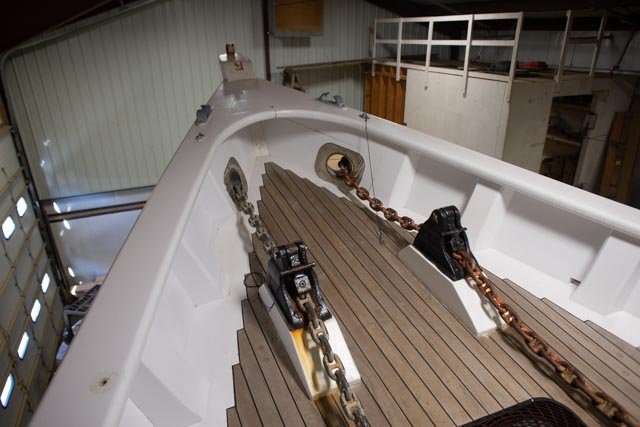
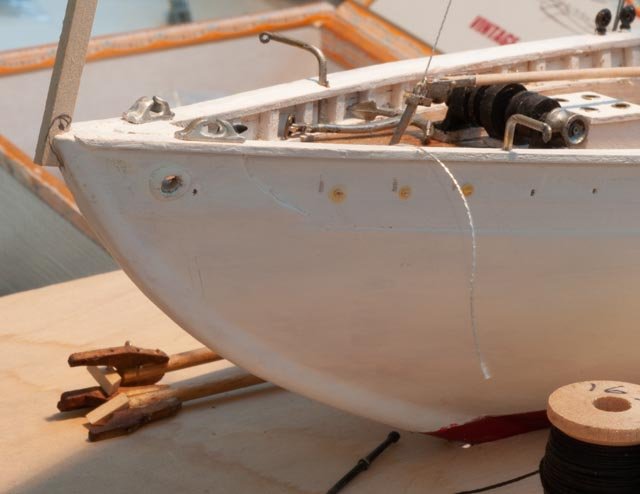
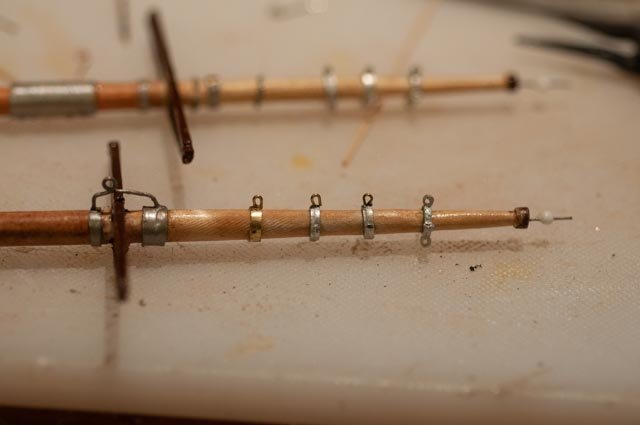
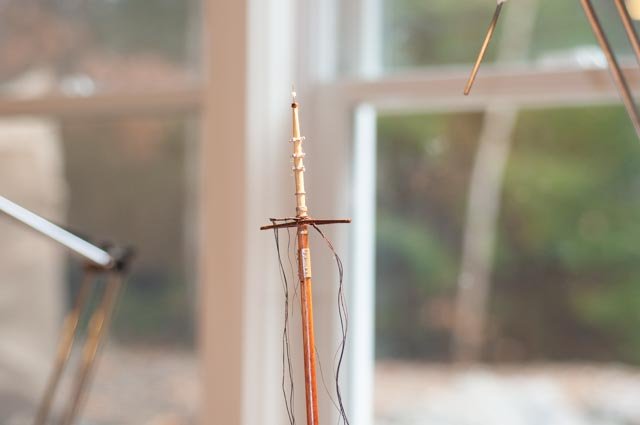
post 11 anchorage I have looked at several photos and climbed aboard to see what is set up today. I also just reread the chapter in Donald’s MacMillan’s book that describes the winter of 1923 where the anchors came into play. I am zeroing in on either the first or this second trip to depict. Anyway, let’s get to the anchors. I hope to meet up with Will McClain the current captain to confirm what I can, but this is what I have now. The two forward 600-pound anchors sure look like they are quite old if not original. · Here they are in 2018 riding on the rail. The rail protection is now four strips and the crane is only about 2 feet long. So before modeling that arrangement let’s look back · In this cropped photo from BRHS the anchor is set up ready to set and riding the rail. · In this cropped photo from BHRS of the same era the anchor is secured for sailing. The rail protection looks like a sheet metal sheet with two cleats holding it down. So, in the winter I will follow other photo and starboard anchor is set and the other stowed away on the rail. Also, of interest, what was in the stern. Due to changing currents and winds they often needed to set a stern anchor to keep from swinging once they set up. · In this cropped Photo from BHRS one sees an anchor riding on the transom. It looks to have a rode about double the main sheet in thickness. The flukes are clearly smaller. I also read in note about selecting the larger anchor while in Repulse bay. This means they had smaller ones….This would likely have been in place a ice break up. Chain · Here we are on board and see the two chains. They are clearly galvanized. Note the starboard chain is much more used than the port anchor. Signs of wear and aging rust….a little more paint needed I think. · Here is bow detail. the inside edge is further forward on the restored boat than shown in the plan. I have not yet found a similar view in old photo. This change makes sense to me, and I think it is a fix to reduce the rail to be forward of the hawse pipes. · Here in another view and confirmed by looking under the fan into the lazarette we find the large turnbuckle that is attached to the stem and penetrates the deck for the forestay. I need to ask the crew as I believe the jumbo boom is pinned to a pipe that is like a sheath around the stay. · Here is my first attempt to age the galvanize chain…more to do. Windless. · Here we have a view of the winch and chain going through the deck. I have drilled holes and will feed the chain there. The winch sure looks original if I compare it to the Zwicker in Lunenburg and other 1920 schooners that are still with us. · Assuming the winch is original, I need to add a hydraulic piston. Not sure if the hose is doable but worth a try. Now the work

-
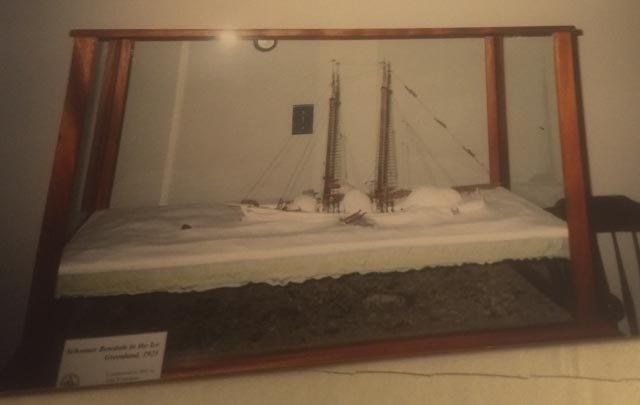
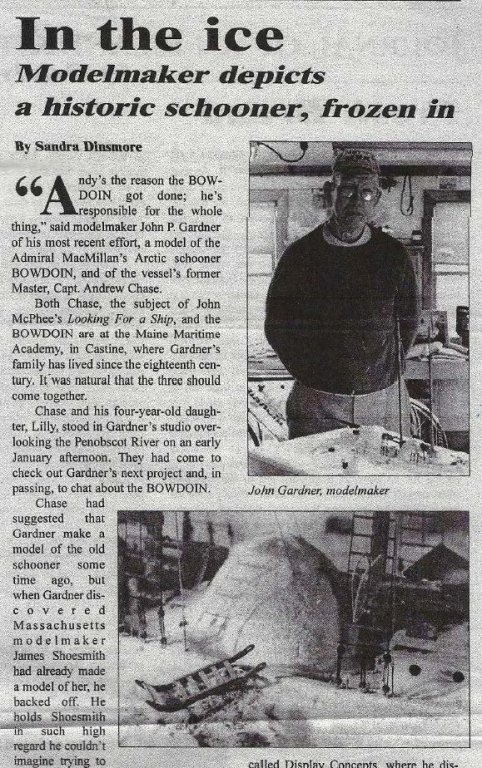
Post 10 Meeting John Gardner Several weeks ago, while researching Bowdoin at the Boothbay Region Historical Society, I came across this great news article. It described the Model of Bowdoin built by John Gardner that rests today at the Maine Maritime Academy Admin building. In this view of the model, one is surprised to see a scene of winter in Greenland. It was on the first cruise on 1922 that they learned this technique. An igloo entrance was built over both gangways and the focsle sky light. The skylights were then opened to ventilate out the humidity into the igloo then out the little vent hole. This process vacated the moisture that would freeze and makes ship board a miserable place in winter. By drying up the air, the crew was snug in their winter quarters and avoided chipping ice off the deck In this article one sees John Standing by his work and then a closeup of the igloo built over the Focsle hatch. The article goes on to briefly discuss the process used to depict the ice both above and below the water in the model. I can’t wait to get up there to Castine and see this model first hand. While I was visiting the Bowdoin a week or so ago, John Gardner came to visit too. I was thrilled to meet him. I was actually humbled in fact…. There is no way I am anywhere near ready to try to do this much of a winter scene. I will have the water and a few ice flows… I wanted to share reference to the great model of Bowdoin that rests at the Academy. I will have many pictures one day to add to this posting cheers
-
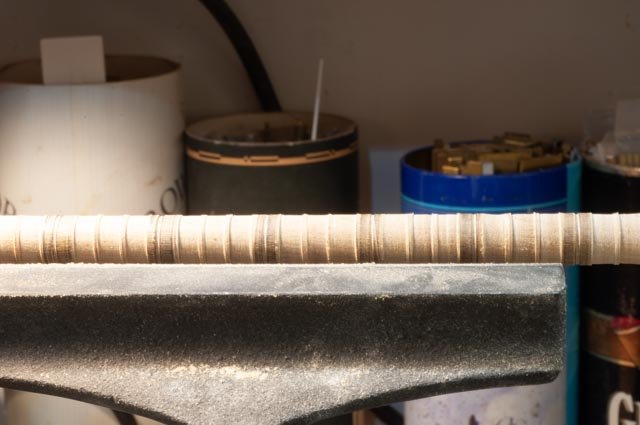
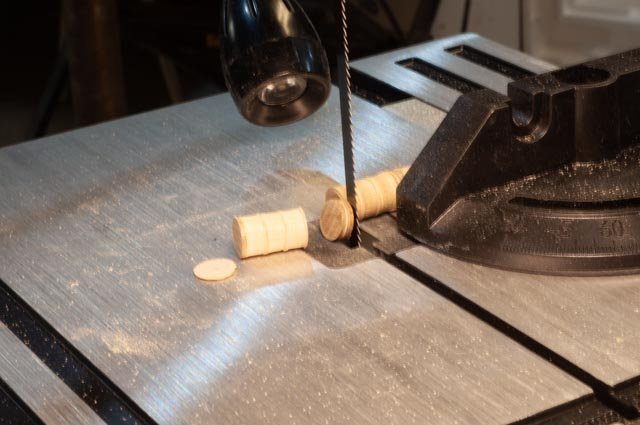
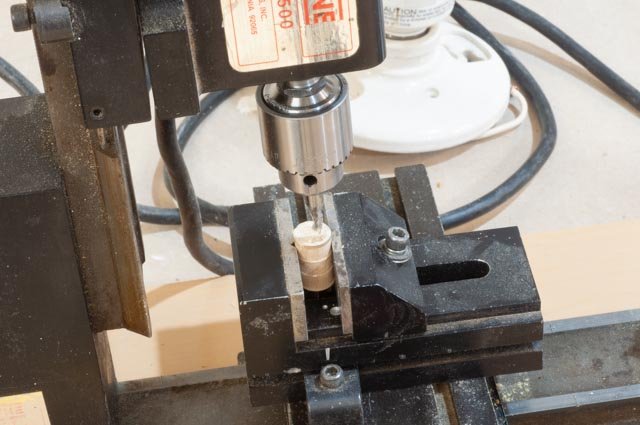
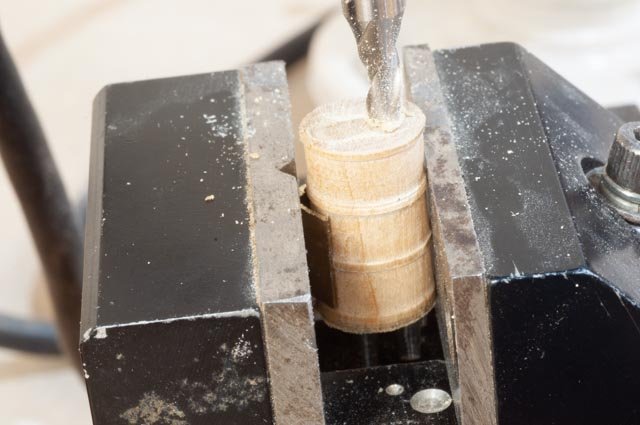
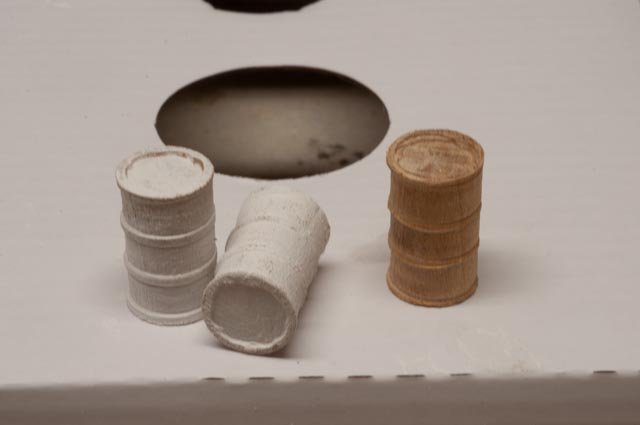
Post 9 Making oil drums for the arctic This update is celebrating a new first for me. I have my late brother’s Sherline lathe and mill combo. I had used the mini lathe a few years ago to make 100+ stations for the Charles Notman Schooner. Since then a rare turn has been seen. I set up the mill over a year ago thinking it would help make store bought RC turnbuckles more realistic. I bought a few parts, got an expert to show me a few things, but never got to that task. I need to build up some confidence. Over the recent weeks of reading about all the fuel they had to take north to last through long periods I got to understand all the white oil drums that show up in so many photos. So how to make 1:48 scale oil drums. And ultimately lash them on deck. Being a wood buthcher and not a tinsmith, i chose wood. · Step one I confirmed the measurements on line to be 23.5 inches diameter and 34.5 inches long. That means just under ½ inch diameter and just under ¾ length. I took a ½ dowel and marked off 7 each 1-inch marks. Then within those marks, I drew 3 lines at ¼ for the four rings one sees on a three foot long barrel. Using my midi lathe and files I got the basic shape for the bunch and precut with a razor saw. · Here I have my new shop toy, a smaller bench sized band saw to replace my old large 12 inch floor model that just takes up too much room for what I do. · Now for the celebration. This barrel is the first thing I have ever milled. · Here we see the obvious reason a mill is so important for making so many things. I have recessed the ends and will add either pin heads or something for the filling points. · Here I have put on a quick coat of white on and yes, the lines pick up the light well. i hope to get better at this as I go. Perhaps a little wireless dremel clean up on the inside roundness of the end rim. Next is boxes and details I picked up from the real Bowdoin. Then I need to finally decide on the shroud material and when I finally install the masts. Then back to sails, then diorama and then the little boats. So much to do all for now
-
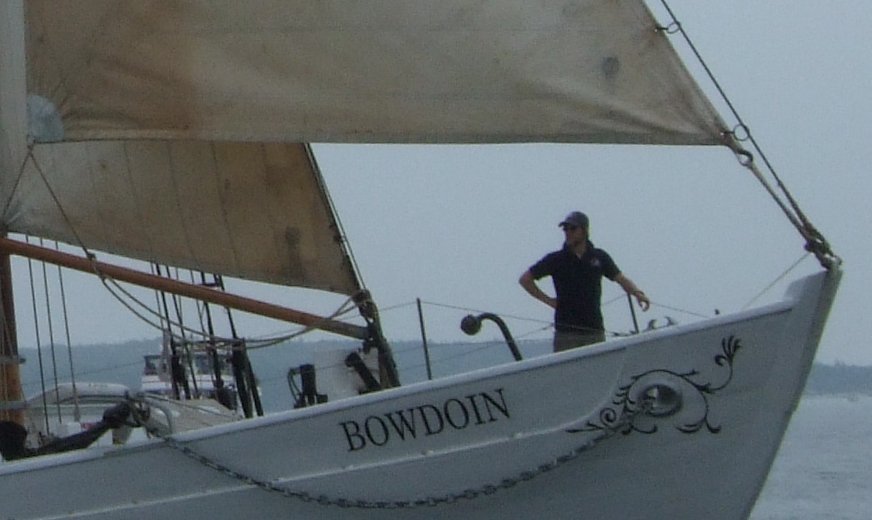
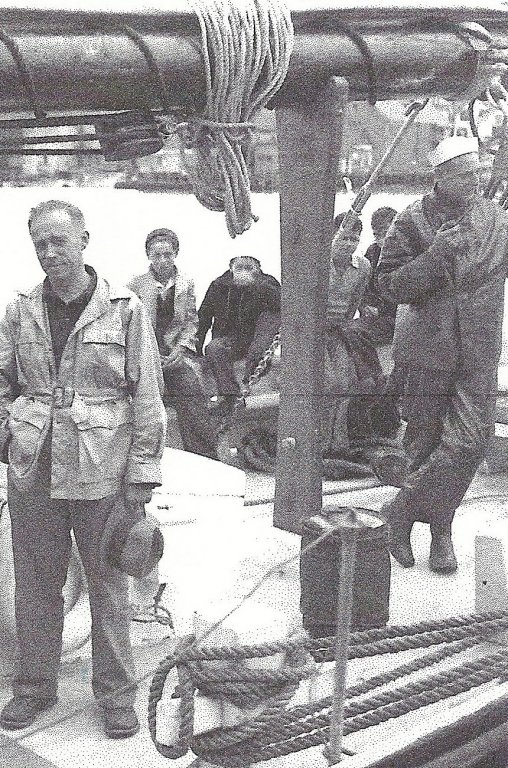
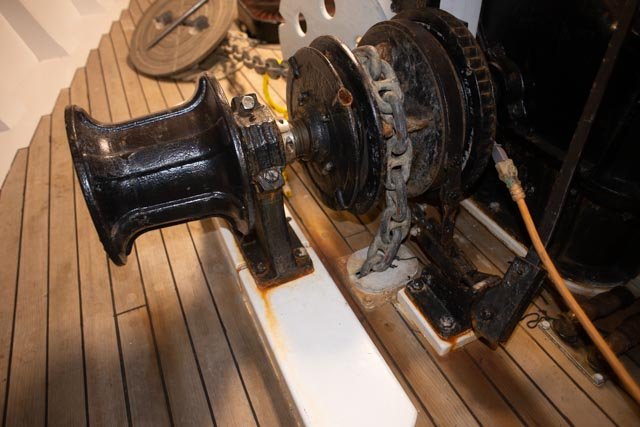
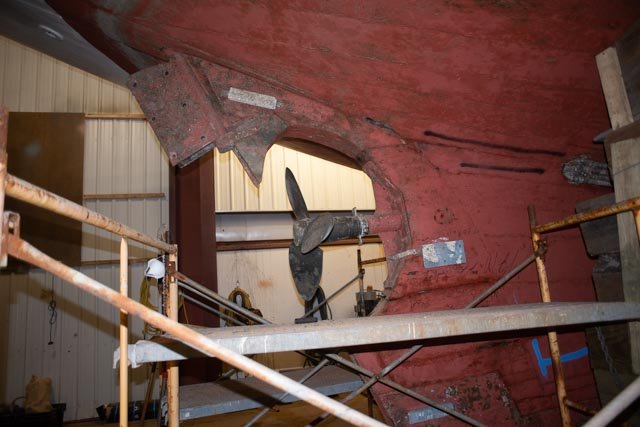
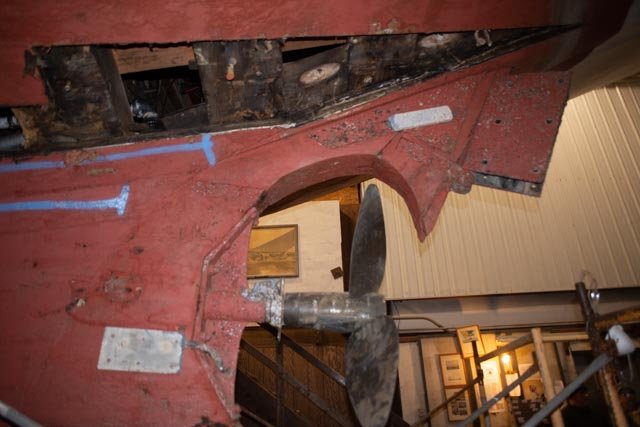
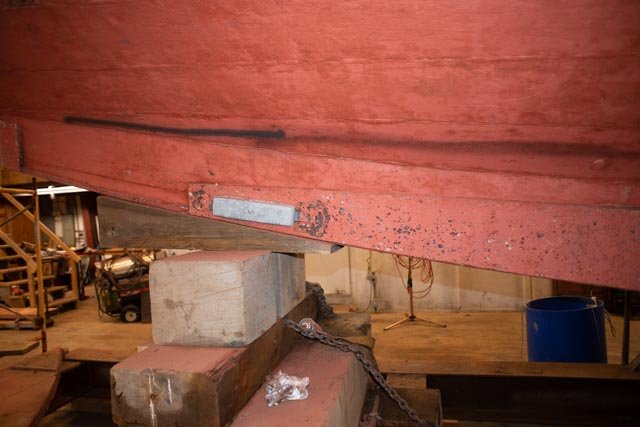
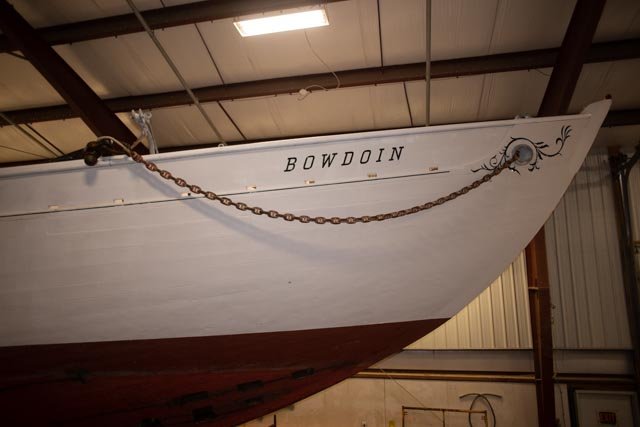
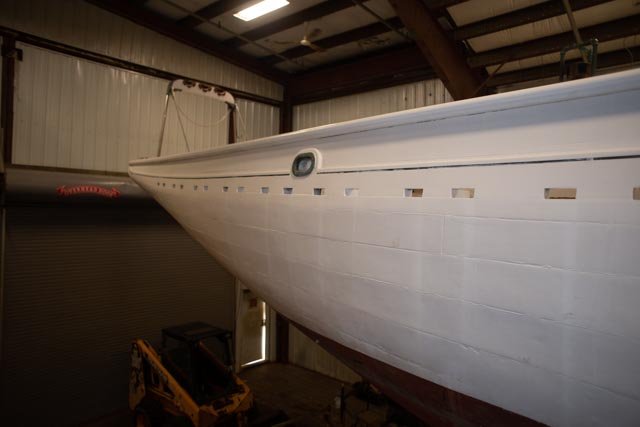
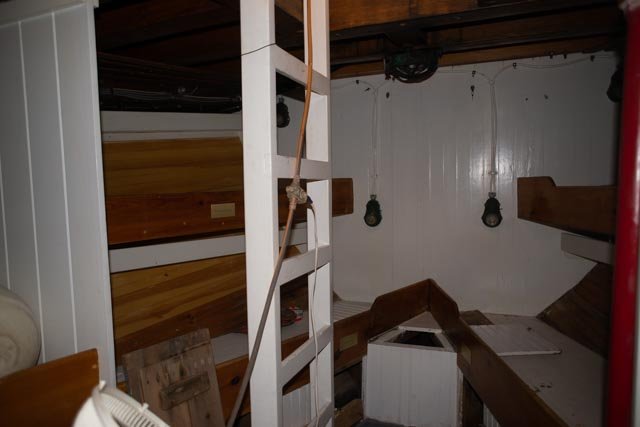
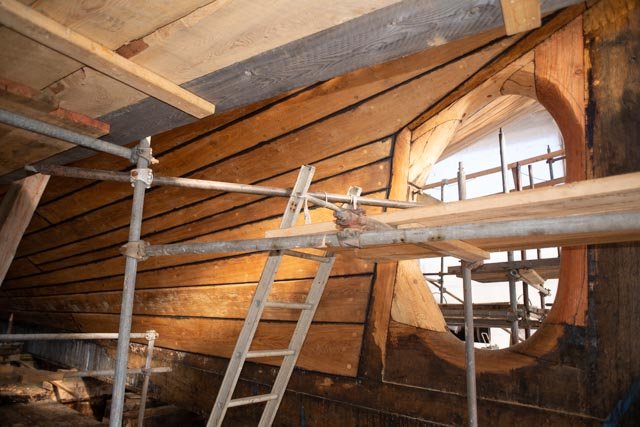
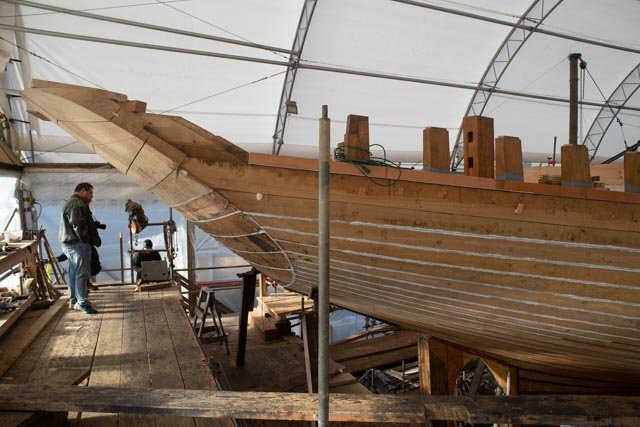
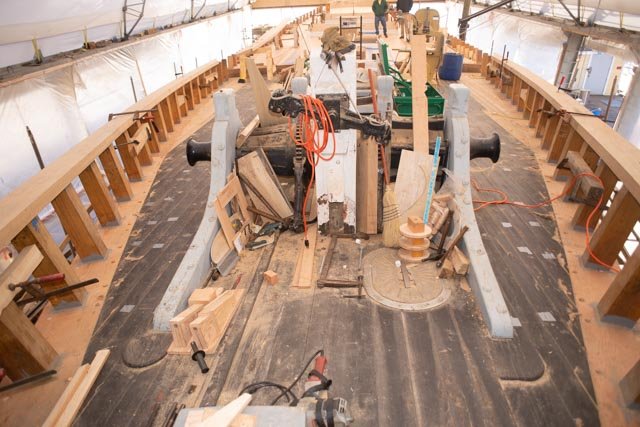
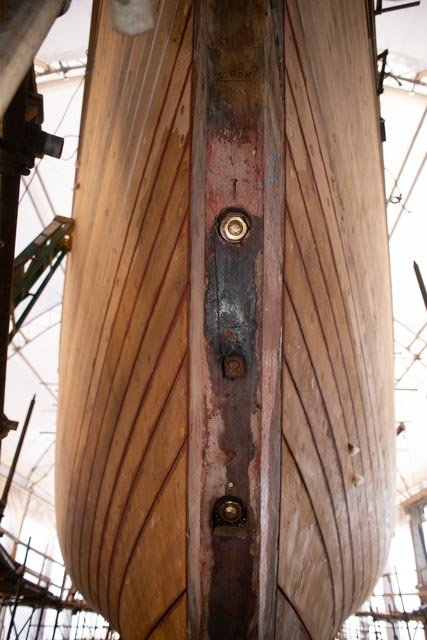
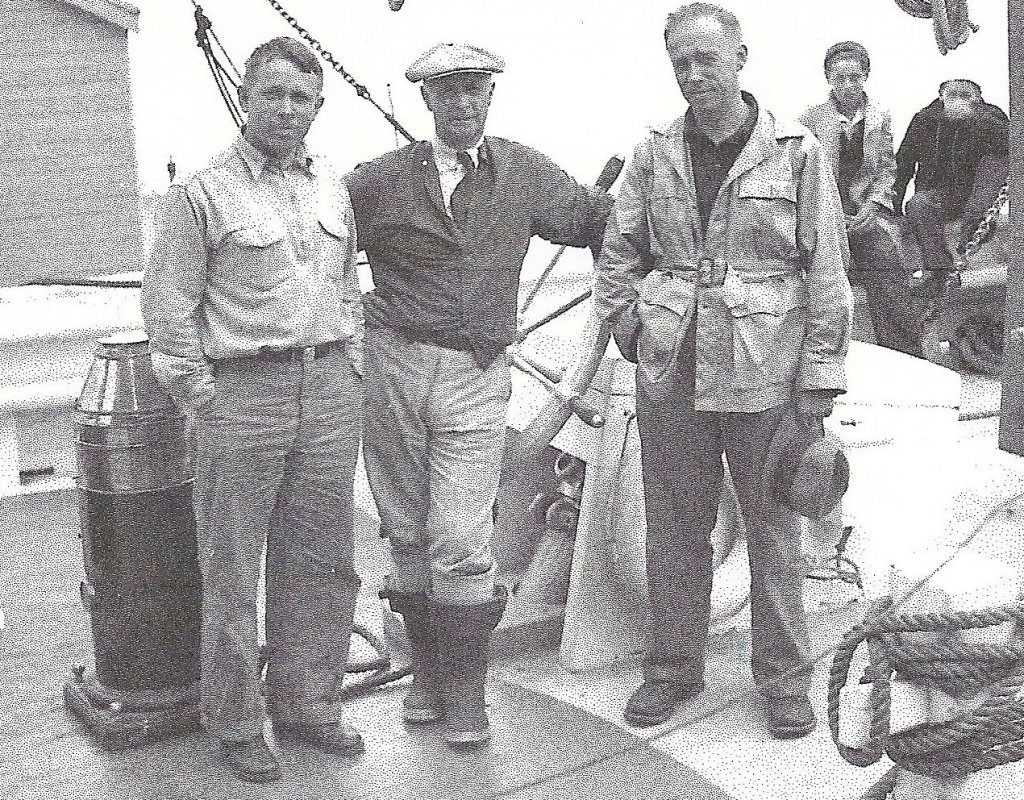
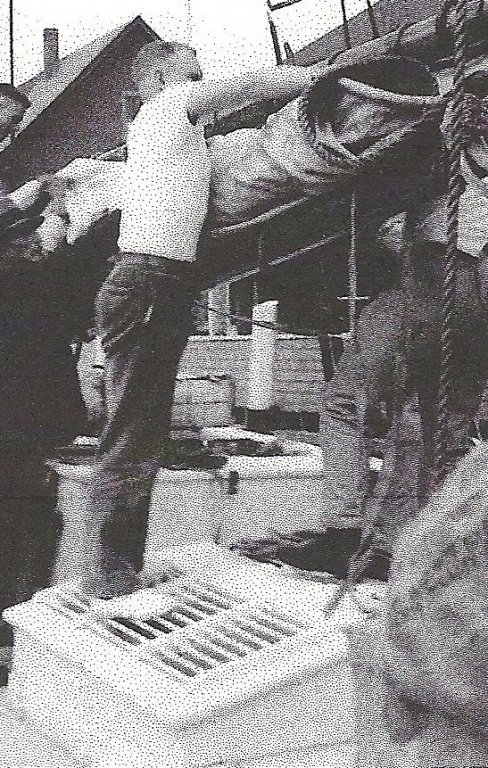
Post 8 Visit the Bowdoin We are extremely lucky to be in Boothbay Harbor this winter. The Boothbay Harbor Shipyard is quite the place. They maintain the marine rail that launched a four masted schooner 100 years ago and still works today. In the recent past they hauled for bottom work many large yachts and working boats, helped the Movie ship Bounty etc. Once called Samples, they won the contract to rebuild the Schooner Ernestina-Morrissey , a 100 foot Gloucester Schooner owned by the State of Massachusetts. This fall they won the contract to take Bowdoin and redo underwater planking and if necessary, frames. The leadership of the Boothbay Harbor Windjammers days including Mark Gimbel, the business owner that is sponsoring the new store and schooner museum, arranged for us to visit. Eric Graves the yard President was happy to show us around. The local paper was on the tour and I was introduced as ‘ the modeler’ OMG!!! I am getting in deep…. I hope I can live up to it …. This raised involvement will force me to work even harder as the diorama I am building is intended for the schooner museum store this spring. Now the Bowdoin is here, and if the repairs stay simple, she may be launched and join in as part of the harbor celebration in late June. Let’s hope she doesn’t need too much work. So where to begin…so much to share and to think about. In this post I will share a sample of the many photos I took. Most of my photos were for detailing and will come out in posts as I get to the further upgrading of the build. What is more important is I will be going back and meet up with the captain to discuss rigging that may have changed and operations of the original engine and electric plant. That type review is interesting to us old engineers in passing but also to record how the windlass works I think is important. The first radio came about in 1924 I believe; I’ll have more on that later So, let’s take a look at the real Bowdoin Here we see the propeller and the hinge bracket to hold the rudder. Notice the anode [ zinc] Here on the port side you can see they have already started removing many of the bottom planks. Here we finally see the famous steel planking discussed in the books. We all believe it is original because the 1980 rebuild was done with few people and very few if any frames were upgraded at that time. Notice the anode [zic]. The bottom plate goes all the way up well above the waterline. Here we see we have the right schooner. I was told today in a research session at the historical society not to call a schooner a boat or a ship. I must have slipped tee-hee Here on the starboard stern we see the small dock line [ hawser] holes are trimmed with bronze. looks like a little paint and glued on hammered wire to me Up on deck all is open and airing out. She will be comfortable this winter inside, I think. I cataloged the cleats and things and it is very much like the plans. I look forward to discussing with the sailors. Here we have a new question. This exhaust pipe coming up on deck and out through the transom makes sense to me. Other fishing schooners of the period had the same detail. The plans and old photos never seem to show this, and the earliest picture I have with someone seated here is in the 1950’s after a major rebuild. I must think about it more before adding. I went below as I was trying to confirm the anchor chain locker and sail storage. This bulkhead is secure with no access forward, and lines up just aft of the chain [ as seen on deck]. Here we see what I am sure is the original winch. The anchor chain goes below with a collar up about one inch. A copper cap [ could be zinc] almost closes the hole. Seems reasonable but some water surely would get in in heavy weather. Note the hydraulic piston…..this also makes sense. The bigger schooners had donkey engines, and we know Bowdoin had an electrical plant…..more to learn… I will add the piston. Also finally settles highlight in B&W photos are misleading…all is black Completing this investigation, we looked down into the forward lazarette. Nothing there!!!! There must be another bulkhead housing the chain……something to ask the skipper Ernestina Morrissey 100 foot schooner being rebuilt in the same yard I must share just a few photos of the 100 schooner they are building from the keel up Here we see beautiful European oak planking around the propeller Here the transom…3-inch-thick oak planks on solid frame Up on deck….it is all douglas fir from Vancouver island...long straight and clear. Live Oak and old yellow pine where needed...... just amazing to tour How is this for a bow! amazing workmanship All for now

-
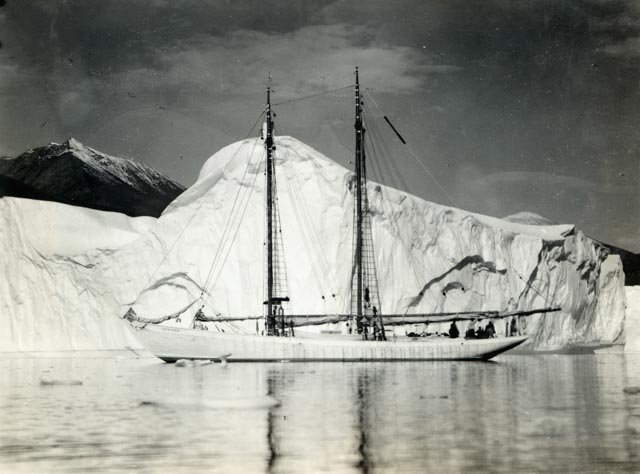
Thank you every one for dropping in. It is always encouraging hear from you. as to animals in the diorama. I am hoping to get some other folks with artisic talents to participate. example the iceberg here is a favorite image of Bowdoin sailing before a berg that comes from the BRHS archives. To carve that is over my pay grade. I think a big photo possible, but not preferred. I will try plaster. what ever will go below water too. Other classic views show dog sleds on the ice and I think that is incredible but a whole new area. I am still looking for ideas and a solution cheers
-
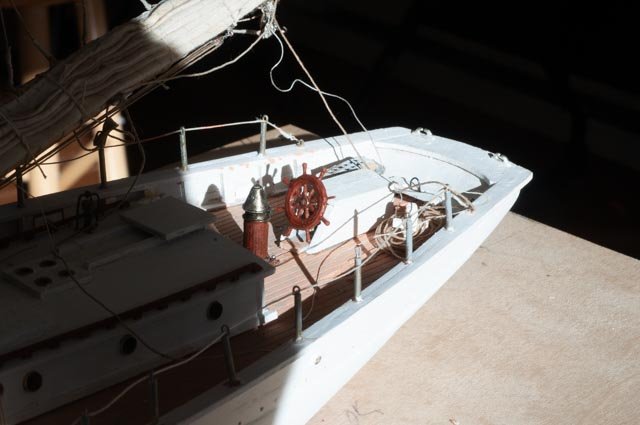
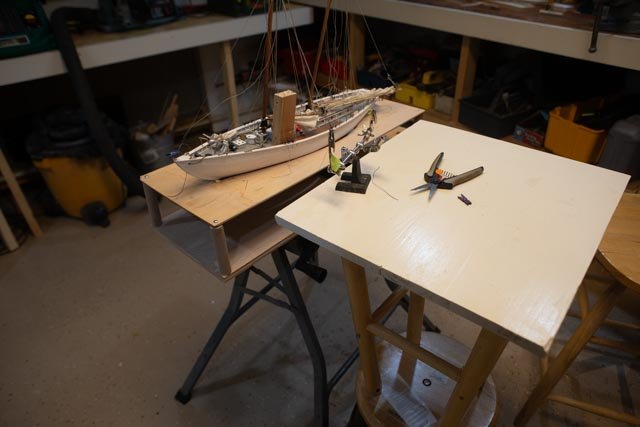
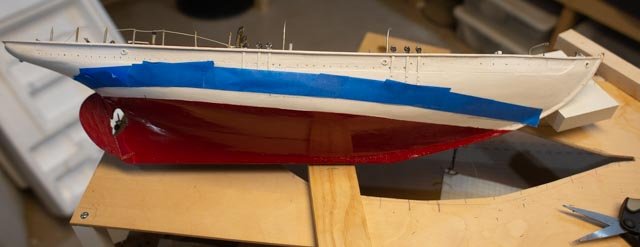
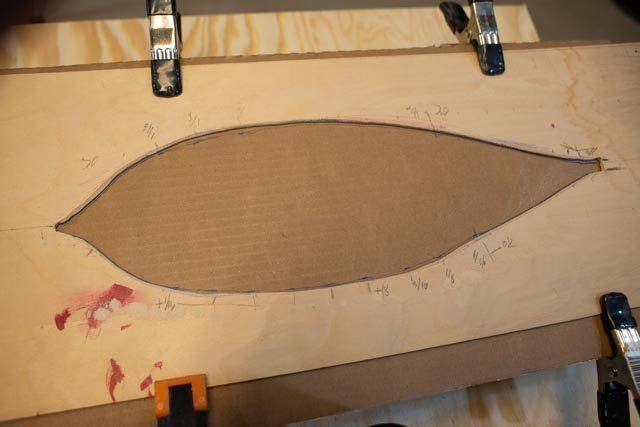
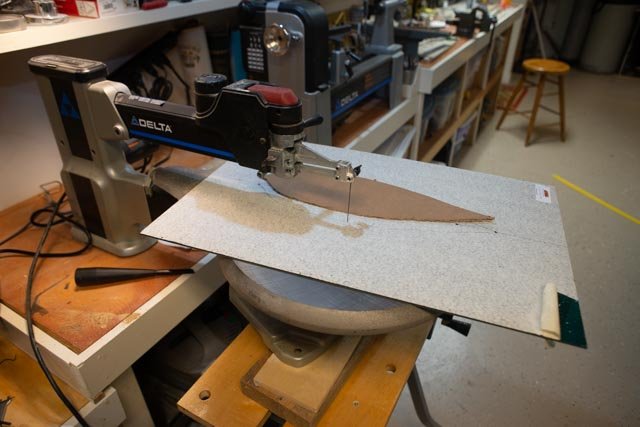
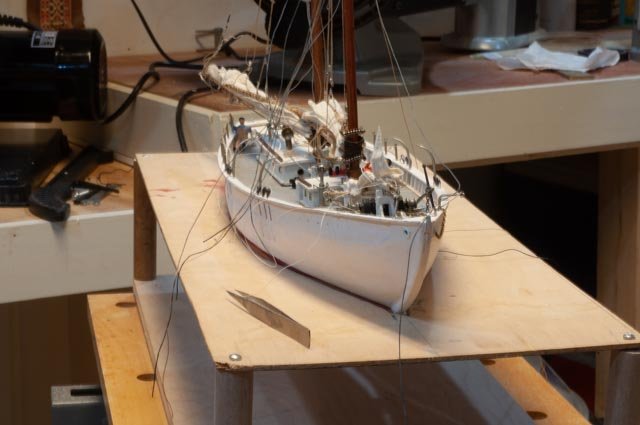
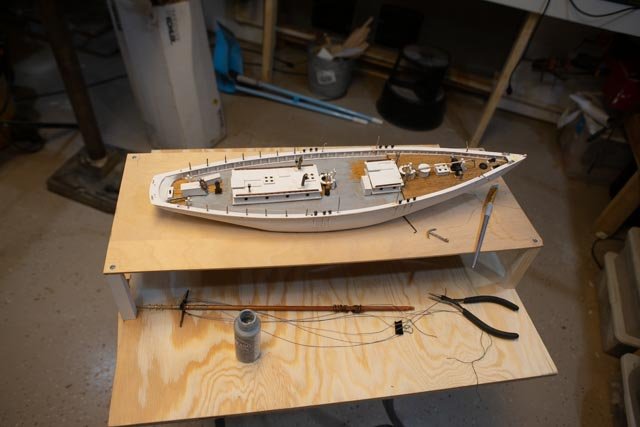
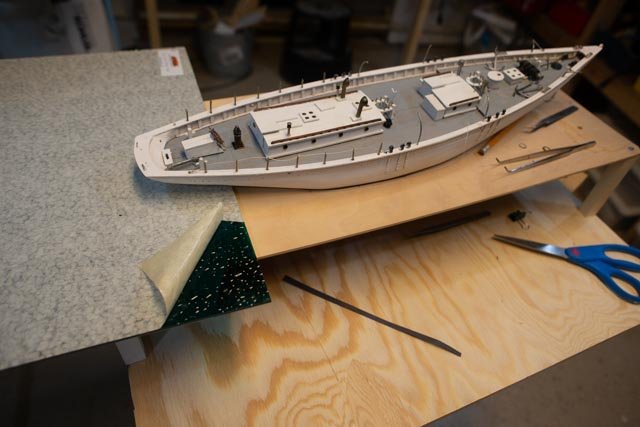
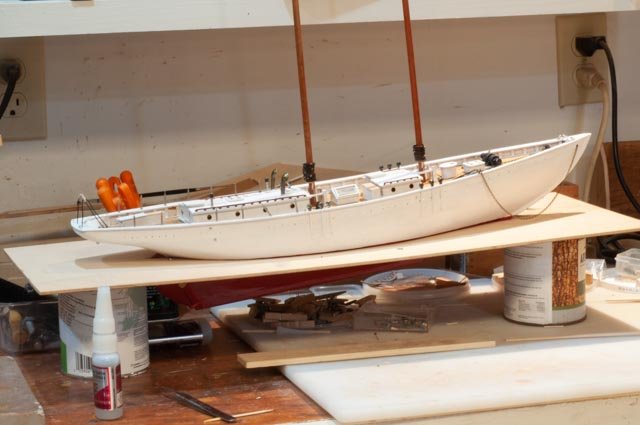
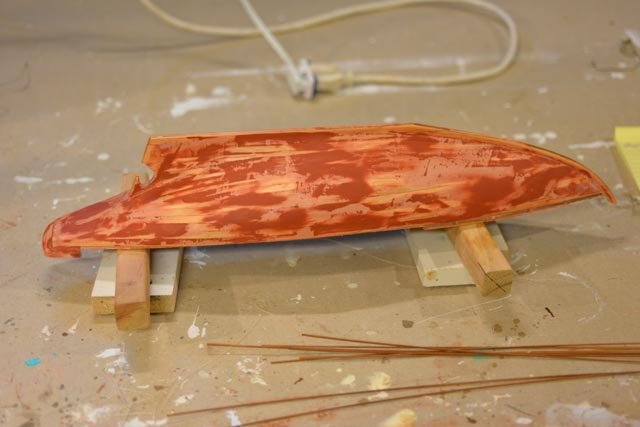
Post 7 Launch boat and set her into an acrylic sea It’s time to get the diorama figured out. Now that I have the acrylic sheet, it is time to cut out the hole. An old saying of measure twice and cut once came into play. The waterline was set up about 6 years ago when I built the hull. The more I looked at it and the photos, the more I thought there is something wrong. Well measuring again, I found it to be about 3/8 too low. Not good by any measure….. · Here we are in the rework stage again. In the end it took first 4 coats of red to get the color matched. Then sand and glazing putty and more sanding. Finally two more coats of read. Oh well… · Now I marked the plywood template and cut more on the jig saw to fit the higher waterline. After about three times I switched to Dremel sander to get it right. In this photo I have a sacrificial cardboard sheet under the template to be marked to transfer the lines to the acrylic…….note the brown side up. · Here I tested the fit and found it ok ...I hope Here I started cutting out the acrylic sheet on the jigsaw. I pulled the saw out to get more clearance for the big sheet. I panicked just before this photo, because in a senior moment I feared I had flipped the lines and the water would be smooth side up….phew...the brown side up lined up and we continued cutting. · Here we are launched……wow cool etc. I set the large Styrofoam up to be the iceberg……. · Here we see the crew is still working. The masts are just set in and the lines are a mess · Here we see again the affect of the furled sail hopefully compressed enough to look realistic. see charlie noble as updated.....next few comments · Here a workman is dreaming about skippering. I think it is time to have a little dram...Before we go however, a few details In this photo of the first lashing of the mainsail we note new turf for me. The blocks are often 1/8 with three lines connecting. I am using smaller drills and those little sewing wires to get thread through. Unfortunately, the beckets sometimes break, and we have to start all over. Here we have the bridles. They are typically two fittings, a block above for the peak halyard and a simplified block with a center bar, not a sheave for the bridle. [ I am sure they have a proper name] I used the small block under the larger. the 1920 plans said the blocks were 7 inch and 6 inch. In the photographs it is obvious the sheet and halyard blocks are larger So in available sizes I am using 1/8 for 6" and 3/16 for the halyard and sheet blocks which equates to 9" Charlie noble upgrade...... as per kit, they are simple and straight forward. They had a large wood stove in the focsle. Here is a 1920’s photo from BRHS where we see stove pie reduce and then has the typical spinning ball with a bar around it to keep line away. Here in the view you can see I upgraded them to be like the photo Finally I had to take her back to a dry dock, to continue work on the boat separate from the diorama stage. All for now Cheers
- 73 replies
-
- 11
-

-
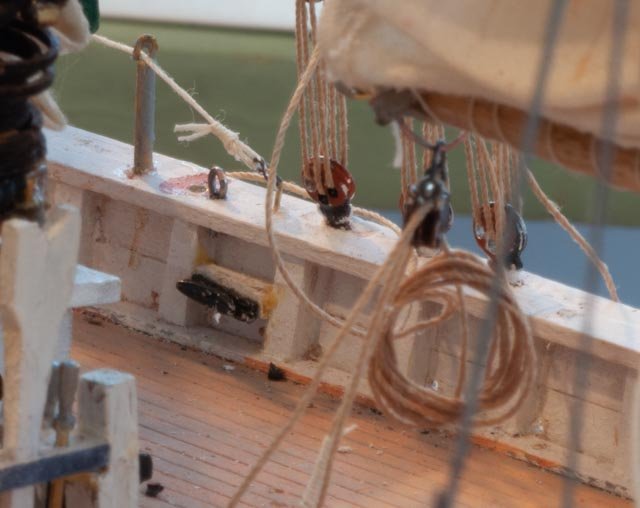
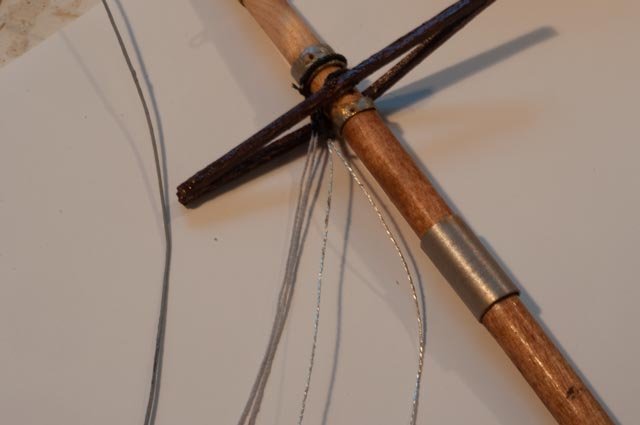
Post 6 A little more progress and some fun. For this posting I will focus on getting the mainsail done; Well sort of done anyway…… after roughing out the spars it was time to lay out sails. · Here I have foreshortened them on a trial and error approach to furling in scale. On Bluenose I did it 1:24 scale without fore shortening and it was almost Ok. I later undid the furl. Here I plan to cut about 50% out and use the same muslin that is left over. All the color photos and even today the color is right….so here we go · Here the foresail I roughly folded to make the test..seems ok. I iron them when for real after adding bias tape to the edges. I will add rope only to exposed edge. · The next step is to lash the sail to the two spars……right? no, I’m wrong. I’ll get to that oops. I just wanted to do less work and see if it works for the furl, so less rework If I need to recut it. · Now to the loops. In large scale or if raised sails I feel comfortable to lash the rings. They are very light and weak lazer cut so………let’s look · Here is a fun internet photo. The rings are tight in the furled condition. The lashed are not prominent... I only see one. · Looking at this photo, I chose not to lash and see if the look is ok after furling. At least I won’t break the rings · Now the first test….just to look. The white Styrofoam is my first attempt to consider a large iceberg in the diorama. I started reading about carving it….not sure I can do it justice…we’ll see. Now to the oops…..I should have completed the trim out of the spars. Examples are both the yoke parrells, bales and hardware and then the gaff bridles. Oops I had to remove have the lashing on the gaff, install the bridles and relash. · Here is a brhs cropped image of the hardware for the bales. The gaff and boom are different · He is another detail that shows how to rig the fore boom and gaff as well as how to make the bales for the parrells. · So, I made repairs, added bolt rope only to the roach as it is visible, completed the hardware for the bales and installed the boom and gaff. here we see the rings...I am ok with it.......this is just sitting loose and we'll see how it ends up. I think i will tie the luff up a bit, maybe around the mast and then one or two lashes to rings. it can not stay like this...... · Here is the front view… Now the fore sail and the diorama….next posting Cheers
-
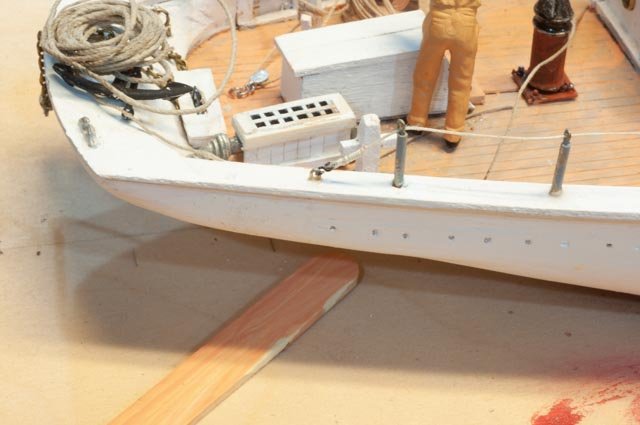
Post 5 I want to update progress on the diorama and a few other items. Diorama Here is a view of Bowdoin on the second cut plywood 9 inches wide over a potential stand of a 9 inch maple veneered sheet. This as for the idea of just using acrylic and no diorama, but just making a stand. To me it's still a viable option. One can notice the deck at this point is still natural. That color is like the Bowdoin today, but not apparently like the old deck. Here I have used a 24 inch by 20-inch sheet of plywood for the first possible size of the diorama. In this view one of the masts is visible. The other spars are roughed out. I did not take lots of pictures as they will show up enough later. In this view I have painted out part of the deck. The light application of medium gray paint lets wood color come through. This is my first attempt at scuff marks etc. · Here we see in a BRHS archive print where there are several items to consider · the beat-up deck in winter conditions. Looks like mud on paint, perhaps scuffing. I will try to get some of this affect through aging…..all new to me. Perhaps light washes of mud color over higher traffic areas. · The rigging of the mainsail and boom · Notice the aft anchor · Confirmation no big box.. a steel barrel seems to be in the edge of photo. they carried lots of fuel. Here we have received a sea blue green sheet of textured acrylic. Wow it looks good. Now I must cut out the hole. A big oops is coming on this one as I start prepping. Rigging I am making a few more fittings each day and dressing out the spars. I have learned to make as much of the spars and rigging off the boat that I can. It is also fun to look up each item and to find it on the old photos and try to adjust. I will share some of those in the next few posts · Here is the main sheet bail and topping lift bands. · Here I have gone to Joann’s and bought gray thread. Honestly it looks the most like galvanized and the twists are visible. I will use this for the standing rigging and bridles. Deck Time to figure out attachments for the two head stays. Here is an old photo from BRHS confirming the stem cap with a shackle for the head stay. The photo clearly shows the anchor chain to be galvanized. Also, I found in the photo there are two white painted vertical planks added over the stem. I assume these are sacrificial to hit ice. In the books so far there were apparently steel plates discussed but no description given. I am still studying that point. I may try to add these planks. The issue is the double curve to ride down the stems to below the waterline....see next photos Here I have cut into the old kit build stem to add a stem dutchman to extend above the deck. Also in this photo one can see I needed to fill in three scuppers. They were not in the old photos although there are changes in this detail, and I have seen them on newer rebuilds. Here I made up and attached a stem cap. It is ready for a shackle..You can also see the difficulty in the double bend here if i added the two planks mentioned above. I have a few soaking and will try to shape them and then decide. Finally, in this view I have placed the rod to receive the forestay in accordance with the original drawing, some 3 feet forward of the Bitts. If modeling the modern boat this would move aft. I also added the braces for the anchor crane. I need to make the eyes look more like blocks. i could not solder blocks so I used the eyes. I may use a wood block with a pin and glue it in place...we'll see. Ialso need to decide how to make the brass anchor chain look like galvanized Cheers


-
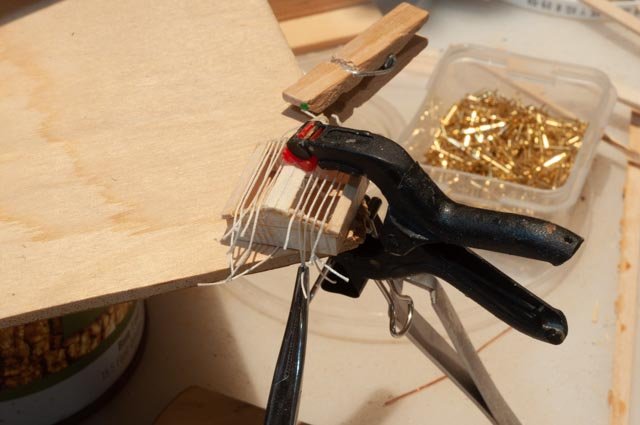
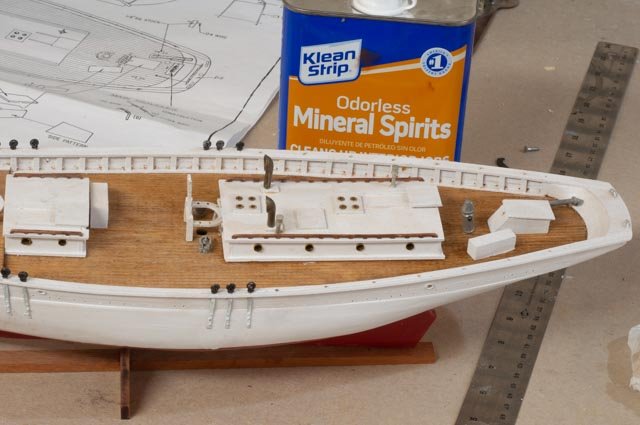
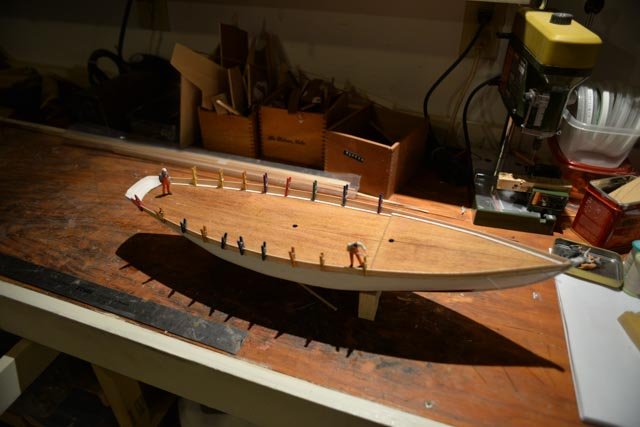
Post 4 I have made some progress working in a few different areas. 1 Research…I have completed rereading the first part of the recent biography on Bowdoin … I am concentrating on the early years. I am also about a third way through rereading MacMillan’s autobiography. The most exciting items is I just bought a copy if the 1925 National Geographic on eBay, which featured both Donald MacMillan and Lt Com Richard Byrd telling their stories about the summer adventures. They flew flying boats from the top of Greenland for a month…quite exciting and wonderful photos. I am thinking about focusing the display be that summer. To pull it off, I need help making models of Leonign Amphibian planes. My son is on the hunt for what might be close enough kits to bash. I will search too. that would mean not a winter in scene but summer arctic scene. 2 Completing the build out of the deck. Some comedy here as I did a few things twice. · Here I saw on the model plans and new photos a rail to build around the binnacle. so, I started soldering little eyes onto 1/16 tube · Looking at the is image found at BRHS archives there are a few details that caught my I. this is 1928 as I recall. o There is no rail around the binnacle....I will use the parts somewhere i am sure. o The deck is gray and white aft of the wheel. I believe this photo is after refit so the paint is new. o There is no big box to port of the wheel like on the model kit plan…..other photos confirm this point too. o The front of the wheel box is open and the shaft and emergency tiller bracket etc are visible. · These are some of the things I like to pick up and add to the build · Next up is the skylight hatch cover over the hold. I had built it a few years back with pins · Here in a photo from the BRHS archive from the 30’s we see crew standing on it. Thus, it was lower and had more bars. · I found this thread method a challenge. I thought I would try what I learned reading a recent blog on one of the Charles Morgan builds…..use thread for the rails. It was very hard the first time. · Here are the first results side by side. I took this problem to our guild meeting and was advised to stop using bass wood for this type of detailing. So, I am moving toward learning to mill some pear or other harder wood. Someday I may remake this with better wood and learn a better method to stretch and hold the threads. · Also, just to carry on, I decided to rebuild the rudder box to include an open front and visible shaft. Cheers
-
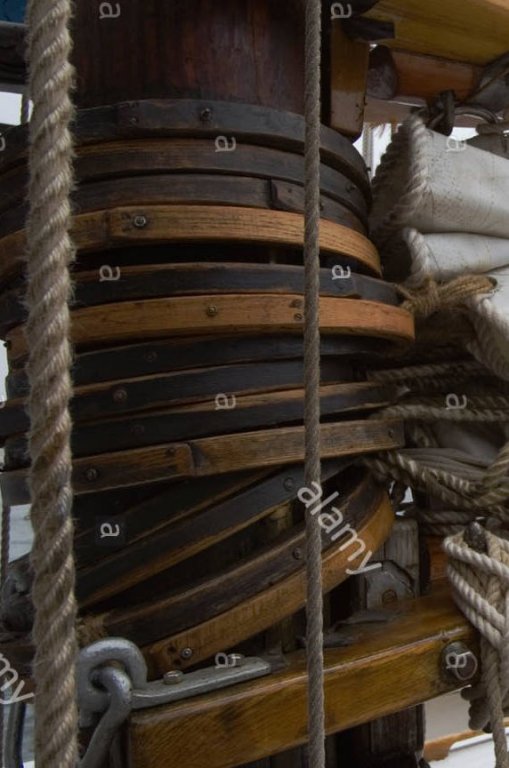
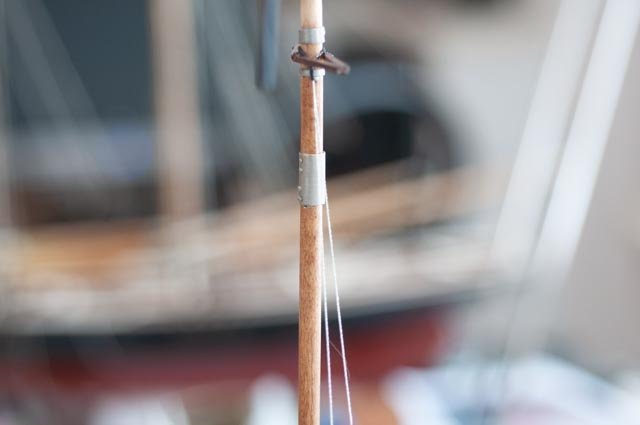
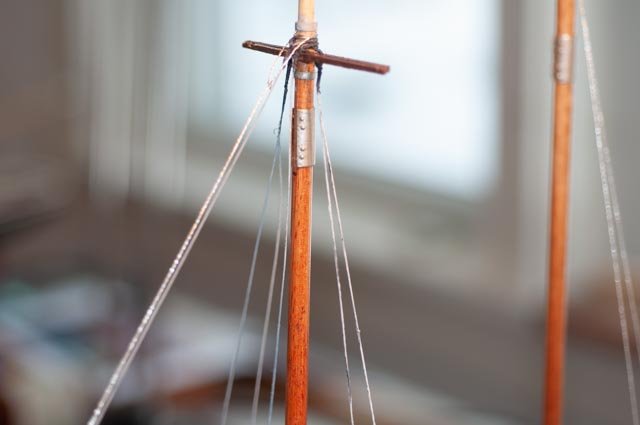
Time for an update we just got a new puppy so time is tough...... study the standing rigging and spars post 3 It has gone slow here as I am focused on learning as much as I can about the original Bowdoin fit out and arctic ventures. I don’t want to build and remove too many things, though I am sure they are coming. I have spent three sessions at the Boothbay region Historical Society[ BRHS in credits] and reviewed many visuals, clippings and most importantly a copy of the William Hand drawings. I will share few cropped details from the research to make some points, but want the archive of the museum to stay where it belongs. Last Saturday I took the Bluejacket plan with me to do a comparison and see what I could learn. An example of issues is the following · In this photo I took a few years back in the harbor, one sees on the new Bowdoin rig that the forestay attaches to a pipe just inches forward of the Bitts. On the Bluejacket plan the attachment of the forestay is about three feet forward. So…….. Looking at the original Sail plan at the BRHS museum, I found the Bluejacket plan to be right on for what must have been the original layout. It is nice to see that many years ago, the Bluejacket team used the real deal to make the kit. The fore stay drops to the deck some three feet forward of the bitts on both Bluejacket and original plans. That makes it easy for me to model but raises a question. In which one of the re-rigging jobs of the Bowdoin did they move the windlass and bitts forward or fore stay aft?????? At a yacht club function last week with some real blue water sailors, and no less than the current generation of the of family that built of Bowdoin I could not resist asking for an opinion. The consensus was the heavy winds took that big jumbo and made it hard to manage. Some years ago the must have brought the stay a bit aft to reduce the sail. It is unlikely that the winch or bitts were ever moved. Hopefully the Bowdoin will be around in June and sail in here as part of Windjammers days , so we can find the crew and ask them to measure this point. I had fun doing that with Bluenose in Lunenburg, and yes there are a few differences on Bluenose too. One great benefit on Saturday was I was able to copy the original 1920 notes on the rigging design giving specifications of all standing and running rigging. I was curious if the spreaders were wood or painted steel. Well originally at least they were dark and made of Oak. More importantly I learned all the shrouds and fore stays were galvanized. The forestay is also a little larger than the others Here is a cropping from a photo take after a re rigging I found at BHHS. Note the shiny galvanized shrouds……..so it's time to get the rigging and spars moving, and I need to consider options for galvanized. Unlike the larger Pond yachts, we don’t have enough strength to stretch real cable, so we need thread. Again, to get the right sizes we are beyond the Joann stock pile. Minor adjustments using the original circumference allowed using the Bluejacket sizing in cotton. There is no spinning like the larger lines, but the cotton might take paint. I used their 020 for the shrouds and 025 for the head stays. · Here I took both the original drawing and developed all the bands. There is another anomaly. On the original plan they suggest a becket style bridle in galvanized wire hangs from above the spreader to hold the throat blocks. There is too much photographic evidence showing the two bands needed for a forged crane to hold the throat halyard block and this is what I am modeling. Another oops is coming however…. · Here I have used aluminum paint to replicate old galvanized as I did on the Charles Notman. I have been experimenting…..and looking at others builds. I don’t see much galvanized and again one must think of the look after a few winters in the arctic…….I am thinking more gray than shiny · First of all let’s make the shrouds. I am using a serving machine and completing each loop and started hanging them. Here is my oops. If I install the crane, it goes over the loops. Therefore, it must somehow let the shrouds come off. For now, I will simply remake them after…. So, we have another question for the crew. · Here is low light view one of galvanized against aluminum, medium and light gray painted thread. Painting the cotton is hard to get cover and even. If I get the color right I am still looking for colored threads. here I hate the black shoping through. after more coats it reduces an I like just a little. It shows dirt soot what ever it just was like that. · Here is the same view in more light · Here we turn things and have lower light · Here we turn up the light I am going slow as I have ordered two different metallec silver embroidery threads to try. But I say in this comparison, the aluminum on the left is out. I am somewhere between the other two. I am also not sure it should be too monochromatic [ if that is a word]. I put some in place and now have some silver metallic line to play with. · Here we see two fore stays, one in silver and one in grey painted cotton in low light · Here we see both in higher light. Looks like tinsel to me · Here we see a bridle made up using the metallic embroidery line, When I cut it, it unspins. It does not receive the serving well and I will have to touch that up with black paint. like this view though · Here we have lots of day light. It really shines...i think too much shine....maybe I think too much · Here we see both masts. One head stay and the two-port side main shrouds are silver and the rest are motley painted cotton. Fortunately, I have a little while to decide. I have another metallic line coming. Maybe it will be more robust and workable. If not, I am getting there in color. I am also looking for gray large thread, but I alternated the light and medium gray paint to get a more aged motley color on the lines. The paint also stiffens them up a bit. working on other things right now and will get back to this one soon. cheers


-
Nic It's great to hear from you. I recall that while attending your wonderful rigging class about 5 years ago held up in Searsport, you were kind enough to replace my missing instruction book for the Bowdoin Model I had acquired years earlier. It was shortly after that class that I completed the Bowdoin hull before moving onto other similar scale schooners and the large Charles Notman. I'll be ordering a few more pieces to help add on to the detail to reflect an ongoing 1925 ish winter over experience. I believe your suggestion of Spackle is a good one, especially if I want to show the hull totally in ice. I have two cut out thin plywood sheets and the one with a hole too big might be the trick for my first experiment. I'll post the results. cheers jon
-
Rich thanks for the encouragement. I will continue to follow you and it won't be 30 years before I come back. I am completing an old model of Bowdoin right now and experimenting on diorama. I started a log for it. When I come back I hope to make a diorama here too. I actually bought line drawings to create whales and I plan to try that with Sculpy….. cheers
-
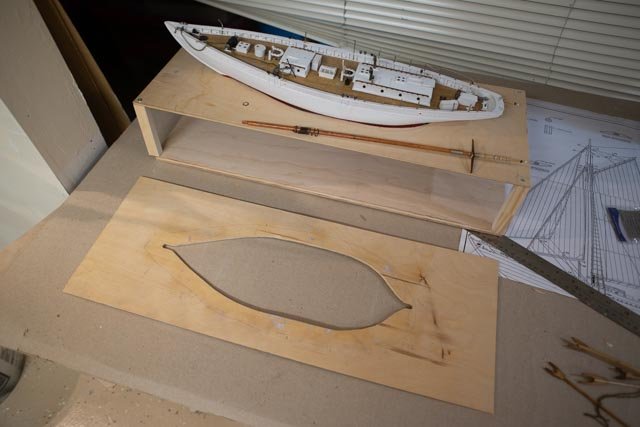
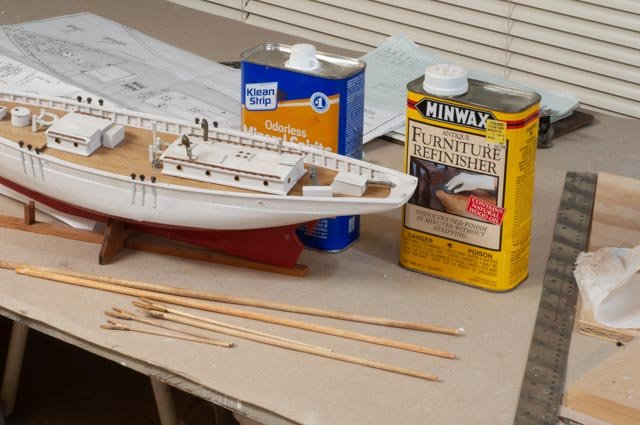
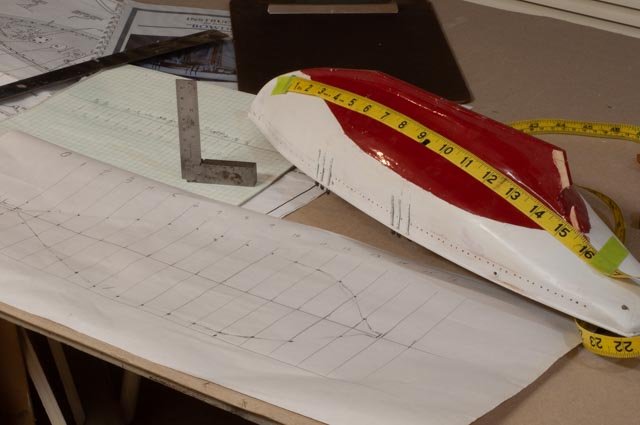
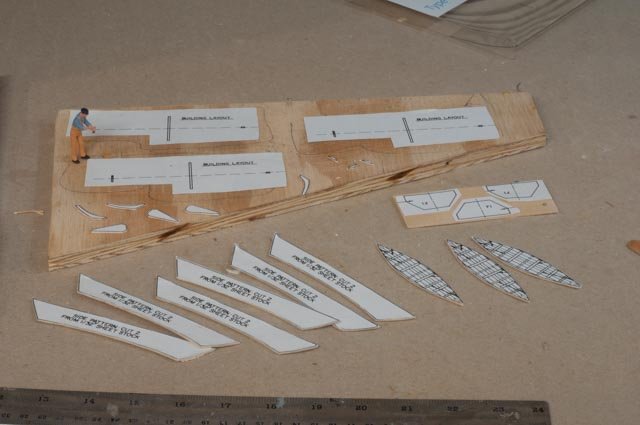
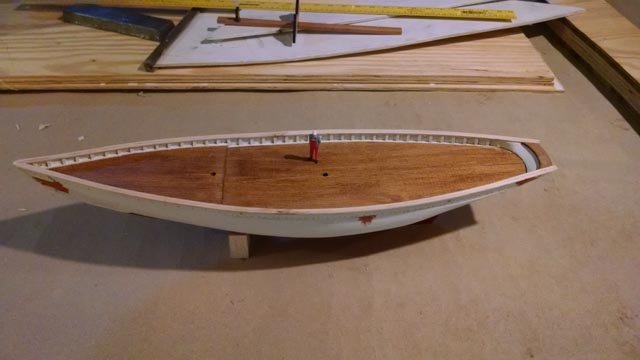
start to rebuild the kit post 2 I need to first get started with the rework on the model. It has sat on a shelf for years and though an occasional once over with a light vacuum, it is shall we say dusty. · First up is cleaning of the deck. I believe I used a satin poly on this. In my preliminary research I am finding a beat-up deck followed by painted decks. I need to think more about the final decision as to what era I shall try to replicate. I think this might be water base poly, very hard to remove for staining. My guess is the first voyage was just oiled deck as was practice of the day. In some reading they advised that good old Charlie Hodgdon... [ his history well known around here as the family still operates one of Maine's great Boat building facility]... took over the line drawings from William Hand and completed the planning of the build that was specific to the needs of the arctic. I doubt in 1921 a painted deck was on the original launched boat, though by the end of the 1920’s it was clearly gray and white paint. More on this later in the build. · Next up are the spars. They were not finished; just roughly shaped and varnished. First step is to remove all finish to allow staining for the lower masts and shaping for rings etc. · Now to the bottom and the shape needed to install the rudder and propeller. Lines check out to be ok, but more shaping is needed to get the rudder installed. also i think the bottom paint is a little loud.....will do again I am sure. · Now my first attempt to build three small dories. I plan to follow the kit instructions and see how I do. I know from Bluenose these little guys are very hard to do. base wood just does not like to bend and I have never been able to get fast glue to dry fast. I have yet to make a dory I like, but must solve that issue. I first experimented with scan and print and found I got copies the same size, and for production printed out three sets to make shaping parts easy, especially with eh spindle sander, my new favorite tool. There are clearly 3 dories on the early trips. They were stacked to port side. more on e that later. Ok off to the diorama stuff. · I had some scrap 1/8 plywood with teak veneer for my pond yachts that I will never use. I have no line drawings, so to trace a drawing of the waterline in plan is not available for a starting point. I used trial and error and the first hole was too big by up to 3/8 in the middle to ok at the ends. So, I measured the offsets as best as possible and cut out the second one. If I were going to set the hull in and make wake water or something for a model under sail, or ice for hull in ice, this is OK. I shall experiment with this version being a sheet of ice. At the same time, I continue to search out the translucent acrylic product. Next up is to collate several visuals I found at the Boothbay Region Historical society. They are extremely helpful to see how the Bowdoin was rigged in the early days.....stay tuned. many changes coming......tweaks that is . All for now
-
Jeff thanks for the tip on the supplier. I will definitely check it out. I have some templates too that I made in 1/8 plywood so I can play with other options like clear resin over paint and more likely ice. that would be resin over white paint, maybe some salt...??? I will look into your log too...see you there regards
-
Gary and Jim thanks for feedback I read a recent article about the resin pour. That is a great solution for waterline display, and I need to keep that as a possibility. I was blown away a few years back with the technique of taking translucent acrylic and displaying it either flat or heat bent for a rolling sea, then setting the model so you see both below and above the water. For a whaler one could have fun trying to place a whale next to the boat. Here I will try an arctic scene, and at this stage am open to experimenting. It seems that the vendors want to sell either textured clear or colored sheets. I have four little sample pieces coming of clear textured and a few colors to experiment with making layers. I will then try some amateur coatings. There may be a peel and stick film that could go on the bottom of the textured sheets too. These two experiments might be like the clear resin over painted back ground. I also found a site that offers a 16 inch by 24 inch piece of sea blue textured that might work. I am just ready to plunge. I want more practice. I have already cut two attempts of holes through scrap 1/8" plywood. A little trial and error as I stated there are no line drawings included in the kit. I will share in future post when I get more progress on making the right size hole. cheers
-
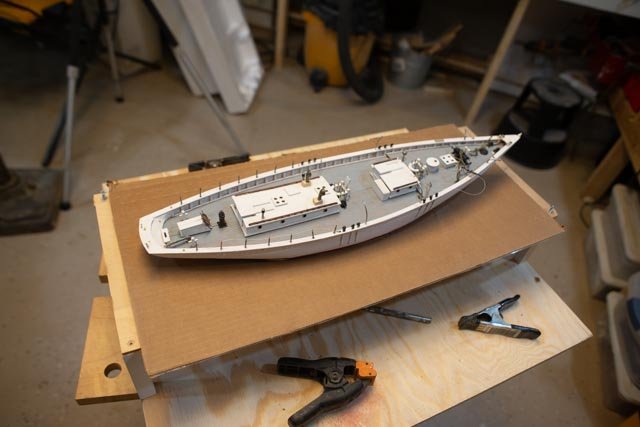
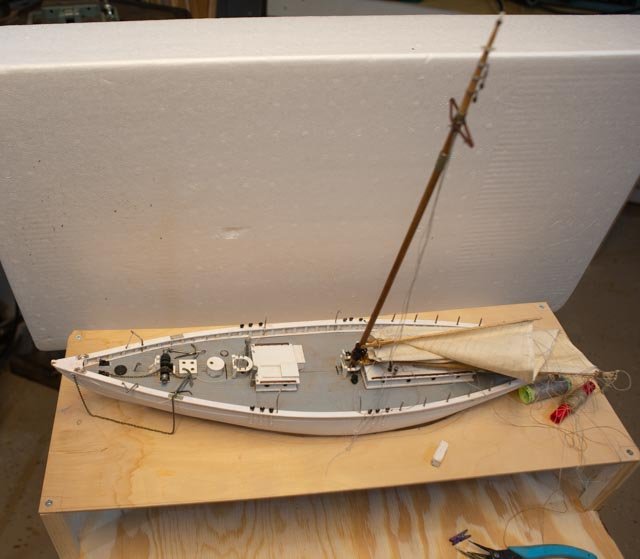
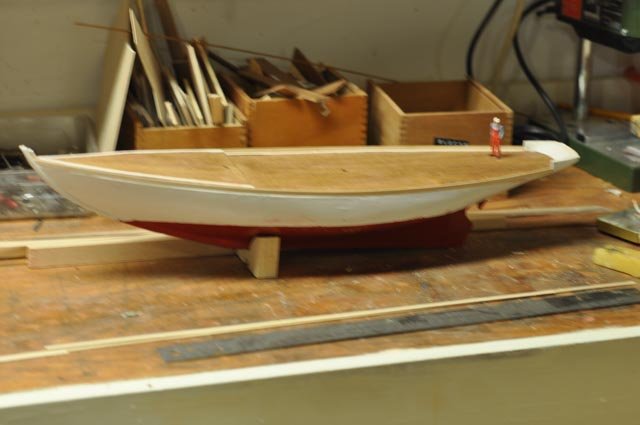
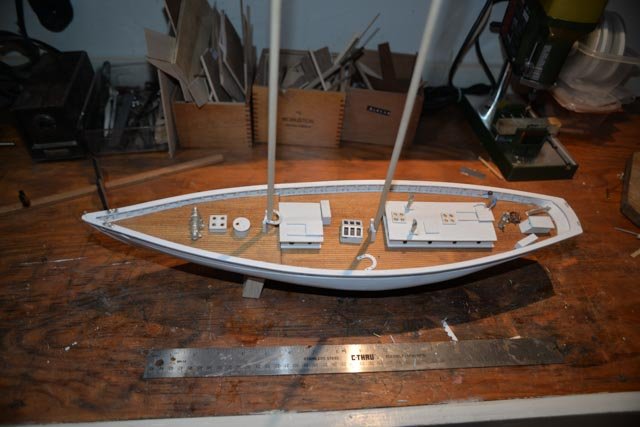
Bowdoin in ice display build post 1 This build will be my first attempt at a diorama I wanted to start this log to record both the research and the effort to replicate an expedition scene. It is going to more about studying the ship from 1924-to say 1930, its expeditions and the making of the overall display rather than only the model itself. I know I am going to need help. More than 15 years ago, I either bought or was given the Bluejacket model of the Bowdoin. When I stared modeling schooners in about 2012, my first thought was to use the 1:48 kit information as a study and then to build a 1:24 sailing model. [ that is the scale of my Bluenose and it is fun!] I still may do that, I just have too many possible projects. I want to use this opportunity to explore more of a diorama display of a type of ship to better learn how it was used. The Kate Cory build that is now on hold will come back, and I will try to have a whale on the side being treated. For the Bowdoin I am not sure, but think I want to show her in the ice or afloat next to the ice set up for winter in the arctic. I hope to have this display ready for next summer as a local family store owner wants to make Boothbay Built schooners a feature of their new venue. I have offered this model up as a backup, as other Bowdoin models may come available. My thought is an icy diorama with the model in it. As I have tried on my other models, I am more about trying to find out how things worked and what they were like in old photos and then try to adjust the model in that direction. I hope I can carry that off. This log is also for the purpose of documenting those items. The local historical society has tons of visuals to review, and the Donald Macmillan material is all available at Bowdoin College that is only 45 minutes away. [ in the winter light traffic anyway]. My love of this boat started in 1962. I was a junior sailing instructor in a summer program in Massachusetts and Donald Macmillan came to talk to us and sell his book. I fortuitously bought an autographed copy that is still in my library. I have read it both years ago and then again more recently as part of my extensive reading about the arctic. So many items will fill in as we go, but to start off …where are we with the actual build? There are just a few old photos that show that in 2012 ish, as I was starting to play with 1:48 scale builds, so I could down size my scale experience to be able build the four masted Schooner Charles Notman. All I did at that time was to rough out the hull and set up the deck. I noted that the kit did not require nor include any line drawings. A few years later as I was researching the Boothbay Harbor One Design at the Boothbay Region Historical society, I found they have a copy of the William Hand design of Bowdoin….I got a copy of the section lines so in the future I could rough out a scaled hull in RC friendly larger scale . I am told the original drawings of all of Hand’s work is in the Hart Museum at MIT. In a casual search of their site, I was unable to find them in their data base. If anyone seriously wants them that is a place to go. So to the build…these photos are about about 5 years ago... . · Here I was using the famous bondo glazing putty to smooth out the hull. Looking at the results 6 years later, I would likely send it back for another few coats. Three days more maybe then would have been great…..oh well. · Here we got some base coats painted and deck stained. · Here we added the bulkhead strips · Here we have the cap rails on and I notice more putty fixing the sides. It seems that for some of us, we can only see those defects after the first base coats of paint. That is why I stared the filler prime process. …. just spilled milk as they say · Finally, here is furniture partially built or as supplied in the kit in place and we are resting waiting for any action. This roughly represents the amount of deck detail I would include for an RC model. I have taken what I can find of the unused kit material. Obviously after this much time, it is scattered, so I am sure I will make or reorder what I need. The bell by example is nowhere to be found. What big new thing do I want to learn? ……The most urgent modeling method study for this build is to find out where to buy and how to work with textured and tinted Acrylic sheets. I want to cut out a hole for the boat and maybe a dory. Then one looks from the side and sees the underwater hull, maybe a fish or two, or even the anchor. There are several of these in Lunenburg museum and they are stunning. So far, I only found one source and they need about $50 for one sheet about the right size. That’s fine if it is right, but I need to practice. I looked all over MSW and was unsuccessful finding any articles or logs that jumped out at me. Anyway that study and experiments will be part of this build…..also how to make ice? then if i get brave or find some help make people and dogs. all in time. Cheers jon
- 73 replies
-
- 11
-
-
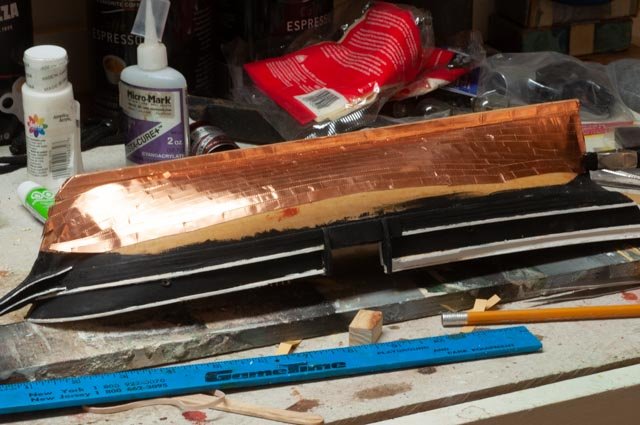
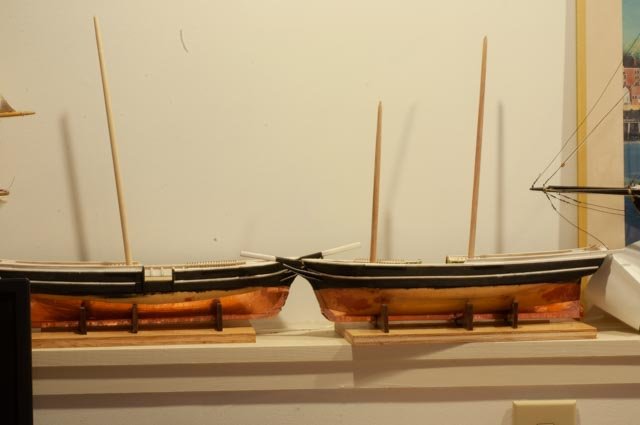
This post is to record an unplanned but wonderful delay in this build. A local vendor in town has decided to celebrate Boothbay schooners in his new maritime focused store. The focus shall aim at those Schooners built in Boothbay. As stated multiple times in my previous builds, both studying and modeling these locally built boats has been my desire for years. Charles Notman was built as a prototype for building some of the 12 big 4 masted schooners built here [ 20 in the county] near the end of the schooner development in 1921. The Maine Ice industry use of schooners and wintertime labor was also a big part of our local history including a 500-foot-long dock feeding up to 4 schooners at a time in the harbor. The great sardine fleets, locally built packet brigs and barks etc. So what does that mean……. These whalers will be on the shelf for some time. Similar sized packet brigs were built here at the same time as the whalers, so who knows what will happen. I will return to spruce up Charles Notman as I am scheduled to talk about the big schooners next summer, and there are several items to be completed and fixed. I shall rebuild and complete Bowdoin hopefully in my first diorama, build a Pinky in 1:24 scale etc. etc. Anyway my other logs will get updates and I will switch to a new one on Bowdoin as that was a first item to get done, so as we pick up this project… Here we see I partially completed my first attempt at copper tape on a bottom. My approach when I got to this stage was to order another roll. I must say the challenge of using this tape is real. It just does not like to easily stick. I will likely remove it all, sand and smooth up the finish with several more coats of buffed varnish. A lesson to learned it needs to be very smooth to hold. Here we see a supply of mock up barrels I bought. I plan to figure out how to make them, as a dock side or even at sea rendering scene would need many, and in that case they should be home made. Also I want to learn to make some hollow ones on the lathe. So much to do! Finally, here we are resting on the shelf. All loose materials, plans and notes back in the box. Not to be forgotten so Bowdoin is next up All for now...we shall return