


barkeater
-
Posts
387 -
Joined
-
Last visited
Content Type
Profiles
Forums
Gallery
Events
Posts posted by barkeater
-
-
Your post asked for minimum tools for scratch build. Like most other scratch builders, I use a lot of hand tools so micro files, scalpels, sandpaper, miter saw and box, and different picks and scrapers are what I use most. I'm not a big fan of rotary tools such as a Dremel as I feel I have more control with hand tools. The one power tool that you use most for scratch building is a scroll saw. If you want to rip your own planks rather than use commercially available wood strips, then you need a table saw. A lathe is not necessary. A mill or thickness sander is also nice, but the scroll saw, and table saw are what you are going to get the most use out of.
Richard
-
I have had the same problem. It has shied me away from some suppliers who are out of line in their shipping.
- Rik Thistle, hollowneck, Dave_E and 2 others
-
 5
5
-
I have done all my masts and yards by hand so far. If you taper down to size by squaring it with a file, then make it eight sided this works quicker than sanding alone. Sand when you are done with filing to round it out. Just remember to keep checking with calipers. Even if you use a lathe, there are portions of masts and yards which need to be done by hand. Having said this, I recently acquired a lathe which I hope will speed up the work.
Richard
-
-
I would suggest Testors Dulcote as a finish. It is a matte finish and as such will not be shiny. It coats evenly and is simple to use right out of the bottle. Also, it is sold in small bottles, so you don't wind up with a lot of unused product.
Richard
- Rodedwards, mtaylor, Canute and 1 other
-
4
-
I'm not familiar with your kit but II built the Alert by Mamoli which was a cutter with a 360-degree rotating canon midship. If I remember correctly, it was a 4 pounder but had no special name. If you look, I'm sure you can find pictures of the Alert in the gallery to see if what you have matches.
Richard
- mtaylor and Keith Black
-
2
-
-
I have used bow string wax which is used for target or hunting bows. I don't know the ph or if there are long term issues, but it is easier to use than bees wax and it works well. It comes in a container like chapstick or lip gloss.
- The Gimps Chimp and mtaylor
-
2
-
Thank you all for the input. I also feel that it was probably removed. Still trying to decide to replace it with something or let it stay. Does anybody have an idea as to what to replace it with which would be similar in size?
Richard
- thibaultron and mtaylor
-
2
-
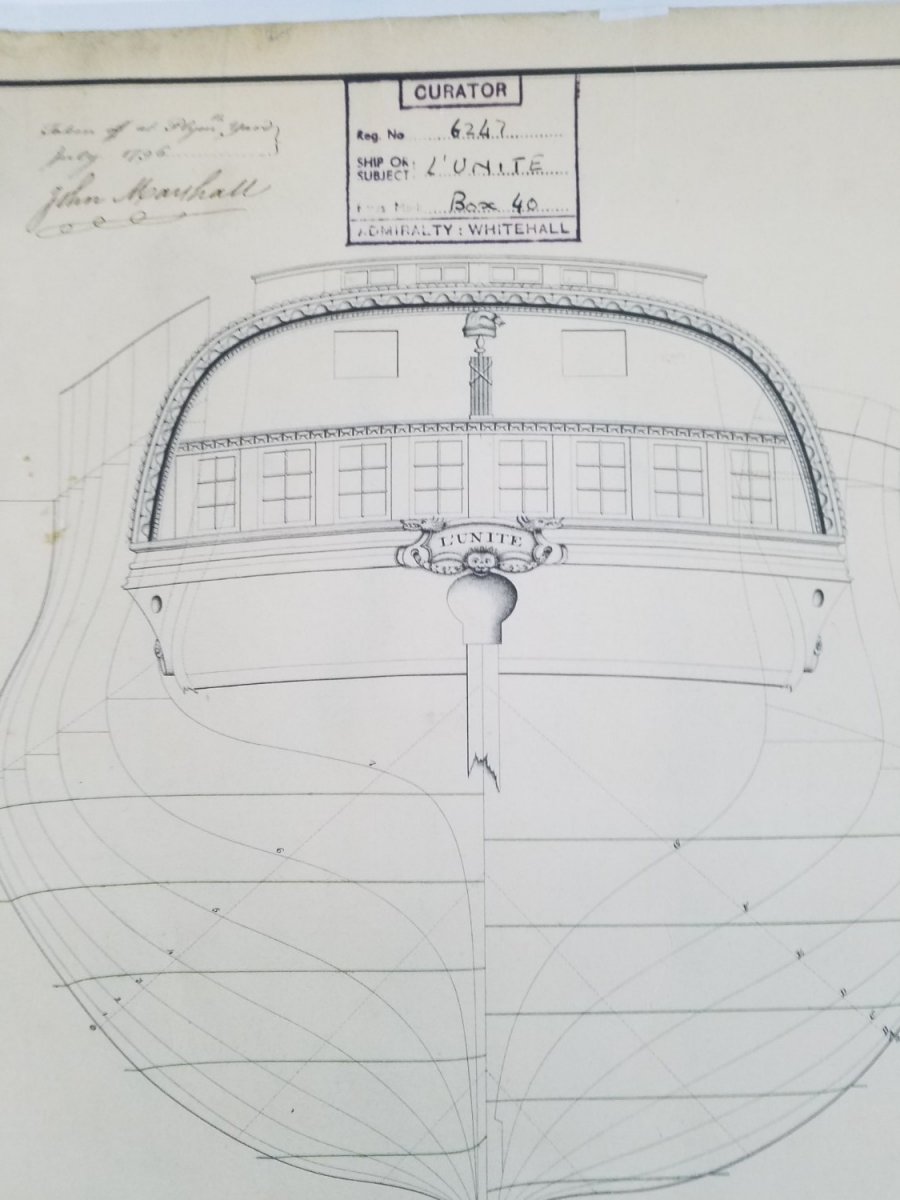
I'm building the U'nite 1797 as refit by the British. She was a captured French vessel. I have both the "as taken" and "as refit" plans. The dockyard removed a hog back cabin and railings on the weather deck and replaced the railings which shows in the refit drawings. My question concerns the Phrygian cap and bundled sticks on the stern. Since these are symbols of the French revolution would the dockyard have removed them? The refit drawings do not show the stern. It would have been a great ruse de guerre. I also don't know what I would replace them with since I would like to keep the same approximate size. Do I go with what I know was there before the refit or make something up? I'll probably go with the Phrygian cap and bundle but I would be interested in opinions. Thanks.
Richard

- druxey, Keith Black, mtaylor and 2 others
-
5
-
Congratulations and nicely done. I enjoyed following your log.
-
-
-
Dave,
Hopefully those brass rings look like eye bolts otherwise you are going to have problems😁. You are correct, superglue (cyanoacrylate) is what you want to use gluing metal. As to breakage, I've never had a problem with kit supplied rings/ eye bolts. They may bend but unless you really use a lot of force, I can't see them breaking. For scratch building I use silver wire which is stronger than craft wire.
Richard
- mtaylor and Keith Black
-
2
-
Bill
The picture of the stock sheet you show is a pretty standard top which you should be able to copy. There are a lot of books on rigging if you can't find what you want for free by search. Rigging: Period Ship Models by Lennarth Petersson shows a similar top and is on Amazon in a kindle version for $11.99 ($36.70 for hardcover). There are a lot of books on rigging so look around, but I believe you could use this one to make the top you show, and it is relatively cheap. It is also a good book for other rigging details in a general fashion but does not go into changes in masting and rigging over time as some of the more voluminous and scholarly works do. Again, look around and see what you feel would be most helpful to you.
Richard
-
Welcome to MSW and enjoy. I'm a little quicker on building models but not much as I'm coming up on 4 years on my current build with years to go.
- JeffT, Keith Black, mtaylor and 3 others
-
6
-
-
Tommy,
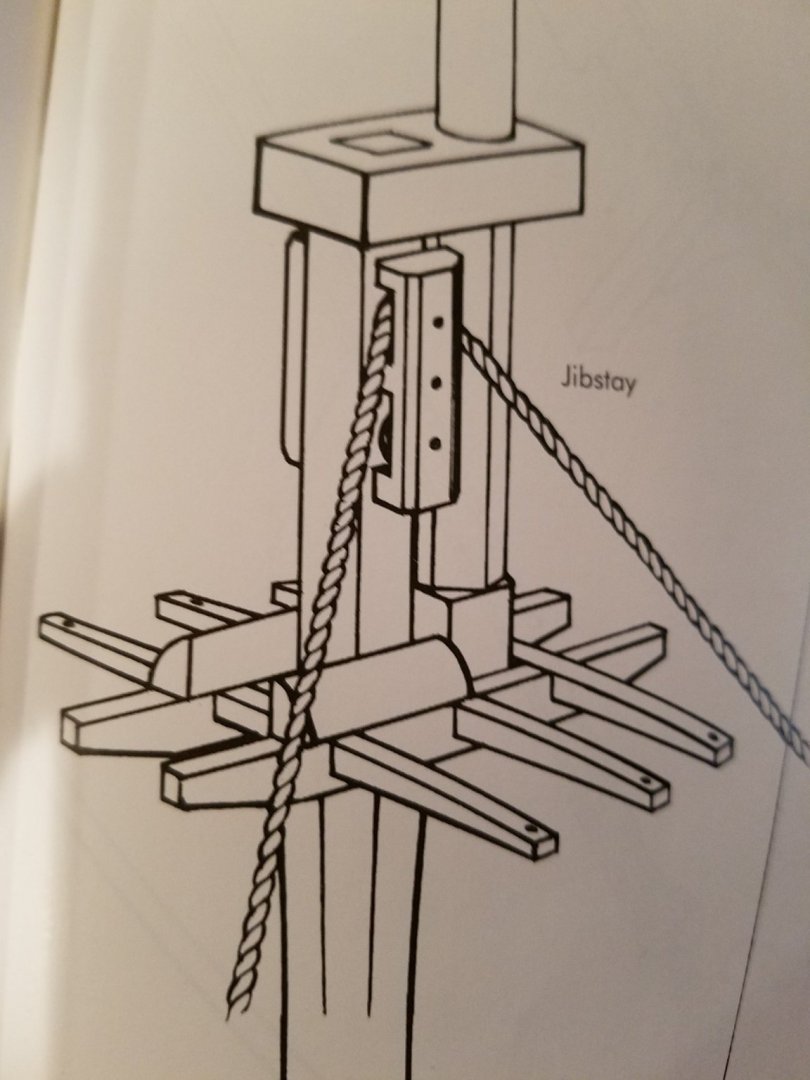
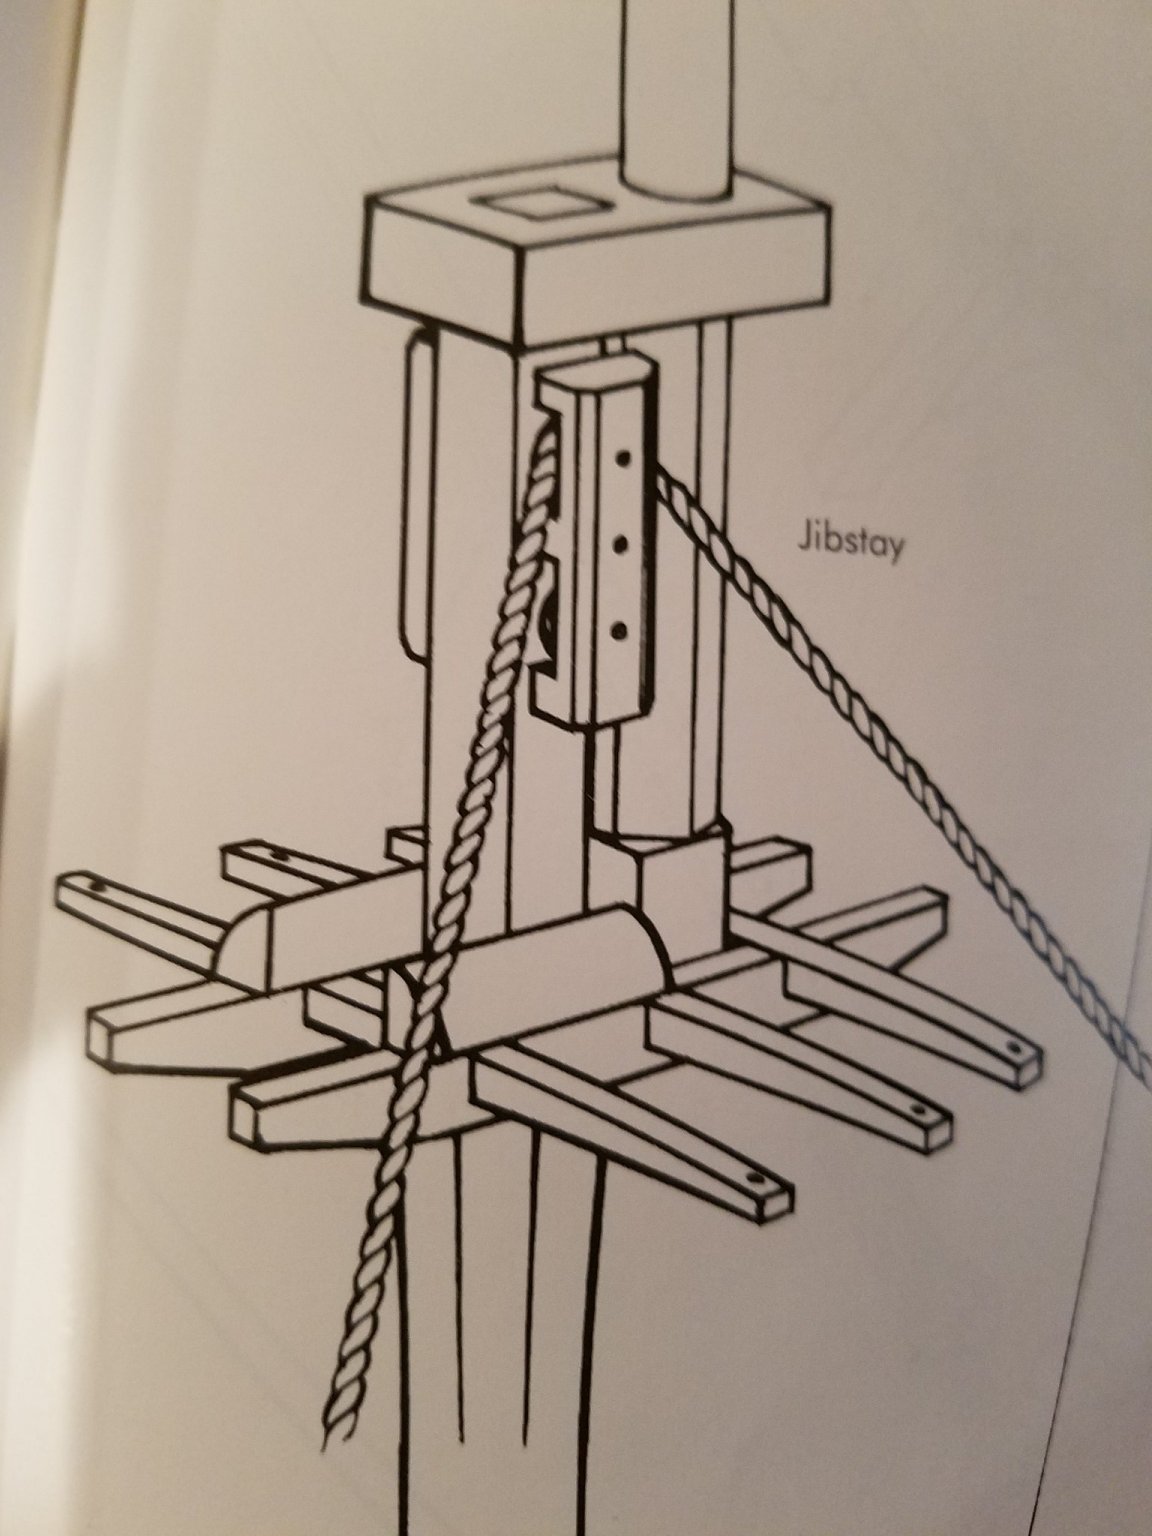
As Mark noted masts are quite a wide topic and different masts and yards show different shapes. They also changed over time. If your question is in regard to mast caps, the following illustration from Petersson's "Rigging Period Ship Models" may be helpful. Here the main mast is squared off to sit into the mast cap. The top mast is first square to sit on the trestle tree, then becomes octagonal before being rounded off to fit through the mast cap.
Richard
- mtaylor and Tommy Vercetti
-
2
-
Painting them black would give you more contrast and help them stand out. Just a thought.
Richard
-
I use 5x glasses. I paid about $10 on Amazon. I like these compared to magnifying lamps because I can change my field of view without having to move the lamp.
Richard
- Canute, Ryland Craze, mtaylor and 1 other
-
4
-
Cisco,
What I did was tear down and replace a shed which was attached to my barn. The barn from around 1860 is in good shape with wooden pegged construction including main beams up to 39 inches. The shed was a later add on probably 1940's and was poorly done and had no footings or foundation being built directly on the dirt. It was a tear down so I used the footprint to design the new shed with the help of an architect. I did have to get permits but by using the existing footprint there really could be no objection as long as I built to code which we did. As to lighting, you will want more than natural light as discussed above. Good luck on you workshop project.
Richard
- Rik Thistle, CiscoH, mtaylor and 1 other
-
4
-
Thanks for the tips. Not in the pictures are high output 4 foot shop lights in the ceiling of both rooms. In the last picture note the brightness. There is no window in this room to the outside with the only window being into the other room which itself has only one window. Without the light on, this room is very dark. I kept the windows to a minimum to give me the most bench/wall space. I moved the two floor lights from the house to get them out of the house but so far have not needed them for modelling but have used the one next to the window when tying flies as I tie a lot of micro flies. I also wear 5x glasses both tying and working on my model. As for pedal controls, I had a Fordom with foot pedal whose motor gave out after long time use. I used to carve decoys with it but don't see any use for it with the way I make models. I do have a Dremmel and a Craftsman rotary tool without foot pedal but use them infrequently. I do have a fold down bracket but use it to hang my waders. My shop vac in the sawing room is not in the picture. Since the other room is set up as a clean room where any dust creation is to be kept to a minimum I can't see cutting a hole in the wall. I do need to look into a dust trap for my sawing.
Richard
-
-
Might I also suggest for your reading list Bloody Mohawk by Richard Berlith which covers the Mohawk Valley and the NY frontier from before the French and Indian War through the Revolutionary War and The British are Coming by Rick Atkinson the first of a trilogy. I'm still awaiting the second installment.
Richard
- mtaylor and Keith Black
-
2

Scratch Builders Reply
in Modeling tools and Workshop Equipment
Posted · Edited by barkeater
I have a MM scroll saw and table saw as well as a Byrnes thickness sander and a Proxxon mini lathe. The scroll saw is fine. You have to go slow but you want to go slow when cutting irregular shaped pieces. The table saw is ok as long as I don't cut anything over about 1/4 inch. (Note: I do use a lot of very dense wood.) I'd love a Byrne's table saw and I might upgrade for the next build when I have a lot of lumber to cut for the hull. The thickness sander is great. On my current build I ripped planks of ebony for the wales before I had it and did not realize that the board I was cutting from was not of uniform thickness which caused the planks to have different widths along their length. Unfortunately, I did not realize it until I was on the third of six courses. It was a pain to wind up with an even wale but it came out fine. With the Byrne's now I can even out any board and avoid this dilemma. Just used it to taper my keel from head to foot. The lathe I just got and have not had a chance to use it yet. Good luck with your scratch build.
Richard