Shipyard sid
-
Posts
1,106 -
Joined
-
Last visited
Content Type
Profiles
Forums
Gallery
Events
Everything posted by Shipyard sid
-
 Greetings all Well I have now finished the rigging of the clue lines sheets and tacks, with only the main port to thread through. The next task is the travelling guy, guy pendant and flying jiboom guy. As I have said before I have never heard of most of these things before . Anyway that should be the completion of the rigging according to the manual. I however done no work at all on the driver boom and driver gaff as I am awaiting the small sheet of 5mm which I have lost, and it contains the jaws for both. Here are a few photos of my progress , and once again you can see there is rigging to be belayed on the inside of the ship on the gun deck, you can see the thread on the cleat were it is belayed. There is also rigging belayed on the upper gun deck. Thanks once again for viewing and your comments.. DAVID
- 439 replies
-
- 8
-

-
- victory
- caldercraft
- (and 1 more)
-
Hello glenn Well you are really moving on with your planking . Well done. Guess what I seen today in morrisons ???? A photo of a ship before it was moored in the historical quay . DAVID
-
Greetings rich And here we go with another caldercraft victory. I want to wish you the best of luck with this project and will follow your log throughout your build as will many others. One thing you will never be short of is advice when ever it is needed, so just take your time and enjoy the next few years . Best wishes DAVID
- 414 replies
-
- 1
-
-
- caldercraft
- victory
- (and 1 more)
-
Hello again Boyd I have just looked at billings plans and it shows stanchions for handrails around the openings next to the grating. Which tells me there is supposed to be a stair way in the openings next to the gratings, (see fig 18B ) this is stupid as we know. Maybe you can cut away the obstructions to a depth of about 30mm and make up a stairway with sides to slip in, and it won't matter what the area you cut out looks like as it will be hidden by the stairs. This should not be to hard to do. It's an idea . DAVID
-
Greetings Boyd Well there's nothing wrong with this . You are doing a great job, everything is clean and really smart. This ladders thing is ridiculous. What does it show or say on the plans, and is there any mention of them.??? I don't think hatch doors would look right ant it's going to be awkward to say the least to remove the obstructive ply. Anyway the best of luck with what ever you decide. You are doing really well, keep enjoying it. DAVID. Are there any other billing kit builds on the site to consult with???
-
Greetings all Well not a great deal of progress over the last week. I completed the cross yard jack brace, you may be able to see that this brace is different to the other braces from the photos. The brace for the starboard side of the yard begins life fast to the main rear shroud on the port side, it then crosses to and through the brace block on the starboard side of the cross jack yard and returns to and through a block made fast to the main rear shroud and belays at deck level. The brace for the port side of the yard simply does the opposite. I then turned to the driver boom and gaff, but alas I have lost a 5mm sheet containing the jibboom and driver gaff jaws. So I have now returned to the front end of the ship and started on the clue lines sheets and tacks ( I have never heard of this before !!! ) anyway the instructions tell me to join three single blocks together to create an assembly which I think is called a garnet strop assembly. Anyway I have added a photo of it and you can decide for your selfs . On the photos you can see the fore yard sheet which begins life fast to an eyelet in the hull. It then travel up through a block and returns along the hull and though the hull side and belays to a large cleat on the upper gun deck. You can clearly see this on the photo of the gun deck, the cleat with the thread on top of it ready to belay. Thanks for putting up with this and for viewing, plus all your comments. Here are some photos that hopefully might help you see what going on, you never know. Cheers DAVID
- 439 replies
-
- 4
-
-
- victory
- caldercraft
- (and 1 more)
-
Hello Glenn I thought you had fitted the beak head bulk head, did not realize you had only dry fitted it. Don't fit it now , add all the fittings then put on..Here's a photo from yons log. Well done with your progress DAVID
-
Hello Glenn It's coming along fine. Now the planking and fitting out the deck which should keep you happy for a week or two. Take your time and enjoy it. Well done.. DAVID
-
Hello Boyd Thanks for posting on my log.....don't worry at all about the wales, they will all sort later. Just get your planking done. There will be all the advice you need come the time for the wales. Display case???? Mine needs to be approx 60 inches long x 42 inches in height and 30 inches depth . Good luck with your planking, just take your timeDAVID
-
Hello Patrick Yep once again excellent work and not a speck of dust. You will enjoy this phase with lots going on. I remember yon fitting out the full bulkhead before fitting it to the ship, which made things a lot easier. Keep enjoying yourself, you are doing a cracking job. DAVID
-
Greetings all A little bit more progress over the last few days. I have completed the main mast braces with only a bit of tidying up to do and a few threads to belay. The next task is the mizzen mast which only involves the brace for cross jack yard, as the topmast and the topgallant braces are fitted with the driver gaff. So once the cross yard jack is completed I need to make the driver boom and the driver gaff, and that will take me a few days. So here's a few photos and thanks for your comments and for viewing DAVID
- 439 replies
-
- 6
-
-
- victory
- caldercraft
- (and 1 more)
-
Greetings Jerry Excellent work again on your shrouds and cleats and you are really buzzing along on those ratlines, mine will need a good tidy up after all the rigging and other remedial work. You have also done a good job on the serving, which I had never heard of before. I have ordered some gear cogs from CMB and will make a serving m/c as there is nothing much to them. I started making the driver gaff thing last night and then it's back to the front again. Anyway keep up the excellent work. OK away you go on those ratlines, Knit one pearl one...... DAVID
-
Hello shihawk I have just had a look at the plans for your ship, and just noticed the step on the sides of the bulkheads . So it appears there is only one layer of planking below the ply strips but the same planks also cover the ply strips. So not all the ship is double planked.. The planking is 1. 8mm x 7mm which is very thick. I don't think there is another layer of planking after this. Have a look at Fig 9. of your plans which confirms it. The plans done look very good at all. Good luck DAVID
-
Hello shihawk Yes as Keith says you are doing fine. Don't worry to much about your first planking just make sure it is nice and smooth for your second planking. Are you fitting copper plates to the hull .? Keep up the good work and let us see your first planking finished . DAVID
-
Hello every one Well it's now becoming very slow and tedious progress. I have fitted only the fore yard and the fore topmast yard braces over the last few days, and cannot fit the top gallant brace as the break from earlier on top of the mast has become a bit dubious , so I will strengthening the break area later and move on to the mainmast braces now. It gets a bit frustrating at times when you belay a thread and you look back later to see for some reason there's slack that needs taken up. So I move on to fit the braces on the main mast , and the way I am working will prob take a week . Here's a few photos for you. Thanks a lot for viewing and all your comments. DAVID
- 439 replies
-
- 4
-
-
- victory
- caldercraft
- (and 1 more)
-
Hello Glenn Certainly is. But it's all fun. DAVID
-
Hello mihai Excellent start to your build. I am looking forward to following your build log. I have just ordered this kit today, so you keep posting plenty of photos and enjoy your build. Best wishes DAVID
-
Hello Patrick Thanks for your post on my log, and as you say the repair work no prob at all. Your build is coming along fine, and all so crisp and clean, but lacking any dust !!!!!!!!!! You must be constantly cleaning it. Yes the quality of your build is excellent.. Keep enjoying it ... DAVID
-
Greetings glen Thanks for post. Well things have gone very well with the second planking, no prob at all , and it does not look as though there will be a great deal of sanding to do. So it's off to the upper gun deck next, and lots to do there, so just take your time and keep enjoying yourself. It's coming along fine. Well done. DAVID
-
Greetings all Well more progress on the bowsprit. Things went well tonight for a change, and I have completed the braces. So the next task is the braces on the fore mast yards. After reading through the last few pages of the rigging manual it appears there is very little to do on the bowsprit now, only the travelling guy, the guy pendant and the jibboom guy. I am not to sure how I should proceed with these braces as the lifts and sheets are not belayed. So do I belay them first, and then belay the braces or what ? I shall just play it by ear and see how it goes. I surmise there will be a lot tweaking to do later. Anyway we will see. Once again thanks for viewing and your comments. Here are a few photos of the completed spritsail yard and spritsail topsail yard braces. Here we go. DAVID
- 439 replies
-
- 6
-
-
- victory
- caldercraft
- (and 1 more)
-
Greetings Jerry Well things are coming along nicely, and those shrouds look fine and await those rat lines. Jerry I have got to say that futtock stave is the best I have seen. It is really neat and tidy, mine are just a piece of brass rod with a bundle of knots around them ......keep enjoying it Jerry, it's coming on fine. DAVID
-
Greetings all Well at last I have completed all the yard sheets, and now directed back to the bowsprit to start the braces. I noticed I had forgotten to attach the foremast preventer stay and the foremast stay which belay at the knighthead with a block and tackle which you can see on the two photos...the first braces to be fitted are the spritsail brace and the spritsail topsail brace. I have only fitted the port side spritsail brace, which you can see is secured at the forestay collar and runs through the brace block on the spritsail yard, and then travels up through two blocks under the fore tops to belay near the belfry. You may be able to follow the run of the thread from the photos. One sad point, the end of the bowsprit is broken again and will stay broken until the finish or a long way further on. I will need to shorten it by about 10mm which will make it simple to repair. Ok here's a few photos and once again thanks for viewing and all your comments. DAVID
- 439 replies
-
- 6
-
-
- victory
- caldercraft
- (and 1 more)
-
Thanks a lot David and Mark for your advice. And as you say David we can all rely on the support of MSW members. Mark I just noticed you are building the sergal Vasa which I was looking at as another choice...... Once again thanks, it's now over to the admiral she has got a plastic card. DAVID
-
Greetings all I have been looking for my next kit build , and looking at building the mamoli Friesland.. Has anybody built this ship or can advise me of the quality of mamoli kits and plans etc. DAVID....... shipyard Sid
-
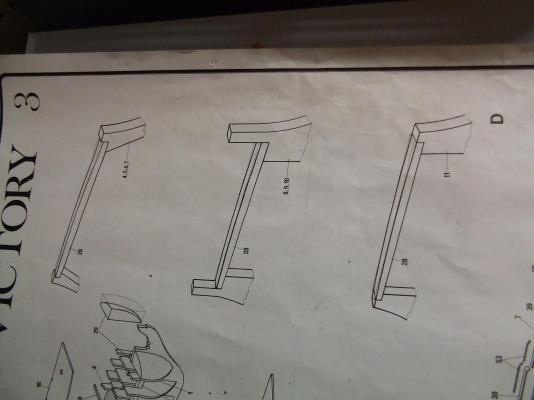
Hello dragzz Ok here's the photo of the beams from your plans. As Popeye says the curve on your beams is wrong. You must have a constant curvature across the beam .... The ends of beam on bulkhead 11 should be level with the top of the bulkhead.. The end of the beams on bulkhead 4,5,6 and 7 appear to be the thickness of the deck, or the thickness of the deck plus the planking below the top of the bulkheads, it's hard to be precise without seeing the drawing. The dimension at the end of the beam 8, 9, and 10 is not easy to determine without seeing the drawings. Hopefully someone else may be able to advise you on this problem, is there any member who has built this kit on the site. But dragzz you must have nice smooth curve on them all. I would make numbers 4 - 7 first you can easily adjust the height. Just take your time, you are in no hurry, and it am sure you will get more advice that will be more helpful than mine....DAVID