JerryTodd
-
Posts
879 -
Joined
-
Last visited
Content Type
Profiles
Forums
Gallery
Events
Everything posted by JerryTodd
-
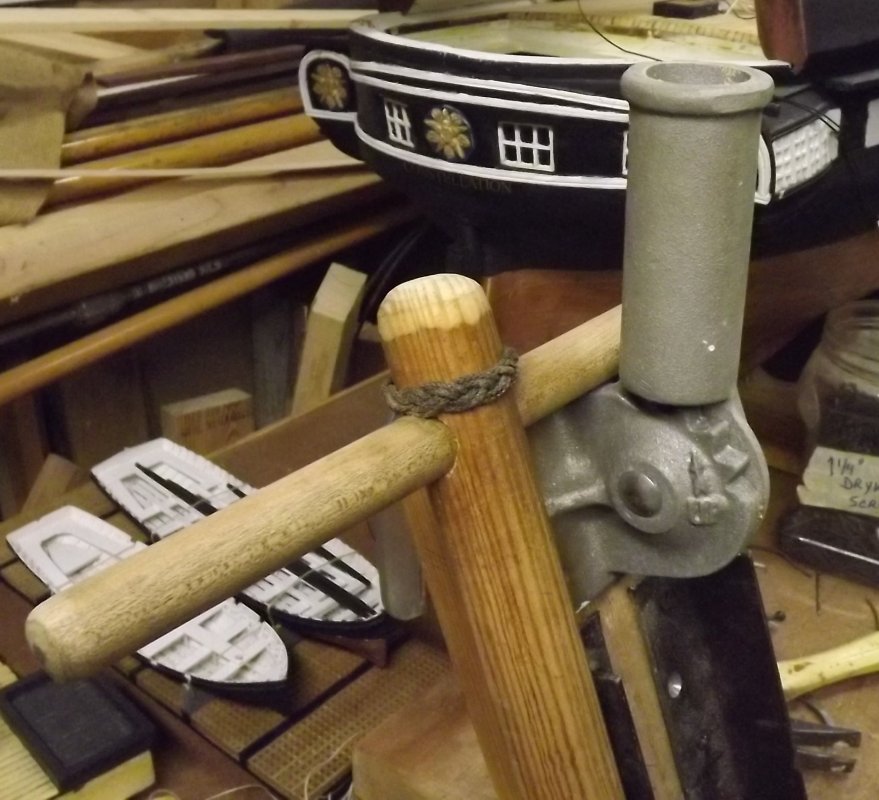
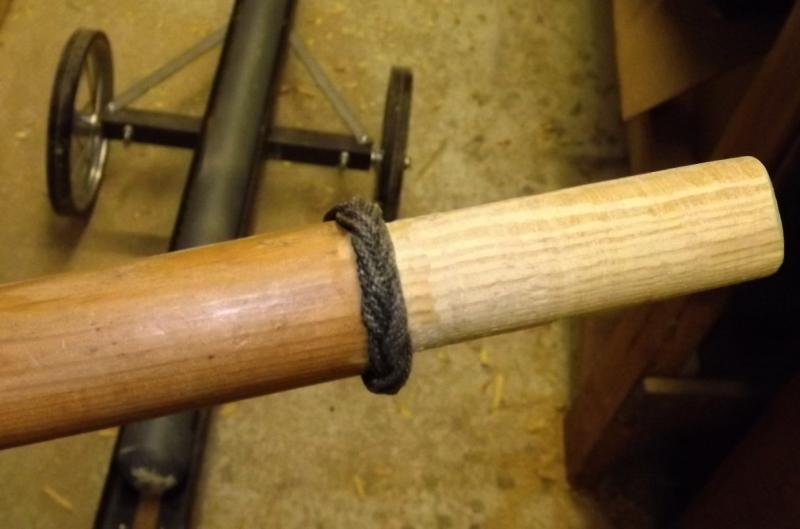
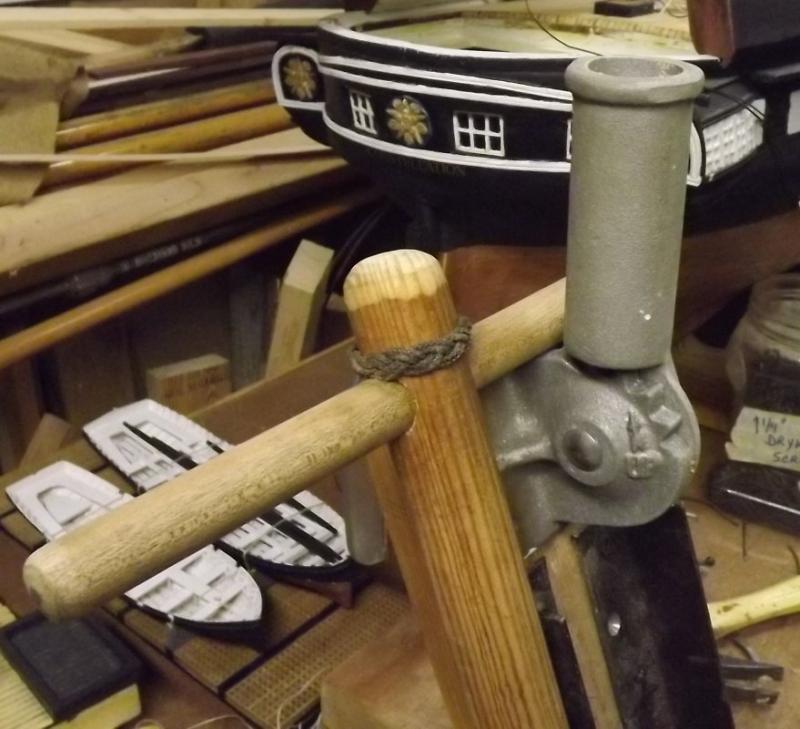
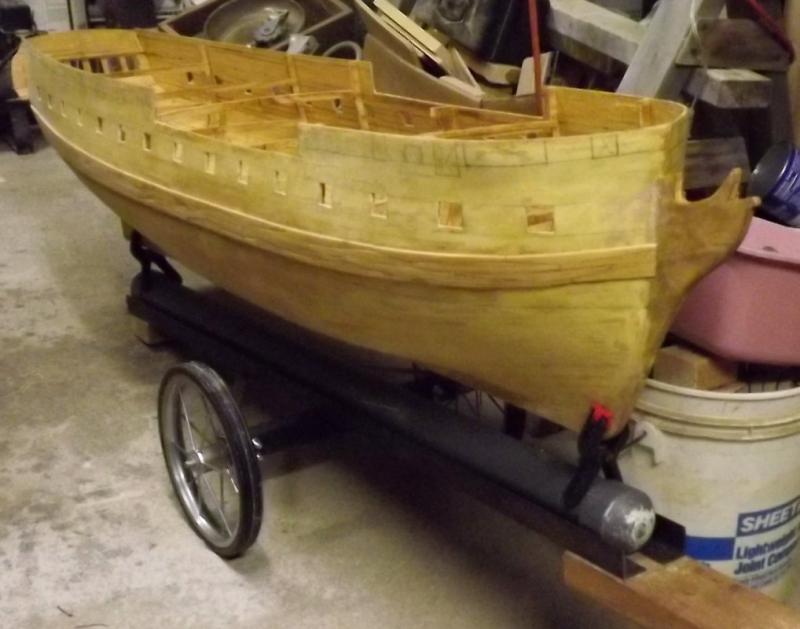
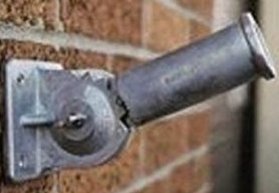
 I thought I had one of those flag pole brackets from when I repaired one of the posts on the porch - I did, in fact it's the exact same design as the picture I posted before, and it's perfect for this. I had to shave 1/8" all round the end of the handle so the 1-1/4" pole would fit into the 1" socket. I also tied a turk's head at the shoulder and above the t-handle to help against splitting - I can't remember how long it's been since I tied a turks-head - it took a while to remember how.. I played around with side supports - just cutting some basic posts from treated 3/4" board and holding them on with C-clamps as I figure out what works best.
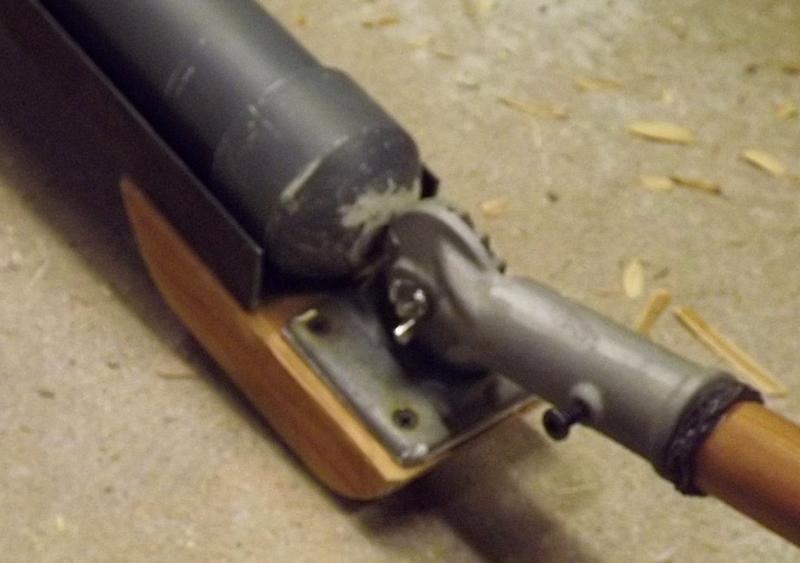

- 553 replies
-
- 6
-

-
- sloop of war
- constellation
- (and 3 more)
-
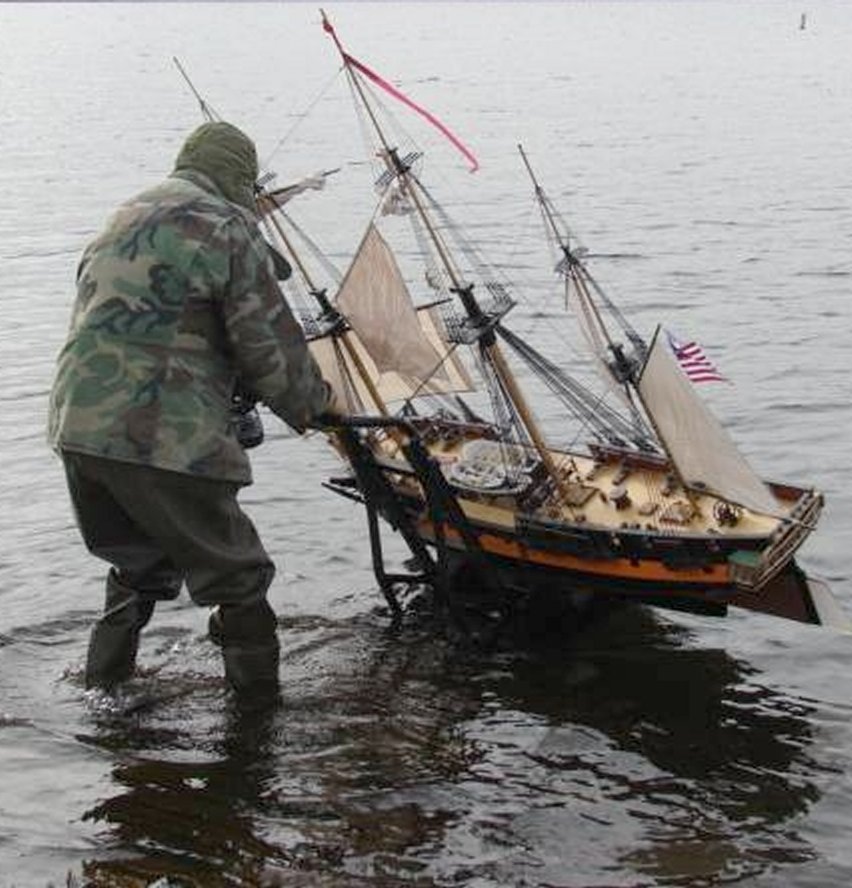
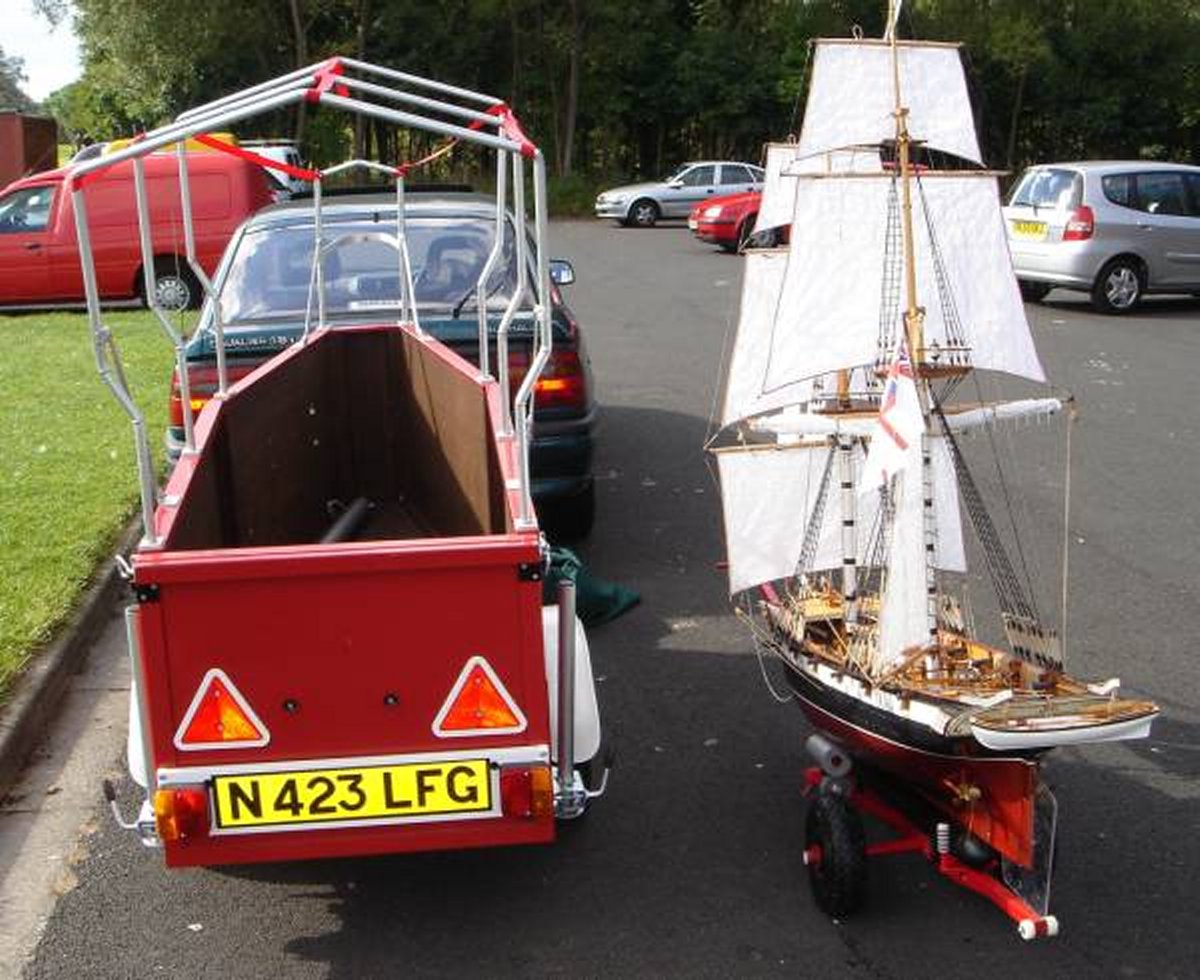
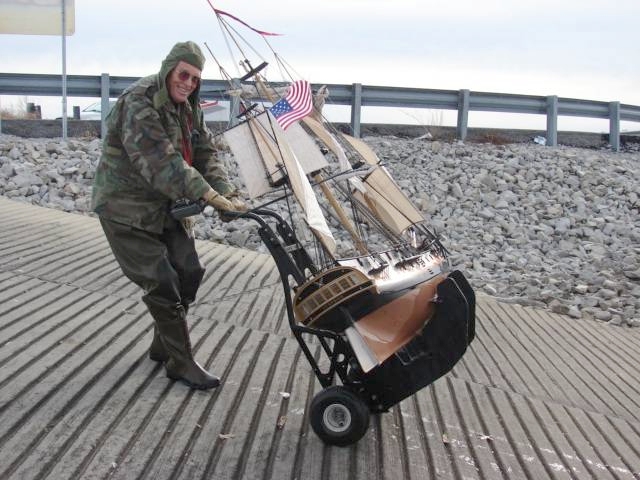
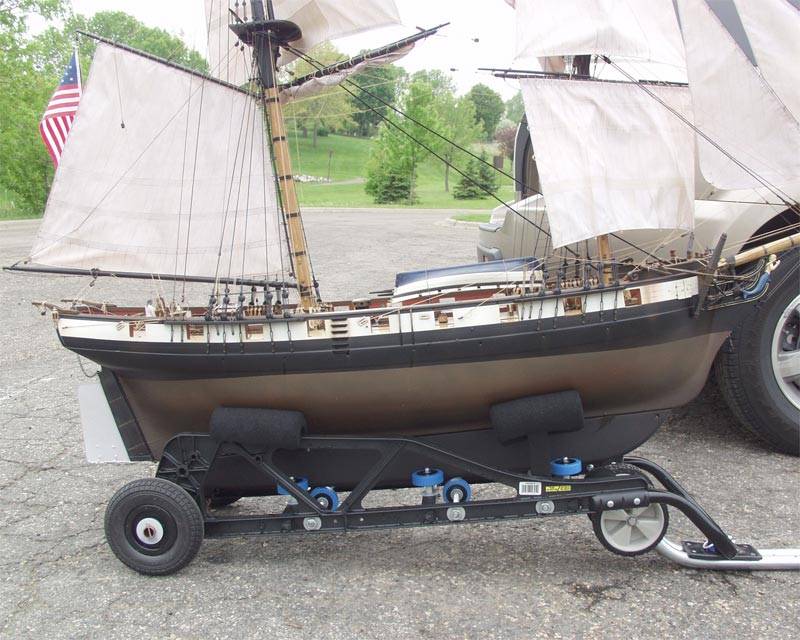
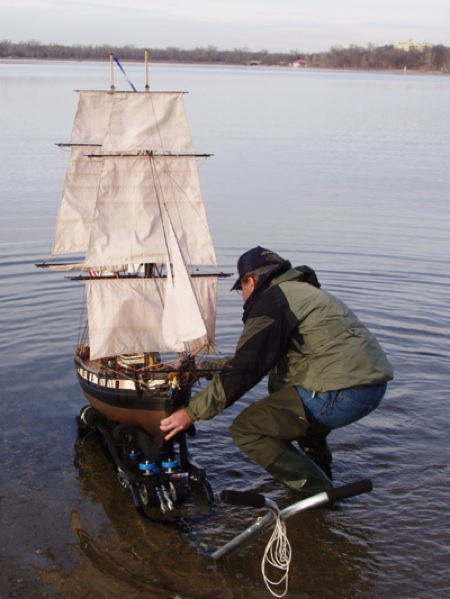
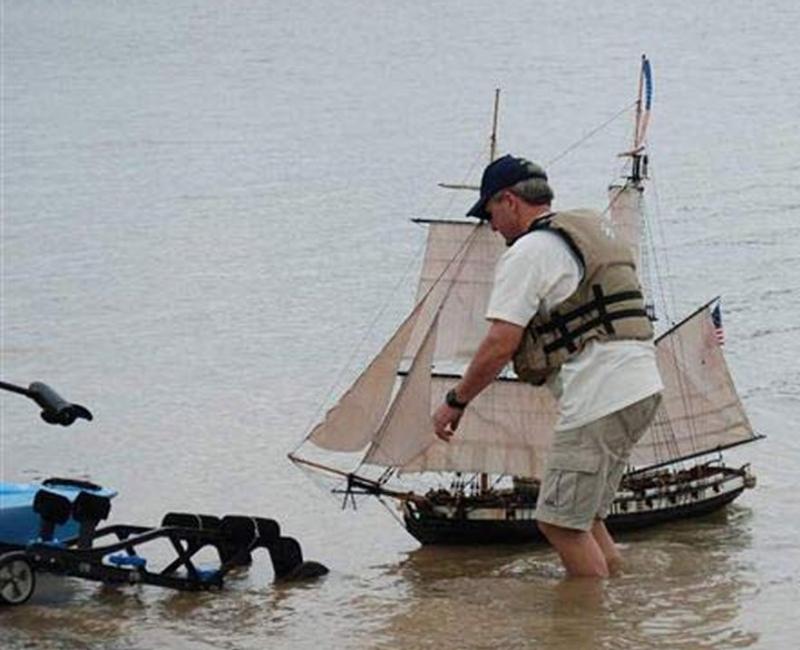
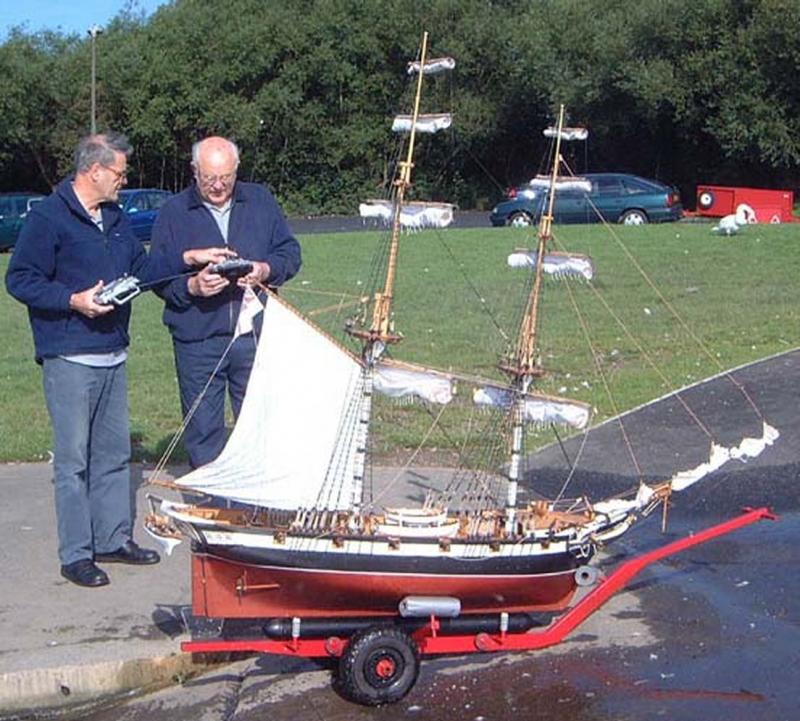
A note on launching carts.... For a working model, how you transport it, get it over to, into, and out of the water is as much a part of the model as hull, rig, and controls. The more work taking your model out to sail is, the more difficult it is, the more likely you'll just not want to fight that battle again, and your model won't get sailed. I developed my idea from the trials and tribulations of other large model sailors I know; two in particular. My conclusions and subsequent design I think are confirmed by Brian Clark's Killingworth, shown previously, which he built back in 1999-2000. Ray had the 1:24 scale HMS Surprise kit from SC&H which is about the same size as my Constellation, a little taller. He used a hand-truck based system that came with the kit. The wood cradle is large and bulky to support the 90+ pound model cantilevered off the cart as it is. The upright portion of the cart also has a lot of potential to hit and damage the rig, especially during retrieval of the model. Ray also told me the inflated tires and wood cradle made the cart want to float, preventing him from just parking it and bringing the boat to it - he had to hold onto the cart all the time in the water or it would fall over. Dan has the SC&H Grasshopper kit, also 1:24 scale; which he's modded to be the US brig Syren. He too started with the kit's supplied hand-truck, the same as the Surprise kit, with all the same issues. Note how leaning the cart back puts him IN the rigging! Dan modded his hand-truck into a trailer style cart, but the wheels being at the end, it doesn't balance on them as mine does. I think this will be a factor in the cart's performance. At a glance, it would seem the hand-truck's main advantage is allowing you to launch at a bulkhead or off a dock - and I considered this, but it's a false assumption. Access to many floating docks are via a gangway with railings which you won't be able to get an 8 foot long model down sideways. Then, trying to control lowering a hand-truck like those shown above, down even a one foot bulkhead or dock with a 100 pound model on it, getting the model off the cradle and away, while trying to hang on to the cart and retrieve it - then attempted to get the model back onto the cart as you dangle it off the bulkhead, without knocking the rig to bits... I'm sure you can imagine the Three Stooges episode this would inspire. Consider too that I'm after something I can handle alone, as I most likely will be.

- 553 replies
-
- 7
-
-
- sloop of war
- constellation
- (and 3 more)
-
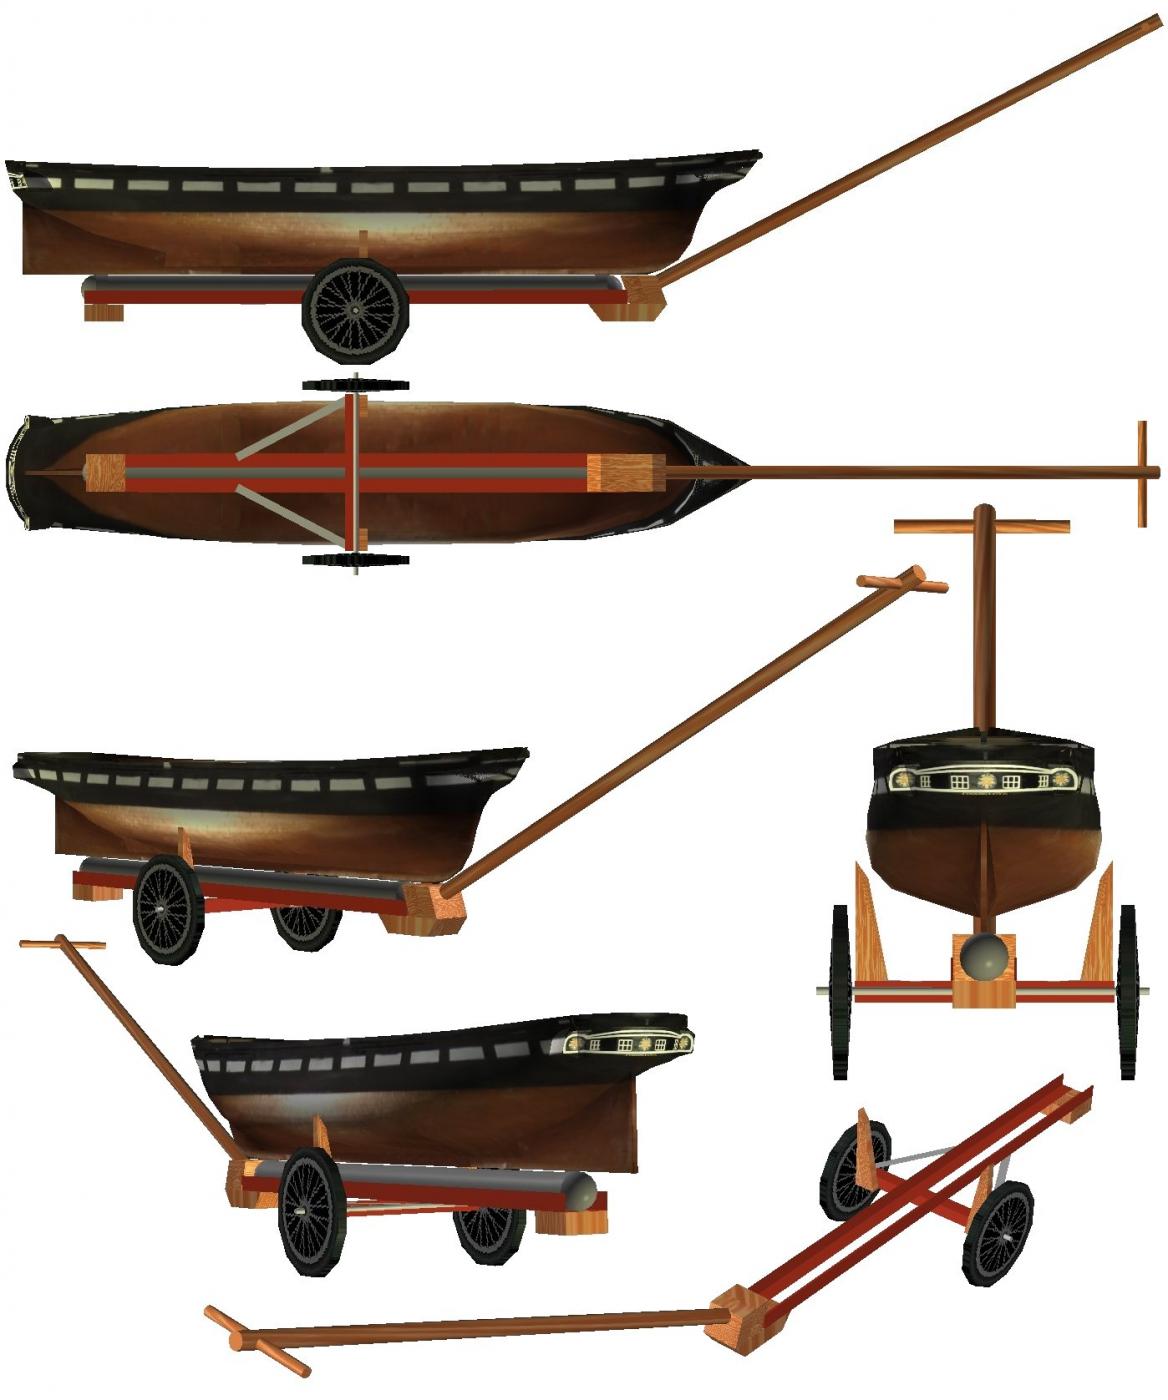
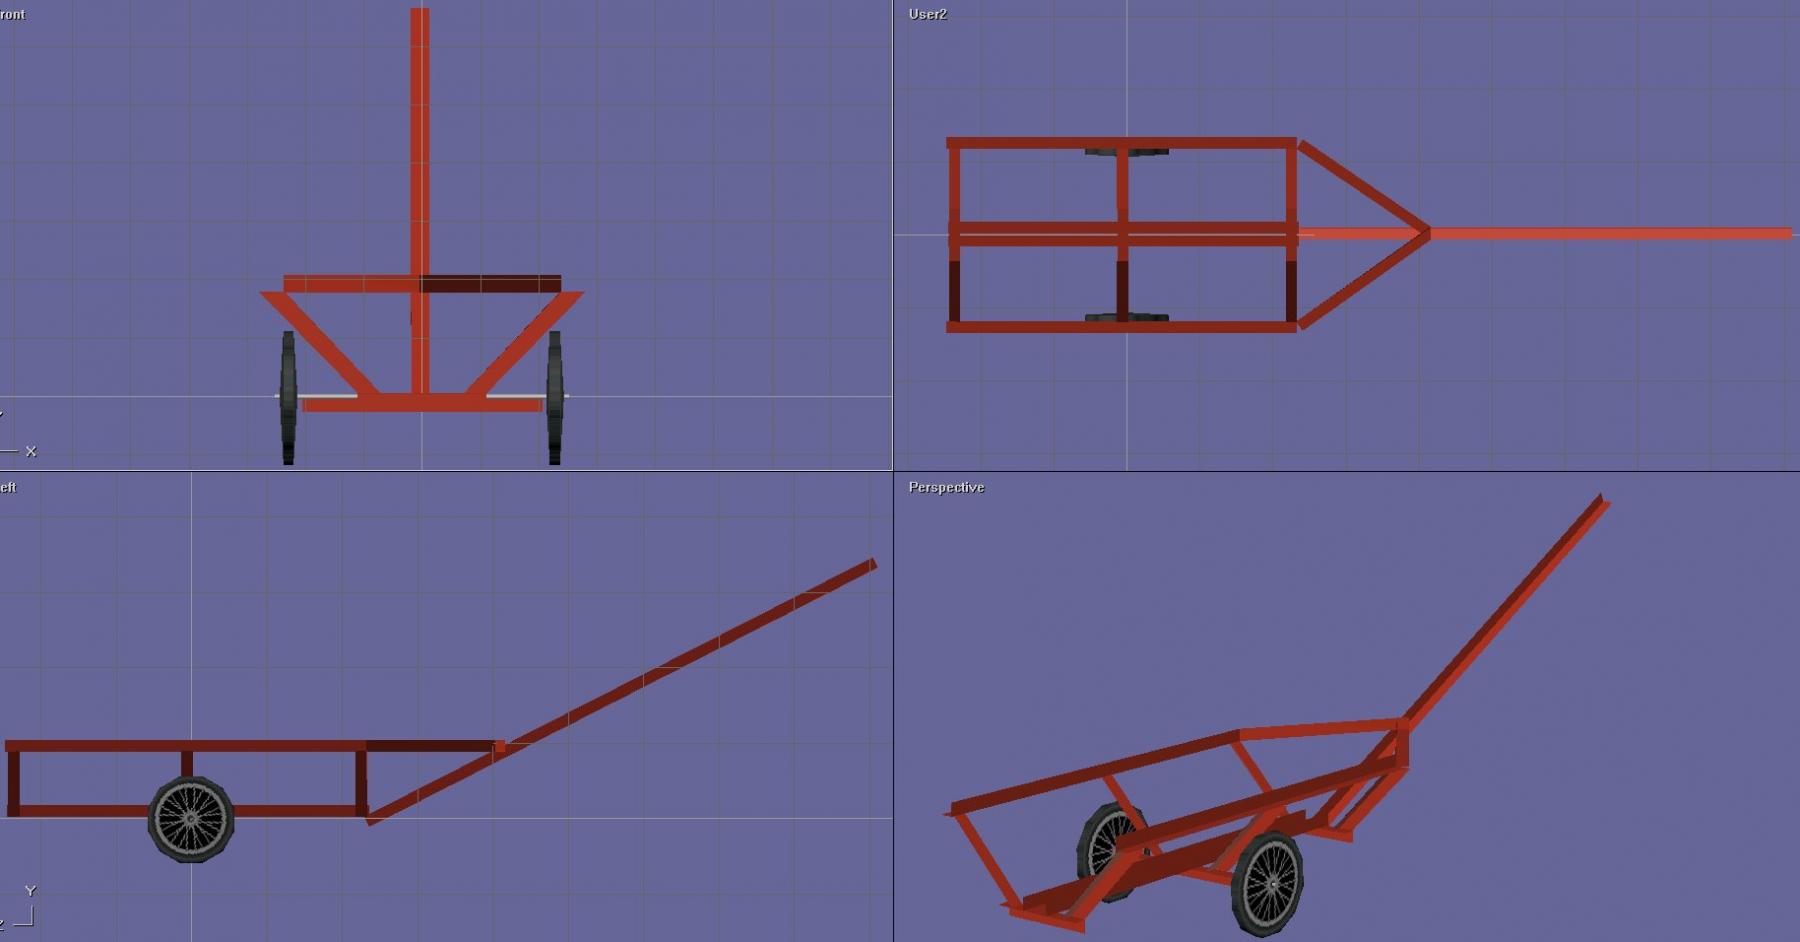
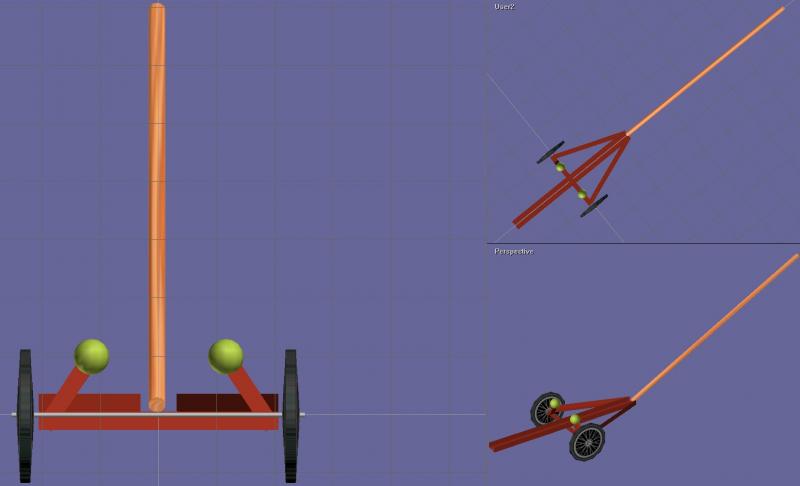
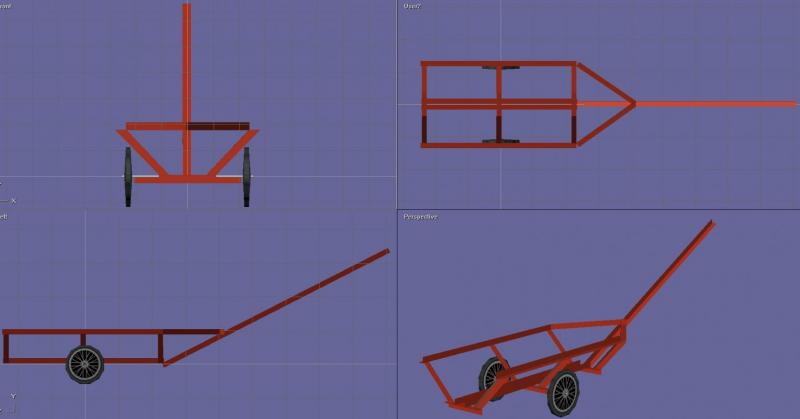
Hey John. My first concern with putting a caster on the back was dunking it in the water - all those little bearings and stuff would have me spraying WD-40 till everyone died of the fumes. The wood blocks also act a bit like tail-skids, so it's not as likely to move when I sit it somewhere, that somewhere very likely to be inclined to some degree. The thing is intended to be a little tail-heavy, so when I park it in the drink to put the model on, the back end isn't sitting up waiting to hole the boat, but instead is sitting down and being a nice inviting ramp (that stays put). I've stood my 260 pounds on it, walked it from end to end like a teeter-totter, and it hardly flexes. It weighs about 20 pounds by itself, Constellation with her ballast weighs about 100 pounds, displacement calculations put her at 98 (I plan to get a more accurate measurement when I go to move her onto the cart). Weight will be an issue if the ground where I'm launching is soft, cause these narrow wheels will tend to sink in. The places I intend to launch her are firm or concrete boat-ramps, so I'm not too concerned there. If I find some fatter wheels, like those on the back of a tricycle, I will swap them out. I updated the 3D model to get some idea of the side supports. Here it is with a preliminary idea of those, and the flag-pole bracket for a handle-holder. This model is now properly and more accurately scaled. The rods that hold the ballast to the model stick out of the keel about 5/8" and set into the couplings inserted into the ballast tube a bit like aligning pins. Because of this, I can sit the ballast on the cart, then sit the model on the ballast and thread the rods in without the model trying to fall off the ballast; ie: I won't need additional bracing for the hull on the cart. Being able to attach and separate the model from 42 pounds of ballast relatively easily is a huge help - and the easier it is to get her to, into, and out of the water - the more likely and more often she'll be sailed.
- 553 replies
-
- 3
-
-
- sloop of war
- constellation
- (and 3 more)
-
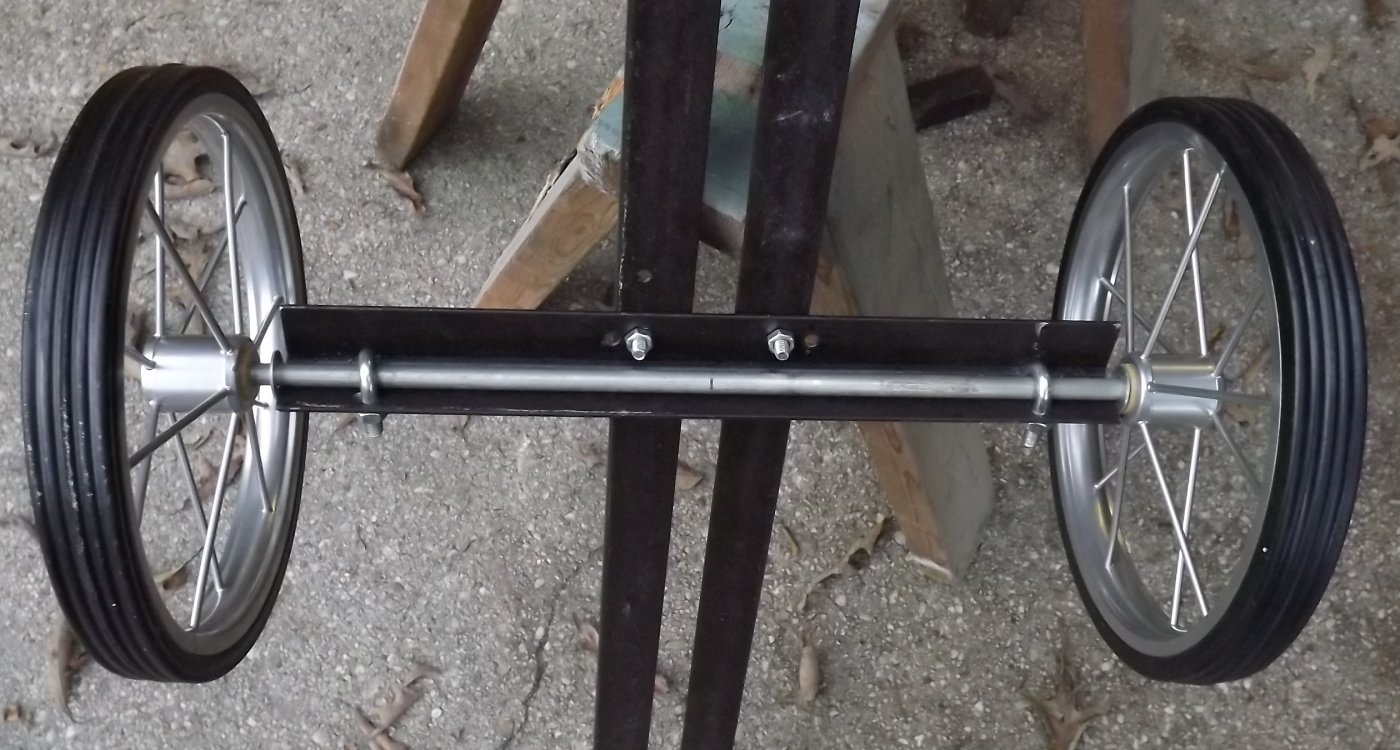
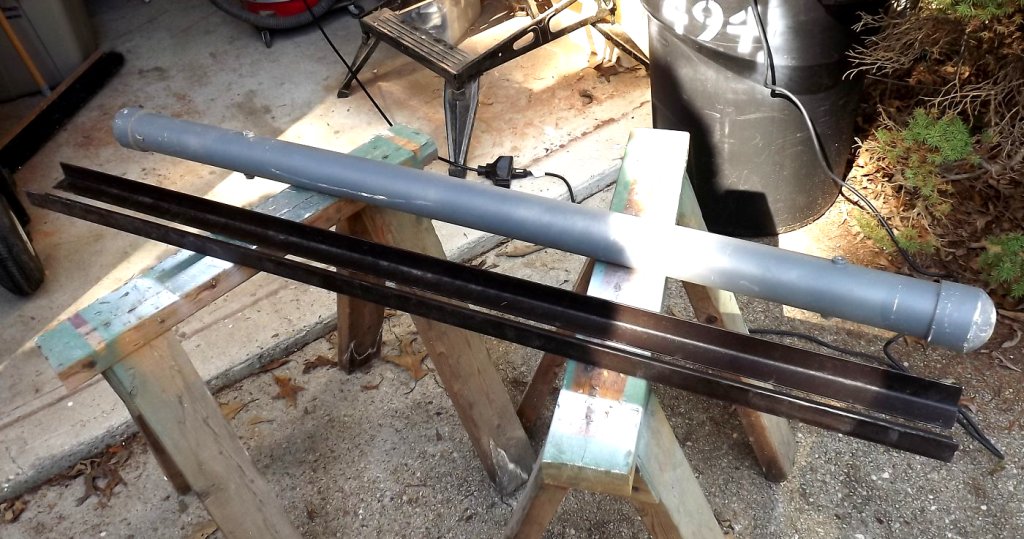
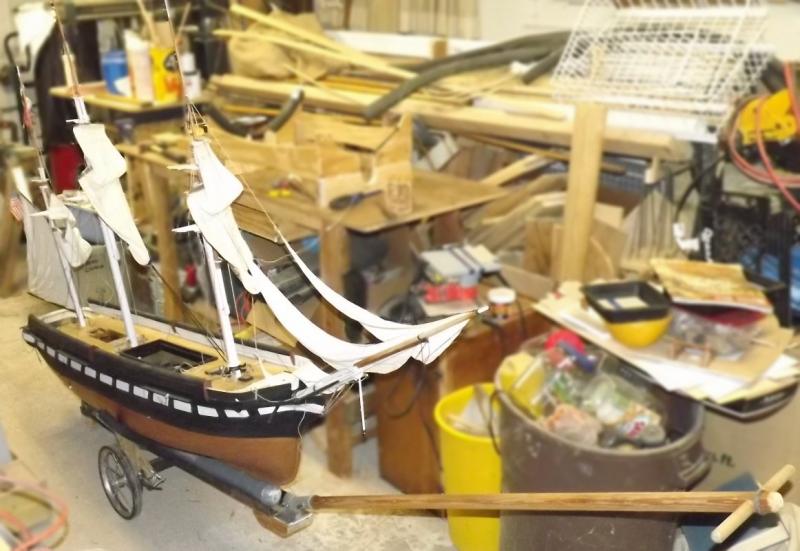
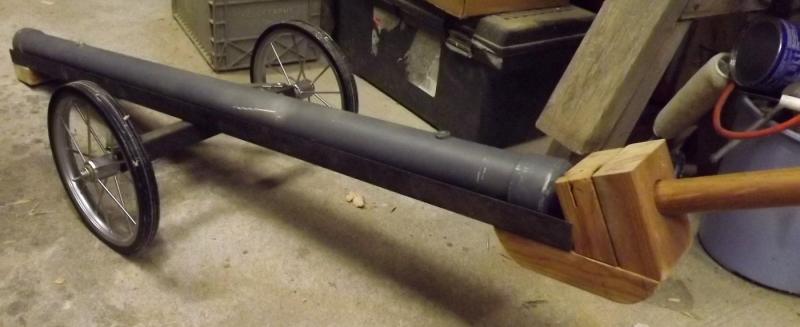
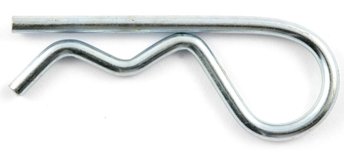
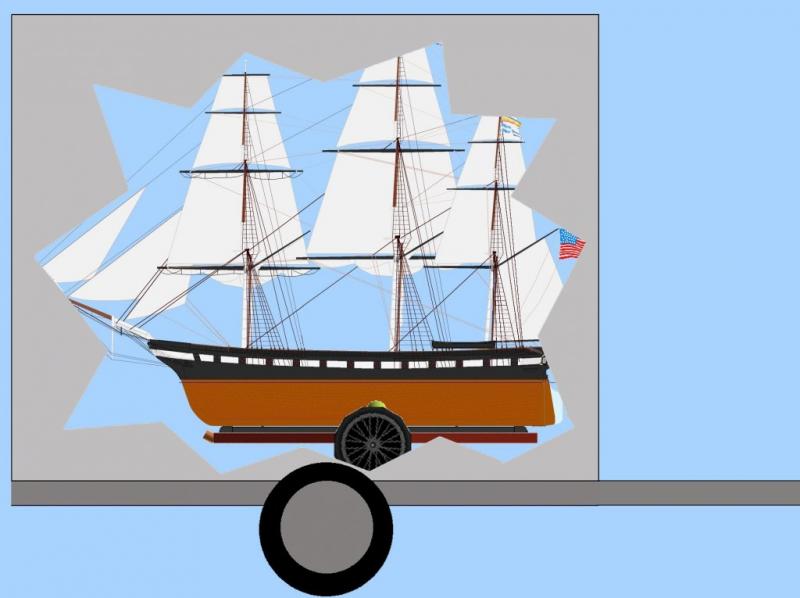
Braced the axle with some 3/4" wide metal I had laying about, and used bits of 2x4 to block the ends and make a receiver for the handle. The handle is a 1-1/4" diameter fir closet rod with a 3/4" x 9-3/4" t-handle. Since Mac's bare hull is much easier to move around, I placed it on the ballast tube to get an idea of how this would look... I also took some measurements and made my 3D model more accurate so I could use it to figure out the side supports... I think some 3/4" thick pieces bolted to the axle support will work. I'll put a cross-piece with some padding at the top of them, and that should work out pretty well. In the model you can see the block the handle goes into was too tall, and I chopped it off so the hull would clear it. The actually makes the hole for the handle lower, which I can't do on the real one, so I have to cut off some at the bottom and the top of those blocks. If I can't do that, I'll make a new set-up with hole for the handle underneath the channel instead of above it. Hmmm, maybe I can just go with one of these? I'd have to shave the end of the pole down to 1", but I think this could work, and it's adjustable!
- 553 replies
-
- 6
-
-
- sloop of war
- constellation
- (and 3 more)
-
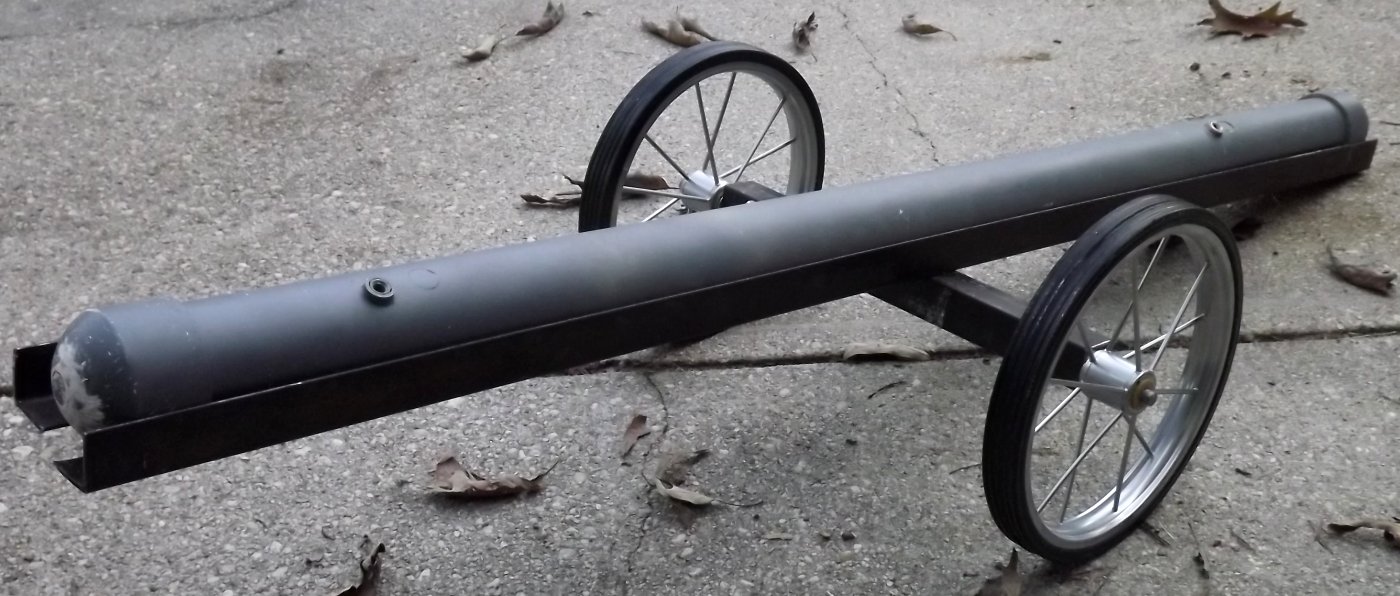
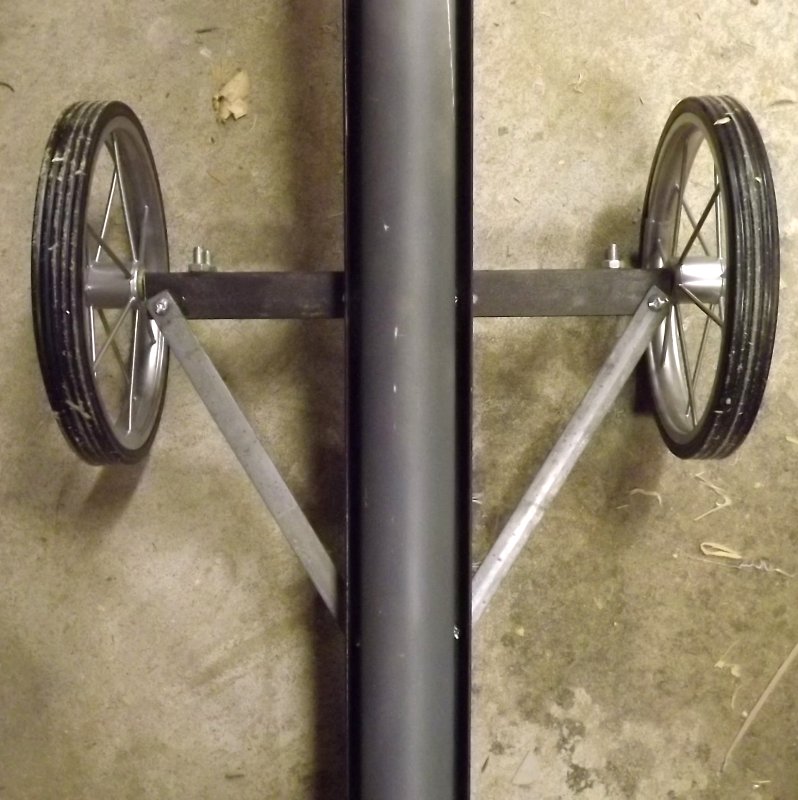
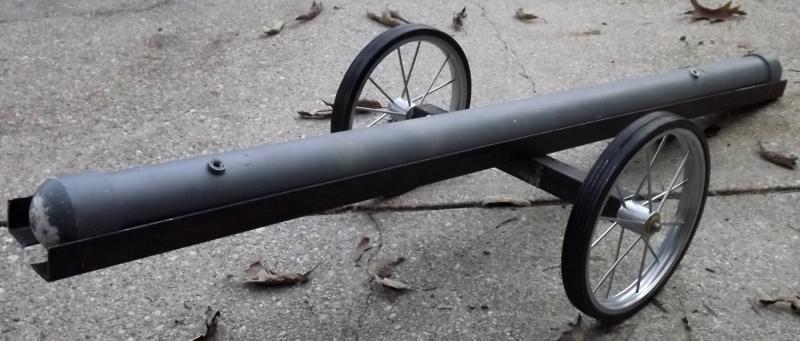
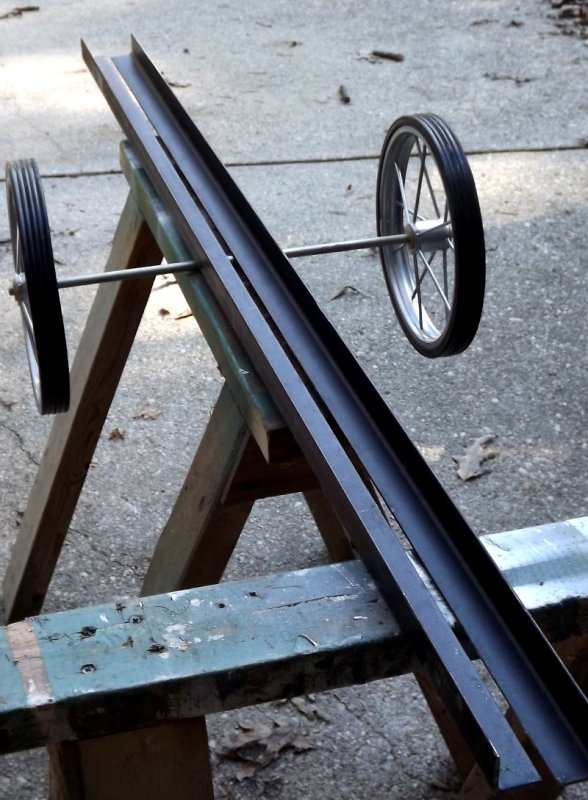
I could only afford one blade and despite it's claim to cut through steel up to 5/16" thick, this 1/8" thick steel made quick work of it. I managed to cut the cross-bar before it gave up the ghost. I drilled the bolt-holes and found some cable clamps to use as u-bolts for the axle. Drilled the axle for cotter pins and slapped together what I've got so far. I was going to mount short pieces of angle at either end to maintain spacing, but I may just use some wood blocks instead of angle-iron. The end on the ground is the back/stern end. This way I'll need to push down on the handle to move the cart, instead of lifting it. I'm a bit surprised the neighbors didn't call the cops thinking I was building a cannon. I have a wood closet pole for the handle, but haven't determined yet how I'll attach it to the cart. I want it removable. I'm thinking a wood block with a hole for the handle, and one for a pin to go through to hold that handle in place. That seems simple enough. On the wheels I think I'll go with hitch pins instead of cotter pins, then I can pop off the wheels easily without tools and it'll take up less space in the car.

- 553 replies
-
- 2
-
-
- sloop of war
- constellation
- (and 3 more)
-
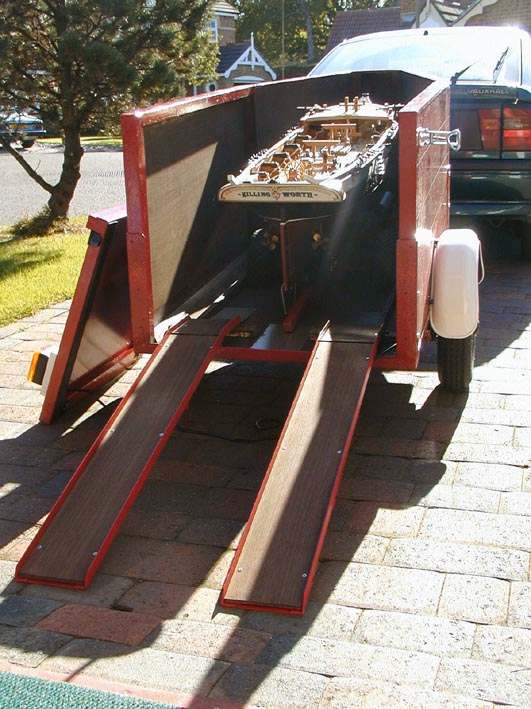
I began cutting my cart's component's from the bed frame material wearing out my only two, already used, metal cutting blades. I keep a lot of pictures of other's models that I like and shows things that help me with my models, things like that. Among them are pictures are Brian Clark's HMS Killingworth, an 1840's British brig in 1:24 scale. Looking through some pictures for something else I came across some showing Brian's launching cart. His is basically the same principle as what I came up with, so there is at least proven precedent for what I'm doing. He also has a little car trailer the model, cart-and-all, can roll up into; I've had this dream of a box trailer I could stow and transport two models in, side-by-side, fully rigged and ready to sail...


- 553 replies
-
- 9
-
-
- sloop of war
- constellation
- (and 3 more)
-
With that 42 pound ballast torpedo clutched in the U channel at the bottom, I don't think there's gonna be any twisting going on. But making the supports higher, so I can see them when the cart's submerged might help things out a bit.
- 553 replies
-
- 2
-
-
- sloop of war
- constellation
- (and 3 more)
-
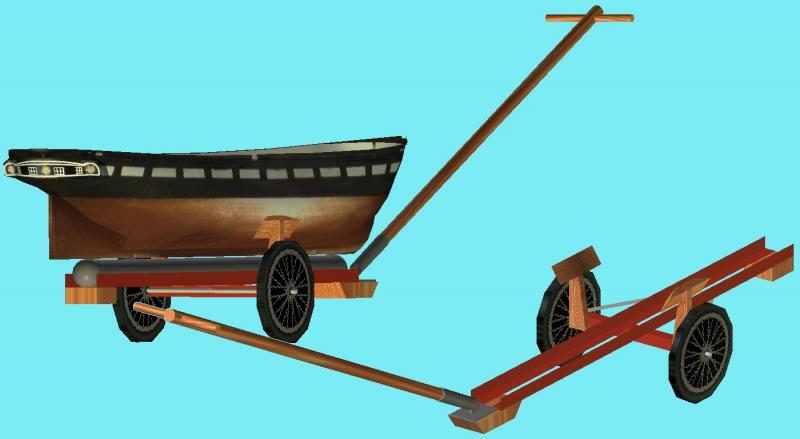
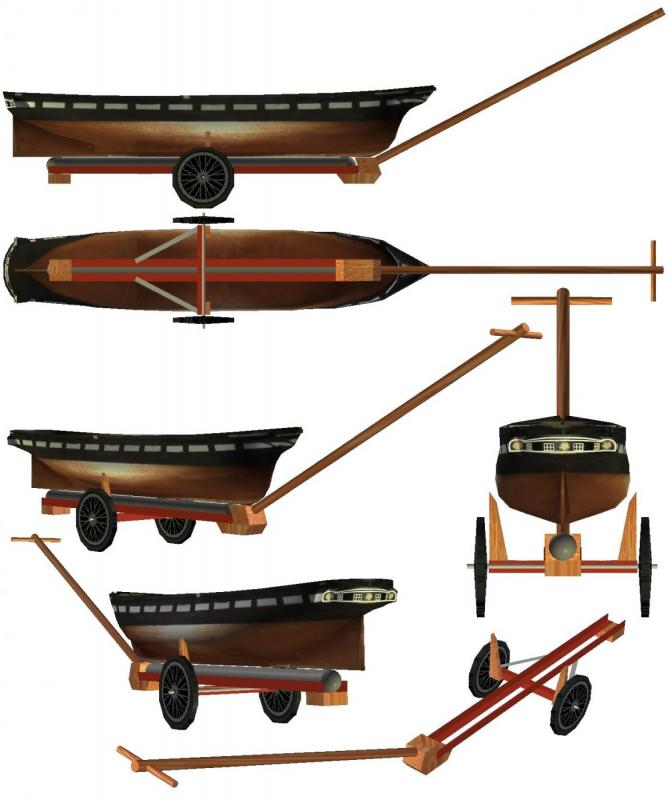
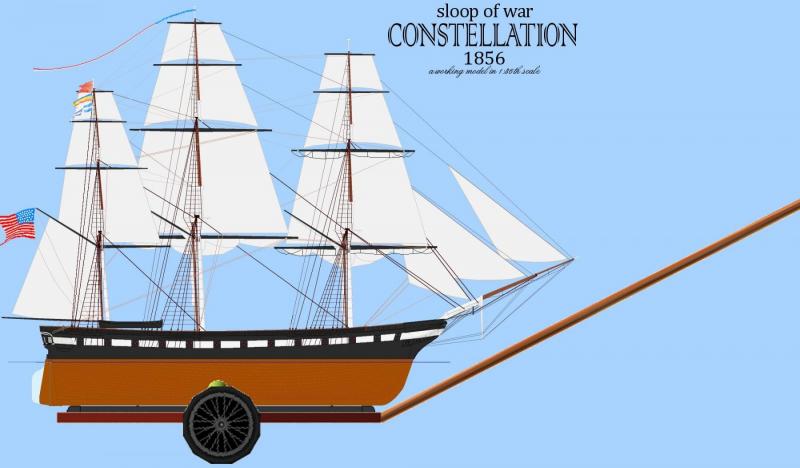
Being able to move a 100+ pound model without breaking things is the trick, so the cart is a critical item. I had a couple of ideas to solve that. Both were based on using 8"-10" wheels from a folding grocery cart or used tricycle; and a bit of angle iron from an old bed frame. The handle would be a wooden closet pole and be removable. The whole thing would simply be bolted together - maybe I could get some of it welded later on. First I came up with this sort of boat-trailer idea. The upper rail would have padding/rollers to hold the model up-right, but the U shaped set-up at the bottom would bear all the weight and keep the hull from turning. These drawings are scale-ish, and it's that brownish color because the bed frame I have is that color. But looking at that got me wanting to simplify and lighten things, so I think this is where I'm headed. A stop at the front of the U channel keeps the model from going to far forward and bumping the rig on the handle. I'm thinking the wheels can be set more forward so the cart will want to tilt aft, and I'll put a leg or a caster back there for it to sit on. I found some 9.5 inch cart wheels online and ordered them, and I have most of the rest I'll need to make this thing.
- 553 replies
-
- 3
-
-
- sloop of war
- constellation
- (and 3 more)
-
Well, I give up. The Transmitter battery won't hold a charge anymore; it's $35+shipping for a new one, and if I could afford it, it still wouldn't get here in time. I have a rough plan for a cart so I could move the model from the car to the creek and back - but I don't have the materials to make it; some angle iron from a used bed frame and a couple of spoked wheels from a tricycle or a cart, an axle, and a bag of nuts and bolts - not hard to find stuff, but not likely to happen inside of 3 days. So, with my tail tucked neatly between my legs - I'm bailing out of the weekend.
- 553 replies
-
- 3
-
-
- sloop of war
- constellation
- (and 3 more)
-
At the top of this page there's a Search feature which usually defaults to the topic you're currently in, and if not, you can click on it and make it so. A search for "ballast" turned up several places it was referenced in this thread, the most recent mention and the earliest reference in this log. There may be a little more detail on my site, click on the signal flags below to get there... Just for giggles... The first time the model sailed she carried 1,149 square inches, or 7.98 square feet of sail (7,413 sq cm) in jib, spanker, and three tops'ls. The last time she sailed she carried 1,677 square inches, or 11.65 square feet of sail (10,819 sq cm) with the addition of the t'gallants and two more heads'ls. I intend to sail her with the coarses brailed up until I can work out operating tacks/sheets for them, and royals. That configuration amounts to 1,836 square inches, or 12.75 square feet of sail (11,845 sq cm).
- 553 replies
-
- 3
-
-
- sloop of war
- constellation
- (and 3 more)
-
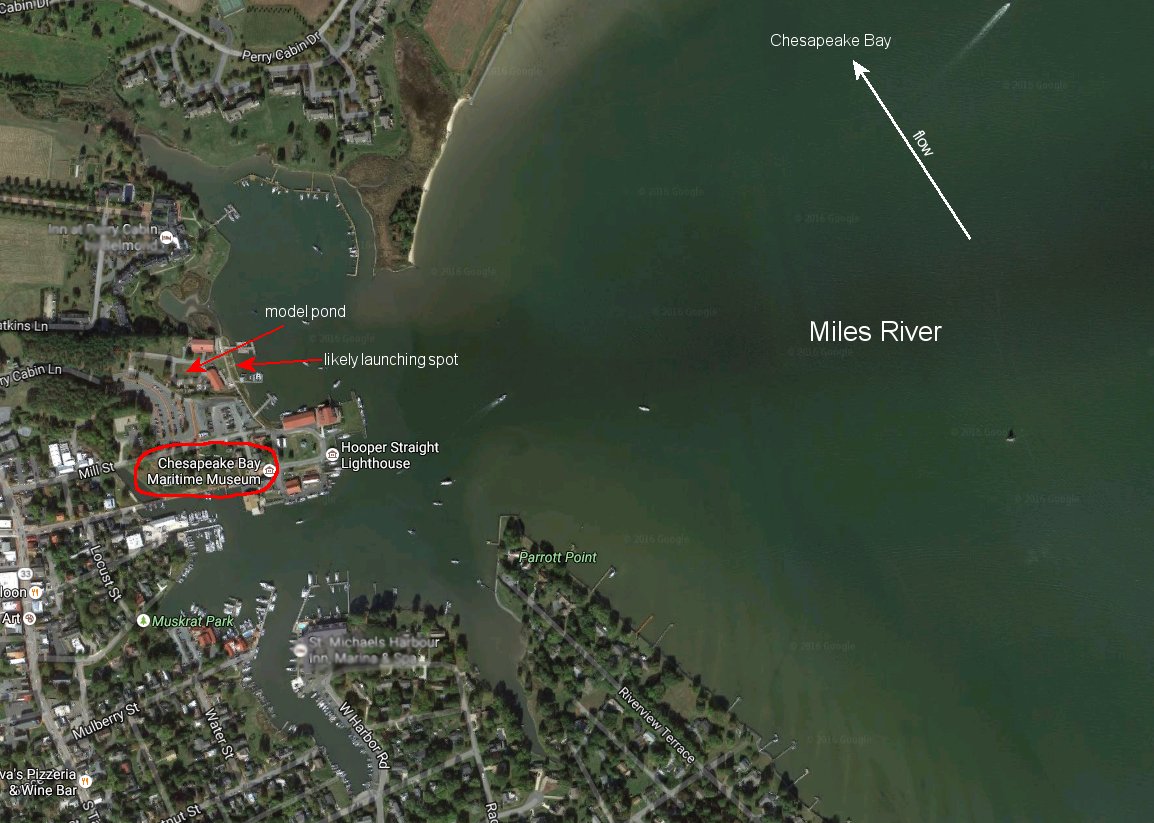
I think the current is maybe 2-3 knots, but it's forecast to rain that Friday so it may be a little stronger. We have like a foot-and-a-half tide here which will ebb about noon both days. The Miles runs North-West past St Michaels which is in something of a cove, so I don't think the current's going to be an issue. The weather forecast is partly cloudy, low 70's F, and NNE-NE winds of about 9 mph. All told, it should be pretty darn perfect actually.

- 553 replies
-
- 4
-
-
- sloop of war
- constellation
- (and 3 more)
-
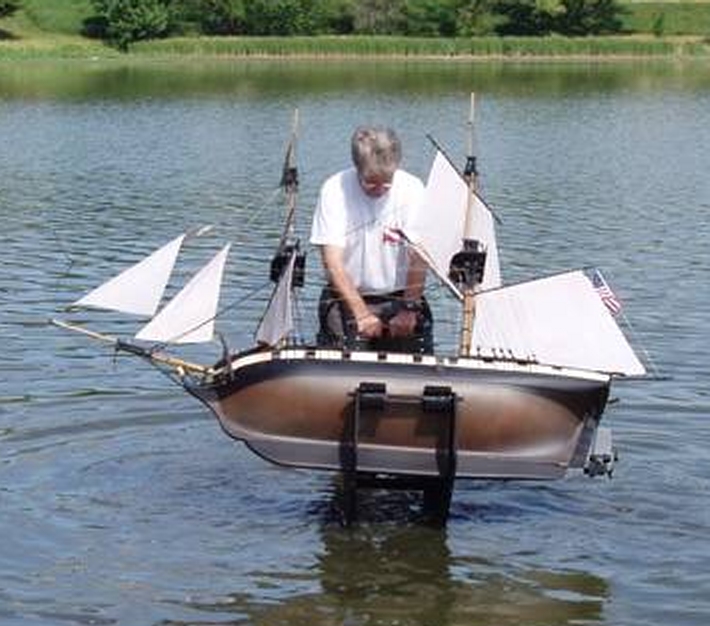
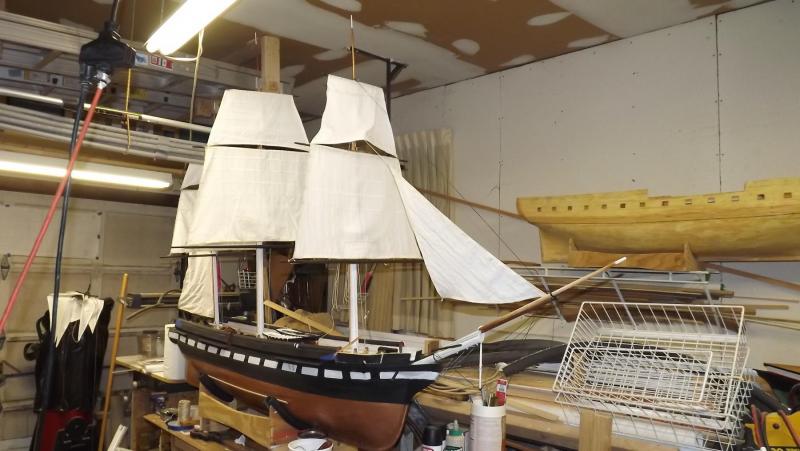
I've been pecking away at jury rigging the old girl to go sailing again, but I don't know if I'm gonna make it. The big problem is the pool they set up is too shallow for her to really sail properly, so I want to sail her in the creek (Miles River), which is what she's meant to do anyway. Getting her to, in, and out of the creek is the problem, and I have a week to solve it. There's also a small-craft festival running concurrently on the site, so I'm a little worried about small boat traffic in the creek while I'm trying to sail this model - then again there'll be no shortage of chase-boats.
- 553 replies
-
- 6
-
-
- sloop of war
- constellation
- (and 3 more)
-
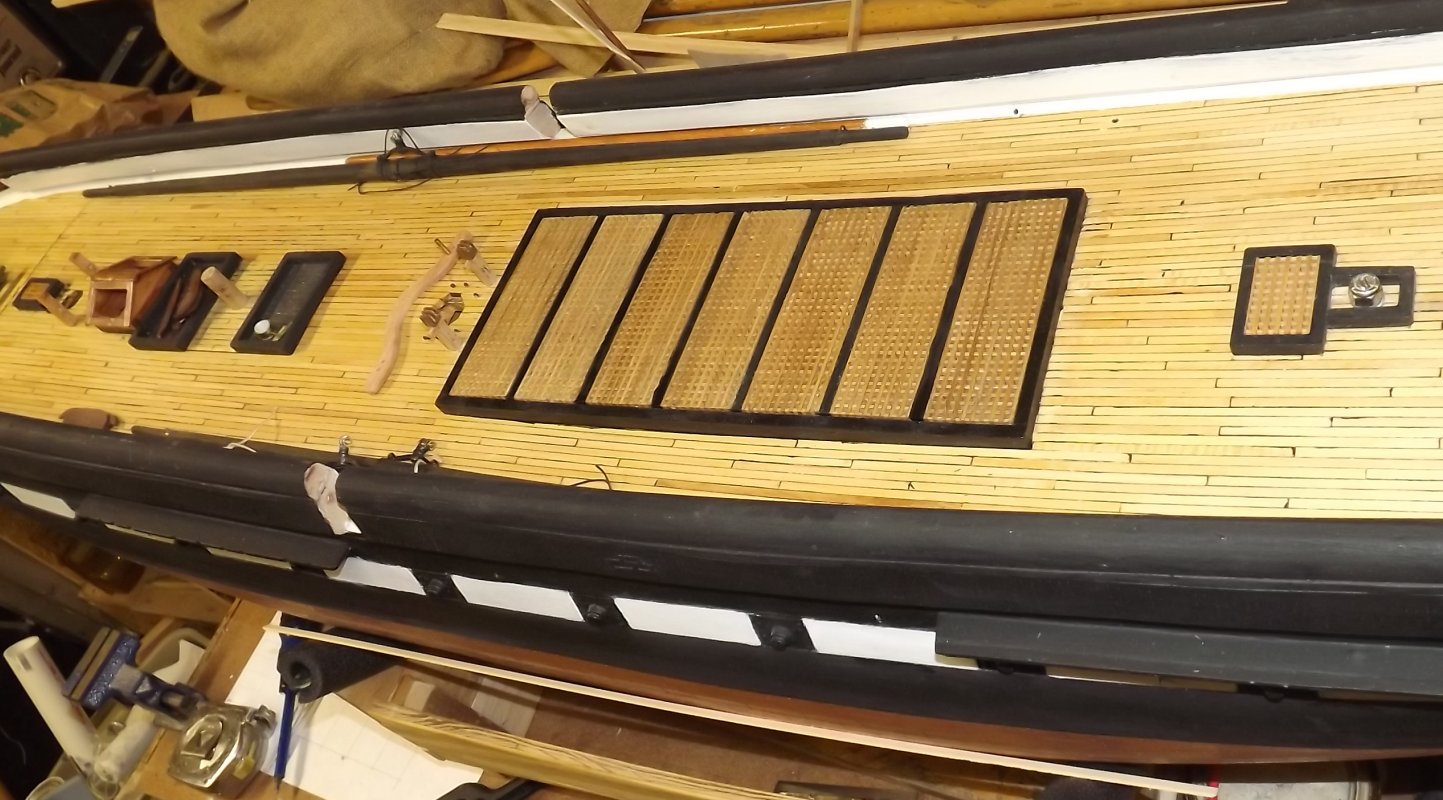
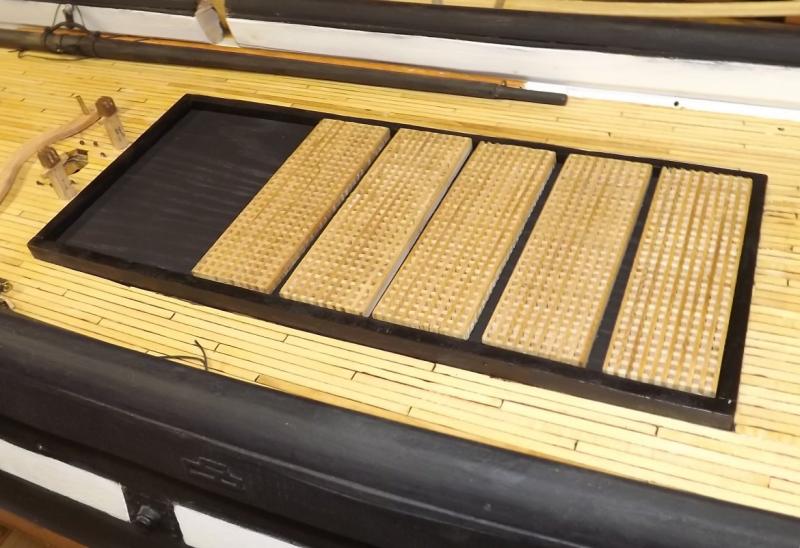
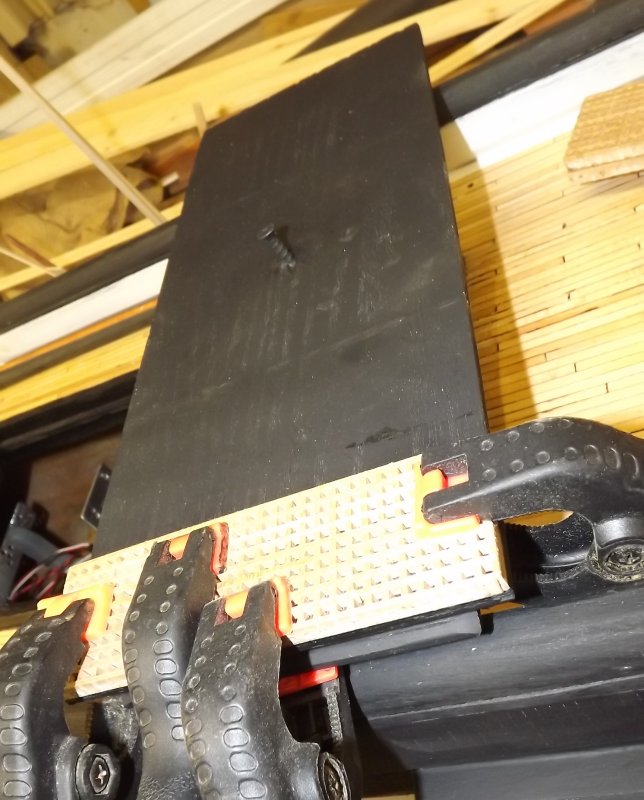
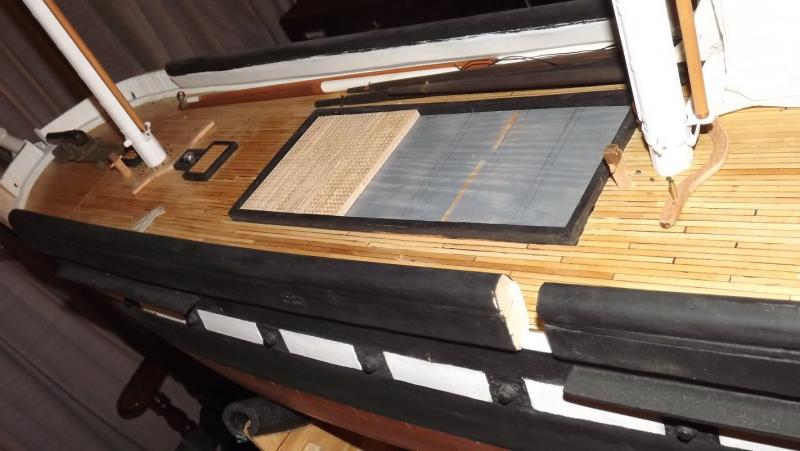
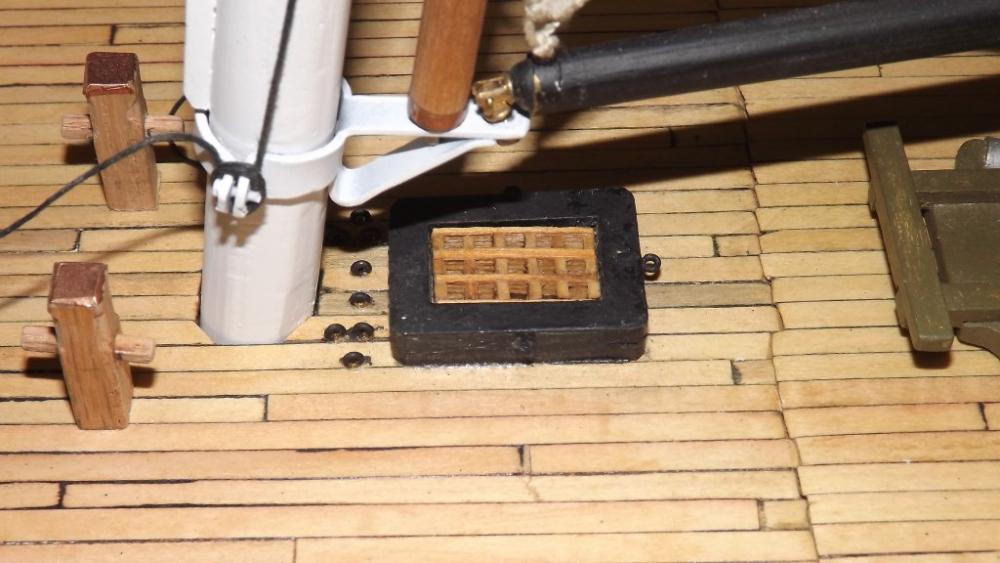
Finished the main hatch gratings yesterday. Not the best photos, but when I get the boat chocks made I'll do better, I hope.

- 553 replies
-
- 12
-
-
- sloop of war
- constellation
- (and 3 more)
-
<snark>About 35-40 pounds</snark> She's just a hull on the worktable at the moment. I'm getting her ready to go to the Chesapeake Bay Maritime Museum the first weekend in October (barring storms and flooding again) so when I have her rigged up and ready, I'll hang her in the slings and see if I can get a real number. Till then, I'm guessing fully loaded and ready to sail she'll weigh in between 100 & 110 pounds (45-50 kilos?)
- 553 replies
-
- 2
-
-
- sloop of war
- constellation
- (and 3 more)
-
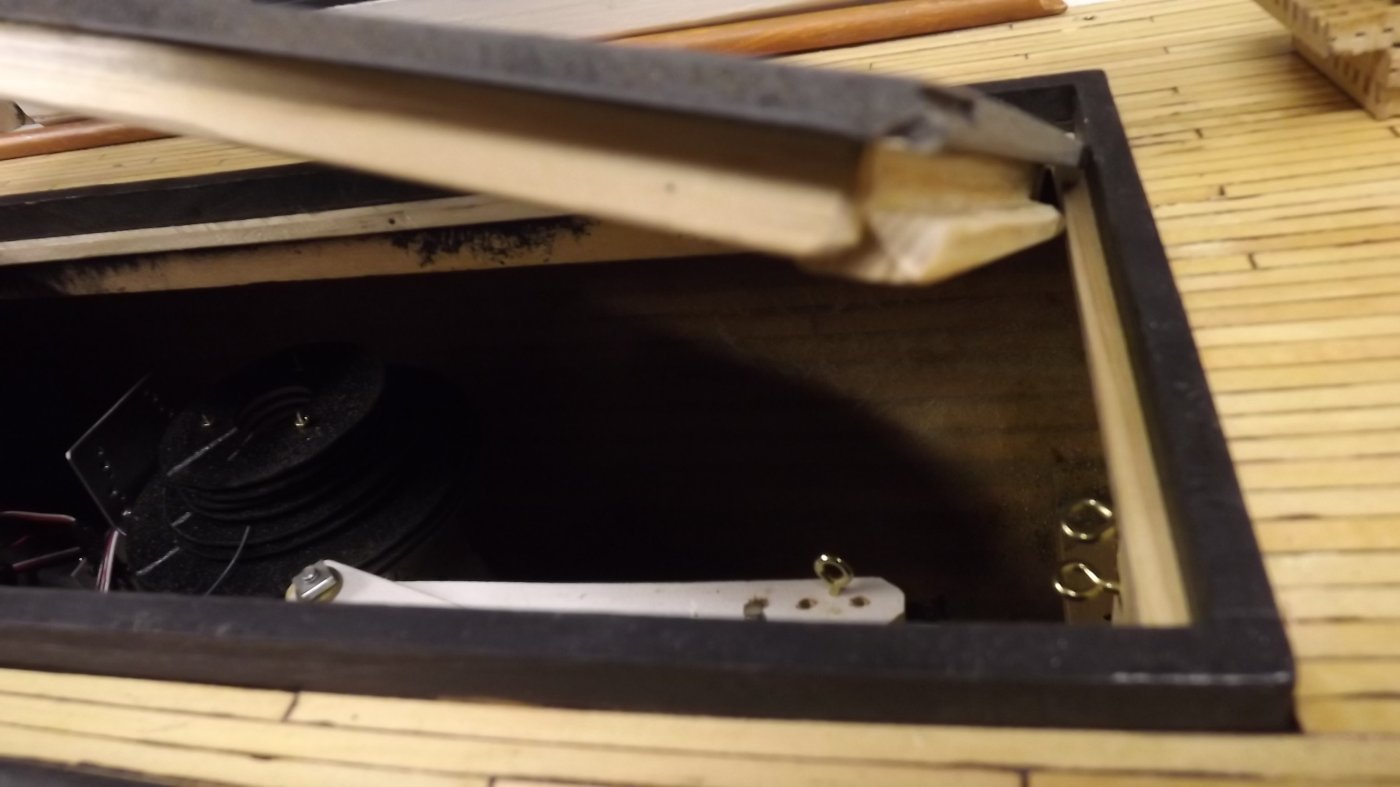
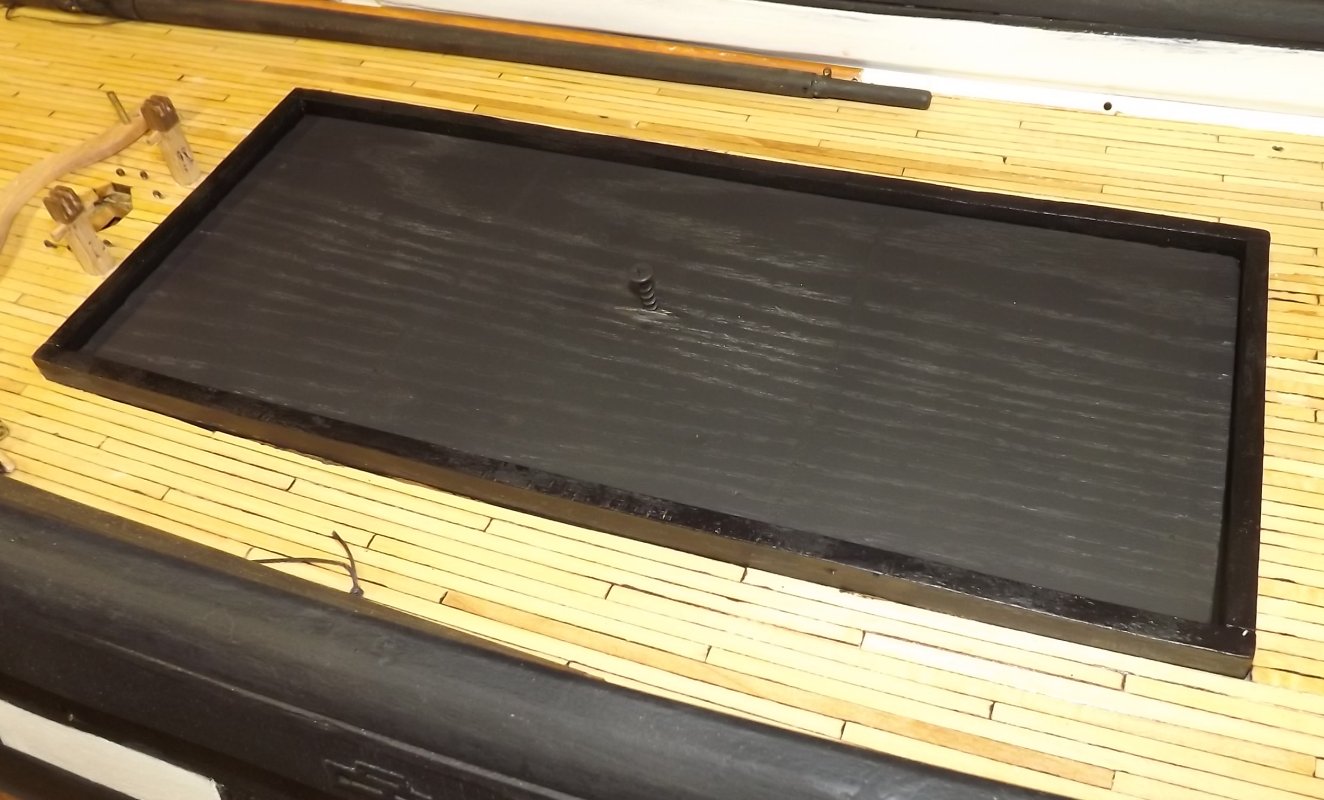
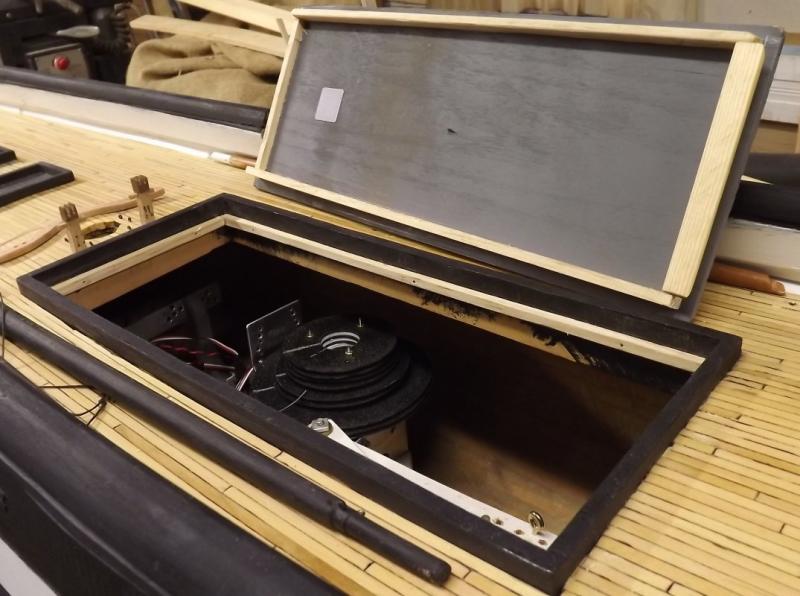
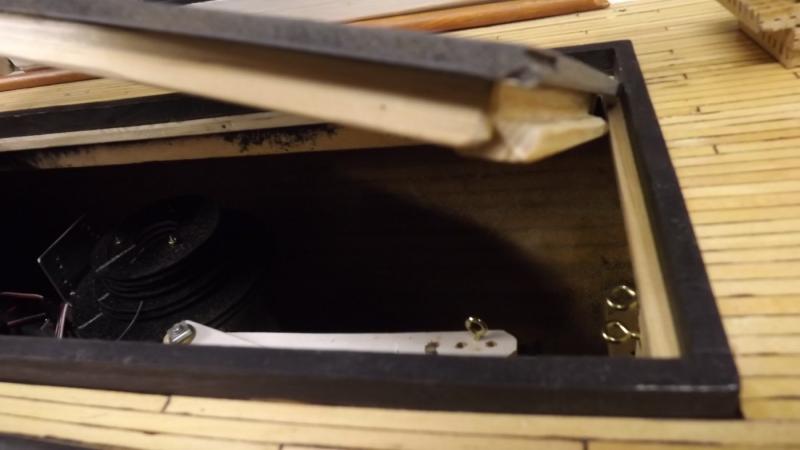
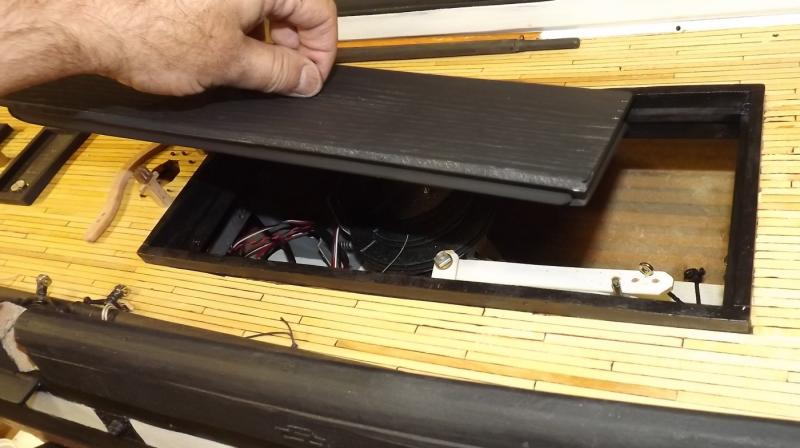
As much as I'd love to make them functional, I have visions of spending all my time repairing them - so yeah, they'll all be in the "up" position. So, I made a couple more main hatch gratings and have two more of the seven left to do. They'll get mounted to a plywood base so the hatch cover, gratings, boats; will all be a single removable unit. I installed a narrow ledge for the cover to sit on so the gratings with be flush with the top of the coaming; and framed the cover so it matches the sheer and has a lip forward to hook under the ledge and hold that end down. I'll probably put a magnet or two aft to hold that end, or a patch of Velcro. All of that got painted and I glued on the first of the hatch gratings.

- 553 replies
-
- 7
-
-
- sloop of war
- constellation
- (and 3 more)
-
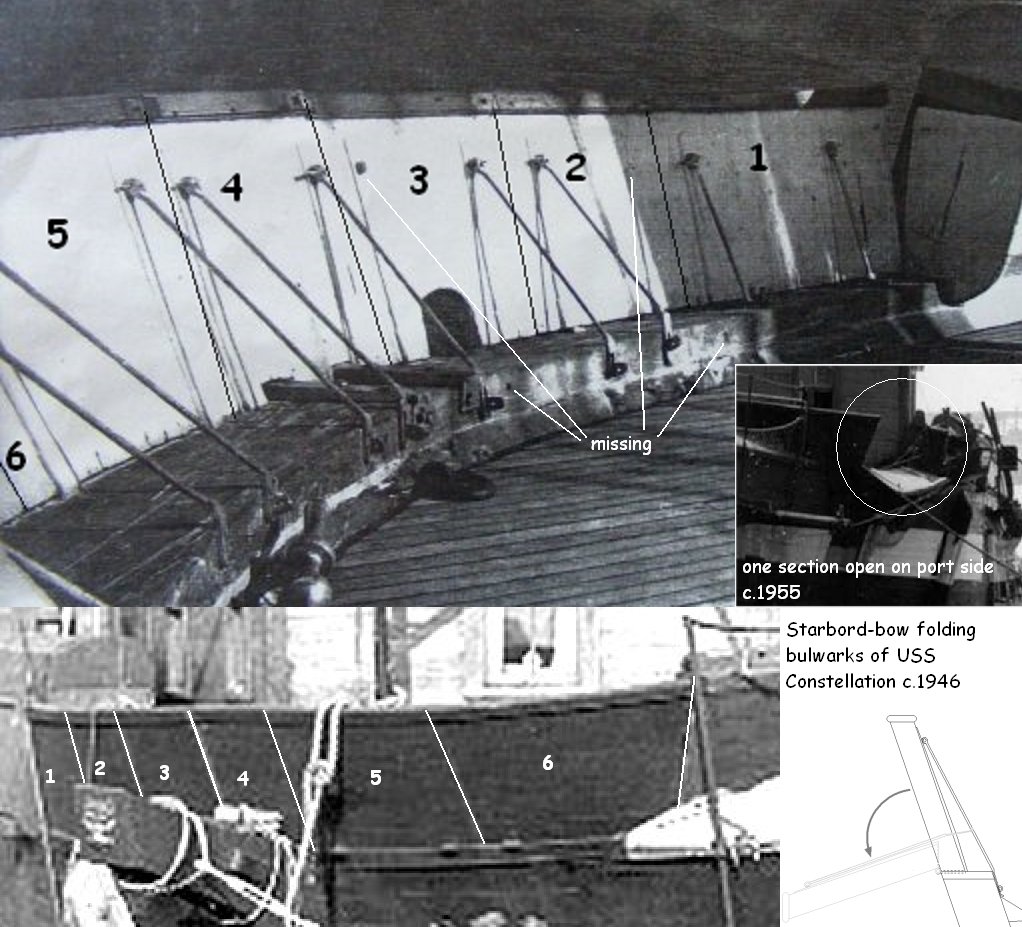
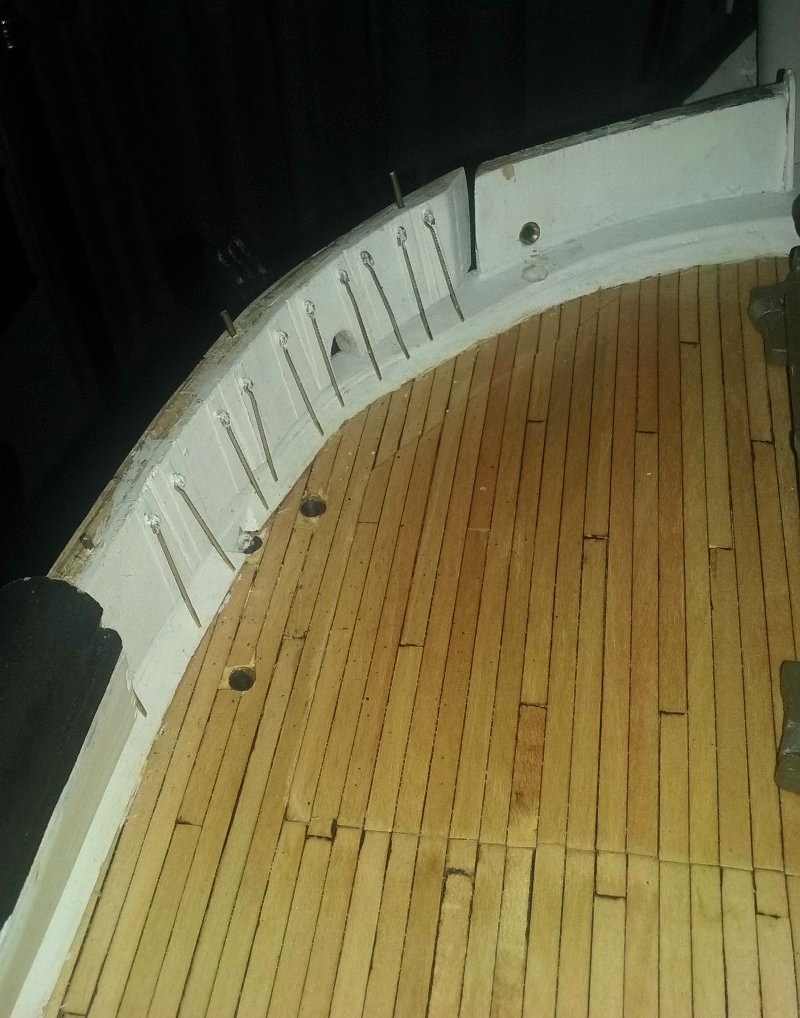
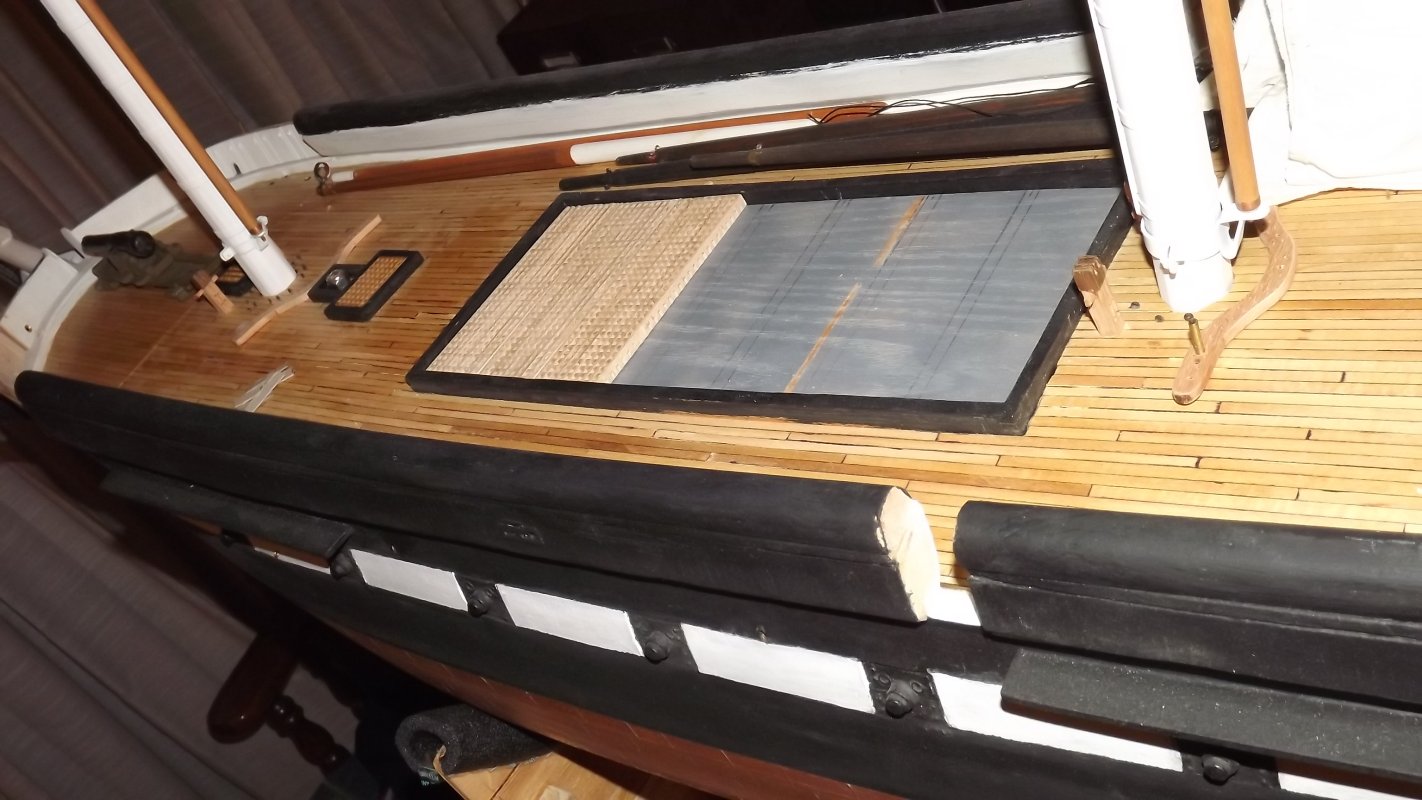
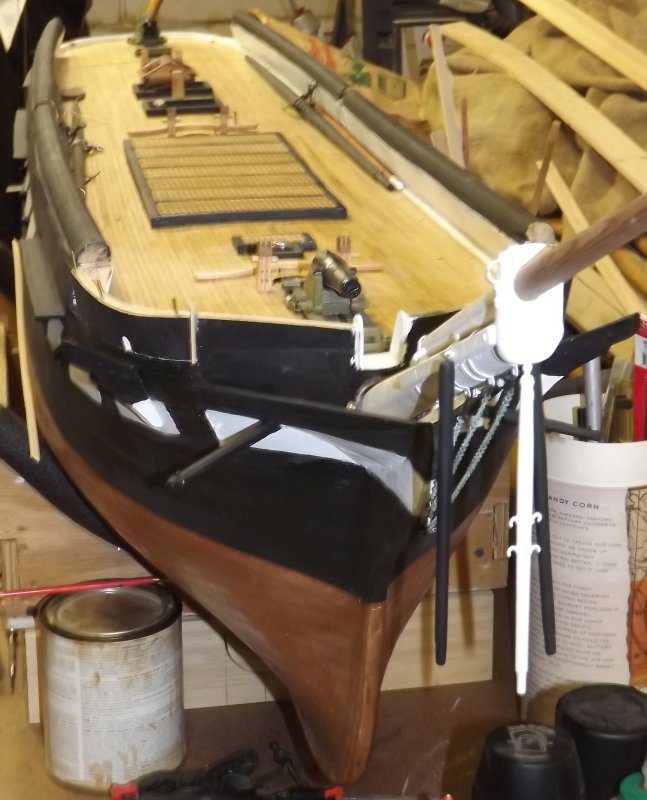
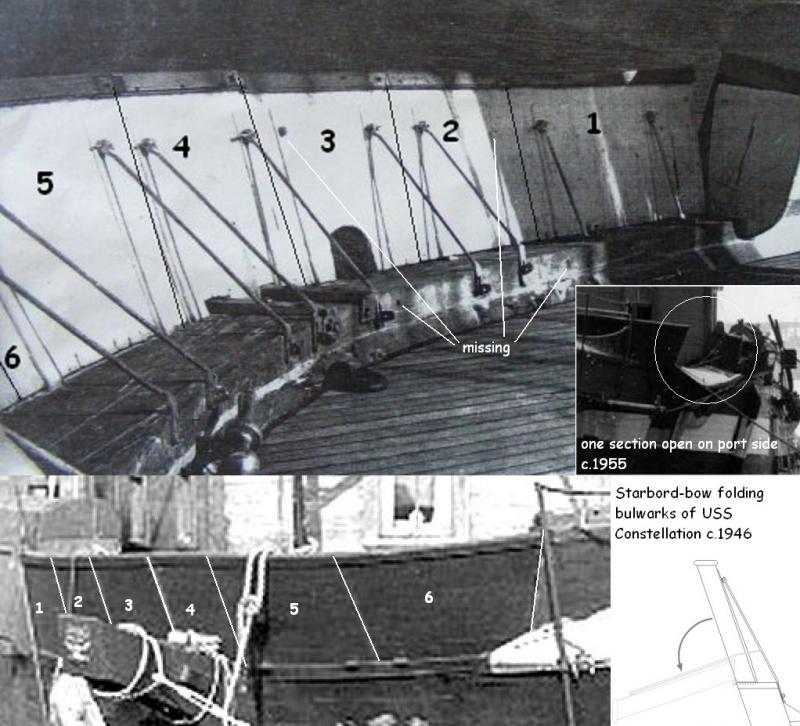
Constellation like many ships with pivot guns, had section of bulwark the could fold down, or even be removed to clear the gun's field of fire. I opted to model these six panels on either side as single units in a fixed upright position as mine is a working model and as much as I'd have loved to make then operate, that's just asking for jib sheets and tacks, and who knows what to snag on them, or some ham-fisted oaf (like me) to grab the model and bend or break one or more, you get the idea. In this image you're near the bowsprit looking starboard and aft. The hinges are custom shaped cast bronze strap hinges which I facsimiled with card-stock, the smallest brass eyes I could find, and prop-rods who's eyes I bent in myself. The bottoms of the actual rods were flattened and slipped over an eye like a lock hasp. I'm not sure how I'll represent that detail, but I'll try to drill a hole and put an eye-spike through it into the cap-rail. This isn't triggering your Post Traumatic Folding Bulwark Syndrome, is it Mark?

- 553 replies
-
- 6
-
-
- sloop of war
- constellation
- (and 3 more)
-
Oh, I'm pretty sure the handles are Jews Harp shaped iron rod and riveted to the iron plate. They also could actually be bolted or screwed to the beam not only to keep them from slipping from under the boat, but they look narrow and would fall over if not held down somehow. I worked on a boat back in the Flintstones days, that had very similar chocks for it's lifeboats. They had a plate with rectangular holes in it, set on risers to hold it maybe an inch off the deck and the tip of the chock had a sort of Z bend to it, like shelving clips. You held up the outboard end and stuck the nose into a hole and lowering it down locked it in place. You couldn't take one out with the boat sitting on it. There was a sort of turnbuckle adjustment to fine tune the angle to the boat. The folks at the restoration told me, a few years ago now, that the Washington Navy Yard has a book from the 1850's-ish that details everything about ship's boats; metal work, fittings, oars, chocks, davits, all with the manufacture of said gear in mind. I inquired of WNY about this book and hardly more than an hour later they replied that they have no such item. I'm inclined to think they didn't want to be bothered.
- 553 replies
-
- 2
-
-
- sloop of war
- constellation
- (and 3 more)
-
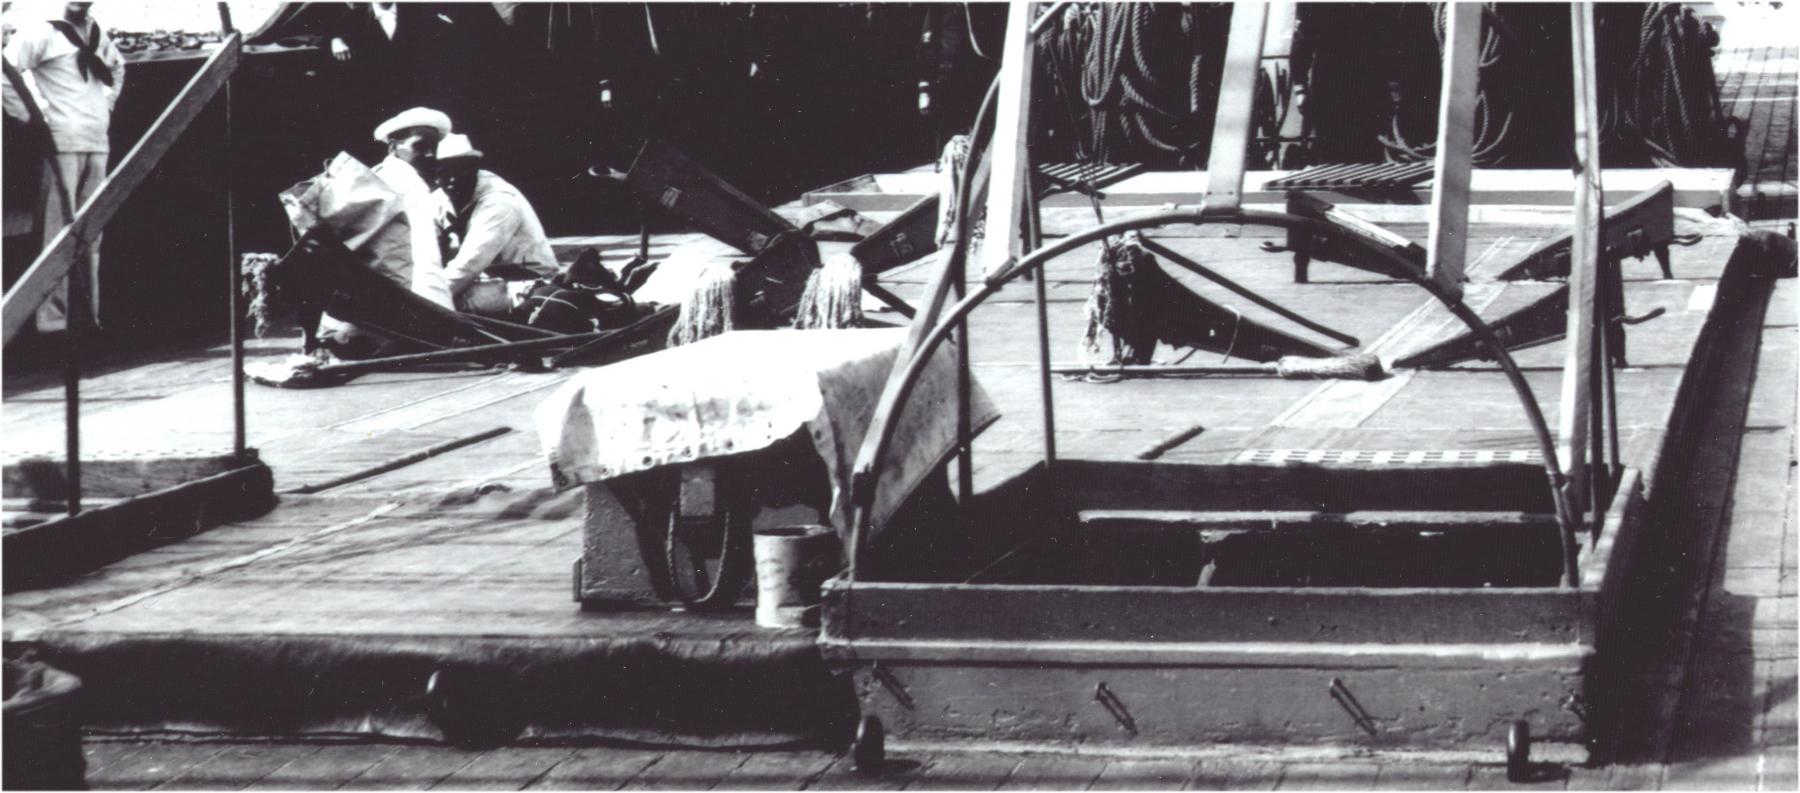
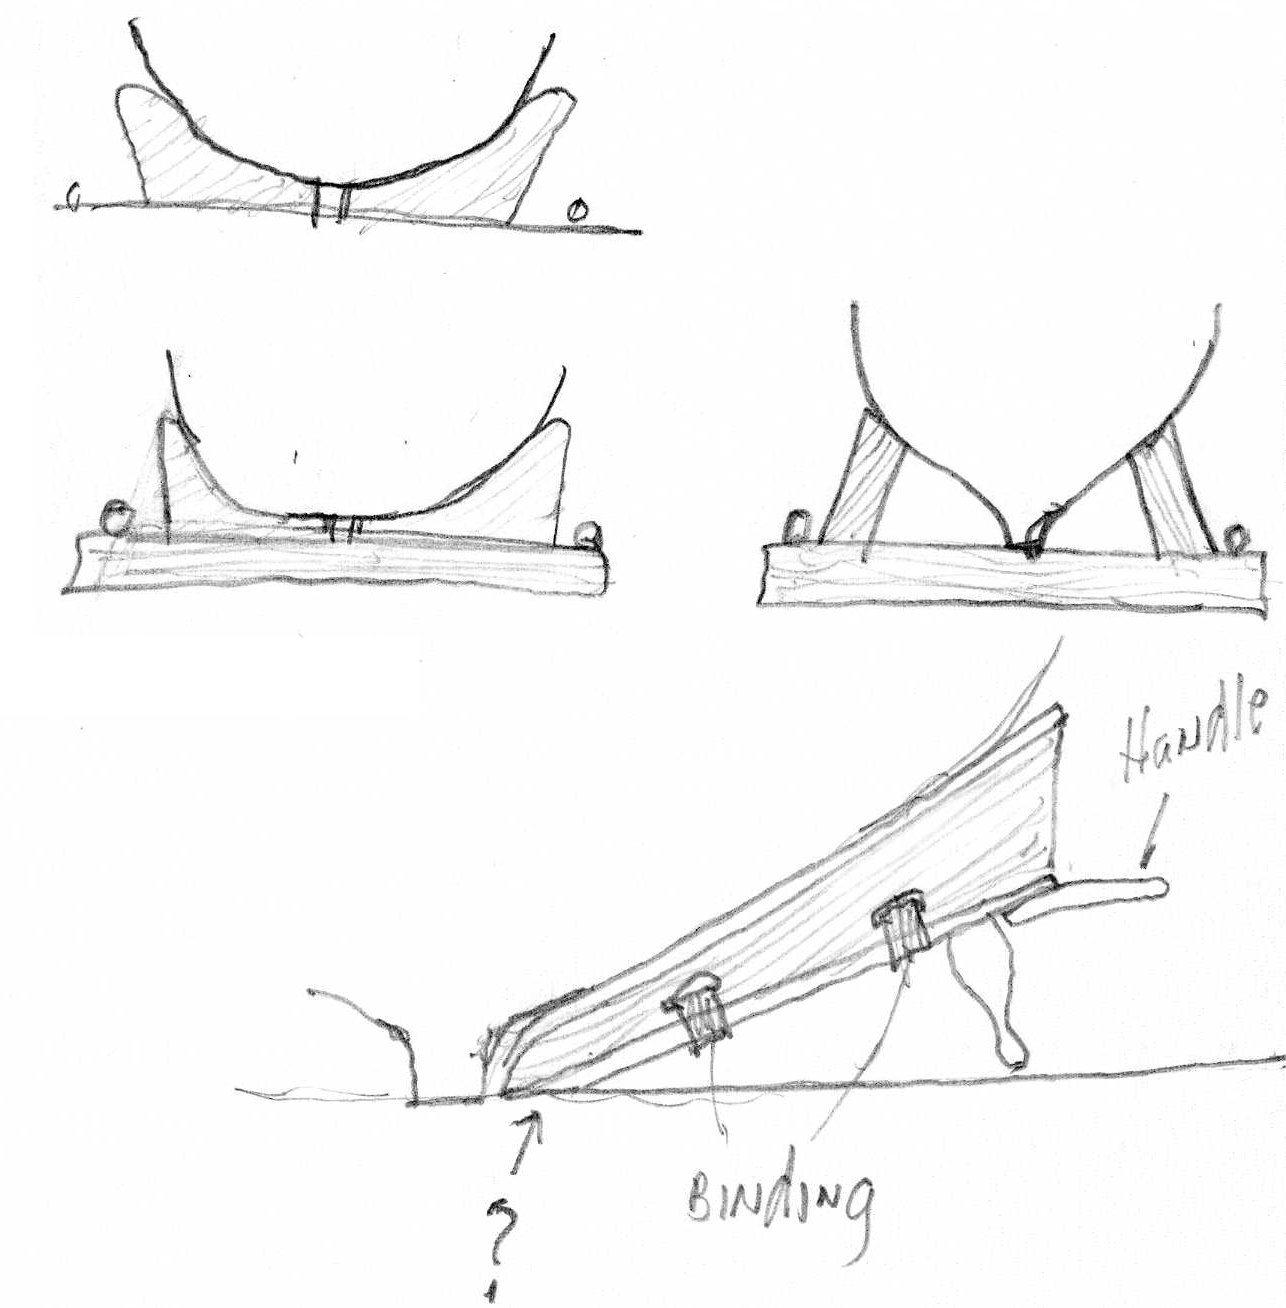
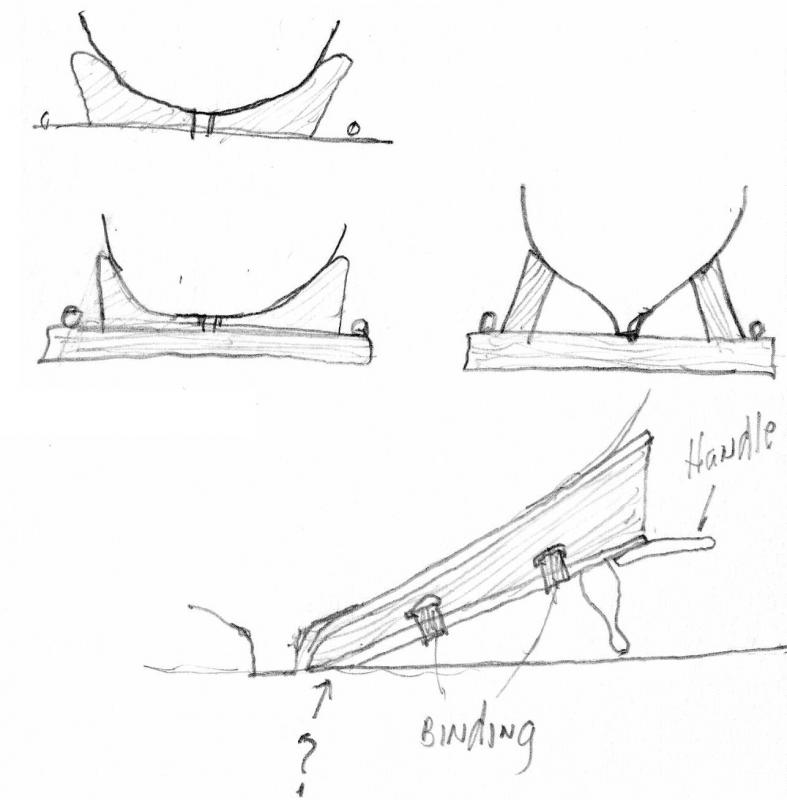
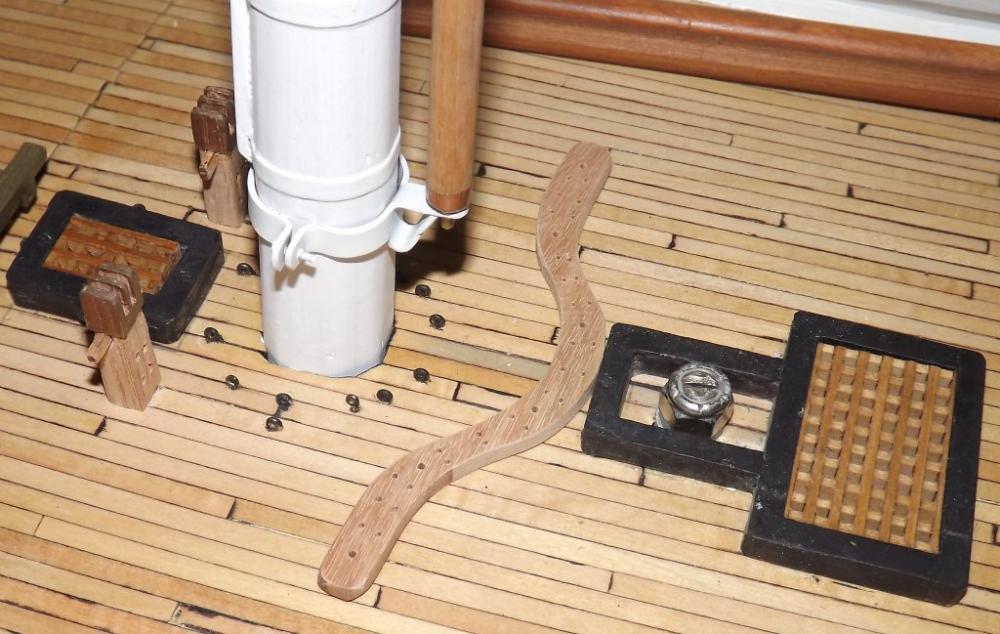
The launch and a pair of cutters stacked, sit atop the main hatch; so I've been trying to discover how these boats were chocked. If you want to find out how little information there is on something - go looking for it. I've looked at photos of Civil War period ships and found very few stowing boats on deck - they're almost all on davits, and a few seem to just sit on deck, lashed to the rail, with davits to left them overboard. Models seem to have gone with simple panels cut to the lines of the boat they support at that position, mounted right on a beam, or mounted on a separate short beam, I guess to be portable. Sometimes instead of shaped panels, there are posts set on end and leaning inward with their tops cut to fit the shape of the boat, like blocking in a dry-dock. In the attached photo of Constellation's deck taken in the 1890's, her boat chocks are visible on the main hatch, but it's hard to make out any real details. They seem to have an iron plat with a loop handle and a bowling pin shaped leg to hold it at an angle. A shaped wood block is bound to this plate, with what appears to be webbing. On this is what is probably padding, like a bit of fire hose or some-such. There's a lot of mops leaning against the chocks that are no part of the chocks, so watch out. I tried to approximate what I think I'm seeing in the doodle above. Where the question mark is I'm guessing there was something that held the thing in place so it wouldn't slip out from under the boat. A pin maybe, or some nail-like spikes that would dig into the beam? This doesn't mean this is how she was fitted out in 1856, and what she had then could even be a version of the three at the top of the doodle. I'm just not sure how to figure out which. I'm inclined to go with a sort-of stylized version of the ones in the photo, though it bothers me that I can't see anything in the photo for lashing the boats down, unless they tie to the handle on the chocks.

- 553 replies
-
- 2
-
-
- sloop of war
- constellation
- (and 3 more)
-
Made two more grating sections for the main hatch, four more to do. I also glued the other three gratings, two ammo hatch, and galley hatch, in place.

- 553 replies
-
- 2
-
-
- sloop of war
- constellation
- (and 3 more)
-
Normally, attached images were shown in-message at a reduced size; you click on then and they show to fit the screen or full-sze in a "light-box" display; but for a few months now, they show in-message at the large size instead of reduced. I can't find that this is account of my preferences or something of that sort - did the forum software change recently?
-
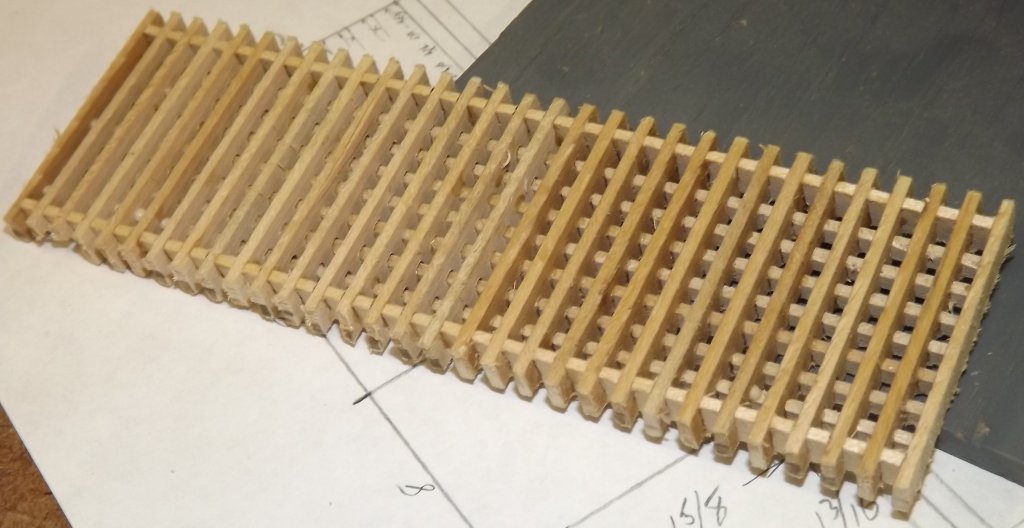
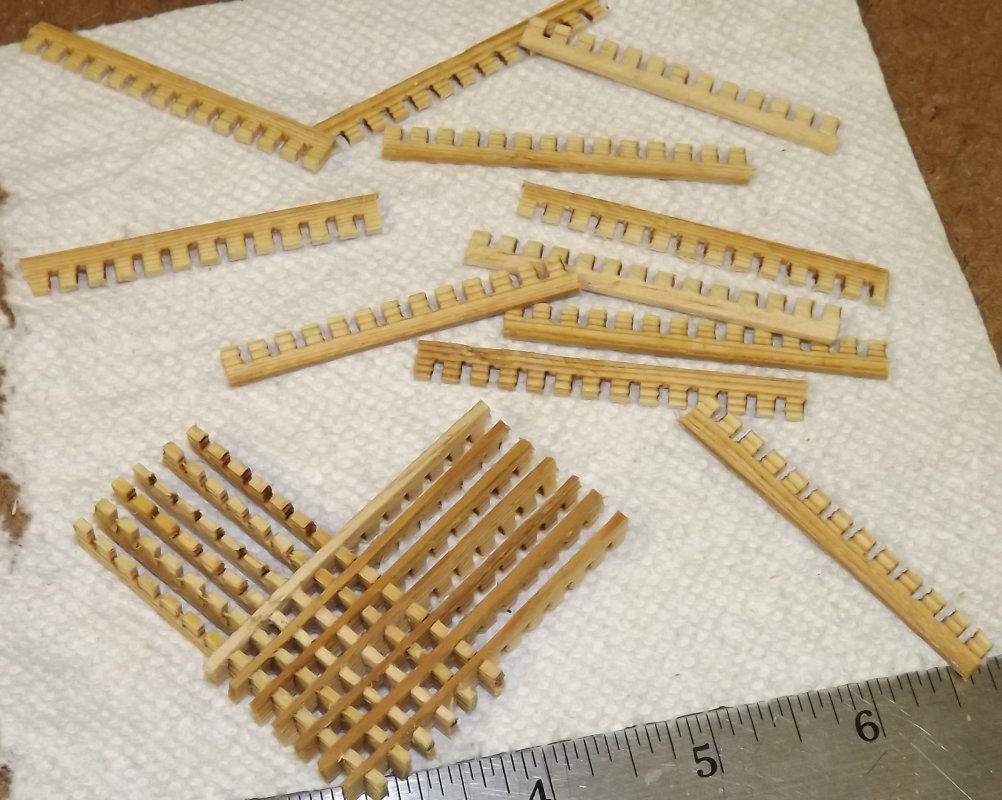
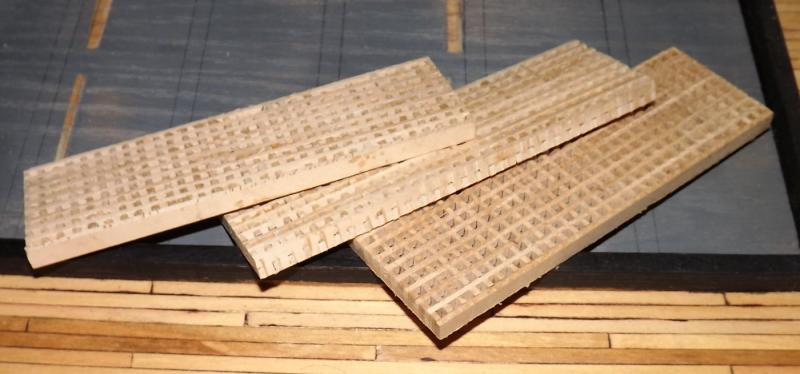
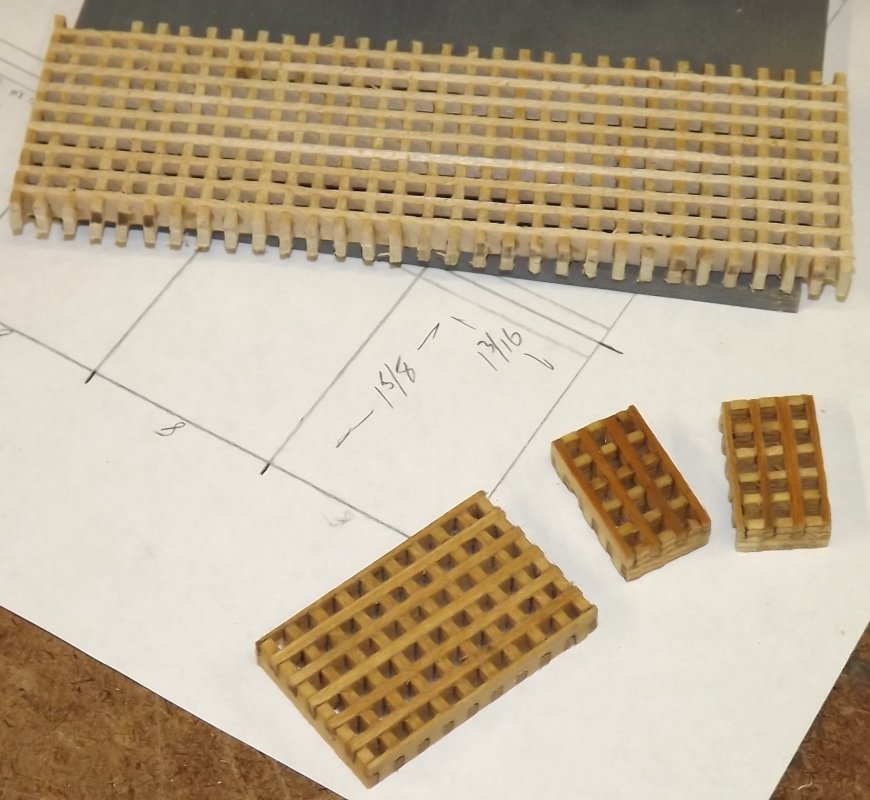
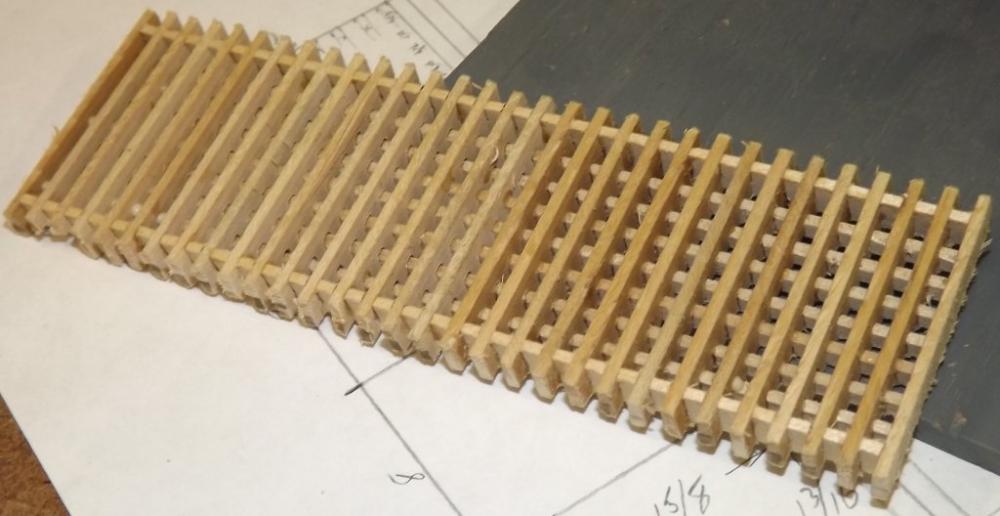
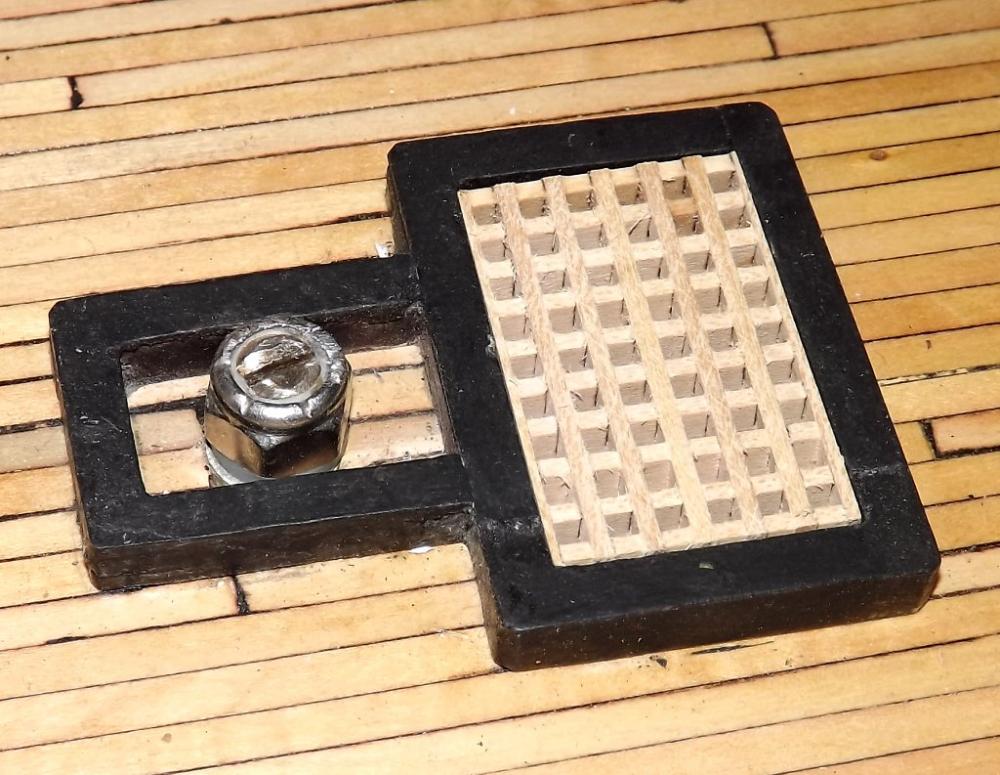
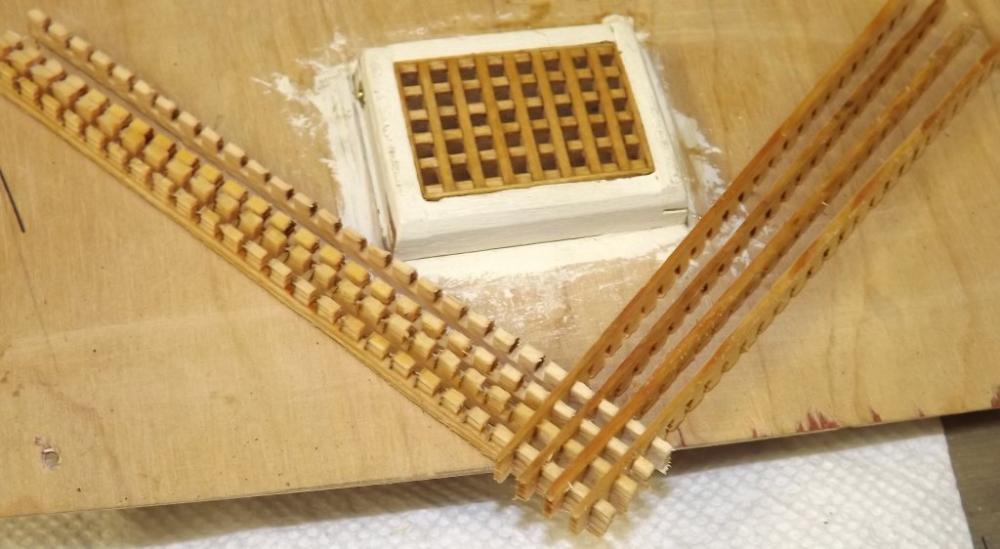
Sized the ammo hatch grates and stained them. I'm not sure I'm going to paint them black. All the photos where they can be seen (more often than now there's hatch covers over them; they look more like the deck, not the hatch coaming. In Civil War period photos of other ships, they are often painted black, but I have no way of knowing what was on Constellation five years before the war. On the restored ship they're painted black, but they say she restored to her Civil War appearance. I like them "natural" and it's one of those things where I can fix it easily enough later if I find out differently, whereas it would be harder to "unpaint" them. The real ship's main hatch had removable beams running athwart-ship dividing the gratings into 7 rows, so I'm going to make 7 gratings, one for each row of 4. Taking jbshan's advice above, I made 32 notched pieces for the short sides and in-between, and two long notched pieces for the long sides. All the notches were filled with 1/8" x 1/16" strips running the width of the combined hatch grating. It's not sized yet, till I make the other 6. Here it is with the galley and ammo hatch gratings. This is the underside where you can see the long runs (other than the outside two) don't notch down to the bottom. Using strips instead of notched pieces does indeed save time and effort, but it also requires some planning on which way you're going to run the strips
- 553 replies
-
- 2
-
-
- sloop of war
- constellation
- (and 3 more)
-
You're saying to put un-notched 1/8" x 1/16" strips in the notches instead of using notched 1/4" wide strips? Yeah, I'll give that a go. I could make those 28 main hatch gratings all one unit easier that way. I've seen real ones made that way, but the one time I actually made full sized ones they wanted them flat on both sides, so we used the interlocking method. They became tables in a bar, with bottle caps in the holes and epoxy poured over them.
- 553 replies
-
- 2
-
-
- sloop of war
- constellation
- (and 3 more)
-
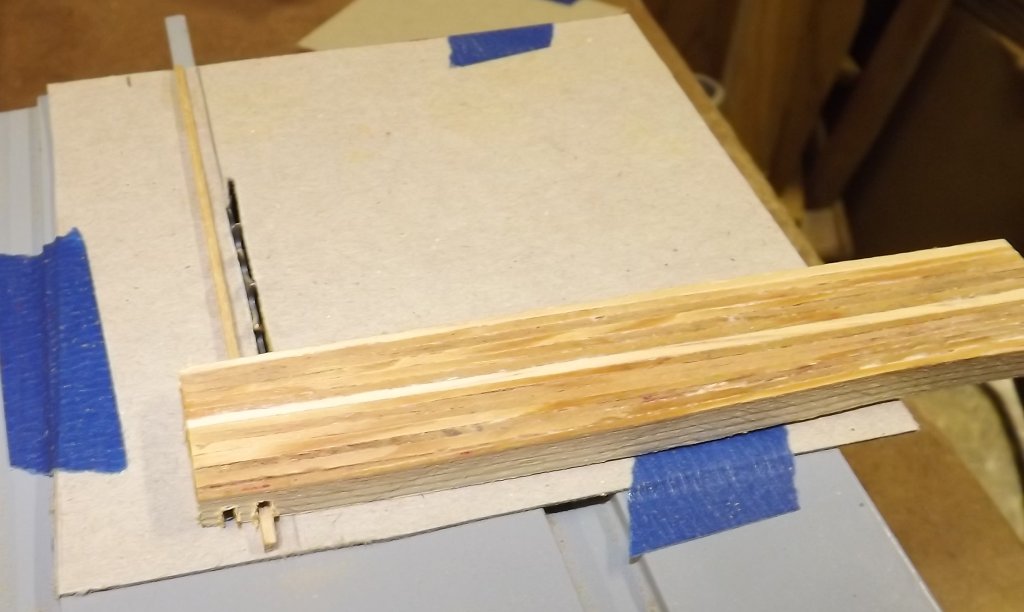
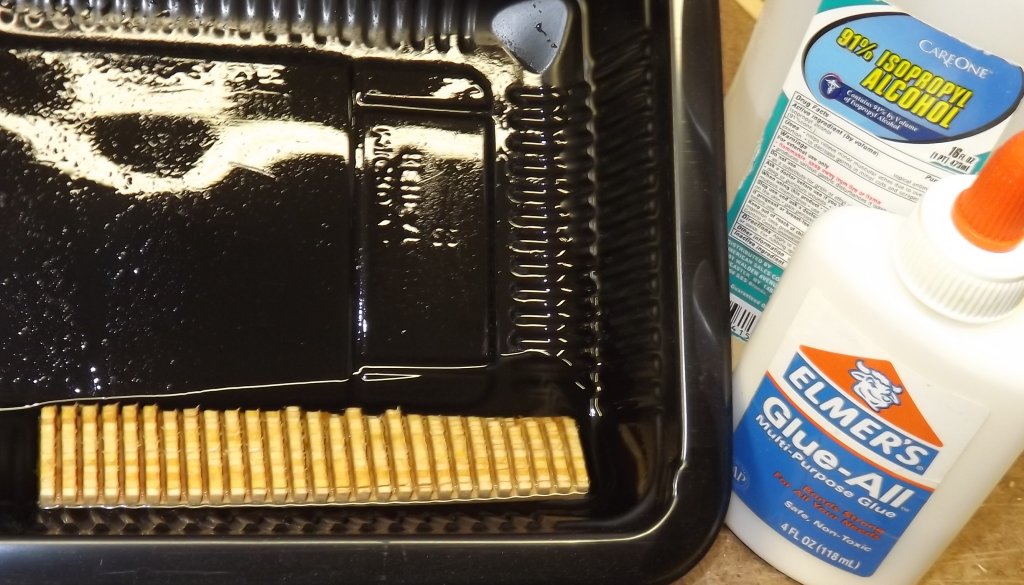
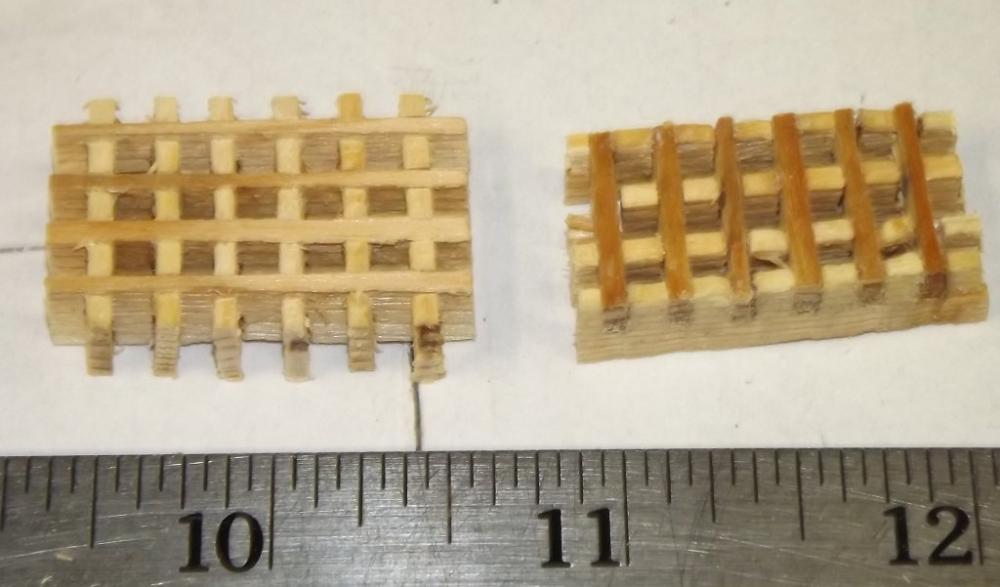
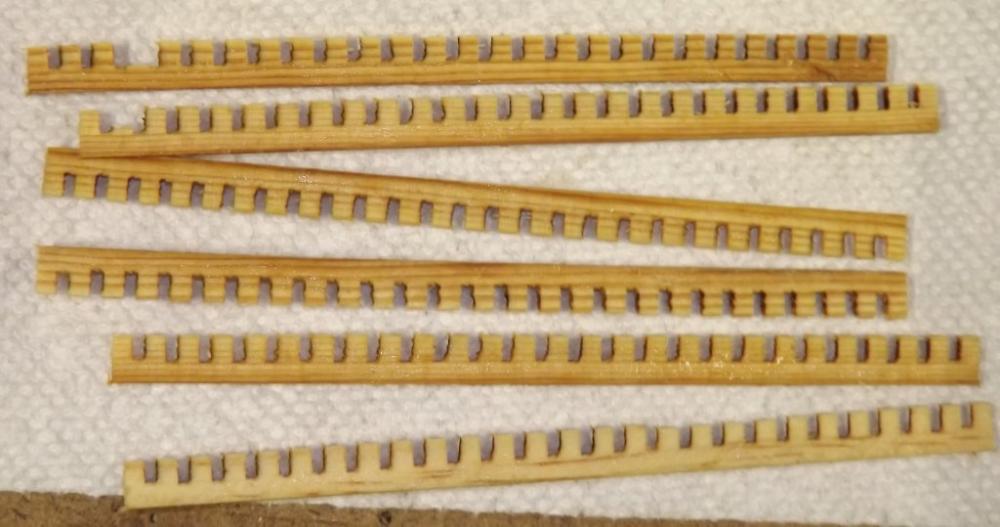
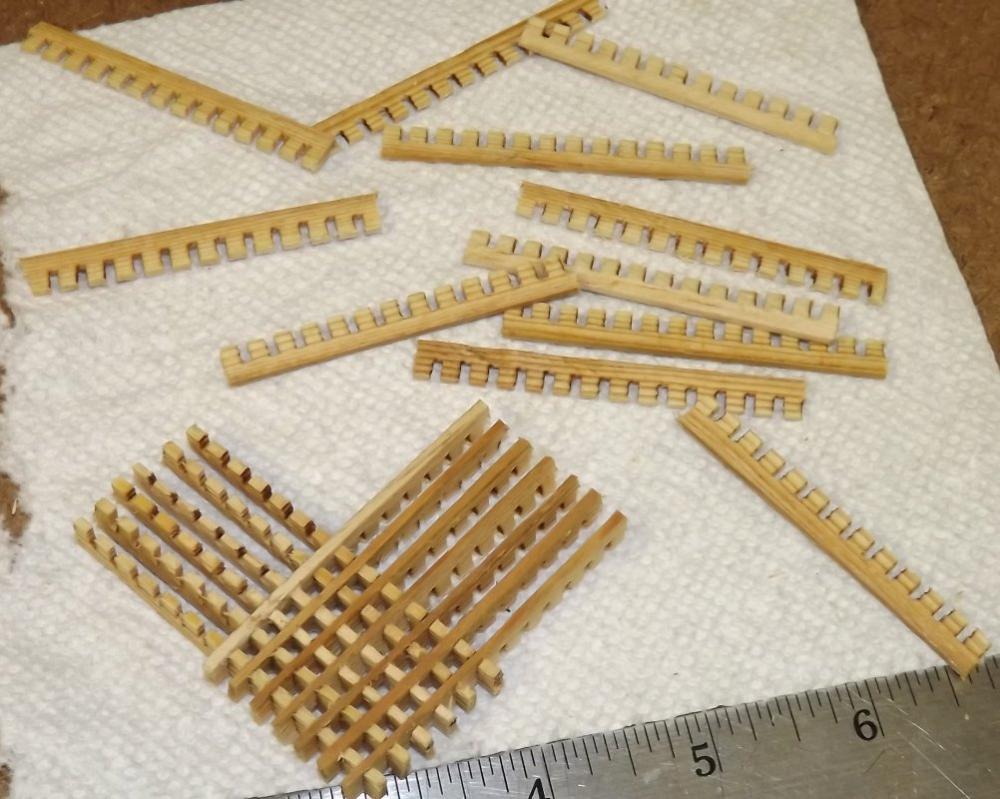
Soaking the strips in alcohol softened the wood, which I should know because that's how I make sail hoops. I didn't allow enough time for them to dry and being spongy made them hard to put together, and more prone to damage while doing it. I managed to save enough to make gratings for the two ammunition hatches behind the pivot guns, but the remaining parts were just to damaged from handling to use. These still need to be sized to fit. So, I went back to bass because I have a bunch of 1/16" x 1/4" x 48" strips on hand. I cut one strip into 17 pieces to make the galley hatch grating. This time, instead of gluing them their whole length, I only glued them together at the ends and added on a couple of extra strips to take the eventual tear-out the saw would cause. This worked out much better. Instead of soaking them, I cut off the glued ends. It was quicker setting up. Didn't have to wait for them to dry after soaking. The cuts were more precise and consistent, which made putting them together a lot easier, which meant less damage from trying to manhandle them into place. With a little sanding, here's the galley hatch grating, it'll get stained and sealed before it's glued in place. So, now I can glue up some strips this way, cut the grooves, and put them aside until I need a hatch grating. I still have 32 to make for Constellation, 28 of them in the main hatch; and one more for Pride. Why are the attached images so big of late - they used to show in the message much smaller, now they seem to display full size.
- 553 replies
-
- 3
-
-
- sloop of war
- constellation
- (and 3 more)
-
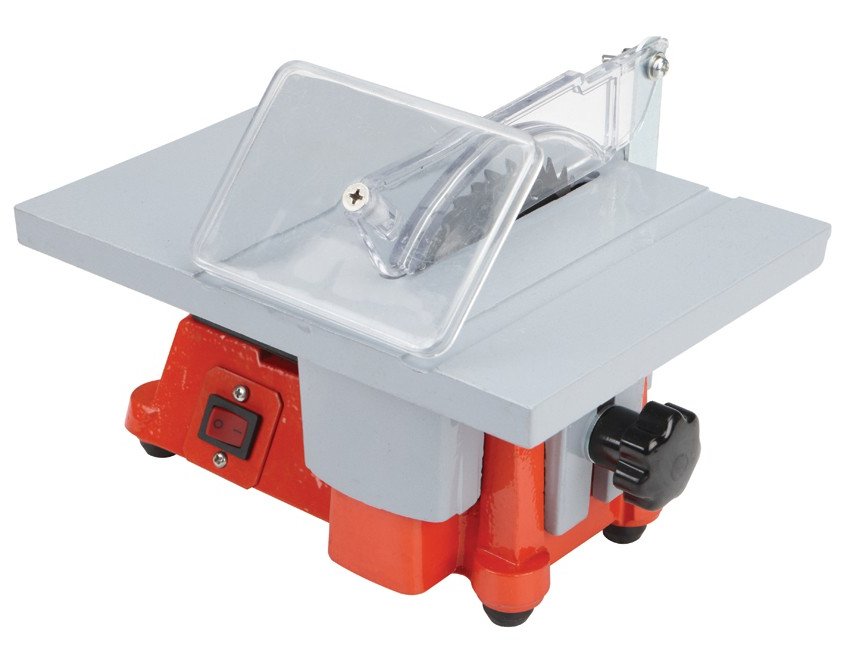
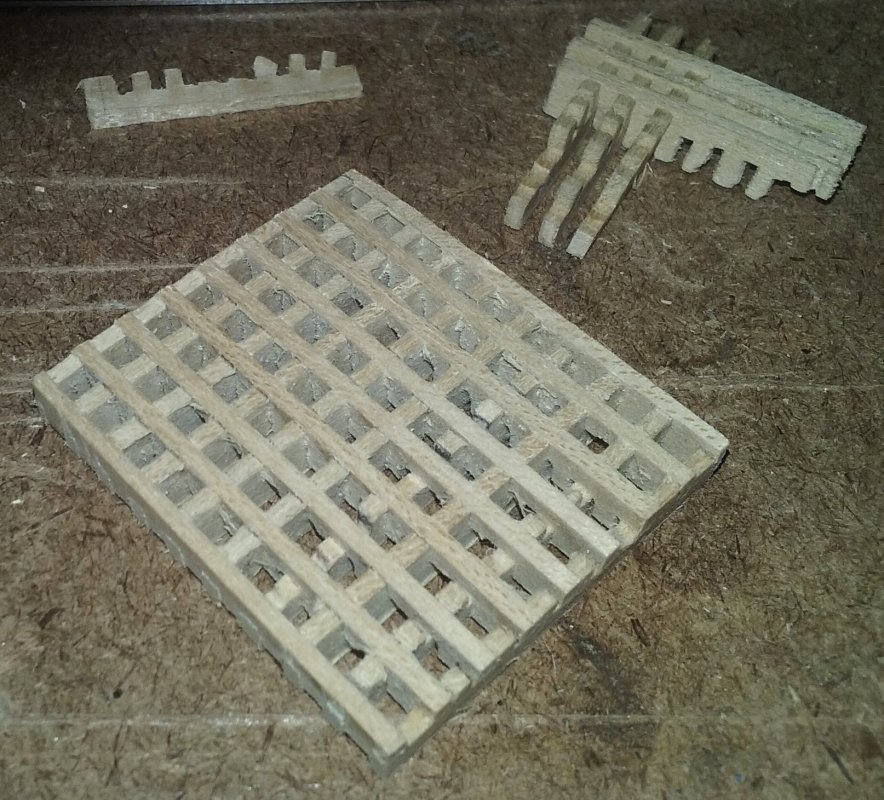
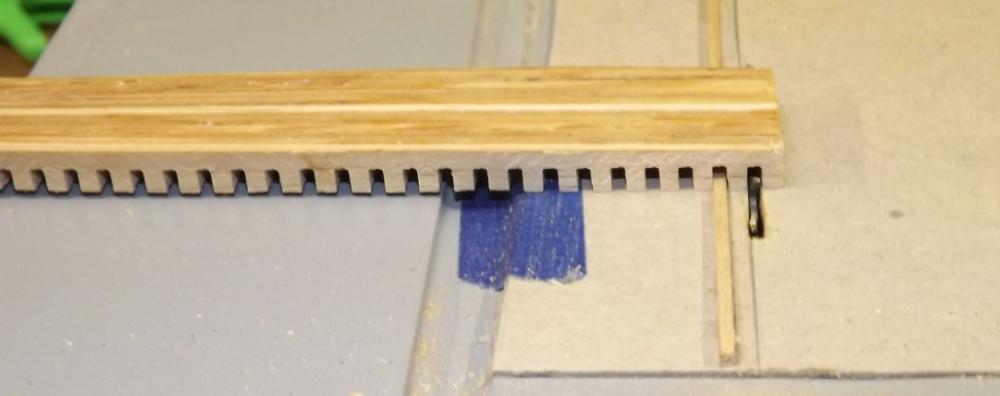
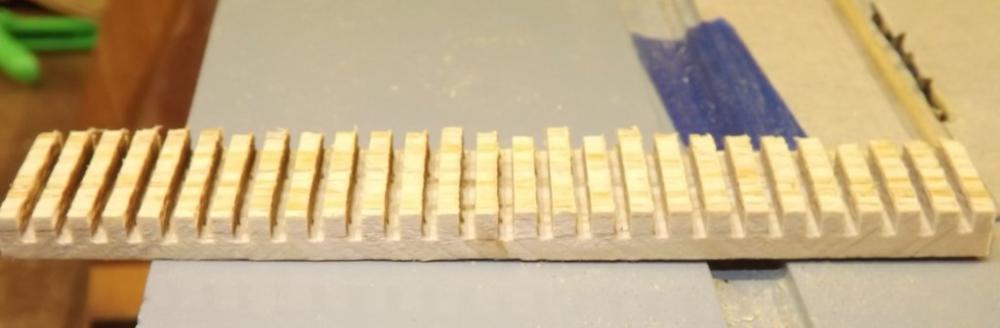
I bought this "Mighty Mite" 4" tablesaw from Harbor Freight a while back with the intention of building a box around it, make setting the blade height easier and more accurate, and use it specifically for things like making hatch gratings. Ok, well I never got to all that, yet, but I decided I needed to give hatch gratings a try. The only time I've made them before I drilled holes in a sheet and squared the holes with a nail ground square. That was ok for the two or three gratings I needed then, but I want to make nice gratings for Constellation, Pride, and Macedonian. For my first try I used 1/16" bass (lime). Glued some strips into a block, and cut the slots on the bandsaw with a stop to keep the cut from going too deep. With my finest blade the bandsaw still knocked teeth out of the "comb." That's when I pulled down the Harbor Freight Mighty Mite. (so "mighty" it binds cutting balsa). I cut a set of "combs" by marking the table with a Sharpie and cutting by eye. That didn't turn out too awful, though I did loose a lot of "teeth." Next I made a jig by gluing a 1/16" square strip to some card and taped it all down with the strip about 3/32 left of the blade and the blade set 1/8" above the table. Then I cut some pine scraps into 5" strips 1/4" wide, glued them all together with PVA, and sanded the block on all 8 sides. The first cut is with the end of the block against the strip. Then that cut is placed on the strip for the second cut, and so on until the whole block is notched. I tossed the block into some alcohol to dissolve the PVA and then separated the "combs" I cut the combs in half so they were about 2-1/2" long The first grate, I dipped in some oak stain and cut down to fit the Pride's lazerette hatch, so it's getting used. So, I'm going to see if I can find a better blade for the Mighty Mite, and add some sacrificial wood on the block of strips so the tear-out won't destroy the last strip or two. The pine seemed to be a little better than the bass, except the bass was much easier to get into strips. If I sandwich the bass between some pine, that may reinforce it enough to not wind up with so much waste. There's a lot more gratings to make, Constellation's main hatch gets 28 of them all about 2" x 2-1/2", so this has to get to assembly line grade but quick.


- 553 replies
-
- 3
-
-
- sloop of war
- constellation
- (and 3 more)
-
Adding these folks to my links page!
- 3 replies
-
- 2
-
-
- scratch build
- RC
- (and 2 more)