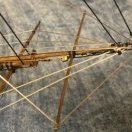
Jonathan_219 Posted January 23, 2021 #1 Posted January 23, 2021 Starting the ratlines on my 1577 Revenge and I've found a lot of information on how to tie the clove hitches on the interior shrouds but almost nothing on how the ratline would be attached at the first and last shroud other than just more clove hitches. For testing I've put a clove hitch on the first and last rope but for some reason it just doesn't look right to me (not that I'd know) and the pictures I've found of period reconstruction ships just don't show enough detail for me to see how it was done. It seems to me that a clove hitch on the end would come loose pretty easily so I feel that has to be more to it than that. Some information seems to show the ratline seized in a loop around the first and last shroud and that makes some sense to me but I though I'd ask before plowing ahead. Any ideas/information would be greatly appreciated. Picture of my test ratline included. mtaylor 1 Completed Build: Revenge 1577 - Amati Models - 1/64 Current Build: San Felipe - Mantua Panart - 1:75
Snug Harbor Johnny Posted January 23, 2021 #2 Posted January 23, 2021 I suppose you could use a taught line hitch. mtaylor 1 Completed builds: Khufu Solar Barge - 1:72 Woody Joe Current project(s): Gorch Fock restoration 1:100, Billing Wasa (bust) - 1:100 Billings, Great Harry (bust) 1:88 ex. Sergal 1:65
Bossman Posted January 23, 2021 #3 Posted January 23, 2021 Johnny, your example is the way I have always done them. I’m not positive but I think the rat lines would start above the seized shrouds. Looking good! mtaylor 1 Current build: Model Shipways “Confederacy “ Completed builds: Mamoli “Royal Louis“ Mantua “Royal Caroline” Scratch 1/4 scale gondola “Philadelphia” Scratch “Hannah” from Hahn plans.
Jonathan_219 Posted January 23, 2021 Author #4 Posted January 23, 2021 Quote I’m not positive but I think the rat lines would start above the seized shrouds. I also wondered about that, the instruction diagrams very specifically show them starting right above the deadeyes, in the seizing so for the trial at least I did it that way. It would certainly be easier to start above the seizings as one of the clove hitches fell right on the edge of a seizing knot and really tended to go up or down. mtaylor 1 Completed Build: Revenge 1577 - Amati Models - 1/64 Current Build: San Felipe - Mantua Panart - 1:75
Jonathan_219 Posted January 23, 2021 Author #5 Posted January 23, 2021 Tied a test with the taught line hitch and it seems much better, like that a lot, thank you. I believe I have the taught line hitch correct. Moab and mtaylor 2 Completed Build: Revenge 1577 - Amati Models - 1/64 Current Build: San Felipe - Mantua Panart - 1:75
dak4482 Posted January 23, 2021 #6 Posted January 23, 2021 several references show the ratline started and ended with an eyesplice seized with several turns to the first and last shroud. mtaylor 1
bartley Posted January 23, 2021 #7 Posted January 23, 2021 (edited) This is true, but if you use a cow hitch at the first and last it kind of simulates this. John Edited February 12, 2021 by bartley mtaylor 1 Current Build: Medway Longboat Completed Builds: Concord Stagecoach HM Cutter Cheerful Royal Caroline Schooner for Port Jackson
Jim Lad Posted January 23, 2021 #8 Posted January 23, 2021 The classic method was to eye splice the ratline at each end and then seize it to the shroud using light line. A clove hitch is not a secure knot so would never be used in practice at the end of the ratline. Except at very large scales, eye splicing each ratline at each end becomes rather impractical. An alternative recommended by Harold Underhill (and one which works well in practice) is to sew the end of the ratline through the shroud. John allanyed, mtaylor and Mark P 3
allanyed Posted January 23, 2021 #9 Posted January 23, 2021 (edited) The ends depend on the vessel, era, etc. Gloucester and other fishing schooners (which obviously have nothing to do with the Revenge) have eye splices on each end which are then seized to the shrouds and/or swifters. Allan Edited January 23, 2021 by allanyed mtaylor and Mark P 2
Jonathan_219 Posted January 24, 2021 Author #10 Posted January 24, 2021 Thanks for all the information and ideas. I've decided to put a taught line hitch on each end and the clove hitch on the shrouds in the middle. Here are my results so far. mtaylor 1 Completed Build: Revenge 1577 - Amati Models - 1/64 Current Build: San Felipe - Mantua Panart - 1:75
popeye2sea Posted January 24, 2021 #11 Posted January 24, 2021 You could try using a cow hitch, where the end of the line comes back in towards the center, giving a more finished edge to the outside. Regards, mtaylor and wefalck 2 Henry Laissez le bon temps rouler ! Current Build: Le Soleil Royal Completed Build: Amerigo Vespucci
Snug Harbor Johnny Posted January 26, 2021 #12 Posted January 26, 2021 'Looks good to me. Another option might be to use a knot we did in Scouting to tie a tent rope to a post or a tent peg- the line is passed around for an overhand half-hitch (for tents or dining flys it was spaced away from the post or peg to allow for later shortening or lengthening of the attachment, but for the end shroud it would be right against the shroud), then the line is wrapped twice underhand and snugged. For shroud application the end would stick inboard and be less visible. If time and convenience are not an issue, the end could be a little longer and lashed vertically against the shroud with find thread. I'll have to look-up a cow hitch (new to me). BTW, is there a source for the 'pear shaped' (triangular?) deadeyes? 'Seems the Wasa had them and if I'm going to finish it, I'd like to get the proper shape for the time period. Ahoy! mtaylor 1 Completed builds: Khufu Solar Barge - 1:72 Woody Joe Current project(s): Gorch Fock restoration 1:100, Billing Wasa (bust) - 1:100 Billings, Great Harry (bust) 1:88 ex. Sergal 1:65
wefalck Posted January 26, 2021 #13 Posted January 26, 2021 We probably don't know what the practice was at the end of the 17th century. On small scales I used a cow hitch as surrogate for the sewed-on eye-splice. Looking at your threads, I think it would be quite feasible to make a fake eye-splice and sew this on with a couple of turns of fly-tying thread. mtaylor 1 wefalck panta rhei - Everything is in flux
Jonathan_219 Posted February 12, 2021 Author #14 Posted February 12, 2021 Update As I progressed on doing the ratlines I realized that I think I was tying the taught line hitches incorrectly. If done correctly the last loop or hitch around the shroud would reverse direction and come out going back to the center of the shrouds. So I switched to what I believe was a correct taught line hitch but the knots often came loose very quickly and I found I was relying on the glue to keep the knot taught, which I didn't like. So I then switched back to the first knot I had used which is basically a clove hitch with a double loop around the shroud on the first loop, I'm not sure if there's a name for this knot or it's just a clove hitch with an extra loop. I'm not sure why the correct taught line hitch had trouble staying tight after tied, it could have been the thread or possibly something to do with the what I stained the thread with a marker. A few of my ratlines have the correct taught line hitch with the end pointing in and the majority have the modified clove hitch with the threads pointing out. If the thread is trimmed properly it's pretty hard to tell which way it's facing so I'm just writing the minor difference up to experience. I'm including a picture with the shrouds facing the camera all done with the modified clove hitch. mtaylor 1 Completed Build: Revenge 1577 - Amati Models - 1/64 Current Build: San Felipe - Mantua Panart - 1:75
Dziadeczek Posted February 12, 2021 #15 Posted February 12, 2021 He is doing it correctly. La Créole 1827 by archjofo - Scale 1/48 - French corvette - Page 59 - - Build logs for subjects built 1801 - 1850 - Model Ship World™ mtaylor 1

Recommended Posts
Create an account or sign in to comment
You need to be a member in order to leave a comment
Create an account
Sign up for a new account in our community. It's easy!
Register a new accountSign in
Already have an account? Sign in here.
Sign In Now