scratch Posted February 21, 2014 Share #1 Posted February 21, 2014 Hello every-one I'm nearly halfway through my build of the Colonial Brig Perseverance but i thought i would try to put up a rough log up to where i am now . This is a slow build as i have been building it now for close to 2 and a half years . I chose this model because i really liked the look of it and not being very experienced thought i shouldn't have to jump to many hurdles . The kit contents .Not to much to add here . The normal cast parts and laser cut ply pieces . The kit normally comes with mahogany for the second planking but i was able to get the mohogany swapped with Tanganika (the timber used for the prototype) after speaking to Modelers shipyard , the supplier of the kit . I will just add that i found i was some parts short last week and e-mail Modelers Shipyard about this so i could order more and they replaced them at no charge . I know the cost was minimal but to replace the parts after nearly 2 and a half years from purchasing the kit was very pleasing . Thumbs up guys . I have replaced a lot of the ply parts to where i am now but i will mention where as the log progresses . Instructions and plans are pretty straight forward although nothing is to scale on the plans . The deck arrangement says it's to scale but i wouldn't rely on it as i found mine to be out . I have no problem with the supplied timber or the fittings , very happy . Although i am disappointed in the ships boats . Not to sure what I'll do there . The plans very detailed except for the rigging configuration . Looks a bit confusing to me . Next up I'll get into the start of the build . David olliechristo 1 Quote Link to comment Share on other sites More sharing options...
scratch Posted February 21, 2014 Author Share #2 Posted February 21, 2014 Hello every-one .Now onto the build . I'm sorry there are no photo's with the first few stages as i didn't take any , but even tho i explain how i did things , it's all pretty straight forward and the photo's i have taken are only taken by a phone camera , sorry , it's all i have .. I started by dry fitting all the bulkheads to the slots on the keel .Most were a perfect fit but some needed a strip of veneer glued on top to make them level .Using lego blocks to keep things nice and square , i glued all the bulkheads on and the bow filler blocks on and left to dry . Here the instructions say to start the fairing process but i glued on the false deck first to give the bulk heads more strength for fairing and so i didn't fair to much off and have them sitting to far under the false deck . For this i used different shape sanding sticks i made up .Transom filler blocks were shaped and then glued on . Take your time with this . I shaped the blocks before fitting by doing a bit at a time them placing them on for checking , then shaping them more untill i was happy then glued them into place .The instructions are pretty good at explaining this process. Next was to tackle the first layer of planking . Again this is pretty straight forward but for those that might find this task a bit daunting (i know i still do ) i highly recommend the planking tutorial here on MSW . I used an Amati crimper to get the planks around the bend onto the transom filler blocks .This is the only time i use the crimpers . All other shaping was done by soaking the timber in water then clamping over night . The bulwark planks were fitted next but don't forget to place some tape over the bulwarks so the planks aren't glued to them . I gave the hull a slight sand then filled any lows i had with filler then sanded again . I kept doing this until i was happy with the shape . It said to plank the inside of the bulwark next but i skipped this and planked the deck first for reason that if i have a slight gap on the decking then the bulwark planking will hide it . Or you can even plank the false deck before putting it on . On to the second layer of planking . Here is where i replaced the laser cut parts of the stem post, false keel and stern post with some walnut , not a great timber for modeling , but better than ply wood . i shaped these to fit then glued on before i did the second planking . I was quite happy with how the second planking went even tho most of it is covered by the copper plates. David Quote Link to comment Share on other sites More sharing options...
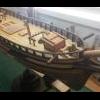
scratch Posted February 21, 2014 Author Share #3 Posted February 21, 2014 Hello every-one The coppering of the hull was next . I have never attempted to copper plate a hull before and wanted to try it at least once , so i thought why not on this model . I think i need a lot more pratice . Not to bad but not good either . I didn't get the kit that came with copper plates , i thought they looked way to big for the scale so i got some from some where else . Next time i might try the copper tape with the adhesive backing , might be less messy and a bit thinner to be able to over lap . The rudder post was also redone in the walnut , dry fitted , coppered , then placed on .This might seem obvious to every-one (but me it seems ) but make sure you mount it with the 4 rudder hinges and not 3 like i did . A big miss by me but whats done is done . Those that do build this model will also noticed i haven't glued the transom on yet as it says to in the instructions . I decided to leave this untill i had put in place the aft deck cap rail and banister rails. The forward deck cap rail , cap rail upright and aft deck cap rail were next to install . These came in the laser cut ply wood which i left as is because they are to be painted anyway . Make sure these sit flush with the inner side of the bulwark as you have to fit the banister stanchions later. Dry fitted first to make sure every thing sits well , then paint (a fine grade sand paper then an under coat then another light sand then a top coat then another fine sand and then the final top coat ) , then glue into place . The bowsprit and jib boom were shaped and assembled then installed . The instructions have the bowsprit stopping at the knight heads but i ran mine all the way down on the deck to give the illusion it was coming out of the deck . The knight heads were shaped and fitted . I had to remake the bow sprit cradle , the one that came with the kit wasn't even close . I used some limewood i had and painted it black before installing .The height of the bowsprit cradle has to end up the same height of the aft deck cap rail . David newbuilder101 1 Quote Link to comment Share on other sites More sharing options...
scratch Posted February 21, 2014 Author Share #4 Posted February 21, 2014 Hello every-one The banister stanchions were on the laser ply sheet . Even tho i painted these black , i still replaced them as i didn't like the shape of them . And they weren't very uniform . I made new ones out of some lime wood . I made one master , then made all the others from this one . No special way of doing this , i just used a razer saw , sand paper and a file , taking a little bit off at a time and checking them with the master . Banister rail installed next . I went my own way on how they finished up on the bow . It said to cut them at 45 , but they weren't long enough to make this possible so i made them to sit flush with the front of the bowsprit cradle . The upper and lower gunwales were next and these were soaked in water then clamped on the hull to dry over night . A paint then glued and clamped on . Now the transom can be fitted . The ply transom is soaked in water and then i used 2 pieces of 4 mm square timber placed under each end with a clamp down the middle to get the right curviture that i needed Lined the inside and out side of the transom in the tanganika , sanding flush when dry .Here it says to use strips of veneer over the tuck of the transom to build it up then paint it . To me that would look shocking . So i used some 4x2 lime wood . the usual soaking and clamping for the night .. After my sand and paint routine , it was glued then clamped , then the transom was fixed on . I fitted the netting next . So far it's just sitting there with a couple of daubs of CA . I would assume it would have to be tied to the banister rail and staunchions . Any ideas anyone ? Mast heals were shaped around the edge , painted and glued on . I blackened the cargo ports . In fact all the brass fittings have been blackened except for the ships bell .( I use a blackening agent called Birchwood Casey's Berma blue . It's a blueing agent for firearms and can be found at any local gun shop . I use a 50/50 mix of the berma blue and water . First i put the parts in the mixture for about 20 seconds , then i rinse them in water and give them a wipe . I do this about 3 or 4 times untill I'm satisfied of the finish ). I drilled holes where the ports had to be then used a file and sanding sticks to get the correct opening . David newbuilder101 1 Quote Link to comment Share on other sites More sharing options...
scratch Posted February 21, 2014 Author Share #5 Posted February 21, 2014 Thank you very much Brian I'm now on my third build . David Quote Link to comment Share on other sites More sharing options...
scratch Posted February 22, 2014 Author Share #6 Posted February 22, 2014 Hello every-one Now onto the Figure head and head rails . I had a lot of cutting to get the figure head to sit properly (she was painted with a gold leaf and attached with 5 minute epoxy ) . I set my figure head more horizontal than what it shows so the gown flows better with the heads rails . The head rails need to have a curve in them so some soaking and drying is needed . The channels were next on . I wanted to put these on now so i could get a coat of vanish on the hull . Now i can tackle all of the deck furniture . The main companionway was assemble with the kit parts and then planked in the Tanganika on the sides , rear and top(i planked the top even tho they say to leave it ) . A strip of 2x2 walnut was placed around the edge of the roof . 2X2 shaped walnut was glued on the vertical edges and some 2x1 around the base . I changed the way the doors were to be done from the instructions because i couldn't see how they would function , especially the Forward companionway . I used some strips of 1 mm thick lime wood stained a Baltic stain . The part of the hinges that bolt to the frames are made out of black card . Once finished a coat of Matt varnish was applied . The Forward companionway was done the same way . Again i strayed from the plans here . Especially how the hatch cover was done . They have the front trim running all the way across the front . David newbuilder101, olliechristo, Dan Vadas and 2 others 5 Quote Link to comment Share on other sites More sharing options...
scratch Posted February 22, 2014 Author Share #7 Posted February 22, 2014 Hello every-one I made my main cargo hatch and forward cargo hatch out of lime wood and stained Baltic . The gratings are from the kit ..I haven't shown it but i also painted under the gratings black The ring bolts were blackened . The winch is from the kit . Nothing hard here , just glue on the ends. The tiller was out of walnut , shaped and installed . The catheads are straight forward . Made out of 5x5 walnut .The cat head knees needed some shaping around the cap rail . I should say at this point all the deck fittings have had pins install in the bases to give them more strength when glue to the deck . David newbuilder101 and WackoWolf 2 Quote Link to comment Share on other sites More sharing options...
Dan Vadas Posted February 22, 2014 Share #8 Posted February 22, 2014 Nicely done David, especially where you differed from the kit's instructions with the linings of the Companionways - yours look much better. That kit-supplied Windlass looks like nice quality - certainly better than some of the cast metal offerings of other kits . Danny scratch, WackoWolf and olliechristo 3 Quote Cheers, Danny ________________________________________________________________________________ Current Build : Forced Retirement from Modelling due to Health Issues Build Logs : Norfolk Sloop HMS Vulture - (TFFM) HMS Vulture Cross-section 18 foot Cutter Concord Stagecoach 18th Century Longboat in a BOTTLE CARD Model Build Logs : Mosel Sydney Opera House (Schreiber-Bogen) WWII Mk. IX Spitfire (Halinski) Rolls Royce Merlin Engine Cape Byron Lighthouse (HMV) Stug 40 (Halinski) Yamaha MT-01 Yamaha YA-1 HMS Hood (Halinski) Bismarck (GPM) IJN Amatsukaze 1940 Destroyer (Halinski) HMVS Cerberus Mi24D Hind (Halinski) Bulgar Steam Locomotive - (Modelik) Tanker and Beer Wagons (Modelik) Flat Bed Wagon (Modelik) Peterbuilt Semi Trailer Fender Guitar Restorations for Others : King of the Mississippi HMS Victory Gallery : Norfolk Sloop, HMAT Supply, HMS Bounty, HMS Victory, Charles W. Morgan, 18' Cutter for HMS Vulture, HMS Vulture, HMS Vulture Cross-section, 18th Century Longboat in a Bottle Other Previous Builds : Le Mirage, Norske Love, King of the Mississippi Link to comment Share on other sites More sharing options...
scratch Posted February 22, 2014 Author Share #9 Posted February 22, 2014 Hello every-one Nothing really to explain with the pin rail stands or the ships bell . Both done out of walnut . I left the ships bell as is and just gave it a little polish to shine it up a bit . The fore and main mast pin rails are all standard . Nothing to say to paint it black , but i prefer the black than to leave it just as ply . The Davits , again i changed from the ply parts . I think they look a lot better than the kit supplied one's . The transom decoration was a cast part . ( i would of liked to have tried to carve one but my skill is nowhere near that type of detail yet ) a bit of scraping to get all the burs off then a good clean , under coat and then a couple of top coats of gold leaf . I used a 5 minute epoxy to attatch it to the transom . Now this is where i am up to now . The next step is the ships boats . These might take a while as i don't like all the ply with them . Will see what happens . David GrandpaPhil, Aussie048, newbuilder101 and 1 other 4 Quote Link to comment Share on other sites More sharing options...
scratch Posted February 22, 2014 Author Share #10 Posted February 22, 2014 Thanks heaps Danny . Your comments mean a lot . David Quote Link to comment Share on other sites More sharing options...
RodR Posted February 22, 2014 Share #11 Posted February 22, 2014 Hi David I'm building the same kit but for me it's a first build so it's great to see your photos and how you've deviated from the kit instructions. Your model looks really nice. Cheers Rod scratch 1 Quote Rod Current Build: Colonial Brig Perseverance - Modellers Shipyard 1:48 Link to comment Share on other sites More sharing options...
edmay Posted February 22, 2014 Share #12 Posted February 22, 2014 Hello David,That's one of the neatest,cleanly built models on MSW,with the extra detailing,nice coloring,she will be a masterpiece,thanks for the info on blackening,etc.Edwin. scratch 1 Quote Link to comment Share on other sites More sharing options...
scratch Posted February 22, 2014 Author Share #13 Posted February 22, 2014 Thank you Rod for your kind words . I didn't realize that there was another build of the Perseverance . Will follow your build with great interest. Edwin , your are to kind , thank you . David Quote Link to comment Share on other sites More sharing options...
WackoWolf Posted February 22, 2014 Share #14 Posted February 22, 2014 Very beautiful build, love the detail you have done. I know from the pictures that when you do the boats they will also be excellent because of the way you do the detail for the extra step. Keep the pictures coming, and thank you for sharing this fine ship with us. scratch 1 Quote Wacko Joe Go MSW :) Link to comment Share on other sites More sharing options...
scratch Posted February 23, 2014 Author Share #15 Posted February 23, 2014 Thanks Joe for your vote of confidence and your kind words . This is what i have to work with . Plastic hulls and ply parts . David Quote Link to comment Share on other sites More sharing options...
RodR Posted February 24, 2014 Share #16 Posted February 24, 2014 Hi David, I will be watching closely to see how you deal with the plastic boats. I hope you don't mind if I copy your companionways. They look so much better than the way the instructions say to do it. Also how did you simulate the caulking on your deck planking? It looks very neat, especially the butt joins. I did mine with a 6B pencil but I found that the graphite got into the grain on the timber. I guess it gives it a more weathered appearance but the rest of the boat will look brand new. Cheers Rod scratch 1 Quote Rod Current Build: Colonial Brig Perseverance - Modellers Shipyard 1:48 Link to comment Share on other sites More sharing options...
Bindy Posted February 24, 2014 Share #17 Posted February 24, 2014 Hi David, And thank you for starting this log! I think what you have done so far looks fantastic and I genuinely look forward to seeing you progress from here. I am not too surprised to read of your happiness with Modeller's Shipyard as I have found them just as helpful and considerate scratch 1 Quote Completed Build: Bregante Il Leudo Merchant Launch - Mamoli - 1:72 Link to comment Share on other sites More sharing options...
scratch Posted February 24, 2014 Author Share #18 Posted February 24, 2014 By all means Rod , if you would like to copy them , go for it . For the caulking I used a pencil as well . If you do use a pencil to simulate the caulking don't use any sand paper to smooth it down . All it does is smear the graphite all over the planking and is a nightmare to clean up . I used a a razor blade ( you can get a pack of 100 for $20 at www.mytoolstore.com.au ) or you can also use a piece of glass as well and scrap it smooth .I laid the planks in full lengths then marked the scale length when all had dried . The butt joints were made with a chisel exacto blade that was ground down to the width of the planks . then i simulated the butt joints with the pencil again not using sand paper but a razor blade to smooth it all out .Make sure the pencil is sharp . Thank you very much Bindy for your kind words . Modelers Shipyard have great after sales service. David BANYAN and Aussie048 2 Quote Link to comment Share on other sites More sharing options...
BANYAN Posted February 24, 2014 Share #19 Posted February 24, 2014 A nice looking build David, I have added you to my watch list cheers Pat scratch 1 Quote If at first you do not suceed, try, and then try again!Current build: HMCSS Victoria (Scratch) Next build: HMAS Vampire (3D printed resin, scratch 1:350) Built: Battle Station (Scratch) and HM Bark Endeavour 1768 (kit 1:64) Link to comment Share on other sites More sharing options...
scratch Posted February 25, 2014 Author Share #20 Posted February 25, 2014 (edited) Thank you very much Pat . I had a sneak peek at your Endeavour , lovely work . I was thinking about this as a build but I want to try my hand at a scratch build next . That's if I can convince the lovely wife to a couple more power tools . David Edited February 25, 2014 by scratch BANYAN and Bindy 2 Quote Link to comment Share on other sites More sharing options...
RodR Posted February 25, 2014 Share #21 Posted February 25, 2014 Hi David, Great idea using the exacto chisel to simulate the butt joints. Looks perfect and so much easier. I have those exact razor blades from my tool store so will give them a go and see if I cant clean up the deck a little. I used a cabinet scraper that I had from years ago but I think it needs sharpening. Thanks for the tips. Cheers Rod Quote Rod Current Build: Colonial Brig Perseverance - Modellers Shipyard 1:48 Link to comment Share on other sites More sharing options...
aliluke Posted March 30, 2014 Share #22 Posted March 30, 2014 Hi David That looks really good. Fantastic work. Any chance of some zoom outs so we can get the bigger picture? It certainly seems like it would be worth seeing! Cheers Alistair Quote Cheers Alistair Current Build - HMS Fly by aliluke - Victory Models - 1/64 https://modelshipworld.com/topic/34180-hms-fly-by-aliluke-victory-models-164/ Previous Build - Armed Virginia Sloop by Model Shipways Previous Build - Dutch Whaler by Sergal (hull only, no log) Link to comment Share on other sites More sharing options...
the learner Posted April 5, 2020 Share #23 Posted April 5, 2020 Some great close up pictures with clear detail. Quote Cheers, GuyThe LearnerCurrent Member NRG,SMA Current Build: HMS Triton 1:48 on line Link to comment Share on other sites More sharing options...

Recommended Posts
Join the conversation
You can post now and register later. If you have an account, sign in now to post with your account.